


Precautions Before Use
2
Preassembly Information
2
Electrical Requirements
3
Sauna Assembly
4
Electrical Connection-Under Bench
7
Electrical Connection-Inside Ceiling
12
Control Panel Instructions
15
Lighting Operation
15
Audio System
16
How to Use Sauna
17
Tips & Troubleshooting
18
Wiring Diagram
19
Warranty
20
This Product is covered by:
US Patents No. 8,692,168
Canadian Patents No. 2,729,500
2,794,059 & 2,813,340
and other Patents Pending.
S-Series
3-4 Person Infrared Sauna
Touch Pad and Bluetooth
IG-880-SH/S880
User Manual
Note: Room must be installed on flat, level surface.
710-0130 IG-880-SH / S880-H 3-4 Person IR Sauna Page 1 01/18/16
Ver. 2 Rev. 3

Precautions before Use: Warning (Room Configuration & Use):
Proper Electrical Grounding is Required
Electrical Receptacles not Allowed in the Room
Do not Apply Water to any Heating Element
Do not Add a Locking or Latching System to the Door
Do not Block Ventilation Openings
Children Must be Supervised at all Times in the Sauna
NOTE: A GFCI (Ground Fault Interrupt Circuit) device is not required by NEC. A
GFCI may be installed if required by local codes but will nuisance trip during use of
the product. - CAUTION: Loose wire connections can cause heat damage to wires,
terminal blocks and other components and may void the warranty.
Electrical Caution – Do not plug the room power cord into an electrical outlet until
Room Assembly is completed!
a. Warning (Human Limitations):
Prolonged Exposure at Elevated Temperatures May Cause Hyperthermia (Body Temperature is Several
Degrees Above 98.6F)
Hyperthermia Symptoms include: Dizziness, Lethargy, Drowsiness, and Fainting
Hyperthermia can cause:
Fetal Damage in Pregnant Women
Physical In-Ability to Exit the Room
Loss of Consciousness
Notice - Use of Alcohol or Drugs Increases the Risk of Fatal Hyperthermia
If You Have any Health Problems or Health Conditions, Consult Your Physician Prior to Sauna Us,
Discontinue Use if Nervousness, Tremor, Headache, Feeling of Sickness or Nausea Occurs
b. Warning (Fire Hazards):
Do Not Use the Sauna Room for Drying Cloths, Bathing Suits, Etc.
Do Not Hang Towels or Other Objects on Heater Grills
Never Operate this Sauna Room if it Has a Damaged Cord or Plug
Pre-assembly Information:
a. Two (2) adults are required for the assembly and installation of the room.
b. Assembly Tools: Phillips Screw Driver
c. Boxes are labeled in the order of room assembly
d. Note: Front wall glass assembly is heavy and fragile.
Box #1: Floor, Ceiling, Bench Skirt, Bench, Manual & Deluxe Door Handle Set
Box #2: Back & Front Walls
Box #3: Back & Side Walls
710-0130 IG-880-SH / S880-H 3-4 Person IR Sauna Page 2 01/18/16
Ver. 2 Rev. 3

Electrical Requirements: The IR Sauna Room is designed for a 120 Volt AC / 15 or 20
IG 810SH
15 Amp
IG 820SH
15 Amp
IG 825SH
20 Amp
IG 830SH
20 Amp
IG 840SH
20 Amp
IG 870SH
15 Amp
IG 880SH
20 Amp
5-15R 5-20R
Amp Circuit Breaker!
A 120 Volt AC (dedicated) circuit is recommended to avoid unnecessary tripping of the breaker.
The Sauna should be plugged into a NEMA (5-15R or 5-20R)
Amp electrical outlet.
Box label will indicate the model of the room and the room serial number, the label will also
give you the box number and the internal contents.
Record your model number and serial number from box in the event you should need to
contact your dealer or technical support.
Serial Number ______________________________
Model Number ______________________________
Dealer Name________________________________
710-0130 IG-880-SH / S880-H 3-4 Person IR Sauna Page 3 01/18/16
Ver. 2 Rev. 3

Sauna Assembly Instructions
_________________________________________________________________________
Floor Panel (Box #1):
Locate the Floor Panel on a level surface (3-6) inches from wall and no more than (5 ft) from
120 Volt AC / 15 amp dedicated receptacle.
Position the Floor panel so that the Ceramic tiles / IR Floor Heaters are to the front of the room
Note: place the Ceiling, Bench Skirt and Bench to the side until the appropriate steps.
Note: place the power cord on the ground to the side of the floor; be sure that all wires and
connectors on the sauna floor are clear of the slots.
Note – Do NOT Plug the Sauna Room 120 VAC Power Cord into the Outlet Yet!
710-0130 IG-880-SH / S880-H 3-4 Person IR Sauna Page 4 01/18/16
Ver. 2 Rev. 3

Right Back Wall (Box #3):
Place Back Right Wall panel into the back slot of the Floor Panel.
Back Right Wall panel must be held in place until the Back Left Wall panel is added.
Left Back Wall (Box #2):
Place Left Back Wall section into the left slot of the Floor Panel
Attach Left Back Wall to the Right Back Wall by lifting up the Left wall sliding into the corner
interlocking brackets.
710-0130 IG-880-SH / S880-H 3-4 Person IR Sauna Page 5 01/18/16
Ver. 2 Rev. 3

Left & Right Front Wood Walls (Box #3):
Place Left Front Wall section into the left slot of the Floor Panel.
Attach the Left Back Wall to the Left Front Wall by lifting up the Left Front Wall sliding into the
corner interlock brackets.
Place Right Front Wall section into the right slot of the Floor Panel.
Attach the Right Back Wall to the Right Front Wall by lifting up the Right Front Wall sliding into
the corner interlock brackets.
Note: When wall panels are connected in place properly the corners will be level and flush on top.
Bench Skirt:
Insert the left Bench Skirt in between the Right Back Wall and the Left Front Wall panels
tracks.
Slide Bench Skirt all the way to the floor. Do not pinch any wires under the skirt.
Insert the right Bench Skirt in between the left Bench Skirt and the Right Front Wall.
710-0130 IG-880-SH / S880-H 3-4 Person IR Sauna Page 6 01/18/16
Ver. 2 Rev. 3

Bench Top (Box #1):
Slide the Long Bench seat down against the back wall with Power Junction Box facing you.
Tilt the Bench against the Back Wall so it will remain standing.
Electrical Connections (under bench - left side):
Connect wire L1 from the distribution plate to L1 from the Left Wall panel.
Connect wire L2 from the distribution plate to L2 from Left Wall panel.
Connect wire B1 from the distribution plate to B1 from the Left Back Wall panel.
Connect wire B2 from the distribution plate to B2 from the Left Back Wall panel.
Connect wire #6 from the distribution plate to #6 from Bench Top.
Connect S2 from the distribution plate to S2 from the Bench Top.
Connect S4 from the distribution plate to S4 from the Bench Skirt.
Bench Top (Left Side):
Install the left Bench Top by tucking the back of the bench under the heater guard. Push
Bench Top all the way to the Left Back Wall.
The Bench Top should fit down flush from front to back. It may be necessary to use the
openings in the skirt to apply pressure forward or rearward on the skirt to allow the bench to
drop into place.
710-0130 IG-880-SH / S880-H 3-4 Person IR Sauna Page 7 01/18/16
Ver. 2 Rev. 3

Electrical Connections (under bench - right side):
Connect wire #4 from distribution plate to #4 from Back Wall harness.
Connect wire #5 from the distribution plate to #5 from the Back Wall harness.
Connect wire #6 from the Back Wall harness to the distribution plate wire #6.
Connect wire R1 from the distribution plate to R1 from the Right Wall junction box.
Connect wire R2 from the distribution plate to R2 from the Right Wall junction box.
Connect wire S3 from the distribution plate to S3 from the Bench Skirt.
Connect wire S1 from the distribution plate to S1 from the Bench Top.
Connect wire #6 from the distribution plate to #6 on Bench Top.
710-0130 IG-880-SH / S880-H 3-4 Person IR Sauna Page 8 01/18/16
Ver. 2 Rev. 3

Locate the electrical switch on the black Master Control Box and ensure the switch is on.
Bench Top (Right Side):
Install the Right Bench Top by tucking the back of the bench under the heater guard. Push
Bench Top all the way to the Right Back Wall.
The Bench Top should fit down flush from front to back. It may be necessary to use the
openings in the skirt to apply pressure forward or rearward on the skirt to allow the bench to
drop into place.
710-0130 IG-880-SH / S880-H 3-4 Person IR Sauna Page 9 01/18/16
Ver. 2 Rev. 3

Left & Right Glass Sidelights (Box #2):
Place the Front Left Sidelight panel into the Floor panel slot and the adjacent Left Wall panel
slot.
Place the Front Right Sidelight panel into the Floor panel slot and the adjacent Right Wall
panel slot.
Ceiling (Box #1):
Install Styrofoam packing squares on top of the Right & Left Wall panels. One block should be
placed in the front portion and one toward the rear portion of each wall. These will be used to
set the ceiling on.
The ceiling can now be set in place on top of the Styrofoam blocks.
710-0130 IG-880-SH / S880-H 3-4 Person IR Sauna Page 10 01/18/16
Ver. 2 Rev. 3
Once the Ceiling panel is lined up directly above the Wall panels; insert the wires harnesses
from the wall panels into the holes in the Ceiling panel.
Note: Position the cam locks on the top of the Left & Right Wall panels as shown above.
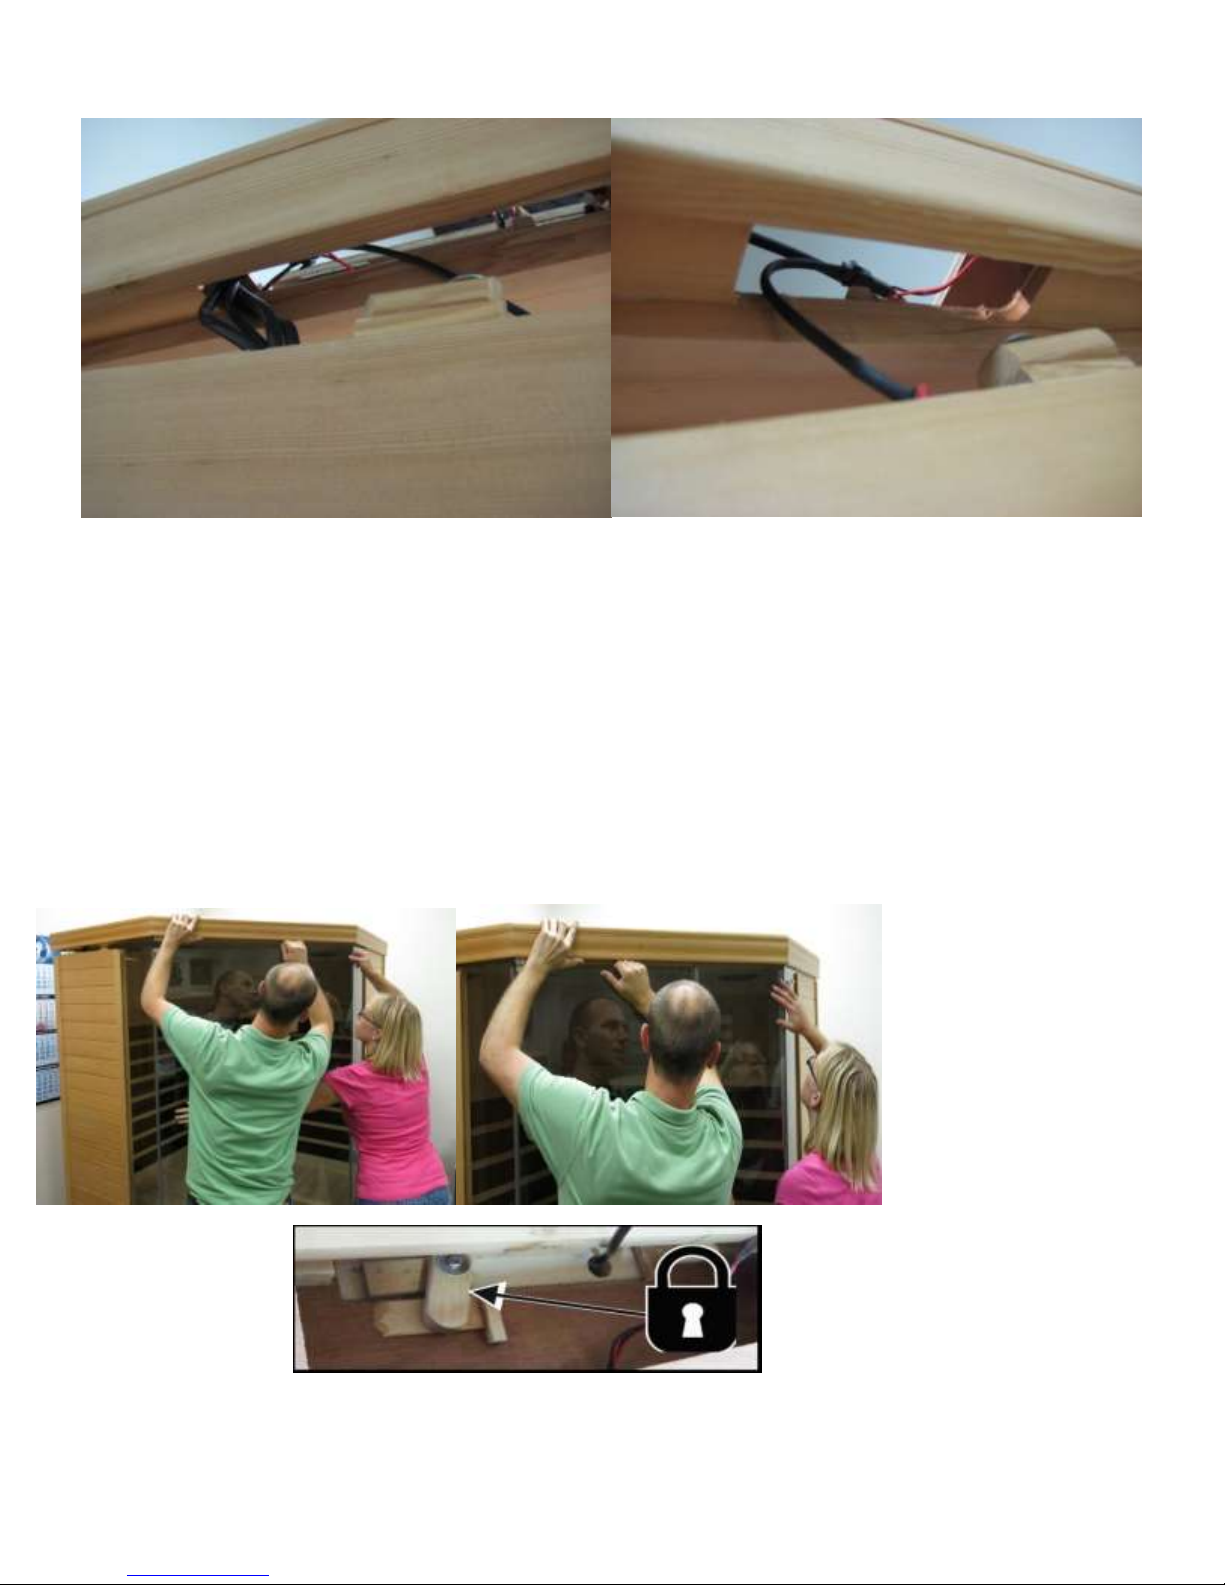
Front Wall Glass (Box #2):
Place the Right Side Front / Door panel into the Floor panel slot.
Note: Do not let go of glass panel, it needs to be held in place.
While carefully still supporting the Front Wall Glass, one person on each side.
Lower the Ceiling panel onto the Walls & Glass panels.
Glass panels must recess into the slot in the Ceiling panel.
Make sure the ceiling fits tight and is flat and level.
Turn the wood ceiling cam locks to lock the ceiling into place.
710-0130 IG-880-SH / S880-H 3-4 Person IR Sauna Page 11 01/18/16
Ver. 2 Rev. 3

Electrical Connections (inside the Ceiling panel-rear right):
Open all hatch doors on the ceiling to locate the necessary electrical plugs.
Access the connectors and connect them according to the labels on the harness.
Connect wire #4 from the Back Wall harness to the Ceiling wire #4.
Connect wire #5 from the Back Wall harness to the Ceiling wire #5.
Connect wire #6 from the Back Wall harness to the Ceiling wire #6.
Connect wire #7 from the Wall panel to the Ceiling wire #7.
Electrical Connections (inside the Ceiling panel-front right):
Near the Touch Screen harness in Ceiling connect Left Wall wire #3 to Ceiling wire #3.
Connect Left Wall wire #6 to the Ceiling wire #6.
Connect Left Wall wire F to Ceiling wire F.
Connect Left Wall wire E to Ceiling wire E.
Connect the Right wall wire #7 to Ceiling wire #7.
710-0130 IG-880-SH / S880-H 3-4 Person IR Sauna Page 12 01/18/16
Ver. 2 Rev. 3

Electrical Connections (inside the Ceiling panel-back corner & middle-not pictured):
Connect Wall panel wire #7 to Ceiling wire #7.
Sauna Room 120 Volt AC Power Cord:
Plug the Sauna room power cord into the 20 amp / 5-20R wall receptacle as noted in page 3
Note: It is important that the sauna be plugged into a dedicated outlet of the correct rating. Plugging your
sauna into a shared circuit through can cause poor performance, circuit breaker tripping, or overheating
of the circuit.
710-0130 IG-880-SH / S880-H 3-4 Person IR Sauna Page 13 01/18/16
Ver. 2 Rev. 3

Deluxe Door Handles:
Your sauna comes equipped with a deluxe door
handle. Locate brown box (typically in the floor/ceiling
carton)
Step 1. Separate two pieces by loosening four set screws with
Allen wrench provided.
Step 2. Remove bolts and spacer from first handle piece. You
will need a Phillips Screw driver.
Step 3. Ensuring gasket remains on both sides of door;
reattach the bolt from outside the glass through to inside
handle section. Make sure you have one plastic gasket
on each side of the glass. Repeat for bottom of handle.
Step 4. Once Secure and tight to inside handle section,
tighten with a Phillips screw driver.
Step 5. Attach exterior portion of door handle on to bolt
section and tighten all four set screws with Allen wrench.
710-0130 IG-880-SH / S880-H 3-4 Person IR Sauna Page 14 01/18/16
Ver. 2 Rev. 3

Control Panel Instructions:
Bench Heat
Valance
Light
Power ON or
Interior Lights
Color Therapy
Lights
Main Power:
Press POWER to switch room ON or OFF
Timer Functions:
Press and hold “+” or “–“ to set room operating time.
Increases time (5 minute increments) / Decreases time (5 minute increments)
Temperature Functions:
Press to alternate between either C or F (C or F will light to indicate the units desired)
Press and hold + or – to set desired room temperature setting.
Pressing once will increase or decrease the desired setting in one-degree increments.
Once the desired room temperature is set, the desired temperature will flash three (3) times
After the fourth (4th) flash, the actual room temperature will remain displayed.
Press Bench Heat to turn ON or OFF
Light Functions: Note – All Lights will operate with main power selection ON or OFF.
Press Interior Lights to turn ON or OFF
Press Valance Light to turn ON or OFF
Color Therapy Functions:
Press Color Therapy Light to activate a color light or sequence. The following details this sequence:
1st press – RED
2nd press – RED-GREEN
3rd press – GREEN
4th press – BLUE-GREEN
5th press – BLUE
6th press – BLUE-RED
7th press – BLUE-RED-GREEN
8th press – Activates full rotation of all 7 color therapy in sequence noted above
9th press – Turns Color Therapy Functions OFF
710-0130 IG-880-SH / S880-H 3-4 Person IR Sauna Page 15 01/18/16
Ver. 2 Rev. 3

Audio System:
Audio Power ON or OFF
Auxiliary Input
AUDIO OPERATION
Audio Power On
Press Bluetooth icon to turn on or off audio system
Blue LED indicates the audio system is operating.
Bluetooth
Bluetooth is always enabled when blue LED is glowing and Aux Input is not connected
Auxiliary Input
Insert 3.5 mm cable into the Aux Input
Automatically disables Bluetooth input and enables Aux Input.
WARNING Apple will not guarantee your Apple product if used at operating temperatures of 32⁰F or
below and 95⁰F and above. The recommended operating temperature is 32⁰F to 95⁰F to fall into the
warranty. Check with any other device manufactures for operation temperatures before using the
device in the Sauna/IR Room.
710-0130 IG-880-SH / S880-H 3-4 Person IR Sauna Page 16 01/18/16
Ver. 2 Rev. 3

!
How to Use Infrared Sauna:
Avoid eating large meals and excessive alcohol intake before using Sauna.
Never smoke or drink alcohol or exercise inside of Sauna.
If you are taking any medications or under the care of a Physician, consult with them prior to Sauna usage.
Refer to Sauna Usage Warning signs located inside of Sauna Room
Prior to Sauna session, if possible before using Sauna, take a warm shower without drying.
Clothing is optional or wear loose fitting clothes. You may choose to sit or lie on a clean soft towel.
Set desired time & temperature.
The Sauna is producing the correct wavelengths to be absorbed into the body within 10-15 minutes of
operation. It is not necessary to wait unit the sauna is at maximum temperature, the absorption of the
wavelength is the same whether the room is in heat up or at set temperature.
Enter Sauna and relax, you may choose to enjoy music. Refer to the above Color Therapy System
instructions.
Sit or lie on bench. Close the door and open the interior ceiling vent allowing for fresh air circulation.
Remain in the Sauna long enough to warm up and stimulate a mild perspiration. Typically that may occur in
10 – 15 minutes. This varies with every individual and their comfort level. Do not over do it!
Drink plenty of cool water or a refreshing healthy drink while using the sauna.
Leave the Sauna and cool down. Shower or bathe if possible to cool down and cleanse the skin.
Cool down period usually is the same length of time as the Sauna session.
Then reenter the Sauna for another 10-15 minute session.
Continue this process of alternating using the Sauna and Cooling Down for 3 to 4 cycles.
Length of time in the Sauna and cool off period varies and depends on the individual.
After final Sauna session and upon leaving the Sauna turn the Sauna off the timer if it is still operating.
Open the door and clean the Sauna walls, bench and floor areas with a soft clean damp cloth.
Enjoy a final shower or bath to cool down. Relax, in the special “after sauna glow” and you may choose to
enjoy a healthy snack and cool drink.
710-0130 IG-880-SH / S880-H 3-4 Person IR Sauna Page 17 01/18/16
Ver. 2 Rev. 3

Additional Usage Warnings Located Inside Sauna Room
Maintenance / General Cleaning
Tips:
DO NOT USE: Alcohol or any strong Cleaning Chemicals
Note: Some chemicals can damage clear finish and wood surfaces.
Interior: Perspiration and dirt may absorb into the wood, so periodic cleaning is needed,
scrubbing benches, back supports, floor boards and walls with a stiff brush and mild detergent
is normally sufficient. Light sanding is another option for cleaning interior surfaces.
Exterior: Use a damp cloth of a mild soap mixed with warm water.
Trouble Shooting Tips:
a. Main Control Touch Pad Lights Not Lit:
Ensure electrical connections between ceiling and back and the ceiling and front wall
Ensure power cord is plugged in to the proper power receptacle and dedicated circuit breaker
Ensure main circuit breaker (house) is not tripped (power is found at the receptacle)
Ensure the room main controller circuit breaker (under the bench) is not tripped and is ON
b. Room not heating:
Ensure power cord is plugged in to the power receptacle
Ensure main circuit breaker (house) is not tripped (power is found at the receptacle)
Ensure the room main controller circuit breaker (under the bench) is not tripped and is ON
Ensure room desired temperature is greater than room actual temperature (controller
demands heat)
Ensure that there is no time in the Delay Start timer if you do want to delay the start
c. Door rubbing or binding:
Ensure that the room is assembled properly; walls and ceiling should all be interlocked.
Ensure the floor is flat by using a level on the ceiling of the room. It may be necessary to use a
small door or window shim to adjust the level under the floor.
------------------------------------------------------------------------------------------For additional assistance or service questions?
Please do not hesitate contacting Saunatec/TyloHelo
Mon – Fri. 8AM – 5PM CST
1-888-780-4427
techsupport@tyloheloinc.com
710-0130 IG-880-SH / S880-H 3-4 Person IR Sauna Page 18 01/18/16
Ver. 2 Rev. 3
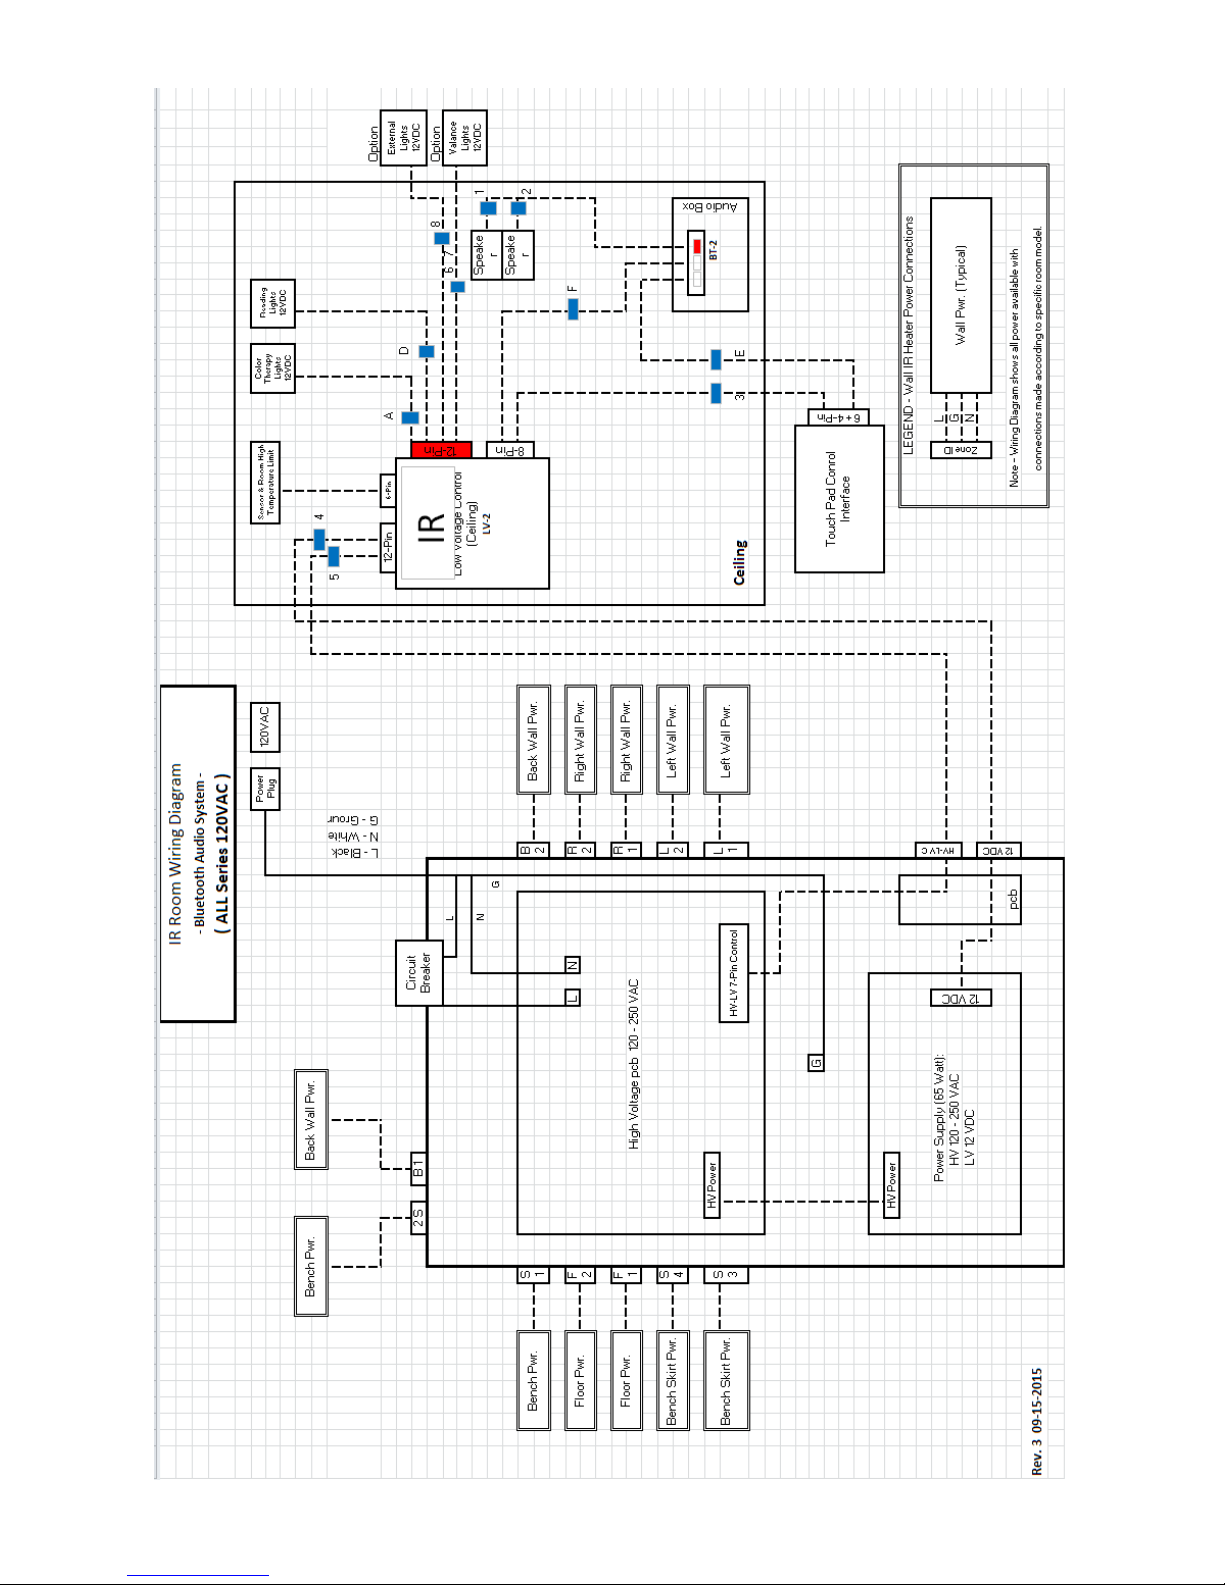
710-0130 IG-880-SH / S880-H 3-4 Person IR Sauna Page 19 01/18/16
Ver. 2 Rev. 3

710-0130 IG-880-SH / S880-H 3-4 Person IR Sauna Page 20 01/18/16
Ver. 2 Rev. 3
 Loading...