

Page 1
Congratulations on your purchase of a Saturn L300. Please read this information and your Owner
Manual to ensure an outstanding ownership experience. Note that your vehicle may not include
all the features described in this booklet.
Instrument Panel . . . . . . . . . . . . . . . . . . . . . . . . . .2
Instrument Panel Cluster . . . . . . . . . . . . . . . . . . .3
Automatic Headlamp System . . . . . . . . . . . . . . . .4
Lockout Prevention . . . . . . . . . . . . . . . . . . . . . . . .4
Wheel Dust . . . . . . . . . . . . . . . . . . . . . . . . . . . . . . .4
Tire Pressure . . . . . . . . . . . . . . . . . . . . . . . . . . . . .5
Sunroof . . . . . . . . . . . . . . . . . . . . . . . . . . . . . . . . . .5
Climate Control System . . . . . . . . . . . . . . . . . . . .6
Operating the Liftgate (Wagon Models) . . . . . . .7
Key “Stuck” in OFF Position . . . . . . . . . . . . . . . .7
Securing the Fuel Cap . . . . . . . . . . . . . . . . . . . . .7
Cruise Control . . . . . . . . . . . . . . . . . . . . . . . . . . . .8
Windshield Wipers . . . . . . . . . . . . . . . . . . . . . . .10
Rear Wiper/Washer (Wagon Models) . . . . . . . .10
Electrochromic Rearview Mirror
with Compass Display . . . . . . . . . . . . . . . . . . . .11
Six-Disc In-Dash CD Player . . . . . . . . . . . . . . . .12
DVD Entertainment System . . . . . . . . . . . . . . . .13
Remote Keyless Entry (RKE) Transmitter
Synchronization . . . . . . . . . . . . . . . . . . . . . . . . .15
Lower Anchorages and Top Tethers for
Children (LATCH) System . . . . . . . . . . . . . . . . .15
Roadside Assistance Program . . . . . . . . . . . . .16
My Saturn . . . . . . . . . . . . . . . . . . . . . . . . . . . . . . .16
Page 2
2
Getting to Know Your L300
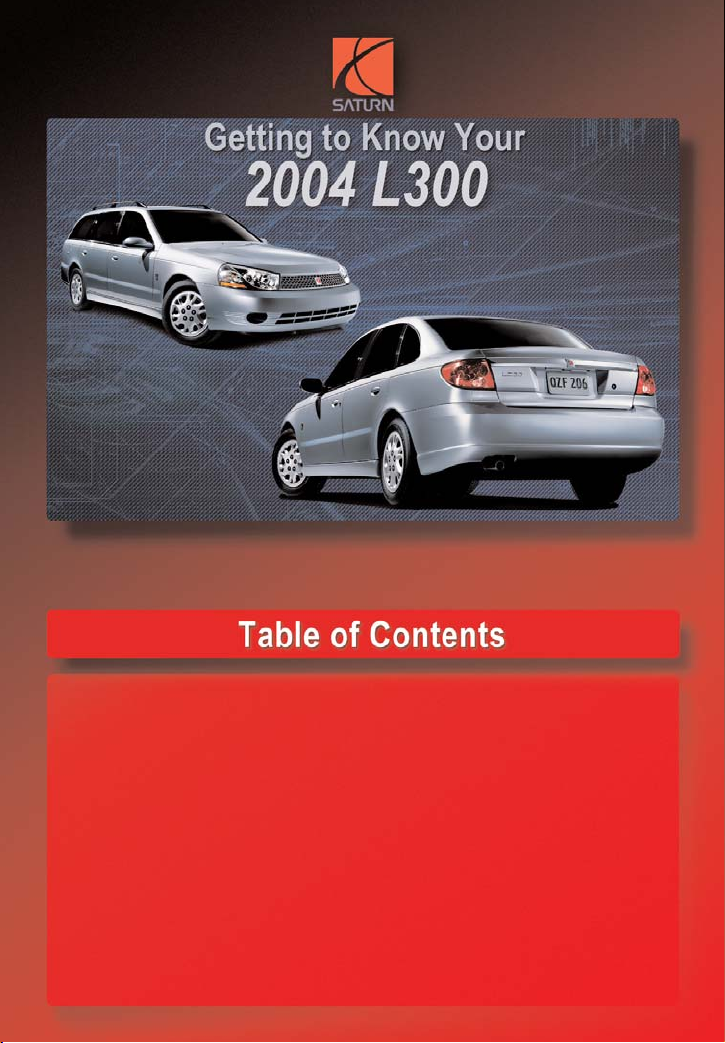
D
H
G
A
FCA A
E
D
M
B
K. Cruise Control
L. Hood Release Lever
M.Windshield Wiper/Washer Lever
I
J
F. Hazard Warning Flasher Button
G. Traction Control Button
H. Glove Box
K
N
L
N. Horn
I. Climate Control System
See Section 3 of your Owner Manual.
J. Audio System
Instrument Panel
A. Air Outlets
B. Exterior Lamp/Turn Signal Controls
C. Instrument Panel Cluster
D. Heated Seat Controls
E. Fog Lamp Button
Page 3
3
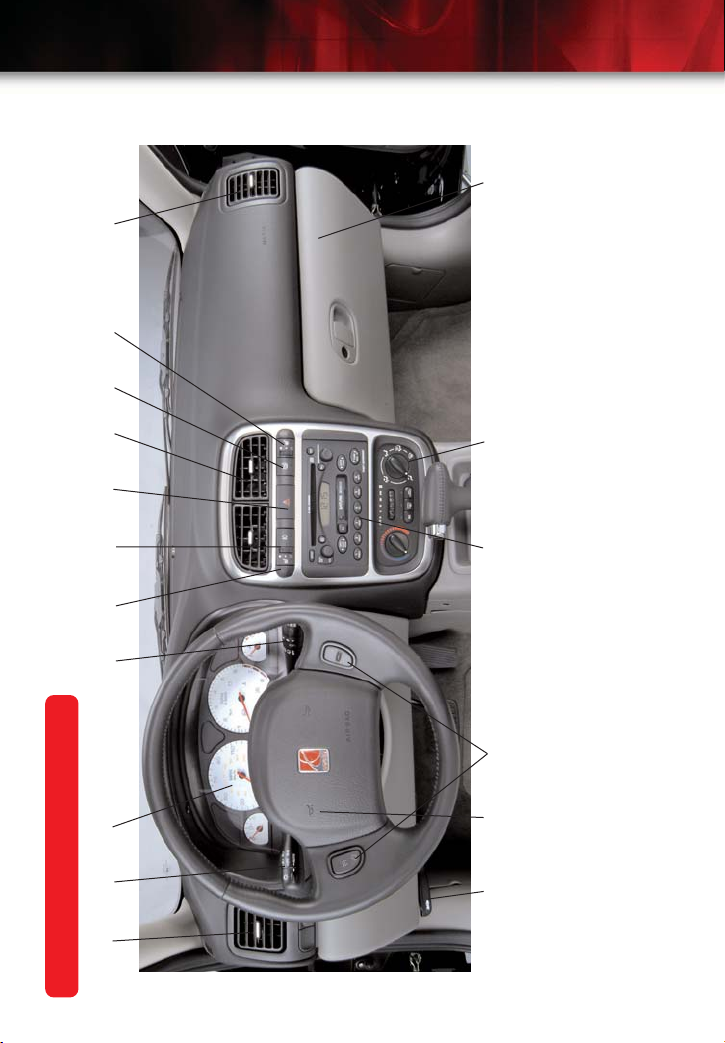
D
C
IMPORTANT: The instrument panel
cluster is designed to let you know
about many important aspects of
your vehicle’s operation. It is impor-
tant to read your Owner Manual and
become familiar with the information
being relayed to you by the lights,
gauges and indicators, and what
action can be taken to ensure safety
and to prevent damage.
B
A
Instrument Panel Cluster
Your vehicle’s instrument panel is
equipped with this cluster or one
very similar to it. The instrument
panel cluster includes these key
features:
A. Fuel Gauge
B. Speedometer
C. Tachometer
D. Engine Coolant Temperature
See Section 3 of your Owner Manual.
Gauge
Page 4

4
Getting to Know Your L300
Automatic Headlamp System
When it is dark enough outside, your
automatic headlamp system will turn on
your headlamps at the normal brightness and will also illuminate the taillamps, sidemarker, parking lamps, and
instrument panel lights. The radio lights
will also dim.
Your vehicle has a light sensor located
on the top of the instrument panel. Be
sure it is not covered, or the automatic
headlamp system will be on whenever
the ignition is on. The system may also
turn on your headlamps when driving
through a parking garage, heavy overcast weather or a tunnel. This is normal.
See Section 3 of your Owner Manual.
Lockout Protection
Your Saturn is equipped with an antilockout protection feature that makes it
difficult for you to lock your key in the
vehicle. If you leave the key in the ignition, and either of the front doors is
opened and a power door lock switch on
either door is depressed, all the doors
will lock. The driver’s door will unlock
within one second.
See Section 2 of your Owner Manual.
Wheel Dust
The wheels on your vehicle may have
black dust on them. The dust is a byproduct of brake use and does not indicate that there is a problem with your
brake system. Routine wheel washing,
with soap and water, will not affect the
performance or service life of the brake
system. Saturn Corporation does not
recommend the use of wheel dust
shields, because they can reduce brake
system cooling.
See Section 5 of your Owner Manual.
Page 5
5
Tire Pressure
Your vehicle’s Tire-Loading Information
Label is located either on the rear edge
of the driver’s door or on the door pillar
between the front and rear seats. The
label provides information about the
size, speed rating, and recommended
tire inflation pressure for your vehicle’s
tires when they’re cold. “Cold” means
the car has been sitting for at least 3
hours or driven no more than 1 mile
(1.6 km).
Over-inflated tires produce a harsh ride,
while under-inflated tires reduce fuel
economy, affect the handling characteristics of the vehicle, and promote tire
wear.
See Section 5 of your Owner Manual.
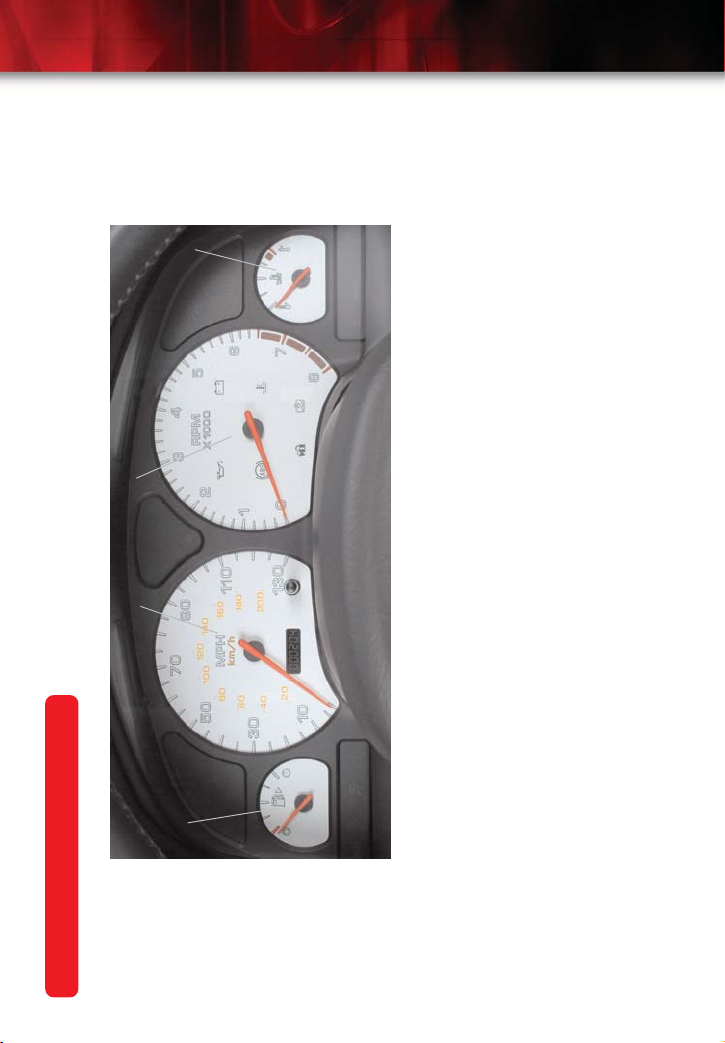
Sunroof (if equipped)
The sunroof switch is located above
your rearview mirror. Your ignition key
must be in the “RUN” or “ACC” position
to operate this feature.
Opening the Sunroof
To open the sunroof three-quarters of
the way, press and hold the “SLIDE”
portion of the switch. To open the sunroof all the way, press and hold the
“SLIDE” portion of the switch again.
Closing the Sunroof
To close the sunroof, press and hold the
“TILT” portion of the switch.
Vent position
To place the sunroof in the vent position
when the sunroof is closed, press and
hold the “TILT” portion of the switch until
the roof is at the desired opening. The
rear of the sunroof will be raised to provide ventilation. To close the sunroof
from the vent position, press and hold
the “SLIDE” portion of the switch.
See Section 2 of your Owner Manual.
Page 6

6
Getting to Know Your L300
Climate Control System
Interior Airflow
Your Saturn vehicle supplies fresh air to
the passenger compartment, even when
the fan is turned off. When the outside
temperature is cool, this airflow may not
be desirable. Options to change the airflow include redirecting the airflow or
changing the air temperature using the
rotary control knobs, or activating the
Recirculate mode ( ).
Prevent Window Fogging
To keep the glass fog-free, the climate
control system knob should be positioned to Defrost/Heater or Defrost
mode. The Recirculate mode ( )
should be left off.
Automatic Air Conditioning (A/C)
Shutoff
Your Saturn’s air conditioning may shut
off for short periods of time when the
engine is under extreme load (steep
grades or passing). This is designed to
provide maximum engine performance.
See Section 3 of your Owner Manual.
Page 7

7
Operating the Liftgate
(Wagon Models)
You may unlock the liftgate by performing any of the following:
• Press the door unlock button on your
remote keyless entry (RKE) transmitter twice.
• Press the liftgate button on your RKE
transmitter.
• Press the interior door unlock switch.
• Enable the automatic door unlocking
feature. (Tailgate will unlock when the
automatic door unlocking feature is
enabled.)
• Insert the ignition key into the rear liftgate key cylinder button. Turn the key
clockwise to unlock the liftgate.
Once the liftgate is
unlocked, press the
rear liftgate key
cylinder button to
open the liftgate.
See Section 2 of your
Owner Manual.
Key “Stuck” in OFF Position
If your ignition key seems stuck in the
OFF position, be sure you are using the
correct key, and be sure it’s inserted all
the way. If it is, turn the steering wheel
to the left and right (even if it is locked)
while you turn the key hard — but turn it
only with your hand. Using a tool to
force it could break the key or the ignition switch. If none of this works, then
your vehicle needs service.
See Section 2 of your Owner Manual.
Securing the Fuel Cap
To reinstall the fuel cap after filling your
tank, turn the fuel cap to the right (clockwise) until you hear at least three clicks.
The vehicle diagnostic system can
determine if the cap has been left off or
improperly installed. This would allow
fuel to evaporate into the atmosphere
and may cause the malfunction indicator
lamp to illuminate.
See Section 5 of your Owner Manual.
Page 8

8
Getting to Know Your L300
Cruise Control
B
A
C
The cruise control buttons are located
on your steering wheel.
• Press the Cruise Control On/Off
button (“A” above) to turn the system
on and off.
• Press the Resume/Accelerate button
(“B” above) to resume a previously
set speed or to accelerate when
cruise is already active.
• Press the Set/Coast button (“C”
above) to set or decrease speed
when cruise is already active.
With cruise control, you can maintain a
speed of about 25 mph (40 km/h) or
more without keeping your foot on the
accelerator. This can help on long trips.
Cruise control does not work at speeds
below about 25 mph (40 km/h). When
you apply your brakes, cruise control will
disengage.
Setting Cruise Control
1. Press the cruise on/off switch. The
indicator light will come on.
2. Achieve the speed you desire.
3. Press the set/coast button.
4. Remove your foot from the
accelerator pedal.
Resuming a Set Speed
You can return to a set speed after having applied your brakes without resetting
cruise control by following these steps:
1. Reach a vehicle speed of 25 mph
(40 km/h).
2. Press the Resume/Accelerate button.
If you hold the Resume/Accelerate button, your vehicle speed will continue to
increase until the button is released or
the brake is applied.
Increasing Speed Using Cruise
Control
You can use the following two methods
to increase vehicle speed while using
cruise control.
Method 1:
1. Achieve the speed you desire with
the accelerator pedal.
2. Press the Set/Coast button.
3. Release accelerator pedal and
Set/Coast button.
Page 9

9
Method 2:
1. Press and hold the
Resume/Accelerate button until you
reach the speed you desire.
2. Release the button once achieving
your desired speed.
Note: You can also increase vehicle
speed by 1 mph (1.6 km/h) increments
by pressing the Resume/Accelerate
button briefly.
Reducing Speed Using Cruise
Control
There are two ways to reduce speed
while using cruise control:
1. Press the Set/Coast button until you
reach the lower speed you want,
then release the button.
2. Slow down by 1-mph (1.6 km/h)
increments by briefly pressing the
Set/Coast button.
Passing Another Vehicle While Using
Cruise Control
Use the accelerator pedal to increase
your speed. When you remove your foot
from the pedal, the vehicle will return to
the speed you set earlier.
Using Cruise Control on Hills
When climbing steep hills while in cruise
control mode, you may have to use your
accelerator pedal to maintain your
speed. When descending hills, you may
have to apply the brake or shift to a
lower gear to slow down. However,
applying the brake or shifting to a lower
gear will disengage cruise control. To
prevent this, you may want to use your
cruise control Set/Coast feature as
described in the “Reducing Speed Using
Cruise Control” section above.
Ending Cruise Control
To end a current cruise control session,
step lightly on the brake pedal. To turn
off the system completely, press the
cruise on/off button.
See Section 3 of your Owner Manual.
Page 10
10
Getting to Know Your L300
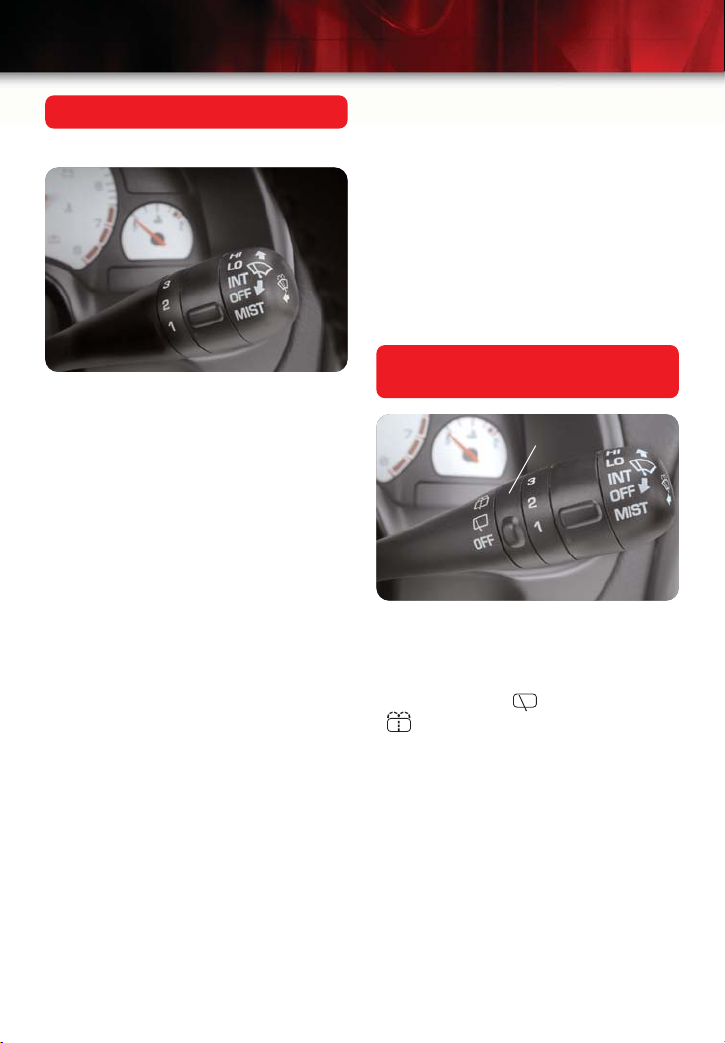
Windshield Wipers
Front Wiper/Washer
The windshield wiper/washer lever has
five settings. To activate the intermittent
(INT) wiper setting, push the windshield
wiper/washer lever up (counterclockwise) one position from the “OFF” position. In the INT position, you can change
the amount of time between wipes by
rotating the band on the windshield
wiper/washer lever to one of the following positions:
• “1” position: Select this setting if a
long delay between windshield wipes
is desired.
• “2” position: Select this setting if a
medium delay between windshield
wipes is desired.
• “3” position: Select this setting if a
short delay between windshield wipes
is desired.
To activate the low (LO) wiper setting,
push the windshield wiper/washer lever
up (counterclockwise) two positions from
the “OFF” position. To activate the high
(HI) setting, push the windshield wiper
lever up (counterclockwise) three positions from the “OFF” position. For
“MIST,” push the windshield wiper/washer lever down (clockwise) one position
from the “OFF” position. The windshield
wiper will perform a single windshield
wipe in this position.
Pull the windshield wiper/washer lever
toward you from any wiper setting to
spray washer fluid on the windshield.
To turn off the windshield wipers, move
the windshield wiper/washer lever to the
“OFF” position.
See Section 3 of your Owner Manual.
Rear Wiper/Washer
(Wagon Models)
A
The rear wiper control is a three-position
switch that is located on the wiper/washer lever on the right side of the steering
column (“A” above). The three positions
are: “OFF,” “ON” ( ), and “WASH”
( ). “OFF” and “ON” are fixed
positions.
To change the amount of time between
windshield wiper wipes, rotate the band
on the wiper/washer lever to one of the
three intermittent (INT) wiper settings.
The “WASH” position will spray washer
fluid onto the back window. The fluid will
stop spraying when you release the
switch. The wiper will continue to be
“ON” until you turn the switch to the
“OFF” position.
See Section 3 of your Owner Manual.
Page 11
11
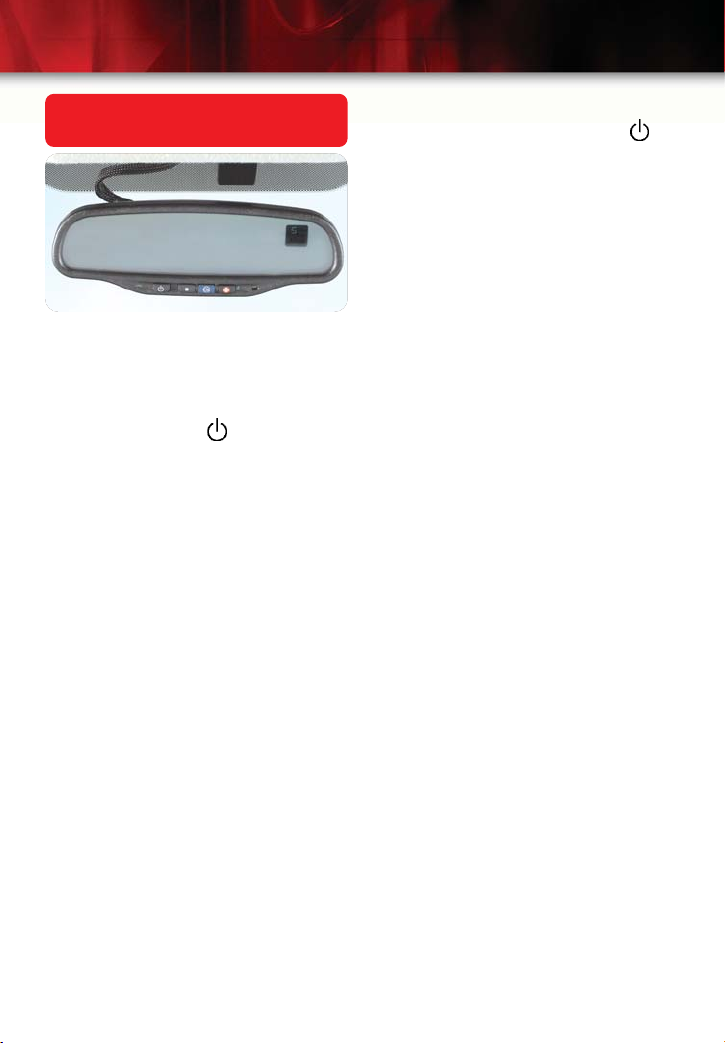
Auto Dimming Rearview Mirror
with Compass (if equipped)
When turned on, this feature automatically dims to the proper level to
minimize glare from headlamps behind
you when dark. The dimming feature
can be turned on or off by briefly pressing the power button ( ) located at
the bottom of the mirror (a light on the
mirror will illuminate when the feature is
on). The mirror is temporarily disabled
when shifting into “R” (Reverse).
Compass Display
The mirror includes an eight-point
compass in the upper-right corner of the
mirror, that shows the vehicle’s current
direction.
Compass Calibration
Press and hold the power button ( )
for six seconds to activate the compass
calibration mode.
The compass can be calibrated in one
of two ways:
• Drive the vehicle in circles at 5 mph
(8 km/h) or less until the “CAL” display appears.
• Drive the vehicle on your everyday
routine (this method may take longer
to calibrate).
See Section 2 of your Owner Manual.
Page 12

12
Getting to Know Your L300
Six-Disc In-Dash CD Player
(if equipped)
A single CD or multiple CDs can be
loaded or ejected. The Load/Eject
(LD/EJ) button is used to begin loading
or ejecting CDs. CDs cannot be loaded
or ejected unless the LD/EJ button is
used.
Loading/Ejecting a Single CD
• Press and release the LD/EJ button.
The radio will display “NUM.”
Flashing numbers in the bottom of
the display indicate empty CD
locations.
• Press the radio preset button (1-6) for
the desired CD location to load or
eject. The radio will display “WAIT.”
If a CD is already present in the desired
location, that CD will be ejected. If the
location is empty, the radio displays
“LOAD,” and a CD can be loaded.
Loading/Ejecting all CDs
• Press and hold the LD/EJ button. If
any CDs are loaded, the radio will
display “EJT” and begin ejecting
all CDs.
When all locations are empty, the radio
will display “LOAD.” Up to six CDs may
be loaded, in order, starting with location
1. The loading operation will continue
until all six CD locations are loaded or
the load operation is stopped by pressing the LD/EJ button.
Cancel Loading or Ejecting CDs
A loading or ejecting operation can be
cancelled by pressing the LD/EJ button
once (if in “NUM” selection) or twice (if
CD is already loading or ejecting).
Loading and ejecting operations also
cancel after 30 seconds of inactivity.
Selecting CDs and Playing Tracks
Each press of the PREV button moves
backward to the beginning of each track
of the CD. Pressing the NEXT button
moves forward to the beginning of the
next track of the CD.
Pressing the DISC/SEEK/SCAN rocker
button selects the next or previous CD
loaded in the CD player.
See Section 3 of your Owner Manual.
Page 13

13
DVD Entertainment System
(if equipped)
This feature works in conjunction with
your audio system and includes a DVD
player, a video display screen, headphones, and a remote control.
The DVD player is located in the center
console between the front seats. The
player can be controlled by the buttons
on the player or on the remote control.
(Note: To use the DVD player, the ignition
must be in the RUN or ACC position.)
DVD Player Buttons
SOURCE: Press this button to choose
DVD or AUX. The AUX source will only
be selected if an auxiliary device is connected, and actively sending video signals to the RCA jacks.
(
) (Play/Pause): Press this button to
II
/
start play or to pause while playing.
Press it again to continue playing.
(/) (Stop/Eject): Press this button to stop playing. Press it again to
eject the disc.
Remote Control
To use the remote control, aim it at the
infrared window above the video screen
and press the desired button.
(
) (Play/Pause): Press this button
/
to start play or to pause while playing.
Press it again to continue playing. If you
press and hold the button for 3 seconds
or more, the DVD player will stop.
() (Fast Forward/Reverse): Press
the right arrow button to fast forward the
disc. Press the left arrow button for
reverse. To resume playback, press the
button again or press the Play/Pause
button. You can also press and hold the
button to fast forward or reverse.
() (Next/Previous): Press the up
arrow button to select the next chapter
on the DVD. Press the down arrow button to select the previous chapter on the
DVD.
Menu: Press this button to view the
media menu. The menu is recorded on
the disc and is different on every disc.
Use the up and down and the right and
left arrow buttons to move the cursor
around the menu. After making your
selection, press ENTER.
Page 14

14
Getting to Know Your L300
SOURCE: Press this button to switch
between the auxiliary device (connected
to the RCA jacks) and the disc in the
DVD player.
Playing a DVD
• Activate the overhead console screen
by pushing forward on the release
button and folding the screen down.
• Gently insert the disc (label side up)
into the loading slot until it stops. The
DVD will continue loading the disc
and the player will automatically start.
• Press the play/pause button on the
DVD player or remote control to play
the DVD.
• Use the in-dash radio controls to
adjust vehicle speaker volume, bass,
treble, etc.
• The 3 RCA jacks located on the player faceplate allow you to use auxiliary
devices such as a camcorder or a
video game unit.
Headphones
Two wireless headphones are included
that allow you to listen to the DVD player or an auxiliary device connected to
the RCA jacks.
•Turn the switch on the left side of the
headphones to ON.
• Use the volume control on the right
side of the headphones to adjust the
volume.
• Switch the headphones to OFF when
they are not in use.
Video Display Screen
The video display screen is located in
the overhead console.
To use the video screen:
• Push forward on the release button
and the screen will fold down.
• Pull the screen toward you and adjust
its position as desired.
To close and turn off video display
screen:
• Fold the screen up into the overhead
console and push it until it clicks into
a locked position.
See Section 3 of your Owner Manual.
Page 15

15
Remote Keyless Entry (RKE)
Transmitter Synchronization
Synchronization is the method used to
keep the RKE transmitter of the vehicle
communicating with the receiver of the
vehicle. If the RKE buttons on your
transmitter are pressed too many times
without the receiver receiving a signal,
your transmitter may become out of synchronization. If this happens, your transmitter may not function properly. Perform
the manual synchronization procedure
provided in your Owner’s Handbook, if
your transmitter is inoperative.
See Section 2 of your Owner Manual.
Lower Anchorages and Top
Tethers for Children (LATCH)
System
Your vehicle has the LATCH system,
which can be used instead of the vehicle’s safety belts to secure a LATCH
system-compatible child restraint. To
assist you in locating the lower anchors
for this child restraint system, each seating position with the LATCH system will
have two tan or gray dots about the size
of a dime affixed to the lower portion of
the seatback.
See Section 1 of your Owner Manual.
Page 16

16
Getting to Know Your L300
Roadside Assistance Program
1-800-533-6000
TTY users: 1-800-833-6000
As the proud owner of a new Saturn
vehicle, you are automatically enrolled
in the Saturn Roadside Assistance
Program. This value-added service is
intended to provide you with peace of
mind as you drive in the city or travel
the open road.
Saturn’s Roadside Assistance toll-free
number is staffed by courteous and
capable Roadside Assistance
Representatives who are available 24
hours a day, 365 days a year.
We will provide the following services
during the Bumper-to-Bumper warranty
period, at no expense to you:
• Fuel delivery
• Lockout service (identification
required)
•Tow to nearest Saturn retailer for
warranty service or in the event of
a vehicle-disabling accident
• Flat tire change
• Jump starts
• Minor repairs to disabled vehicles
• Assistance when vehicle is mired in
sand, mud or snow
• Saturn retailer locator service
For prompt and efficient assistance
when calling, please provide the following information to the Roadside
Assistance Representative:
• Location of vehicle
•Telephone number of your location
•Vehicle model, year and color
•Vehicle mileage
•Vehicle Identification Number (VIN)
•Vehicle license plate number
Saturn reserves the right to limit servic-
es or reimbursement to an owner or
driver when, in Saturn’s judgment, the
claims become excessive in frequency
or type of occurrence.
My Saturn
As your home away from home on the
Internet, you can take advantage of My
Saturn’s numerous owner benefits,
including: vehicle maintenance schedules, service reminders, frequently
asked questions, retailer information and
more. So visit the My Saturn owners site
at Saturn.com and enjoy the ride.
Certain restrictions, precautions and safety procedures apply to your vehicle. Please read your Owner
Manual for complete instructions. All information contained herein is based on information available
at the time of printing and is subject to change without notice. Copyright 2003 by GM Corp.
All rights reserved.
04LSERGTK
 Loading...