

Page 1

Siemens Practices
Operation Series
A30808-X5051-C140-l-B919
Issue 1, December 1984
SATURN@ EPABX
OCIE
DYAD’” DIGITAL TELEP
and 26-BUTTON)
INSTRUCTBO
Issued by Office Systems Group
5500 Broken Sound Boulevard N.W. Boca Raton, Florida 33431 (305) 994-8100 l Telex: 515052
Siemens Communication Systems, Inc.
Printed in U.S.A.
Page 2
Siemens Practices
Operation Series
A30808-X5051-C140-l-6919
Issue 1, December 1984
0 Siemens Communication Systems, Inc., 1984
All rights reserved.
‘\
:;
!
/J
This material is Proprietary to Siemens Communication Systems, Inc. Any
unauthorized reproduction, use or disclosure of this material, or any part there-
of, is strictly prohibited.
Siemens reserves the right to make changes in specifications at any time
and without notice. The information furnished by Siemens in this material
is believed to be accurate and reliable. However, no responsibility is assumed
by Siemens for its use.
SATURN@
is the registered trademark of Siemens Communication Systems,
Inc. for this line of equipment.
DYADTM has been applied for as the registered trademark by Siemens
Communication Systems, Inc.
Page 3

SATURN EPABX A30808-X5051-C140-l-B919
DYAD User Instructions Issue 1, December 1984
CONTENTS
:
SECTiON
1.00 INTRODUCTION ......................... l-l
1.01 General
.............................
1-l
1.02 Feature Access ....................... l-l
1.03 To Place a Call ....................... l-l
1.04 To Answer a Call
...................... l-l
1.05 Automatic Line Preferences ............. l-l
1.06 Discriminating Ringing
................. l-3
1.07 Call Progress Tones ................... 1-3
1.08 Speaker Volume Control. ............... 1-4
1.09 Pickup Button Indications. .............. l-4
1.10 Feature Button Indications .............. l-4
1.11 Alphanumeric Display. ................. 1-4
2.00 HOLD FEATURES. ....................... 2-1
2.01
2.02
2.03
2.04
2.05
2.06
Consultation Hold
............
Call Hold ...................
Call Hold - Flip-Flop (Broker)
Call Park ...................
Manual Hold ................
Exclusive Hold
..............
2-l
2-1
2-l
2-2
2-3
2-3
3.00 CALL TRANSFER FEATURES
.............
3.01 Call Transfer ........................
3.02 Call Transfer to Attendant. .............
3-1
3-1
3-l
4.00 CONFERENCE FEATURES. ................ 4-l
4.01 Add-On Conference ................... 4-1
4.02 Bridge Call .......................... 4-l
4.03 Meet-Me Conference .................. 4-l
4.04 Statiqn Controlled Conference
............ 4-2
5.00 CALL FORWARDING FEATURES ........
. . .
5-l
5.01 Call Forwarding - All Calls.
.........
5-l
5.02 Call Forwarding to Public Network 5-l
5.03 Call Forwarding - Busy Lines
.......
5-2
.
5.04 Call Forwarding - No Answer ....... . 5-3
5.05 Call Forwarding - Secretarial ....... . . 5-3
5.06 Call Forwarding - Return
...........
. . 5-4
5.07 Forced Call Forwarding ............ 5-4
6.00 CALL QUEUING FEATURES ............... 6-1
6.01 Internal Call Queuing - Callback. ........ 6-l
6.02 Internal Call Queuing - Standby ......... 6-1
6.03 Outgoing Call Queuing - Callback ....... 6-1
6.04 Outgoing Call Queuing - Standby
....... 6-2
LIST OF FIGURES
FIGURE PAGE
1.00 Digital Premium Instruments 1-2
SECTION
PAGE
7.00 CALL PICKUP FEATURES ................. .7-l
7.01
Call Pickup - Directed ................. 7-l
7.02 Call Pickup - Group ................... 7-1
6.0d DIRECT ACCESS FE.ATURES
............... .8-i
8.01 Direct Station Selection ................ 8-l
8.02 Direct Trunk Group Selection
............ 8-l
8.03 Direct Trunk Selection ................. 8-l
8.04 Station-Defined Direct Dial .............. 8-l
9.00 INTERCOM FEATURES ...... : ............ .9-i
9.01 Automatic Intercom .................... 9-l
9.02 Manual Intercom and Signaling .......... 9-1
9.03 Executive Intercom .................... 9-1
10.00 PRIVACY FEATURES .................
. . .
10-l
10.01 Executive Override ................ 10-l
10.02 Executive Override - Automatic
......
10-l
10.03 Do Not Disturb ................... 10-l
10.04 Call Privacy.
.....................
10-2
10.05 Station Ringer Cutoff .............. 10-2
11.00 SPEED CALLING FEATURES
............. 11-1
11.01 Last Number Redial .................. 11-l
11.02 Saved Number Redial
................. 11-l
11.03 Speed Calling - Individual .............. 11-l
11.04 Speed Calling - Group ................ 11-2
12.00 ADDITIONAL FEATURES ................ 12-1
12.01 Least Cost Routing ................... 12-1
12.02 SMDR Account Codes ................ 12-1
12.03 I-Use Indication ...................... 12-2
12.04Duration of Call Display
............... 12-2
12.05Time of Day Display .................. 12-2
12.06 Call Tracing
......................... 12-2
12.07 Message Waiting.
.................... 12-2
12.08Stop Hunt .......................... 12-4
12.09 Mobile Authorization Codes
............ 12-4
12.10 Universal Night Answer - Zoned ........ 12-4
12.11 Voice Paging Access - Zoned and Area. 12-4
12.12 Call Release ........................ 12-4
LIST OF TABLES
TABLE
PAGE
12.00 Feature Access Codes and Button Labels 12-6
Page 4
SATURN EPABX
DYAD User instructions
A30808-X5051-C140-l-B919
Issue 1, December 1984
SECTION 1 .OO
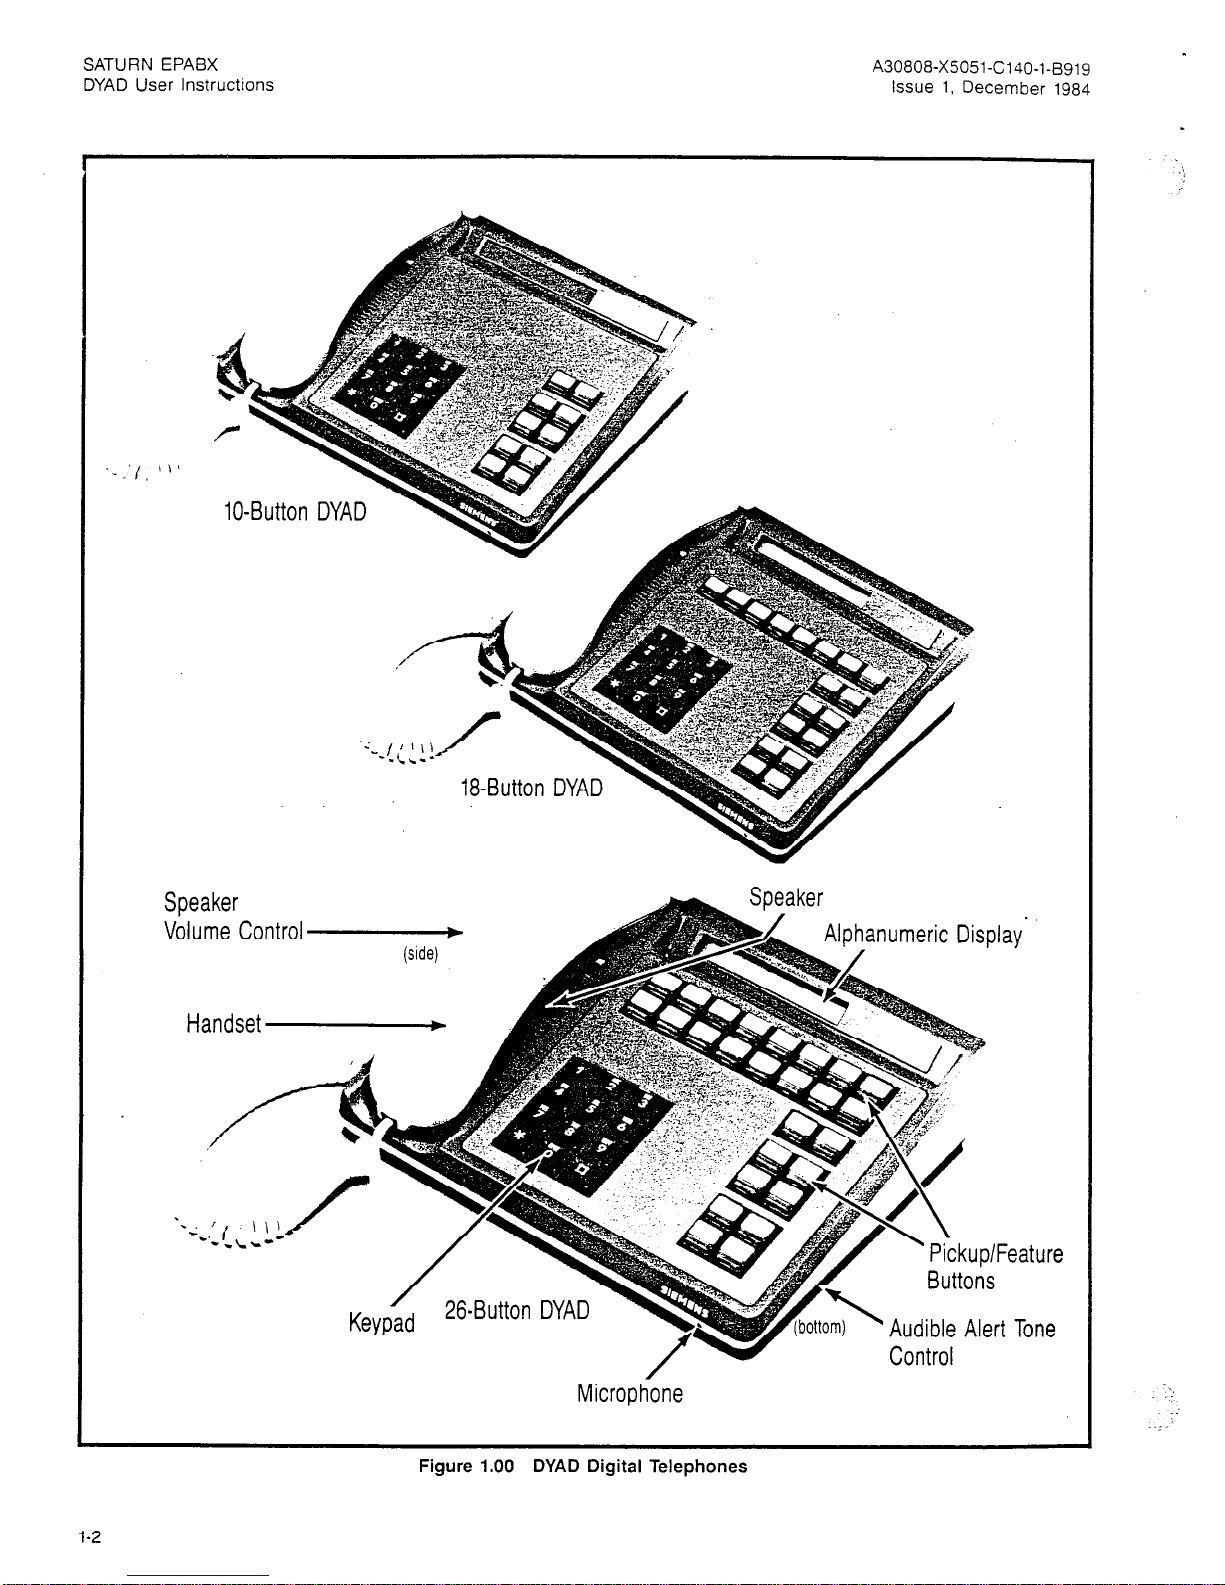
1.01 General. This document provides step-by-step instruc-
tions for accessing SATURN Electronic Private Automatic
Branch Exchange (EPABX) features from the SATURN DYAD
digital telephones. (Refer to Figure 1.00.)
1.02 Feature Access. The instructions provided in this document are for features that can be accessed by depressing a
button and/or dialing an access code. if your DYAD does not
have a button for a particular feature, you may be able to access the feature by dialing an access code, if allowed by
Class-of-Service. Refer to Table 12.00, located in the back of
this document, for a list of the feature access codes and associated button labels. Unless otherwise noted, the instructions provided in this document apply to the lo-, la-, and
26-button DYADs.
For users who are familiar with accessing features from Single Line Telephone (SLTs); whenever hookswitch flashing is
required, you must instead depress the XFER feature button
on your DYAD. Depression of the hookswitch on a DYAD disconnects the call in progress.
1.03 To Place a Call. The following procedures may be used
to place a call:
a. Normal Handset Operation. To place a call from your
DYAD, select and depress an idle line pickup button,
pick up the handset, listen for dial tone, and dial the
desired destination number.
b. On-Hook Dialing. On-Hook Dialing allows you to place
a call to another party without lifting the handset. Call
progress tones such as dial tone, busy tone, ringback
tone, etc., and the called party’s voice are heard over
the DYAD’s loudspeaker.
To place a call, select and depress an idle pickup button, depress the On-Hook Dialing (ON-HK DIAL) feature button, listen for dial tone, and dial the desired
destination number. If busy tone is heard, the call may
be disconnected by again depressing the ON-HK DIAL
feature button. If the called station is idle, ringback tone
is heard. When the called party answers, the party’s
voice is heard over the loudspeaker. To talk to the party,
you must convert to normal handset operation by pick-
ing up the handset.
Alternatively, if your DYAD is equipped with a TALK but-
ton, you may leave the handset on the hookswitch and
talk to the other party by speaking into the DYAD’s
microphone. The TALK button must be depressed each
time you speak toward the microphone and released
to hear the called party’s response over the speaker.
You may convert from On-Hook Dialing to normal handset operation, any time during the call, simply by picking up the handset. Additionally, you may convert from
normal handset operation to On-Hook Dialing, any time
during a call, by depressing the ON-HK DIAL feature
button and hanging up.
c. Hands-Free Operation. Hands-Free Operation allows
you to place a call to another party and talk to the party
without lifting the DYAD’s handset. Lifting the hand-
INTRODUCTION
set or operation of a Push-To-Talk (TALK) feature button is not required. Call progress tones such as dial
tone, busy tone, ringback tone, etc., and the voice of
the called party are heard over the DYAD’s loudspeaker.
Your voice is transmitted via the DYAD’s microphone.
To place a hands-free call, select and depress an idle
pickup button, depress the HANDS FREE feature button, listen for dial tone, and dial the desired destination number. When the called party answers, talk
toward the DYAD’s microphone. The party can be heard
over the DYAD’s loudspeaker.
You may convert from Hands-Free Operation to normal handset operation, anytime during the call, simply by picking up the handset. Additionally, you may
convert from normal handset operation to Hands-Free
Operation, any time during a call, by depressing the
HANDS FREE feature button and hanging up.
1.04 To Answer a Call. The following procedures may be used
to answer a call.
a. Normal Handset Operation. To answer an incoming call
at your DYAD, simply depress the “flashing” pickup
button (if required), pick up the handset, and talk to
the calling party. Immediately after depressing the
“flashing” pickup button the calling party’s extension
number or trunk identity is displayed on the alphanumeric display (la- and 26-button DYADs only):
b. On-Hook Dialing. To answer a call without lifting the
handset, depress the “flashing” pickup button (if required), depress the On-Hook Dialing (ON-HK DIAL)
feature button and talk to the calling party via the
DYAD’s microphone and speaker. You must depress
the TALK button each time you speak toward the
DYAD’s microphone. To hear the response, you must
release the TALK button.
You may convert from On-Hook Dialing to normal handset operation, anytime during the call, by picking up
the handset. Additionally, you may convert from nor-
mal handset operation to On-Hook Dialing, anytime
during a call, by depressing the ON-HK DIAL feature
button and hanging up.
c. Hands-Free Operation. To answer a call and talk to the
calling party without lifting the handset, depress the
“flashing” pickup button (if required), depress the
HANDS FREE feature button and talk to the calling
party via the DYAD’s microphone and speaker. The
Push-to-Talk (TALK) feature button is not required for
Hands-Free Operation.
You may convert from Hands-Free Operation to nor-
mal handset operation, anytime during the call, by picking up the handset. Additionally, you may convert from
normal handset operation to Hands-Free Operation,
any time during a call, by depressing the HANDS
FREE feature button and hanging up.
1.05 Automatic Line Preferences. Connection to a given
pickup line on your DYAD may be provided on an automatic
l-l
Page 5
SATURN EPABX
A30808-X5051-C140-l-6919
DYAD User Instructions
issue 1, December 1984
Speaker
Volume Control -
(side)
Handset
A Speaker
A
b
Alphanumeric Display’
1
Key p<d
26.Button DYAD
Audible Alert Tone
Microphone
Figure 1.00 DYAD Digital Telephones
l-2
Page 6
SATURN EPABX
DYAD User Instructions
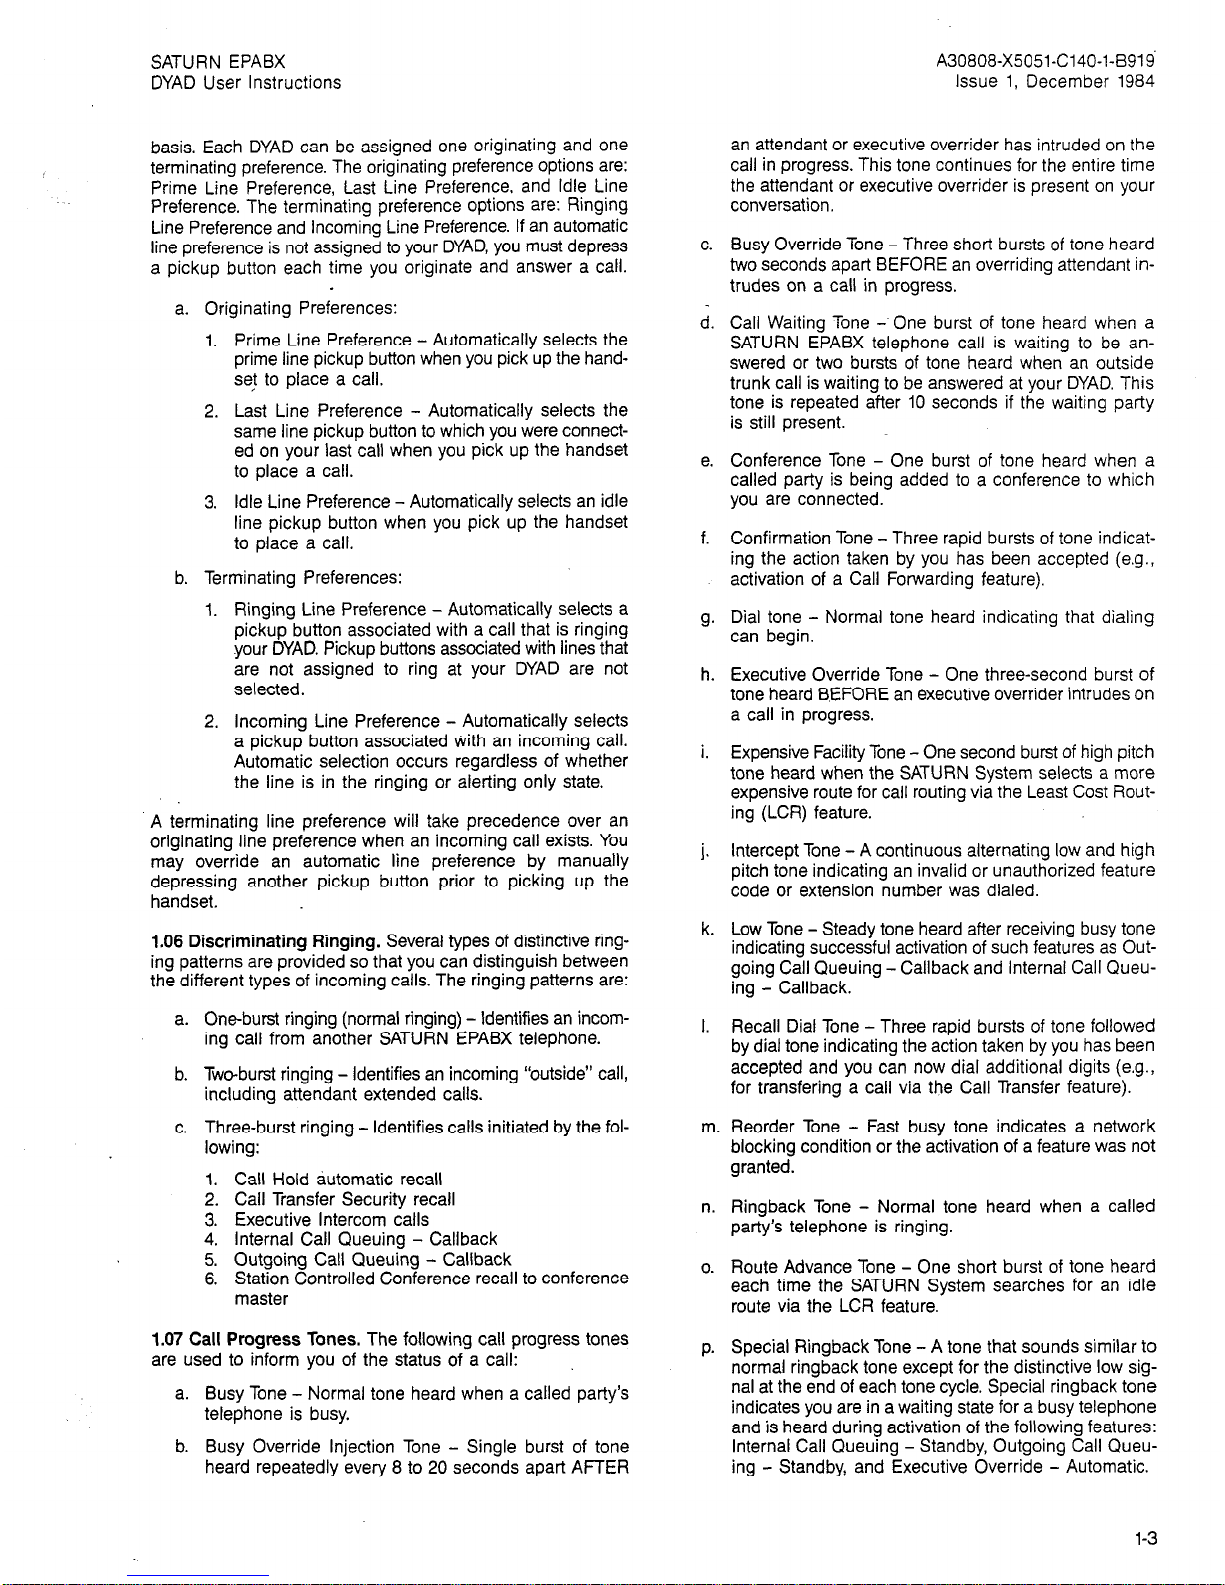
basis. Each DYAD can be assigned one originating and one
terminating preference. The originating preference options are:
Prime Line Preference, Last Line Preference. and Idle Line
Preference. The terminating preference options are: Ringing
Line Preference and Incoming Line Preference. If an automatic
line preference is not assigned to your DYAD, you must depress
a pickup button each time you originate and answer a call.
a. Originating Preferences:
1. Prime Line Preference - Automatically selects the
prime line pickup button when you pick up the handse! to place a call.
2. Last Line Preference - Automatically selects the
same line pickup button to which you were connected on your last call when you pick up the handset
to place a call.
3. Idle Line Preference - Automatically selects an idle
line pickup button when you pick up the handset
to place a call.
b. Terminating Preferences:
1. Ringing Line Preference - Automatically selects a
pickup button associated with a call that is ringing
your DYAD. Pickup buttons associated with lines that
are not assigned to ring at your DYAD are not
selected.
2. Incoming Line Preference - Automatically selects
a pickup button associated with an incoming call.
Automatic selection occurs regardless of whether
the line is in the ringing or alerting only state.
A terminating line preference will take precedence over an
originating line preference when an incoming call exists. You
may override an automatic line preference by manually
depressing another pickup button prior to picking up the
handset.
1.06 Discriminating Ringing. Several types of distinctive ringing patterns are provided so that you can distinguish between
the different types of incoming calls. The ringing patterns are:
One-burst ringing (normal ringing) - Identifies an incoming call from another SATURN EPABX telephone.
Tweburst ringing - Identifies an incoming “outside” call,
including attendant extended calls.
Three-burst ringing - Identifies calls initiated by the fol-
lowing:
1. Call Hold automatic recall
2. Call Transfer Security recall
3. Executive Intercom calls
4. Internal Call Queuing - Callback
5. Outgoing Call Queuing - Callback
6. Station Controlled Conference recall to conference
master
1.07 Call Progress Tones. The following call progress tones
are used to inform you of the status of a call:
a. Busy Tone - Normal tone heard when a called party’s
telephone is busy.
b. Busy Override Injection Tone - Single burst of tone
heard repeatedly every 8 to 20 seconds apart AFTER
C.
d.
e.
f.
h.
i.
i.
k.
I.
m.
n.
0.
P.
A30808-X5051-C140-l-8919’
Issue 1, December 1984
an attendant or executive overrider has intruded on the
call in progress. This tone continues for the entire time
the attendant or executive overrider is present on your
conversation.
Busy Override Tone - Three short bursts of tone heard
two seconds apart BEFORE an overriding attendant intrudes on a call in progress.
Call Waiting Tone - One burst of tone heard when a
SATURN EPABX telephone call is waiting to be answered or two bursts of tone heard when an outside
trunk call is waiting to be answered at your DYAD. This
tone is repeated after 10 seconds if the waiting party
is still present.
Conference Tone - One burst of tone heard when a
called party is being added to a conference to which
you are connected.
Confirmation Tone - Three rapid bursts of tone indicat-
ing the action taken by you has been accepted (e.g.,
activation of a Call Forwarding feature).
Dial tone - Normal tone heard indicating that dialing
can begin.
Executive Override Tone - One three-second burst of
tone heard BEFORE an executive overrider intrudes on
a call in progress.
Expensive Facility Tone - One second burst of high pitch
tone heard when the SATURN System selects a more
expensive route for call routing via the Least Cost Rout-
ing (LCR) feature.
Intercept Tone - A continuous alternating low and high
pitch tone indicating an invalid or unauthorized feature
code or extension number was dialed.
Low Tone - Steady tone heard after receiving busy tone
indicating successful activation of such features as Out-
going Call Queuing - Callback and Internal Call Queu-
ing - Callback.
Recall Dial Tone - Three rapid bursts of tone followed
by dial tone indicating the action taken by you has been
accepted and you can now dial additional digits (e.g.,
for transfering a call via the Call Transfer feature).
Reorder Tone - Fast busy tone indicates a network
blocking condition or the activation of a feature was not
granted.
Ringback Tone - Normal tone heard when a called
party’s telephone is ringing.
Route Advance Tone - One short burst of tone heard
each time the SATURN System searches for an idle
route via the LCR feature.
Special Ringback Tone - A tone that sounds similar to
normal ringback tone except for the distinctive low sig-
nal at the end of each tone cycle. Special ringback tone
indicates you are in a waiting state for a busy telephone
and is heard during activation of the following features:
Internal Call Queuing - Standby, Outgoing Call Queu-
ing - Standby, and Executive Override - Automatic.
l-3
Page 7
SATURN EPABX
A30808-X5051-C140-1-6919
DYAD User Instructions
Issue 1, December 1984
1.08 Speaker Volume Control. You may control the voice and
call progress tones level and the audible alert tone level Of the
DYAD’s speaker with the two controls on the DYAD. Use the
thumbwheel control on the handset side to adjust voice and
call progress tones level and the control on the underside of
the DYAD to adjust the audible alert tone level.
When you pick up a call the calling party’s extension
number or trunk identity (e.g., 3456 or LCCAL) and the
extension number from which you are picking up the
call (e.g., 3939) are displayed. Refer to the operating
instructions for the features, “Call Pickup - Directed and
Call Pickup - Group.”
NOTE: The voice level heard from your handset is not ad-
justable.
f. Call Waiting Source Display
1.09 Pickup Button Indications. The DYAD can be provided
with multiple line and/or trunk pickup buttons. The current status of a line/trunk is displayed via a corresponding lamp Iocated within each pickup button. The bottom two DYAD buttons
(5 and 10) do not have a lamp associated with them.
1 cw 2954 LOCAL
Identifies the extension number or trunk identity of a
call waiting to be answered (e.g., 2954) and the extension number or trunk identity of the party to which you
are currently talking (e.g., LOCAL).
a. Dark - Indicates that the line/trunk is idle.
Callback Number Display
b. Lighted Steady - Indicates that the line/trunk is busy.
c. Flash (lamp blinks 30 times per min.) - Indicates that
the line/trunk has an incoming call.
d. Wink (lamp blinks 60 times per min.) - -Indicates that
the line/trunk has been placed on Manual Hold.
1 CALLBCK 1234 1
Identifies that the call being received is for an automat-
ic callback initiated earlier to another extension. Refer
to the operating instructions for the feature, “Internal Call
Queuing - Callback”.
h. Called Number Display
e. Flutter (lamp blinks 300 times per min.) - Indicates that
the line/trunk has been placed on Exclusive Hold.
2413 )
1.10 Feature Button indications. Feature buttons are used
to activate features at your DYAD. For some features, the button lamp indicates the active/inactive status of the feature.
Generally when the feature is active the lamp is lighted, and
when the feature is inactive the lamp is dark.
i.
Identifies the extension number of the called party.
Calling Number Display
4813
Identifies the extension number of the calling party.
1.11 Alphanumeric Display. (18- and 26-button DYADs only).
Additional information about a call or feature is shown on the
alphanumeric display. The displays available on your DYAD are
shown below. Examples of display types are as follows:
1.
Conference Mode Display
CONF /
1
,
Indicates that a conference call has been established.
Refer to the operating instructions for features, ‘Add-
On Conference, Bridge Call and Meet-Me Conference”.
a.
b.
C.
d.
e.
1-4
Attendant Identification on Display
AI-T 5000 ]
When you originate or receive an attendant call, the attendant’s identification code (e.g., 5000) is displayed.
Call Forwarding Destination Display
FWD TO 1856
Identifies the destination number (e.g., 1856) to which
all your calls are forwarded.
Call Forwarding Source Display
CF 2295
1784
Identifies the extension number (e.g., 2295) from which
a call is being forwarded and the extension number or
trunk identity of the calling party (e.g., 1784).
Call Park Location Number Display
1 PARK 570 4943 1
Identifies the dialed parked code (e.g., 57) and location
code (e.g., 0) which was selected by the SATURN
System.
Call Pickup Source and Destination
Display PU3939 3456
k.
I.
m.
n.
Dial Input Verification Displav
Identifies the keyed digits as
you enter them from your
keypad. The digits are scrolled from right to left as
shown in the example dis-
plays to the right (e.g. exten-
sion 1219 is being dialed).
1219 1
Do Not Disturb Display
( DND ALL
When you activate the Do Not Disturb feature, a Do Not
Disturb indication is shown on your alphanumeric display. Refer to the operating instructions for the feature,
“Do Not Disturb”.
Duration of Call Display
3:35 I
I ,
When you activate the Duration of Call Display feature,
an indication of the total elapsed time of the call in
progress is displayed. Refer to operating instructions for
feature, “Duration of Call Display”.
Hold Display
ON HOLD j
Identifies that another party has placed you on hold.
Page 8
SATURN EPABX A30808-X5051-C140-l-6919
DYAD User Instructions issue 1, December 1984
o. Incoming Call Display
2411 1
When you receive an incoming call (line pickup lamp
flashes), the extension number (e.g., 2411) or trunk identity (e.g., INWATS) of the calling party can be displayed
prior to answering the call by depressing the “flashing”
pickup button.
p. Message Waiting Destination Display
j CALL 1419 I
When a party from another extension initiates message
waiting toward your DYAD, the message “CALL’ and the
party’s extension number are displayed. Refer to the
operating instructions for the feature, “Message Waiting”,
q. Recall Identification Display
1 RECALL 1234 1
L ,
Identifies that you are connected to a call that has been
recalled to your DYAD. Refer to the operating instructions for the feature, “Call Hold and Call Hold - FlipFlop (Broker)“.
r. SMDR Account Code Display
1 ACCT
10810781417 1
I
I
Identifies the default account code associated with your
DYAD. Refer to the operating instructions for the fea-
ture “SMDR Account Codes”.
s. Speed Calling - Individual Display
13
1
13059948800 1
Identifies the destination number and associated speed
call code programmed from your DYAD. Refer to the
operating instructions for the feature, “Speed Calling
- Individual”.
t. Time of Day-Display
4:38 AM 1
Indicates the time of day in reference to the SATURN
System clock. Refer to the operating instructions for the
feature, “Time of Day Display”.
u. Last Number Redial
99948800 /
Identifies the last number dialed from your DYAD. Refer
to operating instructions for the feature “Last Number
Redial”.
v. Save Number Redial
99948800 /
Identifies the number just dialed and saved in system
memory for later dialing. Refer to operating instructions
for the feature “Save Number Redial”.
l-5 (l-6 blank)
Page 9
SATURN EPABX
DYAD User Instructions
SECTION 2.00 HOLD FEATURES
2.01 Consultation Hold. This feature allows you to place a
call (inside or outside) on hold and originate another call on
the same extension line.
a. To place a party on hold and originate another call:
1. First, ask the other party to wait.
2. Depress the II button.
l XFER lamp winks.
l Recall dial tone is heard.
l
The party is placed on hold.
3. Dial the number of the desired party.
l Ringback tone is heard.
NOTE: If busy tone is heard or the called party does not
answer, depress the XFER button to return to the held
call.
2. Resume your conversation.
By using the Call Hold feature access code.
a. To’place a party on hold:
- 1. First, ask the other party to wait.
2. Depress the m button.
l XFER lamp winks.
l Recall dial tone is heard.
3. Dial the Call Hold feature access code.
l Confirmation tone is heard.
l The party is placed on “call hold.”
l XFER lamp extinguishes.
4. Hang up.
4. When the called party answers, you may begin to
talk.
b. To return to the held party:
1. Wait until the consulted party hangs up.
l
You are automatically reconnected to the previously held party.
NOTE: If the held party is from “outside” the SATURN
EPABX, you must return to the held party within a
preset period of time (five minutes, nominal) or the
call is recalled to your DYAD (three-burst ringing is
heard), if idle, otherwise to the attendant. To answer/return to the held call, pick up the handset.
l XFER lamp extinguishes.
2. Resume your conversation.
b. To return to a held call or alternate between two calls:
1. Pick up the handset or depress the
button (if connected to another call).
.pEq
2.02 Call Hold. This feature allows you to place any call (inside
or outside) on hold and hang up without losing the call. After
holding the call, you may originate or receive other calls on the
same extension line and return to the held call or alternate be
tween the two calls (holding one call while speaking to other).
l Dial tone/recall dial tone is heard.
2. Dial the Call Hold feature access code.
By using the Call Hold feature button (PARK PRIV).
a. To place a party on hold:
l You are reconnected to the previously held party
and the other party, if any, is placed on hold.
3. Resume your conversation.
2.03 Call Hold - Flip-Flop (Broker). This feature allows you,
upon hearing a call waiting tone and receiving a call waiting
display, to place the call in progress (inside or outside call) on
hold and establish a connection to the waiting call. When no
call is waiting, this feature allows you to place a call in progress
on hold and originate another call on the same extension line.
In either case, you can return to the held call or alternate
between the two calls (holding one call while speaking to the
other).
1.
2.
3.
NOTE:
First, ask the other party to wait.
Depress the I/ feature button.
l Confirmation tone is heard.
l The party is placed on “call hold.”
. PARK PRIV lamp winks.
Hang up.
If the held party is from “outside” the SATURN
EPABX, you must return to the held party within a
preset period of time or the call is recalled to your
DYAD (three-burst ringing is heard), if idle, otherwise
to the attendant. To answer/return to the held call,
pick up the handset.
b. To return to a held call or alternate between two calls:
1. Pick up the handset or depress “ONHKDIAC’ or
“HANDSFREE” then depress the
pEJ
feature button (if connected to another call).
l
You are reconnected to the previously held party
and the other party, if any, is placed on hold.
A30808-X5051-C140-i-B919
Issue 1. December 1984
By using the Call Hold - Flip-Flop feature button (SPLIT).
a. To place a party on hold and answer a waiting call:
1. First, ask the other party to wait.
2. Depress the m feature button.
. SPLIT lamp winks.
l You are connected to the waiting party and the
other party is placed on hold.
3. You may begin to talk.
b. To place a party on hold and originate another call:
1. First, ask the other party to wait.
2-1
Page 10
SATURN EPABX
A30808-X5051-C140-1-5919
DYAD User Instructions
Issue 1, December 1984
2. Depress the pSPLIT feature button.
l SPLIT lamp winks.
l Dial tone is heard.
l The party is placed on hold.
3. Dial the phone number of the desired party.
l Ringback tone is heard.
NOTE: If the called party does not answer your call or the
line is busy, depress the SPLIT button to return to
the held party.
4. When the called party answers, you may begin to
talk.
c. To return to a held party or alternate between two calls:
1. Depress the
[s,,,,
feature button.
l You are reconnected to the previously held party
and the other party, if any, is placed on hold.
NOTE: If you hang up while a call is on hold, the call is au-
tomatically recalled to your DYAD. To answer/return
to the held call, pickup the handset.
2. Resume your conversation.
By using the Call Hold - Flip-Flop feature access code.
a. To
1.
2.
3.
4.
b. To
1.
2.
place a party on hold and answer a waiting call:
First, ask the other party to wait.
Depress the [,,,,I button.
l XFER lamp winks.
l Recall dial tone is heard.
Dial the Call Hold - Flip-Flop feature access code.
l You are connected to the waiting party and the
other party is placed on hold.
l XFER lamp extinguishes.
You may begin to talk.
place a party on hold and originate another call:
First, ask the other party to wait.
Depress the
m button.
l XFER button winks.
l Recall dial tone is heard.
Dial the Call Hold - Flip-Flop feature access code.
l Dial tone is heard.
l The party is placed on hold.
l XFER lamp extinguishes.
Dial the phone number of the desired party.
l Ringback tone is heard.
NOTE: If the called party does not answer your call or the
line is busy, depress the XFER button to return to
the held party.
5. When the called party answers, you may begin to
talk.
. .
.‘,
c. To return to a held party:
1. Wait until the other party hangs up.
,,?
l You are automatically connected to the previous-
ty held party
2. Resume your conversation.
d. To alternate between two calls:
1. Depress the )I button.
l You are reconnected to ihe previously held party
and the other party is placed on hold.
NOTE: If you hang up while a call is on hold, the call is
automatically recalled to your DYAD. To answer/return to
the held call, pickup the handset.
2. Resume your conversation.
2.04 Call Park. This feature allows you to place a call (inside
or outside) on “system hold” (referred to as parked) and return
to the parked party from the same or another SATURN EPABX
telephone. The call is placed in one of ten selected park locations. A unique access code is assigned to each park location.
By using the Call Park feature button (PARK) (la- and 26-button
DYADs only).
a. To park an established call:
1
2
NOTE:
3.
NOTE:
First, ask the other party to wait.
Depress the
pi&q
feature button.
l Confirmation tone is heard.
l The call is placed in the first available park loca-
tion and is shown in the alphanumeric display.
e.g.,
1 PARK 570 12191
If all park locations are in use, the alphanumeric display shows PARK BUSY and you remain connected
to your party.
Hang up. You are free to originate or receive other
calls.
If you park an outside call and you do not return to
the party within a preset period of time, the call is
automatically recalled to your DYAD, if idle, otherwise
to the attendant.
b. To return to the parked call:
1.
2.
Pick up the handset at any non-restricted DYAD or
telephone.
l Dial tone is heard.
Depress the 1 PARK ] feature button on any DYAD
and dial the park location code (e.g., 0) that was
selected for you by the SATURN System, or if at
another telephone, dial the Call Park and call location codes that were used to park the call.
l You are connected to the parked call.
2-2
Page 11
SATURN EPABX
A30808-X5051-C140-l-8919
DYAD User Instructions
Issue 1, December 1984
NOTE: If reorder tone is heard, the held party has discon-
nected. if intercept tone is heard, the telephone is
restricted from Call Park access.
3. Resume your conversation.
By using the Call Park feature access code.
a. To park an established call:
1. First, ask the other party to wait.
2. Depress the
m button.
3.
4.
NOTE:
5.
NOTE:
l XFER lamp winks.
l Recall dial tone is heard.
Dial the Call Park feature access code.
Dial the Call Park location code (0 to 9).
l Confirmation tone is heard.
l The call is parked at the dialed location.
l XFER lamp extinguishes.
If the dialed Call Park location is not available, busy
tone is heard. If this situation occurs, depress the
XFER button to return to the held party and repeat
the process using a different location code.
Hang up. You are free to originate or receive other
calls.
If you park an outside call and you do not return to
the party within a preset period of time, the call is
automatically recalled to your DYAD, if idle, otherwise
to the attendant.
b. To return to the parked call:
1. Pick up the handset at any non-restricted DYAD or
telephone.
l Dial tone is heard.
2. Dial the Call Park feature access code.
3. Dial the Call park location code which was used to
park the call.
l
You are connected to the parked call.
NOTE: If reorder tone is heard, the held party has discon-
nected. If intercept tone is heard, the telephone is
restricted from Call Park access.
4. Resume your conversation.
2.05 Manual Hold. This feature allows you to place a line on
hold for the purpose of holding a call and originating or receiving another call on a second SATURN EPABX line. The held
call can be picked up at any DYAD with an appearance of the
held line.
a. To place a line on hold:
1. First, ask the other party to wait.
2. Depress the “red”
piq
feature button.
l Line pickup lamp winks at all appearances of
the line.
3. You may hang up without losing the call, or originate
or receive another call on a second EPABX line.
NOTES: Any DYAD with the same appearance of the held line
may be used to pick up the held call.
After depressing the HOLD button to hold a line the
same button can be used to hold another line without
losing the previous held call. As many calls can be
held as there are lines on your DYAD.
You are not allowed to hold an attendant. Additionally, if a party has bridged on a line, that line cannot
be held.
b. To return to the held call:
1. Pickup handset and depress the “winking” line pickup button associated with the held call.
l Line pickup lamp changes from winking to
steadily lighted.
l You are reconnected to the held call.
2. Resume your conversation.
2.06 Exclusive Hold. This feature allows you to place a line
on hold for the purpose of holding a call and originating or
receiving another call on a second SATURN EPABX line. The
held call can be picked up only from your DYAD even though
the line may appear at other DYADs.
a. To place a line on hold:
1. First, ask the other party to wait,
2. Depress the m feature button.
l Line pickup lamp flutters.
NOTES:
The line pickup lamp remains lighted at all other ap-
pearances of the line.
After depressing the HOLD EXCL button to hold a
line, the same button can be used to hold another
line without losing the previously held call. As many
lines can be held as there are lines on your DYAD.
3.
You are not allowed to hold an attendant. Additionally, if a party has bridged on a line, that line cannot
be held.
You may originate or receive another call on a second EPABX line, if provided.
b. To return to the held call:
1. Pickup handset and depress the “fluttering” line
pickup button associated with the held call.
l Line pickup lamp lights steadily.
l You are reconnected to the held call.
2. Resume your conversation.
2-3 (2-4 blank)
Page 12
SATURN EPABX
DYAD User Instructions
SECTION 3.00 CALL TRANSFER FEATURES
A30808-X5051-C140-l-8919
Issue 1, December 1984
3.01 Call Transfer. This feature allows you to tran.Sfer a Call
(inside or outside the SATURN EPABX) to another extension.
a. To transfer a call:
1. First, ask the other party to wait.
2. Depress the
m button.
l
XFER lamp winks.
l
Recall dial tone is heard.
3. Dial the destination number.
l
Ringback tone is heard.
NOTES: If busy tone is heard or the party does not answer,
depress the XFER button to return to the held party.
When an outside party requests to be transferred
to an extension and the extension is busy, you may
invoke the Internal Call Queuing - Standby feature.
This feature allows you to camp-on to the busy extension and wait for the party to answer.
If you desire to transfer the call before the called
party answers, hang up the handset. The held party
hears ringback tone and waits for the called party
to answer. If the party being transferred is an outside party and the called party does not answer within a preset time, the call is automatically recalled
to your DYAD (three-burst ringing is heard), if idle,
otherwise to the attendant. To answer or return to
the held call, pick up the handset.
4. When the called party answers, announce the
transfer and hang up.
l
The call is. transferred to the called party.
l
XFER lamp extinguishes.
3.02 Call Transfer to Attendant. This feature allows you to
transfer a call in progress to the attendant.
a. To transfer a call to the attendant:
1.
2.
NOTE:
First, ask the other party to wait.
Depress the
pq
feature button.
l
The party is placed on hold.
l
Ringback tone is heard and the attendant is
alerted.
If you desire to transfer the call before the attendant
answers, hang up. The held party will hear ringback
tone until the attendant answers.
When the attendant answers, announce the call.
l
Ringback tone is removed.
l
The attendant’s extension number is displayed.
(18- and 26-button DYADs only)
e.g.,
ATT 50001
Hang up.
l
The call is transferred to the attendant.
3-l (3-2 blank)
Page 13
SATURN EPABX
DYAD User Instructions
SECTION 4.00 CONFERENCE FEATURES
A30808-X5051-C140-l-6919
issue 1, December 1984
4.01 Add-On Conference. This feature allows you to add a
third party (inside or outside) to your conversation.
a. To add a third party:
1. First, ask the other party to wait.
2. Depress the
I/ button.
l XFER lamp winks.
l Recall dial tone is heard.
l The party is placed on hold.
3. Dial the desired number of the third party.
l Ringback tone is heard.
NOTE: If busy tone is heard or the party does not answer,
depress the XFER button to return to the held call.
4. When the called party answers, inform the party
of the conference.
5. Depress the
(1
button again.
l A three-party conference is established.
l XFER lamp lights steadily.
l The alphanumeric display (18- and 26-button
DYADs only) indicates this is a conference call.
e.g.,
CONF 1
NOTES: The user that originated the conference may release
the third party by depressing the XFER button.
When more than one outside (trunk) call is added,
transmission quality may be degraded.
6. You may begin to talk.
4.02 Bridge Call. This feature allows you to enter into an existing conversation on a busy line or direct trunk.
a. To enter into an existing conversation:
1. Select and depress the pickup button associated
with the busy line or direct trunk.
2. Pick up the handset.
l Conference tone is heard by the other parties,
after which you are connected in a three-way
conversation.
l The alphanumeric display (18- and 26-button
DYADs only) indicates this is a conference call.
e.g.,
CONF 1
NOTE: If the Call Privacy feature is active on the busy line
or direct trunk, or a three-way connection has al-
ready been established, bridging is denied and busy
tone is heard.
4.03 Meet-Me Conference. This feature allows you to arrange
a conference of up to seven extensions or four extensions and
three outside lines. Outside parties are connected to the conference by the attendant.
a. To establish a Meet-Me conference:
1. Select and depress the appropriate line pickup button.
.
l Line pickup button lamp lights steadily.
Pick up the handset.
l Dial tone is heard.
Dial the.party you want in the conference.
l Ringback tone is heard.
When the called party answers, inform the party
to dial the Meet-Me Conference access code at a
prearranged time. If the called party is from “out-
side” the SATURN System, inform the party to dial
the SATURN attendant console and have the attendant transfer the call to the conference by dial-
ing the Meet-Me Conference access code.
NOTE: More than one Meet-Me Conference bridge may be
assigned in the SATURN EPABX. The last digit of
the Meet-Me Conference access code represents
the selected conference bridge.
5. Hang up.
6. Repeat the above steps for up to seven conferees.
NOTES: The attendant only may enter the conference as an
eighth conferee.
The maximum number of outside parties allowed
in the conference at any one time is three (variable
and assigned by data base management).
b. To enter the conference:
1.
2.
3.
NOTES:
Select and depress the appropriate line pickup
button.
. Line pickup button lamp lights steadily.
Pick up the handset.
l Dial tone is heard.
Dial the pre-announced Meet-Me Conference
feature access code or depress the
[TI
feature button followed by the conference bridge
code.
l Conference tone is heard; all conferees hear
the conference tone as you enter the conference.
l The alphanumeric display (18- and 26-button
DYADs only) indicates this is a conference call.
e.g.,
CONF 1
l MEET ME lamp lights steadily.
Busy tone is heard if the conference is full. Intercept tone is heard if the conference bridge is not
assigned.
When more than one outside (trunk) call is added,
transmission quality may be degraded.
4. You may begin to talk.
4-l
Page 14
SATURN EPABX
DYAD User instructions
A30808-X5051-C140-l-B919
Issue 1, December 1984
4.04 Station Controlled Conference. This feature allows you
to establish a conference of up to seven parties. As the Conference Master you can add members to the conference, remove members from the conference, leave the conference to
consult with a conferee privately, call the attendant, or release
from the conference and allow another conference member
to take over conference mastership.
The maximum number of parties allowed in the conference
is seven; however, the attendant can be added to the conference as an eighth party. The maximum number of outside parties allowed in the conference at any one time is three (variable
and assigned by data base management). When more than
one outside (trunk) call is added, transmission quality may be
degraded.
a. To establish a conference:
1. Select and depress the appropriate line pickup
button.
l Line pickup lamp lights steadily.
2. Pick up the handset
l Dial tone is heard.
3. Dial the Station Controlled Conference access code.
l Recall dial tone is heard.
NOTE: Busy tone is heard if a conference circuit is not
available.
4. Dial the number of the party you want to add to the
conference.
l Ringback tone is heard.
NOTE: If the called party does not answer, is busy, or does
not wish to be included in the conference, you must
hang up. Your phone then rings and, upon answer,
you are connected back into the conference. You may
proceed adding parties to the conference by depressing the XFER button to leave the conference and following the above procedure beginning at Step 4.
5. When the called party answers; inform the party of
the conference.
l Ringback tone is removed.
6. Depress the 1 xFER 1 button to add the party to
the conference.
l Conference tone is heard; all conferees hear the
conference tone as you and the other party enter
the conference.
l The alphanumeric display (18- and 26-button
Dyads only) indicates that this is a conference
call. e.g.,
L
CONF 1
NOTES: If you attempt to add more than seven inside parties
or add more than the allowed number of outside parties into the conference, reorder tone is heard for approximately 1% seconds, after which you are
reconnected to the “would be” conferee. To return
to the conference, depress the XFER button.
Any party can leave the conference by hanging up.
7. To add each additional party to the conference,
depress the piy
button to leave the con-
ference and follow the above procedure beginning
at Step 4.
b. To remove any conferee (extension only) from the con-
ference-and consult with the conferee privately:
Depress the 1 xFER 1 button to leave the conference.
l Recall dial tone is heard.
Dial the conference member remove code.
Dial the extension number of the conferee to be
removed.
l You and the conferee are connected in a private
talk state.
NOTE: As the conference master, you have the option of ad-
ding the party back to the conference or removing
the conferee from the conference totally. To add the
conferee back into the conference, depress the XFER
button; you and the conferee reenter the conference.
To remove the conferee from the conference, hang
up. Your phone then rings and, upon answer, you are
connected back into the conference.
c. To remove the last member added to the conference
and consult with the conferee privately:
1. Depress the /I button to leave the conference.
l Recall dial tone is heard.
2. Dial the last member added access code.
3. You and the conferee are connected in a private talk
state.
NOTE: As the conference master, you have the option of ad-
ding the party back to the conference or removing
the conferee from the conference totally. To add the
conferee back into the conference, depress the XFER
button; you and the conferee reenter the conference.
To remove the conferee from the conference, hang
up. Your phone then rings and, upon answer, you are
connected back into the conference.
d. To transfer the position of conference mastership to
another conferee (SATURN EPABX extension only):
1. Inform the desired conferee that you are releasing
from the conference and that conference mastership
can be gained by hookswitch flashing (depressing
the XFER button on DYADs or momentarily depress-
ing the hookswitch on SLTs) after you hang up.
2. Hang up.
NOTE: The first conferee to hookflash now becomes the con-
ference master.
When all parties in the conference hang up, the conference
circuit is released.
4-2 (2 pages)
Page 15
SATURN EPABX
A30808-X5051-C140-l-6919
DYAD User Instructions
Issue 1, December 1984
SECTION 5.00 CALL FORWARDING FEATURES
5.01 Call Forwarding - All Calls. This feature allows you to
have all calls terminating at your DYAD, forwarded to another
extension or to the attendant.
Activation/deactivation of Call Forwarding - All Calls over the
DYAD’s prime line.
a. To forward all incoming calls:
1. Do not pick up the handset.
2. Depress the
ITI
feature button.
l Dial tone is heard over the DYAD’s speaker.
3. Dial the extension number to which you want all your
calls forwarded.
l Confirmation tone is heard over the DYAD’s
speaker.
l FWD ALL lamp lights steadily.
NOTE: If intercept tone or reorder tone is heard, your call
forwarding request was not granted.
As a reminder that call forwarding is in effect, each time a call
is forwarded, one short burst of ringing is heard from your
DYAD. Additionally, a call forwarding destination display (18-
and 26-button DYAOs only) is provided when your DYAD is idle.
e.g.,
IFWD TO 1219 1
The party at the forwarded-to extension is allowed to call your
extension without being forwarded. Further, the party at the
forwarded-to extension may transfer a call back to your extension or leave a message waiting indication (if message waiting capability is provided).
You may continue to originate calls while Call Forwarding All Calls is in effect. Automatic callbacks from the activation
of features such as Internal Call Queuing - Callback and Outgoing Call Queuing - Callback and station recalls are not forwarded.
b. To cancel Call Forwarding - All Calls:
Depress the TF
El
feature button, anytime.
l FWD ALL lamp extinguishes.
l Call forwarding destination display (la- and
26button DYADs only) is extinguished.
Activation/deactivation of Call Forwarding - All Calls over any
line appearing on the DYAD (if allowed by class of service).
a. To forward all incoming calls:
Select and depress the appropriate line pickup
button.
l Line pickup button lamp lights steadily.
Pick up the handset.
l Dial tone is heard.
Depress the
[-TFj
feature button or dial the
Call Forwarding - All Calls activation code.
4. Dial the extension number to which you want all your
calls forwarded.
l Confirmation tone is heard indicating that the
Call Forwarding - All Calls feature is active.
NOTE: If intercept tone or reorder tone is heard, your call
forwarding request was not granted.
5. Hang up.
As a reminder that call forwarding is in effect, each time a call
is forwarded, one short b.urst of ringing is heard from your
DYAD. (prime line only). Additionally, a call forwarding destination display (18- and 26-button DYADs only) is provided (prime
line only) when your DYAD is idle. e.g.,
IFWD TO
1219 j
The party at the forwarded-to extension is allowed to call your
extension without being forwarded. Further, the party at the
forwarded-to extension may transfer a call back to your extension or leave a message waiting indication (if message waiting capability is provided).
You may continue to originate calls while Call Forwarding All Calls is in effect. Automatic callbacks from the activation
of features such as Internal Call Queuing - Callback and Outgoing Call Queuing - Callback, and station recalls are not forwarded.
b. To cancel Call Forwarding - All Calls:
Select and depress the line pickup button from
which Call Forwarding - All Calls was activated.
l Line pickup button lamp lights steadily.
Pick up the handset
l Dial tone is heard.
Dial the call forwarding cancellation code or
Depress the
]I
feature button.
l Confirmation tone is heard indicating that the
Call Forwarding - All Calls feature has been
cancelled.
Hang up.
5.02 Call Forwarding to Public Network. This feature allows
you to have all calls terminating at your DYAD, forwarded to
an outside destination number.
a. To forward all calls:
Select and depress the appropriate line pickup
button.
l Line pickup button lamp lights steadily.
Pick up the handset.
l Dial tone is heard.
Dial the Call Forwarding to Public Network activation code.
Dial the trunk group access code (e.g., “9” for outside) and the outside number (e.g., 9948800).
5-1
Page 16
SATURN EPABX
A30808-X5051-C140-1-5919
DYAD User Instructions
Issue 1, December 1984
l After a short pause (approximately five seconds),
confirmation tone is heard indicating that the Call
Forwarding to Public Network feature is active.
NOTES: You may expedite receiving confirmation tone by
depressing the # key immediately after dialing the last
digit of, the outside number.
If intercept tone or reorder tone is heard, your call for-
warding request was not granted.
5. Hang up.
As a reminder that call forwarding is in effect, each time a call
is forwarded, one short burst of ringing is heard from your DYAD.
Additionally, a call forwarding destination display (18- and
26.button DYADs only) is provided when your DYAD is idle,
e.g.,
[FWD TCI NETWORK]
You may continue to originate calls while Call Forwarding to Public Network is in effect. Automatic callbacks from the activation
of features such as Internal Call Queuing - Callback and Outgoing Call Queuing - Callback, and station recalls are not forwarded.
b. To cancel Call Forwarding to Public Network:
1. Select and depress the line pickup button from which
Call Forwarding to Public Network was activated.
l Line pickup button lamp lights steadily.
2. Pick up the handset.
l Dial tone is heard.
3. Dial the call forwarding cancellation code.
l Confirmation tone is heard indicating that the Call
Forwarding to Public Network feature has been
cancelled.
4. Hang up.
5.03 Call Forwarding - Busy Lines. This feature allows you
to have all calls terminating at your DYAD, forwarded to another
extension or to the attendant when your extension is busy. When
your DYAD is idle, incoming calls are completed as usual.
Activation/deactivation of Call Forwarding - Busy Lines over the
DYAD’s prime line.
a. To forward incoming calls:
Do not pick up the handset
Depress the ml feature button.
l Dial tone is heard over the DYAD’s speaker.
Dial the extension number to which you want your
calls forwarded.
l Confirmation tone is heard over the DYAD’s
speaker.
l FWD BUSY lamp lights steadily.
NOTE: If intercept tone or reorder tone is heard, your call for-
warding request was not granted.
As a reminder that call forwarding is in effect, a call forwarding
destination display (18- and 26button DYADs only) is provided
when your DYAD is idle e.g., FWD x)
1219 1
When Call Forwarding - Busy Lines is in effect, incoming calls
will not wait (via Internal Call Queuing - Standby and internal
Call Queuing - Callback) on your prime line. If the forwardedto telephone is busy, forwarded calls will wait at the forwardedto telephone.
b. To cancel Call Forwarding - Busy Lines:
Depress the I[ feature button.
l FWD BUSY lamp extinguishes.
l Call forwarding destination display is extin-
guished.
Activation/deactivation of Call Forwarding - Busy Lines over any
line appearing on the DYAD (if allowed by class of service).
a. To forward incoming calls:
Select and depress the appropriate line pickup
button.
l Line pickup button lamp lights steadily.
Pick up the handset.
l Dial tone is heard.
Depress the
II
feature button or dial the
Call Forwarding - Busy Lines activation code.
Dial the extension number to which you want your
calls forwarded.
l Confirmation tone is heard indicating that the Call
Forwarding - Busy Lines feature is active.
NOTE: If intercept tone or reorder tone is heard, your call for-
warding request was not granted.
5. Hang up.
As a reminder that call forwarding is in effect, a call forwarding
destination display (1% and 26button DYADs only) is provided
(prime line only) when your DYAD is idle. e.g.,
[FWD TQ
1219 J
When Call Forwarding - Busy Lines is in effect, incoming calls
will not watt (via activation of the Internal Call Queuing - Standby
and Internal Call Queuing - Callback features) on the associated line. If the forwarded-to telephone is busy, forwarded calls
will wait at the forwarded-to telephone.
b. To cancel Call Forwarding - Busy Lines:
1. Select and depress the line pickup button from which
Call Forwarding - Busy Lines was activated.
l Line pickup button lamp lights steadily.
2. Pick up the handset.
l Dial tone is heard.
3. Dial the call forwarding cancellation code.
l Confirmation tone is heard indicating that the Call
Forwarding - Busy Lines feature has been cancelled.
4. Hang Up.
5-2
Page 17
SATURN EPABX
A30808-X5051-C140-l-B919
DYAD User Instructions
Issue 1, December 1984
5.04 Call Forwarding - No Answer. This feature allows you
+o have all calls terminating at your DYAD that are not answered
Within a predetermined period of time (three rings, nominal),
forwarded to another telephone or to the attendant. When your
DYAD is busy, call forwarding does not occur and the usual
station hunting, call waiting, and automatic callback arrangements (if assigned) are applied.
Activation/deactivation of Call Forwarding - No Answer over
the DYAD’s prime line.
NOTE: If intercept tone or reorder tone is heard, your call
forwarding request was not granted.
5. Hang up.
a. To forward incoming unanswered calls:
1. Do not pick up the handset.
2. Depress the No A~s feature button.
I
l Dial tone is heard over the DYAD’s speaker.
3. Dial the extension number to which you want your
unanswered calls forwarded.
As a reminder that call forwarding is in effect, a call forwarding destination display (18- and 28button DYADs only) is provided (prime line only) when your DYAD is idle. e.g.,
[FWD TO- 1219)
You may continue to originate calls while Call Forwarding No Answer is in effect. Automatic callbacks from the activation of features such as Internal Call Queuing - Callback and
Outgoing Call Queuing - Callback, and station recalls are not
forwarded.
b. To
1.
l (Z;2i;Fration tone is heard over the DYAD’s
l FWD NO ANS lamp lights steadily.
NOTE: If intercept tone or reorder tone is heard, your call
forwarding request was not granted.
As a reminder that call forwarding is in effect, a call forwarding destination display (18- and 26button DYADs only) is provid-
ed when your DYAD is idle. e.g., lFWD To
1219 1
‘ou may continue to originate calls while Call Forwarding I\10 Answers is in effect. Automatic callbacks from the activation of features such as Internal Call Queuing - Callback and
Outgoing Call Queuing - Callback and station recalls are not
forwarded.
cancel Call Forwarding - No Answer:
Select and depress the line pickup button from
which Call Forwarding - No Answer was activated.
l Line pickup button lamp lights steadily.
Pick up the handset.
l Dial tone is heard.
Dial the call forwarding cancellation code or
Depress the
p&l
feature button.
l Confirmation tone is heard indicating that the
Call Forwarding - No Answer feature has been
cancelled.
Hang up.
b. To cancel Call Forwarding - No Answer:
Depress the ml feature button, anytime.
l FWD NO ANS lamp extinguishes.
l Call forwarding destination display is extin-
guished.
5.05 Call Forwarding - Secretarial. This feature allows you
to have all calls terminating at your DYAD, forwarded to another
predetermined SATURN extension (assigned by data base
management).
Activation/deactivation of Call Forwarding - Secretarial over the
DYAD’s prime line.
a. To forward all incoming calls:
1. Do not pick up the handset.
Activation/deactivation of Call Forwarding - No Answer over
any line appearing on the DYAD (if allowed by class of service).
2. Depress the
r-?q
feature button.
a. To forward incoming unanswered calls over any line ap-
pearing on your DYAD:
1. Select and depress the appropriate line pickup
button.
l FWD TO lamp lights steadily.
As a reminder that call forwarding is in effect, each time a call
is forwarded, one short burst of ringing is heard from your
DYAD. Additionally, a call forwarding destination display (18and 26-button DYADs only) is provided when your DYAD is idle.
l Line pickup button lamp lights steadily.
2. Pick up the handset.
. Dial tone is heard.
e.g.,
\FWD TO 1219 1
3. Depress the NO ANS feature button or dial the
I
Call Forwarding - No Answer activation code.
The party at the forwarded-to extension is allowed to call your
extension without being forwarded. Further, the party at the
forwarded-to extension may transfer a call back to your extension or leave a message waiting indication (if message waiting capability is provided).
4. Dial the extension number to which you want your
unanswered calls forwarded.
l Confirmation tone is heard indicating that the
Call Forwarding - No Answer feature is active.
You may continue to originate calls while Call Forwarding Secretarial is in effect. Automatic callbacks from the activation
of features such as Internal Call Queuing - Callback and Outgoing Call Queuing - Callback and station recalls are not forwarded.
5-3
Page 18
SATURN EPABX
DYAD User instructions
A30808-X5051-C140-l-B919
issue 1, December 1984
b. To cancel Call Forwarding - Secretarial:
2. Depress the %D
El
feature button.
l FWD TO lamp extinguishes indicating that the
Call Forwarding - Secretarial feature has been
canceiled.
Activation/deactivation of Call Forwarding - Secretarial over any
line appearing on the DYAD (if allowed by class of service).
a. To forward all incoming calls:
1. Select and depress the appropriate line pickup
button.
l Line pickup button lamp lights steadily.
2. Pick up the handset.
l Dial tone is heard.
3. Depress the
pq
feature button or dial the
Call Forwarding - Secretarial activation code.
l Confirmation tone is heard indicating that the Call
Forwarding - Secretarial feature is active.
NOTE: If intercept tone or reorder tone is heard, your call for-
warding request was not granted.
4. Hang up.
As a reminder that call forwarding is in effect, each time a call
is forwarded (prime line only), one short burst of ringing is heard
from your DYAD. Additionally, a call forwarding destination display (18 and 28button DYADs only) is provided (prime line only)
when your DYAD is idle, e.g., FWD TO
1219 ]
The party at the forwarded-to extension is allowed to call your
extension without being forwarded. Further, the party at the
forwarded-to extension may transfer a call back to your extension or leave a message waiting indication (if allowed).
You may continue to originate calls while Call Forwarding - All
Calls is in effect. Automatic callbacks from the activation of fea-
tures such as Internal Call Queuing - Callback and Outgoing
Call Queuing - Callback, and station recalls are not forwarded.
b. To cancel Call Forwarding - Secretarial:
1. Select and depress the line pickup button from which
Call Forwarding - Secretarial was activated.
l Line pickup button lamp lights steadily.
2. Pick up the handset.
l Dial tone is heard.
3. Dial the call forwarding cancellation code.
l Confirmation tone is heard indicating that the Call
Forwarding - Secretarial feature has been cancelled.
‘4. Hang up,
5.06 Call Forwarding - Return. This feature allows you to transfer a forwardedcall to the extention that activated call forwarding.
a. To return a forwarded-call:
1. First, ask the connected party to wait.
2. Depress the m feature button.
l XFER lamp winks.
l Recall dial tone is heard.
3. Dial the Call Forwarding - Return access code.
l Ringback tone is heard.
NOTES: If busy tone is heard or the party does not answer,
depress the XFER button to return to the held party.
When an outside party requests to be transferred to
an extension and the extension is busy, you may invoke the Internal Call Queuing - Standby feature. This
feature allows you to camp-on to the busy extension
and wait for the party to answer.
If you desire to transfer the call before the called party
answers (ringback tone must be heard), hang up the
handset. The held party hears ringback tone and waits
for the called party to answer. If the party being transferred is an “outside” party and the called party does
not answer within a preset time, the call is automatically recalled to your DYAD (three-burst ringing is
heard), if idle, otherwise to the attendant. To answer/return to the held call, pick up the handset.
4. When the party at the forwarding station answers,
announce the transfer.
l Ringback tone is removed.
5. Hang up.
l The call is transferred to the called party.
5.07 Forced Call Forwarding. This feature allows you to for-
ward a waiting or ringing call on your prime line extension to
another preassigned SATURN extension. Waiting or ringing calls
on other lines appearing at your DYAD cannot be forwarded.
a. To forward a waiting or ringing call:
Depress the
pEJ
feature button.
5-4 (4 pages)
Page 19
SATURN EPABX
DYAD User Instructions
A30808-X5051-C140-1-5919
Issue 1, December 1984
SECTION 6.00 CALL
6.01 Internal Call Queuing - Callback. This feature allows
you, upon dialing a busy extension number, to enter into a
queue, hang up, and be called back when the extension becomes available.
a. To establish an automatic callback condition.
1. You have dialed a busy extension and busy tone is
heard.
2. Do not hang up. Listen to busy tone until busy tone
changes to a steady low tone (approximately five seconds). Steady low tone is confirmation that you may
invoke callback queuing.
3. Hang up.
You may originate or receive other calls while waiting for the
callback however, the callback sequence does not take place
until both your extension and the previously dialed extension
are idle at the same time.
Only one callback request (Internal or Outgoing Call Queuing
- Callback) is allowed at any one time. If a second callback
is initiated, the original callback is automatically cancelled.
4. When both the called extension and your extension
become idle,
l Three-burst ringing is heard.
NOTE: If you do not answer the callback attempt within ap-
proximately 18 seconds, callback queuing is automatically cancelled.
5. Pick up the handset.
l Ringback tone is heard.
l Called extension rings.
6. When the called party answers, you may begin to
talk.
b. To cancel an automatic callback:
1. Pick up the handset.
l Dial tone is heard.
2. Dial the automatic callback cancellation code.
l Confirmation tone is heard indicating the can-
cellation of the callback.
3. Hang up.
6.02 Internal Call Queuing - Standby. This feature allows you,
upon dialing a busy extension, to enter into a queue and wait
for the called party to answer. While in the standby queue, you
hear a special ringback tone and the called party hears a call
waiting tone.
a. To establish a standby queueing condition:
1. You have dialed a busy extension and busy or special ringback tone is heard.
NOTE: On some telephones, Internal Call Queuing - Stand-
by is activated on an automatic originating or automatic terminating basis. If your DYAD is assigned the
automatic originating option or the called party’s tel-
QUEUING FEATURES
- 2.
NOTE:
3.
4.
NOTE:
5.
ephone is assigned the automatic terminating option,
ignore the remainder of this procedure; when spe-
cial ringback tone is heard simply wait for the called
party to answer.
Do not hang up. Listen to busy tone until it changes
to a steady low tone (approximately five seconds).
Steady low tone is confirmation that callback queuing can be invoked, if desired, by hanging up. Refer
to the feature, “Internal Call Queuing - Callback.”
Again do not hang up. Wait ‘until steady low tone
changes to a special ringback tone (approximately
five seconds). This is confirmation that you have
been placed in the standby queuing mode.
l The called party hears the call waiting tone.
Wait until the called party answers the waiting call.
You may convert from standby queuing to callback
queuing, any time, by hanging up.
When the called party answers, you may begin to
talk.
6.03 Outgoing Call Queuing - Callback. This feature allows
you, upon dialing a busy outgoing trunk group, to enter into
a queue, hang up, and be called back when a trunk becomes
available.
This feature applies to direct trunk group access only. For Least
Cost Routing (LCR) access, refer to the feature, “Least Cost
Routing.”
a. To activate Outgoing Call Queuing - Callback:
You have dialed a trunk group access code (e.g.,
9, 82, 83, etc.) and encountered busy tone.
Do not hang up. Listen to busy tone until you hear
a steady low tone (approximately five seconds).
Steady low tone is confirmation that you may invoke
callback queuing.
Hang up.
You can originate or receive calls while callback queuing is
active. When a trunk becomes available and your DYAD is idle,
a callback is attempted.
Only one callback request (Internal or Outgoing Call Queuing
- Callback) is allowed at any one time. If a second automatic
callback is initiated, the original callback is cancelled.
4. When a trunk becomes available,
l Three-burst ringing is heard.
NOTE: If you do not answer the callback attempt within 18
seconds (nominal), callback queuing is automatically
cancelled.
5. Pick up the handset.
l Dial tone is heard.
6. Complete dialing the desired number (do not dial
the trunk group access code).
.
6-l
Page 20
SATURN EPABX
DYAD User instructions
A30808-X5051-C140-l-6919
Issue 1, December 1984
b. To cancel an automatic callback:
1. Pick up the handset.
. Dial tone is heard.
2. Dial the automatic callback cancellation code.
l
Confirmation tone is heard indicating the cancellation of the callback.
3. Hang up.
6.04 Outgoing Call Queuing - Standby. This feature allows
you, upon dialing a busy outgoing trunk group, to enter into
a queue and wait for a trunk to become available.
This feature applies to direct trunk group access only. For Least
Cost Routing (LCR) access, refer to the feature, “Least Cost
Routing.”
a. To activate Outgoing Call Queuing - Standby:
1. You have dialed a trunk group access code (e.g.,
9, 82, 83, etc.) and encountered busy tone.
2. Do not hang up. Listen to busy tone until you hear
a steady low. tone (approximately five seconds).
NOTE: Steady low tone is confirmation that callback queu-
ing can be invoked, if desired, by hanging up. Refer
to the feature, “Outgoing Call Queuing - Callback.”
3. Again do not hang up. Listen to steady low tone (approxi_mately five seconds) until you hear silence (or
music, if provided). This is confirmation that you
have been placed in the standby queuing mode.
4. Continue to listen to silence (or music, if provided)
until a trunk becomes available.
l
Dial tone is heard when a trunk becomes
available.
NOTE: You may convert from standby queuing to callback
queuing, anytime after hearing steady low tone, by
hanging up. Refer to the feature, “Outgoing Call
Queuing - Callback.”
5. Upon hearing dial tone, complete dialing the desired
number (do not redial the trunk group access code).
6-2 (2 pages)
Page 21
SATURN EPABX A30808-X5051-C140-l-B919
DYAD User Instructions Issue 1, December 1984
SECTION 7.00 CALL PICKUP FEATURES
7.01 Call Pickup - Directed. This feature allows you to answer an incoming call that is ringing at another telephone.
a. To answer a call ringing at another telephone:
1.
2.
3.
4.
5.
Select and depress the appropriate pickup button.
l
Line pickup button lights steadily.
Pick up the handset.
l
Dial tone is heard.
Depress the m feature button or dial the
Call Pickup - Directed feature access code.
Dial the extension number of the telephone that
is ringing.
l
Ringing ceases at the other telephone and you
are automatically connected to the incoming
call.
l
The calling party’s extension number or trunk
identity (e.g., 1219 or LOCAL) and the extension number of the ringing phone (e.g., 2503)
appears on the alphanumeric display (18- and
26-button DYADs onlv) e.o..
/PU 2503 1219j -
You may begin to talk.
7.02 Call Pickup - Group. This feature allows you to answer
an incoming call that is ringing at another telephone within
your pickup group. Your pickup group consists of a group of
extensions for which any ringing telephone may be answered
by any member in the pickup group.
a. To
1.
answer a call ringing at another telephone:
Select and depress the appropriate pickup button.
l
Line pickup button lights steadily.
Pick up the handset.
l
Dial tone is heard.
Depress the m feature button or dial the
Call Pickup - Group feature access code.
l
Ringing ceases at the other telephone and you
are connected to the incoming call.
l
The calling party’s extension number or trunk
identity (e.g., 1219 or LOCAL) and the exten-
sion number of the ringing phone (e.g., 2503)
appears on the alphanumeric display (18- and
26-button DYADs only) e.g.,
[PU 2503 1219 [
You may begin to talk.
7-l (7-2 blank)
Page 22
SATURN EPABX
A30808-X5051-C140-l-8919
DYAD User Instructions Issue 1, December 1984
SECTION 8.00 DIRECT ACCESS FEATURES
8.01 Direct Station Selection. The Direct Station Selection
(DSS) feature allows you to place a call to a party at a
predesignated SATURN extension by depressing a dedicated feature button instead of dialing the party’s extension
number.
a. To place a DSS call:
1.
2.
3.
4.
5.
Determine if the extension to be called is idle (a
lighted DSS lamp indicates the extension is busy
and a dark lamp indicates the extension is idle).
Select and depress a line pickup button.
l Line pickup lamp lights steadily.
Pick up the handset.
l Dial tone is heard.
Depress the labeled DSS feature button.
l Ringback tone is heard.
l
The called party’s extension number appears
on the alphanumeric display (18- and 26button
DYADs only).
. The DSS lamp flashes.
When the called party answers, you may begin to
talk.
8.02 Direct Trunk Group Selection. This feature allows you
to access an idle trunk in a designated trunk group by
depressing a Direct Trunk Group Selection pickup button. The
busy/idle status of the trunk group is indicated by the lamp
associated with the pickup button. No incoming calls can ter-
minate on this pickup button.
a. To establish an outside call:
1. Determine if a trunk is available in the trunk group
associated with the type of outside call to be dialed (e.g., Central Office, Florida WATS, National
WATS, etc.). The busy/idle status of the trunk group
is as follows:
a. Direct Trunk Group Selection lamp dark - At
least one trunk is idle in the trunk group.
b.
Direct Trunk Group Selection lamp lighted - All
trunks in the trunk group are busy.
2. If a trunk is available, depress the associated Direct
Trunk Group Selection pickup button.
l Associated Direct Trunk Group Selection lamp
momentarily lights steadily and remains lighted if all trunks in the trunk group are busy.
NOTE:
If other DYADs are provided with the same Direct
Trunk Group Selection button, the associated lamp
on their DYADs remain dark unless that was the last
idle trunk in the trunk group.
3. Pick up the handset.
l Dial tone is heard.
4. Dial the desired number.
8.03 Direct Trunk Selection. This feature allows you to
originate,or receive calls over a specific trunk by depressing
a pickup button on your DYAD. The busy/idle status of the
trunk is indicated by the lamp associated with the pickup
button.
a. To establish an outside call:
1. Determine if the trunk is busy or idle. The busy/idle
status of the desired trunk is as follows:
a. Direct Trunk Selection lamp dark -
Trunk is idle.
b. Direct Trunk Selection lamp lighted -
Trunk is busy.
2. If the trunk is idle, depress the associated Direct
Trunk Selection pickup button.
l Direct Trunk Selection lamp lights steadily
NOTE: If other DYADs are provided with the same Direct
Trunk Selection button, the associated lamp on their
DYADs-also light steadily.
3.
4.
b. To
1.
Pick up the handset.
l Dial tone is heard.
Dial the desired outside number.
answer an incoming call:
The Direct Trunk Selection lamp flashes and your
DYAD rings.
Depress the associated Direct Trunk Selection pickup button.
l Direct Trunk Selection lamp lights steadily.
Pick up the handset.
You may begin to talk.
8.04 Station-Defined Direct Dial. This feature allows you to
depress a dedicated feature button and have the SATURN
System automatically dial the telephone number (inside or
outside number) assigned to that button. One or more of
these feature buttons may be assigned on your DYAD. Each
button is assigned to a telephone number in SATURN EPABX
memory.
Note that on some DYADs the destination number may be
changed by using the Speed Calling - Individual feature (18and 26-button DYADS only). At these DYADs, the destination
number is indexed to one of the speed calling codes (O-9).
To change the destination number associated with the speed
calling code, refer to the operating instructions of the Speed
Calling - Individual feature.
a. To initiate a call to the stored number:
1. Select and depress the appropriate line pickup
button.
. Associated line pickup lamp lights steadily.
8-l
Page 23
SATURN EPABX
DYAD User Instructions
2. Pick up the handset.
l Dial tone is heard.
3. Depress the I! feature button
l Ringback tone is heard.
A30808-X5051-C140-l-B919
issue 1, December 1984
l The destination number is displayed (18-
26-button DYADs only) e.g.,
1
9 994 8800 1
4. When the called party answers, you may start
talking.
.
8-2 (2 pages)
Page 24

SATURN EPABX
DYAD User Instructions
SECTION 9.00 INTERCOM FEATURES
A30808-X5051-C140-l-B919
Issue 1, December 1984
9.01 Automatic intercom. This feature allows you to place
an intercom call to another predetermined DYAD. This feature overrides the Do Not Disturb feature and Call Forwarding features, if active at the called DYAD.
a. To place an Automatic Intercom call:
1. Depress the
I
pickup button.
. ICOM __ lamp lights steadily.
2. Pick up the handset.
l Ringback tone is heard.
l The extension number of the called station is
displayed (18- and 2Sbutton DYADs only).
3. When the called party answers, you may begin to
talk.
b. To answer an Automatic Intercom call:
1. Your automatic intercom lamp flashes and you
receive three-burst ringing.
2. Depress the
I
pickup button.
l ICOM- lamp lights steadily.
l The extension number of the calling party is
displayed (18- and 26-button DYADs only).
3. Pick up the handset.
l Three-burst ringing ceases.
l You are connected to the calling party.
4. You may begin to talk.
9.02 Manual Intercom and Signaling. This feature allows you
to connect to a common intercom path by depressing a dedicated intercom pickup button. A maximum of eight intercom
pickup appearances may be connected within each intercom
group and a maximum of eight parties simultaneously con-
nected at any one time. Signaling of another preassigned
DYAD within the intercom group is performed by depressing
the Manual Signaling feature button.
a. To place a Manual Intercom call:
1. Determine if the intercom is idle.
a. ICOM lamp dark - Intercom is idle.
b. ICOM lamp lighted - Intercom is busy.
NOTE: A call origination attempt over a busy intercom will
cause you to bridge onto the existing intercom connection.
2. Depress the I] pickup button.
l ICOM lamp lights steadily indicating you are
connected to the intercom.
NOTE: Reorder tone is heard if the intercom is full (seven
parties simultaneously connected).
3.
Depress
the 1 suz 1 feature button to signal the
other DYAD.
l The other DYAD’s audible alert tone sounds
(your DYAD’s audible alert tone also sounds)
for as long-as the BUZZ button is depressed;
all other alerting in progress is preempted and
resumes after the button is released.
b. To answer a Manual Intercom Call:
1. The audible alert tone is heard at your DYAD.
2. Depress the 1 rcoM 1 pickup button.
3. Pick up the handset.
4. You may begin to talk.
9.03 Executive Intercom. This feature allows you to place
a call to another DYAD within a prearranged executive intercom group. This feature overrides the Do Not Disturb feature
and Call Forwarding features, if active at the called DYAD.
a. To place an Executive Intercom call:
1. Depress the wi feature button.
.
l ICOM DIAL - lamp lights steadily.
2. Pick up the handset.
l Dial tone is heard.
3. Dial the single digit code that corresponds to the
desired party.
l Ringback tone is heard.
4. When the called party answers, you may begin to
talk.
b. To answer an Executive Intercom call:
1. Your ICOM DIAL - lamp flashes and three-burst
ringing is heard.
2. Depress the w/ feature button:
3. Pick up the handset.
l Three-burst ringing ceases.
l ICOM DIAL - lamp lights steadily.
l You are connected to the calling party.
4. You may begin to talk.
9-1 (9-2 blank)
Page 25
SATURN EPABX
DYAD User Instructions
A30808-X5051-C140-l-B919
Issue 1, December 1984
SECTION 10.00
10.01 Executive Override. This feature allows you, upon encountering busy tone, to enter into the existing conversation
for the intended purpose of announcing a high priority or
emergency call. Before the override occurs a warning tone
is heard by the two conversing parties alerting them of the
impending override.
By using the Executive Override feature button (OVER RIDE).
a. To override a busy call:
NOTE:
2.
NOTE:
While listening to busy tone, depress the m1
feature button.
l
Executive Override tone is heard followed by
the connection to the existing conversation.
l
OVER RIDE lamp lights steadily.
l
The alphanumeric display (18- and 26-button
DYADs only) indicates that this is now a con-
ference call, e.g., 1
CONF 1
Reorder tone is heard if the connection is denied
(e.g., the telephone is assigned Data Line Security
or Executive Override Security).
You may begin to talk.
The Busy Override Injection tone is heard repeatedly
every 8 to 20 seconds apart after overriding a call
in progress.
By using the Executive Override feature access code.
a. To override a busy call:
1. While listening to busy or special ringback tone,
depress the XFER feature button.
l
Recall dial tone is heard
2. Dial the Executive Override feature access code.
l
The alphanumeric display (18- and 26-button
DYADs only) indicates that this is now a con-
ference call, e.g., 1
CONF ]
l
Executive Override tone is heard followed by
the connection to the existing conversation.
NOTE: Reorder tone is heard if the connection is denied
(e.g., the telephone is assigned Data Line Security
or Executive Override Security.
3. You may begin to talk.
NOTE: The Busy Override Injection tone is heard repeat-
edly every 8 to 20 seconds apart after overriding a
call in progress.
10.02 Executive Override - Automatic. This feature allows
you to camp-on to a busy extension and automatically break
into the existing conversation if the called party does not an-
swer your waiting call within a predetermined period of time.
a. To activate Executive Override - Automatic:
1. You have dialed an extension number and special
PRIVACY FEATURES
ringback tone is heard.
l
Either special ringback tone or, if your DYAD
is classmarked for callback queuing, busy tone
followed by low tone followed by special ringback tone is heard indicating that the extension
line is busy. At this time call waiting tone is also
applied to the called party.
NOTE: If your DYAD is also provided with the Internal Call
Queuing - Standby feature and a busy extension
is dialed, busy tone is heard instead of special ring-
back tone. You must wait until busy tone changes
to low tone (approximately five seconds) and low
tone changes to special ringback tone (approximately five seconds) before the called party’s line is
camped-on (call waiting tone is applied).
Wait until the called party answers the waiting call.
If the called party does not answer your waiting call
within a predetermined time,
l
Executive Override tone is heard followed by
a “break-in” to the existing conversation.
l
The alphanumeric display (18- and 26-button
DYADs only) indicates that this is now a con-
ference call, e.g., 1
CONF 1
You may begin to talk.
NOTE: Busy Override Injection tone is heard repeatedly ev-
ery 8 to 20 seconds apart after overriding the call
in progress.
10.03 Do Not Disturb. This feature allows you to make your
DYAD busy to all incoming calls whenever you desire not to
be disturbed.
Activation of Do Not Disturb by using the DND feature button
will “busy out” your prime line extension only. For all nonprime lines appearing on your DYAD, incoming calls will cause
the LED in the respective line pickup button to flash however,
ringing will be inhibited.
Activation of Do Not Disturb can be performed on any line
appearing at your DYAD (including your prime line) by dialing the Do Not Disturb feature activation code, if allowed by
the line’s class of service.
By depressing the Do Not Disturb feature button (DND).
a. To
1.
2.
make your DYAD busy to incoming calls:
Depress the m feature button (the button
can be depressed while you’re busy on a call or
when the DYAD is idle).
l
DND lamp lights steadily indicating that the Do
Not Disturb feature is activated.
l
When your DYAD is idle, a Do Not Disturb indication (18- and 26-button DYADS only) is dis-
played. e.g., IDND ALL
Hang up if off-hook.
10-l
Page 26
.
SATURN EPABX
DYAD User Instructions
You can originate calls while Do Not Disturb is in effect;
however, other calls cannot wait on your DYAD’s prime line.
Intercom calls are not affected by activation of the Do Not Dis-
turb feature. Messages may also wait at your DYAD (la- and
26-button DYADs only).
Each time you pick up the handset recall dial tone is heard
as a reminder that your DYAD is in the busy mode.
b. To re-establish normal operation to your DYAD:
1. Depress the 1 DNo 1 feature button (the button
can be depressed while you’re busy on a call or
when the DYAD is idle).
l DND lamp extinguishes indicating that the Do
Not Disturb feature is deactivated.
. Alphanumeric display (18- and 26-button
DYADs only) no longer displays DND ALL when
your phone is idle.
2. Hang up if off-hook.
By dialing the Do Not Disturb feature access code.
a. To make your DYAD busy to incoming calls:
1. Select and depress the appropriate line pickup
button.
l Line pickup button lamp lights steadily.
2. Pick up the handset.
l Dial tone is heard.
3. Dial the Do Not Disturb feature activation code.
l Confirmation tone is heard.
l Your DYAD is now made busy to incoming calls
on the prime line only. Audible tone alerting will
be inhibited on all other lines appearing on your
DYAD.
l When your DYAD is idle, a Do Not Disturb indi-
cation (la- and 26-button DYADS only) is displayed. e.g., /DND ALL
4. Hang up.
You can originate calls while Do Not Disturb is in effect;
however, other calls cannot wait on the associated line. Intercom calls and voice calls are not affected by activation of the
Do Not Disturb feature. Messages may also wait at your DYAD
(la- and 26-button DYADs only).
Each time you pick up the handset recall dial tone is heard
as a reminder that your DYAD is in the busy mode.
b. To
1.
2.
re-establish normal operation to your DYAD:
Pick up the handset.
l Recall dial tone is heard indicating Do Not Dis-
turb is in effect.
Dial the Do Not Disturb cancellation code.
. Confirmation tone is heard indicating cancel-
lation of the Do Not Disturb feature.
A30808-X5051-C140-1-B9~g
Issue 1, December 1984
l Alphanumeric display (la- and 26-button
DYADs only) no longer displays the Do Not Dis-
turb indication.
3. Hang up.
10.04 Call Privacy:‘Activation of the Call Privacy feature on
a specific line prevents all other parties from bridging on that
line. This feature is assigned to DYADs on an automatic activating and manual activating basis. If your DYAD is assigned
the automatic activating option, each time you receive or place
a call, Call Privacy is automatically activated.
For DYADs assigned the automatic activation option.
a. To deactivate Call Privacy:
While in an established conversation, depress the
(,,,,
feature button.
l PRIV lamp extinguishes indicating Call Priva-
cy is deactivated. (The PRIV lamp remains extinguished until the call is disconnected.)
NOTES: A third party can now bridge on the line by depress-
ing associated line pickup button.
Call Privacy may be reactivated by redepressing the
PRIV feature button.
For DYADs assigned the manual activation option.
a. To activate Call Privacy:
Depress the p--j
feature button (the button can be
depressed while you’re busy on a call or when the
DYAD is idle).
NOTES:
l PRIV lamp lights steadily indicating that Call
Privacy is active.
Any party attempting to bridge on the line receives
busy tone. If a party has already bridged on the line,
the bridged party is disconnected from the call and
busy tone is heard.
b. To deactivate Call Privacy:
Depress
the m feature button (the button can
be depressed while you are busy on a call or when the
DYAD is idle).
. PRIV lamp extinguishes indicating that the Call
Privacy feature is deactivated.
10.05 Station Ringer Cutoff. This feature allows you to disable your DYAD’s audible alert tone. When disabled, the only
indication that you receive of an alerting call is the pickup
button’s flashing lamp.
a. To disable the audible alert tone:
Depress the
ml
feature button, anytime.
l RINGER OFF lamp lights steadily.
b. To enable the audible alert tone:
Depress the
m
feature button.
l RINGER OFF lamp extinguishes.
10-2 (2 pages)
Page 27
SATURN EPABX
DYAD User Instructions
A30808-X5051-C140-l-8919
Issue 1, December 1984
SECTION 11.00 SPEED CALLING FEATURES
11.01 Last Number Redial. This feature allows you to have
the last phone number dialed from your DYAD automatically
redialed by the SATURN System. This feature is normally used
after dialing a busy number or when the called party does
not answer.
a. To display the last number dialed from your DYAD (la-
and 26-button DYADs only):
1. Do not pick up the handset.
2. Depress the [Fi feature button.
l
The number aooears on the alphanumeric display. e.g., 1 ’ ’
9 994 88001
b. To place a call to the last number dialed from your
DYAD:
Select and depress the appropriate line pickup
button.
l
Associated line pickup lamp lights steadily.
Pick up the handset.
l
Dial tone is heard.
Depress the
pE?J
feature button or dial the
Last Number Redial feature access code.
l
The SATURN System autoqatically dials the
last phone number dialed from your DYAD.
l
Ringback tone is heard.
l
The phone number appears in the alphanumer-
ic display (18- and 26-button DYADs only) e.g.,
9 994 8800 1
NOTE: The SATURN System will redial only the last valid
destination phone number. Unassigned extension
numbers, partial dialed numbers, and feature ac-
cess codes are not dialed.
4. When the called party answers, you may begin to
talk.
11.02 Saved Number Redial. This feature allows you to store,
into system memory, a telephone number that you have just
dialed by depressing a feature button and have this number
automatically redialed at a later time by depressing the same
feature button. Only one number can be stored at a time from
your DYAD.
a. To display the stored number (18- and 26-button DYADs
only):
1. Do not pick up the handset.
2. Depress the ml feature button.
. The number appears on the alphanumeric dis-
play (18- and 26-button DYADs only) e.g.,
L
9 994 88001
1. Upon dialing a do-not-answer (ringback tone is
heard) or busy (busy tone is heard) number, or
while established in conversation with a called
party, depress the
(
feature button to
store the just dialed number.
l
SAVE NO. lamp lights steadily.
9 After you hang up, the SAVE NO. lamp extin-
guishes; however, the number is stored in
memory.
NOTE: The number is saved regardless of whether the
called party answers or is busy.
c. To initiate a call to the party associated with the stored
number:
Select and depress the appropriate line pickup
button.
l
Associated line pickup lamp lights steadily.
Pick up the handset.
l
Dial tone is heard.
Depress the (1 feature button.
l
SAVE NO. lamp lights steadily during system
dialing then extinguishes.
l
Ringback tone is heard.
l
The dialed digits appear on the alphanumeric
display (18- and 26-button DYADs only) e.g.,
9 994 88001
When the called party answers, you may begin to
talk.
11.03 Speed Calling - Individual. This feature allows you
to establish a personal speed call list of up to 10 frequently
called telephone numbers. Each number (internal or exter-
nal to the SATURN System) is assigned a one-digit code (0
to 9) and programmed into SATURN memory from your DYAD.
By using the Speed Calling - Individual feature button
(SPEED IND).
a. To display the speed call list (18- and 26-button DYADs
only):
1. Do not pick up the handset.
2. Depress the 1-1 feature button.
l
SPEED IND lamp lights steadily.
l
The speed call code and the telephone num-
ber of the first member of the speed call list is
displayed. e.g., 10
99948800)
NOTE: VACANT is displayed if no telephone number has
been assigned to the speed calling code.
3. You can scroll through the speed call list by b. To store a number:
11-l
Page 28

SATURN EPABX
A30808-X5051-C140-l-B919
DYAD User Instructions
Issue 1, December 1984
NOTES:
repeatedly depressing the WI feature
button.
After the last member of the speed call list is displayed, depressing the SPEED IND feature button
again causes the display to go blank and SPEED
IND lamp to extinguish.
If you desire to place a call to a displayed member
number while in the display mode, select any line
pickup button and pick up the handset. The
SATURN System will automatically dial the displayed number.
b. To store or change speed calling codes (18- and
26-button DYADs only):
1. Do not pick up the handset.
2.
Use the display procedure to scroll to the appropri-
ate speed call code/telephone number.
3. Do not pick up the handset.
4. Depress the * key on the DYAD’s keypad to enter
the change mode.
l Speed IND lamp flashes.
l Alphanumeric display prompts you to enter a
new number. e.g.,
10 ENTER NEW NO 1
5. Dial the desired telephone number corresponding
to the speed calling code. Be sure to enter the com-
.
plete number including any prefix digits (e.g., 9 1
800 342 8300).
NOTE: The destination may be a number that requires sup-
plementary dialing.
6. Depress the m feature button to store the
new number.
l SPEED IND lamp lights steadily indicating the
number is stored in memory.
l The dialed number is displayed along with the
corresponding speed calling code. e.g.,
10 99948800 1
NOTE:
If the action is unsuccessful for any reason, the
SATURN System responds with an error message
(e.g. 3 ERROR-REENTER).
c. To place a speed call (18- and 26-button DYADs only):
1. Select and depress the appropriate line pickup
button.
l Line pickup lamp lights steadily.
2. Pick up the handset.
l Dial tone is heard.
3. Depress the (sI;NEoEDI feature button.
l SPEED IND lamp lights steadily.
4. Dial the one-digit speed calling code corresponding
to the desired telephone destination number.
l SPEED IND lamp extinguishes.
l Telephone number associated with the dialed
speed calling code appears on the alphanumeric display.
l Ringback tone is heard.
5. When the called party answers, you may begin to
talk.
By using the Speed Calling - Individual access code.
a. To store or change speed calling numbers:
1.
Select and depress the appropriate line pickup
button.
2.
l Line pickup lamp lights steadily.
Pick up the handset.
l Dial tone is heard.
3.
4.
5.
Dial the Speed calling - store/change code.
Dial the speed call code (0 to 9).
Dial the desired telephone number corresponding
to the speed calling code. Be sure to enter the complete number including any prefix digits (e.g., 9 1
800 342 8300).
l Confirmation tone is heard.
NOTES: To expedite receiving dial tone, depress the # key
immediately after entering the last digit of the telephone number.
The destination may be a number that requires supplementary dialing.
6. Hang up.
b. To place a speed call:
1.
2.
3.
4.
5.
Select and depress the appropriate line pickup
button.
l Line pickup lamp lights steadily.
Pick up the handset.
l Dial tone is heard.
Dial the Speed Calling - Individual feature access
code.
Dial the one-digit speed calling code correspond-
ing to the desired telephone destination number.
l Telephone number associated with the dialed
speed calling code appears on the alphanumeric display (18- and 26-button DYADs only).
l Ringback tone is heard.
When the called party answers, you may begin to
talk.
11.04 Speed Calling - Group. This feature allows you to place
speed calls to frequently called destinations. The destina-
11-2
Page 29
SATURN EPABX
DYAD User Instructions
tion numbers (normally outside telephone numbers) are stored
in SATURN EPABX memory, along with a two-digit code associated with each number. These codes are normally listed
in your company’s telephone directory.
a. To place a speed call:
1. Select and depress the appropriate line pickup
button.
l
Associated line pickup lamp lights steadily.
2. Pick up the handset.
l
Dial tone is heard.
3. Depress the one- feature button or dial the
PI
Speed Calling - Group feature access code.
A30808-X5051-C140-l-6919
Issue 1, December 1984
l
SPEED GRP- lamp lights steadily.
NOTE: In SATURN Systems utilizing only one speed calling
group, the SPEED SYSTEM feature button is used.
4. Dial the two-digit code corresponding to the desired
.telephone number.
l
SPEED GRP- lamp extinguishes after system
dialing.
l
Ringback tone is heard.
l
Telephone number associated with the dialed
speed call code is displayed (la- and 26-button
DYADs only).
5. When the called party answers, you may begin to
talk.
11-3 (11-4 blank)
Page 30
SATURN EPABX
DYAD User Instructions
SECTION 12.00 ADDITIONAL FEATURES
A30808-X5051-C140-l-6919
Issue 1, December 1984
12.01 Least Cost Routing. The Least Cost Routing (LCR)
feature is used in some SATURN EPABX Systems to route
outgoing (trunk) calls over the least costly route available at
the time of call placement.
a. To place an outside call:
Select and depress the appropriate line pickup
button.
l
Line pickup button lamp lights steadily.
Pick up the handset.
l
Dial tone is heard.
Dial the LCR access code.
l
Dial tone is heard.
Dial the outside destination number.
l
Confirmation tone (three-bursts of tone) is
heard indicating that the dialed number has
been accepted and a route has been found.
l
The SATURN System then dials the destination number. Ringback tone is heard if the destination number is idle. Busy tone is heard if
the destination number is busy.
NOTES: If Route Advance Tone (one short burst of tone) is
heard immediately after dialing the destination num-
’ ber, wait until you hear confirmation tone. Route Ad-
vance tone indicates that the SATURN System has
accepted the dialed number and is searching for an
idle route. Additional Route Advance Tones may be
heard as the SATURN System searches for alternate routes to your destination.
If Expensive Facility Tone (one burst of tone) is heard
immediately after hearing confirmation tone, the
SATURN System has found a more expensive route.
If you desire not to place the call over a more ex-
pensive route, hang up.
If a route is not found within a preset period of time,
the SATURN System provides a steady burst of low
tone (if Callback Queuing is assigned) to indicate
that Callback Queuing can be invoked, if desired.
Callback Queuing allows you to hang up and be
called back (three-burst ringing is heard) when a
route becomes available. To answer the callback,
pick up the handset, listen for confirmation tone fol-
lowed by ringback tone. When the called party answers, you may begin to talk. If you do not answer
the callback attempt within approximately 18 se-
conds, the callback is temporarily cancelled. Addi-
tional callbacks (maximum of nine) will be attempted
every five minutes.
5. When the called party answers, you may begin to
talk.
b. To cancel callback queuing:
1. Pick up the handset.
l
Dial tone is heard.
2. Dial the automatic callback cancellation code
‘0 Confirmation tone is heard indicating the can-
cellation of the callback.
3. Hang up.
12.02 SMDR Account Codes. If your DYAD is equipped with
an ACCT feature button, you may display the default account
code or the previously entered special account code (18- and
26-button DYADs only). You may also change the account
code to another account code, any time during an established
call.
a. To enter a special account code.
1.
NOTE:
2.
After dialing a trunk access code (e.g., “9” for outside) or an LCR access code, if you hear recall dial
tone, enter a valid account code.
l
Dial tone is heard.
The account code must be entered within a preset
period of time or else the trunk is released and reorder tone is heard.
Complete the call by dialing the desired destination number (do not redial the trunk or LCR access
code).
b. To display the account code associated with your DYAD
(18- and 26-button DYADs only):
1..
NOTES:
Depress the 1 Accr 1 feature button (the button
can be depressed while you’re busy on a call or
when the DYAD is idle).
l
The default account code or previously entered
special account code is disDlaved e.o.,
[ACCT 10828397689 1 . -
After a preset period of time, the alphanumeric display is restored to the original call display.
If a special account code had been previously entered, the special account code is displayed for that
call. The default account code is restored automatically at the end of the call during which such
change has been made.
c. To change an account code to another code (18- and
26-button DYADs only).
1. During an established call, depress the
feature button.
(1
l
The current account code (default or previously
entered special account code) is displayed. e.g.,
1 ACCT 19305784385 [
2. Depress the * key on the DYAD’s keypad.
l
If the call is being recorded by SMDR, the current displayed account code is removed and
the account code indicator is displayed, e.g.,
1 ACCT
1
12-1
Page 31

SATURN EPABX
DYAD User Instructions
A30808-X5051-C140-1-B9~g
Issue 1, December 1984
l If the call is not being recorded by SMDR,
depressing the * key (or any additional dial-
ing) has no effect on the alphanumeric display.
The default account code remains displayed for
approximately 15 seconds after depressing the
ACCT feature button.
3. Dial the new account code.
l As the digits are dialed, the digits are scrolled
from left to right across the alphanumeric display.
nal) after which it is replaced by whatever previous display existed. e.g.,
4:35 PM]
12.06 Call Tracing. This feature allows you to have a connected call’s data recorded on the Station Message Detail
Recording (SMDR) printer. The SMDR printer prints out the
calling party’s.extension number (if an internal call) or the incoming trunk and trunk group number (if an external call),
the called number, the date and time of the call, and a special character on the SMDR report that the call was traced.
NOTE: If a mistake is made in dialing the new account code,
depress the ACCT feature button (current account
a. To trace a call:
code is displayed), depress the * key on the keypad
(ACCT is displayed), and dial the new account code.
1. While connected to a call, depress the 1 xFsa 1
button.
4. Upon completion of dialing the correct account
code, depress the # key on the DYAD’s keypad.
l If a valid account code was entered, the al-
phanumeric display is restored to the original
call display, e.g:,
I
LOCAL 1
l XFER lamp winks.
l Recall dial tone is heard.
. The call is placed on Consultation Hold.
2. Dial the Call Tracing feature access code.
l Confirmation tone is heard indicating the call’s
data has been recorded.
l If an.invalid account code was entered, an er-
ror message is displayed (e.g., VOID
12131415100). After five seconds, the alphanumeric display is restored back to the current account code. (e.g., ACCT 21010117171).
l You are automatically reconnected to the call.
NOTE: Reorder tone is heard if your phone is not allowed
to activate this feature.
12.03 I-Use Indication. For DYADs provided with multiple
lines, this feature is useful in determining which line the user
is presently utilizing when other lines and features are in use.
a. To activate:
Depress the
p&q
feature button.
* All button lamps momentarily go dark for ap-
proximately 1% seconds with the exception of
the lamp corresponding to the line you’re on.
3. Hang up or continue talking to the other party.
12.07 Message Waiting. This feature allows you to send a
message waiting indication to a party at another extension.
This feature also provides a means for you to respond to the
message or cancel the message.
a. To activate Message Waiting after dialing a do-not-
answer or busy extension:
1. While listening to ringback tone or busy tone,
depress the m feature button or depress
the I[ button and dial the message waiting
activation code.
12.04 Duration of Call Display. (18- and 26-button DYADs
only) This feature allows you to display the elapsed time you
have been engaged on a particular call.
a. To display the elapsed time of the call:
feature button, anytime, during
. CALL TIMER lamp lights steadily until the end
of the call.
l The elapsed time of the call is momentarilv dis-
played.’ e.g., 1
3:23 1 .
NOTE: After completion of the call, the total time duration
for that call is displayed for a predetermined period
of time. Note that if a new call is begun the display
extinguishes.
12.05 Time of Day Display. (18- and 26-button DYADs only)
This feature allows you to display the time of the day on the
alphanumeric display.
a. To display the time:
Depress the II feature button, anytime.
l The time is displayed for lV2 seconds (nomi-
l MSG SET lamp momentarily lights steadily,
then extinguishes.
l Confirmation tone is heard.
l The message waiting lamp flashes at the called
telephone.
NOTE: If the called telephone is unable to accept any more
messages (maximum of four), busy tone is heard.
If the called telephone does not have the capability
to receive message waiting indications, reorder tone
is heard.
2. Hang up.
l MSG SET lamp extinguishes.
b. To activate Message Waiting without first attempting
to call the other party:
1. Select and depress the appropriate line pickup
button.
l Line pickup lamp lights steadily.
12-2
Page 32

A30808-X5051-C140-I-8919
Issue 1, December 1984
SATURN EPABX
DYAD User Instructions
2. Pick up the handset.
l Dial tone is heard.
3. Depress the i] feature button or dial the
Message Waiting activation code.
4. Dial the extension number of the party you wish
to leave a message waiting indication.
l Confirmation tone is heard.
NOTE: If the called telephone is unable to accept any more
messages (maximum of four), busy tone is heard.
If the called telephone does not have the capability
to receive message waiting indications, reorder tone
is heard.
5. Hang up.
l MSG SET lamp extinguishes.
c. To display each message waiting at your DYAD (18- and
26-button DYADs only):
1. Do not pick up the handset.
2. Depress the CALL ek feature button repeatedly
I
to scroll through the waiting messages.
l Each depression of the MSG CALL BK feature
button displays the next succeeding message.
d. To respond to a message waiting at your DYAD:
The MSG CALL BK lamp flashes and/or a message
is displayed requesting you to call another exten-
sion (18- and 26-button DYADs only) e.g.,
[CALL
. -
1219 1
2.
3.
NOTE:
4.
NOTE:
5.
NOTE:
Select and depress the appropriate line pickup
button.
l Line pickup lamp lights steadily.
Pick up the handset.
l Dial tone is heard.
At this point, you can simply dial the extension number displayed in the alphanumeric display (18- and
e&button DYADs only) or inititate an automatic callback as described in the following procedure.
Depress the cALL ek feature button or dial the
El
Message Waiting - Automatic Callback access
code.
l The SATURN System automatically dials the
extension number of the party that sent the
message.
l Ringback tone is heard.
If busy tone is heard, the extension is busy; try initiating the callback at a later time.
When the party answers, ask for the message.
The completion of an automatic callback automatically cancels the associated message.
e. To cancel a message you sent to another telephone:
1. Select and depress the appropriate line pickup
button.
l Line pickup button lamp lights steadily.
Pick up the handset.
l Dial tone is heard.
Dial the Message Waiting - Sent cancellation code
or depress the c~~cs~ feature button.
I
Dial the extensjon number to which the message
was sent.
l Confirmation tone is heard indicating that mes-
sage waiting has been cancelled.
NOTE: Reorder tone is heard instead of confirmation tone
if an invalid access code is dialed or the message
was already cancelled at the called telephone.
5. Hang up.
f. To cancel a message that is waiting at your DYAD:
1. Select and depress the appropriate line pickup
button.
l Line pickup lamp lights steadily.
2. Pick up the handset.
l Dial tone is heard.
3. Depress the [ml feature button or dial the
Message Waiting - Received cancellation code.
l Confirmation tone is heard.
l The alphanumeric display goes blank unless
another message (maximum of four) is waiting
at your DYAD (Ia- and 26-button DYADs only).
4. Repeat the above procedure for each message to
be cancelled.
5. Hang up.
g. To cancel a particular message that is waiting at your
DYAD (18- and 26-button DYADs only):
I. Do not pick up the handset.
2. Scroll through the waiting messages (maximum
of four) by repeatedly depressing the
IiEq
feature button. Display the message to be
cancelled.
3. Depress the Ei feature button.
l The alphanumeric display goes blank unless
another message is waiting.
l The MSG CALL BK lamp extinguishes if no
other messages exist, otherwise the MSG
CALL BK lamp continues to flash and the next
message appears on the alphanumeric display.
12-3
Page 33

SATURN EPABX
DYAD User Instructions
12.08 Stop Hunt. This feature allows a sequential hunt group
to be temporarily reduced in size.
1.
2.
a. To
1.
shorten the sequential hunt group:
Select and depress the appropriate line pickup
button.
Dial the Stop Hunt activation code from the extension at which all succeeding extensions are to be
excluded from the hunting list. For example, if the
hunt sequence includes extensions 234-235-236237-238-239 and you want to exclude extensions
238 and 239, dial the Stop Hunt access code from
extension 237.
3.
l Line pickup lamp lights steadily.
Pick up the handset.
l Dial tone is heaid.
4.
Depress the II feature button or dial the
appropriate Universal Night Answer access code.
l Confirmation tone is heard indicating the suc-
cessful activation of the Stop Hunt feature.
Hang up.
l A talking connection is established between
you and the incoming-party.
2.
b. To
1.
NOTES:
return the hunt group to full size:
Dial the Stop Hunt cancellation code from the extension that activated Stop Hunt.
If reorder tone is heard, the night call already has been
answered. If intercept tone is heard, you are not allowed to answer incoming night calls from your DYAD.
l Confirmation tone is heard indicating the suc-
cessful cancellation of the Stop Hunt feature.
In some SATURN Systems, multiple night answering
zones are provided. In these systems, depress the
associated UNA ZONE - feature button or dial
the associated Universal Night Answering - Zoned
access code (1 to 4).
2. Hang up. 5. You may begin to talk.
12.09 Mobile Authorization Codes. This feature allows you
to place a call from a telephone that otherwise would be res-
tricted by its Class-of-Service. An authorization code, which
is assigned to a Class-of-Service with its own call restrictions,
must be dialed.
a. To override a call restriction:
1. Select and depress the appropriate line pickup
button.
l Line pickup lamp lights steadily,
2. Pick up the handset.
3.
4.
Dial the mobile authorization access code.
Dial an authorization code.
l Recall dial tone is heard indicating that the
Class-of-Service assigned to the dialed authorization code is now in effect.
NOTE: Intercept tone is heard if an invalid authorization
code is dialed.
5.
Place the call previously restricted.
NOTE: If you are still restricted from placing the call, the
Class-of-Service assigned to the dialed authorization code may not allow it.
l Dial tone is heard.
After you have completed the call and hanged up, the Classof-Service defined by the authorization code is removed and
the telephone’s original Class-of-Service returns active.
12.10 Universal Night Answer - Zoned. This feature allows
you to answer incoming calls ringing the night bell(s) when
the SATURN EPABX System is in the night service mode.
a. To answer an incoming call:
A30808-X5051-C140-l-B919
Issue 1, December 1984
You hear the night bell(s) ringing.
12.11.Voice Paging Access - Zoned and Area. This feature
allows you to page another party over the loudspeaker system.
a. To page a party:
1.
2.
3.
NOTE:
Select and depress the appropriate line pickup
button.
l Line pickup lamp lights steadily. ~
Pick up the handset.
l Dial tone is heard.
Depress the m feature button or dial the
associated Voice Paging access code.
l PAGE is displayed (18- and 26-button DYADs
only) e.g., 1
PAGE 1
In some SATURN Systems, multiple Voice Paging
zones are provided. In these systems, depress the
associated PAGE ZONE -feature button or dial
the associated Universal Night Answer - Zoned access code (1 to 4).
4. Speak slowly and distinctly into the handset.
5. Hang up.
12.12 Call Release. This feature allows you to place your
DYAD in the on-hook/off-hook state when the DYAD’s handset is off the hookswitch. This feature is useful in applications
where the handset is placed in an accoustically coupled
device (i.e. modem) or when a headset is used instead of the
handset.
a. To place your DYAD in the on-hook state (idle) when
the handset is off the hookswitch:
Depress the 1 RLs 1 feature button
l Line pickup lamp extinguishes.
12-4
Page 34

SATURN EPABX
DYAD User Instructions
b. To place your DYAD in the off-hook state (busy) when
the handset is off the hookswitch:
Depress the
p-l
feature button.
l
The automatic preference feature connects the
appropriate line.
l
Line pickup button lights steadily.
A30808-X5051-C140-l-6919
Issue 1, December 1984
l
Dial tone is heard.
NOTE: If the handset is on the hookswitch and your DYAD
is idle, depressing the RLS feature button is ignored.
If the DYAD’s handset is on the hookswitch and your
DYAD is non-idle (i.e., Hands-Free or On-Hook Dialing feature is active), depressing the RLS feature
button will disconnect the call.
12-5
Page 35

SATURN EPABX
A30808-X5051-C140-l-6919
DYAD User instructions
Issue 1, December 1984
Table 12.00 Feature Access Codes and Button Labels
FEATURE
ACCESS CODE BUTTON LABEL
HOLD FEATURES
-
Consultation Hold
.........................................
none XFER
Call Hold ................................................
PARK PRIV
Call Hold - Flip-Flop (Broker) ...............................
SPLIT
Call Park.. ..............................................
PARK
Manual Hold.. ...........................................
none HOLD
Exclusive Hold ...........................................
none HOLD EXCEL
CALL TRANSFER FEATURES
CallTransfer.. ...........................................
none
XFER
Call Transfer to Attendant.
..................................
none XFER “0”
CONFERENCE FEATURES
Add-On Conference .......................................
Bridge Call ..............................................
Meet-Me Conference
......................................
Station Controlled Conference
To access conference ....................................
To remove any conferee ..................................
To remove last conferee
..................................
none
none
___
XFER
see note 1
MEET ME
none
none
none
CALL FORWARDING FEATURES
Call Forwarding - All Calls
To activate.. ...........................................
Tocancel ..............................................
___
Call Forwarding to Public Network
To activate.. ...........................................
Tocancel ..............................................
Call Forwarding - Busy Lines
To activate.. ...........................................
____
Tocancel
...............................................
Call Forwarding - No Answer
To activate .............................................
___
Tocancel ..............................................
____
Call Forwarding - Secretarial
To activate.. ...........................................
To cancel ..............................................
Call Forwarding - Return.
...................................
Forced Call Forwarding ....................................
none
FWD ALL
FWD ALL
none
none
FWD BUSY
FWD BUSY
FWD NO ANS
FWD NO ANS
FWD TO
FWD TO
none
FWD FORCE
Note 1: Activate by depressing the associated busy line pickup button.
12-6
Page 36

SATURN EPABX
A30808-X5051-C140-l-6919
DYAD User Instructions
Issue 1, December 1984
Table 12.00 Feature Access Codes and Button Labels (Continued)
FEATURE
ACCESS CODE BUTTON LABEL
CALL QUEUING FEATURES
Internal Call Queuing - Callback
To cancel callback ................................. ,-, ...
Internal Call Queuing - Standby.
............................
Outgoing Call Queuing - Callback
To cancel callback
......................................
Outgoing Call Queuing - Standby
...........................
none
none
none
none
none
none
CALL PICKUP FEATURES
Call Pickup - Directed
..................................... PICKUP DIR
Call Pickup-Group
.......................................
PICKUP GRP
DIRECT ACCESS FEATURES
Direct Station Selection
....................................
Direct .Trunk Group Selection. ...............................
Direct Trunk Selection
.....................................
Direct Destination Selection. ................................
none
see note 2
see note 2
see note 2
DIAL -
INTERCOM FEATURES
.
Automatic Intercom.
.......................................
Manual Intercom
..........................................
and Signaling ..........................................
Executive Intercom
........................................
none ICOM none ICOM
none BUZZ
none ICOM DIAL -
PRIVACY FEATURES
Executive Override.. ......................................
Executive Override - Automatic
.............................
Do Not Disturb
To activate.. ...........................................
To cancel ..............................................
Call Privacy
..............................................
Station Ringer Cutoff
......................................
OVER RIDE
none none
DND
DND
none PRIV
none RINGER OFF
SPEED CALLING FEATURES
Last Number Redial
.......................................
Saved Number Redial
.....................................
Speed Calling - Individual
To store or change
......................................
To place a Call
.........................................
none
LAST NO.
SAVE NO.
SPEED IND
SPEED IND
Vote 2: Customer defined button label.
Page 37

SATURN EPABX
A30808-X5051-C140-l-6919
DYAD User Instructions
Issue 1, December 1984
Table 12.00 Feature Access Codes and Button Labels (Continued)
FEATURE
ACCESS CODE
BUTTON LABEL
SPEED CALLING FEATURES
Speed Calling - Group
Group1 ...............................................
Group 2 ...............................................
Group3
................................................
Group4 ...............................................
SPEED GRP 1
SPEED GRP 2
SPEED GRP 3
SPEED GRP 4
VOICE CALLING FEATURES
Voice Calling - Dial .......................................
none VOICE CALL
Voice Calling -
DSS
....................................... none VOICE -
SPECIAL CALLING FEATURES
On-Hook Dialing ..........................................
none ON-HK DlAL
Hands-Free Operation
..................................... none HANDS FREE
ADDITIONAL FEATURES
Least Cost Routing
To access .............................................
___
To’cancel callback ................. :. .................... ___
To display and change
...................................
none
I-Use Indication ...........................................
none
SMDR Account Codes
Duration of Call Display ....................................
none
CallTracing ...............................................
Time of Day Display.
...................................... none
Message Waiting
To activate.. ...........................................
To respond......................................~ ......
To cancel sent message ..................................
To cancel received message ............................... -
Mobile Authorization Codes. .......... ,. .....................
~
Stop Hunt
Toactivate...........................’..................
To cancel..............~ ................................
Universal Night Answer
All zones..
..........
.,>
.................................
Zonel...........~....................’. ............... -
Zone 2 .................................................
Zone 3.....:- ...........................................
Zone4...‘.1’........................................... ___
Voice Paging Access
Zone 1 ................................................
Zone2 .................................................
Zone 3 ................................................
-
Zone 4 ................................................
Zone Combination. ......................................
Call Release.. ...........................................
none
none
none
ACCT
I-USE
CALL TIMER
none
TIME
MSG SET
MSG CALL BK
none
MSG CANCEL
none
none
none
UNA
UNA ZONE 1
UNA ZONE 2
UNA ZONE 3
UNA ZONE 4
PAGE ZONE 1
PAGE ZONE 2
PAGE ZONE 3
PAGE ZONE 4
PAGE
RLS
12-8 (8 pages)
Page 38

Siemens Practices
Operation Series
A30808-X5051-C150-l-8919
Issue 1, June 1985
SATURN@
EPABX
OCIE
T”JR-DYAD USER INSTRUCTIONS
Issued by Office Systems Group
5500 Broken Sound Boulevard N.W. Boca Raton, Florida 33431
(305) 994-8100 l Telex: 515052
Siemens Communication Systems, Inc.
Printed in U.S.A.
Page 39

Siemens Practices
Operation Series
A30808-X5051-C150-l-8919
Issue 1, June 1985
0 Siemens Communication Systems, Inc., 1985
All rights reserved.
,
This material is Proprietary to Siemens Communication Systems, Inc. Any unauthorized reproduction, use or disclosure of this material, or any part thereof,
is strictly prohibited.
Siemens reserves the right to make changes in specifications at any time and
without notice. The information furnished by Siemens in this material is believed
to be accurate and reliable. However, no responsibility is assumed by Siemens
for its use.
“JR-DYAD has been applied for as a registered trademark by Siemens for this
line of equipment.
Page 40

SATURN EPABX
JR-DYAD User Instructions
4
A30808-X5051-C150-l-B919
Issue 1, June 1985
CONTENTS
SECTION
PAGE SECTION PAGE
1.00 INTRODUCTION
.......................... l-l
1.01 General
.............................. l-l
1.02 Feature Access ........................ l-l
1.03 To Place a Call ........................ 1-l
1.04 To Answer a Call.
...................... l-l
1.05 Automatic Line Preference ...............
l-l
1.06 Discriminating Alerting Tone. ............. l-l
1.07 Call Progress Tones ................... .1-l
1.08 Speaker Volume Control ................. l-2
1.09 Pickup Button Indications ............... l-2
1.10 Feature Button Indications
.............. .l-2
2.00 JR-DYiiD FIXED FEATURE BUTTONS.
....... .2-l
2.01 Hang Up ............................ .2-l
2.02 On Hook Dial
........................ .2-l
2.03 Store
............................... .2-l
2.04 Speed Dial .......................... .2-l
2.05 Group Pickup
........................ .2-l
2.06 Redial
.............................. .2-l
2.07 Xfer
Conf
............................ .2-l
2.08 Hold.
............................... .2-2
3.00 JR-DYAD PROGRAMMABLE BUTTONS
...... .3-l
4.00 HOLD FEATURES
........................ .4-l
4.01 Call Hold
............................
.4-l
4.02 Call Hold - Flip-Flop (Broker) ........... .4-l
4.03 Call Park ............................ .4-2
4.04 Exclusive Hold
....................... .4-2
5.00 CALL TRANSFER FEATURES ..............
.5-l
5.01 Call Transfer to Attendant. ..............
.5-l
6.00 CONFERENCE FEATURES ................. .6-l
6.01 Bridge Call
.......................... .6-l
6.02 Meet-Me Conference ..................
.6-l
6.03 Station-Controlled Conference ........... .6-l
7.00 CALL FORWARDING FEATURES ............ .7-l
7.01 Call Forwarding - All Calls .............. .7-l
7.02 Call Forwarding to Public Network.
....... .7-l
7.03 Call Forwarding - Busy Lines ........... .7-2
7.04 Call Forwarding - No Answer
........... .7-2
7.05 Call Forwarding - Secretarial ............
.7-3
7.06 Call Forwarding - Return
............... .7-4
7.07 Forced Call Forwarding
................ .7-4
8.00 CALL QUEUING FEATURES
............... .8-l
8.01 Internal Call Queuing - Callback.
........ .8-l
8.02 Internal Call Queuing - Standby
......... .8-l
8.03 Outgoing Call Queuing - Callback
....... .8-l
8.04 Outgoing Call Queuing - Standby
....... .8-2
9.00 CALL PICKUP FEATURES ................ .9-l
9.01
Call Pickup - Directed
........
...... ,9-i
1O;OO DIRECT ACCESS FEATURES
............. .10-l
10.01
Direct Station Selection .............. .10-l
10.02 Direct Trunk Group Selection .......... .10-l
10.03 Direct Trunk Selection. ............... .10-l
10.04
Station-Defined Direct Dial ............ ,10-l
11.00 INTERCOM FEATURES ................... .ll-’
11.01 Automatic Intercom ..................
.11-l
11.02 Executive Intercom ..................
.11-l
12.00 PRIVACY FEATURES. ...................
.12-l
12.01 Executive Override ..................
.12-l
- 12.02 Executive Override - Automatic. ....... .12-l
12.03
Do Not Disturb ..................... .12-l
12.04 Call Privacy ........................
.12-2
12.05 Station Ringer Cutoff ................ .12-2
13.00 SPEED CALLING FEATURES ............. .13-l
13.01
Saved Number Redial ............... .13-l
13.02 Speed Calling - Individual
............ .13-l
13.03 Speed Calling - Group. .............. .13-l
14.00 ADDITIONAL FEATURES ................
.14-t
14.01 Least Cost Queuing . .14-l
14.02 SMDR Account Codes ,14-l
14.03 I-Use Indication .14-l
14.04 Call Tracing 14-1
14.05 Message Waiting . .14-2
14.06
Stop Hunt . . 14-2
14.07 Mobile Authorization Codes .14-3
14.08
Universal Night Answer - Zoned. .14-3
14.09 Voice Paging Access - Zoned and Area. .14-3
LIST OF FIGURES
FIGURE
PAGE
1.00 JR-DYAD Digital Telephone l-3
LIST OF TABLES
TABLE
PAGE
14.00 Feature Access Codes and Button Labels . .14-4
i
Page 41

SATURN EPABX
JR-DYAD User Instructions
A30808-X5051-C150-l-B919
Issue 1, June 1985
SECTION 1.00 INTRODUCTION
1.01 General. This document provides step-by-step instruc-
tions for accessing SATURN Electronic Private Automatic
Branch Exchange (EPABX) features from the SATURN
JR-DYAD. The JR-DYAD has sixteen buttons for line appear-
ances and feature access. See Figure 1.00. Eight of the but-
tons are assigned fixed features and are labeled as follows:
2. Last Line Preference - Automatically selects the
same line pickup button to which you were con-
nected on your last call when you pick up the hand-
set to place a call.
Hang Up
- On-hook Dialing release, On/Off-Hook for
headset use
3. Idle Line Preference -Automatically selects an idle
line pickup button when you pick up the handset
to place a call.
On Hook Dial - On-hook dialing
Store
- Speed Dial programming
Speed Dial - Speed Dial activation
Group Pickup - Group Pick-Up feature activation
Redial
- Last Number Redial
Xfer Conf - Hookflash/Transfer/Conference
Hold (red) - Manual Hold feature
The operation of these buttons is discussed in Section 2.00.
b. Terminating Preferences:
Ringing Line Preference - Automatically selects a
pickup button associated with a call that is ringing
your JR-DYAD. Pickup buttons associated with lines
that are not assigned to ring at your station are not
selected.
The remaining eight buttons, which have visual indicators,
are system programmable for each station for feature activation or line appearances. Their operation is discussed in Sections 3.00 through 14.00.
incoming Line Preference - Automatically selects
a pickup button associated with an incoming call.
Automatic selection occurs regardless of whether
the line is in the ringing or alerting-only state.
1.02 Feature Access. The instructions provided in this document are for features that can be accessed by depressing a
button or dialing an access code. If the JR-DYAD does not
have a button for a particular feature, the feature may be accessed by dialing an access code, if it is allowed by the class
of service assigned to the station.
A terminating line preference will take precedence over an
originating line preference when an incoming call exists. You
may override an automatic line preference by manually
depressing another pickup button prior to picking up the
handset.
Table 14.00 at the back of this document lists the feature ac-
cess codes and the associated button labels.
1.06 Discriminating Alerting Tone. Several types of distinctive alerting tone patterns are provided so that you can distinguish between the different types of incoming calls. The
alerting patterns are:
1.03 To Place a Call. The following procedures can be used
to place a call:
One burst of tone (normal ringing) - Identifies an incoming call from another SATURN EPABX telephone.
a. Handset operation
Two bursts of tone - Identifies an incoming, “outside”
call, including attendant-extended calls.
To place a call from the JR-DYAD select and depress
an idle line pickup button, pick up the handset, listen
for dial tone, and dial the destination number.
Three bursts of tone - Identifies calls initiated by the
following:
b. On-Hook dialing (see paragraph 2.02)
1.04 To Answer a Call. The following procedures can be used
to answer a call:
To answer an incoming call at the JR-DYAD depress the flash-
ing pickup button, pickup the handset and talk to the calling
pafly.
l
Call Hold automatic recall
l
Call Transfer Security recall
l
Executive Intercom calls
l
Internal Call Queuing - Callback
l
Outgoing Call Queuing - Callback
l
Station-Controlled Conference recall to conference
master
1.05 Automatic Line Preferences. Connection to a given
pickup line on your JR-DYAD may be provided on an automatic basis. Each JR-DYAD can be assigned one originating
and one terminating preference. The originating preference
options are: Prime Line Preference, Last Line Preference, and
Idle Line Preference. The terminating preference options are:
Ringing Line Preference and incoming Line Preference. If an
automatic line preference is not assigned to your JR-DYAD,
you must depress a pickup button each time you originate
and answer a call.
1.07 Call Progress Tones. The following call progress tones
are used to inform you of the status of a call:
a. Busy Tone - Tone heard when a called party’s tele-
phone is busy (60 impulses per minute)
b. Busy Override Injection Tone - Single burst of tone
heard repeatedly every 8 to 20 seconds apart AFTER
an attendant or executive overrider has intruded on the
call in progress. This tone continues for the entire time
the attendant or executive overrider is present on your
conversation.
a. Originating Preferences:
1. Prime Line Preference-Automatically selects the
prime line pickup button when you pick up the
handset to place a call.
c. Busy Override Tone -Three short bursts of tone heard
two seconds apart BEFORE an overriding attendant
intrudes on a call in progress.
d. Call Waiting Tone - One burst of tone heard when a
l-l
Page 42

SATURN EPABX
JR-DYAD User Instructions
A30808-X5051-C150-l-B919
Issue 1, June 1985
e.
f.
9.
h.
i.
L
k.
I.
SATURN EPABX telephone call is waiting to be answered, or two bursts of tone heard when an outside
trunk call is waiting to be answered at your JR-DYAD.
This tone is repeated after 10 seconds if the waiting
party is still present.
Conference Tone - One burst of tone heard when a
called party is being added to a conference to which
you are connected.
Confirmation Tone -Three rapid bursts of tone indicat-
ing the action taken by you has been accepted (e.g.,
activation of a Call Forwarding feature).
Dial Tone - Continuous tone heard indicating that di-
aling can begin.
Executive Override Tone - One three-second burst of
high pitch tone heard BEFORE an executive overrider
intrudes on a call in progress.
\
Expensive Facility Tone - One second burst of high
pitch tone heard when the SATURN System selects a
more expensive route for call routing via the Least Cost
Routing (LCR) feature.
Intercept Tone -A continuous alternating low and high
pitch tone indicating an invalid or unauthorized feature
code or extension number was dialed.
Low Tone - Steady tone heard after receiving busy tone
indicating successful activation of such features as
Outgoing Call Queuing Callback and Internal Call
Queuing - Callback.
Recall Dial Tone - Three rapid bursts of tone followed
by dial tone indicating the action taken by you has been
accepted and you can now dial additional digits (e.g.,
for transferring a call, via the Call Transfer feature).
m. Reorder Tone - Tone heard when a network blocking
condition exists or activation of a feature was not grant-
ed (120 impulses per minute)
n. Ringback Tone - Tone heard when a called party’s tel-
ephone is ringing.
o. Route Advance Tone - One short burst of tone heard
each time the SATURN System searches for an idle
route via the LCR feature.
p. Special Ringback Tone - Tone that sounds similar to
ringback tone, except for the distinctive low signal at
-/
the end of each tone cycle. Special ringback tone indicates you are in a waiting state for a busy telephone
and is heard during activation of the following features:
l
Internal Call Queuing - Standby
l
Outgoing Call Queuing - Standby
l
Executive Override -- Automatic
1.08 Speaker Volume Control. You may control the voice and
call progress tone levels and the audible alert tone level of
the JR-DYAD speaker with the two controls on the JR-DYAD.
Use the thumbwheel control on the line cord side of the set
to adjust voice and call progress tones, and the control on
the underside of the JR-DYAD to adjust the audible alert tone
level.
NOTE: The voice level heard from your handset is not ad-
justable.
1.09 Pickup Button Indications. The JR-DYAD can be provid-
ed with multiple line and/or trunk pickup buttons. The cur-
rent status of a line/trunk is displayed via a corresponding
lamp located by each pickup button:
a.
b.
C.
d.
e.
Dark
Lighted Steady
Flashing (lamp blinks
60 times per minute)
Winking (lamp blinks
- Indicates that the line/trunk
is idle.
- Indicates that the line/trunk
is busy.
- Indicates that the line/trunk
has an incoming call.
- Indicates that the line/trunk
120 times per minute)
has been placed on Manual
hold via the Hold button.
Fluttering (lamp blinks - Indicates that the line/trunk
600 times per minute) has been placed on Exclu-
sive hold via the HOLD
EXCL button.
1.10 Feature Button Indications. Feature buttons are used
to activate features at your JR-DYAD. For some features, the
button lamp indicates the active/inactive status of the feature.
Generally, when the feature is active the lamp is lighted, and
when the feature is inactive, the lamp is dark.
1-2
Page 43

A30808-X5051-CEO-l-B919
Issue 1,June 1985
Figure 1.00 JR-DYAD Digital Telephone
l-3 (l-4 blank)
Page 44

SATURN EPABX A30808-X5051-C150-l-B919
JR-DYAD User Instructions issue 1, June 1985
SECTION 2.00 JR-DYAD FIXED FEATURE BUTTONS
2.01 Hang Up. Depressing the Hang Up button will cause
a change in the on-/off-hook state of the JR-DYAD. This function can substitute for removing or replacing the handset on
the hookswitch when a series of consecutive calls are being
made or when a headset is being used instead of a handset.
2.02 On Hook-Dial. Depressing this button allows placing
a call to another party without lifting the handset. Call progress
tones such as dial tone, busy tone, ringback tone and others
and the called party’s voice are heard over the JR-DYAD loudspeaker.
To place a call depress an idle pickup button then depress
the On Hook Dial button, listen for dial tone, and dial the destination number. If busy tone is heard, disconnect the call by
depressing the On Hook Dial button or the Hang Up button.
Some JR-DYADs may be assigned “single button” operation
in which case depressing an idle pickup button automatically enables On-Hook dialing. In this case, after depressing the
idle pickup button and hearing dialtone, dial the destination
number.
If the called station is idle, ringback tone is heard over the
loudspeaker. When the called party answers, the voice is
heard over the loudspeaker. To talk to the party, pick up the
handset.
To hang up, place the handset on the hookswitch or depress
the Hang Up button. After the telephone is idle and the handset is off the hookswitch, the phone will still ring for incoming
calls. To answer, depress the Hang Up button.
2.03 Store. Depressing this button allows the user to to es-
tablish a personal speed calling list of one to ten frequently
called telephone numbers up to 25 digits each. Each number (internal or external to the SATURN system) is assigned
a one-digit code (O-9) and programmed into the JR-DYAD
memory.
a. To store or change repertory dialing codes:
1. Do not pick up the handset.
2. Depress the
STORE
button.
I
3. Depress one of the numbers O-9 on the key pad
to indicate which cell in the JR-DYAD memory is
to be programmed.
4. Enter the number to be stored, including * and
#, (up to 25 digits) from the dial.
5. Depress the
STORE
I
button to indicate the end of
the storage sequence.
2.04 Speed Dial. Depressing this button permits a number
in the repertory dialing list to be called.
a. To initiate a call using speed dialing:
button, or pick up the hand-
l
Dial tone is heard.
2. Depress the
I
Speed
Dial
button.
- 3.
Depress the number (O-9) indicating which stored
number is to be.dialed.
The JR-DYAD sends the stored number to the EPABX.
The set sends the stored number as if it were dialed
manually.
The stored number is supported in the JR-DYAD
memory by a long life (up to three years) battery. This
support continues even though the station set is un-
plugged.
2.05 Group Pickup. Depressing this button permits an incoming call that is ringing at another station within a pickup group
to be answered by any other member of the pickup group.
a. To answer a call ringing at another station in the pick-
up group:
1. Select and depress an idle pickup button.
2. Pickup the handset.
l
Dial tone is heard.
3. Depress the
I
Group
Picku
button.
l
Ringing ceases at the ringing station and you
are connected to the incoming call. Intercept
tone is heard if no phone is ringing in your pick-
up group.
4. You may begin to talk.
2.06 Redial. Depressing this button causes the last number
dialed by Speed Dial or manually, up to 25 digits, to be sent
to the EPABX.
a. To place a call to the last number dialed from the
JR-DYAD:
1. Select and depress an idle pickup button.
2. Pick up the handset.
l
Dial tone is heard.
3. Depress the
REDIAL
button.
I
l
Ringback tone is heard.
4.
When the called party answers, you may begin to
talk.
2.07 Xfer Conf. This button is used for two functions: call
transfers and for establishing conferences.
a. Call Transfer. The Xfer Conf button permits the trans-
fer of a call, from inside or outside the SATURN EPABX,
to another extension.
2-1
Page 45

A30808-X5051-C150-l-B919
Issue 1, June 1985
SATURN EPABX
JR-DYAD User instructions
To transfer a call:
Ask the other party to wait.
C.
Depress the 1 $rf 1 button.
l
Recall dial tone is heard.
Dial the destination number.
l
Ringback tone is heard.
If busy tone is heard or the party does not answer,
depress the, Xfer Conf button to return to the held party.
When an outside party requests to be transferred to
an extension and the extension is busy, the internal
Call Queuing - Standby feature can be invoked. This
feature allows camping-on of the busy extension and
waiting for the party to answer.
If it is desired to transfer the call before the called party
answers, hang up the handset. The held party hears
ringback tone and waits for the called party to answer.
If the party being transferred is an outside party and
the called party does not answer within a preset time,
the call is automatically recalled to the transferring JR-
DYAD (three burst alerting tone is heard), if idle, or to
the Attendant if busy. To answer or return to the held
call pick up the handset.
4. When the called party answers, announce the call
and hang up.
l
The call is transferred to the called party,
b. Add-On Conference. The Xfer Conf button also permits
the addition of a third party (inside or outside) to a con-
versation.
To add a third party:
1. Ask the other party to wait.
2. Depress the 1 tg, 1 button.
l
Recall dial tone is heard.
l
The party is placed on hold.
3. Dial the number of the third party.
l
Ringback tone is heard.
If busy tone is heard, or the party does not answer,
depress the Xfer Conf button to return to the held
call.
4. When the called party answers, inform the party
of the conference.
5. Depress the
Xler
t-l
Cod
button again.
l
A three party conference is established
The user that originated the conference may
release the third party by depressing the Xfer Conf
button.
When more than one outside (trunk) call is added,
transmission quality may be degraded.
6. Conversation may begin.
Consultation Hold. The Xfer Conf button also allows
a caller (inside or outside) to be placed on hold and
another call to be made on the same line.
1. To place a party on hold and originate another call:
(a)
(b)
(4
(d)
Ask the other party to wait.
Depress the
Xler
I
Con1
button.
l
Recall dial tone is heard.
l
The party is placed. on hold.
Dial the destination number.
l
Ringback tone is heard.
If busy tone is heard or the called party does
not answer, depress the Xfer Conf button to
rcturn to the held call.
When the called party answers begin to talk.
2. To return to the held party
(a) Wait until the consulted party hangs up.
l
The call is automatically reconnected to the
previously held party.
(b) Resume your conversation.
2.08 Hold. Depressing this button allows you to place a line
on hold for the purpose of holding a call or originating or
receiving another call on a second SATURN EPABX line. The
held call can be picked up at any JR-DYAD with an appearance of the held line.
a. To place a line on hold:
1.
2.
Ask the other party to wait.
Depress the red
I
Hold feature button.
3. The receiver may be hung up without losing the
call, or another call can be originated or received
on another line.
b. To
1.
Any JR-DYAD with the same appearance of the
held line may be used to pick up the held call. After depressing the Hold button to hold a line, the
same button can be used to hold another line,
without losing the previously held call. As many
calls can be held as there are lines on the JR-DYAD.
The attendant can not be placed on hold. If a party
has bridged on a line, that party cannot be held.
return to the held call:
Pickup the handset. Depress the line pickup but-
ton associated with the held call.
l
The call is reconnected.
2.
Resume the conversation.
2-2 (2 pages)
Page 46

SATURN EPABX
JR-DYAD User instructions
A30808-X5051-C150-l-6919
Issue 1, June 1985
SECTION 3.00 JR-DYAD PROGRAMMABLE BUTTONS
The remaining eight buttons, which have visual indicators,
are system programmable for each station for feature activa-
tion or line appearances. Their operation is discussed in Sections 4.00 through 14.00.
3-1 (3-2 blank)
Page 47

SATURN EPABX
A30808-X5051-C150-l-B919
JR-DYAD User Instructions
Issue 1. June 1985
SECTION 4.00 HOLD FEATURES
4.01 Call Hold. This feature allows you to place any call (inside or outside) on hold and hang up without losing the call.
After holding the call, you may originate or receive other calls
on the same extension line and return to the held call or alternate between the two calls (holding one call while speaking to the other).
By using
a. To
1.
2.
3.
the Call Hold feature button (PARK PRIV):
place a party on hold:
First, ask the other party to wait.
Depress the feature button.
l
Confirmation tone is heard.
l
The party is placed on “Call Hold”
l
PARK PRIV lamp winks.
Hang up.
NOTE: If the held party is from “outside” the SATURN
EPABX, you must return to the held party within a
preset period of time or the call is recalled to your
station (three-burst alerting tone is heard), if idle,
otherwise, to the attendant. To answer/return to the
held call, pick up the handset.
b. To return to a held call or alternate between two calls:
1. Pick up the handset or depress the
PARK
I
PI-IV
feature button (if connected to another call).
l
You are reconnected to the previously held
party and the other party, if any, is placed on
hold.
l
PARK PRIV lamp extinguishes when no call is
on hold.
2. Resume your conversation.
By using the Call Hold feature access code:
a. To place a party on hold:
1. First, ask the other party to wait.
2. Depress the
Xler
El
Cod
button.
3.
l
Recall dial tone is heard.
3. Dial the Call Hold feature access code.
l
Confirmation tone is heard.
l
The party is placed on “call hold.”
4. Hang up.
NOTE: If the held party is from “outside” the SATURN
EPABX, you must return to the held party within a
preset period of time or the call is recalled to your
station (three-burst alerting tone is heard), if idle,
otherwise, to the attendant. To answer/return to the
held call, pick up the handset.
b. To return to a held call or alternate between two calls:
1. Pick up the handset or depress the
Xler
button (if connected to another call).
El
Cod
l
Dial tone/recall dial tone is heard.
2. Dial the Call Hold feature access code.
l
You are reconnected to the previously held
party and the other party, if any, is placed on
hold.
3. Resume your conversation.
4.02 Call Hold - Flip-Flop (Broker). This feature allows you,
upon hearing a call waiting tone, to place the call in progress
(inside or outside call) on hold and establish a connection to
the waiting call. When no call is waiting, this feature allows
you to place a call in progress on hold and originate another
call on the same extension line. In either case, you can return
to the held call or alternate between the two calls (holding
one call while speaking to the other).
By using the Call Hold - Flip-Flop feature button
I
SPLIT
a. To place a party on hold and answer a waiting call:
1.
2.
3.
b. To
1.
2.
4.
c. To
1.
2.
d. To
1.
First, ask the other party to wait.
Depress the
El
SPLIT feature button.
l
SPLIT lamp winks.
l
You are connected to the waiting party and the
other party is placed on hold.
You may begin to talk.
place a party on hold and originate another call:
First, ask the other party to wait.
Depress the
I
SPLIT feature button.
l
SPLIT lamp winks.
l
Dial tone is heard.
9 The party is placed on hold.
Dial the phone number of the desired party.
l
Ringback tone is heard.
When the called party answers, you may begin to
talk.
return to a held party:
Wait until the other party hangs up.
l
You are automatically connected to the previously held party.
Resume your conversation.
alternate between two calls:
Depress the feature button.
4-1
Page 48

SATURN EPABX
A30808-X5051-C150-l-B919
JR-DYAD User Instructions
issue 1, June 1985
9 You are reconnected to the previously held
party, and the other party, if any, is placed on
hold.
NOTE: If you accidentally hang up while a call is on hold,
the call is automatically recalled (one burst alerting
tone) to your JR-DYAD. To answer/return to the held
call, pick up the handset.
2.
By using
a. To
1.
2.
3.
4.
b. To
1.
2.
Resume your conversation.
the Call Hold - Flip-Flop feature access code:
place a party on hold and answer a waiting call:
First, ask the other party to wait.
Depress the
Xler
I
Conf
feature button.
l
Recall dial tone is heard.
Dial the Call Hold - Flip-Flop feature access code.
l
You are connected to the waiting party and the
other party is placed on hold.
You may begin to talk.
place a party on hold and originate another call:
First, ask the other party to wait.
Depress the
Xfer
I
Conf
feature button.
l
Recall dial tone is heard.
Dial the Call Hold - Flip-Flop feature access code.
l
Dial tone is heard.
l
The party is placed on hold.
Dial the phone number of the desired party.
l
Ringback tone is heard.
NOTE:
If the called party does not answer your call or the
line is busy, depress the Xfer Conf button to return
to the held party.
5. When the called party answers, you may begin to
talk.
c. To return to a held party:
1. Wait until the other party hangs up.
l
You are automatically connected to the previously held party.
2. Resume your conversation.
d. To alternate between two calls:
1. Depress the
Xler
I
Conf
feature button.
l
You are reconnected to the previously held
party, and the other party, if any, is placed on
hold.
NOTE: If you accidentally hang up while a call is on hold,
the call is automatically recalled (one burst alerting
tone) to your JR-DYAD. To answer/return to the held
call, pick up the handset.
2. Resume your conversation.
4.03 Call Park. This feature allows you to place a call (inside
or outside) on “system’hold” (referred to as parked) and return
to the parked party from the same or another SATURN EPABX
telephone. The call is placed in.one of ten selected park locations. A unique access code is assigned to each park location.
a. To park an established call:
1.
2.
3.
4.
NOTE:
5.
NOTE:
First, ask the other party to wait.
Depress the
Xfer
I
Conf
feature button.
l
Recall dial tone is heard.
Dial the Call Park feature access code.
Dial the Call Park location code (0 to 9).
l
Confirmation tone is heard.
l
The call is parked at the dialed location.
If the dialed Call Park location is not available, busy
tone is heard. If this occurs, depress the Xfer Conf
button to return to the held party and repeat the
process using a different location code.
Hang up. You are free to originate or receive other
calls.
If you park an outside call and you do not return to
the party within a preset period of time, the call is
automatically recalled to your JR-DYAD, if idle, otherwise to the attendant.
b. To return to the parked call:
1. Pick up the handset at any nonrestricted telephone.
l
Dial tone is heard.
2. Dial the Call Park feature access code.
3. Dial the Call Park location code which was used
to park the call.
l
You are connected to the parked call.
NOTE: If reorder tone is heard, the held party has discon-
nected. If intercept tone is heard, the telephone is
restricted from Call Park access.
4. Resume your conversation.
4.04’Exclusive Hold. This feature allows you to place a call
on hold for the purpose of holding the call and originating
or receiving another call on a second SATURN EPABX line.
The held call can be picked up only from your JR-DYAD, even
though the line may appear at other telephones.
a. To place a call on hold:
1. First, ask the other party to wait.
2. Depress the
feature button.
4-2
Page 49

SATURN EPABX
JR-DYAD User Instructions
A30808-X5051-C150-l-B919
Issue 1, June 1985
NOTES:
l
Line pickup lamp flutters.
The line pickup lamp remains lighted at all other ap-
pearances of the line.
After depressing the HOLD EXCL button to hold a
line, the same button can be used to hold another
line without losing the previously held call. As many
lines can be held as there are lines on your JR-DYAD.
You are not allowed to hold an attendant. Additionally, if a party has bridged on a line, that line cannot be held.
3. You may originate or receive another call on a second line, if provided.
b. To return to the held call:
1. Pick up the handset and depress the fluttering line
pickup button associated with the held call.
l
Line pickup lamp lights steadily.
l
You are reconnected to the held call.
2. Resume your conversation.
4-3 (4-4 blank)
Page 50

----_-__ - -- --. .
SECTION 5.00 CALL
TRANSFER FEATURES
5.01 Call Transfer to Attendant. This feature allows you to
transfer a call in progress to the attendant.
a. To transfer a call to the attendant:
1. First, ask the other party to wait.
2. Depress the
m
feature button.
NOTE: If you desire to transfer the call before the attendant
answers, hang up. The held party will hear ringback
tone until the attendant answers.
3.
When the attendant answers, announce the call.
l
Ringback tone is removed.
SATURN EPABX
JR-DYAD User Instructions
A30808-X5051-C150-l-0919
Issue 1, June 1985
l
The party is placed on hold.
l
Ringback tone is heard and the attendant is
alerted.
l
XFER “0” lamp winks.
4. Hang up.
l
The call is transferred to the attendant.
l
XFER “0” lamp extinguishes.
5-l (5-2 blank)
Page 51

SATURN EPABX
A30808-X5051-C150-1-B9i9
JR-DYAD User Instructions
Issue 1, June 1985
SECTION 6.00 CONFERENCE FEATURES
6.01 Bridge Call. This feature allows you to enter into an existing conversation on a busy line or direct trunk.
a. To enter an existing conversation:
1. Select and depress the pickup button associated
with the busy line or direct trunk.
2. Pick up the handset.
l
Conference tone is heard by the other parties,
after which you are connected in a three-way
conversation.
NOTE: If the Call Privacy feature is active on the busy line
or direct trunk, or a three-way connection has al-
ready been established, bridging is denied and busy
tone is heard.
6.02 Meet-Me Conference. This feature allows you to arrange
a conference of up to seven extensions or four extensions and
three outside lines. Outside parties are connected to the conference by the attendant.
a. To establish a Meet-Me Conference:
1. Select and depress the appropriate line pickup
button.
2.
l
Line pickup button lamp lights steadily.
Pick up the handset.
l
Dial tone is heard-.
3.
Dial the party you want in the conference.
l
Ringback tone is heard.
4. When the called party answers, inform the party
to dial the Meet-Me Conference access code at a
prearranged time. If the called party is from outside the SATURN System, inform the party to dial
the SATURN attendant console and have the attendant transfer the call to the conference by dial-
ing the Meet-Me Conference access code.
NOTE: More than one Meet-Me Conference bridge may be
assigned in the SATURN EPABX. The last digit of
the access code represents the selected conference
bridge.
5.
6.
NOTES:
Hang up.
Repeat the above steps for up to seven conferees.
The attendant only may enter the conference as the
eighth conferee.
The maximum number of outside parties allowed
in the conference at any one time is three (variable
and assigned by data base management).
b. To enter the conference:
1. Select and depress the appropriate line pickup
button.
2.
3.
NOTES:
l
Line pickup button lamp lights steadily.
Pick up the handset.
l
Dial tone is heard.
Dial the preannounced Meet-Me Conference feature access code or depress the ml feature
button followed by the conference bridge code.
l
Conference tone is heard; all conferees hear
the conference tone as you enter the conference.
l
MEET-ME lamp lights steadily.
Busy tone is heard if the conference is full. Intercept tone is heard if the conference bridge is not
assigned.
When more than one outside (trunk) call is added,
transmission quality may be degraded.
6.03 Station Controlled Conference. This feature allows you
to establish a conference of up to seven parties. As the Conference Master, you can add members to the conference, remove members from the conference, leave the conference
to consult with a conferee privately, call the attendant, or
release from the conference to allow another conference
member to take over conference mastership.
The maximum number of parties allowed in the conference
is seven; however, the attendant can be added to the conference as an eighth party. The maximum number of outside
parties allowed in the conference at any one time is three (variable and assigned by data base management). When more
than one outside (trunk) call is added, transmission quality
may be degraded.
a. To establish a conference:
Select and depress the appropriate line pickup
button.
l
Line pickup lamp lights steadily.
Pick up the handset.
l
Dial tone is heard.
Dial the Station Controlled Conference access
code.
l
Recall dial tone is heard.
NOTE: Busy tone is heard if a conference circuit is not avail-
able.
4. Dial the number of the party you want to add to
the conference.
l
Ringback tone is heard.
NOTE: If the called party does not answer, is busy, or does
not wish to be included in the conference, you must
hang up. Your phone then rings and, upon answer,
you are connected back into the conference. You
6-l
Page 52

SATURN EPABX
JR-DYAD User instructions
A30808-X5051-C150-l-B919
Issue 1, June 1985
5.
6.
NOTES:
7.
may proceed adding parties to the conference by
depressing the Xfer Conf button to leave the conference and following the above procedure beginning at step 4.
When the called party answers, inform the party
of the conference.
l
Ringback tone is removed.
Depress the
Xfer
conference.
I
Cod
button to add the party to the
l
Conference tone is heard; all conferees hear
the tone as you and the other party enter the
conference.
If you attempt to add more than seven inside parties or add more than the allowed number of outside parties into the conference, reorder tone is
heard for approximately 1112 seconds, after which
you are reconnected to the “would be” conferee. To
return to the conference, depress the Xfer Conf
button.
Any party can leave the conference by hanging up.
To add each additional party to the conference,
depress the
Xler
I
Cod
button to leave the confer-
ence and follow the above procedure beginning at
step 4.
b. To remove any conferee (extension only) from the con-
ference and consult with the conferee privately:
1. Depress the
1 2 1
button to leave the confer-
ence.
l
Recall dial tone is heard.
2. Dial the conference member remove code.
3. Dial the extension number of the conferee to be
removed.
l
You and the conferee are connected in a private talk state.
NOTE: As the conference master, you have the option of
adding the party back to the conference or removing the conferee from the conference totally. To add
the conferee back into the conference, depress the
Xfer Conf button; you and the conferee reenter the
conference. To remove the conferee from the conference, hang up. Your phone then rings and, upon
answer, you are connected back into the conference.
c. To remove the last member added to the conference
and consult with the conferee privately:
NOTE:
Depress the
Xler
ence.
I
Cool
button to leave the confer-
l
Recall dial tone is heard.
Dial the last member added access code.
You and the conferee are connected in a private
talk state.
As the conference master, you have the option of
adding the party back to the conference or removing the conferee from the conference totally. To add
the conferee back into the conference, depress the
Xfer Conf button; you and the conferee reenter the
conference. To remove the conferee from the conference, hang up. Your phone then rings and, upon
answer, you are connected back into the conference.
d. To transfer the position of conference mastership to
another conferee (SATURN EPABX extension only):
1. Inform the desired conferee that you are releasing
from the conference, and that conference mastership can be gained by hookswitch flashing
(depressing the Xfer Conf button, if available) or
momentarily depressing the hookswitch after you
hang up.
2. Hang up.
NOTE: The first conferee to hookflash now becomes the
conference master.
When all parties in the conference hang up, the conference
circuit is released.
6-2 (2 pages)
Page 53

SATURN EPABX
A30808-X5051-C150-i-B919
JR-DYAD User Instructions
Issue 1, June 1985
SECTION 7.00 CALL FORWARDING FEATURES
7.01 Call Forwarding - All Calls. This feature allows you to
have all calls terminating at your JR-DYAD forwarded to
another extension or to the attendant.
Activation/deactivation of Call Forwarding - All Calls over the
prime line:
a. To forward all incoming calls:
1. Do not pick up the handset.
2. Depress the y: I feature button.
l
Dial tone is heard over the JR-DYAD speaker.
3. Dial the extension number to which you want all
your calls forwarded.
l
Confirmation tone is heard over the speaker.
l
FWD ALL lamp lights steadily.
NOTE: If intercept tone or reorder tone is heard, your call
forwarding request was not granted.
As a reminder that call forwarding is in effect, each time a
call is forwarded, one short burst of alerting tone is heard from
your JR-DYAD.
The party at the forwarded-to extension is allowed to call your
extension without being forwarded. Further, the party at the
forwarded-to extension may transfer a call back to your extension or leave a message waiting indication (if message
waiting capability is provided).
You may continue to originate calls while Call Forwarding -
All Calls is in effect. Automatic callbacks from the activation
of features such as Internal Call Queuing - Callback and Out-
going Call Queuing - Callback, and station recalls are not
forwarded.
b. To cancel Call Forwarding - All Calls: Depress the
FVVD
I
ALL
feature button.
l
FWD ALL lamp extinguishes.
Activation/deactivation of Call Forwarding -All Calls over any
line appearing on the JR-DYAD (if allowed by class of service).
a. To forward all incoming calls:
Select and depress the appropriate line pickup
button.
l
Line pickup button lamp lights steadily.
Pick up the handset.
l
Dial tone is heard.
Depress the
FWD
El
ALL
feature button or dial the
Call Forwarding - All Calls activation code.
Dial the extension number to which you want all
your calls forwarded.
l
Confirmation tone is heard indicating that the
Call Forwarding - All Calls feature is active.
NOTE: If. intercept tone or reorder tone is heard, your call
forwarding request was not granted.
5. Hang up.
As a reminder that call forwarding is in effect, each time a
call is forwarded, one short burst of alerting tone is heard from
your JR-DYAD (prime line only).
The party at the forwarded-to extension is allowed to call your
extension without being forwarded. Further, the party at the
forwarded-to extension may transfer a call back to your extension or leave a message waiting indication (if message
waiting capability is provided).
You may continue to originate calls while Call Forwarding All Calls is in effect. Automatic callbacks from the activation
of features such as Internal Call Queuing - Callback and Outgoing Call Queuing - Callback, and station recalls are not
forwarded.
b. To cancel Call Forwarding - All Calls:
1. Select and depress the line pickup button from
which Call Forwarding
l
Line pickup button
2. Pick up the handset.
l
Dial tone is heard.
- All Calls was activated.
lamp lights steadily.
3. Dial the call forwarding cancellation code.
l
Confirmation tone is heard indicating that the
Call Forwarding - All Calls feature has been
cancelled.
4. Hang up.
7.02 Call Forwarding to Public Network. This feature allows
you to have all calls terminating at your JR-DYAD forwarded
to an outside destination number.
a. To forward all calls:
Select and depress the appropriate line pickup
button.
l
Line pickup button lamp lights steadily.
Pick up the handset.
l
Dial tone is heard.
Dial the Call Forwarding to Public Network activation code.
Dial the trunk group access code (e.g. “9” for out-
side) and the outside number (e.g. 9948800).
l
After a short pause (approximately five seconds), confirmation tone is heard indicating
that the Call Forwarding to Public Network feature is active.
7-l
Page 54

SATURN EPABX
JR-DYAD User Instructions
NOTES: You may expedite receiving confirmation tone by
depressing the # key immediately after dialing the
last digit of the outside number.
If intercept tone or reorder tone is heard, your call
forwarding request was not granted.
5. Hang up.
As a reminder that call forwarding is in effect, each time a
call is forwarded, one short burst of alerting tone is heard from
your JR-DYAD.
You may continue to originate calls while Call Forwarding to
Public Network is in effect. Automatic callbacks from the activation of features such as Internal Call Queuing - Callback
and Outgoing Call Queuing - Callback, and station recalls
are not forwarded.
b. To cancel Call Forwarding to Public Network:
1. Select and depress the line pickup button from
which Call Forwarding to Public Network was ac-
tivated.
l
Line pickup button lamp lights steadily.
2. Pick up the handset.
l
Dial tone is heard.
3. Dial the call forwarding cancellation code.
l
Confirmation tone is heard indicating that the
Call Forwarding to Public Network feature has
been cancelled.
4. Hang up.
7.03 Call Forwarding - Busy Lines. This feature allows you
to have all calls terminating at your JR-DYAD forwarded to
another extension or to the attendant when your extension
is busy. When your JR-DYAD is idle, incoming calls are com-
pleted as usual.
Activation/deactivation of Call Forwarding - Busy Lines over
the prime line:
a. To forward incoming calls:
Do not pick up the handset.
Depress the FWD
I
BUSY
feature button.
l
Dial tone is heard over the speaker.
Dial the extension number to which you want your
calls forwarded.
l
Confirmation tone is heard over the speaker.
l
FWD BUSY lamp lights steadily.
NOTE: If intercept tone or reorder tone is heard, your call
forwarding request was not granted.
When Call Forwarding - Busy Lines is in effect incoming calls
will not wait (via Internal Call Queuing - Standby and Inter-
nal Call Queuing Callback) on your prime line. If the
forwarded-to telephone is busy, forwarded calls will wait at
the forwarded-to telephone.
A30808-X5051-C150-l-B919
Issue 1, June 1985
b. To cancel Call Forwarding - Busy Lines: Depress
the
feature button
l
FWD BUSY lamp extinguishes.
Activation/deactivation of Call Forwarding - Busy Lines over
any line appearing on the JR-DYAD (if allowed by class of
service):
a. To forward incoming calls:
Select and depress the appropriate line pickup
button.
l
Line pickup button lamp lights steadily.
Pick up the handset.
l
Dial tone is heard.
Depress the feature button or dial the
Call Forwarding - Busy Lines activation code.
Dial the extension number to which you want your
calls forwarded.
l
Confirmation tone is heard indicating that the
Call Forwarding - Busy Lines feature is active.
NOTE:
If intercept tone or reorder tone is heard, your call
forwarding request was not granted.
5. Hang up.
When Call Forwarding - Busy Lines is in effect, incoming calls
will not wait (via Internal Call Queuing - Standby and Internal Call Queuing Callback) on the associated line. If the
forwarded-to telephone is busy, forwarded calls will wait at
the forwarded-to telephone.
b. To cancel Call Forwarding - Busy Lines:
1. Select and depress the line pickup button from
which Call Forwarding - Busy Lines was activated.
l
Line pickup button lamp lights steadily.
2. Pick up the handset.
l
Dial tone is heard.
3. Dial the call forwarding cancellation code.
l
Confirmation tone is heard indicating the Call
Forwarding - Busy Lines feature has been can-
celled.
4. Hang up.
7.04 Call Forwarding - No Answer. This feature allows you
to have all calls terminating at your JR-DYAD that are not answered within a predetermined period of time (three rings,
nominal), forwarded to another telephone or to the attendant.
When your JR-DYAD is busy, call forwarding does not occur
and the usual station hunting, call waiting, and automatic callback arrangements (if assigned) are applied.
Activation/deactivation of Call Forwarding - No Answer over
the prime line.
7-2
Page 55

A30808-X5051-C150-l-B919
Issue 1. June 1985
SATURN EPABX
JR-DYAD User Instructions
a. To forward incoming unanswered calls:
1.
2.
3.
Do not pick up the handset.
Depress the N& feature button.
cl
l
Dial tone is heard over the speaker.
Dial the extension number to which you want your
calls forwarded.
l
Confirmation tone is heard over the speaker.
l
FWD NO ANS lamp lights steadily.
NOTE: If intercept tone or reorder tone is heard, your call
forwarding request was not granted.
You may continue to originate calls while the Call Forwarding - No Answer feature is in effect. Automatic callbacks from
the activation of features such as Internal Call Queuing - Callback and Outgoing Call Queuing - Callback, and station
recalls are not forwarded.
b. To cancel Call Forwarding - No Answer: Depress
‘the I NyA\s feature button.
l
FWD NO ANS lamp extinguishes.
Activation/deactivation of Call Forwarding - No Answer over
any line appearing on the JR-DYAD (if allowed by class of
service).
a. To forward incoming unanswered calls over any line
appearing on your JR-DYAD:
1.
2.
3.
4.
NOTE:
5.
Select and depress the appropriate line pickup
button.
l
Line pickup button lamp lights steadily.
Pick up the handset.
l
Dial tone is heard.
Depress the &,PNs I feature button or dial the
Call Forwarding - No Answer activation code.
Dial the extension number to which you want your
unanswered calls forwarded.
l
Confirmation tone is heard indicating that the
Call Forwarding - No Answer feature is active.
If intercept tone or reorder tone is heard, your call
forwarding request was not granted.
Hang up.
You may continue to originate calls while Call Forwarding No Answer is in effect. Automatic callbacks from the activation of features such as Internal Call Queuing - Callback and
Outgoing Call Queuing - Callback, and station recalls are not
forwarded.
b. To cancel Call Forwarding - No Answer:
1. Select and depress the line pickup button from
which Call Forwarding - No Answer was activated.
l
Line pickup button lamp lights steadily.
2. Pick up the handset.
l
Dial tone is heard.
3. Dial the call forwarding cancellation code.
l
Confirmation tone is heard indicating that the
Call Forwarding - No Answer feature has been
cancelied.
4. Hang up.
7.05 Call Forwarding - Secretarial. This feature allows you
to have all calls terminating at your JR-DYAD forwarded to
another predetermined SATURN extension (assigned by data
base management).
Activation/deactivation of Call Forwarding - Secretarial over
the prime line:
a. To forward all incoming calls:
1. Do not pick up the handset.
2. Depress the
sl
rwDTo feature button
l
FWD TO lamp lights steadily.
As a reminder that call forwarding is in effect, each time a
call is forwarded, one short burst of alerting tone is heard from
your JR-DYAD.
The party at the forwarded-to extension is allowed to call your
extension without being forwarded. Further, the party at the
forwarded-to extension may transfer a call back to your extension or leave a message waiting indication (if message
waiting capability is provided).
You may continue to originate calls while Call Forwarding Secretarial is in effect. Automatic callbacks from the activa-
tion of features such as Internal Call Queuing - Callback and
Outgoing Call Queuing - Callback, and station recalls are not
forwarded.
b. To cancel Call Forwarding - Secretarial: Depress the
El
FWD To feature button.
l
FWD TO lamp extinguishes indicating that the Call
Forwarding - Secretarial feature has been cancelled.
Activation/deactivation of Call Forwarding - Secretarial over
any line appearing on the JR-DYAD (if allowed by class of
service):
a. To forward all incoming calls:
Select and depress the appropriate line pickup
button.
l
Line pickup button lamp lights steadily.
Pick up the handset.
l
Dial tone is heard.
Depress the
El
FWDTo feature button or dial the
Call Forwarding - Secretarial activation code.
7-3
Page 56

SATURN EPABX
JR-DYAD User Instructions
l
Confirmation tone is heard indicating that the
Call Forwarding - Secretarial feature is active.
NOTE:
If intercept tone or reorder tone is heard, your call
forwarding request was not granted.
5. Hang up.
As a reminder that call forwarding is in effect, each time a
call is forwarded, one short burst of alerting tone is heard from
your JR-DYAD.
The party at the forwarded-to extension is allowed to call your
extension without being forwarded. Further, the party at the
forwarded-to extension may transfer a call back to your extension or leave a message waiting indication (if message
waiting capability is provided).
You may continue to originate calls while Call Forwarding Secretarial is in effect. Automatic callbacks from the activation of features such as Internal Call Queuing - Callback and
Outgoing Call Queuing - Callback, and station recalls are not.
forwarded.
b. To cancel Call Forwarding - Secretarial:
1. Select and depress the line pickup button from
which Call Forwarding - Secretarial was activated.
l
Line pickup button lamp lights steadily.
2. Pick up the handset.
l
Dial tone is heard.
3. Dial the call forwarding cancellation code.
l
Confirmation tone is heard indicating that the
Call Forwarding - Secretarial feature has been
cancelled.
4. Hang up.
7.06 Call Forwarding -
Return. This feature allows you to
transfer a forwarded-call to the extension that activated call
forwarding.
To return a forwarded-call:
A30808-X5051-C150-l-0919
Issue 1, June 1985
a. First ask the connected party to wait.
b. Depress the
Xler
L---l
Conf
feature button.
l
Recall dial tone is heard.
c. Dial the Call Forwarding - Return access code.
.
NOTES:
Ringback tone is heard.
If busy tone is heard or the party does not answer,
depress the Xfer Conf button to return to the held
pa%
When an outside party requests to be transferred
to an extension and the extension is busy,.you may
invoke the Internal Call Queuing - Standby feature.
This feature allows you to camp-on to the busy extension and wait for the party to answer.
If you desire to transfer the call before the called
party answers (ringback tone must heard), hang up
the handset. The held party hears ringback tone and
waits for the called party to answer. If the party be-
ing transferred is an “outside” party and the called
party does not answer within a preset time the call
is automatically recalled to your JR-DYAD (three-
burst alerting tone is heard), if idle, otherwise to the
attendant. To answer/return to the held call, pick up
the handset.
d. When the party at the forwarding station answers, an-
nounce the transfer.
l
Ringback tone is removed.
e. Hang up.
l
The call is transferred to the called party.
7.07 Forced Call Forwarding. This feature allows you to forward a waiting or ringing call on your prime line extension
to another preassigned SATURN extension. Waiting or ringing calls on other lines appearing at your JR-DYAD cannot
be forwarded.
To forward a waiting or ringing call: Depress the
feature button.
7-4 (4 pages)
Page 57

SATURN EPABX
JR-DYAD User Instructions
SECTION 8.00 CALL QUEUING FEATURES
A30808-X5051-C150-l-B919
Issue 1, June 1985
8.01 Internal Call Queuing - Callback. This feature allows
you, upon dialing a busy extension number, to enter into a
queue, hang up, and be called back when the extension be-
comes available.
a. To establish an automatic callback condition:
1. You have dialed a busy extension and busy tone
is heard.
2. Do not hang up. Listen to busy tone until busy tone
changes to a steady low tone (approximately 5 seconds). Steady low tone is confirmation that you
have invoked callback queuing.
3. Hang up.
You may originate or receive other calls while waiting for the
callback; however, the callback sequence does not take place
until both your extension and the previously dialed extension
are idle at the same time.
Only one callback request (Internal or Outgoing Call Queu-
ing - Callback) is allowed at any one time. If a second callback is initiated, the original callback is automatically
cancelled.
4. When both the called extension and your extension become idle:
l
Three-burst alerting tone is heard.
NOTE: If you do not answer the callback attempt within ap-
proximately 18 seconds, callback queuing is automatically cancelled.
5. Pick up the handset.
l
Ringback tone is heard.
l
Called extension rings.
6. When the called party answers, you may begin to
talk.
b. To cancel an automatic callback:
1. Pick up the handset.
l
Dial tone is heard.
2. Dial the automatic callback cancellation code.
l
Confirmation tone is heard, indicating the cancellation of the callback.
3. Hang up.
8.02 Internal Call Queuing - Standby. This feature allows
you, upon dialing a busy extension, to enter into a queue and
wait for the called party to answer. While in the standby queue,
you hear special ringback tone and the called party hears call
waiting tone.
a. To establish a standby queuing condition:
1. You have dialed a busy extension and busy or special ringback tone is heard.
NOTE:
2.
NOTE:
3.
4.
NOTE:
5.
On some telephones, Internal Call Queuing - Standby is activated on an automatic originating or auto-
matic terminating basis. If your JR-DYAD is assigned
the automatic originating option or the called party’s
telephone is assigned the automatic terminating option, ignore.the remainder of this procedure. When
special ringback tone is heard simply wait for the
called party to answer.
Do not hang up. Listen to busy tone until it changes
to a steady low kone (approximately 5 seconds).
Steady low tone is confirmation that callback queu-
ing can be invoked, if desired, by hanging up. Refer
to the feature, “Internal Call Queuing Callback.”
Again, do not hang up. Wait until steady low tone
changes to special ringback tone (approximately
5 seconds more). This is confirmation that you have
been placed in the standby queuing mode.
l
The called party hears ‘call waiting tone.
Wait until the called party answers the waiting call.
You may convert from standby queuing to callback
queuing, any time, by hanging up. Refer to the feature, “Internal Call Queuing - Callback.”
When the called party answers, you may begin to
talk.
8.03 Outgoing Call Queuing - Callback. This feature allows
you, upon dialing a busy outgoing trunk group, to enter into
a queue, hang up, and be called back when a trunk becomes
available.
This feature applies to direct trunk group access only. For
Least Cost Routing (LCR) access, refer to the feature, “Least
Cost Routing.”
a. To activate Outgoing Call Queuing - Callback:
1.
You have dialed a trunk group access code (e.g.,
“9’: “82’: “83’: etc.) and encountered busy tone.
2. Do not hang up. Listen to busy tone until you hear
steady low tone (approximately 5 seconds). Steady
low tone is confirmation that you have invoked call-
back queuing.
3. Hang up.
You can originate or receive calls while callback queuing is
active. When a trunk becomes available and your JR-DYAD
is idle, a callback is attempted.
Only one callback request (Internal or Outgoing Call Queu-
ing - Callback) is allowed at any one time. If a second automatic callback is initiated, the original callback is automatically
cancelled.
4. When a trunk becomes available:
l
Three-burst alerting tone is heard.
8-l
Page 58

SATURN EPABX
A30808-X5051-C150-l-B919
JR-DYAD User Instructions
Issue 1, June 1985
NOTE:
If you do not answer the callback attempt within approximately 18 seconds, callback queuing is automatically cancelled.
5. Pick up the handset.
l
Dial tone is heard.
6. Complete dialing the desired number (do not redial the trunk group access code).
b. To cancel an automatic callback:
1. Pick up the handset.
l
Dial tone is heard.
2. Dial the automatic callback cancellation code.
l
Confirmation tone is heard, indicating the cancellation of the callback.
3. Hang up.
8.04 Outgoing Call Queuing - Standby. This feature allows
you, upon dialing a busy outgoing trunk group, to enter into
a queue and wait for a trunk to become available.
This feature applies to direct trunk group access only. For
Least Cost Routing (LCR) access, refer to the feature, “Least
Cost Routing.”
a. To activate Outgoing Call Queuing - Standby:
1. You have dialed a trunk group access code (e.g.,
“9’: “82’: “83”, etc.) and encountered busy tone.
2. Do not hang up. Listen to busy tone until you hear
NOTE:
3.
4.
NOTE:
5.
steady low-tone (approximately 5 seconds).
Steady low tone is confirmation that callback queuing can be invoked, if desired, by hanging up. Refer
to the feature, “Outgoing Call Queuing Callback.”
Again, do not hang up. Wait until steady low tone
changes to silence, or music if provided (approxi-
mately 5 seconds more). This is confirmation that
Eid;ave been placed in the standby queuing
Continue to listen to silence (or music) until a trunk
becomes available.
l
Dial tone is heard when a trunk becomes
available.
You may convert from standby queuing to callback
queuing, any time, by hanging up. Refer to the feature, “Outgoing Call Queuing - Callback.”
Upon hearing dial tone, complete dialing the
desired number (do not redial the trunk group access code).
8-2 (2 pages)
Page 59

SATURN EPABX
JR-DYAD User Instructions
SECTION 9.00 CALL PICKUP -FEATURES
A30808-X5051-C150-l-B919
issue 1, June 1985
9.01 Call Pickup - Directed. This feature allows you to answer an incoming call that is ringing at another telephone.
a. To answer a call ringing at another telephone:
1. Select and depress the appropriate line pickup
button.
3.
-4.
l
Line pickup button lights steadily.
2. Pick up the handset.
l
Dial tone is heard. 5.
Depress the
C.all Pickup - Directed feature access code.
Dial the extension number of the telephone that
is ringing.
l
Ringing ceases at the other telephone and you
are automatically connected to the incoming
call.
You may begin to-talk.
9-1 (9-2 blank)
Page 60

SATURN EPABX
JR-DYAD User Instructions
SECTION 10.00 DIRECT ACCESS FEATURES
A30808-X5051-C150-l-B919
Issue 1. June 1985
10.01 Direct Station Selection. The Direct Station Selection
(DSS) feature allows you to place a call to a party at a
predesignated SATURN extension by depressing a dedicated feature button instead of dialing the party’s extension
number.
a. To place a DSS call:
1. Determine if the extension to be called is idle (a
lighted DSS lamp indicates the extension is busy
and a dark lamp indicates the extension is idle).
2. Select and depress a line pickup button.
l
Line pickup lamp lights steadily.
3. Pick up the handset.
l
Dial tone is heard.
4. Depress the appropriate DSS feature button.
l
Ringback tone is heard.
l
The DSS lamp flashes.
5. When the called party answers, you may begin to
talk.
10.02 Direct Trunk Group Selection.This feature allows you
to access an idle trunk in a designated trunk group by
depressing a Direct Trunk Group Selection pickup button. The
busy/idle status of the trunk group is indicated by the lamp
associated with the pickup button. No incoming calls can terminate on this pickup button.
a. To establish an outside call:
1. Determine if a trunk is available in the trunk group
associated with the type of outside call to be dialed (e.g., Central Office, Florida WATS, National
WATS, etc.). The busy/idle status of the trunk group
is as follows:
(a) Direct Trunk Group Selection lamp dark - At
least one trunk is idle in the trunk group.
(b) Direct Trunk Group Selection lamp lighted - All
trunks in the trunk group are busy.
2. If a trunk is available, depress the associated Direct
Trunk Group Selection pickup button.
l
The associated Direct Trunk Group Selection
lamp momentarily lights steadily and remains
lighted if all trunks in the trunk group are busy.
NOTE:
If other station instruments are provided with the
same Direct Trunk Group Selection button, the associated lamp on their telephone remains dark unless that was the last idle trunk in the trunk group.
3. Pick up the handset.
l
Dial tone is heard.
4. Dial the desired number.
10.03 Direct Trunk Selection. This feature allows you to
originate or receive calls over a specific trunk by depressing
a pickup button on your JR-DYAD. The busy/idle status of the
trunk is indicated by the lamp associated with the pickup
button.
a. To establish an outside call:
1. Determine if the trunk is busy or idle. The busy/idle
status of the desired trunk is as follows:
(a) Direct Trunk Selection lamp dark -Trunk is idle.
(b) Direct Trunk Selection lamp lighted - Trunk is
busy.
2. If the trunk is idle, depress the associated Direct
Trunk Selection pickup button.
l
Direct Trunk Selection lamp lights steadily.
NOTE: If other station instruments are provided with the
same Direct Trunk Selection button, the associated lamp on their telephone remains dark unless that
was the last idle trunk in the trunk group.
3. Pick up the handset.
l
Dial tone is heard.
4. Dial the desired outside number.
b. To answer an incoming call:
1. The Direct Trunk Selection lamp flashes and your
JR-DYAD provides call alerting tone.
2. Depress the associated Direct Trunk Selection pickup button.
l
The Direct Trunk Selection lamp lights steadily.
3. Pick up the handset.
4. You may begin to talk.
10.04 Station-Defined Direct Dial. This feature allows you
to depress a dedicated feature button and have the SATURN
System automatically dial the telephone number (inside or
outside number) assigned to that button. One or more of these
feature buttons may be assigned to your JR-DYAD. Each button is assigned to a telephone number in SATURN EPABX
memory.
On some JR-DYADs, the destination number may be changed
by using the Speed Calling - Individual feature. At these stations, the destination number is indexed to one of the speed
calling codes (O-9). To change the destination number associated with the speed calling code, refer to the operating
instructions of the Speed Calling - Individual feature.
a. To initiate a call to the stored number:
1. Select and depress the appropriate line pickup
button.
10-l
Page 61

SATURN EPABX
JR-DYAD User Instructions
. The associated line pickup lamp lights steadily.
2. Pick up the handset.
l Dial tone is heard.
A30808-X5051-C150-l-B919
issue 1, June 1985
3. Depress the
DIAL
I
feature button.
l Ringback tone is heard.
4. When the called party answers, you may start talking.
10-2 (2 pages)
Page 62

SATURN EPABX
JR-DYAD User Instructions
SECTION 11.00 INTERCOM FEATURES
11.01 Automatic Intercom. This feature allows you to place
an intercom call to another predetermined JR-DYAD or DYAD.
This feature overrides the Do Not Disturb feature and Call Forwarding features, if active at the called JR-DYAD.
a. To place an Automatic Intercom call:
1. Depress the
ICOM
I.
pickup button.
l
The ICOM lamp lights steadily.
2. Pick up the handset.
l
Ringback tone is heard.
3. When the called party answers, you may begin to
talk.
b. To answer an Automatic Intercom call:
1. Your ICOM lamp flashes and you receive three-
burst alerting tone.
2. Depress the
ICOM
I
pickup button.
l
The ICOM lamp lights steadily.
3. Pick up the handset.
l
Three-burst alerting tone ceases.
l
You are connected to the calling party.
4. You may begin to talk.
11.02 Executive Intercom. This feature allows you to place
a call to another JR-DYAD within a prearranged executive in-
A30808-X5051-C150-i-B919
Issue 1, June 1985
tercom group. This feature overrides the Do Not Disturb feature and Call Forwarding features, if active at the called
JR-DYAD.
a. To place an Executive Intercom call:
Depress the s,AFy pickup button.
‘I
l
The ICOM DIAL lamp lights steadily.
Pick up the handset.
l
Dial tone is heard.
Dial the single-digit code that corresponds to the
desired party.
l
Ringback tone is heard.
When the called party answers, you may begin to
talk.
b. To answer an Executive Intercom call:
1. Your ICOM DIAL lamp flashes and you receive
three-burst alerting tone.
2. Depress the s,dfT pickup button.
I
l
The ICOM lamp lights steadily.
3. Pick up the handset.
l
Three-burst alerting tone ceases.
l
You are connected to the calling party.
4. You may begin to talk.
11-l (11-2 blank)
Page 63

SATURN EPABX
JR-DYAD User Instructions
SECTION 12.00 PRIVACY FEATURES
A30808-X5051-C150-l-B919
Issue 1, June 1985
12.01 Executive Override. This feature allows you, upon encountering busy tone, to enter into the existing conversation
for the intended purpose of announcing a high priority or
emergency call. Before the override occurs, a warning tone
is heard by the two conversing parties, alerting them of the
impending override.
a. To override a busy call using the Executive Override
feature button:
1. While listening to busy tone, depress the
OVER
I
RIDE
feature button.
l
Executive Override tone is heard, followed by
the connection to the existing conversation.
l
OVER RIDE lamp lights steadily.
2. You may begin to talk.
NOTE: The Busy Override injection tone is heard repeat-
edly every 8 to 20 seconds after overriding a call
in progress.
b. To override a busy call using the Executive Override
feature access code:
1. While listening to busy tone, or special ringback
tone, depress the
Xler
El
Conf
feature button.
l
Recall dial tone is heard.
2. Dial the Executive Override feature access code.
l
Executive Override tone is heard, followed by
the connection to the existing conversation.
NOTE: Reorder tone is heard if the connection is denied
(e.g, the telephone is assigned Data Line Security
or Executive Override Security.
3. You may begin to talk.
NOTE: The Busy Override injection tone is heard repeat-
edly every 8 to 20 seconds after overriding a call
in progress.
12.02 Executive Override - Automatic. This feature allows
you to camp-on to a busy extension and automatically break
into the existing conversation if the called party does not answer your waiting call within a predetermined period of time.
a. To activate Executive Override - Automatic:
1. While listening to busy tone or special ringback
tone, wait for the called party to answer.
2. If the called party does not answer your waiting call
within a predetermined time, the override occurs
automatically.
l
Executive Override tone is heard followed by
the connection to the existing conversation.
3. You may begin to talk.
NOTE: The Busy Override injection tone is heard repeat-
edly every 8 to 20 seconds after overriding a call
in progress.
12.03 Do Not Disturb. This feature allows you to make your
JR-DYAD busy to all incoming calls whenever you desire not
to be disturbed.
Activation of Do Not Disturb by using the DND feature button
will “busy out” your prime line extension only. For all nonprime lines appearing on your;lR-DYAD, incoming calls will
cause the lamp of the associated line pickup button to flash;
however, alerting tone will be inhibited.
Activation of Do Not Disturb can be performed on any line
appearing at your JR-DYAD (including your prime line) by di-
aling the Do Not Disturb feature activation code, if allowed
by the line’s class of service.
To activate Do Not Disturb using the DND feature button:
a. To make your JR-DYAD busy to incoming calls:
Depress the II feature button. (The button
may be depressed while you’re busy on a call or
when the JR-DYAD is idle.)
l
DND lamp lights steadily indicating that the Do
Not Disturb feature is activated.
Hang up, if off-hook.
You can originate calls while Do Not Disturb is in effect;
however, other calls cannot wait on the associated line. Intercom calls are not affected by activation of the feature. Messages may also wait at your JR-DYAD.
Each time you pick up the handset, recall dial tone is heard
as a reminder that your JR-DYAD has Do Not Disturb ac-
tivated.
b. To reestablish normal operation of your JR-DYAD:
1. Depress the DND I feature button. (The
button
may be depressed while you’re busy on a call or
when the JR-DYAD is idle.)
l
DND lamp extinguishes indicating that the Do
Not Disturb feature is deactivated.
2. Hang up, if off-hook.
To activate Do Not Disturb using the Do Not Disturb feature
access code:
a. To make your JR-DYAD busy to incoming calls:
1. Select and depress the appropriate line pickup
button.
l
Line pickup button lamp lights steadily.
2. Pick up the handset.
12-1
Page 64

SATURN EPABX
JR-DYAD User Instructions
l
Dial tone is heard.
3. Dial the Do Not Disturb feature activation code.
l
Confirmation tone is heard.
l
Your JR-DYAD is now made busy to incoming
calls on the prime line only. Audible tone alert-
ing will be inhibited on all other lines appearing on your JR-DYAD.
4. Hang up.
You can originate calls while Do Not Disturb is in effect;
however, other calls cannot wait on the associated line. Intercom calls are not affected by activation of the feature. Messages may also wait at your JR-DYAD.
Each time you pick up the handset, recall dial tone is heard
as a reminder that your JR-DYAD has Do Not Disturb activated.
b. To reestablish normal operation of your JR-DYAD:
1. Pick up the handset.
l
Recall dial tone is heard indicating Do Not Dis-
turb is in effect.
2. Dial the Do Not Disturb cancellation .code.
l
Confirmation tone is heard indicating cancel-
lation of the Do Not Disturb feature.
3. Hang up.
12.04 Call Privacy. Activation of the Call Privacy feature on
a specific line prevents all other parties from bridging on that
line. This feature may be assigned to your JR-DYAD on an
automatic activating and manual activating basis. If your JRDYAD is assigned the automatic activating option, each time
you receive or place a call, Call Privacy is automatically activated.
For JR-DYADs assigned the automatic activation option:
a. To deactivate Call Privacy:
While in an established conversation, depress the
I
PRIV feature button.
l
PRIV lamp extinguishes indicating Call Privacy is
deactivated. (The PRIV lamp remains extinguished
A30808-X5051-C150-l-B919
Issue 1, June 1985
until the call is disconnected.)
A third party can now bridge on the line by depressing the associated line pickup button.
Call Privacy may be reactivated by depressing the
I
PRIV
feature button.
For JR-DYADs assigned the manual activation option:
a.
NOTE:
To activate Call Privacy:
Depress the
I
PRIV feature button. (The button can
be depressed while you’re busy on a call or’when the
JR-DYAD is idle.)
PRIV lamp lights steadily, indicating Call Privacy
is active.
Any party attempting to bridge on the line receives
busy tone. If a party has already bridged on the line,
the bridged party is disconnected from the call and
busy tone is heard.
b. To deactivate Call Privacy:
Depress the
I
PRIV
feature button. (The button can
be depressed while you’re busy on a call or when the
JR-DYAD is idle.)
l
PRIV lamp extinguishes, indicating Call Privacy is
deactivated.
12.05 Station Ringer Cutoff. This feature allows you to disable the audible alerting device in your JR-DYAD. When disabled, the only indication that you receive of an alerting call
is the pickup button’s flashing lamp.
a. To disable the audible alert tone:
feature button, at any time.
l
RINGER OFF lamp lights steadily.
b. To enable the audible alert tone:
feature button, at any time.
l
RINGER OFF lamp extinguishes.
12-2 (2 pages)
Page 65

SATURN EPABX A30808-X5051-C150-l-B919
JR-DYAD User Instructions Issue 1. June 1985
SECTION 13.00 SPEED CALLING FEATURES
13.01 Saved Number Redial. This feature allows you to store,
into system memory, a telephone number that you have just
dialed by depressing a feature button and have this number
automatically redialed at a later time by depressing the same
feature button. Only one number can be stored at a time from
your JR-DYAD.
NOTES: After dialing the telephone number, you can expe-
dite receiving confirmation tone by depressing the
# key.
The destination may be a number that requires sup-
plemental dialing.
a. To store a number:
5. Hang up.
Upon dialing a do-not-answer (ringback tone is heard)
or busy (busy tone is heard) number, or while estab-
lished in conversation with a called party, depress the
SAVE
I
feature button to store the just-dialed
NO
number.
l
SAVE NO lamp lights steadily.
l
After you hang up, the SAVE NO lamp extinguishes; however, the number is stored in memory.
b. To place a Speed Call:
1. Select and depress the appropriate line pickup
button.
l
The associated line pickup lamp lights steadily.
2. Pick up the handset.
l
Dial tone is heard.
NOTE: The number is saved regardless of whether the
called party answers or is busy.
b. To initiate a call to the party associated with the stored
number:
3. Depress the I ‘rikD feature button or dial the
Speed Calling - Individual feature access code.
l
SPEED IND lamp lights steadily.
1. Select and depress the appropriate line pickup
4.
button.
Dial the one-digit speed calling code corresponding to the desired telephone destination number.
l
SPEED IND lamp extinguishes.
l
The associated line pickup lamp lights steadily.
2. Pick up the handset.
l
Dial tone is heard.
5. When the called party answers, you may begin to
talk.
SAVE
3. Depress the NO I feature button.
l
SAVE NO lamp lights steadily during system dialing, then extinguishes.
l
Ringback tone is heard.
13.03 Speed Calling - Group. This feature allows you to place
speed calls to frequently-called destinations. The destination
numbers (normally outside telephone numbers) are stored in
SATURN EPABX memory, along with a two-digit code associated with each number. These codes are normally listed
in your company’s telephone directory.
4. When the called party answers, you may begin to
talk.
.a. To place a speed call:
1. Select and depress the appropriate line pickup
button.
13.02 Speed Calling - Individual. This feature allows you
to establish a personal speed call list of up to IO frequentlycalled telephone numbers. Each number (up to a maximum
of 18 digits. and internal or external to the SATURN System)
is assicmed a one-digit code (0 to 9) and programmed into
2.
l
The associated line pickup lamp lights steadily.
Pick up the handset.
SATURN
a. To
1.
memory from your telephone.
. Dial tone is heard.
store or change speed calling numbers:
Pick up the handset.
3. feature button or dial the
Speed Calling - Group feature access code.
2.
3.
4.
l
Dial tone is heard.
Dial the Speed Calling store/change code.
Dial the Speed Call code (0 to 9) for the number
to be stored or changed.
NOTE:
l
SPEED GRP lamp lights steadily.
in SATURN Systems using only one speed calling
group, the SPEED SYSTEM feature button is used.
4.
Dial the desired telephone number corresponding
to the speed calling code. Be sure to enter the com-
plete number including any prefix digits (e.g.,
9-l-800-342-8300).
Dial the two-digit code corresponding to the desired
telephone number.
l
SPEED GRP lamp extinguishes after system
dialing.
l
Ringback tone is heard.
l
Confirmation tone is heard.
5. When the called party answers, you may begin to talk.
13-l 113-2 blank)
Page 66

SATURN EPABX
JR-DYAD User instructions
SECTION 14.00 ADDITIONAL FEATURES
A30808-X5051-C150-l-B919
issue 1, June 1985
14.01 Least Cost Routing. The Least Cost Routing (LCR) fea-
ture is used in some SATURN EPABX Systems to route out-
going (trunk) calls over the least costly route available at the
time of call placement.
a. To place an outside call:
1. Select and depress the appropriate line pickup
button.
l
Line pickup button lamp lights steadily.
2. Pick up the handset.
l
Dial tone is heard.
3. Dial the LCR access code. (Optional for some
systems.)
l
Dial tone is heard.
4. Dial the outside destination number.
l
Confirmation tone (three bursts of tone) is
heard, indicating that the dialed number has
been accepted and a route has been found.
l
The SATURN System then dials the destination number. Ringback tone is heard if the destination number is idle. Busy tone is heard if
the destination number is busy.
NOTES: If route advance tone (one short burst of tone) is
heard immediately after dialing the destination num-
ber, wait until you hear confirmation tone. Route advance tone indicates that the SATURN System has
accepted the dialed number and is searching for an
idle route. Additional route advance tones may be
heard as the SATURN System searches for alter-
nate routes to your destination.
If expensive facility tone (one long burst of tone) is
heard, the SATURN System has found a more expensive route. If you desire not to place the call via
a more expensive route, hang up.
If a route is not found within a preset period of time,
the SATURN System provides a steady burst of low
tone (if Callback Queuing is assigned) to indicate
that Callback Queuing has been invoked. Callback
Queuing allows you to hang up and be called back
(three bursts of alerting tone is heard) when a route
becomes available.
To answer the callback, pick up the handset, listen
for confirmation tone followed by ringback tone.
When the called party answers, you may begin to
talk.
If you do not answer the callback attempt within approximately 18 seconds, the callback is temporarily cancelled. Additional callbacks (maximum of nine)
will be attempted by the system every five minutes.
5. When the called party answers, you may begin to
talk.
b. To cancel callback queuing:
1. Pick up the handset.
l
Dial tone is heard.
2. Dial the automatic callback cancellation code.
l
Confirmation tone is heard indicating the cancellation of the callback.
3. Hang up. _
14.02 SMDR Account Codes. Account codes are used with
Station Message Detail Recording (SMDR) or preselected incoming and outgoing trunk calls. Two types of account codes
are used: standard (or default) account codes and special account codes. Default account codes are assigned to stations
and trunks and are automatically activated when you originate
or receive a call over one of these groups. Special account
codes must be entered from your telephone to complete an
otherwise restricted outgoing call.
a. After dialing a trunk access code (e.g., “9” for outside)
or an LCR access code, if you hear recall dial tone,
enter a valid account code.
l
Dial tone is heard.
NOTE: The account code must be entered within a preset
period of time or else the trunk is released and reorder tone is heard.
b. Complete the call by dialing the desired destination
number. (Do not redial the trunk.)
14.03 I-Use Indication. For JR-DYADs provided with multi-
ple lines, this feature is useful in determining which line the
user is presently using when other lines and features are in
use.
To activate, depress the
I
I-USE feature button.
l
All button lamps momentarily go dark for ap-
proximately
1%
seconds with the exception of
the lamp corresponding to the line which you
are using.
14.04 Call Tracing. This feature allows you to have a connected call’s data recorded on the SMDR printer. The SMDR
printer prints out the calling party’s extension number (if an
internal call) or the incoming trunk and trunk group number
(if an external call), the called number, the date and time of
the call, and a special character on the SMDR report that the
call was traced.
a. To trace a call:
1. While connected to a call, depress the
Xler
button.
I
Coof
l
Recall dial tone is heard.
l
The call is placed on Consultation Hold.
2. Dial the Call Tracing feature access code.
14-l
Page 67

SATURN EPABX
JR-DYAD User instructions
A30808-X5051-C150-l-B919
Issue 1, June 1985
l Confirmation tone is heard indicating the call’s
data has been recorded.
l You are automatically reconnected to the call.
NOTE:
Reorder tone is heard if your phone is not allowed
to activate this feature.
3. Hang up or continue talking to the other party.
14.05 Message Waiting. This feature allows you to send a
message waiting indication to a party at another extension.
This feature also provides a means for you to respond to a
received message or cancel a sent message.
a. To activate Message Waiting after dialing a do-not-
answer or busy extension:
1.
NOTES:
2.
While listening to ringback tone or busy tone,
depress the
MSG
El
SET
feature button or depress the
xfer
I
button and dial the message set activation
calf
code.
l MSG SET lamp lights momentarily, then extin-
guishes.
l Confirmation tone is heard.
l Message waiting indication is provided at the
called telephone.
If the called telephone is unable to accept any more
messages (maximum of four), busy tone is heard.
If the called telephone does not have the capability
to receive message waiting indications, reorder tone
is heard.
Hang up.
b. To activate Message Waiting without first attempting to
call the other party:
1. Select and depress the appropriate line pickup
button.
l Line pickup lamp lights steadily.
2. Pick up the handset.
l Dial tone is heard.
MSG
3. Depress the sET
I
feature button or dial the
message waiting activation code.
l MSG SET lamp lights steadily.
4. Dial the extension number of the party to whom you
wish to leave a message waiting indication.
l Confirmation tone is heard.
NOTES:
If the called telephone is unable to accept any more
messages (maximum of four), busy tone is heard.
If the called telephone does not have the capability
to receive message waiting indications, reorder tone
is heard.
5. Hang up.
l MSG SET lamp extinguishes.
. .
c. To respond to a message waiting at your JR-DYAD:
The MSG CALL BK lamp flashes.
Select and depress the prime line pickup button.
l -Line pickup lamp lights steadily.
Pick up the handset.
l Dial tone is heard.
Depress the $fr& I feature button or dial the
Message Waiting - Automatic Callback access code.
l The SATURN System automatically dials the ex-
tension number of the party that sent the
message.
l Ringback tone is heard.
NOTE: If busy tone is heard, the extension is busy; try initiat-
ing the callback at a later time.
d. To cancel a message you sent to another telephone:
Select and depress the appropriate line pickup
button.
l Line pickup button lamp lights steadily.
Pick up the handset.
l Dial tone is heard.
Dial the Message Waiting - Sent cancellation code,
or depress the ,$& feature button.
I
l MSG CANCEL lamp lights steadily.
Dial the extension number to which the message was
sent.
l MSG CANCEL lamp extinguishes.
l Confirmation tone is heard.
NOTE: Reorder tone is heard instead of confirmation tone if
an invalid access code is dialed or the message was
already cancelled at the called telephone.
5.. Hang up.
e. To cancel a message that is waiting at your JR-DYAD:
1. Depress the ,-$~-&
I
feature button or dial the
Message Waiting - Received cancellation code.
l MSG CALL BK lamp extinguishes if no other
messages exist.
14.06 Stop Hunt. This feature allows a sequential hunt group
to be temporarily reduced in size. This feature also allows a UCD
member to be temporarily removed from a UCD hunt group.
a. For sequential hunt groups.
1. To shorten the sequential hunt group:
14-2
Page 68

SATURN EPABX
JR-DYAD User Instructions
a) Dial the Stop Hunt activation code from the ex-
tension in the hunt group at which all succeeding extensions are to be excluded from the
hunting list. For example: if the hunt sequence
includes extensions 234-235-238-237-238-239
and you want to exclude extensions 238 and 239,
dial the Stop Hunt access code from extension
237.
l
Confirmation tone is heard indicating the successful activation of the Stop Hunt feature.
b) Hang up.
2. To return the hunt group to full size:
a) Dial the Stop Hunt Cancellation code from the
extension that activated Stop Hunt.
l
Confirmation tone is heard indicating the successful cancellation of the Stop Hunt feature.
b) Hang up.
b. For UCD hunt groups.
1. To remove a member from a UCD hunt group:
a) Dial the Stop Hunt activation code from the ex-
tension to be removed from the UCD hunt group.
l
Confirmation tone is heard indicating the successful activation of the Stop Hunt feature.
b) Hang up.
2. To add a member back to a UCD hunt group:
a) Dial the Stop Hunt Cancellation code from the
extension that was previously removed from the
hunt group.
l
Confirmation tone is heard indicating the successful cancellation of the Stop Hunt feature.
b) Hang up.
14.07 Mobile Authorization Codes. This feature allows you to
place a call from a telephone that otherwise would be restricted by its class of service. An authorization code, which is assigned to a class of service with its own restrictions, must be
dialed.
a. To override a call restriction:
1. Select and depress the appropriate line pickup
button.
l
Line pickup lamp lights steadily.
2. Pick up the handset.
l
Dial tone is heard.
3. Dial the mobile authorization access code.
4. Dial an authorization code.
l
Recall dial tone is heard indicating that the class
of service assigned to the dialed authorization
code is now in effect.
A30808-X5051-C150-l-8919
Issue 1. June 1985
NOTE:
Intercept tone is heard if an invalid authorization code
is dialed.
5. Place the call previously restricted.
NOTE: If you are still restricted from placing the call, the class
of. service assigned to the dialed authorization code
may not allow it.
After you have completed the call and hang up, the class of
service defined by the authorization code is removed and the
telephone’s original class of service is in effect.
14.08 Universal Night Answer - Zoned. This feature allows
you to answer incoming calls ringing the night bell(s) when the
SATURN EPABX System is in the night service mode.
a. To answer an incoming call:
1. You hear the night bell(s) ringing.
2. Select and depress the appropriate line pickup
button.
l
Line pickup lamp lights steadily.
3. Pick up the handset.
9 Dial tone is heard.
4. Depress the
I
UNA
feature button or dial the
appropriate Universal Night Answer access code.
l
A talking connection is established between you
and the incoming party.
NOTES: If reorder tone is heard, the night call already has been
answered. If intercept tone is heard, you are not allowed to answer incoming night calls from your
JR-DYAD.
In some SATURN Systems, multiple night answering
zones are provided. In these systems, depress the associated UNA ZONE feature button or dial the associated Universal Night Answering - Zoned access
code (1 to 4).
5. You may begin to talk.
14.09 Voice Paging Access - Zoned and Area. This feature
allows you to page another party over the loudspeaker system.
a. To page a party:
Select and depress the appropriate line pickup
button.
l
Line pickup lamp lights steadily.
Pick up the handset.
. Dial tone is heard.
Depress the
I
PAGE
feature button or dial the
associated Voice Paging access code.
NOTE:
In some SATURN Systems, multiple Voice Paging
zones are provided. In these systems, depress the associated PAGE ZONE feature button or dial the associated Universal Night Answer - Zoned access code
(1 to 4).
14-3
Page 69

SATURN EPABX
A30808-X5051-C150-l-B919
JR-DYAD User Instructions
Issue 1, June 1985
Table 14.00 Feature Access Codes and Button Labels
FEATURE
ACCESS CODE
BUTTON LABEL
HOLD FEATURES
-
Consultation Hold
.........................................
none
Call Hold
.................................................
Call Hold - Flip-Flop (Broker)
..................................
Call Park
.................................................
Manual Hold .............................................
none
Exclusive Hold
............................................
none
Xfer Conf
PARK PRIV
SPLIT
none
Hold
HOLD EXCEL
CALL TRANSFER FEATURES
CallTransfer ..............................................
none Xfer Conf
Call Transfer to Attendant ...................................
none
XFER “0”
CONFERENCE FEATURES
Add-On Conference ........................................
BridgeCall ...............................................
Meet-Me Conference
.......................................
Station Controlled Conference
To access conference
....................................
To remove any conferee.
..................................
To remove last conferee.
..................................
none
none
___
___
Xfer Conf
(Note 1)
MEET ME
none
none
none
CALL FORWARDING FEATURES
Call Forwarding - All Calls
To activate
.............................................
To cancel ..............................................
Call Forwarding to Public Network
To activate
.............................................
To cancel ..............................................
Call Forwarding - Busy Lines
To activate .............................................
To cancel ..............................................
Call Forwarding - No Answer
To activate .............................................
To cancel ..............................................
Call Forwarding - Secretarial
To activate .............................................
To cancel ..............................................
Call Forwarding - Return
...................................
Forced Call Forwarding
.....................................
____
___
___
none
FWD ALL
FWD ALL
none
none
FWD BUSY
FWD BUSY
FWD NO ANS
FWD NO ANS
FWDTC
FWDTO
none
FWD FORCE
Note 1: Activate by depressing the associated busy line pickup button.
14-4
Page 70

SATURN EPABX A30808-X5051-C150-l-B919
JR-DYAD User instructions
Issue 1, June 1985
.
Table 14.00 Feature Access Codes and Button Labels (Continued)
FEATURE
ACCESS CODE
BUTTON LABEL
9LL QUEUING FEATURES
Internal Call Queuing - Callback
To cancel callback
.......................................
Internal Call Queuing - Standby.
.............................
Outgoing Call Queuing - Callback
To cancel callback .......................................
Outgoing Call Queuing - Standby ............................
none
none _
none
none
none
none
9LL PICKUP FEATURES
Call Pickup - Directed. .....................................
PICKUP DIR
Call Pickup - Group .......................................
Group Pickup
1RECT ACCESS FEATURES
Direct Station Selection .....................................
Direct Trunk Group Selection. ................................
Direct Trunk Selection ......................................
Direct Destination Selection. ................................. none
(Note 2)
(Note 2)
(Note 2)
DIAL __
TERCOM FEATURES
Automatic Intercom ........................................ none
ICOM -
Executive Intercom ........................................ none ICOM DIAL -
3IVACY FEATURES
Executive Override .........................................
Executive Override - Automatic ..............................
Do Not Disturb
To activate .............................................
To cancel ..............................................
Call Privacy.. ............................................
Station Ringer Cutoff .......................................
none
none
none
OVER RIDE
none
DND
DND
PRIV
RINGER OFF
‘EED CALLING FEATURES
Last Number Redial
.......................................
Saved Number Redial ......................................
Speed Dialing
To store or change. ......................................
To place a Call. .........................................
none
none
none
none
Redial
SAVE NO.
Store
Speed Dial
lte 2: Customer-defined button label.
14-5
Page 71

SATURN EPABX
A30808-X5051-C150-l-B919
JR-DYAD User Instructions
Issue 1, June 1985
,
Table 14.00 Feature Access Codes and Button Labels (Continued)
FEATURE
ACCESS CODE BUTTON LABEL
SPEED CALLING FEATURES (Continued)
Speed Calling - Individual
To store or change
.......................................
To place a call ..........................................
Speed Calling - Group
Group1 ...............................................
Group2.. .............................................
Group3
..................................................
Group 4.. .............................................
none
SPEED IND
SPEED GRP 1
SPEED GRP 2
. SPEED GRP 3
SPEED GRP 4
SPECIAL CALLING FEATURES
On-Hook Dialing ...........................................
none On Hook Dial
ADDITIONAL FEATURES
Least Cost Routing
To access ..............................................
To cancel callback .......................................
I-Use Indication ...........................................
SMDR Account Codes ......................................
Call Tracing ..............................................
Message Waiting
To activate .............................................
To respond
.............................................
To cancel sent message ..................................
To cancel received message
...............................
Mobile Authorization Codes
................... .1 ... 1: ........
Stop Hunt
To activate .............................................
To cancel ..............................................
Universal Night Answer
All zones ..............................................
Zone 1 ................................................
Zone 2................................:
...............
Zone 3 ................................................
Zone 4.. ..............................................
Voice Paging Access
Zone 1 ................................................
Zone 2.. ..............................................
Zone3 .................................................
Zone 4.. ..............................................
Zone Combination .......................................
On-Hook Dialing Release,
on/off-hook for headset use
....................................
none
(Note 3)
___
___
none
none
none
I-USE
none
none
MSG SET
MSG CALL BK
none
MSG CANCEL
none
none
none
UNA
UNA ZONE 1
UNA ZONE 2
UNA ZONE 3
UNA ZONE 4
PAGE ZONE 1
PAGE ZONE 2
PAGE ZONE 3
PAGE ZONE 4
PAGE
Hang Up
Note 3: Special account code is dialed.
.
14-6 (6 pages)
Page 72

Siemens Practices
Operation Series
A30808-X5051-C120-l-B918
Issue 1. December 1984
Issued by Office Systems Group
5500 Broken Sound Boulevard N.W. Boca Raton, Florida 33431
(305) 994-8100 l Telex: 515052
Siemens Communication Systems, Inc.
Printed in U.S.A.
Page 73

Siemens Practices
Operation Series
A30808-X5051-C120-l-8918
Issue 1, December 1984
0 Siemens Communication Systems, inc., 1984
Ail rights reserved
This material is Proprietary to Siemens Communication Systems, Inc. Any
unauthorized reproduction, use or disclosure of this material, or any part there-
of, is strictly prohibited.
Siemens reserves the right to make changes in specifications at any time
and without notice. The information furnished by Siemens in this material
is believed to be accurate and reliable. However, no responsibility is assumed
by Siemens for its use.
SATURN@ is the registered trademark of Siemens Communication Systems,
Inc. for this line of equipment.
Page 74

SATURN EPABX A30808-X5051-C120-l-8918
Standard Station User Instructions Issue 1. December 1984
CONTENTS
SECTION PAGE SECTION PAGE
1.00 INTRODUCI-ION .......................... l-l
1.01 General .............................. l-1
1.02 inside Calling ......................... l-l
1.03 Outside Calling ........................ l-l
1.04 Outside Calling During a Power Failure .... l-l
1.05 Discriminating Ringing .................. l-1
1.06 Call Progress Tones .................... l-l
2.00 CALL FORWARDING FEATURES. . . . .
2.01 Call Forwarding - All Calls .
2.02 Call Forwarding - Busy Lines
2.03 Call Forwarding - No Answer . .
2.04 Call Forwarding to Public Network
2.05 Call Forwarding - Secretarial .
2.06 Call Forwarding - Return . .
. . .
2-1
2-1
2-1
. 2-1
. 2-2
2-2
2-2
3.00 CALL PICKUP FEATURES . . . . . . . . . . . . .
. . 1
3-1
3.01 Call Pickup - Directed . 3-l
3.02 Call Pickup - Group. . . . . . 3-1
4.00 CALL QUEUING FEATURES ............... 4-1
4.01 internal Call Queuing - Callback ......... 4-l
4.02 Internal Call Queuing - Standby .......... 4-l
4.03 Outgoing Call Queuing - Callback ........ 4-l
4.04 Outgoing Call Queuing - Standby ........ 4-2
5.00 CONFERENCE FEATURES. ............
5.01 Add-On Conference ................
5.02 Meet-Me Conference ...............
5.03 Station Controlled Conference ........
LIST OF FIGURES LIST OF TABLES
. . .
5-1
5-l
. 5-l
5-l
6.00 HOLD FEATURES ........................ -6-l
6.01 Consultation Hold ..... ... .. ....... .6-l
6.02 Call Hold ... ... ........ ........... .6-l
6.03 Call Hold - Flip-Flop (Broker) ............ .6-l
6.04 Call Park ..... ... .. ....... ... .6-2
7.00 PRIVACY FEATURES ...................... .7-l
7.01 Executive Override ..................... .7-l
7.02 Executive Override - Automatic .......... .7-l
7.03 Do Not Disturb ........................ .7-l
8.00 SPEED CALLING FEATURES. .............. .8-l
8.01 Last Number
Redial
.................... .8-l
8.02 Speed Calling - Group ................. .8-l
8.03 Speed Calling - Individual .............. .8-l
9.00 ADDITIONAL FEATURES .................. .9-l
9.01 Call Transfer .......................... .9-t
9.02 Call Tracing
..........................
.9-l
9.03 Least Cost Routing .................... .9-l
9.04 Message Waiting ...................... ,9-2
9.05 Mobile Authorization Codes .............. 9-2
9.06 SMDR Account Codes ................. .9-3
9.07 Stop Hunt. ........................... .9-3
9.08 Universal Night Answer - Zoned ......... .9-3
9.09 Voice Paging Access - Zoned and Area ... .9-3
FIGURE PAGE
1.00 Illustration of Industry Standard Telephones. l-2
TABLE
PAGE
9.00 Feature Access Codes. . .9-4
9.01 Feature Instruction Guide . .9-5
Page 75

SATURN EPABX
Standard Station User Instructions
SECTION 1 .OO
1.01 General. This document provides step-by-step instruc-
tions for accessing SATURN Electronic Private Automatic
Branch Exchange (EPABX) features from industry standard
telephones: rotary dial telephones and Dual-Tone Multifrequency (DTMF) telephones (refer to Figure 1.00).
Most of the instructions provided in this document are of features that can be accessed by dialing an access code. Ac-
cess codes can range from 0 to 9999. The leading digit of
an access code may also be a I’ * ” or ‘Y.” Refer to Table
9.00 for a list of the feature access codes.
An abbreviated Feature Instruction Guide is provided in the
back of this document (refer to Table 9.01). The guide can be
removed and used as a quick reference for activating the
SATURN EPABX features.
1.02 inside Calling. To place a call to another extension, pick
up the telephone handset, listen for dial tone, and dial the
desired extension number. Dial tone must be heard before
dialing can begin.
If attendant assistance is required, dial “0” for attendants in
general or dial the appropriate extension number for the
desired attendant function.
1.03 Outside Calling. To place an outside call, pick up the
handset, listen for dial tone, dial the appropriate trunk group
or LCR access code (e.g., “9”), listen for dial tone again, and
dial the desired directory number. Don’t forget to include the
toll prefix (e.g., “1”) and/or area code (e.g., “305’7, if required.
If outside calls are restricted from your telephone, attendant
assistance can be obtained by dialing “0” for attendants in
general or the appropriate extension number for the desired
attendant function.
1.04 Outside Calling During a Power Failure. In the event
of a commercial power failure in which normal telephone service is interrupted, users with failure transfer telephones may
originate outside calls. To place an outside call during a power
failure, pick up the handset, depress the power failure button (if provided), listen for dial tone, and dial the outside
number.
1.05 Discriminating Ringing. Several types of distinctive ringing patterns are provided so that you can distinguish between
the different types of incoming calls. The ringing patterns are:
a. One-burst ringing (normal ringing) - Identifies an in-
coming call from another SATURN EPABX telephone.
b. Two-burst ringing - Identifies an incoming “outside”
call including attendant extended calls.
c. Three-burst ringing - Identifies calls initiated by the fol-
lowing:
1. Call Hold automatic recall
2. Call Transfer Security recall
3. Internal Call Queuing - Callback
4. Outgoing Call Queuing - Callback
5. Station Controlled Conference recall to conference
master
A30808-X5051-C120-1-5918
Issue 1, December 1984
INTRODUCTION
1.06 Call Progress Tones. The following call progress tones
are used to inform you of the status of a call:
a.
b.
C.
d.
e.
f.
9.
h.
i.
j.
k.
I.
m.
n.
Busy Tone - Normal tone heard when a called party’s
telephone is busy.
Busy Override Injection Tone - Single bursts of tone
heard 8 to 20 seconds apart AFTER an attendant or
executive overrider has intruded on the call in progress.
This tone continues for the entire time the attendant
or executive overrider is present on your conversation.
Busy Override Tone - Three short bursts of tone heard
two seconds apart BEFORE an overriding attendant
intrudes on a call in progress.
Call Waiting Tone - One burst of tone heard when a
SATURN EPABX telephone call is waiting to be answered or two bursts of tone heard when an outside
trunk call is waiting to be answered on your telephone.
This tone is repeated after 10 seconds if the waiting
party is still present.
Conference Tone - One burst of tone heard when a
party is being added to a conference to which you are
connected.
Confirmation Tone -Three rapid bursts of tone indicating the action taken by you has been accepted (e.g.,
activation of the Internal Call Queuing - Standby
feature).
Dial Tone - Normal tone heard indicating that dialing
can begin.
Executive Override Tone - One three-second burst of
tone heard BEFORE an executive overrider intrudes
on a call in progress.
Expensive Facility Tone - One second burst of high
pitch tone heard when the SATURN System selects a
more expensive route for call routing via the Least Cost
Routing (LCR) feature.
Intercept Tone - A continuous alternating low and high
pitch tone indicating an invalid or unauthorized feature
code or extension number was dialed.
Low Tone - Steady tone heard after receiving busy tone
indicating successful activation of such features as
Outgoing Call Queuing - Callback and Internal Call
Queuing - Callback.
Recall Dial Tone - Three rapid bursts of tone followed
by dial tone indicating the action taken by you has been
accepted and you can now dial additional digits (e.g.,
for transferring a call via the Call Transfer feature).
Reorder Tone - Fast busy tone indicates a network
blocking condition or the activation of a feature was
not granted.
Ringback Tone - Normal tone heard when a called
party’s telephone is ringing.
1-l
Page 76

SATURN EPABX
Standard Station User Instructions
A30808-X5051-C120-l-8918
Issue 1, December 1984
o.
Route Advance Tone - One short burst of tone heard
each time the SATURN System searches for an idle
route via the LCR feature.
p. Special Ringback Tone - A tone that sounds similar
to normal ringback tone except for the distinctive low
signal at the end of each tone cycle. Special ringback
tone indicates you are in a waiting state for a busy telephone and is heard during activation of the following
features: internal Call Queuing - Standby, Outgoing
Call Queuing - Standby, and Executive Override - Automatic.
Rotary Dial Telephone
-Handset
Hookswitch
Pushbutton Tone Signaling Telephone
‘.
. . . .
,..I
Figure 1.00 illustration of Industry Standard Telephones
1-2 (2 pages)
Page 77

SATURN EPABX
A30808-X5051-C120-1-8918
Standard Station User Instructions
Issue 1, December 1984
SECTION 2.00 CALL FORWARDING FEATURES
2.01 Call Forwarding - All Calls. This feature allows you to
have all calls terminating at your extension, forwarded to
another extension or to the attendant.
a. To Forward All Incoming Calls:
Pick up the handset.
l Dial tone is heard.
Dial the Call Forwarding -All Calls activation code.
Dial the extension number to which you want all
your calls forwarded.
. Confirmation tone is heard indicating Call For-
warding - All Calls is activated.
NOTE: If intercept tone or reorder tone is heard, your call
forwarding request was not granted.
4. Hang up.
As a reminder that call forwarding is in effect, each time a
call is forwarded, one short burst of ringing is heard from your
telephone.
The party at the forwarding-to extension is allowed to call your
extension without being forwarded. Further, the party at the
forwarding-to extension may transfer a call back to your ex-
tension or leave a message waiting indication (if message
waiting capability is provided).
If a call is forwarded to a member of a hunt group that is busy,
the system hunts for the first idle member in that hunt group.
If no idle member is found, the forwarding station user can
activate the Camp-On, Call Waiting, or Automatic Callback
features. A station within a hunt group that has this feature
in effect is skipped during hunting. If the station is called direct
(not part of a hunt sequence) the call is forwarded as previously described.
You may continue to originate calls while Call Forwarding All Calls is in effect. Automatic callbacks from the activation
of features such as Internal Call Queuing - Callback and Out-
going Call Queuing - Callback, and station recalls are not
forwarded.
b. To Cancel Call Forwarding - All Calls:
1. Pickup the handset.
l Dial tone is heard.
2. Dial the call forwarding cancellation code.
l Confirmation tone is heard indicating Call For-
warding - All Calls is deactivated.
3. Hang up.
2.02 Call Forwarding - Busy Lines. This feature allows you
to have all calls terminating at your extension, forwarded to
another extension or to the attendant when your extension
is busy. When your extension is idle, incoming calls are com-
pleted as usual.
a. To Activate Call Forwarding - Busy Lines:
1. Pick up the handset.
2.
3.
Dial the Call Forwarding - Busy Lines activation code.
Dial the extension number to which you want the
calls forwarded.
NOTE:
l Confirmation tone is heard indicating Call For-
warding - Busy Lines is activated.
If intercept tone or reorder tone is heard, your call
forwarding request was not granted.
4. Hang up.
l Dial tone is heard.
W’- ?n the Call Forwarding - Busy Lines feature is in effect,
incoming calls will not wait (via activation of the Internal Call
Queuing - Standby and lnteral Call Queueing - Callback features) on the associated line. If the forwarded-to telephone
is busy, forwarded calls will wait at the forwarded-to telephone.
If a call is forwarded to a member of a hunt group that is busy,
the system hunts for the first idle member in that hunt group.
If no idle member is found, the forwarding station user can
activate the Camp-On, Call Waiting, or Automatic Callback
features. A station within a hunt group that has this feature
in effect is skipped during hunting. If the station is called direct
(not part of a hunt sequence) the call is forwarded as previously described.
b. To Cancel Call Forwarding - Busy Lines:
1. Pick up the handset.
l Dial tone is heard.
2. Dial the call forwarding cancellation code.
l Confirmation tone is heard indicating Call
Forwarding - Busy Lines is deactivated.
3. Hang up.
2.03 Call Forwarding - No Answer. This feature allows you
to have all calls terminating at your telephone that are not
answered within a predetermined period of time (three rings,
nominal), forwarded to another telephone or to the attendant.
When your telephone is busy, call forwarding does not occur
and the usual station hunting, call waiting, and automatic call-
back arrangements (if assigned) are applied.
a. To Activate Call Forwarding - No Answer:
1. Pick up the handset.
l Dial tone is heard.
2. Dial the Call Forwarding - No Answer activation
code.
3. Dial the extension number to which you want to forward all your unanswered calls.
l Confirmation tone is heard indicating Call For-
warding - No Answer is activated.
NOTE: If intercept tone or reorder tone is heard, your Call
forwarding request was not granted.
4. Hang up.
2-l
Page 78

SATURN EPABX
Standard Station User Instructions
A30808-X5051-C120-l-B918
Issue 1, December 1984
If a call is forwarded to a member of a circular or terminal
hunt group that is busy, the system hunts for the first idle member in that hunt group. If no idle member is found and the
Call Forwarding - No Answer feature is in effect, the forwarding station continues to ring for another no answer interval.
At the end of the time interval, the forwarding process is attempted again. If the Call Forwarding - All Calls or Call Forwarding - Busy Lines feature is in effect, the forwarding station
user can ac!ivate the Camp-On, Call Waiting, or Automatic
Callback features. A station within the circular hunt group that
has this feature in effect is skipped during hunting. If the sta-
tion is called direct (not part of a hunt sequence) the call is
forwarded as previously described.
You may continue to originate calls while Call Forwarding -
No Answer is in effect. Automatic callbacks from the activation of features such as Outgoing Call Queuing - Callback
and Internal Call Queuing - Callback, and station recalls are
not forwarded.
b. To Cancel Call Forwarding to Public Network:
1. Pick up the handset.
l
Dial tone is heard.
2. Dial the call forwarding cancellation code.
l
Confirmation tone is heard indicating Call Forwarding to Public Network is deactivated.
3. Hang up.
2.05 Call Forwarding - Secretarial. This feature allows you
to have all calls terminating at your extension, forwarded to
a predetermined extension (assigned by data base
management).
a. To Forward All Incoming Calls to the Predetermined
Extension:
1. Pick up the handset.
b. To Cancel Call Forwarding - No Answer:
1. Pick up the handset.
l
Dial tone is heard.
l
Dial tone is heard.
2. Dial the Call Forwarding - Secretarial activation
code.
2. Dial the call forwarding cancellation code.
l
Confirmation tone is heard indicating activation
of the Call Forwarding - Secretarial feature.
l
Confirmation tone is heard indicating Call For-
warding - No Answer is deactivated.
NOTE: If intercept tone or reorder tone is heard, your call
forwarding request was not granted.
3. Hang up.
3. Hang up.
2.04 Call Forwarding to Public Network. This feature allows
you to have all calls terminating at your extension, forwarded
to an outside telephone number.
As a reminder that call forwarding is in effect, each time a
call is forwarded, one short burst of ringing is heard from your
telephone.
a. To Forward All Incoming Calls:
1. Pick up the handset.
l
Dial tone is heard.
2. Dial the Call Forwarding to Public Network activation code.
3. Dial the trunk group access code (e.g., “9” for outside) and the outside number (e.g., 9948800).
0 After a short pause (approximately five se-
conds), confirmation tone is heard indicating
Call Forwarding to Public Network is activated.
NOTES: If you’re using a DTMF telephone, you may expe-
dite receiving confirmation tone by depressing the
# key immediately after dialing the last digit of the
outside number.
The party at the forwarding-to extension is allowed to call your
extension without being forwarded. Further, the party at the
forwarding-to extension may transfer a call back to your extension or leave a message waiting indication (if message
waiting capability is provided).
You may continue to originate calls while Call Forwarding Secretarial is in effect. Automatic callbacks from the activation of features such as Internal Call Queueing - Callback
and Outgoing Call Queueing - Callback, and station recalls
are not forwarded.
b. To Cancel Forwarding of Your Calls:
1. Pick up the handset.
l
Dial tone is heard.
2. Dial the call forwarding cancellation code.
If intercept tone or reorder tone is heard, your call
forwarding request was not granted.
4. Hang up.
As a reminder that call forwarding is in effect, each time a
call is forwarded, one short burst of ringing is heard from your
telephone.
0 Confirmation tone is heard indicating the for-
warding of your calls has been cancelled.
3. Hang up.
2.06 Call Forwarding - Return. This feature allows you to
transfer a forwarded-call to the extension that activated call
forwarding.
You may continue to originate calls while call forwarding is
in effect. Automatic callbacks from the activation of features
such as Outgoing Call Queuing - Callback and Internal Call
Queuing - Callback, and station recalls are not forwarded.
a. To Return a Forwarded-Call:
1. First, ask the connected party to wait.
2. Momentarily depress the hookswitch.
’
i
.:
2-2
Page 79

SATURN EPABX
A30808-X5051-C120-1-5918
Standard Station User Instructions
Issue 1. December 1984
3.
NOTES:
l
Recall dial tone is heard.
Dial the Call Forwarding - Return access code.
l
Ringback tone is heard.
If busy tone is heard or the party does not answer.
momentarily depress the hookswitch to return to the
held party.
When an outside party requests to be transferred
to an extension and the extension is busy, you may
invoke the Internal Call Queueing - Standby feature.
This feature allows you to camp-on to the busy extension and wait for the party to answer.
4.
5.
If you desire to transfer the call before the called
party answers (ringback tone must be heard), hang
l
The call is transferred to the called party.
up the handset. The held party hears ringback tone
and waits for the called party to answer. If the party
being transferred is an “outside” party and the
called party does not answer within a preset time
(25 seconds, nominal), the call is automatically
recalled to your telephone (three-burst ringing is
.heard), if idle, otherwise to the attendant. To an-
swer/return to the held call, pick up the handset.
When the party at the forwarding station answers,
announce the transfer.
l
Ringback tone is removed.
Hang up.
2-3 (2-4 blank)
Page 80

SATURN EPABX
A30808-X5051-C120-l-8918
Standard Station User Instructions
Issue 1, December 1984
SECTION 3.00 CALL PICKUP FEATURES
3.01 Call Pickup - Directed. This feature allows you to answer an incoming call that is ringing at another telephone.
a. To Answer a Call Ringing at Another Telephone:
1. Pick up the handset.
l
Dial tone is heard.
2. Dial the Call Pickup - Directed feature access
code.
3. Dial the extension number where the call is ringing.
l
Ringing ceases at the other telephone and you
are automatically connected to the incoming call.
4. You may begin to talk.
3.02 Call Pickup - Group. This feature allows you to answer
an incoming call that is ringing at another telephone within
your pickup group. Your pickup group consists of a group of
extensions for which any ringing telephone may be answered
by any member in the pickup group.
a. To Answer a Call Ringing at Another Telephone:
1. Pick up the handset.
l
Dial tone is heard.
2. Dial the Call Pickup - Group feature access code.
l
Ringing ceases at the other telephone and you
are connected to the incoming call.
3. You may begin to talk.
3-l (3-2 blank)
Page 81

SATURN EPAEX
Standard Station User Instructions
SECTION 4.00 CALL QUEUING FEATURES
4.01 Internal Call Queuing - Callback. This feature allows
you, upon dialing a busy extension number, to enter into a
queue, hang up, and be called back when the extension becomes available.
a. To Activate Internal Call Queuing - Callback:
1. You have dialed a busy extension and busy tone
is heard.
2. Do not hang up. Listen to busy tone until busy tone
changes to a steady low tone (approximately five
seconds). Steady low tone is confirmation that you
may invoke callback queuing.
3. Hang up.
You may originate or receive other calls while waiting for the
callback however, the callback sequence does not take place
until both your extension and the previously dialed extension
are idle at the same time.
Only one callback request (Internal or Outgoing Call Queuing - Callback) is allowed at any one time. If a second callback is initiated, the original callback is automatically
cancelled.
4. When both the called extension and your extension become idle,
l Three-burst ringing is heard.
NOTE: If you donot answer the callback attempt within ap-
proximately 18 seconds, callback queuing is automatically cancelled.
5. Pick up the handset.
l Ringback tone is heard.
l Called extension rings.
6. When the called party answers, you may begin to
talk.
b. To Cancel an Automatic Callback:
1. Pick up the handset.
l Dial tone is heard.
2. Dial the automatic callback cancellation code.
l Confirmation tone is heard indicating the can-
cellation of the callback.
3. Hang up.
4.02 Internal Call Queuing - Standby. This feature allows
you, upon dialing a busy extension, to enter into a queue and
wait for the called party to answer. While in the standby queue,
you hear a special ringback tone and the called party hears
a call waiting tone.
a. To Activate Internal Call Queuing - Standby:
1. You have dialed a busy extension and busy tone
is heard.
NOTE: On some telephones, Internal Call Queuing - Stand-
A30808-X5051-C120-l-8918
Issue 1. December 1984
by is activated on an automatic originating or automatic terminating basis. If your telephone is
assigned the automatic originating option or the
called party’s telephone is assigned the automatic
terminating option, ignore the remainder of this
procedure; when special ringback tone is heard simply wait for the called party to answer.
2. Do not hang up. Listen to busy tone until it changes
to a steady low tone (approximately five seconds).
NOTE: Steady low tone is confirmation that callback queu-
ing may be invoked, if desired, by hanging up. Refer
to the feature, “Internal Call Queuing - Callback.”
3.
4.
NOTE:
Again do not hang up. Wait until steady low tone
changes to a special ringback tone (approximately five seconds). This indicates standby queuing
has been invoked.
l The called party hears the call waiting tone.
Wait until the called party answers the waiting call.
You may convert from standby queuing to callback
queuing, any time, by hanging up.
5. When the called party answers, you may begin to
talk.
4.03 Outgoing Call Queuing - Callback. This feature allows
you, upon dialing a busy outgoing trunk group, to enter into
a queue, hang up, and be called back when a trunk becomes
available.
This feature applies to direct trunk group access only. For
Least Cost Routing (LCR) access, refer to the feature, “Least
Cost Routing.”
a. To Activate Outgoing Call Queuing - Callback:
1. You have dialed a trunk group access code (e.g.,
9, 82, 83, etc.) and encountered busy tone.
2. Do not hang up. Listen to busy tone until you hear
a steady low tone (approximately five seconds).
Steady low tone is confirmation that you may invoke callback queuing.
3. Hang up.
You can originate or receive calls while callback queuing is
active. When a trunk becomes available and your telephone
is idle, a callback is attempted.
Only one callback request (Internal or Outgoing Call Queuing - Callback) is allowed at any one time. If a second auto-
matic callback is initiated, the original callback is cancelled.
4. When a trunk becomes available,
l Three-burst ringing is heard.
NOTE: If you do not answer the callback attempt within ap-
proximately 18 seconds, callback queuing is automatically cancelled.
5. Pick up the handset.
l Dial tone is heard.
4-1
Page 82

SATURN EPABX
Standard Station User Instructions
6.
b. To
1.
Complete dialing the desired number (do not dial
the trunk group access code).
Cancel an Automatic Callback:
Pick up the handset.
l Dial tone is heard.
Dial the automatic callback cancellation code.
l Confirmation tone is heard indicating the can-
cellation of the callback.
Hang up.
4.04 Outgoing Call Queuing - Standby. This feature allows
you, upon dialing a busy outgoing trunk group, to enter into
a queue and wait for a trunk to become available.
This feature applies to direct trunk group access only. for
Least Cost Routing (LCR) access, refer to the feature, “Least
Cost Routing.”
a. To Activate Outgoing Call Queuing - Standby:
1. You have dialed a trunk group access code (e.g.,
9, 82, 83, etc.) and encountered busy tone.
A30808-X5051-C120-1-8918
Issue 1, December 1984
2. Do not hang up. Listen to busy tone until you hear
“1
a steady low tone (approximately five seconds).
-I
Steady low tone is confirmation that you have been
.J’
placed in the callback queuing mode.
NOTE: Steady low tone is confirmation that callback queu-
ing may be’invoked, if desired, by hanging up. Refer
to the feature, “Outgoing Call Queuing - Callback.”
3. Again do not hang up. Listen to steady low tone
(approximately five seconds) until you hear silence
(or music, if provided). This is confirmation that you
have been placed in the standby queuing mode.
4. Continue to listen to silence (or music, if provided)
until a trunk becomes available.
l Dial tone is heard when a trunk becomes
available.
NOTE: You may convert from standby queuing to callback
queuing, anytime, by hanging up.
5. Upon hearing dial tone, complete dialing the
desired number (do not redial the trunk group ac-
cess code).
4-2 (2 pages)
Page 83

SATURN EPABX
Standard Station User Instructions
SECTION 5.00 CONFERENCE
FEATURES
A30808-X5051-C120-l-6918
Issue 1, December 1984
5.01 Add-On Conference. This feature allows you to add a
third party (inside or outside) to your conversation.
a. To Add a Third Party:
1. First, ask the other party to wait.
2. Momentarily depress the hookswitch.
l
Recall dial tone is heard.
l
The party is placed on hold
3.
Dial the desired number of the third party.
l
Ringback tone is heard.
NOTE:
If busy tone is heard or the party does not answer,
momentarily depress the hookswitch to return to the
held call.
4. When the called party answers, inform the party
of the conference.
5. Momentarily depress the hookswitch again.
l
A three-party conference is established.
NOTES: The user that originated the conference may release
the third party by momentarily depressing the hook-
switch.
When more than one outside (trunk) call is added,
transmission quality may be degraded.
6. You may begin to talk.
5.02 Meet-Me Conference. This feature allows you to arrange
a conference of up to seven extensions or four extensions and
three outside lines. Outside parties are connected to the conference by the attendant.
a. To
1.
Establish a Meet-Me Conference:
Pick up the handset.
l
Dial tone is heard.
2.
Dial the party you want in the conference.
3.
NOTE:
l
Ringback tone is heard.
When the called party answers, inform the party
to dial the Meet-Me Conference access code at a
prearranged time. If the called party is from
“out-
side” the SATURN System, inform the party to dial
the SATURN attendant console and have the attendant to transfer the call to the conference by di-
aling the Meet-Me Conference access code.
More than one Meet-Me Conference bridge may be
assigned in the SATURN EPABX. The last digit of
the Meet-Me Conference access code represents
the selected conference bridge.
4.
5.
NOTES:
Hang up.
Repeat the above steps for up to seven conferees.
The attendant only may enter the conference as an
eighth conferee.
The maximum number of outside parties allowed
in the conference at any one time is three (variable
and assigned by data base management).
b. To Enter the Conference:
1. Pick up the handset.
l
Dial tone is heard.
2. Dial the preannounced Meet-Me Conference feature access code.
l
Conference tone is heard; all conferees hear
the conference tone as you enter the con-
ference.
NOTES: Busy tone is heard if the conference is full.
When more than one outside (trunk) call is added,
transmission quality may be degraded.
3. You may begin to talk.
5.03 Station Controlled Conference. This feature allows you
to establish a conference of up to seven parties. As the Conference Master you can add members to the conference, re-
move members from the conference, leave the conference
to consult with a conferee privately, call the attendant, or
release from the conference and allow another conference
member. to take over conference mastership.
The maximum number of parties allowed in the conference
is seven; however, the attendant can be added to the conference as an eighth party, The maximum number of outside
parties allowed in the conference at any one time is three (variable and assigned by data base management). When more
than one outside (trunk) call is added, transmission quality
may be degraded.
a. To
1.
2.
Establish a Conference:
Pick up the handset.
l
Dial tone is heard.
Dial the Station Controlled Conference access
code.
l
Recall dial tone is heard.
NOTE:
Busy tone is heard if a conference circuit is not
available.
3.
NOTE:
4.
Dial the number of the party you want to add to
the conference.
l
Ringback tone is heard.
If the called party does not answer, is busy, or does
not wish to be included in the conference, you
must
hang up. Your phone then rings (three-burst ringing) and, upon answer, you are connected back into
the conference. You may proceed adding parties to
the conference by momentarily depressing the hook-
switch to leave the conference and following the
above procedure beginning at Step 3.
When the called party answers, Inform the party
of the conference.
5-l
Page 84

SATURN EPABX
Standard Station User Instructions
0 Ringback tone is removed.
5. Momentarily depress the hookswitch,to add the
party to the conference.
Q Conference tone is heard; all conferees hear
the conference tone as you and the other party
enter the conference.
NOTES: If you attempt to add more than seven inside par-
ties or add more than the allowed number of outside parties into the conference. reorder tone is
heard for approximately 1% seconds, after which
you are reconnected to the “would be” conferee. To
return the conference, momentarily depress the
hookswitch.
Any party can leave the conference by hanging up.
6. To add each additional party
io
the conference,
momentarily depress the hookswitch and follow the
above procedure beginning at Step 3.
b. To Remove Any Conferee (Extension Only) From the
Conference and Consult With the Conferee Privately:
1. Momentarily depress the hookswitch to leave the
conference.
- Recall dial tone is heard.
2. Dial the Conference Member Remove code.
3. Dial the extension number of the conferee to be
removed.
* You and the conferee are connected in a pri-
vate talk state.
NOTE: As the Conference Master, you have the option of
adding the party back to the conference or removing the conferree from the conference totally. To add
the conferee back into the conference, momentarily depress the hookswitch; you and the conferee
reenter the conference. To remove the conferee from
the conference, hang up. Your phone then rings
A30808-X5051-C120-l-8918
Issue 1, December 1984
(three-burst ringing) and, upon answer, you are connected back into the conference.
c. To Remove the Last Member Added to the Conference
and Consult’With the Conferee Privately:
1. Momentarily depress the hookswitch to leave the
conference.
l
Recall dial tone is heard.
2. Dial the Last Member Added access code.
3. You and the conferee are connected in a private
talk state.
NOTE: As the Conference Master, you have the option of
adding the party back to the conference or removing the conferee from the conference totally. To add
the conferee back into the conference, momentarily depress the hookswitch; you and the conferee
reenter the conference. To remove the conferee from
the conference, hang up. Your phone then rings
(three-burst ringing) and, upon answer, you are connected back into the conference.
d. To Transfer the Position of Conference Mastership to
Another Conferee (SATURN EPABX extension only):
1. Inform the desired conferee that you are releasing
from the conference and that conference mastership can be gained by hookswitch flashing after you
hang up.
2. Hang up.
NOTE: The first conferee to hookflash now becomes the
Conference Master.
When all parties in the conference hang up, the confe’rence
is released.
5-2 (2 pages)
Page 85

SATURN EPABX
Standard Station User Instructions
SECTION 6.00 HOLD FEATURES
6.01 Consultation Hold. This feature allows you to place a
call (inside or outside) on hold and originate another call on
the same extension line.
a. To Place a Party on Hold and Originate Another Call:
1. First, ask the other party to wait.
2. Momentarily depress the hookswitch.
l
Recall dial tone is heard.
.
The party is placed on hold.
NOTE:
The hookswitch must be depressed and held for a
short period, normally one-half to one second, then
released. If the hookswitch is held for more than one
second, it is the equivalent to hanging up.
3. Dial the number of the desired party.
l
Ringback tone is heard.
NOTE:
If busy tone is heard or the called party does not
answer, momentarily depress the hookswitch to
return to the held call.
4. When the called party answers, you may begin to
talk.
b. To Return to the Held Party:
1. Wait until the consulted party hangs up.
l
You are automatically reconnected to the previously held party.
2. Resume your conversation.
6.02 Call Hold. This feature allows you to place any call (inside or outside) on hold and hang up without losing the call.
After holding the call, you may originate or receive other calls
on the same extension line and return to the held call or alternate between the two calls (holding one call while speak-
ing to the other).
a. To Place a Party on Hold:
1.
First, ask the other party to wait.
2.
Momentarily depress the hookswitch.
3.
l
Recall dial tone is heard.
Dial the Call Hold access code.
l
Confirmation tone is heard.
l
The party is placed on “call
Hang up.
hold.”
4.
NOTE:
If the held party is from “outside” the SATURN
EPABX, you must return to the held party within a
preset period of time or the call is recalled to your
telephone (three-burst ringing is heard), if idle, otherwise to the attendant. To answer/return to the held
call, pick up the handset.
b. To Return to a Held Call or Alternate Between Two
Calls:
A30808-X5051-C120-l-6918
Issue 1, December 1984
1.
2.
3.
Pick up the handset or momentarily depress the
hookswitch (if connected to another call).
l
Dial tone/recall dial tone is heard.
Dial the Call Hold access code.
l
You are reconnected to the previously held
party and the other party, if any, is placed on
hold.
Resume your conversation.
6.03 Call Hold - Flip-Flop (Broker). This feature allows you,
upon hearing a call waiting tone, to place the call in progress
(inside or outside call) on hold and establish a connection to
the waiting call. When no call is waiting, this feature allows
you to place a call in progress on hold and originate another
call on the same extension line. In either case, you can return
to the held call or alternate between the two calls (holding
one call while speaking to the other).
a. To Place a Party on Hold and Answer a Waiting Call:
1. First, ask the other party to wait.
2. Momentarily depress the hookswitch.
l
Recall dial tone is heard.
3.
Dial the Call Hold - Flip-Flop feature access code.
l
You are connected to the waiting party and the
other party is placed on hold.
4. You may begin to talk.
b. To Place a Party on Hold and Originate Another Call:
1. First, ask the other party to wait.
2. Momentarily depress the hookswitch.
l
Recall dial tone is heard.
3.
Dial the Call Hold - Flip-Flop feature access code.
l
Dial tone is heard.
. The party is placed on hold.
4.
Dial the phone number of the desired party.
9 Ringback tone is heard.
NOTE:
If the called party does not answer your call or the
line is busy, momentarily depress the hookswitch to
return to the held party.
5.
c. To
1.
2.
When the called party answers, you may begin to
talk.
Return to a Held Party:
Wait until the other party hangs up.
l
You are automatidally connected to the previously held party.
Resume your conversation.
6-1
Page 86

SATURN EPABX
A30808-X5051-C120-l-6918
Standard Station User Instructions
issue 1, December 1984
d. To Alternate Between Two Calls:
1. Momentarily depress the hookswitch.
l
You are reconnected to the previously held
party and the other party is placed on hold.
NOTE: If you hang up while a call is on hold, the call is au-
tomatically recalled to your telephone (three-burst
ringing is heard). To answer/return to the held call,
pickup the handset.
2. Resume your conversation.
6.04 Call Park. This feature allows you to place a call (inside
or outside) on “system hold” (referred to as parked) and return
to the parked party from the same or another SATURN EPABX
telephone. The call is placed in one of ten selected park loca-
tions. A unique access code is assigned to each park location.
a. To Park an Established Call:
First, ask the other party to wait.
Momentarily depress the hookswitch.
l
Recall dial tone is heard.
Dial the Call Park feature access code.
Dial the Call Park location code (0 to 9).
l
Confirmation tone is heard.
* The call is parked at the dialed location.
NOTE:
5.
NOTE:
If the dialed call park location is not available, busy
tone is heard. If this situation occurs, momentarily
depress the hookswitch to return to the held party
and repeat the process using a different location
code.
‘/
/’
Hang up..You are free to originate or receive other
calls.
If you park an outside call and you do not return to
the party within a preset period of time, the call is
automatically recalled to your telephone, if idle,
otherwise to the attendant.
b. To Return to the Parked Call:
1. Pick up the handset at any non-restric!ed telephone.
. Dial tone is heard.
2. Dial the Call Park feature access code.
3. Dial the Call Park location code which was used
to park the call.
l
You are connected to the parked call.
NOTE:
If reorder tone is heard, the held party has disconnected. If intercept tone is heard, the telephone is
restricted from Call Park access.
4. Resume your conversation.
6-2 (2 pages)
Page 87

SATURN EPABX
Standard Station User Instructions
A30808-X5051-C12C-1-8918
Issue 1, December 1984
SECTION 7.00 FWVACY FEATURES
7.01 Executive Override. This feature allows you, upon encountering busy tone, to enter into the existing conversation
for the intended purpose of announcing a high priority or
emergency call. Before the override occurs a warning tone
is heard by the two conversing parties alerting them of the
impending override.
a. To Override a Busy Call:
1.
2.
NOTE:
3.
NOTE:
While listening to busy tone, momentarily depress
the hookswitch.
l
Recall dial tone is heard.
Dial the Executive Override feature access code.
l
Executive Override tone is heard followed by
the connection to the existing conversation.
Reorder tone is heard if the connection is denied
(e.g., the telephone is assigned the Data Line Security or Executive Override Security feature).
You may begin to talk.
The Busy Override Injection tone is heard 8 to 20
seconds apart after overriding the call in progress.
7.02 Executive Override - Automatic. This feature allows
you to camp-on to a busy extension and automatically break
into the existing conversation if the called party does not answer your waiting call within a predetermined period of time.
Break-in does not occur if the called telephone is assigned
the Data Line Security or Executive Override Security feature.
a. To Activate Executive Override - Automatic:
1. You have dialed an extension number and special
ringback tone is heard.
l
Special ringback tone indicates the extension
line is busy and a call waiting tone is applied
to the called party.
NOTE: If your telephone is also provided with the Internal
Call Queuing - Standby feature and a busy exten-
sion is dialed, busy tone is heard instead of special
ringback tone. You must wait until busy tone
changes to low tone (approximately five seconds)
and low tone changes to special ringback tone (approximately five seconds) before the called party’s
line is camped-on (call waiting tone is applied).
2. Wait until the called party answers the waiting call.
3. If the called party does not answer your waiting call
within a predetermined time,
l
Executive Override tone is heard followed by
a “break-in” to the existing conversation.
4. You may begin to talk.
NOTE: Busy Override Injection tone is heard 8 to 20 se-
conds apart after overriding the call in progress.
7.03 Do Not Disturb. This feature allows you to make your
telephone busy to all incoming calls whenever you desire not
to be disturbed.
a. To Make Your Telephone Busy to all Incoming Calls:
1. Pick up the handset.
l
Dial tone is heard.
2. Dial the Do Not Disturb feature activation code.
l
Confirmation tone is heard.
l
Your telephone is now made busy to all incom-
ing calls.
3. Hang up.
You can originate calls while Do Not Disturb is in effect;
however, other calls cannot wait at your telephone (e.g., individuals invoking the Internal Call Queuing - Standby fea-
ture). Message Waiting is not affected by activation of the Do
Not Disturb feature.
Each time you pick up the handset recall dial tone is heard
as a reminder that your telephone is in the busy mode.
b. To Re-establish Normal Operation to Your Telephone:
Pick up the handset.
l
Recall dial tone is heard indicating Do Not Dis-
turb is in effect.
Dial the Do Not Disturb cancellation code.
e Confirmation tone is heard indicating cancel-
lation of the Do Not Disturb feature.
Hang up.
7-l (7-2 blank)
Page 88

SATURN EPABX
Standard Station User Instructions
SECTION 8.00 SPEED CALLING FEATURES
8.01 Last Number Redial. This feature allows you to dial an
access code and have the last phone number dialed from your
telephone automatically redialed by the SATURN System. This
feature is normally used after dialing a busy number or when
the called party does not answer.
a. To Originate a Call to the Last Number Dialed From
Your Telephone:
1. Pick up the handset.
l
Dial tone is heard.
2. Dial the Last Number Redial feature access code.
l
The SATURN System automatically dials the
last number dialed from your telephone.
l
Ringback or busy tone is heard depending on
the on-/off-hook condition of destination station
or availability of trunks.
NOTE: The SATURN System will redial only the last valid
destination phone number. Unassigned extension
numbers, partial dialed numbers, and feature access codes are not dialed.
3. When the called party answers, you may begin to
talk.
8.02 Speed Calling - Group. This feature allows you to place
speed calls to frequently called destinations. The destination
numbers (normally outside telephone numbers) are stored in
SATURN EPABX memory, along with a two-digit code associated with each number. These codes are normally listed
in your company’s telephone directory.
a. To Place a Speed Call:
1. Pick up the handset.
l
Dial tone is heard.
2. Dial the Speed Calling - Group (1 to 4) feature access code.
3. Dial the two-digit code corresponding to the desired
telephone number.
l
Ringback or busy tone is heard depending on
the on-/off-hook condition of destination station
or availability of trunks.
NOTE: If dial tone is heard instead of ringback tone, sup-
A30808-X5051-C120-l-8918
Issue 1, December 1984
plementary dialing is required to reach the desired destination.
4. When the called party answers, you may begin to
talk.
8.03 Speed Calling - Individual. This feature allows you to
establish a personal speed call list of up to 10 frequently called
telephone numbers. Each number (internal or external to the
SATURN System) is assigned a one-digit code (0 to 9) and
programmed into SATURN memory from your telephone.
a. To Store or Change Speed Calling Codes:
1.
Pick up the handset.
l
Dial tone is heard.
2.
3.
4.
Dial the Speed Calling - store/change code.
Dial the Speed Call code (0 to 9).
Dial the desired telephone number corresponding
to the Speed Calling code. Be sure to enter the
complete number including any prefix digits (e.g.,
9-l-800-342-8300).
l
Confirmation tone is heard.
NOTES:
For DTMF telephones, after dialing the telephone
number, you can expedite receiving confirmation
tone by depressing the # key.
5.
The destination may be a number that requires sup-
plementary dialing.
Hang up.
b. To Place a Speed Call:
1. Pick up the handset.
l
Dial tone is heard.
2. Dial the Speed Calling - Individual feature access
code.
3. Dial the one-digit speed calling code corresponding to the desired telephone destination number.
l
Ringback or busy tone is heard depending on
the on-/off-hook condition of destination station
or availability of trunks.
4. When the called party answers, you may begin to
talk.
8-1 (8-2 blank)
Page 89

SATURN EPABX
A30808-X5051-C120-l-8918
Standard Station User Instructions
Issue 1. December 1984
SECTION 9.00 ADDITIONAL FEATURES
9.01 Call Transfer. This feature allows you to transfer a call
to another destination (inside or outside party).
a. To Transfer a Call:
1.
2.
3
NOTES:
4.
First, ask the other party to wait.
Momentarily depress the hookswitch.
l
Recall dial tone is heard.
Dial the desired destination number.
l
Ringback tone is heard.
If busy tone is heard or the other party does not answer, momentarily depress the hookswitch to return
to the held party.
When an outside party requests to be transferred
to an extension and the extension is busy, you may
invoke the Internal Call Queuing - Standby feature.
This feature allows you to camp-on to the busy extension and wait for the party to answer.
If you desire to transfer the call before the called
party answers, hang up the handset. The held party
hears ringback tone and waits for the called party
to answer. If the party being transferred is an outside party and the called party does not answer within a preset time, the call is automatically recalled
to your telephone (three-burst ringing is heard), if
idle, otherwise to the attendant. To answer/return to
the held call, pick up the handset.
When the called party answers, announce the
transfer and hang up.
0 The call is transferred to the called party.
9.02 Call Tracing. This feature allows you to have a connected call’s data recorded on the Station Message Detail Recording (SMDR) printer. The SMDR printer prints out the calling
party’s extension number (if an internal call) or the incoming
trunk and trunk group number (if an external call), the called
number, the date and time of the call, as well as a special
character on the SMDR report that the call was traced.
a. To Trace a Call:
While connected to a call, momentarily depress the
hookswitch.
l
Recall dial tone is heard.
l
The call is placed on Consultation Hold.
Dial the Call Tracing feature access code.
l
Confirmation tone is heard indicating the call’s
data has been recorded.
l
You are automatically reconnected to the call.
NOTE: Reorder is heard if your telephone is not allowed
to activate this feature.
3. Hang up or continue talking to the other party.
9.03 Least Cost Routing. The Least Cost Routing (LCR) fea-
ture is used in some SATURN EPABX Systems to route outgoing (trunk) calls over the least costly route available at the
time of call placement.
a. To Place an Outside Call:
1.
Pick up the handset.
l
Dial tone is heard.
2. Dial the LCR access code if system is so equipped,
otherwise dial the trunk access code.
l
Dial tone is heard.
3.
Dial the outside destination number.
l
Confirmation tone (three-bursts of tone) is
heard indicating the dialed number has been
accepted and a route has been found.
l
The SATURN System then dials the destina-
tion number. Ringback tone is heard if the destination number is idle. Busy tone is heard if
the destination number is busy.
NOTES:
If Route Advance Tone (one short burst of tone) is
heard immediately after dialing the destination number, wait until you hear confirmation tone. Route Advance tone indicates that the SATURN System has
accepted the dialed number and is searching for an
idle route. Additional Route Advance Tones may be
heard as the SATURN System searches for alternate routes to your destination.
If Expensive Facility Tone (one burst of tone) is heard
immediately after hearing confirmation tone, the
SATURN System has found a more expensive route.
If you desire not to place the call over a more expensive route, hang up.
If a route is not found within a preset period of time,
the SATURN System provides a steady burst of low
tone (if Ca!lback Queuing is assigned) to indicate
that Callback Queuing can be invoked, if desired.
Callback Queuing allows you to hang up and be
called back (three-burst ringing is heard) when a
route becomes available. To answer the callback,
pick up the handset, listen for confirmation tone fol-
lowed by ringback tone. When the called party an-
swers, you may begin to talk. If you do not answer
the callback attempt within approximately 18 se-
conds, the callback is temporarily cancelled. Addi-
tional callbacks (maximum of nine) will be attempted
every five minutes.
4. When the called party answers, you may begin to
talk.
b. To Cancel Callback Queuing:
1. Pick up the handset.
l
Dial tone is heard.
2. Dial the automatic callback cancellation code.
l
Confirmation tone is heard indicating the cancellation of the callback.
9-l
Page 90

SATURN EPABX
A30808-X5051-C120-l-8918
Standard Station User instructions
Issue 1, December 1984
3. Hang up.
9.04 Message Waiting. This feature allows you to send a message waiting indication to a party at another extension. This
feature also provides a means for you to respond to the message or cancel the message.
a. To Activate Message Waiting After Dialing a Do-Not-
Answer or Busy Extension:
1. While listening to ringback tone or busy tone,
momentarily depress the hookswitch.
e Recall dial tone is heard.
2. Dial the Message Waiting activation code.
l
Confirmation tone is heard.
l
The message waiting lamp flashes at the called
telephone.
NOTE:
If the called telephone is unable to accept any more
messages, busy tone is heard. If the called telephone does not have the capability to receive mes-
sage waiting indications, reorder tone is heard.
3. Hang up.
b. To Activate Message Waiting Without First Attempting
to Call the Other Party:
1. Pick up the handset.
l
Dial tone is heard.
2. Dial the Message Waiting activation code.
3. Dial ihe extension number of the party you wish
to leave a message waiting indication.
l
Confirmation tone is heard.
NOTE: If the called telephone is unable to accept any more
messages, busy tone is heard. If the called telephone does not have the capability to receive message waiting indications, reorder tone is heard.
4. Hang up.
c. To Respond to a Message at Your Telephone:
1. The message waiting lamp flashes at your telephone.
2. Pick up the handset.
. Dial tone is heard.
3. Dial the Message Waiting - Automatic Callback access code.
a The SATURN System automatically dials the
extension number of the party that sent the
message.
0 Ringback tone is heard.
NOTE: If busy tone is heard, the extension is busy; try in-
itiating the callback at a later time.
4. When the party answers, identify yourself and ask
for the message.
a At the completion of the automatic callback, the
message is automatically cancelled (lamp extinguishes).
d. To Cancel a Message That is Waiting at Your
Telephone:
1. Pick up the handset.
l
Dial tone is heard.
2. Dial the Message Waiting - Received cancellation
code.
l
Confirmation tone is heard.
. The message waiting lamp extinguishes if no
other message exists.
3. Hang up.
e. To Cancel a Message You Sent to Another Telephone:
Pick up the handset.
l
Dial tone is heard.
Dial the Message Waiting - Sent cancellation code.
Dial the extension number to which the message
was sent.
l
Confirmation tone is heard indicating that the
message is cancelled.
NOTE: Reorder tone is heard instead of confirmation tone
if an invalid access code is dialed or the message
was already cancelled at the called telephone.
4. Hang up.
9.05 Mobile Authorization Codes. This feature allows you
to place a call from a telephone that otherwise would be restricted by its Class-of-Service. An authorization code which
is assigned to a Class-of-Service with its own call restrictions
must be dialed.
a. To Override a Call Restriction:
1. Pick up the handset.
l
Dial tone is heard.
2. Dial the mobile authorization access code.
3. Dial an authorization code.
l
Recall dial tone is heard indicating that the
Class-of-Service assigned to the dialed authorization code is now in effect.
NOTE: Intercept tone is heard if an invalid authorization
code is dialed.
4. Place the call previously restricted.
NOTE:
If you are still restricted from placing the call, the
Class-of-Service assigned to the dialed authorization code may not allow it.
After you have completed the call and hung up, the Class-ofService defined by the authorization code is removed and the
telephone’s original Class-of-Service returns active.
1
:
9-2
Page 91

SATURN EPABX
A30808-X5051-C120-1-6918
Standard Station User Instructions
Issue 1, December 1984
9.06 SMDR Account Codes. Account codes are used with
SMDR on preselected incoming and outgoing trunk calls. Two
types of account codes are used: standard (or default) account codes and special account codes. Default account
codes are assigned to stations and trunks and are automatically activated when you originate or receive a Call over one
of these groups. Special account codes must be entered from
your telephone to complete an otherwise restricted outgoing
call.
a. To Enter a Special Account Code:
1. After dialing a trunk access code (e.g., “9” for outside) or an LCR access code, if you hear recall dial
tone, enter a valid account code.
l
Dial tone is heard.
NOTE: The account code must be entered within a preset
period of time or else the trunk is released and reorder tone is heard.
2. Complete the call by dialing the desired destination number (do not redial the trunk access code).
9.07 Stop Hunt. This feature allows a sequential hunt group
to be temporarily reduced in size.
a. To
1.
2.
b. To
1.
Shorten the Sequential Hunt Group:
Dial the Stop Hunt activation code from the extension at which all succeeding extensions are to be
excluded from the hunting list. For example, if the
hunt sequence includes extensions 234-235-236237-238-239 and you want to exclude extensions
238 and 239, dial the Stop Hunt access code from
extension 237.
l
Confirmation tone is heard indicating the successful activation of the Stop Hunt feature.
Hang up.
Return the Hunt Group to Full Size:
Dial the Stop Hunt cancellation code from the ex-
tension that activated Stop Hunt.
l
Confirmation tone is heard indicating successful cancellation of the Stop Hunt feature.
2. Hang up.
9.08 Universal Night Answer - Zoned. This feature allows
you to answer incoming calls ringing the night bell(s) when
the SATURN EPABX System is in the night service mode.
aI To Answer an Incoming Call:
1. You hear the night bell(s)
2. Pick up the handset.
l
Dial tone is heard.
ringing.
3. Dial the appropriate Universal Night Answer zone
access code.
l
A talking connection is established between
you and the incoming party.
NOTE: If reorder tone is heard, the night call already has
been answered. If intercept tone is heard, you are
not allowed to answer incoming night calls from your
telephone.
4. You may begin to talk.
9.09 Voice Paging Access - Zoned and Area. This feature
allows you to page another party over the loudspeaker system.
a. To .Page a Party:
1. Pick up the handset.
l
Dial tone is heard.
2. Dial the appropriate Voice Paging zone, area (combination of zones), or all zones access code.
l
Confirmation tone is heard indicating connec-
tion to the loudspeaker system.
3. Speak slowly and distinctly into the handset.
4. Hang up.
9-3
Page 92

SATURN EPABX
A30808-X5051-C120-l-5918
Standard Station User Instructions
Issue 1, December 1984
Table 9.00 Feature Access Codes
FEATURE
CODE
FEATURE
CODE
CALL FORWARDING FEATURES
SPEED CALLING FEATURES
Call Forwarding - All Calls
To Activate
.........................
ToCancel .........................
Call Forwarding - Busy Lines
To Activate
.........................
ToCancel .........................
Call Forwarding - No Answer
To Activate
.........................
ToCancel .........................
Call Forwarding - Secretarial
To Activate.
........................
To Cancel
.........................
Call Forwarding to Public Network
To Activate.
........................
ToCancel .........................
Call Forwarding - Return.
..............
CALL PICKUP FEATURES
Call Pickup - Directed
.................
Call Pickup - Group.
..................
CALL QUEUEING FEATURES
Internal Call Queuing - Callback
To Cancel Callback.
.................
Outgoing Call Queueing - Callback
To Cancel Callback.
.................
CONFERENCE FEATURES
Last Number Redial
...................
Speed Calling - Individual
To Store Or Change
.................
To Place A Call
....................
Speed Calling - Group
................
Group1 ...........................
Group2 ...........................
Group3 ...........................
Group4 ...........................
ADDITIONAL FEATURES
Call Tracing.
.........................
Least Cost Routing
To Access
.........................
To Cancel Callback.
.................
Message Waiting
To Activate
.........................
To Respond ........................
To Cancel Sent Message
.............
To Cancel Received Message
.........
Stop Hunt
To Activate
.........................
To Cancel
.........................
,Universal Night Answer
All Zones
...........................
Zone1
............................
Zone2 ............................
Zone3 ............................
Zone4 ............................
Meet-Me Conference
..................
Station Controlled Conference
To Access Conference
...............
To Remove Any Conferee.
............
To Remove Last Conferee
............
HOLD FEATURES
Call Hold.
...........................
Call Hold - Flip-Flop (Broker)
...........
Call Park
............................
PRIVACY FEATURES
Voice Paging Access
Zone 1
............................
Zone2 ............................
Zone 3 ............................
Zone 4 ............................
Zones 1 and 2
.....................
Zones 1 and 3
.....................
Zones 1 and 4
.....................
Zones 2 and 3
..........
.
..........
Zones 2 and 4
.....................
Zones 3 and 4
.....................
Zones 1, 2, and 3
...................
Zones 1, 2, and 4
...................
Zones 1, 3, and 4..
.................
Zones 2, 3, and 4
...................
Zones 1, 2, 3, and 4.
................
Executive Override
....................
Do Not Disturb
To Activate
.........................
ToCancel .........................
Page 93

SATURN EPABX
A30808-X5051-C120-l-B918
Standard Station User Instructions
Issue
1,
December 1984
Table 9.01 Feature Instruction Guide
FEATURE
CALL FORWARDING - FEATURES
PROCEDURE
Call Forwarding - All Calls
- TO Forward all incoming calls:
- To cancel forwarding:
Call Forwarding - Busy Lines
- To forward incoming calls when
your telephone is busy:
- To cancel forwarding:
: fr
Pick up handset (dial tone) - Dial Call Forwarding All Calls activation code Dial forwarded-to extension number (confirmation tone) - Hang up.
Pick up handset (dial tone) - Dial Call Forwarding cancellation code (confirmation tone) - Hang up.
Pick up handset (dial tone) - Dial Call Forwarding Busy Lines activation
code - Dial forwarded-to extension number (confirmation tone) - Hang up.
Pick up handset (dial tone) - Dial Call Forwarding cancellation code (confirmation tone) - Hang up.
Call Forwarding - No Answer
- To forward incoming calls not
answered at your telephone:
- To cancel forwarding:
Pick up handset (dial tone) - Dial Call Forwarding No Answer activation
code - Dial forwarded-to extension number (confirmation tone) - Hang up.
Pick up handset (dial tone) - Dial Call Forwarding cancellation code (confirmation tone) - Hang up.
Call Forwarding to Public Network
- To forward all incoming calls to
an outside number:
- To cancel forwarding:
Pick up handset (dial tone) - Dial Call Forwarding to Public Network activation code - Dial outside destination number (confirmation tone) - Hang up.
Pick up handset (dial tone) - Dial Call Forwarding cancellation code (confirmation tone) - hang up.
Call Forwarding - Secretarial
- To forward all incoming calls to
the preassigned extension:
- To cancel forwarding:
Pick up handset (dial tone) - Dial Call Forwarding Secretarial activation
code (confirmation tone) - Hang up.
Pick up handset (dial tone) - Dial Call Forwarding cancellation code (confirmation tone) - Hang up.
Call Forwarding - Return
- To transfer a call back to the
forwarding-telephone:
Momentarily depress hookswitch (recall dial tone) - Dial Call Forwarding
Return access code (ringback tone) - When party answers, announce the
transfer - Hang up.
CALL PICKUP FEATURES
Call Pickup - Directed
-
To
pick up a call:
Pick up handset (dial tone) - Dial Call Pickup Directed access code - Dial
extension number where call is ringing - You may begin to talk.
Call Pickup - Group
- To pick up a call in your pickup
group:
CALL QUEUING FEATURES
Pick up handset (dial tone) - Dial Call Pickup Group access code - You
may begin to talk.
Internal Call Queuing - Callback
- To establish an automatic
callback:
- To cancel an automatic callback:
Busy tone is heard after dialing busy extension - Do not hang up (busy tone
changes to low tone) - Hang up - When three-burst ringing is heard, pick up
handset (ringback tone) - When called party answers, you may begin to talk.
Pick up handset (dial tone) - Dial automatic callback cancellation code (confirmation tone) - Hang up.
Internal Call Queuing - Standby
- To establish a standby queuing
condition:
Busy tone is heard after dialing busy extension - Do not hang up (busy tone
changes to low tone) - Do not hang up (low tone changes to special ringback tone) - When called party answers, you may begin to talk.
9-5
Page 94

SATURN EPABX
Standard Station User Instructions
A30808-X5051-C120-l-8918
Issue 1, December 1984
,
Table 9.01 Feature Instruction Guide (Continued)
FEATURE
PROCEDURE
CALL QUEUING FEATURES (Con?.)
Outgoing Call Queuing - Callback
- To establish an automatic callback
Busy tone is heard after dialing trunk access code - Do not hang up (busy tone
condition:
changes to low tone) - Hang up - When three-burst ringing is heard, pick up
handset (dial tone) - Complete dialing number.
- To cancel an automatic callback: Pick up handset (dial tone) - Dial automatic callback cancellation code (confirmation tone) - Hang up.
Outgoing Call Queuing - Standby
- To establish a standby queuing
condition:
Busy tone is heard after dialing trunk access code - Do not hang up (busy tone
changes to low tone) - Do not hang up (low tone changes to silence or music,
if provided) - When dial tone is heard, complete dialing the number.
CONFERENCE FEATURES
Add-On Conference
- To add a third party: Momentarily depress hookswitch (recall dial tone) - Dial telephone number of
third party (ringback tone) - When party answers, inform party of conference -
Momentarily depress hookswitch again to add party to conference - You may
begin to talk.
Meet-Me Conference
- To enter the conference: Pick up handset (dial tone) - Dial Meet-Me Conference access code and bridge
code (conference tone) - You may begin to talk.
Station Controlled Conference
- To access a conference circuit:
Pick up handset (dial tone) - Dial Station Controlled Conference access code
(recall dial tone)
- To add parties to the conference:
Momentarily depress hookswitch to leave conference (recall dial tone) - Dial tel-
ephone number of desired party (ringback tone) - When party answers, inform
party of conference - Momentarily depress hookswitch to add party to conference (conference tone) - Repeat procedure to add other parties to conference.
- To remove any conferee from the
Momentarily depress hookswitch to leave conference (recall dial tone) - Dial Con-
conference and consult with the
ference Member Remove code - Dial extension number of conferee to be re-
conferee privately: moved - You may begin to talk.
- To remove the last member added
Momentarily depress hookswitch to leave conference (recall dial tone) - Dial Last
to the conference and consult Member Added access code - You may begin to talk.
with the conferee privately:
- To transfer conference mastership: Inform desired conferee that you are releasing from the conferee and that conference mastership can be gained by hookswitch flashing after you hang up.
HOLD FEATURES
Consultation Hold
- To hold a call and originate
another call:
- To return to the held call:
Call Hold
- To hold a call:
- To return to the held call or
alternate between two calls:
Momentarily depress hookswitch (recall dial tone) - Dial destination number (ringback tone) - When party answers, you may begin to talk.
Wait until consulted party hangs up and you are automatically connected to party.
Momentarily depress hookswitch (recall dial tone) - Dial Call Hold access code
(confirmation tone) - Hang up.
Pick up handset or momentarily depress hookswitch, if connected to another call
(dial tone/recall dial tone) - Dial Call Hold access code (automatic reconnection
to held party and other party, if any, is placed on hold) - Resume your conversation.
9-6
Page 95

SATURN EPABX
Standard Station User Instructions
A30808-X5051-C120-l-8918
Issue 1, December 1984
Table 9.01 Feature Instruction Guide (Continued)
FEATURE
HOLD FEATURES (Con?.)
PROCEDURE
Call Hold - Flip-Flop (Broker)
- To hold a call and answer a
waiting call:
- To hold a call and originate
another call:
- To return to a held call:
- To alternate between two calls:
Momentarily depress hookswitch (recall dial tone) - Dial the Call Hold Flip-Flop
access code - You may begin to talk.
Momentarily depress hookswitch (recall dial tone) - Dial the Call Hold Flip-Flop
access code (dial tone) - Dial number of party (ringback tone) - When party answers, you may begin to talk.
Wait until other party hangs up (automatic reconnection to party) - Resume your
conversation.
Momentarily depress hookswitch (automatic reconnection to other party) - Resume your conversation.
Call Park
- To park (hold) a call:
- To return to the parked call:
Momentarily depress hookswitch (recall dial tone) - Dial Call Park access code
- Dial Code Park location code (confirmation tone) - Hang up.
Pick up handset (dial tone) - Dial Call Park access code - Dial Call Park location
code - Resume your conversation.
PRIVACY FEATURES
Executive Override
- To override a busy call: While listening to busy tone, momentarily depress hookswitch (recall dial tone)
- Dial Executive Override access code (executive override tone) - You may begin to talk.
Executive Override - Automatic
- To activate: Special ringback tone is heard after dialing an extension-Wait until called party
answers waiting call - If called party does not answer your call within a preset
period of time (executive override tone) - You may begin to talk.
30 Not Disturb
- To make your telephone busy to
incoming calls:
- To re-establish normal operation
to your telephone:
SPEED CALLING FEATURES
Pick up handset (dial tone) - Dial Do Not Disturb activation code (confirmation
tone) - Hang up.
Pick up handset (recall dial tone) - Dial Do Not Disturb cancellation code (confirmation tone) - Hang up.
Last Number Redial
- To originate a call to the last
number dialed from your
telephone:
Pick up handset (dial tone) - Dial Last Number Redial access code (ringback
tone) - When called party answers, you may begin to talk.
Speed Calling - Group
- To place a speed call: Pick up handset (dial tone) - Dial Speed Calling Group access code - Dial code
corresponding to desired telephone number (ringback tone) - When called party
answers, you may begin to talk.
Speed Calling - Individual
- To store or change speed
calling codes:
- To place a speed call:
Pick up handset (dial tone) - Dial Speed Calling Store/Change access code Dial a speed call code (0 to 9) - Dial desired telephone number (confirmation
tone) - Hang up.
Pick up handset (dial tone) - Dial Speed Calling Individual access code - Dial
code corresponding to desired telephone number (ringback tone) -When called
party answers, you may begin to talk.
9-7
Page 96

SATURN EPABX
Standard Station User instructions
A30808-X5051-C120-‘~-B918
issue 1, December 1984
Table 9.01 Feature instruction Guide (Continued)
FEATURE
ADDITIONAL FEATURES
PROCEDURE
Call Transfer
- To transfer a call:
Momentarily depress hookswitch (recall dial tone) - Dial destination number (ringback tone) - When party answers, announce the transfer - Hang up.
Call Tracing
- To trace a call:
Momentarily depress hookswitch (recall dial tone) - Dial Call Trace access code
(confirmation tone, reconnection to call) - Hang up or continue to talk.
Least Cost Routing
- To place an outside call:
Pick up handset (dial tone) - Dial LCR access code (dial tone) - Dial destination
number (confirmation tone then ringback tone) - When party answers, you may
begin to talk.
- To cancel callback queuing:
Pick up handset (dial tone) - Dial automatic callback cancellation code (confirmation tone) - Hang up.
Message Waiting
- To activate message waiting after
dialing a do-not-answer or busy
extension:
- To activate message waiting
without first attempting to call
the other party:
- To respond to a message at your
telephone:
- To cancel a message that is
waiting at your telephone:
2 To cancel a message you sent to
another telephone:
Mobile Authorization Codes
- To override a call restriction
or feature:
Momentarily depress hookswitch (recall dial tone) - Dial Message Waiting activation code (confirmation tone) - Hang up.
Pick up handset (dial tone) - Dial Message Waiting activation code - Dial extension number of party (confirmation tone) - Hang up.
Pick up handset (dial tone) - Dial Message Waiting Automatic Callback access
code (ringback tone) - When party answers, identify yourself and ask for the
message.
Pick up handset (dial tone) - Dial Message Waiting Received cancellation code
(confirmation tone) - Hang up.
Pick up handset (dial tone) - Dial Message Waiting Sent cancellation code (confirmation tone) - Hang up.
Pick up handset (dial tone) - Dial Mobile Authorization access code - Dial an
Authorization Code (recall dial tone) - Place the call or activate the feature previously restricted.
SMDR Account Codes
- To enter an account code:
After dialing a trunk access code and recall dial tone is heard, dial a valid account code (dial tone) - Complete dialing destination number.
Stop Hunt
- To shorten the hunt group:
- To return, the hunt group to
full size:
Universal Night Answer - Zoned
- To answer an incoming call:
Dial the Stop Hunt activation code from extension at which all succeeding ex-
tensions are to be excluded from the hunt list (confirmation tone) - Hang up.
Dial the Stop Hunt cancellation code from extension at which Stop Hunt was ac-
tivated (confirmation tone) - Hang up..
.*
You hear the night bells - Pick up handset (dial tone) - Dial appropriate zone
accesslcode ‘-,You may begin to talk.
Voice Paging Access -
Zoned and Area
- To page a party:
i
. ~-
. .
Pick up handset (dial tone) - Dial appropriate zone or zone combination access
code [confirmation tone) - Speak slowly and distinctly into handset - Hang up.
9-8 (8 pages)
Page 97

Siemens Practices
Operation Series
A30808-X5051-CllO-l-8919
Issue 1, December 1984
SATURN@ EPABX
OCIE
ATTENDANT CONSOLE
DESCRIPTION AND
OPERATING INSTRUCTIONS
Issued by Office Systems Group
.
5500 Broken Sound Boulevard N.W. Boca Raton, Florida 33431
l
(305) 994-8100 l Telex: 515052
Siemens Communication Systems, Inc.. Printed in U.S.A.
Page 98

Siemens Practices
Operation Series
A30808-X5051-CllO-l-8919
Issue 1, December 1984
0 Siemens Communication Systems, Inc., 1982, 1984
All rights reserved.
This material is Proprietary to Siemens Communication Systems, Inc. Any unautho-
rized reproduction, use or disclosure of this material, or any part thereof, is strictly
prohibited.
Siemens reserves the right to make changes in specifications at any time and
without notice. The information furnished by Siemens in this material is believed
to be accurate and reliable. However, no responsibility is assumed by Siemens
for its use.
SATURN’ is the registered trademark of Siemens Communication Systems, Inc.
.
Page 99

SATURN EPABX
A30808-X5051-E130-l-8931
Traffic Metering And Analysis Issue 1, December 1984
. TRUNK ACTIVITY AUDIT REPORT
l
TRUNK GROUP NUMBER 3
TRK
INC INC
INC
OUT
OUT OUT
FAIL
GLARE
NUM
ATTEMPT
ccs HTIA
ATTEMPT
ccs HTIA
ATTEMPT ATTEMPT
0 66
91.1
138 0
1.9
.***
0 0
1 50
65.6
131 0
1.0
“ft.
0 0
2 30
41.0
136 0
0.6
60
0 0
3 12
27.3
227 0
0.7
70
0 0
4 4
2.0
50 0
0.0
0
0 0
t DATA RESOURCE USAGE (IN CCS)
l
MODM PL 1 USAGE
6
MODM
PL 2 USAGE
1
MODM PL 1 QUEUE
0
MODM
PL 2 QUEUE
0
t DATAEVENTPEGCOUNTERS
l
DATA CALL BUSY 0
DATA CALL ATTEMPT 19
DATA CALL COMPLETE 97
DATA CALL FAILURE 2
MODM PL 1 ATTEMPTS
4
MODM
PL 2 ATTEMPTS
2
MODM PL 1 BUSY
1
MODM
PL 2 BUSY
0
MODM PL 1 Cl STANDBY
1
MODM
PL 2 Q STANDBY
0
. DATA TRUNK
GROUP REPORT
9
INC DATA CALLS OUT DATA CALLS
DATA STANDBY QUEUING
TG PEGS
USAGE
HTIA PEGS USAGE HTIA PEGS USAGE HTIA
ATB
1 0 0
0
0
0 0
0 0
0 0
2 0 0
0
0
0 0
0 0
0 0
4 0 0
0
0
0 0
0 0
0 0
5 0 0
0
0
0 0
0 0
0 0
7 0 0
0
0
0 0
0 0
0 0
0 0 0
0
0
0 0
0 0
0 0
13 0 0
0
0
0 0
0 0
0 0
19 0 0
0
0
0 0
0 0
0 0
23 0 0
0
0
0 0
0 0
0 0
24 0 0
0
0
0 0
0 0
0 0
REPORT COMPLETE
NOTES: The above sample report indicates the traffic data was accumulated from 08:OO to 12:00 hours on November 15, 1984.
HT/A is the total usage in seconds divided by the total number of pegs. When “ **** ” is printed, one or more
trunk calls were established when the traffic metering session began but no trunk calls were originated during
the traffic metering period.
VoOCC (Percent of Occupancy) - The percent of time in use of the trunks in a particular trunk group during the
traffic metering period.
Figure 7.00 Traffic Metering Report Sample (Continued)
7-3 (7-4 blank)
Page 100

SATURN EPABX
Attendant Console General Description and Operating Instructions
CONTENTS
SECTION PAGE
SECTION
PAGE
1.00 INTRODUCTION
.............................
_
.
l-l
1.01 Purpose of Practice
..........................
l-l
1.02 Purpose of Equipment ........................
l-l
1.03 SIEMENS SATURN Practices ..................
l-l
2.00 GENERAL DESCRIPTION
......................
.2-l
2.01 Operational Characteristics ...................
.2-l
2.02 Physical Characteristics. .....................
.2-l
3.05 Dialing Keypad. ..........................
-3-3
3.06 Call Answer Keys.
..........................
.3-3
3.07 Call Processing Keys
.........................
3-5
3.06 Standard Feature Keys
......................
.3-7
3.09 Optional Feature Keys
......................
.3-8
3.10 Programmable Features.
.....................
-3-13
3.00 CONTROLS AND INDICATORS
..................
.3-l
3.01 General
...................................
.3-l
3.02 Console and System Indicators. ...............
.3-l
3.03 Call Information Display. .3-l
3.04 Audible Signal Volume Control Knob
........... .3-3
4.00 OPERATING INSTRUCTIONS.
...................
.4-l
4.01 General.
..................................
.4-l
4.02 Unstaffed Mode
............................
.4-l
4.03 Answering and Processing Calls ..............
.4-l
4.04 Attendant-Initiated Calls
......................
.4-l
4.05 Attendant-Initiated Feature Functions ...........
.4-l
4.06 Call Types.
................................
-4-l
LIST OF FIGURES
LIST OF FIGURES
FIGURE PAGE
2.00 Basic Assembly of Attendant Console .2-l
3.00 Console and System indicators,
Call Information Display and Dialing Keypad. .3-2
FIGURE
1.
PAGE
3.01 Call Answer, Call Processing, and
Standard Feature Keys .3-4
3.02 Optional Feature Keys .3-9
LIST OF TABLES
LIST OF TABLES
TABLE PAGE
1.00 Mnemonics Used in This Practice.. l-l
3.00 Held Call Hold Locations.. .3-7
4.00 Supervisory Audible Tone Plan .4-l
4.01 Typical Call Situations .4-2
TABLE
PAGE
4.02 Attendant-Initiated Call Situations. .4-2
4.03 Attendant-Initiated Feature Functions .4-2
4.04 Call-Type Information Displays. .4-3/4-4
A30808-X5051-CliO-l-B919
Issue 1, December 1984
 Loading...