

Page 1

Instrument Panel . . . . . . . . . . . . . . . . . . . . . . . . . .2
Instrument Panel Cluster . . . . . . . . . . . . . . . . . . .3
Seat Controls . . . . . . . . . . . . . . . . . . . . . . . . . . . . .4
Audio Systems . . . . . . . . . . . . . . . . . . . . . . . . . . .5
XM Satellite Radio . . . . . . . . . . . . . . . . . . . . . . . . .8
DVD Radio . . . . . . . . . . . . . . . . . . . . . . . . . . . . . . .9
OnStar
®
. . . . . . . . . . . . . . . . . . . . . . . . . . . . . . . . . .9
Cruise Control . . . . . . . . . . . . . . . . . . . . . . . . . . .10
Traction Control System . . . . . . . . . . . . . . . . . . .10
Automatic Headlamp System . . . . . . . . . . . . . . .11
Horn Operation . . . . . . . . . . . . . . . . . . . . . . . . . .11
Turning or Removing the Ignition Key . . . . . . .11
Compass Calibration . . . . . . . . . . . . . . . . . . . . . .11
Climate Controls . . . . . . . . . . . . . . . . . . . . . . . .12
Windshield Wipers and Washer . . . . . . . . . . . . .12
Power Windows . . . . . . . . . . . . . . . . . . . . . . . . . .13
Sunroof . . . . . . . . . . . . . . . . . . . . . . . . . . . . . . . . .13
Rear Window Wind Effects . . . . . . . . . . . . . . . . .14
Manual Door Locks . . . . . . . . . . . . . . . . . . . . . . .14
Saturn Security System/
Remote Keyless Entry . . . . . . . . . . . . . . . . . . . .14
Entry Lighting . . . . . . . . . . . . . . . . . . . . . . . . . . .14
Lockout Prevention . . . . . . . . . . . . . . . . . . . . . . .15
Rear Door Security Locks . . . . . . . . . . . . . . . . .15
Towing Your Vehicle . . . . . . . . . . . . . . . . . . . . . .15
Automatic Door Locking and Unlocking . . . . . .15
Removing and Securing the Fuel Cap . . . . . . .16
Fuel Economy . . . . . . . . . . . . . . . . . . . . . . . . . . .16
Resetting the “Change Oil Soon” Light . . . . . .17
Tire Pressure . . . . . . . . . . . . . . . . . . . . . . . . . . . .17
Fold-Down Passenger Seatback . . . . . . . . . . . .17
Fold-Down Rear Seats . . . . . . . . . . . . . . . . . . . .18
Rear Cargo Organizer . . . . . . . . . . . . . . . . . . . . .18
Preventing Window Fogging . . . . . . . . . . . . . . .19
Removing the Spare Tire . . . . . . . . . . . . . . . . . .19
Driving Off Paved Roads . . . . . . . . . . . . . . . . . .19
Roadside Assistance Program . . . . . . . . . . . . .20
My Saturn . . . . . . . . . . . . . . . . . . . . . . . . . . . . . . .20
Congratulations on your purchase of a Saturn VUE. Please read this information and your Owner Manual to
ensure an outstanding ownership experience. Note that your vehicle may not include all the features
described in this booklet.
Page 2
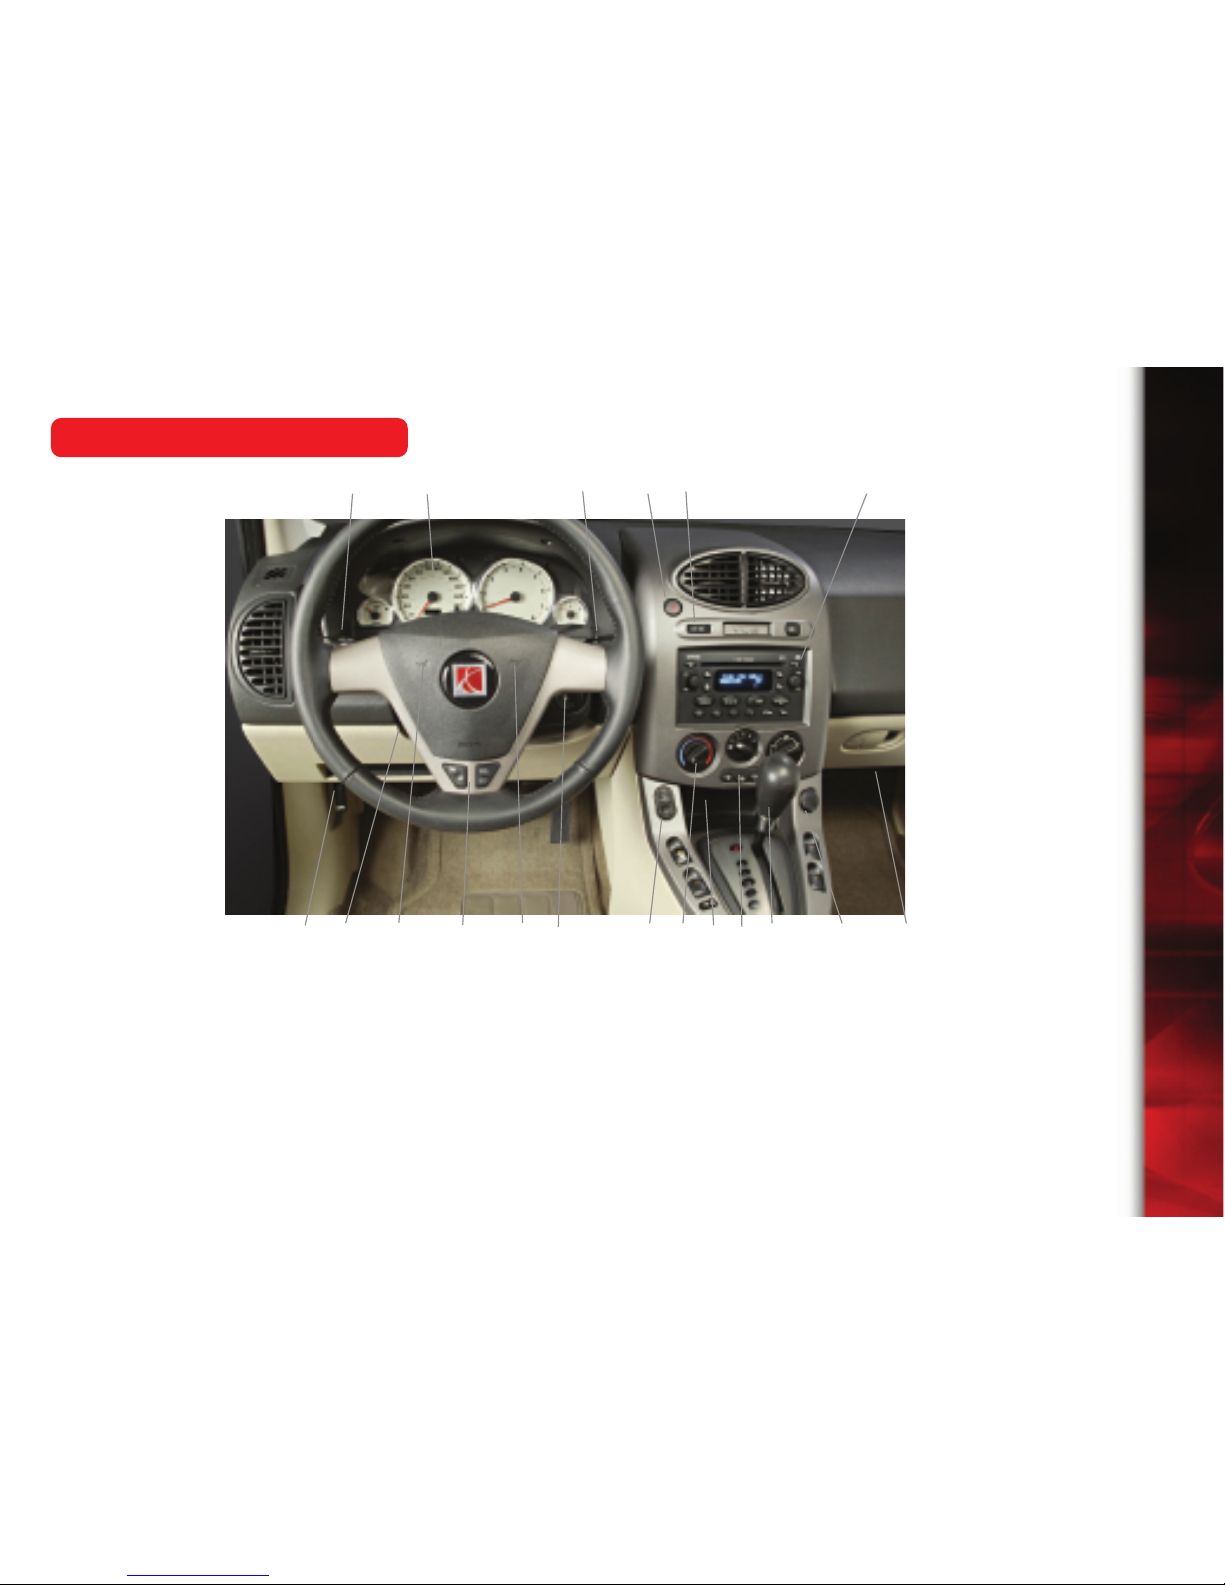
A. Instrument Panel Cluster
B. Hazard Warning Flasher Button
C. Audio System
D. Rear Window Defogger Button
E. HVAC System
F. Remote Power Mirror Control
Button
G.Instrument Panel Brightness Dial
H. Storage Compartment
I. Turn Signal/Multifunction Lever
J. Hood Release
K. Tilt Lever
L. Horn
M.Cruise Control Buttons
N. Ignition Switch
O.Windshield Wiper Lever
P. Shift Lever
Q.Power Outlet
R. Glove Box
Getting to Know Your VUE
2
Instrument Panel
See Section 3 of your Owner Manual.
B
C
A
DE
GI
HJ K
M
L N
O
F
L Q
R
P
Page 3
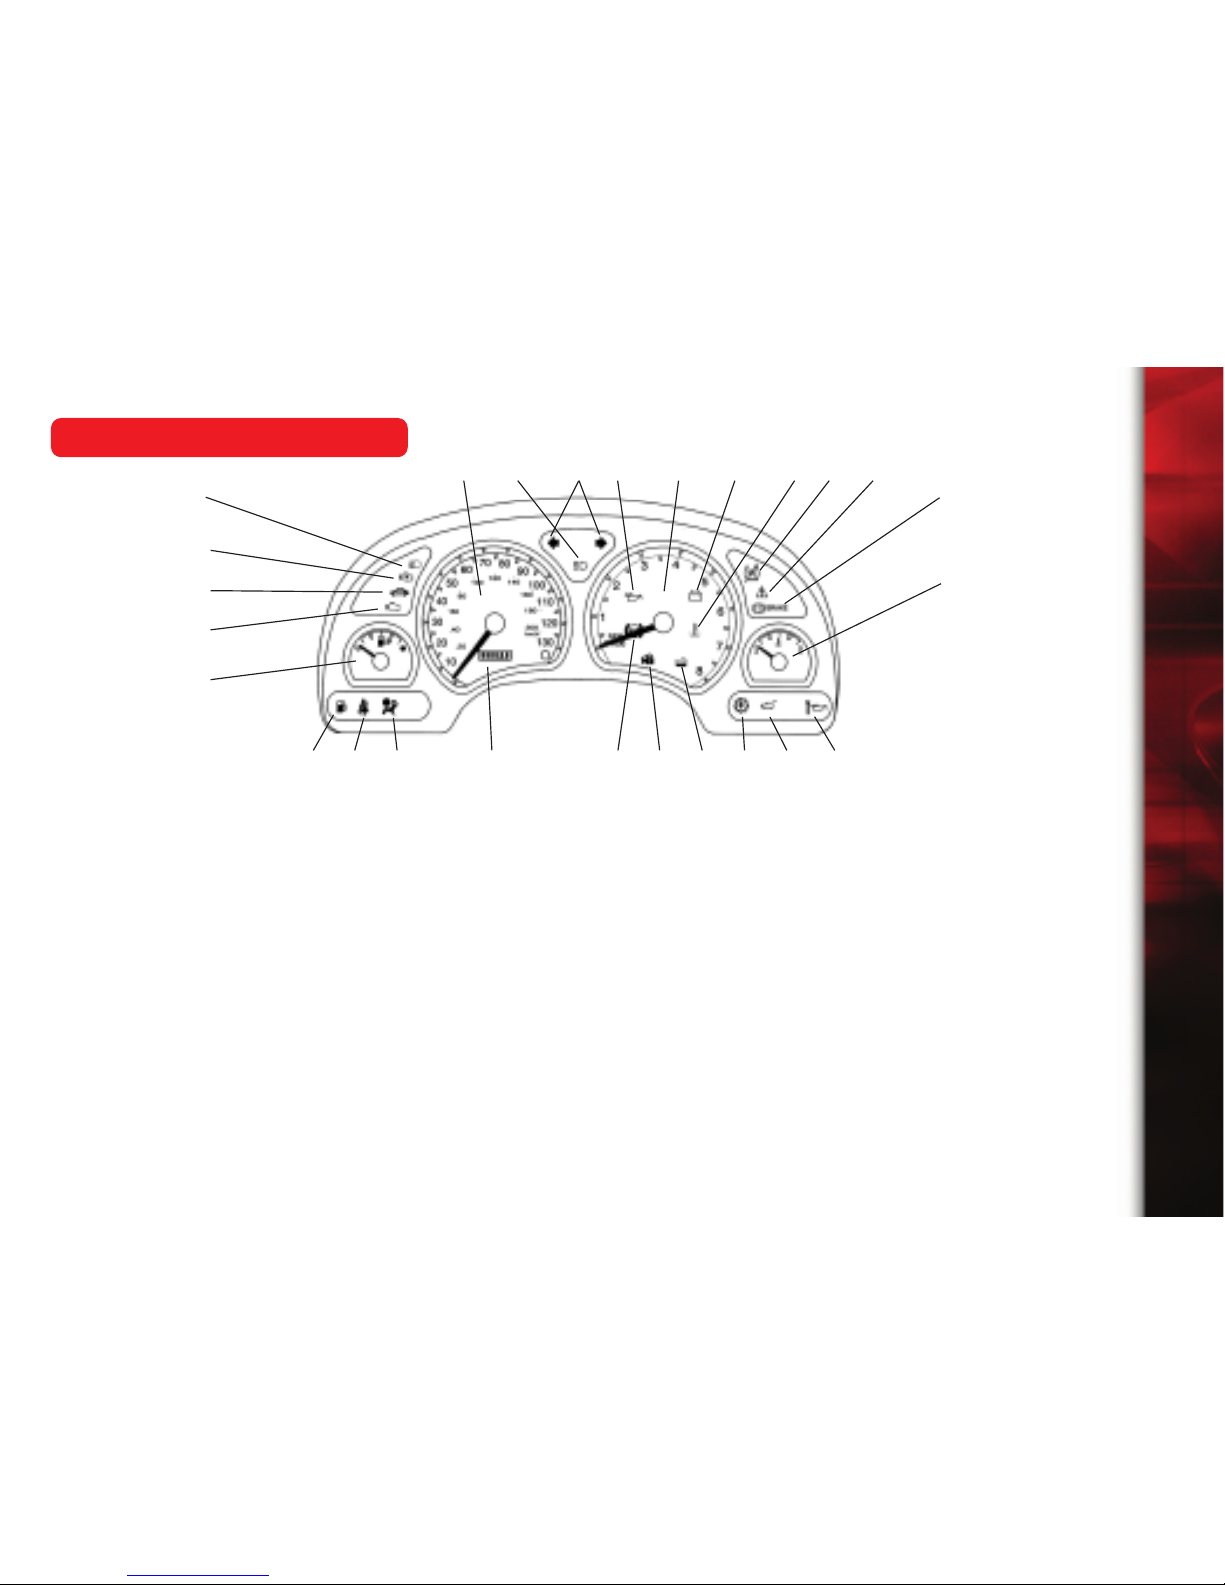
Your vehicle’s instrument panel is
equipped with this cluster or one very
similar to it. The instrument panel
cluster includes these key
features:
A. Odometer
B. Air Bag Readiness Light
C. Safety Belt Reminder Light
D. Low Fuel Warning Light
E. Fuel Gauge
F. Malfunction Indicator
(Service Engine Soon) Lamp
G. Service Vehicle Soon Light
H. Reduced Engine Power Light
I. Daytime Running Lamps
J. Speedometer
K. High Beam Indicator Light
L. Turn Signal Indicator Light
M. Oil Pressure Light
N. Tachometer
O. Battery Warning Light
P. Engine Coolant Temperature Light
Q. Traction Control Disabled Light
R. Low Traction Light
S. Brake System Warning Light
T. Engine Coolant Temperature
Gauge
U. Change Engine Oil Light
V. Gate Ajar Light
W. Upshift Light
X. Low Coolant Warning Light
Y. Security Light
Z. Antilock Brake System Warning
Light
IMPORTANT: The instrument panel
cluster is designed to let you know
about many important aspects of your
vehicle’s operation. It is important to
read your Owner Manual and become
familiar with the information being
relayed to you by the lights, gauges
and indicators, as well as what action
can be taken to ensure safety and to
prevent damage.
3
See Section 3 of your Owner Manual.
S
T
R
Q
P
O
N
M
L
K
J
E
F
G
H
I
U
V
WX
Y
Z
A
B
C
D
Instrument Panel Cluster
Page 4
Getting to Know Your VUE
4
Seat Controls
One of the best things about the VUE is
the way it makes you feel when sitting in
it. Below are a few seat adjustment features that will help make the seats feel
just right for you and your passengers.
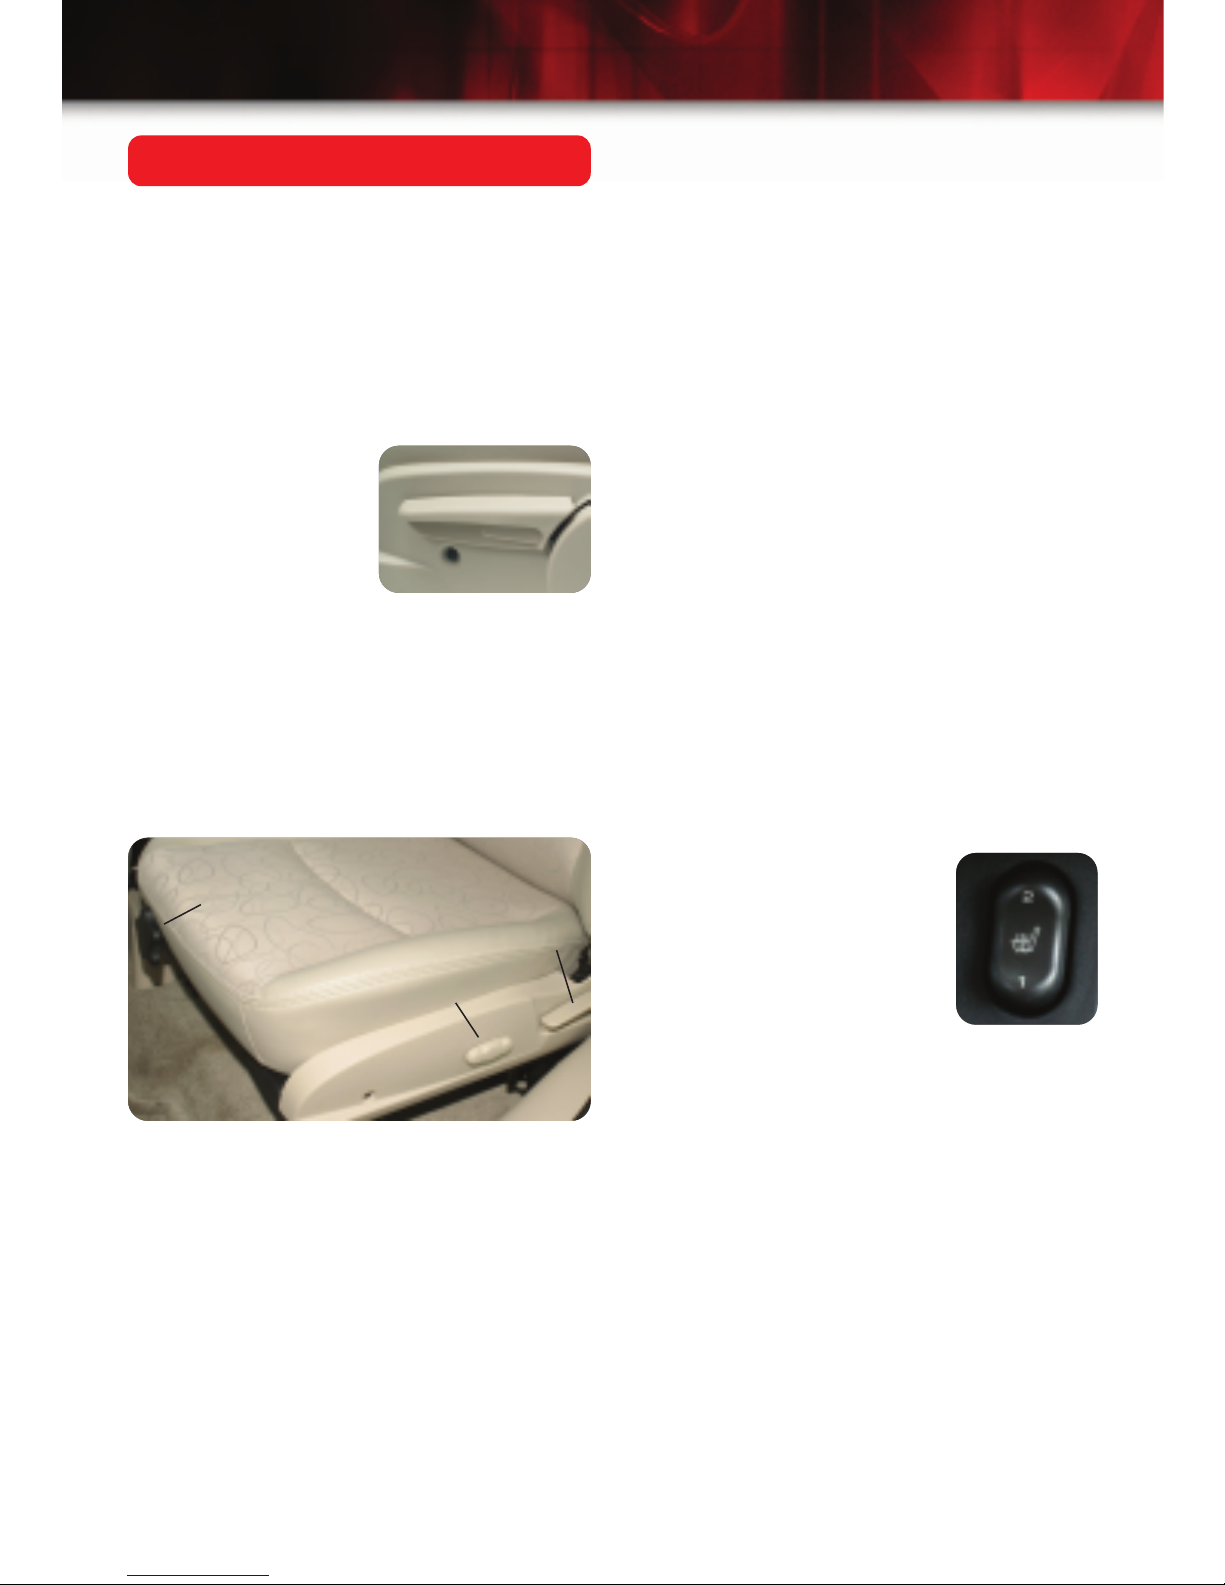
Manual Driver’s Seat Height
Adjustment (if equipped)
The driver’s seat
height adjuster is
located on the leftfront side of your
seat cushion.
To raise the seat:
• Ratchet the lever upward until you
reach the desired height.
To lower the seat:
• Ratchet the lever downward until you
reach the desired height.
Manual Driver’s Seat Lumbar
Adjustment (if equipped)
The driver’s seat lumbar control knob is
located below the front-right side of your
seat cushion (see “A” above). Rotate
the knob to adjust lower back (lumbar)
support of the seat.
Power Seats (if equipped)
If your VUE is equipped with the
Comfort Package, you will find the
power seat control on the door side of
the driver seat, just below your thigh
(see “B” left).
You can raise or lower the front or back
of the seat cushion by moving the end of
the control up or down. To move the
seat forward or rearward, slide the control toward the front or back. To adjust
the height of the seat, move the entire
control up or down.
Manual Front Seatback Recliner
Adjustment
To adjust the seatback, lift the lever
located on the left-rear side of the seat
cushion (see “C” left); then move the
seat to the desired position.
Heated Seats (if equipped)
Your VUE’s heated seats have separate
switches for the driver and front passenger. The switches are located just below
the climate controls. Each switch
includes two settings to heat the seat
cushion and the lower
seatback.
Position 1 warms the
seats, while Position 2
heats the seats to a slightly higher temperature.
Seatbelts
Both front seat positions include heightadjustable shoulder belts. You can
adjust them so that they are centered on
your shoulder or your passenger’s
shoulder. The adjusters are located
above the shoulder belt turning loop.
Move the knob up or down to the positions that are right for each of you.
VUE’s backseats include seatbelt
comfort guides for children who have
outgrown car seats and for smaller
adults. The guides are located on the
back of the seatbacks.
See Section 1 of your Owner Manual.
A
B
C
Page 5
5
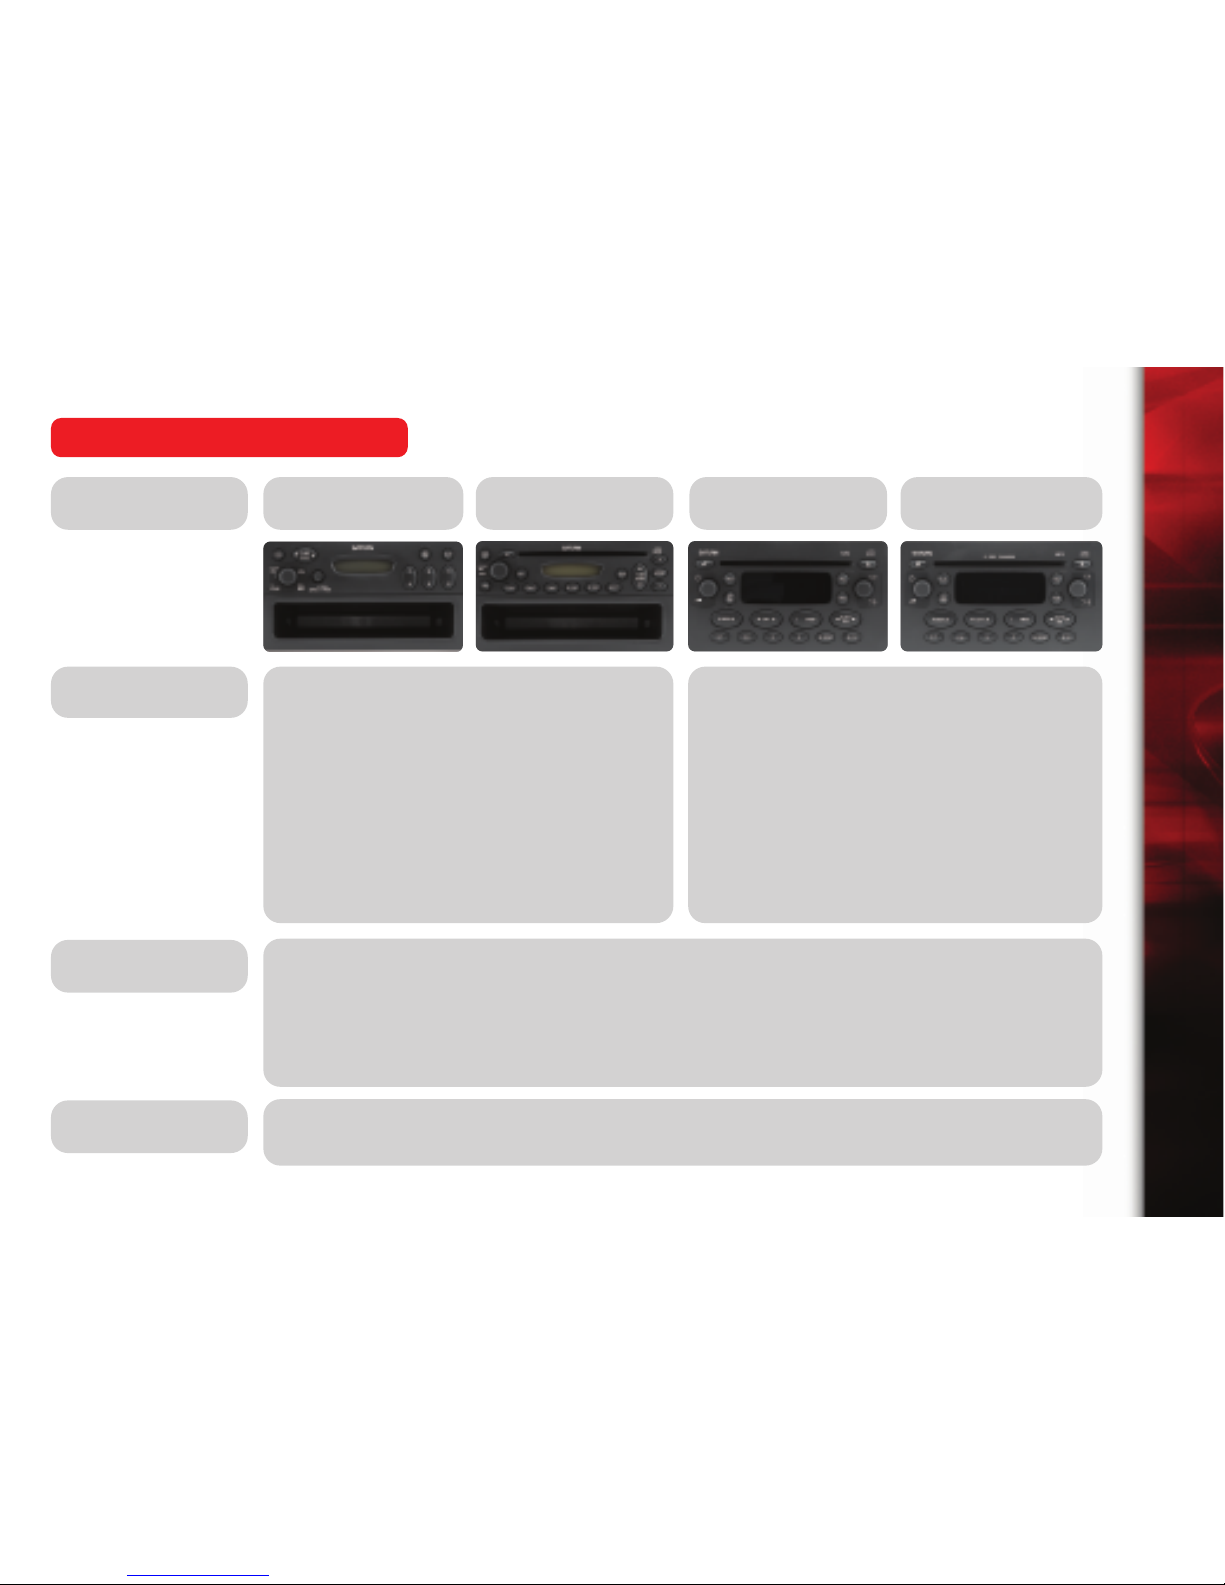
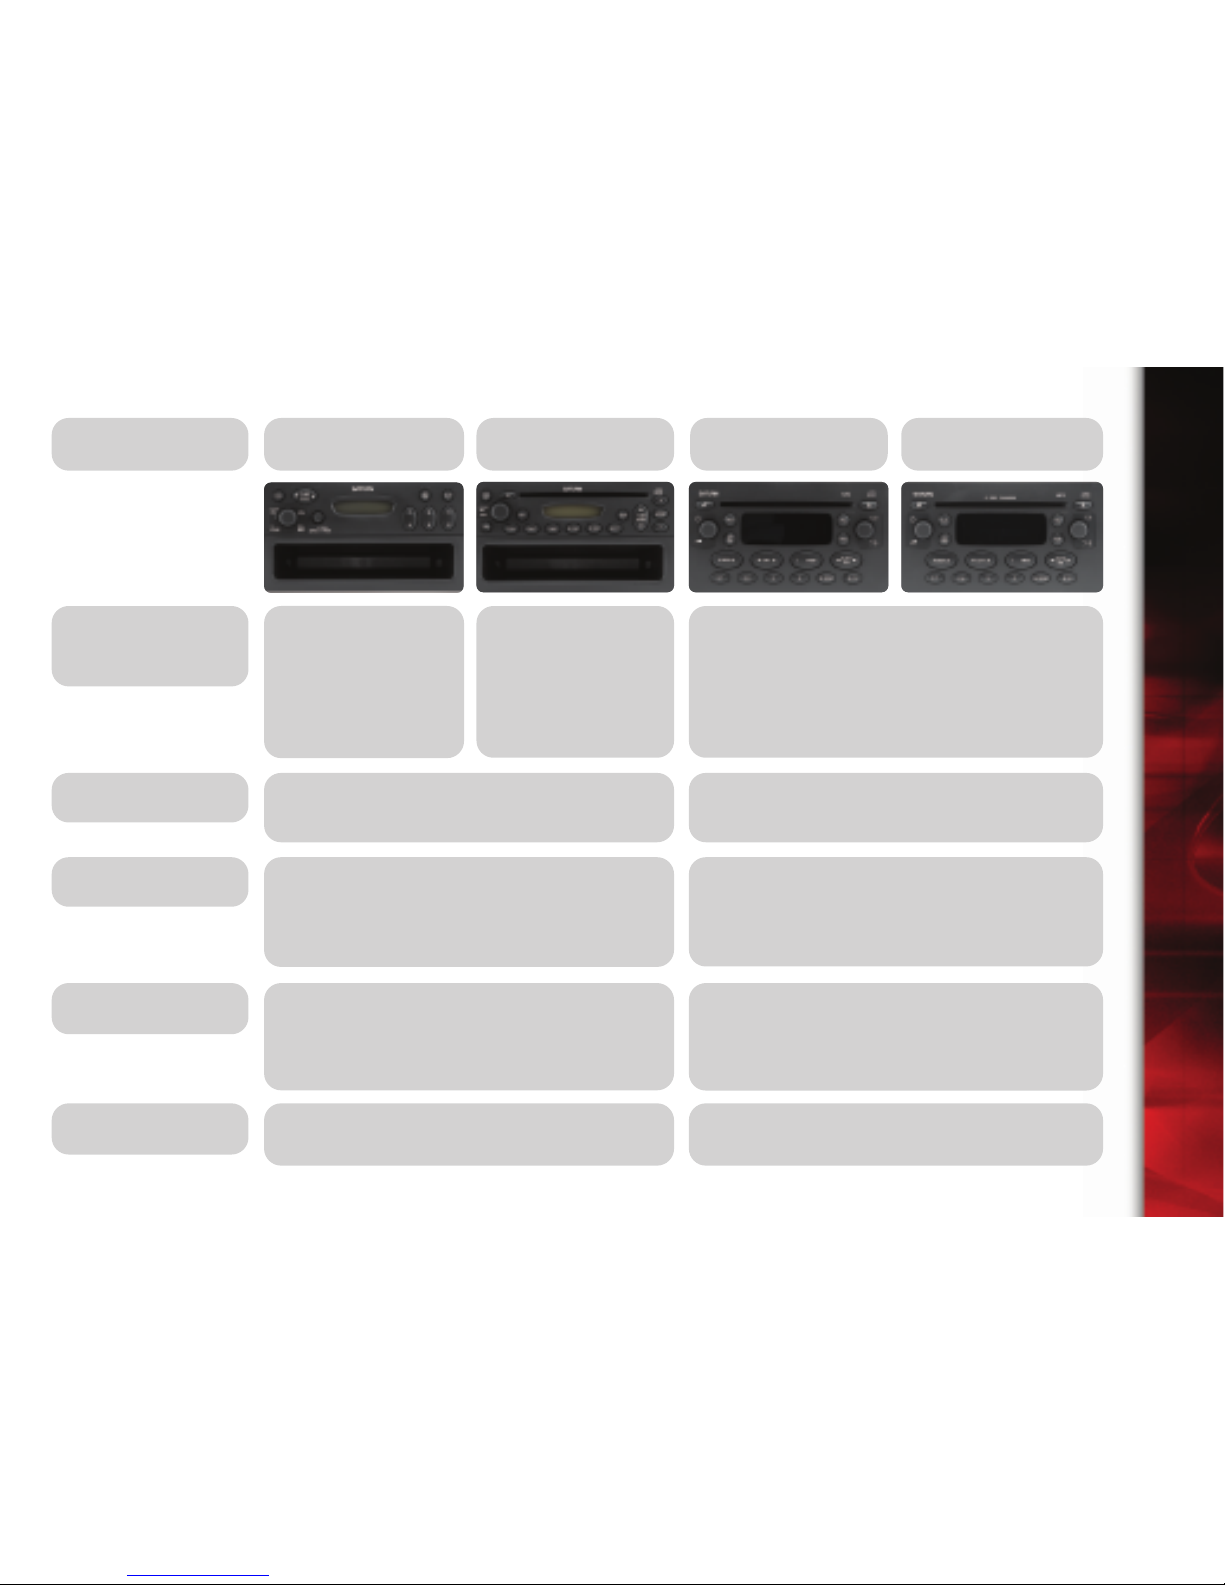
Audio Systems
CONTROL
Preset
AM/FM RADIO
AM/FM RADIO/
CD PLAYER
AM/FM SINGLE-
DISC/MP3 PLAYER
AM/FM 6-DISC/
MP3 PLAYER
To set a preset station frequency to a preset button:
1. Turn the radio to the desired station.
2. Press and hold the desired preset button.
3. An audible tone will sound when the preset is saved, and the message “Preset X saved” will
display. (“X” is the preset location 1 through 6.)
AM/FM
Press to change radio bands.
1. Turn radio on by pressing the On/Off
knob.
2. Press and hold RCL button.
3. While holding RCL button, push left side
of AUTO EQ rocker button until correct
hour appears.
4. While holding RCL button, push right side
of AUTO EQ rocker button until correct
minute appears.
5. Release RCL button when finished.
1. Turn radio on by pressing the On/Off
knob.
2. Press and hold RCL button.
3. While holding RCL button, push down
arrow of TUNE/SEEK button until correct
hour appears.
4. While holding RCL button, push up arrow
of TUNE/SEEK button until correct minute
appears.
5. Release RCL button when finished.
Setting Clock
Page 6
Getting to Know Your VUE
6
Gently pull out
VOL knob to
adjust Balance/Fade.
Press Bass/Treb
knob to release.
Rotate to adjust.
Press MODE
button until
desired mode is
displayed.
Use “+” or “–”
button to adjust.
Balance/Fade/
Bass/Treble
CONTROL
AM/FM RADIO
AM/FM RADIO/
CD PLAYER
AM/FM SINGLE-
DISC/MP3 PLAYER
AM/FM 6-DISC/
MP3 PLAYER
Press the Tune button until the
BASS/TREB/FAD/BAL mode is displayed.
Rotate knob to adjust level.
Tune
Press the TUNE/SEEK button to increase or
decrease frequency.
Rotate the Tune knob to manually change.
Seek
Hold the TUNE/SEEK button until a tone
sounds. Radio will automatically increase or
decrease frequency to next receivable station.
Press the SEEK rocker button momentarily
to automatically increase or decrease
frequency to next receivable station.
Scan
Press SCN button to automatically scan
through all stations sequentially, pausing at
each one for five seconds. Press SCN again
to stop scanning.
Press and hold SEEK rocker button until
tone is generated to automatically scan
through stations, in ascending or descending
order, pausing at each receivable station.
Use either side of AUTO EQ rocker button to
scroll through the preset equalizer options.
Auto EQ
Page 7

7
CONTROL
AM/FM RADIO
AM/FM RADIO/
CD PLAYER
AM/FM SINGLE-
DISC/MP3 PLAYER
AM/FM 6-DISC/
MP3 PLAYER
Press left side of the i/TRAF button for CD
text information, if available.
CD Info
Press the Load
button for less than
three seconds.
Radio will prompt
user to select
which location to
load CD. User
selects location
by pressing
Preset/Disc buttons
1–6.
Insert CD into the
slot, with label side
up.
Press NXT or
PRV button.
Insert CD into the
slot, or press the
Load button and
insert disc when
prompted.
Load Single CD
Press 2 }} button 1||, or rotate the Tune
knob clockwise or counterclockwise.
Next/Previous
Track
Press/hold REV
or FWD button.
Press and hold left side or right side
of || CAT }} button.
Rewind/Fast
Forward
Press || CAT }} rocker button to scroll
through available folders.
Change MP3
Folder
Page 8

Getting to Know Your VUE
8
Audio Systems (cont.)
Six-Disc CD Changer with MP3 Player
CD Changer Controls
(Six-Disc Systems):
(Load): To load a single CD, press
this button for about three seconds. After
being prompted to select a CD loading
location, select a location by pressing
the Preset/Disc buttons 1–6.
To load all CDs, press and hold the
button for at least three seconds.
When prompted, insert one disc at a
time. Press any other radio button to
cancel the operation.
(Eject): Press this button; then
press the preset button when prompted
to indicate which CD should be ejected.
To eject all CDs, press and hold this
button. The CDs will eject in order, one
at a time.
RDM: Press for random play of current
disc. Press and hold for two seconds for
random play of all discs. Press again to
cancel.
: Press right side of button to go
to next CD. Press left side to go to previous CD.
XM Satellite Radio (if equipped)
Your VUE may be equipped with
XM Satellite Radio, which provides
additional listening presets: XM1 and
XM2. To access these, press the AUX
button until XM1 or XM2 appears on
the display.
See Section 3 of your Owner Manual.
Audio System Tips
• To turn on your audio system, press
the On/Off knob located on the upperleft side of the radio. Also use this
knob to adjust the volume.
• On MP3-equipped radios, you can
use your AUTO/EQ button to choose
from six different preset tone mixes
for different types of music. Choose
from among Custom, Flat, Talk, Jazz,
Classical, Country, Rock or Pop.
Each time you press the AUTO/EQ
button, a different preset tone mix is
displayed.
• When loading CDs, always make
sure the CD label is facing up.
Otherwise, the CD(s) will not play.
Your VUE’s audio system is designed to
play premium-quality, store-bought CDs.
This means that you may, on occasion,
have problems with CDs that you have
created and burned yourself. This is a
result of the varied quality of CD burners
and recordable discs.
See Section 3 of your Owner Manual.
Page 9
9
OnStar®(if equipped)
If your vehicle is OnStar-equipped, the
OnStar system provides in-vehicle safety, security and communications services, available 24 hours a day, 7 days a
week. These services are easily
accessed through the three OnStar buttons in your vehicle. For more information about OnStar features, refer to the
OnStar Owner Manual and Audio Tour
CD, located in your glove box.
See Section 2 of your Owner Manual.
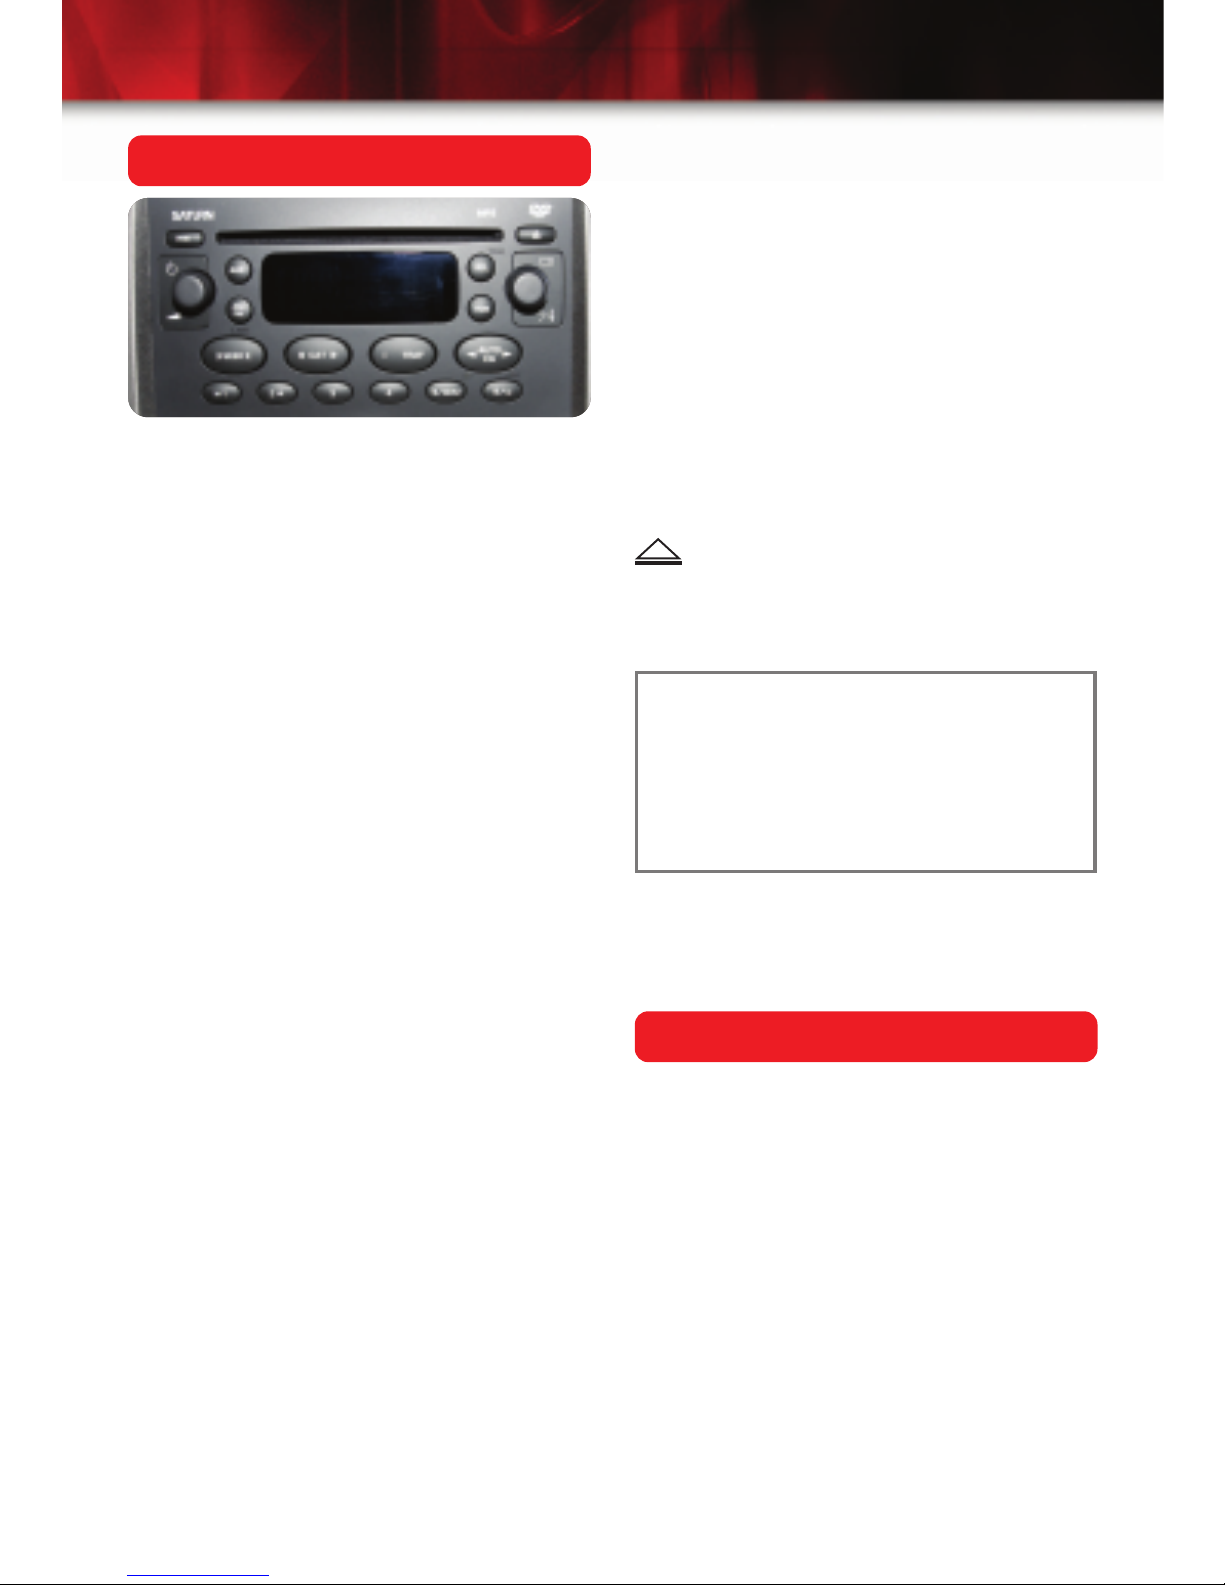
DVD Radio (if equipped)
The DVD Radio is located in the center
of your instrument panel. The following
are the three available DVD modes.
DVD Modes
RSE (Default mode): When a DVD is
inserted into the radio, your VUE’s rear
speakers will be muted. The rear seat
passengers will be able to hear audio
through the wireless headphones. Front
seat passengers will be able to listen to
the AM/FM radio or XM Satellite Radio
(if equipped) by pressing either the
AM/FM button or the AUX button.
DVD Family: When in RSE mode, press
the AUX button to switch to DVD Family.
In this mode, all passengers will be able
to hear audio through your vehicle’s
speakers. Audio remains available
through the wireless headphones.
DVD Aux (Default mode when using
RCA jacks): When the RCA jacks are
connected, your vehicle’s rear speakers
will be muted. The rear seat passengers
will be able to hear audio from the auxiliary device through the wireless headphones. Front seat passengers can listen to the AM/FM radio or XM Satellite
Radio (if equipped), or CD media by
pressing either the AM/FM button or the
AUX button.
DVD Radio Buttons
RSE:
Press this button to pause the
DVD. Press this button again to resume
DVD play.*
AUX (Auxiliary): Press this button to
switch between RSE and DVD Family
when a DVD is playing. Press this button again to switch to XM Satellite Radio
(if equipped). If the auxiliary jacks are
inserted into the DVD console, you will
also be able to switch to listen to CDs
with this button.
(Eject/Load): Press this button to
eject a DVD or CD. If a DVD or CD is
ejected, but not removed, pressing this
button will load the DVD or CD.
For additional DVD Radio details, including
error message information, see Section 3 of
your Owner Manual.
*Note: If a DVD is in the radio and the
vehicle ignition is turned from OFF to
either ON, RUN or ACC, the DVD system will display “Parental Pause.” To
switch to “Parental Restore” and enable
DVD play, press the RSE button.
Page 10

Getting to Know Your VUE
10
Traction Control System
(if equipped)
If your vehicle is a front-wheel-drive
model, it may be equipped with traction
control. This feature activates automatically to reduce engine power when it
senses that one or both of the front
wheels is spinning or is starting to lose
traction.
Four-Cylinder Models
On front-wheel-drive, four-cylinder models, traction control can be turned off by
using the traction control button located
at the top of your center console, just
below and to the right of the vents.
When the system is active, the light in
the button will illuminate.
Six-Cylinder Models
On front-wheel-drive, six-cylinder models, the traction control system is always
on, except when the transmission is in
the R (Reverse) or L (Low) position.
When the system is off, a light will
appear in the instrument panel cluster,
indicating that the system is not active.
To turn off the traction control system on
front-wheel-drive, V6 models, simply
move the shift lever into “R” or “L.”
See Section 4 of your Owner Manual.
Cruise Control (if equipped)
If you opted for the Power Package,
your VUE comes with cruise control,
which allows you to maintain a desired
speed without keeping your foot on the
accelerator pedal. To use this feature,
you must be traveling at a speed of
about 25 mph (40 km/h) or greater.
The cruise control buttons are located
on your steering wheel.
(On/Off): Press this button to turn the
cruise control system on or off. The button’s light will illuminate when the system is active.
– (Set/Coast): Press this button to set
the vehicle speed, or press and hold to
decrease speed when the system is
already active.
+
(Resume/Accelerate): Press this button to resume a previously set speed,
or press and hold button to accelerate
when the system is already active.
Setting Cruise Control
1. Press the cruise control On/Off button
( ). The button’s indicator light will
illuminate when on.
2. Achieve the desired speed.
3. Press the – button (Set/Coast).
4. Remove your foot from the
accelerator pedal.
If you apply the brakes or clutch, the
cruise control system will disengage.
Resume Cruise Control
To resume cruise control after having
disengaged the system:
1. Accelerate to at least 25 mph
(40 km/h).
2. Press the +button
(Resume/Accelerate).
Cruise control will bring your vehicle
back to the set speed.
See Section 3 of your Owner Manual.
Page 11

11
Automatic Headlamp System
(if equipped)
When it is dark enough outside, your
automatic headlamp system will turn on
your headlamps at the normal brightness and will also illuminate the taillamps, side-markers, parking lamps and
instrument panel lights. The radio lights
will also dim.
The system has a light sensor located
on top of the instrument panel. Be sure
it is not covered, or the automatic headlamps will be on whenever the ignition is
on. The system may also turn on your
headlamps when driving through a parking garage, heavy overcast weather or a
tunnel. This is normal.
See Section 3 of your Owner Manual.
Horn Operation
VUE’s horn controls are located on the
steering wheel. For optimum sound,
press either one of the bugle icons
located in the center area of the steering
wheel. On four-cylinder models, the
Saturn logo center section is not part of
the horn.
See Section 3 of your Owner Manual.
Turning or Removing the
Ignition Key
If you are having difficulty either turning
the ignition key or removing it from the
steering column, try this: Rotate the
steering wheel back and forth slightly as
you turn the key.
See Section 2 of your Owner Manual.
Compass Calibration
(if equipped)
Your vehicle may be equipped with an
automatic-dimming rearview mirror that
includes a compass display in the
upper-right corner of the mirror face.
To calibrate the compass:
• Press and hold the COMP button
(located at the bottom of the mirror)
for six seconds to activate the calibration mode. (If your VUE is equipped
with the optional OnStar®system,
press the On/Off button ( ) for
nine seconds.)
Then, do one of the following:
• Drive your vehicle in circles at 5 mph
(8 km/h) or less until the “CAL”
display disappears, or
• Drive the vehicle on your everyday
routine (this method may take longer
to calibrate).
Compass Variance
• At times, it will be necessary to adjust
the compass to account for compass
variance. See your Owner Manual
for the proper adjustment procedure.
See Section 2 of your Owner Manual.
Page 12

Getting to Know Your VUE
12
Climate Controls
Your VUE has a climate control system
that is intuitive and easy to use.
The large knob on the left controls the
interior air temperature. The center knob
operates the fan, and the large knob on
the right controls the direction of the airflow. This knob provides five air direction
settings, but you can also blend the flow
of air by positioning the knob between
the settings.
Press this button to activate your air
conditioning system. When the system
is on, an indicator light above the button
will illuminate.
Use this control to turn your rear
defogger on or off. When the system is
on, an indicator light above the button
will illuminate. The defogger shuts off
automatically after a set period of time.
Press this button when you want to
recirculate air in your vehicle instead of
using outside air. In this mode, the air
cools more quickly and prevents outside
odors from entering your vehicle.
Preventing Window Fogging
To help keep your windows fog-free,
place your climate control system’s
mode knob between the Heater ( )
and Defrost ( ) modes. In cold
weather, glass fogging may be reduced
by slightly opening a window to allow
moisture and humidity to escape from
the passenger cabin.
See Section 3 of your Owner Manual.
Windshield Wipers and Washer
The windshield wipers on your VUE are
controlled by a single lever located on
the right side of your steering column.
The lever operates both the front windshield wipers and washer and the rear
wiper and washer.
The front wiper/washer system provides
you with these five settings:
MIST (Mist): Pull the lever down and
release it for a single wiping cycle. For
additional cycles, hold the lever down
before releasing it.
OFF (Off): Move the lever to this position to turn off your wipers.
INT (Intermittent): Place the lever in this
position to set a delay between wipes.
The Intermittent position allows you to
choose the amount of time between
wipes by rotating the dial marked with
the large arrow (see “A” above) to one
of the following settings:
1 — Long delays between wipes.
2 — Medium delays between wipes.
3 — Short delays between wipes.
LO (Low Speed): Move the lever to this
position for slow, steady wiping cycles.
HI (High Speed): Move the lever to this
position for rapid wiping cycles.
A
B
Page 13

13
Power Windows (if equipped)
If your VUE is equipped with power windows, the switches are located on either
side of the gear shifter — two on the left
and two on the right.
There are power window switches on
the backseat door panels as well.
However, these switches can be disabled by using the LOCK switch located
on the driver’s side of the shifter.
Express Down Window Feature
You may notice that the driver window
Sunroof (if equipped)
Your vehicle’s sunroof switch is located
above your rearview mirror. Keep in
mind that the ignition key must be in the
“RUN” or “ACC” position to operate this
feature.
Opening the Sunroof
As with the power driver window, your
sunroof has an express-open feature.
To express-open the sunroof glass panel
and sunshade, press the switch rearward and hold it before releasing it. This
will open the sunroof to the “Full Open”
position.
If you want to stop the sunroof in a partially opened position, press the switch
to activate the express-open feature;
then press the switch again when the
sunroof reaches the desired partially
opened position.
Closing the Sunroof
To close the glass panel, just press and
hold the switch forward. The sunshade
can be closed only by hand and cannot
be closed with the glass panel open.
Vent Position
You can also choose a vent position for
your sunroof. With the sunshade open
and the glass panel closed, rotate the
switch upward for the vent position.
See Section 2 of your Owner Manual.
(Washer Fluid): Pull the windshield
wiper lever toward you to squirt washer
fluid onto the windshield. The wipers will
cycle several times to clear the windshield. For additional wash cycles, simply pull the lever toward you and hold it.
Rear Wiper/Washer
Your rear wiper and washer are controlled by the same lever used for the
front wiper system. You can choose
from three wiper settings by turning the
band on the inner portion of the lever,
closer to the steering column (see “B”
on previous page).
(Off): Turn the band to this position to
turn off the wiper.
(On): Place the band in this position
for continuous operation with a delay
between wipes.
(Wash): Rotate the band to this position to squirt a stream of washer fluid
onto the rear window. It will continue to
provide fluid until you release the band.
When you select this position, the
wipers will automatically start and stay
on until you rotate the band to the Off
position.
See Section 3 of your Owner Manual.
switch has the word AUTO on it. This is
your Express Down Window control. By
pressing this switch fully down, the window will automatically go all the way
down, until it is fully open. To stop the
express function while it is operating,
simply lift up and release the switch.
See Section 2 of your Owner Manual.
Page 14

Getting to Know Your VUE
14
Manual Door Locks
To manually lock a door from the inside,
move the door-mounted lock control to
the locked position (red rectangle not
showing). To manually unlock the door,
move the lock control to the unlocked
position (red rectangle showing).
See Section 2 of your Owner Manual.
Rear Window Wind Effects
On occasion when one of the rear windows is down, you may hear a beating
or pulsing sound. While this may be distracting to some people, it does not indicate a problem, nor is it dangerous in
any way. If this condition is objectionable, simply open or close the rear window slightly, or open the front window on
the same side of the vehicle. This will
eliminate the wind effect immediately.
See Section 2 of your Owner Manual.
Saturn Security System/Remote
Keyless Entry (if equipped)
If your vehicle is equipped with this feature, you can use your key chain remote
transmitter (or “keyfob”) to lock and
unlock your doors and liftgate from a
distance of up to 30 ft. (9.7 m).
When using the keyfob, be sure there is
nothing between you and the vehicle
that could block the transmitter’s signal.
If the keyfob does not work in the normal range, it is probably time to change
the battery. Under normal use, the battery should last several years.
Regardless of the battery, the range of
the transmitter will vary over time and
from one location to another.
Additional features of the Saturn
Security System include active security
system arming, programmable passive
security system arming and illuminated
entry.
See Section 2 of your Owner Manual.
Entry Lighting
When you press the UNLOCK button on
your keyfob, the dome lamps and exterior lamps (if equipped with the Power
Package) will illuminate for 20 seconds.
After a door is opened, the dome lamps
will remain on as long as the door is
open. Once you close the door, the lamp
will darken after 20 seconds or until you
turn the ignition key to the RUN position.
This feature allows you to see inside
and around your vehicle before you
open the door and provides extended
illumination once inside the vehicle.
See Section 3 of your Owner Manual.
Page 15

15
Lockout Prevention
(if equipped)
If your VUE is equipped with the Power
Package, the lockout prevention feature
makes it difficult for you to lock your key
in the vehicle. If you leave the key in the
ignition with either of the front doors
open and a power door lock switch is
depressed, all the doors will lock.
However, because the key is in the ignition, the driver’s door will unlock automatically within one second.
See Section 2 of your Owner Manual.
Rear Door Security Locks
Each of the rear passenger doors on
your VUE is equipped with a security
lock that makes it impossible to open
the doors from the inside. This is especially important if you have young children in the back. The locks are located
on the rear-inside edge of each door.
To activate the lock, insert a flat screwdriver or key into the slot and turn it so
that the line is in a horizontal position.
When activated, the doors can only be
opened from the outside. To deactivate
this feature, turn the lock so that the line
is in a vertical position.
See Section 2 of your Owner Manual.
Towing Your Vehicle
The following are the recommended towing methods for your VUE. Note that
alternate towing methods can be used on
models equipped with the manual, 4speed automatic or 5-speed automatic
transaxle.
VTi Auto Variable Transaxle Models
This VUE model should not be towed
with all four wheels on the ground. To
properly tow this model, place the entire
vehicle on a platform trailer.
Manual, 4-Speed Automatic or
5-Speed Automatic Models
These models can be towed from the
front with the front wheels placed on a
dolly or from the front with all four
wheels on the ground.
For 5-speed automatic transaxle models, the towing method with all four
wheels on the ground is limited to 520
miles (837km) at speeds below 65 mph
(105km/h).
Important: Towing your vehicle from the
rear could cause damage. Repairs
would not be covered by the warranty.
Never have your vehicle towed from the
rear.
See Section 4 of your Owner Manual.
Automatic Door Locking
and Unlocking (if equipped)
If your VUE is equipped with power door
locks, the doors will lock and unlock
automatically during certain conditions.
Automatic Door Locking
Automatic Transmission-Equipped
Vehicles:
All of the doors will automatically lock
when the shift lever is moved out of “P”
(Park), the ignition key is in the RUN
position and all the doors are closed.
In the following two situations, when a
door is opened, all doors will lock again:
• The brake pedal is applied, a door is
opened and closed, and the brake
pedal is released.
Page 16

Getting to Know Your VUE
16
• A door is opened and closed without
the brake pedal applied while the
vehicle is moving more than 3 mph
(5 km/h).
Manual Transaxle-Equipped Vehicles:
If your VUE has a manual transaxle, all
doors will automatically lock when the
vehicle is traveling over 3 mph (5 km/h),
the ignition key is in the RUN position
and all the doors are closed.
If you need to get in or out of the vehicle
after the doors have automatically
locked, unlock all the doors using a
power door lock switch or unlock the
door you want using the manual door
lock control.
Programmable Automatic Door
Unlocking
You can activate and deactivate the
unlocking feature by turning the ignition
key to RUN (engine off) and pressing
the UNLOCK portion of the power door
lock switch for eight seconds.
If the horn
chirps once
after pressing
the power door
lock switch, the
automatic door
unlocking feature will operate. If the horn
chirps twice after pressing the switch,
the unlocking feature will not operate.
When this feature is activated, all doors
will unlock when the key is removed
from the ignition.
See Section 2 of your Owner Manual.
Removing and Securing the
Fuel Cap
To remove your vehicle’s fuel cap, turn it
to the left about half a turn.
To reinstall the cap after filling your tank,
turn the cap to the right (clockwise)
about a quarter turn until you hear at
least three clicks. An improperly installed
fuel cap may cause a fuel vapor leak, or
cause your vehicle’s Service Engine
Soon Light (Malfunction Indicator Lamp)
to illuminate.
See Section 5 of your Owner Manual.
Note: If the “Service Engine Soon”
light is flashing, bring your vehicle in for
diagnosis and service as soon as
possible. Depending on the cause of
the alert, if you continue driving, this
could cause damage to your vehicle’s
emission control system.
Fuel Economy
Your VUE’s fuel economy rating can
be found on your driver’s side window
sticker. Your actual mileage may vary
depending upon vehicle options, driving
habits and conditions, and the vehicle’s
overall condition.
For additional fuel economy-related
information, including a Consumer
Information Guide and tips for improving
gas mileage, visit the Environmental
Protection Agency (EPA) website at:
http://www.fueleconomy.gov/feg/drive.shtml
See Section 5 of your Owner Manual.
Page 17

17
Resetting the “Change Oil
Soon” Light
Your VUE has a light in the lower-right
corner of the instrument cluster that is
shaped like an oilcan. This is the
Change Oil Soon Light. The light is controlled by a computer system that measures oil life, based on engine revolutions
and engine temperature. When the light
comes on, change your oil as soon as
possible, preferably within the next few
times that you stop for fuel.
After changing the oil, you need to reset
the system. You can do so by following
these steps:
1. Turn the ignition key to the ON
position, but don’t start the engine.
2. Fully depress the accelerator pedal
three times within five seconds.
The next time you turn the key to the
ON position, the light should go off.
See Section 5 of your Owner Manual.
Tire Pressure
The Tire-Loading Information label
(located on the rear edge of the driver’s
door) provides you with information
about the size, speed rating and recommended inflation pressure for your
VUE’s tires. Overinflated tires can produce a harsh ride, while underinflated
tires can reduce fuel economy and promote tire wear.
Both overinflated and underinflated tires
can affect the handling characteristics of
your vehicle.
See Section 5 of your Owner Manual.
Fold-Down Passenger Seatback
Your vehicle is equipped with a fold-flat
front passenger seatback to help you
carry extra-long items. To fold the seatback flat, lift the bar under the front seat
to unlock it. Slide the seat to the rearmost position; then release the bar.
Next, lift the recliner lever, located on
the outside of the seat, and fold the
seat forward until it locks into a folded
position.
See Section 5 of your Owner Manual.
Page 18

Getting to Know Your VUE
18
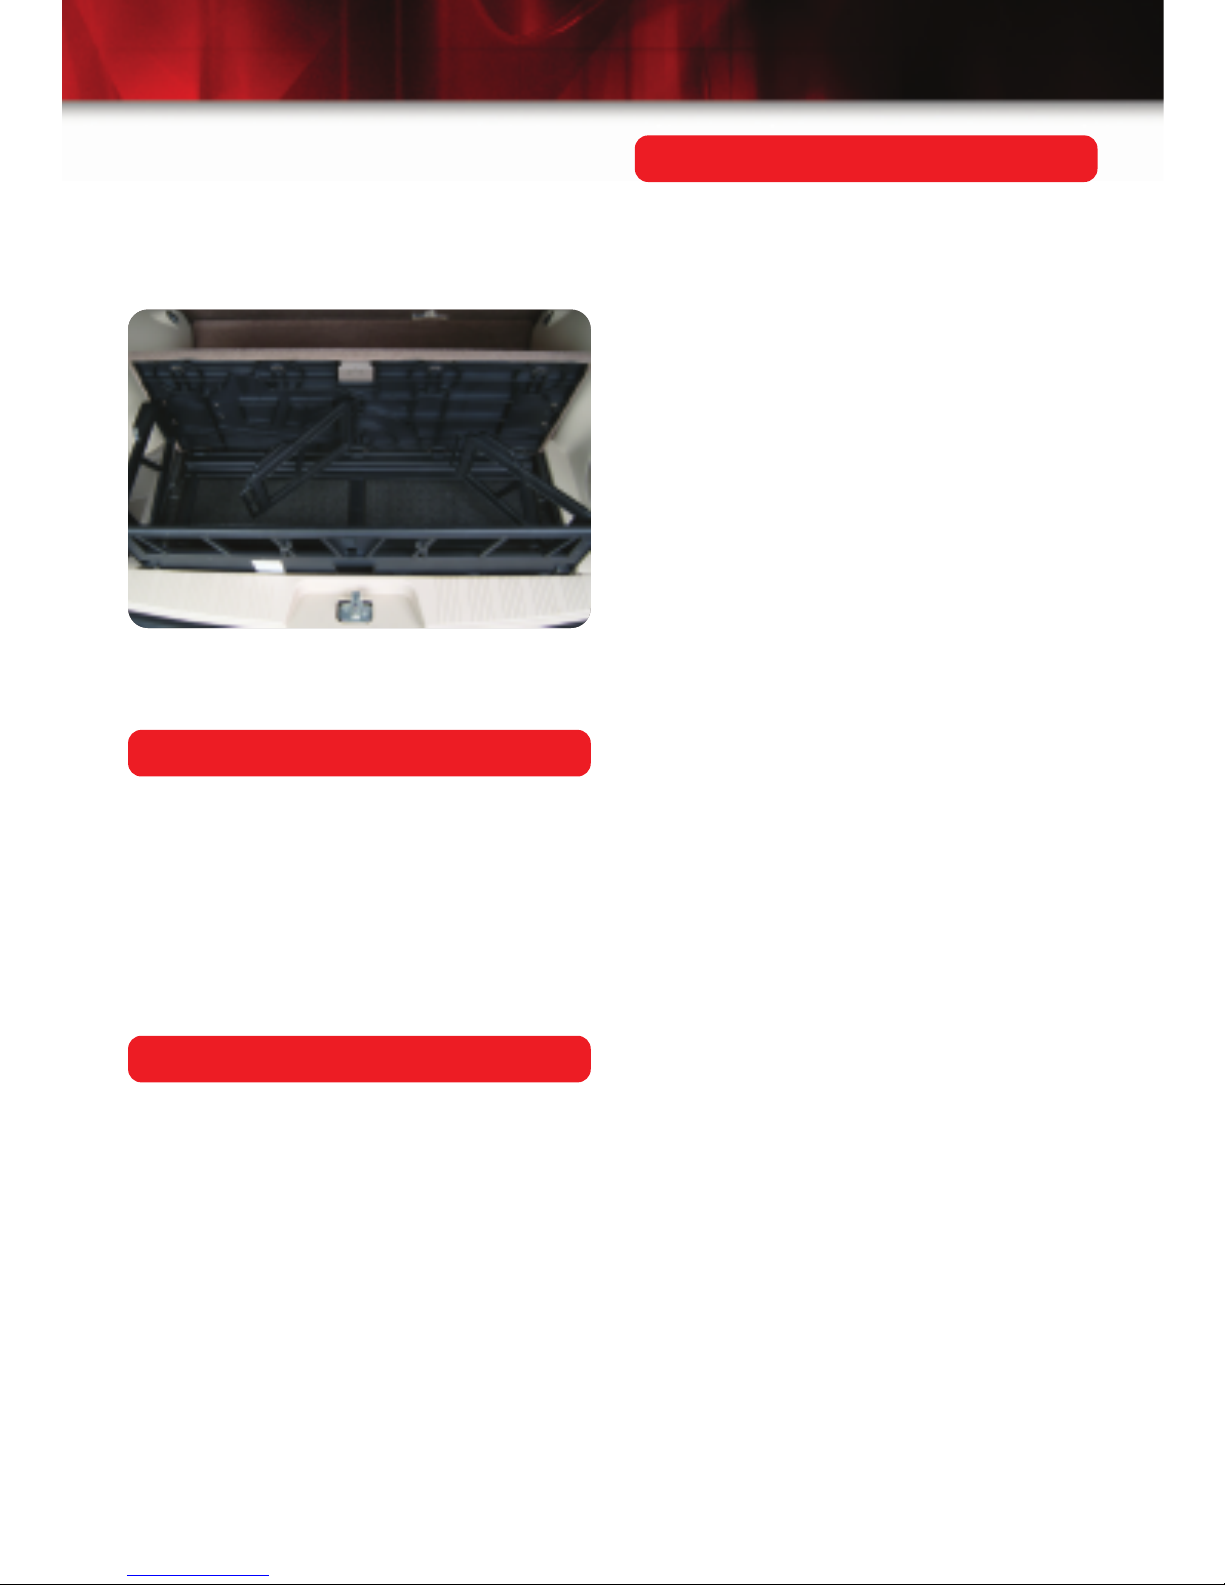
Rear Cargo Organizer
Your vehicle’s rear cargo organizer
helps you store small, light items in the
rear of the vehicle. To access and
assemble the rear cargo organizer:
1. Pull up on the latch of the rear panel
lid of the
rear cargo
organizer
to open it.
2. Lift the
front of the
cargo
organizer
and fold out the end panels.
3. Rotate the end panels forward and
snap them into the rear panel lid.
4. Pull the center divider out from the
rear panel lid.
5. Rotate the center divider rearward
and snap it into the rear wall.
Fold-Down Rear Seats
The VUE’s reclining and folding rear
seats provide added comfort and
increased flexibility — a valuable feature
for camping trips or when you are carrying cargo.
The rear split-bench seatbacks have
three available positions:
• Folded forward
• Upright
• Partially reclined
Each of the rear seatbacks can be
moved to any of the three positions
independent of the other seatback position. To move the seatback to any of the
available positions:
• Lift the lever
on the upperback corner
of the seatback and
move the
seatback to
the desired
position.
• Push and
pull on
the seatback
to make sure
it is locked in the desired position.
To return the seatback from a folded-flat
position to an upright position:
• Push down on the seatback while
lifting the lever.
See Section 1 of your Owner Manual.
Page 19
19
Removing the Spare Tire
Your vehicle’s spare tire is located
beneath the load floor cargo organizer in
the rear cargo area of the vehicle. All of
the tools you need to replace a flat tire
are located in the storage compartment,
on the driver’s side of the cargo area.
After use, it is important to secure
the spare tire, jack and tools properly.
See your Owner Manual for detailed
instructions.
See Section 5 of your Owner Manual.
Preventing Window Fogging
To help prevent window fogging, clean
your interior glass surfaces often. GM
Glass Cleaner or a liquid household
glass cleaner will remove most dust
films on interior glass.
See Section 5 of your Owner Manual.
Driving Off Paved Roads
Your VUE has been designed primarily
for use on pavement. However, if you
drive it off paved roads, keep the following things in mind:
• If your vehicle does not have allwheel drive, you should not drive it
off-road unless you’re on a level,
solid surface.
• If your VUE is equipped with allwheel drive, you may travel on
unpaved roads to campgrounds,
picnic sites and similar sites on
occasion.
Many of the same design features
that help make the VUE responsive on
paved roads during poor weather conditions — features like all-wheel drive —
help make it much better suited for
off-road use than a conventional
passenger car. Its higher ground clearance also helps your vehicle step over
some off-road obstacles. But your vehicle does not have features like special
underbody shielding and a transfer case
low gear range, things that are usually
thought necessary for extended or
severe off-road use.
See Section 4 of your Owner Manual.
6. To close the cargo organizer, unsnap
the dividers and place them into the
stowed position. Then, close the rear
panel lid of the organizer and push on
the latch firmly to engage it.
See Section 2 of your Owner Manual.
Page 20
Getting to Know Your VUE
20
05VUEGTK
A
Roadside Assistance
My Saturn
1-800-553-6000
TTY users: 1-888-889-2438
As the proud owner of a new Saturn
vehicle, you are automatically enrolled
in the Saturn Roadside Assistance program. This value-added service is
intended to provide you with peace of
mind as you drive in the city or travel
the open road.
Saturn’s Roadside Assistance toll-free
number is staffed by courteous and
capable Roadside Assistance
Representatives who are available 24
hours a day, 365 days a year.
We will provide the following services
during the Bumper-to-Bumper warranty
period, at no expense to you:
• Fuel delivery
• Lockout service (identification
required)
• Tow to nearest Saturn retailer for
warranty service or in the event of a
vehicle disabling accident
• Flat tire change
• Jump starts
• Minor repairs to disabled vehicles
• Assistance when the vehicle is mired
in sand, mud or snow
• Saturn retailer locator service
As your home away from home on the
Internet, you can take advantage of
My Saturn’s numerous owner benefits,
including: vehicle maintenance schedule, service reminders, frequently asked
questions, retailer information and more.
So visit the My Saturn owners site at
Saturn.com and enjoy the ride.
For prompt and efficient assistance
when calling, please provide the following information to the Roadside
Assistance Representative:
• Location of the vehicle
• Telephone number of your location
• Vehicle model, year and color
• Vehicle mileage
• Vehicle Identification Number (VIN)
• Vehicle license plate number
Saturn reserves the right to limit service
or reimbursement to an owner or driver
when, in Saturn’s judgment, the claims
become excessive in frequency or type
of occurrence.
Certain restrictions, precautions and safety procedures apply to your vehicle. Please read your Owner
Manual for complete instructions. All information contained herein is based on information available
at the time of printing and is subject to change without notice. Copyright 2004 by GM Corp.
All rights reserved.
 Loading...