

Page 1
SATURN
LOW SPEED AND DUAL SPEED
FLOOR MACHINE
OWNER’S/OPERATOR’S MANUAL
17LS3-SS, 17LS3-BK
20LS3-SS, 20LS3-BK
20DS3-SS
17LS4-Bk, 20LS4-BK
WWW.EDIC-USA.COM
Page 2
UNPACKING YOUR NEW SATURN:
When your package is delivered, check each of the 3
cartons carefully for signs of rough handling. If the
SATURN is damaged, notify the carrier immediately
and request an inspection. Be sure to keep the cartons,
packing inserts, packing lists and carrier’s receipt until
the inspector has veried your claim.
EDIC’s liability ceases when the carrier picks up the
shipment. However, our customer service sta will be
happy to furnish any information needed in connection
with the claim and will attempt to expedite a resolution.
PLEASE READ BEFORE
OPERATING YOUR NEW SATURN:
Read the manual carefully and completely before attempting to operate the unit. is manual has important
information for the use and safe operation of the machine. Keep this manual handy at all times.
is equipment has been engineered and manufactured
to provide excellent performance and service. To ensure
that your equipment will continue to perform as intended:
• Maintain and inspect equipment regularly
• Use only original EDIC parts when servicing.
• Operate equipment with care.
If additional information is needed, please contact EDIC
at: 800-338-3342 or email info@edic-usa.com
All information and specications printed in the manual
are current at the time of printing; however, because of
EDIC’s policy of continual product improvement, we
reserve the right to make changes at any time without
notice.
FAILURE TO COMPLY WITH THE FOL-
LOWING WARNINGS AND INSTRUC-
TIONS WILL VOID THE WARRANTY.
WARNING!
• Do not operate the machine unless trained and authorized.
• Do not leave the machine unattended when plugged
in. Unplug from the outlet when not in use, before
servicing, and when changing the brushes or pads.
• Use indoors only.
• Do not allow to be used as a toy. Close attention is
necessary when used by or near children.
• Do not bypass or defeat the safety “lock-out lever.”
• e machine was designed for use as per instructions and recommendations written in this manual.
Any deviation from its proper use or purpose and
the consequential damage that may occur is the sole
responsibility of the end user.
• Do not use with damaged cord or plug. If the machine is not working as it should, or it has been
dropped, damaged, le outdoors or dropped into
water, take it to an authorized service center.
• Do not pull or carry by cord, use cord as handle,
close a door on the cord or pull cord around sharp
edges or corners. Do not run machine over cord.
Keep cord away from heated surfaces.
• Do not unplug by pulling on cord. To unplug, grasp
the plug, not the cord.
• Do not handle plug or appliance with wet hands.
• Make sure the machine is plugged into an electrical
outlet with the same voltage and frequency rating
as shown on the nameplate of the machine. Do not
attempt to plug a 115- volt machine into a 230- volt
outlet.
• Do not immerse or use this machine in standing
water. Such use can cause electric shock.
• Keep the electrical supply cord from contacting the
rotating brush or drive block.
• Do not expose machine to freezing temperatures.
• To avoid electric shock, do not expose the unit to
rain. Store indoors only.
• Connect to a properly grounded outlet only. See
“Grounding Instructions.”
• Turn o all controls before unplugging.
• When using an extension cord, use a 3 conductorgrounding cord, 12 gauge wire or heavier. Do not use
more than 25’ of extension cord.
• Do not put any object into openings.
• Do not use with any opening blocked. Keep free of
dust, lint, hair and anything that may reduce air ow.
• Do not operate machine in ammable or explosive
areas.
• All servicing of EDIC equipment should be per-
2
Page 3
formed by an EDIC authorized service center.
• Keep hair, loose clothing, ngers and all parts of
body away from openings and moving parts.
• Use extra care when cleaning near stairs.
• When servicing machine, use manufacturer’s supplied or approved replacement parts.
• Do not wrap the cord too tightly when storing.
• Work only in well lit areas.
• is equipment is heavy. Use proper liing techniques when liing heavy equipment.
GROUNDING INSTRUCTIONS:
is piece of equipment must be grounded. Should an
electrical malfunction occur, grounding provides a path
of least resistance for electrical current- reducing the risk
of electric shock. is piece of equipment is furnished
with a cord that has a grounding conductor and grounding plug. e grounded plug must only be plugged
into an appropriate outlet that is properly installed and
grounded in accordance with all local codes and ordinances.
WARNING:
Connecting the equipment to an improperly grounded
outlet can result in an increased risk of electric shock. A
qualified electrician should be consulted if you are unsure that the outlet is properly grounded. Do not modify
the plug provided with the equipment. If it will not fit
the outlet, have a proper outlet installed by a qualified
electrician.
Servicing:
In the event that your SATURN requires service, please
contact EDIC at:
800-338-3342
or email info@edic-usa.com
Do not attempt repairs yourself. EDIC will assist you in
locating an indepedent service contractor.
PREPARING THE MACHINE FOR
OPERATION
Your oor machine will operate in a wide variety of hard
oors and carpet cleaning applications. Consult with
your local dealer or EDIC Customer Service to select the
correct accessories for the job you are going to perform.
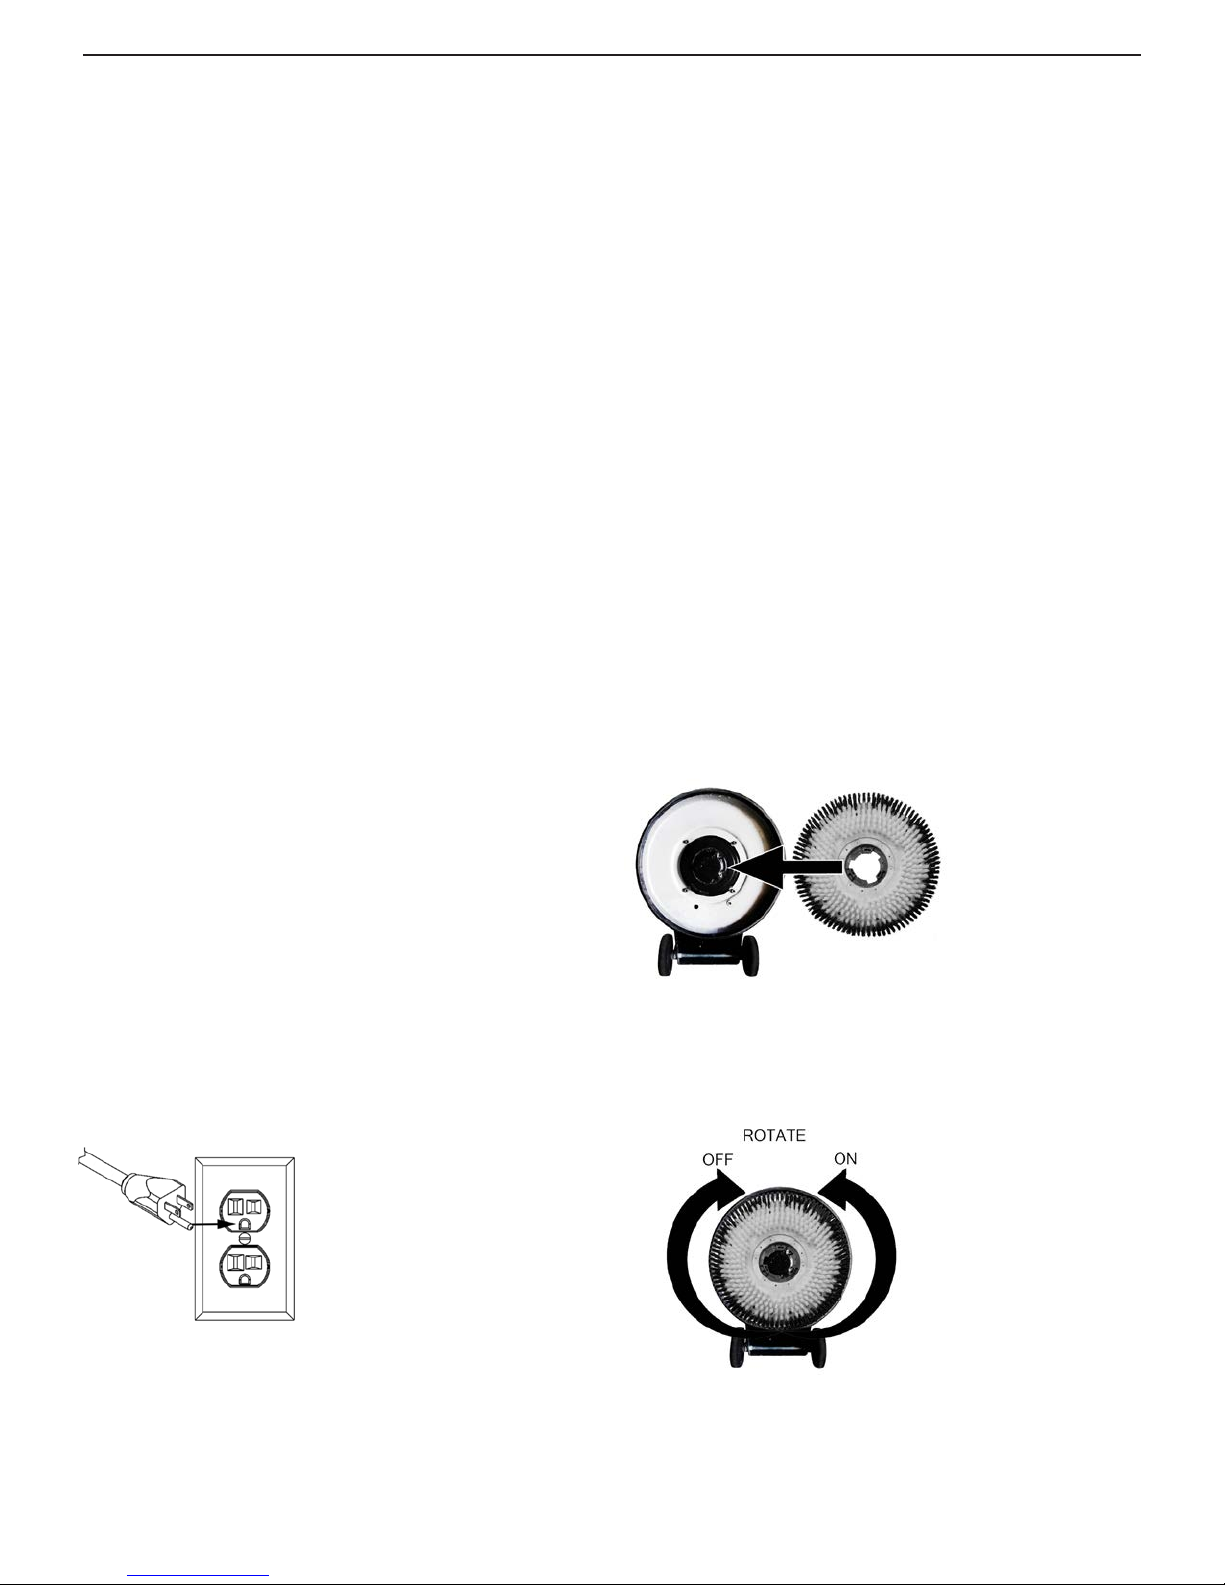
BRUSH, PAD DRIVER
INSTALLATION
Lock the handle in the upright position and tip the machine back so it rests on the handle and wheels. Fit the
three slots of the clutch plate in the back of the brush
or pad driver over the three lugs of the drive plate (Fig.
1). Push it rmly into position and turn it counterclockwise until it locks in place (Fig. 2).
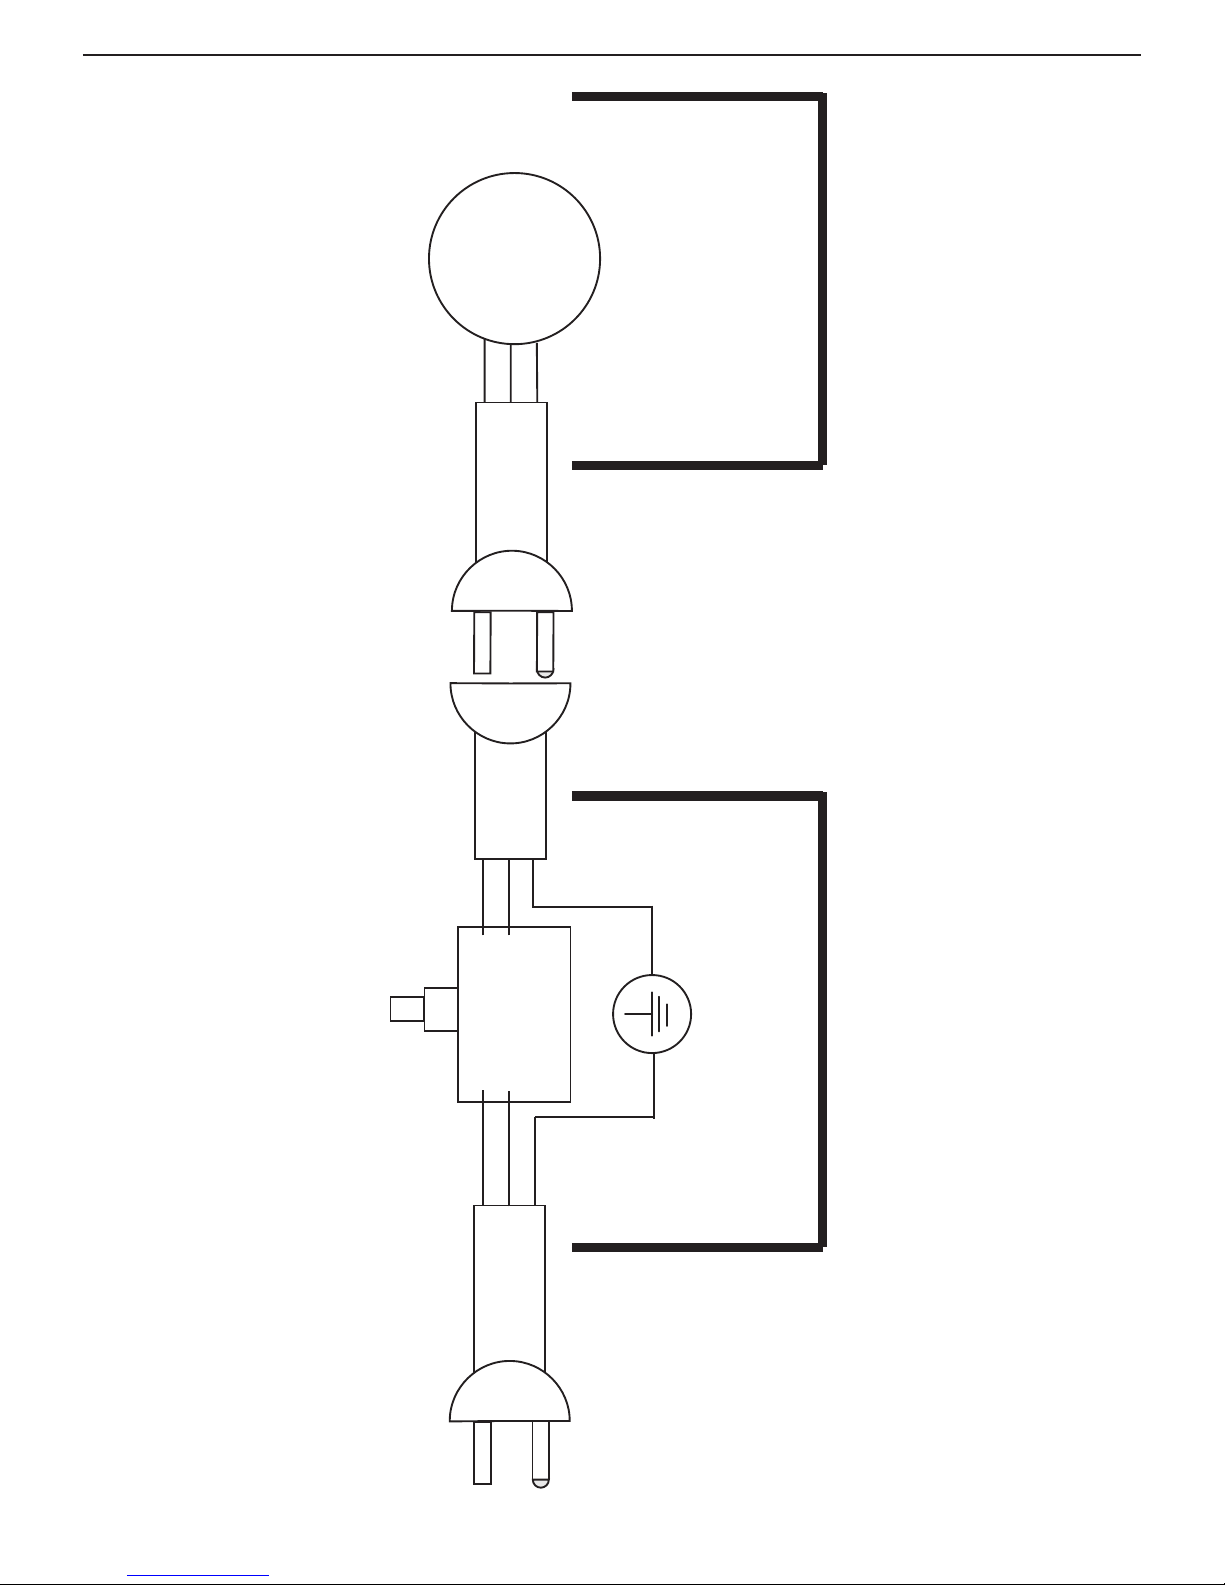
is appliance is designed for use on a 120-volt circuit.
e grounding plug provided looks like the plug illustrated in Figure 1. Replace the plug if the grounding pin
is damaged or broken.
Figure 1
e Green (or Green/Yellow) wire in the cord is the
grounding wire. When replacing a plug, this wire must
be attached to the grounding pin only.
DO NOT use extension cords.
Fig. 1
Fig. 2
3
Page 4

TO REMOVE PAD DRIVER:
Tip the machine back so it rests on the
handle and wheels. Turn the brush or pad driver
clockwise until it disengages and lis o. Do not store
the machine with the brush or pad drivers installed.
PAD INSTALLATION
TO INSTALL PAD: Tilt the machine back on wheels
until machine is resting on handle. Center the pad on the
pad holder and press the pad onto the pad holder.
TO REMOVE PAD: Simply remove the pad from the
pad holder by pulling it away from the pad holder with
steady force.
MACHINE OPERATION
1. Install the pad driver and pad, brush or attachment.
2. Plug in machine.
3. Lower the handle to the desired operating position.
4. Place both hands on the handle grips with your ngers around the ON/OFF lever which extends from
one side to the other underneath the handle grips.
5. e safety LOCK-OUT lever is located underneath
the right side handle grip and ON/OFF lever. To
unlock the LOCK-OUT lever, use your right hand
forenger to press the lever down toward the back of
the switch box
6. While pressing the LOCK-OUT lever, pull the ON/
OFF lever on either side of the handle to start the
machine.
7. e LOCK-OUT lever will automatically lock when
you release the ON/OFF lever preventing the machine from being turned on until it is unlocked
again.
ning. Always wait until motor has stopped completely
before changing speeds.
Storage:
Wipe with a clean damp cloth aer every use.
Store in a clean dry place.
CORD STORAGE:
• Unplug the cord- Clean and inspect for damage.
• Wrap the cord around the le side handle grip.
• Do not wrap too tightly.
TO MANEUVER YOUR FLOOR MACHINE
1. Raise the handle slightly and the machine will go to
the right. e higher you raise it, the faster it will go.
2. Lower the handle and the machine will go le. e
more you lower it, the faster it will go.
3. Practice on a smooth surface to gain experience in
operating the unit before moving on to other surfaces.
DUAL SPEED FUNCTION FOR 17DS3-BK &
20DS3-BK:
Use the black switch located directly behind the motor
to switch between low speed (180RPM) and high speed
(320RPM). Do not change speeds while machine is run-
4
Page 5

NOTES
5
Page 6
LOW SPEED
WIRING
AC MOTOR
B
W
G
B
W
G
SWITCH
B
W
G
HANDLE MOTOR
6
Page 7

DUAL SPEED WIRING
AC MOTOR
7
Page 8

1 43 5 6 7
ITEM
NO.
1
B11487 Power Cord, 14-3, 50 FT, SJTW
2
K11498 Grip
3
C11528 Screw, 10-32 X .25 in
4
H12066 Label, 0.5 HP, Saturn
5
H11831 Label, EDIC, Black-Silver
6
D11496B Switch Box Cover, Black
7
H11493 Label, Safety, Floor Machine
8
C11529 Screw, 10-32 X .375 in
9
K11519 Lever Grip, Lockout, Black
10
C00278 Locknut, 10-32, Nylon, SS
11
D11494 Lockout Bracket
12
D11524 Spring, Lockout
13
C90007 Screw, 10-32 X .625 Phillips, Truss Head, SS
14
C11491 Screw, 10-32 X 1 in, SS
15
C00306 Roll Pin, .125 X 1.75
16
D11523 Spring, Trigger
17
D11479 Handle, Chrome, Floormachine
18
D11495 Trigger, Zinc Plated
19
K11520 Lever Grip, Trigger, Black
20
11507A Assembled Locking Handle, Cord Hook
21
D11497 Handle, Locking Clamp
22
C11538 Cap Nut, .31 in, Push-On
23
C00259 Washer, Slotted, Zinc
24
C11536 Spade Bolt, .375-16 X 4 in
25
D11507 Cord Hook Clamp
26
D11507-2 Cord Hook Body
27
C11558 Locknut, .375-16, Nylon
28
C11502 Socket Cap Screw, .375-16 X 2.5 in
29
C11537 Dowel Pin, .31 X 1.5 in
30
C13101 Screw, Hex Cap, M14-2.0
31
B10719 Power Cord, 25', 16-3
32
B11518 Switch Insulation
33
B11751 Switch, Rocker, DPDT, Black
34
C00293 #8 X .5in Pan, Black SMS, Phillips
35
D11582 Bracket, Switch Mount
36
C00297 Screw,#8 X .25 in, Pan Head
37
D11646 Switch Bracket Cover
38
B00177-1 Terminal Lug, Female, QD, .25 X .032
39
B00177 Terminal Lug, Female, QD, .25 X .032
40
K00674 Bushing, .50 in, Nylon
41
D11510 Axle, Floor Machine
42
D11482 Handle Brace, Right, Black
43
C00240 Washer, Shoulder, Nylon
44
C11559 Washer, .515 X .875 X .032
45
G11943 Wheel, 5 in Saturn
46
C02305 Cap Nut, .5in Push-on
47
B00185-30 Wire, 14 Ga X 2 ft, White, UL195
48
B00185-40 Wire, 14 Ga X 2 ft, Black, UL1015
49
B00185-86 Wire, 14 Ga X 2 ft, Red, UL1015
50
B00228-2 1 Foot Shrinktube, .375 in, Poly
51
C11619 Allen Wrench, .31 in
52
C11501 Socket Cap Screw, .31 - 18
53
C00251 Lockwasher, .31, Split
54
E11478 Bumper, 20 in Floor Machine
55
D11486-SS Brush Cover, 20 in, Stainless
56
K11521 Spacer, Base, Floor Machine
57
D11483 Frame, Motor, Black
58
D11545 Motor Screen
59
G11573 Motor
60
B00181 Butt Connector, Blue, 1 Wire
61
B00179-1 Closed End Cntr, 16-3
62
D11481 Handle Brace, Left, Black
63
K11517 Spacer, .19 ID X .375 High X .50 OD, Nylon
64
B11199 Strain Relief, Pigtail w-Locknut
65
H10976-1 Label, UL STD 561-507
66
H00565-5 Label, Serial #, Standard
67
H03545 Cover, Serial #, Label
68
H11490C-H Drip Cover w - Light, Chrome
69
H11830 Label, Saturn, Drip Cover
70
B02196-1 Light, Motor Carbon Brush Wear
71
C13100 Nut, M14-2.0 Nylon Insert
72
B10734 Strain Relief, Handle
73
B11513 Cord, Handle, 14-3 SJTW
74
B11762 Terminal Lug, Nylon, Female
75
B11465 Switch, DPST, Pushbutton
76
C00252 Washer, .375 in, Flat
77
C11541 Washer, .375 in, Star
78
C00284 Screw, 10-32 X .375 Ground
79
B00187 Cable Clamp, Nylon, .43 in.
80
B00180-10-3 Ring Terminal, #10 Center
81
B11505 Strain Relief Nut, Metal
82
C11560 Washer, .93 ID X 1.5 OD
83
B11504 Strain Relief, Metal
84
H02548-2 Label, Important, Cord
84
79
70
78
77
69
68
13
67
62
61
60
59
58
57
56
55
54
66
36
2
76
63
65
64
75
39
74
73
72
71
32
8
80818283
39
33
39
32
34
8
9
10
11
12
13
14
15
16
17
18
19
20 21
22
23
24
25
29
26
28
30
31
27
35
36
37
38
39
4241 43 4544 46
40
47
48
49
20DS3-SS
10-9-07
50515253
Page 9

20DS3-SS 10-9-07
ITEM
NO.
1
B11487 Power Cord, 14-3, 50 FT, SJTW
2
K11498 Grip
C11528 Screw, 10-32 X .25 in
3
4
H12066 Label, 0.5 HP, Saturn
5
H11831 Label, EDIC, Black-Silver
6
D11496B Switch Box Cover, Black
7
H11493 Label, Safety, Floor Machine
8
C11529 Screw, 10-32 X .375 in
K11519 Lever Grip, Lockout, Black
9
10
C00278 Locknut, 10-32, Nylon, SS
D11494 Lockout Bracket
11
12
D11524 Spring, Lockout
13
C90007 Screw, 10-32 X .625 Phillips, Truss Head, SS
14
C11491 Screw, 10-32 X 1 in, SS
15
C00306 Roll Pin, .125 X 1.75
D11523 Spring, Trigger
16
17
D11479 Handle, Chrome, Floormachine
D11495 Trigger, Zinc Plated
18
19
K11520 Lever Grip, Trigger, Black
20
11507A Assembled Locking Handle, Cord Hook
21
D11497 Handle, Locking Clamp
22
C11538 Cap Nut, .31 in, Push-On
23
C00259 Washer, Slotted, Zinc
C11536 Spade Bolt, .375-16 X 4 in
24
25
D11507 Cord Hook Clamp
26
D11507-2 Cord Hook Body
C11558 Locknut, .375-16, Nylon
27
28
C11502 Socket Cap Screw, .375-16 X 2.5 in
29
C11537 Dowel Pin, .31 X 1.5 in
C13101 Screw, Hex Cap, M14-2.0
30
31
B10719 Power Cord, 25', 16-3
B11518 Switch Insulation
32
33
B11751 Switch, Rocker, DPDT, Black
C00293 #8 X .5in Pan, Black SMS, Phillips
34
35
D11582 Bracket, Switch Mount
36
C00297 Screw,#8 X .25 in, Pan Head
D11646 Switch Bracket Cover
37
38
B00177-1 Terminal Lug, Female, QD, .25 X .032
B00177 Terminal Lug, Female, QD, .25 X .032
39
40
K00674 Bushing, .50 in, Nylon
41
D11510 Axle, Floor Machine
D11482 Handle Brace, Right, Black
42
43
C00240 Washer, Shoulder, Nylon
C11559 Washer, .515 X .875 X .032
44
45
G11943 Wheel, 5 in Saturn
46
C02305 Cap Nut, .5in Push-on
B00185-30 Wire, 14 Ga X 2 ft, White, UL195
47
48
B00185-40 Wire, 14 Ga X 2 ft, Black, UL1015
B00185-86 Wire, 14 Ga X 2 ft, Red, UL1015
49
50
B00228-2 1 Foot Shrinktube, .375 in, Poly
51
C11619 Allen Wrench, .31 in
C11501 Socket Cap Screw, .31 - 18
52
53
C00251 Lockwasher, .31, Split
E11478 Bumper, 20 in Floor Machine
54
55
D11486-SS Brush Cover, 20 in, Stainless
56
K11521 Spacer, Base, Floor Machine
D11483 Frame, Motor, Black
57
58
D11545 Motor Screen
59
G11573 Motor
B00181 Butt Connector, Blue, 1 Wire
60
61
B00179-1 Closed End Cntr, 16-3
D11481 Handle Brace, Left, Black
62
63
K11517 Spacer, .19 ID X .375 High X .50 OD, Nylon
64
B11199 Strain Relief, Pigtail w-Locknut
65
H10976-1 Label, UL STD 561-507
H00565-5 Label, Serial #, Standard
66
67
H03545 Cover, Serial #, Label
H11490C-H Drip Cover w - Light, Chrome
68
69
H11830 Label, Saturn, Drip Cover
70
B02196-1 Light, Motor Carbon Brush Wear
C13100 Nut, M14-2.0 Nylon Insert
71
72
B10734 Strain Relief, Handle
73
B11513 Cord, Handle, 14-3 SJTW
B11762 Terminal Lug, Nylon, Female
74
75
B11465 Switch, DPST, Pushbutton
76
C00252 Washer, .375 in, Flat
C11541 Washer, .375 in, Star
77
78
C00284 Screw, 10-32 X .375 Ground
79
B00187 Cable Clamp, Nylon, .43 in.
B00180-10-3 Ring Terminal, #10 Center
80
81
B11505 Strain Relief Nut, Metal
82
C11560 Washer, .93 ID X 1.5 OD
B11504 Strain Relief, Metal
83
84
H02548-2 Label, Important, Cord
PART NUMBER
DESCRIPTION
9
QTY.
1
2
1
1
1
1
1
2
1
1
1
1
4
1
2
2
1
1
2
1
1
1
1
1
1
1
2
1
1
1
1
3
1
2
1
4
2
1
11
2
1
1
6
6
2
2
1
1
1
1
1
4
4
1
1
4
1
1
1
1
1
1
3
1
1
1
1
1
1
1
1
1
1
2
1
1
1
1
1
2
1
1
1
1
Page 10

68
ITEM
NO.
1
B11487 Power Cord, 14-3, 50 FT, SJTW
2
K11498 Grip
3
C11528 Screw, 10-32 X .25 in
4
H12066 Label, 1.5 HP, Saturn
5
H11831 Label, EDIC, Black-Silver
6
D11496B Switch Box Cover, Black
7
H11493 Label, Safety, Floor Machine
8
C11529 Screw, 10-32 X .375 in
9
K11519 Lever Grip, Lockout, Black
10
C00278 Locknut, 10-32, Nylon, SS
11
D11494 Lockout Bracket
12
D11524 Spring, Lockout
13
C90007 Screw, 10-32 X .625 Phillips, Truss Head, SS
14
C11491 Screw, 10-32 X 1 in, SS
15
D11479 Handle, Chrome, Floormachine
16
C00306 Roll Pin, .125 X 1.75
17
D11523 Spring, Trigger
18
D11495 Trigger, Zinc Plated
19
K11520 Lever Grip, Trigger, Black
20
11507A Assembled Locking Handle, Cord Hook
21
C11619 Allen Wrench, .31 in
22
D11497 Handle, Locking Clamp
23
C11538 Cap Nut, .31 in, Push-On
24
C00259 Washer, Slotted, Zinc
25
C11536 Spade Bolt, .375-16 X 4 in
26
D11507 Cord Hook Clamp
27
D11507-2 Cord Hook Body
28
C11558 Locknut, Black Oxide, Thin
29
C11502 Socket Cap Screw, .375-16 X 2.5 in
30
C11537 Dowel Pin, .31 X 1.5 in
31
C13101 Screw, Hex Cap, M14-2.0
32
K00674 Bushing, .50 in, Nylon
33
D11510 Axle, Floor Machine
34
D11482 Handle Brace, Right, Black
35
C00240 Washer, Shoulder, Nylon
36
C11559 Washer, .515 X .875 X .032
37
G11943 Wheel, 5 in Saturn
38
C02305 Cap Nut, .5in Push-on
39
C11501 Socket Cap Screw, .31 - 18
40
C00251 Lockwasher, .31, Split
41
E11477 Bumper, 17 in Floor Machine
42
D11485B Brush Cover, 17 in, Black
43
K11521 Spacer, Base, Floor Machine
44
D11483 Frame, Motor, Black
45
G11468 Motor W-Gearbox, 1.5 HP
46
D11481 Handle Brace, Left, Black
47
H10976-1 Label, UL STD 561-507
48
H00565-5 Label, Serial #, Standard
49
H03545 Cover, Serial #, Label
50
D11490B Drip Cover, Black
51
H12913 Label, Drip Cover, White
52
C11916 Screw, 10-32 X .375 Phillips
53
C13100 Nut, M14-2.0 Nylon Insert
54
B10734 Strain Relief, Handle
55
B11513 Cord, Handle, 14-3 SJTW
56
B11762 Terminal Lug, Nylon, Female
57
B11465 Switch, DPST, Pushbutton
58
B00177 Terminal Lug, Female, QD, .25 X .032
59
C00252 Washer, .375 in, Flat
60
C11541 Washer, .375 in, Star
61
B11518 Switch Insulation
62
C00284 Screw, 10-32 X .375 Ground
63
B00187 Cable Clamp, Nylon, .43 in.
64
B00180-10-3 Ring Terminal, #10 Center
65
B11505 Strain Relief Nut, Metal
66
C11560 Washer, .93 ID X 1.5 OD
67
B11504 Strain Relief, Metal
68
H02548-2 Label, Important, Cord
52
51
50
46
45
44
43
42
41
40
39
1
2
3
4
5 6
7
8
9
67
62
61
60
59
49
48
47
66
58
65
10
64
63
555657
54
53
10
12 13 14 15
11
16
17
18 19
29
30
31
32
33
34
17LS3-BK
10-19-07
35
36
20
21
22
23
24
25
26
27
28
37
38
Page 11

17LS3-BK 10-19-07
ITEM
NO.
1
B11487 Power Cord, 14-3, 50 FT, SJTW
2
K11498 Grip
3
C11528 Screw, 10-32 X .25 in
4
H12066 Label, 1.5 HP, Saturn
5
H11831 Label, EDIC, Black-Silver
D11496B Switch Box Cover, Black
6
7
H11493 Label, Safety, Floor Machine
8
C11529 Screw, 10-32 X .375 in
9
K11519 Lever Grip, Lockout, Black
10
C00278 Locknut, 10-32, Nylon, SS
11
D11494 Lockout Bracket
12
D11524 Spring, Lockout
C90007 Screw, 10-32 X .625 Phillips, Truss Head, SS
13
14
C11491 Screw, 10-32 X 1 in, SS
15
D11479 Handle, Chrome, Floormachine
16
C00306 Roll Pin, .125 X 1.75
D11523 Spring, Trigger
17
18
D11495 Trigger, Zinc Plated
19
K11520 Lever Grip, Trigger, Black
20
11507A Assembled Locking Handle, Cord Hook
21
C11619 Allen Wrench, .31 in
22
D11497 Handle, Locking Clamp
23
C11538 Cap Nut, .31 in, Push-On
24
C00259 Washer, Slotted, Zinc
25
C11536 Spade Bolt, .375-16 X 4 in
26
D11507 Cord Hook Clamp
27
D11507-2 Cord Hook Body
28
C11558 Locknut, Black Oxide, Thin
C11502 Socket Cap Screw, .375-16 X 2.5 in
29
30
C11537 Dowel Pin, .31 X 1.5 in
C13101 Screw, Hex Cap, M14-2.0
31
32
K00674 Bushing, .50 in, Nylon
33
D11510 Axle, Floor Machine
34
D11482 Handle Brace, Right, Black
35
C00240 Washer, Shoulder, Nylon
36
C11559 Washer, .515 X .875 X .032
37
G11943 Wheel, 5 in Saturn
38
C02305 Cap Nut, .5in Push-on
39
C11501 Socket Cap Screw, .31 - 18
40
C00251 Lockwasher, .31, Split
41
E11477 Bumper, 17 in Floor Machine
42
D11485B Brush Cover, 17 in, Black
43
K11521 Spacer, Base, Floor Machine
44
D11483 Frame, Motor, Black
45
G11468 Motor W-Gearbox, 1.5 HP
46
D11481 Handle Brace, Left, Black
47
H10976-1 Label, UL STD 561-507
48
H00565-5 Label, Serial #, Standard
49
H03545 Cover, Serial #, Label
50
D11490B Drip Cover, Black
51
H12913 Label, Drip Cover, White
52
C11916 Screw, 10-32 X .375 Phillips
53
C13100 Nut, M14-2.0 Nylon Insert
54
B10734 Strain Relief, Handle
55
B11513 Cord, Handle, 14-3 SJTW
56
B11762 Terminal Lug, Nylon, Female
57
B11465 Switch, DPST, Pushbutton
58
B00177 Terminal Lug, Female, QD, .25 X .032
59
C00252 Washer, .375 in, Flat
60
C11541 Washer, .375 in, Star
61
B11518 Switch Insulation
62
C00284 Screw, 10-32 X .375 Ground
63
B00187 Cable Clamp, Nylon, .43 in.
64
B00180-10-3 Ring Terminal, #10 Center
65
B11505 Strain Relief Nut, Metal
66
C11560 Washer, .93 ID X 1.5 OD
67
B11504 Strain Relief, Metal
68
H02548-2 Label, Important, Cord
PART NUMBER
DESCRIPTION
QTY.
1
2
1
1
1
1
1
2
1
1
1
1
1
1
1
2
2
1
2
1
1
1
1
1
1
1
1
2
1
1
1
2
1
1
6
6
2
2
4
4
1
1
4
1
1
1
1
1
1
1
1
3
1
1
1
2
1
2
1
1
1
1
1
2
1
1
1
1
11
Page 12

1
ITEM
NO.
1
B11487 Power Cord, 14-3, 50 FT, SJTW
2
K11498 Grip
3
C11528 Screw, 10-32 X .25 in
4
H12066 Label, 1.5 HP, Saturn
5
H11831 Label, EDIC, Black-Silver
6
D11496B Switch Box Cover, Black
7
H11493 Label, Safety, Floor Machine
8
C11529 Screw, 10-32 X .375 in
9
K11519 Lever Grip, Lockout, Black
10
C00278 Locknut, 10-32, Nylon, SS
11
D11494 Lockout Bracket
12
D11524 Spring, Lockout
13
C90007 Screw, 10-32 X .625 Phillips, Truss Head, SS
14
C11491 Screw, 10-32 X 1 in, SS
15
D11479 Handle, Chrome, Floormachine
16
C00306 Roll Pin, .125 X 1.75
17
D11523 Spring, Trigger
18
D11495 Trigger, Zinc Plated
19
K11520 Lever Grip, Trigger, Black
20
11507A Assembled Locking Handle, Cord Hook
21
C11619 Allen Wrench, .31 in
22
D11497 Handle, Locking Clamp
23
C11538 Cap Nut, .31 in, Push-On
24
C00259 Washer, Slotted, Zinc
25
C11536 Spade Bolt, .375-16 X 4 in
26
D11507 Cord Hook Clamp
27
D11507-2 Cord Hook Body
28
C11558 Locknut, Black Oxide, Thin
29
C11502 Socket Cap Screw, .375-16 X 2.5 in
30
C11537 Dowel Pin, .31 X 1.5 in
31
C13101 Screw, Hex Cap, M14-2.0
32
K00674 Bushing, .50 in, Nylon
33
D11510 Axle, Floor Machine
34
D11482 Handle Brace, Right, Black
35
C00240 Washer, Shoulder, Nylon
36
C11559 Washer, .515 X .875 X .032
37
G11943 Wheel, 5 in Saturn
38
C02305 Cap Nut, .5in Push-on
39
C11501 Socket Cap Screw, .31 - 18
40
C00251 Lockwasher, .31, Split
41
E11477 Bumper, 17 in Floor Machine
42
D11485-SS Brush Cover, 17 in, Stainless
43
K11521 Spacer, Base, Floor Machine
44
D11483 Frame, Motor, Black
45
G11468 Motor W-Gearbox, 1.5 HP
46
D11481 Handle Brace, Left, Black
47
H10976-1 Label, UL STD 561-507
48
H00565-5 Label, Serial #, Standard
49
H03545 Cover, Serial #, Label
50
D11490C Drip Cover, Chrome
51
H11830 Label, Saturn, Drip Cover
52
C11916 Screw, 10-32 X .375 Phillips
53
C13100 Nut, M14-2.0 Nylon Insert
54
B10734 Strain Relief, Handle
55
B11513 Cord, Handle, 14-3 SJTW
56
B11762 Terminal Lug, Nylon, Female
57
B11465 Switch, DPST, Pushbutton
58
B00177 Terminal Lug, Female, QD, .25 X .032
59
C00252 Washer, .375 in, Flat
60
C11541 Washer, .375 in, Star
61
B11518 Switch Insulation
62
C00284 Screw, 10-32 X .375 Ground
63
B00187 Cable Clamp, Nylon, .43 in.
64
B00180-10-3 Ring Terminal, #10 Center
65
B11505 Strain Relief Nut, Metal
66
C11560 Washer, .93 ID X 1.5 OD
67
B11504 Strain Relief, Metal
68
H02548-2 Label, Important, Cord
2 3 4 5 6 7
8
68
67
52
51
50
46
45
44
43
42
41
40
39
66
61
60
59
49
48
47
65
64
63
565758
62
55
54
53
10
10
9
11 12
17LS3-SS
10-30-07
13 14 1615
32
33
29
30
31
34
17 18
35
36
?
19
37
20
21
22
23
24
25
26
27
28
38
Page 13

17LS3-SS
10-30-07
ITEM
NO.
1
2
3
4
5
6
7
8
9
10
11
12
13
14
15
16
17
18
19
20
21
22
23
24
25
26
27
28
29
30
31
32
33
34
35
36
37
38
39
40
41
42
43
44
45
46
47
48
49
50
51
52
53
54
55
56
57
58
59
60
61
62
63
64
65
66
67
68
PART NUMBER
B11487 Power Cord, 14-3, 50 FT, SJTW
K11498 Grip
C11528 Screw, 10-32 X .25 in
H12066 Label, 1.5 HP, Saturn
H11831 Label, EDIC, Black-Silver
D11496B Switch Box Cover, Black
H11493 Label, Safety, Floor Machine
C11529 Screw, 10-32 X .375 in
K11519 Lever Grip, Lockout, Black
C00278 Locknut, 10-32, Nylon, SS
D11494 Lockout Bracket
D11524 Spring, Lockout
C90007 Screw, 10-32 X .625 Phillips, Truss Head, SS
C11491 Screw, 10-32 X 1 in, SS
D11479 Handle, Chrome, Floormachine
C00306 Roll Pin, .125 X 1.75
D11523 Spring, Trigger
D11495 Trigger, Zinc Plated
K11520 Lever Grip, Trigger, Black
11507A Assembled Locking Handle, Cord Hook
C11619 Allen Wrench, .31 in
D11497 Handle, Locking Clamp
C11538 Cap Nut, .31 in, Push-On
C00259 Washer, Slotted, Zinc
C11536 Spade Bolt, .375-16 X 4 in
D11507 Cord Hook Clamp
D11507-2 Cord Hook Body
C11558 Locknut, Black Oxide, Thin
C11502 Socket Cap Screw, .375-16 X 2.5 in
C11537 Dowel Pin, .31 X 1.5 in
C13101 Screw, Hex Cap, M14-2.0
K00674 Bushing, .50 in, Nylon
D11510 Axle, Floor Machine
D11482 Handle Brace, Right, Black
C00240 Washer, Shoulder, Nylon
C11559 Washer, .515 X .875 X .032
G11943 Wheel, 5 in Saturn
C02305 Cap Nut, .5in Push-on
C11501 Socket Cap Screw, .31 - 18
C00251 Lockwasher, .31, Split
E11477 Bumper, 17 in Floor Machine
D11485-SS Brush Cover, 17 in, Stainless
K11521 Spacer, Base, Floor Machine
D11483 Frame, Motor, Black
G11468 Motor W-Gearbox, 1.5 HP
D11481 Handle Brace, Left, Black
H10976-1 Label, UL STD 561-507
H00565-5 Label, Serial #, Standard
H03545 Cover, Serial #, Label
D11490C Drip Cover, Chrome
H11830 Label, Saturn, Drip Cover
C11916 Screw, 10-32 X .375 Phillips
C13100 Nut, M14-2.0 Nylon Insert
B10734 Strain Relief, Handle
B11513 Cord, Handle, 14-3 SJTW
B11762 Terminal Lug, Nylon, Female
B11465 Switch, DPST, Pushbutton
B00177 Terminal Lug, Female, QD, .25 X .032
C00252 Washer, .375 in, Flat
C11541 Washer, .375 in, Star
B11518 Switch Insulation
C00284 Screw, 10-32 X .375 Ground
B00187 Cable Clamp, Nylon, .43 in.
B00180-10-3 Ring Terminal, #10 Center
B11505 Strain Relief Nut, Metal
C11560 Washer, .93 ID X 1.5 OD
B11504 Strain Relief, Metal
H02548-2 Label, Important, Cord
DESCRIPTION
QTY.
1
2
1
1
1
1
1
2
1
1
1
1
1
1
1
2
2
1
2
1
1
1
1
1
1
1
1
2
1
1
1
2
1
1
6
6
2
2
4
4
1
1
4
1
1
1
1
1
1
1
1
3
1
1
1
2
1
2
1
1
1
1
1
2
1
1
1
1
11
Page 14

1
ITEM
NO.
PART NUMBER
1
B11487 Power Cord, 14-3, 50 FT, SJTW
2
K11498 Grip
3
C11528 Screw, 10-32 X .25 in
4
H12066 Label, 1.5 HP, Saturn
5
H11831 Label, EDIC, Black-Silver
6
D11496B Switch Box Cover, Black
7
H11493 Label, Safety, Floor Machine
8
C11529 Screw, 10-32 X .375 in
9
K11519 Lever Grip, Lockout, Black
10
C00278 Locknut, 10-32, Nylon, SS
11
D11494 Lockout Bracket
12
D11524 Spring, Lockout
13
C90007 Screw, 10-32 X .625 Phillips, Truss Head, SS
14
C11491 Screw, 10-32 X 1 in, SS
15
D11479 Handle, Chrome, Floormachine
16
C00306 Roll Pin, .125 X 1.75
17
D11523 Spring, Trigger
18
D11495 Trigger, Zinc Plated
19
K11520 Lever Grip, Trigger, Black
20
11507A Assembled Locking Handle, Cord Hook
21
C11619 Allen Wrench, .31 in
22
D11497 Handle, Locking Clamp
23
C11538 Cap Nut, .31 in, Push-On
24
C00259 Washer, Slotted, Zinc
25
C11536 Spade Bolt, .375-16 X 4 in
26
D11507 Cord Hook Clamp
27
D11507-2 Cord Hook Body
28
C11558 Locknut, Black Oxide, Thin
29
C11502 Socket Cap Screw, .375-16 X 2.5 in
30
C11537 Dowel Pin, .31 X 1.5 in
31
C13101 Screw, Hex Cap, M14-2.0
32
K00674 Bushing, .50 in, Nylon
33
D11510 Axle, Floor Machine
34
D11482 Handle Brace, Right, Black
35
C00240 Washer, Shoulder, Nylon
36
C11559 Washer, .515 X .875 X .032
37
G11943 Wheel, 5 in Saturn
38
C02305 Cap Nut, .5in Push-on
39
C11501 Socket Cap Screw, .31 - 18
40
C00251 Lockwasher, .31, Split
41
E11478 Bumper, 20 in Floor Machine
42
D11486B Brush Cover, 20 in, Black
43
K11521 Spacer, Base, Floor Machine
44
D11483 Frame, Motor, Black
45
G11468 Motor W-Gearbox, 1.5 HP
46
D11481 Handle Brace, Left, Black
47
H10976-1 Label, UL STD 561-507
48
H00565-5 Label, Serial #, Standard
49
H03545 Cover, Serial #, Label
50
D11490B Drip Cover, Black
51
H12913 Label, Drip Cover, White
52
C11916 Screw, 10-32 X .375 Phillips
53
C13100 Nut, M14-2.0 Nylon Insert
54
B10734 Strain Relief, Handle
55
B11513 Cord, Handle, 14-3 SJTW
56
B11762 Terminal Lug, Nylon, Female
57
B11465 Switch, DPST, Pushbutton
58
B00177 Terminal Lug, Female, QD, .25 X .032
59
C00252 Washer, .375 in, Flat
60
C11541 Washer, .375 in, Star
61
B11518 Switch Insulation
62
C00284 Screw, 10-32 X .375 Ground
63
B00187 Cable Clamp, Nylon, .43 in.
64
B00180-10-3 Ring Terminal, #10 Center
65
B11505 Strain Relief Nut, Metal
66
C11560 Washer, .93 ID X 1.5 OD
67
B11504 Strain Relief, Metal
68
H02548-2 Label, Important, Cord
68
67
52
51
50
46
45
44
43
42
41
40
39
2
66
62
61
60
59
58 57 56
49
48
47
3 5 6 7 8
4
10 11 12 13 14
9
65
64
63
55
54
53
10
15
16
17
18 19
20
21
2930 28
20LS3-BK
10-20-07
22
23
24
25
26
27
31
32
33
34
35
36
37
38
Page 15

ITEM
PART NUMBER
NO.
1
B11487 Power Cord, 14-3, 50 FT, SJTW
2
K11498 Grip
3
C11528 Screw, 10-32 X .25 in
4
H12066 Label, 1.5 HP, Saturn
5
H11831 Label, EDIC, Black-Silver
D11496B Switch Box Cover, Black
6
7
H11493 Label, Safety, Floor Machine
8
C11529 Screw, 10-32 X .375 in
9
K11519 Lever Grip, Lockout, Black
C00278 Locknut, 10-32, Nylon, SS
10
11
D11494 Lockout Bracket
12
D11524 Spring, Lockout
13
C90007 Screw, 10-32 X .625 Phillips, Truss Head, SS
14
C11491 Screw, 10-32 X 1 in, SS
15
D11479 Handle, Chrome, Floormachine
C00306 Roll Pin, .125 X 1.75
16
17
D11523 Spring, Trigger
18
D11495 Trigger, Zinc Plated
19
K11520 Lever Grip, Trigger, Black
20
11507A Assembled Locking Handle, Cord Hook
C11619 Allen Wrench, .31 in
21
22
D11497 Handle, Locking Clamp
23
C11538 Cap Nut, .31 in, Push-On
C00259 Washer, Slotted, Zinc
24
25
C11536 Spade Bolt, .375-16 X 4 in
26
D11507 Cord Hook Clamp
27
D11507-2 Cord Hook Body
28
C11558 Locknut, Black Oxide, Thin
C11502 Socket Cap Screw, .375-16 X 2.5 in
29
30
C11537 Dowel Pin, .31 X 1.5 in
31
C13101 Screw, Hex Cap, M14-2.0
32
K00674 Bushing, .50 in, Nylon
33
D11510 Axle, Floor Machine
34
D11482 Handle Brace, Right, Black
35
C00240 Washer, Shoulder, Nylon
36
C11559 Washer, .515 X .875 X .032
37
G11943 Wheel, 5 in Saturn
38
C02305 Cap Nut, .5in Push-on
39
C11501 Socket Cap Screw, .31 - 18
C00251 Lockwasher, .31, Split
40
41
E11478 Bumper, 20 in Floor Machine
D11486B Brush Cover, 20 in, Black
42
43
K11521 Spacer, Base, Floor Machine
44
D11483 Frame, Motor, Black
45
G11468 Motor W-Gearbox, 1.5 HP
46
D11481 Handle Brace, Left, Black
47
H10976-1 Label, UL STD 561-507
48
H00565-5 Label, Serial #, Standard
49
H03545 Cover, Serial #, Label
50
D11490B Drip Cover, Black
51
H12913 Label, Drip Cover, White
52
C11916 Screw, 10-32 X .375 Phillips
53
C13100 Nut, M14-2.0 Nylon Insert
54
B10734 Strain Relief, Handle
55
B11513 Cord, Handle, 14-3 SJTW
56
B11762 Terminal Lug, Nylon, Female
57
B11465 Switch, DPST, Pushbutton
58
B00177 Terminal Lug, Female, QD, .25 X .032
59
C00252 Washer, .375 in, Flat
60
C11541 Washer, .375 in, Star
61
B11518 Switch Insulation
62
C00284 Screw, 10-32 X .375 Ground
63
B00187 Cable Clamp, Nylon, .43 in.
64
B00180-10-3 Ring Terminal, #10 Center
65
B11505 Strain Relief Nut, Metal
66
C11560 Washer, .93 ID X 1.5 OD
67
B11504 Strain Relief, Metal
68
H02548-2 Label, Important, Cord
20LS3-BK
10-20-07
DESCRIPTION
QTY.
1
2
1
1
1
1
1
2
1
1
1
1
1
1
1
2
2
1
2
1
1
1
1
1
1
1
1
2
1
1
1
2
1
1
6
6
2
2
4
4
1
1
4
1
1
1
1
1
1
1
1
3
1
1
1
2
1
2
1
1
1
1
1
2
1
1
1
1
11
Page 16

1
ITEM
NO.
PART NUMBER
1
B11487 Power Cord, 14-3, 50 FT, SJTW
2
K11498 Grip
3
C11528 Screw, 10-32 X .25 in
4
H12066 Label, 1.5 HP, Saturn
5
H11831 Label, EDIC, Black-Silver
6
D11496B Switch Box Cover, Black
7
H11493 Label, Safety, Floor Machine
8
C11529 Screw, 10-32 X .375 in
9
K11519 Lever Grip, Lockout, Black
10
C00278 Locknut, 10-32, Nylon, SS
11
D11494 Lockout Bracket
12
D11524 Spring, Lockout
13
C90007 Screw, 10-32 X .625 Phillips, Truss Head, SS
14
C11491 Screw, 10-32 X 1 in, SS
15
D11479 Handle, Chrome, Floormachine
16
C00306 Roll Pin, .125 X 1.75
17
D11523 Spring, Trigger
18
D11495 Trigger, Zinc Plated
19
K11520 Lever Grip, Trigger, Black
20
11507A Assembled Locking Handle, Cord Hook
21
C11619 Allen Wrench, .31 in
22
D11497 Handle, Locking Clamp
23
C11538 Cap Nut, .31 in, Push-On
24
C00259 Washer, Slotted, Zinc
25
C11536 Spade Bolt, .375-16 X 4 in
26
D11507 Cord Hook Clamp
27
D11507-2 Cord Hook Body
28
C11558 Locknut, Black Oxide, Thin
29
C11502 Socket Cap Screw, .375-16 X 2.5 in
30
C11537 Dowel Pin, .31 X 1.5 in
31
C13101 Screw, Hex Cap, M14-2.0
32
K00674 Bushing, .50 in, Nylon
33
D11510 Axle, Floor Machine
34
D11482 Handle Brace, Right, Black
35
C00240 Washer, Shoulder, Nylon
36
C11559 Washer, .515 X .875 X .032
37
G11943 Wheel, 5 in Saturn
38
C02305 Cap Nut, .5in Push-on
39
C11501 Socket Cap Screw, .31 - 18
40
C00251 Lockwasher, .31, Split
41
E11478 Bumper, 20 in Floor Machine
42
D11486-SS Brush Cover, 20 in, Stainless
43
K11521 Spacer, Base, Floor Machine
44
D11483 Frame, Motor, Black
45
G11468 Motor W-Gearbox, 1.5 HP
46
D11481 Handle Brace, Left, Black
47
H10976-1 Label, UL STD 561-507
48
H00565-5 Label, Serial #, Standard
49
H03545 Cover, Serial #, Label
50
D11490C Drip Cover, Chrome
51
H11830 Label, Saturn, Drip Cover
52
C11916 Screw, 10-32 X .375 Phillips
53
C13100 Nut, M14-2.0 Nylon Insert
54
B10734 Strain Relief, Handle
55
B11513 Cord, Handle, 14-3 SJTW
56
B11762 Terminal Lug, Nylon, Female
57
B11465 Switch, DPST, Pushbutton
58
B00177 Terminal Lug, Female, QD, .25 X .032
59
C00252 Washer, .375 in, Flat
60
C11541 Washer, .375 in, Star
61
B11518 Switch Insulation
62
C00284 Screw, 10-32 X .375 Ground
63
B00187 Cable Clamp, Nylon, .43 in.
64
B00180-10-3 Ring Terminal, #10 Center
65
B11505 Strain Relief Nut, Metal
66
C11560 Washer, .93 ID X 1.5 OD
67
B11504 Strain Relief, Metal
68
H02548-2 Label, Important, Cord
68
67
52
51
50
46
45
44
43
42
41
40
39
2
66
62
61
60
59
58 57 56
49
48
47
3 5 6 7 8
4
10 11 12 13 14
9
65
64
63
55
54
53
10
15
16
17
18 19
20
21
2930 28
20LS3-SS
10-20-07
22
23
24
25
26
27
31
32
33
34
35
36
37
38
Page 17

ITEM
PART NUMBER
NO.
1
B11487 Power Cord, 14-3, 50 FT, SJTW
2
K11498 Grip
3
C11528 Screw, 10-32 X .25 in
H12066 Label, 1.5 HP, Saturn
4
5
H11831 Label, EDIC, Black-Silver
D11496B Switch Box Cover, Black
6
7
H11493 Label, Safety, Floor Machine
C11529 Screw, 10-32 X .375 in
8
9
K11519 Lever Grip, Lockout, Black
10
C00278 Locknut, 10-32, Nylon, SS
11
D11494 Lockout Bracket
D11524 Spring, Lockout
12
13
C90007 Screw, 10-32 X .625 Phillips, Truss Head, SS
C11491 Screw, 10-32 X 1 in, SS
14
15
D11479 Handle, Chrome, Floormachine
C00306 Roll Pin, .125 X 1.75
16
17
D11523 Spring, Trigger
18
D11495 Trigger, Zinc Plated
19
K11520 Lever Grip, Trigger, Black
20
11507A Assembled Locking Handle, Cord Hook
21
C11619 Allen Wrench, .31 in
22
D11497 Handle, Locking Clamp
23
C11538 Cap Nut, .31 in, Push-On
24
C00259 Washer, Slotted, Zinc
25
C11536 Spade Bolt, .375-16 X 4 in
26
D11507 Cord Hook Clamp
27
D11507-2 Cord Hook Body
C11558 Locknut, Black Oxide, Thin
28
29
C11502 Socket Cap Screw, .375-16 X 2.5 in
30
C11537 Dowel Pin, .31 X 1.5 in
31
C13101 Screw, Hex Cap, M14-2.0
32
K00674 Bushing, .50 in, Nylon
33
D11510 Axle, Floor Machine
34
D11482 Handle Brace, Right, Black
C00240 Washer, Shoulder, Nylon
35
36
C11559 Washer, .515 X .875 X .032
37
G11943 Wheel, 5 in Saturn
38
C02305 Cap Nut, .5in Push-on
39
C11501 Socket Cap Screw, .31 - 18
40
C00251 Lockwasher, .31, Split
41
E11478 Bumper, 20 in Floor Machine
D11486-SS Brush Cover, 20 in, Stainless
42
43
K11521 Spacer, Base, Floor Machine
44
D11483 Frame, Motor, Black
45
G11468 Motor W-Gearbox, 1.5 HP
D11481 Handle Brace, Left, Black
46
47
H10976-1 Label, UL STD 561-507
48
H00565-5 Label, Serial #, Standard
H03545 Cover, Serial #, Label
49
50
D11490C Drip Cover, Chrome
51
H11830 Label, Saturn, Drip Cover
52
C11916 Screw, 10-32 X .375 Phillips
53
C13100 Nut, M14-2.0 Nylon Insert
54
B10734 Strain Relief, Handle
55
B11513 Cord, Handle, 14-3 SJTW
B11762 Terminal Lug, Nylon, Female
56
57
B11465 Switch, DPST, Pushbutton
58
B00177 Terminal Lug, Female, QD, .25 X .032
59
C00252 Washer, .375 in, Flat
60
C11541 Washer, .375 in, Star
B11518 Switch Insulation
61
62
C00284 Screw, 10-32 X .375 Ground
63
B00187 Cable Clamp, Nylon, .43 in.
64
B00180-10-3 Ring Terminal, #10 Center
B11505 Strain Relief Nut, Metal
65
66
C11560 Washer, .93 ID X 1.5 OD
67
B11504 Strain Relief, Metal
H02548-2 Label, Important, Cord
68
20LS3-SS
10-20-07
11
DESCRIPTION
QTY.
1
2
1
1
1
1
1
2
1
1
1
1
1
1
1
2
2
1
2
1
1
1
1
1
1
1
1
2
1
1
1
2
1
1
6
6
2
2
4
4
1
1
4
1
1
1
1
1
1
1
1
3
1
1
1
2
1
2
1
1
1
1
1
2
1
1
1
1
Page 18

17LS4-BK
10
Page 19

17LS4-BK
11
Page 20

20
17LS4-BK
10
Page 21

20
20
17LS4-BK
11
 Loading...