

Page 1
THE PROFESSIONAL EQUIPM EN T
USER’S MANUAL
THE P ROFES SIONA L EQU IPMEN T
WS-6936
Page 2

Product Description
1.Guide
1.1 Face Panel & Button
1.2 Power On/Off
1.3Power Supply & Battery
2. Menu
2.1 DVB-S
2.2 DVB-T
2.4 System Setup
Product Description
2
3
4
4
4
5
24
2.3 Multimedia
21
CO NTEN TS
CO NTEN TS
2.5 Spectrum-S
5.Product Standard Package
THE P R OF E SS I ON AL E Q U IP ME N T- - -- -- - -- - -- -- - -- - |U S E R ’S M A N U A L| THE P R OF E SS I ON AL E Q U IP ME N T- - -- -- - -- - -- -- - -- - |U S E R ’S M A N U A L|
3.Specifications
26
36
39
4.Warnings
37
2.1.1 Quick Search
2.1.2 Satellite Install
17
2.2.1 Quick Search
2.2.2 Freq-Checking
20
16
10
5
Signa l Fin de r Pro fessi ona l Combo | 1
It is a battery powered hand held Satellite adjustment meter demodulating
DVB-S and DVB-T Signal. It's veryconvenient for installer to catch the
signal quickly andaccurately and adjust the antenna to the best position.
It's with microprocessor controller, reliable and stable performance.
When it's turned on, channel picture, Signal Strength and Signal
Quality can be showed on LCD Screen a fter you set up your local
DVB-S or DVB-T Parameter. Also, it enables you to select large
menu window for data figure which is helpful for adjustment.
It shows Azimuth and Elevation, CBER/VBER, Singal Quality, Signal
Strength and signal lock sound forDVB-S, And for DVB-T channel
picture, Signal Strength and Signal Quality can be showed on LCD
Screen after you set up your local DVB-T Parameter. Also, it can at most
show five channels' signal at the same menu which is very helpful
for adjustment.
For DVB-S it can detect very faint signal, and supports antenna power
OFF/13V/18V selectable and it's with auto-protection for LNB shortcircuit.
For DVB-T it can detect very faint signal, and supports antenna power
OFF/5V/12V/15V/24V selectable and it's with auto-protection
for antenna short-circuit.
It includ es both AV IN a nd AV OUT for C amera, mo nitor…etc
It's used with 12V Power Adaptor when you need to use
external power.
It includes high capacity Lithium Battery 8.4V 3000mAh
which works for more than 4 hours after it's fully charged.
2.6 Spectrum-T
29
2.7 Shortcut Buttons
32
Page 3
1.GUIDE
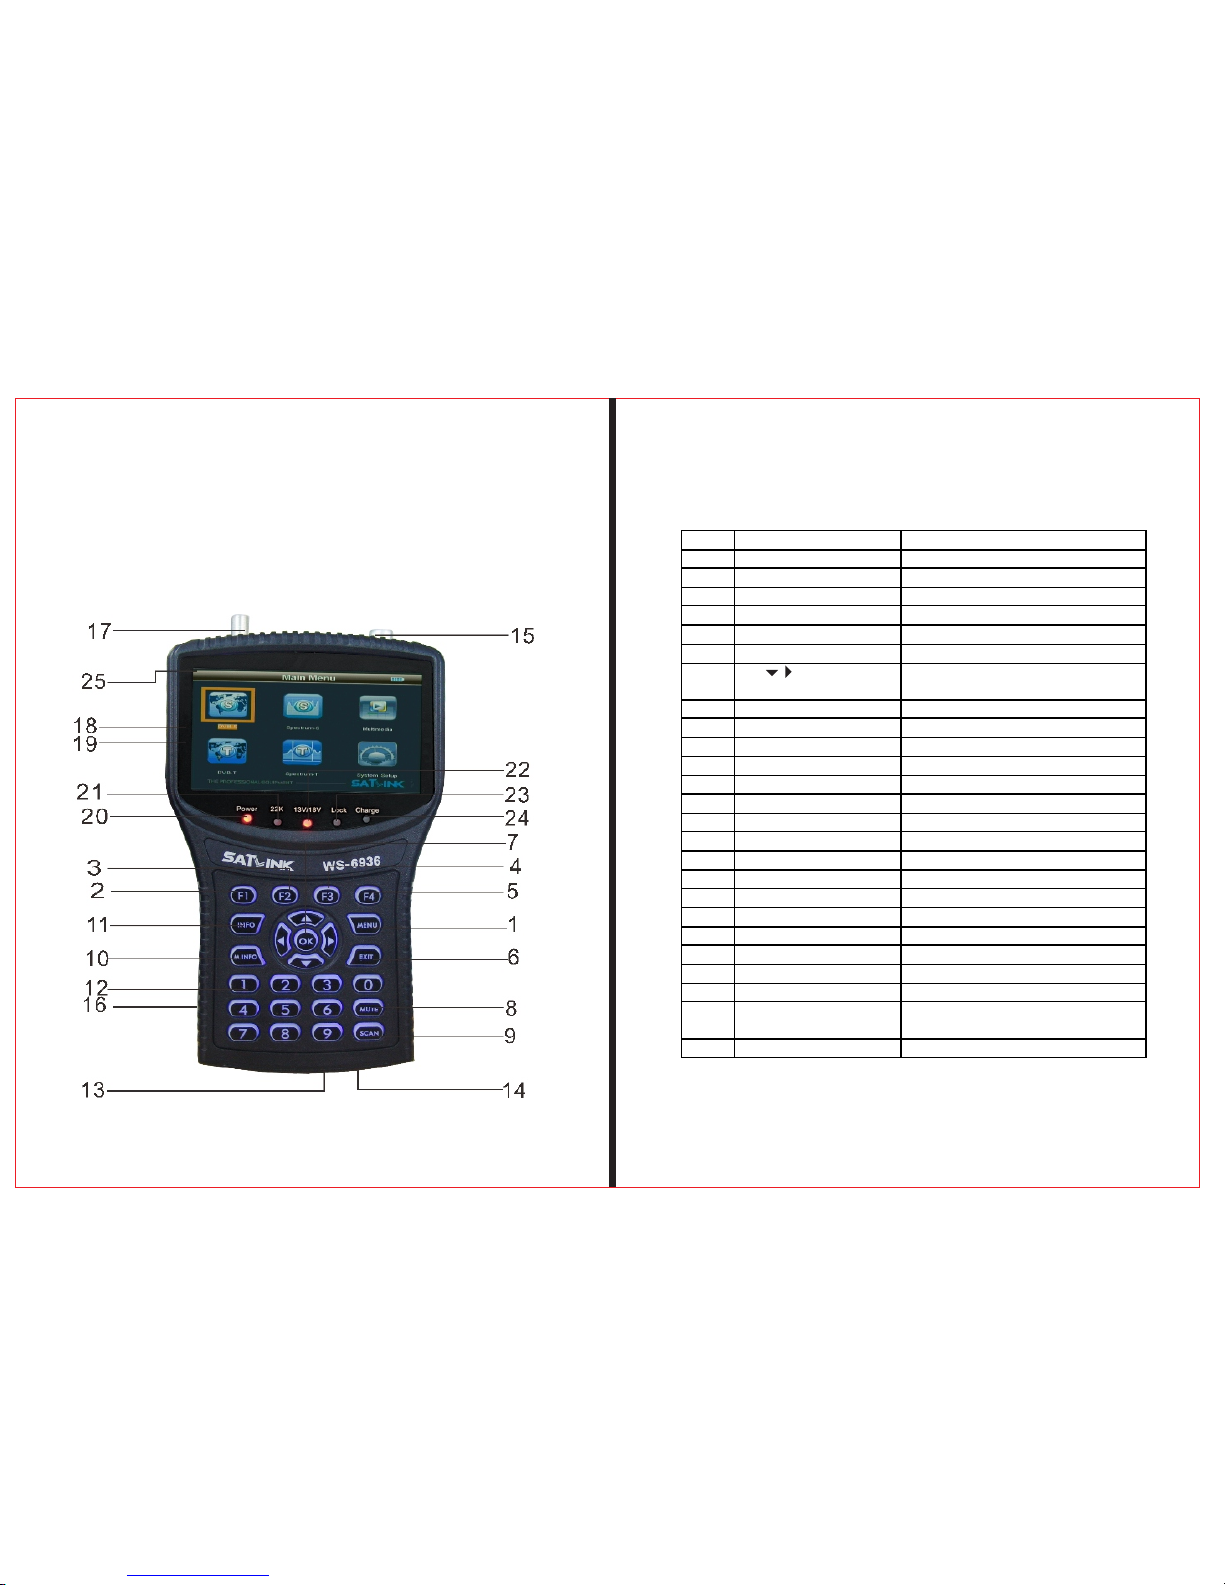
1.1Face Panel & Button
THE P R OF E SS I ON AL E Q U IP ME N T- - -- -- - -- - -- -- - -- - |U S E R ’S M A N U A L| THE P R OF E SS I ON AL E Q U IP ME N T- - -- -- - -- - -- -- - -- - |U S E R ’S M A N U A L|
Signa l Fin de r Pro fessi ona l Combo | 3
2 | Signa l Fin de r Pro fessi ona l Combo
NO. Name Function
1 MENU To show main menu or return to previous menu
2 F1 Function But ton
3 F2 Function But ton
4 F3 Function But ton
5 F4 Function But ton
6 EXIT To cancel selection or exit from current menu
7 ▲▼ OK Arrow for Cursor Moving
OK for Confirming
8 Mute Soun d On/Off Switching
9 SCAN Quick search for DVB-S
10 M.INFO Show 5 channels signal information for DVB-T
11 INFO Show information of current program
12 0-9 Numerical Button To input numer for s etting parameters
13 Power Connection port Port for power charging
14 USB Por t Port for Upgrading or connecting to multimedia
15 Antenna IN Connecting to the antenna for DVB-T
16 Power Switch Power Switch for machine power
17 LNB IN Connecting to the dish for DVB-S
18 AV OUT AV OUT
19 AV IN AV IN
20 Power Indicator Light The light is on when meter is turned on
21 22K Swi tch Indicator Light 22K Switch is on when it lights
22 13/18V Indicat or Light To show H/V switch output
23 Signal Lock Indicator Light Locked signal when it lights
24 Charging Indicator Light The light is on when it’s charging and
off when charging is completed.
25 Flashlight holes flashlight
Page 4
1.2 Power On/Off
To turn on the meter when Power Switch moves to I
position.
To turn off the meter when Power Switch moves to 0
position.
Please turn off the meter to charge the meter in time
when system information for showing low power popes
up.
1.3Power Supply and Battery
It's used with 12V 1.5A Power Adaptor. It charges
through external power when battery is out of power.
It's used with 8.4V 3000 mAH Lithium Battery. It n ee ds
6 hours charging time by connecting power adaptor with
external power or car charging. After it's full charge, it
works for more than 5 hours (It also depends on the load
of external antenna).
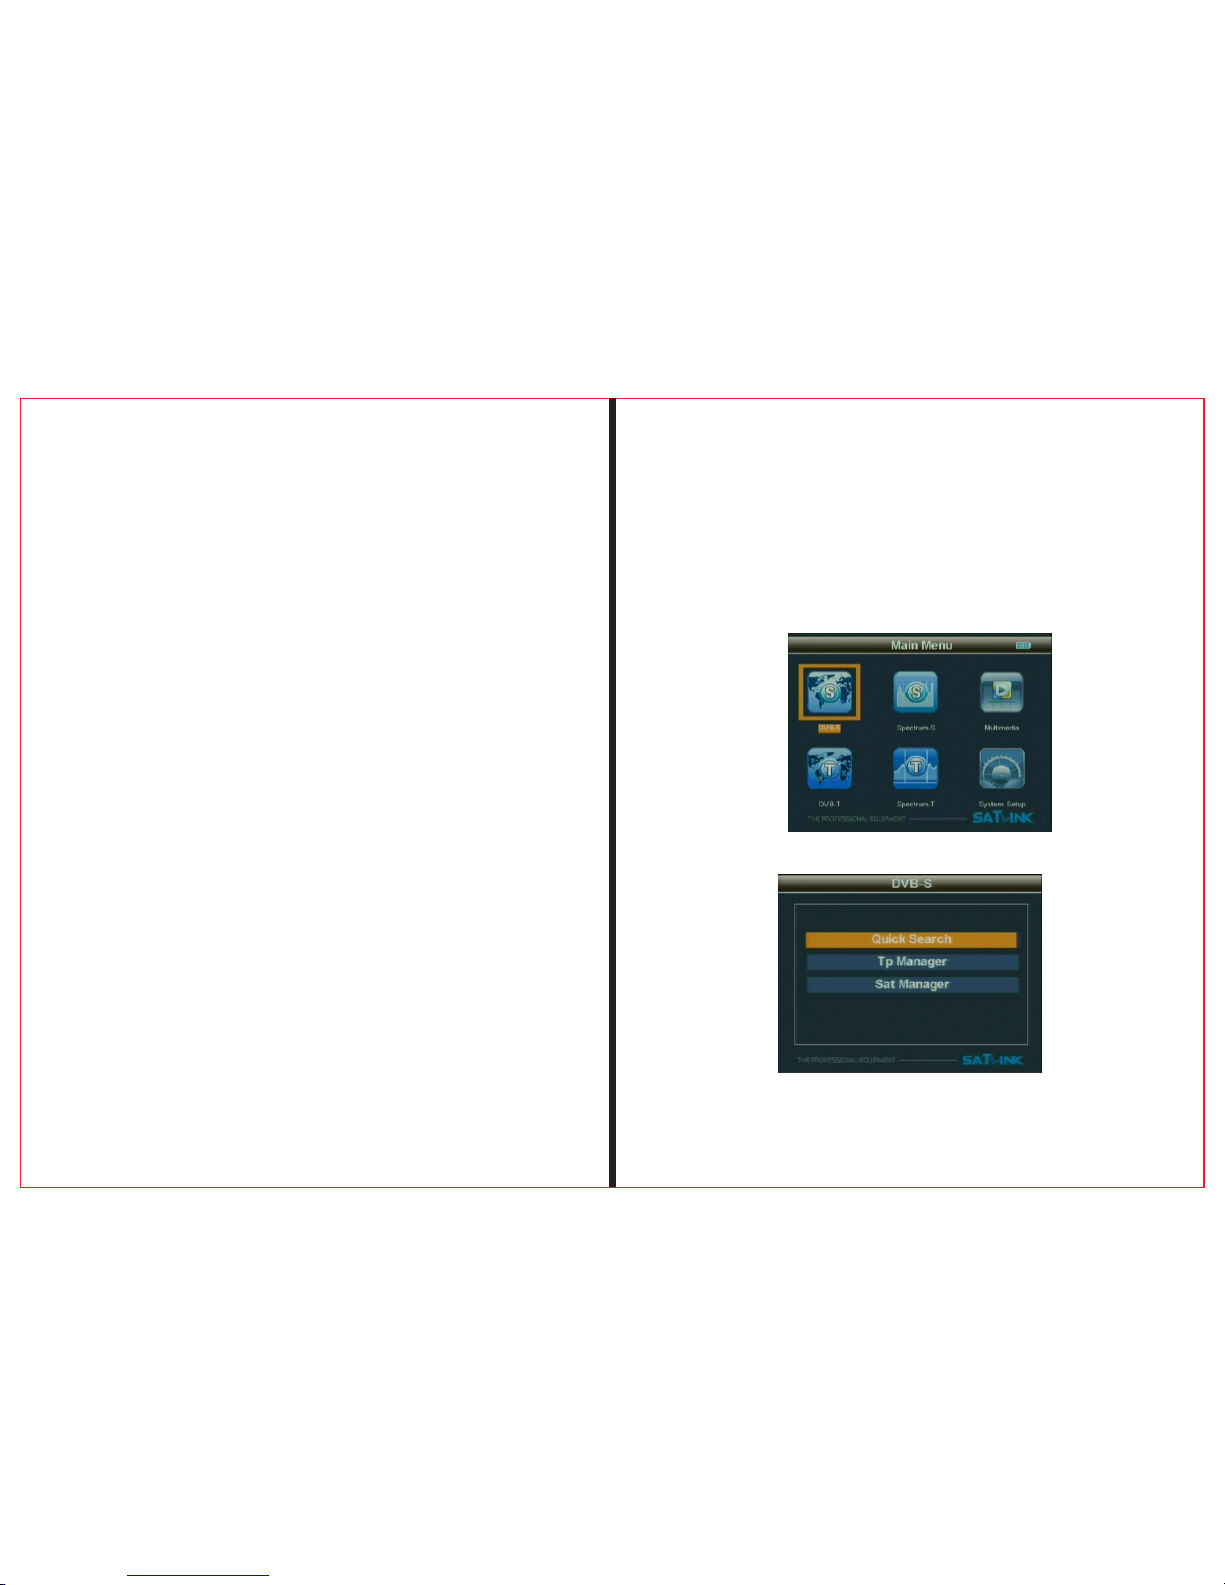
2.MENU
Press “ MENU” key to enter into main menu, and
2.1.1 Quick Searc h
THE P R OF E SS I ON AL E Q U IP ME N T- - -- -- - -- - -- -- - -- - |U S E R ’S M A N U A L| THE P R OF E SS I ON AL E Q U IP ME N T- - -- -- - -- - -- -- - -- - |U S E R ’S M A N U A L|
Notice: For initial charge, please make battery fullycharged(We suggest it charge for 8 hours).
use Arrow key to move cursor, and then press “OK” key to
select sub-menu.
2.1 DVB-S
select DVB-S and press OK to enter DVB-S system
Signa l Fin de r Pro fessi ona l Combo | 5
4 | Signa l Fin de r Pro fessi ona l Combo
Page 5
THE P R OF E SS I ON AL E Q U IP ME N T- - -- -- - -- - -- -- - -- - |U S E R ’S M A N U A L| THE P R OF E SS I ON AL E Q U IP ME N T- - -- -- - -- - -- -- - -- - |U S E R ’S M A N U A L|
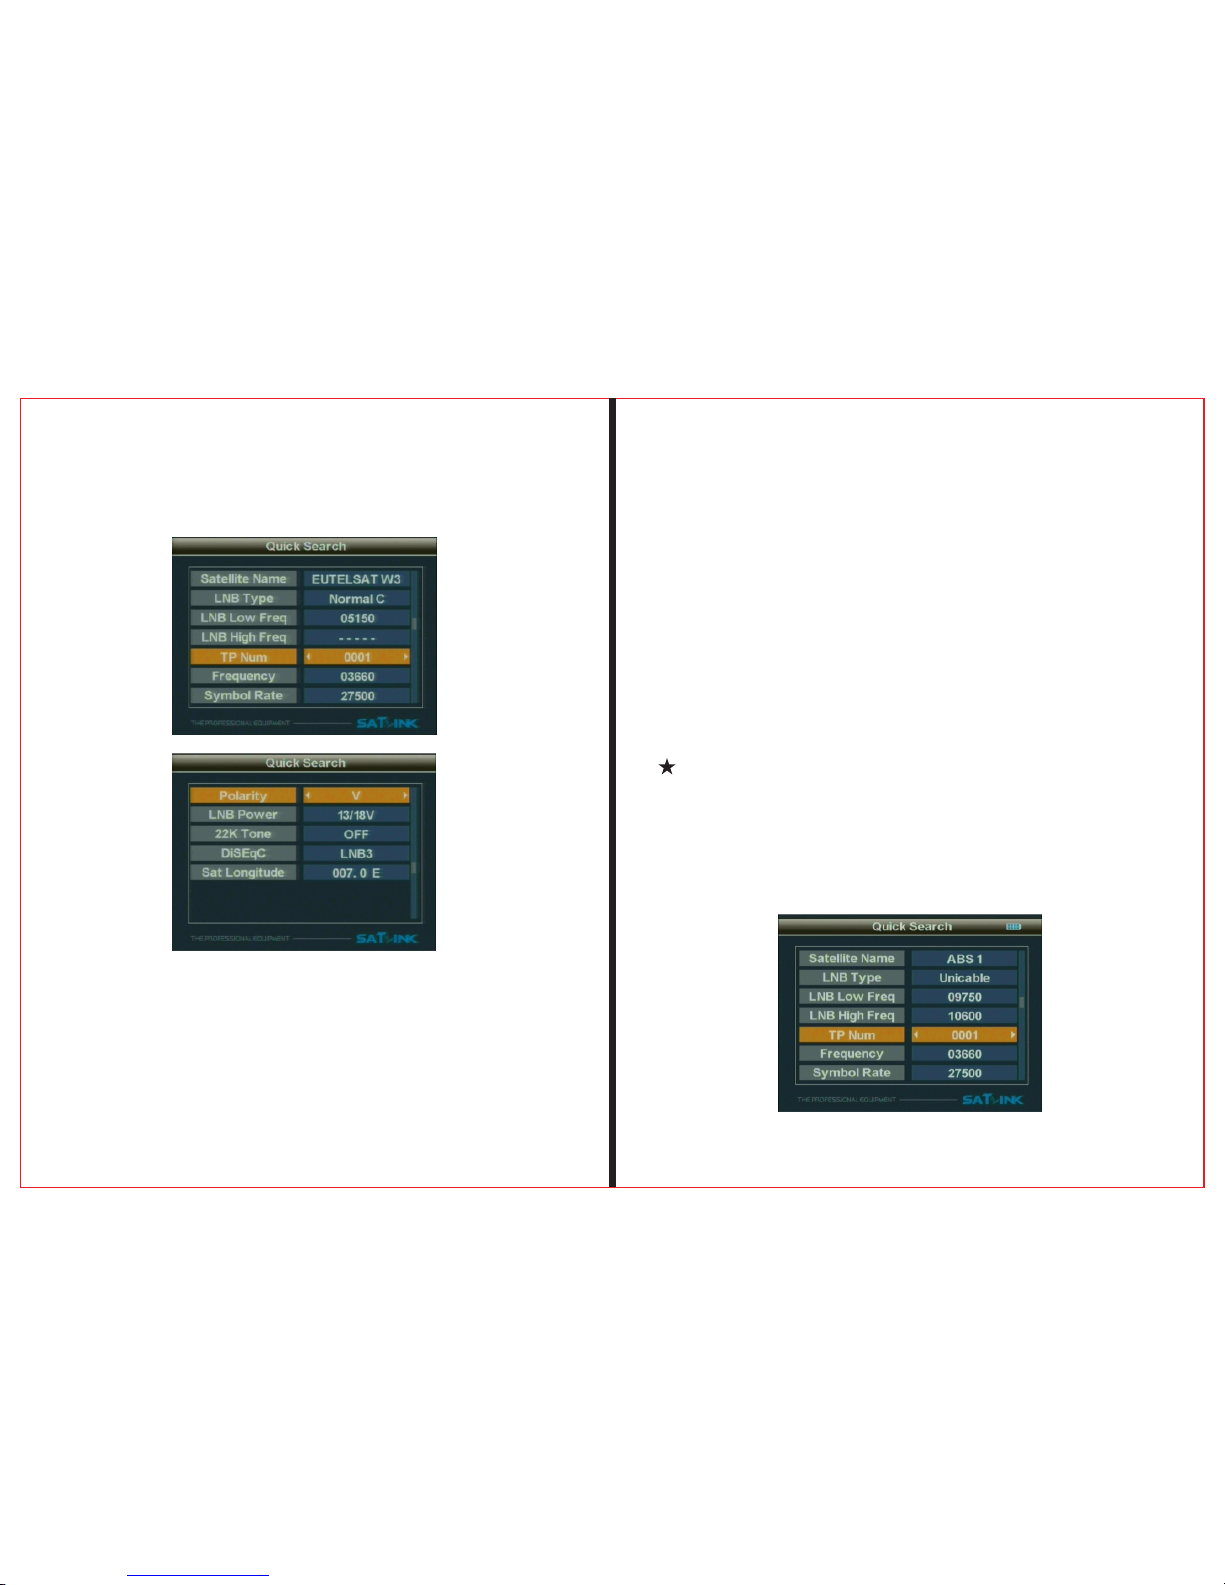
2.1. 1 .1 Satellit e Name
To select the satellite name for receiving signal
2.1. 1.2 LNB Type
Select LNB Type
2.1. 1.3 LNB Low Fre q/ LNB High Fre quency
Use the numerical button to input Freq Valu e of L NB
2.1. 1.4 Frequen cy
Us the numerical button to input Freq Value of Frequency.
U se t h e n u m e ri c al b u t t on t o in p u t Va l u e f o r
S YM B OL RAT E
2.1. 1.5 Symbol Ra te
2.1. 1.6 Polarit y
Chose Polar Mode(OFF/13V/18V)
Press OK to the sub-menu
Signa l Fin de r Pro fessi ona l Combo | 7
6 | Signa l Fin de r Pro fessi ona l Combo
2.1. 1.7 SCR funct ion:
Pls enter Quick Search in menu,LN B Type choose Unicable
Then move to second page.Channe l N0 ,S el ec t th e ma chine
is connected to the correspondi ng S CR L NB p or t an d
frequency.At t hi s po in t se t to c omplete SCR . TP ca n
choose or enter the satellite dat a ,s ea rc hi ng f or s ignal.
Page 6
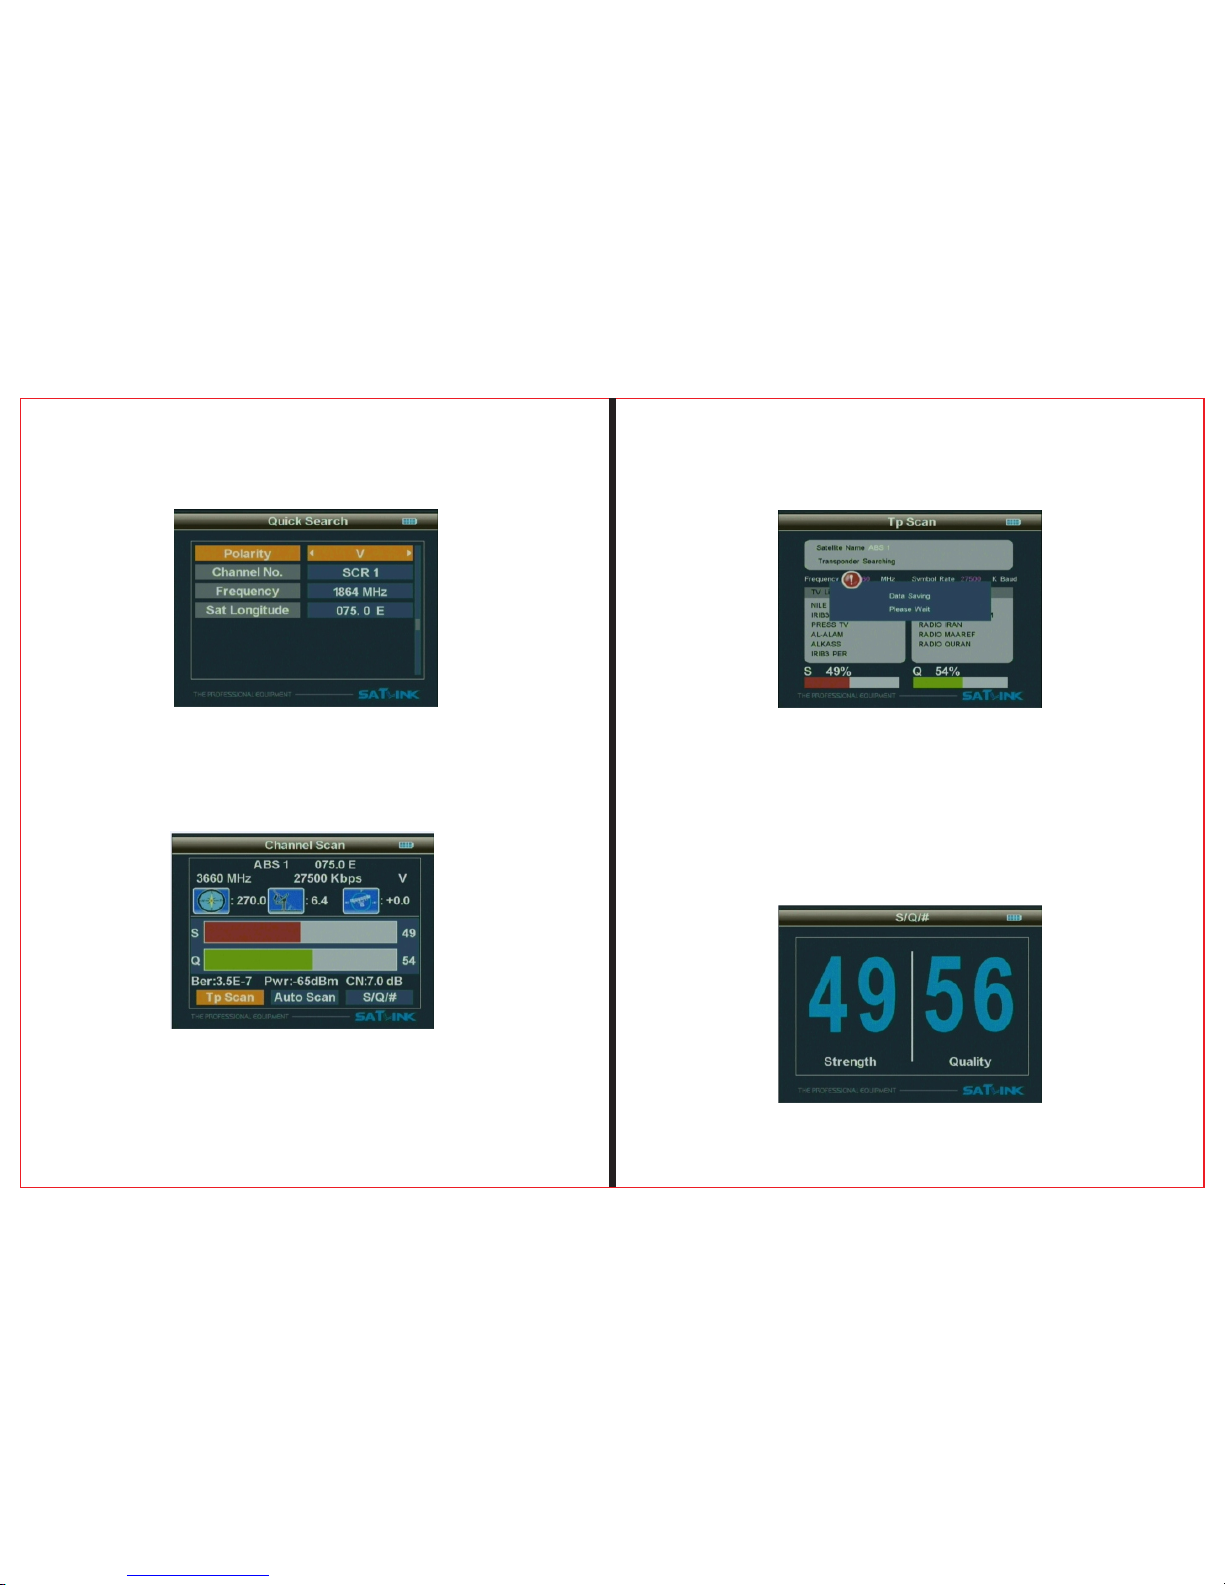
2.1. 1.10TP Scan
Scan all programs of the current frequency, and
automatically store them after scanning, and then
return back to the previous menu.
2.1.1.11 Scan All
Scan all programs of all channels, and automatically store
them after scanning, and then return back to theprevious
menu.
THE P R OF E SS I ON AL E Q U IP ME N T- - -- -- - -- - -- -- - -- - |U S E R ’S M A N U A L| THE P R OF E SS I ON AL E Q U IP ME N T- - -- -- - -- - -- -- - -- - |U S E R ’S M A N U A L|
2. 1.1.9 Set p arame ters, and pr ess “ OK” b utton to enter
the Sub -menu, and then adju st the dish accor ding to th e
inter face param eters .
2.1. 1.12 S/Q/#
Use ◄ ► button to select S/Q/#, and press “OK”
button to enter the Sub-menu, and then adjust the dish to
the best direction.
Signa l Fin de r Pro fessi ona l Combo | 9
8| Sign al Fi nd er Pr ofess ion al C omb o
2.1. 1.8 Longitu de
Use the numerical button to input Longitude of Satellite
Page 7
THE P R OF E SS I ON AL E Q U IP ME N T- - -- -- - -- - -- -- - -- - |U S E R ’S M A N U A L| THE P R OF E SS I ON AL E Q U IP ME N T- - -- -- - -- - -- -- - -- - |U S E R ’S M A N U A L|
Signa l Fin de r Pro fessi ona l Combo | 11
10 | Sign al Fi nd er Pr ofess ion al C omb o
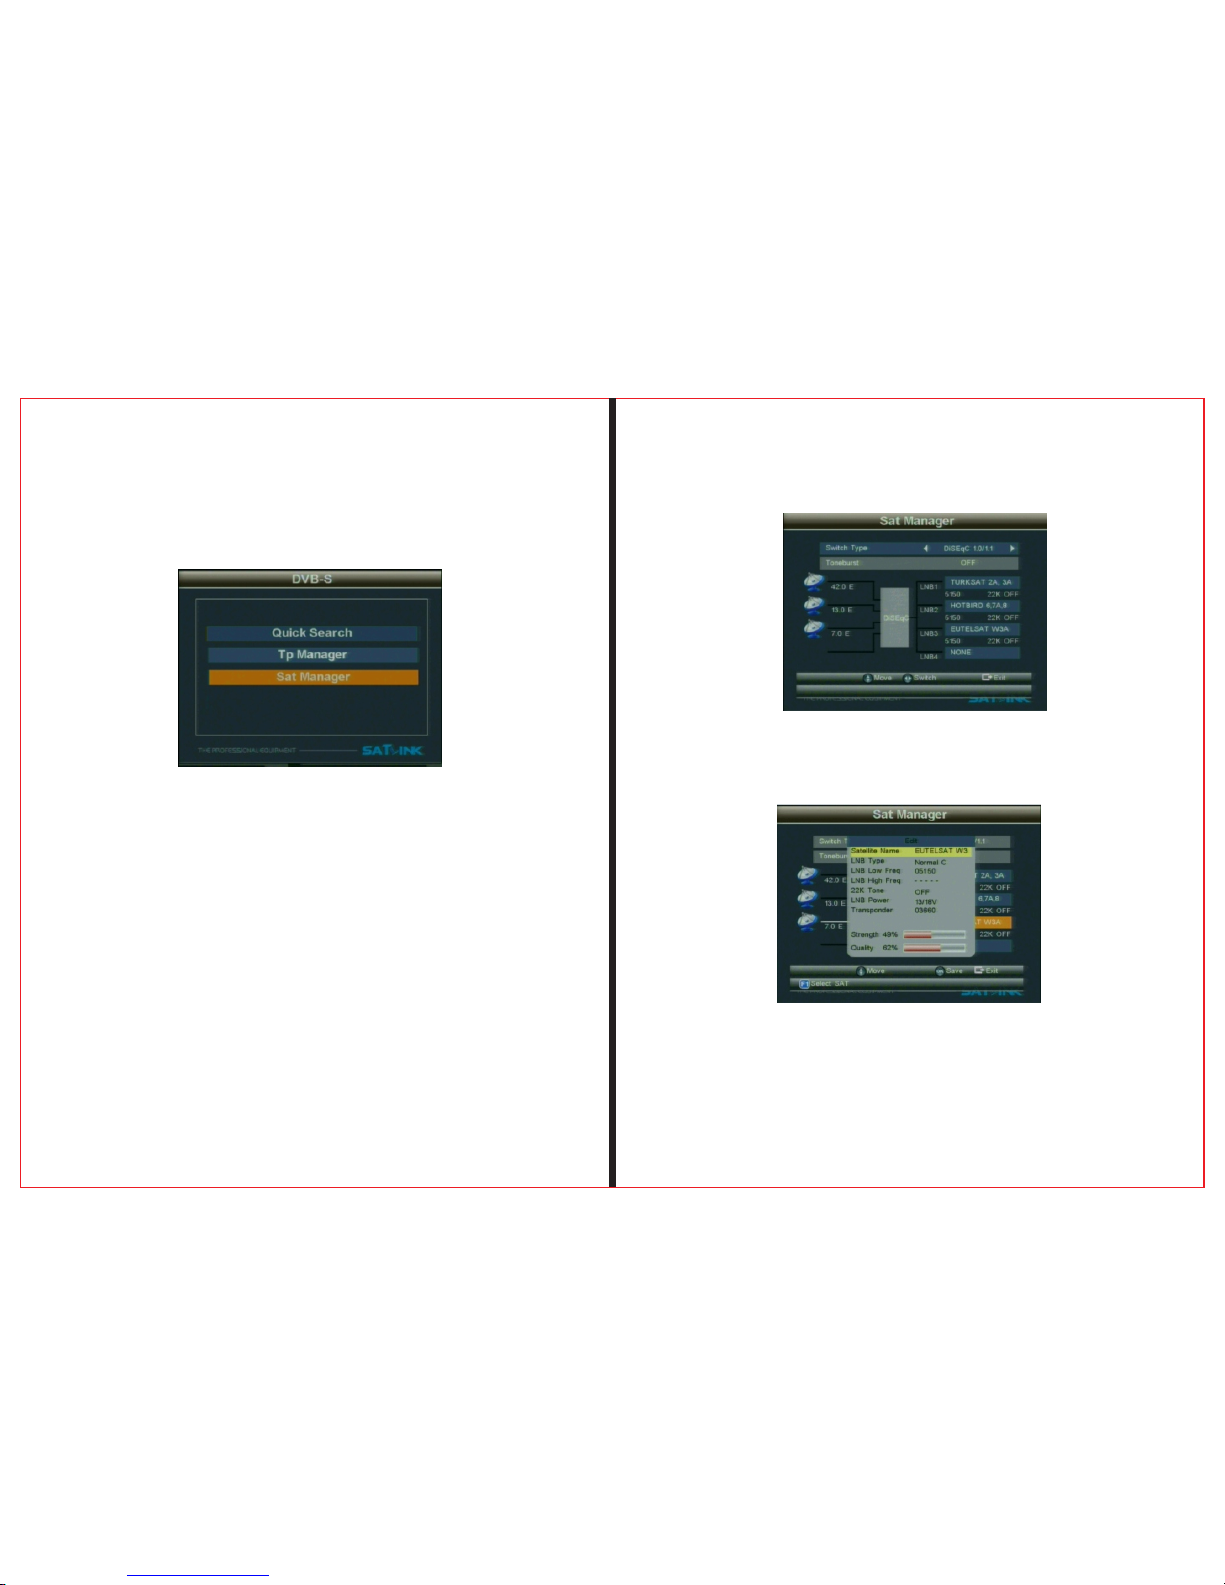
2.1.2.1 S a t M a n a g e r
Pres s “OK ” but t o n t o ent e r th e Sub - m e nu, a nd t h en
set the s tate of t h e d i s h
2.1.2.1.1 S w itch Type
Pres s ◄ ► b u t t on t o c h o o se S w itch Type(NO N E ,
DisE q C 1 .0/1. 1 , Di s E q C 1 . 2 /USALS )
1、DiSEqC 1.0/1.1
Use ◄ ► butto n to select L NB1/LNB2/ LNB3/LN B4
2.1 .2 S at e lli t e I ns t all
Press “F1” button to enter the Su b- Me nu,s el ec t sa tellite。
Press “OK” button to enter the Sub- Me nu,P re ss “▲ ▼” Ed it
parameter.
Page 8
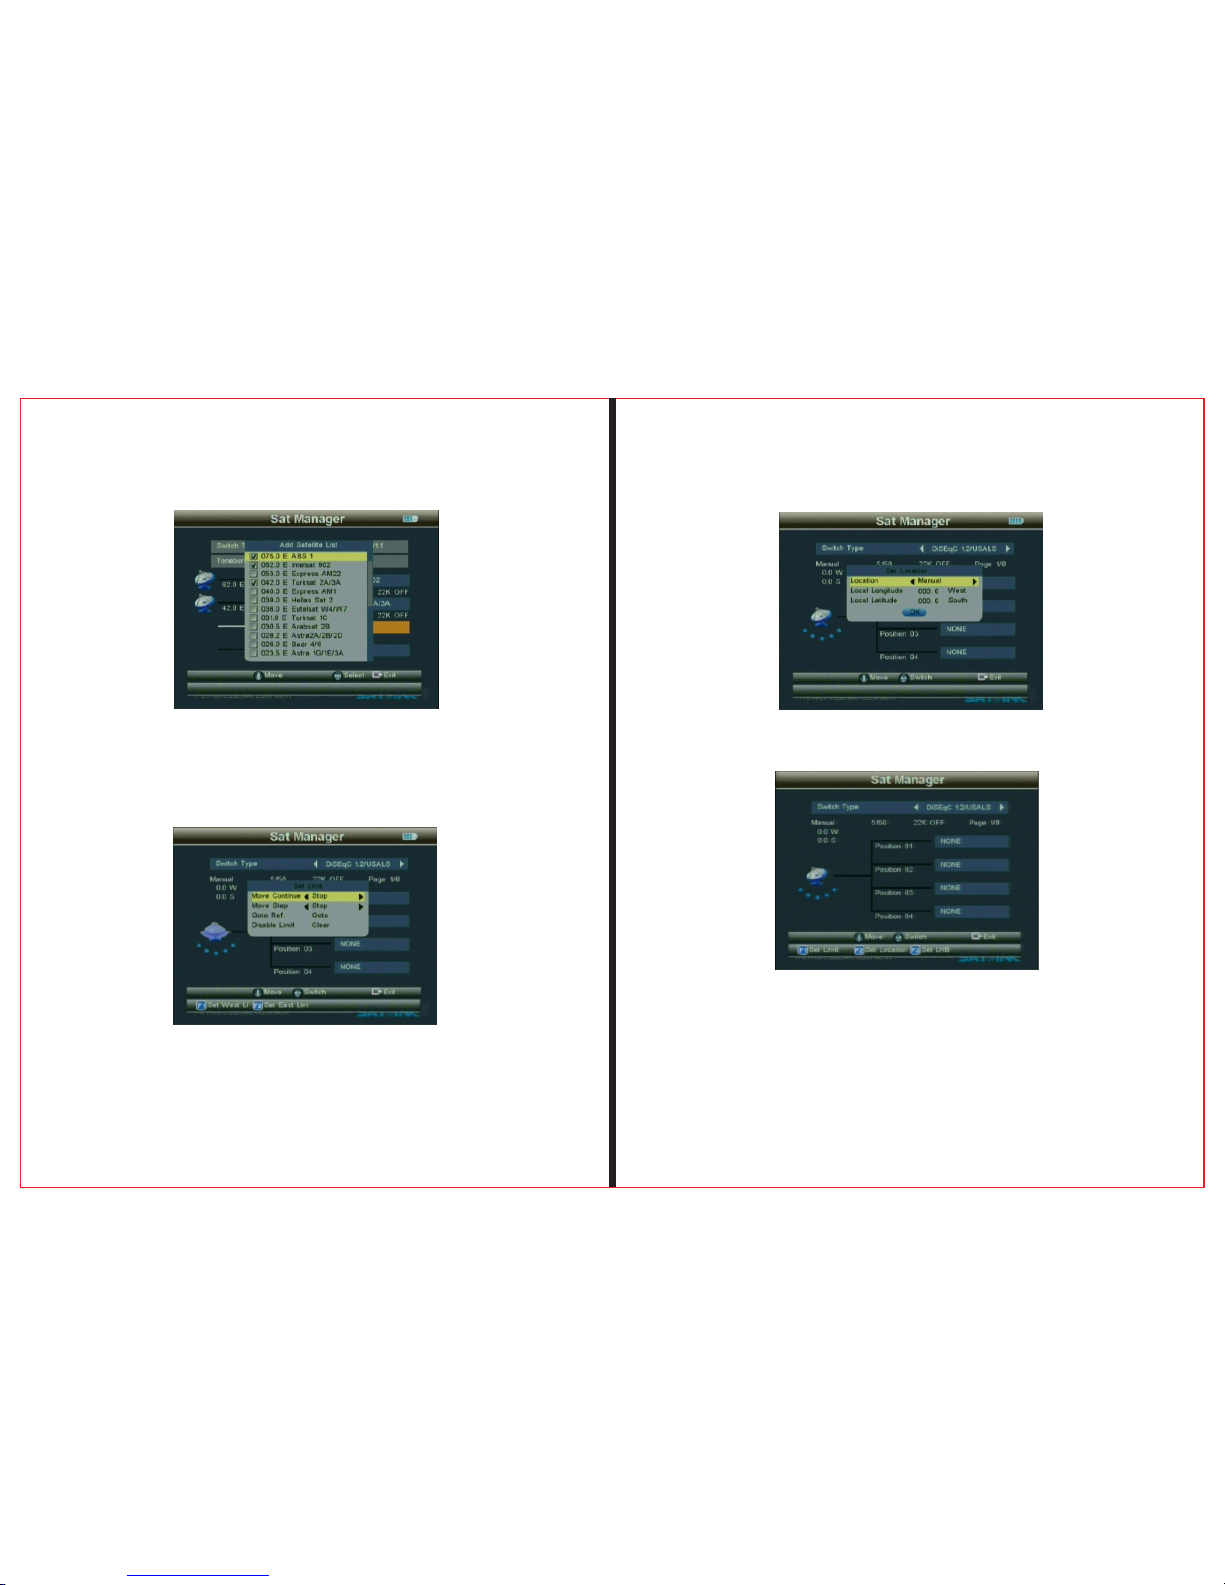
Press OK to finish setting DiSEqC 1. 0/ 1. 1
THE P R OF E SS I ON AL E Q U IP ME N T- - -- -- - -- - -- -- - -- - |U S E R ’S M A N U A L| THE P R OF E SS I ON AL E Q U IP ME N T- - -- -- - -- - -- -- - -- - |U S E R ’S M A N U A L|
Signa l Fin de r Pro fessi ona l Combo | 13
12 | Sign al Fi nd er Pr ofess ion al C omb o
2、DiSEqC 1.2/USALS。
Press “F1” button to enter the Sub- Me nu,a nd t he n ma ke
operations according to the ins tr uc ti on s ,Ed it p arameter。
Press “F2” button to enter the Sub- Me nu,a nd t he n ma ke
operations according to the ins tr uc ti on s ,Ed it p arameter。
Use ▲▼ b utton to select Postion 01/Postio n 02 /P os ti on 0 3/
Postion 04
Page 9
THE P R OF E SS I ON AL E Q U IP ME N T- - -- -- - -- - -- -- - -- - |U S E R ’S M A N U A L| THE P R OF E SS I ON AL E Q U IP ME N T- - -- -- - -- - -- -- - -- - |U S E R ’S M A N U A L|
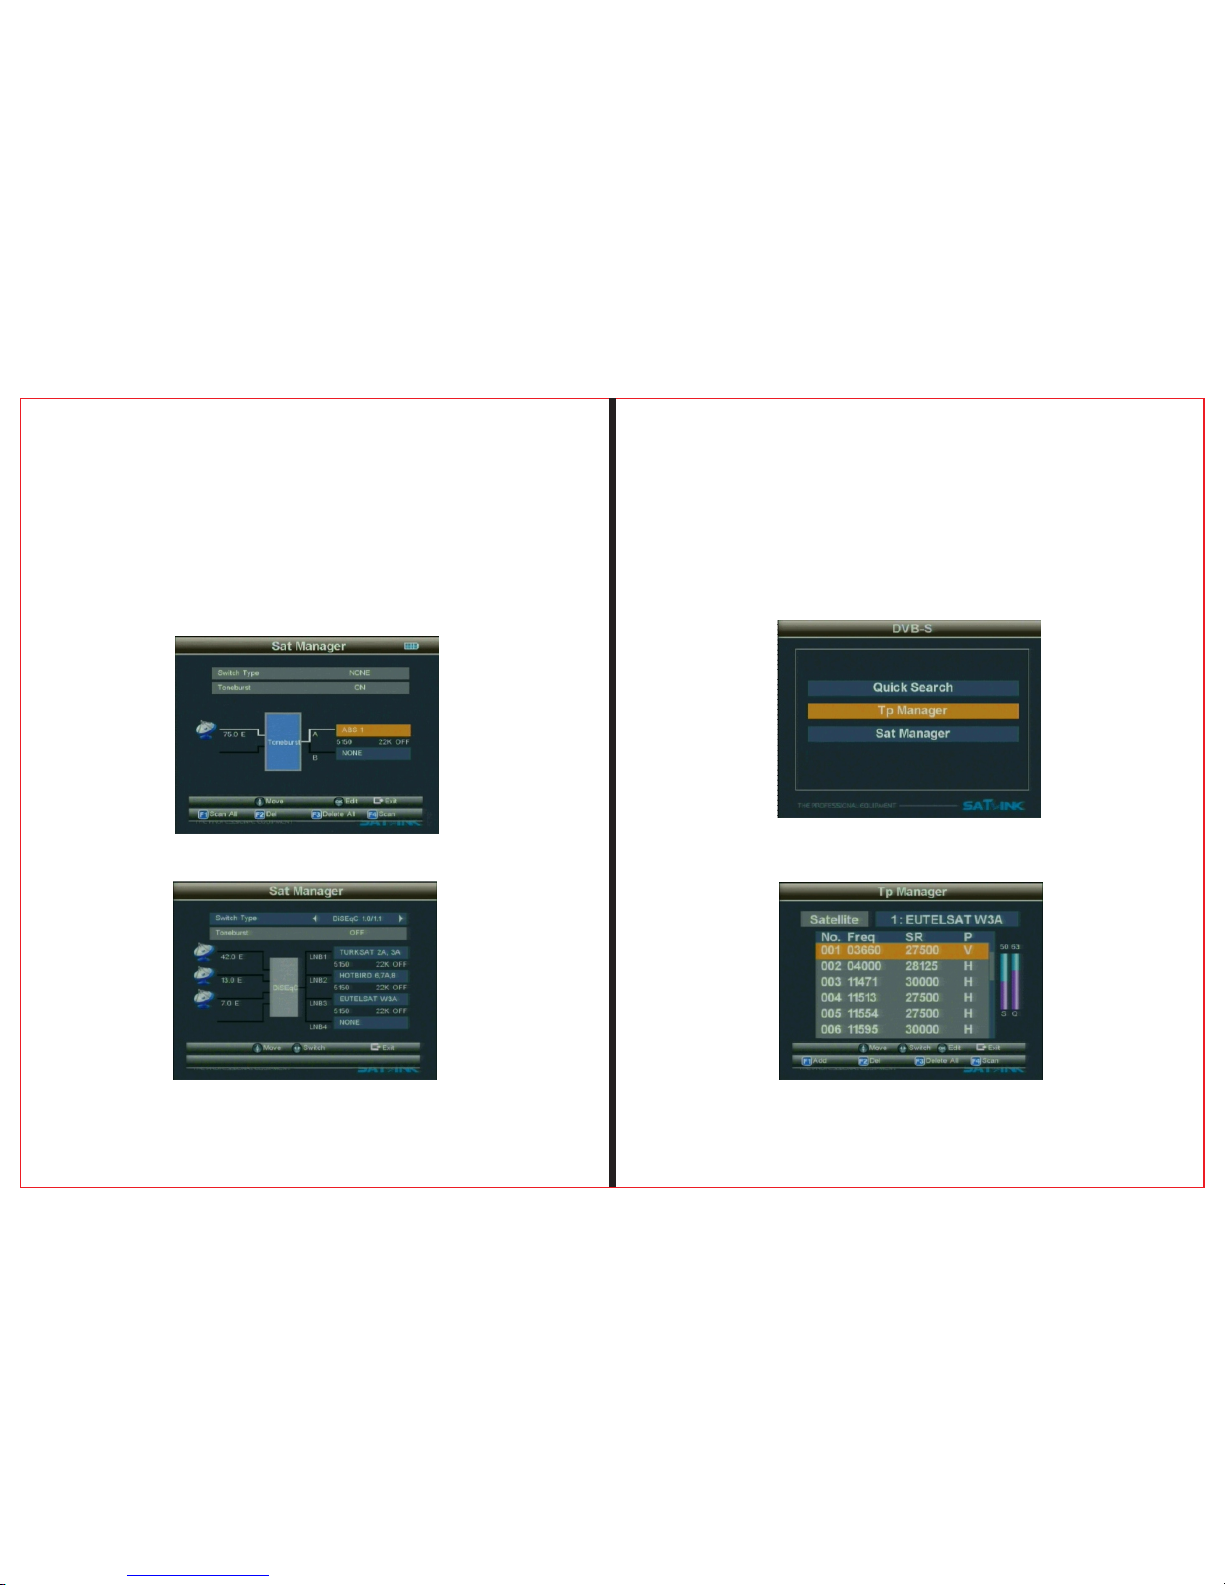
2.1.2.1.2Toneburst
P ress ◄ ► butt o n to choo s e Ton e b u rst m ode
(OFF / O N ).
1、Switch Type on NON E
Signa l Fin de r Pro fessi ona l Combo | 15
14 | Sign al Fi nd er Pr ofess ion al C omb o
2、Switch Type on DiS Eq C 1. 0/ 1. 1
2. 1 . 3 TP Ma na g e r
Pres s “ OK” b u t t o n t o en t e r the S u b - M e n u , a n d
then
make o p e ratio n s according t o t o t he i n s t r u ction s .
Page 10
THE P R OF E SS I ON AL E Q U IP ME N T- - -- -- - -- - -- -- - -- - |U S E R ’S M A N U A L| THE P R OF E SS I ON AL E Q U IP ME N T- - -- -- - -- - -- -- - -- - |U S E R ’S M A N U A L|
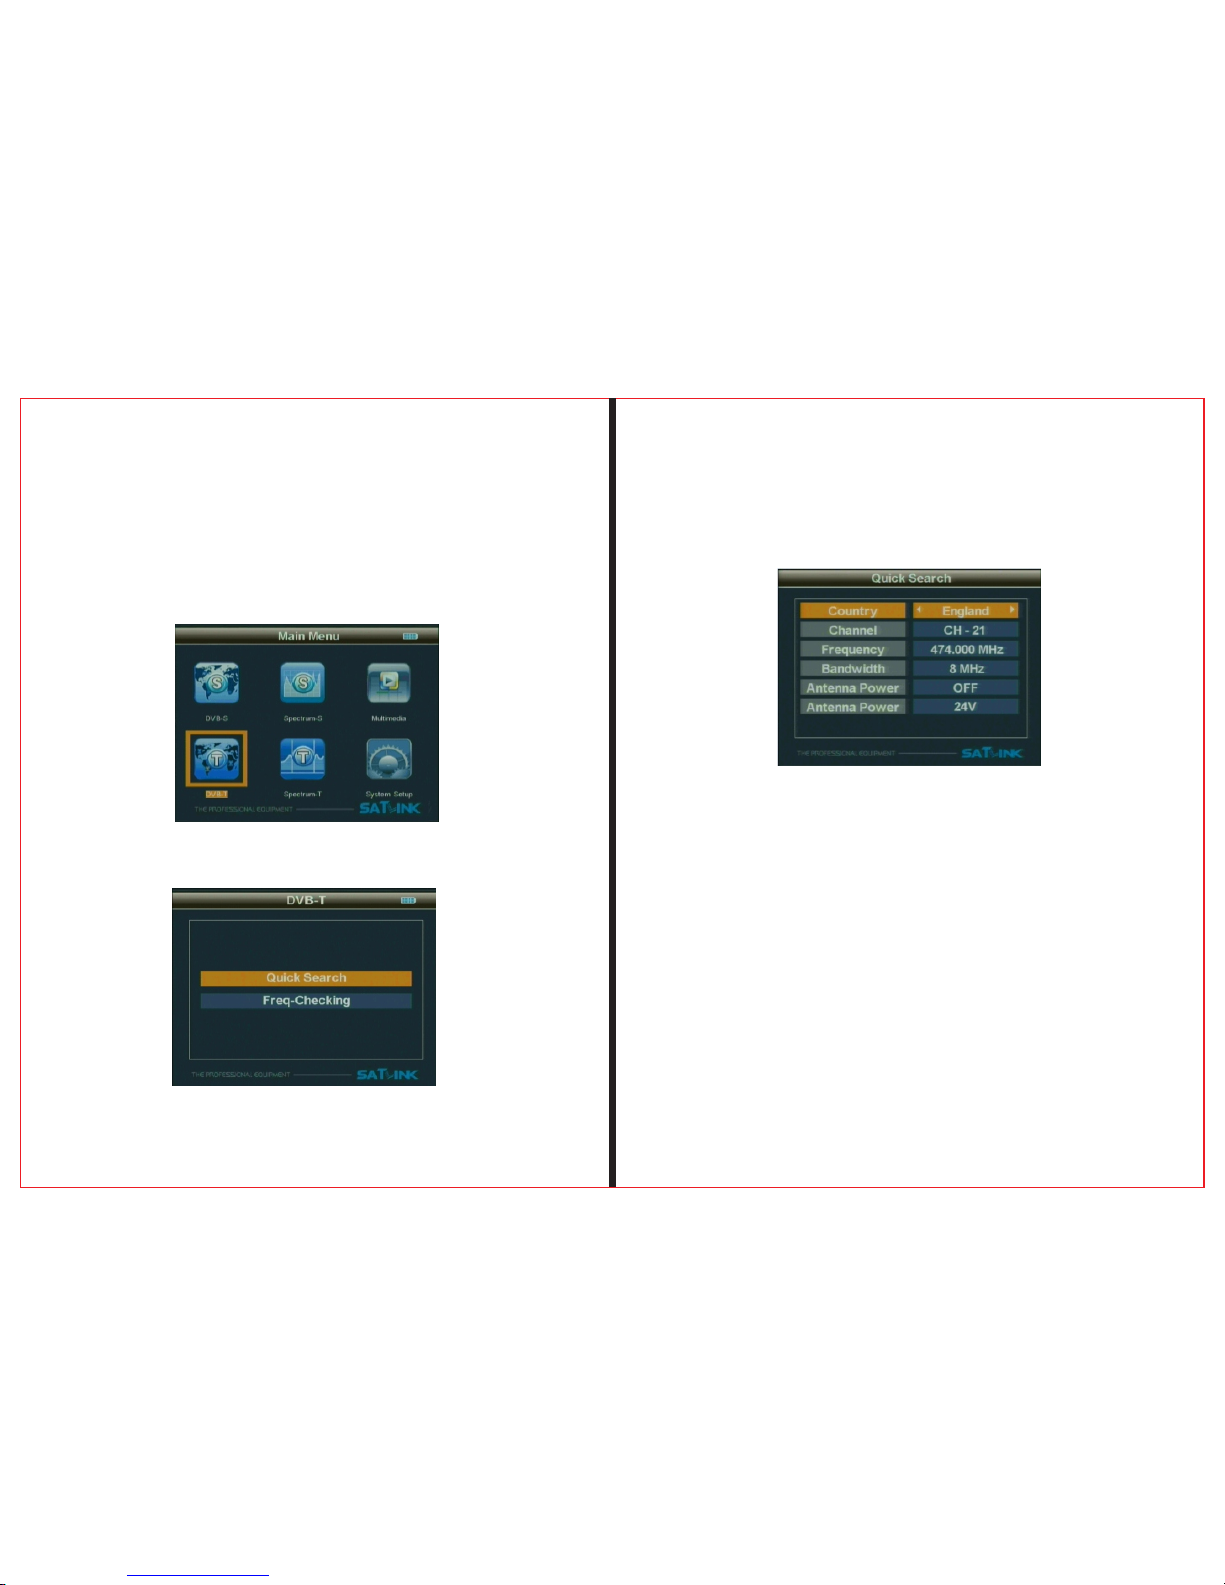
2.2 DVB-T
Pr ess “ MENU” t o ent er in to ma in me nu, and use Ar row
ke y to move cur sor, and Select D VB-T, andth en pr ess
“O K” en ter DVB- T sys tem.
Pres s OK to enter the s ub-menu
Signa l Fin de r Pro fessi ona l Combo | 17
16 | Sign al Fi nd er Pr ofess ion al C omb o
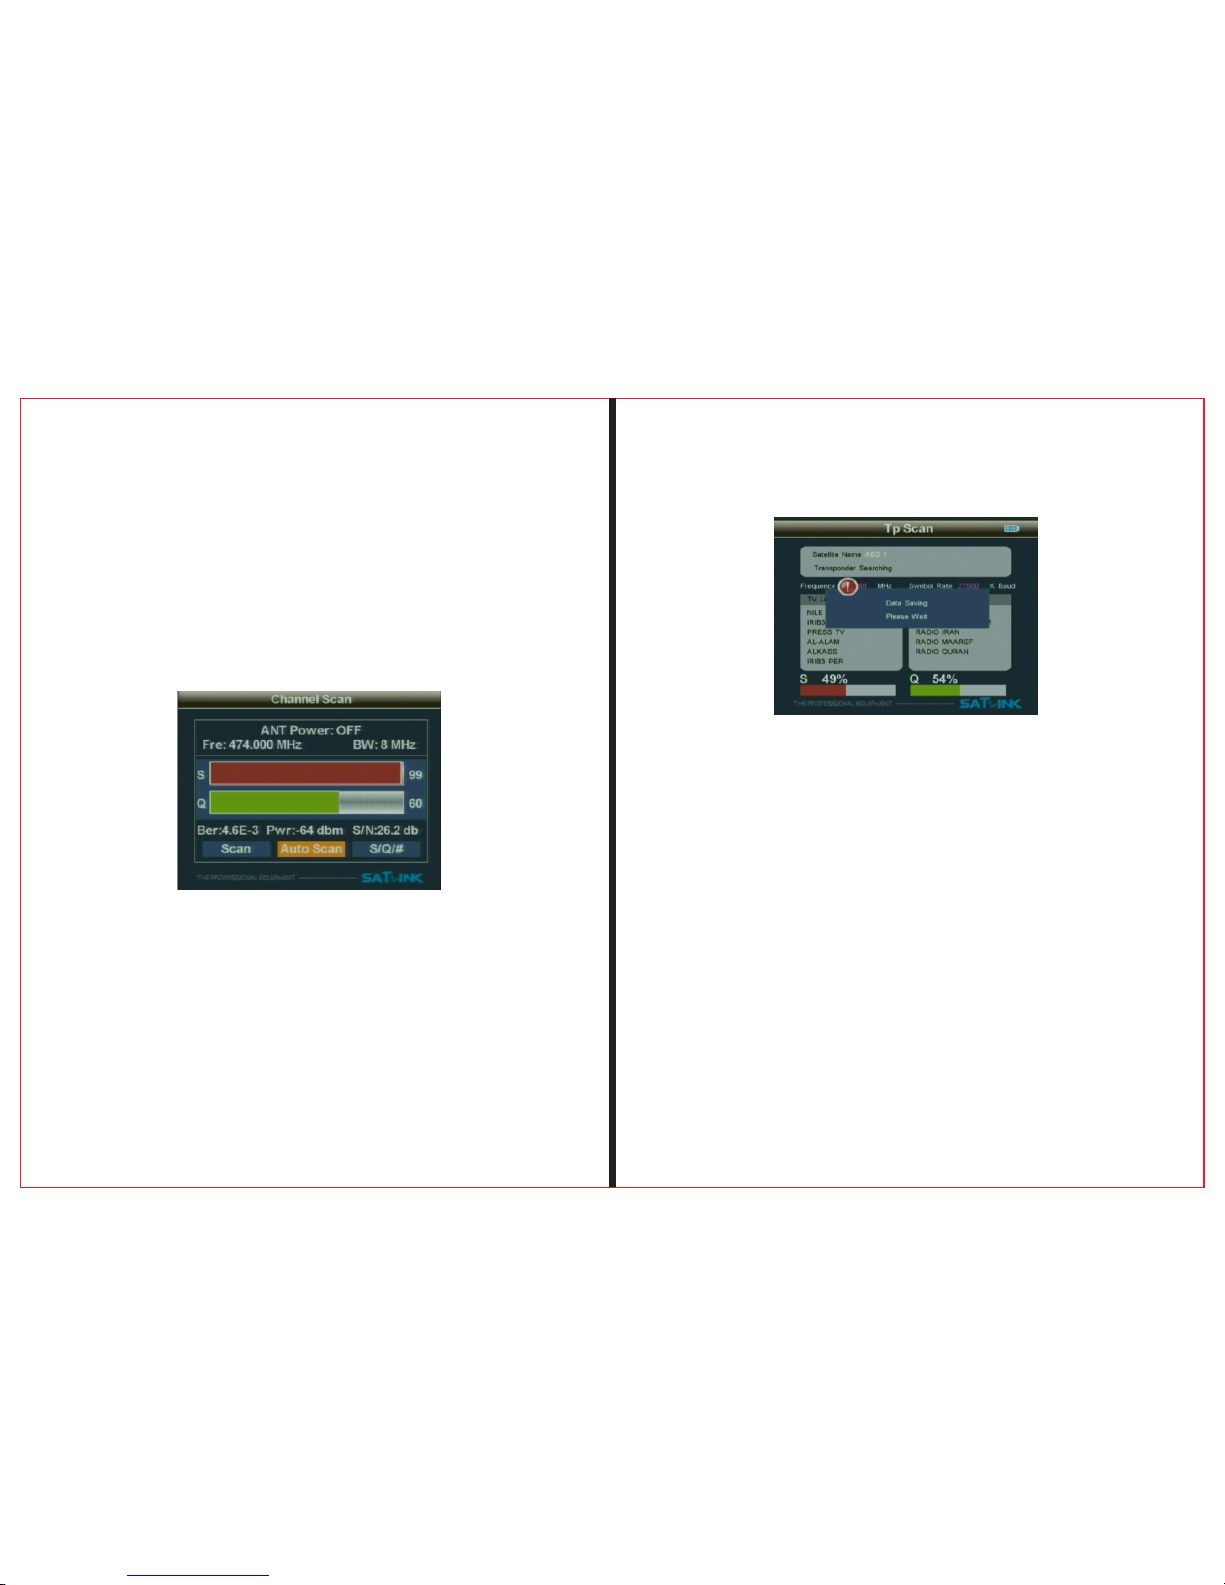
2.2.1.1Quick Search
2.2. 1.1.1Count ry Setting
To select country to receive signal
2.2. 1.1.2Chan nel
To select channel type to be received
2.2. 1.1.3Freq uncy
To set frequency for receiving signal by inputting frequency
value with numerical keys
2.2. 1.1.4Band width
To Select Bandwidth 6M/7M/8M based on your local region.
Page 11
THE P R OF E SS I ON AL E Q U IP ME N T- - -- -- - -- - -- -- - -- - |U S E R ’S M A N U A L| THE P R OF E SS I ON AL E Q U IP ME N T- - -- -- - -- - -- -- - -- - |U S E R ’S M A N U A L|
2.2. 1.1.6 An tenna Setti ng
To select antenna power ON/OFF
2.2. 1.1.7 An tenna Power
To select antenna power voltage(OFF/5V/12V/15V/18V/24V)
2.2. 1.1.8
To set parameter, and press “ OK” to enter into sub-menu.
2.2. 1.1.8.1 Sca n
To scan all the channels of current frequency, and it autorestores the scanned channels, and then return to previous
menu.
Signa l Fin de r Pro fessi ona l Combo |19
18| Sig nal Fin der P ro fes siona l Com bo
2.2. 1.1.8.2 Sca n All
To s c a n a l l c h a n nels, and it a u to-re s t o res t he s canned
c hannel s , an d the n ret u r n t o pre v i ous m enu.
Page 12
THE P R OF E SS I ON AL E Q U IP ME N T- - -- -- - -- - -- -- - -- - |U S E R ’S M A N U A L| THE P R OF E SS I ON AL E Q U IP ME N T- - -- -- - -- - -- -- - -- - |U S E R ’S M A N U A L|
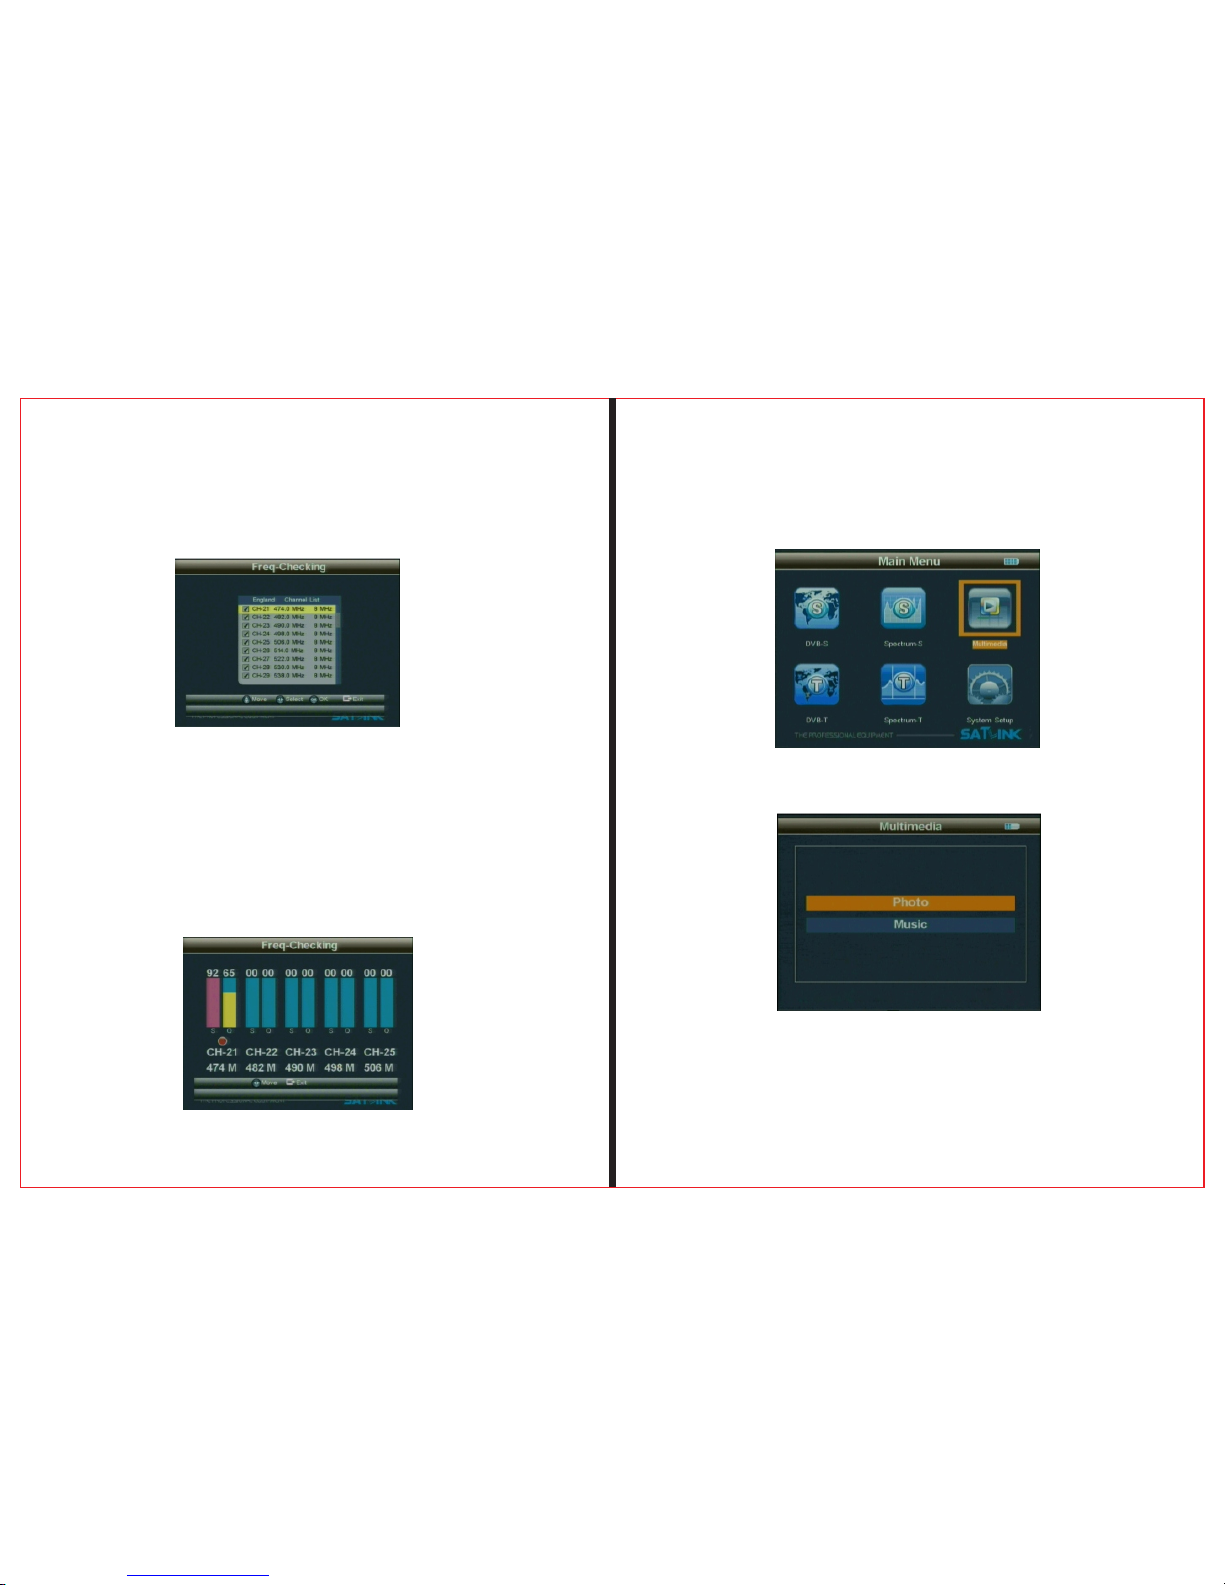
2.2. 2.1 Move
Press ▲▼ b ut to n to m ov e Cu rs or
2.2. 2.2Select
Press ◄ ►button to local channel, and tick the box to select it.
2.2. 2.3
Press OK button to enter into multichannel display.
Each screen display signal indicators of five channels, and
press ◄ ► button to PGUP or PGDOWN.
Signa l Fin de r Pro fessi ona l Combo | 21
20 | Sign al Fi nd er Pr ofess ion al C omb o
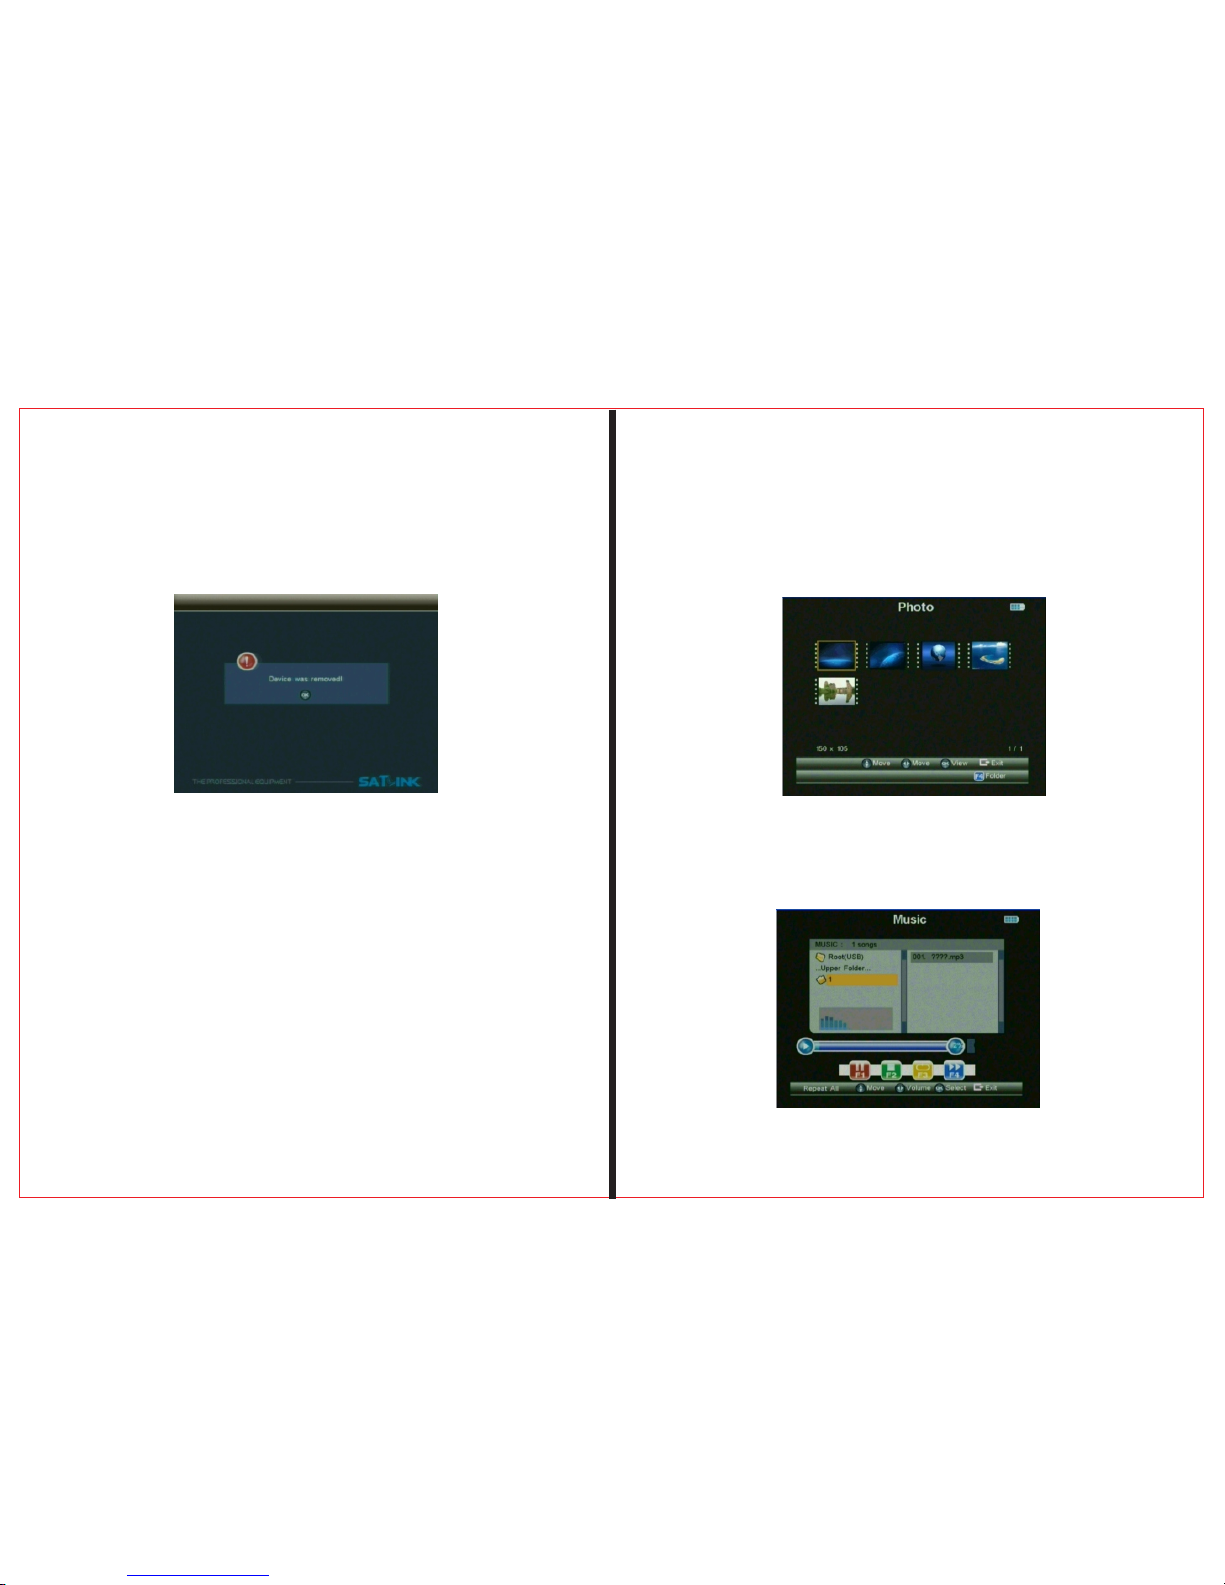
2.3 Mu ltimedia
2.2.2Freq-Checking
Page 13
THE P R OF E SS I ON AL E Q U IP ME N T- - -- -- - -- - -- -- - -- - |U S E R ’S M A N U A L| THE P R OF E SS I ON AL E Q U IP ME N T- - -- -- - -- - -- -- - -- - |U S E R ’S M A N U A L|
2.3.1 Photo
Previewing the pictures in JPG format, and make operations
according to its instructions.
2.3.2 My Music
Play the Music in MP3 format, and then make operations
according to its instructions.
Signa l Fin de r Pro fessi ona l Combo | 23
22 | Sign al Fi nd er Pr ofess ion al C omb o
For M u l t i m edia, t h e ex t e r n a l memory s h o u l d be
insert e d i nto U S B port . O t h erwise , “ D e vice n o t
suppor t e d ” will p o p up o n the w i n d o w.
Page 14
THE P R OF E SS I ON AL E Q U IP ME N T- - -- -- - -- - -- -- - -- - |U S E R ’S M A N U A L| THE P R OF E SS I ON AL E Q U IP ME N T- - -- -- - -- - -- -- - -- - |U S E R ’S M A N U A L|
Signa l Fin de r Pro fessi ona l Combo | 25
24 | Sign al Fi nd er Pr ofess ion al C omb o
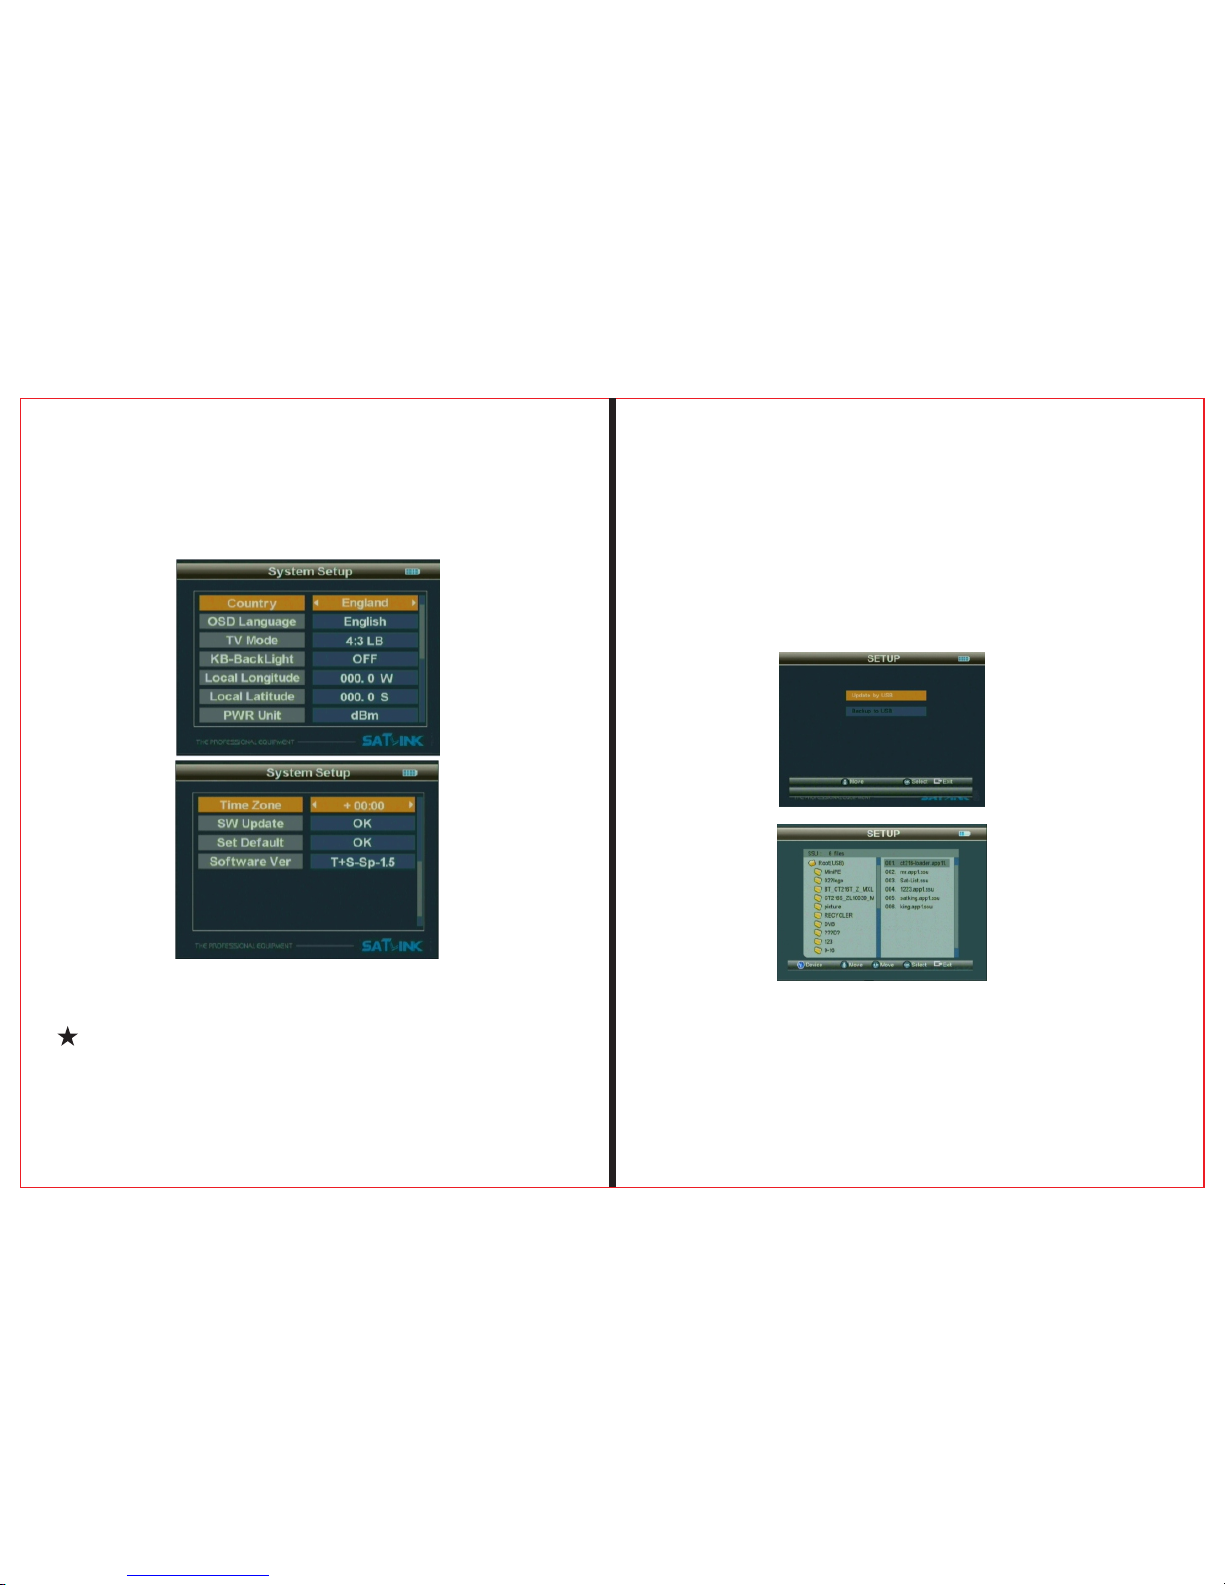
2.4. 3 SW Update
To upg rad e SW or Da ta th rou gh USB p ort .
To sto re th e u pgr adi ng fi le in th e e xte rna l mem ory, an d
2.4 System Setup
2.4. 1 OSD Languag e
Set OSD Language
2.4. 2 KB-BackLi ght
Butt on backligh t delay slect s witch
(OFF、5 Se cond、10 Secon d、20 Second)
in ser t i t int o U SB po rt, an d the n e nte r upg rad e m enu .
To sel ect t he fil e, it wi ll au tom ati cal ly ret urn b ack to t he
2.4. 4 Set Default
Press “OK” button to set Factory Default.
2.4. 5 GMT Usage
Set the GMT parameter
Page 15
THE P R OF E SS I ON AL E Q U IP ME N T- - -- -- - -- - -- -- - -- - |U S E R ’S M A N U A L| THE P R OF E SS I ON AL E Q U IP ME N T- - -- -- - -- - -- -- - -- - |U S E R ’S M A N U A L|
Signa l Fin de r Pro fessi ona l Combo | 27
26 | Sign al Fi nd er Pr ofess ion al C omb o
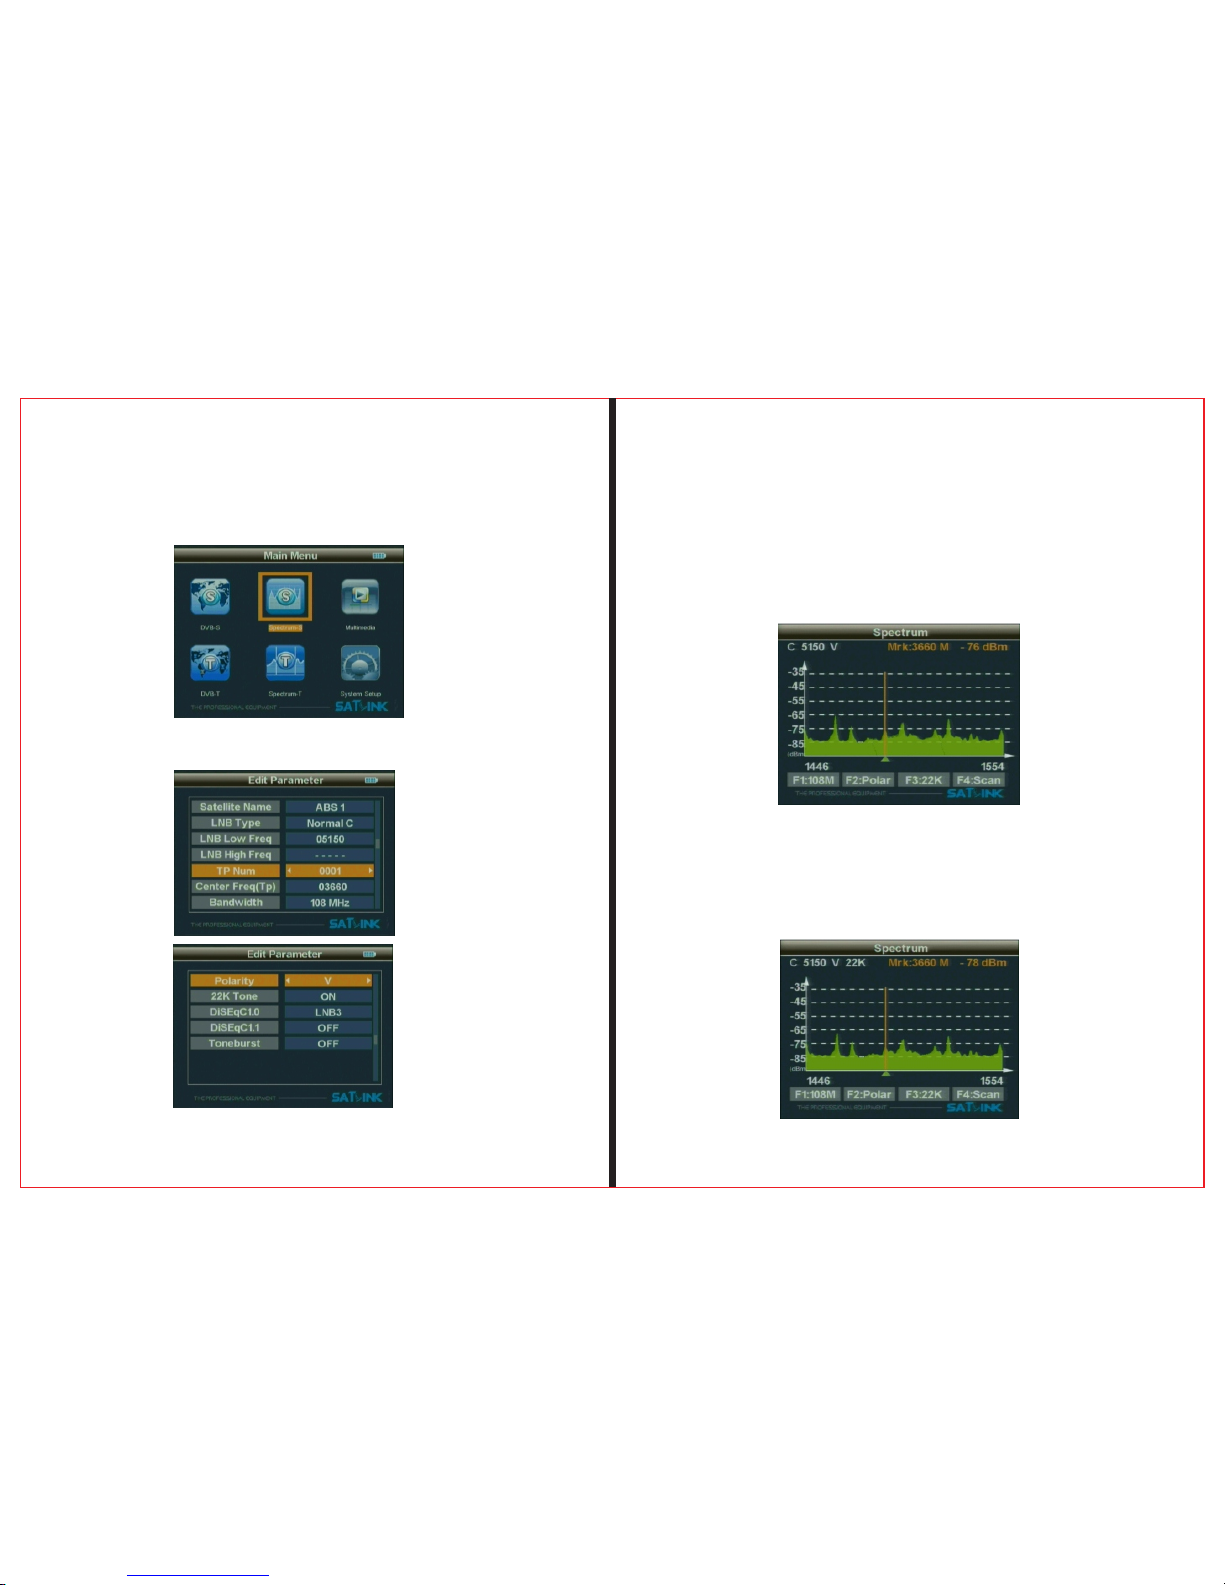
2.5. 1 Frequency is t he d ifference value between the
downstream frequency and local frequency and the value
range is 950---2150MHz.
To set parameters according to requirements, and then
press OK button to enter the chart of spectrum.
2.5.2 When the screen appears the spectrum, press "F1"
button to change bandwidth and press"F2" to change the
polarity.press "F3"t to select 22K ON/OFF.
2.5.3 To select the beginning frequency to scan and press
"F4" button then press OK button.
Press OK button and then enter spectrum-s parameter to set
menu.parameter
2.5 Spectrum-S
Page 16
THE P R OF E SS I ON AL E Q U IP ME N T- - -- -- - -- - -- -- - -- - |U S E R ’S M A N U A L| THE P R OF E SS I ON AL E Q U IP ME N T- - -- -- - -- - -- -- - -- - |U S E R ’S M A N U A L|
Signa l Fin de r Pro fessi ona l Combo | 29
28| Sig nal Fin der P ro fes siona l Com bo
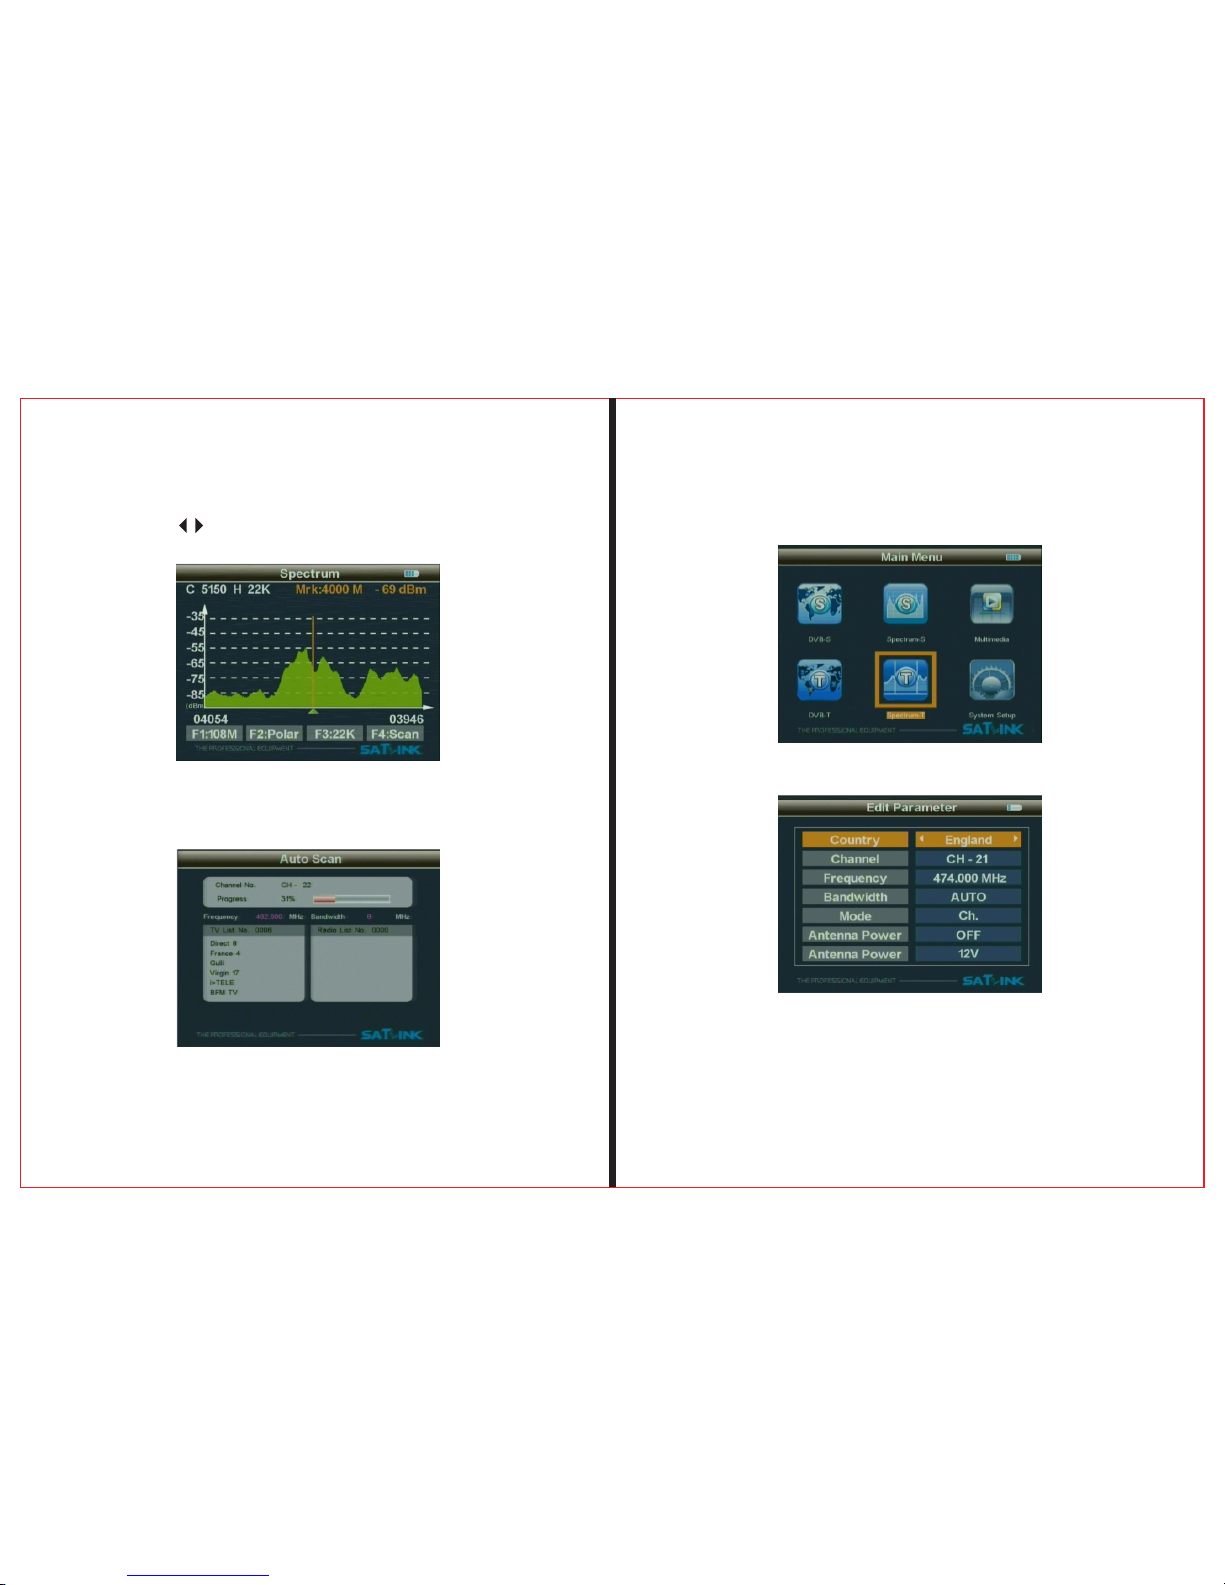
2.5. 4 Press button to move the cur so r to t he e nd
frequency of the scanning.
2.5.5Press "OK" and "F4 " button to enter the selected
frequency range to scan the programs. When finished, exits
2.6 Spectrum-T
Press"ok" keyboard, enter DVB-T spectrum item
Choo se pre-stor e data( count ry -channel - b andwith
- ante nna power sup ply), press "OK" enter
spec trum workin g interface .
Page 17
THE P R OF E SS I ON AL E Q U IP ME N T- - -- -- - -- - -- -- - -- - |U S E R ’S M A N U A L| THE P R OF E SS I ON AL E Q U IP ME N T- - -- -- - -- - -- -- - -- - |U S E R ’S M A N U A L|
Signa l Fin de r Pro fessi ona l Combo | 31
30 | Sign al Fi nd er Pr ofess ion al C omb o
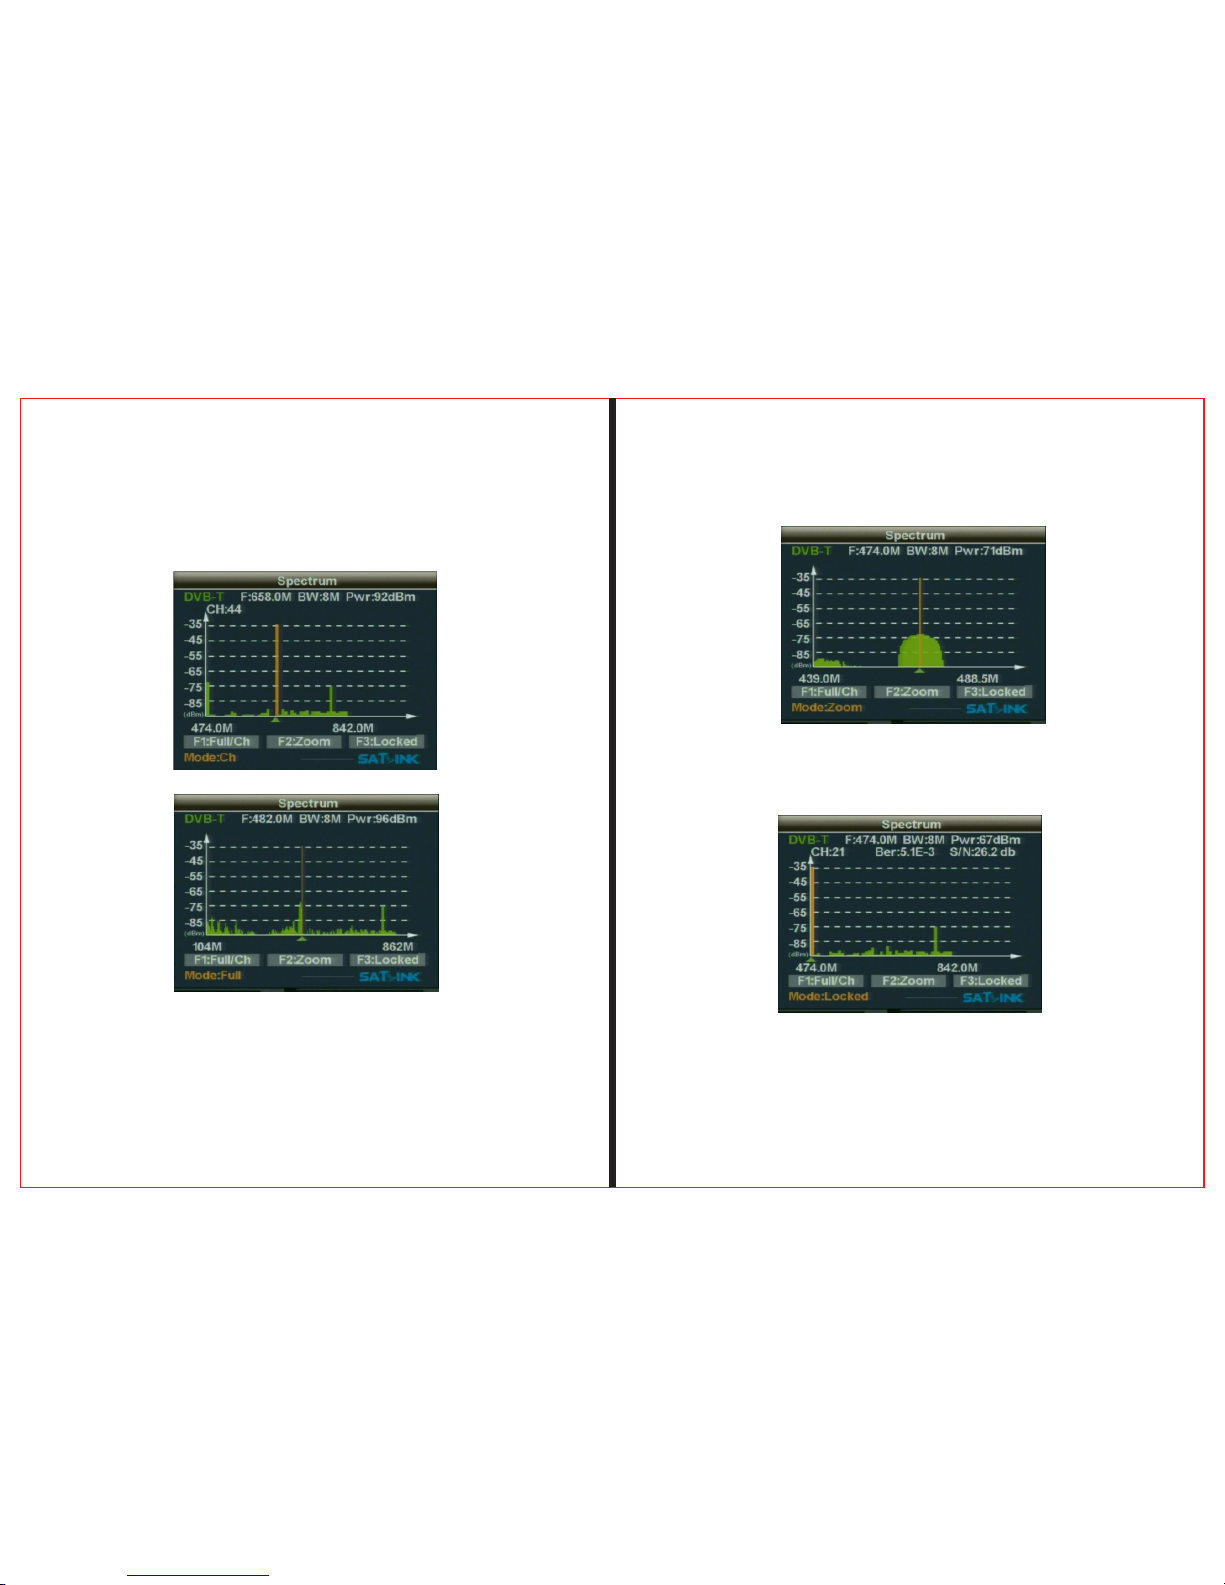
2.6.1 Press F1, choose DVB-T whole paragraph frequency
scanning or choose the country's current channel scanning
2.6. 2 Press F2, dis play to be sele cted as the cen ter
freq uency 50MHz b andwith for t he spectrum
2.6. 3 Press F3 , lock s elected fre quency , and
disp lays the freq uency' spec trum of indic ators
Page 18
THE P R OF E SS I ON AL E Q U IP ME N T- - -- -- - -- - -- -- - -- - |U S E R ’S M A N U A L| THE P R OF E SS I ON AL E Q U IP ME N T- - -- -- - -- - -- -- - -- - |U S E R ’S M A N U A L|
2.7 .3Pr e ss “F2” bu tton to ent er Sub- m enu whe n
pla ying pr o gram s, and make op erat i ons acc ordi n g
to its in stru c tion s.
Signa l Fin de r Pro fessi ona l Combo | 33
32 | Sign al Fi nd er Pr ofess ion al C omb o
2.7 Shortcut Buttons
2.7.1 Press “OK” button to enter the Sub-menu when it's
playing programs, and make operations according to its
instructions.
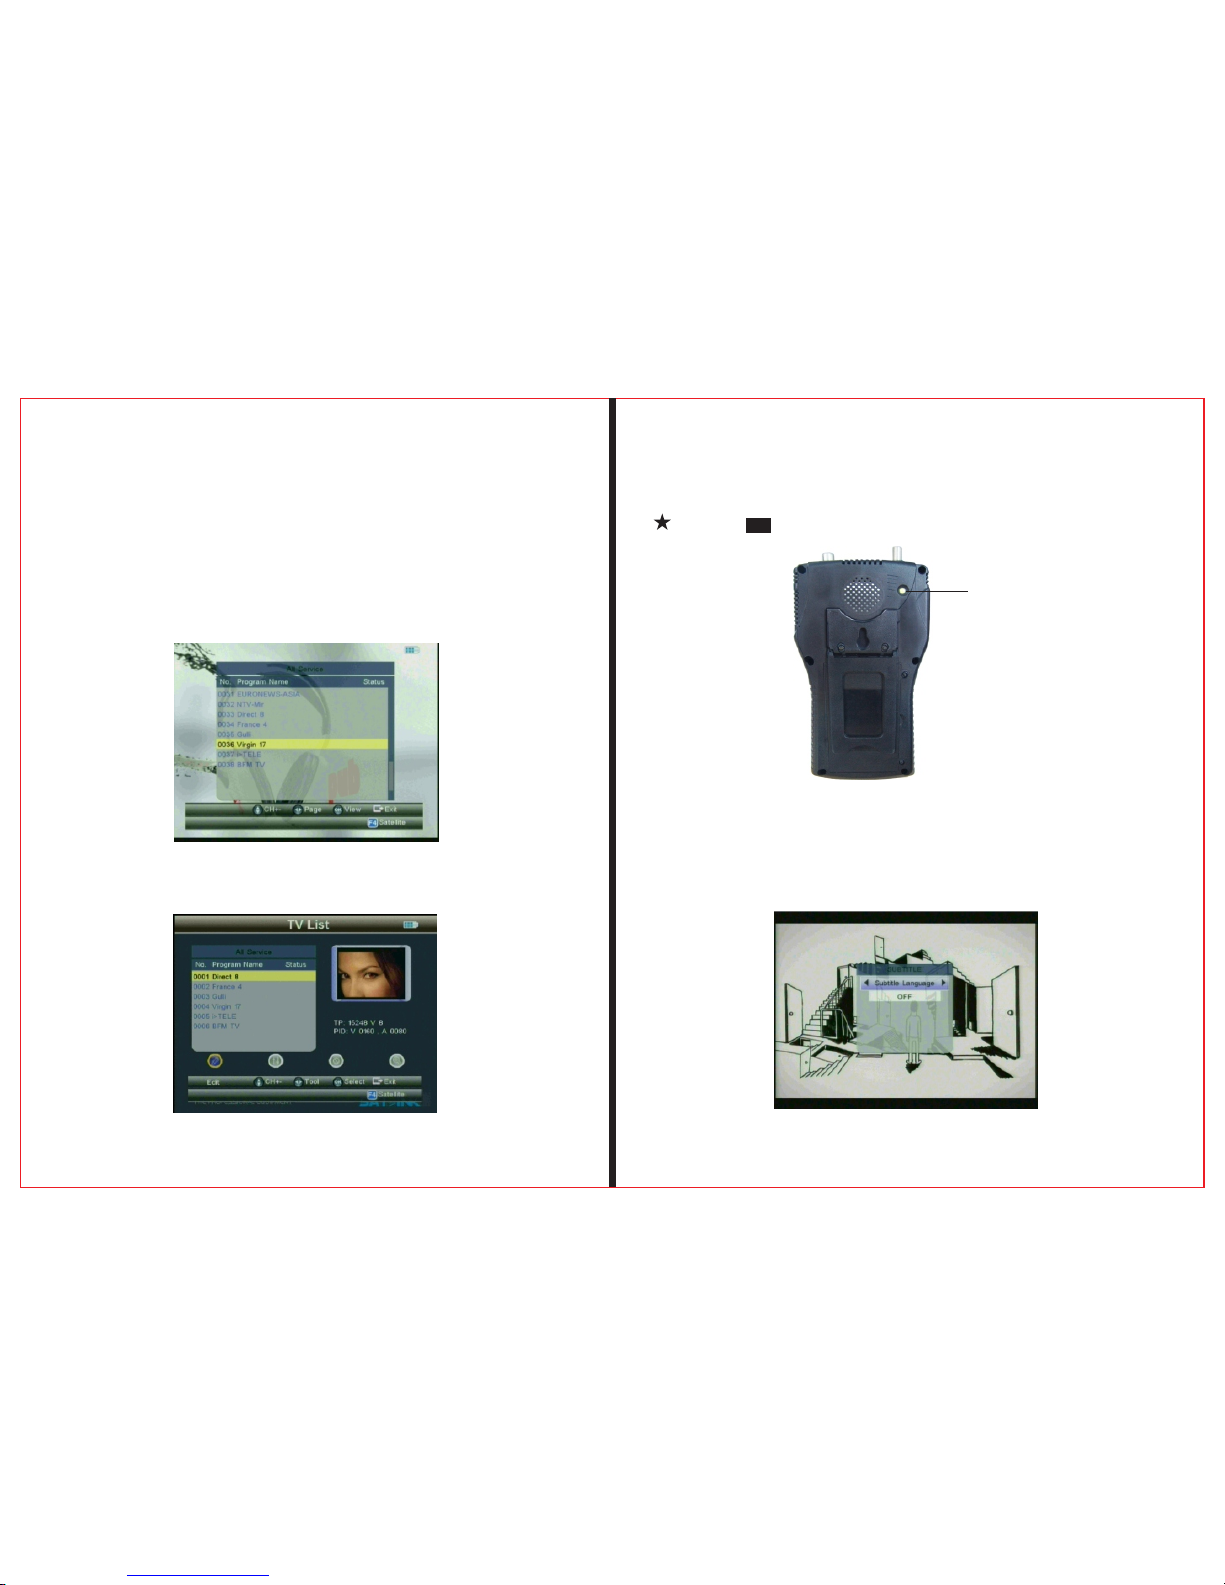
2.7 . 2 Pre s s “ F 1” butto n to en t e r TV List .
Pres s “ ”over 3 secon d OFF/ON flas hlight.
F1
flashli ght holes
Page 19
THE P R OF E SS I ON AL E Q U IP ME N T- - -- -- - -- - -- -- - -- - |U S E R ’S M A N U A L| THE P R OF E SS I ON AL E Q U IP ME N T- - -- -- - -- - -- -- - -- - |U S E R ’S M A N U A L|
Signa l Fin de r Pro fessi ona l Combo | 35
34 | Sign al Fi nd er Pr ofess ion al C omb o
The ma rk with “ ”is the o pitional fu nctional it em.
2. 7.5 Pr ess “ F4” bu tto n to ent er th e S ub- men u whe n i t's
pl ayi ng pro gra ms, a nd mak e ope rat ion s a cco rding to its
in str uct ion s.
2. 7.6 pr ess I NFO ke ybo ard , sho w t he cu rre nt pro gra m
in for mat ion
2. 7.7 Un der D VB- T sta tus , p res s M.I NFO ke ybo ard , ent er
Fr eq- che cki ng men ue
2. 7.8 pr ess M UTE ke ybo ard , en ter m ute st atu s.
2. 7.9 pre ss Sca n key boa rd, en ter Q UIC K S EAR CH , and
An d r est ore t he def aul t dat aba se.
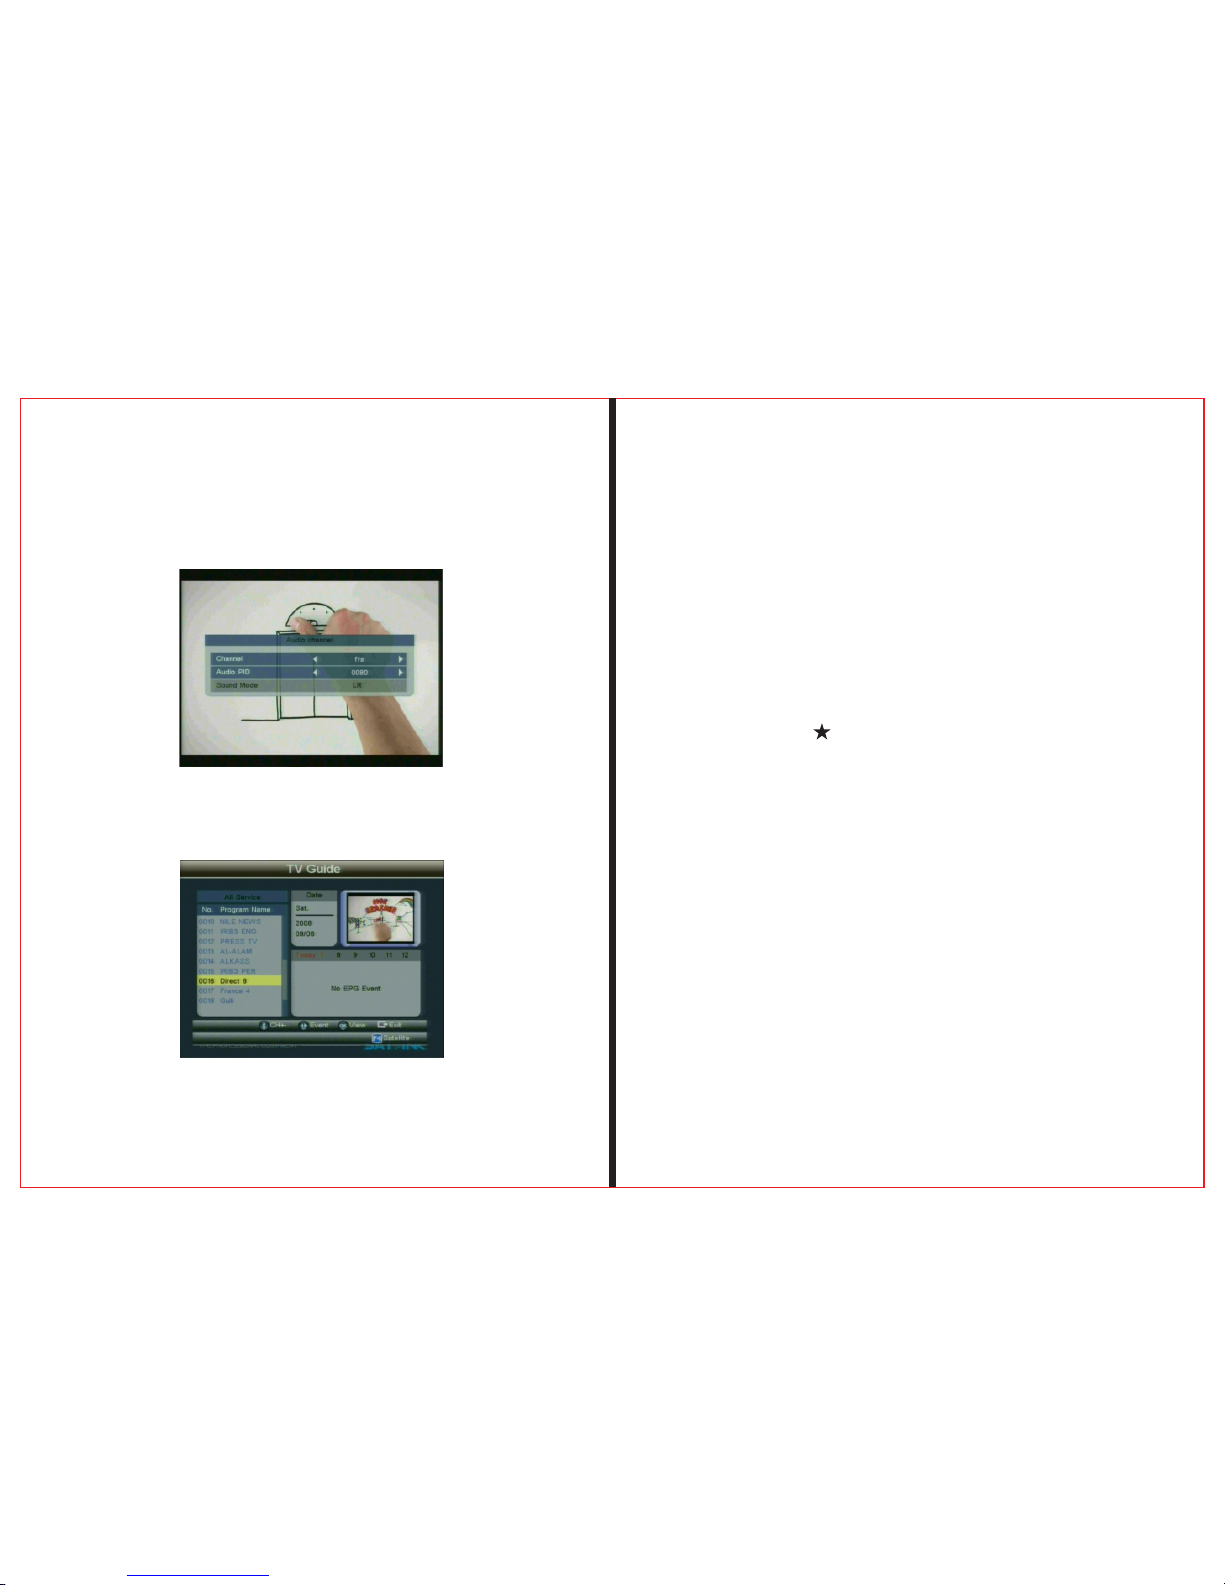
2. 7.4 Pr ess “F3” bu tto n t o ent er the Sub-menu f or
Au dio Ch ann el, to c han ge Audi o P ID an d S oun d mode.
Page 20
THE P R OF E SS I ON AL E Q U IP ME N T- - -- -- - -- - -- -- - -- - |U S E R ’S M A N U A L| THE P R OF E SS I ON AL E Q U IP ME N T- - -- -- - -- - -- -- - -- - |U S E R ’S M A N U A L|
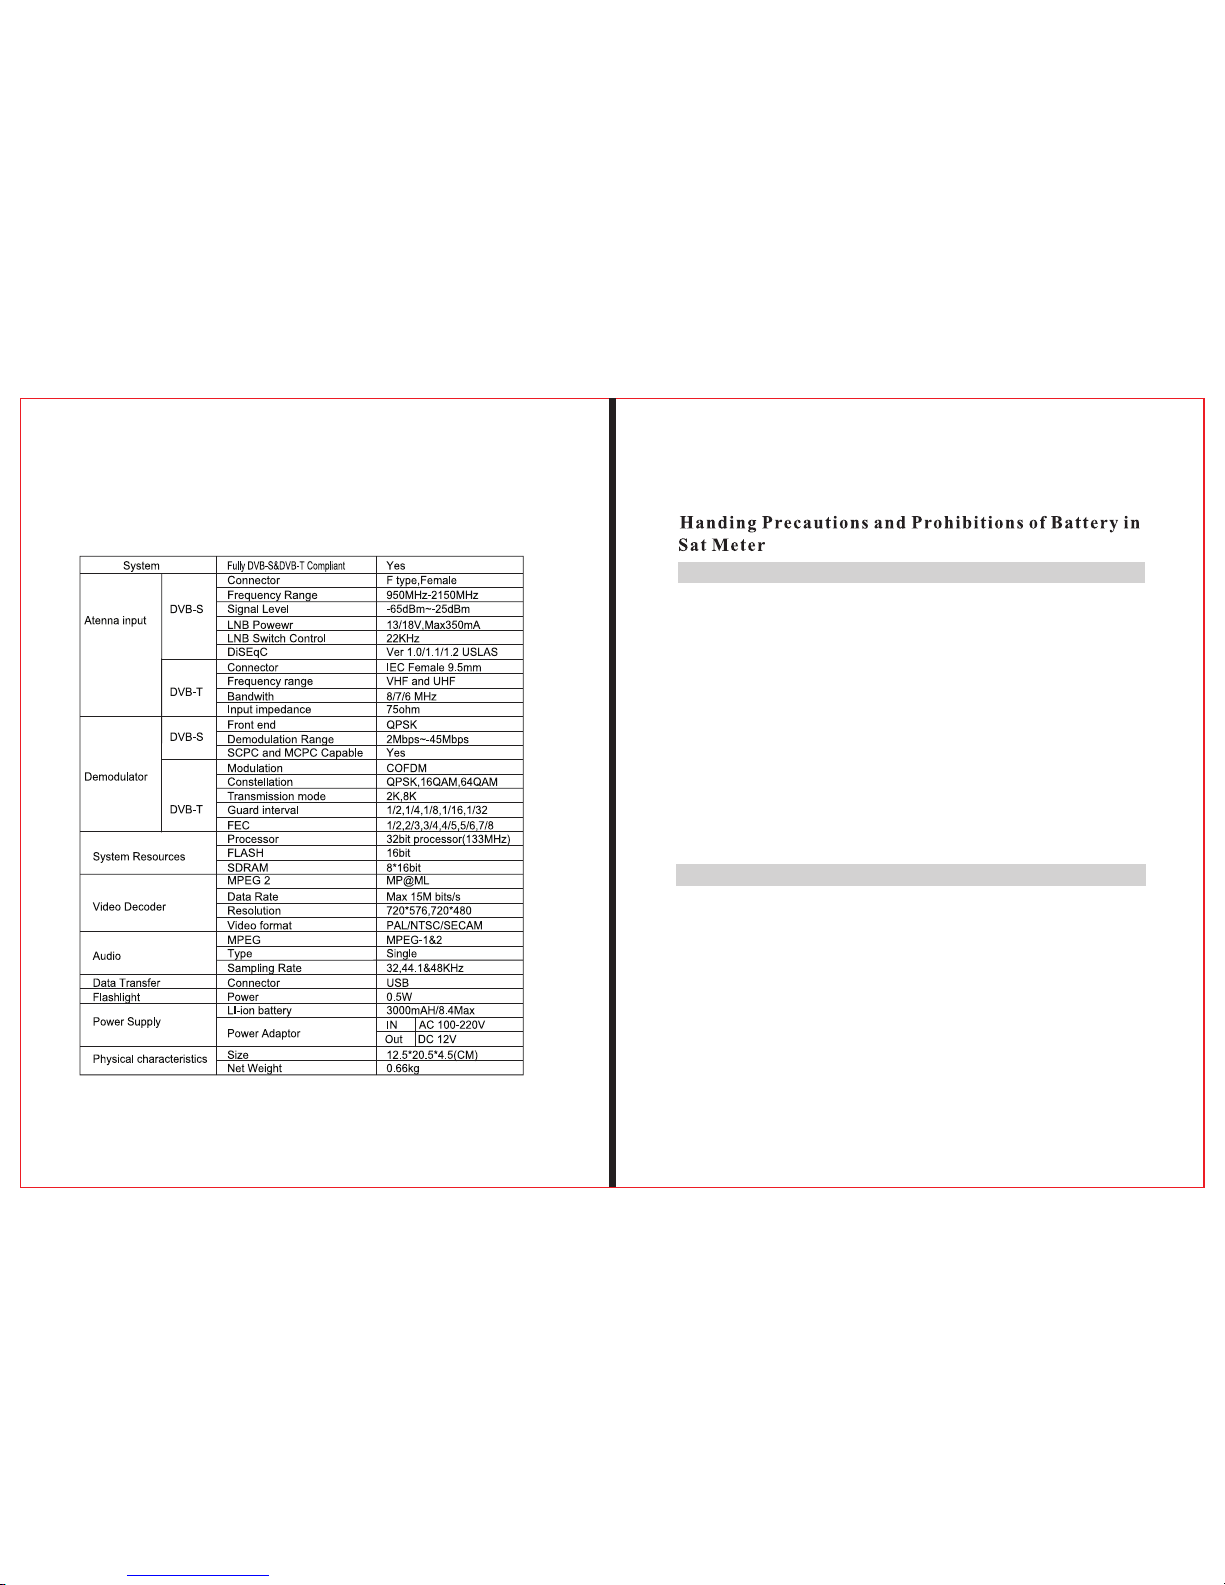
You ar e u sin g L ith ium io n b atte rie s a nd Nic k el met al hyd rid e
bat t eri es in the ma chi ne now, so Pl e ase do n't wo rk und e r
hi g h t emp era ture or h i gh pre ssu re con d iti ons . I f t he fol l owi n g i tem s h app ened , a bno rma l c hemi cal re act i on may o c cur
wh i ch wil l l ead to th e b att ery ov e rhe at, em it smo k e, ign ite
and / or bur st.
(1 ) inc ine r ate an d d isp ose th e b atte ry in fir e o r h eat it ;
(2 ) pie rce th e b atte ry wit h a n a il or oth er sha rp obj ects , s tri ke
it wit h a ha mme r o r s tep on it ;
(3 ) imm ers e t he batt ery wi th wat er or con nect th e p osi tiv e(+)
and ne gati ve( -) ter m ina ls wit h a me tal ob jec t s s uch as
nec k lac es, ha ir pin s , etc.
Warning:
Notice:
Th e battery i s onl y applicabl e t o the charger w hic h
su ppl ied or a ppo inted by the man ufacturer o f thi s machine.
Th e chargi ng ti me should b e min imu m 5 h our s for th e fir st
ti me, and it sh oul d not be char ged o ver 12 h our s aft er the
first ti me.
Pl eas e keep y our m ach ine off wh en the b att ery i s c hargi ng.
Th e battery s hou ld be stored wit hin a tempera tur e range of
0℃ t o 40℃.
Wh en stored f or a long per iod , cha rge t he batte ry at le ast
Signa l Fin de r Pro fessi ona l Combo | 37
36 | Sign al Fi nd er Pr ofess ion al C omb o
Specifications
Page 21
THE P R OF E SS I ON AL E Q U IP ME N T- - -- -- - -- - -- -- - -- - |U S E R ’S M A N U A L|
|
38 | Sign al Fi nd er Pr ofess ion al C omb o
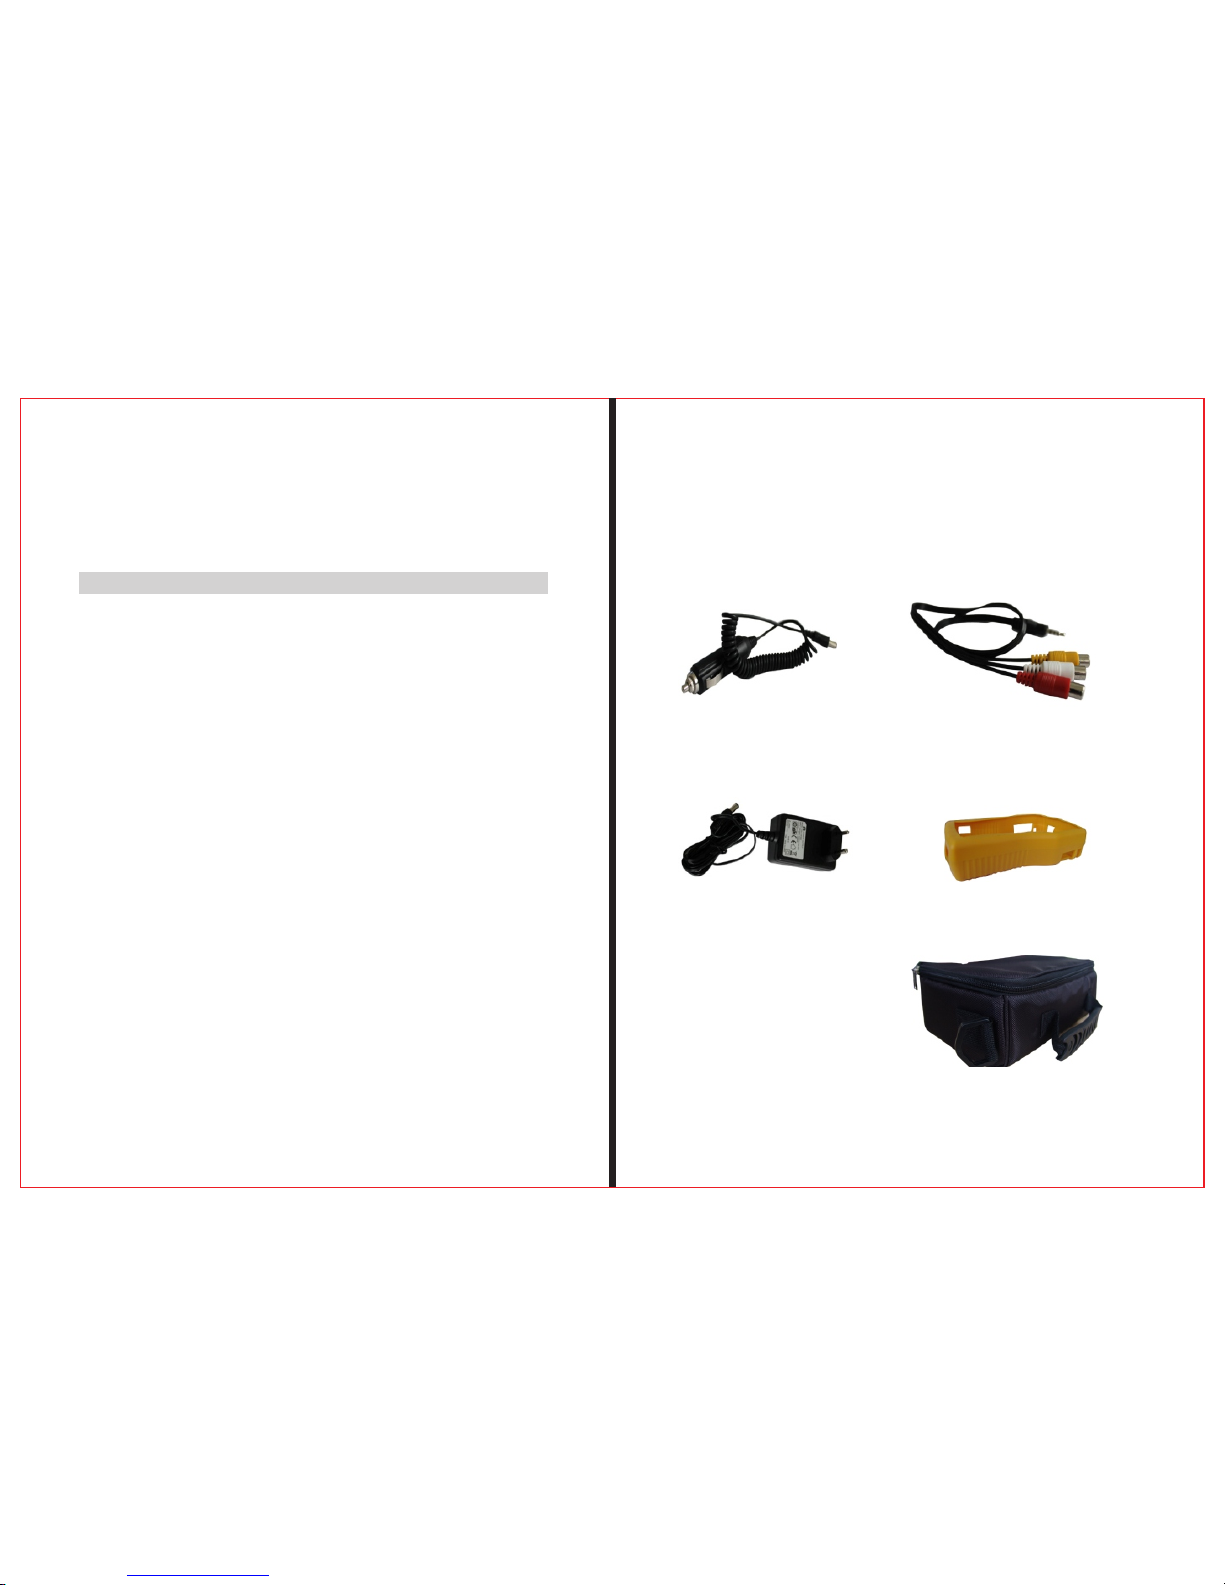
Car charger cabl e
AV cable
Power
THE P R OF E SS I ON AL E Q U IP ME N T- - -- -- - -- - -- -- - -- - |U S E R ’S M A N U A L|
Signa l Fin de r Pro fessi ona l Combo | 39
once per half month so as to prevent over discharge.
The battery is expendable.
Handling:
Improper setting of new battery may lead to the battery
burst.
Please use the battery only supplied by the manufacturer, if
you want to change a new battery.
Please do not put the battery in fire or dispose it together
with garbage.
Please contact the waste administrative institute in your
place to get the nearest battery collection station.
Product Standard Package
Ruob ber Cover
Carr ying case
 Loading...