

Page 1

DIGITAL
SATELLITE
METER
THE PROFES SIONAL EQUIPMEN T
USER’S MANUAL
DIGITAL SATELLITE METER
THE P ROFES SIONA L EQU IPMEN T
Page 2

Product Description
1.Guide
1.1 Face Panel & Button
1.2 Power On/Off
1.3Power Supply & Battery
2. Menu
2.1 Channel Scan
2.2Channel Check
2.4 System Setup
Product Description
2
3
4
4
4
5
9
14
2.3 Multimedia
12
CO NT EN TS
CO NT EN TS
2.5 Spectrum
THE PRO FES SI ON AL E QU IP MEN T- -- -- -- --- -- -- -- --| U SE R’S MAN UA L | THE PRO FES SI ON AL E QU IP MEN T- -- -- -- --- -- -- -- --| U SE R’S MAN UA L |
3. Specifications
Digita S ate llite Met er 1
|
Using WS6918 can r eceiv e DVB-S and D VB-S2 signal.
It's very c onvenient for in stall er to catch quick an d accurate ali gnmen t for antenna to the best position.
Ws6918 uses microprocessor controller with reliable and
stable performance. When it is turned on , channel picture
, signal strength and signal quality will be showed on LCD
screen. And also big menu window can be selected for data
figure.
Ws6918 di splay s EL/AZ, CBER/VBER, S/N , signal strength and lo ck sound al arm.
Ws6918 ha s the functions to t est spectrum analyzer a nd
sh ow the chart of cons tella tion.
WS6918 ca n detect very weak s ignal a nd provide anten na
po wer(OFF /13V/ 18V). It's with auto – protection for
LNB short – circuit.
WS6918 ha s the AV in and AV out fun ction.
WS6918 us es the 12V power a dapter. It i nclud es
8. 4V/30 00mAH h igh capacity LI- ION bat tery which can
work for mo re than 4 hou rs when it is f ully charged .
16
24
2.6 Constellation
2.7 Shortout Buttons
18
20
5.Product Standard Package
27
4.Warning
25
Page 3
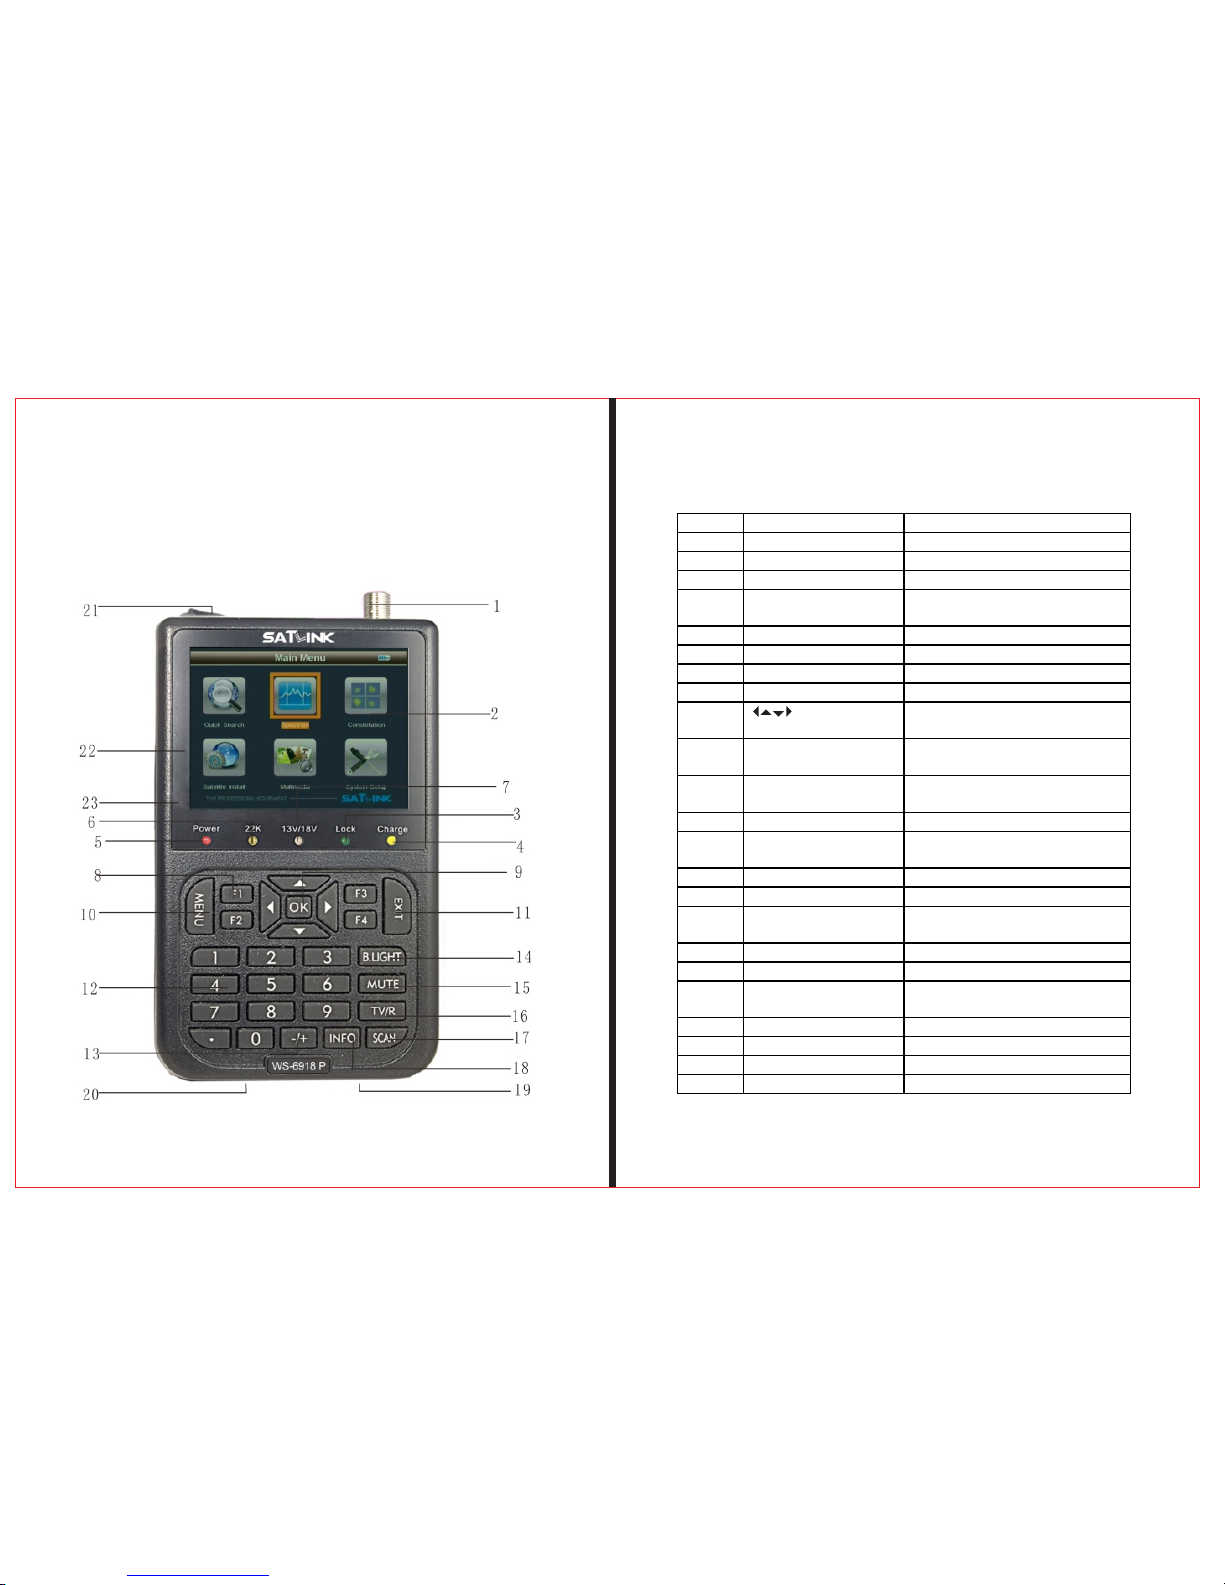
NO. Name Function
1 Signal Input To connect it with external antenna
2 LCD Screen To show menu and channel pictures…etc
3 Signal Lock Indicator Light To lock signal when it lights
4 Charging Indicator Light The light is on when it’s charging;
It’s off when charging is complete.
5 Power Indicator Light The light is on when meter is turned on
6 22K Switch Indicator Light 22K Switch is on when it lights
7 13/18V Indicator Light To show H/V switch output
8 F1 F2 F3 F4 Function Buttons
9 OK Arrow for Cursor Moving
OK for Confirmation
10 MENU To show main menu or return to previous
menu
11 EXIT To cancel selection or exit from current
menu
12 0-9 Numerical Button To input numerical for setting parameters
13 +/- Button To turn on or off sound indicator for signal
strength
14 B.Light LCD Screen Switch
15 Mute Sound On/Off Switch
16 TV/Radio Switch between TV Channel and Radio
Channel
17 SCAN Enter into Quick Seach
18 INFO To show parameter of current channel
19 USB Port Port for Upgrade or connecting to
multimedia
20 Power Connection port Port for connecting to external power supply
21 Power Switch Power Switch for machine power
22 AV Ouput AV Output
23 AV Input AV Input
1.GUIDE
1.1Panel keypads
THE PRO FES SI ON AL E QU IP MEN T- -- -- -- --- -- -- -- --| U SE R’S MAN UA L | THE PRO FES SI ON AL E QU IP MEN T- -- -- -- --- -- -- -- --| U SE R’S MAN UA L |
Digita S ate llite Met er 3
Digita S ate llite Met er
|
2
|
Page 4
1.2 Power On/Off
To turn on the meter when P ower Switch moves to I
position .
To turn off the me ter when Power Switc h moves to 0
position .
Please tur n off the meter to charge the meter in ti me
when syste m information for showing low power p opes
up.
1.3Power Supply and Battery
It's used wi th 12V 1.5A Power Adaptor. It charges
through ex ternal power when battery is out of pow er.
It's used wi th 8.4V 3000 mAH Lithium Ba ttery. It needs
4 hours charging time by connecting p ower adaptor with
external p ower or car charging. After it's f ull charge, it
works for mo re than 5 hours (It also depends on the loa d
of externa l antenna).
2.MENU
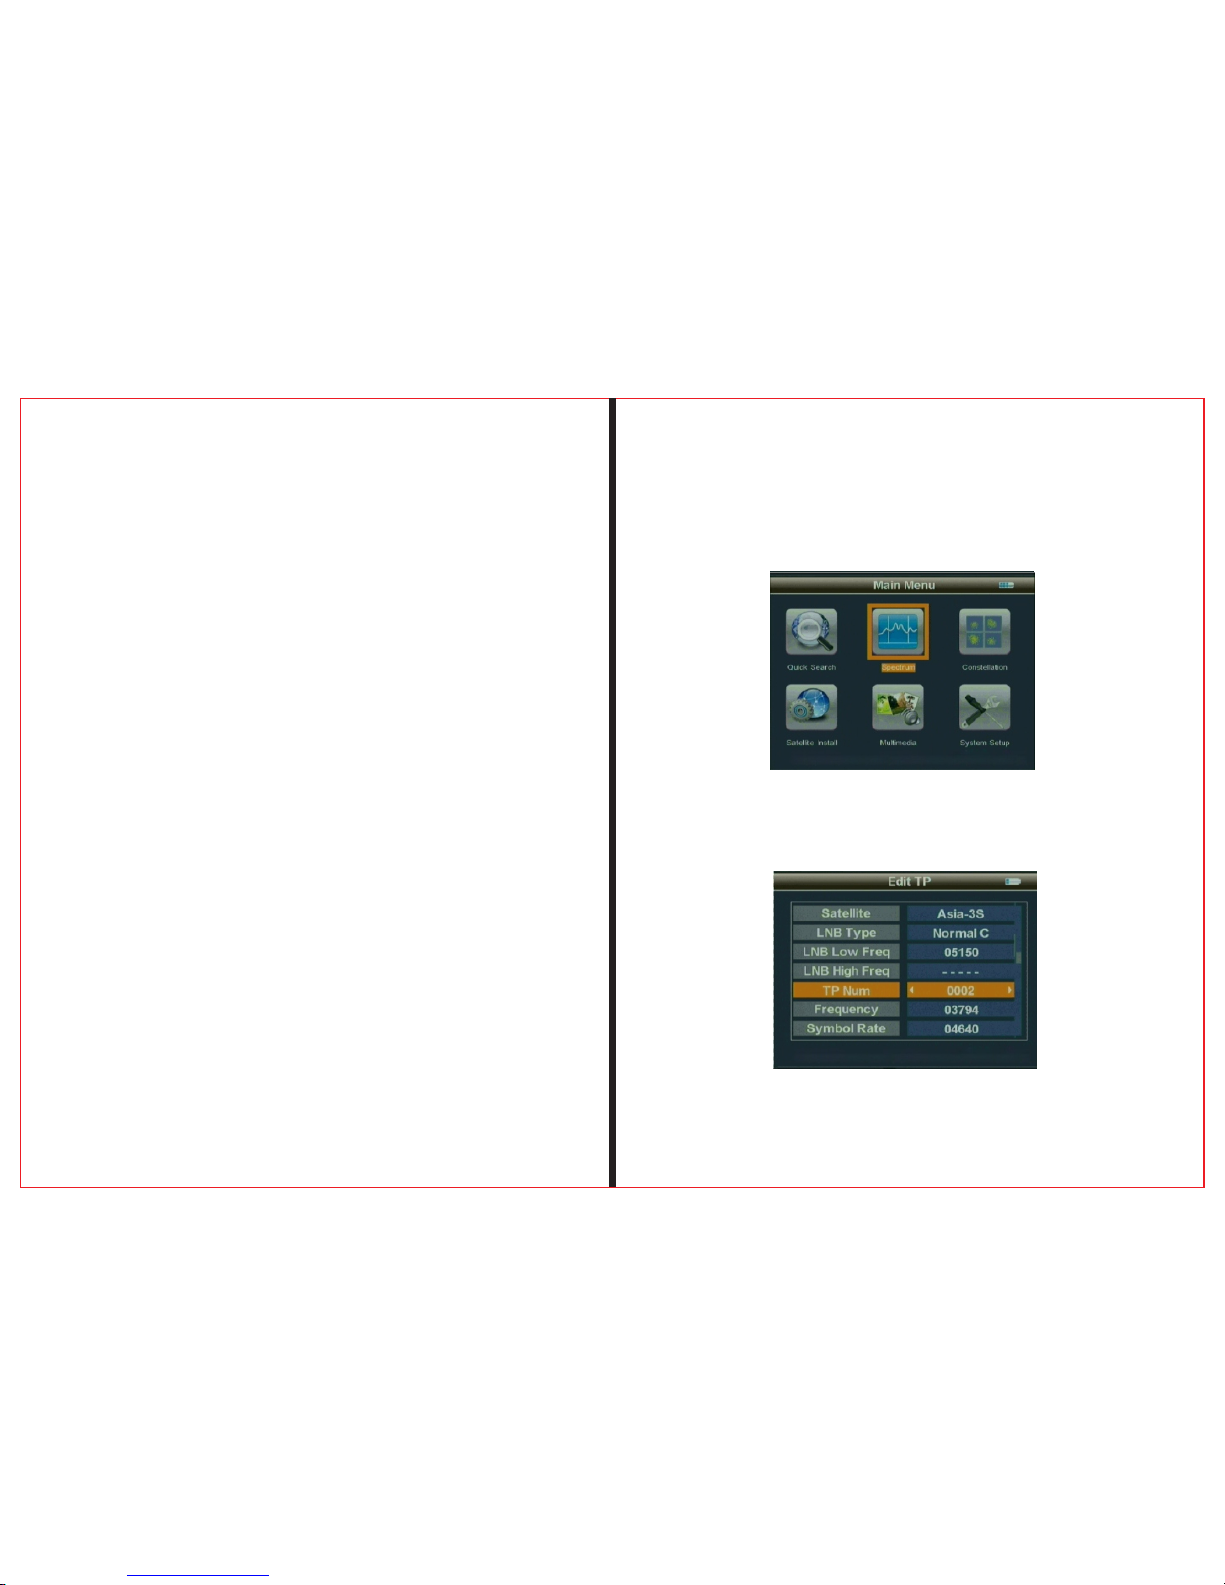
Press “ MENU ” key to enter into main menu, and
2.1Quick Search
THE PRO FES SI ON AL E QU IP MEN T- -- -- -- --- -- -- -- --| U SE R’S MAN UA L | THE PRO FES SI ON AL E QU IP MEN T- -- -- -- --- -- -- -- --| U SE R’S MAN UA L |
Digita S ate llite Met er 5
Digita S ate llite Met er
|
4
|
Notice: Fo r initial charge, pleas e make battery fully charged(We suggest it charge for 5 hour s).
use Arrow key to move c ursor, and then press “OK” key to sel ect
sub-menu .
Page 5
THE PRO FES SI ON AL E QU IP MEN T- -- -- -- --- -- -- -- --| U SE R’S MAN UA L | THE PRO FES SI ON AL E QU IP MEN T- -- -- -- --- -- -- -- --| U SE R’S MAN UA L |
Digita S ate llite Met er 7
Digita S ate llite Met er
|
6
|
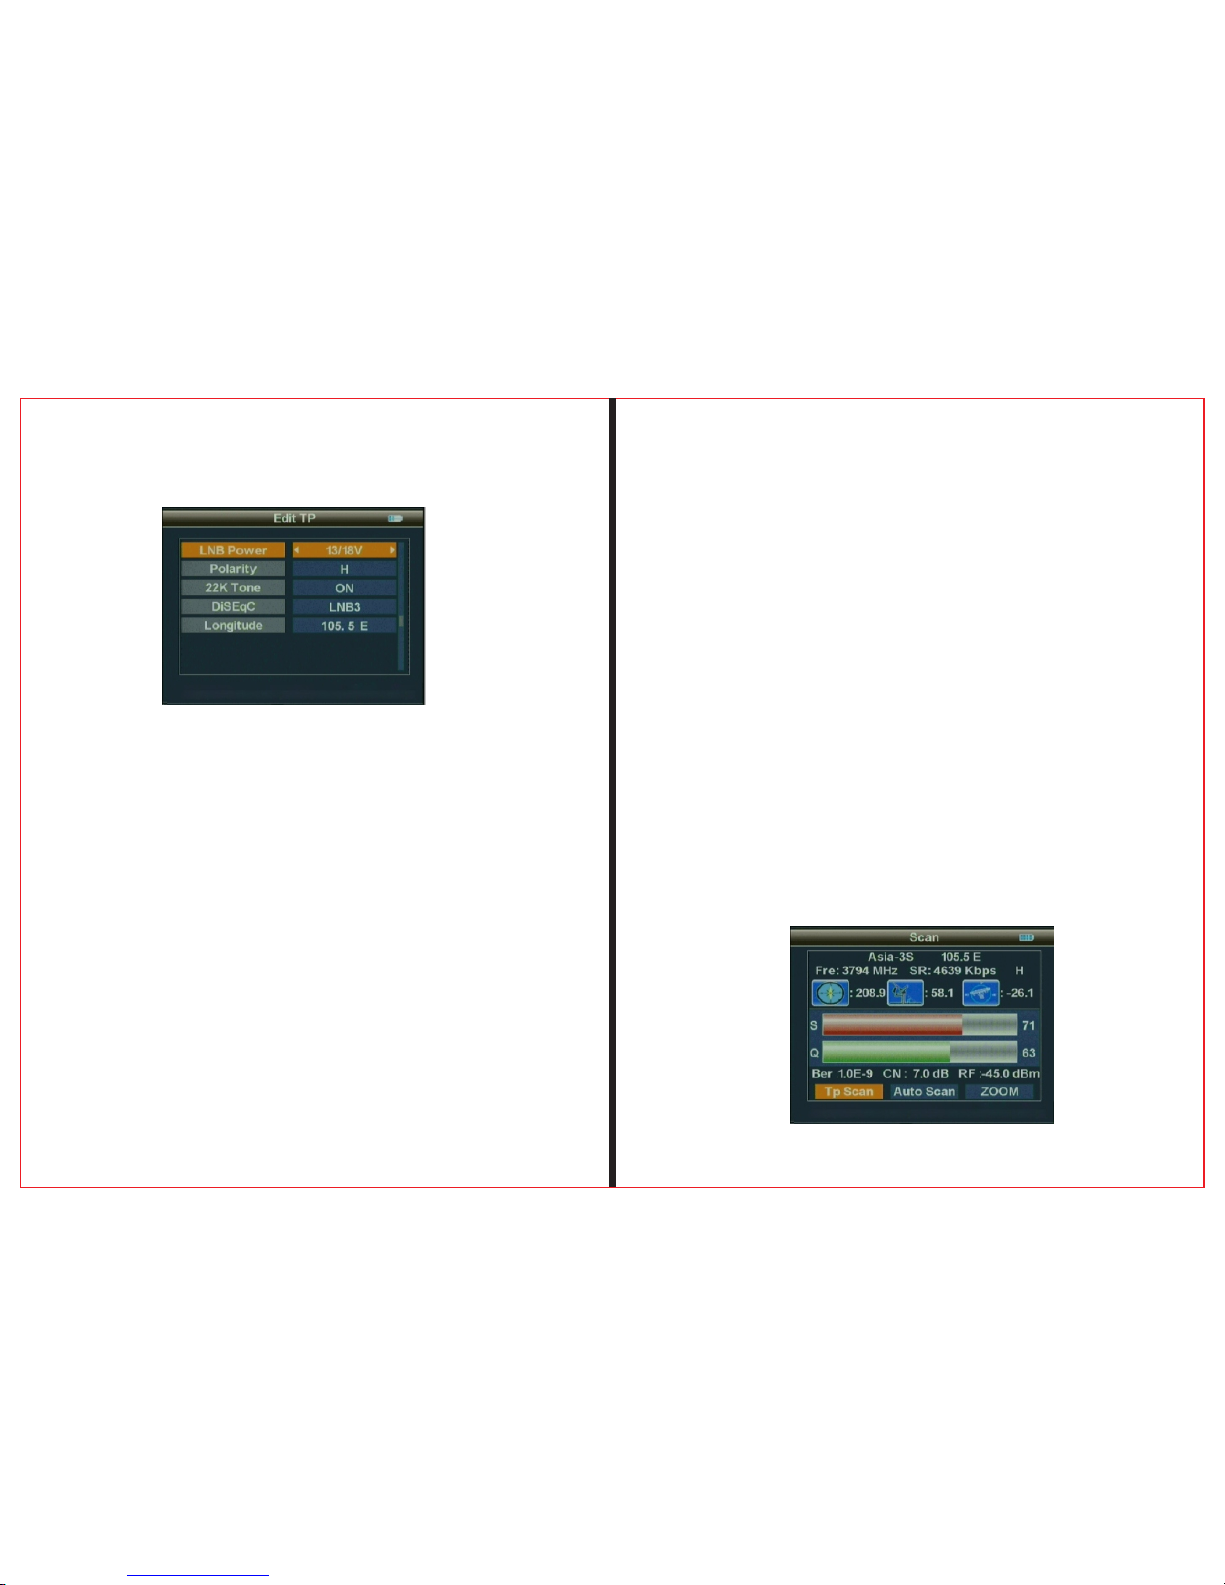
2.1.1 Satellite Name
To select the satelli te name for receiving signal
2.1.2 LNB Type
Select LNB Type
2.1.3 LNB Low Freq/ LNB High Freq
Use the nume rical button to input Freq Value for
Local Freq
2.1.4 Frequency
Use the nume rical button to input Freq Value for
Down Freq.
Use the nume rical button to input Value for
2.1.5 Symbol Rate
2.1.6 Polarity
Select Pol ar Mode
2.1.9 22K Tone
Select 22K TONE(ON/OF F)
2.1.11 Longitude
To show the selection of lon gitude of satellit e
2.1.12 Set parame ters, and press “OK” button to enter th e
Sub-menu , and then align direction of antenna a ccording to
the interf ace parameters.
SYMBOL RATE
2.1.8 LNB Power
Select Pol ar Mode
2.1.10Di SEqC
To adapt the connect state of DiSEqC
Page 6
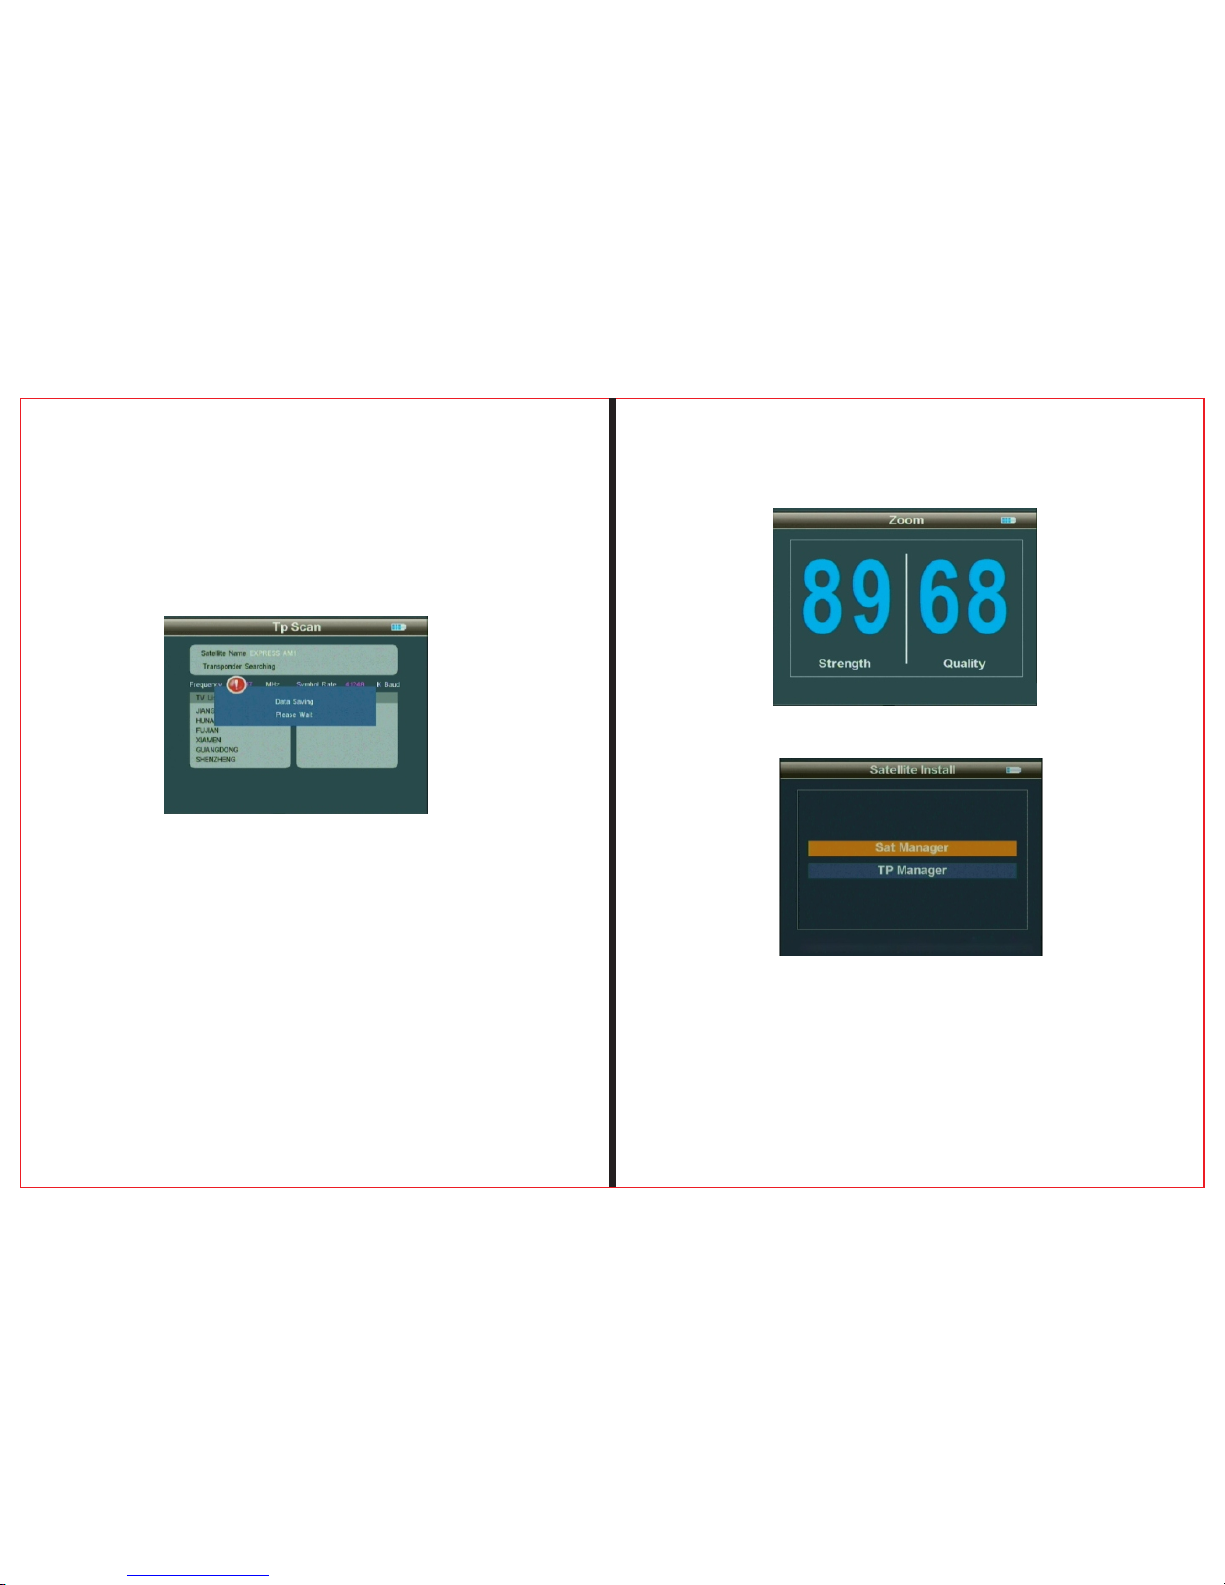
2.1.12.1TP Scan
Scan all programs of the current frequency, and automatically store them after scanning, and then return
back to the previous menu.
2.1.12.2 Scan All
Scan all pro grams of all channels and keep the prog rams automat ically after finish the scan and then return to
previous m enu.
THE PRO FES SI ON AL E QU IP MEN T- -- -- -- --- -- -- -- --| U SE R’S MAN UA L | THE PRO FES SI ON AL E QU IP MEN T- -- -- -- --- -- -- -- --| U SE R’S MAN UA L |
Digita S ate llite Met er 9
Digita S ate llite Met er
|
8
|
2 . 2 Sat el l i t e I n s t a l l
2.1.12.3Zoom
Use ◄ ► button t o select Zoom, and press “OK” button to
enter the Su b-menu, and then align the antenna position to
reach the be st state.
2.2.1 Sat Manager
Press “OK” button to enter the Sub-menu, and then
set connec ting state.
Page 7
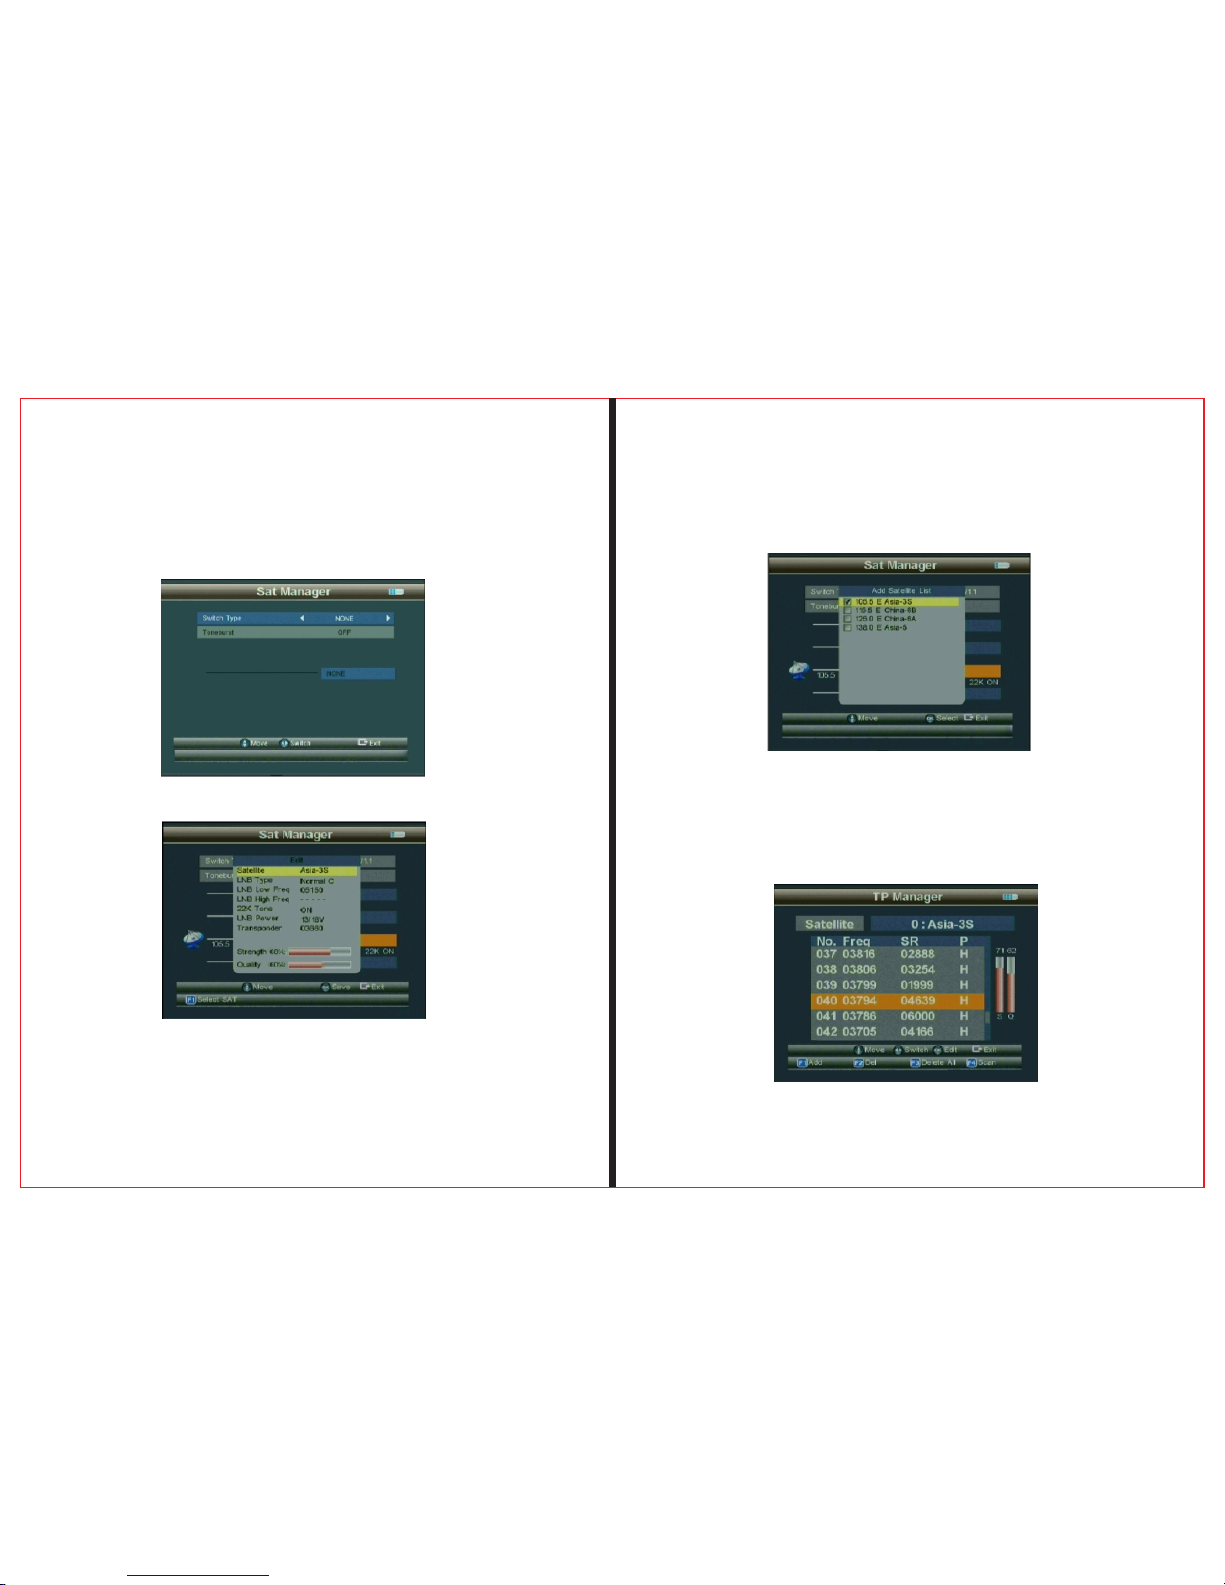
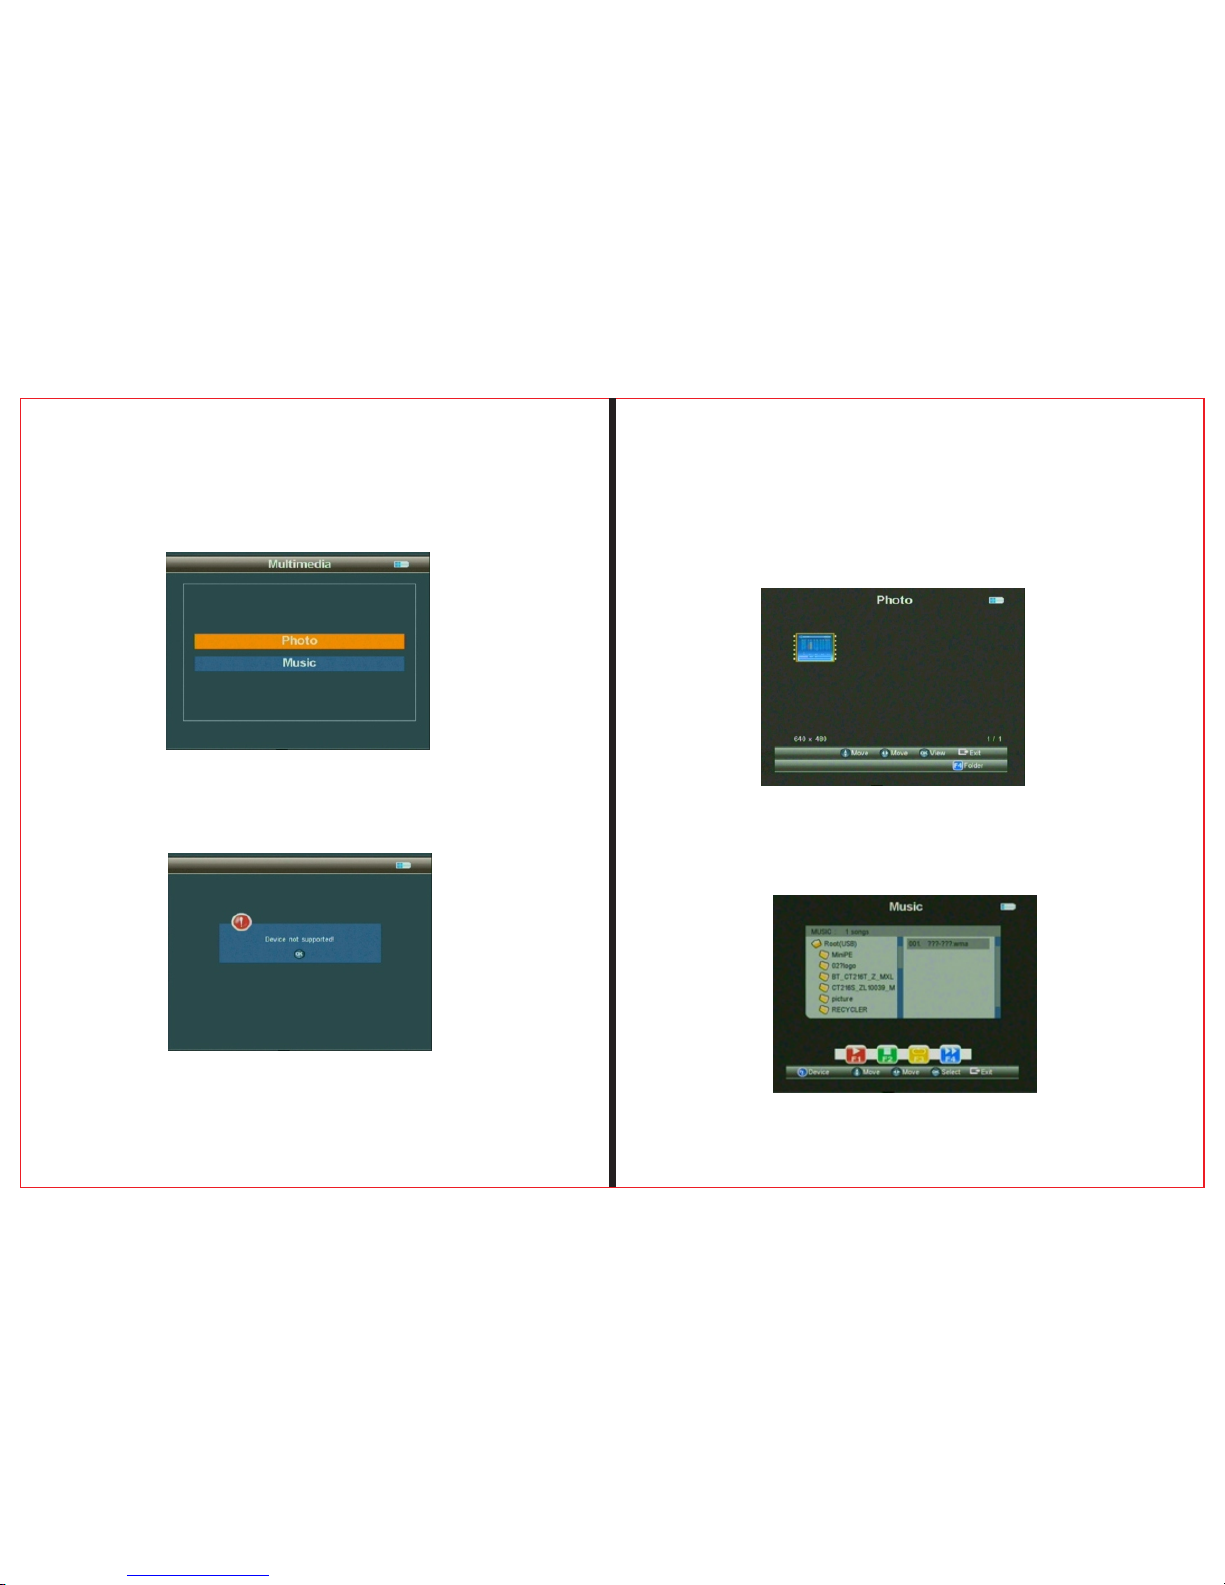
2.2.2 T P Ma nager
P re ss “O K” button t o enter t he Sub- me nu
THE PRO FES SI ON AL E QU IP MEN T- -- -- -- --- -- -- -- --| U SE R’S MAN UA L | THE PRO FES SI ON AL E QU IP MEN T- -- -- -- --- -- -- -- --| U SE R’S MAN UA L |
Digita S ate llite Met er 11
Digita S ate llite Met er
|
10
|
Page 8
THE PRO FES SI ON AL E QU IP MEN T- -- -- -- --- -- -- -- --| U SE R’S MAN UA L | THE PRO FES SI ON AL E QU IP MEN T- -- -- -- --- -- -- -- --| U SE R’S MAN UA L |
Digita S ate llite Met er 13
Digita S ate llite Met er
|
12
|
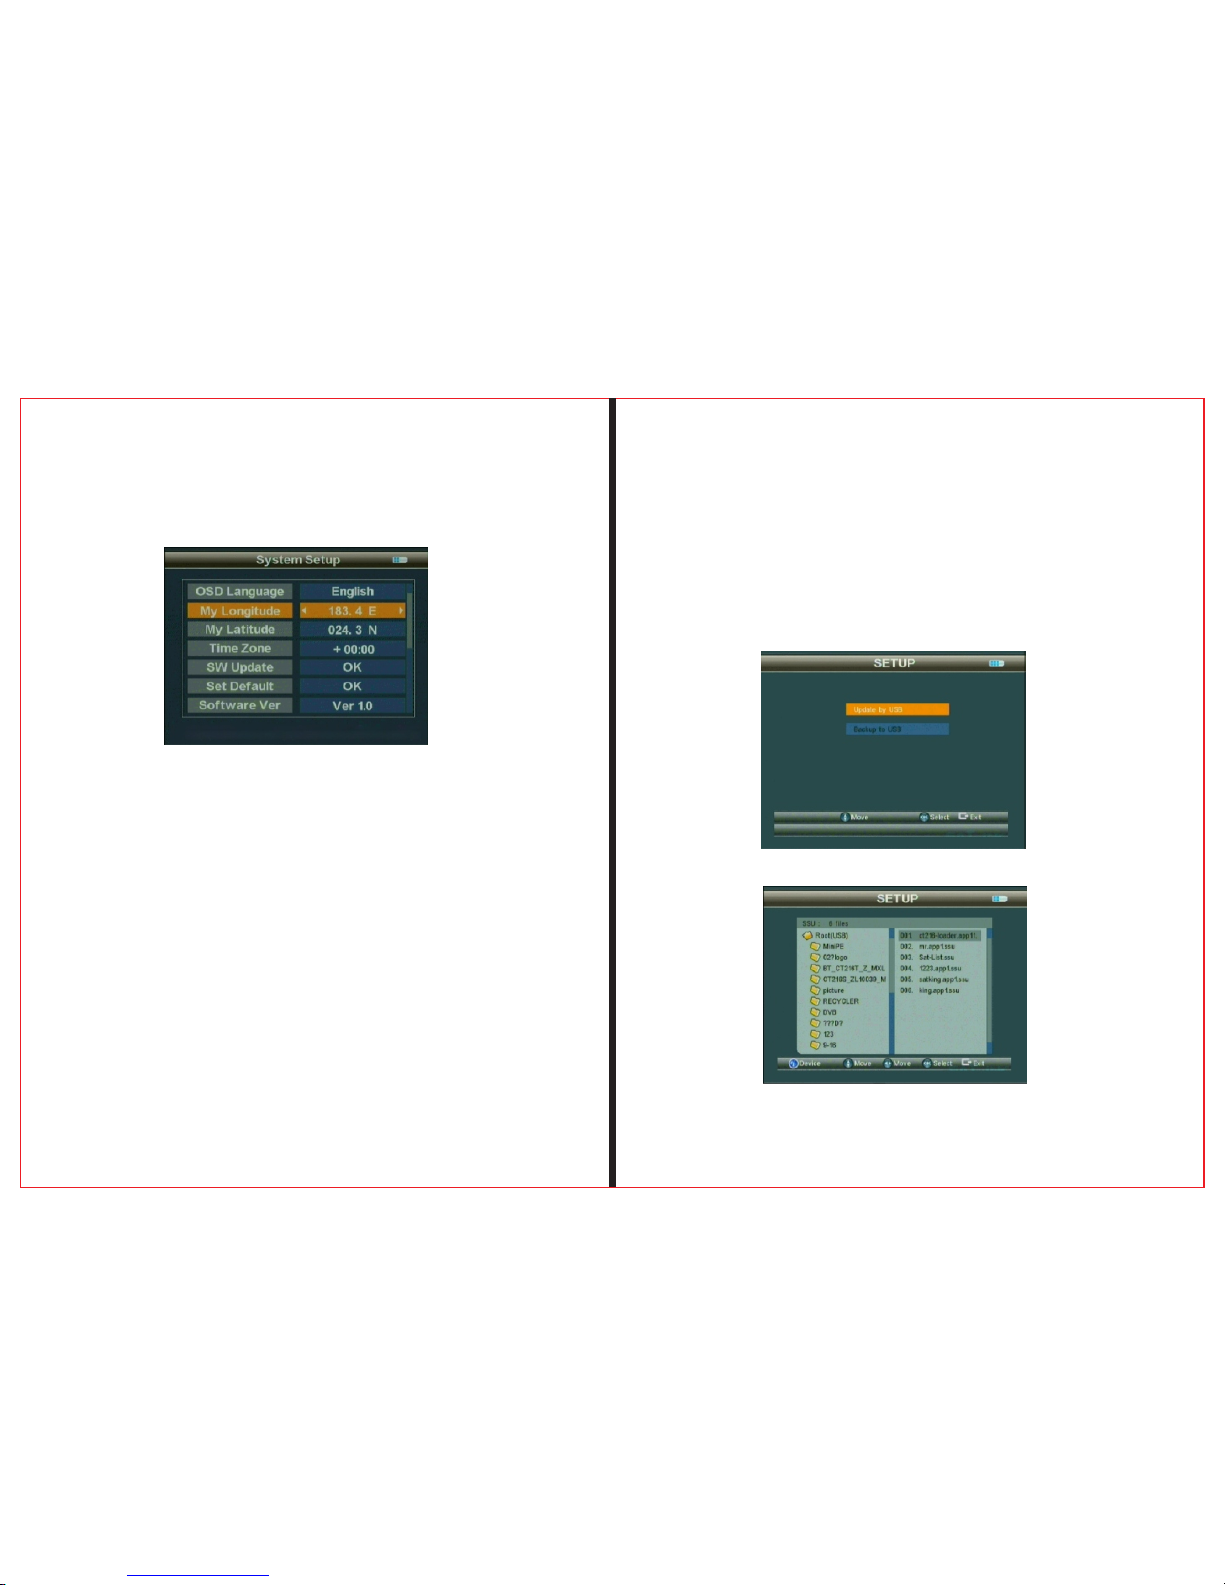
2.3 Multimedia
For Multim edia, the external memory should be inserted
into USB por t. Otherwise, “Device not support ed” will
pop up on the wi ndow.
2.3.1 Photo
Scan JPG pic ture.
2.3.2My Mus ic
Pla y MP3 m us ic .
Page 9
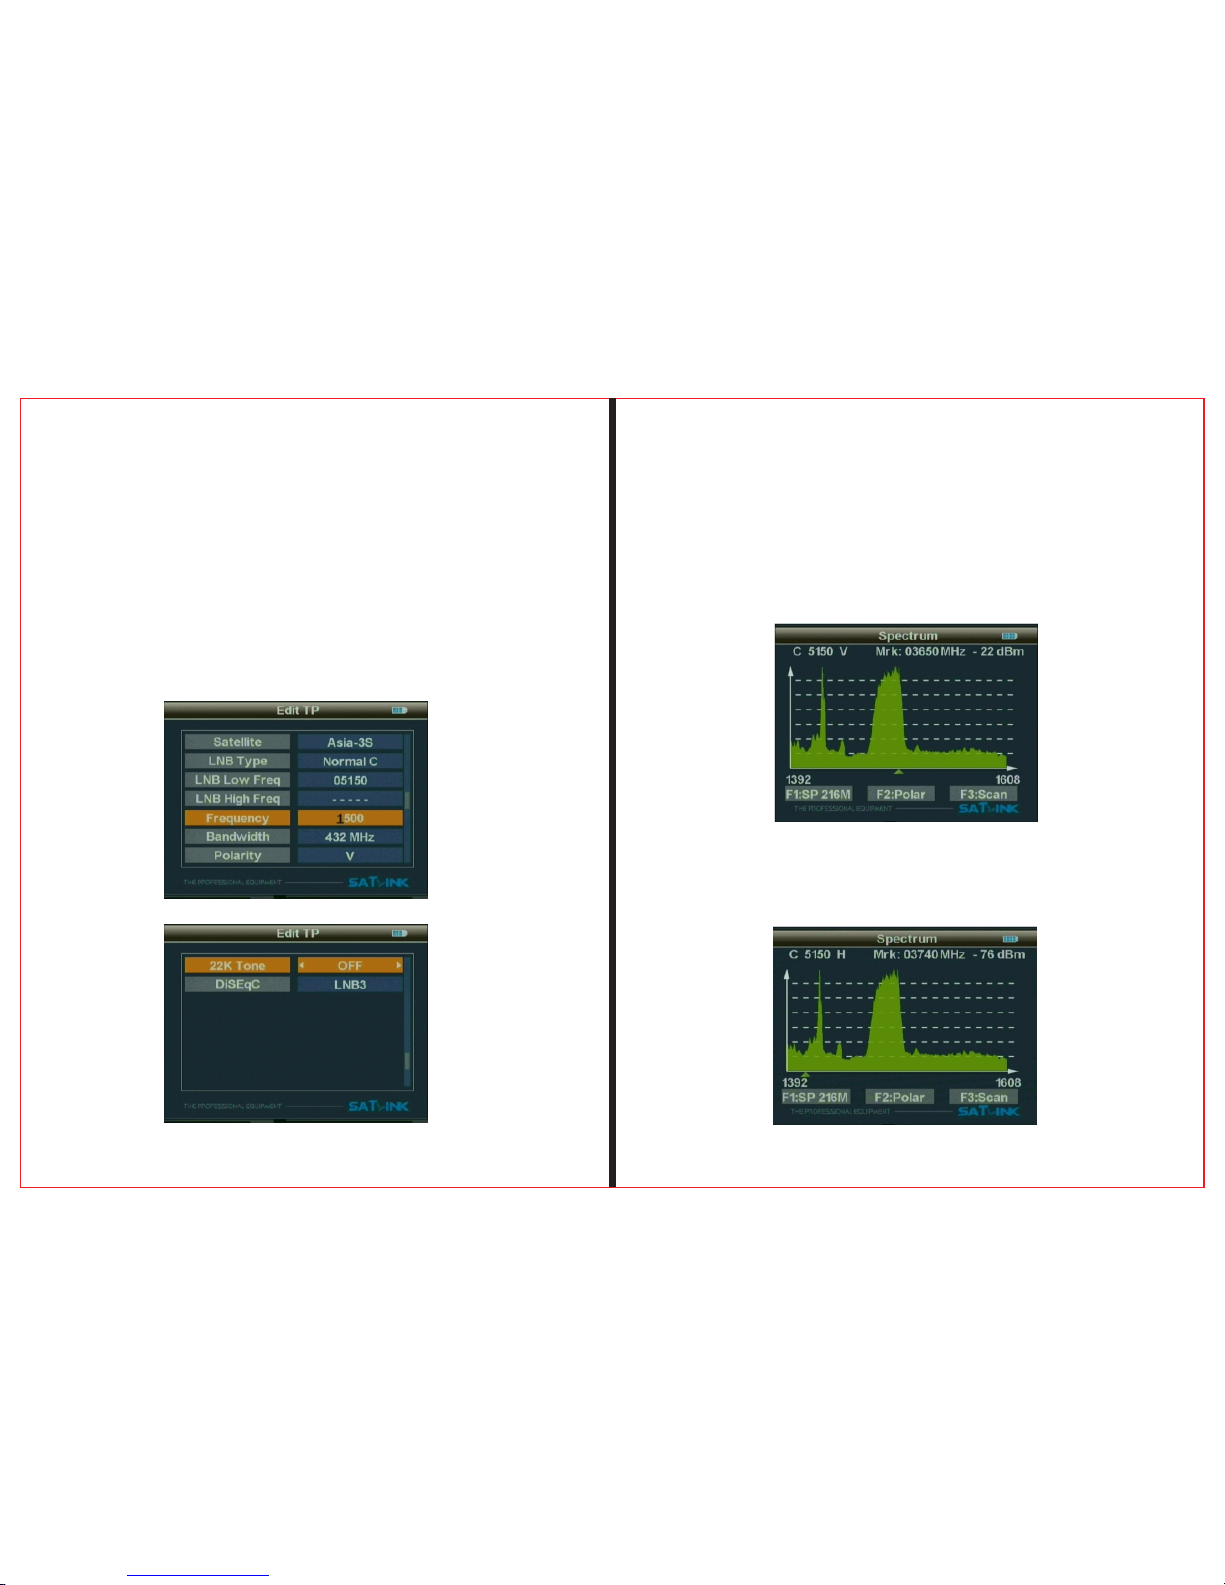
2.4 System Setup
2.4.1 OSD Language
Set OSD Lang uage
2.4 .2 My lon git u de
Pr ess OK b utt on , i npu t My lon gi tud e. It is av ai lab le
t o inp ut nu mer ica l dir ectly. To pre ss le ft butto n , you can
c ha nge to e ast lo ng itu de an d r ight but ton t o c hange to
wes t lon git ud e.
2.4 .3My La tit u de
P re ss OK bu tto n, in put My l ati tud e. It is a vai lable to
inp ut nu mer ic al direc tly. To press le ft bu tto n, yo u c an
cha ng e t o e as t l ati tu de and r igh t but ton to c han ge to we st
lat it ude .
THE PRO FES SI ON AL E QU IP MEN T- -- -- -- --- -- -- -- --| U SE R’S MAN UA L | THE PRO FES SI ON AL E QU IP MEN T- -- -- -- --- -- -- -- --| U SE R’S MAN UA L |
Digita S ate llite Met er 15
Digita S ate llite Met er
|
14
|
2.4 .4 SW Upd ate
To upgrade software or dat a through USB port. St ore
the upgrad ing file into the external memory and insert it
into USB por t to and the enter will upgrade the menu. To
select the u pgrading file it will automatically return back to
the previo us menu after upgrade.
Page 10
2.4.5 Set Defualt
Press OK button to set factory default.
2.4.6 GMT Usage
Set the GMT parameter
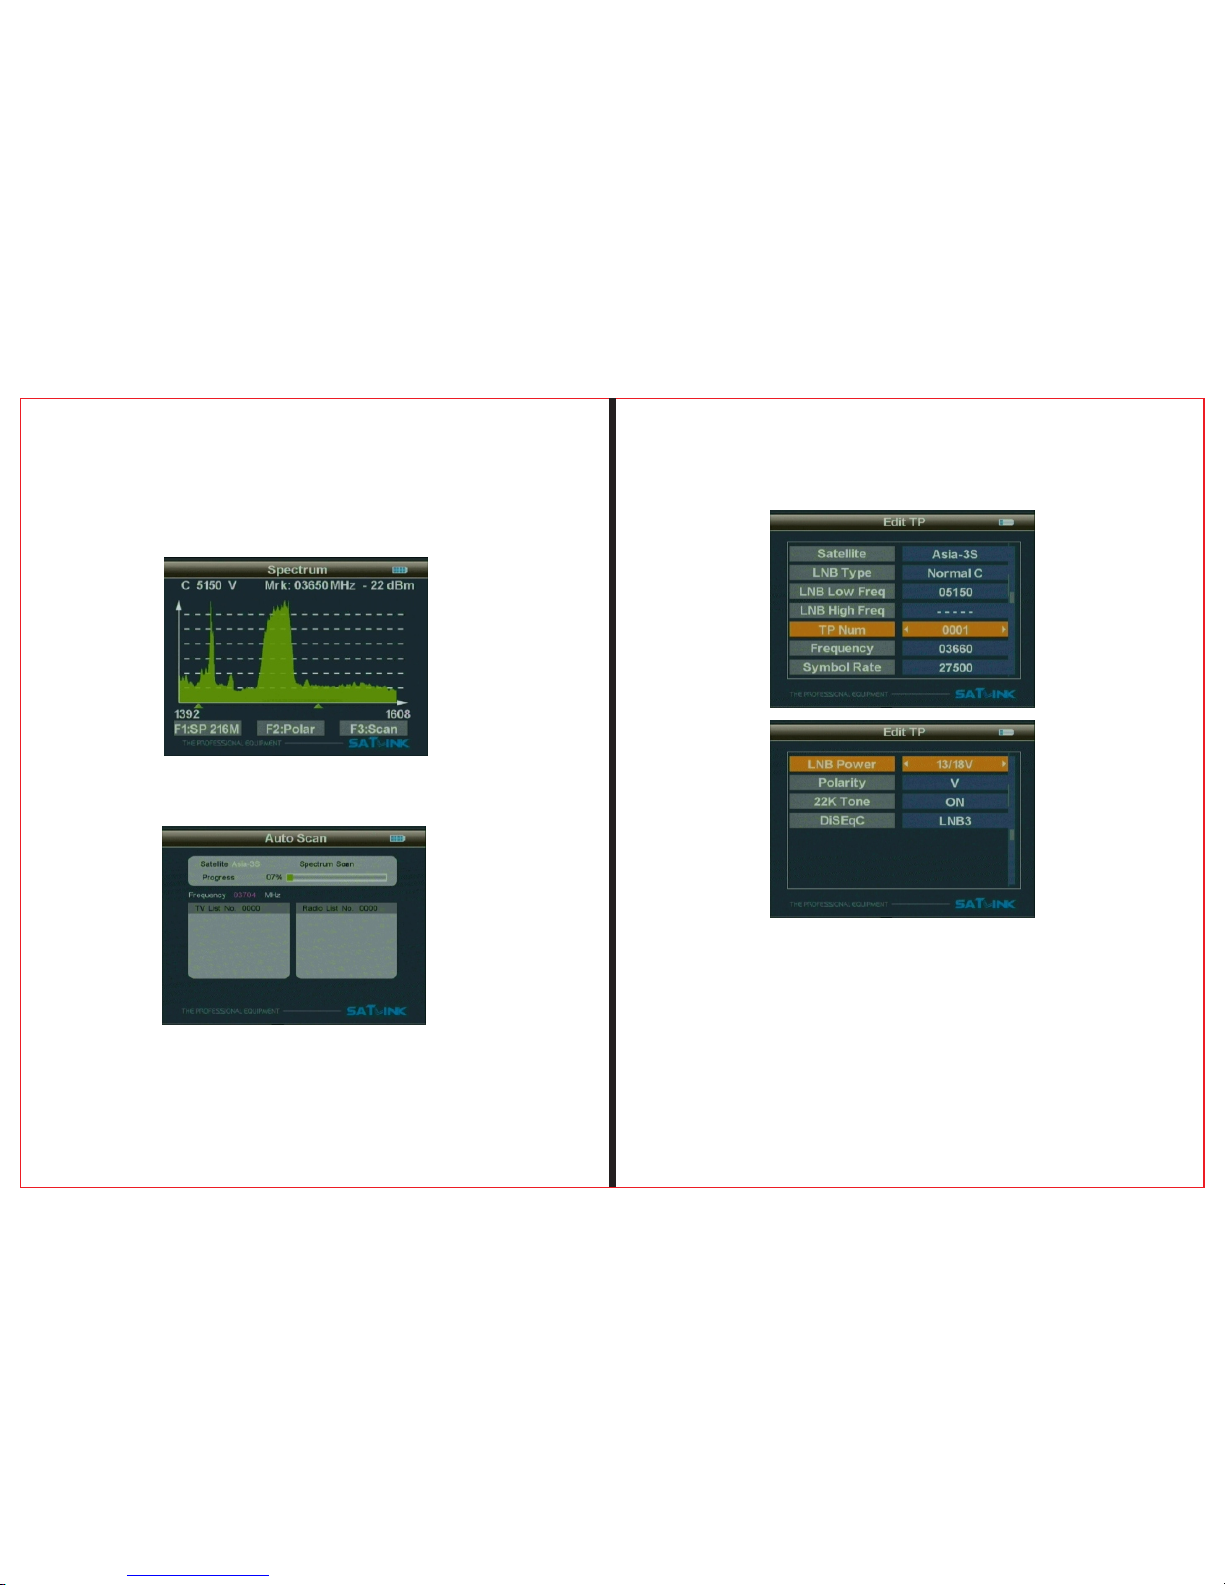
2.5 Spectrum
Press OK button and then enter spectrum parameter to set
menu.parameter
THE PRO FES SI ON AL E QU IP MEN T- -- -- -- --- -- -- -- --| U SE R’S MAN UA L | THE PRO FES SI ON AL E QU IP MEN T- -- -- -- --- -- -- -- --| U SE R’S MAN UA L |
Digita S ate llite Met er 17
Digita S ate llite Met er
|
16
|
2.5.1 Frequency is the diffe rence value between the
downstream frequency and local frequency and the
value range is 950---2150MHz.
To set parameters according to requirements, and
then press OK button to enter the chart of spectrum.
2.5.2 When the screen appears the spectrum, press F1button to change bandwidth and press F2 to change the polarity.
2.5.3 To select the beginning frequency to scan and press
F3 button then press OK button.
Page 11
THE PRO FES SI ON AL E QU IP MEN T- -- -- -- --- -- -- -- --| U SE R’S MAN UA L | THE PRO FES SI ON AL E QU IP MEN T- -- -- -- --- -- -- -- --| U SE R’S MAN UA L |
Digita S ate llite Met er 19
Digita S ate llite Met er
|
18
|
2.5.4 Press left an d right button to move t he cursor to the
end freque ncy of the scanning.
2.5.5Press OK button to enter the selected frequency range
to scan the programs. When finished, exits the menu.
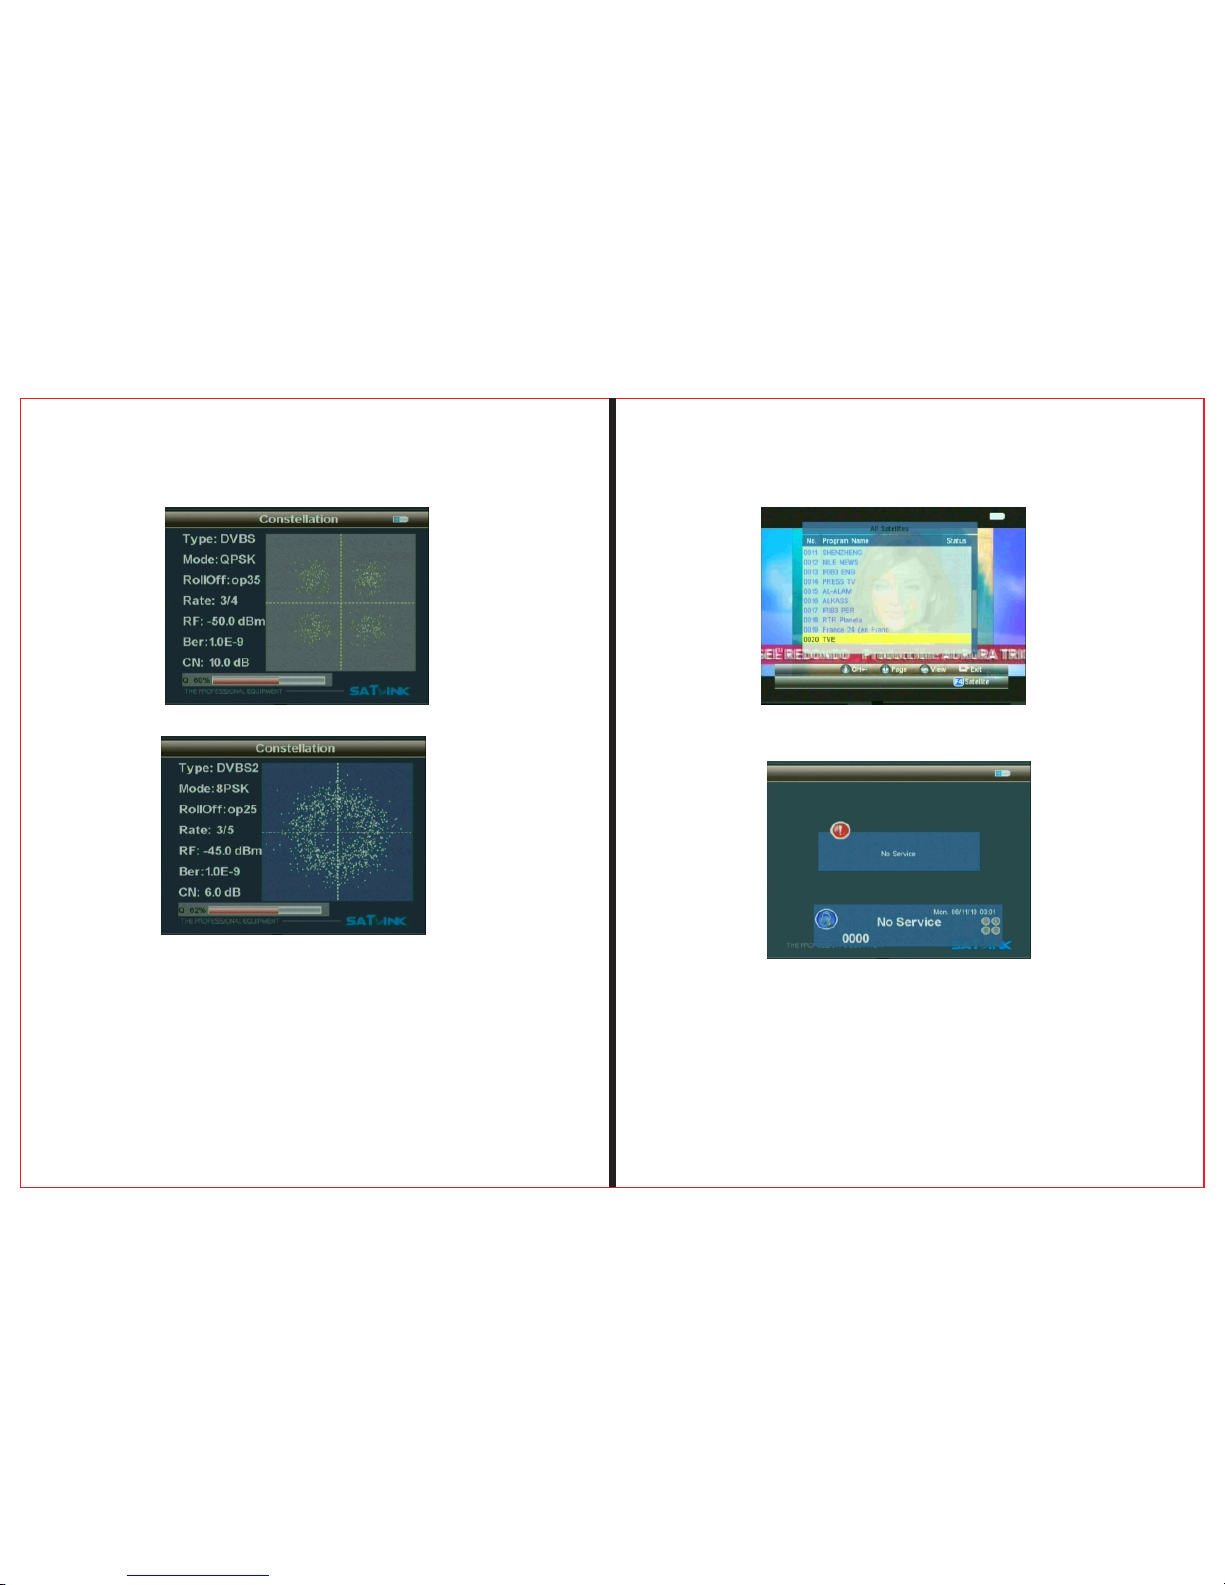
2.6 Constellation
Press OK button , then enter the constellation pa rameter
to set menu.
2.6.1 To set parameters according to the requirements,
press OK button to enter the constellation chart parameter.
To show signal parameter DVB-S(QPSK)、DVB-S2
(8PSK)according to the parameter of satellite
finder.(For the same satellite, different transponders show
different signal strength, the signal of DVB-S(QPSK) )
is stronger than DVB-S2(8PSK)
Page 12
THE PRO FES SI ON AL E QU IP MEN T- -- -- -- --- -- -- -- --| U SE R’S MAN UA L | THE PRO FES SI ON AL E QU IP MEN T- -- -- -- --- -- -- -- --| U SE R’S MAN UA L |
Digita S ate llite Met er 21
Digita S ate llite Met er
|
20
|
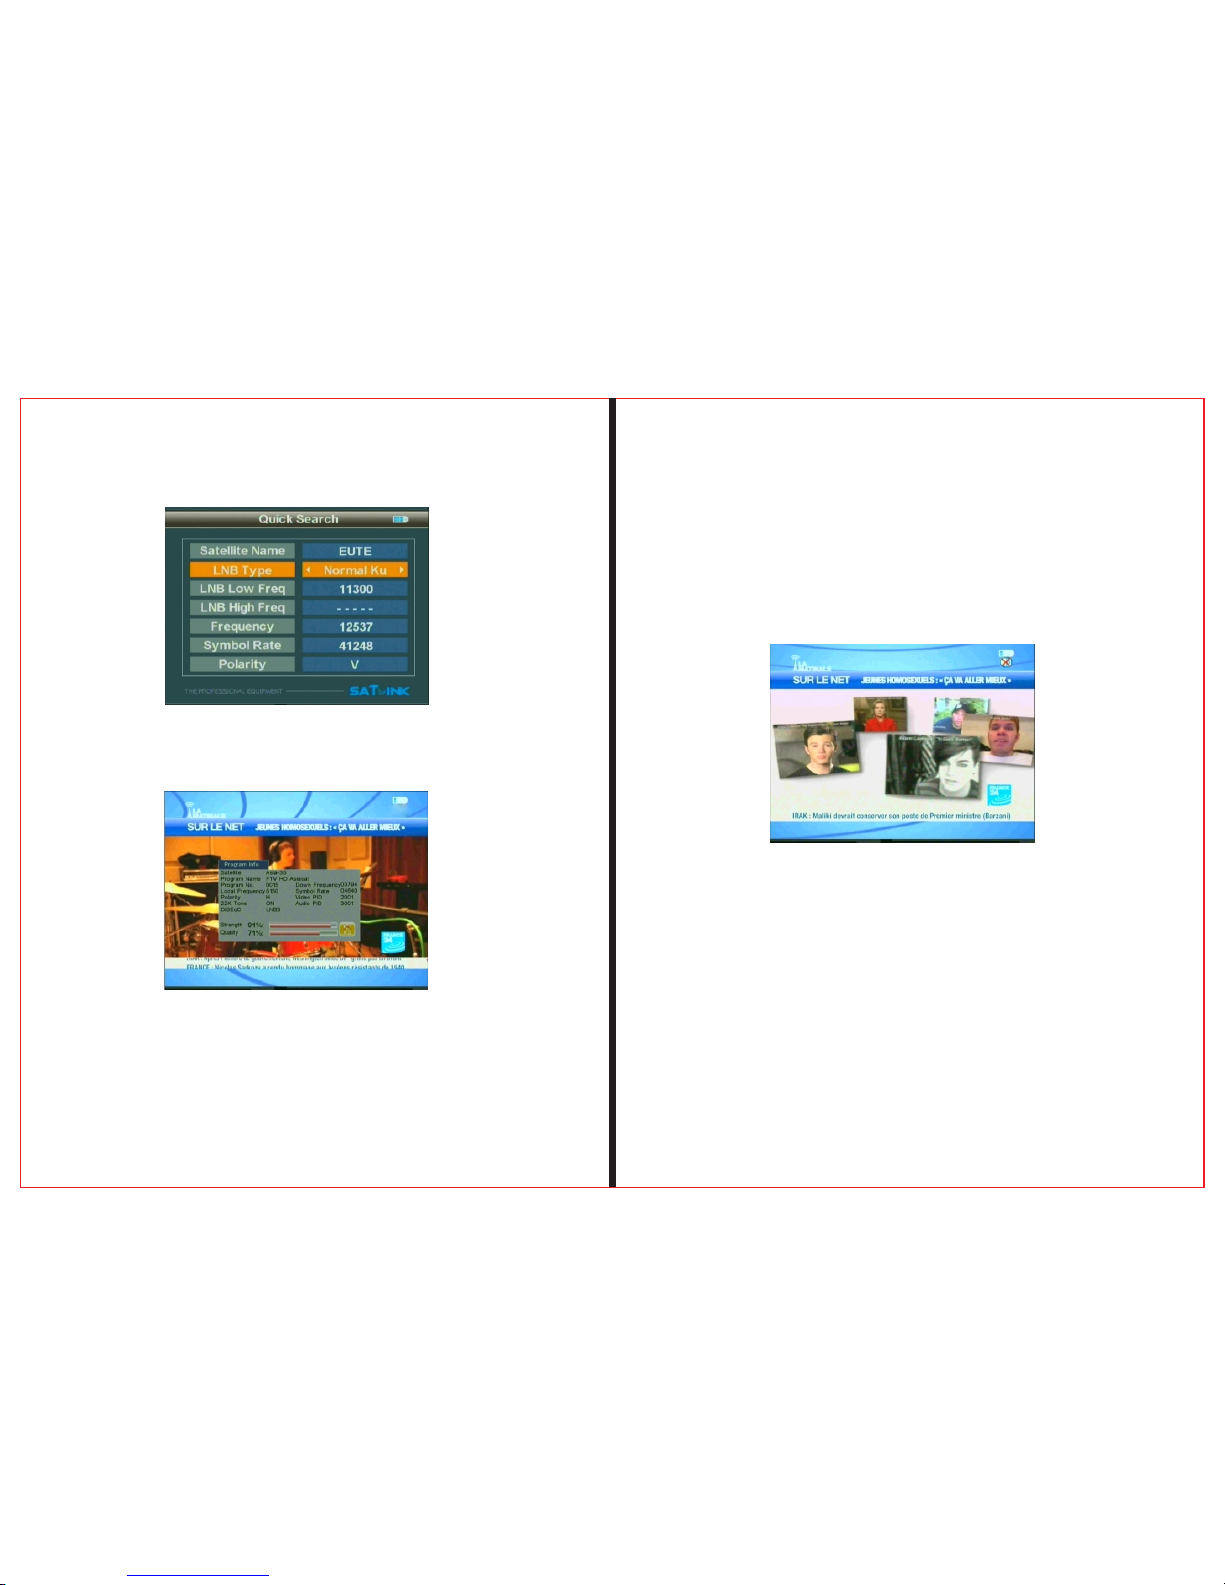
2.7 Shortcut Function
2.7.1 Press the OK button to enter the sub menu when
it's playing programs and make operations according
to the instruction.
2.7.2 Press TV /Radi o to sele ct programs between TV
and Radio when it's playing program.
2.7.3 Press the OK button to enter the SCAN menu
when it's playing programs and make operations according to the instruction.
Page 13
THE PRO FES SI ON AL E QU IP MEN T- -- -- -- --- -- -- -- --| U SE R’S MAN UA L | THE PRO FES SI ON AL E QU IP MEN T- -- -- -- --- -- -- -- --| U SE R’S MAN UA L |
Digita S ate llite Met er 23
Digita S ate llite Met er
|
22
|
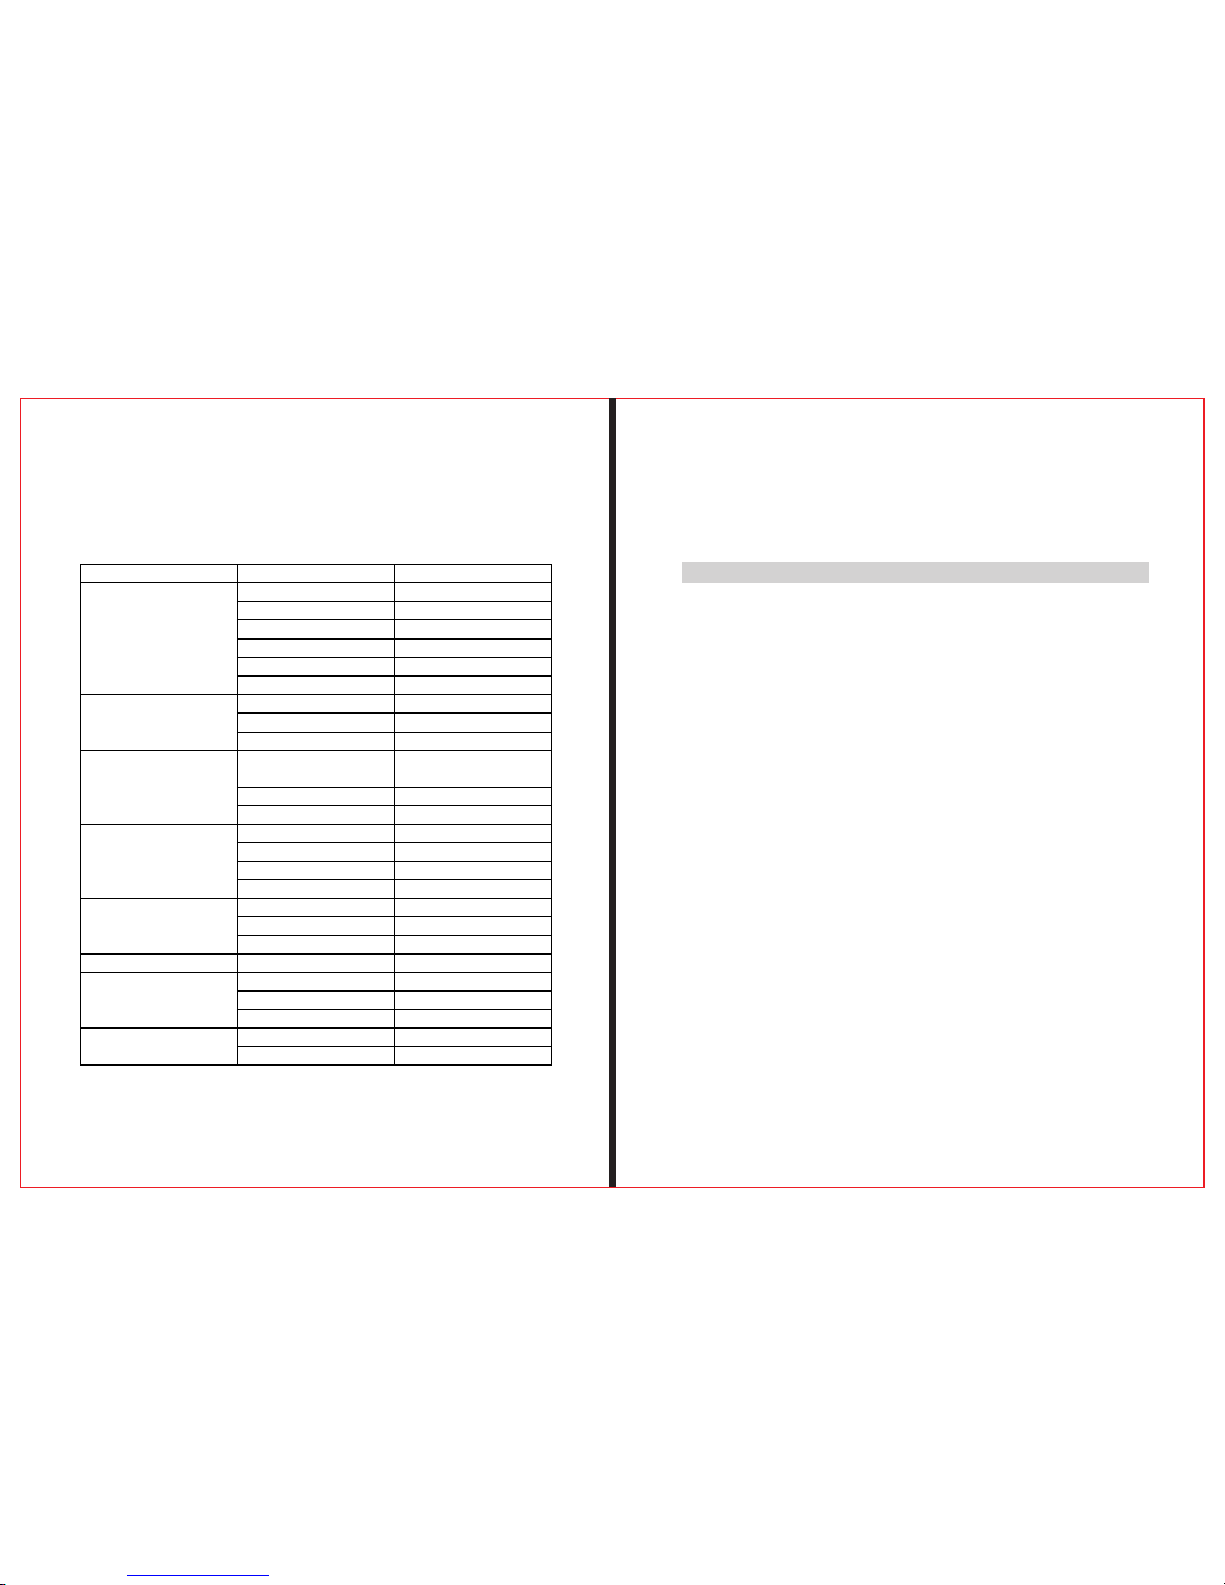
2.7.4 Press the OK button to enter the INFO menu
when it's playing programs and make operations
according to the instruction.
2.7.5 Press “ -/+” button to turn on or turn off Signal
Lock Sound to show the signal strength.
2.7.6 Press MUTE button to turn on or turn off the
sound.
Page 14
THE PRO FES SI ON AL E QU IP MEN T- -- -- -- --- -- -- -- --| U SE R’S MAN UA L | THE PRO FES SI ON AL E QU IP MEN T- -- -- -- --- -- -- -- --| U SE R’S MAN UA L |
Digita S ate llite Met er 25
Digita S ate llite Met er
|
24
|
Specifications
Handi ng Prec au tions and Prohibi ti ons o f B at tery in
S at Mete r
Warning:
System Fully DVB compliant yes
connector F type feminin
frequency range 950MHz-2150MHz
signal level -65dBm~-25dBm
LNB power supply 13/18V,最大max 350mA
LNB switch control 22KHz
LNB input
DiSEqC Ver 1.0/1.1/ 1.2
Front end QPSK 8PSK
Modulation range 2Mbps~45Mbps Demodulator
SCPC和MCPC both yes
processor 16bit处理器processor
(133MHz)
FLASH 8Mbyte
System resource
SDROM 4*16Mbyte
MPEG 2 MP@ML
Data rate speed up to 15M bits/s
Resolution 720*576,720*480
Vedio decoder
Vedio format PAL/NTSC/SECAM
MPEG 1 1&2
Type Mono Audio
sampling rates 32,44.1 和48KHz
Data interface connector USB
LI-ION battery 3000 mA
Supply voltage 8.4Volt Power supply
Charger 100-220V
Mesurement 9.5x15.5x4.5 (cm)
Physical characteritics
Weight(net weight) 0.5 Kg
一、 You ar e using Lithimum ion b atteries and Licke l
metal hydr ide batteries.So Please don't wor k under high
tempratu re or high pressure condition. If the f ollowing
items happ ened,abnormal chemical reaction mey occur
which will l ead to the battery overheat,emit smoke,ignite
and/or bur st.
1.Incine rate and dispose the battery in fire or h eat it.
2.Pierce t he battery with a nail or other sharp objects.
Strike it wi th a hammer or step on it.
3.Immers e the batttery with water or connect the positive
(+) and nega tive
4.Connec t the positive (+) and negative (-)te rminals with
other meta l objects, such as necklaces hair pins and so on.
The batter y is only applicable to the charger which suppl ied or appoin ted by the manufacturer of this machine.
(二) The battery is only applicable to the charger w hich
supplied o r appointed by the manufacturer of th is machine.
1.The batt ery should be stored within a temprat ure range
of 0℃ to 40℃.
2.The batt ery is expendable. When store d for a long time,
charge the battery at least once per half month so as to
prevent ov er discharge.
Page 15
THE PRO FES SI ON AL E QU IP MEN T- -- -- -- --- -- -- -- --| U SE R’S MAN UA L | THE PRO FES SI ON AL E QU IP MEN T- -- -- -- --- -- -- -- --| U SE R’S MAN UA L |
Digita S ate llite Met er 27
Digita S ate llite Met er
|
26
|
Handling:
Please use the battery only supplied by the manufacturer,
otherwise it will destroy the battery.
Please do not put the battery in fire or dispose it together with
garbage.
Please contact the waste administrative institute to cope with
waste battery carefully.
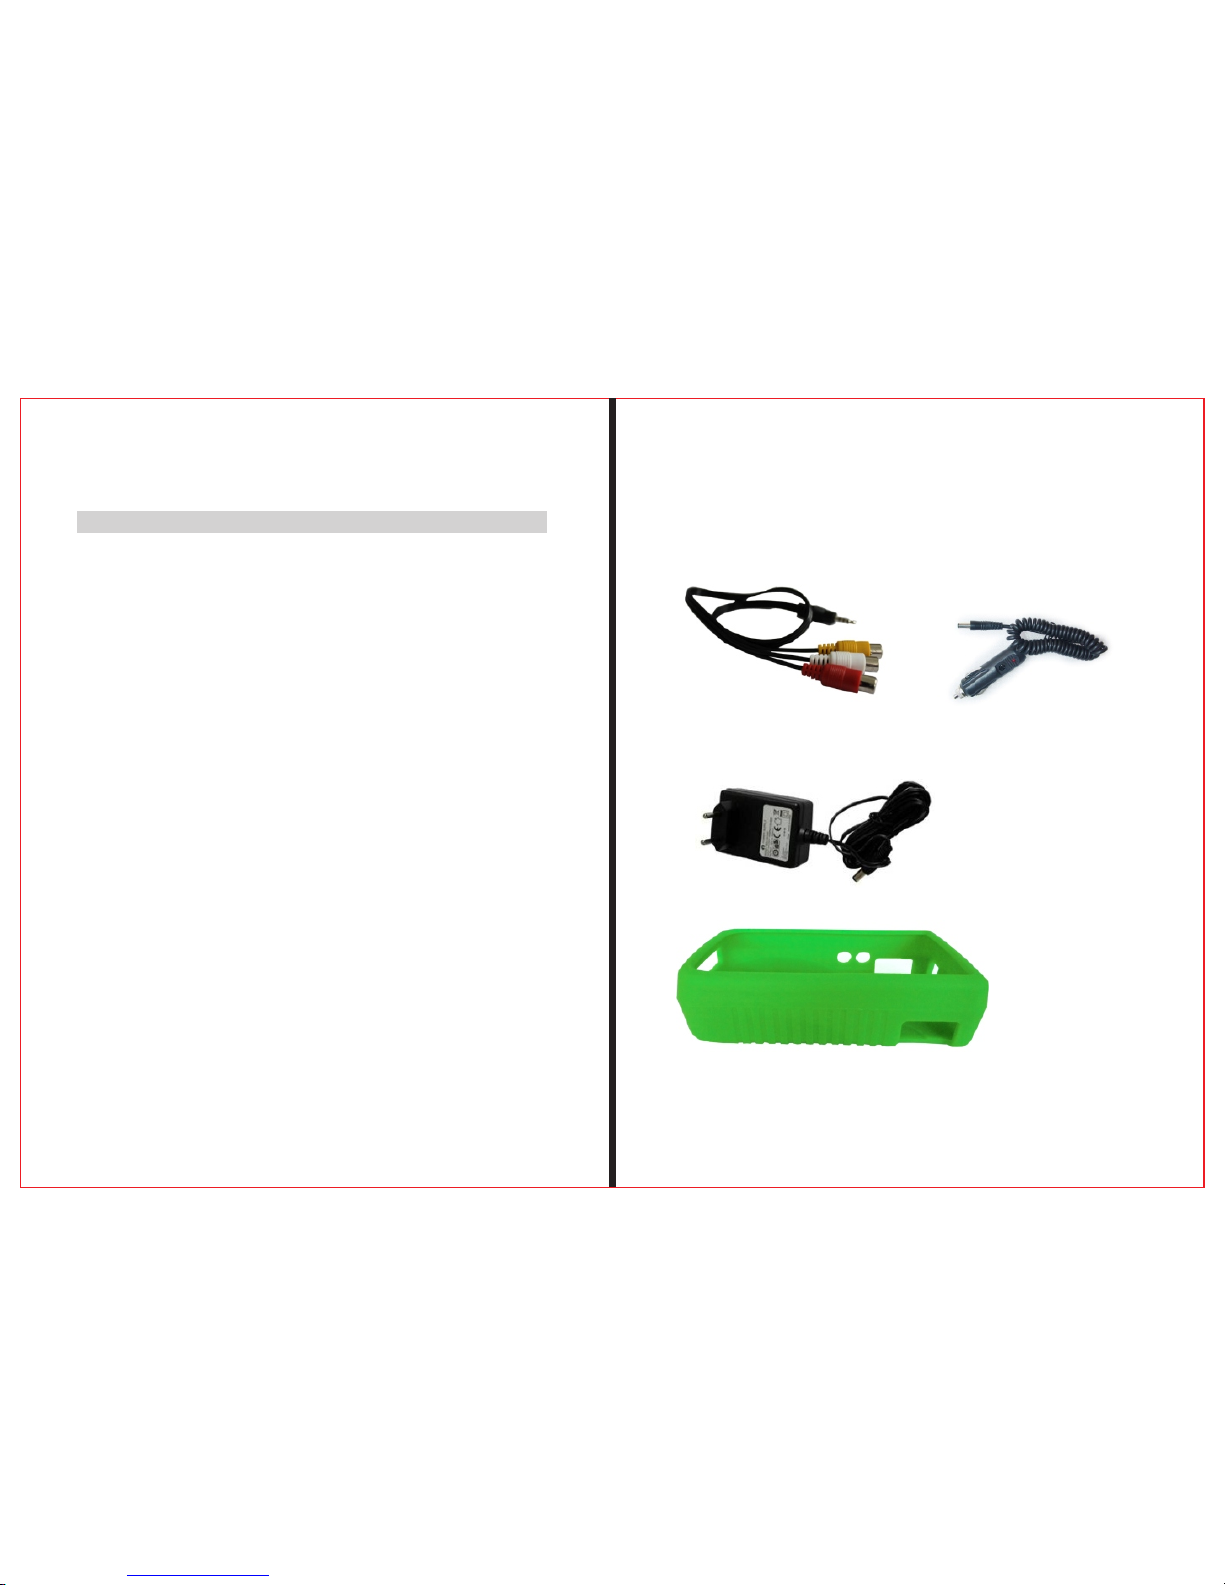
5.Product Standard Package
Car char ger cable
Carrying case
Power
AV lable
 Loading...