

Page 1
Product Description
1.Guide
1.1 Face Panel & Button
1.2 Power On/Off
1.3Power Supply & Battery
2. Menu
2.1 Channel Scan
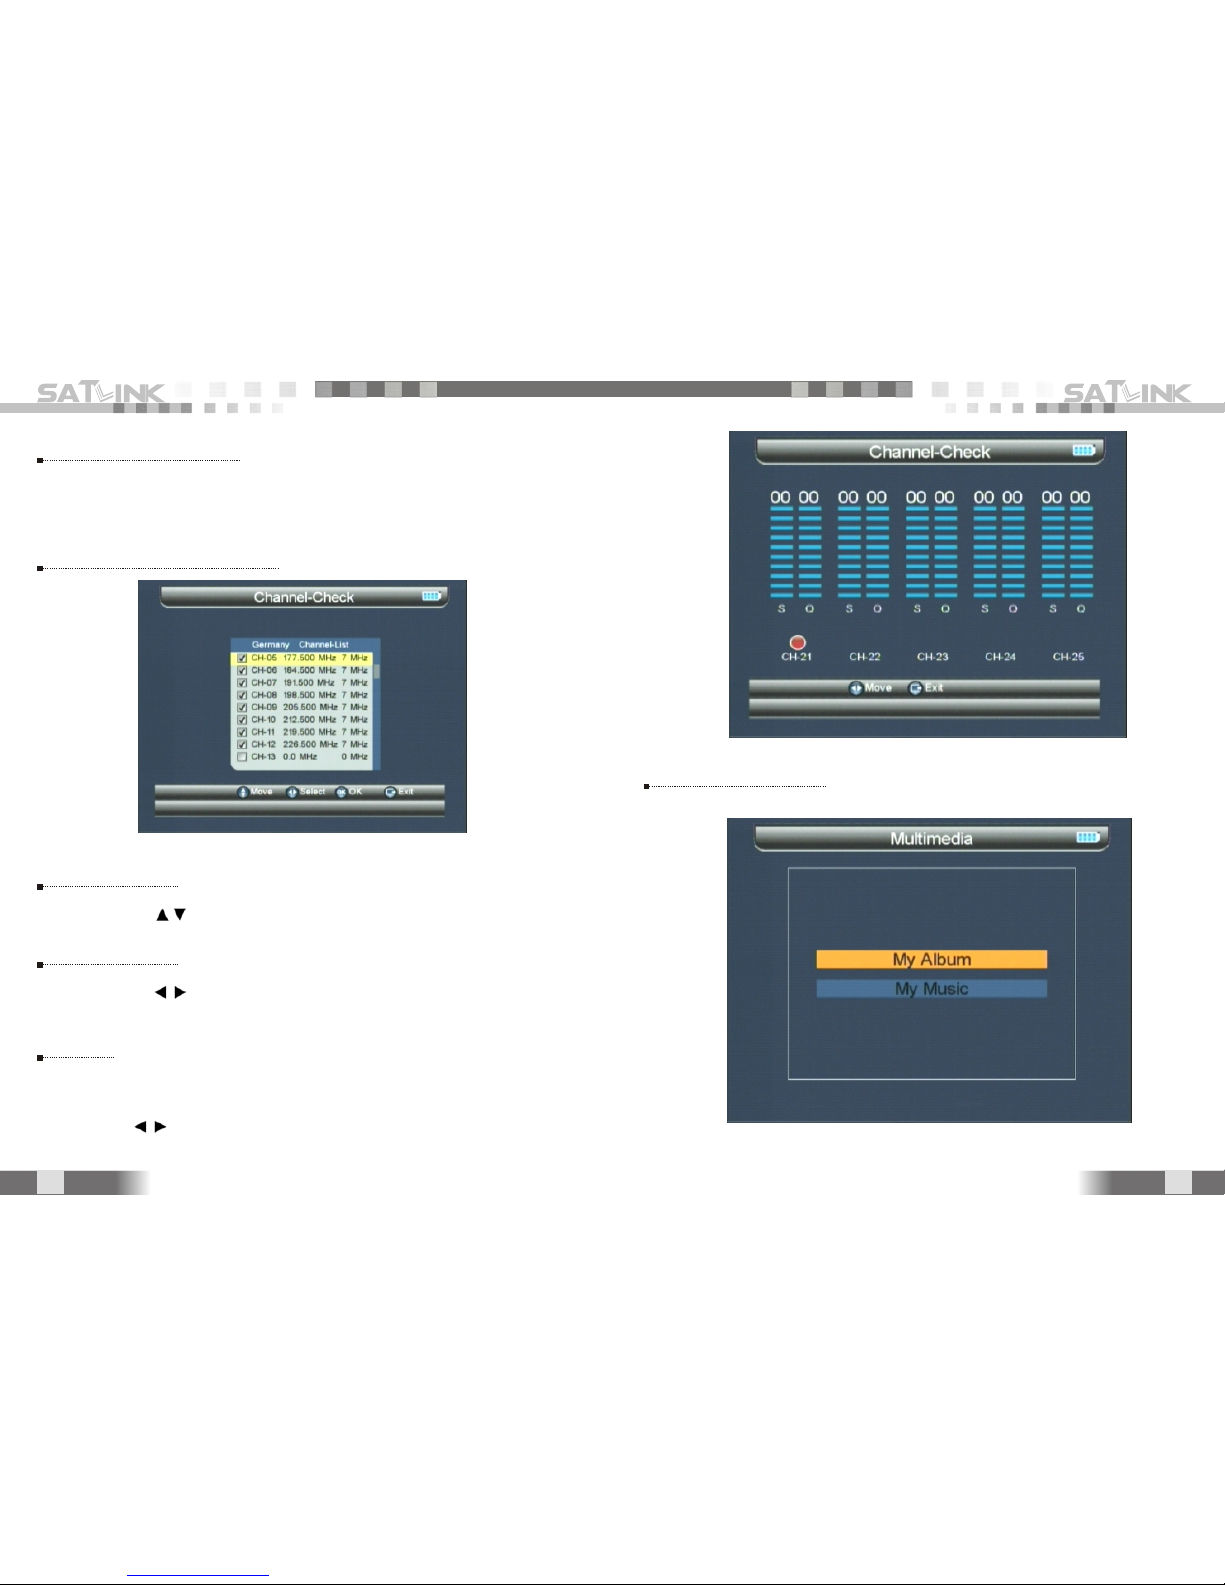
2.2 Channel Check
2.3 Multimedia
2.4 System Setup
3.Specification
WS-6905 User Manual
Product Description
It is a battery powered hand held DVB-T
terrestrial alignment meter demodulating DVB-T
COFDM Signal. Its very convenient for installer to
catch quick and accurate Alignment for Antenna to the
best direction.
It s with microprocessor controller, reliable and
stable performance. When it s turned on, channel
picture, Signal Strength and Signal Qulaity will be
showed on LCD Screen after you set up your local
DVB-T Parameter. Also, it s with multichannel Signal
indicator which is very helpful for alignment.
It supports BER, S/N, Signal Strength and signal
lock sound.
It detects very faint signal, and supports antenna
power OFF/5V/12V/15V/18V/24V selectable.
It s with auto-protection for LNB short-circuit.
It includes both AV IN and AV OUT for Camera,
LCD...etc.
It s used with 12V Power Adaptor when you need
to use external power.
It includes high capacity Lithium Battery 8.4V
3000mAh which works for more than 4 hours after it s
fully charged.
'
'
'
'
'
'
'
1
1
3
3
3
4
7
8
10
13
Page 2
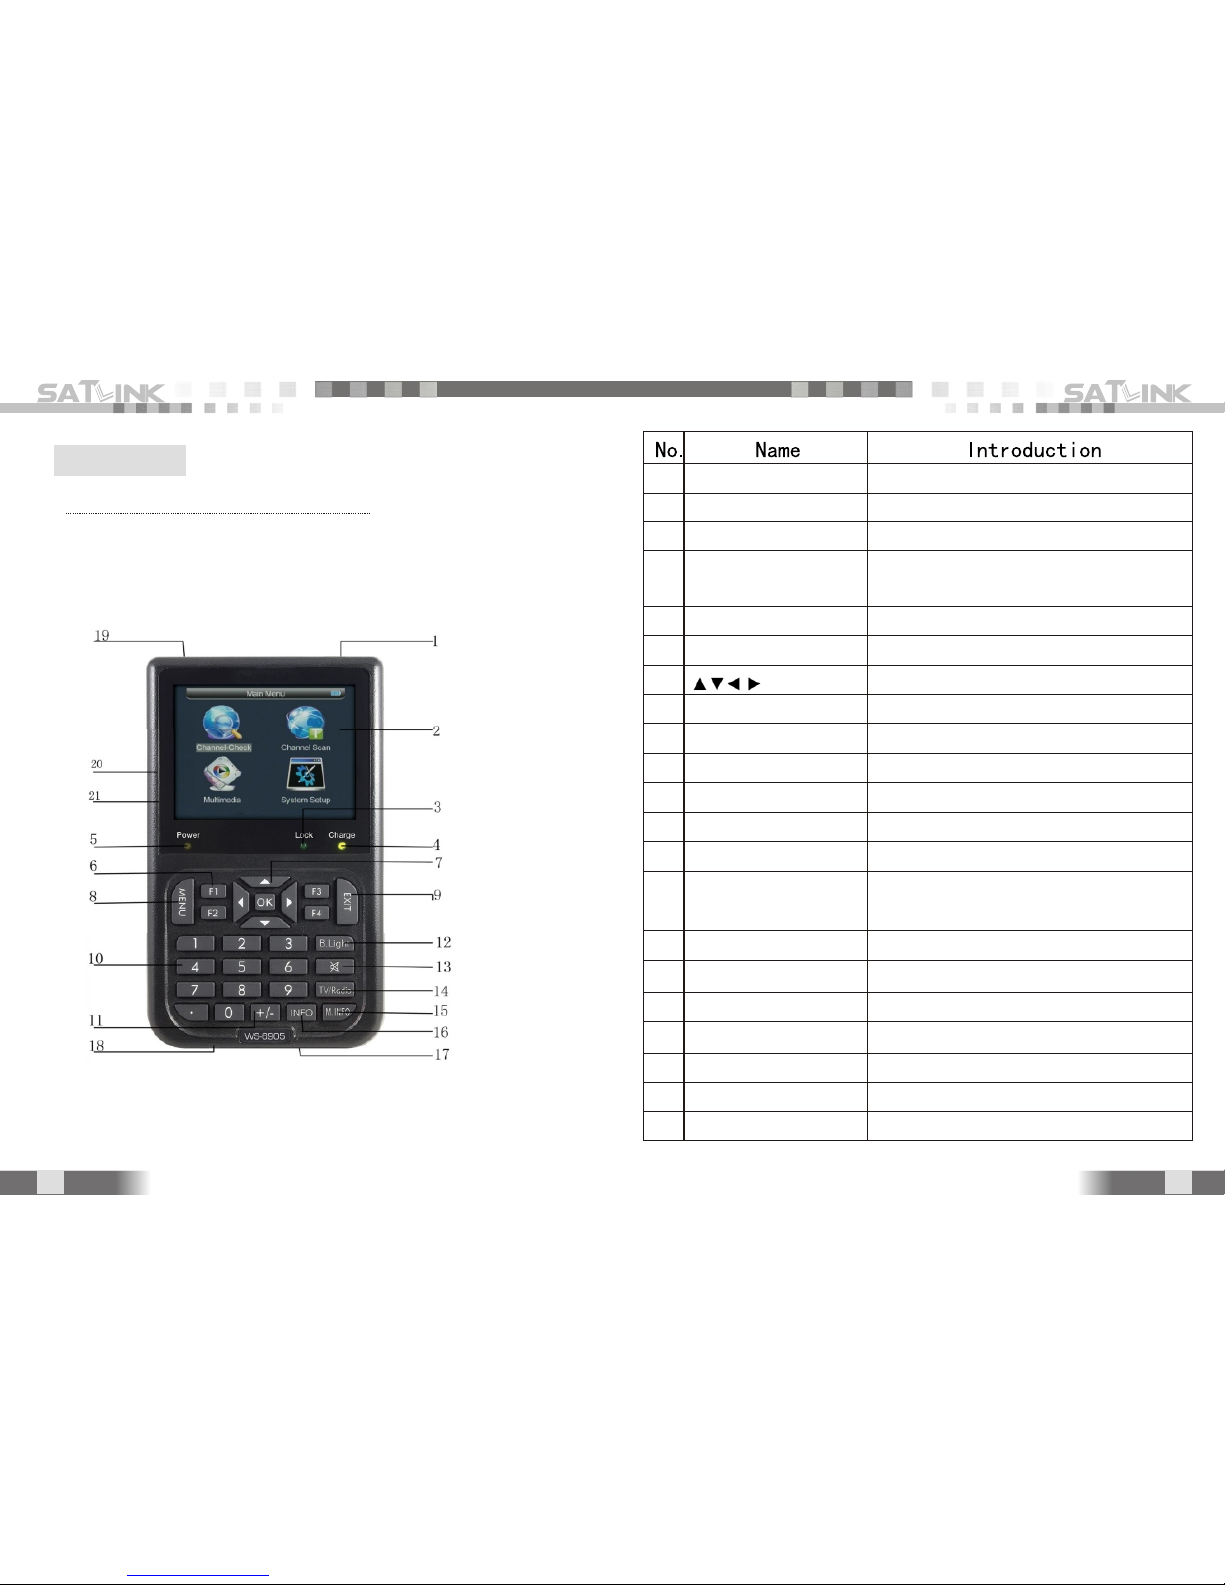
To connect it with external antenna
To show menu and channel pictures...etc
To lock signal when it lights
The light is on when its charging;
Its off when charging is complete.
The light is on when meter is turned on
Function Buttons
Arrow for Icon Moving. OK for Confirmation
To show main menu or return to previous menu
To cancel selection or exit from current menu
To input numerical for setting parameters
LCD Screen Switch
Sound Switch
Switch between TV Channel and Radio
Channel
Shortcut Button for Multichannel Display
To show parameter of current channel
Port for Upgrade or connecting to multimedia
Port for connecting to external power supply
Power Switch for machine power
AV Output
AV Input
'
'
Signal Input
LCD Screen
Signal Lock Indicator Light
Charging Indicator Light
Power Indicator Light
F1 F2 F3 F4
OK
MENU
EXIT
0-9 Numerical Button
+/- Button
B.Light
Mute
TV/Radio
M.INFO
INFO
USB Connector
Power Connection port
Power Switch
AV Ouput
AV Input
1
2
3
4
5
6
7
8
9
10
11
12
13
14
15
16
17
18
19
20
21
1.Guide
1.1 Face Panel & Button
1
2
Page 3
To turn on the meter when Power Switch moves to I
position
To turn off the meter when Power Switch moves to 0
position
Please turn off the meter to charge the meter in time
when system information for showing low power popes
up
It s used with 12V 1.5A Power Adaptor. It charges
through external power when battery is out of power.
It s used with 8.4V 3000 AH Lithium Battery. It needs
5hours charging time by connecting power adaptor with
external power or car charging. After it s full charge, it works
for more than 5 hours (It also depends on the load of external
antenna).
Notice: For initial charge, please make battery fullycharged(We suggest it charge for 5 hours).
'
'
'
1.3 Power Supply and Battery
2.1 Channel Scan
1.2 Power On/Off
2.Menu
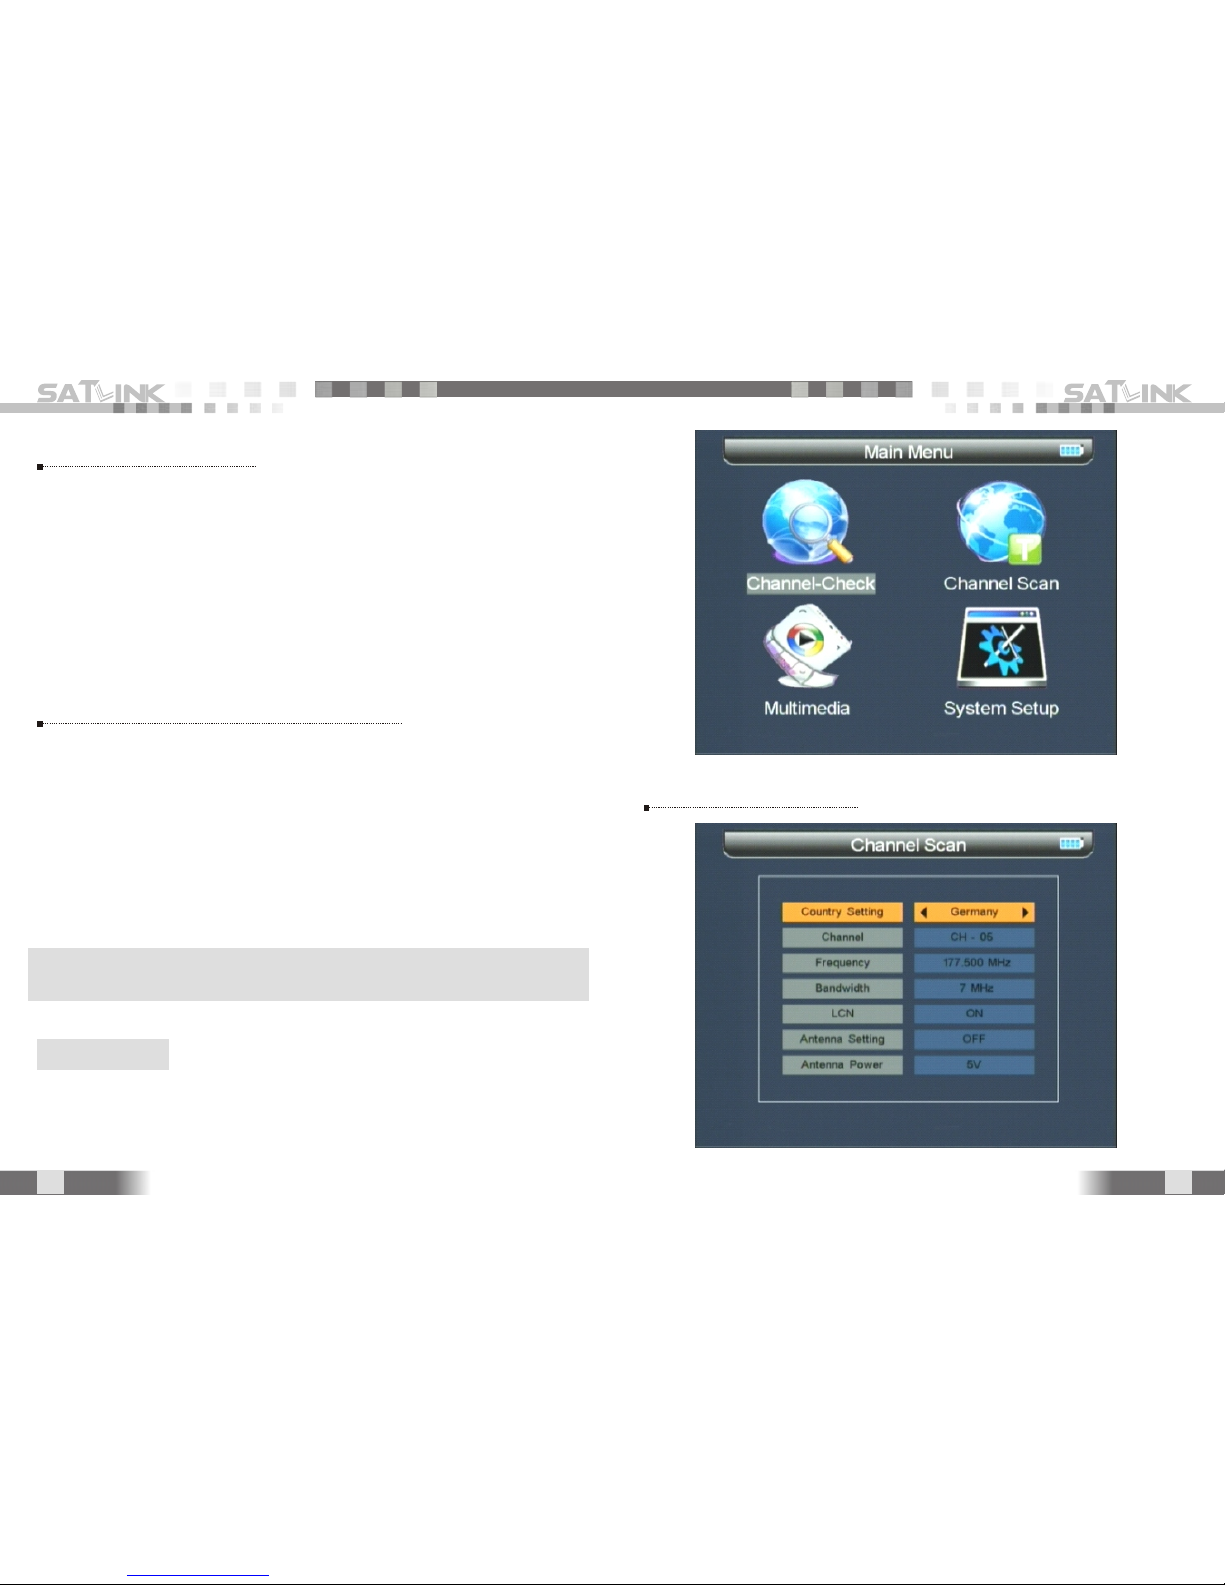
Press MENU key to enter into main menu, and use Arrow
key to move icon, and then press OK key to select sub-menu.
""
""
3
4
Page 4
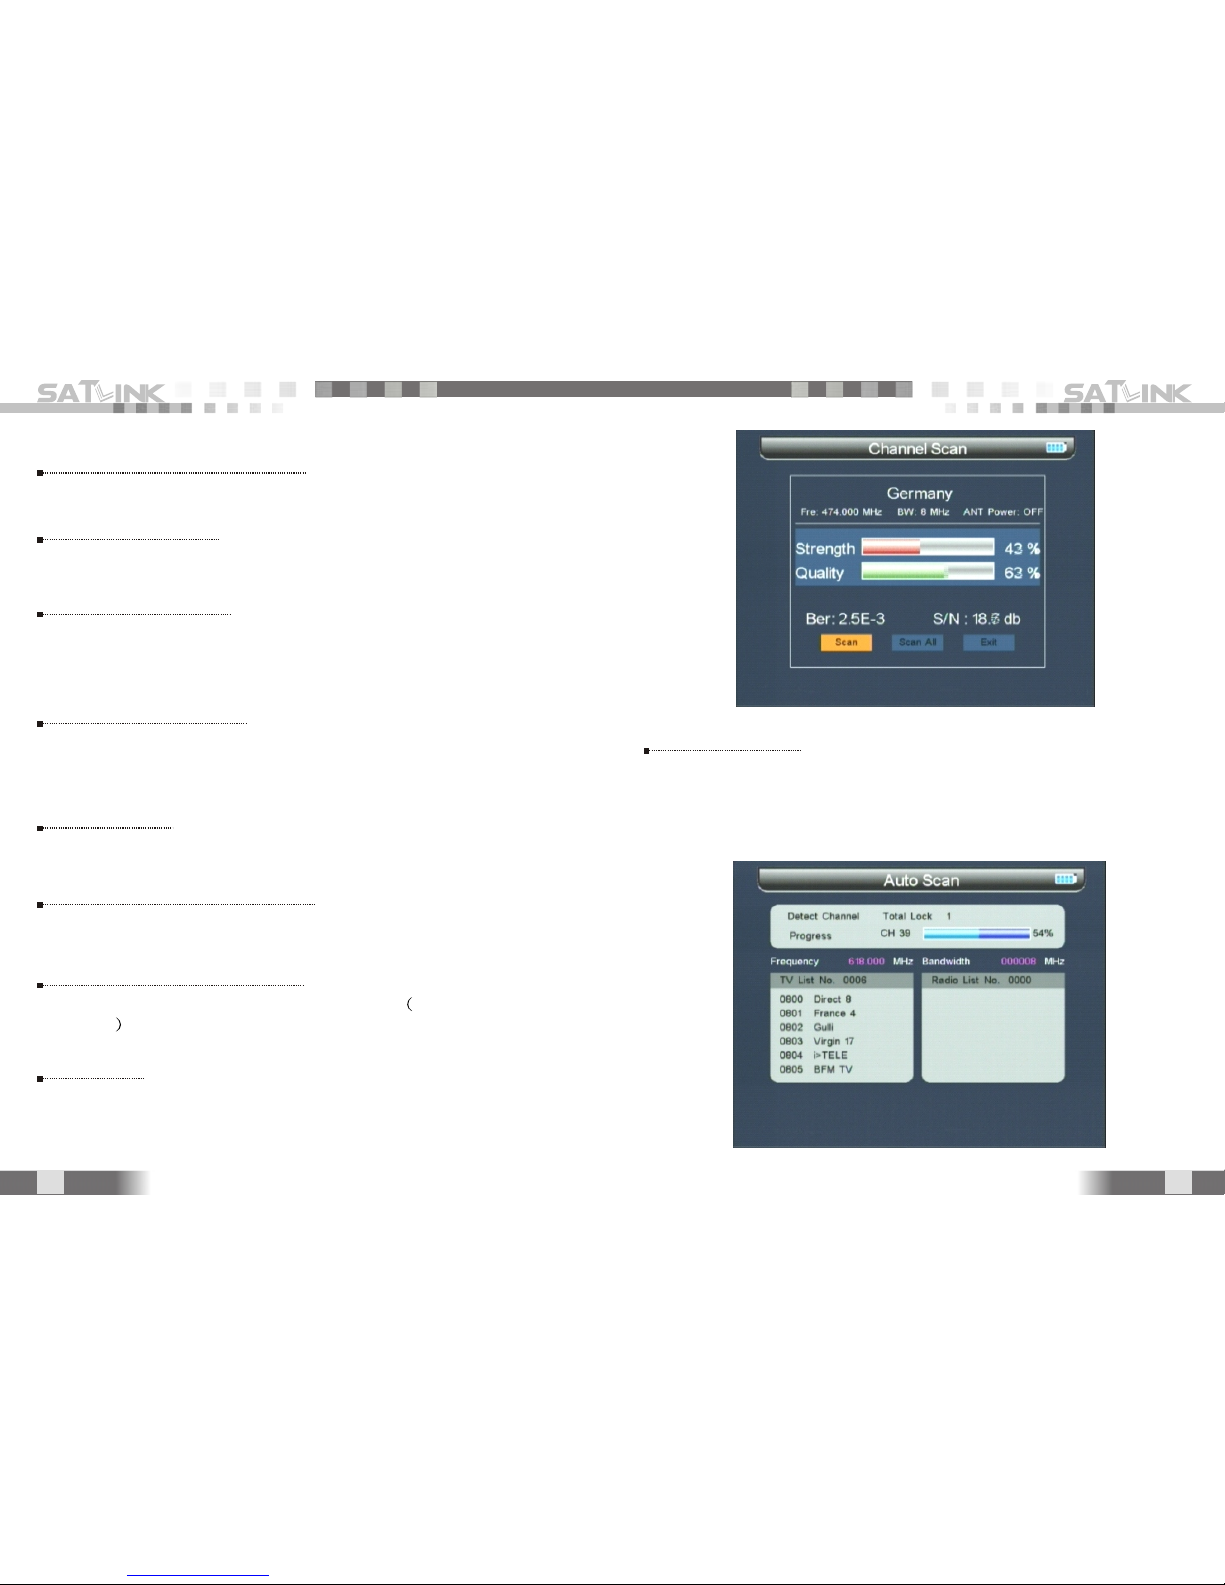
2.1.1 Country Setting
2.1.2 Channel
2.1.3 Frequncy
2.1.4 Bandwidth
2.1.5 LCN
To select country to receive signal.
To select channel type to be received.
To set frequency for receiving signal by inputting
frequency value with numerical keys.
To Select Bandwidth 6M/7M/8M based on your local
region.
Select LCN ON or LCN Off.
2.1.6 Antenna Setting
2.1.7 Antenna Power
2.1.8
To select antenna power ON/OFF.
To select antenna power voltage OFF/5V/12V/15V/
18V/24V
To set parameter, and press OK to enter into submenu.
""
2.1.8.1 Scan
To scan all the channels of current frequency, and it
auto-restores the scanned channels, and then return to
previous menu.
5
6
Page 5
2.1.8.2 Scan All
2.2.1 Move
2.2.2 Select
2.2 Channel Check
2.3 Multimedia
To scan all channels, and it auto-restores the scanned
channels, and then return to previous menu.
Press button to move Icon.
Press button to local channel, and tick the box to
select it.
2.2.3
Press OK button to enter into multichannel display.
Each screen display signal indicators of five channels,
and press button to PGUP or PGDOWN.
7
8
Page 6
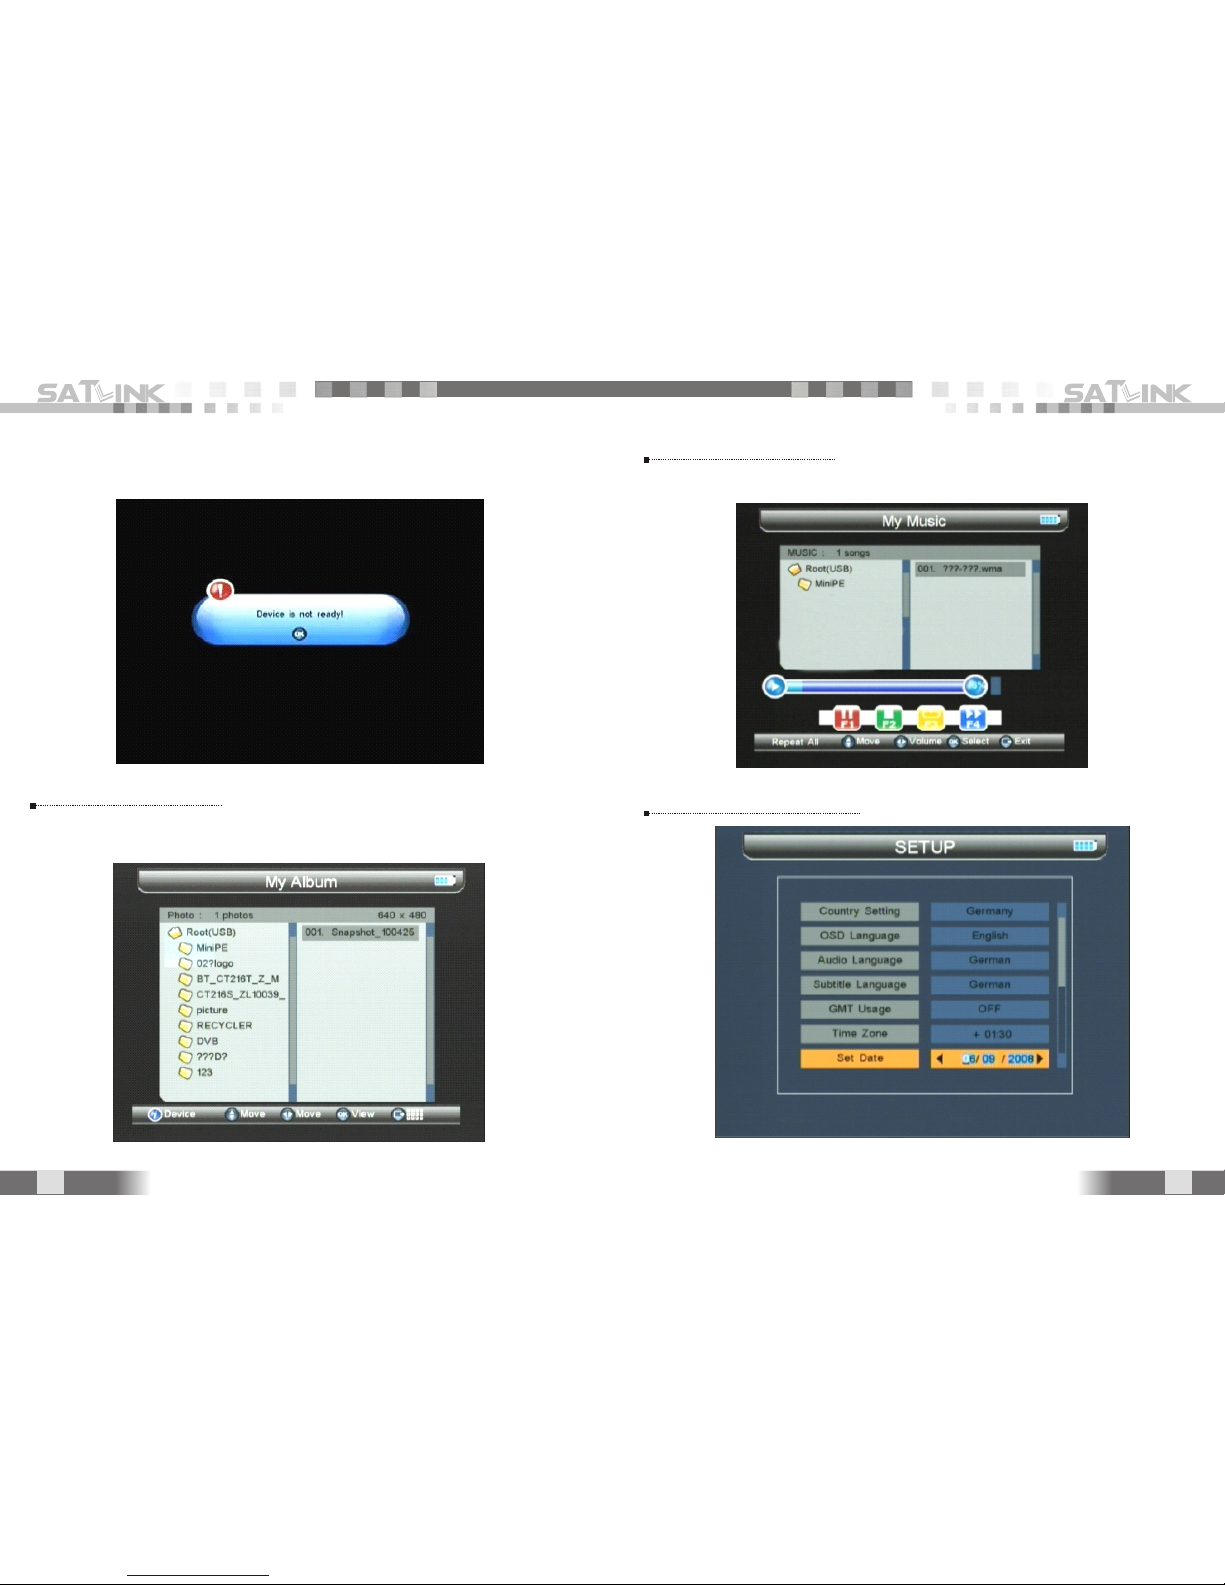
For multimedia playing, the external flash stick must
be inserted into USB port. Otherwise, it will pop up Device
is not ready in the screen.
"
"
2.3.1 My Album
2.3.2 My Music
2.4 System Setup
Review pictures with JPG/GIF/BMP format.
Play music with MP3/WMA format.
9
10
Page 7
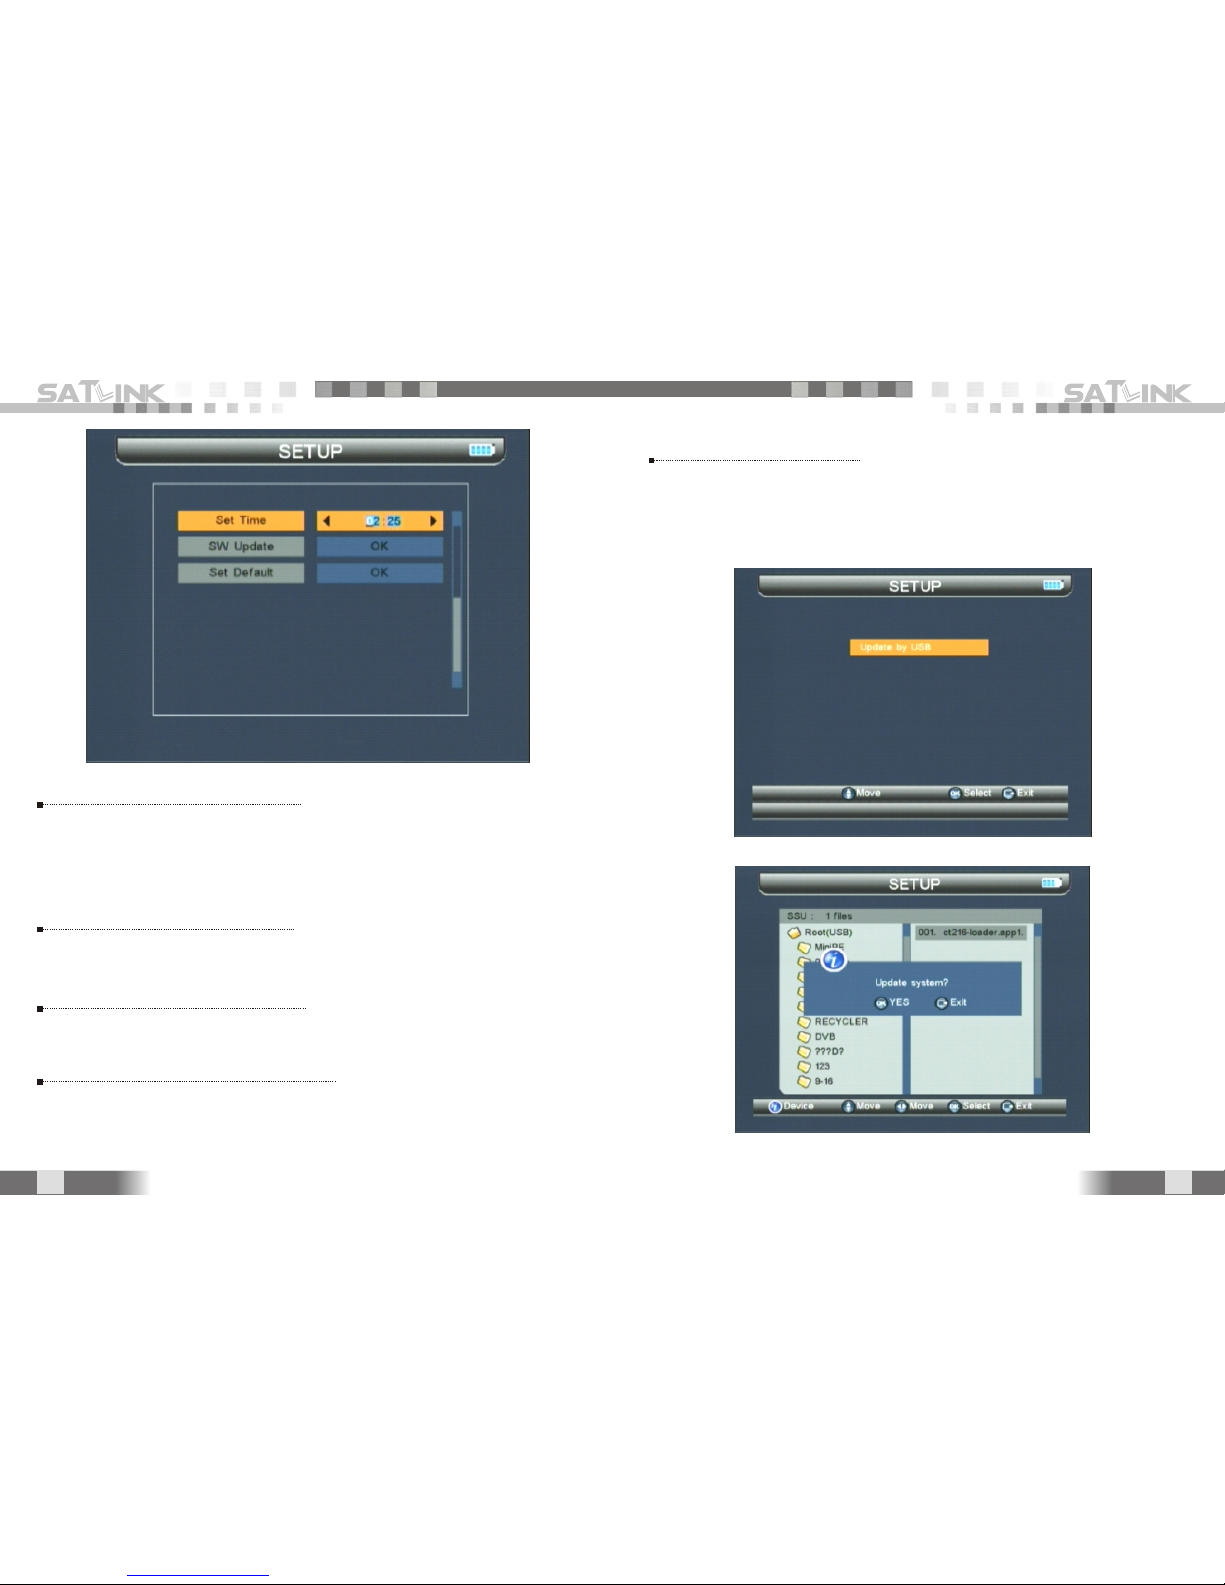
2.4.1 Country Setting
2.4.2 OSD Language
Select country to receive TV channel. The preset
channel parameters of different countries is used to make
auto scan.
Set the On Screen Display Language.
2.4.3 Audio Language
2.4.4 Subtitle Language
Set the audio language for watching program.
Set the language for displaying subtitle .
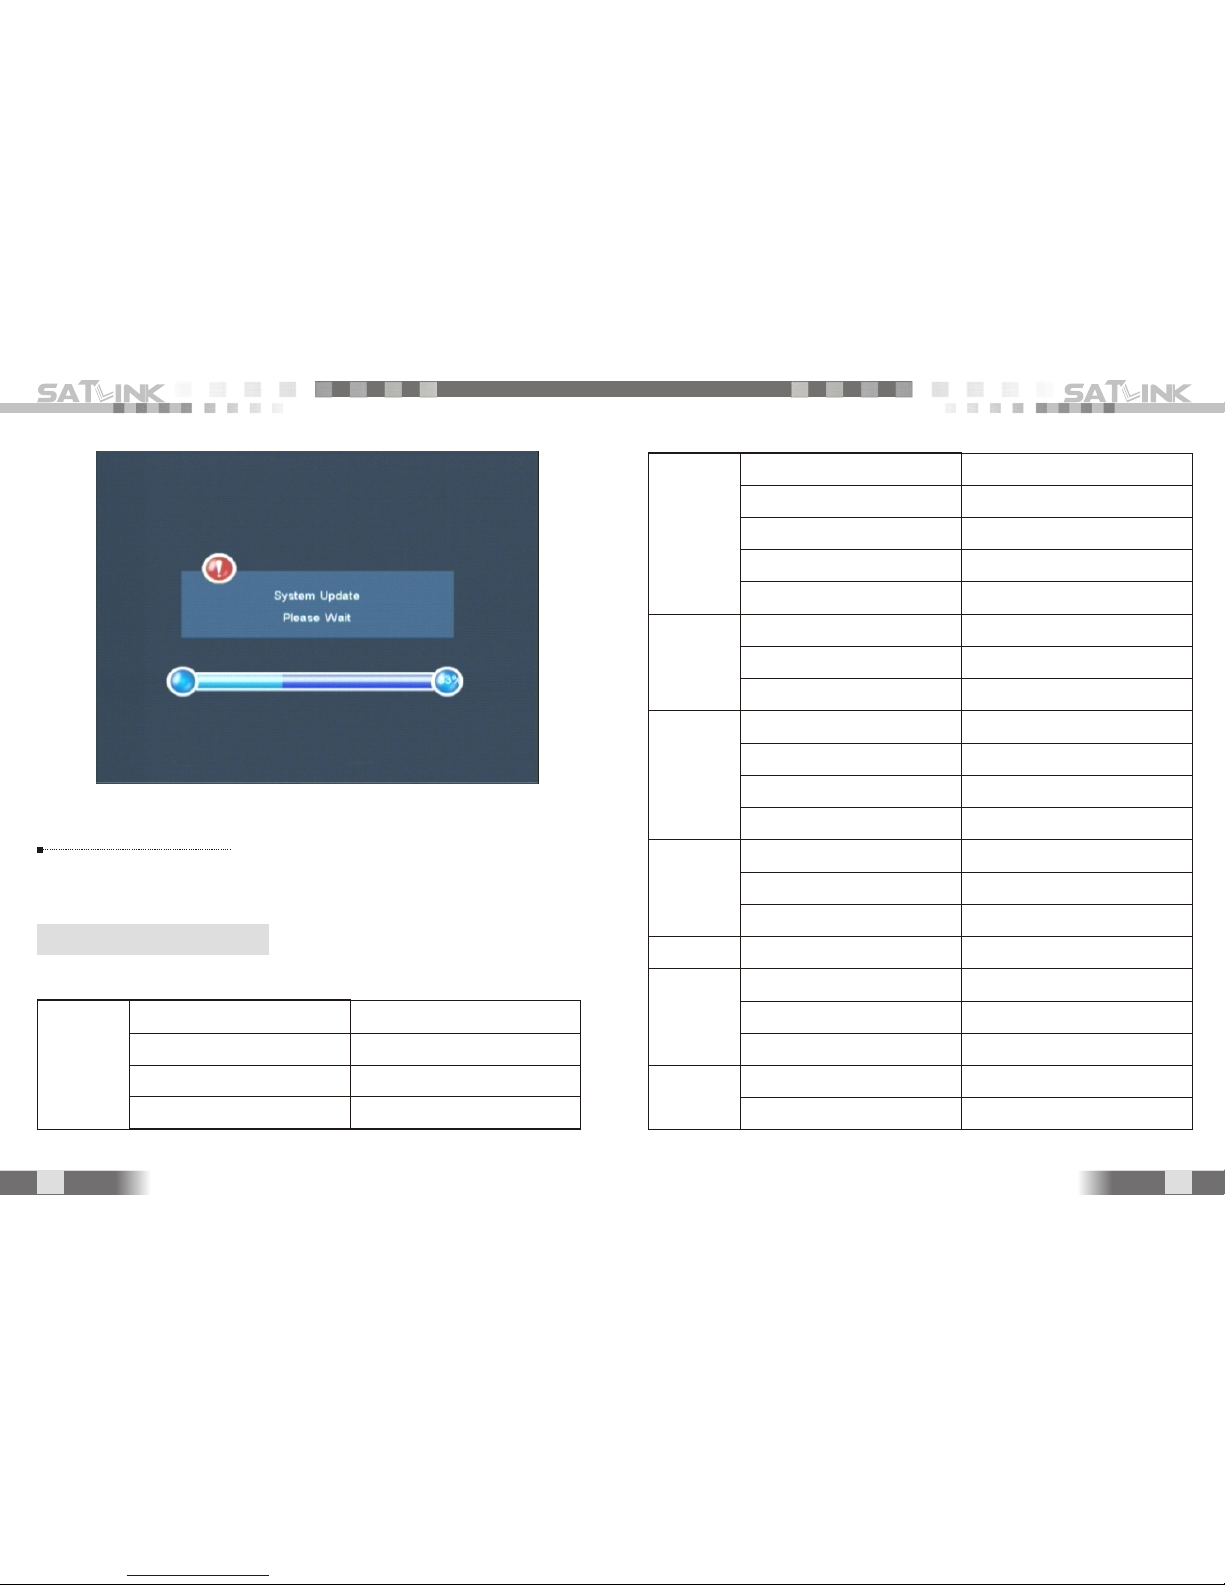
2.4.5 SW Update
To update SW or Data via USB port.
To insert the external flash stick (including updated SW)
into USB port, and then enter into upgrade menu to select
updated SW. It automatically returns after updating SW.
11
12
Page 8
2.4.6 Set Default
Press factory default to set default.""
3. Specification
Modulation
CPU &
Memories
Video
Decoder
Audio
Decoder
Serial data
interface
Power
supply
Physical
Specification
RF Input
Modulation
Constellation
Transmission mode
Guard interval
FEC
Processor
SDRAM
FLASH
MPEG 2
Date rate
Resolution
Video format
MPEG-2 Layer 1&2
Type
Sampling rates
Connctor
Li-oN Battery
Supply voltage
Charger
Size
Weight
Connector
Frequency range
Bandwith
Input impedance
COFDM
QPSK,16QAM,64QAM
2K,8K
1/2,1/4,1/8,1/16,1/32
1/2,2/3,3/4,4/5,5/6,7/8
32Bit RISC
64M
16M
Main Proflie@Main Level
Up to 15M bit/s
720*576,720*480
PAL/NTSC/SECAM
Mono
32,44.1 and 48KHz
USB type
8.4V 3000mAH
12V 1.5A
90-240V
155x 95x45 (mm)
0.5Kg
IEC Female 9.5mm
VHF and UHF
8/7/6MHz
75 ohm
13
14
 Loading...