

Page 1
12.05.2014
Firmware 1.06
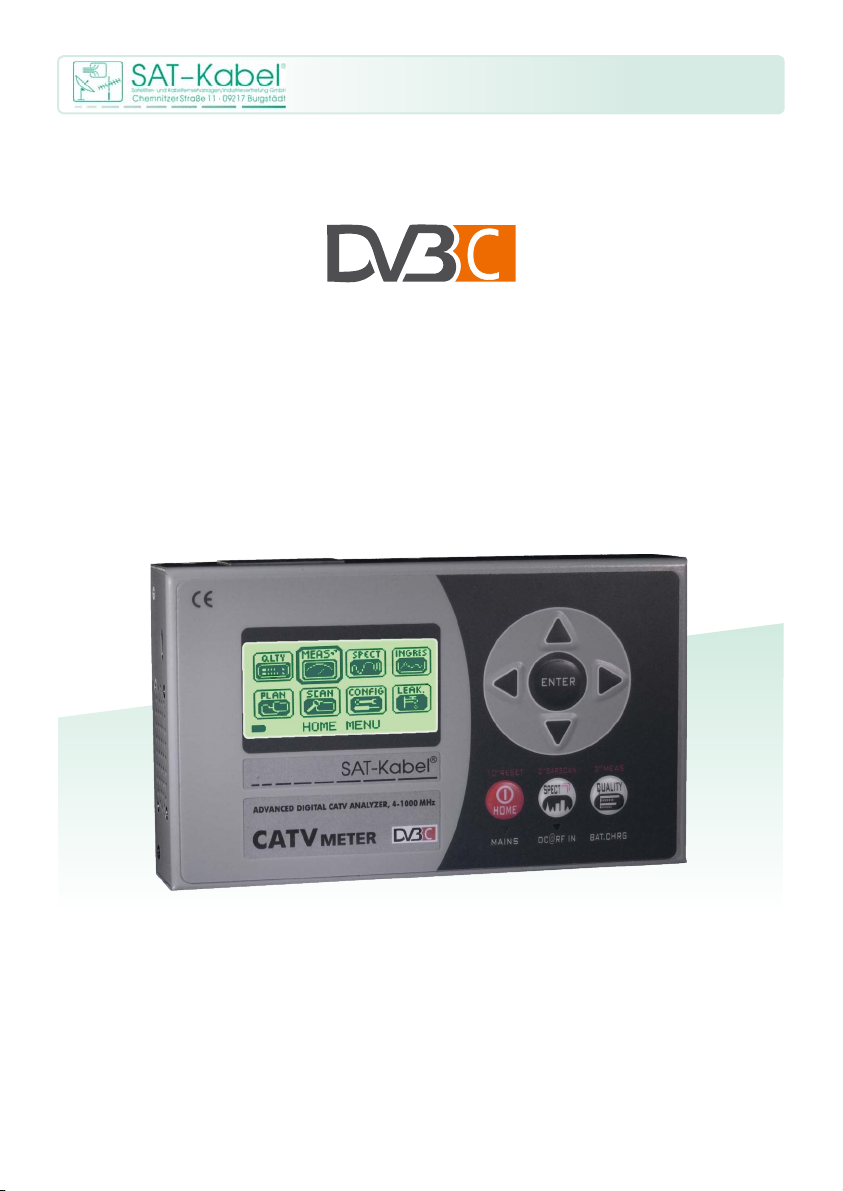
USER MANUAL
CATVmeter
analog+digital
Page 2

Index
3 – FRONTPANEL&KEYS
4 – NAVIGATION
5 – CONFIGURATIONS
6 – “PLAN” SCREEN AND NAVIGATION
7 – QUALITY MEASUREMENT SCREEN
8– TV
8 – ANALOG TV MEASUREMENT SCREEN
9 – DVB-C DIGITAL CATV MEASUREMENT SCREEN
10 – INGRESS & LEAKAGE MEASUREMENT SCREENS
11 – SPECT11 – SPECTRUM ANALYZER SCREENS
12 – TV: BARSCAN LEVEL/POWER OF ALL CHANNELS
13 – SCAN: CHANNEL PLANS AND LOG FILES
13 – TV: AUTOMEMORY TV
14 – TV: MANUAL MEMORY
15 – LOGGER SAVE & RECALL
16 – BATTERY TEST & BATTERY REGENERATION
2
17 – LI-ION POLYMER BATTERIES
17 – WARNINGS
18 – POWER SUPPLY & BATTERY CHARGE LED STATUS
19 – METER MAINTENANCE
19 – DISPOSAL of ELECTRONIC EQUIPMENT
Page 3
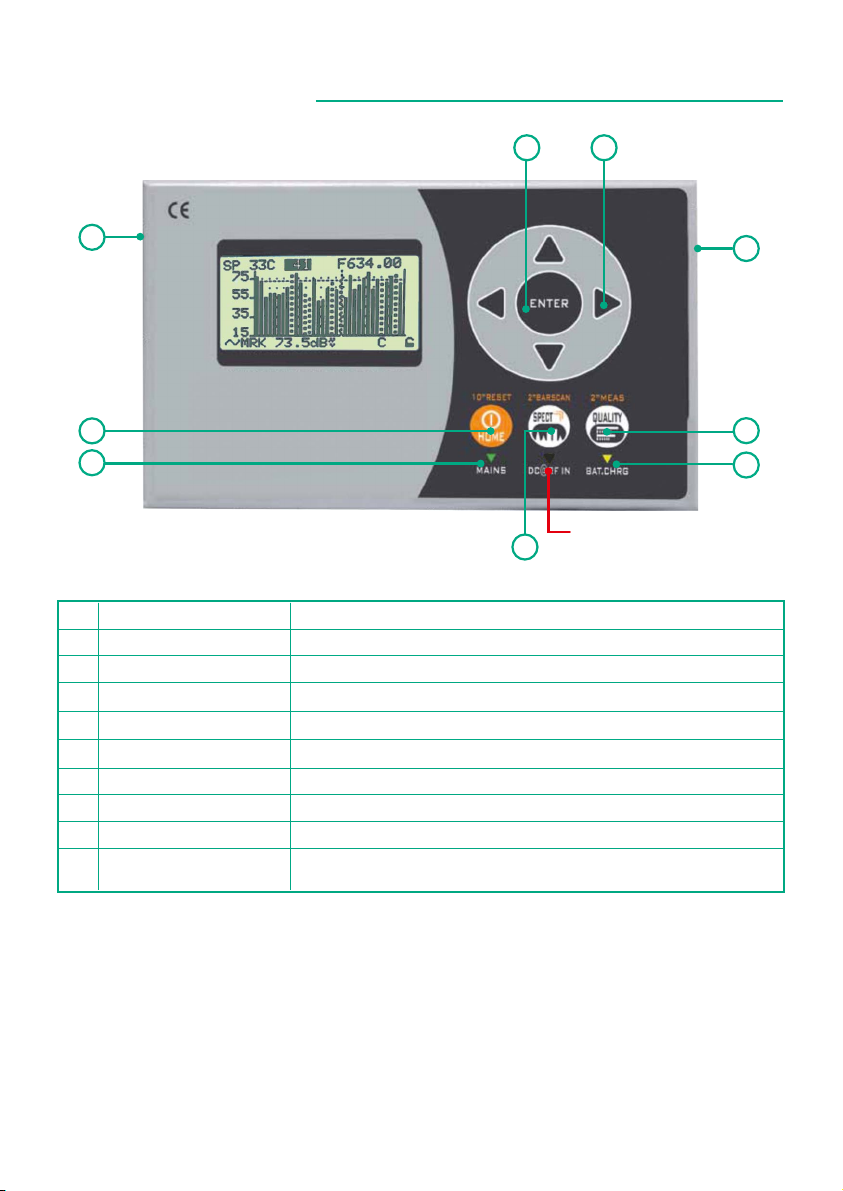
Front Panel & Keys
3
8 7
9
1
2
1 HOME Key
MAINS
2
3 SPECT Key
BAT. CHRG
4
QUALITY Key
5
RF TV Input
6
Arrow keys
7
ENTER
8
9
USB/Power Supply
6
5
4
not included
3
Press to turn on. Keep pressed to turn off.
LED on when the meter is connected to the mains power supply
Press to visualize spectrum
LED on during battery charge
Press to visualize signal quality
TV/CATV input connector 47-1.000 MHz
Press to select and adjust values/fields
Press to select/confirm
5 V power supply connector via MICRO-USB
and for PC connection
N.B:
To comply with European standards, we used a Micro-USB connector in the instrument,because
the European Community does not recommend providing power supplies. This meter can be
chargedanduseddirectlyfromaPCviatheUSBsocket,orusinganyMICRO-USB,5V,1Apower
supply.
Page 4
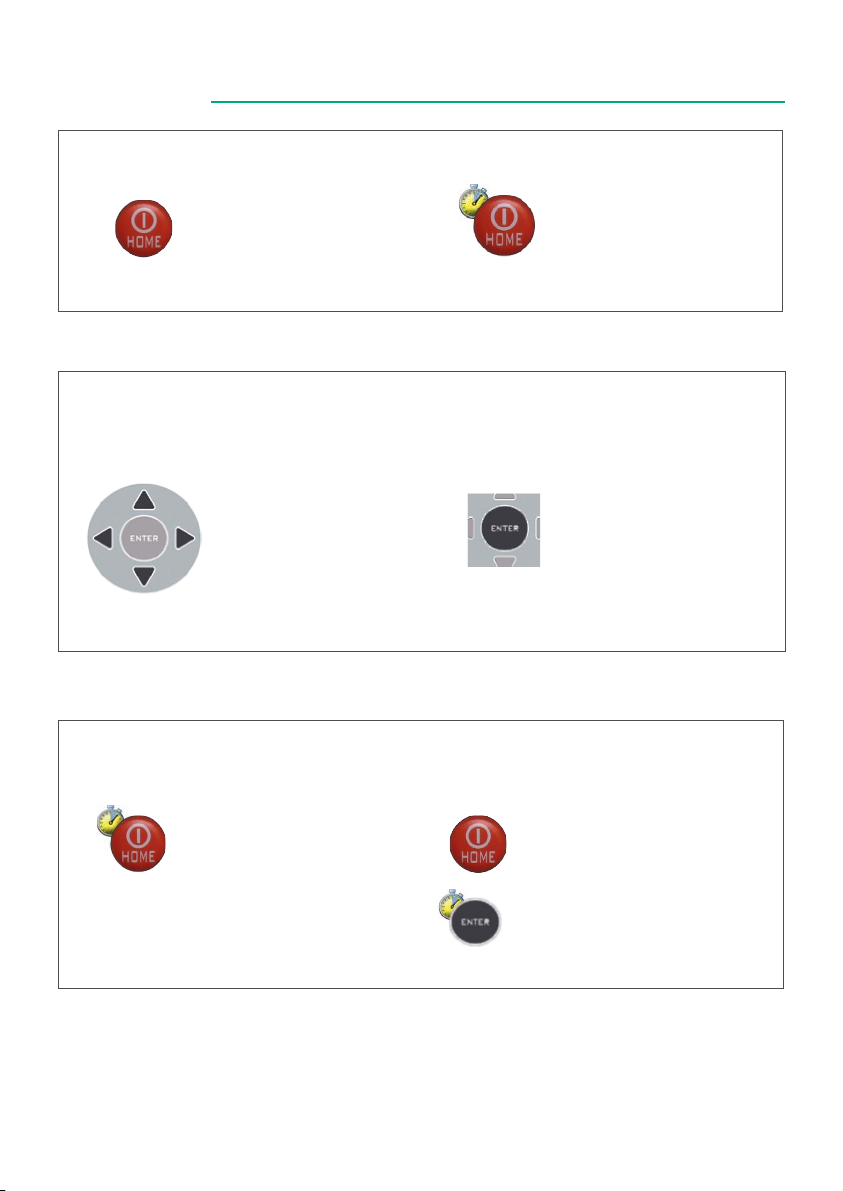
Navigation
• POWER
4
To turn on press
the ‘HOME’ key.
• ARROW KEYS
Press the arrowkeys to
select the menu required
or to adjust the value in a
selected field
(number/menu).
• RESET HARDWARE
To turn off keep the
‘HOME’ keypressed.
• ENTER
Presstoselectamenu
or to confirm.
• RESET SOFT WARE
With the meter turned
on keep the ‘HOME’ key
pressed for 10 sec. and
then turn on again.
With the meter turned off,
turn the instrument on
keeping the “ENTER” key
pressed and only release
when the boot has been
completed.
Page 5
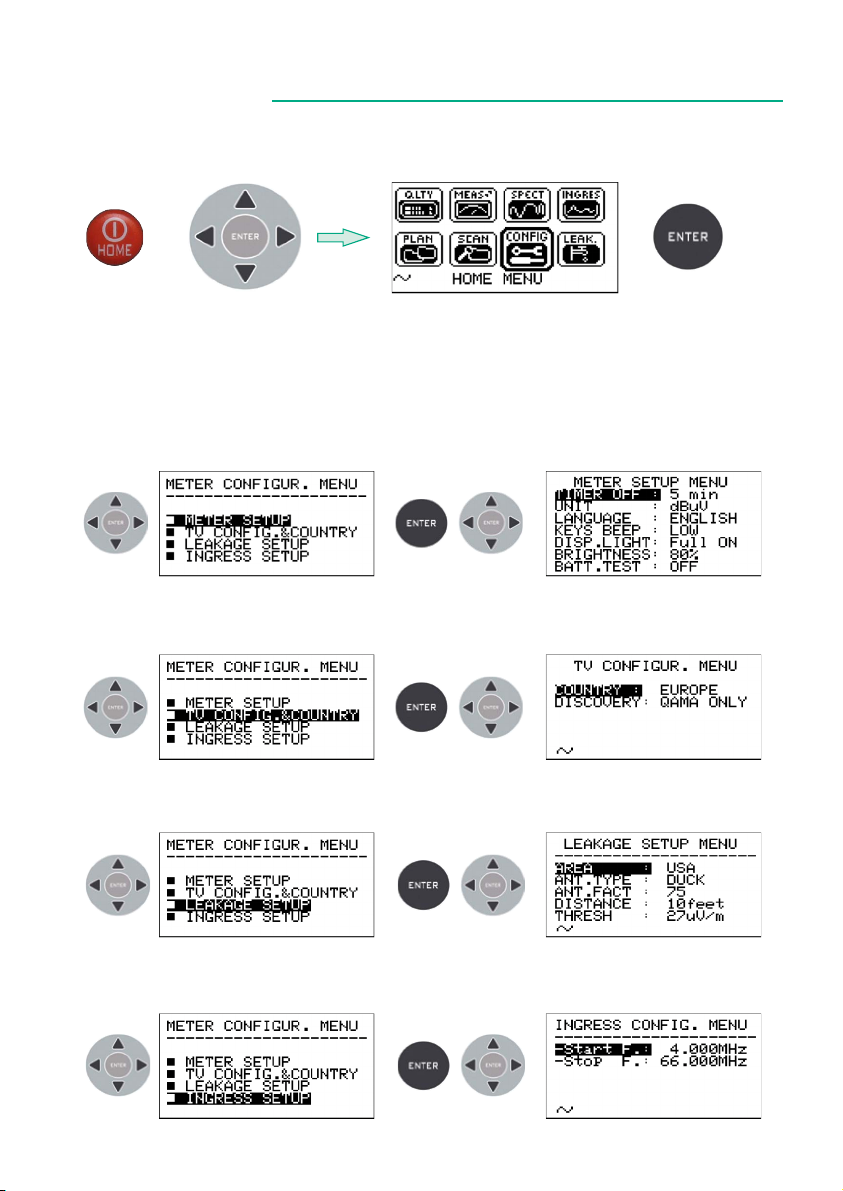
Configurations
Press the ‘HOME’ key, use the arrow keys to select “CONFIG”, then press “ENTER”.
Use the arrow keys to select and adjust the settings/values in the various menus.
CONFIGURATION OF THE INSTRUMENT PARAMETERS:
COUNTRY CONFIGURATION & DISCOVERY MODE:
5
LEAKAGE PARAMETERS CONFIGURATION:
INGRESS PARAMETERS CONFIGURATION:
Page 6
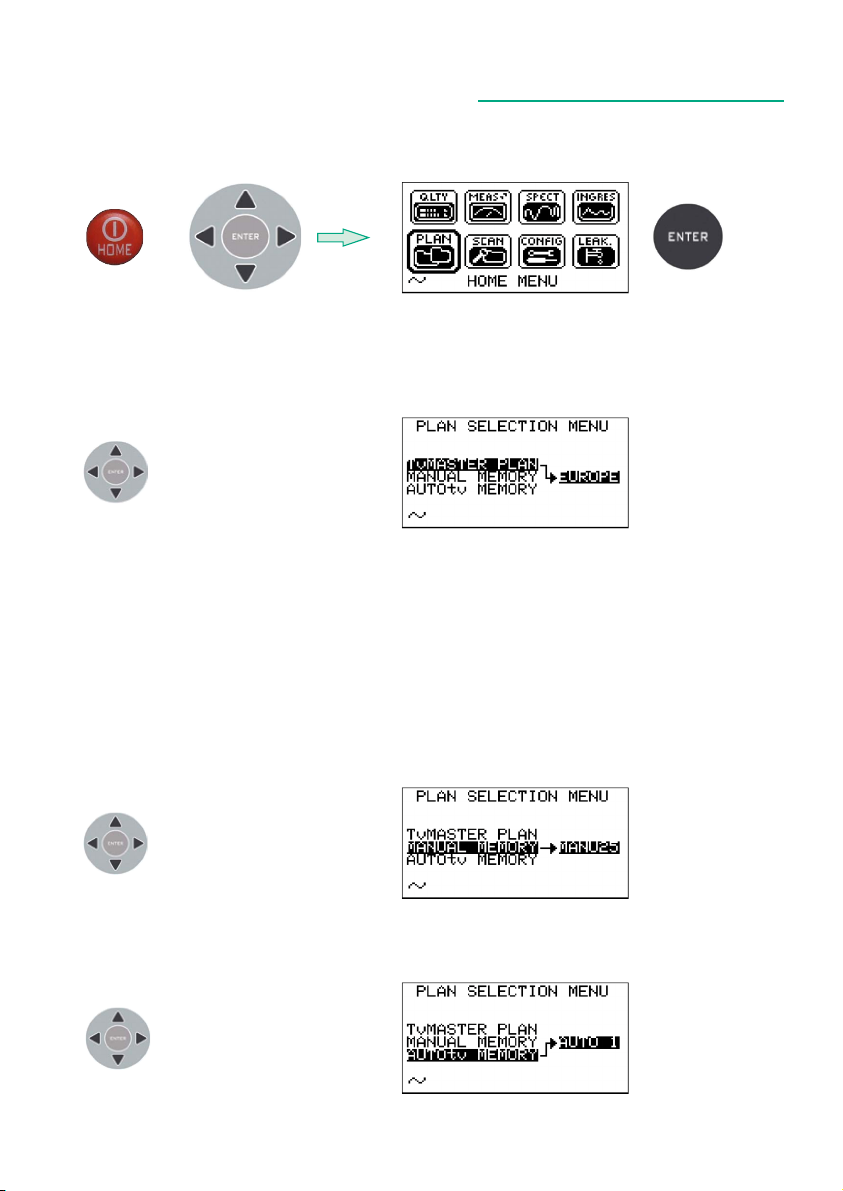
“PLAN” Screen and Navigation
Press the “HOME” key, use the arrow keys to select “PLAN”, then press “ENTER”.
Use the arrow keys to select the TV MASTER (Tv MASTER PLAN) memory plans you wish
to use, manual (MANUAL MEMORY) or automatic (AUTOtv MEMORY).
• MASTER TV PLAN SELECTION:
6
• MANUAL MEMORY SELECTION:
• AUTO MEMORY SELECTION:
Page 7
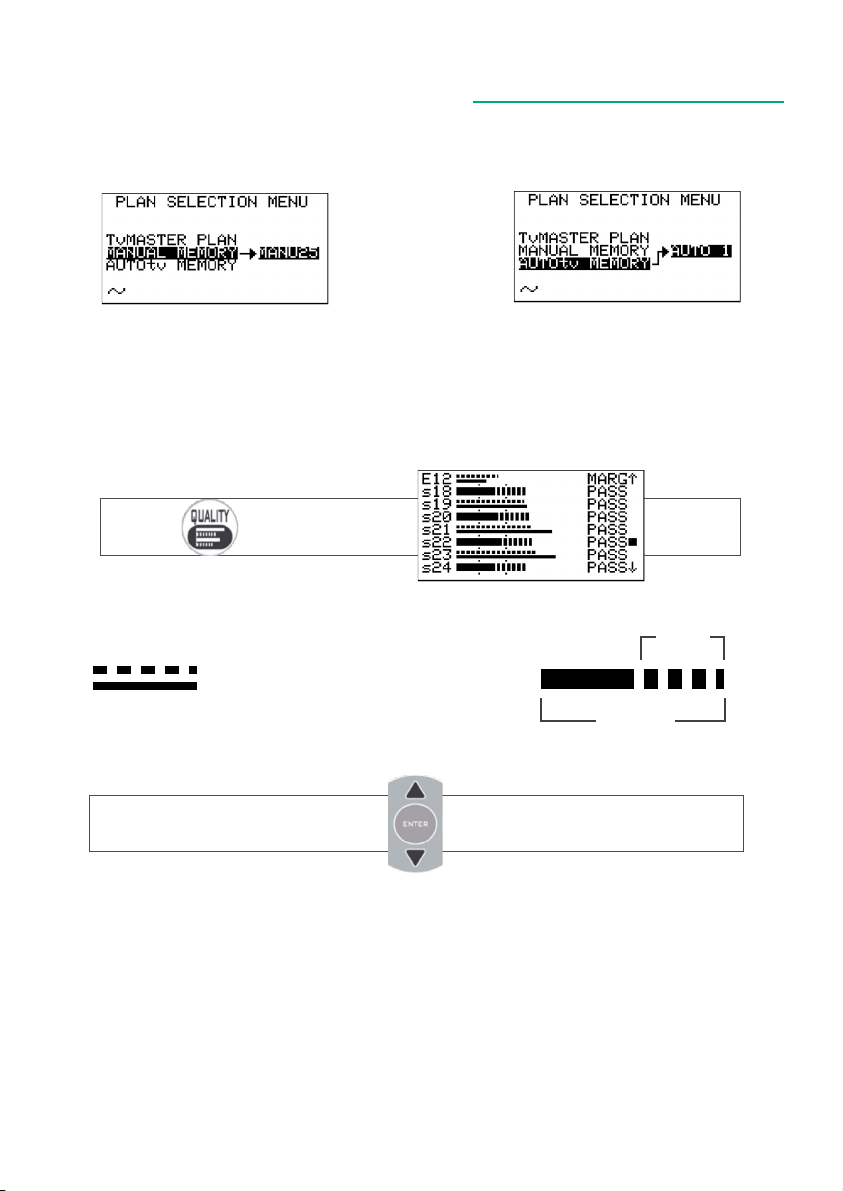
QUALITY measurement screen
Measure the quality and power of up to 140 channels in blocks of 8 channels.
or
7
Select the manual memory
plan required(MANU XX).
Select the automatic
memory plan
required(AUTO XX).
DIGITAL CHANNEL: ANALOG CHANNEL:
A/V
POWER
QUALITY
LEVEL
Pressthearrowkeys toscrollthechannellist.
Page 8
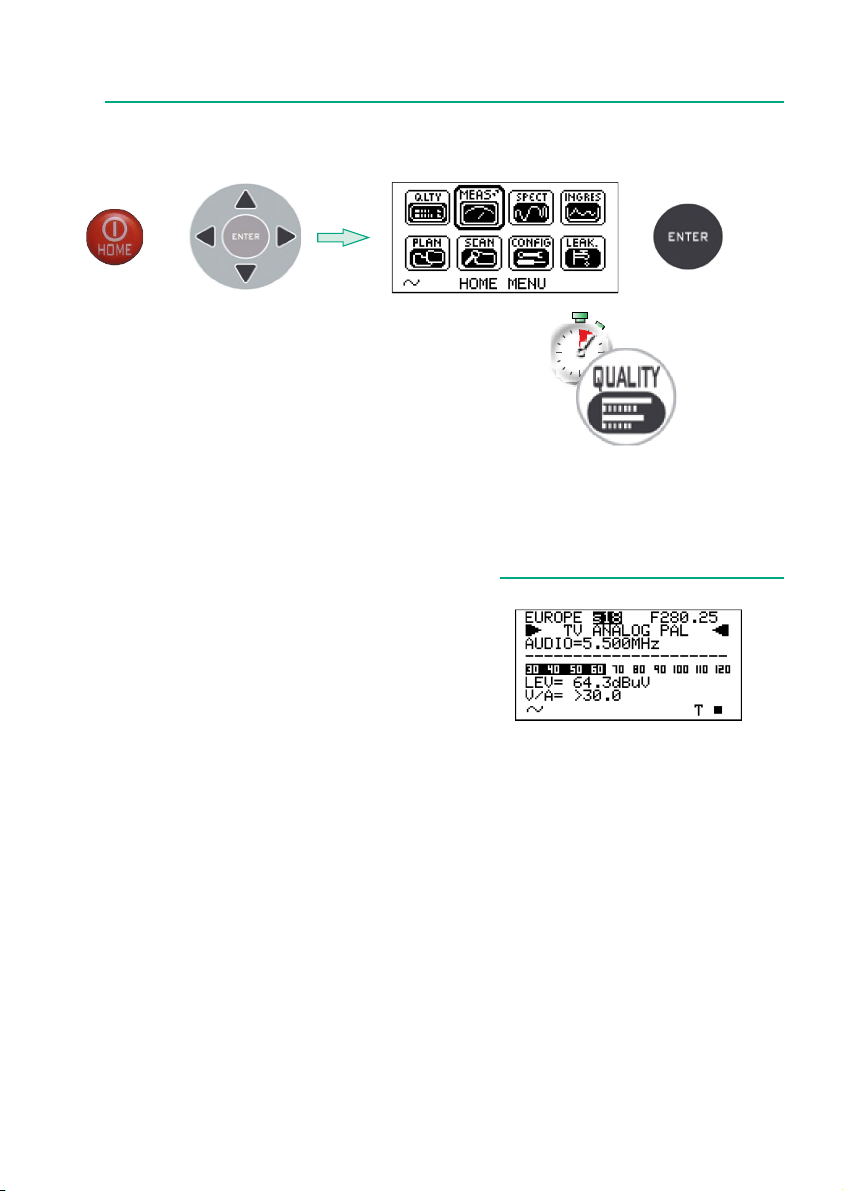
TV SIGNAL ANALYSIS
TV
Pressthe“HOME”key,usethearrowkeystoselect“MEAS”,thenpress“ENTER”.
Or keep the “QUALITY” key pressed for 2 seconds.
Analog TV Measurement screen
Use the “LEFT” and “RIGHT” keys to select the
field required.Use the “UP” and “DOWN” arrow
keystoadjustthevalue.Keeppressedtorapidly
adjust.
8
Signal Level (LEV)Report
carrier VIDEO-AUDIO (V/A)
Page 9
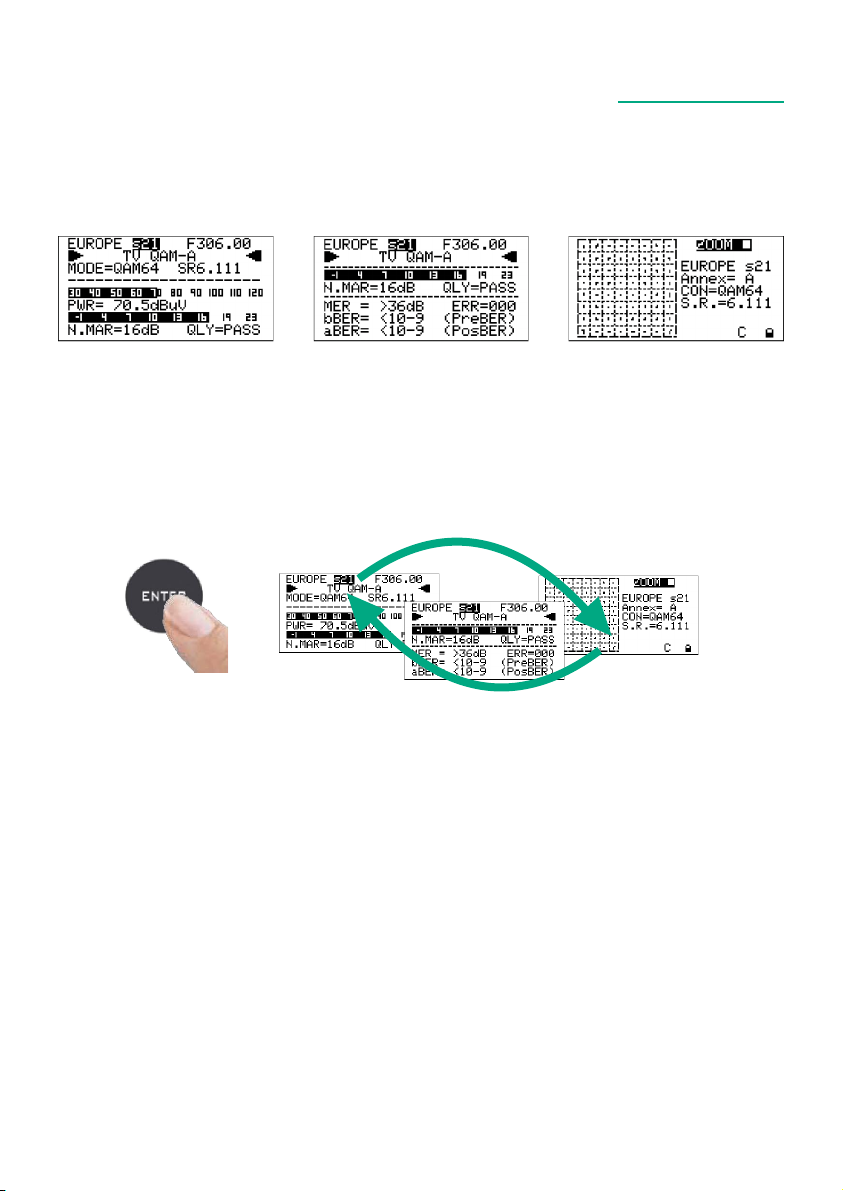
DVB-C Digital CATV Measurement screen
Repeatedly press the “ENTER” key to navigate in the TV measurement screens.Use
the “LEFT” & “RIGHT” keys to select the field required.Use the “UP” & “DOWN” arrow
keys to adjust the value.Keep pressed to rapidly adjust.
9
Digital Average Power
(PWR)Noise Margin
(N.MAR) Quality (QLY)
PresstonavigateintheTVmeasurements
MERBER before Viterbi
(bBER)BER after Viterbi
(aBER)
64 QAM Constellation
Page 10
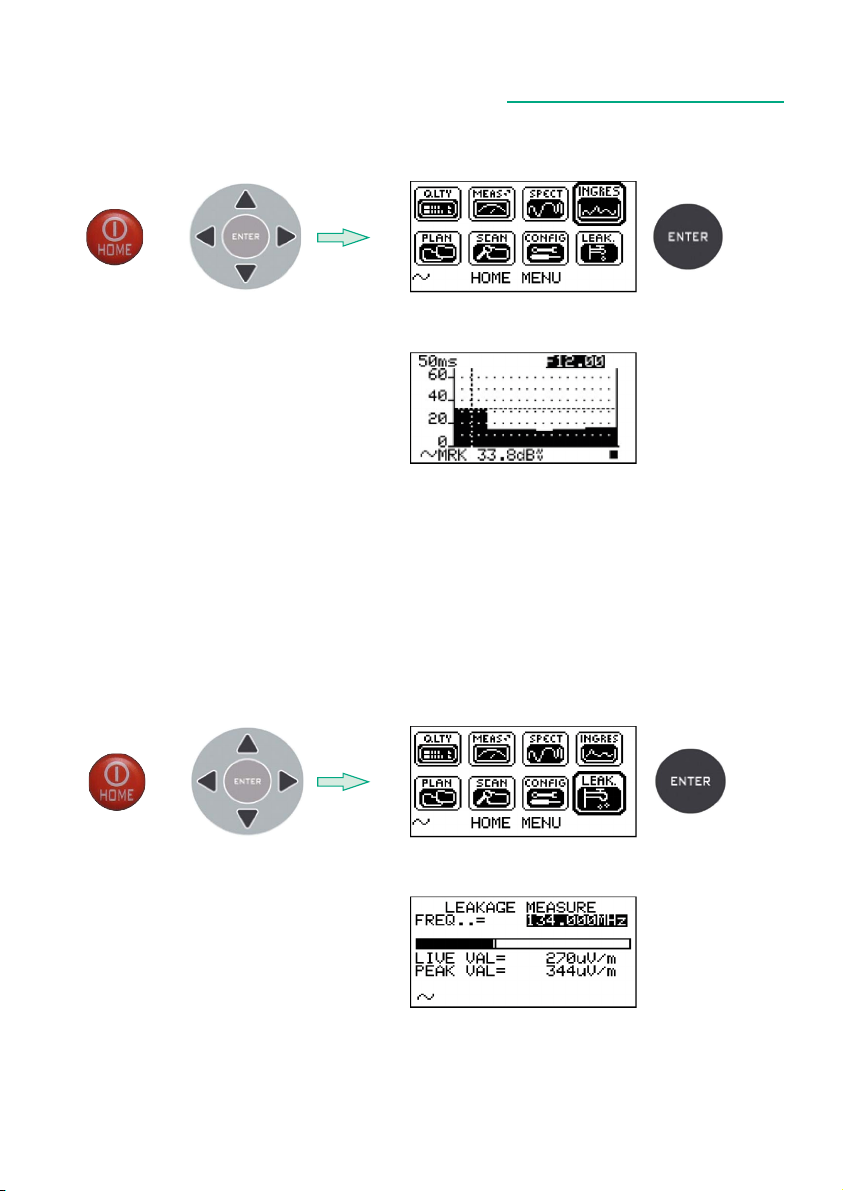
INGRESS MEASUREMENT SCREEN
Press the “HOME” key, use the arrow keys to select “INGRESS”, then press “ENTER”.
LEAKAGE MEASUREMENT SCREEN
Press the “HOME” key, use the arrow keys to select “LEAK”, then press “ENTER”.
10
Page 11
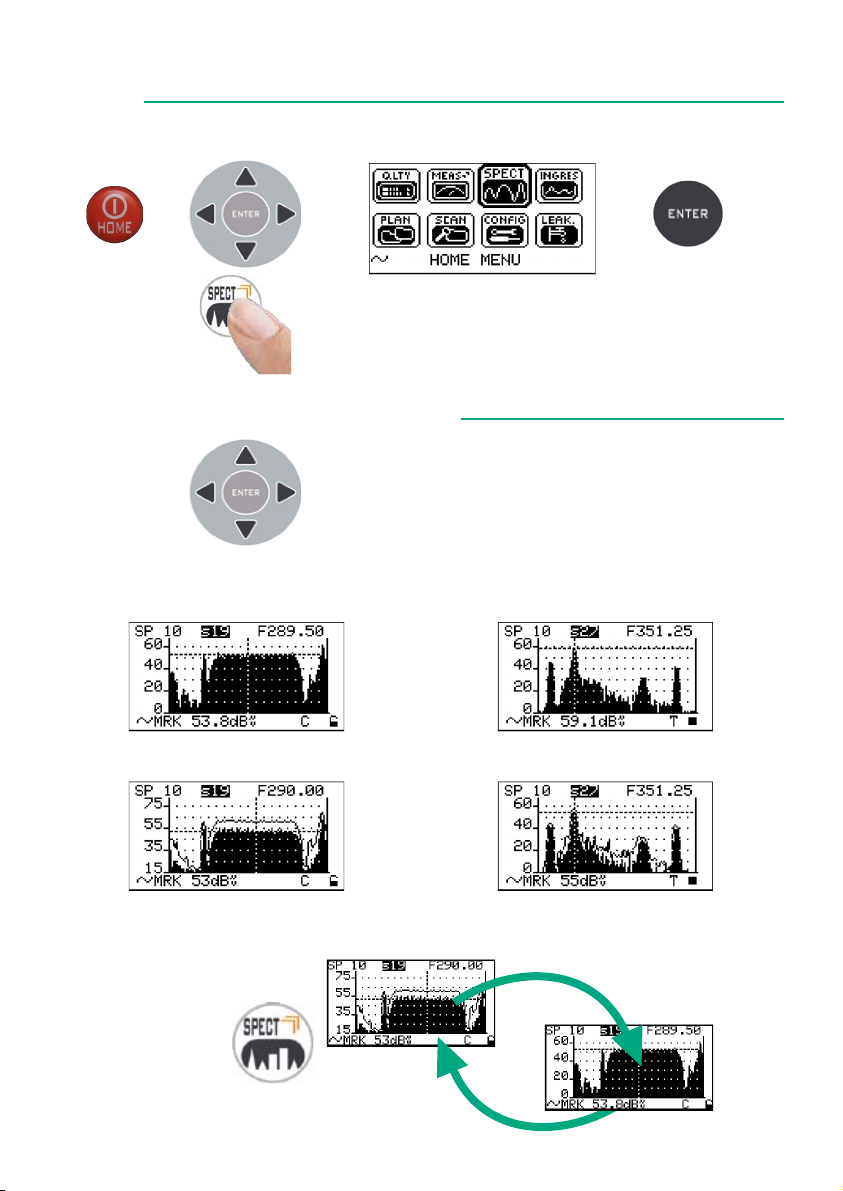
SPECT
Press the “SPECT” key to go to Spectrum mode
Spectrum analyzer
11
or
Or press the “HOME” key, use the arrow keys to
select “SPECT”, then press “ENTER”.
SPECTRUM ANALYZER SCREENS
Use the arrow keys to select and adjust the
spectrum’s numerical values: SPAN (SP) -
CHANNEL - FREQUENCY (F) - REFERENCE LEVEL
DIGITAL TV SIGNALS
SPECTRUM
Fast spectrum
ANALOG TV SIGNALS
SPECTRUM
Fast spectrum
Fast spectrum with memory
peak (MAX HOLD)
Presstocycle
through spectrum
analyzer screens
Fast spectrum with memory
peak (MAX HOLD)
Page 12
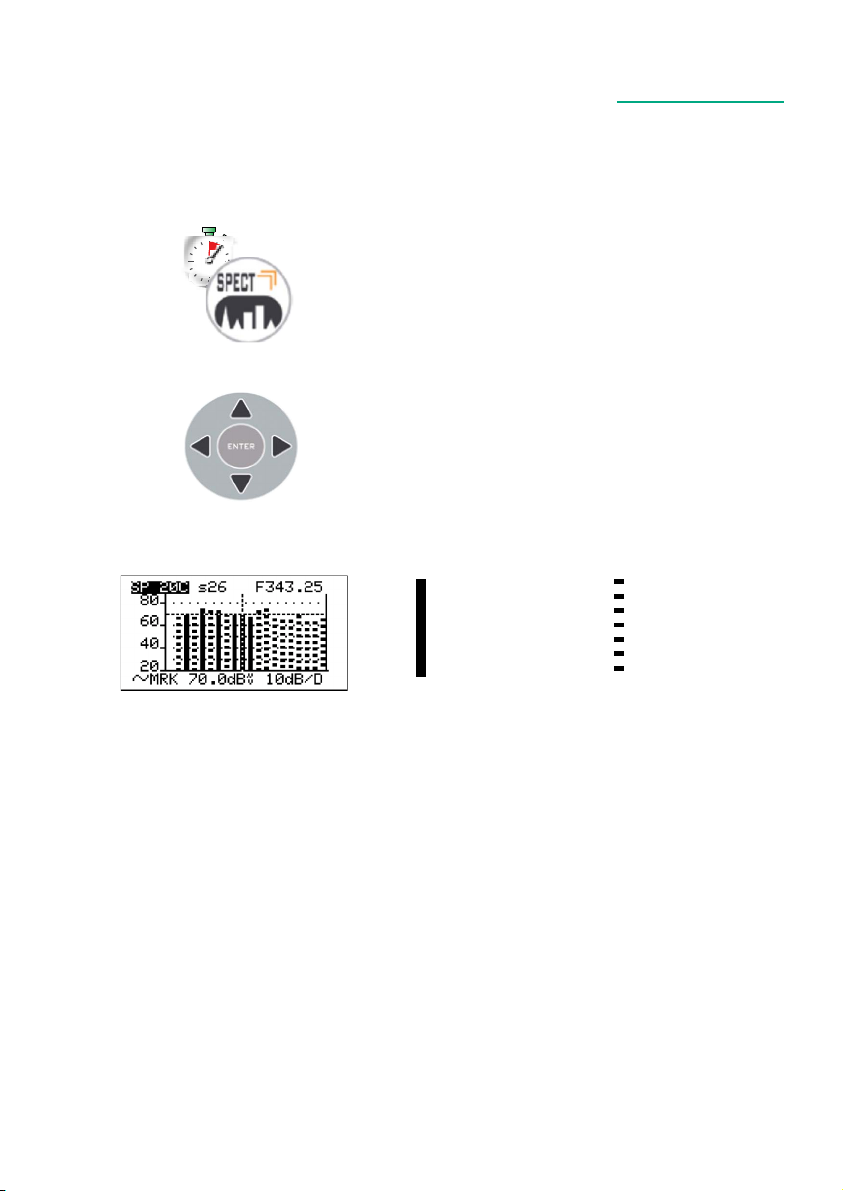
TV: level/power of all channelsBARSCAN
In the TV standard canalization the meter displays the level/power of all TV channels.In
MANUAL MEMORY or AUTOMATIC TV MEMORY (AUTOtv MEMORY) the meter displays the
memorized channels and distinguishes analog and digital signals using two different bars.
Press the “SPECT” key for 2 seconds to visualize
the Barchart
Use the arrow keys to select and change the
barchart’s numerical values: SPAN (SP) -
CHANNEL - FREQUENCY (F) - RESOLUTION (dB/ D) -
REFERENCE LEVEL
12
Barscan (level bar chart)
ANALOG
CHANNELS
DIGITAL
CHANNELS
Page 13
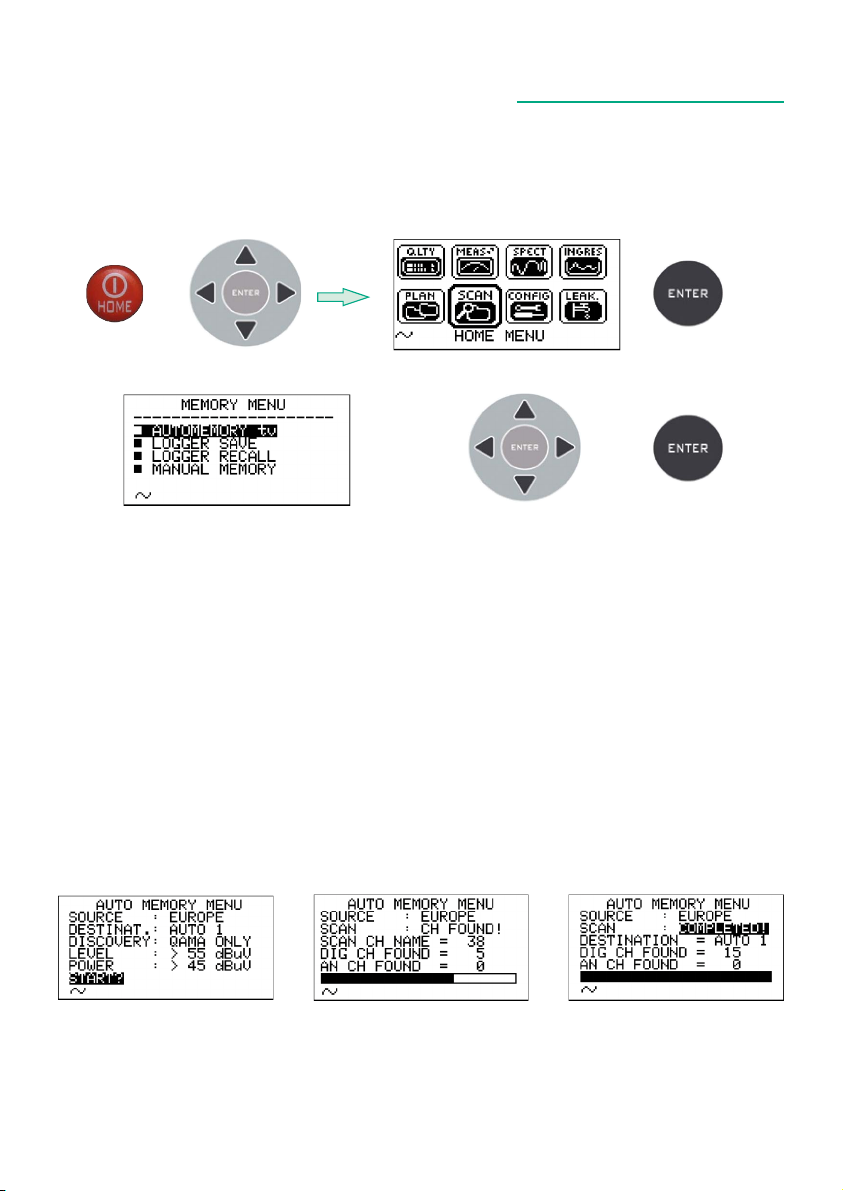
SCAN: channel plans and log files
TV: AUTOMEMORY TV
To automatically store all the existing channels in a city or building.
Press the “HOME” key, using the arrow keys select “SCAN”, then press ENTER.
13
select “AUTOMEMORY TV”
1. Select “DESTINAT” and select the destination file “AUTO” where the search must be
saved
2. Select “DISCOVERY” and set search mode (fig 1),
3. Select “LEVEL” and set the minimum level threshold of the analog channels searched
(fig 1).
4. Select “POWER” and set the minimum power level of the digital channels searched
(fig 1).
5. Select “START” to create a new channel plan and to activate the search (fig 1).
N.B.:
If the word “OVERWRITE” appears, the selected file will be overwritten.Wait a few
minutes (fig 2), the meter indicates the recorded ANALOG & DIGITAL CHannels (fig 3).
Fig 1
Set the desired
parameters and select
“START”
Memorization in progress
Use the arrow keys to select and change
the required parameters
Fig 2
Memorization complete
Fig 3
Page 14
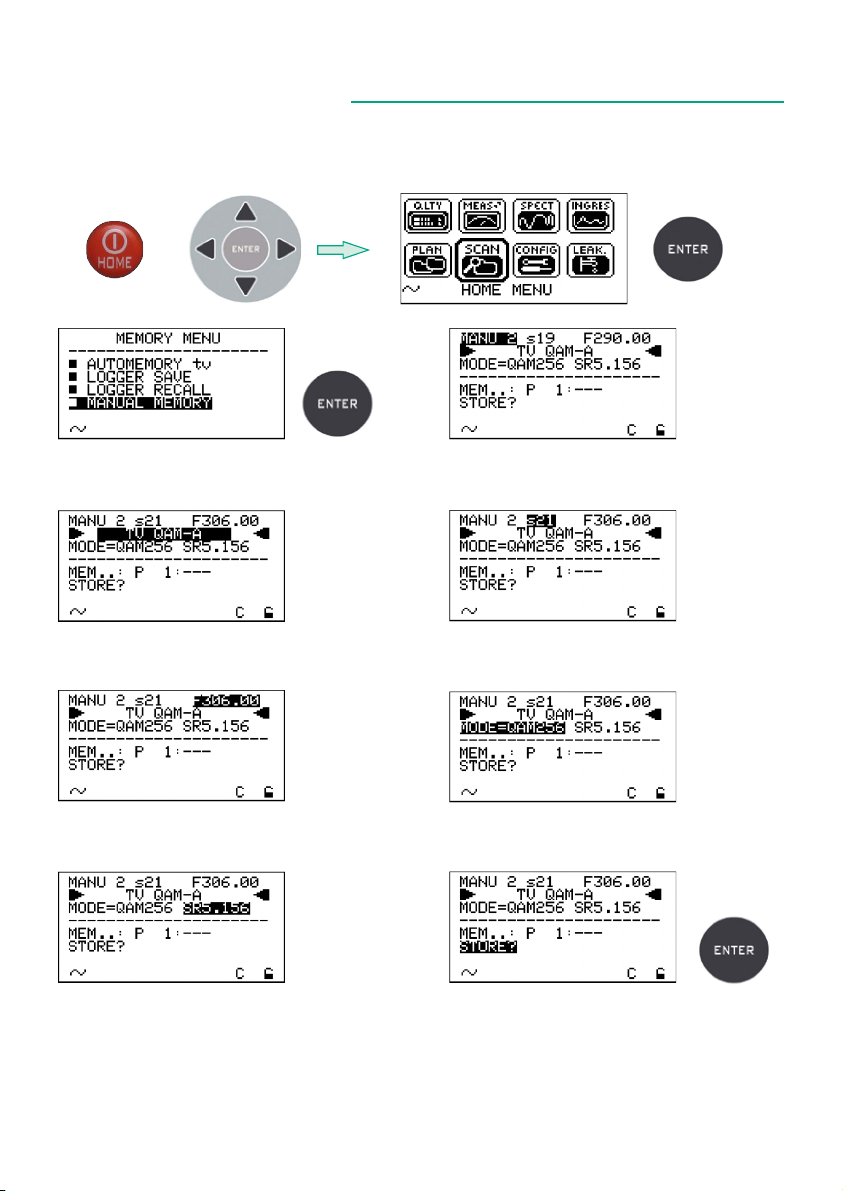
TV: MANUAL MEMORY
How to create/edit a manual memory plan.Press the “HOME” key, use the arrow keys to
select “SCAN”, then press “ENTER”.
14
1
Select “MANUAL MEMORY” and press “ENTER”
3
Use the “UP” and “DOWN’” keys and select the
type of signal required
5
Use the “UP” and “DOWN’” keys and select the
channel required
7
2
Use the arrow keys “UP” and “DOWN” and
select the manual plan required
4
Use the “UP” and “DOWN’” keys and select
the channel required
6
Use the “UP” and “DOWN’” keys and select
the type of signal required
8
Use the “UP” and “DOWN” arrow keys to select
the required Symbol Rate (SR) value.
N.B.: When the memorization of a channel has finished, follow the steps described above to add
other channels in the same memory plan, or in a new one. The instrument automatically suggests
the zone “MEM ..: Pxx: ___”, the memory position where you can save or overwrite the new channel.
Select “STORE” and press “ENTER” to
memorize
Page 15
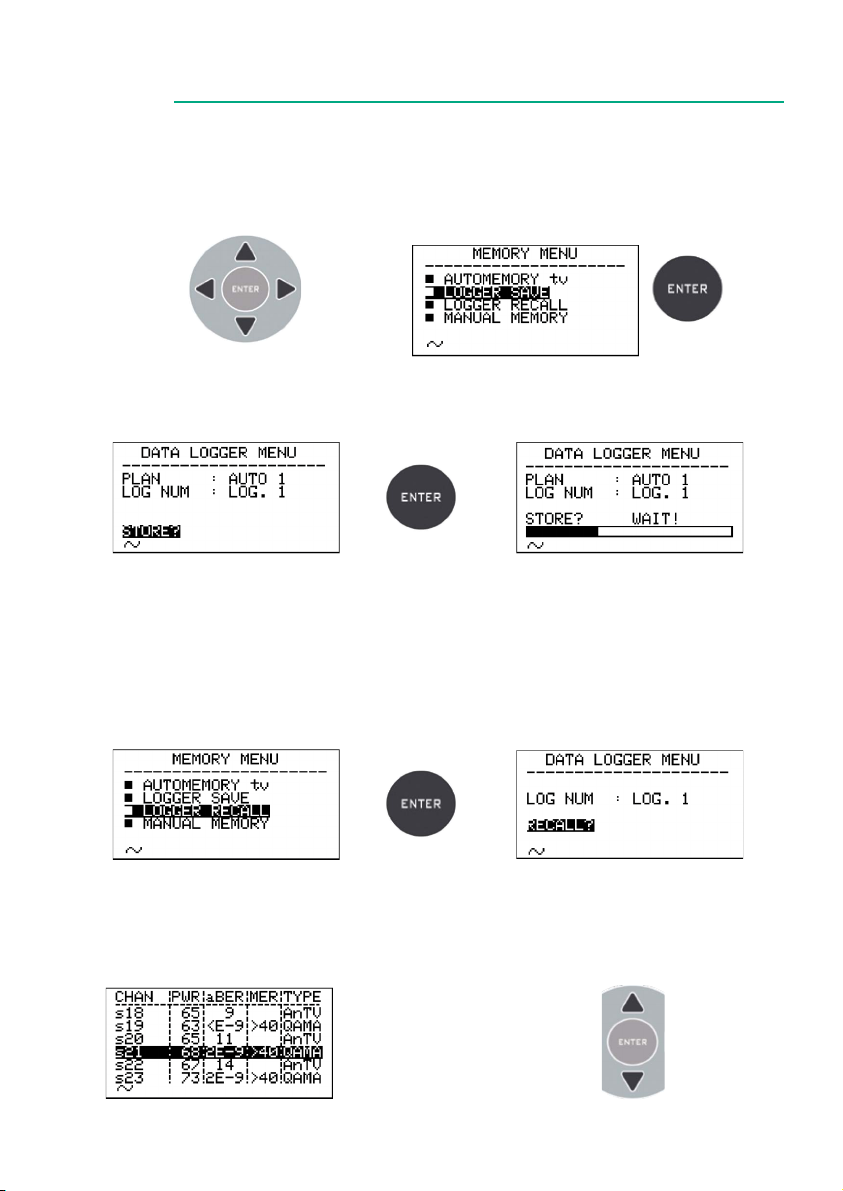
LOGGE R
Use the arrow keys to select and change the items/values in the various menus.
LOGG ER SAVE
Press the “HOME” key, use the arrow keys to select “MEMORY”, than press “ENTER”.
Select LOGGER SAVEand press “ENTER”.
15
Set the desired parameters and select
“STORE?”tocreateanewLOGfile.
N.B.:
If the word “OVERWRITE” appears, the selected log will be overwritten. Wait a few
minutes for the Datalogger to complete.
“DATA LOGGER” in progress.
LOGGER RECALL
Select “Logger RECALL”and press
“ENTER”.
Pressthearrowkeysto
select themeasurement
of the required signal.
Select the “LOG” (LOG NUM) number to
be recalled and select “RECALL”.
Page 16
Battery Test & Battery regeneration
THIS PROCEDURE EXPLAINS HOW TO REGENERATE/CHECK YOUR BATTERIES AND
CALIBRATE THEBATTERY CHARGE INDICATOR
USEFUL ADVICE:
• CHARGE THE BATTERIES EVERY NIGHT AFTER USE, EVEN IF THEY ARE NOT
COMPLETELY DISCHARGED;
• ALWAYS USE THE “BATTERY SAVE” & “TIMER OFF” FUNCTIONS TO INCREASE YOUR
METER’S AUTONOMY;
• THE MAXIMUM CAPACITY OF THE BATTERIES AND BATTERY CHARGE INDICATOR’S
ACCURACY IMPROVES BY UP TO 20% IF YOU CARRY OUT MANY BATTERY TEST CYCLES;
• DO NOT REPLACE THE BATTERIES: FIRST CARRY OUT 3 TO 5 BATTERY TEST CYCLES
UNTIL YOU RECOVER THE MAXIMUM CAPACITY OF THE BATTERIES.
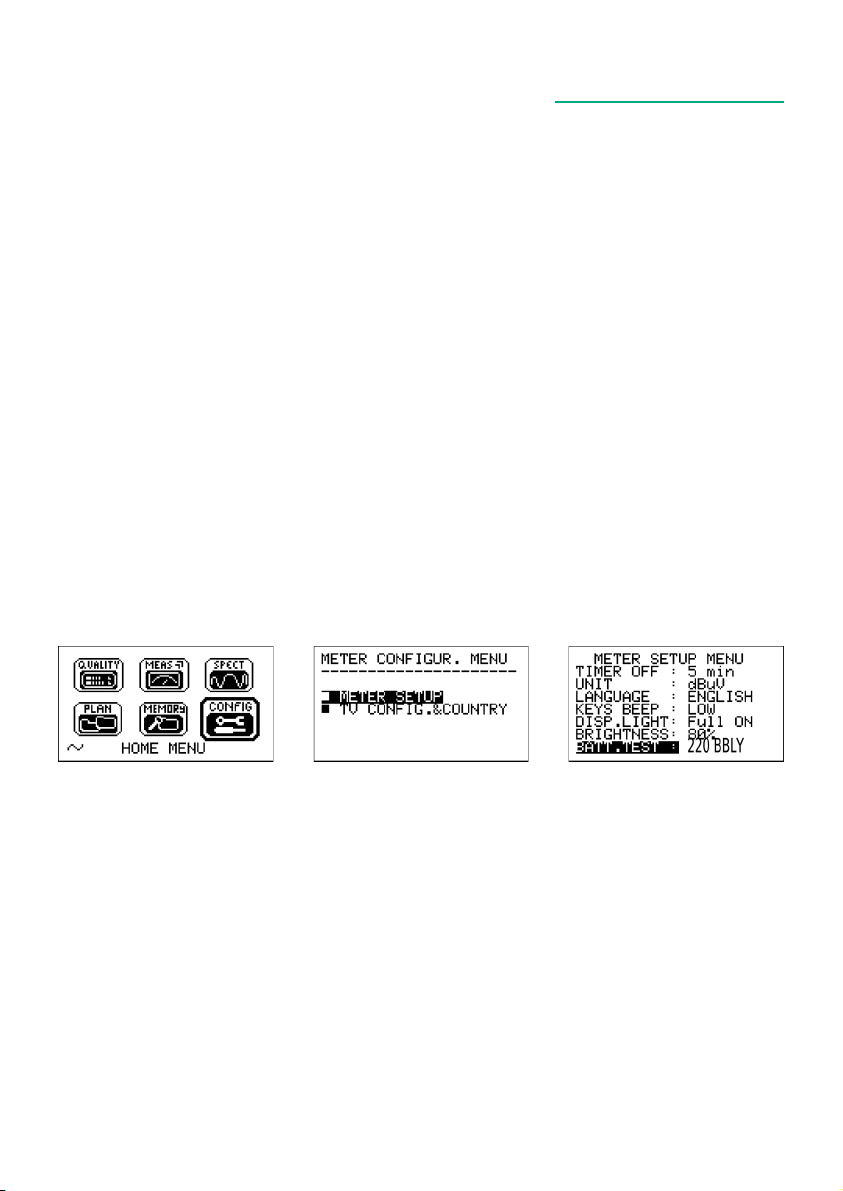
“BATTERY TEST” INSTRUCTIONS & PROCEDURE:
1. Before carrying out the test, connect the meter to the original battery charger:
• Turn on the meter;• Press the Home key (fig. 1);
• Select the word “CONFIG” and press “ENTER” to confirm (fig. 1);
• Select “METER SETUP” and press “ENTER” (fig. 2);
• Select the word “BATT. TEST” and press the “RIGHT” keys to select “ON”;
• Press “ENTER” to confirm.
• Carefully read the various screens, pressing “ENTER” in succession;
• In the last instructions window, select “START” and press “ENTER” to start the test.
The procedure will be cancelled if you select “exit” on any screen.WARNING:
16
FIG. 2∗FIG. 1∗ FIG. 3∗
IMPORTANT ADVICE:
• Do not connect any type of load to the “F” input connector (LNB, TV head-end,
amplifiers, etc.).
• Extract the conditional access module (CAM), if it is present in your meter.
2. The battery test takes approx. 12 hours (charging/discharging/recharging activities and
measurement of the battery autonomy), during this time the meter must not be used.
At the end of the test the meter will turn off automatically. In order to make sure that
the test has been carried out correctly, all the meter’s commands are blocked except
for the reset function, which remains active so that the meter can be turned off if
necessary.3. The batteries will be completely charged at the end of the test.
4. To check the battery test results, enter “METER SETUP” (fig. 2), select “BATTERY TEST”
function and read the results: for example 220BBLY (fig. 3) = 220 minutes. The “Y” of
YES confirms that the battery is still good enough, whereas an “N” for NO indicates
that it could be faulty, too deteriorated or that the cycle was interrupted.
Page 17

Battery Test & Battery regeneration
IMPORTANT NOTES: If the test is interrupted using “reset”, the battery charge indicator may provide incorrect
indications, therefore repeat the battery test procedure.
∗ The displays shown in this guide may change according to the model and are subject to change without
notice. If you connect your meter, using the S.M.A.R.T. Pro program, from the USB port to the PC, you can
download the screens shown above.
17
LI-ION Polymer Batteries
IMPORTANT:
• ALWAYS TURN THE INSTRUMENT OFF BEFORE CONNECTING THE BATTERY CHARGER;
• DO NOT LEAVE THE BATTERIES DISCHARGED FOR LONG PERIODS;
• ALWAYS CHARGE THE BATTERIES AT NIGHT FOR AT LEAST 7 HOURS, EVEN IF THEY ARE
NOT COMPLETELY DISCHARGED.
USEFUL INFORMATION:
1. The batteries supplied are high quality and tested individually, their autonomy
depends on the following conditions:
– the LNB power consumption: Single, dual or Quadruple;
– the external temperature: with temperatures of less than 10 °C, 20 % of the
capacity is lost;
– the age of the batteries: a 10 % loss in effi ciency each year;
– Remember that the TIMER OFF function, that automatically turns off the Meter
after 5 to 10 minutes of inactivity, saves up to 30 %.
2. The battery indicator has a tolerance (like all battery powered electronic devices)
according to the following factors:
- the battery’s charging percentage;
- external temperatures;
- battery wear and tear;
•+/–2%.
ICONS SHOWING THE BATTERY CHARGE STATUS:
BATTERY AUTONOMY:
The battery autonomy of between: 2 hours min. and 4 hours max.
Page 18
WARNINGS
18
RECHARGEABLE BATTERY
This device contains a built-in Li-PO (Lithium polimer) battery that can be recharged many
times. The battery contains chemicals that might wear with time even if not used. Please
dispose of batteries properly.
Do not take the battery pack apart or expose it to extreme temperatures (over 50 °C). If the
device has been exposed to very low or high temperatures let it rest at room temperature
before use.
RECHARGING THE BATTERY
The Battery must be recharged at room temperature (about 20 °C) with the device turned off.
To avoid premature failure of the battery never leave the device with an empty battery for
prolonged periods.
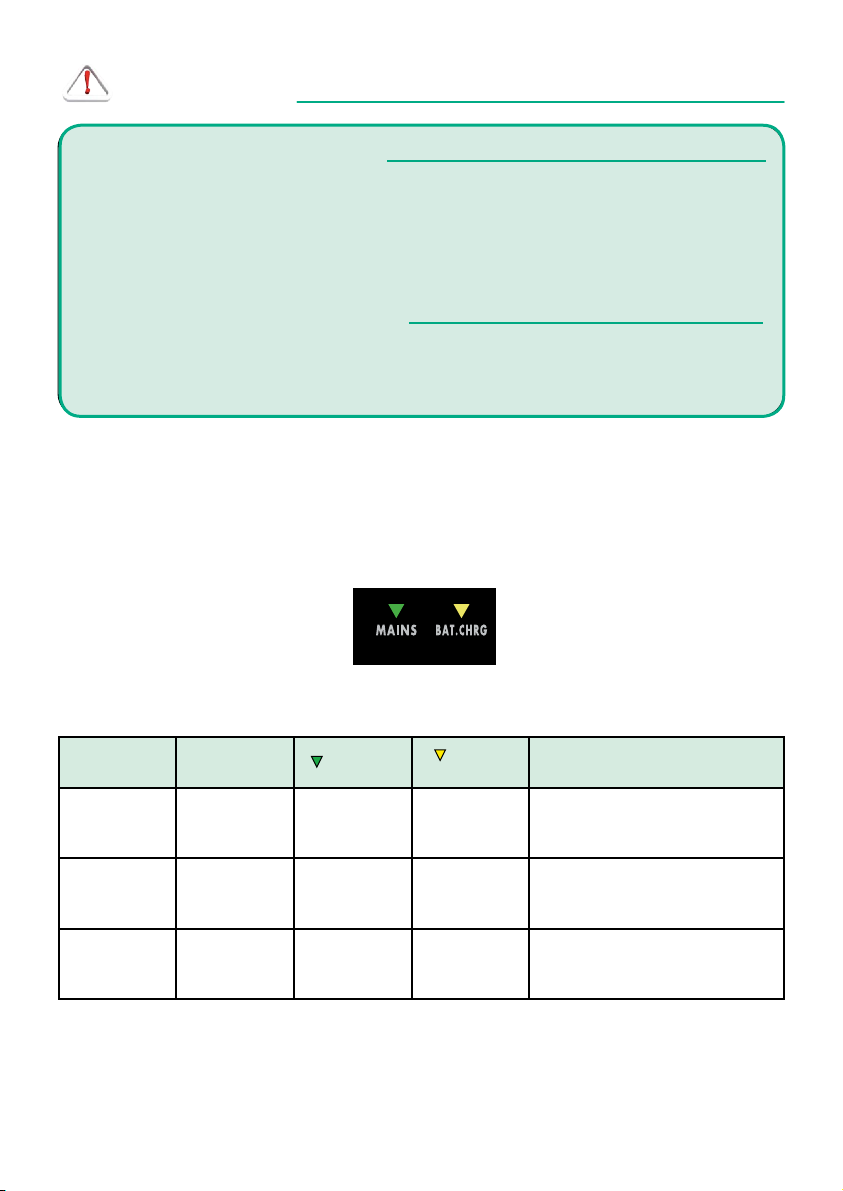
Power Supply (mains) and Battery Charge (chrg)
LED status
INSTRUMENT
OFF YES ON ON Batteriesinfastcharge
OFF YES ON OFF Battery charge completed
OFF YES ON
____________________________________________________________________
CONNECTED
TO THE MAINS
POWER SUPPLY
LED MAINS
LED BATT
CHRG
Flashing
0.5 SECONDS OFF
0.5 SECONDS ON
Abnormal battery temperature.
The recharge cycle has been suspended
temporarily and will auto matically rese t.
NOTES
Page 19

Meter Maintenance
CLEANING THE METER
Keeping the meter clean from dust and dirt is easy and helps mantain optimum
working conditions over the years. The cleaning procedure is simple and quick and
requires only minor attention. Never use aggressive, chemical products (diluent)
and/or abrasive or rough clothes, which may damage plastics and displays. Always
use a soft cloth, dampened with a solution of water and alcohol or a de-greasing, nonabrasive liquid soap. The keyboard and display should be gently cleaned. Rubbing the
keyboard and/or the display(s) may seriously damage their functions.
MAINTENANCE AND CARE OF THE METER
This meter has been designed to withstand severe conditions of use. Even so, its life
can be prolonged by respecting some simple and effective rules:
• The meter has not been designed to withstand high temperatures (over 60 °C or
140 °F). These temperatures can be easily reached when the meter is left in a car,
especially behind the windshield, or in a trunk. The LCD display and/or other details
could easily be damaged by extreme temperatures.
• The internal battery could rapidly loose its efficiency if exposed to high or low
temperatures. This may result in reduced meter autonomy when powered by its
internal battery.
• When recharging the internal battery, allow good air circulation around the meter
and the adapter: do not cover it with clothes and do not recharge the battery when
the meter is in its transport case.
• The meter is not waterproof, even if it is protected against incidental water drops. If
it comes into contact with water electronic circuits may be damaged. Allow the
meter to dry thoroughly before trying to turn it on. Do not use hairdryers or other
strong heating sources, just leave the meter at room temperature. If necessary,
contact SAT-Kabel GmbH for technical assistance.
19
Disposal of electronic equipment
Disposal of electric / electronic equipment (applicable in all CEE countries and
wherever a separate waste collection system is applied).This symbol on the packaging
indicates that the product should not be considered domestic waste. The product, at
the moment of disposal, should be brought to a waste collection point with the proper
facilities to manage electrical/electronic appliances.Electric/electronical appliances, if
not disposed of correctly, may have negative consequences on your
health and the enivironment.Furthermore, a proper recycling
procedure helps mantain natural resources.For more information
about the correct disposal of this product, please refer to your local
waste disposal management offices or the shop where this product
was bought.
Page 20

Telefon: +49 (0)3724 6665-0
Telefax: +49 (0)3724 6665-44
[email protected] • www.sat-kabel.de
Errors, technical amendmends and developments are subject to change without notice!
SAT-Kabel GmbH 2014-05-30
 Loading...