

Page 1
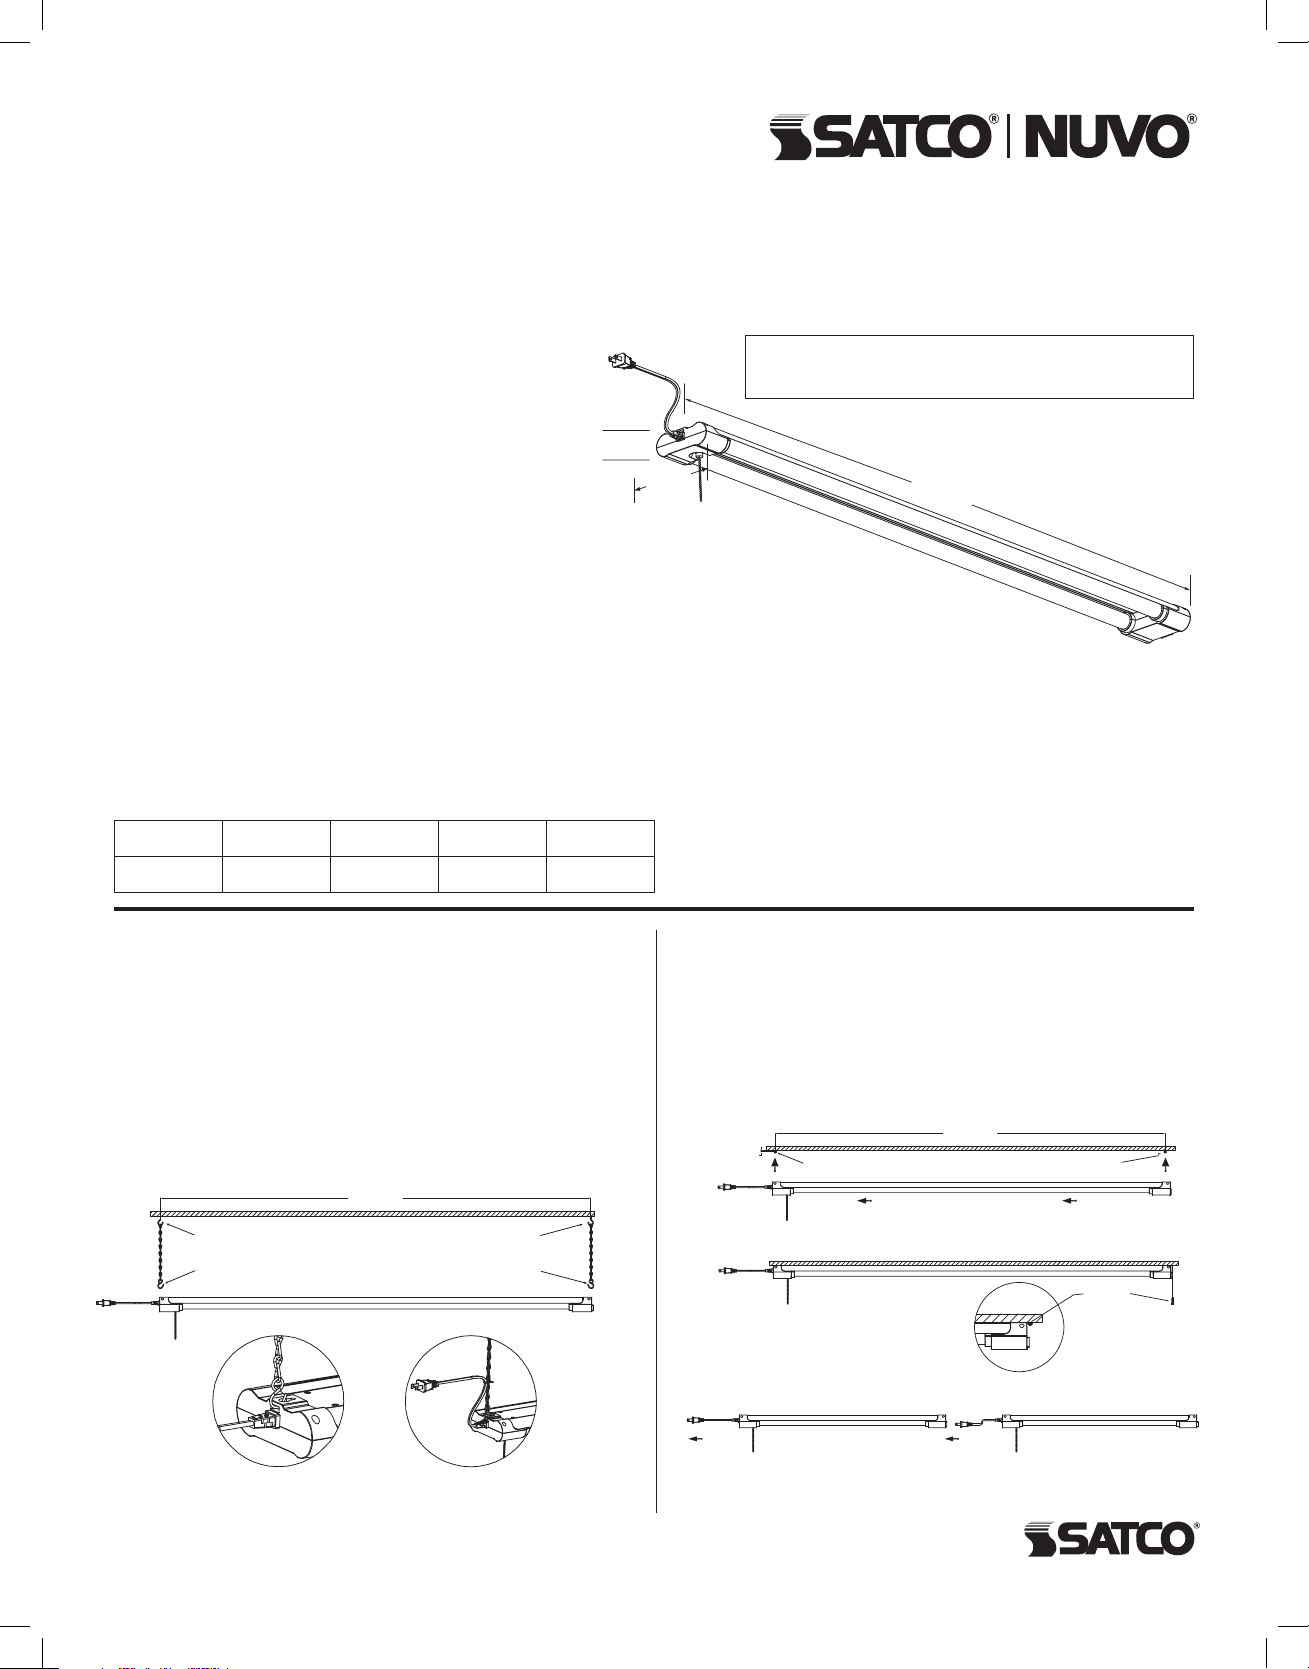
LED LINKABLE SHOP LIGHT
Ceiling hookCeiling hook
S-hookS-hook
47.83in
Limit
Screw
Screw
Ceiling hookCeiling hook
S-hookS-hook
Screw
47.06in
47.83in
0.118~0.12in
Model: 62-928
INSTALLATION AND SAFETY INSTRUCTIONS
IMPORTANT: Read before installing xture. Retain for future reference.
WARNING: Risk of Fire or Electric Shock
• To avoid damage, falling, electric shock or re,
do not modify the xture or replace accessories
without conrming with the supplier rst.
• Only authorized, qualied personnel should install
this xture and should follow the owner’s manual.
Any improper installation might cause failure,
1.57"
(40mm)
4.33"
(110mm)
NOTE: Outlet on xture is for use ONLY to connect
additional 62-928 Shop Lights (max. 4). Do not plug in
any device other than a 62-928 Shop Light.
electric shock, re or other injury, damage or hazard.
• Disconnect power before installation or any maintenance of the xture.
• Do not dismantle the xture without the supplier’s authorization.
• Do not touch the power supply when the xture is operating.
• The electrical tting must be installed by a licensed electrician.
• For indoor or damp location only.
• The LED module is integrated to the xture and is not removable or replaceable.
IMPORTANT: This product must be installed in accordance with the applicable
installation code by a person familiar with the construction and operation of the
product and the hazards involved.
SPECIFICATIONS
Model Watts Volts CCT CRI
62-928 42W 120V 4000K 80
48.03"
(1220mm)
Parts Included Quantity
4' Fixture 1
9" Hanging Chains 2
Mounting Screws (Flush Mt.) 3
Drywall Anchor (Flush Mt.) 3
Cord Tie 1
INSTALLATION: Hanging Flush Mount
NOTE: Install xture to any desired hanging height using chain
and S-hooks.
1. Install directly beneath a ceiling-mounted receptacle.
2. Mount ceiling hooks (not supplied) to the ceiling, spacing between
hooks should be 47.83in.
3. Use S-hooks to hang the key holes of end caps, secure S-hook
opening by closing them using needle-nose pliers.
4. Attach the hanging chains to the ceiling hooks.
5. Plug in power cord to outlet or to additional shop lights.
6. Attach the power cord to the chain with cord tie.
47.83in
Ceiling hookCeiling hook
S-hookS-hook
1. Install directly beneath a ceiling-mounted receptacle.
2. Install two screws on mounting surface, spacing between screws
should be 47.06 in. The gap between screw and ceiling should
be 0.118 ~ 0 .120 i n .
3. Lift xture up to screws and slide to one side to secure into place.
Fixture should be rmly xed against screws. Limit position with
the limit screw.
4. Plug in power cord to outlet or to additional shop lights.
0.118~0.12in
Screw
Link up to 4 Shop Lights
Connect to
Power Outlet
47.06in
Screw
Limit
Screw
Connect to
Additional Shop light
© Copyright 2019 Satco Pro ducts, In c. 1/19
Satco Products, Inc.
Br ent woo d, N Y 11717
Page 2

ESPAÑOL:
INSTRUCCIONES DE INSTALACIÓN Y SEGURIDAD
IMPORTANTE: Lea esto antes de instalar el accesorio. Consérvelo para referencia futura.
SEGURIDAD: Riesgo de incendio y descarga eléctrica
• Para evitar daños, caídas, choques eléctricos o incendios, no modique la lámpara ni reemplace accesorios sin la conrmación
previa del proveedor.
• Solo personal autorizado y calicado debe instalar esta luminaria y debe seguir el manual de propietario. Cualquier instalación inadecuada
puede resultar en fallas, choques eléctricos, incendios u otros peligros, daños o lesiones.
• Desconecte la alimentación antes de la instalación o de cualquier mantenimiento a la luminaria.
• No desmantele la luminaria sin la autorización del proveedor.
• No toque la fuente de alimentación mientras la luminaria esté funcionando.
• Un electricista calicado deberá instalar la conexión eléctrica.
• Sólo para lugares interiores o húmedos.
• El módulo LED está integrado al accesorio y no es removible ni reemplazable.
IMPORTANTE: Este producto debe instalarse de acuerdo con el código de instalación aplicable, y debe hacerlo una persona que conozca
la construcción y el funcionamiento del producto, así como los riesgos implicados
INSTALACION: Colgante
NOTA: Instale el dispositivo en cualquier altura de colgado utilizando una cadena y ganchos en S.
1. Instale directamente debajo de un receptáculo montado en el techo.
2. Coloque los ganchos de techo (no suministrados) en el techo; el espacio entre los ganchos debe ser de 1.21 m (47.83 pulg.)
3. Utilice los ganchos en S para colgar los oricios clave de las tapas de extremo; asegure la abertura de los ganchos en S cerrándolos
utilizando pinzar de punta.
4. Coloque las cadenas de colgado en los ganchos de techo.
5. Conecte el cable de energía en la conexión o a luces de taller adicionales.
6. Conecte el cable de energía en la cadena con un sujeta cables.
INSTALACION: Montaje empotrado
1. Instale directamente debajo de un receptáculo montado en el techo.
2. Coloque dos tornillos en la supercie de montaje; el espacio entre los tornillos debe ser de 1,19 m (47,06 pulg). El espacio entre el tornillo
y el techo debe ser 2,99 ~ 3,04 milímetros (0,118 ~ 0,120 pulg.)
3. Levante el dispositivo hacia los tornillos y deslice a un lado para asegurar en su lugar. El dispositivo debe estar jo rmemente en los
tornillos. Limite la posición con el tornillo de restricción.
4. Conecte el cable de energía en la conexión o a luces de taller adicionales.
LUZ ENLAZABLE DE LED PARA TALLER
Modelos: 62-928
FRANCAIS:
INSTRUCTIONS SUR L’INSTALLATION ET LA SÉCURITÉ
IMPORTANT: Lisez avant d’installer le luminaire. Conservez à titre de référence.
SÉCURITÉ: Risque d’incendie ou de décharge électrique
• Pour éviter dommages, chutes, décharges électriques ou incendies, ne modiez pas la lampe ou ne remplacez pas les accessoires
sans conrmation préalable du fournisseur.
• Seul un personnel autorisé et qualié doit installer ce luminaire et il doit le faire conformément au manuel du propriétaire. Toute
installation incorrecte peut occasionner pannes, décharges électriques, incendies ou autres blessures, dommages ou dangers.
• Débranchez l’alimentation avant d’installer ou d’effectuer l’entretien du luminaire.
• Ne démontez pas le luminaire sans autorisation du fournisseur.
• Ne touchez pas à l’alimentation quand le luminaire est branché.
• L’accessoire électrique doit être installé par un électricien agréé.
• Pour emplacement intérieur ou humide seulement.
• Le module DEL est intégré à l’appareil et n’est pas amovible ni remplaçable.
IM P ORTANT: Ce produit doit être installé conformément aux codes en vigueur et par une personne qui connaît bien le produit, son
fonctionnement et les dangers qui y sont associés.
INSTALLATION: Suspendu
REMARQUE : Installez le lumi-naire à la hauteur de suspen-sion désirée en utilisant la chaîne et les crochets en S.
1. Installez le produit directe-ment sous une prise installée au plafond.
2. Montez les crochets de pla-fond (non fournis) sur le plafond en laissant un espace de 121,48 cm (47,83 po) entre les crochets.
3. Utilisez les crochets en S pour suspendre les fentes de clavette des capuchons d’extrémité et xez l’ouverture des crochets en
S en les fer-mant à l’aide d’une pince à bec pointu.
4. Fixez les chaînes de suspen-sion aux crochets de plafond.
5. Branchez le cordon d’alimentation à la prise ou aux éclairages de magasin sup-plémentaires.
6. Branchez le cordon d’alimentation à la chaîne avec la xation de câble.
INSTALLATION: Montage afeurant
1. Installé directement sous une prise installée au plafond.
2. Posez deux vis sur la surface de montage en laissant un es-pace de 119,53 cm (47,06 po) entre les vis. L’écart entre la vis et le plafond
doit être compris entre 2,99 et 3,04 mm (0,118 po à 0,120 po).
3. Levez le luminaire vers les vis et faites-le glisser sur un cô-té pour le xer en place. Le lu-minaire doit être fermement xé contre les vis.
Limitez la posi-tion avec la vis de butée.
4. Branchez le cordon d’alimentation à la prise ou aux éclairages de magasin sup-plémentaires.
LUMINAIRE DE MAGASIN RACCORDABLE À DEL
Modèles: 62-928
 Loading...