


1
SAS6000UTK-7-WIFI
OPERATING
INSTRUCTION

1
This manual apply for SAS6000UTK-7-WIFI,used with Single Stage,Multi-Stage,Heat pump
and has mobile control function .
SPECIFICATION
Power Supply ……………………… Dual Power 24VAC (18-30VAC,50/60Hz) or Battery Powered
Terminal Load…………………………1.0 A per terminal, 2.0A maximum total load
Set point Temperature Range………….41℉ to 95℉(5℃ to 35℃)
Operating Ambient…………………….32℉to 122℉(0℃to 50℃)
Operating Humidity…………………...90% non-condensing max
Shipping Temperature Range…………. 14℉ to +140℉ (-10℃ to 60℃)
Dimensions……………………………. 5.9 inch×4.5 inch×1.2inch(150mm×115mm ×32mm)
Color……………………………………White
FEATURE
Apply with various kind of heating and cooling system. Including Single stage, Multi-stage
And Heat Pump (Up to 3-stage heat, 2-stage cool, with Aux. Or Emergency heat)
Large LCD display with backlight, continuous backlight option
Menu Driven Programming

2
The screen displays the set temperature, the room temperature and current time simultaneously
Fan switch with on and auto
Auto change over
Permanent user setting retention during power loss, no batteries are required,
Optional 7 day programming and non-programmable
Optional temperature display of Celsius or Fahrenheit scale
Both Vacation mold and hold duration mode available for comfort and energy saving
Air filter change indicator
UV light change indicator
IMPORTANT SAFETY INFORMATION
Always turn off power at the main power source by unscrewing fuse or switching circuit breaker to the off
position before installing, removing, cleaning, or servicing this thermostat.
Read all of the information in this manual before installing this thermostat.
Only a professional contractor should install this thermostat.
All wiring must conform to local and national building and electrical codes and ordinances.
Use this thermostat only as described in this manual.
3
KEYBOARD, DISPLAY AND SWITCH DESCRIOPTION
Touch Screen Thermostat
Figure 1

4
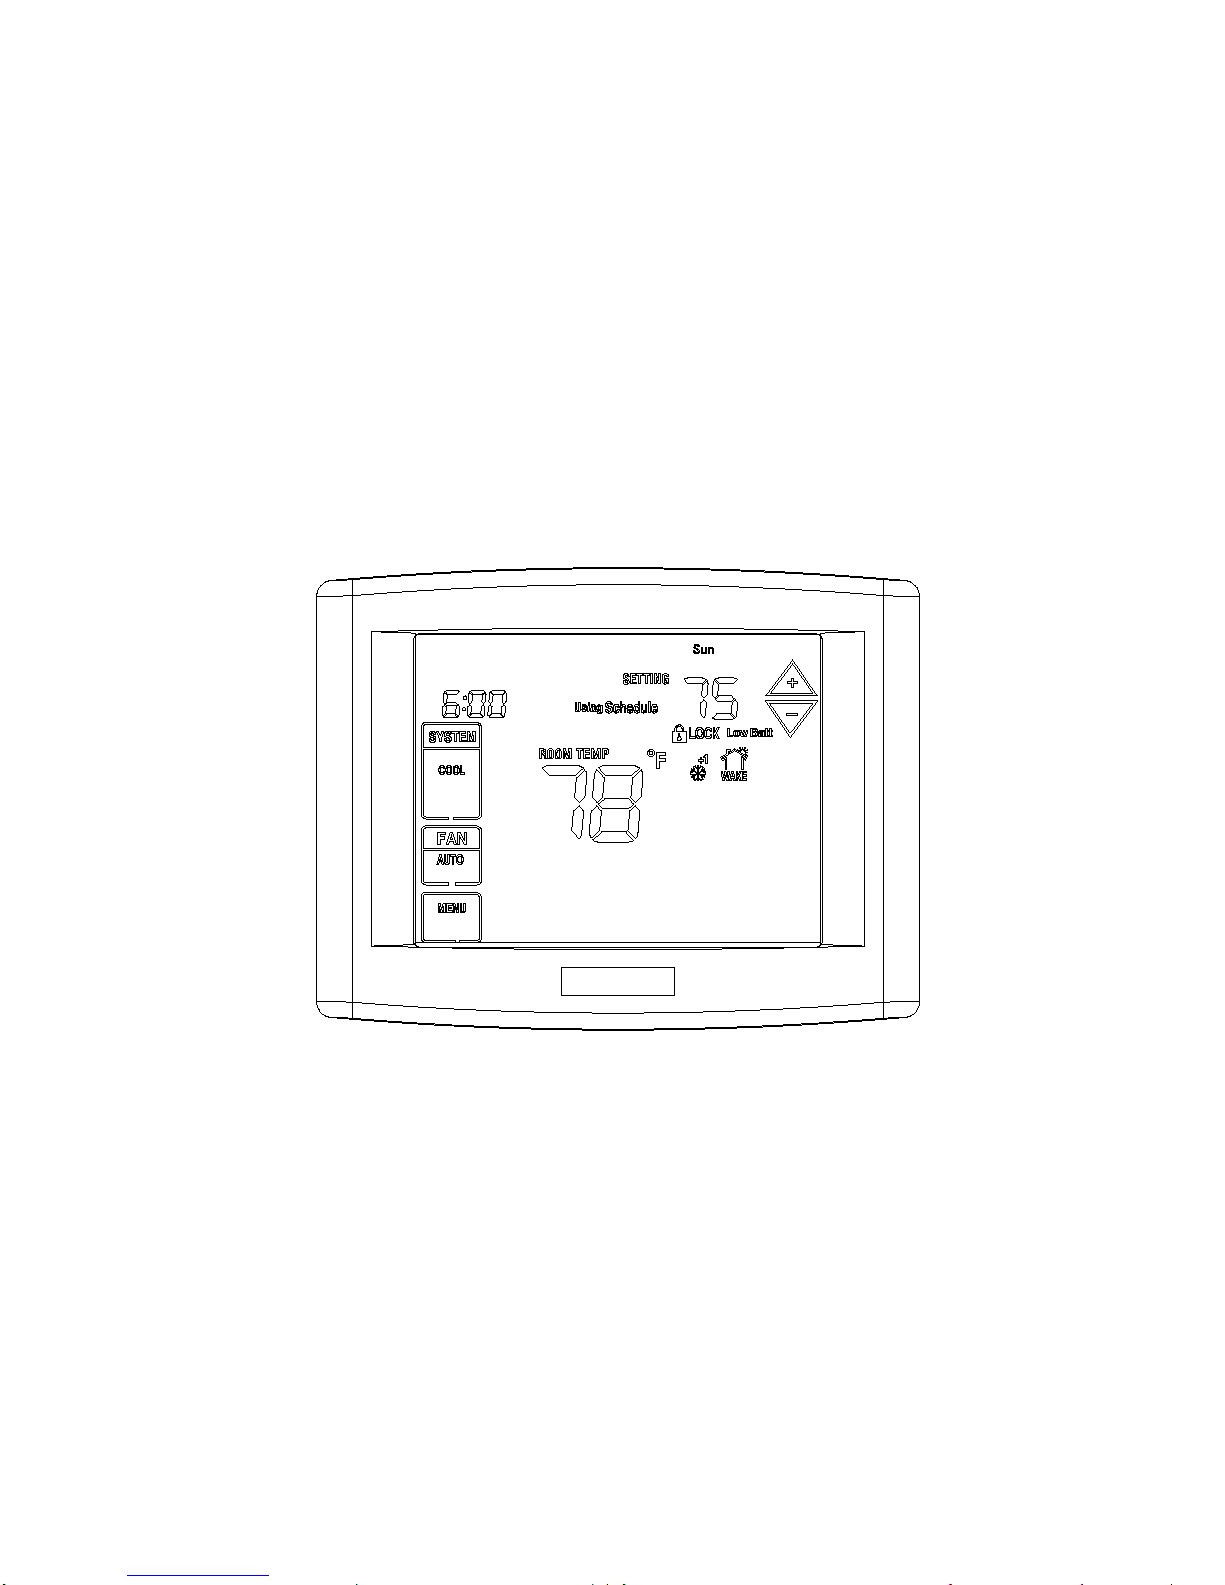
Home Screen Description
Figure 2
Time of the day
System Switch
Fan Swtich
Menu key for entering
different modes
Date of Week Set Temperature
Room
Temperature
Temperature
Up/Down
used for modifying
set point
Low Battery
Indication
Keypad lockout
Indication

5
Figure 3
(1)
(2)
(14)
(13)
(15)
(16)
(17)
(18)
(19)
(20)
(24)
(23)
(22)
(21)
(5) (6)
(7) (8) (9)
(10)
(11)
(3)
(4)
(12)

6
(1) Press day(s) to set program schedule
(2) “Hold Until” indicates the time when a temporary hold period will end
(3) Press to select system type
(4) Press to select fan operation
(5) Press “MENU” to display first function menu of button (6) (7) (8) (9) (10)
Press “DONE” to confirm current setting
(6) Press “SET TIME” to set current time clock
Press “INFO” to check outside temperature or inquiry for count back time for changing filter or inquiry for UV
light duration hours.
(7) Press “RUN SCHED” to resume program operation
Press “RESET” to current program setting or current configuration setting to factory default value
Press “CONFIG” to set configuration menu item
(8) Press “HOLD” to permanent hold current set point
Press “CLEAN DISPLAY” for entering 30 second count back time for cleaning the display
Press “PREVIOUS STEP” for going back to last configuration menu item
(9) Press “SET SCHED” for setting schedule for each days of the week
Press “NEXT STEP” for going forward to next configuration menu item or next day of week when setting
schedule.
(10) Press “OTHER” for entering the second function menu of (5) (7) (8) (10)
Press “CANCEL” to disregard current setting and go back to last operation
(11) Press “WAKE” “LEAVE” “RETURN” “SLEEP” to choose the 4 setting period of each day when setting program

7
schedule
(12) Press UP and DOWN for modifying set point
(13) “Days” displays during steps in setting vacation duration days or count back days of vacation duration days
“Am” indicate current time clock is in the morning. “Pm” indicates current time clock is in the afternoon
(14) Press UP and DOWN for setting current time clock or setting time in programming or changing
selections in configuration menu or setting the time when a temporary hold period will end
(15) “Emergency” flashes when system mode is set “EMER”
“ Using Schedule” displays when thermostat is operating under presetting schedule
“ Permanent Hold” displays when thermostat is in permanent hold setting temperature period
“ Temporary Hold” displays when thermostat is in temporary hole setting temperature period
(16) displays when first stage cooling activate
displays when both first stage cooling and second stage cooling activate
(17) displays when first stage heating activate
displays when both first stage heating and second heating activate
(18) displays when Auxiliary heating or Emergency heating activate
(19) displays when circulating fan activate

8
(20) “TECHNICIAN SET UP: USE UP AND DOWN FOR SURRENT SELECTION AND NEXT STEP PREVIOUS
STEP KEY TO THE NEXT PREVIOUS STEP” displays to help technician how to operate in configuration mode
(21) Indicate current status of the thermostat
(22) “Chg Filter” displays indicate changing filter count back has expired
(23) “Comp Dly” displays when compressor delay lock out activate
(24) “Chg UV” displays when changing UV duration days has expired
Direct switch AP mode: Long Press System Switch from direct connect to AP mode, from WIFI switch to AP display.
When the battery power alone, WIFI function failure, When the external power supply, WIFI Function effectively.
INSTALLATION
1. Pull the thermostat body off the thermostat base. Forcing or prying on the thermostat will cause damage to the
unit.
2. Place base over hole in wall and mark mounting hole locations on wall using base as a template
3. Move base out of the way. Drill mounting holes. If you are using existing mounting holes and the holes drilled
are too large and do not allow you to tighten base snugly, use plastic screw anchors to secure the base.
4. Fasten base snugly to wall using mounting holes shown in Figure 3 and two mounting screws. Leveling is for
appearance only and will not affect thermostat operation.
5. Connect wires to terminal block on base using appropriate wiring schematic (See Figure 5、Figure 6)
6. Carefully line the thermostat up with the base and snap into place.

9
Battery Location
Batteries are optional (to provide backup power) if your thermostat was wired to run on AC power when installed.
Battery replacement
Install fresh batteries immediately when the Low Batt warning begins flashing. The warning flashes about 60 days
before batteries are depleted. Even if the warning does not appear, you should replace batteries once a year, or before
leaving home for more than 1 month
To replace batteries, set system to OFF, remove thermostat from wall and install the batteries in the rear along the
top of the thermostat. (See figure 4)
Figure 4
Front Panel
2 AA Batteries
Base

10
WIRING DIAGRAM
Figure 5
Wiring guide

11
1H/1C System(1 transformer) 1H/1C System(2 transformer)
2H/2C System (1 transformer) 2H/2C System (2 transformer)
RC
Power【1
】
RH
(RH+RC joined by jumper)
W
Heat Relay
Y
Compressor contactor
G
Fan relay
C
24VAC common
S1/S2
Remote sensor
RC
Power (cooling transformer) 【1,2】
RH
Power (heating transformer) 【1,2】
W
Heat relay
Y
Compressor contactor
G
Fan relay
C
24VAC common
S1/S2
Remote sensor
RC
Power 【1,2】
RH
(RH+RC joined by jumper) 【1,2】
W
Heat relay 1
Y
Cool relay 1
W2
Heat relay 2
Y2
Cool relay 2
G
Fan relay
C
24VAC common
S1/S2
Remote sensor
RC
Power 【1】
RH
(RH+RC joined by jumper)
W
Heat relay 1
Y
Cool relay 1
W2
Heat relay 2
Y2
Cool relay 2
G
Fan relay
C
24VAC common
S1/S2
Remote sensor

12
1H/1C Heat Pump (no auxiliary heat) 2H/2C Heat Pump (no auxiliary heat)
RC
Power 【1】
RH
(RH+RC joined by jumper)
Y
Compressor relay
O/B,O:
Changeover valve energized in heating
B:
Changeover valve energized in cooling
G
Fan relay
C
24VAC common
S1/S2
Remote sensor
RC
Power【1,2
】
RH
(RH+RC joined by jumper) 【1,2】
Y
Compressor relay
O/B,O:
Changeover valve energized in heating
B:
Changeover valve energized in cooling
Y2
Compressor 2 relay
G
Fan relay
C
24VAC common
S1/S2
Remote sensor

13
2H/1C Heat Pump (with auxiliary heat) 3H/2C Heat Pump (with auxiliary heat)
【1】 Power supply
【2】 Remove jumper for 2-transformer system
【3】 Optional 24VAC common connection
【4】 Common connection must come from cooling transformer
【5】 If L terminal is used, 24VAC common (terminal C) must be connected
【6】 Install field jumper between Aux and E terminals if there is no emergency heat relay
L
Equipment monitor【5
】
RC
Power 【1】
RH
(RH+RC joined by jumper)
Y
Compressor relay
E
Emergency heat relay【6
】
Aux
Auxiliary heat relay (Heat 2)【6
】
O/B,O:
Changeover valve energized in heating
B:
Changeover valve energized in cooling
G
Fan relay
C
24VAC common
S1/S2
Remote sensor
L
Equipment monitor【5
】
RC
Power【1
】
RH
(RH+RC joined by jumper)
Y
Compressor relay
E
Emergency heat relay 【6】
Aux
Auxiliary heat relay (Heat 2)【6
】
O/B,O:
Changeover valve energized in heating
B:
Changeover valve energized in cooling
Y2
Compressor relay 2
G
Fan relay
C
24VAC common
S1/S2
Remote sensor

14
CONFIGURATION MENU
The configuration menu allows you to set certain thermostat operating characteristics to your system or personal
requirements.
To enter the configuration menu, switch off the thermostat
Pres s system
until O FF blink
Pres s DONE
to save changes

15
1) Press MENU for displaying main menu button, Press OTHER for display other menu button
2) Press CONFIG for entering configuration menu, change setting according to following figure.
For resume factory default setting, press RESET and then confirm by pressing DONE.
Press MENU
for displaying main
menu button
Press OTHER
for displaying other
menu button
Press DOWN
to confirm and
exit
Press CONFIG
for entering
configuration menu
Press CANCEL
to exit to main
home screen

16
Press NEXT
STEP changing to
next menu item
Display menu item
Press UP and DOWN
for change setting
Press DOWN
to confirm and
exit
Press RESET
for resume to
factory default
setting
Press PREVIOUS
STEP changing to
previous menu
item
Press CANCEL
to exit to main
home screen

17
1 H
2H
HP1
HP2
Press
Display
factory
default
Press Up and
DOWN
To select
Comments
1
NEXT
STEP
SYSTEM
(2H)
1H,2H,HP1,HP2
Select control system
2
NEXT
STEP
BLowER
(HA)
HA,HE
HA: Gas heating, Furnance
controls blower
HE: Electric heating.
Thermostat controls blower
NANA3
NEXT
STEP
AxMOdE
HA,HE
HA: Fossil fuel backup heat
HE: Electric backup heat
4
NEXT
STEP
CHANGE
(0)
0,1
0: Manual changeover
1: Auto changeover
5
NEXT
STEP
DbaNd(3)
2,3,4,5,6,7,8,9
Auto changeover dead band
6
NEXT
STEP
RECVRY
(OFF)
OFF/ON
Intelligent Recovery operation
7
NEXT
STEP
HCYCLE
(FA)
FA, SL
First heating cycle rate

18
8
NEXT
STEP
CCYCLE
(FA)
FA, SL
First cooling cycle rate
NANA9
NEXT
STEP
EMER
(FA)
FA, SL
Emergency heating rate
10
NEXT
STEP
DELAy
(5)
0,5
Select compressor lockout
delay
11
NEXT
STEP
LIGHT
(2)
1,2, 3
Select backlight display
12
NEXT
STEP
CALIbR
(0)
+4 TO -4
Select Temperature
Calibration
13
NEXT
STEP
F OR C
(F)
F or C
Select ºF or ºC Readout
14
NEXT
STEP
PRGM
(7)
0,7
7: 7-day program
0: non-program
NA
15
NEXT
STEP
H2SP
(FA)
FA, SL
Select second stage heating
rate
NANA16
NEXT
STEP
C2SP
(FA)
FA,SL
Select second stage cooling
rate

19
17
NEXT
STEP
FILTER
(00)
00 – 12
Select filter replacement run
time
18
NEXT
STEP
UVLAMP
(UF)
UO or UF
Select UV lamp replacement
run time
19
NEXT
STEP
CLOCK
(24)
24,12
Selection of time scale
20
NEXT
STEP
SENSOR
(0)
0,1,2,3
Remote sensor option
NANA21
NEXT
STEP
HPLOCK
(0)
0,15,20,25,30,35,4
0
℉
Heat pump compressor
lockout option
NANA22
NEXT
STEP
AxLOCK
(0)
0,40,45,50,55,60
℉
Heat pump auxiliary lockout
option
23
NEXT
STEP
VOICE
(yES)
YES,No
Select audible beeper On/off
24
NEXT
STEP
LOCK
(unL)
PAL,unL,FUL
Select keypad lockout option
25
NEXT
STEP
o/b(o)
o,b
Select Changeover valve
output

20
1.System type option
1H: 1 heat/1 cool conventional
2H: 2 heat/2 cool conventional
HP1: 1 compressor heat pump
HP2: 2 compressors or 2 speed compressor heat pump
2.Fan control option
HA: Gas heating. Furnace controls blower
HE: Electric heating. Thermostat controls blower
3. Auxiliary heat type option
This option apply only to HP1 or HP2 setting in system type option
HA: Fossil fuel backup heat
HE: Electric backup heat
4. Manual/Auto changeover option
0: Manual changeover
1: Auto changeover
5. Auto changeover dead ban option
Option: 2~9℉, factory default setting is 3℉, which means cooling set temperature must be 3℉ higher above heating
set temperature if Manual/Auto changeover option is selected at 1 and SYSTEM button is set at AUTO.
6. Intelligent Recovery operation
The thermostat has an intelligent recovery function that brings your room temperature to the set temperature at
exactly the pre-set time by turning on the heating earlier. Select ON to activate the intelligent recovery function,

21
Select OF to deactivate the intelligent recovery function. Intelligent recovery function doesn’t activate when program
setting to non-programmable.
7.First heating cycle rate
FA: Fast rate, heating will activate 0.6℉ below set point
SL: Slow rate, heating will activate 1.2℉ below set point
8.First cooling cycle rate
FA: Fast rate, cooling will activate 1.2℉above set point
SL: Slow rate, cooling will activate 1.7℉ above set point
9. Emergency heat cycle rate
This option apply only to HP1or HP2 setting in heating type option
FA: Fast rate, Emergency will activate 1.2 ℉ below set point
SL: Slow rate, Emergency heat will activate 1.7℉ below set point
10.Select compressor lockout delay
To protect the compressor from short cycling, you can select compressor off-time cycle between 0 or 5 minutes.
When the thermostat compressor time delay occurs, “Comp Dly” display during compressor lockout.
11.Select display backlight
The display backlight improves display contrast in low lighting conditions.
Select 1 for NO backlight display. Select 2 for the backlight to come on for approximately 30 seconds when any button
of the thermostat is touched. Select 3 for the backlight to remain on continuously.
NOTE: When operated from batteries (No “C” terminal connection, or if AC power goes off), the LCD
continuously display of backlight will be disabled.)

22
12. Select temperature recalibration
This feature allows you to adjust the displayed room temperature up to 4º higher or lower. Your thermostat can be
accurately calibrated to match your previous thermostat. The current or adjusted room temperature will be
displayed on the display.
13. Select ºF or ºC readout
Changes the display readout to Centigrade or Fahrenheit as required.
14. Program options
7: Select 7-day program function for the thermostat
0: Select non-program function for the thermostat
15. Select second stage heating rate
This option apply only to HP1, HP2, 2H setting in system type option
FA: Fast second stage heating rate. Second stage heating will activate 1.5℉ below first stage heating
SL: Slow second stage heating rate. Second stage heating will activate 2.5℉ below first stage heating
16.Select second stage cooling rate
This option apply only to HP2, 2H setting in system type option
FA: Fast second stage cooling rate. Second stage cooling will activate 1.5℉ above first stage cooling
SL: Slow second stage cooling rate. Second stage heating will activate 2.5℉ above first stage cooling
17. Select filter replacement run time
The thermostat will display the “Chg Filter” after a set time of operation. This is a reminder to change or clean
your air filter. This time can be set from 0 to 12 months in 1 month increments. Selection of 00 WILL CANCEL THIS
FEATURE. You can check the count back time and clear it by following step

23
1.Press MENU button for displaying main button
2.Press OTHER button for displaying other button
3.Press INFO to inquiry for the count back change filter time
4.When “Chg Filter” is displayed, RESET button will be shown when inquiry for count back time. Press
RESET and then press DOWN to reset the timer. This resets the timer and starts counting the hours until the
next filter change.
18. Select UV lamp replacement run time
This is the reminder to change UV lamp. Select UF means you have canceled the feature. Select UO starts to
counting for 0 day to 400 day. The thermostat will display “Chg UV” when UV time (400 days) has expired. You can
check the duration run time and clear it by following step
1.Press MENU button for displaying main button
2.Press OTHER button for displaying other button
3.Press INFO to inquiry for the UV duration time. If displays shows the counter back time of filter change
replacement. Press INFO again, UV duration time will appear.
4.When “Chg UV” is displayed, RESET button will be shown when inquiry for UV lamp duration time. Press
RESET and then press DOWN to reset the timer. This resets the timer and starts counting the duration days
19. Selection of time scale
Select 12 for 12 hours display for time clock and select 24 for 24 hours display for time clock
20. Remote sensor option
0: No remote sensor
1: Outdoor sensor (display only). Assuming 1 is selected, if an optional outdoor sensor is installed, INFO will display

24
in Home screen. Press INFO for inquiry for the outside temperature.
2: Outdoor control sensor (See Menu item 21 Heat pump temperature lockout)
3: Indoor sensor. If 3 is selected and the thermostat is installed with an indoor remote sensor, display will show the
read temperature from the indoor sensor.
21. Heat pump compressor lockout temperature
This option apply only to HP1 HP2 setting in system type option and only works when remote sensor option (menu
item 20) is set 2.
0: No heat pump compressor lockout
15,20,25,30,35,40℉: heat pump compressor lockout temperature
With fossil-fuel backup (See menu item 3. Auxiliary heat type option). If the thermostat is installed with an optional
outdoor sensor, you can select the compressor lockout temperature. When the outdoor temperature is below the
compressor lockout temperature, only the auxiliary heat operates. When the outdoor temperature is above the
compressor lockout temperature, only the compressor operates.
With electric heat back up (See menu item 3. Auxiliary heat type option). If the thermostat is installed with an
optional outdoor sensor, you can select the compressor lockout temperature and /or an auxiliary heat lockout
temperature. (See menu item 22) When the outdoor temperature is below the compressor lockout temperature, only
the auxiliary heat operates. When the outdoor temperature is above the auxiliary lockout temperature, only the
compressor operates. If the outdoor temperature is between the compressor and auxiliary lockout temperatures, both
the compressor and auxiliary heat can operate.
22. Heat pump auxiliary heating temperature lockout option
This option apply only to HP1 HP2 setting in system type option and only works when remote sensor option (menu

25
item 20) is set 2.
0: No auxiliary heating temperature lockout
40,45,50,55,60℉: heat pump auxiliary heating temperature lockout. ( See menu item 22 explains how it work)
23. Select audible beeper On/off
Select YES, thermostat will beep when any button touched
Select NO, thermostat will turn off the voice
24. Select keypad lockout on or off
UnL-unlock. All keys are available. Screen is unlocked
PAL-partially locked. All key functions are locked except SYSTEM key; temperature UP and DOWN keys and the
CANCEL key. Enter Configuration setup to unlock the screen
FUL-fully locked. Screen is fully locked except SYSTEM key. Enter Configuration setup to unlock the screen
25. O: Said in heating mode, O/B relay will be output, Heating is effective.
B: Said in Cooling mode, O/B relay will be output, Cooling is effective.

26
OPERATING YOUR THERMOSTAT
Choose the Fan Setting (Auto or On)
Fan Auto is the most commonly selected setting and runs the fan only when the heating or cooling system is on.
Fan On selection runs the fan continuously for increased air circulation or to allow additional air cleaning
Choose the System Setting (Cool, Off, Heat, Emer, Auto)
Press the SYSTEM button to select:
Heat: Thermostat controls only the heating system
Cool: Thermostat controls only the cooling system
Press SYSTEM option
to your requirement
Press FAN option
to your requirement
Press DONE to save
and exit
Press CANCEL to
disregard current
setting and exit

27
Auto: Auto Changeover is used in areas where both heating and cooling may be required on the same day. When
SYSTEM button set to AUTO, the thermostat automatically select heating or cooling depending on the indoor
temperature if AUTO changeover option is set to 1. (See configuration menu item 4). Heat and cool settings must be
over the dead ban value which is set at Auto changeover dead ban (configuration menu item 5). If heat and cool setting
is lower than the dead ban, thermostat will auto change to heat or cool according to the current set temperature and the
dead ban setting.
Emer: Emergency heat is available only when the thermostat is configured in HP1 or HP2 mode.
Manual Operation for Non-programmable Thermostats
Press the SYSTEM button to select Heat or Cool and Use the △or▽ buttons to adjust the temperature to your desired
setting. After selecting your desired settings you can also press the SYSTEM button to select AUTO to allow the
thermostat to automatically change between Heat and Cool if AUTO changeover option is set to 1. (See configuration
menu item 4)
Manual Operation for programmable thermostats
This operation applies only when Program option (See configuration menu item 14) is set to programmable.

28
Permanent Hold Override
Press HOLD to permanently adjust the temperature. This
will turn off the program schedule.
Whatever temperature you set will be maintained 24 hours
a day, until you manually change it, or press RUN SCHED
to cancel “Hold’ and resume the program schedule.
Press HOLD
Press RUN SCHED
to resume program
schedule
Adjust temperature

29
Vacation Hold Override
This feature can suspend the program schedule for
extended period of days.
Press HOLD for 5 seconds.
Press △ or ▽ to set the temperature you want, then press
△or ▽ to set time of day you want to schedule to resume
when you return.
Whatever temperature you set will be maintained 24 hours a
day for the number of days you select. After these numbers
of days have elapsed, the previously programmed schedule
will resume at the time you set.If you return earlier than
expected, press
RUN SCHED to resume the program schedule.
Press HOLD
for 5 seconds
Press RUN SCHED
to resume program
schedule
Press RUN SCHED
to resume program
schedule
Adjust temperature
Press to select number
of days

30
Temporary Hold Override
Inquiry for outside temperature
Press △or▽ to immediately adjust the temperature. This will
temporarily override the temperature setting for the current time
period.
The new temperature will be maintained until the time you set.
When the timer expires, the program schedule will resume and
set
the temperature to the level you’ve programmed for the current
time period.
To cancel the temporary setting at any time, press RUN
SCHED. The program schedule will resume.
Inquiry for outside temperature
When remote sensor option is set to 1 or 2, INFO will display in
home screen. Press INFO for inquiring outside temperature.
Thermostat will display outside temperature.
Press RUN SCHED
to resume program
schedule
Adjust temperature
Press to set time
Press INFO for
inquiry the outside
temperature

31
Inquiry for filter count back time
This operation is only available when filter replacement time is set. Configuration menu item 17 explains the way for
inquiry for the count back time.
Inquiry for UV lamp duration time
Press DONE to resume
indoor temperatur
Press DONE to resume
indoor temperatur
display
Shows when
there outside sensor
is either not installed
or damaged

32
This operation is only available when UV lamp duration time is set. Configuration menu item 18 explains the way for
inquiry for the UV lamp duration time.
Screen cleaning
Press CLEAN DISPLAY to lock the screen for cleaning.
The screen will remain locked for 30 seconds so you
can clean the screen without changing any setting.
After 30 seconds, press DONE to resume normal
operation, or press CLEAN DISPLAY again if you
require more time for cleaning.
Note: Do not spray any liquid directly on the thermostat.
Spray liquids onto a cloth, then use the damp cloth to
clean the screen. Use water or household glass cleaner.
Avoid abrasive cleansers
Press CLEAN DISPLAY
Screen lock timer
(count back 30 seconds)

33
Screen lock
To prevent tampering, the screen can be partially or fully locked. Configuration menu item 24 explain the way to partially
or fully locked the screen
Special feature
Intelligent Recovery: See configuration menu item 6- Intelligent Recovery operation.
Compressor protection: See configuration menu item 10- Select compressor lockout delay
Heat Pump Temperature Lockout: See configuration menu item 21-Heat pump compressor lockout temperature
PROGRAMMING
Set Current Time clock and Day of the week
Press MENU for displaying main menu button.
Press SET TIME button to enter to the clock-setting
mode.
Press the day to set current day of the week. Press △
or▽ to adjust the minutes or hours. Press NEXT STEP
to shift between setting minutes and setting hours.
Press DONE to save & exit (or press CANCEL to exit
without changing the time).
Set current day
of the week
Set current minutes
or hours
Press NEXT STEP to
shift from setting minuts
to setting hours
Press DONE to
confirm and exit
Press CANCEL to
cancel current setting
and exit

34
Adjust program schedules
Press MENU button to display main menu button. Press
SET SCHED to enter set program mode.
Select days to set program schedule. It can be a single day
of the week or a group of days of the week
Select HEAT or COOL for program setting by pressing
system button.
To view preset schedule, press VIEW SCHED button.
Press SET SCHED
to set program
Select HEAT or
COOL for program
set
Press VIEW SCHED
to view preset program
Press RESET
to resume factory
difault program setting
Press CANCEL
to cancel setting
and exit
Press DONE
to confirm and
exit
Select day(s) to set program schedule

35
Select 4 different time period for setting program schedule.WAKE, LEAVE, RETURN, SLEEP. When viewing the
program, you can view the preset program schedule by selecting the day and the time period.
Press CANCEL
to cancel setting
and exit
Press RESET
to resume factory
difault program setting
Select HEAT or
COOL for program
set
Select day(s) to set program schedule
Press NEXT STEP
for setting the program
for the rest day(s) of the week
Press time period
for setting program
schedule
Press DONE
to confirm and
exit

36
Adjust time and set temperature for selected time period by pressing △or▽
Press DONE to save and exit (or press CANCEL to exit without saving changes)
Press RESET and confirm by DONE to resume to factory default program schedule setting.
Adjust set
temperature for
the time period
Adjust time for
program period
start
Press DONE
to confirm and
exit
Press time period
for setting program
schedule
Press NEXT STEP
for setting the program
for the rest day(s) of the week
Select day(s) to set program schedule
Select HEAT or
COOL for program
set
Press RESET
to resume factory
difault program setting
Press CANCEL
to cancel setting
and exit

37
Factory Default Pre-program
The thermostat is programmed with the energy saving settings shown in the table below for all days of the week. If this
program suits your needs, simply set the thermostat clock and press the RUN button. The table below shows the
factory set heating and cooling schedule for all days of the week
Wake Up
(Morning)
Leave For Work
(Day)
Return Home
(Evening)
Go To Bed
(Night)
Heating Program
6:00
70℉
8:00
62℉
17:00
70℉
22:00
62℉
Cooling Program
6:00
75℉
8:00
82℉
17:00
75℉
22:00
78℉
Planning Your Program
The Heating and Cooling Program schedules below allow you to pencil in your own program times and temperatures.
Keep the following guidelines in mind when planning your program
In Heating, lower temperatures will save energy
In Cooling, higher temperatures will save energy
If you plan on using Auto Changeover, set the heating temperature below the cooling set temperature for more
than the value of pre-set dead ban (See configuration menu item 5).

38
Worksheet for Re-programming 7 day program
Heating
Program
Wake Up
(Morning)
Leave For Work
(Day)
Return Home
(Evening)
Go To Bed
(Night)
Mon
6:00
70℉
8:00
62℉
17:00
70℉
22:00
62℉
Tue
Wed
Thu
Fri
Sat
6:00
70℉
8:00
62℉
17:00
70℉
22:00
62℉
Sun
6:00
70℉8:00
62℉17:00
70℉22:00
62
℉

39
CUSTOMER ASSISTANCE
After reading this guide, if you have any question about the operation of your thermostat,please contact
your installer or Energy Utility company or service provider.


FCC Radiation Exposure Statement:
The transmitter must not be co-located or operated in conjunction with any other antenna or
transmitter. This equipment complies with the FCC RF radiation exposure limits set forth for an
uncontrolled environment. This equipment should be installed and operated with a minimum
distance of 20cm between the radiator and any part of your body.
FCC Warning
This device complies with Part 15 of the FCC Rules. Operation is subject to the following two
conditions:
(1) This device may not cause harmful interference, and (2) this device must accept any
interference received, including interference that may cause undesired operation.
NOTE : Any changes or modifications to this unit not expressly approved by the party responsible
for compliance could void the user's authority to operate the equipment.
 Loading...