

Page 1

SAS® Financial Management
Adapter 5.1 for SAP
User’s Guide
Page 2

®
The correct bibliographic citation for this manual is as follows: SAS Institute Inc. 2010. SAS
Financial
Management Adapter 5.1 for SAP: User’s Guide. Cary, NC: SAS Institute Inc.
SAS® Financial Management Adapter 5.1 for SAP: User’s Guide
Copyright © 2010, SAS Institute Inc., Cary, NC, USA
All rights reserved. Produced in the United States of America.
For a hard-copy book: No part of this publication may be reproduced, stored in a retrieval system, or
transmitted, in any form or by any means, electronic, mechanical, photocopying, or otherwise, without
the prior written permission of the publisher, SAS Institute Inc.
For a Web download or e-book: Your use of this publication shall be governed by the terms
established by the vendor at the time you acquire this publication.
U.S. Government Restricted Rights Notice: Use, duplication, or disclosure of this software and related
documentation by the U.S. government is subject to the Agreement with SAS Institute and the
restrictions set forth in FAR 52.227-19, Commercial Computer Software-Restricted Rights (June 1987).
SAS Institute Inc., SAS Campus Drive, Cary, North Carolina 27513.
1st electronic book, November 2010
®
Publishing provides a complete selection of books and electronic products to help customers use
SAS
SAS software to its fullest potential. For more information about our e-books, e-learning products, CDs,
and hard-copy books, visit the SAS Publishing Web site at support.sas.com/publishing or call 1-800727-3228.
®
and all other SAS Institute Inc. product or service names are registered trademarks or trademarks
SAS
of SAS Institute Inc. in the USA and other countries. ® indicates USA registration.
Other brand and product names are registered trademarks or trademarks of their respective companies.
Page 3

iii
Contents
Contents .................................................................................................................................. iii
Chapter 1 Introduction to SAS Financial Management Adapter for SAP .................. 1
Introduction............................................................................................................................... 1
Data Flow Architecture ............................................................................................................ 1
Benefits ...................................................................................................................................... 3
Configuration and Administration .......................................................................................... 3
Components ............................................................................................................................... 3
Job Organization and Names ................................................................................................... 4
Accessibility ............................................................................................................................... 5
What’s New in the SAS Financial Management Adapter for SAP ........................................ 5
Chapter 2 SAP Administration Tasks .......................................................... 7
Overview: Customizing for the Installation Environment..................................................... 7
Configuring SAS/ACCESS Interface to R/3 Software ............................................................ 7
Chapter 3 Customizing the SAS Financial Management Adapter for SAP ................ 9
Installation Prerequisites ...................................................................................................... 10
Prepare to Import the SAS Financial Management Adapter for SAP ................................ 10
Define the Environment ......................................................................................................... 10
Deploy SAS Financial Management Adapter for SAP Metadata ........................................ 29
Customizing SAS Data Integration Studio Jobs and Programs .......................................... 30
Customizing the preprocglobal.sas Program ........................................................................ 30
Customizing Non-Leaf Text in the preprocparms13.sas Program ...................................... 41
Setting Up for Internationalization (I18N) ........................................................................... 42
Additional General Information ............................................................................................ 43
Chapter 4 Transformations Provided for SAP ................................................ 45
Overview of Transformations Provided for SAP ................................................................... 45
Add Standard Dimension Rows and Add Standard Dimension ASSOC Rows
Transformations ..................................................................................................................... 46
Format Generator ................................................................................................................... 59
User Written Code for Multiple Input Output Tables Transformation .............................. 65
Changed Data Extraction Using Date or Time-Stamp and Overlap Transformation ....... 70
Date Join Transformation ...................................................................................................... 70
Period Consolidation Transformation ................................................................................... 72
Repeat Record for Date Range Overlap Transformation ..................................................... 73
Split the NLS Data Transformation ...................................................................................... 75
Additional Generic Transformations ..................................................................................... 77
Chapter 5 Initialization Jobs ................................................................... 79
Introduction to Initialization Jobs ......................................................................................... 79
fmsadpt_I0050_Initialize_Blank_Business_Area_Table ...................................................... 79
Page 4

iv Contents
Chapter 6 Extraction Jobs ...................................................................... 81
Extraction Jobs ....................................................................................................................... 81
Job Group: E00 Extraction of T Tables ................................................................................. 82
Job Group: E01 Extraction of Master Tables ........................................................................ 87
Job Group: E02 Extraction of Transaction Tables ............................................................... 89
Job Group: E03 Extraction of Summary Tables ................................................................... 92
Job Group: E04 Extraction of Hierarchies and Structures .................................................. 93
Job Group: E05 Extraction of Miscellaneous Tables ............................................................ 94
Chapter 7 Transformation Jobs ................................................................ 97
Introduction to Transformation Jobs .................................................................................... 98
Job Group: T0000 SAS Supplied Tables ................................................................................ 99
Job Group: T0001 Transformations for Common Tables ................................................... 100
Job Group: T0002 Time Dimension ..................................................................................... 102
Job Group: T0003 Exchange Rates ...................................................................................... 106
Job Group: T0004 Analysis Dimension ............................................................................... 109
Job Group: T0005 Account Dimension ................................................................................ 109
Job Group: T0006 Cost Center Dimension .......................................................................... 118
Job Group: T0007 Profit Center Dimension ....................................................................... 120
Job Group: T0008 Currency Dimension .............................................................................. 123
Job Group: T0009 Financial Documents ............................................................................. 123
Job Group: T1000 External Org Dimension ....................................................................... 128
Job Group: T1100 Internal Org Dimension ........................................................................ 130
Job Group: T1200 Data Validation ...................................................................................... 135
Chapter 8 Integrating into the SAS Detail Data Store .................................... 137
Integrating Data into the SAS Detail Data Store .............................................................. 137
Customizing the Validation Steps in the Load SAS Detail Data Store Jobs .................... 138
Apendix 1 Tables Extracted from SAP ...................................................... 141
Tables Extracted from SAP .................................................................................................. 141
Apendix 2 Job Groups and SAS Solution Data Marts ..................................... 143
Job Groups and SAS Solution Data Marts.......................................................................... 143
Apendix 3 Recommended Reading .......................................................... 145
Recommended Reading ........................................................................................................ 145
Page 5

1
CHAPTER
1
Introduction to SAS Financial Management Adapter for SAP
Introduction ....................................................................................................................................................... 1
Data Flow Architecture ..................................................................................................................................... 1
Benefits ............................................................................................................................................................... 3
Configuration and Administration .................................................................................................................. 3
Components ........................................................................................................................................................ 3
Job Organization and Names ........................................................................................................................... 4
Accessibility ....................................................................................................................................................... 5
What’s New in the SAS Financial Management Adapter for SAP ................................................................. 5
Overview ..................................................................................................................................................... 5
General Enhancements .............................................................................................................................. 5
Platform Support ....................................................................................................................................... 6
New Jobs .................................................................................................................................................... 6
Introduction
Based on the requirements of your source SAP system and your business needs, you
can customize the extract, transform, and load (ETL) jobs that make up the SAS
Financial Management Adapter for SAP. The architecture of SAS Data Integration
Studio and SAS Data Integration Server provides the environment for these ETL jobs.
As a result, you can use SAS Data Integration Studio to view and edit your ETL jobs as
needed.
Data Flow Architecture
The SAS Financial Management Adapter for SAP facilitates the beginning of a data
flow that moves data from an SAP source system into a format that businesses manage
and use with SAS solutions.
Source system data must flow through a series of ETL steps to be converted into a
usable format for SAS solution data marts such as SAS Financial Management. The
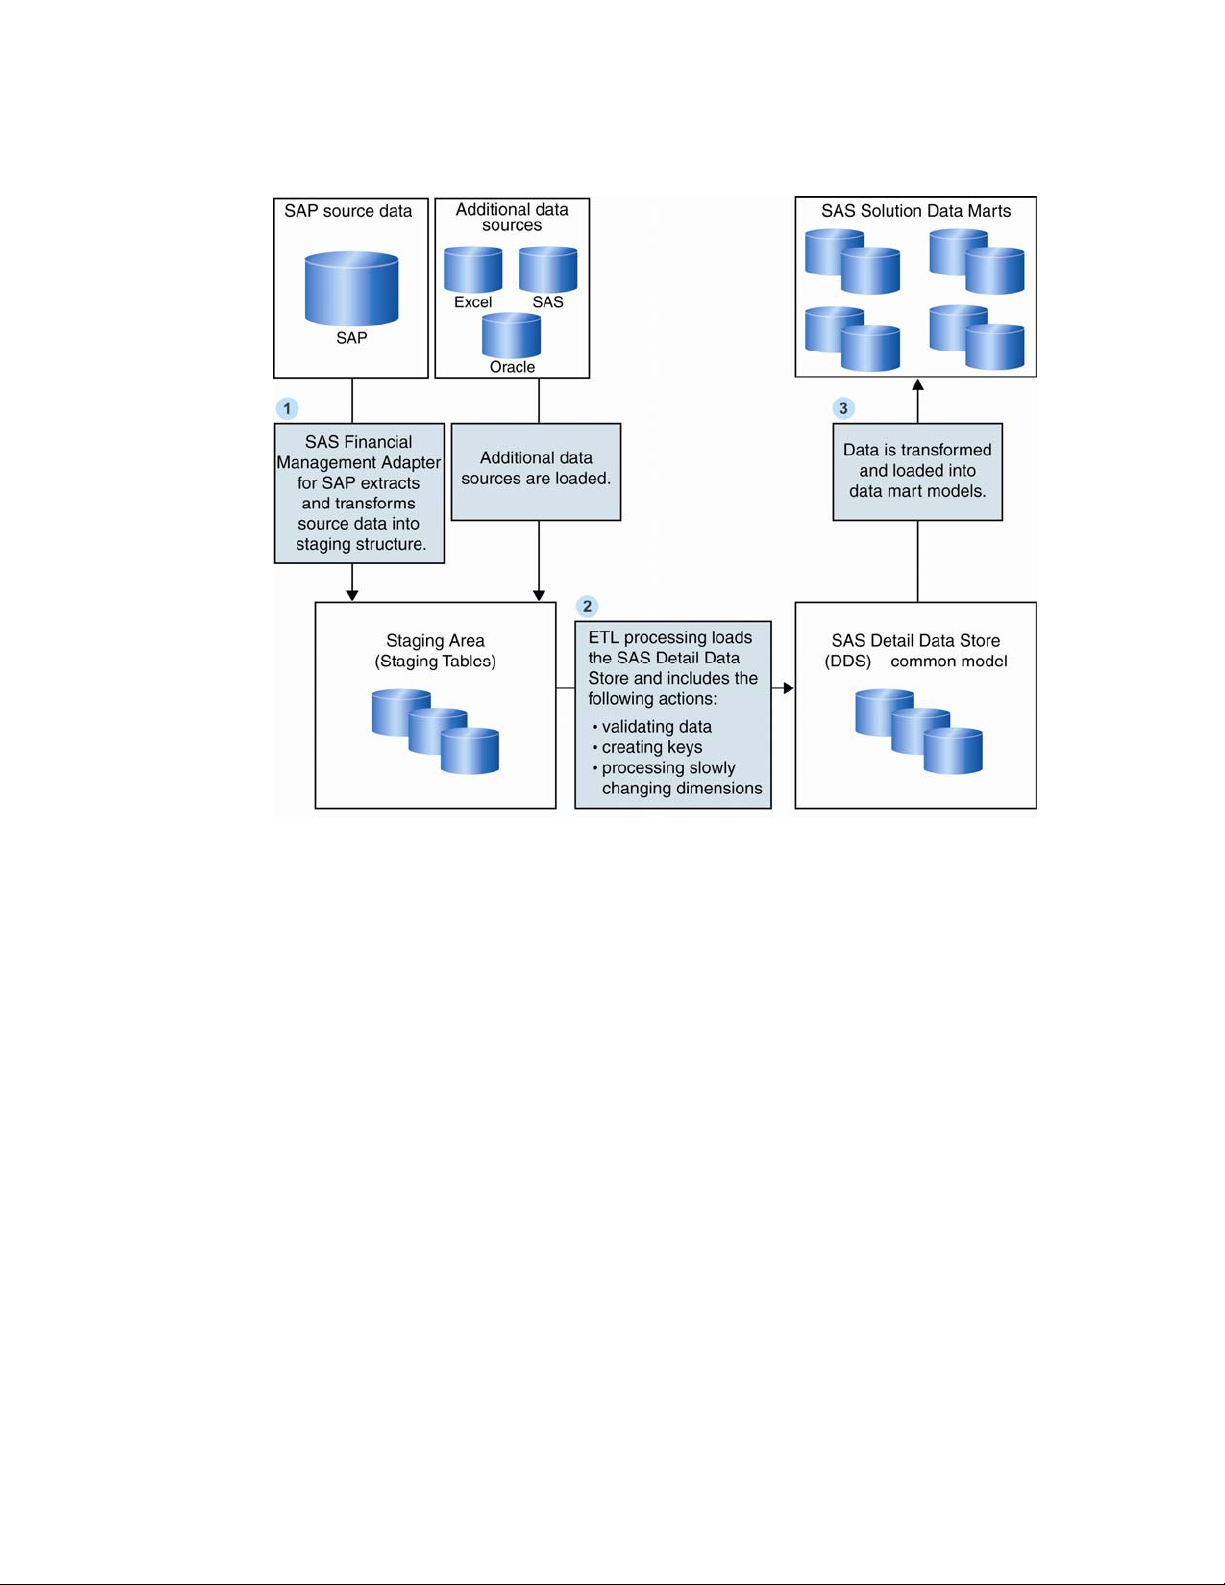
figure details the basic architecture of this data flow. The SAS Financial Management
Adapter for SAP acts in the first step.
Page 6
2 Data Flow Architecture Chapter 1
Figure 1.1 Data Flow Architecture: SAP to SAS Solution Data Marts
The following steps describe the data flow:
1 The SAS Financial Management Adapter for SAP extracts and transforms the
SAP source data into a staging area. The staging area is the first target after the
data is extracted from an operational system. This staging area is a repository for
raw data that is extracted from an operational system, and prepared for
transformation and loading to the SAS Detail Data Store.
Once the source data is loaded into the staging area, it is ready for ETL processing
that loads it into the DDS. ETL processing includes these actions:
validating the data
creating surrogate keys instead of operational system IDs to identify the data
introducing date-and-time stamps to reflect data validity if differences in
dimensional arise
2 The transformed data is stored in the SAS Detail Data Store, a lightly
denormalized, relational data model that provides storage flexibility. The SAS
Detail Data Store is a specific detail data model that represents a standard
business function and supports SAS solution data marts. Some of the data that
the SAS Detail Data Store captures contains current and historical information.
This includes temporal data (event data that occurs at a particular date and time,
such as an account inquiry) and nontemporal data (non-event data such as a
customer or a financial account).
Page 7

Introduction to SAS Financial Management Adapter for SAP Components 3
3 Once data is cleansed, validated, and stored in the SAS Detail Data Store, it is
ready for transforming and loading to a data mart model.
Benefits
The SAS Financial Management Adapter for SAP enables SAS solutions to turn SAP
data into business intelligence that is manageable on an enterprise scale. By
automating and streamlining parts of the data conversion from SAP to SAS, the adapter
decreases the time it takes to retrieve business intelligence from source data by 80% or
more. It primarily reduces the time needed to set up SAP ETL. This gives you more time
to concentrate on generating business intelligence from your SAP data.
The SAS Financial Management Adapter for SAP includes SAP knowledge that
streamlines the data conversion process. This built-in knowledge reduces your
dependence on SAP resources that help you understand how SAP works. It saves you
time and valuable SAP resources, so that the resources are available to work on other
projects.
The SAS Financial Management Adapter for SAP supports SAS Financial
Management 5.1 and SAS Financial Management 5.2.
Configuration and Administration
The SAS Financial Management Adapter for SAP is configured and managed using
the SAS Deployment Wizard and SAS Data Integration Studio:
The SAS Deployment Wizard enables you to specify the adapter configurations
that are required for your unique business environment. You can use this tool to
specify parameters during initial installation or import.
After you configure the SAS Financial Management Adapter for SAP, you can use
SAS Data Integration Studio to manage and customize the adapter.
Components
The SAS Financial Management Adapter for SAP includes components that you can
manage and configure using the SAS Deployment Wizard. This wizard enables you to
configure and manage the following components that you need to import a SAS
Financial Management Adapter for SAP environment:
SAS Data Integration Studio jobs
extract SAP tables into a partial mirror image of the SAP tables. These jobs mirror
only the necessary tables and, in many cases, transfer only the required data rows
and columns. This limited transfer places a smaller load on the SAP system. The
extractions are typically run as SAP batch processes that do not use complex logic,
so that the jobs can run in a short time during off-peak SAP system load.
transformation jobs
create intermediate tables or populate tables in the SAP staging area.
Page 8

4 Job Organization and Names Chapter 1
table metadata
include the standard tables that are needed by the SAS solutions. Intermediate
tables are defined to enable flexibility in customizing the jobs to fit local
requirements.
new SAS Data Integration Studio transformations
work in the default SAS Data Integration Studio jobs or new jobs. Additional
transformations are available.
SAS code files
install on the SAS Application Server. These open-source code files are
automatically copied to a location where they can be modified.
SAS macros
include simple macros that are provided as open source code, and complex macros
that are provided without source code so that SAS can maintain them easily.
SAS libraries
provide storage for administration and data tables.
Job Organization and Names
The SAS Financial Management Adapter for SAP is a collection of ETL jobs that
extract, transform, and load data from standard SAP tables into standard SAS tables.
These jobs are organized into two groups:
extraction jobs
transformation jobs
To help identify job functions and streamline the extraction process, extraction job
numbering begins with the letter E and transformation job numbering begins with T.
This naming structure enables all extractions to occur without waiting for follow-on
transformation jobs to complete. As a result, extractions can be completed in a shorter
time period.
Extraction jobs and transformation jobs are grouped into several SAS Data
Integration Studio job groups. Once they are grouped, each job name in a job group
begins with the same initial letter and number. This enables quick navigation on the
Custom tab of SAS Data Integration Studio.
To help identify the job functions of a job group, the group name begins with a
structure that is similar to the job name. The extraction job group names begin with the
letter E, followed by a two-digit number. The transformation job group names begin
with T, followed by a four-digit number.
The numbering of transformation jobs within a job group generally implies the order
of execution, unless a specific job does not depend on another. As a result, the specific
numbers assigned to jobs within a group allow for new jobs to be inserted numerically
between existing jobs.
Unlike transformation jobs, the extraction jobs generally do not depend on each other.
Exceptions to this rule are those jobs that extract new or changed data and must run
after the job that did the initial extract.
Page 9

Introduction to SAS Financial Management Adapter for SAP What’s New in the SAS Financial Management Adapter for SAP 5
Accessibility
The SAS Financial Management Adapter for SAP does not have a stand-alone GUI. It
is configured and managed using features of SAS Data Integration Studio and SAS
Management Console.
SAS Data Integration Studio and SAS Management Console include accessibility and
compatibility features that improve their usability for users with disabilities. These
features are related to accessibility standards for electronic information technology that
were adopted by the U.S. Government under Section 508 of the U.S. Rehabilitation Act
of 1973, as amended.
For more information about specific accessibility features of SAS Data Integration
Studio and SAS Management Console, refer to their respective documentation available
from http://support.sas.com.
SAS is committed to improving product accessibility and usability. If you have
questions or concerns about the accessibility of SAS products, send an e-mail to
accessibility@sas.com.
What’s New in the SAS Financial Management Adapter for SAP
Overview
SAS Financial Management Adapter for SAP leverages the SAS 9.2 intelligence
platform. The new features and enhancements in the SAS 9.2 intelligence platform
improve the deployment process of the SAS Financial Management Adapter for SAP.
With this release, SAS Financial Management Adapter for SAP provides additional
platform support. Some new jobs are also included to suit specific requirements.
General Enhancements
SAS Financial Management Adapter for SAP has the following general enhancements:
SAS Financial Management Adapter for now SAP supports SAS Financial
Management 5.1 and 5.2.
SAS Financial Management Adapter for SAP supports these SAP versions:
SAP R/3 4.7 (SAP Kernel 620)
SAP - ECC 5.0 (SAP Kernel 710)
SAP - ECC 6.0 (ERP 6.0) (SAP Kernel 710)
Installation and Configuration tasks are automated by the SAS Deployment
Wizard. For more information about the SAS Deployment Wizard, see the SAS 9.2
Intelligence Platform documentation at http://support.sas.com
.
Page 10

6 What’s New in the SAS Financial Management Adapter for SAP Chapter 1
Platform Support
The adapter supports the platforms that are supported by the SAS Financial
Management solution. The following platforms are supported:
Windows
• WIN (Windows 32 bit on x86)
• WX6 (Windows 64 bit on x86)
UNIX
• S64 (Solaris on SPARC)
• R64 (AIX on PowerPC)
For more details, see the Platform Support Matrix for the SAS Financial Management
solution.
New Jobs
SAS Financial Management Adapter for SAP contains the following new jobs:
fmsadpt_E00080_Extract_New_GL_Control_Table
fmsadpt_E03000_Extract_GL_Balance_from_New_GL_Tables (New GL)
fmsadpt_E03010_Extract_Split_Docs_from_FAGLFLEXA (New GL)
These jobs are designed to support implementation of new GL accounts. For more
details see “Job Group: E03 Extraction of Summary Tables” in the chapter “Extraction
Jobs”.
Page 11

7
CHAPTER
2
SAP Administration Tasks
Overview: Customizing for the Installation Environment .............................................................................. 7
Configuring SAS/ACCESS Interface to R/3 Software .................................................................................. 7
Install Transports and Customize the Installation Environment .......................................................... 7
Define User Permissions ............................................................................................................................ 8
Overview: Customizing for the Installation Environment
The SAS Financial Management Adapter for SAP requires customization to work in
your unique installation environment. When you make these changes for your site, you
must configure the SAS Data Surveyor for SAP software, and also customize the SAS
Financial Management Adapter for SAP for the assigned libraries in your installation
environment.
Configuring SAS/ACCESS Interface to R/3 Software
Install Transports and Customize the Installation Environment
The SAS Financial Management Adapter for SAP uses SAS/ACCESS Interface to R/3.
This software requires extensive installation setup before use. For detailed installation
instructions and configuration information, see the SAS/ACCESS Interface to R/3
Installation documentation that is included in your installation package.
In addition to configuring SAS/ACCESS Interface to R/3 software, the following
transport must be copied and installed on the SAP server to accommodate the SAS
Financial Management Adapter for SAP:
Transport: SAPKD92010INSAS
Object: Development class /SAS/ADDDS
Applied to: SAP R/3 Systems
Objects: Function group /SAS/ADDDS1 includes function modules
/SAS/FI_IMPORT_BAL_SHEET_POS and
/SAS/FI_IMPORT_BAL_SHEET_TEXT
Purpose: ADDDS1 retrieves balance sheet information
You can locate this transport in the \fmadaptsap\sasmisc directory that is relative
to the location where your SAS Foundation software is installed (for example,
x:\Program Files\SAS\SASFoundation\9.2\fmadaptsap).
Page 12

8 Configuring SAS/ACCESS Interface to R/3 Software Chapter 2
Define User Permissions
The SAP administrator must define and provide appropriate authorizations to SAP
users so that they can log on and extract data using the SAS Financial Management
Adapter for SAP. The SAS administrator needs to configure the SAS Financial
Management Adapter for SAP so that only authorized SAP users can log on.
Page 13

9
CHAPTER
3
Customizing the SAS Financial Management Adapter for SAP
Installation Prerequisites ................................................................................................................................ 10
Prepare to Import the SAS Financial Management Adapter for SAP ......................................................... 10
Define the Environment .................................................................................................................................. 10
Define a User ............................................................................................................................................ 10
Define an SAP Library and an SAP Server ........................................................................................... 15
Test the SAP Connection ......................................................................................................................... 25
Configure the Properties File .................................................................................................................. 27
Set Install Folder Authorizations ........................................................................................................... 28
Deploy SAS Financial Management Adapter for SAP Jobs and Tables Metadata .................................... 29
Overview of Install Process ..................................................................................................................... 29
Incremental Install of the SAS Financial Management Adapter for SAP ........................................... 29
Customizing SAS Data Integration Studio Jobs and Programs .................................................................. 30
Customizing the preprocglobal.sas Program ................................................................................................. 30
Overview of the preprocglobal.sas Program ........................................................................................... 30
Locating Files ........................................................................................................................................... 31
SAP System Parameters .......................................................................................................................... 32
Introduction ............................................................................................................................................. 32
Data Source ...................................................................................................................................... 33
SAP Queries ...................................................................................................................................... 33
SAP Language Codes ....................................................................................................................... 33
SAP Client ........................................................................................................................................ 34
Common Extraction Parameters ............................................................................................................. 35
E-Mail Address for the Recipient of Error Reports ........................................................................ 35
Cost Center and Profit Center Hierarchies ..................................................................................... 35
Company Codes ................................................................................................................................ 35
Euro Currency Conversion .............................................................................................................. 35
SAS Financial Management Parameters ............................................................................................... 36
Chart of Accounts ............................................................................................................................. 36
Digits in the Account Number ......................................................................................................... 37
Operating Concern ........................................................................................................................... 37
External Organizations ................................................................................................................... 37
Controlling Areas ............................................................................................................................. 37
SAP R/3 Table GLT0 Data Subsets ............................................................................................... 38
Period Type for Exchange Rates ...................................................................................................... 38
Financial Statement ........................................................................................................................ 39
Fiscal Year Variant .......................................................................................................................... 39
Set the Extraction Starting Date ..................................................................................................... 40
Determine Current Fiscal Year ....................................................................................................... 41
Buffer for Re-Extraction .................................................................................................................. 41
Customizing Non-Leaf Text in the preprocparms13.sas Program ................................................................ 41
Setting Up for Internationalization (I18N) .................................................................................................... 42
Steps for Setting Up for Internationalization ........................................................................................ 42
Warning Messages ................................................................................................................................... 43
Additional General Information ..................................................................................................................... 43
Page 14

10 Define the Environment Chapter 3
Installation Prerequisites
As part of the installation of SAS Financial Management Adapter for SAP, first
install the dependent (required) SAS software listed below. Refer to the installation
instructions of the specific product for more information.
second maintenance release for SAS 9.2
SAS Data Surveyor for SAP 4.3 (includes SAS/ACCESS to R/3)
If you are using the second maintenance release for SAS 9.2, then update the SAS
Platform from the second maintenance release to the third maintenance release, before
you begin to install the SAS Financial Management Adapter for SAP.
After you update SAS 9.2 with updates from the third maintenance release, run the
setup.exe with the nosasupdate option. SAS 9.2 is already updated with the third
maintenance release as part of the above prerequisite task.
Prepare to Import the SAS Financial Management Adapter for SAP
After the install process is complete, the next step is to prepare your system
environment. Perform the following tasks before you access the SAS Deployment Wizard
to configure the SAS Financial Management Adapter for SAP:
Define user and SAP Login details in SAS Management Console in the
Foundation repository.
Define an SAP library and an SAP server in SAS Management Console.
Test and verify the resulting connection in SAS Data Integration Studio.
Configure the properties file for SAS Financial Management Adapter for SAP.
These prerequisite tasks are required to ensure that the SAS Financial Management
Adapter for SAP works properly when it is configured. The remaining sections in this
chapter provide instructions on how to complete the required tasks.
Define the Environment
Define a User
To define a user for SAS Financial Management Adapter for SAP, complete the
following steps:
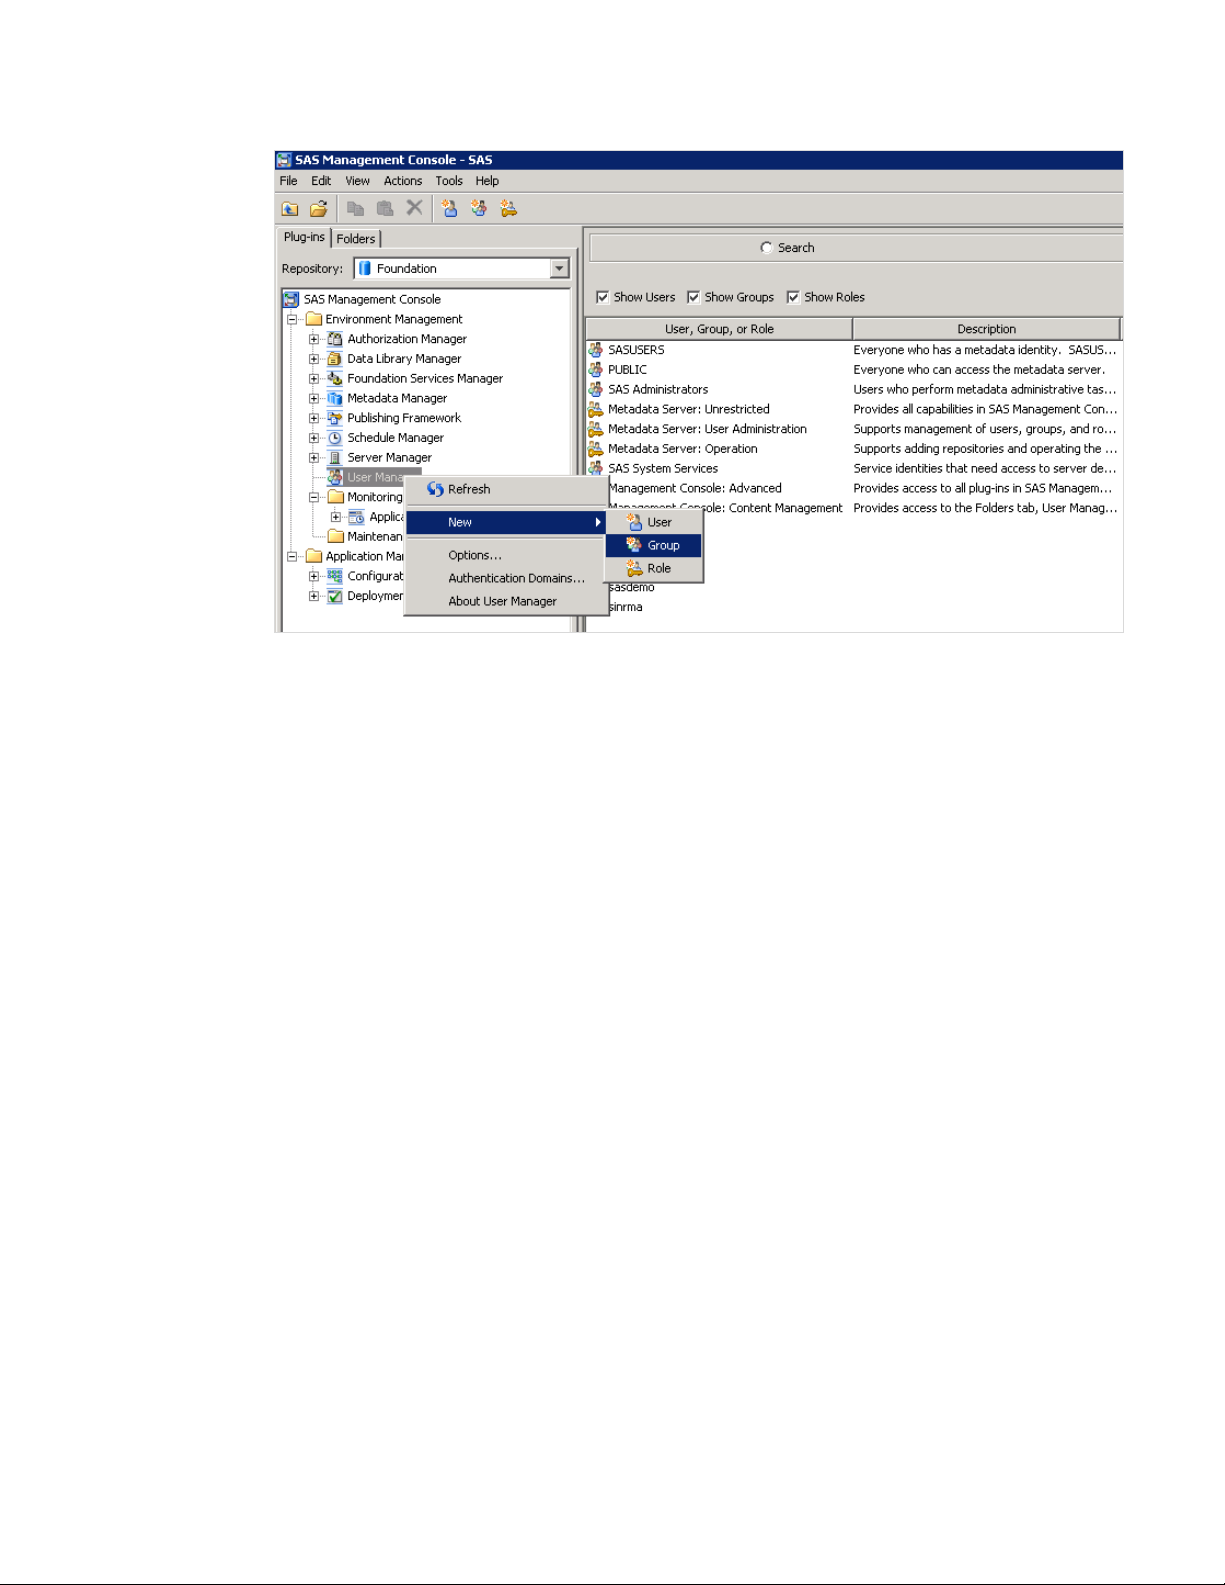
1 Open SAS Management Console.
2 Right-click User Manager in the hierarchy tree in the left pane of the SAS
Management Console window, and select NewÆGroup.
Page 15
Customizing the SAS Financial Management Adapter for SAP Define the Environment 11
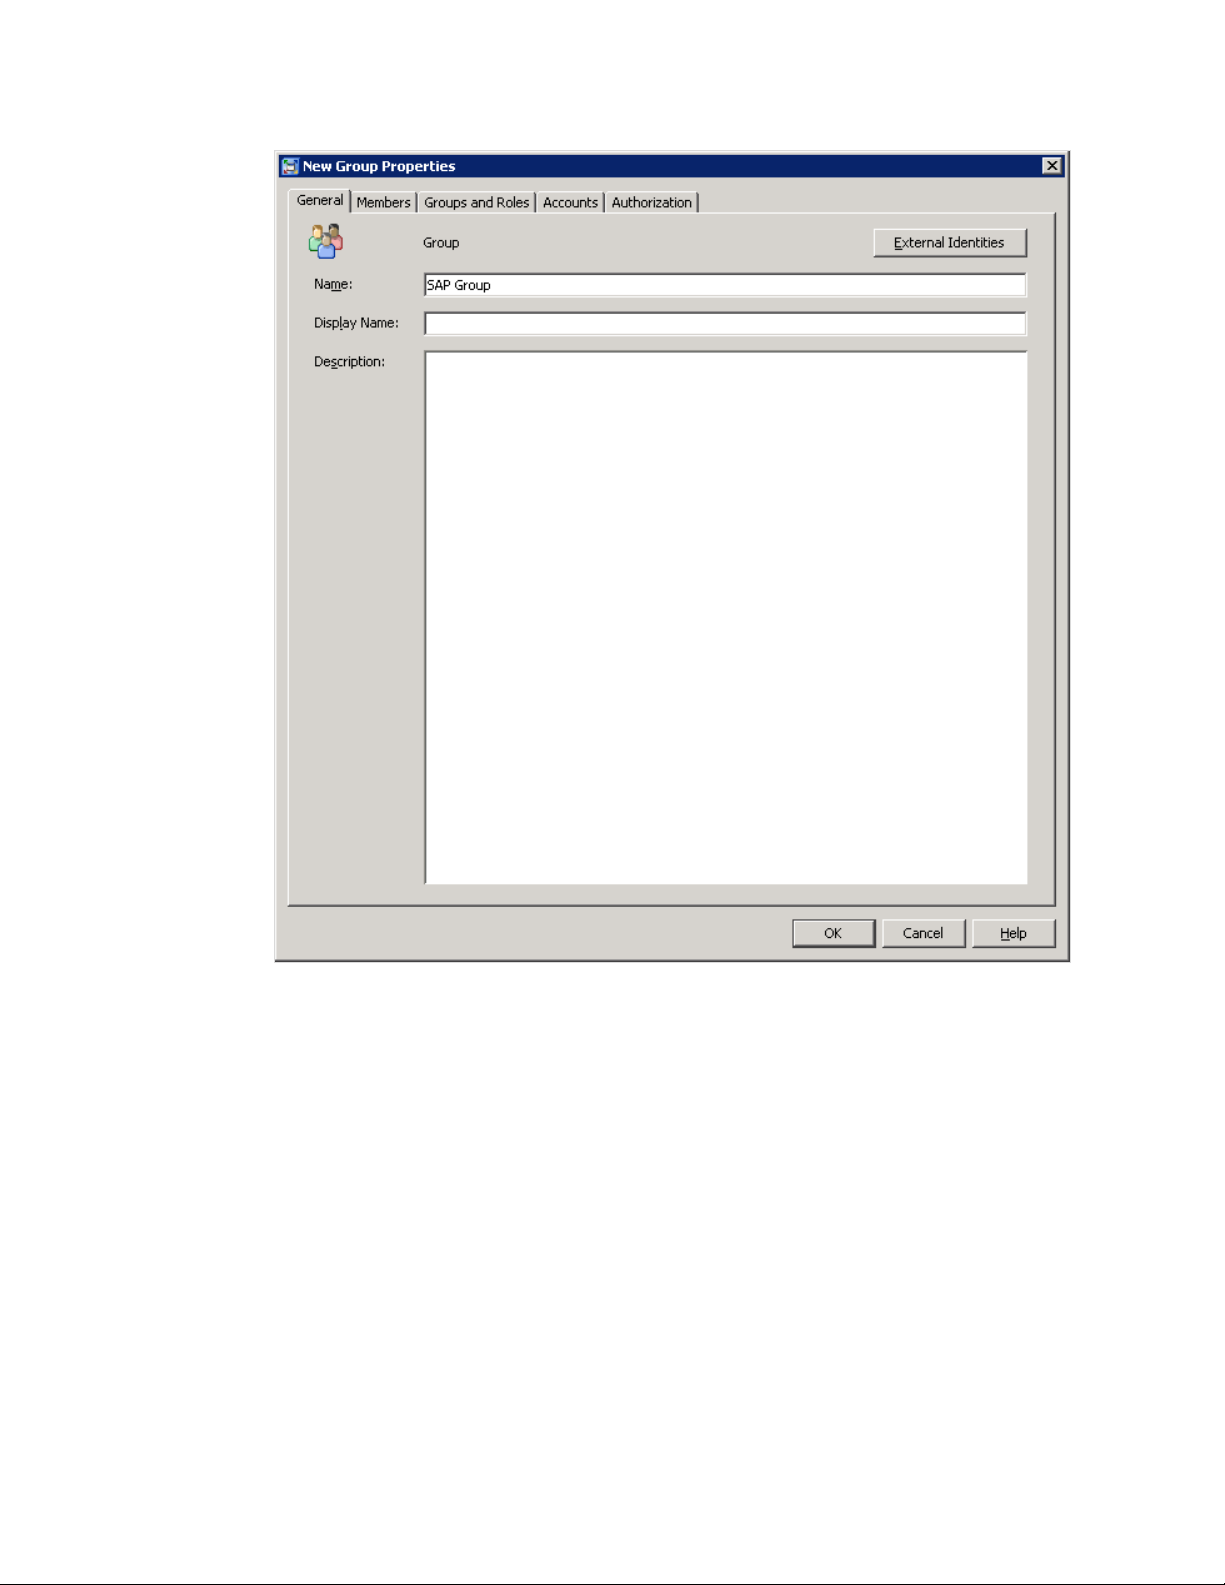
A New Group Properties dialog box appears.
Page 16
12 Define the Environment Chapter 3
3 Enter SAP Group in the Name field.
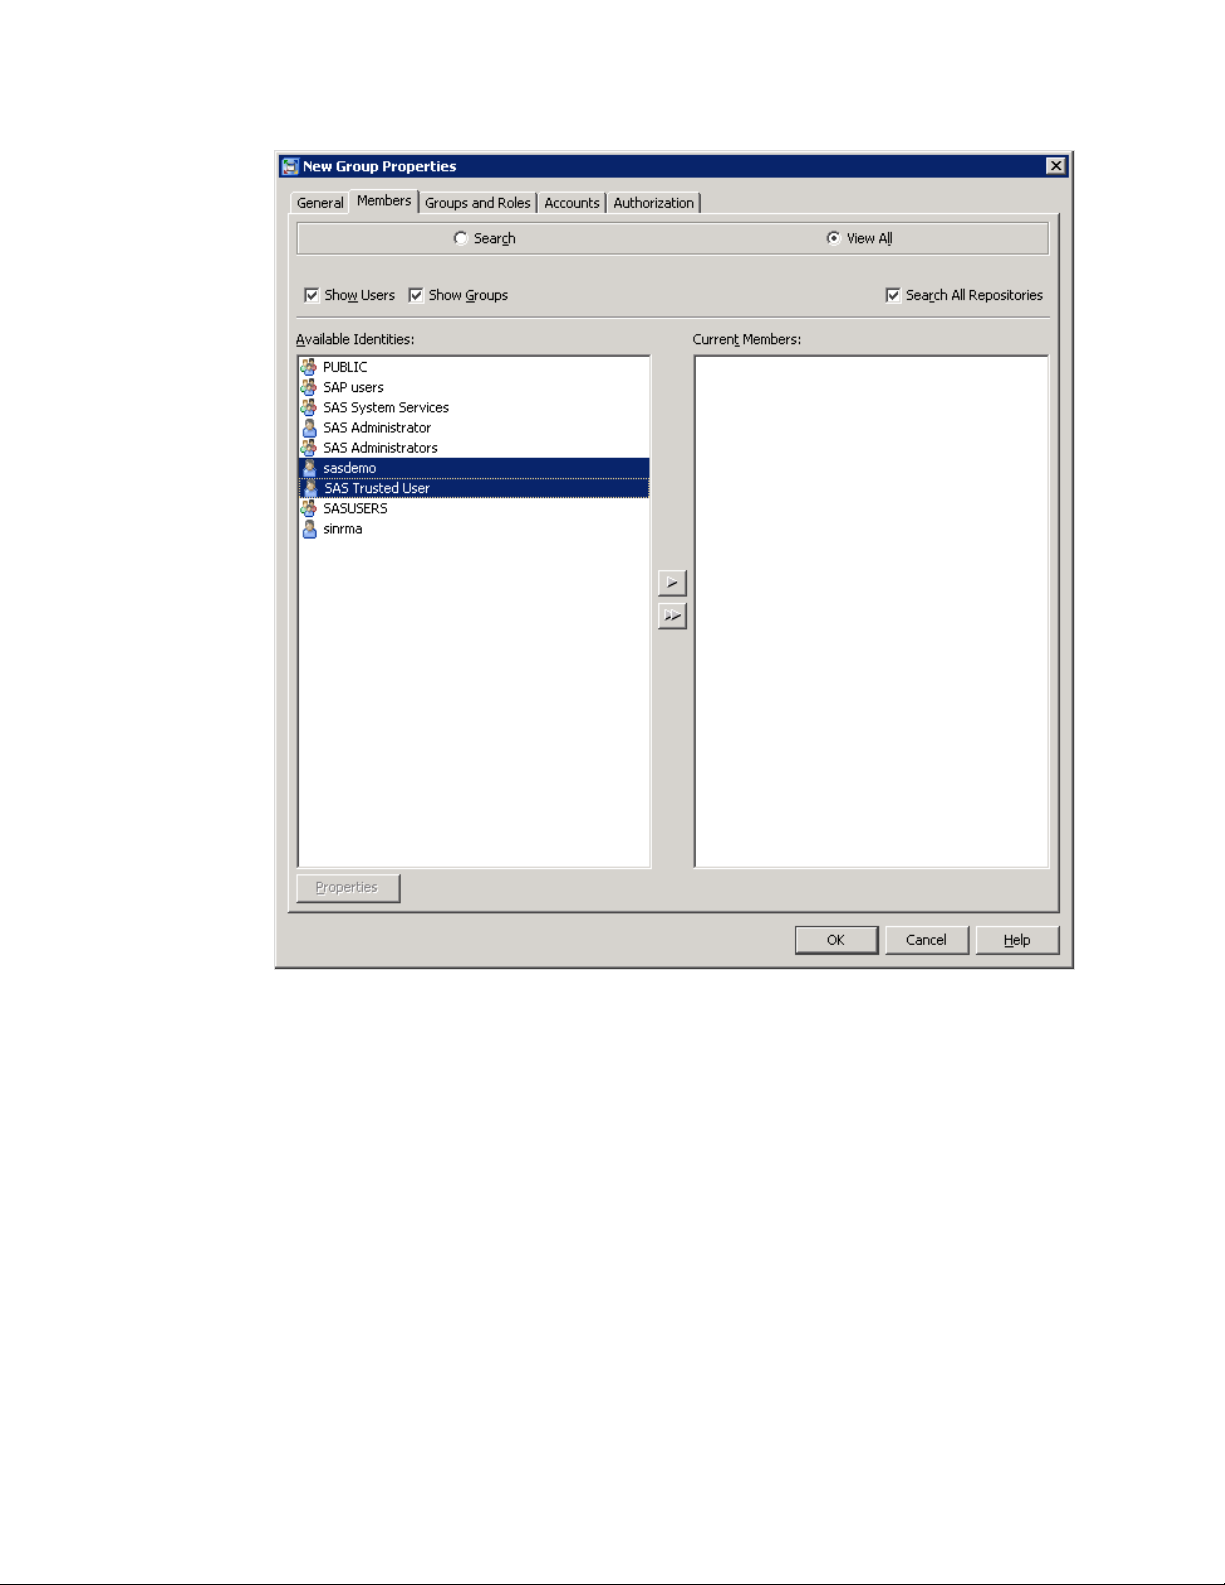
4 Click the Members tab.
Page 17
Customizing the SAS Financial Management Adapter for SAP Define the Environment 13
5 Select sasdemo and SAS Trusted User in Available Identities.
6 Click the arrow button that points to the Current Members pane.
Your selections appear in the Current Members pane. You can add other users to
the SAP User Group, as required.
7 Click the Accounts tab.
Page 18

14 Define the Environment Chapter 3
8 Click New. The New Login Properties dialog box appears.
9 Complete the following steps to provide the necessary information for the New
Login Properties dialog box:
a Enter the user ID for the SAP Server.
b Enter the password for the SAP Server.
c Select SAPAuth from the Authentication Domain list. If this option is not
already available on the list, click New, and enter SAPAuth as the name for the
new authentication domain. Also enter a short description. Then, click OK to
save the new authentication domain.
d Click OK to save the new login properties.
Page 19

Customizing the SAS Financial Management Adapter for SAP Define the Environment 15
e Click OK to save the user definitions.
Define an SAP Library and an SAP Server
To define an SAP library and an SAP server, complete the following steps:
1 Open SAS Management Console.
2 Expand Data Library Manager in the hierarchy tree on the left of the SAS
Management Console window.
3 Right-click Libraries and select New Library. A New Library Wizard dialog
box appears.
Page 20
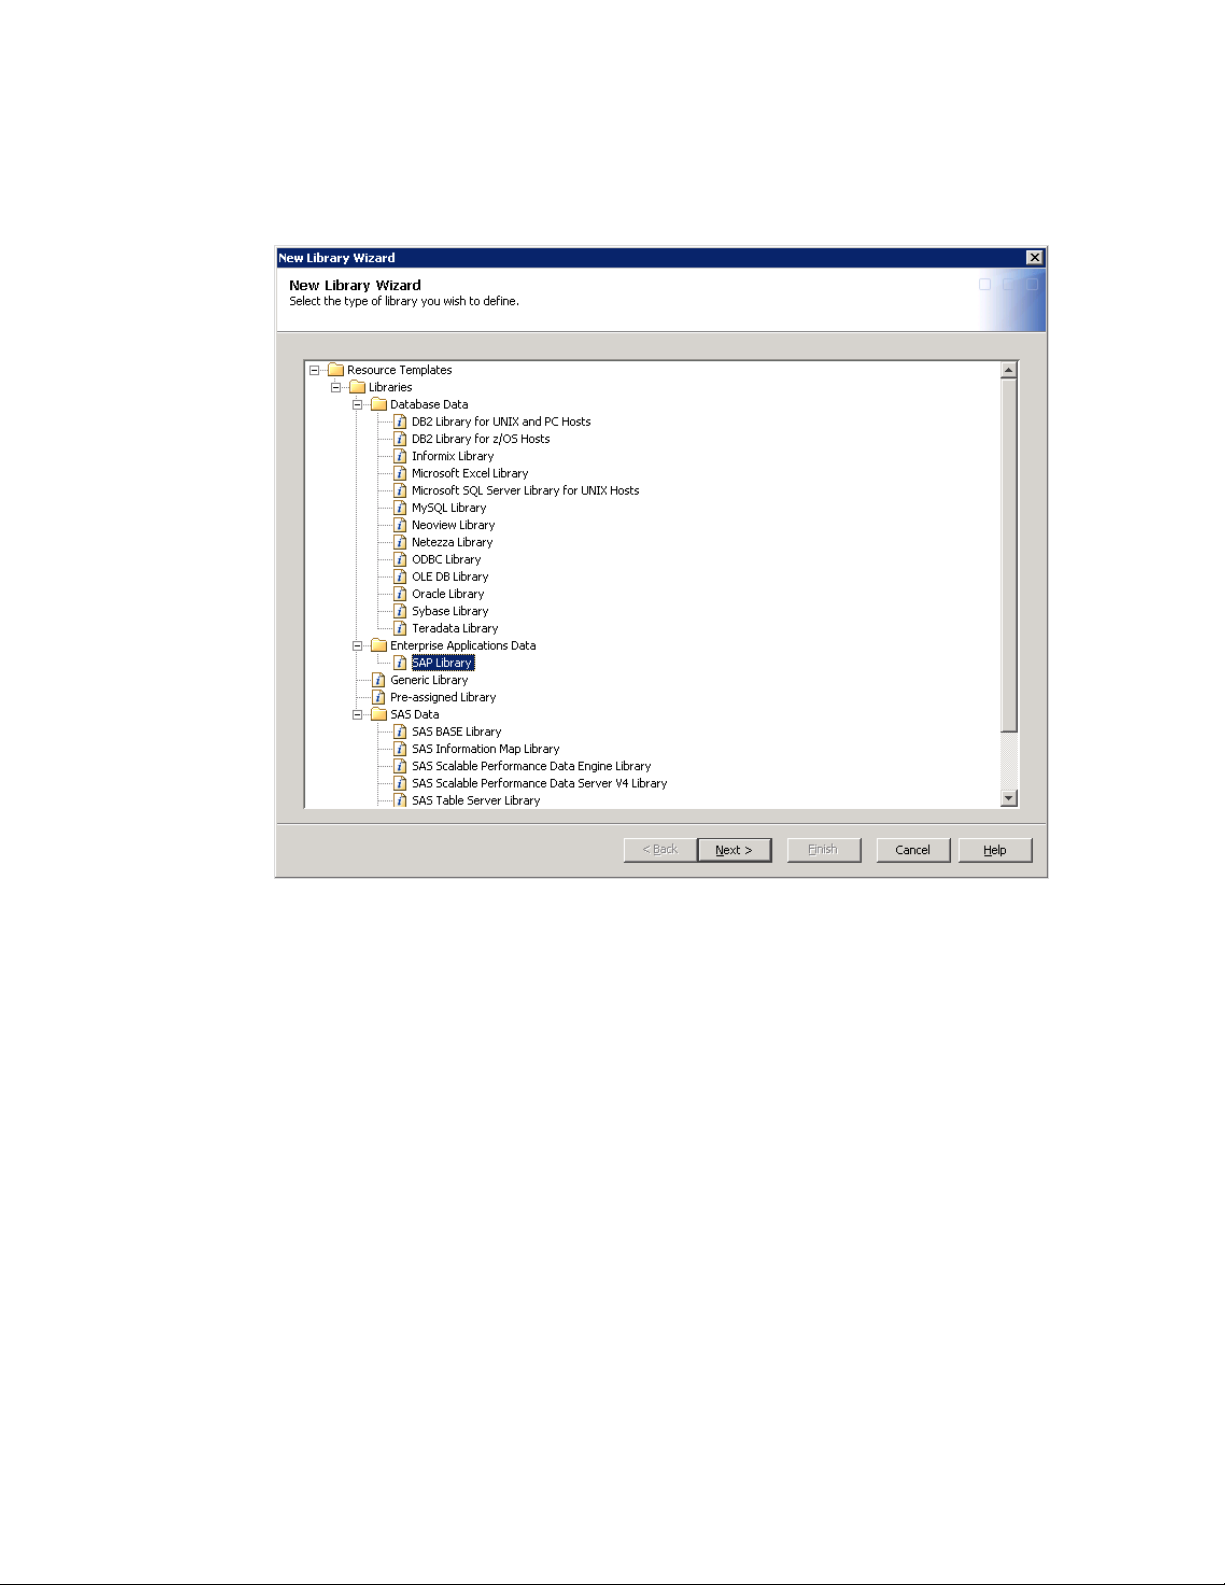
16 Define the Environment Chapter 3
4 Select SAP Library in the Enterprise Applications Data folder.
Page 21
Customizing the SAS Financial Management Adapter for SAP Define the Environment 17
5 Click Next to name the new SAP library.
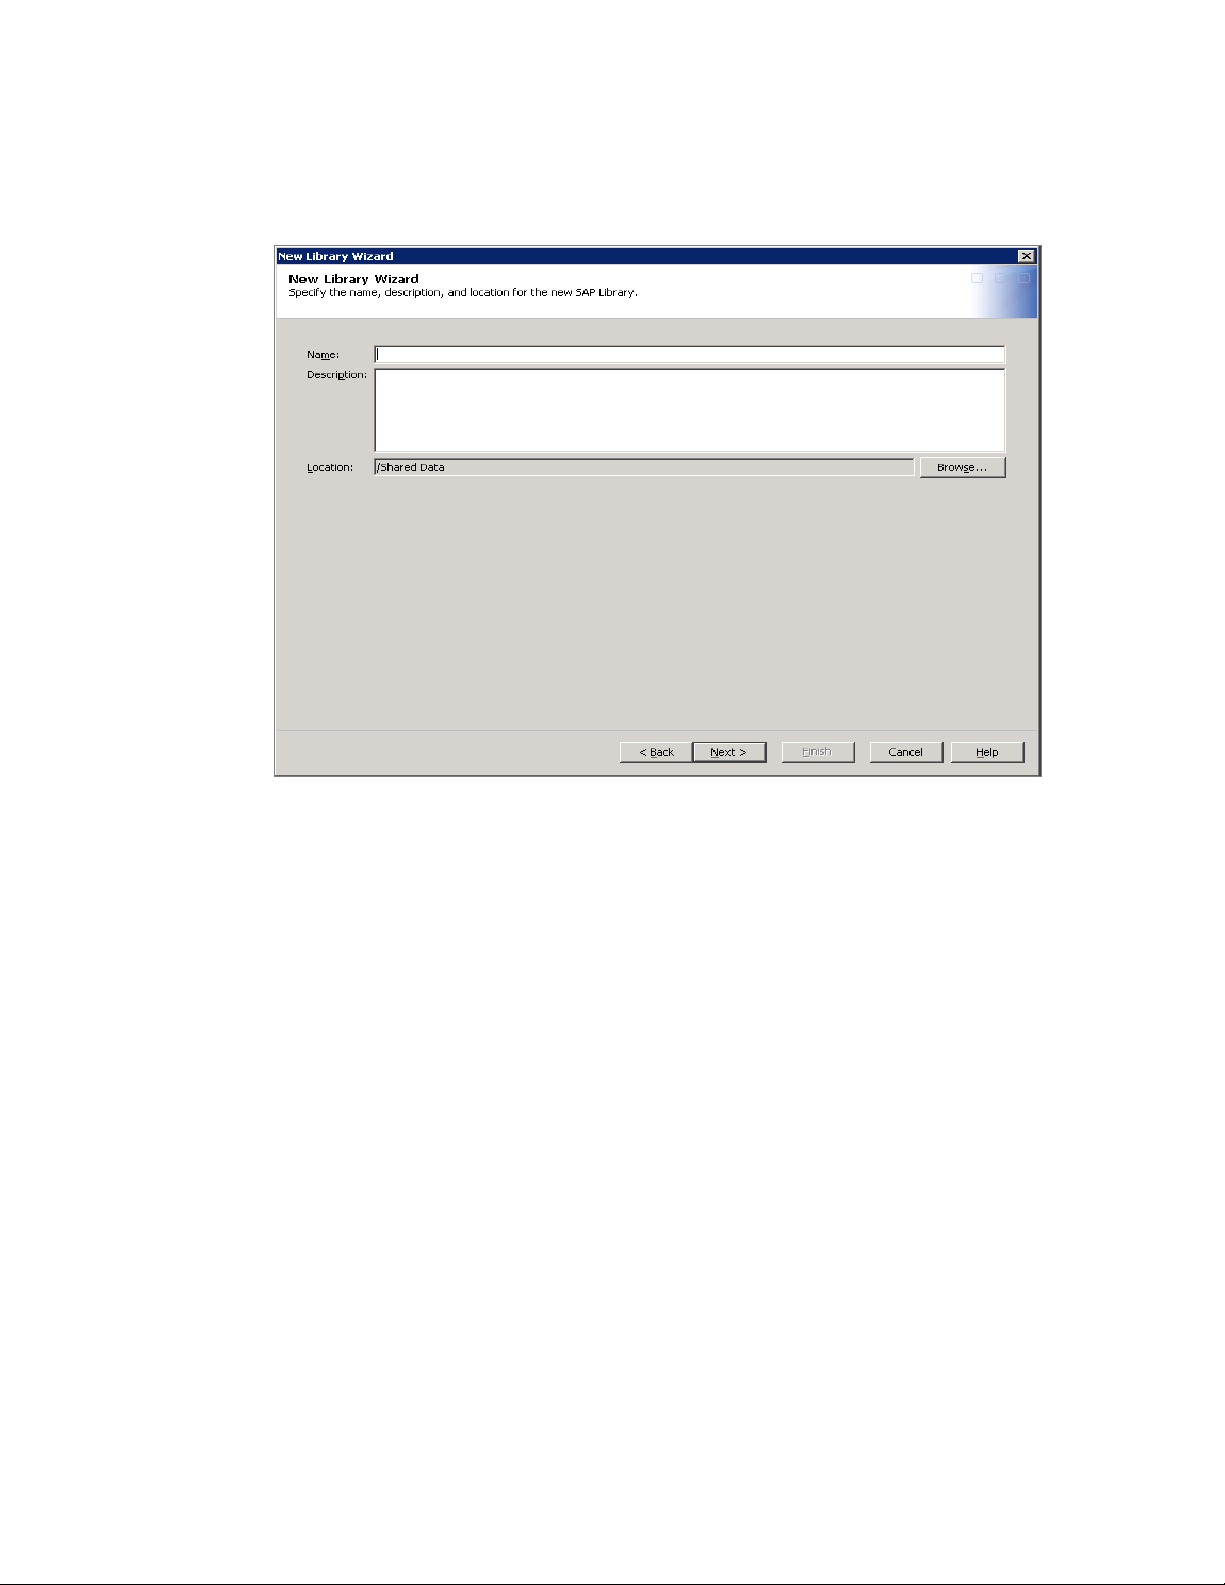
6 Enter a name and description for the SAP library and click Next.
Page 22
18 Define the Environment Chapter 3
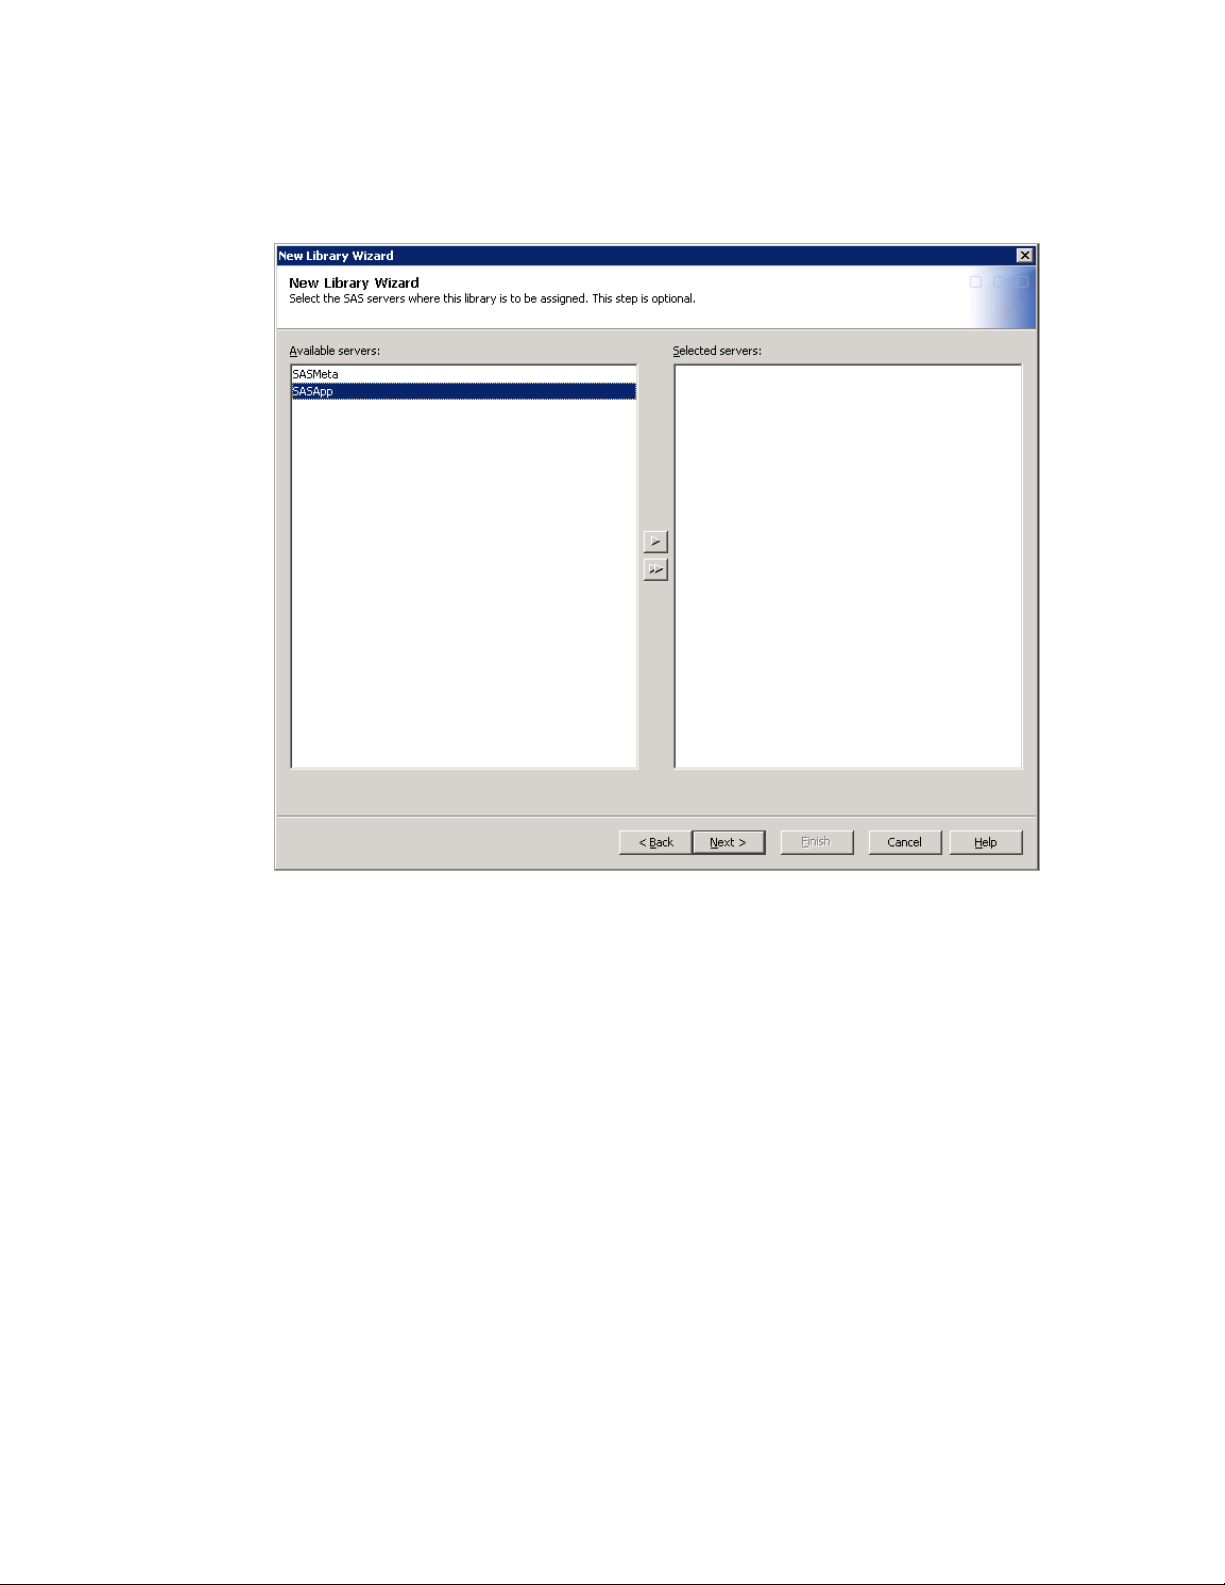
7 Select SASApp as the SAS server. Click Next to specify the library properties.
Page 23
Customizing the SAS Financial Management Adapter for SAP Define the Environment 19
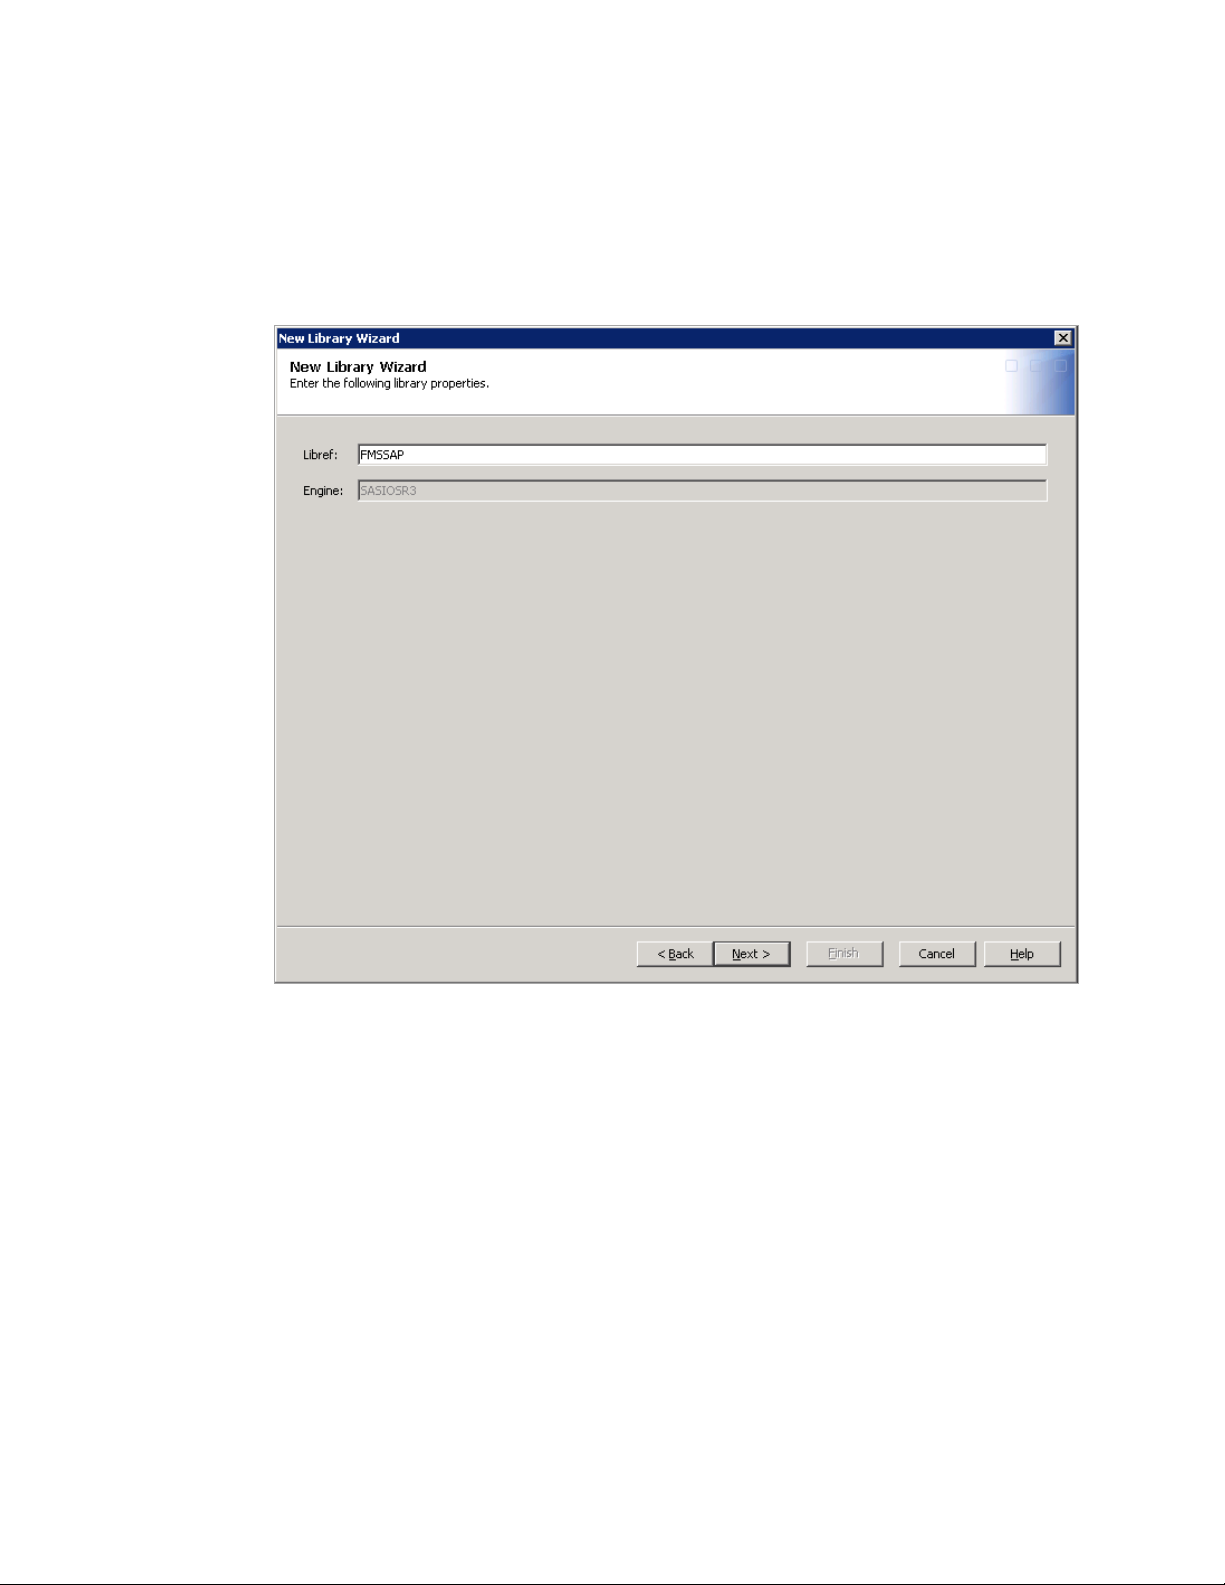
8 Enter FMSSAP in the Libref field.
FMSSAP is the default value that the imported metadata uses.
9 Click Next to select a database server.
Page 24

20 Define the Environment Chapter 3
10 In the Database Server field, select a database server that contains
parameters that connect to the SAP server.
11 Complete the following steps to create an appropriate database server if one is
not already available in the field list:
a Click New to open the New SAP Server Wizard.
Page 25

Customizing the SAS Financial Management Adapter for SAP Define the Environment 21
b Enter a name and description for the server.
c Click Next to enter information about your SAP software.
Page 26
22 Define the Environment Chapter 3
d Enter the version numbers for your SAP software. These values are optional.
e Click Next to enter connection properties.
f Select SAPAuth in the Authentication Domain field.
Page 27
Customizing the SAS Financial Management Adapter for SAP Define the Environment 23
g Specify the SAP client number and SAP language.
h Select the connection type (Application Server) that corresponds to a normal
SAP GUI connection for your system.
i Click the Options button that corresponds to your selection and enter the
required values.
Page 28
24 Define the Environment Chapter 3
12 Scroll down the page and click the Advanced Options button. If you have
defined batch servers or processes, you might need to specify some advanced
options. Click OK.
13 Click Next to display a summary page that lists your new specifications.
Page 29

Customizing the SAS Financial Management Adapter for SAP Define the Environment 25
14 Review the set parameters and click Finish to save the new SAP server and
return to the New Library Wizard.
Based on your system specifications up to this point, the wizard might prompt you
to select a SAS server where the library is to be assigned. If this page appears,
select SASMain and click Next to continue.
15 Click Next to review the library parameters.
16 Click Finish to save.
Test the SAP Connection
To test the SAP connection, complete the following steps:
1 Open SAS Management Console.
2 Open the connection profile for the user. Select ToolsÆExtract from R/3. The
Source Designer dialog box opens.
Page 30
26 Define the Environment Chapter 3
3 In the Configured SAP Server field, select the name of the SAP server that you
defined in SAS Management Console.
4 Click Test SAP Server Connection.
5 If the connection is successful, then the following message appears
Note: If the connection is not successful, a SAS log indicates the problem. For
example, RFC server errors might indicate that the RFC server is not running, or
an invalid user ID might indicate that the password is incorrect. For more
information about troubleshooting the connection, refer to Installation
Instructions for SAS/ACCESS Interface to R/3 that is included in your SAS
software order.
Page 31

Customizing the SAS Financial Management Adapter for SAP Define the Environment 27
6 Click Yes to view a SAS log.
The View SAS Log dialog box displays the LIBNAME statement that is generated
using the specified parameters.
7 Click OK to exit the SAS log.
8 Click Cancel to exit the Register Tables.
Configure the Properties File
To configure the properties file for SAS Financial Management Adapter for SAP,
complete the following steps:
1 Open the properties file “
configuration folder. If the installation is done at the default location, then the
properties file is located at “
Files\SAS\SASFinancialManagementAdapterforSAPData\5.1\Config
2 At the end of the file, replace the value of the property
“
fmadaptdata.simserver.name” from “TBD” to the name of the SAP Server created
in the previous section.
The default property value is given as “
the SAP Server that you have created.
fmadaptdata.properties” located in the default product
C:\Program
TBD”. The value must be changed to match
”.
Page 32

28 Define the Environment Chapter 3
Set Install Folder Authorizations
To avoid deployment errors, perform the steps below in the order in which they are
listed:
1 Grant full permissions to the Install folder CustomSASCode, as the deployment
process writes the custom SAS code into this folder.
Note: This is a mandatory step. If you ignore the above step and proceed with the
deployment, the following load content failed error message appears.
Page 33

Customizing the SAS Financial Management Adapter for SAP Deploy SAS Financial Management Adapter for SAP Metadata 29
2 When you import the metadata for the SAS Financial Management Adapter for
SAP using the SAS Deployment Wizard in the SAS Financial Management
Adapter for SAP Dependencies window, the parameter SAS Application
Server Context has the value SASMeta selected by default. Change it to
SASApp.
Note: The screen above appears only when you install the SAS Financial
Management Adapter for SAP on the SAS9.2M3 environment.
Deploy SAS Financial Management Adapter for SAP Metadata
Overview of Install Process
In this release, the deployment is done automatically by the SAS Deployment Wizard.
In the previous version, the metadata for objects (in this case, jobs and tables) for the
SAS Financial Management Adapter for SAP was deployed manually.
Incremental Install of the SAS Financial Management Adapter for SAP
If you have installed the SAS Financial Management and plan to do an incremental
install of the SAS Financial Management Adapter for SAP, there are specific steps that
you must follow:
1 After you install and configure SAS Financial Management, stop all SAS services.
2 Set the Startup to Manual mode and restart the server.
3 Start the SAS Deployment Wizard with -nosasupdate and -sasprompt switches.
Page 34

30 Customizing the preprocglobal.sas Program Chapter 3
4 On the Select Deployment Task page, select Install SAS Software.
5 On the Select Deployment Type page, make sure that the Install SAS
Software option is checked and the Configure SAS Software option is
unchecked.
6 On the Select Products to Install page, select SAS Foundation and SAS
Financial Management Adapter for SAP.
7 Specify the SAS Foundation components through the interactive install prompt.
Select Base SAS and SAS Financial Management Adapter for SAP.
Note: If Base SAS update fails to update, then select Yes when prompted to
continue and complete the installation.
8 After the installation is complete, restart your machine. Also, start all services
and change the Startup from Manual to Automatic.
Note: If the OLAP server, Table server, and SAS Shared Server fail to start, use a
SAS Installation Data (SID) file that contains SAS Financial Management, SAS
Financial Management Adapter for SAP, and other required components.
9 After you implement the new SID file, ensure that all SAS services have started
successfully.
10 Restart the SAS Deployment Wizard. Check the Configure SAS Software
option on the Select Deployment Type page, and proceed with the configuration
tasks.
11 On the Select Products to Configure page, select SAS Add-on for SAP and SAS
Financial Management Adapter for SAP Data.
Customizing SAS Data Integration Studio Jobs and Programs
To customize the SAS Financial Management Adapter for SAP to fit into your unique
environment, you must review and change several jobs in SAS Data Integration Studio.
Several SAS programs within these jobs also require your review and changes.
Although many of the jobs and programs might not require changes, you must review
each one to ensure the results that you want. This section provides information about
each job and program that requires your review and changes. It describes each job in
SAS Data Integration Studio and explains whether the job or program requires changes
to work successfully.
Customizing the preprocglobal.sas Program
Overview of the preprocglobal.sas Program
SAS Financial Management Adapter for SAP jobs use several global macro variables
that are initialized in the SAS program
preprocparms12.sas, which is subsequently
Page 35

Customizing the SAS Financial Management Adapter for SAP Customizing the preprocglobal.sas Program 31
called in the program
preprocglobal.sas. This program serves as the preprocessing
step in each job.
Make appropriate changes in the following section of the program to suit your
environment.
libname fmamacro 'C:\Program Files\SAS\SASFoundation\9.2\fmadaptsap\cmacros';
options MSTORED SASMSTORE=fmamacro;
Use this section of the program given above to change the path to the Adapter macro
catalog as per your host requirement.
Note: Be sure to make a backup copy of the program before changing it.
Locating Files
The preprocparms12.sas program is located in the install directory. This file can be
found at the location that you specified in the field Enter the path for SAS source
code, on the Enter Parameters page of the SAS Deployment Wizard.
The
preprocparms12.sas program file is called by the preprocglobal.sas program.
The
preprocglobal.sas program must be edited to suit the local environment.
Page 36

32 Customizing the preprocglobal.sas Program Chapter 3
/*************************************************************************/
/* Copyright (c) 2010 by SAS Institute Inc., Cary, NC 27513, USA */
/* */
/* Name: preprocglobal.sas */
/* */
/*************************************************************************/
%put NOTE: Executing SAS Financial Management Adapter 5.1 for SAP - ImplementationVersion 20051004;
/* Global Preprocessing */
proc display c=sashelp.adptsap.startup.scl batch;
run;
options mstored mrecall;
filename macro '!ADPTFMSINSTALL';
options sasautos = (macro sasautos );
libname fmamacro 'C:\Program Files\SAS\SASFoundation\9.2\fmadaptsap\cmacros';
options MSTORED SASMSTORE=fmamacro;
/* ---- FORMATS LIBRARY Preassigned here */
Libname library '!ADPTFMSDATA/Formats';
%global spras ktopl versn sakln gjahr _ktopl _versn _start
dds_source_system_id
wanted_controlling_areas operating_concern ;
%include "!ADPTFMSINSTALL/preprocparms12.sas";
options fmtsearch = (fmtsearch library.fmt&lang library.fmt&_ktopl.&lang);
/*
* End of preprocglobal.sas
*/
After you open preprocparms12.sas, you can see the banner for the SAS program file.
Edit this file to suit your local environment.
SAP System Parameters
Introduction
The subtopics below discuss sections of the preprocparms12.sas file.
Page 37

Customizing the SAS Financial Management Adapter for SAP Customizing the preprocglobal.sas Program 33
Data Source
Below the banner, the first section of preprocparms12.sas designates the data source
location.
%let dds_source_system_id=800; * 3 char ID to tell DDS where info
* is coming from. It could be SAP,
* or client number - or SAP sysid - anything
* that uniquely represents the current
* ETL ;
The macro variable DDS_SOURCE_SYSTEM_ID is a three-character ID that tells
the SAS Detail Data Store where the data is coming from. The value can be anything
that uniquely represents the current ETL environment such as SAP, the SAP client
number, or the SAP system ID.
This variable populates the SOURCE_SYSTEM_CD column that occurs in multiple
tables of the SAS Detail Data Store. If data originates from multiple SAP systems,
multiple extracts are necessary, with each extract having its own
file and unique value set for the variable DDS_SOURCE_SYSTEM_ID.
preprocparms12.sas
SAP Queries
The program’s SAP queries section enables you to view information about queries that
are passed directly to SAP.
* Use only when testing to see what is passed to SAP ;
* options debug=dbms_select;
The statement options debug=dbms_select shows detailed information about
queries that are passed directly to SAP. Generally, the SAP queries section is not needed
unless you think that SAP server-side joins are taking longer than expected to run. This
section provides additional tracking that might help solve problems.
SAP Language Codes
Use the SAP Language Codes section of the program file to designate the language
that SAP uses.
%let spras = 'E'; * single-char SAP language with quotes;
%let lang = E; * language without quotes;
* set valid SAS language value to be used in the
* solution data mart ;
%let sas_lang_for_sdm='en';
Set the macro variables spras and lang to the single-character language code that
corresponds to the main language that SAP uses. This is also the language that the
program uses to maintain texts. Quoted and unquoted versions exist for easy inclusion
into code and for making the code easy to understand and read.
Page 38

34 Customizing the preprocglobal.sas Program Chapter 3
Use the following language code table to determine the valid language value for your
local environment.
Table 3.1 Language Codes for preprocparms12.sas
Code Language Code Language
0 Serbian I Italian
1 Chinese J Japanese
2 Thai K Danish
3 Korean L Polish
4 Romanian M Chinese (traditional)
5 Slovenian N Dutch
6 Croatian O Norwegian
7 Malaysian P Portuguese
8 Ukrainian Q Slovakian
9 Estonian R Russian
A Arabic S Spanish
B Hebrew T Turkish
C Czech U Finnish
D German V Swedish
E English W Bulgarian
F French X Lithuanian
G Greek Y Latvian
H Hungarian Z Customer Reserve
The macro variable SAS_LANG_FOR_SDM sets the main language that SAS uses.
The two-character language code must be lowercase and in the table
SASHELP.LANGUAGE that is supplied by SAS.
The new macro variable DEFAULT_LANG is a two-digit ISO code that sets the
default language flag in the STAGE_CODE_LANGUAGE table.
SAP Client
The value of the LET CLIENT macro variable is the SAP client (column MANDT)
that is part of the SAP R/3 logon in most cases.
%let client = 800 ; * = MANDT ;
Page 39

Customizing the SAS Financial Management Adapter for SAP Customizing the preprocglobal.sas Program 35
Common Extraction Parameters
E-Mail Address for the Recipient of Error Reports
The e-mail contact for the error reports section of preprocparms12.sas includes the
e-mail address of the contact who receives error notifications. These error notifications
might be sent for extractions or transformation flows that use a publish-to-e-mail
transformation. The initial value is obtained from the parameters that are supplied in
the import steps.
*---Email contact for error reports---*;
%let emailerror=xxx@yyy.zzz.domain;
Cost Center and Profit Center Hierarchies
By default, the SAS Financial Management Adapter for SAP extracts the standard
hierarchies for the cost center and the profit center. You can select a different
hierarchy by specifying alternative hierarchy roots in the macro variables
COST_CENTER_HIER_ROOT and PROFIT_CENTER_HIER_ROOT.
To accept the default standard hierarchies, leave the macro variables blank.
* Set values if you want to override the default hierarchy;
%global cost_center_hier_root profit_center_hier_root;
%let cost_center_hier_root=;
%let profit_center_hier_root=;
Company Codes
To extract data from SAP for only selected companies, specify the
WANTED_COMPANY_CODES macro variable to select company codes. The list of
valid company code values is in the SAP R/3 table TKA02. The companies that you
specify need to belong to controlling areas that are selected by the macro variable
WANTED_CONTROLLING_AREAS.
* Select wanted company codes from TKA02 -
List must be entered as quoted company codes
separated by commas ;
%let wanted_company_codes='1000' , '2000' , '6000';
Euro Currency Conversion
The SAS Financial Management Adapter for SAP can convert employee
compensation amounts that are paid to employees in pre-euro currencies, so that all
amounts are in euros. The macro variables CONVERT_CURRENCY_TO_EURO and
PRE_EURO_CURRENCY control this conversion. This conversion is performed
because the salary results table does not explicitly contain currency information.
Page 40

36 Customizing the preprocglobal.sas Program Chapter 3
The macro variable CONVERT_CURRENCY_TO_EURO needs to have a value of
YES or NO. The macro PRE_EURO_CURRENCY must be set to one of the standard
international currency codes. These codes are three characters in length. The macro
PRE_EURO_CURRENCY is used only when the macro
CONVERT_CURRENCY_TO_EURO is set to YES.
Note: The SAS Financial Management Adapter for SAP does not use the euro
currency conversion macro variables in areas other than the calculation of employee
compensation. However, you can use these macros elsewhere.
/*
* Currency amount before 2001 might be converted from pre-euro currencies
* to euro using the standard fixed exchange rates.
* To switch on this conversion the macro variable convert_currency_to_euro
* has to be set to YES, pre_euro_currency has to be set to the pre-euro currency
* as 3-character ISO code like DEM, FFR, BEF,...
* Note that only a single currency is assumed.
*/
%let convert_currency_to_euro = NO;
%let pre_euro_currency = DEM;
SAS Financial Management Parameters
Chart of Accounts
The SAS Financial Management Adapter for SAP uses one chart of accounts at a
time. You must specify this chart of accounts in the macro variables KTOPL and
_KTOPL.
A chart of accounts in SAP is a list of all general ledger accounts that one or more
company codes use. For each general ledger account, the chart of accounts contains the
account number and the account name. It also contains information that controls how
an account functions, and how the account is created in a company code.
%let ktopl = 'INT'; * chart of accounts ;
%let _ktopl = INT; * chart of accounts without quotes;
If you need more than one chart of accounts for your environment, you must set up
additional instances of the SAS Financial Management Adapter for SAP and specify
the relevant values. Be sure to select unique values for the data source macro variable
DDS_SOURCE_SYSTEM_ID, as shown in the data source section of the
preprocparms12.sas file.
To specify a correct value for the chart of accounts, see the contents of the SAP R/3
table T004T. This table contains the names of the charts of accounts based on language
dependency. You can use a WHERE clause to select the appropriate language. Also, the
KTOPL value must appear in the KTOPL column of the T001 table.
After you have determined the correct variable for the chart of accounts, enter the
value. You must enclose the KTOPL value in single quotation marks. Do not enclose the
_KTOPL value in double quotation marks.
Page 41

Customizing the SAS Financial Management Adapter for SAP Customizing the preprocglobal.sas Program 37
Digits in the Account Number
The value for SAKLN determines the number of digits in the account number. If you
do not know this value, see the contents of the SAP R/3 table T004. The SAKLN column
in this table corresponds to the chart of accounts KTOPL value previously chosen.
Remember that valid account numbers often contain leading zeros. You can delete
these leading zeros from the account digit value.
%let sakln = 6; * number of digits in the account number;
Operating Concern
The preprocparms12.sas program file enables you to specify the operating concern
in the macro variable OPERATING_CONCERN and a corresponding country code in
the macro variable OPERATING_CONCERN_COUNTRY_CD.
* List of valid operating concerns is in
* TKEB, language-dependent descriptions are in TKEBT ;
%let operating_concern=IDEA;
* specify country where the operating concern HQ is located;
%let operating_concern_country_cd=DEU;
To specify a correct value for the operating concern and country code, see the contents
of the SAP R/3 table TKEB. Descriptions based on language dependencies are available
in the TKEBT table.
External Organizations
The macro variable EXT_ORG_ASSOC_TYPE_CD specifies the default value for
external organizations that are not found in the customer and vendor hierarchies from
SAP. This value populates the EXTERNAL_ORG_ASSOC_TYPE_CD column in the
EXTERNAL_ORG_ASSOC_TYPE table of the staging area.
* Specify ext_org_assoc_type_cd to use as the default value for
external organizations that are not found in the customer and
vendor (supplier)hierarchies from SAP;
%let ext_org_assoc_type_cd=A;
The default SAP value for EXT_ORG_ASSOC_TYPE_CD is A. For other valid values,
see the contents of the SAP R/3 tables, THITT and TLHITT.
Controlling Areas
You can use controlling areas to form the second level of the internal organizational
hierarchy. You can use them to select cost-center and profit-center standard hierarchies.
You must specify the corresponding country for each controlling area.
Page 42

38 Customizing the preprocglobal.sas Program Chapter 3
%let wanted_controlling_areas=1000 6000;
%let controlling_area_countries=DEU MEX;
To set the variables for the controlling area, you first need to specify a list of
controlling areas that are required in the macro variable
WANTED_CONTROLLING_AREAS. This list should contain values from the KOKRS
column in the TKA01 table. When specifying the list, make sure that the controlling
areas are all in the same operating concern. For example, select values for KOKRS only
where ERKRS="&OPERATING_CONCERN".
After you specify the required controlling areas, specify the corresponding country for
each controlling area. Each country is identified with a three-digit ISO code in the
SASHELP.SAS_COUNTRY table.
Use the macro variable CONTROLLING_AREA_COUNTRIES to specify the
corresponding country for each controlling area. The first country code must correspond
to the first controlling area. The second country code must correspond with the second
controlling area, and so on.
SAP R/3 Table GLT0 Data Subsets
Use the macro variables RLDNR, RRCTY, and RVERS to subset the data that is
extracted from the SAP R/3 table GLT0. The GLT0 table contains figures that are
summed by transaction.
* Define macro variables used as "constants" in the
* where clause of R/3 table GLT0 . ;
%let rldnr=00; * Ledger ; * see T881 or T881T for value ;
%let rrcty=0; * Record Type ; * 0=Actual, 1=Planned;
%let rvers=001; * Version ; * see T894 or T894T
* (apply WHERE clause where rldnr="&rldnr");
Although the default settings are generally acceptable, check them against valid
values.
For valid ledger values, see the contents of the SAP R/3 tables T881 and T881T.
For the record type value, 0 is the typical value for actual data.
For valid version values, see the contents of the SAP R/3 table T894. The
version descriptions are in the T894T table.
Period Type for Exchange Rates
Use the macro variable PERIOD_TYPE_CD_FOR_EXRATES to specify the period
type that will be associated with exchange rates. A list of valid values is in the
SASHELP.SAS_PERIOD_TYPE table that is provided by SAS.
%let period_type_cd_for_exrates=MO; * This value must be chosen from the table
* sashelp.sas_period_type. This is used
* in the jobs that build table
* STAGE_CURRENCY_EXCHANGE_RATE;
Page 43

Customizing the SAS Financial Management Adapter for SAP Customizing the preprocglobal.sas Program 39
Financial Statement
The SAS Financial Management Adapter for SAP handles one financial statement at
a time. You must specify this financial statement in the macro variables VERSN and
_VERSN as shown:
* Versn is a value taken from T011;
%let versn = 'ERL'; * Financial statement version Version ;
%let _versn = ERL; * Financial statement version without quotes;
To specify a correct value for the financial statement, see the contents of the SAP R/3
table T011. You can use the T011 table for text descriptions as well. You can use a
WHERE clause in the T011 table to select the KTOPL value.
Using these references, choose and enter one of the matching VERSN values. You
must enclose the VERSN value in single quotation marks. Do not enclose the _VERSN
value in double quotation marks.
The financial statement that is extracted from SAP is used to build the accounts
dimension hierarchy. This hierarchy has no common root because it consists of
disjointed subtrees. You can add a common root by specifying a description for it in the
macro variable FINANCIAL_STATEMENT_ROOT_TXT.
Note: It is recommended that you leave this macro variable blank.
* The following macro variable is used to specify text for the
* top combination node of financial hierarchy (root)* Otherwise the hierarchy contains disjoint subtrees.;
%let Financial_statement_root_txt = %nrquote(Financial Statement);
Fiscal Year Variant
SAP enables companies to have multiple fiscal year variants, although most
companies use only one variant. If your organization uses multiple variants, you must
include the variant name in period IDs and descriptions to avoid ambiguity. For best
results, be sure to use clear period IDs and descriptions that do not include the variant
information.
The macro variable USE_FISCAL_YR_VARIANT_IN_TIME can control behavior
based on the following two values:
The value N causes the variant to not be used.
The value Y forces the variant information into the period IDs and descriptions.
* The use_fiscal_yr_variant_in_time macro variable determines whether the
* fiscal variant name is use in the time dimension ID and descriptions.
* In most cases, only one fiscal variant is used, and the default is
* therefore N ;
%let use_fiscal_yr_variant_in_time=N;
Page 44

40 Customizing the preprocglobal.sas Program Chapter 3
Set the Extraction Starting Date
1 Use the macro variables START and STARTFINYEAR to set the starting date
for the extraction financial transactions.
These values help reduce the amount of data that is extracted in the initial load
by not extracting financial transactions with dates before the specified date.
* If the financial year starts in January then use value 1,
February then use 2, and so on ;
%let finyear_startmonth=1;
* The following macro variables determine from which date financial
* transactions
* should be extracted from SAP. This is IMPORTANT when
* initializing the data
* during the initial load phase. In subsequent extracts,
* only new/changed data
* is extracted;
%let _start = 01JAN2000; * Start date - First extraction to
* take transactions after this date;
%let _startfinyear = 2000;
%let _opening_balance_period=200001; * Opening balance period.
* This must be in the
* format YYYYMM - It should usually
* be the period of _start macro
* variable above.
* If it is set to blank, then No
* opening balance
* is extracted. ;
2 Set the extraction variables based on your environment.
The FINYEAR_STARTMONTH value is the number of the month in which
the financial year starts. January is represented by 1, February by 2, and so
on.
The _START value is the first day of your organization’s financial year. This
value must be in SAS DATE9 format.
The _STARTFINYEAR value is your organization’s financial year. For
example, if your organization’s financial year for 2005 begins on 01
December 2004, then you must set the _STARTFINYEAR value to 2005.
Choose a value that reflects the year after which detailed transaction data
is to be extracted from SAP.
Page 45

Customizing the SAS Financial Management Adapter for SAP Customizing Non-Leaf Text in the preprocparms13.sas Program 41
Determine Current Fiscal Year
The current fiscal year and time period are derived from the current date.
*--- Determine the current Fiscal year ---- and period *;
data _null_;
today=today(); * FOR TESTING PURPOSES can be set to a fixed date for
example’01JAN2000’d;
fiscal_year=year(today);
call symput('GJAHR',put(fiscal_year,4.));
month=month(today);
if month=1 then do;
prevmonth=12;
prevmonth_fiscal_year=fiscal_year-1;
end;
else do;
prevmonth=month-1;
prevmonth_fiscal_year=fiscal_year;
end;
call symput('current_time_period',put(fiscal_year,4.)!!put(month,z2.));
call symput('previous_time_period',
put(prevmonth_fiscal_year,4.)!!put(prevmonth,z2.));
run;
* Set the number of years into the future the time dimension should
cover ;
%let time_dim_future_yrs=10;
Buffer for Re-Extraction
The macro variable OVERLAP enables you to re-extract data that has changed during
the overlap since the last extraction of financial transactions.
The OVERLAP value is specified in number of days. Do not set this value to less than 2
because that is the minimum time needed to handle overnight processing and time zone
differences. The default value is 4 days.
%let overlap=4; * Set number of days to re-extract financial documents;
* This might be needed to catch late processing, long
* running processes, and so on ;
* The value should not be made lower than 2!;
Customizing Non-Leaf Text in the preprocparms13.sas Program
The preprocparms13.sas program enables you to specify parameters that identify
leaf nodes and non-leaf nodes in the cost center and profit center standard hierarchies
for your site. This program is called by the
in the preprocessing section of every SAS Financial Management Adapter for SAP
extract and transformation.
preprocglobal.sas program that is specified
Page 46

42 Setting Up for Internationalization (I18N) Chapter 3
You can use the preprocparms13.sas program to prepend a string to non-leaf node
IDs in the cost center and profit center standard hierarchies. This action enables you to
easily identify non-leaf nodes in the hierarchies.
Setting Up for Internationalization (I18N)
Steps for Setting Up for Internationalization
If your SAP system is a Unicode system, configure the SAS environment to point to
the SAS Unicode Server. SAP data is on the Unicode pages, and you must use the
appropriate transcoding while extracting the SAP data using the Data Surveyor.
To configure the SAS Financial Management Adapter for SAP in an
Internationalization environment, perform the following steps:
1 Modify the SASV9.CFG file to access the SAS Unicode Server. The default path
for the SASV9.CFG file is C:\Program Files\SAS\SASFoundation\9.2.
2 Open the SASV9.CFG file to make changes. Replace en with u8 in the code
below.
-CONFIG "C:\Program Files\SAS\SASFoundation\9.2\nls\u8\SASV9.CFG"
3 Restart the SAS Services after the code changes are complete.
4 Change the above SASV9.CFG file to point to the appropriate encoding format
that suits your encoding requirement.
Note: The example given above applies in a Windows environment only. You need
to apply the above changes appropriately, as per your site host.
5 Use the appropriate SAS supplied tables suitable to your environment.
Page 47

Customizing the SAS Financial Management Adapter for SAP Additional General Information 43
For example, if you use the Adapter with euc-cn encoding to load the data from
SAP into the solution. Ensure that the tables supplied by SAS, such as
SAS_CURRENCY, contain Chinese text. This is because the Adapter jobs load the
stage tables with the currency text as defined in the table SAS_CURRENCY. If
you use the SAS_CURRENCY table with English text, then the stage currency
table will contain currency descriptions in English text.
Note: This guideline also applies to SAS_COUNTRY_ISO3166, another table
supplied by SAS.
Warning Messages
The Adapter is packaged with predefined SAP metadata that is suitable for both
Unicode and non-Unicode systems. Due to this, you might see warning messages that
are related to the base and data length mismatch in the Adapter jobs, depending on the
encoding option that you have used.
For example, when you run the Adapter jobs in WLATIN1 encoding, you see a
warning message as shown below. However, warning messages do not appear if you use
Unicode encoding or another double-byte encoding like euc-cn.
These warning messages are displayed for your information only, and can be safely
ignored. They have no impact on the data extraction or loading.
Additional General Information
Some Adapter jobs use a new feature from the latest version of the SAS Data
Integration Studio that enables you to reuse a table multiple times in a job data flow.
This capability was not available in the previous version of SAS Data Integration
Studio. Because of this feature, you might see control flow warnings when you try to
execute a job. These warning messages appear due to the default behavior of the table
loader transform.
Page 48

44 Additional General Information Chapter 3
The warning messages are displayed for your information only and can be safely
ignored. They have no impact on the data extraction or loading.
Page 49

45
CHAPTER
4
Transformations Provided for SAP
Overview of Transformations Provided for SAP ........................................................................................... 45
Add Standard Dimension Rows and Add Standard Dimension ASSOC Rows Transformations ............ 46
Introduction ............................................................................................................................................. 46
Using the Add Standard Dimension Rows Transformation ................................................................. 46
Using the Add Standard Dimension ASSOC Rows .............................................................................. 52
Using the Add Parent to Hierarchy Table Based on Level and Position Transformation .................. 54
Format Generator ............................................................................................................................................ 59
Introduction ............................................................................................................................................. 59
Properties Handled by the Format Generator Transformation ............................................................ 59
Table Properties ............................................................................................................................... 59
Format Issues and Properties .......................................................................................................... 59
Code Properties and Requirements ................................................................................................. 59
Issues for CNTLIN Table Columns ................................................................................................. 59
Using the Format Generator Transformation ........................................................................................ 60
User Written Code for Multiple Input Output Tables Transformation ........................................................ 65
Introduction ............................................................................................................................................. 65
Using the User Written Code for Multiple Input Output Tables Transformation ............................... 65
Changed Data Extraction Using Date or Time-Stamp and Overlap Transformation ................................ 70
Date Join Transformation .............................................................................................................................. 70
Period Consolidation Transformation ........................................................................................................... 72
Repeat Record for Date Range Overlap Transformation .............................................................................. 73
Split the NLS Data Transformation .............................................................................................................. 75
Introduction ............................................................................................................................................. 75
Using the Split NLS Data Transformation ........................................................................................... 76
Additional Generic Transformations ............................................................................................................. 77
Introduction ............................................................................................................................................. 77
Keep First or Last Record in Group Transformation ............................................................................ 78
DATA Step Merge Transformation ......................................................................................................... 78
Convert Number Order to Integer Value Transformation ..................................................................... 78
Map SAP Address Lines to SAS Address Lines Transformation ......................................................... 78
Overview of Transformations Provided for SAP
The SAS Financial Management Adapter for SAP provides extraction jobs and
transformation jobs that integrate data from standard SAP tables into standard SAS
tables for SAS Financial Management. Some of the jobs use transformations that are
not part of SAS Data Integration Studio, but are provided as part of the SAS Financial
Management Adapter for SAP.
There are two types of transformations that are provided and used by the SAS
Financial Management Adapter for SAP:
transformations that are specific to applications related to SAP
generic transformations that are not specific or exclusive to applications related to
SAP
Page 50

46 Add Standard Dimension Rows and Add Standard Dimension ASSOC Rows Transformations Chapter 4
This chapter describes these transformations. This information can help you better
understand the existing SAS Financial Management Adapter for SAP jobs that use
these transformations. You can use this information to determine whether the
transformation can be used for other jobs that you might create.
Add Standard Dimension Rows and Add Standard Dimension ASSOC Rows Transformations
Introduction
The Add Standard Dimension Rows transformation and the Add Standard Dimension
ASSOC Rows transformation add standard row values to dimension and dimension
ASSOC tables. These two transformations work with each other.
These transformations are necessary, because the SAS Detail Data Store does not
allow fact tables to have blank values for dimension foreign key columns. As a result,
the transformations convert blank values to standard or special values.
Some dimension tables might need additional standard rows. For example, a financial
transaction in SAP that does not involve a cost center has a blank value in the cost
center column. This blank value is converted to UNASSIGNED value.
The following list describes the standard row values and their corresponding
meanings or instances:
ALL represents the root node in the hierarchy of certain dimensions. The
hierarchy is stored in the _ASSOC table.
UNASSIGNED implies that the original value in the transaction was blank.
OPENBAL implies that the transaction was obtained from the opening balance
summary information, for which there is no detail information for all
dimensions.
EXT is a required row for the internal organization dimension.
Using the Add Standard Dimension Rows Transformation
This section describes how to use the Add Standard Dimension Rows transformation
in a way that might overlap with basic SAS Data Integration Studio usage.
Note: This section explains the specific steps that you must complete to perform the
corresponding tasks. Other sections describe transformations that are provided by the
SAS Financial Management Adapter for SAP, but they do not explain the specific steps.
Use this section as a reference and generalize the steps for use with other
transformations.
Page 51

Transformations Provided for SAP Add Standard Dimension Rows and Add Standard Dimension ASSOC Rows Transformations 47
Complete the following steps to use the Add Standard Dimension Rows
transformation:
1 Add the transformation to a job.
2 Add an input and an output table.
To add an input and an output table, drag and drop a dimension table. The
dimension table must have a key column ending in _ID.
Page 52

48 Add Standard Dimension Rows and Add Standard Dimension ASSOC Rows Transformations Chapter 4
3 Select the Mappings tab.
Make sure that all columns in the output table are in the input table. Complete
the following steps to check the tables:
Right-click Column under Target tables.
Select Import Columns.
4 Select all of the columns from the output table that you just dragged and dropped.
The result should look similar to this image:
Page 53

Transformations Provided for SAP Add Standard Dimension Rows and Add Standard Dimension ASSOC Rows Transformations 49
5 Click the Options tab.
6 Enter Yes or No as the option value for the following option names:
Add OPENBAL
Add UNASSIGNED
Add ALL
Add EXT
A Yes option value adds the corresponding row to the target table.
7 From the Model table for Target menu, select the table that you dragged
and dropped.
Note: The model table must physically exist before you run the job. Only the
structure, not the content, is used as a model for all the column definitions.
8 Select the Options tab.
Page 54

50 Add Standard Dimension Rows and Add Standard Dimension ASSOC Rows Transformations Chapter 4
9 From the list of options, select the table columns and map these columns to their
predefined roles.
Dimension Id column - ends in ID and is the primary key of the dimension table
Dimension Name Column - ends in NM and is the name of the dimension
Dimension Description column - ends in DESC and describes the dimension
The generated code checks for invalid selections, but this checking does not
happen immediately.
10 Right-click the Update Loader transformation and select Properties.
This transformation is located below the Add Standard Dimension Rows
transformation.
11 In the Upload Loader Properties window, select the Load Technique tab to
review the load step.
Page 55

Transformations Provided for SAP Add Standard Dimension Rows and Add Standard Dimension ASSOC Rows Transformations 51
The generated code creates a table with the requested rows in the correct
structure. Add these rows to the dimension table.
12 Enable the job so that it can run multiple times.
To do this, modify the default settings for the load step.
13 Set Load Style to Update/Insert.
14 Select an update type.
15 Select the ID column option from Available column(s) and click the right
arrow to move it to Column(s) to match.
The ID column is the only column that you must move to the Column(s) to
match area.
Page 56

52 Add Standard Dimension Rows and Add Standard Dimension ASSOC Rows Transformations Chapter 4
Using the Add Standard Dimension ASSOC Rows
Using the Add Standard Dimension ASSOC Rows transformation is very similar to
using the Add Standard Dimension Rows transformation. Complete the following steps:
1 Drag and drop the Add Standard Dimension ASSOC Rows transformation onto a
job.
2 Drag and drop a dimension _ASSOC_TYPE table as the input table.
3 Drag and drop a dimension _ASSOC table as the output table.
4 Select the Mappings tab.
Make sure that all columns in the output table are in the input table.
Page 57

Transformations Provided for SAP Add Standard Dimension Rows and Add Standard Dimension ASSOC Rows Transformations 53
5 Select the Options tab.
6 Enter Yes or No as the option value for the following option names:
Add OPENBAL
Add UNASSIGNED
Add ALL
Add EXT
A Yes option value adds the corresponding row to the target table.
7 Enter Yes or No for Convert blank parents to ALL.
A Yes option value changes blank parent IDs to ALL. The DDS requires that a
parent ID is not blank. This requirement includes the root node. In that case, the
root becomes its own parent.
8 From the Target ASSOC table menu, select the _ASSOC table that you
dragged and dropped.
Note: The model table must physically exist before you run the job. Only the
structure, not the content, is used as a model for all of the column definitions.
Page 58

54 Add Standard Dimension Rows and Add Standard Dimension ASSOC Rows Transformations Chapter 4
9 Select the Options tab.
10 Select available columns and map the columns to their predefined roles.
The Dimension ID column ends in _ID and is the primary key of the dimension
table.
Note: The name of the parent column is derived from the name of the ID column.
11 Select the Load Technique tab to review the load step.
12 Set Load Style to Update/Insert.
13 Add Parent to Hierarchy Table Based on Level and Position.
The Add Parent to Hierarchy Table Based on Level and Position transformation
adds a parent column to a table that already has a specified hierarchy in the form
of a level and position. This is a common SAP hierarchy storage format.
The level and position use the root node as the first record. To establish the parent of
a row, a preceding row with a lower level is used. Therefore, preceding rows with
identical levels are siblings.
The macro %ADPT_LEVEL_TO_PARENT_CHILD represents the level and position
hierarchy by including the following parameters:
IN_DSN=&_INPUT0
OUT_DSN=&_OUTPUT0
LEVEL=&LEVEL
PARENT=&PARENT
CHILD=&CHILD
DSTYPE=&DSTYPE
KEEP=&KEEP
ROOTLEVEL=&ROOTLEVEL
GENERATED_SEQUENCE_VAR=&GENERATED_SEQUENCE_VAR
You can define each of these parameters.
Using the Add Parent to Hierarchy Table Based on Level and Position Transformation
Complete the following steps to use the Add Parent to Hierarchy Table Based on
Level and Position transformation:
1 Drag and drop the Add Parent to Hierarchy Table Based on Level and Position
transformation onto a job.
Page 59

Transformations Provided for SAP Add Standard Dimension Rows and Add Standard Dimension ASSOC Rows Transformations 55
This transformation requires a single input table. It returns a single output table.
2 Drag and drop an input table and an output table.
The input table must include an ID or key column that contains unique values.
The input table must also include a column that stores the level. This level column
can contain either numeric- or character-based content. However, character-based
content must contain numeric strings. The names of the columns must be
associated with the roles in the column options.
Page 60

56 Add Standard Dimension Rows and Add Standard Dimension ASSOC Rows Transformations Chapter 4
The output table must include an ID or key column and a PARENT_ID column.
The PARENT_ID column must be the same type and length as the ID column. The
parent of the root node can be blank.
Page 61

Transformations Provided for SAP Add Standard Dimension Rows and Add Standard Dimension ASSOC Rows Transformations 57
3 Select the Mappings tab.
Make sure that all columns in the output table (Source table) are in the input
table (Target table). The generated code copies all columns that are in both the
input table and the output table. Although mapping is not required in this
transformation, resolve any inconsistencies so that the impact analysis tool has
more information, if needed.
In the example, four of the original five columns are propagated to the output
table. Two new columns Nr (numeric column) and Parent (character column) are
added.
Note: Do not add target table columns that do not exist in the input table, or that
are not assigned a parent role or sequence number. For more information, review
the Options tab.
4 Select the Options tab.
5 Enter option values for the following option names:
Output type Select VIEW if the output table is loaded through a standard
load step. Select DATA if the output table is loaded through a
load step with code generation turned off (a null loader).
Page 62

58 Format Generator Chapter 4
Root level Use the default value. If the input table contains multiple,
6 Select the Options tab.
disjointed hierarchies (many root nodes), then the root level
forces the parent to be blank.
7 From the Options menu, select column options and map the columns to their
predefined roles.
Generated Sequence Column - contains a value that is equal to the row
number of the input table. This is a generated column that is numeric. You
must add or import this column to the target table before you can select it.
Level - contains the level information. This column is in the input table.
Node (Child) ID - identifies each node in the hierarchy. This column is in the
input table and output table. It should be the primary key of the input table.
Parent ID - identifies the parent ID (node ID of the parent) in the hierarchy.
This column is in the output table. It must be the same type and length as the
node ID. You must add or import this column to the target table before you can
select it.
Page 63

Transformations Provided for SAP Format Generator 59
Format Generator
Introduction
The Format Generator transformation creates code that generates a format from a
single input table. This transformation uses the generic transformation generator. The
transformation can run multiple times on a single input table to generate multiple SAS
formats.
You can access information about this transformation’s options on the Options tab.
Properties Handled by the Format Generator Transformation
Table Properties
The code that the Format Generator transformation creates must handle several table
properties. These properties include specifications and tasks:
specifications such as format, and library catalogs
tasks such as creating and managing CNTLIN tables, and managing duplicate
values
Format Issues and Properties
The generated code must address these format issues and properties:
The format of the generated code can have a description that is also in the
description of the format library catalog entry.
The format does not have to be saved in an existing catalog. When the
transformation creates a format, it can also create a catalog in which to save it. A
string that includes a macro variable such as FORMATS&LOCALE_LANGUAGE
can specify the catalog.
Code Properties and Requirements
The generated code must conform to the following properties and requirements for
defining library catalogs:
The default library should be LIBRARY.FORMATS if the library LIBRARY is
available.
If metadata does not define the library LIBRARY, then this default library cannot
be used. Only libraries that are available in the current metadata server can be
used. In this case, a message notifies the user to define and use the LIBNAME
LIBRARY.
Issues for CNTLIN Table Columns
The Format Generator transformation creates a temporary format CNTLIN table
from the underlying table. (For a description of the CNTLIN table, see the online Help
Page 64

60 Format Generator Chapter 4
for PROC FORMAT.) This transformation process uses metadata to generate each
column of the CNTLIN table. When creating this table, the transformation must address
the following issues for the CNTLIN table columns:
The format must have a name (maximum of 30 characters) that is unique within
the format catalog. Because the Format Generator transformation does not verify
uniqueness, a new format overwrites an existing format with the same name.
The START column must be an expression of the columns in the underlying table.
The END column is optional. It can be an expression of the columns in the
underlying table.
The LABEL column must be an expression of the columns in the underlying table.
You can add a row to map missing values into a specified value. The specified
value can be any expression. For example, the START column can be set to a
missing value such as a blank value for characters or a . (period) value for
numerics. LABEL can be set to MISSING, UNKNOWN, or an expression such as
PUT(‘MISSING’, $FORMAT_WORDS). In this case, enter the expression to specify
the LABEL for MISSING. If you are using an expression that another format uses,
the format must already be defined.
A row can be added to handle the OTHER concept. The CNTLIN table column
HLO must be 0. The START column can be set to a missing value. The LABEL
column can be set to OTHER, UNKNOWN, or an expression such as
PUT(‘OTHER’, $FORMAT_WORDS.). In this case, enter the expression to specify
the LABEL for MISSING.
The rows in the CNTLIN: The WHERE clause must be controlled so that the
WHERE clause subsets the underlying table into the CNTLIN table. It might be
necessary to base a format on only some rows of the underlying table such as
LANGUAGE=”&LOCALE_LANGUAGE”. The WHERE clause is an expression on
the columns in the underlying table.
The Format Generator transformation must consider removing duplicate values. The
generated CNTLIN table can contain duplicate START values or overlapping ranges.
The START value is inside the range of a START-END combination of another row. The
following variables eliminate duplicates in the START value:
The NODUP option generates a PROC SORT NODUP by START value. Because
this might remove the wrong rows, consider using more controlled variables such
as FIRST and LAST.
FIRST and LAST variables assume that there are additional columns in the
underlying table that enable determination of which rows are best to keep. These
additional columns are kept in the temporary CNTLIN table. The subsequent
SORT variable has these additional columns in the BY statement. A second DATA
step keeps only the required rows. The FIRST variable keeps the first row in each
BY group. The LAST variable keeps the last row in each BY group.
Using the Format Generator Transformation
Complete the following steps to use the Format Generator transformation:
1 Drag and drop the Format Generator transformation onto a job that loads the
table on which the format is to be based. If possible, use the same job that created
or loaded the table. That way, any changes to, or reloading of the table
automatically regenerates the formats based on the table.
Page 65

Transformations Provided for SAP Format Generator 61
2 Drag and drop the table as the input table.
3 Select the General tab.
Change the name of the transformation to $FORMATNAME Format Generator or
to a similar name.
4 Select the Options tab.
The option names and option values are listed below. Use this information to
verify and edit your Format Generator transformation properties.
Label: System Options
Macro Variable: OPTIONS
Description: Options on a SAS OPTIONS statement.
Page 66

62 Format Generator Chapter 4
Type: String
Required? N
Label: Format Name
Macro Variable: FORMATNAME
Description: Name of the format.
Type: String
Required? Y
Label: Description
Macro Variable: FORMATDESCRIPTION
Description: Description of the format.
Type: String
Required? N
Label: Format Type (C/I/J/N)
Macro Variable: FORMATTYPE
Description: Type of format. Possible values are C for character format, I
Type: String
Required? Y
Default: C
Valid Values: C N J I
Label: Target Library
Macro Variable: TARGETLIBRARY
Description: Target library for the generated format.
Type: Metadata Library
Required? Y
Label: Target Catalog
Macro Variable: TARGETCATALOG
Description: Name of the target catalog for the format.
Type: String
Required? Y
Default: FORMATS
Constraints: Minimum string length is 1; maximum string length is 32.
Label: From Expression
Macro Variable: FROMEXPRESSION
Description: Expression to be used for the starting value of the range. Use
Type: String
Required? N
Label: To Expression
Macro Variable: TOEXPRESSION
for numeric informat, J for character informat, and N for
numeric format (excluding pictures). Picture formats are not
supported.
this field to enter an expression or use the From Column(s)
option on the Options tab to select columns.
Page 67

Transformations Provided for SAP Format Generator 63
Description: Expression to be used for the ending value of the range. Use
this field to enter an expression or use the To Column(s)
option on the Options tab to select columns.
Type: String
Required? N
Label: Label Expression
Macro Variable: LABELEXPRESSION
Description: Expression to build the unformatted or formatted value. Use
this field to enter an expression or use the Label Column(s)
option on the Options tab to select columns.
Type: String
Required? N
Label: Label for Other Values
Macro Variable: OTHERLABEL
Description: String or expression to be used as the label for the range
OTHER. This range includes all values that are not in one of
the specified ranges.
Type: String
Required? N
Label: Label for Missing Values
Macro Variable: MISSINGLABEL
Description: String or expression to be used as the label for missing values.
Type: String
Required? N
Label: Strategy for Removing Duplicates
Macro Variable: DUPSTRATEGY
Description: Specify NODUP to remove duplicates (unordered), FIRST to
keep the first duplicate, and LAST to keep the last duplicate.
Used with the Sort By Column(s) to Remove Dups option
on the Options tab.
Type: String
Required? N
Default: FIRST
Valid Values: FIRST LAST NODUP
Label: WHERE Clause
Macro Variable: WHERECLAUSE
Description: WHERE clause to be applied to the input data set.
Type: String
Required? N
5 Select the Options tab.
You can specify the starting and ending values for the range and the formatted or
unformatted values in two different ways:
If the values are a concatenation of columns in the input table, you can use
the From Column(s), To Column(s), and Label Column(s) options on the
Options tab.
Page 68

64 Format Generator Chapter 4
If the values are a more complicated expression of columns, you can use the
From Expression, To Expression, and Label Expression options on the
Options tab. If specified, these values take precedence over the selected
columns.
The following information describes the option names and options values that are
available. Use this information to verify and edit your Format Generator transformation
properties.
Label: From Column(s)
Macro Variable: FROMCOLUMNS
Description: Selects columns for the starting value of the format. Multiple
columns are concatenated. Specify either From Column(s) or
From Expression.
Constraint: No limit on number of selectable columns
Label: To Column(s)
Macro Variable: TOCOLUMNS
Page 69

Transformations Provided for SAP User Written Code for Multiple Input Output Tables Transformation 65
Description: Selects columns for the ending value of the format. Multiple
columns are concatenated. Specify either To Column(s) or To
Expression.
Constraint: No limit on number of selectable columns
Label: Label Column(s)
Macro Variable: LABELCOLUMNS
Description: Selects columns for the unformatted or formatted value.
Multiple columns are stripped and concatenated with a blank
between the columns. Specify either Label Column(s) or
Label Expression.
Constraint: No limit on number of selectable columns
Label: Sort By Cols to Remove Dups
Macro Variable: SORTBYCOLUMNS
Description: Sorts the control data set by the selected columns and
removes duplicate keys according to the Strategy for
Removing Duplicates option.
User Written Code for Multiple Input Output Tables Transformation
Introduction
The User Written Code for Multiple Input Output Tables transformation is a generic, userwritten code transformation. Use this transformation in the following two cases, not the
standard user-written code transformation that SAS Data Integration Studio provides:
when there is more than one input table or output table
when the user-written code needs additional LIBNAME statements to be available
or generated
Using the User Written Code for Multiple Input Output Tables Transformation
Complete the following steps to use the User Written Code for Multiple Input Output
Tables transformation:
1 Drag and drop the User Written Code for Multiple Input Output Tables
transformation onto a job.
Page 70

66 User Written Code for Multiple Input Output Tables Transformation Chapter 4
2 Right-click on the transformation and select the following ports:
Add Input Port to add drop zones for the input tables
Add Output Port for each required output table
3 Drag and drop tables or transformations onto the new drop zone.
4 Select the General tab. Replace the default transformation name with a more
specific name.
5 Select the Code tab.
6 Check the Code generation mode field with these two important points in
mind:
Do not modify the default settings for Code generation mode.
Make sure that Automatic is selected for the Code generation mode.
Page 71

Transformations Provided for SAP User Written Code for Multiple Input Output Tables Transformation 67
7 Review the registered target tables. Specify parameters for the target tables based on
the following three scenarios:
Scenario 1. Source code refers to tables that are using a macro
variable
If the source code refers to tables that are using a macro variable such as
&_OUTPUT or &_OUTPUT0, then the default target table names can remain
unchanged. Make sure that the load steps of the output tables load the output
tables from these temporary target tables. Right-click on the transformation,
select Properties and view the Physical Storage tab.
Page 72

68 User Written Code for Multiple Input Output Tables Transformation Chapter 4
Scenario 2. Source code creates tables with more logical names
If the source code creates tables with more logical names, register these tables
as target tables. In the following example, my_logical_name replaces the
default target table name W5UYV7RN.
Scenario 3. Source code loads the output tables that you dropped onto
the transformation
If the source code directly loads the output tables that you dragged and
dropped onto the transformation, then specify the physical name of the target
table. Also, select the library accordingly.
8 Select the Mappings tab.
For the subsequent load step to automatically generate code for the load, import
all columns in the output tables into the corresponding target tables.
Although mapping in this transformation is not required to generate code, you can
use the mapping assignments to document the mapping that is made in the source
code. This provides the impact analysis tool with more information if needed.
Page 73

Transformations Provided for SAP User Written Code for Multiple Input Output Tables Transformation 69
9 Select the Options tab.
10 Replace the default Source code option value sapdds/source/include_code.sas
with a valid path and the name of the source code that you want to include. The path
must be relative to the server environment.
Four additional parameters can force library assignments to occur before your source
code executes:
PREDEFINED LIBRARY 1
PREDEFINED LIBRARY 2
PREDEFINED LIBRARY 3
PREDEFINED LIBRARY 4
The automatic code generation assigns libraries for all input tables and all libraries
that are entered in the Data Location dialog box for the target tables on the Code tab.
However, some libraries, such as SAP server libraries, need to be assigned by using one
of these four parameters to specify them.
Page 74

70 Date Join Transformation Chapter 4
Changed Data Extraction Using Date or Time-Stamp and Overlap Transformation
The Changed Data Extraction Using Date or Time-stamp and Overlap transformation
creates a SAS Data Integration Studio transformation that extracts changed data. This
transformation uses key, datestamp, and timestamp information to identify new or
changed data from a source table. Then, it extracts the data and stores the results in a
target table that is conceptually a mirror image of the source table. The target table can
have fewer columns than the source table.
This transformation is often required when extracting all of the data from the source
table would be a very time-consuming task. For example, extracting 20 million rows of
data across an entire network might take many hours. In comparison, extracting only
the changed data and merging it with the previous extraction might take only a few
minutes.
The logic for this transformation can be used only with source tables that contain a
timestamp, datestamp, or other key column value that increases over time. A new
extraction occurs for all records with a key or timestamp that is greater than the largest
value that was previously extracted. The resulting data is then appended to the previous
data.
The timestamp or key does not need to exclusively increase to work in this
transformation. You can use an overlap to re-extract data that is in the overlap range.
For example, you might have financial transactions that change in an operational
system before the books are closed for a period. But, the operational system does not
create a real datestamp or timestamp for the changed financial transactions. In this
case, there is an overlap when two or more financial periods are open, and the data can
change. To manage this overlap, an extraction needs to re-extract data from all open
periods. The new records can replace the previous records that have the same keys. If
records can be deleted, or if records have keys that are modified, then it is not always
possible to match the new records with the previous records. All records previously
extracted from an open period need to be removed from the main target table.
After newly extracted data has been successfully appended to or merged with the
target table, the record must be updated. In addition, a record of previous extractions
must be kept to create the next extraction. If the extract, append, or merge step fails,
then the data should remain unchanged. This ensures that the next extraction gets the
data that would have been extracted if the previous extraction had not failed.
Date Join Transformation
The Date Join transformation creates a SAS Data Integration Studio transformation
that works with tables that have date range columns. This transformation joins two
input tables that have a common key into a single output table so that the date ranges
interweave.
Many fields, such as HR, contain historical information. This information can be true
for past periods and extend into future periods. For example, SAP HR information types
contain effective starting dates and effective ending dates for past and current
Page 75

Transformations Provided for SAP Date Join Transformation 71
employees. The Date Join transformation uses a macro that can be used with any
effective date, including the HR data that is extracted from SAP.
To join tables that have effective dates, consider that the dates are basically keys. A
logical match can occur when periods overlap, even if they overlap only partially. To join
tables for a fixed date, you can select the date from each contributing table to simplify
the join. The algorithm for joining tables with effective dates is not trivial, considering
that the date ranges might partially overlap. A join algorithm that loops for all fixed
dates can cause the volume of data to increase exponentially. The increase in volume of
data is based on the validity of records that might span from one to ten years.
The Date Join transformation and the underlying %DATEJOIN macro provide an
efficient alternative. You can join tables accurately by introducing a time dimension. A
list of dates is used, with each date selecting a record from the contributing tables. This
is effective if you want to capture a snapshot of results, such as employee head count at
the beginning of each month. However, the drawback is that the number of selected
records could increase dramatically. For example, to prepare a table for ad hoc date
queries, you might need to duplicate a table row 365 times per year. As a result, use the
Date Join transformation and %DATEJOIN macro for exploitation time unless you need
to represent only a few fixed dates.
The following example shows how two input tables with a common key value are
joined into a single output table. Note the new begin dates and end dates in the tables.
Note how the values in Var1 from Input Table 1 and Var2 from Input Table 2 are
populated respectively.
Figure 4.1 Input and Output Tables Using Date Join Transformation
Input Table 1
Key Begin Date End Date Var1
1 01JAN06 15FEB06 1
1 16FEB06 20APR06 2
1 01JUN06 31JUL06 3
1 01AUG06 31AUG06 4
Input Table 2
Key Begin Date End Date Var2
1 01FEB06 31MAR06 A
1 01APR06 31JUL06 B
1 01AUG06 30SEP06 C
Page 76

72 Period Consolidation Transformation Chapter 4
Output Table
Key Begin Date End Date Var1 Var2
1 01JAN06 31JAN06 1
1 01FEB06 15FEB06 1 A
1 16FEB06 31MAR06 2 A
1 01APR06 30APR06 2 B
1 01MAY06 31APR06 B
1 01JUN06 31JUL06 3 B
1 01AUG06 31AUG06 4 C
1 01SEP06 30SEP06
Period Consolidation Transformation
The Period Consolidation transformation creates a SAS Data Integration Studio
transformation that works with tables that have date range columns. This
transformation identifies single key values in which there are no changes in the
corresponding, non-key columns that are specified. The similar and sequential data is
consolidated into a single date range. The transformation uses the generic
transformation generator.
The Period Consolidation transformation uses the %CONSOLIDATE_PERIOD macro.
This macro consolidates into a single record with consecutive date ranges for a key that
is passed as a parameter.
The following example shows a data table before and after the Period Consolidation
transformation. The key values are represented by Key1 and Key2. Begin Date and End
Date specify the date range. The important columns for consolidation are non_key1 and
non_key3. The non_key2 column is dropped from the output table because its value
might not be correct for the full and consolidated date ranges.
Page 77

Transformations Provided for SAP Repeat Record for Date Range Overlap Transformation 73
b
Figure 4.2 Input and Output Tables Using Period Consolidation Transformation
Input Table
Key1 Key2 Begin Date End Date non_key1
123 A
1
123 A
2
123 A
3
123 A
4
123 A
5
125 A
6
125 A
7
126 A
8
126 A
9
126 A
10
01JAN2006 31JAN2006
01FEB2006 15FEB2006
16FEB2006 15JUL2006
16JUL2006 31OCT2006
01NOV2006 31DEC2006
01JAN2006 31AUG2006
01SEP2006 31DEC2006
01JAN2006 15FEB2006
16FEB2006 31MAR2006
01AUG2006 31DEC2006
21 ABC XYZ
21 DEF XYZ
21 DEF XYZZY
21 BCD XYZZY
21 CEF XYZZY
21 ABC CCC
22 ABC CCC
22 FED DDD
22 DEF DDD
22 DEF DDD
non_key2
(not important for usage)
Output Table
Key1 Key2 Begin Date End Date non_key1 non_key3
123
1
123
2
125
3
126
4
126 A
5
A
A
A
A
01JAN2006 15FEB2006
16FEB2006 31DEC2006
01JAN2006 31DEC2006
01JAN2006 31MAR2006
01AUG2006 31DEC2006
21 XYZ 1,2
21 XYZZY 3-5
21 CCC 6,7
22 DDD 8,9
22 DDD 10 (This row is not
non_key3
contributing rows
from input table
concatenated to 9,
ecause there is a gap
between the end date
of 9 and the begin
date of 10.)
Repeat Record for Date Range Overlap Transformation
The Repeat Record for Date Range Overlap transformation reads an input table and
writes to an output table with the same structure. In the output table, the records are
repeated so that the values in the date column exist for all dates in a time range.
The time range starts at the date that is specified in the date column and is adjusted
by the overlap and interval values. For missing values, the time range starts at the date
that is specified by the INITIAL START parameter. The time range ends on the latter of
two dates: either the current date as adjusted with the interval value or the specified
date in the date column as adjusted with the overlap and interval values.
Page 78

74 Repeat Record for Date Range Overlap Transformation Chapter 4
Here are the parameters that you can specify for this transformation:
OPTION NAME describes the transformation option.
DATE COLUMN specifies date values that determine the begin date for
a time range.
OVERLAP specifies the number of intervals to go back (negative
value) or to go forward (positive value), when
determining begin date and end date for a time range.
INTERVAL specifies the calendar interval (month, day, or year) to
go back, when determining begin date and end date for
a time range. This parameter specifies the calendar
interval that is used for adding records within a time
range. For example, one record is added for each month
between the begin date and end date if the INTERVAL
parameter is monthly.
ALIGNMENT specifies if new date values are aligned at the
beginning, midpoint, or end of the interval. The default
value is BEGINNING.
INITIAL START specifies the begin date of a time range for missing
values.
CREATE OUTPUT AS VIEW specifies the output as a view or a table. Specify YES to
create the output as a view.
The following example shows a data table before and after the Repeat Record for Date
Range Overlap transformation. In this example, the overlap is –2, the interval is
MONTH, the INITIAL START date is 01JAN2006, and the transformation was run
April 19, 2006.
Figure 4.3 Input and Output Tables Using Repeat Record for Date Range Overlap Transformation
Input Table
DATECOL
A
B
C
D
01JAN2006
01MAR2006
01JUL2006
Page 79

Transformations Provided for SAP Split the NLS Data Transformation 75
Output Table
DATECOL
A
A
A
A
B
B
B
B
B
B
C
C
C
C
D
D
D
01JAN2006
01FEB2006
01MAR2006
01APR2006
01NOV2005
01DEC2005
01JAN2006
01FEB2006
01MAR2006
01APR2006
01JAN2006
01FEB2006
01MAR2006
01APR2006
01MAY2006
01JUN2006
01JUL2006
Split the NLS Data Transformation
Introduction
The Split the NLS Data transformation splits the data of the dimension member table
into two tables. One table stores the default language-specific data, and the other table
stores the non-default, language-specific data.
You can store names and descriptions in multiple languages and locales. The SAS
Detail Data Store has a three-character language code that differs based on the locale
used by the solution data mart and the operating system.
The SAS Detail Data Store language code can identify differences in the languages
and their descriptions in the DDS. Different procedures are used, depending on the type
of table. Language code is part of the primary key in a SAS Detail Data Store
_ASSOC_TYPE table. However, in some _ASSOC_TYPE tables, there can be multiple
records for the same _ASSOC_TYPE code, which are differentiated by the language
code.
A dimension member table such as DDS.GL_ACCOUNT is more complex. The
language code is not represented in a dimension member table. For example, a
dimension member table such as GL_ACCOUNT should contain the name and
description of the default language code in the DDS.CODE_LANGUAGE table. If more
Page 80

76 Split the NLS Data Transformation Chapter 4
than one language code is required, then the names and descriptions are added to the
GL_ACCOUNT_NLS table.
Here is a sample DDS.CODE_LANGUAGE table:
LANGUAGE_CD LOCALE_LANGUAGE_CD LOCALE_COUNTRY_CD LOCALE_VARIANT_CD DEFAULT_LANGUAGE_FLG
zh Zh CN Y
zhx Zh TW N
en En N
In the above table names and descriptions of the language codes for account members
are added. For example, the language code zh of account member table
GL_ACCOUNT is added in the table above.
Based on this action, the transformation splits the data in the SAS Detail Data Store.
Using the Split NLS Data Transformation
Complete the following steps to use the Split the NLS Data transformation:
1 Drag and drop the Split the NLS Data transformation onto a job.
2 Drag and drop one input table and two output tables.
The input table stores data that corresponds to all of the languages. The two
output tables store the default language-specific data and the non-default
language-specific data.
Page 81

Transformations Provided for SAP Additional Generic Transformations 77
3 Select the Options tab. Provide specifications for the input table and output
tables.
The following types of tables are required:
An input table with the prompt Place the Input Source table. This table has data
that corresponds to all of the languages. In most scenarios, this input table is an
intermediate table that contains the dimension member data in all languages.
An output table with the prompt Place the NLS table here. This table specifies the
NLS table. This table stores the non-default language-specific data. Non-default
languages are languages that have DEFAULT_LANGUAGE_FLG set to blank in
the table STAGE_CODE_LANGUAGE.
An output table with the prompt Place the Stage Table here. This table specifies
the stage dimension table. This table stores the default language-specific data. The
default language is the language that has DEFAULT_LANGUAGE_FLG set to Y
in the table STAGE_CODE_LANGUAGE.
Additional Generic Transformations
Introduction
A group of transformations called data transforms are based on the generic
transformation generator. These transformations process data for the SAS Financial
Management Adapter for SAP. However, the processing capabilities of the
Page 82

78 Additional Generic Transformations Chapter 4
transformations are not restricted to SAP data and functionality. These transformations
can also be used in jobs outside of the SAS Financial Management Adapter for SAP.
Keep First or Last Record in Group Transformation
This transformation keeps the first record or last record in a group. It differs from
SORT NODUPKEY in that it can control which record is kept.
DATA Step Merge Transformation
This transformation includes a DATA step that merges a master table (left table) with
one or more additional tables. A single parse goes through all the tables, which is not
possible using an SQL left join.
Convert Number Order to Integer Value Transformation
Some columns depict a numerical order using floating-point numbers. In this case, it
might be necessary to convert the numbers to unique integer values so that they are
accepted in a subsequent data model. The Convert Number Order to Integer Value
transformation accepts a single table as input.
On the Options tab, a single column must be selected. This column has its existing
order changed to an integer value. The Convert Number Order to Integer Value
transformation sorts the input table by the column that was selected. An update step
substitutes the existing column value with an integer value that corresponds to the
DATA step iteration. The value of each subsequent row in the input table is then
incremented by 1.
This transformation does not have an output table because all processing is performed
on the input table.
Map SAP Address Lines to SAS Address Lines Transformation
SAS data models use the field names ADDRESS_LINE_1 through ADDRESS_LINE_4
to store address data that appears after the addressee or company name but before the
city and ZIP code. SAP has many fields that are available to store address data. The
Map SAP Address Lines to SAS Address Lines transformation enables you to select
between one and four relevant address columns from SAP data and map them to the
SAS columns ADDRESS_LINE_1 to ADDRESS_LINE_4.
On the Options tab, select the SAP address columns that correspond to the required
SAS address columns. For example, you can define SAP columns CNAME, STRAS, and
STR2 to feed to SAS as ADDRESS_LINE_1, ADDRESS_LINE_2, and
ADDRESS_LINE_3, respectively. If a particular data record has missing STRAS data,
then the STR2 value populates the ADDRESS_LINE_2 column, and the
ADDRESS_LINE_3 column remains blank.
Page 83

79
CHAPTER
5
Initialization Jobs
Introduction to Initialization Jobs ................................................................................................................. 79
fmsadpt_I0050_Initialize_Blank_Business_Area_Table............................................................................... 79
Introduction to Initialization Jobs
Initialization jobs create administration tables that extraction jobs and
transformation jobs use. Initialization jobs need to be run only once.
These jobs initialize your environment and provide data for SAS Financial
Management.
fmsadpt_I0050_Initialize_Blank_Business_Area_Table
The SAS Financial Management Adapter for SAP requires business area descriptions
when creating default internal organization dimensions. However, descriptions might be
missing in the transaction data from SAP, because SAP allows blank descriptions in
business area text tables.
The fmsadpt_I0050_Initialize_Blank_Business_Area_Table initialization job assigns
text descriptions to business areas that do not have descriptions in the transaction data
from SAP. When a business area description is missing in the transaction data from
SAP, the initialization job assigns a default text description “
specified
Note: This initialization job is site-dependent and must be reviewed for each local
implementation. You can substitute wording or use another language, as needed.
”. The source code for this job is in i0050_set_blank_busarea.sas.
Business Area not
Page 84

80 fmsadpt_I0050_Initialize_Blank_Business_Area_Table Chapter 5
Page 85

81
CHAPTER
6
Extraction Jobs
Extraction Jobs ................................................................................................................................................ 81
Job Group: E00 Extraction of T Tables .......................................................................................................... 82
Overview ................................................................................................................................................... 82
fmsadpt_E00010_Extract_SAP_General_T_Tables Job ........................................................................ 82
fmsadpt_E00011_Create_Formats_from_SAP_FI_Tables Job ............................................................. 83
fmsadpt_E00020_Extract_SAP_FI_T_Tables Job ................................................................................. 83
fmsadpt_E00030_Extract_SAP_Fiscal_Period_T_Tables Job .............................................................. 84
fmsadpt_E00031_Create_Formats_from_SAP_Fiscal_Period_Tables ................................................. 84
fmsadpt_E00040_Extract_Currency_T_Tables Job ............................................................................... 85
fmsadpt_E00050_Extract_Account_T_Tables ........................................................................................ 85
fmsadpt_E00060_Extract_Operating_Concern_T_Tables Job .............................................................. 85
fmsadpt_E00070_Extract_Addl_Tables_for_Formats Job .................................................................... 86
fmsadpt_E00080_Extract_New_GL_Control_Table Job ....................................................................... 86
Job Group: E01 Extraction of Master Tables ................................................................................................ 87
fmsadpt_E01000_Extract_SAP_Master_Code_Tables Job ................................................................... 87
fmsadpt_E01010_Extract_SAP_Master_Description_Tables Job ........................................................ 87
fmsadpt_E01050_Create_Formats_from_SAP_Tables Job ................................................................... 88
Job Group: E02 Extraction of Transaction Tables ........................................................................................ 89
Introduction ............................................................................................................................................. 89
fmsadpt_E02000_Extract_Financial_Documents_from_BKPF_BSEG (Initial) Job........................... 89
Additional Notes .............................................................................................................................. 89
fmsadpt_E02005_Extract_Intermediate_Table_merging_BKPF_BSEG .............................................. 90
fmsadpt_E02010_Extract_Intermediate_Table_from_BKPF_BSEG (Changes) .................................. 90
Additional Notes .............................................................................................................................. 91
Job Group: E03 Extraction of Summary Tables ........................................................................................... 92
Introduction ............................................................................................................................................. 92
fmsadpt_E03000_Extract_GL_Balance_from_New_GL_Tables (New GL) Job ................................... 92
fmsadpt_E03010_Extract_Split_Docs_from_FAGLFLEXA (New GL) ................................................. 92
fmsadpt_E03020_Extract_GL_Balances_from_OLd_GL_Tables ......................................................... 92
Job Group: E04 Extraction of Hierarchies and Structures ........................................................................... 93
Introduction ............................................................................................................................................. 93
fmsadpt_E04010_Extract_Balance_Sheet_FSV_Structures ................................................................. 93
fmsadpt_E04020_Extract_Supplier_Hierarchy ..................................................................................... 93
fmsadpt_E04030_Extract_Customer_Hierarchy .................................................................................... 94
Job Group: E05 Extraction of Miscellaneous Tables ..................................................................................... 94
Introduction ............................................................................................................................................. 94
fmsadpt_E05000_Extract_Number_Ranges_from_NRIV Job .............................................................. 94
fmsadpt_E05010_Extract_State_Region_County_Data_from_T005U Job .......................................... 94
fmsadpt_E05020_Extract_Cost_Elements_from_CSKB Job ................................................................. 95
Extraction Jobs
The SAS Financial Management Adapter for SAP uses several extraction jobs to
extract data from SAP R/3. There are the four essential types of extractions that the
SAS Financial Management Adapter for SAP uses:
Page 86

82 Job Group: E00 Extraction of T Tables Chapter 6
Simple complete extraction
extract and load all rows of a table from the SAP server into a mirror SAS table.
Rerunning these extractions re-extracts the entire table and automatically
retrieves all new information.
Simple partial extraction
extract and load a subset (not all rows and not all columns) of an SAP table into a
partial mirror SAS table. Running these extractions again re-extracts the same
logical parts of the table and automatically retrieves all relevant new information.
Change data capture extraction
extract and load data that was added or changed in SAP since the previous
extraction. These extractions are subsequent loads that are used after an initial
load is completed by a simple complete extraction or a simple partial extraction.
Change data capture extractions are important for large transaction tables. This
extraction’s complexity is not needed for small amounts of data.
Extraction done through SAP remote-callable function
is the easiest way to extract SAP data in some cases.
Job Group: E00 Extraction of T Tables
Overview
This job group includes common jobs that extract data for SAS Financial Management. A
mirror SAS table is created in the R3mirror library for each job given below.
fmsadpt_E00010_Extract_SAP_General_T_Tables Job
This job extracts general and financial tables from SAP R/3 that are small and are
named with a T prefix. For each table, a mirror SAS table is created in the R3mirror
library. Individual extractions are independent of each other.
This job extracts the following tables from SAP:
T001: Company Codes
T002: Language Keys (Component BC - 118)
T002T: Language Key Texts
T005T: Country Names
T011: Financial Statement Versions
T011T: Financial Statement Version Names
T880: Global Company Data (for KONS Ledger)
This job uses the following input tables from the SAP server:
T001
T002
T002T
T005T
T011
Page 87

Extraction Jobs Job Group: E00 Extraction of T Tables 83
T011T
T880
This job creates the following output:
Fmsr3mir.T001
Fmsr3mir.T002
Fmsr3mir.T002T
Fmsr3mir.T005T
Fmsr3mir.T011
Fmsr3mir.T011T
Fmsr3mir.T880
fmsadpt_E00011_Create_Formats_from_SAP_FI_Tables Job
This job creates formats from the tables that are extracted in the E00010 job. Run this
job immediately after the job E00010, so that the formats are as current as the tables on
which they are based.
This job uses the following input tables from SAS:
Fmsr3mir.T001: Company Codes
Fmsr3mir.T002: Language Keys
Fmsr3mir.T011: Financial Statement Versions
This job creates the following output formats:
$SAPTOSAS_LANGUAGE
$company_to_country
$LOCALCR
$unassigned_accounts_parent
$COMPANY_TO_FY_VARIANT
$BUKRS
$TRAD_PTNR_TO_BUKRS
$COM2CAC
fmsadpt_E00020_Extract_SAP_FI_T_Tables Job
This job extracts general and financial tables from SAP R/3 that are named with a T
prefix. These tables are generally text description tables. Individual extractions are
independent of each other.
This job extracts the following tables:
T8G21: Splitting rule: (Item to be processed)
TGSBT: Business Area Names
TKA01: Controlling Areas
TKA02: Controlling area assignment
TKA00: Control parameters for controlling areas
Page 88

84 Job Group: E00 Extraction of T Tables Chapter 6
This job uses the following input tables from the SAP server:
T8G21
TGSBT
TKA00
TKA01
TKA02
This job creates the following output:
Fmsr3mir.T8G21
Fmsr3mir.TGSBT
Fmsr3mir.TKA00
Fmsr3mir.TKA01
Fmsr3mir.TKA02
$CC2CA converts Company Code (BUKRS) to Controlling Area (KOKRS)
fmsadpt_E00030_Extract_SAP_Fiscal_Period_T_Tables Job
This job extracts financial tables from SAP R/3 that are named with a T009 prefix.
This job extracts the following tables:
T009: Fiscal Year Variants
T009B - Fiscal year variant periods
T009C - Period names
T009T - Fiscal year variant names
This job uses the following input:
T009
T009B
T009C
T009T
&lang (set in the preprocessing step)
This job creates the following output:
Fmsr3mir.T009
Fmsr3mir.T009T
Fmsr3mir.T009B
Fmsr3mir.T009C
fmsadpt_E00031_Create_Formats_from_SAP_Fiscal_Period_Tables
This job creates formats from the tables that are extracted in the job E00030. Run this
job immediately after the job E00030, so that the formats are as current as the tables on
which they are based.
This job uses the following input:
Fmsr3mir.T009C - Period names
Page 89

Extraction Jobs Job Group: E00 Extraction of T Tables 85
&lang (set in the preprocessing step)
This job creates the following output:
$PERIOD_DESCRIPTION converts concatenated Fiscal Year Variant (PERIV)
and Posting Period (POPER) to Period Name Long Text (LTEXT)
$PERIOD_NAME output converts concatenated Fiscal Year Variant (PERIV) and
Posting Period (POPER) to Period Name Short Text (KTEXT)
fmsadpt_E00040_Extract_Currency_T_Tables Job
This job extracts the currency tables from SAP R/3 that are named with a TCUR
prefix.
This job extracts the following tables:
TCURR - Exchange Rates
TCURT - Currency Code Names
This job uses the following input tables from the SAP server:
TCURR
TCURT
This job creates the following output:
Fmsr3mir.TCURR
Fmsr3mir.TCURT
fmsadpt_E00050_Extract_Account_T_Tables
This job extracts general and financial tables from SAP R/3 that are named with a
T030 prefix, and are related to accounts.
This job extracts the following tables:
T030 - Standard Accounts Table
T030C - Global Standard Account Table
This job uses the following input tables from the SAP server:
T030
T030C
This job creates the following output:
Fmsr3mir.T030
Fmsr3mir.T030C
fmsadpt_E00060_Extract_Operating_Concern_T_Tables Job
This job extracts operating concern tables from SAP R/3 that are named with a T
prefix.
This job extracts the following tables:
Page 90

86 Job Group: E01 Extraction of Master Tables Chapter 6
TKEB - Management for Operating Concerns
TKEBT - Description of operating concern
This job uses the following input tables from the SAP server:
TKEB
TKEBT
This job creates the following output:
Fmsr3mir.TKEB
Fmsr3mir.TKEBT
fmsadpt_E00070_Extract_Addl_Tables_for_Formats Job
This job extracts miscellaneous tables from SAP R/3 that are required for formats, and
have not already been extracted.
This job extracts the table DD07T – DD (Domain Fixed Values (Language Dependent)
Texts.)
This job uses the following input:
DD07T from the SAP server
&lang (set in the preprocessing step)
This job creates the following output:
Fmsr3mir.DD07T
$SHKZG uses Fmsr3mir.DD07T to create the format $SHKZG. It converts values
for domains. It converts single value or lower limit (DOMVALUE_L) to short text for
fixed values (DDTEXT). $SHKZG is stored in the LIBRARY.FMT&LANG catalog,
which is language dependent.
fmsadpt_E00080_Extract_New_GL_Control_Table Job
This job extracts the new GL Control table from SAP ECC. This job extracts the
following table:
FAGL_ACTIVEC - Activation of New General Ledger
This job uses the following input table from the SAP server:
FAGL_ACTIVEC
This job creates the following output:
Fmsr3mir.FAGL_ACTIVEC
Page 91

Extraction Jobs Job Group: E01 Extraction of Master Tables 87
Job Group: E01 Extraction of Master Tables
Overview
This job group includes common jobs that extract data for SAS Financial
Management.
fmsadpt_E01000_Extract_SAP_Master_Code_Tables Job
This job extracts all required master data tables from SAP R/3. For each table, a mirror
SAS table is created in the R3mirror library.
This job extracts the following tables:
CEPC - Profit Center Master Data Table
CSKS - Cost Center Master Data
SKA1 - G_L Account Master (Chart of Accounts)
KNA1 - General Data in Customer Master
LFA1 - Vendor Master (General Section).
This job uses the following input tables from the SAP server:
CEPC
CSKS
SKA1
KNA1
LFA1
This job creates the following output:
Fmsr3mir.CEPC
Fmsr3mir.CSKS
Fmsr3mir.SKA1
Fmsr3mir.KNA1
Fmsr3mir.LFA1
fmsadpt_E01010_Extract_SAP_Master_Description_Tables Job
This job extracts all required master data description tables from SAP R/3. For each table,
a mirror SAS table is created in the R3mirror library.
This job extracts the following tables:
CEPCT - Texts for Profit Center Master Data
CSKT - Cost Center Texts
SKAT - GL Chart of Accounts Description
This job uses the following input tables from the SAP server:
CEPCT
CSKT
Page 92

88 Job Group: E01 Extraction of Master Tables Chapter 6
SKAT
This job creates the following output:
Fmsr3mir.CEPCT
Fmsr3mir.CSKT
Fmsr3mir.SKAT
fmsadpt_E01050_Create_Formats_from_SAP_Tables Job
This job creates formats from the tables that are extracted in the previous jobs. This
job uses the following input:
Fmsr3mir.DD07T
Fmsr3mir.SKA1
Fmsr3mir.T001
Fmsr3mir.T002
Fmsr3mir.T009C
Fmsr3mir.T011
Fmsr3mir.TKA02
This job creates the following output formats:
$LOCALCR.
$COMPANY_TO_FY_VARIANT.
$company_to_country.
$TRAD_PTNR_TO_BUKRS.
$BUKRS.
$COM2CAC.
$unassigned_accounts_parent.
$SAPTOSAS_LANGUAGE.
$PERIOD_DESCRIPTION.
$PERIOD_NAME.
$responsible_employee_id_to_name.
$CC2CA. Converts Company Code (BUKRS) to Controlling Area (KOKRS).
$ SHKZG uses the Fmsr3mir.DD07T table to create the format $SHKZG. It
converts values for domains: Single Value or Lower Limit (DOMVALUE_L) to short
text for fixed values (DDTEXT). $SHKZG is stored in the LIBRARY.FMT&LANG
catalog, which is language-dependent.
$ACCBALS output uses the Fmsr3mir.SKA1 table to create the format
$ACCBALS. It also converts Values for General Ledger Account Number (SAKNR)
to Indicator: Account is a Balance Sheet Account? (XBILK). This stores the format
in the Library.fmt&_ktopl&lang catalog that is for the chart of accounts, and is
language-dependent.
This job calls the user-written code e01010_responsible_employee_to_id_
mapping.sas to create the format $responsible_employee_id_to_name. Edit this
program to include all responsible employees. Data should be based on the R3mirror
CSKS data provided in this extract.
Page 93

Extraction Jobs Job Group: E02 Extraction of Transaction Tables 89
Job Group: E02 Extraction of Transaction Tables
Introduction
This job group includes jobs that extract transactional data for SAS Financial
Management from SAP R/3.
fmsadpt_E02000_Extract_Financial_Documents_from_BKPF_BSEG (Initial) Job
This job extracts financial documents from SAP R/3. The E00011 job must execute before
the E02000 job. The E02005 job must run immediately after this job in order to create a
consolidated table of financial document data.
This job extracts the following tables:
BKPF - Accounting Document Header
BSEG - Accounting Document Segment
This job uses the following input:
BKPF from the SAP server
BSEG from the SAP server
$LOCALCR (created in the E00010 job)
$COM2CAC (created in the E00010 job)
$BUKRS (created in the E00010 job)
$TRAD_PTNR_TO_BUKRS (created in the E00010 job)
&_STARTFINYEAR (set in preprocessing step)
&OVERLAP (set in preprocessing step)
This job creates the following output:
Fmsr3mir.BKPF
Fmsr3mir.BSEG
Additional Notes
This job does a complete extraction. In addition, it executes the SAS macro
%ADPT_UPDATE_BKPF_DELTA to update the delta control date record for the BKPF
table.
In general, this job should be run during the first run of the job suite. However, you might
need to refresh data later if you think that there is incomplete data.
You must run the E02010 job in all subsequent cases. The initial extraction by the E02000
job completely extracts the financial document data from the BKPF and BSEG tables. The
extraction depends on the date in the macro variable &_STARTFINYEAR. However, in the
subsequent run, the E02010 job saves time by extracting only changes made to the tables.
The initial extraction by the E02000 job works in two stages:
Page 94

90 Job Group: E02 Extraction of Transaction Tables Chapter 6
The first stage extracts data from SAP to SAS data sets. This stage fully extracts
the BSEG table, but only partially extracts the BKPF table. From the BKPF table,
extraction is restricted to rows that have a fiscal year (GJAHR) not less than the
value specified in the macro variable &_STARTFINYEAR.
The second stage joins the two resulting SAS data sets in the job E2005. Because
the BKPF table extraction is restricted by date, an SQL LEFT join is run.
Information from the BSEG table is joined with information from the BKPF table.
fmsadpt_E02005_Extract_Intermediate_Table_merging_BKPF_BSEG
This job joins the results of job E02000 to provide a consolidated table of the SAP R/3
financial document tables. If customization is required for this job, you can rerun the job.
Because E2000 creates a complete extract of the input tables, running this join process again
does not create any load on the SAP server.
The job E02000 Initial Extraction Financial Documents BKPF and BSEG must execute
before this job. This job joins the following R3mirror tables:
BKPF - Accounting Document Header
BSEG - Accounting Document Segment
This job uses the following input:
BKPF from R3mirror
BSEG from R3mirror
This job creates the output Intermed.Financial_Documents.
fmsadpt_E02010_Extract_Intermediate_Table_from_BKPF_BSEG (Changes)
This job extracts changes made to the financial document tables. See the related E02000
job for more information.
The following jobs must run before this job:
E00011
E02000
This job extracts the following tables:
BKPF
BSEG
This job uses the following input:
BKPF from SAP server
BSEG from SAP server
$LOCALCR (created in the E00010 job)
$COM2CAC (created in the E00010 job)
$BUKRS (created in the E00010 job)
Page 95

Extraction Jobs Job Group: E03 Extraction of Summary Tables 91
$TRAD_PTNR_TO_BUKRS (created in the E00010 job)
&_STARTFINYEAR (set in preprocessing step)
&OVERLAP (set in preprocessing step)
This job creates the following output:
Fmsr3mir.BKPF
Fmsr3mir.BSEG
Intermed.Financial_Documents
Additional Notes
This job includes E02010_CHECK_DELTA_CONTROL_DATE.SAS. In addition, it
executes the SAS macro %ADPT_DELTACTL2 to get the latest delta control date record for
the BKPF table. This job includes E02010_UPDATE_BKPF_DELTA_CONTROL_DATE.SAS,
which calls the macro %ADPT_UPDATE_BKPF_DELTA to update the delta control date
record for the BKPF table.
If you require a complete refresh of financial document data, you can run the E02000 job.
The E02010 job extracts only changes that were made since the last extraction.
Extracting changes to the BKPF and BSEG tables efficiently is one of the most technically
demanding tasks for the SAS Financial Management Adapter for SAP. Because a complete
extraction takes many hours and uses a significant amount of SAP R/3 and network
resources, it should not be done frequently.
There is no perfect approach to this task because SAP does not use a perfect process to
create timestamps for the tables. However, you can use the following columns in the BKPF
table to identify changes:
CPUDT (Accounting Document Entry Date)
AEDAT (Date of Last Document Change by Transaction)
UPDDT (Date of Last Document Update)
In the same way, the BSEG table has no date-and-time stamps that are useful for
extraction. The SAS Financial Management Adapter for SAP must identify the new and
changed records in the heading table BKPF. It then extracts the matching records from the
BSEG table. A server-side join extracts the new and changed records in the BKPF and BSEG
tables.
This process restricts the extraction by checking the three dates in the columns previously
listed against an extract date. The extract date is stored in a SAS data set named
DELTACONTROL, in the Admin library. This extract date helps identify changed records.
The SAS Financial Management Adapter for SAP uses this date to subset the extraction. It
updates the latest extract date in a postprocessing step. The macro %ADPT_DELTACTL
updates DELTACONTROL.
You can use the macro variable &OVERLAP to specify a value of overlap days. This
variable subtracts the specified number of days from the last extract date, and thus,
increases the amount of data extracted.
Page 96

92 Job Group: E03 Extraction of Summary Tables Chapter 6
Job Group: E03 Extraction of Summary Tables
Introduction
This job group includes jobs that extract data for SAS Financial Management.
fmsadpt_E03000_Extract_GL_Balance_from_New_GL_Tables (New GL) Job
This job extracts account transaction summary tables from SAP R/3. For each table, a
mirror SAS table is created in the R3mirror library.
This job extracts the table GLT0 – GL account master record transaction
This job uses the following input:
GLT0 - GL account master record transaction
FAGLFLEXT - General Ledger: Totals
FAGLFLEXP - General Ledger: Plan Line Item
FAGLFLEXA - General Ledger: Actual Line It
This job creates the following output:
Fmsr3mir.GLT0
Fmsr3mir.FAGLFLEXT
Fmsr3mir.FAGLFLEXP
Fmsr3mir.FAGLFLEXA
fmsadpt_E03010_Extract_Split_Docs_from_FAGLFLEXA (New GL)
This job extracts the split documents from SAP R/3 if the new GL is implemented. For
each table, a mirror SAS table is created in the R3mirror library.
The output table Inter_Split_Documents is blank if the customer SAP system does not
have split documents.
This job uses the following input:
Fmsr3mir.FAGLFLEXA
Fmsr3mir.T8G21
This job creates the output FMS_Inter.Inter_Split_Documents.
fmsadpt_E03020_Extract_GL_Balances_from_OLd_GL_Tables
This job extracts account transaction summary tables from SAP R/3. For each table, a
mirror SAS table is created in the R3mirror library.
This job extracts the table GLT0 - GL account master record transaction
Page 97

Extraction Jobs Job Group: E04 Extraction of Hierarchies and Structures 93
This job uses the input table GLT0 from the SAP server.
This job creates the output Fmsr3mir.GLT0.
The first two jobs in this group need to be run only if New GL is implemented in your
SAP system. These jobs should not be run if your SAP system does not have New GL
capabilities.
In case your system does not have New GL capabilities, then run the third job.
Job Group: E04 Extraction of Hierarchies and Structures
Introduction
This job group includes jobs that extract, transform, and load data for SAS Financial
Management.
fmsadpt_E04010_Extract_Balance_Sheet_FSV_Structures
This job extracts financial statement data from SAP R/3. The easiest way to approach this
data is by calling the remote-enabled SAP functions. However, the SAP functions that
produce this data are not remote-enabled. The SAS Financial Management Adapter for SAP
provides functions that are remote enabled, and can call the relevant SAP functions.
This job uses the following input:
The macro variables listed below:
_VERSN Financial statement version from T011 without quotation marks
SPRAS Language code
This job creates the following output:
Fmsr3mir.RF011P
Fmsr3mir.RF011Q
Fmsr3mir.RF011Z
This job calls E04010_CALLRFC_IMPORT_BALANCE_SHEET.SAS and submits a PROC
CALLRFC to execute the following SAP functions:
/SAS/FI_IMPORT_BAL_SHEET_POS
/SAS/FI_IMPORT_BAL_SHEET_TEXT
fmsadpt_E04020_Extract_Supplier_Hierarchy
This job extracts supplier hierarchy tables from SAP R/3. For each table, a mirror SAS
table is created in the R3mirror library.
This job extracts the following tables:
LFMH - Vendor hierarchy
TLHITT - Vendor hierarchy category (description)
Page 98

94 Job Group: E05 Extraction of Miscellaneous Tables Chapter 6
This job uses the following input tables from the SAP server:
LFMH
TLHITT
This job creates the following output:
Fmsr3mir.LFMH
Fmsr3mir.TLHITT
fmsadpt_E04030_Extract_Customer_Hierarchy
This job extracts customer hierarchy tables from SAP R/3. For each table, a mirror SAS
table is created in the R3mirror library.
This job extracts the following tables:
KNVH - Customer Hierarchies
THITT - Texts for Customer Hierarchy Types
This job uses the following input tables from the SAP server:
KNVH
THITT
This job creates the following output:
Fmsr3mir.KNVH
Fmsr3mir.THITT
Job Group: E05 Extraction of Miscellaneous Tables
Introduction
This job group includes jobs that extract data for SAS Financial Management.
fmsadpt_E05000_Extract_Number_Ranges_from_NRIV Job
This job extracts the table NRIV - Number Range Intervals.
This job uses the input table NRIV from the SAP server.
This job creates the output Fmsr3mir.NRIV.
fmsadpt_E05010_Extract_State_Region_County_Data_from_T005U Job
This job extracts the table T005U - Taxes: Region Key: Texts.
This job uses the input table T005U from the SAP server.
This job creates the output Fmsr3mir.T005U.
Page 99

Extraction Jobs Job Group: E05 Extraction of Miscellaneous Tables 95
fmsadpt_E05020_Extract_Cost_Elements_from_CSKB Job
This job extracts the table CSKB - Cost Elements.
This job uses the input table CSKB from the SAP server.
This job creates the output Fmsr3mir.CSKB.
Page 100

96 Job Group: E05 Extraction of Miscellaneous Tables Chapter 6
 Loading...