

Sartorius Stedim Biotech Flexel Series, Flexel 3000L, Flexel 1500L User Manual [en, de, it, es, fr]
Page 1
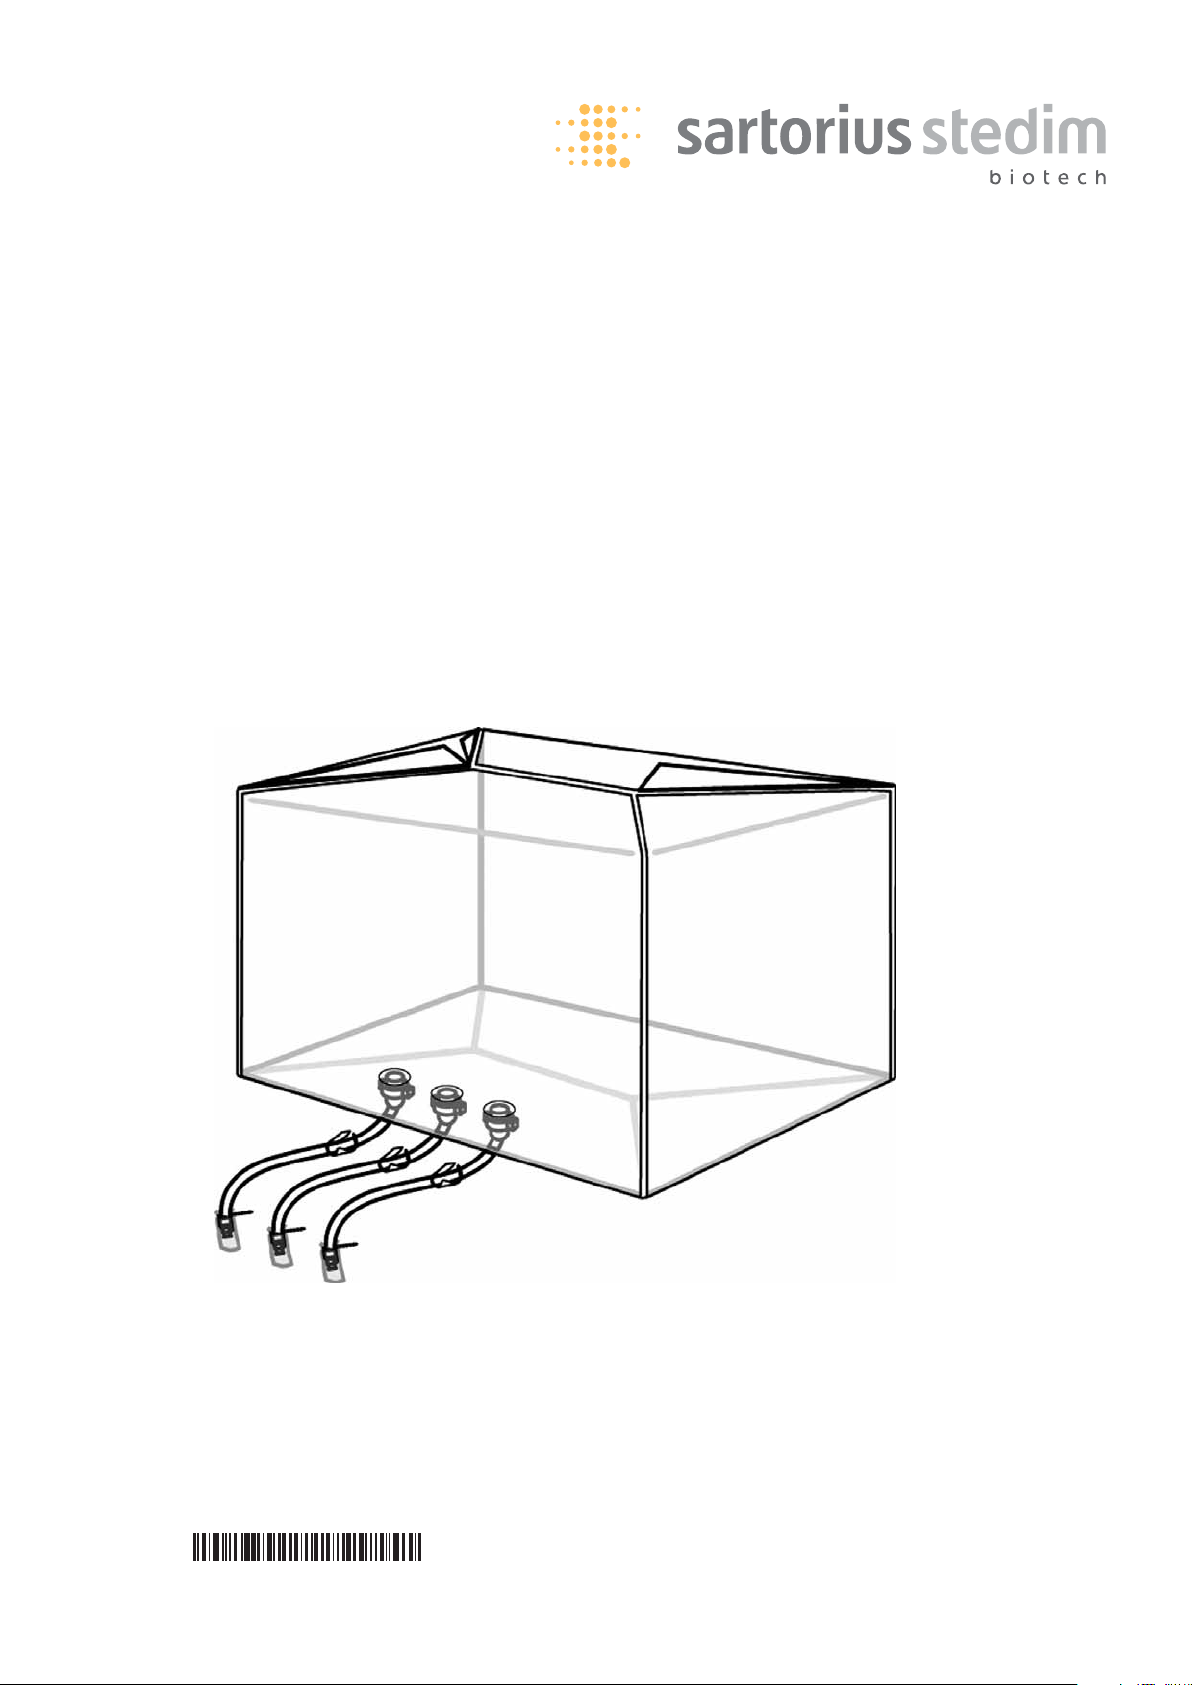
User Manual|Mode d’emploi|Benutzerhandbuch|Manual de usuario|Manuale d'uso
Flexel®3D Bag | Poche Flexel®3D | Flexel®3D Bag |
Bolsa 3D Flexel
®
| Sacche Flexel®3D
1500L | 3 000L
85034-535-64
IU101214 rev01
Page 2

English page 2
Français page 8
Deutsch Seite 14
Español página 20
Italiano pagina 26
1. Introduction 3
2. Palletank
®
& Flexel®3D Bag
Description 3
2.1. Palletank
®
Description 3
2.2. Flexel
®
3D Bag Description 3
3. Flexel
®
3D System 1500L to
3000L Instructions for Use 4
3.1. Preparation of the Palletank
®
4
3.2. Flexel
®
3D Bag Installation 4
3.3. Flexel
®
3D Bag Filling 4
3.4. Flexel
®
3D Bag Emptying 5
4. Trouble Shooting Guide 5
5. Precautions of Use 5
6. Flexel
®
3D Bag Storage Conditions 6
7. Shelf Life of a Flexel
®
3D Bag 6
8. Product Complaint 6
9. Disclaimers 7
10. Warranty 7
11. Trademark & Patents 7
2
Table of Contents
Page 3

For use with:
Palletank
®
For In-Process Fluid Handling:
1500L, 2000L, 2500L and 3000L
3
Flexel®3D BAG 1. Introduction 2. Palletank®& Flexel®3D Bag
1500L | 3000L Description
The Flexel®3D System is composed of a disposable sterile bag, the Flexel
®
3D Bag and
the Palletank
®
rigid container constructed of
stainless steel. The Palletank
®
supports the
fluid contained within the Flexel
®
3D Bag.
The two make up the System and must be
used together to ensure a robust process
solution. The Flexel
®
3D Bags are manufactured according to a patented design that
precisely fits the Palletank
®
. When filling,
bottom and sides of the bag conform exactly
to the shape and dimensions of the tank.
The exact fit ensures that there are no folds
or creases to trap pockets of air or liquid for
maximum bag functionality.
The Flexel
®
3D System has been designed
with bottom ports that allow both bottom
filling and drainage of the bag for virtually
100% fluid recovery.
The various configurations of tubing and the
Palletank
®
make it compatible with a wide
range of bio-processing applications. Bags
and corresponding Palletank
®
for In-Process
Fluid Handling are currently available from
1500L to 3000L.
Purpose
This Instruction for use describes the operations required to prepare, fill and drain the
Flexel
®
3D Bag in its dedicated Palletank
®
from 1,500L and above.
2.1. Palletank
®
Description
Sartorius Stedim Biotech currently offers the
Palletank
®
For In-Process Fluid Handling for
use with 1500L to 3000L Flexel
®
3D Bags.
(See Fig. 1)
2.2. Flexel
®
3D Bag Description
(See Fig. 2)
Page 4

3.1. Preparation of the Palletank
®
a) Open the hinged front and side doors by
removing the locking systems (See Fig. 4)
b) Before proceeding to Flexel
®
3D Bag
installation in the Palletank®, check that
the internal surfaces of the Palletank
®
are
SMOOTH, FREE OF ANY PARTICLES that
might damage the bag surface and DRY
c) Open the three bottom gates (See Fig 3):
- Do not open the bottom gates when the
Flexel
®
3D Bag is filled (Failure to follow
this instruction may result in product
loss)
- Remove the retaining clip from the
retaining clip fastening point.
- Grasp the retaining clip fastening point
and swing the bottom gate completely
open.
- Repeat the procedure for the two
remaining bottom gates.
d) If needed, remove the stainless steel
hanger from the limit stopper (See Fig. 1).
3.2. Flexel
®
3D Bag Installation
a) Obtain a packaged Flexel
®
3D Bag of
the appropriate size (bag size matches
Palletank
®
size) and position it on a
smooth table with no sharp angular
corners.
b) Check that the irradiation indicator on
the label is red and record the batch
number of the bag (as seen on the product label). (See Fig. 5)
c) On a table, position the bag in such a
way that the bottom ports are underneath and facing you. This correct positioning will ensure a proper insertion of
the Flexel
®
3D Bag in the Palletank
®
(See Fig. 7)
d) To open the secondary (external) packag-
ing (See Fig. 6):
- cut one of its corner just under the clo-
sure weld with a pair of rounded scissors and open completely by tearing
along the weld.
- Remove the secondary packaging by
sliding it away from the Flexel
®
3D Bag.
e) Check that the Flexel
®
3D bag secondary
packaging is free from any damage that
could compromise the sterility.
f) Repeat the d) and e) steps for the primary
(internal) packaging.
g) Remove the adhesive tape at the top of
the bag and the protective foam from the
Flexel
®
3D Bag without unfolding the bag
(See Fig 7).
h) Bag positioning inside the Palletank
®
hold the folded bag on both arms with
the three bottom ports underneath
(See Fig. 8)
- Position yourself in front of the
Palletank
®
.
- Introduce the folded bag in the
Palletank
®
by the front opening in
such a way that the bottom ports
face the bottom gates.
The accordion pleats of the bag have
been especially designed to facilitate
its manipulation, installation in the
Palletank
®
and unfolding during hoisting
of the bag.
i) Pass the bottom port tubes thought the
front channels, coil them to position
these in the Palletank
®
bottom plate.
j) Insertion of the bottom port tubes in the
bottom gates:
- Insert the bottom port tube and pull it
through the jaw.
- Place the bottom port in contact with
the fixed jaw of the bottom gate. The
edge of the fixed jaw must be inserted
inside the groove of the bottom port.
(See Fig. 9)
- Slightly pull down the bottom port and
close the mobile jaw inside the groove
of the bottom port. (See Fig. 10)
- Lock the latch of the bottom gate to
secure the bottom port. (See Fig. 3)
- Check the correct positioning of the
bottom port in the bottom gate by trying to pull the bottom port out from
the bottom gate. The bottom port must
remain in place. If it is not the case,
repeat the j) step.
- Repeat the same operations for the two
other bottom port tubes positioning in
the bottom gates
k) Position the clamps on the bottom tubes
as close as possible to the bottom ports
and close them (See Fig. B).
l) Pass and lock-in the four stainless steel
hooks of the cable positioned through
corresponding holes located on the
Flexel
®
3D Bag top flaps. (See Fig. 11
and Fig. 12)
m) Pull the stainless steel hanger of the
cable to lift the Flexel
®
3D Bag until the
limit stopper of the hanger. Attach the
hanger to the limit stopper (See Fig. 13).
The bag is ready for the filling operation.
n) Check that the K-seal is in the middle and
parallel to the front and back of the container (See Fig. 14).
3.3. Flexel
®
3D Bag Filling
a) Check that all the clamps are closed.
(See Fig. B)
b) Open the connector protective outer-
wrap using the reversible cable tie on the
bottom filling line (See Fig. C) and connect the bag to the supply tank in accordance with the standard procedures used
on your site.
c) Open the clamps on the tubing line that
the bag will be filled from. (See Fig. A)
d) Start to fill the Flexel
®
3D Bag - Sartorius
Stedim Biotech recommends the use of
peristaltic pumps for filling and dispensing from the bag. (See Fig. 15)
e) After having filled the bag with 1- 2%
of the bag nominal volume:
- Stop filling the bag
- Using the front doors access, manually
adjust front bag corners the corresponding Palletank
®
angles
- Using the side openings, manually
adjust backside bag corners to the
corresponding Palletank
®
angles
(See Fig. 16)
- Continue the filling until the full bot-
tom surface of the Palletank
®
is covered
with liquid.
f) Close front and side doors and secure
locking systems (See Fig. 17)
g) When filling is complete, close the clamps
(See Fig. B) and disconnect the filling
line.
4
3. Flexel®3D System 1500L to 3000L Instructions for Use
Page 5

3.4. Flexel®3D Bag Emptying
a) Warning: Before starting bag emptying,
remove the stainless steel hanger from its
limit stopper (See Fig 18).
b) Take the bottom port tube and position it
vertically. Open the connector protective
outer-wrap using the reversible cable tie
on the dispensing line and carry out the
connection according to the standard
procedures that apply on the site
(See Fig. C).
c) Unclamp the drain line and start the
draining operation (See Fig. A) - Gravity
can be used, but for faster draining Sartorius Stedim Biotech recommends the
use of a peristaltic pump. (See Fig. 19)
d) The Flexel
®
3D Bag closes down on itself
and collapses automatically. To obtain
100% fluid recovery, lift the collapsed
bag.
e) When dispensing is complete, clamp the
line (See Fig. B) and disconnect the main
drain line from the drain tube of the
Flexel
®
3D Bag.
f) Remove each stainless steel hook of the
cable from holes located on the Flexel
®
3D Bag top flaps.
g) Open the three bottom gates to free the
bottom ports by removing the retaining
clip from the retaining clip fastening
point; then grasp the retaining clip fastening point and swing the bottom gate
open.
h) Remove the collapsed bag from the
Palletank
®
(See Fig. 20).
5
4. Trouble Shooting Guide 5. Precautions of Use
The bag will not fill
> Check that the clamp is open and that
the tube is not pinched.
When filling through the bottom, the
bag comes out of the bottom gate.
> The edge of the jaw is not closed inside
the groove of the bottom port. Position
it correctly in the groove.
The bag does not open out correctly
during filling:
> The port system is incorrectly aligned.
The bag is incorrectly positioned in
the Palletank
®
. Lift the bag out of the
Palletank
®
, turn it round and go through
Flexel
®
3D Bag installation procedure
once again.
> The bottom of the bag is incorrectly
positioned.
Place the corners of the bag in the corners of the Palletank
®
(make sure that
only 1-2% of nominal volume is filled
before adjusting, otherwise bag failure
may occur)
Many folds appear in the bag during
filling
> The bag is too big, use the bag suited to
the size of the Palletank
®
The bag does not come up against the
walls
> The bag is too small, use the bag suited
to the size of the Palletank
®
The bag will not drain
> Check that the clamp is open and that the
tube is not pinched.
a) The Sartorius Stedim Biotech Flexel
®
3D
Bag must imperatively be used with the
Sartorius Stedim Biotech Palletank
®
.
b) The Palletank
®
must be clean and dry
before inserting the Flexel
®
3D Bag.
Traces of cleaning agents left on the
Palletank
®
can potentially damage the
Flexel
®
3D Bag.
c) It is under the user’s responsibility to
verify the compatibility of the Flexel
®
3D
Bag materials with the solutions used in
your process. Sartorius Stedim Biotech
can provide guidelines for chemical compatibility, bio-compatibility and extractables.
d) Avoid leaving sharp objects (scissors, cut-
ters, scalpels, etc.) in the vicinity of the
Flexel
®
3D Bag.
e) The Flexel
®
3D Bag is not to be handled
by its connections (i.e. tubing).
f) Avoid folding the Flexel
®
3D Bag other
than the original folds. Do not fold the
bag in the direction of the “gussets”.
(Gussets Heat-sealed seams)
g) When positioning the Flexel
®
3D Bag in
the Palletank
®
and when adjusting it after
the initial fill, handle the bag gently and
do not force fit or pull hard.
h) The Flexel
®
3D Bag is for single-use and
should not be re-used.
Page 6

Flexel®3D Bags can be stored in their original primary packaging at room temperature
(5°C to 40°C), in a dry environment.
The shelf life after gamma sterilisation has
been validated as indicated on the labelling
(product packaging and case) and in the
specifications. Details are available from Sartorius Stedim Biotech upon request.
When may a complaint occur?
When a malfunction or deterioration in
the characteristics and/or performance of
a marketed product as well as any inadequacy in the labelling, instructions for
use, release certificate and/or customer
services have occurred.
To whom should the complaint be sent?
To your Sartorius Stedim Biotech commercial contact person or distributor.
How and which information should be
conveyed?
A complaint form is available at
http://www.sartorius-stedim.com and
should be sent by e-mail, fax or letter
with:
– the defect description;
– the description of the process in which
the defect was detected;
– the bag or bag system traceability (prod-
uct code & lot number).
The bag or device deemed defective is
required to perform the investigation.
6
6. Flexel® 3D Bag 7. Shelf Life of a 8. Product Complaint
Storage Conditions Flexel
®
3D Bag
Page 7

a) Sartorius Stedim Biotech Flexel®3D Bag
is for SINGLE-USE only. Sartorius Stedim
Biotech will not endorse any responsibility of any kind for re-use of the Flexel
®
3D
Bag.
b) Sartorius Stedim Biotech will not accept
any responsibility for use of Flexel
®
3D
Bag with any other container than
Palletank
®
.
c) Sartorius Stedim Biotech will not endorse
any responsibility if the Flexel
®
3D Bag
instructions for use as described in this
document are not strictly followed and
the above mentioned Precautions of Use
applied. Upon request, Sartorius Stedim
Biotech engineers can perform training of
employees.
d) Sartorius Stedim Biotech is not responsi-
ble for any special, incidental or consequential damages resulting from any
legal theory, including lost profits, downtime, goodwill, damage to or replacement
of equipment or property.
7
9. Disclaimers 10. Warranty 11. Trademark & Patents
Sartorius Stedim Biotech warrants that the
Flexel
®
3D Bag is produced according to
specifications. Unless otherwise provided for
in agreed upon specifications, the general
Sartorius Stedim Biotech specifications will
apply. In the case of defect, please follow
the above mentioned product complaint
procedure.
a) Flexel
®
and Palletank®are registered
trademarks of Sartorius Stedim Biotech.
b) The Flexel
®
3D System is covered by 2
patents filed internationally.
Page 8

1. Introduction 9
2. Description du Palletank
®
et
de la Poche Flexel
®
3D 9
2.1. Description du Palletank
®
9
2.2. Description de la Poche Flexel
®
3D 9
3. Mode d'emploi du Système
Flexel
®
3D de 1 500 l à 3 000 l 10
3.1. Préparation du Palletank
®
10
3.2. Installation de la Poche Flexel
®
3D 10
3.3. Remplissage des Poche Flexel
®
3D 10
3.4. Vidange des Poche Flexel
®
3D 11
4. Incidents de Fonctionnement :
Origines et Solutions 11
5. Précautions d'emploi 11
6. Conditions de Stockage de
la Poche Flexel
®
12
7. Durée de Conservation des
Poches Flexel
®
3D 12
8. Réclamations 12
9. Clauses de Non-Responsabilité 13
10. Garantie 13
11. Marques et Brevets 13
8
Table des matières
Page 9

À utiliser avec :
Palletank
®
pour la manutention de fluides
en cours de traitement : 1 500 L, 2 000 L,
2 500 L et 3 000 L
9
Poche Flexel®3D 1. Introduction 2. Description du Palletank
®
1 500 L | 3 000 L et de la Poche Flexel®3D
Le système Flexel®3D se compose d'une
poche stérile à usage unique, la poche
Flexel
®
3D et d'un conteneur rigide, le
Palletank
®
en acier inoxydable. Le Palletank
®
maintient la poche Flexel®3D contenant le
fluide. Les deux dispositifs forment le système et doivent être utilisés ensemble pour
obtenir une solution de traitement robuste.
Les poches Flexel
®
3D sont fabriquées selon
une conception brevetée parfaitement adaptée au Palletank
®
. Pendant le remplissage, le
fond et les côtés de la poche épousent parfaitement la forme et les dimensions du
conteneur. Cette compatibilité garantit l'absence de pliures et de faux-pli qui peuvent
former des poches d'air ou de liquide et
veille au fonctionnement parfait de la poche.
Le système Flexel
®
3D a été conçu avec des
lignes basses permettant le remplissage et la
vidange par le bas de la poche pour une
récupération presque totale du liquide.
Les différentes configurations de tubes et le
Palletank
®
assurent la compatibilité avec une
large gamme d'applications biotechnologiques. Les poches et les Palletank
®
pour la
manutention de fluides en cours de traitement sont actuellement disponibles de
1 500L à 3 000L.
Objectif
Le présent mode d'emploi décrit les opérations nécessaires pour préparer, remplir et
vider une poche Flexel
®
3D dans le Palletank
®
correspondant à partir de 1 500L.
2.1. Description du Palletank
®
Sartorius Stedim Biotech propose actuellement le Palletank
®
pour la manutention de
fluides en cours de traitement à utiliser avec
les poches Flexel
®
3D de 1 500L à 3 000L.
(voir Fig. 1)
2.2. Description de la Poche Flexel
®
3D
(voir Fig. 2)
Page 10

3.1. Préparation du Palletank
®
a) Ouvrez les portes frontales et latérales
sur charnières en retirant les dispositifs de
verrouillage (voir Fig. 4).
b) Avant d'introduire la poche Flexel
®
3D
dans le Palletank
®
, vérifiez que les sur-
faces internes du Palletank
®
sont LISSES,
EXEMPTES DE PARTICULES risquant
d'endommager la surface de la poche et
SECHES
c) Ouvrez les trois orifices bas (voir Fig. 3) :
- N’ouvrez pas les orifices bas lorsque la
poche Flexel
®
3D est en cours de remplissage (la non-observation de ces instructions peut entraîner une perte de
produit)
- Retirez le clip de son point d'attache.
- Saisissez le point d'attache du clip et
ouvrez complètement l'orifice bas.
- Répétez la procédure pour les deux
orifices bas restants.
d) Si nécessaire, retirez la prise du câble de
levage en acier inoxydable de la butée
(voir Fig. 1).
3.2. Installation de la Poche Flexel
®
3D
a) Choisissez une poche Flexel
®
3D aux
dimensions adéquates (le format de la
poche correspondant aux dimensions
du Palletank
®
) et placez-la sur une table
lisse sans coins coupants.
b) Vérifiez que l’indicateur d’irradiation de
l’étiquette est rouge et notez le numéro
de lot de la poche (indiqué sur l’étiquette
du produit) (voir Fig. 5).
c) Sur une table, placez la poche de sorte
que les lignes basses soient situées audessous et face à vous. Il est important de
respecter ce positionnement pour garantir
l'insertion adéquate de la poche Flexel
®
3D dans le Palletank®(voir Fig. 7).
d) Pour ouvrir le second emballage (externe)
(voir Fig. 6):
- coupez l'un des coins juste au-dessous
de la soudure de fermeture à l'aide
d'une paire de ciseaux à bouts ronds et
ouvrez complètement en déchirant le
long de la soudure.
- Retirez le second emballage en le fai-
sant glisser hors de la poche Flexel
®
3D.
e) Vérifiez que le second emballage de la
poche Flexel
®
3D n'est pas endommagé ;
si c'était le cas, la stérilité pourrait être
compromise.
f) Répétez les étapes d) et e) pour l'emballa-
ge principal (interne).
g) Retirez le ruban adhésif du haut de la
poche et la mousse protectrice de la
poche Flexel
®
3D sans déplier la poche
(voir Fig.7).
h) Positionnement de la poche dans le
Palletank
®
- Tenez la poche pliée des deux bras avec
le système des 3 ports situé en-dessous
(voir Fig. 8)
- Placez-vous devant le Palletank
®
.
- Insérez la poche pliée dans le Palletank
®
par l'ouverture avant de sorte que les
lignes basses soient face aux orifices
bas.
Le pliage accordéon de la poche a été
spécialement conçu pour faciliter sa
manipulation, l’installation dans le Palletank
®
et le dépliage pendant le levage de
la poche.
i) Passez les tubes de la ligne basse à
travers les passages situés à l'avant,
enroulez-les pour les placer dans le
plateau du Palletank
®
.
j) Insertion des tubes de la ligne basse dans
les orifices bas :
- Insérez le tube de la ligne basse et tirezle dans la mâchoire.
- Mettez en contact l'embase de la ligne
basse avec la mâchoire fixe de l'orifice
bas. L'encolure de l'embase de la ligne
basse doit être placée dans le logement
de la partie fixe de l'orifice bas du
Palletank
®
(voir Fig. 9).
- Tirez légèrement la ligne basse vers le
bas et fermez la mâchoire mobile dans
la rainure de la ligne basse (voir Fig.
10).
- Verrouillez le clip de l'orifice bas pour
fixer la ligne basse (voir Fig. 3).
- Vérifiez le positionnement adéquat de
la ligne basse dans l'orifice bas en
essayant de retirer la ligne basse de
l'orifice bas. La ligne basse doit rester
en place. Si ce n'est pas le cas, répétez
l'étape j).
- Procédez de même pour placer les deux
autres tubes de la ligne basse dans les
orifices bas
k) Placez les clamps des tubes inférieurs le
plus près possible de l'embase des lignes
basses et fermez-les (voir Fig. B).
l) Passez et verrouillez les quatre mousque-
tons en acier inoxydable du câble dans les
trous situés sur les rabats supérieurs de la
poche Flexel
®
3D (voir Fig. 11 et 12).
m) Tirez la prise en acier inoxydable du
câble pour soulever la poche Flexel
®
3D
jusqu’à la butée de fin de course.
Attachez la prise à la butée de fin de
course (voir Fig. 13). La poche est prête
pour le remplissage.
n) Vérifiez que le joint en forme de K est au
milieu et parallèle à l’avant et l’arrière du
container (voir Fig. 14).
3.3. Remplissage des Poche Flexel
®
3D
a) Vérifiez que tous les clamps sont fermés
(voir Fig. B).
b) Ouvrez le sachet protecteur de la ligne de
remplissage inférieure (voir Fig. C) à l'aide
du collier réversible et connectez la poche
à la cuve de remplissage conformément
aux procédures en vigueur sur le site.
c) Ouvrez les clamps sur le tube de remplis-
sage de la poche (voir Fig. A).
d) Démarrez le remplissage de la poche
Flexel
®
3D. Sartorius Stedim Biotech
recommande d'utiliser une pompe
péristaltique pour remplir et vidanger
la poche (voir Fig. 15.).
e) Après avoir rempli la poche à 1- 2 %
de son volume nominal :
- Arrêtez le remplissage de la poche
- Par les portes avant, ajustez manuelle-
ment les coins avant de la poche de
manière à ce qu'ils se logent dans les
coins correspondants du Palletank
®
- Par les ouvertures latérales, ajustez
manuellement les coins arrière de la
poche pour qu’ils épousent les angles
du Palletank
®
(voir Fig. 16).
- Continuez le remplissage jusqu’à ce que
toute la surface inférieure du Palletank
®
soit recouverte de liquide.
f) Fermez les portes avant et latérales et
fermez les systèmes de verrouillage (voir
Fig. 17).
g) Une fois le remplissage terminé, fermez
les clamps (voir Fig. B) et déconnecter la
ligne de remplissage.
10
3. Mode d'emploi du Système Flexel®3D de 1 500L à 3 000L
Page 11

3.4. Vidange des Poches Flexel®3D
a) Avertissement : avant de vider la poche,
retirez la prise en acier inoxydable de la
butée (voir Fig. 18).
b) Prenez le tube de la ligne basse et placez-
le à la verticale. Ouvrez le sachet protecteur de la ligne de vidange à l'aide du
collier réversible et connectez en suivant
la procédure en vigueur sur le site
(voir Fig. C).
c) Déclamper la ligne de vidange et démar-
rez la vidange (voir Fig. A). La poche peut
être vidanger par gravité. Pour une vidange plus rapide, Sartorius Stedim Biotech
recommande l'utilisation d'une pompe
péristaltique (voir Fig. 19).
d) La poche Flexel
®
3D Bag s’affaisse au fur
et à mesure. Pour récupérer 100 % du
liquide, soulevez la poche affaissée.
e) Une fois la vidange terminée, clampez la
ligne (voir Fig. B) et déconnectez la ligne
de vidange du tube de vidange de la
poche Flexel
®
3D.
f) Retirez mousqueton crochet en acier
inoxydable du câble des trous situés sur
les rabats supérieurs de la poche Flexel
®
3D.
g) Ouvrez les trois orifices bas pour libérer
les lignes basses en retirant le clip de son
point d’attache.
h) Retirez la poche affaissée du Palletank
®
(voir Fig. 20).
11
4. Incidents de Fonctionnement : 5. Précautions d'emploi
Origines et Solutions
La poche ne se remplit pas
> Vérifiez que le clamp est ouvert et que le
tube n'est pas pincé
Lors du remplissage, la poche sort de
l'orifice bas.
> L'encolure de la mâchoire n'est pas cor-
rectement insérée dans la rainure de la
ligne basse. Placez-la correctement dans
la rainure.
La poche ne s'ouvre pas correctement
pendant le remplissage :
> Le système des ports n'est pas correcte-
ment aligné
La poche n’est pas correctement positionnée dans le Palletank
®
. Soulevez et retirez
la poche du Palletank
®
, retournez-la et
répétez la procédure d’installation de la
poche Flexel
®
3D.
> Le fond de la poche n'est pas correcte-
ment positionné
Placez les coins de la poche dans les coins
du Palletank
®
(veillez à ce que seulement
1-2 % du volume nominal soit rempli
avant l'ajustage pour un bon fonctionnement de la poche)
Des plis se forment dans la poche pendant le remplissage
> La poche est trop grande, utilisez une
poche adaptée aux dimensions du
Palletank
®
La poche ne touche pas les parois
> La poche est trop petite, utilisez une
poche adaptée aux dimensions du
Palletank
®
La poche ne se vide pas
> Vérifiez que le clamp est ouvert et que le
tube n'est pas pincé.
a) La poche Flexel
®
3D de Sartorius Stedim
Biotech doit être obligatoirement utilisée
avec le Palletank
®
de Sartorius Stedim
Biotech.
b) Le Palletank
®
doit être propre et sec avant
d'insérer la poche Flexel
®
3D. Les résidus
de produit nettoyant sur le Palletank
®
peuvent endommager la poche Flexel
®
3D.
c) Il incombe à l'utilisateur de vérifier la
compatibilité des matériaux de la poche
Flexel
®
3D avec les solutions utilisées.
Sartorius Stedim Biotech peut fournir de
plus amples informations sur la compatibilité chimique, la biocompatibilité et les
extractibles.
d) Ne pas laisser d'objets pointus (ciseaux,
cutters, scalpels, etc.) à proximité de la
poche Flexel
®
3D.
e) La poche Flexel
®
3D ne doit pas être
manipulée par ses connexions (par ex.
tubes).
f) Ne pas plier la poche Flexel
®
3D (hors plis
d'origine). Ne pas plier la poche dans le
sens des « soufflets » (soudures soudées
à chaud).
g) Lors de l'insertion de la poche Flexel
®
3D
dans le Palletank
®
et de son ajustage
après le remplissage initial, manipulez la
poche délicatement, sans forcer ni la tirer
brusquement.
h) La poche Flexel
®
3D est à usage unique et
ne doit pas être réutilisée.
Page 12

Les poches Flexel®3D peuvent être stockées
dans leur emballage d'origine à température
ambiante (5°C à 40°C), dans un environnement sec.
La durée de conservation après stérilisation
Gamma figurant sur l'étiquette (emballage
du produit et boîte) et dans les spécifications
a été validée. Vous pouvez obtenir de plus
amples informations auprès de Sartorius Stedim Biotech.
Quand peut-il y avoir une réclamation ?
En cas de dysfonctionnement ou de détérioration des caractéristiques et|ou performances d'un produit commercialisé et
en cas d'erreur sur l'étiquetage, dans le
mode d'emploi, dans les certificats
d'émission et/ou du service client.
À qui adresser la réclamation ?
Au responsable commercial ou au distributeur Sartorius Stedim Biotech.
Quelles informations envoyer et
comment ?
Un formulaire de réclamation est disponible à l'adresse http://www.sartoriusstedim.com et doit être retourné par email, fax ou lettre, avec :
- la description du problème ;
- la description du processus durant lequel
est survenu le problème ;
- la traçabilité de la poche ou du système
(code produit et numéro de lot).
La poche ou le dispositif défectueux
devront subir un examen.
12
6. Conditions de Stockage 7. Durée de Conservation 8. Réclamations
de la Poche Flexel
®
des Poches Flexel® 3D
Page 13

a) La poche Sartorius Stedim Biotech Flexel
®
3D est destinée à un USAGE UNIQUE.
Sartorius Stedim Biotech décline toute
responsabilité en cas de réutilisation de la
poche Flexel
®
3D.
b) Sartorius Stedim Biotech décline toute
responsabilité en cas d'utilisation d'une
poche Flexel
®
3D avec un conteneur autre
que le Palletank
®
.
c) Sartorius Stedim Biotech décline toute
responsabilité en cas de non-observation
des consignes d'utilisation de la poche
Flexel
®
3D contenues dans ce document
et des précautions d'emploi précitées. Sur
demande, les techniciens de Sartorius
Stedim Biotech peuvent assurer la formation des employés.
d) Sartorius Stedim Biotech n'est pas res-
ponsable des dommages spéciaux, accessoires ou indirects issus d'une théorie
juridique, y compris ceux causant une
perte de profit, une immobilisation ou
affectant la notoriété, ainsi que les dommages causés à ou entraînant le remplacement de l'équipement ou de biens
matériels.
13
9. Clauses de Non-Responsabilité 10. Garantie 11. Marques et Brevets
Sartorius Stedim Biotech garantit que la
poche Flexel
®
3D est fabriquée conformément aux spécifications. Sauf dispositions
contraires acceptées dans les spécifications,
les spécifications générales de Sartorius Stedim Biotech s'appliquent. Si la poche est
défectueuse, suivre la procédure de réclamation mentionnée ci-dessus.
a) Flexel
®
et Palletank®sont des marques
déposées de Sartorius Stedim Biotech.
b) Le système Flexel
®
3D est protégé par
2 brevets internationaux.
Page 14

1. Einführung 15
2. Beschreibung von
Palletank® & Flexel
®
3D Bag 15
2.1. Beschreibung des Palletanks
®
15
2.2. Beschreibung des Flexel
®
3D Bag 15
3. Gebrauchsanleitung für
das Flexel
®
-3D-System:
1500 bis 3000 Liter 16
3.1. Vorbereitung des Palletanks
®
16
3.2. Einbau des Flexel
®
3D Bags 16
3.3. Das Befüllen des Flexel
®
3D Bags 16
3.4. Entleeren des Flexel
®
3D Bags 17
4. Fehlerbehebung 17
5. Vorsichtsmaßnahmen für
den Gebrauch 17
6. Lagerungsbedingungen für
den Flexel
®
3D Bag 18
7. Haltbarkeit des Flexel
®
3D Bags 18
8. Produktreklamation 18
9. Haftungsausschlüsse 19
10. Garantie 19
11. Warenzeichen & Patente 19
14
Inhalt
Page 15

Zur Anwendung mit:
Palletank
®
für prozessinternes
Flüssigkeitsmanagement:
1500, 2000, 2500 und 3000 Liter
15
Flexel®3D Bag 1. Einführung 2. Beschreibung von
1500L | 3000L Palletank
®
& Flexel®3D Bag
Das Flexel®-3D-System besteht aus dem
Flexel
®
-3D-Bag, einem sterilen Einweg-Bag,
und dem Palletank
®
, einem formfesten, aus
Edelstahl gefertigten Behälter. Der Palletank
®
verleiht dem mit Flüssigkeit gefüllten
Flexel
®
-3D-Bag die nötige mechanische
Stabilität. Beide gehören zum Flexel
®
-3DSystem und müssen auch zusammen verwendet werden. Nur so lässt sich eine robuste Prozesslösung gewährleisten. Die
Flexel
®
-3D-Bags werden nach einem patentierten Design hergestellt und passen perfekt
in den Palletank
®
. Boden und Seiten des
Bags passen sich der Form und den Abmessungen des Edelstahlbehälters beim Befüllen
an. Die genaue Passform sorgt dafür, dass
keine Knicke oder Falten entstehen, in denen
sich Luft- oder Flüssigkeitseinschlüsse bilden
könnten, und garantiert damit ein Höchstmaß an Funktionalität.
Über die Bodenauslassöffnungen des
Flexel
®
-3D-Systems lässt sich der Bag von
unten sowohl befüllen als auch entleeren.
Damit gelingt eine nahezu 100%-ige Flüssigkeitsrückgewinnung.
Verschiedene Ausführungen von Schlauchkonfigurationen und Palletanks® gewährleisten die Kompatibilität des Systems mit einer
breiten Palette von biopharmazeutischen
Anwendungen. Die Bags und der dazugehörige Palletank
®
für prozessinternes Flüssigkeitsmanagement sind derzeit in verschiedenen Größen von 1500 bis 3000 Litern
erhältlich.
Bestimmungszweck
Diese Gebrauchsanleitung beschreibt, wie
man die Flexel
®
-3D-Bags für 1500 und mehr
Liter Flüssigkeit in den passenden Palletank
®
einsetzt, befüllt und entleert.
2.1. Beschreibung des Palletanks
®
Sartorius Stedim Biotech bietet den
Palletank
®
für prozessinternes Flüssigkeits-
management zur Verwendung von Flexel
®
3D-Bags mit einem Volumen von 1500 bis
3000 Litern an (siehe Abb. 1).
2.2. Beschreibung des Flexel
®
3D Bag
(siehe Abb. 2)
Page 16

3.1. Vorbereitung des Palletanks
®
a) Öffnen Sie die aufschwenkbaren Vorder-
und Seitentüren, indem Sie die Verriegelungen lösen (siehe Abb. 4).
b) Bevor Sie mit dem Einsetzen des Flexel
®
-
3D-Bags in den Palletank
®
fortfahren,
vergewissern Sie sich bitte, dass die
Innenoberflächen des Palletanks® GLATT,
TROCKEN und FREI VON PARTIKELN
sind, die die Oberfläche des Bags beschädigen könnten.
c) Öffnen Sie die drei Schlauchauslasssvor-
richtungen am Boden des Palletanks®
(siehe Abb. 3):
- Öffnen Sie die Schlauchauslasssvorrich-
tungen aber nur, wenn der Flexel
®
-3DBag nicht gefüllt ist (ansonsten kann es
zu Produktverlust kommen).
- Lösen Sie die Rückhalteklemme von
ihrem Befestigungspunkt.
- Fassen Sie am Befestigungspunkt an
und öffnen Sie die Schlauchauslasssvorrichtung vollständig.
- Wiederholen Sie diesen Vorgang nun
auch für die beiden anderen Auslassvorrichtungen.
d) Gegebenenfalls müssen Sie den Edelstah-
laufhänger vom Endanschlag lösen (siehe
Abb. 1).
3.2. Einbau des Flexel
®
3D Bags
a) Besorgen Sie sich einen verpackten
Flexel
®
-3D-Bag in der richtigen Größe
(Bag-Größe entspricht der Größe des Palletanks®) und legen ihn auf einen Tisch
mit glatter Oberfläche und ohne scharfe
Kanten.
b) Vergewissern Sie sich, dass der Bestrah-
lungsindikator auf dem Bag rot ist (Zeichen für Sterilität durch Gammabestrahlung), und notieren Sie sich die
Chargennummer des Bags (die auf dem
Produktetikett steht) (siehe Abb. 5).
c) Legen Sie den Bag so auf den Tisch, dass
die am Boden des Bags befindlichen
Anschlusssysteme nach unten zeigen und
Ihnen zugewandt sind. Die richtige Positionierung gewährleistet das korrekte
Einsetzen des Flexel
®
-3D-Bags in den
Palletank
®
(siehe Abb. 7).
d) Zum Öffnen der (sekundären) Außenver-
packung (siehe Abb. 6):
- Schneiden Sie die Verpackung an einer
Ecke knapp unterhalb der Schweißnaht
mit einer abgerundeten Schere auf und
reißen Sie sie an der Schweißnaht vollständig auf.
- Ziehen Sie die Außenverpackung vom
Flexel
®
-3D-Bag ab.
e) Vergewissern Sie sich, dass die Außenver-
packung des Flexel
®
-3D-Bags keinerlei
Beschädigungen aufweist, die seine Sterilität beeinträchtigen könnten.
f) Wiederholen Sie die Schritte d) und e),
um auch die (primäre) Innenverpackung
zu entfernen.
g) Entfernen Sie den Klebestreifen auf der
Oberseite des Flexel
®
-3D-Bags und den
Schutzschaum, ohne den Bag dabei auseinander zu falten (siehe Abb. 7).
h) Einsetzen des Bags in den Palletank
®
:
- Legen Sie sich den gefalteten Bag so
auf die Arme, dass die drei Anschlusssysteme am Boden des Bags nach unten
zeigen (siehe Abb. 8).
- Stellen Sie sich damit vor den
Palletank
®
.
- Setzen Sie den gefalteten Bag nun
durch die vordere Türöffnung so in den
Palletank
®
ein, dass die Anschlusssysteme am Boden des Bags über den
Schlauchauslasssvorrichtungen am
Boden des Palletanks® zu liegen kommen. Die Ziehharmonikafaltung des
Bags soll die Handhabung, den Einbau
in den Palletank
®
und das Entfalten
beim Anheben des Bags erleichtern.
i) Stecken Sie die Auslassschläuche durch
die dafür vorgesehenen Öffnungen an der
Vorderseite und biegen Sie die Schläuche
etwas, um sie auf der Bodenplatte des
Palletanks® in die richtige Position zu
bringen
j) Einsetzen der unten am Bag befindlichen
Auslassschläuche in die Schlauchauslasssvorrichtungen am Boden des Palletanks®:
- Führen Sie einen der Schläuche in die
Schlauchauslasssvorrichtung ein und
ziehen Sie ihn ganz durch die Öffnung.
- Setzen Sie den Schlauch in die dafür
vorgesehene Fassung an der fest montierten Backe der Schlauchauslassvorrichtung am Palletank
®
ein. Der Rand
der feststehenden Backe muss genau
mit der Fassung der Schlauchauslassvorrichtung abschließen (siehe Abb. 9).
- Ziehen Sie das Schlauchanschlusssystem
des Bags leicht nach unten und schließen Sie die bewegliche Backe, indem Sie
sie in der Fassung ihres feststehenden
Gegenstücks einrasten lassen (siehe
Abb. 10).
- Sichern Sie den Auslassschlauch des
Bags durch Verriegelung der Schlauchauslassvorrichtung (siehe Abb. 3).
- Prüfen Sie den passgenauen Sitz des
Schlauchanschlusssystems in der
Schlauchauslassvorrichtung, indem Sie
versuchen, es durch die Auslassöffnung
nach draußen zu ziehen. Das Anschlusssystem darf sich dabei nicht bewegen
lassen. Ist dies nicht der Fall, wiederholen Sie Schritt j).
- Wiederholen Sie dieselben Schritte nun,
um auch die beiden anderen Schlauchanschlusssystems an den entsprechenden Schlauchauslassvorrichtungen des
Palletanks® zu befestigen.
- Schieben Sie die Klemmen an den Auslassschläuchen möglichst nah an die
jeweilige Schlauchauslassvorrichtung
heran und schließen Sie sie (siehe Abb. B).
l) Fädeln Sie die vier Edelstahlhaken an der
in Position gebrachten Schnur in die
jeweiligen Ösen auf der Oberseite des
Flexel
®
-3D-Bags ein (siehe Abb. 11 und
Abb. 12)
m) Ziehen Sie den Edelstahlaufhänger an der
Aufziehhilfe nun bis zum Endanschlag
an, um den Flexel
®
-3D-Bag anzuheben.
Befestigen Sie den Aufhänger anschließend am Endanschlag (siehe Abb. 13).
Jetzt kann der Bag befüllt werden.
n) Achten Sie auf den korrekten Sitz der K-
Schweißnaht am Flexel
®
-3D-Bag: Sie
muss in der Mitte des Palletanks® verlaufen und parallel zur Vorder- und Rückseite des Tankbehälters ausgerichtet sein
(siehe Abb. 14).
3.3. Das Befüllen des Flexel
®
3D Bags
a) Vergewissern Sie sich, dass alle Klemmen
geschlossen sind (siehe Abb. B).
b) Entfernen Sie nun vorsichtig die äußere
Schutzhülle des Einfüllschlauchs mit Hilfe
des wieder lösbaren Kabelbinders (siehe
Abb. C) und verbinden Sie den Bag dann
– in Übereinstimmung mit den in Ihrem
Betrieb üblichen Arbeitsvorschriften
(SOPs) – mit dem Versorgungstank.
c) Öffnen Sie die Klemmen an der Schlauch-
leitung, über die Sie den Bag befüllen
wollen (siehe Abb. A).
d) Beginnen Sie nun mit dem Befüllen des
Flexel
®
-3D-Bags – für das Befüllen und
die Entnahme aus dem Bag empfiehlt
Sartorius Stedim Biotech die Verwendung
peristaltischer Pumpen (siehe Abb. 15).
e) Wenn sich der Bag zu 1–2 % seiner
Nennfüllmenge mit Flüssigkeit gefüllt
hat:
- unterbrechen Sie den Füllvorgang,
- fassen Sie durch die Vordertür an den
vorderen Ecken des Bags an und richten
sie diese mit der Hand in den entsprechenden Ecken des Tankbehälters aus.
- Entsprechend gehen Sie nun von den
Seitentüren aus vor, um auch die hinteren Ecken des Bags von Hand in die
richtigen Ecken des Palletanks® einzupassen (siehe Abb. 16).
- Fahren Sie nun mit dem Befüllen fort,
bis die gesamte Bodenfläche des Palletanks® von Flüssigkeit bedeckt ist.
f) Schließen und verriegeln Sie Vorder- und
Seitentüren (siehe Abb. 17).
g) Nach Abschluss des Füllvorgangs schlie-
ßen Sie die Klemmen (siehe Abb. B) und
montieren den Füllschlauch ab.
16
3. Gebrauchsanleitung für das Flexel®-3D-System: 1500 bis 3000 Liter
Page 17

3.4. Entleeren des Flexel®3D Bags
a) Achtung: Bevor Sie mit dem Entleeren
des Bags beginnen, müssen Sie den Edelstahlaufhänger von seinem Endanschlag
lösen (siehe Abb. 18).
b) Nehmen Sie den Bodenauslassschlauch
und richten Sie ihn vertikal aus. Entfernen Sie vorsichtig die äußere Schutzhülle
des Anschlusses mit Hilfe des wieder lösbaren Kabelbinders am Einfüllschlauch
und stellen Sie die Verbindung – unter
Einhaltung der in Ihrem Betrieb üblichen
Arbeitsvorschriften (SOPs) – her (siehe
Abb. C).
c) Öffnen Sie die Klemme am Entnahme-
schlauch und beginnen Sie mit dem Entleeren (siehe Abb. A) – Dies kann unter
Ausnutzung der Schwerkraft geschehen.
Zur schnelleren Entleerung empfiehlt Sartorius Stedim Biotech jedoch den Einsatz
einer peristaltischen Pumpe (siehe Abb.
19).
d) Der Flexel
®
-3D-Bag fällt beim Entleeren
von selbst in sich zusammen. Heben Sie
den zusammengesunkenen Bag leicht an,
um eine 100%-ige Flüssigkeitsrückgewinnung zu gewährleisten.
e) Nach Beendigung des Entleerungsvor-
gangs klemmen Sie den Schlauch ab
(siehe Abb. B) und trennen die Hauptentnahmeleitung vom Entnahmeschlauch
des Flexel
®
-3D-Bags.
f) Lösen Sie alle Edelstahlhaken an der
Schnur aus den entsprechenden Ösen auf
der Oberseite des Flexel
®
-3D-Bags.
g) Um die Auslassschläuche freizulegen, öff-
nen Sie die drei Schlauchauslassvorrichtungen am Boden des Palletanks®, indem
Sie die Rückhalteklemme von ihrem
Befestigungspunkt lösen; fassen Sie dann
am Befestigungspunkt an und klappen
die Schlauchauslassvorrichtung auf.
h) Nehmen Sie den zusammengesunkenen
Bag aus dem Palletank
®
(siehe Abb. 20).
17
4. Fehlerbehebung 5. Vorsichtsmaßnahmen
für den Gebrauch
Der Bag lässt sich nicht befüllen.
> Vergewissern Sie sich, dass die Klemme
offen und der Schlauch nicht abgeklemmt ist.
Beim Befüllen von unten ragt der Bag
aus der Schlauchauslassvorrichtung
heraus.
> Der Rand der Backe ist nicht richtig in der
Fassung der Schlauchauslassvorrichtung
eingerastet. Korrigieren Sie ihren Sitz entsprechend.
Der Bag entfaltet sich während des
Befüllens nicht richtig:
> Das Anschlusssystem ist nicht korrekt
ausgerichtet.
Der Flexel
®
-3D-Bag ist nicht richtig im
Palletank
®
positioniert. Heben Sie den
Bag aus dem Palletank
®
, drehen Sie ihn
und setzen Sie ihn, wie in der Einbauanleitung beschrieben, erneut in den
Palletank
®
ein.
> Der Boden des Bags wurde nicht richtig
in den Palletank
®
eingesetzt.
Richten Sie die Ecken des Bags an den
Ecken des Palletanks® aus (vergewissern
Sie sich, dass der Bag vor diesem Schritt
nur mit 1–2 % der Nennfüllmenge
befüllt ist, da er andernfalls zu stark
belastet wird).
Beim Befüllen zeigen sich zahlreiche
Falten im Bag.
> Der Bag ist zu groß; verwenden Sie die
zum Palletank
®
passende Bag-Größe.
Der Bag reicht nicht an die Wände des
Palletank® heran.
> Der Bag ist zu klein; verwenden Sie die
zum Palletank
®
passende Bag-Größe.
Der Bag lässt sich nicht entleeren.
> Vergewissern Sie sich, dass die Klemme
geöffnet und die Schlauchleitung nicht
abgeknickt ist.
a) Der Flexel
®
-3D-Bag von Sartorius Stedim
Biotech muss unbedingt zusammen mit
dem Sartorius Stedim Biotech Palletank
®
verwendet werden.
b) Der Palletank
®
muss vor dem Einsetzen
des Flexel
®
-3D-Bags sauber und trocken
sein. Auf den Oberflächen des Palletanks®
verbliebene Spuren von Reinigungsmitteln können den Flexel
®
-3D-Bag poten-
ziell schädigen.
c) Es obliegt dem Benutzer sicherzustellen,
dass die Materialien, aus denen der
Flexel
®
-3D-Bag hergestellt ist, mit den in
seinem Prozess eingesetzten Lösungen
verträglich sind. Entsprechende Leitfäden
zur chemischen und biologischen Kompatibilität sowie zu auswaschbaren Substanzen sind bei Sartorius Stedim Biotech
erhältlich.
d) Lassen Sie keine scharfen Gegenstände
(Scheren, Cutter, Skalpelle etc.) in der
Nähe von Flexel
®
-3D-Bags liegen.
e) Heben Sie den Flexel
®
-3D-Bag nicht an
seinen Anschlüssen (d.h. an den Schläuchen) an.
f) Legen Sie den Flexel
®
-3D-Bag wieder in
seiner ursprünglichen Faltung zusammen.
Falten Sie den Bag nicht in Richtung der
so genannten „Gussets” (Gusset = thermisch verschweißte Nähte).
g) Gehen Sie vorsichtig vor, wenn Sie den
Flexel
®
-3D-Bag in den Palletank®einsetzen und ihn nach der ersten Teilfüllung
ausrichten. Wenden Sie keine Gewalt an
und vermeiden Sie heftiges Ziehen.
h) Der Flexel
®
-3D-Bag ist für den einmaligen
Gebrauch bestimmt und sollte danach
nicht wieder verwendet werden.
Page 18

Flexel®-3D-Bags können in ihrer primären
Originalverpackung (d.h. in der Außenverpackung) bei Raumtemperatur (5°C bis 40°C)
und in trockener Umgebung aufbewahrt
werden.
Die Haltbarkeit eines Bags wird nach der Sterilisation mit Gamma-Strahlen validiert festgelegt und ist auf den Etiketten (Produktverpackung und Karton) wie auch in den
Spezifikationen vermerkt. Einzelheiten dazu
werden auf Anfrage von Sartorius Stedim
Biotech zur Verfügung gestellt.
Wann kann man reklamieren?
Bei Fehlfunktionen oder einer Verschlechterung der Produkteigenschaften
und|oder der Produktleistung sowie bei
Unzulänglichkeiten hinsichtlich Etikettierung, Gebrauchsanleitung, Freigabezertifikat und/oder Kundendienstleistungen.
An wen sollten Sie die Reklamation
richten?
An Ihren Handelsvertreter oder Ihren
Händler für Sartorius Stedim BiotechProdukte.
Welche Angaben sind erforderlich und
in welcher Form?
Ein Reklamationsformular können Sie
unter http://www.sartorius-stedim.com
abrufen und ausgefüllt per E-Mail, Fax
oder per Post schicken. Es sollte folgende
Angaben enthalten:
– eine Beschreibung des Defekts;
– die Beschreibung des Prozesses, bei dem
der Defekt bemerkt wurde;
– die Rückverfolgbarkeitsdaten des Bags
oder Bag-Systems (Produktcode & Char-
gennummer).
Um eine entsprechende Untersuchung
durchführen zu können, benötigen wir
den als schadhaft befundenen Bag oder
das als defekt erachtete Gerät.
18
6. Lagerungsbedingungen 7. Haltbarkeit des 8. Produktreklamation
für den Flexel
®
3D Bag Flexel® 3D Bags
Page 19

a) Der Flexel®-3D-Bag von Sartorius Stedim
Biotech ist nur für den EINMALIGEN
GEBRAUCH bestimmt. Bei Wiederverwendung eines Flexel
®
-3D-Bags übernimmt
Sartorius Stedim Biotech keinerlei Verantwortung.
b) Sartorius Stedim Biotech übernimmt
keine Haftung, wenn der Flexel
®
-3D-Bag
in Verbindung mit einem anderen Behälter als dem Palletank
®
benutzt wird.
c) Sartorius Stedim Biotech übernimmt kei-
nerlei Verantwortung, wenn die in diesem
Dokument beschriebene Gebrauchsanweisung für den Flexel
®
-3D-Bag nicht
genauestens befolgt und die oben
erwähnten „Vorsichtsmaßnahmen für den
Gebrauch“ nicht eingehalten werden.
Auf Anfrage führen die Ingenieure von
Sartorius Stedim Biotech entsprechende
Mitarbeiterschulungen durch.
d) Sartorius Stedim Biotech haftet nicht für
spezielle, zufällige oder Folgeschäden,
gleich aus welchem Rechtsgrund; dies
schließt Gewinn- oder Firmenwertverluste, Produktionsausfälle sowie Schäden an
oder Ersatz von Geräten oder Eigentum
ein.
19
9. Haftungsausschlüsse 10. Garantie 11. Warenzeichen & Patente
Sartorius Stedim Biotech garantiert, dass der
Flexel
®
-3D-Bag spezifikationsgemäß hergestellt wird. Wenn vorab keine anderen Spezifikationen vereinbart wurden, gelten die allgemeinen Spezifikationen von Sartorius
Stedim Biotech. Im Falle eines schadhaften
Bags verfahren Sie bitte, wie oben im
Abschnitt „Produktreklamation“ beschrieben.
a) Flexel
®
und Palletank®sind eingetragene
Warenzeichen von Sartorius Stedim Biotech.
b) Das Flexel
®
-3D-System ist durch zwei
international angemeldete Patente
geschützt.
Page 20

1. Introducción 21
2. Descripción del Palletank
®
y
de la Bolsa 3D Flexel
®
21
2.1. Descripción del Palletank
®
21
2.2. Descripción de da Bolsa 3D Flexel
®
21
3. Instrucciones de uso del Sistema
3D Flexel
®
1500L a 3000L 22
3.1. Preparación del Palletank
®
22
3.2. Colocación de la Bolsa 3D Flexel
®
22
3.3. Llenado de la Bolsa 3D Flexel
®
22
3.4. Vaciado de la Bolsa 3D Flexel
®
23
4. Solución de Problemas 23
5. Precauciones de Uso 23
6. Condiciones de Almacenamiento
de la Bolsa 3D Flexel
®
24
7. Vida útil de una
Bolsa 3D Flexel
®
24
8. Reclamación del Producto 24
9. Exención de Responsabilidades 25
10. Garantía 25
11. Marcas Comerciales y Patentes 25
20
Índice
Page 21

Para utilizar con:
Palletank
®
para la manipulación de fluidos
durante el procesamiento:
1500L, 2000L, 2500L y 3000L
21
Bolsa 3D Flexel
®
1. Introducción 2. Descripción del Palletank
®
1500L | 3000L y de la Bolsa 3D Flexel
®
El sistema 3D Flexel®se compone de una
bolsa estéril desechable, la bolsa 3D Flexel
®
,
y el contenedor rígido Palletank
®
fabricado
en acero inoxidable. El Palletank
®
sirve de
soporte para el fluido contenido dentro de la
bolsa 3D Flexel
®
. Ambos componen el Sistema y deben utilizarse juntos para garantizar
una solución de proceso robusta. Las bolsas
3D Flexel
®
están fabricadas siguiendo un
diseño patentado que encaja con precisión
en el Palletank
®
. Durante el llenado, la parte
inferior y los laterales de la bolsa se adaptan
exactamente a la forma y dimensiones del
contenedor. Este ajuste preciso garantiza
que no se produzcan pliegues o arrugas que
generen bolsas de aire o de líquido para así
obtener la máxima operatividad de la bolsa.
El sistema 3D Flexel
®
se ha diseñado con un
puerto inferior que permite el llenado y drenaje por la parte inferior de la bolsa para
obtener una recuperación de prácticamente
el 100% del fluido.
Las diversas configuraciones de tubos y el
Palletank
®
lo hacen compatible con una
amplia gama de aplicaciones para bioprocesamientos. Actualmente, las bolsas y el
correspondiente Palletank
®
para la manipulación de fluidos durante el procesamiento
están disponibles en tamaños de 1500 a
3000 l.
Objetivo
Estas instrucciones de uso describen las operaciones necesarias para preparar, llenar y
vaciar una bolsa 3D Flexel
®
en su Palletank
®
dedicado a partir de 1.500 l.
2.1. Descripción del Palletank
®
Actualmente, Sartorius Stedim Biotech ofrece el Palletank
®
para la manipulación de
fluidos durante el procesamiento en combinación con las bolsas 3D Flexel
®
1500L y
3000L. (Ver Fig. 1)
2.2. Descripción de da Bolsa 3D Flexel
®
(ver Fig. 2)
Page 22

3.1. Preparación del Palletank
®
a) Abra las puertas frontales y laterales de
bisagra desbloqueando los sistemas de
bloqueo (ver Fig. 4)
b) Antes de proceder a la instalación de la
bolsa 3D Flexel
®
en el Palletank®, compruebe que las superficies internas del
Palletank
®
están LISAS, LIBRES DE CUALQUIER PARTÍCULA que pudiera dañar la
superficie de la bolsa y SECAS.
c) Abra las tres compuertas inferiores (ver
Fig. 3):
- No abra las puertas inferiores estando la
bolsa 3D Flexel
®
llena (el incumplimiento de esta instrucción puede causar la
pérdida de producto)
- Extraiga la lengüeta de retención del
punto de unión de la misma.
- Sujete el punto de unión de la lengüeta
de retención y gire la compuerta inferior
hasta abrirla por completo.
- Repita el procedimiento con las otras
dos puertas inferiores.
d) Si fuese necesario, retire el colgador de
acero inoxidable del tope limitador (ver
Fig. 1).
3.2. Colocación de la Bolsa 3D Flexel
®
a) Tome una bolsa 3D Flexel®embalada del
tamaño apropiado (el tamaño de las bolsas equivale al del Palletank
®
) y colóquela
sobre una mesa lisa sin esquinas afiladas
ni angulosas.
b) Compruebe que el indicador de irradia-
ción de la etiqueta esté en color rojo y
anote el número de lote de la bolsa (que
aparece en la etiqueta del producto).
(Ver Fig. 5)
c) Coloque la bolsa sobre una mesa de
manera que las aberturas del fondo se
encuentren debajo y de cara a usted. Esta
colocación correcta garantizará una
inserción correcta de la bolsa 3D Flexel
®
en el Palletank®(ver Fig. 7)
d) Para abrir el embalaje secundario (exter-
no) (ver Fig. 6):
- Con unas tijeras de punta redonda,
corte una de sus esquinas justo por
debajo de la soldadura de cierre y ábrala
por completo tirando a lo largo de la
soldadura.
- Extraiga el embalaje secundario desli-
zando la bolsa 3D Flexel
®
fuera de él.
e) Compruebe que el embalaje secundario
de la bolsa 3D Flexel
®
no presenta ningún
daño que pudiera comprometer su esterilidad.
f) Repita los pasos d) y e) para el embalaje
principal (interno).
g) Retire la cinta adhesiva de la parte supe-
rior y la espuma protectora de la bolsa 3D
Flexel
®
sin desplegar ésta (ver Fig. 7).
h) Colocación de la bolsa dentro del
Palletank
®
- Sostenga la bolsa plegable en ambos
brazos, con las tres aberturas inferiores
debajo (ver Fig. 8)
- Sitúese frente al Palletank
®
.
- A través de la abertura frontal, introduzca la bolsa plegada en el Palletank
®
de forma que los puertos inferiores
estén orientados hacia las compuertas
inferiores.
Los pliegues de acordeón de la bolsa han
sido especialmente diseñados para facilitar la manipulación de la bolsa, su instalación en el Palletank
®
y su despliegue al
elevarla.
i) Pase los tubos de puertos inferiores por
los canales frontales y arróllelos para
colocarlos en la placa inferior del
Palletank
®
.
i) Inserción de los conductos de los puertos
inferiores en las compuertas inferiores:
- Inserte el tubo del puerto inferior y tire
de él a través de la mordaza.
- Ponga el puerto inferior en contacto
con la mordaza fija de la compuerta
inferior. El borde de la mordaza fija
debe insertarse en la ranura del puerto
inferior. (Ver Fig. 9)
- Tire ligeramente hacia abajo del puerto
inferior y cierre la mordaza móvil dentro
de la ranura del puerto inferior. (Ver
Fig. 10)
- Bloquee el pasador de la compuerta
inferior para asegurar el puerto inferior.
(Ver Fig. 3)
- Compruebe que la posición del puerto
inferior en la compuerta inferior es
correcta intentando extraerlo de ésta
tirando de él. El puerto inferior debe
permanecer en su posición. Si no es así,
repita el paso j).
- Repita el mismo procedimiento para
situar los dos otros tubos de puertos
inferiores en las puertas inferiores
k) Coloque las pinzas en los conductos infe-
riores, lo más cerca posible de los puertos
inferiores, y ciérrelas (ver Fig. B).
l) Introduzca y bloquee los cuatro ganchos
de acero inoxidable del cable insertado en
los orificios correspondientes de las aletas
de la parte superior de la bolsa 3D Flexel
®
.
(ver Fig. 11 y 12)
m) Tire del colgador de acero inoxidable del
cable para levantar la bolsa 3D Flexel
®
hasta el tope limitador del colgador. Acople el colgador al tope limitador (ver Fig.
13). La bolsa está lista para la operación
de llenado.
n) Compruebe que el sello K se encuentre en
el centro y paralelo a los lados frontal y
posterior del contenedor (ver Fig. 14).
3.3. Llenado de la Bolsa 3D Flexel
®
a) Asegúrese de que todas las pinzas estén
cerradas. (Ver Fig. B)
b) Abra la envoltura exterior que protege el
conector utilizando la brida de cables
reversible que se encuentra en la línea de
llenado inferior (ver Fig. C), y conecte la
bolsa al depósito de suministro de acuerdo con los procedimientos estándar
vigentes en su lugar de trabajo.
c) Abra las pinzas correspondientes al con-
ducto desde el que se llenará la bolsa.
(Ver Fig. A)
d) Comience a llenar la bolsa 3D Flexel
®
Sartorius Stedim Biotech recomienda utilizar bombas peristálticas para llenar la
bolsa y dispensar desde ella. (Ver Fig. 15)
e) Una vez llenada la bolsa con el 1% al 2%
de su volumen nominal:
- Detenga el llenado de la bolsa
- Con las puertas de acceso frontales,
ajuste manualmente las esquinas delanteras de la bolsa correspondientes a los
ángulos del Palletank
®
.
- Con las aperturas laterales, ajuste
manualmente las esquinas posteriores
de la bolsa a los ángulos correspondientes del Palletank
®
(ver Fig. 16)
- Continúe el relleno hasta que el fondo
del Palletank
®
esté completamente
cubierto de líquido.
f) Cierre las puertas frontales y laterales y
bloquee los sistemas (ver Fig. 17)
g) Cuando el llenado se haya completado,
cierre las pinzas (ver Fig. B) y desconecte
el tubo de llenado.
22
3. Instrucciones de uso del Sistema 3D Flexel®1500L a 3000L
Page 23

3.4. Vaciado de la Bolsa 3D Flexel
®
a) Advertencia: Antes de proceder al
vaciado de la bolsa, separe el colgador
de acero inoxidable de su tope limitador
(ver Fig.18).
b) Coloque el tubo del puerto inferior en
posición vertical. Abra la envoltura exterior que protege el conector utilizando la
brida de cables reversible que se encuentra en la línea de dispensación y lleve a
cabo la conexión siguiendo los procedimientos estándar vigentes en su lugar de
trabajo (ver Fig. C).
c) Libere el conducto de drenaje y comience
la operación de drenaje (ver Fig. A) Puede utilizarse la gravedad, pero Sartorius Stedim Biotech recomienda utilizar
una bomba peristáltica para acelerar el
drenaje. (Ver Fig. 19)
d) La bolsa 3D Flexel
®
se cierra sobre sí
misma y se repliega automáticamente.
Para obtener una recuperación de líquido
del 100%, levante la bolsa replegada.
d) Cuando haya finalizado la dispensación,
coloque una pinza en la línea (ver Fig. B)
y desconecte la línea de drenaje principal
del conducto de drenaje de la bolsa 3D
Flexel
®
.
f) Retire todos los ganchos de acero inoxi-
dable del cable de los orificios situados en
las aletas de la parte superior de la bolsa
3D Flexel
®
.
g) Abra las tres puertas inferiores para libe-
rar los accesos inferiores. Para ello, separe
la lengüeta de retención de su punto de
unión. A continuación, sujete el punto de
unión de la lengüeta de retención y haga
pivotar la puerta inferior para abrirla.
h) Extraiga la bolsa replegada del Palletank
®
(ver Fig. 20).
23
4. Solución de Problemas 5. Precauciones de Uso
La bolsa no se llena.
> Compruebe que la pinza está abierta y
que el tubo no está aprisionado.
Si el llenado se efectúa por la parte
inferior, la bolsa se saldrá de la compuerta inferior.
> El borde de la mordaza no está cerrado
dentro de la ranura del puerto inferior.
Colóquelo correctamente en la ranura.
La bolsa no se despliega correctamente
durante el llenado:
> El sistema de puertos está incorrectamen-
te alineado
Bolsa colocada incorrectamente en el
Palletank
®
. Levante la bolsa y extráigala
del Palletank
®
. Vuélvala y repita el procedimiento de colocación de la bolsa 3D
Flexel
®
.
> La parte inferior de la bolsa está colocada
incorrectamente
Coloque las esquinas de la bolsa en las
esquinas del Palletank
®
(asegúrese de que
antes del ajuste únicamente se llena la
bolsa hasta el 1-2% de su volumen nominal, de lo contrario la bolsa podría no
funcionar).
Durante el llenado, la bolsa presenta
muchos pliegues.
> La bolsa es demasiado grande, utilice
una bolsa apropiada para el tamaño del
Palletank
®
.
La bolsa no roza las paredes.
> La bolsa es demasiado pequeña, utilice
una bolsa apropiada para el tamaño del
Palletank
®
.
La bolsa no se drena.
> Compruebe que la pinza está abierta y
que el tubo no está aprisionado.
a) La bolsa 3D Flexel
®
de Sartorius Stedim
Biotech debe utilizarse obligatoriamente
con el Palletank
®
de Sartorius Stedim
Biotech.
b) Antes de insertar la bolsa 3D Flexel
®
, el
Palletank
®
debe estar limpio y seco. Si
quedaran restos de productos de limpieza
en el Palletank
®
, la bolsa 3D Flexel
®
podría resultar dañada.
c) Es responsabilidad del usuario verificar la
compatibilidad de los materiales de la
bolsa 3D Flexel
®
con las soluciones
empleadas en su proceso. Sartorius Stedim Biotech puede proporcionar pautas
sobre la compatibilidad química, la biocompatibilidad y las sustancias extraíbles.
d) No deje objetos afilados (tijeras, cuchillas,
escalpelos, etc.) cerca de la bolsa 3D
Flexel
®
.
e) La bolsa 3D Flexel
®
no se debe manipular
sujetándola por la zona de sus conexiones (p. ej. los tubos).
f) No pliegue la bolsa 3D Flexel
®
de forma
distinta al plegado original. No pliegue la
bolsa en el sentido de los “refuerzos”
(refuerzos = costuras termosoldadas).
g) Al colocar la bolsa 3D Flexel
®
en el
Palletank
®
, y al ajustarla tras el llenado
inicial, manipule la bolsa con suavidad
y no la fuerce ni tire fuerte de ella.
h) La bolsa 3D Flexel
®
es una bolsa desecha-
ble y no debe reutilizarse.
Page 24

Las bolsas 3D Flexel®se pueden almacenar
en su embalaje principal original en un
lugar seco y a temperatura ambiente
(de 5 °C a 40 °C).
La vida útil tras la esterilización gamma se
ha validado tal y como se indica en el etiquetado (embalaje y caja del producto) y en
las especificaciones. Bajo petición, Sartorius
Stedim Biotech suministrará información
detallada.
¿Cuándo puede producirse una reclamación?
Cuando se haya producido un mal funcionamiento o deterioro de las características y|o el rendimiento de un producto
comercializado, así como cualquier inadecuación en el etiquetado, las instrucciones de uso, el certificado de idoneidad
y/o los servicios al cliente.
¿A quién debe dirigirse la reclamación?
A su persona de contacto comercial o
distribuidor de Sartorius Stedim Biotech.
¿Qué información se debe proporcionar? ¿Cómo?
En la dirección http://www.sartorius-stedim.com encontrará un formulario de
reclamación que deberá enviar por correo
electrónico, fax o correo ordinario indicando:
- Descripción del defecto
- Descripción del proceso durante el cual
se detectó el defecto
- Trazabilidad de la bolsa o del sistema de
bolsas (código del producto y número
de lote).
Para llevar a cabo la investigación, es
necesario contar con la bolsa o dispositivo que se considere defectuoso.
24
6. Condiciones de Almace- 7. Vida útil de una 8. Reclamación del Producto
namiento de la Bolsa 3D Flexel
®
Bolsa 3D Flexel
®
Page 25

a) La bolsa 3D Flexel®de Sartorius Stedim
Biotech es DE UN SOLO USO. Sartorius
Stedim Biotech no asumirá alguna responsabilidad de ningún tipo en caso de
reutilización de la bolsa 3D Flexel
®
.
b) Sartorius Stedim Biotech no asumirá nin-
gún tipo de responsabilidad por el uso de
la bolsa 3D Flexel
®
con un contenedor
distinto del contenedor Palletank
®
.
c) Sartorius Stedim Biotech no asumirá nin-
guna responsabilidad si no se cumplen
estrictamente las instrucciones de uso de
la bolsa 3D Flexel
®
descritas en este documento y si no se aplican las precauciones
de uso anteriormente mencionadas. Bajo
petición, los ingenieros de Sartorius Stedim Biotech pueden dar cursillos de formación a empleados.
d) Sartorius Stedim Biotech no se hace res-
ponsable de ningún daño especial, incidental o resultante que se deba a ninguna doctrina legal, incluido el lucro
cesante, tiempo de inactividad, pérdida
del fondo de comercio, daños en equipos
o propiedades o sustitución de los mismos.
25
9. Exención de Responsabilidades 10. Garantía 11. Marcas Comerciales y
Patentes
Sartorius Stedim Biotech garantiza que las
bolsas 3D Flexel
®
están fabricadas conforme
a sus especificaciones. A menos que se indique lo contrario para las especificaciones
acordadas, serán aplicables las especificaciones generales de Sartorius Stedim Biotech. Si
alguna bolsa estuviese defectuosa, siga el
procedimiento de reclamación descrito anteriormente.
a) Flexel
®
y Palletank®son marcas registra-
das de Sartorius Stedim Biotech.
b) El sistema 3D Flexel
®
está protegido por 2
patentes internacionales.
Page 26

1. Introduzione 27
2. Descrizione del Palletank
®
&
della Scca Flexel
®
3D 27
2.1. Descrizione del Palletank
®
27
2.2. Descrizione della Sacca Flexel
®
3D 27
3. Istriuzioni per l’uso del Sistema
Flexel® 3D da 1500L a 3000L 28
3.1. Preparazione del Palletank
®
28
3.2. Installazione di Sacche Flexel
®
3D 28
3.3. Riempimento delle Sacche
Flexel
®
3D 28
3.4. Svuotamento delle Sacche
Flexel
®
3D 29
4. Guida per la Risoluzione
di Problemi 29
5. Precauzioni per l’uso 29
6. Condizioni per lo Stoccaggio
delle Sacche Flexel
®
3D 30
7. Tempo di Stoccaggio di una
Sacca Flexel
®
3D 30
8. Reclami sulla Qualità del
Prodotto 30
9. Declinazione di Pesponsabilità 31
10. Garanzia 31
11. Marchio & Brevetti 31
26
Sommario
Page 27

Per l’utilizzo con:
Palletank
®
Per Trattamento Fluidi di proces-
so: 1500L, 2000L, 2500L e 3000L
27
Sacche Flexel®3D 1. Introduzione 2. Descrizione del Palletank®&
di 1500L | 3000L della Scca Flexel
®
3D
Il sistema Flexel®3D è composto da una
sacca sterile monouso, la sacca Flexel
®
3D, e
dal contenitore rigido Palletank
®
, in acciaio
inossidabile. Il Palletank
®
funge da supporto
per il fluido contenuto nella sacca Flexel
®
3D. Il sistema è composto da entrambe le
parti che devono essere utilizzate congiuntamente per garantire una soluzione di processo resistente. Le sacche Flexel
®
3D sono prodotte secondo un design brevettato
concepito appositamente per il Palletank
®
.
Durante il riempimento, il fondo e le pareti
laterali della sacca aderiscono perfettamente
alla forma e alle dimensioni del contenitore.
La perfetta aderenza al contenitore evita la
formazione di piegature e angolature, in cui
potrebbero formarsi sacche di aria o liquido,
assicurando così la massima funzionalità
della sacca stessa.
Il sistema Flexel
®
3D è stato progettato con
fori nella parte inferiore che consentono sia
il riempimento che lo scarico del fluido dal
basso, con una percentuale di recupero
effettiva del 100%.
Le numerose configurazioni delle tubazioni e
del Palletank
®
stesso lo rendono adatto
all’impiego in una varietà di applicazioni di
processo biotecnologico. Le sacche ed il relativo Palletank
®
per il trattamento di fluidi di
processo sono attualmente disponibili per
volumi da 1500L a 3000L.
Scopo
Il presente manuale descrive anche le operazioni necessarie per preparare, riempire e
svuotare una sacca Flexel
®
3D di 1500L e
superiore nell’apposito Palletank
®
.
2.1. Descrizione del Palletank
®
Sartorius Stedim Biotech offre attualmente il
Palletank
®
per trattamento fluidi di processo
da utilizzare con sacche Flexel
®
3D da 1500L
a 3000L. (vedere fig. 1)
2.2. Descrizione della Sacca Flexel
®
3D
(vedere fig. 2)
Page 28

3.1. Preparazione del Palletank
®
a) Aprire gli sportelli cernierati per l’accesso
frontale e laterale rimuovendo i dispositivi di bloccaggio (vedere fig. 4)
b) Prima di effettuare l'installazione della
sacca Flexel
®
3D nel Palletank®, verificare
che le superfici interne del Palletank
®
siano LISCE, PRIVE DI CORPI ESTRANEI,
che potrebbero danneggiare la superficie
delle sacche, e ASCIUTTE.
c) Aprire i tre sportelli nella parte inferiore
(vedere fig. 3):
- Non aprire gli sportelli nella parte inferiore se la sacca Flexel
®
3D è piena (la
mancata osservanza di questa istruzione
potrebbe comportare la perdita del prodotto)
- Rimuovere il perno di bloccaggio dalla
relativa sede di bloccaggio.
- Afferrare la sede di bloccaggio e spalancare lo sportello in basso.
- Ripetere la procedura per i due sportelli
restanti nella parte inferiore.
d) Se necessario rimuovere la staffa in
acciaio inossidabile dall'arresto (vedere
fig. 1).
3.2. Installazione di Sacche Flexel
®
3D
a) Prendere una sacca Flexel
®
3D confezionata di dimensioni adeguate (le dimensione della sacca corrispondono alle
dimensioni del Palletank
®
) e collocarla su
un piano di lavoro liscio, privo di angoli
acuti.
b) Verificare che l’indicatore di radiazione
sull’etichetta sia rosso e registrare il
numero di lotto della sacca (riportato sull’etichetta del prodotto) (vedere fig. 5)
c) Posizionare la sacca sul piano di lavoro in
modo tale che i fori nella parte inferiore si
trovino in basso e siano rivolti verso la
propria persona. Questa posizione garantisce l’inserimento corretto della sacca
Flexel
®
3D nel Palletank®(vedere fig. 7)
d) Per aprire l’imballaggio secondario (ester-
no) (vedere fig. 6):
- tagliare uno degli angoli direttamente al
di sotto della saldatura di chiusura con
un paio di forbici a punte arrotondate e
aprirlo completamente tirando lungo la
saldatura.
- rimuovere l’imballaggio secondario
facendolo scorrere lungo la sacca
Flexel
®
3D.
e) Verificare che l’imballaggio secondario
della sacca Flexel
®
3D non presenti danni
o difetti che potrebbero comprometterne
la sterilità.
f) Ripetere i passaggi d) ed e) per l’imballag-
gio primario (interno).
g) Rimuovere il nastro adesivo nella parte
superiore e il materiale schiumoso dell’imballaggio protettivo dalla sacca
Flexel
®
3D senza spiegare la sacca (vedere
fig. 7).
h) Per collocare la sacca all’interno del
Palletank
®
:
- tenere la sacca piegata su entrambe le
braccia con i 3 fori nella parte inferiore
rivolti verso il basso (vedere fig. 8).
- mettersi davanti al Palletank
®
.
- Introdurre la sacca piegata nel
Palletank
®
attraverso l’apertura frontale
in modo tale che i fori inferiori siano
rivolti verso gli sportelli in basso.
Le pieghe a soffietto della sacca sono
state concepite appositamente per
facilitarne l’utilizzo, l’installazione nel
Palletank
®
e la distensione durante il
sollevamento della sacca.
i) Inserire i tubi dei fori nella parte inferiore
attraverso le condotte anteriori, avvolgerli
per posizionarli nella piastra di fondo del
Palletank
®
.
j) Inserimento dei tubi dei fori in basso
negli sportelli nella parte inferiore:
- Inserire il tubo del foro inferiore e tirarlo attraverso l’attacco.
- Mettere il foro inferiore a contatto con
l’attacco fisso dello sportello in basso. Il
bordo dell’attacco fisso deve essere
inserito all’interno della scanalatura del
foro in basso (vedere fig. 9).
- Tirare leggermente verso il basso il foro
inferiore e bloccare l’attacco mobile
all’interno della scanalatura del foro
inferiore (vedere fig. 10).
- Chiudere il dispositivo di bloccaggio
dello sportello in basso per fissare il foro
inferiore (vedere fig. 3)
- Controllare la posizione corretta del
foro inferiore nello sportello in basso
cercando di estrarre il foro inferiore
dallo sportello in basso. Il foro inferiore
deve restare in posizione. In caso contrario ripetere il passaggio j).
- Ripetere le stesse operazioni per i tubi
degli altri due fori in basso posizionandoli negli sportelli nella parte inferiore.
k) Collocare i morsetti sui tubi inferiori il più
vicino possibile ai fori inferiori e chiuderli
(vedere fig. B).
l) Inserire e bloccare i quattro ganci in
acciaio inossidabile del cavo infilato
attraverso i fori corrispondenti posti sui
lembi superiori della sacca Flexel
®
3D
(vedere fig. 11e fig. 12)
m) Tirare la staffa in acciaio inossidabile del
cavo per sollevare la sacca fino a raggiungere l’arresto della staffa. Agganciare la
staffa all’arresto (vedere fig. 13). La sacca
è ora pronta per il riempimento.
n) Controllare che la sigillatura K sia posi-
zionata correttamente al centro del
Palletank
®
e in parallelo rispetto alla
parete anteriore e posteriore del
contenitore (vedere fig. 14).
3.3. Riempimento delle Sacche Flexel
®
3D
a) Verificare che tutti i morsetti siano chiusi
(vedere fig. B)
b) Aprire la copertura protettiva esterna del
connettore utilizzando la fascetta serracavo reversibile sulla linea di riempimento
(vedere fig. C) e collegare la sacca al serbatoio di alimentazione in conformità
con le procedure standard adottate dalla
propria azienda.
c) Aprire i morsetti dei tubi flessibili della
linea attraverso la quale si vuole riempire
la sacca (vedere fig. A)
d) Iniziare il riempimento della sacca Flexel
®
3D - Sartorius Stedim Biotech raccomanda di utilizzare delle pompe peristaltiche
per il riempimento e lo svuotamento di
fluidi dalla sacca (vedere fig. 15)
e) Dopo aver riempito la sacca con l’1-2%
del volume nominale della sacca:
- Arrestare l’operazione di riempimento
- Attraverso gli sportelli d’accesso ante-
riori aggiustare manualmente gli angoli
anteriori della sacca facendoli corrispondere agli angoli del Palletank
®
.
- Attraverso le aperture laterali, aggiusta-
re manualmente gli angoli posteriori
della sacca facendoli corrispondere agli
angoli del Palletank
®
(vedere fig. 16)
- Proseguire con il riempimento sino a
quando tutta la superficie inferiore del
Palletank
®
è coperta di liquido.
f) Chiudere gli sportelli anteriori e laterali e
chiudere i dispositivi di bloccaggio (vedere fig. 17).
g) Una volta completato il riempimento,
chiudere i morsetti (vedere fig. B) e scollegare la linea di riempimento.
28
3. Istriuzioni per l’uso del Sistema Flexel®3D da 1500L a 3000L
Page 29

3.4. Svuotamento delle Sacche Flexel®3D
a) Attenzione: Prima di avviare lo svuota-
mento, rimuovere la staffa in acciaio
inossidabile dal relativo arresto (vedere
fig. 18).
b) Prendere il tubo del foro inferiore e posi-
zionarlo verticalmente. Aprire la copertura protettiva esterna del connettore utilizzando la fascetta serracavo reversibile
sulla linea di scarico fluidi ed eseguire il
collegamento in conformità con le procedure standard adottate presso la propria
azienda (vedere fig. C).
c) Aprire il morsetto della linea di svuota-
mento e avviare l’operazione di svuotamento (vedere fig. A). Lo svuotamento
può avvenire per effetto della forza di
gravità, tuttavia per uno svuotamento più
veloce Sartorius Stedim Biotech consiglia
di utilizzare una pompa peristaltica
(vedere fig. 19)
d) La sacca Flexel
®
3D si ripiega su se stessa
automaticamente durante lo svuotamento. Per ricuperare il fluido al 100%, sollevare la sacca ripiegata su se stessa.
e) Una volta completato lo svuotamento,
chiudere la linea con il morsetto (vedere
fig. B) e scollegare la linea di scarico principale dal tubo di svuotamento della
sacca Flexel
®
3D.
f) Rimuovere tutti i ganci in acciaio inossi-
dabile del cavo dai fori posti nei lembi
superiori della sacca Flexel
®
3D.
g) Aprire i tre sportelli in basso per liberare i
fori nella parte inferiore rimuovendo il
perno di bloccaggio dalla relativa sede di
bloccaggio; quindi afferrare la sede di
bloccaggio e spalancare lo sportello.
h) Rimuovere la sacca ripiegata su se stessa
dal Palletank
®
(vedere fig. 20).
29
4. Guida per la Risoluzione 5. Precauzioni per l’uso
di Problemi
La sacca non si riempie
> Verificare che il morsetto sia aperto e che
il tubo non sia schiacciato.
Se il riempimento viene effettuato dal
basso, la sacca esce dallo sportello in
basso.
> Il bordo dell’attacco non è inserito all’in-
terno della scanalatura del foro inferiore.
Posizionarlo correttamente nella scanalatura.
La sacca non si apre correttamente
durante il riempimento:
> Il sistema di fori non è allineato corretta-
mente
La sacca non è posizionata correttamente
nel Palletank
®
. Sollevare la sacca ed
estrarla dal Palletank
®
, girarla ed eseguire
nuovamente la procedura d’installazione
per la sacca Flexel
®
3D.
> Il fondo della sacca non è posizionato
correttamente
Far coincidere gli angoli della sacca con
gli angoli del Palletank
®
(accertarsi che la
sacca sia riempita solo per l’1-2% del
volume nominale prima di aggiustarne la
posizione; in caso contrario la sacca
potrebbe danneggiarsi).
Durante il riempimento la sacca resta
piegata in molti punti
> La sacca è troppo grande; utilizzare
una sacca adatta alle dimensioni del
Palletank
®
.
La sacca non aderisce alle pareti
> La sacca è troppo piccola; utilizzare
una sacca adatta alle dimensioni del
Palletank
®
.
La sacca non si svuota
> Verificare che il morsetto sia aperto e che
il tubo non sia schiacciato.
a) È imperativo che le sacche Flexel
®
3D di
Sartorius Stedim Biotech siano utilizzate
con il Palletank
®
Sartorius Stedim Biotech.
b) Il Palletank
®
deve essere pulito e asciutto
prima di inserire la sacca Flexel
®
3D. Trac-
ce di detergenti presenti sul Palletank
®
potrebbero danneggiare la sacca Flexel
®
3D.
c) È responsabilità dell’utente verificare la
compatibilità dei materiali utilizzati per
produrre le sacche Flexel
®
3D con le soluzioni utilizzate nei processi. Sartorius Stedim Biotech può fornire direttive sulla
compatibilità con prodotti chimici, biochimici e derivati.
d) Evitare di lasciare oggetti appuntiti (for-
bici, cutter, bisturi, ecc.) nei pressi della
sacca Flexel
®
3D.
e) Non afferrare la sacca Flexel
®
3D prendendola per i punti di collegamento
(tubi).
f) Evitare di piegare la sacca Flexel
®
3D in
modo diverso da quello originale. Non
piegare la sacca nei pressi del “rinforzo”
(rinforzo = giunzioni sigillate a caldo).
g) Introducendo la sacca Flexel
®
3D nel
Palletank
®
ed aggiustandola dopo il riempimento iniziale, maneggiarla con precauzione evitando di adattarla alle pareti
o tirarla con forza.
h) La sacca Flexel
®
3D è di tipo monouso e
non deve essere riutilizzata.
Page 30

Le sacche Flexel®3D possono essere immagazzinate nel loro imballaggio originale, a
temperatura ambiente (5-40 °C), in locali
asciutti.
Il tempo di stoccaggio dopo la sterilizzazione a raggi gamma è stato convalidato secondo quando indicato sull’etichetta (involucro
prodotto e imballaggio) e nelle specifiche di
prodotto. Maggiori dettagli possono essere
richiesti alla Sartorius Stedim Biotech.
Quali casi possono essere oggetto di
reclamo?
Un reclamo può essere presentato in caso
di malfunzionamento o peggioramento
delle caratteristiche e|o prestazioni del
prodotto immesso in commercio, nonché
in caso di inadeguatezza delle etichette,
delle istruzioni per l’uso, della certificazione del prodotto e/o del servizio al
cliente.
A chi deve essere inviato il reclamo?
Al rappresentante o distributore Sartorius
Stedim Biotech locale.
Come deve essere compilato il modulo
di reclamo e quali informazioni deve
contenere?
Un modulo di reclamo può essere scaricato dal sito http://www.sartoriusstedim.com e inviato per e-mail, fax o
posta, dopo essere stato completato con
le seguenti informazioni:
– descrizione del difetto;
– descrizione del processo nel corso del
quale è stato constatato il difetto;
– rintraccialibiltà della sacca o del sistema a
sacche (codice prodotto & numero di
lotto).
La sacca o il dispositivo giudicato difetto-
so deve essere sottoposto a investigazio-
ne.
30
6. Condizioni per lo Stoccaggio 7. Tempo di Stoccaggio di 8. Reclami sulla Qualità
delle Sacche Flexel
®
3D una Sacca Flexel® 3D del Prodotto
Page 31

a) La sacca Flexel®3D di Sartorius Stedim
Biotech è unicamente MONOUSO. Sartorius Stedim Biotech non assume alcuna
responsabilità in caso di riutilizzo della
sacca Flexel
®
3D.
b) Sartorius Stedim Biotech non assume
alcuna responsabilità in caso di utilizzo
della sacca Flexel
®
3D con un contenitore
diverso dal Palletank
®
.
c) Sartorius Stedim Biotech non assume
alcuna responsabilità nel caso in cui le
istruzioni per l'uso della sacca Flexel
®
3D,
riportate nel presente documento, non
vengano rigorosamente osservate e nel
caso in cui non vengano applicate le precauzioni per l’uso di cui sopra. Su richiesta, i tecnici Sartorius Stedim Biotech
possono istruire il personale addetto.
d) Sartorius Stedim Biotech non è responsa-
bile per danni diretti, indiretti o accessori
così come contemplati dalle norme giuridiche in materia, compresa perdita di profitti, tempi di fermo impianto, costi di
avviamento, danni o sostituzione di
apparecchiature o proprietà.
31
9. Declinazione di Pesponsabilità 10. Garanzia 11. Marchio & Brevetti
Sartorius Stedim Biotech garantisce che la
sacca Flexel
®
3D è prodotta in conformità
alle specifiche di prodotto. Salvo indicazioni
contrarie contenute in specifiche concordate
espressamente, trovano applicazione le specifiche generali di Sartorius Stedim Biotech.
In caso di sacca difettosa, si prega di seguire
la procedura di reclamo del prodotto di cui
sopra.
a) Flexel
®
e Palletank®sono marchi registrati
di Sartorius Stedim Biotech.
b) Il sistema Flexel
®
3D è coperto da 2 bre-
vetti internazionali.
Page 32
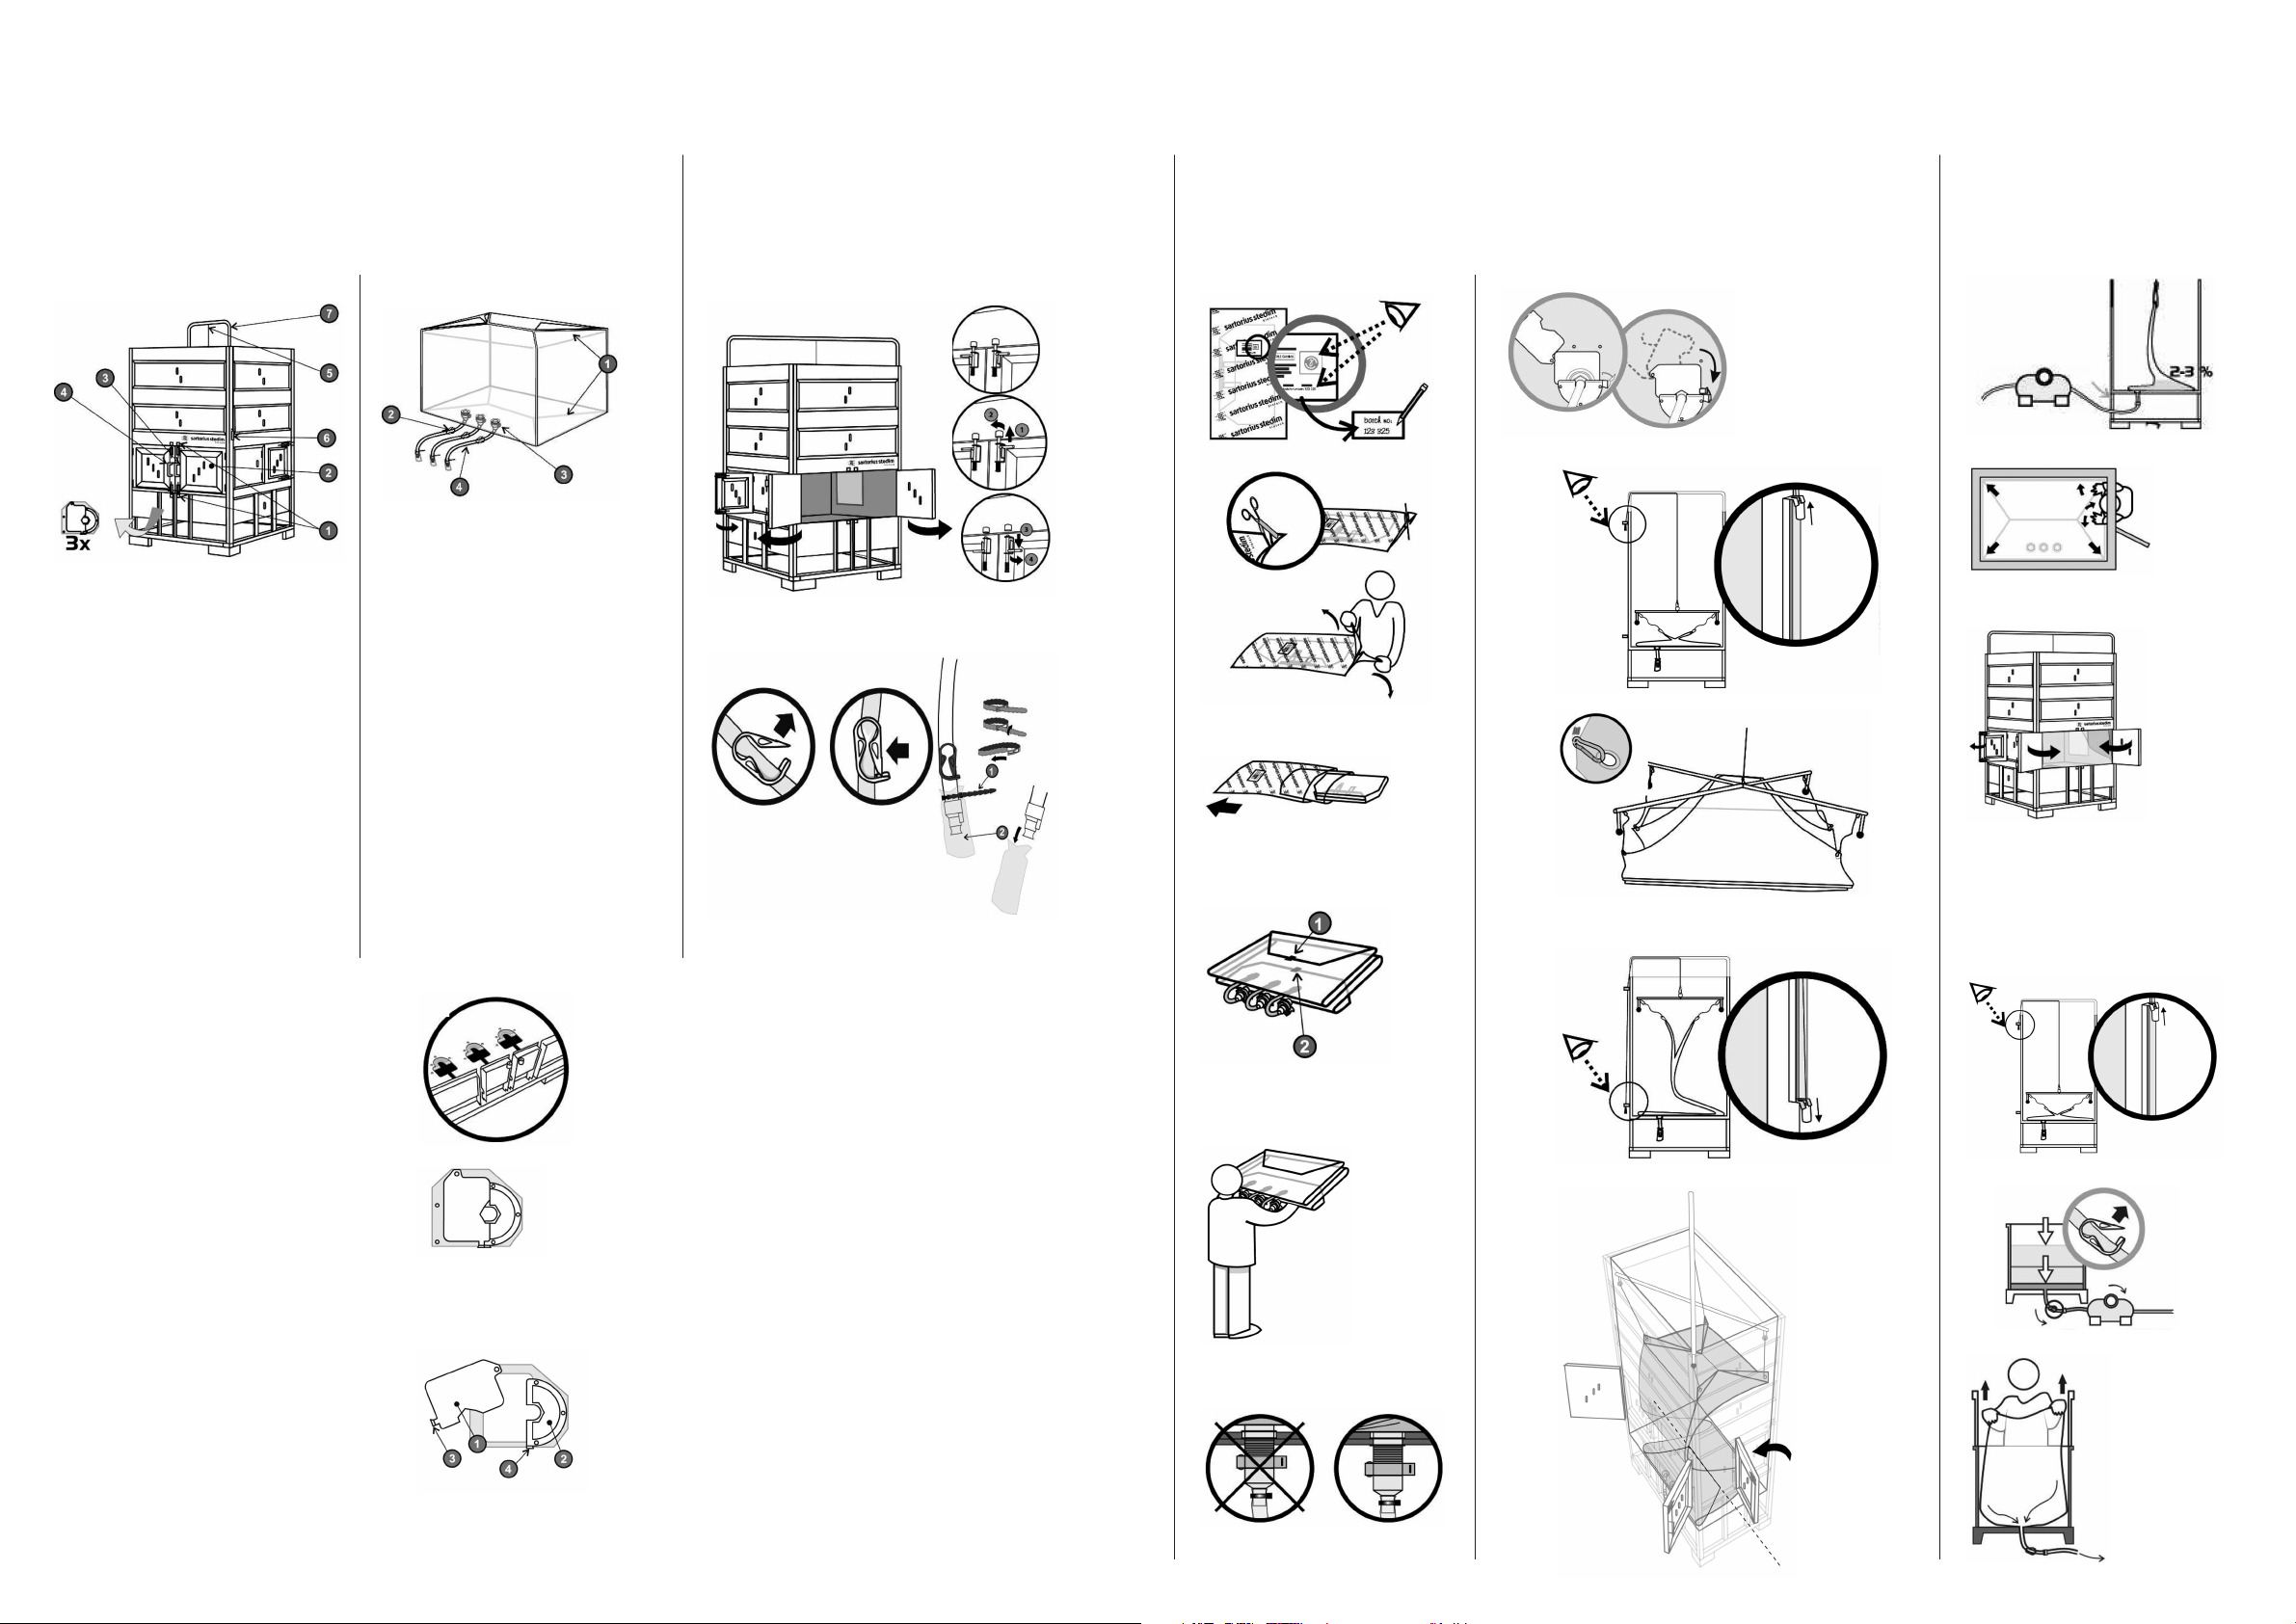
Flexel®3D Bag 1500L – 3000L | Poche Flexel®3D 1500 l – 3 000 l | Flexel® -3D-Bags 1500L – 3000L | Bolsa 3D Flexel®1500L – 3000L | Sacche Flexel®3D da 1500L – 3000L
Fig. 1
1. Locking system
2. Front hinged door
3. Right front door handle
4. Left front door handle
Bag suspension components
5. Cable
6. Limit stopper and stainless
steel hanger
7. Pully system
Fig. 2
1. K-Seals
2. Clamp
3. Bottom port
4. Filling tubes |
Dispensing tubes
Fig. 3
1. Swinging portion of bottom gate
2. Fixed portion of bottom gate
3. Retaining clip fastening point
4. Retaining clip
Fig. 3
1. Parte giratoria de la compuerta inferior
2. Parte fija de la compuerta inferior
3. Punto de unión de la lengüeta de retención
4. Lengüeta de retención
Fig. 3
1. Parte mobile della piastra di fondo
2. Parte fissa della piestra di fondo
3. Punto di bloccarggio dei fermi
4. Fermi
Fig. 3
1. Partie mobile de l’orifice bas
2. Partie fixe de l’orifice bas
3. Point d’attache du clip
4. Clip
Abb. 3
1. bewegliche Backe der Bodenauslassvorrichtung
2. feststehende Backe der Bodenauslassvorrichtung
3. Befestigungspunkt der Rückhalteklemme
4. Rückhalteklemme
Bottom gate closed
Orifice bas fermé
Bodenauslassvorrichtung, eschlossen
Compuerta inferior cerrada
Bottom gate opened
Orifice bas ouvert
Bodenauslassvorrichtung, geöffnet
Compuerta inferior abierta
Fig. 2
1. Joints en forme de K
2. Clamp
3. Ligne basse
4. Tubes de remplissage |
Tubes de vidange
Fig. 2
1. Soldaduras en K
2. Pinza
3. Puerto inferior
4. Tubos de llenado |
Tubos de dispensación
Fig. 2
1. Soudures en forme de K
2. Clamp
3. Ligne basse
4. Tubes de remplissage |
Tubes de vidange
Fig. A Fig. B
Fig. C
Abb. 2
1. K-Nähte
2. 4er-Anschlusssystem
3. Schlauchanschlusssystem
4. Füllschläuche | Entnahmeschläuche
Palletank®& Flexel®3D Bag Description
Description du Palletank
®
et de la poche Flexel®3D
Beschreibung von Palletank
®
& Flexel® -3D-Bag
Descripción del Palletank
®
y de las bolsas 3D Flexel
®
Descrizione del Palletank®& delle sacche Flexel®3D
Flexel
®
3D Bag emptying
Vidange de la poche Flexel
®
3D
Entleeren des Flexel
®
-3D-Bags
Vaciado de la bolsa 3D Flexel
®
Svuotamento della sacca Flexel®3D
Flexel
®
3D Bag filling
Remplissage de la poche Flexel
®
3D
Befüllen des Flexel
®
-3D-Bags
Llenado de la bolsa 3D Flexel
®
Riempimento della sacca Flexel®3D
Flexel
®
3D Bag installation
Installation de la poche Flexel
®
3D
Einbau des Flexel
®
-3D-Bags
Colocación de la bolsa 3D Flexel
®
Installazione della sacca Flexel®3D
Fig. 1
1. Système de verrouillage
2. Porte frontale sur gonds
3. Poignée de la porte frontale droite
4. Poignée de la porte frontale gauche
Composants de suspension de la poche
5. Câble
6. Butée de fin de course et crochet de
suspension en acier inoxydable
7. Système de levage
Abb. 1
1. Verriegelungssystem
2. Aufklappbare Vordertür
3. Rechter Türgriff (Vordertür)
4. Linker Türgriff (Vordertür)
Bestandteile der Bag-Aufhängung
5. Schnur
6. Endanschlag und Aufhänger aus Edelstahl
7. Aufziehhilfe
Fig. 1
1. Sistema de bloqueo
2. Puerta frontal con bisagras
3. Mango de la puerta frontal derecha
4. Mango de la puerta frontal izquierda
Elementos de suspensión de la bolsa
5. Cable
6. Tope limitador y colgador de acero
inoxidable
7. Sistema de tirador
Fig. 1
1. Dispositivo di bloccaggio
2. Sportello anteriore cernierato
3. Manopola sportello anteriore destro
4. Manopola sportello anteriore sinistro
Componenti sollevamento sacca
5. Cavo
6. Arresto e staffa in acciaio inossidabile
7. Sistema di estrazione
Fig. 20
Fig. 11
Preparation of the Palletank
®
Préparation du Palletank
®
Vorbereitung des Palletanks
®
Preparación del Palletank
®
Preparazione del Palletank
®
Fig. 8
Fig. 9
Fig. 10Fig. 5Fig. 4Fig. 2Fig. 1
Fig. 3
Fig. 6
Fig. 7
Fig. 12
Fig. 13
Fig. 14
Fig. 19
Fig. 18
Fig. 17
Fig. 16
Fig. 15
Peristaltic pump |
Pompe péristaltique |
Peristaltische Pumpe |
Bomba peristáltica
Peristaltic pump |
Pompe péristaltique |
Peristaltische Pumpe |
Bomba peristáltica
Page 33

Printed in Germany on paper that has
been bleached without any use of chlorine
Publication No.: SPT5710-p08071
Sartorius Stedim Biotech GmbH
August-Spindler-Strasse 11
37079 Goettingen
Phone +49.551.308.0
Fax +49.551.308.3289
www.sartorius-stedim.com
Copyright by Sartorius Stedim
Biotech GmbH, Goettingen,
Germany. All rights reserved.
No part of this publication may
be reprinted or translated in any
form or by any means without
the prior written permission
of Sartorius Stedim Biotech GmbH.
The status of the information,
specifications and illustrations
in this manual is indicated by the
date given below. Sartorius Stedim
Biotech GmbH reserves the right to
make changes to the technology,
features, specifications, and design
of the equipment without notice.
Status:
July 2008,
Sartorius Stedim Biotech GmbH,
Goettingen, Germany
 Loading...