


98647-001-33
Operating Instructions | Betriebsanleitung |
Installation et mode d’emploi
Sartorius
YDP 03-0CE
Data Printer | Messwertdrucker |
Imprimante des valeurs de mesure

2
English – page 3
In cases involving questions of interpretation,
the German-language version shall prevail.
Deutsch – Seite 41
Im Auslegungsfall ist die deutsche Sprache
maßgeblich.
Français – page 79
En cas de questions concernant l’interprétation,
la version en langue allemande fera autorité.

3
Contents
21 Settings
21 Setting the Date and the Time
23 Configuring an ISO/GLP-compliant
Data Printout
24 Menu – Interface Settings for the
Data Printer
28 Menu – Settings for Statistics
Applications
30 Printing a Hard Copy of the Settings
32 Troubleshooting Guide
33 Maintenance
37 Accessories
37 Specifications
38 Electromagnetic Compatibility
40 Test Certificate
3 Contents
4 Intended Use
5 Safety Precautions
6 Installation
9 Operation
10 Printing the Data of the
Connected Weighing Instrument
11 Statistical Evaluation of the Data
19 Use in Legal Metrology in the EU
20 ISO/GLP-compliant Data Printout

4
Intended Use
Model YDP 03-0CE is a data printer designed to
receive weighing data from a connected weighing
instrument and to print it on plain paper (roll
width: 57.5 mm). Text and data are printed with
up to 24 characters per line.
This data printer is equipped with a real-time
clock. After the printer has been configured
according to the required settings, it is suitable
for use in legal metrology.
The data printer meets the quality standards
of the chemical and pharmaceutical industries,
in compliance with the requirements of GLP
(Good Laboratory Practice) and GMP
(Good Manufacturing Practice).
In addition to recording individual weighing data,
the data printer can generate a statistical evaluation of weighing data. All values transferred from
an on-line weighing instrument are stored.
The following can be computed/printed out:
– Number of weighing operations
– Mean value
– Standard deviation
– Variation coefficient
– Minimum value/weight
– Maximum value/weight
– Difference between the maximum
and minimum value/weight
Data is transferred either automatically or
manually by pressing a key.

5
Safety Precautions
The data printer complies with the
EC Directives and Standards for electrical equipment and electromagnetic
compatibility.
Use only rechargeable AA batteries of
the following type: nickel-cadmium
UM-3, order no. 69Y03136.
Avoid draining the batteries excessively,
as this will reduce their recharging
capacity.
Used batteries are hazardous waste and
must be properly disposed of according
to your local hazardous waste disposal
regulations.
When this unit is powered externally,
use only an original Sartorius AC
adapter (see “Accessories”). The printer
must be supplied with external power
via an AC adapter, if one of the following devices is connected:
– an MP8-1/MP8-2 balance with
Data Input software
– an infrared dryer, model
7393…/YDU01L
– an external keyboard, such as 73392
When cleaning the data printer, make
sure that no liquid enters the printer
housing: use only a moist cloth to wipe
down the housing.
§ Deactivate the ISO/GLP-compliant
printout function for the following
instruments:
– Economy/Express Series, EA/EB scales
(up to serial number: 912xxxxx,
“December 1999)”
– GT/PT/QS/QT/XQ balances and scales
(MP 10 processor)
– QS/TS scales (MP 12 processor)
– MA… moisture analyzers
$ To change this setting, refer to the
section entitled “Configuring an
ISO/GLP-compliant Data Printout”

6
Installation
Equipment Supplied
The following components are supplied:
– Interface cable for connecting the printer
to a weighing instrument
– Black ink ribbon cassette (is installed)
– 4 rechargeable batteries
– Paper roll
Installing the Rechargeable Batteries
§ Remove the 4 batteries from the packaging
(they are discharged)
§ Lift the cover of the paper roll compartment
§ To open the battery compartment, tilt back the cover
§ Install the 4 rechargeable batteries in the battery compart-
ment. Make sure that the poles match the + and – signs!
§ To close the battery compartment, press down on the
cover
§ To close the paper roll compartment, lower the cover
– You cannot thread the paper roll until the printer has been
turned on.

7
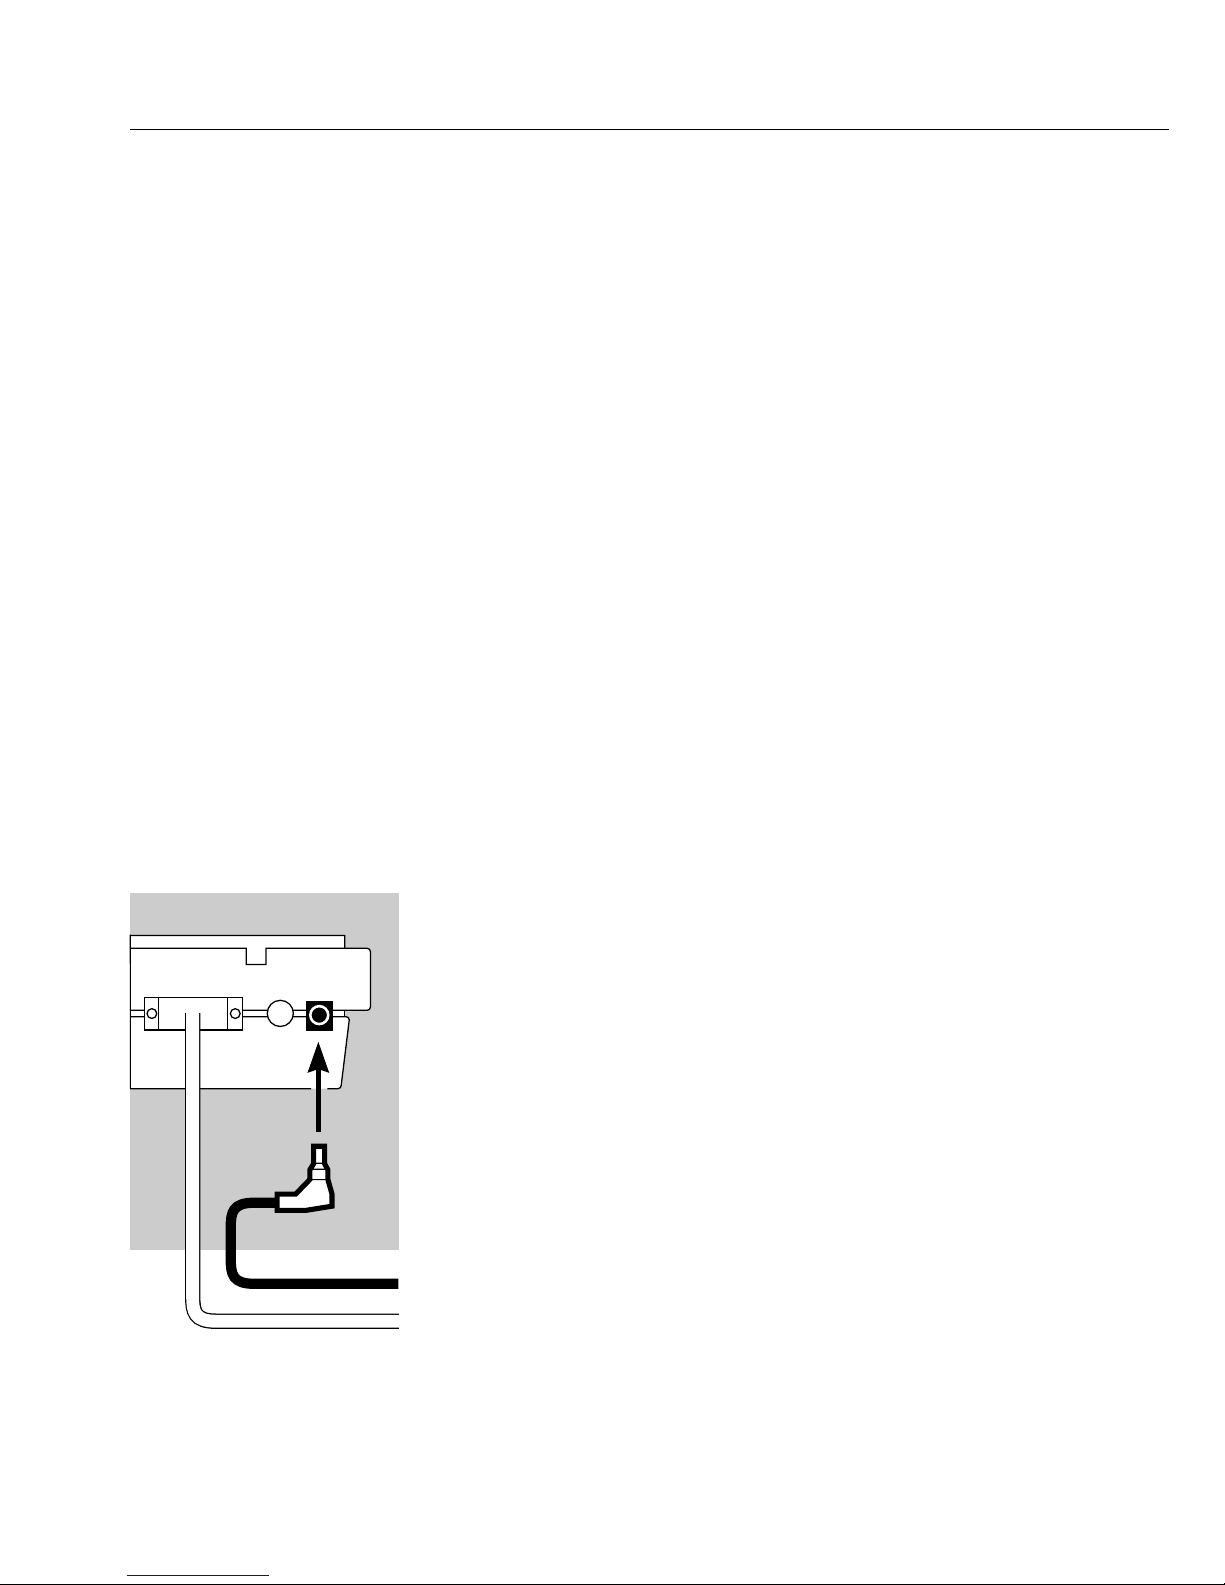
Connecting the Data Printer to a Weighing Instrument
§ Connect the interface cable to the printer and the
weighing instrument you are using.
Secure the connection.
Turning On the Weighing Instrument and the Printer
§ To power the weighing instrument, plug in the AC
adapter/power supply
§ Turn on the weighing instrument
> The printer will turn on automatically
> Self-test: all segments of the printer’s display light up
Charging the Batteries during Initial Operation
§ Charge the batteries by leaving the weighing instrument
turned on
> The batteries are charged in the standby mode of the
weighing instrument
> After 28 hours, the printer’s batteries are charged
$ If the symbol does not go out within 3 hours at the latest,
change the batteries (see page 35)
8
Installing the Ink Ribbon Cassette
§ To install the ink ribbon cassette, refer to “Maintenance”
on page 33
Inserting the Paper Roll
§ Insert the paper roll as described in “Maintenance”
on page 33
Setting the Date and Time
§ For instructions on setting the date and time,
please refer to “Settings” on page 21
Supplying the Printer with External Power
The printer must be supplied with external power via
an AC adapter (optional, see “Accessories”), if one of the
following devices is connected:
– an MP8-1/MP8-2 with Data Input software
– an infrared dryer, model 7393…/YDU01L
– an external keyboard, such as 73392
§ Plug the original Sartorius AC adapter into an electrical
outlet
§ Insert the right-angle plug into the jack on the right of the
printer’s rear panel
$ Install the rechargeable batteries: see page 6
$ Connect the printer and the weighing instrument
by following the steps mentioned in the previous section
9
Operation
The data printer has 6 function keys for operation:
: Line Feed. Press the LF key to advance the paper by
one blank line.
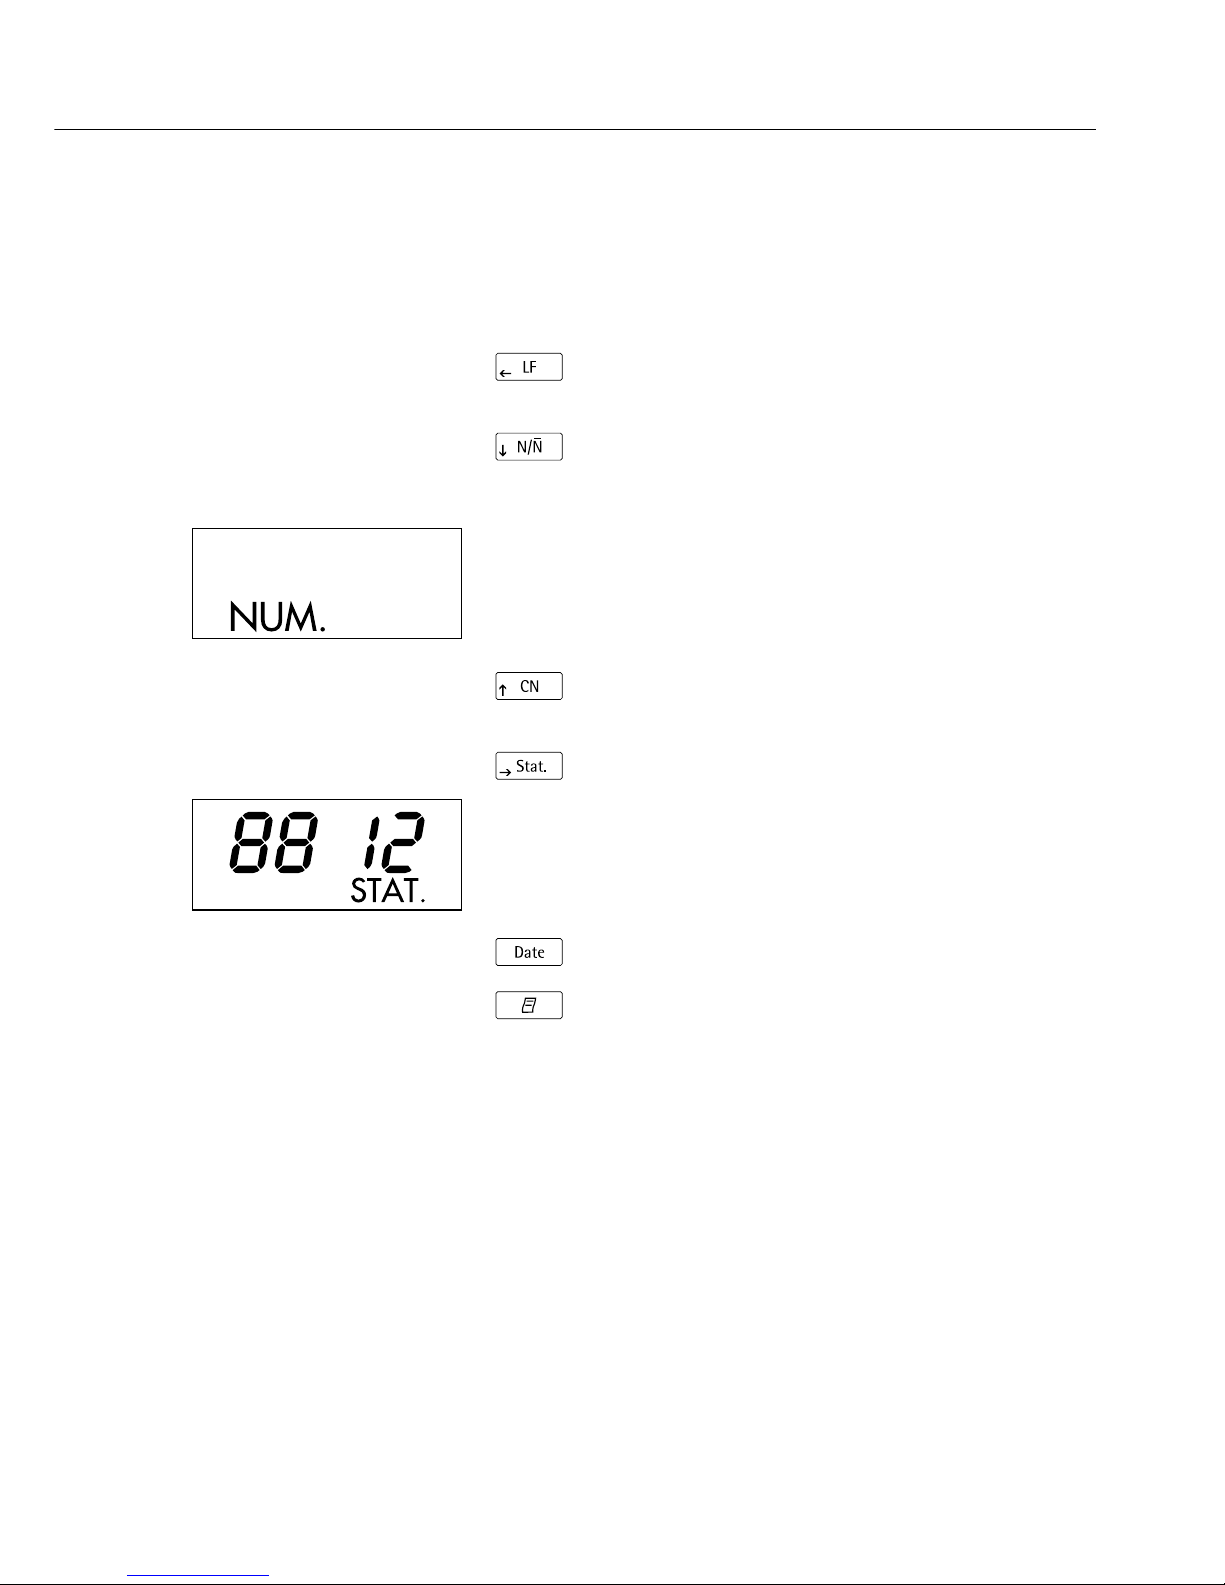
: Numbering Function ON/OFF. This is only possible
if the numbering function (-p4-) in the menu
“Interface Settings for the Data Printer” has been
activated (page 24).
The readout shown on the left will be displayed
once the numbering function has been activated.
The numbering function generates a consecutive
index number from 001 to 999.
: Clear Number. This key resets the numbering
function to “001”
: Statistical Evaluation of the Collected Values
This is only possible if the statistics program (-a3-)
in the “Statistics Applications” menu (page 28) has
been activated. The readout shown on the left (an
example for 12 values) will be displayed for every
value read into the statistics memory.
: Date: Print the Date and Time
: Prints the values or reads them into the statistics
memory:
Prints the data of the connected weighing
instrument without statistics
With the statistics program (-a3- page 29):
Data Transfer in Manual Mode:
In this mode, the current data is transferred from
the weighing instrument and read into the statistics
memory. (The printing function can be turned either
on or off).
Data Transfer in Automatic Mode:
In this mode, printouts are started automatically.

10
Printing the Data of the
Connected Weighing Instrument
$ If necessary, print several blank lines (line feed):
Press the key several times, or keep it pressed for
continuous line feed
$ To print the date and time, press the key
> The printout will be as shown on the left
§ To print data, press the key
$ To reset the numbering function, if necessary, press the
key
$ To turn off the numbering function, press the key
123456789012345678901234
12-DEC-95 10:25:38
123456789012345678901234
001: + 123.4 g

11
Statistical Evaluation of the Data
The printer’s built-in statistics program can process all
values that are computed or weighed and transferred from
an on-line weighing instrument. To use this function,
you must activate the statistics program (-a3-) in the
“Statistics Applications” menu (see “Settings”). When the
program is activated, the code shown on the right will
appear each time (approx. 0.5 sec.) to indicate that a
particular value is being read into the statistics memory.
The number of values read into the statistics memory is
displayed.
After you have pressed the key, the values transferred will be read into the statistics memory. Data transfer
in the manual mode allows you to preselect the specific
values to be transferred by pressing . In the automatic data transfer mode, all values will be read into the
statistics memory once you have pressed a single
time.
To print the statistics, press the key. Once the
data has been printed out, the statistics memory will be
cleared and either the time or the date will be displayed.
Configuring the Data Printer for Statistical Evaluation
Any of the following statistical values can be configured in
the “Statistics Applications” menu so that it will be printed
or not printed:
– Number of weighing operations n (-s3-)
– Mean value x¯(-s4-)
– Standard deviation s (-s5-)
– Variation coefficient s
rel
(-s6-)
– Sum of the individual values/weights Σx (-s7-)
– Minimum value/weight min (-s8-)
– Maximum value/weight max (-s9-)
– Difference between the minimum
and the maximum value/weight diff (-s 10)
12
Printing Individual Values
All values upon which the statistical evaluation is to be
based will be printed out if you set the “Statistics
Applications” menu as follows:
– Printout of the statistic program values = 1 (-a4-)
(Factory setting = 1: all values will be printed)
If you now deactivate the numbering function by pressing
the key, the individual values will not be printed.
They will be read into the statistics memory. The counter
on the display will increase by 1 for each value.
Numbering Each Value
All individual values printed will be numbered if you set
the “Statistics Applications” menu as follows:
– Numbering function = 1 (-p4-)
(Factory setting = 1)
The symbol shown on the left will be displayed
You can deactivate the numbering function during
subsequent operation of the printer by pressing the
key
Taring Function
The weighing instrument will be tared automatically after
data transfer, if you set the “Statistics Applications” menu
as follows:
– Automatic taring = 1
Setting: (-a2-)
(Factory setting = 0)
This is a very convenient feature for the statistical
evaluation of a series of weights, as you can consecutively
place your samples on the weighing pan without having
to remove them.
13
Data Transfer and Statistical Evaluation
in the Manual Mode
Required Printer Configuration
You must set the following printer configuration
in the “Statistics Applications” menu:
– Statistics program = 1 (-a3-)
(Factory setting = 1)
The symbol shown on the left will be displayed
– Data printout = 1 (-a4-)
– Data transfer manual = 0 (-p5-).
Recording and Evaluating Data
§ Press the key to clear the printer memory prior
to initial data transfer
> Any previous values remaining will be evaluated first,
then you will obtain a printout of the statistics.
The statistics will be deleted.
§ Place the first sample on the weighing pan
§ Transfer the value by pressing the key
> The value will be printed, if the printer has been
configured accordingly
> The count of the transferred values will be displayed
14
If you have deactivated the automatic taring
function (-a2-):
§ Remove the sample from the weighing pan
§ Place the next sample on the weighing pan
§ Transfer the value by pressing the key
> The values will be printed out (see example)
If you have activated the automatic taring function (-a2-):
§ Leave the sample on the weighing pan
§ Add the next sample to the one already on the weighing
pan
§ Make sure that the expected total weight does not exceed
the maximum capacity of your weighing instrument
(otherwise, “H” will be displayed)
§ Transfer the value by pressing the key
> The values will be printed out
§ To record consecutive weighing operations, follow the
steps mentioned above. Then:
§ Press the key to obtain a printout of the statistics
> The values, as shown on the left, are automatically
computed and printed out
> Once the data has been printed out, the statistics memory
will be cleared
Vartext1, Vartext2
You can define a header consisting of 2 lines maximum,
each with 24 characters maximum. These user-defined
lines will be printed at the beginning of each hard copy,
and are identified as Vartext1 and Vartext2. They are
stored in the printer’s non-volatile memory (to input headers, see “Settings” on page 27).
123456789012345678901234
001: + 123.6 g
002: + 117.8 g
003: + 119.1 g
123456789012345678901234
n 12
x 99.8 g
s 3.55 g
srel 3.57 %
x 1203.4 g
min 96.0 g
max 103.2 g
Diff 7.2 g
12-DEC-95 16:02:11

15
Data Transfer and Statistical Evaluation
in the Automatic Mode
Data Transfer
The first value transferred must be greater than 30 scale
intervals of the weighing instrument’s display (e.g., > 3.0
g, if the weighing instrument displays decigrams).
The weighing instrument must display a stability symbol
(fluctuation > 1 scale interval). The first value read into
the statistics memory is used as the reference value for the
statistics. Afterwards, data transfer will be blocked until
it is detected that the weighing instrument has been
unloaded. This means that the load on the pan is below
<30% of the reference value.
The next value will be transferred and read into the
statistics memory if it is > 70% of the reference value.
Required Printer Configuration
You must set the following printer configuration parameters in the “Statistics Applications” menu:
– Statistics program = 1 (-a3-)
– Data transfer automatic = 1 (-P6-)
Required Weighing Instrument Configuration
The weighing instrument must be configured as follows
(see instructions for the weighing instrument connected):
– Auto print
– Data output without stability
16
Recording and Evaluating Data
§ Press the key to clear the statistics memory prior to
initial data transfer
> Any previous values remaining will be evaluated first,
then you will obtain a printout of the statistics.
The statistics will be deleted.
§ Place the first sample on the weighing pan
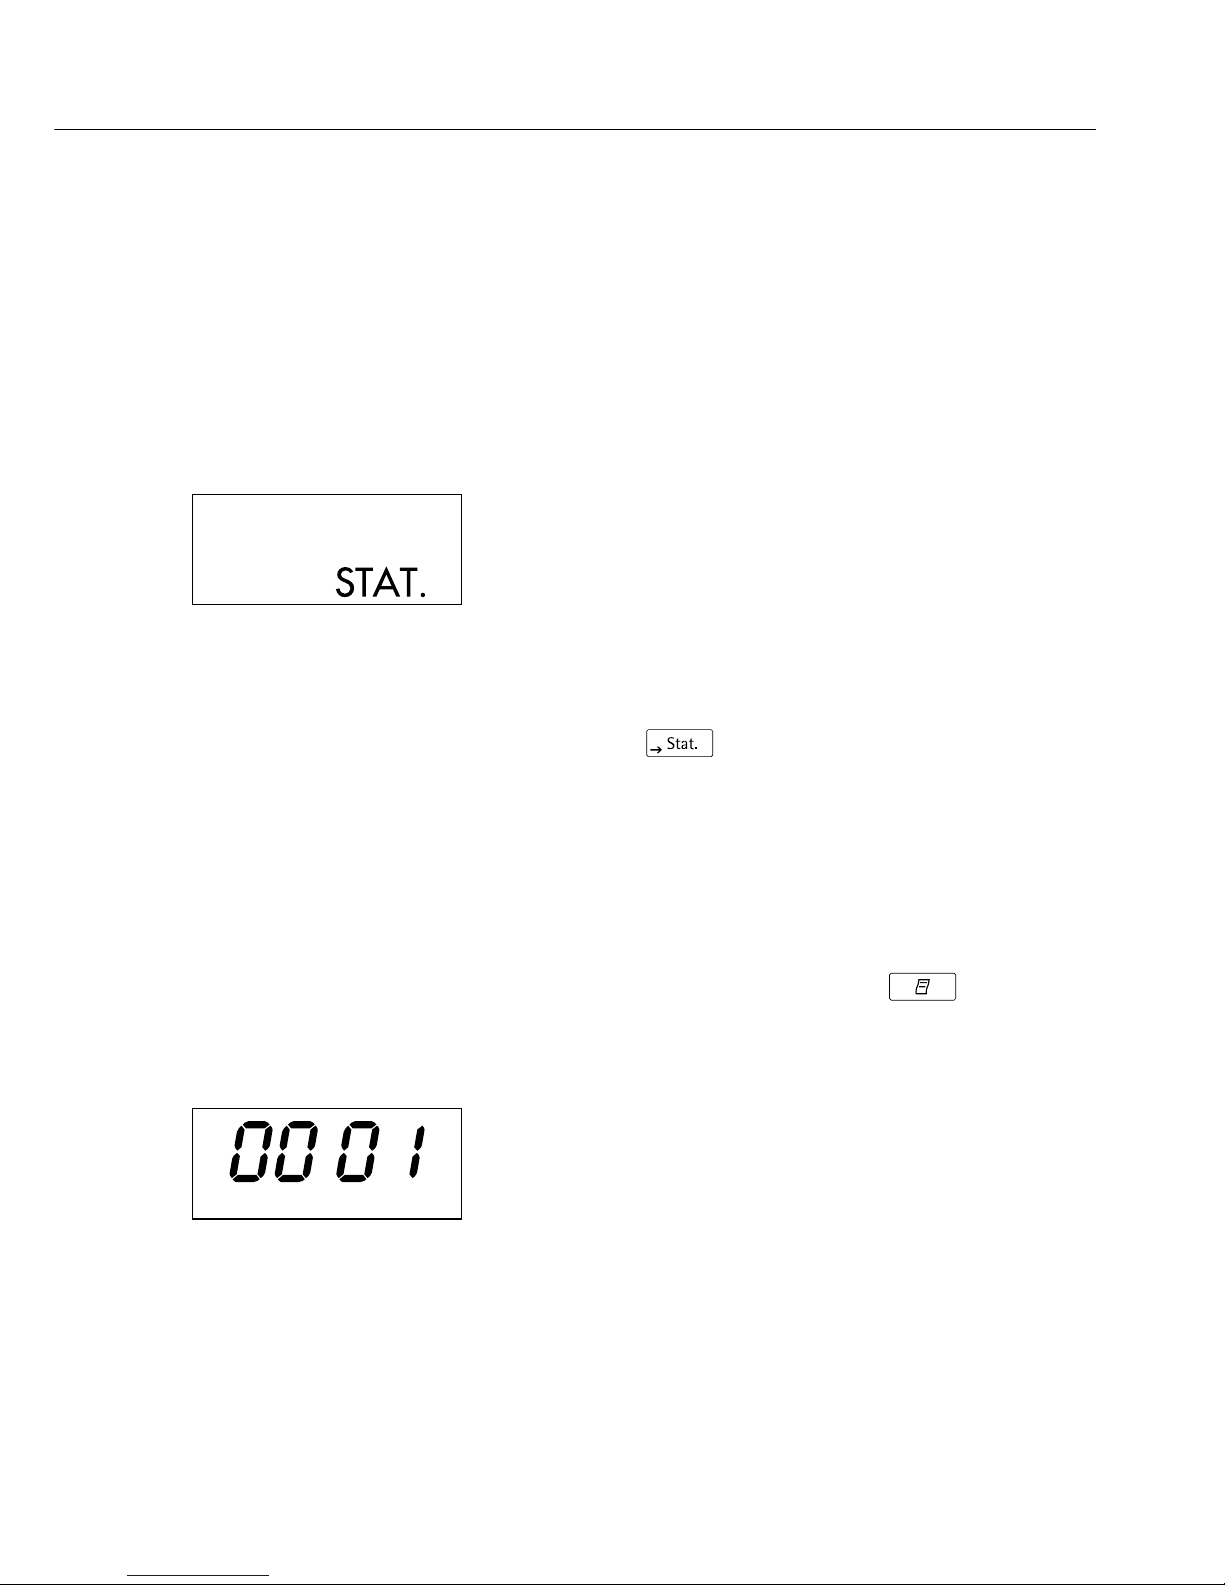
§ To activate data transfer, press the key
> The readout shown on the left will appear
> “STAT” will be displayed for approx. 0.5 sec.
> This value will be read into the statistics memory as the
reference value
If you have deactivated the automatic taring function:
§ Remove the sample from the weighing pan
§ Place the next sample on the weighing pan
> The value will be automatically transferred when the
weighing instrument displays the stability symbol
> Each value will be printed out (example)
If you have activated the automatic taring function:
> The weighing instrument is automatically tared after initial
data transfer
§ Leave the sample on the weighing pan
§ Add the next sample to the one already on the weighing pan
§ Make sure that the expected total weight does not exceed
the maximum capacity of your weighing instrument
(otherwise, “H” will be displayed)
> The value will be automatically transferred when the
weighing instrument displays the stability symbol
> The value will be printed out
123456789012345678901234
001: + 123.6 g
002: + 117.8 g
003: + 119.1 g
17
§ To record consecutive weighing operations, follow the
steps mentioned above. Then:
§ Press the key to obtain a printout of the statistics
> The values, as shown on the left, are automatically
computed and printed out
> Once the data has been printed out, the statistics memory
will be cleared
Practical Example
Suppose you wish to weigh tablets and have their weights
statistically evaluated. Let’s assume that your weighing
instrument is used in legal metrology.
You need to make the following settings:
– Generate an ISO/GLP-compliant printout = 1 (-a1-)
– Automatic taring after each data transfer = 1 (-a2-)
– Statistics program = 1 (-a3-)
– Printout after each data transfer = 1 (-a4-)
– Index number for each data printout
(numbering function) = 1 (-p4-)
– Automatic data transfer = 0 (-p6-)
$ In addition, set the menu code for an ISO/GLP printout on
your weighing instrument:
refer to the “Installation and Operating Instructions” for
this instrument.
§ Press the key to clear the statistics memory prior to
initial data transfer
> Any previous values remaining will be evaluated first,
then you will obtain a printout of the statistics.
§ Place the first tablet on the weighing pan
§ Activate data transfer by pressing the key
> When the weighing instrument has stabilized, this value
will be transferred and read into the statistics memory
as the reference weight
123456789012345678901234
n 12
x 99.8 g
s 3.55 g
srel 3.57 %
x 1203.4 g
min 96.0 g
max 103.2 g
Diff 7.2 g
12-DEC-95 16:02:11

18
> The example on the left shows a printout with an ISO/GLP
header, which is only printed in the manual data transfer
mode.
The last digit of the weight must be printed inversely
because the verification scale interval (e) of the weighing
instrument used in legal metrology is not equal to its
actual scale interval (d).
> After data transfer, the printer transmits a signal to the
weighing instrument so that the instrument will be tared.
§ Leave the tablet on the weighing pan
§ Add the next tablet to the one already on the weighing pan
> The weight is automatically read into the statistics memory
when the weighing instrument has stabilized
> The next weight is printed out (example)
> The weighing instrument is tared
When the weighing instrument displays a zero readout:
§ Add the next tablet to the weighing pan
§ Press the key
§ As described above, add the next tablet each time after the
weighing instrument has been tared
When you have placed the last tablet on the weighing pan
and the last weight is displayed and printed:
§ Generate a statistical evaluation by pressing the key
> The statistical evaluation will be printed (in this case,
only
those values preset in the “Statistics Applications”
menu:
number of weighing operations, mean value, sum of the
individual weights, minimum and maximum weights)
§ Press the c key on the weighing instrument
> The ISO/GLP footer will be printed
123456789012345678901234
SARTORIUS
Model BP6100
S/N 040240772
Id
Date : 22-May-95
Start: 10:25:14
Ser. :
001: + 9.81 g
123456789012345678901234
002: + 10.13 g
123456789012345678901234
n 12
X 9.98 g
x 120.34 g
min 9.60 g
max 10.32 g
End : 10:31:56
Name :
19
Use in Legal Metrology in the EU and the Signatories of
the Agreement on the EEA
The German Federal Institute of Physics and Metrology
(PTB) has issued an independent test certificate, number
D09-96.15, for the YDP03-0CE. Based on this certificate,
the printer is allowed to be used in legal metrological
applications in the EU and the EEA, provided that the
printer is operated with weighing instruments verified for
such use by an EC or national type-approval certificate.
– Set up the printer so that you will be able to see the
weight readout of the connected weighing instrument
– For weighing instruments verified for use in legal
metrology, where e = d:
Configure the data printer so that the last digit of the
weight value is inversely printed (refer to the subsection
“Menu – Interface Settings for the Data Printer” under
“Settings”)
Important Note:
For a weighing instrument where e=d and d < 0.1 mg, the
last digit of the weight value may not be inversely printed.
– If your printer has the mark “M” on a green background,
you can use the printer immediately in legal metrology,
provided that the weighing instrument is also verified for
use in legal metrology.
If the printer is subsequently connected to a verified
weighing instrument already in use in legal metrology:
– Notify your local weights and measures inspection office,
or
– Please contact your local Sartorius service center if you
wish to have the data printer configured and prepared for
verification for legal metrology.
The above does not concern printers that are immediately
used in legal metrology.
N + 208.76 g
N + 218.88 g
N + 220.33 g
N + 222.65 g
N + 224.02 g

20
ISO/GLP-compliant Data Printout
To obtain an ISO/GLP*-compliant data printout,
the following information must head each data printout of
every measurement:
– Manufacturer of the weighing instrument
– Model name
– Serial number
– Date and time for the start and finish of each measurement
– Operator/workstation ID
– Operator’s signature
§ To set the data printer for ISO/GLP-compliant data printouts: refer to the subsection “Configuring an ISO/GLPcompliant Data Printout” under “Settings” on page 23
§ In addition, set the appropriate menu code on your
weighing instrument: refer to the section on “ISO/GLPcompliant Record or Printout” in the Sartorius instruction
manual
* ISO: International Organization for Standardization
GLP: Good Laboratory Practice
123456789012345678901234
Sartorius
Model BP210D
S/N 040500046
Id
-------------------Date : 30-May-95
Start: 10:05:30
Cal. : Extern
Set. : 200.00000 g
End : 10:05:45
Name :
--------------------
21
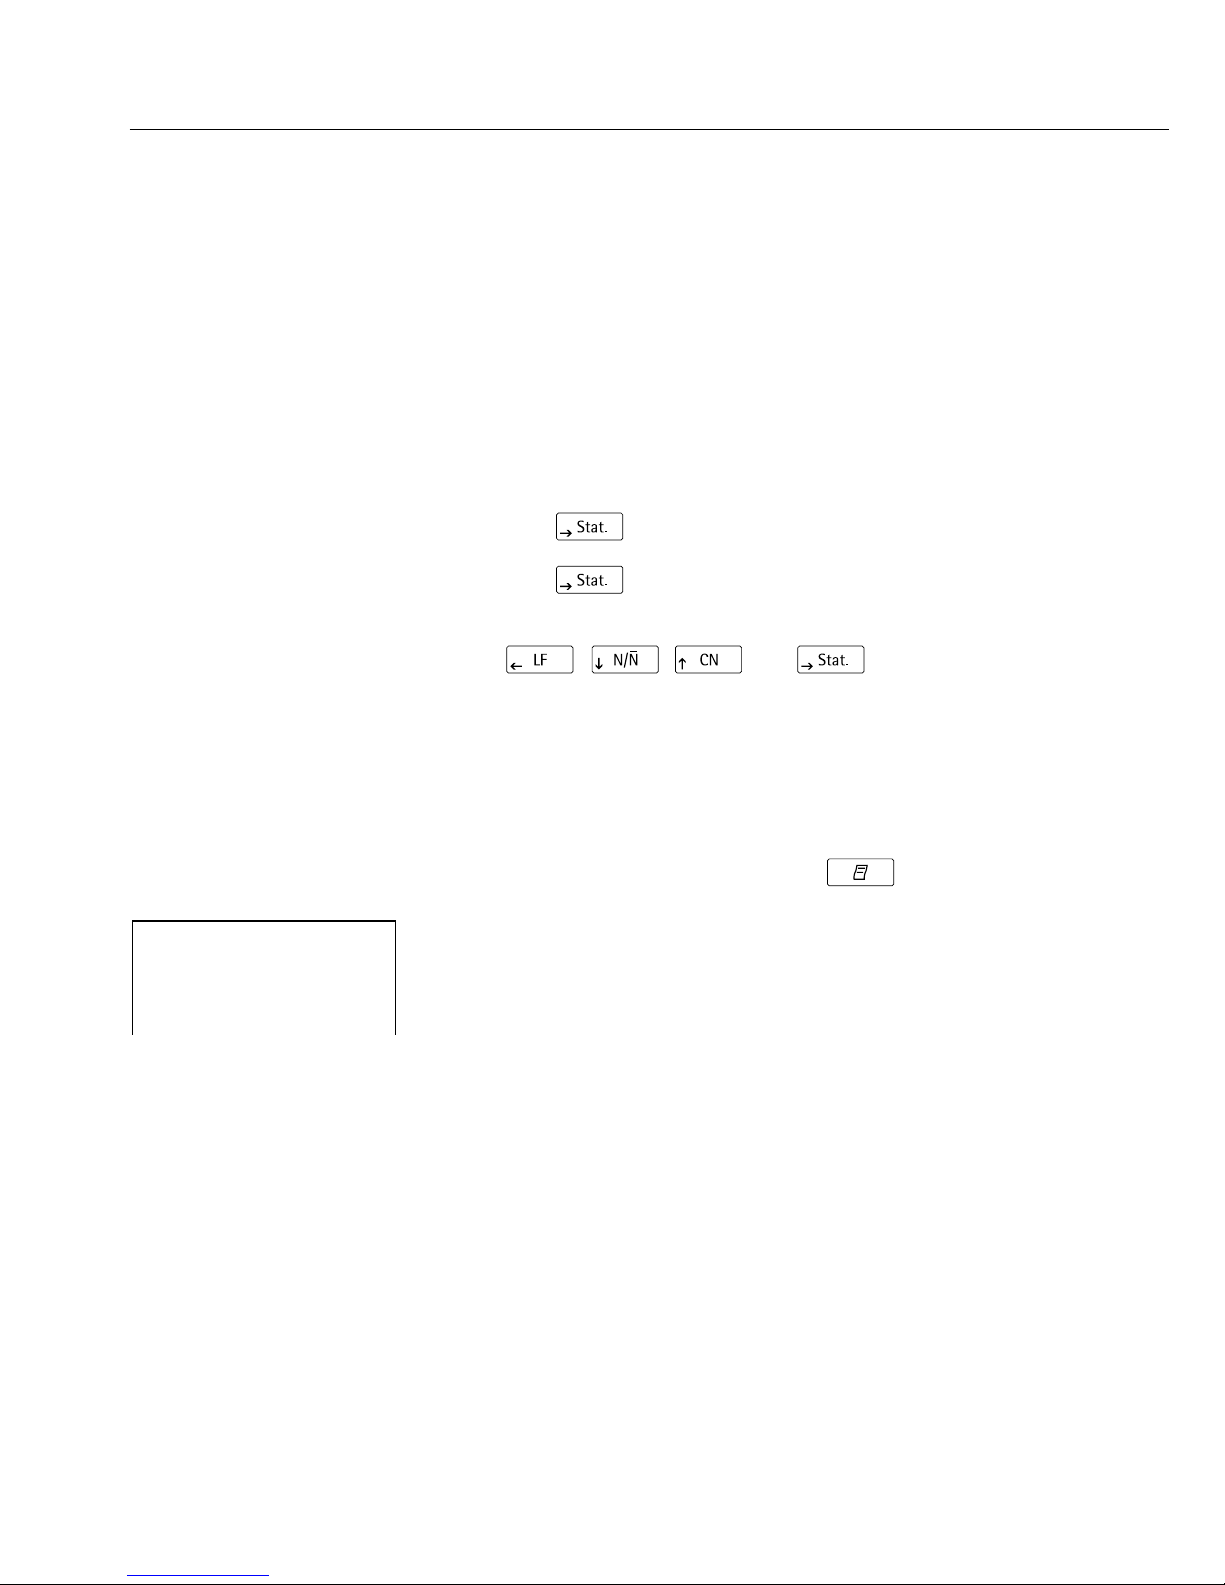
Settings
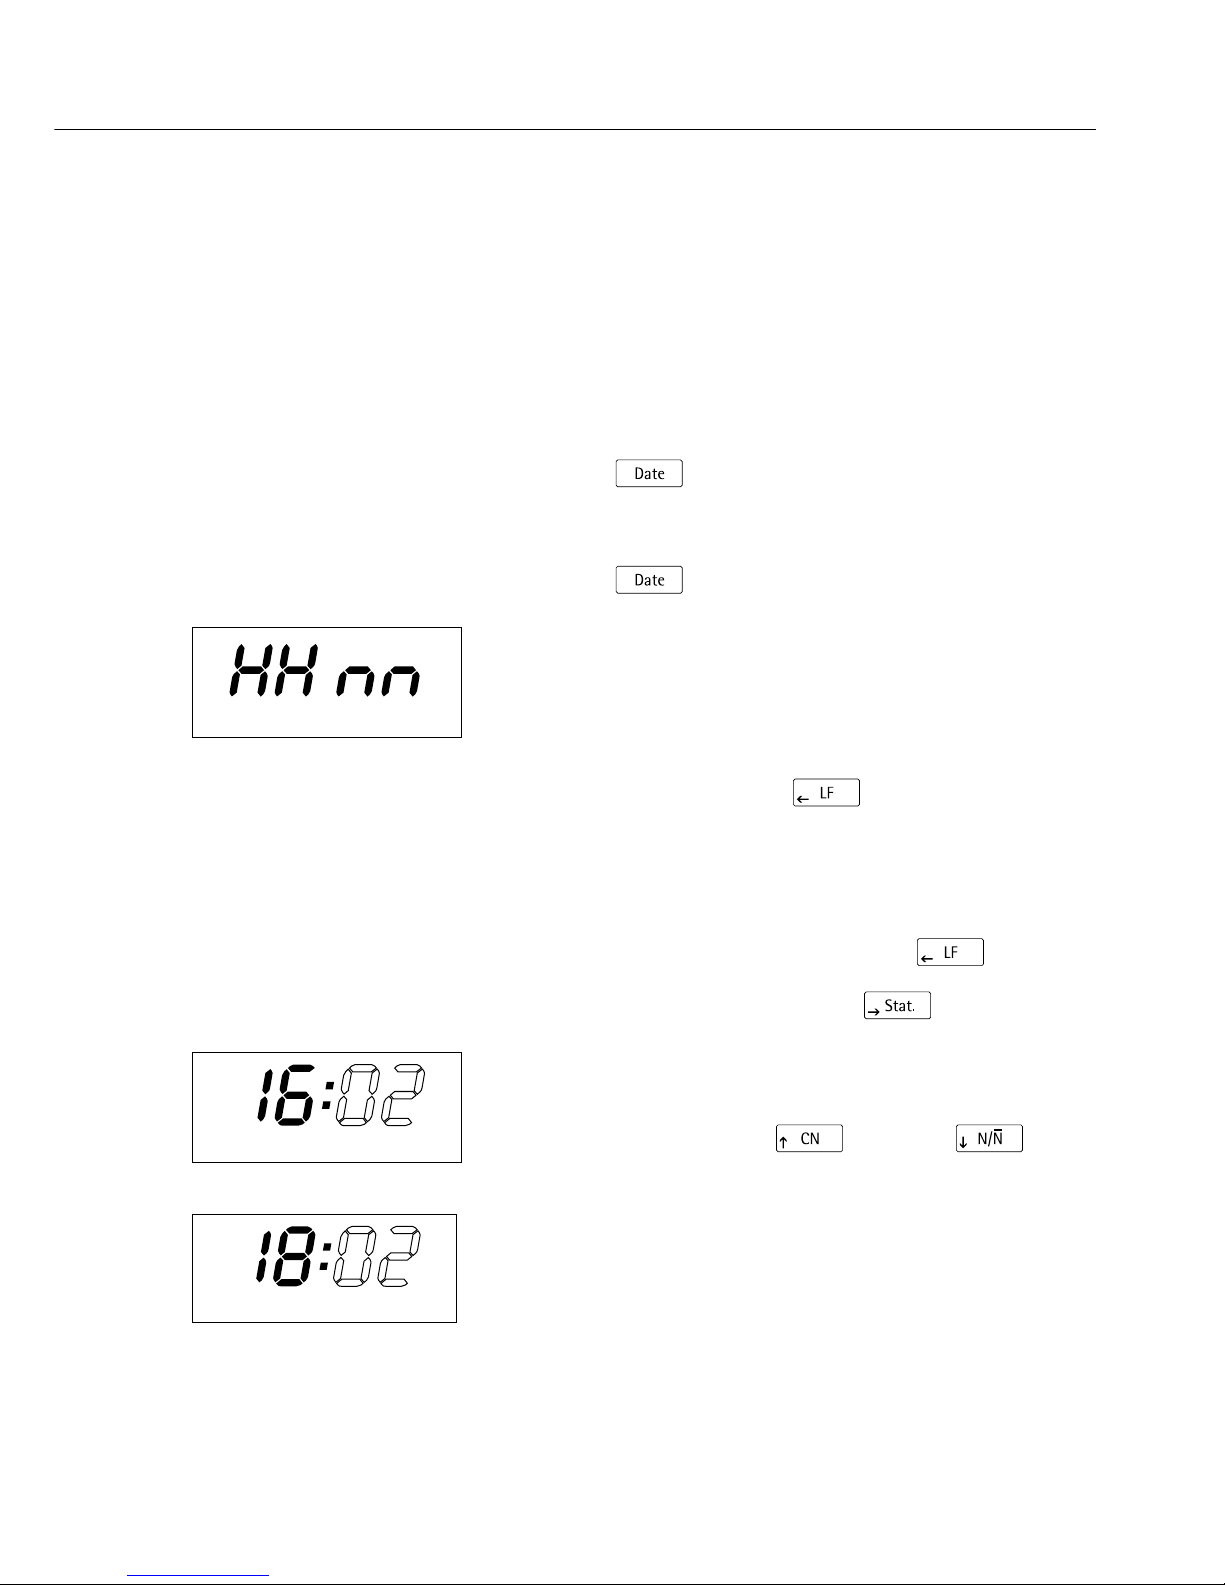
Setting the Date and Time
Select the “Set Date and Time” mode in one of two ways:
1) Turn on the data printer and the weighing instrument
When all display segments are lit,
§ press the key
or 2) During operation,
§ press the key for at least 5 seconds
> You will obtain the readout shown on the left, which
stands for the hour (HH)
You can also exit the “Set Date and Time” mode during
any of the following steps:
$ To exit the mode, press the key, depending on the
menu level
You can also return to the previous step during any of the
following steps:
$ To return to the previous step, press the key
§ To select “Set the Hour,” press the key
> You will obtain a readout as shown on the left; both the
digits on the left will flash
§ To set the hour, press the key or the key –
several times, if necessary
> You will obtain a readout as shown in the example on the
left
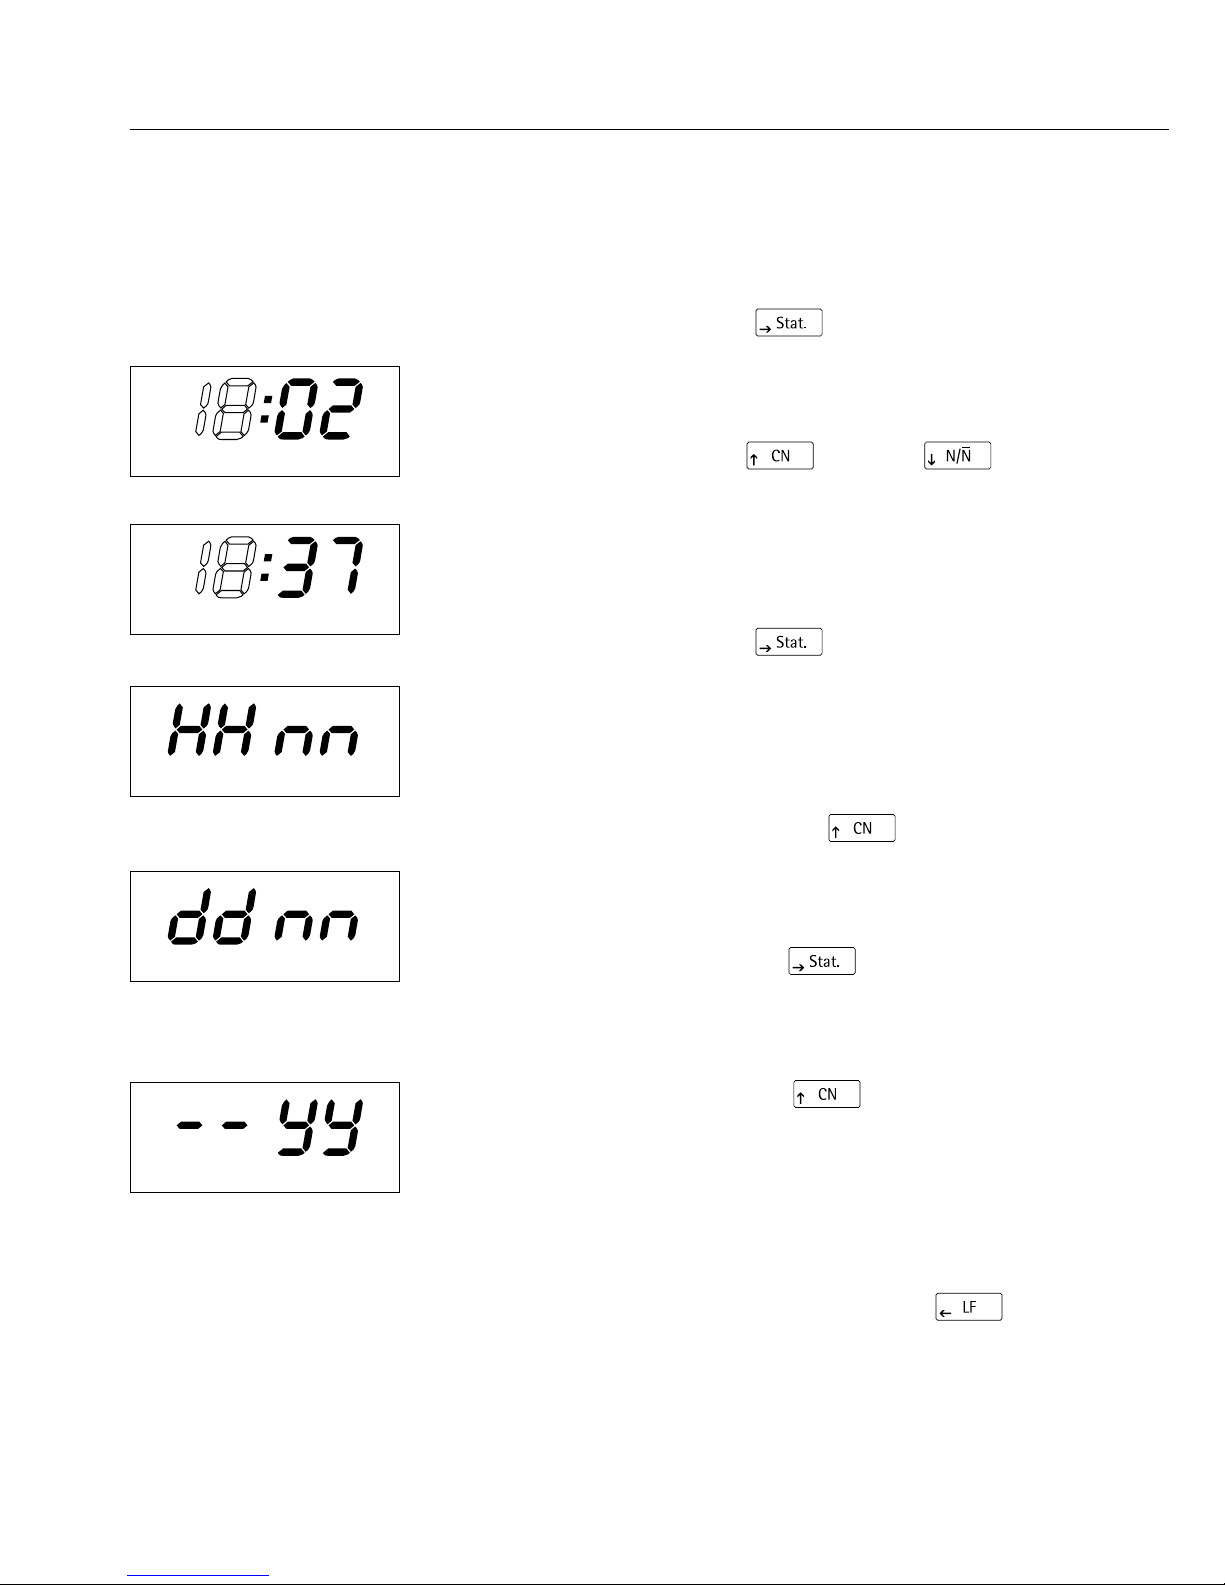
22
§ To store the setting, press the key
> You will obtain a readout as shown in the example on the
left. Both the digits on the right will flash
§ To set the minutes, press the key or the key
– several times, if necessary
> You will obtain a readout as shown in the example
on the left
§ To store the setting, press the key
> You will obtain a readout as shown in the example on the
left
§ To select “Set Day, Month,” press the key
> You will obtain the readout shown on the left, which
stands for the day (dd)
§ To select “Set the Day,” press the key
§ Enter the day and month in the same manner as for the
hours and minutes
§ To select “Set the Year,” press the key
> You will obtain the readout shown on the left, which
stands for the year (YY)
§ Enter the year (the last two digits) in the same manner as
for the minutes
§ To exit the “Set Date and Time” mode, press the
key
23
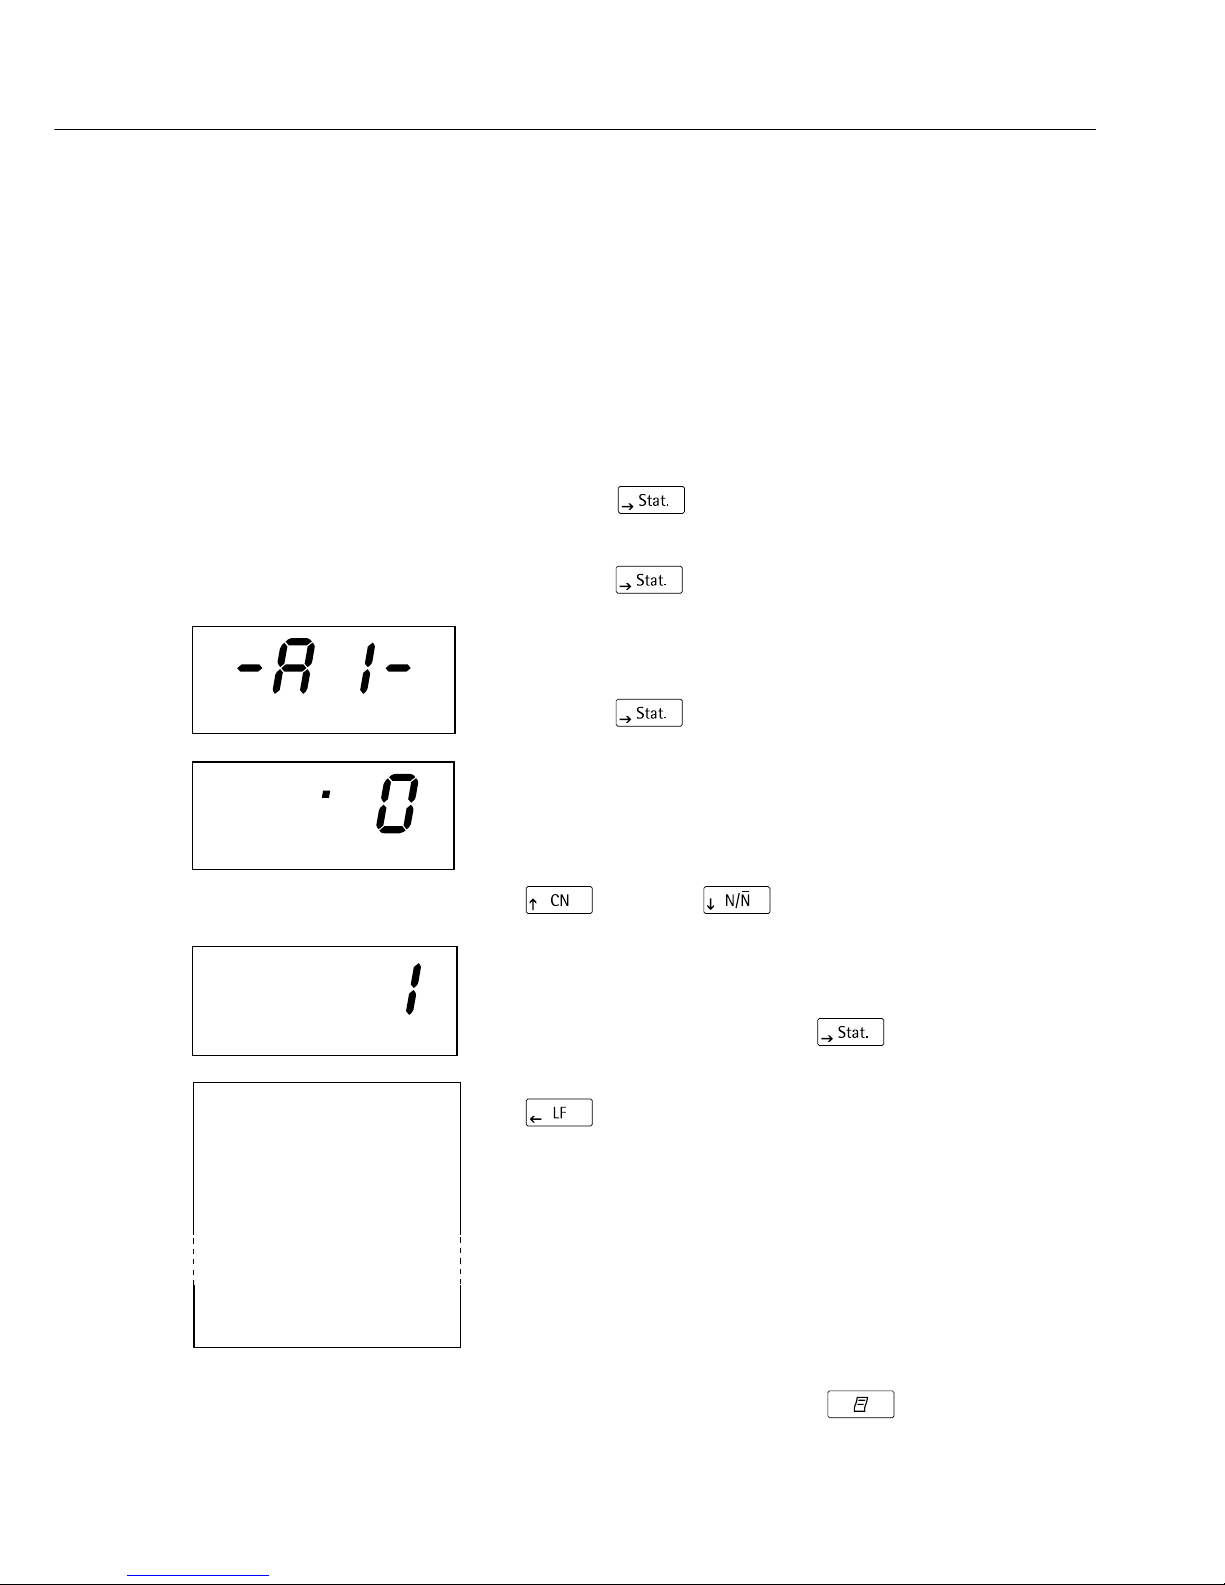
Configuring an ISO/GLP-compliant Data Printout
Select the “Statistics Applications” menu in one of two
ways:
1) Turn on the data printer and the weighing instrument
When all display segments are lit,
§ press the key;
or 2) During operation,
§ press the key for at least 5 seconds
> You will obtain the readout shown on the left
§ To select the setting “ISO/GLP-compliant Data Printout,”
press the key
> You will obtain a readout as shown in the example on the
left
The dot indicates the setting used until now
§ To set “ISO/GLP-compliant Data Printout,” press either the
key or the key until “1” is displayed
> You will obtain a readout as shown in the example on the
left
§ To store the setting, press the key
§ To exit the “Statistics Applications” menu, press the
key
§ In addition, set the appropriate menu codes on your
weighing instrument: refer to the section on “ISO/GLPcompliant Record or Printout” in the Sartorius instruction
manual
> In all subsequent printouts, an ISO/GLP header and footer
similar to the example shown on the left will be automatically printed
$ To print the settings, press the key
123456789012345678901234
SARTORIUS
Model BP6100
S/N 040240772
Id 564
Date : 22-May-95
Start: 10:25:14
Ser. :
End : 10:25:32
Name :
24
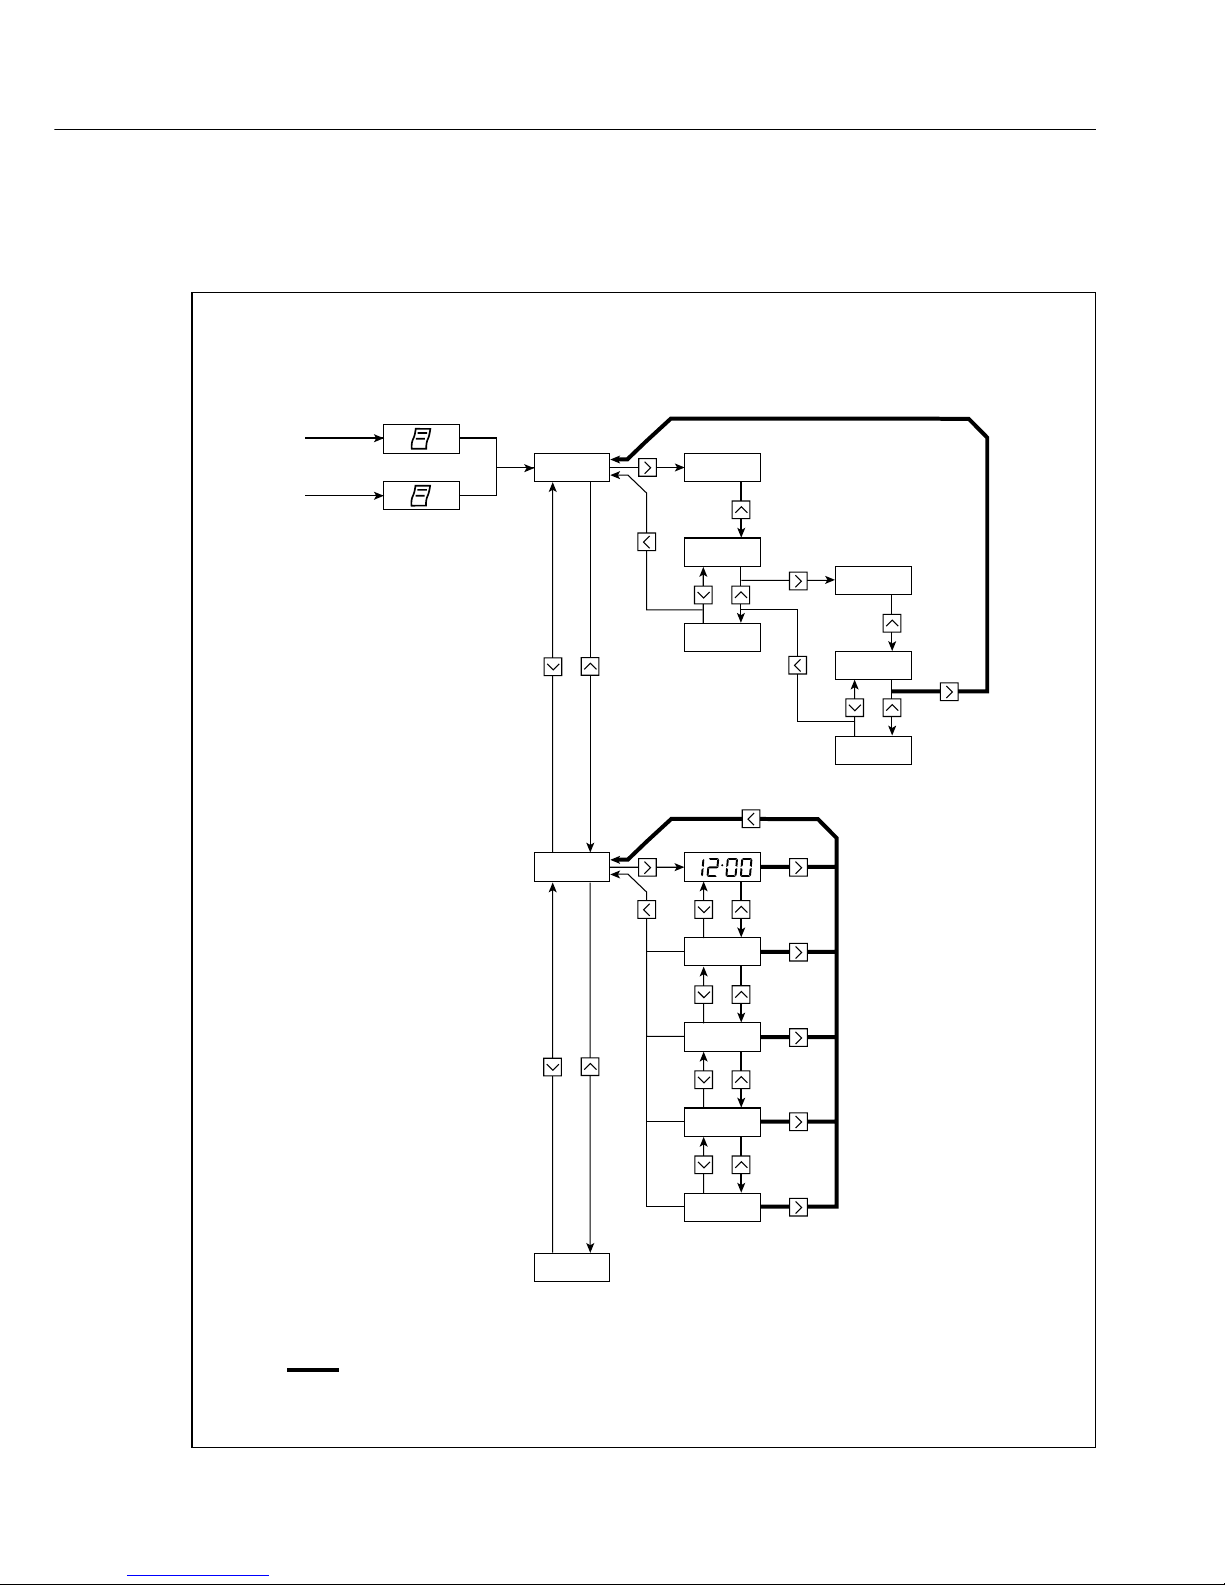
Menu – Interface Settings for the Data Printer
You can prevent the settings of this menu from being
changed. To do so, enter a four-digit number (PIN number) that others cannot easily guess.
If you lose or forget this number, please contact your local
Sartorius Service Center for help.
When the printer is turned on, all settings are read into the
printer’s memory (EEPROM) and subsequently used during
the operation.
To access the menu for “Interface Settings for the Data
Printer,”
– press the key when you start the printer; or
– press the key for more than 5 seconds during
operation
The , , and keys then have
the cursor functions indicated by the corresponding
arrows.
Access to both the code and baud settings is shown in the
flow chart given as an example on the next page.
All setting options for the menu “Interface Settings for the
Data Printer” are listed following this chart.
In the “Setup” menu, you can have the menu settings
printed by pressing the key
The letter at the end of the second line indicates whether
menu settings can be changed:
C: Change: Settings can be changed
L: Locked: Settings cannot be changed
123456789012345678901234
Interface Settings
Program Vers. 1.xx C
-----------------------Baud rate 1200 bd
Parity odd
Handshake DTR/CTS
.
.
.
25
cO de -- --
01 --
99 --
21 --
21 01
21 99
B
B
B
ba ud
pa ry
24 00
48 00
96 00
19 20
When printer is started
or > 5 sec.
…
…
B
= Example
= New value is stored
= Dot indicates previously set value
1st Level 2nd Level 3rd Level
12:00
26
Setting Options in the Menu “Interface Settings for the Data Printer”
Designation Display Factory Setting Options
Setting
Password code 100 … 9999
Data transmission baud 1,200 1,200; 2,400; 4,800;
rate (baud rate) 9,600; 19,200
Parity pary odd even, odd, 0, 1
RS-232C handshake hand 0 0 = hardware, 1 = software
Print using <CR, LF> -p1- 1 0 = no, 1 = yes
Print flush, right-/ -p2- 0 0 = right, 1 = left
left-hand margin
Print -p3- 0 0 = decimal points, 1 = commas
Decimal points/commas
Numbering function on/off -p4- 1 0 = off, 1 = on
Inverse printing -p5- 0 0 = no inverse printing,
1 = last digit inverse,
2 = last 2 digits inverse,
3 = last 3 digits inverse
Manual/automatic data transfer -p6- 0 0 = manual (indiv.) data transfer
1 = automatic data transfer
Date/time when printer starts -p7- 1 0 = no, 1 = yes
Print VARTEXT1 -p8- 0 0 = no, 1 = yes
when printer starts
Print VARTEXT2 -p9- 0 0 = no, 1 = yes
when printer starts
Time display -c1- 24 12, 24 hours
Date/time display -c2- 1 0 = date, 1 = time

27
Entry of the user-defined text for the 1st and 2nd lines (Vartext1, Vartext2):
§ You will need a computer (PC) with a BASIC interpreter
The following BASIC program is used to transfer text via the interface of a connected
computer (PC). The BASIC interpreter already installed on the computer executes this
program.
CLS
PRINT „ 123456789012345678901234“
LINE INPUT „VARTEXT1 ? „, VarText1$
LINE INPUT „VARTEXT2 ? „, Vartext2$
OPEN „com1: 1200,0,7,1,CD0,DS0“ FOR RANDOM AS #1
PRINT #1,CHR$(27)+"j"+VarText1$+"_"+CHR$(13)+CHR$(10)
PRINT #1,CHR$(27)+"k"+Vartext2$+"_"+CHR$(13)+CHR$(10)
CLOSE #1
28
Menu - Settings for Statistics Applications
When the printer is turned on, all settings are read into the
printer’s memory (EEPROM) and subsequently used during
operation.
To access the “Statistics Applications” menu,
– press the key when you start the printer; or
– press the key for more than 5 seconds during
operation
The ,
,
and keys then have
the cursor fuctions indicated by the corresponding arrows.
Access to both the individual settings is shown in the flow
chart given as an example on the next page. All setting
options for the “Statistics Applications” menu are listed
following this chart.
To print the menu settings, press the key
The letter at the end of the second line indicates whether
menu settings can be changed:
C: Change: Settings can be changed
L: Locked: Settings cannot be changed
123456789012345678901234
Application Settings
Program Vers. 1.xx C
-----------------------A1:Mode ISO/GLP ON
A2:Tare func. OFF
A3:Statistics ON

29
Setting Options in the “Statistics Applications” Menu
Designation Display Factory Setting Options
Setting
GLP/GMP printout -A1- 1 0 = no, l = yes
Automatic taring -A2- 0 0 = no, l = yes
Statistics program -A3- 1 0 = no, l = yes
Data printout -A4- 1 0 = no, l = yes
Transfer index header -A5- 0 0…50 (details upon request)
for values to the statistics
Print VARTEXTl -51- 0 0 = no, l = yes
on statistics printout
Print VARTEXT2 -52- 0 0 = no, l = yes
on statistics printout
Print number of measurements -53- 1 0 = no, l = yes
Print mean value -54- 1 0 = no, l = yes
Print standard deviation -55- 1 0 = no, l = yes
Print variation coefficient -56- 1 0 = no, l = yes
Printsum of individual values -57- 1 0 = no, l = yes
Print minimum value -58- 1 0 = no, l = yes
Print maximum value -59- 1 0 = no, l = yes
Print difference between -510- 1 0 = no, l = yes
maximum and minimum values
Print date/time -511- 0 0 = no, 1 = yes

30
Printing a Hard Copy of the Settings
§ To select the “Interface Settings for the Data Printer”
menu,
– hold down the key when you start the printer;
– hold down the key for more than 5 seconds during
printer operation
> You will obtain the readout shown on the left
§ To print the settings, press the key
> You will obtain the readout shown on the left
(Example: these are the factory settings)
§ To exit the “Interface Settings for the Data Printer” menu,
press the key
123456789012345678901234
Interface Settings
Program Vers. 1.xx C
-----------------------Baud rate 1200 bd
Parity odd
Handshake DTR/CTS
P1:Send CR/LF ON
P2:Print format right
P3:Decimal-Char point
P4:Num.function ON
P5:Inverse from 0FF
P6:Print mode Standard
P7:Date/Time ON
P8:Print TEXT1 OFF
P9:Print TEXT2 OFF
C1:Time format 24h
C2:Display Time

31
Printing a Hard Copy of the Settings for the “Statistics
Applications” Menu
§ To select the “Statistics Applications” menu,
– hold down the key when you start the printer; or
– hold down the for more than 5 seconds during
printer operation
> You will obtain the readout shown on the left
§ To print the settings, press the key
> You will obtain the readout shown on the left
(Example: these are the factory settings)
§ To exit the “Statistics Applications” menu, press the
key
123456789012345678901234
Application Settings
Program Vers. 1.xx C
-----------------------A1:Mode ISO/GLP ON
A2:Tare func. OFF
A3:Statistics ON
A4:Print value ON
A6:Header 0
S1:Print TEXT1 OFF
S2:Print TEXT2 OFF
S3:Print n ON
S4:Print x ON
S5:Print s ON
S6:Print srel ON
S7:Print x ON
S8:Print min ON
S9:Print max ON
S10:Print diff ON
S11:Print date OFF
5

32
Troubleshooting Guide
Error Message Causes Solution
err1 flashes Data in printer memory § Press any key
(EEPROM) is wrong
(checksum is incorrect) > Factory settings are
being loaded
$ Reconfigure the menus
for “Printer Interface”
and “Statistics
Applications”
err2 flashes The input buffer capacity § Turn the weighing
has been exceeded instrument off,
then back on again
err3 flashes No control signals § Press any key
for printer
§ Check the
rechargeable batteries
$ Recharge the batteries,
if necessary
$ Change the batteries,
if necessary
flashes Battery power is too low § Recharge the batteries
(see “Maintenance”)
_ Underlining Transfer error § Check to see if the
on the printout in a data string interface parameters of the
weighing instrument and
printer match

33
Maintenance
Changing the Paper Roll
To operate your data printer, the paper rolls must have the
following specifications:
(see “Accessories”):
– Standard paper roll
– Wood-free paper, 60 g
– Width: 57.5 ± 0.5 mm
– Diameter: 65 mm max.
– Core diameter: 8 mm min.
§ To open the paper roll compartment, lift the cover
§ Pull out the roll holders from both sides of the roll core as
shown on the left
§ Remove the old roll core
$ Place a new paper roll on a flat surface
$ The beginning of the paper must be on the bottom and
facing you
§ Use your thumb and index finger of one hand to hold the
paper roll vertically above the paper roll compartment
§ Using your other hand, thread the paper through the slot
underneath the ink ribbon
§ To transport the paper through the ink ribbon cassette,
press the key several times or hold it down
> The paper will be threaded into, then out of the ink ribbon
cassette

34
§ To align the paper roll, hold it so that you can push both
roll holders into the core
§ Release the roll holders on both sides
§ To close the paper roll compartment, lower the cover
Changing the Ink Ribbon Cassette
To operate your data printer, you must use a black ink
ribbon cassette, type ERC-22 (see “Accessories”).
§ Lift the cover of the paper roll compartment
§ To remove the paper from the ink ribbon cassette,
turn the paper roll opposite to the paper feed direction
§ Press down on the right side of the cassette
> The left side of the cassette will lift up
§ Remove the cassette
§ Insert a new ink ribbon cassette from the top
> The cassette will lock into place
$ If necessary, turn the small tension wheel located
on the left in the direction of the arrow until the ribbon
is stretched taut in front of the paper
§ To thread the paper, refer to “Changing the Paper Roll”
§ Lower the cover of the paper roll compartment to close it

35
Charging the Batteries
If the symbol shown on the left lights up:
$ Charge the batteries by leaving the weighing instrument
turned on
> The batteries are charged in the standby mode of the
weighing instrument
> After 28 hours, the printer’s batteries are charged
$ If the symbol does not go out within 3 hours at the latest,
change the batteries (see page 35)
Changing the Rechargeable Batteries
! Avoid draining the batteries excessively;
otherwise, this will reduce their recharging capacity.
! Use only standard AA rechargeable batteries of the follow-
ing type: nickel-cadmium UM-3, Sartorius order no.
69Y03136.
§ Lift the cover of the paper roll compartment
§ To open the battery compartment, tilt back the cover
§ Remove the 4 batteries
! Used batteries are hazardous waste and must be properly
disposed of according to your local hazardous waste
disposal regulations.
$ If you have any questions, please contact your local Sarto-
rius Service Center
§ Install the 4 rechargeable batteries in the battery compartment. Make sure that the poles match the + and – signs!!
§ To close the battery compartment, press down on the cover
§ To close the paper roll compartment, lower the cover

36
Cleaning the Data Printer
! When cleaning the data printer, make sure that no liquid
enters its housing
! Please do not use any aggressive cleaning agents
(solvents or similar agents)
§ Disconnect the power supply by unplugging the interface
cable (connecting the weighing instrument) from the rear
panel of the printer
$ If you are using an external power supply, unplug the AC
adapter from the electrical outlet (mains supply)
§ Use only a cloth moistened with a mild detergent (soap) to
wipe down the printer housing
§ After cleaning, wipe down the printer with a soft, dry piece
of cloth

37
Product Order No.
Spare paper rolls (box of 5) 6906937
Ink ribbon cassette 6906918
AC adapter with
specifications rated for Europe 6971412
UK 6971414
USA 6971413
Australia 6971411
South Africa 6971410
Set of rechargeable batteries
(4 nickel cadmium, UM-3, type AA) 69Y03136
Interface cable for connecting
the printer to a weighing instrument
or other device of an older design
series (MP technology), for use in
residential areas (EN55022, Class B) VF1503
(FastFactory)
Specifications
Designation Dimensions
Length 230 mm
Width 158 mm
Height 80 mm
Weight (without batteries, paper roll) approx. 800 g
Operating temperature 0 to +40 °C
Storage temperature –40 to +70 °C
Accessories

38
Electromagnetic Compatibility
C Marking
The equipment complies with the following Directive:
Council Directive 89/336/EEC
“Electromagnetic Compatibility (EMC)”
Applicable European Standards:
Limitation of emissions:
EN 50081-1 Residential, commercial and
light industry
EN 50081-2 Industrial environment
Defined immunity to interference:
EN 50082-1 Residential, commercial and
light industry
pr EN 50082-2 Industrial environment
Important Note:
The operator shall be responsible for any modifications
to Sartorius equipment and for any connections of cables
or equipment not supplied by Sartorius and must check and,
if necessary, correct these modifications and connections.
On request, Sartorius will provide information on the minimum operating specifications (in accordance with the
Standards listed above for defined immunity to interference).

39
Important Information for Connecting Devices of an Older
Design Series:
If you connect this printer to weighing instruments or devices
of an older design series (MP technology), they might exceed
the permissible limits designed to provide reasonable protection against harmful radio interference in residential areas
(EN55022, Class B).
For this reason, please observe the following:
Warning!
This a Class A device that can cause radio interference in
residential areas. In this case, the user may be required to
correct the interference by taking appropriate measures at his
own expense.
You can order a special Sartorius interface cable
(accessory) that complies with the radio interference limits
for operation of equipment in residential areas.
Information on Radio Frequency Interference
Warning!
This equipment generates, uses and can radiate radio
frequency energy and, if not installed and used in accordance
with the instruction manual, may cause interference to radio
communications. It has been tested and found to comply
with the limits for a Class A computing device pursuant
to Subpart J of Part 15 of FCC Rules, which are designed
to provide reasonable protection against such interference,
when operated in a commercial environment. Operation
of this equipment in a residential area is likely to cause interference, in which case the user, at his own expense, will be
required to take whatever measures may be required to
correct the interference.

40
Z.14-75532034-10.93

41
Inhalt
42 Verwendungszweck
43 Sicherheitshinweise
44 Installation
47 Betrieb
48 Messwert der angeschlossenen
Waage drucken
49 Messwerte statistisch auswerten
57 Hinweise für eichpflichtigen Einsatz
beachten
58 ISO/GLP konform protokollieren
59 Voreinstellungen
59 Uhrzeit und Datum einstellen
61 ISO/GLP-Protokoll konfigurieren
62 Menü Drucker-Schnittstelle
66 Menü Statistik-Anwendungens
68 Protokoll der Voreinstellungen
ausdrucken
70 Fehlermeldungen
71 Instandhaltung
75 Zubehör
75 Technische Daten
76 Elektromagnetische Verträglichkeit
78 Prüfschein

42
Verwendungszweck
Der Typ YDP 03-0CE ist ein Messwertdrucker, der Wägedaten von einer angeschlossenen Waage übernimmt und
auf Normalpapier (Rollenbreite: 57,5 mm) ausdruckt. Text
wird mit bis zu 24 Zeichen pro Zeile ausgegeben.
Der Drucker verfügt über eine eingebaute Echtzeituhr. Nach
erforderlicher Konfiguration ist der Messwertdrucker für
eichpflichtige Messungen einsetzbar.
Der Drucker erfüllt die Qualitätsstandards aus Chemie und
Pharmazie, die im Bereich der Forschung unter dem Begriff
GLP (Good Laboratory Practice) und in der Fertigung unter
dem Begriff GMP (Good Manufacturing Practice) eingeführt sind.
Mit dem Drucker können neben einzelnen Wägedaten auch
statistische Auswertungen von Wägedaten vorgenommen
werden. Dazu werden alle von der Waage empfangenen
Gewichtswerte gespeichert. Ausgegeben werden können:
– die Anzahl der Messungen
– der arithmetische Mittelwert
– die Standardabweichung
– der Variationskoeffizient
– der kleinste Messwert
– der größte Messwert
– die Differenz zwischen größtem und kleinstem Messwert
Die Datenübergabe kann auf Tastendruck
oder automatisch erfolgen.

43
Sicherheitshinweise
Der Drucker entspricht den Richtlinien
und Normen für elektrische Betriebsmittel und elektromagnetische Verträglichkeit.
Es darf nur folgender Akkutyp
(keine Batterien) verwendet werden:
Nickel-Cadmium UM-3, Typ AA Best.Nr. 69Y03136.
Tiefentladung der Akkus vermeiden, da
sonst die maximale Ladekapazität sinkt.
Verbrauchte Akkus müssen als Sondermüll entsorgt werden.
Bei externer Spannungsversorgung nur
Original Sartorius Netzgerät für diesen
Drucker verwenden (siehe Kapitel Zubehör). Die externe Spannungsversorgung
ist zu verwenden, wenn der Drucker mit
folgenden Geräten zusammengeschaltet
wird:
– Waage MP8-1/MP8-2 mit internem Data
Input
– Infrarot-Trockner 7393…/YDU01L
– externes Tastenfeld, z. B. 73392
Beim Reinigen dürfen keine Flüssig-
keiten in den Drucker gelangen: nur
leicht angefeuchtetes Reinigungstuch
verwenden.
§ ISO/GLP-Protokoll bei folgenden Geräten abschalten:
– Economy Serie, EA-/EB-Modelle
(bis Seriennummer: 912xxxxx, »Dezember 1999«)
– GT/PT/QS/QT/XQ-Waagen
(Prozessor MP 10)
– QS/TS-Waagen (Prozessor MP 12)
– MA…-Feuchtemessgeräte
$ Einstellungsänderung siehe Kapitel
Voreinstellungen »ISO/GLP-Protokoll
konfigurieren«

44
Installation
Lieferumfang
Folgende Einzelteile werden mitgeliefert:
– Datenleitung Drucker – Waage
– Schwarzes Farbband
– 4 Akkus
– Papierrolle
Akkus einlegen
§ 4 Akkus aus der Verpackung entnehmen
(Akkus sind entladen)
§ Papierfach öffnen: Papierfachabdeckung anheben
§ Akkufach öffnen: Akkufachabdeckung nach hinten
aufklappen
§ 4 Akkus in Akkufach einsetzen: Polarität beachten!
§ Akkufach schließen: Akkufachabdeckung nach vorne her-
unterklappen
§ Papierfach schließen: Papierfachabdeckung nach vorne her-
unterklappen
– Die Papierrolle kann erst eingefädelt werden,
wenn der Drucker eingeschaltet ist.

45
Drucker an Waage anschließen
§ Datenverbindungskabel am Drucker und an der Waage
anschließen und sichern
Waage und Drucker einschalten
§ Waage mit Netzspannung versorgen: Netzgerätstecker
einstecken
§ Waage einschalten
> Drucker schaltet automatisch ebenfalls ein
> Kontrolle: alle Elemente der Druckeranzeige leuchten auf
Akkus aufladen bei Erst-Inbetriebnahme
§ Akkus aufladen: Waage eingeschaltet lassen
> Akkus werden im Standby-Betrieb der Waage geladen
> nach 28 Stunden sind die Akkus im Drucker aufgeladen
$ Falls das Symbol nach spätestens 3 Stunden nicht erlischt:
Akkus wechseln, siehe Seite 73
Farbband einlegen
§ Farbband einlegen: siehe Kapitel
Instandhaltung, Seite 72

46
Papierrrolle einlegen
§ Papierrolle einlegen: siehe Kapitel Instandhaltung, Seite 71
Datum und Uhrzeit einstellen
§ Datum und Uhrzeit einstellen: siehe Kapitel Voreinstellungen, Seite 59
Ggf. Drucker mit externer Spannung versorgen
Beim Anschluss folgender Geräte muss der Drucker extern
mit Spannung versorgt werden (Netzgerät nur optional
erhältlich: siehe »Zubehör«):
– Waage MP8-1/MP8-2 mit internem Data Input
– Waage der Economy-Serie (Modell EA…, EB…)
– Infrarot-Trockner 7393…/YDU01L
– Externes Tastenfeld, z. B. 73392
§ Original Sartorius Netzgerät an Netzsteckdose anschließen
§ Winkelstecker des Netzgeräts an rechten Ausgang der
Druckerrückseite anschließen
$ Akkus einlegen: siehe Seite 44
$ Drucker und Waage anschließen und einschalten:
siehe vorherigen Abschnitt

47
Betrieb
Für den Betrieb des Druckers stehen 6 Tasten zur
Verfügung:
: Leerzeile drucken; Papiervorschub um 1 Zeile
: Numerator (Numerierung der ausgedruckten
Messwerte) ein-/ausschalten; dies ist nur möglich,
wenn der »Numerator« (-p4-) im Menü DruckerSchnittstelle (Seite 62) eingeschaltet wurde;
bei eingeschaltetem Numerator leuchtet die nebenstehende Anzeige auf
: Numerator zurücksetzen auf »001«
: Gesammelte Messwerte statistisch auswerten;
dies ist nur möglich, wenn das Statistikprogramm
(-a3-) im Menü Statistik-Anwendungen (Seite 66)
eingeschaltet
ist. Nebenstehende Anzeige (Beispiel für 12 Werte)
leuchtet auf für jeden übernommenen Messwert
: Datum und Uhrzeit ausdrucken
: Messwert ausdrucken oder in Statistik übernehmen:
Messwert der angeschlossenen Waage ohne Statistik
ausdrucken
Mit Statistikprogramm (-a3- Seite 67):
bei manueller Messwertübernahme: aktuellen Messwert der Waage für statistische Auswertung übernehmen (Ausdruck kann ein- oder ausgeschaltet sein)
bei automatischer Messwertübernahme:
automatische Messwertübernahme starten

48
Messwert der angeschlossenen Waage ausdrucken
$ Ggf. einige Leerzeilen drucken (Papiervorschub):
Taste (mehrfach) drücken oder gedrückt halten
$ Ggf. Datum und Uhrzeit drucken: Taste drücken
> Nebenstehender Ausdruck erscheint (Beispiel)
§ Messwert ausdrucken: Taste drücken
$ Ggf. Numerator zurücksetzen: Taste drücken
$ Ggf. Numerator ausschalten: Taste drücken
123456789012345678901234
12-DEC-95 10:25:38
123456789012345678901234
001: + 123.4 g

49
Messwerte statistisch auswerten
Mit dem Drucker können übernommene Messwerte statistisch ausgewertet werden. Im Menü Statistik-Anwendungen
(siehe Kapitel Voreinstellungen) muss dafür das Statistikprogramm (-a3-) eingeschaltet werden. Wenn es eingeschaltet ist, leuchtet das nebenstehende Zeichen in der
Anzeige für jeden übernommenen Messwert kurz (ca. 0,5 s)
auf. Die Anzahl der übernommenen Messwerte wird
angezeigt.
Für die statistische Auswertung werden die übernommenen
Messwerte gesammelt, nachdem die Taste gedrückt
wurde. Bei manueller Übernahme können ausgewählte
Messwerte durch Tastendruck selektiert werden.
Bei automatischer Übernahme werden alle Messwerte nach
einmaligem Tastendruck gesammelt.
Die Statistik wird ausgedruckt, wenn die Taste
gedrückt wird. Danach wird die Statistik gelöscht, in der
Anzeige erscheinen Uhrzeit oder Datum.
Druckerkonfigurationen für statistische Auswertungen
Jeder der folgenden Statistikwerte kann im Menü StatistikAnwendungen so konfiguriert werden, dass er ausgedruckt
oder nicht ausgedruckt wird:
– Anzahl Messungen n (-s3-)
– Arithmetischer Mittelwert x¯(-s4-)
– Standardabweichung s (-s5-)
– Variationskoeffizient s
rel
(-s6-)
– Summe der Messwerte Σx (-s7-)
– Kleinster Messwert min (-s8-)
– Größter Messwert max (-s9-)
– Differenz zwischen kleinstem
und größtem Messwert diff (-s10)
50
Einzelmesswerte ausdrucken
Alle Messwerte, über die die statistische Auswertung
gebildet werden soll, werden ausgedruckt,
wenn im Menü Statistik-Anwendungen:
– Messwertausdruck bei Statistikprogramm = 1 eingestellt ist
(-a4-)
(Werkseinstellung = 1: jeder Wert wird gedruckt)
Wird jetzt der Numerator mit der Taste ausgeschaltet, wird der Ausdruck unterdrückt.
Die Messwerte werden in die Statistik übernommen.
Der Postenzähler in der Anzeige wird für jeden Wert um
1 erhöht.
Jeden einzelnen Messwert numerieren
Alle ausgedruckten Einzelmesswerte werden numeriert,
wenn im Menü Drucker-Schnittstelle:
– Numerator = 1 eingestellt ist (-p4-)
(Werkseinstellung = 1)
In der Anzeige erscheint nebenstehendes Zeichen
Der Numerator kann im Betrieb nachträglich ausgeschaltet
werden: Taste drücken
Tarafunktion
Die Waage wird nach der Messwertübernahme automatisch
tariert, wenn im Menü Statistik-Anwendungen:
– Waage automatisch tarieren = 1
eingestellt ist (-a2-)
(Werkseinstellung = 0)

51
Messwerte manuell übernehmen
und statistisch auswerten
Notwendige Druckerkonfiguration
Der Drucker muss im Menü Statistik-Anwendungen
so konfiguriert sein, dass:
– Statistikprogramm = 1 eingestellt ist (-a3-)
(Werkseinstellung = 1)
In der Anzeige erscheint nebenstehendes Zeichen
– Messwertausdruck = 1eingestellt ist (-a4-)
– Messwertübernahme manuell = 0 eingestellt ist (-p6-).
Messwerte erfassen und auswerten
§ Vor der ersten Messwertübernahme Druckerspeicher leeren:
Taste drücken
> Eventuell vorhandene alte Messwerte werden ausgewertet
und es erscheint ein Statistikausdruck. Die Statistik wird
gelöscht.
§ Erstes Wägegut auf die Waage legen
§ Messwert übernehmen: Taste drücken
> Messwert wird ausgedruckt, wenn der Drucker entspre-
chend konfiguriert ist
> In der Anzeige werden die übernommenen Messwerte
gezählt

52
Wenn Automatisches Tarieren (-a2-) ausgeschaltet ist:
§ Wägegut von der Waage nehmen
§ Neues Wägegut auf die Waage legen
§ Messwert übernehmen: Taste drücken
> Messwert wird ausgedruckt (Beispiel)
Wenn Automatisches Tarieren (-a2-) eingeschaltet ist:
§ Wägegut auf der Waage liegen lassen
§ Neues Wägegut auf die Waage legen zum bereits
vorhandenen Wägegut
§ Höchstlast der Waage beachten (Anzeige »H«)
§ Messwert übernehmen: Taste drücken
> Messwert wird ausgedruckt
§ Nacheinander wie oben beschrieben alle Wägegüter
erfassen
§ Statistik erstellen: Taste drücken
> Nebenstehender Ausdruck erscheint (Beispiel)
> Alle gespeicherten Messwerte im Druckerspeicher werden
gelöscht
Vartext1, Vartext2
Vor jedem Ausdruck der Messwerte können maximal
2 Zeilen mit maximal je 24 Zeichen kunden-spezifischer
Text erscheinen. Diese Zeilen haben die Bezeichnung
Vartext1 und Vartext2. Sie werden netzausfallsicher
im Druckerspeicher gesichert. (Eingabe siehe Kapitel
Voreinstellungen, Seite 65).
123456789012345678901234
001: + 123.6 g
002: + 117.8 g
003: + 119.1 g
123456789012345678901234
n 12
x 99.8 g
s 3.55 g
srel 3.57 %
x 1203.4 g
min 96.0 g
max 103.2 g
Diff 7.2 g
12-DEC-95 16:02:11

53
Messwerte automatisch übernehmen
und statistisch auswerten
Übernahme der Messwerte
Der erste Messwert, der übernommen wird, muss größer
als 30 Teilschritte der Waagenanzeige sein (z. B. > 3,0 g,
wenn die Waage Zehntelgramm anzeigt). Die Waage muss
dabei Stillstand anzeigen (Schwankung ≤ 1 Teilschritt).
Der erste Messwert ist Referenzwert für die Statistik.
Nach der Übernahme des Messwertes ist die Messwertübernahme so lange gesperrt, bis die Waage unter 30 % des
Referenz-wertes entlastet wird. Der nächste Messwert wird
übernommen, wenn er > 70 % des Referenzwertes ist.
Notwendige Druckerkonfiguration
Der Drucker muss im Menü Statistik-Anwendungen
so konfiguriert sein, dass:
– Statistikprogramm = 1 eingestellt ist (-a3-)
– Messwertübernahme automatisch = 1 eingestellt ist (-P6-).
Notwendige Waagenkonfiguration
Die Waage muss folgendermaßen eingestellt sein
(siehe Anleitung der angeschlossenen Waage):
– Autoprint
– Datenausgabe ohne Stillstand

54
Messwerte erfassen und auswerten
§ Vor der ersten Messwertübernahme Statistikspeicher leeren:
Taste drücken
> Eventuell vorhandene alte Messwerte werden ausgewertet
und es erscheint ein Statistikausdruck
§ Erstes Wägegut auf die Waage legen
§ Messwertübernahme starten: Taste drücken
> In der Anzeige erscheint der Numerator (Beispiel)
> In der Anzeige erscheint für ca. 0,5 s »STAT.«
> Dieser Messwert wird als Referenzwert übernommen
Wenn Automatisches Tarieren ausgeschaltet ist:
§ Wägegut von der Waage nehmen
§ Neues Wägegut auf die Waage legen
> Messwert wird automatisch übernommen, wenn die Waage
Stillstand anzeigt
> Messwert wird ausgedruckt (Beispiel)
Wenn Automatisches Tarieren eingeschaltet ist:
> Nach der ersten Messwertübernahme wird die Waage auto-
matisch tariert
§ Wägegut auf der Waage liegen lassen
§ Neues Wägegut auf die Waage legen zum bereits vorhande-
nen Wägegut
§ Höchstlast der Waage beachten (Anzeige »H«)
> Messwert wird automatisch übernommen, wenn die Waage
Stillstand anzeigt
> Messwert wird ausgedruckt
123456789012345678901234
001: + 123.6 g
002: + 117.8 g
003: + 119.1 g

55
§ Nacheinander wie oben beschrieben alle Wägegüter
erfassen
§ Statistik erstellen: Taste drücken
> Nebenstehender Ausdruck erscheint (Beispiel)
> Alle gespeicherten Messwerte im Druckerspeicher werden
gelöscht
Beispiel
Es sollen Tabletten gewogen werden. Die Messwerte
sollen statistisch ausgewertet werden. Die Waage sei im
eichpflichtigen Einsatz. Folgende Voreinstellungen sollen
gelten:
– ISO/GLP-Protokoll drucken = 1 (-a1-)
– Automatisches Tarieren nach jeder
Messwertübernahme = 1 (-a2-)
– Statistikprogramm = 1 (-a3-)
– Ausdruck nach jeder Messwertübernahme = 1 (-a4-)
– Messwertausdruck numerieren (Numerator) = 1 (-p4-)
– Automatische Messwertübernahme = 1 (-p6-)
$ Zusätzlich entsprechende Menüeinstellung für das
ISO/GLP-Protokoll an der Waage vornehmen:
siehe Betriebsanleitung der Waage
§ Vor der ersten Messwertübernahme Druckerspeicher leeren:
Taste drücken
> Eventuell vorhandene alte Messwerte werden ausgewertet
und es erscheint ein Statistikausdruck.
§ Erste Tablette auf die Waage legen
§ Messwertübernahme starten: Taste drücken
> Bei Stillstand der Waage wird dieser Messwert als Referenz-
wert übernommen
123456789012345678901234
n 12
x 99.8 g
s 3.55 g
srel 3.57 %
x 1203.4 g
min 96.0 g
max 103.2 g
Diff 7.2 g
12-DEC-95 16:02:11

56
> Nebenstehender Ausdruck erscheint mit
ISO/GLP-Kopf (Beispiel); ISO/GLP-Kopf nur bei manueller
Messwertübernahme
Die letzte Ziffer des Messwertes muss invers gedruckt werden, da die im eichpflichtigen Verkehr befindliche Waage
einen Eichwert (e) ungleich dem Teilungswert (d) besitzt.
> Der Drucker sendet nach Messwertübernahme ein Signal
zur Waage, damit diese tariert wird.
§ Tablette auf der Waage liegen lassen
§ Neue Tablette auf die Waage legen zur bereits vorhandenen
Tablette
> Messwert wird automatisch übernommen, wenn die Waage
Stillstand anzeigt
> Nebenstehender Ausdruck erscheint (Beispiel)
> Waage wird tariert
Wenn die Waage »Null« anzeigt:
§ Nächste Tablette auflegen
§ Taste drücken
§ Wie oben beschrieben alle Tabletten nach und nach
auflegen, jeweils wenn die Waage tariert ist
Wenn die letzte Tablette aufgelegt ist und der Messwertausdruck erscheint:
§ Statistische Auswertung erstellen: Taste drücken
> Statistische Auswertung wird ausgedruckt
(hier nur die im Menü Statistik-Anwendungen voreingestellten Größen für Anzahl, Mittelwert, Summe, kleinster
und größter Messwert)
§ An der Waage: Taste c drücken
> ISO/GLP-Fuß wird ausgedruckt
123456789012345678901234
SARTORIUS
Model BP6100
S/N 040240772
Id
Date : 22-May-95
Start: 10:25:14
Ser. :
001: + 9.81 g
123456789012345678901234
002: + 10.13 g
123456789012345678901234
n 12
X 9.98 g
x 120.34 g
min 9.60 g
max 10.32 g
End : 10:31:56
Name :

57
Hinweise für eichpflichtigen Einsatz beachten
Der Drucker YDP03-0CE verfügt über einen eigenständigen
Prüfbericht der PTB Deutschland mit der Nummer D 09-
96.15. Hierdurch ist der Drucker qualifiziert zur Verwendung im gesetzlichen Messwesen der EU und des EWR in
Zusammenhang mit geeichten Waagen, die durch eine EGoder nationale Bauartzulassung zur Eichung bescheinigt
sind.
– Drucker in Sichtverbindung zur Gewichtsanzeige der ange-
schlossenen Waage aufstellen.
– Für geeichte Waagen mit e ungleich d:
Drucker so konfigurieren, dass die letzte Stelle des
Gewichtswertes invers gedruckt wird (siehe Kapitel »Voreinstellungen«, Abschnitt »Voreinstellungen im Menü DruckerSchnittstelle vornehmen«)
Hinweis:
Für eine Waage mit e = d und d < 0,1 mg darf die letzte
Stelle des Gewichtswertes nicht invers gedruckt werden.
– Trägt der Drucker das Zeichen „M“ auf grünem Grund,
so darf er in Verbindung mit einer geeichten Waage von
Sartorius sofort im gesetzlichen Messwesen eingesetzt
werden.
Wenn der Drucker nachträglich an eine geeichte und
bereits im eichpflichtigen Verkehr eingesetzte Waage angeschlossen wird, ist in Deutschland eine Information an das
zuständige Eichamt gefordert. Der sofortige Einsatz im
gesetzlichen Messwesen ist davon nicht betroffen.
N + 208.76 g
N + 218.88 g
N + 220.33 g
N + 222.65 g
N + 224.02 g

58
ISO/GLP-konform protokollieren
Um ISO/GLP*-konform zu protokollieren,
müssen für jede Messung folgende Angaben auf dem Ausdruck erscheinen:
– Hersteller der Waage
– Modell der Waage
– Seriennummer der Waage
– Datum und Uhrzeit für Start und Ende der Messungen
– Identifizierung des Bedieners/Arbeitsplatzes
– Unterschriftsfeld für den Bediener
§ Drucker für ISO/GLP-Ausdruck einstellen: siehe Kapitel
„Voreinstellungen“, Abschnitt „ISO/GLP-Protokoll konfigurieren“, Seite 61
§ Zusätzlich entsprechende Menüeinstellung an der Waage
vornehmen: siehe Betriebsanleitung der Waage, Abschnitt
»ISO/GLP-Protokoll«
* ISO: International Organization for Standardization
GLP: Good Laboratory Practice (Gute Laborpraxis)
123456789012345678901234
Sartorius
Model BP210D
S/N 040500046
Id
-------------------Date : 30-May-95
Start: 10:05:30
Cal. : Extern
Set. : 200.00000 g
End : 10:05:45
Name :
--------------------

59
Voreinstellungen
59
Uhrzeit und Datum einstellen
Einstellmodus für Uhrzeit und Datum wählen: entweder
beim Starten des Druckers (resp. der Waage), d.h. wenn alle
Elemente der Druckeranzeige aufleuchten:
§ Taste drücken
oder während des Betriebs:
§ Taste mindestens 5 Sekunden drücken
> Nebenstehende Anzeige erscheint für die Eingabe
der Stundenzahl (HH)
Der Einstellmodus für Uhrzeit und Datum kann, auch bei
allen folgenden Schritten, verlassen werden:
$ Einstellmodus verlassen: je nach Menüebene Taste
mehrfach drücken
Es kann jeweils, auch bei allen folgenden Schritten,
ein Schritt zurückgesprungen werden:
$ Einen Schritt zurückspringen: Taste drücken
§ Einstellung der Stundenzahl auswählen:
Taste drücken
> Nebenstehende Anzeige erscheint, die beiden linken Ziffern
blinken (Beispiel)
§ Stundenzahl einstellen: Taste oder ggf.
mehrfach drücken
> Nebenstehende Anzeige erscheint (Beispiel)

60
§ Einstellung speichern: Taste drücken
> Nebenstehende Anzeige erscheint, die beiden rechten Zif-
fern blinken (Beispiel)
§ Minutenzahl einstellen: Taste oder ggf.
mehrfach drücken
> Nebenstehende Anzeige erscheint (Beispiel)
§ Einstellung speichern: Taste drücken
> Nebenstehende Anzeige erscheint
§ Einstellung Tag, Monat wählen: Taste drücken
> Nebenstehene Anzeige erscheint für die Eingabe
des Tages (dd)
§ Einstellung für Tag auswählen: Taste drücken
§ Tag und Monat eingeben ähnlich wie Stundenzahl und
Minutenzahl
§ Einstellung Jahr wählen: Taste drücken
> Nebenstehene Anzeige erscheint für die Eingabe
des Jahres (YY)
§ Jahreszahl (die letzten beiden Ziffern) eingeben ähnlich
wie Minutenzahl:
80 bis 99 für Jahr 1980 bis 1999,
00 bis 79 für Jahr 2000 bis 2079
§ Einstellmodus Uhrzeit und Datum verlassen:
Taste drücken

61
ISO/GLP-Protokoll konfigurieren
Menü Statistik-Anwendungen wählen:
entweder beim Starten des Druckers (resp. der Waage),
d.h. wenn alle Elemente der Druckeranzeige aufleuchten:
§ Taste drücken
oder während des Betriebs:
§ Taste mindestens 5 Sekunden drücken
> Nebenstehende Anzeige erscheint
Einstellung des ISO/GLP-Protokolls auswählen:
Taste drücken
> Nebenstehende Anzeige erscheint (Beispiel)
Der Punkt zeigt die bisher gewählte Einstellung
§ ISO/GLP-Protokoll einstellen: Taste oder
drücken bis „1“ erscheint
> Nebenstehende Anzeige erscheint
§ Einstellung speichern: Taste drücken
§ Menü Statistik-Anwendungen verlassen: Taste
drücken
§ Zusätzlich entsprechende Menüeinstellung an der Waage
vornehmen: siehe Betriebsanleitung der Waage, Abschnitt
»ISO/GLP-Protokoll«
> Bei nachfolgenden Ausdrucken erscheint
der ISO/GLP-Kopf und -Fuß bei jedem Ausdruck ähnlich
nebenstehendem Ausdruck (Beispiel)
$ Einstellungen ausdrucken: Taste drücken
123456789012345678901234
SARTORIUS
Model BP6100
S/N 040240772
Id 564
Date : 22-May-95
Start: 10:25:14
Ser. :
End : 10:25:32
Name :

62
Voreinstellungen im Menü
»Drucker-Schnittstelle« vornehmen
Das Verändern von Einstellungen in diesem Menü kann
verhindert werden. Dazu muss der Benutzer eine nur
ihm bekannte vierstellige Zahl (PIN Nummer) eingeben.
Falls diese Zahl verloren geht, hilft der Sartorius Service
weiter.
Alle Voreinstellungen werden beim Start des Druckers
aus dem Druckerspeicher (EEPROM) gelesen und anschließend vom Drucker für den Betrieb übernommen.
Das Menü Drucker-Schnittstelle wird erreicht, wenn
– während des Druckerstarts die Taste
gedrückt wird oder wenn
– im Betrieb die Taste länger als 5 Sekunden
gedrückt wird
Die Tasten , , und haben
dann die Funktion der entsprechenden Pfeile.
Der Zugang für die beiden Voreinstellungen code und
baud ist beispielhaft im nachfolgenden Bild dargestellt.
Alle möglichen Voreinstellungen im Menü DruckerSchnittstelle sind aufgelistet auf der übernächsten Seite.
Im Setup Menü kann die Menüeinstellung ausgedruckt
werden: Taste drücken
Der Buchstabe am Ende der zweiten Druckzeile gibt an,
ob die Menüeinstellungen geändert werden können:
C: Change Einstellungen können geändert werden
L: Locked Einstellungen können nicht geändert werden
123456789012345678901234
Interface Settings
Program Vers. 1.xx C
-----------------------Baud rate 1200 bd
Parity odd
Handshake DTR/CTS
.
.
.

63
cO de -- --
01 --
99 --
21 --
21 01
21 99
B
B
B
ba ud
pa ry
24 00
48 00
96 00
19 20
bei Druckerstart
oder > 5 Sek.
…
…
B
= Beispiel
= Neuer Wert wird gespeichert
= Punkt zeigt bisher eingestellten Wert an
1. Ebene 2. Ebene 3. Ebene
12:00

64
Einstellmöglichkeiten im Menü Drucker-Schnittstelle
Bezeichnung Anzeige Werks- Einstellmöglichkeit
einstellung
Passwort code 100 … 9999
Übertragungsgeschwindigkeit baud 1200 1200, 2400, 4800, 9600, 19200
(Baudrate)
Parität pary odd even (gerade),
odd (ungerade), 0, 1
RS232C Handshake hand 0 0 = Hardware, 1 = Software
Druck mit <CR, LF> -p1- 1 0 = nein, 1 = ja
Druck rechts/linksbündig -p2- 0 0 = rechts, 1 = links
Druck Dezimalpunkt/Komma -p3- 0 0 = Dezimalpunkt, 1 = Komma
Numerator ein/aus -p4- 1 0 = aus, 1 = ein
Inversdruck -p5- 0 0 = kein Inversdruck,
1 = letzte Stelle invers,
2 = 2 letzte Stellen invers,
3 = 3 letzte Stellen invers
Einzelne/Automatische -p6- 0 0 = einzelne Übernahme
Messwertübernahme 1 = automatische Übernahme
Datum/Uhrzeit bei Start -p7- 1 0 = nein, 1 = ja
Druck VARTEXT1 bei Start -p8- 0 0 = nein, 1 = ja
Druck VARTEXT2 bei Start -p9- 0 0 = nein, 1 = ja
Zeitdarstellung -c1- 24 12, 24 Stunden
Anzeige Datum/Uhrzeit -c2- 1 0 = Datum, 1 = Uhrzeit

65
Eingabe des kundenspezifischen Textes für die 1. und 2. Druckzeile
(Vartext1, Vartext2)
§ benötigt wird hierzu ein Rechner (PC) mit einem BASIC-Interpreter
Das folgende BASIC-Programm dient dem Texttransfer über die Schnittstelle
von einem angeschlossenen Rechner (PC). Der beim Kauf des Rechners miterworbene
BASIC-Interpreter führt dieses Programm aus.
CLS
PRINT " 123456789012345678901234"
LINE INPUT "VARTEXT1 ? ", VarText1$
LINE INPUT "VARTEXT2 ? ", Vartext2$
OPEN "com1: 1200,0,7,1,CD0,DS0" FOR RANDOM AS #1
PRINT #1,CHR$(27)+"j"+VarText1$+"_"+CHR$(13)+CHR$(10)
PRINT #1,CHR$(27)+"k"+Vartext2$+"_"+CHR$(13)+CHR$(10)
CLOSE #1

66
Voreinstellungen im Menü
»Statistik-Anwendungen« vornehmen
Alle Voreinstellungen werden beim Start des Druckers aus
dem Druckerspeicher (EEPROM) gelesen und anschließend
vom Drucker für den Betrieb übernommen.
Das Menü Statistik-Anwendungen wird erreicht, wenn
– während des Druckerstarts die Taste gedrückt wird
oder wenn
– im Betrieb die Taste länger als 5 Sekunden gedrückt
wird
Die Tasten , , und haben
dann die Funktion der entsprechenden Pfeile.
Der Zugang zu den einzelnen Voreinstellungen geschieht
ähnlich dem Zugang zum Menü Drucker-Schnittstelle. Alle
möglichen Voreinstellungen im Menü Statistik-Anwendungen sind aufgelistet auf der nachfolgenden Seite.
Die Menüeinstellung kann ausgedruckt werden:
Taste drücken
Der Buchstabe am Ende der zweiten Druckzeile gibt an,
ob die Menüeinstellungen geändert werden können:
C: Change Einstellungen können geändert werden
L: Locked Einstellungen können nicht geändert werden
123456789012345678901234
Application Settings
Program Vers. 1.xx C
-----------------------A1:Mode ISO/GLP ON
A2:Tare func. OFF
A3:Statistics ON

67
Einstellmöglichkeiten im Menü Statistik-Anwendungen
Bezeichnung Anzeige Werks- Einstellmöglichkeit
einstellung
GLP/GMP Ausdruck -a1- 1 0 = nein, 1 = ja
Waage automatisch tarieren -a2- 0 0 = nein, 1 = ja
Statistikprogramm -a3- 1 0 = nein, 1 = ja
Messwertausdruck -a4- 1 0 = nein, 1 = ja
Index-Übernahme-Header -a5- 0 0 … 50 (Details auf Anfrage)
für Werte in die Statistik
Ausdruck VARTEXT1 -s1- 0 0 = nein, 1 = ja
beim Statistikausdruck
Ausdruck VARTEXT2 -s2- 0 0 = nein, 1 = ja
beim Statistikausdruck
Druck Anzahl Messungen -s3- 1 0 = nein, 1 = ja
Druck Mittelwert -s4- 1 0 = nein, 1 = ja
Druck Standardabweich. -s5- 1 0 = nein, 1 = ja
Druck Variationskoeffizient -s6- 1 0 = nein, 1 = ja
Druck Summe Einzelwerte -s7- 1 0 = nein, 1 = ja
Druck Kleinster Messwert -s8- 1 0 = nein, 1 = ja
Druck Größter Messwert -s9- 1 0 = nein, 1 = ja
Druck Differenz zwischen -s10 1 0 = nein, 1 = ja
größtem und kleinstem Messwert
Druck Datum/Uhrzeit -s11 0 0 = nein, 1 = ja

68
Protokoll der Voreinstellungen ausdrucken
Protokoll der Voreinstellungen Drucker-Schnittstelle
ausdrucken
§ Menü Drucker-Schnittstelle wählen:
– während des Druckerstarts Taste gedrückt halten
oder
– im Betrieb Taste länger als 5 Sekunden drücken
> Nebenstehende Anzeige erscheint
§ Voreinstellungen ausdrucken: Taste drücken
> Nebenstehender Ausdruck erscheint (Beispiel:
dies sind die Werksvoreinstellungen)
§ Menü Drucker-Schnittstelle verlassen:
Taste drücken
123456789012345678901234
Interface Settings
Program Vers. 1.xx C
-----------------------Baud rate 1200 bd
Parity odd
Handshake DTR/CTS
P1:Send CR/LF ON
P2:Print format right
P3:Decimal-Char point
P4:Num.function ON
P5:Inverse from 0FF
P6:Print mode Standard
P7:Date/Time ON
P8:Print TEXT1 OFF
P9:Print TEXT2 OFF
C1:Time format 24h
C2:Display Time

69
Protokoll der Voreinstellungen
Statistik-Anwendungen ausdrucken
§ Menü Statistik-Anwendungen wählen:
– während des Druckerstarts Taste gedrückt halten
oder
– im Betrieb Taste länger als 5 Sekunden drücken
> Nebenstehende Anzeige erscheint
§ Voreinstellungen ausdrucken: Taste drücken
> Nebenstehender Ausdruck erscheint
(Beispiel: dies sind die Werksvoreinstellungen)
§ Menü Statistik-Anwendungen verlassen:
Taste drücken
123456789012345678901234
Application Settings
Program Vers. 1.xx C
-----------------------A1:Mode ISO/GLP ON
A2:Tare func. OFF
A3:Statistics ON
A4:Print value ON
A6:Header 0
S1:Print TEXT1 OFF
S2:Print TEXT2 OFF
S3:Print n ON
S4:Print x ON
S5:Print s ON
S6:Print srel ON
S7:Print x ON
S8:Print min ON
S9:Print max ON
S10:Print diff ON
S11:Print date OFF
5

70
Fehlermeldungen
Meldung Ursache Abhilfe
err1 blinkt Daten im Druckerspeicher § Beliebige Taste drücken
(EEPROM) sind fehlerhaft
(Prüfsumme stimmt nicht) > Werksvoreinstellungen
werden geladen
$ Ggf. Menü Drucker-
Schnittstelle und Menü
Statistik-Anwendungen
neu konfigurieren
err2 blinkt Überschreitung § Waage ausschalten
der Eingangskapazität und neu einschalten
des Eingangspuffers
err3 blinkt Steuersignale des Druckers § Beliebige Taste drücken
fehlen § Akkus überprüfen
$ Akkus ggf. aufladen
$ Akkus ggf. wechseln
blinkt Akkuladung zu gering § Akku aufladen (siehe
Kapitel Instandhaltung)
_ Unterstreichungszeichen Übertragungsfehler § Einstellungen der
im Ausdruck in einer Datenkette Schnittstellenparameter
Waage/Drucker auf
Gleichheit prüfen

71
Instandhaltung
Papierrolle wechseln
Für den Betrieb wird eine Papierrolle mit folgenden
Eigenschaften benötigt (siehe auch Kapitel Zubehör):
– Standard-Papierrolle
– Holzfreies 60 g Papier
– Breite: 57,5 ± 0,5 mm
– Durchmesser: max. 65 mm
– Offener Kerndurchmesser: min. 8 mm
§ Papierfach öffnen: Papierfachabdeckung anheben
§ Rollenhalterungen an beiden Seiten des Rollenkerns nach
außen ziehen
§ Alten Rollenkern entnehmen
$ Neue Papierrolle flach auf eine Fläche legen
$ Papieranfang der Rolle muss sich unten befinden und auf
Ihren Körper zeigen
§ Papierrolle mit einer Hand zwischen Daumen und Zeigefinger senkrecht über dem Rollenfach halten
§ Papieranfang mit der anderen Hand in den Einführschlitz
unter dem Farbband einführen
§ Papier durch die Farbbandkassette transportieren:
Bei eingeschaltetem Drucker Taste mehrfach
drücken oder gedrückt halten
> Papier wird in die Farbbandkassette eingezogen und nach
oben ausgeführt

72
§ Papierrolle einrichten: Papierrolle so halten, dass die Rollenhalterungen in die Kernöffnung der Papierrolle zusammengeschoben werden können
§ Rollenhalterungen an beiden Seiten loslassen
§ Papierfach schließen: Papierfachabdeckung nach vorne her-
unterklappen
Farbband wechseln
Für den Betrieb wird ein schwarzes Farbband vom Typ
ERC-22 benötigt (siehe auch Kapitel Zubehör).
§ Papierfach öffnen: Papierfachabdeckung anheben
§ Papier aus Farbbandkassette entfernen:
Papierrolle zurückdrehen
§ Von oben auf die rechte Seite des Farbbandes drücken
> Linke Seite des Farbbandes hebt sich
§ Farbband entnehmen
§ Neues Farbband von oben einsetzen
> Farbband rastet ein
$ Ggf. Farbband straff ziehen: Aufwickelkern
auf der linken Seite des Farbbandes in Pfeilrichtung drehen
§ Papier einfädeln: siehe Papierrrolle wechseln
§ Papierfach schließen: Papierfachabdeckung nach vorne her-
unterklappen

73
Akkus laden
Falls das nebenstehende Symbol aufleuchtet:
$ Akkus aufladen: Waage eingeschaltet lassen
> Akkus werden im Standby-Betrieb der Waage geladen
> nach 28 Stunden sind die Akkus im Drucker aufgeladen
$ Falls das Symbol nach spätestens 3 Stunden nicht erlischt:
Akkus wechseln
Akkus wechseln
! Tiefentladung der Akkus vermeiden, da sonst die maximale
Ladekapazität sinkt.
! Nur Standard Mignon Akkus vom Typ Nickel-Cadmium
UM-3 Typ AA verwenden (siehe auch »Zubehör«) Sartorius
Best.-Nr. 69Y03136
§ Papierfach öffnen: Papierfachabdeckung anheben
§ Akkufach öffnen: Akkufachabdeckung nach hinten
aufklappen
! 4 Akkus entnehmen
Verbrauchte Akkus sind Sondermüll (kein Hausmüll):
Akkus gemäß Abfallwirtschaftsgesetz als Sondermüll
speziell entsorgen
$ Ggf. Sartorius Kundendienstleitstelle befragen
§ 4 neue Akkus in Akkufach einsetzen: Polarität beachten
§ Akkufach schließen: Akkufachabdeckung nach vorne her-
unterklappen
§ Papierfach schließen: Papierfachabdeckung nach vorne herunterklappen

74
Drucker reinigen
! Es darf keine Flüssigkeit in den Drucker gelangen
! Keine aggressiven Reinigungsmittel (Lösungsmittel o. ä.)
verwenden
§ Spannungsversorgung trennen: Datenkabel (zur Waage) an
der Rückseite des Druckers lösen
$ Bei externer Spannungsversorgung ggf. Netzgerät aus der
Steckdose ziehen
§ Drucker mit in Seifenlauge leicht angefeuchtetem Tuch
reinigen
§ Drucker mit weichem Tuch abtrocknen

75
Zubehör
Bezeichnung Best.-Nr.
Papierrolle (5er Pack) 6906937
Farbband 6906918
Steckernetzgerät für Norm Europa 6971412
Großbritannien 6971414
USA 6971413
Australien 6971411
Südafrika 6971410
Akkusatz
(4 Nickel Cadmium UM-3 Typ AA) 69Y03136
Datenleitung Drucker <–> Gerät älterer
Bauart (MP…-Technologie) zum Einsatz
im Wohnbereich (EN55022, Klasse B) VF1503
(Fast Factory)
Technische Daten
Bezeichnung Größe
Länge 230 mm
Breite 158 mm
Höhe 80 mm
Gewicht (ohne Akkus, Papierrolle) ca. 800 g
Betriebstemperatur 0 bis +40°C
Lagertemperatur –40 bis +70°C

76
Elektromagnetische
Verträglichkeit
C-Kennzeichnung
Das Gerät erfüllt die Anforderungen der Richtlinie:
89/336/EWG »Elektromagnetische Verträglichkeit (EMV)«.
Zugehörige Europäische Normen:
Störaussendung:
EN 50081-1 Wohnbereich, Geschäfts- und
Gewerbebereich sowie Kleinbetriebe
EN 50081-2 Industriebereich
Störfestigkeit:
EN 50082-1 Wohnbereich, Geschäfts- und
Gewerbebereich sowie Kleinbetriebe
EN 50082-2 Industriebereich
Hinweis!
Modifikationen der Geräte sowie der Anschluss von nicht von
Sartorius gelieferten Kabeln oder Geräten unterliegen der Verantwortung des Betreibers und sind von diesem entsprechend
zu prüfen und falls erforderlich zu korrigieren. Sartorius stellt
auf Anfrage Angaben zur Betriebsqualität zur Verfügung
(gemäß den o. g. Normen zur Störfestigkeit).

77
Hinweis bei Anschluss von Geräten älterer Bauart:
Ist der Drucker mit Waagen oder Geräten älterer Bauart
(MP...-Technologie) verbunden, können die zulässigen Werte
für die Störaussendung im Wohnbereich (EN55022, Klasse B)
überschritten werden.
Hierzu den nachstehenden Warnhinweis beachten:
Warnung!
Dies ist eine Einrichtung der Klasse A. Diese Einrichtung kann
im Wohnbereich Funkstörungen verursachen. In diesem Fall
kann vom Betreiber verlangt werden, angemessene Maßnahmen durchzuführen und dafür aufzukommen.
Auf Anfrage ist eine Datenleitung als Sonderzubehör zu
erhalten, bei deren Verwendung die Anforderungen für den
Wohnbereich eingehalten werden.
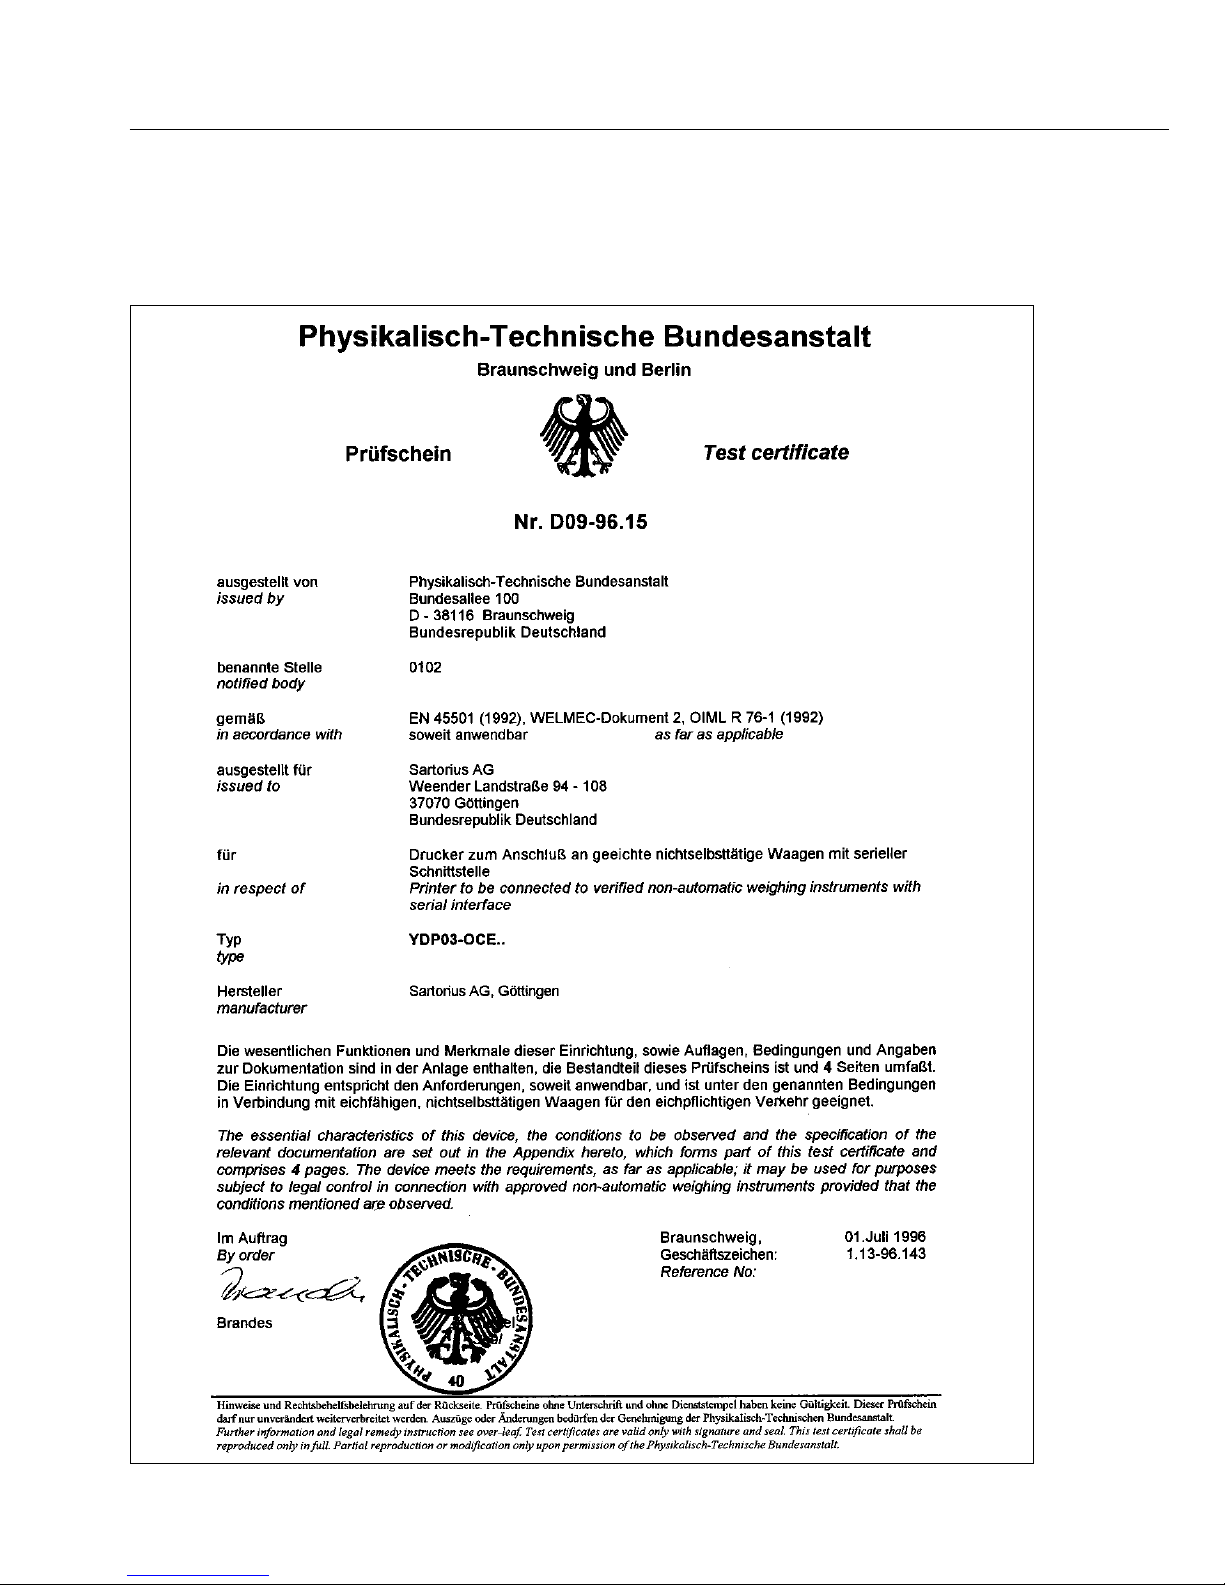
78
Z.14-75532034-10.93

79
Sommaire
80 Domaines d’utilisation
81 Conseils de sécurité
82 Installation
85 Fonctionnement
86 Impression de la valeur de mesure
de la balance connectée
87 Evaluation statistique des valeurs
de mesure
95 Remarques concernant l’utilisation
en usage réglementé
96 Edition de procès-verbaux conforme
à ISO/BPL
97 Réglages
97 Réglage de l’heure et de la date
99 Configuration d’un procès-verbal
ISO/BPL
100 Menu de l’interface de l’imprimante
104 Menu des applications statistiques
106 Impression du procès-verbal des
réglages
108 Messages d’erreur
109 Entretien
113 Accessoires
113 Caractéristiques techniques
114 Compatibilité électromagnétique
116 Certificat d’approbation

80
Domaines d’utilisation
80
Le type YDP 03-0CE est une imprimante des valeurs
de mesure qui reçoit les données de pesée d’une balance
connectée et imprime sur papier normalisé (largeur du
rouleau : 57,5 mm). Le texte est édité avec au maximum
24 caractères par ligne.
L’imprimante est équipée d’une horloge à temps réel.
Une fois la configuration nécessaire effectuée, l’imprimante des valeurs de mesure peut être utilisée pour des
mesures en usage réglementé.
L’imprimante répond aux standards de qualité exigés dans
les domaines de la chimie et de la pharmacie et qui ont été
introduits dans la recherche sous le nom de BPL (Bonnes
Pratiques de Laboratoire) et dans la production sous le
nom de BPF (Bonnes Pratiques de Fabrication).
A l’aide de l’imprimante, il est également possible d’effectuer des évaluations statistiques de données de pesée en
plus des données de pesée individuelles. A cet effet toutes
les valeurs de poids reçues par la balance sont mémorisées.
Il est possible d’éditer :
– le nombre de mesures
– la valeur moyenne arithmétique
– l’écart-type
– le coefficient de variation
– la valeur de mesure minimale
– la valeur de mesure maximale
– la différence entre la valeur minimale et la valeur maximale
La transmission des données peut se faire automatiquement ou manuellement en appuyant sur une touche.

81
Conseils de sécurité
81
L’imprimante répond aux directives et
aux normes concernant les moyens
d’exploitation électriques et la compatibilité électromagnétique.
Seuls les types d’accus suivants (pas de
batteries) doivent être utilisés : nickelcadmium UM-3, type AA référence
69Y03136.
Eviter une décharge profonde des accus
sinon la capacité de charge maximale
diminue.
Les accus usagés doivent être recyclés
en tant qu’ordures spéciales.
En cas d’une alimentation en courant
externe, n’utilisez pour cette imprimante que des blocs d’alimentation d’origine Sartorius (voir le chapitre «Accessoires»). L’alimentation en courant par
l’intermédiaire d’un bloc externe est
nécessaire si vous connectez l’imprimante aux appareils suivants :
– balance MP8-1/MP8-2 ayant un Data
Input interne
– dessiccateur à infrarouge
7393.../YDU01L
– clavier externe, par exemple 73392
Lors du nettoyage, veillez à ce qu’aucun
liquide ne pénètre dans votre imprimante : utilisez uniquement un chiffon de
nettoyage légèrement mouillé.
§ Désactiver le protocole ISO/BPL avec les
appareils suivants :
– série Economy, modèles EA/EB (jus-
qu’au numéro de série : 912xxxxx,
«décembre 1999»)
– balances GT/PT/QS/QT/XQ (processeur
MP 10)
– balances QS/TS (processeur MP 12)
– analyseurs d’humidité MA…
$ Modification de réglage :
voir le chapitre «Réglages» dans la partie
«Configuration d’un procès-verbal
ISO/BPL»

82
Installation
Contenu de la livraison
La livraison comprend les éléments suivants :
– câble de transmission des données imprimante-balance
– ruban encreur noir
– 4 accus
– rouleau de papier
Mise en place des accus
§ Retirer les 4 accus de l’emballage (les accus sont déchar-
gés).
§ Ouvrir le compartiment du rouleau de papier : soulever le
cache du compartiment du rouleau de papier.
§ Ouvrir le compartiment à accus : relever le cache du com-
partiment à accus vers l’arrière.
§ Insérer les 4 accus dans le compartiment à accus :
respecter la polarité !
§ Fermer le compartiment à accus :
rabattre le cache du compartiment à accus vers l’avant.
§ Fermer le compartiment du rouleau de papier : rabattre le
cache du compartiment du rouleau de papier vers l’avant.
– Le rouleau de papier ne peut être inséré que si l’impriman-
te est sous tension.

8383
Raccordement de l’imprimante à la balance
§ Raccorder le câble de transmission des données
à l’imprimante et à la balance et assurer la connexion.
Mise sous tension de la balance et de l’imprimante
§ Alimenter la balance avec la tension du secteur :
brancher le raccord du bloc d’alimentation.
§ Mettre la balance sous tension.
> L’imprimante est également mise automatiquement sous
tension.
> Contrôle : tous les éléments sur l’afficheur de l’imprimante
s’allument.
Chargement des accus lors de la première mise
en service
§ Charger les accus : laisser la balance sous tension.
> Les accus doivent être chargés lorsque la balance se trouve
en mode de veille.
> Les accus de l’imprimante sont chargés au bout
de 28 heures.
$ Au cas où le symbole ne s’est toujours pas éteint au bout
de 3 heures : changer les accus, voir page 111.

84
Insertion du ruban encreur
§ Insérer le ruban encreur : voir le chapitre «Entretien»,
page 110.
Insertion du rouleau de papier
§ Insérer le rouleau de papier : voir le chapitre «Entretien»,
page 109.
Réglage de la date et de l’heure
§ Régler la date et l’heure : voir le chapitre «Réglages»,
page 97.
Le cas échéant alimenter l’imprimante en courant
externe.
Si l’imprimante est connectée aux appareils suivants,
il faut l’alimenter par l’intermédiaire d’un bloc d’alimentation externe (bloc d’alimentation disponible uniquement
en option : voir «Accessoires») :
– balance MP8-1/MP8-2 ayant un Data Input interne
– balance de la série Economy (modèle EA…, EB…)
– dessiccateur à infrarouge 7393.../YDU01L
– clavier externe, par exemple 73392
§ Raccorder le bloc d’alimentation d’origine Sartorius à une
prise du secteur.
§ Raccorder la fiche coudée du bloc d’alimentation
à la sortie droite sur la face arrière de l’imprimante.
$ Mise en place des accus : voir page 82.
$ Raccorder l’imprimante et la balance et les mettre sous
tension : voir la partie précédente.

85
Fonctionnement
Pour faire fonctionner l’imprimante, vous disposez
de 6 touches :
: Impression d’un interligne ; fait avancer le papier
d’une ligne.
: Marche/Arrêt du compteur (numérotation des
valeurs de mesure imprimées) ; ceci n’est possible
que si le «compteur» (-p4-) a été réglé sur «en
service» dans le menu de l’interface de l’imprimante
(page 100) ; l’affichage ci-contre est allumé lorsque
le compteur est en service.
: Remise à «001» du compteur.
: Evaluation statistique des valeurs de mesure
recueillies ; ceci n’est possible que si le programme
de statistiques (-a3-) est réglé sur «en service» dans
le menu des applications statistiques (page 104).
L’affichage ci-contre (exemple pour 12 valeurs)
s’allume pour chaque valeur de mesure transmise.
: Impression de la date et de l’heure.
: Impression ou transfert en statistiques de la valeur
de mesure :
Impression sans statistiques de la valeur de mesure
provenant de la balance connectée.
Avec programme de statistiques (-a3- page 105) :
transfert manuel des valeurs de mesure :
transmettre la valeur de mesure actuelle de la
balance en vue d’une évaluation statistique
(l’impression peut être en service ou hors service).
transfert automatique des valeurs de mesure :
déclencher un transfert manuel des valeurs de
mesure.

86
Impression de la valeur de mesure de la balance
connectée
$ Le cas échéant, imprimer quelques interlignes
(faire avancer le papier) : appuyer sur la touche
(plusieurs fois) ou la maintenir enfoncée.
$ Le cas échéant, imprimer la date et l’heure :
appuyer sur la touche
> L’impression ci-contre apparaît (exemple).
§ Imprimer la valeur de mesure :
appuyer sur la touche .
$ Le cas échéant, remettre le compteur à zéro :
appuyer sur la touche .
$ Le cas échéant, mettre le compteur hors service :
appuyer sur la touche .
123456789012345678901234
12-DEC-95 10:25:38
123456789012345678901234
001: + 123.4 g

87
Evaluation statistique des valeurs de mesure
A l’aide de l’imprimante, il est possible d’évaluer de manière statistique des valeurs de mesure transmises. Pour cela,
il faut avoir mis le programme de statistiques (-a3-) en
service dans le menu des applications statistiques (voir le
chapitre «Réglages»). Lorsqu’il est en service, l’abréviation
ci-contre s’allume brièvement (env. 0,5 sec.) à l’affichage
pour chaque valeur de mesure transmise. Le nombre de
valeurs de mesure transmises apparaît à l’affichage.
Pour l’évaluation statistique, les valeurs de mesure transmises sont regroupées après que la touche a été
activée. Avec un transfert manuel, les valeurs de mesure
choisies peuvent être sélectionnées par une pression de la
touche . Avec un transfert automatique, toutes les
valeurs de mesure sont regroupées après une seule pression de la touche .
Les statistiques sont imprimées lorsque l’on appuie sur
la touche . Ensuite les statistiques sont effacées,
l’heure ou la date apparaissent à l’affichage.
Configurations de l’imprimante en vue d’évaluations
statistiques
Chacune des valeurs statistiques suivantes peut être configurée dans le menu des applications statistiques de telle
sorte à être imprimée ou pas :
– Nombre de mesures n (-s3-)
– Valeur moyenne arithmétique x¯(-s4-)
– Ecart-type s (-s5-)
– Coefficient de variation s
rel
(-s6-)
– Total des valeurs de mesure Σx (-s7-)
– Valeur de mesure minimale min (-s8-)
– Valeur de mesure maximale max (-s9-)
– Différence entre la valeur
minimale et la valeur maximale diff (-s 10)

88
Impression de valeurs de mesure individuelles
Toutes les valeurs de mesure dont l’évaluation statistique
doit être calculée sont imprimées si dans le menu des
applications statistiques :
– l’impression des valeurs de mesure avec programme de
statistiques = 1 est réglée (-a4-) (réglage d’usine = 0 :
chaque valeur est imprimée).
Si en revanche le compteur est mis hors service à l’aide de
la touche , l’impression n’a pas lieu. Les valeurs de
mesure sont transmises dans les statistiques. Le compteur
d’items sur l’afficheur augmente d’1 pour chaque valeur.
Numérotage de chaque valeur de mesure individuelle
Toutes les valeurs de mesure individuelles imprimées sont
numérotées si dans le menu de l’interface de l’imprimante :
– le compteur = 1 est réglé (-p4-) (réglage d’usine = 1).
L’abréviation ci-contre apparaît à l’affichage.
Le compteur peut être mis hors service ultérieurement
pendant le fonctionnement : appuyer sur la touche .
Fonction de tare
La balance est automatiquement tarée après le transfert
des valeurs de mesure si dans le menu des applications
statistiques :
– tarage automatique de la balance = 1
est réglé (-a2-)
(réglage d’usine = 0).

89
Transmettre manuellement et évaluer de manière
statistique des valeurs de mesure
Configuration nécessaire de l’imprimante
L’imprimante doit être configurée dans le menu des
applications statistiques de telle manière que :
– le programme de statistiques = 1 soit réglé (-a3-)
(réglage d’usine = 1).
L’abréviation ci-contre apparaît à l’affichage.
– l’impression de la valeur de mesure = 1 soit réglée (-a4-).
– le transfert des valeurs de mesure manuel =
0 soit réglé (-p6-).
Enregistrer et évaluer des valeurs de mesure
§ Avant le premier transfert de valeurs de mesure, vider la
mémoire de l’imprimante : appuyer sur la touche .
> D’anciennes valeurs de mesure éventuellement présentes
sont évaluées et une impression de statistiques apparaît.
Les statistiques sont effacées.
§ Déposer le premier échantillon à peser sur la balance.
§ Transmettre la valeur de mesure :
appuyer sur la touche .
> La valeur de mesure est imprimée si l’imprimante est
configurée en conséquence.
> Les valeurs de mesure transmises sont comptées
à l’affichage.

90
Si «Tarage automatique» (-a2-) est hors service :
§ Retirer l’échantillon de la balance.
§ Déposer un nouvel échantillon sur la balance.
§ Transmettre la valeur de mesure : appuyer sur
la touche .
> La valeur de mesure est imprimée (exemple).
Si «Tarage automatique» (-a2-) est en service :
§ Laisser l’échantillon posé sur la balance.
§ Déposer un nouvel échantillon sur la balance en plus de
l’échantillon déjà présent.
§ Veiller à ne pas dépasser la charge maximale de votre
balance (sinon «H» apparaît à l’affichage).
§ Transmettre la valeur de mesure : appuyer sur
la touche .
> La valeur de mesure est imprimée.
§ Enregistrer tous les échantillons les uns après les autres
comme décrit ci-dessus.
§ Editer des statistiques : appuyer sur la touche .
> L’impression ci-contre apparaît (exemple).
> Toutes les valeurs de mesure mémorisées dans la mémoire
de l’imprimante sont effacées.
Vartext1, Vartext2
Au maximum 2 lignes comprenant chacune 24 caractères
au maximum avec un texte spécifique au client peuvent
apparaître avant chaque impression des valeurs de mesure.
Ces lignes sont désignées sous les noms de Vartext1 et de
Vartext2. Elles sont assurées contre les coupures de
courant dans la mémoire de l’imprimante. (Entrée, voir
le chapitre «Réglages», page 103).
123456789012345678901234
001: + 123.6 g
002: + 117.8 g
003: + 119.1 g
123456789012345678901234
n 12
x 99.8 g
s 3.55 g
srel 3.57 %
x 1203.4 g
min 96.0 g
max 103.2 g
Diff 7.2 g
12-DEC-95 16:02:11

91
Transfert automatique et évaluation statistique
des valeurs de mesure
Transfert des valeurs de mesure
La première valeur de mesure qui est transmise doit être
supérieure à 30 digits de l’affichage de la balance (par
exemple > 3,0 g si la balance affiche des décigrammes).
La balance doit alors afficher l’état de stabilité (fluctuation
>1 digit). La première valeur de mesure est la valeur de
référence pour les statistiques. Après ce transfert de la
valeur de mesure, le transfert de valeurs est bloqué jusqu’à
ce que la balance soit déchargée. Cela signifie que la
charge sur le plateau de la balance est inférieure à 30 %
de la valeur de référence. La valeur de mesure suivante est
transmise si elle est supérieure à 70 % de la valeur
de référence.
Configuration nécessaire de l’imprimante
L’imprimante doit être configurée dans le menu des applications statistiques de telle sorte que :
– le programme de statistiques = 1 soit réglé (-a3-).
– le transfert de valeurs de mesure automatique = 1 soit
réglé (-p6-).
Configuration nécessaire de la balance
La balance doit être réglée de la manière suivante
(voir le mode d’emploi de la balance connectée) :
– Autoprint (impression automatique)
– Edition des données sans stabilité
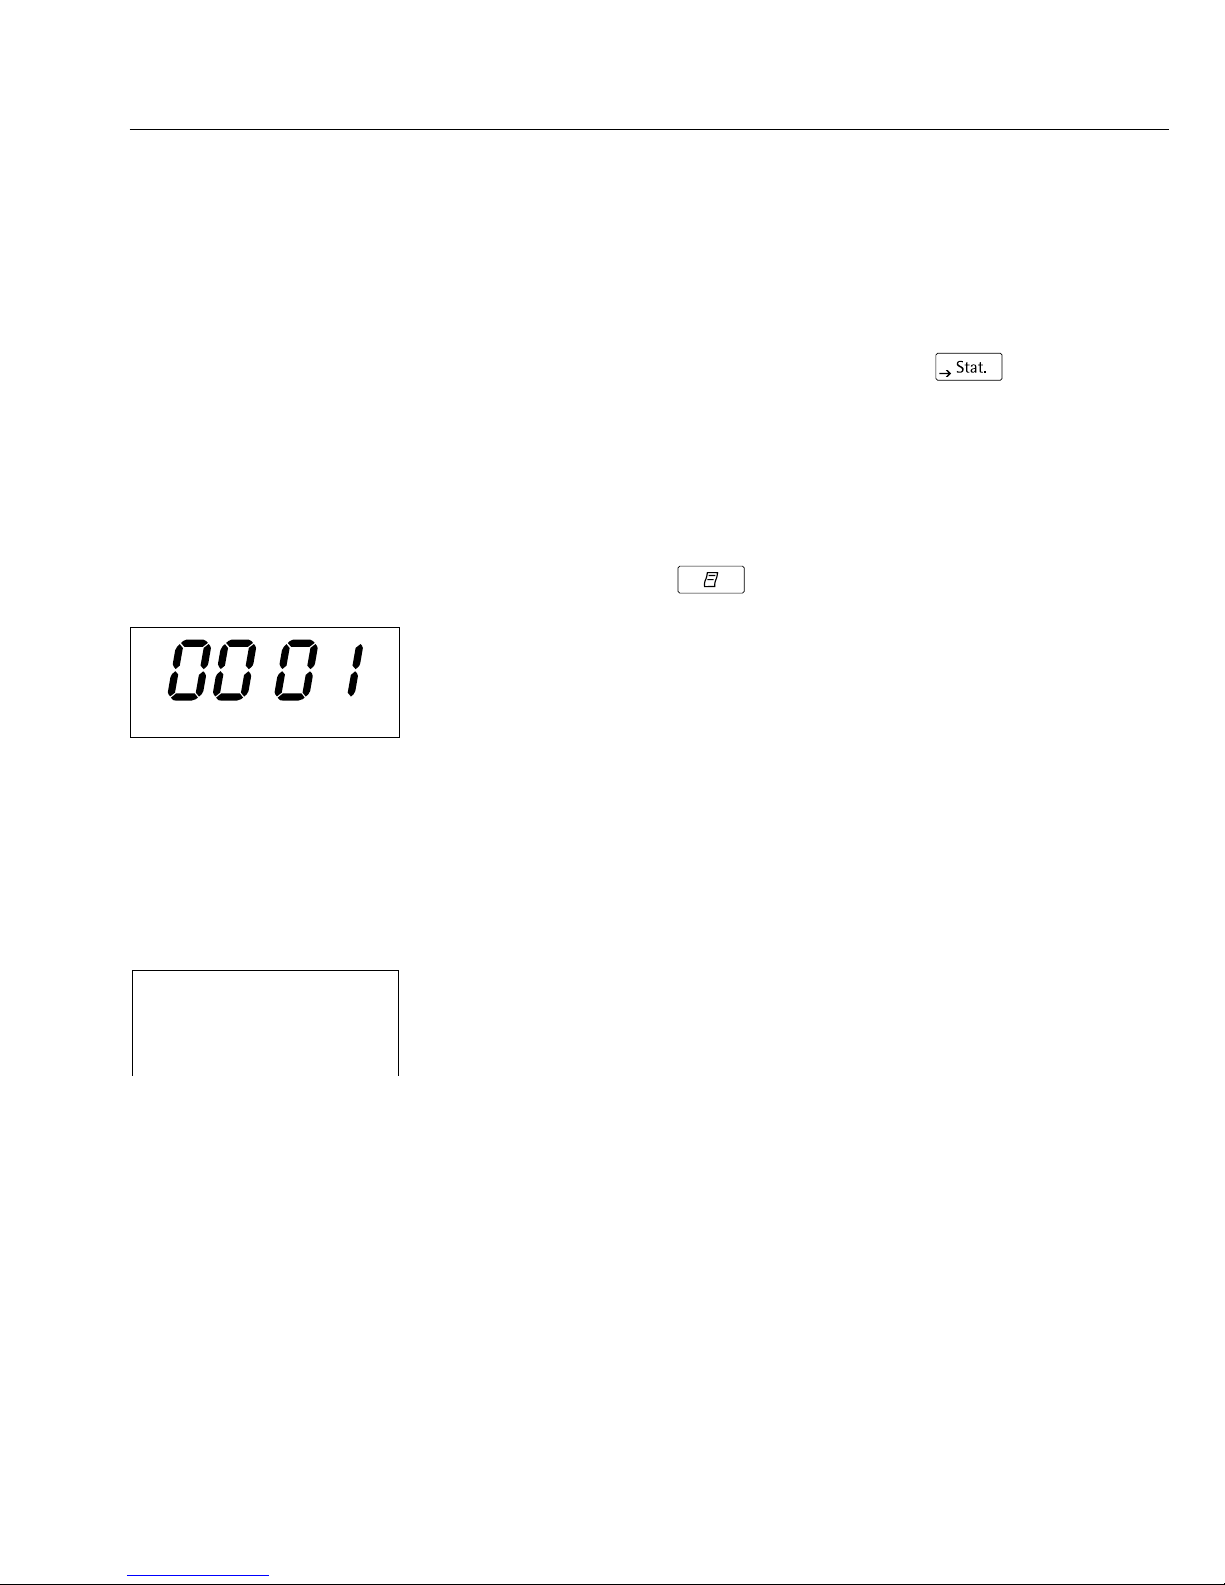
92
Enregistrer et évaluer des valeurs de mesure
§ Avant le premier transfert de valeurs de mesure, vider la
mémoire des statistiques : appuyer sur la touche .
> D’anciennes valeurs de mesure éventuellement présentes
sont évaluées et une impression de statistiques apparaît.
§ Déposer le premier échantillon à peser sur la balance.
§ Déclencher le transfert des valeurs de mesure :
appuyer sur la touche .
> Le compteur apparaît à l’affichage (exemple).
> «STAT.» apparaît à l’affichage pendant env. 0,5 sec.
> Cette valeur de mesure est transmise comme valeur de
référence.
Si «Tarage automatique» est hors service :
§ Retirer l’échantillon de la balance.
§ Déposer un nouvel échantillon sur la balance.
> La valeur de mesure est automatiquement transmise
lorsque la balance affiche l’état de stabilité.
> La valeur de mesure est imprimée (exemple).
Si «Tarage automatique» est en service :
> La balance est automatiquement tarée après le premier
transfert de valeurs de mesure.
§ Laisser l’échantillon posé sur la balance.
§ Déposer un nouvel échantillon sur la balance en plus de
l’échantillon déjà présent.
§ Respecter la charge maximale de la balance (affichage «H»).
> La valeur de mesure est automatiquement transmise
lorsque la balance affiche l’état de stabilité.
> La valeur de mesure est imprimée.
123456789012345678901234
001: + 123.6 g
002: + 117.8 g
003: + 119.1 g

93
§ Enregistrer tous les échantillons les uns après les autres
comme décrit ci-dessus.
§ Editer des statistiques : appuyer sur la touche .
> L’impression ci-contre apparaît (exemple).
> Toutes les valeurs de mesure mémorisées dans la mémoire
de l’imprimante sont effacées.
Exemple
Des comprimés doivent être pesés. Les valeurs de mesure
doivent être évaluées de manière statistique.
La balance est utilisée en usage réglementé.
Les réglages suivants ont été effectués :
– Impression d’un procès-verbal ISO/BPL = 1 (-a1-)
– Tarage automatique après chaque
transfert d’une valeur de mesure = 1 (-a2-)
– Programme de statistiques = 1 (-a3-)
– Impression après chaque transfert
de valeurs de mesure = 1 (-a4-)
– Numérotation de l’impression des valeurs
de mesure (compteur) = 1 (-p4-)
– Transfert automatique des valeurs de mesure = 1 (-p6-)
$ De plus, effectuer les réglages du menu correspondants
pour le procès-verbal ISO/BPL :
voir le mode d’emploi de la balance.
§ Vider la mémoire de l’imprimante avant le premier transfert de valeurs de mesure : appuyer sur la touche .
> D’anciennes valeurs de mesure éventuellement présentes
sont évaluées et une impression de statistiques apparaît.
§ Déposer le premier comprimé sur la balance.
§ Déclencher le transfert des valeurs de mesure :
appuyer sur la touche .
> Lorsque la balance est stable, cette valeur de mesure est
transmise comme valeur de référence.
123456789012345678901234
n 12
x 99.8 g
s 3.55 g
srel 3.57 %
x 1203.4 g
min 96.0 g
max 103.2 g
Diff 7.2 g
12-DEC-95 16:02:11

94
> L’impression ci-contre apparaît avec un en-tête ISO/BPL
(exemple) ; en-tête ISO/BPL uniquement avec un transfert
manuel des valeurs de mesure.
Le dernier chiffre de la valeur de mesure doit être imprimé
en surimpression étant donné que la balance utilisée en
usage réglementé a un échelon de vérification (e) différent
de l’échelon partiel (d).
> Une fois le transfert de la valeur de mesure effectué,
l’imprimante envoie un signal à la balance afin que celle-ci
soit tarée.
§ Laisser le comprimé posé sur la balance.
§ Déposer un autre comprimé sur la balance en plus de celui
déjà présent.
> La valeur de mesure est automatiquement transmise
lorsque la balance affiche l’état de stabilité.
> L’impression ci-contre apparaît (exemple).
> La balance est tarée.
Lorsque la balance affiche «Zéro» :
§ Déposer le comprimé suivant.
§ Appuyer sur la touche .
§ Déposer tous les comprimés les uns après les autres comme
décrit ci-dessus à chaque fois que la balance est tarée.
Une fois que le dernier comprimé est déposé et que
l’impression des valeurs de mesure apparaît :
§ Editer une évaluation statistique :
appuyer sur la touche .
> l’évaluation statistique est imprimée (ici uniquement les
résultats réglés dans le menu des applications statistiques
pour le nombre, la valeur moyenne, le total, la valeur de
mesure minimale et la valeur de mesure maximale).
§ Sur la balance : appuyer sur la touche c.
> Un bas de page ISO/BPL est imprimé.
123456789012345678901234
SARTORIUS
Model BP6100
S/N 040240772
Id
Date : 22-May-95
Start: 10:25:14
Ser. :
001: + 9.81 g
123456789012345678901234
002: + 10.13 g
123456789012345678901234
n 12
X 9.98 g
x 120.34 g
min 9.60 g
max 10.32 g
End : 10:31:56
Name :

95
Remarques concernant l’utilisation en usage réglementé
L’imprimante YDP 03-0CE possède un certificat de contrôle
original du PTB d’Allemagne portant le numéro D 09-96.15.
L’imprimante est ainsi habilitée en vue d’une utilisation
en métrologie légale dans l’Union Européenne et dans
l’Espace Economique Européen en connexion avec des
balances approuvées pour l’utilisation en usage réglementé
et qui possèdent une approbation de type CE ou nationale
en vue de la vérification.
– Installer l’imprimante de manière à ce que l’utilisateur
puisse lire l’imprimante et l’afficheur pondéral de la balance connectée.
– Pour les balances approuvées pour l’utilisation en usage
réglementé avec e différent de d :
Configurer l’imprimante de telle sorte que le dernier digit
de la valeur pondérale soit imprimé en surimpression (voir
le chapitre «Réglages», paragraphe «Effectuer des réglages
dans le menu de l’interface de l’imprimante»).
Remarque :
pour une balance ayant e = d et d < 0,1 mg, le dernier
digit de la valeur pondérale ne doit pas être imprimé en
surimpression.
– Si l’imprimante porte la marque «M» sur fond vert, elle
peut être immédiatement utilisée en métrologie légale en
connexion avec une balance Sartorius approuvée pour
l’utilisation en usage réglementé.
Si l’imprimante est connectée ultérieurement à une
balance approuvée pour l’utilisation en usage réglementé
et qui est déjà utilisée en usage réglementé :
– en informer le bureau de vérification des poids et mesures
compétent ou
– faire effectuer une configuration et un marquage par le
service après-vente Sartorius.
L’utilisation immédiate en usage réglementé n’est pas
concernée par cette mesure.
N + 208.76 g
N + 218.88 g
N + 220.33 g
N + 222.65 g
N + 224.02 g

96
Edition de procès-verbaux conforme à ISO/BPL
Afin d’éditer des procès-verbaux conformément à
ISO/BPL*, les données suivantes doivent, pour chaque
mesure, apparaître sur l’impression :
– Fabricant de la balance
– Modèle de la balance
– Numéro de série de la balance
– Date et heure du démarrage et de la fin des mesures
– Identification de l’opérateur/du poste de travail
– Zone pour la signature de l’opérateur
§ Régler l’imprimante en vue d’une impression ISO/BPL :
voir le chapitre «Réglages», paragraphe «Configuration
d’un procès-verbal ISO/BPL» page 99.
§ De plus, effectuer les réglages du menu correspondants
sur la balance : voir le mode d’emploi de la balance,
paragraphe «Procès-verbal ISO/BPL».
* ISO : Organisation internationale de normalisation
BPL : Bonnes Pratiques de Laboratoire
123456789012345678901234
Sartorius
Model BP210D
S/N 040500046
Id
-------------------Date : 30-May-95
Start: 10:05:30
Cal. : Extern
Set. : 200.00000 g
End : 10:05:45
Name :
--------------------

97
Réglages
Réglage de l’heure et de la date
Sélectionner le mode de réglage pour l’heure et la date :
soit lors du démarrage de l’imprimante (resp. de la balance),
c’est-à-dire lorsque tous les éléments de l’affichage de
l’imprimante s’allument :
§ appuyer sur la touche .
ou bien pendant le fonctionnement :
§ maintenir la touche enfoncée pendant au moins
5 secondes.
> L’affichage ci-contre apparaît pour l’entrée du nombre des
heures (HH).
Il est possible de quitter le mode de réglage pour l’heure et
la date même au cours de chacune des étapes suivantes :
$ Quitter le mode de réglage : selon le niveau du menu,
appuyer plusieurs fois sur la touche .
Il est possible, même au cours de chacune des étapes suivantes, de revenir à l’étape précédente :
$ Revenir à l’étape précédente : appuyer sur la touche
.
§ Sélectionner le réglage du nombre des heures : appuyer sur
la touche .
> L’affichage ci-contre apparaît, les deux chiffres de gauche
clignotent (exemple).
§ Régler le nombre des heures : appuyer, le cas échéant plusieurs fois, sur la touche ou sur la touche .
> L’affichage ci-contre apparaît (exemple).

98
§ Mémoriser le réglage : appuyer sur la touche .
> L’affichage ci-contre apparaît, les deux chiffres de droite
clignotent (exemple).
§ Régler le nombre des minutes : appuyer, le cas échéant
plusieurs fois, sur la touche ou sur la touche
.
> L’affichage ci-contre apparaît (exemple).
§ Mémoriser le réglage : appuyer sur la touche .
> L’affichage ci-contre apparaît.
§ Sélectionner le réglage Jour, Mois :
appuyer sur la touche .
> L’affichage ci-contre apparaît pour l’entrée du jour (dd).
§ Sélectionner le réglage pour le jour :
appuyer sur la touche .
§ Entrer le jour et le mois comme pour le nombre des heures
et le nombre des minutes.
§ Sélectionner le réglage de l’année : appuyer sur la touche
.
> L’affichage ci-contre apparaît pour l’entrée de l’année (YY).
§ Entrer l’année (les deux derniers chiffres) ; procéder
comme pour le nombre des minutes :
80 à 99 pour les années 1980 à 1999,
00 à 79 pour les années 2000 à 2079.
§ Quitter le mode de réglage de l'heure et de la date:
appuyer sur la touche .

99
Configuration d’un procès-verbal ISO/BPL
Sélectionner le menu des applications statistiques :
soit lors du démarrage de l’imprimante (ou de la balance),
c’est-à-dire lorsque tous les éléments de l’affichage de
l’imprimante s’allument :
§ Appuyer sur la touche .
ou pendant le fonctionnement :
§ Appuyer sur la touche pendant au moins
5 secondes.
> L’affichage ci-contre apparaît.
§ Sélectionner le réglage du procès-verbal ISO/BPL :
appuyer sur la touche .
> L’affichage ci-contre apparaît (exemple).
Le point indique le réglage sélectionné jusqu’à présent.
§ Régler le procès-verbal ISO/BPL : appuyer sur la touche
ou sur la touche jusqu’à ce que «1»
apparaisse.
> L’affichage ci-contre apparaît.
§ Mémoriser le réglage : appuyer sur la touche .
§ Quitter le menu des applications statistiques :
appuyer sur la touche .
§ Effectuer de plus les réglages du menu correspondants
sur votre balance : voir pour cela le mode d’emploi de la
balance au chapitre «Configuration ou impression de
procès-verbaux ISO/BPL».
> Pour les impressions suivantes, l’en-tête et le bas de page
ISO/BPL apparaissent lors de chaque impression comme
sur l’impression ci-contre (exemple).
$ Imprimer les réglages : appuyer sur la touche .
123456789012345678901234
SARTORIUS
Model BP6100
S/N 040240772
Id 564
Date : 22-May-95
Start: 10:25:14
Ser. :
End : 10:25:32
Name :

100
Effectuer des réglages dans le menu de «l’interface de
l’imprimante»
Il est possible d’empêcher la modification de réglages dans
ce menu. L’opérateur doit à cet effet entrer un nombre de
quatre chiffres connu de lui seul (numéro PIN). Si ce
nombre venait à se perdre, le service après-vente Sartorius
peut vous aider.
Tous les réglages sont lus dans la mémoire de l’imprimante
(EEPROM) lors du démarrage de cette dernière et ensuite
utilisés par l’imprimante pour le fonctionnement.
Le menu de l’interface de l’imprimante est atteint lorsque
– pendant le démarrage de l’imprimante, la touche
est activée ou lorsque
– pendant le fonctionnement, vous appuyez sur la touche
pendant plus de 5 secondes.
Les touches , , et ont alors
la fonction des flèches correspondantes.
L’accès aux deux réglages code et baud est représenté en
exemple sur le schéma suivant. Tous les réglages possibles
dans le menu de l’interface de l’imprimante sont énumérés
deux pages plus loin.
Dans le setup du menu, le réglage du menu peut être
imprimé : appuyer sur la touche .
La lettre se trouvant à la fin de la deuxième ligne
d’impression indique si les réglages du menu peuvent être
modifiés :
C: Change Les réglages peuvent être modifiés.
L : Locked Les réglages ne peuvent pas être modifiés.
123456789012345678901234
Interface Settings
Program Vers. 1.xx C
-----------------------Baud rate 1200 bd
Parity odd
Handshake DTR/CTS
.
.
.
 Loading...