

Page 1
User’s Manual | Betriebsanleitung | Mode d’emploi |
Instrucciones de funcionamiento | 操作指南
Sartorius YDK04
Density Determination Kit | Dichtebestimmungsset
Dispositif de détermination de masses volumiques |
Kit para la determinación de la densidad | 密度测定套件
98648-019-55
Page 2

English – page 3
Deutsch – Seite 17
Français – page 31
Español – página 45
中文 – 第 59 页
2
Page 3

Contents
Kit Components � � � � � � � � � � � � � � � � � � � � � � � � � � � 5
Getting Started � � � � � � � � � � � � � � � � � � � � � � � � � � � 6
Method Used to Determine Density � � � � � � � � � � � � 8
Sources of Error and Options for Correction � � � � � 9
Density Determination � � � � � � � � � � � � � � � � � � � � � � 12
– of Solid Objects � � � � � � � � � � � � � � � � � � � � � � � � � � 12
Tables � � � � � � � � � � � � � � � � � � � � � � � � � � � � � � � � � � � 13
Density Values of H
Density Values of Ethanol � � � � � � � � � � � � � � � � � � � � 14
Appendix � � � � � � � � � � � � � � � � � � � � � � � � � � � � � � � � 15
O � � � � � � � � � � � � � � � � � � � � � � � 13
2
3
Page 4

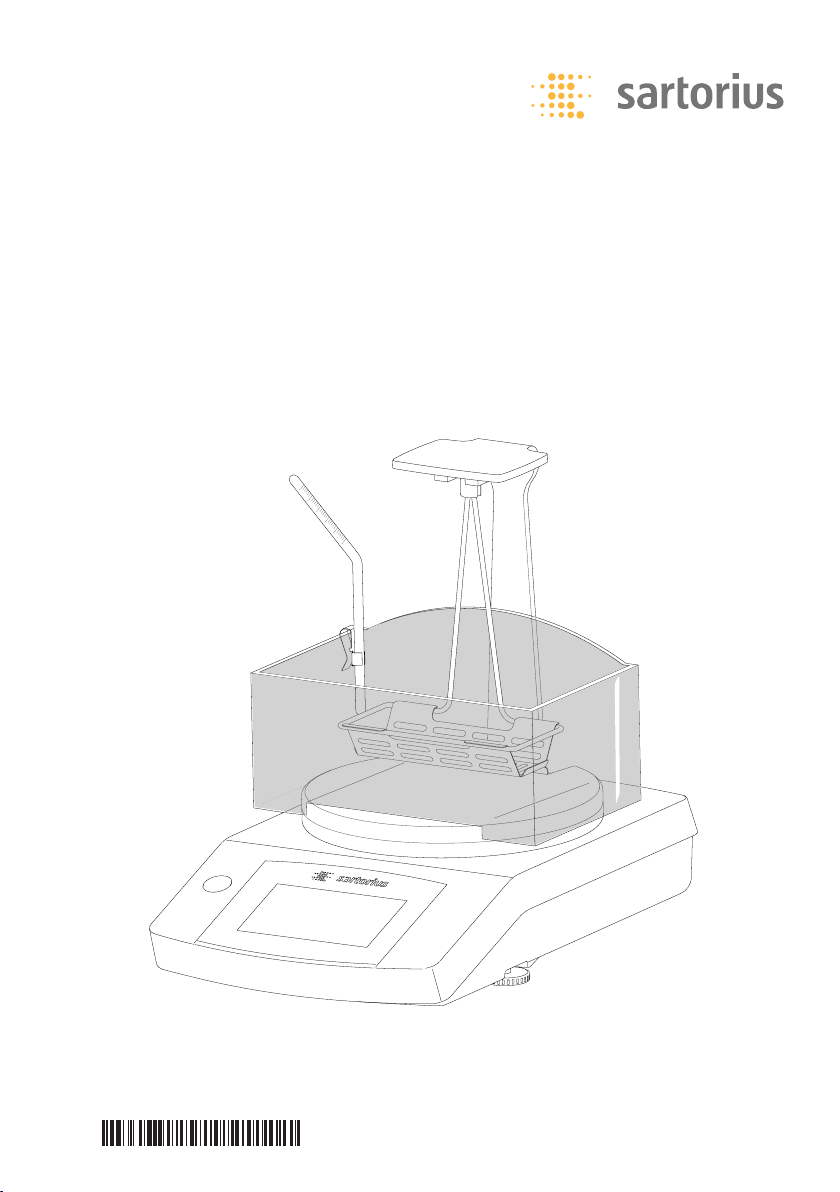
The new Sartorius Density Determination Kit is a highquality accessory to your electronic balance�
With this accessory, Sartorius is making your daily work
easier�
Please read through the set-up and user’s manual
carefully before setting up the balance and starting
your work with the density determination kit�
If you equip your balance with a density
determination program, the program will then
determine the density for you.
In this particular case, please refer exclusively to the
set-up guide and work instructions.
The density determination should then be carried out as
described in the instructions for the density
determination program�
4
Page 5

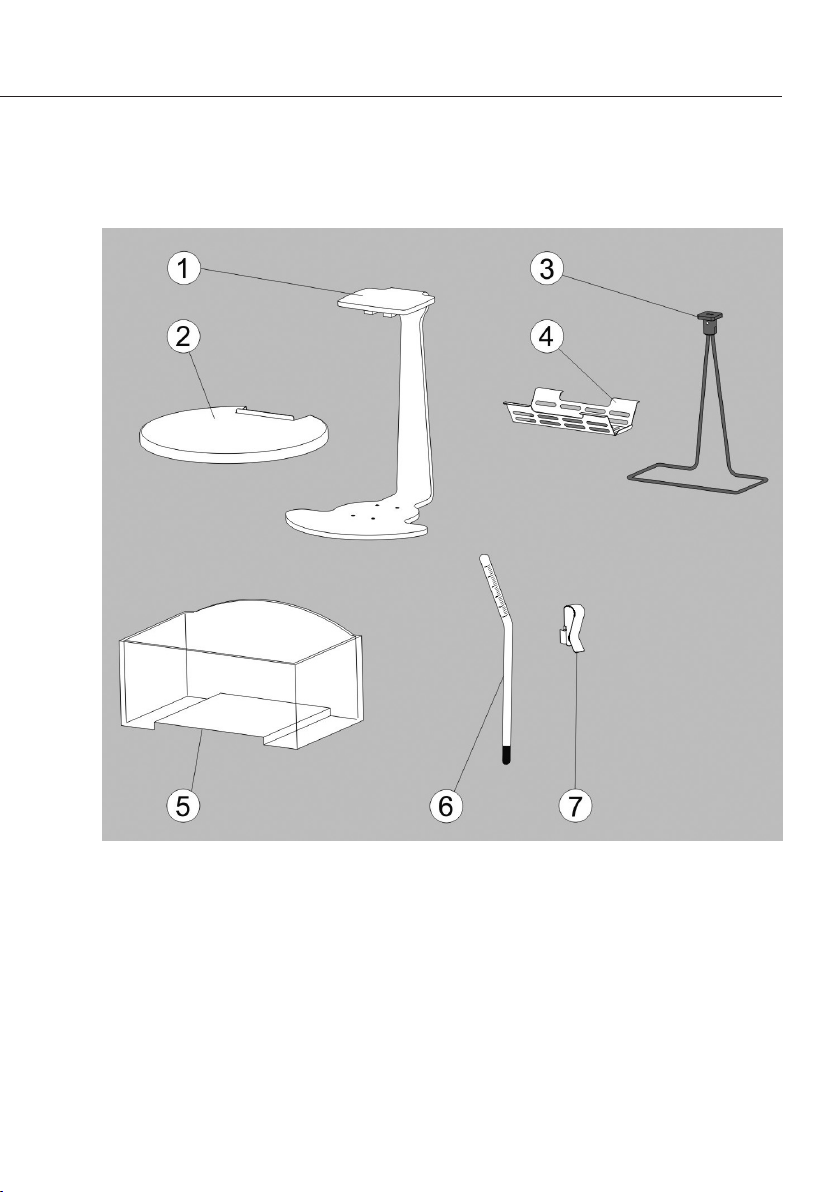
Kit Components
1 Beam
2 Cover plate
3 Immersion frame
4 Sample holder (pan hanger assembly)
5 Container
6 Thermometer
7
Fastening clamp
5
Page 6

Getting Started
The YDK04 density determination kit can be used with
the following balances:
– Secura
– Quintix
– Practum
Preparing the Balance
Before placing the beam on the balance, the balance
will need to be modified�
®
Type 1102, 2102, 3102, 5102
®
Type 612, 1102, 2102, 3102, 5102
®
Type 612, 1102, 2102
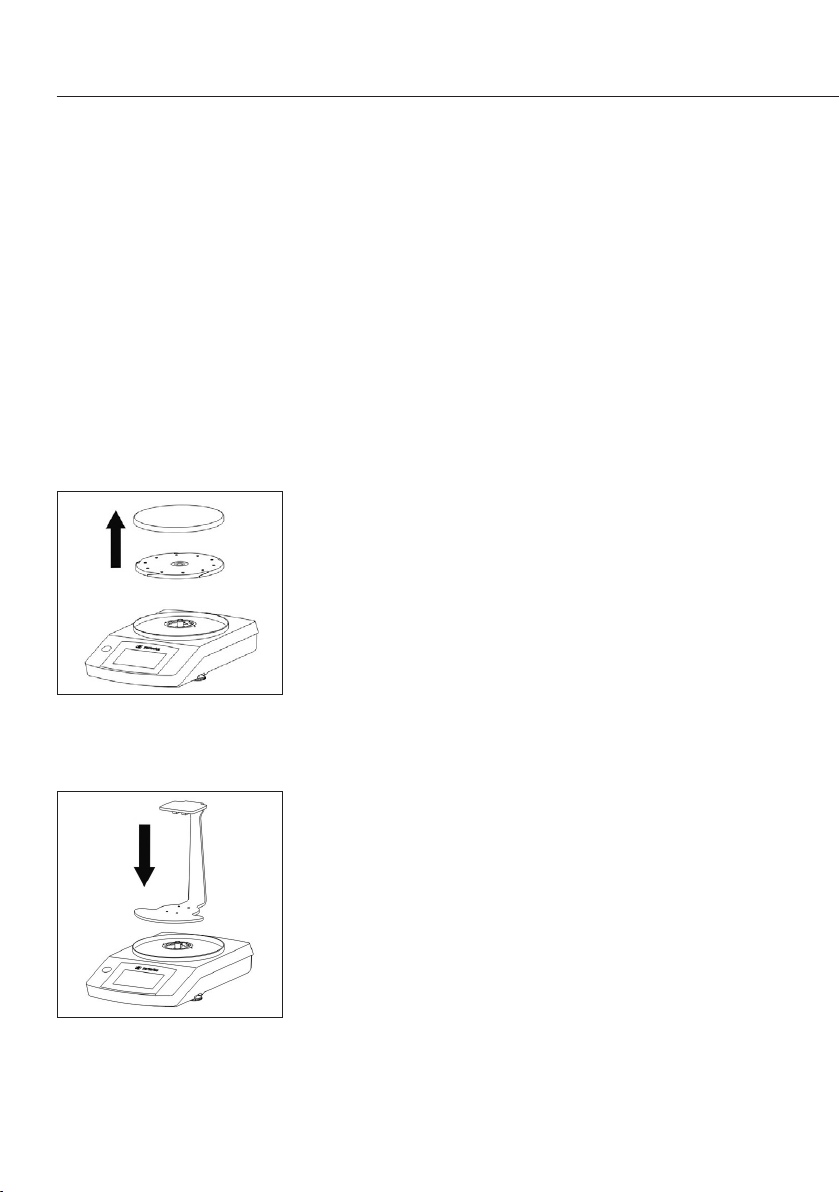
t Remove the weighing pan and pan support for the
balance�
Installing the Density Determination Kit
To install the density determination kit on the balance,
proceed as follows:
t Mount the beam on the stud of the balance�
6
Page 7

t Mount the cover plate on the beam you have just
attached�
When doing this, ensure the cover plate is exactly
positioned and centered�
t Fill the container with liquid (e�g� water or ethanol)
and place the container on the mounted cover plate�
t Insert the sample holder (pan hanger assembly) into
the immersion frame�
t Attach the immersion frame, with the sample holder
mounted on it, to the beam�
Make sure that the sample holder is fully immersed
in the liquid� Add more liquid if necessary�
When immersing the sample holder, make sure that
there are no air bubbles in the sample holder�
t Use the fastening clamp to fasten the thermometer
to the container (where this is required)�
7
Page 8

Method Used to Determine Density
To determine the density of a solid object,
the measurement system employed here
uses the “Archimedes’ principle”:
An object immersed in liquid will be subject
to an upward buoyant force� This force is
equal to the weight of the liquid displaced
by the object�
Using a hydrostatic balance, which enables
you to weigh the solid object in air and
in water, it is possible to determine the
density of a solid object, if the density of
the buoyancy medium is known:
W (a) ∙ ρ (fl)
ρ =
W (a) – W (fl)
Where:
ρ = the density of the solid object
ρ (fl) = the density of the liquid
W (a) = the weight of the solid object
in air
W (fl) = the weight of the solid object
in liquid
8
8
Page 9

Sources of Error and Options for Correction
The above formula to determine the
density of solid objects is sufficiently
accurate for determining the density
to two decimal places depending on
samples volume� This density kit is
designed for determining density of
10 g – 2 kg weight of samples�
Depending on the accuracy required, the
following error and correction factors will
need to be considered:
– effect of temperature on the density of
the bouyancy liquid
– air bouyancy when weighing in air
– changes in the immersion depth of the
immersion frame when immersing the
sample
– adhesion of the liquid to the immersion
frame
– air bubbles sticking to the sample�
Some of the errors can be corrected
mathematically� To do this, you have to:
– measure the temperature of the liquid
and correct the liquid density
accordingly�
Effect of Temperature on the Liquid
Density
The density of the buoyancy liquid is
temperature dependent� The density
change per °C temperature change is
of the order of:
– 0�02% for distilled water
– 0�1% for alcohols and hydrocarbons�
In other words, this can show up in the
third decimal place during density
determination�
To correct the liquid density based on
temperature, proceed as follows:
– measure the temperature of the liquid
using the thermometer supplied�
– the density of the most common
buoyancy liquids, water and ethanol,
at the measured temperature can then
be found in the table provided and used
for ρ (fl)�
9
9
Page 10

Air Buoyancy
Depending on the temperature, humidity
and air pressure, a 1 cm
3
volume of air will
have a weight of around 1�2 mg� When
weighing in air, the object experiences
a corresponding buoyancy per cm
3
of its
volume� The error that results if the air
buoyancy is not allowed for shows up in
the third decimal place and should
therefore be corrected�
Immersion Depth
The sample holder to collect and/or
immerse the sample during the weighing in
liquid is fastened rigidly to two wires and
plunges about 30 mm deep into the liquid�
Since the balance is tared prior to each
measurement, the additional buoyancy
from the submerged part of the
measurement setup is not factored
into the determination of the density�
The buoyancy force is taken into account
in the following formula:
W (a) ∙ [ρ (fl) – ρ (a)]
ρ = + ρ (a)�
W (a) – W (fl)
Where ρ (a) = 0�0012 g/cm
3
= density of
air under normal conditions (temperature
20°C, pressure 101�325 kPa)�
When weighing in liquid, a volume of
liquid corresponding to the volume of the
sample body gets displaced�
This causes the fastening wires on the pan
to plunge deeper and generate additional
buoyancy, creating an error in the density
determination�
The following formula will correct the
error:
W (a) ∙ [ρ (fl) – ρ (a)]
ρ = + ρ (a)
Corr [W (a) – W (fl)]
10
10
Page 11

Adhesion of the Liquid to the Wire
When immersing the sample holder in the
buoyancy liquid, liquid creeps up the wire
because of adhesion forces and creates a
few additional milligrams of weight�
Since the sample holder is in the
buoyancy medium both when weighing in
air and when weighing in liquid, and the
balance is tared at the beginning of each
measurement, the influence of the liquid
meniscus can be ignored�
In order to reduce the surface tension and
the friction of the liquid on the wire,
around three drops of a surfactant (Mirasol
Antistatic or a conventional detergent) are
added to the vessel’s distilled water
contents�
With the buoyancy liquid creeping up the
wire, the weight value may still slowly
change after the “g” has appeared�
For this reason, the weight value should be
read as soon as the “g” appears�
Air Bubbles
The measurement errors which occur as
a result of air bubbles sticking to the
sample can be evaluated as follows: If the
air bubble has a diameter of 0�5 mm, this
will produce an additional buoyancy of less
than 0�1 mg when weighing in water� If the
air bubble has a diameter of 1 mm, the
additional buoyancy will be around 0�5 mg,
and if the diameter is around 2 mm,
roughly 4�2 mg� It is therefore imperative
that larger air bubbles are taken off with
a fine brush or similar�
Moisture can also be added in advance in
a separate container�
11
11
Page 12

Density Determination
Determining Density of Solid Objects
Preparation
(the description uses distilled water)
– Align the container in the center of the
base plate; the beam acts as the stopper
at the back�
– Fill with distilled water up to approx�
5 mm below the edge�
– Add three drops of surfactant to the
distilled water�
– Use the clamp to fasten the
thermometer to the edge of the beaker�
– Clean the sample holder with solvent
(paying particular attention to the
immersed wires) and hook on to the
beam�
Measurement Procedure
Determining the Sample Weight in Air
– Tare the balance�
– Place the sample on the beam weighing
pan and weigh it�
– Make a note of the weight value W (a)�
Determining the Buoyancy
G = W (a) – W (fl)
– Tare the balance with the sample on the
beam�
– Lay the sample in the sample holder
1
)�
– Make a note of the absolute value of
buoyancy G, with a minus sign in front�
Calculating the Density
– Read off the temperature�
– Locate the density value ρ (fl) in the table
using the temperature you have read off�
– Calculate the density using the following
formula:
W (a) ∙ [ρ (fl) – 0�0012 g/cm3]
ρ = +
Corr G
0�0012 g/cm
W (a) and G in g; ρ (fl) in g/cm3
G = W (a) – W (fl)
3
12
12
1
) (If you have to remove the sample holder
from the measurement equipment to do
this, make sure that no additional air
bubbles become attached upon
re-immersion in the liquid; it is better to
add the sample directly with forceps or
similar�)
Page 13

Tables
Density Values of H2O at Temperature T (in °C)
T/°C 0.0 0.1 0.2 0.3 0.4 0.5 0.6 0.7 0.8 0.9
10. 0�99973 0�99972 0�99971 0�99970 0�99969 0�99968 0�99967 0�99966 0�99965 0�99964
11. 0�99963 0�99962 0�99961 0�99960 0�99959 0�99958 0�99957 0�99956 0�99955 0�99954
12. 0�99953 0�99951 0�99950 0�99949 0�99948 0�99947 0�99946 0�99944 0�99943 0�99942
13. 0�99941 0�99939 0�99938 0�99937 0�99935 0�99934 0�99933 0�99931 0�99930 0�99929
14. 0�99927 0�99926 0�99924 0�99923 0�99922 0�99920 0�99919 0�99917 0�99916 0�99914
15. 0�99913 0�99911 0�99910 0�99908 0�99907 0�99905 0�99904 0�99902 0�99900 0�99899
16. 0�99897 0�99896 0�99894 0�99892 0�99891 0�99889 0�99887 0�99885 0�99884 0�99882
17. 0�99880 0�99879 0�99877 0�99875 0�99873 0�99871 0�99870 0�99868 0�99866 0�99864
18. 0�99862 0�99860 0�99859 0�99857 0�99855 0�99853 0�99851 0�99849 0�99847 0�99845
19. 0�99843 0�99841 0�99839 0�99837 0�99835 0�99833 0�99831 0�99829 0�99827 0�99825
20. 0�99823 0�99821 0�99819 0�99817 0�99815 0�99813 0�99811 0�99808 0�99806 0�99804
21. 0�99802 0�99800 0�99798 0�99795 0�99793 0�99791 0�99789 0�99786 0�99784 0�99782
22. 0�99780 0�99777 0�99775 0�99773 0�99771 0�99768 0�99766 0�99764 0�99761 0�99759
23. 0�99756 0�99754 0�99752 0�99749 0�99747 0�99744 0�99742 0�99740 0�99737 0�99735
24. 0�99732 0�99730 0�99727 0�99725 0�99722 0�99720 0�99717 0�99715 0�99712 0�99710
25. 0�99707 0�99704 0�99702 0�99699 0�99697 0�99694 0�99691 0�99689 0�99686 0�99684
26. 0�99681 0�99678 0�99676 0�99673 0�99670 0�99668 0�99665 0�99662 0�99659 0�99657
27. 0�99654 0�99651 0�99648 0�99646 0�99643 0�99640 0�99637 0�99634 0�99632 0�99629
28. 0�99626 0�99623 0�99620 0�99617 0�99614 0�99612 0�99609 0�99606 0�99603 0�99600
29. 0�99597 0�99594 0�99591 0�99588 0�99585 0�99582 0�99579 0�99576 0�99573 0�99570
30. 0�99567 0�99564 0�99561 0�99558 0�99555 0�99552 0�99549 0�99546 0�99543 0�99540
13
13
Page 14

Density Values of Ethanol at Temperature T (in °C)
T/°C 0.0 0.1 0.2 0.3 0.4 0.5 0.6 0.7 0.8 0.9
10. 0�79784 0�79775 0�79767 0�79758 0�79750 0�79741 0�79733 0�79725 0�79716 0�79708
11. 0�79699 0�79691 0�79682 0�79674 0�79665 0�79657 0�79648 0�79640 0�79631 0�79623
12. 0�79614 0�79606 0�79598 0�79589 0�79581 0�79572 0�79564 0�79555 0�79547 0�79538
13. 0�79530 0�79521 0�79513 0�79504 0�79496 0�79487 0�79479 0�79470 0�79462 0�79453
14. 0�79445 0�79436 0�79428 0�79419 0�79411 0�79402 0�79394 0�79385 0�79377 0�79368
15. 0�79360 0�79352 0�79343 0�79335 0�79326 0�79318 0�79309 0�79301 0�79292 0�79284
16. 0�79275 0�79267 0�79258 0�79250 0�79241 0�79232 0�79224 0�79215 0�79207 0�79198
17. 0�79190 0�79181 0�79173 0�79164 0�79156 0�79147 0�79139 0�79130 0�79122 0�79113
18. 0�79105 0�79096 0�79088 0�79079 0�79071 0�79062 0�79054 0�79045 0�79037 0�79028
19. 0�79020 0�79011 0�79002 0�78994 0�78985 0�78977 0�78968 0�78960 0�78951 0�78943
20. 0�78934 0�78926 0�78917 0�78909 0�78900 0�78892 0�78883 0�78874 0�78866 0�78857
21. 0�78849 0�78840 0�78832 0�78823 0�78815 0�78806 0�78797 0�78789 0�78780 0�78772
22. 0�78763 0�78755 0�78746 0�78738 0�78729 0�78720 0�78712 0�78703 0�78695 0�78686
23. 0�78678 0�78669 0�78660 0�78652 0�78643 0�78635 0�78626 0�78618 0�78609 0�78600
24. 0�78592 0�78583 0�78575 0�78566 0�78558 0�78549 0�78540 0�78532 0�78523 0�78515
25. 0�78506 0�78497 0�78489 0�78480 0�78472 0�78463 0�78454 0�78446 0�78437 0�78429
26. 0�78420 0�78411 0�78403 0�78394 0�78386 0�78377 0�78368 0�78360 0�78351 0�78343
27. 0�78334 0�78325 0�78317 0�78308 0�78299 0�78291 0�78282 0�78274 0�78265 0�78256
28. 0�78248 0�78239 0�78230 0�78222 0�78213 0�78205 0�78196 0�78187 0�78179 0�78170
29. 0�78161 0�78153 0�78144 0�78136 0�78127 0�78118 0�78110 0�78101 0�78092 0�78084
30. 0�78075 0�78066 0�78058 0�78049 0�78040 0�78032 0�78023 0�78014 0�78006 0�77997
14
14
Page 15

Appendix
To gain a better understanding of the
process, the theory behind the formulas
and the correction factor is explained here�
Basic Principles
Mass (g)
Density =
Volume (cm
The
Archimedes’ principle states:
An object immersed in liquid will be
subject to a buoyant force (G)� This force is
equal to the weight of the liquid displaced
by the object�
The volume of the immersed object V (k) is
equal to the volume of the displaced
liquid
V (fl)�
The following are determined:
1� Weight in air W (a)
2� Buoyancy of the object in the liquid (G)
The density of an object is:
mass of object
ρ = =
volume of object
If the density ρ (fl) of the displaced liquid
is known:
Mass (fl)
V (fl) = =
ρ (fl)
Thus:
W (a) ∙ ρ (fl)
ρ =
G
3
)
W (a)
V (s)
G
ρ (fl)
=
W (a)
V (fl)
Calculation
The density of a solid object is calculated
based on the ratio
ρ : W (a) = ρ (fl) : W (a) – W (fl)
Thus:
W (a) ∙ ρ (fl)
ρ =
W (a) – W (fl)
W (a) – W (fl) = G =
Where:
ρ = the density of the solid object
ρ (fl) = the density of the liquid
W (a) = the weight of the solid object
in air
W (fl) = the weight of the solid object
in liquid
buoyancy of the sample
15
15
Page 16
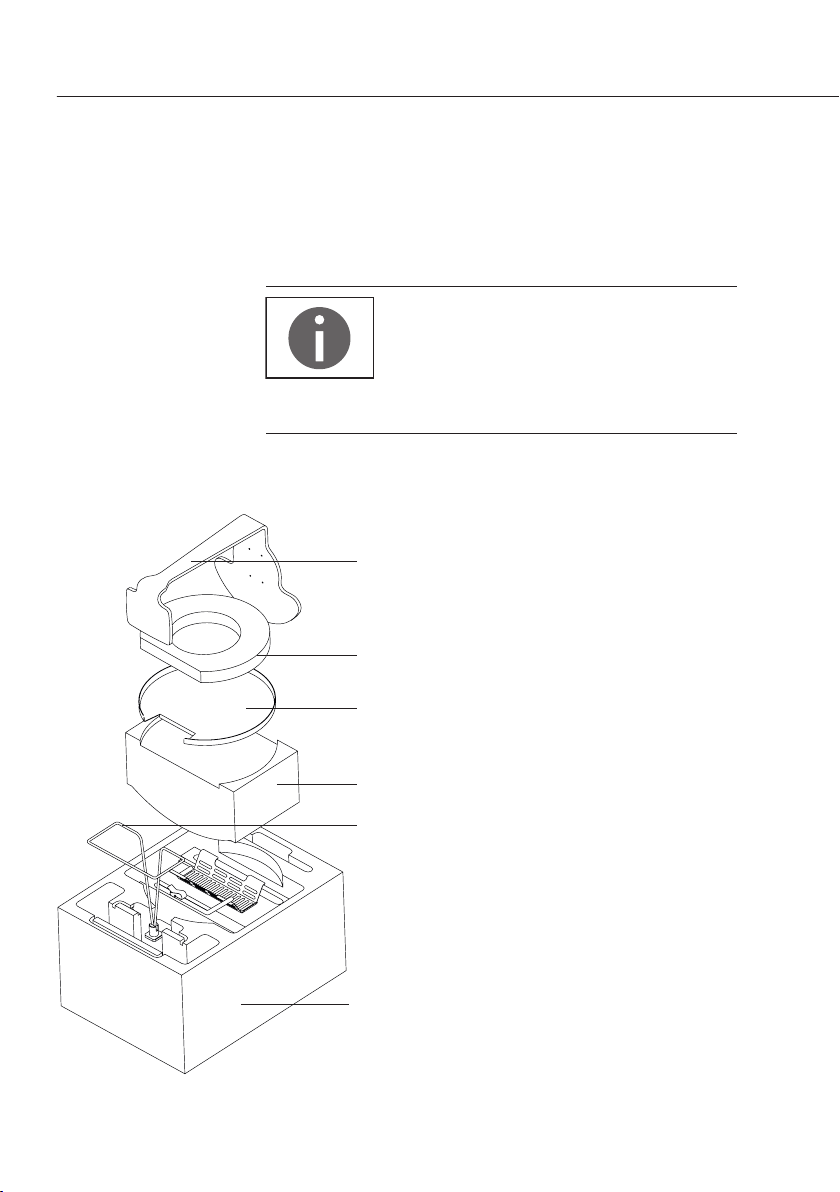
Packing the Density Determination Kit for Shipping
To pack the density determination kit
for shipping, proceed as follows:
Make sure to place the container and
cover plate in the inner foam piece
exactly as shown in the illustration.
Otherwise you will not be able to place
the density determination kit in its
correct position in the carrying case.
t Insert the immersion frame (1) the inner
foam piece (6)�
5
4
3
2
1
t Insert the container (2) into the inner
foam piece (6)�
t Put the cover plate (3) on the container�
t Lay the round cushion (4) on the cover
plate�
t Insert the beam (5) over the round
cushion into the inner foam piece from
above�
1616
6
Page 17

Inhalt
Die Bestandteile � � � � � � � � � � � � � � � � � � � � � � � � � � � 19
Inbetriebnahme � � � � � � � � � � � � � � � � � � � � � � � � � � � 20
Verfahren zur Dichtebestimmung � � � � � � � � � � � � � � 22
Fehlerquellen und Korrekturmöglichkeiten � � � � � � 23
Dichtebestimmung � � � � � � � � � � � � � � � � � � � � � � � � � 26
– von Festkörpern � � � � � � � � � � � � � � � � � � � � � � � � � � 26
Tabellen � � � � � � � � � � � � � � � � � � � � � � � � � � � � � � � � � 27
Dichtewerte von H
Dichtewerte von Ethanol � � � � � � � � � � � � � � � � � � � � � 28
Anhang � � � � � � � � � � � � � � � � � � � � � � � � � � � � � � � � � 29
O � � � � � � � � � � � � � � � � � � � � � � � � 27
2
17
17
Page 18

Mit diesem Sartorius-Dichtebestimmungsset haben Sie
ein hochwertiges Zubehör zu Ihrer elektronischen
Waage erworben�
Sartorius erleichtert Ihnen mit diesem Zubehör die
tägliche Arbeit�
Bitte lesen Sie die Aufstellungs- und Betriebs anleitung
aufmerksam durch, bevor Sie mit dem Einrichten der
Waage und der Arbeit mit dem Dichtebestimmungsset
beginnen�
Bei Ausrüstung Ihrer Waage mit einem Dichtebestimmungsprogramm können Sie die Berechnung
der Dichte vom Programm erledigen lassen.
Beachten Sie in diesem Fall bitte nur die
Einrichtungs- und Arbeitshinweise.
Die Durchführung der Dichtebestimmung sollte dann
erfolgen, wie in der Anleitung des Dichte bestimmungsprogramms beschrieben�
1818
Page 19
Die Bestandteile
1 Gestell
2 Abdeckblech
3 Tauchbügel
4 Tauchkorb
5 Behälter
6 Thermometer
7
Befestigungs klemme
19
Page 20
Inbetriebnahme
Das Dichtebestimmungsset YDK04 kann mit folgenden
Waagen verwendet werden:
– Secura
– Quintix
– Practum
Waage vorbereiten
Bevor das Gestell auf die Waage aufgesetzt wird, muss
die Waage modifiziert werden�
®
Typ 1102, 2102, 3102, 5102
®
,
Typ 612, 1102, 2102, 3102, 5102
®
Typ 612, 1102, 2102
t Demontieren Sie die zur Waage gehörenden Waag-
schale und Unterschale�
20
Dichtebestimmungsset installieren
Gehen Sie bei der Installation des Dichtebestimmungssets auf der Waage wie folgt vor:
t Montieren Sie das Gestell auf dem Zapfen der
Waage�
Page 21

t Montieren Sie die Abdeckblech auf dem zuvor ange-
brachten Gestell�
Achten Sie dabei auf exakte Positionierung und Zentrierung�
t Füllen Sie den Behälter mit der Flüssigkeit
(z�B� Wasser oder Ethanol) und setzen Sie den
Behälter auf die montierte Abdeckblech�
t Setzen Sie den Tauchkorb in den Tauchbügel ein�
t Hängen Sie den Tauchbügel mit montiertem Tauch-
korb an das Gestell�
Achten Sie dabei darauf, dass der Tauchkorb
komplett in er Flüssigkeit eintaucht� Füllen Sie ggf�
Flüssigkeit nach�
Achten Sie beim Eintauchen des Tauchkorbes
darauf, dass sich keine Luftblasen am Tauchkorb
befinden�
t Befestigen Sie das Thermometer mit der
Befestigungsklemme am Behälter (bei Bedarf)�
21
Page 22

Verfahren zur Dichtebestimmung
Zur Bestimmung der Dichte eines
Fest körpers wird bei der vorliegenden
Messeinrichtung das »Archimedische
Prinzip« herangezogen:
Ein in eine Flüssigkeit getauchter Körper
erfährt eine nach oben gerichtete Auftriebskraft� Diese Kraft ist dem Betrag nach
gleich der Gewichtskraft der durch
das Volumen des Körpers verdrängten
Flüssigkeit�
Mit einer hydrostatischen Waage, die es
gestattet den Festkörper sowohl in Luft
als auch in Wasser zu wägen, ist es möglich, die Dichte eines Festkörpers zu
bestimmen, wenn die Dichte des Auftriebsmediums bekannt ist:
W (a) ∙ ρ (fl)
ρ =
W (a) – W (fl)
Dabei ist:
ρ = die Dichte des Festkörpers
ρ (fl) = die Dichte der Flüssigkeit
W (a) = das Gewicht des Festkörpers
in Luft
W (fl) = das Gewicht des Festkörpers
in der Flüssigkeit
22
Page 23

Fehlerquellen und Korrekturmöglichkeiten
Die o�g� Formel zur Dichtebestimmung
von Festkörpern ist für eine Bestimmung
mit einer Genauigkeit von zwei Nachkommastellen je nach Probenvolumen
ausreichend� Dieses DichtebestimmungsSet ist für die Bestimmung der Dichte mit
einem Probengewicht von 10 g bis 2 kg
entwickelt�
Abhängig von der geforderten Genauig keit
sind folgende Fehler- bzw� Korrekturfaktoren zu berücksichtigen�
– Temperaturabhängigkeit der Dichte der
Auftriebsflüssigkeit
– Luftauftrieb bei der Wägung in Luft
– Änderung der Eintauchtiefe der Bügel-
schale beim Untertauchen der Probe
– Adhäsion der Flüssigkeit am Aufhänge-
draht der Bügelschale
– an der Probe anhaftende Luftbläschen
Die Fehler können teilweise rechnerisch
korrigiert werden� Dazu ist es notwendig
– die Temperatur der Flüssigkeit zu
messen und die Flüssigkeitsdichte
entsprechend zu korrigieren�
Temperaturabhängigkeit der
Flüssigkeitsdichte
Die Dichte der Auftriebsflüssigkeit
ist temperaturabhängig� Die Dichteänderung pro °C Temperaturänderung liegt
in der Größenordnung
– 0,02% für destilliertes Wasser
– 0,1% für Alkohole und Kohlenwasser-
stoffe, kann also in der 3� Nachkommastelle bei der Dichtebestimmung in
Erscheinung treten�
Um die Flüssigkeitsdichte bzgl� der Temperatur zu korrigieren, wird folgendermaßen
verfahren:
– die Temperatur der Flüssigkeit wird
mit dem mitgelieferten Thermometer
gemessen
– die Dichte der gebräuchlichsten
Auf triebs flüssigkeiten Wasser und
Ethanol bei der gemessenen Temperatur
wird der mitgelieferten Tabelle
entnommen und für ρ (fl) eingesetzt�
23
Page 24

Luftauftrieb
Ein Volumen von 1 cm
3
Luft hat in
Abhängigkeit von der Temperatur, der
Luftfeuchtigkeit und dem Luftdruck ein
Gewicht um 1,2 mg� Bei der Wägung in
Luft erfährt der Körper pro cm
3
seines
Volumens einen entsprechenden Auf trieb�
Der resultierende Fehler bei Nichtberücksichtigung des Luftauftriebs macht sich
also in der dritten Nachkommastelle
bemerkbar und sollte somit korrigiert
werden�
Der Luftauftrieb wird in folgender Formel
berücksichtigt
W (a) ∙ [ρ (fl) – ρ (a)]
ρ = + ρ (a)�
W (a) – W (fl)
Dabei ist ρ (a) = 0,0012 g/cm
3
= Dichte der
Luft unter Normalbedingungen (Temperatur 20°C, Druck 101,325 kPa)�
Eintauchtiefe
Der Tauchkorb zur Aufnahme bzw� zum
Untertauchen der Probe während der
Wägung in Flüssigkeit ist an zwei Drähten
starr befestigt und taucht etwa 30 mm tief
in die Flüssigkeit ein�
Da vor jeder Messung die Waage tariert
wird, geht der zusätzliche Auftrieb durch
den untergetauchten Teil der Messanordnung nicht in die Be stimmung der Dichte
ein�
Bei der Wägung in Flüssigkeit wird ein dem
Volumen des Probekörpers ent sprechendes
Volumen an Flüssigkeit verdrängt�
Dies führt dazu, dass die Befestigungsdrähte
der Schale tiefer eintauchen und einen
zu sätzlichen Auftrieb erzeugen, der als
Fehler bei der Dichtebestimmung eingeht�
Dieser Fehler wird bei Anwendung der
nachfolgenden Formel korrigiert:
W (a) ∙ [ρ (fl) – ρ (a)]
ρ = + ρ (a)
Korr [W (a) – W (fl)]
24
Page 25

Adhäsion der Flüssigkeit am Draht
Beim Eintauchen des Tauchkorbes in die
Auftriebsflüssigkeit kriecht Flüssigkeit
infolge von Adhäsionskräften am Draht
hoch und erzeugt ein zusätzliches Gewicht
in der Größenordnung von einigen
Milligramm�
Da sich der Tauchkorb sowohl bei der
Wägung in Luft als auch bei der Wägung
in der Flüssigkeit im Auftriebsmedium
befindet und zu Beginn jeder Messung die
Waage tariert wird, kann der Einfluss des
Flüssigkeitsmeniskus vernachlässigt
werden�
Um die Oberflächenspannung und die
Reibung der Flüssigkeit am Draht zu
reduzieren, werden auf den Gefäßinhalt an
dest� Wasser etwa drei Tropfen eines
Tensids (Mirasol Antistatic oder herkömmliches Spülmittel) dazugegeben�
Durch das Hochkriechen der Auftriebsflüssigkeit am Draht kann es vorkommen,
dass sich der Wägewert nach Erscheinen
des »g« noch langsam verändert�
Der Wägewert sollte deshalb direkt nach
Auftreten des »g« abgelesen werden�
Luftblasen
Der Messfehler, der durch anhaftende
Luftbläschen an der Probe entsteht, lässt
sich folgendermaßen abschätzen� Bei einer
Luftblase mit einem Durchmesser von
0,5 mm ergibt sich ein zusätzlicher Auf trieb
bei der Wägung in Wasser kleiner als
0,1 mg� Bei einem Durchmesser von 1 mm
beträgt der zusätzliche Auftrieb schon etwa
0,5 mg und bei einem Durch messer von
2 mm etwa 4,2 mg� Größere Luftbläschen
sollten also unbedingt mit einem feinen
Pinsel o�ä� Hilfsmittel abgestreift werden�
Das Benetzen kann auch vorab in einem
separaten Gefäß erfolgen�
25
Page 26

Dichtebestimmung
Dichtebestimmung von Festkörpern
Vorbereitung
(in der Beschreibung wird dest� Wasser
verwendet)
– Gefäß mittig auf dem Bodenblech
ausrichten, als Anschlag nach hinten
dient das Gestell
– bis ca� 5 mm unter den Rand mit dest�
Wasser füllen
– drei Tropfen Tensid in das dest� Wasser
geben
– Thermometer mit der Klemme am Rand
des Becherglases befestigen
– Tauchkorb mit Lösungsmittel reinigen
(insbesondere die eintauchenden
Drähte) und in das Gestell einhängen
Messablauf
Bestimmen des Probengewichtes
in Luft
– Waage tarieren
– Probe auf die Gestellwaagschale
auflegen und wägen
– Gewichtswert W (a) notieren
Bestimmung des Auftriebs
G = W (a) – W (fl)
– Waage mit der Probe auf der Gestell-
waagschale tarieren
– Probe in den Tauchkorb legen
1
)
– den Absolutwert des, mit negativem
Vorzeichen angezeigten, Auftriebs G
notieren
Berechnen der Dichte
– Temperatur ablesen
– Dichtewert ρ (fl) der Tabelle im Anhang
unter Berücksichtigung der abgelesenen
Temperatur entnehmen
– Dichte nach folgender Formel berechnen:
W (a) ∙ [ρ (fl) – 0�0012 g/cm3]
ρ = +
Korr G
0�0012 g/cm
W (a) und G in g; ρ (fl) in g/cm3
G = W (a) – W (fl)
3
26
1
) (wird dazu der Tauchkorb aus der Mess-
vorrichtung entfernt, unbedingt darauf
achten, dass beim Wiedereintauchen
in die Flüssigkeit keine zusätzlichen
Luftbläschen anhaften; besser Probe mit
Pinzette o�a� direkt aufgeben)
Page 27

Tabellen
Dichtewerte von H2O bei Temperatur T (in °C)
T/°C 0,0 0,1 0,2 0,3 0,4 0,5 0,6 0,7 0,8 0,9
10. 0,99973 0,99972 0,99971 0,99970 0,99969 0,99968 0,99967 0,99966 0,99965 0,99964
11. 0,99963 0,99962 0,99961 0,99960 0,99959 0,99958 0,99957 0,99956 0,99955 0,99954
12. 0,99953 0,99951 0,99950 0,99949 0,99948 0,99947 0,99946 0,99944 0,99943 0,99942
13. 0,99941 0,99939 0,99938 0,99937 0,99935 0,99934 0,99933 0,99931 0,99930 0,99929
14. 0,99927 0,99926 0,99924 0,99923 0,99922 0,99920 0,99919 0,99917 0,99916 0,99914
15. 0,99913 0,99911 0,99910 0,99908 0,99907 0,99905 0,99904 0,99902 0,99900 0,99899
16. 0,99897 0,99896 0,99894 0,99892 0,99891 0,99889 0,99887 0,99885 0,99884 0,99882
17. 0,99880 0,99879 0,99877 0,99875 0,99873 0,99871 0,99870 0,99868 0,99866 0,99864
18. 0,99862 0,99860 0,99859 0,99857 0,99855 0,99853 0,99851 0,99849 0,99847 0,99845
19. 0,99843 0,99841 0,99839 0,99837 0,99835 0,99833 0,99831 0,99829 0,99827 0,99825
20. 0,99823 0,99821 0,99819 0,99817 0,99815 0,99813 0,99811 0,99808 0,99806 0,99804
21. 0,99802 0,99800 0,99798 0,99795 0,99793 0,99791 0,99789 0,99786 0,99784 0,99782
22. 0,99780 0,99777 0,99775 0,99773 0,99771 0,99768 0,99766 0,99764 0,99761 0,99759
23. 0,99756 0,99754 0,99752 0,99749 0,99747 0,99744 0,99742 0,99740 0,99737 0,99735
24. 0,99732 0,99730 0,99727 0,99725 0,99722 0,99720 0,99717 0,99715 0,99712 0,99710
25. 0,99707 0,99704 0,99702 0,99699 0,99697 0,99694 0,99691 0,99689 0,99686 0,99684
26. 0,99681 0,99678 0,99676 0,99673 0,99670 0,99668 0,99665 0,99662 0,99659 0,99657
27. 0,99654 0,99651 0,99648 0,99646 0,99643 0,99640 0,99637 0,99634 0,99632 0,99629
28. 0,99626 0,99623 0,99620 0,99617 0,99614 0,99612 0,99609 0,99606 0,99603 0,99600
29. 0,99597 0,99594 0,99591 0,99588 0,99585 0,99582 0,99579 0,99576 0,99573 0,99570
30. 0,99567 0,99564 0,99561 0,99558 0,99555 0,99552 0,99549 0,99546 0,99543 0,99540
27
Page 28

Dichtewerte von Ethanol bei Temperatur T (in °C)
T/°C 0,0 0,1 0,2 0,3 0,4 0,5 0,6 0,7 0,8 0,9
10. 0,79784 0,79775 0,79767 0,79758 0,79750 0,79741 0,79733 0,79725 0,79716 0,79708
11. 0,79699 0,79691 0,79682 0,79674 0,79665 0,79657 0,79648 0,79640 0,79631 0,79623
12. 0,79614 0,79606 0,79598 0,79589 0,79581 0,79572 0,79564 0,79555 0,79547 0,79538
13. 0,79530 0,79521 0,79513 0,79504 0,79496 0,79487 0,79479 0,79470 0,79462 0,79453
14. 0,79445 0,79436 0,79428 0,79419 0,79411 0,79402 0,79394 0,79385 0,79377 0,79368
15. 0,79360 0,79352 0,79343 0,79335 0,79326 0,79318 0,79309 0,79301 0,79292 0,79284
16. 0,79275 0,79267 0,79258 0,79250 0,79241 0,79232 0,79224 0,79215 0,79207 0,79198
17. 0,79190 0,79181 0,79173 0,79164 0,79156 0,79147 0,79139 0,79130 0,79122 0,79113
18. 0,79105 0,79096 0,79088 0,79079 0,79071 0,79062 0,79054 0,79045 0,79037 0,79028
19. 0,79020 0,79011 0,79002 0,78994 0,78985 0,78977 0,78968 0,78960 0,78951 0,78943
20. 0,78934 0,78926 0,78917 0,78909 0,78900 0,78892 0,78883 0,78874 0,78866 0,78857
21. 0,78849 0,78840 0,78832 0,78823 0,78815 0,78806 0,78797 0,78789 0,78780 0,78772
22. 0,78763 0,78755 0,78746 0,78738 0,78729 0,78720 0,78712 0,78703 0,78695 0,78686
23. 0,78678 0,78669 0,78660 0,78652 0,78643 0,78635 0,78626 0,78618 0,78609 0,78600
24. 0,78592 0,78583 0,78575 0,78566 0,78558 0,78549 0,78540 0,78532 0,78523 0,78515
25. 0,78506 0,78497 0,78489 0,78480 0,78472 0,78463 0,78454 0,78446 0,78437 0,78429
26. 0,78420 0,78411 0,78403 0,78394 0,78386 0,78377 0,78368 0,78360 0,78351 0,78343
27. 0,78334 0,78325 0,78317 0,78308 0,78299 0,78291 0,78282 0,78274 0,78265 0,78256
28. 0,78248 0,78239 0,78230 0,78222 0,78213 0,78205 0,78196 0,78187 0,78179 0,78170
29. 0,78161 0,78153 0,78144 0,78136 0,78127 0,78118 0,78110 0,78101 0,78092 0,78084
30. 0,78075 0,78066 0,78058 0,78049 0,78040 0,78032 0,78023 0,78014 0,78006 0,77997
28
Page 29

Anhang
Zum besseren Verständnis soll hier die
Herleitung der verwendeten Formeln und
des Korrekturfaktors erfolgen�
Grundlagen
Masse (g)
Dichte =
Volumen (cm
Das Archimedische Gesetz:
Ein in eine Flüssigkeit getauchter Körper
erfährt eine Auftriebskraft (G)� Diese Kraft
ist dem Betrag nach gleich der Gewichtskraft der durch das Volumen des Körpers
verdrängten Flüssigkeit�
Das Volumen eines getauchten Körpers
V (k) ist gleich dem Volumen der
verdrängten Flüssigkeit V (fl)�
Es werden bestimmt:
1� Das Gewicht in der Luft W (a)
2� Auftrieb des Körpers in der
Flüssigkeit (G)
Die Dichte eines Körpers ist:
Masse Körper
ρ = =
Volumen Körper
Ist die Dichte ρ (fl) der verdrängten
Flüssigkeit bekannt, so ergibt sich mit
Masse (fl)
V (fl) = =
ρ (fl)
Damit folgt:
W (a) ∙ ρ (fl)
ρ =
G
3
)
W (a)
V (s)
G
ρ (fl)
=
W (a)
V (fl)
Berechnung
Die Dichte eines Festkörpers errechnet sich
aus dem Verhältnis von
ρ : W (a) = ρ (fl) : W (a) – W (fl)
Daraus ergibt sich:
W (a) ∙ ρ (fl)
ρ =
W (a) – W (fl)
W (a) – W (fl) = G = Auftrieb der Probe
Dabei ist:
ρ = die Dichte des Festkörpers
ρ (fl) = die Dichte der Flüssigkeit
W (a) = das Gewicht des Festkörpers
W (fl) = das Gewicht des Festkörpers
in Luft
in der Flüssigkeit
29
Page 30

Dichtebestimmungsset einpacken
für den Versand
Gehen sie beim Einpacken des
Dichtebetimmungssets wie folgt vor:
Beachten Sie das Behälter und
Abdeckblech genau so in dem inneren
Schaufstoffteil plaziert werden müssen,
wie in der Abbildung dargstellt.
Anderenfalls kann das Dichtebestimmungsset nicht korrekt im
Transportkoffer plaziert werden!
t Setzen Sie den Tauchbügel (1) in das
innere Schaumstoffteil (6)
5
4
3
2
1
t Setzen Sie den Behälter (2) in das innere
Schaumstoffteil (6)
t Setzen Sie das Abdeckbleck (3) und auf
den Behälter�
t Legen Sie das runde Polster (4) auf das
Abdeckblech�
t Setzen Sie das Gestell (5) von oben über
das runde Polster in das innere Schaumstoffteil�
30
6
Page 31

Sommaire
Les composants � � � � � � � � � � � � � � � � � � � � � � � � � � � 33
Mise en service � � � � � � � � � � � � � � � � � � � � � � � � � � � � 34
Méthodes de détermination
de la masse volumique � � � � � � � � � � � � � � � � � � � � � � 36
Sources d’erreur et possibilités de correction � � � � � 37
Détermination de la masse volumique � � � � � � � � � � 40
– de solides � � � � � � � � � � � � � � � � � � � � � � � � � � � � � � � 40
Tables � � � � � � � � � � � � � � � � � � � � � � � � � � � � � � � � � � � 41
Valeurs des masses volumiques de H
Valeurs des masses volumiques de l’éthanol � � � � � � � 42
Annexe � � � � � � � � � � � � � � � � � � � � � � � � � � � � � � � � � � 43
O � � � � � � � � � � 41
2
31
Page 32

Avec ce dispositif Sartorius de détermination de la
masse volumique, vous avez équipé votre balance
électronique d’un accessoire de haute qualité�
Cet accessoire Sartorius simplifie vos tâches
quotidiennes�
Veuillez lire attentivement les instructions de montage
et d’utilisation avant d’installer le dispositif de
détermination de masses volumiques et de commencer
les essais�
Si votre balance est équipée d’un programme de
détermination des masses volumiques, les valeurs
seront automatiquement calculées par le programme.
Dans ce cas, référez-vous uniquement au guide de
configuration et aux instructions opératoires.
Le processus de détermination des masses volumiques
est décrit en détail dans le manuel du programme de
détermination des masses volumiques�
32
Page 33

Les composants
1 Structure
2 Plaque métallique
3 Support d’échantillon
4 Tamis pour immerger des échantillons
5 Plongeur en verre
6 Thermomètre
7
Clip de fixation
33
Page 34

Mise en service
Le dispositif de détermination de la masse volumique
YDK04 peut être utilisé avec les balances suivantes :
– Secura
– Quintix
– Practum
Préparation de la structure de balance
Il faut modifier la balance avant de placer la structure
sur celle-ci�
®
type 1102, 2102, 3102, 5102
®
type 612, 1102, 2102, 3102, 5102
®
type 612, 1102, 2102
t Retirez le plateau de pesée et le support de plateau
de la balance�
34
Installation du kit de détermination de la masse
volumique
Procédez comme suit pour installer le kit de
détermination de la masse volumique :
t Montez la structure sur le tourillon de la balance�
Page 35

t Montez la plaque de protection sur la structure que
vous venez de fixer�
Ce faisant, assurez-vous que la plaque de protection
est parfaitement positionnée et centrée�
t Remplissez le récipient de liquide (ex� eau ou étha-
nol) et placez-le sur la plaque de protection montée�
t Insérez le support d’échantillon (dispositif de
suspension) dans le panier�
t Fixez le panier avec le support d’échantillon monté
dessus sur la structure�
Assurez-vous que le support d’échantillon est
complètement immergé dans le liquide� Au besoin,
ajoutez du liquide�
Lorsque vous immergez le support d’échantillon,
assurez-vous de l’absence de bulles d’air dans le
support d’échantillon�
t Utilisez la pince de serrage pour serrer le
thermomètre sur le récipient (le cas échéant)�
35
Page 36

Méthodes de détermination de la masse volumique
Pour déterminer la masse volumique
d’un solide avec cet accessoire, on utilise le
principe d’Archimède :
Un solide immergé dans un liquide est
soumis à la force appelée poussée
hydrostatique� La valeur de cette force est
égale au poids du volume liquide déplacé
par l’échantillon�
Avec une balance hydrostatique qui permet
d’effectuer aussi bien les pesées dans l’air
que dans le liquide, il est possible de :
déterminer la masse volumique d’un solide
si l’on connaît la masse volumique du
liquide provoquant cette poussée
hydrostatique :
W (a) ∙ ρ (fl)
ρ =
W (a) – W (fl)
avec :
ρ = masse volumique du solide
ρ (fl) = masse volumique du liquide
W (a) = poids du solide dans l’air
W (fl) = poids du solide dans le liquide
36
Page 37

Sources d’erreurs et possibilités de correction
La formule de la page précédente pour la
détermination de la masse volumique de
solides est suffisante pour obtenir la
précision de une, voire deux décimales,
selon le volume d’échantillon� Ce kit est
conçu pour déterminer la masse volumique
d’échantillons pesant entre 10 g et 2 kg�
Pour un niveau de précision supérieur, il
est nécessaire de tenir compte des erreurs
et facteurs d’erreurs suivants :
– la masse volumique du liquide d’im-
mersion en fonction de la tem pérature,
– la poussée aérostatique lors de la pesée
dans l’air,
– la variation de profondeur d’immersion
du panier lors de l’immersion de
l’échantillon,
– la tension superficielle du liquide sur le
panier,
– les bulles d’air sur l’échantillon�
Quelques-unes de ces erreurs peuvent être
corrigées par calcul�
Pour cela, procédez comme suit :
– mesurez la température du liquide de
référence et corrigez sa masse volumique en tenant compte de ce critère
Influence de la température sur la masse
volumique du liquide
La masse volumique du liquide créant la
poussée hydrostatique dépend de la
température� La variation de masse volumique par °C de température est de l’ordre
de :
– 0,02% pour l’eau distillée
– 0,1% pour les alcools et les hydrocar-
bures� En d’autres termes, cela peut
influencer la troisième décimale d’un
résultat de détermination de masse
volumique�
Pour corriger la masse volumique du
liquide en fonction de la température,
procéder comme suit :
– mesurer la température du liquide
avec le thermomètre contenu dans
la livraison,
– se reporter à la table à la fin de ce
manuel pour connaître les masses
volumiques des liquides les plus
couramment utilisés (eau distillée et
éthanol) à la température mesurée et
utiliser cette masse volumique comme
valeur ρ (fl)�
37
Page 38

Poussée aérostatique
Un cm3 d’air pèse environ 1,2 mg
selon les conditions de température,
de pression et d’humidité� Quand un
échantillon solide est pesé dans l’air,
il est soumis à une poussée aérostatique
égale au poids du volume d’air déplacé�
L’erreur qui en découle est suffisamment
importante pour influer sur la troisième
décimale et il faut faire intervenir une
correction�
La formule suivante tient compte de la
poussée aérostatique :
W (a) ∙ [ρ (fl) – ρ (a)]
ρ = + ρ (a)�
W (a) – W (fl)
Avec ρ (a) = 0,0012 g/cm3 = masse
volumique de l’air dans des conditions
normales (température 20°C et pression
101,325 hPa)�
Profondeur d’immersion
Le plateau pour supporter et/ou immerger
l’échantillon pendant la pesée dans le
liquide est maintenu par deux tiges et est
situé à environ 30 mm sous la surface du
liquide� Puisque la balance est tarée avant
chaque mesure, la poussée hydro statique
induite par la partie immergée de
l’accessoire n’influence en rien la
détermination de la masse volumique�
Quand un solide est immergé dans le
liquide, il déplace un volume de liquide
égal au volume du solide� Ceci entraîne une
montée du niveau du liquide et de ce fait
une poussée hydrostatique sur la partie
des tiges nouvellement immergée, d’où une
erreur dans la détermination de la masse
volumique�
Appliquer la formule suivante pour
corriger cette erreur :
W (a) ∙ [ρ (fl) – ρ (a)]
ρ = + ρ (a)
Corr� [W (a) – W (fl)]
38
Page 39

Tension superficielle sur le support
Quand le support d’échantillon est
immergé dans le liquide produisant ainsi
une poussée hydrostatique, le liquide
adhère aux tiges du fait des forces de capillarité et génère ainsi un poids supplémentaire de l’ordre de quelques milligrammes�
Puisque le support d’échantillon se trouve
dans le liquide pendant la pesée dans l’air
et également pendant la pesée dans le
liquide et que la balance est tarée au début
de chaque manipulation, l’effet de
ménisque peut être négligé�
Bulles d’air
L’erreur de mesure causée par des bulles
d’air collées à l’échantillon peut être
évaluée de la façon suivante� Une bulle
d’air d’un diamètre de 0,5 mm induit une
poussée hydrostatique supplémentaire
légèrement inférieure à 0,1 mg quand
l’échantillon est pesé dans l’eau� Une bulle
d’air de 1 mm de diamètre a une influence
de l’ordre de 0,5 mg et une bulle d’air
de 2 mm de diamètre crée une perturbation
d’environ 4,2 mg� Des bulles d’air plus
conséquentes doivent absolument être
éliminées à l’aide d’une petite brosse�
Pour réduire la tension superficielle et la
friction du liquide sur les tiges, ajouter
trois gouttes de tensio-actif (de type
Teepol ou liquide pour vaisselle) dans l’eau
distillée contenue dans le bécher�
Comme le liquide se déplace le long des
tiges, le poids peut légèrement évoluer
après l’apparition du symbole de
stabilité «g»�
Pour pallier cet inconvénient, noter le
poids juste après l’apparition du «g»�
Il est aussi possible de mouiller
l’échantillon dans un autre récipient avant
la pesée dans le liquide�
39
Page 40

Détermination de la masse volumique
Détermination de la masse volumique de
solides
Préparation
(Le liquide employé dans cette description
est de l’eau distillée)
– Alignez le récipient au centre du
plateau�
La structure sert de butée à l’arrière�
– Remplissez-le avec de l’eau distillée
jusqu’à environ 5 mm du bord�
– Ajoutez trois gouttes de tensio-actif
dans l’eau distillée�
– Fixez le thermomètre sur le bord du
bécher avec le clip de fixation
métallique�
– Nettoyez le support d’échantillon avec
un solvant (en particulier les tiges qui
seront immergées) et suspendez-le à la
structure�
Déroulement de la mesure
Détermination du poids de l’échantillon
dans l’air
– Tarez la balance�
– Placez l’échantillon sur le plateau
supérieur de la structure et peser�
– Enregistrez le poids W (a)�
Détermination de la poussée
hydrostatique G = W (a) – W (fl)
– Tarez la balance avec l’échantillon sur
le plateau supérieur de la structure�
– Placez ensuite l’échantillon dans
le support d’échantillon
1
)�
– Enregistrez la valeur absolue de la
poussée hydrostatique «G» affichée avec
un signe négatif�
Calcul de la masse volumique
– Relevez la température du liquide
d’immersion�
– En utilisant les tables figurant à la fin
de ce manuel, déterminer la masse
volumique ρ (fl) du liquide d’immersion
à la température mesurée ci-dessus�
– Calculez la masse volumique en
appliquant la formule suivante :
W (a) ∙ [ρ (fl) – 0�0012 g/cm3]
ρ = +
Corr� G
W (a) et G sont exprimés en grammes ;
ρ (fl) en g/cm
3
0�0012 g/cm
G = W (a) – W (fl)
3
40
1
) Si le support d’échantillon doit être
retiré de l’équipement de mesure, s’assurer
qu’aucune nouvelle bulle d’air ne vienne
s’ajouter après l’immersion� Il est préférable de placer l’échantillon directement,
au moyen de pincettes ou autres�)
Page 41

Tables
Masses volumiques de H2O selon la température T (en °C)
T/°C 0,0 0,1 0,2 0,3 0,4 0,5 0,6 0,7 0,8 0,9
10. 0,99973 0,99972 0,99971 0,99970 0,99969 0,99968 0,99967 0,99966 0,99965 0,99964
11. 0,99963 0,99962 0,99961 0,99960 0,99959 0,99958 0,99957 0,99956 0,99955 0,99954
12. 0,99953 0,99951 0,99950 0,99949 0,99948 0,99947 0,99946 0,99944 0,99943 0,99942
13. 0,99941 0,99939 0,99938 0,99937 0,99935 0,99934 0,99933 0,99931 0,99930 0,99929
14. 0,99927 0,99926 0,99924 0,99923 0,99922 0,99920 0,99919 0,99917 0,99916 0,99914
15. 0,99913 0,99911 0,99910 0,99908 0,99907 0,99905 0,99904 0,99902 0,99900 0,99899
16. 0,99897 0,99896 0,99894 0,99892 0,99891 0,99889 0,99887 0,99885 0,99884 0,99882
17. 0,99880 0,99879 0,99877 0,99875 0,99873 0,99871 0,99870 0,99868 0,99866 0,99864
18. 0,99862 0,99860 0,99859 0,99857 0,99855 0,99853 0,99851 0,99849 0,99847 0,99845
19. 0,99843 0,99841 0,99839 0,99837 0,99835 0,99833 0,99831 0,99829 0,99827 0,99825
20. 0,99823 0,99821 0,99819 0,99817 0,99815 0,99813 0,99811 0,99808 0,99806 0,99804
21. 0,99802 0,99800 0,99798 0,99795 0,99793 0,99791 0,99789 0,99786 0,99784 0,99782
22. 0,99780 0,99777 0,99775 0,99773 0,99771 0,99768 0,99766 0,99764 0,99761 0,99759
23. 0,99756 0,99754 0,99752 0,99749 0,99747 0,99744 0,99742 0,99740 0,99737 0,99735
24. 0,99732 0,99730 0,99727 0,99725 0,99722 0,99720 0,99717 0,99715 0,99712 0,99710
25. 0,99707 0,99704 0,99702 0,99699 0,99697 0,99694 0,99691 0,99689 0,99686 0,99684
26. 0,99681 0,99678 0,99676 0,99673 0,99670 0,99668 0,99665 0,99662 0,99659 0,99657
27. 0,99654 0,99651 0,99648 0,99646 0,99643 0,99640 0,99637 0,99634 0,99632 0,99629
28. 0,99626 0,99623 0,99620 0,99617 0,99614 0,99612 0,99609 0,99606 0,99603 0,99600
29. 0,99597 0,99594 0,99591 0,99588 0,99585 0,99582 0,99579 0,99576 0,99573 0,99570
30. 0,99567 0,99564 0,99561 0,99558 0,99555 0,99552 0,99549 0,99546 0,99543 0,99540
41
Page 42

Masses volumiques de l’éthanol selon la température T (en °C)
T/°C 0,0 0,1 0,2 0,3 0,4 0,5 0,6 0,7 0,8 0,9
10. 0,79784 0,79775 0,79767 0,79758 0,79750 0,79741 0,79733 0,79725 0,79716 0,79708
11. 0,79699 0,79691 0,79682 0,79674 0,79665 0,79657 0,79648 0,79640 0,79631 0,79623
12. 0,79614 0,79606 0,79598 0,79589 0,79581 0,79572 0,79564 0,79555 0,79547 0,79538
13. 0,79530 0,79521 0,79513 0,79504 0,79496 0,79487 0,79479 0,79470 0,79462 0,79453
14. 0,79445 0,79436 0,79428 0,79419 0,79411 0,79402 0,79394 0,79385 0,79377 0,79368
15. 0,79360 0,79352 0,79343 0,79335 0,79326 0,79318 0,79309 0,79301 0,79292 0,79284
16. 0,79275 0,79267 0,79258 0,79250 0,79241 0,79232 0,79224 0,79215 0,79207 0,79198
17. 0,79190 0,79181 0,79173 0,79164 0,79156 0,79147 0,79139 0,79130 0,79122 0,79113
18. 0,79105 0,79096 0,79088 0,79079 0,79071 0,79062 0,79054 0,79045 0,79037 0,79028
19. 0,79020 0,79011 0,79002 0,78994 0,78985 0,78977 0,78968 0,78960 0,78951 0,78943
20. 0,78934 0,78926 0,78917 0,78909 0,78900 0,78892 0,78883 0,78874 0,78866 0,78857
21. 0,78849 0,78840 0,78832 0,78823 0,78815 0,78806 0,78797 0,78789 0,78780 0,78772
22. 0,78763 0,78755 0,78746 0,78738 0,78729 0,78720 0,78712 0,78703 0,78695 0,78686
23. 0,78678 0,78669 0,78660 0,78652 0,78643 0,78635 0,78626 0,78618 0,78609 0,78600
24. 0,78592 0,78583 0,78575 0,78566 0,78558 0,78549 0,78540 0,78532 0,78523 0,78515
25. 0,78506 0,78497 0,78489 0,78480 0,78472 0,78463 0,78454 0,78446 0,78437 0,78429
26. 0,78420 0,78411 0,78403 0,78394 0,78386 0,78377 0,78368 0,78360 0,78351 0,78343
27. 0,78334 0,78325 0,78317 0,78308 0,78299 0,78291 0,78282 0,78274 0,78265 0,78256
28. 0,78248 0,78239 0,78230 0,78222 0,78213 0,78205 0,78196 0,78187 0,78179 0,78170
29. 0,78161 0,78153 0,78144 0,78136 0,78127 0,78118 0,78110 0,78101 0,78092 0,78084
30. 0,78075 0,78066 0,78058 0,78049 0,78040 0,78032 0,78023 0,78014 0,78006 0,77997
42
Page 43

Annexe
Cette annexe décrit comment ont été
établies les formules utilisées pour le calcul
des masses volumiques, et quels sont les
facteurs de correction dont on a tenu
compte�
Règles de base
Masse (g)
Masse volumique =
Volume (cm
Principe d’Archimède :
Un solide immergé dans un liquide est
soumis à la force appelée poussée
hydrostatique (G)� La valeur de cette force
est égale au poids du volume liquide
déplacé par l’échantillon�
Le volume du solide immergé V (k) est
égal au volume liquide déplacé V (fl)�
On détermine :
1� le poids du solide dans l’air W (a),
2� la poussée hydrostatique appliquée au
solide (G)�
La masse volumique d’un solide est :
masse du solide
ρ = =
volume du solide
Lorsque la masse volumique ρ (fl) du
liquide déplacé est connue, alors
Masse (fl)
V (fl) = =
ρ (fl)
Par conséquent :
W (a) ∙ ρ (fl)
ρ =
G
G
ρ (fl)
W (a)
V (s)
=
3
)
W (a)
V (fl)
Calcul
La masse volumique d’un solide est
calculée à partir de la relation :
ρ : W (a) = ρ (fl) : W (a) – W (fl)
Il en résulte :
W (a) ∙ ρ (fl)
ρ =
W (a) – W (fl)
W (a) – W (fl) = G = poussée hydrostatique
sur l’échantillon�
avec :
ρ = masse volumique du solide
ρ (fl) = masse volumique du liquide
W (a) = poids du solide dans l’air
W (fl) = poids du solide dans le liquide
43
Page 44

Emballage du kit de détermination de la masse volumique pour expédition
Pour emballer le kit de détermination
de la masse volumique en vue de l’expédier, procédez comme suit :
Assurez-vous de placer le récipient et
la plaque de protection dans la partie
en mousse précisément comme indiqué
sur l’illustration. Dans le cas contraire,
vous n’arriverez pas à installer le kit
correctement dans la boîte de transport.
t Insérez le support d’immersion en acier
(1) dans la partie en mousse (6)�
5
4
3
2
1
t Insérez le récipient (2) dans la partie en
mousse (6)�
t Placez la plaque de protection (3) sur le
récipient�
t Posez le coussin rond (4) sur la plaque
de protection�
t Insérez la structure (5) sur le coussin
rond dans la partie en mousse par le
dessus�
44
6
Page 45

Contenido
Los componentes � � � � � � � � � � � � � � � � � � � � � � � � � � 47
Puesta en funcionamiento � � � � � � � � � � � � � � � � � � � 48
Método para la determinación
de la densidad � � � � � � � � � � � � � � � � � � � � � � � � � � � � 50
Fuentes de error y posibilidades de corrección � � � � 51
Determinación de la densidad � � � � � � � � � � � � � � � � 54
– De cuerpos sólidos � � � � � � � � � � � � � � � � � � � � � � � � 54
Tablas � � � � � � � � � � � � � � � � � � � � � � � � � � � � � � � � � � � 55
Valores de densidad del H
Valores de densidad del etanol � � � � � � � � � � � � � � � � � 56
Anexo � � � � � � � � � � � � � � � � � � � � � � � � � � � � � � � � � � � 57
O � � � � � � � � � � � � � � � � � � 55
2
45
Page 46

Con este kit para la determinación de la densidad
Sartorius Ud� ha adquirido un accesorio de alto valor
para su balanza electrónica�
Con este accesorio, Sartorius le facilita el trabajo diario�
Le pedimos que lea estas instrucciones de instalación y
manejo con mucha atención, antes de comenzar con la
configuración de la balanza y el trabajo con el kit para
la determinación de la densidad�
Al equipar su balanza con un programa para la
determinación de la densidad, éste realizará automáticamente el cálculo de los valores de densidad.
Para este caso, le rogamos observar las advertencias
sobre la instalación y manejo.
Luego, el proceso de determinación de la densidad
debería realizarse según se describe en las in strucciones
del programa para la determinación de la densidad�
46
Page 47

Los componentes
1 Soporte
2 Placa de metal
3 Cubierta
4 Estribo de inmersión
5 Cesta de inmersión
6 Termómetro
7 Grapa de sujeción
47
Page 48

Puesta en funcionamiento
Le dispositif de détermination de la masse volumique
YDK04 peut être utilisé avec les balances suivantes :
– Secura
– Quintix
– Practum
Preparar la balanza
Antes de colocar el soporte en la balanza, es necesario
modificar la balanza�
®
tipo 1102, 2102, 3102, 5102
®
,
tipo 612, 1102, 2102, 3102, 5102
®
tipo 612, 1102, 2102
t Desmonte el platillo de pesaje y el platillo inferior de
la correspondiente balanza�
48
Instalar el kit de determinación de densidad
Para la instalación del kit debe proceder de la siguiente
manera:
t Monte el soporte sobre el pivote de la balanza�
Page 49

t Monte la cubierta en el soporte previamente
colocado�
Preste atención a que quede perfectamente
posicionado y centrado�
t Llene el recipiente con el líquido (p� ej� agua o eta-
nol) y coloque el recipiente sobre la cubierta
previamente montada�
Introduzca la cesta de inmersión en el estribo de
inmersión�
t Enganche el estribo de inmersión con la cesta
montada en el soporte�
Preste atención a que la cesta quede totalmente
sumergida en el líquido� Si es necesario, rellene con
más líquido�
Al sumergir la cesta debe prestar atención a que no
se encuentren burbujas en la cesta�
t Fije el termómetro al recipiente con ayuda de la
grapa de sujeción (si es necesario)�
49
Page 50

Método para la determinación de la densidad
La determinación de la densidad de un
cuerpo sólido, con el equipo de medición
presente, se realiza mediante el “Principio
de Arquímedes”:
Un cuerpo sumergido en un líquido
experimenta una fuerza de empuje hacia
arriba� Esta fuerza es igual a la fuerza que
ejerce el peso del líquido desplazado por el
volumen del cuerpo�
Con una balanza hidrostática, que permite
la medición del cuerpo sólido en el aire
y en el agua, es posible determinar
la densidad de un cuerpo sólido, si la
densidad del medio de empuje es conocida:
W (a) ∙ ρ (fl)
ρ =
W (a) – W (fl)
en donde:
ρ = densidad del cuerpo sólido
ρ (fl) = densidad del líquido
W (a) = peso del cuerpo sólido en el aire
W (fl) = peso del cuerpo sólido en
el líquido
50
Page 51

Fuentes de error y posibilidades de corrección
La ecuación aquí utilizada para la determinación de la densidad de cuerpos sólidos es
una determinación, con una exactitud de
una y hasta dos posiciones decimales,
suficiente en función del volumen de la
muestra� Este kit para la determinación de
la humedad se ha desarrollado para determinar la densidad con unos pesos de
muestre de 10 g hasta 2 kg�
Dependiendo de la exactitud requerida,
han de considerarse los siguientes errores
y factores de corrección�
– Dependencia de la temperatura de la
densidad del líquido de empuje
– Empuje del aire al realizar la medición
(en el aire)
– Modificación de la profundidad de
inmersión del platillo arqueado al
sumergir la muestra
– Adhesión del líquido en el alambre del
que cuelga el platillo
– Burbujas de aire adheridas a la muestra
Los errores pueden corregirse según
cálculo� Para esto se necesita:
– medir la temperatura del líquido y
corregir la densidad del líquido de
forma correspondiente�
Dependencia de la temperatura de la
densidad del líquido
La densidad del líquido de empuje depende
de la temperatura� La modificación de la
densidad por modificación de temperatura
°C es equivalente al
– 0,02% para el agua destilada
– 0,1% para alcoholes e hidrocarburos,
que puede aparecer en la 3� posición
decimal durante la determinación de la
densidad�
Para corregir la densidad del líquido,
respecto a la temperatura, se procede de la
siguiente manera:
– la temperatura del líquido se mide con
el termómetro suministrado
– la densidad de los líquidos de empuje
más utilizados, agua y etanol, con
temperatura ya medida, se indica en
la tabla y se utiliza para ρ (fl)�
51
Page 52

Empuje del aire
Un volumen de 1 cm
3
de aire tiene,
dependiendo de la temperatura, humedad
del aire y presión del aire, un peso aprox�
de 1,2 mg� En la medición en el aire el
cuerpo experimenta por cm3 de su
volumen un empuje correspondiente�
El error que resulta, al no considerar el
empuje del aire, se registra en la tercera
posición decimal, y que ha de ser corregido�
El empuje del aire se considera en la
ecuación siguiente
W (a) ∙ [ρ (fl) – ρ (a)]
ρ = + ρ (a)�
W (a) – W (fl)
en donde ρ (a) = 0,0012 g/cm
3
= densidad
del aire en condiciones normales (temperatura 20°C, presión 101,325 kPa)�
Profundidad de inmersión
La cesta, para la inmersión de la muestra
durante la medición en líquido, está fijado
por dos alambres y se sumerge aprox�
30 mm en el líquido� Puesto que la balanza
se tara antes de cada medición, el empuje
adicional, mediante la pieza sumergida del
sistema de medida, no se considera en la
determinación de la densidad�
En la medición en líquido, el volumen
de líquido desplazado corresponde al
volumen de la muestra� Esto hace que los
alambres que fijan el platillo se sumerjan
a más profundidad y originen un empuje
adicional, el que se considera como
error en la determinación de la densidad�
Este error se corrige mediante la ecuación
siguiente:
W (a) ∙ [ρ (fl) – ρ (a)]
ρ = + ρ (a)
corr [W (a) – W (fl)]
52
Page 53

Adhesión del líquido en el alambre
Al sumergirla cesta de inmersión en el
líquido de empuje se escurre líquido hacia
arriba por el alambre, debido a las fuerzas
de adhesión, resultando de esto un peso
adicional de algunos miligramos�
Puesto que la cesta de inmersión, tanto en
la medición en aire así como también en la
medición en líquido, se encuentra en el
medio de empuje y la balanza se tara al
comienzo de cada medición, puede desatenderse la influencia del “menisco” del
líquido�
Para reducir la tensión de superficie y el
roce del líquido en el alambre se agrega,
en el agua destilada contenida en el
recipiente, aprox� tres gotas de un agente
tensioactivo (Mirasol antiestático o detergente de limpieza común)�
A causa del escurrimiento del líquido de
empuje hacia arriba en el alambre, puede
que el valor del peso sufra todavía una
modificación lenta después de aparecer
“g”� Es por eso que, el valor de peso
debería ser leído directamente después
de aparecer “g” �
Burbujas de aire
El error de medición, producto de burbujas
de aire adheridas en la muestra, puede
estimarse de la manera siguiente: en una
burbuja de aire con un diámetro de 0,5
mm resulta un empuje adicional menor que
0,1 mg, al realizar la medición en agua�
Con un diámetro de 1 mm el empuje
adicional resultante es de aprox� 0,5 mg,
y con un diámetro de 2 mm aprox� 4,2 mg�
Por eso, las burbujas de aire más grandes
deberían barrerse con un pincel fino o
medio auxiliar similar�
La humectación también puede realizarse
de antemano, en un recipiente separado�
53
Page 54

Determinación de la densidad
Determinación de la densidad de cuerpos
sólidos
Preparación
(en la descripción se utiliza agua destilada)
– Centrar el recipiente en la chapa
inferior, el soporte sirve como tope
trasero
– Llenar con agua destilada hasta aprox�
5 mm bajo el borde
– Echar tres gotas de agente tensioactivo
en el agua destilada
– Fijar el termómetro con la abrazadera
al borde del vaso analítico
– Limpiar la cesta de inmersión con
algún disolvente (especialm� los
alambres sumegidos) y colgarlo en el
soporte de barras
Proceso de medición
Determinar el peso de la muestra
en el aire
– Tarar balanza
– Colocar muestra en el platillo superior
del soporte de barras y pesar
– Anotar el valor de peso W (a)
Determinar el empuje G = W (a) – W (fl)
– Tarar balanza con la muestra puesta en
la cesta superior del soporte de barras
– Colocar la muestra en el platillo de
inmersión
1
)
– Anotar el valor absoluto del empuje
indicado G con signo negativo
Cálculo de la densidad
– Leer la temperatura
– Utilizar el valor de la densidad ρ (fl) de
la tabla, en el anexo, considerando la
temperatura ya leída
– Calcular la densidad según la ecuación
siguiente:
W (a) ∙ [ρ (fl) – 0�0012 g/cm3]
ρ = +
corr G
0�0012 g/cm
W (a) y G en g; ρ (fl) en g/cm3
G= W (a) – W (fl)
3
54
1
) (para esto se retira la cesta de inmersión
del dispositivo de medición, es importante
aquí que al volver a sumergir en el líquido
no se adhiera adicionalmente ninguna
burbuja de aire; es mejor, en este caso,
poner la muestra directamente con pinza
o similar)
Page 55

Tablas
Valores de densidad del H2O a temperatura T (en °C)
T/°C 0,0 0,1 0,2 0,3 0,4 0,5 0,6 0,7 0,8 0,9
10. 0,99973 0,99972 0,99971 0,99970 0,99969 0,99968 0,99967 0,99966 0,99965 0,99964
11. 0,99963 0,99962 0,99961 0,99960 0,99959 0,99958 0,99957 0,99956 0,99955 0,99954
12. 0,99953 0,99951 0,99950 0,99949 0,99948 0,99947 0,99946 0,99944 0,99943 0,99942
13. 0,99941 0,99939 0,99938 0,99937 0,99935 0,99934 0,99933 0,99931 0,99930 0,99929
14. 0,99927 0,99926 0,99924 0,99923 0,99922 0,99920 0,99919 0,99917 0,99916 0,99914
15. 0,99913 0,99911 0,99910 0,99908 0,99907 0,99905 0,99904 0,99902 0,99900 0,99899
16. 0,99897 0,99896 0,99894 0,99892 0,99891 0,99889 0,99887 0,99885 0,99884 0,99882
17. 0,99880 0,99879 0,99877 0,99875 0,99873 0,99871 0,99870 0,99868 0,99866 0,99864
18. 0,99862 0,99860 0,99859 0,99857 0,99855 0,99853 0,99851 0,99849 0,99847 0,99845
19. 0,99843 0,99841 0,99839 0,99837 0,99835 0,99833 0,99831 0,99829 0,99827 0,99825
20. 0,99823 0,99821 0,99819 0,99817 0,99815 0,99813 0,99811 0,99808 0,99806 0,99804
21. 0,99802 0,99800 0,99798 0,99795 0,99793 0,99791 0,99789 0,99786 0,99784 0,99782
22. 0,99780 0,99777 0,99775 0,99773 0,99771 0,99768 0,99766 0,99764 0,99761 0,99759
23. 0,99756 0,99754 0,99752 0,99749 0,99747 0,99744 0,99742 0,99740 0,99737 0,99735
24. 0,99732 0,99730 0,99727 0,99725 0,99722 0,99720 0,99717 0,99715 0,99712 0,99710
25. 0,99707 0,99704 0,99702 0,99699 0,99697 0,99694 0,99691 0,99689 0,99686 0,99684
26. 0,99681 0,99678 0,99676 0,99673 0,99670 0,99668 0,99665 0,99662 0,99659 0,99657
27. 0,99654 0,99651 0,99648 0,99646 0,99643 0,99640 0,99637 0,99634 0,99632 0,99629
28. 0,99626 0,99623 0,99620 0,99617 0,99614 0,99612 0,99609 0,99606 0,99603 0,99600
29. 0,99597 0,99594 0,99591 0,99588 0,99585 0,99582 0,99579 0,99576 0,99573 0,99570
30. 0,99567 0,99564 0,99561 0,99558 0,99555 0,99552 0,99549 0,99546 0,99543 0,99540
55
Page 56

Valores de densidad del etanol a temperatura T (en °C)
T/°C 0,0 0,1 0,2 0,3 0,4 0,5 0,6 0,7 0,8 0,9
10. 0,79784 0,79775 0,79767 0,79758 0,79750 0,79741 0,79733 0,79725 0,79716 0,79708
11. 0,79699 0,79691 0,79682 0,79674 0,79665 0,79657 0,79648 0,79640 0,79631 0,79623
12. 0,79614 0,79606 0,79598 0,79589 0,79581 0,79572 0,79564 0,79555 0,79547 0,79538
13. 0,79530 0,79521 0,79513 0,79504 0,79496 0,79487 0,79479 0,79470 0,79462 0,79453
14. 0,79445 0,79436 0,79428 0,79419 0,79411 0,79402 0,79394 0,79385 0,79377 0,79368
15. 0,79360 0,79352 0,79343 0,79335 0,79326 0,79318 0,79309 0,79301 0,79292 0,79284
16. 0,79275 0,79267 0,79258 0,79250 0,79241 0,79232 0,79224 0,79215 0,79207 0,79198
17. 0,79190 0,79181 0,79173 0,79164 0,79156 0,79147 0,79139 0,79130 0,79122 0,79113
18. 0,79105 0,79096 0,79088 0,79079 0,79071 0,79062 0,79054 0,79045 0,79037 0,79028
19. 0,79020 0,79011 0,79002 0,78994 0,78985 0,78977 0,78968 0,78960 0,78951 0,78943
20. 0,78934 0,78926 0,78917 0,78909 0,78900 0,78892 0,78883 0,78874 0,78866 0,78857
21. 0,78849 0,78840 0,78832 0,78823 0,78815 0,78806 0,78797 0,78789 0,78780 0,78772
22. 0,78763 0,78755 0,78746 0,78738 0,78729 0,78720 0,78712 0,78703 0,78695 0,78686
23. 0,78678 0,78669 0,78660 0,78652 0,78643 0,78635 0,78626 0,78618 0,78609 0,78600
24. 0,78592 0,78583 0,78575 0,78566 0,78558 0,78549 0,78540 0,78532 0,78523 0,78515
25. 0,78506 0,78497 0,78489 0,78480 0,78472 0,78463 0,78454 0,78446 0,78437 0,78429
26. 0,78420 0,78411 0,78403 0,78394 0,78386 0,78377 0,78368 0,78360 0,78351 0,78343
27. 0,78334 0,78325 0,78317 0,78308 0,78299 0,78291 0,78282 0,78274 0,78265 0,78256
28. 0,78248 0,78239 0,78230 0,78222 0,78213 0,78205 0,78196 0,78187 0,78179 0,78170
29. 0,78161 0,78153 0,78144 0,78136 0,78127 0,78118 0,78110 0,78101 0,78092 0,78084
30. 0,78075 0,78066 0,78058 0,78049 0,78040 0,78032 0,78023 0,78014 0,78006 0,77997
56
Page 57

Anexo
Este anexo le ayudará a comprender mejor
cómo se han obtenido las fórmulas y del
factor de corrección�
Principios básicos
Masa (g)
Densidad =
Volumen (cm
La ley de Arquímedes:
Un cuerpo sumergido en un líquido
experimenta una fuerza de empuje (G)�
Esta fuerza es igual a la fuerza del peso
del líquido desplazado por el volumen
del cuerpo� El volumen de un cuerpo
sumergido V (k) es igual al volumen del
líquido desplazado V (fl)�
Se determina:
1� El peso en el aire W (a)
2� Empuje del cuerpo en el líquido (G)
La densidad de un cuerpo es:
Masa del cuerpo
ρ = =
Volumen cuerpo
Si la densidad ρ (fl) del líquido desplazado
es conocido, entonces
Masa (fl)
V (fl) = =
ρ (fl)
de aquí resulta:
W (a) ∙ ρ (fl)
ρ =
G
W (a)
V (s)
G
ρ (fl)
3
)
W (a)
=
V (fl)
Cálculo
La densidad del cuerpo sólido se calcula
según la relación
ρ : W (a) = ρ (fl) : W (a) – W (fl),
de aquí resulta:
W (a) ∙ ρ (fl)
ρ =
W (a) – W (fl)
W (a) – W (fl) = G = empuje de la muestra
De donde:
ρ = la densidad del cuerpo sólido
ρ (fl) = la densidad del líquido
W (a) = el peso del cuerpo sólido
W (fl) = el peso del cuerpo sólido
en el aire
en el líquido
57
Page 58

Empaquetar el dit de determinación
de densidad para el transporte
Para empaquetar el kit, proceda de la
siguiente manera:
Preste atención a colocar el recipiente
y la cubierta en la pieza de espuma
interior tal y como se muestra en la
figura. De lo contrario no podrá colocarse
correctamente el kit de determinación
de densidad en la maleta de transporte.
t Introduzca el estribo de inmersión (1)
en la pieza de gomaespuma interior (6)
5
4
3
2
1
t Introduzca el recipiente (2) en la pieza
de gomaespuma interior (6)
t Coloque la cubierta (3) sobre el
recipiente
t Ponga la almohadilla redonda (4) sobre
la cubierta
t Introduzca el soporte (5) desde arriba
sobre la almohadilla redonda en la pieza
de gomaespuma interior
58
6
Page 59

目录
套件组件 � � � � � � � � � � � � � � � � � � � � � � � � � � � � � � � � 61
准备开始 � � � � � � � � � � � � � � � � � � � � � � � � � � � � � � � � 62
确定密度的方法� � � � � � � � � � � � � � � � � � � � � � � � � � � 64
误差来源和纠正选项 � � � � � � � � � � � � � � � � � � � � � � � 65
确定比密度 � � � � � � � � � � � � � � � � � � � � � � � � � � � � � � 68
– 固体 � � � � � � � � � � � � � � � � � � � � � � � � � � � � � � � � � � 68
表格 � � � � � � � � � � � � � � � � � � � � � � � � � � � � � � � � � � � � 69
H
O 的密度值 � � � � � � � � � � � � � � � � � � � � � � � � � � � � � 69
2
乙醇的密度值 � � � � � � � � � � � � � � � � � � � � � � � � � � � � 70
补充资料 � � � � � � � � � � � � � � � � � � � � � � � � � � � � � � � � 71
59
Page 60

有了新 Sartorius 密度测定套件,您的电子天平从此
将拥有一套优质附件。
此附件套件将减轻您的日常工作负担。
在设置您的密度测定套件并开始操作它之前,请仔
细阅读本用户手册。
如果您的天平配备有密度测定程序,您可以使用该
程序测定密度值。
在此情况下,请仅参考设置指南和操作介绍。
然后按照密度测定程序的相关说明执行密度测定。
60
Page 61

套件组件
1 支架
2 盖板
3 沉浸架
4 样品架
5 容器
6 温度计
7 固定夹
61
Page 62

准备开始
YDK04 密度测定套件可用于下列天平:
– Secura
– Quintix
– Practum
®
型号1102、2102、3102、5102
®
型号612、1101、2101、3102、5102
®
型号621、1102、2102
准备天平
将支架放置于天平上之前,需先调好天平。
t 移除天平称重盘和盘支架。
安装密度测定套件
请按以下步骤安装密度测定套件:
t 将支架安装在天平称尖柱上。
62
Page 63

t 将盖板安装在刚才搭好的支架上。
此时,请确保盖板定位准确,位于中心。
t 在容器中加入液体(如水或乙醇)并将容器置于
安装好的盖板上。
t 将样品架(盘钩挂件)插入沉浸架。
t 将装有样品架的沉浸架与支架连接。
确保样品架完全浸入液体中。如有需要,可添加
液体。沉浸样品支架时,确保样品支架中无气
泡。
t 使用固定夹将温度计固定于容器(如需要)。
63
Page 64

测定密度的方法
使用本测量设备测定固体的比重时,适
用阿基米德定律:
浸入液体的固体具有浮力。浮力值等于
固体体积排开的液体重力。
利用允许您在大气中以及水中称量固体
重量的流体静力学天平,可以测定固体
的密度,如果已知液体介质的密度:
W (a) ∙ ρ (fl)
ρ =
W (a) – W (fl)
其中:
ρ = 固体的比重
ρ (fl) = 液体的密度
W (a) = 固体在大气中的重量
W (fl) = 固体在液体中的重量
64
Page 65

误差来源和纠正选项
上一页中用于测定固体密度的公式足以
实现两位小数点的精确度,取决于样品
量。该密度测定套件设计用于测定重量
为 10g-2kg 样品的密度。
取决于您需要的精确度而定,请考虑下
列误差和公差系数。
– 产生浮力的液体密度依赖于其温度
– 在大气中称量的大气浮力
– 浸入样品时沉浸架浸入水位的变化
– 沉浸架悬线上的液体粘附力
– 样品上的气泡
可以通过计算来修正一些误差。操作
时,请执行以下步骤:
– 测量参考液体的温度并相应修正其
密度
液体密度对温度的依赖性
产生浮力的液体密度依赖于温度。温度
发生每摄氏度变化时密度变化的范围
– 蒸馏水,0�02%
– 酒精和碳氢化合物,0�1%。
换句话说,在密度测定期间,这可以
表现在第三个小数位。
要根据温度修正液体密度,请执行下列
步骤:
– 使用本套件随附的温度计测量液体
温度
– 使用本手册背面的表格
体、水和乙醇在已测温度下的
并使用此密度求 ρ (fl) 值。
查找常用液
密度,
65
Page 66

大气浮力
1 立方厘米体积大气的重量约为 1.2 毫克,
具体取决于其温度、湿度和大气压力。
在大气中称量重量时,固体的浮力为其
每立方厘米体积的相应浮力。如果不在
第三个小数位考虑大气浮力,则会出现
误差,因此应进行修正。
浸入深度
在液体中称重期间,用于固定和/或浸入
样品的盘可靠连接到两根连接线上并浸
入液体表面以下大约 30 毫米。由于每次
测量之前已经称出天平的皮重,密度测
定中不考虑测量设备浸入部分产生的其
它浮力。
下列公式考虑到大气浮力:
W (a) ∙ [ρ (fl) – ρ (a)]
ρ = + ρ (a)。
W (a) – W (fl)
其中 ρ (a) = 0.0012 克/立方厘米 = 标准条
件(温度 20°C、压力 101.325 kPa)下的
大气密度。
在液体中称量固体样品时,将排开
一定量的液体体积,该体积对应于
固体样品的体积。这会使盘挂钩组
件的连接线浸入更深并产生导致
比重测定误差的额外浮力。
使用下列公式修正该误差:
W (a) ∙ [ρ (fl) – ρ (a)]
ρ = + ρ (a)
修正 [W (a) – W (fl)]
66
Page 67

液体对连接线的粘附力
当样品架被浸入会产生浮力的液体时,
液体由于粘附力的作用会抬起连接线
并产生几毫克范围的额外重量。
在大气中称重或在液体中称重期间,由
于样品架位于会产生浮力的液体中,且
在每次测量程序开始时已称出天平的皮
重,因此可以忽视液体弯月面的影响。
气泡
可以采用下列方式消除因气泡粘附到样
品上所产生的测量误差。在水中称量样
品时,直径为 0.5 毫米的气泡会产生低
于 0.1 毫克的额外浮力。直径为 1 毫米
的气泡会产生 0.5 毫克的额外浮力,直
径为 2 毫米的气泡会产生约 4.2 毫克的
额外浮力。必须使用细刷或其他工具清
除更大的气泡。
为了减少液体在连接线上的表面张力和
摩擦,将三滴表面活性剂(Mirasol 防静
电剂或普通洗涤剂)添加到烧杯中的蒸
馏水内。
由于液体会抬起连接线,即使在显示
稳定符号 “g" 之后,重量可能也会慢慢
变化。因此,在显示 “g" 之后立即读取
重量。
您也可以在称重之前先在独立的容器中
弄湿样品。
67
Page 68

测定密度
测定固体密度
准备
(本描述使用蒸馏水)
– 将容器对准底座中心;支架在后部作
为阻挡器。
– 加注蒸馏水,使蒸馏水水位大约处在
边缘之下 5 毫米
– 将三滴表面活性剂添加到蒸馏水中
– 使用保持器夹将温度计固定到烧杯
边缘
– 使用溶剂清洁样品托盘(特别是将被
浸入的连接线)并将其悬挂在支架上
测量程序
测定样品在大气中的重量
– 清除天平的皮重
– 将样品置于支架的上盘内并称重
– 记录重量 W (a)
测定浮力
G = W (a) – W (fl)
– 将样品置于支架的上盘内时清除天平的
皮重
– 将样品置于样品托盘内
1
)
– 记录浮力 “G" 的绝对读数,该读数显
示时带有一个负号
计算比重
– 读取液体的温度
– 使用本手册背面的表格查找密度 ρ (fl),
该密度对应于您正使用的液体的温度
– 使用下列公式计算比重:
W (a) ∙ [ρ (fl) – 0�0012 g/cm3]
ρ = +
修正
G
0�0012 g/cm
W (a) 和 G 的单位为克;ρ (fl) 的单位为
克/立方厘米;G = W (a) – W (fl)
3
68
1
) 如果您在执行此操作时从测量设备上拆
下盘挂钩组件,确保重新浸入时该组件
上面没有其他气泡;最好使用镊子或相
似工具将样品直接放在盘上。
Page 69

表格
H2O 在温度 T (°C) 时的密度
T/°C 0.0 0.1 0.2 0.3 0.4 0.5 0.6 0.7 0.8 0.9
10. 0�99973 0�99972 0�99971 0�99970 0�99969 0�99968 0�99967 0�99966 0�99965 0�99964
11. 0�99963 0�99962 0�99961 0�99960 0�99959 0�99958 0�99957 0�99956 0�99955 0�99954
12. 0�99953 0�99951 0�99950 0�99949 0�99948 0�99947 0�99946 0�99944 0�99943 0�99942
13. 0�99941 0�99939 0�99938 0�99937 0�99935 0�99934 0�99933 0�99931 0�99930 0�99929
14. 0�99927 0�99926 0�99924 0�99923 0�99922 0�99920 0�99919 0�99917 0�99916 0�99914
15. 0�99913 0�99911 0�99910 0�99908 0�99907 0�99905 0�99904 0�99902 0�99900 0�99899
16. 0�99897 0�99896 0�99894 0�99892 0�99891 0�99889 0�99887 0�99885 0�99884 0�99882
17. 0�99880 0�99879 0�99877 0�99875 0�99873 0�99871 0�99870 0�99868 0�99866 0�99864
18. 0�99862 0�99860 0�99859 0�99857 0�99855 0�99853 0�99851 0�99849 0�99847 0�99845
19. 0�99843 0�99841 0�99839 0�99837 0�99835 0�99833 0�99831 0�99829 0�99827 0�99825
20. 0�99823 0�99821 0�99819 0�99817 0�99815 0�99813 0�99811 0�99808 0�99806 0�99804
21. 0�99802 0�99800 0�99798 0�99795 0�99793 0�99791 0�99789 0�99786 0�99784 0�99782
22. 0�99780 0�99777 0�99775 0�99773 0�99771 0�99768 0�99766 0�99764 0�99761 0�99759
23. 0�99756 0�99754 0�99752 0�99749 0�99747 0�99744 0�99742 0�99740 0�99737 0�99735
24. 0�99732 0�99730 0�99727 0�99725 0�99722 0�99720 0�99717 0�99715 0�99712 0�99710
25. 0�99707 0�99704 0�99702 0�99699 0�99697 0�99694 0�99691 0�99689 0�99686 0�99684
26. 0�99681 0�99678 0�99676 0�99673 0�99670 0�99668 0�99665 0�99662 0�99659 0�99657
27. 0�99654 0�99651 0�99648 0�99646 0�99643 0�99640 0�99637 0�99634 0�99632 0�99629
28. 0�99626 0�99623 0�99620 0�99617 0�99614 0�99612 0�99609 0�99606 0�99603 0�99600
29. 0�99597 0�99594 0�99591 0�99588 0�99585 0�99582 0�99579 0�99576 0�99573 0�99570
30. 0�99567 0�99564 0�99561 0�99558 0�99555 0�99552 0�99549 0�99546 0�99543 0�99540
69
Page 70

乙醇在温度 T (°C) 时的密度
T/°C 0.0 0.1 0.2 0.3 0.4 0.5 0.6 0.7 0.8 0.9
10. 0�79784 0�79775 0�79767 0�79758 0�79750 0�79741 0�79733 0�79725 0�79716 0�79708
11. 0�79699 0�79691 0�79682 0�79674 0�79665 0�79657 0�79648 0�79640 0�79631 0�79623
12. 0�79614 0�79606 0�79598 0�79589 0�79581 0�79572 0�79564 0�79555 0�79547 0�79538
13. 0�79530 0�79521 0�79513 0�79504 0�79496 0�79487 0�79479 0�79470 0�79462 0�79453
14. 0�79445 0�79436 0�79428 0�79419 0�79411 0�79402 0�79394 0�79385 0�79377 0�79368
15. 0�79360 0�79352 0�79343 0�79335 0�79326 0�79318 0�79309 0�79301 0�79292 0�79284
16. 0�79275 0�79267 0�79258 0�79250 0�79241 0�79232 0�79224 0�79215 0�79207 0�79198
17. 0�79190 0�79181 0�79173 0�79164 0�79156 0�79147 0�79139 0�79130 0�79122 0�79113
18. 0�79105 0�79096 0�79088 0�79079 0�79071 0�79062 0�79054 0�79045 0�79037 0�79028
19. 0�79020 0�79011 0�79002 0�78994 0�78985 0�78977 0�78968 0�78960 0�78951 0�78943
20. 0�78934 0�78926 0�78917 0�78909 0�78900 0�78892 0�78883 0�78874 0�78866 0�78857
21. 0�78849 0�78840 0�78832 0�78823 0�78815 0�78806 0�78797 0�78789 0�78780 0�78772
22. 0�78763 0�78755 0�78746 0�78738 0�78729 0�78720 0�78712 0�78703 0�78695 0�78686
23. 0�78678 0�78669 0�78660 0�78652 0�78643 0�78635 0�78626 0�78618 0�78609 0�78600
24. 0�78592 0�78583 0�78575 0�78566 0�78558 0�78549 0�78540 0�78532 0�78523 0�78515
25. 0�78506 0�78497 0�78489 0�78480 0�78472 0�78463 0�78454 0�78446 0�78437 0�78429
26. 0�78420 0�78411 0�78403 0�78394 0�78386 0�78377 0�78368 0�78360 0�78351 0�78343
27. 0�78334 0�78325 0�78317 0�78308 0�78299 0�78291 0�78282 0�78274 0�78265 0�78256
28. 0�78248 0�78239 0�78230 0�78222 0�78213 0�78205 0�78196 0�78187 0�78179 0�78170
29. 0�78161 0�78153 0�78144 0�78136 0�78127 0�78118 0�78110 0�78101 0�78092 0�78084
30. 0�78075 0�78066 0�78058 0�78049 0�78040 0�78032 0�78023 0�78014 0�78006 0�77997
70
Page 71

补充资料
本补充资料能够帮助您更好了解本手册
使用的公式和公差系数是如何求值的。
基本原理
质量(克)
密度 =
体积(立方厘米)
阿基米德定律:
浸在液体里的固体受到向上的浮力 (G) 的
作用。浮力的大小等于被该固体排开的
液体的重力。浸入固体的体积 V 等于被
排开的液体的体积 V (fl)。
测定下列数值:
1. 样品在大气中的重量:W (a)
2. 固体在液体中的浮力:G
固体的密度:
样品质量
ρ = =
样品体积
如果排开液体的密度 ρ (fl) 已知,则
质量 (fl)
V (fl) = =
ρ (fl)
因此:
W (a) ∙ ρ (fl)
ρ =
G
W (a)
V (s)
G
ρ (fl)
=
W (a)
V (fl)
计算
固体的比重可通过比率
ρ 计算:W (a) = ρ (fl):W (a) – W (fl),
其中:
W (a) ∙ ρ (fl)
ρ =
W (a) – W (fl)
W (a) – W (fl) = G = 样品的浮力
其中:
ρ = 固体的比重
ρ (fl) = 液体的密度
W (a) = 固体在大气中的重量
W (fl) = 固体在液体中的重量
71
Page 72

密度测定套件的运输包装
密度测定套件的运输包装步骤如下:
务必将容器和盖板放置在内部泡沫
板上,如图所示。否则您无法 将密
度测定套件放置于其在运输箱内的
正确位置上。
t 将沉浸架(1)插入内部泡沫板
(6)。
5
4
3
2
1
t 将容器( 2)插入内部泡沫板(6)。
t 将盖板(3)放置在容器上。
t 将圆垫(4)置于盖板上方。
t 将支架(5)置于圆垫上,从上方插
入内部泡沫板。
72
6
Page 73

Sartorius Weighing Technology GmbH
Weender Landstrasse 94–108
37075 Goettingen, Germany
Phone +49�551�308�0
Fax +49�551�308�3289
www�sartorius�com
Sartorius Scientific Instruments (Beijing) Co�,
Ltd�No� 33 Yu An Road,
Shunyi District, Zone B,
Tianzhu Airport Industry Park,
101300 Beijing, P�R� China
Phone +86�10�8042�6300
Fax +86�10�8042�6551
www�sartorius�com�cn
Copyright by Sartorius, Goettingen, Germany�
All rights reserved� No part of this publication
may be reprinted or translated in any form
or by any means without the prior written
permission of Sartorius�
The status of the information, specifications
and illustrations in this manual is indicated
by the date given below�
Sartorius reserves the right to make changes
to the technology, features, specifications and
design of the equipment without notice�
Status:
May 2013,
Sartorius Weighing Technology GmbH,
Goettingen, Germany
Printed in Germany on paper that has
been bleached without any use of chlorine
W_YDK04 ∙ KT
Publication No�: WYD6153ck13051
 Loading...