

Sartorius MCM10K3, YCM20MC-DAkkS, YCM20MC-Tower, MCM10K3-DAkkS, MCM40K3 Installation Instructions Manual
...Page 1

Installation Instructions | Installationsanleitung
Sartorius YCM20MC...
Climate Module | Klimamodul
98647-004-99
Page 2

English Page 3
In cases involving questions of
interpretation, the German-language
version shall prevail.
Deutsch Seite 12
Im Auslegungsfall ist die
deutsche Sprache maßgeblich.
22
Page 3

Contents
Contents ....................................3
Intended Use................................. 3
Possible Application............................ 4
Warning and Safety Instructions .................. 5
Installation .................................. 6
Air Buoyancy Correction ........................ 9
Transporting the Climate Module................. 11
Intended Use
The climate module is used to record climate data such as
temperature, air pressure, and humidity. When used in a
Sartorius balance near the sample, it can determine the air
density and thus perform an air buoyancy correction. This
in turn considerably increases the measurement accuracy
of the balance. The monitoring of climate limit values
is also possible both inside and outside of the weighing
chamber.
The climate module is located within the weighing
chamber in balances with a corresponding draft shield.
The climate module can also be attached to an external
tower outside of the draft shield to record climate data.
3
Page 4

Possible Application
– YCM20MC:
Climate module, uncalibrated, for all Cubis MCM and
MSAxx-PC models
– YCM20MC-DAkkS:
Climate module with DAkkS calibration certificate for all
Cubis MCM and MSAxx-PC models
– YCM20MC-Tower:
Tower for climate module, for mounting YCM20MC
(-DAkkS), can be connected to the following models
MCM10K3 (-DAkkS), MCM40K3 (-DAkkS), MCM60K3
(-DAkkS), MCM60K2 (-DAkkS) and MSAxxx-PC.
4
Page 5
Warning and Safety Instructions
Installation
Only connect or disconnect the climate
module when the device is unplugged
from the power supply.
t Connect the D-SUB plug securely to the
device.
Safety
The climate module should only be
used indoors, and make sure that
foreign bodies and liquids cannot
penetrate it.
ESD protection measures must be
taken
Do not touch conductive parts for
reasons of ESD protection.
Therefore, when inserting the climate
module, only touch the housing or the
side edges! Do not touch the contact
surfaces.
Therefore: Take preventative measures.
As a minimum safeguard, you should
touch a grounded piece of metal to
discharge any static electricity.
5
Page 6
Installation
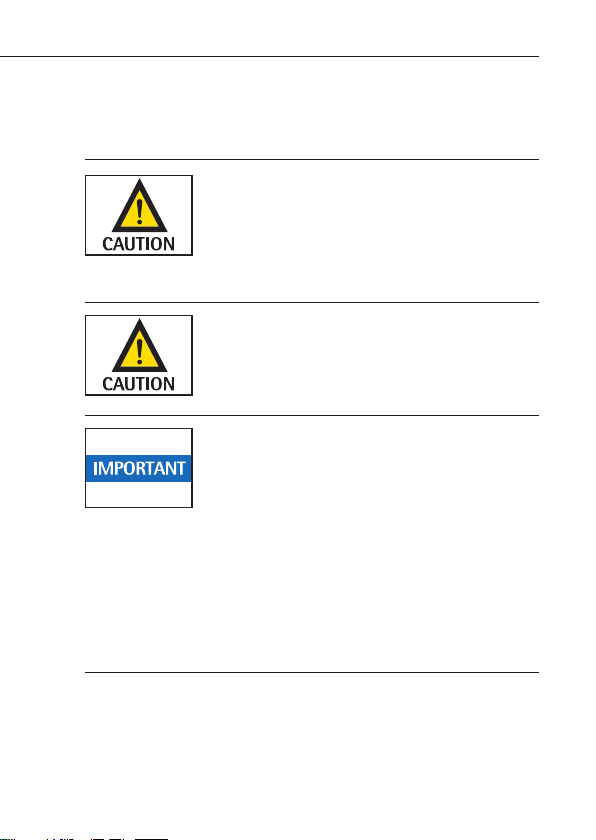
Removing the Sticker
Remove the sticker
t
over the recess in the
weighing chamber.
Inserting the Climate Module into the Weighing
Chamber
t Insert the climate
module into the recess
provided on the back of
the weighing chamber.
6
Page 7

Comparator model MCM6.7: Inserting the Climate
Module
t Fold up the climate
module holder.
t Insert the climate
module into the recess
provided on the climate
module holder and then
carefully lower the
climate module in the
holder into the draft
shield.
7
Page 8
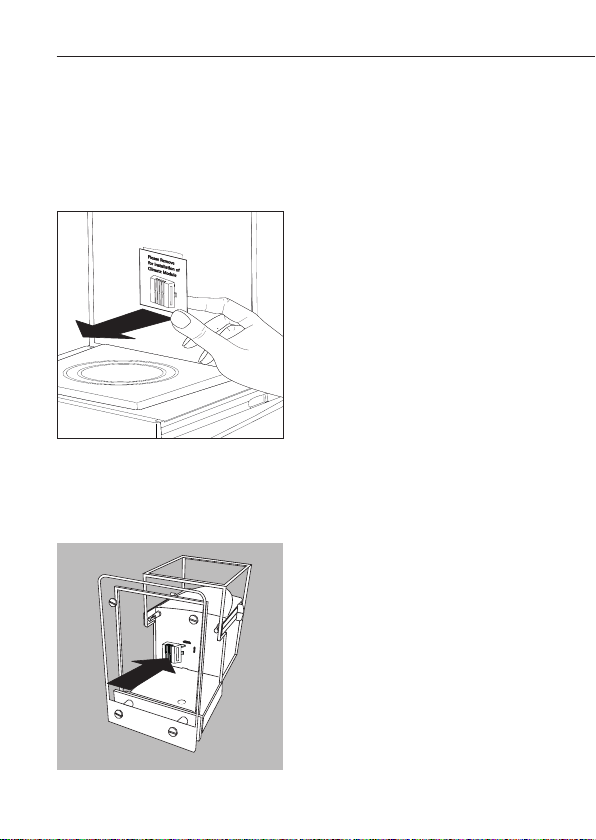
YCM20MC-Tower Installation
t Insert the climate
module into the recess
provided on the housing
of the tower.
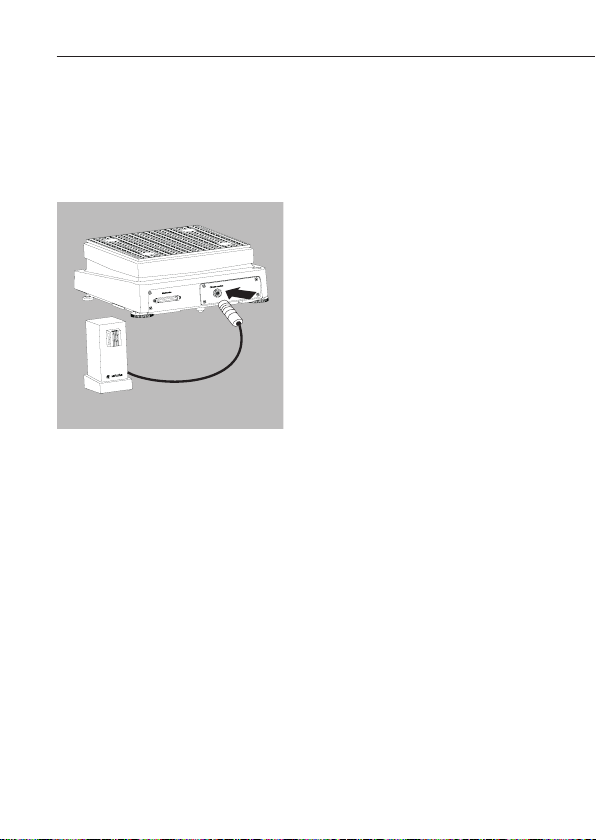
t Next, connect the tower
at the rear of the weigh
cell:
Screw the supplied 5-pin
cable into the tower and
the weigh cell.
8
Page 9

Specifications
The climate module internal memory contains parameters for
correcting the raw data from the individual climate sensors
including the associated uncertainty data.
The processing and correction of raw sensor data takes place
in the respective end device to which the climate module has
been adapted (e.g. Cubis mass comparator).
The specific corrected value for the respective climate
parameter (
measurement in connection with the associated uncertainty
data
to the climate module memory sensor-specific.
For a calibrated climate module (YCM20MC-DAkkS), the
following standard uncertainties
the given measurement ranges:
t, p, hr
) represents the result of the climate
U, k
= 2. The expanded uncertainty U is saved in this case
u, k
= 1 are specified for
– Temperature:
– Air pressure:
– Humidity:
u
= 0.15 K, 18°C < t < 27°C
t
u
= 1 hPa, 800 hPa < p < 1100 hPa
p
u
= 1%, 30% < hr < 70%
hr
u
= 2%, 70% < hr < 90%
hr
9
Page 10

For a non-calibrated climate module (YCM20MC), the
following standard uncertainties
u, k
= 1 are specified for the
given measurement ranges:
– Temperature:
– Air pressure:
– Humidity:
10
u
= 0.45 < K,18°C < t < 27°C
t
u
= 3 hPa, 800 hPa < p < 1100 hPa
p
u
= 3%, 30% < hr < 70%
hr
u
= 6%, 70% < hr < 90%
hr
Page 11

Transporting the Climate Module
Only transport the climate module packed in its original case.
t Unlock the climate
module by pressing the
two sides together, then
remove.
11
Page 12

12
Page 13

Inhalt
Inhalt ..................................... 13
Verwendungszweck ...........................13
Einsatzmöglichkeit............................ 14
Warn- und Sicherheitshinweise .................. 15
Installation ................................. 16
Spezifikation ................................19
Versand des Klimamoduls ...................... 21
Verwendungszweck
Das Klimamodul dient der Erfassung der Klimadaten
Temperatur, Luftdruck und Luftfeuchte. Eingesetzt
in einer Sartorius Waage kann in unmittelbarer Nähe
des Wägeguts die Luftdichte bestimmt und somit
eine Luftauftriebskorrektur durchgeführt werden.
Dadurch kann die Messwertgenauigkeit der Waage
erheblich gesteigert werden. Die Überwachung von
Klimagrenzwerten innerhalb wie außerhalb des
Wägeraumes ist ebenso möglich.
Das Klimamodul befindet sich bei Waagen mit
entsprechendem Windschutz innerhalb des Wägeraumes.
Zur Erfassung der Klimadaten auch außerhalb des
Windschutzes wird das Klimamodul an einem externen
Tower befestigt.
13
Page 14

Einsatzmöglichkeit
– YCM20MC:
Klimamodul, unkalibriert, für alle Cubis MCM und
MSAxxx-PC Modelle
– YCM20MC-DAkkS:
Klimamodul mit DAkkS-Kalibrierschein für alle Cubis MCM
und MSAxxx-PC Modelle
– YCM20MC-Tower:
Tower für Klimamodul, zur Aufnahme des YCM20MC
(-DAkkS), anschließbar an folgende Modelle MCM10K3
(-DAkkS), MCM40K3(-DAkkS), MCM60K3(-DAkkS),
MCM60K2(-DAkkS) und MSAxxx-PC.
14
Page 15

Warn- und Sicherheitshinweise
Installation
Das Klimamodul nur stecken oder
trennen, wenn das Gerät nicht unter
Spannung steht.
t D-SUB-Stecker fest am Gerät
anschrauben.
Sicherheit
Das Klimamodul nur innerhalb von
Gebäuden einsetzen und nur so, dass
das Eindringen von Fremdkörpern oder
Flüssigkeiten verhindert wird.
ESD-Schutz beachten
Aus Gründen des ESD-Schutzes nicht
an elektrisch leitende Teile fassen.
Deshalb beim Einsetzen das Klimamodul nur am Gehäuse oder seitlich
am Rand berühren! Die Kontaktflächen
dabei nicht berühren.
Deshalb: Entsprechende Schutzvorkeh-
rungen treffen. Als mindeste Schutzmaßnahme zum Entladen an geerdetes
Metall fassen.
15
Page 16

Installation
Aufkleber entfernen
t Aufkleber über der
Aussparung im
Wägeraum entfernen.
Klimamodul in den Wägeraum einsetzen
t Setzen Sie das
Klimamodul in die dafür
vorgesehene Aussparung
an der Rückwand des
Wägeraumes ein.
16
Page 17

Komparator-Modell MCM6.7: Klimamodul einsetzen
t Klappen Sie den Halter
des Klimamoduls hoch.
t Setzen Sie das
Klimamodul in die dafür
vorgesehene Aussparung
in den Halter des
Klimamoduls ein und
senken Sie anschließend
das Klimamodul an dem
Halter vorsichtig in den
Windschutz ab.
17
Page 18

YCM20MC-Tower installieren
t Das Klimamodul in die
dafür vorgesehene
Aussparung am Gehäuse
des Towers einsetzen.
t Danach den Tower an der
Rückseite der Wägezelle
anschließen:
Das beiliegende 5-polige
Kabel am Tower und an
der Wägezelle
einschrauben.
18
Page 19

Spezifikation
Auf dem internen Speicher des Klimamoduls sind Parameter
zur Korrektur der Rohdaten der einzelnen Klimasensoren mit
zugehörigen Unsicherheitsangaben hinterlegt.
Die Verarbeitung und Korrektur der Sensorrohdaten erfolgt auf
dem jeweiligen Endgerät, an welches das Klimamodul adaptiert
wurde (z. B. Cubis Massekomparator).
Der spezifisch korrigierte Wert für den jeweiligen Klimaparameter (
Unsicherheitsangabe
dar. Die erweiterte Unsicherheit
im Speicher des Klimamoduls hinterlegt.
Für ein kalibriertes Klimamodul (YCM20MC-DAkkS)
werden für die angegebenen Messbereiche folgende
Standardunsicherheiten
t, p, hr
) stellt in Verbindung mit der zugehörigen
U, k
= 2 das Ergebnis der Klima messung
U
ist hierbei sensorspezifisch
u, k
= 1 spezifiziert:
– Temperatur:
– Luftdruck:
– Luftfeuchte:
u
= 0,15 K, 18 °C < t < 27 °C
t
u
= 1 hPa, 800 hPa < p < 1100 hPa
p
u
= 1 %, 30 % < hr < 70 %
hr
u
= 2 %, 70 % < hr < 90 %
hr
19
Page 20

Für ein nicht kalibriertes Klimamodul (YCM20MC)
werden für die angegebenen Messbereiche folgende
Standardunsicherheiten
u, k
= 1 spezifiziert:
– Temperatur:
– Luftdruck:
– Luftfeuchte:
20
u
= 0,45 < K,18 °C < t < 27°C
t
u
= 3 hPa, 800 hPa < p < 1100 hPa
p
u
= 3 %, 30 % < hr < 70 %
hr
u
= 6 %, 70 % < hr < 90 %
hr
Page 21

Versand des Klimamoduls
Das Klimamodul nur im Originalkoffer verpacken und
transportieren.
t Das Klimamodul durch
Zusammendrücken der
beiden Seiten entriegeln
und herausziehen.
21
Page 22

Page 23

Page 24

Sartorius Lab Instruments GmbH & Co. KG
Weender Landstrasse 94–108
37075 Goettingen, Germany
Phone +49.551.308.0
Fax +49.551.308-3289
www.sartorius.com
Copyright by Sartorius, Goettingen, Germany.
All rights reserved. No part of this publication may be
reprinted or translated in any form or by any means without
the prior written permission of Sartorius.
The status of the information, specifications and
illustrations in this manual is indicated by the date given
below. Sartorius reserves the right to make changes to
the technology, features, specifications and design of the
equipment without notice.
Status:
May 2015,
Sartorius Lab Instruments GmbH & Co. KG
Printed in the EU on paper bleached
without chlorine.
W_YCM20_ · KT
Publication No.: WYC6043-a150501
 Loading...