

Sartorius YCC01-USBM2,YCO12,YCRI-CC13,YCO13 Installation Instructions Manual

Installation Instructions | Installationsanleitung
Notice d’installation | Manuale d’installazione
Instrucciones de instalación
Sartorius
YCC01-USBM2,
YCO12 (USB-SBI), YCO13 (USB-BPI),
YCRI-CC13
RS-232/USB Interface Cable
Verbindungskabel RS232/USB
Câble de connexion RS232/USB
Cavo di collegamento RS232/USB
Cable de conexión RS232/USB
98647-003-67

English page 3
In cases involving questions of
interpretation, the German-language
version shall prevail.
Deutsch Seite 9
Im Auslegungsfall ist die
deutsche Sprache maßgeblich.
Français Page 15
En cas de problème d'interprétation,
la version allemande fait référence.
Italiano pagina 21
Nei casi di interpretazione dubbia
prevale la versione in lingua tedesca.
Español Página 27
En caso de duda o interpretaciones
dispares sobre el contenido de esta
documentación, prevalecerá la versión
en idioma alemán.
22

Contents
Contents ................................... 3
Intended Use................................ 3
Compatibility................................ 4
Warnings and Safety Precautions................. 4
Installation ................................. 5
Initial Connection ............................ 6
Notes on Installation .......................... 7
Declaration of Conformity ......................33
Intended Use
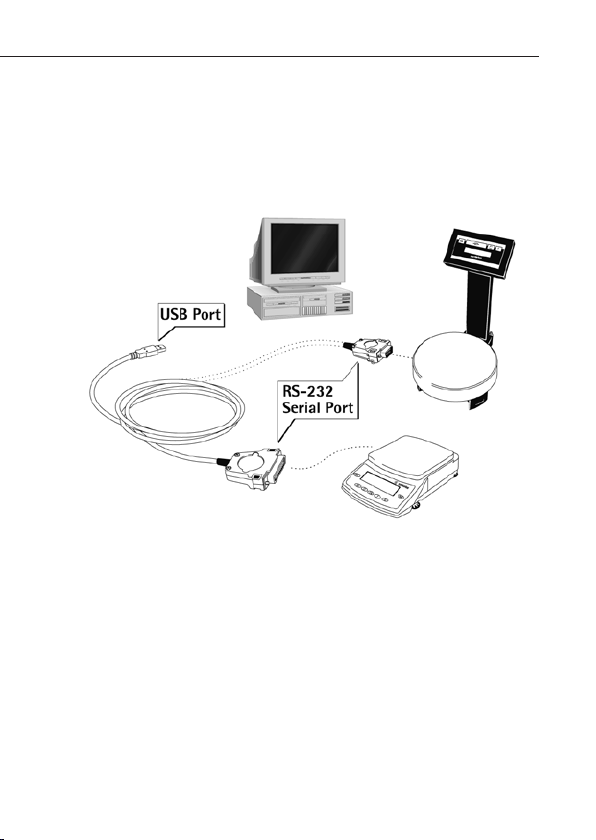
This USB interface device cable is a solution that enables
connection of a balance or scale to a computer via the
USB (universal serial bus) port. The USB interface is implemented as a virtual serial interface (virtual COM port).
For the application program running on the computer,
there is no difference between a serial interface physically
installed in the PC and one enabled in the form of a
virtual interface. The interface offers the same capabilities
in either case.
3

Compatibility
– YCC01-USBM2: Connect a Sartorius weighing instrument
with 25-pin data interface
– YCO12 (USB-SBI), YCO13 (USB-BPI):
Connect a Sartorius PMA series scale
– YCRI-CC13: Connect a Sartorius laboratory refractometer
System Requirements
– Computer (PC) running Windows
Windows
Server 2008, Windows
systems
– Available USB port
®
2000, Windows® XP, Windows® Vista, Windows®
®
7 or Windows® 8/8.1 operating
®
98SE, Windows® ME,
Warnings and Safety Precautions
Installation
! Be sure to turn off the power to the equipment on either
side of the cable before connecting or disconnecting this
cable.
§ Securely fasten the D-SUB male connector to the balance
or scale.
Safety
! Use the cable only indoors and only in such a way that
penetration by foreign objects or liquids is prevented.
! Use the USB interface connector only outside hazardous
areas.
4
Installation
§ Disconnect the balance scale power supply:
Unplug the AC adapter from the wall socket (mains).
§ Connect the cable to the balance scale and to the USB
port on the computer.
§ Plug in the balance scale and switch it on.
> Windows
The first time the cable is detected, Windows
®
detects the cable connected to the USB port.
®
auto-
matically runs the Wizard for adding/removing hardware.
5

Initial Connection
Loading the Software Drivers
Download the VCP driver online: http://www.ftdichip.
com/FTDrivers.htm
Once you have downloaded the software, set up the
virtual port on the computer.
Installation Guides
The installation guides for the drivers can be found here:
http://www.ftdichip.com/Documents/InstallGuides.htm
Installing the Drivers for the USB Interface
Installing the Software Drivers for the USB Interface
1. Start the installation process for the downloaded program.
2. Each version of Windows
®
may have slightly different
procedures for loading the drivers; however all versions
have a wizard.
Windows
®
usually adds the virtual interface in the
position following your highest-numbered COM port.
Insert paragraph spacing as per source. For example,
on a PC with 4 COM ports, the virtual interface is added
as COM5 (shown in the Device Manager).
6

Notes on Installation
Changing the Port Number
If you use the USB interface with a program that limits
the number of COM port designations (e.g., only COM1
through COM4), you may have to assign one of these port
numbers to the new virtual interface.
– Set up is as follows in Windows:
Select “Start”
– Select “System”
– Select “Hardware” Insert arrow “Device Manager”
– Expand “Ports
– Double-click on “USB Serial Port
– Select “Port Settings” Insert arrow “Advanced”
Changing the Latency Timer
In the dialog opened above for changing the port number,
you can set the latency timer to 1 msec for faster data
communication.
“Settings” “Control Panel”
7

Plug & Play Mode with Autoprint (SBI)
To use the autoprint function, you need to deactivate
the plug & play mode. This setting is configured in the
same dialog as that described above for changing the port
number.
Using Different USB Ports on a Single PC
Driver installation must be performed each time the cable
is connected to a different USB port. It is a good idea to
use the same port every time, if possible.
Deinstalling the Driver
– Select “Start"
“Settings" “Control Panel"
– Select “Software"
– Select “FTD1USB Serial Converter Driver"
– Click on “Add/Remove"
> The software is deinstalled.
8

Inhalt
Inhalt ..................................... 9
Verwendungszweck ........................... 9
Einsatzmöglichkeit............................ 10
Warn- und Sicherheitshinweise .................. 10
Installation .................................11
Erstmaliger Anschluss ......................... 12
Installationshinweise .......................... 13
Konformitätserklärung.........................33
Verwendungszweck
Dieses USB-Verbindungskabel bietet eine Lösung für den
Anschluss des Gerätes an einen Rechner mit USB-Schnitt-
stelle (Universal Serial Bus). Auf der USB-Schnittstelle wird
als Gerätetyp eine virtuelle serielle Schnittstelle (virtueller
COM-Port) eingerichtet. Für das Applikationsprogramm
auf dem PC besteht kein Unterschied, ob die serielle
Schnittstelle im PC eingebaut ist oder ob sie als virtuelle
Schnittstelle zur Verfügung gestellt wird. Die Schnittstelle
bietet immer die gleiche Funktion.
9

Einsatzmöglichkeit
– YCC01-USBM2: Sartorius-Waage mit 25-poliger
Datenschnittstelle anschließen
– YCO12 (USB-SBI), YCO13 (USB-BPI):
Sartorius-Waage der PMA-Serie anschließen
– YCRI-CC13: Sartorius Labor-Refraktometer anschließen
Systemvoraussetzungen
– Rechner (PC) mit Windows
Windows
Windows
– freier USB-Anschluss
®
2000, Windows® XP, Windows® Vista,
®
Server 2008, Windows® 7 oder Windows® 8/8.1
®
98SE, Windows® ME,
Warn- und Sicherheitshinweise
Installation
! Kabel nur stecken oder trennen, wenn die Geräte auf
beiden Seiten des Kabels nicht unter Spannung stehen.
§ D-SUB-Stecker fest am Gerät anschrauben.
Sicherheit
! Das Kabel nur innerhalb von Gebäuden einsetzen und nur
so, dass das Eindringen von Fremdkörpern oder
Flüssigkeiten verhindert wird.
! Den USB-Stecker nur außerhalb des explosionsgefährdeten
Bereichs verwenden.
10

Installation
§ Spannungsversorgung des Gerätes trennen:
Netzgerät aus der Steckdose ziehen.
§ Verbindungskabel an das Gerät und den USB-Port des
Rechners anschließen.
§ Danach das Gerät wieder an das Netz anschließen und
einschalten (ON).
> Windows erkennt das an die USB-Schnittstelle
angeschlossene Kabel. Beim erstmaligen Anschluss
aktiviert es den Installations-Assistenten.
11
 Loading...