

Page 1
User Manual
Tacta® Mechanical Pipette
Page 2

2
Tell us what you think of
Sartorius Pipettes and Tips
www.sartorius.com/lh-satisfaction
Table of Contents
1. Introduction ................................................................................................................................................................................................................................................... 3
1.1 Intended Use .............................................................................................................................................................................................................................................. 3
1.2 Pipette Parts and Materials ........................................................................................................................................................................................................... 3
1.3 Sartorius Pipette Tips ...................................................................................................................................................................................................................... 4
1.4 Adjustment Tool ................................................................................................................................................................................................................................ 4
2. Package Contents ......................................................................................................................................................................................................................................... 4
3. Tagging the Pipette ..................................................................................................................................................................................................................................... 5
4. Stands and Holders ...................................................................................................................................................................................................................................... 5
4.1 Installing the Pipette Holder ......................................................................................................................................................................................................... 5
4.2 Using the Carousel Stand Adapter ............................................................................................................................................................................................. 6
5. Preparing the Pipette .................................................................................................................................................................................................................................. 6
5.1 Setting the Volume .......................................................................................................................................................................................................................... 6
5.2 Attaching and Ejecting Tips .......................................................................................................................................................................................................... 7
5.3 Using Protective Tip Cone Filters .............................................................................................................................................................................................. 10
6. Operating the Pipette ............................................................................................................................................................................................................................... 11
6.1 Good Pipetting Practices ............................................................................................................................................................................................................. 11
6.2 Forward Pipetting .......................................................................................................................................................................................................................... 11
6.3 Reverse Pipetting ...........................................................................................................................................................................................................................12
6.4 Repetitive Reverse Pipetting ......................................................................................................................................................................................................12
7. Maintaining the Pipette ............................................................................................................................................................................................................................. 12
7.1 Cleaning the Outer Surface of the Pipette (daily) ................................................................................................................................................................13
7.2 Cleaning the Lower Part of the Pipette (every three months) .........................................................................................................................................13
7.3 Sterilizing the Pipette ................................................................................................................................................................................................................... 15
8. Testing and Adjusting the Pipette .........................................................................................................................................................................................................15
8.1 Testing Pipette Performance ......................................................................................................................................................................................................16
8.2 Adjusting the Pipette ................................................................................................................................................................................................................... 17
9. Troubleshooting ..........................................................................................................................................................................................................................................18
10. Order Information ....................................................................................................................................................................................................................................19
11. Warranty Information .............................................................................................................................................................................................................................20
Page 3

3
10
11
12
1
2
3
5
4
6
7
9
8
13
1. Introduction
1.1 Intended Use
The Tacta® pipette is intended, designed and manufactured for dispensing liquids in a variety of
applications, and to be used in combination with Sartorius Optifit Tips or SafetySpace Filter Tips.
The Sartorius pipette and tip combination, fall within the scope of in-vitro diagnostics, and can
be used as a diagnostic medical device in related applications. Thereby, Tacta® and Sartorius tips
fulfil the relevant demands of the Directive 98/97/EC of the European Parliament.
The Tacta® product range covers a volume range of 0.1 μl to 10 ml. It is recommended that Sartorius Optifit Tips or SafetySpace Filter
Tips are used with Sartorius pipettes to ensure optimum compatibility and performance.
The Sartorius pipette is a general purpose laboratory device that fulfils ISO 9001 and ISO 13485 standards.
Read this user manual carefully before using the pipette for the first time. Additional copies can be downloaded from www.sartorius.
com or hardcopies ordered by email from lhinfo.finland@sartorius.com.
NOTE: Prolonged pipetting can cause Work Related Upper Limb Disorder (WRULD). The manufacturer is not responsible for WRULD or
any related injuries caused by using a pipette.
1.2 Pipette Parts and Materials
1. Operating button (polyamide (PA), silicone (SI), stainless steel (SS))
2. Finger support (polypropylene (PP))
3. Tip ejector (PA)
4. Handle (PP)
5. Volume lock (SI)
6. Display (polycarbonate (PC))
7. Tip ejector collar (PP)
8. Tip cone (polyvinylidenefluoride (PVDF) in 3, 10, 20, and 100 μl pipettes, polyetherimide (PEI) in 200 and 300 μl pipettes,
polyphenylenesulphide (PPS) in 1000 μl, 5000 μl, and 10 ml pipettes)
9. Safe-Cone Filter (polyethylene (PE))
10. Adjustment window (PC)
11. Tip cone housing (PA)
12. Tip ejector bar (PA)
13. Stainless steel, corrosion-resistant metal ring (SSt EN 1.4404 / AISI 316L)
Page 4
4
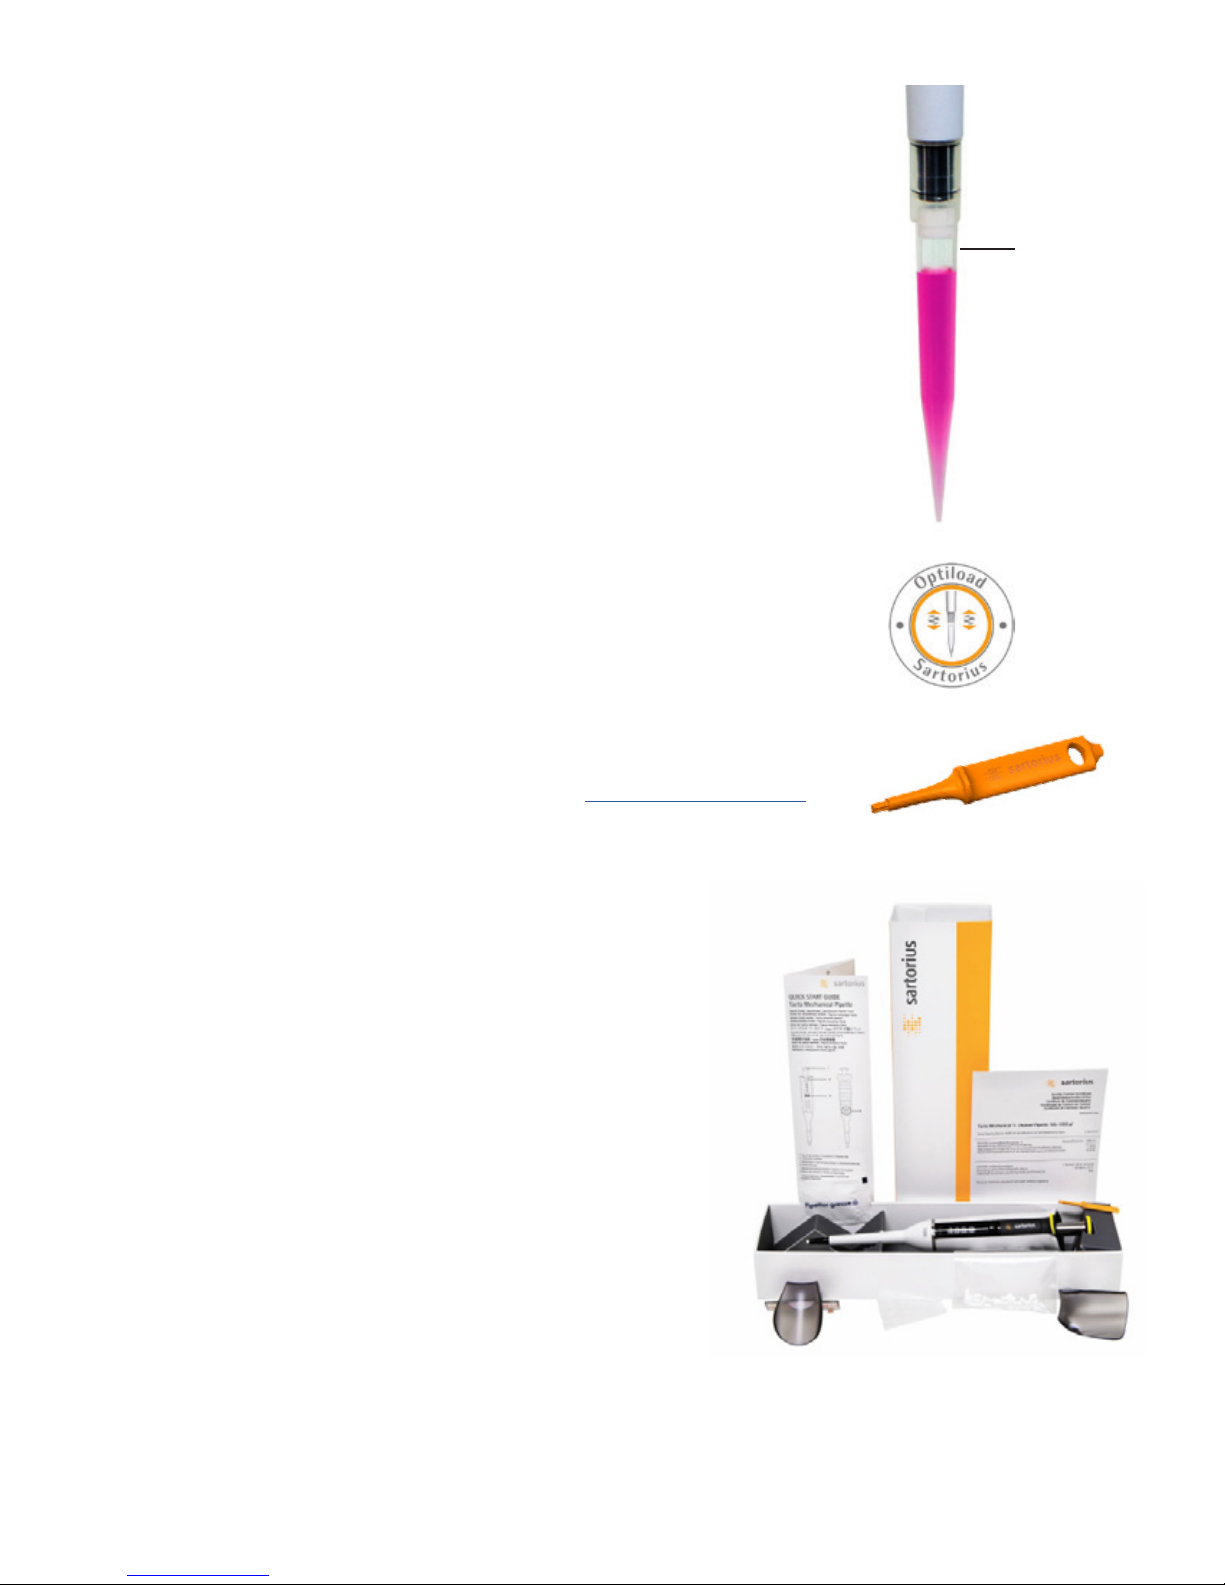
SafetySpace
air gap
]
1.3 Sartorius Pipette Tips
We recommend only using Sartorius pipette tips with the Tacta® pipette. Using fully
compatible tips guarantees the pipette’s performance specifications and ensures pipetting
accuracy and precision.
Sartorius tips are made of pure virgin polypropylene and manufactured in protected
cleanroom conditions.
Sartorius non-filter tips are available in trays, bulk packages, and space-saving refill systems.
Both non-filter tips and trays are autoclavable at 121°C (252°F), 20 min, 1 bar (15 psi). All
Single Tray racks and clean Refill Packs are certified RNase, DNase, and endotoxin-free.
To avoid aerosol contamination, use SafetySpace Filter Tips and discard them after each
pipetting. These can also be used to avoid sample loss caused by the sample coming into
contact with the filter. The extra space between the sample and the filter (see picture)
ensures that even foaming or viscous liquids do not come into contact with the filter in
reverse pipetting or repetitive/multiple dispensing modes.
For more information, please visit www.sartorius.com or contact your local Sartorius
representative.
2. Package Contents
The Tacta® pipette package contains the following items:
− Tacta® mechanical pipette
− Sartorius Optifit tip(s)
− Adjustment tool
− Four identification tags
− Safe-Cone Filters (except 3 and 10 μl models)
− Autoclavable grease, 1 g
− Pipette holder
− Carousel stand adapter
− QC certificate from gravimetric testing according to ISO 8655-6 standard
− Quick Start Guide
If any item in the package is missing or damaged, contact your local Sartorius
representative.
1.4 Adjustment Tool
For situations where factory calibration is not applicable, the adjustment tool allows you to
calibrate the pipette accurately.
NOTE: For more information on adjusting of the Tacta® pipette see 8.2, Adjusting the pipette.
Page 5
5
3. Tagging the Pipette
You can use personalized tags to make each Tacta® pipette easily identifiable.
NOTE: If you intend to autoclave the pipette, make sure you use suitably resistant ink.
1. Write the identifying information on the tag.
2. Attach the tag to the finger support.
4. Stands and Holders
For convenience and safety, always keep the pipette upright in its holder or stand when not in use.
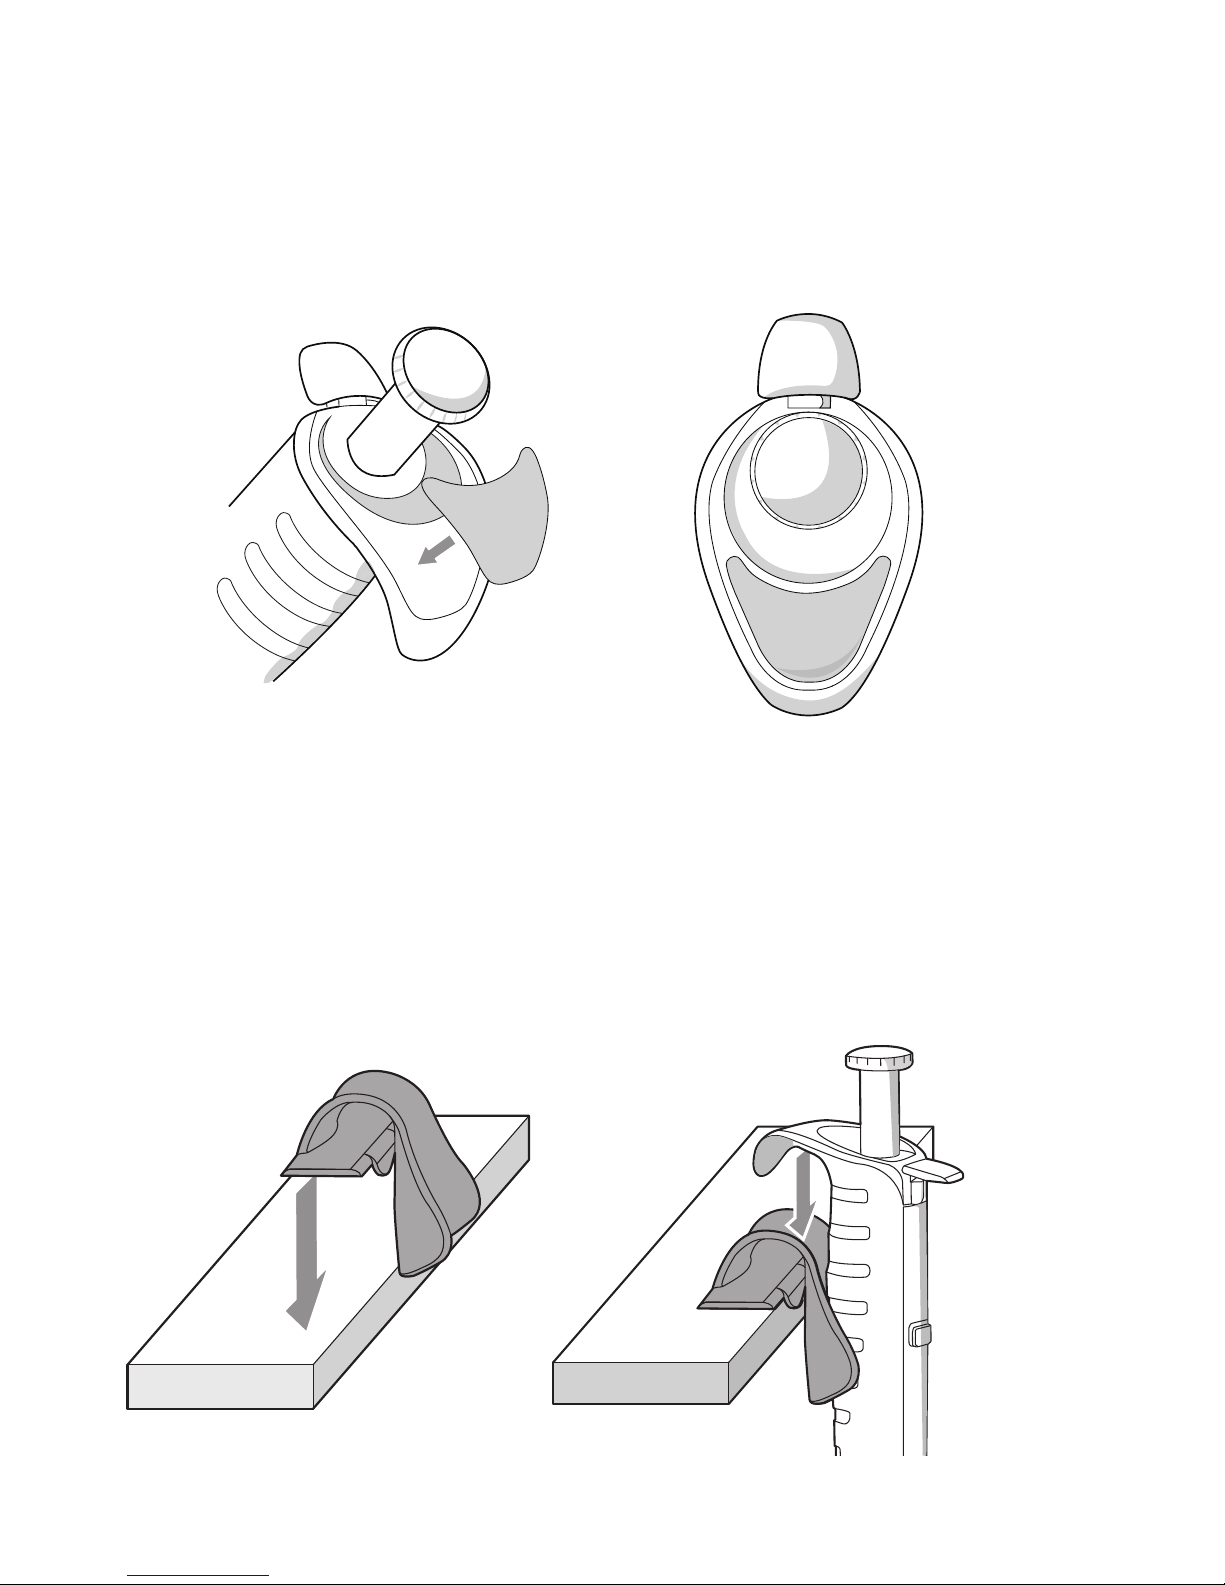
4.1 Installing the Pipette Holder
1. Clean the shelf surface with ethanol.
2. Remove the protective paper from the adhesive tape.
3. Install the holder by pressing it against the edge of the shelf.
4. Hook the finger support onto the holder.
Page 6

6
4.2 Using the Carousel Stand Adapter
The Carousel Stand (Order Code 725600) is made compatible with Tacta® by using the adapter provided in the Tacta® package.
5. Preparing the Pipette
5.1 Setting the Volume
The volume to be aspirated is shown on the display. To adjust the volume, you can use the volume lock button in two different ways.
We recommend that in normal use the volume lock is engaged, with the red bar hidden. This prevents accidental volume changes.
To adjust the volume:
1. Press and hold the volume lock button.
2. Turn the operating button to adjust the volume.
3. Release the button to lock the volume adjustment again.
OR
1. Slide the volume lock button up. The red bar becomes visible and volume adjustment is now unlocked.
2. Turn the operating button to adjust the volume.
NOTE: A Carousel Stand that holds six Tacta® pipettes is available separately see 10.1 Order Information and Specifications.
Page 7
7
!
Always lock after setting the volume
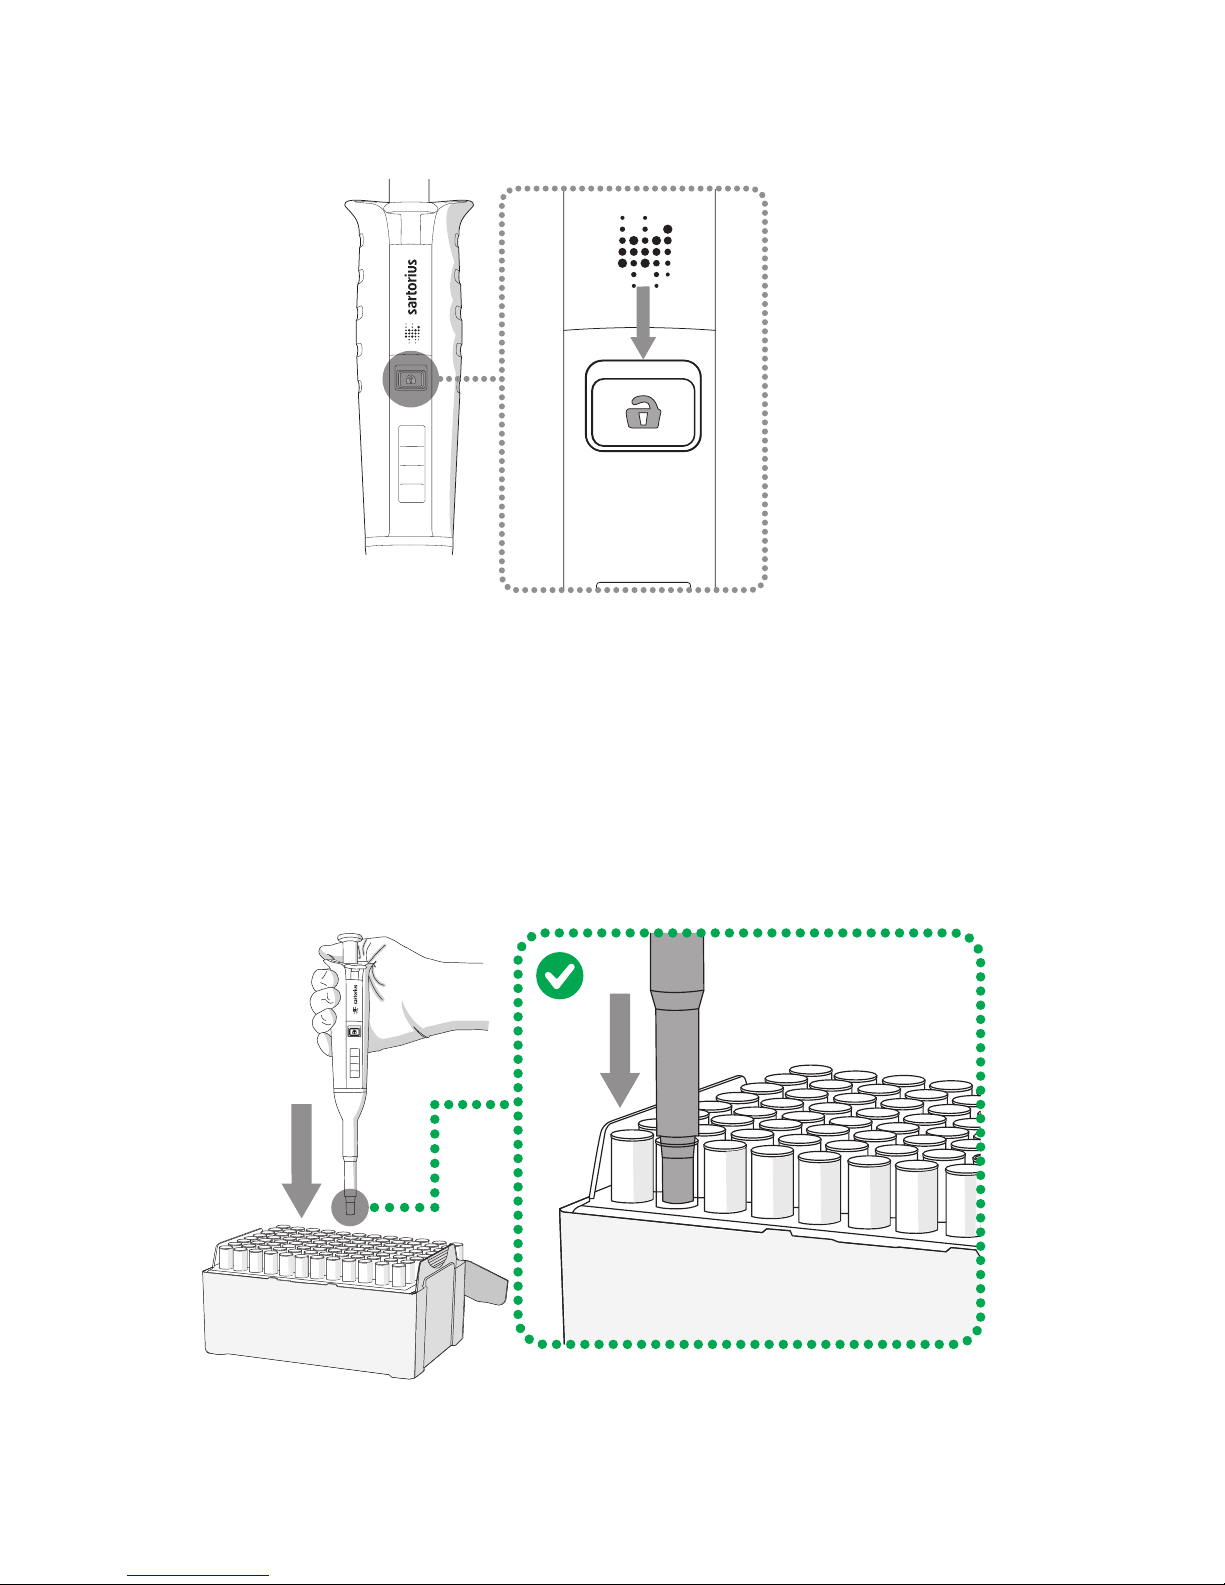
5.2 Attaching and Ejecting Tips
The pipette has a spring-loaded tip cones for optimal sealing.
To attach a tip:
1. Make sure the pipette tip cones are clean and undamaged.
2. Press the tip cone carefully into a tip held in a tip tray.
If the volume is unlocked (the red bar is visible):
1. Turn the operating button to adjust the volume.
2. Slide the volume lock button down. Volume adjustment is now locked, preventing accidental volume changes.
NOTE: If the volume lock is not used, volume can be accidentally changed.
Page 8

8
NOTE: Do not force the pipette into the tip, or rock it from side to side, or front to back when attaching tips.
Page 9

9
To eject a tip:
1. Hold the pipette over a suitable waste container.
2. Press the tip ejector with your thumb.
Page 10

10
5.3 Using Protective Tip Cone Filters
Replaceable Sartorius Safe-Cone Filters can be used with your pipette to help prevent liquids and aerosols from entering the pipette
housing, and causing contamination or damage. We recommend you always use these filters when using non-filter tips. The operating
button allows safe and easy filter ejection.
NOTE: Do not use a Safe-Cone Filter with a filter tip.
Safe-Cone Filters are available in Standard or
Plus versions. We recommend the Standard filter
for general applications, and the Plus filter for
more demanding applications, such as:
− Cell culture
− Bacterial and virological work
− Molecular biology
The filter must be changed regularly. The
change interval depends on the application,
but we recommend regular daily replacement
and always in the case of over-aspiration. If
you notice that the pipette is not functioning
properly, change the filter.
To insert a Safe-Cone Filter:
1. Clean the tip cone if necessary.
2. Insert a new filter.
You can remove a Safe-Cone Filter with the filter ejector, without touching them.
To remove a Safe-Cone Filter:
1. Hold the pipette over a suitable waste container.
2. Press the operating button and the tip ejector at the same time.
Page 11

11
0
1
2
6. Operating the Pipette
The Tacta® pipette is generally used for forward and reverse pipetting.
6.1 Good Pipetting Practices
− Make sure the tip is firmly attached to the tip cone(s).
− Pre-rinse the tip before aspirating by filling and emptying the tip three to five times. This is particularly important when pipetting
liquids with a viscosity and density greater than water, or volatile liquids with high vapor pressure (such as ethanol).
− Make sure the pipette, tip, and liquid are at the same temperature.
− Hold the pipette upright when aspirating, and only place the tip a few millimeters into the liquid (2-3 mm if the pipette’s volume
is 3-2000 μl; 5-6 mm if the volume is 5-10 ml).
− Always press and release the operating button slowly and smoothly.
− When pipetting a liquid that is not at the ambient temperature, change the tip after each pipetting. Do not rinse the tip before
use.
− To avoid contaminating the pipette’s housing with either the sample in the tip or the work surface, do not lay the pipette on its
side.
− Never strike the tip cone against the tip tray.
− When handling infectious or radioactive agents, wear appropriate protective gear and take all sensible precautions.
− Avoid exposing the unit to extreme temperature changes, humidity, or dust. Operating temperatures should be between 15 and
40°C.
6.2 Forward Pipetting
Forward pipetting is the most common pipetting technique. It uses a blow-out function to ensure complete delivery of the liquid.
This technique aspirates and then dispenses the selected liquid volume. It is recommended for aqueous liquids, liquids containing small
amounts of detergents or proteins, and solvents.
1. Fit the tip onto the pipette tip cone.
2. Press the operating button to the first stop.
3. Place the tip just under the surface of the liquid and smoothly release the operating button, allowing it to return to to the starting
position. Wait one second.
4. Carefully withdraw the tip from the liquid, touching it against the edge of the container to remove any excess liquid.
5. Dispense the liquid by pressing the operating button to the first stop.
6. After a short delay, press the operating button to the second stop. This empties the tip.
Page 12

12
0
1
2
6.3 Reverse Pipetting
Reverse pipetting is recommended for highly viscous, biological, or foaming liquids, or very small volumes. The selected volume is
aspirated into the tip along with an excess volume. Delivery is done without blow-out ensuring the excess volume remains in the tip.
This excess is then discarded after the selected volume is aspirated. You may need to adjust the pipette in order to use the reverse
pipetting technique.
1. Fit the tip onto the pipette tip cone.
2. Press the operating button all the way to the second stop.
3. Place the tip just under the surface of the liquid and smoothly release the operating button, allowing it to return to the starting
position.
4. Carefully withdraw the tip from the liquid, touching it against the edge of the container to remove any excess from the tip.
5. Press the operating button smoothly to the first stop to deliver the desired volume. The liquid that remains in the tip should not
be included in the delivery.
6. Discard the remaining liquid by pressing the operating button to the second stop.
6.4 Repetitive Reverse Pipetting
The reverse technique allows you to repeatedly deliver the same volume.
1. Follow steps 1 to 5 of the reverse-pipetting technique above (see 6.3, Reverse pipetting).
2. Repeat steps 3 to 5 as many times as necessary.
3. Discard the remaining liquid by pressing the operating button to the second stop.
7. Maintaining the Pipette
The Tacta® pipette range has been designed for easy in-house service. If the pipette is in daily use, we recommend you clean and
decontaminate it and check its performance every three months. Sartorius also provides a complete repair and calibration service,
including a service report and performance certificate.
Disinfecting the Pipette
Disinfectant liquid
Always ensure the pipette materials are chemically compatible with the detergent, disinfectant, or decontaminant liquids you plan to
use. See 1.1, Pipette parts and materials for information on pipette materials. For information on chemical compatibility, please send a
request by email to lhinfo.finland@sartorius.com.
NOTE: Make sure the pipette has been decontaminated before you send it for repair or calibration. Be sure to note any hazardous
material that the pipette has been exposed to. For more information see 7.3, Sterilizing the pipette.
NOTE: Using tip cone filters may lengthen the service interval. Change filters regularly.
NOTE: We recommend always using gloves when cleaning the pipette.
Page 13

13
1
2
3
4
1
2
3
4
1
3
5
2
4
5
7.1 Cleaning the Outer Surface of the Pipette (daily)
Your Tacta® pipette should be checked daily to ensure it is clean.
To clean and decontaminate the outer surface of the pipette, use a disinfectant liquid or mild detergent and a soft, lint-free cloth.
Gently clean the surface of the pipette with the moistened cloth and wipe it dry. Pay special attention to the tip cone.
Change the tip cone filter.
7.2 Cleaning the Lower Part of the Pipette (every three months)
If the pipette is in daily use, it is recommended to clean, decontaminate, and grease it every three months. We recommend sending
multichannel pipettes to your local Sartorius service center for cleaning and greasing.
Parts and materials:
1. Tip ejector collar (polypropylene (PP))
2. Locking ring (polyetherimide (PEI) in 10 ml pipettes, polyamide (PA) in all other pipettes)
3. Tip cone (polyvinylidenefluoride (PVDF) in 3, 10, 20, and 100 μl pipettes, polyetherimide (PEI) in 200 and 300 μl pipettes,
polyphenylenesulphide (PPS) in 1000 μl, 5000 μl, and 10 ml pipettes)
4. Piston (stainless steel (SS) in 3, 10, and 20 μl single-channel and 10 μl multichannel pipettes, polyphenylenesulphide (PPS) in 10
μl
single-channel and 200, 1000, 5000 μl and 10 ml single-channel and 300 μl multichannel pipettes, polyetherimide (PEI) in 100μl
multichannel pipettes)
5. Piston seal (fluoroelastomer (FKM) in 3, 10, and 20 μl pipettes and 10 ml pipettes, ethylene propylene diene monomer (EPDM) in
100, 200, 1000, and 5000 μl pipettes)
3, 10, 20, and 100 μl pipettes
200 and 1000 μl pipettes
5000 μl and 10 ml pipettes
To clean and decontaminate the lower parts of a single-channel pipette, follow the steps below.
To disassemble and clean the pipette:
1. Eject the tip cone filter (if fitted; see 5.3, Using protective tip cone filters)
2. Unscrew the tip ejector collar (1) counterclockwise and remove it.
3. Depending on the pipette volume:
a. With all pipettes other than the 5000 μl or 10 ml models, unscrew the locking ring (2) counterclockwise and carefully remove it
together with the tip cone (3).
OR
Page 14

14
c. With a 10 ml pipette hold the tip cone cylinder firmly and turn the locking ring (2) clockwise with your fingers (see image
below). Do not turn the tip cone (3) as this will break the pipette.
4. Clean the tip ejector collar (1), the tip cone holder, the tip cone cylinder, and the piston (4) with a disinfectant liquid or
mild detergent and a soft, lint-free cloth.
5. Clean the interior of the tip ejector collar (1) and the tip cone cylinder with a cotton swab. Be careful with 3, 10, 20, and 100 μl
pipettes to ensure the seal inside the tip cone is not damaged.
6. Rinse the parts with distilled water if necessary and allow them to dry.
7. Depending on the pipette volume:
a. With a 3, 10, 20, or 100 μl pipette, apply a thin layer of grease on the piston (4).
OR
b. With a 200 or 1000 μl pipette, apply a thin layer of grease around the seal (5).
OR
c. With a 5000 μl or10 ml pipette, apply a thin layer of grease on the interior of the tip cone cylinder and around the seal (5).
NOTE: Avoid excess grease. Only use the grease provided with the pipette.
NOTE: Before reassembling, check that there is no lint or particles on the surface of the piston.
b. With a 5000 μl pipette, hold the locking ring (2) firmly with your fingers and turn the tip cone cylinder counterclockwise with
the other hand (see image below). Do not turn the locking ring as you turn the tip cone (3) as this will break the pipette.
OR
Page 15

15
To reassemble the pipette:
1. Depending on the pipette volume:
a. With a 3, 10, 20, 100, 200, or 1000 μl pipette, carefully place the tip cone (3) on the piston (4) and attach it by screwing the tip
cone holder clockwise.
OR
b. With a 5000 μl pipette, carefully place the tip cone cylinder on the piston (4) and screw clockwise. Make sure the tip cone
cylinder is properly tightened. Avoid over-tightening.
OR
c. With a 10 ml pipette, carefully place the tip cone cylinder on the piston (4) and screw the locking ring (2) counterclockwise.
Make sure the tip cone cylinder is properly tightened. Avoid over-tightening.
2. Attach the tip ejector collar (1) by screwing it clockwise.
3. Insert a new tip cone filter.
4. Press the operating button several times to ensure that the grease has spread evenly.
5. Check the performance of the pipette.
NOTE: Always check the performance of the pipette after in-house service or maintenance.
7.3 Sterilizing the Pipette
The Tacta® pipette can be sterilized using autoclaving, UV, disinfectant, or
decontaminant liquids. Always follow the instructions below.
Autoclaving
1. Remove the Safe-Cone Filter if attached (see 5.3, Using protective tip cone filters).
2. With a multichannel pipette, hold the connecting collar and unscrew the lower part
by turning it 360° counterclockwise.
3. Put the pipette into the sterilization bag, and place the bag into the autoclave.
4. Sterilize at 121°C and 1 bar overpressure for 20 minutes.
5. Let the parts cool and dry overnight.
6. Depending on the pipette model:
a. With a multichannel pipette, reattach the tip cone housing to the pipette handle.
OR
b. With a single-channel pipette, check if the lower parts have become loose during
autoclaving, and tighten them if necessary.
UV sterilization
Tacta® pipettes are made of UV-resistant materials. Sartorius pipettes tolerate temporary exposure to UV radiation. Take note that
prolonged or frequent exposure to UV radiation may cause yellowing and brittling of the pipette.
8. Testing and Adjusting the Pipette
We recommend you check the performance of your Tacta® pipette regularly (we suggest, every three (3) months) and always after inhouse maintenance. Establish a regular testing routine that takes account of the following:
− Accuracy requirements of the application
− Frequency of use
− Number of operators using the pipette
− Nature of the liquid dispensed
− Maximum number of permissible errors (ISO 8655-1)
Page 16

16
8.1 Testing Pipette Performance
Performance testing should take place in a draft-free room at 15-30°C, constant to +/- 0.5°C, and with humidity above 50%. The
pipette, tips, and test water should stay in the test room long enough (at least two hours) to reach equilibrium with the room
conditions. Use distilled or deionized water (grade 3, ISO 3696) and an analytical balance with a readability of 0.01 mg (ISO 8655-6).
Weighing
1. Adjust the desired test volume (V
S
).
2. Fit the tip onto the tip cone.
3. Fill the tip with test water and expel it into a waste container five times to reach a humidity equilibrium in the dead air volume.
4. Replace the tip.
5. Pre-wet the tip by filling it once with test water then expelling it into a waste container.
6. Aspirate the test water, immersing the tip only 2-3 mm below the surface of the water. Keep the pipette vertical.
7. Withdraw the pipette vertically, and touch the tip against the inside wall of the test water container.
8. Dispense the water into the weighing vessel, touching the tip against the inside wall of the vessel just above the liquid surface at
an angle of 30-45°. Withdraw the pipette by drawing the tip 8-10 mm along the inner wall of the weighing vessel.
9. Read the weight in mg (m
i
).
10. Repeat the test cycle until you have recorded 10 measurements.
11. Convert the recorded masses (mi) to volumes (Vi):
Vi = mi Z, Z = correction factor (see Table 1: Z-values (μl/mg))
12. Calculate the mean volume (V) delivered: V=(V
i
)/10
13. For conformity evaluation, calculate the systematic error (e
s
) of the measurement:
in μl: eS = V- VS VS = selected test volume
or in %: eS = 100 (V- VS)/VS
14. For conformity evaluation, calculate the random error of the measurement:
as standard deviation
or as coefficient of variation CV = 100s/V
15. Compare the systematic error (inaccuracy) and random error (imprecision) with the values in the performance specifications
(see 10.1, Order information and specifications) or the specifications of your own laboratory. If the results fall within the
specifications, the pipette is ready for use. Otherwise, check for both systematic and random errors and, when necessary, adjust
the pipette (see 8.2, Adjusting the pipette).
NOTE: A systematic error (inaccuracy) is the difference between the dispensed volume and the selected test volume. A random error
(imprecision) is the scatter of dispensed volumes around the mean dispensed volume (ISO 8655-1).
NOTE: Sartorius specifications are achieved in strictly controlled conditions (ISO 8655-6). We recommend establishing your own
specifications based on the field of use and the accuracy requirements placed on the pipette (ISO8655-1).
Table 1: Z-values (μl/mg)
Temp. (°C) Air Pressure (kPa)
95 100 101.3 105
20.0
20.5
21.0
21.5
22.0
22.5
23.0
23.5
1.0028
1.0029
1.0030
1.0031
1.0032
1.0033
1.0034
1.0036
1.0028
1.0029
1.0031
1.0032
1.0033
1.0034
1.0035
1.0036
1.0029
1.0030
1.0031
1.0032
1.0033
1.0034
1.0035
1.0036
1.0029
1.0030
1.0031
1.0032
1.0033
1.0034
1.0036
1.0037
Page 17

17
8.2 Adjusting the Pipette
Your Tacta® pipette has been factory-checked using the forward pipetting technique and certified at 22°C using grade-3 distilled
water according to ISO 3696. The calibration is based on ISO 8655-6: Gravimetric test method for volumetric instruments.
In the following situations factory calibration is not applicable and the pipette will need adjusting:
− When pipetting liquids which differ from water in density, viscosity, vapor pressure, or other quality.
− When reverse pipetting
− When the geometry of the tip used clearly differs from standard tip geometry.
− When the pipette is used at high altitudes.
To adjust the pipette:
1. Use the tool to open the cover above the adjustment window.
2. Place the star head of the adjustment tool into the socket, and press firmly. This releases the lock.
3. Turn the adjustment tool counterclockwise to decrease the volume and clockwise to increase it.
NOTE: When adjusting multichannel models, hold the pipette by the handle. The lower part of the pipette (the tip cone housing) will
move during adjustment – allow it to move freely to prevent breaking the pipette.
Table 2: Volume adjustment units in μl
Tacta® model Channels Increment (μl) -45 -10 -5 -1 0 1 5 10 45
0.1-3 μl 1 0,002 -0.09 -0.02 -0.01 -0.002 0 0.002 0.01 0.02 0.09
0.5-10 μl 1 0,01 -0.45 -0.1 -0.05 -0.01 0 0.01 0.05 0.1 0.45
2-20 μl 1 0,02 -0.9 -0.2 -0.1 -0.02 0 0.02 0.1 0.2 0.9
10-100 μl 1 0,1 -4.5 -1 -0.5 -0.1 0 0.1 0.5 1 4.5
20-200 μl 1 0,2 -9 -2 -1 -0.2 0 0.2 1 2 9
100-1000 μl 1 1 -45 -10 -5 -1 0 1 5 10 45
500-5000 μl 1 5 -225 -50 -25 -5 0 5 25 50 225
1-10 ml 1 10 -450 -100 -50 -10 0 10 50 100 450
0.5-10 μl 8 and 12 0,01 -0.45 -0.1 -0.05 -0.01 0 0.01 0.05 0.1 0.45
5-100 μl 8 and 12 0,1 -4.5 -1 -0.5 -0.1 0 0.1 0.5 1 4.5
30-300 μl 8 and 12 0,2 -9 -2 -1 -0.2 0 0.2 1 2 9
Page 18

18
9. Troubleshooting
Table 3: Symptoms and solutions
Symptom Possible cause Solution
Droplets left inside tip - Unsuitable tip - Use original Sartorius tips
Leakage
Pipetted volume too small
- Pre-rinsing of the tip unsuccessful - Pre-rinse the tip again
- Tip incorrectly attached - Attach tip firmly
- Unsuitable tip - Use original Sartorius tips
- Foreign particles between the tip and cone - Clean tip cone, attach new tip
- Tip cone holder incorrectly tightened - Tighten the tip cone holder
- Pipette damaged - Return to your Sartorius service center
for servicing
Pipette outside established
specifications
- Incorrect operation - Follow instructions
- Unsuitable tip - Use original Sartorius tips
- Adjustment altered - Readjust the pipette
Operating button jammed or moves
erratically
- Liquid has penetrated tip cone and dried - Clean and grease piston and seal
- Clean tip cone
- Safe-Cone Filter has been contaminated - Change filter
- Insufficient amount of grease on piston
and seal
- Grease as required
Tip ejector jammed or moves
erratically
- Tip ejector collar has been contaminated - Remove and clean ejector collar and tip
cone
Page 19

19
10. Order Information
Order Information and Specifications
These specifications are only guaranteed when original Sartorius tips are used. The specifications should be used as guidelines when
establishing your own performance specifications.
Table 4: Tacta® pipette specifications
Order Code Channels Volume Range
(μl)
Colur
Coding
Increment
(μl)
Test Volume
(μl)
Systematic
Error* (%)
Random Error*
(%)
Safe-Cone Filters
Standard Plus
LH-729010 1 0.1-3
0.002 3
1.5
0.3
1.30
2.40
10.00
0.80
1.60
6.00
-
-
LH-729020 1 0.5-10
0.01 10
5
1
1.00
1.50
2.50
0.60
1.00
1.50
-
-
LH-729030 1 2-20
0.02 20
10
2
0.90
1.20
3.00
0.40
1.00
2.00
721014 -
LH-729050 1 10-100
0.10 100
50
10
0.80
1.00
2.00
0.15
0.40
1.00
721008 721018
LH-729060 1 20-200
0.20 200
100
20
0.60
0.80
2.30
0.15
0.30
0.90
721007 721017
LH-729070 1 100-1000
1.00 1000
500
100
0.70
0.70
2.00
0.20
0.20
0.50
721006 721016
LH-729080 1 500-5000
10.0 5000
2500
500
0.50
0.60
2.00
0.20
0.30
0.60
721005 721015
LH-729090 1
1-10
ml
20.0 10000
5000
1000
0.60
1.20
3.00
0.20
0.30
0.60
721005 721015
LH-729120 8 0.5-10
0.01 10
5
1
1.50
2.50
4.00
1.00
2.50
4.00
-
-
LH-729130 8 5-100
0.10 100
50
10
0.70
1.00
3.00
0.25
0.70
1.50
721008 721018
LH-729140 8 30-300
0.20 300
150
30
0.60
1.00
2.00
0.25
0.50
1.00
721007 721017
LH-729220 12 0.5-10
0.01 10
5
1
1.50
2.50
4.00
1.00
2.50
4.00
-
-
LH-729230 12 5-100
0.10 100
50
10
0.70
1.00
3.00
0.25
0.70
1.50
721008 721018
LH-729240 12 30-300
0.20 300
150
30
0.60
1.00
2.00
0.25
0.50
1.00
721007 721017
* The listed systematic and random error values are valid for Pipetting mode only and are achieved under strictly controlled conditions during type tests per
ISO 8655. Due to Sartorius’ continuous product development, the systematic and random error values may change without prior notice.
Page 20

20
11. Warranty Information
The Tacta® pipette is guaranteed for two years against defective materials or workmanship.
If your Tacta® pipette fails to function at any time, contact your local Sartorius
representative.
ANY WARRANTY WILL, HOWEVER, BE DEEMED AS VOID IF FAULT IS FOUND TO HAVE
BEEN CAUSED BY MALTREATMENT, MISUSE, UNAUTHORIZED MAINTENANCE OR SERVICE,
NEGLIGENCE OF REGULAR MAINTENANCE OR SERVICE, ACCIDENTAL DAMAGE, INCORRECT
STORAGE, USE OF THE PRODUCT FOR OPERATIONS OUTSIDE ITS SPECIFIED LIMITATIONS, OR
SPECIFICATIONS, USAGE CONTRARY TO THE INSTRUCTIONS GIVEN IN THIS MANUAL, OR USE
WITH ANYTHING BUT THE MANUFACTURER’S ORIGINAL TIPS.
Every Tacta® pipette is tested by the manufacturer before shipping. The Sartorius Quality
Assurance Procedure guarantees that the pipette you have purchased is ready for use.
Order Code Product
LH-727640 Pipette Holder for Tacta® pipette
LH-727650 Adapter for Mechanical Carousel Stand
LH-725630 Carousel Stand for 6 pipettes
725620 Linear Pipette Stand
Table 5: Stand and holder models
Page 21

Page 22

www.sartorius.com
Contact Details
Sartorius Biohit Liquid Handling Oy
Laippatie 1
00880 Helsinki
Finland
Phone +358.9.755.951
lhinfo.finland@sartorius.com
Sartorius Lab Instruments GmbH
Otto-Brenner-Strasse 20
37079 Goettingen
Germany
Phone +49.551.308.0
Fax +49.551.308.3289
www.sartorius.com
The status of the information, specifications, and illustrations
in this manual are subject to change.
Sartorius reserves the right to make changes to the
technology, features, specifications, and design of the
equipment without notice.
All trademarks are Sartorius property unless otherwise
stated. Patents granted or pending.
Publication No. LLH6001-e170104 • Order No. 98649-018-56 • Ver. 01 | 2017 © Sartorius Biohit Liquid Handling Oy
 Loading...