

Sartorius secura series,quintix series,practum series Application Manual

Application Guide for the
Secura, Quintix and Practum Series
Getting Started Quickly
Density
Counting
Conversion
Unstable Conditions
Components
Weighing Mixing
Percentage
Peak Hold
Checkweighing
Statistics

The Touch Screen on Your Balance
1
2
3
4
5
6
13
12
11
10
9
8
7
1 Toolbar showing currently available buttons:
Zero, Tare, Print (data output), GLP Printout
2 Line for metrological specifications
3 Alert icon indicating calculated values
4 Current weight or value measured
5 Key for toggling between the weight unit and display accuracy
6 Key for running an application
7 Application toolbar: Settings for the selected application
8 Menu key: For toggling to the selection mode for applications
and functions
9 Secura models only: USP minimum sample weight, SQmin
10 Bar graph: Scaled display showing capacity usage (in percent)
11 Plus (or minus) sign of the weight
12 Key for toggling between various display modes of a weight
13 Field for displaying the operating status and warnings
Leveling
To ensure accurate measurement results, you need
to level the balance each time after you have moved it
to a different location.
Secura Balances
As soon as LEVEL
appears on the display,
you will need to level
the balance. Make sure
that the weighing pan
is unloaded before
you begin. Touch
LEVEL. Then follow the
prompts shown on the
interactive display.
Touch the menu key
to enter the selection
mode for applications
and functions.
Selecting the Language
Each balance has been factory preset to English.
You can select your preferred language as follows:
Touch the open-end
wrench icon.
Select Language.
Touch the desired
language and confirm
selection by touching
the checkmark.
Quintix and
Practum Balances
Turn the two feet as
shown in the picture
until the air bubble
is centered within the
circle of the level
indicator.
Initial Operation of Balances Without a Draft Shield
Touch CAL to select
the combined
calibration and adjustment mode.
Quick Access to
Calibration and
Adjustment
You will need to perform the combined calibration
and adjustment procedure the first time you operate
the balance, each time after changing it to a different
location and at regular intervals during operation.
If you are using a Practum series balance, you will
have to do this manually as described below.
The Secura and Quintix series perform this procedure
fully automatically.
To perform external
adjustment, touch
CAL-Extern.
First touch A, then
w to calibrate
the balance. Place a
calibration weight
equal to that displayed
on the balance on the
pan. The balance will
now perform automatic calibration and
adjustment, then it will
change to the operating mode.
Getting Started Quickly
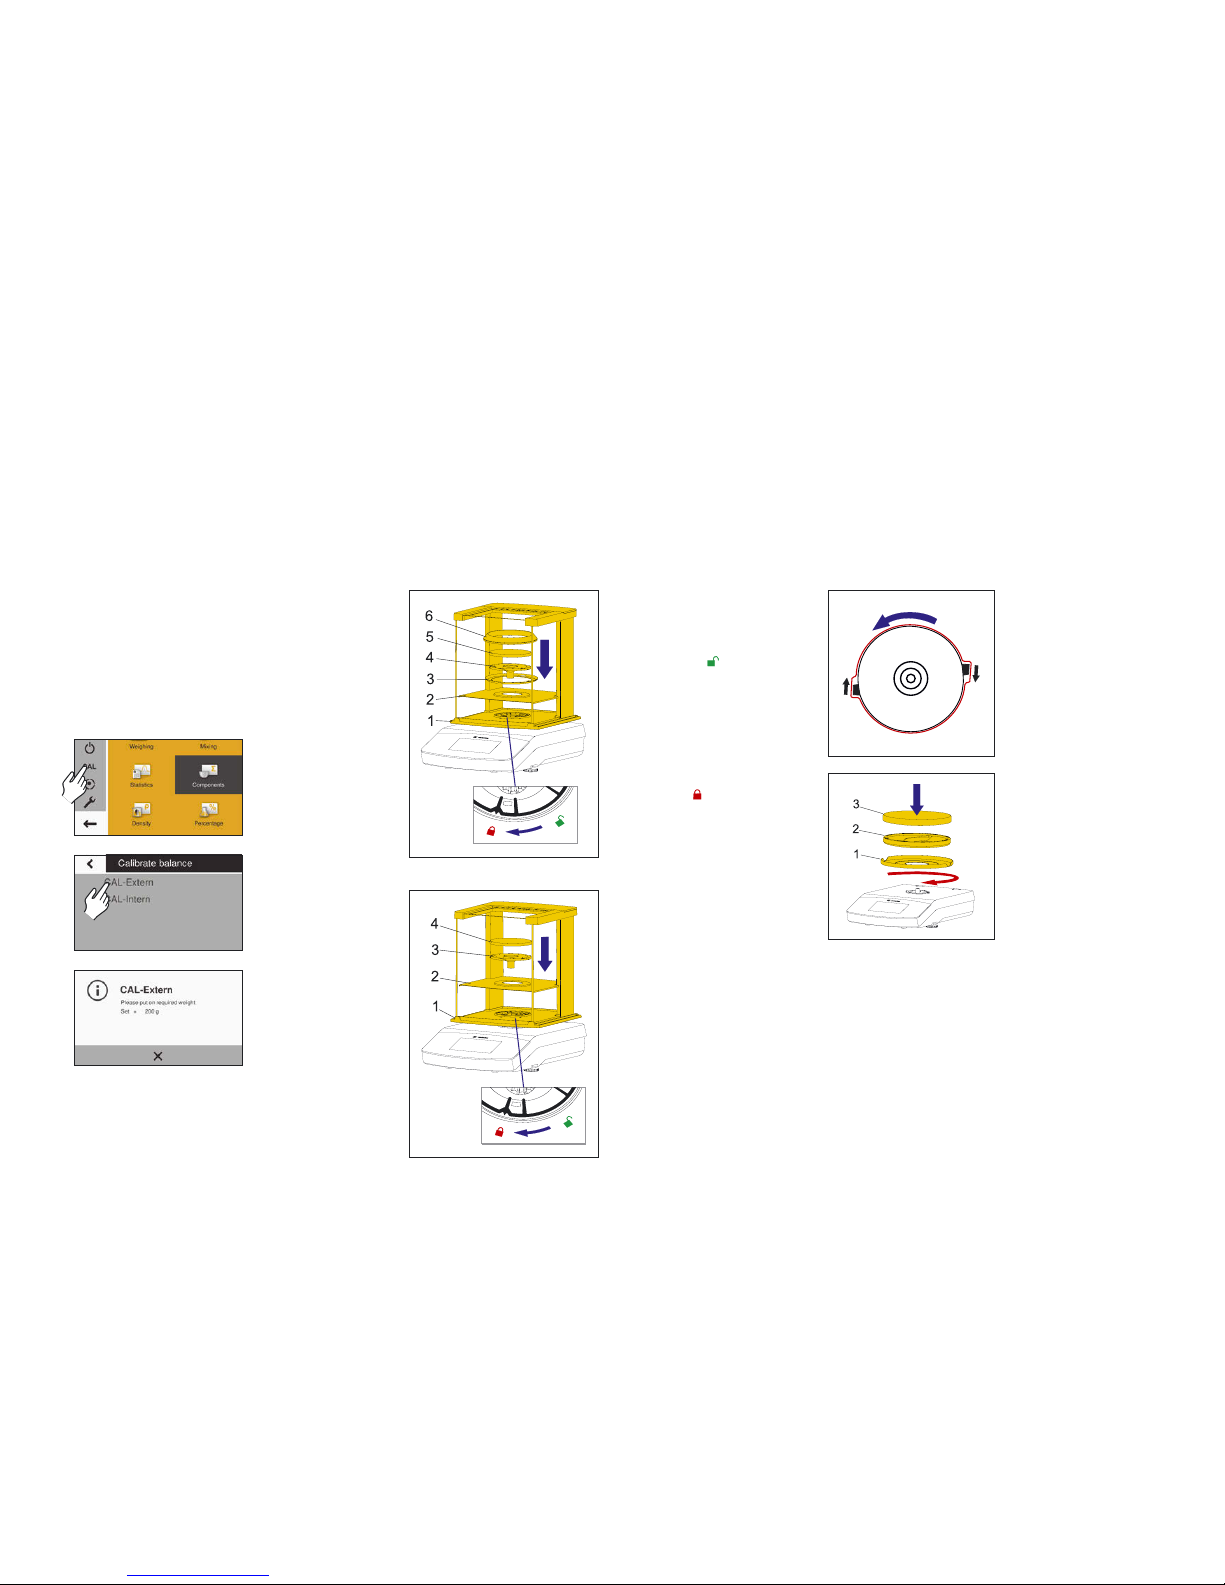
Initial Operation of Balances with a Draft Shield
Install the following parts in
the order listed:
– In-use dust cover
– Turn the draft shield lock
to “unlocked”
.
– Place the draft shield (1) on
the balance. Note: Use both
hands to hold the top struts
of the draft shield.
– Slide the side doors all the
way to the back.
– Turn the draft shield lock
to “locked” .
– Position the base plate (2),
centering ring* (3), pan
support (4), weighing pan (5)
and high-rim shield ring* (6)
on the balance.
Note: For information about
how to clean the draft shield,
see the Care and Maintenance
chapter in the Installation
Instructions.
* only for Secura with 0.1 mg
readability
Install the following parts in
the order listed:
1) In-use dust cover
2) Position the shield
disk (1) and turn it clockwise until it is locked
securely in place.
3) Position the pan support (2)
and the weighing pan (3).
For detailed instructions, please refer to our Installation
Instructions and our detailed User Manual.
Secura Balances
Quintix and Practum Balances
 Loading...