

Page 1
Sartorius QC - Scales
Service Manual
QC7CCE-S, -S0UR
QC34EDE-S, -S0UR
QC64EDE-S, -S0UR
Q
U
A
L
I
T
Y
S
Y
S
T
E
M
C
E
R
T
I
F
I
E
D
Q
U
A
L
I
T
Y
S
Y
S
T
E
M
R
e
g
.
N
o
.
1
9
4
4
0
-
0
2
C
E
R
T
I
F
I
E
D
DIN EN ISO 9001
Sartorius AG, Weighing Technology
Sartorius AG, Weighing Technology
WQC5001-e95121
Page 2

2
Page 3

3
SARTORIUS QC - Scales
Page
General Information 4
Brief Operating Instructions 4
Key Functions 4
Scale Operating Menu 5
Accessing the Scale Operating Menu and Changing Settings 5
Overview of the Scale Operating Menu 6
Activating the BPI Mode 11
Adjusting the QC Scales 11
Table of Adjustment Data 11
Adjustment Sequence 12
Overload Stops 12
1. QC7CCE... 12
2. QC34EDE..., QC64EDE... 14
Zero-Point Offset Value 15
Adjusting the Linearity 16
Adjusting the Span (Senitivity) 17
Replacing the Main PCB 17
Replacing the Strain Gauge System 18
1. QC7CCE... 18
2. QC34EDE..., QC64EDE... 20
Error Codes 22
Installation of the YDI01IS-0CE (Industry Printer) 23
Spare Parts 23
Page 4
4
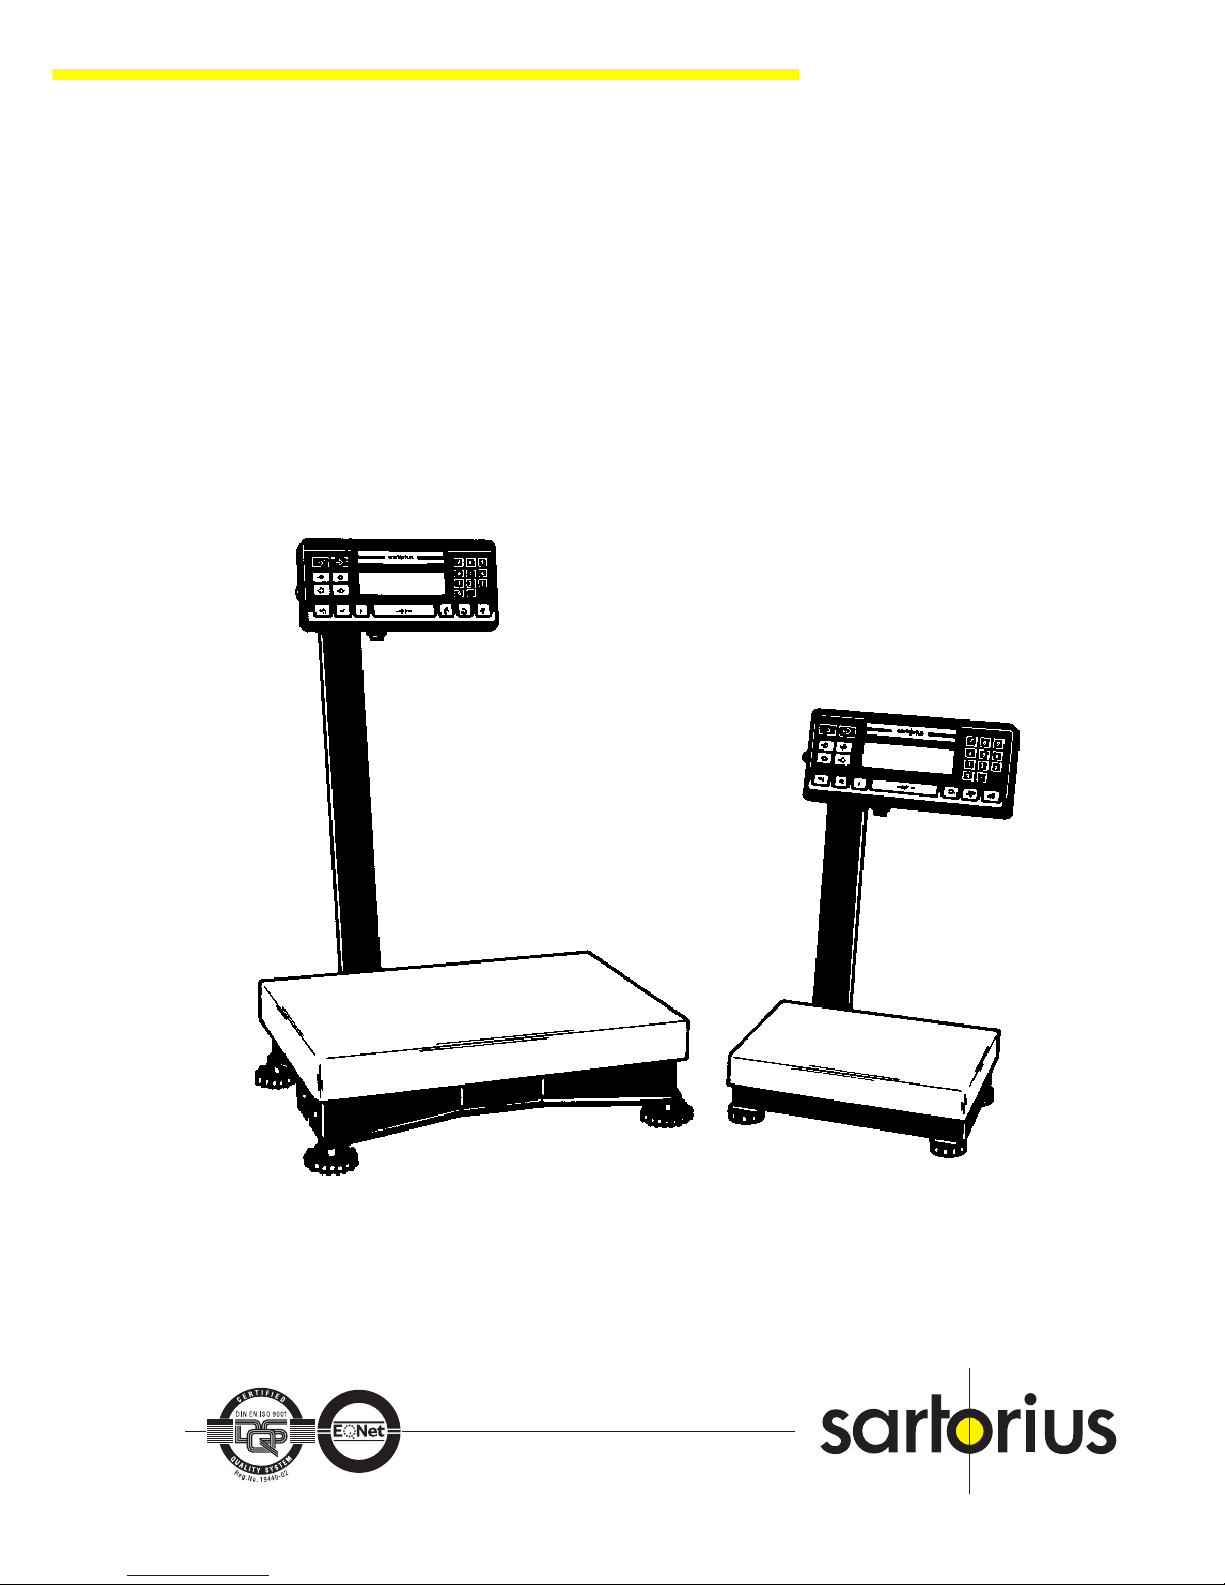
General Information
QC scales come in different model series, each with different housing
versions.
The QC7CCE... series comes in the “QS-Mini” housing version and the
QC34EDE... and QC64EDE... series in the “QS-Maxi” version.
The strain gauge Systems are different in these models.
The electronics are the same in all of these models (MC1), i.e., the operating
instructions, scale operating menu and error codes are the same for each
model.
The -S0UR versions are equipped with a different keyboard foil compared to
the standard versions (for american users).
Brief Operating Instructions
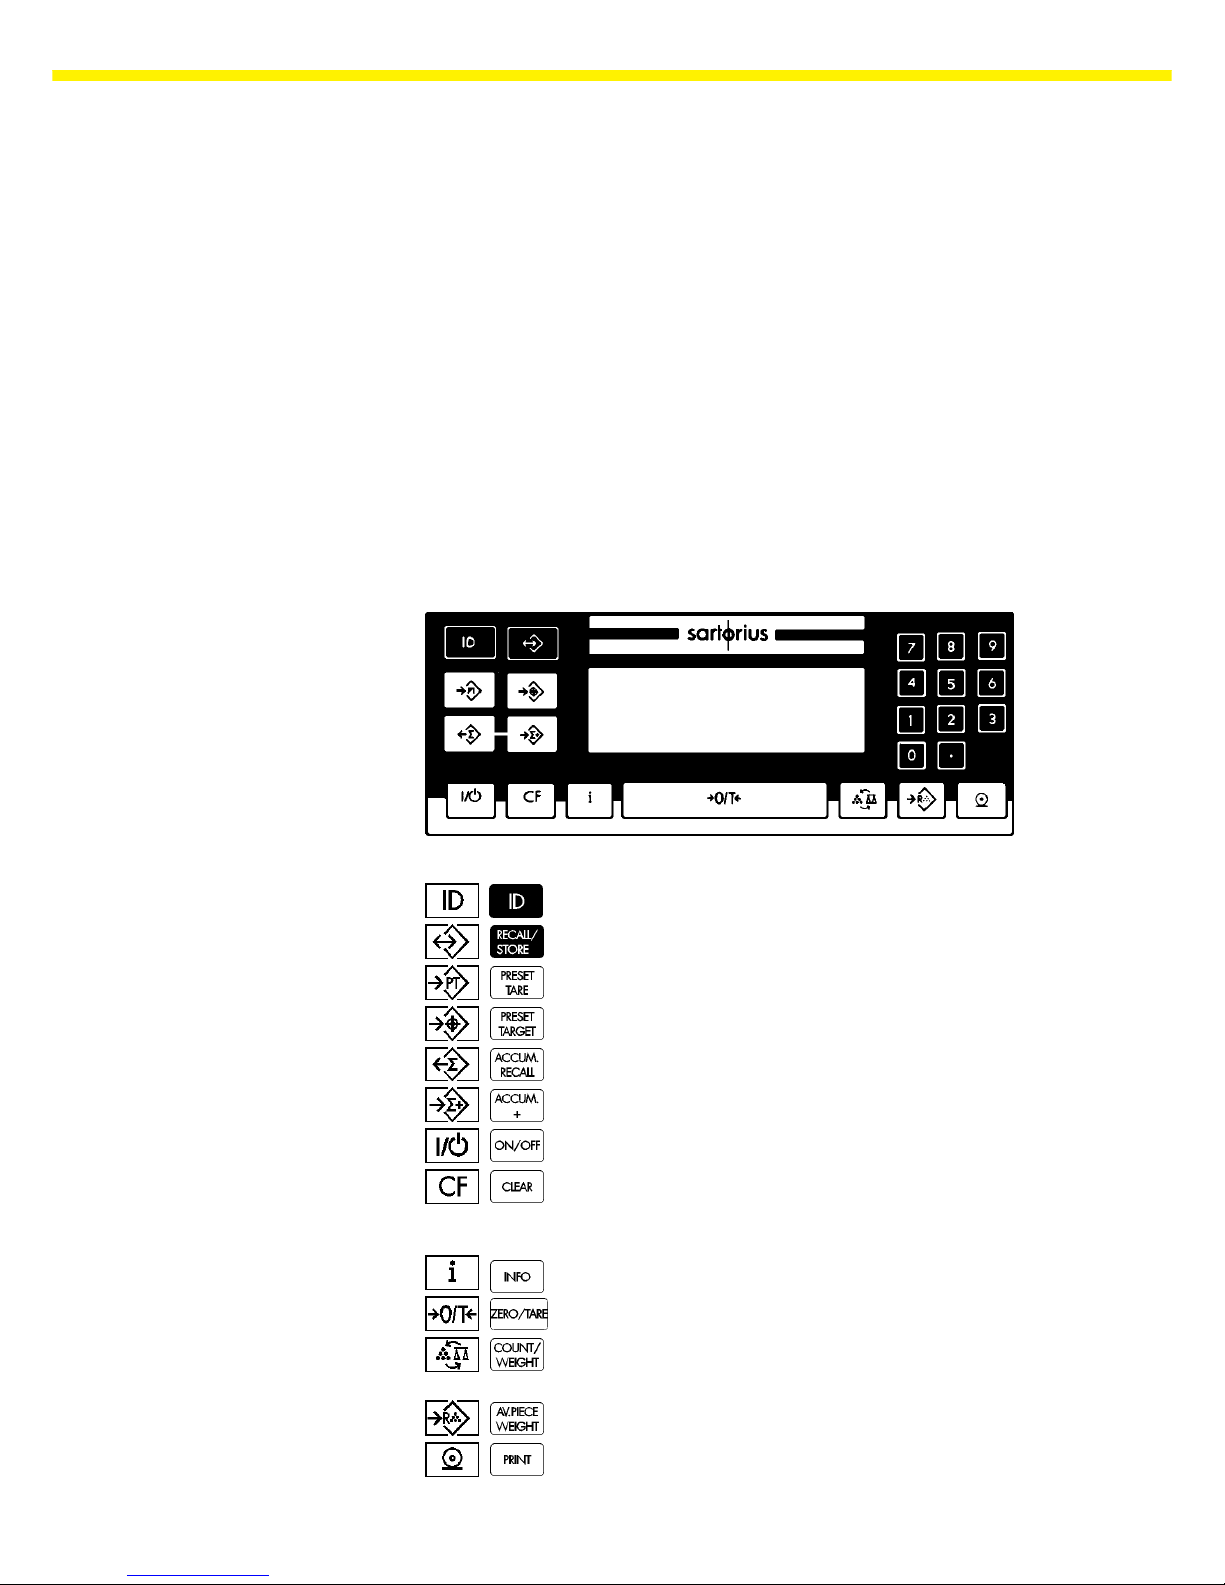
Key Functions
-S -S0UR
ID key, for generating ID codes with data output
Memory key, call and save
Save data in tare 2 memory
“Start” checkweighing
Output totalization result
Add to totalization memory
On/off key
CF (Clear Function); cancel a function or delete data from
memory. First press CF key, then press the key
corresponding to the function or memory to be deleted.
Info key
Tare/zero key
Toggle between weighing and counting applications, or
between ref. weight and reference piece count
Call counting application
Print key
Page 5
5
SARTORIUS QC - Scales
Scale Operating Menu
Accessing the Scale Operating Menu and Changing Settings
Press e to switch the scale off and back on again.
While all segments are displayed (segment check), briefly press the = key.
A “1” is displayed.
Note:
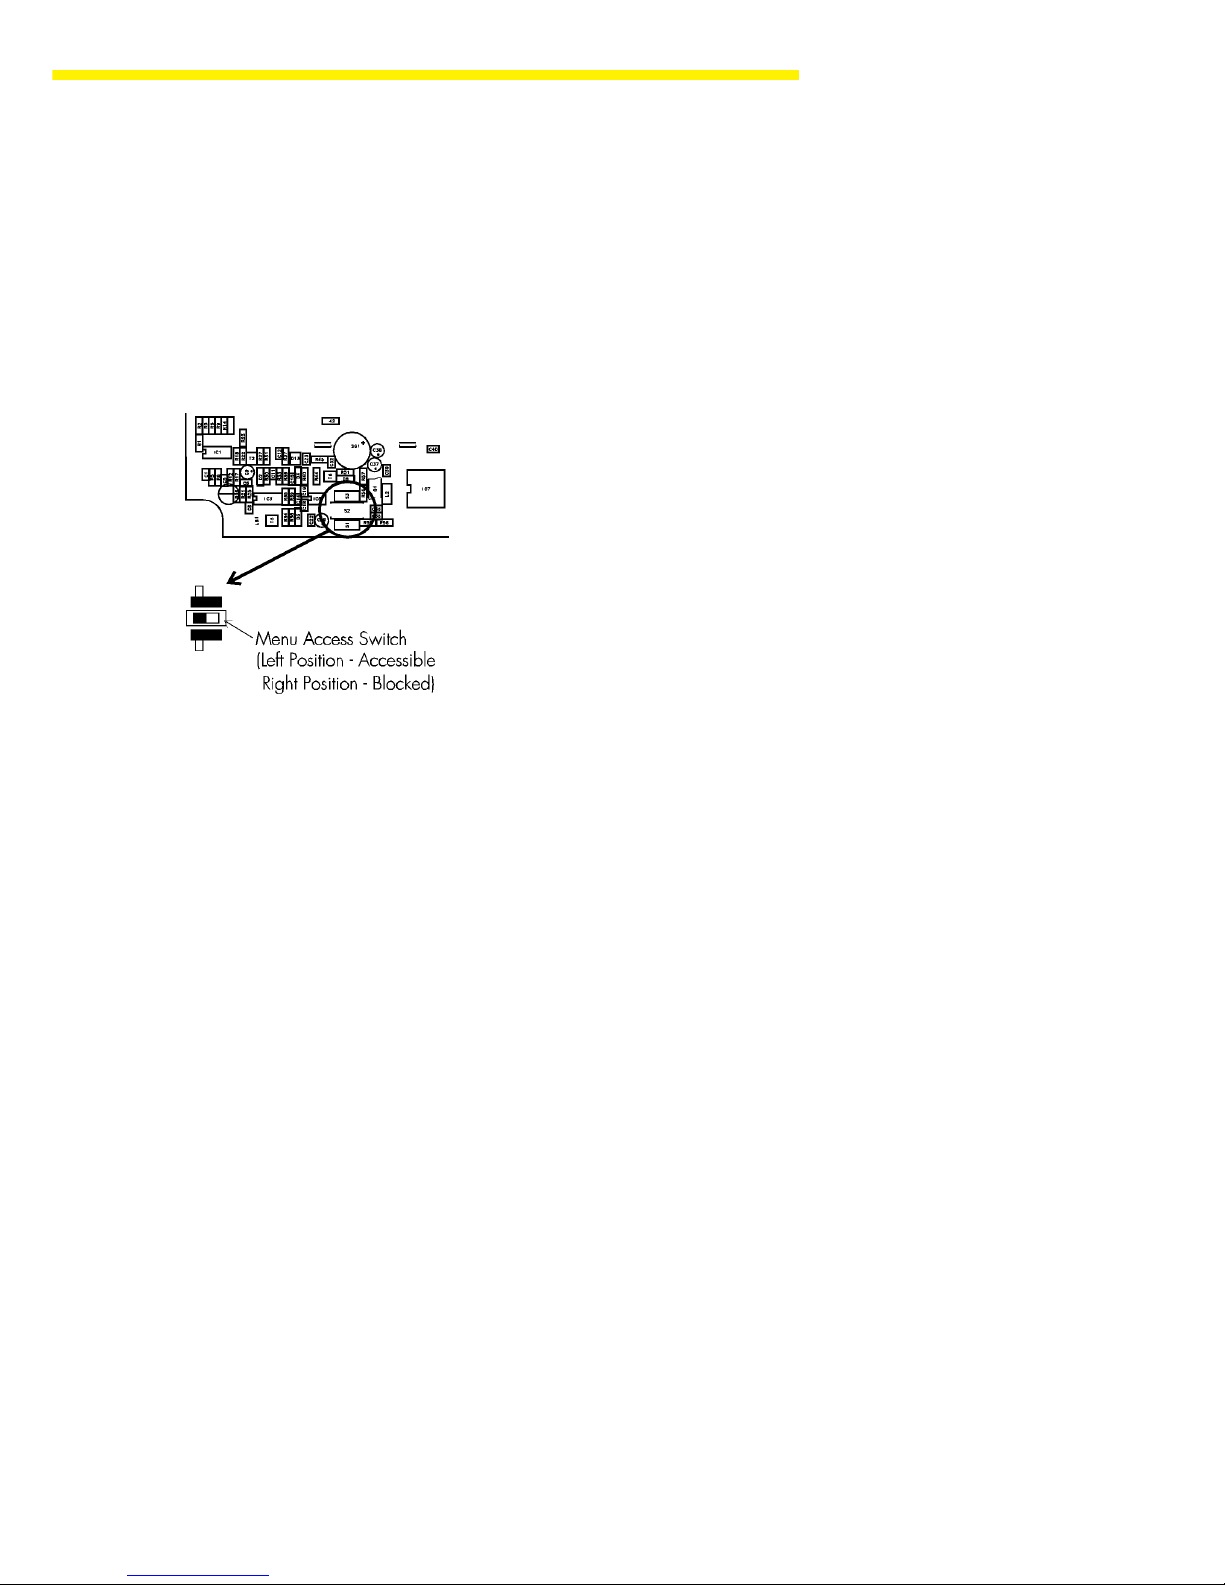
If you wish to change the settings in the scale operating menu, the menu
access switch must be open. The menu access switch is not accessible
when the scale housing is closed; it is located on the solder side of the main
PCB. To access this switch, you need to open the display unit. The factory
setting of the menu access switch is “accessible” (open).
Selecting a Code:
Press u to change the number, in series (1, 2, 3 ... 9, 1).
Press p to move from the 1st to the 2nd, 2nd to 3rd and, if desired, back
to the 1st position of the 3-part menu code.
Changing a Code:
Press = to confirm the desired setting; the “°” symbol is displayed next to
the code when it is set.
Exiting the Menu with or without Saving a New Setting:
To exit the scale operating menu, first move the cursor to the first position of
the code.
If you wish to save the changes you have made, press the = key for at
least 1.5 seconds to exit the menu.
If you do not wish to save any changes, press the e key to exit the menu.
Page 6
6
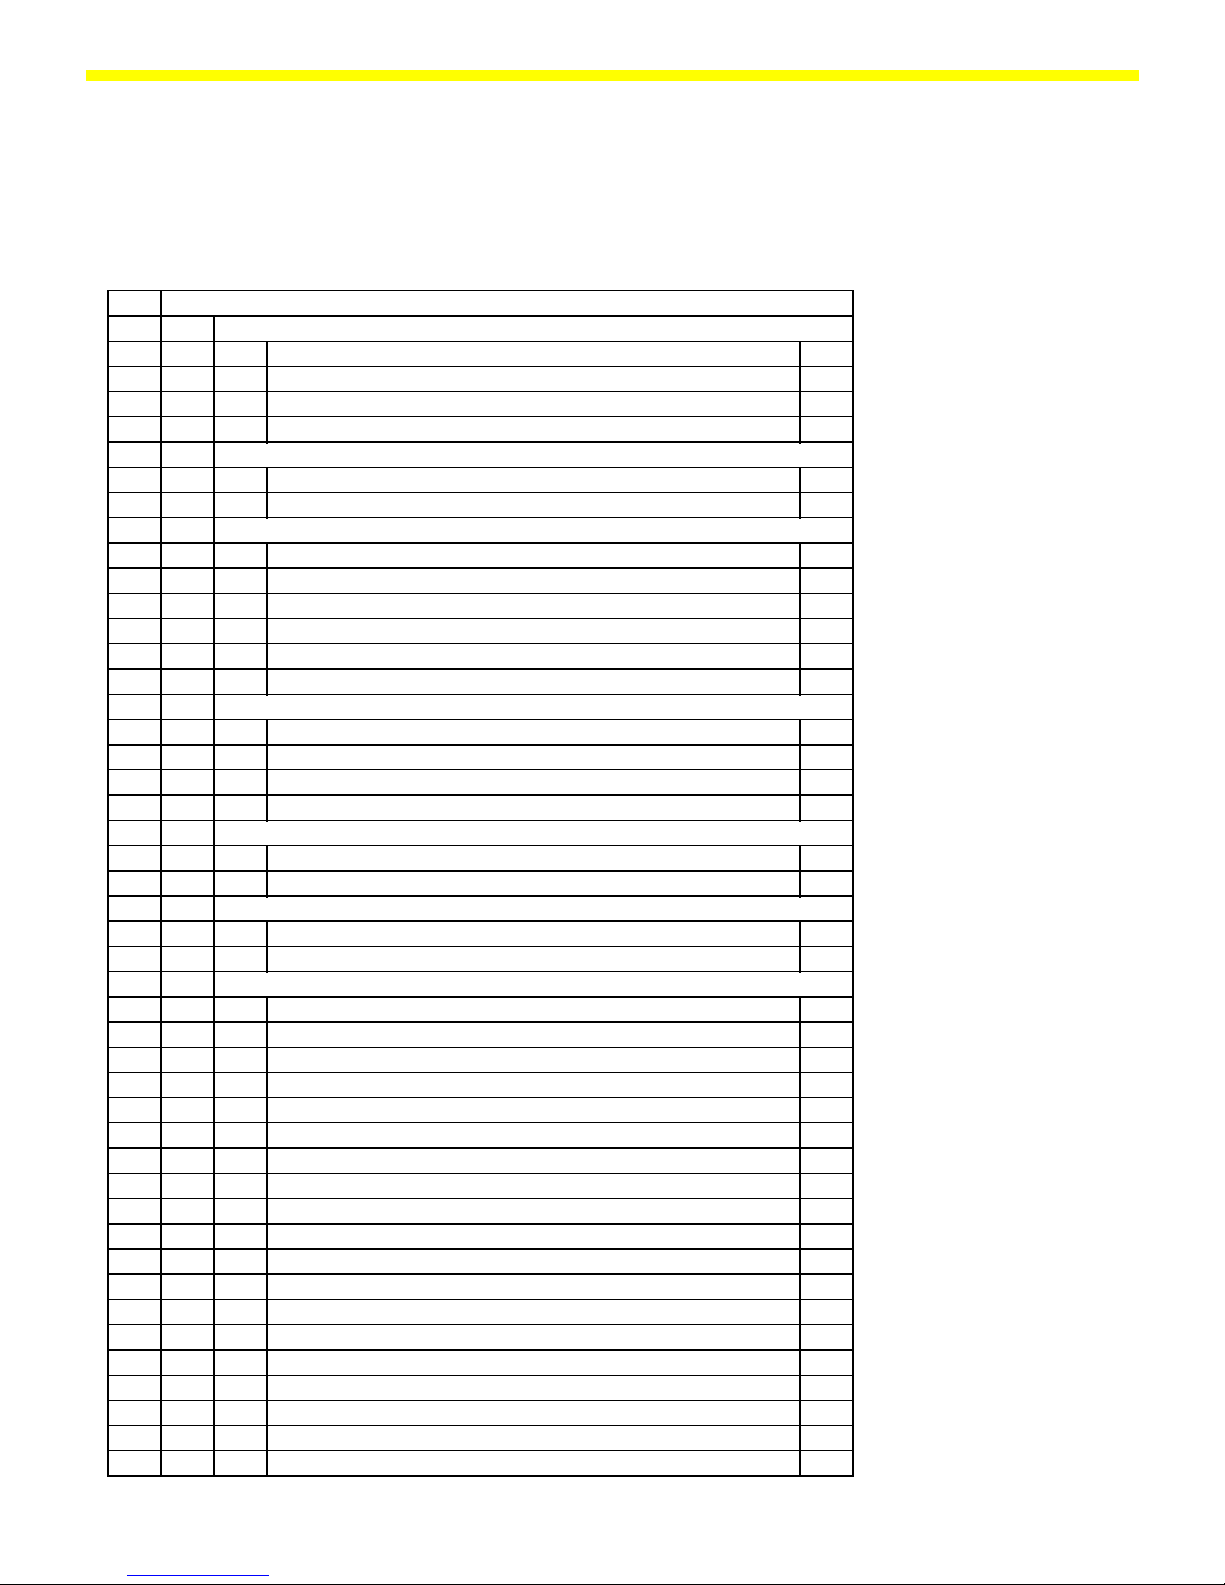
Overview of the Scale Operating Menu
1 Weighing Mode
1 1 Ambient Conditions
1 1 1 Very stable
1 1 2 Stable
1 1 3 Unstable
1 1 4 Very Unstable
1 2 Weighing / Filling
1 2 1 Standard weighing
1 2 2 Filling
1 3 Stability Range
1 3 1 1/4 digit
1 3 2 1/2 digit
1 3 3 1 digit
1 3 4 2 digits
1 3 5 4 digits
1 3 6 8 digits
1 4 Stability Symbol Delay
1 4 1 None
1 4 2 Short
1 4 3 Long
1 4 4 Extremely long
1 5 Tare Parameter
1 5 1 At any time
1 5 2 After stability
1 6 Auto Zero
1 6 1 On
1 6 2 Off
1 7 Weight Units
1 7 1 User - definable o
1 7 2 Gramsm g
1 7 3 Kilograms Kg
1 7 4 Carats ct
1 7 5 Pounds lb
1 7 6 Ounces oz
1 7 7 Troy ounzes ozt
1 7 8 Hong Kong taels tl
1 7 9 Singapore taels tl
1 7 10 Taiwanese taels tl
1 7 11 Grains gr
1 7 12 Pennyweights dwt
1 7 14 Parts per Pound o
1 7 15 Chinese taels tl
1 7 16 Mommes m
1 7 17 Carats k
1 7 18 Tola t
1 7 19 Bath b
1 7 20 Mesghal m
Page 7
7
SARTORIUS QC - Scales
1 8 Display Mode
1 8 1
Highest possible accuracy
1 8 2 Last numeral blanced when load changes
1 8 3 Rounding factor 1
1 8 4 Rounding factor 5
1 8 5 Rounding factor 10
1 8 6
1 % accuracy
1 8 7
0.1 % accuracy
1 8 8
0.2 % accuracy
1 8 9
0.1 % accuracy
1 8 10
0.05 % accuracy
1 8 11
0.02 % accuracy
1 8 12
0.01 % accuracy
1 8 13 PolyRange function
1 9 Adjustment Functions
1 9 1 External adjustment
1 9 5
External linearization
1 9 7 Adjustment function locket
2 APPLIKATION PROGRAMS
2 1 Counting
2 1 1 blocked
2 1 4
free
2 2 Tare Memory
2 2 1 blocked
2 2 2
Tare input memory
2 2 3 Tare input memory automatically
2 4 Clearing Function CF-Key
2 4 1
clearing all stored values
2 4 3 selektive clearing
2 5 Number Keys
2 5 1 blocked
2 5 2 free
2 6 Checkweighing
2 6 1 blocked
2 6 2 Net checkweighing
2 6 3 Diff. checkweighing
2 7 Totalling
2 7 1 blocked
2 7 2 free
2 8 Individual Data ID
2 8 1 blocked
2 8 2 free
2 9 Memory - Funktion
2 9 1 blocked
2 9 2 free
3 APPLIKATION PARAMETERS
3 5 Storage of the Reference Weight / Value
3 5 2 Accuracy to the display accuracy
3 5 3 10-fold higher accuracy
3 5 4 100-fold higher accuracy
Page 8
8
3 9 Average Pieceweight Output
3 9 1 blocket
3 9 2 Display by pressing key
3 10 Accuracy Test
3 10 1 without
3 10 2 99,0 % (100 digits)
3 10 3 99,5 % (200 digits)
3 10 4 99,8 % (500 digits)
3 10 5 99,9 % (1000 digits)
3 11 Criterion for Storing Ref. Weight and Tare Value
3 11 1 At stability
3 11 2 At "increased" stability
3 12 Reference Optimizing
3 12 1 Blocked
3 12 2 Manual
3 12 3 Automatic
3 13 Forced Print when M+ is Pressed
3 13 1 free
3 13 2 blocked
4 CHECKWEIGHING - APPLIKATIONSPARAMETER
4 2 Printout
4 2 1 free
4 2 2 blocked
4 3 Control through Control Lines
4 3 1 Only in check range
4 3 2 Always
4 3 3 Only at stability in check range
4 3 4 Only at stability
5 DATA INTERFACE PARAMETER
5 1 Baud Rate
5 1 1 150 baud
5 1 2 300 baud
5 1 3 600 baud
5 1 4 1200 baud
5 1 5 2400 baud
5 1 6 4800 baud
5 1 7 9600 baud
5 1 8 19200 baud
5 2 Parity Bit
5 2 1 Mark
5 2 2 Space
5 2 3 Odd
5 2 4 Even
5 3 Number of Stop Bits
5 3 1 1 stop bit
5 3 2 2 stop bits
5 4 Handshake Mode
5 4 1 Software
5 4 2 Hardware, 2 characters after CTS
5 4 3 Hardware, 1 character after CTS
Page 9

9
SARTORIUS QC - Scales
6 UTILITIES
6 1 Data Output
6 1 1 Single print without stability
6 1 2
Single print after stability
6 1 3 Single print at stability
6 1 4 Auto print without stability
6 1 5 Auto print after stability
6 2 Auto Print
6 2 Stop/start by pressing key
6 2 2
Not stoppable
6 3 Auto Print Interval After
6 3 1 1 display update
6 3 2
2 display updates
6 3 3 5 display updates
6 3 4 10 display updates
6 3 5 20 display updates
6 3 6
50 display updates
6 3 7 100 display updates
7 SOFTKEY APPLIKATIONS
7 1 Output of Application Parameters
7 1 1
OFF
7 1 2 All parameters
7 2 Data ID Code
7 2 1
without header
7 2 2 with header
7 3 Auto Output of the Tare Memory Data
7 3 1 Last net value
7 3 2 Tare memory data (total)
7 4 Data Output with Time and ID
7 4 1
keineNo output
7 4 2 Output of Date and Time
7 4 3 Output of article ID no.
7 4 4 Output of Date and Time and article ID no.
7 5 Output of Header Lines 1 and 2
7 5 1 No output
7 5 2 Output 1st header line
7 5 3 Output 2nd header line
7 5 4 Output both lines
7 6 Output og "wRef" and "nRef"
7 6 1 No output
7 6 2 Piece count "nRef"
7 6 3 Average piece weight "wRef"
7 6 4 Both
7 7 Output: Net / Tare / Gross / Counting Resault
7 7 1 No output
7 7 2 Output of net value and counting result
7 7 3
Output of Net/tare-comp./gross or counting result
7 7 4 Output of Net/tare-comp./gross and counting result
Page 10

10
7 8 Line Feed
7 8 1 No line feed
7 8 2 Line feed - 1 line
7 8 3 Line feed - 2 lines
7 8 4 Line feed - 3 lines
8 ADDITIONAL FUNCTIONS
8 1 Menü Access
8 1 1 Change mode
8 1 2 List mode
8 2 Acoustic Signal
8 2 1 On
8 2 2 OFF
8 3 Keyboard Function
8 3 1 free
8 3 2 Blocked
8 4 Universal Key
8 4 1 p
8 4 2 =
8 4 3 =
8 4 4 g
8 4 5 o
8 4 6 u
8 4 7 z
8 4 8 S
8 5 Power-On Mode
8 5 1 off > on / Standby
8 5 2 off > on
8 5 3 on / standby
8 5 4 auto on
8 6 Display Backlighting
8 6 1 ON
8 6 2 OFF
8 6 3 Auto-off after 2 minutes
8 7 Auto OFF
8 7 1 ON
8 7 2 OFF
9 1 RESET
9 1 1 ON
9 1 2 OFF
Page 11

11
SARTORIUS QC - Scales
Activating the BPI Mode
In order to use CAS programs with the MC1 server or a personal computer,
the scale must be set to the BPI mode.
Disconnect the AC adapter from the scale and open the display unit by
removing the 4 screws at the back.
Carefully pull the front panel with the main PCB far enough away from the
rear panel to access the BPI switch (see illustration at left).
Reconnect the AC adapter and switch on the scale by pressing e.
Once 0.0g is displayed, move the BPI switch to the right.
The segment check is now displayed periodically. Wait until the segment
check has lit up at least 3 times; the scale is now in the BPI mode.
Move the switch back to the original position; the scale now shows the
normal weighing display.
Close the display unit.
You can now operate the scale in conjunction with the Sartorius MC1 server
in the BPI mode.
Important Note: After working in the BPI mode, make sure to set the write-protect again (with
the Sartorius MC1 server: “close”), so that the QC scale returns to the
standard data output protocol (SBI mode).
Otherwise you will not be able to transfer data to a peripheral device; if
you press the print key, the error code “Err30” will be displayed.
Important Note: This function switch has no effect on service operations, but you need to
make sure that it is always in the correct position, i.e., set to the left (see
illustration).
Adjusting the QC Scales
Table of Adjustment/Calibration Data
Scale Type QC7CCE-S... QC34EDE-S... QC64EDE-S...
Weighing Range
7204 g 34020 g 64040 g
Readability
0,1 g 0,5 g 1 g
Reproducebility
<=± 0,2 g <=± 1 g <=± 2 g
Linearity Deviation
<=± 0,2 g <=± 2 g <=± 4 g
Adjustment Weight
5000 g 10000 g 20000 g
Off-Center Load Test Weight
5000 g 10000 g 20000 g
Off-Center Load Test Area
up to the brim of the pan
Off-Center Load Tolerance
0,6 g 1,5 g 3 g
Zero Point Offset Test Weight
without weight on the pan
Zero Point Offset Voltage
- 300 mV ... - 2 V
(14,8 % ±11%)
Page 12

12
Adjustment Sequence
1. Adjusting the Overload stops
2. Adjusting the Zero point offset
3. Adjusting the Linearity
4. Adjusting the Span (Sensitivity)
Overload Stops
1. QC7CCE-S
Adjusting the Lower Middle Stops
Important note: The lower middle stop cannot be seen while you are adjusting it; thus you
need to go by sound in checking and finding the correct position.
– Place the scale on a stable surface, so that you can reach both stop
screws (113) from underneath the scale.
– Place a load equal to the maximum capacity of the scale plus 1 kg on
the middle of the weighing pan.
– Unscrew the stop screws (113) until you can hear that the stop is free.
– Turn one of the screws (113) slowly against the stop while checking the
distance by pressing down on the load.
– Continue this procedure until you have found the position in which the
screw (113) touches the stop (the sound of the stop can no longer be
heard).
Important note: After setting the first screw correctly, turn it back by ¼ turn in order to adjust
the second screw.
- Follow the same procedure to adjust the second screw (113).
- After the second stop screw (113) is in the correct position, readjust the
first screw by ¼ turn so that it is back in the correct position as well.
- Once both screws (113) are adjusted properly, remove the scale from its
raised position.
Page 13

13
SARTORIUS QC - Scales
Adjusting the Upper Middle Stop
– Remove the weighing pan.
– There must not be any load on the scale when the upper middle stop is
being adjusted.
– Adjust the upper middle stop so that the gap between the weighing pan
and the stop is 0.6 mm (tolerance range: + 0.1 mm); check the gap size
with a feeler gauge.
– When the gap is correct, place the weighing pan on the scale.
Adjusting the Corner Stops
– Remove the weighing pan and place it upside down on the scale.
– Place a load equal to the maximum capacity in Position 1 on the
weighing pan.
– Use a feeler gauge to check the distance between the corner stop screws
(115) and the weighing pan.
– Proceed as in the following example to adjust the corner stops:
– The actual value of the gap (as determined with the feeler gauge) is
1mm.
– The target value is 0.25 mm.
– The deviation (actual minus target value) is, in this example, 0.75mm.
– The lead of the stop screws is 1 mm, i.e.:
1 turn clockwise increases the gap by 1 mm
1 turn counter-clockwise decreases the gap by 1 mm
– The adjustment step is calculated from the above values:
1 turn of the stop screw changes the gap size by 1 mm, i.e. in the above
example, you would need to turn the screw ¾ of a turn counter clockwise
to achieve the required adjustment (deviation: 0.75 mm).
– Before adjusting the screws (115), remove the weighing pan from the
scale.
– Proceed in the same manner to adjust the corner stops in positions 2 – 4.
– After completing this adjustment procedure, place the weighing pan right
side up on the scale.
– When you have finished adjusting the corner stops, proceed to the
adjustment/calibration functions.
Page 14

14
2. QC34EDE-S, QC64EDE-S
The models QC34EDE-S and QC64EDE-S have two overload-protection
features.
The first overload stop is in the pan support, accessible from beneath the
scale. This is an adjustable set screw, fixed by a locknut.
Adjustment:
– Remove any load from the scale.
– Place the scale on 4 blocks of equal height in order to make the bottom
of the scale easily accessible, since the set screw is only accessible from
the bottom.
– Place a load on the scale, on the front of the weighing pan, equal to the
following weight:
QC34EDE-S 40kg
QC64EDE-S 70kg
– Carefully turn the set screw until it just touches the System, and then attach
the locknut.
– Check your adjustment by placing the maximum load on the scale
(QC34... 34kg; QC 64... 64kg) - the set screw must be free and the
weight displayed.
Adjusting the Second Overload Stop Feature:
The second overload protection device consists of four hex nuts, located in
the base pan of the scale and accessible from below. You can adjust the
height of these hex nuts with a 13 mm wrench.
– Unload the scale and turn it over.
– Place a load on the first corner (see illustration):
QC34...: 20kg
QC64...: 40kg
- Adjust the height of the hex nut until a slight overload (QC34...: +2kg;
QC64...: +5kg) causes the base pan to rest on the screw (displayed
value
no longer changes).
- Repeat this procedure on all 4 corners.
Page 15

15
SARTORIUS QC - Scales
Zero Point Offset Value
The zero point offset value must be adjusted in order to adapt the bridge
voltage of the strain gauge System to the working range of the scale’s
electronics. You may need to adjust this value:
- after replacing the strain gauge system
- after replacing the main PCB
- if the scale’s span (sensitivity) cannot be adjusted (not even with the
PSION server) and the error code “Err02” is generated
- if the zero point offset voltage has changed and lies outside the tolerance
range, e.g., if the strain gauge System becomes “warped”
Adjusting the Zero Point Offset Value
The are two ways of adjusting the zero point offset value:
1. using a digital voltmeter
2. using the PSION server, Datapack version 4.4 and newer
1. Adjustment using a digital voltmeter:
- Open the display unit by removing the 4 screws at the back.
- Reconnect the scale to AC power.
- With no load on the weighing pan, use the digital voltmeter to measure
to ground on R122 (OP output IC 20 / pin 6).
The zero point offset voltage should be between - 300 mV and - 2V.
- If the zero point offset voltage lies outside these limits, you can adjust it by
changing the following solder bridges on the main PCB.
Solder bridge Position number
LB 7 [ 1 ] [ 2 ]
LB 8 [ 1 ] [ 2 ]
LB7 LB7/LB8 LB8 LB7/LB8
Zero Point Offset Voltage 1 / 2 1 / 1 1 / 2 2 / 2
< - 2 V open close open open
> - 300 mV close open close open
Page 16

16
2. Adjustment using the PSION server
– Switch the scale to the BPI mode (see page 11).
– Switch on the PSION server and call the CAS program (version 4.4 or
newer)
– Select the menu item “Electr-zero-point” from the “Diagnosis” submenu
– With no load on the weighing pan, a value of 14.8 % ±11% should
appear in the PSION display.
If the value displayed is outside the tolerance limits, you can adjust this
voltage by changing the solder bridges LB7 and LB8.
LB7 LB7/LB8 LB8 LB7/LB8
Zerp Point Offset Value 1 / 2 1 / 1 1 / 2 2 / 2
< 25,8 % open close open open
> 3,8 % close open close open
After adjusting the zero point offset, proceed with the adjustment of the span
(sesitivity) (with the PSION server, if desired).
Adjusting the Linearity
Note: There are two methods for adjusting the linearity:
1. As described in this manual, or
2. Using the MC1 PSION server
– Test the linearity of the scale in 1000g steps over the entire weighing
range.
– If any deviation is greater than the tolerance values given, you need to
adjust the linearity.
– Set the code “1 9 5” in the scale operating menu (external
linearization accessible).
– When 0.0g is displayed, press the e key and hold it for about 3
seconds; then release it.
– The first linearization value is displayed.
– Place the prompted weight on the middle of the weighing pan.
– After the weight is stored, the next weight value is displayed.
– Each linearity support point is called and stored.
– When this routine ends, the scale returns to the normal operating mode.
– If desired, reset the menu item “1 9 “ to the standard setting.
Note: After linearization, make sure you perform the adjustment of the span
(sensitivity).
Page 17

17
SARTORIUS QC - Scales
Adjusting the Span (Sensitivity)
Note: There are two methods for adjusting the span (sensitivity):
1. As described in this manual, or
2. Using the MC1 PSION server
– Set the code “1 9 1” in the scale operating menu (external calibration
accessible).
– When 0.0g is displayed, press and hold the e key for about 3
seconds; then release it.
– The adjustment weight is displayed.
Important note: The scale will only accept an adjustment weight that is within a tolerance of
2% of the target value. Any greater deviation can only be adjusted using the
MC1 PSION server (Datapack version 4.4).
– Place the prompted adjustment weight on the middle of the weighing
pan.
After confirming the weight, the scale returns to the normal operating
mode.
Replacing the Main PCB
In the case of defects, do not attempt to make any repairs at the component
level, but rather replace the entire subassembly.
Note: Before replacing the main PCB, read out and store the scale’s data records
using the MC1 PSION server, if possible.
If this is not possible, order a replacement PCB; make sure you supply the
model and serial number of the scale for programming purposes.
– Open the display unit by removing the 4 screws at the back.
– Carefully pull the front panel far enough away from the rear panel to
disconnect the 3 cables (data output, power supply and connecting
cable)
that lead to the strain gauge system.
– Remove the entire front panel.
– The main PCB is connected to the front panel by 5 screws (one in each
corner and one to ground the keypad overlay). Remove these 5 screws.
– Remove the cable that leads to the keypad.
– You can now remove the main PCB.
Important note: Make sure you duplicate the solder bridges from the old main PCB to the
new one!
- Install the new main PCB (follow the above steps in reverse order).
- Switch the scale to BPI mode.
Note: You will now need to program the scale with the appropriate data set.
Check the following points and adjust them if necessary:
- Zero point offset value
- Linearity
- Span (Sensitivity)
Page 18

18
Replacing the Strain Gauge System
1. QC7CCE...
– Open the display unit.
– Disconnect the data output, power supply and connecting cables that
lead to the main PCB.
– Remove the front panel together with the main PCB (102) and place them
to one side.
– Unscrew the two retainers (104.B) from the rear panel of the display
unit (104).
– Unscrew the cable clamp (103) and pull the strain gauge System with
washer (104.C) from the rear panel of the display unit (104), and place
the display unit casing (104) to one side.
– Pull the strain gauge System connecting wire out of the display unit
holder (108).
– Remove the weighing pan and lay the scale on its side.
– Unscrew the cable clamp (112) and pull the strain gauge System
connecting wire out of the cable guide under the base pan.
– Stand the scale upright.
– Remove the stop screws (119) from the pan support (118).
– Loosen the fastening screws (116.D) on the pan support (118) far
enough
so that you can remove the pan support (118) with the load spring (117)
from the strain gauge system (116).
Page 19

19
SARTORIUS QC - Scales
– Now loosen the two fastening screws (116.B) far enough so that you can
remove the strain gauge system through the base pan (116).
– Unscrew the retaining plates from the old strain gauge system (116) and
attach them loosely to the new strain gauge system (116).
– Thread the strain gauge system connecting wire (116.A) from the top
through the base pan (116.B); set the new strain gauge system in
place (116) and screw it down loosely.
– Position the strain gauge system (116) and tighten down the two
screws (116.C) to 7.5 (+0.4) Nm.
– Set the pan support (118) and load spring (117) on the strain gauge
system (116) and screw them down loosely.
– Position the pan support (118) and the load spring (117) and tighten
down the two screws (116.C) to 7.5 (+0.4) Nm.
– Screw in the stop screws (119) until there is a gap of 0.6 mm between
the
pan support (118) and the stop screws (119).
– Lay the scale on its side.
– Thread the strain gauge system connecting wire through the guide under
the base pan and fasten it in place with the two cable clamps (112).
– Stand the scale upright and place the weighing pan on it.
Page 20

20
– Now pull the strain gauge system connecting wire into the display unit
holder.
– Thread the strain gauge system connecting wire through the opening in
the
rear panel of the display unit (104) and put the washer (104.C) in place.
– Fasten the strain gauge system connecting wire (and the data output
cable,
if any) with the cable clamp (103).
– Attach the rear panel of the display unit (104) to the display unit holder
(108) with the two retainers (104.B).
– Replace the front panel with the main PCB.
– Now perform a through check and, where necessary, readjustment of the
following points:
Overload stops
Zero point offset value
Linearity
Span (Sensitivity)
– The scale is now ready for operation.
2. QC34EDE... and QC64EDE...
– Open the display unit.
– Disconnect the data output, power supply and connecting cables that
lead
to the main PCB.
– Remove the front panel together with the main PCB (102) and place them
to one side.
– Unscrew the two retainers (104.B) from the rear panel of the display
unit (104).
– Unscrew the cable clamp (103) and pull the strain gauge system with
washer (104.C) from the rear panel of the display unit (104), and place
the display unit casing (104) to one side.
– Pull the strain gauge system connecting wire out of the display unit
holder (108).
– Remove the weighing pan and unscrew the pan support (102) from the
strain gauge system (A).
Page 21

21
SARTORIUS QC - Scales
– Lay the scale on its side.
– Remove the cover plate (209) from the holder (210) (A).
– Remove the strain gauge system connecting wire from the bottom
plate (106) (remove the strain relief (105)).
– Unscrew the strain gauge system (103) from the bottom plate (106).
– Unwind the strain gauge system connecting wire from the bottom plate
and remove the strain gauge system.
– Place the new strain gauge system (103/113) on the bottom plate (106)
and screw it down loosely.
– Position the strain gauge system (103/113) and tighten the fastening
screws to 25 Nm.
– Attach the strain gauge system connecting wire to the bottom plate (106)
(re-attach the strain relief).
– Loosely attach the screws that hold the pan support (102) on the strain
gauge system, then position it and tighten the screws (25 Nm).
– Now pull the strain gauge system connecting wire into the display unit
holder.
– Thread the strain gauge system connecting wire through the opening in
the rear panel of the display unit (104) and put the washer (104.C) in
place.
– Fasten the strain gauge system connecting wire (and the data output
cable,
if any) with the cable clamp (103).
– Attach the rear panel of the display unit (104) to the display unit
holder (108) with the two retainers (104.B).
– Replace the front panel with the main PCB.
– Now perform a through check and, where necessary, readjustment of the
following points:
Overload stops
Zero point offset value
Linearity
Span (Sensitivity)
– The scale is now ready for operation.
Page 22

22
Error Codes
Error Code Explanation Solution
Err 01
Display overflow, i.e., the value to be output cannot
be displayed
Reset the scale operating menu with code “9-1"
Err 02
Zero point error when starting adjustment function
(scale not tared or load not removed); no stability;
zero point is not within tolerance limits
Unload scale; tare scale; adjust using PSION server; adjust
zero point offset value
Err 03
Zero point error when adjustment function ended
(drift is too strong)
Observe warmup time and restart adjustment function
Err 10
Tare 1 blocked with data in Tare 2
The tare functions are mutually exclusive; once the data in
the tare 2 memory is deleted the tare 1 memory will be
accessible
Err 11
Invalid data;, cannot be stored in the tare memory
Displayed value was negative, for example; check load on
scale
Err 12
Value in tare memory exceeds weighing range Check load on scale; delete tare data
Err 20
W key was pressed before an application was
initialized
Select an application in the operating menu
Err 22
Reference value not permissible in the counting
application
Reference weight too low or no load on scale
Err 23
Reference value not permissible in the
checkweighing application
No load on scale, or displayed value is negative
Err 30
Print key pressed while BPI mode active
Use the PSION server to switch scale to SBI mode (RS-232
mode).
Err 50
Temperature compensation (TC) converter error;
value measured by the TC switch exceeds the
tolerance range.
TC-sensor or main PCB defective (replace)
Err 53
Temperature compensation (TC) converter not
functioning (no value passed to the scale processor
from the TC switch)
TC-sensor or main PCB defective (replace)
Err 54
Level control in A/D converter under the minimum
limit
Scale underloaded; no weighing pan on the scale;
mechanical defect; main PCB defective (replace)
Err 55
Level control in A/D converter under the maximum
limit
Scale overloaded; mechanical defect; main PCB defective
(replace)
Err 62
key not permitted
Err 63
key not permitted
Err 64
Input via number pad not permitted
Err 70
Faulty input via number pad
Input value too high or too low; data input in the wrong
order
Err 101
Short circuit in the keypad overlay
More than one key pressed when switching on the scale;
keypad defective (replace)
Err 102
Err 103
Err 104
Err 110
Defective KDC-AOC interface
Faulty connection betw. display unit and main PCB;
defective display unit; defective main PCB
Err 220
ROM checksum test (faulty data in the ROM range
of the scale processor)
Reprogram or replace the main PCB
Err 230
RAM read/write test (faulty data in the RAM range
of the scale processor)
Reprogram or replace the main PCB
Err 237
EEPROM checksum test – linearity range defective
(scale has not been linearized or the data stored
are faulty)
Linearize the scale
Err 241
EEPROM checksum test – fixed range (faulty data in
the fixed range of the scale processor)
Overwrite the data records (reprogram or replace the main
PCB)
Err 243
EEPROM checksum test – menu range (faulty data in
the menu range of the scale processor)
Reset the menu (code 9—1)
Err 247
EEPROM checksum test – adjustment weight (scale
has not been adjusted or the data stored are faulty)
Adjust the span of the scale, if necessary, reprogram the
main PCB
Page 23

23
SARTORIUS QC - Scales
Installation of the YDI01IS-0CE (Industry Printer)
It is possible to use the industrial printer (paper strip or label) YDP01IS-0CE
(from the isi range) together with the QC scales.
The following changes must be done on the QC´s menu configuration:
9600 Bd 5 1 7
Space Parity 5 2 2
2 Stopbits 5 3 2
Handshake 2 Z. 5 4 2
Print Art-Nr ID 7 4 3
(Restriction: Date/time print is not possible; for this feature you need to use
the YDP02-0CEV3)
The following initialisation procedure must be done on printer YDP01IS-0CE
if paper shifts out several print lines after pressing FEED key:
Hold FEED key while power switching on. Release if paper begins to shift
out automatically.
Wait until shift out stops (approx.after 20cm). Then again press the FEED
key.
Switch power off and on again, now FEED works for the rest of printers life
with only one line shift.
Note: You can use the printer YDP01IS-0CE for label printing!
Spare Parts
Due to the relatively simple construction of the QC scales, only complete
subassemblies need to be replaced (main PCB, strain gauge system).
The following parts list is current as of July 1, 1995.
Designation
QC7CCE QC34EDE QC64EDE
-S -S0UR -S -S0UR -S -S0UR
Main PCB 69QC0003
Strain Gauge System, compl. 69QC0007 69QS0056 69QS0063
Back Panel 69QC0005
Front Plate, compl.
69QC0001 69QC0009 69QC0001 69QC0009 69QC0001 69QC0009
Pan 69QS0036 69QS0001
Set of misc.Parts (Display Head) 69QC0002
Set of misc.Parts (System) 69QC0008 -- --
Dust Cover
-- 6960IB01
Page 24

Sartorius AG
37070 Goettingen, Germany
Weender Landstrasse 94 - 108, 37075 Goettingen, Germany
(551) 308-0, (551) 308-289
Copyright by Sartorius AG, Goettingen, Germany.
All rights reserved. No part of this publication
may be reprinted or translated in any form or by any means
without the prior written permission of Sartorius AG.
The status of the information, specifications and
illustrations in this manual is indicated by the date
given below. Sartorius AG reserves the right to
make changes to the technology, features,
specifications and design of the equipment
without notice.
Status: January 1996 Sartorius AG, Goettingen, Germany
Printed in Germany on paper that has been bleached without any use of chlorine · M
Publication No.: WQC5001-e95121
 Loading...