

Sartorius PMA.Quality PMA7501,PMA.Quality PMA7501-000 series,PMA7501,PMA7501-000W Installation Instructions Manual
98648-014-21
Installation Instructions
Sartorius PMA.Quality
PMA7501, PMA7501-000…
Electronic Paint-mixing Scales

2
General View of the Equipment
PMA7501
1 Display and control unit
2 Q key (On/Standby)
3 R key: Upwards
4 S key: Downwards
5 U key: Zero/Tare
6 I key (TOGGLE)
With the PMA 7501, you can toggle to
two decimal places – from 0.05 g to
999.95 g – or toggle between – “g” and
“p” – parts per pound, depending on
the menu settings
7 K factor key (FORMULATION)
for paint-mixing applications
8 c key (Clear) and [REC] key for
paint-mixing applications
9 L key [ENTER] and [MEM] key for
paint-mixing applications
10 Display
11 Weighing pan
12 Interfaces
(here: D-Sub connector, 9-contact)
13 DC jack for connection to AC power
14 Column
15 Joint
The following symbols are used in
these instructions:
§ Indicates required steps
$ Indicates steps required only under
certain conditions
> Describes what happens after you have
performed a particular step
– Indicates an item in a list
! Indicates a hazard
1
2
3
4
5
6
7
8
9
11
12
14
10
13
15

3
Contents
General View of the Equipment
PMA 7501 | PMA7501-000W ........2
Contents .......................3
Intended Use ....................3
Warnings and Safety Precautions .....4
Getting Started ...................5
Operation .......................7
Applications .....................9
Calibration/Adjustment ............12
Menu Settings ..................13
Troubleshooting .................18
Care and Maintenance ............19
Recycling ......................20
Specifications ...................21
Interface Ports ..................22
Accessories .....................23
USB Port (PC) ...................24
Declaration of Conformity ..........26
The PMA7501 has been specially
designed for use in the paint-mixing
sector. This scale can be operated either
using the keypad on the display and
control unit (in “stand alone” mode) or
using the application software (e.g., paint
manufacturers’ paint-mixing applications) installed on your PC.
If required, Sartorius can supply you with
DOS or Windows®-based device drivers to
generate application programs.
Note:
– Read the installation and operating
instructions carefully before connecting
the scale and putting it into operation.
– The application examples and menu
settings described in these installation
instructions are not valid for
PMA7501-000W.
Intended Use

4
Warnings and Safety Precautions
This scale meets the guidelines and
standards governing electronic equipment,
electromagnetic compatibility and the
stipulated safety standards. Improper use
or handling can result in property damage
and/or personal injury. To prevent damage
to the equipment, read these operating
instructions thoroughly before using your
scale. Keep these instructions in a safe
place.
– If the equipment is not used in accord-
ance with the operating instructions,
product liability may be affected.
– Do not expose the scale to extreme
temperatures, aggressive chemical vapors,
moisture, shocks or vibrations.
– The displayed values can be affected
when subjected to extreme electromagnetic influence. When the negative influence has subsided, the scale will again be
fully operational.
! The equipment must be used indoors
only.
! The scale may not be operated in hazard-
ous /EX Zone areas.
! To ensure safety, disconnect the equip-
ment from power before connecting or
disconnecting the cables or electronic
peripheral devices.
– If you use cables purchased from another
manufacturer, check the pin assignments
in the cable against those specified by
Sartorius before connecting the cable
to Sartorius equipment, and disconnect
any wires that are assigned differently.
The operator shall be solely responsible
for any damage or injuries that occur
when using cables not supplied by
Sartorius.
– When connecting the scale to the power
supply, the laws valid in your country
must be observed. If you should have any
questions, please contact your supplier or
Sartorius Customer Service for information on the legal regulations applicable in
your country. The scale must be installed
by a certified technician to avoid forfeiture of all claims under the manufacturer’s
warranty.
! If you see any indication that the scale
cannot be operated safely (for example,
due to damage), turn it off and lock it in
a secure place or otherwise prevent use of
the equipment for the time being. Adhere
to the accident prevention regulations
and inform the operators accordingly.
! Always make sure the equipment
is disconnected from AC power before
performing any installation, cleaning,
maintenance or repair work on the
scale.
To avoid forfeiture of all claims under the
manufacturer’s warranty, all repair and
maintenance work must be performed by
authorized Sartorius service technicians.
– All other cables connecting the weighing
equipment and peripheral devices, as well
as the wiring inside the devices, are cased
in PVC materials. Chemicals that corrode
these materials must be kept away from
these cables.
! Never use a hammer to close the lid of a
paint can while it is still on the weighing
pan. Otherwise, you will damage the
weighing system.

5
Getting Started
§ Remove the scale from its packaging.
§ After unpacking the scale, check it immediately
for any visible damage as a result of rough handling
during shipment.
Equipment Supplied
– Scale
– Weighing pan
– Table adapter with country-specific mains cable
– 2+ protective plugs (in the column)
– Model PMA7501-000U only: USB data cable
Setting Up the Scale
Choose a suitable place to set up the scale. Avoid
exposure to drafts, heat, moisture and vibration.
Make sure to read the instructions carefully before
connecting the scale to AC power.
! Observe the safety instructions and warnings in this
manual.
§ Place the weighing pan on the scale.
°C

6
Connection to AC Power
The equipment is powered through the AC adapter
supplied
§ Insert the right-angle plug into the DC jack (13) on
the scale
§ Connect the country-specific mains cable to the
adapter
§ Plug the mains cable into an electrical AC power
outlet
! Observe the safety instructions and warnings in this
manual.
Check that the voltage rating of the AC adapter
matches that of your local line voltage (mains supply).
If it does not match your local voltage rating or if
the plug design differs from your local standard,
contact your Sartorius office or dealer.
Use only original Sartorius AC adapters.
The use of AC adapters from other manufacturers,
even if these units have a registered approval rating from a national testing laboratory, requires the
approval of a certified technician.

7
Operation
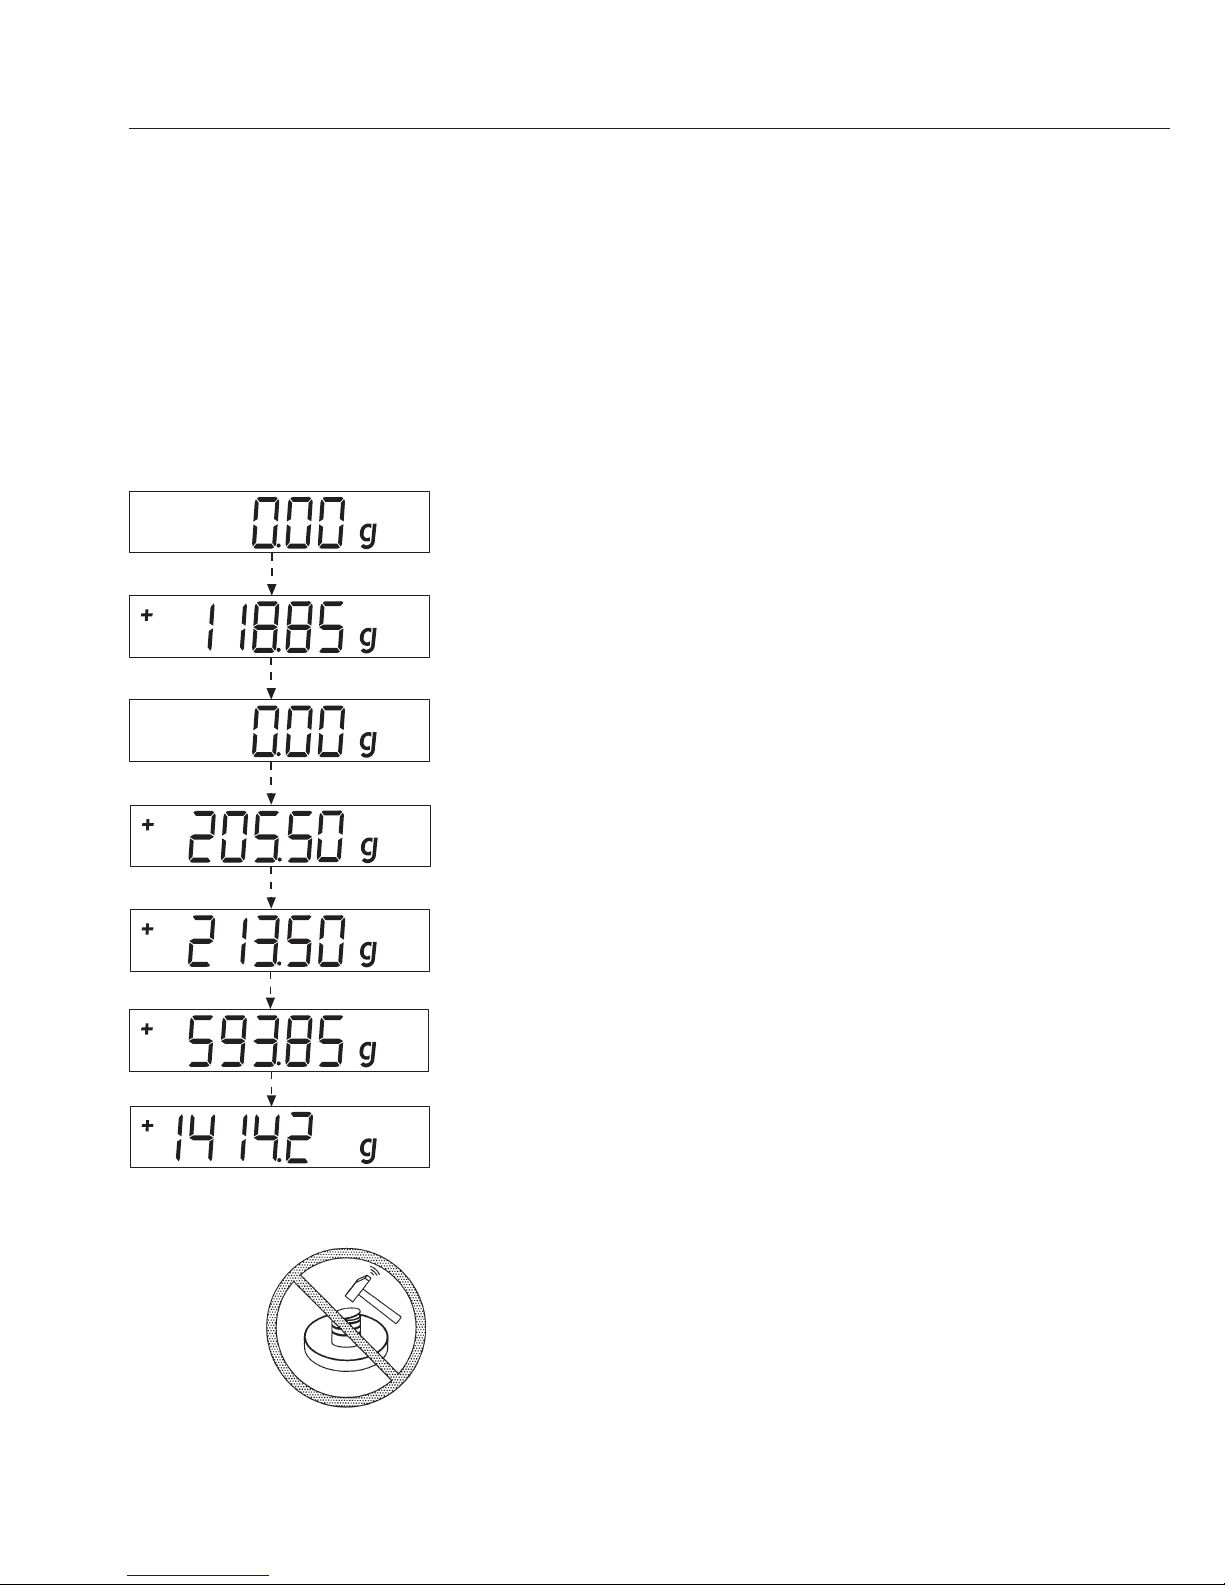
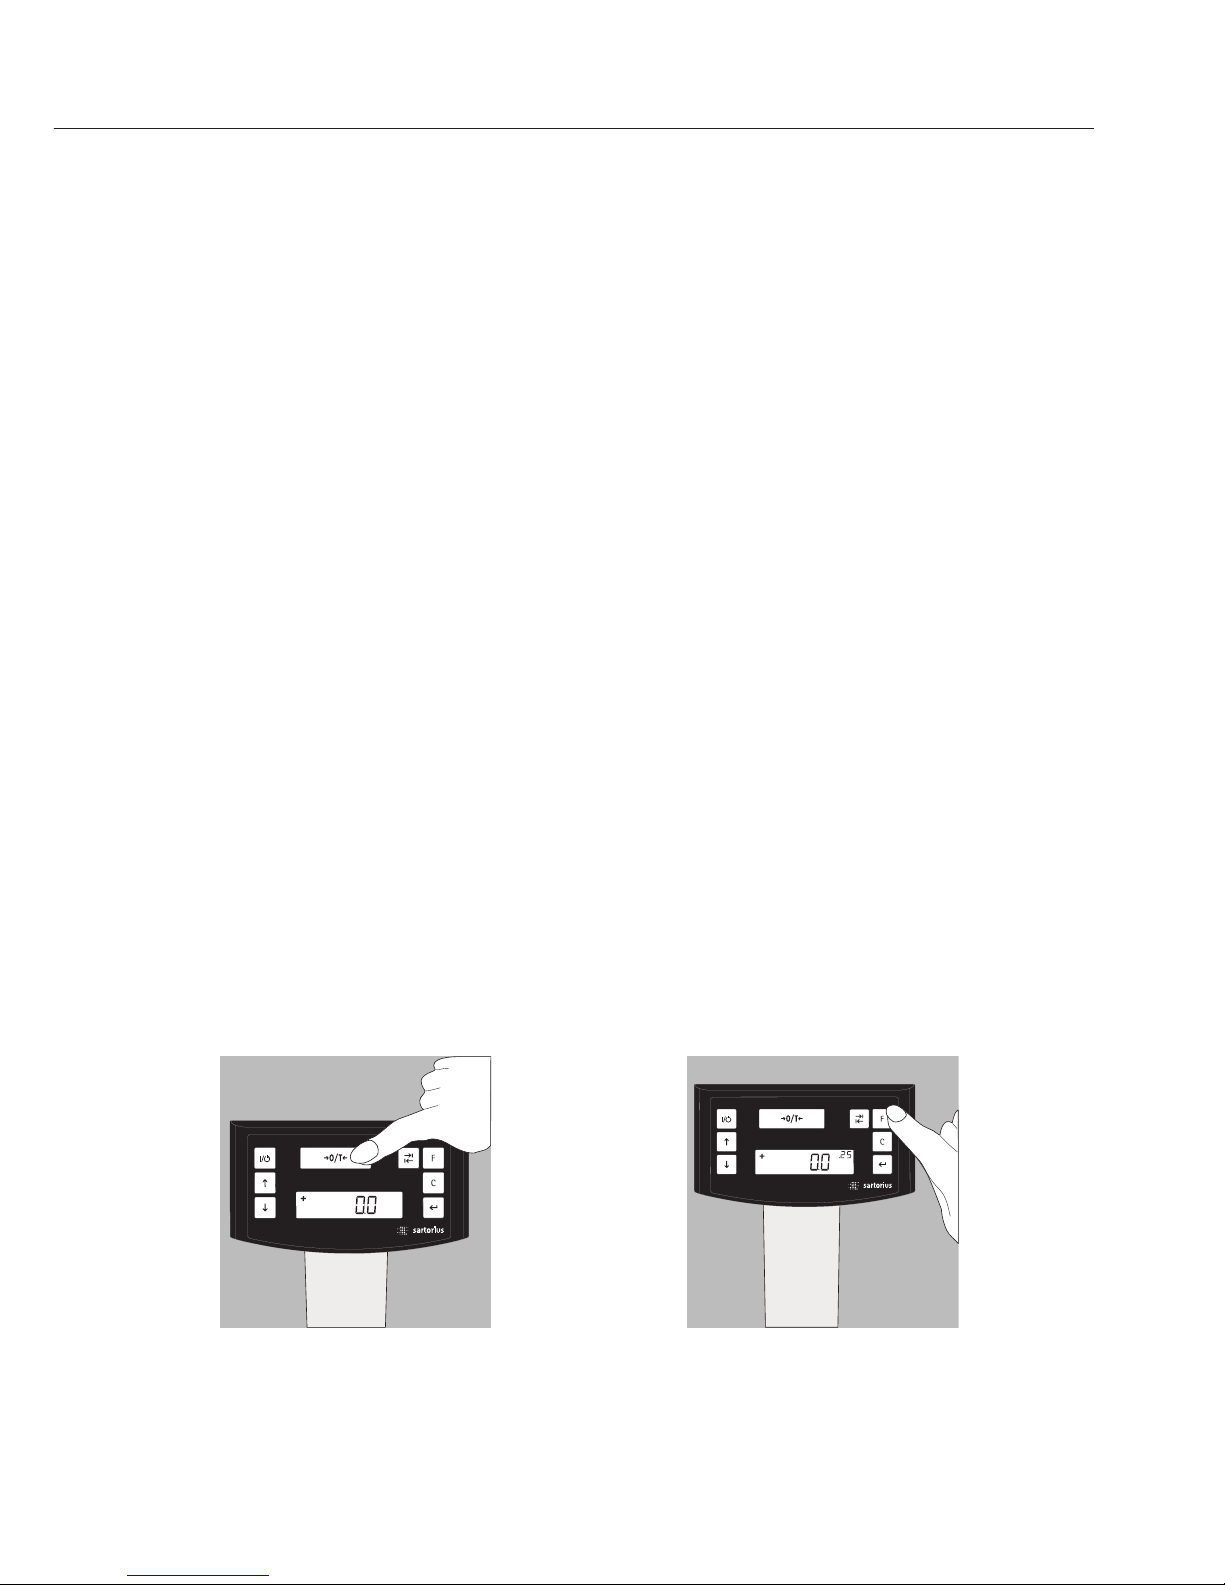
Weighing with One Decimal Place
Place an empty paint can on the weighing pan.
Press the tare key U (5). The display shows “0.0 g.”
Pour in the first component, and read off the weight as
soon as the stability symbol appears; in this case, “g.”
Pour in additional components until the desired weight
of your formula is reached.
Remove the filled paint can from the weighing pan.
Never use a hammer to close the lid of a paint can
while it is still on the weighing pan.
Otherwise, you will damage the weighing system.
Turn on the scale using the
Q key (2).
After the scale has been
turned on, it will automatically run a self-test.
At the end of this test, 0.0 g
is displayed.
If a different readout is
displayed, zero or tare the
scale using the tare key
U (5).
8
Weighing with Two Decimal Places
Note:
To weigh using two decimal places, you must first
adapt the settings (refer to the chapter entitled “Menu
Settings”)
Press the toggle key I (6). The display shows “0.00 g.”
Place an empty paint can on the weighing pan (11).
Press the tare key U (5). The display shows “0.00 g.”
Pour in the first component: 205.50 g.
Read off the weight as soon as the stability symbol
appears; in this case, “g.”
Pour in additional components until the desired weight
of your formula is reached.
Remove the filled paint can from the weighing pan.
Important Note:
If you tare the scale, and then press the toggle key I (6)
to toggle to the second decimal place with a resolution
of 0.05 g, you can continue weighing with two decimal
places up to 999.95 g.
For weights exceeding 999.95 g, only one decimal place
will be displayed.
Never use a hammer to close the lid of a paint can
while it is still on the weighing pan.
Otherwise, you will damage the weighing system
9
Applications
Formulation Mode (Calculation by a Factor)
This mode enables you to weigh in amounts that are smaller or larger than that of your
basic formula for a specific paint color (e.g., 250 ml of a 1-l formula).
You can select various factors (amounts) by pressing the K formulation key (7):
0.25 0.5 0.75 1.0 1.5 2.0 2.5 3.0 3.5 4.0 4.5 5.0.
By pressing the R key (3): upwards
or S key (4): downwards,
you can alter the value – in 0.1 increments, as of factor 1.0
or – 0.01 increments, from factor 0.25 to 1.0.
Important Note:
The flashing arrow
n on the display means that the weight shown is not verified for use
in legal metrology (not legal for trade).
Example:
As you pour in the components of your formula, the weight is displayed in “g.”
Let’s suppose you want to weigh only 250 ml of a basic formula that is for a total amount
of 1 L. With the recalculation mode, you do not need to manually recalculate the individual
components.
The basic formula for 1 liter is:
250 g 1
st
component
+ 250 g 2
nd
component
+ 500 g 3
rd
component
Total: 1000 g
1. Place the empty paint can on the
weighing pan and tare (zero the display).
2. Press the K formulation key (7) several
times to select the conversion factor “.25”
used in this example.
 Loading...