

Page 1
Installation Instructions | Installationsanleitung | Notice d’installation |
Manuale d’installazione | Instrucciones de instalación | Instrukcja montażu
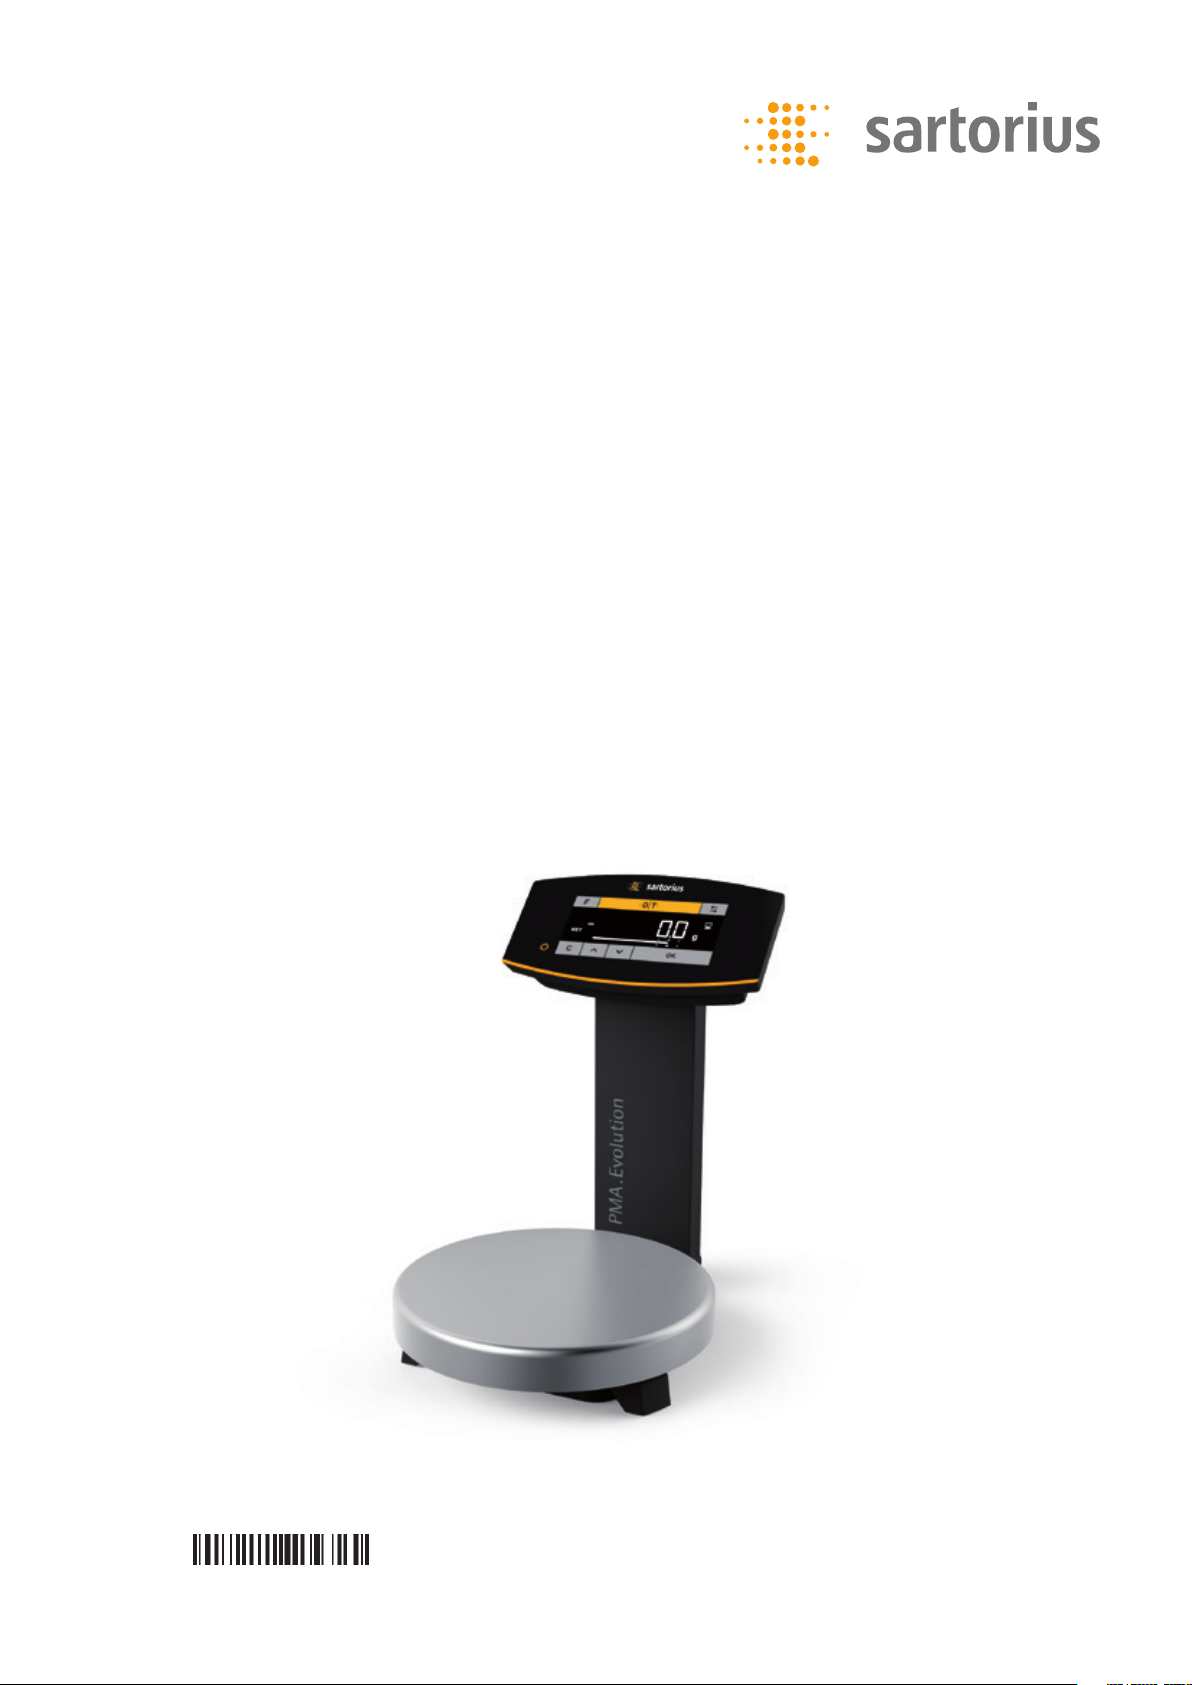
PMA.Evolution
EVO1Y1
Paint-mixing Scales for Potentially Explosive Areas Zone 2 |
Farbmischwaagen für den Einsatz in explosionsgefährdeten Bereichen der Zone 2 |
Balances pour peintures pour atmosphères explosibles de la zone 2 |
Bilance per la miscelazione di vernici per l’utilizzo in aree a rischio di esplosione della zona 2 |
Balanzas para la mezcla de pinturas en áreas potencialmente explosivas de la zona 2 |
Wagi do mieszania farb do stosowania w obszarach zagrożonych wybuchem strefy 2
1000025350
Page 2

Contents of DVD:
− Operating instructions as a pdf file in various
international languages
− Adobe Reader
− Software drivers for configuration of USB interfaces
Download online: www.sartorius.com/paintmixing
System Requirements:
– Windows, MacOS X
– Browser with JavaScript enabled
– PDF-Reader
English – page 3
In cases involving questions of interpretation,
the German-language version shall prevail.
Deutsch – Seite 12
Im Auslegungsfall ist die deutsche Sprache maßgeblich.
Français – page 21
En cas de questions concernant l‘interprétation,
la version en langue allemande fera autorité.
Italiano – pagina 30
Nei casi di interpretazione dubbia fa testo l’originale in
lingua tedesca.
Use start.html to run the application
Español – página 39
En caso de interpretación, la versión en lengua
alemana será determinante.
Polski – strona 48
W kwestiach budzących wątpliwości znaczenie nadrzędne
ma wersja w języku niemieckim.
Page 3
English
Contents
1 About This Document.....................................3
1.1 Scope.................................................. 3
1.2 Symbols Used .........................................3
2 Safety
3 Installation
4 Cleaning and Maintenance
5 Disposal
6 Accessories
7 Serial Number Coding
......................................................3
2.1 Intended Use..........................................3
2.2 Explosion Protection..................................4
2.3 Personnel Qualification...............................4
2.4 Significance of these Instructions ....................4
2.5 Proper Working Order of the Device .................4
2.6 Work on the Electrical Equipment of the Device.....5
2.7 Personal Protective Equipment....................... 5
2.8 Safety Instructions Concerning Operation of the
Device................................................. 5
................................................5
3.1 Scope of Delivery .....................................5
3.2 Unpacking.............................................5
3.3 Selecting a Setup Location ...........................5
3.4 Installing the Scale....................................6
3.5 Connecting the Grounding Cable.....................6
3.6 Supply Voltage........................................6
3.7 Anti-theft Locking Device ............................7
3.8 Leveling ...............................................7
3.9 Warm-up Time........................................8
...............................8
4.1 Cleaning............................................... 8
4.2 Servicing ..............................................8
. . . . . . . . . . . . . . . . . . . . . . . . . . . . . . . . . . . . . . . . . . . . . . . . . . . . 8
5.1 Information on Decontamination ....................8
.................................................9
....................................9
1.2.1 Warnings
WARNING
Denotes a danger with risk that death or severe injury may
result if it is not avoided.
CAUTION
Denotes a danger with risk that moderate or minor injury may
result if it is not avoided.
NOTICE
Denotes a danger with risk that property damage may result if
the risk is not avoided.
1.2.2 Other Symbols
t
y
−
Figures on the Operating Display
The figures in these instructions are based on “standard”
scales. On verified scales, some displays and reports may
deviate slightly from the figures. Where this is significant for
operation, the differences will be explained in the text.
Required action: Describes actions which must be
carried out.
Result: Describes the result of the actions carried
out.
Text that follows this symbol is a list.
This symbol provides information for the sale of
scales verified for use in legal metrology.
In the following, the term “verified” is used to
mean “verified for use in legal metrology” or
“conformity-assessed.”
8 Technical Data
8.1 General Data.........................................10
8.2 Model-specific Data .................................11
8.3 Verified Models with EC Type Approval Certificate:
Model-Specific Technical Specifications.............11
9 EU Declaration of Conformity
............................................10
..........................11
1 About This Document
1.1 Scope
These instructions apply to color-mixing scale models:
− EVO1Y
1.2 Symbols Used
The term “device” used in these instructions always refers to
the combined unit of scale, AC adapter and ex-link converter.
2 Safety
2.1 Intended Use
This scale is only intended for mixing colors and paints.
The scale is used in potentially explosive areas in Zone 2.
Appropriate containers must be used for loading each type
of material.
The scale can be operated via the display as a stand-alone
device or using application software (e.g., a paint-mixing
program from a paint manufacturer) installed on a connected
PC. The scale is connected to the PC/notebook installed
outside of the potentially explosive area via a USB cable.
Follow and observe the explosion protection instructions in
“2.2 Explosion Protection,” page4.
These instructions are part of the device. The device is
intended exclusively for use in accordance with these
instructions.
Installation Instructions EVO1Y1 3
Page 4

Any further use beyond this is considered improper. If the
device is not used properly: The protective systems of the
device may be impaired. This can lead to personal injury and
property damage.
In the event of use in systems and ambient conditions which
have greater safety requirements, you must observe the
requirements and provisions applicable in your country.
Operating Conditions for the Device
The device may only be used indoors.
Only use the device with the equipment and under the
operating conditions described in the Technical Data.
Do not modify the device or make any technical changes.
Do not expose the device or accessories supplied by Sartorius
to extreme temperatures, aggressive chemical vapors,
moisture, shock, vibrations, or strong electromagnetic fields.
Observe the operating conditions described in the Technical
Data section.
The casing on all connection cables between the devices as
well as on the wires inside the device housing is made of PVC.
Chemicals that corrode this material must be kept away from
these cables.
2.2 Explosion Protection
Use within the scope of validity of the European ATEX
Directive:
− In accordance with Directive 2014/34/EU, the EVO1Y1
model is a category 3 device, suitable for use in Zone 2
potentially explosive areas.
− Refer to the EU Type Examination Certificates from
page 59 in Section “18.2 Explosion protection approvals”
for the device ID codes.
− Please observe the safety instructions in drawing 2021460
from page 59.
Use in Australia/New Zealand:
− Please observe IECEx Certificate of Conformity IECEx FME
15.0004X and the Safety Instructions in drawing 2021460
from page 59.
2.3 Personnel Qualification
These instructions are addressed to the target groups
mentioned below. All persons working on the device must
possess the stated knowledge and authorizations.
If no qualifications are indicated for the actions described in
these instructions: The actions described are addressed to the
“User” target group.
If individual actions must be carried out by other target
groups or by Sartorius Service personnel: The qualification
required will be indicated in the description of the action.
Target
group
User The user is familiar with the operation of the
Operating
engineer/
laboratory
manager
Electrician A qualified electrician has the specialized
Operator The device operator is responsible for ensuring
Knowledge/authorizations
device and the associated work processes. They
understand the hazards which may arise when
working with the device and can avoid these
hazards.
The user is trained in the operation of the
device. Training takes place during startup and
is carried out by the operating engineer/
laboratory manager or the operator of the
device.
The operating engineer/laboratory manager
makes decisions about the use and
configuration of the device.
The operating engineer/laboratory manager is
trained in the operation of the device. Training
takes place during startup and is carried out by
Sartorius Service or the operator.
training, knowledge, and experience as well
as familiarity with applicable regulations to
evaluate the assigned work and identify possible
hazards.
compliance with workplace health and safety
regulations.
The operator must ensure that anyone working
with the device has access to the relevant
information and is trained to work with the
device.
2.4 Significance of these Instructions
Failure to follow the instructions in this manual can have
serious consequences, e.g., exposure of individuals to
electrical, mechanical, or chemical hazards.
t Before working with the device: Read the instructions
carefully and completely.
t If these instructions are lost: Request a replacement or
download the latest version from the Sartorius website
(www.sartorius.com).
t The information contained in these instructions must be
available to all individuals working on the device.
2.5 Proper Working Order of the Device
A damaged device can cause malfunctions or lead to hard-todetect hazards.
4 Installation Instructions EVO1Y1
Page 5
English
t Only operate the device when it is safe and in perfect
working order.
t Immediately disconnect the damaged device from the
power.
t Have any malfunctions or damage repaired immediately
by Sartorius Service personnel.
2.6 Work on the Electrical Equipment of the Device
Work on and modifications to the electrical equipment of the
device may only be carried out by Sartorius Service personnel.
The device may only be opened by Sartorius Service personnel.
Seal on Scales Verified for Use in Legal Metrology
Legislation requires that a seal be affixed to
verified scales. On Sartorius devices, this seal takes
the form of a sticker with the “Sartorius” logo. If
the seal is removed, the validity of verification will
become void and you must have your scale
re-verified. For verified scales for use in the EEA,
the declaration of conformity set out in the
calibration and supplied here shall apply. Please
keep it in a safe place.
2.7 Personal Protective Equipment
Personal protective equipment protects against risks arising
from the material being processed.
t When the workplace or the process in which the device
is used requires personal protective equipment: Wear
personal protective equipment.
2.8 Safety Instructions Concerning Operation of the Device
− Take care that the glass panel of the operating display is not
damaged (e.g., by falling objects, impact, or extreme
pressure). If the glass panel is damaged, disconnect the device
from the power supply immediately.
− The surface of the operating display should not be touched
with pointed, sharp, hard, or rough objects. You should only
use the touch pen provided or your fingertips. Do not use
parts of clothing (e.g., sleeves) or sponges for cleaning
because these can scratch the surface (e.g., due to rivets or
buttons in the sleeve or sand in the sponge).
− Avoid generating static electricity on the glass panel of the
operating display and plastic casing.
Danger of Damage to the Scale!
Never close a paint can using a hammer while
it is still on the weighing pan.
When closing, place the paint can on a firm,
stable surface.
3 Installation
3.1 Scope of Delivery
Item Quantity
Large weighing pan: d 233 mm
USB cable 1
AC adapter YPS06-USB Optional
Installation instructions x
3.2 Unpacking
Procedure
t Open the packaging, making sure to remove all parts
carefully.
t After unpacking the device, check it immediately for any
external damage.
t If the device is stored temporarily: Store the device
according to the ambient conditions (ambient conditions
see Chapter “8.1 General Data,” page 10).
t Save all parts of the original packaging for any future
transport. All cables should be unplugged when
transporting.
3.3 Selecting a Setup Location
Select the right setup location:
− Set up the device on a stable, even surface that is not
exposed to vibrations.
− Maintain free access to the device at all times.
Choose a location that is not subject to the following negative
influences:
− Heat (heater or direct sunlight)
− Drafts from open windows, AC systems, and doors
− Extreme vibrations during weighing
− Heavy “traffic areas” (personnel)
− Extremely high humidity
− Electromagnetic fields
− Extremely dry air
Acclimatization
Condensation from humidity can form on the surfaces of a
cold device when it is brought into a warm area. You should
therefore let a device that has been disconnected from its
power source acclimatize for approximately 2 hours before
reconnecting it to the supply voltage.
1
Installation Instructions EVO1Y1 5
Page 6
3.4 Installing the Scale
NOTICE
The device must be disconnected from the power supply for
all assembly work.
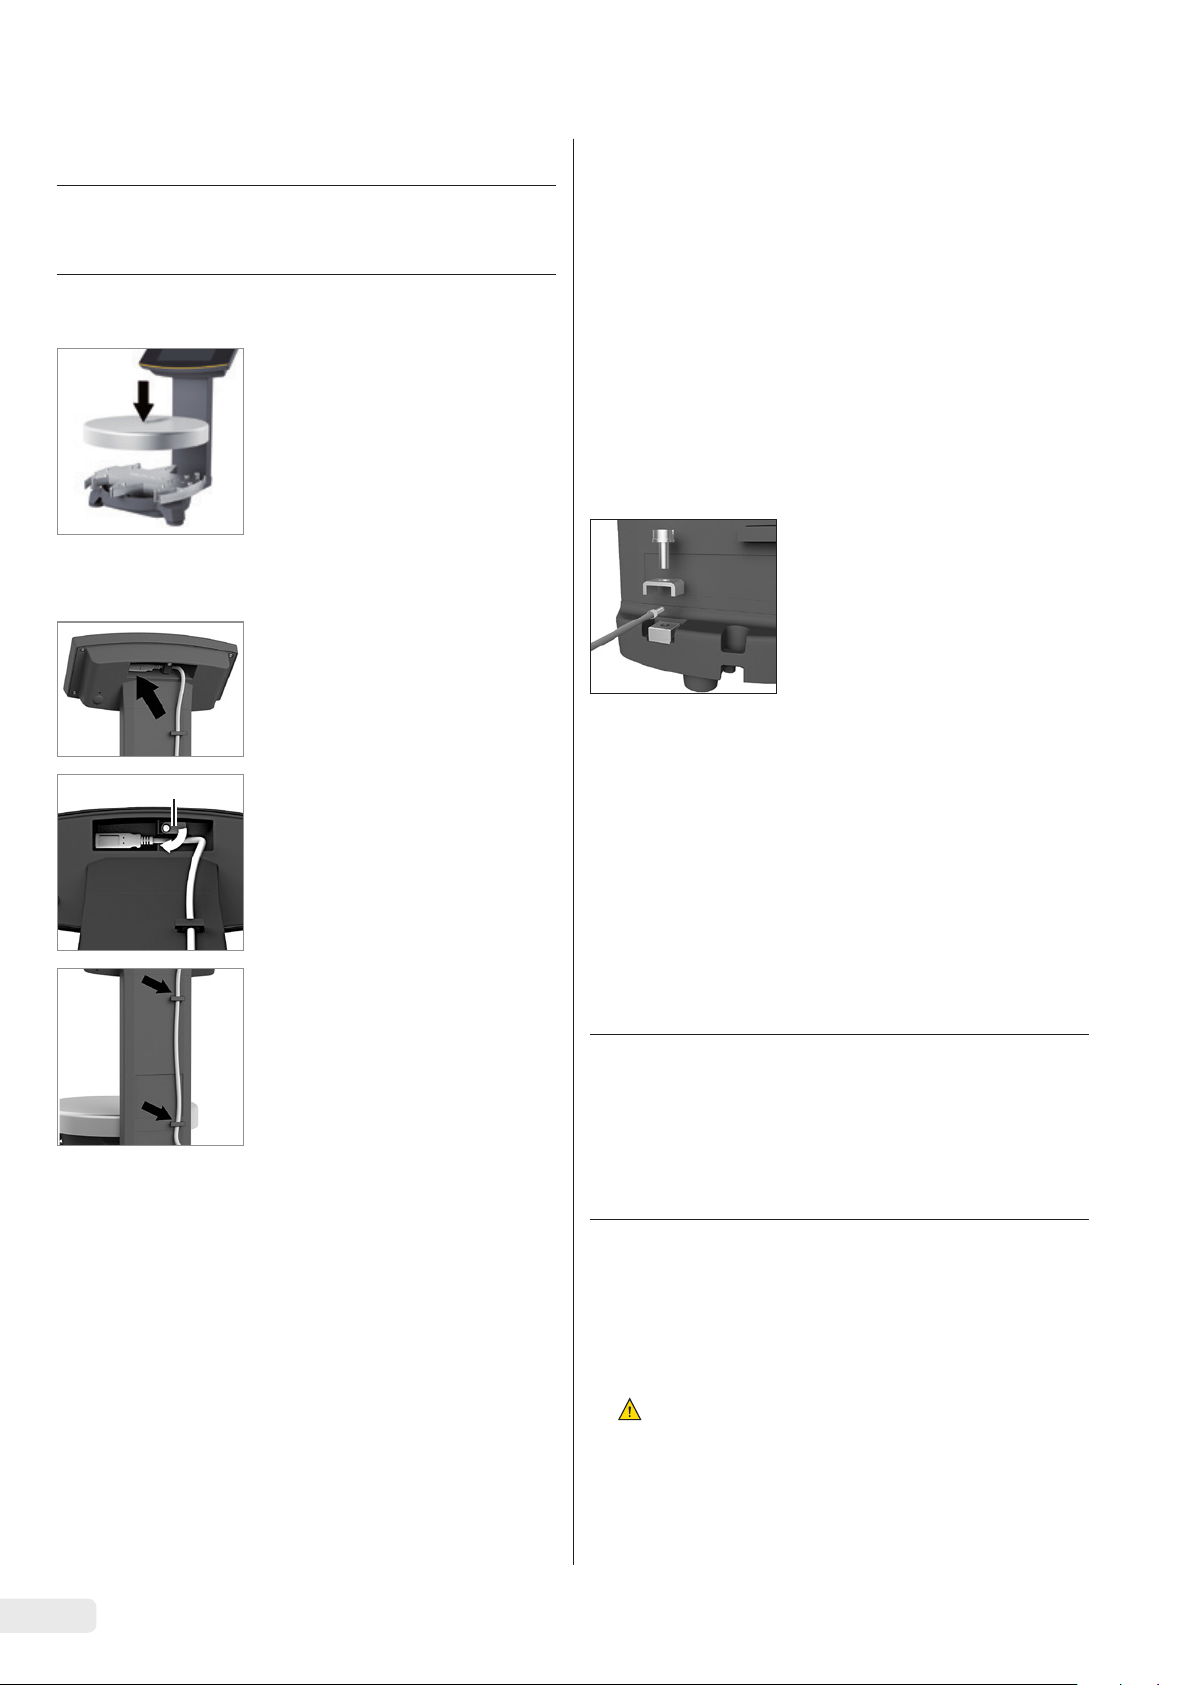
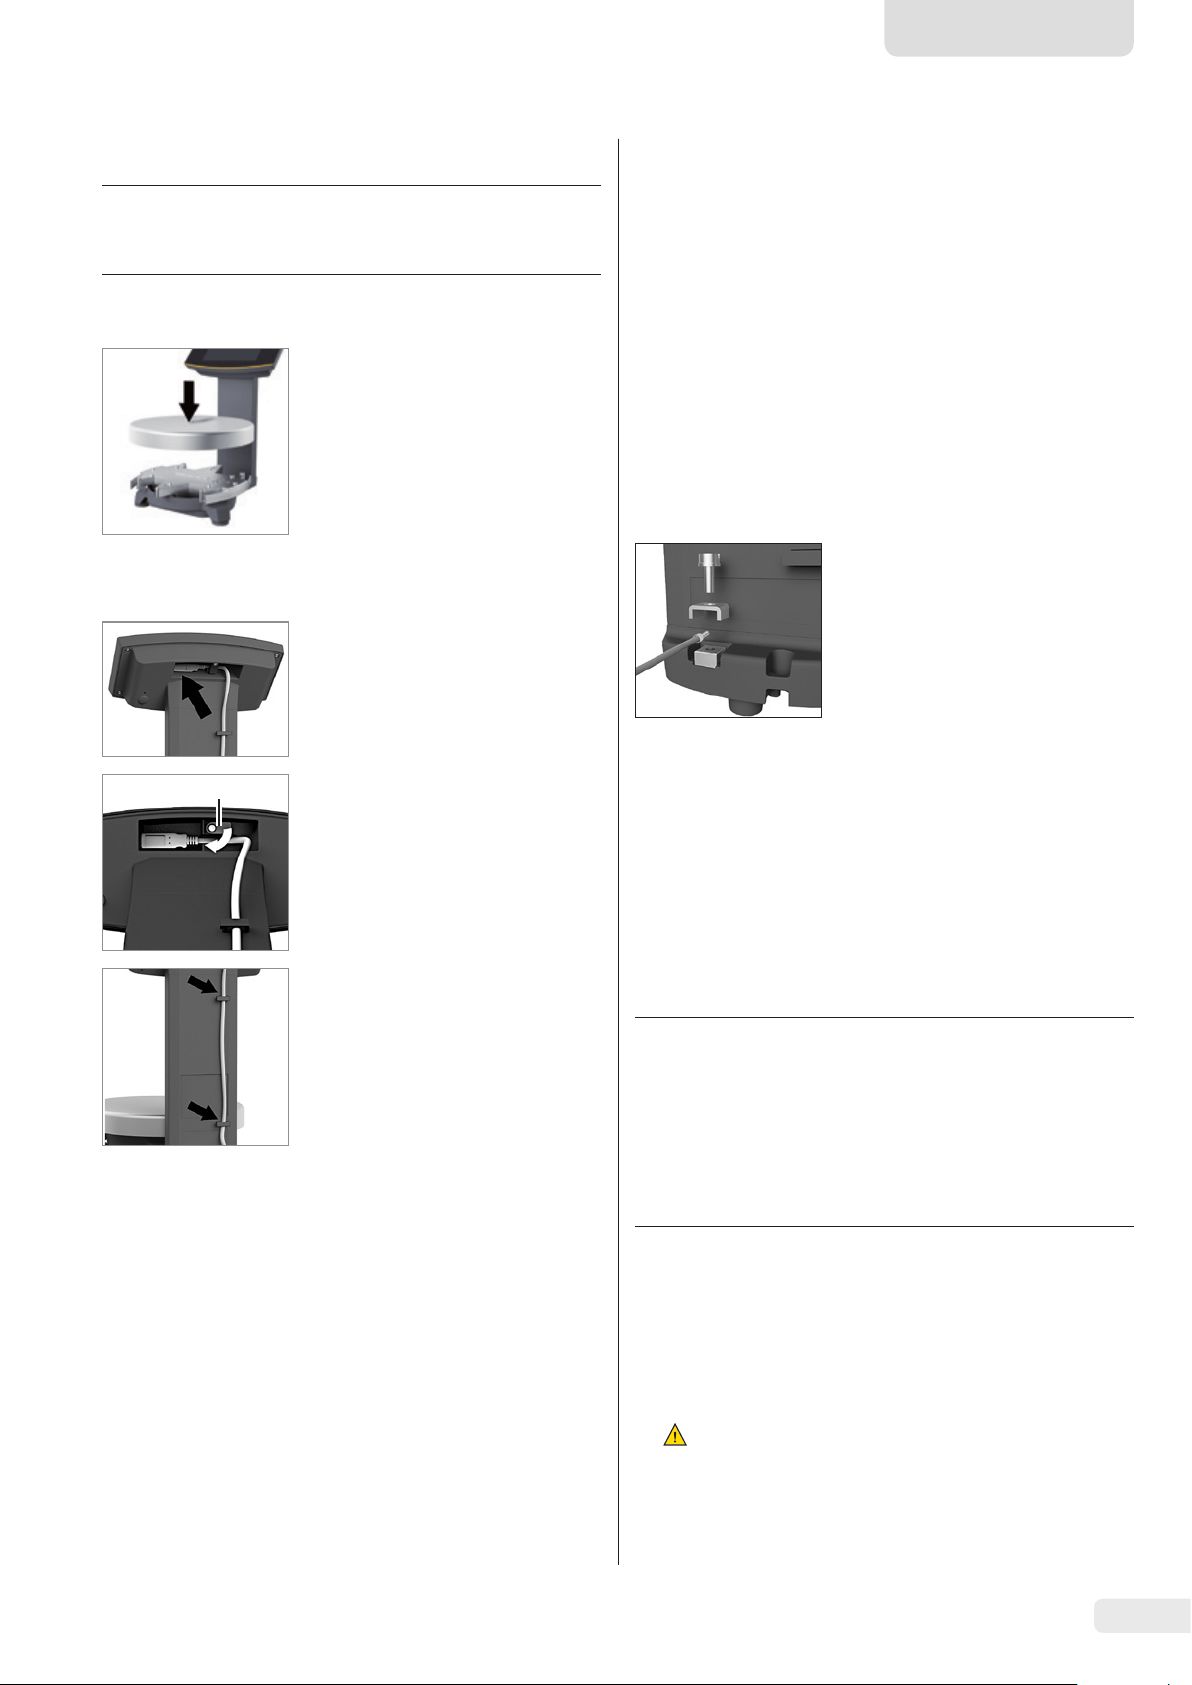
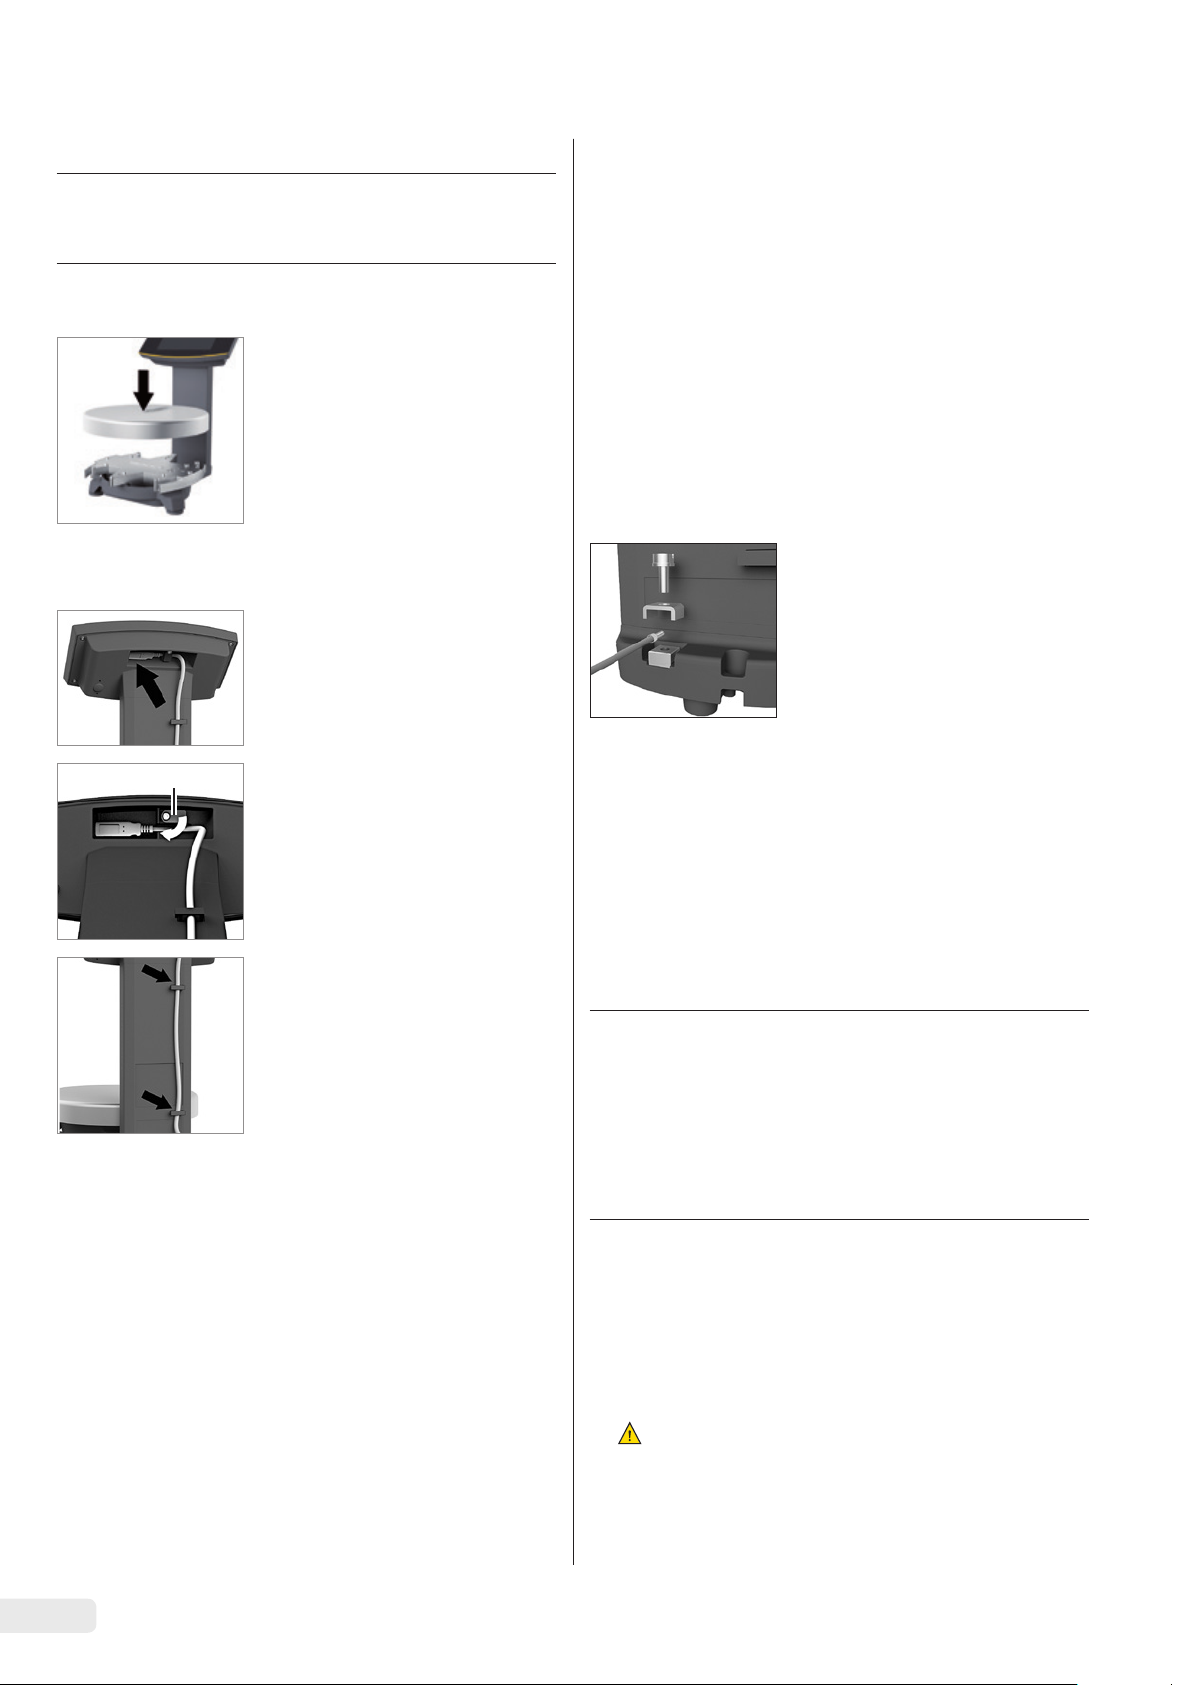
3.4.1 Place the weighing pan on the scale
t Place the weighing pan onto the
scale from above.
3.4.2 Connecting the Scale
t Insert the USB cable into the
socket on the back of the
display.
1
t Loosen the screw (1) on the lock.
t Swivel the lock over the USB
cable.
t Re-tighten the lock screw.
Inspections should be carried out at least once every three
years. The applicable requirements and guidelines should
also be observed during operation.
Establish a low resistance connection from the scale to
a customer-supplied equipotential bonding conductor
connection via the equipotential bonding conductor
connection on the device using a suitable grounding cable
with a gauge of at least 4 mm2 (not included).
Installation must be carried out properly by trained personnel
and according to commonly accepted technical standards.
The system should only be operated for the first time when it
is certain that the area is not potentially explosive.
If deviations are evident during startup due to transport
damage (e.g., no display, no backlighting), disconnect the
scale from the power supply and contact Sartorius Service.
Connect the scale to the equipotential bonding conductor using
an equipotential bonding cable
with a gage of at least 4 mm².
t Connect the cable lug of the
equipotential bonding cable to
the grounding terminal of the
scale.
t Connect the equipotential
bonding cable to the customer-supplied equipotential
bonding conductor.
3.6 Supply Voltage
t Lay the USB cable through the
cable holders on the back of the
scale.
3.5 Connecting the Grounding Cable
This explosion-protected system should be set up according
to commonly accepted technical standards. The applicable
national electrical code and safety regulations for your
particular country must be observed.
Before starting up the scale, a check must be carried out by
or under the supervision of a qualified electrician to ensure
that the system is in good working order.
Check whether or not the competent authorities (e.g.
industrial supervisory board) need to be informed. It is also
necessary to carry out inspections of the system during
operation.
Inspection intervals should be such that any significant
defects that may occur can be identified in good time.
Required qualifications: Electrician
The scale is connected to the power supply via a PC/notebook
or using the optional AC adapter YPS06-USB (see Chapter “6
Accessories,” page 9), which is supplied with mains
adapters for use in various countries.
NOTICE
− Ensure that the voltage rating printed on the AC adapter is
identical to your local mains voltage (for connection data,
see Chapter “8.1 General Data”, page 21).
− If the stated supply voltage or the plug design of the power
supply does not comply with your country's standard then
please inform your nearest Sartorius representative.
Power supply via the AC adapter is only required:
− When no PC or notebook is available.
− In exceptional cases, when the output voltage of the USB
interface of the PC or notebook is not sufficient.
3.6.1 Installing the AC Adapter
WARNING Lethal electric shock and equipment
t
damage due to incorrect power plug adapter! Only use
the country-specific power plug adapter. Never plug
the power plug adapter into the socket when it is
disconnected from the power supply.
6 Installation Instructions EVO1Y1
Page 7
English
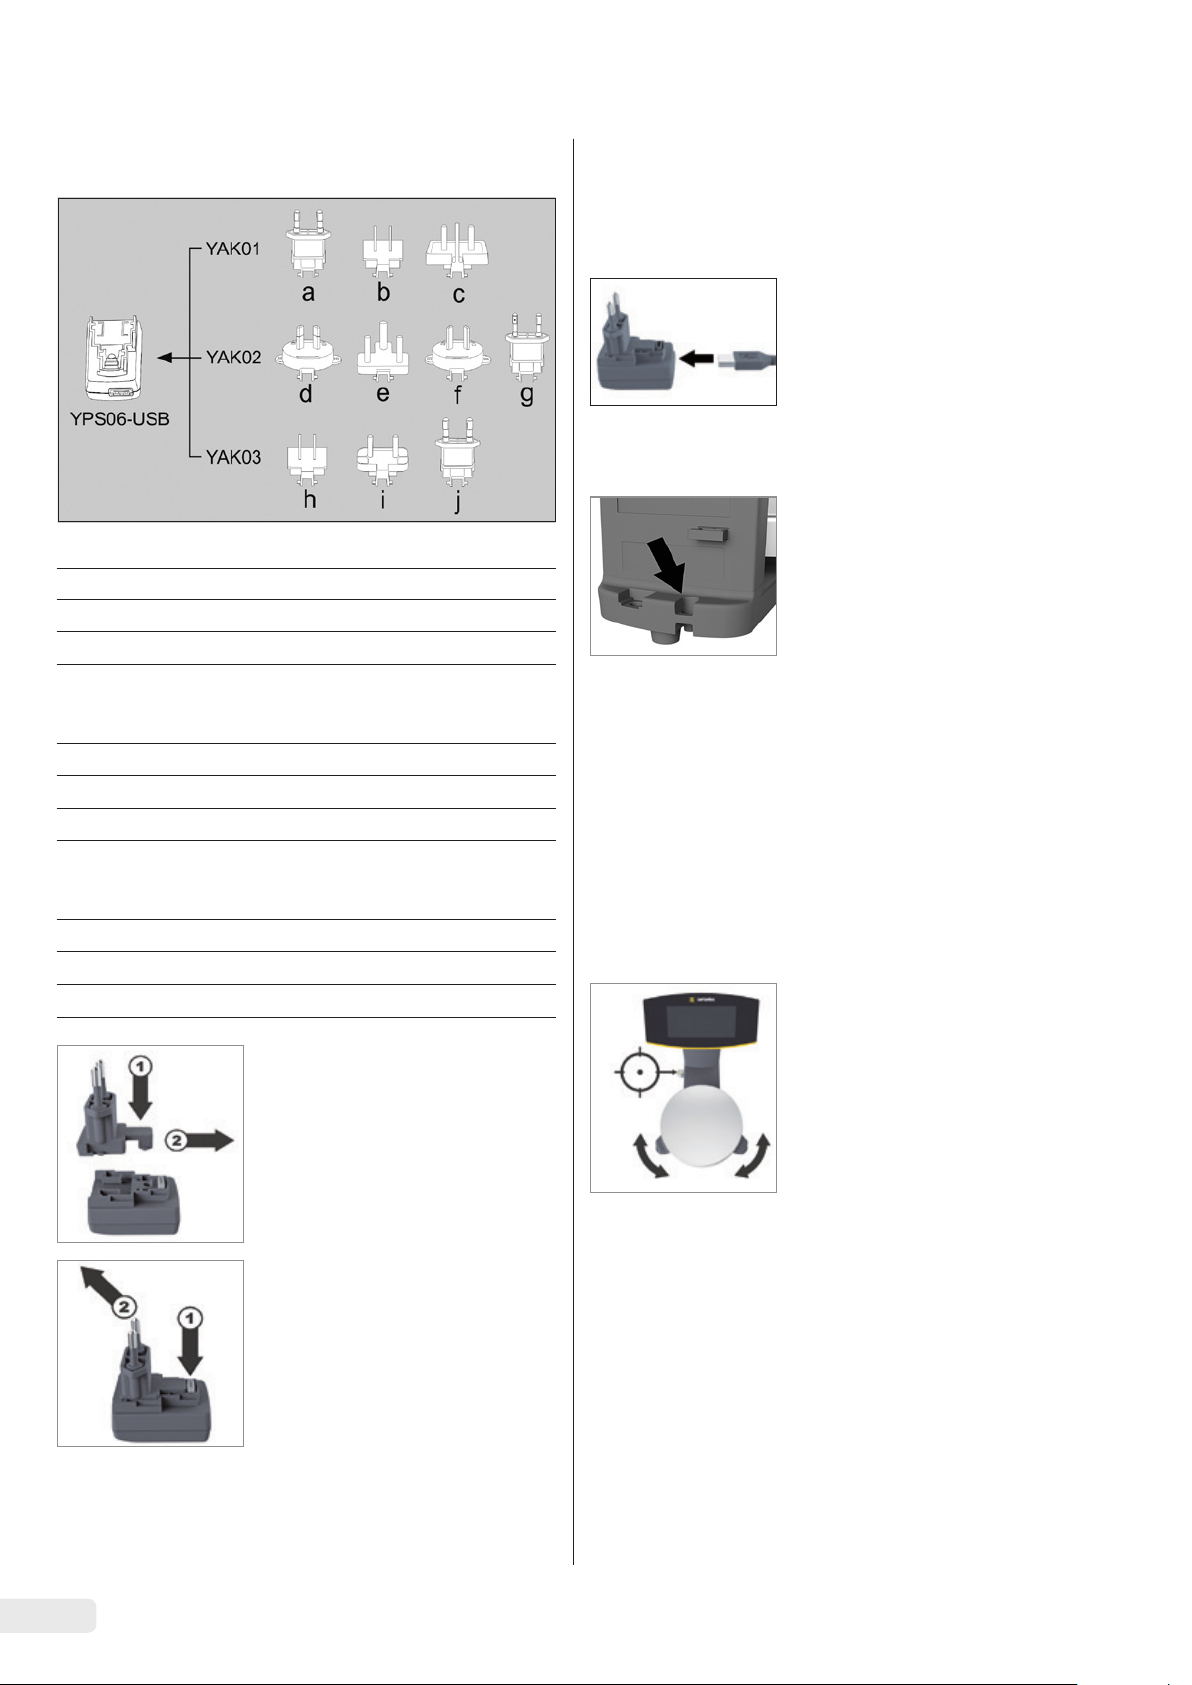
t Use the right mains adapter for your mains power supply:
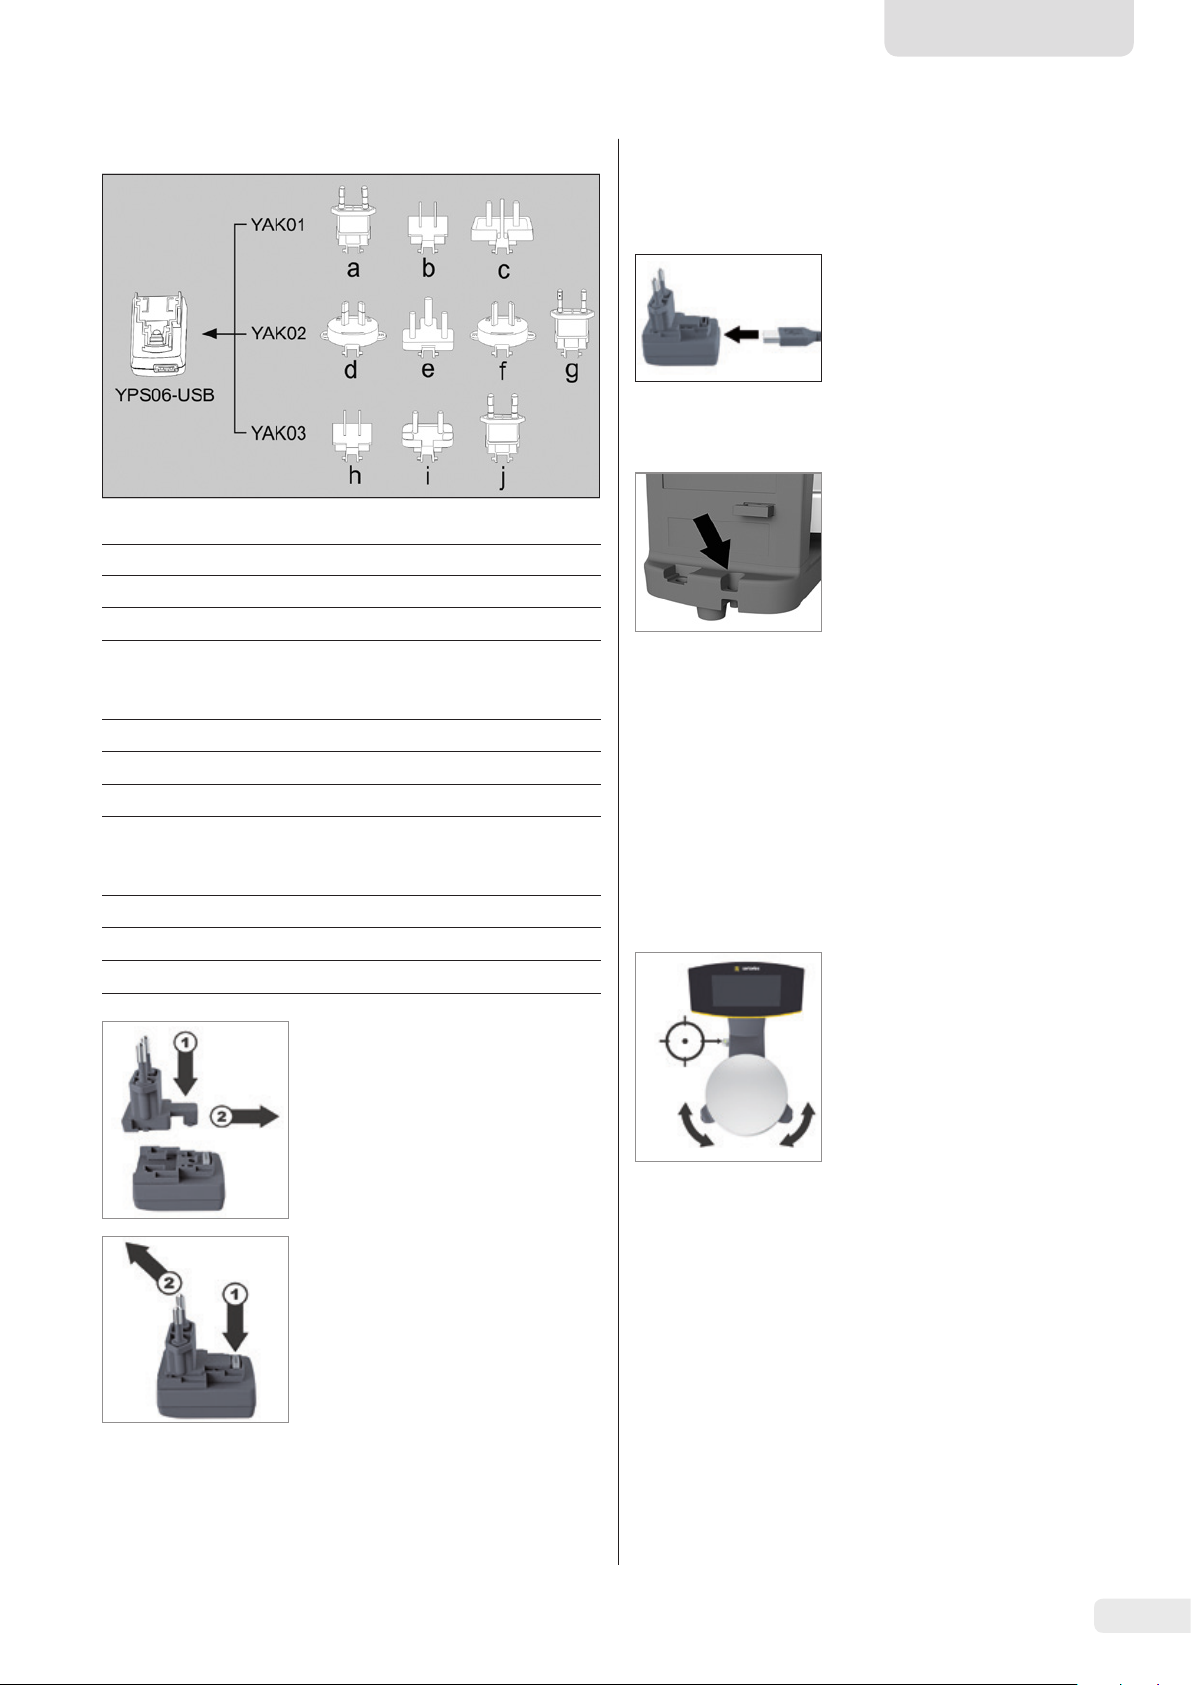
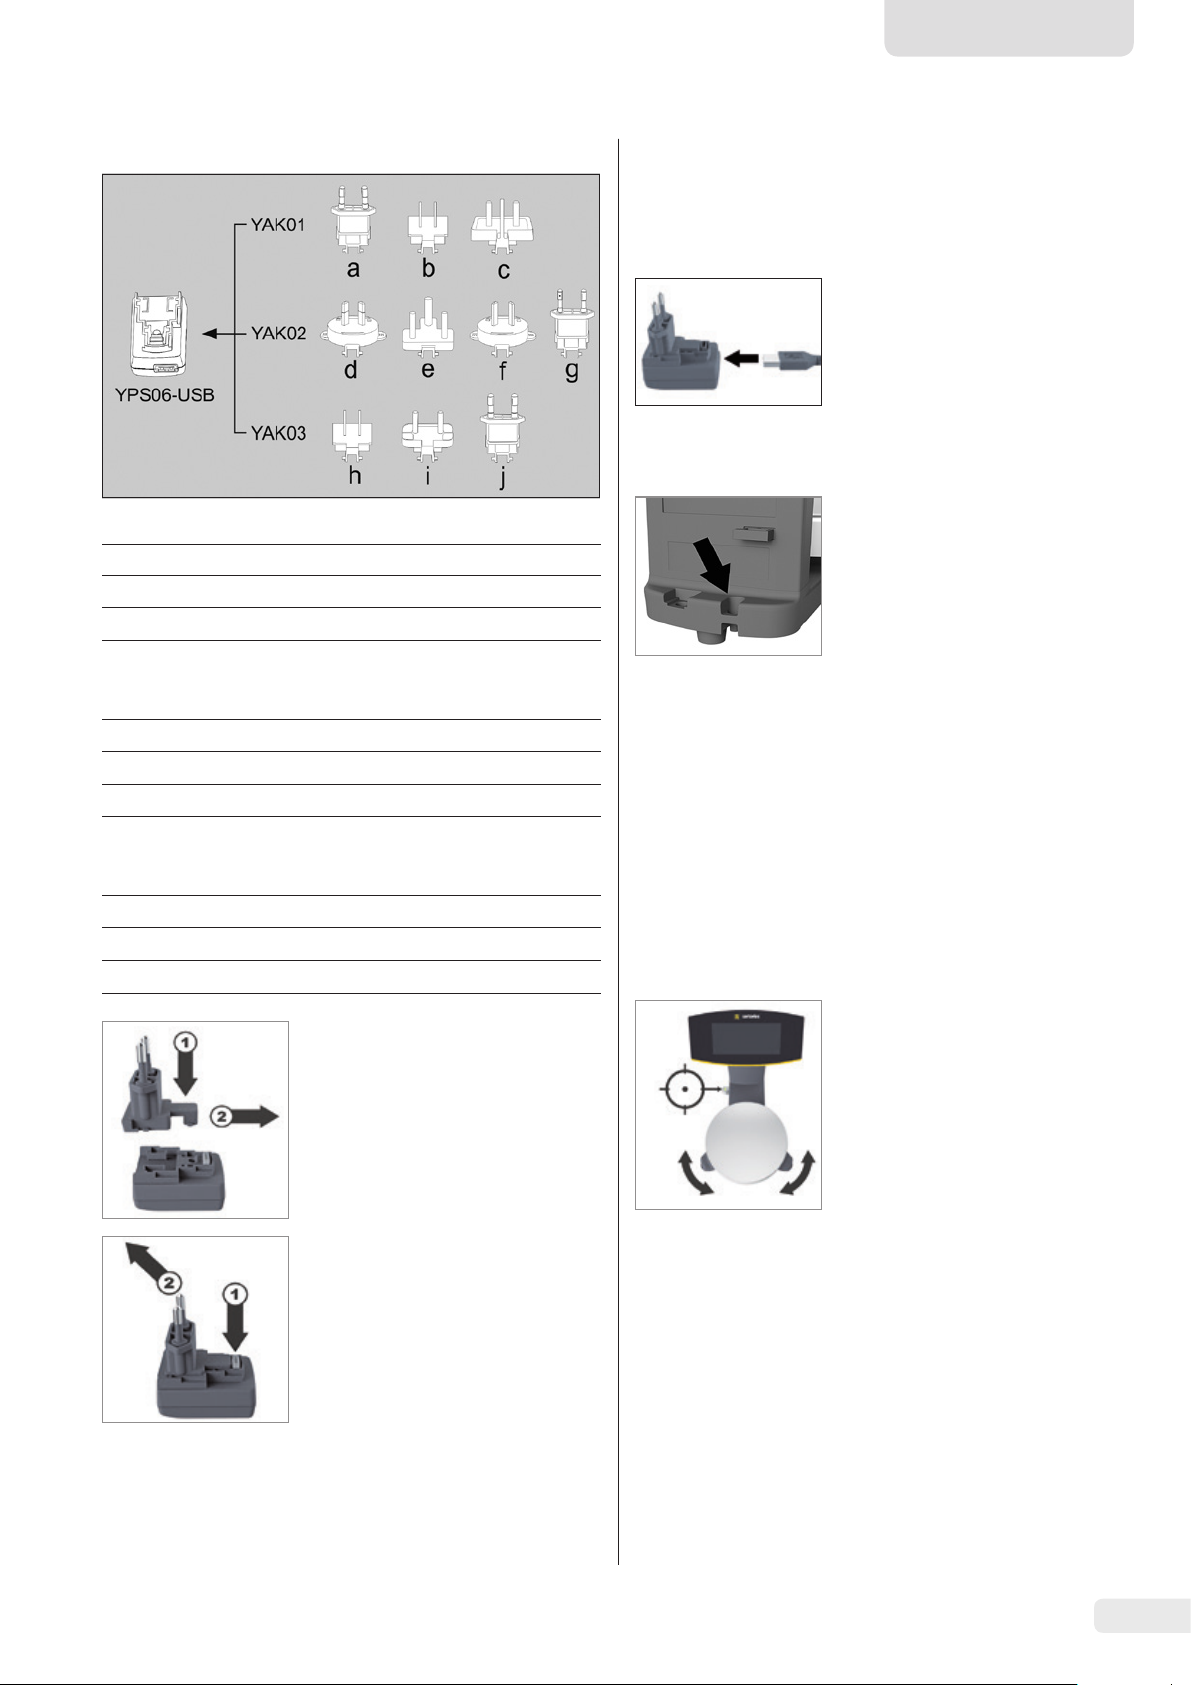
Mains adapter set YAK01
Bag Region/Country
a) transparent Europe/EU (except United Kingdom)
b) blue USA
c) yellow United Kingdom
Mains adapter set YAK02
d) red Australia
e) turquoise South Africa
f) white Argentina
g) pink Brazil
Mains adapter set YAK03
h) light brown China
i) black India
j) green Korea
t Push (1) and slide (2) to insert
the mains adapter required for
your power supply into the
opening of the AC adapter.
When doing this, the mains
adapter needs to lock into
position.
Removing/Replacing
the Mains Adapter
t Unlock (1) and then remove the
mains adapter (2).
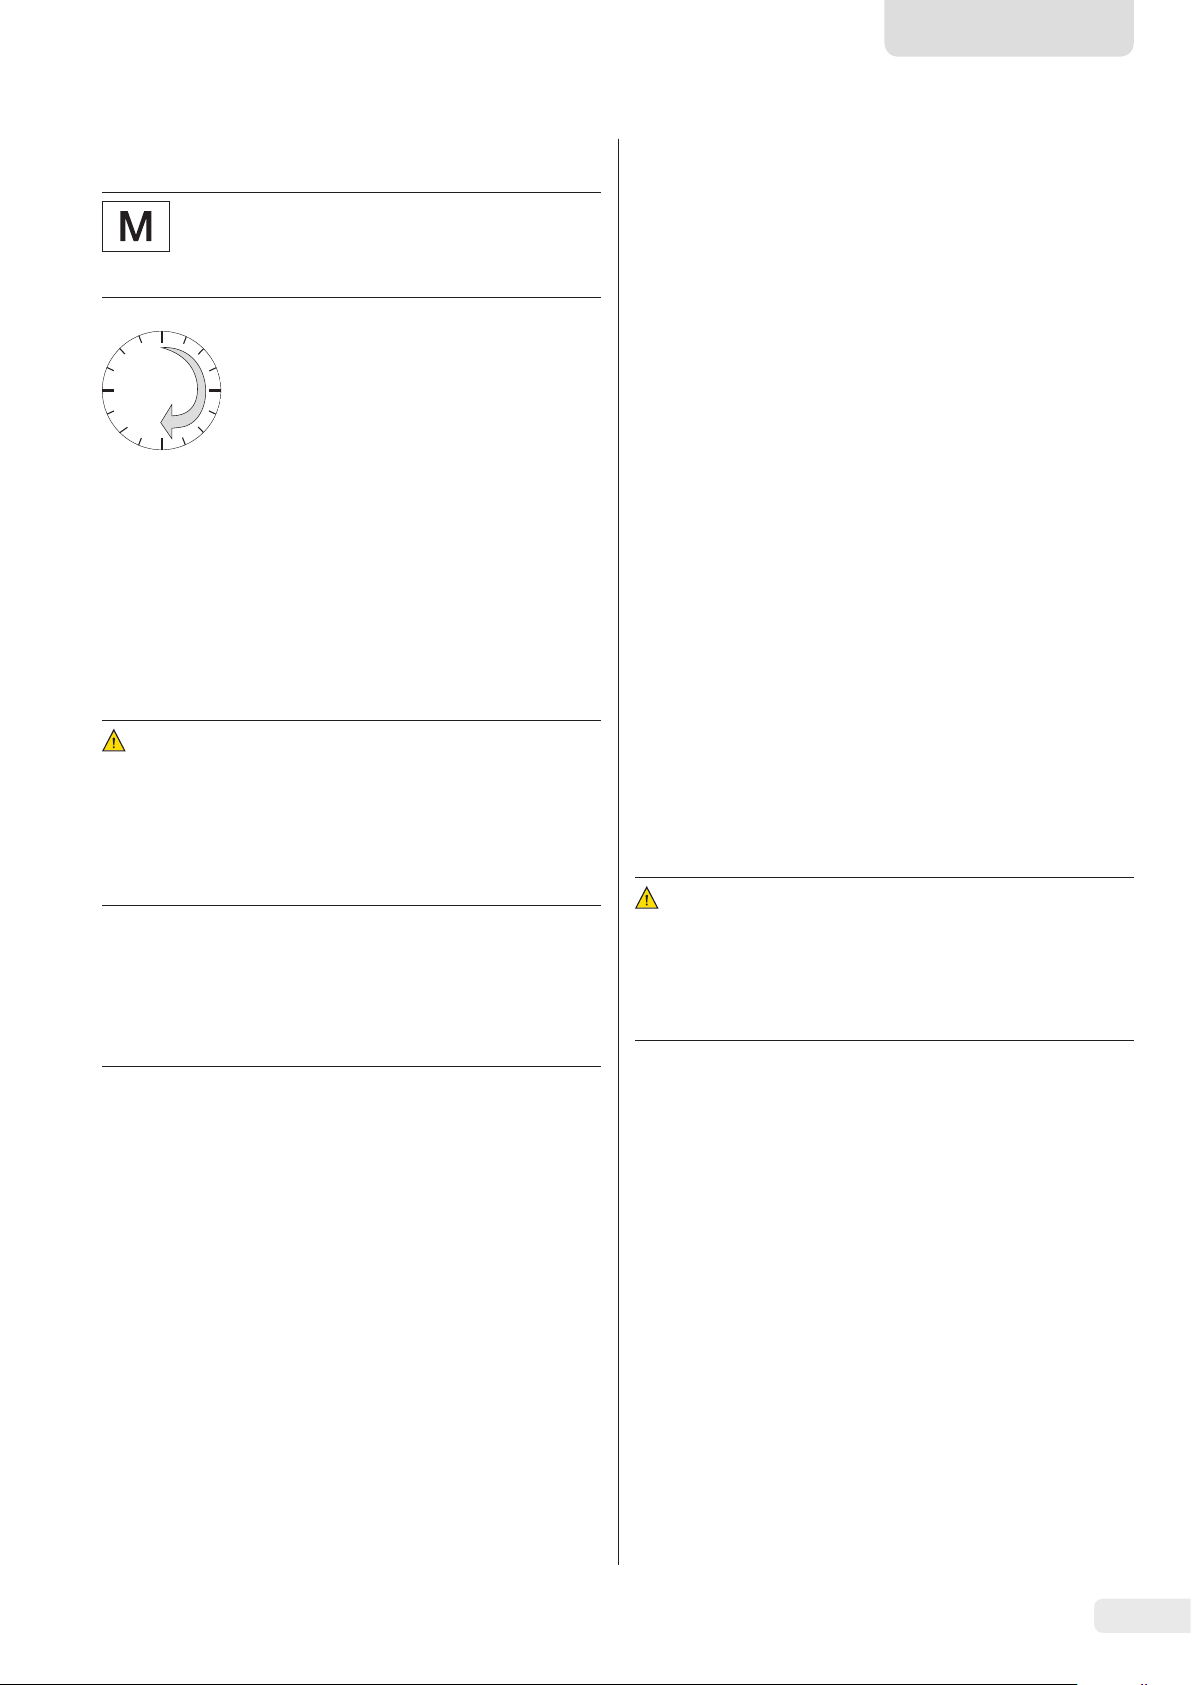
Connecting a PC/Notebook
t Insert the USB cable into a USB socket on a PC or laptop.
Connecting an AC Adapter (Optional)
t Insert the USB cable into the
AC adapter.
t Plug the AC adapter into the
wall outlet (supply voltage).
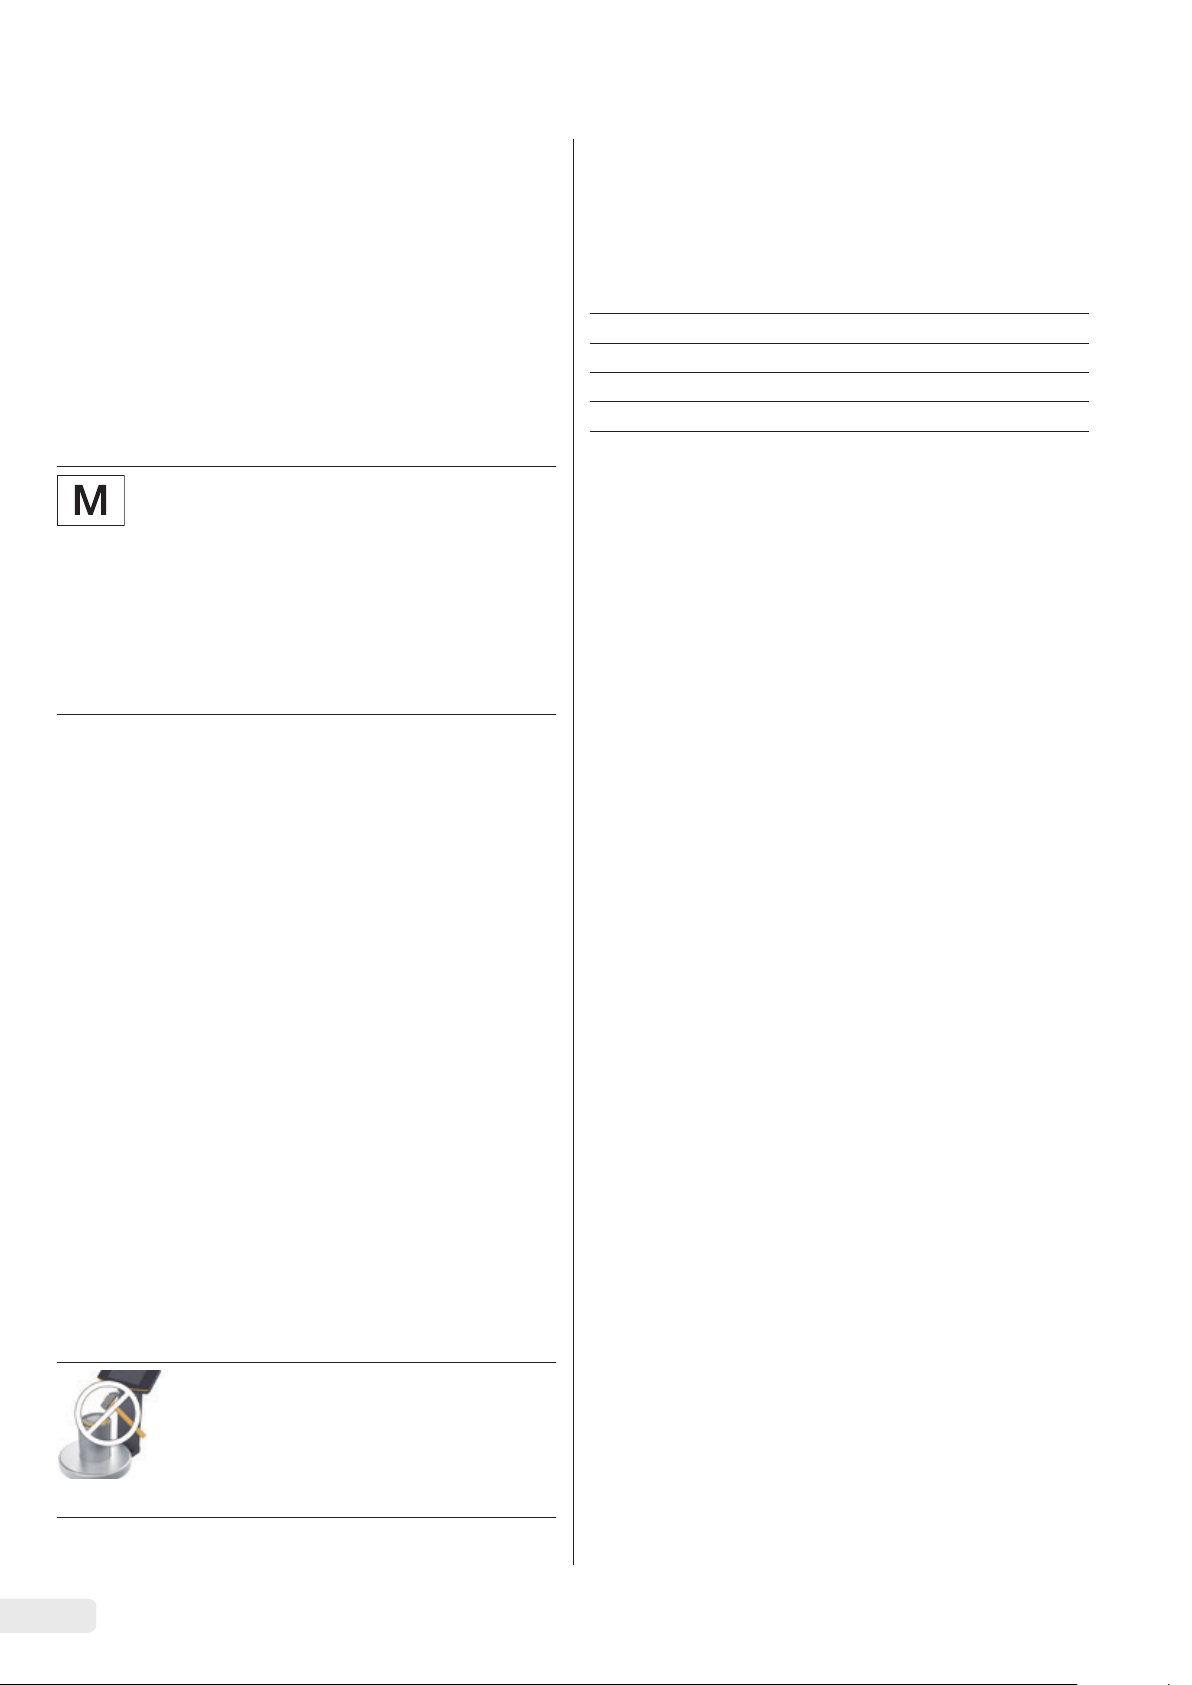
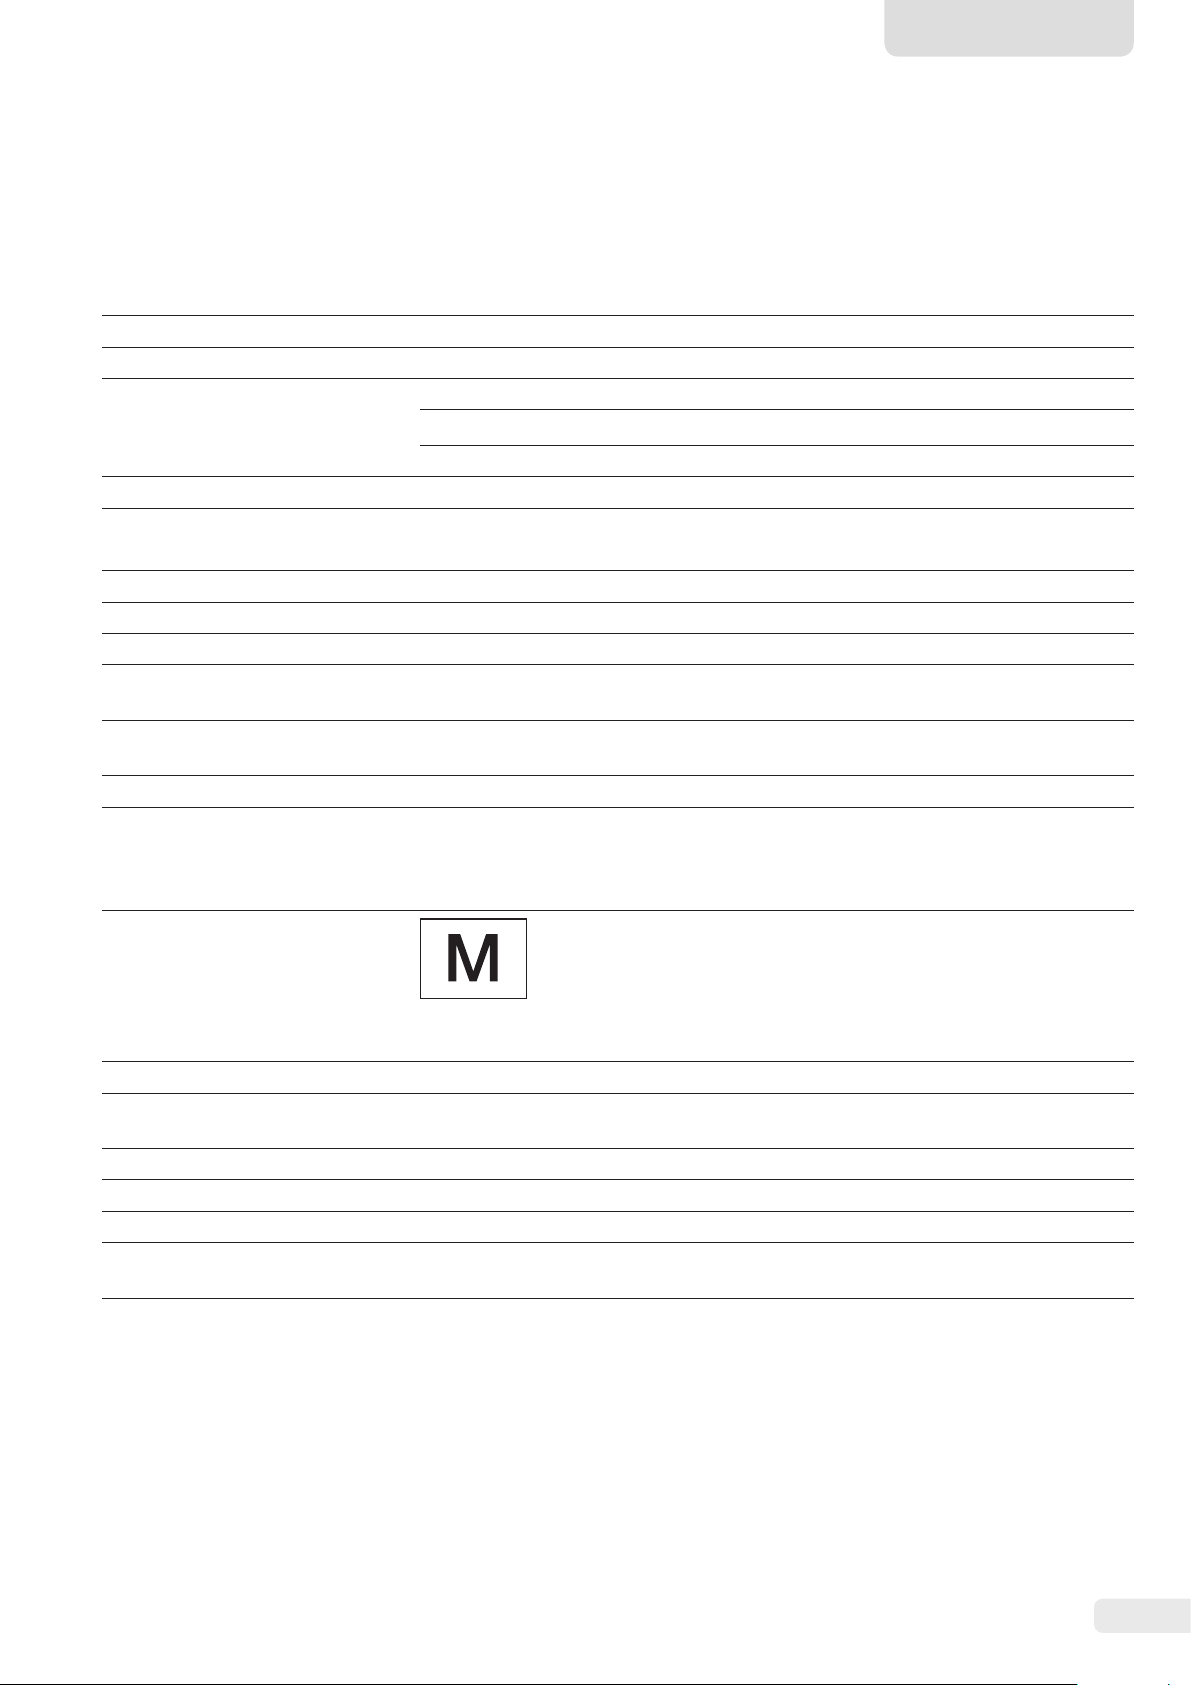
3.7 Anti-theft Locking Device
t If required, secure the scale at
the back.
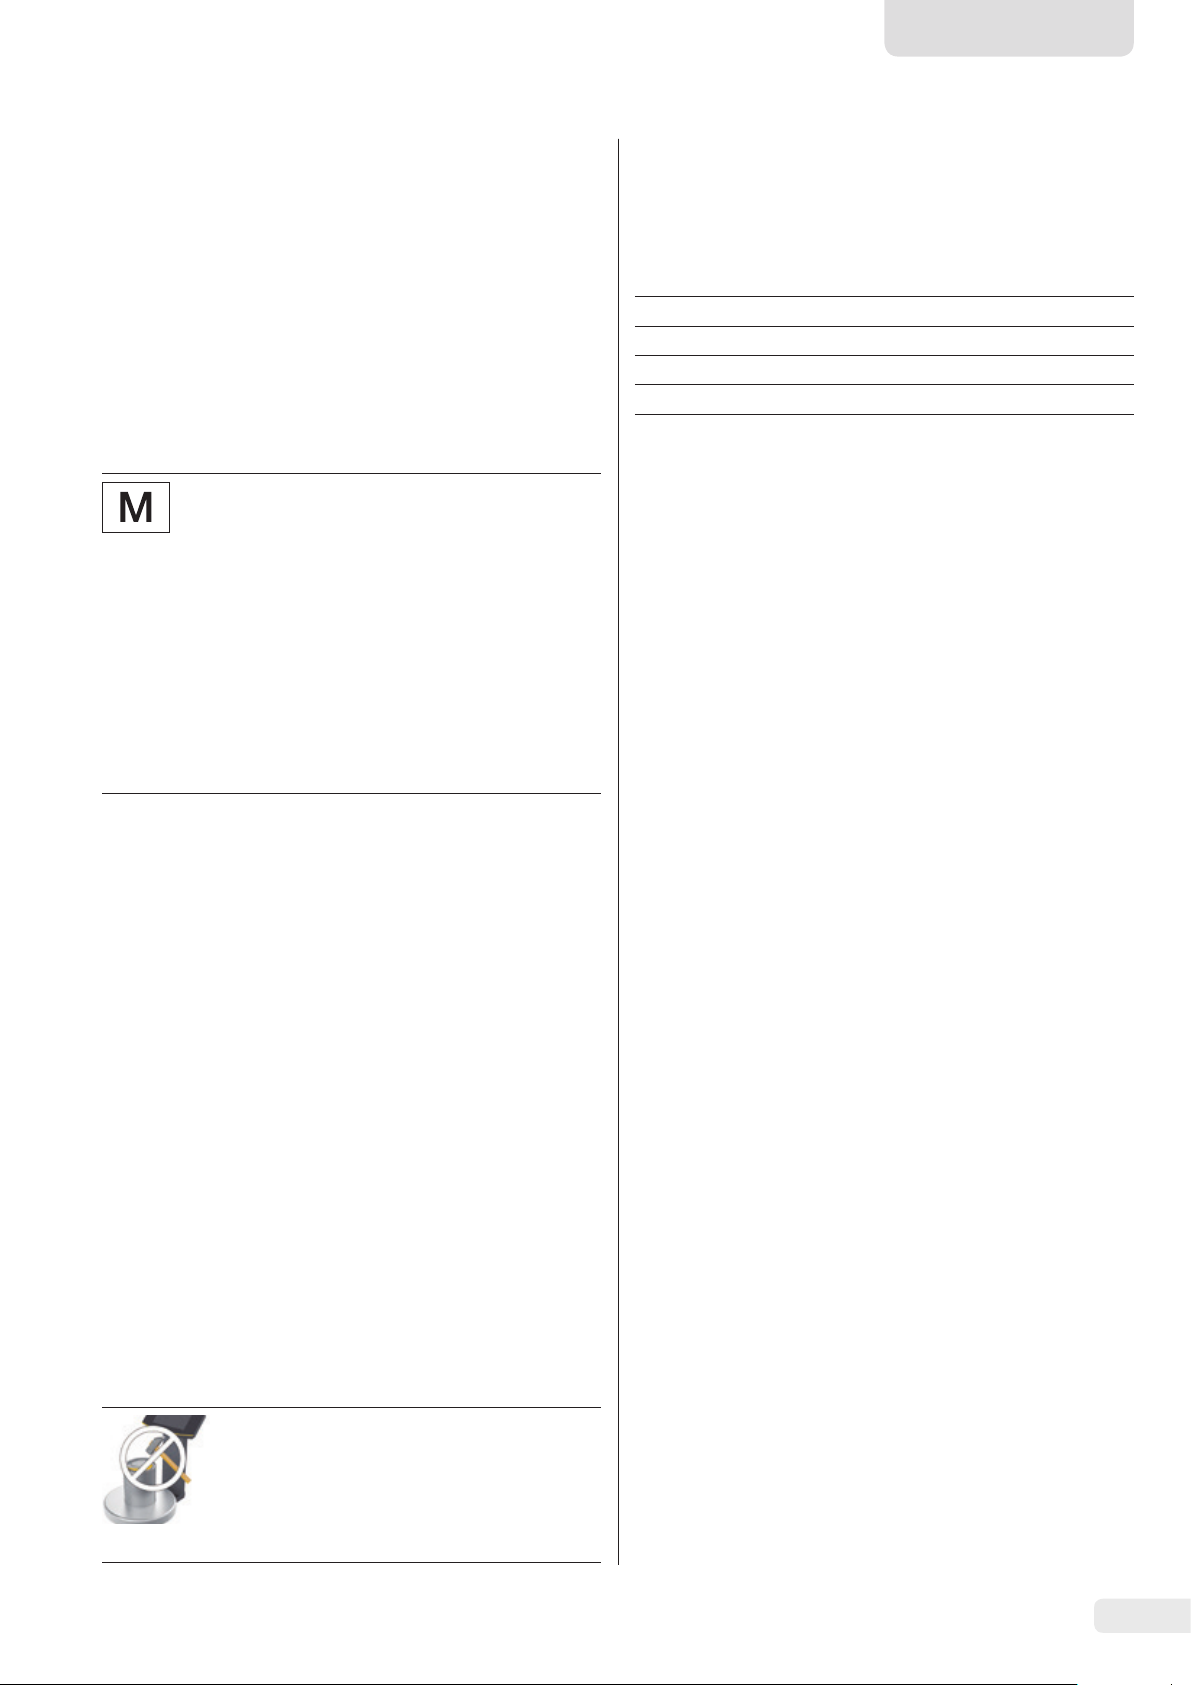
3.8 Leveling
Leveling for Models Verified for Use in Legal Metrology
Only
Leveling the scale compensates for slant or unevenness at the
place of installation. The scale must be perfectly horizontal to
ensure consistent, reproducible weighing results.
The scale needs to be re-leveled and then adjusted if
necessary each time its setup location is changed.
t Turn the two leveling feet as
shown in the illustration until
12*
9*
6*
* o'clock
the air bubble is centered within
the circle of the level indicator.
− Air bubble at “12 o'clock:” Turn
both feet clockwise.
− Air bubble at “3 o'clock:” Turn the
left foot clockwise and the right
foot counterclockwise.
− Air bubble at “6 o'clock:” Turn
both feet counterclockwise.
− Air bubble at “9 o'clock:” Turn the
left foot counterclockwise and
the right foot clockwise.
Installation Instructions EVO1Y1 7
Page 8
3.9 Warm-up Time
0
30
Using a Scale Verified for Use in Legal Metrology:
Ensure that there is a warm-up time of at least 24
hours after initial connection to the power supply.
Cleaning the Device Housing
t Wipe off the housing with a slightly damp cloth. For more
severe contamination, use a mild soap solution.
t Wipe the device with a soft cloth.
4.2 Servicing
To ensure accurate results are
delivered, the scale must warm up
for at least 30 minutes after initial
connection to the power supply.
Only then will the device have
reached the required operating
temperature.
4 Cleaning and
Maintenance
4.1 Cleaning
Before cleaning the AC adapter or the scale: Disconnect all
devices from the power supply.
WARNING Electrical Hazard from Voltage or
Current
Disconnect the AC adapter (if connected) from the mains.
Unplug any connected data cables from the PC. Never open
the scale or the AC adapter. The parts contained in these
devices cannot be cleaned, repaired, or replaced by the user.
To ensure the continued accuracy of your scale, we
recommend scheduling regular servicing at least once a year.
Sartorius Service offers different service contracts with
maintenance intervals that are tailored to your needs.
A calibration certificate should always be issued as part of
every maintenance session. Safety inspections of the AC
adapter and its connections must be performed at appropriate
intervals by a qualified electrician (e.g., every 2 years).
5 Disposal
5.1 Information on Decontamination
The operator is responsible for adhering to local legislation on
the proper declaration of transport and disposal and the
proper disposal of the device.
WARNING
Risk of injury due to contaminated devices!
Devices contaminated with hazardous materials (NBC
contamination) will not be accepted for repair or disposal.
NOTICE
Do not clean the following parts with acetone or aggressive
cleaning agents:
− Mains socket
− Data interface
− Labels, and all other plastic parts
Procedure
t Disconnect the device from the power supply.
t NOTICE Make sure that no liquid or dust gets into the
scale or the AC adapter.
t NOTICE Corrosion or damage to the device due to
unsuitable cleaning agents!
t Do not use corrosive, chloride-containing, and
aggressive cleaning agents.
t Do not use cleaning agents that contain abrasive
ingredients, e.g. scouring agents, steel wool.
t Only use soft brushes and cloths for cleaning.
t Do not use solvent-based cleaning agents.
Cleaning the Control Panel
t Before cleaning the control panel: Turn off the device as
touching the screen could trigger unwanted inputs.
5.1.1 Information on Disposal
The device and its accessories do not belong in your regular
household waste, since they are made of high-grade materials
which can be recycled and reused. All parts must be disposed
of properly by disposal facilities. The packaging is made of
environmentally friendly materials that can be used as
secondary raw materials.
5.1.2 Disposal
Requirements
The device has been decontaminated.
Procedure
t Dispose of the device. Follow the disposal instructions
on our website (www.sartorius.com).
t Dispose of the packaging in accordance with local
government regulations.
8 Installation Instructions EVO1Y1
Page 9
English
6 Accessories
Accessories Order Number
USB connection cable YCC01-0040M5
Power supply (5 V/900 mA) YPS06-USB
Power plug adapter set for YPS06-USB YAK01
− USA and Japan
− Europe/EU
− United Kingdom
Power plug adapter set for YPS06-USB YAK02
− Australia
− South Africa
− Argentina
− Brazil
Power plug adapter set for YPS06-USB YAK03
− India
− Korea
− China
Equipotential bonding cable, 2 m
In-use cover for the control panel,
pack of 10
In-use cover for the support arm,
pack of 10
In-use cover for weighing pan,
pack of 10
CAL weight
− 5 kg, accuracy class F2 YCW654-AC-00
− 2 kg, accuracy class F2 YCW624-AC-00
− 1 kg, accuracy class F2 YCW614-AC-00
YCC01-X046M2
YDC03PMA10
YDC03PMA-CO10
YDC03PMA-WP10
7 Serial Number Coding
The manufacture date of this device is encoded in the serial
number. The format is as follows:
YMM x x x x x
Y Year
3 2014-2020
4 2021-2027
5 2028-2034, etc.
The Y column indicates the year group, which covers a period
of 7 years. Within each year group, the months (M M) are
counted up from 13.
Year: 2015 2016 2017 2018 2019 ...
MM: 25-36 37-48 49-60 61-72 73-84 ...
Example:
328xxxxx (April 2015). “xxxxx” is a consecutive number that
resets and starts from one every month.
Installation Instructions EVO1Y1 9
Page 10
8 Technical Data
8.1 General Data
Specification Unit Value
ID code (explosion protection) II 3G Ex ic nA IIB T4 Gc as per EC Type Examination Certificate no.
FM15ATEX0008X
Supply voltage only via USB interface or Sartorius AC adapter YPS06-USB
Input voltage V
Power consumption W 2.0 (typically)
Further data IP40 in accordance with EN 60529/IEC 60529
Ambient conditions
The technical specifications apply under the following ambient conditions:
Environment For indoor use only.
Ambient temperature* +10°C to +30°C
Operational capability °C Guaranteed between +5 and +40
Storage and shipping °C -10 to +60
Relative humidity** % 15 to 80 for temperatures up to 30°C non-condensing, decreasing
Electromagnetic compatibility In accordance with EN 61326-1/IEC61326-1
Interference resistance Basic requirements
Transient emissions Class B
DC
+4.5–5.0
linearly to 50% relative humidity at 40°C
Electrical equipment for measurement, control and laboratory use –
EMC requirements – Part 1: General requirements
Suitable for use in residential areas and areas that are connected to a
low voltage network that also supplies residential buildings.
Verified scales in accordance with EU requirements comply with the
requirements of Council Directive 2014/31/EC with EN 45501:2015 and
OIML R76:2006.
* For verified scales in accordance with EU requirements, refer to the
information on the scale.
** For verified scales in accordance with EU requirements, the legal
regulations apply.
Available application programs Recalculation, factor calculation, formula
AC adapter YPS06-USB
USB power plug (5 V/900 mA) Type FW7712 (manufacturer's certificate)
Primary 100–240 V~, -10%/+10%, 50–60 Hz, 0.125 A
Secondary 5 V
Further data Protection class II
10 Installation Instructions EVO1Y1
, ± 5%, 900 mA (max.)
DC
IP40 in accordance with EN 60529/IEC 60529
Page 11

English
8.2 Model-specific Data
Specification Unit Value
PMA.Evolution
EVO1Y1
Weighing capacity g 7500/999.95
Readability g 0.1/0.05
Tare range (subtractive) g -7500
External adjustment weight /
accuracy class
Size of weighing pan
Net weight kg 2.4
8.3 Verified Models with EC Type Approval Certificate: Model-Specific Technical Specifications
kg 1, 2, 5 /
F2 or better
d mm
233
Specification Unit Value
Model
Accuracy class
Type PMA-EV
Weighing capacity max. g 7500
Scale interval d g 0.1
Verification scale interval e g 1
Temperature range +10°C to +30°C
Tare equalization range (subtractive)
PMA.Evolution, EVO1Y
�
< 100% from max. weighing capacity
9 EU Declaration of Conformity
The attached Declaration of Conformity hereby confirms compliance of the device with the directives cited.
For verified scales for use in the EEA, the declaration of conformity set out in the conformity assessment (calibration) shall apply.
Please keep it in a safe place.
Installation Instructions EVO1Y1 11
Page 12
Inhalt
1.2.1 Warnungen
1 Über dieses Dokument...................................12
1.1 Gültigkeit ............................................12
1.2 Darstellungsmittel ...................................12
2 Sicherheit
2.1 Bestimmungsgemäße Verwendung..................12
2.2 Explosionsschutz.....................................13
2.3 Personalqualifikation ................................13
2.4 Bedeutung dieser Anleitung .........................13
2.5 Einwandfreiheit des Geräts ..........................13
2.6 Arbeiten an der elektrischen Ausrüstung
2.7 Persönliche Schutzausrüstung.......................14
2.8 Sicherheitshinweise zur Bedienung des Gerätes.....14
3 Installation
3.1 Lieferumfang.........................................14
3.2 Auspacken ...........................................14
3.3 Aufstellort wählen ...................................14
3.4 Waage montieren....................................15
3.5 Erdung anschließen..................................15
3.6 Spannungsversorgung ...............................15
3.7 Diebstahlsicherung...................................16
3.8 Nivellieren............................................16
3.9 Anwärmzeit ..........................................17
4 Reinigung und Wartung
4.1 Reinigen..............................................17
4.2 Warten ...............................................17
5 Entsorgung
5.1 Hinweise zur Dekontamination......................17
6 Zubehör
7 Codierung der Seriennummer
8 Technische Daten
8.1 Allgemeine Daten....................................19
8.2 Modellspezifische Daten.............................20
8.3 Geeichte Modelle mit EG-Bauartzulassung:
9 EU-Konformitätserklärung
.................................................12
des Geräts............................................14
...............................................14
.................................17
...............................................17
...................................................18
...........................18
........................................19
Modellspezifische technische Daten.................20
..............................20
WARNUNG
Kennzeichnet eine Gefährdung, die Tod oder schwere Körperverletzung zur Folge haben kann, wenn sie nicht vermieden
wird.
VORSICHT
Kennzeichnet eine Gefährdung, die eine mittelschwere oder
leichte Körperverletzung zur Folge haben kann, wenn sie nicht
vermieden wird.
ACHTUNG
Kennzeichnet eine Gefährdung, die Sachschäden zur Folge
haben kann, wenn sie nicht vermieden wird.
1.2.2 Weitere Darstellungsmittel
t
y
−
Abbildungen der Bedienanzeige
Die Abbildungen in dieser Anleitung basieren auf „Standard“-Waagen. Bei den geeichten Waagen können einige
Anzeigedarstellungen und Protokolle von den Abbildungen
etwas abweichen. Wo dies für den Betrieb von Bedeutung ist,
werden die Unterschiede im Text erläutert.
Handlungsanweisung: Beschreibt Tätigkeiten, die
ausgeführt werden müssen.
Ergebnis: Beschreibt das Ergebnis der ausgeführten Tätigkeiten.
Texte, die dieser Markierung folgen, sind Aufzählungen.
Dieses Symbol gibt einen Hinweis für den eichpflichtigen Verkehr für konformitätsbewertete
(geeichte) Waagen.
Im weiteren Text steht der Begriff ‚geeicht‘ für
den Fachausdruck konformitätsbewertet.
2 Sicherheit
1 Über dieses Dokument
1.1 Gültigkeit
Diese Anleitung gilt für Farbmischwaagen der Modelle:
− EVO1Y
1.2 Darstellungsmittel
Der in der Anleitung verwendete Begriff Gerät bezeichnet
immer die Kombination Waage, Netzgerät und Ex-Link
Konverter.
12 Installationsanleitung EVO1Y1
2.1 Bestimmungsgemäße Verwendung
Diese Waage ist nur bestimmt für das Mischen von Farben und
Lacken. Die Waage wird im explosionsgefährdeten Bereich der
Zone 2 eingesetzt. Zur Aufnahme der Materialien müssen
geeignete Gefäße verwendet werden.
Die Waage darf sowohl über das Display im Stand-Alone-Betrieb, als auch mit Hilfe einer auf dem PC installierten
Applikationssoftware (z. B. eine Farbmischapplikation des
Lackherstellers) gesteuert werden. Die Waage wird dabei über
ein USB-Kabel mit dem außerhalb des explosionsgefährdeten
Bereiches aufgestellten Personalcomputer / Notebook verbunden. Die Angaben zum Explosionsschutz im „2.2 Explosionsschutz“, Seite 13 sind zu beachten.
Page 13
Deutsch
Die Anleitung ist Teil des Geräts. Das Gerät ist ausschließlich
für den Einsatz gemäß dieser Anleitung bestimmt.
Jede weitere Verwendung gilt als nicht bestimmungsgemäß.
Wenn das Gerät nicht bestimmungsgemäß eingesetzt wird:
Die Schutzvorrichtungen des Geräts können beeinträchtigt
werden. Dies kann zu Personenschäden und Sachschäden
führen.
Bei Verwendung in Anlagen und Umgebungs bedingungen mit
erhöhten Sicherheitsanforderungen die Auflagen und Bestimmungen Ihres Landes beachten.
Einsatzbedingungen für das Gerät
Das Gerät nur in Gebäuden verwenden.
Das Gerät nur mit den Ausstattungen und unter Betriebsbe-
dingungen einsetzen wie sie in den Technischen Daten
beschrieben sind. Das Gerät nicht umbauen oder technisch
verändern.
Das Gerät sowie das von Sartorius gelieferte Zubehör nicht
extremen Temperaturen, aggressiven chemischen Dämpfen,
Feuchtigkeit, Stößen, Vibrationen oder starken elektromagnetischen Feldern aussetzen. Einsatzbedingungen gemäß den
Technischen Daten einhalten!
Die Verbindungskabel zwischen den Geräten sowie die
Ummantelung der Litzen der inneren Verdrahtungen bestehen
aus PVC-Materialien. Chemikalien, die diese Materialien
angreifen, müssen von diesen Leitungen ferngehalten werden.
2.2 Explosionsschutz
Verwendung im Geltungsbereich der europäischen
ATEX-Richtlinie:
− Bei dem Modell EVO1Y1 handelt es sich gemäß Richtlinie
2014/34/EU um ein Gerät der Kategorie 3, das für den
Einsatz im explosionsgefährdeten Bereich der Zone 2
geeignet ist.
− Die Kennzeichnungen der Geräte sind den EU-Type
Examination Certificates (EU-Baumusterprüfbescheinigungen) im Kapitel „18.2 Zulassungen Explosionsschutz“, Seite
59 zu entnehmen.
− Die Sicherheitshinweise gemäß der Zeichnung 2021460 ab
Seite 59 sind zu befolgen.
Verwendung in Australien / Neuseeland:
− Das IECEx Certificate of Conformity IECEx FME 15.0004X
sowie die Sicherheitshinweise gemäß der Zeichnung
2021460 ab Seite 59 sind zu befolgen.
2.3 Personalqualifikation
Diese Anleitung richtet sich an die unten genannten Zielgruppen. Alle Personen, die am Gerät arbeiten, müssen über die
genannten Kenntnisse und Zuständigkeiten verfügen.
Wenn bei den beschriebenen Tätigkeiten in dieser Anleitung
keine Qualifikation angegeben ist: Die beschriebenen Tätigkeiten richten sich an die Zielgruppe „Bediener“.
Wenn einzelne Tätigkeiten durch andere Zielgruppen oder den
Sartorius Service ausgeführt werden müssen: Die benötigte
Qualifikation ist bei der Beschreibung der Tätigkeit
angegeben.
Zielgruppe Kenntnisse und Zuständigkeiten
Bediener Der Bediener ist mit dem Betrieb des Geräts und
den damit verbundenen Arbeitsprozessen vertraut. Er kennt die Gefahren, die bei Arbeiten
mit dem Gerät auftreten können und kann diese
Gefahren vermeiden.
Der Bediener ist in den Betrieb des Geräts eingewiesen. Die Einweisung erfolgt im Rahmen
der Inbetriebnahme und wird durch den
Betriebsingenieur / Laborleiter oder den Betreiber des Geräts durchgeführt.
Betriebsingenieur /
Laborleiter
Elektrofachkraft
Betreiber Der Betreiber des Geräts ist für die Einhaltung
Der Betriebsingenieur / Laborleiter entscheidet
über den Einsatz und die Parametrierung des
Geräts.
Der Betriebsingenieur / Laborleiter ist in den
Betrieb des Geräts eingewiesen. Die Einweisung
erfolgt im Rahmen der Inbetriebnahme und
wird durch den Sartorius Service oder den
Betreiber durchgeführt.
Die Elektrofachkraft kann aufgrund ihrer fachlichen Ausbildung, Kenntnisse und Erfahrungen
sowie Kenntnis der einschlägigen Bestimmungen die ihr übertragenen Arbeiten beurteilen
und mögliche Gefahren erkennen.
der Sicherheits- und Arbeitsschutzbestimmungen zuständig.
Der Betreiber muss sicherstellen, dass alle Personen, die am Gerät arbeiten, Zugang zu den relevanten Informationen haben und in die Arbeit
am Gerät eingewiesen sind.
2.4 Bedeutung dieser Anleitung
Die Nichtbeachtung der Anleitung kann ernste Folgen haben,
z. B. Gefährdung von Personen durch elektrische, mechanische
oder chemische Einflüsse.
t Vor allen Arbeiten am Gerät die Anleitung aufmerksam
und vollständig durchlesen.
t Bei Verlust der Anleitung Ersatz anfordern oder die
aktuelle Anleitung von der Sartorius-Internetseite herunterladen (www.sartorius.com).
t Die Informationen aus der Anleitung müssen für alle
Personen verfügbar sein, die am Gerät arbeiten.
2.5 Einwandfreiheit des Geräts
Ein beschädigtes Gerät kann zu Fehlfunktionen führen oder
schwer erkennbare Gefährdungen hervorrufen.
Installationsanleitung EVO1Y1 13
Page 14
t Das Gerät nur in sicherheitstechnisch einwandfreiem
Zustand betreiben.
t Beschädigtes Gerät sofort spannungslos schalten.
t Beschädigungen umgehend durch den Sartorius Service
beheben lassen.
3 Installation
3.1 Lieferumfang
2.6 Arbeiten an der elektrischen Ausrüstung des Geräts
Jegliche Arbeiten und Modifikationen an der elektrischen
Ausrüstung des Geräts dürfen nur vom Sartorius Service
vorgenommen werden. Das Gerät darf nur vom Sartorius
Service geöffnet werden.
Versiegelungsmarke an geeichten Varianten
Der Gesetzgeber fordert eine Versiegelung der
geeichten Waage. Diese Versiegelung erfolgt
mittels einer Klebemarke mit Namenszug „Sartorius“. Wird sie entfernt, erlischt die Eichgültigkeit
und die Waage muss geeicht werden. Bei geeichten Waagen für den Einsatz im EWR gilt die bei
der Eichung ausgestellte und der Waage beigelegte Konformitätserklärung. Bitte unbedingt
aufbewahren.
2.7 Persönliche Schutzausrüstung
Die persönliche Schutzausrüstung schützt vor Gefährdungen
durch die verarbeiteten Materialien.
t Wenn der Arbeitsbereich oder der Prozess, in dem das
Gerät eingesetzt wird, eine persönliche Schutzausrüstung
erfordert: Die persönliche Schutzausrüstung tragen.
2.8 Sicherheitshinweise zur Bedienung des Gerätes
− Die Glasscheibe des Bediendisplays nicht beschädigen (z. B.
durch herabfallende Gegenstände, Schläge oder starken
Druck). Wird die Glasscheibe beschädigt, ist das Gerät sofort
vom Netz zu trennen!
− Die Oberfläche des Bediendisplays nicht mit spitzen, scharfen,
harten oder rauen Gegenständen berühren, sondern ausschließlich mit einem dafür vorgesehenen Touchpen oder mit
den Fingerspitzen. Zum Reinigen keinesfalls Teile der Kleidung
(z. B. Jackenärmel) oder Schwämme verwenden, da diese die
Oberfläche zerkratzen können (z. B. durch Nieten oder Knöpfe
im Jackenärmel oder Sand in Schwämmen).
− Elektrostatische Aufladung der Glasscheibe des Bediendisplays
und des Kunststoffgehäuses vermeiden.
Beschädigungsgefahr der Waage!
Verschließen Sie nie die Farbdose mit einem
Hammer, solange diese auf der Waagschale
steht.
Stellen Sie die Farbdose zum Verschließen auf
einen festen stabilen Untergrund.
Artikel Menge
Waagschale groß: d 233 mm
USB Kabel 1
Netzgerät YPS06-USB optional
Installationsanleitung x
1
3.2 Auspacken
Vorgehen
t Öffnen Sie die Verpackung und entnehmen Sie vorsichtig
alle Teile.
t Überprüfen Sie das Gerät nach dem Auspacken sofort auf
äußere Beschädigungen.
t Wenn das Gerät zwischengelagert wird: Das Gerät gemäß
den Umgebungsbedingungen lagern (Umgebungsbedingungen siehe Kapitel „8.1 Allgemeine Daten“, Seite 19
t Bewahren Sie alle Teile der Originalverpackung für einen
eventuellen Rücktransport auf. Lassen Sie beim Versand
keine Kabel stecken!
3.3 Aufstellort wählen
Den richtigen Standort wählen:
− Das Gerät auf eine stabile, erschütterungsarme, gerade Fläche
stellen.
− Zugang zu dem Gerät jederzeit freihalten.
Bei der Aufstellung Standorte mit ungünstigen Einflüssen
vermeiden:
− Hitze (Heizung, Sonneneinstrahlung)
− Direkter Luftzug durch offene Fenster, Klimaanlagen und
Türen
− Erschütterungen während der Messung
− Kein „Personendurchgangsverkehr“
− Extrem hohe Luftfeuchtigkeit
− Elektromagnetische Felder
− Extrem trockene Luft
Akklimatisieren
Wenn ein kaltes Gerät in eine warme Umgebung gebracht
wird kann dies zu Kondensation von Luftfeuchtigkeit führen
(Betauung). Daher akklimatisieren Sie das vom Netz getrennte
Gerät ca. 2 Stunden, bevor Sie es wieder an die Versorgungsspannung anschließen.
14 Installationsanleitung EVO1Y1
Page 15
Deutsch
3.4 Waage montieren
ACHTUNG
Für alle Montagearbeiten muss das Gerät von der Spannungsversorgung getrennt sein.
3.4.1 Waagschale aufsetzen
t Setzen Sie die Waagschale von
oben auf die Waage auf.
3.4.2 Waage anschließen
t Stecken Sie das USB-Anschluss-
kabel auf der Rückseite des
Displays in die Buchse.
1
t Lösen Sie die Schraube (1) der
Verriegelung.
t Schwenken Sie die Verriegelung
über das USB-Kabel.
t Ziehen Sie die Schraube der
Verriegelung an.
t Verlegen Sie das USB-Anschluss-
kabel durch die Kabelhalter auf
der Rückseite der Waage.
3.5 Erdung anschließen
Die explosionsgeschützte Anlage nach den anerkannten
Regeln der Technik errichten. Dabei sind die entsprechenden
nationalen Gesetze/Vorschriften zu beachten.
Vor Inbetriebnahme der Waage muss der ordnungsgemäße
Zustand durch eine Elektrofachkraft oder unter Leitung und
Aufsicht einer Elektrofachkraft überprüft werden.
Prüfen Sie, ob die zuständigen Behörden (z. B. Gewerbeaufsichtsamt) informiert werden müssen. Auch während des
Betriebes sind Prüfungen der Anlage erforderlich.
Die Fristen dazu sind so zu bemessen, dass entstehende
Mängel, mit denen gerechnet werden muss, rechtzeitig
erkannt werden. Die Prüfungen sind mindestens alle drei Jahre
durchzuführen. Während des Betriebes sind die entsprechenden Auflagen und Richtlinien zu erfüllen.
Die Waage mit einem geeigneten Erdungskabel von mindestens 4 mm2 Querschnitt (nicht im Lieferumfang enthalten)
niederohmig über die am Gerät vorhandenen Potenzialausgleichsanschluss an einen kundenseitigen Potenzialausgleichsanschluss anschließen.
Die Installation muss von einer dafür ausgebildeten Fachkraft
vorschriftsmäßig und nach den Regeln der Technik durchgeführt werden. Die Anlage erstmalig nur dann in Betrieb
nehmen, wenn sichergestellt ist, dass der Bereich nicht
explosionsgefährdet ist.
Zeigen sich bei dieser Inbetriebnahme durch Transportschäden
Abweichungen (z. B. keine Anzeige, keine Hintergrundbeleuchtung), so ist die Waage vom Netz zu trennen und der Sartorius
Service zu informieren.
Verbinden Sie die Waage mit
einem Potenzialausgleichskabel
von mindestens 4 mm² Querschnitt
mit dem Potenzialausgleich.
t Schließen Sie den Kabelschuh
des Potenzialausgleichskabels
an die Erdungsklemme der
Waage an.
t Schließen Sie das Potenzialaus-
gleichskabel an den kundenseitigen Potenzialausgleich an.
3.6 Spannungsversorgung
Benötigte Qualifikation: Elektrofachkraft
Die Spannungsversorgung der Waage erfolgt über einen
PC / Notebook oder durch das optionale Netzgerät YPS06-USB
(siehe Kapitel „6 Zubehör“, Seite 18), das mit verschiedenen
länderspezifischen Netzadaptern geliefert wird.
ACHTUNG
− Der auf dem Netzgerät aufgedruckte Spannungswert muss
mit der lokalen Netzspannung übereinstimmen (Anschlussdaten siehe Kapitel „8.1 Allgemeine Daten“, Seite 21).
− Sollte die angegebene Netzspannung oder die Steckerausführung des Netzgerätes nicht der verwendeten Ländernorm
entsprechen, verständigen Sie bitte die nächste Sartorius-Vertretung.
Die Spannungsversorgung über das Netzgerät wird nur
benötigt:
− wenn kein PC oder Notebook vorhanden ist.
− in Ausnahmefällen die Ausgangsspannung der USB-Schnittstelle des PCs oder Notebooks nicht ausreichend ist.
3.6.1 Netzgerät montieren
WARNUNG Tödliche Stromschläge und Geräteschäden
t
durch falsche Netzsteckeradapter! Nur den länderspezifischen Netzsteckeradapter verwenden. Den Netzsteckeradapter nie getrennt vom Netzgerät in die Steckdose stecken.
Installationsanleitung EVO1Y1 15
Page 16
t Verwenden Sie den zu Ihrem Stromnetz passenden
Netzadapter:
Netzadapterset YAK01
Beutel Region/Land
a) transparent Europa/EU (außer Großbritannien)
b) blau USA
c) gelb Großbritannien
Anschluss an Personalcomputer / Notebook
t Stecken Sie das USB-Anschlusskabel in eine USB-Buchse
(z. B. Personalcomputer, Laptop).
Anschluss an Netzgerät (optional)
t Stecken Sie das USB-Anschluss-
kabel in das Netzgerät.
t Stecken Sie das Netzgerät in
eine Steckdose (Netzspannung)
3.7 Diebstahlsicherung
t Sichern Sie die Waage bei
Bedarf an der Rückseite.
Netzadapterset YAK02
d) rot Australien
e) türkis Südafrika
f) weiß Argentinien
g) rosa Brasilien
Netzadapterset YAK03
h) hellbraun China
i) schwarz Indien
j) grün Korea
Netzadapter
demontieren / tauschen
t Drücken (1) und schieben (2)
Sie den für Ihre Stromversorgung erforderlichen Netzadapter in die Öffnung des Netzgeräts.
Der Netzadapter muss dabei
einrasten.
t Entriegeln (1) Sie den Netz-
adapter und ziehen (2) Sie
ihn ab.
3.8 Nivellieren
Nivellieren bei konformitätsbewerteten (geeichten)
Modellen
Mit der Nivellierung der Waage können Neigungen am
Aufstellort der Waage ausgeglichen werden. Eine exakte
waagerechte Stellung der Waage gewährleistet genaue
Wägeergebnisse.
Die Waage muss nach jedem Standortwechsel neu nivelliert
und danach gegebenenfalls justiert werden.
t Drehen Sie die beiden Fuß-
schrauben gemäß Abbildung,
12*
9*
6*
* Uhr
bis die Luftblase der Libelle in
der Kreismitte steht.
− Luftblase bei »12 Uhr«: beide
Fußschrauben im Uhrzeigersinn
drehen.
− Luftblase bei »3 Uhr«: linke
Fußschraube im Uhrzeigersinn,
rechte Fußschraube gegen den
Uhrzeigersinn drehen.
− Luftblase bei »6 Uhr«: beide
Fußschrauben gegen den
Uhrzeigersinn drehen.
− Luftblase bei »9 Uhr«: linke
Fußschraube gegen den Uhrzeigersinn, rechte Fußschraube im
Uhrzeigersinn drehen.
16 Installationsanleitung EVO1Y1
Page 17
0
30
Deutsch
3.9 Anwärmzeit
Geeichte Waagen im eichpflichtigen Verkehr
einsetzen:
Anwärmzeit von mindestens 24 Stunden einhalten
nach erstmaligem Anschluss an das Stromnetz.
Um genaue Resultate zu liefern,
benötigt die Waage eine Anwärmzeit von mindestens 30 Minuten
nach erstmaligem Anschluss an die
Spannungsversorgung. Erst dann
hat das Gerät die notwendige
Betriebstemperatur erreicht.
4 Reinigung und Wartung
4.1 Reinigen
Vor Reinigen des Netzgerätes oder der Waage: Alle Geräte
spannungslos schalten.
Gerätegehäuse reinigen
t Das Gehäuse mit einem leicht feuchten Reinigungstuch
abwischen. Für stärkere Verschmutzungen eine milde
Seifenlauge verwenden.
t Das Gerät danach mit einem weichem Tuch abwischen.
4.2 Warten
Um die fortdauernde Messsicherheit Ihrer Waage zu gewährleisten, empfehlen wir die regelmäßige, mindestens jährliche
Wartung. Der Sartorius Service bietet Ihnen hierzu unterschiedliche Wartungsverträge an, die wir individuell an Ihre
Bedürfnisse anpassen.
Im Rahmen jeder Wartung sollte immer ein Kalibrierzertifikat
erstellt werden. Lassen Sie eine sicherheitstechnische Überprüfung des Netzgerätes und dessen Anschlüsse in angemessenen
Abständen von einer Elektrofachkraft durchführen (z. B. alle
2 Jahre).
5 Entsorgung
WARNUNG Gefahr durch elektrische Span-
nung!
Vorhandenes Netzgerät (optional) vom Netz trennen. Gegebenenfalls angeschlossenes Datenkabel am PC abziehen. Öffnen
Sie niemals die Waage oder das Netzgerät. Diese enthalten
keine Geräteteile, die vom Bediener gereinigt, repariert oder
ausgetauscht werden können.
ACHTUNG
Folgende Teile nicht mit Aceton oder aggressiven Reinigungsmitteln reinigen:
− Netzsteckereingang
− Datenschnittstelle
− Schilder sowie alle restlichen Kunststoffteile
Vorgehen
t Das Gerät von der Spannungsversorgung trennen.
t ACHTUNG Darauf achten, dass keine Flüssigkeit oder
Staub in die Waage oder in das Netzgerät gelangen.
t ACHTUNG Korrosion oder Beschädigungen am Gerät
durch ungeeignete Reinigungsmittel!
t Keine ätzenden, chloridhaltigen und aggressiven
Reinigungsmittel verwenden.
t Keine Reinigungsmittel verwenden, die scheuernde
Bestandteile enthalten, z. B. Scheuermilch, Stahlwolle.
t Zur Reinigung nur weiche Bürsten und Putzlappen
verwenden.
t Keine lösemittelhaltigen Reinigungsmittel verwenden.
Bedienfeld reinigen
t Vor dem Reinigen des Bedienfeldes: Das Gerät ausschalten,
da durch die Berührung sonst ungewollt Eingaben
erfolgen können.
5.1 Hinweise zur Dekontamination
Der Betreiber ist für die Einhaltung der landesrechtlichen
Bestimmungen zur sachgerechten Deklaration bei Transport
und Entsorgung und zur sachgerechten Entsorgung des Geräts
verantwortlich.
WARNUNG
Verletzungsgefahr durch kontaminierte Geräte!
Mit gefährlichen Stoffen kontaminierte Geräte (ABC-Kontamination) werden nicht zur Reparatur und Entsorgung
zurückgenommen.
5.1.1 Hinweise zur Entsorgung
Das Gerät und das Zubehör gehören nicht in den Hausmüll,
denn sie sind aus hochwertigen Materialien hergestellt, die
recycelt und wiederverwendet werden können. Alle Teile
müssen durch Entsorgungseinrichtungen fachgerecht entsorgt
werden. Die Verpackung besteht aus umweltfreundlichen
Materialien, die als Sekundärrohstoffe dienen können.
5.1.2 Entsorgen
Voraussetzungen
Das Gerät ist dekontaminiert.
Vorgehen
t Das Gerät entsorgen. Dazu die Entsorgungshinweise auf
unserer Internetseite (www.sartorius.com) beachten.
t Die Verpackung gemäß den landesrechtlichen Bestimmun-
gen entsorgen.
Installationsanleitung EVO1Y1 17
Page 18

6 Zubehör
7 Codierung der
Zubehör Bestellnummer
USB-Verbindungskabel YCC01-0040M5
Netzgerät (5 V / 900 mA) YPS06-USB
Netzstecker-Adapterset für YPS06-USB YAK01
− USA und Japan
− Europa / EU
− Großbritannien
Netzstecker-Adapterset für YPS06-USB YAK02
− Australien
− Südafrika
− Argentinien
− Brasilien
Netzstecker-Adapterset für YPS06-USB YAK03
− Indien
− Korea
− China
Potenzialausgleichskabel, 2 m
Arbeitsschutzhaube für Bedienfeld,
10er Pack
Arbeitsschutzhaube für Stativ,
10er Pack
Arbeitsschutzhaube für Waagschale,
10er Pack
Justiergewicht
− 5 kg, Genauigkeitsklasse F2 YCW654-AC-00
− 2 kg, Genauigkeitsklasse F2 YCW624-AC-00
− 1 kg, Genauigkeitsklasse F2 YCW614-AC-00
YCC01-X046M2
YDC03PMA10
YDC03PMA-CO10
YDC03PMA-WP10
Seriennummer
Das Herstelldatum des Gerätes ist in der Seriennummer codiert.
Die Struktur ergibt sich wie folgt:
JMM x x x x x
J Jahr
3 2014–2020
4 2021-2027
5 2028-2034 usw.
Die Jahresspalte J steht für die Jahresgruppennummer, die
einen Zeitraum von jeweils 7 Jahren definiert. Innerhalb jeder
Jahresgruppe werden die Monate (M M) von 13 an
hochgezählt.
18 Installationsanleitung EVO1Y1
Jahr: 2015 2016 2017 2018 2019 ...
MM: 25-36 37-48 49-60 61-72 73-84 ...
Beispiel:
328xxxxx (April 2015). „xxxxx“ ist eine fortlaufende Nummer,
die jeden Monat neu hochgezählt wird.
Page 19
Deutsch
8 Technische Daten
8.1 Allgemeine Daten
Angabe Einheit Wert
Kennzeichnung (Explosionsschutzart) II 3G Ex ic nA IIB T4 Gc lt. EG-Baumusterprüfung Nr. FM15ATEX0008X
Spannungsversorgung nur über USB Schnittstelle oder Sartorius Netzgerät YPS06-USB
Eingangsspannung V
Leistungsaufnahme W 2,0 (typisch)
Weitere Daten IP40 gemäß EN 60529/IEC 60529
Umgebungsbedingungen
Die technischen Daten gelten bei folgenden Umgebungsbedingungen:
Umgebung Verwendung nur in Innenräumen
Umgebungstemperatur* +10 °C – +30 °C
Betriebsfähigkeit °C Gewährleistet zwischen +5 – +40
Lager und Transport °C –10 – +60
Relative Luftfeuchte** % 15 – 80 für Temperaturen bis zu 30 °C nicht-kondensierend,
Elektromagnetische Verträglichkeit gemäß EN 61326-1/IEC61326-1 Elektrische Mess-, Steuer-, Regel- und
Störfestigkeit Grundanforderungen
Störaussendung Klasse B
DC
+4,5 bis 5,0
linear abnehmend bis zu 50 % relativer Luftfeuchte bei 40 °C
Laborgeräte – EMV-Anforderungen – Teil 1: Allgemeine Anforderungen
Geeignet für den Gebrauch im Wohnbereich und Bereichen, die direkt
an ein Niederspannungsnetz angeschlossen sind, das (auch) Wohngebäude versorgt.
Geeichte Waagen gemäß EU entsprechen den Anforderungen der
EG-Richtlinie 2014/31/EU mit EN45501:2015 bzw. OIML R76:2006.
* Bei geeichten Waagen gemäß EU, siehe Angaben auf der Waage.
** Bei geeichten Waagen gemäß EU gelten die gesetzlichen Vorschriften
Wählbare Anwendungsprogramme Rekalkulation, Faktorverrechnung, Rezeptur
Netzgerät YPS06-USB
USB Steckernetzteil (5 V / 900 mA) Type FW7712 (Herstellerbezeichnung)
Primär 100 – 240 V~, –10 % / +10 %, 50 – 60 Hz, 0,125 A
Sekundär 5 V
Weitere Daten Schutzklasse II
, ± 5 %, 900 mA (max.)
DC
IP40 gemäß EN 60529/IEC 60529
Installationsanleitung EVO1Y1 19
Page 20

8.2 Modellspezifische Daten
Angabe Einheit Wert
PMA.Evolution
EVO1Y1
Wägebereich g 7500 / 999,95
Ablesbarkeit g 0,1 / 0,05
Tarierbereich (subtraktiv) g –7500
Externer Justiergewichtswert /
Genauigkeitsklasse
Größe der Waagschale
Nettogewicht kg 2,4
kg 1, 2, 5 /
F2 oder besser
d mm
233
8.3 Geeichte Modelle mit EG-Bauartzulassung: Modellspezifische technische Daten
Angabe Einheit Wert
Modell
Genauigkeitsklasse
Bauart PMA-EV
Wägebereich Max g 7500
Ziffernschritt d g 0,1
Eichwert e g 1
Temperaturbereich +10°C – +30°C
Taraausgleichsbereich (subtraktiv)
PMA.Evolution EVO1Y
�
< 100% vom maximalen Wägebereich
9 EU-Konformitätserklärung
Mit der beigefügten Konformitätserklärung wird die Übereinstimmung des Geräts mit den benannten Richtlinien erklärt.
Bei geeichten Waagen für den Einsatz im EWR gilt die bei der Konformitätbewertung (Eichung) ausgestellte Konformitätserklärung. Bitte unbedingt aufbewahren.
20 Installationsanleitung EVO1Y1
Page 21

Français
Table des matières
1 À propos de ce manuel ....................................21
1.1 Validité ................................................21
1.2 Typographie ...........................................21
2 Sécurité
2.1 Utilisation conforme ..................................21
2.2 Protection contre les explosions ......................22
2.3 Qualification du personnel............................22
2.4 Importance de ce mode d’emploi .....................22
2.5 État de l'appareil ......................................22
2.6 Travaux sur l’équipement électrique de l’appareil ....23
2.7 Équipement de protection individuelle ...............23
2.8 Consignes de sécurité concernant l’utilisation de
3 Installation
3.1 Contenu de la livraison................................23
3.2 Déballage ..............................................23
3.3 Choisir le lieu d'installation ...........................23
3.4 Monter la balance .....................................24
3.5 Raccorder la mise à la terre ...........................24
3.6 Alimentation électrique ...............................24
3.7 Système antivol........................................25
3.8 Mettre à niveau .......................................25
3.9 Temps de préchauffage ...............................26
4 Nettoyage et maintenance
4.1 Nettoyage .............................................26
4.2 Maintenance ..........................................26
5 Recyclage
5.1 Instructions de décontamination .....................26
6 Accessoires
7 Codification du numéro de série
8 Caractéristiques techniques
8.1 Caractéristiques générales ............................28
8.2 Caractéristiques techniques spécifiques aux
8.3 Modèles approuvés pour l’utilisation en métrologie
9 Déclaration de conformité UE ..........................29
.....................................................21
l’appareil...............................................23
.................................................23
................................26
...................................................26
.................................................27
.........................27
...............................28
différents modèles.....................................29
légale avec approbation CE de type : caractéristiques
techniques spécifiques aux différents modèles.......29
1.2.1 Avertissements
AVERTISSEMENT
Signale un danger qui est susceptible d’entraîner la mort ou
des blessures graves s’il n’est pas évité.
ATTENTION
Signale un danger qui est susceptible d'entraîner des blessures
moyennes ou légères s'il n'est pas évité.
AVIS
Signale un danger qui est susceptible de provoquer des
dommages matériels s’il n’est pas évité.
1.2.2 Autres signes typographiques
t
y
−
Affichage sur l'écran de commande
Les illustrations représentées dans ce manuel se basent sur les
balances « standard ». Si vous utilisez une balance approuvée
pour l'usage en métrologie légale, il se peut que certains
affichages à l'écran et certains rapports diffèrent légèrement
des illustrations représentées. Ces différences sont expliquées
si cela s'avère nécessaire pour le fonctionnement.
Instruction : décrit des actions qui doivent être
effectuées.
Résultat : décrit le résultat des actions qui
viennent d'être effectuées.
Les textes qui suivent ce signe sont des énumérations.
Ce symbole donne une indication relative à l’utilisation en métrologie légale de balances évaluées
conformes (approuvées pour l’utilisation en métrologie légale).
Par la mention « approuvé pour l’utilisation en
métrologie légale », le texte fait référence à
l’évaluation de la conformité.
2 Sécurité
1 À propos de ce manuel
1.1 Validité
Ce manuel d'installation est valable pour les modèles de
balances pour peintures suivants :
− EVO1Y
1.2 Typographie
Le terme « appareil » utilisé dans le manuel désigne toujours la
combinaison de la balance, du bloc d’alimentation et du
convertisseur de jonction antidéflagrant.
2.1 Utilisation conforme
Cette balance doit uniquement être utilisée pour mélanger des
peintures et des vernis. La balance peut être utilisée dans les
atmosphères explosibles de la zone 2. Utilisez des récipients
adaptés pouvant contenir les matières.
La balance peut être commandée par l’intermédiaire de
l'écran en fonctionnement autonome ou à l’aide d'un logiciel
d'application installé sur un ordinateur (par ex. une application de mélange de peinture du fabricant de peinture).
La balance est connectée à l'ordinateur/ordinateur portable
installé hors de la zone à risque d'explosions à l'aide d'un
câble USB. Respectez les instructions relatives à la protection
contre les explosions dans le chapitre « 2.2 Protection contre
les explosions », page 22.
Manuel d'installation EVO1Y1 21
Page 22

Le manuel fait partie intégrante de l'appareil. L’appareil est
exclusivement destiné à être utilisé en conformité avec ce
mode d’emploi.
Si certaines opérations doivent être effectuées par d'autres
groupes cibles ou par le Sartorius Service : la qualification
nécessaire est indiquée dans la description de l’opération.
Toute autre utilisation est considérée comme non conforme.
Si l’appareil n’est pas utilisé de manière conforme : cela peut
nuire aux systèmes de protection de l'appareil et entraîner des
dommages corporels et matériels.
Dans des installations et des conditions ambiantes exigeant
des mesures de sécurité accrues, vous devez respecter les
instructions et les dispositions en vigueur dans votre pays.
Conditions d’utilisation de l’appareil
Utilisez l'appareil uniquement dans des bâtiments.
Utilisez l'appareil uniquement avec l'équipement et dans les
conditions de fonctionnement qui sont spécifiés dans les
caractéristiques techniques. N'apportez aucune transformation ni aucun changement technique à l'appareil.
N’exposez pas l’appareil ainsi que les accessoires fournis par
Sartorius à des températures extrêmes, des vapeurs chimiques
agressives, de l’humidité, des chocs, des vibrations ou de forts
champs électromagnétiques. Respectez les conditions d’utilisation conformément aux caractéristiques techniques !
Les câbles de raccordement entre les appareils ainsi que les
gaines des cordons de câblage internes sont en PVC. Les
produits chimiques pouvant endommager ces matériaux
doivent être tenus à l’écart de ces câbles.
2.2 Protection contre les explosions
Utilisation dans le cadre du champ d’application de la
directive européenne ATEX :
− Conformément à la directive 2014/34/UE, le modèle
EVO1Y1 est un appareil de la catégorie 3 adapté à une
utilisation dans les atmosphères explosibles de la zone 2.
− Les identifications des appareils sont indiquées dans les
certificats d'examen UE de type (EU-Type Examination
Certificates) dans le chapitre « 18.2 Approbations pour la
protection contre les explosions », à partir de la page 59.
− Respectez les consignes de sécurité contenues dans le
schéma 2021460 à partir de la page 59.
Utilisation en Australie / Nouvelle-Zélande :
− Respectez le certificat de conformité IECEx (IECEx Certificate of Conformity) avec la référence IECEx FME 15.0004X,
ainsi que les consignes de sécurité conformément au
schéma 2021460 à partir de la page 59.
2.3 Qualification du personnel
Ce manuel s’adresse aux groupes cibles mentionnés ci-dessous.
Toutes les personnes qui travaillent sur l'appareil doivent
disposer des connaissances et des compétences mentionnées.
Si aucune qualification n'est indiquée avec les opérations
décrites dans ce manuel : les opérations décrites s'adressent
au groupe cible « Opérateur ».
Groupe
cible
Opérateur L'opérateur connaît le fonctionnement de l'appa-
Ingénieur
d'exploitation /
responsable du
laboratoire
Électricien
qualifié
Exploitant L'exploitant de l'appareil est responsable de
Connaissances et compétences
reil et les processus de travail qui y sont associés.
Il connaît les dangers potentiels lors du travail
avec l'appareil et il est en mesure de les éviter.
L'opérateur a reçu une formation pour savoir
faire fonctionner l'appareil. Cette formation a
lieu dans le cadre de la mise en service et est
dispensée par l'ingénieur d'exploitation / le
respon sable du laboratoire ou par l'exploitant
de l'appareil.
L'ingénieur d'exploitation / le responsable du
laboratoire prend les décisions concernant l'utilisation et le paramétrage de l'appareil.
L'ingénieur d'exploitation / le responsable du
laboratoire a reçu une formation pour savoir
faire fonctionner l'appareil. Cette formation a
lieu dans le cadre de la mise en service et est
dispensée par le Sartorius Service ou par l'exploitant de l'appareil.
L’électricien qualifié peut évaluer les travaux
qui lui sont attribués et identifier les éventuels
dangers grâce à sa formation spécialisée, ses
connaissances et son expérience, ainsi que ses
connaissances des réglementations en vigueur.
faire respecter les règles de protection et de
sécurité au travail.
L'exploitant doit s'assurer que toutes les personnes qui travaillent sur l'appareil ont accès
aux informations importantes et ont reçu une
formation sur la manière d'utiliser l'appareil.
2.4 Importance de ce mode d’emploi
Le non-respect des instructions contenues dans ce mode
d’emploi peut avoir des conséquences graves, par ex. mise
en danger des personnes par des évènements électriques,
mécaniques ou chimiques.
t Avant toute intervention sur l’appareil, lisez le manuel
avec attention et dans son intégralité.
t En cas de perte du mode d'emploi, demandez-en un autre
exemplaire ou téléchargez la version la plus récente sur le
site Internet de Sartorius (www.sartorius.com).
t Toutes les personnes qui travaillent sur l'appareil doivent
avoir accès aux informations contenues dans le manuel.
2.5 État de l'appareil
Un appareil endommagé peut entraîner des dysfonctionnements ou des risques difficilement détectables.
22 Manuel d'installation EVO1Y1
Page 23
Français
t Utilisez l’appareil uniquement s’il est dans un état technique
irréprochable.
t Si l'appareil est endommagé, mettez-le immédiatement
hors tension.
t En cas de dommages, demandez immédiatement au
Sartorius Service d'y remédier.
2.6 Travaux sur l’équipement électrique de l’appareil
Seuls des techniciens du Sartorius Service sont autorisés à
effectuer des opérations et des modifications sur l'équipement
électrique de l'appareil. Seuls les membres du Sartorius Service
sont autorisés à ouvrir l’appareil.
Sceau adhésif sur les modèles approuvés pour
l’utilisation en métrologie légale
La législation exige que les balances approuvées
pour l’utilisation en métrologie légale portent un
sceau. Ce sceau est constitué d’une marque
adhésive portant l’inscription « Sartorius ». Si on
l’enlève, l’autorisation pour l’utilisation en métrologie légale n’est plus valide et la balance doit faire
l’objet d’une nouvelle vérification. Pour les balances
approuvées pour l’utilisation en métrologie légale
au sein de l’EEE, la déclaration de conformité jointe
à la balance et délivrée lors du calibrage s’applique.
Il est obligatoire de la conserver.
3 Installation
3.1 Contenu de la livraison
Article Quantité
Grand plateau de pesée : d 233 mm
Câble USB 1
Bloc d'alimentation YPS06-USB En option
Manuel d'installation x
3.2 Déballage
Procédure
t Ouvrez l'emballage et retirez toutes les pièces avec
précaution.
t Aussitôt après avoir déballé l’appareil, vérifiez s’il ne
présente aucune détérioration externe visible.
t Si vous entreposez l'appareil temporairement : conservez
l’appareil conformément aux conditions ambiantes
(conditions ambiantes, voir le chapitre «8.1 Caractéristiques générales», page 28).
t Conservez tous les éléments de l’emballage pour les
retours éventuels. Débranchez tous les câbles avant de
réexpédier l’appareil !
1
2.7 Équipement de protection individuelle
L’équipement de protection individuelle protège contre les
risques qui émanent des matières traitées.
t Si la zone de travail ou le processus dans lequel l’appareil
est intégré nécessite un équipement de protection individuelle : portez l'équipement de protection individuelle.
2.8 Consignes de sécurité concernant l’utilisation de l’appareil
− Veillez à ce que la vitre en verre de l’écran de commande ne
soit pas endommagée (par ex. par la chute d’objets, des coups
ou une forte pression). Si la vitre en verre est endommagée,
débranchez immédiatement l’appareil du secteur !
− Ne touchez pas la surface de l’écran de commande avec des
objets pointus, coupants, durs ou rugueux, mais exclusivement avec le stylet prévu à cet effet ou du bout des doigts.
Pour nettoyer l’écran, n’utilisez en aucun cas des parties de
vos vêtements (par ex. vos manches) ou des éponges, car cela
pourrait rayer la surface (par ex. à cause d’œillets ou de
boutons sur vos manches ou de sable dans les éponges).
− Évitez que la vitre en verre de l’écran de commande et le
boîtier en plastique ne soient chargés électrostatiquement.
3.3 Choisir le lieu d'installation
Choisissez un lieu d’installation adapté :
− Posez l’appareil sur une surface plane, stable et sans vibrations.
− L’accès à l’appareil doit être libre en permanence.
Lors de l’installation, choisissez un emplacement adéquat afin
de ne pas exposer la balance aux influences externes
suivantes :
− Chaleur due à un radiateur ou aux rayons du soleil
− Courants d'air directs causés par des fenêtres ou des portes
ouvertes ou encore par un climatiseur
− Vibrations pendant la pesée
− Passage de personnes
− Humidité de l'air très élevée
− Champs électromagnétiques
− Air très sec
Adapter l’appareil à l’environnement
De la condensation peut se former lorsqu’un appareil froid est
placé dans un environnement plus chaud. Dans ce cas, adaptez
l'appareil débranché du secteur à la température de la pièce
pendant environ deux heures avant de le raccorder au secteur.
Risque de dommages sur la balance !
Ne fermez jamais les bidons de peinture avec
un marteau s'ils sont encore posés sur le
plateau de pesée.
Avant de fermer les bidons de peinture,
posez-les sur une surface stable et solide.
Manuel d'installation EVO1Y1 23
Page 24
3.4 Monter la balance
AVIS
Ne branchez pas l’appareil au secteur avant d’avoir terminé le
montage.
3.4.1 Poser le plateau de pesée
t Posez le plateau de pesée sur la
balance par le dessus.
3.4.2 Raccorder la balance
t Branchez le câble USB dans le
connecteur femelle à l’arrière de
l’écran.
1
t Dévissez la vis (1) du dispositif
de verrouillage.
t Faites pivoter le dispositif de
verrouillage au-dessus du câble
USB.
t Revissez la vis du dispositif de
verrouillage.
t Insérez le câble USB dans les
fixations à l’arrière de la
balance.
3.5 Raccorder la mise à la terre
Le système antidéflagrant doit être installé conformément aux
règles techniques reconnues. Veuillez vous conformer pour cela
aux lois et directives nationales en vigueur dans votre pays.
Avant de mettre la balance en service, faites vérifier par un
électricien qualifié ou bien sous la direction et le contrôle
d’un électricien que le système est dans un état conforme.
Vérifiez si les autorités compétentes (par ex. les services de
l’Inspection du Travail) doivent être informées. Des vérifications sont également nécessaires pendant le fonctionnement
du système.
La périodicité de ces vérifications doit être fixée de telle
manière que l'apparition de défauts éventuels, avec lesquels
il faut toujours compter, puisse être détectée à temps. Ces
vérifications doivent être réalisées au minimum tous les
trois ans. Pendant le fonctionnement, veillez à respecter les
prescriptions et directives correspondantes.
À l'aide d'un câble de mise à la terre adapté d'une section
transversale d'au moins 4 mm2 (non compris dans la livraison),
raccordez le raccord d'équipotentialité de la balance avec une
basse impédance à un raccord d'équipotentialité installé dans
votre usine.
Seul un technicien formé en conséquence est autorisé à
effectuer l’installation de manière réglementaire et conformément aux règles techniques reconnues. Avant de mettre le
système en service pour la première fois, assurez-vous qu’il n’y
a aucun risque d’explosion dans cette zone.
Lors de la mise en service, s'il se produit des erreurs provoquées par des dommages dus au transport (par ex. pas
d'affichage, pas de rétroéclairage), débranchez la balance du
secteur et informez-en le Sartorius Service.
Connectez la balance à la borne
d'équipotentialité à l'aide d'un
câble d'équipotentialité d'au moins
4 mm² de section transversale.
t Raccordez la cosse du câble
d'équipotentialité à la borne de
mise à la terre de la balance.
t Raccordez le câble d'équipoten-
tialité à la borne d'équipotentialité installée dans votre usine.
3.6 Alimentation électrique
Qualification nécessaire : électricien qualifié
La balance est alimentée en courant par un PC / ordinateur
portable ou par le bloc d'alimentation YPS06-USB optionnel
(voir chapitre «6 Accessoires», page 27) qui est livré avec
différents adaptateurs secteur spécifiques à divers pays.
AVIS
− Veillez à ce que la tension indiquée sur le bloc d’alimentation
corresponde à la tension d’alimentation secteur sur votre lieu
d’installation (caractéristiques de connexion, voir le chapitre
« 8.1 Caractéristiques générales », page 21).
− Si la tension secteur ou le type de la fiche du bloc d'alimentation ne correspondent pas aux normes en vigueur dans votre
pays, contactez votre représentant Sartorius.
L’alimentation électrique à l’aide du bloc d’alimentation est
nécessaire uniquement dans les cas suivants :
− si aucun PC ou ordinateur n'est disponible,
− si, dans des cas exceptionnels, la tension de sortie du port
USB du PC ou de l’ordinateur portable n’est pas suffisante.
3.6.1 Assembler le bloc d’alimentation
AVERTISSEMENT Électrocutions mortelles et dom-
t
mages sur l’appareil en cas d’adaptateur secteur inadapté !
Utilisez uniquement l'adaptateur secteur spécifique au
pays. Ne branchez jamais l’adaptateur secteur dans la prise
de courant s’il n’est pas inséré dans le bloc d’alimentation.
24 Manuel d'installation EVO1Y1
Page 25
Français
t Utilisez l’adaptateur adapté à votre réseau électrique :
Jeu d'adaptateurs secteur YAK01
Sachet Région/Pays
a) transparent Europe/UE (sauf la Grande-Bretagne)
b) bleu États-Unis
c) jaune Grande-Bretagne
Jeu d'adaptateurs secteur YAK02
d) rouge Australie
e) turquoise Afrique du Sud
f) blanc Argentine
g) rose Brésil
Jeu d'adaptateurs secteur YAK03
h) marron clair Chine
i) noir Inde
j) vert Corée
t Enfoncez (1) et poussez (2)
l'adaptateur secteur dont vous
avez besoin pour votre alimentation électrique dans l'ouverture du bloc d'alimentation.
L'adaptateur doit s'enclencher.
Démonter / remplacer
l’adaptateur secteur
t Débloquez (1) l'adaptateur et
retirez-le (2).
Connexion à un PC / ordinateur portable
t Branchez le câble USB dans un port USB
(par ex. PC, ordinateur portable).
Connexion au bloc d’alimentation (option)
t Raccordez le câble USB au bloc
d’alimentation.
t Branchez le bloc d'alimentation
dans une prise
(tension électrique).
3.7 Système antivol
t Si nécessaire, fixez la balance à
l'aide du système antivol qui se
trouve à l'arrière.
3.8 Mettre à niveau
Mettre à niveau les modèles évalués conformes
(approuvés pour l’utilisation en métrologie légale)
La mise à niveau de la balance permet de compenser une
inclinaison ou des inégalités de la surface de travail sur
laquelle est installée la balance. Un positionnement
horizontal exact garantit des résultats de pesée précis.
La balance doit être remise à niveau et ajustée à chaque fois
qu’elle est déplacée.
t Tournez les deux pieds de
réglage comme indiqué sur
12*
9*
6*
* Heure
l’illustration jusqu’à ce que la
bulle d’air du niveau se trouve
au milieu du cercle.
− Bulle d’air à « 12 h » : tournez les
deux pieds de réglage dans le sens
horaire.
− Bulle d’air à « 3 h » : tournez le
pied de réglage gauche dans le
sens horaire et le pied de réglage
droit dans le sens anti-horaire.
− Bulle d’air à « 6 h » : tournez les
deux pieds de réglage dans le sens
anti-horaire.
− Bulle d’air à « 9 h » : tournez le
pied de réglage gauche dans le
sens anti-horaire et le pied de
réglage droit dans le sens horaire.
Manuel d'installation EVO1Y1 25
Page 26

3.9 Temps de préchauffage
0
30
Utiliser des balances approuvées en métrologie
légale :
Observer un temps de préchauffage d’au moins
24 heures après le premier raccordement au
secteur.
Après le premier raccordement au
secteur, la balance a besoin d'un
temps de préchauffage d'au moins
30 minutes afin de pouvoir fournir
des résultats précis. L’appareil
n'atteint la température de fonctionnement nécessaire qu'après ce délai.
4
Nettoyage et maintenance
4.1 Nettoyage
Avant de procéder au nettoyage du bloc d’alimentation ou de
la balance : mettez tous les appareils hors tension.
Nettoyer le panneau de commande
t Avant de nettoyer le panneau de commande : éteignez
l’appareil pour éviter d’effectuer involontairement des
saisies lorsque vous touchez le panneau.
Nettoyer le boîtier de l’appareil
t Essuyez le boîtier avec un chiffon légèrement humide.
En cas de saletés plus importantes, utilisez un savon doux.
t Ensuite, essuyez l’appareil avec un chiffon doux.
4.2 Maintenance
Il est conseillé d’effectuer la maintenance de votre balance
au moins une fois par an pour garantir en permanence des
mesures précises. À cet effet, le Sartorius Service propose
différents contrats de maintenance modulables selon vos
besoins.
Un certificat de calibrage doit toujours être délivré dans le
cadre de la maintenance. Faites vérifier régulièrement la
sécurité du bloc d’alimentation et de ses connecteurs par un
électricien qualifié (par ex. tous les deux ans).
AVERTISSEMENT Danger dû à la tension
électrique !
Débranchez le bloc d'alimentation (optionnel) du secteur.
Si un câble de données est connecté au PC, débranchez-le.
N'ouvrez jamais la balance ni le bloc d'alimentation. Ils ne
contiennent pas de pièces qui doivent être nettoyées,
réparées ou remplacées par l'utilisateur.
AVIS
Ne nettoyez pas les parties suivantes avec de l’acétone
ou des produits de nettoyage agressifs :
− Entrée de la fiche secteur
− Interface de données
− Plaques et tous les autres éléments en plastique
Procédure
t Débranchez l’appareil de l’alimentation électrique.
t AVIS Assurez-vous qu’aucun liquide ni aucune poussière
ne pénètre dans la balance ou dans le bloc d’alimentation.
t AVIS Des produits de nettoyage inadaptés risquent de
provoquer de la corrosion ou d'endommager l’appareil.
t N'utilisez pas de produits de nettoyage caustiques,
agressifs et contenant du chlore.
t N’utilisez pas de produits de nettoyage qui contiennent
des composants récurants (par ex. des produits à
récurer, laine d’acier).
t Pour nettoyer la balance, utilisez uniquement des
brosses souples et des chiffons.
t N’utilisez pas de produits de nettoyage qui contiennent
des solvants.
5 Recyclage
5.1 Instructions de décontamination
Il incombe à l’exploitant de l’appareil de faire respecter les
réglementations en vigueur relatives à la déclaration appropriée pour le transport et à l'élimination adéquate de l'appareil.
AVERTISSEMENT
Risque de blessures causées par des appareils contaminés !
Les appareils contaminés par des matières dangereuses (contaminations NBC) ne sont pas repris pour être réparés ou éliminés.
5.1.1 Remarques concernant l'élimination et le recyclage
L’appareil ainsi que les accessoires ne doivent pas être jetés dans
les ordures ménagères normales, car ils sont fabriqués à partir de
matériaux de grande qualité pouvant être recyclés et réutilisés.
Tous les éléments doivent être éliminés de manière appropriée
par des entreprises spécialisées. L’emballage se compose
entièrement de matériaux écologiques pouvant être recyclés.
5.1.2 Recyclage
Conditions requises
L'appareil a été décontaminé.
Procédure
t Éliminez l'appareil. Consultez à cet effet les consignes
d'élimination disponibles sur notre site Internet (www.
sartorius.com).
t Recyclez l'emballage conformément aux réglementations
en vigueur dans votre pays.
26 Manuel d'installation EVO1Y1
Page 27

Français
6 Accessoires
Accessoires Référence
Câble USB YCC01-0040M5
Bloc d'alimentation (5 V / 900 mA) YPS06-USB
Jeu d'adaptateurs secteur pour YPS06-USB YAK01
− États-Unis et Japon
− Europe / UE
− Grande-Bretagne
Jeu d'adaptateurs secteur pour YPS06-USB YAK02
− Australie
− Afrique du Sud
− Argentine
− Brésil
Jeu d'adaptateurs secteur pour YPS06-USB YAK03
− Inde
− Corée
− Chine
Câble d'équipotentialité, 2 m
Housse de protection pour le panneau de
commande,
boîte de 10
Housse de protection pour la colonne,
boîte de 10
Housse de protection pour le plateau de
pesée,
boîte de 10
Poids d’ajustage
− 5 kg, classe de précision F2 YCW654-AC-00
− 2 kg, classe de précision F2 YCW624-AC-00
− 1 kg, classe de précision F2 YCW614-AC-00
YCC01-X046M2
YDC03PMA10
YDC03PMA-CO10
YDC03PMA-WP10
7 Codification du
numéro de série
La date de fabrication de l’appareil est codée dans le numéro
de série. La structure est la suivante :
AMM x x x x x
A Année
3 2014-2020
4 2021-2027
5 2028-2034, etc.
La colonne de l’année A représente le numéro du groupe
d’années qui définit une période de respectivement 7 ans.
À l'intérieur de chaque groupe d'années, on augmente les
chiffres des mois (M M) en partant de 13.
Année : 2015 2016 2017 2018 2019 ...
MM : 25-36 37-48 49-60 61-72 73-84 ...
Exemple :
328xxxxx (avril 2015). « xxxxx » est un numéro continu qui,
tous les mois, recommence à 1.
Notice d'installation EVO1Y1 27
Page 28

8 Caractéristiques techniques
8.1 Caractéristiques générales
Caractéristique Unité Valeur
Identification (mode de protection
contre les explosions)
Alimentation électrique Uniquement via port USB ou bloc d’alimentation Sartorius YPS06-USB
Tension d'entrée V
Puissance absorbée W 2,0 (standard)
Autres caractéristiques IP40 selon EN 60529 / CEI 60529
Conditions ambiantes
Les caractéristiques techniques sont valables pour les conditions ambiantes suivantes :
Environnement Utilisation uniquement à l’intérieur
Température ambiante* +10 °C – +30 °C
Capacité opérationnelle °C Garantie entre +5 – +40
Stockage et transport °C -10 – +60
Humidité relative de l'air** % 15 – 80 % pour des températures jusqu'à 30 °C sans condensation,
Compatibilité électromagnétique Selon EN 61326-1 / IEC61326-1 : Appareils électriques de mesure, de
Immunité aux émissions parasites Exigences de base
Émissions parasites Classe B
DC
II 3G Ex ic nA IIB T4 Gc selon le certificat d'examen CE de type n°
FM15ATEX0008X
+4,5 à 5,0
décroissance linéaire jusqu'à 50 % d'humidité relative de l'air à 40 °C
commande et de laboratoire – Exigences relatives à la CEM – Partie 1 :
exigences générales
Convient à une utilisation dans les zones résidentielles et les zones
directement raccordées au réseau basse tension alimentant (également)
des habitations.
Les balances approuvées pour une utilisation en métrologie légale selon
l’UE répondent aux exigences de la directive européenne 2014/31/UE
avec les normes EN45501:2015 ou OIML R76:2006.
* Pour les balances approuvées pour l’utilisation en métrologie légale
selon l’UE, voir les indications apposées sur la balance.
** Pour les balances approuvées pour l’utilisation en métrologie légale
selon l’UE, la législation en vigueur s’applique.
Programmes d'application sélectionnables
Bloc d'alimentation YPS06-USB
Bloc d'alimentation USB
(5 V / 900 mA)
Primaire 100 – 240 V~, –10 % / +10 %, 50 – 60 Hz, 0,125 A
Secondaire 5 V
Autres caractéristiques Classe de protection II
28 Manuel d'installation EVO1Y1
Recalcul, calcul avec un facteur, formulation
Type FW7712 (désignation du fabricant)
, ± 5 %, 900 mA (max.)
DC
IP40 selon EN 60529 / CEI 60529
Page 29

Français
8.2 Caractéristiques techniques spécifiques aux différents modèles
Caractéristique Unité Valeur
PMA.Evolution
EVO1Y1
Étendue de pesée g 7500 / 999,95
Précision de lecture g 0,1 / 0,05
Étendue de tarage (soustractive) g –7500
Valeur du poids d'ajustage externe /
classe de précision
Dimensions du plateau de pesée
Poids net kg 2,4
8.3 Modèles approuvés pour l’utilisation en métrologie légale avec approbation CE de type : caractéristiques techniques spécifiques aux différents modèles
kg 1, 2, 5 /
F2 ou mieux
d mm
233
Caractéristique Unité Valeur
Modèle
Classe de précision
Type PMA-EV
Étendue de pesée Max g 7500
Échelon réel d g 0,1
Échelon de vérification e g 1
Plage de température +10°C – +30°C
Étendue de compensation de tare
(soustractive)
PMA.Evolution EVO1Y
�
< 100 % de l’étendue de pesée maximale
9 Déclaration de conformité UE
Par la déclaration de conformité ci-jointe, la société Sartorius atteste que l'appareil est conforme aux directives mentionnées.
La déclaration de conformité établie lors de l'évaluation de la conformité (vérification) est valide pour les balances approuvées
pour l’utilisation en métrologie légale dans l’Espace Économique Européen. Il est obligatoire de la conserver.
Notice d'installation EVO1Y1 29
Page 30
Indice
1.2.1 Avvertimenti
1 Riguardo questo manuale.................................30
1.1 Validità ................................................30
1.2 Spiegazione dei simboli ...............................30
2 Sicurezza
2.1 Uso previsto ...........................................30
2.2 Protezione contro le esplosioni .......................31
2.3 Qualificazione del personale ..........................31
2.4 Importanza del manuale ..............................31
2.5 Stato ineccepibile dell'apparecchio ...................31
2.6 Interventi sulla dotazione elettrica dell'apparecchio..32
2.7 Attrezzature di protezione individuale................32
2.8 Istruzioni di sicurezza per l'utilizzo dell'apparecchio..32
3 Installazione
3.1 Equipaggiamento fornito .............................32
3.2 Disimballare ...........................................32
3.3 Scegliere il luogo di installazione .....................32
3.4 Montare la bilancia....................................33
3.5 Collegare la messa a terra.............................33
3.6 Alimentazione elettrica ...............................33
3.7 Dispositivo antifurto ..................................34
3.8 Livellare................................................34
3.9 Tempo di preriscaldamento ...........................35
4 Pulizia e manutenzione
4.1 Pulizia..................................................35
4.2 Manutenzione .........................................35
5 Smaltimento
5.1 Indicazioni per la decontaminazione .................35
6 Accessori
7 Codifica del numero di serie
8 Dati tecnici
8.1 Dati generali...........................................37
8.2 Dati specifici del modello .............................38
8.3 Modelli omologati con approvazione CE del tipo:
9 Dichiarazione di conformità UE
....................................................30
................................................32
....................................35
...............................................35
....................................................36
..............................36
.................................................37
dati tecnici specifici del modello......................38
..........................38
1 Riguardo questo manuale
1.1 Validità
Il presente manuale concerne i seguenti modelli di bilance per
la miscelazione di vernici:
− EVO1Y
AVVERTENZA
Questo simbolo segnala un pericolo che potrebbe causare
lesioni gravi o mortali se non fosse evitato.
ATTENZIONE
Questo simbolo segnala un pericolo che potrebbe causare
lesioni di media o lieve entità se non fosse evitato.
AVVISO
L'avviso segnala un pericolo che potrebbe causare danni
materiali se non fosse evitato.
1.2.2 Ulteriori simboli utilizzati
t
y
−
Schermate del display di comando
Le illustrazioni in questo manuale si basano sulle bilance
“standard”. Per le bilance omologate CE-M alcune schermate
e rapporti possono differire leggermente dalle illustrazioni. Se
queste differenze sono importanti ai fini del funzionamento,
verranno spiegate nel testo.
Istruzione operativa: descrive delle attività che
devono essere eseguite.
Risultato: descrive il risultato delle attività eseguite.
Questo segno precede delle elencazioni.
Questo simbolo informa sull'uso metrico-legale
delle bilance per le quali è stata eseguita la valutazione della conformità (bilance omologate CE-M).
In tutto il testo con il termine 'omologato CE-M'
s'intende il termine tecnico 'valutato conforme'.
2 Sicurezza
2.1 Uso previsto
Questa bilancia è destinata esclusivamente alla miscelazione
di colori e vernici. La bilancia viene utilizzata nell'area a
rischio di esplosione della zona 2. Per la pesatura dei materiali
devono essere usati contenitori idonei.
La bilancia può essere comandata tramite il display nel
funzionamento stand alone oppure tramite software applicativo (per es. un'applicazione di miscelazione vernici del
produttore della vernice) installato su PC. Nel secondo caso
la bilancia viene collegata mediante un cavo USB al PC/
computer portatile che è installato al di fuori dell'area a
rischio di esplosione. Si devono osservare le indicazioni
riguardanti la protezione contro le esplosioni contenute nel
capitolo “2.2 Protezione contro le esplosioni”, pagina 31.
1.2 Spiegazione dei simboli
Il termine 'apparecchio' usato nel presente manuale indica
sempre la combinazione bilancia, alimentatore e convertitore
Ex Link.
30 Manuale d'installazione EVO1Y1
Il manuale fa parte dell’apparecchio. L'apparecchio è destinato
ad essere usato solo in conformità a quanto descritto nel
presente manuale.
Page 31

Italiano
Qualsiasi altro uso è da considerarsi non conforme alla
destinazione. Se l'apparecchio non viene usato per la destinazione prevista: si può compromettere il funzionamento dei
dispositivi di protezione dell'apparecchio. Ciò può causare
danni a persone e a cose.
In caso di utilizzo in impianti o condizioni ambientali che
richiedono maggiori standard di sicurezza, rispettare le
disposizioni in materia vigenti nel proprio Paese.
Condizioni di utilizzo per l'apparecchio
Utilizzare l'apparecchio solo all’interno di edifici.
Utilizzare l'apparecchio solo con le dotazioni e nel rispetto
delle condizioni d'esercizio che sono descritte nei dati tecnici.
Non trasformare l'apparecchio o non apportarvi modifiche
tecniche.
Non esporre l'apparecchio nonché gli accessori forniti da
Sartorius, a temperature estreme, vapori chimici aggressivi,
umidità, urti, vibrazioni o forti campi elettromagnetici. Rispettare le condizioni d'impiego in conformità con i dati tecnici!
I cavi di collegamento tra gli apparecchi, nonché le guaine dei
cavetti dei cablaggi interni sono in PVC. I prodotti chimici che
corrodono questi materiali devono essere tenuti a debita
distanza da questi cavi.
2.2 Protezione contro le esplosioni
Utilizzo nell'ambito di applicazione della direttiva ATEX
europea:
− In conformità alla direttiva 2014/34/UE, il modello EVO1Y1
è un apparecchio della categoria 3, adatto ad essere
utilizzato in aree a rischio di esplosione della zona 2.
− Le marcature degli apparecchi sono riportate nei certificati
di esame UE del tipo (EU Type Examination Certificates) nel
capitolo “18.2 Approvazioni relative alla protezione contro
le esplosioni”, a pagina 59.
− Si devono osservare le istruzioni di sicurezza contenute nel
disegno 2021460 a partire da pagina 59.
Utilizzo in Australia / Nuova Zelanda:
− Si devono osservare il certificato di conformità IECEx FME
15.0004X (IECEx Certificate of Conformity) nonché le
istruzioni di sicurezza contenute nel disegno 2021460 a
partire da pagina 59.
2.3 Qualificazione del personale
Questo manuale si rivolge ai destinatari elencati qui di
seguito. Tutte le persone che lavorano con l'apparecchio
devono possedere le conoscenze e competenze menzionate.
Se tra le attività descritte in questo manuale non è indicata la
qualificazione: le attività descritte sono rivolte agli operatori.
La qualificazione richiesta sarà indicata nella descrizione
dell'attività qualora delle singole attività debbano essere
eseguite da altri destinatari oppure dal Sartorius Service.
Destinatari Conoscenze e competenze
Operatore L'operatore conosce il modo di funzionamento
dell'apparecchio e le procedure di lavoro correlate. Conosce i pericoli che possono insorgere
lavorando con l'apparecchio ed è in grado di
prevenirli.
L'operatore è stato istruito sul funzionamento
dell'apparecchio. L'addestramento viene eseguito nell'ambito della messa in funzione e
viene impartito dall'ingegnere aziendale /
direttore di laboratorio oppure dal gestore
dell'apparecchio.
Ingegnere
aziendale /
direttore di
laboratorio
Elettricista
specializzato
Gestore Il gestore dell'apparecchio è responsabile del
L'ingegnere aziendale / direttore di laboratorio
decide sull'utilizzo e sulla parametrizzazione
dell'apparecchio.
L'ingegnere aziendale / direttore di laboratorio
è stato istruito sul funzionamento dell'apparecchio. L'addestramento viene eseguito nell'ambito della messa in funzione e viene impartito
dal Sartorius Service oppure dal gestore.
L'elettricista specializzato, in virtù della sua
formazione tecnica, know how ed esperienza,
nonché della conoscenza delle regolamentazioni in materia, è in grado di valutare i lavori
che gli sono affidati e di riconoscere i potenziali pericoli.
rispetto delle norme di sicurezza e di prevenzione e protezione sui luoghi di lavoro.
Il gestore deve garantire che tutte le persone
che lavorano con l'apparecchio abbiano
accesso alle informazioni rilevanti e siano istruite su come lavorare con l'apparecchio.
2.4 Importanza del manuale
Il mancato rispetto delle istruzioni contenute in questo
manuale può avere conseguenze gravi, per es. pericolo per
le persone dovuto a influssi elettrici, meccanici o chimici.
t Leggere attentamente e completamente il presente
manuale prima di lavorare con l'apparecchio.
t In caso di perdita del manuale, richiederne una copia
oppure scaricare il manuale aggiornato dal nostro sito
web: www.sartorius.com
t Le informazioni contenute nel manuale devono essere
messe a disposizione a tutte le persone che lavorano con
l'apparecchio.
2.5 Stato ineccepibile dell'apparecchio
Un apparecchio danneggiato può provocare malfunzionamenti o causare dei pericoli difficilmente riconoscibili.
Manuale d'installazione EVO1Y1 31
Page 32

t Usare l'apparecchio solo se è in condizioni tecniche
perfette e sicure.
t Se l'apparecchio è danneggiato, scollegarlo immediata-
mente dalla rete elettrica.
t Se ci sono dei danni, essi devono essere eliminati immedia-
tamente da parte del Sartorius Service.
2.6 Interventi sulla dotazione elettrica dell'apparecchio
Qualsiasi intervento e modifica sulla dotazione elettrica
dell'apparecchio devono essere eseguiti solo da parte del
Sartorius Service. L'apparecchio può essere aperto solo dal
Sartorius Service.
Apposizione del sigillo sulle versioni omologate
CE-M
Per legge, sulla bilancia omologata CE-M deve
essere apposta una sigillatura. Questa sigillatura
consiste in un marchio adesivo portante il logo
“Sartorius”. Se il marchio adesivo viene tolto,
decade la validità della verifica metrica e la bilancia
deve essere omologata nuovamente. Per le bilance
omologate CE-M destinate all'utilizzo all'interno
dello Spazio economico europeo (SEE) vale la
dichiarazione di conformità compilata al momento
della verifica e allegata alla bilancia. Si prega di
conservare scrupolosamente tale dichiarazione.
3 Installazione
3.1 Equipaggiamento fornito
Articolo Quantità
Piatto di pesata grande: d 233 mm
Cavo USB 1
Alimentatore YPS06-USB opzionale
Manuale di installazione x
3.2 Disimballare
Procedura
t Aprire l'imballaggio e togliere con cautela tutte le parti.
t Subito dopo aver disimballato l'apparecchio, controllare
che non sia danneggiato esternamente.
t Se l'apparecchio viene stoccato temporaneamente:
stoccare l'apparecchio rispettando le condizioni ambientali
(condizioni ambientali vedi capitolo “8.1 Dati generali”,
pagina 37).
t Conservare tutte le parti dell'imballaggio per un eventuale
trasporto di ritorno. In caso di spedizione scollegare tutti i
cavi!
1
2.7 Attrezzature di protezione individuale
Le attrezzature di protezione individuale servono a proteggere
contro i pericoli causati dai materiali trattati.
t Indossare le attrezzature di protezione individuale qualora
l'ambiente di lavoro o il processo in cui viene impiegato
l'apparecchio lo richiedano. Indossare le attrezzature di
protezione individuale.
2.8 Istruzioni di sicurezza per l'utilizzo dell'apparecchio
− Non danneggiare il pannello in vetro del display di comando
(per es. a causa di oggetti che cadono, colpi o forte pressione). Se il pannello in vetro viene danneggiato, staccare
immediatamente l'apparecchio dalla rete elettrica!
− Non toccare la superficie del display di comando con oggetti
acuminati, affilati, duri o ruvidi, bensì esclusivamente con un
pennino apposito o con le punte delle dita. Per la pulizia non
usare in nessun caso parti dell'abbigliamento (per es. la manica
della giacca) o spugne, poiché queste potrebbero graffiare la
superficie (per es. per la presenza di rivetti o bottoni nella
manica della giacca oppure di sabbia nelle spugne).
− Evitare il caricamento elettrostatico del pannello in vetro del
display di comando e dell'alloggiamento in plastica.
3.3 Scegliere il luogo di installazione
Scegliere un luogo di installazione adatto:
− Mettere l'apparecchio su una superficie piana, stabile e
insensibile alle vibrazioni.
− L'accesso all'apparecchio deve essere possibile in ogni
momento.
Per l'installazione evitare luoghi con condizioni ambientali
sfavorevoli:
− Calore forte (riscaldamento, irraggiamento solare)
− Correnti d'aria dirette provenienti da finestre e porte aperte
ed impianti di climatizzazione
− Forti vibrazioni durante le operazioni di pesatura
− Aree di forte passaggio di persone
− Umidità dell'aria molto elevata
− Campi elettromagnetici
− Aria molto secca
Acclimatare
Quando un apparecchio freddo viene portato in un ambiente
caldo, l'umidità dell'aria può condensarsi sulle superfici
dell'apparecchio. Pertanto acclimatare l'apparecchio per circa
2 ore, staccato dalla rete elettrica, prima di collegarlo nuovamente alla tensione di alimentazione.
Rischio di danneggiamento della bilancia!
Non chiudere mai il contenitore di vernice
con un martello finché è ancora sul piatto di
pesata.
Per chiudere il contenitore di vernice metterlo su un piano solido e stabile.
32 Manuale d'installazione EVO1Y1
Page 33

Italiano
3.4 Montare la bilancia
AVVISO
L'apparecchio deve essere scollegato dall'alimentazione
elettrica durante tutti i lavori di montaggio.
3.4.1 Posizionare il piatto della bilancia
t Collocare dall'alto il piatto di
pesata sulla bilancia.
3.4.2 Collegare la bilancia
t Inserire il cavo di collegamento
USB nella presa che si trova sul
retro del display.
1
t Allentare la vite (1) del disposi-
tivo di blocco.
t Girare il dispositivo di blocco
sopra il cavo USB.
t Serrare la vite del dispositivo di
blocco.
t Posizionare il cavo di collega-
mento USB lungo il retro della
bilancia inserendolo nei fissacavi.
3.5 Collegare la messa a terra
I controlli devono essere eseguiti almeno ogni tre anni.
Durante il funzionamento devono essere soddisfatte le
disposizioni e direttive in materia.
Collegare il conduttore equipotenziale presente sulla bilancia
ad un conduttore equipotenziale predisposto dal cliente
usando un cavo di messa a terra appropriato a bassa impedenza, avente una sezione di almeno 4 mm2 (non in dotazione).
L'installazione deve essere eseguita a norma e secondo le
regole della tecnica da personale tecnico specializzato.
Mettere in funzione l'impianto per la prima volta solo dopo
aver verificato che l'area non sia a rischio di esplosione.
Se durante questa messa in funzione apparissero delle
disfunzioni dovute a danneggiamento durante il trasporto
(per es. nessuna indicazione sul display o mancanza di
retroilluminazione), staccare la bilancia dalla rete elettrica
e informare il Sartorius Service.
Collegare la bilancia al conduttore
equipotenziale usando un cavo
apposito avente una sezione di
almeno 4 mm².
t Collegare il capocorda del cavo
equipotenziale al morsetto di
terra della bilancia.
t Collegare il cavo equipotenziale
al conduttore equipotenziale
predisposto dal cliente.
3.6 Alimentazione elettrica
Qualificazione richiesta: elettricista specializzato
La bilancia viene alimentata mediante un PC / computer
portatile oppure mediante l’alimentatore YPS06-USB opzionale (vedi capitolo “6 Accessori”, pagina 36), il quale viene
fornito insieme a diversi adattatori per prese elettriche
specifiche del paese.
AVVISO
− Il valore di tensione riportato sull'alimentatore deve coincidere
con la tensione della rete locale (dati di collegamento vedi
capitolo “8.1 Dati generali” pagina 21).
− Se la tensione di rete o la forma della spina dell'alimentatore
non corrispondono alla norma del paese di utilizzo, contattare
la più vicina rappresentanza Sartorius.
L'impianto dotato di protezione antideflagrante deve essere
installato secondo le regole riconosciute della tecnica.
Attenersi inoltre alle leggi/disposizioni nazionali vigenti.
Prima di mettere in funzione la bilancia, un elettricista
specializzato deve controllare che la bilancia sia in uno stato
di funzionamento regolare, oppure il controllo deve essere
eseguito sotto la direzione e la sorveglianza di un elettricista
specializzato.
Verificare se le autorità preposte (per es. l'ispettorato del
lavoro) debbano essere informate. L'impianto deve essere
sottoposto a controlli anche durante il funzionamento.
La periodicità dei controlli deve essere fissata in modo da
riconoscere tempestivamente i guasti che possono verificarsi.
È necessario usare l'alimentatore solo se:
− non è disponibile un PC o computer portatile,
− in casi eccezionali la tensione di uscita dell'interfaccia USB
del PC o computer portatile non è sufficiente.
3.6.1 Montare l'alimentatore
AVVERTENZA L’uso di adattatori non adatti può
t
causare scosse elettriche letali e danni all’apparecchio!
Utilizzare esclusivamente l'adattatore per presa elettrica
specifico del paese. Non inserire mai l'adattatore nella
presa elettrica se è separato dall'alimentatore.
Manuale d'installazione EVO1Y1 33
Page 34

t Usare l'adattatore adatto all'alimentazione elettrica locale:
Set di adattatori YAK01
Busta Regione/Paese
a) trasparente Europa/UE (tranne Gran Bretagna)
b) blu USA
c) gialla Gran Bretagna
Collegamento al PC / computer portatile
t Inserire il cavo di collegamento USB in una presa USB
(per es. del computer, computer portatile).
Collegamento all'alimentatore (opzionale)
t Inserire il cavo di collegamento
USB nell'alimentatore.
t Inserire l'alimentatore in una
presa elettrica (tensione di rete).
3.7 Dispositivo antifurto
t Se necessario, è possibile
installare un dispositivo antifurto sul retro della bilancia.
Set di adattatori YAK02
d) rossa Australia
e) turchese Sudafrica
f) bianca Argentina
g) rosa Brasile
Set di adattatori YAK03
h) marrone chiaro Cina
i) nera India
j) verde Corea
t Premere (1) e spingere (2)
l'adattatore richiesto per
l'alimentazione elettrica locale
nell'apertura dell'alimentatore.
Inserirlo in modo che scatti in
posizione.
Rimuovere / sostituire
l'adattatore
t Sbloccare (1) l'adattatore e poi
toglierlo (2).
3.8 Livellare
Livellamento per i modelli valutati conformi
(omologati CE-M)
L'operazione di livellamento della bilancia permette di
compensare le inclinazioni del piano su cui è installata.
Un'esatta posizione orizzontale della bilancia garantisce la
precisione dei risultati di pesata.
La bilancia deve essere livellata di nuovo ogni volta che si
cambia il luogo di installazione e poi deve essere eventualmente regolata.
t Girare i due piedini come
mostrato in figura fino a
12*
9*
6*
* ore
quando la bolla d'aria si trova
nel centro della livella.
− Bolla d'aria sulle «ore 12»: girare i
due piedini in senso orario.
− Bolla d'aria sulle «ore 3»: girare il
piedino sinistro in senso orario e il
piedino destro in senso antiorario.
− Bolla d'aria sulle «ore 6»: girare i
due piedini in senso antiorario.
− Bolla d'aria sulle «ore 9»: girare il
piedino sinistro in senso antiorario e il piedino destro in senso
orario.
34 Manuale d'installazione EVO1Y1
Page 35

0
30
Italiano
3.9 Tempo di preriscaldamento
Impiego di bilance omologate CE-M per
uso metrico-legale:
Osservare un tempo di preriscaldamento di
almeno 24 ore dopo il primo collegamento alla
rete elettrica.
Per fornire risultati precisi la
bilancia richiede un tempo di
preriscaldamento di almeno 30
minuti dopo il primo collegamento
all'alimentazione elettrica. Solo
dopo questo tempo l'apparecchio
ha raggiunto la temperatura
d'esercizio necessaria.
4 Pulizia e manutenzione
4.1 Pulizia
Prima di pulire l'alimentatore o la bilancia: scollegare tutti gli
apparecchi dalla rete elettrica.
Pulire l'alloggiamento della bilancia
t Pulire l'alloggiamento con un panno leggermente umido.
Usare un detergente delicato in presenza di sporco più
ostinato.
t Infine passare l'apparecchio con un panno morbido.
4.2 Manutenzione
Per garantire una sicurezza metrologica costante della bilancia,
consigliamo di eseguire la manutenzione regolarmente, almeno
una volta all'anno. A tale scopo, il Sartorius Service offre
diversi contratti di manutenzione che personalizziamo in base
alle vostre esigenze.
Nell'ambito di un intervento di manutenzione dovrebbe essere
sempre rilasciato un certificato di calibrazione. L'ispezione di
sicurezza dell'alimentatore e dei suoi attacchi deve essere
eseguita ad intervalli appropriati da parte di un elettricista
qualificato (per es. ogni 2 anni).
5 Smaltimento
5.1 Indicazioni per la decontaminazione
AVVERTENZA Pericolo dovuto alla tensione
elettrica!
Scollegare l'alimentatore (opzionale) dalla rete elettrica.
Staccare il cavo dati nel caso in cui sia collegato al PC. Mai
aprire la bilancia o l'alimentatore. Questi apparecchi non
contengono delle parti che possono essere pulite, riparate o
sostituite dall’operatore.
AVVISO
Le seguenti parti non devono essere pulite con acetone o
detergenti aggressivi:
− Presa di rete
− Interfaccia dati
− Etichette e tutte le altre parti in materiale plastico
Procedura
t Scollegare l'apparecchio dall'alimentazione elettrica.
t AVVISO Fare attenzione che non penetri del liquido o
della polvere nella bilancia o nell'alimentatore.
t AVVISO Rischio di corrosione o danneggiamento dell'ap-
parecchio dovuto a prodotti detergenti non appropriati!
t Non usare detergenti corrosivi, aggressivi o contenenti
cloruro.
t Non usare detergenti che contengono componenti
abrasivi, per es. crema abrasiva, lana d'acciaio.
t Usare per la pulizia solo spazzole morbide e panni.
t Non usare detergenti contenenti solventi.
Pulire il pannello dei comandi
t Prima di pulire il pannello dei comandi: spegnere l'appa-
recchio prima di iniziare la pulizia del pannello dei
comandi, poiché toccandolo si potrebbero eseguire degli
inserimenti accidentali.
Per il trasporto e lo smaltimento il gestore è responsabile del
rispetto delle normative nazionali concernenti la dichiarazione
pertinente e lo smaltimento a norma dell'apparecchio.
AVVERTENZA
Pericolo di lesioni dovuto ad apparecchi contaminati!
Gli apparecchi contaminati con sostanze pericolose (contaminazione NBC) non saranno ritirati per lavori di riparazione e
per lo smaltimento.
5.1.1 Indicazioni per lo smaltimento
L'apparecchio e gli accessori non devono essere smaltiti con
i rifiuti domestici, poiché sono costituiti da materiali di alta
qualità che possono essere riciclati e riutilizzati. Tutti i
componenti devono essere smaltiti in modo appropriato dai
centri di smaltimento rifiuti. L'imballaggio è composto di
materiali non inquinanti, riciclabili come materie prime
secondarie.
5.1.2 Smaltire
Presupposti
L'apparecchio è decontaminato.
Procedura
t Smaltire l'apparecchio. Consultare a riguardo le indicazioni
per lo smaltimento disponibili nel nostro sito Internet
(www.sartorius.com).
t Smaltire l'imballaggio secondo le normative nazionali
vigenti.
Manuale d'installazione EVO1Y1 35
Page 36
6 Accessori
7 Codifica del numero di
Accessori Codice d'ordine
Cavo di collegamento USB YCC01-0040M5
Alimentatore (5 V / 900 mA) YPS06-USB
Set di adattatori per prese elettriche per
YPS06-USB
− USA e Giappone
− Europa / UE
− Gran Bretagna
Set di adattatori per prese elettriche per
YPS06-USB
− Australia
− Sudafrica
− Argentina
− Brasile
Set di adattatori per prese elettriche per
YPS06-USB
− India
− Corea
− Cina
Cavo equipotenziale, 2 m
Copertina di protezione per il pannello dei
comandi, confezione da 10
Copertina di protezione per la colonnina,
confezione da 10
Copertina di protezione per il piatto di
pesata, confezione da 10
Peso di regolazione
− 5 kg, classe di precisione F2 YCW654-AC-00
− 2 kg, classe di precisione F2 YCW624-AC-00
− 1 kg, classe di precisione F2 YCW614-AC-00
YAK01
YAK02
YAK03
YCC01-X046M2
YDC03PMA10
YDC03PMA-CO10
YDC03PMA-WP10
serie
La data di fabbricazione dell'apparecchio è codificata nel
numero di serie. La struttura è la seguente:
AMM x x x x x
A Anno
3 2014-2020
4 2021-2027
5 2028-2034 ecc.
La colonna dell'anno (A) indica il numero del gruppo di anni
che definisce di volta in volta un periodo di 7 anni. Le due cifre
successive (M M) rappresentano i mesi che vengono contati
partendo da 13 all'interno di ogni gruppo di anni.
36 Manuale d'installazione EVO1Y1
Anno: 2015 2016 2017 2018 2019 ...
MM: 25-36 37-48 49-60 61-72 73-84 ...
Esempio:
388xxxxx (aprile 2015). “xxxxx” è un numero progressivo che
riparte da uno ogni mese.
Page 37

Italiano
8 Dati tecnici
8.1 Dati generali
Indicazione Unità Valore
Marcatura
(tipo di protezione antideflagrante)
Tensione di alimentazione Solo tramite la presa USB o l'alimentatore Sartorius YPS06-USB
Tensione in ingresso V
Potenza assorbita W 2,0 (mediamente)
Ulteriori dati IP40 conforme a EN 60529/IEC 60529
Condizioni ambientali
I dati tecnici sono validi per le seguenti condizioni ambientali:
Ambiente Utilizzo solo in ambienti interni
Temperatura ambiente* +10 °C – +30 °C
Capacità operativa °C Garantita tra +5 e +40
Stoccaggio e trasporto °C –10 – +60
Umidità relativa dell'aria** % 15 – 80 per temperature fino a 30°C, non condensante, con riduzione
Compatibilità elettromagnetica Conforme alla norma EN 61326-1/IEC61326-1 Apparecchi elettrici di
Immunità ai disturbi Requisiti essenziali
Emissione di disturbi Classe B
DC
II 3G Ex ic nA IIB T4 Gc secondo il certificato di esame CE del tipo n°
FM15ATEX0008X
+4,5 – 5,0
lineare fino al 50% di umidità relativa a 40°C
misura, controllo e laboratorio - Prescrizioni di compatibilità elettromagnetica – Parte 1: Prescrizioni generali
Idoneità all'utilizzo in ambienti residenziali e in ambienti collegati
direttamente a una rete a bassa tensione che alimenta (anche) edifici
d'abitazione.
Le bilance omologate CE-M in conformità ai requisiti UE soddisfano le
prescrizioni della Direttiva CE 2014/31/UE con EN45501:2015 e OIML
R76:2006.
* Per le bilance omologate CE-M in conformità ai requisiti UE si vedano
le indicazioni riportate sulla bilancia.
** Per le bilance omologate CE-M in conformità ai requisiti UE si
applicano le disposizioni vigenti.
Programmi applicativi selezionabili Ricalcolo, calcolo con fattore, formulazione
Alimentatore YPS06-USB
Alimentatore USB (5 V / 900 mA) Tipo FW7712 (denominazione del costruttore)
Primario 100 – 240 V~, –10 % / +10 %, 50 – 60 Hz, 0,125 A
Secondario 5 V
Ulteriori dati Classe di protezione II
, ± 5 %, 900 mA (max.)
DC
IP40 conforme a EN 60529/IEC 60529
Manuale d'installazione EVO1Y1 37
Page 38

8.2 Dati specifici del modello
Specifica Unità Valore
PMA.Evolution
EVO1Y1
Campo di pesata g 7500 / 999,95
Precisione di lettura g 0,1 / 0,05
Campo di tara (sottrattiva) g –7500
Peso di regolazione esterno /
classe di precisione
Dimensioni del piatto di pesata
Peso netto kg 2,4
kg 1, 2, 5 /
F2 o superiore
d mm
233
8.3 Modelli omologati con approvazione CE del tipo: dati tecnici specifici del modello
Specifica Unità Valore
Modello
Classe di precisione
Tipo PMA-EV
Campo di pesata Max g 7500
Divisione di lettura d g 0,1
Divisione di verifica e g 1
Campo di temperatura +10°C – +30°C
Campo di compensazione della tara
(sottrattiva)
PMA.Evolution EVO1Y
�
< 100% della portata max.
9 Dichiarazione di conformità UE
Con la dichiarazione di conformità allegata si attesta che l'apparecchio è conforme alle direttive menzionate.
Per le bilance omologate CE-M destinate all'utilizzo all'interno dello Spazio economico europeo (SEE) vale la dichiarazione di
conformità redatta durante la valutazione della conformità (verifica). Si prega di conservare tale dichiarazione.
38 Manuale d'installazione EVO1Y1
Page 39
Español
Índice
1 Acerca de este documento................................39
1.1 Validez .................................................39
1.2 Símbolos...............................................39
2 Seguridad
2.1 Uso previsto ...........................................39
2.2 Protección contra explosiones ........................40
2.3 Cualificación del personal.............................40
2.4 Importancia de estas instrucciones de uso............40
2.5 Perfecto estado del aparato...........................40
2.6 Trabajos en el equipo eléctrico del aparato...........41
2.7 Equipo de protección individual ......................41
2.8 Indicaciones de seguridad para el manejo del
3 Instalación
3.1 Volumen de suministro................................41
3.2 Desembalaje ...........................................41
3.3 Elección del lugar de colocación ......................41
3.4 Montaje de la balanza.................................42
3.5 Puesta a tierra.........................................42
3.6 Suministro de corriente ...............................42
3.7 Protección antirrobo ..................................43
3.8 Nivelación .............................................43
3.9 Tiempo de calentamiento previo......................44
4 Limpieza y mantenimiento
4.1 Limpieza ...............................................44
4.2 Mantenimiento........................................44
5 Eliminación
5.1 Indicaciones para la descontaminación...............44
6 Accesorios
7 Codificación del número de serie
8 Datos técnicos
8.1 Datos generales........................................46
8.2 Datos específicos de modelos .........................47
8.3 Modelos verificados con certificado de aprobación
9 Declaración de conformidad UE
...................................................39
aparato ................................................41
..................................................41
................................44
.................................................44
..................................................45
........................45
..............................................46
CE de tipo: datos técnicos específicos de cada
modelo.................................................47
..........................47
1.2.1 Advertencias
ADVERTENCIA
Identifica un riesgo que podría tener como consecuencia la
muerte o graves lesiones corporales si no se evita.
ATENCIÓN
Identifica un riesgo que podría tener como consecuencia
lesiones corporales de gravedad media o leve si no se evita.
AVISO
Identifica un posible riesgo que podría tener como
consecuencia daños materiales si no se evita.
1.2.2 Otros medios de representación
t
y
−
Ilustraciones de la pantalla de usuario
Las figuras en este manual se basan en balanzas “estándar”. En
las balanzas calibradas puede haber pequeñas diferencias en
la forma en que se muestran los avisos y en los protocolos de
las figuras. En los casos importantes para el funcionamiento,
se explicarán las diferencias en el texto.
Instrucción de actuación: describe tareas que
deben realizarse en el orden indicado.
Resultado: describe el resultado de las tareas
realizadas.
Los textos que aparecen detrás de estas marcas son
enumeraciones.
Este símbolo hace referencia a la metrología legal
para balanzas de conformidad evaluada (verificadas).
Más adelante aparece el término “verificado” para
la expresión técnica de la evaluación de la conformidad.
2 Seguridad
2.1 Uso previsto
1 Acerca de este documento
1.1 Validez
Estas instrucciones corresponden a las balanzas para la mezcla
de pinturas de los modelos:
− EVO1Y
1.2 Símbolos
El término “aparato” utilizado en estas instrucciones identifica
siempre a la combinación de balanza, fuente de alimentación
y convertidor Ex-Link.
Esta balanza solo es adecuada para la mezcla de pinturas y
lacas. La balanza se emplea en entornos con riesgo de explosión de la Zona 2. Para contener los materiales se deben usar
envases apropiados.
La balanza puede controlarse tanto de forma independiente
con ayuda de una pantalla como con un software de aplicación instalado en un PC (p. ej. una aplicación de mezcla de
pinturas del fabricante de pinturas). Para ello, la balanza se
conectará mediante un cable USB a un ordenador de escritorio/portátil situado fuera de la zona con riesgo de explosión.
Deberán observarse las indicaciones sobre la protección contra
explosiones en el capítulo “2.2 Protección contra explosiones”,
página 40.
Instrucciones de instalación de EVO1Y1 39
Page 40

Estas instrucciones forman parte del aparato. El aparato es
adecuado únicamente para el uso conforme a este manual.
Cualquier uso distinto se considera inadecuado. Si el aparato
no se va a utilizar conforme a las instrucciones, los dispositivos de protección del aparato pueden verse afectados. Esto
puede provocar daños personales o materiales.
En caso de uso en instalaciones y condiciones ambientales con
exigencias de seguridad elevadas, tenga en cuenta las disposiciones y normas de su país.
Condiciones de uso para el aparato
Utilice el aparato únicamente en edificios.
Utilice el aparato únicamente con el equipamiento y en las
condiciones de funcionamiento que se describen en los datos
técnicos. No desmonte el aparato ni lo someta a modificaciones técnicas.
El aparato, así como los accesorios suministrados por Sartorius, no deben someterse a temperaturas extremas, vapores
químicos agresivos, humedad, golpes, vibraciones ni campos
electromagnéticos fuertes. Respete las condiciones de uso
especificadas en los datos técnicos.
Tanto los cables de conexión de aparatos como los recubrimientos de los hilos interiores del cable están fabricados en
PVC. Mantenga alejado de estos conductores cualquier
producto químico agresivo para este material.
2.2 Protección contra explosiones
Uso en el ámbito de la aplicación de la directiva ATEX:
− El modelo EVO1Y1 es, según la directiva 2014/34/EU,
un aparato de la categoría 3, adecuado para áreas potencialmente explosivas de la zona 2.
− Las identificaciones de los dispositivos se deben extraer
de los EU-Type Examination Certificates (certificados de
examen de tipo de la UE) en el capítulo “18.2 Homologaciones de la protección contra explosiones”, a partir de la
página 59.
− Observe las notas de seguridad según el dibujo adjunto
2021460 a partir de la página 59.
Uso en Australia o Nueva Zelanda:
− Deberá observarse el Certificado de Conformidad IECEx
FME 15.0004X, así como las notas de seguridad según el
dibujo 2021460 a partir de la página 59.
2.3 Cualificación del personal
Estas instrucciones están dirigidas a los grupos de destinatarios mencionados más abajo. Todas las personas que utilicen el
aparato deberán contar con los conocimientos y responsabilidades mencionados.
Si en las tareas descritas en estas instrucciones no se indica
ninguna cualificación, significa que las tareas descritas están
orientadas al grupo de destinatarios “Usuario”.
Si otros grupos de destinatarios o Sartorius Service deben
llevar a cabo tareas concretas, en la descripción de las mismas
se indican las cualificaciones necesarias para realizarlas.
Grupo de
destinatarios
Usuario El usuario está familiarizado con el uso del
Ingeniero
técnico/Jefe
de laboratorio
Personal
electricista
especializado
Operador El operador del aparato es responsable del
Conocimientos y responsabilidades
aparato y con los procesos de trabajo ligados
al mismo. Conoce los peligros que pueden
aparecer mientras trabaja con el aparato y
puede evitarlos.
El usuario ha recibido formación sobre el uso
del aparato. La instrucción inicial se produce
en el marco de la puesta en marcha y la
imparte el ingeniero técnico/jefe de laboratorio o el operador.
El ingeniero técnico/jefe de laboratorio es el
encargado de tomar las decisiones relacionadas con el uso y la parametrización del aparato.
El ingeniero técnico/jefe de laboratorio ha
recibido formación sobre el uso del aparato.
La instrucción inicial se produce en el marco
de la puesta en marcha y la imparte Sartorius
Service o el operador.
El personal electricista especializado, gracias
a su formación técnica, conocimientos, experiencia y conocimiento de las normas aplicables, puede evaluar los trabajos encomendados y detectar los posibles peligros.
cumplimiento de las disposiciones de
seguridad y protección en el trabajo.
El operador debe asegurar que todas las personas que trabajan con el aparato tengan
acceso a la información relevante y hayan
sido instruidas en el manejo del aparato.
2.4 Importancia de estas instrucciones de uso
El incumplimiento de las instrucciones puede tener graves
consecuencias como, por ejemplo, peligros para personas por
influencias eléctricas, mecánicas o químicas.
t Antes de efectuar cualquier trabajo en el aparato, lea las
instrucciones atenta y completamente.
t En caso de pérdida del manual puede solicitar uno nuevo o
descargar el manual más reciente de la página de Internet
de Sartorius (www.sartorius.com).
t La información del manual de instrucciones debe estar al
alcance de todas las personas que trabajan con el aparato.
2.5 Perfecto estado del aparato
Un aparato dañado puede ocasionar funcionamientos
incorrectos o dar lugar a peligros difíciles de identificar.
40 Instrucciones de instalación de EVO1Y1
Page 41

Español
t El aparato debe utilizarse únicamente en un estado
perfecto en razón de la seguridad.
t Desconecte inmediatamente de la corriente el aparato si
está dañado.
t Encargue la reparación de daños a Sartorius Service de
inmediato.
2.6 Trabajos en el equipo eléctrico del aparato
Todos los trabajos y modificaciones en el equipo eléctrico del
aparato deben encomendarse exclusivamente a Sartorius
Service. Solo Sartorius Service puede abrir el aparato.
Sello en las variantes verificadas
La legislación exige un sello en los modelos de
balanza verificados. Para garantizar la seguridad
de los aparatos verificados se coloca una marca
adhesiva con el nombre “Sartorius”. En caso de
que esta se elimine, se extingue la validez de la
verificación y la balanza debe regularse de nuevo.
Para las balanzas verificadas que se vayan a
emplear en el EEE es válida la verificación
efectuada y la declaración de conformidad
adjuntada. Guárdela sin falta.
2.7 Equipo de protección individual
3 Instalación
3.1 Volumen de suministro
Artículo Cantidad
Plato de pesaje grande: d 233 mm
Cable USB 1
Fuente de alimentación YPS06-USB opcional
Instrucciones de instalación x
3.2 Desembalaje
Procedimiento
t Abra el embalaje y saque cuidadosamente todas las piezas.
t Inmediatamente después de desembalar, compruebe si el
aparato tiene daños externos.
t Si el aparato se va a almacenar temporalmente,
hágalo de acuerdo con las condiciones ambientales
(ver Capítulo “8.1 Datos generales”, página 46).
t Conserve todas las piezas del embalaje original para un
eventual envío de retorno. Antes del envío, desconecte
todos los cables.
1
El equipo de protección individual protege contra peligros
derivados de los materiales procesados.
t Si el área de trabajo o el proceso en el que se va a utilizar
el aparato requieren un equipo de protección individual,
utilice el equipo de protección individual.
2.8 Indicaciones de seguridad para el manejo del aparato
− No dañe el vidrio de la pantalla de manejo (p. ej. por caídas de
objetos, golpes o presión excesiva). Si la placa de vidrio sufre
algún daño, desenchufe inmediatamente el aparato de la
alimentación eléctrica.
− No toque la superficie de la pantalla de manejo con objetos
puntiagudos, cortantes, duros ni rugosos, sino exclusivamente
con un lápiz táctil previsto para este fin o con las yemas de
los dedos. Para limpiar, no utilice bajo ningún concepto
prendas de vestir (como mangas, etc.) ni esponjas, ya que
pueden arañar la superficie (p. ej. debido a remaches o
botones en las mangas o a arena en las esponjas).
− Evite que el vidrio de la pantalla de manejo y la carcasa de
plástico se carguen electrostáticamente.
Riesgo de daños en la balanza.
No cierre nunca la lata de pintura con un
martillo mientras esta se encuentre sobre el
plato de pesaje.
Coloque la lata de pintura sobre una superficie
estable para cerrarla.
3.3 Elección del lugar de colocación
Elija la ubicación correcta:
− Coloque el aparato sobre una superficie estable, libre de
vibraciones y nivelada.
− Mantenga siempre libre el acceso al aparato.
Al instalar el aparato, evite lugares con influencias
desfavorables:
− Calor (calefacción, radiación solar)
− Corrientes de aire directas por ventanas abiertas, instalaciones
de aire acondicionado y puertas
− Vibraciones y sacudidas durante la medición
− Evite lugares con gran circulación de personas
− Humedad extremadamente alta
− Campos electromagnéticos
− Aire extremadamente seco
Aclimatación
Puede producirse condensación (rocío) de la humedad del aire
en el aparato cuando está frío si se instala en un ambiente
con mayor temperatura. Por lo tanto, es necesario aclimatar el
aparato durante aproximadamente 2 horas, antes de conectarlo al suministro de corriente.
Instrucciones de instalación de EVO1Y1 41
Page 42

3.4 Montaje de la balanza
AVISO
Para todos los trabajos de montaje, el aparato debe estar
desconectado de la alimentación eléctrica.
3.4.1 Colocar el plato de pesaje
t Coloque el plato de pesaje desde
arriba sobre la balanza.
3.4.2 Conexión de la balanza
t Enchufe el cable USB a la
conexión de la parte posterior
de la pantalla.
1
t Retire para ello el tornillo (1) del
bloqueo.
t Gire el bloqueo por encima del
cable USB.
t Apriete el tornillo del bloqueo.
t Pase el cable USB por el soporte
de cable de la parte posterior de
la balanza.
3.5 Puesta a tierra
El aparato con protección contra explosiones debe instalarse
según las reglas reconocidas de la técnica. Debe observar las
leyes/reglamentaciones nacionales correspondientes.
Antes de poner en funcionamiento la balanza, debe controlarse el estado correcto, bien por un electricista o bien bajo la
dirección y supervisión de un electricista.
Verifique si es necesario informar a los organismos pertinentes
(p. ej. oficina de inspección industrial). También son necesarios
controles durante el funcionamiento del aparato.
Los plazos deben calcularse de manera que los defectos que se
originen, con los que debe contarse, puedan reconocerse a
tiempo. Los controles deben realizarse por lo menos cada tres
años. Durante la utilización deberán cumplirse todas las
obligaciones y directrices pertinentes.
Conecte la balanza mediante un cable de puesta a tierra
apropiado con una sección mínima de 4 mm2 (no incluido en
el suministro) de baja impedancia, conectando para ello las
conexiones de compensación de potencial existentes en el
aparato a una conexión de compensación de potencial del
cliente.
La instalación debe efectuarse como es debido por un especialista formado específicamente para ello y según las reglas de la
técnica. Ponga en funcionamiento el aparato solamente después
de asegurarse de que el área no presenta riesgo de explosión.
Si al ponerlo en funcionamiento se presentan problemas
provocados por daños durante el transporte (p. ej. ninguna
indicación, sin retroiluminación), desconecte la balanza de la
red e informe a Sartorius Service.
Conecte la balanza a la compensación de potencial utilizando un
cable de compensación de potencial
con una sección mínima de 4 mm².
t Conecte el terminal del cable
de compensación de potencial
al borne de tierra de la balanza.
t Conecte el cable de compensa-
ción de potencial a la compensación de potencial del cliente.
3.6 Suministro de corriente
Cualificaciones necesarias: personal electricista especializado
La alimentación eléctrica a la balanza se realiza a través de
un ordenador de escritorio/portátil o mediante la fuente
de alimentación YPS06-USB (ver Capítulo “6 Accesorios”,
página 45), que se suministra con diferentes adaptadores de
red específicos para cada país.
AVISO
− El valor de tensión eléctrica indicado en la fuente de alimentación debe coincidir con la tensión de red local (para los datos
de conexión, ver capítulo “8.1 Datos generales”, página 47).
− Si la tensión de red indicada o el modelo de enchufe de la
fuente de alimentación no se corresponden con las normas
utilizadas en el país, póngase en contacto con la representación de Sartorius más próxima.
La alimentación eléctrica con la fuente de alimentación solo
será necesaria:
− Cuando no esté disponible un PC o portátil.
− En casos excepcionales cuando la tensión de salida de la
interfaz USB del PC o portátil no es suficiente.
3.6.1 Ensamblaje de la fuente de alimentación
ADVERTENCIA Los adaptadores de red incorrectos
t
pueden provocar descargas mortales de corriente y dañar
el aparato. Utilice solo el adaptador de red específico del
país. No enchufe jamás el adaptador de red separado de la
fuente de alimentación.
42 Instrucciones de instalación de EVO1Y1
Page 43

Español
t Utilice el adaptador de red adecuado para la red eléctrica:
Juego de adaptadores de red YAK01
Bolsa Región/País
a) transparente Europa/UE (excepto Reino Unido)
b) azul EE. UU.
c) amarilla Reino Unido
Juego de adaptadores de red YAK02
d) rojo Australia
e) turquesa Sudáfrica
f) blanco Argentina
g) rosa Brasil
Juego de adaptadores de red YAK03
h) marrón claro China
i) negro India
j) verde Corea
t Presione (1) y desplace (2) el
adaptador de red requerido para
su suministro de corriente en la
apertura del módulo de la
fuente de alimentación.
El adaptador de red debe quedar
encajado.
Desmontaje/sustitución del
adaptador de red
t Desbloquee (1) el adaptador de
red y extráigalo (2).
Conexión a un ordenador de escritorio/portátil
t Conecte el cable de conexión USB al conector USB (p. ej.,
ordenador personal o portátil).
Conexión a la fuente de alimentación (opcional)
t Conecte el cable de conexión
USB a la fuente de alimentación.
t Conecte la fuente de alimenta-
ción a una toma de pared
(tensión de red).
3.7 Protección antirrobo
t Asegure la balanza por el lado
posterior, en caso necesario.
3.8 Nivelación
Nivelación en modelos (verificados) con conformidad
evaluada
Con la nivelación de la balanza pueden compensarse inclinaciones en el lugar de instalación. Una colocación exacta y
horizontal de la balanza garantiza resultados de pesaje
precisos.
La balanza debe nivelarse y ajustarse de nuevo en caso
necesario cada vez que se cambie su ubicación.
t Gire los dos tornillos de las patas
tal y como se muestra en la
12*
9*
6*
* horas
figura, hasta que la burbuja de
aire del nivel esté en el centro
del círculo.
− Burbuja a las “12 horas”: girar las
dos patas en sentido horario.
− Burbuja a las “3 horas”: girar la
pata izquierda en sentido horario,
la pata derecha en sentido
antihorario.
− Burbuja a las “6 horas”: girar las
dos patas en sentido antihorario.
− Burbuja a las “9 horas”: girar la
pata izquierda en sentido
antihorario, la pata derecha en
sentido horario.
Instrucciones de instalación de EVO1Y1 43
Page 44

3.9 Tiempo de calentamiento previo
0
30
Utilización de balanzas verificadas para la
metrología legal:
Respete un tiempo de precalentamiento de mínimo
24 horas después de conectarla a la red eléctrica.
Para obtener resultados exactos,
la balanza necesita un tiempo
de precalentamiento mínimo de
30 minutos después de conectarla
por primera vez al suministro de
corriente. En ese momento, el
aparato habrá alcanzado la temperatura de funcionamiento necesaria.
4 Limpieza y
mantenimiento
4.1 Limpieza
Antes de limpiar la fuente de alimentación o la balanza,
desconecte todos los aparatos.
ADVERTENCIA Peligro por tensión eléctrica.
Desconecte la fuente de alimentación (opcional) de la red
eléctrica. En caso necesario, desconecte el cable de datos
conectado al PC. No abra jamás la balanza ni la fuente de
alimentación. No contienen piezas del aparato que el usuario
pueda limpiar, reparar o sustituir.
AVISO
No limpie las siguientes piezas con acetona o productos de
limpieza agresivos:
− Entrada del conector de alimentación
− Interfaz de datos
− Rótulos y los demás componentes de plástico
Procedimiento
t Desconecte el aparato del suministro eléctrico.
t AVISO Asegúrese de que no entre polvo ni líquido en la
balanza o la fuente de alimentación.
t AVISO Puede aparecer corrosión y producirse daños en el
aparato por el uso de productos de limpieza inadecuados.
t No utilice productos de limpieza cáusticos, clorados ni
agresivos.
t No utilice productos de limpieza que incluyan compo-
nentes decapantes, como por ejemplo crema limpiadora o lana de acero.
t Utilice un cepillo blando y un paño para la limpieza.
t No utilice productos de limpieza con disolventes.
Limpieza del panel de control
t Antes de limpiar el panel de control, desconecte el aparato
para evitar la introducción accidental de datos por
pulsaciones involuntarias.
Limpieza de la carcasa
t Limpie la carcasa con un paño de limpieza ligeramente
humedecido. Utilice agua jabonosa para eliminar las
impurezas más persistentes.
t A continuación, seque el aparato con un paño suave.
4.2 Mantenimiento
Para garantizar la seguridad de medición constante de su
balanza, recomendamos un mantenimiento regular, al menos
una vez al año. Sartorius Service le ofrece al efecto diversos
contratos de mantenimiento, que podemos adecuar a sus
necesidades.
En el marco de cada mantenimiento debería extenderse
siempre un certificado de calibración. Haga realizar una
comprobación de seguridad técnica de la fuente de alimentación y sus conexiones a un electricista en intervalos adecuados
(p. ej. cada 2 años).
5 Eliminación
5.1 Indicaciones para la descontaminación
El operador es el responsable del cumplimiento de las normas
locales para la declaración adecuada de transporte y eliminación, y para la eliminación adecuada del aparato.
ADVERTENCIA
Peligro de lesiones por aparatos contaminados.
No se admitirá para su reparación y eliminación ningún
aparato contaminado con sustancias peligrosas
(contaminación ABC).
5.1.1 Indicaciones para la eliminación
El aparato y los accesorios incluidos no deben desecharse
junto con los residuos domésticos, ya que están fabricados con
materiales de gran calidad que se pueden reciclar y reutilizar.
Todas las piezas deben desecharse correctamente a través de
centros de recogida de residuos. El embalaje está compuesto
por materiales respetuosos con el medioambiente que se
pueden utilizar como materia prima reciclada.
5.1.2 Eliminación
Requisitos
El aparato está descontaminado.
Procedimiento
t Desechar el aparato. Consulte las instrucciones de elimina-
ción en nuestra página de Internet (www.sartorius.com).
t Deseche el embalaje de conformidad con las normas locales.
44 Instrucciones de instalación de EVO1Y1
Page 45
Español
6 Accesorios
Accesorios Número
de pedido
Cable de conexión USB YCC01-0040M5
Fuente de alimentación (5 V/900 mA) YPS06-USB
Juego de adaptadores de conector de red
para YPS06-USB
− EE. UU. y Japón
− Europa/UE
− Reino Unido
Juego de adaptadores de conector de red
para YPS06-USB
− Australia
− Sudáfrica
− Argentina
− Brasil
Juego de adaptadores de conector de red
para YPS06-USB
− India
− Corea
− China
Cable de compensación de potencial, 2 m
Cubierta protectora para el panel de control,
paquete de 10 unidades
Cubierta protectora para el soporte,
paquete de 10 unidades
Cubierta protectora para el plato de pesaje,
paquete de 10 unidades
Pesa de calibración
− 5 kg, clase de precisión F2 YCW654-AC-00
− 2 kg, clase de precisión F2 YCW624-AC-00
− 1 kg, clase de precisión F2 YCW614-AC-00
YAK01
YAK02
YAK03
YCC01-X046M2
YDC03PMA10
YDC03PMA-CO10
YDC03PMA-WP10
7 Codificación del
número de serie
La fecha de fabricación del aparato está codificada en el
número de serie. La estructura es como sigue:
AMM x x x x x
A Año
3 2014-2020
4 2021-2027
5 2028-2034 etc.
La columna año A representa el número de grupo de años, que
corresponde a un período de 7 años cada vez. Dentro de cada
grupo de años se cuentan los meses hacia arriba (MM) a partir
de 13.
Año: 2015 2016 2017 2018 2019 ...
MM: 25-36 37-48 49-60 61-72 73-84 ...
Ejemplo:
328xxxxx (abril 2015). “xxxxx” es un número correlativo que se
regenera cada mes.
Instrucciones de instalación de EVO1Y1 45
Page 46
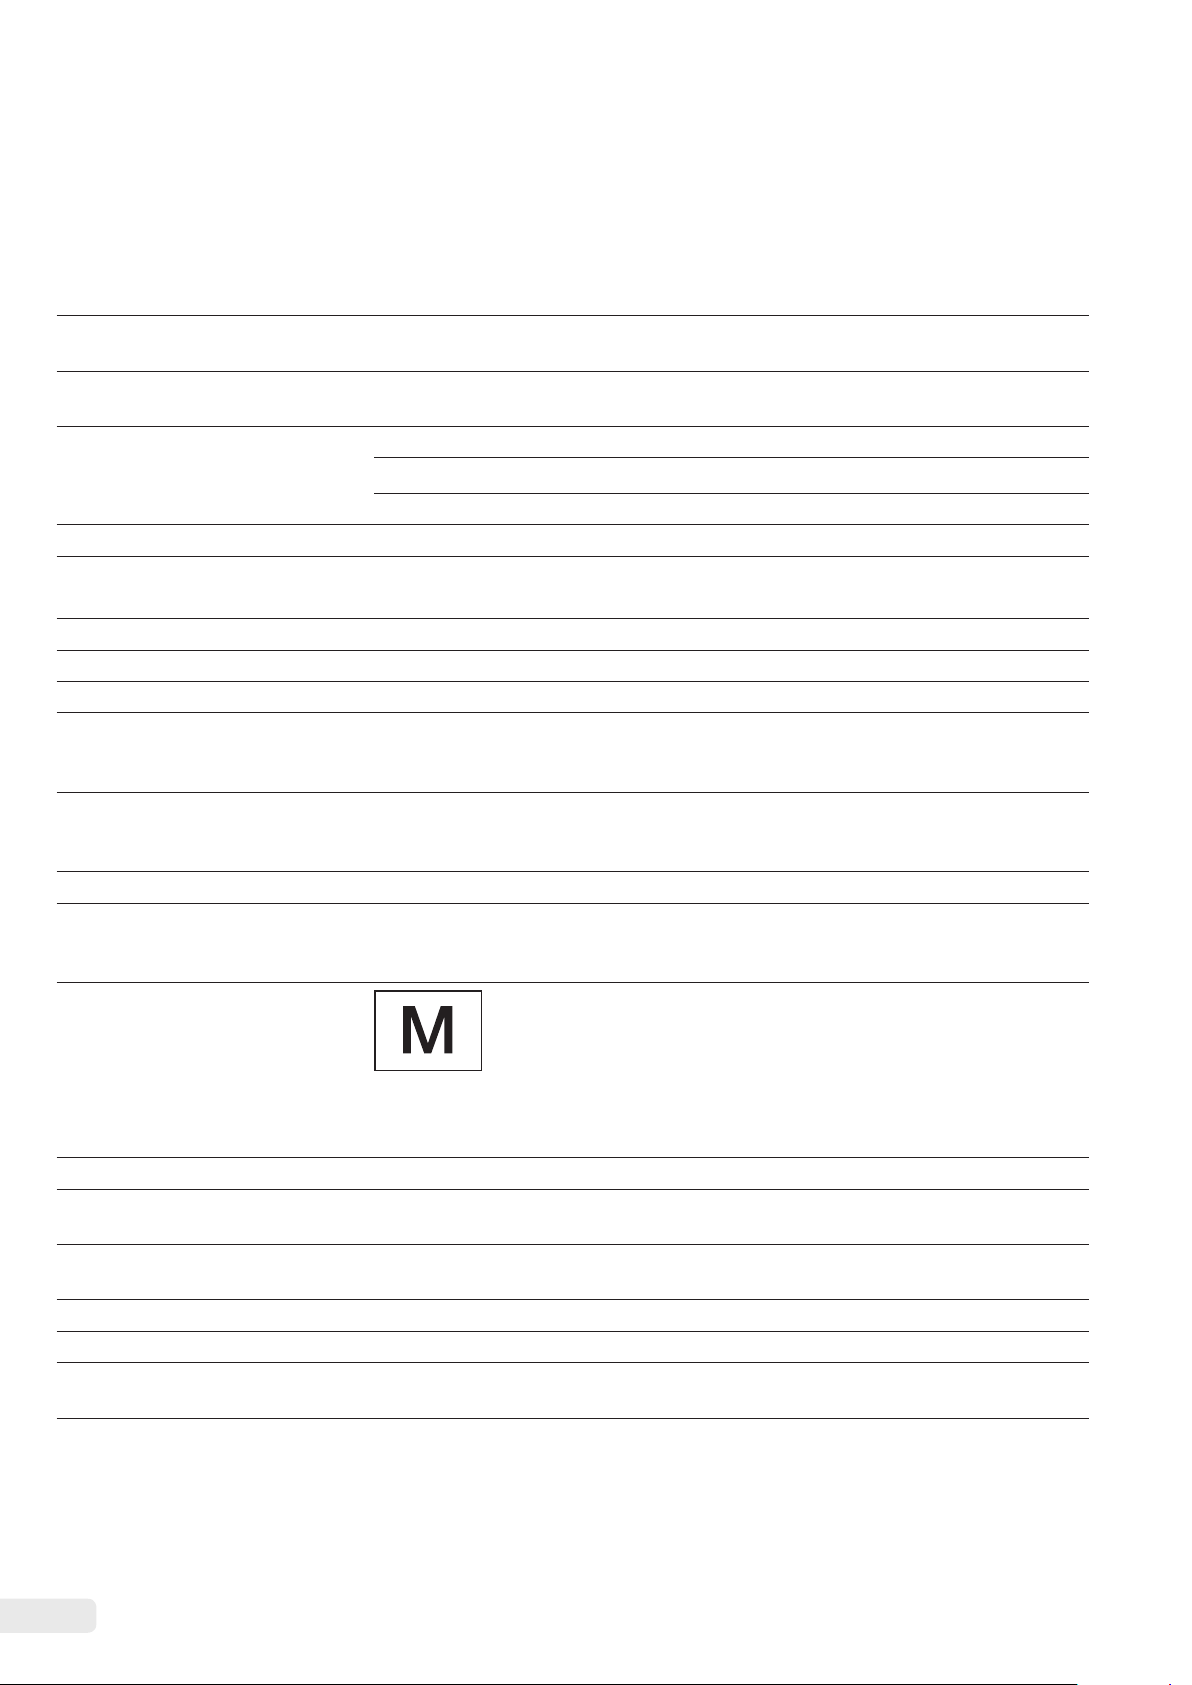
8 Datos técnicos
8.1 Datos generales
Especificaciones Unidad Valor
Identificación (tipo de protección
contra explosiones)
Suministro de corriente Solo mediante interfaz USB o fuente de alimentación YPS06-USB de
Voltaje de entrada V
Consumo de potencia W 2,0 (típico)
Otros datos IP40 según EN 60529/IEC 60529
Condiciones ambientales
Las especificaciones técnicas son válidas para las siguientes condiciones medioambientales:
Entorno Utilizar solo en espacios interiores
Temperatura ambiente* +10 °C – +30 °C
Operatividad °C Garantizada entre +5 y +40
Almacenamiento y transporte °C -10 – +60
Humedad relativa del aire** % 15 – 80 % para temperaturas de hasta 30 °C, sin condensación,
Compatibilidad electromagnética
externa
Resistencia a interferencias Requisitos básicos
Emisión de interferencias Clase B
CC
II 3G Ex ic nA IIB T4 Gc según examen CE de tipo n.° FM15ATEX0008X
Sartorius
+4,5 hasta 5,0
disminuyendo linealmente hasta el 50 % de humedad relativa del aire
a 40 °C
Según EN 61326-1/IEC61326-1 Material eléctrico para medida, control,
y uso en laboratorio. Requisitos de compatibilidad electromagnética
(CEM). Parte 1: Requisitos generales
Apto para el uso en zonas urbanas y zonas conectadas directamente
a la red de baja tensión que (también) da suministro a viviendas.
Las balanzas verificadas según la UE cumplen las exigencias de la
directiva europea 2014/31/UE con EN45501:2015 o, en su caso,
OIML R76:2006.
* En balanzas verificadas conforme a la UE, ver los datos en la balanza.
** En balanzas verificadas conforme a la UE, se aplica la normativa legal.
Aplicaciones seleccionables Recálculo, cálculo del factor, formulación
Fuente de alimentación YPS06-USB
Adaptador de alimentación USB
(5 V/900 mA)
Primario 100 – 240 V~, -10 % / +10 %, 50 – 60 Hz, 0,125 A
Secundario 5 V
Otros datos Clase de protección II
46 Instrucciones de instalación de EVO1Y1
Tipo FW7712 (denominación del fabricante)
, ± 5 %, 900 mA (máx.)
CC
IP40 según EN 60529/IEC 60529
Page 47

Español
8.2 Datos específicos de modelos
Especificaciones Unidad Valor
PMA.Evolution
EVO1Y1
Rango de pesaje g 7500/999,95
Legibilidad g 0,1/0,05
Rango de tara (sustractiva) g -7500
Valor de la pesa externa de ajuste/
Categoría de precisión
Tamaño del plato de pesaje
Peso neto kg 2,4
8.3 Modelos verificados con certificado de aprobación CE de tipo: datos técnicos específicos de cada modelo
kg 1, 2, 5/
F2 o mejor
d mm
233
Especificaciones Unidad Valor
Modelo
Clase de precisión
Tipo de construcción PMA-EV
Rango de pesaje máximo g 7500
Incremento de indicación d g 0,1
Valor verificable e g 1
Rango de temperatura +10°C – +30°C
Rango de compensación de tara
(sustractivo)
PMA.Evolution EVO1Y
�
< 100 % del rango de pesaje máximo
9 Declaración de conformidad UE
Con la declaración de conformidad adjunta se ratifica que el aparato cumple las directivas mencionadas.
Para las balanzas verificadas que se vayan a emplear en el EEE es válido el certificado de conformidad (calibración) de la
declaración de conformidad efectuada. Guárdela sin falta.
Instrucciones de instalación de EVO1Y1 47
Page 48

Spis treści
1.2.1 Ostrzeżenia
1 Informacje o niniejszym dokumencie....................48
1.1 Zakres obowiązywania ...............................48
1.2 Sposoby prezentacji..................................48
2 Bezpieczeństwo
2.1 Użytkowanie zgodne z przeznaczeniem..............48
2.2 Ochrona przeciwwybuchowa.........................49
2.3 Kwalifikacje personelu ...............................49
2.4 Znaczenie niniejszej instrukcji .......................49
2.5 Bezusterkowość urządzenia..........................49
2.6 Prace przy wyposażeniu elektrycznym urządzenia ...50
2.7 Środki ochrony indywidualnej........................50
2.8 Instrukcje bezpieczeństwa dotyczące obsługi
urządzenia............................................50
3 Instalacja
3.1 Zakres dostawy.......................................50
3.2 Rozpakowanie........................................50
3.3 Wybór miejsca ustawienia ...........................50
3.4 Montaż wagi .........................................51
3.5 Podłączanie uziemienia ..............................51
3.6 Zasilanie elektryczne.................................51
3.7 Zabezpieczenie przed kradzieżą......................52
3.8 Poziomowanie........................................52
3.9 Czas nagrzewania....................................53
4 Czyszczenie i konserwacja
4.1 Czyszczenie ..........................................53
4.2 Konserwacja..........................................53
5 Utylizacja
5.1 Wskazówki dotyczące odkażania.....................53
6 Akcesoria
7 Kodowanie numeru seryjnego
8 Dane techniczne
8.1 Dane ogólne..........................................55
8.2 Dane charakterystyczne dla danego modelu .........56
8.3 Modele legalizowane z zatwierdzeniem typu WE:
Dane techniczne charakterystyczne
dla danego modelu...................................56
9 Deklaracja zgodności UE
. . . . . . . . . . . . . . . . . . . . . . . . . . . . . . . . . . . . . . . . . . . 48
..................................................50
................................53
.................................................53
..................................................54
............................54
. . . . . . . . . . . . . . . . . . . . . . . . . . . . . . . . . . . . . . . . . . 55
.................................56
1 Informacje o niniejszym
dokumencie
1.1 Zakres obowiązywania
Niniejsza instrukcja dotyczy następujących modeli wag do
mieszania farb:
− EVO1Y
OSTRZEŻENIE
Oznacza zagrożenie, które może skutkować śmiercią lub
poważnymi obrażeniami ciała, jeżeli się go nie uniknie.
PRZESTROGA
Oznacza zagrożenie, które może skutkować średnimi albo
lekkimi obrażeniami ciała, jeżeli się go nie uniknie.
UWAGA
Oznacza zagrożenie, które może skutkować szkodami
materialnymi, jeżeli się go nie uniknie.
1.2.2 Inne sposoby prezentacji
t
y
−
Ilustracje zawierające wyświetlane komunikaty i informacje
Zawarte w niniejszej instrukcji ilustracje bazują na wagach
„standardowych”. W przypadku wag legalizowanych niektóre
z wyświetlanych komunikatów i informacji mogą wyglądać
inaczej niż na ilustracjach. Tam, gdzie ma to znaczenie dla
eksploatacji, różnice objaśniono w tekście.
Instrukcja postępowania: opisuje czynności, jakie
należy wykonać.
Wynik: opisuje wynik wykonanych czynności.
Teksty po tym znaczniku to wyliczenia.
Symbol ten oznacza wskazówkę dotyczącą eksplo-
atacji wag poddanych ocenie zgodności (legalizowanych) w metrologii prawnej.
W dalszym tekście pojęcie „legalizowana” oznacza
wyrażenie specjalistyczne „poddana ocenie zgodności”.
2 Bezpieczeństwo
2.1 Użytkowanie zgodne z przeznaczeniem
Niniejsza waga jest przeznaczona tylko do mieszania farb
i lakierów. Wagę można użytkować w obszarach zagrożenia
wybuchem strefy 2. Do przyjęcia materiałów należy zastosować
odpowiednie naczynia.
Wagą można sterować zarówno z poziomu wyświetlacza
w trybie Stand Alone, jak i z poziomu zainstalowanego na
komputerze oprogramowania (np. aplikacji do mieszania farb
dostarczanej przez producenta lakierów). Wagę łączy się
kablem USB z komputerem osobistym/laptopem ustawionym
poza strefą zagrożenia wybuchem. Należy przestrzegać
informacji „2.2 Ochrona przeciwwybuchowa”, strona 49
dotyczących ochrony przeciwwybuchowej.
1.2 Sposoby prezentacji
Stosowane w niniejszej instrukcji pojęcie „urządzenie” oznacza
zawsze zespół składający się z wagi, zasilacza sieciowego
i konwertera Ex-Link.
48 Instrukcja instalacji EVO1Y1
Page 49

Polski
Niniejsza instrukcja jest częścią urządzenia. Urządzenie jest
przeznaczone wyłącznie do użytkowania zgodnego z niniejszą
instrukcją.
Każdy inny sposób użytkowania uznaje się za niezgodny
z przeznaczeniem. Jeżeli urządzenie jest eksploatowane
niezgodnie z przeznaczeniem: może to pogarszać działanie
zabezpieczeń urządzenia. Może to prowadzić do nieprzewidywalnych uszczerbków na zdrowiu i strat materialnych.
W przypadku stosowania w instalacjach i warunkach otoczenia
o podwyższonych wymaganiach dotyczących bezpieczeństwa
przestrzegać przepisów obowiązujących w kraju instalacji.
Warunki stosowania urządzenia
Urządzenie wolno stosować wyłącznie w budynkach.
Urządzenia używać tylko z wyposażeniem i w warunkach
zgodnych z opisem zawartym w danych technicznych. Nie
wolno przebudowywać urządzenia ani wprowadzać w nim
zmian technicznych.
Nie narażać urządzenia ani akcesoriów dostarczanych przez
firmę Sartorius na działanie ekstremalnych temperatur, żrących
oparów chemicznych, wilgoci, uderzeń, drgań ani silnych pól
elektromagnetycznych. Przestrzegać warunków użytkowania
podanych w danych technicznych!
Kable łączące urządzenia, a także izolacja żył okablowania
wewnętrznego są wykonane z PVC. Chemikalia wchodzące
w reakcje z tymi materiałami należy trzymać z dala
od przewodów.
2.2 Ochrona przeciwwybuchowa
Zastosowanie w zakresie obowiązywania europejskiej
dyrektywy ATEX:
− W przypadku modelu EVO1Y1, zgodnie z dyrektywą
2014/34/UE chodzi o urządzenie kategorii 3, przystosowane
do użytku w obszarze zagrożenia wybuchem strefy 2.
− Oznaczenia urządzeń podano w EU-Type Examination
Certificates (certyfikatach badania typu UE) w rozdziale
„18.2 Zezwolenia dotyczące ochrony przeciwwybuchowej”,
strona 59.
− Należy stosować się do instrukcji bezpieczeństwa zgodnie
z rysunkiem 2021460 od strony 59.
Zastosowanie na terenie Australii/Nowej Zelandii:
− Należy stosować się do IECEx Certificate of Conformity
IECEx FME 15.0004X oraz instrukcji bezpieczeństwa zgodnie
z rysunkiem 2021460 od strony 59.
2.3 Kwalifikacje personelu
Instrukcja jest skierowana do następujących grup docelowych.
Wszystkie osoby pracujące przy urządzeniu muszą dysponować
wymaganą wiedzą i kompetencjami.
Jeżeli w opisie czynności w niniejszej instrukcji nie określono
kwalifikacji: opisane czynności dotyczą grupy docelowej
„Operator”.
Jeżeli poszczególne czynności muszą być wykonywane przez
osoby należące do innych grup docelowych albo przez Sartorius
Service: w opisie czynności wyszczególniono wymagane
kwalifikacje.
Grupa
docelowa
Operator Operator jest zaznajomiony z eksploatacją
Inżynier ds.
eksploatacji/kierownik laboratorium
Wykwalifikowany
elektryk
Użytkownik Użytkownik urządzenia jest odpowiedzialny
Wiedza i kompetencje
urządzenia i związanymi z nią procesami
roboczymi. Zna niebezpieczeństwa, jakie mogą
wystąpić podczas pracy z urządzeniem i potrafi
ich uniknąć.
Operator został przeszkolony w zakresie
eksploatacji urządzenia. Szkolenie odbywa się
w ramach rozruchu i przeprowadza je inżynier
ds. eksploatacji/kierownik laboratorium albo
użytkownik urządzenia.
Inżynier ds. eksploatacji/kierownik laboratorium
decyduje o zastosowaniu i parametryzacji urządzenia.
Inżynier ds. eksploatacji/kierownik laboratorium
został przeszkolony w zakresie eksploatacji urządzenia. Szkolenie odbywa się w ramach rozruchu
i przeprowadza je Sartorius Service albo użytkownik.
Wykwalifikowany elektryk potrafi na podstawie
swojego wykształcenia, wiedzy i doświadczenia,
a także na podstawie znajomości odpowiednich
aktualnych przepisów ocenić przekazane mu
prace i rozpoznać ewentualne niebezpieczeństwa.
za przestrzeganie przepisów bezpieczeństwa
i higieny pracy.
Użytkownik musi zapewnić, że wszystkie osoby
pracujące przy urządzeniu będą miały dostęp do
właściwych informacji oraz zostaną przeszkolone
w zakresie pracy przy urządzeniu.
2.4 Znaczenie niniejszej instrukcji
Nieprzestrzeganie instrukcji może pociągać za sobą poważne
skutki, np. zagrożenie osób stwarzane przez czynniki elektryczne,
mechaniczne lub chemiczne.
t Przed rozpoczęciem wszelkich prac przy urządzeniu
przeczytać uważnie całą instrukcję.
t W razie zagubienia instrukcji poprosić o dodatkowy
egzemplarz lub pobrać aktualną instrukcję ze strony firmy
Sartorius (www.sartorius.com).
t Zawarte w instrukcji informacje muszą być dostępne dla
wszystkich osób pracujących przy urządzeniu.
2.5 Bezusterkowość urządzenia
Uszkodzenie urządzenia może skutkować nieprawidłowym
działaniem lub trudno rozpoznawalnymi zagrożeniami.
Instrukcja instalacji EVO1Y1 49
Page 50

t Urządzenie wolno stosować wyłącznie w stanie bezusterko-
wym, zapewniającym bezpieczeństwo techniczne.
t Uszkodzone urządzenie natychmiast odłączyć od zasilania.
t Niezwłocznie zlecać usunięcie uszkodzeń Sartorius Service.
2.6 Prace przy wyposażeniu elektrycznym urządzenia
Wszelkie prace i modyfikacje wyposażenia elektrycznego
urządzenia mogą wykonywać wyłącznie pracownicy Sartorius
Service. Urządzenie mogą otwierać tylko pracownicy Sartorius
Service.
Plomba w wersjach legalizowanych
Ustawodawca wymaga zaplombowania wagi
legalizowanej. Plombę stanowi nalepka z napisem
„Sartorius”. Jej usunięcie unieważnia legalizację
i oznacza konieczność ponownej legalizacji wagi.
W przypadku wag legalizowanych przeznaczonych
do zastosowania na EOG obowiązuje deklaracja
zgodności dołączona do wagi przy legalizacji.
Należy ją koniecznie zachować.
2.7 Środki ochrony indywidualnej
Środki ochrony indywidualnej chronią przed zagrożeniami
stwarzanymi przez przetwarzane materiały.
t Jeżeli na obszarze roboczym albo w procesie, w którym
stosowane jest urządzenie, wymagane jest użycie środków
ochrony indywidualnej: nosić środki ochrony indywidualnej.
2.8 Instrukcje bezpieczeństwa dotyczące obsługi urządzenia
− Nie uszkodzić szybki wyświetlacza (przyczyną mogą być np.
spadające przedmioty, uderzenia albo silny nacisk). W przypadku uszkodzenia szybki natychmiast odłączyć urządzenie
od sieci!
− Nie dotykać powierzchni wyświetlacza ostro zakończonymi,
ostrymi, twardymi ani chropowatymi przedmiotami – dotykać
wyłącznie przewidzianym do tego celu rysikiem albo końcem
palca. Nigdy nie używać do czyszczenia fragmentów odzieży
(np. mankietu fartucha) ani gąbek, ponieważ można nimi
zarysować powierzchnię (np. nitami albo guzikami na rękawie
fartucha, piaskiem w gąbce).
− Unikać gromadzenia się ładunków elektrostatycznych na szybie
wyświetlacza i obudowie z tworzywa sztucznego.
Niebezpieczeństwo uszkodzenia wagi!
Nigdy nie zamykać puszki z farbą młotkiem,
dopóki puszka stoi na szalce wagi.
Do zamykania ustawić puszkę z farbą na
mocnym, stabilnym podłożu
3 Instalacja
3.1 Zakres dostawy
Artykuł Liczba
Szalka wagi duża: d 233 mm
Kabel USB 1
Zasilacz YPS06-USB opcjonalnie
Instrukcja instalacji x
3.2 Rozpakowanie
Sposób postępowania
t Otworzyć opakowanie i ostrożnie wyjąć wszystkie części.
t Po rozpakowaniu natychmiast sprawdzić urządzenie pod
kątem widocznych uszkodzeń zewnętrznych.
t W przypadku przejściowego składowania urządzenia:
przechowywać urządzenie odpowiednio do warunków
otoczenia (warunki otoczenia – patrz Rozdział „8.1 Dane
ogólne”, strona 55).
t Wszystkie części oryginalnego opakowania przechowywać
w celu ewentualnego późniejszego zwrotu. W przypadku
wysyłki nie pozostawiać kabli podłączonych do gniazd!
3.3 Wybór miejsca ustawienia
Wybrać właściwe miejsce ustawienia:
− Ustawić urządzenie na stabilnej, wolnej od drgań i równej
powierzchni.
− Zapewnić swobodny dostęp do urządzenia w każdej chwili.
Podczas ustawiania unikać miejsc narażonych na działanie
poniższych czynników:
− wysoka temperatura (ogrzewanie, promieniowanie słoneczne);
− bezpośredni strumień powietrza spowodowany przez otwarte
okna, klimatyzację i drzwi;
− wstrząsy podczas pomiaru;
− „ruch osób”;
− bardzo wysoka wilgotność powietrza;
− pola elektromagnetyczne;
− bardzo suche powietrze.
Aklimatyzacja
W przypadku umieszczenia zimnego urządzenia w ciepłym
pomieszczeniu może dojść do kondensacji wilgoci zawartej
w powietrzu (obroszenia). Dlatego przed podłączeniem do sieci
należy przeprowadzić aklimatyzację urządzenia, pozostawiając
je odłączone od sieci na ok. 2 godziny.
1
50 Instrukcja instalacji EVO1Y1
Page 51

Polski
3.4 Montaż wagi
UWAGA
Na czas wykonywania wszelkich prac montażowych odłączyć
urządzenie od zasilania elektrycznego.
3.4.1 Nasadzanie szalki wagi
t Nasadzić od góry szalkę wagi na
wagę.
3.4.2 Podłączanie wagi
t Podłączyć kabel USB do gniazda
z tyłu wyświetlacza.
1
t Odkręcić śrubę blokady (1).
t Założyć blokadę przez kabel USB.
t Dokręcić śrubę blokady.
najmniej co trzy lata. W czasie użytkowania przestrzegać
odpowiednich przepisów i wytycznych.
Wagę z odpowiednim przewodem uziemiającym o minimalnym
przekroju poprzecznym 4 mm2 (poza zakresem dostawy) należy
przyłączyć niskoomowo przez przyłącze wyrównania potencjałów umieszczone na urządzeniu do przyłącza wyrównania
potencjałów dostępnego na miejscu instalacji urządzenia.
Instalację mogą przeprowadzić wyłącznie wykwalifikowani
pracownicy, zgodnie z przepisami i regułami techniki. Pierwszy
raz urządzenie wolno uruchomić dopiero po upewnieniu się, że
obszar nie jest zagrożony wybuchem.
Jeżeli podczas uruchomienia wykryje się nieprawidłowości
spowodowane uszkodzeniami transportowymi (np. brak
wskazań, brak podświetlenia tła wyświetlacza), odłączyć wagę
od sieci zasilającej i poinformować pracowników Sartorius
Service.
Połączyć wagę z wyrównaniem
potencjałów przeznaczonym do tego
kablem o przekroju przynajmniej
4 mm².
t Podłączyć końcówkę kablową
kabla wyrównania potencjałów
do zacisku uziemiającego wagi.
t Podłączyć kabel wyrównania
potencjałów do wyrównania
potencjałów dostępnego na
miejscu instalacji urządzenia.
3.6 Zasilanie elektryczne
t Przełożyć kabel USB z tyłu wagi
przez uchwyty kablowe.
3.5 Podłączanie uziemienia
Wykonać instalację zabezpieczoną przed wybuchem zgodnie
z uznanymi regułami techniki. Przestrzegać właściwych ustaw/
przepisów obowiązujących w danym kraju użytkowania.
Przed uruchomieniem wagi, wykwalifikowany elektryk lub
osoba pod kierownictwem i nadzorem wykwalifikowanego
elektryka muszą sprawdzić prawidłowość stanu urządzenia.
Sprawdzić, czy konieczne jest poinformowanie właściwych
instytucji (np. urzędu sprawującego nadzór nad działalnością
gospodarczą). Także podczas pracy urządzenia konieczne są
jego kontrole.
Terminy dobrano tak, aby w odpowiednim czasie wykryć usterki,
z którymi należy się liczyć. Kontrole należy przeprowadzać co
Wymagane kwalifikacje: wykwalifikowany elektryk
Waga zasilana jest przez komputer/notebook lub opcjonalny
zasilacz typu YPS06-USB (patrz Rozdział „6 Akcesoria”,
strona 54), dostarczany z różnymi adapterami sieciowymi
odpowiednimi dla danego kraju.
UWAGA
− Wydrukowana na zasilaczu wartość napięcia musi być zgodna
z napięciem panującym lokalnie w sieci (dane przyłączeniowe
– patrz rozdział „8.1 Dane ogólne”, strona 21).
− Jeśli podane napięcie sieciowe lub wersja wtyczki zasilacza nie
odpowiadają normom obowiązującym w kraju użytkowania,
skontaktować się z lokalnym przedstawicielem firmy Sartorius.
Zasilanie przez zasilacz potrzebne jest tylko, gdy:
− nie jest dostępny komputer ani notebook,
− w wyjątkowych przypadkach, jeżeli napięcie wyjściowe portu
USB komputera albo notebooka nie jest wystarczające.
3.6.1 Montaż zasilacza
OSTRZEŻENIE Niebezpieczeństwo śmiertelnego
t
porażenia prądem i uszkodzenia urządzenia wskutek
stosowania niewłaściwego adaptera sieciowego! Używać
tylko adapterów odpowiednich dla danego kraju. Nigdy nie
wkładać do gniazda adaptera sieciowego odłączonego od
zasilacza.
Instrukcja instalacji EVO1Y1 51
Page 52
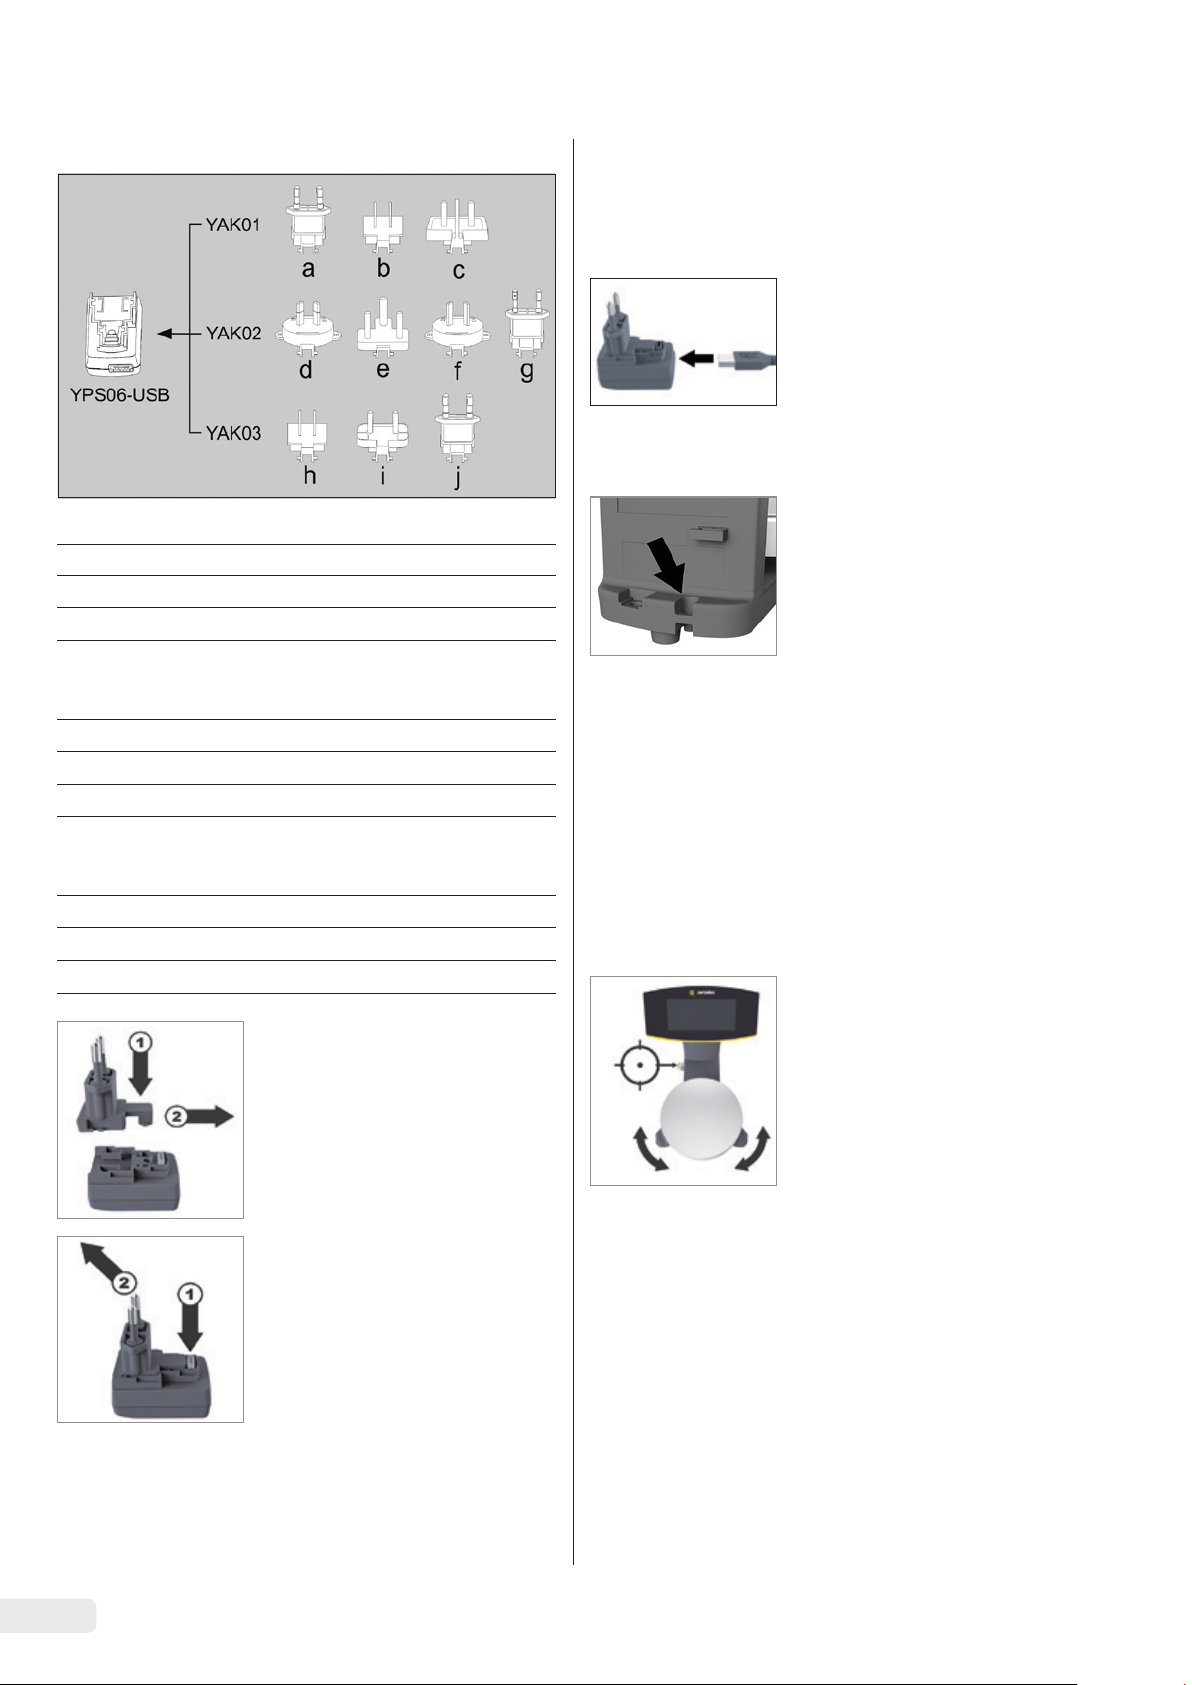
t Stosować adapter sieciowy dostosowany do sieci:
Zestaw adaptera sieciowego YAK01
Torebka Region/kraj
a) przezroczysta Europa/UE (oprócz Wielkiej Brytanii)
b) niebieska Stany Zjednoczone
c) żółta Wielka Brytania
Przyłączenie do komputera osobistego/notebooka
t Przyłączyć kabel USB do portu USB, (np. w komputerze
osobistym albo laptopie).
Przyłączenie do zasilacza (opcja)
t Przyłączyć kabel przyłączeniowy
USB do zasilacza.
t Przyłączyć zasilacz do gniazda
(napięcia sieciowego).
3.7 Zabezpieczenie przed kradzieżą
t W razie potrzeby zabezpieczyć
wagę z tyłu.
Zestaw adaptera sieciowego YAK02
d) czerwona Australia
e) turkusowa RPA
f) biała Argentyna
g) różowa Brazylia
Zestaw adaptera sieciowego YAK03
h) jasnobrązowa Chiny
i) czarna Indie
j) zielona Korea
t Nacisnąć (1) i wsunąć (2)
odpowiedni adapter sieciowy do
otworu zasilacza.
Adapter sieciowy powinien się
zatrzasnąć.
Demontaż/wymiana adaptera
sieciowego
t Odblokować (1) i wyciągnąć (2)
adapter sieciowy.
3.8 Poziomowanie
Poziomowanie w przypadku modeli legalizowanych
(poddanych ocenie zgodności)
Dzięki poziomowaniu można skompensować nierówności
w miejscu ustawienia wagi. Dokładne wypoziomowanie wagi
zapewnia precyzyjne wyniki ważenia.
Po każdej zmianie miejsca ustawienia należy ponownie
wypoziomować i skalibrować wagę.
t Należy przekręcać obie stopki
zgodnie z rysunkiem, dopóki
12*
9*
6*
* godzina
pęcherzyk powietrza w poziomicy nie znajdzie się pośrodku
okręgu.
− Pęcherzyk powietrza na godzinie
12: obracać obie stopki w kierunku
ruchu wskazówek zegara.
− Pęcherzyk powietrza na godzinie 3:
obracać lewą stopkę w kierunku
ruchu wskazówek zegara, a prawą
w kierunku przeciwnym do ruchu
wskazówek zegara.
− Pęcherzyk powietrza na godzinie 6:
obracać obie stopki w kierunku
przeciwnym do ruchu wskazówek
zegara.
− Pęcherzyk powietrza na godzinie 9:
obracać lewą stopkę w kierunku
przeciwnym do ruchu wskazówek
zegara, a prawą w kierunku ruchu
wskazówek zegara.
52 Instrukcja instalacji EVO1Y1
Page 53

0
30
Polski
3.9 Czas nagrzewania
Stosowanie wag zalegalizowanych
w metrologii prawnej:
Po pierwszym podłączeniu do sieci zasilającej zachować co najmniej 24-godzinny czas nagrzewania.
Aby uzyskać dokładne wyniki, waga
wymaga przynajmniej 30-minutowego nagrzewania po pierwszym
przyłączeniu do zasilania. Dopiero
wtedy urządzenie osiąga konieczną
temperaturę roboczą.
4 Czyszczenie i konserwacja
4.1 Czyszczenie
Przed rozpoczęciem czyszczenia zasilacza lub wagi: odłączyć
wszystkie urządzenia od zasilania.
OSTRZEŻENIE Niebezpieczeństwo stwarzane
przez napięcie elektryczne!
Odłączyć zasilacz (opcjonalny) od sieci. W razie potrzeby wyciągnąć podłączony kabel transmisji danych z komputera. Nigdy
nie otwierać wagi ani zasilacza sieciowego. Nie zawierają one
żadnych części, które operator musiałby czyścić, naprawiać
bądź wymieniać.
UWAGA
Następujących części nie czyścić acetonem ani agresywnymi
środkami czyszczącymi:
− wejście wtyczki sieciowej
− złącze danych
− tabliczki oraz pozostałe elementy z tworzyw sztucznych
Sposób postępowania
t Odłączyć urządzenie od zasilania.
t UWAGA Zwracać uwagę, aby do wnętrza systemu wago-
wego nie dostały się ciecz ani pył.
t UWAGA Korozja lub uszkodzenie urządzenia wskutek stoso-
wania nieodpowiednich środków czyszczących!
t Nie stosować żrących, zawierających chlor ani agresyw-
nych środków czyszczących.
t Nie stosować środków czyszczących zawierających
cząstki ścierne, np. mleczka do szorowania, wełny
stalowej.
t Do czyszczenia używać tylko miękkich szczotek i ścierek.
t Nie stosować środków czyszczących zawierających
rozpuszczalniki.
Czyszczenie panelu obsługi
t Przed przystąpieniem do czyszczenia panelu obsługi:
wyłączyć urządzenie, ponieważ dotknięcie może spowodować mimowolne wprowadzanie poleceń.
Czyszczenie obudowy urządzenia
t Obudowę urządzenia przecierać lekko wilgotną szmatką.
Do silniejszych zabrudzeń stosować łagodny roztwór mydła.
t Następnie osuszyć urządzenie miękką szmatką.
4.2 Konserwacja
Aby zapewnić pewność pomiarów wykonywanych na wadze,
zalecamy regularną, co najmniej coroczną, konserwację.
Sartorius Service oferuje różne umowy o konserwację, które
są indywidualnie dostosowywane do potrzeb klienta.
W ramach każdej konserwacji należy zawsze udostępnić
certyfikat kalibracji. Zlecać elektrykowi wykonanie kontroli
bezpieczeństwa technicznego zasilacza i jego przyłączy
w rozsądnych odstępach czasu (np. co 2 lata).
5 Utylizacja
5.1 Wskazówki dotyczące odkażania
Użytkownik odpowiada za przestrzeganie krajowych przepisów
w sprawie odpowiedniej deklaracji w przypadku transportu oraz
utylizacji, a także za prawidłową utylizację urządzenia.
OSTRZEŻENIE
Niebezpieczeństwo odniesienia obrażeń ciała spowodowanych
skażeniem urządzeń!
Urządzenia skażone niebezpiecznymi substancjami (kontaminacja
ABC) nie zostaną przyjęte ani do naprawy, ani utylizacji.
5.1.1 Wskazówki dotyczące utylizacji
Urządzenie i akcesoria nie stanowią odpadów domowych,
ponieważ zostały wyprodukowane z wysokogatunkowych
materiałów, które można poddać recyklingowi i ponownie
wykorzystać. Wszystkie części należy zutylizować w odpowiednich instalacjach do utylizacji. Opakowanie jest wykonane
z materiałów ekologicznych, mogących służyć jako surowce
wtórne.
5.1.2 Utylizacja
Warunki
Urządzenie jest odkażone.
Sposób postępowania
t Zutylizować urządzenie. Przestrzegać wskazówek dotyczących
utylizacji zamieszczonych na naszej stronie internetowej
(www.sartorius.com).
t Opakowanie zutylizować zgodnie z przepisami krajowymi.
Instrukcja instalacji EVO1Y1 53
Page 54

6 Akcesoria
7 Kodowanie numeru
Akcesoria Nr katalogowy
Kabel łączący USB YCC01-0040M5
Zasilacz sieciowy (5 V / 900 mA) YPS06-USB
Zestaw adaptera gniazda sieciowego
do YPS06-USB
− USA i Japonia
− Europa/UE
− Wielka Brytania
Zestaw adaptera gniazda sieciowego do
YPS06-USB
− Australia
− RPA
− Argentyna
− Brazylia
Zestaw adaptera gniazda sieciowego
do YPS06-USB
− Indie
− Korea
− Chiny
Kabel wyrównania potencjałów, 2 m
Osłona robocza panelu obsługi,
pakiet 10 osłon
Osłona robocza statywu,
pakiet 10 osłon
Osłona robocza szalki wagi,
pakiet 10 osłon
Obciążnik kalibrujący
− 5 kg, klasa dokładności F2 YCW654-AC-00
− 2 kg, klasa dokładności F2 YCW624-AC-00
− 1 kg, klasa dokładności F2 YCW614-AC-00
YAK01
YAK02
YAK03
YCC01-X046M2
YDC03PMA10
YDC03PMA-CO10
YDC03PMA-WP10
seryjnego
Data produkcji urządzenia jest zakodowana w numerze
seryjnym. Numer seryjny ma następującą strukturę:
RMM x x x x x
R Rok
3 2014–2020
4 2021-2027
5 2028-2034 itd.
Kolumna roku R oznacza numer grupy lat, każda to okres 7 lat.
W obrębie każdej grupy liczone są miesiące (M M) od 13 w górę.
Rok: 2015 2016 2017 2018 2019 ...
MM: 25-36 37-48 49-60 61-72 73-84 ...
54 Instrukcja instalacji EVO1Y1
Przykład:
328xxxxx (kwiecień 2015). „xxxxx” to numer liczony na bieżąco,
każdego miesiąca na nowo.
Page 55

Polski
8 Dane techniczne
8.1 Dane ogólne
Dane Jednostka Wartość
Oznaczenie
(typ ochrony przeciwwybuchowej)
Zasilanie elektryczne tylko przez port USB albo zasilacz Sartorius YPS06-USB
Napięcie wejściowe V
Pobór mocy W 2,0 s (typowo)
Pozostałe dane IP40 wg normy EN 60529/IEC 60529
Warunki otoczenia
Dane techniczne obowiązują w następujących warunkach otoczenia:
Otoczenie Urządzenie wolno stosować wyłącznie w pomieszczeniach
Temperatura otoczenia* +10°C–+30°C
Zdolność do pracy °C gwarantowana pomiędzy +5–+40
Przechowywanie i transport °C –10–+60
Wilgotność względna powietrza** % 15–80 dla temperatury do 30°C bez skraplania,
Kompatybilność elektromagnetyczna Zgodnie z normą EN 61326-1/IEC 61326-1 Wyposażenie elektryczne do
Odporność na zakłócenia Wymagania podstawowe
Emisja zakłóceń Klasa B
DC
II 3G Ex ic nA IIB T4 Gc wg certyfikatu badania typu WE FM15ATEX0008X
+4,5 do 5,0
liniowy spadek do 50% wilgotności względnej powietrza przy 40°C.
pomiarów, sterowania i użytku w laboratoriach -- Wymagania dotyczące
kompatybilności elektromagnetycznej (EMC) -- Część 1: Wymagania
ogólne
Nadaje się do zastosowania w obszarach mieszkalnych i obszarach
podłączonych bezpośrednio do sieci niskiego napięcia, (również)
zasilających budynek mieszkalny.
Wagi legalizowane zgodnie z dyrektywami UE spełniają wymogi
dyrektywy WE 2014/31/UE z EN 45501:2015 lub OIML R76:2006.
* W przypadku wag legalizowanych zgodnie z przepisami UE,
patrz dane na wadze.
** W przypadku wag legalizowanych zgodnie z przepisami
UE obowiązują przepisy ustawowe
Aplikacje do wyboru Rekalkulacja, przeliczanie współczynnika, receptura
Zasilacz YPS06-USB
Zasilacz USB (5 V / 900 mA) Typ FW7712 (oznaczenie producenta)
Napięcie pierwotne 100–240 V~, -10% / +10%, 50–60 Hz, 0,125 A
Napięcie wtórne 5 V
Pozostałe dane Klasa ochrony II
, ± 5%, 900 mA (maks.)
DC
IP40 wg normy EN 60529/IEC 60529
Instrukcja instalacji EVO1Y1 55
Page 56

8.2 Dane charakterystyczne dla danego modelu
Dane Jednostka Wartość
PMA.Evolution
EVO1Y1
Zakres ważenia g 7500/999,95
Rozdzielczość g 0,1/0,05
Zakres tarowania (subtrakcyjny) g -7500
Wartość masy zewnętrznego
odważnika do kalibracji/
klasa dokładności
Wielkość szalki wagi
Masa netto kg 2,4
kg 1, 2, 5/
F2 albo lepsza
d mm
233
8.3 Modele legalizowane z zatwierdzeniem typu WE: dane techniczne charakterystyczne dla danego modelu
Dane Jednostka Wartość
Model
Klasa dokładności
Konstrukcja PMA-EV
Zakres ważenia maks. g 7500
Rozdzielczość d g 0,1
Wartość kalibracji e g 1
Zakres temperatury +10°C–+30°C
Zakres kompensacji tary (subtrakcyjny)
PMA.Evolution EVO1Y
�
< 100% maksymalnego zakresu ważenia
9 Deklaracja zgodności UE
Dołączona deklaracja zgodności stanowi potwierdzenie zgodności urządzenia z wymienionymi dyrektywami.
W przypadku wag poddanych ocenie zgodności (legalizacji) przeznaczonych do zastosowania na EOG obowiązuje dołączona do
wagi deklaracja zgodności. Należy ją koniecznie zachować.
56 Instrukcja instalacji EVO1Y1
Page 57

EC/EU Declaration of Conformity
Installation Instructions EVO1Y1 57
Page 58
Traduction du document original
Déclaration de conformité UE
Fabricant
37070 Goettingen, Allemagne
Type d'appareil Balance pour peintures
Série
2014/30/UE Compatibilité électromagnétique
2011/65/UE Limitation de l'utilisation de certaines substances dangereuses dans les équipements électriques et
EN 50581:2012
2014/34/UE Appareils et systèmes de protection destinés à être utilisés en atmosphères explosibles
EN 60079-0:2012, EN 60079-11:2012, EN 60079-15:2010
Marquage
Attestation d'examen CE de type n°
Sartorius Lab Instruments GmbH & Co. KG
déclare sous sa seule responsabilité que l'appareil
EVO1Y1, LAB1Y1
dans la version que nous avons mise sur le marché, est conforme à toutes les dispositions pertinentes
des directives européennes suivantes - y compris aux amendements en vigueur au moment de cette
déclaration - et répond aux exigences applicables des normes européennes harmonisées suivantes :
EN 61326-1:2013
électroniques (RoHS)
II 3G Ex ic nA IIB T4 Gc
FM15ATEX0008X
16
Année de l'attribution du marquage CE :
Sartorius Lab Instruments GmbH & Co. KG
Goettingen, 20/04/2016
___________________________________________ ___ _______________________________________________________
Dr Reinhard Baumfalk
Vice President R&D Head of International Certification Management
Cette déclaration certifie la conformité avec les directives européennes citées plus haut, mais ne constitue pas une
garantie des propriétés. Cette déclaration n'est plus valable si le produit est modifié sans notre accord. Les
consignes de sécurité mentionnées dans la documentation correspondante du produit doivent être respectées.
___________________________________________________________________________________________
Doc : 2032888-01 SLI15CE004-01.fr 1 / 1 PMF : 2032887 OP-113_fo1_2015.10.12
Dr Dieter Klausgrete
58 Installation Instructions EVO1Y1
Page 59

Traduzione del testo originale
Dichiarazione di conformità UE
Fabbricante
37070 Goettingen, Germania
Tipo di
apparecchio Bilancia per miscelazione di vernici
Serie
2014/30/UE Compatibilità elettromagnetica
2011/65/UE Restrizione dell’uso di determinate sostanze pericolose nelle apparecchiature elettriche ed elettroniche
EN 50581:2012
2014/34/UE Apparecchi e sistemi di protezione destinati a essere utilizzati in atmosfera potenzialmente esplosiva
EN 60079-0:2012, EN 60079-11:2012, EN 60079-15:2010
Marcatura
Numero del certificato d'esame CE del tipo
Sartorius Lab Instruments GmbH & Co. KG
dichiara sotto la propria responsabilità che l'apparecchiatura
EVO1Y1, LAB1Y1
nella versione da noi immessa sul mercato, è conforme a tutte le disposizioni pertinenti delle seguenti
direttive europee - comprese le loro modifiche vigenti al momento della dichiarazione - e soddisfa le
prescrizioni applicabili delle seguenti norme europee armonizzate:
EN 61326-1:2013
(RoHS)
II 3G Ex ic nA IIB T4 Gc
Anno della concessione del marchio CE:
FM15ATEX0008X
16
Sartorius Lab Instruments GmbH & Co. KG
Goettingen, 20-04-2016
___________________________________________ ___ _______________________________________________________
Dr. Reinhard Baumfalk
Vice President R&D Head of International Certification Management
La presente dichiarazione certifica la conformità con le suddette direttive UE, non costituisce tuttavia alcuna
garanzia delle proprietà del prodotto. Qualora vengano apportate modifiche al prodotto senza la nostra
autorizzazione, la presente dichiarazione perde la sua validità. Vanno osservate le istruzioni di sicurezza contenute
nella documentazione del prodotto pertinente.
___________________________________________________________________________________________
Doc: 2032888-01 SLI15CE004-01.it 1 / 1 PMF: 2032887 OP-113_fo1_2015.10.12
Dr. Dieter Klausgrete
Installation Instructions EVO1Y1 59
Page 60

Traducción del original
Declaración de conformidad UE
Fabricante
37070 Goettingen, Alemania
Tipo de aparato Balanza para la mezcla de pintura
Serie
2014/30/UE Compatibilidad electromagnética
2011/65/UE Restricciones a la utilización de determinadas sustancias peligrosas en aparatos eléctricos y electrónicos
EN 50581:2012
2014/34/UE Aparatos y sistemas de protección para el uso previsto en áreas potencialmente explosivas
EN 60079-0:2012, EN 60079-11:2012, EN 60079-15:2010
Identificación
Número de certificado de examen CE de tipo
Sartorius Lab Instruments GmbH & Co. KG
declara bajo su sola responsabilidad que el medio de producción
EVO1Y1, LAB1Y1
en la variante comercializada por nosotros, cumple todas las disposiciones pertinentes de las siguientes
–
Directivas Europeas
los requisitos aplicables de las siguientes Normas Armonizadas Europeas:
EN 61326-1:2013
(RUSP)
Año de concesión de la marca CE:
incluidas las modificaciones vigentes en el momento de la declaración– y cumple
II 3G Ex ic nA IIB T4 Gc
16
FM15ATEX0008X
Sartorius Lab Instruments GmbH & Co. KG
Goettingen, 20/04/2016
___________________________________________ ___ _______________________________________________________
Dr. Reinhard Baumfalk
Vice President R&D Head of International Certification Management
Esta declaración certifica la conformidad con las directivas de la UE enumeradas anteriormente, pero no constituye
una aseveración de características. En caso de modificar el producto sin coordinarse con nosotros, esta declaración
perderá su validez. Deberán observarse las indicaciones de seguridad contenidas en la documentación adjunta al
producto.
___________________________________________________________________________________________
Doc: 2032888-01 SLI15CE004-01.es 1 / 1 PMF: 2032887 OP-113_fo1_2015.10.12
Dr. Dieter Klausgrete
60 Installation Instructions EVO1Y1
Page 61
Tłumaczenie dokumentu oryginalnego
Deklaracja zgodności UE
Producent
37070 Getynga, Niemcy
Rodzaj
urządzenia Waga do mieszania farb
Seria
produkcyjna
2014/30/UE Kompatybilność elektromagnetyczna
2011/65/UE Ograniczenie stosowania niektórych niebezpiecznych substancji w sprzęcie elektrycznym i elektronicznym
EN 50581:2012
2014/34/UE Urządzenia i systemy ochronne przeznaczone do użytku w atmosferze potencjalnie wybuchowej
EN 60079-0:2012, EN 60079-11:2012, EN 60079-15:2010
Oznaczenie
Świadectwo badania typu WE, numer
Sartorius Lab Instruments GmbH & Co. KG
oświadcza z pełną odpowiedzialnością, że poniższy sprzęt
EVO1Y1, LAB1Y1
w wersji wprowadzonej przez nas do obrotu jest zgodny ze wszystkimi właściwymi postanowieniami
następujących Dyrektyw Europejskich – włącznie ze zmianami do nich, obowiązującymi do dnia
wystawienia deklaracji – i spełnia mające zastosowanie wymogi następujących zharmonizowanych
Norm Europejskich:
EN 61326-1:2013
(RoHS)
II 3G Ex ic nA IIB T4 Gc
Liczba lat, na które przyznano oznaczenie CE:
FM15ATEX0008X
16
Sartorius Lab Instruments GmbH & Co. KG
Getynga, 2016-04-20
___________________________________________ ___ _______________________________________________________
dr Reinhard Baumfalk
Vice President R&D Head of International Certification Management
Niniejsza deklaracja poświadcza zgodność z wymienionymi dyrektywami UE, nie stanowi jednak zapewnienia
o właściwościach produktu. W przypadku nieuzgodnionej z nami zmiany produktu niniejsza deklaracja traci
ważność. Należy stosować się do wskazówek bezpieczeństwa zawartych w odpowiedniej dokumentacji produktu.
___________________________________________________________________________________________
Doc: 2032888-01 SLI15CE004-01.pl 1 / 1 PMF: 2032887 OP-113_fo1_2015.10.12
dr Dieter Klausgrete
Installation Instructions EVO1Y1 61
Page 62
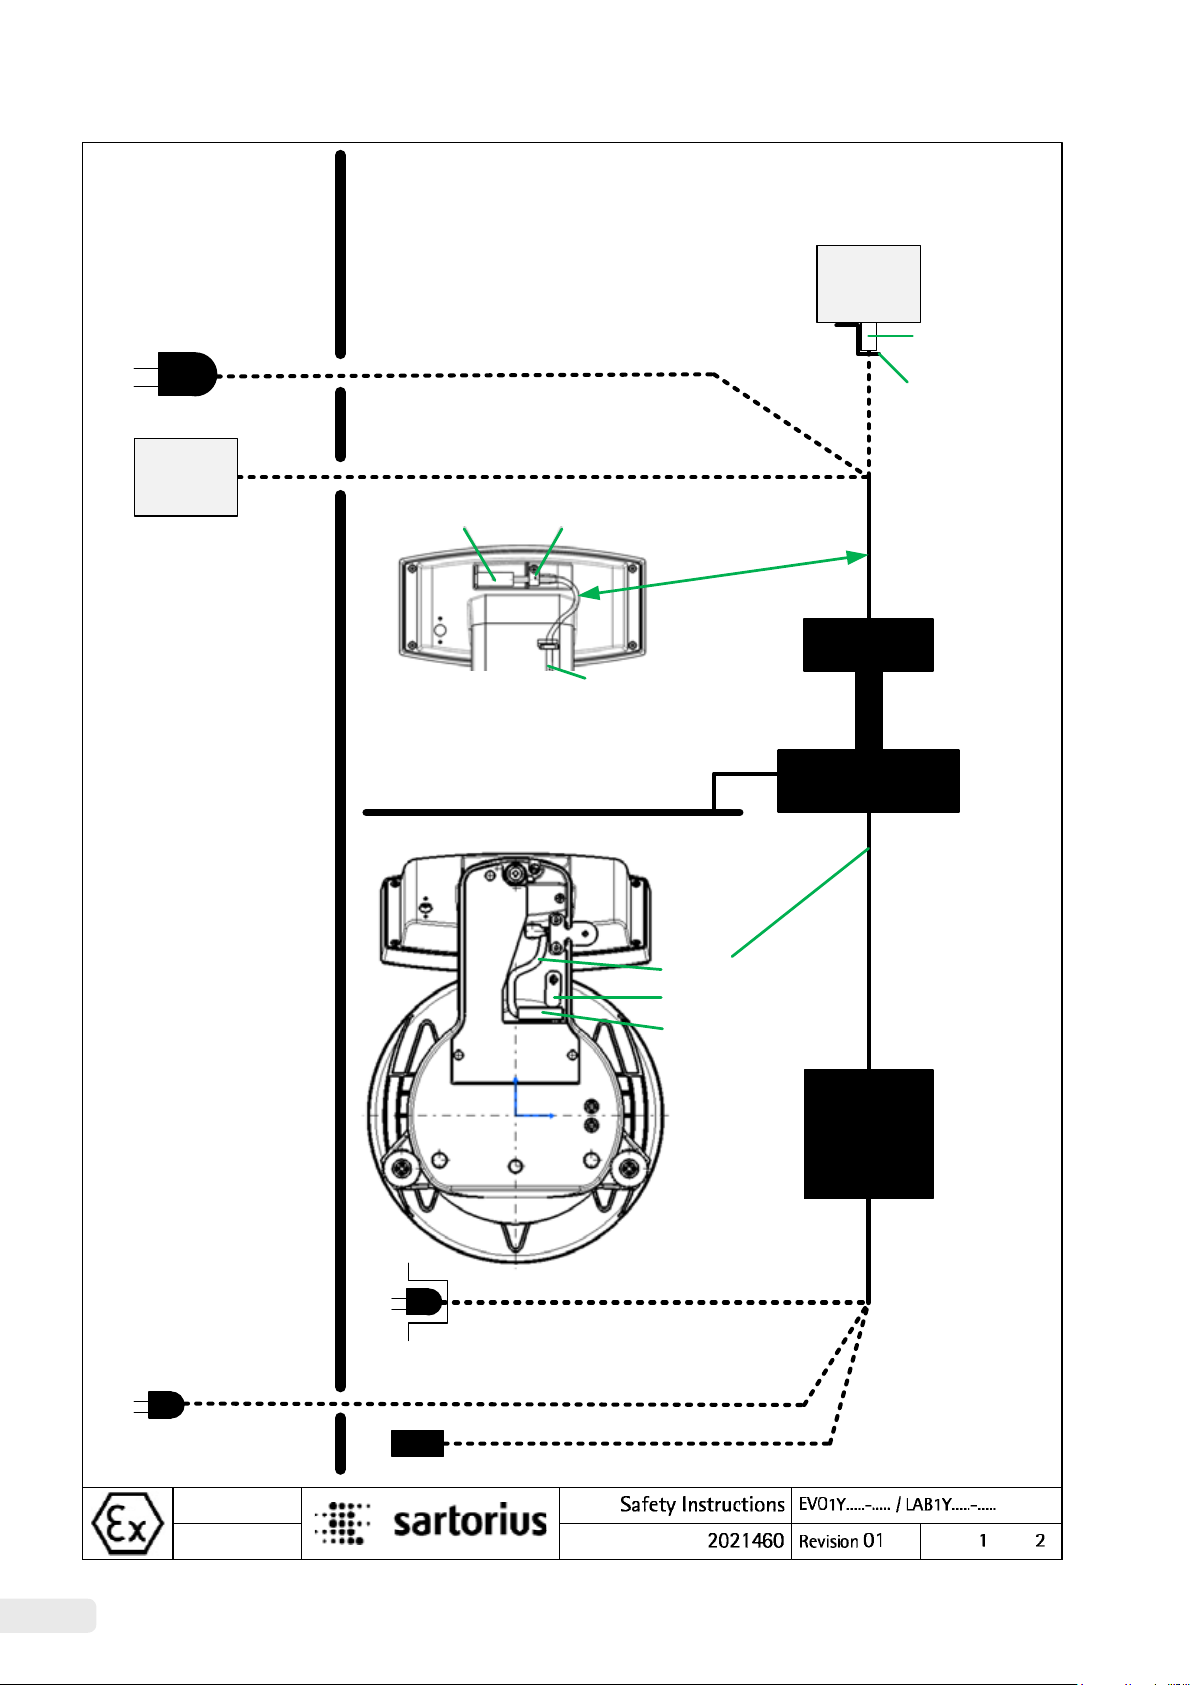
Non-hazardous area
Hazardous area Zone 2
Gas group IIB, temperature class T4
Ambient temperature: 0°C to +40°C
Power Supply
e.g. Sartorius
YPS06-USB
Device
Cable clampUSB plug
USB cable
Equipotential bonding conductor
7)
9)
Device
Display unit
Weighing cell
18)
Alternative
connections
USB cable
USB plug
Cable clamp
19)
EVO1Y.....-.....
LAB1Y.....-.....
Plug provided
with standard
equipment
2015-11-11
Dr. D. Klausgrete
DC cable
Clamping block
DC cable plug
Secure plug (standard equipment supplied)
so that it cannot become accidently
disconnected. Ensure that an emergency
off switch is available.
Use EX plug
7)
Power
Supply
Sartorius
YPS04-Y..
Alternative
connections
Sheet of
62 Installation Instructions EVO1Y1
Page 63

1) Install the equipment in compliance with applicable laws, rules and regulations, ordinances and standards. In
particular, be sure to conform to the European Standards EN 60079-14 (Explosive atmospheres – Part 14:
Electrical installations design, selection and erection), or IEC 60079-14 as applicable.
2) Be sure to follow the installation, operating, maintenance and servicing instructions given in the manuals
supplied.
3) The equipment shall be installed in such a way that it is protected against the entry of solid foreign objects or
water capable of impairing the safety of the apparatus. Reduce the risk of mechanical damage to a minimum.
4) Exposure to UV radiation is not allowed!
5) The connecting cable of the display unit must be prevented against damage and stress caused by strain.
6) Prior to opening the equipment, disconnect the power supply or make sure that there is no potentially
explosive atmosphere or any other explosion hazard in the surrounding area!
7) The data cable connected to the scale (weighing unit) is considered as non intrinsically safe circuit. The
connection is secured against accidental disconnection and may only be plugged in or disconnected when the
power is switched completely off. Check the correct function of the data transfer before you use the
equipment in a hazardous location. Lock the USB plug of the USB cable by the cable clamp and in case of the
option „additional power supply board“ lock the plug of the DC cable by the clamping block.
8) If the equipment does not operate properly, unplug it immediately from line power (mains supply)!
9) All metal parts must be electrically connected to the terminal for the equipotential bonding conductor (PA).
The equipment operator is obligated to connect a lead with a gauge of at least 4 mm² (cross section) to the PA
terminal located on the housing of the scale. The low resistance of this connection to the PA bus bar must be
checked when the system is installed at the intended place of use. The shielding of the connecting cables may
only be used for grounding when no impermissible difference in voltage is generated and, if necessary, the
shielding is able to conduct the equipotential current.
10) Avoid generating static electricity. Use only a damp cloth to wipe down the equipment. The equipment
operator shall be responsible for preventing any risks caused by static electricity.
11) Keep chemicals and other agents, which can corrode the housing seals and cable sheaths, away from the
equipment. These agents include oil, grease, benzene, acetone and ozone. If you are not sure about the safety
of a certain substance, please contact the manufacturer.
12) Use equipment only in the temperature ranges indicated. Avoid exposing the equipment to heat.
13) The equipment operator is responsible for any non-Sartorius cables used.
14) At reasonable intervals, have your equipment installation checked for proper functioning and safety by a
trained and certified technician.
15) If your equipment needs to be repaired, use only original spare parts supplied by the manufacturer!
16) Any tampering with the equipment by anyone, other than repair work done by authorized Sartorius service
technicians, will result in the loss of EX conformity and in the forfeiture of all claims under the manufacturer's
warranty. Only authorized specialists may open the equipment.
17) Modifications, including those to be carried out by Sartorius employees, may be permitted only after the
express written authorization has been obtained from Sartorius.
18) The USB port of any IECEx certified EPL Gc or ATEX Category II 3 G certified electrical equipment may be
connected to the scale (weighing unit) via a standard USB cable.
19) The USB data cable connected to the scale (weighing unit) is considered as non intrinsically safe circuit. The
connection is secured against accidental disconnection and may only be plugged in or disconnected when the
power is switched completely off. Check the correct function of the data transfer before you use the
equipment in a hazardous location. Lock the USB plug of the USB cable at the scale (weighing unit) and any
note 18 device by a cable clamp or tool secured device.
2015-11-11
Dr. D. Klausgrete
Sheet of
Installation Instructions EVO1Y1 63
Page 64
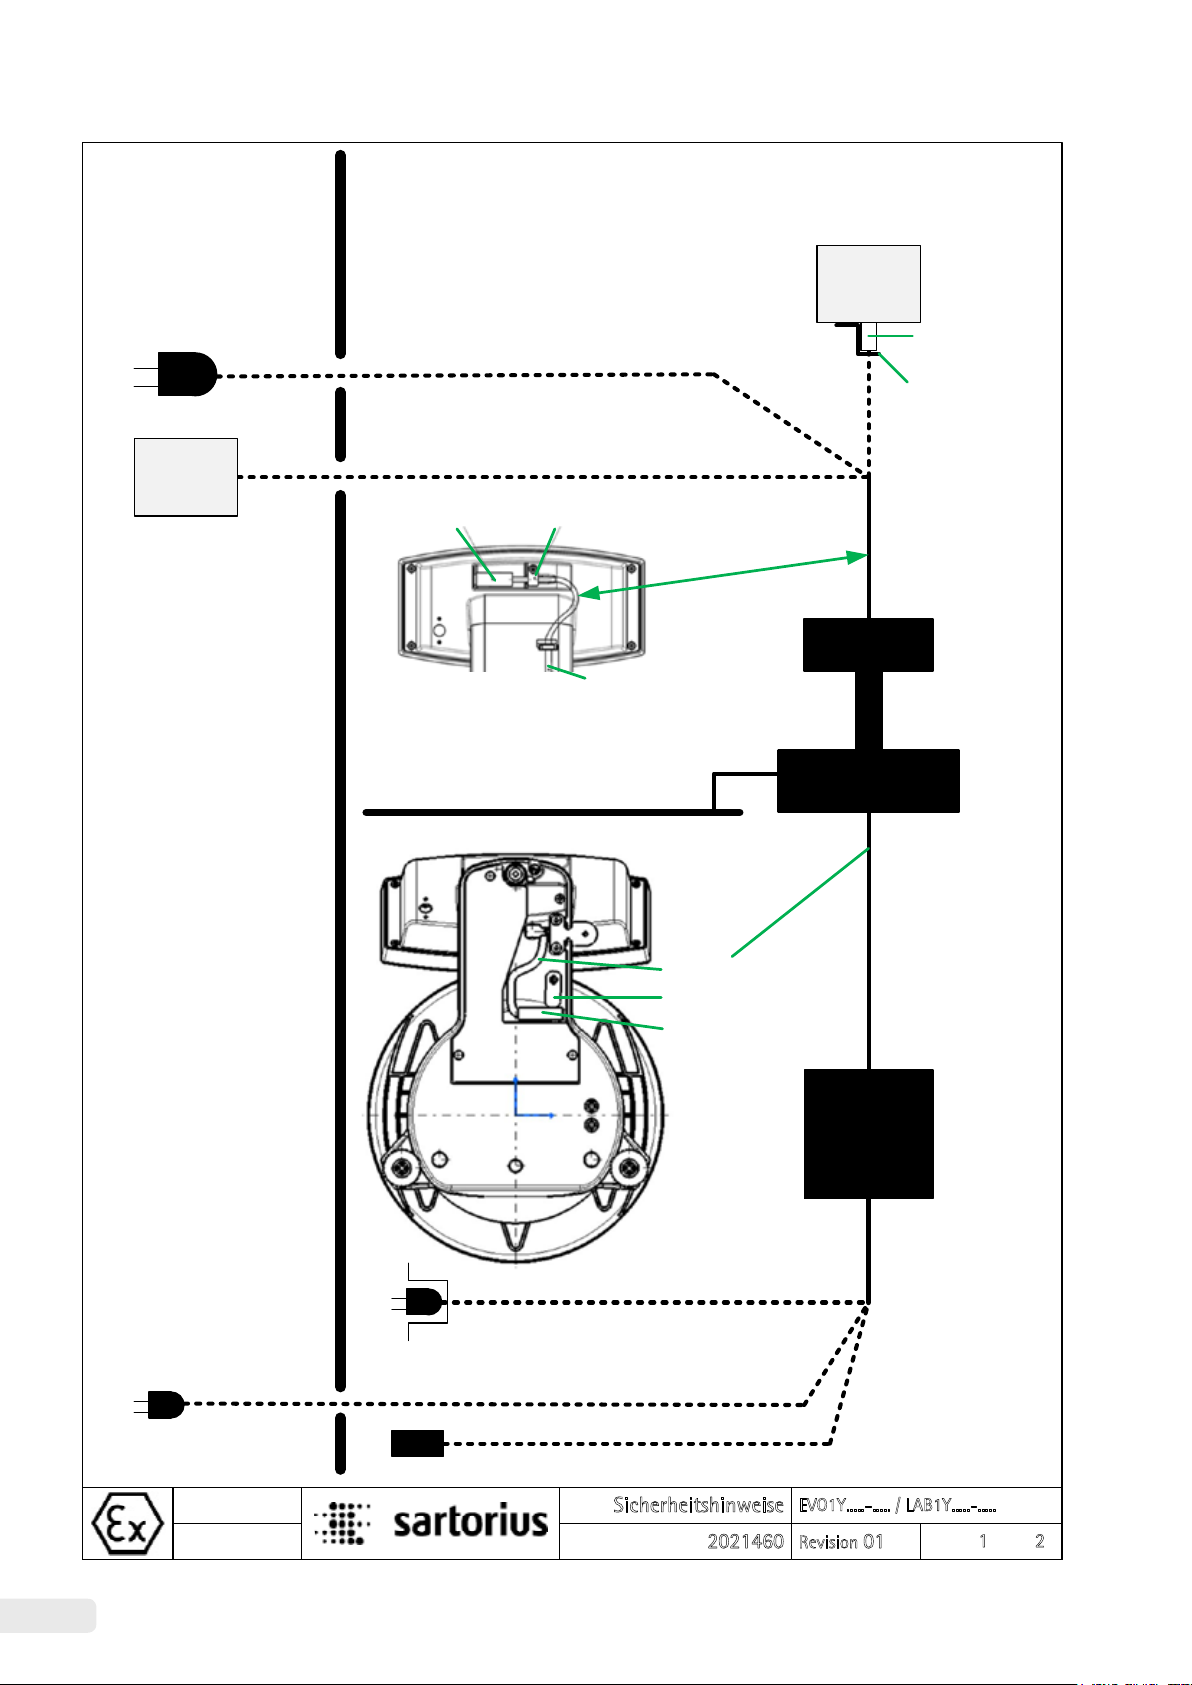
Sicherer Bereich
Netzgerät
z. B. Sartorius
YPS06-USB
Explosionsgefährdeter Bereich Zone 2
Gasgruppe IIB, Temperaturklasse T4
Umgebungstemperatur: 0 °C bis +40 °C
PC
18)
USB-Stecker
PC
KabelklemmeUSB-Stecker
USB-Kabel
Potenzialausgleichsleiter
7)
9)
Alternative
Verbindungen
USB-Kabel
Anzeigeeinheit
EVO1Y.....-.....
LAB1Y.....-.....
Wägezelle
Kabelklemme
19)
Im Standardlieferumfang
enthaltener Stecker
11.11.2015
Dr. D. Klausgrete
DC-Kabel
Anschlussblock
DC-Kabelstecker
Der Stecker (Standardlieferumfang) ist so
zu sichern, dass er sich nicht versehentlich
lösen kann. Stellen Sie sicher, dass ein
Not-Aus-Schalter zur Verfügung steht.
EX-Stecker verwenden
7)
Sicherheitshinweise
2021460
Netzgerät
Sartorius
YPS04-Y..
Alternative
Verbindungen
EVO1Y.....-..... / LAB1Y.....-.....
Blatt von
Revision
01
1
2
64 Installation Instructions EVO1Y1
Page 65

Diese Sicherheitshinweise betreffen die Installation, Bedienung, Wartung und Reparatur des Gerätes.
1) Das Gerät ist gemäß den geltenden Gesetzen, Regeln und Vorschriften, Verordnungen und Standards zu installieren.
Insbesondere sind die europäischen Standards EN 60079-14 (Explosionsfähige Atmosphäre – Teil 14: Projektierung, Auswahl
und Errichtung elektrischer Anlagen) oder, sofern anwendbar, IEC 60079-14 einzuhalten.
2) Die in den mitgelieferten Handbüchern enthaltenen Installations-, Betriebs-, Wartungs- und Servicehinweise müssen
unbedingt befolgt werden.
3) Das Gerät muss so installiert werden, dass es vor eindringenden Festkörpern oder Wasser und einer hierdurch bedingten
Beeinträchtigung der Gerätesicherheit geschützt ist. Das Risiko mechanischer Schäden ist auf ein Minimum zu reduzieren.
4) Die Exposition gegenüber UV-Strahlung ist nicht zulässig!
5) Das Anschlusskabel der Anzeigeeinheit muss vor Schäden und Zugbelastung geschützt werden.
6) Vor dem Öffnen ist das Gerät von der Stromversorgung zu trennen bzw. sicherzustellen, dass in der Umgebung keine
explosionsfähige Atmosphäre oder eine sonstige Explosionsgefahr vorhanden ist!
7) Das an die Waage (Wägeeinheit) angeschlossene Datenkabel gilt als nicht eigensicherer Stromkreis. Die Verbindung ist gegen
versehentliche Trennung gesichert. Sie darf nur hergestellt oder getrennt werden, nachdem die Stromversorgung vollständig
ausgeschaltet wurde. Vor der Nutzung des Gerätes an gefährlichen Einsatzorten muss überprüft werden, ob die Daten übertragung ordnungsgemäß funktioniert. Arretieren Sie den USB-Stecker des USB-Kabels mit der Kabelklemme und
blockieren Sie den Stecker des DC-Kabels bei der Option „zusätzliche Stromversorgungskarte“ am Anschlussblock.
8) Sollte das Gerät nicht einwandfrei arbeiten, ist es unverzüglich von der Netzversorgung zu trennen!
9) Alle Metallteile müssen elektrisch mit der Potenzialausgleichsklemme (PA) verbunden werden. Der Betreiber des Gerätes ist
verpflichtet, eine Leitung mit einem Querschnitt von min. 4 mm² an die am Gehäuse der Waage angebrachte Potenzialaus gleichsklemme anzuschließen. Beim Installieren des Systems am vorgesehenen Aufstellungsort ist zu prüfen, ob diese
Verbindung zum Potenzialausgleichsleiter niederohmig ist. Die Abschirmung der Anschlusskabel ist nur dann für die Erdung zu
nutzen, wenn hierdurch keine unzulässige Spannungsdifferenz erzeugt wird und wenn die Abschirmung ggf. in der Lage ist,
den Ausgleichsstrom zu führen.
10) Es ist darauf zu achten, dass keine statische Elektrizität erzeugt wird. Das Gerät nur mit einem feuchten Tuch abwischen.
Der Betreiber des Gerätes ist dafür verantwortlich, dass jegliches Risiko bedingt durch statische Elektrizität vermieden wird.
11) Halten Sie Chemikalien und andere Mittel, die Korrosion an den Gehäusedichtungen und Kabelummantelungen verursachen
können, vom Gerät fern. Hierzu zählen u. a. Öl, Fett, Benzol, Azeton und Ozon. Falls Sie unsicher sind, ob eine bestimmte
Substanz sicher ist, setzen Sie sich bitte mit dem Hersteller in Verbindung.
12) Das Gerät darf nur innerhalb des vorgegebenen Temperaturbereichs verwendet werden. Vermeiden Sie es, das Gerät hohen
Temperaturen auszusetzen.
13) Die Verwendung von Kabeln anderer Hersteller als Sartorius erfolgt auf Verantwortung des Gerätebetreibers.
14) Lassen Sie Ihre Geräteinstallation in angemessenen Abständen von einem geschulten und zertifizierten Techniker auf
ordnungsgemäße Funktion und Sicherheit überprüfen.
15) Sollte eine Reparatur Ihres Gerätes erforderlich sein, dürfen nur vom Hersteller gelieferte Originalersatzteile verwendet
werden!
16) Alle unerlaubten Änderungen am Gerät, außer den von zugelassenen Sartorius-Servicetechnikern vorgenommenen
Reparaturen, führen zum Verlust des Explosionsschutzes sowie aller Ansprüche im Rahmen der Herstellergewährleistung.
Das Gerät darf nur von qualifizierten Fachkräften gewartet werden.
17) Modifikationen, einschließlich derjenigen, die von Sartorius-Mitarbeitern durchgeführt werden, setzen die ausdrückliche
schriftliche Genehmigung von Sartorius voraus.
18) Der USB-Anschluss von IECEx-zertifizierter elektrischer Ausrüstung nach EPL Gc oder nach ATEX-Kategorie II 3 G kann über
ein herkömmliches USB-Kabel mit der Waage (Wägeeinheit) verbunden werden.
19) Das an die Waage (Wägeeinheit) angeschlossene USB-Datenkabel gilt als nicht eigensicherer Stromkreis. Die Verbindung ist
gegen versehentliche Trennung gesichert. Sie darf nur hergestellt oder getrennt werden, nachdem die Stromversorgung
vollständig ausgeschaltet wurde. Bevor Sie das Gerät im explosionsgefährdeten Bereich einsetzen, überprüfen Sie bitte, ob
die Datenübertragung richtig funktioniert. Arretieren Sie den USB-Stecker des USB-Kabels an der Waage (Wägeeinheit) und
allen unter Punkt 18 genannten Geräten mit einer Kabelklemme oder einer mit einem Werkzeug gesicherten Vorrichtung.
11.11.2015
Dr. D. Klausgrete
Sicherheitshinweise
2021460
Installation Instructions EVO1Y1 65
EVO1Y.....-..... / LAB1Y.....-.....
Blatt von
Revision
01
2
2
Page 66

Feuille de
2021460
Consignes de sécurité
11/11/2015
Dr D. Klausgrete
Révision 01
1
EVO1Y.....-..... / LAB1Y.....-.....
2
Atmosphère explosive zone 2
Atmosphère non
explosive
Groupe de gaz IIB, classe de température T4
Température ambiante : 0 °C à +40 °C
Assurer le connecteur (équipement standard
fourni) de manière à ce qu'il ne puisse pas se
débrancher accidentellement. S'assurer qu'un
interrupteur d'urgence est disponible.
Bloc d'alimentation
par ex. Sartorius
YPS06-USB
Autres possibilités
de connexion
Utiliser un connecteur antidéflagrant
Conducteur d'équipotentialité
9)
Appareil
Unité
d'affichage
EVO1Y.....-.....
LAB1Y.....-.....
Serre-câble
Connecteur
USB
Câble USB
Connecteur fourni
avec l'équipement
standard
Autres possibilités
de connexion
Bloc
d'alimentation
Sartorius
YPS04-Y..
Capteur de pesage
Câble USB
Bloc de fixation
Connecteur du câble DC
Câble DC
7)
7)
Appareil
Serre-câble
19)
Connecteur USB
18)
66 Installation Instructions EVO1Y1
Page 67

Feuille de
2021460
Consignes de sécurité
11/11/2015
Dr D. Klausgrete
Révision 01
2
EVO1Y.....-..... / LAB1Y.....-.....
2
Ces consignes de sécurité s'appliquent à l'installation, à l'utilisation, à la maintenance et à la réparation de l'équipement.
1) Installez l'équipement conformément aux lois, règlements, ordonnances et normes en vigueur. Veillez notamment à vous
conformer aux normes européennes EN 60079-14 (Atmosphères explosives – Partie 14 : Conception, sélection et
construction des installations électriques) ou IEC 60079-14 si applicable.
2) Respectez les conseils d'installation, d'utilisation, de maintenance et d'entretien qui se trouvent dans les manuels fournis.
3) L'équipement doit être installé de manière à empêcher l'introduction de corps étrangers solides ou d'eau susceptibles de
nuire à la sécurité de l'appareil. Réduisez au minimum les risques de dommages mécaniques.
4) Il est interdit d'exposer l'appareil aux rayons UV.
5) Il convient de protéger le câble de raccordement de l'unité d'affichage contre les dommages et les contraintes causés par
les déformations.
6) Avant d'ouvrir l'équipement, déconnectez l'alimentation électrique ou assurez-vous qu'il n'y a pas d'atmosphère
potentiellement explosive ou tout autre risque d'explosion dans la zone avoisinante !
7) Le câble de données connecté à la balance (unité de pesage) est considéré comme étant un circuit à sécurité non
intrinsèque. La connexion est assurée contre tout débranchement accidentel. Le câble ne doit être branché ou débranché
que lorsque l'alimentation électrique est totalement coupée. Vérifiez le bon déroulement du transfert de données avant
d'utiliser l'équipement dans une zone à risque. Bloquez le connecteur USB du câble USB à l'aide du serre-câble et en cas
d'option « carte d'alimentation supplémentaire », bloquez le connecteur du câble DC à l'aide du bloc de fixation.
8) Si l'équipement ne fonctionne pas correctement, débranchez-le immédiatement de la ligne électrique (alimentation
secteur) !
9) Toutes les pièces métalliques doivent être connectées électriquement à la borne d'équipotentialité (PA). L'opérateur de
l'équipement est tenu de brancher un conducteur d'au moins 4 mm² (section transversale) à la borne d'équipotentialité
située sur le boîtier de la balance. La faible impédance de cette connexion à la borne d'équipotentialité doit être vérifiée
lorsque le système est installé sur le lieu d'utilisation prévu. Le blindage des câbles de raccordement peut être utilisé pour
la mise à la terre uniquement lorsqu'aucune différence non admissible de la tension n'est générée et que le blindage peut,
si nécessaire, conduire le courant de compensation de potentiel.
10) Évitez de générer de l'électricité statique. Essuyez l'équipement uniquement avec un chiffon humide. L'opérateur de
l'équipement doit veiller à éviter les risques liés à l'électricité statique.
11) Les produits chimiques et autres agents susceptibles de corroder les joints du boîtier et les gaines des câbles doivent être
tenus éloignés de l'équipement. Parmi ces produits, citons notamment l'huile, la graisse, le benzène, l'acétone et l'ozone.
En cas de doute sur la dangerosité potentielle d'une substance donnée, contactez le fabricant.
12) Utilisez l'équipement uniquement dans les plages de température indiquées. Évitez d'exposer l'équipement à une source de
chaleur.
13) L'opérateur de l'équipement est responsable des câbles utilisés ne provenant pas de Sartorius.
14) Faites régulièrement vérifier le bon fonctionnement et la sécurité de votre installation par un technicien formé et agréé.
15) Si votre équipement doit être réparé, utilisez uniquement des pièces de rechange d'origine fournies par le fabricant !
16) Toute modification non autorisée de l'équipement, à l'exception des réparations réalisées par un technicien d'entretien
agréé par Sartorius, entraîne la perte de la conformité EX et annule la garantie du fabricant. Seuls les spécialistes agréés
sont autorisés à ouvrir l'équipement.
17) Toute modification, y compris celles réalisées par le personnel de Sartorius, ne peut avoir lieu qu'avec l'autorisation écrite
expresse de Sartorius.
18) Le port USB de tout équipement électrique avec niveau de protection EPL Gc certifié IECEx ou certifié ATEX catégorie II 3
G peut être connecté à la balance (unité de pesage) via un câble USB standard.
19) Le câble de données connecté à la balance (unité de pesage) est considéré comme étant un circuit à sécurité non
intrinsèque. La connexion est assurée contre tout débranchement accidentel. Le câble ne doit être branché ou débranché
que lorsque l'alimentation électrique est totalement coupée. Vérifiez le bon déroulement du transfert de données avant
d'utiliser l'équipement dans une zone à risque. Bloquez le connecteur USB du câble USB sur la balance (unité de pesage)
et tout appareil mentionné au point 18 à l'aide d'un serre-câble ou d'un dispositif de sécurisation mécanique.
Installation Instructions EVO1Y1 67
Page 68

di
2021460
Istruzioni di sicurezza
11.11.2015
Dr. D. Klausgrete
Revisione 01
1
EVO1Y.....-..... / LAB1Y.....-.....
2
Area a rischio di esplosione zona 2
Area sicura
Gruppo gas IIB, classe temperatura T4
Temperatura ambiente: 0°C - +40°C
Assicurare la spina (fornita con la dotazione
standard) in modo da impedirne un distacco
accidentale. Accertarsi che sia disponibile un
interruttore di spegnimento di emergenza.
Alimentatore
per es. Sartorius
YPS06-USB
Connessioni
alternative
Usare una spina antideflagrante
Conduttore equipotenziale
9)
Apparecchio
Unità di
visualizzazione
EVO1Y.....-.....
LAB1Y.....-.....
Serracavo
Connettore
USB
Cavo USB
Spina fornita con
la dotazione
standard
Connessioni
alternative
Alimentatore
Sartorius
YPS04-Y..
Cella di pesatura
Cavo USB
Blocchetto di fissaggio
Connettore del cavo DC
Cavo DC
7)
7)
Dispositivo
Serracavo
19)
Connettore USB
18)
68 Installation Instructions EVO1Y1
Scheda
tecnica
Page 69

di
2021460
Istruzioni di sicurezza
11.11.2015
Dr. D. Klausgrete
Revisione 01
2
EVO1Y.....-..... / LAB1Y.....-.....
2
Queste istruzioni per la sicurezza concernono l'installazione, il funzionamento, la manutenzione e la riparazione dell'apparecchio
1) Installare l'apparecchio in conformità con le leggi, le norme e i regolamenti, gli ordinamenti e gli standard attualmente
vigenti in materia. Osservare in particolare le norme europee EN 60079-14 (Atmosfere esplosive - Parte 14: Progettazione,
scelta ed installazione di impianti elettrici) o IEC 60079-14 se applicabile.
2) Seguire attentamente le istruzioni per l'installazione, il funzionamento, la manutenzione e l'assistenza tecnica contenute
nei manuali forniti.
3) L'apparecchio deve essere installato in modo tale da prevenire la penetrazione di corpi solidi estranei o acqua che
potrebbero pregiudicare la sicurezza dell'apparecchio. Ridurre al minimo il rischio di danni meccanici.
4) Non è consentito esporre l'apparecchio ai raggi ultravioletti!
5) Il cavo di collegamento dell'unità di visualizzazione deve essere protetto da eventuali danni e da sforzo di trazione.
6) Prima di aprire l'apparecchio, separarlo dall'alimentazione elettrica o verificare che l'atmosfera non sia potenzialmente
esplosiva o che l'area circostante non sia esposta al rischio di esplosione!
7) Il cavo dati collegato alla bilancia (strumento di pesatura) è considerato al pari di un circuito non a sicurezza intrinseca. Il
collegamento è protetto contro il distacco accidentale e il cavo può essere collegato o scollegato soltanto quando
l'alimentazione elettrica è completamente interrotta. Verificare che il trasferimento dei dati funzioni perfettamente prima
di usare l'apparecchio in un'area a rischio d'esplosione. Bloccare il connettore USB del cavo USB per mezzo del serracavo e
se si tratta dell'opzione "piastra alimentatore aggiuntivo" bloccare il connettore del cavo DC per mezzo del blocchetto di
fissaggio.
8) Se l'apparecchio non funziona correttamente, separarlo immediatamente dall'alimentazione elettrica (rete elettrica)!
9) Tutte le parti in metallo devono essere collegate al morsetto per il conduttore equipotenziale (PA). Il gestore
dell'apparecchio è obbligato a collegare un conduttore con una sezione di almeno 4 mm² (sezione trasversale) al morsetto
PA presente sull'alloggiamento della bilancia. La bassa resistenza di questo collegamento alla barra collettrice PA deve
essere verificata dopo che il sistema è stato installato nel luogo d'utilizzo. La schermatura dei cavi di collegamento può
essere utilizzata per la messa a terra soltanto se non si genera una differenza di tensione inammissibile e, se necessario, la
schermatura è in grado di condurre la corrente di compensazione del potenziale.
10) Evitare che si generi elettricità statica. Pulire l'apparecchio solo con un panno umido. È il gestore dell'apparecchio ad
essere responsabile della prevenzione di ogni rischio causato dall'elettricità statica.
11) L'apparecchio non deve venire a contatto con sostanze chimiche o altri agenti che potrebbero corrodere le guarnizioni
dell'alloggiamento e le guaine dei cavi. Tali agenti comprendono olio, grasso, benzene, acetone e ozono. Rivolgersi al
produttore se non si è certi che una sostanza sia sicura.
12) Utilizzare l'apparecchio soltanto con temperature comprese nei range indicati. Evitare di esporre l'apparecchio a fonti di
calore.
13) Il gestore dell'apparecchio è responsabile dell'utilizzo di cavi che non sono Sartorius.
14) Far controllare ad intervalli regolari l'installazione del proprio apparecchio da un tecnico qualificato e certificato per
assicurarne il funzionamento corretto e la sicurezza.
15) Se l'apparecchio deve essere riparato, utilizzare soltanto pezzi di ricambio originali forniti dal produttore!
16) Qualsiasi intervento, da parte di chiunque, che comporta la manomissione dell'apparecchio, ad eccezione degli interventi
di riparazione eseguiti da tecnici autorizzati del Sartorius Service, causano la perdita della conformità EX e di ogni diritto
previsto dalla garanzia del produttore. Soltanto tecnici specializzati autorizzati possono aprire l'apparecchio.
17) Tutte le modifiche, comprese quelle che devono essere eseguite dai dipendenti Sartorius, sono consentite solo dopo aver
ottenuto l'autorizzazione scritta esplicita da parte di Sartorius.
18) La porta USB di qualsiasi apparecchiatura elettrica con livello di protezione EPL Gc certificata IECEx o certificata ATEX per
la categoria II 3 G, può essere collegata alla bilancia (strumento di pesatura) mediante un cavo USB standard.
19) Il cavo USB collegato alla bilancia (strumento di pesatura) è considerato al pari di un circuito non a sicurezza intrinseca. Il
collegamento è protetto contro il distacco accidentale e il cavo può essere collegato o scollegato soltanto quando
l'alimentazione elettrica è completamente interrotta. Verificare che il trasferimento dei dati funzioni perfettamente prima
di usare l'apparecchio in un'area a rischio d'esplosione. Bloccare il connettore USB del cavo USB sulla bilancia (strumento
di pesatura) e qualsiasi dispositivo menzionato al punto 18 mediante un serracavo o un dispositivo di fissaggio meccanico.
Installation Instructions EVO1Y1 69
Scheda
tecnica
Page 70

Hoja de
2021460
Instrucciones de seguridad
11/11/2015
Dr. D. Klausgrete
Revisión
01
1
EVO1Y.....-..... / LAB1Y.....-.....
2
Zona 2 del área peligrosa
Área no peligrosa
Grupo de gases IIB, clase de temperatura T4
Temperatura ambiente: de 0 °C a +40 °C
Fije el enchufe (suministrado con el equipo
estándar) para que no se pueda desconectar de
forma accidental. Asegúrese de tener disponible
un interruptor de desactivación de emergencia.
Fuente de alimentación
p. ej. Sartorius
YPS06-USB
Conexiones
alternativas
Utilice el enchufe EX
Terminal del conductor equipotencial
9)
Dispositivo
Unidad de
visualización
EVO1Y.....-.....
LAB1Y.....-.....
Abrazadera
de cables
Conexión USB
Cable USB
El enchufe se
proporciona con el
equipo estándar
Conexiones
alternativas
Fuente de
alimentación
Sartorius
YPS04-Y.
Célula de pesaje
Cable USB
Bloque de sujeción
Conexión del cable de CC
Cable de CC
7)
7)
Dispositivo
Abrazadera
de cables
19)
Conexión USB
18)
70 Installation Instructions EVO1Y1
Page 71

Hoja de
2021460
Instrucciones de seguridad
11/11/2015
Dr. D. Klausgrete
Revisión
01
2
EVO1Y.....-..... / LAB1Y.....-.....
2
Estas instrucciones de seguridad se refieren a la instalación, al mantenimiento y a la reparación del equipo.
1) Instale el equipo de acuerdo con la legislación, las normativas, los reglamentos, las ordenanzas y las normas
vigentes. Asegúrese de cumplir las normas europeas, en particular la EN 60079-14 ("Atmósferas explosivas.
Parte 14: Diseño, elección y realización de instalaciones eléctricas") o la IEC 60079-14, según corresponda.
2) Asegúrese de observar las instrucciones de instalación, manejo, mantenimiento y reparación contenidas en los
manuales adjuntos.
3) El equipo debe instalarse de manera que quede protegido contra la penetración de cuerpos sólidos extraños y
de agua, que podrían comprometer la seguridad del aparato. Reduzca al mínimo posible el riesgo de daños
mecánicos.
4) No se permite la exposición a radiación UV (ultravioleta).
5) Proteja el cable de conexión de la unidad de visualización contra daños y tirones.
6) Antes de abrir el equipo, desconecte la fuente de alimentación o asegúrese de que no se encuentre en una
atmósfera explosiva y de que no exista ningún otro riesgo de explosión en la cercanía.
7) El cable de datos conectado a la balanza (unidad de pesaje) se considera un circuito de seguridad no intrínseca.
La conexión está protegida contra su desconexión accidental y solo se puede enchufar o desenchufar después
de desconectado completamente la alimentación. Antes de utilizar el equipo en una zona peligrosa, verifique el
correcto funcionamiento de la transferencia de datos. Bloquee el enchufe USB del cable USB a través de la
abrazadera de cables y, en caso de que aparezca la opción "tablero de alimentación opcional", bloquee el
enchufe del cable de CC a través del bloque de sujeción.
8) Si el equipo dejase de funcionar correctamente, desenchúfelo inmediatamente de la alimentación eléctrica.
9) Todos los componentes metálicos deberán conectarse eléctricamente al terminal del conductor equipotencial
(PA). El operador del equipo será responsable de conectar un cable con una sección mínima de 4 mm² a la
regleta situada en la carcasa de la balanza. Una vez instalado el sistema en el lugar de uso previsto, deberá
comprobarse la baja resistencia de esta conexión a la regleta. El blindaje de los cables de conexión solo se
podrá emplear como puesta a tierra si con ello no se genera ninguna diferencia de tensión inadmisible y, si
fuese necesario, si dicho blindaje es capaz de conducir la corriente equipotencial.
10) Evite la generación de electricidad estática. Para limpiar el equipo, utilice exclusivamente un paño húmedo. El
operador del equipo será responsable de prevenir los riesgos causados por la acumulación de electricidad
estática.
11) Mantenga alejados del equipo todo tipo de productos químicos y demás agentes que puedan corroer los sellos
de la carcasa y los blindajes de los cables. Entre estos agentes se cuentan: aceite, grasa, benceno, acetona y
ozono. Si desconoce el grado de seguridad de una determinada sustancia, consulte el fabricante.
12) Utilice el aparato solo en los rangos de temperatura indicados. Evite exponer el equipo al calor.
13) El operador del equipo asume plena responsabilidad por las consecuencias que puedan derivarse de utilizar
cables no originales de Sartorius.
14) Encargue periódicamente a un técnico debidamente cualificado y certificado que compruebe el correcto
funcionamiento y la seguridad de la instalación de su equipo.
15) Si el equipo necesitase algún tipo de reparación, utilice exclusivamente recambios originales suministrados por
el fabricante.
16) Cualquier manipulación del equipo por parte de cualquier persona no perteneciente a un servicio técnico
autorizado de Sartorius conllevará la pérdida de la conformidad EX y la anulación de la garantía por parte del
fabricante. Solo especialistas debidamente autorizados pueden abrir el equipo.
17) Para cualquier modificación, incluso aunque vaya a ser efectuada por empleados de Sartorius, se requiere una
autorización expresa, previa y por escrito de Sartorius.
18) El puerto USB de cualquier equipo eléctrico EPL Gc con certificado IECEx o con certificado ATEX Categoría II 3G
puede conectarse a la balanza (unidad de pesaje) por medio de un cable USB estándar.
19) El cable de datos USB conectado a la balanza (unidad de pesaje) se considera un circuito de seguridad
intrínseca. La conexión está protegida contra su desconexión accidental y solo se puede enchufar o
desenchufar después de desconectado completamente la alimentación. Antes de utilizar el equipo en una zona
peligrosa, verifique el correcto funcionamiento de la transferencia de datos. Bloquee la conexión USB del cable
USB en la balanza (unidad de pesaje) y cualquier dispositivo de la nota 18 por medio de un dispositivo
protegido con una herramienta o abrazadera de cables.
Installation Instructions EVO1Y1 71
Page 72

Strefa bezpieczna
Zasilacz
n p. Sartorius
YPS06-USB
Obszar zagrożenia wybuchem strefa 2
Grupa gazowa IIB, klasa temperaturowa T4
Temperatura otoczenia: 0°C–+40°C
PC
18)
Wtyczka USB
PC
Wtyczka USB
Przewód wyrównywania
potencjałów
kablowy
Zacisk
Kabel USB
7)
9)
Przetwornik wagowy
Połączenia
alternatywne
Kabel USB
Jednostka
wyświetlacza
Zacisk
kablowy
19)
EVO1Y.....-.....
LAB1Y.....-.....
Wtyczka objęta
zakresem dostawy
standardowej
11.11.2015
dr D. Klausgrete
Kabel DC
Blok przyłączy
Wtyczka kabla
DC
7)
Zasilacz
Sartorius
YPS04-Y..
Połączenia
alternatywne
Wtyczkę (z zakresu dostawy standardowej)
zabezpieczyć tak, by uniknąć przypadkowego
odłączenia. Upewnić się, że dostępny jest
wyłącznik awaryjny.
Stosować wtyczki do obszarów zagrożonych wybuchem
Instrukcje
bezpieczeństwa
2021460
EVO1Y.....-..... / LAB1Y.....-.....
Wersja
01
Arkusz z
1
2
72 Installation Instructions EVO1Y1
Page 73

Niniejsze instrukcje bezpieczeństwa dotyczą instalacji, użytkowania, konserwacji i naprawy urządzenia.
1) Urządzenie zainstalować zgodnie z obowiązującymi ustawami, przepisami, rozporządzeniami i normami.
W szczególności należy przestrzegać standardu europejskiego EN 60079-14 (Atmosfery wybuchowe – część 14:
Projektowanie,
dobór i montaż instalacji elektrycznych) lub, o ile mają zastosowanie, IEC 60079-14.
2) Bezwzględnie przestrzegać wskazówek dotyczących instalacji, eksploatacji, konserwacji i naprawy zawartych w
załączonych instrukcjach obsługi.
3) Urządzenie zainstalować tak, aby zapobiec przedostawaniu się do jego wnętrza ciał stałych lub wody i wywołaniu w ten
sposób
obniżenia bezpieczeństwa urządzenia. Ryzyko uszkodzeń mechanicznych obniżyć do minimum.
4) Wystawianie urządzenia na działanie promieniowania UV jest niedopuszczalne!
5) Przewód przyłączeniowy jednostki wyświetlacza należy chronić przed uszkodzeniami i naprężeniami.
6) Przed otwarciem urządzenia odłączyć napięcie lub sprawdzić, czy na obszarze nie ma atmosfery grożącej wybuchem lub
innych zagrożeń wybuchowych!
7) Przyłączony do wagi (zespołu wagi) przewód transmisji danych nie jest samobezpiecznym obwodem prądowym.
Połączenie jest zabezpieczone przed przypadkowym rozłączeniem. Połączenie wolno wykonać lub rozłączyć tylko po
uprzednim całkowitym odłączeniu zasilania elektrycznego. Przed użyciem urządzenia w miejscach zagrożeń należy
sprawdzić, czy transmisja
danych działa prawidłowo. Zablokować wtyczkę USB kabla USB zaciskiem kablowym i zablokować wtyczkę kabla DC w
bloku przyłączy, w przypadku korzystania z opcji „dodatkowa karta zasilania elektrycznego”.
8) W przypadku stwierdzenia nieprawidłowej pracy urządzenia natychmiast odłączyć je od sieci zasilającej!
9) Wszystkie elementy metalowe należy elektrycznie połączyć z zaciskiem wyrównywania potencjałów (PA). Użytkownik
urządzenia jest
zobowiązany do przyłączenia przewodu o przekroju przynajmniej 4 mm² do zacisku wyrównywaniapotencjałów umieszczonego na obudowie wagi. Podczas instalowania systemu na przewidzianym miejscu sprawdzić, czy
połączenie z przewodem wyrównywania potencjałów jest niskoomowe. Ekranowania kabla przyłączeniowego można użyć
w charakterze uziemienia tylko wtedy, gdy nie spowoduje to niedopuszczalnych różnic napięć, a ekran jest zdolny do
odprowadzania,
ewentualnie pojawiającego się prądu kompensacyjnego.
10) Należy uważać, aby nie wytwarzały się ładunki elektrostatyczne. Urządzenie przecierać wyłącznie zwilżoną szmatką.
Użytkownik urządzenia jest odpowiedzialny za to, aby unikać jakiegokolwiek ryzyka stwarzanego przez ładunki
elektrostatyczne.
11) Nie dopuścić do kontaktu urządzenia z substancjami chemicznymi i innymi, które mogą spowodować korozję uszczelek
urządzenia oraz uszkodzenie otuliny kabli. Do takich substancji zaliczają się m.in. oleje, smary, benzen, aceton i ozon. W
razie braku pewności, czy określona substancja jest bezpieczna, skontaktować się z producentem.
12) Urządzenie można użytkować wyłącznie w zakresie podanych temperatur. Unikać wystawiania urządzenia na działanie
wysokich
temperatur.
13) Użycie kabli innych producentów niż firma Sartorius odbywa się na odpowiedzialność użytkownika urządzenia.
14) Instalację w odpowiednich odstępach czasu powinien kontrolować wykwalifikowany i certyfikowany technik pod kątem
sprawności
i bezpieczeństwa.
15) W przypadku konieczności naprawy urządzenia wolno stosować wyłącznie oryginalne części zamienne dostarczone przez
producenta urządzenia!
16) Każda nieuprawniona ingerencja w urządzenie (z wyjątkiem napraw przeprowadzanych przez techników autoryzowanych
przez firmę Sartorius) prowadzi do utraty ochrony przeciwwybuchowej oraz możliwości wysuwania jakichkolwiek roszczeń
z tytułu gwarancji producenta.Urządzenie mogą konserwować tylko specjaliści.
17) Modyfikacje, włącznie z tymi przeprowadzanymi przez pracowników firmy Sartorius, wymagają uzyskania wyraźnej,
pisemnej zgody firmy Sartorius.
18) Przyłącze USB certyfikowanego przez IECEx wyposażenia elektrycznego zgodnego z EPL Gc lub kategorią ATEX-
Kategorie II 3 G można połączyć
19) Przyłączony do wagi (zespołu wagi) kabel USB nie jest samobezpiecznym obwodem prądowym. Połączenie jest
zabezpieczone przed
przypadkowym rozłączeniem. Połączenie wolno wykonać lub rozłączyć tylko po uprzednim całkowitym odłączeniu
zasilania elektrycznego. Przed użyciem urządzenia w strefie zagrożenia wybuchem sprawdzić, czy transmisja danych
działa prawidłowo. Zablokować wtyczkę USB kabla USB w wadze (zespole wagowym) i wszystkich urządzeniach
wymienionych w punkcie 18 zaciskiem kablowym lub przyrządem zabezpieczanym narzędziem.
z wagą (zespołem wagowym) zwykłym kablem USB.
11.11.2015
dr D. Klausgrete
Instrukcje
bezpieczeństwa
2021460
EVO1Y.....-..... / LAB1Y.....-.....
Arkusz z
Wersja
01
2
2
Installation Instructions EVO1Y1 73
Page 74

cn=Mick Gower, o=FM Approvals,
ou,
email=mick.gower@fmapprovals.
com, c=GB
2017.07.25 09:00:19 +01'00'
1
TYPE EXAMINATION CERTIFICATE
2
Equipment or Protective systems intended for use in Potentially
Explosive Atmospheres - Directive 2014/34/EU
3
Type Examination Certificate No: FM15ATEX0008X
4
Equipment or protective system:
(Type Reference and Name)
5
Name of Applicant:
6
Address of Applicant:
7 This equipment or protective system and any acceptable variation thereto is specified in the schedule to this
certificate and documents therein referred to.
8 FM Approvals Ltd. certifies that this equipment has been found to comply with the Essential Health and
Safety Requirements relating to the design and construction of equipment intended for use in potentially
explosive atmospheres given in Annex II to the Directive.
The examination and test results are recorded in confidential report number:
9 Compliance with the Essential Health and Safety Requirements, with the exception of those identified in
item 15 of the schedule to this certificate, has been assessed by compliance with the following documents:
EN 60079-0:2012+A11:2013, EN 60079-11:2012 and EN 60079-15:2010
10 If the sign ‘X’ is placed after the certificate number, it indicates that the equipment is subject to specific
conditions of use specified in the schedule to this certificate.
11 This Type Examination certificate relates only to the design, examination and tests of the specified
equipment or protective system in accordance to the directive 2014/34/EU. Further requirements of the
Directive apply to the manufacturing process and supply of this equipment or protective system. These are
not covered by this certificate.
12 The marking of the equipment or protective system shall include:
II 3 G Ex ic nA IIB T4 Gc 0 °C Ta 40 °C
PMA.Evolution EVO1Yab-c and LAB1Yab-c
Sartorius Lab Instruments GmbH & Co. KG
Otto-Brenner-Straße 20
Göttingen 37079
Germany
th
3049975 dated 15
July 2015
Mick Gower
Certification Manager, FM Approvals Ltd.
Issue date: 25
THIS CERTIFICATE MAY ONLY BE REPRODUCED IN ITS ENTIRETY AND WITHOUT CHANGE
FM Approvals Ltd. 1 Windsor Dials, Windsor, Berkshire, UK. SL4 1RS
T: +44 (0) 1753 750 000 F: +44 (0) 1753 868 700 E-mail: atex@fmapprovals.com www.fmapprovals.com
F ATEX 029 (Apr/16) Page 1 of 3
74 Installation Instructions EVO1Y1
th
July 2017
Page 75

SCHEDULE
to Type Examination Certificate No. FM15ATEX0008X
13
Description of Equipment or Protective System:
The PMA.Evolution EVO1Yab-c and LAB1Yab-c are designed for the measurement of weight in the
hazardous location. The PMA.Evolution contains the processing circuitry and has a touch enable LCD
display with backlight facility. Power and data are provided via a USB connection.
Uin = +15Vdc / +5Vdc
Um = 20 Vdc.
An optional power supply YPS04-Y.. (KEMA 09ATEX0121X) can be used to provide power if
necessary.
The PMA.Evolution is available in two versions EVO1Yab-c and LAB1Yab-c.
PMA.Evolution EVO1Yab-c
a = Up to three letters and/or numbers or blank (not critical to safety)
b = Up to two letters and/or numbers or blank (not critical to safety)
c = Up to five letters and/or numbers or blank (not critical to safety)
PMA.Evolution LAB1Yab-c
a = Up to three letters and/or numbers or blank (not critical to safety)
b = Up to two letters and/or numbers or blank (not critical to safety)
c = Up to five letters and/or numbers or blank (not critical to safety)
14
Specific Conditions of Use:
1. The enclosure of the PMA.Evolution EVO1Yab-c and LAB1Yab-c are non-metallic and shall not be
used where UV light or radiation may impinge on the enclosure.
2. The PMA.Evolution EVO1Yab-c and LAB1Yab-c shall be installed in such a way that it is protected
against the entry of solid foreign objects or water capable of impairing the safety of the apparatus.
Reduce the risk of mechanical damage to a minimum.
3. The enclosure of the PMA.Evolution EVO1Yab-c and LAB1Yab-c is non-conducting and may
generate an ignition-capable level of electrostatic charges under certain extreme conditions. The user
shall ensure that the equipment is not installed in a location where it may be subjected to external
conditions that might cause a build-up of electrostatic charges on non-conducting surfaces, additionally,
cleaning of the equipment should be done only with a damp cloth.
15
Essential Health and Safety Requirements:
The relevant EHSRs that have not been addressed by the standards listed in this certificate have been identified
and assessed in the confidential report identified in item 8.
16
Test and Assessment Procedure and Conditions:
This Type Examination Certificate is the result of testing of a sample of the product submitted, in
accordance with the provisions of the relevant specific standard(s), and assessment of supporting
documentation. It does not imply an assessment of the whole production.
Whilst this certificate may be used in support of a manufacturer’s claim for CE Marking, FM Approvals Ltd
accepts no responsibility for the compliance of the equipment against all applicable Directives in all
applications.
This Certificate has been issued in accordance with FM Approvals Ltd’s ATEX Certification Scheme.
THIS CERTIFICATE MAY ONLY BE REPRODUCED IN ITS ENTIRETY AND WITHOUT CHANGE
FM Approvals Ltd. 1 Windsor Dials, Windsor, Berkshire, UK. SL4 1RS
T: +44 (0) 1753 750 000 F: +44 (0) 1753 868 700 E-mail: atex@fmapprovals.com www.fmapprovals.com
F ATEX 029 (Apr/16) Page 2 of 3
Installation Instructions EVO1Y1 75
Page 76

SCHEDULE
to Type Examination Certificate No. FM15ATEX0008X
17
Schedule Drawings
A list of the significant parts of the technical documentation is annexed to this certificate and a copy has
been kept by FM Approvals Ltd.
18
Certificate History
Details of the supplements to this certificate are described below:
Date Description
17th July 2015 Original Issue.
th
February 2016.
th
June 2017
18th February 2016
25th July 2017
Report Reference: RR203381 dated 17
Description of the Change: Update to Safety Instruction 2021460, allowing
connection via USB to a certified device located in the Hazardous Area.
Report Reference: RR209731 dated 6
Description of the Change: Applicant address change and labeling address change.
Minor related documentation updates.
Update to the latest standards and Directive 2014/34/EU.
THIS CERTIFICATE MAY ONLY BE REPRODUCED IN ITS ENTIRETY AND WITHOUT CHANGE
FM Approvals Ltd. 1 Windsor Dials, Windsor, Berkshire, UK. SL4 1RS
T: +44 (0) 1753 750 000 F: +44 (0) 1753 868 700 E-mail: atex@fmapprovals.com www.fmapprovals.com
F ATEX 029 (Apr/16) Page 3 of 3
76 Installation Instructions EVO1Y1
Page 77

Installation Instructions EVO1Y1 77
Page 78

78 Installation Instructions EVO1Y1
Page 79

Installation Instructions EVO1Y1 79
Page 80

80 Installation Instructions EVO1Y1
Page 81

Last updated:
The information and figures contained in these
instructions correspond to the version date
specified below.
Sartorius reserves the right to make changes
to the technology, features, specifications and
design of the equipment without notice.
Masculine or feminine forms are used to
facilitate legibility in these instructions and
always simultaneously denote the other
gender as well.
Copyright notice:
This instruction manual, including all of its
components, is protected by copyright.
Any use beyond the limits of the copyright law
is not permitted without our approval.
This applies in particular to reprinting,
translation and editing irrespective of the type
of media used.
© Sartorius Germany
Sartorius Lab Instruments GmbH & Co. KG
Otto-Brenner-Strasse 20
37079 Goettingen, Germany
Phone:
+49.551.308.0
Fax:
www.sartorius.com
+49.551.308.3289
10 | 2017
Printed in the EU on paper bleached
without chlorine. | UB
Publication No.: WEV6002ek171005
 Loading...