

Sartorius PMA 7501-X,PMA 7501-X00V1,PMA 7501-X00W Installation Instructions Manual

98648-014-43
Installation Instructions
Sartorius PMA.Quality
PMA 7501-X|PMA 7501-X00V1|PMA 7501-X00W
Electronic Paint-mixing Scales for Zone 1
2
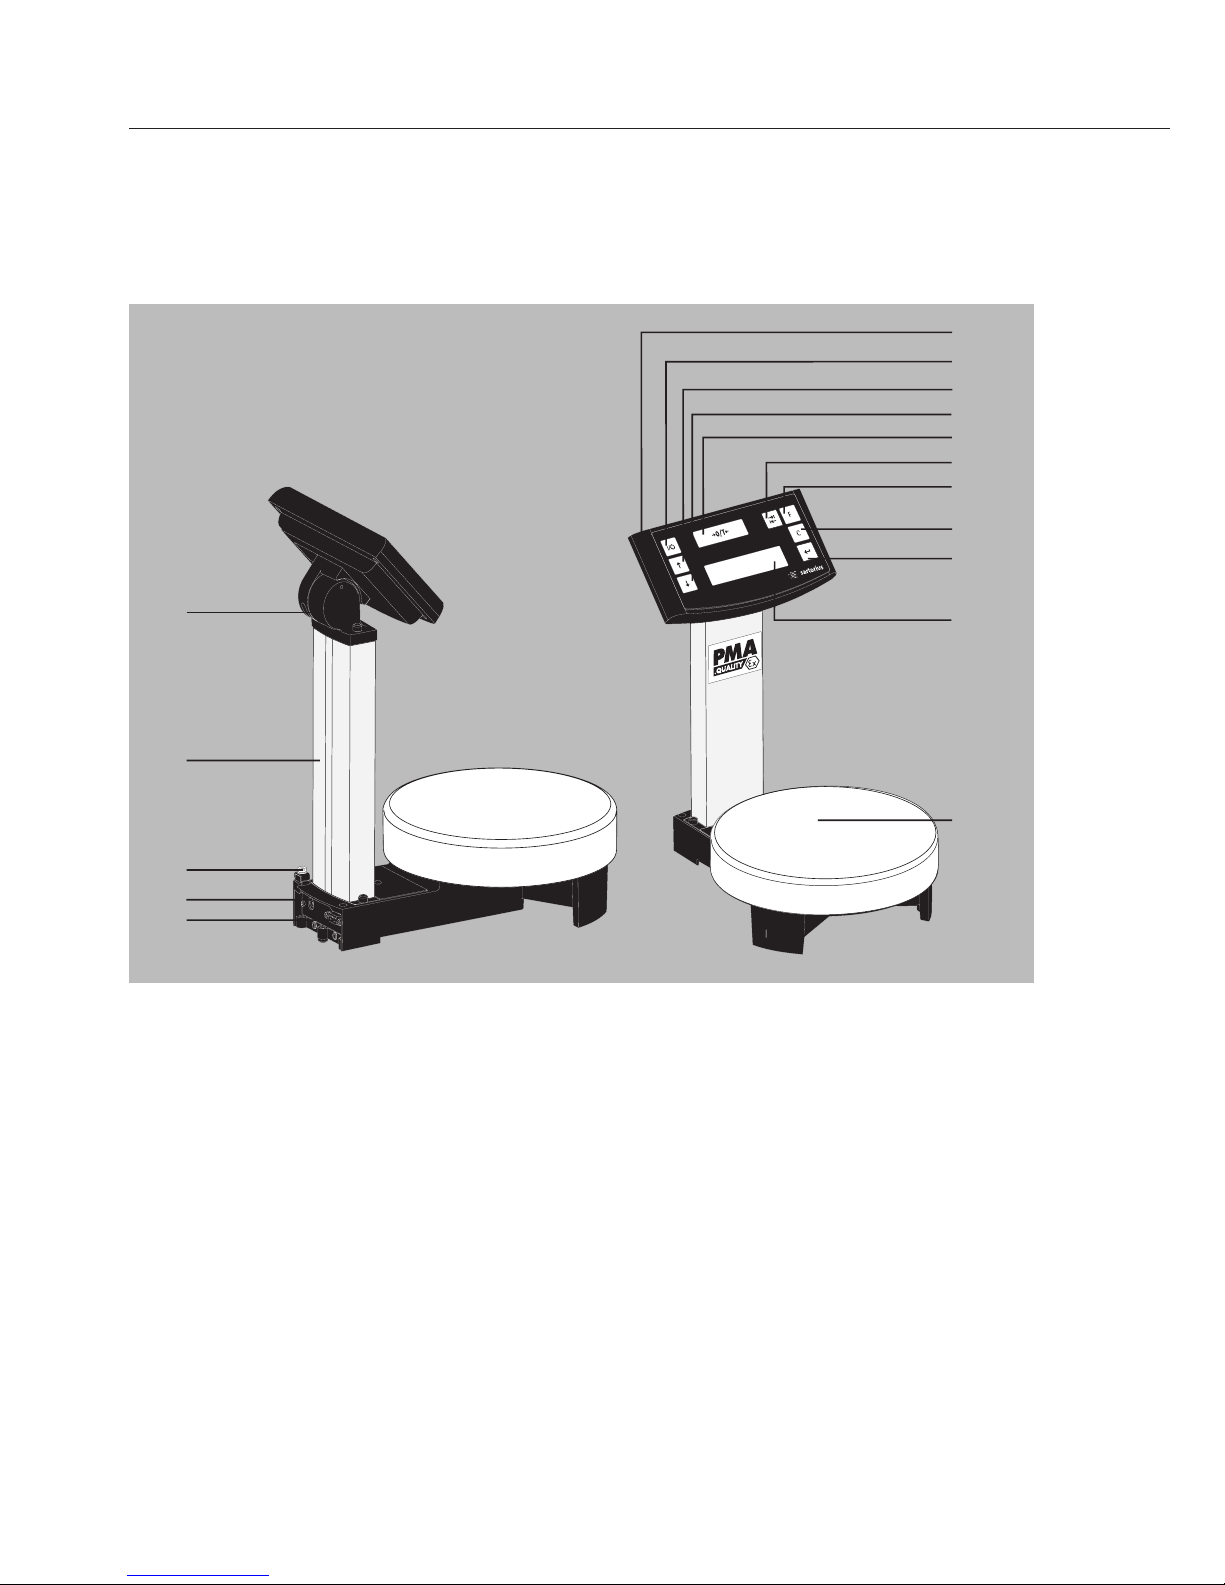
General View of the PMA 7501-X
1 Display and control unit
2 Q key (On/Standby)
3 R key: Upwards
4 S key: Downwards
5 U key: Zero/Tare
6 I key (TOGGLE)
With the PMA 7501-X, you can toggle
to two decimal places – from 0.05 g to
999.95 g – or toggle between – “g” and
“p” – parts per pound, depending on
the menu settings
7 K factor key (FORMULATION)
for paint-mixing applications
8 c key (Clear) and [REC] key for
paint-mixing applications
9 L key [ENTER] and [MEM] key for
paint-mixing applications
10 Display
11 Weighing pan
12 Interfaces (D-Sub plug, 9-contact)
13 Connection to AC power
14 Grounding terminal
15 Column
16 Joint
The following symbols are used in
these instructions:
§ Indicates required steps
$ Indicates steps required only under
certain conditions
> Describes what happens after you have
performed a particular step
– Indicates an item in a list
! Indicates a hazard
1
2
3
4
5
6
7
8
9
11
12
15
10
13
14
16

3
Contents
General View of the Equipment ...... 2
Intended Use ................... 3
Warnings and Safety Precautions .... 3
Getting Started .................. 6
Operating the Equipment .......... 8
Applications ....................10
Calibration/Adjustment ............13
Menu Settings ..................14
Troubleshooting .................19
Care and Maintenance ............20
Recycling ......................21
Specifications ...................22
Interface Port ...................22
Accessories .....................23
Declaration of Conformity ..........24
Control Drawing .................30
Verification of Intrinsic Safety .......32
Intended Use
The PMA7501-X (Quality) has been
specially designed for use in the paintmixing applications. This scale can be
controlled by a computer connected to
the interface port.
Note:
– Read the installation and operating
instructions carefully before connecting the PMA7501-X and putting it into
operation.
– The application examples and menu
settings described in these installation
instructions are not valid for
PMA7501-X00W.
Note:
Improper use or handling can result in
property damage and/or personal injury.
Only qualified personnel may install and
operate the equipment. Make sure you
observe the warning and safety information in its entirety during installation
and operation, as well as while performing maintenance and repair work on the
equipment. The standards, regulations,
occupational safety requirements and
environmental protection laws valid in
your country must be observed. It is
important that all personnel using the
equipment understand this warning and
safety information, and have access to
the relevant documents at all times.
Furthermore, the warning and safety
information supplied with any electrical
equipment connected, such as peripheral
devices, must be observed as well.
The warnings and safety precautions may
have to be supplemented by the equipment operator. All operating personnel
must be informed of any additions to
these instructions. Make sure the equipment is accessible at all times.
General Provisions for Installing the
PMA7501-X
PMA7501-X models meet the require-
ments defined in EC Directive 94/9/EC
for equipment group II, category 2G
and are marked in accordance with the
KEMA05 ATEX1247X EC type-examination certificate. In addition, they are
approved for hazardous (classified) location Class I, Division 1, Groups C,D, and
Class I, Zone 1, Groups IIA and IIB, in the
United States and in Canada, respectively.
Furthermore, PMA7501-X models meet
the EC Directives for electromagnetic
compatibility and electrical safety
(please see the Declaration of Conformity
in these installation instructions.)
Warnings and
Safety Precautions

4
- The area of use for the PMA7501-X
model is defined in the type-examination
certificate. All restrictions listed in
the type-examination certificate must
be strictly observed. Operating the
PMA7501-X model beyond the restrictions indicated is not permitted, and
is considered use of the equipment for
other than its intended purpose.
Any installation work that does not con-
form to the instructions in this manual
will result in forfeiture of all claims under
the manufacturer’s warranty. If you use
the equipment in a hazardous area outside Germany, you must comply with the
national electrical code and safety
regulations applicable in your country
(e.g.: EN60079-14). Ask your supplier
for information on the legal regulations applicable in your country. For the
USA and Canada, please refer to Control
Drawing 35958-000-07-A4.
– If the equipment housing is opened by
anyone other than persons authorized by
Sartorius, this will negate its conformity
with regulations governing its use and
result in forfeiture of all claims under the
manufacturer’s warranty.
– Installation of the PMA7501-X in a
potentially explosive atmosphere must be
performed by a certified electrician who is
familiar with both the assembly, start-up
and operation of both the system and the
relevant guidelines and regulations,
and has the required qualifications for
performing the installation. If you need
assistance, contact your Sartorius dealer
or the Sartorius Service Center.
– Avoid static electricity. Connect an equi-
potential bonding conductor.
Disconnecting equipotential bonding
conductors is not permitted. The bore
hole is marked by a “ground” symbol. If a
bore hole is provided, use a stainless steel
screw and nut to connect the grounding
conductor. The wire used for the grounding conductor should have a cross-sectional diameter of at least 4 mm
2
and have
a suitable ring lug attached. Connect all
equipment, including peripheral devices,
to the equipotential bonding conductor.
– Do not expose the scale to extreme
temperatures, aggressive chemical vapors,
moisture, shocks or vibrations.
Exposure to excessive electromagnetic disturbance can cause the readout value to
change. Once the disturbance has ceased,
the instrument can be used again in
accordance with its intended use.
– The equipment must be used indoors.
– To ensure safety, disconnect the equip-
ment from power before connecting or
disconnecting the cables or electronic
peripheral devices.
– If you use cables purchased from another
manufacturer, check the pin assignments
in the cable against those specified by
Sartorius before connecting the cable to
Sartorius equipment, and disconnect any
wires that are assigned differently.
The operator shall be solely responsible for
any damage or injuries that occur when
using cables not supplied by Sartorius.
– When connecting the scale to the power
supply, the laws valid in your country
must be observed. If you should have any
questions, please contact your supplier or
Sartorius Customer Service for information
on the legal regulations applicable in your
country. The scale must be installed by
a certified technician to avoid forfeiture
of all claims under the manufacturer’s
warranty.
– To avoid generating static electricity
(e.g., when using the in-use dust cover),
connect the equipotential bonding
conductor.
– The equipment is protected against
penetration by solid foreign objects.

5
For the User
– Always make sure the equipment is
disconnected from AC power before
performing any installation, cleaning,
maintenance or repair work on the scale.
– If you see any indication that the scale
cannot be operated safely (for example,
due to damage), turn it off and lock it in
a secure place or otherwise prevent use of
the equipment for the time being.
– Chemicals (e.g., gases or dusts) that can
corrode and damage the inside or outside
of the device must be kept away from the
equipment. Handle the equipment and
any accessories in accordance with the IP
rating (IP65 or higher) and EN 60529.
– The casing on all connecting cables,
as well as the casing on wires inside the
equipment housing, is made of PVC.
The casing of the power cable is made
of rubber.
– Do not expose the scale to aggressive
chemical vapors or to extreme temperatures, moisture, shocks, or vibration.
The allowable operating temperature
range during operation is 0°C to +40°C
+(32°F to +104F). Make sure the place
of installation is adequately ventilated to
prevent build-up of excessive heat.
– Use original Sartorius spare parts only.
– Never use a hammer to close the lid of a
paint can while it is still on the weigh-
ing pan. Otherwise, you will damage the
weighing system.
PMA7501-X Designed for Use in Zone 1 Hazardous Areas
Please refer to the drawings unter “Verification of Intrinsic Safety” for details.
6
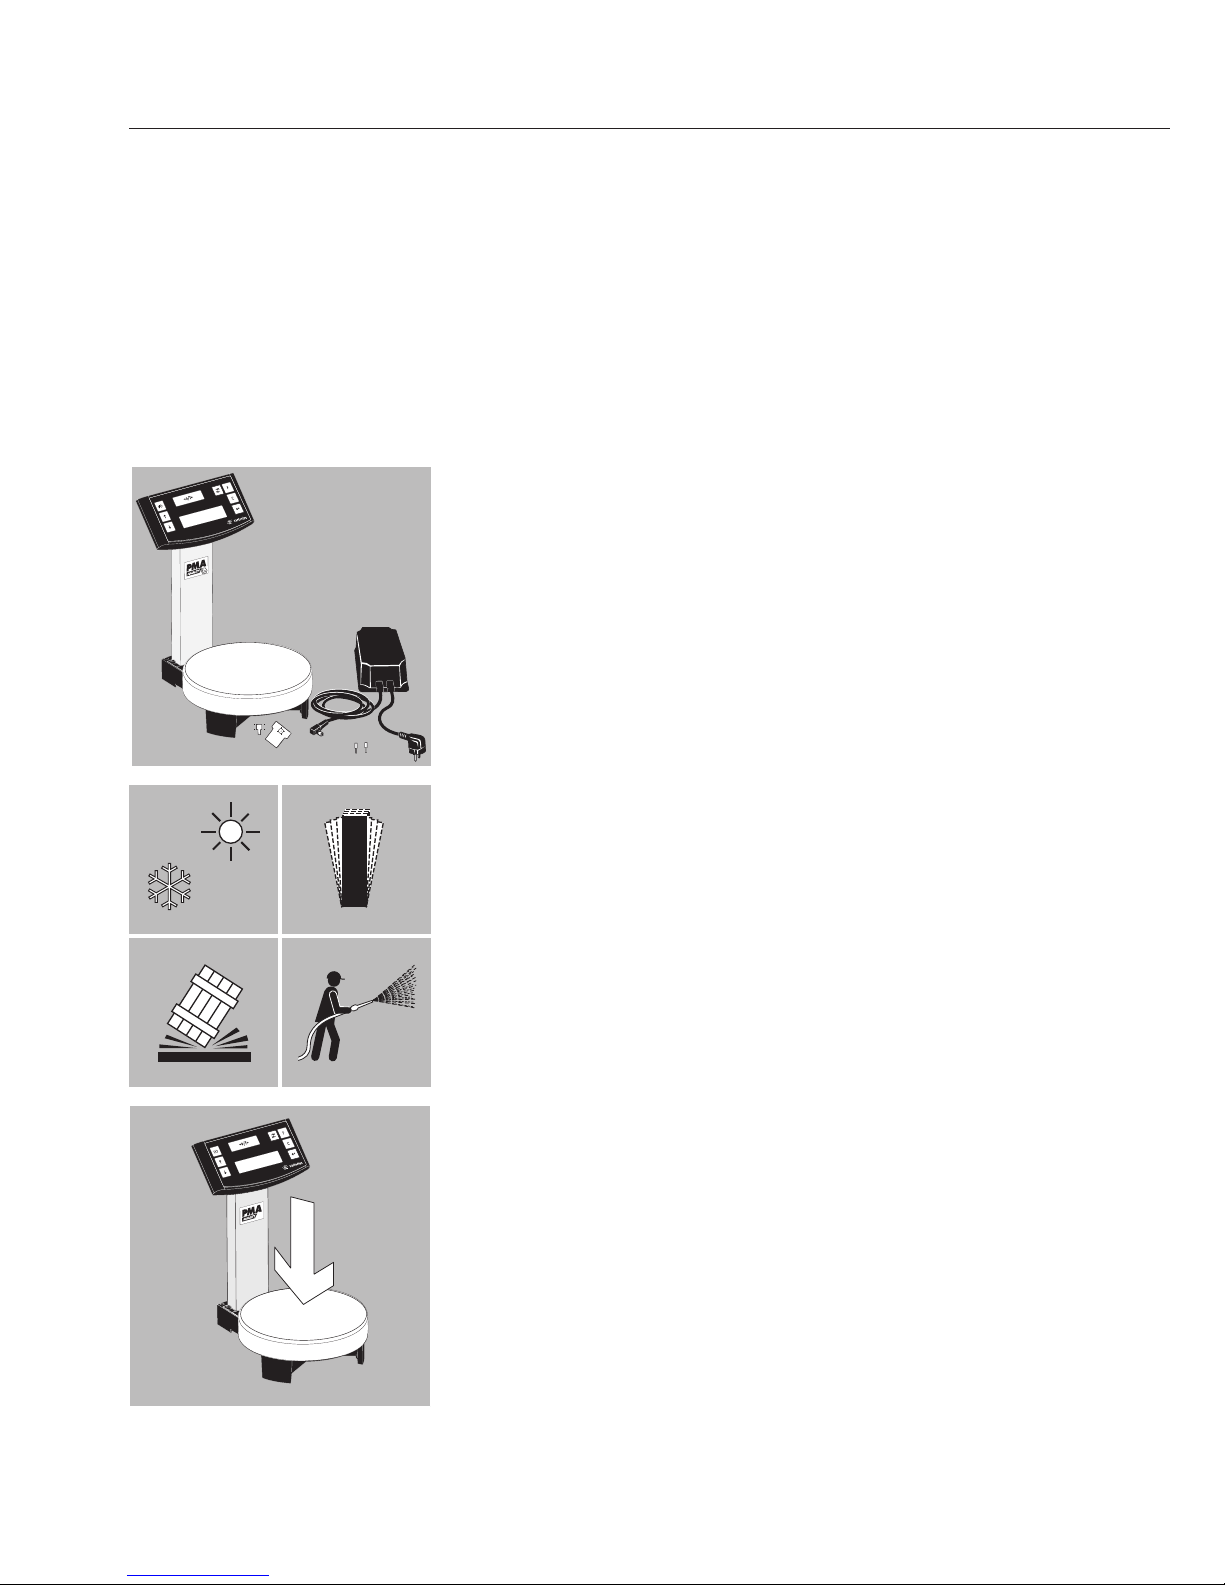
Getting Started
§ Remove the scale from its packaging.
§ After unpacking the scale, check it immediately
for any visible damage as a result of rough handling
during shipment.
Equipment Supplied
– Scale
– Weighing pan
– Power supply
Setting Up the Scale
Choose a suitable place to set up the scale. Avoid
exposure to drafts, heat, moisture and vibration.
Make sure to read the instructions carefully before
connecting the scale to AC power.
! Observe the safety instructions and warnings in this
manual.
§ Place the weighing pan on the scale.
°C

Connection to AC Power
The equipment is energized by the power supply
provided. Make sure that the voltage rating printed
on the power supply is identical to your local AC
power rating. When connecting the scale to the
power supply, the laws valid in your country must be
observed. If you should have any questions, please
contact your supplier or Sartorius Customer Service
for information on the legal regulations applicable
in your country. Use only genuine Sartorius power
supplies. The use of power supplies from other
manufacturers, even if these units have a registered
approval rating from a national testing laboratory,
requires the approval of a certified technician.
§ Insert the right-angle plug into the IEC jack (13) on
the scale
§ Plug the power supply into an electrical AC power
outlet
! Observe the safety instructions and warnings in this
manual
§ Ground the scale.
Connect the cable to the grounding terminal (14).
7

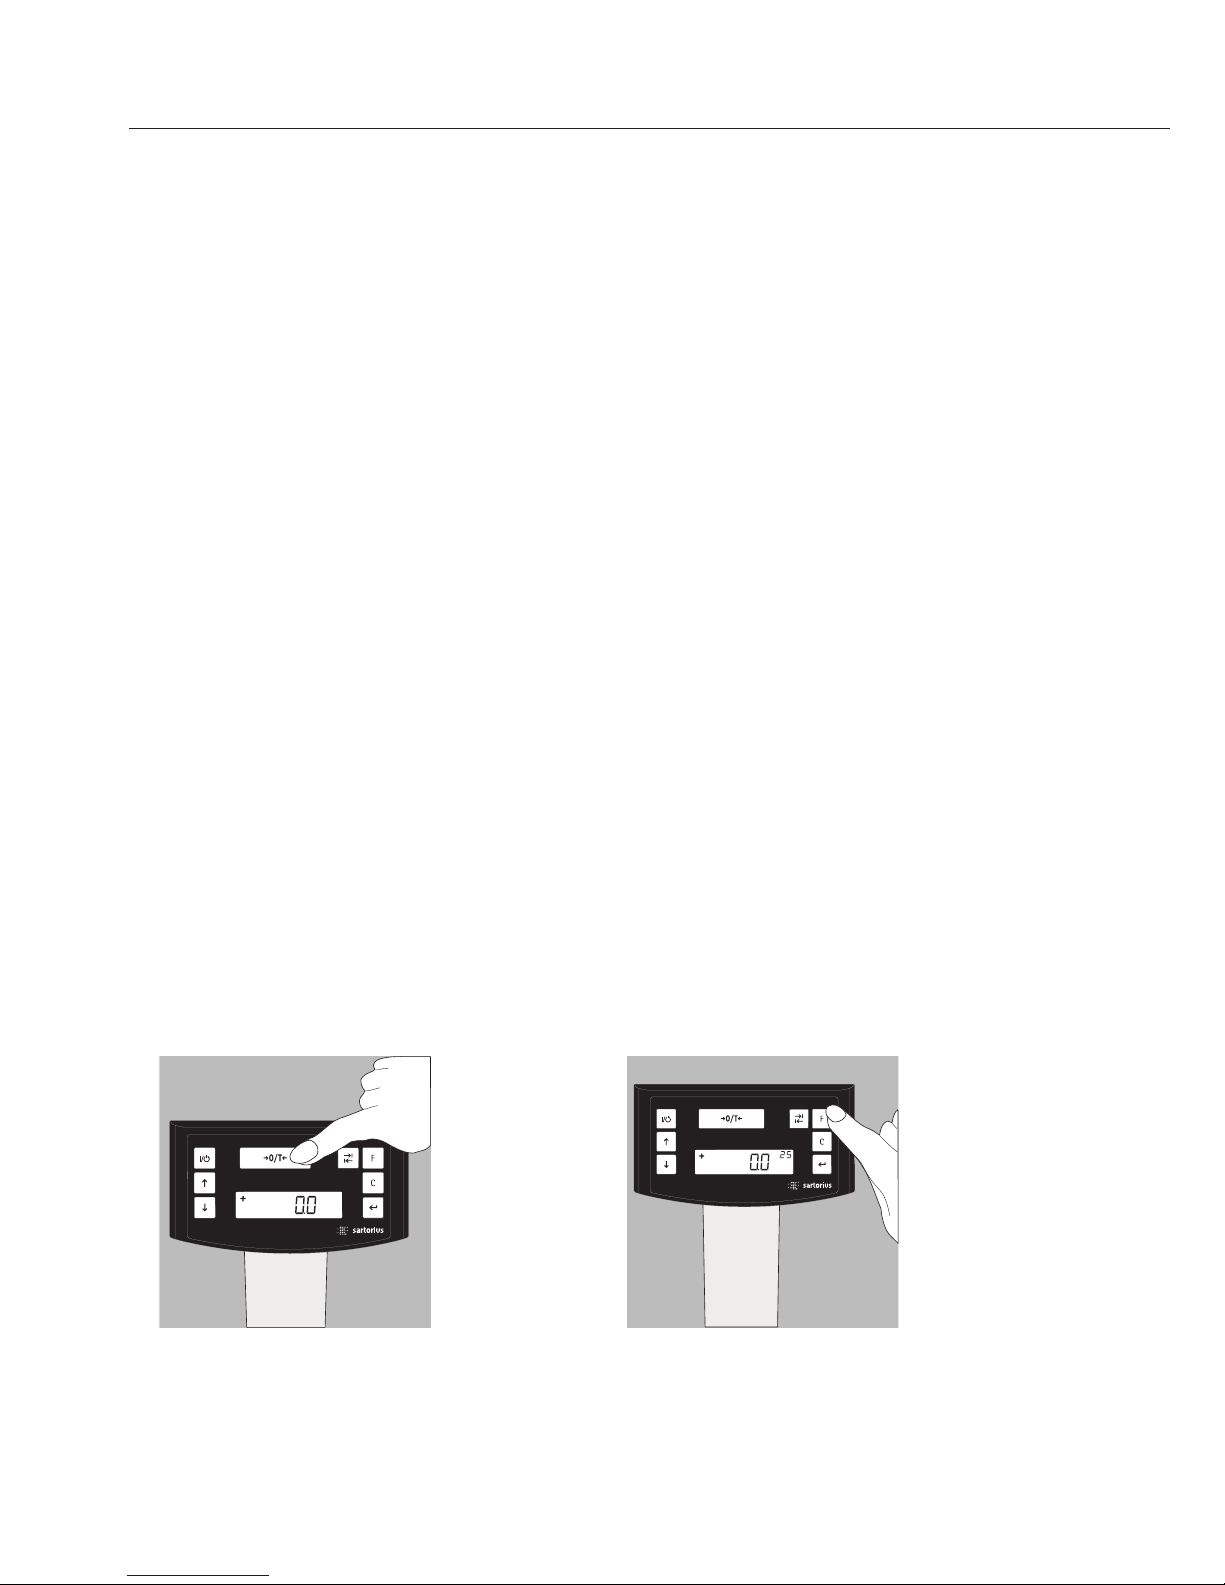
Operating the Equipment
Weighing with One Decimal Place
Place an empty paint can on the weighing pan.
Press the U key (5). The display shows “0.0 g.”
Pour in the first component, and read off the weight as
soon as the stability symbol appears; in this case, “g.”
Pour in additional components until the desired weight
of your formula is reached.
Remove the filled paint can from the weighing pan.
Never use a hammer to close the lid of a paint can
while it is still on the weighing pan.
Otherwise, you will damage the weighing system.
8
Turn on the scale using the
Q key (2).
After the scale has been
turned on, it will automatically run a self-test.
At the end of this test, 0.0 g
is displayed.
If a different readout is
displayed, zero or tare the
scale using the U key (5).

9
Weighing with Two Decimal Places
Note:
To weigh using two decimal places, you must first
adapt the settings (refer to the chapter entitled “Menu
Settings”)
Press the I key (6). The display shows “0.00 g.”
Place an empty paint can on the weighing pan (11).
Press the U key (5). The display shows “0.00 g.”
Pour in the first component: 205.50 g.
Read off the weight as soon as the stability symbol
appears; in this case, “g.”
Pour in additional components until the desired weight
of your formula is reached.
Remove the filled paint can from the weighing pan.
Important Note:
If you zero the display by pressing the tare key,
and then press the I key (6) to toggle to the second
decimal place with a resolution of 0.05 g, you can
continue weighing up to 999.95 g.
For weights exceeding 999.95 g, only one decimal place
will be displayed.
Never use a hammer to close the lid of a paint can
while it is still on the weighing pan.
Otherwise, you will damage the weighing system
Applications
Formulation Mode (Calculation by a Factor)
This mode enables you to weigh in amounts that are smaller or larger than that of your basic
formula for a specific paint color (e.g., 250 ml of a 1-l formula).
You can select various factors (amounts) by pressing the K formulation key (7):
0.25 0.5 0.75 1.0 1.5 2.0 2.5 3.0 3.5 4.0 4.5 5.0.
By pressing the R key (3): upwards
or S key (4): downwards,
you can alter the value – in 0.1 increments, as of factor 1.0
or – 0.01 increments, from factor 0.25 to 1.0.
Important Note:
The flashing arrow
n on the display means that the weight value shown is not verified
for use in legal metrology (not legal for trade).
Example:
As you pour in the components of your formula, the weight is displayed in “g.”
Let’s suppose you want to weigh only 250 ml of a basic formula that is for a total amount
of 1 L. With the recalculation mode, you do not need to manually recalculate the individual
components.
The basic formula for 1 liter is:
250 g green paint
+ 250 g red paint
+ 500 g blue paint
Total: 1000 g
10
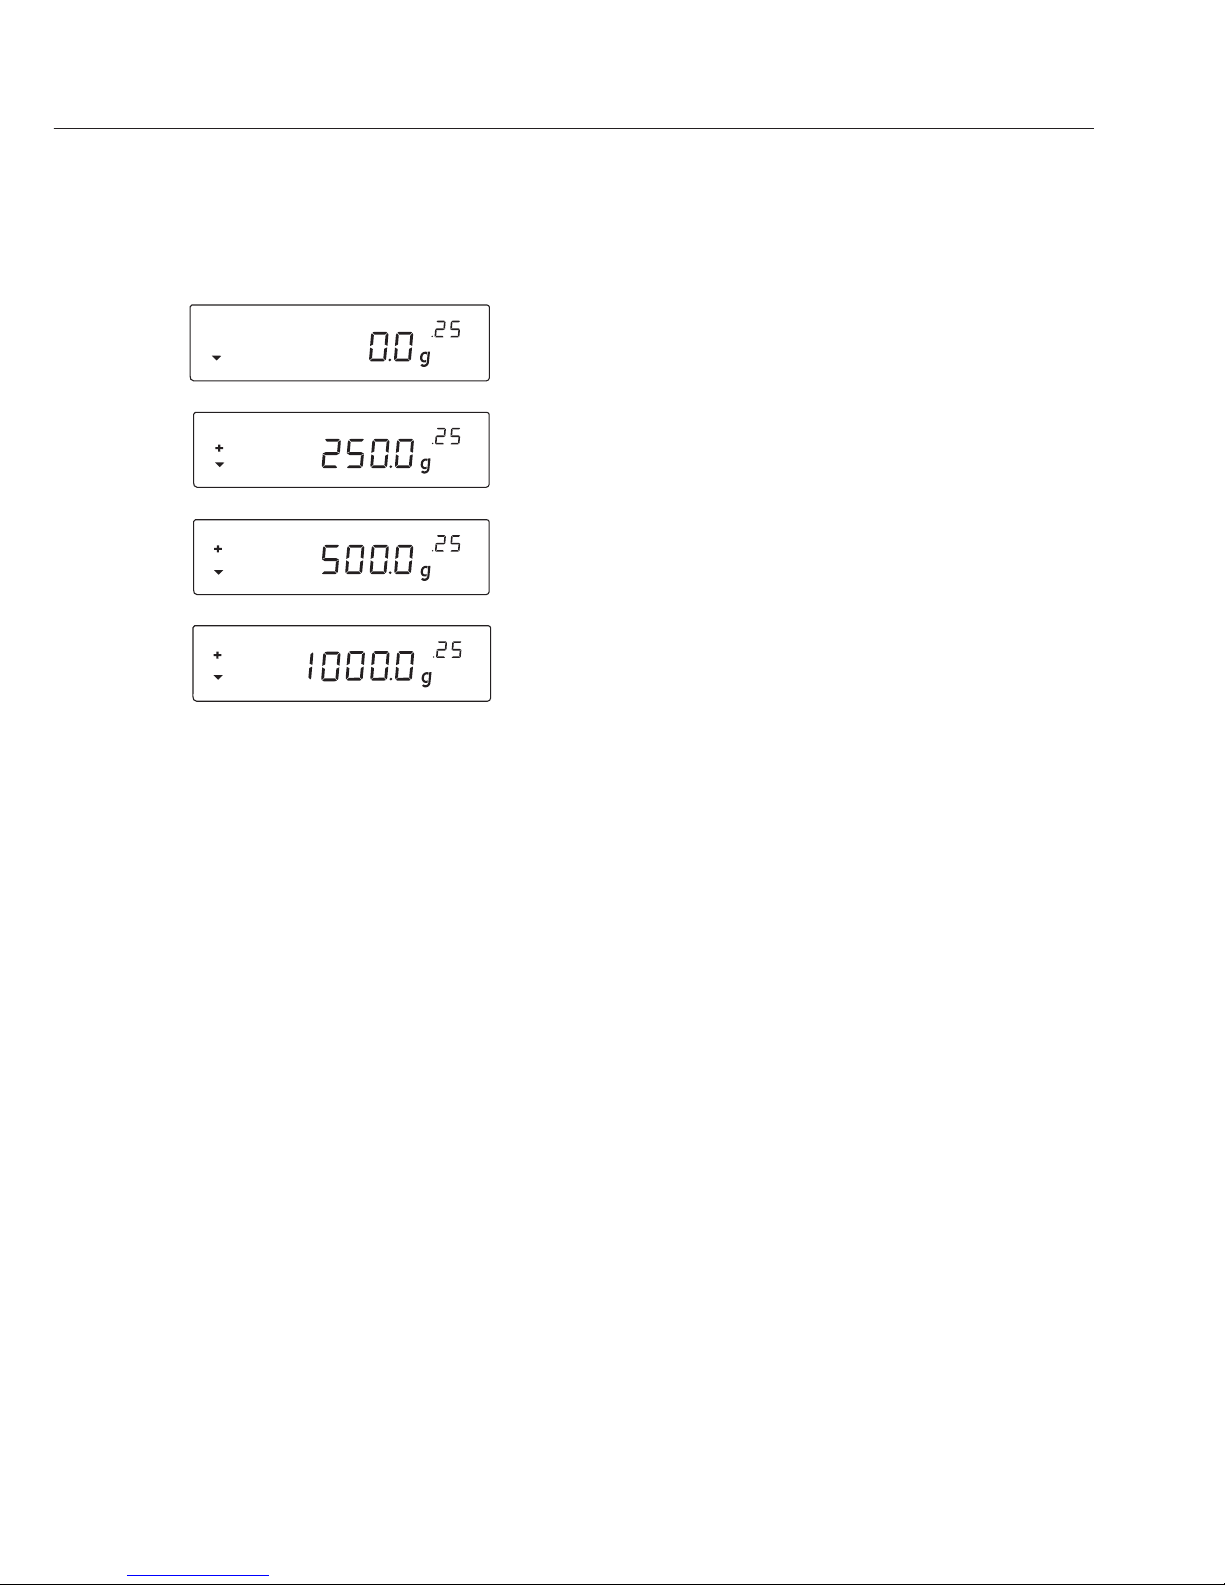
1. Place the empty paint can on the
weighing pan and tare (zero the display).
2. Press the K formulation key (7) several
times to select the conversion factor “.25”
used in this example.
11
We have come to the end of our example. According to the display, exactly 1,000 g was
poured in, but the paint can actually contains only 250 g by weight according to the factor
you selected, .25. Follow the same procedure for any other conversion factor or to convert
a 1-gallon formula into quarts.
Weighing Using the Recalculation Mode
Let’s suppose that you poured in too much of one color component for a given formula
(e.g., one consisting of 4 components).
In addition, let’s assume that you previously poured in all of the other amounts exactly
according to each of the values you entered and stored by pressing the L key [MEM] (9).
Press the S key (4) to start the recalculation program. “C” will begin flashing on the display.
To correct the weight displayed to the same value you entered for the given formula, either
scroll upwards using the R key (3), or downwards using the S key (4). When you then press
the L key [MEM] (9), the scale will automatically calculate and display the amounts of paint
in “g” to add for each of the other components that you already poured in. This mode thus
ensures that the total result of your formula for these components will be correct.
After pouring in these amounts, you can continue to add the remaining components of your
formula.
Important Note:
You can correct an incorrect amount any number of times. However, the total (liter) quantity
in the paint can will increase each time you correct a component. Therefore, press the c key
(8) to check how much the total quantity (in liters) will be. (“C” = correction factor)
The flashing arrow
n in the display means that the weight value shown is not verified for
use in legal metrology (not legal for trade).
3. “.25” is displayed next to the weight
4. Slowly pour in the first component, “250 g” of green
paint, until the display shows “250 g.”
5. Pour in the second component, “250 g” of red
paint, until the display shows “500 g.”
6. Pour in the last component, “500 g” of blue, until
“1000 g” is displayed.
3. Pour in the first component.
+ 50.0 g
2. Press the U key (5)
0.0 g
12
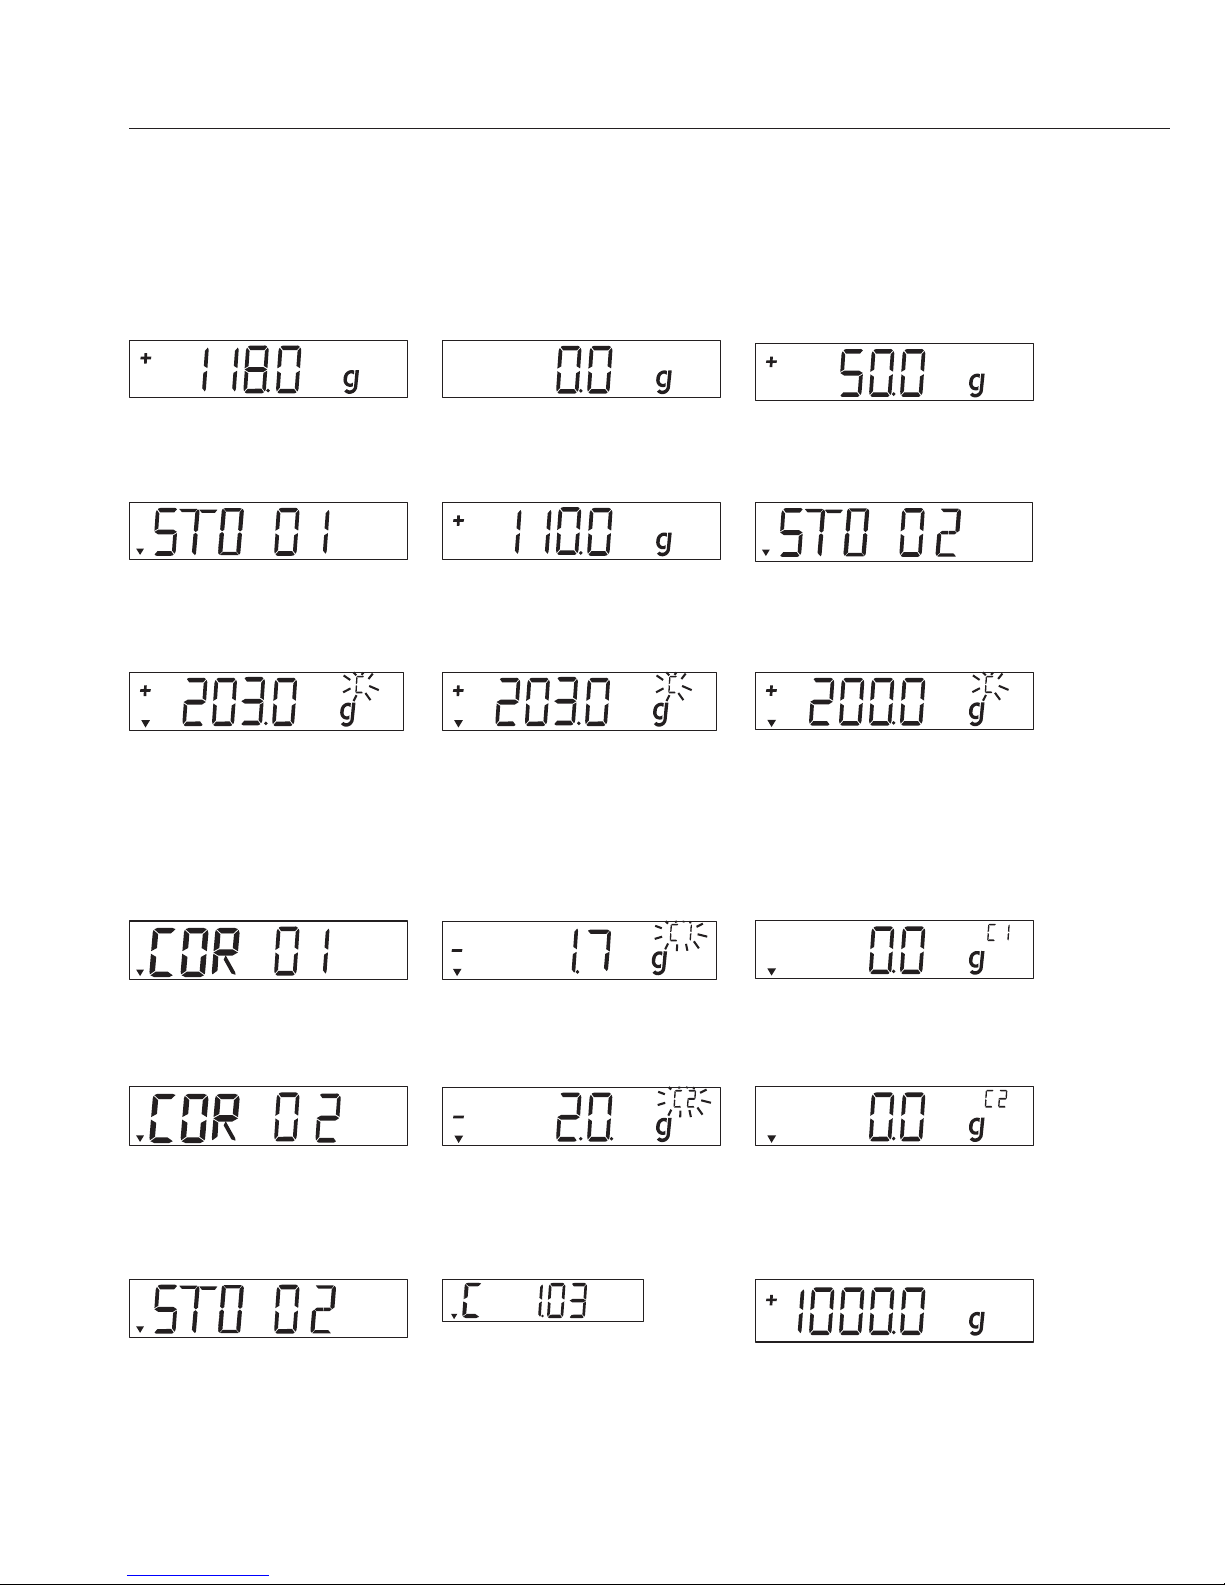
Example (cumulative):
1. Place an empty paint can on
the weighing pan (11).
+ 118.0 g
4. Press the L key [MEM] (9).
STO 01
5. Pour in the 2nd component.
+ 110.0 g
6. Press the L key [MEM] (9).
STO 02
7. Pour in the 3rd component.
+ 203.0 g
Oops!
You poured in too much!
The correct weight for the
formula is 200.0 g.
8. Press the y key (4) to start
the recalculation mode.
A “C” (= correct).
9. Press the y key (4) several
times to correct the value to:
+ 200.0 g
10. Press the L key [MEM] (9).
COR 01
11. 1. Add the first component.
“C1” is displayed. –1.5 g
12. Pour in paint until 0.0 g is
displayed.
0.0 g
13. Press the L key [MEM] (9)
COR 02
14. Add the second compo-
nent. “C2” is displayed.
–2.0 g
15. Pour in paint until the
value 0.0 g is obtained.
0.0 g
16. Press the L key [MEM].
The scale will automatically
return to the formulation
program. “C” disappears.
+ 200.0 g.
17. To check the prospective
total weight, press the c
key (8) [REC].
“C” = Correction factor; in
this example, 1.02. (Total
formula weight + correction factor = total weight)
18. Add the fourth component
+1000.0 g
We have come to the end
of our example.
 Loading...