

Page 1
98648-016-10
E
c
onom
y
PMA
.
Installation Instructions
Sartorius PMA.Economy
Model PMA5000 | PMA5000-000U
Electronic Paint-mixing Scales
Page 2
2
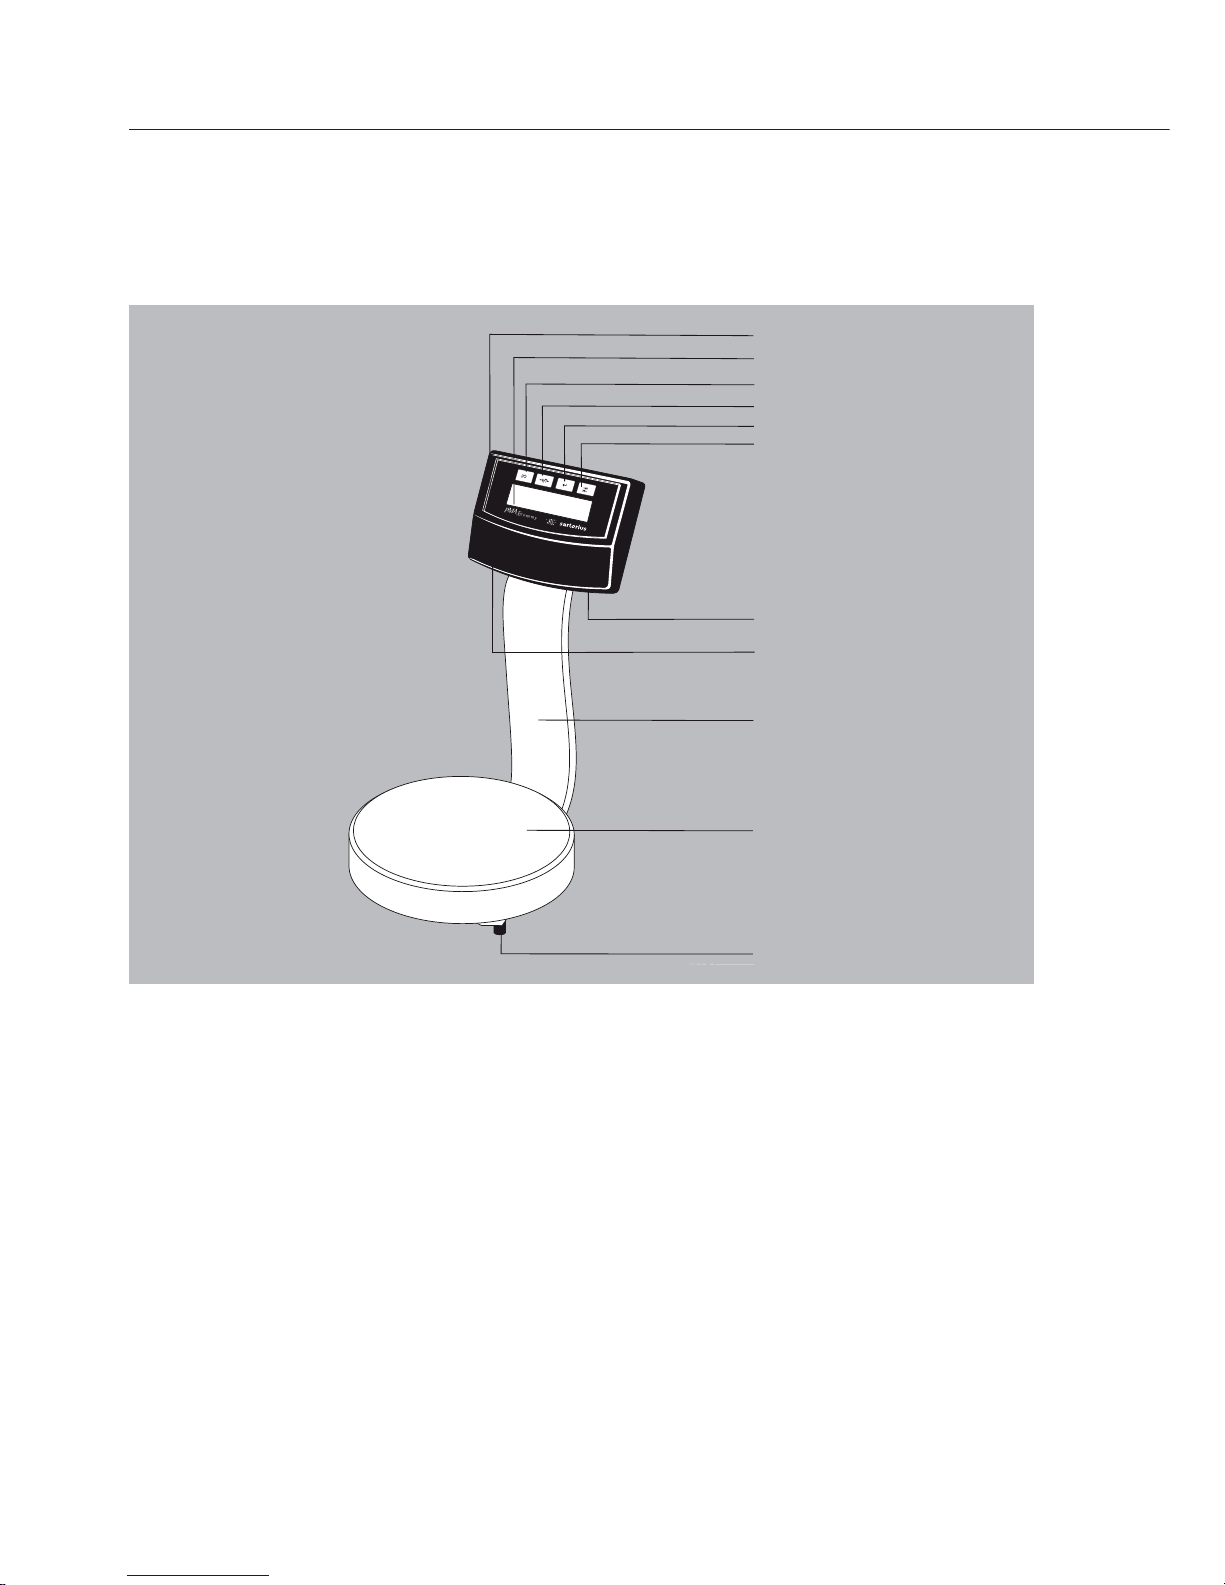
General View of the Equipment
Model PMA5000 | PMA5000-000U
(PMA.Economy)
1 Display and control unit
2 Display/readout
3 Q key (On/Standby)
4 U key: Zero/Tare
5 L key [ENTER]
6 I key (TOGGLE)
7 DC jack for connection to AC power
8 USB connection (optional)
9 Column with channels for power and
USB cables
10 Weighing pan
11 Foot
The following symbols are used in these
instructions:
§ Indicates required steps
$ Indicates steps required only under
certain conditions
> Describes what happens after you have
performed a particular step
– Indicates an item in a list
!Indicates a hazard
E
con
omy
PMA
.
1
2
3
4
5
6
7
8
9
11
10
Page 3

3
Contents
2 General View of the Equipment
3 Intended Use
3 Warnings and Safety Precautions
5 Getting Started
7 Operation
8 Calibration/Adjustment
9 Menu Settings
11 Troubleshooting
12 Care and Maintenance
13 Recycling
14 Interface Port
16 Specifications
16 Accessories
16 C Marking
The PMA5000 | PMA5000-000U
(PMA.Economy) has been specially
designed for use in the paint-mixing
sector. Due to its easy operability and
upright display, the PMA.Economy is an
ideal dose scale.
Note:
– Read the installation and operating
instructions carefully before
connecting and putting the PMA5000 |
PMA5000-000U into operation.
Warnings and Safety
Precautions
This scale meets the guidelines and standards governing electronic equipment,
electromagnetic compatibility and the
stipulated safety standards. Improper use
or handling can result in property damage
and/or personal injury. To prevent damage to the equipment, read these operating instructions thoroughly before using
your scale. Keep these instructions in
a safe place.
– If you use electrical equipment in instal-
lations and under ambient conditions
requiring higher safety standards, you
must comply with the provisions as specified in the applicable regulations for
installation in your country.
– Do not expose the scale to extreme
temperatures, aggressive chemical vapors,
moisture, shocks or vibrations.
Intended Use
Page 4

4
– The displayed values can be affected
by up to ±30 digits when subjected to
extreme electromagnetic influence.
When the negative influence has subsided,
the scale will again be fully operational.
On request, Sartorius will provide
information on the minimum operating
specifications (in accordance with the
Standards listed in the CE Directive.
– The equipment must be used indoors only.
– The scale may not be operated in
hazardous areas.
– To ensure safety, disconnect the equip-
ment from power before connecting or
disconnecting the cables or electronic
peripheral devices.
The operator shall be responsible for any
modifications to Sartorius equipment and
for any connections of cables or equipment not supplied by Sartorius and must
check and, if necessary, correct these
modifications and cable connections.
– If you use cables purchased from another
manufacturer, check the pin assignments
in the cable against those specified by
Sartorius before connecting the cable
to Sartorius equipment, and disconnect
any wires that are assigned differently.
The braided shield in the cable must be
made of metal and must provide at least
80% coverage. Both the plug and socket
of all connections on the cable ends or in
the equipment housing must have foil
shielding that is suitable for high fequencies in accordance with CE regulations.
The operator shall be solely responsible for
any damage or injuries that occur when
using cables not supplied by Sartorius.
– When connecting the scale to the power
supply, the laws valid in your country
must be observed. If you should have any
questions, please contact your supplier or
Sartorius Customer Service for information on the legal regulations applicable in
your country. The scale must be installed
by a certified technician to avoid forfeiture of all claims under the manufacturer’s
warranty.
– If you see any indication that the scale
cannot be operated safely (for example,
due to damage), turn it off and lock it in
a secure place or otherwise prevent use of
the equipment for the time being. Adhere
to the accident prevention regulations
and inform the operators accordingly.
– Always make sure the equipment is
disconnected from AC power before
performing any installation, cleaning,
maintenance or repair work on the scale.
To avoid forfeiture of all claims under the
manufacturer’s warranty, all repair and
maintenance work must be performed by
authorized Sartorius service technicians.
– All other cables connecting the weighing
equipment and peripheral devices, as well
as the wiring inside the devices, are cased
in PVC materials. Chemicals that corrode
these materials must be kept away from
these cables.
Page 5
5
Getting Started
§ Remove the scale from its packaging.
§ After unpacking the scale, check it immediately
for any visible damage as a result of rough handling
during shipment.
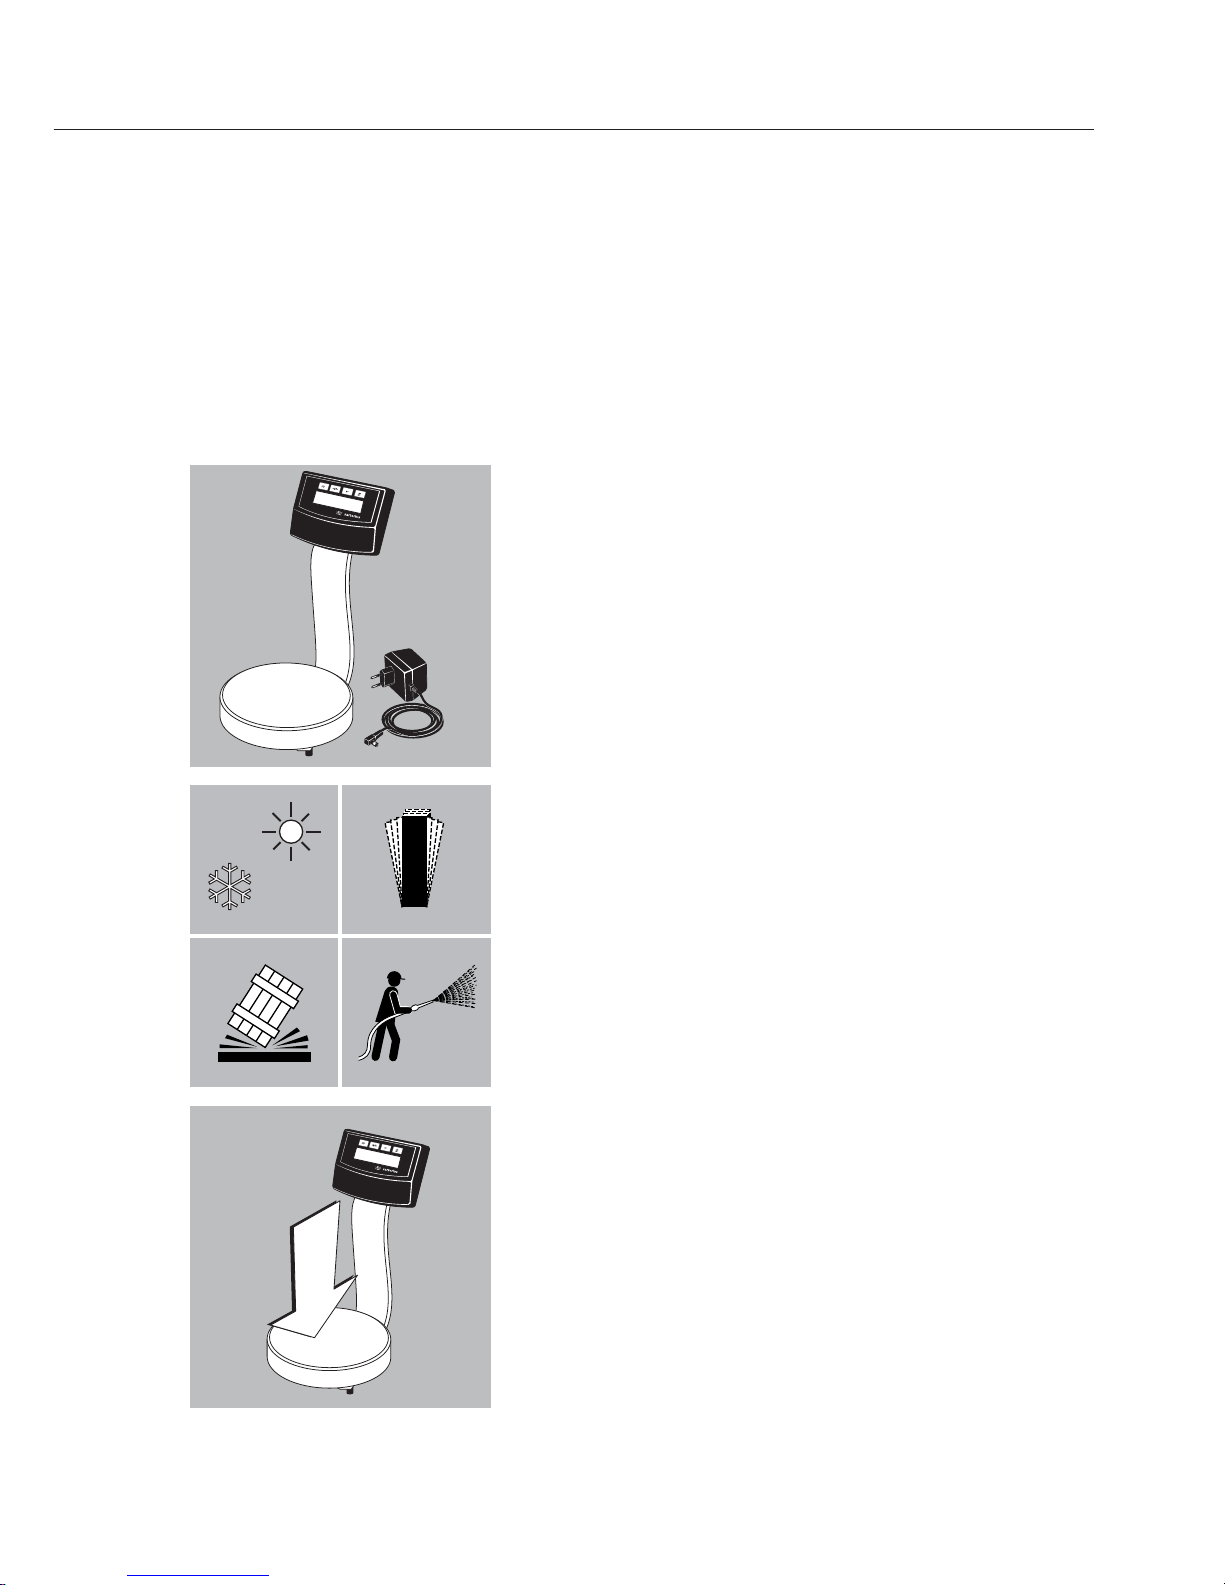
Equipment Supplied
– Scale
– Weighing pan
– AC adapter or power supply
– USB cable (only supplied with the PMA5000-000U)
Setting Up the Scale
Choose a suitable place to set up the scale. Avoid
exposure to drafts, heat, moisture and vibration.
Make sure to read the instructions carefully before
connecting the scale to AC power.
!Observe the safety instructions and warnings in this
manual.
§ Place the weighing pan on the scale.
PM
A
.
Economy
E
con
om
y
PM
A
.
°C
Page 6

6
Connection to AC Power
The equipment is powered through the AC adapter
supplied
§ Insert the right-angle plug into the DC jack (7) on
the scale
§ Insert the cable of the right-angle plug into the
cable channel located on the back of column (9)
!Plug the AC adapter into an electrical AC power outlet
!Observe the safety instructions and warnings in this
manual.
Check that the voltage rating of the AC adapter
matches that of your local line voltage (mains supply).
If it does not match your local voltage rating or if
the plug design differs from your local standard,
contact your Sartorius office or dealer.
Use only original Sartorius AC adapters.
The use of AC adapters from other manufacturers,
even if these units have a registered approval rating
from a national testing laboratory, requires the
approval of a certified technician.
E
conomy
PM
A
.
PM
A
.
Economy
Page 7

7
Operation
Weighing Example
Place an empty paint can on the weighing pan.
Press the tare key U (4). The display shows “0.0 g.”
Pour in the first component, and read off the weight as
soon as the stability symbol appears; in this case, “ .”
Pour in additional components until the desired weight
of your formula is reached.
Remove the filled paint can from the weighing pan.
Never use a hammer to close the lid of a paint can
while it is still on the weighing pan.
Otherwise, you will damage the weighing system.
E
conomy
PMA
.
PMA
E
conomy
PMA
.
E
conomy
PMA
Turn on the scale using the
Q key (3).
After the scale has been
turned on, it will automatically run a self-test.
At the end of this test, 0.0 g
is displayed.
If a different readout is
displayed, zero or tare the
scale using the tare key
U (4).
Page 8

8
You can calibrate/adjust the scale by pressing the tare
key U (4).
After connection to AC power and before each
calibration/adjustment, allow the scale to warm up for
approximately 30 minutes.
§ Hold down the tare key U (4) for 2 sec.
When 5000 is displayed, release the key.
You can select the calibration weight via the I
toggle key (6).
Example: calibration weight 5000 g
§ Confirm the calibration weight selected by pressing
the L key [ENTER] (5)
§ After the scale has been tared, place the displayed
calibration weight on the weighing pan.
§ Center the calibration weight on the weighing pan (10).
Calibration/adjustment is performed automatically.
When the calibration has been accepted, the symbol
will disappear and the stability symbol is displayed
§ After calibration and adjustment, remove the weight.
Calibration/Adjustment
E
co
nomy
PMA
.
PMA
E
conomy
PMA
.
PMA
E
conomy
PMA
.
Page 9

9
Navigating the SETUP Menu
§ Hold down the L key [ENTER] for longer than 2 sec.
Key Functions in the Setup Menu:
Key Press Briefly Press Longer
L key Menu level: scroll to the right (cyclic) Confirm setting
I key Menu item: scroll upwards –
U key Menu level: scroll to the left (cyclic) Save settings and
exit the setup menu
Parameter Settings (Overview) o Factory Settings
Setup- 1 Weighing
Menu 1.1. Filter adjustment 1.1.1 Very stable Ambient conditions
1.1.2 o Stable Ambient conditions
1.1.3 Unstable Ambient conditions
1.1.4 Very unstable Ambient conditions
1.2. Application filter 1.2.1 Tare
1.2.2 o Dose
1.3. Stability range 1.3.1 1/4 increment step
1.3.2 1/2 increment step
1.3.3 1 increment step
1.3.4 o 2 increment steps
1.3.5 4 increment steps
1.5. Calibration/Linearization: 1.5.1 o Calibration
Key function (CAL) 1.5.2 Linearization (for service only)
1.5.3 Key is locked
1.6. Auto zero 1.6.1 On
1.6.2 o Off
1.7. Weight units 1.7.1 Parts per pound
1.7.2 Gram
5. and 6. are relevant only if interface port is installed:
(refer to the corresponding description of the interface port on the next page)
8. Additonal functions
8.1. Lock key functions 8.1.1 All are locked with the exception
of (ON/OFF) and (ZERO) functions
8.1.2 o All unlocked
9. Reset menu
9.1. Reset 9.1.1 Factory settings
9.1.2 o Do not reset
Menu Settings
Page 10

10
Parameter Settings for the Optional Interface Port
o Factory Settings
5. Interface
5.1 Baud rate 5.1.2 300 baud
5.1.3 600 baud
5.1.4 1200 baud
5.1.5 o 2400 baud
5.1.6 4800 baud
5.1.7 9600 baud
5.1.8 19200 baud
5.2 Parity 5.2.3 o Odd
5.2.4 Even
5.2.5 None
5.3 Number of stop bits 5.3.1 o 1 stop bit
5.3.2 2 stop bits
5.4 Handshake 5.4.1 Software handshake
mode 5.4.2 o Hardware handshake
5.4.3 None
6.Printing
6.1 Data output 6.1.1 On request regardless of stability
6.1.2 On request after stability
6.1.3 o Auto print regardless of stability
6.1.4 Auto print after stability
Page 11

11
Troubleshooting
Error messages are displayed for approximately 2 seconds, after which the program automatically
returns to the weighing mode.
Problem Cause Solution
No segments appear – No AC power available – Check the AC power supply
on the weight display – AC adapter is unplugged – Connect AC adapter to power supply
Weight display shows – The load on the pan – Unload the scale
“oL” exceeds the scale’s capacity
Weight display shows – The weighing pan is – Position the weighing pan
“UL” is not in place
– Contact between weighing – Weighing pan may not come into
pan and other objects contact with other objects
disErr Display overload: Reduce weighing load
Value to be output is not
displayed
calErr – Calibration prerequisites Unload scale
were not met, e.g.,: Zero/tare with the U key
– Zero/tare Do not calibrate until a zero readout
– Weighing pan is loaded is displayed
appErr Too little weight or, in the Increase weight
case of application programs,
no sample on weighing pan
PrtErr – Interface port locked – Contact Sartorius Customer Service
for print function responsible for application programs
bAL.Err – Scale is loaded – Unload scale before turning it on
or defective when turned on – Contact Sartorius Customer Service
SYS.Err – Scale is defective – Contact Sartorius Customer Service
Max. weighing range – Scale was turned on – Position weighing pan
less than defined before positioning – Turn the scale off and on
under “Specifications“ weighing pan again using the Q key
The weight readout – Scale is not calibrated – Calibrate scale
is obviously wrong – Scale was not tared – Zero/tare scale
prior to weighing
Contact your Sartorius Customer Service Center if any other error messages occur.
Page 12

12
Care and Maintenance
Cleaning
!Do not use caustics, concentrated acids
or pure alcohol.
!Make sure that no liquid enters the scale
housing
$ Clean the scale using either a paint brush
or a dry, soft and lint-free cloth.
Storage and Shipping Conditions
$ To ensure safe shipment, your scale has
been packaged using environmentally
friendly materials. You should retain
these materials in case you need to
package your scale for storage or return
shipment.
$ Storage temperature: –20°C to +75°C
$ Permissible moisture level for storage of
the packaged scale: 90% max.
$ Read and follow the instructions given in
the section entitled “Safety Inspection.”
Safety Inspection
Safe operation of the PMA is no longer
ensured when:
– There is visible damage to the AC
adapter/power supply or cables
– The AC adapter/power supply no longer
functions properly
– The AC adapter/power supply has been
stored for a relatively long period under
unfavorable conditions
– The equipment has been exposed to
rough handling during shipment
§ Observe the warning and safety
information
In this case, notify your nearest
Sartorius Service Center or the International Technical Support Unit based in
Goettingen, Germany. Maintenance and
repair work may only be performed by
service technicians who are authorized
by Sartorius and who:
– Have access to the required service and
maintenance manuals, or
– Have attended the relevant service
training courses
!The seals affixed to this equipment
indicate that only authorized service
technicians are allowed to open the
equipment and perform maintenance
work so that safe and trouble-free
operation of the equipment is ensured
and the warranty remains in effect.
Page 13

13
Recycling
Information and Instructions
on Disposal and Repairs
In Germany and many other countries
(see www.sartorius.com, Service Download area for details), Sartorius AG or the
organization contracted by us takes care
of the proper return and legally compliant disposal of its electrical and electronic
equipment on its own. These products
may not be placed with household waste
or brought to collection centers run by
local public disposal operations – not
even by small commercial operators.
For disposal in Germany and in the other
Member States of the European Economic
Area (EEA), please contact our service
technicians on location or our Service
Center in Goettingen, Germany:
Sartorius AG
Service Center
Weender Landstrasse 94-108
37075 Goettingen, Germany
In countries that are not members
of the European Economic Area (EEA) or
where no Sartorius affiliates, subsidiaries,
dealers or distributors are located, please
contact your local authorities or a commercial disposal operator.
Prior to disposal and/or scrapping
of the equipment, any batteries should be
removed and disposed of in local collection boxes.
Sartorius AG, its affiliates, subsidiaries,
dealers and distributors will not take back
equipment contaminated with hazardous
materials (ABC contamination) – either
for repair or disposal. Please refer to the
accompanying leaflet/manual or visit our
Internet website (www.sartorius.com) for
comprehensive information that includes
our service addresses to contact if you
plan to send your equipment in for
repairs or proper disposal.
If you no longer need the
packaging after successful
installation of the equipment,
you should return it for recycling. The packaging is made
from environmentally-friendly
materials and is a valuable source of
secondary raw material.
Page 14

14
Installing the Interface Port
The following instructions are valid only for the
PMA 5000. The PMA 5000-000U comes equipped
with an integrated interface port.
§ Disconnect power supply:
Unplug the AC adapter.
§ Turn the scale onto its side.
§ Slide off the plate located on the back of the
display and control unit.
§ Insert the USB interface port.
§ Insert the USB cable
§ Guide the USB cable through the cable channel
located on the column.
Page 15

15
System Requirements for the
YDO01PMA-USB Adapter
– Computer (PC) running the Windows
2000® or Windows XP® operating system
– Available USB port (Type A, 4-pin, female)
Configuring the USB Interface
The USB cable terminates in a 4-pin male
Type A USB connector.
1. Switch on the computer and make sure
the USB port is activated and functional.
2. Plug the USB cable into the USB port on
the computer and switch on the scale.
Windows® detects the USB device and
runs the Wizard for adding/removing
hardware.
Installing the Drivers for the
USB Interface
1. Place the enclosed CD in your computer’s
CD-ROM drive.
2. Each version of Windows® may have
slightly different procedures for uploading the driver from the CD. All versions
have a Wizard for adding and removing
hardware, which guides you through the
process.
3. After you click on “Finish” at the end
of the process, the virtual port should be
ready to operate.
Windows® usually adds the virtual port
in the position following your highestnumbered COM port.
Example:
On a PC with 4 COM ports, the virtual
interface is added as COM5 (shown in the
Device Manager).
If you use the USB interface with
a program that limits the number of COM
port designations (e.g., COM1 through
COM4 only), you may have to assign one
of these port numbers to the new virtual
port.
Port numbers are assigned under “Port
Settings” in the Device Manager, opened
from (My Computer >) Control Panel >
System Properties > Hardware.
Page 16

16
Specifications
Model PMA5000 | PMA5000-000U
Weighing range g 5000
Readability g 0.1
Stabilization time (average) digit 0.25 to 4
(can be defined in the menu)
Moisture-proof rating F Non-condensing
Allowable ambient operating
temperature range °C 0 to +40
Weighing pan d mm 233
Scale housing (W + D + H) mm 233 + 372 + 382
Net weight, approx. kg 3.4
Calibration weight kg 5, class F2 or better
kg 2, class F2 or better
kg 1, class M1 or better
Power consumption VA Average: 1.6; maximum: 5.8
Interface port (optional) USB
– Format 7-bit ASCII, 1 start bit, 1 or 2 stop bits
– Parity Even, odd or no parity
– Transmission rates 300 to 19,200 baud
– Handshake mode Software, hardware or none
Accessories
Order no.:
USB interface port, incl. cable (2 m) YDO01PMA-USB
AC adapter, plug-mounted, model STNG 8:
EU 230 V, 50-60 Hz 6971948
USA/CDN/J 120 V, 50-60 Hz 6971947
ZA 230 V, 50-60 Hz 6971949
AUS 230 V, 50-60 Hz 6971950
IN 240 V 6971963
CN 230 V, 50-60 Hz 6971970
AC adapter, benchtop, model TNG 8:
Universal 115–230 V, 50-60 Hz 6971951
GB 230V 6971952
Page 17

17
C Marking
Page 18

Printed in Germany on paper that has
been bleached without any use of chlorine
W1A000 · KT
Publication No.: WPM6061-e08012
Sartorius AG
Weender Landstrasse 94–108
37075 Goettingen, Germany
Phone +49.551.308.0
Fax +49.551.308.3289
www.sartorius.com
Copyright by Sartorius AG,
Goettingen, Germany.
All rights reserved. No part
of this publication may
be reprinted or translated in
any form or by any means
without the prior written
permission of Sartorius AG.
The status of the information,
specifications and illustrations
in this manual is indicated
by the date given below.
Sartorius AG reserves the
right to make changes to the
technology, features,
specifications and design of the
equipment without notice.
Status:
January 2008, Sartorius AG,
Goettingen, Germany
 Loading...