

Sartorius PMA 35D-X,Sartorius PMA 35D-X00C,PMA 35D-X,PMA 35D-X00C,PMA 35D-X00CV1 Nstallation And Operating Instructions

98648-008-38
Sartorius
PMA 35D-X, PMA 35D-X00C ,
PMA 35D-X00CV1
Electronic Paint-Mixing Scales
Installation and Operating Instructions
2
PMA 35D-X, PMA 35D-X000C, PMA 35D-X00CV1
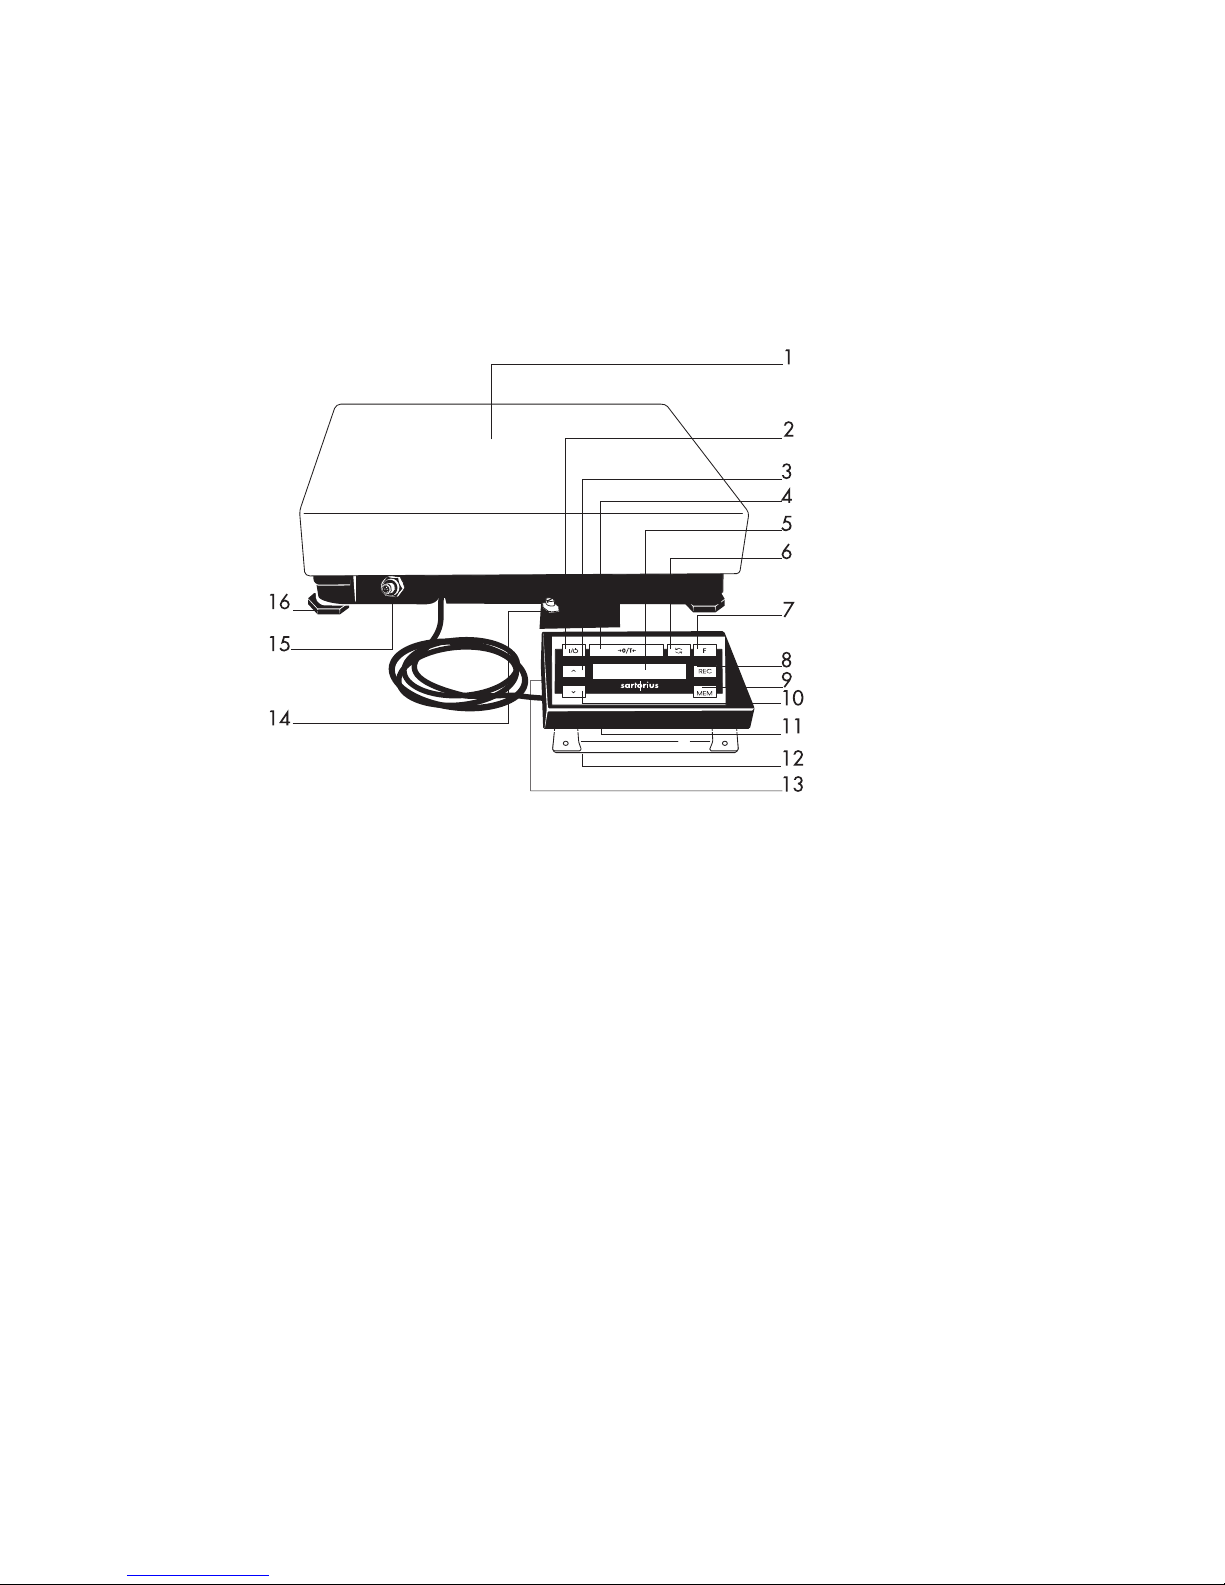
1 Load plate
2 e key (ON/OFF)
3 y Correction key: decrease
(only on the PMA 35D-X00C and
PMA35D-X00CV)
4 = Tare key
5 Display
6 w key (TOGGLE) On the 35D-X/35D-
X00C, you can toggle to two decimal places
– from 0.5 g to 1.0 g – within the entire
weighing range of – 0.5 g to 35 kg –
or – 1 g to 35 kg – On the PMA 35D-
X00CV1, you can toggle from g to Parts per
pound within the entire weighing range
7 v key (FORMULATION)
8 [REC] key (for displaying the final quantity in
the recalculation mode (only on PMA 35D-
X00C and PMA 35D-X00CV1)
9 [MEM] key (MEMORY) (only on PMA 35D-
X00C and PMA 35D-X00CV1)
10 Y Correction key: increase (only on PMA
35D-X00C and PMA 35D-X00CV1)
11 Display and control unit
12 Column
13 Data interface port (25-pin)
14 Terminal for connecting an equipotential
bonding conductor (grounding terminal)
15 DC jack
16 Leveling foot
Important Note to Users
G Make sure to carefully read and follow
sections marked with this symbol.
They contain important safety instructions
and information.
G Use only the adapter that is included in
delivery (part no. 6965619) to connect a 9-pin
connecting cable to the 25-pin data interface
Note:
This equipment has been tested and found to
comply with the limits for a Class A digital
device, pursuant to Part 15 of the FCC Rules.
These limits are designed to provide reasonable
protection against harmful interference when the
equipment is operated in a commercial
environment. This equipment generates, uses,
and can radiate radio frequency energy and, if
not installed and used in accordance with the
instruction manual, may cause harmful interference
to radio communications. Operation of this
equipment in a residential area is likely to cause
harmful interference in which case the user will be
required to correct the interference at his own
expense. Changes or modifications not expressly
approved by Sartorius AG could void the user’s
authority to operate the equipment.

3
Getting Started
Remove the scale, load plate
and AC adapter from the
package.
Immediately after unpacking the
equipment, check it for any
visible damage.
Equipment Supplied:
Scale, load plate,
AC adapter, data cable
(25-pin - 9-pin)
Do not miss out on the benefits
of our full warranty. Please
contact your local Sartorius
office or dealer for further
information. If available,
complete the warranty
registration card, indicating the
date of installation, and return
the card to your Sartorius office
or dealer.
Choose a suitable place to set up the scale. Avoid exposure to
drafts, heat, moisture and vibration.
G Check that the voltage rating of the AC adapter matches that
of your local line voltage (mains supply). If it does not match your
local line voltage, contact your Sartorius office or dealer. Use
only original Sartorius AC adapters! If you operate the scale in a
hazardous area/location outside Germany, you must comply with
the national electrical code and applicable safety regulations of
your country. For information on the legal regulations currently
applicable in your country, please ask your Sartorius office or
dealer or your paint supplier.
G The model 609308... AC adapter must be installed outside
the hazardous area/location.
G Before you operate your scale in a hazardous area/location,
the scale must be inspected either by a certified electrician or
under the guidance and supervision of a certified electrician to
make sure that the scale complies with the applicable regulations
(in Germany, in accordance with Section 12 of the ElexV).
Determine whether your scale must be reported to the technical
inspection authorities (e.g., trade board) in your country. The
system must also be inspected during operation. The system should
be inspected at intervals which allow for early detection of the
faults which occur as a result of normal wear and tear, so that they
can be corrected before damage is caused. In any case,
inspection must be performed at least every three years.
G Fasten the AC adapter cable to the balance. Tighten down the
locking ring to secure the connection. Do not disconnect an
energized cable during operation in a hazardous location/area.
G All applicable requirements (e.g., occupational safety
regulations) must be observed during operation.
G Any tampering with the equipment by anyone, other than repair
work done by authorized Sartorius service technicians, will
invalidate the approval for use in hazardous areas/locations and
result in forfeiture of all claims under the manufacturer’s warranty.
4
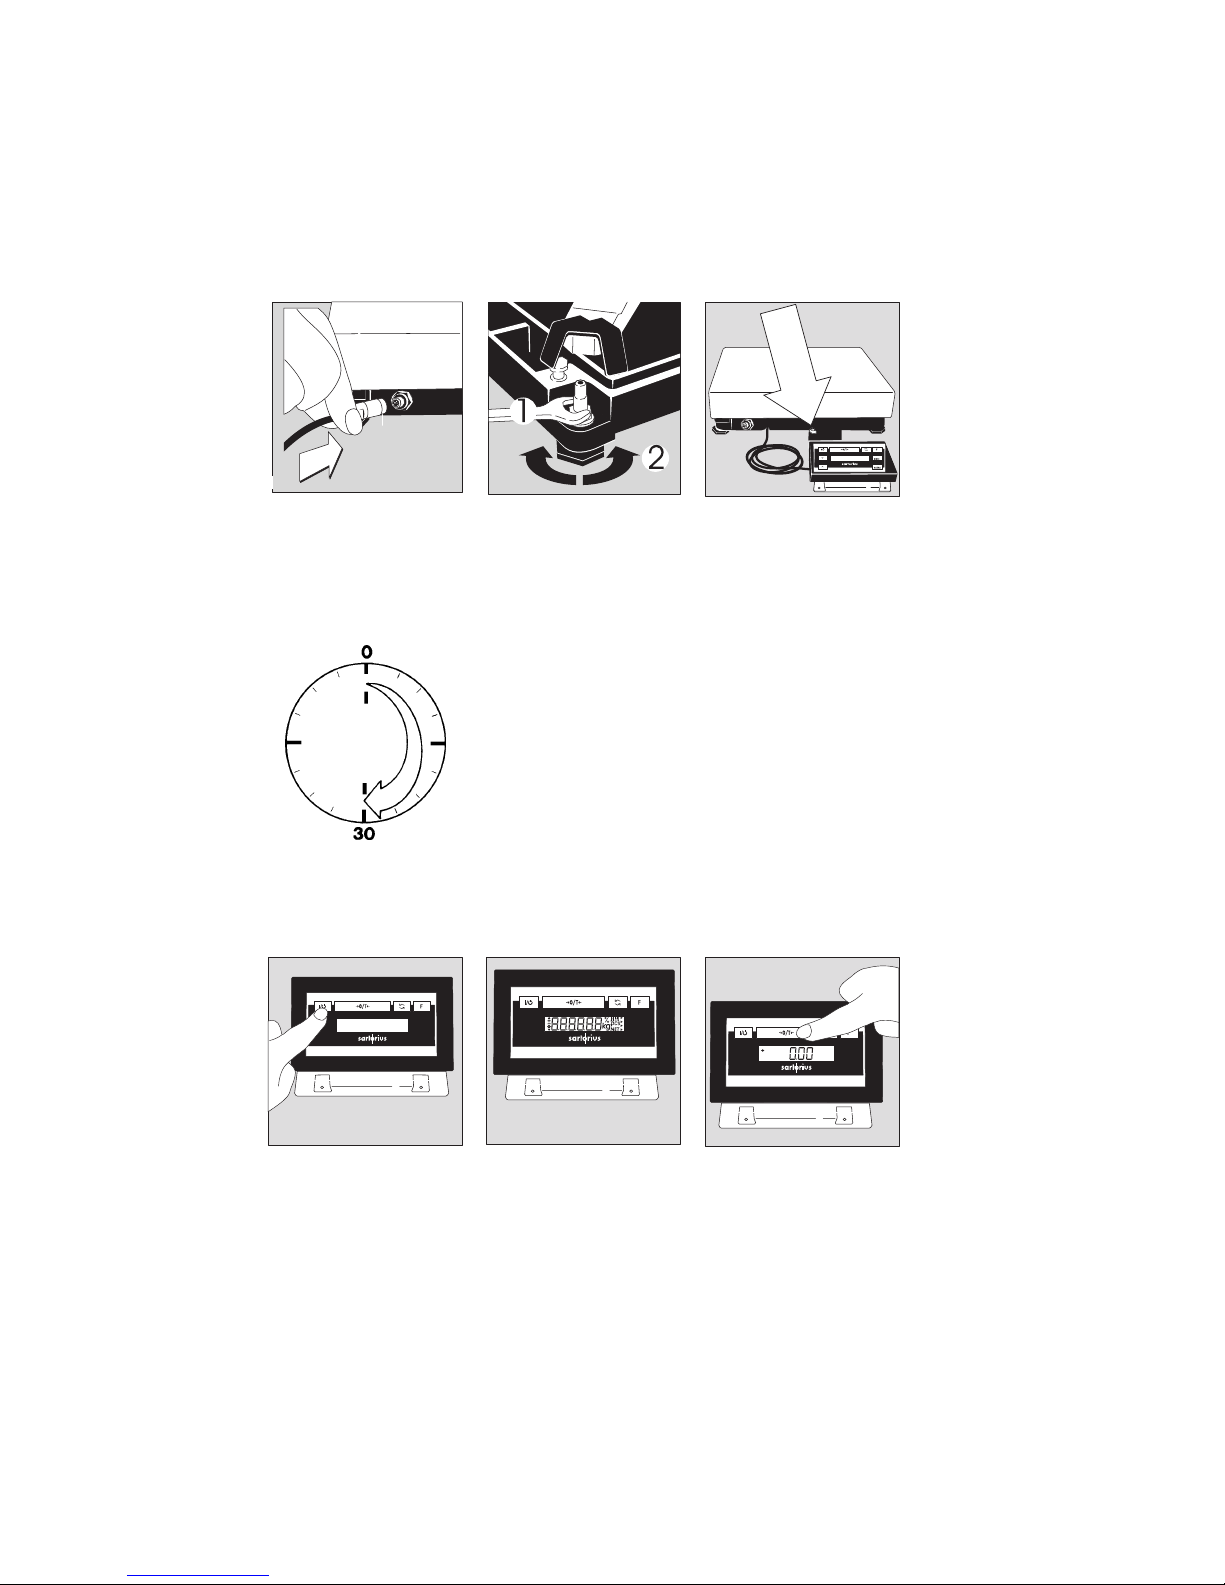
Connect the scale to AC
power. Install the power cable
and grounding cable with
adequate protection so that
they cannot be damaged.
Remove the load plate.
Use a 13-mm open-end wrench
to loosen the leveling foot (1).
Turn the leveling foot (2) until
the scale is level. Tighten the
lock nut (1) with the wrench.
Replace the load plate
Ground the scale in the
hazardous area/location.
Connect an equipotential
bonding conductor to the
terminal (11).
After connecting the scale to AC power, wait approx. 30 minutes
for it to warm up.
Operating the Scale
Turn on the scale using the e
key (2).
After the scale has been turned
on, it will automatically run a
self-test. At the end of this test,
0.0 g is displayed.
If a different readout is
displayed, zero or tare the
scale using the = key (4).
5
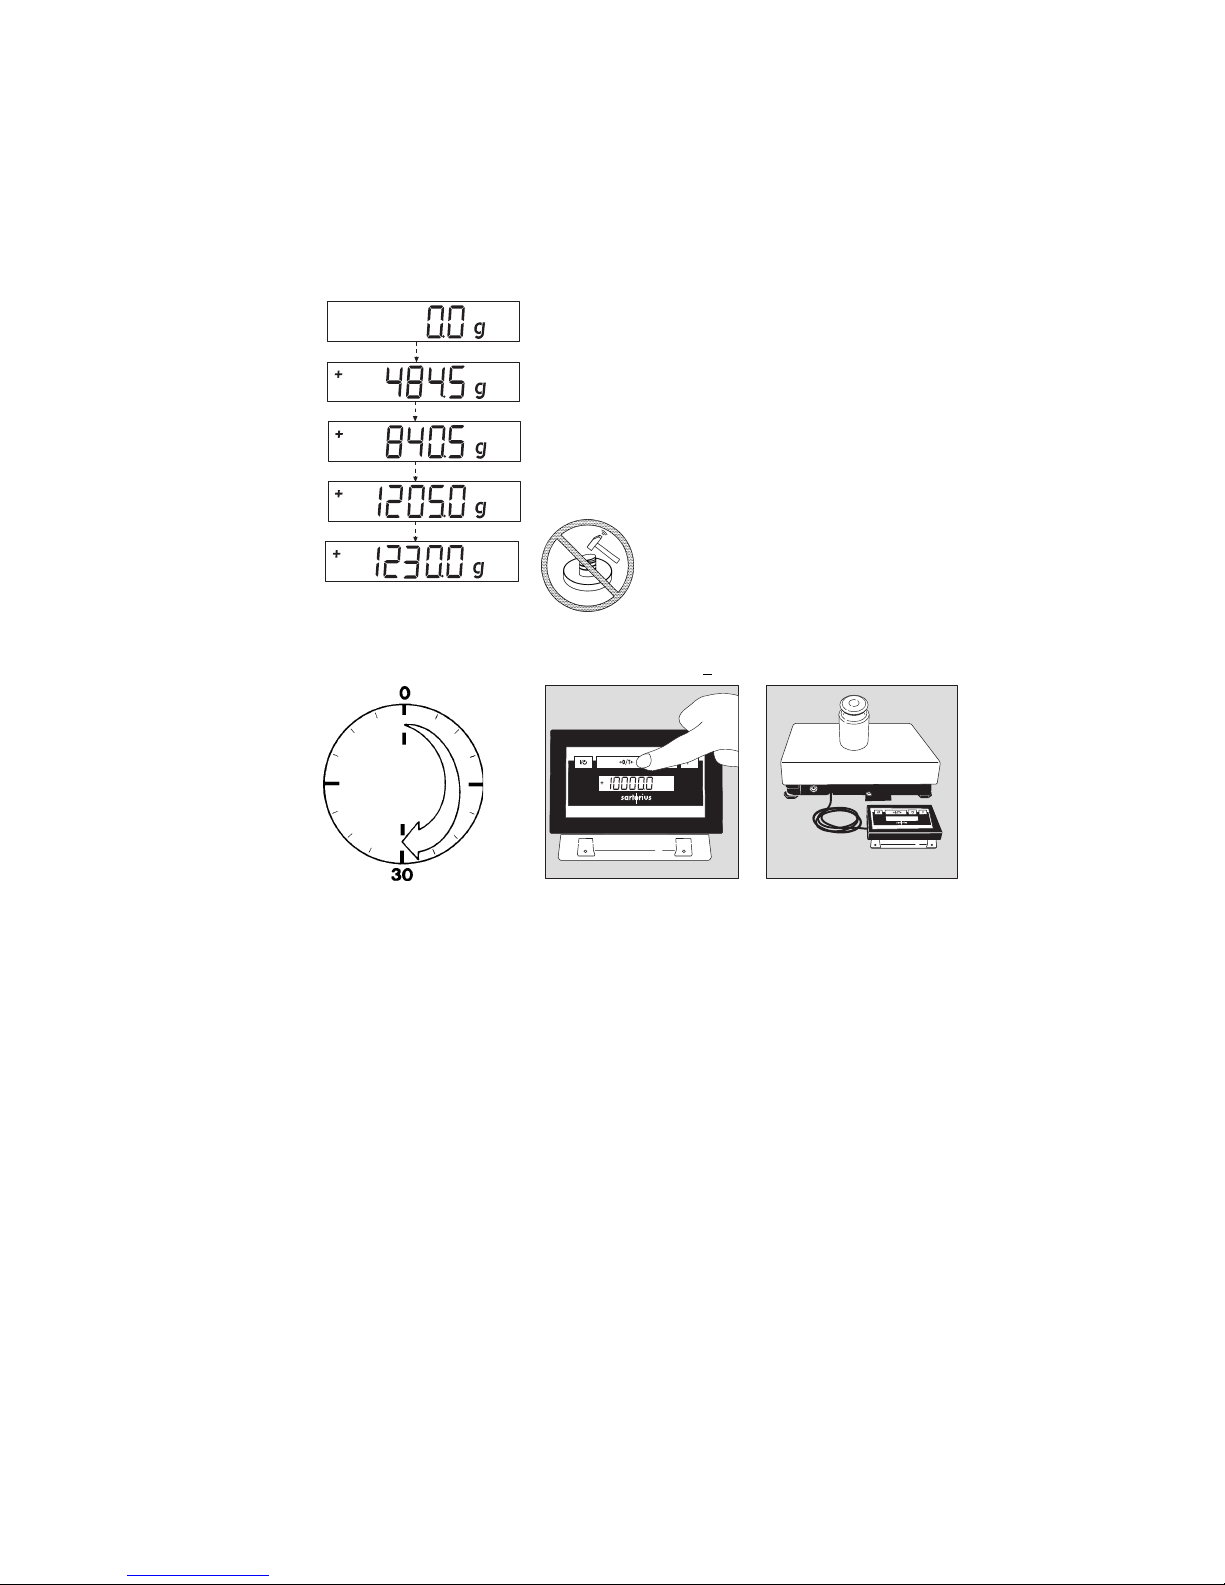
Weighing with One Decimal Place
Place an empty paint can on the load plate (1).
Press = (4). The display shows “0.0 g.”
Pour in the first component, and read off the weight
as soon as the stability symbol appears; in this case, “g.”
Pour in additional components until the desired
weight of your formula is reached.
Remove the filled paint can from the load plate.
Calibration/Adjustment
You can calibrate/adjust the scale by pressing the = key (4). To do so, menu code 1 5 1 must be
selected. Calibration weight: 5,000 g; accuracy: class F1 + 0.075 g.
G Never use a hammer to close the lid of a
paint can while it is still on the load plate, as this
will damage the weighing system.
After connection to AC power
and before each calibration/
adjustment, allow the scale to
warm up for approx. 30 min.
Hold down the = key (4) for
2 sec. When 5000 is
displayed, release the key.
Center the calibration weight
on the load plate (1).
Calibration/adjustment is
performed automatically. After
calibration/adjustment, remove
the calibration weight.
Formulation Mode (Calculation by a Factor)
This mode enables you to weigh in amounts that are smaller or larger than that of your basic formula
for a specific paint color (e.g., 25 l of a 1-l formula), without having to do any manual recalculation.
You can select from among the following factors (amounts) by pressing the v key (7):
0.5, 1.0, 1.5, 2.0, 2.5, 3.0, 3.5, 4.0, 4.5, 5.0, 10, 15, 20, 25.
As you pour in the components of your formula, the weight is displayed in “g.”
Note:
The flashing arrow n on the display means that the weight shown is not valid for use in legal
metrology (not legal for trade).
 Loading...