

Sartorius PMA 35D-X, Sartorius PMA 35D-X00C, PMA 35D-X00C, PMA 35D-X00CV1 Nstallation And Operating Instructions
Page 1

98648-008-38
Sartorius
PMA 35D-X, PMA 35D-X00C ,
PMA 35D-X00CV1
Electronic Paint-Mixing Scales
Installation and Operating Instructions
Page 2
2
PMA 35D-X, PMA 35D-X000C, PMA 35D-X00CV1
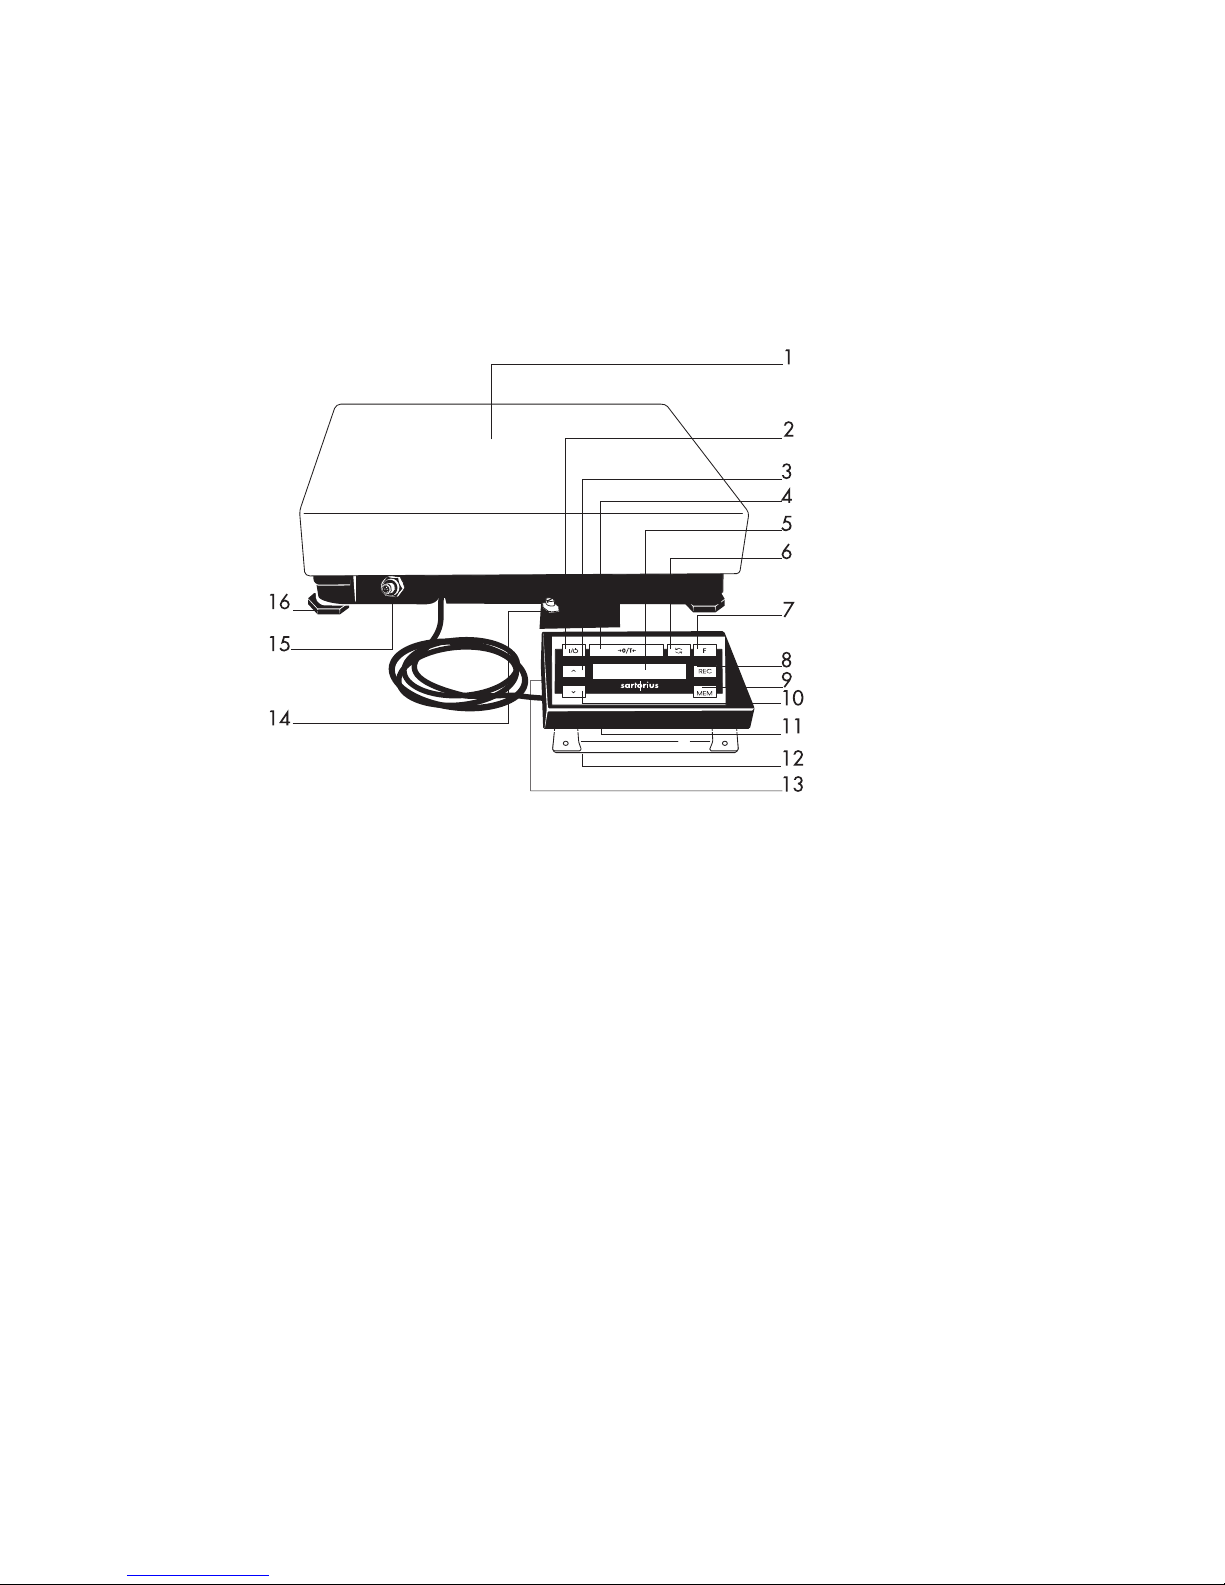
1 Load plate
2 e key (ON/OFF)
3 y Correction key: decrease
(only on the PMA 35D-X00C and
PMA35D-X00CV)
4 = Tare key
5 Display
6 w key (TOGGLE) On the 35D-X/35D-
X00C, you can toggle to two decimal places
– from 0.5 g to 1.0 g – within the entire
weighing range of – 0.5 g to 35 kg –
or – 1 g to 35 kg – On the PMA 35D-
X00CV1, you can toggle from g to Parts per
pound within the entire weighing range
7 v key (FORMULATION)
8 [REC] key (for displaying the final quantity in
the recalculation mode (only on PMA 35D-
X00C and PMA 35D-X00CV1)
9 [MEM] key (MEMORY) (only on PMA 35D-
X00C and PMA 35D-X00CV1)
10 Y Correction key: increase (only on PMA
35D-X00C and PMA 35D-X00CV1)
11 Display and control unit
12 Column
13 Data interface port (25-pin)
14 Terminal for connecting an equipotential
bonding conductor (grounding terminal)
15 DC jack
16 Leveling foot
Important Note to Users
G Make sure to carefully read and follow
sections marked with this symbol.
They contain important safety instructions
and information.
G Use only the adapter that is included in
delivery (part no. 6965619) to connect a 9-pin
connecting cable to the 25-pin data interface
Note:
This equipment has been tested and found to
comply with the limits for a Class A digital
device, pursuant to Part 15 of the FCC Rules.
These limits are designed to provide reasonable
protection against harmful interference when the
equipment is operated in a commercial
environment. This equipment generates, uses,
and can radiate radio frequency energy and, if
not installed and used in accordance with the
instruction manual, may cause harmful interference
to radio communications. Operation of this
equipment in a residential area is likely to cause
harmful interference in which case the user will be
required to correct the interference at his own
expense. Changes or modifications not expressly
approved by Sartorius AG could void the user’s
authority to operate the equipment.
Page 3

3
Getting Started
Remove the scale, load plate
and AC adapter from the
package.
Immediately after unpacking the
equipment, check it for any
visible damage.
Equipment Supplied:
Scale, load plate,
AC adapter, data cable
(25-pin - 9-pin)
Do not miss out on the benefits
of our full warranty. Please
contact your local Sartorius
office or dealer for further
information. If available,
complete the warranty
registration card, indicating the
date of installation, and return
the card to your Sartorius office
or dealer.
Choose a suitable place to set up the scale. Avoid exposure to
drafts, heat, moisture and vibration.
G Check that the voltage rating of the AC adapter matches that
of your local line voltage (mains supply). If it does not match your
local line voltage, contact your Sartorius office or dealer. Use
only original Sartorius AC adapters! If you operate the scale in a
hazardous area/location outside Germany, you must comply with
the national electrical code and applicable safety regulations of
your country. For information on the legal regulations currently
applicable in your country, please ask your Sartorius office or
dealer or your paint supplier.
G The model 609308... AC adapter must be installed outside
the hazardous area/location.
G Before you operate your scale in a hazardous area/location,
the scale must be inspected either by a certified electrician or
under the guidance and supervision of a certified electrician to
make sure that the scale complies with the applicable regulations
(in Germany, in accordance with Section 12 of the ElexV).
Determine whether your scale must be reported to the technical
inspection authorities (e.g., trade board) in your country. The
system must also be inspected during operation. The system should
be inspected at intervals which allow for early detection of the
faults which occur as a result of normal wear and tear, so that they
can be corrected before damage is caused. In any case,
inspection must be performed at least every three years.
G Fasten the AC adapter cable to the balance. Tighten down the
locking ring to secure the connection. Do not disconnect an
energized cable during operation in a hazardous location/area.
G All applicable requirements (e.g., occupational safety
regulations) must be observed during operation.
G Any tampering with the equipment by anyone, other than repair
work done by authorized Sartorius service technicians, will
invalidate the approval for use in hazardous areas/locations and
result in forfeiture of all claims under the manufacturer’s warranty.
Page 4
4
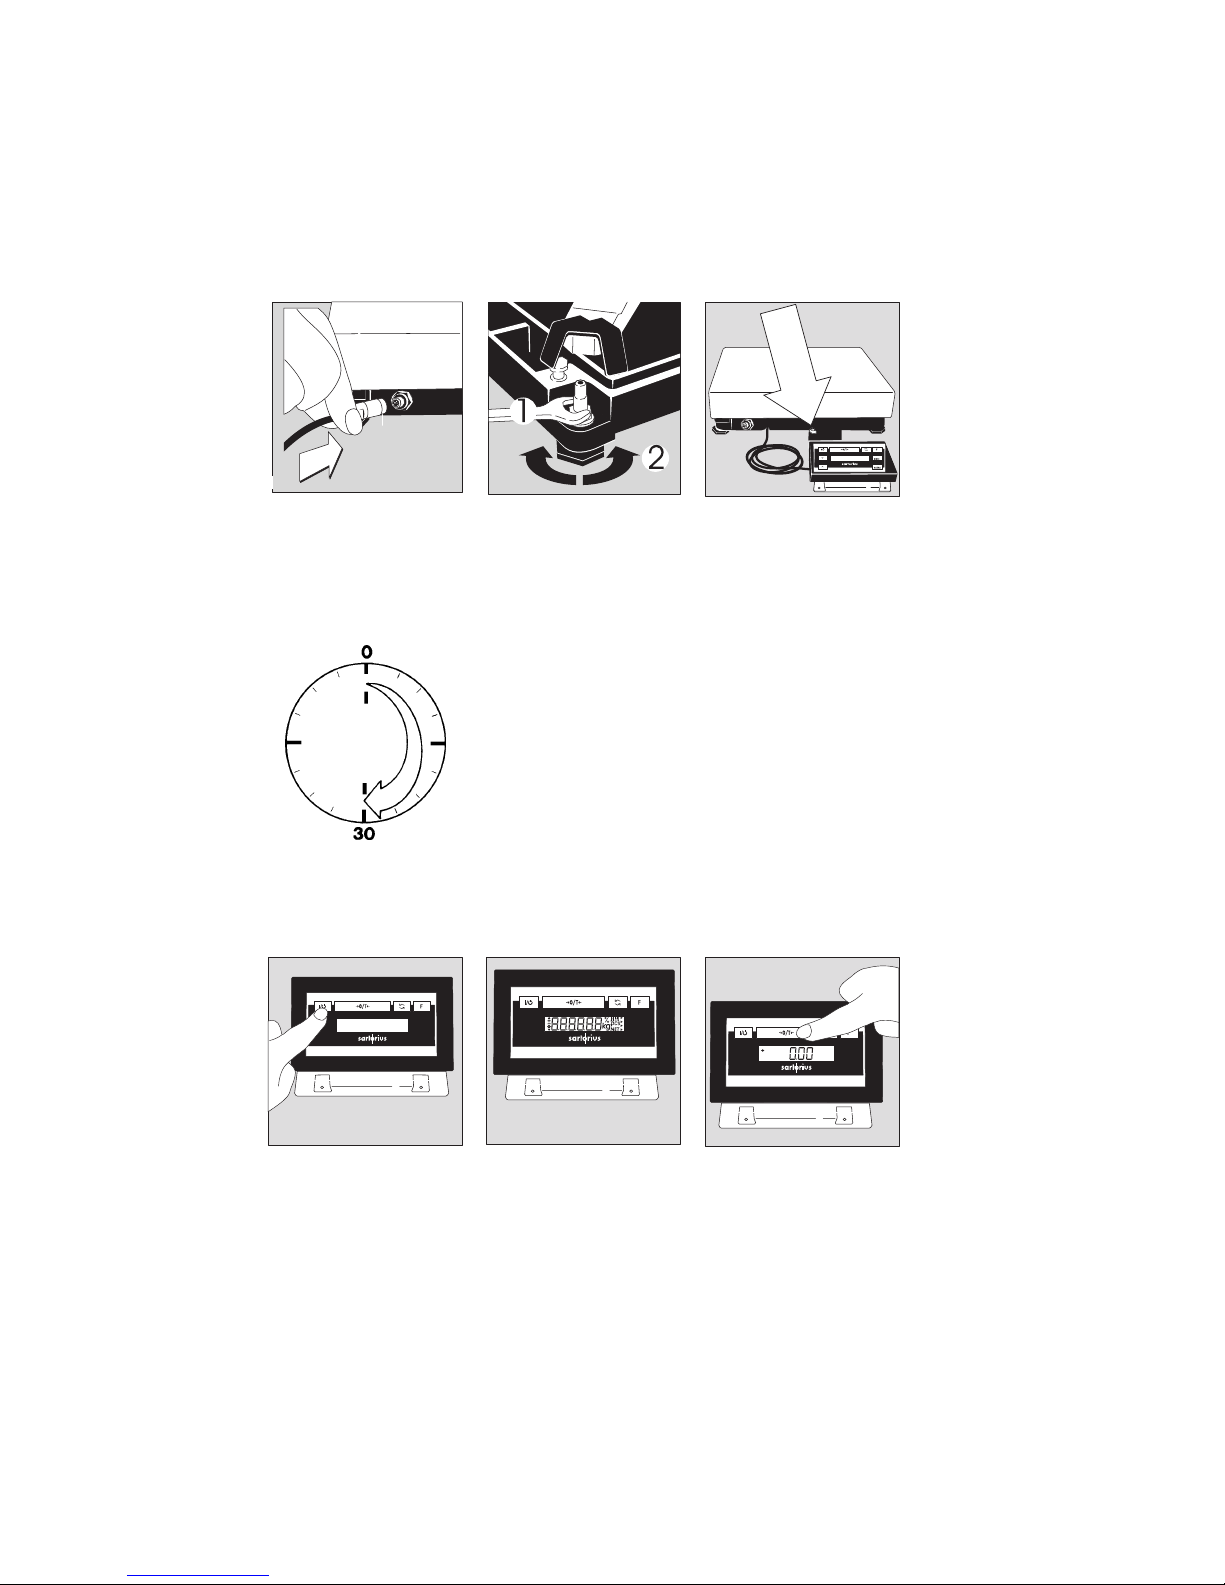
Connect the scale to AC
power. Install the power cable
and grounding cable with
adequate protection so that
they cannot be damaged.
Remove the load plate.
Use a 13-mm open-end wrench
to loosen the leveling foot (1).
Turn the leveling foot (2) until
the scale is level. Tighten the
lock nut (1) with the wrench.
Replace the load plate
Ground the scale in the
hazardous area/location.
Connect an equipotential
bonding conductor to the
terminal (11).
After connecting the scale to AC power, wait approx. 30 minutes
for it to warm up.
Operating the Scale
Turn on the scale using the e
key (2).
After the scale has been turned
on, it will automatically run a
self-test. At the end of this test,
0.0 g is displayed.
If a different readout is
displayed, zero or tare the
scale using the = key (4).
Page 5
5
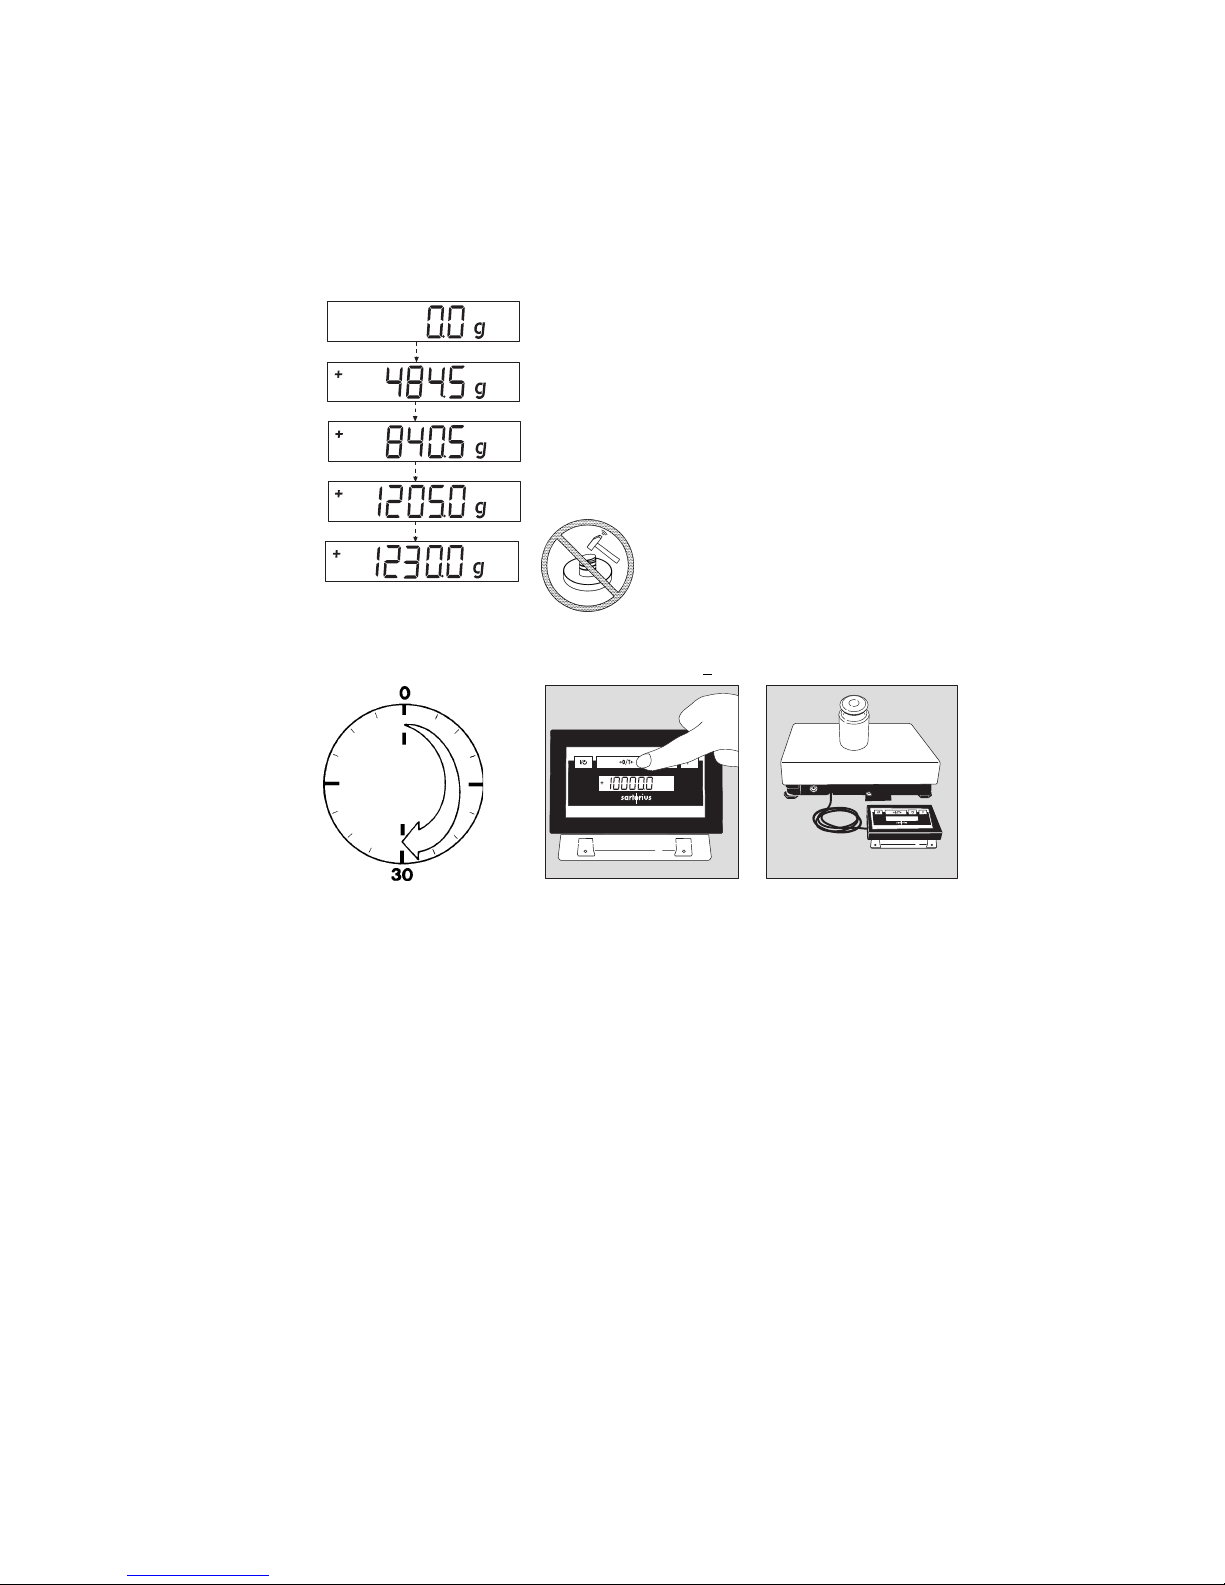
Weighing with One Decimal Place
Place an empty paint can on the load plate (1).
Press = (4). The display shows “0.0 g.”
Pour in the first component, and read off the weight
as soon as the stability symbol appears; in this case, “g.”
Pour in additional components until the desired
weight of your formula is reached.
Remove the filled paint can from the load plate.
Calibration/Adjustment
You can calibrate/adjust the scale by pressing the = key (4). To do so, menu code 1 5 1 must be
selected. Calibration weight: 5,000 g; accuracy: class F1 + 0.075 g.
G Never use a hammer to close the lid of a
paint can while it is still on the load plate, as this
will damage the weighing system.
After connection to AC power
and before each calibration/
adjustment, allow the scale to
warm up for approx. 30 min.
Hold down the = key (4) for
2 sec. When 5000 is
displayed, release the key.
Center the calibration weight
on the load plate (1).
Calibration/adjustment is
performed automatically. After
calibration/adjustment, remove
the calibration weight.
Formulation Mode (Calculation by a Factor)
This mode enables you to weigh in amounts that are smaller or larger than that of your basic formula
for a specific paint color (e.g., 25 l of a 1-l formula), without having to do any manual recalculation.
You can select from among the following factors (amounts) by pressing the v key (7):
0.5, 1.0, 1.5, 2.0, 2.5, 3.0, 3.5, 4.0, 4.5, 5.0, 10, 15, 20, 25.
As you pour in the components of your formula, the weight is displayed in “g.”
Note:
The flashing arrow n on the display means that the weight shown is not valid for use in legal
metrology (not legal for trade).
Page 6

6
Example:
Let’s suppose you want to weigh only 250 l of a basic formula for a total amount of 1 l. With the
recalculation mode, you do not need to manually recalculate the individual components.
The basic formula for 1 liter is:
250 g green paint
+ 250 g red paint
+ 500 g blue paint
Total: 1000 g
1. Place the empty paint can
on the load plate and tare.
2. Press the v key (7)
once.
3. “25 “ is displayed next
to the weight.
4. Slowly pour in the first
component, “250 g” of
green paint, until the
display shows
“250 g”.
5. Pour in the second
component, “250 g” of
red paint, until
“500 g” is displayed.
6. Pour in the last
component, “500 g” of
blue paint, until “1000 g”
is displayed.
We have come to the end of our example. According to the display, exactly 1000 g was poured in,
but the paint can actually contains only 250 g by weight according to the factor you selected, .25.
Follow the same procedure for any other conversion factor.
Weighing Using the Recalculation Mode (Model PMA35D-X000C Only)
Let’s suppose that you poured in too much of one color component for a given formula (e.g., with 4
components). In addition, let’s assume that you previously poured in all of the other amounts exactly
according to each of the values you entered and saved by pressing the [MEM] key (9). Use the
correction keys, y (3) and Y (10), to correct the weight displayed to the value given in the
formula. Then press the y key (3) to start the recalculation mode; “C” flashes on the display. The
scale automatically calculates and displays the amounts in “g” to add for each of the other
components that you already poured in. This will ensure that the total result of your formula for these
components will be correct. After pouring in these amounts, you can continue to add the remaining
components of your formula.
Important Note:
You can correct an incorrect amount any number of times. However, the total (liter) quantity in the
paint can will increase each time you correct a component. Press the [REC] key (8) to check how
much the total quantity (in liters) will be. The arrow n on the display means that the weight shown is
not valid for use in legal metrology (not legal for trade).
Page 7

7
15. Fill to 0.0 g.
0.0 g
14. Pour in the 2nd component;
“C2” flashes on the display.
– 2.0 g
13. Press the [MEM] key (9)
ST 01
Example:
1. Place an empty paint can
on the load plate (1).
+ 118.0 g
2. Press the = key (4).
0.0 g
3. Pour in the 1st component.
+ 50.0 g
4. Press the [MEM] key (9).
ST 01
5. Pour in the 2nd component.
+ 110.0 g
6. Press the [MEM] key (9)
ST 02
7. Pour in the 3rd component.
+ 203.0 g
Oops! You poured in too much.
The correct weight for the
formula is 200.0 g.
8. Press the y key (10) to
start the recalculation mode.
A “C” (= correct) flashes
on the display.
9. Press the y key (10) to
correct the value to:
+ 200.0 g
10.Press the [MEM] key (9)
ST 03
11. Add the 1st component;
“C1” flashes on the display.
– 1.5 g
12. Fill to 0.0 g.
0.0 g
16. Press the [MEM] key (9);
the scale now automatically
returns to the formula
weighing mode.
+ 200.0 g
17. Press the [REC] key (8) to
check what the total weight
will be “A” = Amount
(displayed in liters)
A 1.03
18. Pour in the 3rd component.
+1000.0 g
We have come to the end
of our example.
Page 8

8
Accessing the Menu
Press e (2) to turn off the scale. Press e again to turn the scale
back on; briefly press the = key (4) during the automatic self-test.
“I “ is now displayed.
Set the desired code as follows:
Press = (4) until the desired number is displayed.
Press w (6); the middle number appears. Press = (4) until the
desired number is displayed. Press w (6); the third digit appears.
Press (= (4) until the desired number is displayed. Then press w
(6) for 2 seconds until “o” appears. This symbol indicates that the
new code has been set. Hold down = (4) for 2 seconds until an
automatic self-test is run. Then release this key. The new code is
now saved.
Important Codes:
Adaptation to ambient conditions
You can adapt the scale to the ambient conditions that prevail at the
place of installation.
Code
Very stable conditions 1 1 1
Stable conditions (factory setting) 1 1 2°
Unstable conditions 1 1 3
Very unstable conditions 1 1 4
To obtain a detailed list of the menu codes, please ask your nearest
Sartorius office, dealer or paint supplier.
Care and Maintenance
Cleaning
Use only naphtha or alcohol to clean the scale.
G Do not wash down the scale with water or dry it with compressed air.
Safety Inspection
G If there is any indication that safe operation of the scale with the AC adapter is no longer
warranted, turn off the power and disconnect the equipment from AC power immediately. Lock the
equipment in a secure place to ensure that it cannot be used for the time being.
In this case, notify your Sartorius office, dealer or paint supplier. Only service technicians who are
authorized by Sartorius and have access to the required maintenance manuals are allowed to perform
maintenance and repair work on the equipment.
Safe operation of the equipment is no longer ensured when:
- there is visible damage to the equipment
- the equipment no longer functions properly.
Always unplug the scale before connecting peripheral equipment. You can choose the 9-pin or 25-pin
data output port.
Page 9

9
Troubleshooting Guide
Problem Causes Solution
No segments appear – No AC power available – Check the AC power supply
on the weight display
The display shows “L” – The load plate is not in place – Position the load plate
The display shows “H” – The load on the pan exceeds – Unload the scale
the scale’s capacity
The weight readout – Unstable ambient conditions – Set up the scale in another area
changes constantly – Too much vibration or the – adapt the scale to the particular
scale is exposed to a draft weighing environment
The weight readout – Scale not adjusted –- Adjust scale
is obviously wrong – The scale was not tared Tare/zero before weighing
(zeroed) before weighing
Storage and Shipping Conditions
Storage temperature: – 40 to + 70°C/ – 40 to +158°F
Read and follow the instructions given in the section entitled “Safety Inspection.”If you need to return this
equipment, disconnect all cables before shipping to prevent damage. Remove any splashes or spill of
paint. Please enclose a description of the equipment failures/faults.
C Marking
Note:
G The seal marking affixed to the equipment indicates that the equipment may be opened and serviced
only by technicians authorized by Sartorius to ensure proper functioning and safe operation of this
equipment. Otherwise, you will invalidate the warranty.
The equipment meets the requirements of the following Council Directives:
89/336/EEC “Electromagnetic Compatibility (EMC)”
Applicable European Standards:
Limitation of emissions: EN 50081-1 Residential, commercial and light industry
EN 50081-2 Industrial environment
Defined immunity to interference: EN 50082-1 Residential, commercial and light industry
EN 50082-2 Industrial environment
Note:
The operator shall be responsible for any modifications to Sartorius equipment and for any connections of
cables or equipment not supplied by Sartorius and must check and, if necessary, correct these
modifications and connections. On request, Sartorius will provide information on the minimum operating
specifications (in accordance with the Standards listed above for defined immunity to interference).
Page 10

10
Specifications
Model PMA 35D-X PMA35D-X000C
Weight range kg 35 35
Readability g 0.5/1 0.5/1
Tare range (subtractive) kg – 35 – 35
Max. overload capacity kg 70 70
Max. linearity g < 2 < 2
Repeatability < g 1 1
Sensitivity drift 1/K < + 10 ppm
at + 10° C to 30° C
Integration time,
can be selected externally s 1.6 to 6.4
Stability range
can be selected externally digit 0.25 to 4
Allowable ambient
operating temperature °C 0 to + 40
Moisture-proof rating Class F Non-condensing
Scale housing (WxDxH) mm 400x 425 x approx. 90
Load plate (WxDxH) mm 400 x 300 x 53
Net weight kg 8
Calibration weight kg 10, class F2 or better
Dust and water protection rating
of the weighing platform IP 54
Dust and water protection rating
of the display and control unit IP 40
Power consumption VA average: 8
Interface RS-232C
– Format 7-bit ASCII, 1 start bit, 1 or 2 stop bits
– Parity odd, even, mark, or space
– Transmission rates 150 to 9600 baud
– Handshake Software or hardware
Power supply
– 609308-011 EC 230 V, 50-60 Hz
– 609308-61 USA/CDN 120 V, 50-60 Hz
– 609308-211 GB 230 V, 50-60 Hz
YDS03-XGR GB 230 V, 50-60 Hz
YDS03-XKR USA/CDN 120 V,50-60 Hz
Data output, 25-pin:
Pin 1: shield, pin 2: transmit data (TXD), Pin 3: receive data (RXD),
Pin 5: clear to send (CTS), pin 20: data terminal ready (DTR), pins 7, 14: (SGN GND)
If the weighing instrument is installed in a hazardous area/location, any electrical circuits connected
to the data output port must be intrinsically safe. The specifications listed in the KEMA Certificate
98ATEX0609X (see below) must be observed.
Accessories
Calibration weight YCW713-00 1 x 10,000 g
Note:
If you need extra literature for your equipment, you can order it directly from your local Sartorius
office.
Page 11

11
Page 12

12
Page 13

13
Page 14

14
Page 15

15
Page 16

Sartorius AG
37070 Goettingen, Germany
Weender Landstrasse 94 - 108, 37075 Goettingen, Germany
Copyright by Sartorius AG, Goettingen, Germany.
All rights reserved. No part of this publication
may be reprinted or translated in any form or by any means
without the prior written permission of Sartorius AG.
The status of the information, specifications and
illustrations in this manual is indicated by the date
given below. Sartorius AG reserves the right to
make changes to the technology, features,
specifications and design of the equipment
without notice.
Status: June 1999 Sartorius AG, Goettingen, Germany
Printed in Germany on paper that has been bleached without any use of chlorine · MJ · K ·
Publication No.: WPM6028-e99051
(+49/551) 308-0, (+49/551) 308-289
Internet: http://www.sartorius.com
 Loading...