

Page 1
Operating Instructions
Sartorius Cubis Series
Electronic Semimicro, Micro, Precision and Analytical Balances
MSE Models
1000025315
Page 2

Contents
Contents
Notes on Using these Instructions � � � � � � � � � � � � � � � � 3
Safety Instructions ���������������������������� 4
Intended Use �������������������������������� 6
General View of the Equipment ���������������� 7
Getting Started ������������������������������ 9
Unpacking the Equipment ��������������������� 9
Setup Instructions ��������������������������� 9
Assembly ��������������������������������� 11
Transporting the Balance ��������������������� 17
Storage and Shipping Conditions ���������������� 17
Power Connection ��������������������������� 18
Warm-up Time ����������������������������� 19
Anti-theft Locking Device ��������������������� 20
Modification Options ������������������������ 21
Preparing Below-Cell Weighing ����������������� 26
Using the Cable Opening in the
Analytical Balance Draft shield� � � � � � � � � � � � � � � � � � 28
Operation ����������������������������������� 29
Display and Control Panel ��������������������� 29
Basic Weighing Function ���������������������� 30
Leveling the Balance with the Inclination Sensor ���� 31
Turning the Ionizer On/Off (Optional) ������������ 31
Calibration and Adjustment �������������������� 33
Configuration (Operating Menu) ����������������� 36
Key Functions during Configuration ������������� 36
Menu Navigation Example: Setting the Language ��� 36
Menu Structure (Overview) �������������������� 37
Parameter Settings: Overview ������������������ 38
Application Programs �������������������������� 45
Density Determination ������������������������ 45
Counting ��������������������������������� 48
Weighing in Percent ������������������������� 50
Calculation �������������������������������� 52
Animal Weighing/Averaging ������������������� 54
Net-total Formulation ������������������������ 56
Totalizing ��������������������������������� 58
Mass Unit Conversion ������������������������ 60
ISO/GLP-compliant Print-out �������������������� 62
Data Interfaces� � � � � � � � � � � � � � � � � � � � � � � � � � � � � � � 63
Error Codes ��������������������������������� 75
Care and Maintenance
(Packing the Balance for Shipping) �������������� 76
Transporting the Balance ����������������������� 80
Disposal ������������������������������������ 86
Specifications �������������������������������� 87
Dimensions (Balance Drawings) ����������������� 100
Accessories (Options) ������������������������� 108
EC / EU Declaration of Conformity ��������������� 110
FCC Supplier’s Declaration of Conformity ��������� 111
CSA Certificate of Compliance ������������������ 112
EC Type Approval Certificate ������������������� 115
Plates and Markings �������������������������� 116
The enclosed CD-ROM contains the
h
operating instructions as a PDF file�
To read and print the file, you require
the program Acrobat Reader, which
you can download for free from the
Adobe website (www�adobe�com)�
Software drivers for configuration of
SB interfaces can also be downloaded
from the internet:
http://www�ftdichip�com/FTDrivers�htm
The “installation guides" for these
drivers can be found here:
http://www�ftdichip�com/Documents/
InstallGuides�htm
2 Cubis MSE Operating Instructions
Page 3
Notes on Using these Instructions
t Please read these instructions carefully and completely before using the device�
t Read the Safety Instructions carefully�
t These instructions are part of the product� Keep them in a safe and easily
accessible location�
t If the instructions should be lost or misplaced, please contact Sartorius
for a replacement or download the latest version from our website:
www�sartorius�com
Symbols and Signs
The following symbols are used in this manual:
Danger of explosion
1
Potential danger of physical injury or death
Notes on Using these Instructions
Danger of electrical shock
2
Danger of physical injury or death
Warning of potential physical injury,
3
Health risk or risk of property damage
Useful information and tips
h
Notes on use in legal metrology within the scope of validity of
Council Directive 2014/31/EU for instruments for which the conformity assessment
procedure has been carried out (verified instruments)�
Note regarding device operation
Explanation of Symbols
The following symbols are used in these instructions:
t Indicates a required action
y Describes what happens after you have performed a particular step
1�, Perform steps in the specified order
2�
– Indicates an item in a list
Technical advice / Hotline:
h
Phone: +49�551�308�4440
Fax: +49�551�308�4449
Cubis MSE Operating Instructions 3
Page 4

Safety Instructions
Safety Instructions
This device complies with European Council Directives as well as international regulations and standards for electrical
equipment, electromagnetic compatibility, and the stipulated safety requirements� Improper use or handling can,
however, result in damage and/or injury�
This device should only be operated by trained personnel�
Operators must read these installation instructions, particularly the safety information, and must be familiar with the
operation of the equipment� The operator is required to supplement these safety precautions as appropriate�
The operating personnel must be provided with the appropriate training�
The requirements pertaining to applicable installation regulations must be followed when using electrical equipment
in systems and environmental conditions with increased safety requirements� Relevant laws, standards, regulations,
guidelines and environmental protection laws valid in your country must be observed�
Always keep the equipment and balance freely accessible�
Any installation work or balance operation that does not conform to the instructions will result in forfeiture of all
claims under the manufacturer's warranty�
Danger of Explosion!
Do not use this equipment in hazardous areas in which explosive materials are present�
1
Danger of Electrical Shock!
If the device is not used in accordance with the instructions, this can affect the product liability for the device�
3
Make sure that the voltage rating printed on the AC adapter is identical to your local line voltage� The wall outlet must
2
2
2
2
2
have a protective grounding conductor� The operating instructions included with the AC adapter must be followed�
Do not switch on the equipment if the AC adapter or power cord are damaged� If the balance, the AC adapter or
any of the cables are damaged, disconnect the equipment from the power supply and secure it so that it cannot be
turned on�
Chemicals (e�g� gases or liquids) that can corrode and damage the inside or outside of the balance, AC adapter, power cable or
peripherals must be kept away from the equipment�
Do not operate the balance unless the housing and the display are undamaged and the housing is closed so that
inadvertent contact with parts inside the equipment is not possible� Make sure that no liquids penetrate the balance
and do not allow conductive parts to touch the balance�
Note on Installation:
The operator shall be solely responsible for any modifications to the equipment
and for connecting any cables or equipment not supplied by Sartorius�
Information on operational quality is available upon request from Sartorius�
You should only use peripherals and options supplied by Sartorius�
Protection Class of the Balance Housing
3
4 Cubis MSE Operating Instructions
– Models with a readability of ≥10 mg and 0�1 mg: These models fulfill the requirements of protection class IP54�
The IP protection only applies to the balance housing and not to the AC adapter�
– The IP protection is only guaranteed when the weighing pan is mounted�
– The IP protection is restricted if the data interfaces are used�
Retain the cover cap for the data output� When the data output is not in use, reapply the cover cap to protect it
against vapors, moisture, and dust or dirt�
Page 5

Safety Instructions
Note on cable quality:
3
3
3
3
CE conformity is only guaranteed with well shielded cables�
The shielding braid of the cable must be made of metal with at least 80% coverage and also covered with metal foil
as much as possible�
The shielding on both sides on the full metal or metalized connector casing, as well as on the casing inlet, must be
high-frequency compliant and have a flat design�
You can only turn off power to the device by pulling the plug or disconnecting the power cord, or by unscrewing the four-
pin plug at the DC supply cable for the balance�
Only use a lightly-moistened cloth for cleaning� See “Care and Maintenance" for cleaning the device� Do not
compromise the IP protection of the balance�
Do not open the balance housing� If the seal is broken, this will result in forfeiture of all claims under the
manufacturer’s warranty� The device may only be opened by specialized personnel trained by Sartorius�
Disconnect the balance from the wall outlet prior to moving the device�
3
Avoid condensation damage to the device� When the balance is turned on,
3
Hazards at the Place of Installation and During Operation
3
3
3
3
3
condensation build-up is not possible� If the device is moved from a cool environment to a warm environment, you
must allow the device to acclimatize for approx� 2 hours before connecting to the power supply�
Avoid generating static electricity and establish potential equalization� A 10 kOhm ground is used when connecting
the balance to the power supply�
Disconnecting the ground conductor is not permitted�
Models with a separate electronics module (e� g� MSE6�6/3�6/2�7 225S/P and 125P): Do not replace the electronics
module�
Replacing with, e� g� models of the ME/SE series will damage the device�
Exercise caution to avoid glass breakage�
There is a danger of lacerations or cuts caused by sharp edges on glass or metal (contact springs), particularly when
removing or replacing the glass draft shield panels; during cleaning; if a glass sample container breaks, or when
modifying the balance hardware configuration�
Make sure all equipment operators have received proper instructions when working with hazardous or toxic materials�
Failure to follow correct handling procedures can result in breakage of parts or spillage of liquids or other substances�
Make sure the necessary protective clothing or equipment is worn, such as protective gloves, clothing, eyewear� All safety
regulations applicable in the laboratory must be observed�
Exercise caution to avoid squeezing or crushing fingers when
– Operating the electronic draft shield
– Removing or installing the panels
– Adjusting the display
Do not expose the device to aggressive chemical vapors or to unnecessarily extreme temperatures, moisture, shocks,
3
3
or vibration�
The device should be setup in areas away from equipment or devices that have strong magnetic properties�
Extreme electromagnetic fields from electrical lines should also be avoided�
Cubis MSE Operating Instructions 5
Page 6
Safety Instructions
Use69719
87
1
2
3
4
5
6
7
8
9
11
12
13
14
15
16
17
18
19
7
1
3
20
10
10
Intended Use
Cubis models are high-resolution balances� They were specially
developed for exact determination of material mass in liquid,
paste, powder or solid form�
Appropriate containers must be used for each type of sample
material�
Specific models cover specific weighing ranges: see
“Specifications�"
Cubis models are designed specially for use in research,
education and day-to-day laboratory tasks in science and
industry�
They are designed to be used exclusively indoors�
Cubis models can be operated as standalone, connected to a
PC, or on a network�
General View of the Equipment and Equipment Supplied
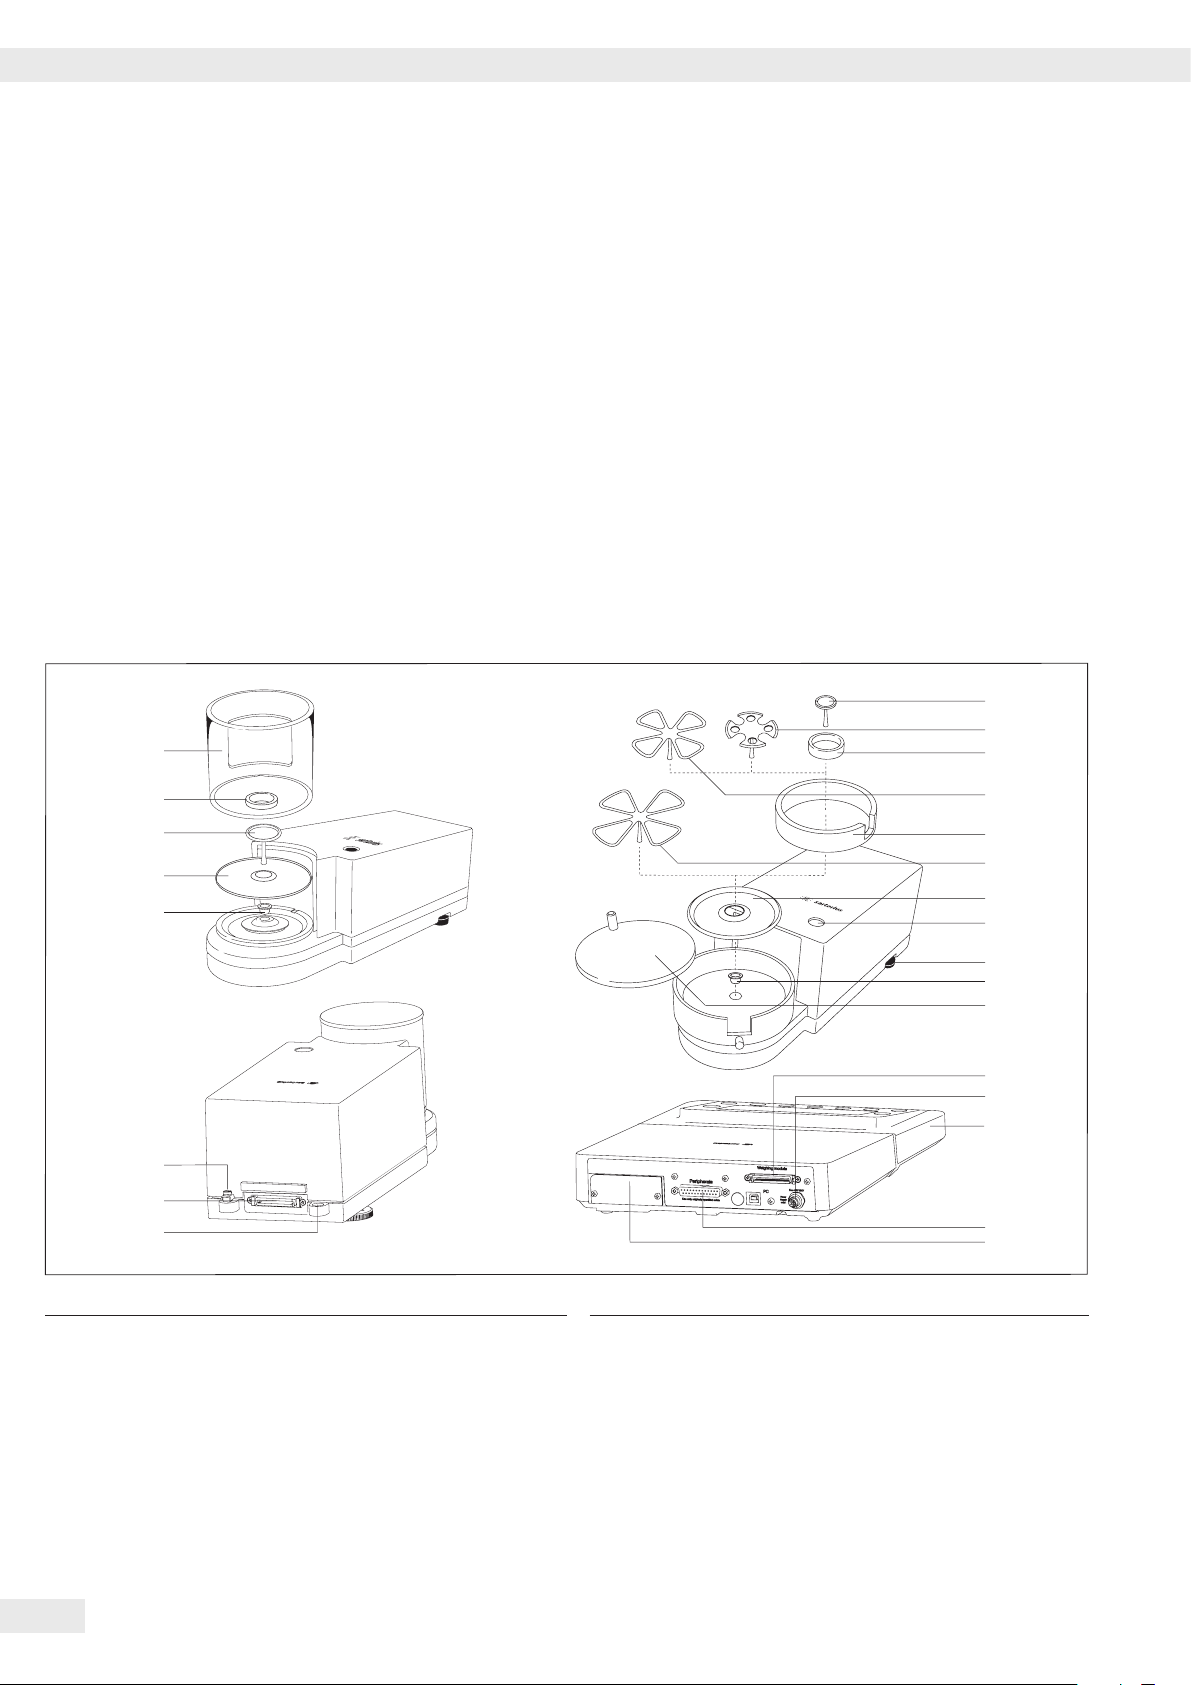
Balances with a readability of ≤ 1 µg
Pos� Description
1 Weighing pan
2 Filter weighing pan d 50 mm
3 Internal draft shield (for MSx2�7S-F only)
4 Optional weighing pan d 75 mm
5 Shield disk
6 Optional filter weighing pan d 90 mm
7 Shield plate
8 Level indicator
9 Leveling foot
10 MSE2�7�� model: bush
11 Draft shield cover
6 Cubis MSE Operating Instructions
Pos� Description
12 Female connector for weigh cell
13 DC jack
14 Display and control unit
15 Serial communications port (PERIPHERALS)
16 Slot for optional interfaces, e� g� 9-pin data output or Bluetooth�
PS2 socket has no function�
17 Lug for attaching antitheft locking device
18 Equipotential bonding conductor terminal
19 Equipotential bonding conductor terminal
20 Draft shield
Not shown: AC adapter, USB cable
Page 7
General View of the Equipment and Equipment Supplied
9
10
22
3
4
5
5
6
6
12
12
10
10
13
13
6
11
11
4
3
3
14
15
16
17
18
19
20
21
4
23
24
14
16
19
20
21
1
2
3
4
5
6
7
8
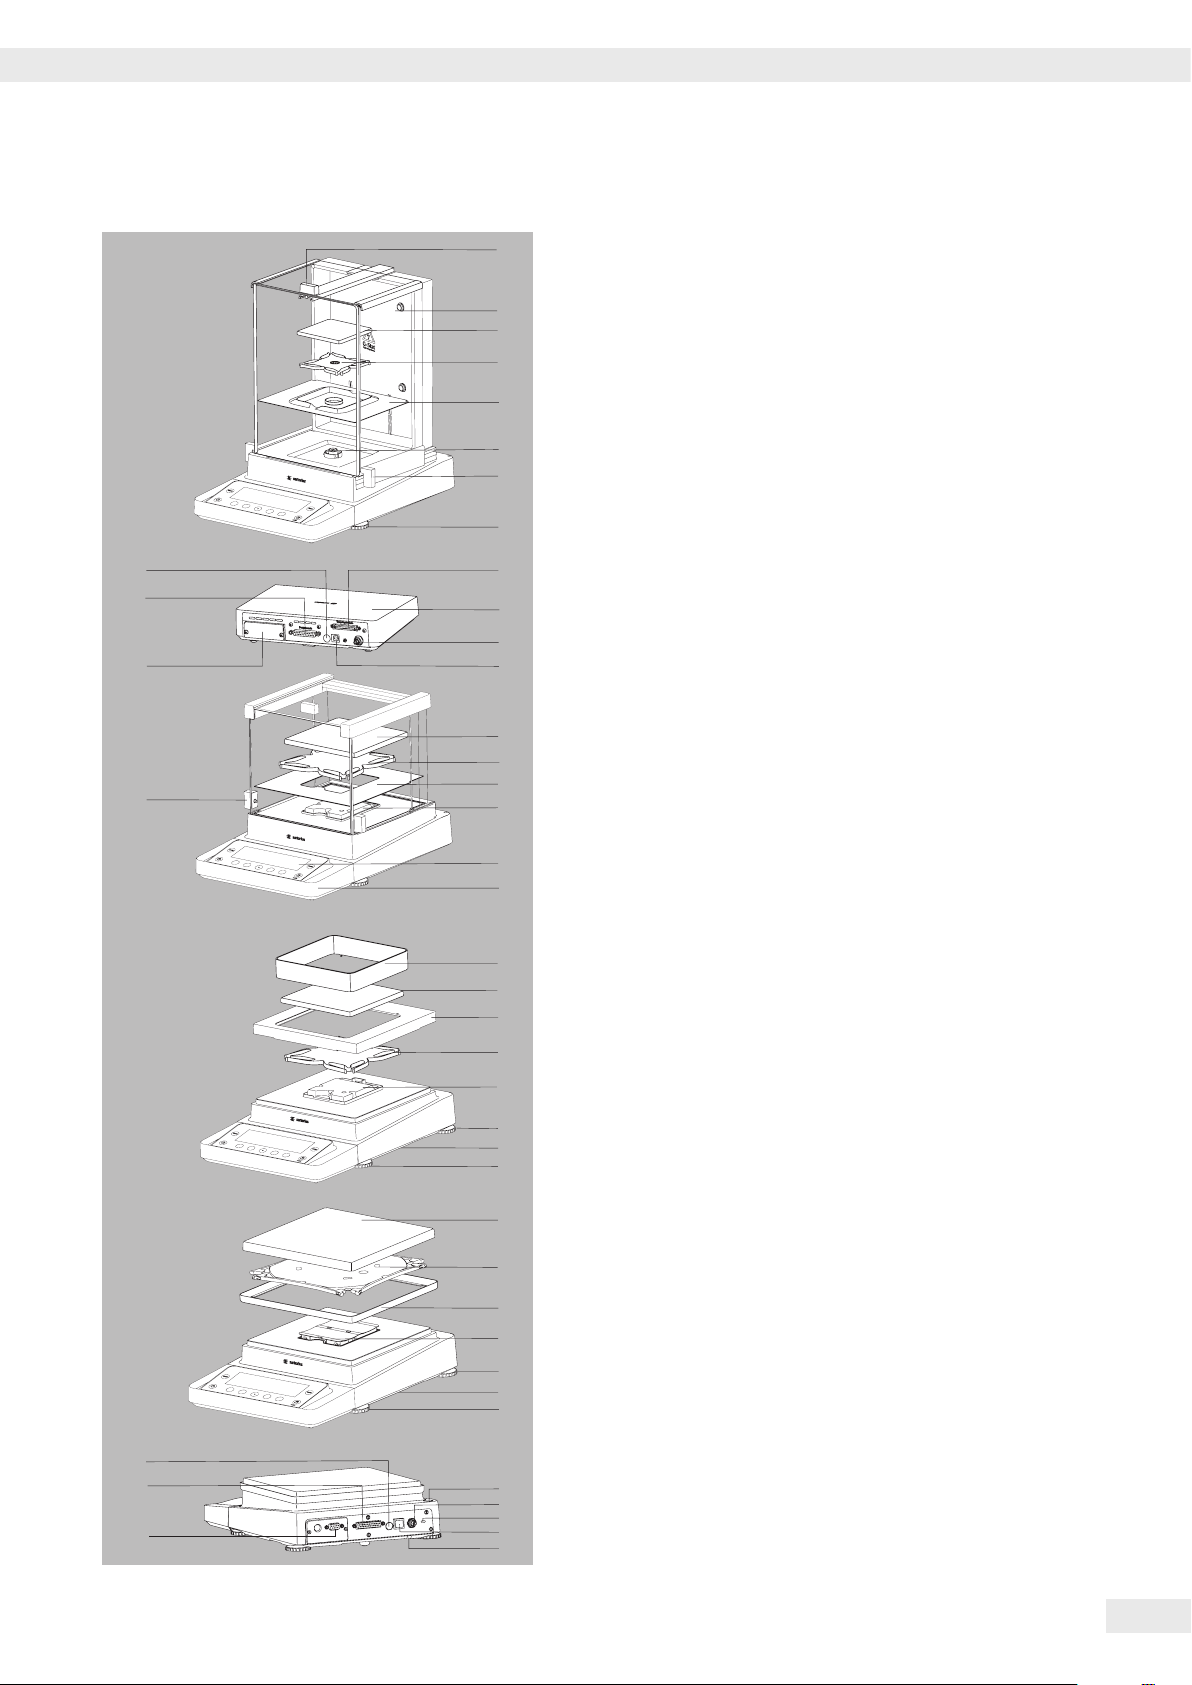
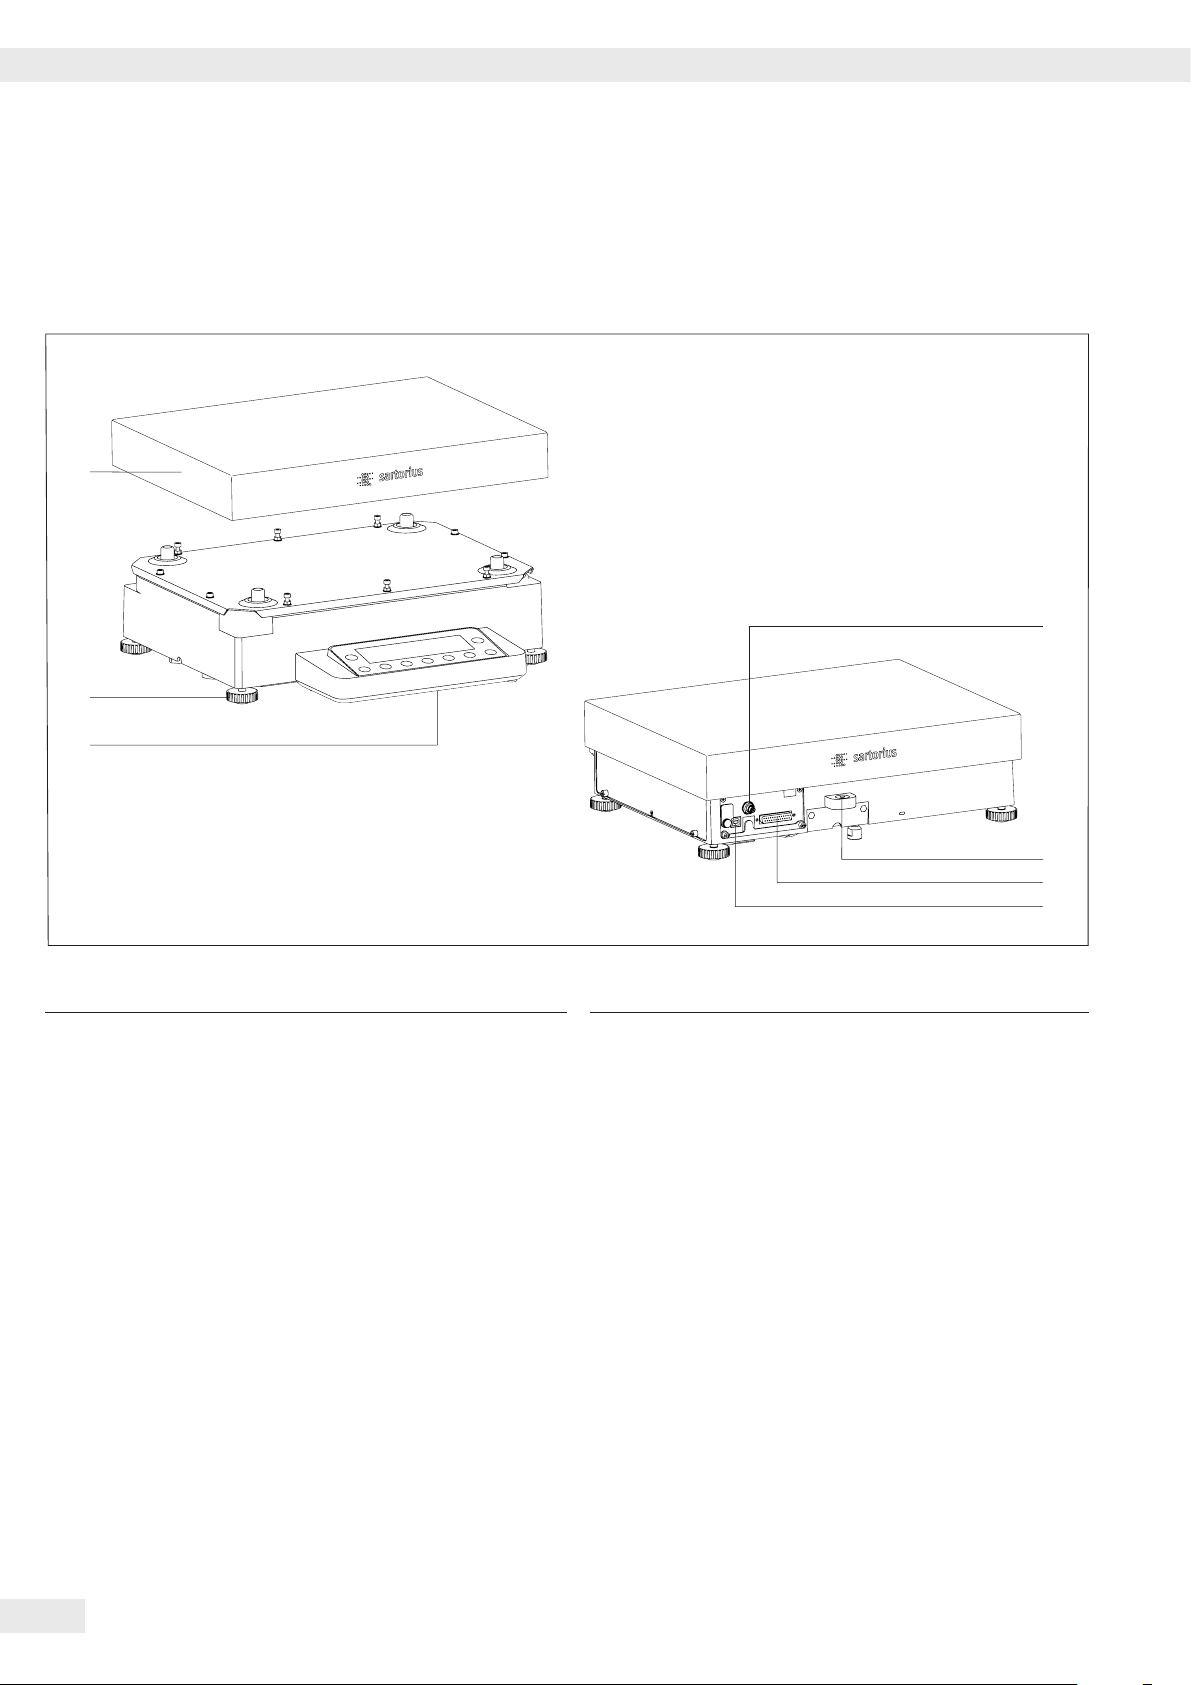
General View of the Equipment
and Equipment Supplied
Item Description
Analytical and precision balances with a weighing range of up to 15 kg
1 Upper sliding draft shield panel/Handle
2 Back panel
3 Weighing pan
4 Pan support (not for MSx225���/MSx125��� models)
5 Shield plate
6 Pan retainer
7 Right sliding panel/Handle
8 Leveling foot
9 Display
10 Display and control unit
11 Draft shield/Shield disk (only for models with a readability of
1 mg and 10 mg)
12 Below-cell weighing port
(on the bottom of the balance)
13 Leveling foot
14 Level indicator
15 Power socket
16 Slot for attaching an
anti-theft locking device
17 USB socket for a PC connection
18 Below-cell weighing hook
19 Slot for optional interfaces,
e�g�, 9-pin data output (as shown) or Bluetooth�
PS2 socket has no function�
20 Communication port (PERIPHERALS) for accessories
21 Menu access switch
22 Left sliding panel/handle
23 Semi-microbalances: Female connector for weigh cell
24 Semi-microbalances: Electronics module
(for MSx225���/MSx125��� models)
Not shown:
– AC adapter
– USB cable
– Operating instructions
– In-use cover over the display unit
– Dust cover (only for balances with a draft shield)
– In-use cover for housing (only for models with a readability of
19 mg/100 mg and a weighing capacity of <14 kg)
Cubis MSE Operating Instructions 7
Page 8
General View of the Equipment and Equipment Supplied
1
3
4
5
7
2
6
Equipment Supplied and General View of the Equipment
Balances with a weighing range of 20 kg or more
Pos� Bezeichnung
1 DC jack
2 Leveling foot
3 Level indicator
4 Serial communications port (PERIPHERALS)
Pos� Bezeichnung
5 USB interface for PC connection
6 Display and control unit
7 Weighing pan
Not shown: AC adapter, USB cable
8 Cubis MSE Operating Instructions
Page 9
Getting Started
°C
Getting Started
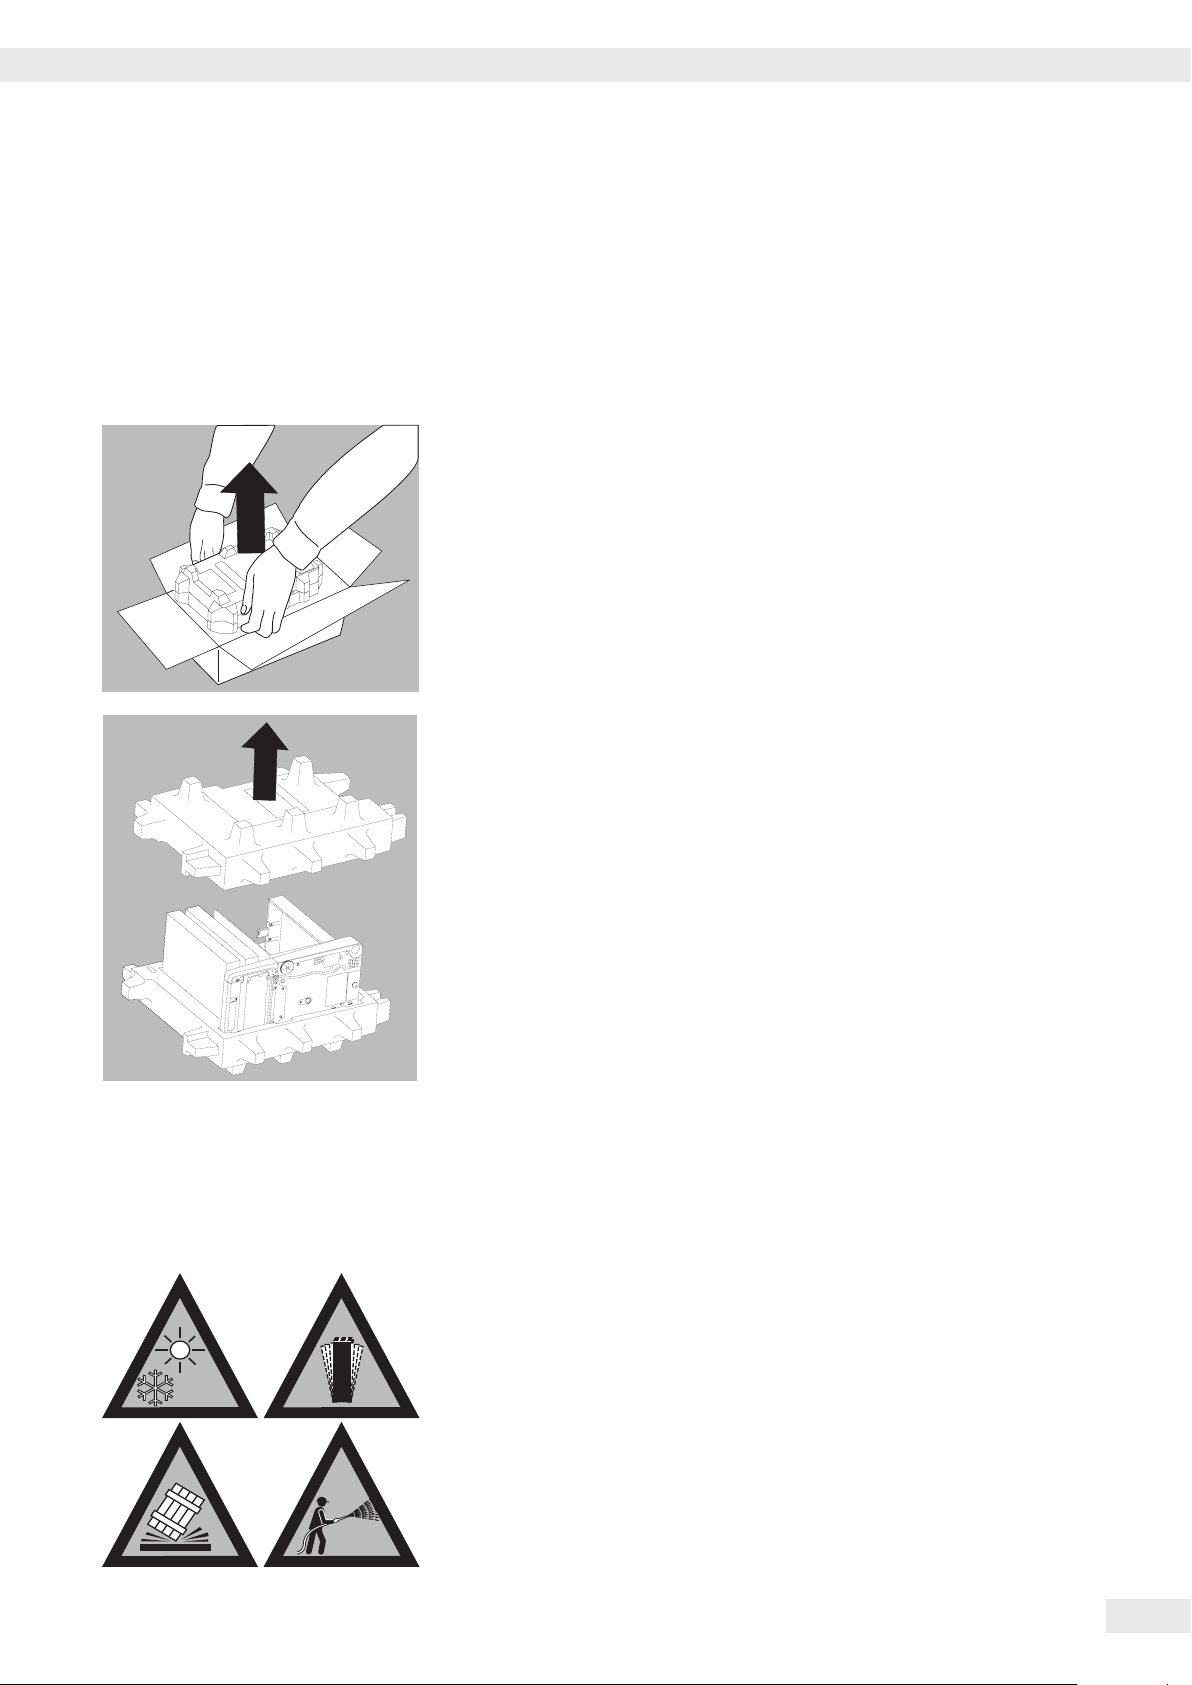
Unpacking the Equipment
t Open the packaging at the top�
t Use both hands to lift the balance, with the packaging, out of the cardboard
box�
t Place the packaging with the balance on the floor�
t Remove the top part of the packaging�
Installation Instructions
t Select the proper setup location:
– Set up the device on a stable, even surface that is not exposed to vibrations
(e�g� weighing stone)�
– Place the device in a location with enough free space around it so that
excessive heat cannot build up�
– Maintain free access to the device at all times�
Choose a location that is not subject to the following negative influences:
– Heat (heater or direct sunlight)
– Drafts from open windows, AC systems and doors
– Extreme vibrations during weighing
– Excessive moisture
Acclimatization
Condensation from humidity can form on the surfaces of a cold device when it is
brought into a substantially warmer area�
To avoid the effects of condensation, condition the balance for about two hours at
room temperature, leaving it unplugged from the power supply�
Carefully read all warnings and safety precautions in the respective section of this
manual�
Cubis MSE Operating Instructions 9
Page 10
Getting Started
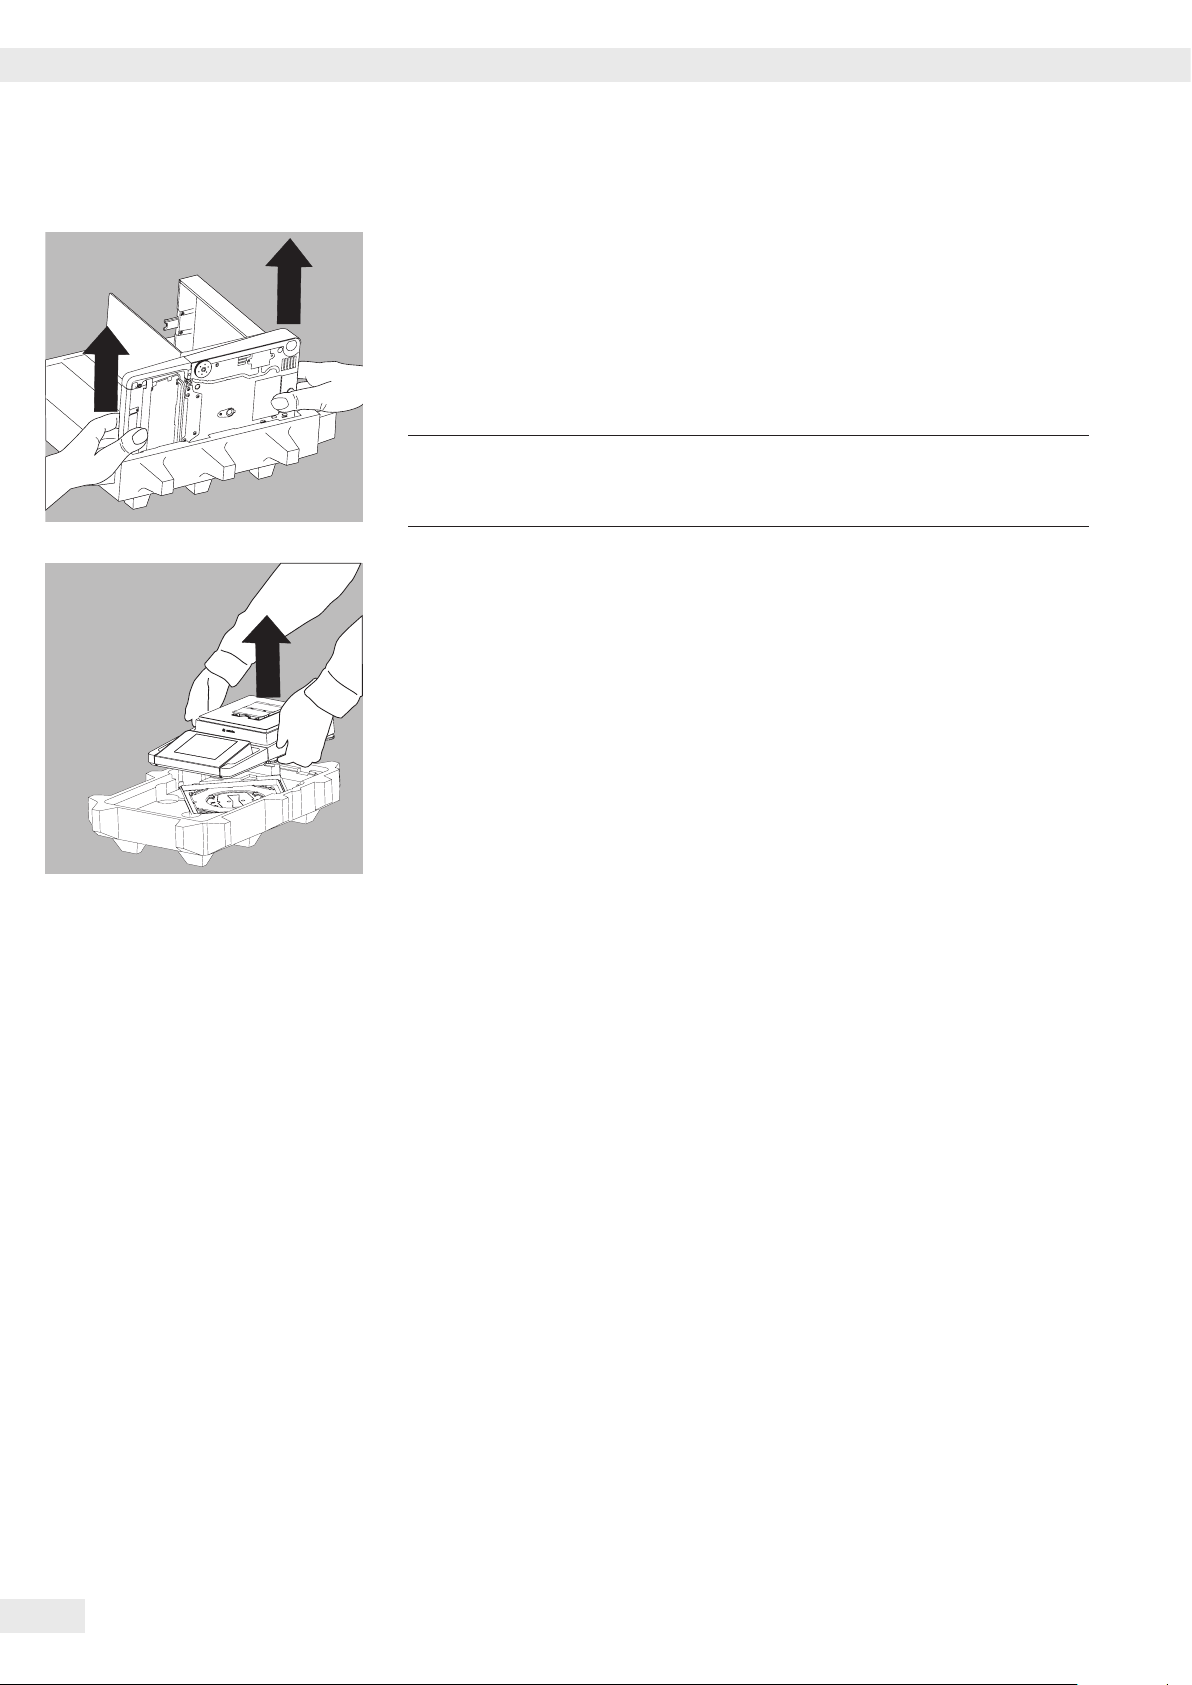
Balance with Draft Shield
t Remove the packages (containing draft shield panels, weighing pan, pan
support, AC adapter, etc�) from the lower packaging and place them to one
side�
t Use both hands to lift the balance out of the packaging�
Exercise caution to avoid glass breakage�
3
t Place the balance on an even surface�
Never lift the equipment by the draft shield panels to remove it from the
packaging�
Balance with No Draft Shield
t Use both hands to remove the model without a draft shield from the
packaging�
t Remove the AC adapter and the balance parts from the packaging�
10 Cubis MSE Operating Instructions
Page 11
Getting Started
Assembly
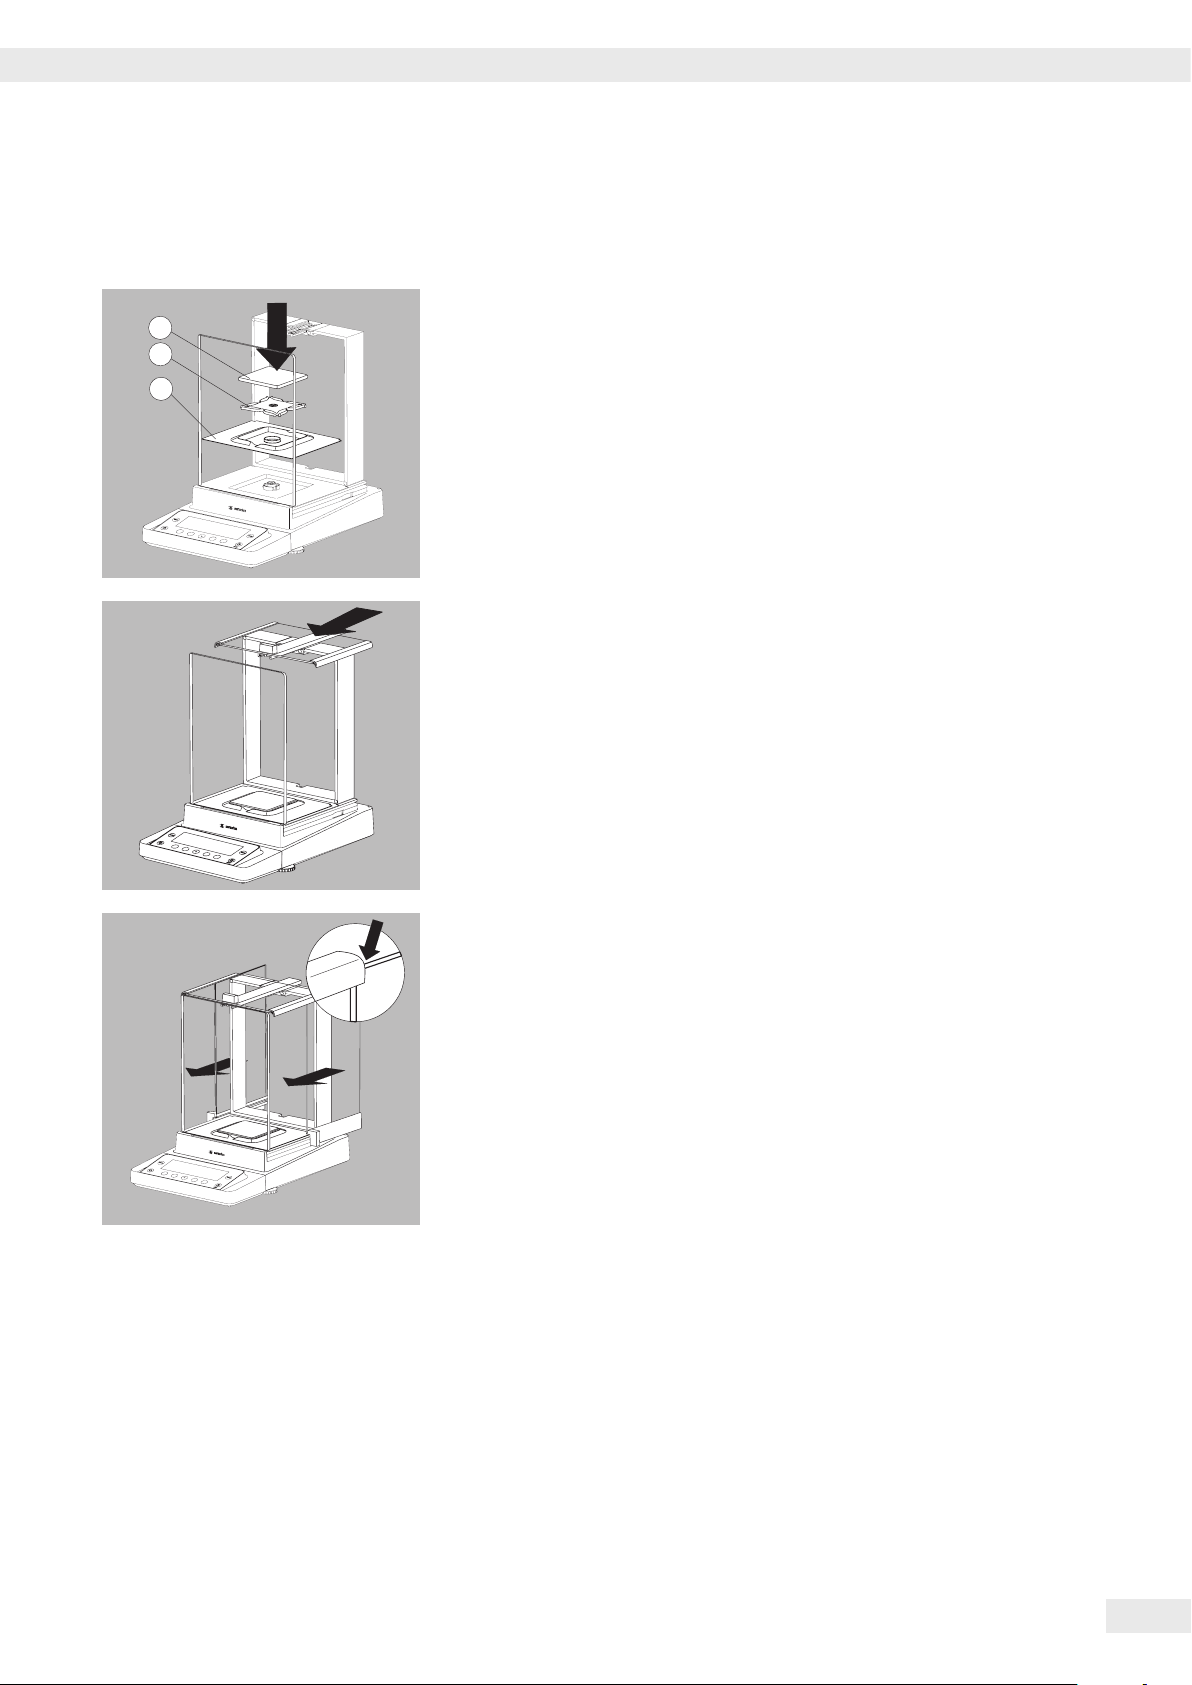
Installing the Analytical Draft Shield Labeled DA, DI, and DU
3
2
1
Assembling the Balance
t Fit parts onto the balance as shown in the picture�
1. Shield plate
2. Pan support (not for MSx225���/MSx125��� models)
3. Weighing pan
t Slide the upper draft shield panel into the guide rails from the rear�
t Slide the left and right draft shield panels into the guide rails from the rear�
Make sure the panels are within the upper and lower guide rails�
t Slide the panels in until they engage�
1. Right draft shield panel
2. Left draft shield panel
y This completes the balance assembly�
Cubis MSE Operating Instructions 11
Page 12

3
2
1
3
2
1
Getting Started
Installing the Draft Shield Labeled DE for Milligram Balances
Assembling the Balance
t Fit parts onto the balance as shown in the picture�
1. Shield plate
2. Pan support
3. Weighing pan
Assembly of Milligram Balances without Glass Draft Shield (DR Option):
Balance Assembly
4
3
2
1
t Fit all components listed below onto the balance in the order given:
1. Pan support (see also next section)
2. Shield plate
3. Weighing pan
4. Draft shield frame
t First insert the shield plate�
t Make sure the pin on the pan support is facing toward the front, and slide it
under the clip on the pan retainer�
1. Insert the pan support�
t After inserting the pan support, press it down against the shield plate so that it
lies flat�
3
2. Press down the pan support�
Exercise caution to avoid pinching or crushing fingers�
12 Cubis MSE Operating Instructions
t Place the weighing pan on the pan support�
3. Weighing pan
Page 13
Getting Started
2
1
2
1
t Slide the upper draft shield panel into the guide rails from the rear while
pressing the locking tab�
t Slide the side draft shield panel into the guide rails from the rear while pressing
the locking tab�
y This completes the balance assembly�
t Remove the panel again if necessary
1. Press on the locking tab�
2. Remove the panel again if necessary
t Place the panel in the storage slot at the back of the balance�
Assembly for Precision Balances without Draft Shield with a Weighing Range
3
2
1
up to 15 kg
t Fit parts onto the balance as shown in the picture�
1. Pan support
2. Shield plate/Draft shield
3. Weighing pan
1
t Place the pan support diagonally and press down lightly�
1. Pan support
Cubis MSE Operating Instructions 13
Page 14

Getting Started
3
t Carefully turn the pan support clockwise until the two buttons engage�
The pan support is now attached�
t 2. Insert the shield plate/draft shield�
t 3. Place the weighing pan on the pan support�
2
y This completes the balance assembly�
Models with a Weighing Range from 20 kg Upwards:
t Place the weighing pan on the balance�
14 Cubis MSE Operating Instructions
Page 15
Getting Started
MSE225…, MSx125:
MSE6�6S/3�6P/2�7S:
Connecting the Weigh Cell to the Electronics Module/Evaluation Unit
t Connect the weigh cell and electronics module using the connection cable�
Make sure that the connectors click into place so that both ends are securely
connected�
Please check the plug contacts to ensure a proper connection�
3
t Connecting the Weigh Cell to the Evaluation Unit
3
There should be no tension on the connection cable�
We therefore recommend placing the device close to the wall�
Make sure that the connectors click into place so that the connection is secure�
Models with a separate electronics module (e�g� MSE6�6/3�6/2�7),
MSE225S/P and MSE125P: Do not replace the electronics module�
Replacing them with models from the ME/SE series, for example, can
damage the device�
MSE6�6S/3�6P/2�7S:
MSE6�6S-F/2�7S-F:
Microbalances (Models MSE6.6S/3.6P/2.7S):
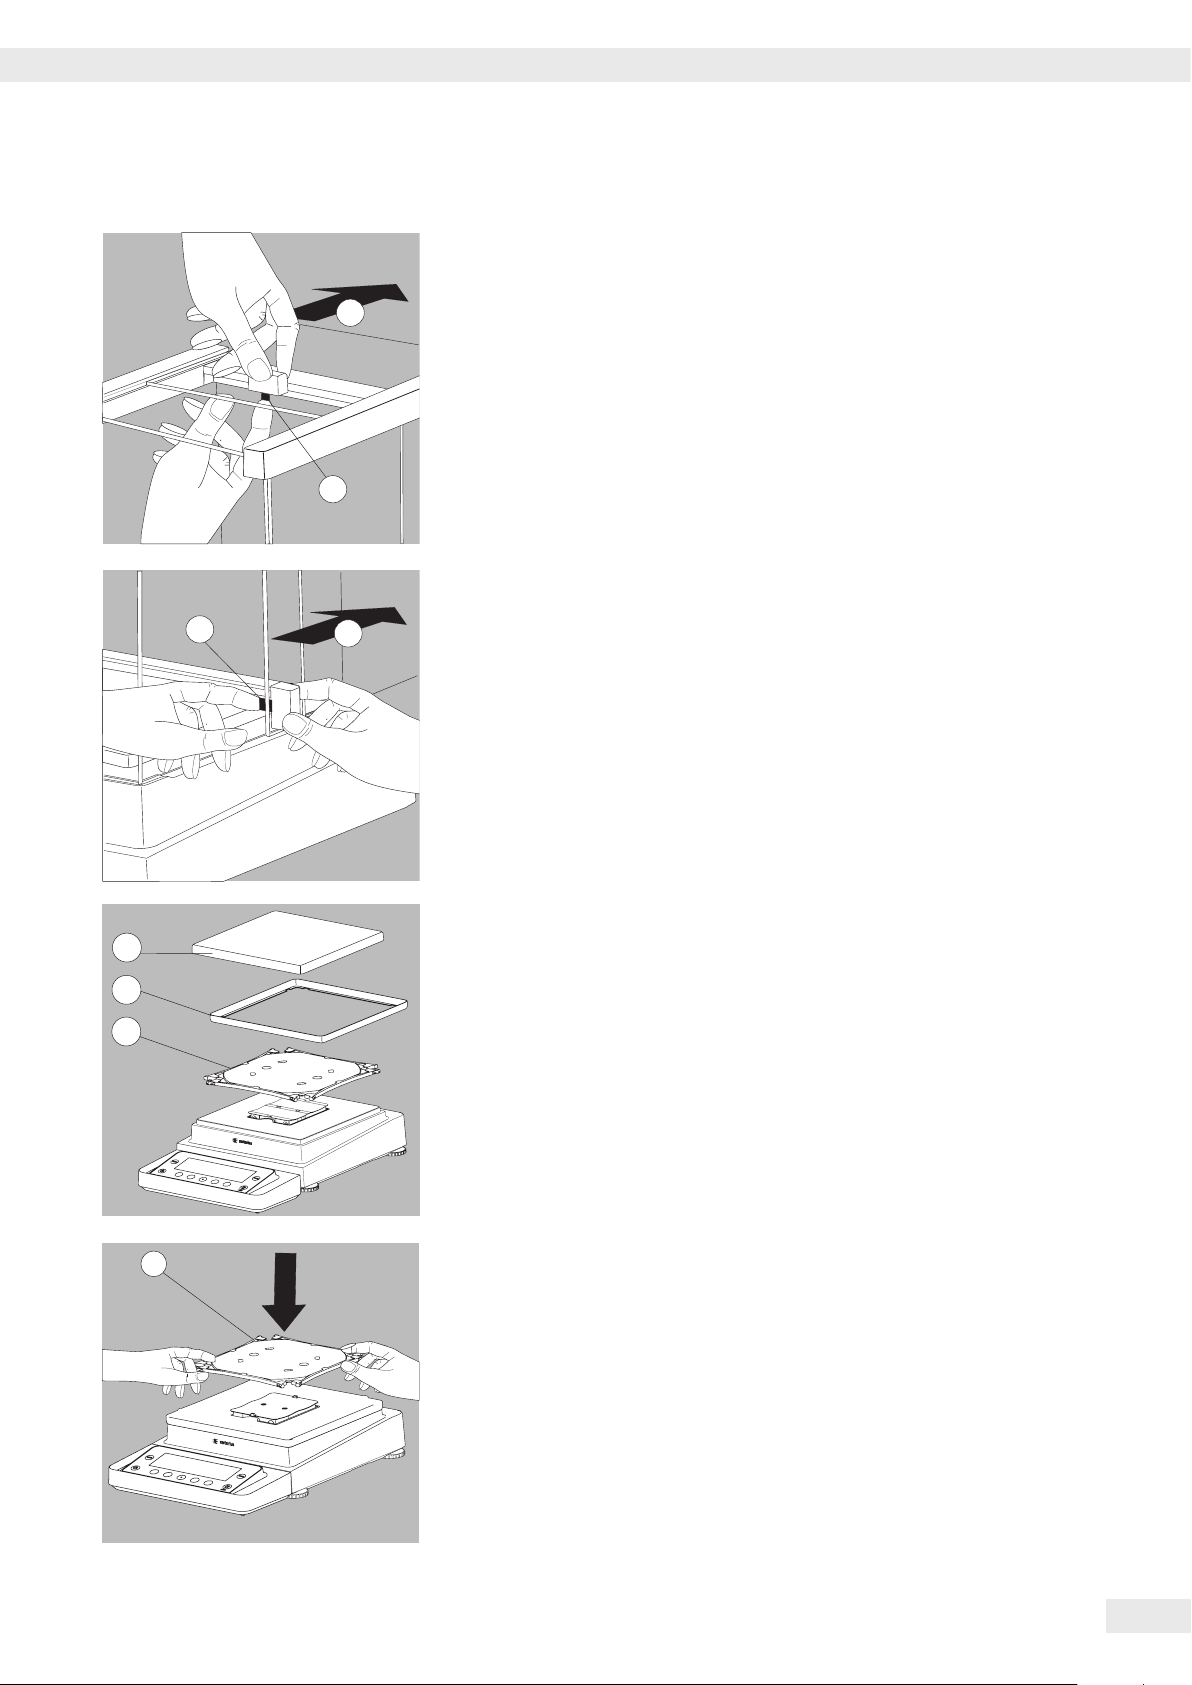
Placing Components on the Weigh Cell
t Install the following parts in the order listed:
5
1� MSE2,7S models: bush
4
3
2
1
2� Shield plate
3� Weighing pan
Note: After inserting the weighing pan, turn it slightly to the left and right,
while pressing it down lightly�
4� Internal draft shield (for MSE2�7S only)
5� Draft shield: Center the hole over the pan (see arrows)
Filter Balances (Models MSE6.6S-F/2.7S-F):
Placing Components on the Weigh Cell
t Place the components listed below inside the weigh cell in the order given:
1� MSE2,7S-F models: female connector
2� Shield plate
3� Internal draft shield
4� Filter weighing pan d 50 mm or weighing pan
(optional filter weighing pan d 75 mm or d 90 mm)
Note: After inserting the pan, turn it slightly to the left and right,
while pressing it down lightly�
5� Draft shield cover
!
Tip: Turn the balance off and then on again after replacing the pan during
operation�
Cubis MSE Operating Instructions 15
Page 16
Getting Started
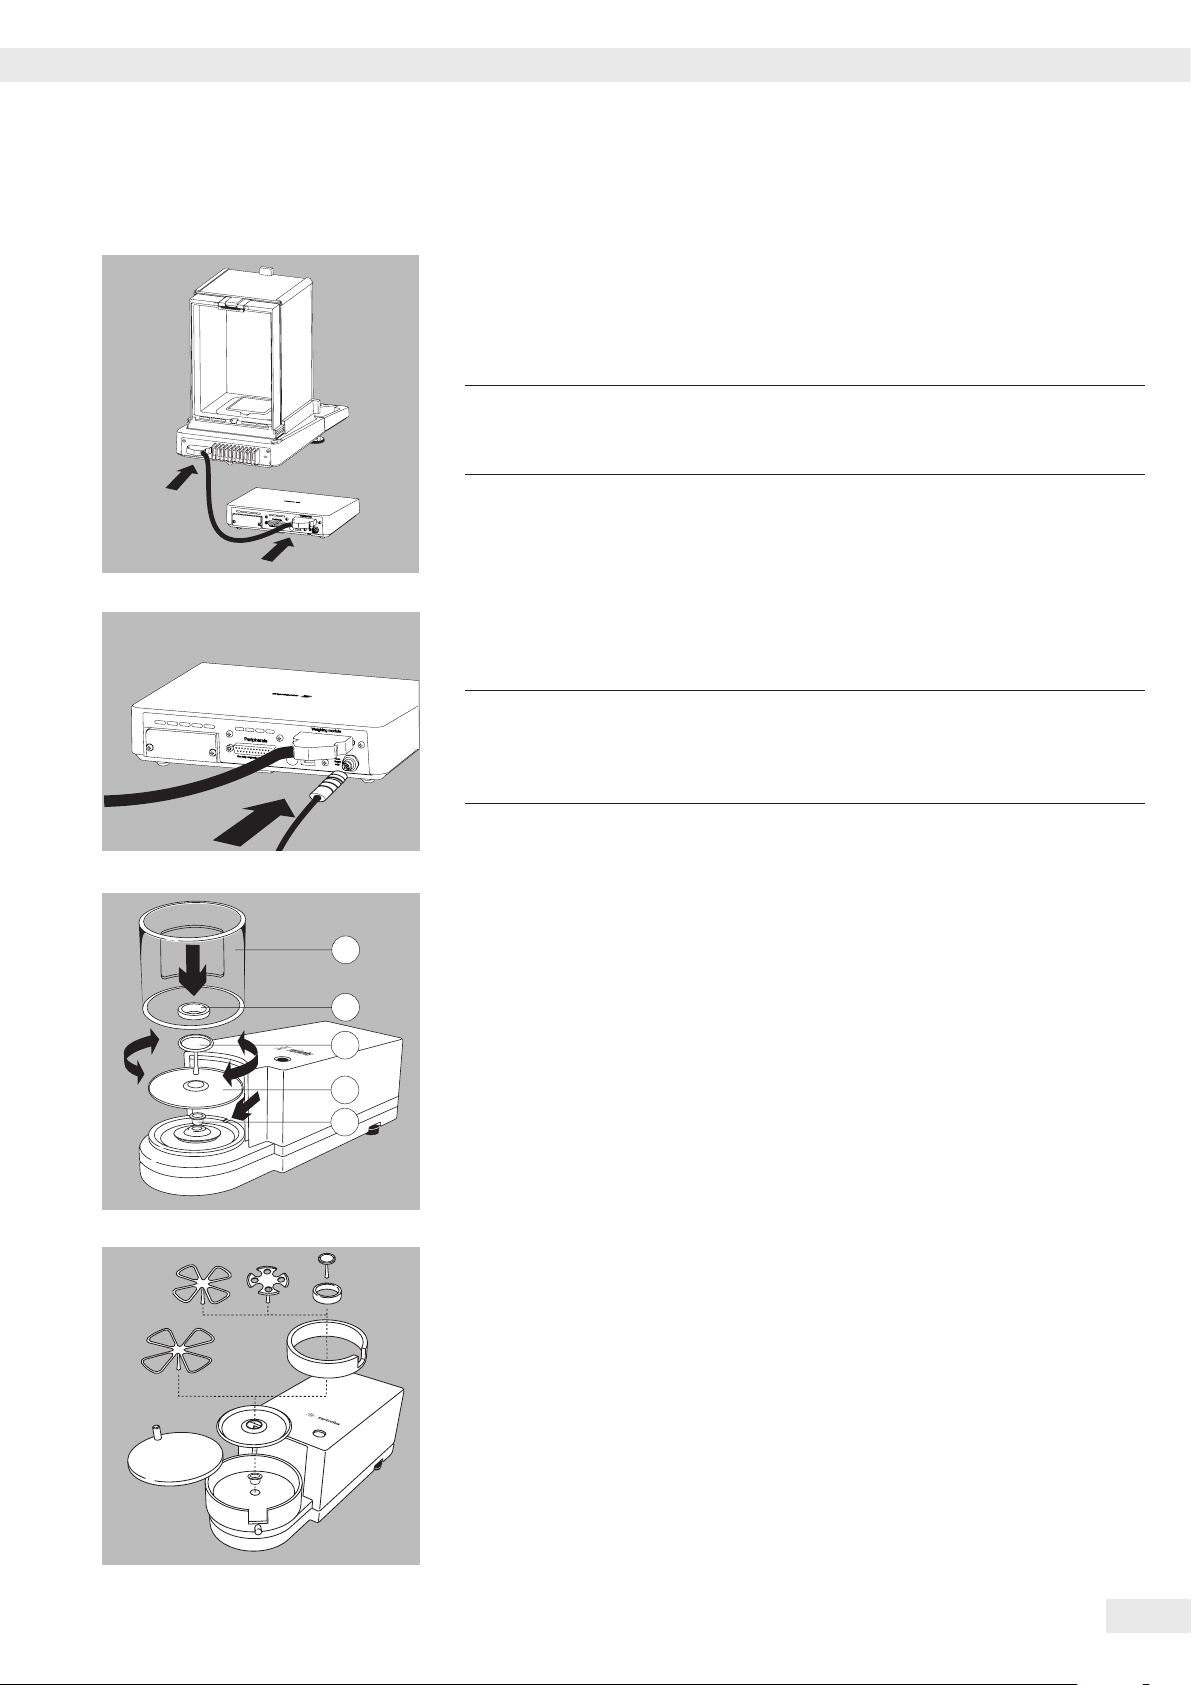
Setting up a filter weighing pan for left-handed users:
t Remove the draft shield cover
t Unscrew the pin and move from the right to the left side
t Turn draft shield parts approx� 90 degrees to the left (loosen knurled screw)
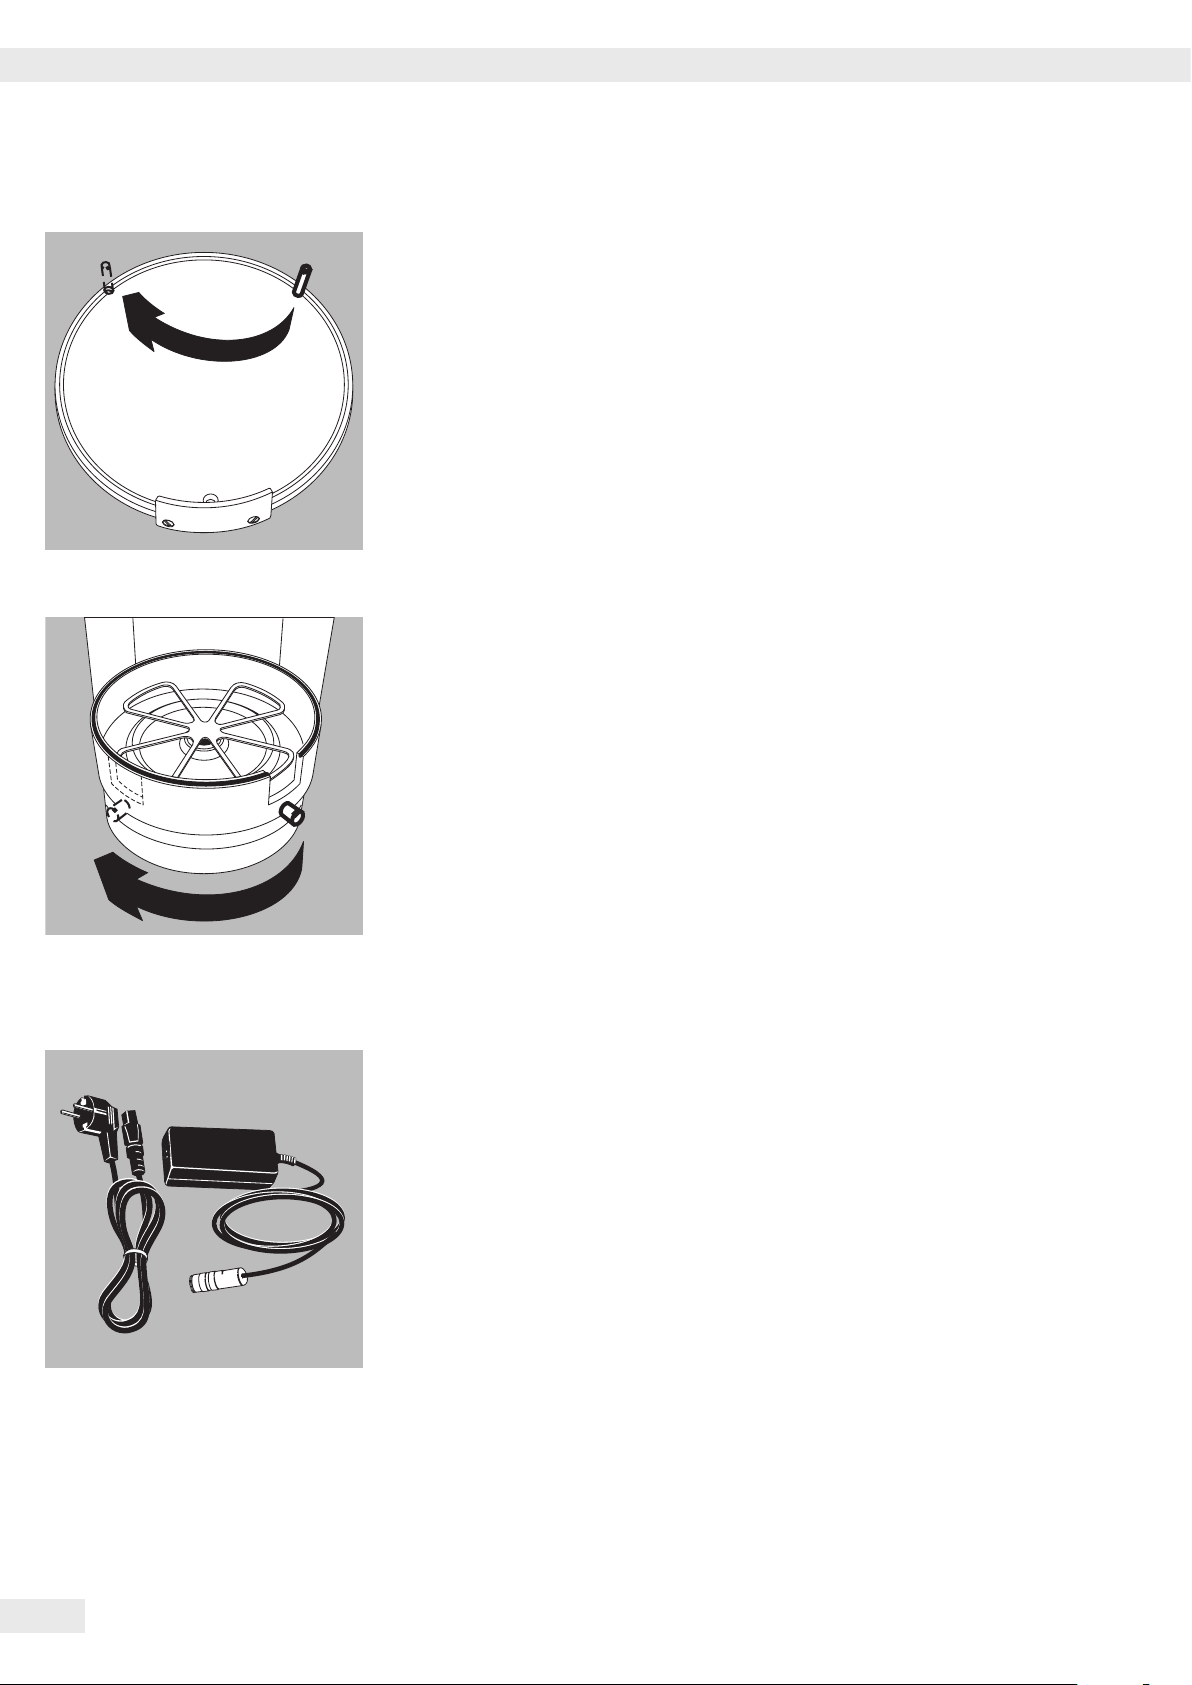
Power Connection
t Check the voltage rating and plug design�
– Make sure that the voltage rating printed on the manufacturer’s ID label is
identical to that of your local line voltage�
– If the stated supply voltage or the plug design of the power cord does not
comply with your country’s standard, please inform the nearest Sartorius
representative or your dealer�
– The power connection must be made in accordance with the regulations
applicable in your country�
– In order to connect the equipment to the power supply (protection class 1), use
a suitable, correctly installed wall outlet with a protective grounding conductor
(PE) and a fuse of a maximum 16 A�
– If a main feeder from the ceiling is required or if installation of a CEE plug is
necessary, these must be carried out by a qualified electrician�
– Only use original Sartorius AC adapters�
16 Cubis MSE Operating Instructions
Page 17
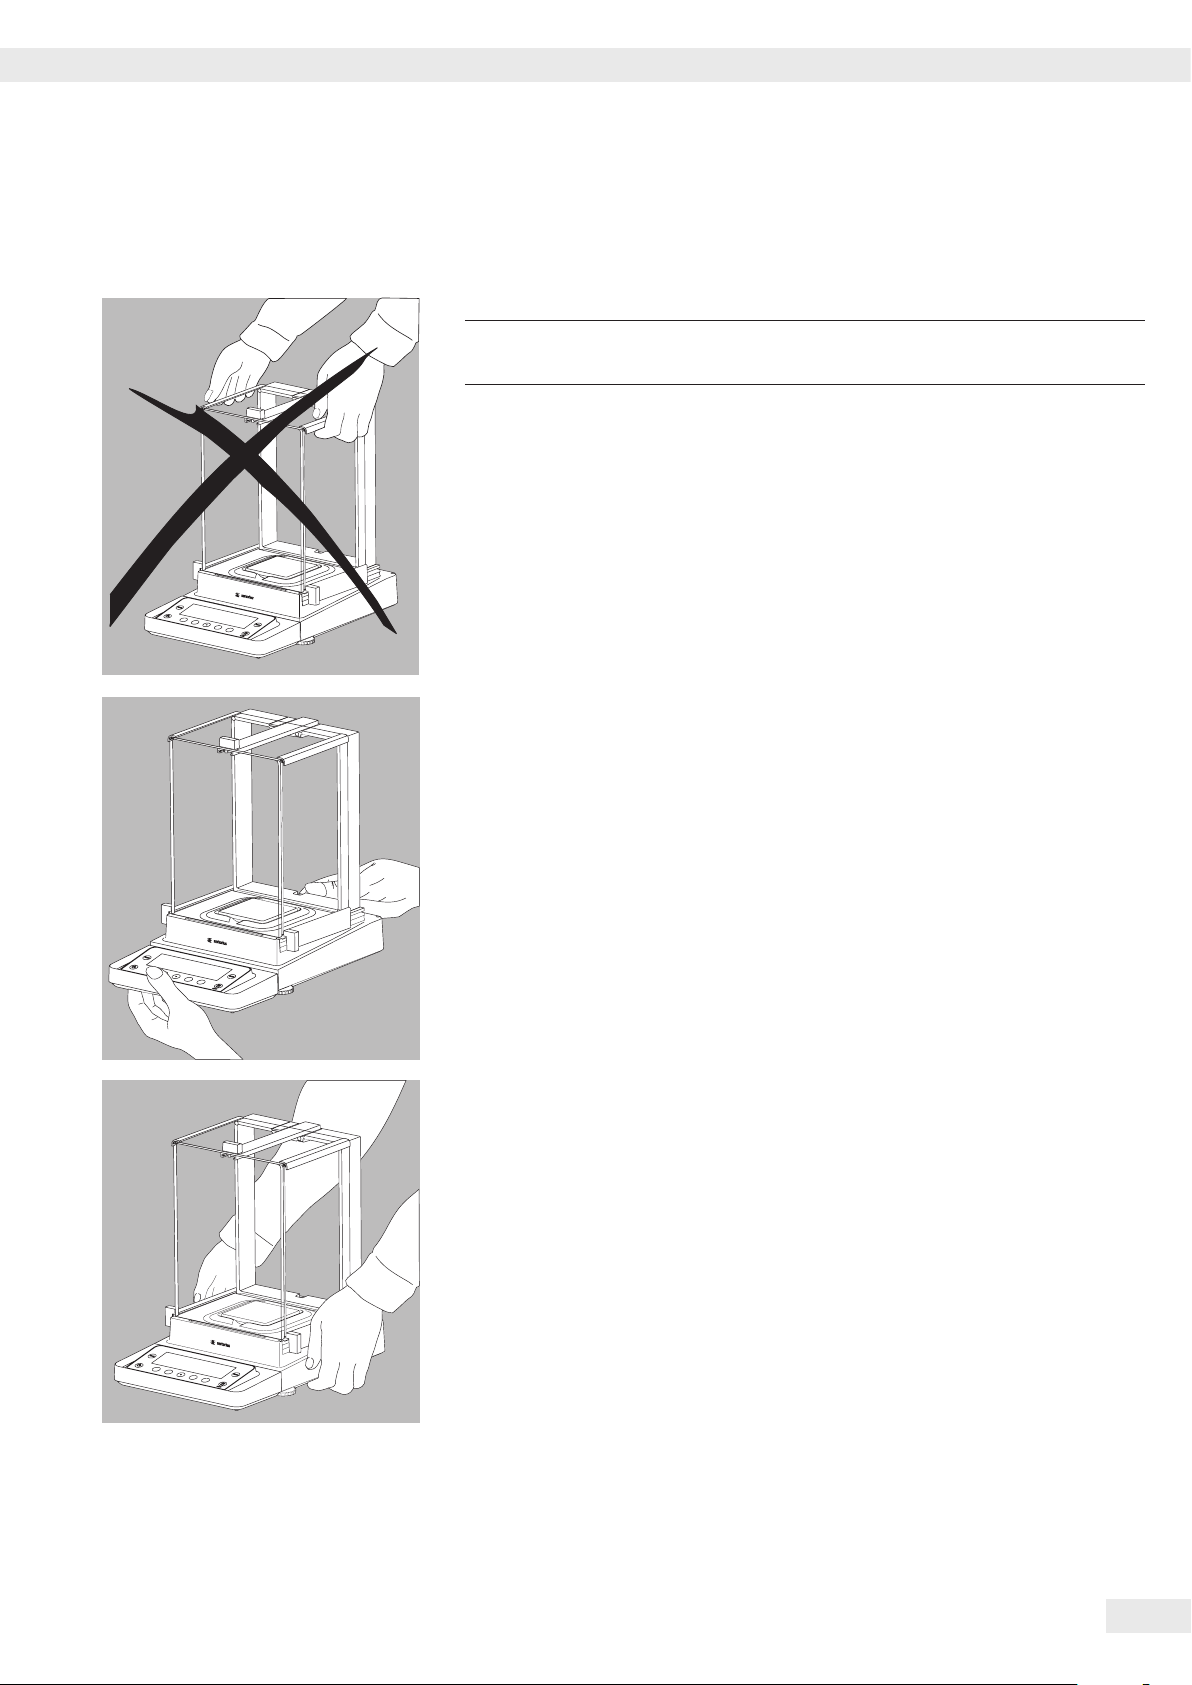
Transporting the Balance
Transporting the Device over Short Distances
Exercise caution to avoid glass breakage�
3
Never lift and carry the balance by its draft shield�
Getting Started
t Carry as shown in the illustration�
or
t Carry as shown in the illustration�
Storage and Shipping Conditions
– Permitted storage and shipping temperature: -10 to +60 °C
– Unpacked devices can lose their precision if subject to extreme vibrations�
– Excessive vibrations may compromise the safety of the equipment�
Save the packaging for any future storage or shipment of the balance�
Only the original packaging provides optimum protection for the equipment�
– Follow all warnings and safety precautions�
– Follow the instructions in the chapter: “Transporting the Balance�"
Cubis MSE Operating Instructions 17
Page 18
Getting Started
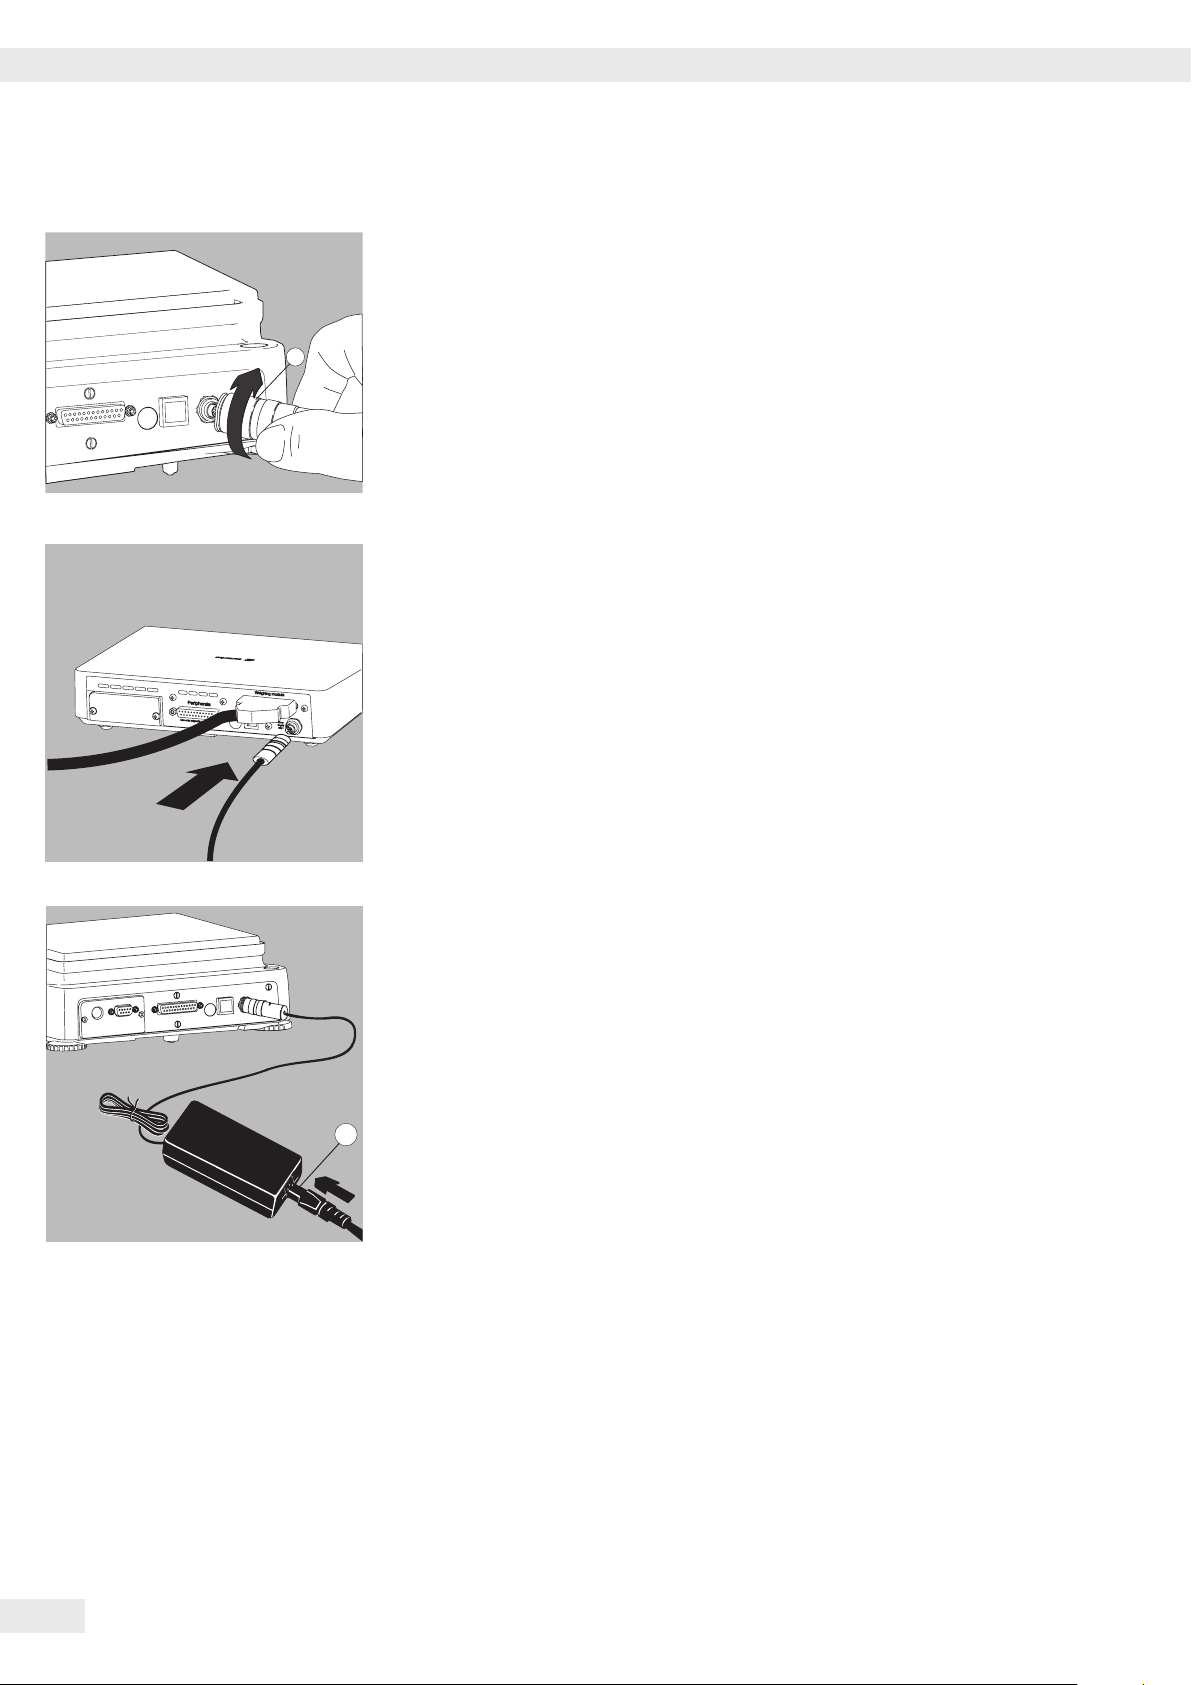
2
1
Analytical and precision balances:
1. Plug the DC supply cable of the AC adapter into the power socket of the
balance and tighten the threaded fitting�
Balances with a readability of ≤ 0�01 mg
1. Plug the DC supply cable of the AC adapter into the power socket of the
electronics module and tighten the threaded fitting�
2. Plug the other end of the power cord into the AC adapter�
3. Insert the AC adapter power plug into the wall outlet�
y The balance is now ready to use�
Safety Precautions
The output line of the adapter has a terminal (GND) connected to the metal
housing of the balance� The data port is also galvanically linked to the balance
housing (GND)�
18 Cubis MSE Operating Instructions
Page 19
Getting Started
93
R
L
L
L
R
R
12
2
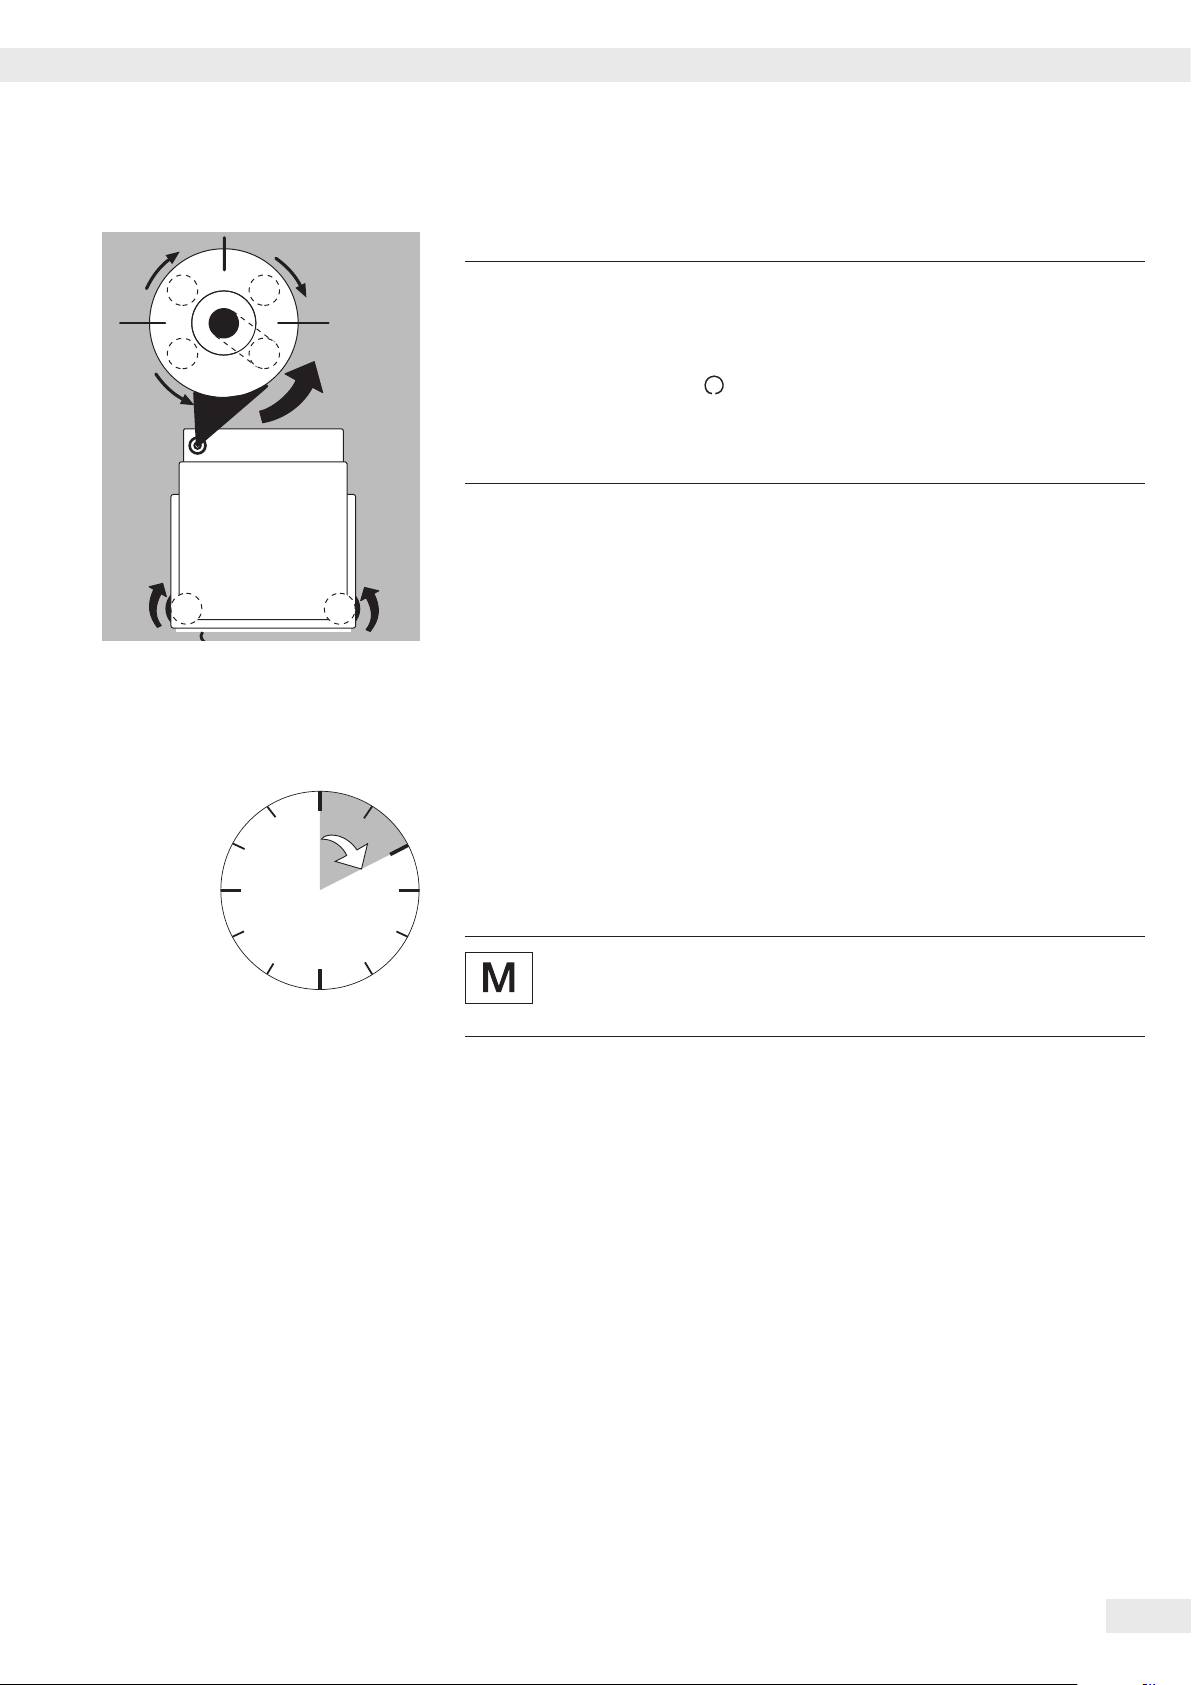
Leveling the Balance, Setting the Level Indicator
Leveling the balance compensates for slant or unevenness at the place
h
Leveling the Balance Manually
t The balance is leveled using both front leveling feet�
t Screw in both back leveling feet (only for models with back leveling feet)�
t Turn the two front feet as shown in the illustration until the air bubble is
y Normally, several leveling steps are required�
t Screw out both back leveling feet until they touch the setup surface
Warm-up Time
y In order to deliver the precise results described in the Technical Specifications,
of installation� The balance must be perfectly horizontal to ensure
consistent, reproducible weighing results� All models are equipped with
an electronic tilt angle detection feature� If the balance is not level,
a warning symbol is shown on the display� Push-button automatic
leveling is available on models with motorized leveling feet� For models
with manual leveling feet, please follow the instructions on the display:
see “Leveling the Balance with the Inclination Sensor�"
centered within the circle of the level indicator�
(only for models with back leveling feet)�
the balance must warm up for at least 30 minutes after initial connection to
the power supply� Only after this time will the device have reached the required
operating temperature�
6
When a verified balance used in legal metrology (legal-for-trade
applications) is connected to the power, it must warm up for at least
two hours before operation�
Cubis MSE Operating Instructions 19
Page 20

Getting Started
Connecting Electronic Devices (Peripherals)
t Make absolutely sure that the device is unplugged from the power supply
before connecting/disconnecting any peripheral device (printer, scanner, PC) to
or from the data port�
A device connected to the power supply should never be opened�
3
Anti-theft Locking Device (Accessory)
Balances with a readability of ≤ 0�01 mg
t An anti-theft locking device can be installed to the back of the balance if
required�
Balances with a readability of ≤ 1 µg
To fasten an antitheft locking device, use the lug located on the back of the weigh
cell�
20 Cubis MSE Operating Instructions
Page 21
Getting Started
2
1
2
1
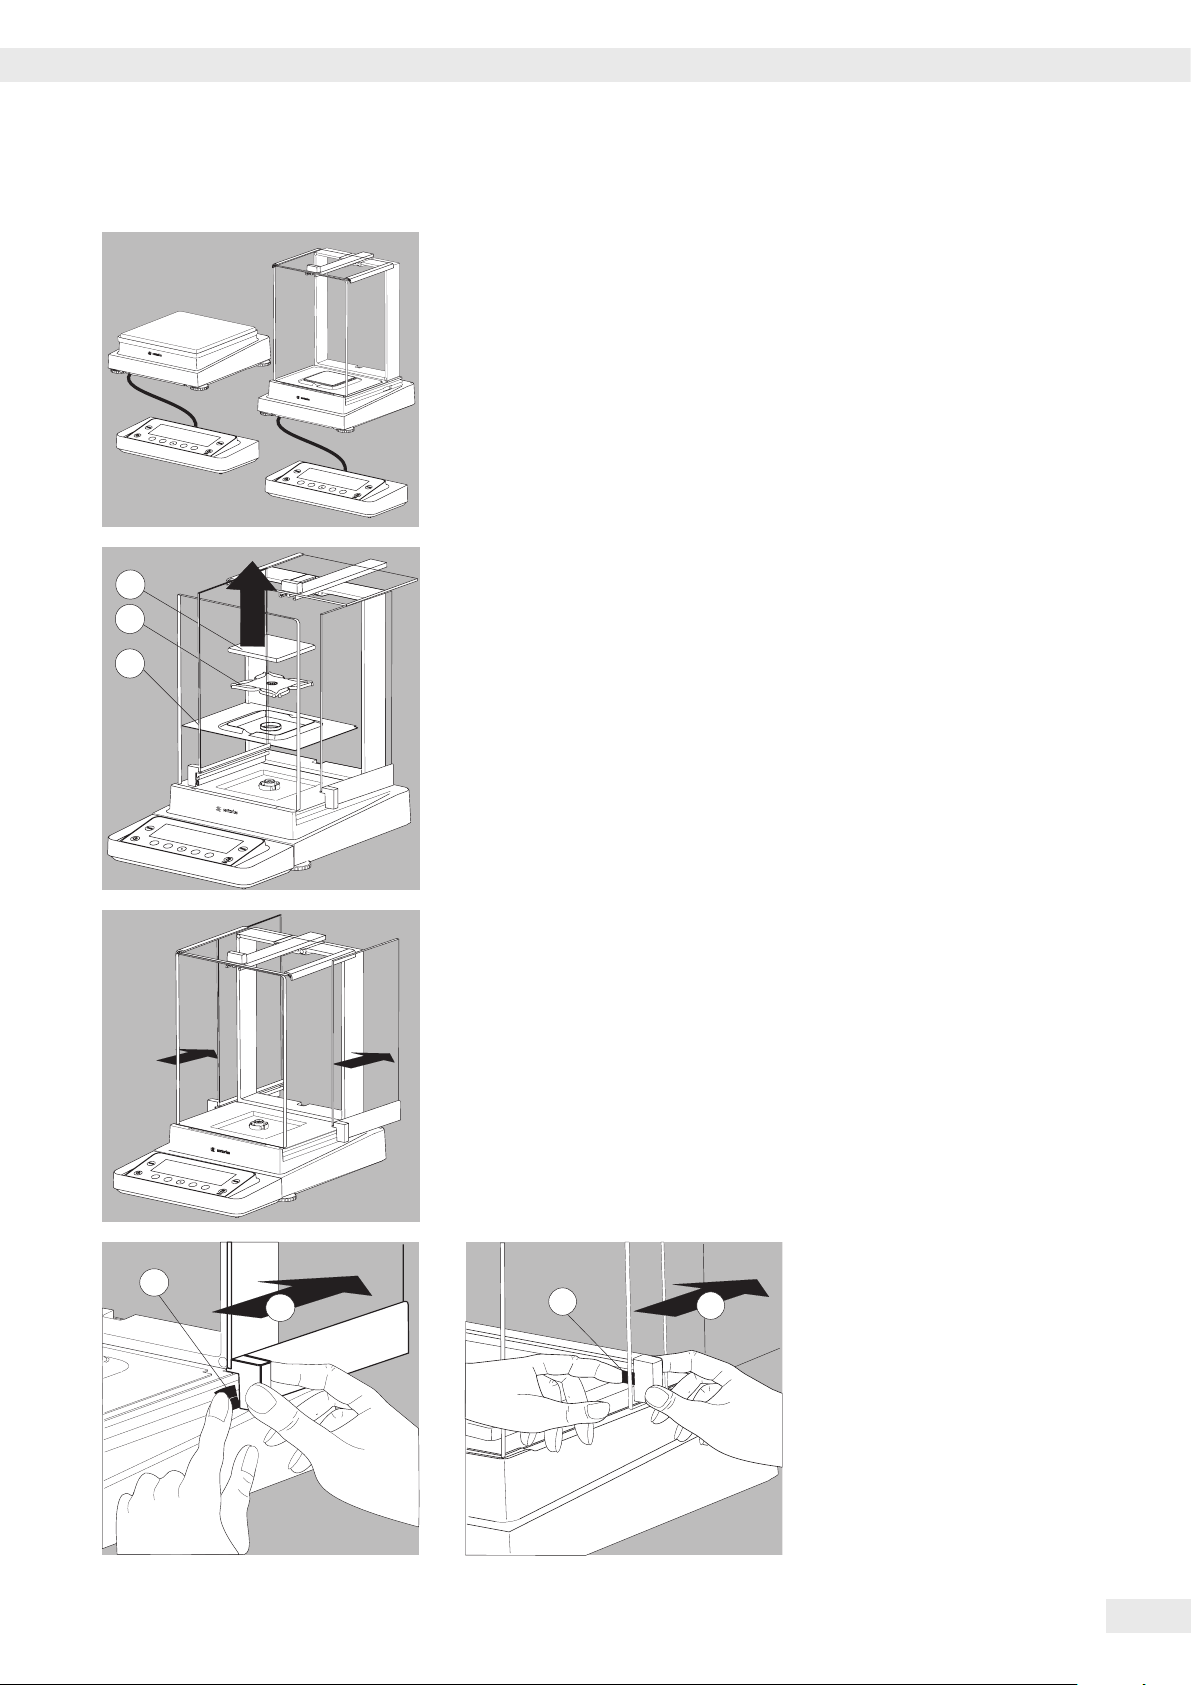
Modification Options
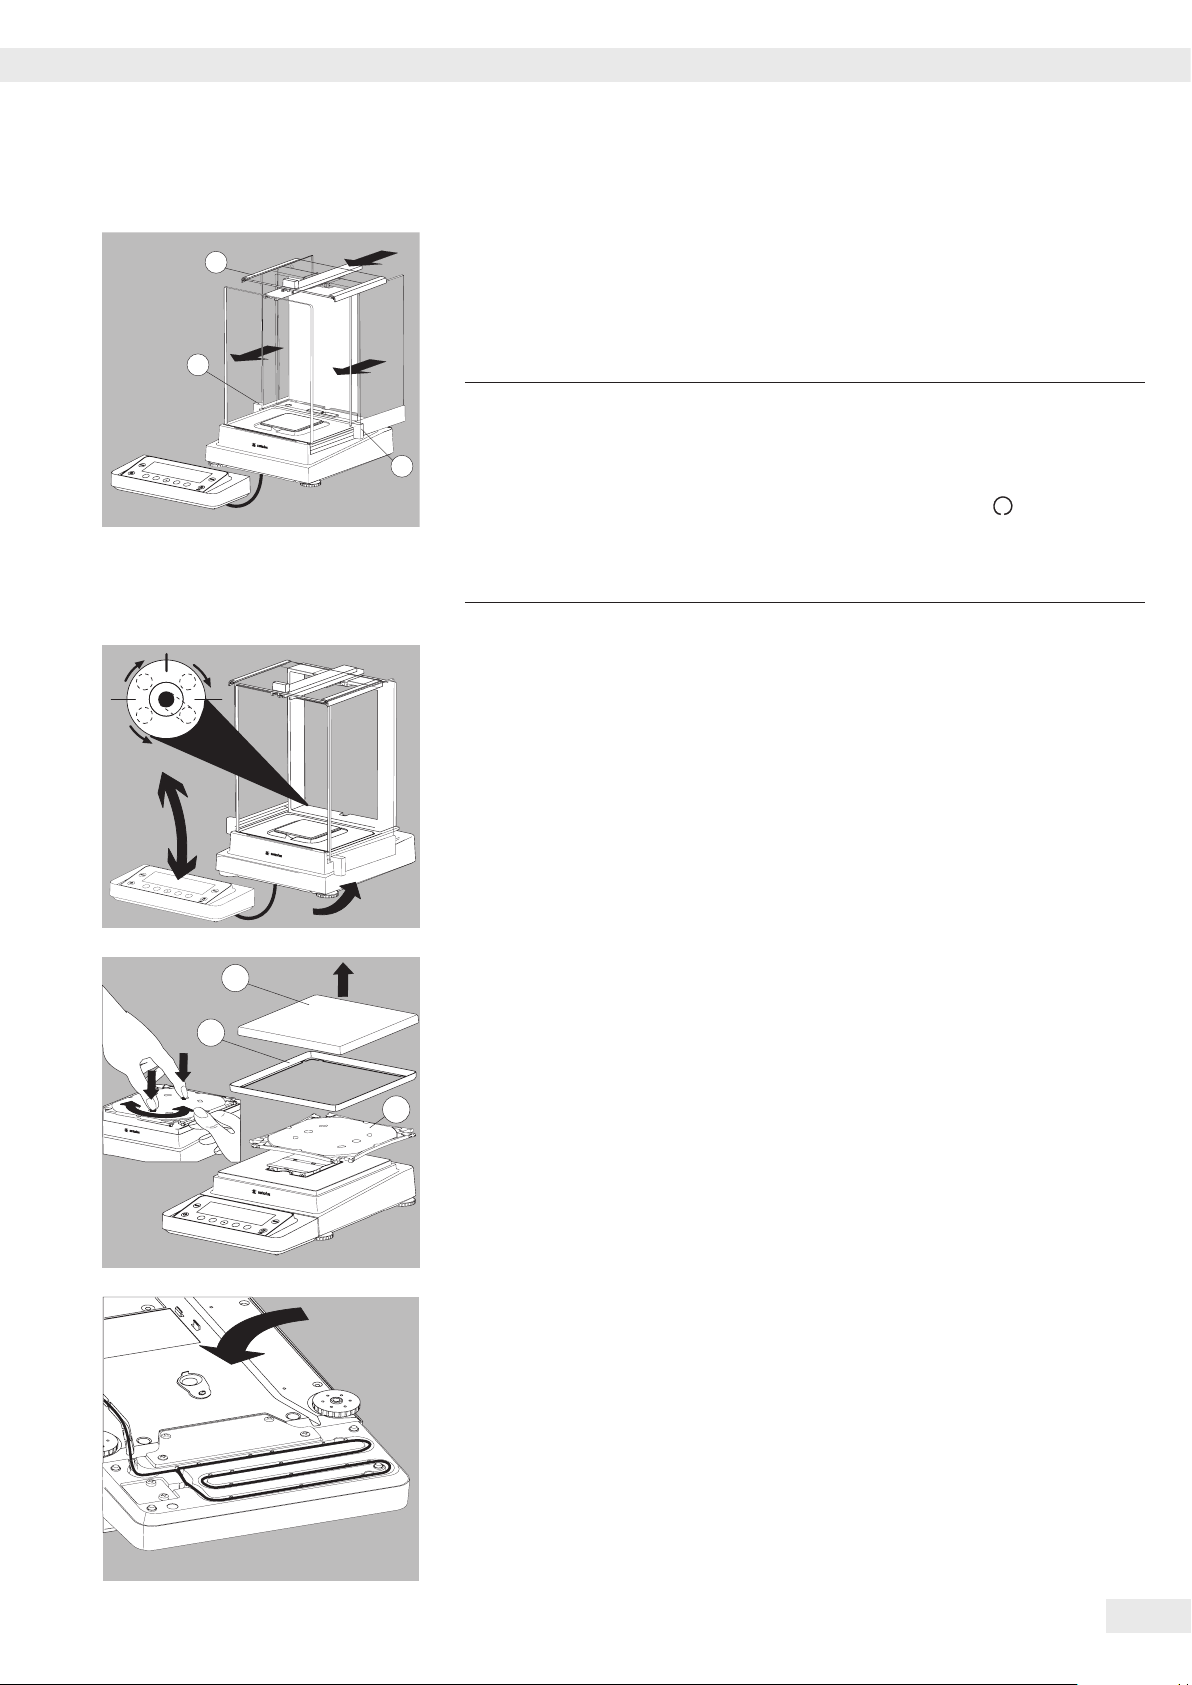
Setting Up the Display and Control Unit at the Place of Use
The display and control unit can be removed for all models to enable the operator
to customize the work space�
Removing the Retainer with the Display and Control Unit
1
2
t Remove all items (such as weights) from the draft shield�
3
t Carefully remove all parts as shown in the illustration�
1. Weighing pan
2. Pan support (not for MSE225… MSE125… models)
3. Shield plate/Draft shield
t Keep all parts in a safe place�
t Remove the panels (right and left)�
Models with the analytical draft shield:
1. Press on the locking tab�
2. Remove the panel�
Models with the milligram draft shield:
1. Press on the locking tab�
2. Remove the panel�
t Keep all parts in a safe place�
Cubis MSE Operating Instructions 21
Page 22
Getting Started
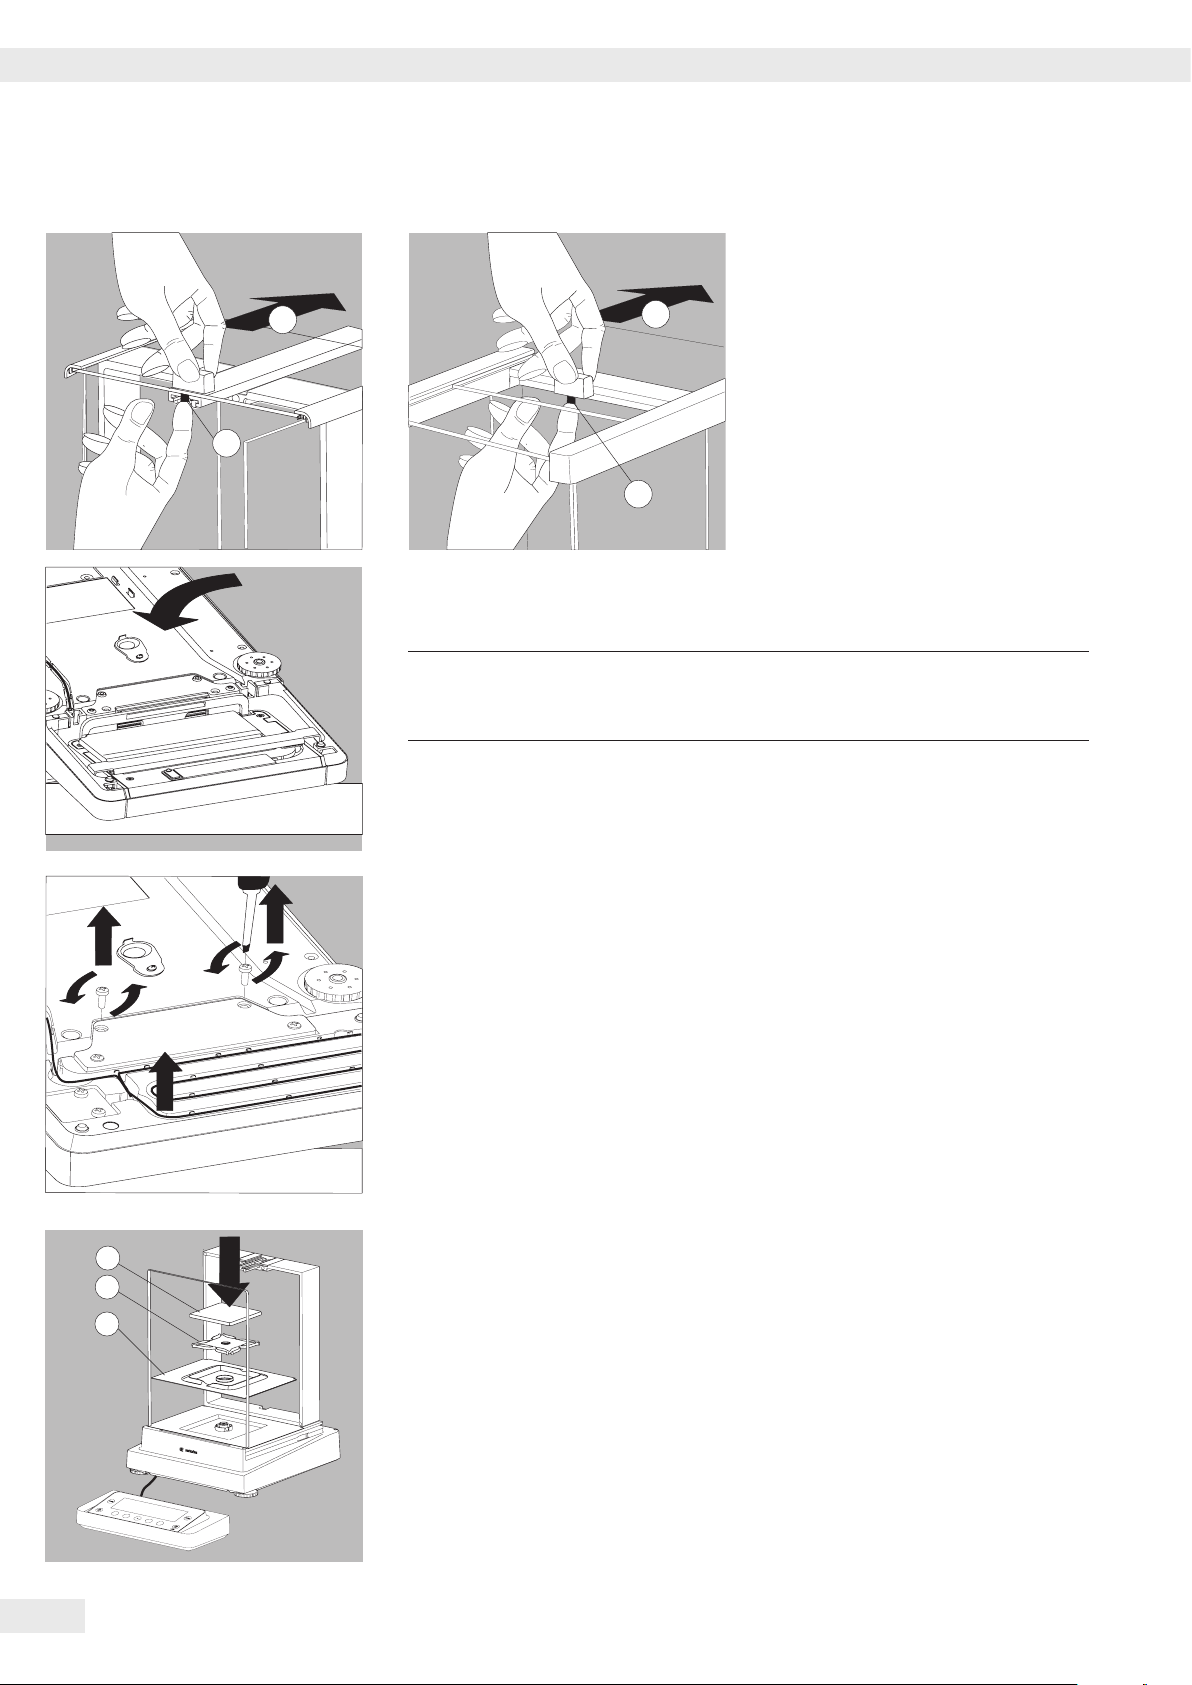
2
1
2
1
t Remove the upper draft shield panel�
Models with the analytical draft shield
(left illustration)�
1. Press on the locking tab�
2. Remove the panel�
Models with the milligram draft shield
(right figure):
1. Press on the locking tab�
2. Remove the panel�
t Keep all parts in a safe place�
t Turn over the balance and place it on a soft surface�
3
t Use a 2�5 mm Allen wrench to remove the two screws from the display and
t Remove the display and re-insert both screws back into their holes�
t Lengthen the cable and position the display and control unit as desired�
t Turn the balance over and place it on an even surface�
3
2
1
t Carefully place all parts on the balance:
1. Shield plate/Draft shield
2. Pan support (not for MSE225… /MSE125… models)
3. Weighing pan
Exercise caution to avoid breaking the glass on models with a draft
shield�
control unit retainer bracket�
22 Cubis MSE Operating Instructions
Page 23
Getting Started
1
1. Upper draft shield panel
2. Right draft shield panel
3. Left draft shield panel
t Replace the upper and side shield panel�
3
t Level the balance�
Leveling the balance compensates for slant or unevenness at the place
h
2
of installation� The balance must be perfectly horizontal to ensure
consistent, reproducible weighing results� All models are equipped with
an electronic tilt angle detection feature�
If the balance is not level, a warning symbol is shown on the display�
The display shows a graphical representation of a level indicator and text
prompts that guide the user through the leveling process: see “Leveling
the Balance with the Inclination Sensor�"
R
L
t The balance is leveled using both front leveling feet�
t Screw in both back leveling feet (only for models with back leveling feet)�
L
t Turn the two front feet as shown in the illustration until the air bubble is
centered within the circle of the level indicator�
y Normally, several leveling steps are required�
R
1
2
t Screw out both back leveling feet until they touch the setup surface
(only for models with back leveling feet)�
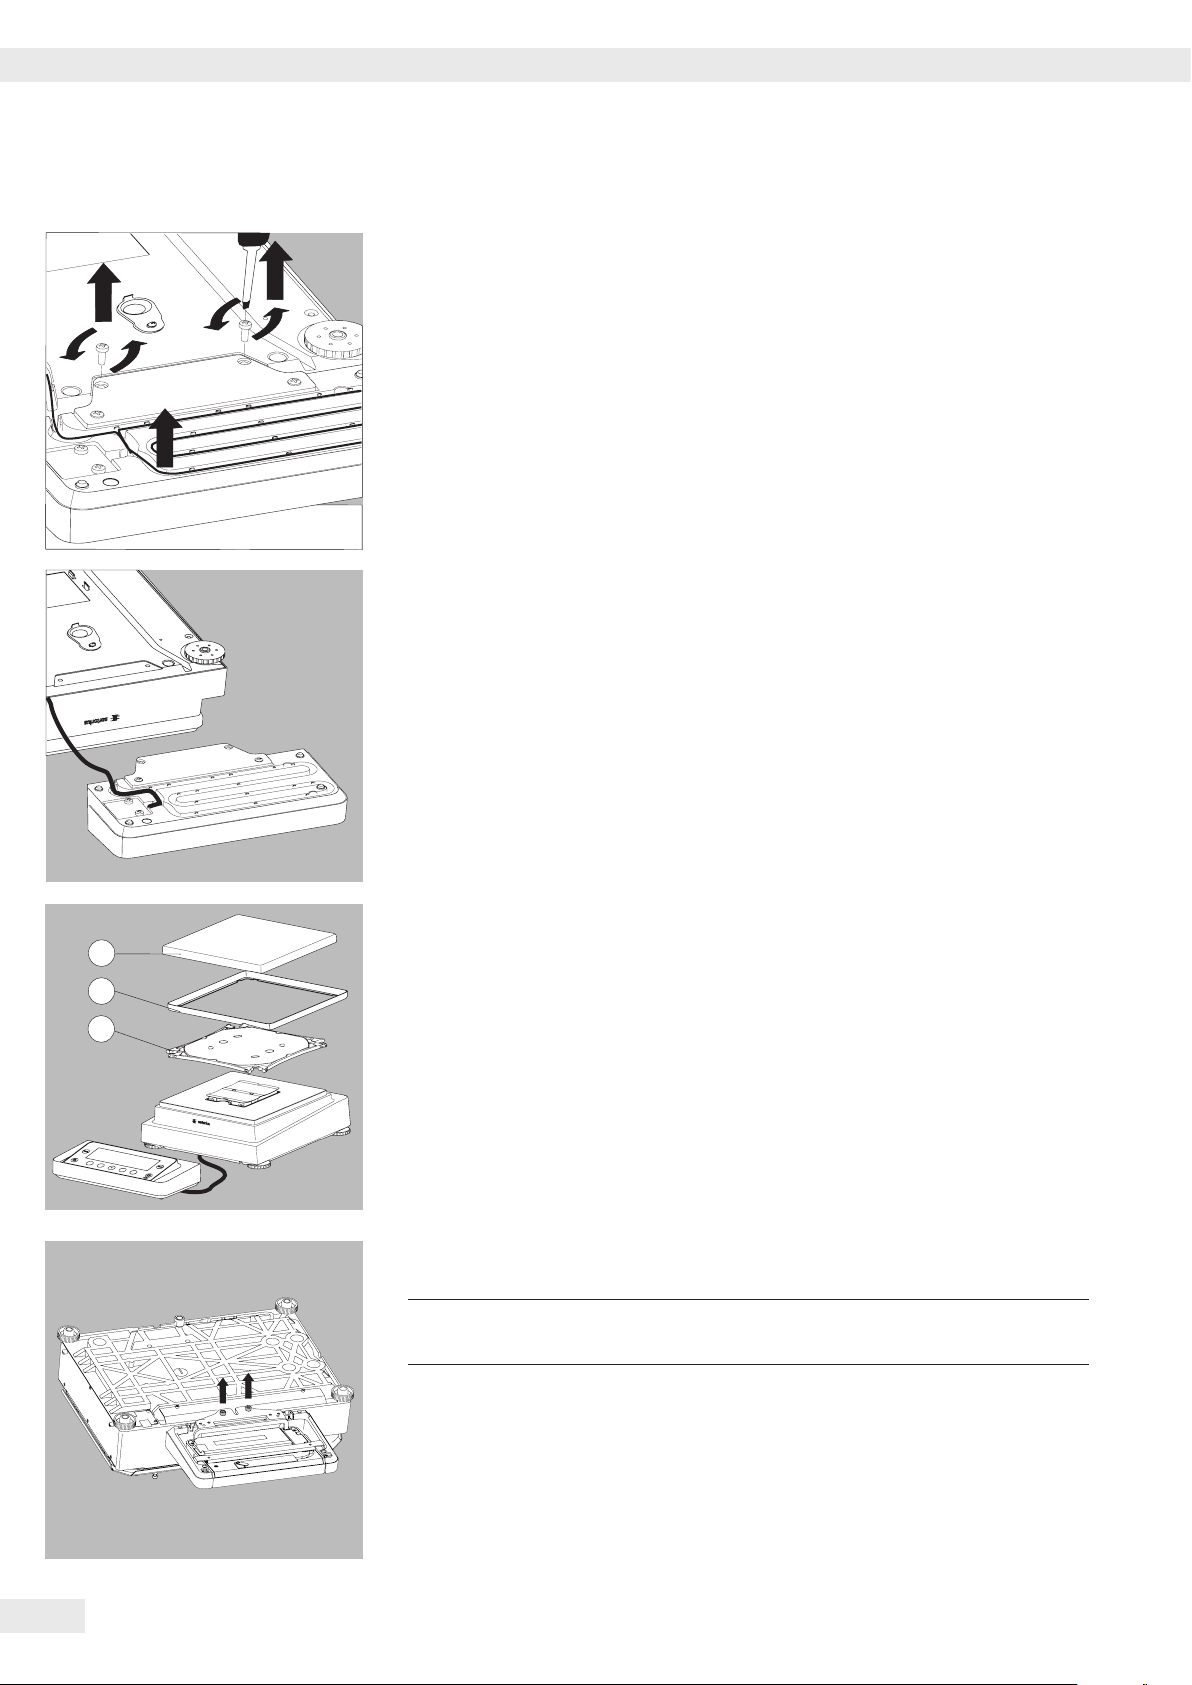
Removing the Display and Control Unit from Precision Balances
without a Draft Shield and with a Weighing Range of up to 15 kg
t Carefully remove all parts as shown in the illustration�
1. Weighing pan
3
2. Shield plate/Draft shield
3. Pan support
t Keep all parts in a safe place�
t Turn over the balance and place it on a soft surface�
Cubis MSE Operating Instructions 23
Page 24
Getting Started
2
1
3
t Remove the two retaining screws�
t Remove the display and re-insert both screws back into their holes�
t Carefully pull the cable connected between the display and control unit from
the retainer�
t Determine the required cable length�
t Return the balance to an upright position and fit the parts onto the balance�
1. Attach the pan support�
2. Shield disk (only for models with a readability of 10 mg)
3. Weighing pan
t Level the balance�
Removing the Display and Control Unit from Models with a Weighing Range
of 20 kg or more
Remove the weighing pan before unscrewing the control unit so that
3
t Turn over the balance so that the pan side is facing down�
t Remove the two fixing screws using a screwdriver�
t Remove the control unit and re-insert both screws into their holes�
t Carefully remove the connection cable from its holder�
y Long connection cables should only be installed by a Sartorius technician�
the weighing pan does not fall and cause injury�
24 Cubis MSE Operating Instructions
Page 25
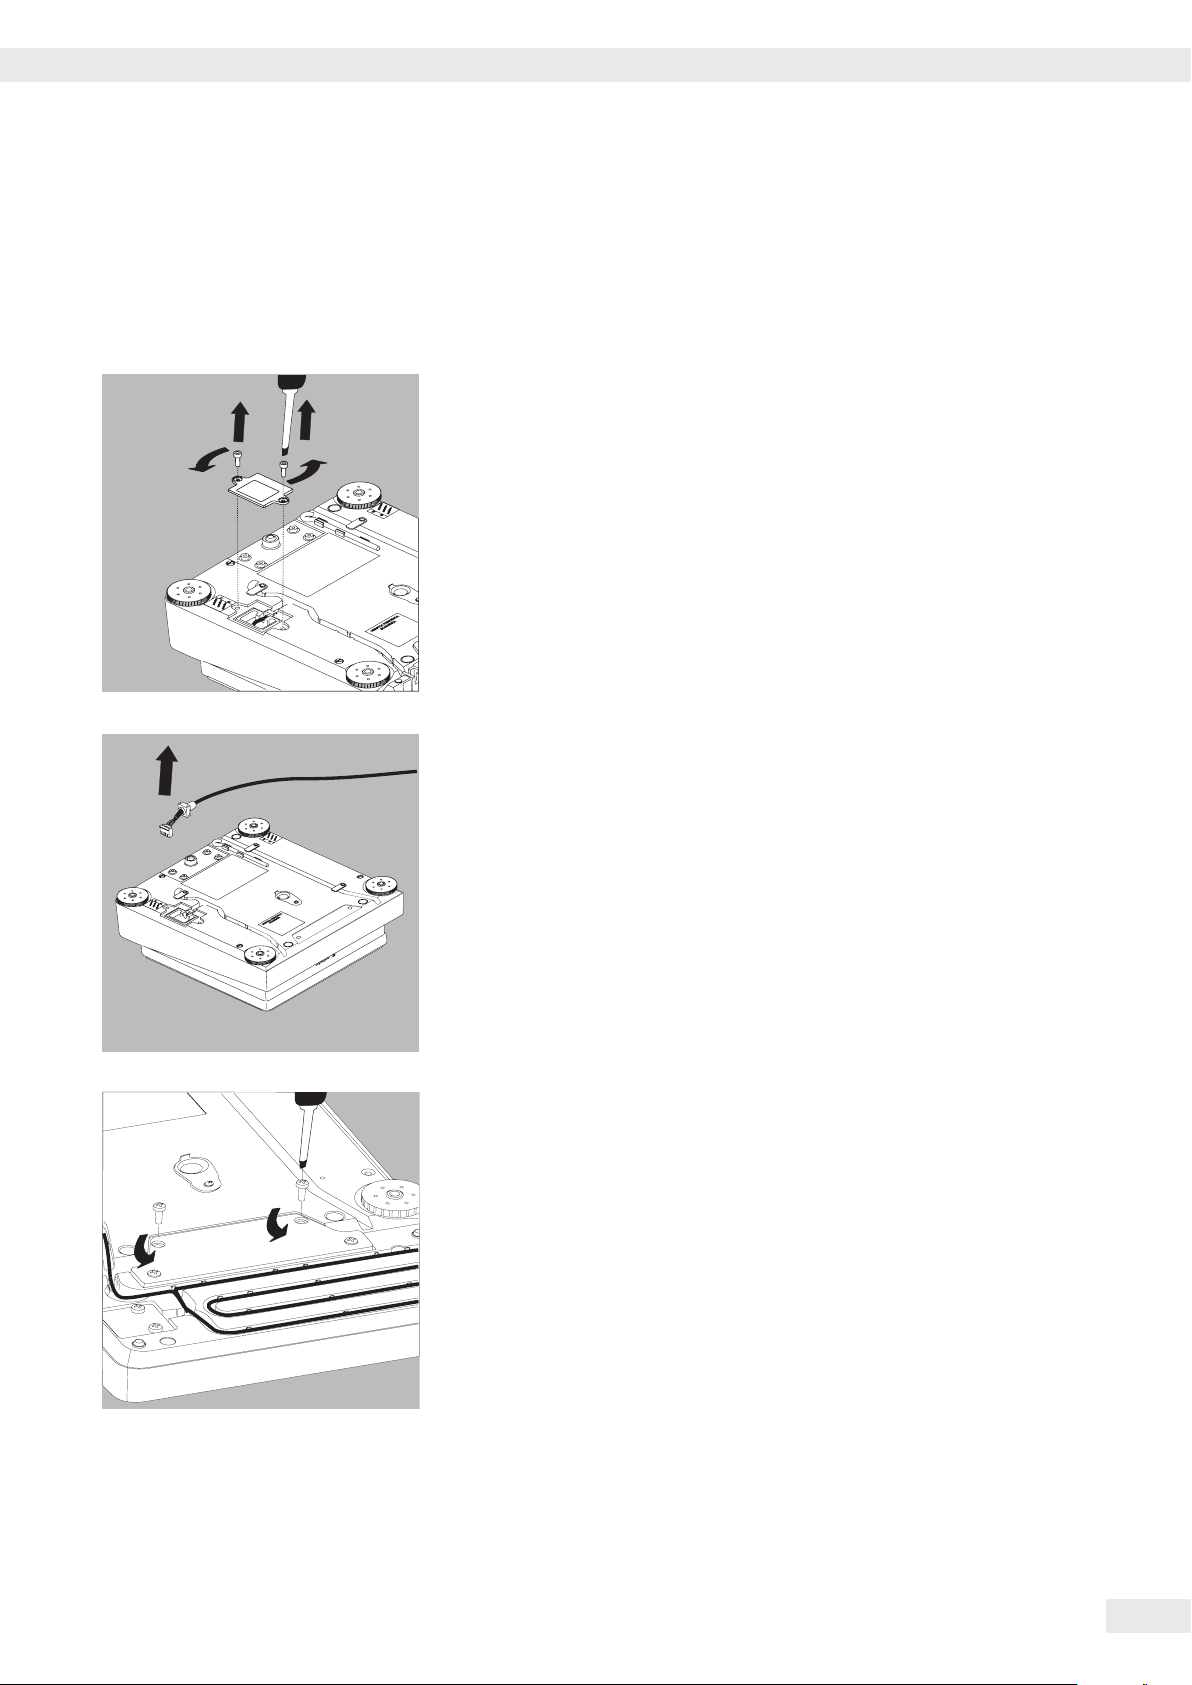
Getting Started
Semi-microbalances: Attaching the Display and Control Unit to the Electronics
Module (MSE225..., MSE125... models)
The display and control unit can also be attached to the electronics module if
required for operation�
t Turn over the balance and place it on a soft surface�
Remove the connection cable from the cable channel:
t Remove two screws from beneath the weigh cell and detach the plate�
t Remove the connection cable plug�
t Then reattach the plate to the slot�
t Remove the display and control unit from the weigh cell:
Remove two retaining screws�
t Remove the display and control unit�
Cubis MSE Operating Instructions 25
Page 26

Getting Started
t Attach the display and control unit to the electronics module:
Reattach the two retaining screws�
Open the slot for the connection cable on the electronics module:
t Remove the screws from beneath the electronics module and detach the plate�
Connect the display and control unit to the electronics module:
t Plug in the connection cable�
t Then reattach the plate to the slot�
t Slide the cable that sticks out into the cable channel�
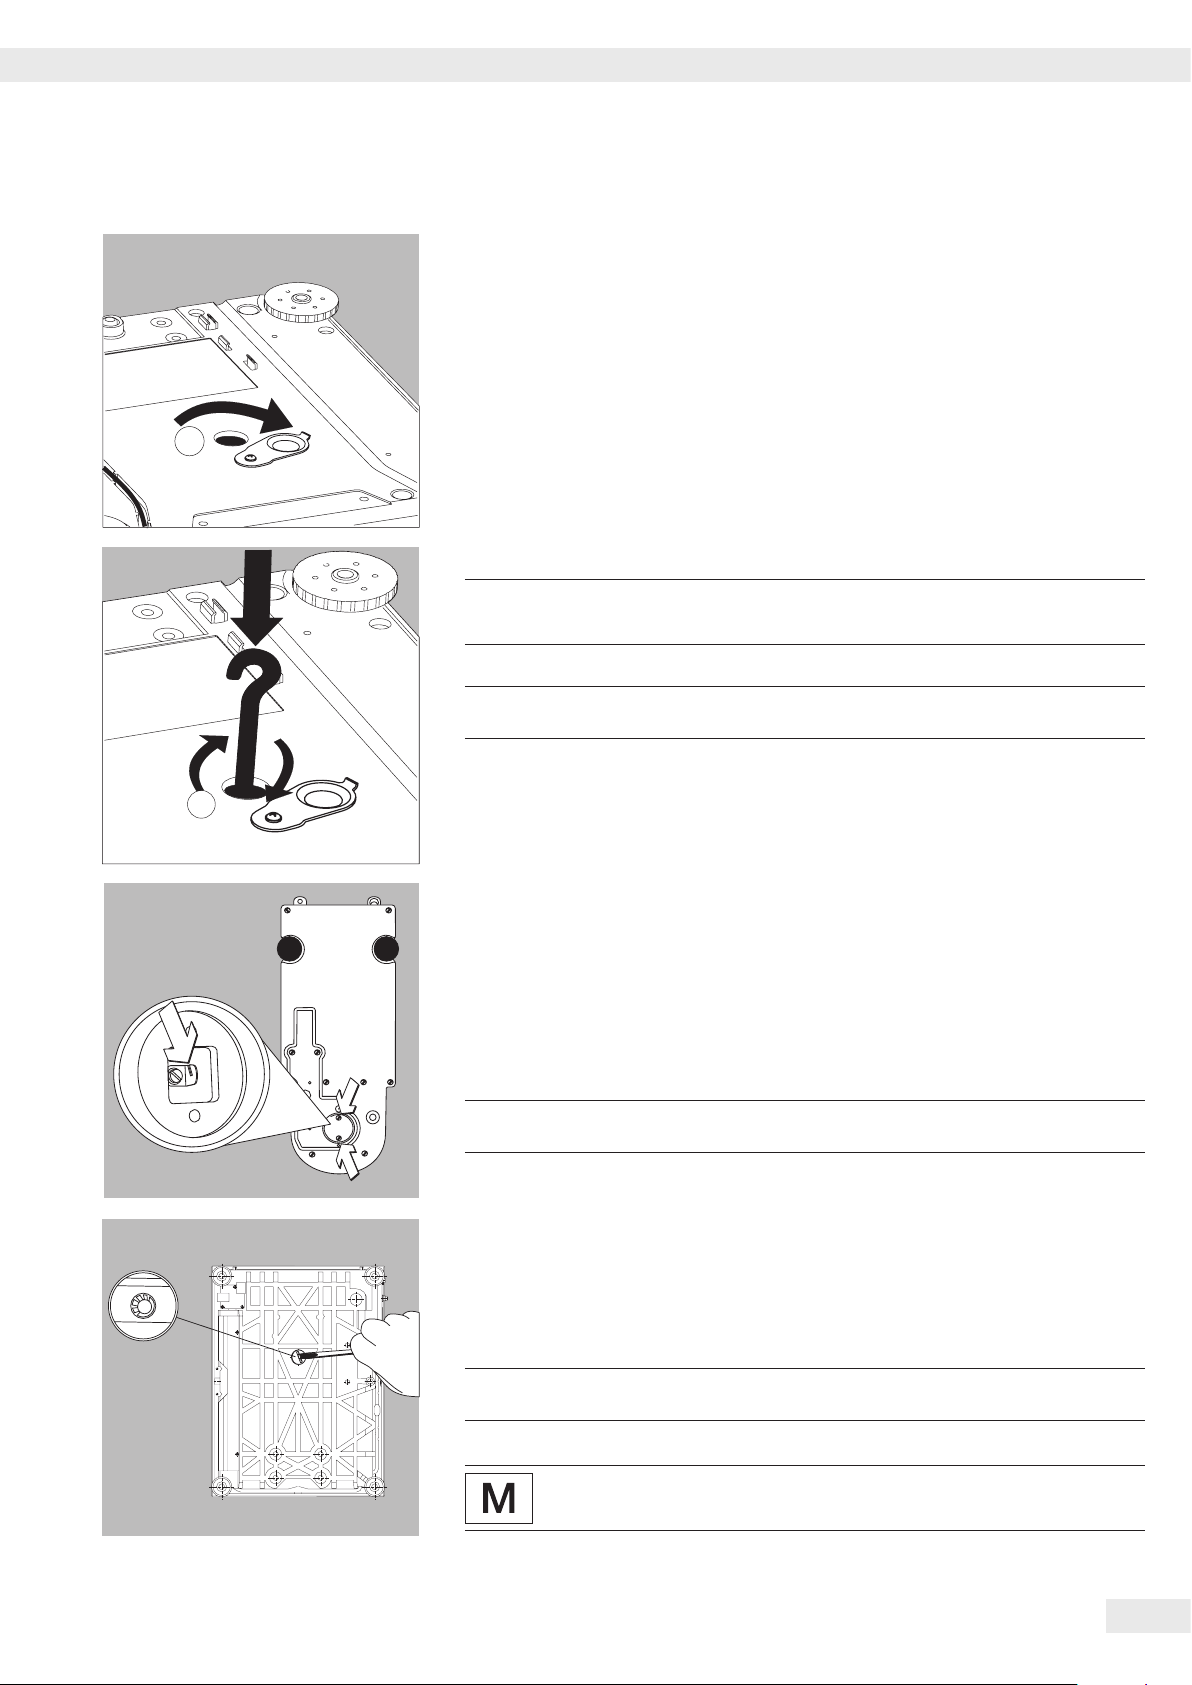
Preparing Below-Cell Weighing
Balances with a readability of ≥ 0,01 mg:
1
A port for a below-cell weighing hook is located on the bottom of the balance�
Analysis and Precision Balances with a Weighing Range up to 15 kg:
1. Remove the hook for below-cell weighing from the clip on the bottom of the
balance�
26 Cubis MSE Operating Instructions
Page 27
Getting Started
2. Push the cover of the below-cell weighing port to one side�
2
3. Carefully screw on the below-cell weighing hook�
Do not screw it in too tightly, as this could damage the thread
3
or the balance�
Install a draft protection shield�
h
t Attach the sample (e�g�, using a suspension wire) to the hook�
3
4. When weighing has been completed, unscrew the hook and return it to the clip�
t Close the cover of the below-cell weighing port�
Balances with a readability of ≤ 1 µg
t Remove both screws from beneath the weigh cell and detach the cover plate�
t Attach a wire, for example, to the sample and hang it on the notched hook�
Install a draft protection shield�
h
Balances with a Weighing Range of 20 kg or more:
t Use a suitable screwdriver to unscrew the cover plate from the bottom of the
balance�
t Request the hook directly from Sartorius� The hook is available as an accessory�
Install a draft protection shield�
h
The below-cell weighing port may not be opened or used on balances
used for legal metrology�
Cubis MSE Operating Instructions 27
Page 28
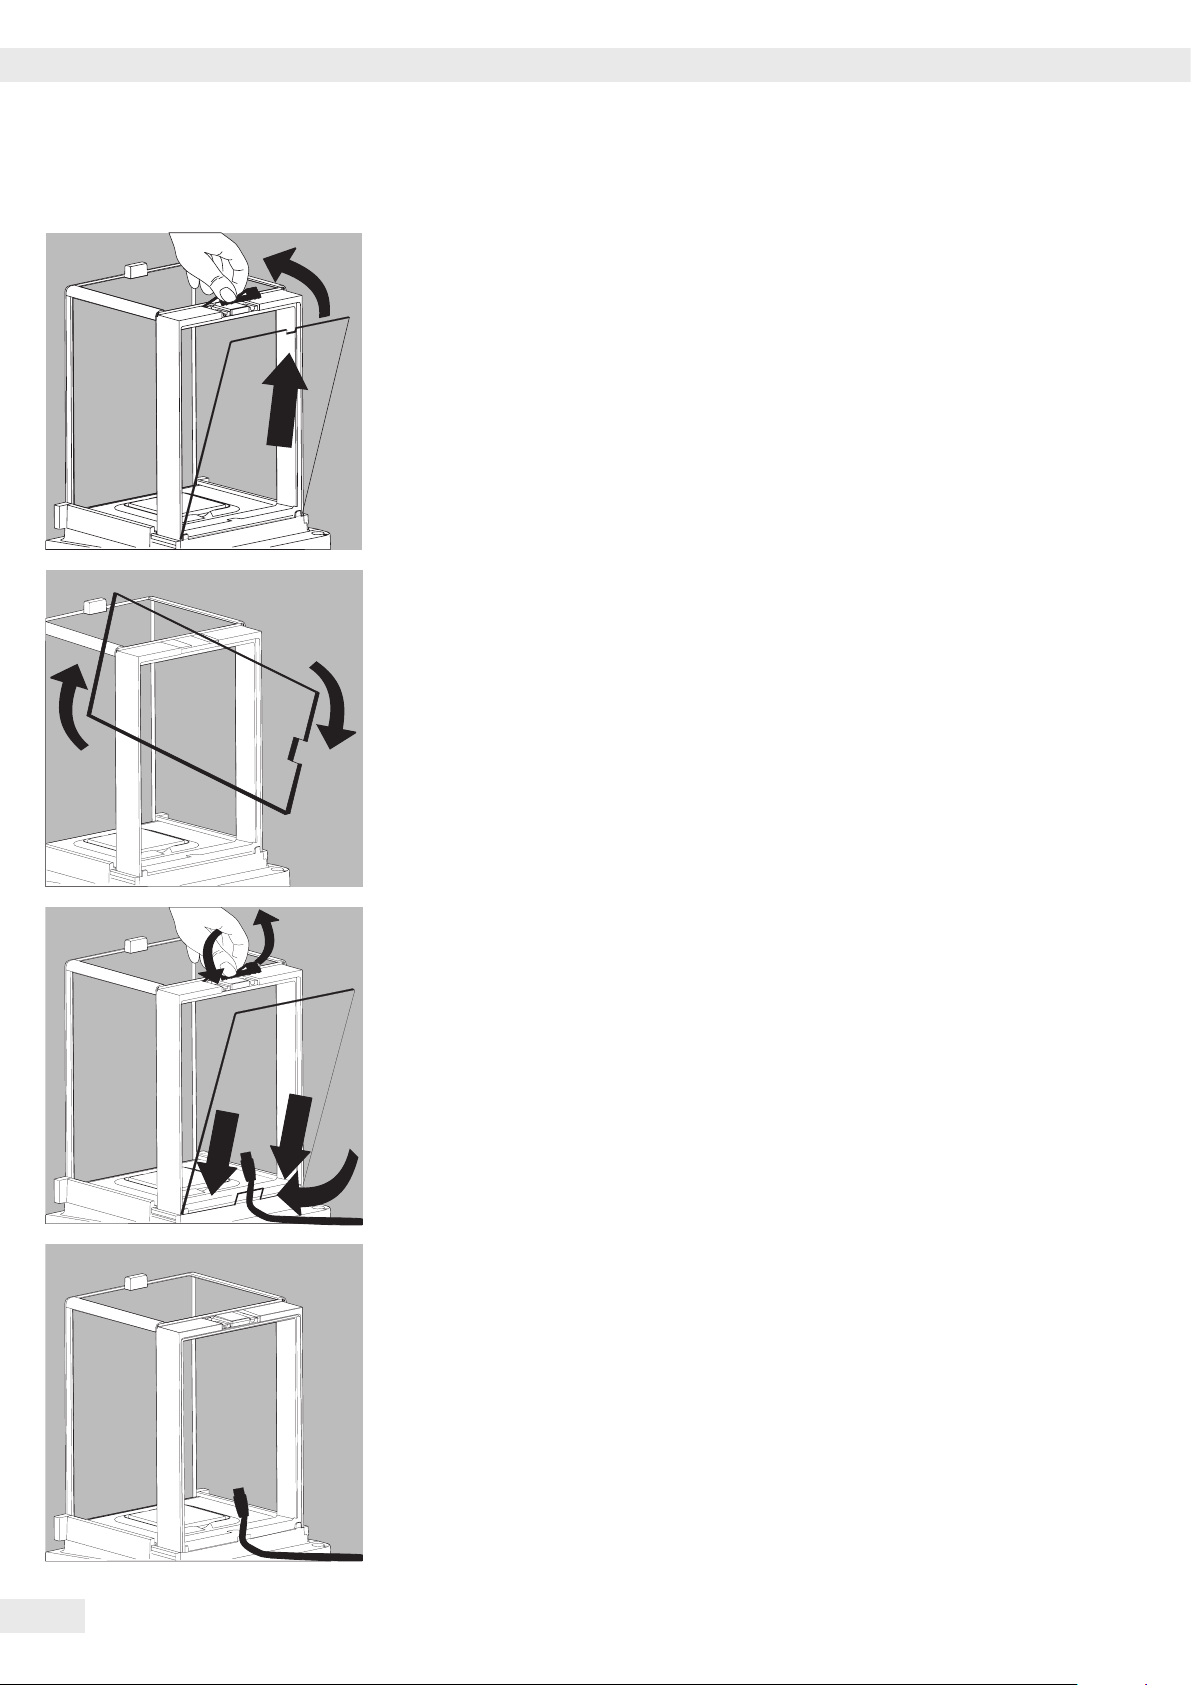
Getting Started
Using the Cable Opening of the
Manual Analytical Balance Draft Shield
Models with a manual analytical draft shield have an opening for passing a cable
(for example, for a temperature sensor) through to the interior of the weighing
chamber�
1. Lift the locking tab on the rear panel of the analytical draft shield�
2. Lift the panel out of the draft shield�
t Turn the panel clockwise 180° so that the opening is at the bottom�
t Install the desired sensor�
t Insert the panel in the guide rail�
t Lift the locking tab and gently press the panel into position�
t Press the locking tab down and close it�
t You can now begin weighing�
28 Cubis MSE Operating Instructions
Page 29
Operation
Operation
22
21
3
20
19
18
17
16
15
14
13
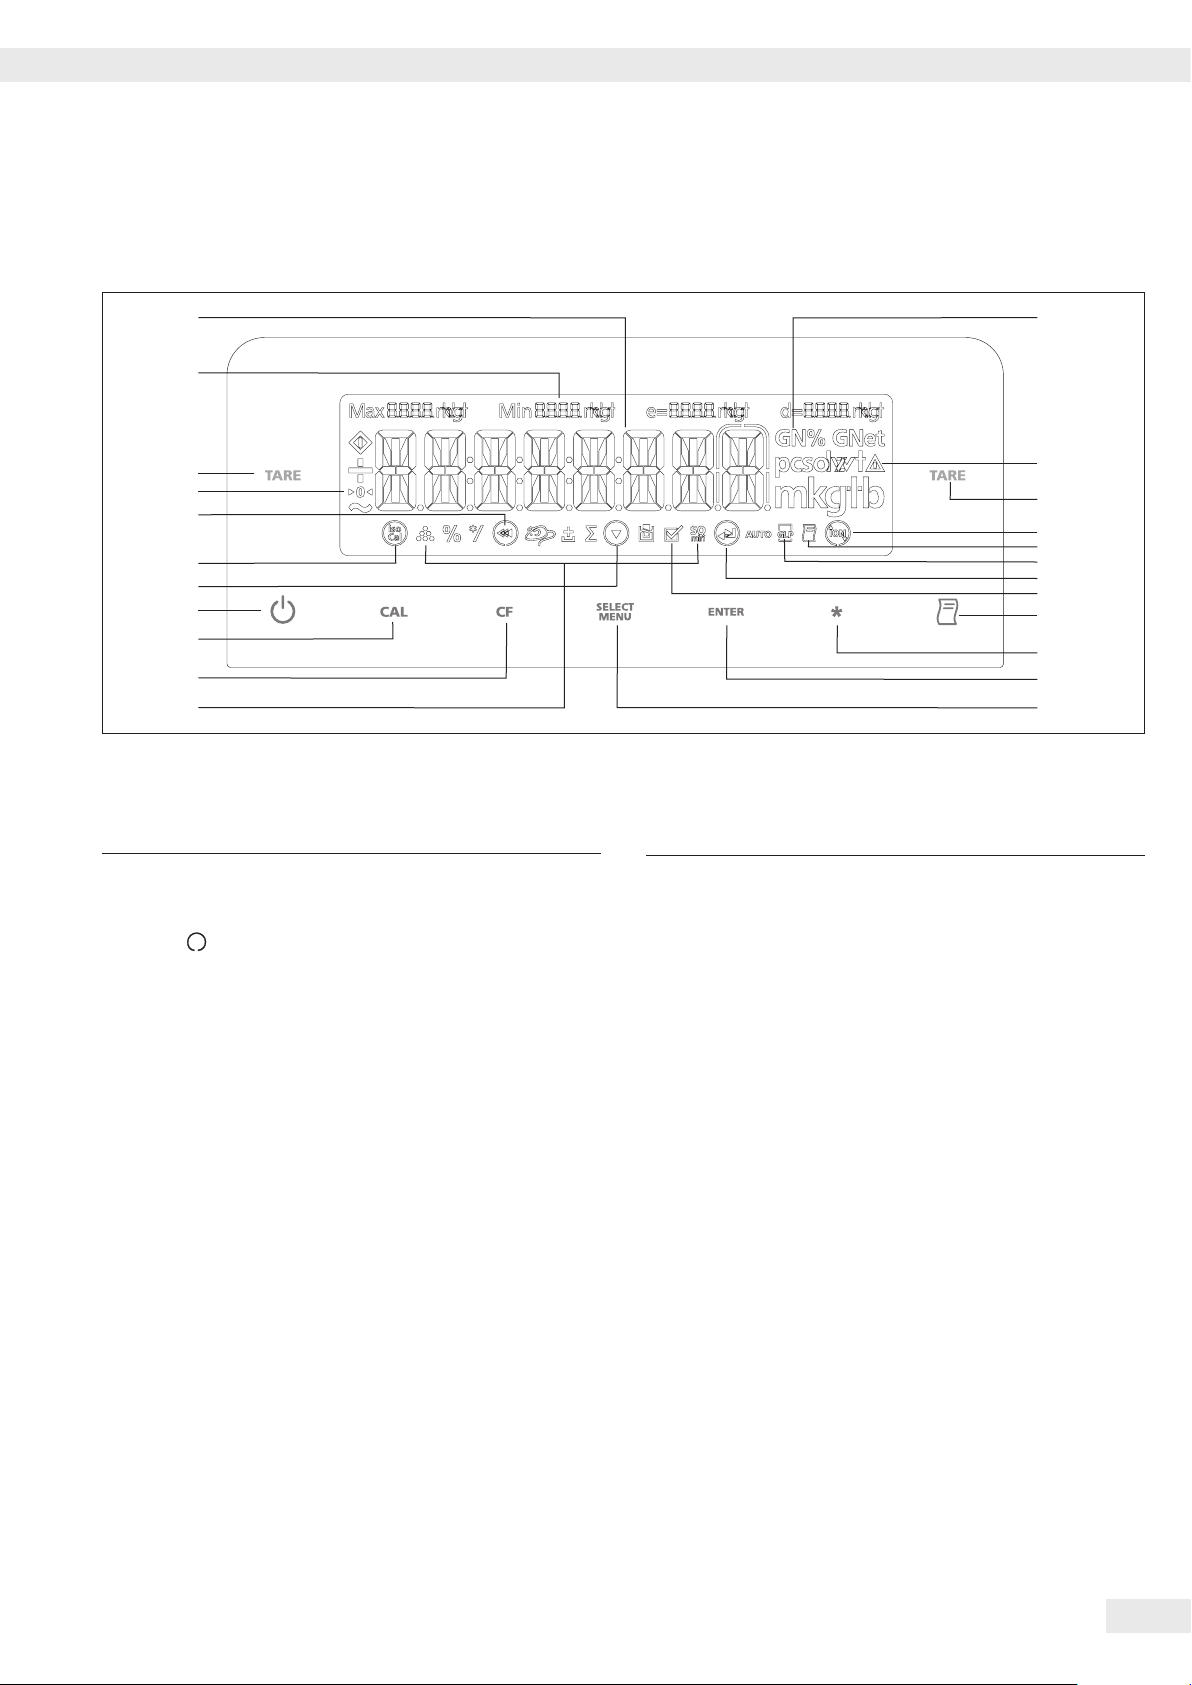
Overview of Display and Control Panel
Position Description
1 Weight units
2 Calculated-value indicator: not a weight value
3 Tare
4
5 Symbol for “Printing mode active"
6 Symbol for “GLP printing mode active"
8 Symbol for “Application program active"
9 Data output: Press this key to send readout values
10 Level balance, open/close draft shield or turn on/
11 Start an application program
12 Select an application program | Access the menu
13 Symbols for an active application
symbol flashes: Balance is not level, leveling
is required; n: open/close draft shield using key
*; m: ionizer active
to the built-in data interfaces�
off ionizer
(Z, L, V, +, /, u, o)
1
2
3
4
5
6
7
8
9
10
11
12
Position Description
14 Clear Function
This key is generally used to cancel functions:
– Quit application program
– Cancel calibration/adjustment routine |
Exit the menu
– GLP-compliant printout
15 Start the calibration process
16 On/off Key
18 Display: “isoCAL:" Calibration/adjustment function
20 Symbols for zero range (verified models only)
21 Metrological Data
22 Weight value displayed in selected weight unit
Symbol:
19 tt Exit the menu
19 t Select previous menu level
17 q Select menu item
7 u Select next item in current menu level
7↵ Confirm menu item
Cubis MSE Operating Instructions 29
Page 30

Operation
Basic Weighing Function
Features
– Tare the balance
– Print weight value
Using a verified balance in legal metrology:
The Type-Approval Certificate for verified balances is only valid for non-automatic
weighing instruments�
For automatic operation with or without additional, integrated equipment, please
follow the applicable national regulations for the installation location�
§ Before use in legal metrology, the balance should be adjusted via the internal
motorized calibration weight at the installation location:
see the “Calibration and Adjustment" section in this chapter�
$
The temperature range (°C) listed on the ID label should not be exceeded during
operation�
Example:
MSX
K
+10/+30°C
+5°C/+40°C isoCAL
Preparation
§ Turn balance on: Press the A key
§ Level the balance if required
§ Tare the balance if necessary: Press the J key
$ If necessary, change the configuration settings: see “Configuration"
$ If desired, load the factory settings: see “Configuration"
Additional functions:
$ Turn balance off: Press the A key
Quick Guide: First Weighing
Step Press key Display/Printout
1� Turn balance on A 0.0 g
Self-test runs�
Then the balance performs an automatic initial tare�
2� Place container on weighing pan (in this example : 11�5 g)� + 11.5 g
Close the draft shield (if available)�
3� Tare the balance J 0.0 g
The balance is tared and the displayed value is zero�
4� If required, open the draft shield and carefully place the sample in
the container on the weighing pan - in this example : 132 g� + 132.0 g
Close the draft shield (if available)� You can read the measured value
as soon as the weight value stops changing and the unit is displayed�
5� Print weight value P N + 132.0 g
30 Cubis MSE Operating Instructions
Page 31

Operation
Level the Balance (Q-Level)
It is essential for exact weighing results that the balance is absolutely level� The
front leveling feet can be used to level out small tilts in the floor� An integrated
sensor detects the alignment of the balance and triggers a warning message when
leveling is required� When “ " flashes on the display, you must level the balance�
Leveling with the inclination sensor:
Step Press key Display
1�
2� Fully screw in both back leveling feet
3� Directional arrow on the right of TURN:
Directional arrow on the left of TURN:
flashes on the display: flashes
Start leveling� * SCREW IN
(depends on the model) and confirm� * TURN
Turn right leveling foot� TURN
Turn left leveling foot� TURN
Directional arrow : Turn the respective leveling
foot to the right until the
directional arrow disappears�
Directional arrow : Turn the respective leveling
foot to the left until the
directional arrow disappears� SCREW OUT
4� Screw out both back leveling feet
(depends on the model) until they
touch the setup surface� * 0.0g
Leveling the balance with motorized leveling feet (optional):
t To start the leveling function, press the * key� flashes
y You can continue when the balance displays a weight value�
Each time the balance is leveled, the balance must be calibrated/adjusted
3
(see Calibrating/Adjusting the Balance)�
Turning the ionizer on/off (optional)
Purpose: The electrostatically charged weighing sample is neutralized as much as
possible in the air flow of the ionizer�
If your balance is equipped with an ionizer module, you can use the * key to
turn the ionizer on/off�
Preparation
t Set the intensity of the ionization in the menu�
Menu setting: extras: device: ionisat.: *Off, Soft intensity, Normal
intensity
or Strong intensity
AUT.LEV
Cubis MSE Operating Instructions 31
Page 32

Operation
Opening and closing the motorized draft shield (optional)
*
h
If your balance is equipped with a motorized draft shield, you can use the * key
to open and close the draft shield doors�
Models with the analytical draft shield:
The * key can be set, for example, so that it opens and closes the right and
top door (for right-handed people)� The opening width (entirely or partially) of the
sliding panels can also be defined� You can configure these settings manually on
the draft shield itself (see next section “Learning Function" below)�
Assigning Opening Functions to the * Key (Learning Function)
The balance must be turned on�
t Close all draft shield doors�
t Manually operate the door you want to assign to the * key: Push the right
door open as far as you want it to opened (entirely or partially)�
t Press the * key�
y The door will close again� Now you have configured the * key so that, when
pressed, it opens or closes the right door�
t Proceed in the same way to configure the left door�
Using the same method, you can assign the upper door to this key� You can also
configure one key to move both doors by manually opening both doors during
setup before pressing the * key�
Models with a rotation draft shield (MSx6.6S/3.6P/2.7S):
100°
t Set the opening width: manually select the desired opening angle
t 1) Open to the previously selected opening angle:
Press the * key
2) Close: Press the * key
0°
260°
180°
32 Cubis MSE Operating Instructions
Page 33

Operation
Calibration and Adjustment
Purpose
Adjustment is the correction of the difference between the measured value
displayed and the true weight of a sample, or the reduction of the difference to an
allowable level within maximum permissible error limits�
Using a verified balance in legal metrology:
Before use in legal metrology, the “internal calibration" function should be carried
out at the installation location�
Features
The adjustment procedure should only be started when
– The balance is unloaded
– The balance is tared
– The weighing signal is stable
– The sensitivity of the balance can be corrected a max� of 2%�
– Adjustment with a Sartorius density determination kit YDK… is possible�
– Balances with motorized leveling feet are leveled automatically prior to each
new calibration/adjustment (menu setting: device: extras: level: auto.)
If these settings are not made, the error message “Err 02" appears�
Adjustment can be made using different weight units:
CAL.UNIT - grams, Kilogr (not for verified models)
– You can also configure the mass comparator to perform calibration/adjustment
automatically (isoCAL), when the preset time or temperature limit has been
exceeded�
External calibration for verified balances of accuracy class K
– When the balance is used in legal metrology, external calibration is blocked
as follows:
– The menu access switch is locked
– The menu access switch cap is sealed
To block calibration/adjustment:
– Select Cal./Adj. - Blocked
– Close the menu access switch on the back of the balance
Calibration and adjustment results can be printed in an ISO/GLP-compliant
printout: settings and printout templates are listed starting on page 62�
Application parameters are deleted after calibration/adjustment�
Internal Calibration
In the operating menu, select Cal./Adj. -Cal.Int.�
The balance housing has a built-in motorized calibration weight�
§ Select Calibration/Adjustment: Press the C key
> The internal calibration weight is loaded automatically
> The balance is adjusted
> The internal calibration weight is removed
Cubis MSE Operating Instructions 33
Page 34

Operation
isoCAL*: automatic calibration and adjustment
In the operating menu, select isocal-on�
The balance will automatically display a flashing “isoCAL" character whenever the
ambient temperature has changed since the last calibration|adjustment or a time
interval has been exceeded�
The balance wants to perform an automatic adjustment�
The automatic internal calibration and adjustment prompt is activated when the
following conditions have been met
– Temperature change or time interval is higher than listed in the table below
– The load has not changed within the last 2 minutes
– The balance has not been operated within the last 2 minutes
– The load may not exceed 2% of the maximum capacity�
The following appears when the requirements are met
1� The “isoCal" symbol flashes
2� CAL�INT� appears in the measured value line
In the Setup menu, you can configure the balance so that it displays an adjustment
prompt, but does not perform the calibration and adjustment functions
automatically� (menu item NOTE)�
isoCAL is turned off on verified models:
the balance can only be used for legal-for-trade applications within a limited
temperature range�
– Balance of accuracy class k: +15°C to +25°C
– Balance of accuracy class �: +10°C to +30°C
The fully automatic adjustment function is triggered by the following criteria:
Model When the After
temperature a time
changes by interval of
MSE6�6…, MSE3�6P, MSE2�7…, MSE225S,
MSE225P, MSE125P, MSE324S,
MSE224S, MSE324P, MSE124S, MSE3203P,
MSE2203S, MSE2203P, MSE1203P 1�5 °C 4 h
MSE623S, MSE623P, MSE323S, MSE10202S,
MSE8202S, MSE6202P, MSE4202S,
MSE70201S, MSE36201S, MSE36201P,
MSE20201S, MSE70200S, MSE36200S 2 °C 6 h
MSE2202S, MSE1202P 4 °C 12 h
MSE8201S, MSE5201S 4 °C 24 h
These criteria are also set on the corresponding verified models (models
MSE…-0CE)�
34 Cubis MSE Operating Instructions
Page 35

Operation
Internal Calibration/Adjustment
Configuration:
SETUP - Bal.Scal- CAL./ADJ. - Cal.Int.
The balance housing has a built-in calibration/adjustment
weight�
§ Select Calibration/Adjustment: (CAL) key
> The internal calibration weight is automatically loaded
> The balance is calibrated
> When the setup is configured to “Calibration and
adjustment in one,” the balance will be adjusted
automatically
> The internal calibration weight is removed
Performing Calibration and Adjustment Routines
The following settings can be configured:
– Always perform calibration and adjustment in one
routine (factory setting)
– After calibration, the user has the option to quit the
routine without correction or to adjust the balance
If no deviations are found during calibration, the calibration/
adjustment routine can be exited after the calibration is
completed�
Two keys are now active:
– The (CAL) key for initiating the adjustment routine
– The (CF) key for exiting the routine
External Calibration
Configuration:
SETUP - Bal.Scal- CAL./ADJ. - Cal.Ext.
The balance has a factory-set calibration weight value (see
“Specifications”)�
Step Key Display/
Printout
1� Tare the balance J 0.0 g
2� Start the calibration process C CAL.ext.
Once you store the zero - 5000.0 g
point, the display prompts
for the required calibration
weight (flashing display)�
3� Place displayed calibration 5000.0 g
weight on balance (in this
example: 5000 g)�
Weight too low:
a minus sign “-" is shown
Weight too high:
a plus sign “+" is shown
The display stops flashing
as soon as the weight value
is within the defined limit�
Step Key Display/
Printout
1� Tare the balance J 0.0 g
2� Start the calibration process C CAL.Int.
Internal weight is CAL.RUN.
applied automatically
3� Calibration/Adjustment CAL.end
executed
4� The internal weight is
removed 0.0 g
4� Calibration/Adjustment Cal.end
executed; then the calibration
weight value is displayed +5000.0 g
5� Remove calibration weight 0.0 g
Cubis MSE Operating Instructions 35
Page 36

Configuration (Operating Menu)
Configuration (Operating Menu)
You can configure the balance; i�e�, adapt it to individual requirements�
Functions of the Keys in the Menu:
Symbol displayed Key Function
q S Scroll through menu items
u V Select next item on current menu level
(use right cursor to scroll through up to
4menu levels)
↵ V Confirm menu item
F (Press Save settings and exit menu from
and hold) any position
tt F Save settings and exit menu
t F Select previous menu level (left cursor)
2. 3. 1. 1 Indicates menu level
Menu Navigation
Example: Setting the Language
Step Press key Display/Printout
1� Open the menu: S Hold Applic.
Display the 1st menu item
in the weighing mode
2� Scroll upward within the Press repeatedly Input
menu level; S ���
After the last menu code, the first
code is displayed again (scroll) language
3� Select next menu level Press repeatedly english
(scrolls to the right) V
5� Change setting: S English
Select the menu item by
scrolling up
6� Confirm setting; V English
“o” indicates the menu item
you have set
o
o
36 Cubis MSE Operating Instructions
7� Go back to the previous menu F Language
level (from menu level 4)
$ If required, select further menu items S, V
8� Save setting Press repeatedly
and exit the menu F
> Restart your application 0.0 g
Page 37

Configuration (Operating Menu)
Menu Structure (Overview)
Level 1 Level 2 Level 3 Info about Menu Level
1) Setup Bal.Scal. Ambientconditions 1� 1� 1�
Balance parameters App.Filt. Application filter 1� 1� 2�
Stab.Rng. Stability range 1� 1� 3�
STABILDLY� Stability delay 1� 1� 4�
Tare
AutoZer. Auto zero 1� 1� 6�
Wt.Unit Basic weight unit 1� 1� 7�
DISP.DIG. Display accuracy
Cal./ADJ. Function of the C key 1� 1� 9�
Cal.routine 1� 1� 10�
Zero rng. Zero range 1� 1� 11�
INIT.ZERO Zero at Power On 1� 1� 12�
ON TARE Tare/zero at Power On 1� 1� 13�
CYC.rate Output rate 1� 1� 14�
ISOCAL Autom� calibration/adjustment 1� 1� 15�
EXT.Cal. External adjustment 1� 1� 16�
Cal.Unit Weight unit for calibration
GEN.SERV. General Service MEN.RESET Factory settings 1� 9� 1�
2) DEVICE extras Menu Menu read only/can edit 2� 1� 1�
(Additional functions) Signal Acoustic Signal 2� 1� 2�
Keys (Keypad) 2� 1� 3�
Ext.Key External switch function 2� 1� 4�
On Mode Power-on mode 2� 1� 6�
DR.SHIELD 2� 1� 9�
RE.DR.SH Resolution, draft shield open 2� 1� 10�
IONIZER 2� 1� 11�
LEVEL 2� 1� 12�
LEVELING 2� 1� 13�
PERIPHER. DAT.REC. Communication mode 2� 2� 1�/2� 3� 1�
(25-pin “Peripherals” interface) Baudrate 2� 2� 2�/2� 3� 2�
parity Parity 2� 2� 3�/2� 3� 3�
pc-usb (USB port “PC”) Stopbit Number of stop bits 2� 2� 4�/2� 3� 4�
Handshk. Handshake mode 2� 2� 5�/2� 3� 5�
Databit Number of data bits 2� 2� 6�/2� 3� 6�
3) DATA OUT COM.SBI Communications output 3� 1� 1�
(data output (PC communication) Stop automatic output 3� 1� 2�
Aut.Cycl. Time-dependent automatic data output 3� 1� 3�
Format (Line format) 3� 1� 4�
Auto.Tare Autom� taring after data output 3� 1� 5�
PRINT.PARA for printing RES.olution (manual/automatic) 3� 2� 1�
Format Line format for printout 3� 2� 2�
Prt.Init. Printout of appl� parameters 3� 2� 3�
GLP ISO/GLP-compliant printout 3� 2� 4�
tar./prt. Tare bal�/scale after ind� print 3� 2� 5�
time: 12h/24h 3� 2� 6�
date format 3� 2� 7�
4) Applic. Application programs Weigh 4� 1�
Unit Toggle 4� 2�
Counting resolut. 4� 3� 1�
Ref.Updt.Automatic Reference updating 4� 3� 2�
percentweighing Dec.Plcs Decimal places 4� 4� 1�
net.tot. Net total Comp.Prt. Printout of components 4� 5� 1�
Total Totalizing Comp.Prt. Printout of components 4� 6� 1�
AnimalW. Animal weighing Activty. Animal activity 4� 7� 1�
start 4� 7� 2�
Calc. Calculation Method (Operator) 4� 8� 1�
Dec.Plcs Decimal places 4� 8� 2�
Density determination Dec.Plcs Decimal places 4� 9� 1�
5) Input Input ID. ID input; max� 7 characters 5� 1�
Date Set date 5� 2�
Time Set time 5� 3�
password Password entry (for Service) 5� 4�
Cal.wt.. Enter weight value 5� 5�
6) InFoInformation Version, Ser. nr. , model,
lobs, kdc vers, DR.Shield, if OPT�MOD
7) Language English (factory setting) 7� 1�
(Language) Deutsch (German) 7� 2�
franc.çais (French) 7� 3�
ital.iano (Italian) 7� 4�
Espanol (Spanish) 7� 5�
Polski (Polish) 7� 7�
(Russian) 7� 6�
8) opt.MOD (optional interface) 8� 1� to 8� 6�
1
) Not available on balances verified for use in legal metrology
1
) 1� 1� 5�
1
) 1� 1� 8�
1
) 1� 1� 17�
Display software version, serial no�, model
6� 1� to 6� 6�
Cubis MSE Operating Instructions 37
Page 38

Configuration (Operating Menu)
Parameter Settings: Overview
ο = Factory setting√ = User-defined setting
Info about
Level 1 Level 2 Level 3 Level 4 Menu Level
1) Setup BAL.SCAL. AMBIENT conditions (adapt filter) V.Stable Very stable 1� 1�1� 1
Balance ο STABLE 1� 1�1� 2
parameters UNSTABL 1� 1�1� 3
V.UNSTBL. Very unstable 1� 1�1� 4
App.Filt. Application filter ο FINAL.RD. Final readout mode 1� 1�2� 1
Filling Filling mode 1� 1�2� 2
REDUC. Reduced 1� 1�2� 3
OFF 1� 1�2� 4
Stab.Rng. Stability range Max. ACC. Maximum accuracy 1� 1�3� 1
V.ACC. 1� 1�3� 2
ο ACC. 1� 1�3� 3
FAST 1� 1�3� 4
V.FAST. 1� 1�3� 5
Max.FAST
ST.DEL� Delay No 1� 1�4� 1
ο Short 1� 1�4� 2
AVERG. 1� 1�4� 3
LONG 1� 1�4� 4
Tare
ο WISTB.After stability 1� 1�5� 2
ATSTAB. At stability 1� 1�5� 3
Aut.zero Off 1� 1�6� 1
Auto zero ο on 1� 1� 6� 2
WT.UNIT For list of units, see 1� 1�7� 1
Basic weight unit “Toggling Between Weight Units” to
1� 1�7�24
DISP.DIG.
Display accuracy lp.on.off (last digit after load change) 1� 1�8� 2
DIV.1 1 interval 1� 1�8� 6
Minus 1 Reduced by 1 digit 1� 1� 8� 7
Cal./ADJ. EXT.CAL. External calibration with standard weight
Function of C key e.cal.usr. External calibr�/adjustment with user-defined weight
ο Cal.Int. Internal calibration 1� 1�9� 4
Int.lin. Internal linearization (on analytical balances only) 1� 1�9� 5
Set.Prel. Setting the Preload 1� 1�9� 8
Del.Prel. Clearing the Preload 1� 1�9� 9
blocked C Blocked 1� 1�9�10
Select 1� 1�9�12
set.ext.w. Determine ext� calibration weight for e.cal.usr. 1� 1�9�17
Cal.adj.ON ο Sequence adjustment 1� 1�10� 1
CAL.ADJ. Adjustment as needed 1� 1�10� 2
Zero rng. Zero range 1 perc.ent 1� 1�11� 1
ο 2 perc.ent 1� 1�11� 2
INIT.ZERO Zero at Power On ο default Factory setting 1� 1�12� 1
2 perc.ent 1� 1�12� 2
On Tare Tare/zero at power on ο ON 1� 1�13� 1
OFF 1� 1�13� 2
CYC.rate Output rate ο normal 1� 1�14� 1
highvar. 1� 1�14� 2
slow 1� 1�14� 3
medium 1� 1�14� 4
fast 1� 1�14� 5
veryfast 1� 1�14� 6
maximum 1� 1�14� 7
ISOcal Autom� calibration/adjustment Off 1� 1�15� 1
Note 1� 1�15� 2
ο On 1� 1�15� 3
To.w.linearization (for analytical balances only) 1� 1�15� 4
EXT.Cal. External calibration
Locked (blocked) 1� 1�16� 2
cal.unit
for calibration weight Kilogr. Kilograms 1� 1�17� 2
USERDEF. (factory setting: pound) 1� 1�17� 4
GEN.SERV. men.Reset Menu reset Yes Restore fcty� settings 1� 9� 1� 1
General servicing (Factory Settings) ο no Do not restore settings 1� 9� 1� 2
Standard
Verifiable
38 Cubis MSE Operating Instructions
1
) WIOSTB.W/o stability 1� 1�5� 1
1
) ο All 1� 1�8� 1
1
) ο Free 1� 1�16� 1
1
) ο Gram 1� 1�17� 1
1
) 1� 1�3� 6
2
) 1� 1�9� 1
1
) 1� 9� 1� 3
1
) 1� 9� 1� 4
1
) Not available on balances verified for use in legal metrology
2
) Not available on balances for use in legal metrology of accuracy class K
2
) 1� 1�9� 3
Page 39

Configuration (Operating Menu)
Level 1 Level 2 Level 3 Level 4 Info about Menu Level
2) device extras menu CAN EDIT 2� 1� 1� 1
(Additional Rd. Only Read only 2� 1� 1� 2
functions)
Signal Acoustic Signal off 2� 1� 2� 1
ο on 2� 1� 2� 2
Keys (Keypad) ο Free 2� 1� 3� 1
Locked 2� 1� 3� 2
ext.key ο Print key P 2� 1� 4� 1
External switch function Z/Tara key J 2� 1� 4� 2
cal. key C 2� 1� 4� 3
cf key F 2� 1� 4� 5
enter key V 2� 1� 4� 6
DR.SHIELD 2� 1� 4� 9
Ionizer 2� 1� 4� 10
appl. key 2� 1� 4� 11
Asterisk key * 2� 1� 4� 12
on mode ο off/on/sb off/on/standby 2� 1� 6� 1
Power-on mode off/on/so off/on/autom� shut-off 2� 1� 6� 2
on/sb On/Standby 2� 1� 6� 3
Auto On Auto on 2� 1� 6� 4
DR.SHIELD ο Off 2� 1� 9� 1
on/ion: Ionizer is turned on
when closing the draft shield 2� 1� 9� 2
Cl/Co: Close →Execute command 2� 1� 9� 3
Locked (blocked) 2� 1� 9� 4
Locked (blocked) 2� 1� 9� 5
Res.dr.sh (Weight ο All All decimal places 2� 1�10� 1
resolution when door is open) REDUC.ed 2� 1�10� 2
IONIZER ο Off 2� 1�11� 1
Intensity Weak 2� 1�11� 2
Medium 2� 1�11� 3
Strong 2� 1�11� 4
Level Off 2� 1�12� 1
ο Note to 2� 1�12� 2
Err.msg. Error message 2� 1�12� 3
LEVELING ο key (manual start) 2� 1�13� 1
auto. Auto� before cali�/adjustment 2� 1�13� 2
Periphery:/PC USB:
peripher Dat.rec. # SBI (ASCII) 1) 2� 2� 1� 1 / 2� 3� 1� 1
Uni.print.
pc-usb ο lab.print
(25-pin “Peripherals”
interface)
Rem.displ. 2� 2� 1� 4 / 2� 3� 1� 4
(USB port “PC”)
OFF 2� 2� 1�10 / 2� 3� 1�10
Operating mode XBPI 2� 2� 1� 2 / 2� 3� 1� 2
Universal printer
(parameters for YDP10 printer)
2� 2� 1� 7 / 2� 3� 1� 7
2� 2� 1� 8 / 2� 3� 1� 8
Baudrate 600 2� 2� 2� 3 / 2� 3� 2� 3
1200 2� 2� 2� 4 / 2� 3� 2� 4
2400 2� 2� 2� 5 / 2� 3� 2� 5
4800 2� 2� 2� 6 / 2� 3� 2� 6
ο 9600 2� 2� 2� 7 / 2� 3� 2� 7
19200 2� 2� 2� 8 / 2� 3� 2� 8
38400 2� 2� 2� 9 / 2� 3� 2� 9
57600 2� 2� 2�10 / 2� 3� 2�10
115200 2� 2� 2�11 / 2� 3� 2�11
1
) Note concerning verified balances/scales as legal measuring instruments in the EU*: In the “SBI” setting, the non-verified display digit is not automatically
identified�
Please take the corresponding measures or adjust the settings on the peripheral device (see also “Interfaces”)�
Cubis MSE Operating Instructions 39
Page 40

Configuration (Operating Menu)
Info about
Level 1 Level 2 Level 3 Level 4 Menu Level
Periphery:/PC USB:
2) device peripher Parity ο Odd 2� 2� 3� 3 / 2� 3� 3� 3
pc-usb Parity Even 2� 2� 3� 4 / 2� 3� 3� 4
None 2� 2� 3� 5 / 2� 3� 3� 5
StopBit ο 1 Stop 2� 2� 4� 1 / 2� 3� 4� 1
Numberofstopbits 2 bits 2� 2� 4� 2 / 2� 3� 4� 2
Handshk. Softw.are 2� 2� 5� 1 / 2� 3� 5� 1
Handshake mode ο Hardw.are 2� 2� 5� 2 / 2� 3� 5� 2
# None 2� 2� 5� 3 / 2� 3� 5� 3
DataBit 7 Bits 2� 2� 6� 1 / 2� 3� 6� 1
Numberofdatabits ο 8 Bits 2� 2� 6� 2 / 2� 3� 6� 2
3) data out comm.SBI COM. Output ο IN.WIO Stability 3� 1� 1� 1
(data (computer (manual/automatic) IN.AFTER Stability 3� 1� 1� 2
output) communication) IN.AT Stability 3� 1� 1� 3
Auto.WIO Auto w/o stability 3� 1� 1� 4
Aut.With Stability 3� 1� 1� 5
Stop ο Off 3� 1� 2� 1
Auto output on 3� 1� 2� 2
Auto.CYCL. ο Every 3� 1� 3� 1
Time-dependent automatic data output 2ndValue 3� 1� 3� 2
Format (Line format) 16 chars (digit is not identified) 3� 1� 4� 1
ο 22 chars (digit is identified) 3� 1� 4� 2
Extr.line (date, time and weight value) 3� 1� 4� 4
Auto.tare ο Off 3� 1� 5� 1
Autom� taring after data output on 3� 1� 5� 2
PRINT.PARA RES. Manual without Stability 3� 2� 1� 1
for printing (manual/autom�) ο man.after. Stability 3� 2� 1� 2
man.at Stability 3� 2� 1� 3
auto.lc (autom� at load change) 3� 2� 1� 6
Format Line format 16 chars (digit is not identified) 3� 2� 2� 1
for printout ο 22 chars (digit is identified) 3� 2� 2� 2
Extr.line (date, time and weight value) 3� 2� 2� 4
Prt.Init.
application parameters ο all Parameters 3� 2� 3� 2
mainpar. Main parameters 3� 2� 3� 3
GLP ISO/GLP-compliant printout ο Off 3� 2� 4� 1
cal.adj. For calibration/adjustment only 3� 2� 4� 2
Always on 3� 2� 4� 3
Printout
of off 3� 2� 3� 1
tar./prt. ο off 3� 2� 5� 1
Tare bal�/scale after ind� print on 3� 2� 5� 2
Time ο 24h display 3� 2� 6� 1
12h display “AM/PM” 3� 2� 6� 2
Date ο dd.mmm.yy format 3� 2� 7� 1
mmm.dd.yy format 3� 2� 7� 2
# = Factory setting for “PC-USB” interface
40 Cubis MSE Operating Instructions
Page 41

Configuration (Operating Menu)
Info for
Level 1 Level 2 Level 3 Level 4 Menu level
4) App- WEIGH. 4� 1�
lic. Unit Toggle 4� 2�
Application
programs
Counting resolut. ο Disp.dig. Display accuracy 4� 3� 1� 1
10 fold 10 times > disp� 4� 3� 1� 2
100 fold 10 times > disp� 4� 3� 1� 3
Ref.Updt. Auto� ο off 4� 3� 2� 1
Reference updating autom.atically 4� 3� 2� 2
percent dec.plcs. None No decimal places 4� 4� 1� 1
Weighing Decimal places ο 1 dec.pl. 1 decimal place 4� 4� 1� 2
in Percent 2 Dec.Pl. 2 decimal places 4� 4� 1� 3
3 Dec.Pl. 3 decimal places 4� 4� 1� 4
net.tot. comp.prt. off 4� 5� 1� 1
Net-total Component printout ο On 4� 5� 1� 2
Formulation
Total comp.prt. off 4� 6� 1� 1
Totalizing Component printout ο On 4� 6� 1� 2
AnimalW. activty. calm (fluct�: 2% of test obj�) 4� 7� 1� 1
Animal Animal activity ο active (fluct�: 5% of test obj�) 4� 7� 1� 2
Weighing v.active (fluct�: 20% of test obj�) 4� 7� 1� 3
start manual 4� 7� 2� 1
ο auto 4� 7� 2� 2
Calc. Method (Operator) ο Mul. Multiplier 4� 8� 1� 1
Calculation div. Divisor 4� 8� 1� 2
Dec.plcs none No decimal places 4� 8� 2� 1
Decimal places ο 1 dec.pl. 1 decimal place 4� 8� 2� 2
2 Dec.Pl. 2 decimal places 4� 8� 2� 3
3 Dec.Pl. 3 decimal places 4� 8� 2� 4
Density dec.plcs none No decimal places 4� 9� 1� 1
determination Decimal places ο 1 dec.pl. 1 decimal place 4� 9� 1� 2
2 Dec.Pl. 2 decimal places 4� 9� 1� 3
3 Dec.Pl. 3 decimal places 4� 9� 1� 4
1
) Not available on balances verified for use in legal metrology
Cubis MSE Operating Instructions 41
Page 42

Configuration (Operating Menu)
Input: ID number, date and time
Info about
Level 1 Level 2 Level 3 Menu Level
5) Input ID. ID input, max� 7 characters 5� 1�
Input Possible characters: 0-9, A-Z,
dash|hyphen and space
DATE Set date 5� 2�
Time Set time 5� 3�
password Password entry (for Service) 5� 4�
cal.wt. Enter weight value 5� 5�
Depending on the setting of the “Print PRINT�PARA – DATE” menu item, the date
is displayed in the following format:
Format Display: Date
DD�MMM�YY
MMM�DD�YY
Depending on the setting of the “Print PRINT�PARA – TIME” menu item, the time is
displayed in the following format:
Time Display: Time
24h mode
12h mode
42 Cubis MSE Operating Instructions
Page 43

Configuration (Operating Menu)
Level 1 Level 2 Level 3 Level 4 Info about Menu Level
Device-specific information
6) InFo Ver. no. Displays the software version 00-39-13 6� 1�
Info
Ser. no. Displays the serial number 10801234 6� 2�
(to toggle between the upper/lower part of the display:
press the S key)
Model Displays the model ID mse8201s 6� 3�
(to toggle between the upper, middle and lower part of the display:
Press the S key)
lobs Displays the software version Rel.19.03 6�4�1�
kDc vers Displays the software version Rel.10.02 6�6�1�
DR.SHIELD Displays the software version 00-00-00 6�6�1�
Menu display: Selecting languages or codes
7)
Language
(Language) Deutsch (German) 7� 2�
franc.çais (French) 7� 3�
ital.iano (Italian) 7� 4�
Espanol (Spanish) 7� 5�
(Russian) 7� 6�
Polski (Polish) 7� 7�
English (factory setting) 7� 1�
Interface Options
8) opt.MOD: Dat.rec. SBI (ASCII) 1) 8� 1� 1
9-pin or 25-pin interface Operating mode uni.print universal printer 8� 1� 7
ο lab.print (: parameters for YDP10 printer) 8� 1� 8
OFF 8� 1�10
Baudrate 1200 8� 2� 3
2400 8� 2� 5
4800 8� 2� 6
ο 9600 8� 2� 7
19200 8� 2� 8
38400 8� 2� 9
57600 8� 2�10
115200 8� 2�11
Parity ο Odd 2� 3� 1
Parity Even 2� 3� 2
None 2� 3� 3
StopBit ο 1 Stop 2� 4� 1
Numberofstopbits 2 Bits 2� 4� 2
Handshk. Softw.are 2� 5� 1
Handshake mode ο Hardw.are 2� 5� 2
None 2� 5� 3
DataBit 7 Bits 2� 6� 1
Numberofdatabits ο 8 Bits 2� 6� 2
or
8) opt.MOD: Dat.rec. SBI (ASCII) 1) 8� 1� 1
Bluetooth Operating mode uni.print universal printer 8� 1� 2
ο lab.print (: parameters for YDP10 BT printer) 8� 1� 3
OFF 8� 1� 4
Find 8� 2�
ser. no. 10801234 8� 3� 1
(serial number)
Model YDP10BT 8� 4� 1
(e� g� printer ID)
1
) Note concerning verified balances/scales as legal measuring instruments in the EU*: In the “SBI” setting, the non-verified display digit is not automatically
identified�
Please take the corresponding measures or adjust the settings on the peripheral device (see also “Interfaces”)�
Cubis MSE Operating Instructions 43
Page 44

Configuration (Operating Menu)
Setting the ID number, date and time
Step Press key Display
1� Starting the Menu: S Hold Applic.
1� Display menu level
2� Select “Input” S Input
ID no.:
3� Select input for ID 2x V ID.
4� Set or change ID number – S 3-------
With auto key repeat: S Press and hold
5� Moving within the 7-digit number V or 3-aBC12
Move ID no� F
6� Save at the V ID.
last position of the ID no�
Date:
7� Select and confirm “Date” S, V 08.feb.09
8� Change setting – S 10.feb.09
With auto key repeat: S Press and hold
9� Change position between V or 10.feb.09
the day/month/year
10� Save setting at “Year” position V date
Time:
11� Select “Time” S, V 10.46.23
12� Change setting – S 11.46.23
With auto key repeat: S Press and hold
13� Change position between V or 11.46.32
hour/minute/second
14� Set seconds to “zero” S 11.47.00
44 Cubis MSE Operating Instructions
15� Save setting at “Second” position V time
16� Save settings and exit menu Press repeatedly
F
> Restart your application 0.0 g
Page 45

Application Programs
Application Programs
All application programs can be selected on models
verified for use in legal metrology�
Verified values can be marked using the following
characters:
– Percent = %
– Piece count (Counting) = pcs
– Computed values = o, G
Density Determination
Display symbol: u
Purpose
This application program can be used to determine the
density of solid materials according to the buoyancy method�
Features
The density of liquid (g/cm3) can be set for a corresponding
temperature via the S key� See the next page for a table
on water density values� Factory setting is 1 g/cm3�
The following formula is used:
Density of sample =
Weight in air
————————————————————————
(weight in air – weight in water)
The liquid density is displayed briefly when you start the
density calculation�
Positive and negative weight values can be applied for the
sample in the air and water� The value in water, however,
must be less than the value in the air; otherwise, this will
trigger an error message�
The results can be displayed with 0 to 3 decimal places:
See the chapter entitled “Configuration�” Not part
of the scope of delivery: sample holder and suspension
wire�
Preparation
§ Select the “Density Determination” application in the
menu:
See “Configuration”
§ Configuring parameters:
•Density of liquid
Applic. Application programs
Density Density determination
DEC.PLCS Number of decimal places
none No dec� places
o 1 dec pl. 1 decimal place
2 dec pl. 2 decimal places
3 dec pl. 3 decimal places
Note on using 3 decimal places:
Using three decimal places for density can result in a high
measurement error rate because corrections to the air density
and the density calculation sets are not taken into account,
for example�
o= Factory settings
Cubis MSE Operating Instructions 45
Page 46

Application Programs
Density determination printout
RhoFl 0.99823 o : Liquid density (g/cm3)
Wa + 20.0 g : Weight in air
Wfl + 15.0 g : Weight in liquid
Rho 4.0 o : Result: Density of sample
Table:
Density values of H2O at temperature T (in °C)
T/°C 0.0 0.1 0.2 0.3 0.4 0.5 0.6 0.7 0.8 0.9
10. 0�99973 0�99972 0�99971 0�99970 0�99969 0�99968 0�99967 0�99966 0�99965 0�99964
11. 0�99963 0�99962 0�99961 0�99960 0�99959 0�99958 0�99957 0�99956 0�99955 0�99954
12. 0�99953 0�99951 0�99950 0�99949 0�99948 0�99947 0�99946 0�99944 0�99943 0�99942
13. 0�99941 0�99939 0�99938 0�99937 0�99935 0�99934 0�99933 0�99931 0�99930 0�99929
14. 0�99927 0�99926 0�99924 0�99923 0�99922 0�99920 0�99919 0�99917 0�99916 0�99914
15. 0�99913 0�99911 0�99910 0�99908 0�99907 0�99905 0�99904 0�99902 0�99900 0�99899
16. 0�99897 0�99896 0�99894 0�99892 0�99891 0�99889 0�99887 0�99885 0�99884 0�99882
17. 0�99880 0�99879 0�99877 0�99875 0�99873 0�99871 0�99870 0�99868 0�99866 0�99864
18. 0�99862 0�99860 0�99859 0�99857 0�99855 0�99853 0�99851 0�99849 0�99847 0�99845
19. 0�99843 0�99841 0�99839 0�99837 0�99835 0�99833 0�99831 0�99829 0�99827 0�99825
20. 0�99823 0�99821 0�99819 0�99817 0�99815 0�99813 0�99811 0�99808 0�99806 0�99804
21. 0�99802 0�99800 0�99798 0�99795 0�99793 0�99791 0�99789 0�99786 0�99784 0�99782
22. 0�99780 0�99777 0�99775 0�99773 0�99771 0�99768 0�99766 0�99764 0�99761 0�99759
23. 0�99756 0�99754 0�99752 0�99749 0�99747 0�99744 0�99742 0�99740 0�99737 0�99735
24. 0�99732 0�99730 0�99727 0�99725 0�99722 0�99720 0�99717 0�99715 0�99712 0�99710
25. 0�99707 0�99704 0�99702 0�99699 0�99697 0�99694 0�99691 0�99689 0�99686 0�99684
26. 0�99681 0�99678 0�99676 0�99673 0�99670 0�99668 0�99665 0�99662 0�99659 0�99657
27. 0�99654 0�99651 0�99648 0�99646 0�99643 0�99640 0�99637 0�99634 0�99632 0�99629
28. 0�99626 0�99623 0�99620 0�99617 0�99614 0�99612 0�99609 0�99606 0�99603 0�99600
29. 0�99597 0�99594 0�99591 0�99588 0�99585 0�99582 0�99579 0�99576 0�99573 0�99570
30. 0�99567 0�99564 0�99561 0�99558 0�99555 0�99552 0�99549 0�99546 0�99543 0�99540
46 Cubis MSE Operating Instructions
Page 47

Application Programs
Parameter configuration: Applic. - Density - dec.plcs. -1 dec.pl.
Example: Determining the density of a solid sample� The density at 20�0 degrees Celsius is 0�99823 g/cm3�
Step Press key Display/Printout
1� Attach sample holder and suspension wire
2� Tare the balance J 0.0 g
3� Change density of buoyancy liquid S _1.00000
4� Set density value (in this example: 0�99823)
Enter numerals in increments of 1 or: Repeatedly press S, press
and hold the V key _0.99823
5� Set the density value and start the application� V
The current density value will be saved in protected
memory until the setting is changed�
6� Confirm “air” display V air
7� Determining the weight of the sample in air:
Place sample on the balance + 20.0 g
8� Save weight in air V
9� Remove sample from the balance water
10� Determining weight value in liquid:
Place sample in basket
11� Confirm “water” display V 0.0 g
12� Place sample in liquid + 15.0 g
13� Save weight value in liquid, display and print results V
+ 4.0
o
RhoFl 0.99823 o
Wa + 20.0 g
Wfl + 15.0 g
14� Delete results F Rho 4.0 o
15� Repeat as needed, starting from Step 5
Cubis MSE Operating Instructions 47
Page 48

Application Programs
Counting
Display symbol: Z
Purpose
With the Counting application, you can determine the
number of parts which each have approximately equal
weight� First the weight of a manually-determined number
of parts is calculated and then the individual weight is
determined from this (reference)�
The total number of the unknown number of parts is then
calculated from the weight�
Changing the Reference Sample Quantity
Activate function: Press the S key
Select the desired reference quantity (1 to 100):
In increments of one: Press the S key briefly
In increments of ten: Press and hold the S key
The selected number is saved to protected memory�
Optimizing the counting results
Automatic reference sample updating optimizes the counting
accuracy� This function can be turned on or off in the menu�
Automatic reference sample updating is performed when the
requirements, including the specified stability criterion, have
been met�
Preparation
§ Select the “Counting” application in the menu: see
“Configuration”
§ Configuring parameters:
Applic. Application programs
Count.
RES.
o DISP.ACC Display accuracy
10-fold 10-fold higher
100-fold 100-fold higher
Ref.Updt. Autom� ref� sample updating
o Off Switched off
autom. Automatic
o = Factory settings
Printout: Counting
nRef 10 : Reference sample quantity
wRef 21.14 g : Reference weight for
1unit
Qnt + 500 pcs : Calculated quantity
The abbreviation opt, for “optimizing”, is displayed briefly
with the new reference sample quantity�
48 Cubis MSE Operating Instructions
Page 49

Application Programs
Example: Counting parts of equal weight
Parameter settings: Applic. - Count.
Step Press key Display/Printout
1� Place the parts container +22.6 g
on the balance
2� Tare the balance J 0.0 g
3� Place the reference sample quantity in the container
(in this example: 20 units)
4� Changing the Reference Sample Quantity S ref10
pcs
5� Select the reference sample quantity: Repeatedly press S
In increments of one (1, 2, 3, ���, 100) briefly or
In increments of ten (1, 10, 20, ���, 100) hold the S key ref20
6� Confirm selected reference sample quantity V + 20
pcs
pcs
and start the application�
The current reference weight remains saved nRef 20 pcs
until a new reference is set� wRef 1.07 g
7� Add desired number of pieces +500
pcs
8� If desired, print the results P Qnt + 500 pcs
9� Toggle display between average piece + 1.07 g G
weight, weight and quantity + 535.0 g
Repeatedly press S +500
10� Unload the balance – 21
pcs
pcs
11� Repeat as needed, starting from Step 7
12� Delete the reference value F 0.0 g
Cubis MSE Operating Instructions 49
Page 50

Application Programs
Weighing in Percent
Display symbol: %
Purpose
This application allows you to obtain weight readouts in percent which are in
proportion to a reference weight�
Changing the reference percentage value
Activate function:
Press the S key
Select the desired reference quantity (1 to 100):
In increments of one: Press the S key briefly
In increments of ten: Press and hold the S key
The selected percentage is saved to protected memory�
Preparation
§ Select the “Weighing in Percent” application in the menu:
See “Configuration”
§ Configuring parameters:
Applic. Application programs
Percent Weighing in Percent
DEC.PLCS Number of decimal places
none No dec� places
o 1 dec.pl. 1 decimal place
2 Dec.Pl. 2 decimal places
3 Dec.Pl. 3 decimal places
o = Factory settings
Weighing in percent printout
pRef 100 % : Reference percentage
Wxx% 111.6 g : Reference weight net xx% for selected
reference percentage
Prc + 94.9 % : Calculated reference percentage
50 Cubis MSE Operating Instructions
Page 51

Application Programs
Example: Determining residual weight in percent
Parameter settings: Applic. - percent
Reference percentage value: Ref 100%
Step Press key Display/Printout
1� Tare the balance J 0.0 g
2� Information:
Enter the reference percentage S ref 100
%
(Changing the reference: see the previous page)
3� Place sample equal to 100% on the balance
(in this example: 111�6 g)
4� Initialize the balance V + 100.0
%
The current reference weight remains pRef 100 %
saved until a new reference is set Wxx% + 111.6 g
5� Remove sample (e�g� for drying)
6� Place unknown weight on balance + 94.9
%
(in this example: 105�9 g)
7� If desired, print the percentage P Prc + 94.9 %
8� Toggle display between weight and percentage + 105.9 g
Repeatedly press S + 94.9
%
9� Clear display of residual weight and reference percentage F + 105.9 g
10� If desired, print the residual weight P N + 105.9 g
Cubis MSE Operating Instructions 51
Page 52

Application Programs
Calculation
Display symbol: /
Purpose
With this application, you can calculate weight values using
a multiplier or divisor�
This can be used, for example, to determine the weight per unit area, or “gsm”
weight (grams per square meter), of paper�
Setting the Factor or Divisor
Activate function:
Press the S key
Select a number of up to 8 digits and, if needed, one decimal point
(0�0000001–99999999):
In increments of one: Press the S key briefly
To increase the value without pressing repeatedly: Press and hold the S key
The selected operator is saved to protected memory�
Preparation
§ Select the “Calculation” application in the menu:
See “Configuration”
§ Configuring parameters:
Applic. Application programs
Calc. Calculation
Method (Operator)
o Mul. Multiplier
Div. Divisor
DEC.PLCS Number of decimal places
none No dec� places
o 1 dec.pl. 1 decimal place
2 Dec.Pl. 2 decimal places
3 Dec.Pl. 3 decimal places
o = Factory settings
52 Cubis MSE Operating Instructions
Calculation printout
Mul + 1.2634 : Multiplier
Div + 0.6237 : Divisor
Res + 79.7 o : Result
Page 53

Application Programs
Example:
Calculating the weight per unit area of paper: An A4 sheet of paper is used in this example, with surface dimensions of 0�210 m
+ 0�297 m = 0�06237 m2� To determine the weight per unit area, the total weight is divided by the surface�
Parameter settings:
Applic. - calc. - method - Divis.
Step Press key Display/Printout
1� Tare the balance J 0.00 g
2� Activate divisor input S ______1.0
3� Set the divisor (in this example: 0�06237):
Position the decimal point, V, 4+ S, ___.00000
2+ V,
Enter numerals in increments of 1 or: Repeatedly press S ___.06000
briefly or hold
the, V key ___.06237
4� Save the divisor and initialize the balance V + 0.0
o
The current divisor will be saved in protected Div 0.06237
memory until the setting is changed�
5� Determine the weight per unit are: + 79.7
o
Place a sheet of DIN A4 paper on the balance
6� If desired, print the result P Res + 79.7 o
7� Toggle display between weight and calculated value Repeatedly press S + 4.97 g
+ 79.7
8� Unload the balance + 0.0
o
o
9� Repeat as needed, starting from Step 5
Cubis MSE Operating Instructions 53
Page 54

Application Programs
Averaging (animal weighing)
Display symbol: V
Purpose
This application is used to determine the weights of unstable samples (e�g�, live
animals) or to determine weights under very unstable ambient conditions�
This requires an average to be calculated over several measurement cycles (also
referred to as “subweighing operations”)�
Changing the number of subweighing operations
Activate function: Press the S key
Select the desired number of measurements (1 to 100):
In increments of one: Press the S key briefly
In increments of ten: Press and hold the S key
The selected number of subweighings is saved to protected memory�
Preparation
§ Select the “Animal Weighing” application in the menu:
See “Configuration”
§ Configuring parameters:
Applic. Application programs
Anim.WG Animal weighing
Activty. Animal activity
Calm stable
o Active unstable
UNSTABL very unstable
Start
manual
o Autom. Automatic
o = Factory settings
54 Cubis MSE Operating Instructions
Printout: Averaging
mDef 20 : Defined number of subweighing operations
x-Net + 410.1 g : Result of averaging
Page 55

Application Programs
Example: Automatic weighing of animals with 20 subweighing operations
Parameter configuration: Applic. - AnimalW.
Step Press key Display/Printout
1� Place animal weighing bowl on the balance 22.6 g
2� Tare the balance J 0.0 g
3� Change the number of subweighing operations S ref 30
4� Set number of measurements: Repeatedly press S
In increments of one (1, 2, 3, ���, 100) briefly or
In increments of ten (10, 20, ���, 100) hold the S key ref 20
5� Confirm selected subweighing operations V + 0.0 g
and start automatic animal weighing�
The number of subweighing operations will be saved
in protected memory until the setting is changed�
6� Place first animal in bowl� 888
The balance delays the start of measurements 20
until the difference between 4 measurements 19
meets the criterion� ....
1
7� Read the result + 410.1 g G
The result is displayed with the “G” (= calculated value)
and remains displayed until the sample (animal) mDef 20
is removed from the load plate (bowl)� x-Net + 410.1 g
8� Unload and tare the balance + 0.0 g
9� Weigh next animal (if desired)�
The next weighing series starts automatically�
Cubis MSE Operating Instructions 55
Page 56

Application Programs
Net-total Formulation
Display symbol: +
Purpose
This application can be used to weigh different components up to a defined
total� You can print out both the total weight and the individual weights of the
components�
Features
– Weigh up to 99 components from “0” to a defined total component weight�
– Save component weights (“Store xx comp�”), with
– display zeroed automatically after value is stored, and
– automatic printout
– Clear component memory following cancellation of the weighing sequence by
pressing F and print the total weight�
– Toggle between component weight and total weight by pressing and holding
the S key�
– Print the total of the individual component weights T-Comp)
Preparation
§ Select the “Net-total Formulation” application in the menu:
See “Configuration”
§ Configuring parameters:
Applic. Application programs
Net-Totl. Net-total formulation
Comp.Prt. Printout of components
Off
o On
o = Factory settings
56 Cubis MSE Operating Instructions
Net-total formulation printout
Comp 2+ 278.1 g : Second component weight
T-Comp+ 2117.5 g : Total components
Page 57

Application Programs
Example: Counting parts into a container
Parameter configuration: Applic. - Net.totl.
Step Press key Display/Printout
1� Place empty container
on the balance 65.0 g
2� Tare J 0.0 g
3� Add first component + 120.5 g
4� Save component data V + 0.0 g
Net
Comp 1+ 120.5 g
5� Add next component + 70.5 g
Net
6� Save component data V + 0.0 g
Net
Comp 2+ 70.5 g
7� Weigh further components as desired Repeat steps 5 and 6
as often as necessary
8� Fill to desired final value S + 191.0 g
(toggle to the total weight value)
9� Print total weight and delete F + 2117.5 g
the component memory T-Comp+ 2117.5 g
Cubis MSE Operating Instructions 57
Page 58

Application Programs
Totalizing
Display symbol: +
Purpose
This application can be used to add values from successive, mutually independent
weight values to a total that exceeds the capacity of the balance�
Features
– Totalizing memory for up to 99 products
– Save component weights (“Store xx comp�”), with automatic printout
– Toggle display between the current individual weight value and the value in
totalizing memory by pressing S�
– Print the total of the individual component weights S-Comp)
– To close the application and print the total weight:
press F
Preparation
§ Select the “Totalizing” application in the menu:
See “Configuration”
§ Configuring parameters:
Applic. Application programs
Total Totalizing
Comp.Prt. Printout of components
Off
o On
o = Factory settings
Printout: Totalizing
58 Cubis MSE Operating Instructions
Comp 2+ 278.1 g : Second component weight
S-Comp+ 2117.5 g : Totalizing memory
Page 59

Application Programs
Example: Totalizing weight values
Parameter configuration: Applic. - total - comp.prt: On
Step Press key Display/Printout
1� Tare J 0.0 g
2� Place sample on the balance (in this example: 380 g) + 380.0 g
3� Save the value to memory V + 380.0 g
Comp 1+ 380.0 g
4� Remove sample + 0.0 g
5� Place the next sample on the balance (in this example: 575 g) + 575.0 g
6� Save the value to memory V + 955.0 g
+ 575.0 g
Comp 2+ 575.0 g
7� Remove sample + 0.0 g
8� View value in totalizing memory S + 955.0 g G
9� Weigh further components as desired Repeat steps 5 and 6 as often as necessary
10� Print total weight and delete the totalizing memory F 0.0 g
S-Comp+ 2117.5 g
Cubis MSE Operating Instructions 59
Page 60

Application Programs
Mass Unit Conversion
Purpose
This application is used to change the weight value displayed from the basic weight unit to any of 4 application weight units
(see table on next page)�
Features
– Set the basic unit and display accuracy in the Setup menu: See “Configuration�”
– Set the application weight units and display accuracies for all 4 units in the Application menu�
– The units selected are saved to protected memory�
– The basic unit is always active once the balance is turned on�
Example: Change display from grams [g] (basic unit) to pounds [lb] and then to Troy ounces [ozt] reduced by 1 digit�
Configuration: Applic. - unit
Step Press key Display/Printout
Preparation:
1� Start selection of an application weight unit S unit 1
2� Confirm unit 1 V NO °
3� Select an application unit (in this example: pounds)
Units and display accuracy: Press repeatedly
See table on the next page S pounds
SDgr
°
4� Confirm pounds weight unit V pounds
5� Select next application unit, F unit 2
Units and display accuracy: S, V NO
See table on the next page Repeatedly press S, V troy.oz.
6� Confirm troy ounces weight unit V troy.oz. °
7� Reduce display unit by 1 Repeatedly press S, V minus 1 SDgr
8� You can select an additional 4 units, if desired
(otherwise, confirm “NO” using V)
9� Save selection Repeatedly press F 0.00 g
Operation:
10� Place the sample on the scale + 100.00 g
11� Change weight unit Press repeatedly + 0.22046 lb
V + 3.527 ozt
60 Cubis MSE Operating Instructions
Page 61

Application Programs
The balance can operate using the following units and display accuracies
(in legal metrology, only units permitted by national law are available):
Menu item2) Unit2) Conversion factor Symbol displayed Display accuracy
0) no Unit same as used 0)no (display accuracy
in menu same as basic unit)
under basic unit 1) all Show all decimal places
2) lp.on.off Last digit after load
6) Div. 1 1 interval
7) Minus 1 Reduced by 1 digit
1)USERDEF. Grams 1�00000000000 o none to minus 1
2)Grams (factory setting) Grams 1�00000000000 g none to minus 1
3)Kilogr. Kilograms 0�00100000000 kg none to minus 1
4)carats Carats 5�00000000000 o none to minus 1
5)Pounds Pounds 0�00220462260 lb none to minus 1
6)ounces Ounces 0�03527396200 oz none to minus 1
7)troy.oz. Troy ounces 0�03215074700 ozt none to minus 1
8)HKTael Hong Kong taels 0�02671725000 tl none to minus 1
9)Sng.Tael. Singapore taels 0�02645544638 tl none to minus 1
10)Twn.tael. Taiwanese taels 0�02666666000 tl none to minus 1
11)grains Grains 15�4323583500 GN none to minus 1
12)Peny.Wt. Pennyweights 0�64301493100 dwt none to minus 1
13)milligr. Milligrams 1000�00000000 mg none to minus 1
14)Pt.P.Lb. Parts per pound 1�12876677120 o none to minus 1
15)Chn.Tael Chinese taels 0�02645547175 tl none to minus 1
16)mommes Mommes 0�26670000000 m none to minus 1
17)Carats Carats 5�00000000000 Kt none to minus 1
18)tola Tola 0�08573333810 o none to minus 1
19)baht Baht 0�06578947436 b none to minus 1
20)mesghal Mesghal 0�21700000000 o none to minus 1
21)tons Tons 0�00000100000 t none to minus 1
1
22)Lb|Oz
) Pounds : Ounces (lb/oz) 0�03527396200 lb oz none to minus 1
23)newton Newton 0�00980665000 N none to minus 1
24)Microgr. Micrograms 1000000�00000 o none to minus 1
change
1
) = The format for display of pounds|ounces cannot be changed: xx:yy�yy x=lb, y=oz
2
) = Depending on the country-specific model version, not all weight units listed may be available�
! Some weight units may be blocked from use in legal metrology, depending on national verification laws�
Cubis MSE Operating Instructions 61
Page 62

ISO/GLP-compliant Printout
ISO/GLP-compliant Printout
Features
You can have the device information, ID and the current date
printed before (GLP header) and after (GLP footer) the values
from the weighing series� These parameters include:
GLP Header:
– Date
– Time at the start of a weighing series
– Balance manufacturer
– Balance model
– Model serial number
– Software version number
– ID number (of weighing series)
GLP footer:
– Date
– Time at the end of a weighing series
– Field for signature
Configuration
t Set the following menu items
(Setup mode, see “Configuration”):
– Line format for printout with ID –
22 characters (factory setting): print - Prnt.para. -
format - 22 chars
– ISO/GLP-compliant printout or record for calibration/
adjustment only:
data out- Prnt.para. - Glp - Cal.|Adj.
or
ISO/GLP-compliant printout or record always on:
data out- Prnt.para. - Glp -always on
– Time formats:
data out- Prnt.para. - time - 24h
or
data out- Prnt.para. - time -12h
with “Ahh:mm” or “Phh:mm”
– Date formats:
data out- Prnt.para. - Date - dd.mmm.yy
or
data out- Prnt.para. - Date - mmm.dd.yy
! No ISO|GLP-compliant record is output if any of the
following settings are configured:
data out- prnt.para.-format -16 chars
Operation
t To print the header and the first measurement value:
Press the P key�
y The header is included with the 1st printout�
t To print the header and reference data automatically
when an application program is active:
Press the V key
t Print the footer/Exit the application:
Application Functional process
Density Determination,
Net-total Formulation,
Totalizing
Counting, Weighing in
Percent Calculation,
Animal Weighing
The ISO/GLP-compliant printout can have the following lines:
-------------------- Dash line
17-Aug-2008 10:15 Date/Time (start of measurement)
SARTORIUS Balance manufacturer
Mod. MSE8201S Balance type
Ser. no. 10105355 Balance serial number
Ver. no. 00-39-04 Software version
ID 690 923 ID no�
-------------------- Dash line
L ID Weighing series no� (Lot ID)
nRef 10 pcs Counting: Reference sample quantity
wRef 21.14 g Counting: Reference weight
Qnt + 567 pcs Counting results
-------------------- Dash line
17-Aug-2008 10:20 Date/Time (end of measurement)
Name: Field for signature
Space line
-------------------- Dash line
The ISO/GLP-compliant printout for external calibration/adjustment:
-------------------- Dash line
17-Aug-2008 10:30 Date/Time (start of measurement)
SARTORIUS Balance manufacturer
Mod. MSE8201S Balance type
Ser. no. 10105352 Balance serial number
Ver. no. 00-39-04 Software version
ID 690 923 ID no�
-------------------- Dash line
Cal. Ext. Test Calibration/adjustment mode
Set + 5000.0 g Calibration weight value
Diff. + 0.2 g Difference after calibration
Cal. Ext. Complete Confirmation of completed calibration
Diff. 0.0 g Difference between current and target
Level ok Balance level
-------------------- Dash line
17-Aug-2008 10:32 Date/Time (end of measurement)
Name: Field for signature
Space line
-------------------- Dash line
Print footer and quit
application program:
1+ Press the F key
1) Print footer: press F
2) Quit application program:
press F
process
values after calibration
62 Cubis MSE Operating Instructions
Page 63

Data Interfaces
Data Interfaces
Purpose Interfaces are used to exchange data with connected peripheral devices: Measured
values and calculated values can be output to a printer or PC; conversely, control
commands and data inputs can be sent to connected devices (PC, keyboard, foot
switch, barcode scanner)�
Each interface has to be configured according to the peripheral device and desired
function� No error messages are generated when no devices are connected to an
interface port (open data port)�
Features Cubis series balances have at least two interfaces:
1 Peripheral port (25-pin interface)
1
2 USB socket for PC connection
2
3 In models with a weighing range of up to 15 kg, the slot may contain other
ports:
– 25-pin interface (YDO01MS-R)
– 9-pin interface with PS2 port The PS2 socket has no function� (YDO01MS-P)
– Bluetooth® module (YDO01MS-B)
3
Protocols For data exchange, the interfaces are configured with the following protocols:
– Printer output
– SBI (Sartorius Balance Interface): Sartorius standard protocol for output to a
PC or control unit� This simple ASCII-based protocol allows you to use ESC
commands from your PC to control the basic weighing functions�
– xBPI (eXtended Balance Processor Interface, also called X-Bus): binary protocol
with extended command volume� This protocol lets you control numerous
weighing functions� For further information on this, please contact Sartorius�
To use the protocols, application software must be installed on the PC, e� g�,
SartoTerminal�
Synchronization During data communication between balance and PC, messages consisting of ASCII
or binary characters are transmitted via the interface� For error-free data exchange,
parameters for baud rate, parity, handshake mode, and character format must be
identical for both units�
You can configure the respective settings in System Settings (menu)� In addition to
these settings, data output for the balance can also be made dependent on several
conditions that are defined in the individual tasks� These conditions are described
under each of the tasks�
Cubis MSE Operating Instructions 63
Page 64

Data Interfaces
USB Port (PC)
Purpose Any Cubis balance can be connected to a PC equipped with a USB port� A virtual
serial interface (virtual COM port) is set up as a device type at the USB port� This
virtual serial interface is identified und operated by the application program�
The protocols xBPI and SBI can be transmitted via the USB port�
The USB port is designed for the laboratory environment and is not suitable for use
3
System Requirements – Computer (PC) with Windows 98SE
Software Driver and Installation Guides The VCP driver, used to set up the virtual interface on the computer, can be
in rough industrial environments� Full IP protection is only guaranteed when the
USB cover is closed�
®
, Windows ME®, Windows 2000®, Windows
XP®, Windows Vista® or Windows 7® or Windows 8*
– Available USB port on the PC
– USB cable
downloaded from the internet:
http://www�ftdichip�com/FTDrivers�htm
The installation guides for the drivers can be found here:
http://www�ftdichip�com/Documents/InstallGuides�htm
Connecting the Balance via USB
The current USB port for the computer is established when the software driver is
h
t Switch off the balance�
being installed� The driver must be re-installed every time you wish to change the
port�
Therefore, choose one USB port that can permanently or regularly be used to
connect the balance�
t Unplug the balance from the mains�
t Connect the USB cable to the balance and to the USB port on the computer�
t Plug the balance into the mains again and switch it on�
y Windows detects the device connected to the USB port�
If the device is being connected for the first time, the Windows Installation
Wizard will run�
Installing Software Drivers
t Run the Installation Wizard for the driver�
t Follow the instructions that appear�
t To complete the installation, click on Finish�
y The virtual interface is now ready for operation�
®
Windows
numbered COM port�
Example: For a PC with up to 4 COM ports, the new virtual port would then be COM5 (see
Device Manager)�
usually adds the virtual port in the position following your highest-
64 Cubis MSE Operating Instructions
Page 65

Data Interfaces
Installation Guides for Windows XP®, Windows Vista® and Windows 7®
and Windows 8
®
Changing the Port Number If you use the USB interface with a program that limits the number of COM port
designations (e� g�, only COM1, 2, 3, 4), you may have to assign one of these port
numbers to the new virtual port�
t Open the setting for the USB serial port in the Windows® Control Panel:
– START > My Computer > Control Panel
– System > Hardware > Device Manager
t Open the Connections submenu�
t Double-click on USB Serial Port�
t Select Port Settings > Advanced�
Changing Latency Time t Open the settings for the USB serial port, following the above instructions�
t For a faster rate of communication, change the setting for the latency timer to
1msec�
Plug & Play Mode in Autoprint (SBI) t Open the settings for the USB serial port, following the above instructions�
t Stop the Plug & Play mode from running�
Uninstalling the Driver
The software driver for the USB connection can be uninstalled with the Windows®
Uninstaller�
Cubis MSE Operating Instructions 65
Page 66

Data Interfaces
1
14
13
25
Pin Assignment Chart
“Peripherals” Interface and Optional RS-232 Interface
(25-pin)
Female Interface Connector:
Pin Assignment Chart, 25-pin socket, RS-232:
Pin 1: Signal ground
Pin 2: Data output (TxD)
Pin 3: Data input (RxD)
Pin 4: Internal ground (GND)
Pin 5: Clear to send (CTS)
Pin 6: Not used
Pin 7: Internal ground (GND)
Pin 8: Internal ground (GND)
Pin 9: Not used
Pin 10: Not used
Pin 11: + 12 V output For remote
Pin 12: Reset _ Out*) switch
Pin 13: + 5 V output
Pin 14: Internal ground (GND)
Pin 15: Universal switch
Pin 16: Not used
Pin 17: Not used
Pin 18: Not used
Pin 19: Not used
Pin 20: Data terminal ready (DTR)
Pin 21: No function
Pin 22: No function
Pin 23: No function
Pin 24: No function
Pin 25: + 5 V output
66 Cubis MSE Operating Instructions
*) = Hardware restart
Preparation
You can set these parameters for other devices in the Setup menu:
See “Configuration�”
The many and versatile properties of these balances can be fully utilized for
printing out records of the results when you connect your balance to a Sartorius
data printer�
The recording capability for printouts makes it easy for you to work in compliance
with GLP�
Page 67

3
W
aage Computer
Stecker Buchse
25-pin 9 pin
TxD 2 2 RxD
RxD 3 3 TxD
CTS 5 4 DTR
DTR 20 8 CTS
GND 4/7 6 DSR
GND 14 5 GND
9
15
6
Data Interfaces
Cabling Diagram 25-pin Interface
Diagram for interfacing a computer or other peripheral device to the balance using
the RS-232/V24 standard and cables up to 15 m (50 ft�) long
Do not connect any other pins to the cable connector of the balance.
Balance
Plug
25-pin
Computer
socket
9-pin
Cable type: AWG 2 specification
Pin Assignment Chart, 9-contact Female Connector, RS-232:
Pin 1: Not used
Pin 2: Data output (TxD)
Pin 3: Data input (RxD)
Pin 4: Not used
Pin 5: Internal ground (GND)
Pin 6: Not used
Pin 7: Clear to send (CTS)
Pin 8: Data Terminal Ready (DTR)
Pin 9: Not used
Establish a connection via a conventional RS-232 cable�
Cubis MSE Operating Instructions 67
Page 68

Data Interfaces
Data Output
You can define the data output parameter so that output is activated either when
a print command is received or automatically synchronized with the display or at
defined intervals (see application programs and autoprint settings)�
Data Output by Print Command The print command can be transmitted by pressing P or by a software
command (EscP)�
Automatic Data Output In autoprint mode, data is output to the data interface port without an extra print
command� You can have synchronized data output automatically at defined display
update intervals, with or without the stability parameter� The interval time depends
on the balance operating status and balance type�
If the automatic data output is activated in the Device Configuration, it starts
immediately after the balance is turned on� You can also configure whether the
automatic data output can be stopped and started by pressing the P key�
Data Output Formats
You can output the values displayed in the line for measured values and weight
units with or without an ID code� Configure this output parameter in the Device
Parameters menu (Menu > Device parameters > Configure data output > Line
format)�
Example: Output Without an ID Code + 253 pcs 16 characters are printed
Example: Output With an ID Code Qnt + 253 pcs 22 characters are printed
Data Output Format with 16 Characters
Display segments that are blank are output as spaces�
Display values without a decimal point are printed without a decimal point�
The type of character that can be printed depends on the character’s position�
Normal Operation
Position 1 2 3 4 5 6 7 8 9 10 11 12 13 14 15 16
+ A A A A A A A A A * E E E CR LF
or – � � � � � � � � � � * * *
or * * * * * * * * * *
*: Space CR: Carriage return
A: Displayed characters LF: Line feed
S: Characters for the unit
68 Cubis MSE Operating Instructions
Page 69

Data Interfaces
Special Outputs
Position 1 2 3 4 5 6 7 8 9 10 11 12 13 14 15 16
* * * * * * * * * * * * * * CR LF
or H i g h
or L o w
or C a l � E x t �
*: Space High: Overload
Cal� Ext�: Calibration, external Low: Underload
W: Draft shield status (optional)
I: Ionizer (optional)
Y,Y,Y = Draft shield doors
XXX = Decimal value calculated from binary data:
Control information for models with normal draft shields
Decimal value Binary value Control information
Bit0 = 1: Draft shield error/ionizer on
Bit1 = 1: Draft shield in motion
Bit3 = 1: Learning function on
Bit4 = 1: All draft shield doors closed
Bit6 = 1: Manual draft shield operation
R,M,L = COO: Right door closed (Closed), Middle and Left doors open (Open)
R,M,L = OCC: Right door open (Open), Middle and Left doors closed (Closed)
Error message
Position 1 2 3 4 5 6 7 8 9 10 11 12 13 14 15 16
E r r * # # # * * * * CR LF
A P P � E R R
D I S � E R R
P R T � E R R
*: Space # # #: Error code number
1
) For cause and solution, please refer to “Error Messages”
Bit0 = 0: No error/ionizer off
1
Bit1 = 0: Draft shield motors off
2
Bit3 = 0: Learning function off
8
Bit4 = 0: At least one draft shield door open
16
Bit6 = 0: Motorized draft shield operation
32
1
)
* * * * CR LF
1
)
* * * * CR LF
1
)
* * * * CR LF
Example: Output of the weight value + 123,56 g
Position 1 2 3 4 5 6 7 8 9 10 11 12 13 14 15 16
+ * * * 1 2 3 � 5 6 * g * * CR LF
+ * * 1 2 3 � 5 [ 6 ]
Position 1: Plus +, or minus – or space
Position 2: Space
Positions 3 – 10: Weight value with decimal point; leading zeros are output
as spaces�
Position 11: Space
Position 12 – 14: Characters for unit of measure or space
Position 15: Carriage Return
Position 16: Line Feed
Cubis MSE Operating Instructions 69
1
) g * * CR LF
Page 70

Data Interfaces
Data Output Format with 22 Characters
Here, the data output format with 16 characters is preceded by an ID code
with a 6 characters� These six characters identify the subsequent value�
Normal Operation
1 2 3 4 5 6 7 8 9 10 11 12 13 14 15 16 17 18 19 20 21 22
K K K K K K + A A A A A A A A A * E E E CR LF
* * * * * * – � � � � � � � � � * * * *
* * * * * * * * * *
K: ID code character
1
) S: Unit symbol character1)
*: Space See Section “Mass Unit Conversion”
A: Displayed characters CR: Carriage return
LF: Line feed
Example:
1 2 3 4 5 6 7 8 9 10 11 12 13 14 15 16 17 18 19 20 21 22
N + 1 2 3 � 5 6 * g * * CR LF
N + 1 2 3 � 5 [ 6 ]
1
) Identification of non-verified digits
1
) g * * CR LF
Non-verified digits where „e=d“ are automatically marked on the printout by
square brackets when you select the following setting: Configuration:
Communication mode: Printer (code 1� 5� 6� 2)�
SBI setting:
In the SBI setting (code 1� 5� 6� 1), the unverified values are not automatically
identified� Please take appropriate measures or adjust the settings on the
peripheral device�
Special Outputs
1 2 3 4 5 6 7 8 9 10 11 12 13 14 15 16 17 18 19 20 21 22
S t a t * * * * * * * * * * * * * * * * CR LF
H i g h
L o w
C a l � E x t �
70 Cubis MSE Operating Instructions
*: Space High: Overload
Cal� Ext�: Calibration, external Low: Underload
Error message
1 2 3 4 5 6 7 8 9 10 11 12 13 14 15 16 17 18 19 20 21 22
S t a t * * * * * E R R * # # # * * * * CR LF
2
S t a t * * * * * A P P � E R R
S t a t * * * * * D I S � E R R
S t a t * * * * * P R T � E R R
)
* * * * CR LF
2
)
* * * * CR LF
2
)
* * * * CR LF
*: Space # # #: Error code number
2
) For cause and solution, please refer to „Error Messages“
Page 71

Data Interfaces
Data Input
SBI Commands (Data Input Format)
The computer connected via the data port can send control commands to the
balance to control balance and application program functions�
These control commands may have different formats and contain up to 20
characters� Each of these characters must be sent based on the setup configuration
for data transmission�
Formats for Control Commands (Syntax)
Format 1: Esc ! CR LF
Format 2: Esc ! # _ CR LF
Esc: Escape
!: Command character
#: Digit
&: Parameter (number or letter)
_: Underline (ASCII: 95)
CR: Carriage return (optional)
LF: Line feed (optional)
Examples:
Format 1: Esc P
Format 2: Esc x1_
Cubis MSE Operating Instructions 71
Page 72

Data Interfaces
Overview of SBI Commands
Format Command Action/Function Comments
1 ESC P Print to the interface where the prompt originated Corresp� to menu, with/
without stability
1 ESC T “TARE” key taring and zeroing
1 ESC K Filter “Very stable conditions”
1 ESC L Filter “Stable conditions”
1 ESC M Filter “Unstable conditions”
1 ESC N Filter “Very unstable conditions”
1 ESC O Block keys
1 ESC Q Acoustic signal
1 ESC R Unblock keys
1 ESC S Restart
1 ESC Z Internal calibration/adjustment Depending on menu,
1/2step increments
1 ESC U Tare
1 ESC V Zero
1 ESC W Ext� Adjustment with default weight Depending on menu,
1/2step increments
2 ESC f0_ S key
2 ESC f1_ Start calibration
2 ESC f2_ V key
2 ESC f5_ Left draft shield key (closing and opening as learned or default) Only if available
2 ESC f6_ Right draft shield key (closing and opening as learned or default) Only if available
2 ESC kP_ Print as with “PRINT” key (e�g�, to several interfaces)
2 ESC m0_ Ionizer status Only if available
2 ESC m1_ Ionizer on, with preset time Only if available
2 ESC m2_ Ionizer off Only if available
2 ESC s3_ F key: Back, exit, cancel
Models with the Models with the
analytical draft shield: rotational draft shield
2 ESC w0_ Draft shield status Draft shield status Only if available
2 ESC w1_ Open left door Open draft shield 100% to the left Only if available
2 ESC w2_ Close all doors Close draft shield Only if available
2 ESC w3_ Open upper door Open draft shield up to position saved Only if available
2 ESC w4_ Open right door Open draft shield door 100% to the right Only if available
2 ESC w5_ Open left and upper doors – Only if available
2 ESC w6_ Open left and right doors – Only if available
2 ESC w7_ Open right and upper door – Only if available
2 ESC w8_ Open all doors – Only if available
2 ESC x1_ Print weigher type
2 ESC x2_ Output serial number of
2 ESC x3_ Print balance software version
2 ESC s0_ Press and hold the S key
72 Cubis MSE Operating Instructions
Page 73

Data Interfaces
1
14
13
25
9
15
6
Optional Interfaces (RS-232) 25-pin and 9-pin
The balance is standard-equipped with a 25-pin interface (peripheral port) where
different Sartorius peripheral devices can be connected, e� g�, hand or foot switch�
This interface is also used for the control lines for the Checkweighing application�
A 9-pin interface can optionally be installed into models with a weighing range of
up to 15 kg� This port is intended for connecting a PC�
Warning When Using Pre-wired RS-232 Connecting Cables for the 25-pin
3
Interface:
RS-232 cables purchased from other manufacturers often have incorrect pin
assignments for use with Sartorius devices� Failure to do so may damage or destroy
your weighing system and/or peripheral devices!
t Be sure to check the pin assignments before you connect cables purchased
from other manufacturers�
t Disconnect any lines assigned differently (e� g�, Pin 6)�
Features (* = factory settings)
Type of interface: Serial interface
Interface operating mode: Full duplex
Level: RS232
Interface connector: D-SUB connector, 25-pin or 9-pin
Transmission rate: 600, 1200, 2400, 4800, *9600 und 19200 baud
(selectable)
Parity: *Even, odd, none; blank spaces (selectable)
Character transmission: Start bit, 7/8* bit ASCII, parity, *1 or 2stop bits
(selectable)
Handshake (selectable): 25-pin For 2-wire interface: Software (XON/XOFF)
For 4-wire interface: *Hardware (CTS/DTR)
9-pin Hardware (CTS/RTS)
Operating mode: *SBI, xBPI, printer, 2nd display
Manual print mode: Without stability, *after stability
Auto print mode: *Without stability, at stability, after load change
Cancel automatic printing: Not possible
Time-dependent automatic printout: After 1 display update
Data output of balance: 16 or *22 characters
Tare after individual printout: Off
Basic values, application: Off
Connectable Peripherals The following devices can be connected to the interface:
– Verifiable data printers YDP03-0CE, YDP10-0CE, YDP20-0CE
– Verifiable data printer with Bluetooth data transmission YDP10BT-0CE (module
required)
– Universal (serial printer)
– Strip/label printer YDP04IS-OCEUV
– Hand switch YHS01
– Foot switch YFS01, YPE01RC
– External control display YRD11Z
– Remote display YRD03Z
Cubis MSE Operating Instructions 73
Page 74

Data Interfaces
Bluetooth® Interface (optional)
How to assemble the Bluetooth® module is described in the supplied installation
instructions�
In order to transmit data via the Bluetooth module, the interface must first be
configured�
Configuring the Bluetooth® Interface
Step Press key Display
t If necessary, toggle to the menu
1� Accessing the Menu: S Press and hold Applic.
1� Display menu level
2� Select and confirm OPT.MOD Repeatedly press Opt.Mod
S, V
3� Select and confirm the DAT.PROT. submenu S, V DAT.PROT.
The following operating modes are possible for this interface under DAT.PROT.:
– SBI (data exchange with PC or notebook)
– Universal printer
– Laboratory printer: parameters for YDP10BT
– No function (off)
t Select the desired operating type�
Establishing a Radio Connection with the Bluetooth® Printer
t Make sure that the printer to which you wish to connect is ready to operate�
t To establish a connection,
Select the OPT�MOD: FIND submenu� S, V Find
y The balance will now search for the Bluetooth device�
This process may take time� wait
Wait for the next message to appear on the display�
! You can only connect to one Bluetooth printer at a time�
y A message will appear to confirm whether the printer has been found� Ser. no.
Connection established to printer YDP01BT: The serial no� appears 23201234
y As soon as the menu is exited, the connection will be re-established�
The LED on the printer will then illuminate permanently (blue)�
Bluetooth Series No. and Model ID
t If required, you can enter the serial number and device name S, V SER.No.
(only with Bluetooth modules from Version 04-10-01)� S, V Model
74 Cubis MSE Operating Instructions
Page 75

Error Messages
Error Messages
Error codes are displayed for about 2 seconds� The program then returns automatically to the weighing mode�
Display Cause Solution
No segments appear No power
Power supply not plugged in
high
low or Err 54 Contact between load plate and environment Move the object that is touching the weighing pan
App.err.
dis.err.
prt.err.
modul.err.
err 02
err 10
err 11
err 81
level.err.
Weighing capacity exceeded Unload the weighing pan
Cannot save data: load is too light or
no sample on the weighing pan while
application is active
Data output not compatible with output format Change the configuration with output format in
Interface port for printer output is blocked Reset the menu factory settings or
Balance cannot find a Bluetooth printer
No Bluetooth connection
Adjustment condition was not met, e�g�,
– Tare with the J key
– Load on weighing pan
The J key is blocked when the “Net-total
Formulation" application is active; only 1 tare
function can be used at a time
Tare memory not allowed
1) No print command received from the balance� Bluetooth
interrupted�
2) Balance was turned on and then data output
took place�
You should level the balance Level balance
®
connection was briefly
Check power supply
Connect power supply to the wall outlet (mains)
Increase load
the operating menu
Contact your local Sartorius Service Center
Establishing a radio connection between the bal-
ance and printer:
See “Establishing a Radio Connection with the
Bluetooth
Calibrate only when zero is displayed
Unload the balance
The J key can be used again after the tare
memory has been deleted using the F key
Press the J key
Wait approx� 40 seconds; device will reconnect
automatically�
Reestablish connection: See “Establishing a Radio
Connection with the Bluetooth® Printer"
®
Printer"
flashes
The weight readout
changes constantly
The weight readout is
obviously wrong
If any other errors occur, contact your local Sartorius Service Center.
Contact information: Please point your Internet browser to: http://www�sartorius�com
Balance not level 1) Level the balance using the leveling feet
2) or for models with motorized leveling feet:
Press the * key
Setup location unstable (excessive vibration or
draft)
Foreign object is caught between weighing pan
and balance/scale housing
The balance was not calibrated/adjusted
Balance was not tared before weighing
Cubis MSE Operating Instructions 75
Set up balance in another area
Change Setup Configurations
Remove the foreign object
Adjustment
Tare
Page 76

Care and Maintenance
Care and Maintenance
Service
Regular servicing by a Sartorius technician will extend the service life of your balance
and ensure its continued weighing accuracy� Sartorius offers its customers service
contracts with regular maintenance intervals ranging from 1 month to 2 years�
The frequency of the maintenance intervals depends on the operating conditions
and user‘s tolerance requirements�
Repairs
Repair work must only be carried out by trained service technicians� Repairs
performed by untrained persons may result in considerable hazards for the user�
The device should be unplugged during repair work�
3 Unplug the power cord from the outlet�
Repair work must only be performed by Sartorius-trained service technicians�
If required: Please contact your Sartorius dealer!
Cleaning the Balance
Ensure that no dust or liquid enters the balance weighing system�
3 Do not use aggressive cleaning agents (solvents or similar�
Isolate from supply voltage: Unplug the power cord from the wall outlet and
unplug any data cables connected to the balance�
Make sure all equipment operators have received proper instructions when working
with hazardous or toxic materials�
Failure to follow correct handling procedures can result in breakage of parts or
spillage of liquids or other substances�
Make sure the necessary protective clothing or equipment is worn, such as
protective gloves, clothing, eyewear�
All safety regulations applicable in the laboratory must be observed�
When using the balance in the chemical industry, handle defective or device parts
to be cleaned according to respective regulations�
Models with a Readability of >1 mg:
– These models meet the requirements of protection class IP54�
The IP protection only applies to the balance housing and not to the AC adapter�
– The IP protection is only guaranteed when the weighing pan is mounted�
– The IP protection is limited when the data interfaces are used� Retain the cover
cap for the data output� When the data output is not in use, reapply the cover
cap to protect it against vapors, moisture, and dust or dirt�
t Open the panels of the analytical draft shield completely�
76 Cubis MSE Operating Instructions
t Clean the housing and interior of the balance with a cloth lightly moistened
with a soap solution�
t Dry all parts with a soft, dry cloth or use blotting paper to absorb dampness�
Then replace all dried parts�
t Remove panels from the analytical draft shield and clean them with
commercially available glass cleaner� Dry the panels�
Then reinstall them to the balance�
Page 77

Care and Maintenance
t Carefully remove any sample residue/spilled powder using a brush or hand-held
vacuum�
t If necessary, remove the weighing pan, shield plate, and pan support�
1
1. Weighing pan
2
2. Shield plate/Draft shield
3
t Clean parts with a cloth or brush�
3. Pan support
Then replace the parts�
Cubis MSE Operating Instructions 77
Page 78

Care and Maintenance
Cleaning the Weighing Chamber of Balances with a Readability of ≤ 1 µg
t Carefully remove any powdered sample material from beneath the shield disk
using a small car vacuum cleaner with an mini-hose attached�
t Use blotting paper to remove any liquid sample material�
Do not insert forceps or similar utensils behind the draft shield plate�
3
Note: The weighing system is hermetically separated from the area of the draft
shield plate� This prevents spillage or other impurities from entering�
Cleaning the Weighing Pan
All stainless steel parts should be cleaned at regular intervals�
Use a damp cloth or sponge to clean stainless steel parts on the balance�
Only use conventional household cleaning agents which are suitable for stainless
steel (e�g� Stahlfix)� After this, let the device dry�
For additional protection, protective oil may be applied�
Remove the stainless steel weighing pan and thoroughly clean it separately�
Only use solvents for cleaning stainless steel parts�
The stainless steel weighing pan should be cleaned simply by rubbing� After this,
rinse the equipment thoroughly until all residue is removed�
No protective oil should be applied to the stainless steel weighing pan�
78 Cubis MSE Operating Instructions
Page 79

Care and Maintenance
Safety Inspection
If there is any indication that safe operation of the balance is no longer warranted:
t Disconnect from the supply voltage: Unplug the power cord from the outlet�
t Secure the AC adapter and cord so that they cannot be used�
Safe operation of the AC adapter is no longer ensured:
– The AC adaptor or the mains connecting lead shows visible damage�
– The AC adaptor no longer functions properly�
– Following extended storage in adverse conditions�
In this case, notify the Sartorius Service Center�
Maintenance and repair work may be performed only by authorized service
technicians who have access to the required maintenance manuals and instructions
and who have received the necessary training�
We recommend that the AC adapter be inspected by a qualified service technician
with regard to the following:
– Leakage current: <0�25 mA measured with a properly calibrated multimeter�
– Insulation resistance >7MOhm as measured with a constant voltage of at least
500 volts at a 500 kOhm load�
The duration and number of checks should be determined by a qualified Sartorius
service technician on site based on specific ambient and operating conditions (once
a year as a minimum)�
Cubis MSE Operating Instructions 79
Page 80

Care and Maintenance
Transporting the Balance
If repairs are required, use the original packaging to transport the balance�
Toensure adequate protection for safe shipment, Sartorius products have been
packaged to the extent necessary using environmentally friendly materials� Only the
original packaging provides optimum protection for the equipment�
t Disconnect the device from the power supply�
t Disconnect any data cables from the device�
t Remove all items (such as weights, sensors, etc�) from the weighing chamber�
1. Remove the other side draft shield panel
4
5
6
1
3
2. Remove the other side draft shield panel
3. Remove the upper draft shield panel
4. Remove the weighing pan
5. Remove pan support (not for MSE225…/MSE125… models)
6. Remove shield plate/draft shieldz
2
t On models without a draft shield: press down on the two pan support
fasteners�
t Rotate and remove the pan support�
t Place the balance in the lower part of the packaging�
80 Cubis MSE Operating Instructions
Page 81

Care and Maintenance
Transporting the Parts (Large Analytical Draft Shield)
t Get the box for the individual parts of the balance ready�
t Place the bottom foam piece in the box�
t Place the panels in the packaging:
1) Place the upper draft shield panel into the packaging (handle upwards)�
3
2
2) Place the side draft shield panel into the packaging (handle upwards)�
3) Place the other side panel into the packaging (handle downwards)�
1
t Then place the top foam piece in the box�
Cubis MSE Operating Instructions 81
Page 82

Care and Maintenance
For small weighing pans:
t Place the shield plate into the box�
t Place the pan support and weighing pan into the opening�
t Close the box�
For large weighing pans:
t Insert the following parts into the foam piece:
1) Pan support
2) Shield plate
3) Weighing pan
t Close the box�
82 Cubis MSE Operating Instructions
Page 83

Care and Maintenance
Transporting the Parts (Small Analytical Draft Shield)
t Get the box ready for the individual parts of the balance�
t Get the foam pieces ready�
t Place the balance parts on top of each other
1) Upper draft shield panel
2) Shield plate/draft shield
3) Pan support
3
2
1
t Slide the parts into the foam�
Cubis MSE Operating Instructions 83
Page 84

Care and Maintenance
t Place the panels in the packaging�
1) Place one side panel into the packaging (handle downwards)�
2) Place the other side panel into the packaging (handle downwards)�
2
1
t Place the foam piece in front of the parts�
t Place the package in the box�
t Slide the shield plate into the packaging�
84 Cubis MSE Operating Instructions
Page 85

t Close the box�
t Place the box into the packaging�
Care and Maintenance
t Place the top part on to the packaging�
t Insert the balance into the box with cushioning�
t The balance is now ready for transport�
Cubis MSE Operating Instructions 85
Page 86

Disposal
Disposal
The packaging is made of environmentally friendly materials that can be used as
secondary raw materials� If you no longer require the packaging, you can dispose
of it free of charge in Germany through the Vfw dual system (contract number
D-59101-2009-1129)� Otherwise you should dispose of the material in accordance
with the waste disposal regulations that are applicable in your area� The device,
including its accessories and batteries, should not be disposed of as household
waste� It should instead be recycled as electric/electronic equipment� For more
information regarding disposal and recycling, please contact our local service
representatives� Our partners listed on the following website will also be able to
provide assistance within the EU:
1) Go to http://www�sartorius�com�
2) Select the “Services” tab�
3) Then select “Information on Disposal”�
4) Addresses for the local Sartorius disposal contacts can be found in the PDF files
available for download on this page�
Sartorius will not take back equipment contaminated with hazardous materials
(ABC contamination) – either for repair or disposal�
Detailed information, including service addresses for returning your device for
repair or disposal, can be found on our website (www�sartorius�com) or requested
from a Sartorius Service Center�
86 Cubis MSE Operating Instructions
Page 87

Technical Specifications
Technical Specifications
General Data
Sartorius power supply 6971987
Primary 100 – 240 V~, –15%/+10%, 50 – 60 Hz, 1�0 A
Secondary 15 V, ± 5%, 2�66 A (max�), protected electronically against short circuit
Other data Protection class II as per EN/IEC 60950-1 | up to 3000 m above sea level |
IP40 as per EN 60529/IEC 60529
Power supply cable Two-sided plug with a 3-pin country-specific power plug and 3-pin socket
(IEC/EN60320-1/C14) for connection to the power supply
Other data See the power supply label
Balance
Power supply Only via Sartorius adaptor 6971987
Input voltage 15 VDC, ± 5%
Power consumption 7 W (max�)
Environmental conditions
Environment For indoor use only
Ambient temperature:
Storage and shipping -10 °C ��� +60 °C
Ambient temperature: Operation* +5 °C ��� +40 °C
Elevation 2000 m above sea level
Highest relative humidity** 80% for temperatures up to 31°C, decreasing linearly to 50% relative humidity for 40°C
Safety of electrical equipment According to EN 61010-1:2010
Safety requirements for electrical equipment for measurement, control, and labora-
tory use - Part 1: general requirements
Electromagnetic compatibility According to EN 61326-1:2013
Electrical equipment for measurement, control, and laboratory use -
EMC requirements - Part 1: general requirements
Defined immunity to interference: Suitable for use in industrial areas
Interference emission: Class B (suitable for use in residential areas and areas that are connected to a low
voltage network that also supplies residential buildings)�
Standard equipment
Selectable weight units
1
) Grams, Kilograms, Carats, Pounds, ounces, troy ounces, Hong Kong tael,
Singapore tael, Taiwanese tael, grains, pennyweights, milligrams,
parts per pound, Chinese tael, mommes, Austrian carats, tola, baht and mesghal
Available application programs Changing unit, counting, weighing in percent, calculation, averaging (animal
weighing), density determination, totalizing, net-total formulation
CE model balances verified for use in legal metrology comply with the requirements of Council Directive No� 2014/31/EU
with EN 45501:2015 and OIML R76:2006�
* For -�CE model balances/scales verified for use in legal metrology, refer to the information on the balance/scale�
** For -�CE model balances/scales verified for use in legal metrology, the legal regulations apply�
1
) Depending on the country-specific model version, not all weight units listed may be available�
Cubis MSE Operating Instructions 87
Page 88

Technical Specifications
Model-specific Data
Microbalances 0�001mg
Model MSE6.6S MSE6.6S-F MSE3.6P
Readability mg 0�001 0�001 0�001/0�002/0�005
Weighing capacity g 6�1 6�1 1�1/2�1/3�1
Tare range (subtractive) g -6�1 -6�1 -3�1
Repeatability <±mg 0�001 0�001 0�003/0�004/0�005
Linearity <±mg 0�004 0�004 0�004
Corner load (test load [g])*) µg 4 (2 g) 4 (2 g) 5 (1 g)
Optimal starting point of the measuring range**)
Sensitivity drift between +10 to +30°C ±ppm/K 1 1 1
Typical stabilization time s < 5 < 5 < 5
Typical measurement time s < 8 < 8 < 8
External standard calibration value g 5 (E2) 5 (E2) 3 (E2)
(of at least accuracy class���)
Display result
(depending on the set filter level) 0�1 – 0�4 0�1 – 0�4 0�1 – 0�4
Weighing pan size d mm 30 50/30*) 30
Weighing chamber height mm 70 15 70
Protection Protected against dust and water
mg 0�82 – 0�82
Ultramicrobalances 0�0001mg
Model MSE2.7S MSE2.7S-F
Readability mg 0�0001 0�0001
Weighing capacity g 2�1 2�1
Tare range (subtractive) g –2�1 –2�1
Repeatability <±mg 0�00025 0�00025
Linearity <±mg 0�0009 0�0009
Corner load (test load [g])*) µg 0�5 (1 g) 0�5 (1 g)
Optimal starting point of the measuring range**)
mg 0�082 –
Sensitivity drift between +10 to +30°C ±ppm/K 1 1
Typical stabilization time s < 7
Typical measurement time s < 10
External standard calibration value g 2 (E2) 2 (E2)
(min� accuracy class)
Display result
(depending on the set filter level) 0�1 – 0�4 0�1 – 0�4
Weighing pan size d mm 20 50/20*
)
Weighing chamber height mm 70 15
Protection Protected against dust and water
*) = Standard pan
**) = According to USP (United States Pharmacopeia) section 41, the optimal measuring range is defined from 820 d to the max� weighing
range� Typically the value can be higher depending on the setup location and the ambient conditions�
88 Cubis MSE Operating Instructions
Page 89

Technical Specifications
Model-specific Data
Semi-microbalances 0�01 mg
Model MSE225S MSE225P MSE125P
Readability mg 0�01 0�01/0�02/0�05 0�01/0�1
Weighing capacity g 220 60/120/220 60/120
Tare range (subtractive) g – 220 – 220 – 120
Repeatability <±mg 0 to 60 g: 0�015 0 to 60 g: 0�015 0 to 60 g: 0�015
60 to 220 g: 0�025 60 to 220 g: 0�04 60 to 120 g: 0�06
Linearity <±mg 0�1 0�15 0�15
Corner load (test load [g]) mg 0�15 (100) 0�2 (100) 0�15 (50)
Optimal starting point
of the measuring range* mg 8�2 8�2 8�2
Sensitivity drift between +10 to +30°C ±ppm/K 1 1 1
Typical stabilization time s < 2 < 2 < 2
Typical measurement time s < 6 < 6 < 6
External standard calibration value g 200 (E2) 200 (E2) 100 (E2)
(min� accuracy class)
Display result
(depending on the set filter level) 0�2 – 0�4
Weighing pan size (W + D) mm 85 + 85
Weighing chamber height (draft shield DU)
Protection Protected against dust and water
* = According to USP (United States Pharmacopeia) section 41, the optimal measuring range is defined from 820 d to the max� weighing
range� Typically the value can be higher depending on the setup location and the ambient conditions�
mm 261
Analytical balances 0�1 mg
Model MSE524S MSE524P MSE324S MSE224S MSE324P MSE124S
Readability mg 0�1 0�1/0�2/0�5 0�1 0�1 0�1/0�2/0�5 0�1
Weighing capacity g 520 120/240/520 320 220 80/160/320 120
Tare range (subtractive) g – 520 – 520 – 320 – 220 – 320 – 120
Repeatability <±mg 0�1 0�15/0�2/0�4 0�1 0�07 0�1/0�2/0�4 0�1
Linearity <±mg 0�4 0�5 0�3 0�2 0�5 0�2
Corner load (test load [g]) mg 0�3 (200) 0�4 (200) 0�3 (200) 0�2 (100) 0�4 (200) 0�2 (50)
Optimal starting point
of the measuring range* mg 82 82 82 82 82 82
Sensitivity drift between +10 to +30°C ±ppm/K 1 1 1 1 1 1
Typical stabilization time s < 1 < 1 < 1 < 1 < 1 < 1
Typical measurement time s < 3 < 3 < 3 < 3 < 3 < 3
External standard calibration value g 500 500 200+100 200 (E2) 200+100 100 (E2)
(min� accuracy class) (E2) (E2) (E2) (E2)
Display result
(depending on the set filter level) 0�1 – 0�4
Weighing pan size (W + D) mm 85 + 85
Weighing chamber height (draft shield DU)
mm 261
IP protection
(according to EN 60529/IEC 60529) IP54
* = According to USP (United States Pharmacopeia) section 41, the optimal measuring range is defined from 820 d to the max� weighing
range� Typically the value can be higher depending on the setup location and the ambient conditions�
Cubis MSE Operating Instructions 89
Page 90

Technical Specifications
Model-specific Data
Precision balances
Models MSE5203S MSE5203P MSE3203S MSE3203P
Readability mg 1 1/2/5 1 1/10
Weighing capacity g 5,200 1,200/2,400/5,200 3,200 1,010/3,200
Tare range (subtractive) g – 5,200 – 5,200 – 3,200 – 3,200
Repeatability <±mg 1 1 1 1/6
Linearity <±mg 5 5 5 5
Corner load (test load [g]) mg 2 (2,000) 2 (2,000) 2 (1,000) 2 (1,000)
Optimal starting point
of the measuring range* g 0�82 0�82 0�82 0�82
Sensitivity drift between +10 to +30°C ±ppm/K 1 1 1 1
Typical stabilization time s < 1 < 1 < 1 < 1
Typical measurement time s < 2 < 2 < 2 < 1�5
External standard calibration value g 5,000 5,000 2,000 2,000 (E2)
(min� accuracy class)
Display result
(depending on the set filter level) 0�1 – 0�4
Weighing pan size (W + D) mm 140 + 140
Weighing chamber height
(draft shield DE) mm 172
Protection Protected against dust and water
* = According to USP (United States Pharmacopeia) section 41, the optimal measuring range is defined from 820 d to the max� weighing
range� Typically the value can be higher depending on the setup location and the ambient conditions�
Models MSE2203S MSE2203P MSE1203S
Readability mg 1 1/10 1
Weighing capacity g 2,200 1,010/2,200 1,200
Tare range (subtractive) g – 2,200 – 2,200 – 1,200
Repeatability <±mg 1 1/6 0�7
Linearity <±mg 3 5 2
Corner load (test load [g]) mg 2 (1,000) 3 (1,000) 2 (500)
Optimal starting point
of the measuring range* g 0�82 0�82 0�82
Sensitivity drift between +10 to +30°C ±ppm/K 1 1 1�5
Typical stabilization time s < 1 < 1 < 1
Typical measurement time s < 1�5 < 1�5 < 1�5
External standard calibration value g 2,000 (E2) 1,000 (E2) 1,000 (E2)
(min� accuracy class)
Display result
(depending on the set filter level) 0�1 – 0�4
Weighing pan size (W + D) mm 140 + 140
Weighing chamber height
(draft shield DE) mm 172
Protection Protected against dust and water
* = According to USP (United States Pharmacopeia) section 41, the optimal measuring range is defined from 820 d to the max� weighing
range� Typically the value can be higher depending on the setup location and the ambient conditions�
90 Cubis MSE Operating Instructions
Page 91

Technical Specifications
Model-specific Data
Precision balances
Models MSE623S MSE623P MSE323S
Readability mg 1 1/2/5 1
Weighing capacity g 620 150/300/620 320
Tare range (subtractive) g – 620 – 620 – 320
Repeatability <±mg 0�7 1/2/4 0�7
Linearity <±mg 2 5 2
Corner load (test load [g]) mg 2 (200) 4 (200) 2 (200)
Optimal starting point
of the measuring range* g 0�82 0�82 0�82
Sensitivity drift between +10 to +30°C ±ppm/K 2 2 2
Typical stabilization time s < 0�8 < 0�8 < 0�8
Typical measurement time s < 1 < 1 < 1
External standard calibration value g 500 (E2) 500 (F1) 200 (E2)
(min� accuracy class)
Display result
(depending on the set filter level) 0�1 – 0�4
Weighing pan size (W + D) mm 140 + 140
Weighing chamber height
(draft shield DE) mm 172
Protection Protected against dust and water
* = According to USP (United States Pharmacopeia) section 41, the optimal measuring range is defined from 820 d to the max� weighing
range� Typically the value can be higher depending on the setup location and the ambient conditions�
Models MSE14202S MSE14202P MSE10202S MSE8202S
Readability mg 10 10/20/50 10 10
Weighing capacity g 14,200 3,500/7,000/14,200 10,200 8,200
Tare range (subtractive) g –14,200 –14,200 –10,200 –8,200
Repeatability <±mg 10 10/20/40 7 7
Linearity <±mg 30 50 20 20
Corner load (test load [g]) mg 20 (5,000) 40 (5,000) 20 (5,000) 20 (5,000)
Optimal starting point
of the measuring range* g 8�2 8�2 8�2 8�2
Sensitivity drift between +10 to +30°C ±ppm/K 1�5 1�5 2 2
Typical stabilization time s < 1 < 1 < 1 < 1
Typical measurement time s < 1�5 < 1�5 < 1�5 < 1�5
External standard calibration value kg 10 (E2) 10 (E2) 10 (E2) 5 (E2)
(min� accuracy class)
Display result
(depending on the set filter level) 0�1 – 0�4
Weighing pan size (W + D) mm 206 + 206
IP protection
(according to EN 60529/IEC 60529) IP54
* = According to USP (United States Pharmacopeia) section 41, the optimal measuring range is defined from 820 d to the max� weighing
range� Typically the value can be higher depending on the setup location and the ambient conditions�
Cubis MSE Operating Instructions 91
Page 92

Technical Specifications
Model-specific Data
Precision balances
Models MSE6202S MSE6202P MSE5202S MSE4202S
Readability mg 10 10/20/50 10 10
Weighing capacity g 6,200 1,500/3,000/ 5,200 4,200
6,200
Tare range (subtractive) g – 6,200 – 6,200 – 5,200 – 4,200
Repeatability <±mg 7 7/20/40 6 7
Linearity <±mg 20 50 10 20
Corner load (test load [g]) mg 20 (2,000) 50 (2,000) 10 (2,000) 30 (2,000)
Optimal starting point
of the measuring range* g 8�2 8�2 8�2 8�2
Sensitivity drift between +10 to +30°C ±ppm/K 2 2 2 2
Typical stabilization time s < 1 < 1 < 0�8 < 0�8
Typical measurement time s < 1�5 < 1�5 < 1 < 1
External standard calibration value kg 5 (E2) 5 (F1) 5 4 (E2)
(min� accuracy class)
Display result
(depending on the set filter level) 0�1 – 0�4
Weighing pan size (W + D) mm 206 + 206 206 + 206 140 + 140 206 + 206
IP protection
(according to EN 60529/IEC 60529) IP54
* = According to USP (United States Pharmacopeia) section 41, the optimal measuring range is defined from 820 d to the max� weighing
range� Typically the value can be higher depending on the setup location and the ambient conditions�
Models MSE2202S MSE1202S MSE70201S MSE36201S MSE36201P
Readability mg 10 10 100 100 100/1,000
Weighing capacity g 2,200 1,200 70,200 36,200 10,200/36,200
Tare range (subtractive) g – 2,200 – 1,200 – 70,200 – 36,200 – 36,200
Repeatability <±mg 7 7 70 70 70/500
Linearity <±mg 20 20 500 200 200
Corner load (test load [g]) mg 20 (1,000) 20 (500) 500 (20,000) 300 (10,000) 300 (10,000)
Optimal starting point
of the measuring range* g 8�2 8�2 82 82 82
Sensitivity drift between +10 to +30°C ±ppm/K 2 2 3 2 2
Typical stabilization time s < 0�8 < 0�8 < 1 < 1 < 1
Typical measurement time s < 1 < 1 < 1�5 < 1�5 < 1�5
External standard calibration value kg 2 (F1) 1 (F1) 50 (F1) 20 (F1) 20 (F1)
(min� accuracy class)
Display result
(depending on the set filter level) 0�1 – 0�4
Weighing pan size (W + D) mm 206 + 206 206 + 206 400 + 300 400 + 300 400 + 300
IP protection
(according to EN 60529/IEC 60529) IP54
* = According to USP (United States Pharmacopeia) section 41, the optimal measuring range is defined from 820 d to the max� weighing
range� Typically the value can be higher depending on the setup location and the ambient conditions�
92 Cubis MSE Operating Instructions
Page 93

Technical Specifications
Model-specific Data
Precision balances
Models MSE20201S MSE12201S MSE8201S MSE5201S
Readability mg 100 100 100 100
Weighing capacity g 20,200 12,200 8,200 5,200
Tare range (subtractive) g – 20,200 – 12,200 – 8,200 – 5,200
Repeatability <±mg 70 50 50 50
Linearity <±mg 200 100 100 100
Corner load (test load [g]) mg 300 (5,000) 200 (5,000) 200 (5,000) 200 (2,000)
Optimal starting point
of the measuring range* g 82 82 82 82
Sensitivity drift between +10 to +30°C ±ppm/K 2 4 4 4
Typical stabilization time s < 1 < 0�8 < 0�8 < 0�8
Typical measurement time s < 1�5 < 1 < 1 < 1
External standard calibration value kg 20 (F1) 10 (F1) 5 (F2) 5 (F2)
(min� accuracy class)
Display result
(depending on the set filter level) 0�1 – 0�4
Weighing pan size (W + D) mm 206 + 206
IP protection
(according to EN 60529/IEC 60529) IP54
* = According to USP (United States Pharmacopeia) section 41, the optimal measuring range is defined from 820 d to the max� weighing
range� Typically the value can be higher depending on the setup location and the ambient conditions�
Models MSE70200S MSE36200S
Readability mg 1,000 1,000
Weighing capacity g 70,200 36,200
Tare range (subtractive) g – 70,200 – 36,200
Repeatability <±mg 500 500
Linearity <±mg 1,000 1,000
Corner load (test load [g]) mg 1,000 (20,000) 1,000 (10,000)
Optimal starting point
of the measuring range* g 820 820
Sensitivity drift between +10 to +30°C ±ppm/K 3 2
Typical stabilization time s < 0�8 < 0�8
Typical measurement time s < 1 < 1
External standard calibration value kg 50 (F1) 20 (F1)
(min� accuracy class)
Display result
(depending on the set filter level) 0�1 – 0�4
Weighing pan size (W + D) mm 400 + 300
IP protection
(according to EN 60529/IEC 60529) IP54
* = According to USP (United States Pharmacopeia) section 41, the optimal measuring range is defined from 820 d to the max� weighing
range� Typically the value can be higher depending on the setup location and the ambient conditions�
Cubis MSE Operating Instructions 93
Page 94

Technical Specifications
Model-specific Data
Verified Models with EC Type Approval Certificate: Micro- and ultramicrobalances
Model MSE6.6S-0CE MSE2.7S-0CE MSE3.6P-0CE
Accuracy class* k k k
For verified models: EC Type Approval Certificate D09-09-015, Type: MSX
Scale interval d* mg 0�001 0�0001 0�001/0�002/0�005
Weighing capacity max* g 6�1 2�1 1�1/2�1/3�1
Calibration value e* mg 1 1 1
Min� load min* mg 0�1 0�01 0�1
Tare equalization range (subtractive) < 100 % from max� weighing capacity
Application range according to DIR* g 0�001 – 6�1 0�001 – 2�1 0�001 – 3�1
Optimal starting point
of the measuring range** mg 0�82 0�082 0�82
Typical stabilization time s < 5 < 7 < 5
Typical measurement time s < 8 < 10 < 8
External standard calibration value
(min� accuracy class) g 5 2 3
Application range (temperature) With “isoCAL” function: +5…+40°C |
Without “isoCAL” function: +15 … +25°C
Display result (depending on the set filter level) By selection of 1 of 4 optimized filter levels
Weighing pan size d mm 30 20 30
Weighing chamber height
(draft shield DM) mm 70 70 70
Protection Protected against dust and water
* DIR = Directive 2014/31/EU on non-automatic weighing instruments used within the European Economic Area
** = According to USP (United States Pharmacopeia) section 41, the optimal measuring range is defined from 820 d to the max� weighing
range� Typically the value can be higher depending on the setup location and the ambient conditions�
94 Cubis MSE Operating Instructions
Page 95

Technical Specifications
Model-specific Data
Verified models with EC Type Approval Certificate: Semi-microbalances 0�01 mg
Model MSE225S-0CE MSE225P-0CE MSE125P-0CE
Accuracy class* k k k
For verified models: EC Type-Approval Certificate D09-09-015, Type: MSX
Scale interval d* mg 0�01 0�01/0�02/0�05 0�01/0�1
Weighing capacity max* g 220 60/120/220 60/120
Calibration value e* mg 1 1 1
Min� load min* mg 1 1 1
Tare equalization range (subtractive) < 100% from max� weighing capacity
Application range according to DIR* g 0�001 – 220 0�001 – 220 0�001 – 120
Optimal starting point
of the measuring range** mg 8�2 8�2 8�2
Typical stabilization time s < 2 < 2 < 2
Typical measurement time s < 6 < 6 < 6
External standard calibration value g 200 (E2) 200 (E2) 100 (E2)
(min� accuracy class)
Application range (temperature) With “isoCAL” function: +5 to +40 °C | Without “isoCAL” function: +15 to +25 °C
Adaptation to ambient conditions By selection of 1 of 4 optimized filter levels
Display result (depending on the set filter level) 0�2 – 0�4
Weighing pan size (W + D) mm 85 + 85
Weighing chamber height (draft shield DU)
Protection Protected against dust and water
mm 261
Verified models with EC Type Approval Certificate: Analytical balances 0�1 mg
Model MSE524S- MSE524P- MSE324S- MSE224S- MSE324P- MSE124S 0CE 0CE 0CE 0CE 0CE 0CE
Accuracy class* k k k k k k
For verified models: EC Type-Approval Certificate D09-09-015, Type: MSX
Scale interval d* mg 0�1 0�1/0�2/0�5 0�1 0�1 0�1/0�2/0�5 0,1
Weighing capacity max* g 520 120/240/520 320 220 80/160/320 120
Calibration value e* mg 1 1 1 1 1 1
Min� load min* mg 10 10 10 10 10 10
Tare equalization range (subtractive) < 100% from max� weighing capacity
Application range according to DIR* g 0�01–520 0�01–520 0�01–320 0�01–220 0�01–320 0�01–120
Optimal starting point
of the measuring range** mg 82 82 82 82 82 82
Typical stabilization time s < 1 < 1 < 1 < 1 < 1 < 1
Typical measurement time s < 3 < 3 < 3 < 3 < 3 < 3
External standard calibration value g 500 500 200+100 200 200 +100 100
(min� accuracy class) (E2 (E2) (E2) (E2) (E2) (E2
Application range (temperature) With “isoCAL” function: +5 to +40 °C | Without “isoCAL” function: +15 to +25 °C
Display result (depending on the set filter level) 0�1 – 0�4
Weighing pan size (W + D) mm 85 + 85
Weighing chamber height (draft shield DU)
mm 261
Protection Protected against dust and water
* DIR = Directive 2014/31/EU on non-automatic weighing instruments used within the European Economic Area
** = According to USP (United States Pharmacopeia) section 41, the optimal measuring range is defined from 820 d to the max� weighing
range� Typically the value can be higher depending on the setup location and the ambient conditions�
Cubis MSE Operating Instructions 95
Page 96

Technical Specifications
Model-specific Data
Verified models with EC Type Approval Certificate: Precision balances
Models MSE5203S-0CE MSE5203P-0CE MSE3203S-0CE MSE3203P-0CE
Accuracy class* k k k k
For verified models: EC Type-Approval Certificate D09-09-015, Type: MSX
Scale interval d* mg 1 1/2/5 1 1/10
Weighing capacity max* g 5,200 1,200/2,400/5,200 3,200 1,010/3,200
Calibration value e* mg 10 10 10 10
Min� load min* mg 100 100 100 100
Tare equalization range (subtractive) < 100% from max� weighing capacity
Application range according to DIR* g 0�1 – 5,200 0�1 – 5,200 0�1 – 3,200 0�1 – 3,200
Optimal starting point
of the measuring range** g 0�82 0�82 0�82 0�82
Typical stabilization time s < 1 < 1 < 1 < 1
Typical measurement time s < 2 < 2 < 2 < 1�5
External standard calibration value g 5,000 (E2 5,000 (E2 2,000 (E2 2,000 (E2)
(min� accuracy class)
Application range (temperature) With “isoCAL” function: +5 ��� +40 °C
Without “isoCAL” function: +15 ��� +25 °C
Display result
(depending on the set filter level) 0�1 – 0�4
Weighing pan size (W + D) mm 140 + 140
Weighing chamber height (draft shield DE)
Protection Protected against dust and water
mm 172
Models MSE2203S-0CE MSE2203P-0CE MSE1203S-0CE
Accuracy class* k k k
For verified models: EC Type-Approval Certificate D09-09-015, Type: MSX
Scale interval d* mg 1 1/10 1
Weighing capacity max* g 2,200 1,010/2,200 1,200
Calibration value e* mg 10 10 10
Min� load min* mg 100 100 100
Tare equalization range (subtractive) < 100% from max� weighing capacity
Application range according to DIR* g 0�1 – 2,200 0�1 – 2,200 0�1 – 1,200
Optimal starting point
of the measuring range** g 0�82 0�82 0�82
Typical stabilization time s < 1 < 1 < 1
Typical measurement time s < 1�5 < 1�5 < 1�5
External standard calibration value g 2,000 (E2) 1,000 (E2) 1,000 (E2)
(min� accuracy class)
Application range (temperature) With “isoCAL” function: +5 ��� +40 °C
Without “isoCAL” function: +15 ��� +25 °C
Display result
(depending on the set filter level) 0�1 – 0�4
Weighing pan size (W + D) mm 140 + 140
Weighing chamber height (draft shield DE)
mm 172
Protection Protected against dust and water
* DIR = Directive 2014/31/EU on non-automatic weighing instruments used within the European Economic Area
** = According to USP (United States Pharmacopeia) section 41, the optimal measuring range is defined from 820 d to the max� weighing
range� Typically the value can be higher depending on the setup location and the ambient conditions�
96 Cubis MSE Operating Instructions
Page 97

Technical Specifications
Model-specific Data
Verified models with EC Type Approval Certificate: Precision balances
Models MSE623S-0CE MSE623P-0CE MSE323S-0CE
Accuracy class* K K K
For verified models: EG-Type-Approval Certificate D09-09-015, Type: MSX
Scale interval d* mg 1 1/2/5 1
Weighing capacity max* g 620 150/300/620 320
Calibration value e* mg 10 10 10
Min� load min* mg 20 20 20
Tare equalization range (subtractive) < 100% from max� weighing capacity
Application range according to DIR* g 0�02 – 620 0�02 – 620 0�02 – 320
Optimal starting point
of the measuring range** g 0�82 0�82 0�82
Typical stabilization time s < 0�8 < 0�8 < 0�8
Typical measurement time s < 1 < 1 < 1
Application range (temperature) With “isoCAL” function: +5 to +40 °C | Without “isoCAL” function: +10 to +30 °C
Display result
(depending on the set filter level) 0�1 – 0�4
Weighing pan size (W + D) mm 140 + 140
Weighing chamber height (draft shield DE)
Protection Protected against dust and water
) mm 172
Models MSE14202S- MSE14202P- MSE10202S- MSE8202S 0CE 0CE 0CE 0CE
Accuracy class* k k K K
For verified models: EC Type-Approval Certificate D09-09-015, Type: MSX
Scale interval d* g 0�01 0�01/0�02/0�05 0�01 0�01
Weighing capacity max* g 14,200 3,500/7,000/ 10,200 8,200
14,200
Calibration value e* g 0�1 0�1 0�1 0�1
Min� load min* g 1 1 1 0�5
Tare equalization range (subtractive) < 100% from max� weighing capacity
Application range according to DIR* g 1 – 14,200 1 – 14,200 1 – 10,200 0�5 – 8200
Optimal starting point
of the measuring range** g 8�2 8�2 8�2 8�2
Typical stabilization time s < 1 < 1 < 1 < 1
Typical measurement time s < 1�5 < 1�5 < 1�5 < 1�5
Application range (temperature):
With “isoCAL” function +5 to +40 °C +5 to +40 °C +5 to +40 °C +5 to +40 °C
Without “isoCAL” function +15 to +25 °C +15 to +25 °C +15 to +25 °C +10 to +30 °C
Display result
(depending on the set filter level) 0�1 – 0�4
Weighing pan size (W + D) mm 206 + 206
IP protection
(according to EN 60529/IEC 60529) IP54
* DIR = Directive 2014/31/EU on non-automatic weighing instruments used within the European Economic Area
** = According to USP (United States Pharmacopeia) section 41, the optimal measuring range is defined from 820 d to the max� weighing
range� Typically the value can be higher depending on the setup location and the ambient conditions�
Cubis MSE Operating Instructions 97
Page 98

Technical Specifications
Model-specific Data
Verified models with EC Type Approval Certificate: Precision balances
Models MSE6202S- MSE6202P- MSE5202S- MSE4202S 0CE 0CE 0CE 0CE
Accuracy class* K K K K
For verified models: EC Type-Approval Certificate D09-09-015, Type: MSX
Scale interval d* g 0�01 0�01/0�02/0�05 0�01 0�01
Weighing capacity max* g 6,200 1,500/3,000/6,200 5,200 4,200
Calibration value e* g 0�1 0�1 0�1 0�1
Min� load min* g 0�5 0�5 0�5 0�5
Tare equalization range (subtractive) < 100% from max� weighing capacity
Application range according to DIR* g 0�5 – 6,200 0�5 – 6,200 0�5 – 5,200 0�5 – 4,200
Optimal starting point
of the measuring range** g 8�2 8�2 8�2 8�2
Typical stabilization time s < 1 < 1 < 0�8 < 0�8
Typical measurement time s < 1�5 < 1�5 < 1 < 1
Application range (temperature):
With “isoCAL” function +5 to +40 °C +5 to +40 °C +5 to +40 °C
Without “isoCAL” function +10 to +30 °C +10 to +30 °C +10 to +30 °C
Display result
(depending on the set filter level) 0�1 – 0�4
Weighing pan size (W + D) mm 206 + 206 206 + 206 140 + 140 206 + 206
IP protection
(according to EN 60529/IEC 60529) IP54
Models MSE2202S- MSE1202S- MSE36201S- MSE36201P- MSE20201S 0CE 0CE 0CE 0CE 0CE
Accuracy class* K K K K K
For verified models: EC Type-Approval Certificate D09-09-015, Type: MSX
Scale interval d* mg 10 10 100 100/1,000 100
Weighing capacity max* g 2,200 1,200 36,200 10,200/36,200 20,200
Calibration value e* g 0�1 0�1 1 1 1
Min� load min* g 0�5 0�5 5 5 5
Tare equalization range (subtractive) < 100% from max� weighing capacity
Application range according to DIR* g 0�5 – 2,200 0�5 – 1,200 5 – 36,200 5 – 36,200 5 – 20,000
Optimal starting point
of the measuring range** g 8�2 8�2 82 82 82
Typical stabilization time s < 0�8 < 0�8 < 1�5 < 1�5 < 1�5
Typical measurement time s < 1 < 1 < 2 < 2 < 2
Application range (temperature) With “isoCAL” function: +5 to +40 °C | Without “isoCAL” function: +10 to +30 °C
Display result
(depending on the set filter level) 0�1 – 0�4
Weighing pan dimensions (W + D) mm 206 + 206 206 + 206 400 + 300 400 + 300 400 + 300
IP protection
(according to EN 60529/IEC 60529) IP54
* DIR = Directive 2014/31/EU on non-automatic weighing instruments used within the European Economic Area
** = According to USP (United States Pharmacopeia) section 41, the optimal measuring range is defined from 820 d to the max� weighing
range� Typically the value can be higher depending on the setup location and the ambient conditions�
98 Cubis MSE Operating Instructions
Page 99

Technical Specifications
Model-specific Data
Verified models with EC Type Approval Certificate: Precision balances
Modelle MSE12201S- MSE8201S- MSE5201S- MSE70200S- MSE36200S 0CE 0CE 0CE 0CE 0CE
Accuracy class* K K K K K
For verified models: EC Type-Approval Certificate D09-09-015, Type: MSX
Scale interval d* mg 100 100 100 1,000 1,000
Weighing capacity max* g 12,200 8,200 5,200 70,200 36,200
Calibration value e* g 1 1 1 10 1
Min� load min* g 5 5 5 50 50
Tare equalization range (subtractive) < 100% from max� weighing capacity
Application range according to DIR* g 5 – 12,200 5 – 8,200 5 – 5,200 50 – 70,200 50 – 36,200
Optimal starting point
of the measuring range** g 82 82 82 820 820
Typical stabilization time s < 0�8 < 0�8 < 0�8 < 1 < 1
Typical measurement time s < 1 < 1 < 1 < 1�2 < 1�2
Application range (temperature) With “isoCAL” function: +5 to +40 °C | Without “isoCAL” function: +10 to +30 °C
Display result
(depending on the set filter level) 0�1 – 0�4
Weighing pan size (W + D) mm 206 + 206 206 + 206 400 + 300 400 + 300 400 + 300
IP protection IP54
* DIR = Directive 2014/31/EU on non-automatic weighing instruments used within the European Economic Area
** = According to USP (United States Pharmacopeia) section 41, the optimal measuring range is defined from 820 d to the max� weighing
range� Typically the value can be higher depending on the setup location and the ambient conditions�
Cubis MSE Operating Instructions 99
Page 100

Balance Dimensions
121
Balance Dimensions
Microbalances
All dimensions are given in millimeters
53
240
d 85
d 80
277
312
56
192
122
d 86.5
67
35
50
70
100 Cubis MSE Operating Instructions
180
340
246
94
132
106.5
 Loading...