

Sartorius Micro M 500 P,Micro M 500 P Installation And Operating Instructions Manual

Sartorius Micro
M 500 P
Installation and Operating Instructions
98648-000-73
2
1
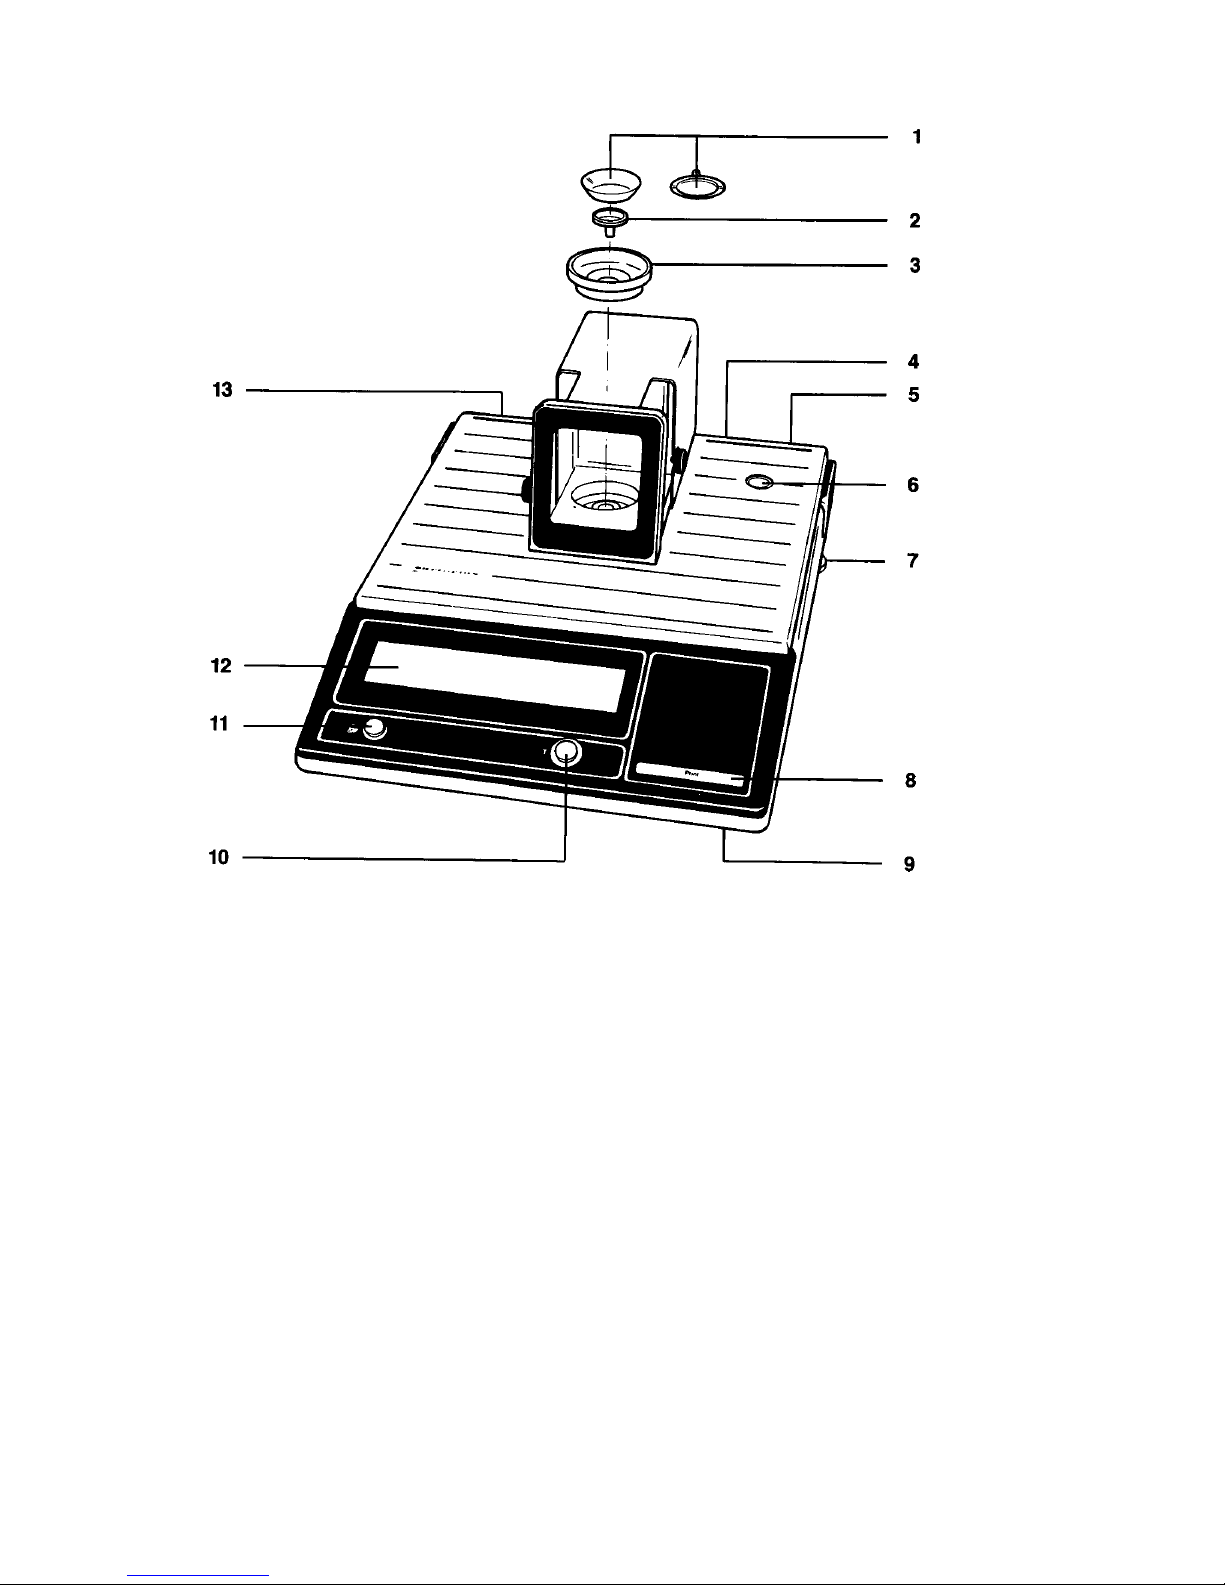
Weighing pans
2
Pan support
3
Interior draft shield
4
Interface
5
Power receptacle
6
Level indicator
7
Leveling foot
8
Print control
9
Menu access switch
10
Tare control
11
ON/OFF button
12
Weight display
13
Manufacturer's label

3
Contents
Page
About the Product
(Warranty) 4
Storage and Shipping Conditions 5
Equipment Supplied
6
How to Handle Your Microbalance
7
Installation Instructions
8
Ambient Conditions 8
Connecting Electronic Devices (Peripherals) 8
Startup
9
Connecting the Balance to Line Power 9
Voltage Selection 9
Safety Precautions 11
Leveling the Balance using the Level Indicator 11
Operation
12
Weight Display 12
Turning the Display On and Off 13
Self-Test 13
Weighing 13
Taring 13
Calibration
14
Balance Operating Program
15
How to Access the Menu of the
Balance Operating Program 15
How to Read a Program Menu Code (List Mode) 15
How to Change a Program Menu Code
(Change Mode) 16
Menu of the Balance Operating Program 17
Troubleshooting Guide
18
Accessories
19
Care and Maintenance
20
Cleaning 20
Safety Inspection 20
Data Interface
21
Specifications
22

4
About the Product (Warranty)
With this Sartorius Balance you have acquired a high-quality
electronic weighing Instrument that will ease your daily workload.
Please read these Installation and operating instructions carefully before operating your new balance.
Pursuant to the German Directive for the Implementation
of Regulations for Prevention of Accidents "Elektrische
Anlagen und Betriebsmittel (VBG 4)" [Electrical
Installations and Equipment] of April 1986, it is hereby
certified that the equipment delivered, "Electronic
Microbalance, model M 500 P," is manufactured and
tested in compliance with the following DIN/VDE
regulations
DIN IEC 348/VDE 0411 Safety requirements for
electronic measuring apparatus
DIN IEC 380/VDE 0806 Safety of
electrically energized Office
machines
DIN IEC 601/VDE 0750 Safety of medical electrical
equipment
and Article 10 of the Low Voltage Directive (73/23/EEC)
issued on February 19, 1973 by the European
Community. When you use electrical equipment in
installations and under ambient conditions requiring
higher safety Standards, you must comply with the
provisions as specified in the applicable regulations for
installation in your country.

5
Storage and Shipping Conditions
Allowable storage temperature range: -40°C...+70°C
-40°F... 158°F
The packaging of the balance has been designed to ensure that
the balance will not be damaged even if it is dropped from a
height of 80 cm (about 32 inches).
After unpacking the balance, please check it immediately for
any visible damage as a result of rough handling during shipment. If this is the case, proceed as directed in the section entitled "Safety Inspection."
Save all parts of the packaging and the box for shipping
your balance to prevent any damage during transportation.
In addition, please disconnect all connecting cables (e.g.
the plug on the power supply) to avoid damaging them.
Do not expose the balance unnecessarily to extreme temperatures, moisture, shocks, blows or vibrations.

6
Equipment Supplied
The equipment supplied consists of the components pictured on
the left:
— balance
— draft shield
— portable power supply
— dust cover
The kit of Standard accessories contains the following:
1 Standard weighing pan
1 special pan for weighing filaments
1 pan support
1 interior draft shield
1 calibration weight, 500 mg (accuracy class: E2)
1 brush
1 pair of forceps
1 chamois

7
How to Handle Your Microbalance
Before you Start weighing, please observe the
following:
After plugging your balance into a wall outlet, make sure to allow for >2 hours' warmup.
Working with a microbalance requires a steady hand and a
smooth, uninterrupted technique.
Use forceps or other suitable Utensils to load your sample on
the pan.
Do a few trial weighing procedures before you begin with actual
weighing of your sample.
lf the weighing chamber has not been opened for a relatively
long period, it may have a temperature which is different from
that of the balance's surrounding environment. Therefore, as
soon as you open the weighing chamber, a change in the temperature will inevitably occur. This change in temperature may
show up as a change in the weight readout. In this case, we
recommend that before you begin with an actual repetitive
weighing procedure you open and dose the weighing chamber
at the same rate as you will be doing during such a procedure.
Carefully place you sample on the pan and, if necessary, remove it along with the pan. After the weighing chamber is
closed, the weight readout, as a rule, will stabilize after 30 sec.
at the latest.
The accuracy of the resulting weight readouts will increase as
the degree of consistency is increased for successive weighing
procedures.
 Loading...