

Sartorius LMA110S,Mark 3 LTE,LMA100P,Mark 3 Operating Instructions Manual
Operating Instructions
Sartorius LMA110S Moisture Analyzer
Model Mark 3 LTE
Electronic Moisture Analyzer
98040-699-09 Rev. D

Contents
Contents 2
Introduction 3
Intended Use 3
Descriptions and Symbols 3
Warning and Safety Information 4
Sample Pans 6
Safety Precautions 7
Getting Started 8
Storage and Shipping Conditions 8
Unpacking the Moisture Analyzer 8
Instructions for Recycling the Packaging 9
Equipment Supplied
General Views of the Moisture Analyzer 10
Assembly 12
Choosing a Suitable Location 13
Connecting the Moisture Analyzer
to AC Power 13
Leveling the Moisture Analyzer 14
Operating Design 15
Keypad 15
Display Modes 17
Menu Structure 19
Data Output 20
LED Status Lights 20
Operating the Moisture Analyzer 21
Standby Screen 21
Standby Temperature with a
New Program 22
Default Drying Program 23
Recalling a Program 24
Testing a Sample 25
Setup Menu 28
Setting the Device Parameters in
Program Manage Menu 28
Edit Current Program 29
Table: Program Settings 30
Units 31
Factors 32
Temperature 1 and 2 33
Time 1 and 2 34
Slope 34
Target Limits 39
Test Mode 40
Program Name 41
Create a New Program 42
Delete Program 42
Sort Programs 42
Configuring the Printout 43
Print Current Program 43
Print Program List 43
Print All Programs 43
Data Log 44
Device Information 45
Modify Operators 46
Graphing 47
Results Printout Format 48
Setting the Time and Date 51
Communication Ports 52
Pin Assignment Chart 52
Serial Command List 53
Conserve Mode 60
Security 61
Activate and Deactivate Security 61
Setup Security Access 62
Clear Data Log 63
Clear Operators 63
Restore Factory Defaults 64
Manage Program Storage 64
Transfer Programs 66
Audio, Video and Language 67
Audio Adjustments 67
Video Contrast Adjustment 68
Video Color Scheme 68
Service 69
System 69
Calibration | Adjustment Functions 70
Calibrate Balance 70
Heater Adjustment 73
Adjust Temperature 73
Verify Temperature 73
Concentration Mode 77
Multi-module Mode 78
Cleaning 80
Dispoal 81
Specifications 82
Accessories (Options) 83
Regulatory Compliance 84
2

3
Introduction
Thank you for choosing the Sartorius
Mark 3 LTE moisture analyzer, the international version of the field-proven Mark
3 from Sartorius. This analyzer is a modular analytical instrument that can be configured to meet various performance
requirements. Each analyzer consists of
two parts, a control module and a heater
module. The control module is comprised
of a keypad, a display and a printer
(optional) with the appropriate electronics. The heater module consists of the
electronic balance and heating cavity. Up
to two heater modules may be interfaced
with a single control module. On initial
power-up, the control module will automatically detect how many heater modules have been connected and are powered on. If more than one heater module
is detected, the analyzer will run in the
Multi-module mode.
The Mark 3 LTE moisture analyzer is used
as a quick and reliable means of determining the moisture content in various
samples by the principle of loss on
drying.
Key features of the Mark 3 LTE include:
§ Sample heating with infrared quartz tubes
§ Precision electronic balance for accurate
weighing and continuous weight monitoring during analysis
§ Quarter VGA screen for easy viewing
§ Large storage of methods for easy recall
of frequently used drying procedures
§ Modular system for add-on capability
of multiple heater modules
Please take the time to read these
Operating Instructions to learn the safe
operation of this analyzer. The Mark 3
LTE has many features that will be
described and can be of benefit to your
moisture testing program.
The Operating Instructions contain
guidance in the form of descriptions,
charts, software flow charts, and
pictorial diagrams:
§ Key names are presented in bold:
Start|Stop
§ Safety symbols indicate notes or caution
of risks as detailed below.
Descriptions and Symbols
Important safety related instructions
are highlighted visually throughout the
Operating Instructions with a description:
Danger
Warning of a possible danger that may
lead to a serious injury.
Caution
Warning of a possible danger that may
result in minor injury or damage.
Note
Important guideline on how to use the
moisture analyzer correctly.
Instrument labels
Caution:
!
Read manual before operating
Danger:
Electrical hazard
Caution:
Hot surface

Warning and Safety Information
This moisture analyzer complies
with the European Council Directives as well as international regulations and standards for electrical
equipment, electromagnetic compatibility, and the stipulated safety
requirements. Improper use or
handling, however, can result in
damage and/or injury.
Read these operating instructions
thoroughly before using your moisture analyzer to prevent damage to
the equipment. Keep these instructions in a safe place.
Follow the instructions below to
ensure safe and trouble-free operation of your moisture analyzer:
!
Use the moisture analyzer only
for performing moisture analysis of
samples. Any improper use of the
analyzer can endanger persons and
may result in damage to the analyzer or other material assets.
!
Samples or containers (e.g., beakers
or graduated flasks) that are too
large or bulky to permit complete
closure of the sample chamber
hood must not be placed in the
analyzer.
!
Do not use this moisture analyzer
in a hazardous area/location; operate it only under the ambient conditions specified in these instructions.
– The moisture analyzer may be
operated only by qualified persons
who are familiar with the properties
of the sample to be analyzed.
!
Class A Warning
Warning: This is a class A product.
In a domestic environment this
product may cause radio interference in which case the user may
be required to take adequate
measures.
4

!
Make sure before getting started
that the voltage rating printed on
the manufacturer‘s label is identical
to your local line voltage (see the
section on “Connecting the Moisture Analyzer to AC Power” in the
chapter entitled “Getting Started”)
– The analyzer comes with a power
supply that has a grounding conductor
– The only way to switch the power
off completely is to unplug the
power cord.
– Position the power cable so that it
cannot touch any hot areas of the
moisture analyzer.
– Use only extension cords that meet
the applicable standards and have
a protective grounding conductor.
– Disconnecting the ground conduc-
tor is prohibited.
– Connect only Sartorius accessories
and options, as these are optimally
designed for use with your moisture analyzer.
– Protect the moisture analyzer from
contact with liquid.
– If there is visible damage to the
moisture analyzer or power cord:
unplug the equipment and lock it
in a secure place to ensure that it
cannot be used for the time being.
!
Clean your moisture analyzer
according to the cleaning instructions only (see “Cleaning”).
Do not open the analyzer housing.
If the seal is broken, this will result in
forfeiture of all claims under the manufacturer’s warranty.
In case you have any problems with
your moisture analyzer:
$ contact your local Sartorius office,
dealer or service center
Warning: Severe Burns!
– When setting up the moisture analyzer,
leave enough space to prevent heat
from building up and to keep your
analyzer from overheating:
– leave 20 cm (about 8 inches) around
the moisture analyzer
– 1 m (3 ft.) above the device
– Do not put any flammable substances
on, under or near the moisture analyzer,
because the area around the heating
unit will heat up.
– Be careful when removing the sample
from the chamber: the sample itself, the
heater module and the sample pan used
can still be extremely hot.
– Do not remove the heater module unit
during operation: the heating element
and its protective glass panels can get
extremely hot!
– Prevent excess heat build-up around the
analyzer.
5

Hazards for persons or equipment
posed by using specific samples:
Fire Explosion
– Flammable or explosive substances
– Substances that contain solvents
– Substances that release flammable or
explosive gases or vapors during the
drying process
In some cases, it is possible to operate
the moisture analyzer in an enclosed
nitrogen atmosphere to prevent the
vapor released during drying from
coming in contact with oxygen in the
surrounding atmosphere. Check on a
case-to-case basis whether this method
can be used, because installation of the
analyzer in too small an enclosed space
can affect its functions (for instance
through excessive heat build-up within
the analyzer). When in doubt, perform
a risk analysis.
The user shall be liable and responsible
for any damage that arises in connection with this moisture analyzer.
Poisoning Caustic burns
– Substances containing toxic or caustic
or corrosive substances: These may
be dried only under a fume hood.
The value for the “lower toxic limit” in
a work area must not be exceeded.
Corrosion:
– Substances that release aggressive
vapors during the heating process
(such as acids): In this case we recommend that you work with small sample
quantities. Otherwise, vapors can condense on cold housing parts and cause
corrosion.
The user shall be liable and responsible
for any damage that arises in connection with this moisture analyzer.
– Sample Pans (Delivered with the
Analyzer):
The reusable metal pans are not
made of stainless steel. For this reason,
they are not resistant to corrosion.
These pans can be used only for powder
and granules (e.g. plastics) with very
low moisture content.
If the moisture content is higher, the
disposable aluminium pans (90 mm
diameter) must be used (see chapter
“Accessories”).
6

Caution
Do not touch the metal surfaces inside
the drying chamber while removing
or placing a sample in the analyzer since
the surfaces are very hot.
Do not touch the heater hood ventilation area at any time because this area
can be hot during and after a test.
§ Do not test flammable or toxic
materials.
§ Use the analyzer in a fume hood if the
samples emit fumes which could be
harmful.
§ Know where the fire extinguisher is
located. Use only an extinguisher rated
for use with electrical fires.
§ Keep the analyzer clean. Always unplug
the analyzer and cool it thoroughly
before cleaning or performing service.
§ Do not block the ventilation areas of
the heating chamber.
§ If necessary, press the Start|Stop key
during a test to stop the test.
§ Locate the analyzer away from
flammable materials.
§ If liquid is spilled into the analyzer,
unplug the Heating Module from the
electrical supply immediately.
§ Analyzer is suitable for continuous
operation
Safety Precautions
Danger
Use of this product in a manner
not specified by the manufacturer
may impair any safety protection
provided by the equipment!
Every attempt has been made to
make this analyzer safe and easy to
use. However, like any laboratory
instrument respect must be given
to the operation of the analyzer
due to environmental conditions,
the nature of the samples being
tested and of the chemicals which
might be near the analyzer.
To avoid personal injury or damage
to the analyzer, please observe the
following precautions:
Read all instructions in the Operating Instructions prior to operating
your analyzer.
Warning
Control module contains 3V Lithium
Battery. Please dispose of in accordance with local regulations and
conventions.
7

Getting Started
Thank you for choosing the Sartorius
LMA110S moisture analyzer. The
LMA110S is a modular analytical instrument designed to be configured to meet
various performance requirements. Each
analyzer consists of two parts, a control
module and a heater module. The control module contains the keypad, display and a printer (optional) with the
appropriate electronics. The heater
module consists of an electronic balance and heating cavity. Up to two
heater modules may be interfaced with
a single control module. On initial
power-up, the control module will
automatically detect how many heater
modules have been connected and are
powered on. If more than one heater
module is detected, the analyzer will
run in the multi-module mode.
Storage and Shipping Conditions
Allowable storage temperature:
–10 to +50°C
–14°F to +122°F
Allowable shipping temperature:
–40 to +70°C
–40°F...+158°F
Unpacking the Moisture Analyzer
The moisture analyzer is delivered in
a set of two custom-made boxes specifically designed for this precision instrument to provide optimum protection
during transportation.
Note
Retain the original packaging in order
to ship the analyzer if it needs to be
transported or stored at some future
time.
8

Follow the instructions carefully when
unpacking the analyzer:
§ Unpack the analyzer carefully and
gently.
§ Remove all the contents of the carton.
Check carefully to make sure you have
removed all accessory items.
§ The LMA110S consists of two modules,
a control module and a heater module.
Up to two heater modules
may be connected to a single control
module.
§ Inspect each module for physical damage and report any damage immediately
to Sartorius or the distributor that you
purchased the analyzer from.
§ Verify that you have received the
following accessories:
Instructions for Recycling
the Packaging
To ensure adequate protection for safe
shipment, your moisture analyzer has
been packaged to the extent necessary
using environmentally friendly materials. After successful installation of the
moisture analyzer, you should return
this packaging for recycling because
it is a valuable source of secondary raw
material. For information on recycling
options, including recycling of old
weighing equipment, contact your
municipal waste disposal center or local
recycling depot.
Equipment Supplied
– Inter-module cable
– Power module cable
– Pan support
– Pan shield
– Power cord
– Tweezers
– Sample pans
– Operating instructions manual
9
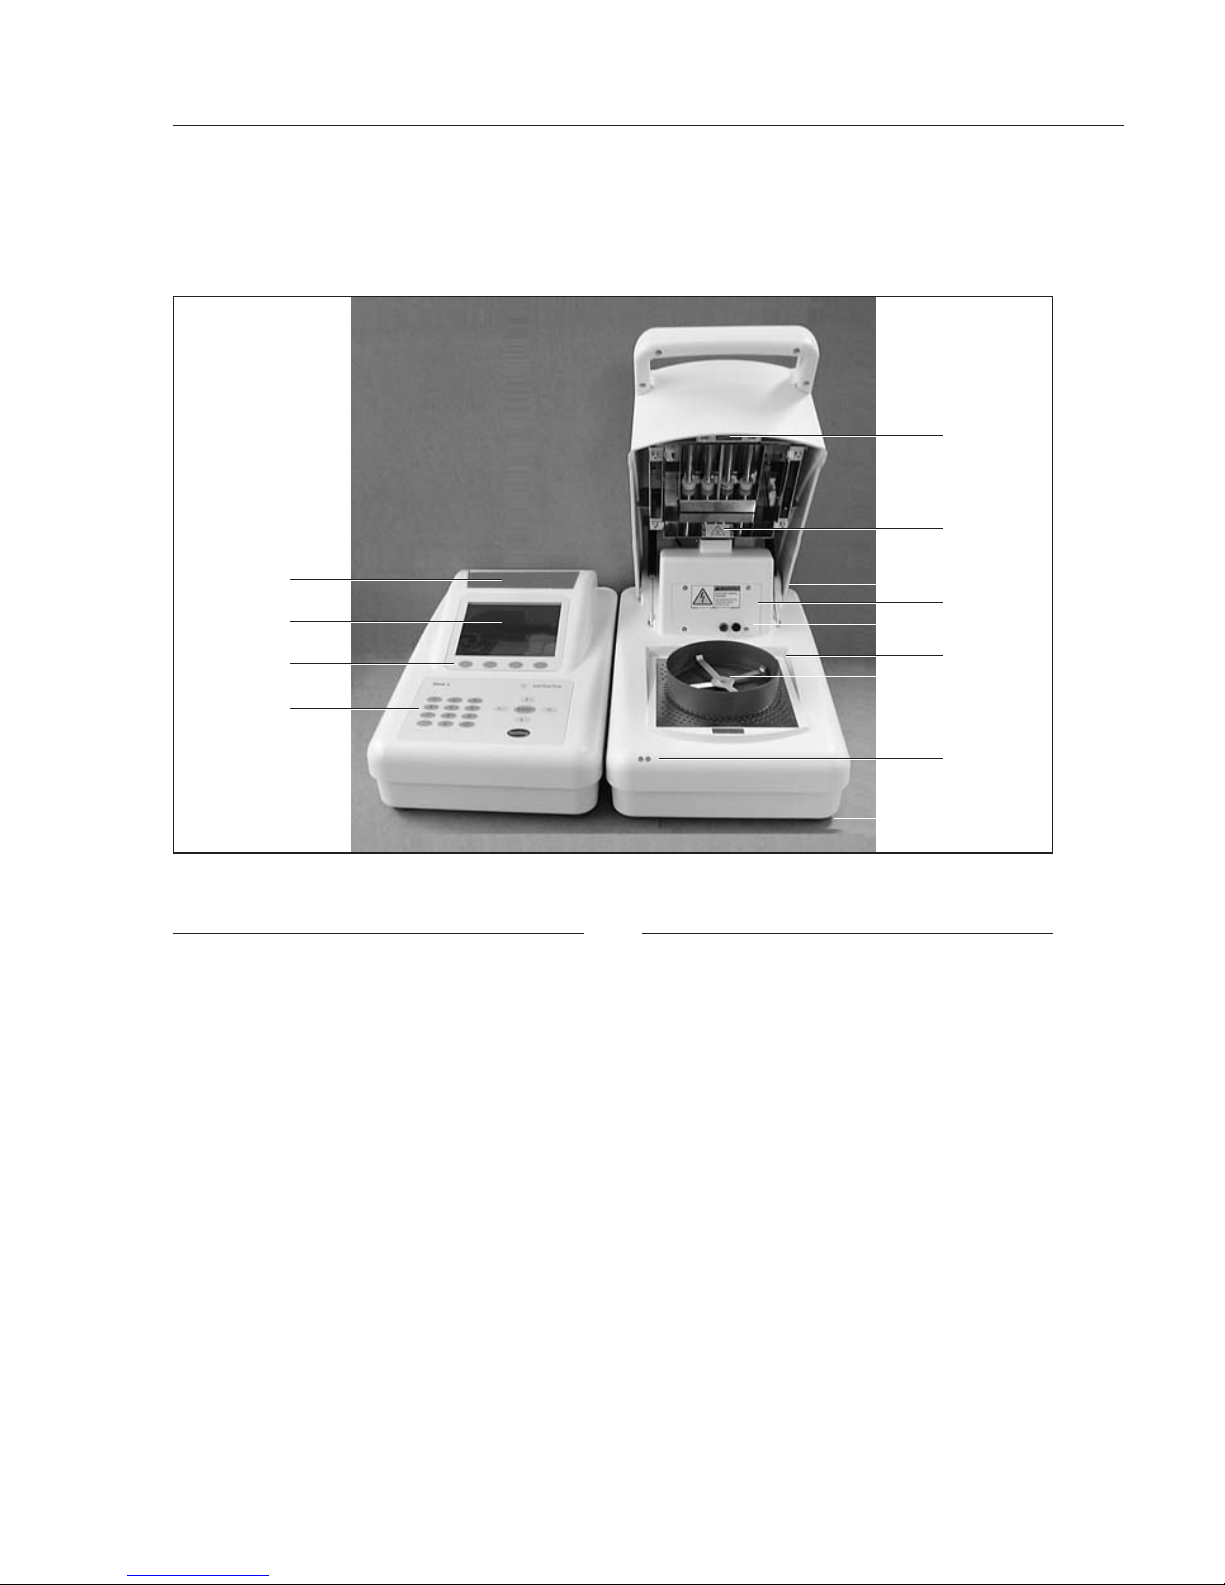
General Views of the Moisture Analyzer
No. Designation
Heater Module
1 Pan shield
2 Pan support
3 Cylindrical quartz heating tubes
4 RTD temperature sensor
5 Heater adjustment tool connector
6 LED status lights
7 Service panel, heaters & RTD
temperature sensor
8 Level vial
9 Adjustable leveling feet
10 Inter-module cable receptacle
11 Main power switch
12 Main cord receptacle
13 Fuse 1 (250 V~5A T)
14 Fuse 2 (250 V~5A T)
15 Module power cable receptacle
No. Designation
Control Module
16 Storage Bin
17 VGA display
18 Soft keys and display overlay
19 Keypad
20 Inter-module cable receptacle
21 Module power cable receptacle
22 Ethernet socket: only for Sartorius
Service
23 USB socket: only for Sartorius
Service
Cables and Power cord
24 Serial connector
25 Inter-module cable
27 Main power cord
10
16
17
18
19
4
3
8
7
5
1
2
6
9
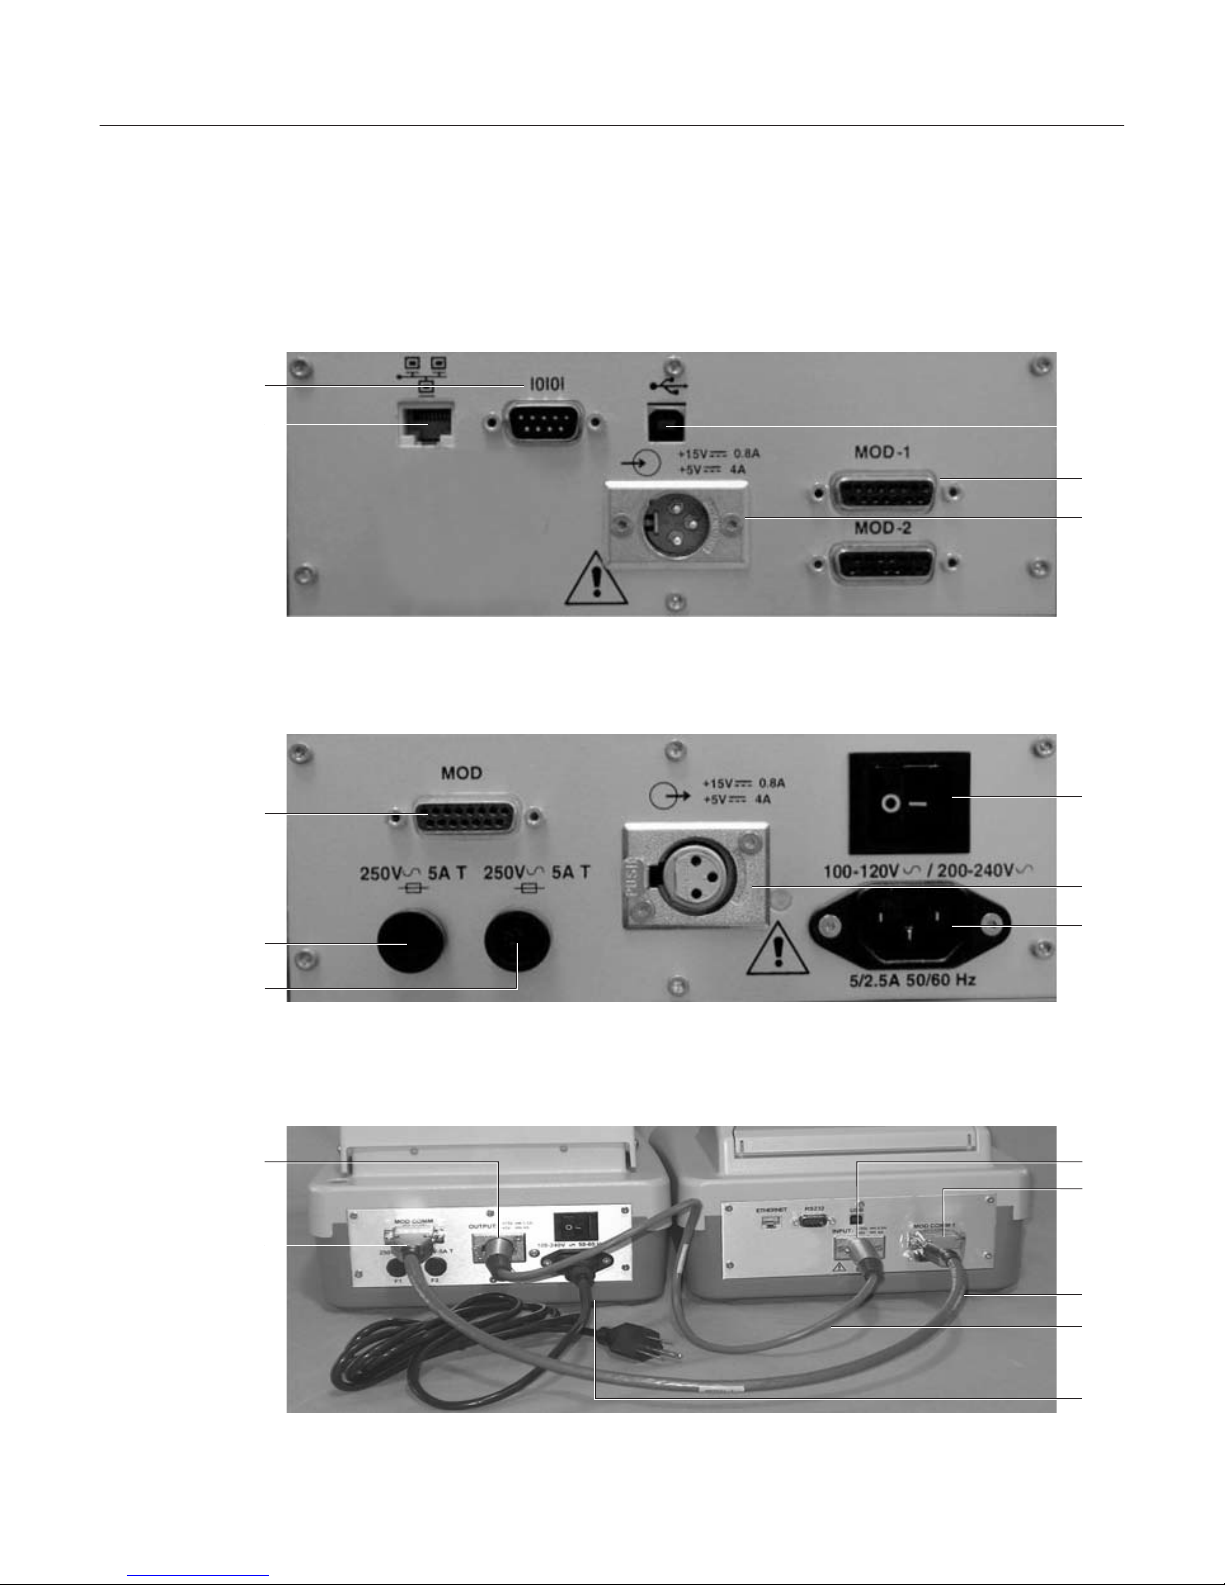
Control Module Connector Panel
Heater Module Connector Panel
Cables Connected to Control and Heater Modules
11
23
20
21
11
15
12
21
20
25
26
27
24
22
10
13
14
15
10

Assembly
The analyzer does not come fully
assembled. The control and heater
modules are placed next to each other
and may be placed on either side of
each other. Assemble the modules and
individual components in the following
order:
1. Open the heater hood using the handle
and install the pan shield so that the
center hole fits over the center ring of
the cavity base plate.
2. Next, place the stem of the pan support
through the center ring of the base
plate and into the hole of pan receiver.
3. Remove the foam from the heater
chamber.
4. Connect the power module cable
between the control module and the
heater module, observing the pin orientation.
5. Connect the inter-module cable
between the control module (MOD
COMM 1 connector) and the heater
module, observing the connector orientation.
6. If multiple heater modules are used,
install the additional inter-module
cables from each heater module to the
control module inter-module cable
receptacle (MOD COMM 1-2). Refer to
the chapter in this manual on multimode operation for instructions specific
to operating multiple heater modules.
12

Choosing a Suitable Location
In order to ensure that the analyzer
functions properly, select a location that
meets the following requirements:
§ Permissible ambient environment
– Temperature:
+15 to +40°C (59°F to 104°F)
– Relative humidity:
10 – 85%, non-condensing
– Altitude:
0 to 2,000 meters (0 to ~6562 ft)
§ The analyzer is intended for indoor use.
§ Place the analyzer on a rigid, horizontal
surface, preferably free of vibration.
§ Avoid drafts and excessive temperature
fluctuation.
§ Locate the analyzer away from
flammable materials.
Connecting the Moisture Analyzer
to AC Power
This Class I Equipment (grounded
type) analyzer contains a universal
self-adjusting power supply rated to
100-120/200-250V~5/2.5A 50/60 Hz.
Check that this voltage matches your
local line voltage. If your voltage is not
within this rating, do not connect the
power cord to the power supply.
Danger
! The analyzer may only be operated
using the original power cord supplied.
Please do not use it with an extension
cord. The wall socket must be grounded.
The AC Power mains supply fluctuations
are not to exceed +/–10% of the nominal supply voltage. The (Over Voltage)
Category II for transient over voltages
is EN 61010-1. The pollution Degree 2
is supplied EN 61010-1. The analyzer
is rated to Normal Protection (not
protected against harmful ingress of
moisture).
§ Insert the power cord that with the
analyzer into the power input receptacle
on the back of the heater module.
§ Then plug the power cord into a wall
socket.
§ Turn the analyzer on by moving the
power switch on the back of the analyzer
to the On position. The analyzer will
briefly proceed through a self-diagnostic
routine and then display the standby
screen. It will automatically enter a
warm-up period as noted on the screen.
Should the analyzer display any warnings, consult the troubleshooting section of this manual, or call Sartorius.
13

Leveling the Moisture Analyzer
In order to function properly, the heater
module should be horizontal. The heater
module has a level vial. You can tell
when the analyzer is level by checking
whether the bubble is centered in the
vial.
§ Check that all four feet are in the fully
inserted position.
§ Observing the level vial, rotate one foot
at a time to level.
Adjust control module so that it does
not rock.
Note
The heater module must be re-leveled
each time the analyzer is moved.
LMA110S Keypad
Warm-up
To enable the analyzer to function
optimally, plug it in and leave it powered on for a minimum of 15 minutes.
The analyzer is preprogrammed to alert
the operator that the device is in the
warm-up period. It is best to allow the
analyzer to complete this warm-up
period before testing samples; however,
this may be overridden by pressing the
Enter key.
14
Numeric
keys
Soft keys
Navigational
keys

Operating Design
The Mark 3 LTE analyzer is operated
through the keypad in conjunction
with the quarter VGA screen. The
Mark 3 LTE is preprogrammed with
operational and setup software that
enables the analyzer to be custom
configured to meet the particular
needs of the application, environment or user ability.
Keypad
The analyzer has two membrane
type keypads: the main keypad and
a second that also serves to sealed
the display. The keypad consists of
three dedicated keys, numeric keys,
navigational keys and soft keys.
The following is a description of
each of the key functions:
Dedicated keys:
Each key has a particular function.
Pressing the key once will initiate the
desired action.
Initiates the testing of a sample
Stops a test in progress
u Press to finalize the entry of
a numeric value
– Selects the highlighted menu
selection in a list
– From the Standby screen will print
the last result
Start|Stop
Numeric and Decimal Point Keys
Numbers from 0 to 9 and the decimal point are pressed either to enter
a specific numeric value or to make
a selection from a list of menu
choices preceded by a number.
Navigational Keys
Four keys are intended to move the
highlighted cursor on the screen in
a particular direction.
Moves the cursor to the right
Moves the cursor to the left
Moves the cursor up
Moves the cursor down
15

Soft keys:
The functionality of these keys will
change depending on what is on the
display. A label on the display just
above the key will describe the key
function at the moment.
Some examples of the soft keys are
as follows:
Prints various items corresponding to
the menu selection
Toggles a highlighted selection
between on and off
Used to select a drying program from
the Program menu
Access to all setup parameters from
the Setup menu.
Setup
Recall
On/off
Print
Used to select an operator. Name will
be printed on the results printout.
Display will return to the previous
menu.
Display will return to the Standby
menu.
Deletes the single highlighted
character when entering alphanumeric program names and operators.
Sets analyzer to the weighing mode.
Weigh
Delete
Users
16
Display Modes
The large quarter VGA display is designed to make
operation and setting up the analyzer easy through
of detailed information in clear descriptions, choices
or menus. The analyzer will display information in
several different formats as described below:
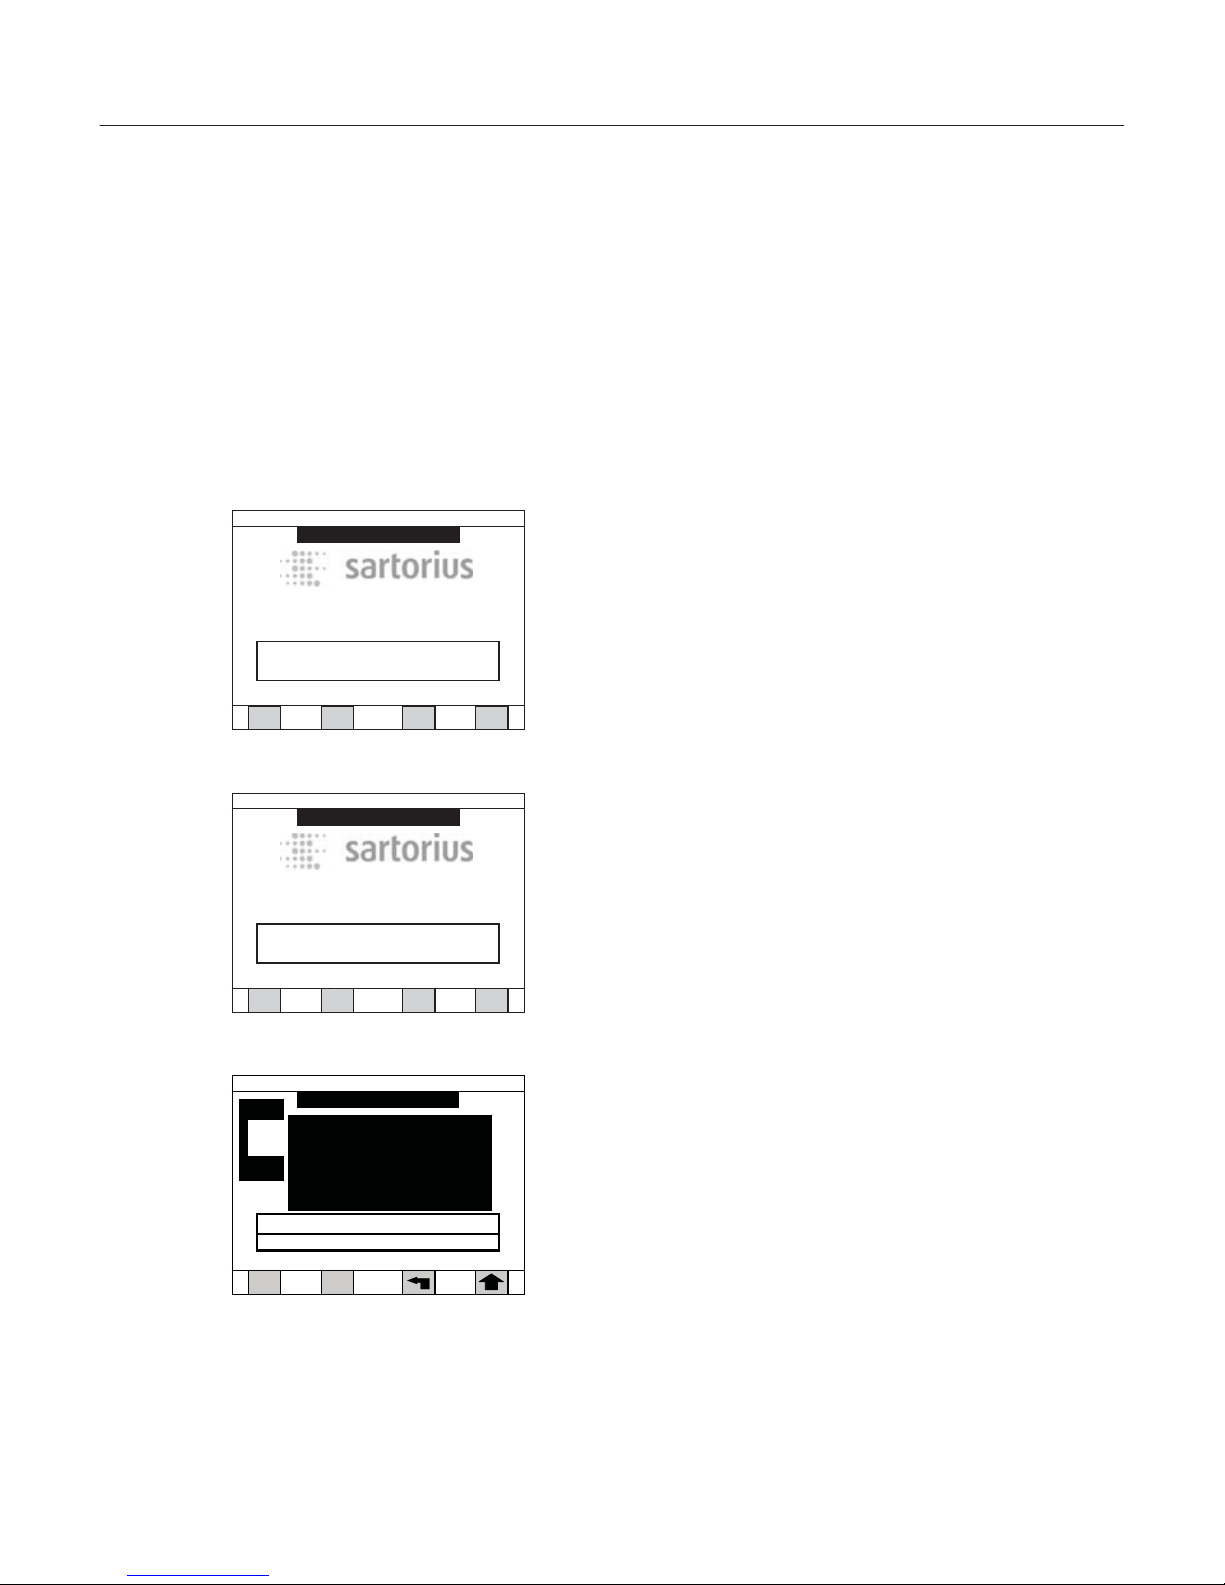
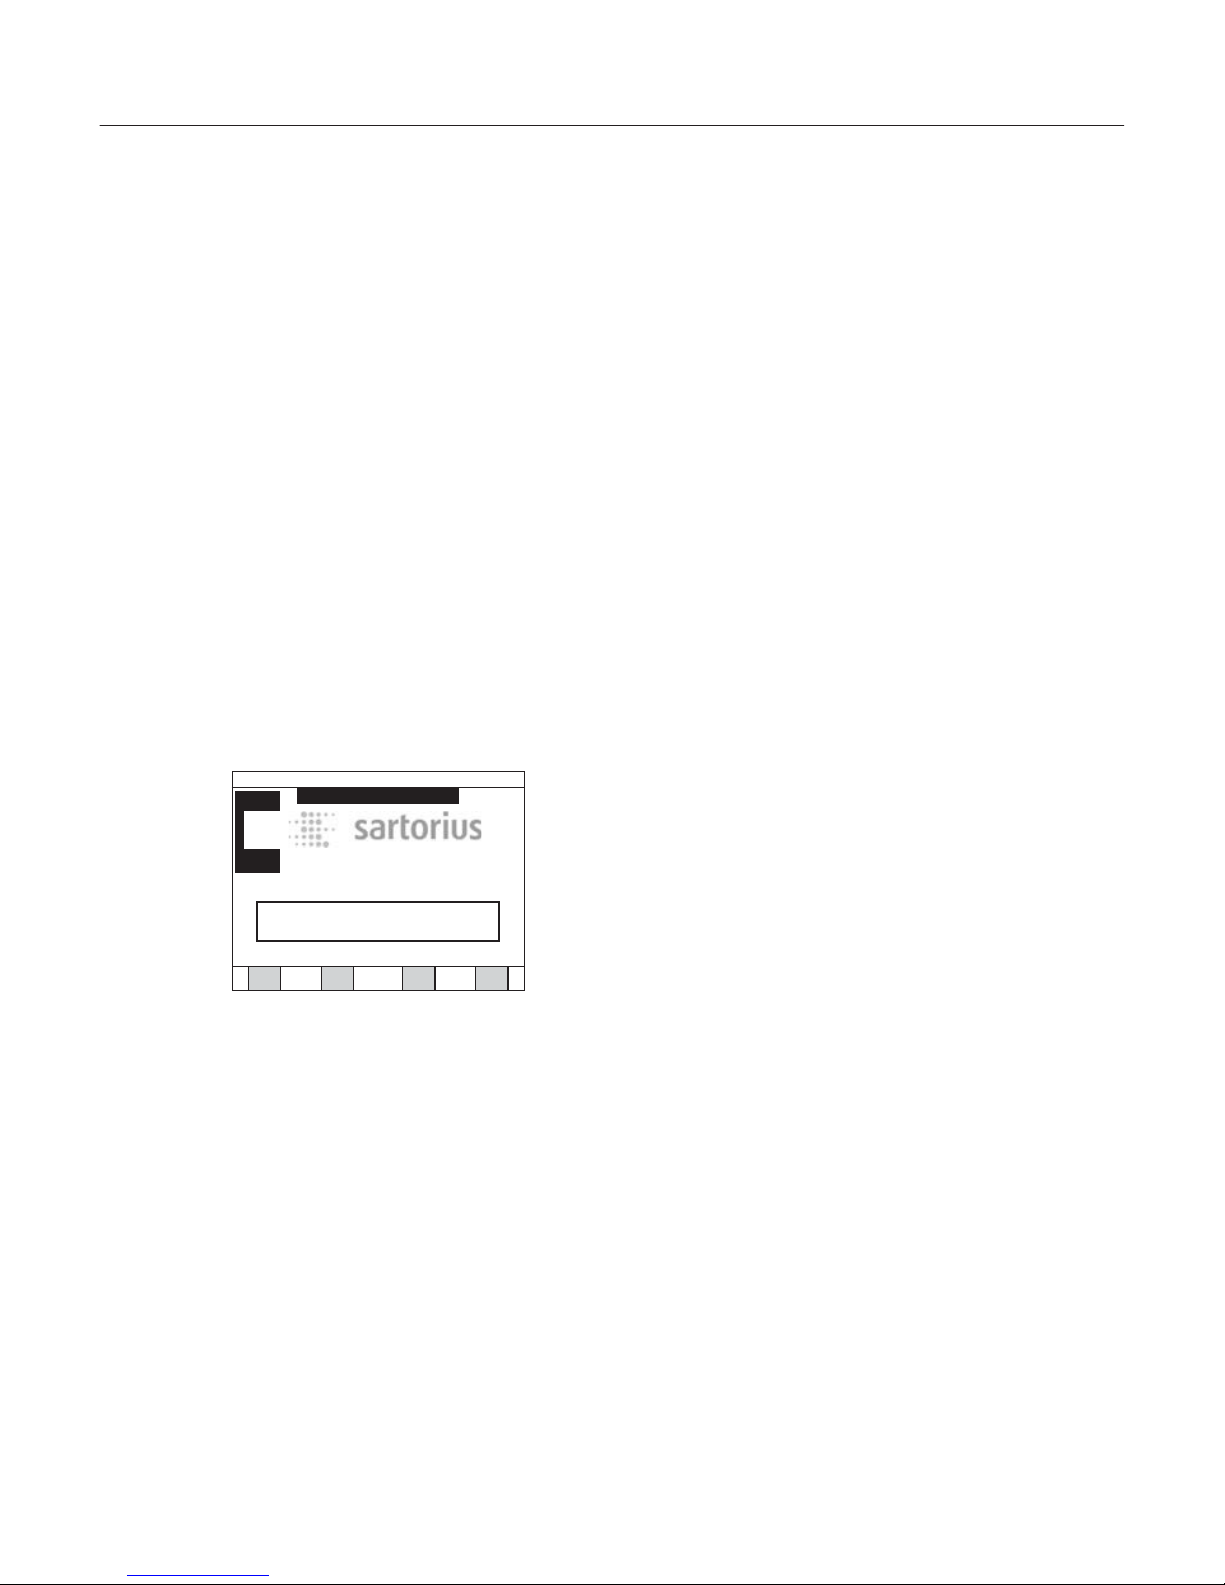
Warm-up:
This mode is entered whenever the analyzer is powered on. The warm-up period ensures that the analyzer is properly conditioned before testing is begun.
During warm-up the screen will be mostly blank.
Standby (or Test Done):
In this mode the analyzer is in an ideal status.
This is the period between testing samples.
The temperature of the chamber is controlled to a
particular level based on the Standby temperature
set for the last test performed. The screen will display
the program name, date and time, temperature and
the last result, if a test has been run.
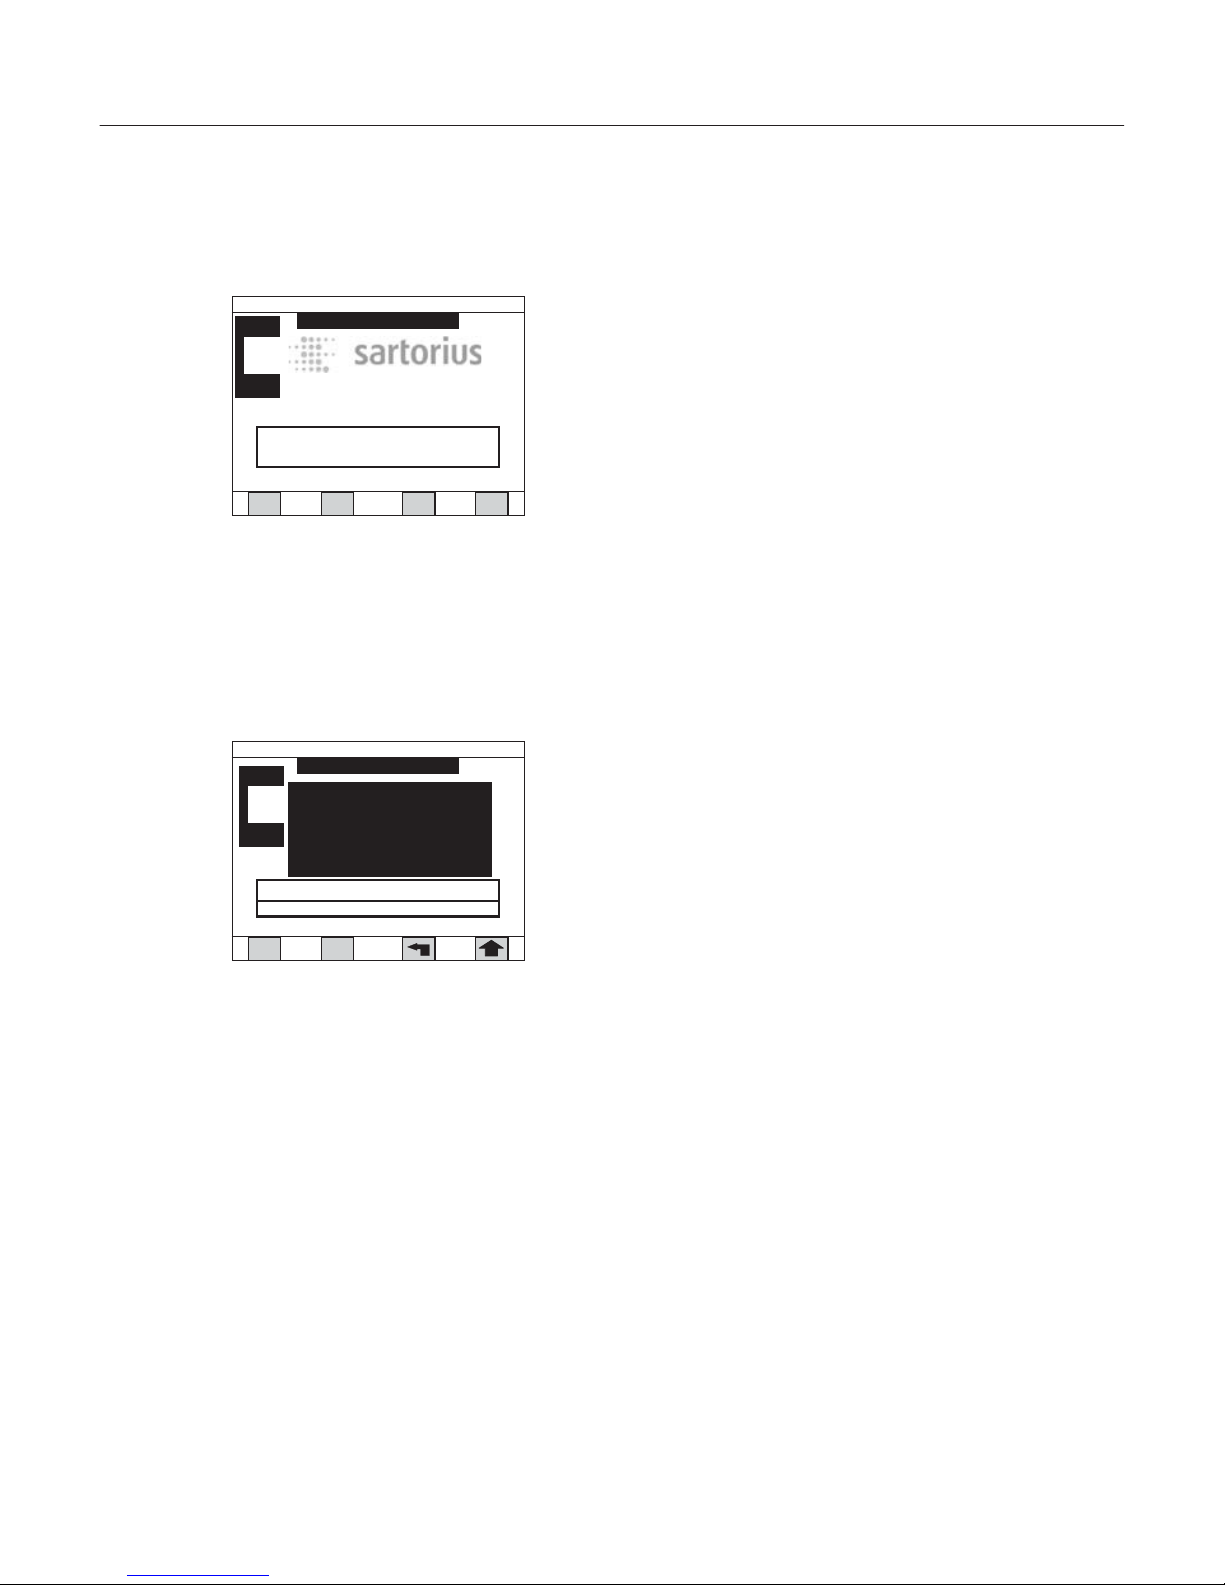
Test:
This mode is entered when the Start|Stop key
is pressed to initiate a test. The screen is similar in
design to the Standby mode but also includes
prompts to guide the operator through the steps
of adding a sample, entering an ID, if desired, and
displaying the result when the test is completed.
Default
05/01/2011 02:14 PM
WARMIN G UP
Ver. 1.00.00
Mark 3 LTE Moisture Analyzer
Recall
Setup
Weigh
Users
Press ENTER to override warm up
Default
05/01/2011 02:14 PM
WARMIN G UP
Ver. 1.00.00
Mark 3 LTE Moisture Analyzer
Recall
Setup
Weigh
Users
Press ENTER to override warm up
Add sample to pan
DRY MILK POWDER
05/01/2011 02:14 PM
Module 1
0.000
g
Zero
{ }
0%
Standby
Current
60
57
17
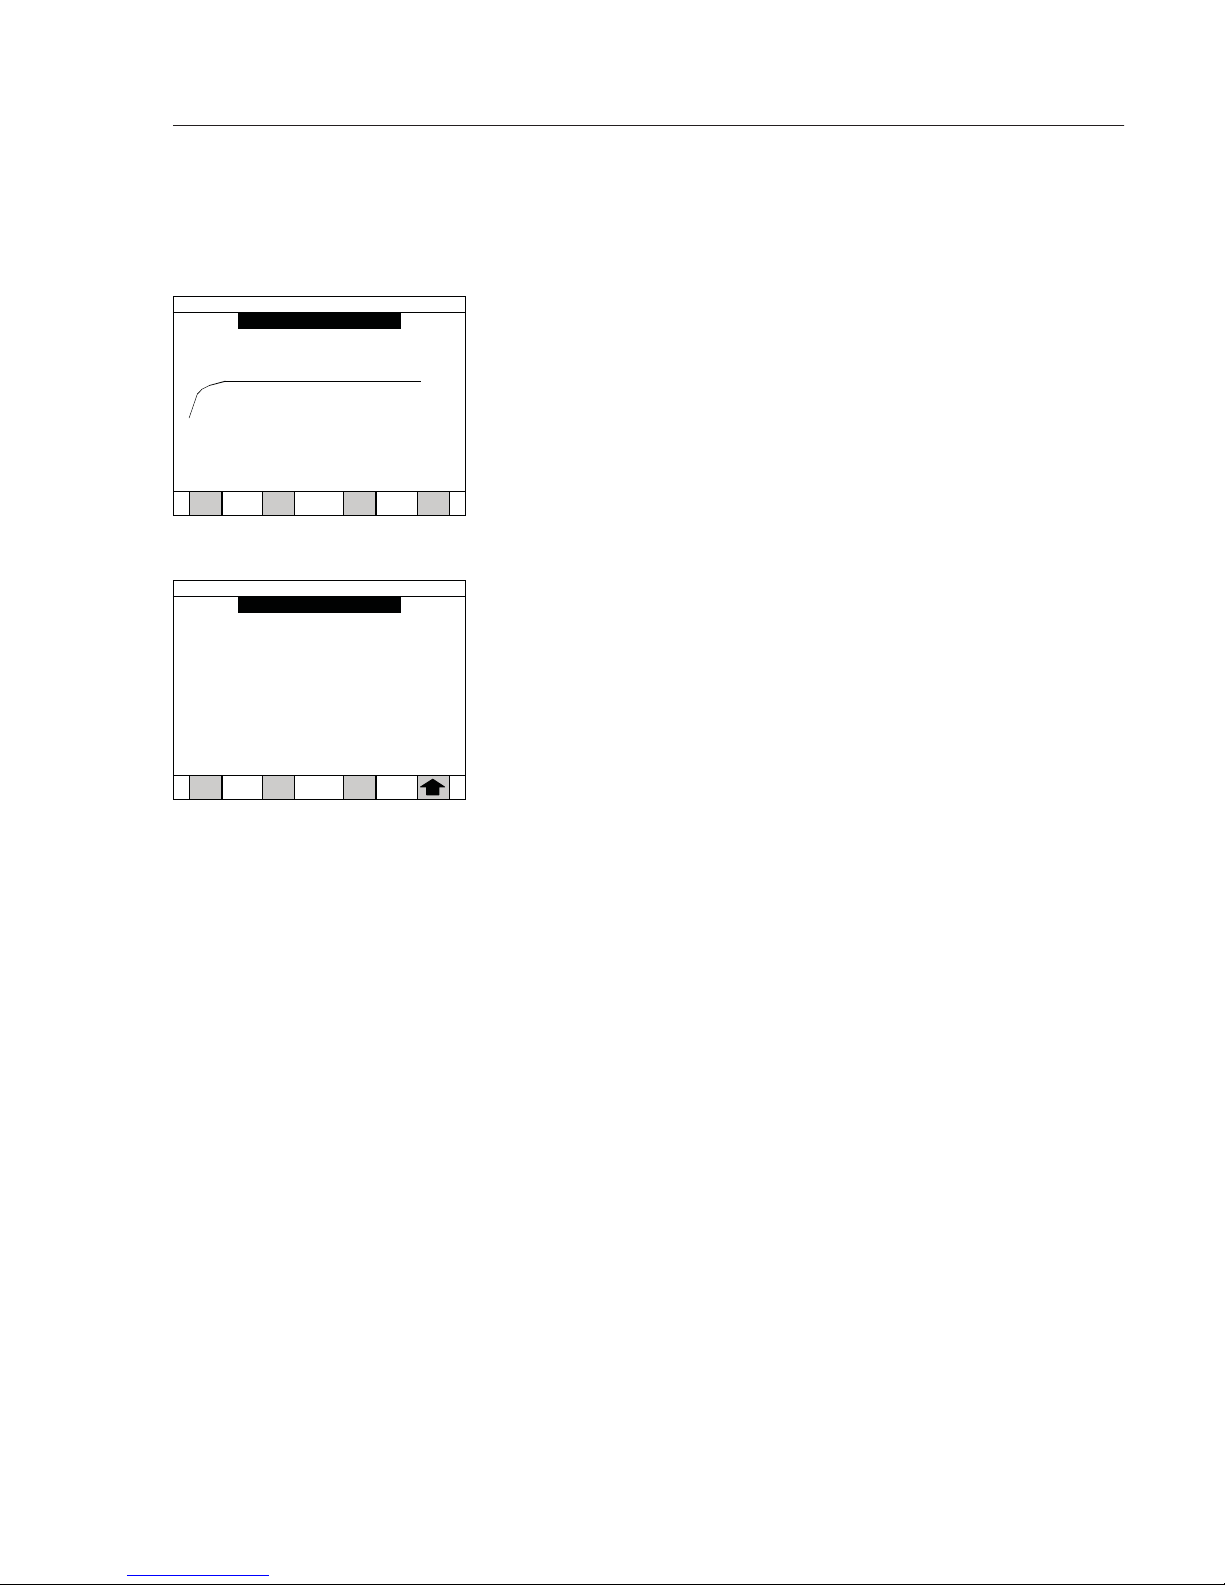
Graph:
The graph mode can be entered during or after
a test to show a graph of the weight versus time,
temperature versus time, or result versus time.
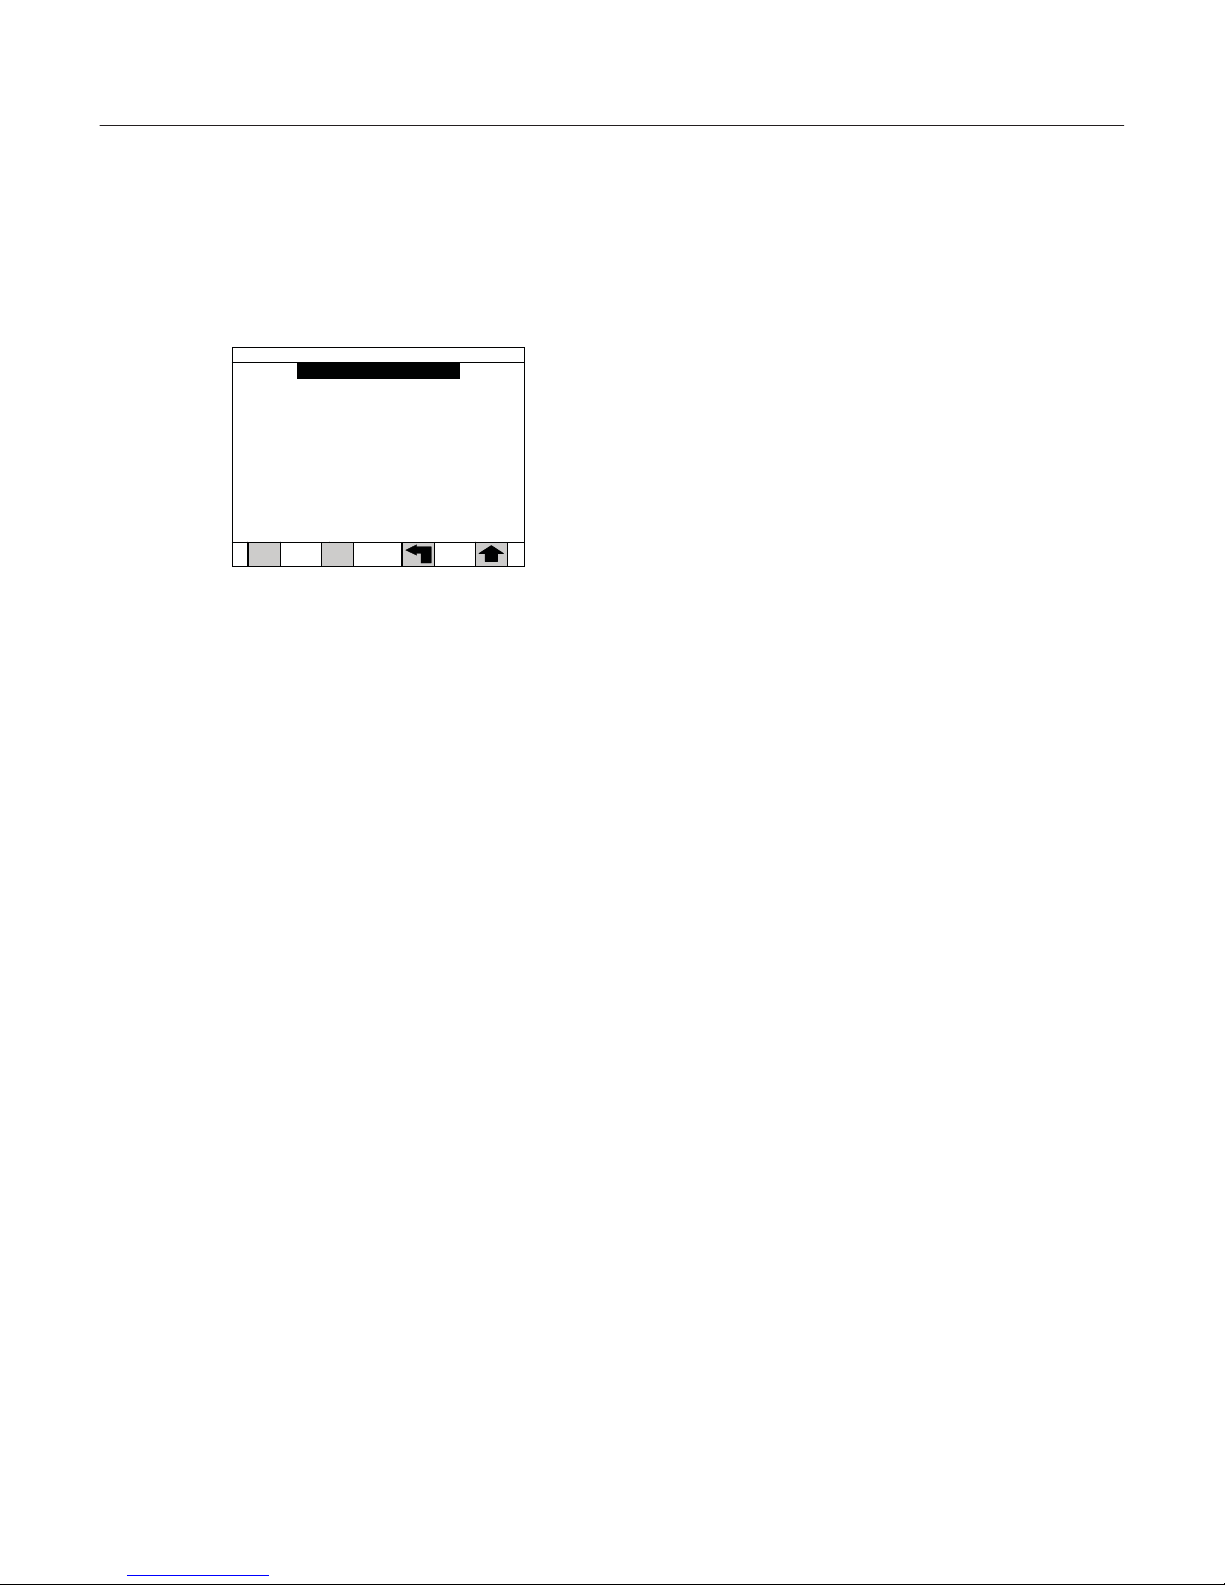
Data Log:
The data log mode is used for reviewing past
samples that have been tested. The log of samples
can be sorted, or samples can be manually selected
to perform statistical calculations.
18
Temperature / time
DRY MILK POWD ER
05/01/2011 02:14 PM
Print Result
210
30
0.5 1.0 1.5 2.0 2.5 3.0
3.5 4.0 4.5 5.0 min
25.67 %
View Data Log
Down Up
Top
Dry milk power 05/01/2011 02:10
3.45%M 6.7min 672001
Dry milk power 05/01/2011 02:02
3.50%M 6.8min 672002
Dry milk power 05/01/2011 01:53
3.47%M 7.0min 672003
05/01/2011
02:18 PM
Menu Structure
The Mark 3 LTE set up software is structured
according to a series of menus. The Setup menu lists
several topics of instrument setup. By drilling down
into these topics, sub-menus will allow specific
choices to be selected. See the Setup section for
details.
How to navigate in the menu structure:
§ To select a menu and to drill down to more specific
information:
– Press the preceding number key of this listing or
– Use the navigational arrow keys to highlight the
desired listing first, then press the Enter key
§ To return to a preceding menu level, press the arrow
soft key. Subsequent presses will return you to the
Standby screen.
§ To return to the Standby screen, press the bent
arrow if one is available from that screen. To choose
a specific selection option or to enter a value:
A selection can be made by:
– Pressing the preceding number key of this listing,
or
– Using the navigational arrow keys to highlight the
desired listing first, then press the Enter key.
§ How to make a numeric input:
– Use the numeric keypad to enter a value fist, then
press the Enter key.
19
1)Program manage
2)Data log
3)Modify operators
4)Results printout format
5)Time and date
6)Communication ports
7)Conserve mode
8)Security
9)Audio & video
0)Module port scan
. ) Service
Setup Menu
05/01/2011 02:18 PM

Data Output
LED Status Lights
The Mark 3 LTE heater module has two
LED lights on the front left corner that
visually indicate the status of the analyzer. The left LED shows the status of
the balance. The right LED indicates the
status of the heating function.
Each LED may have three colors:
red, green or amber. Red is generally
associated with a warning state and
shows that corrective action must be
taken. Green is generally associated with
a positive condition, indicating you can
proceed. Yellow generally indicates
a transitional period or that the test
is in progress.
20
Warmup
Balance LED
Heater LED
Warming up
Rapidly ashing RED Rapidly ashing RED
Ready to test
Steady GREEN Steady GREEN
Heater in conserve mode
Steady GREEN Steady YELLOW
Standby
Balance LED Heater LED
Sample in chamber
heating cavity (chamber)
Flashing YELLOW Flashing GREEN
Test mode Balance LED
Heater LED
Test in progress Steady YELLOW
Steady YELLOW
Test done
Flashing YELLOW Flashing GREEN
Sample loading
Below target
Flashing GREEN
Steady GREEN
Within target Flashing YELLOW
Steady GREEN
Above target Flashing RED
Steady GREEN
Diagnostics Balance LED
Heater LED
Failed diagnostics
Flashing RED
Flashing RED
The Mark 3 LTE Moisture Analyzer is designed to
test moisture content in a large variety of materials
including powders, pastes and liquids. The performance of the analyzer is dependent upon selecting
optimum drying analysis conditions for your specific
sample type. Sartorius will support you in finding
the set of testing parameters (referred to as a program) you need for your specific tests. On request,
we will provide a chart of the parameters and test
results we have compiled by testing samples in our
laboratory and comparing the results to those
obtained by reference methods.
If our chart of applications shows a drying program
that is not already programmed into your analyzer,
you may do this yourself by following the instructions under Setup in this manual.
Standby Screen
During warm-up, your analyzer will enter the Standby mode and the Standby screen will be displayed.
It is from the Standby (or Test Done) screen that all
functions of operating the analyzer, including testing samples and setting parameters, take place.
The standby screen shows the following
information:
§ Program name
§ Time and date
§ Standby temperature and actual temperature
§ Various soft keys for options that are available
depending on the security setup options engaged
§ Warnings that will need to be addressed before
testing
21
Operating
the Moisture Analyzer
DRY MILK POWDER
Standby
Recall Setup
Weigh Users
Press START key to begin test
Standby
Current
60
59
05/01/2011 02:18 PM
Ver. 1.00.00
Mark 3 LTE Moisture Analyzer

Functions available from the Standby screen:
§ Press Start|Stop key to initiate a test
§ Press Recall soft key to change the program to
be used for testing a sample
§ Press User soft key to select an operator name
(feature must be turned on in Setup)
§ Press Setup soft key to enter the Setup menu in
order to make all parameter changes
§ Press Graph soft key to display a graph
§ Press Weigh soft key to use as a balance
Standby-Temperature
!
with a New Program
When creating a new program, the standby
temperature setting from the previous drying
program is used automatically by the analyzer.
Example:
You have created a new program for drying
a temperature-sensitive sample at low temperature. The analyzer uses the standby temperature, e.g. 165°C, from the previous program.
You must call up the standby temperature
parameter and change the temperature value.
If you forget performing this setting, your analyzer is always too hot before starting the test.
22

Default Drying Program
Your analyzer is delivered with a default drying program. The drying program contains all the specific
parameters to test a sample including temperature,
endpoint, unit of measure, standby temperature,
etc. You will notice if you are in the default program
or a specific material program by the program name
at the top left of the display.
23
Program name: Default
Temp1=105C
Time1=Off
Temp2=Off, Time2=Off
Slope=0.050%/1 minute, Actual
Start delay=0 second
Standby temp=60C, Ideal weight=5g, Lock=Off
Target limits=Off
Mode=Standard

Recalling a Program
Drying programs are stored for easy access at a later
time. This eliminates the need to change parameters
for frequently tested samples. Up to 60 drying programs can be stored. Creating and storing a program
is described under Developing a Drying Program.
To recall a stored program, perform the following
steps:
1. From the Standby screen, press the RECALL soft key.
The screen will change to the first page of stored
programs as show below.
2. To display programs on the next pages, press the
Down soft key.
3. Press the number(s) key followed by the Enter key
for the number that precedes the program name.
As an alternative, use the arrow keys to highlight the
desired program name, then press Enter. The display
will change to the Standby screen with the new
program in the top left corner. This program will be
used for the next test. If a blank program is entered,
the analyzer will use the last valid program that
was entered.
Note
As a shortcut, it is not necessary to have the desired
program listed on the display to recall it. Simply
enter the desired number from your memory on the
first page and press the Enter key.
24
11)
2) Whey Protein 12)
)3
1 )3
)4
1
)
4
)5
1
)
5
)6
1
)6
)71 )7
)8
1
)
8
)91
)9
)0
2
)01
Programs
Program #:
Down
1)
Dry Milk Powder
Up
_
Top
05/01/2011 02:18 PM
Testing a Sample
A test can only be initiated from the Standby or Test
Done screen. The program that will be used is shown
in the upper left corner.
To test a sample, perform the following:
1) Open the hood of the heater module using the
handle on the front of the analyzer.
Caution
The heater hood will be hot during testing and the
standby mode.
Only touch the heater hood by the handle.
2) Place one pan onto the pan support and close the
heater hood.
3) From the Standby screen, press the Start|Stop key.
The display will change to the test mode as shown
on the left. The balance will automatically tare and
show zero weight on the screen.
Note
If you forgot to place the pan onto the balance
ahead of time, you may open the heater hood now,
add the pan, close the heater hood and manually
tare by pressing the Zero soft key.
25
DRY MILK POWDER
Standby
Recall Setup
Weigh Users
Press START key to begin test
Standby
Current
60
59
05/01/2011 02:18 PM
Ver. 1.00.00
Mark 3 LTE Moisture Analyzer
Sampling
DRY MILK POWDER
Module 1
0.000
g
Zero
{ }
0%
Standby
Current
60
57
05/01/2011 02:19 PM

4. At the “Add sample to pan” prompt, open the heater
hood and begin adding sample to the pan. A bar
graph on the display will guide the operator to place
the correct amount of sample as set by the ideal
weight parameter of the drying program. Continue
adding sample until the beeper sounds, indicating
that the sample amount is within 10% of the ideal
weight. The exact weight is also displayed on the
screen.
5. At the “Close heater hood” prompt, close the heater
hood. The balance will capture the initial weight of
the sample “Sampling” and then show that the test
is in progress. The display will change to show current information including the elapsed time and the
current percentage weight loss in the units as specified in the drying program.
Note
To stop the test in progress, press the Start|Stop key.
The optional printer will begin to print as the test
begins. Printout information can be selected in
Setup menu under Printer.
At the end of the test the display will show “Test
Done.” The result will stay on the screen as well as
be printed. The analyzer will enter the Standby
mode until the next test is initiated.
26
Dry Milk Powder
Test in Progress
0.01
% Moisture
Elapsed time: 00.10
Graph
Press STOP key to stop test
Temp 1
Current
105
71
05/01/2011 02:18 PM
Press START key to begin test
Dry Milk Powder
Test Done
3.47 % Moisture
Result time: 7.0 min
ID: 126399.1
Target: Pass
Recall Setup
Graph User
Warning: Sample on pan
Standby
Current
105
105
05/01/2011 02:18 PM

The display will prompt you, the
operator to remove the sample
before the next sample can be tested. Open the hood and carefully
remove this sample using tweezers,
and while the hood is open, add
the sample pan for the next sample
to be tested.
Caution
!
The sample is hot during and after
the test. Remove the sample with
care by using the tweezers provided
with the analyzer. Do not touch
any internal part of the heating
chamber or pan shield as they will
be very hot.
Press the Start|Stop key to begin the
next test using the same program.
Note
The analyzer balance must be calibrated
before putting the unit into routine
service. See the section on Calibrate
Balance in this manual.
27
 Loading...