

Page 1
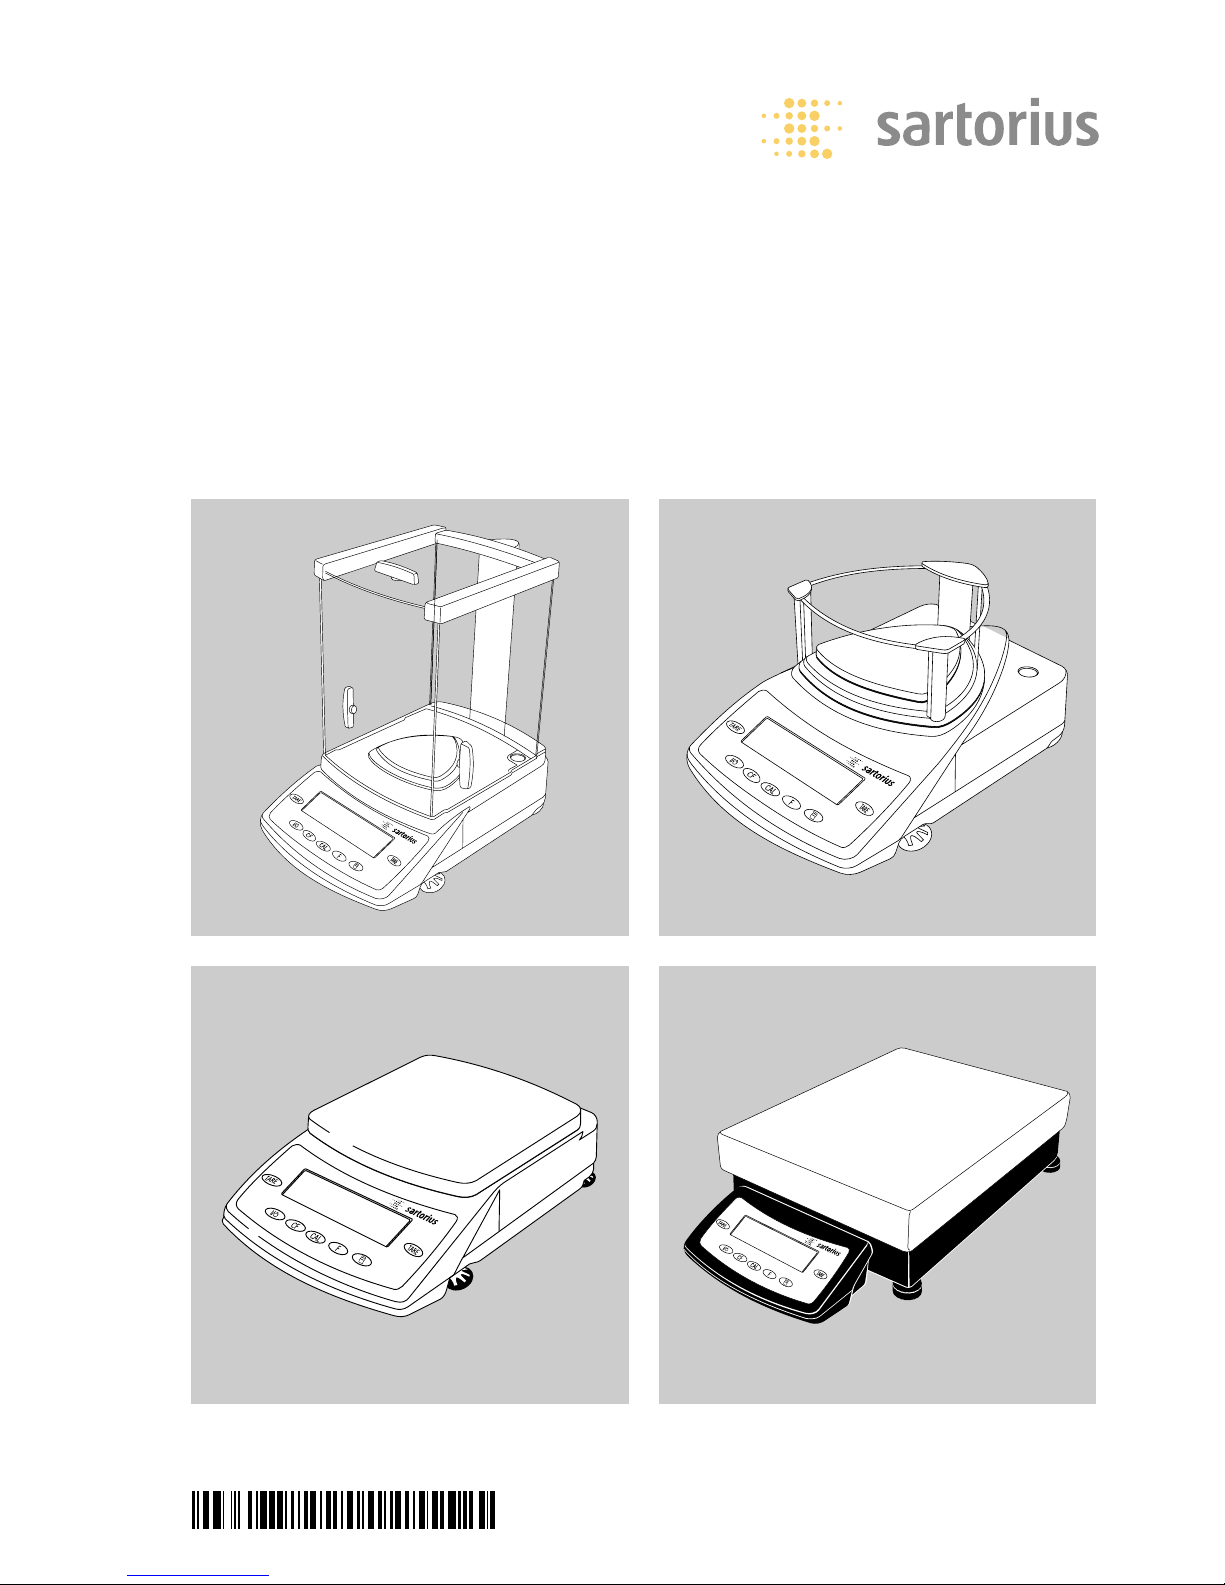
Operating Instructions
Sartorius Expert Series
LE Models
Electronic Micro-, Analytical and Precision Balances
98648-011-40
Page 2

Contents
3 Warnings and Safety
Precautions
4 Getting Started
5 Installation
13 Operation
13 Overview of Display and
Operating Elements
14 Basic Weighing Function
16 Below-Balance Weighing
18 Calibration and Adjustment
23 Configuration
23 Printing the Parameter Settings
24 Setting the Parameters
(Menu Codes)
25 Parameter Settings (Overview)
30 Setting IDs, Time, Date and
Display Brightness
33 Application Programs
34 Net-total Formulation
38 Counting
38 Reference Balance/Scale
for Counting
41 Weighing in Percent
43 Animal Weighing/Averaging
45 Toggling between Weight Units
46 Generating a Printout
48 ISO/GLP-compliant
Printout/Record
50 Interface Port
54 Data Input Format
57 Pin Assignment Charts
58 Cabling Diagram
59 Troubleshooting Guide
61 Care and Maintenance
63 Instructions for Recycling
64 Overview
64 Specifications
73 Accessories (Options)
76 Declarations of Conformity
79 EC Type-approval Certificate
80 Plates and Markings
2
Page 3

Warnings and Safety Precautions
Safety Instructions
§ Please read these operating instructions
carefully before using your balance to
prevent damage to the equipment.
! Do not use this equipment in hazardous
areas/locations.
! The balance housing may be opened
only by Sartorius service technicians
who have been trained at the factory.
! Make sure you disconnect the balance
from power before connecting or disconnecting peripheral devices to or
from the balance.
! If you operate the equipment under
ambient conditions that require higher
safety standards, you must comply with
the installation regulations applicable in
your country.
When cleaning your balance, make
sure that no liquid enters the balance
housing; use only a slightly moistened
cloth to clean the balance.
Installation
! Make sure the voltage rating printed on
the AC adapter is identical to your local
line voltage.
– Proceed with extreme caution when
using pre-wired RS-232 connecting
cables, as the pin assignments may not
be compatible with Sartorius equipment.
Check all pin assignments against the
cabling diagrams and disconnect any
lines that do not match.
! If there is visible damage to the equip-
ment or power cord, disconnect the
equipment from power and lock it in a
secure place to ensure that it cannot be
used for the time being.
– Connect only Sartorius accessories and
options, as these are optimally designed
for use with your balance. The operator
shall be responsible for any modifications to Sartorius equipment and for
any connection of cables or equipment
not supplied by Sartorius and must
check and, if necessary, correct these
modifications and connections. On
request, Sartorius will be happy to provide information on operating specifications (in accordance with the Standards
for defined immunity to interference).
$ Do not open the balance. If the seal is
broken, this will result in forfeiture of
all claims under the manufacturer's
warranty.
$ If you have any problems with your bal-
ance, please contact your local
Sartorius office, dealer or service center.
IP Rating:
Industrial protection ratings for the
housing:
– LE34001S, LE34001P and LE16001S
models meet IP44 requirements
– Other models with readabilities > 10 mg
meet IP53 requirements
– Models with readabilities < 1 mg meet
IP32 requirements
– The AC adapters meet IP20 require-
ments
3
Page 4

Getting Started
Storage and Shipping Conditions
– Do not expose the balance to extreme
temperatures, moisture, shocks, blows
or vibration.
Unpacking the Balance
§ After unpacking the equipment, please
check it immediately for any external
damage
$ If damage is evident, refer to the
instructions under “Safety Inspection"
in the chapter entitled “Care and
Maintenance."
$ Save the box and all parts of the
packaging for any future transport.
Disconnect all cables before packing
the balance for shipping!
Equipment Supplied
– Balance
– Weighing pan
– AC adapter
– Dust cover
Additional equipment for models
with readabilities < 0.1 mg and LE…-DS
models:
– Electronics box
(models LE26P, LE225D only)
– Draft shield with base plate
– Shield ring
Additional equipment for models with
a readability of 1mg:
– Draft shield with shield plate
– Weighing pan receptor
– Base plate
Installation
Choose a location that is not subject
to the following negative influences:
– Heat (heater or direct sunlight)
– Drafts from open windows and doors
– Extreme vibrations during weighing
– Excessive moisture
Conditioning the Balance
Moisture in the air can condense on
the surfaces of a cold balance whenever
it is brought into a substantially warmer
place. If you transfer the balance to
a warmer area, make sure to condition
it for about 2 hours at room tempera-
ture, leaving it unplugged from AC
power.
Seal on Balances Verified for Use in
Legal Metrology in the EU*:
EU legislation requires that a control
seal be affixed to verified balances
of accuracy class K. The control seal
consists of a sticker with the “Sartorius"
logo. If the seal is broken, the verifica-
tion becomes null and void and the bal-
ance must be re-verified.
* Including the Signatories of the Agree-
ment on the European Economic Area
4
Page 5

Installation
Balances with an Analytical Draft Shield
!Check the sliding lock device on the back of the
draft shield; make sure it is in the “open" position
(to the right).
§ Position the draft shield carefully on the balance
§ Secure the draft shield by pressing lightly on the
draft shield base and moving the sliding lock device
to the left
§ Place components inside the chamber in the
following order:
– Base plate
– Shield ring
– Pan support (not with model LE225D)
– Weighing pan
5
Page 6

Connecting Model LE26P, LE225D(-0CE) to the
Electronics Box
– Plug the male connector on the cable into the
female connector on the electronics box
!Do not exchange the balance or electronics box with
a component of a different balance!
Balances with a 3-Sided Draft Shield
§ Place draft shield on the balance with the cover
opening in front on the right
§ Turn the draft shield clockwise until it is firmly in
position
§ Place components inside the chamber in the
following order:
– Base plate
– Weighing pan receptor
– Weighing pan
$ To access the weighing chamber from the side,
remove side panels as desired
6
1
2
Page 7
7
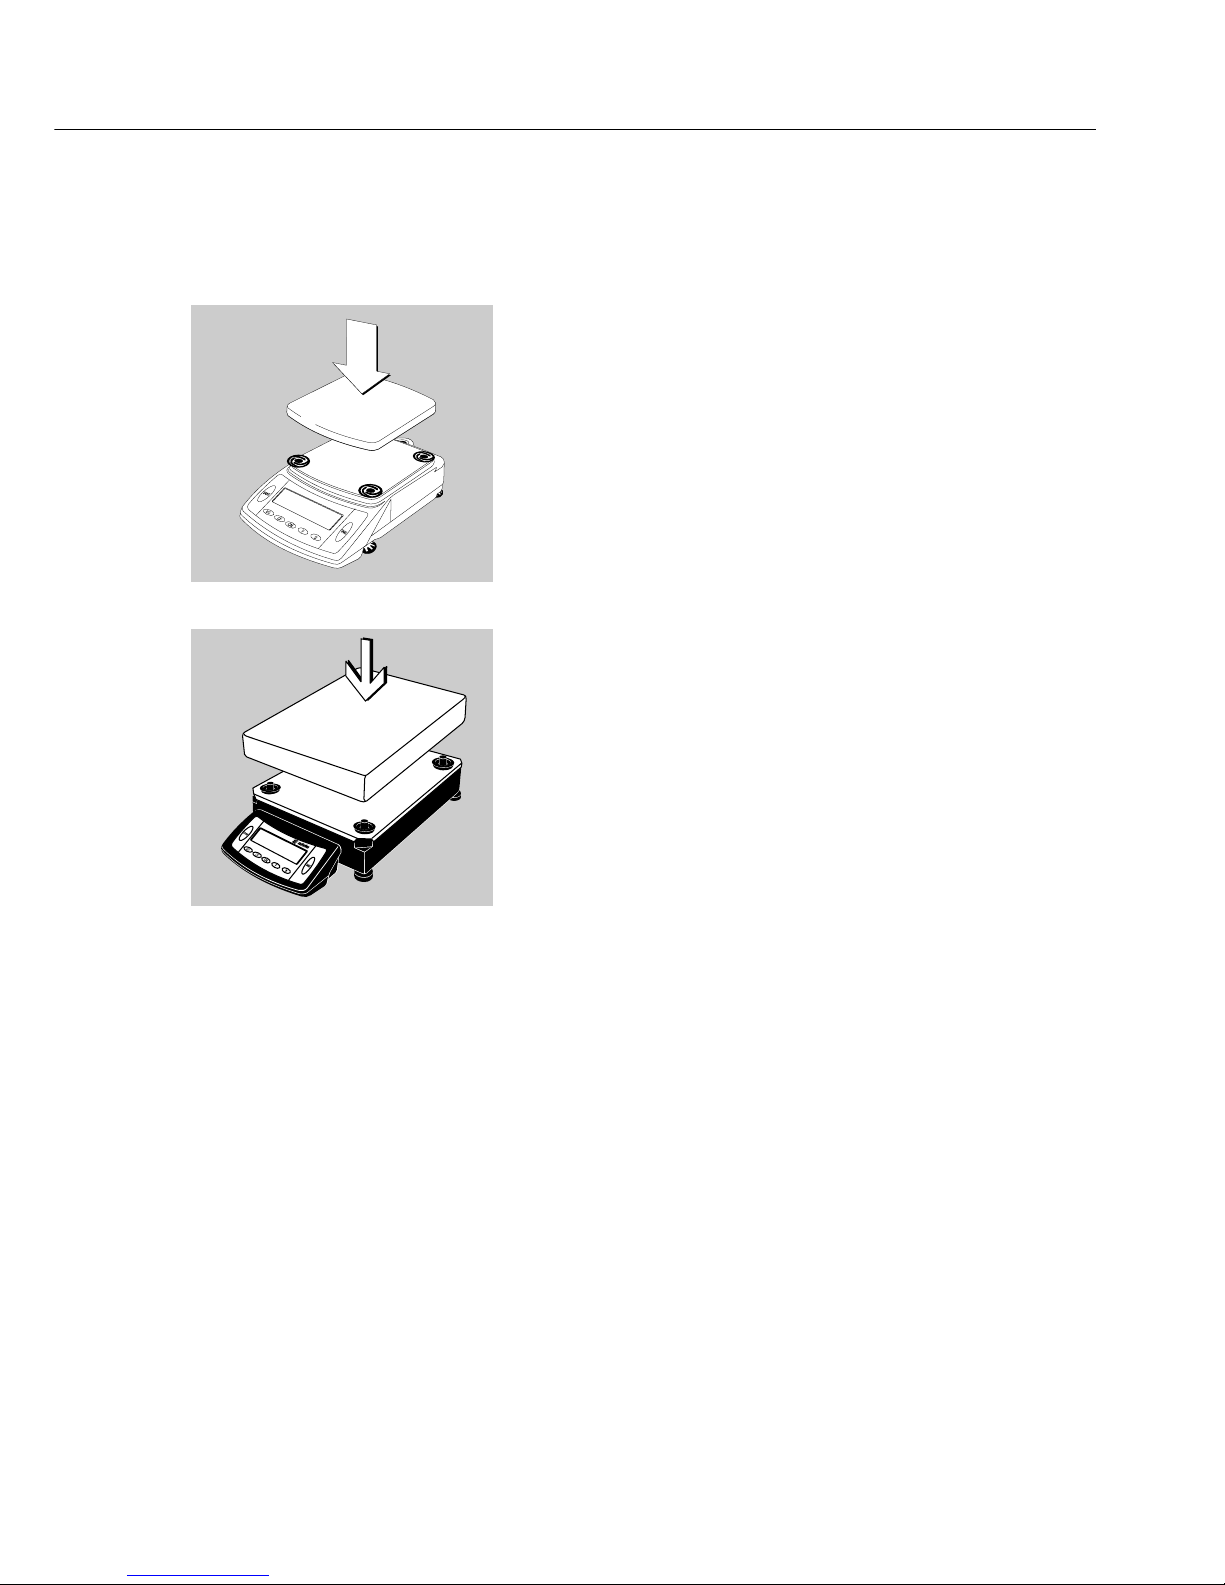
Balances with a Rectangular Weighing Pan and
a Weighing Capacity up to 10 kg
§ Place the weighing pan on the balance
Balances with a Rectangular Weighing Pan and a
Weighing Capacity over 10 kg
§ Place the weighing pan on the balance
Page 8
8
Connecting the Balance
to AC Power/Safety Precautions
$ Use only original Sartorius equipment.
The AC adaptor meets the requirements of IP20 in
accordance with EN 60529.
$ For AC adapters with higher protection
ratings or for an external rechargeable
battery pack, please see “Accessories."
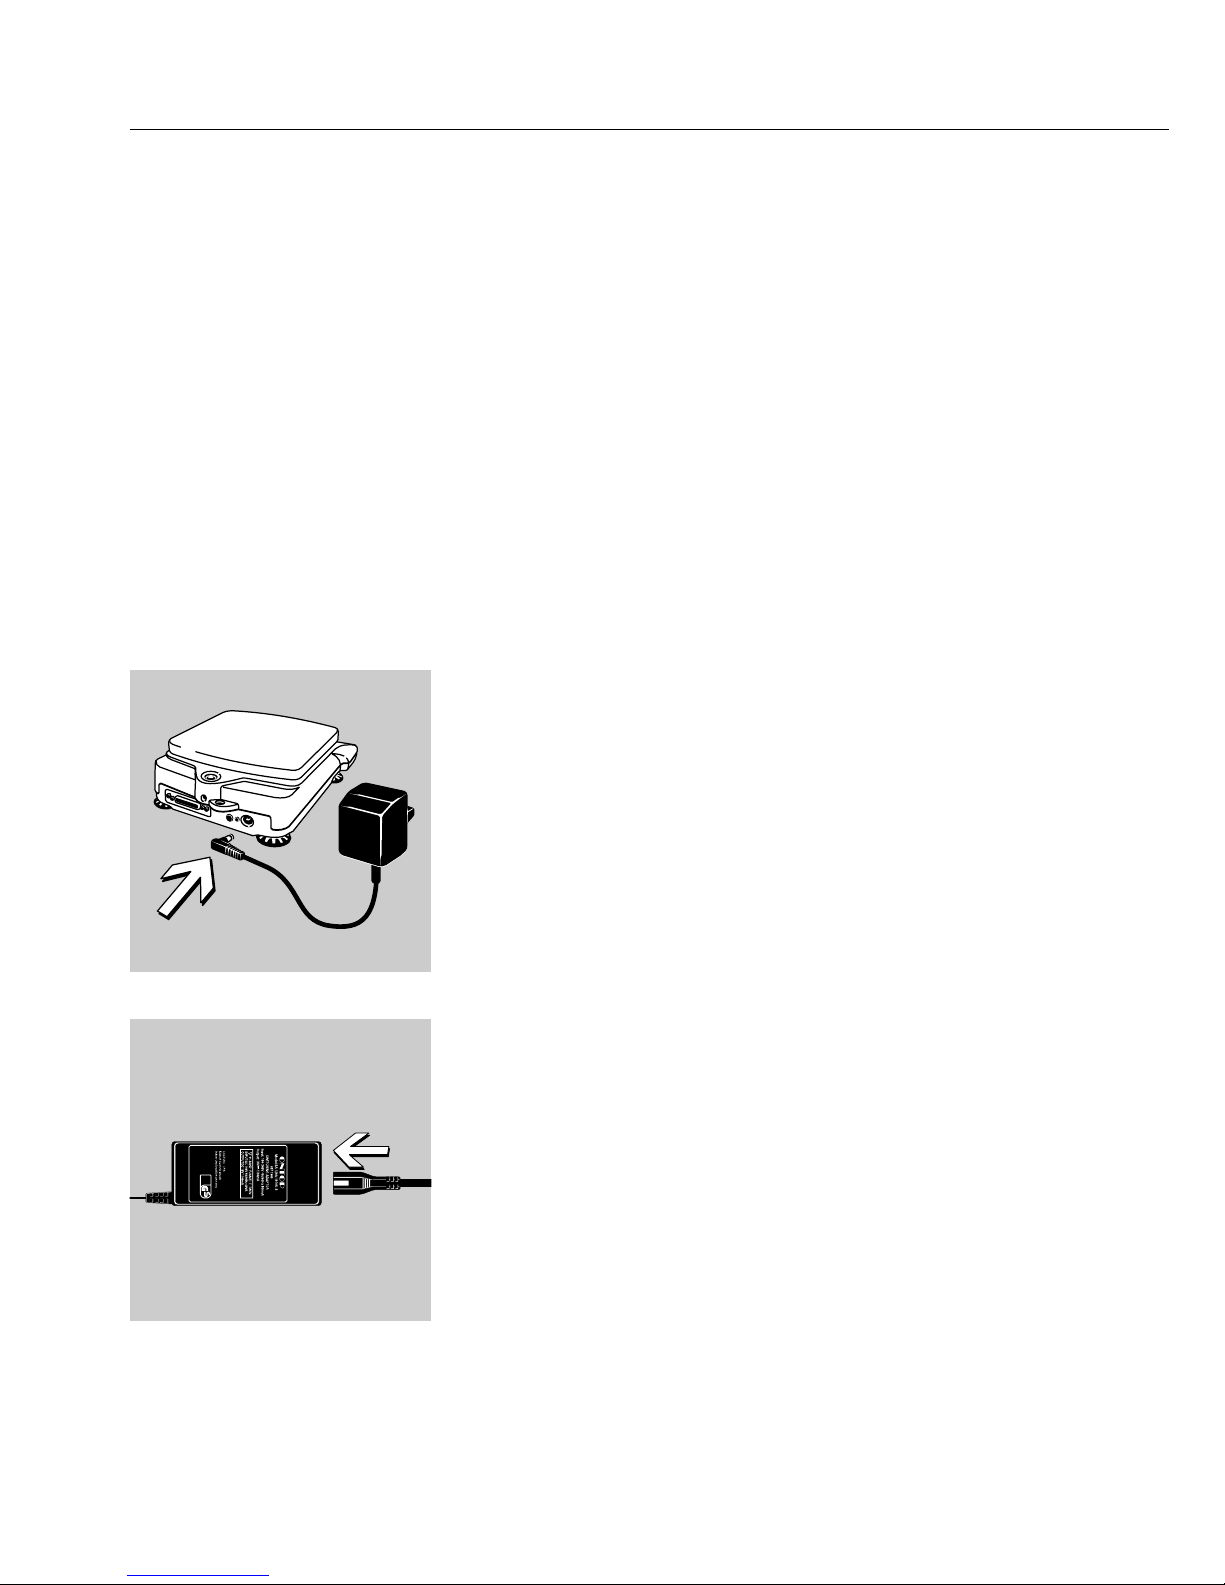
LE26P, LE225D:
§ Insert the right-angle plug from the AC adapter into
the jack on the electronics box.
All Other Balances with a Weighing
Capacity up to 10 kg:
§ Insert the right-angle plug from the AC adapter into
the jack on the balance.
Connect the power cord to the AC adapter (on balances with weighing capacities up to 10 kg)
$ Use an original Sartorius AC adapter
with a wide input voltage range (100 to 240 V~),
order no. 6971966, and replaceable
power cord:
6900900 (Europe)
6900901 (US/CDN)
6971945 (UK)
6900905 (AUS)
6900902 (ZA)
Page 9
9
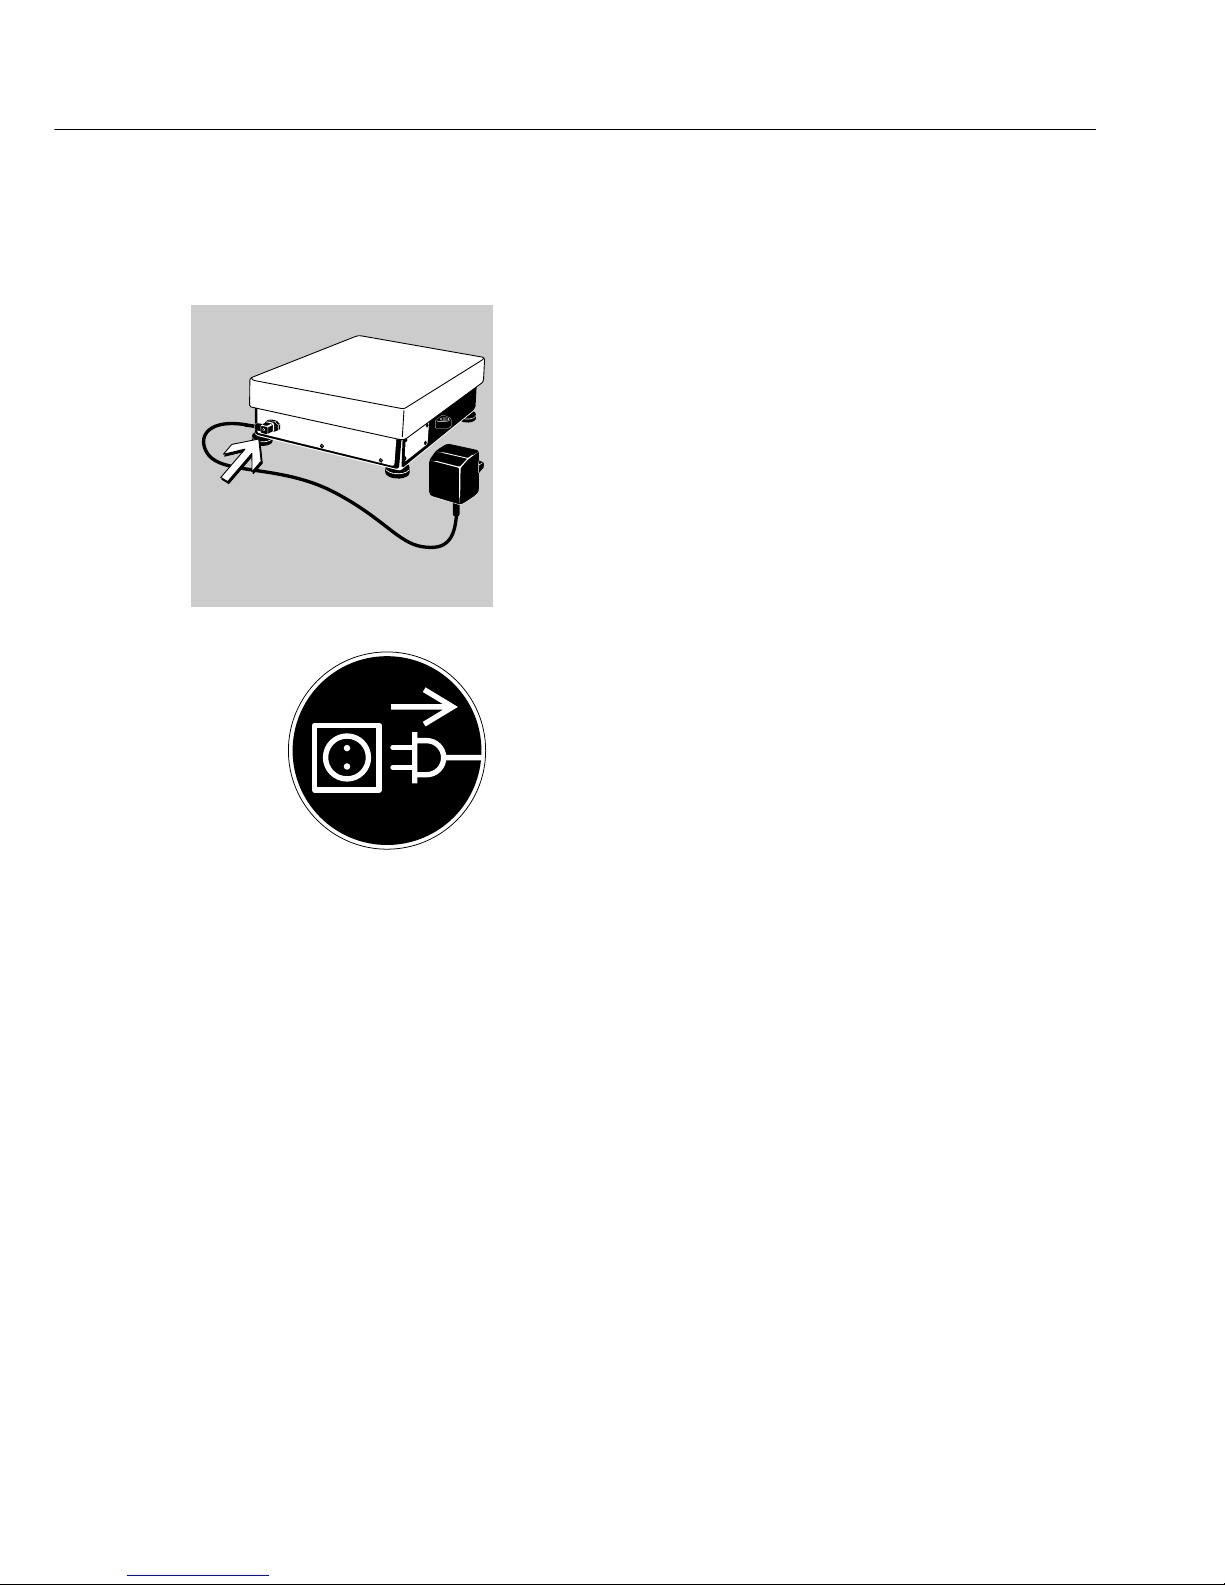
Balances with a Weighing Capacity over 10 kg:
● Insert the right-angle plug into the jack and tighten
the screw.
Safety Precautions
Plug-in AC Adapter:
The AC adapter rated to Class 2 can be plugged
into any wall outlet without additional safety
precautions.
Benchtop AC Adapter 6971966:
The AC adapter rated to Class 1 can be plugged into
any wall outlet without additional safety precautions.
The ground terminal is connected to the balance
housing, which can be additionally grounded for
operation. The data interface is also electrically
connected to the balance housing (ground).
Note:
This equipment has been tested and found to
comply with the limits pursuant to part 15 of FCC
Rules. These limits are designed to provide reasonable protection against harmful interference. This
equipment generates, uses and can radiate radio
frequency energy and, if not installed and used
in accordance with these instructions, may cause
harmful interference to radio communications.
For information on the specific limits and class of
this equipment, please refer to the Declaration
of Conformity. Depending on the particular class,
you are either required or requested to correct the
interference.
Page 10

If you have a Class A digital device, you need
to comply with the FCC statements as follows:
“Operation of this equipment in a residential area
is likely to cause harmful interference in which case
the user will be required to correct the interference
at his own expense.”
If you have a Class B digital device, please read and
follow the FCC information given below:
However, there is no guarantee that interference
will not occur in a particular installation. If this
equipment does cause harmful interference to radio
or television reception, which can be determined
by turning the equipment off and on, the user is
encouraged to try to correct the interference by
one or more of the following measures:
– Reorient or relocate the receiving antenna.
– Increase the separation between the equipment
and receiver.
– Connect the equipment into an outlet on a
circuit different from that to which the receiver
is connected.
– Consult the dealer or an experienced radio/TV
technician for help.
Before you operate this equipment, check which
FCC class (Class A or Class B) it has according to
the Declaration of Conformity included. Be sure
to observe the information of this Declaration.
10
Page 11
Connecting Electronic Peripheral Devices
● Make sure to unplug the balance from AC power
before you connect or disconnect a peripheral device
(printer or PC) to or from the interface port.
Warmup Time
To deliver exact results, the balance must warm up
as listed below after initial connection to AC power
or after a relatively long power outage.
– Model LE26P…: at least 4 hours
– All other precision and analytical models:
at least 30 minutes
Only after this time will the balance have reached
the required operating temperature.
Using Verified Balances in Legal Metrology:
$ Allow the equipment to warm up for at least
24 hours after initial connection to AC power.
Leveling the Balance
Purpose:
– To compensate for unevenness at the place of
installation
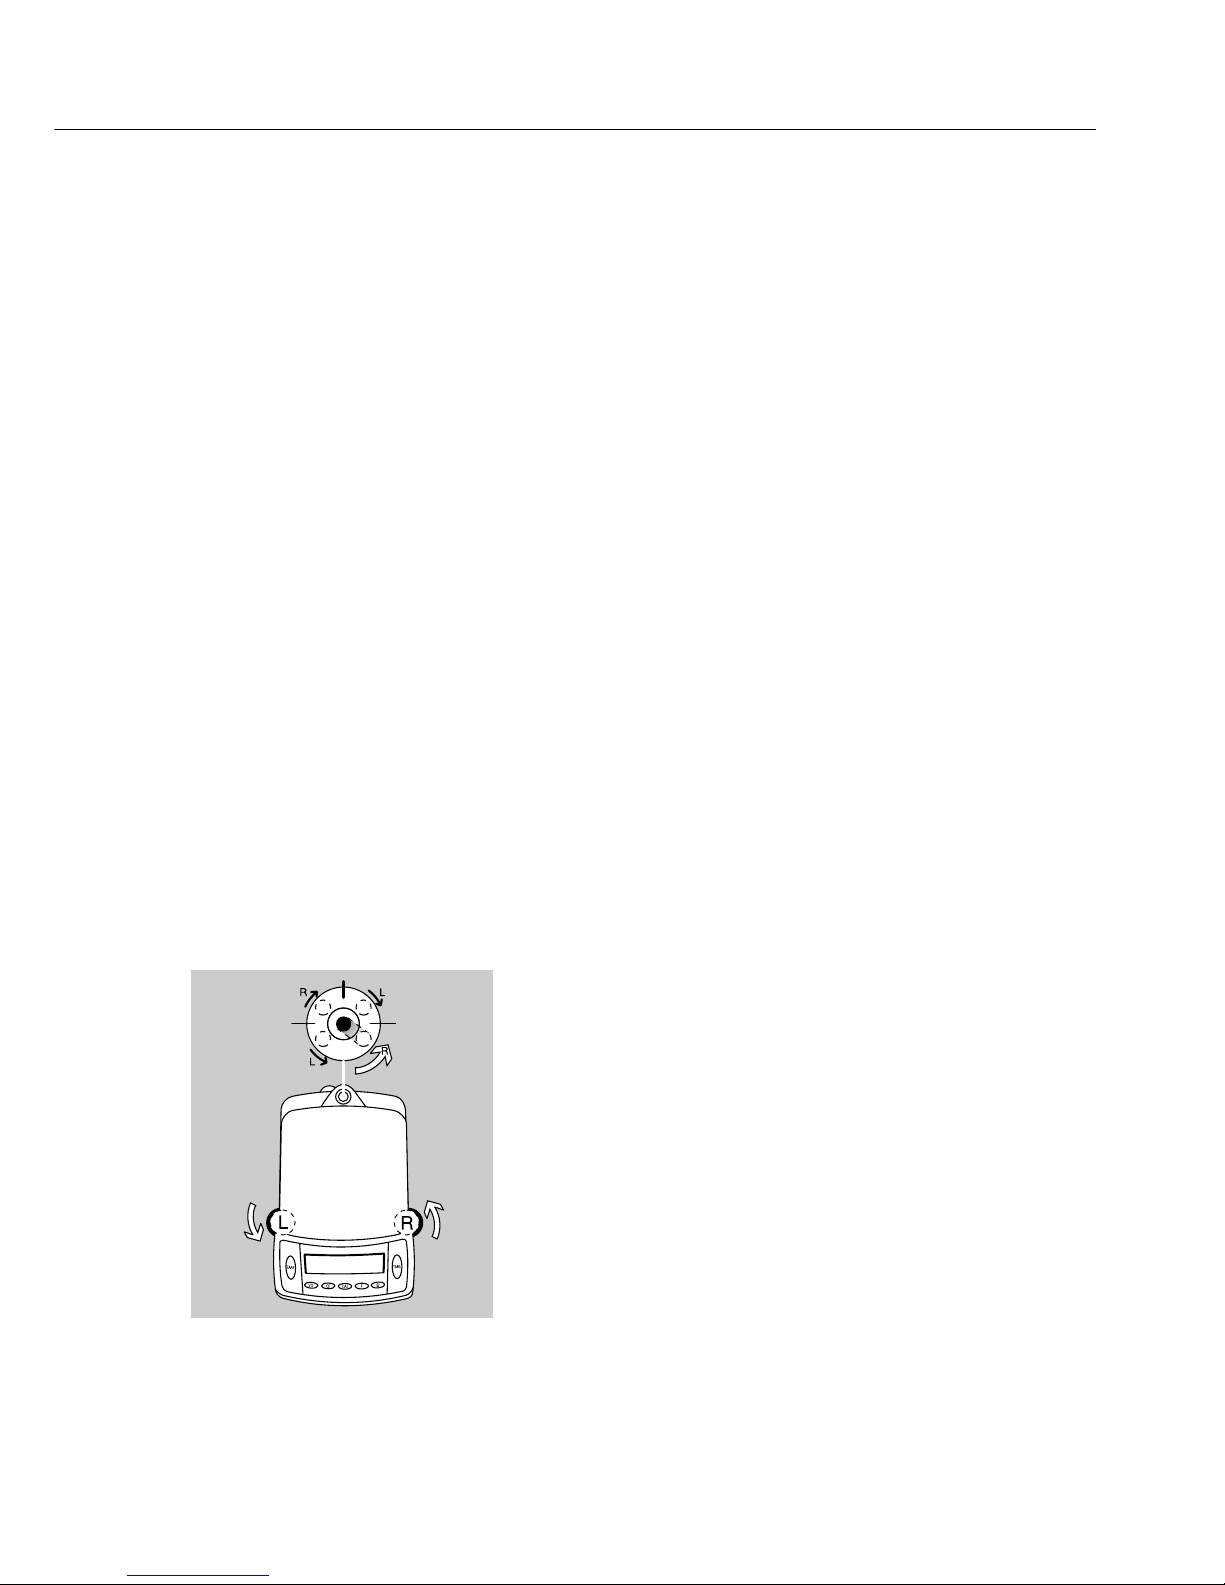
Leveling Balances with a Weighing Capacity
up to 10 kg
Only the 2 front feet are adjusted to level the
balance.
● Retract the two rear feet (only on models with
a rectangular weighing pan).
● Turn the 2 front feet as shown in the diagram until
the air bubble is centered within the circle of the
level indicator.
> In most cases this will require several adjustment
steps.
● For weighing heavy samples: Extend the 2 rear feet
until they touch the surface on which the balance
rests (only on models with a rectangular weighing
pan).
11
Page 12
12
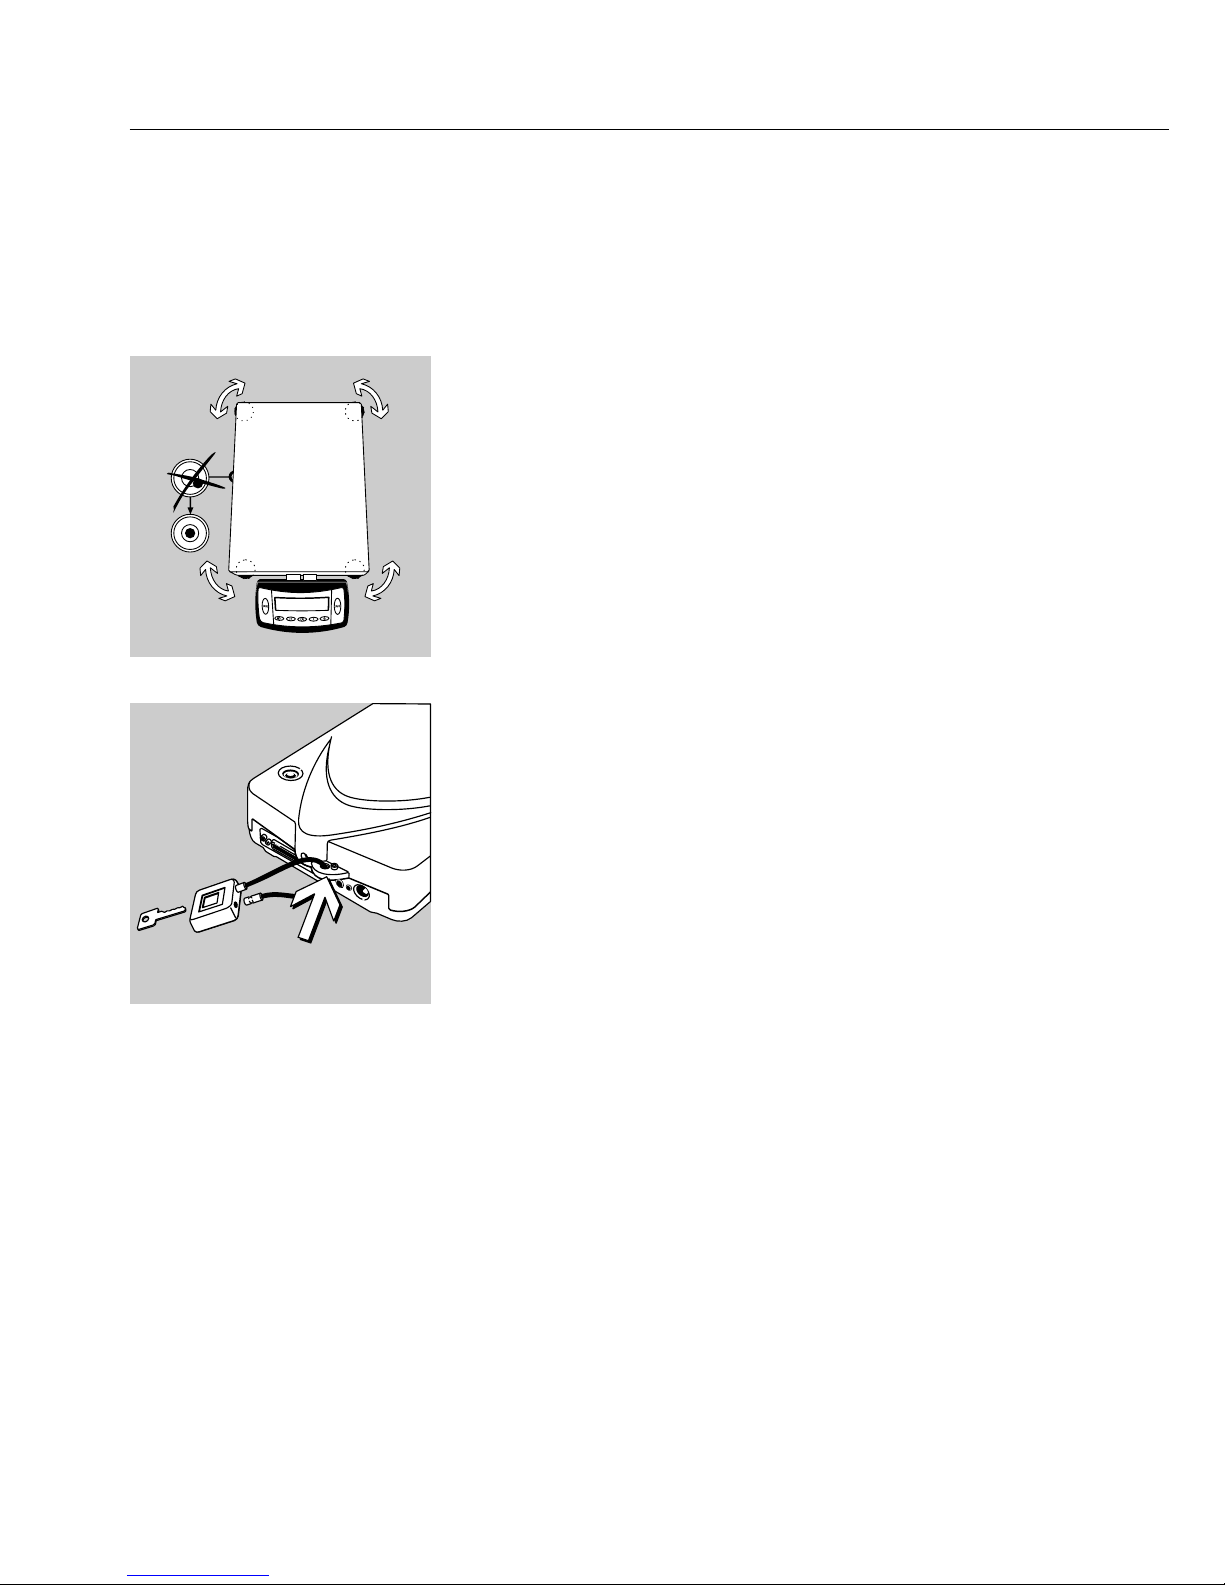
Leveling Balances with a Weighing Capacity
over 10 kg
● Adjust the leveling feet until the air bubble
is centered within the circle on the level indicator.
Antitheft Locking Device on Balances
with a Weighing Capacity up to 10 kg
● To secure the balance at the place of installation,
fasten a chain or a lock to the lug located on the
rear panel of the balance.
Page 13
13
Operation
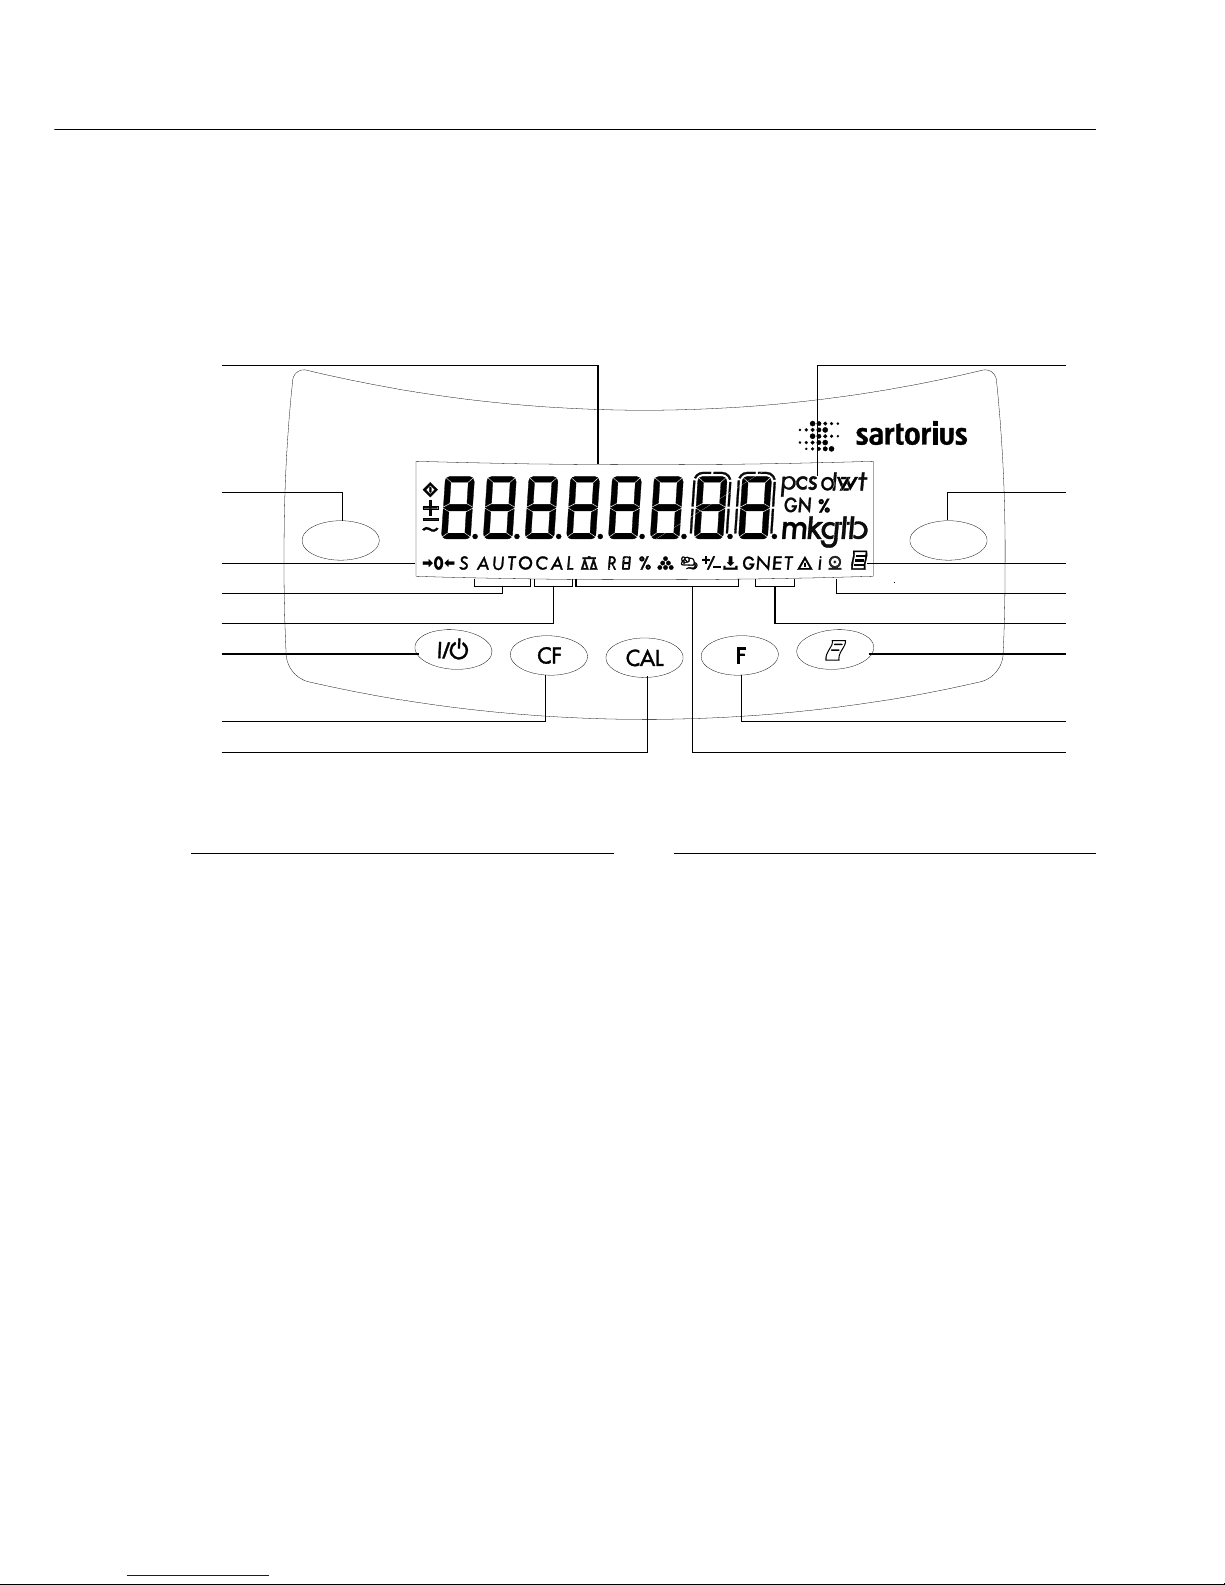
Overview of Display and Operating Elements
Position Designation
1 Weight units
2 Taring
3 Symbol: “GLP printing mode
active"
4 Symbol: “Printing mode active"
5 Display: Data in memory for
net-total formulation program
6 Data output: Press this key to
output readout values to the
built-in data interface.
7 Function key: Start application
program
8 Symbols for active application
9 Start calibration/adjustment rou-
tine Position
Position Designation
10 Delete (Clear Function)
This key is generally used to
cancel functions.
– Quit application program
– Cancel calibration/adjustment
routine
11 On/off
12 Display: Calibration/adjustment
function
13 Display: Animal weighing with
automatic start
14 Symbols for stand-by mode or
zero range
15 Weight value displayed in selected
weight unit
Tare Tare
15 1
2 2
14 3
4
5
6
13
12
11
10
9
7
8
Page 14

14
Purpose
The basic weighing function can be
used alone or in combination with
an application program (counting,
weighing in percent, etc.).
Features
– Taring the balance.
– Assigning IDs to weights (as needed).
– Printing weights.
Using Verified Balances as Legal
Measuring Instruments in the EU*:
The type-approval certificate for verification applies only to non-automatic
weighing instruments. For automatic
operation with or without auxiliary
measuring devices, you must comply
with the regulations applicable to the
place of installation.
● Before using the balance as a legal
measuring instrument, calibrate and
adjust it at the place of use using the
built-in motorized calibration weight;
for details, see “Calibration/Adjustment"
in this chapter.
$ The temperature range (°C) indicated
on the verification label may not be
exceeded during operation.
Example:
BD BL 200
+10°C to +30°C
0°C to +40°C isoCAL
K
* Including the Signatories of the Agree-
ment on the European Economic Area
Working with LE26P… Models:
Working with the microbalance requires a
steady hand and a smooth, uninterrupted
technique.
Use forceps or other suitable utensil to
place the sample on the weighing pan.
Perform a number of test measurements
before you begin weighing, to allow the
temperature inside the weighing chamber
to adjust to the ambient temperature
outside the chamber. Otherwise, if the
chamber door was closed for a longer
period of time prior to beginning weighing,
the sudden change in temperature inside
the chamber when you open the door
might affect the weight readout. This
is why a series of test measurements is
recommended; the repeated opening and
closing of the weighing chamber door,
at the same rate of speed as will be used
during the actual weighing sequence,
will both compensate this difference in
temperature to some extent and help you
develop a smooth working rhythm.
Place the sample gently on the weighing
pan. The weight readout should stabilize
within 15 to 20 seconds.
The degree of precision attained increases
in proportion as the weighing operations
become more homogenous.
Basic Weighing Function
Page 15
15
Preparation
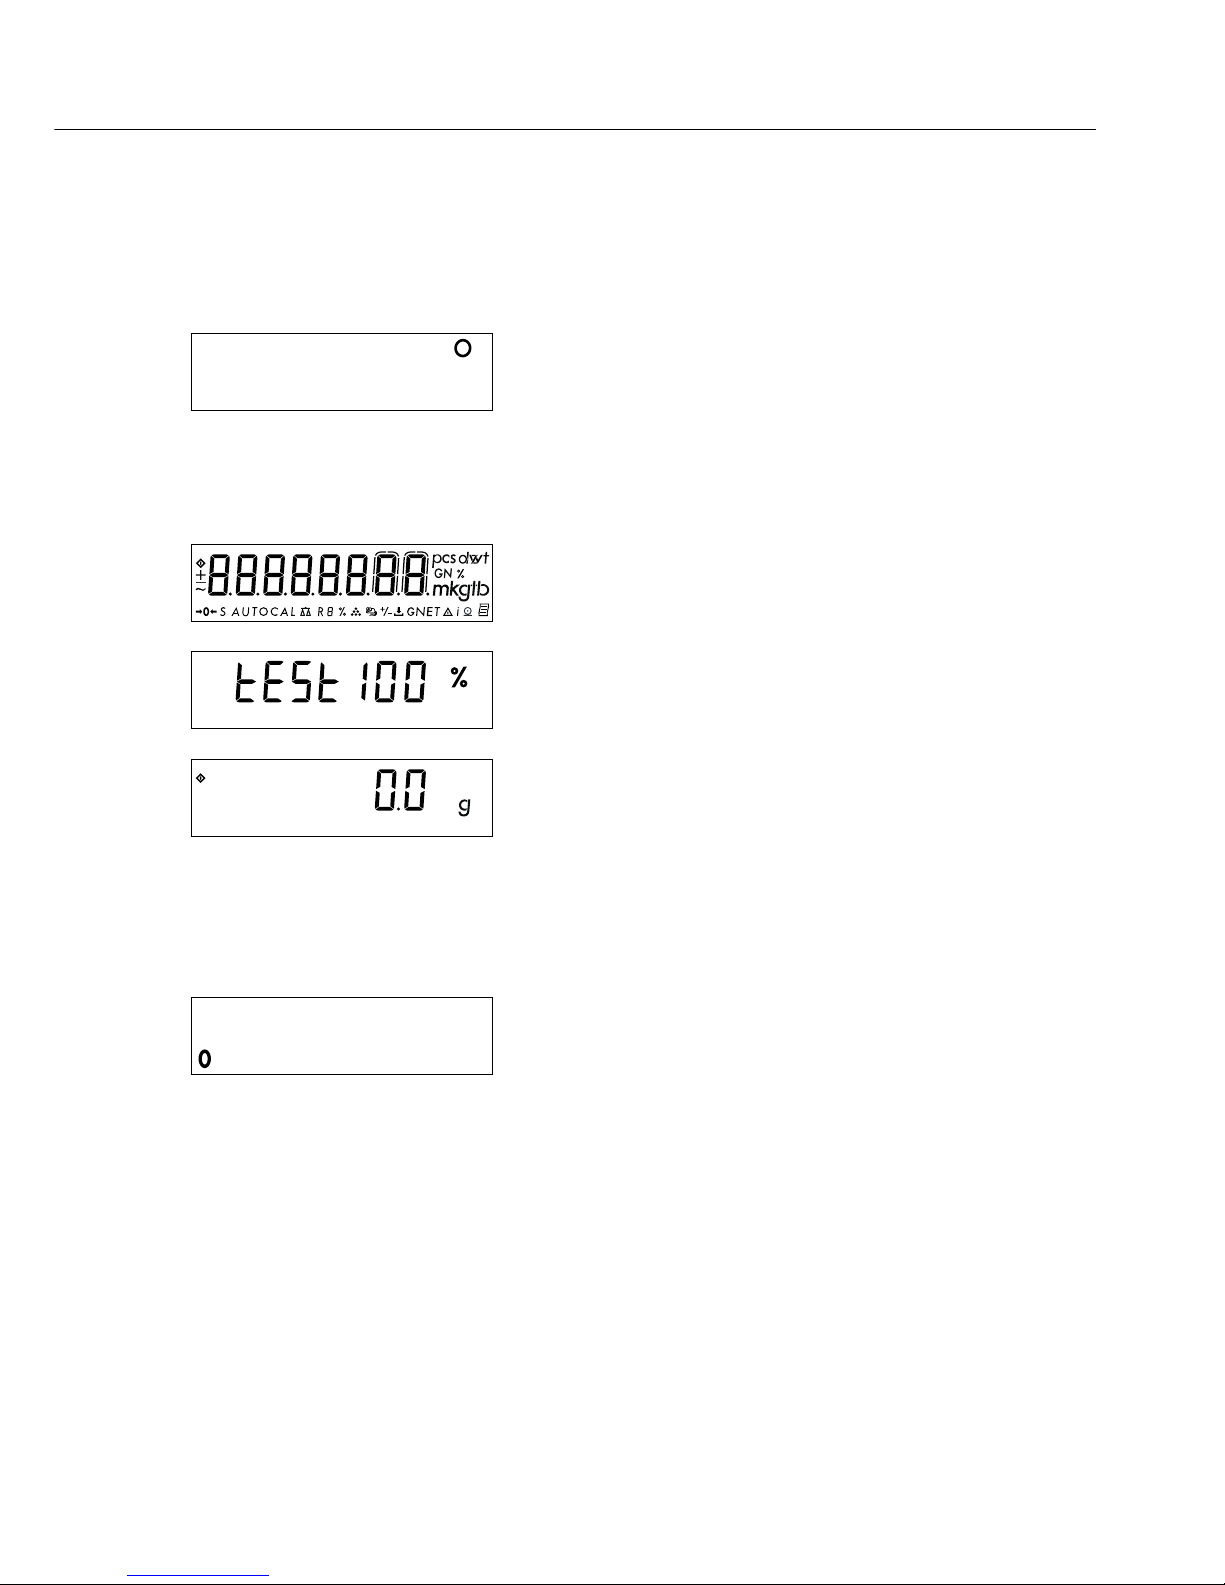
A circle in the upper right-hand corner of the display
indicates that the balance was disconnected from
power.
This symbol is shown, for example, the first time
the balance is put into operation, or after a power
outage.
● Switch on the balance: Press e.
> All symbols on the display light up briefly.
> The balance performs a display test.
$ Tare the balance, if necessary: Press w
When you turn on the balance, the b symbol is
displayed until you press a key.
If the b symbol is displayed during operation,
this indicates that the processor is performing
a function and cannot receive further commands
at the moment.
Additional Functions
● Switching off the balance: Press e
A circle in the lower left-hand corner of the display
indicates that the balance has been switched off and
is in stand-by mode.
Page 16
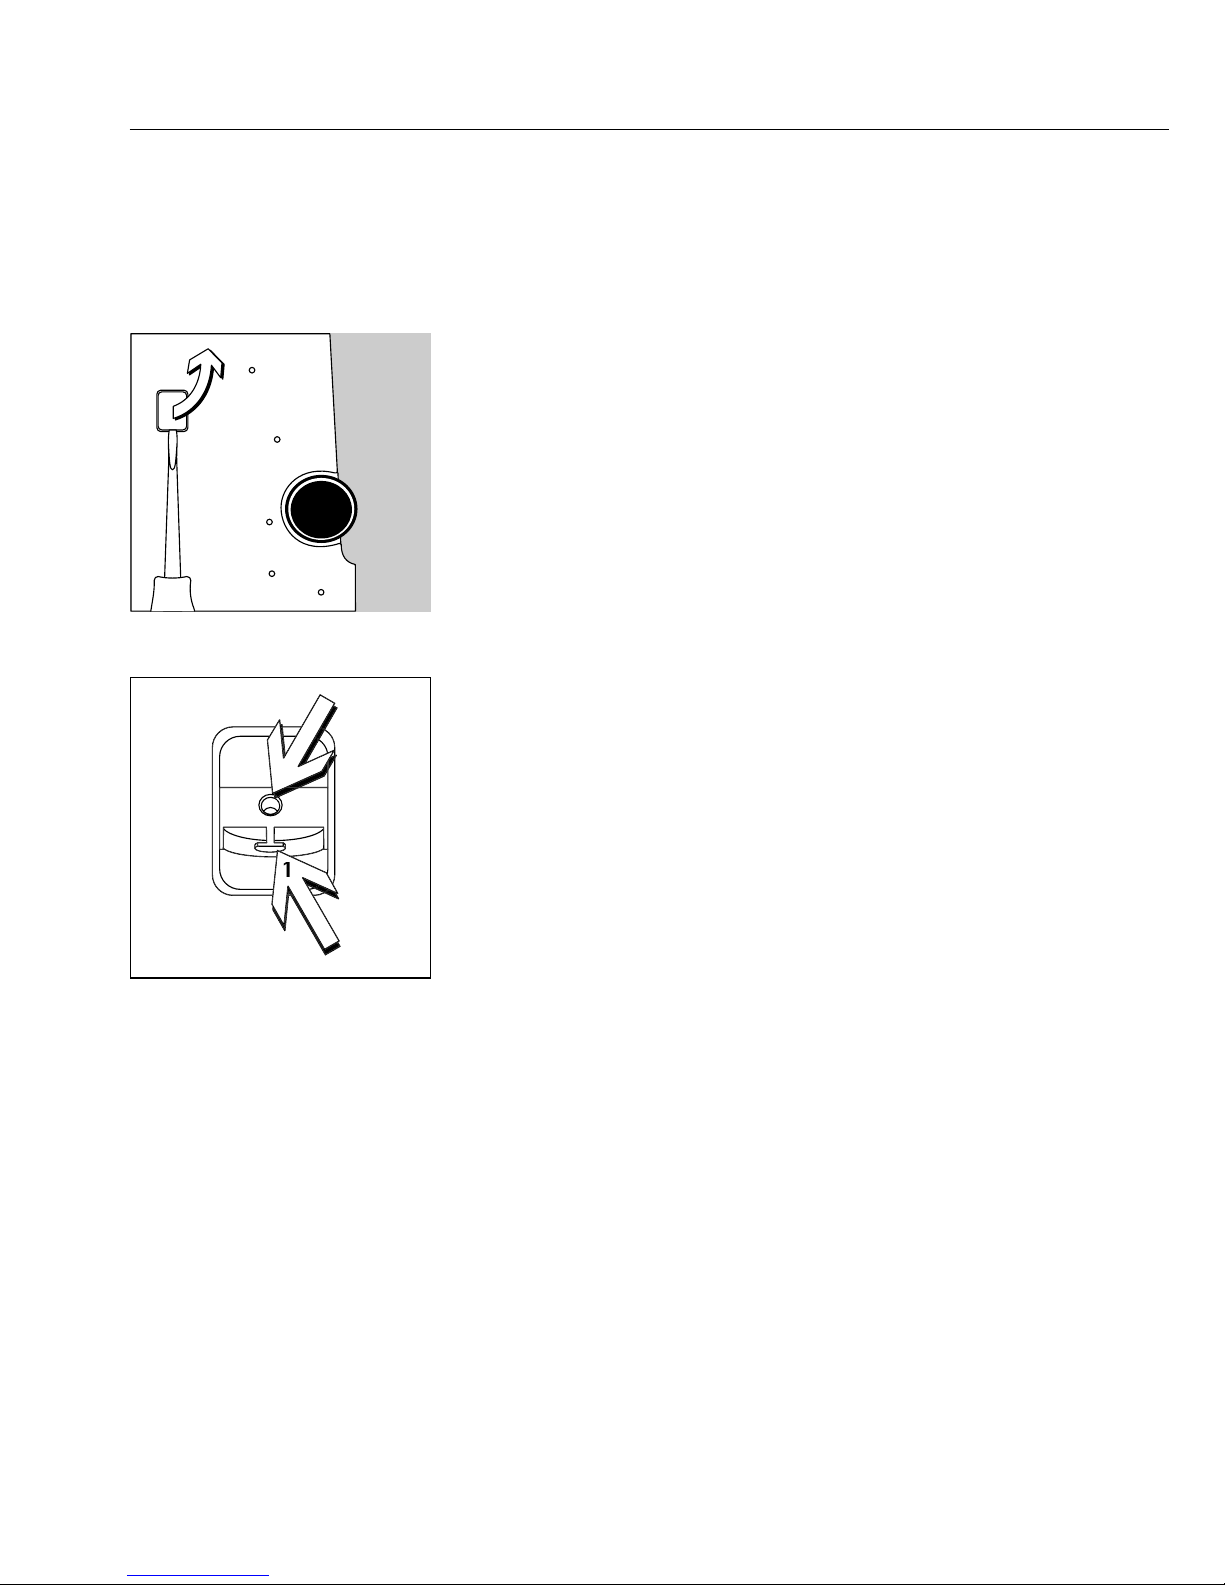
16
Below-Balance Weighing
A port for a below-balance weighing hanger
is located on the bottom of the balance (for models
with a weighing capacity of 12 kg or more, order the
hanger directly from Sartorius).
$ Below-balance weighing is not permitted in legal
metrology.
● Open cover plate on the bottom of the balance.
● Using the built-in hanger (1): Attach the sample
(e.g., using a suspension wire) to the hanger.
$ Bore hole (2): Carefully fasten the special hanger,
or order a hanger directly from Sartorius.
$ If necessary, install a shield for protection against
drafts.
2
Page 17
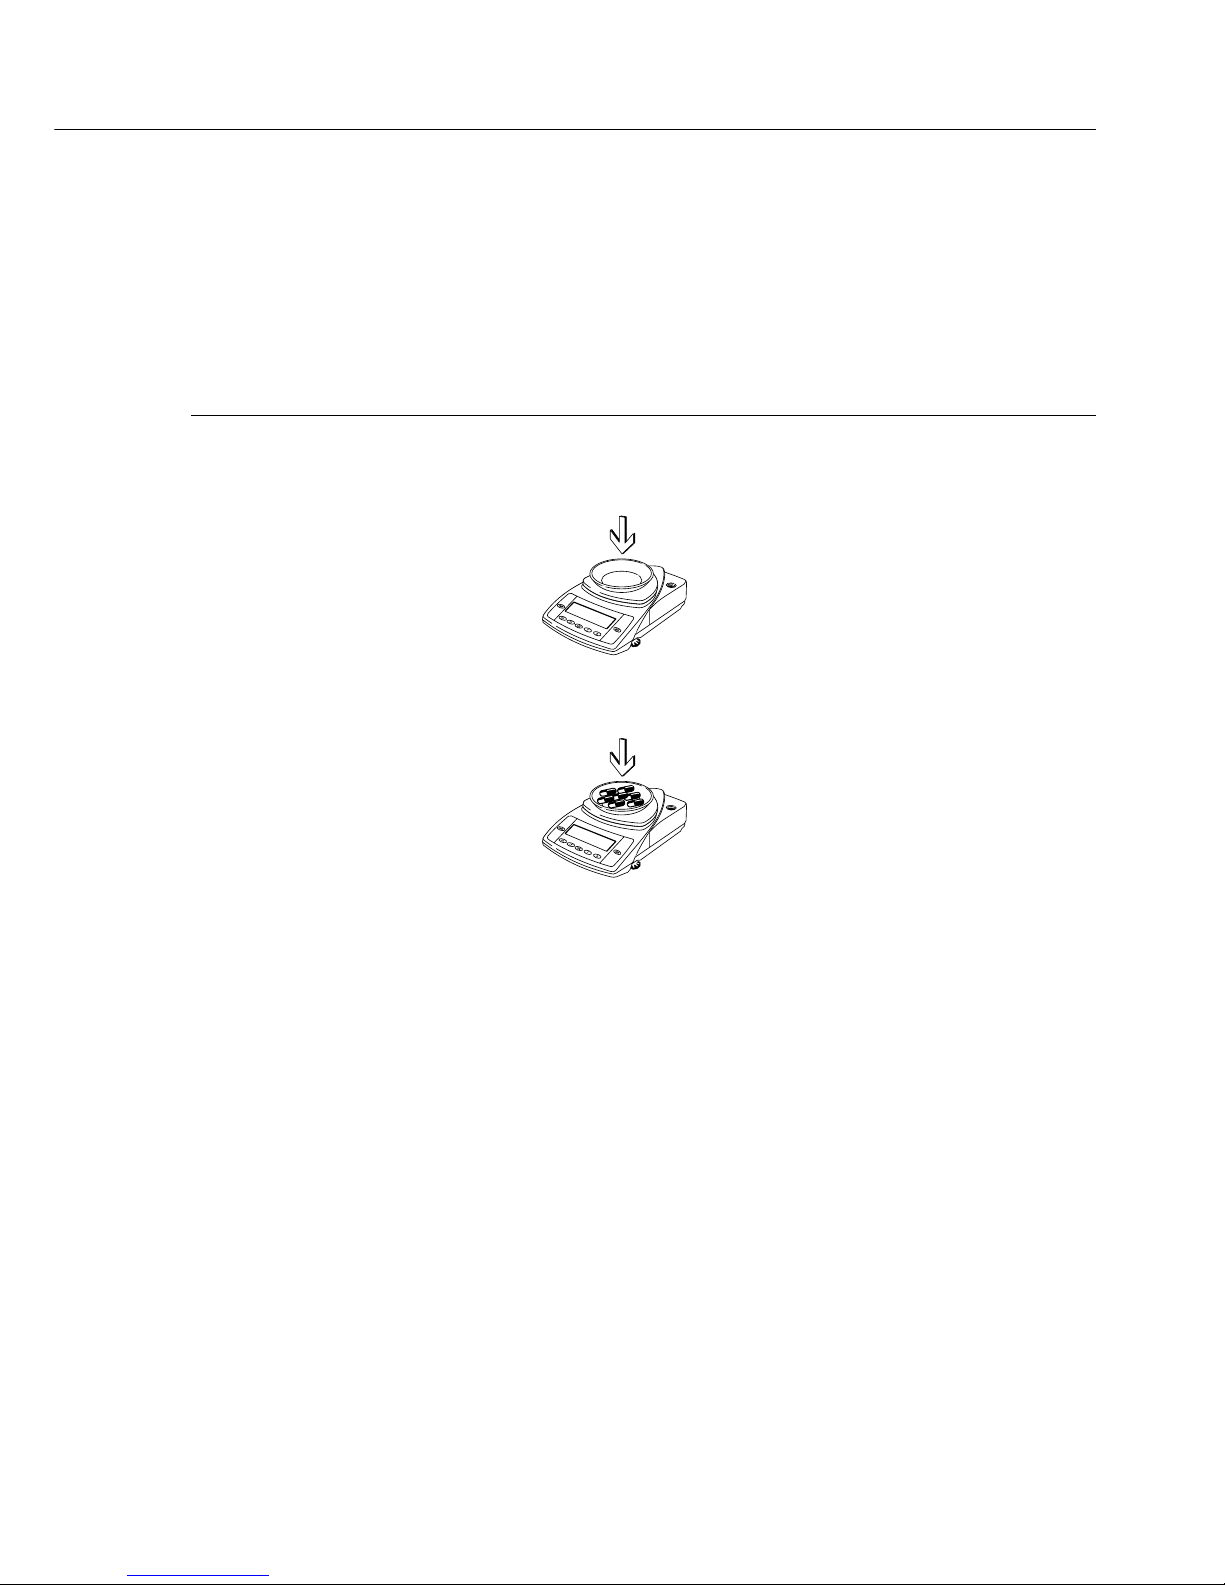
17
Example
Simple Weighing
Step Key (or instruction) Display/Data Output
1. Switch on the balance. e
+ 0.0 g
Self-test is performed,
followed by automatic
initial tare function.
2. Place container on the balance
+ 11.5 g
(in this example, 11.5 g).
3. Tare the balance. w
+ 0.0 g
4. Place sample in container
+ 132.0 g
on balance (in this
example, 132 g).
6. Print weight. r
N + 132.0 g
Page 18

18
Calibration and Adjustment
Purpose
Calibration is the determination of the
difference between the weight readout
and the true weight (mass) of a sample.
Calibration does not entail making any
changes within the balance.
Adjustment is the correction of any
difference between the measured value
displayed and the true weight (mass)
of the sample, or the reduction of the
difference to an allowable level within
the maximum permissible error limits.
Using Verified Balances as Legal
Measuring Instruments in the EU*:
Before using your balance as a legal
measuring instrument, you must perform “internal calibration" at the place
of installation after the warmup period.
Features
Calibration/adjustment can be
performed only when:
– there is no load on the balance,
– the balance is tared, and
– the internal signal is stable.
If these conditions are not met, an error
message is displayed (Err 02).
Adjustment can be performed
– automatically following calibration
(1 10 1), or
– manually, at operator discretion,
after calibration (1 10 2)
* Including the Signatories of the Agree-
ment on the European Economic Area
The weight displayed for the sample
on the balance must not differ from the
nominal weight by more than 2%.
You can use any of the following weight
units to calibrate/adjust the balance:
g, kg, lb (1 11 1 to 3, factory setting:
1 11 1)
You can block calibration/adjustment
of the balance as follows:
– Select menu code 1 9 7, and
– Close the menu access switch on the
back of the balance
– You can have calibration/adjustment
start automatically when a specified
time or temperature limit is reached
(isoCAL function; 1 15 3).
You can have calibration and adjustment
results documented as an ISO/GLP-
compliant printout; see page 47.
External Calibration in Verified
Balances of Accuracy Class K
– When the balance is used in legal
metrology, external calibration is
blocked by a seal over the menu access
switch.
Page 19

19
Internal Calibration/Adjustment
The menu code setting 1 9 3
must be selected in the Setup menu.
Inside the balance housing is a motorized calibration weight which is applied
and removed automatically for internal
calibration.
● Activate calibration: Press q
> The built-in calibration weight
is applied automatically
> The balance is calibrated
> If “Calibrate, then auto adjust in one
operation" is selected in the Setup
menu, the balance is now adjusted
automatically.
> The internal calibration weight
is removed.
Calibration and Adjustment Sequence
In the Setup menu, you can configure
whether:
– calibration is always followed automati-
cally by adjustment (1 10 1; factory
setting), or
– you have the choice of ending the
sequence or starting adjustment after
calibration (1 10 2)
If no difference is determined between
nominal and actual weights, you can
end the calibration routine following
calibration.
Two keys are active at this point:
– q = start adjustment
– c = end the sequence
Page 20

20
isoCAL:
Automatic Calibration and Adjustment
The menu code setting 1 15 3 must be
selected in the Setup menu.
– Temperature range with isoCAL:
0°C to +40°C
The “AUTOCAL" display automatically
begins flashing if the ambient temperature has changed in relation to the
temperature at the time of the last calibration/adjustment, or after a defined
time interval has elapsed.
The balance is telling you that it wants to
self-calibrate and adjust.
This adjustment prompt is activated
when:
– The change in temperature or the
elapsed time interval is greater than that
shown in the table below
– The load on the pan has not been
changed within the last 2 minutes
– The balance has not been operated within
the last 2 minutes
– The weight on the pan is no more than
2% of the maximum capacity of the
balance
– Then let the balance perform the
adjustment procedure
When these requirements are met,
the following symbols are displayed:
– C in the measured value line
– AUTOCAL flashes in the symbol display
In the Setup menu, you can configure the
balance to display the adjustment prompt
only, without performing
calibration/adjustment automatically
(menu code 1 15 2)
isoCAL Deactivated on Verified Balances:
The permitted operating temperature
range for balances used in applications
subject to legal metrology (legal for
trade) is restricted as follows:
– Balances of accuracy class k:
+15°C to 25°C (+59 to +77°F)
– Balances of accuracy class K:
+10°C to +30°C (+50 to 86°F)
Fully automatic adjustment is initiated under the following conditions:
Model When the After a time
temperature interval
changes by of
LE26P, LE225D, LE324S, LE244S 1.5 Kelvin 4 h
LE1003S, LE1003P, LE623S, LE623P, LE6202S,
LE5202S-DS, LE6202P, LE4202S 2 Kelvin 6 h
LE323S, LE2202S, LE34001P, LE34001S 4 Kelvin 12 h
LE5201, LE2201, LE10001, LE16001S 4 Kelvin 24 h
These values are also set in the corresponding verified balances (LE models with the -0CE
designation).
Page 21

Internal Calibration
Step Key (or instruction) Display
1. Tare the balance. w
0.0 g
2. Start calibration. q
C
The internal weight is CAL
applied automatically.
3. The balance is calibrated –
0.2 g
(displayed only if menu CAL ± G
code 1 10 2 is set).
4. If the “Calibrate, then
Adjust*
auto adjust" setting is CAL
selected (1 10 1), the balance
is now adjusted automatically.
5. The calibration sequence is completed.
CC
CAL
6. The internal weight is removed.
0.0 g
* = displayed only if menu item 1 10 2 is selected.
21
Page 22
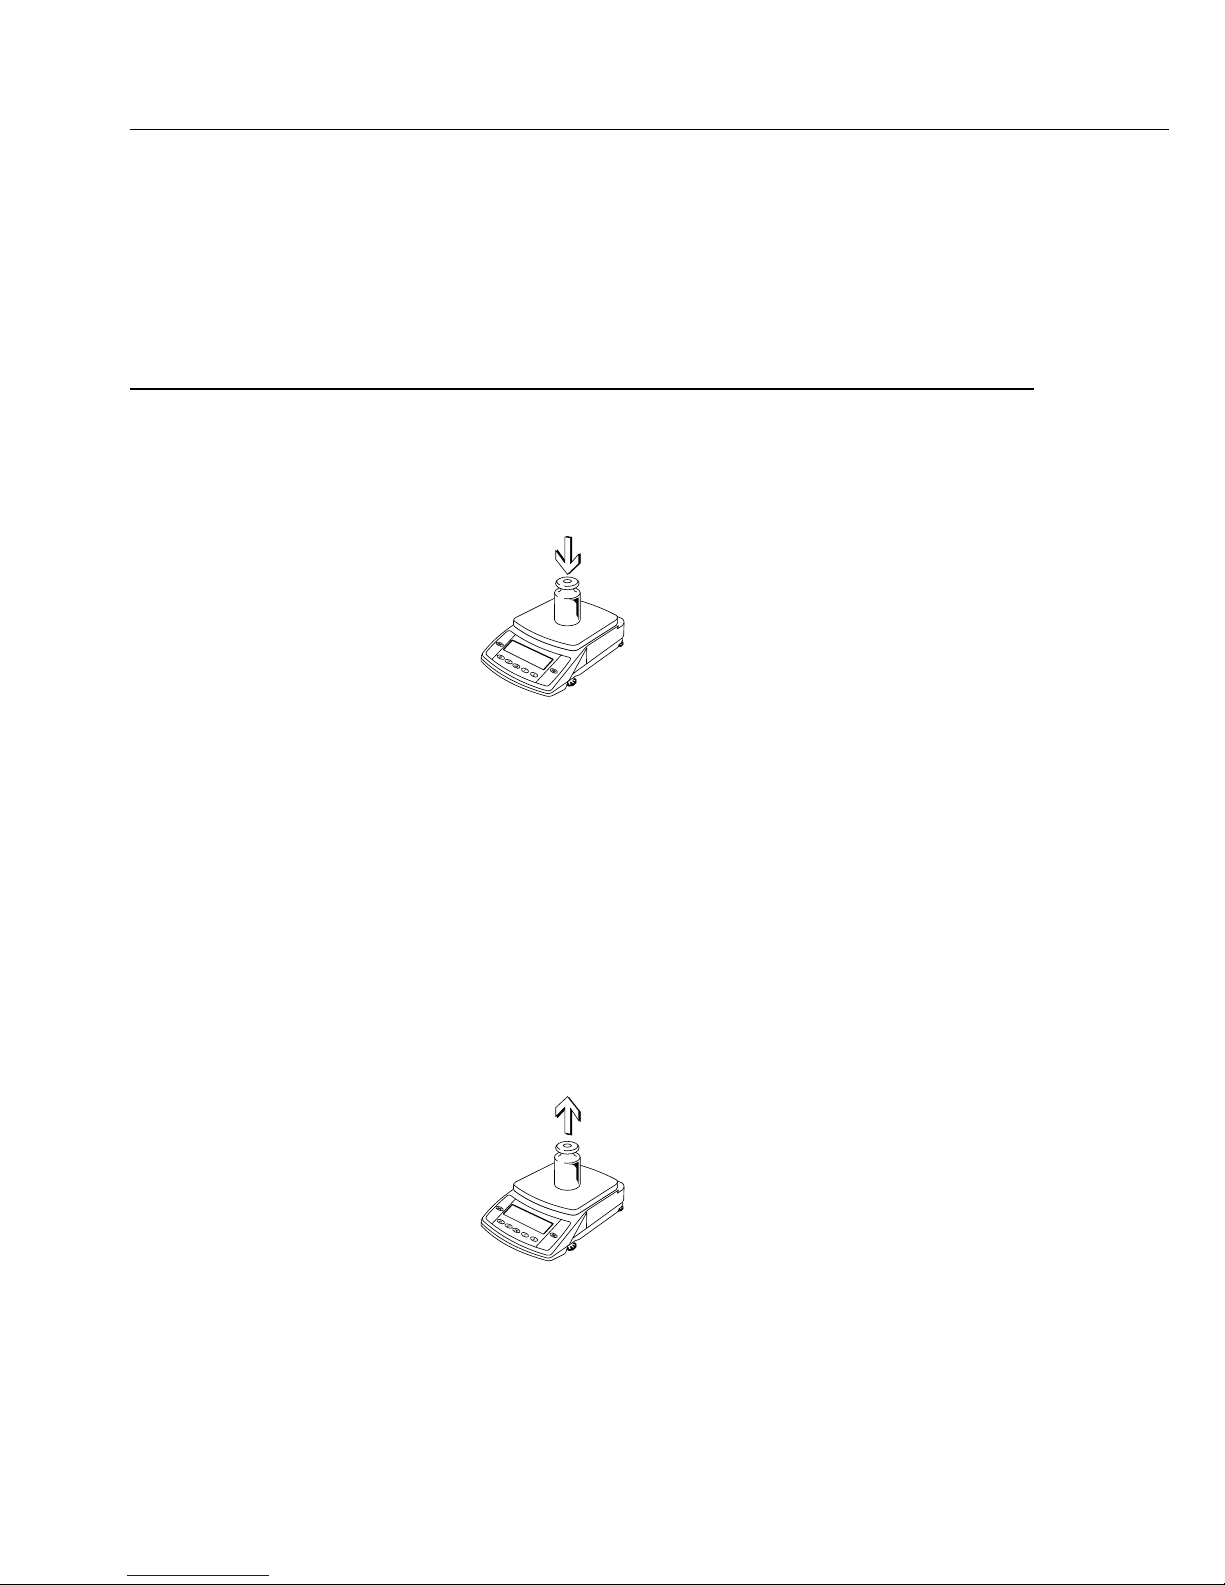
22
External Calibration
Step Key (or instruction) Display
1. Tare the balance. w
0.0 g
2. Start calibration. q
+ 5000.0 g
CAL G
3. Apply the prompted calibration
weight (in this example, 5000 g).
4. The balance is calibrated – 0.2 g
(displayed only if menu CAL ± G
code 1 10 2 is set).
5. If the “Calibrate, then
Adjust
*
auto adjust" setting is CAL
selected (1 10 1), the balance
is now adjusted automatically.
6. The calibration sequence is completed.
CC
CAL
7. After calibration/adjustment, the
+ 5000.0 g
weight is displayed with weight unit
8. Remove the calibration weight.
0.0 g
* Adjust shown only if menu code 1 10 2 is set.
Important note:
Afterwards, do not perform internal calibration/adjustment again.
Page 23

Purpose
To adapt the balance to individual
requirements by choosing from parameters
options in the Setup menu.
Features
To open the Setup menu, switch the
balance off and then on again by pressing
e. While all segments are lit, press
w briefly.
Scroll upward ↑: Press q
Scroll to the right →: Press r
Confirm input: Press w
Save settings and exit menu:
Press and hold w (> 2 sec.)
● Printing the Parameter Settings
– At the 3rd menu level (lowest level;
see also the next page): Press and hold
r (> 2 sec.)
> Printout (Example)
Menu711
– At the 2nd menu level: Press and hold
r.
> Printout (Example)
Menu711
Menu721
Menu731
– All current menu settings are printed
when the 1st menu level (highest level)
is displayed:
Press and hold r.
23
Configuration
Page 24
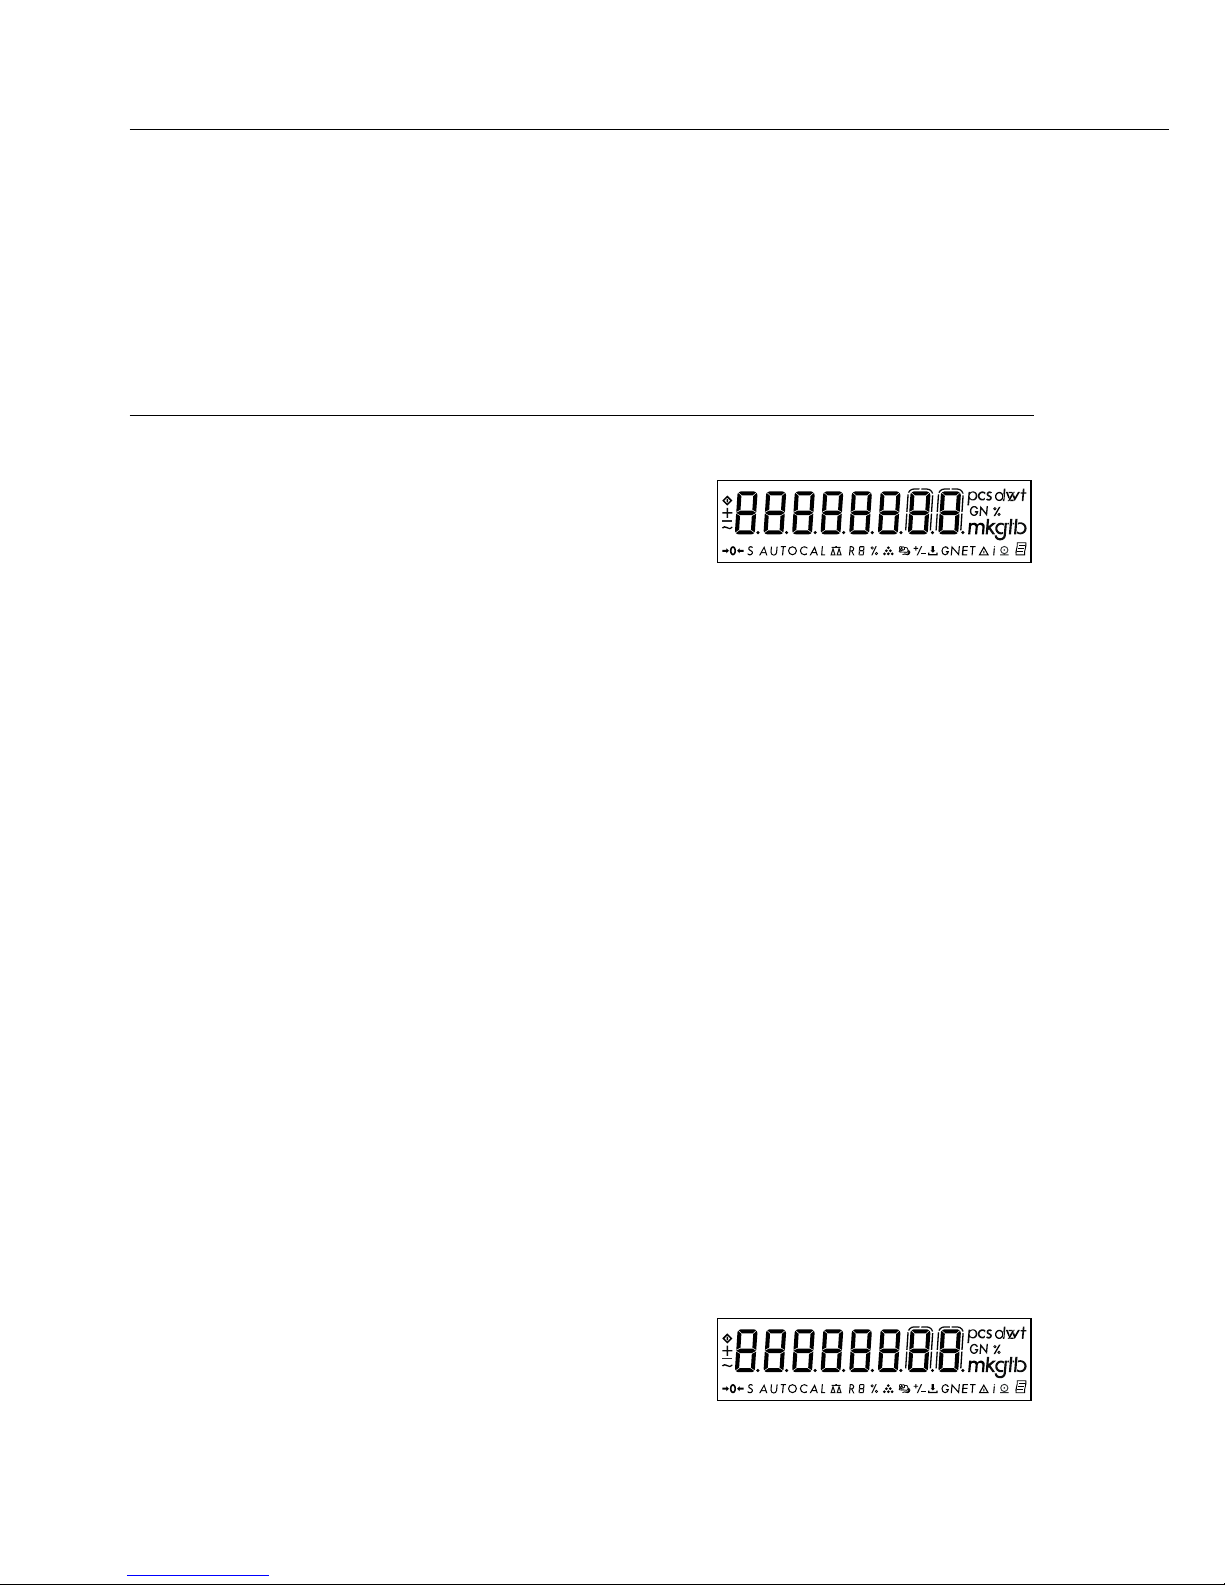
Setting the Parameters (Menu Codes)
Example: Adapting the balance to “very unstable" ambient conditions (menu code 1 1 4).
Step Key (or instruction) Display
1. Switch off the balance. e
2. Switch the balance on; e
while all segments
are displayed: w briefly
1
$ Scroll upward within a q 2
menu level; after the last repeatedly ...
menu code, the first
9
code is displayed again. 1
3. Select menu level 2 r 1 1
(scroll to the right).
4. Select menu level 3 r
1 1 2
o
(scroll to the right).
5. Menu level 3: q
Scroll until the desired repeatedly
1 1 4
number is shown.
6. Confirm change; “o" w
1 1 4
o
on display indicates
active setting.
$ Return to higher menu level r
1
(from the third level).
$ Set other codes as desired. r, q
7. Save changes and exit Press and
the menu hold w (> 2 sec.)
or
$ Exit menu without saving
changes. e
24
Page 25
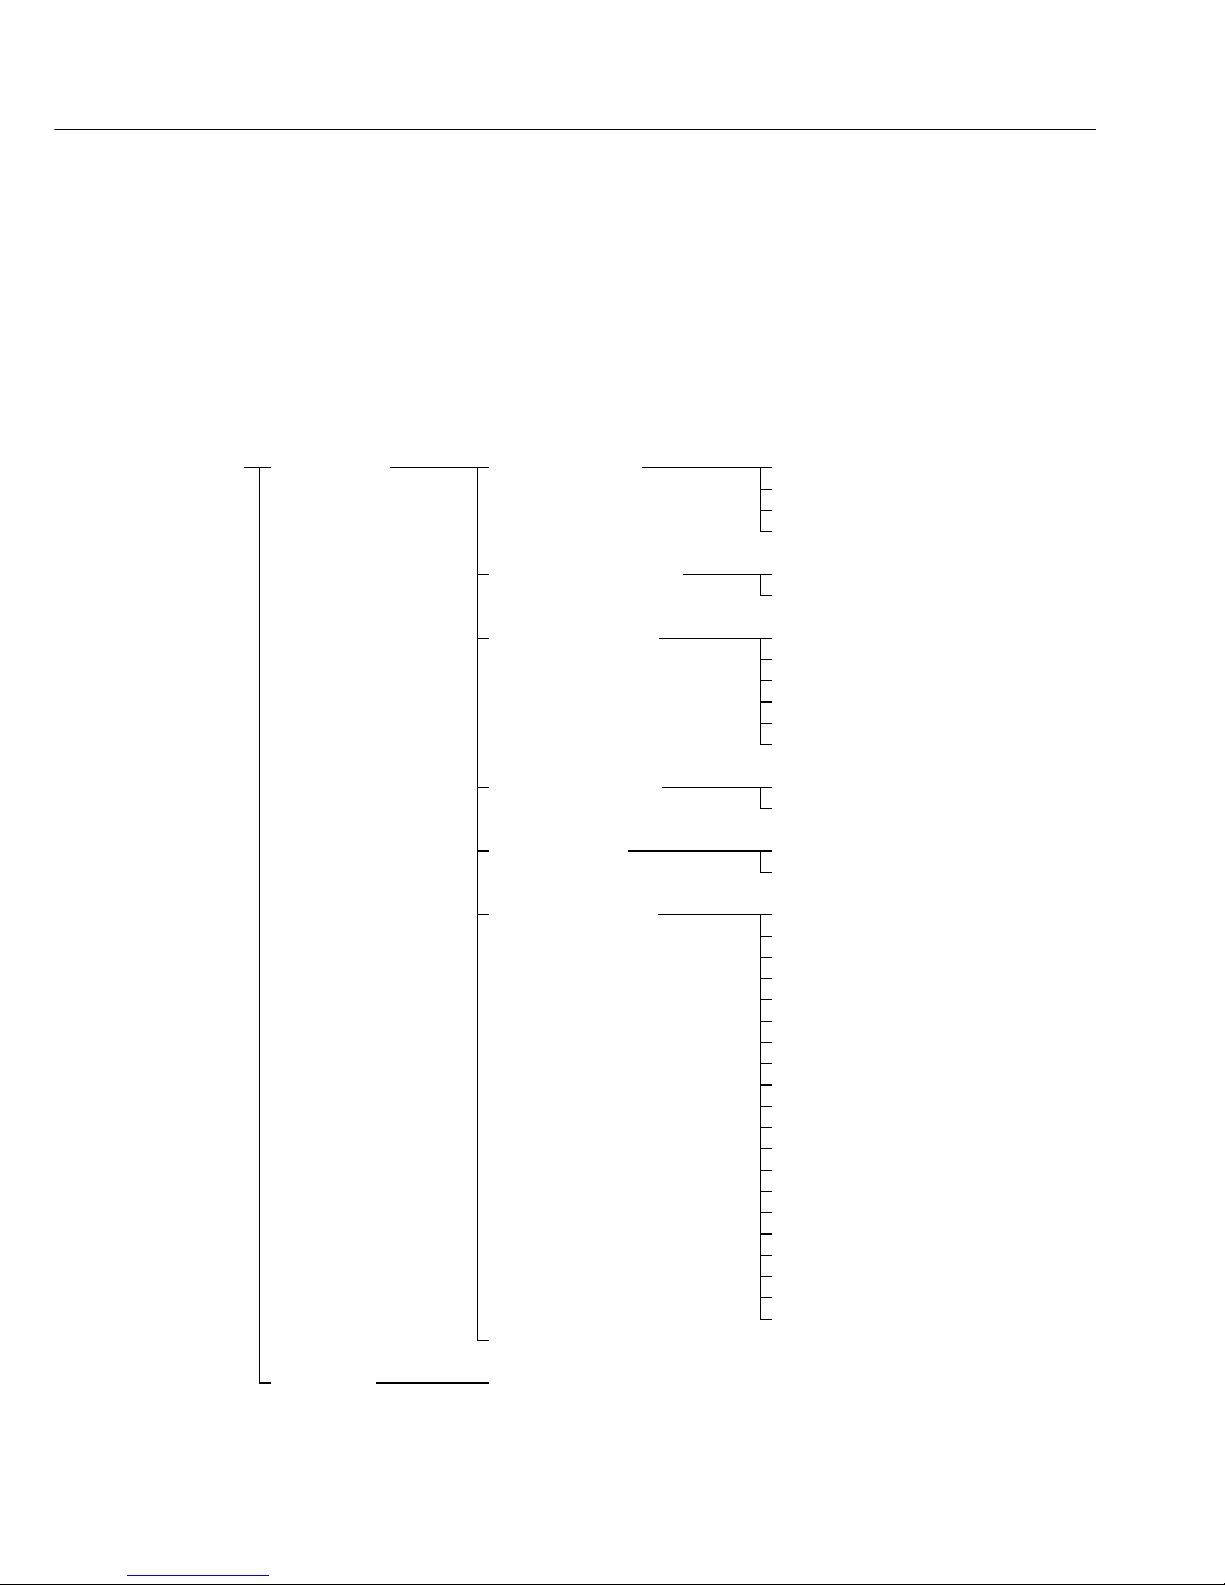
Parameter Settings (Overview)
o Factory setting
√ User-defined setting
Setup 1 Weighing 1 1 Adapt filter 111 Very stable conditions
112 o Stable conditions
113 Unstable conditions
114 Very unstable conditions
1 2 Application filter 121 o Final readout
122 Filling mode
1 3 Stability range 131 4 digit
The stability symbol is 132 1 digit
displayed when the 133 1 digit
value is stable within 134 o 2 digits
this number of digits. 135 4 digits
136 8 digits*
1 5 Tare function* 151 Without stability
152 o After stability
1 6 Auto zero 161oOn
162 Off
1 7 Weight unit 1 171 Grams (display: o)*
172 o Grams (display: g)
173 Kilograms
174 Carats
175 Pounds*
176 Ounces*
177 Troy ounces*
178 Hong Kong taels*
179 Singapore taels*
1710 Taiwanese taels*
1711 Grains*
1712 Pennyweights*
1713 Milligrams
1
)
1714 Parts per pound*
1715 Chinese taels*
1716 Mommes*
1717 Austrian carats*
1718 Tola*
1719 Baht*
1720 Mesghal*
1 8 see next page
2 through 9 see following pages
* = Not available in balances verified for use in legal metrology
1
) = Not available on verified balances of accuracy class K
25
M
enu level 1
M
enu level 2
M
enu level 3
Factory setting
M
enu item
Page 26

Menu 1 Weighing 1 1 through 1 7 see previous page
1 8 Display accuracy 1 * 181 o All digits
185 Reduced by 1 digit*
1 9 q key function 191 External cal./adj.
1
)
193 o Internal cal./adj.
197 q key blocked
1 10 Calibration/ 110 1 o Calibrate, then auto adjust
adjustment sequence in one operation
110 2 Calibrate, then manual
adjust
1 11 Weight unit for 1111 o Grams
calibration weight * 1112 Kilograms
1113 Pounds
1 15 isoCAL function 1151 Off
1152 Only adjustment prompt
1153oOn
2 Application 2 1 Program selection 211 o Weighing
programs 212 Toggle weight units
214 Counting
215 Weighing in percent
216 Net-total formulation
217 Animal weighing
3 through 9 see next page
* = Setting cannot be changed on verified balances
1
) = Not available on verified balances of accuracy class K
26
M
enu level 1
M
enu level 2
M
enu level 3
Factory setting
M
enu item
Page 27
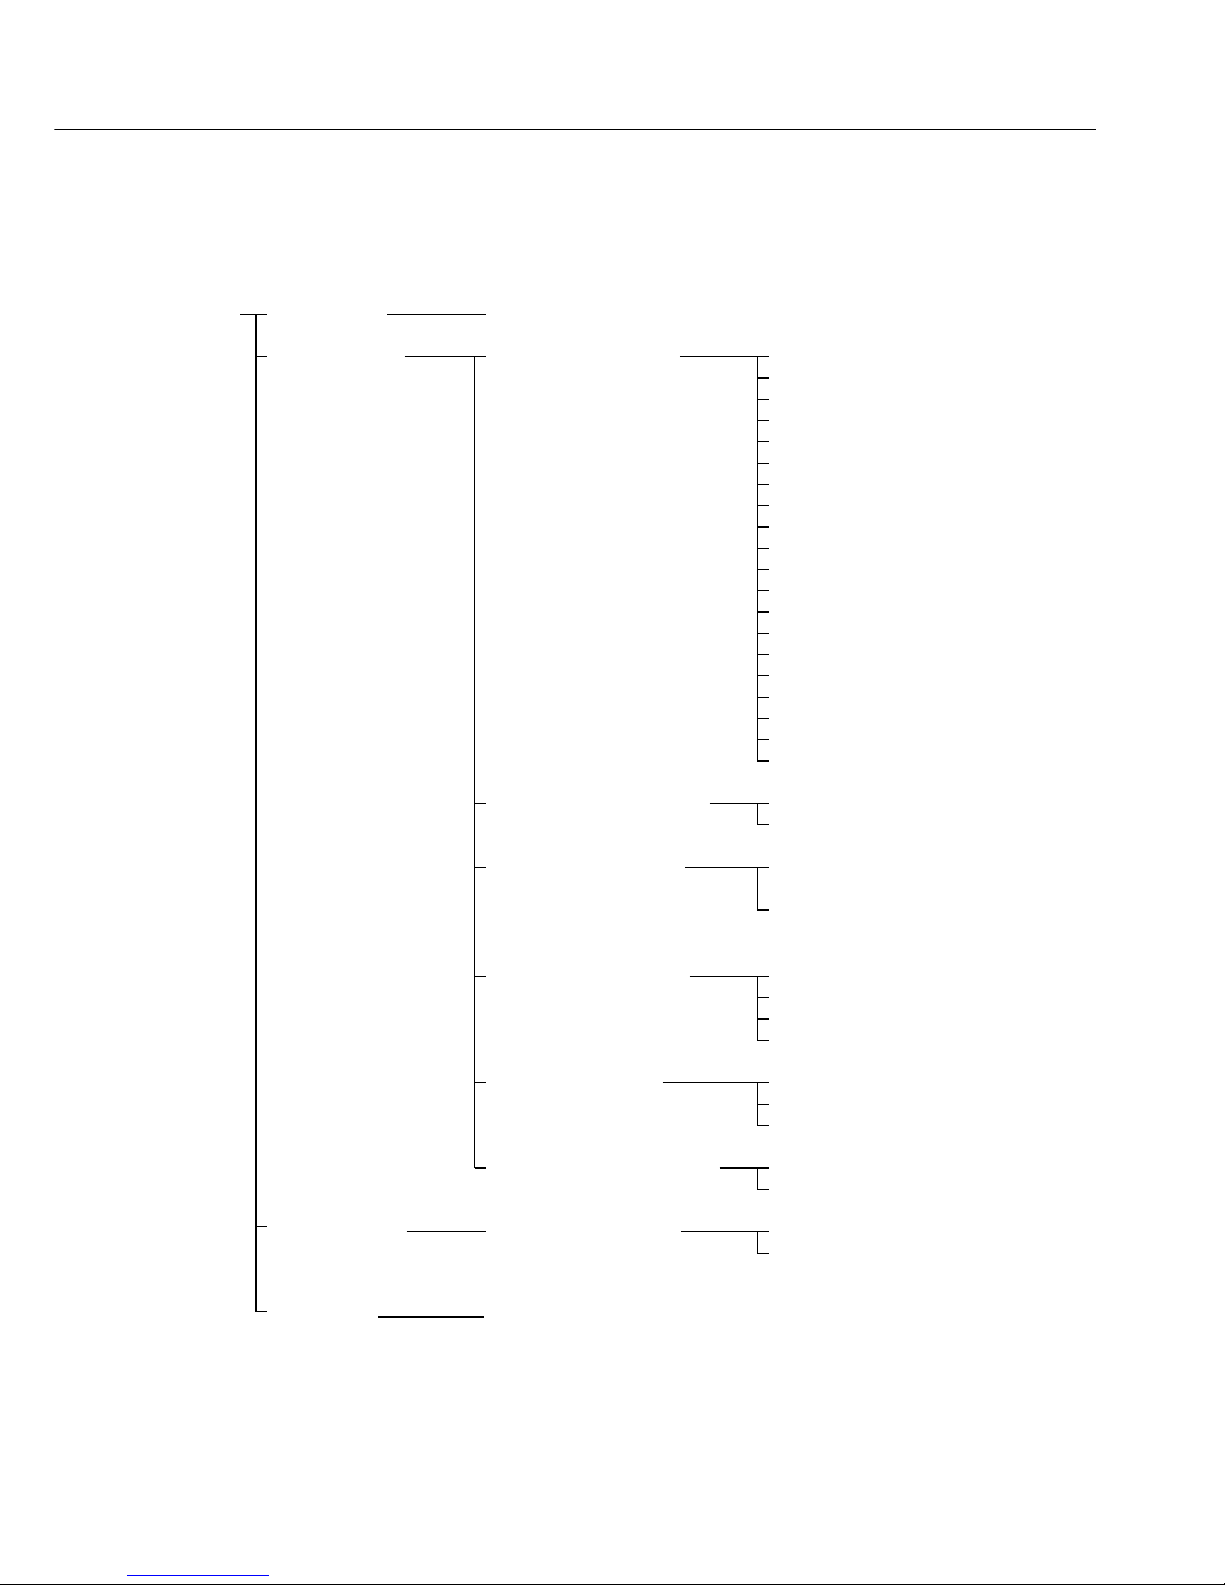
Menu 1 through 2 see previous page
3 Application 3 1 Weight unit 2 311 Grams (display: o)*
parameters 312 o Grams (display: g)
313 Kilograms
314 Carats
315 Pounds*
316 Ounces*
317 Troy ounces*
318 Hong Kong taels*
319 Singapore taels*
3110 Taiwanese taels*
3111 Grains*
3112 Pennyweights*
3113 Milligrams
1
)
3114 Parts per pound*
3115 Chinese taels*
3116 Mommes*
3117 Austrian carats*
3118 Tola*
3119 Baht*
3120 Mesghal*
3 2 Display accuracy 2 * 321 o All digits
325 Reduced by 1 digit
3 5 Storage parameter 351 Internal resolution
for Counting and
Weighing in Percent 352 o Display accuracy with
higher stability
3 6 Decimal places for 361 None
calculations 362 o 1 decimal place
363 2 decimal places
364 3 decimal places
3 7 Animal activity 371 Calm
372 o Normal
373 Strong vibration
3 8 Start Animal weighing 381 Manual start
382 o Automatic start
4 Application 4 1 Autom. reference 411 o Off
parameters sample updating 412On
Counting
5 through 9 see next page
* = Setting cannot be changed on verified balances
1
) = Not available in verified balances of accuracy class K
27
M
enu level 1
M
enu level 2
M
enu level 3
Factory setting
M
enu item
Page 28
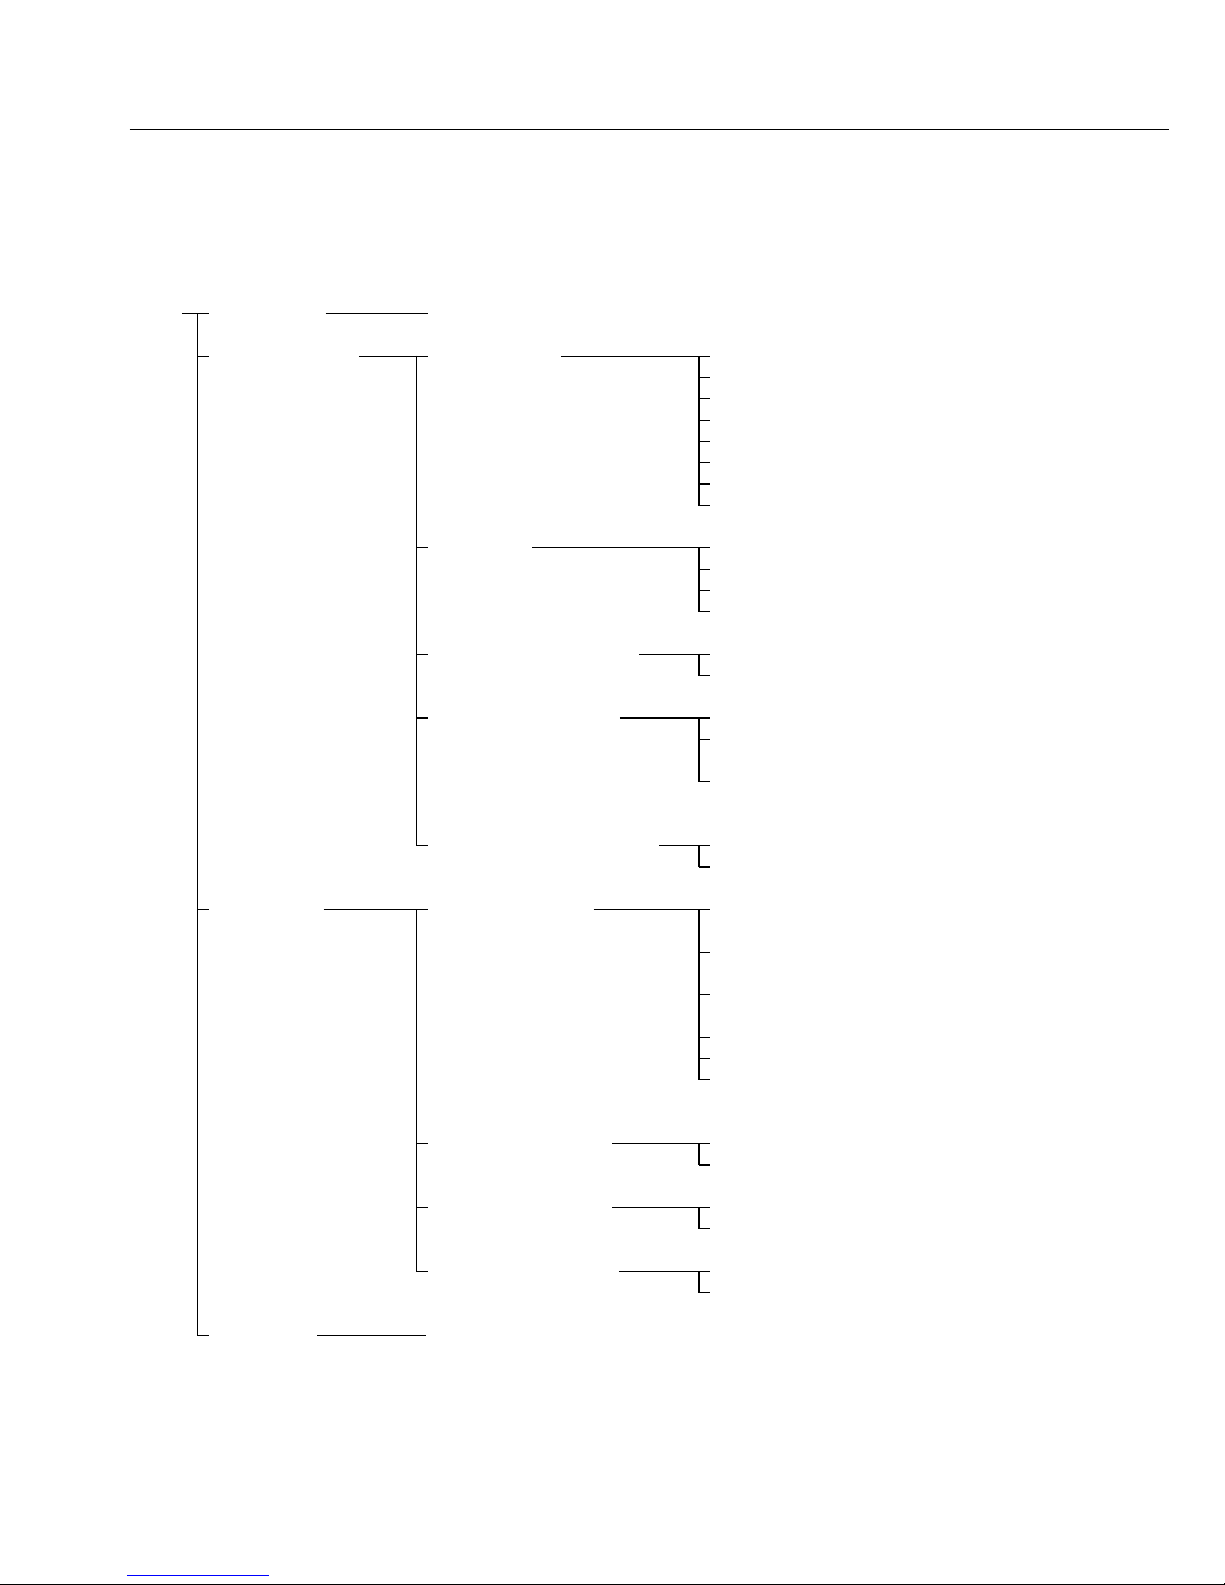
Menu 1 through 3 see previous page
5 Data interface 5 1 Baud rate 511 150 baud
512 300 baud
513 600 baud
514 o 1200 baud
515 2400 baud
516 4800 baud
517 9600 baud
518 19,200 baud
5 2 Parity 521 Mark
522 Space
523 o Odd
524 Even
5 3 Number of stop bits 531 o 1 stop bit
532 2 stop bits
5 4 Handshake mode 541 Software
542 o Hardware,
2 char. after CTS
543 Hardware,
1 char. after CTS
5 5 Communication mode 551 o SBI (ASCII)
552 Universal printer
6 Print for 6 1 Manual/auto/ 611 Manual without stability
weighing mode with r key
612 o Manual after stability
with r key
613 Manual at stability
with r key
614 Automatic without stability
615 Automatic at stability
616 Automatic when load
is changed
1
)
6 2 Stop automatic 621 Manual (r key)
printing 622 o Not stoppable
6 3 Time-dependent 631 o 1 display update
autom. printing 632 2 display updates
6 4 Tare the balance 641 o Off
after ind. printout 642On
7 through 9 see next page
1
) = Auto print when load change is > 10 d and stability is reached: no printout until residual difference in load
value is < 5 d
28
M
enu level 1
M
enu level 2
M
enu level 3
Factory setting
M
enu item
Page 29
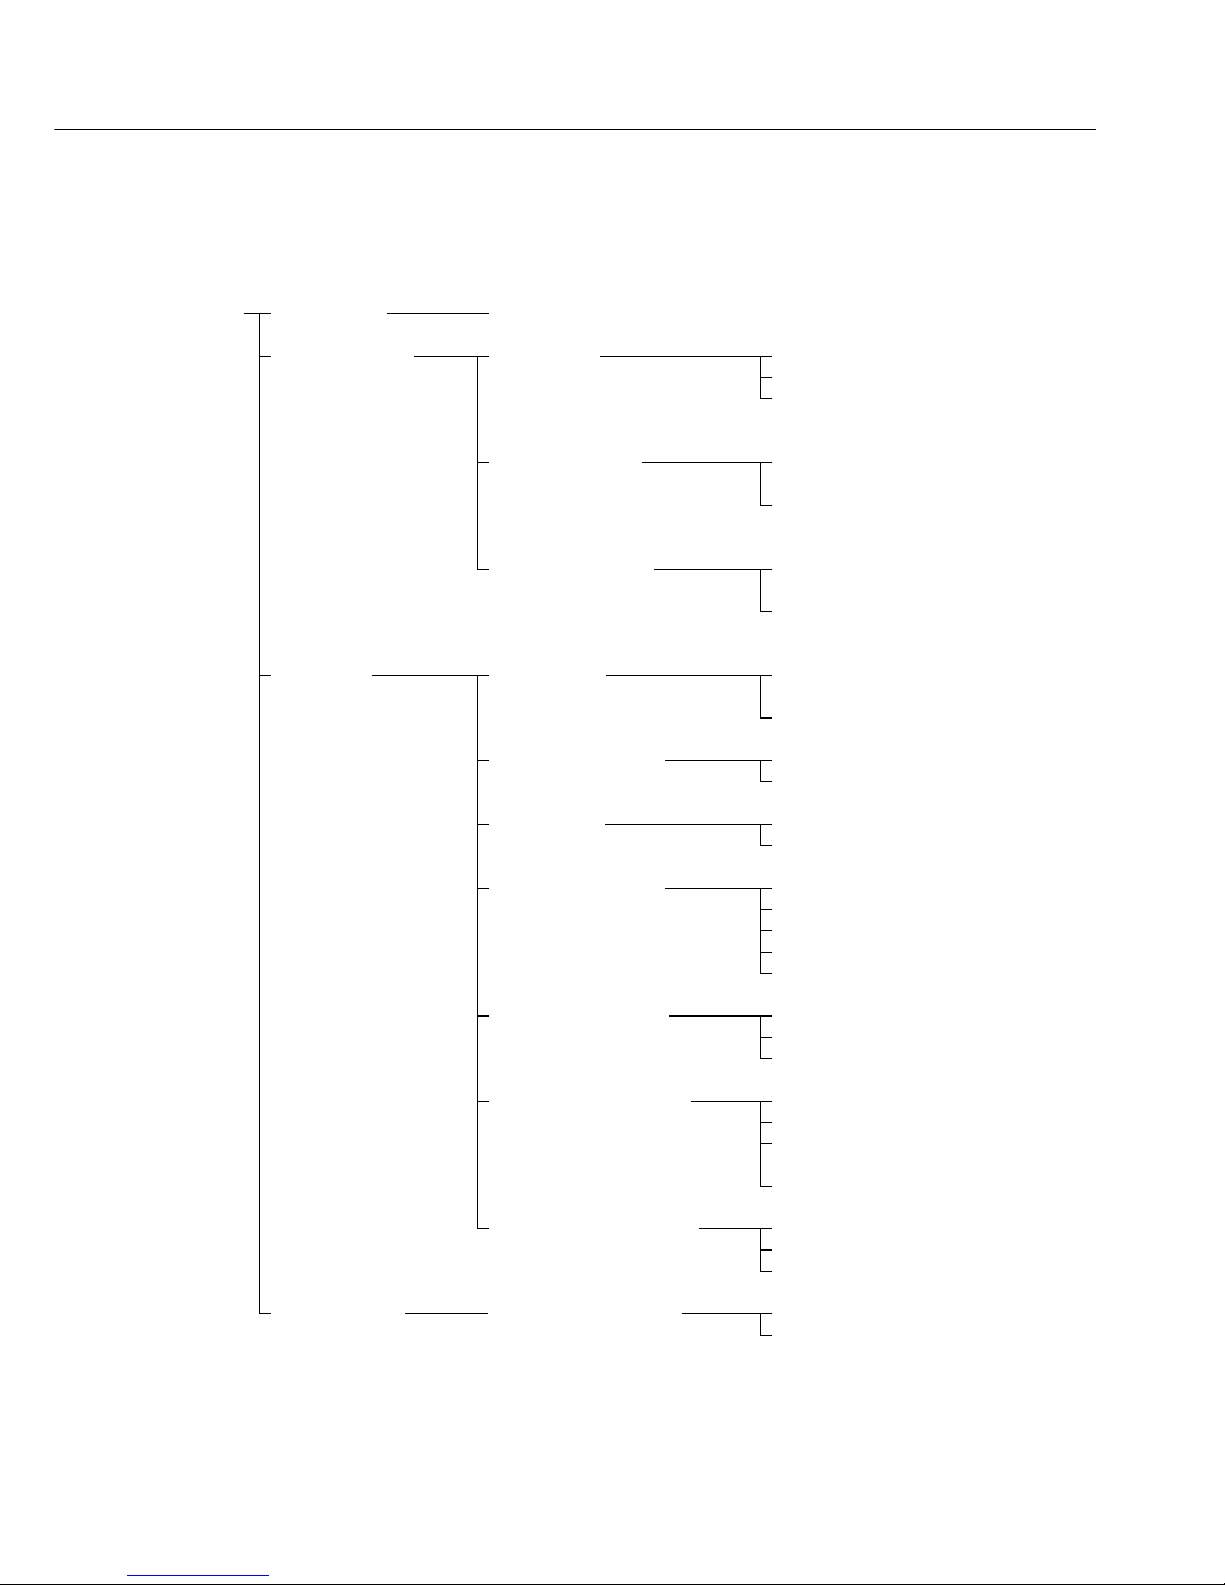
29
Menu 1 through 6 see previous page
7 Printing with 7 1 Print 711 Off
application application 712 o On; all parameters
programs parameters 713 On; main
parameters only
7 2 Line format 721 For raw data
of printout (16 characters)
722 o For other apps.
(22 characters)
7 3 Printout with 731 o Autom. printout
Net-total of last net value
program 732 Autom. printout
of tare value
8 Extra 8 1 Menu * 811 o Parameter settings
functions alterable
812 Parameters “read only"
8 2 Acoustic signal 821oOn
822 Off
8 3 Keypad 831 o Accessible
832 Blocked
8 4 External switch 841or key
function 842 w key
843 q key
844 v key
845 c key
8 5 Power-on mode 851 o Off/on/standby
for balance 853 Standby/on
854 Auto on
8 8 Reference balance 881 o Off
for Counting 882 On for QC scale
883 On for FB /FC /LA /LP
balances/scales
884 On for isi terminal
8 10 ISO/GLP-compliant 8101 o No ISO/GLP printout
printout 8102 For calibration/adjustment only
8103 Always on
9 Reset menu 9 – Factory settings 9 – 1 Restore
9 – 2 Do not restore
*= Setting cannot be changed on verified balances
M
enu level 1
M
enu level 2
M
enu level 3
Factory setting
M
enu item
Page 30

Setting IDs, Time, Date
and Display Brightness
Purpose
– Configuring measurement environment parameters
for ISO/GLP-compliant data records.
– Setting date and time (for ISO/GLP-compliant
records only).
– Adapting display to ambient lighting conditions.
Features
– Enter up to 8 characters to identify a measurement
series. Permissible characters include the numbers 0
through 9 and the dash or minus sign (“–"). A dash
is output as a space on printouts. Leading zeroes are
not output.
– Date and time at beginning and end of ISO/GLP-
printouts.
– Display brightness
1
):
0 = off; levels of brightness: 1 through 9
Key functions during configuration:
Activate input of IDs, time and date:
Switch the balance off and then on again by
pressing e; while all segments are displayed,
press the v key briefly
Scroll upward ↑: Press q
Scroll to the right →: Press r
Confirm input and toggle between IDs, time and
date: Press w
Save settings and exit menu:
Press and hold w (> 2 sec.)
1
) No display backlighting on models LE26P(-0CE)
and LE225D(-0CE)
30
Page 31
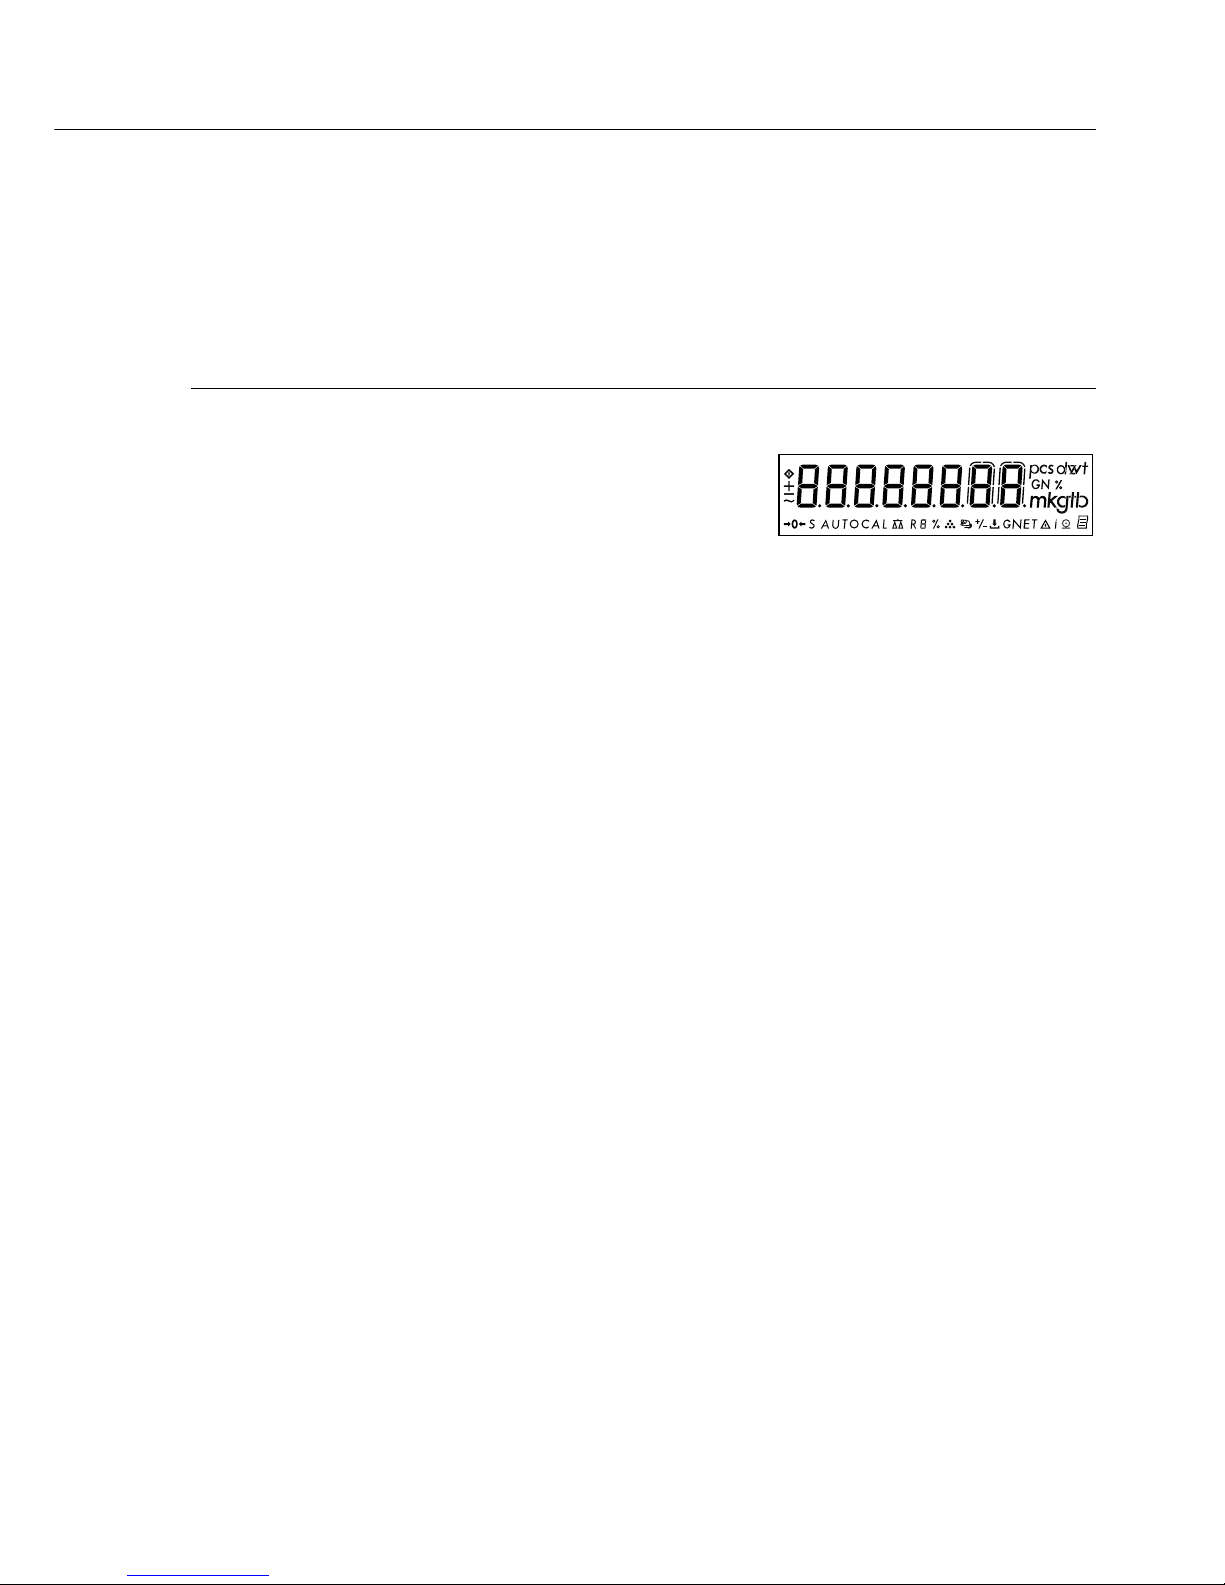
Example: Setting the time, date and display brightness
Step Key (or instruction) Display
1. Switch off the balance. e
2. Switch the balance on; e
while all segments
are displayed: v briefly
--------
$ To move the cursor within r --------
ID number: repeatedly
$ To set or change ID: q
-3------
repeatedly
3. Confirm ID and activate w
H10.14.11
time setting.
4. Select 24-hour clock (“H") or
12-hour clock (“P"). q
H10.14.19
5. Toggle between hours, r H10.15.19
minutes and seconds.
6. Synchronize seconds with
a reference clock. q
H10.15.00
7. Confirm time and activate date. w 29.jan.011
8. Set date q repeatedly,
“Day", r
01.jan.01
“Month", and , q repeatedly,
r
22.apr.01
if desired, “Year". q repeatedly
Confirm date and activate
display brightness. w
22.apr.01
31
Page 32
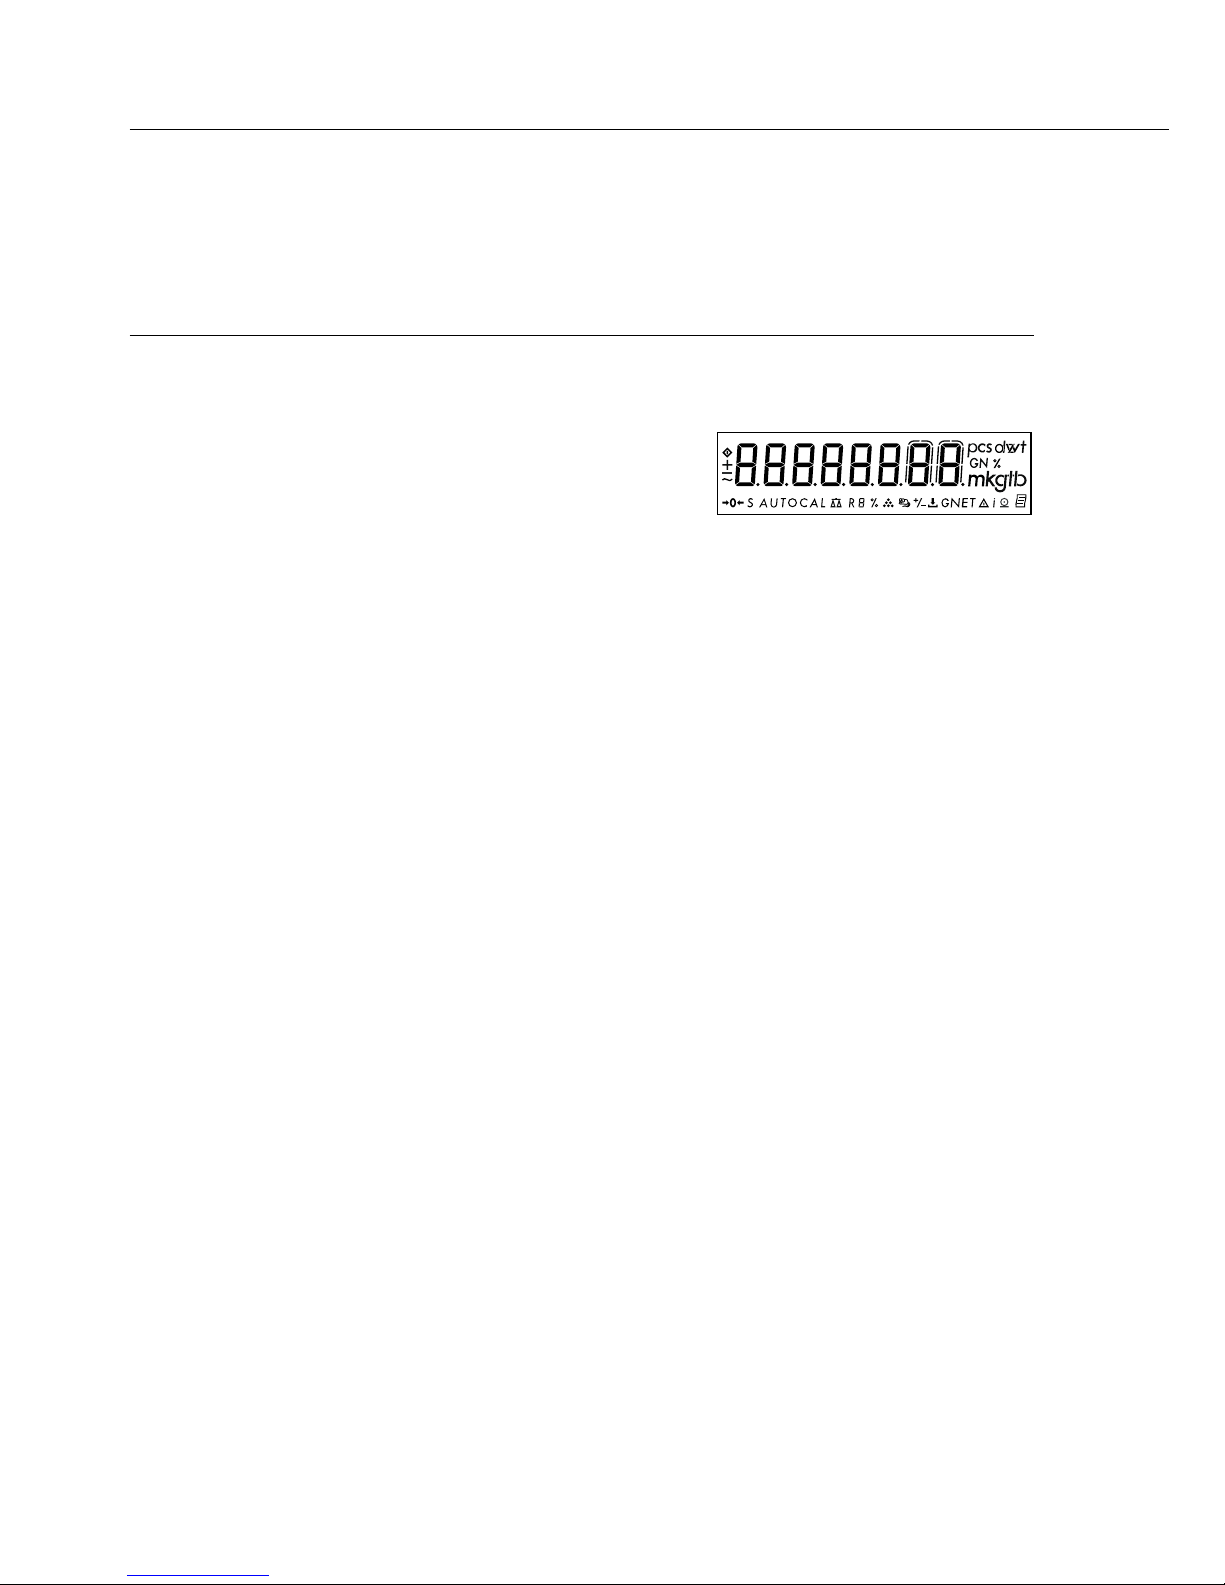
Step Key (or instruction) Display
9. Set display brightness. q
repeatedly
lamp 7
10. Save changes and exit Press and
the menu hold w (2 sec.)
or
$ Exit menu without
saving changes. e
32
Page 33

Application Programs
Function Keys
v key: Start application program/
store component
c key: Toggle between component
press and weight and total weight
hold for (net-total formulation);
2 seconds change reference quantity
(counting), reference percentage
(weighing in percent) or number
of measurements (animal weighing)
c key: End application program; delete
Using Verified Balances as Legal Measuring Instruments in the EU*:
All application programs can be selected on balances
used as legal measuring instruments.
Calculated values are alternately indicated with the
following symbols:
– Percent = %
– Piece count (Counting) = pcs
– Computed value = o, G
* Including the Signatories of the Agreement
on the European Economic Area
33
Page 34

Net-total Formulation
Menu code: 2 1 6
Display symbol: R
Purpose
With this application program you can weigh in
different components up to a defined total.
Features
– Weigh up to 99 components from “0" to a defined
total component weight.
– Store component weights (“Store xx comp."), with
– display zeroed automatically after value is stored,
and
– automatic printout
– Clear component memory following cancellation
of the weighing sequence (by pressing c) and
printout of the total weight.
– Toggling between component weight and total
weight by pressing and holding v (2 sec.).
– Printout of the total of the individual component
weights (T COMP)
34
Page 35

35
Preparation
Set parameters for net-total formulation:
§ Set parameters for automatic printout when
component stored
2 Application programs
2 1 Program selection
2 1 6 Net-total
7 Print for application
7 1 Print application parameters
7 1 1 Off
7 1 2 ο On; all parameters
7 1 3 On; main parameters only
7 3 Printout of net-total formulation data
7 3 1 ο Autom. print of last net value
7 3 2 Autom. print of tare value
o = Factory setting
Printout of Net-total Formulation Data
COMP2 + 278.1 g : Second component
T COMP+ 2117.5 g : Sum of components
T1 + 1821.5 g : Tare weight (2nd tare memory)
N1 + 278.1 g : Net weight = Gross – tare
2nd tare memory
N + 2099.6 g : Net weight = Gross – tare
Page 36
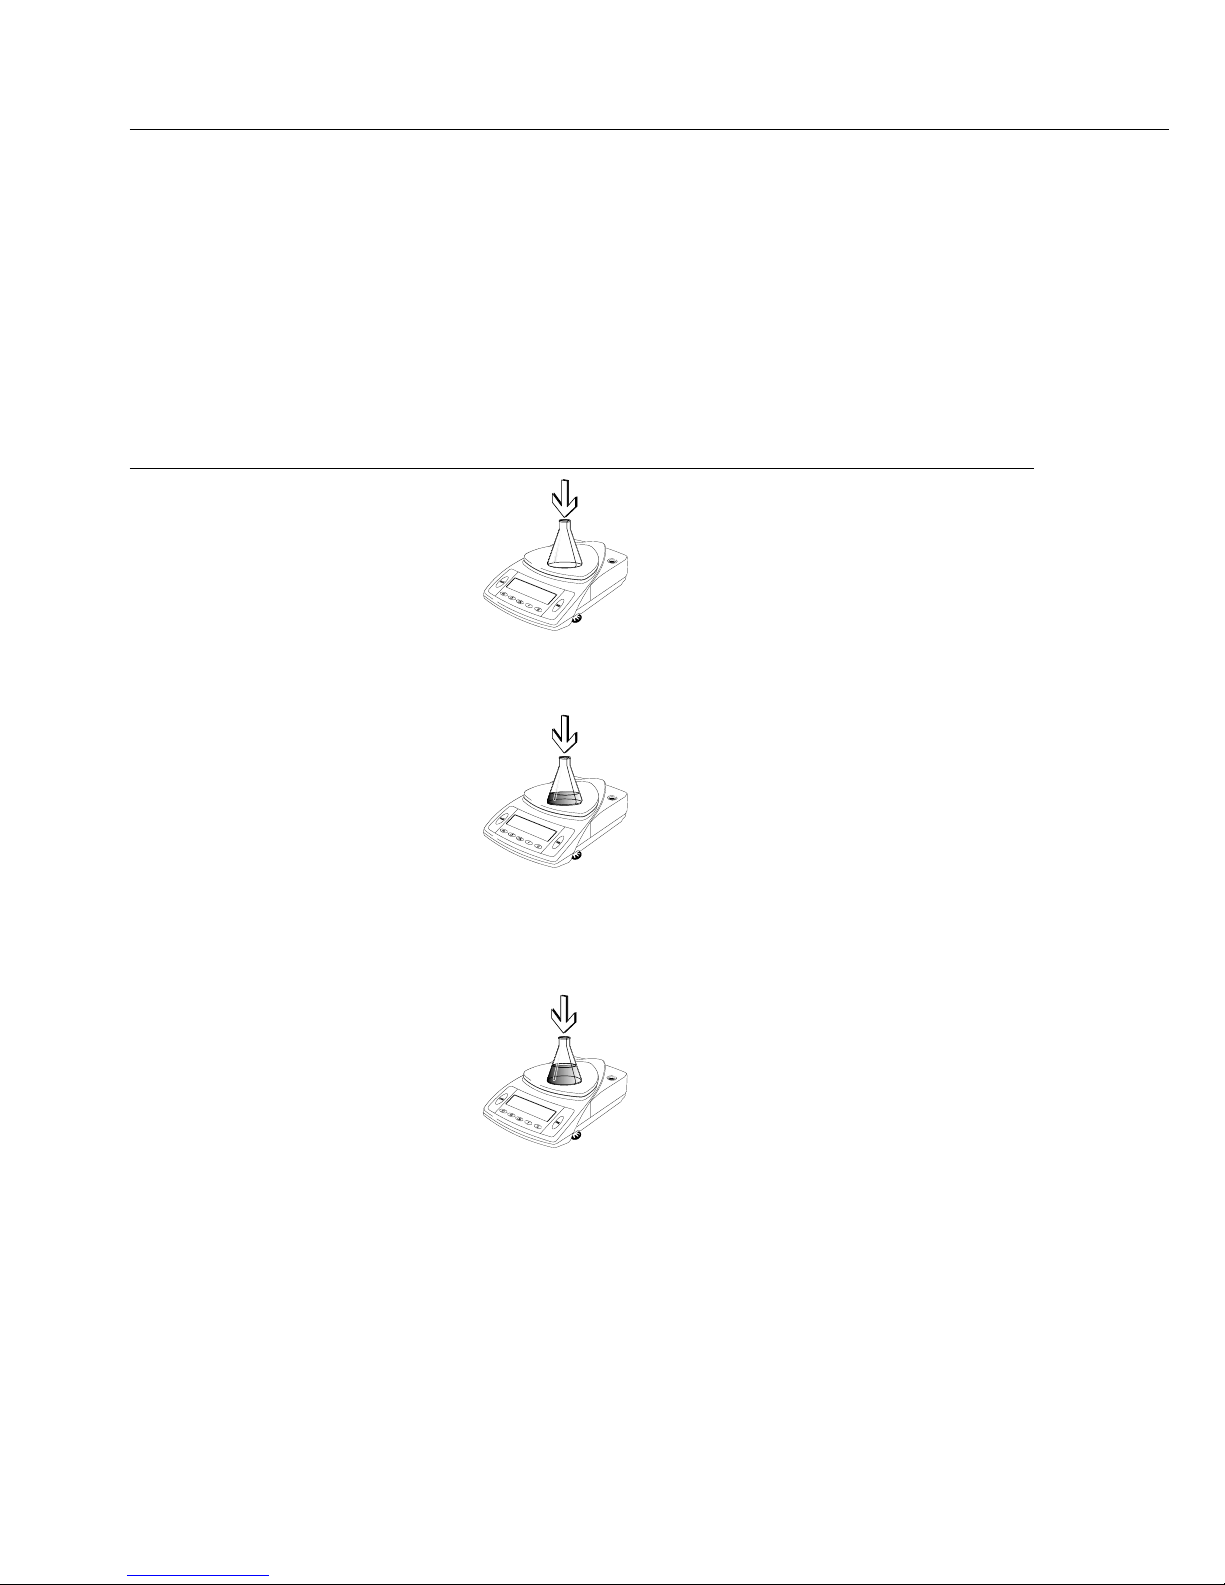
Example: Counting parts into a container
Settings: Application program: Net-total formulation 2 1 6;
Print application parameters: On, print all 7 1 2; Automatic printout of last net value 7 3 1
Step Key (or instruction) Display/Data output
1. Place empty container +
65.0 g
on the balance.
2. Tare the balance. w
0.0 g
3. Add first component.
+ 120,5 g
4. Store component data. v
0.0 g
NET
COMP1 + 120.5 g
5. Add next component. + 70,5 g
6. Store component data. v
0.0 g
NET
COMP2 + 70.5 g
7. Weigh in further components Repeat steps
as desired. 5 and 6.
8. Continue filling to target press and hold v
+ 191,0 g
(view total). (2 sec.) G
36
Page 37
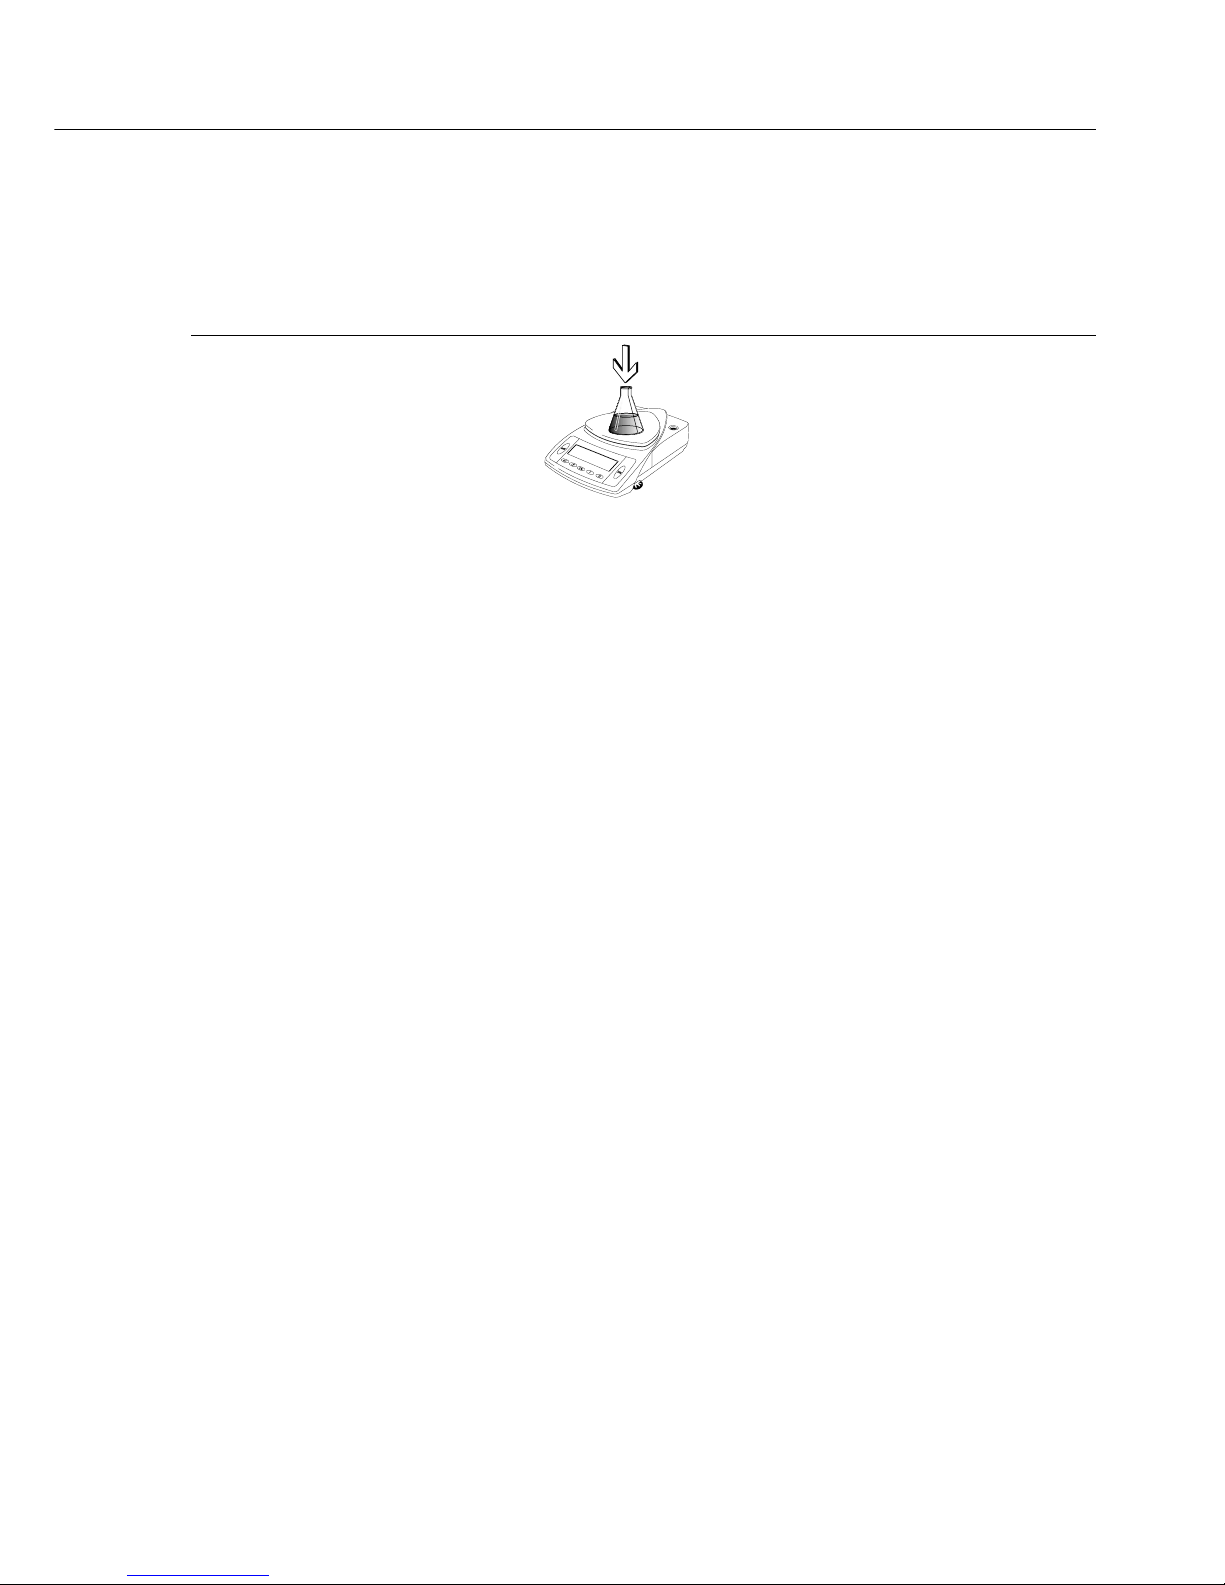
Step Key (or instruction) Display/Data output
9. Add last component. +
12,5 g
G
10. Store component data. v
0.0 g
NET
COMP 3+ 12.5 g
11. Display total weight. c + 203,5 g
T COMP+ 203.5 g
37
Page 38

38
Counting
Menu code: 2 1 4
Display symbol: Z
Purpose
With the Counting program you can
determine the number of parts that
each have approximately equal weight.
To do this, a known number of parts
(the reference sample quantity) is
weighed first, and the individual piece
weight (reference weight) is calculated
from this result. Thus the number
of parts subsequently placed on the
balance can be determined from
their weight.
Reference Sample Updating
Automatic reference sample updating
optimizes the counting accuracy.
You can activate or deactivate this
function in the Setup menu.
When this function is active, automatic
reference sample updating is performed
when the selected stability criterion has
been met.
> The abbreviation opt, for “optimizing,"
is displayed briefly with the new
reference sample quantity.
Reference Balance/Scale
(Counting with two balances/scales)
Purpose:
Use of a reference balance/scale affords
higher precision in counting large
amounts of parts. The LE balance is
used to determine the reference weight.
The following weighing instruments or
terminals can be used for sample
weighing in conjunction with a refer-
ence balance/scale:
– For a QC scale: set menu code 8 8 2
– For an FB/FC/LA/LP balance/scale:
set menu code 8 8 3
– For an isi terminal:
set menu code 8 8 4
§ Please order the required connecting
cables directly from Sartorius.
The following settings must have the
same configurations in both
balances/scales:
– Counting program
– Weight units
– Settings in the LE balance:
Menu codes 7 1 2 and 7 2 2
– All data interface parameters:
– Baud rate
– Parity
– Number of stop bits
– Handshake mode
Transferring the Reference Value from
the LE Reference Balance:
– Press the v key
> The reference value is passed to the
counting balance/scale
Counting Balance/Scale:
$ Refer to the operating manual of the
particular weighing instrument for
further instructions
Page 39

39
Preparation
Set parameters for the Counting program:
$ Select the application program in the Setup menu
§ Set the following parameters:
2 Application programs
2 1 Program selection
2 1 4 Counting
3 Application parameters
3 5 Storage parameter
3 5 1 Standard resolution
(internal resolution)
3 5 2 ο 10 x higher resolution
4 Application parameters for Counting
4 1 Autom. ref. sample updating
4 1 1 o Off
4 1 2 On
8 Extra functions
8 8 Reference balance/scale
8 8 1 o Off
8 8 2 On for QC scales
8 8 3 On for FB-/FC-/LA-/LP models
8 8 4 On for isi terminals
o= Factory setting
Printout: Counting
nRef + 10 : Reference sample quantity
wRef + 21.14 g : Reference weight
Qnt + 500 pcs : Calculated quantity
Page 40
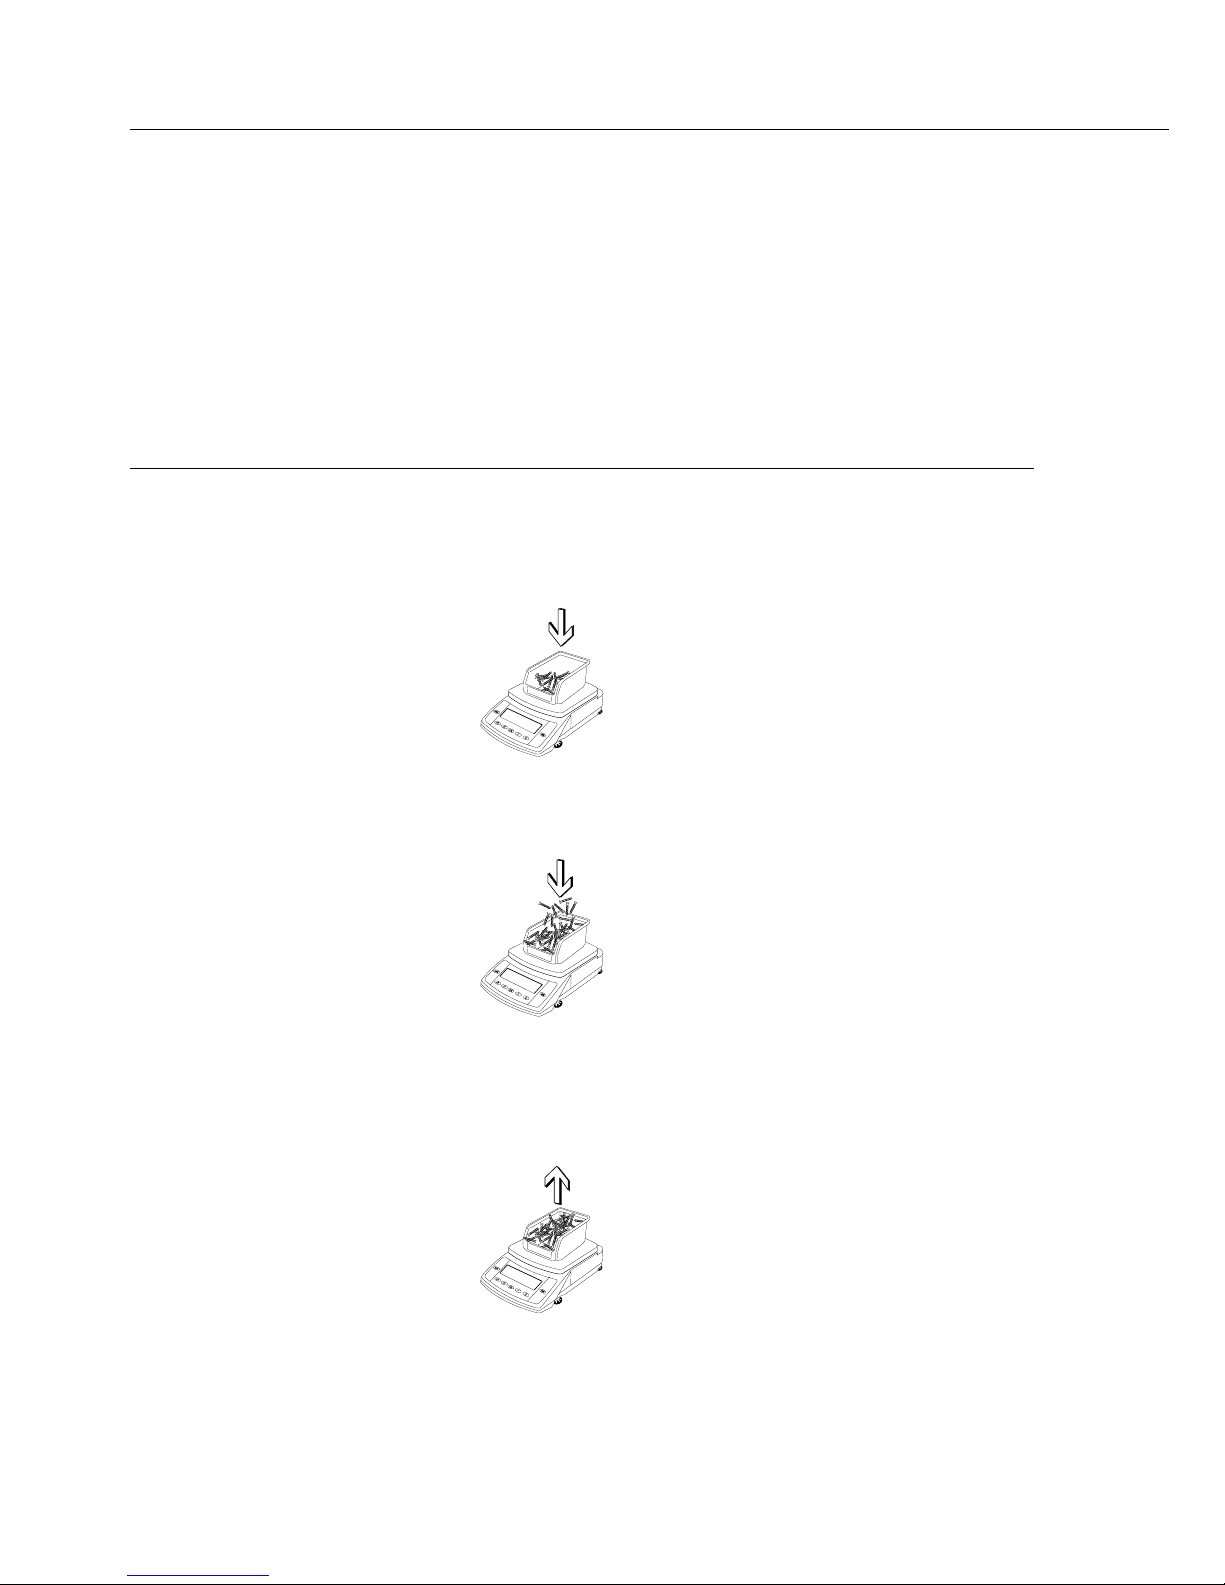
Example: Counting parts of equal weight
Settings:
Menu: Counting program (menu code 2 1 4)
Step Key (or instruction) Display/Data output
1. Place empty container +
22.6 g
on the balance/scale.
2. Tare the balance. w
0.0 g
3. Add reference sample quantity
to container (in this example:
10 pcs).
4. Initialize the balance. v
ref 10 (briefly)
+ 2.14 g
+ 10 pcs
nRef + 10 pcs
wRef + 2.14 g
5. Add uncounted parts
+ 500
pcs
as desired.
6. Print piece count, if desired. r
Qnt + 500 pcs
7. Display weight. v + 1070.0 g
8. Display piece count. v +
500 pcs
9. Unload the balance. –
511 pcs
10. Repeat as necessary,
starting from Step 5.
11. Delete reference
sample quantity c
0.0 g
40
Page 41

Weighing in Percent
41
Preparation
Set parameters for the Weighing in
Percent program:
$ Select the application program in the
Setup menu
§ Set the following parameters:
2 Application programs
2 1 Program selection
2 1 5 Weighing in percent
3 Application parameters
3 5 Storage parameter
3 5 1 ο Standard resolution
(internal resolution)
3 5 2 10 + higher resolution
3 6 Decimal places for calc.
3 6 1 None
3 6 2 ο 1 decimal place
3 6 3 2 decimal places
3 6 4 3 decimal places
ο = Factory setting
Menu code: 2 1 5
Display symbol: %
Purpose
This application program allows you to
obtain weight readouts in percent which
are in proportion to a reference weight.
Printout: Weighing in Percent
pRef + 100 %: Reference percentage
Wxx% + 111.6 g : Reference weight net xx%
Prc + 94.7 % : Calculated percentage
Page 42
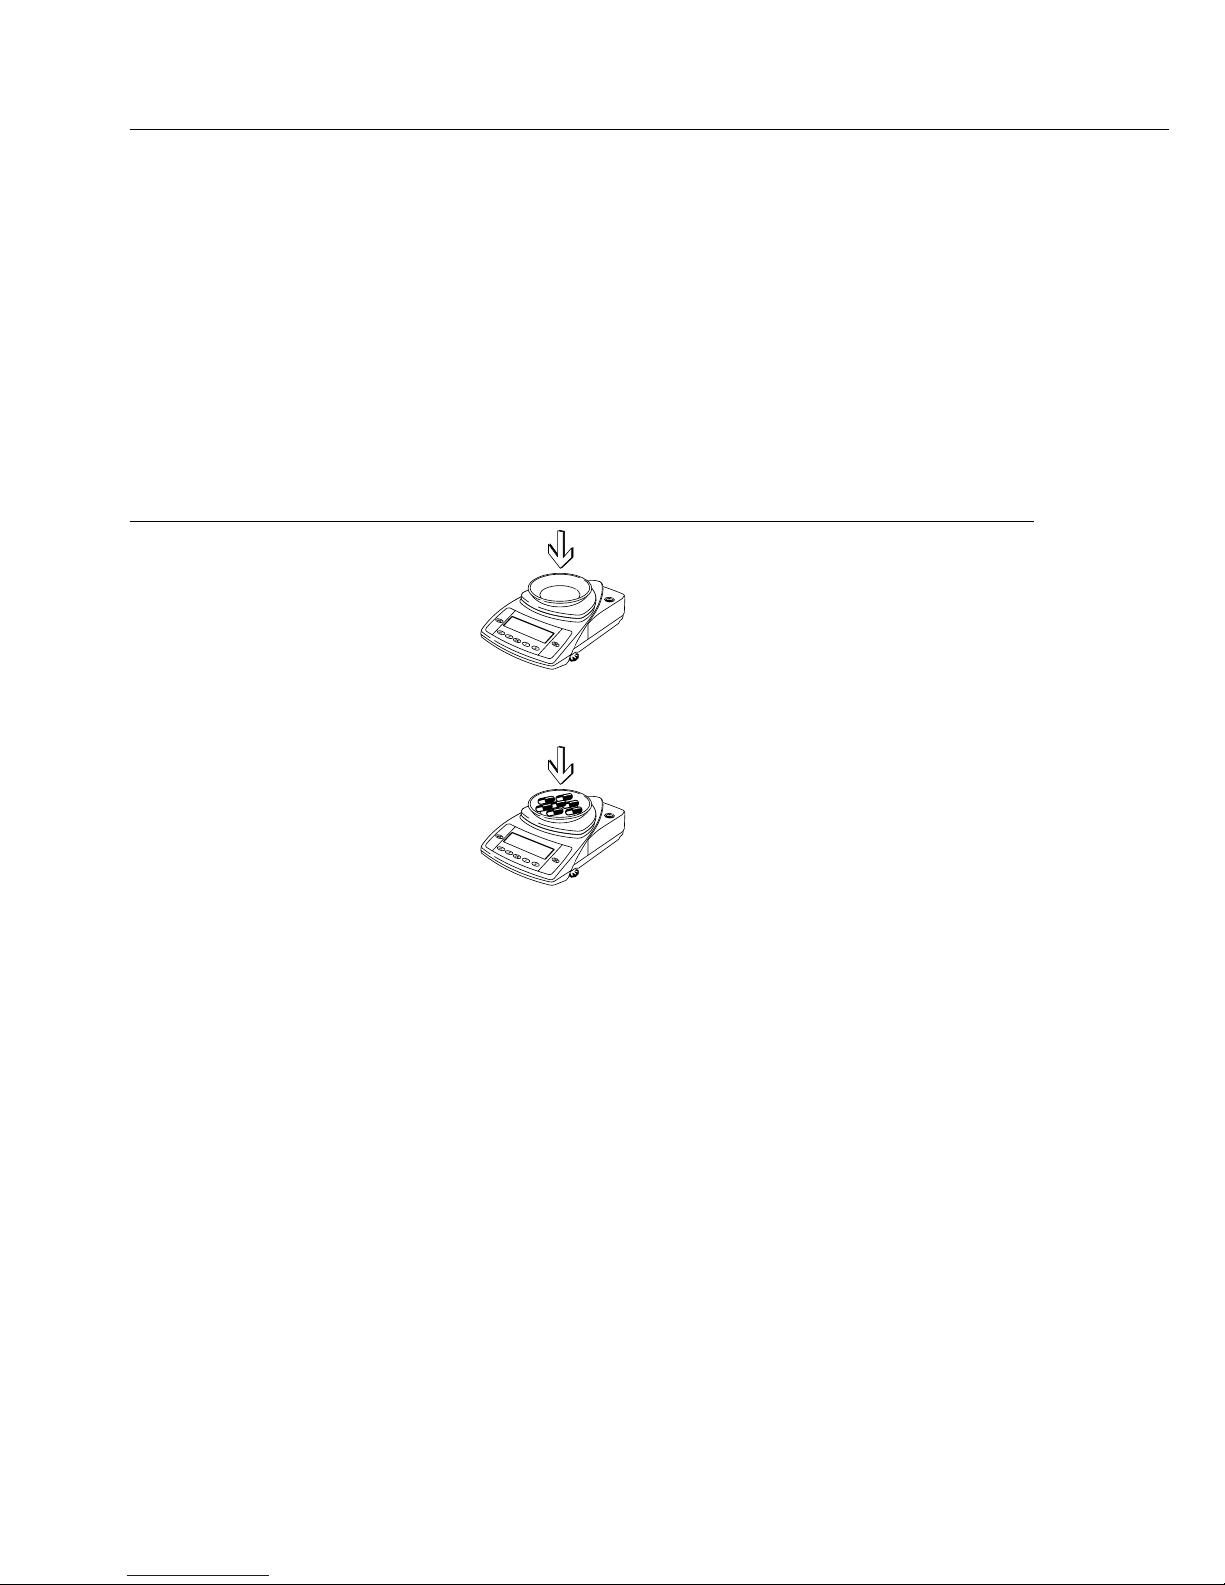
Example: Determining residual weight in percent
Settings:
Menu: Weighing in percent program (menu code 2 1 5),
Print application parameters: On; all parameters (menu code 7 1 2),
Reference percentage: ref 100%
Step Key (or instruction) Display/Data output
1. Place empty container +
22.6 g
on balance
2. Tare the balance. w
0.0 g
3. Place sample equal to 100%
of reference percentage
on the balance (in this
example: 111.6 g).
4. Initialize the balance. v
ref 100 (briefly)
+ 111.6 g
+ 100.0 %
pRef + 100 %
Wxx% + 111.6 g
5. Remove container; e.g., to
treat sample (in this example,
the sample is now dried).
6. Place container with sample
+ 94.9 %
on the balance again (after
treatment).
7. Optional: print percentage. r
Prc + 94.9 %
8. Display residual weight and c + 105.9 g
delete reference value.
9. Optional: print net r
N + 105.9 g
residual weight.
42
Page 43

Animal Weighing/Averaging
43
Preparation
Set parameters for the Animal Weighing
program:
$ Select the application program in the
Setup menu
§ Set the following parameters:
2 Application programs
2 1 Program selection
2 1 7 Animal weighing
3 Application parameters
3 7 Animal activity
3 7 1 Calm (2% of the
animal/object)
3 7 2 ο Normal (5% of the
animal/object)
3 7 3 Strong vibration (20% of
the animal/object
3 8 Start
3 8 1 Manual
3 8 2 ο Automatic
o= Factory setting
Printout: Animal Weighing
mDef 20 : Number of subweighing operations
x-Net + 401.1 g : Calculated average
Menu code: 2 1 7
Display symbol: V
Purpose
Use this program to determine the weights
of unstable samples (e.g., live animals)
or to determine weights under unstable
ambient conditions. With this program,
the balance calculates the weight as the
average of a defined number of individual
weighing operations (also referred to as
“subweighing operations").
Page 44
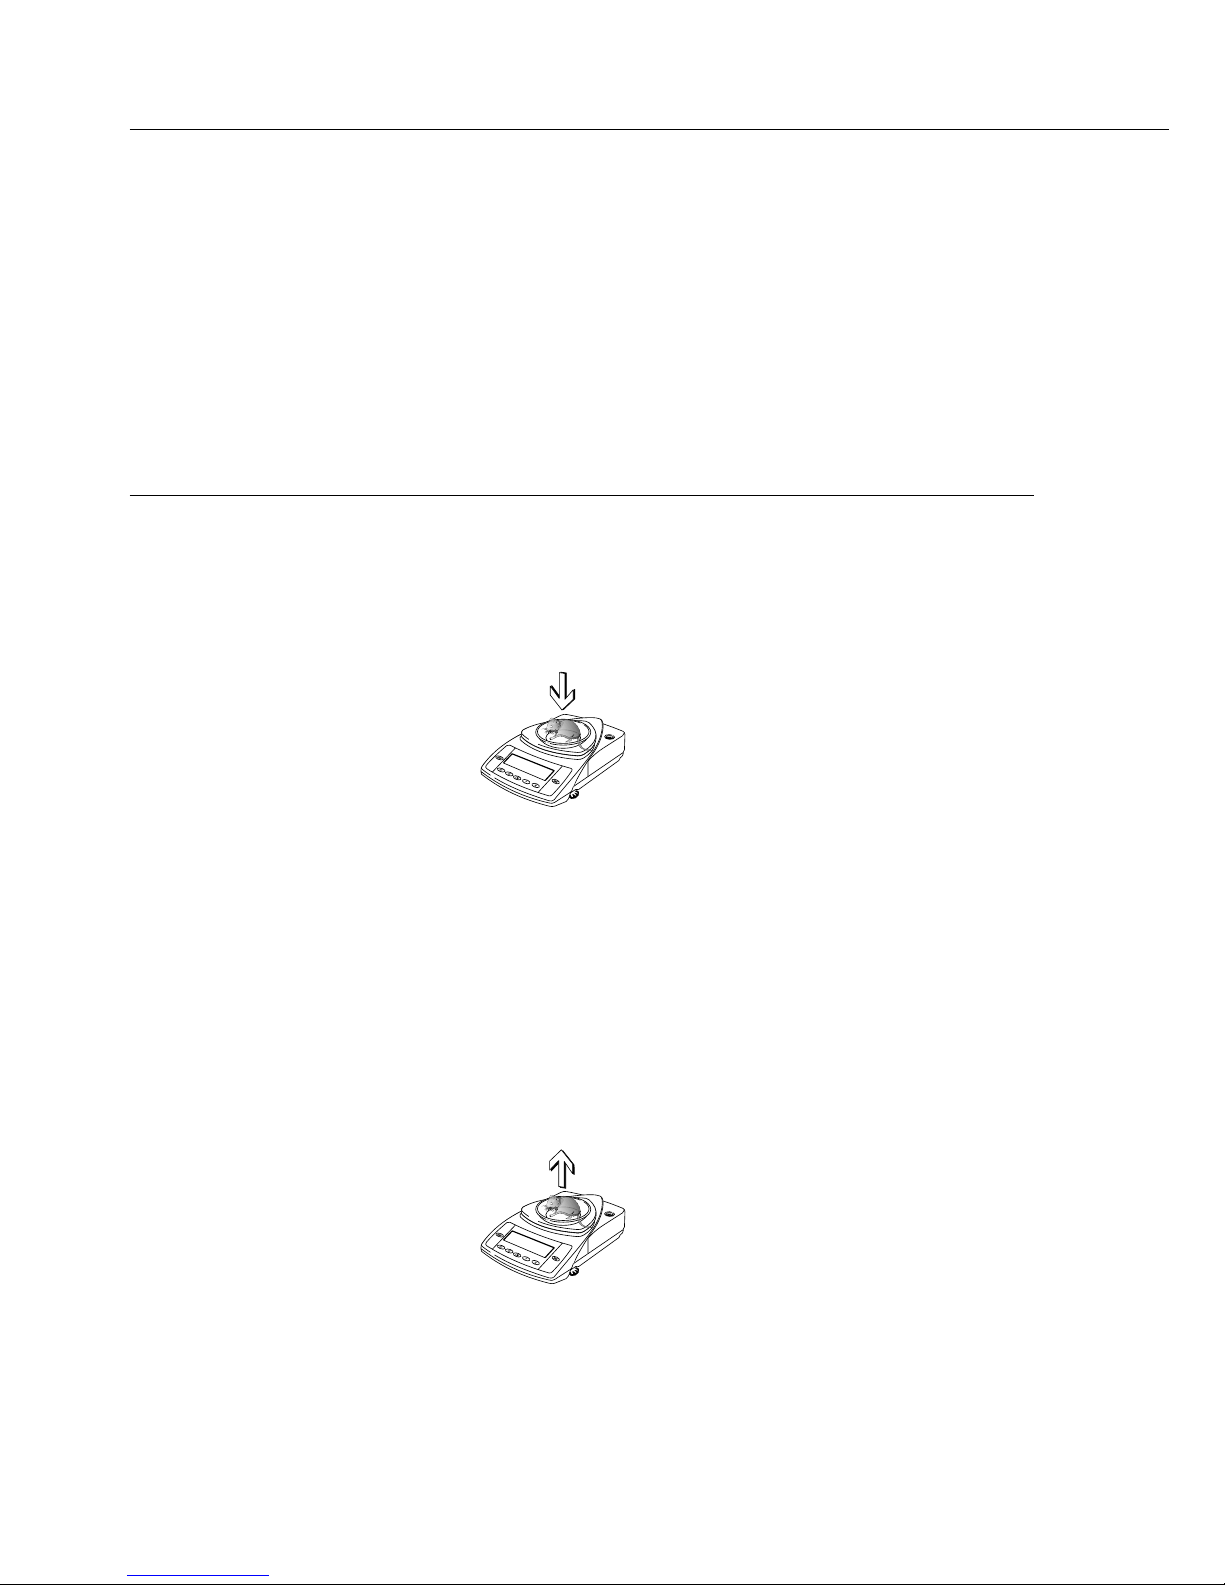
Example: Determining animal weight with automatic start of 20 subweighing operations
Settings:
Menu: Animal weighing program (menu code 2 1 7),
Print application parameters: On; all parameters (menu code 7 1 2)
Step Key (or instruction) Display/Data output
1. Switch on the balance. e
2. Place animal weighing bowl on the balance.
+ 22.6 g
3. Tare the balance. w
0.0 g
4. Place the first animal Weight value fluctuates due
in bowl. to animal activity.
5. Start automatic animal v
888
weighing starts. The balance 20
delays starting the subweighing 19
operation until successive 18
subweights lie within the range ...
defined.
1
6. After 20 subweighing operations + 410.1 g G
the arithmetic average “x-Net" mDef 20
is displayed. x-Net + 410.1 g
7. Unload the balance. 0.0 g
8. Weigh next animal (if applicable).
Next weighing series begins
automatically.
44
Page 45

Toggling between Weight Units
Menu code: 2 1 2
With this application program you can switch the display of a weight value back and forth
between two weight units.
Configure the “Toggle Weight Units" application in the Setup menu:
see “Configuration" Menu code: 2 1 2
Menu code Unit Conversion Display Printout
Weight unit 1 Weight unit 2
1 7 1 3 1 1 ο Grams* 1.00000000000 o o
1 7 2 ο 3 1 2 ο Grams 1.00000000000 g g
1 7 3 3 1 3 Kilograms 0.00100000000 kg kg
1 7 4 ο 3 1 4 Carats 5.00000000000 ct ct
1 7 5 3 1 5 Pounds* 0.00220462260 lb lb
1 7 6 3 1 6 Ounces* 0.03527396200 oz oz
1 7 7 3 1 7 Troy ounces* 0.03215074700 ozt ozt
1 7 8 3 1 8 Hong Kong taels* 0.02671725000 tl tlh
1 7 9 3 1 9 Singapore taels* 0.02645544638 tl tls
1 7 10 3 1 10 Taiwanese taels* 0.02666666000 tl tlt
1 7 11 3 1 11 Grains* 15.4323583500 GN GN
1 7 12 3 1 12 Pennyweights* 0.64301493100 dwt dwt
1 7 13 3 1 13 ο Milligrams
1
) 1000.00000000 mg mg
1 7 14 3 1 14 Parts per pound* 1.12876677120 o /lb
1 7 15 3 1 15 Chinese taels* 0.02645547175 tl tlc
1 7 16 3 1 16 Mommes* 0.26670000000 m mom
1 7 17 3 1 17 Austrian carats* 5.00000000000 K K
1 7 18 3 1 18 Tola* 0.08573333810 t tol
1 7 19 3 1 19 Baht* 0.06578947437 b bat
1 7 20 3 1 20 Mesghal* 0.21700000000 m MS
o = Factory setting, depends on model
* = Not available in verified balances
1
) = Not available in verified balances of accuracy class K
Function
§ Press v to toggle between weight unit 1 and weight unit 2
45
Page 46

46
Generating a Printout
Purpose
You can generate printouts that include
weights, other measured values and
identification codes for documentation
purposes. You can format the printout
to meet individual requirements.
Features
Printouts generated automatically or
manually (at the press of a key): weight
or calculated value is output.
Line format: Values printed with up to
6 preceding characters for identification.
Print application parameters:
Printout of initialization values before
printing measurement results.
ISO/GLP-compliant printout: Printout
of ambient characteristics.
Printouts generated automatically or by
pressing r, dependent on or independent of stability.
You can have the following values
output automatically when using the
application programs if menu code
7 1 2 is configured (printout with data
ID codes):
– Net-total: Component or total weight
– Counting:
Reference sample quantity (nRef)
Reference weight for one piece (wRef)
– Weighing in percent:
Reference percentage (pRef)
Reference weight (Wxx%)
– Animal weighing/averaging:
Number of subweighing operations
(mDef)
Calculated average (x-Net)
Factory settings:
Print manual/automatic: Individual
printout dependent on stability:
Manual at stability (menu code: 6 1 2)
Line format:
Up to 6 characters at the beginning
of each line to identify the weight or
calculated value: Print net, tare, or gross
value, reference sample quantity,
or average piece weight with ID
(menu code 7 2 2).
Print application parameters:
Printout of one or more initialization
values for the active application
program: On (menu code 7 1 2)
ISO/GLP-compliant printout:
No ISO/GLP-compliant printout
(menu code 8 10 1)
Auto print:
Automatic printout of weight values:
No default setting; see print manual/automatic (menu code 6 1 2). Auto print
cannot be interrupted by pressing r
(menu code 6 2 2). Auto print after
each display update (menu code 6 3 1).
§ Setting menu codes for the printout:
see “Configuration"
Page 47

47
Printout without Data ID Codes: Examples
The value currently
+ 1530.0 g Weight in grams
displayed is printed
+ 58.562 ozt Weight in Troy ounces
(weight or calculated
+ 253 pcs Piece count
value with unit)
+ 88.23 % Percentage
Printout with Data ID Codes:
The current value displayed
ID 12345678 Identification*
can be printed with a data
N + 153.0 g Current net value
ID code of up to 6 characters
T1 + 23.4 g Value in 2nd tare memory
at the beginning of the line.
Qnt + 253 pcs Piece count
Prc + 88.23 % Percentage
* = on ISO/GLP records only
Print Application Parameters:
You can have one or
COMP7 + 278.1 g Net-total:
more of the values con-
T COMP+ 21.14 g 7th component weight
figured for initialization
nRef + 10 Net-total: Total
of an application printed
wRef + 21.14 g Counting:
automatically on
Wxx% + 1200.0 g Reference sample quantity
initialization. Counting: Reference weight
Weighing in percent:
Reference weight
Auto Print:
You can have the
N + 153.0 g Net weight
weight readout printed
Stat Display blank
automatically.
Stat L Display underload
Stat H Display overload
Page 48

48
ISO/GLP-compliant Printout/Record
Features
You can have the parameters pertaining
to the ambient weighing conditions
printed before (GLP header) and after
(GLP footer) the values of a weighing
series. These parameters include:
GLP header:
– Date
– Time at beginning of measurement
– Balance manufacturer
– Balance model
– Balance serial number
– Software version number
– Identification number of the current
sampling operation
GLP footer:
– Date
– Time at end of measurement
– Field for operator signature
The record is output to a Sartorius data
printer or a computer.
Settings
§ Setting menu codes for the printout
(see “Configuration"):
– ISO/GLP-compliant record after
calibration/adjustment only:
menu code 8 10 2; or ISO/GLP-compliant
record always on: menu code 8 10 3
– Line format for printout: With data ID
codes - 22 characters: menu code 7 2 2
! No ISO/GLP-compliant record is output
if any of the following settings are
configured:
menu code 6 1 4, 6 1 5, 6 1 6
(automatic printout) or 7 2 1
Function Keys
Press r to output header and first
measured value.
> Header is output the first time r
is pressed
Press v to include output header
and reference data on automatic
printouts when an application
program is active
Close the application:
1) Output GLP footer:
Press c
2) End application program:
Press c
Page 49

49
The ISO/GLP-compliant printout can contain the following lines:
-------------------- Dotted line
17-Jan-2003 10:15 Date/time (beginning of measurement)
SARTORIUS AG Balance manufacturer
Mod. LE10001 Balance model
Ser. no. 10105355 Balance serial number
Ver. no. 00-13-46 Software version
ID 2690 923 ID
-------------------- Dotted line
LID Measurement series no.
nRef + 10 pcs Counting: Reference sample quantity
wRef + 21.14 g Counting: Reference weight
Qnt + 235 pcs Counting result
Qnt + 567 pcs Counting result
-------------------- Dotted line
17-Jan-2003 10:20 Date/time (end of measurement)
Name: Field for operator signature
Blank line
-------------------- Dotted line
ISO/GLP-compliant printout for external calibration/adjustment:
-------------------- Dotted line
17-Jan-2003 10:30 Date/time (beginning of measurement)
SARTORIUS AG Balance manufacturer
Mod. LE10001 Balance model
Ser. no. 10105355 Balance serial number
Ver. no. 00-13-46 Software version
ID 2690 923 ID
-------------------- Dotted line
Cal. Ext. Calibration/adjustment mode
Set + 5000.0 g Calibration weight
Diff. + 0.2 g Difference determined in calibration
Cal. Ext. Complete Confirmation of completed calibration procedure
Diff. + 0.0 g Difference from target following adjustment
-------------------- Dotted line
17-Jan-2003 10:32 Date/time (end of measurement)
Name: Field for operator signature
Blank line
-------------------- Dotted line
Page 50

50
Interface Port
Purpose
Your balance is equipped with an interface
port for connection to a computer or other
peripheral device.
You can connect a computer to change,
start and/or monitor the functions of the
balance and the application programs.
Features
Type of interface: Serial interface
Operating mode: Full duplex
Standard: RS-232
Transmission rates:
150, 300, 600, 1200, 2400, 4800, 9600
and 19,200 baud
Parity: Mark, space, odd, even
Character format:
1 start bit, 7-bit ASCII, parity,
1 or 2 stop bits
Handshake:
2-wire interface:
via software (XON/XOFF)
4-wire interface:
Hardware via handshake lines (CTS/DTR)
Operating mode: SBI
Data output format of the balance:
16 or 22 characters
Factory settings:
Transmission rate:
1200 baud (5 1 4)
Parity: Odd (5 2 3)
Stop bits: 1 stop bit (5 3 1)
Handshake: Hardware, 2 characters
after CTS (5 4 2)
Operating mode: Standard SBI (5 5 1)
Print manually/automatically:
Manual after stability (6 1 2)
Preparation
§ see “Pin Assignments" and
“Pin Assignment Chart"
Identification of Non-Verified Digits
Non-verified digits when “e = d"
are automatically identified on the
printout:
Select universal printer:
menu code 5 5 2.
Brackets are used to identify
non-verified digits.
Page 51

Output Format with 16 Characters
Display segments that are not activated are output as spaces.
The following characters can be output, depending on the characters displayed on the balance:
Normal Operation
Position 12345678910111213141516
+ DDDDDD * UUUCRLF
or – ........ ***
or * ********
*: Space CR: Carriage return
D: Digit or letter LF: Line feed
U: Unit symbol
Special Codes
Position 12345678910111213141516
**********CRLF
or H *
or L *
or C *
*: Space H: Overload
C: Calibration/adjustment L: Underload
Error Codes
Position 12345678910111213141516
Err*###****CRLF
*: Space
# # #: Error code number
51
Page 52

Data output example: +123.56 g
Position 12345678901234
+ 123 . 56 g CRLF
+ 123.5[6]g CRLF
Position 1: Plus or minus sign or space
Position 2: Space
Positions 3-10: Weight with a decimal point; leading zeros = space
Position 11: Space
Positions 12-14: Unit symbol or space
Position 15: Carriage return
Position 16: Line feed
Output Format with 22 Characters
When data is output with an ID code, the ID code (consisting of 6 characters) precedes the
16-character string described above.
These 6 characters identify the subsequent value.
12345678910111213141516171819202122
IIIIII+*DDDDDDDD * UUUCRLF
*****– ........ ***
* ********
I: ID code character U: Unit symbol
1
)
*: Space CR: Carriage return
D: Digit or letter LF: Line feed
Example:
12345678901234567890
N + 123. 56 g CRLF
N + 123. 5[ 6 ] g CRLF
1
) depends on balance type; for example, not all units or characters are available on balances
verified for use in legal metrology.
52
Page 53

Special Codes
12345678910111213141516171819202122
Stat****************CRLF
H*
L*
*: Space H: Overload
L: Underload
Error Codes
12345678910111213141516171819202122
Stat*****Err*###****CRLF
*: Space # # #: Error code number
ID code
characters I Meaning
Stat Status
T1 Tare T1
N Net N
N1 Net N1
COMPxx Net-total: Component no.
T COMP Net-total: Total weighed in
Qnt Counting: Quantity
wRef Counting: Reference weight
nRef Counting: Reference sample quantity
Prc Weighing in percent: Percentage
Wxx% Weighing in percent: Reference weight
pRef Weighing in percent: Reference percentage
mDef Animal weighing: No. of measurements remaining
x-Net Animal weighing: Calculated average
53
Page 54

Data Input Format
You can connect a computer to your balance to send commands via the balance interface
port to control balance functions and applications.
The commands sent are control commands and may have different formats.
Control commands consist of up to 13 characters. Each character must be transmitted
according to the settings configured in the operating menu for data transmission.
Format for Control Commands
Format 1: Esc ! CR LF
Format 2: Esc ! # _ CR LF
Esc: Escape CR: Carriage return (optional)
!: Command character LF: Line feed (optional)
Command character Format 1:
! Meaning
K Weighing mode 1 (very stable conditions)
L Weighing mode 2 (stable conditions)
M Weighing mode 3 (unstable conditions)
N Weighing mode 4 (very unstable conditions)
O Block keys
P r key (print, auto print; activate or block)
R Unblock keys
S Restart/self-test
T w key
Z Internal calibration/adjustment
Command character Format 2:
!# Meaning
f0 Function key v
f1 Function key q
s3 c key
x0 Perform internal calibration
x1 Print balance model
x2 Print weighing cell serial number
54
Page 55

55
Synchronization
During data communication between the
balance and a connected device (computer), messages consisting of ASCII characters
are transmitted via the interface. For errorfree data communication, the parameters
for baud rate, parity, handshake mode and
character format must be the same for
both units.
You can set these parameters in the
Setup menu so that they match those of
the connected device. You can also define
parameters in the balance to make data
output dependent on various conditions.
The conditions that can be configured are
listed in the descriptions of the application
programs.
If you do not connect a peripheral device
to the balance interface port, this will not
generate an error message.
Handshake
The balance interface (Sartorius Balance
Interface = SBI) has transmit and receive
buffers. You can define the handshake
parameter in the Setup menu:
– Hardware handshake (CTS/DTR)
– Software handshake (XON, XOFF)
Hardware Handshake
With a 4-wire interface, 1 more character
can be transmitted after CTS (Clear to
Send).
Page 56

56
Software Handshake
The software handshake is controlled via
XON and XOFF. When a device is switched
on, XON must be transmitted to enable any
connected device to communicate.
Data Output by Print Command
The print command can be transmitted by
pressing r or by a software command
(Esc P).
Automatic Data Output
In the “auto print" operating mode, data
is output to the interface port without a
print command. You can have data output
automatically at defined print intervals,
with or without the stability parameter.
The length of a print interval depends on
the settings for “Adapting the filter"
(1 1 x) and “Time-dependent automatic
printing" (6 3 x).
If you select the auto print setting,
data will be transmitted immediately the
moment you turn on the balance. In the
operating menu, you can define whether
automatic printing can be stopped by
pressing r.
Faster Output Speeds
If you require output speeds faster than
10 Hz, please contact Sartorius for
information.
Page 57

Female Interface Connector:
25-contact D-Submini (DB25S) with screw lock hardware
Male connector used (please use connectors with the same specifications):
25-pin D-Submini DB25 with integrated shielded cable clamp assembly
(Amp 826 985-1C) and fastening screws (Amp 164 868-1)
! Warning When Using Pre-wired RS-232 Connecting Cables:
RS-232 cables purchased from other manufacturers often have incorrect pin assignments
for use with Sartorius weighing systems. Be sure to check the pin assignments against the
chart below before connecting the cable, and disconnect any lines identified differently
from those specified by Sartorius (e.g., pin 6).
Failure to do so may damage or even completely ruin your weighing system and/ or
peripheral device.
Pin Assignment Chart:
Pin 1: Signal ground
Pin 2: Data output (TxD)
Pin 3: Data input (RxD)
Pin 4: Internal ground (GND)
Pin 5: Clear to send (CTS)
Pin 6: Internally connected
Pin 7: Internal ground (GND)
Pin 8: Internal ground (GND)
Pin 9: Reset _ In*)
Pin 10: Not connected
Pin 11: + 12 V
Pin 12: Reset _ Out *) For remote switch
Pin 13: + 5 V
Pin 14: Internal ground (GND)
Pin 15: Universal remote switch
Pin 16: Not connected
Pin 17: Not connected
Pin 18: Not connected
Pin 19: Not connected
Pin 20: Data terminal ready (DTR)
Pin 21: Ground input for external voltage supply
Pin 22: Not connected
Pin 23: Not connected
Pin 24: Ext. supply voltage input + 12 to 30 V
Pin 25: + 5 V
*) = Hardware restart
57
Pin Assignment Charts
Page 58
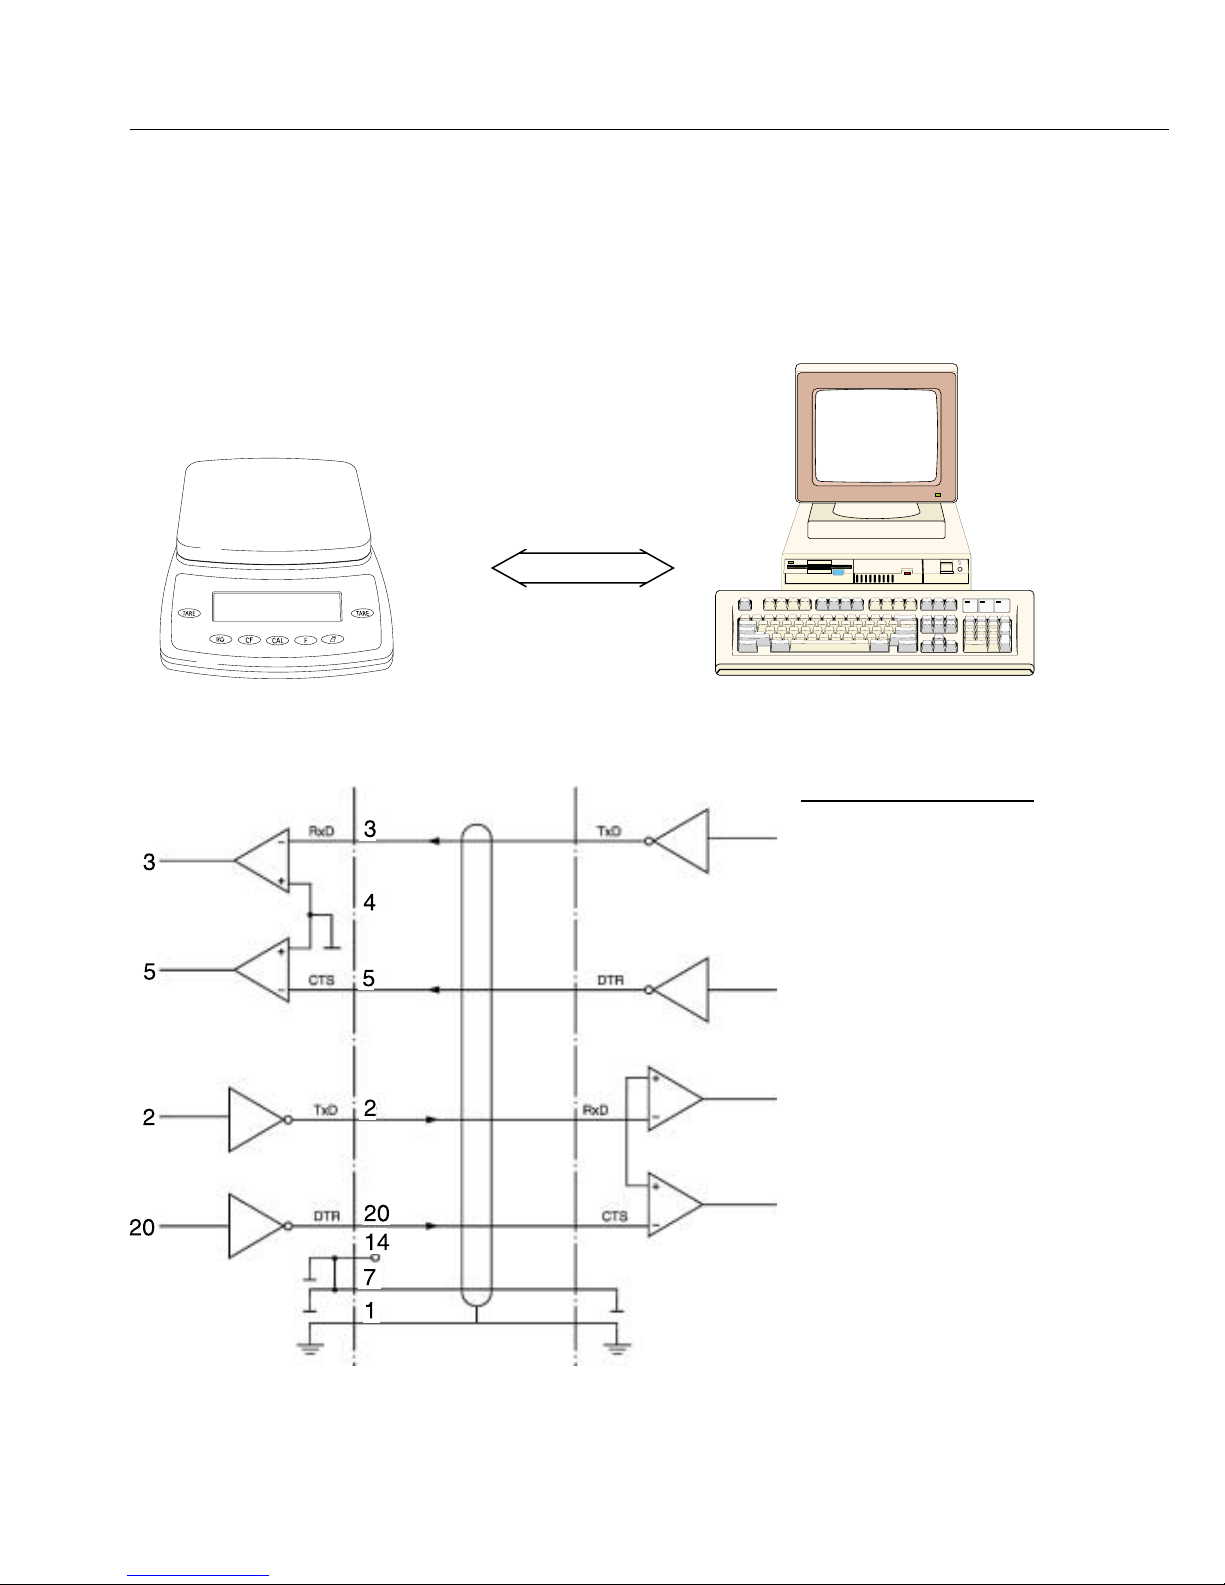
58
Cabling Diagram
Peripheral device
PC PC
25-pin or 9-pin
23
20 4
32
58
66
75
Cable type: AWG 24 specification
– For connecting a computer or other peripheral device to the balance using the
RS-232C/V24 protocol and cables up to 15 m (50 ft.) long.
V24
Balance
Page 59

Troubleshooting Guide
Error codes are shown on the main display for 2 seconds. The program then returns
automatically to the previous mode (e.g., weighing).
Display Cause Solution
No segments appear No AC power is available Check the AC power supply
on the display
The power supply is not Plug in the power supply
plugged in
h The load exceeds the balance Unload the balance
capacity
l or Err 54 Something is touching Move the object that is
the weighing pan touching the weighing pan
err 01 Data output not compatible Change the configuration in
with output format the operating menu
err 02 Calibration parameter Calibrate only when zero
not met; e.g.: is displayed
– balance not zeroed – Press w to tare the balance
– load on weighing pan – Unload the balance
err 10 The w key is blocked Press c to clear the tare
when there is data in the memory and release
second tare memory (net- the tare key
total); only 1 tare function
can be used at a time
err 11 Tare memory not allowed Press w
err 22 Weight is too light or, Increase the weight on the
when using an appli- balance
cation program, there is no
sample on the balance
err 30 Interface port for printer Reset the menu
output is blocked factory settings, or
Contact your local Sartorius
Service Center
59
Page 60

Display Cause Solution
err 235 Connecting cable not Connect the cable correctly
on model LE26P, connected correctly
LE225D Cable connected to junction Connect the equipment
box on a different balance correctly
The weight readout Unstable ambient conditions Set up the balance
changes constantly (excessive vibration or draft) in another area
at the place of installation
A foreign object is caught Remove the foreign object
between weighing pan and
balance housing
The weight readout The balance was not Calibrate/adjust the balance
is obviously wrong calibrated/adjusted before
weighing
The balance was not Tare or zero the balance
tared/zeroed defore weighing before weighing
If any other errors occur, contact your local Sartorius Service Center!
Contact information:
Please point your Internet browser to: http://www.sartorius.com
60
Page 61

Care and Maintenance
61
Service
On request, Sartorius can offer you an
individual service contract.
Repairs
Repair work must be performed by trained
service technicians. Any attempt by
untrained persons to perform repairs may
lead to hazards for the user.
Cleaning
§ Unplug the AC adapter from the wall
outlet (mains supply). If you have an
interface cable connected to the
balance port, unplug it from the port.
§ Clean the balance using a piece of cloth
which has been wet with a mild detergent (soap).
§ After cleaning, wipe down the balance
with a soft, dry cloth
! Make sure that no liquid or other
foreign objects or dust (powder) enters
the balance housing.
! Do not use any aggressive cleaning
agents (solvents or similar agents)
Cleaning Stainless Steel Surfaces
Clean all stainless steel parts regularly.
Remove the stainless steel weighing
pan and thoroughly clean it separately.
Use a damp cloth or sponge to clean
any stainless steel parts on the balance.
You can use any commercially available
household cleaning agent that is suitable
for use on stainless steel. Clean stainless
steel surfaces by wiping them down.
Then rinse the equipment thoroughly,
making sure to remove all residues.
Afterwards, allow the balance to dry.
If desired, you can apply oil to the
cleaned surfaces as additional
protection.
Solvents are permitted for use only on
stainless steel parts.
Page 62
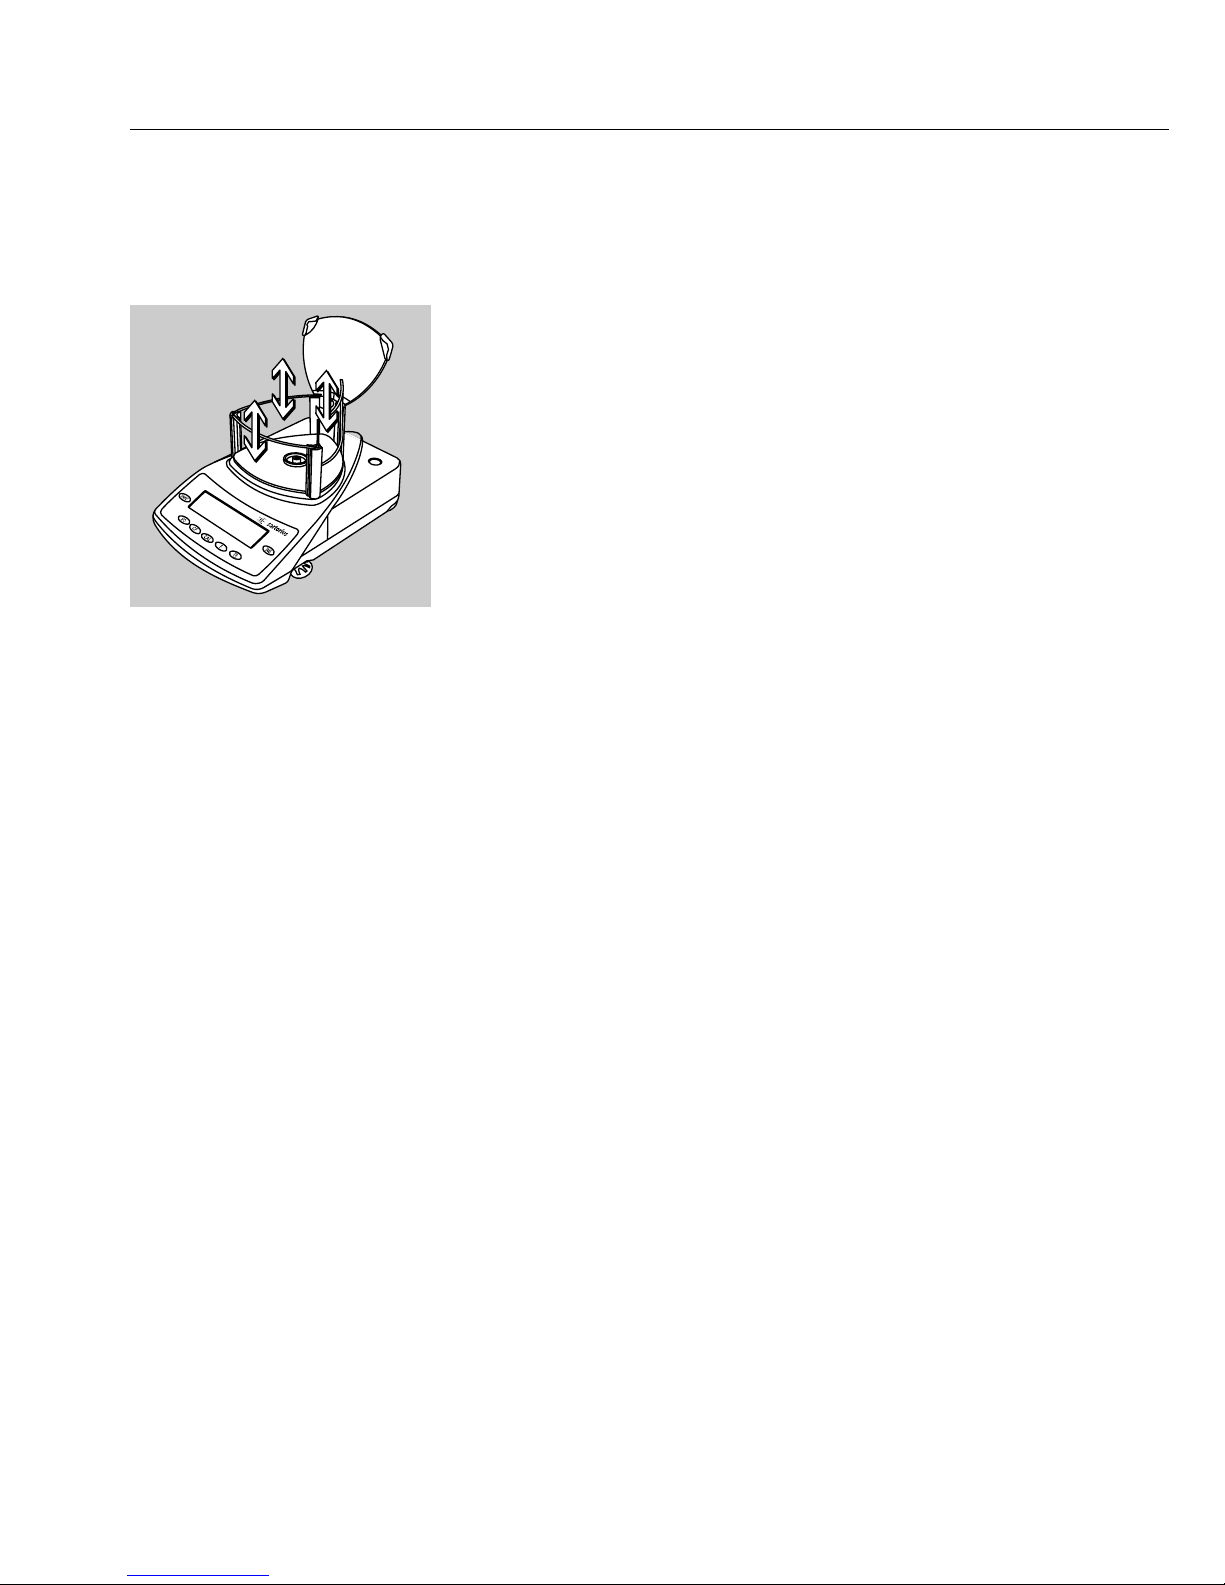
Cleaning the Weighing Chamber and Draft Shield
§ Open the draft shield cover and take out the
removable parts
§ Use a hand-held vacuum cleaner and mini-hose
to remove any powdered sample material carefully.
§ Use blotting paper to remove any liquid sample
material.
§ On models with a 3-sided draft shield, pull the
3 draft shield walls upwards to remove, if necessary.
Safety Inspection
If there is any indication that safe operation of the
balance is no longer warranted:
§ Turn off the power and disconnect the equipment
from AC power immediately
> Lock the equipment in a secure place to ensure that
it cannot be used for the time being.
Notify your nearest Sartorius Service Center.
Repair work must be performed by trained service
technicians.
We recommend having the power supply inspected
by a certified electrician at regular intervals,
according to the checklist given below:
– Insulating resistance: > 7 megaohms measured
with a constant voltage of at least 500 volts
at a 500 K-ohm load
– Leakage current: < 0.05mA measured with a properly
calibrated multimeter
62
Page 63

Instructions for Recycling
Information and Instructions on
Disposal and Repairs
Packaging that is no longer required
must be disposed of at the local waste
disposal facility. The packaging is made
of environmentally friendly materials
that can be used as secondary raw
materials.
The equipment, including
accessories and batteries,
does not belong in your
regular household waste.
The EU legislation requires
its Member States to collect
electrical and electronic equipment and
disposed of it separately from other
unsorted municipal waste with the aim
of recycling it.
In Germany and many other countries,
Sartorius AG takes care of the return
and legally compliant disposal of its
electrical and electronic equipment on
its own. These products may not be
placed with the household waste or
brought to collection centers run by
local public disposal operations – not
even by small commercial operators.
For disposal in Germany and in the
other Member States of the European
Economic Area (EEA), please contact
our service technicians on location
or our Service Center in Goettingen,
Germany:
Sartorius AG
Service Center
Weender Landstrasse 94-108
37075 Goettingen, Germany
63
In countries that are not members of the
European Economic Area (EEA) or where
no Sartorius affiliates, subsidiaries, dealers
or distributors are located, please contact
your local authorities or a commercial
disposal operator.
Prior to disposal and/or scrapping of the
equipment, any batteries should be
removed and disposed of in local collection
boxes.
Sartorius AG, its affiliates, subsidiaries,
dealers and distributors will not take back
equipment contaminated with hazardous
materials (ABC contamination) – either for
repair or disposal. Please refer to the
accompanying leaflet/manual or visit our
Internet website (www.sartorius.com) for
comprehensive information that includes
our service addresses to contact if you plan
to send your equipment in for repairs or
proper disposal.
Page 64
64
Overview
Specifications
Model LE26P LE225D LE324S LE244S
Weighing capacity g 5/21 40/100/220 320 240
Readability mg 0.002/0.01 0.01/0.01/0.1 0.1 0.1
Tare range (subtractive) g –21 –220 –320 –240
Repeatability (std. deviation) <±mg 0.004 0.02/0.05/0.1 0.2 0.1
Linearity <±mg 0.008 0.03/0.1/0.2 0.3 0.2
Response time (average) s 10 < 6/3 < 3 < 2
Operating temperature range °C 10° to 30° (50° to 86°F)
Allowable ambient
operating temperature °C 5° to 40° (41° to 104°F)
Sensitivity drift within
10 to 30°C <±/K 1 · 10
–6
External calibration weight g 20 (E2) 200 (E2) 200 + 200 (E2)
(of at least accuracy class...) 100 (E2)
Net weight, approx. kg 7.6 7.6 6.5 6.5
Weighing pan size mm 50 d 80 d* 80 d* 80 d*
(inner diameter)
Weighing pan surface cm
2
20 64* 64* 64*
Weighing chamber height
(weighing pan to draft
shield cover) mm 162 232 232 232
Dimensions (W+ D + H)
– Balance mm 213+ 342+ 270 213+ 342 + 340 213 + 342 + 340 213+ 342+ 340
– Electronics box mm 134 + 51 + 155 134+ 51+ 155 – –
AC power source/ V~ AC adapter STNG6, 230 V or15 V,
power requirements +15% to – 20% (protection rating IP20)
Frequency Hz 48 – 60
Power consumption (average) VA maximum 16; typical 8
Approx. hours of operation
with the YRB05Z
rechargeable battery pack h 20 20 22 22
Selectable weight units Grams, carats, pounds, ounces, Troy ounces, Hong Kong taels,
Singapore taels, Taiwanese taels, grains, pennyweights,
milligrams, parts per pound, Chinese taels, mommes, Austrian
carats, tola, baht and mesghal
Built-in interface RS-232C-S/V24-V28; 7-bit; parity: even, odd, mark, or space;
transmission rates: 150 to 19,200 baud; 1 or 2 stop bits;
software/hardware handshake
* Three-sided weighing pan: d = diameter of inner circle.
The cross-hatched section can be fully utilized.
Page 65

65
Model LE1003S LE1003P LE623S LE323S LE623P
Weighing capacity g 1010 500/1010 620 320 120/240/620
Readability g 0.001 0.001/0.01 0.001 0.001 0.001/0.002/0.005
Tare range (subtractive) g –1010 -1010 –620 –320 –320
Repeatability (std. deviation) <± g 0.001 0.001/0.01 0.001 0.001 0.001/0.001/ 0.003
Linearity <± g 0.002 0.002/0.02 0.002 0.002 0.002/0.002/0.005
Response time (average) s < 2 < 2 < 1.5 < 1.5 < 1.5
Operating temperature range °C 10° to 30° (50° to 86°F)
Allowable ambient
operating temperature °C 0° to 40° (32° to 104°F)
Sensitivity drift
within +10 to +30°C <±/K 2 · 10
–6
External calibration weight g 1000 (E2) 1000 (E2) 500 (E2) 200 (F1) 500 (F1)
(of at least accuracy class...)
Net weight, approx. kg 6.5 6.5 4.6 4.6 4.6
Weighing pan size mm 110 d
(inner diameter)*
Weighing pan surface* cm2120
Weighing chamber height
(weighing pan to draft shield
cover) mm 240 240 50 50 50
Dimensions (W + D + H) mm 213 + 342 + 340 213 + 342 + 153
AC power source/ V~ AC adapter STNG6, 230 V or 115 V,
power requirements +15% to – 20% (protection rating IP20)
Frequency Hz 48 – 60
Power consumption (average) VA maximum 16; typical 8
Approx. hours of operation
with the YRB05Z
rechargeable battery pack h 27
Selectable weight units Grams, carats, pounds, ounces, Troy ounces,
Hong Kong taels, Singapore taels, Taiwanese taels, grains, pennyweights, milligrams, parts per pound, Chinese taels, mommes,
Austrian carats, tola, baht and mesghal
Built-in interface RS-232C-S/V24-V28; 7-bit; parity: even, odd, mark,
or space; transmission rates: 150 to 19,200 baud;
1 or 2 stop bits; software/hardware handshake
* Three-sided weighing pan: d = diameter of inner circle.
The cross-hatched section can be fully utilized.
Page 66

Model LE6202S LE5202S-DS LE4202S LE6202P LE2202S
LE2202S-DS
Weighing capacity g 6200 5200 4200 1500/3000/ 2200
6200
Readability g 0.01 0.01 0.01 0.01/0.02/ 0.01
0.05
Tare range (subtractive) g –6200 –5200 –4200 –6200 –2200
Repeatability (std. deviation) <± g 0.01 0.01 0.01 01/0.01/ 0.01
0.03
Linearity <± g 0.02 0.02 0.02 0.02/0.02/ 0.02
0.05
Response time (average) s < 1.5
Operating temperature range °C 10° to 30° (50° to 86°F)
Allowable ambient
operating temperature °C 0° to 40° (32° to 104°F)
Sensitivity drift
within +10 to +30°C <±/K 2 ·10
–6
External calibration weight g 5000 (E2) 5000 (E2) 4000 (E2) 5000 (F1) 2000 (F1)
(of at least accuracy class...)
Net weight, approx. kg 4.7 6 4.7 4.7 4.7/6
Weighing pan size mm 190+204 d 130 190+204 190+204 190+204/
Weighing pan surface cm
2
388 133 388 388 d 130
388/133
Dimensions (W + D + H) mm 213 + 213 + 213 + 213 + 213 +
342 + 342 + 342 + 342 + 342 +
88 340 88 88 88/340
AC power source/ V~ AC adapter STNG6, 230 V or 115 V,
power requirements +15% to – 20% (protection rating IP20)
Frequency Hz 48 – 60
Power consumption (average) VA maximum 16; typical 8
Approx. hours of operation
with the YRB05Z
rechargeable battery pack h 27
Selectable weight units Grams, kilograms, carats, pounds, ounces, Troy ounces,
Hong Kong taels, Singapore taels, Taiwanese taels, grains,
pennyweights, milligrams, parts per pound, Chinese taels,
mommes, Austrian carats, tola, baht and mesghal
Built-in interface RS-232C-S/V24-V28; 7-bit; parity: even, odd, mark, or space;
transmission rates: 150 to 19,200 baud;
1 or 2 stop bits; software/hardware handshake
66
Page 67

67
Model LE10001 LE5201 LE2201 LE34001S LE34001P LE16001S
Weighing capacity kg 10 5.2 2.2 34 8 16
Readability (scale interval) g 0.1 0.1 0.1 0.1 0.1/0.2/0.5 0.1
Tare range (subtractive) kg –10 –5.2 –2.2 –34 –34 –16
Repeatability (std. deviation) <±g 0.1 0.1 0.1 0.1 0.05/0.05/ 0.05
Linearity <±g 0.2 0.2 0.2 0.2 0.2 0.2
Response time (average) s < 1
Operating temperature range °C 10° to 30° (50° to 86°F)
Allowable ambient
operating temperature °C 0° to 40° (32° to 104°F)
Sensitivity drift
within 10° to 30°C <±/K 4 · 10
–6
4 · 10–610 · 10–62 · 10
–6
2 · 10
–6
2 · 10
–6
External calibration weight kg 5 (F1) 5 (F2) 2 (F2) 10 (F1) 10 (F2) 10 (F1)
(of at least accuracy class...)
Net weight, approx. kg 4.7 4.7 3.6 16 16 16
Weighing pan size mm 190 + 204 190 + 204 190+ 204 300 + 400 300 + 400 300 + 400
Dimensions (W+ D + H) mm 213+ 213+ 213 + 313+ 313 + 313+
342+ 342+ 342 + 532+ 532 + 532+
90 90 90 120 120 120
AC power source/ V~ AC adapter STNG6, 230 V or 115 V,
power requirements +15% to – 20% (protection rating IP20)
Frequency Hz 48 – 60
Power consumption (average) VA maximum 16; typical 8
Approx. hours of operation
with a rechargeable
ibattery pack h 40 40 40 22 22 22
Selectable weight units Grams, kilograms, carats, pounds, ounces, Troy ounces,
Hong Kong taels, Singapore taels, Taiwanese taels, grains,
pennyweights, milligrams, parts per pound, Chinese taels, mommes,
Austrian carats, tola, baht and mesghal
Built-in interface RS-232C-S/V24-V28; 7-bit; parity: even, odd, mark, or space;
transmission rates: 150 to 19,200 baud; 1 or 2 stop bits;
software/hardware handshake
* Three-sided weighing pan: d = diameter of inner circle.
The cross-hatched section can be fully utilized.
Page 68

68
Verified models with EC type-approval
Model LE26P-OCE LE225D-OCE LE324S-OCE LE244S-OCE
Type BC BL 100 BC BL 100 BD BL 100 BD BL 100
Accuracy class1) kkkk
Weighing capacity, Max1) g 5/21 100/220 320 240
Scale interval d1) mg 0.002/0.01 0.01/0.1 0.1 0.1
Tare range (subtractive) g < 100% of the maximum capacity
Verification scale interval e1) g 0.0001 0.001 0.001 0.001
Minimum capacity, Min1) g 0.0001 0.001 0.01 0.01
Response time (average) s 10 < 6/3 < 3 < 2
Range of use according to CD1) g 0.0001–21 0.001–220 0.01–320 0.01–240
Allowable ambient operating
temperature:
– with »isoCAL« function °C 0° to +40° (+32° to +104°F)
– without »isoCAL« function °C +15° to +25° (+59° to +77°F)
External calibration weight g 20 (E2) 200 (E2) 200 +100 (E2) 200 (E2)
(of at least accuracy class…)
Net weight, approx. kg 7.6 7.6 6.5 6.5
Weighing pan size mm 50 d 80 d* 80 d* 80 d*
(inner diameter)
Weighing pan surface cm220 64* 64* 64*
Weighing chamber height (weighing pan to draft shield cover) mm 162 232 232 232
Dimensions (W+D+H)
– Balance mm 213+ 342 + 270 213 +342 + 340 213+ 342+ 340 213 + 342 + 340
– Electronics box mm 134 + 51 + 155 134+ 51 + 155 – –
AC power source/ V~ AC adapter STNG6, 230 V or 115 V,
power requirements +15%…– 20% (protection rating IP20)
Frequency Hz 48 – 60
Power consumption (average) VA maximum 16; typical 8
Approx. hours of operation
with the YRB05Z reachargeable
battery pack h 20 20 22 22
Selectable weight units Grams, carats, milligrams
Built-in interface RS-232C-S/V24-V28; 7-bit; parity: even, odd, mark, or space;
transmission rates: 150 to19,200 baud; 1 or 2 stop bits;
software/hardware handshake
1
) CD= Council Directive 90/384/ECC for non-automatic weighing instruments;
applicable to the European Economic Area
* Three-sided weighing pan: d = diameter of inner circle.
The cross-hatched section can be fully utilized.
Page 69
69
Model LE623S-OCE LE323S-OCE LE623P-OCE
Type BD BL 200 BD BL 200 BD BL 200
Accuracy class1) KKK
Weighing capacity, Max1) g 620 320 120/240/620
Scale interval d1) g 0.001 0.001 0.001/0.002/0.005
Tare range (subtractive) g < 100% of the maximum capacity
Verification scale interval e1) g 0.01 0.01 0.01
Minimum capacity, Min1) g 0.02 0.02 0.02
Response time (average) s < 1,5
Range of use according to CD1) g 0.02–620 0.02–320 0.02–620
Allowable ambient operating
temperature:
– with »isoCAL« function °C 0° to +40° (+32° to +104°F)
– without »isoCAL« function °C +10° to +30° (+50° to +86°F)
Net weight, approx. kg 4.6
Weighing pan size mm 110 d
(inner diameter)*
Weighing pan surface* cm
2
120
Weighing chamber height (weighing pan to draft shield cover) mm 50
Dimensions (W+D+H) mm 213+342+153
AC power source/ V~ AC adapter STNG6 230 V or 115 V,
power requirements +15% to – 20% (protection rating IP20)
Frequency Hz 48 – 60
Power consumption (average) VA maximum 16; typical 8
Approx. hours of operation
with the YRB05Z reachargeable
battery pack h 27
Selectable weight units Grams, carats
Built-in interface RS-232C-S/V24-V28; 7-bit; parity: even, odd, mark,
or space; transmission rates: 150 to19,200 baud;
1 or 2 stop bits; software/hardware handshake
1
) CD= Council Directive 90/384/ECC for non-automatic weighing instruments;
applicable to the European Economic Area
* Three-sided weighing pan: d = diameter of inner circle.
The cross-hatched section can be fully utilized.
Page 70

70
Model LE6202S-OCE LE4202S-OCE LE6202P-OCE LE2202S-OCE
Type BD BL 200 BD BL 200 BD BL 200 BD BL 200
Accuracy class1) KKK K
Weighing capacity, Max1) g 6200 4200 1500/3000/6200 2200
Scale interval d1) g 0.01 0.01 0.01/0.02/0.05 0.01
Tare range (subtractive) g < 100% of the maximum capacity
Verification scale interval e1) g 0.1 0.1 0.1 0.1
Minimum capacity, Min1) g 0.5 0.5 0.5 0.5
Response time (average) s < 1.5
Range of use according g 0.5–6200 0.5–4200 0.5–6200 0.5–2200
to CD1)
Allowable ambient operating
temperature:
– with »isoCAL« function °C 0° to +40° (+32° to +104°F)
– without »isoCAL« function °C +10° to +30° (+50° to +86°F)
Net weight, approx. kg 4.7
Weighing pan size mm 190+204
Weighing pan surface* cm
2
388
Dimensions (W+D+H) mm 213+ 342+88
AC power source/ V~ AC adapter STNG6 230 V or 115 V,
power requirements +15% to – 20% (protection rating IP20)
Frequency Hz 48 – 60
Power consumption (average) VA maximum 16; typical 8
Approx. hours of operation
with the YRB05Z reachargeable
battery pack h 27
Selectable weight units Grams, kilograms, carats
Built-in interface RS-232C-S/V24-V28; 7-bit; parity: even, odd, mark, or space;
transmission rates: 150 to19,200 baud;
1 or 2 stop bits; software/hardware handshake
1
) CD= Council Directive 90/384/ECC for non-automatic weighing instruments;
applicable to the European Economic Area
* Three-sided weighing pan: d = diameter of inner circle.
The cross-hatched section can be fully utilized.
Page 71

71
Model LE10001-OCE LE5201-OCE
Type BD BL 200 BD BL 200
Accuracy class1) KK
Weighing capacity, Max1) g 10,000 5200
Scale interval d1) g 0.1 0.1
Tare range (subtractive) g < 100% of the maximum capacity
Verification scale interval e1)g 1 1
Minimum capacity, Min1)g5 5
Response time (average) s < 1
Range of use according g 5–10,000 5–5200
to CD1)
Allowable ambient operating
temperature:
– with »isoCAL« function °C 0° to +40° (+32° to +104°F)
– without »isoCAL« function °C +10° to +30° (+50° to +86°F)
Net weight, approx. kg 4.7 4.7
Weighing pan size mm 190 + 204 190 + 204
Weighing pan surface* cm
2
388 388
Dimensions (W+D+H) mm 213 + 342 + 90 213+ 342 + 90
AC power source/ V~ AC adapter STNG6 230 V or 115 V,
power requirements +15% to – 20% (protection rating IP20)
Frequency Hz 48 – 60
Power consumption (average) VA maximum 16; typical 8
Approx. hours of operation
with the YRB05Z reachargeable
battery pack h 40 40
Selectable weight units Grams, kilograms, carats
Built-in interface RS-232C-S/V24-V28; 7-bit; parity: even, odd, mark, or
space; transmission rates: 150 to19,200 baud;
1 or 2 stop bits; software/hardware handshake
1
) CD= Council Directive 90/384/ECC for non-automatic weighing instruments;
applicable to the European Economic Area
* Three-sided weighing pan: d = diameter of inner circle.
The cross-hatched section can be fully utilized.
Page 72

Model LE34001S-OCE LE34001P-OCE LE16001S-OCE
Type BF BL 500 BF BL 500 BF BL 500
Accuracy class1) KKK
Weighing capacity, Max1) kg 34 8/16/34 16
Scale interval d1) g 0.1 0.1/0.2/0.5 0.1
Tare range (subtractive) g < 100% of the maximum capacity
Verification scale interval e1)g1 1 1
Minimum capacity, Min1)g5 5 5
Response time (average) s < 2 < 2 < 2
Range of use according g 5–34,000 5–34,000 5–16,000
to CD1)
Allowable ambient operating
temperature:
– with »isoCAL« function °C 0° to +40° (+32° to +104°F)
– without »isoCAL« function °C +10° to +30° (+50° to +86°F)
Net weight, approx. kg 16 16 16
Weighing pan size mm 300+ 400 300+400 300+ 400
Dimensions (W+D+H) mm 313 + 532 + 120 313 + 532 + 120 313 + 532 + 120
AC power source/ V~ AC adapter STNG6, 230 V or 115 V,
power requirements +15% to –20% (protection rating IP20)
Frequency Hz 48 – 60
Power consumption (average) VA maximum 16; typical 8
Approx. hours of operation
with the YRB05Z reachargeable
battery pack h 22
Selectable weight units Grams, kilograms, carats
Built-in interface RS-232C-S/V24-V28; 7-bit; parity: even, odd, mark, or space;
transmission rates: 150 to19,200 baud;
1 or 2 stop bits; software/hardware handshake
1
) CD= Council Directive 90/384/ECC for non-automatic weighing instruments;
applicable to the European Economic Area
72
Page 73
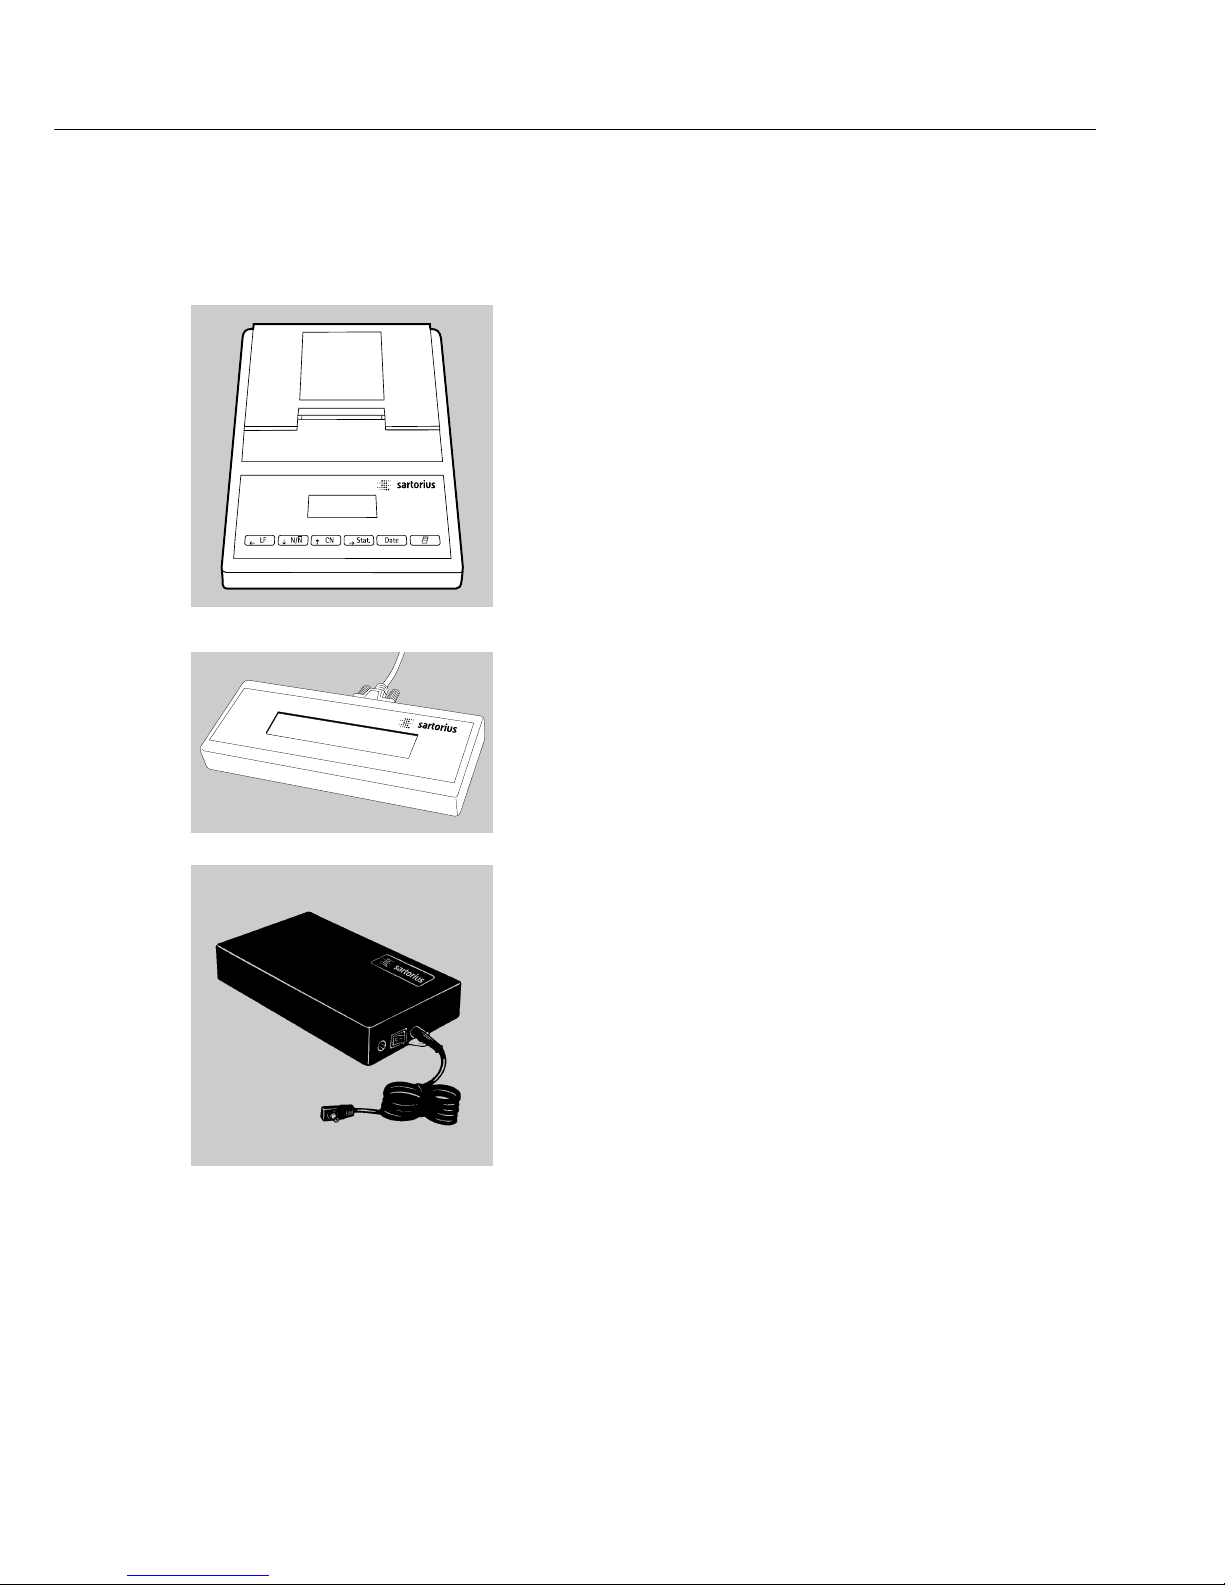
73
Accessories (Options)
Product Order No.
Data printer YDP03-0CE
with date, time, statistics evaluation
and transaction counter functions
and LCD
Remote display
1
), reflective
(data interface required) YRD02Z
External rechargeable battery pack
– for models with weighing capacities
under 10 kg YRB05Z
– for models with weighing capacities
over 10 kg YRB06Z
With battery-level indicator (LED);
can be recharged using the AC adapter
(time it takes to charge the discharged
battery pack: 15 hours); see
“Specifications" for hours of operation
To recharge the battery pack:
– Unplug the AC adapter from the balance
and plug it into the battery pack
Carrying case
– for models with analytical
draft shield chamber YDB01CP
– for models with weighing capacities
up to 10 kg and without analytical
draft shield chamber YDB02CP
1
) Not available in verified balances
Page 74

Product Order No.
SartoConnect
1
) software for direct transfer of weighing data to an YSC01L
application program (e. g. Exel) from the LE balance to a computer
– with RS-232C adapter cable; length: 1 m YSC01L
– with RS-232C adapter cable; length: 5 m YSC01L5
– with RS-232C adapter cable; length: 15 m YSC01L15
Density determination kit
1
)
– for LE225D YDK01
– for LE324S and LE244S YDK01LP
Antistatic weighing pan
1
)
– for LE225D, LE324S and LE244S YWP01CP
Calibration weights
for all LE balances; extensive assortment, optionally available
with DKD certificate Information
available
on request
Standard Operating Procedure
optimum use of your balance in quality-management systems YSL01E
Industrial AC adapter, model ING1
for balances with weighing capacities up to 10 kg; protection rating:
IP65 in accordance with DIN VDE 0470/DIN EN 60529
– for 230 V 69 71476
– for 120 V 69 71480
Industrial AC adapter, model ING2 for balances with weighing
capacities over 10 kg; protection rating: IP65 in accordance
with DIN VDE 0470/DIN EN 60529
– for 230 V 69 71899
– for 120 V 69 71500
Analytical draft shield chamber
– for LE623S, LE323S and LE623P YDS01CP
1
) Not available in verified balances
74
Page 75

75
Product Order No.
Draft shield cover
with opening (d 30 mm)
– for LE623S, LE323S and LE623P YDS02CP
Data cable
– for PC connection, 25-pin 7357312
– for PC connection, 9-pin 7357314
Adapter:
D-Sub 25-pin male connector to 6965619
D-Sub 9-position, length: 0.25 m
Universal remote control switch
for remote control of the following functions (configured
in the balance menu): r, w, c or v
(see “Configuration" for details):
Foot switch with T-connector YFS01
Hand switch with T-connector YHS02
T-connector YTC01
! The T-connector is not intended for use with multiple intelligent
peripheral devices, such as PCs or YDP03-0CE printers.
Hanger for below-balance weighing
1
)
– for models LE34001S, LE34001P and LE16000S 69EA0040
Weighing bowl, nickel chromium steel, with pouring spout;
– weighing capacity: >300 g; volume: 1000 ml 641211
– Vol.: 500 ml 641212
– Vol.: 3000 ml 641213
Dust cover
– for display unit on models LE34001S, LE16001S, LE34001P 6960CP01
– for models LE623S, LE323S, LE623P 6960CP02
– for models LE6202S, LE4202S, LE2202S, LE6202P, LE10001,
LE5201, LE2201 6960CP03
– for display and control unit on models LE225D, LE324S, LE244S,
LE1003S, LE1003P, LE…-DS 6960CP04
1
) Not available in verified balances
Page 76

Declaration of Conformity
76
Weighing Instruments for Use in
Legal Metrology:
Council Directive 90/384/EEC
“Non-automatic weighing instruments”
This Directive regulates the determination
of mass in legal metrology.
For the respective Declaration of Type
Conformity for weighing instruments that
have been verified by Sartorius for use as
legal measuring instruments and that have
an EC Type-Approval Certificate, see the
page after next.
This Directive also regulates the
performance of the EC verification by the
manufacturer, provided that an EC TypeApproval Certificate has been issued and
the manufacturer has been accredited
by an officer of a Notified Body registered
at the Commission of the European Community for performing such verification.
Sartorius complies with EC Directive
No. 90/384/EEC for non-automatic weighing instruments, which has been in effect
since January 1, 1993, within the Single
European Market, as well as the accreditation of the Quality Management System of
Sartorius AG by Lower Saxony’s Regional
Administrative Department of Legal Metrology (Niedersächsisches Landesverwaltungsamt – Eichwesen) from February 15,
1993.
For additional information on the C mark
on Sartorius equipment, see Sartorius
Publication No. W--0052-e93081.
“New Installation“ Service
Initial verification is covered in our “New
Installation” service package. In addition
to initial verification, this package provides
you with a series of important services
which will guarantee you optimal results in
working with your weighing instrument:
– Installation
– Startup
– Inspection
– Training
– Initial verification
“EC Verification“ – A Service Offered
by Sartorius
Our service technicians authorized to perform the verification* of your weighing
instruments that are acceptable for legal
metrological verification can inspect and
verify the metrological specifications at the
place of installation within the Member
States of the European Union and the Signatories of the Agreement on the European
Economic Area.
Subsequent Verifications within the
European Countries
The validity of the verification will become
void in accordance with the national regulations of the country in which the weighing instrument is used. For information on
verification and legal regulations currently
applicable in your country, and to obtain
the names of the persons to contact, please
contact your local Sartorius office, dealer
or service center.
For more information on the verification of
weighing instruments for use in legal
metrology, contact the Sartorius Service
Center.
* = in accordance with the accreditation
certificate received by Sartorius AG
Page 77
77
C
Page 78
78
Page 79
79
Page 80
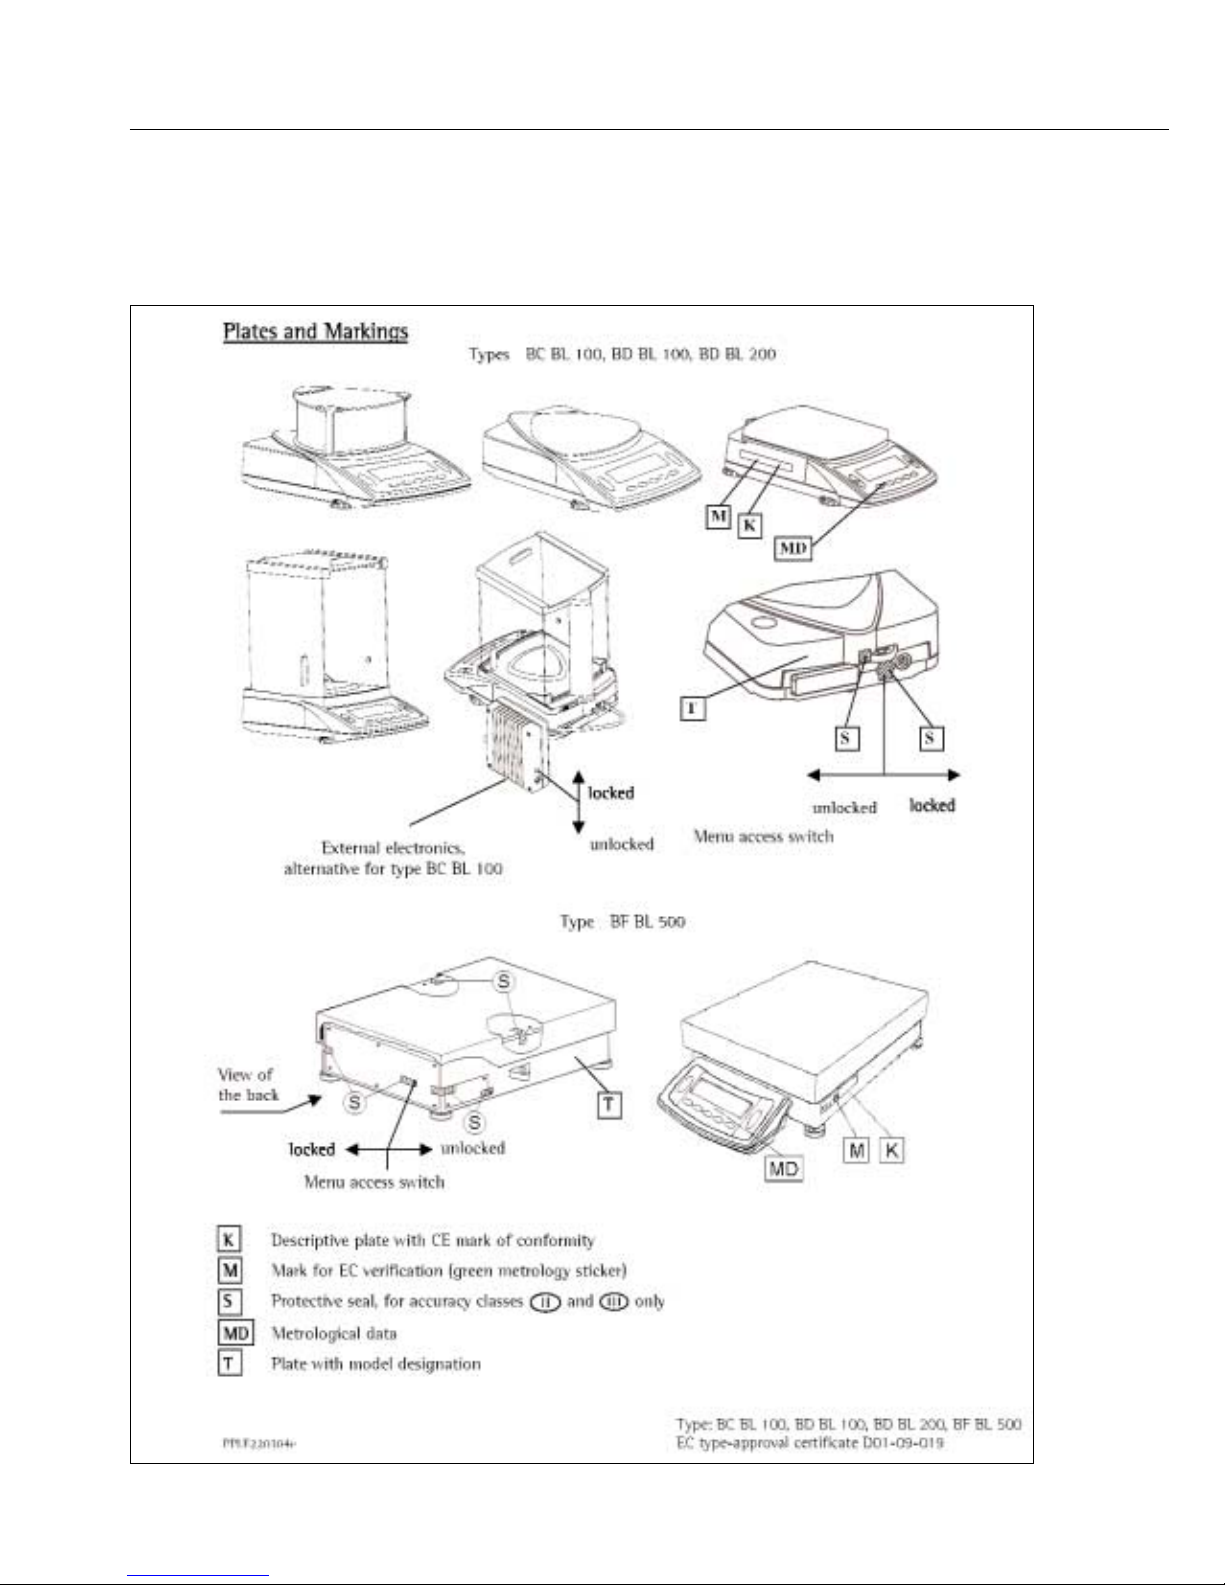
80
Page 81
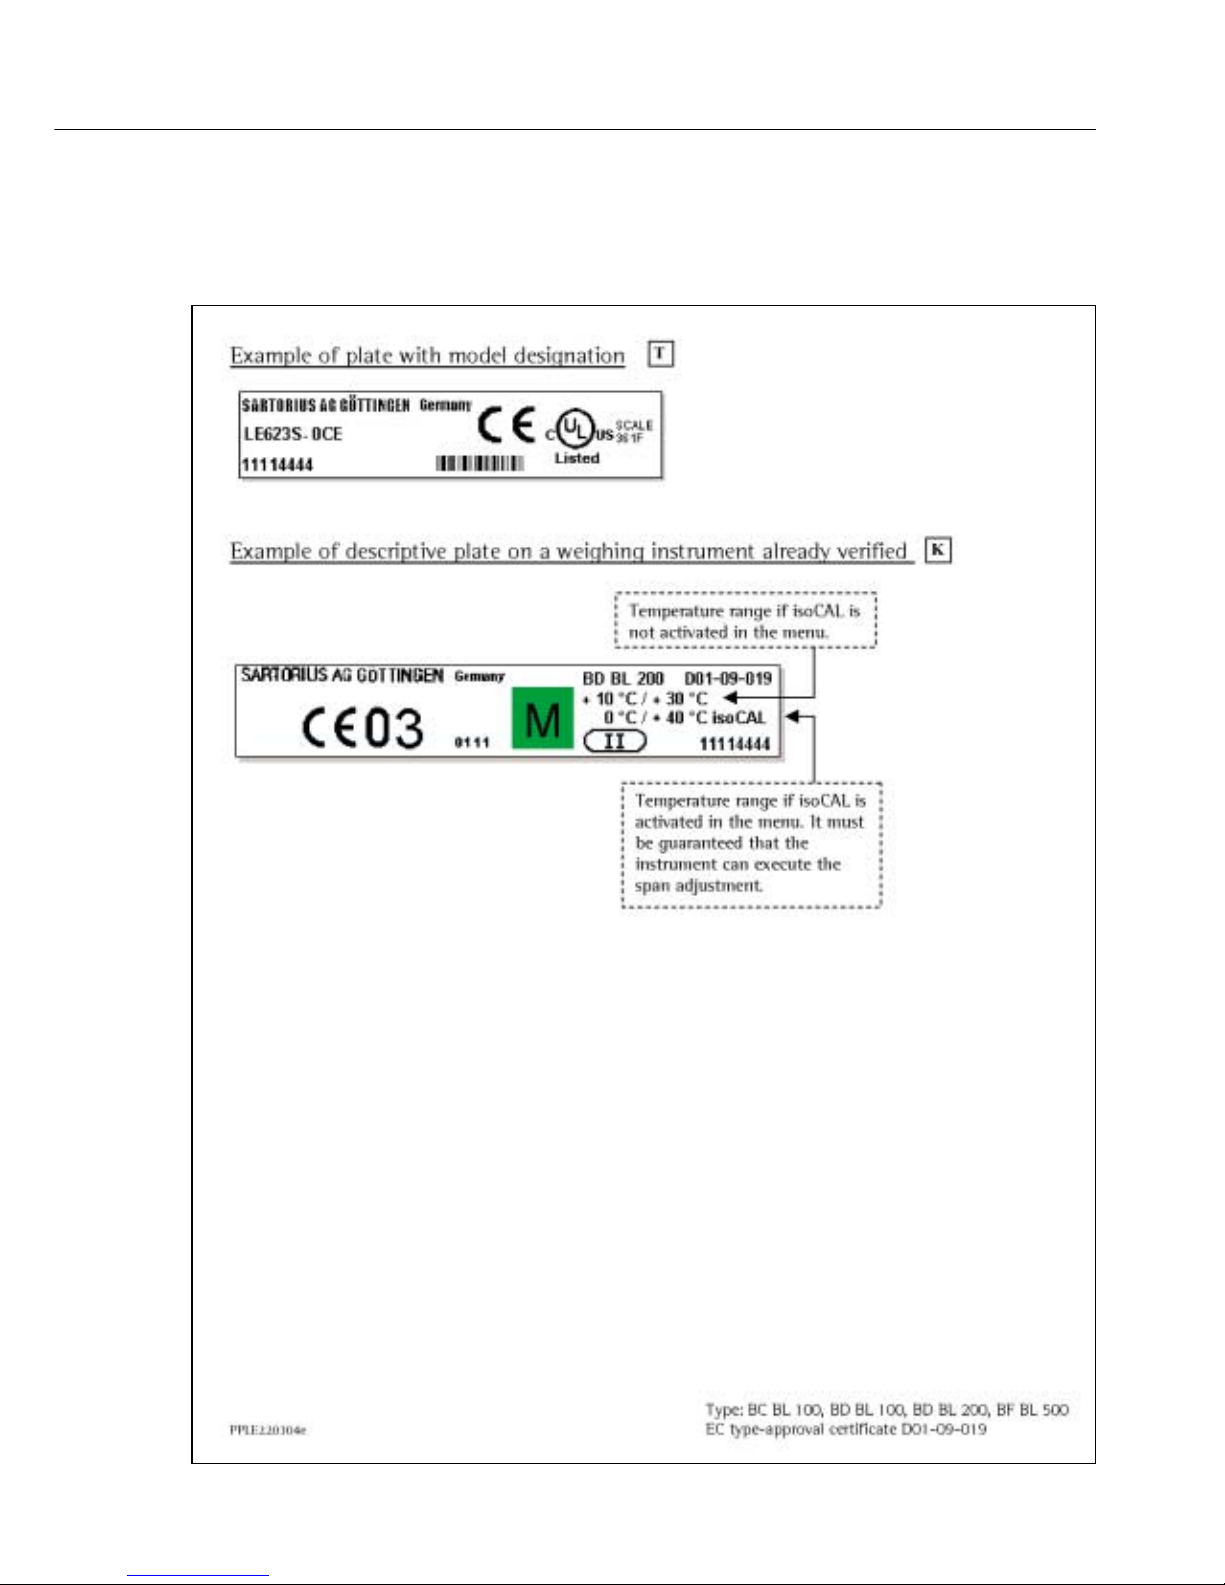
81
Page 82

2
Page 83

2
Page 84

Sartorius AG
Weender Landstrasse 94–108
37075 Goettingen, Germany
Phone +49.551.308.0
Fax +49.551.308.3289
www.sartorius.com
Copyright by Sartorius AG,
Goettingen, Germany.
All rights reserved. No part
of this publication may
be reprinted or translated in
any form or by any means
without the prior written
permission of Sartorius AG.
The status of the information,
specifications and illustrations
in this manual is indicated
by the date given below.
Sartorius AG reserves the
right to make changes to the
technology, features,
specifications and design of the
equipment without notice.
Status:
April 2006, Sartorius AG,
Goettingen, Germany
Printed in Germany on paper that has
been bleached without any use of chlorine
W3A000 · KT
Publication No.: WLE6001-e06046
 Loading...