

Sartorius H2O-MA-UV-T-US, H2O-MA-T-US, H2O-MM-UV-T, H2O-MA-UV-T, H2O-MM-T Operating Instructions Manual
...Page 1

Operating Instructions
Translation of the Original Operating Instructions
arium® mini plus | arium® mini | arium® mini essential
H2O-MA-... | H2O-MM-... | H2O-MU-...
Ultrapure Water System
1000025355
Page 2

Page 3

Contents
Contents
1 About this Document..................................................6
1.1 Validity ..........................................................6
1.2 Symbols Used .....................................................6
1.2.1 Warnings in Action Descriptions...............................6
1.2.2 Other Symbols..............................................6
2 Safety Notes .........................................................7
2.1 Intended Use......................................................7
2.2 Personnel Qualification.............................................7
2.3 Significance of These Instructions ....................................8
2.4 Flawlessness of the Device ..........................................8
2.5 Electrical Equipment ...............................................9
2.5.1 Damage to the Electrical Equipment of the Device ...............9
2.5.2 Working on the Electrical Equipment of the Device...............9
2.5.3 Power Supply and Power Cord ................................9
2.6 Accessories, Consumables and Spare Parts .............................9
3 Device Description ...................................................10
3.1 Device Overview..................................................10
3.2 Electrical Connections.............................................11
3.3 Water Connections ...............................................11
3.4 Tubing ..........................................................12
3.4.1 Feed Water Tubing .........................................12
3.4.2 Tank Filling Tubing .........................................12
3.4.3 Drain Water Tubing ........................................12
3.4.4 Tank Outlet Tubing with Ball Cock ............................12
3.4.5 Dispense Tube .............................................12
3.5 Ultrapure Water Treatment ........................................13
3.5.1 System Setup .............................................13
3.5.2 Feed Water Intake .........................................14
3.5.3 Treatment Stages ..........................................14
3.5.4 Final Purification Stage .....................................15
3.5.5 Circulation of the Ultrapure Water ...........................15
4 Operating Design ....................................................16
4.1 Dispensing Mode .................................................16
4.2 Message Display..................................................17
4.3 Messages in Dispensing Mode ......................................18
4.4 Message List .....................................................19
4.5 Menu...........................................................20
4.6 Navigating Menus ................................................21
4.7 Numeric Keypad..................................................22
4.8 Menu Structure ..................................................23
4.9 Parameters of the “Settings” Menu..................................25
4.10 Parameters of the “Care” Menu .....................................26
5 Installation..........................................................27
5.1 Equipment Supplied...............................................27
5.2 Prerequisites for Installation at the Installation Location................28
5.3 Unpacking and Setting up the Device................................28
Operating Instructions arium® mini plus | arium® mini | arium® mini essential 3
Page 4

Contents
6 Startup .............................................................29
6.1 Connecting the AC Adapter ........................................29
6.2 Starting up the Device ............................................31
6.2.1 Startup Overview ..........................................31
6.2.2 Setting the Language.......................................31
6.2.3 Starting Startup Mode......................................32
6.2.4 Setting the Date and Time...................................32
6.2.5 Setting Displayed Values . . . . . . . . . . . . . . . . . . . . . . . . . . . . . . . . . . . .33
6.3 Inserting Pretreatment Cartridge (only arium® mini plus)................34
6.4 Inserting Ultrapure Water Cartridge .................................35
6.5 Inserting Bag (only arium® mini plus or arium® mini) ...................36
6.6 Connecting Tubing................................................38
6.6.1 Connecting Feed Water Tubing (only arium® mini plus or
arium® mini) ..............................................38
6.6.2 Connecting Tank Filling Tubing (only arium® mini)...............38
6.6.3 Connecting Drain Water Tubing (only arium® mini plus or
arium® mini) ..............................................39
6.6.4 Connecting the Tank Outlet Tubing (only arium® mini plus or
arium® mini)...............................................39
6.7 Rinsing Pretreatment Cartridge (only arium® mini plus) .................40
6.8 Rinsing the Ultrapure Water Cartridge ...............................41
6.8.1 Filling of the Bag (only arium® mini plus and arium® mini) ........41
6.8.2 Performing a Rinse Cycle....................................42
6.8.3 Re-filling the Bag During the Rinse Cycle (only arium® mini) ......42
6.8.4 Completing the Rinsing Process . . . . . . . . . . . . . . . . . . . . . . . . . . . . . .43
6.9 Connecting the Final Filter .........................................44
6.10 Rinsing the Final Filter.............................................44
7 Operation ...........................................................45
7.1 Turning the Device On and Off......................................45
7.2 Dispensing Ultrapure Water ........................................45
7.2.1 Preparing to Dispense Ultrapure Water ........................45
7.2.2 Manually Dispensing Ultrapure Water.........................46
7.2.3 Volume-controlled Dispensing of Ultrapure Water ..............46
7.2.4 Confirming Dispensing Cancelation ...........................47
7.2.5 Ending Dispensing via Outlet Tubing ..........................48
®
7.2.6 Removing Pure Water from the Bag (only arium
mini plus or
arium® mini) ..............................................48
7.3 Opening the Menu................................................48
7.4 Manually Filling the Bag (only arium® mini) ...........................49
7.4.1 Starting Manual Filling Using the Wizard ......................49
7.4.2 Starting Manual Filling in the Menu ..........................49
7.5 Activating or Deactivating Standby Mode ............................50
7.5.1 Automatic ECO Mode.......................................50
7.6 Changing System Settings .........................................51
7.7 Performing Volume Adjustment.....................................52
8 Cleaning and Maintenance............................................53
8.1 Cleaning ........................................................53
8.1.1 Cleaning the Display .......................................53
8.1.2 Cleaning the Device Housing ................................53
8.2 Maintenance Schedule ............................................54
8.3 Opening the “Care” Menu..........................................54
4 Operating Instructions arium® mini plus | arium® mini | arium® mini essential
Page 5

Contents
8.4 Displaying Reminders .............................................55
8.5 Replacing Consumables............................................55
8.5.1 Selecting Consumables for Replacement.......................55
8.5.2 Replacing Bag (only arium® mini plus or arium® mini) ............56
8.5.3 Replacing Pretreatment Cartridge (only arium® mini plus) ........58
8.5.4 Replacing Ultrapure Water Cartridge..........................59
8.5.5 Replacing the UV Lamp .....................................60
8.5.6 Changing Final Filter .......................................62
8.6 Enabling, Disabling or Configuring Reminders for Replacing Final Filters ..63
8.7 Carrying Out Depressurization ......................................63
8.8 Carrying Out Venting..............................................64
9 Malfunctions ........................................................66
9.1 Error Messages ...................................................66
9.2 Warning Messages................................................68
9.3 Additional Faults .................................................69
10 Storage and Shipping ................................................70
10.1 Storage .........................................................70
10.2 Returning Device and Parts ........................................70
11 Decommissioning ....................................................70
12 Transport ...........................................................71
12.1 Transporting the Device ...........................................71
13 Disposal.............................................................71
13.1 Information on Decontamination ...................................71
13.2 Disposing of Device and Parts ......................................72
13.2.1 Information on Disposal ....................................72
13.2.2 Disposal ..................................................72
14 Technical Specifications ..............................................73
14.1 Power Supply . . . . . . . . . . . . . . . . . . . . . . . . . . . . . . . . . . . . . . . . . . . . . . . . . . . .73
14.2 Ambient Conditions...............................................73
14.3 Safety of Electrical Equipment......................................74
14.4 Electromagnetic Compatibility......................................74
14.5 Product Water Quality.............................................74
®
14.5.1 arium
mini plus ...........................................74
14.5.2 arium® mini and arium® mini essential .........................75
14.6 Feed Water Quality ...............................................75
14.6.1 arium® mini plus ...........................................75
14.6.2 arium® mini ...............................................76
14.6.3 arium® mini essential .......................................76
14.7 Device Properties .................................................76
15 Consumables ........................................................77
16 Sartorius Service.....................................................77
17 Conformity..........................................................77
17.1 EU Declaration of Conformity ......................................77
17.2 CSA Declaration of Conformity .....................................77
Operating Instructions arium® mini plus | arium® mini | arium® mini essential 5
Page 6

About this Document
1 About this Document
1.1 Validity
These instructions are part of the device. These instructions apply to the device in the
following versions:
Device Model name
®
arium
mini plus H2O-MA-UV-T | H2O-MA-T | H2O-MA-UV-T-US |
H2O-MA-T-US
®
arium
mini H2O-MM-UV-T | H2O-MM-T | H2O-MM-UV-T-US |
H2O-MM-T-US
®
arium
mini essential H2O-MU-UV-T | H2O-MU-T | H2O-MU-UV-T-US |
H2O-MU-T-US
1.2 Symbols Used
1.2.1 Warnings in Action Descriptions
WARNING
This symbol denotes a danger with risk that death or severe injury may result
if it is not avoided.
CAUTION
Denotes a danger with risk that moderate or minor injury may result if it is not
avoided.
NOTICE
Denotes a danger that can result in property damage if the risk is not avoided.
1.2.2 Other Symbols
t
y
[ ] Text inside brackets refers to control and display elements.
Figures on the Operating Display
Depending on your device configuration, the figures on the operating display of your
device may deviate from those in these instructions.
Required action: Describes activities that must be performed.
Result: Describes the result of the activities carried out.
6 Operating Instructions arium® mini plus | arium® mini | arium® mini essential
Page 7

Safety Notes
2 Safety Notes
2.1 Intended Use
The device is a water purification system that produces "ASTM Type 1" ultrapure
water for daily requirements of up to 10 liters.
The device is intended exclusively for use in accordance with these instructions.
Any further use beyond this is considered improper.
If the device is not used properly: The protective systems of the device may be
impaired. This can lead to unforeseeable personal injury or property damage.
Operating Conditions for the Device
Do not use this device in potentially explosive environments. The device may only
be used indoors.
The device may only be used with the equipment and under the operating conditions
described in the Technical Data of these instructions.
Modifications of the Equipment
You may not modify the device or make any technical changes on your own.
Any retrofitting or technical changes to the device are only permitted with prior
written permission by Sartorius.
Foreseeable Misuse
Using the device is only safe when it is operated in accordance with its intended use.
The following applications, for example, are not permitted:
− Operation outside the permissible ambient conditions (see Chapter "14 Technical
Specifications," page 73) e.g. extreme temperatures, chemical vapors, moisture,
shock, vibration or strong electromagnetic fields
− Carrying out unauthorized modifications or other technical changes on the device
− Connecting unsuitable devices
− Installation of unauthorized items on or in the device
2.2 Personnel Qualification
These instructions are addressed to the target groups mentioned below. All persons
working on the device must possess the stated knowledge and authorizations.
If no qualifications are indicated for the actions described in these instructions:
The actions described are addressed to the “user” target group.
If individual actions must be carried out by other target groups or by Sartorius
Service personnel: The qualification required will be indicated in the description of
the action.
Target group Knowledge / responsibilities
User The user is familiar with the operation of the device and
the associated work processes. He knows the dangers that
can occur when working with the device and can avoid
these dangers.
The user has been trained in the operation of the device.
The training is carried out by the operating engineer /
laboratory manager or the operator of the device.
Operating Instructions arium® mini plus | arium® mini | arium® mini essential 7
Page 8

Safety Notes
Target group Knowledge / responsibilities
Operating engineer /
laboratory manager
Operator The operator of the device is responsible for compliance
The operating engineer / laboratory manager makes
decisions about the use and parameterization of the device.
The operating engineer / laboratory manager is trained in
the operation of the device. The training is performed by
Sartorius Service or the operator.
with safety requirements and workplace safety regulations.
The operator must ensure that all persons who work with
the device have access to the relevant information and
have been instructed in work with the device.
2.3 Significance of These Instructions
Failure to follow these instructions can have serious consequences, e.g. exposure of
individuals to electrical, mechanical or chemical hazards.
t Before working with the device: Read the instructions carefully and completely.
t If the instructions are lost: Request a replacement or download the latest
instructions from the Sartorius website (www.sartorius.com).
t The information contained in these instructions must be made available to all
individuals working with the device.
2.4 Flawlessness of the Device
Damaged equipment or worn-out parts can cause malfunctions or lead to
hard-to-detect hazards.
t Only operate the device when it is safe and in perfect working order.
t Observe the maintenance intervals (intervals and maintenance tasks, see
Chapter "8.2 Maintenance Schedule," page 54).
t Have any damage repaired immediately by Sartorius Service.
8 Operating Instructions arium® mini plus | arium® mini | arium® mini essential
Page 9

Safety Notes
2.5 Electrical Equipment
2.5.1 Damage to the Electrical Equipment of the Device
Damage to the electrical equipment of the device, e.g. damage to the insulation, can
be life-threatening. Contact with parts under voltage represents a direct danger to life.
t If the electrical equipment of the device is defective, immediately switch off the
power supply and contact Sartorius Service.
t Keep live parts away from moisture. Moisture can cause short circuits.
t Make sure that the power connection is equipped with a ground lead.
2.5.2 Working on the Electrical Equipment of the Device
Any work on or modifications to the electrical equipment of the device may only be
carried out by Sartorius Service personnel. The device may only be opened by
Sartorius Service personnel.
2.5.3 Power Supply and Power Cord
Serious injury can result, e.g. from electric shocks, if an unsuitable power supply
or an unsuitable / inadequately dimensioned power cords is used.
t Use only original power supplies and original power cords.
t Do not use inadequately dimensioned power cords.
t If the power supply or the power cord must be replaced: Contact Sartorius
Service. Do not repair or modify the power supply or power cord.
2.6 Accessories, Consumables and Spare Parts
The use of unsuitable accessories, consumables and spare parts can affect the
functionality of the device, be hazardous and have the following consequences:
− Risk of injury to persons
− Damage to the device
− Malfunctions of the device
− Total failure of the device
t Only use accessories, consumables and spare parts from Sartorius. Sartorius
can provide information on operational quality upon request.
t Only use accessories, consumables and spare parts that are in technically
perfect condition.
Operating Instructions arium® mini plus | arium® mini | arium® mini essential 9
Page 10
Device Description
3 Device Description
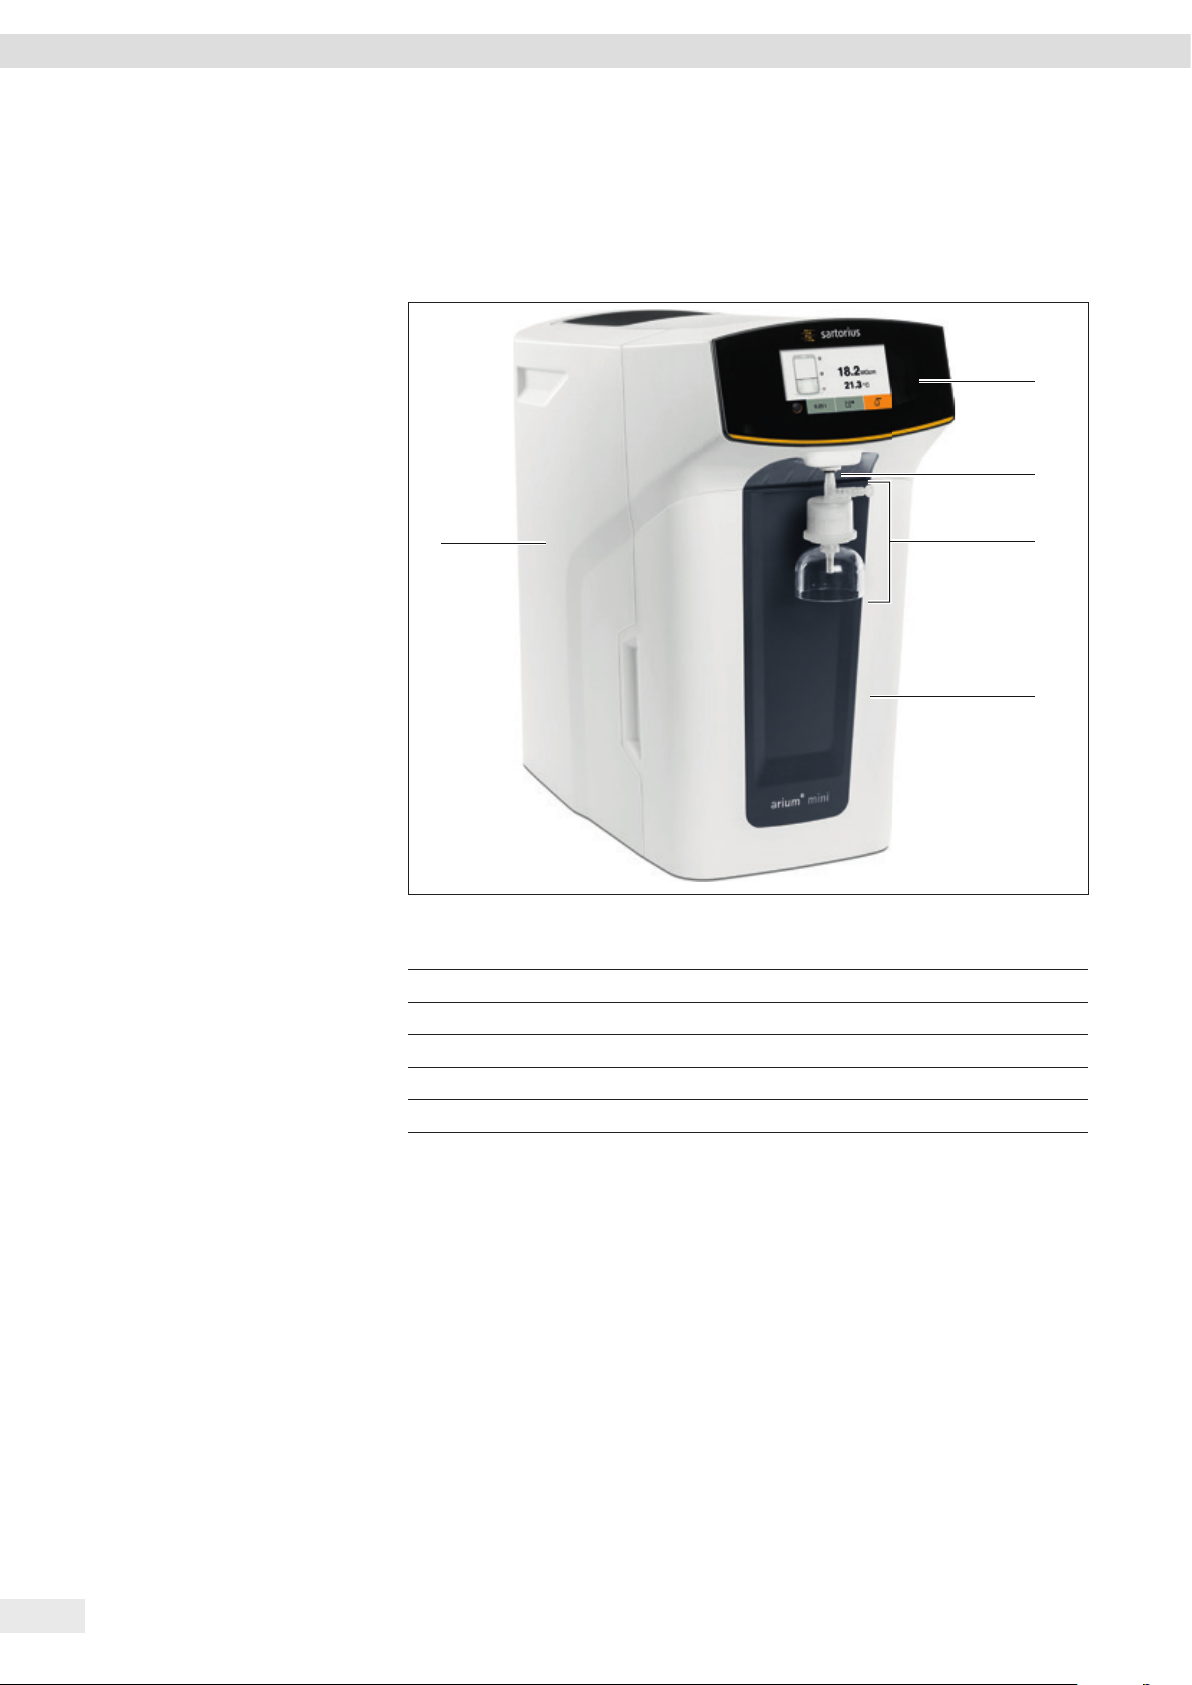
3.1 Device Overview
1
2
5
Fig. 3-1: arium® mini plus (example)
No. Description
1 Display with touch function
2 Water outlet
3 Final filter
4 Front cover
5 Side cover
3
4
10 Operating Instructions arium® mini plus | arium® mini | arium® mini essential
Page 11
Device Description
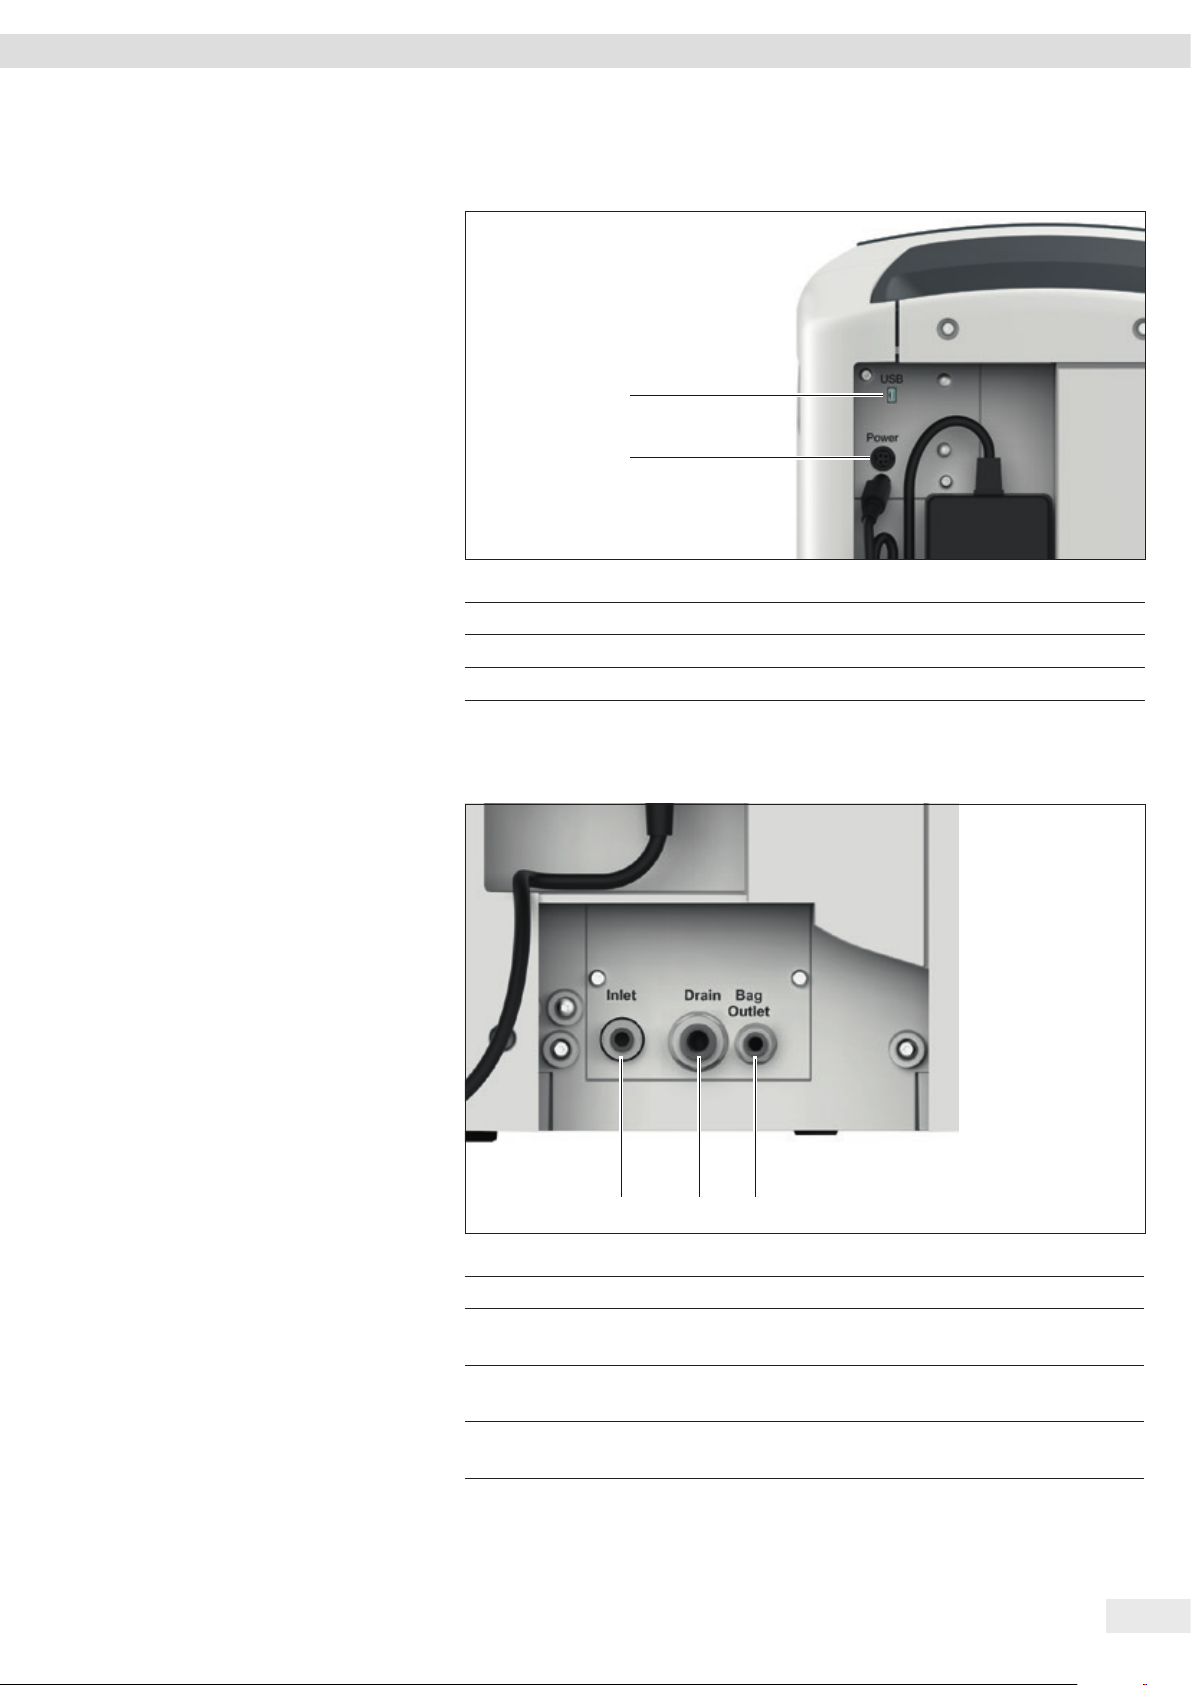
3.2 Electrical Connections
1
2
Fig. 3-2: Electrical connections on the arium® mini plus (example)
No. Description Explanation
1 “USB” connection For Sartorius Service
2 “Power” connection For connection of the AC adapter (power supply)
3.3 Water Connections
3
1
Fig. 3-3: Water connections on the arium® mini plus (example)
No. Description Explanation
1 “Inlet” connection For connecting the tank filling tubing
2 “Drain” connection For connecting the waste water tubing
3 “Bag Outlet” connection For connecting the tank outlet tubing
2
or feed water tubing
(only arium
(only arium
®
mini plus and arium® mini)
®
mini plus and arium® mini)
Operating Instructions arium® mini plus | arium® mini | arium® mini essential 11
Page 12
Device Description
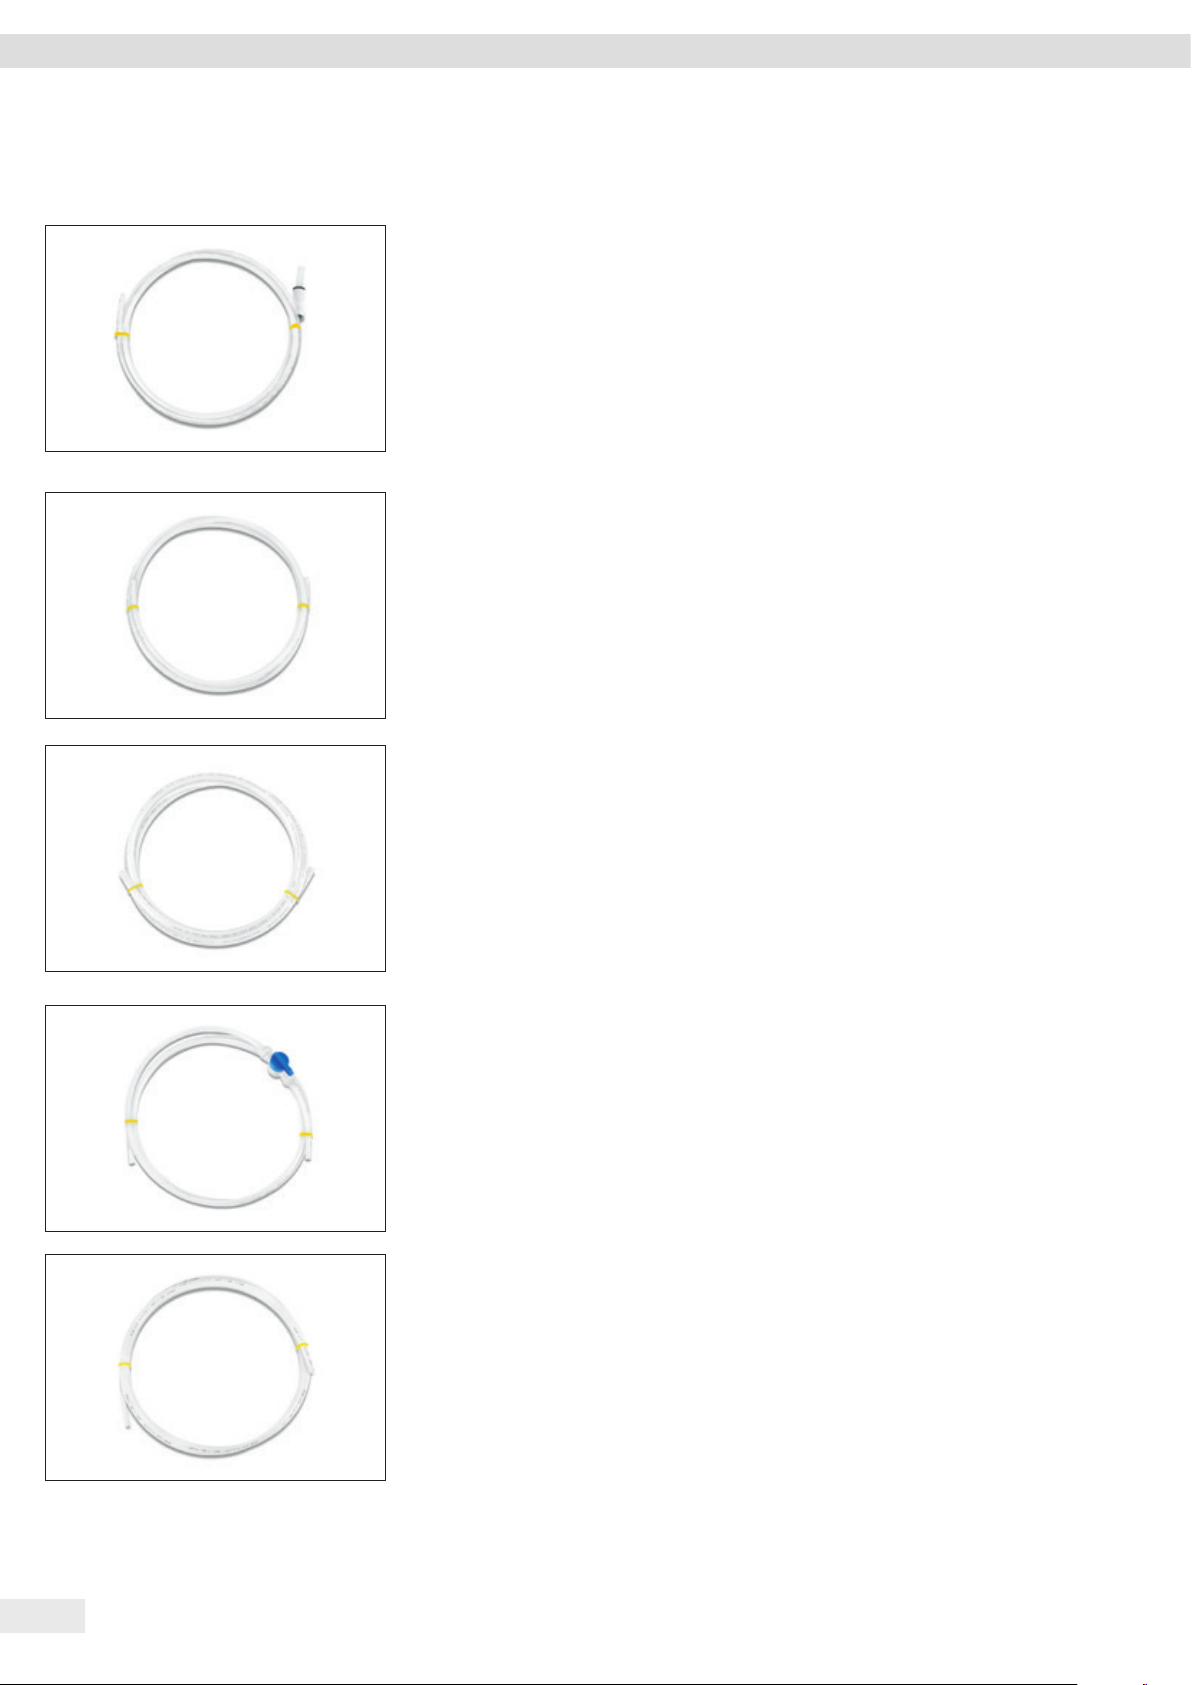
3.4 Tubing
3.4.1 Feed Water Tubing
The feed water tubing is used to supply feed water to the device:
®
− arium
− arium® mini essential: Supply of pretreated water
The feed water tubing is marked “Inlet”.
3.4.2 Tank Filling Tubing
mini plus: Supply of tap water
The tank filling tubing serves to feed pretreated water from an
®
external tank to the device (only arium
mini).
The tank filling tubing is marked “Inlet”.
3.4.3 Drain Water Tubing
The drain water tubing is used to drain unpurified water and rinse water
out of the device.
The drain water tubing is marked “Drain”.
3.4.4 Tank Outlet Tubing with Ball Cock
Pure water can be dispensed without pressure directly from the bag via the tank
outlet tubing with ball cock. This option can be used to empty the bag when
performing maintenance or to dispense pretreated water directly from the bag
for further use.
The tank outlet tubing is marked “Bag Outlet”.
3.4.5 Dispense Tube
The dispense tube is used for rinsing functions during startup and maintenance
as well as when dispensing larger volumes of water.
12 Operating Instructions arium® mini plus | arium® mini | arium® mini essential
Page 13

11
Device Description
3.5 Ultrapure Water Treatment
3.5.1 System Setup
1 2 3 4 5 6 7 8 9
Fig. 3-4: arium® mini plus system setup
11
1 2 5 6 7 8 9
Fig. 3-5: arium® mini system setup
10
10
1 6 7 8 9
Fig. 3-6: arium® mini essential system setup
Operating Instructions arium® mini plus | arium® mini | arium® mini essential 13
10
Page 14

Device Description
No. Description No. Description
1 Inlet (feed water) 7 UV lamp (185/254 nm)
2 Pump 8 Ultrapure water cartridge
(Scientific Pack)
3 Pretreatment cartridge 9 Conductivity measurement
4 Conductivity measurement 10 Product water outlet
5 Bag 11 Outlet (drain water)
6 Pump
3.5.2 Feed Water Intake
The feed water intake differs according to the device type:
Device type Feed water intake
®
arium
mini plus Direct connection to tap water connection possible,
automatic filling of the bag
®
arium
mini Manual filling of the bag with pretreated water
®
arium
mini essential Direct connection to pretreated water
3.5.3 Treatment Stages
Device type Required treatment stages
®
arium
mini plus Pretreatment stage, ultrapure water stage
®
arium
mini Ultrapure water stage
®
arium
mini essential Ultrapure water stage
Pretreatment level (first treatment stage)
In the first treatment stage, the tap water is treated with pretreated water: The feed
water is passed through the pretreatment cartridge by means of a membrane pump.
The pretreatment cartridge contains a combination of activated carbon, catalyst and
downstream reverse osmosis. The pretreatment cartridge removes particles, salts and
impurities, e.g. chlorine, from the tap water.
A large proportion of the impurities are discarded by means of a concentrate outlet
(drainage water outlet).
The treated water is stored in the bag for further use. The quality of the treated
water is monitored via a conductivity measuring cell (LFR).
14 Operating Instructions arium® mini plus | arium® mini | arium® mini essential
Page 15

Device Description
Ultrapure water stage (second treatment stage)
In the second treatment stage, the pretreated water is purified to ultrapure water
(ASTM type 1): The pretreated water stored in the bag (arium
®
mini plus and arium®
mini) or directly fed pretreated water (arium® mini essential) is fed into the ultrapure
water circuit.
The water fed in can be freed from organic residues using an optional UV lamp
(185/254 nm). The pretreated water is then treated using the ultrapure water
cartridge (Scientific Pack).
The quality of the ultrapure water is monitored via a conductivity measuring cell (LFP).
3.5.4 Final Purification Stage
The ultrapure water passes through a final filter as it is dispensed. A sterile filter
or an ultrafilter can be used as a final filter.
3.5.5 Circulation of the Ultrapure Water
To guarantee ultrapure water of consistent and high quality, the ultrapure water
purification system is constructed like a circulation ring:
− If no water is dispensed, the water circulates through the UV lamp and
the ultrapure water cartridge.
− If there is no interaction with the device, the device automatically switches
to ECO mode.
Operating Instructions arium® mini plus | arium® mini | arium® mini essential 15
Page 16
Operating Design
4 Operating Design
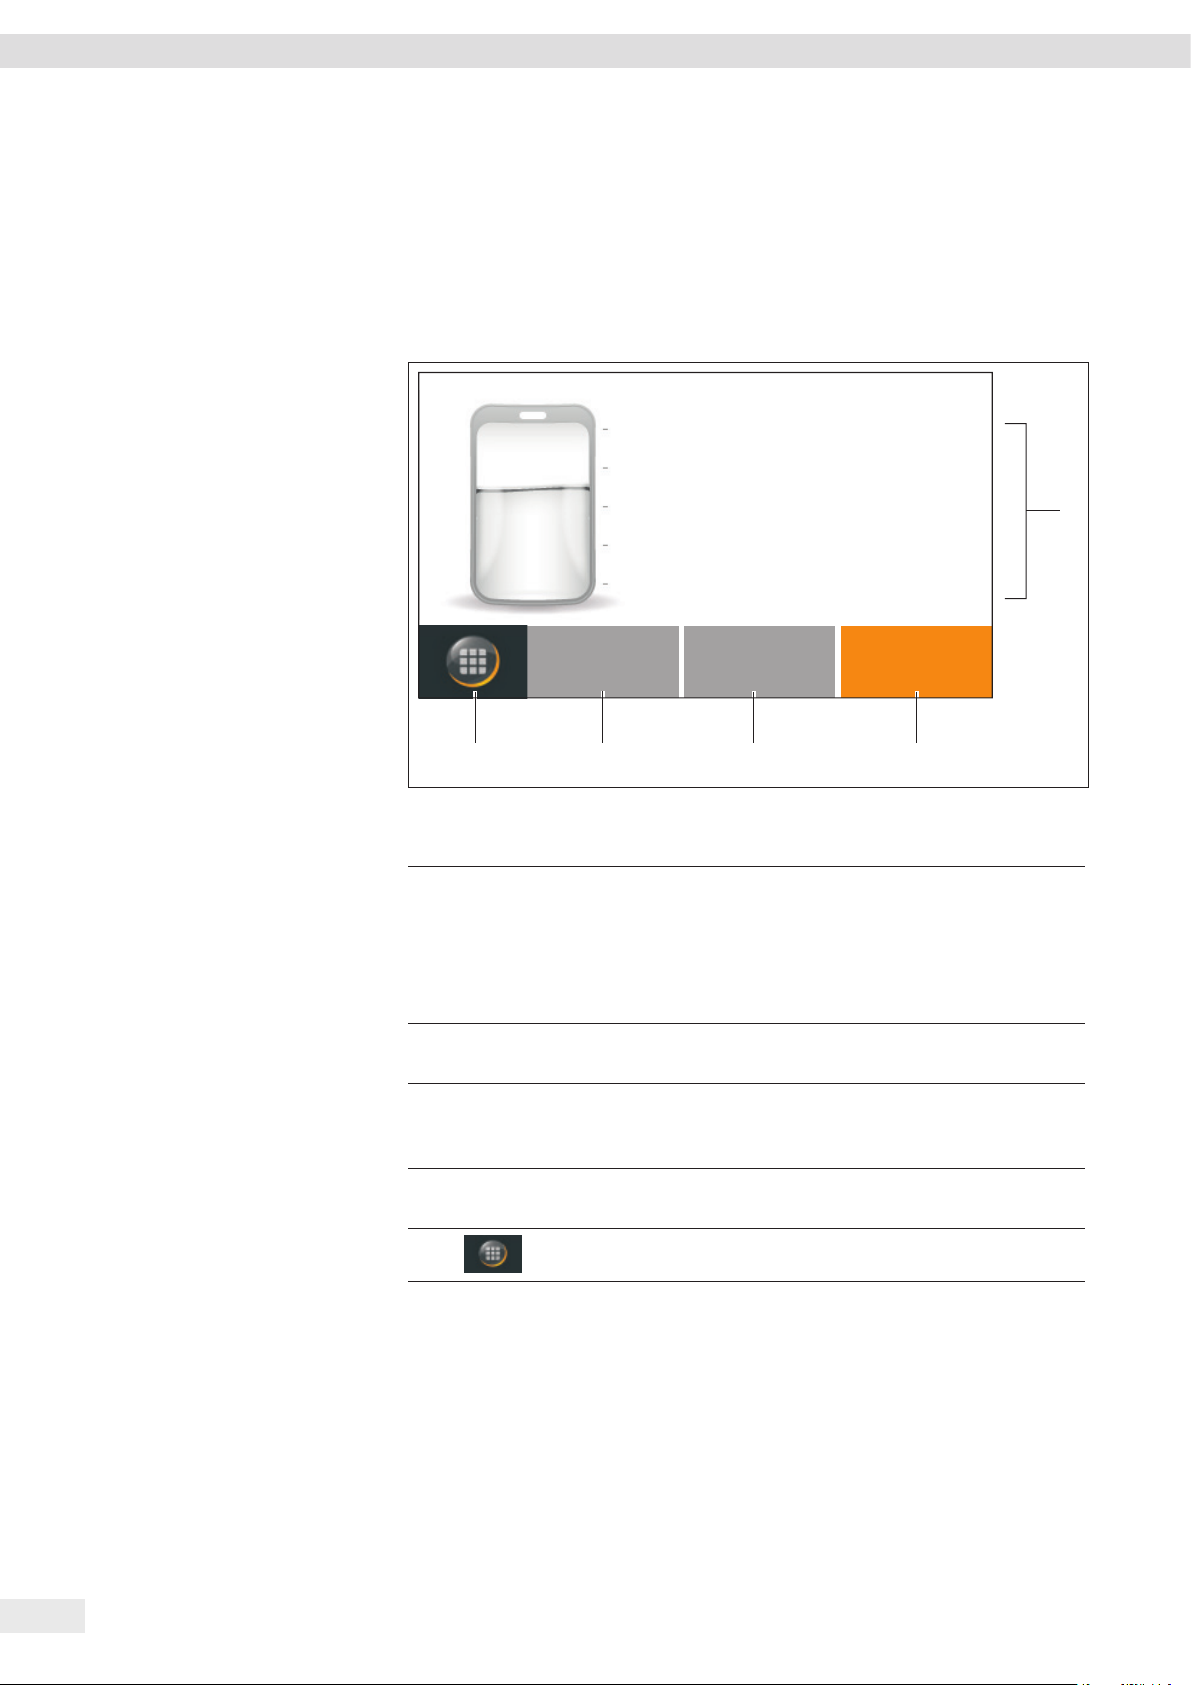
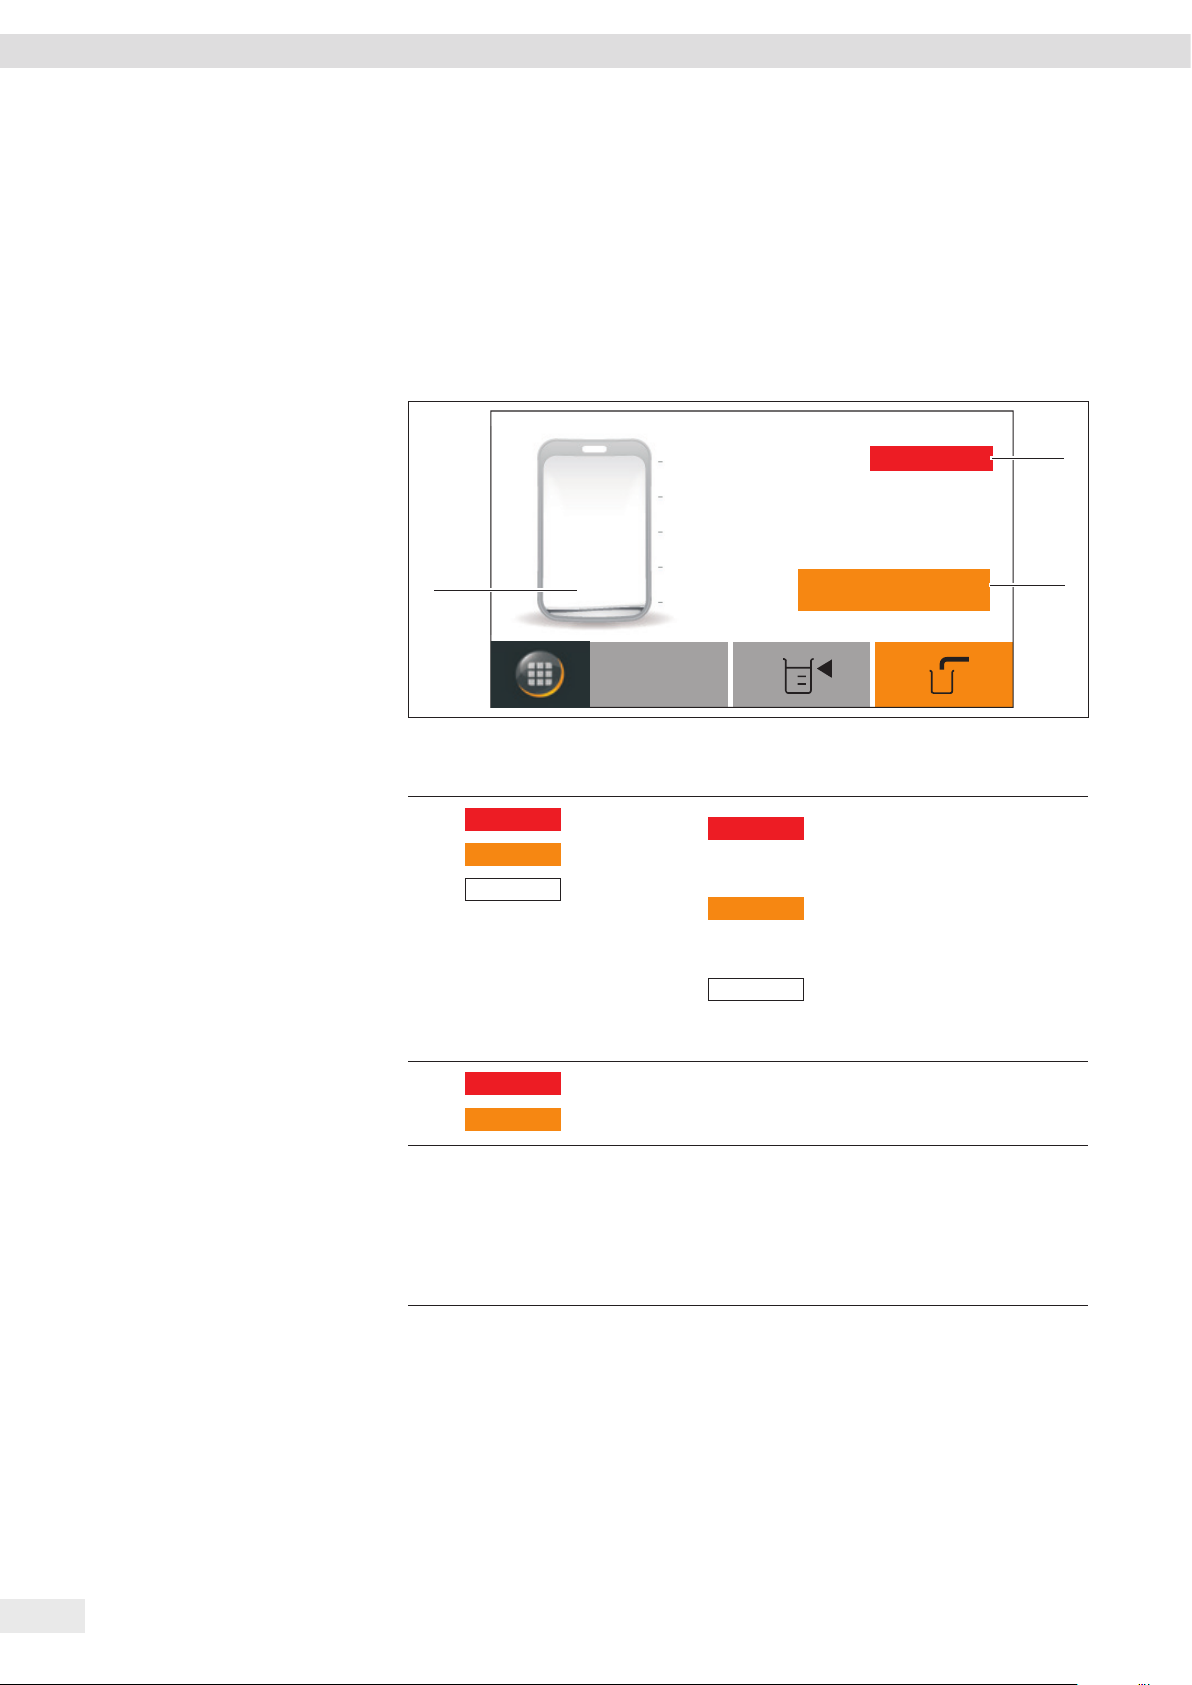
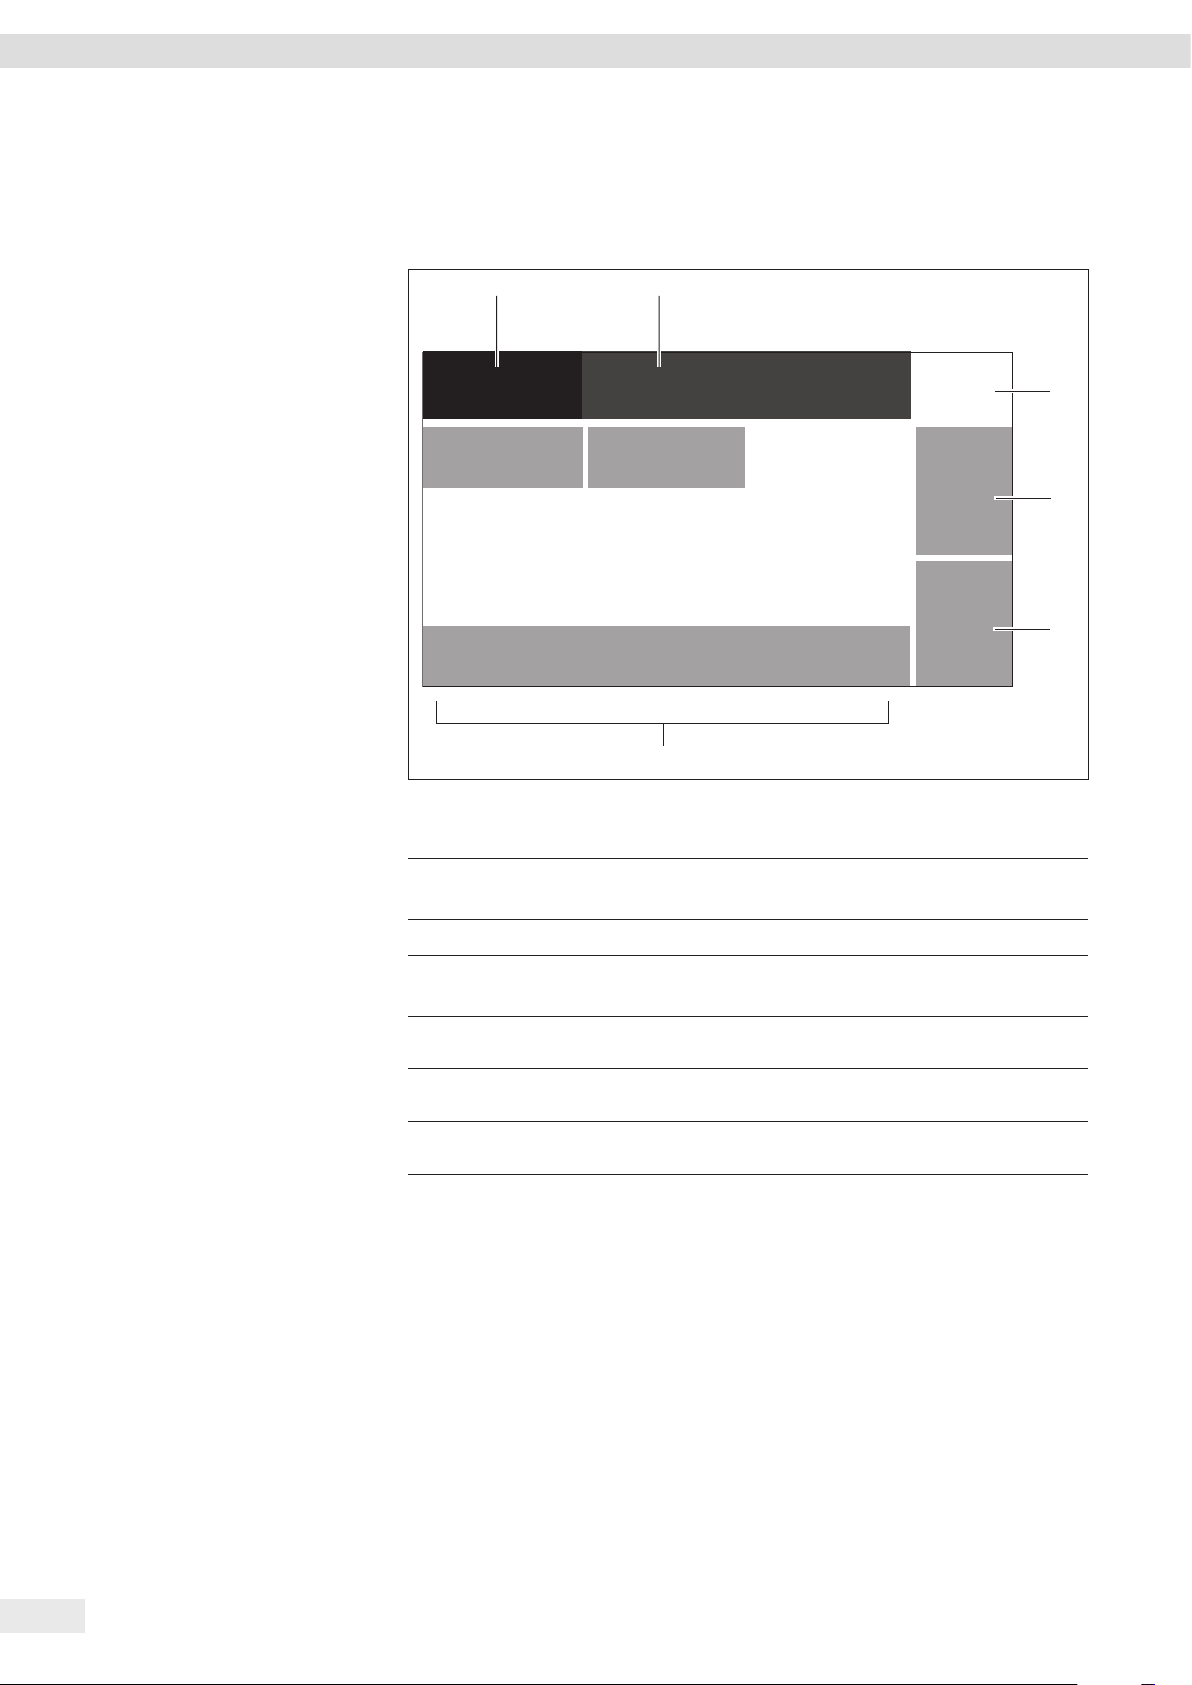
4.1 Dispensing Mode
In dispensing mode, the display shows information on water quality and the level of
the bag as well as buttons relevant to dispensing.
5l
3l
1l
0.055 μS/cm c
$&0.25
34 25
Fig. 4-1: Dispensing mode arium® mini plus (example)
No. Symbol Name Description
1 Working
environment
2
&
Manual
dispensing
The following information can be displayed:
− Current conductivity of the ultrapure water
− Current temperature of the ultrapure water
− Filling level of the bag (only arium
and arium® mini)
− Messages, warnings, errors
Starts dispensing without a preset dispensing
volume.
21.3 °C
®
mini plus
1
3
$
4 Favorite Starts dispensing the most recently specified
5
16 Operating Instructions arium® mini plus | arium® mini | arium® mini essential
Volumecontrolled
dispensing
Menu Opens the menu.
Starts dispensing after a dispensing volume has
been specified.
dispensing volume.
Page 17

Operating Design
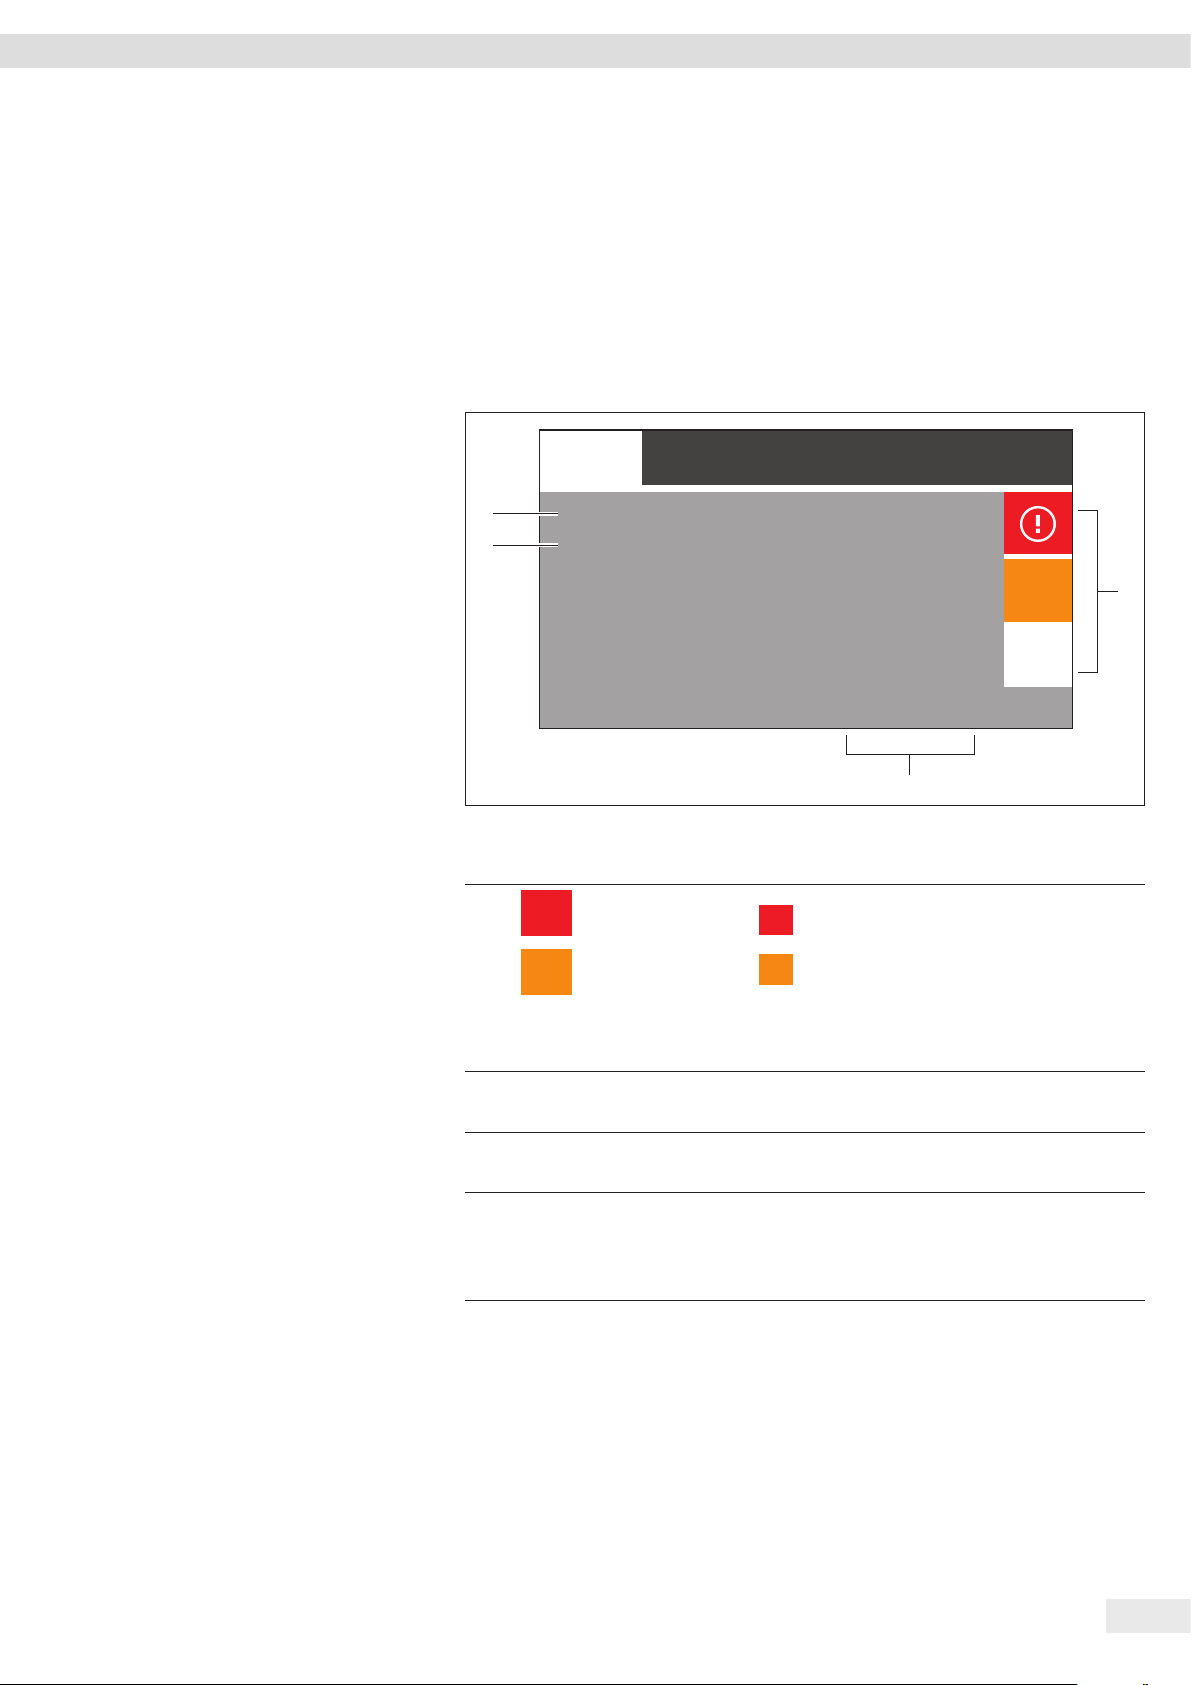
4.2 Message Display
The device displays three types of messages:
− Error messages (errors):
− Dispensing is not possible.
− Details on the cause of error messages and how to troubleshoot them
can be found in Chapter 9.1, page 66.
− The user’s ability to troubleshoot error messages is limited.
− Warning messages (warnings):
− Dispensing is possible.
− Details on the cause of warning messages and how to troubleshoot them
can be found in Chapter 9.2, page 68.
− The user can troubleshoot warning messages.
− Status messages (info):
− Dispensing is possible.
− Specific information requires the user’s attention. Action is not absolutely
necessary.
1
1
Error
0166
01.07.2016 11:32
Check proper t of the ultrapure water cartridge (L).
>
3
Fig. 4-2:
Error message (example)
No. Symbol Name Description
1
1
2
3
2 Message Shows the information to be displayed:
Message
symbol
1
Displays an error message.
2
Displays a warning message.
3
Displays a status message (info).
− Message type (error, warning, info)
− Error number or brief description of a warning
or status message (see Chapter 9, page 66)
− Date and time of occurrence
− Details on the message
2
3
>
Operating Instructions arium® mini plus | arium® mini | arium® mini essential 17
Confirmation Confirms the message.
Page 18
Operating Design
4.3 Messages in Dispensing Mode
If several messages are active in dispensing mode, the message list can be called up
(see Chapter “4.4 Message List,” page 19). The message list only appears if several
messages are active and at least one water conductivity or temperature message
cannot be displayed. If only one message is active, the message is opened directly
instead of the message list.
Dispensing is not possible when there is an error message. The three buttons for
dispensing can be used, but when you try dispensing, the error message reappears.
5l
3l
3
8
1l
0.055 μS/cm c
0.25
Fig. 4-3:
Message display in dispensing mode (example)
No. Symbol Name Description
1
1
Messages
Messages
Messages
Message list
2
3
Messages
Messages
Messages
Messages
30.1 °C
1
Indicates that error messages
1
8
are stored and opens the
message list.
2
Indicates that warning messages
are stored and opens the
message list.
Indicates that status messages
3
are stored and opens the
message list.
1
2
2
3
8
Conductivity or
8
temperature
8
message
Message
pertaining to
8
the filling level
of the bag
18 Operating Instructions arium® mini plus | arium® mini | arium® mini essential
Displays an error or warning with respect to the
water conductivity or the water temperature.
Indicates that the bag is empty. Water
8
dispensing is not possible.
Indicates that only a small amount of
8
water can still be dispensed
(only arium
®
mini plus and arium® mini).
Page 19
Operating Design
;
4.4 Message List
All active messages can be viewed in the message list.
The messages in the message list are sorted by priority. Error messages are on top.
Within the same priority level, the messages are sorted by date and time.
Messages cannot be deleted manually. They remain in the message list and continue
to be displayed on the display until their cause has been corrected. The device will
detect if the cause of the message has been corrected and automatically clear the
message from the message list and the display.
Messages
4
3
Fig. 4-4:
No. Symbol Name Description
1
Error
Error 0166
Care
Cartridge change
Service
Service needed
Message list (example)
1
Message symbol
8
Displays an error message.
1
Displays a warning message.
8
Displays a status message (info).
3
3
2 Occurrence
of the message
Displays the date and time of occurrence
of the message.
01 Jul. 2016
11:46:00 AM
13 July 2016
09:33:10 AM
02 July 2016
2:17:55 PM
2
8
3
1
3 Brief description Displays the error number or a short description
of the message (see Chapter 9, page 66).
4 Message type − Error: Displays and opens an error message.
− Care: Displays and opens a warning
message.
− Service: Displays and opens a status message.
Operating Instructions arium® mini plus | arium® mini | arium® mini essential 19
Page 20
Operating Design
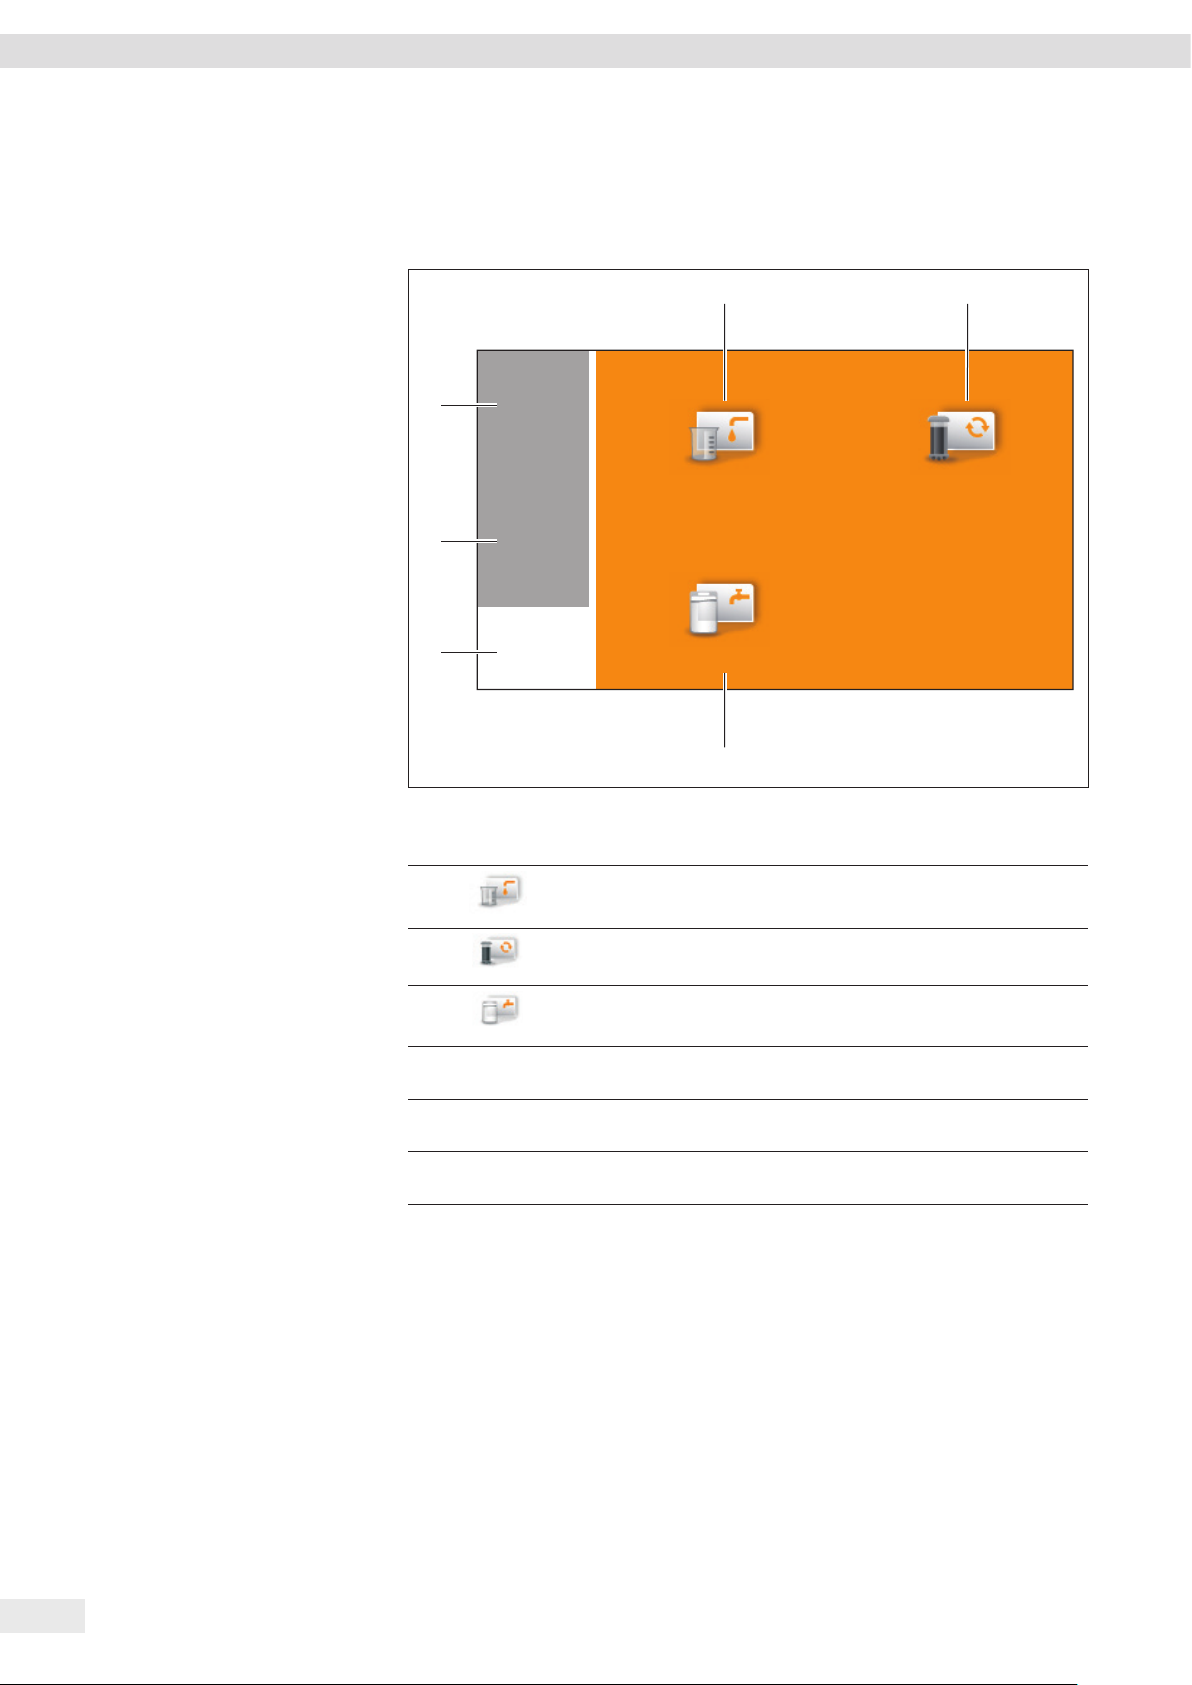
4.5 Menu
All system settings and operation steps for the care of the device can be carried out
in the menu.
1
6
5
4
Fig. 4-5:
No. Symbol Name Description
Menu
j
i
k
Dispense
Fill bag
3
2
Care
1
Dispense Opens the dispensing screen.
2
3
4
5
6
k
i
j
Care Opens the “Care” menu.
Fill bag Opens the bag filling wizard
(only on arium® mini).
Back Closes the menu.
Settings Opens the “Settings” menu.
Standby Switches to standby mode.
20 Operating Instructions arium® mini plus | arium® mini | arium® mini essential
Page 21
;
Settings
;
Language
Date and time
Information
Water quality
Acoustic signals
Settings
Operating Design
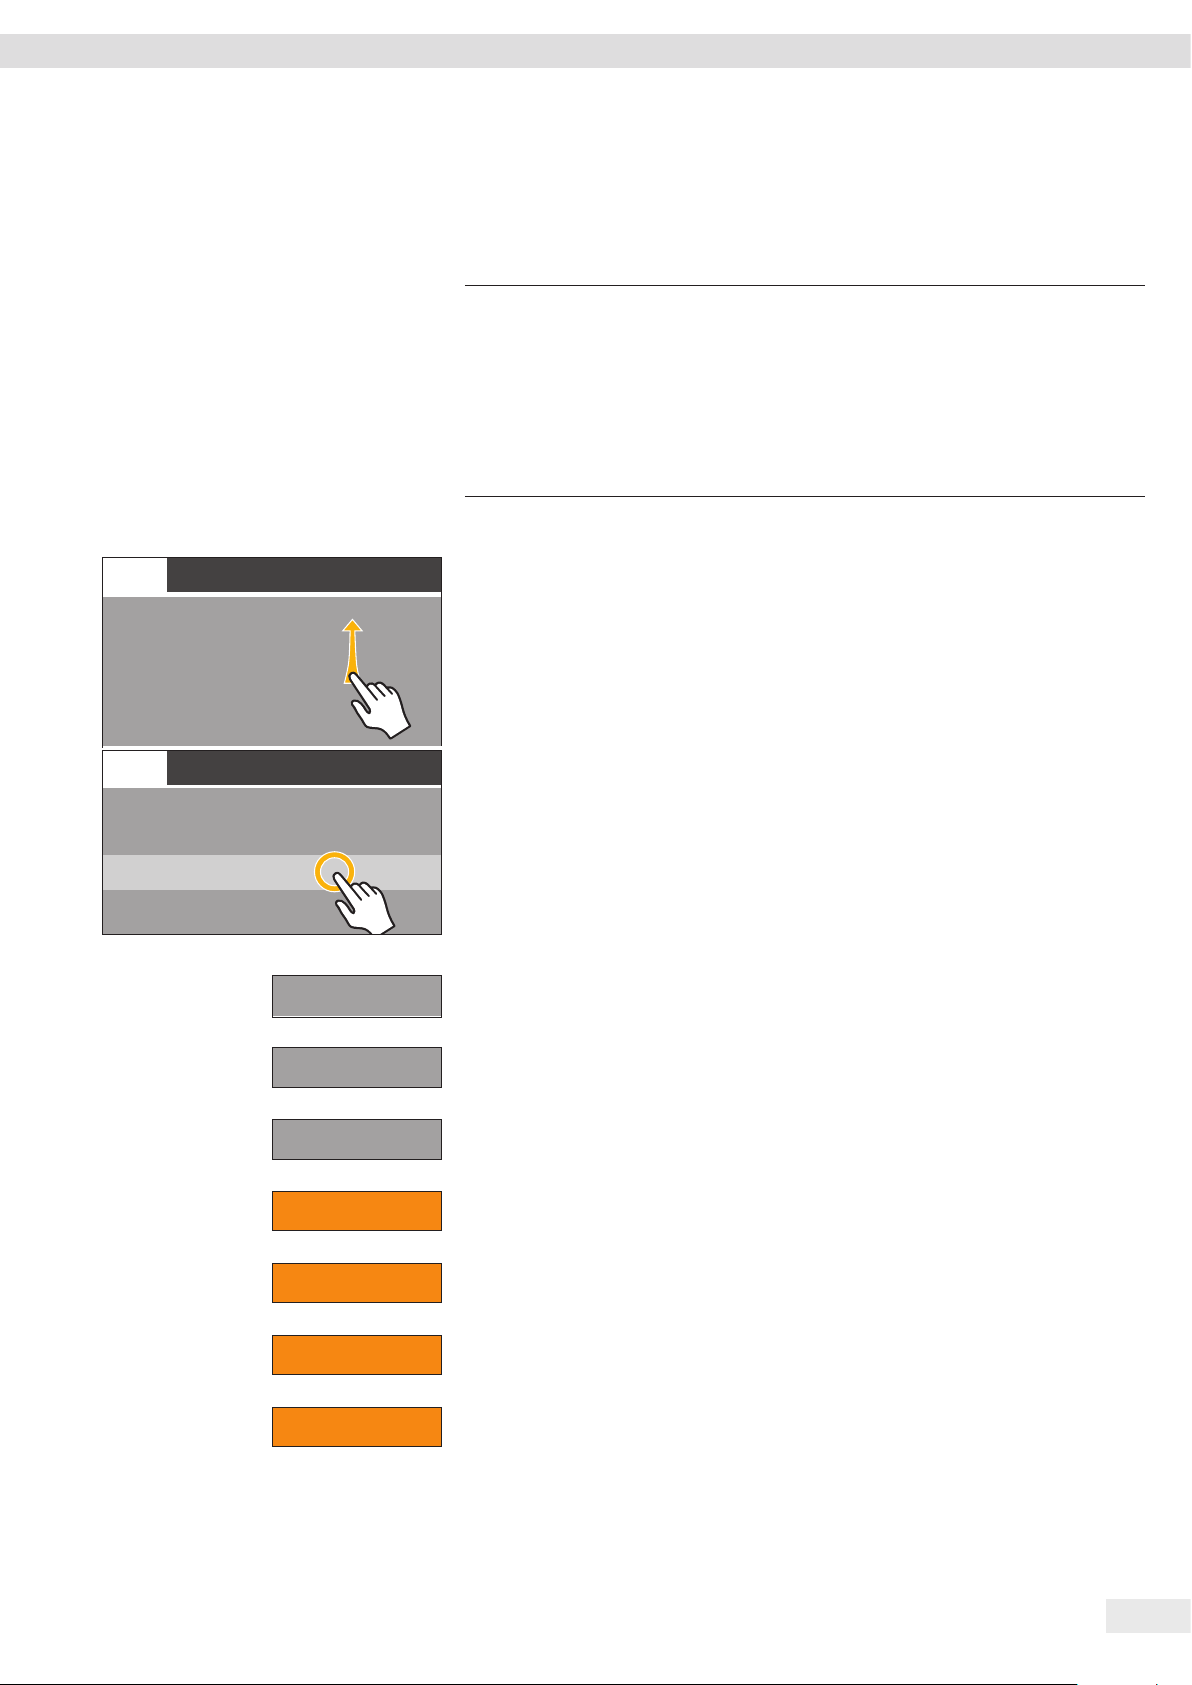
4.6 Navigating Menus
A display with touch function is used to operate the device.
If multiple menu items are available, you can scroll up and down using the touch
screen to select the desired entry.
NOTICE
Sharp or pointed instruments (such as ballpoint pens) can damage the device!
When using the touch screen with the aid of objects, the touch screen can be easily
damaged.
t The touch screen should only be operated by lightly pressing it using the tips of
your fingers.
t The touch screen can also be operated with lab gloves.
Procedure
t To scroll: Slowly swipe the touch screen up or down.
y The menu entries move in the corresponding direction.
y During scrolling, a gray scrollbar is displayed on the right for orientation.
t To select a menu item: Tap the desired item.
Language
Date and time
Information
Water quality
Acoustic signals
>
<
o
t
OK
w
t To confirm a selection: Tap the [>] button.
t To cancel an operation and return to the previous screen: Tap the [x] button.
t To switch to the next higher menu level or to the previous dialog box:
Tap the [o] button.
t To enter a manual value via the numeric keypad: Tap the [t] button.
t To confirm a message: Tap the [OK] button.
t To start a process: Tap the [START] button.
STOP
t To cancel a process: Tap the [STOP] button.
Operating Instructions arium® mini plus | arium® mini | arium® mini essential 21
Page 22
Operating Design
1
2
4.7 Numeric Keypad
The numeric keypad is used to enter a dispensing volume or to configure various
system settings.
Time
10:11 AM
>
12 3
p
45 6
789
u
0
6
Fig. 4-6:
Numeric keypad (example: Entering the time)
No. Symbol Name Description
1 Name of the
dialog box
2 Numerical value Displays the currently entered numeric value.
Displays the name of the current dialog box.
3
4
5
3
4
5
6 Numeric Keypad Transfers numerical values to the dialog box.
Tip
When entering numerical values, only the numbers admissible for the value
can be selected.
Example: Inputting a dispensing volume of more than 5 liters is not possible. The
numeric fields 6 to 9 are therefore inactive when entering the dispensing volume.
l
t Observe the validity of the numerical values.
Confirmation
beep
Correction Deletes the last digit entered.
p
Delete Clears all digits entered.
u
Accepts the numeric string entered and returns
to the menu or dispensing mode.
22 Operating Instructions arium® mini plus | arium® mini | arium® mini essential
Page 23

Operating Design
4.8 Menu Structure
t Navigating menus (see Chapter 4.6, page 21).
Menu Menu Submenu Description
j
Standby
i
Settings
Dispensing
Language Changes the language of the
Date and time Changes the date and time.
Information Device
information
Measured
values
Service
information
Displayed
values
Ultrapure water
limit value
Acoustic signals Key beeps Enables/disables beeps when
Alarm beep Enables/disables persistent beeps
Error Enables/disables beeps for error
Confirmation
beep
Display
brightness
Volume
adjustment
Reset settings Resets the device to default
Starts standby mode.
user interface.
Shows all the features of the
device, e.g. the model and serial
number.
Displays the current water
quality of the ultrapure water
stage and pre-stage.
Shows Sartorius contact
information and the next
maintenance date.
Changes the display units
for water quality and water
temperature.
Sets a limit for the ultrapure
water quality.
pressing buttons.
for warnings.
messages.
Enables/disables beeps for
expired waiting times.
Changes the brightness of the
display.
Readjusts the flow rate sensor
of the device.
settings.
Opens the dispensing screen.
Operating Instructions arium® mini plus | arium® mini | arium® mini essential 23
Page 24
Operating Design
Menu Menu Submenu Description
Reminder Displays the times for the next
required consumables changes.
Care
Change material Bag Starts a bag change (only arium
mini plus and arium® mini).
Pretreatment
cartridge
Ultrapure water
cartridge
Starts a pretreatment cartridge
change (only arium
Starts an ultrapure water
cartridge change.
UV lamp Starts a UV lamp change.
Final filter Starts a final filter change.
Final filter
reminder
Enables | disables the reminder
for the next required final filter
change. Allows selection of final
filter types.
Depressurization Starts a reduction of pressure
in the device.
Ventilation Starts manual flushing.
Starts manually filling the bag
(only arium
Fill bag
®
mini).
®
mini plus).
®
24 Operating Instructions arium® mini plus | arium® mini | arium® mini essential
Page 25

Operating Design
4.9 Parameters of the “Settings” Menu
Parameters Setting values Explanation
Language English
Deutsch
French
Italian
Spanish
Portuguese
Polish
Russian
Japanese
Chinese
Date format DD.MM.YYYY day.month.year
MM/DD/YYYY Month/Day/Year
YYYY-MM-DD
(ISO)*
Time format 12 h (AM/PM) 12-hour clock notation
24 h* 24-hour clock notation
Displayed values
μS/cm c* Shows the water quality on the dispensing
(water quality)
μS/cm Shows the water quality on the dispensing
MOcm c
MOcm
Displayed values
°C Shows the water temperature on the
(temperature)
°F Shows the water temperature on the
Off* Disables the display of the water temperature
Ultrapure water
On* Enables the limit value for water quality. If
limit value
(activation)
Off Disables the limit value for water quality.
Dispensing lock On
Off* Disables the dispensing lock.
* Basic settings
Year-month-day, according to ISO standard
screen in μS/cm and compensated to 25 °C.
screen in μS/cm as well as the water
temperature.
Shows the water quality on the dispensing
screen in MOcm and compensated to 25 °C.
Shows the water quality on the dispensing
screen in MOcm as well as the water
temperature.
dispensing screen in degrees Celsius.
dispensing screen in degrees Fahrenheit.
(only selectable if the water quality is
compen sated to 25 °C is displayed).
the limit value is exceeded during dispensing,
a warning message with a yellow warning
triangle 8 appears. Dispensing is possible.
Enables the dispensing lock. If the limit value is
exceeded during dispensing, an error message
with a red warning triangle 8 appears. Dispen sing is not possible. This setting is recommended for particularly critical applications.
Operating Instructions arium® mini plus | arium® mini | arium® mini essential 25
Page 26

Operating Design
Parameters Setting values Explanation
Key beeps On Enables | disables short beeps when you
Off*
touch a button.
Alarm beep On* Enables | disables the sustained beep when a
Off
warning message occurs until the warning
message has been confirmed.
Error On* Enables | disables the sustained beep when an
error message occurs until the error message
Off
has been confirmed. Does not disable the
error tone in the case of a leak.
Confirmation
beep
On* Enables | disables the beep at the end of
longer time sequences, e.g. after volumecontrolled dispensing or after filling the bag.Off
Display
brightness
Bright* Sets the display brightness to 100%.
Dark Sets the display brightness to 60%.
Volume adjustment See Chapter 7.3.4, page 47.
Reset settings Yes, reset Restores all system settings to default, e.g.
the ultrapure water limit value and the
display ed values. Does not reset the dates
for the reminders to change consumables.
No Cancels the settings reset.
* Basic settings
4.10 Parameters of the “Care” Menu
Parameters Setting values Explanation
Final filter
reminder
Depressurization See Chapter 8.7, page 63.
Ventilation See Chapter 8.8, page 64.
* Basic settings
Active* Enables | disables the reminder to change the
Inactive
final filter (see Chapter 8.7, page 58).
Sterile filters Used for selection of the final filter type.
Ultrafilter
Reminder [weeks] Sets the time interval for the reminder.
The default is 4 weeks.
26 Operating Instructions arium® mini plus | arium® mini | arium® mini essential
Page 27

Installation
5 Installation
5.1 Equipment Supplied
Version as a bench system
Feed water tubing: PE, 4” outer diameter, 2.40 m in length with reduction
connector a” to 4” (conversion adapter) and hose (PE, a” outer diameter,
0.05 m in length)
Drain water tubing: PE, a” outer diameter, 2.40 m in length
Dispense tubing: PVDF, 4” outer diameter, 2.40 m in length
Tubing adapter for feed water with built-in screen: 1” internal thread, a”
external diameter
Tubing adapter for feed water with built-in screen: G 3” internal thread,
a” external diameter with threaded adapter G 3“ to 4“
Tank outlet tubing: PE, 4” , 4” outer diameter, 0.10 m in length)PE, 4“ outer
diameter, 1.50 m in length with shut-off valve and hose (PE, 4“ outer
diameter in length)
Tank filling tubing: 4” outer diameter, 2.40 m in length
Hose release tool
AC adapter with country-specific power cord
Operating Instructions
QA certificate
Quantity
®
arium
mini
1 1 1
– 1 1
1 1 1 1 1
– 1 1
– 1 1
1 1 -
1 – 1 1 1
1 1 1
1 1 1
1 1 1
arium® mini
plus
arium® mini
essential
Upon delivery, the following parts are located behind the left side cover
of the device:
− Tubing
− Tubing adapter
− Hose release tool
− Power cord
Consumables
The consumables are not included in the scope of delivery:
− Pretreatment cartridge
− Ultrapure water cartridge (Scientific Pack)
− Bag
− Final filter
Operating Instructions arium® mini plus | arium® mini | arium® mini essential 27
Page 28

Installation
5.2 Prerequisites for Installation at the Installation Location
Procedure
t Make sure that the following conditions are met at the place of installation:
Requirement Features
Ambient conditions − Suitability tested (ambient conditions, see Chapter 14.2, page 73; electromagnetic
compatibility, see Chapter 14.4, page 74)
Footprint − Stable and level surface
− Sufficient space for the device (device space requirements, see Chapter “14.7
Device Properties,” page 76)
− Sufficient load capacity for the device, including when it has been filled
(device weight, see Chapter “14.7 Device Properties,” page 76)
Access to utilities − Access to utilities is a maximum of 2 meters:
− Feed water supply
− Power outlet
− Pressureless drain
Feed water quality − Suitability tested (see Chapter “14.6 Feed Water Quality,” page 75)
5.3 Unpacking and Setting up the Device
We recommend having the installation and initial startup of the device carried out
by Sartorius Service. Please contact Sartorius Service in this regard.
CAUTION
Risk of electric shock due to leaking water!
Water may spill when using the device. Electric shocks can occur if water comes into
contact with electrical appliances.
t Do not place the device close to electrically powered devices.
CAUTION
Danger of fire or explosion!
The device contains components that can ignite highly inflammable or combustible
materials.
t Do not operate the device in the vicinity of such substances.
Procedure
t If the device is stored: Observe the information on storage (see Chapter “10.1
Storage,” page 70).
t NOTICE Equipment damage due to improper transport! If the device is lifted
where there are loose components, it may fall and be seriously damaged.
t Never lift the device by the two side covers for transport.
t Grip the front of the device under the display and the recess for the power
supply at the back of the device and lift carefully.
28 Operating Instructions arium® mini plus | arium® mini | arium® mini essential
Page 29

Startup
t Take the device out of the packaging and place it at the intended
installation location.
t Remove the left side cover:
2
1
t Reach behind the side cover and pull the side cover to the side (1).
t Pull the side cover up and off to remove it (2).
t Remove the following parts from the inside of the device:
− Tubing
− Tubing adapter
− Hose release tool
− Power cord
6 Startup
We recommend having the initial startup of the device carried out by
Sartorius Service. Please contact Sartorius Service in this regard.
6.1 Connecting the AC Adapter
CAUTION
Risk of electric shock due to incorrect handling of power cables!
The use of damaged or non-standard power cables as well as the mishandling of
power cords can cause fatal electric shock or equipment damage.
t Only connect the device (protection class 1) to properly installed power sockets
with protective grounding conductors (PE) with a fuse of a maximum of 16 A.
t Use only standard cables that have protective grounding conductors for
operation.
t Never disconnect the device from the protective grounding conductor.
t Connect to the power supply according to the regulations of your specific
country.
t Never plug the power cable into the mains wall outlet when it is disconnected
from the device.
t Make sure that the power plug or another suitable disconnecting device for
the power can be easily reached in case of danger.
NOTICE
Equipment damage due to operation with third-party equipment!
The use of third-party power supplies not authorized by Sartorius may cause
damage to the device.
t Use only the original Sartorius power supply.
Procedure
t Check whether the plug design of the power cord is equivalent to your
country’s standard.
t If required: Call Sartorius Service or your dealer.
Operating Instructions arium® mini plus | arium® mini | arium® mini essential 29
Page 30

Startup
t Connect the power supply to the connection labeled “Power” on the rear
of the device.
t Fix the power supply to the housing using the supplied Velcro strip.
To do this, pull the Velcro strip through the eyelet as shown in the figure.
t Lay the protruding power cord so that it cannot be damaged or obstruct
subsequent connection of hoses.
t Connect the device to the AC power using the power cord.
arium mini
Booting device...
y The device starts up and performs a system scan.
30 Operating Instructions arium® mini plus | arium® mini | arium® mini essential
Page 31

Startup
>
6.2 Starting up the Device
6.2.1 Startup Overview
When the system check is complete, the dialog box “Language” appears.
The wizard automatically performs all startup steps. Startup takes approx. 120 minutes
and cannot be canceled.
All system settings (e.g. date, time, displayed values) that are made during the
startup can be changed afterwards in the “Settings” menu (see Chapter “7.6
Changing System Settings,” page 51).
Startup includes the following tasks:
Startup procedure Chapter, page
Set the language 6.2.2, page 31
Start startup mode 6.2.3, page 32
Set date and time 6.2.4, page 32
Set the displayed values 6.2.5, page 33
Insert pretreatment cartridge (only arium
Insert ultrapure water cartridge 6.4, page 35
Insert bag (only arium
®
mini plus or arium® mini) 6.5, page 36
Connect tubing 6.6, page 38
Rinse pretreatment cartridge (only arium
Rinse the ultrapure water cartridge 6.8, page 41
Connect final filter 6.9, page 44
Rinse final filter 6.10, page 44
®
mini plus) 6.3, page 34
®
mini plus) 6.7, page 40
Language
English
Deutsch
Français
Español
6.2.2 Setting the Language
Procedure
t Select the language for the display. The factory setting is English.
t Confirm the selection with the [l] button.
y The dialog box “Startup” appears.
Operating Instructions arium® mini plus | arium® mini | arium® mini essential 31
Page 32

Startup
;
t
>
>
>
1
Startup
Welcome. You will be guided step-by-step
through the startup procedure of your new
arium mini.
6.2.3 Starting Startup Mode
The demo mode of the device can be started by pressing the [DEMO] button. Access
to demo mode is password-protected and only accessible to Sartorius employees.
Procedure
t To start startup mode: Tap the [START] button.
DEMO
1
Date format
Date and time
First, set up the date and time.
YYYY-MM-DD (ISO)
DD.MM.YYYY
MM/DD/YYYY
w
6.2.4 Setting the Date and Time
Requirements
The “Date and Time” dialog box appears.
Procedure
t Tap the [t] button.
t Select the desired date format:
− DD.MM.YYYY
− MM/DD/YYYY
− YYYY-MM-DD (ISO)
t Confirm the selection with the [l] button.
Date
Time format
32 Operating Instructions arium® mini plus | arium® mini | arium® mini essential
01.07.2015
123
456
789
0
24h
12h (AM/PM)
p
u
t Enter the date.
t Confirm the selection with the [l] button.
t Select the desired time format:
− 24h
− 12h (AM/PM)
t Confirm the selection with the [l] button.
Page 33

Startup
>
;
t
>
Time
1
Displayed values
10:11 AM
123
456
789
0
Displayed values
Select the measurement values which
you would like to display during
dispensing
μS/cm c
MΩcm c
t Enter the time.
t Confirm the selection with the [l] button.
p
u
6.2.5 Setting Displayed Values
Requirements
The “Displayed values” dialog box appears.
°C
°F
Off
water
Procedure
t Tap the [t] button.
t Set the desired format for the water quality:
− μS/cm c (compensated to 25°C)
− MOcm c (compensated to 25°C)
t Set the desired format for the temperature:
− °C
− °F
− Off (no temperature display)
t Confirm the selection with the [l] button.
.
Temperature [°C]Water quality
1
Remove cover
Please remove the front cover.
OK
y ”Remove cover” appears on the screen. Depending on the device type,
a pretreatment cartridge or a cleaning cartridge must be inserted (see
Chapter “6.3 Inserting Pretreatment Cartridge (only arium® mini plus),”
page 34, Chapter “6.4 Inserting Ultrapure Water Cartridge,” page 35).
Operating Instructions arium® mini plus | arium® mini | arium® mini essential 33
Page 34

Startup
6.3 Inserting Pretreatment Cartridge (only arium® mini plus)
A pretreatment cartridge must be inserted in the device. The cartridge holder for the
pretreatment cartridge is marked “R”.
Procedure
t Remove the front cover.
t Confirm removal of the cover with the [OK] button.
y The dialog box “Insert cartridge” appears.
1
Insert cartridge
Insert the pretreatment cartridge (R) as
described in the manual.
OK
t NOTICE Equipment damage due to impurities! If dirt or foreign objects enter the
ultrapure water circulation, individual device components can become clogged or
wear out faster. Do not touch the connections of the pretreatment cartridge.
This will prevent impurities from getting into the device.
t Remove the plugs from all three connections of the pretreatment cartridge.
t Hold the pretreatment cartridge in the upper area and insert it into the holder
marked “R”. To do this, push the pretreatment cartridge straight into the guide
rails of the cartridge holder.
t Press the pretreatment cartridge firmly into the cartridge holder until it locks
into the guide rails with a distinct clicking sound on both the left and right sides.
Check that the pretreatment cartridge has been installed securely by turning it
slightly.
t Confirm the insertion of the pretreatment cartridge with the [OK] button.
y The “Insert cartridge” dialog box (Step 2) appears. An ultrapure water cartridge
1
Insert cartridge
Insert the ultrapure water cartridge (R) as
described in the manual.
must be inserted (see Chapter 6.4, page 35).
OK
34 Operating Instructions arium® mini plus | arium® mini | arium® mini essential
Page 35

Startup
6.4 Inserting Ultrapure Water Cartridge
An ultrapure water cartridge must be inserted in the device. The cartridge holder for
the ultrapure water cartridge is marked “L”.
Procedure
t Remove the front cover.
t Confirm removal of the cover with the [OK] button.
y The dialog box “Insert cartridge” appears.
1
Insert cartridge
Insert the ultrapure water cartridge (L) as
described in the manual.
OK
t NOTICE Equipment damage due to impurities! If dirt or foreign objects enter the
ultrapure water circulation, individual device components can become clogged or
wear out faster. Do not touch the connections of the ultrapure water cartridge.
This will prevent impurities from getting into the device.
t Remove the plugs from the two external ultrapure water cartridge connections.
t Hold the ultrapure water cartridge in the upper area and insert it into the holder
marked “L”. To do this, push the pretreatment cartridge straight into the guide
rails of the cartridge holder.
t Press the ultrapure water cartridge firmly into the cartridge holder until it locks
into the guide rails with a distinct clicking sound on both the left and right sides.
Check that the ultrapure water cartridge has been installed securely by turning it
slightly.
t Confirm the insertion of the ultrapure water cartridge with the [OK] button.
1
Put the cover back on
Please put the front cover back on.
OK
y The dialog box “Attaching the cover” appears.
t Put the front cover on the device.
t Confirm that the cover has been put on with the [OK] button.
Operating Instructions arium® mini plus | arium® mini | arium® mini essential 35
Page 36

Startup
1
1
Insert bag
Remove the left cover of device. Insert
the empty bag as described in the
manual. Put the left cover back on.
Connect tubing
Connect the feed water tubing (Inlet) to
the back of the device according to the
operating instructions.
y If an arium® mini plus or arium® mini is used: The dialog box “Insert bag” appears.
A bag must be inserted (see Chapter 6.5, page 36).
OK
y If an arium® mini plus is used: The dialog box “Connect tubing” appears.
Feed water tubing must be connected (see Chapter 6.6.1, page 38).
OK
6.5 Inserting Bag (only arium® mini plus or arium® mini)
Procedure
t Remove the left side cover:
2
1
t Reach behind the side cover and pull the side cover to the side (1).
t Pull the side cover up and off to remove it (2).
t To make it easier to reach the lower connections on the device:
Pull the tray up and remove it from the device.
36 Operating Instructions arium® mini plus | arium® mini | arium® mini essential
Page 37

Startup
t NOTICE Danger of damage to the device from improper handling! The bag may
be damaged if forced into the guide rails: The bag can be damaged. Use only
slight pressure when inserting the bag into the guide rail.
t Using the handle, slide the bag into the guide rail in the upper portion of the
device housing. The bag is secure when the reinforcing piece on the carrying
handle is completely engaged in the guide rail.
t Using the quick connector, fasten the upper hose of the bag to the device’s
upper connection.
y The quick connector locks into place with an audible click.
t Fasten the two lower bag hoses to the lower device connections using the
quick connectors.
y The quick connectors lock into place with an audible click.
Connect tubing
1
Connect tubing for feed water (Inlet), drain
water (Drain) and tank outlet (Bag outlet)
on the rear of the device as described in
the manual.
OK
t Reinsert the tray. Make sure not to damage the bag.
t Reattach the left side cover of the device.
t Confirm the insertion of the bag with the [OK] button.
y The dialog box “Connect tubing” appears. Tubing must be connected
(see Chapter 6.6, page 38).
Operating Instructions arium® mini plus | arium® mini | arium® mini essential 37
Page 38

Startup
6.6 Connecting Tubing
6.6.1 Connecting Feed Water Tubing (only arium® mini plus or arium® mini)
To prevent the entry of particles into the device, it is recommended to use the
supplied screens.
Procedure
t Connect the feed water tubing to the connection labeled “Inlet” on the rear of
the device.
t NOTICE Water leakage due to excessive inlet pressure! If the water pressure is
too high: Water can leak out of the device. Check the water pressure inlet
specification (see Chapter “14.6 Feed Water Quality,” page 75).
t If required: Reduce the inlet pressure.
t NOTICE Water leakage can occur if feed water tubing is not watertight! If the
feed water tubing is deformed or not inserted deep enough: Water can leak out.
After startup, make sure that all external water connections are leak proof.
t Connect the feed water tubing to the feed water supply.
6.6.2 Connecting Tank Filling Tubing (only arium
®
mini)
To prevent the entry of particles into the device, it is recommended to use the
supplied screens.
NOTICE
Contamination of tank filling tubing!
If the tank filling tubing is improperly stored: The tank filling tubing can be
contaminated. Sufficient quality of the pure water that the bag is filled with is no
longer guaranteed in this case.
t Do not leave the tank filling tubing on the floor or near sources of
contamination (e.g. in the vicinity of an outlet).
t If the tank filling tubing cannot be kept secure while connected to the device:
Remove the tank filling tubing and keep it in a clean place.
t If the tank filling tubing is contaminated:
− Replace the bag (see Chapter 8.5.2, page 56).
− Replace the tank filling tubing.
t Use the tank filling tubing exclusively for filling.
Procedure
t Connect the tank filling tubing to the connection labeled “Inlet” on the rear
of the device.
t NOTICE Water leakage due to excessive inlet pressure! If the water pressure is
too high: Water can leak out of the device. Check the water pressure inlet
specification (see Chapter “14.6 Feed Water Quality,” page 75).
t NOTICE Water leakage can occur if feed water tubing is not watertight! If the
feed water tubing is deformed or not inserted deep enough: Water can leak out.
After startup, make sure that all external water connections are leak proof.
38 Operating Instructions arium® mini plus | arium® mini | arium® mini essential
Page 39

Startup
6.6.3 Connecting Drain Water Tubing (only arium® mini plus or arium® mini)
NOTICE
Bag can burst due to excess pressure!
If the drain water tubing of the device is sealed off, clogged or exposed to counterpressure, the bag may burst.
t Do not seal off, clog or expose the drain water tubing to counter-pressure.
Procedure
t Connect the drain water tubing to the connector labeled “Drain” on the rear of
the device.
t NOTICE Water can leak out if drain water hose detaches! Water can escape
from the drain water tubing during operation. Attach the drain water tubing
to the outlet.
t Guide the free end of the waste water tubing to the drain and attach it.
6.6.4 Connecting the Tank Outlet Tubing (only arium
®
mini plus or arium® mini)
Procedure
t Connect the long tank outlet tubing to the connector labeled “Bag Outlet”
on the rear of the device.
t Close the ball cock.
y The prompt to open and close the ball cock is shown later in the wizard.
Operating Instructions arium® mini plus | arium® mini | arium® mini essential 39
Page 40

Startup
m
1
1
Prepare rinsing
Open the tank outlet (Bag Outlet) at the
rear of the device.
Start rinsing
Tap “Start” to begin the rinsing process.
6.7 Rinsing Pretreatment Cartridge (only arium® mini plus)
Procedure
t Open the ball cock on the tank outlet tubing.
t Run the tank outlet tubing to the drain for rinsing. Water can escape from the
tubing during rinsing.
OK
t Start the rinsing process for the pretreatment cartridge.
To do this, tap the [START] button.
1
w
Rinsing
10:00 min
Close bag outlet
Close the tank outlet (Bag Outlet) at the
rear of the device.
OK
y During the rinse cycle, the remaining rinse time is displayed in minutes.
t To interrupt the rinse cycle:
t Tap the [x] button.
y The dialog box “Start rinsing” appears again.
t To resume the rinse cycle after an interruption: Tap the [START] button.
t When the rinse cycle is finished: Close the ball cock on the tank outlet tubing.
t Confirm that the tank outlet is closed. To do this, tap the [OK] button.
40 Operating Instructions arium® mini plus | arium® mini | arium® mini essential
Page 41

m
Fill bag
m
14%
Startup
6.8 Rinsing the Ultrapure Water Cartridge
6.8.1 Filling of the Bag (only arium® mini plus and arium® mini)
®
Automatic Filling (arium
During rinsing, the device fills and rinses the ultrapure water cartridge.
Air is removed from the ultrapure water circulation in the process.
y If the bag no longer contains a sufficient amount of water (Tank Fill Level)
or empties during the rinsing process, the bag is filled automatically.
y When filling is complete, the dialog box “Prepare rinsing” appears.
mini plus)
1
1
Prepare rinsing
Connect tubing for dispensing as
described in the manual.
OK
Fill bag
14%
Prepare rinsing
Connect tubing for dispensing as
described in the manual.
Manually Filling the Bag (only arium
Procedure
t NOTICE Device functions can be impaired by air intake! If there is insufficient
water during the filling process: Air is drawn into the system. The air in the
system can impair correct functioning of the device. Prepare a container with a
sufficient amount of pretreated water (at least 5 liters).
t Place the tank filling tubing into the container and secure it so that its opening
is completely submerged during filling.
t Tap the [START] button.
y The bag is filled with pretreated water. Progress is displayed as a percentage.
t NOTICE Device functions can be impaired by air intake! If there is insufficient
water during the filling process: Air is drawn into the system. The air in the
system can impair correct functioning of the device.
t If there is insufficient water in the container: Cancel the filling process
prematurely and fill the container with pretreated water.
t To cancel the filling process prematurely:
t Tap the [x] button.
y The dialog box “Fill bag” appears.
t To resume the filling cycle after an interruption: Tap the [START] button.
y When filling is complete, the dialog box “Prepare rinsing” appears. Outlet tubing
must be connected (see Chapter “6.8.2 Performing a Rinse Cycle,” page 42).
®
mini)
OK
Operating Instructions arium® mini plus | arium® mini | arium® mini essential 41
Page 42

Startup
m
6.8.2 Performing a Rinse Cycle
During rinsing, the device fills and rinses the ultrapure water cartridge.
Air is removed from the ultrapure water circulation in the process.
Procedure
t Press the dispense tube into the quick connector of the water outlet.
t Direct the free end of the dispense tube to the drain or into a vessel
(at least 6 liters).
1
Start rinsing
Tap “Start” to begin the rinsing process.
w
Rinsing
4:00 min
t Start the rinse cycle for the ultrapure water cartridge.
To do this, tap the [START] button.
y During the rinse cycle, the remaining rinse time is displayed in minutes.
t To interrupt the rinse cycle:
t Tap the [x] button.
y The dialog box “Start rinsing” appears again.
t To resume the rinse cycle after an interruption: Tap the [START] button.
y The rinse cycle is performed.
6.8.3 Re-filling the Bag During the Rinse Cycle (only arium
If the bag does not contain enough water or empties during the rinse cycle:
The bag must be refilled.
Procedure
y The dialog box “Fill bag” appears: Fill the bag (see Chapter 6.8, page 41).
®
mini)
1
Fill bag
Make sure there is sufcient water to
ll the bag. Tap “START” to begin lling
the bag.
w
42 Operating Instructions arium® mini plus | arium® mini | arium® mini essential
Page 43

1
m
Start rinsing
Tap “Start” to begin the rinsing process.
w
Rinsing
4:00 min
Startup
t Start the rinse cycle for the ultrapure water cartridge. To do this, tap the [START]
button.
y During the rinse cycle, the remaining rinse time is displayed in minutes.
t To interrupt the rinse cycle:
t Tap the [x] button.
y The dialog box “Start rinsing” appears again.
t To resume the rinse cycle after an interruption: Tap the [START] button.
y The rinse cycle is performed.
6.8.4 Completing the Rinsing Process
1
Procedure
y When rinsing is complete, the dialog box “End rinsing” appears.
End rinsing
Remove the dispense tube.
OK
t Remove the dispense tube. To do this, use the tubing removal tool to push the
dark ring of the quick connector up and pull the dispense tube down and out.
t Confirm the rinsing process with the [OK] button.
1
Connect lter
Connect the nal lter as described in
the manual.
OK
y The dialog box “Connect filter” appears. A final filter must be connected
(see Chapter 6.9, page 44).
Operating Instructions arium® mini plus | arium® mini | arium® mini essential 43
Page 44

Startup
6.9 Connecting the Final Filter
Requirements
The “Connect filter” dialog box appears on the display.
Procedure
t Attach the bell assembly to the final filter.
t Press the final filter into the quick connector of the water outlet.
t Confirm that the final filter has been connected with the [OK] button.
y The display changes to the dispensing screen.
6.10 Rinsing the Final Filter
Requirements
The device is now in dispensing mode.
Procedure
t Place a vessel under the final filter.
t If a sterile filter is used as the final filter: Open the final filter’s vent valve.
t Remove the protective cap from the bell assembly.
t If a sterile filter is used as the final filter: Remove at least 5 liters of water.
This will rinse the final filter.
t If an ultrafilter is used as a final filter: Remove at least 20 liters of water.
This will rinse the final filter.
t Only arium
or empties during the rinse cycle:
t Wait until the bag has filled to a sufficient level.
t Complete the rinse cycle.
t When the rinsing process is complete: Close the vent valve.
t Attach the protective cap to the bell assembly.
y Startup is complete.
®
mini plus or arium® mini: If the bag does not contain enough water
44 Operating Instructions arium® mini plus | arium® mini | arium® mini essential
Page 45

Operation
$&
7 Operation
7.1 Turning the Device On and Off
Procedure
t To turn the device on: Connect the device to the power supply.
y The device starts up and performs a system scan.
t To turn the device off: Disconnect the device from the power supply.
Tip
When the device is turned off during normal operation, e.g. in the evening or on
weekends, consistent ultrapure water quality is no longer guaranteed. To ensure
consistently high-quality ultrapure water, we recommend that you activate standby
mode (see Chapter “7.5 Activating or Deactivating Standby Mode,” page 50).
7.2 Dispensing Ultrapure Water
0.25
5l
3l
0.055 μS/cm c
1l
21.3 °C
7.2.1 Preparing to Dispense Ultrapure Water
The ultrapure water can be dispensed as follows:
− Manual dispensing
− Volume-controlled dispensing
Large volumes of ultrapure water can be dispensed via the outlet tubing.
To do this, the final filter must be removed.
Requirements
− The device is ready for operation (see “6 Startup”, page 29).
− The device is now in dispensing mode.
NOTICE
Water leakage due to vessel overflow!
t Do not allow water to be dispensed unattended. The vessel being filled can overflow.
t To avoid dispensing volumes that are too large: Volume-controlled dispensing
of ultrapure water (see Chapter 7.2.3, page 46).
Procedure
t If dispensing is to take place via the final filter: Remove the protective cap
from the final filter bell assembly.
t If dispensing is to take place via the outlet tubing:
t Remove the final filter (see page 62).
t Connect the outlet tubing
(connection, see Chapter “6.8.2 Performing a Rinse Cycle,” page 42).
t Place a suitable vessel under the water outlet.
y The device is ready to dispense ultrapure water.
Operating Instructions arium® mini plus | arium® mini | arium® mini essential 45
Page 46

Operation
$&
$&
5l
3l
1l
0.25
5l
3l
1l
0.055 μS/cm c
21.3 °C
0.055 μS/cm c
21.3 °C
7.2.2 Manually Dispensing Ultrapure Water
During manual dispensing, ultrapure water is dispensed until stopped manually.
®
Only arium
mini plus or arium® mini: When the maximum filling level of the bag
has been reached: Dispensing will end automatically.
Procedure
t Tap the [&] symbol.
y Dispensing begins. The volume dispensed thus far is displayed in increments of
0.05 liters (50 ml).
y The ultrapure water flows into the vessel at a maximum throughput rate of
about 1.0 l/min.
y If an arium
®
mini plus or arium® mini is used: The filling level of the bag will be
updated on the display during dispensing.
t To stop dispensing: Tap the [STOP] button.
t When dispensing is finished: Attach the protective cap to the final filter bell
assembly.
0.90l
5l
3l
0.055 μS/cm c
1l
21.3 °C
STOP
7.2.3 Volume-controlled Dispensing of Ultrapure Water
During volume-controlled water dispensing, a previously specified amount of water
is dispensed. The volume to be dispensed must be entered with the following
specifications:
− The minimum dispensing volume is 0.05 liters (50 ml).
− The maximum dispensing volume is 5.00 liters.
− Only volumes between 0.05 and 5.00 liters can be entered. Invalid numeric fields
become inactive (white background).
− Only arium
®
mini plus or arium® mini: When a higher dispensing volume is
entered than that in the bag, dispensing cannot be started. An appropriate
message will be displayed.
Procedure
t Tap the [
$] symbol.
y The numeric keypad for inputting volumes appears.
0.25
46 Operating Instructions arium® mini plus | arium® mini | arium® mini essential
Page 47

Operation
m
$&
l
Volume
1.00 l
123
456
789
0
5l
3l
1l
w
p
.
u
0.055 μS/cm c
21.3 °C
0.30 / 1.00
STOP
t Enter the desired dispensing volume in liters. Observe the guidelines for
volume input.
y The volume entered appears.
t Tap the [START] button.
y Dispensing begins:
− The volume dispensed thus far is displayed in increments of 0.05 liters (50 ml).
− The ultrapure water flows into the vessel at a maximum throughput rate of
about 1.0 l/min.
− If an arium® mini plus or arium® mini is used: The filling level of the bag will be
updated on the display during dispensing.
− Dispensing will stop automatically when the selected dispensing volume
has been reached.
t To cancel dispensing before it is finished: Tap the [x] button.
Using Favorites
The last selected dispensing volume is automatically stored and displayed on
the Favorites button on the dispensing screen.
1
5l
3l
0.055 μS/cm c
1l
1.00
21.3 °C
Dispense canceled
Wait until enough water is available in
the bag.
Procedure
t To start another dispensing process with the previously selected dispensing
volume: Tap the Favorites button.
y Dispensing begins.
t When dispensing is finished: Attach the protective cap to the final filter bell
assembly.
7.2.4 Confirming Dispensing Cancelation
Only as much water can be dispensed as is present in the bag.
®
arium
mini plus
If the bag contains an insufficient amount of water, dispensing stops and the dialog
box “Dispense canceled” appears.
Procedure
t Confirm the message with the [l] button.
t Wait until the bag has filled to a sufficient level.
t Restart dispensing.
Operating Instructions arium® mini plus | arium® mini | arium® mini essential 47
Page 48

Operation
$&
arium® mini
Procedure
t If the bag no longer contains sufficient water:
t Manually fill the bag (see Chapter , page 48).
t Continue dispensing.
7.2.5 Ending Dispensing via Outlet Tubing
Procedure
t Once dispensing via the outlet tubing is complete:
t Disconnect outlet tubing from the device (disconnecting outlet tubing,
see Chapter “6.8.2 Performing a Rinse Cycle,” page 42).
t Connect the final filter (see Chapter “6.9 Connecting the Final Filter,”
page 44).
1.00
5l
3l
0.055 μS/cm c
1l
21.3 °C
7.2.6 Removing Pure Water from the Bag (only arium
®
mini plus or arium® mini)
Using the tank outlet tubing connected to “Bag Outlet”, pure water can be manually
dispensed directly from the bag. Dispensing takes place entirely without pressure.
Procedure
t Guide the tank outlet tubing into a suitable container.
t Open the ball cock of the tank outlet tubing.
y Pure water flows out of the bag.
t When dispensing is finished: Close the ball cock.
7.3 Opening the Menu
Procedure
t To open the menu: Tap the
can be carried out:
Possible device tasks Chapter, page
Manually filling the bag (only arium
Activate or deactivate standby mode 7.5, page 50
Change system settings 7.6, page 51
Open the “Care” menu 8.3, page 54
button in dispensing mode. The following tasks
®
mini) 7.4, page 49
48 Operating Instructions arium® mini plus | arium® mini | arium® mini essential
Page 49

1
l
k
1
Fill bag?
The bag contains 3 l of water. Would you
like to ll it now?
NO YES
Tank level too low
The tank level is too low for dispensing
water.
Operation
7.4 Manually Filling the Bag (only arium® mini)
If the bag filling level of the device has been reached or is no longer sufficient for
the desired dispensing volume, the bag can be filled manually. Manual filling of the
bag can be carried out in several ways.
7.4.1 Starting Manual Filling Using the Wizard
Procedure
t If the filling level is too low for the dispensing volume entered during
volume-controlled dispensing:
y The dialog box “Fill bag?” appears.
t Tap the [YES] button.
y The bag empties during manual dispensing.
y The message “Tank level too low” appears.
t Confirm the message with the [l] button.
y [FILL BAG] appears on the dispensing screen.
t Tap the [START] button.
j
i
8
5l
3l
0.055 μS/cm c
1l
FILL BAG
Dispense Care
Fill bag
21.3 °C
START
t If the bag is empty before dispensing, e.g. because ultrapure water was
dispensed manually:
y The message [FILL BAG] appears on the dispensing screen.
t Tap the [START] button.
7.4.2 Starting Manual Filling in the Menu
If the bag contains water: Bag filling must be initiated using the menu. To do this:
Procedure
t Tap the
[Fill bag] symbol.
Operating Instructions arium® mini plus | arium® mini | arium® mini essential 49
Page 50

Operation
m
m
m
1
Preparing to ll the
bag
Connect the tank lling tube (Inlet) to
the rear of the device as described in
manual.
1
Fill bag
Make sure there is sufcient water to
ll the bag. Tap “START” to begin lling
the bag.
Fill bag
20 %
OK
w
y The dialog box “Fill bag” (Step 1) appears.
t Check whether the tank filling tubing is connected to the “Inlet” connection.
t If required: Connect the tank filling tubing.
t NOTICE Insufficient water quality possible due to contaminated tank filling
tubing! Check the tank filling tubing for contamination.
t If required: Change tank filling tubing and bag.
t Tap the [OK] button.
y The dialog box “Fill bag” (Step 2) appears.
t NOTICE Device functions can be impaired by air intake! If there is insufficient
water during the filling process: Air is drawn into the system. The air in the
system can impair correct functioning of the device. Prepare a vessel with
pretreated water (at least 5 liters).
t Place the tank filling tubing into the container and secure it so that its opening
is completely submerged during filling.
t Tap the [START] button.
y The bag is filled with water. Progress is displayed as a percentage.
t NOTICE Device functions can be impaired by air intake! If there is insufficient
water during the filling process: Air is drawn into the system. The air in the
system can impair correct functioning of the device.
t If there is insufficient water in the container: Cancel the filling process
prematurely and fill the container with pretreated water.
t To cancel the filling process prematurely:
t Tap the [x] button.
y The dialog box “Fill bag” (Step 2) appears.
t Carry out filling as described above again.
1
Filling nished
Remove the tank lling tube (Inlet) on the
rear of the device.
OK
y When filling is complete, the dialog box “Filling finished” appears.
t Check that the free end of the tank filling tubing is secured.
t If required: Remove the tank filling tubing from the “Inlet” connection
at the rear of the device and keep it in a safe place.
t Confirm the bag filling process with the [OK] button.
y The display changes to the dispensing screen.
7.5 Activating or Deactivating Standby Mode
If no water is dispensed for a long time, the device automatically switches to
standby mode. This ensures more economical and ecological operation. In standby
mode, the pre-stage is no longer active and ultrapure water is no longer in
circulation. Standby mode can also be activated manually.
If the device is manually switched into standby mode while the bag is being
automatically filled, a prompt for further action appears. The filling of the bag can
be canceled immediately, which puts the device in standby mode. If filling is
continued, the device will automatically switch to standby mode.
7.5.1 Automatic ECO Mode
In addition to standby mode, the device also features an ECO function. One minute
after the last operation, recirculation of ultrapure water is stopped and the display
darkens. After another 15 minutes without touching the display, the device
automatically switches to standby mode.
50 Operating Instructions arium® mini plus | arium® mini | arium® mini essential
Page 51

j
k
j
k
;
i
Operation
Procedure
t To activate standby mode: Tap the [j] button.
y The display darkens. The [j] button remains visibly backlit.
Dispense Care
Fill bag
t To deactivate standby mode: Tap the [j] button.
y The start screen appears. When system startup is complete, the display returns to
the dispensing screen.
j
Dispense Care
i
Fill bag
Settings
Language
Date and time
Information
Displayed values
Ultrapure water limit value
7.6 Changing System Settings
The system settings for the device, e.g. date, time, displayed values, can be changed
in the “Settings” menu.
Procedure
t Tap the [i] button.
y The “Settings” menu appears.
t Configure desired settings (possible settings, see parameter list Chapter “4.9
Parameters of the “Settings” Menu,” page 25).
Operating Instructions arium® mini plus | arium® mini | arium® mini essential 51
Page 52

Operation
m
m
m
l
1
Volume adjustment
Place a suitable vessel (1l) under
the dispensing unit.
7.7 Performing Volume Adjustment
To dispense the most accurate amount of ultrapure water, the flow rate sensor of
the device can be readjusted.
For this purpose, a sample volume of approximately one half liter is dispensed. The
actual volume of the extracted sample volume is measured and transmitted to the
device. This sample volume is used as a reference for the volume dispense function.
Procedure
t Tap the menu item [Volume adjustment].
y The dialog box “Volume adjustment” appears.
t Place a graduated measuring cup or graduated cylinder with a capacity of at
least 1 liter under the water outlet.
t Tap the [START] button.
w
1
1
Water dispense
60 %
Water volume
Enter the volume of water in the vessel.
Adjustment nished
Volume adjustment nished successfully.
y The dialog box “Water dispense” appears. Dispensing progress is displayed as a
percentage.
y When 100% is reached, dispensing will stop automatically.
y The dialog box “Water volume” appears.
Use the Weight of the Sample Volume to Determine the Volume
If no graduated measuring cup or graduated cylinder is available, the weight of the
sample volume can be used as an alternative for determination of the actual volume.
Procedure
t Determine the weight of the sample volume.
t Convert the weight of the sample volume into a liter value.
t Enter the value into the device in liters.
t To enter the actual volume dispensed:
t Tap the [t] button.
t Read and enter the value for the sample volume in liters.
y The dialog box “Adjustment finished” appears.
t Confirm the procedure with the [l] button.
52 Operating Instructions arium® mini plus | arium® mini | arium® mini essential
Page 53

Cleaning and Maintenance
8 Cleaning and Maintenance
8.1 Cleaning
8.1.1 Cleaning the Display
Procedure
t To avoid uncontrolled changes to the settings of the device:
Activate standby mode (see Chapter 7.5, page 50).
t Wipe the display gently with a soft, dry cloth.
t Deactivate standby mode (see Chapter 7.5, page 50).
8.1.2 Cleaning the Device Housing
CAUTION
Danger of injury caused by electric current!
When cleaning the device and its components while they are connected
to the power supply, there is a risk of electric shock.
t Always disconnect the device from the AC power before cleaning.
NOTICE
The electronic equipment could be damaged by improper cleaning!
Liquids or dust can damage the device or the power supply.
t Never open the power supply or the right side of the device housing.
t Make sure that no liquids or dust get into the device or the AC adapter.
NOTICE
Damage to the device surfaces!
Aggressive cleaning agents may damage device surfaces.
t Never use cleaning agents that contain solvents, acetone or abrasive ingredients.
Procedure
t Disconnect the device from the power supply.
t Wipe the housing of the device with a damp cloth.
t If installed components must be cleaned: Remove the front cover and the left
side cover and wipe down the installed components with a damp cloth.
t Dry the device with a soft cloth.
Operating Instructions arium® mini plus | arium® mini | arium® mini essential 53
Page 54

Cleaning and Maintenance
j
i
k
;
8.2 Maintenance Schedule
Depending on the volume of water dispensed, it may be necessary to change the
consumables more often than specified in the maintenance schedule. If, for example,
sterile water is required, the final filter must be replaced regularly.
It is advisable to replace different consumables in the same maintenance step. This
saves time and water. We recommend that you make a sensible plan for replacing
consumables.
Interval Component Task Chapter, page
12 months UV lamp (optional) Changing the UV Bulb 8.5.3, page 58
Max. 6 months (depending on the volume
of water dispensed)
6 months
(only arium
6 months (only arium
1 – 24 weeks (depending on the application)
1 – 13 weeks (depending on the application) Ultrafilter (final filter) Change final filter 8.5.6, page 62
®
mini plus or arium® mini)
®
mini plus) Pretreatment cartridge Replace the pretreatment cartridge 8.5.3, page 58
Ultrapure water cartridge
(Scientific Pack)
Bag Replacing the Bag 8.5.2, page 56
Sterile filter (final filter) Change final filter 8.5.6, page 62
Replace ultrapure water cartridge 8.5.4, page 59
Dispense Care
Fill bag
Care
Reminder
Change material
Final lter reminder
Depressurization
Ventilation
8.3 Opening the “Care” Menu
The “Care” menu contains all the steps for the care and maintenance work.
Procedure
t Tap the
y The “Care” menu appears. The following tasks can be carried out.
Possible device tasks Chapter, page
Display reminders 8.4, page 55
Replace consumables 8.5, page 55
Enable, disable or configure reminders for
replacing final filters
Manual depressurization 8.7, page 63
Carry out venting 8.8, page 64
[Care] symbol in the menu.
8.6, page 63
54 Operating Instructions arium® mini plus | arium® mini | arium® mini essential
Page 55

>
Reminder
m
>
Bag: 01.07.2016
Pretreatment cartridge: 01.07.2016
Ultrapure water cartridge: 01.07.2016
UV lamp: 01.02.2017
Sterile nal lter: 01.04.2016
Cleaning and Maintenance
8.4 Displaying Reminders
Reminders to replace certain consumables are automatically displayed as warning
messages (see Chapter 9.2, page 68). Pending consumables replacements can be
viewed at a glance.
All reminders are automatically updated after the consumable has been replaced.
Procedure
t Tap the menu item [
y The date for the next required replacement is displayed for the bag, the
pretreatment and ultrapure water cartridge, the UV lamp and the final filter.
Reminder] in the “Care” menu.
8.5 Replacing Consumables
Change material
Bag
Pretreatment cartridge
Ultrapure water cartridge
UV lamp
Sterile lter
Change material
>
Bag
>
Pretreatment cartridge
>
Ultrapure water cartridge
UV lamp
Sterile lter
8.5.1 Selecting Consumables for Replacement
Consumable replacement must be set using the display. To do this, you must define
which consumables are to be replaced in the menu “Replace consumable”.
1 or more consumables can be selected.
If several consumables are selected: The wizard guides you through the replacement
of the individual consumables. The individual steps are shown on the display.
Procedure
t Tap the menu item [
y The “Change material” menu appears. The consumables that can be changed
are indicated, e.g. bag, pretreatment cartridge.
t Select the desired consumables. To do this, tap on the menu items for the
consumables, e.g. [Bag], [Pretreatment cartridge] and [Ultrapure water cartridge].
y The selected menu items are highlighted and marked with a checkmark.
t Confirm the selection of consumables with the [l] button.
y If several consumables are selected: The wizard guides you through all
consumable replacement and work steps.
Change material] in the “Care” menu.
Operating Instructions arium® mini plus | arium® mini | arium® mini essential 55
Page 56

Cleaning and Maintenance
m
1
Drain the bag
Open the tank outlet (Bag Outlet) at the
rear of the device.
OK
8.5.2 Replacing Bag (only arium® mini plus or arium® mini)
Draining the Bag
Requirements
− In the “Change material” menu, the menu item [
− The “Empty bag” dialog box appears.
Procedure
t Check whether the tank outlet tubing is connected to the “Bag Outlet” connection.
t If required: Connect the tank outlet tubing.
t Guide the tank outlet tubing into a suitable container.
t In order to empty the bag completely: Place the container underneath the device.
t Open the ball cock of the tank outlet tubing.
y Pure water flows out of the bag.
t When the bag is empty: Confirm the emptying of the bag with the [
y The dialog box “Change bag” appears.
Bag] is activated.
OK] button.
1
Bag replacement
Remove the left cover of device. Insert
the empty bag as described in the
manual. Put the left cover back on.
OK
1
Removing Empty Bag
Procedure
t Remove the left side cover:
2
t Reach behind the side cover and pull the side cover to the side (1).
t Pull the side cover up and off to remove it (2).
t To make it easier to reach the lower connections on the device:
Pull the tray up and remove it from the device.
t Disconnect the gray quick connector on the three device connections
successively.
t Slide the empty bag out of the guide rail and remove it from the device.
56 Operating Instructions arium® mini plus | arium® mini | arium® mini essential
Page 57

Cleaning and Maintenance
Inserting New Bag
Procedure
t NOTICE Danger of damage to the device from improper handling! The bag may
be damaged if forced into the guide rails: The bag can be damaged. Use only
slight pressure when inserting the bag into the guide rail.
t Using the handle, slide the bag into the guide rail in the upper portion of the
device housing. The bag is secure when the reinforcing piece on the carrying
handle is completely engaged in the guide rail.
t Using the quick connector, fasten the upper hose of the bag to the device’s
upper connection.
y The quick connector locks into place with an audible click.
t Fasten the two lower bag hoses to the lower device connections using the
quick connectors.
y The quick connectors lock into place with an audible click.
1
Close bag outlet
Close the tank outlet (Bag Outlet) at the
rear of the device.
OK
t Reinsert the tray. Make sure not to damage the bag.
t Reattach the left side cover of the device.
t Confirm the insertion of the bag with the [
y The dialog box “Close tank outlet” appears.
t Close the ball cock of the tank outlet tubing.
t Confirm that the tank outlet has been closed with the [OK] button.
y If an arium® mini plus is used: The device automatically begins filling the bag.
t If an arium® mini is used: The filling process must be started.
y The dialog box “Fill bag?” appears on the device display.
t To fill the bag: Tap the [YES] button. Manually fill the bag (see Chapter 7.2.5,
page 48).
t To fill the bag at a later point in time: Tap the [NO] button.
OK] button.
Operating Instructions arium® mini plus | arium® mini | arium® mini essential 57
Page 58

Cleaning and Maintenance
1
Remove cover
Please remove the front cover.
8.5.3 Replacing Pretreatment Cartridge (only arium® mini plus)
To replace pretreatment cartridges, the final filter must be removed and the device
depressurized. The pretreatment cartridge is marked with an “R”.
Requirements
− In the “Change material” menu, the menu item [
is activated.
− The dialog box “Remove filter” appears.
Procedure
t Remove the final filter (removal, see Chapter “8.5.6 Changing Final Filter,”
page 62).
y The dialog box “Prepare depress. / Start depressurization” appears.
t Start depressurization (see Chapter 8.7, page 63).
y When depressurization is complete, the dialog box “Remove cover” appears.
t Remove the front cover.
t Confirm removal of the cover with the [OK] button.
Pretreatment cartridge]
1
OK
Changing Cartridge
Replace the pretreatment cartridge (R)
according to the operating instructions.
OK
y The dialog box “Change cartridge” appears. The pretreatment cartridge (R)
can be changed.
t Press the two protruding clamps of the pretreatment cartridge together and
pull the pretreatment cartridge forward and out.
t Confirm removal of the pretreatment cartridge with the [OK] button.
t Insert a new pretreatment cartridge in the device (see Chapter 6.3, page 34).
t Rinse the pretreatment cartridge (see Chapter 6.7, page 40).
y Once the pretreatment cartridge has been rinsed:
The dialog box “Connect filter” appears.
t Connect the final filter (see Chapter 6.9, page 44).
y Replacing the pretreatment cartridge is complete.
58 Operating Instructions arium® mini plus | arium® mini | arium® mini essential
Page 59

1
Remove cover
Please remove the front cover.
Cleaning and Maintenance
8.5.4 Replacing Ultrapure Water Cartridge
To replace the ultrapure water cartridge, the final filter must be removed and the
device depressurized. The ultrapure water cartridge is marked with an “L”.
Requirements
− In the “Change consumable” menu, the menu item [Ultrapure water cartridge]
is activated.
− The dialog box “Remove filter” appears.
Procedure
t Remove the final filter (removal, see Chapter “8.5.6 Changing Final Filter,”
page 62).
y The dialog box “Prepare depress. / Start depressurization” appears.
t Start depressurization (see Chapter 8.7, page 63).
y When depressurization is complete, the dialog box “Remove cover” appears.
t Remove the front cover.
t Confirm removal of the cover with the [OK] button.
1
OK
Changing Cartridge
Change the ultrapure water cartridge (L)
as described in the manual.
OK
y The dialog box “Change cartridge” appears. The ultrapure water cartridge (L)
can be changed.
t Press the two protruding terminals of the ultrapure water cartridge together
and pull the ultrapure water cartridge forward and out.
t Confirm removal of the ultrapure water cartridge with the [OK] button.
t Insert a new ultrapure water cartridge in the device (see Chapter 6.4, page 35).
t Rinse the ultrapure water cartridge (see Chapter 6.8, page 41).
y Once the ultrapure water cartridge has been rinsed:
The dialog box “Connect filter” appears.
t Connect the final filter (see Chapter 6.9, page 44).
y Replacing the ultrapure water cartridge is complete.
Operating Instructions arium® mini plus | arium® mini | arium® mini essential 59
Page 60

Cleaning and Maintenance
1
Remove cover
Please remove the front cover.
OK
8.5.5 Replacing the UV Lamp
The device can be equipped with a UV lamp. When replacing the UV lamp: A suitable
UV lamp must be used (suitability, see Chapter “15 Consumables,” page 77).
The UV lamp is installed under the right-side cartridge holder (pretreatment
cartridge). The pretreatment cartridge is marked with an “R”.
To change the UV lamp, the final filter must be removed and the device depressurized.
®
If an arium
mini plus is used: The pretreatment cartridge must be removed to reach
the UV lamp behind it.
Requirements
− In the “Change material” menu, the menu item [UV lamp] is activated.
− The dialog box “Remove filter” appears.
Procedure
t Remove the final filter (removal, see Chapter “8.5.6 Changing Final Filter,”
page 62).
y The dialog box “Prepare depress. / Start depressurization” appears.
t Start depressurization (see Chapter 8.7, page 63).
y When depressurization is complete, the dialog box “Remove cover” appears.
t Remove the front cover.
t Confirm removal of the cover with the [OK] button.
t If an arium
®
mini plus is used:
y The “Remove the pretreatment cartridge (R) as described in the manual”
dialog box appears.
t Remove the pretreatment cartridge (see Chapter 8.5.3, page 58).
1
y The dialog box “Change UV lamp” appears.
Changing the UV Bulb
Disconnect the device from the power
supply. Change the UV lamp as described
in the manual.
Removing the UV Lamp
CAUTION
Risk of injury from electrical current and UV radiation!
The UV lamp emits UV radiation and may be live.
t Disconnect the device from the power supply before the old UV lamp is removed.
Procedure
t Disconnect the device from the power supply.
y The display goes out. After the power has been restored, the wizard will continue
automatically.
t Squeeze the metal retaining clip on the old UV lamp and pull it forward to
remove it.
t Remove the metal retaining clip from the cable and store it in a safe place, e.g.
on the magnet securing the cover.
60 Operating Instructions arium® mini plus | arium® mini | arium® mini essential
Page 61

Cleaning and Maintenance
t Disconnect the black connector from the old UV lamp.
t Unscrew the black plastic cover of the UV lamp housing. If required:
Use a suitable tool to help you do this.
t Remove the black plastic cover of the UV lamp housing.
t Carefully pull the old UV lamp out of the lamp housing, package it and safely
dispose of it (see Chapter “13 Disposal,” page 71).
Inserting the UV Lamp
NOTICE
Touching UV lamps with your bare fingers will cause them to become defective!
Touching the UV lamp with your bare fingers will leave fingerprints. The fingerprints
can become so hot during operation that the UV lamp is destroyed.
t Never touch the glass of the UV lamp with your bare fingers.
t Only hold the UV lamp where it connects to the device or when wearing gloves.
Procedure
t Carefully unpack the new UV lamp without touching the glass with your fingers.
t Insert the new UV lamp all the way into the lamp housing without exerting
pressure on it.
t Unscrew the black plastic cover of the UV lamp housing by hand.
t Attach the black connector to the UV lamp. The connector only fits in two
orientations. Both orientations allow the UV lamp to function.
t Slide any protruding cable back into the housing.
t Slide the metal retaining clip over the cable and onto the black plastic cover of
the UV lamp housing.
t Insert the closed side of the metal retaining clip into the recess of the black
plastic cover provided.
t Squeeze the open side of the metal retaining clip and insert it into the recesses
provided in the black plastic cover.
y Release the metal retaining clip secures it to the black plastic cover.
t Connect the device to the power supply.
y The wizard continues.
t Follow the instructions on the display, e.g. “Insert the new pretreatment cartridge
(R) as described in the manual”.
Operating Instructions arium® mini plus | arium® mini | arium® mini essential 61
Page 62

Cleaning and Maintenance
m
1
Remove the lter
Remove the nal lter.
OK
8.5.6 Changing Final Filter
Remove final filter
Requirements
− If the menu items [Final filter] or [Ultrafilter] are activated in the “Replace
consumable” menu: The dialog box “Remove filter” appears.
− If the menu items [pretreatment cartridge], [ultrapure water cartridge] or
[UV lamp] are activated in the “Replace consumable” menu: The dialog box
“Remove filter” appears.
Procedure
t Use the tubing removal tool to push and hold the water outlet quick connector up.
y The quick connector is unlocked.
t Pull the final filter out of the quick connector.
t Confirm removal of the final filter with the [
OK] button.
1
Connect lter
Connect the nal lter as described in the
manual.
OK
Connect new final filter
Requirements
− The final filter has been removed.
− The dialog box “Connect filter” appears.
Procedure
y Connect and rinse a new final filter (see Chapter 6.9, page 44 and
Chapter 6.10, page 44).
62 Operating Instructions arium® mini plus | arium® mini | arium® mini essential
Page 63

Final lter reminder
Filter Type
Active
Inactive
Sterile filter
Ultralter
Cleaning and Maintenance
8.6 Enabling, Disabling or Configuring Reminders for Replacing Final Filters
If sterile or endotoxin-free water is constantly required, the final filter must be
replaced regularly. The device can provide a reminder about a pending final filter
replacement.
Procedure
t Tap the menu item [Final filter reminder] in the “Care” menu.
y The dialog box “Final filter reminder” appears.
t Tap the [Active] button.
y Select the installed final filter, e.g. [sterile filter] or [ultrafilter].
Reminder [weeks]Final lter reminder
4
y The currently configured replacement interval appears in the column “Reminder
[weeks]”.
t To change the replacement interval: Tap the [t] button.
y The numeric keypad appears.
t Type the desired replacement interval (in weeks) (required maintenance intervals,
see Chapter “8.2 Maintenance Schedule,” page 54)
t Confirm the entry with the [l] button.
t To activate the reminder: In the dialog box “Final filter reminder”, press the [l]
button.
t If no sterile or endotoxin-free water is required:
t Remove the final filter (see Chapter 8.5.3, page 58).
t To deactivate reminders about replacing the final filter: In the dialog box
“Final filter reminder”, press the [lnactive] button.
1
1
Remove the lter
Remove the nal lter.
OK
Prepare depress.
Place a suitable vessel (1l) under the
dispensing unit.
8.7 Carrying Out Depressurization
The device is under pressure during operation. If the device is taken out of service for
an extended period of time or permanently, the pressure in the device must be let
out manually.
Procedure
t Tap the menu item [Depressurize] in the “Care” menu.
y The dialog box “Remove filter” appears.
t Remove final filter (see Chapter 8.5.3, page 58).
t Confirm removal of the final filter with the [OK] button.
y The dialog box “Prepare depress.” appears.
t Place a vessel (at least 1 liter) under the water outlet. Alternatively,
connect the dispense tube and run the free end to the drain.
t Confirm this preparatory step with the [OK] button.
OK
Operating Instructions arium® mini plus | arium® mini | arium® mini essential 63
Page 64

Cleaning and Maintenance
m
1
Start depressurization
Tap “Start” to begin depressurization.
w
Depressurization
00:20 min
1
Turn off device
Disconnect the device from the power
supply.
y That dialog box “Start depressurization” appears.
t Tap the [START] button.
y The dialog box “Depressurization” appears.
y The device depressurizes. The process takes about half a minute.
t To cancel the depressurization process before it is finished, e.g. if a sufficiently
large vessel is unavailable: Tap the [x] button.
y That dialog box “Start depressurization” appears again.
t Carry out depressurization as described above again.
y When depressurization is complete, the dialog box “Turn off device” appears.
t Disconnect the device from the power supply.
t Pressurization is carried out when the device is switched on again.
1
1
Remove the lter
Remove the sterile nal lter.
OK
Prepare rinsing
Place a suitable vessel (1l) under the
dispensing unit.
8.8 Carrying Out Venting
During venting, the device fills and rinses the ultrapure water cartridge. Air is
removed from the ultrapure water circulation in the process.
Given the following conditions: The ultrapure water circuit must be purged:
− The displayed water quality is fluctuating continuously during operation.
− The device was taken out of service for an extended period.
Procedure
t Tap the menu item [Venting] in the “Care” menu.
y The dialog box “Remove filter” appears.
t Remove the final filter (see Chapter 8.5.3, page 58).
t Confirm removal of the final filter with the [
y The dialog box “Prepare rinsing” appears.
t Place a vessel (at least 1 liter) under the water outlet. Alternatively,
connect the dispense tube and run the free end to the drain.
t Tap the [OK] button.
OK] button.
OK
64 Operating Instructions arium® mini plus | arium® mini | arium® mini essential
Page 65

m
1
m
Fill bag
14%
Fill bag
Make sure there is sufcient water to
ll the bag. Tap “START” to begin lling
the bag.
w
Rinsing
00:30 minutes
Cleaning and Maintenance
t arium® mini plus product water quality:
y If the bag no longer contains a sufficient amount of water or empties during
the rinsing process, the bag is filled automatically.
t When filling is complete, the dialog box “Preparing to rinse” appears: Start
the rinsing process again.
t Only arium® mini:
y If the bag in the no longer contains a sufficient amount of water or empties
during the rinsing process, the dialog box “Fill bag” appears.
t The dialog box “Fill bag” appears: Manually fill the bag (see Chapter 7.2.5,
page 48).
y During the rinse cycle, the remaining rinse time is displayed in minutes.
t To interrupt the rinse cycle:
t Tap the [x] button.
y The dialog box “Start rinsing” appears again.
t To resume the rinse cycle after an interruption: Tap the [START] button.
1
Connect lter
Connect the nal lter as described in the
manual.
OK
y When rinsing is complete, the dialog box “Connect filter” appears.
t Connect the final filter (see Chapter 6.9, page 44).
t Confirm that the final filter has been connected with the [OK] button.
y The display changes to the dispensing screen.
Operating Instructions arium® mini plus | arium® mini | arium® mini essential 65
Page 66

Malfunctions
9 Malfunctions
9.1 Error Messages
If an error message is active, dispensing is canceled and locked automatically.
Error message Fault Cause Correction Chapter, page
Error 0105
Error 0140
Check UV lamp,
replacement may be
needed.
Measured values
are not being
displayed.
The UV lamp is
not recognized.
There is an internal
communications
error.
The UV lamp is not
connected properly
or defective.
Disconnect the device from the AC power
and wait a minute.
Reconnect the device to the AC power.
If the error persists: Contact Sartorius Service.
Check whether the black plug of the
UV lamp is connected correctly.
Remove the UV lamp and check for damage.
If required: Change the UV lamp.
7.1, page 45
8.5.5, page 60
8.5.5, page 60
Error 0150
Check device for
leakage.
Please contact your
service technician.
Error 0160
Front cover is open.
Please put the front
cover back on.
Error 0163
Check proper fit of the
pretreatment cartridge
(R).
Error 0166
Check proper fit of the
ultrapure water
cartridge (L).
The device has
a leak.
Operation of the
device is not
possible.
The pretreatment
cartridge is not
recognized.
The ultrapure
water cartridge
is not detected.
Water has leaked
inside the device.
The front cover is
not properly
attached.
The pretreatment
cartridge has not
been properly
inserted.
The ultrapure water
cartridge has not
been properly
inserted.
If the error persists: Contact Sartorius Service.
Remove the left side cover and check that
the three bag hoses are properly connected
to the device connectors. If required:
Remove the bag and reconnect it.
Drain the tray at the bottom of the device
and check that the connections are tight
during operation.
If the error persists: Contact Sartorius Service.
Correctly attach the front cover to the device.
If the error persists: Contact Sartorius Service.
Press the pretreatment cartridge in firmly
until you hear a distinct clicking sound.
If the error persists:
− Remove the pretreatment cartridge.
− Insert the pretreatment cartridge.
If the error persists: Contact Sartorius Service.
Press the ultrapure water cartridge in firmly
until you hear a distinct clicking sound.
If the error persists:
− Remove the ultrapure water cartridge.
− Insert the ultrapure water cartridge.
If the error persists: Contact Sartorius Service.
8.5.2, page 56
8.5.3, page 58
8.5.4, page 59
66 Operating Instructions arium® mini plus | arium® mini | arium® mini essential
Page 67

Malfunctions
Error message Fault Cause Correction Chapter, page
Error 0180
Please contact your
service technician.
The fill level of
the bag is not
being properly
detected.
The bag is damaged
or improperly
connected.
Remove the left side cover and check the
bag for damage. If required: Change bag.
Check that the three bag hoses are properly
8.5.2, page 56
8.5.2, page 56
connected to the device connectors.
If required: Remove the bag and reconnect it.
Error
The conductivity of
the ultrapure water
is outside of the
measuring range.
Error
The temperature of
the ultrapure water is
outside of measuring
range.
Error
Ultrapure water quality
> XX µS/cm
The conductivity
of the ultrapure
water is outside
of the measuring
range.
The temperature
of the ultrapure
water is outside
of measuring
range.
The limit has
been exceeded
and the
dispensing lock is
preventing
further
dispensing.
The sensor is
defective.
There is air in the
ultrapure water
circulation.
The ultrapure water
cartridge has been
used up.
The temperature of
the ultrapure water
is outside of
measuring range.
There is air in the
ultrapure water
circulation.
The limit has been
configured
incorrectly.
Using the tank outlet tubing connected to
7.2.6, page 48
“Bag Outlet”, let about 4 liters of pure water
out of the bag and check the level change.
If the error persists: Contact Sartorius Service.
Initiate venting. 8.8, page 64
Replace the ultrapure water cartridge. 8.5.4, page 59
To dispense water for testing purposes:
Disable the dispensing lock.
If the error persists: Contact Sartorius Service.
Check whether the ambient temperature
14.2, page 73
complies with the device specifications in
the technical data.
Dispense about 1 liter:
− To dispense water for testing
purposes: Disable the dispensing lock.
− Dispense and discard about 1 liter of
water.
If the error persists: Contact Sartorius Service.
Perform venting. 8.9, page 63
Replace the ultrapure water cartridge. 8.6.3, page 63
To dispense water for testing purposes:
Disable the dispensing lock.
If the error persists: Contact Sartorius Service.
Check the limit. If required:
Configure the limit.
Operating Instructions arium® mini plus | arium® mini | arium® mini essential 67
Page 68

Malfunctions
9.2 Warning Messages
If a warning message is active, water can still be dispensed. The water quality is impaired under certain circumstances.
Warning message Fault Cause Correction Chapter, page
The conductivity
measurement of the RO
water is out of range.
The conductivity of
the ultrapure water
is outside of the
measuring range.
Temperature
measurement of the RO
water is out of range.
The temperature of
the ultrapure water is
outside of measuring
range.
RO water quality
> XX µS/cm
Ultrapure water quality
> XX µS/cm
RO water temperature
> XX °C
Ultrapure water
temperature > XX °C
The conductivity
of the pure water
cannot be
determined.
The conductivity
of the ultrapure
water cannot be
determined.
The temperature
of the pure water
cannot be
determined.
The temperature
of the ultrapure
water cannot be
determined.
The limit has
been exceeded.
The limit has
been exceeded.
The limit has
been exceeded.
The limit has
been exceeded.
The quality of the feed
water is insufficient.
The pretreatment
cartridge has been
used up.
There is air in the
ultrapure water
circulation.
The ultrapure water
cartridge has been
used up.
The temperature of the
pure water is outside of
measuring range.
The temperature of the
ultrapure water is
outside of measuring
range.
The quality of the pure
water is insufficient.
The pretreatment
cartridge has been
used up.
There is air in the
ultrapure water
circulation.
The limit has been
configured incorrectly.
The temperature of the
feed water is too high
or too low.
The ambient
temperature of the
device is too high or
too low.
Check whether the quality of the feed
water complies with the device
specifications in the technical data.
Replace the pretreatment cartridge. 8.5.3, page 58
If the error persists:
Contact Sartorius Service.
Perform venting. 8.8, page 64
Replace the ultrapure water cartridge. 8.5.4, page 59
If the error persists:
Contact Sartorius Service.
Check whether the temperature of the
feed water complies with the device
specifications in the technical data.
Check whether the ambient
temperature complies with the device
specifications in the technical data.
If the error persists:
Contact Sartorius Service.
Check whether the ambient
temperature complies with the device
specifications in the technical data.
Dispense and discard about 1 liter of
water.
If the error persists:
Contact Sartorius Service.
Check whether the quality of the
feed water complies with the device
specifications in the technical data.
Replace the pretreatment cartridge. 8.5.3, page 58
Perform venting. 8.8, page 64
Replace the ultrapure water cartridge. 8.5.4, page 59
Check the limit. If required:
Configure the limit.
Check whether the temperature of the
feed water complies with the device
specifications in the technical data.
Check whether the ambient
temperature complies with the device
specifications in the technical data.
Dispense and discard about 1 liter of
water.
14.6, page 75
14.6, page 75
14.2, page 73
14.2, page 73
14.6, page 75
14.6, page 75
14.2, page 73
68 Operating Instructions arium® mini plus | arium® mini | arium® mini essential
Page 69

Malfunctions
Warning message Fault Cause Correction Chapter, page
Replacement of the
pretreatment cartridge
(R) is required.
The pretreatment
cartridge needs
to be replaced.
The replacement
interval of the
pretreatment cartridge
Replace the pretreatment cartridge. 8.5.3, page 58
has expired.
Replacement of the
ultrapure water
cartridge (L) is required.
Replacement of the bag
is required.
The ultrapure
water cartridge
needs to be
replaced.
The bag needs
to be replaced.
The replacement
interval of the ultrapure
water cartridge has
expired.
The replacement
interval of the bag has
Replace the ultrapure water cartridge. 8.5.4, page 59
Replace the bag. 8.5.2, page 56
expired.
Replacement of the
UV lamp is required.
Replacement of the
sterile final filter is
required.
Sartorius maintenance
is required.
The UV lamp
needs to be
replaced.
The sterile final
filter needs to be
replaced.
Maintenance
service must be
performed.
The replacement
interval of the UV lamp
has expired.
The replacement
interval of the sterile
final filter has expired.
The maintenance
service interval has
expired.
Change UV lamp. 8.5.5, page 60
Replace the final filter. 8.5.3, page 58
Contact Sartorius Service.
9.3 Additional Faults
Fault Cause Correction Chapter, page
The device unexpectedly stops dispensing.
The bag is empty. Check the level of the bag on the display.
Remove the left cover and check the fill
level of the bag. If required: Manually fill
the bag (only arium
®
mini).
Check that the feed water tubing has been
correctly connected.
There is no feed water is connected. Connect the feed water tubing or tank
filling tubing.
The final filter is clogged or contains air. If the final filter is attached and no water
can be dispensed:
− Rinse the final filter.
− Vent the final filter.
− If the error persists: Replace the final
filter.
If the final filter has been removed and no
water can be dispensed: Contact Sartorius
Service.
7.3, page 48
6.6.1, page 38
6.6, page 38
6.10, page 44
8.8, page 64
8.5.3, page 58
Operating Instructions arium® mini plus | arium® mini | arium® mini essential 69
Page 70

Storage and Shipping
10 Storage and Shipping
10.1 Storage
Procedure
t If the device is in operation:
t Decommission the device.
t Clean the device.
t Store the device according to the ambient conditions
(see Chapter “14.2 Ambient Conditions,” page 73).
10.2 Returning Device and Parts
You can send defective devices or parts back to Sartorius. Returned devices
must be clean, decontaminated and properly packed.
Transport damage as well as measures for subsequent cleaning and disinfection
of the device or parts by Sartorius shall be charged to sender.
WARNING
Risk of injury due to contaminated equipment!
Devices contaminated with hazardous materials (NBC contamination) will not be
accepted for repair or disposal.
t Observe the information on decontamination (see Chapter 13.1, page 71).
Procedure
t Decommission the device.
t Contact Sartorius Service for instructions on how to return equipment or parts
(please refer to our website at www.sartorius.com for return instructions).
t Pack the device and its parts properly for return.
11 Decommissioning
Requirement
Operation has been ended correctly.
Procedure
t Start depressurization (see Chapter 8.7, page 63)
t Disconnect the device from power.
t Disconnect the device from the supply lines. Remove the consumables
being used.
t Disconnect any attached components from the device.
t Clean the device (see Chapter 8, page 53).
70 Operating Instructions arium® mini plus | arium® mini | arium® mini essential
Page 71

Transport
12 Transport
12.1 Transporting the Device
Requirements
The device has been taken out of operation.
Procedure
t NOTICE Equipment damage due to improper transport! If the device is lifted
where there are loose components, it may fall and be seriously damaged.
t Never lift the device by the two side covers for transport.
t Grip the front of the device under the display and the recess for the power
supply at the back of the device and lift carefully.
t Grip the front of the device under the display and the recess for the power
supply at the back of the device and lift carefully.
13 Disposal
13.1 Information on Decontamination
The device does not contain any hazardous materials that would necessitate special
disposal measures.
If the device has come into contact with hazardous substances: Measures must be
carried out to properly decontaminate and declare such devices. The operator is
responsible for adhering to local legislation on the proper declaration of transport
and disposal and the proper disposal of the device.
WARNING
Risk of injury due to contaminated equipment!
Devices contaminated with hazardous materials (NBC contamination) will not be
accepted by Sartorius for repair or disposal.
Operating Instructions arium® mini plus | arium® mini | arium® mini essential 71
Page 72

Disposal
13.2 Disposing of Device and Parts
13.2.1 Information on Disposal
The device and its accessories do not belong in regular household waste, since they
are made of high-grade materials that can be recycled and reused. All parts must be
disposed of properly by disposal facilities.
Batteries are installed in the device. Batteries do not belong in regular household
waste, since they are made of high-grade materials that can be recycled and reused.
Batteries must be disposed of properly by disposal facilities.
The packaging is made of environmentally friendly materials that can be used as
secondary raw materials.
The consumables are designed and intended for single-use.
Hazardous Substances
The UV lamp contains mercury. The UV lamp must be delivered to an approved
disposal center for hazardous substances.
13.2.2 Disposal
Requirements
If the device has come into contact with hazardous substances: The device and
consumables have been decontaminated.
Procedure
t Remove the UV lamp from the device (see Chapter “8.5.5 Replacing the UV
Lamp,” page 60).
t Deliver the UV lamp to an approved disposal center for hazardous substances.
t Dispose of the device. Follow the disposal instructions on our website (www.
sartorius.com). Inform the disposal facility that batteries are installed in the
device.
t Dispose of the packaging in accordance with local government regulations.
t Dispose of the consumables in accordance with local government regulations.
72 Operating Instructions arium® mini plus | arium® mini | arium® mini essential
Page 73

Technical Specifications
14 Technical Specifications
14.1 Power Supply
Unit Value
Sartorius power supply, Model 1000018304
Primary
Voltage V~ 100 - 240 (±10%)
Frequency Hz 50 to 60
Current, max. A 2.0
Secondary
Voltage V= +24 (<5%)
Current, max. A 6.25
Short circuit protection Electronic
Protection class according to DIN EN/IEC 60950-1 I
Operating height according to DIN EN/IEC 60529 m above
sea level
Power supply connection cable
Connection plug according to
DIN EN/IEC 60320-1/C14
Connector according to DIN EN/IEC 60320-1/C14 3-pin
Other data See power supply label
Device
Power supply Only via Sartorius power supply 1000018304
Input supply voltage V
Current consumption, max. A 3.0
DC
Up to 3000
Country-specific, 3-pin, two-sided plug
+24 (±10%)
14.2 Ambient Conditions
Unit Value
Environment For indoor use only
Storage and shipping temperature °C +5 to +45
Operating temperature °C +2 to +35
Operating height m above
sea level
Relative humidity % 40 to 80
Operating Instructions arium® mini plus | arium® mini 73
Up to 3000
Page 74

Technical Specifications
14.3 Safety of Electrical Equipment
Unit Value
Safety requirements according to DIN EN/IEC 61010-1
Safety requirements for electrical equipment for
measurement, control and laboratory use -
Part 1: General requirements
14.4 Electromagnetic Compatibility
Unit Value
EMC requirements according to DIN EN 61326-1
Interference resistance Suitable for use in industrial areas
Interference emission Class B: Suitable for use in residential areas and areas that
Electrical equipment for measurement, control and laboratory
use – EMC requirements – Part 1: General requirements
(IEC 61326-1:2012)
(Table 2 of the standard)
are connected to a low voltage network that (also) supplies
residential buildings.
14.5 Product Water Quality
14.5.1 arium® mini plus
Unit Value (ultrapure water stage) Value (pre-stage)
Water type Ultrapure water ASTM Type 1 Pure water Type 3
Production output
Water dispensing flow rate
Volume-controlled dispensing
Typical conductivity μS/cm 0.055 (compensated to 25 °C
Typical resistance
TOC content
Microorganism content
Particle content > 0.2 μm
Typical ion retention % –
Retention of dissolved organic substances
(MW > 300 Dalton)
Particle and microorganism retention % – > 99
1
2
2
l/h – 8
l/min
< 1.0
l Between 0.05 and 5
(in 50-ml increments)
5
) < 20
MO × cm
3
(system with UV lamp) ppb < 5 –
4
4
CFU/1.000 ml < 1 < 1
-1
ml
18.2 (compensated to 25 °C
< 1 < 1
5
) < 0.05
% – > 99
without pressure
via ball cock
–
< 98
1
Depending on the feed water pressure, temperature and condition of the RO modules
2
Depending on the hydrostatic pressure, and connected accessories and/or final filter
3
Determined with municipal water (Goettingen), TOC approx. 1000 ppb
4
When using an arium® SterilePlus final filter (Sartopore® 2 150)
5
Measurement output adjustable compensated to 25 °C or uncompensated
74 Operating Instructions arium® mini plus | arium® mini
Page 75

Technical Specifications
14.5.2 arium® mini and arium® mini essential
Unit Value
Water type Ultrapure water ASTM Type 1
Water dispensing flow rate
Volume-controlled dispensing
2
2
l/min
< 1.0
l Between 0.05 and 5 (in 50-ml increments)
Typical conductivity μS/cm 0.055 (compensated to 25 °C
Typical resistance
TOC content
Microorganism content
Particle content > 0.2 μm
2
Depending on the hydrostatic pressure, and connected accessories and/or final filter
3
Determined with municipal water (Goettingen), TOC approx. 1000 ppb
4
When using an arium® SterilePlus final filter (Sartopore® 2 150)
5
Measurement output adjustable compensated to 25 °C or uncompensated
3
(system with UV lamp) ppb < 5
4
4
MO × cm
CFU/1.000 ml < 1
-1
ml
18.2 (compensated to 25 °C
< 1
5
)
5
)
14.6 Feed Water Quality
14.6.1 arium® mini plus
Unit Value
Suitability / type
Inlet pressure bar 0.5 to 6 (recommended: > 2)
Temperature °C 2 to 30
TOC ppb < 2,000
Max. total hardness (max. CaCO
) ppm 360
3
Free chlorine ppm < 4
Iron (total Fe content) ppm < 0.1
Fouling Index (SDI) < 10
Turbidity NTU < 1
pH value 4 to 10
Exclusively potable tap water pursuant to the drinking water
standards of the USA, the European Union or Japan.
Operating Instructions arium® mini plus | arium® mini 75
Page 76

Technical Specifications
14.6.2 arium® mini
Unit Value
Suitability / type Purified water using reverse osmosis,
distillation or deionization
Inlet pressure Depressurized
Temperature °C 2 to 30
Specific conductivity μS/cm < 100 (compensated to 25 °C)
TOC ppb < 50
Turbidity NTU < 1
pH value 4 to 10
14.6.3 arium
®
mini essential
Unit Value
Suitability / type Purified water using reverse osmosis,
distillation or deionization
Inlet pressure 0 to 6 (recommended: > 2)
Temperature °C 2 to 30
Specific conductivity μS/cm < 100 (compensated to 25 °C)
TOC ppb < 50
Turbidity NTU < 1
pH value 4 to 10
14.7 Device Properties
Unit Value
Dimensions (width × height × depth) mm 280 × 509.4 × 530.7
Empty weight, approx. kg 13
Operating weight, approx. kg 23
Water treatment method Adsorption by means of spherical activated carbon, catalyst,
reverse osmosis, ion exchange, optional UV irradiation and
final particle / sterile filtration or removal of endotoxin,
RNAse and DNAse
76 Operating Instructions arium® mini plus | arium® mini
Page 77

Consumables
15 Consumables
This table contains an excerpt of accessories that can be ordered. For information on
other products, contact Sartorius.
Description Order number
Final filter
®
arium
sterile filter SterilePlus (Sartopore® 2 150 capsule) 5441307H4--CE
®
arium
CellPlus ultrafilter H2O-CUF
®
arium
pretreatment cartridge
®
arium
Scientific Pack (
arium® 5-liter bag
®
arium
UV lamp H2O-CEL1
1
Only required for arium® mini plus
2
Only required for arium® mini plus or arium® mini
2
1
H2O-CPR
ultrapure water cartridge) H2O-S-PACK
H2O-CBS-5-S
16 Sartorius Service
The Sartorius Service is at your disposal for queries regarding the device.
For information about the service addresses, services provided or to contact
a local representative, please visit the Sartorius website (www.sartorius.com).
When contacting Sartorius Service with questions about the system or in the
event of malfunctions, be sure to keep the device information—e.g. serial number,
hardware, firmware, configuration—close at hand. This information can be found
on the manufacturer’s ID label and in the “Device Information” menu.
17 Conformity
17.1 EU Declaration of Conformity
The attached Declaration of Conformity hereby confirms compliance of the device
with the directives cited.
17.2 CSA Declaration of Conformity
The attached Declaration of Conformity hereby confirms compliance of the device
with the directives cited.
Operating Instructions arium® mini plus | arium® mini | arium® mini essential 77
Page 78

78 Operating Instructions arium® mini plus | arium® mini | arium® mini essential
Page 79

Issued by:
Certificate of Compliance
Certificate: 70055155 Master Contract: 167555
Project: 70055155 Date Issued: 2016-01-15
Issued to: Sartorius Lab Instruments GmbH & Co. KG
94-108 Weender Landstrasse
Goettingen, 37075
GERMANY
The products listed below are eligible to bear the CSA Mark shown
with adjacent indicators 'C' and 'US' for Canada and US or with adjacent
indicator 'US' for US only or without either indicator for Canada only.
PRODUCTS
CLASS - C872106 - LABORATORY EQUIPMENT-Electrical
CLASS - C872186 - ELECTRICAL EQUIPMENT FOR LABORATORY USE-Certified to US Standards
For details related to rating, size, configuration, etc. reference should be made to the CSA Certification Record or
the descriptive report.
Water Treatment System models:
Nomenclature :
x U: unit is equipped with a ultrapure water treatment loop (including a ultrapure water cartridge, a flow
x M: unit is additionally (related to variant U) equipped with a bag and a pump for filling is the same;
x A: unit is additionally (related to variant M) equipped with a prefilter-RO-module-cartridge combination,
x UV: Unit with suffix UV is additionally (related to H20-Mx-T) equipped with an UV light system
x T: Desktop version
o Arium
o Arium
meter, conductivity cell and a dispense valve);
a pressure regulator and a flushing valve;
®
mini :
Models : H2O-Mx-UV-T and H2O-Mx-T (x = M or U)
®
mini plus :
Models : H2O-MA-UV-T and H2O-MA-T.
Marilyn Laroche
Marilyn Laroche
DQD 507 Rev. 2012-05-22 Page 1
Operating Instructions arium® mini plus | arium® mini | arium® mini essential 79
Page 80

Certificate:
Project: 70055155
2016-01-15
70055155
Rating: 24 Vdc; 3,0 A (max.). For use with the power supply: FSP, Model FSP150-AAAN2 (Sartorius model
Master Contract: 167555
Date Issued:
1000018304): Input: 100-240Vac, 50-60Hz, 2A, Output: 24Vdc, 6.25A.
Notes:
1. The above model has been evaluated for use in a Pollution Degree 2, Installation Category II.
2. Mode of operation: Continuous
3. Environmental Conditions: Normal: +2 to +35 C, 3000m max, 40 to 80% rH non-condensing.
4. The unit has been evaluated for use in ordinary dry locations only and indoors only.
APPLICABLE REQUIREMENTS
CSA Standards
:
CAN/CSA-C22.2 No. 61010-1-12 - Safety Requirements for Electrical Equipment for Measurement,
Control, and Laboratory Use, Part 1: General Requirements
UL Standards:
UL Std. No. 61010-1 (3
rd
Edition) - Safety Requirements for Electrical Equipment for Measurement,
Control, and Laboratory Use - Part 1: General Requirements
CONDITIONS OF ACCEPTABILITY
(1) The main supply cord set provided with the equipment must be an approved type acceptable to the
authorities in the country where the equipment is sold.
(2) Units provided with other than North American Certified power supply cord sets are certified as a
component. Cord length should be not more than 3 m.
(3) Unit is intended to be used with the power supply: FSP, Model FSP150-AAAN2 (Sartorius model
1000018304).
(4) Plug of detachable power supply cord was considered as a disconnect device.
(5) The equipment has been evaluated for use in a Pollution Degree 2 and overvoltage category II
environment and a maximum altitude of 3000 m.
(6) The product was evaluated for maximum ambient temperature 40°C, although maximum operation
ambient temperature for the unit is 35°C.
(7) The user replaceable mains (line) fuse must be an approved type acceptable to the authorities where the
equipment is sold.
(8) Equipment is not to be used with flammable liquids.
(9) Equipment has only been tested for electrical safety. No evaluation of functional safety and performance
characteristics has been conducted.
DQD 507 Rev. 2012-05-22 Page 2
80 Operating Instructions arium® mini plus | arium® mini | arium® mini essential
Page 81

Last updated:
The information and figures contained in these
instructions correspond to the version date
specified below.
Sartorius reserves the right to make changes
to the technology, features, specifications and
design of the equipment without notice.
Masculine or feminine forms are used to
facilitate legibility in these instructions and
always simultaneously denote the other
gender as well.
Copyright notice:
This instruction manual, including all of its
components, is protected by copyright.
Any use beyond the limits of the copyright law
is not permitted without our approval.
This applies in particular to reprinting,
translation and editing irrespective of the type
of media used.
© Sartorius Germany
Sartorius Lab Instruments GmbH & Co. KG
Otto-Brenner-Strasse 20
37079 Goettingen, Germany
Phone:
+49.551.308.0
Fax:
www.sartorius.com
+49.551.308.3289
07 | 2017
Printed in the EU on paper bleached
without chlorine. | NT
Publication No.: WH26014-e170905
 Loading...