

Page 1

Operating Instructions
Entris
Laboratory Balances
98648-019-79
Page 2

Warning | danger symbols used in these instructions:
These notes identify hazards which have a high probability of resulting in
death or serious physical injury if not avoided.
These notes identify hazards that can result in moderate or mild injuries
if not avoided.
These notes identify hazards associated with the risk of material damage.
User Information
2
Explanation of Symbols
The following symbols are used in these
instructions:
t Indicates a required action
y Describes what happens after you have
performed a particular step
Perform steps in the specified order:
1. First action
2. Second action
3. ...
– Indicates an item in a list
Conventions for this User Manual:
– The illustrations in these instructions
are based on “Standard" balances.
Applications Advice | Technical
Support
Addresses for applications advice and
technical support can be found on the
website at:
http://www.sartorius.com
Page 3

3
Contents
User Information. . . . . . . . . . . . . . . . . . 2
Explanation of Symbols . . . . . . . . . . . . . 2
Applications Advice | Technical Support . 2
Contents . . . . . . . . . . . . . . . . . . . . . . . . 3
Intended Use . . . . . . . . . . . . . . . . . . . . . 3
Safety Instructions . . . . . . . . . . . . . . . . 4
Getting Started . . . . . . . . . . . . . . . . . . . 5
Operation . . . . . . . . . . . . . . . . . . . . . . 10
Display and Controls. . . . . . . . . . . . . . . 10
Basic Weighing Function . . . . . . . . . . . 11
Calibration . . . . . . . . . . . . . . . . . . . . . 12
Configuration (Operating Menu). . . . . 15
Functions of the Keys in the Menu . . . . 15
Menu Navigation;
Example: Setting the Language . . . . . . 16
Menu: Structure. . . . . . . . . . . . . . . . . . 17
Menu Settings: Overview . . . . . . . . . . . 18
Application Programs . . . . . . . . . . . . . 23
Counting . . . . . . . . . . . . . . . . . . . . . . . 23
Weighing in Percent . . . . . . . . . . . . . . . 25
Animal Weighing | Averaging . . . . . . . . 27
Toggling Between Weight Units . . . . . . 29
Density Determination . . . . . . . . . . . . . 31
Data Interface. . . . . . . . . . . . . . . . . . . 34
Error Codes . . . . . . . . . . . . . . . . . . . . . 35
Care and Maintenance . . . . . . . . . . . . 36
Disposal. . . . . . . . . . . . . . . . . . . . . . . . 37
Overview . . . . . . . . . . . . . . . . . . . . . . . 38
Specifications. . . . . . . . . . . . . . . . . . . . 38
Accessories. . . . . . . . . . . . . . . . . . . . . . 42
EC Declaration of Conformity . . . . . . . . 45
Intended Use
This high-precision balance is designed to
be used exclusively indoors under normal
atmospheric conditions.
It was developed specifically for the exact
determination of the mass of materials in
liquid, paste, powder, or solid form.
Appropriate containers must be used for
each type of sample material.
Page 4
4
Safety Instructions
Guidelines and General Information
– The balance complies with EU Directives and
standards for electrical safety and electromagnetic compatibility*. Improper use or
handling can, however, result in damage
and | or injury.
Any improper use or operation of the
balance, i.e., that is not consistent with the
instructions, will result in forfeiture of all
claims under the manufacturer's warranty.
– Personnel need to have read and understood
these installation instructions, including the
safety instructions.
– In the event of use in systems and ambient
conditions which have greater safety
requirements, you must observe the
requirements and provisions applicable in
your country.
– Always keep the equipment and balance
freely accessible.
Any installation work or balance operation
that does not conform to the instructions
will result in forfeiture of all claims under the
manufacturer's warranty.
* = see “Specifications"
Danger of explosion
Do not use this equipment in
hazardous areas in which explosive
materials are present.
Make sure that the voltage rating
printed on the AC adaptor is identical
to your local mains voltage.
Installation Instructions
Do not operate the device if the
housing or AC adaptor is damaged.
Immediately disconnect the damaged
device from the power by pulling the
plug.
Do not expose the balance, its power
supply or accessories supplied by
Sartorius to extreme temperatures,
aggressive chemical vapors,
moisture, shock, vibrations or strong
electromagnetic fields.
Observe the conditions of operation
described in the “Technical Data"!
Note on Installation:
The operator shall be solely
responsible for any modifications to
the equipment and for connecting any
cables or equipment not supplied by
Sartorius. Information on operational
quality is available upon request from
Sartorius. Only use original Sartorius
accessories!
Note the IP protection class of
the balance and its power supply!
Do not allow liquid penetration.
The protection class specifies the
suitability of equipment for various
environmental conditions (moisture,
foreign bodies).
Before cleaning the AC adapter or the
balance: Unplug the power cord.
The balance may only be opened
by specialized personnel trained by
Sartorius.
Do not open the AC adaptor.
If glass breaks, there is a risk of injury
posed by cuts on glass edges.
Lay the cables where they pose no risk
of causing someone to trip.
Observe the additional safety and danger
information in the following chapters.
Page 5

5
Getting Started
Storage and Shipping Conditions
– Do not expose the balance to extreme
temperatures, moisture, shocks, blows,
or vibration.
Unpacking the Equipment
t After unpacking the device, check it
immediately for any external damage.
y If you detect any damage, proceed as
directed in the “Care and Maintenance"
chapter, “Safety Inspection" section.
y Save all parts of the original packaging
for any future transportation. During
shipment, please do not leave cables
plugged in!
Equipment Supplied
– Balance
– Weighing pan
– Pan support only for models with
a round weighing pan
– Mains power supply unit
Additional equipment on the following
models:
Entris64-1S, Entris124-1S,
Entris224-1S, Entris64i-1S,
Entris124i-1S, Entris224i-1S
– Sliding panel draft shield
– Shield disk
– Shield plate
– Dust cover
Additional equipment on the following
models:
Entris153-1S, Entris323-1S,
Entris423-1S, Entris623-1S,
Entris153i-1S, Entris323i-1S,
Entris423i-1S, Entris623i-1S
– Round glass draft shield
(with shield plate and cover)
Setup
Choose a location that is not subject
to the following negative influences:
– Heat (heater or direct sunlight)
– Drafts from open windows and doors
– Extreme vibrations during weighing
– Extreme humidity
Conditioning the Balance
Moisture in the air can condense on
cold surfaces whenever the equipment is
moved to a substantially warmer place.
Allow the device to acclimatize
for about 2 hours at room temperature,
leaving it unplugged from the power
supply.
Page 6
Installation
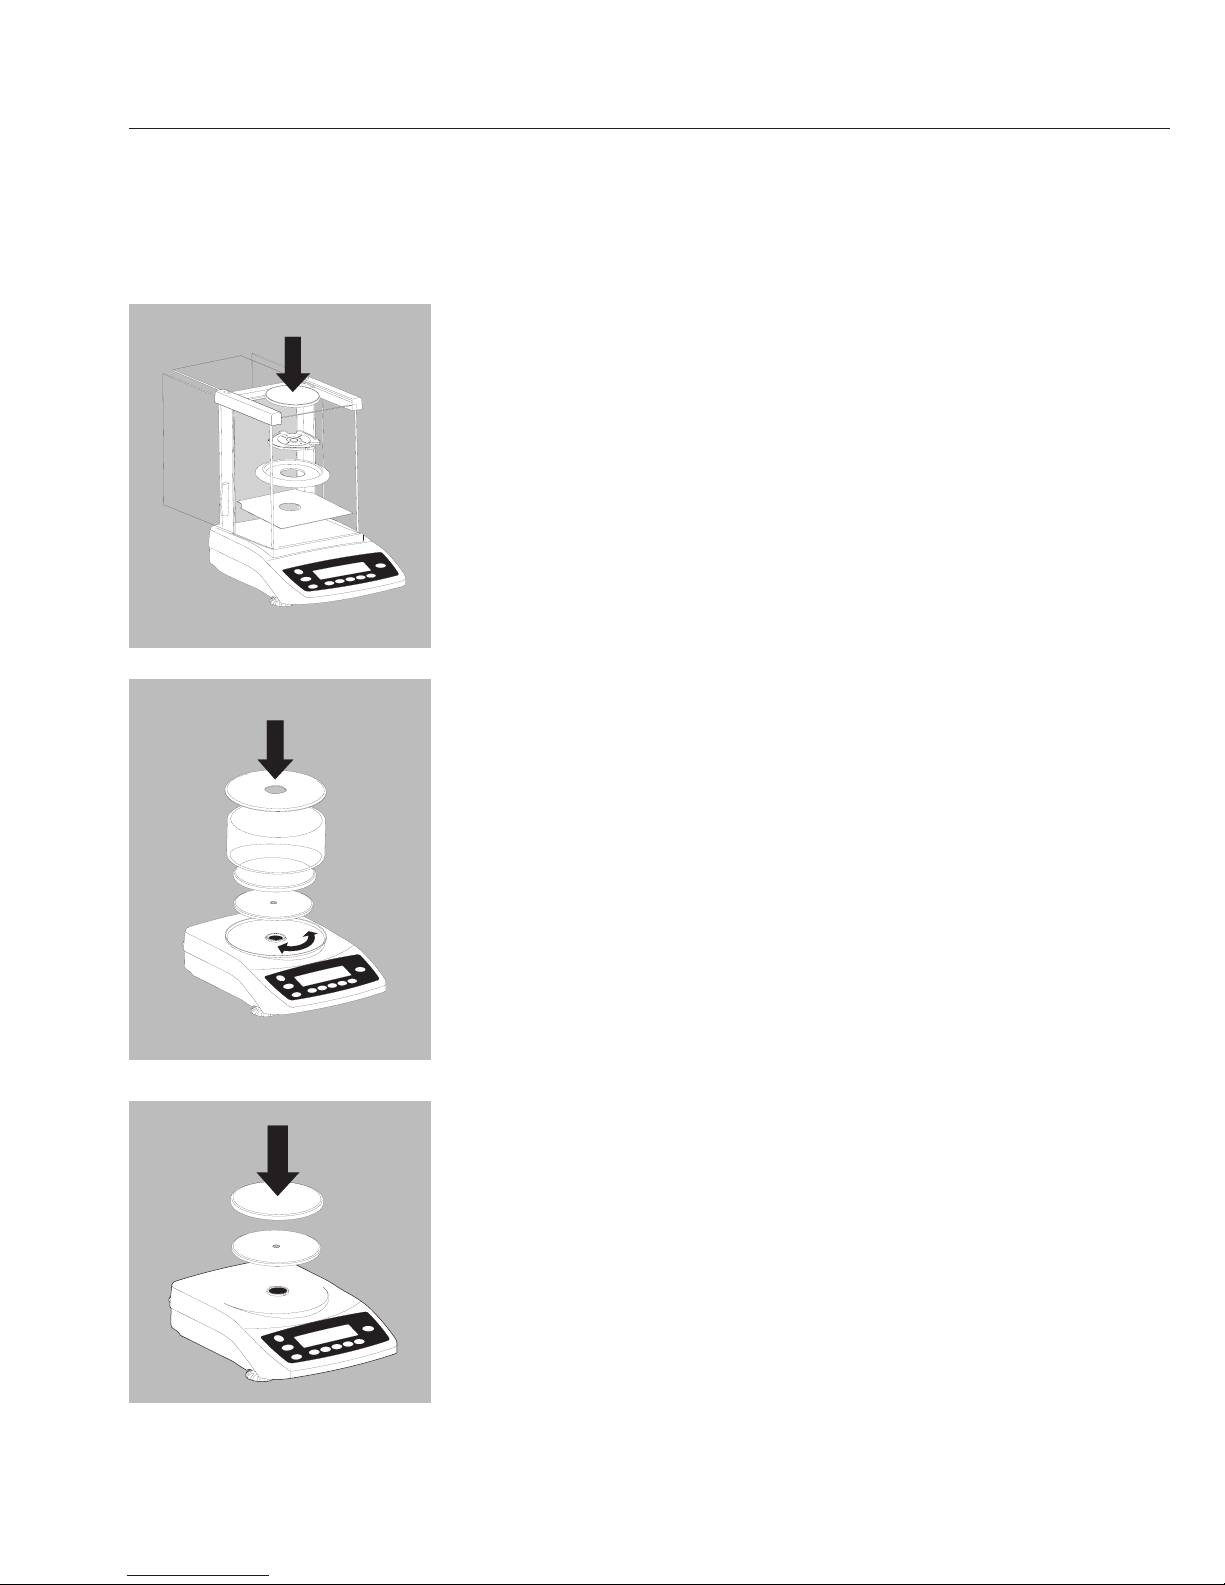
Setting up the Balance
Balances with Sliding Panel Draft Shield
t Place the components listed below inside the
weighing chamber in the order given:
– Shield plate
– Shield disk
– Pan support
– Weighing pan
Balances with Round Glass Draft Shield
t Position the components listed below in the order
given:
– Place lid on top of the balance with the rim facing
upwards and rotate until it is securely in place
– Pan support
– Weighing pan
– Glass cover
– Cover with the rim facing downwards
Balances with a Round Weighing Pan
t Position the components listed below in the order
given:
– Pan support
– Weighing pan
Balances with a Rectangular Weighing Pan
t Place the weighing pan on the balance
6
Page 7
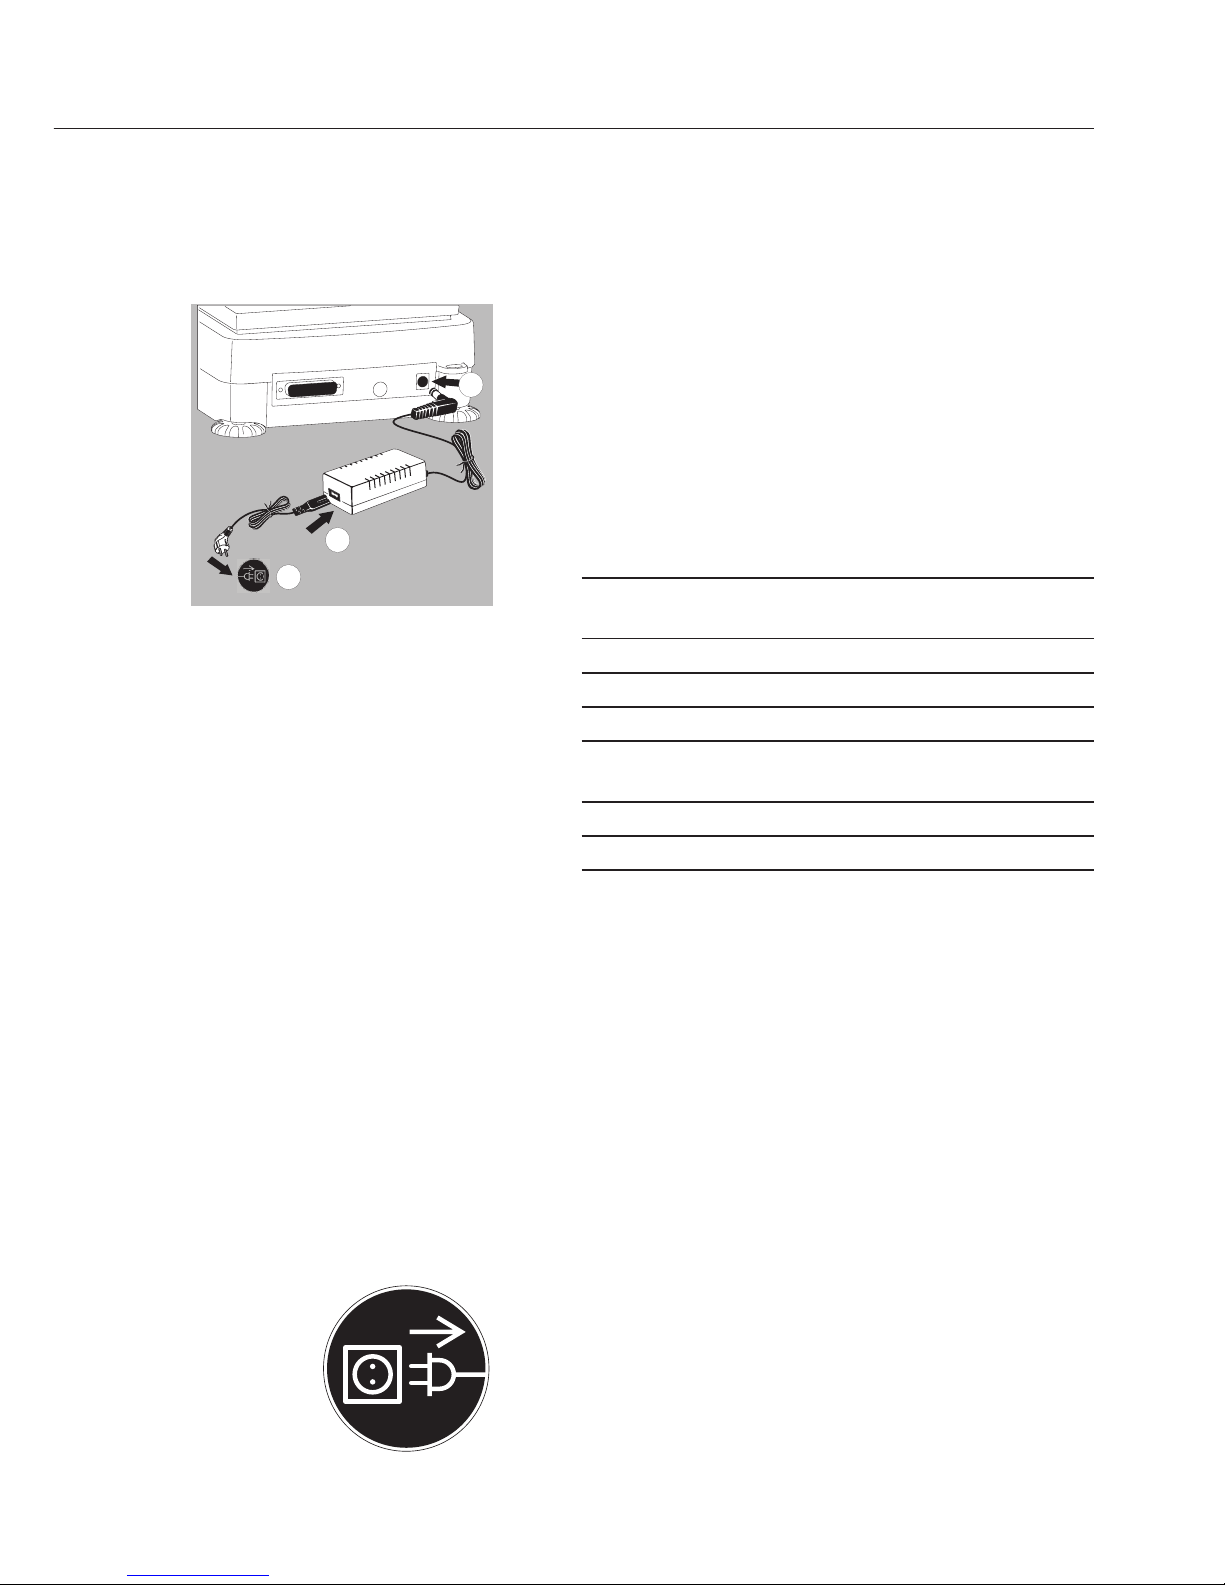
Power Connection | Safety Precautions
– Use only an original AC adapter 6971991
t Insert the right-angle plug into the jack
t Select a country-specific power cable and attach to
the AC adapter
t Connect the device to the power
Mains connecting lead:
Item No. Region | Country
6971953 Europa | EU
(except United Kingdom)
6971954 USA | Canada | China | Japan
6971955 United Kingdom
6971956 Australia, New Zealand
6971957 South Africa
6971964 India
6971998 Brazil
6971999 Argentina
6900931 South Korea
Safety Precautions
Desktop power supply 6971991:
An adaptor rated to Class 2 can be plugged into any
wall outlet with no additional safety precautions
required.
A ground or earth terminal is connected to the
balance housing. The balance housing can be
additionally grounded, if required for certain
functions.
The data port is also galvanically linked to the
balance housing (mass).
Connecting Electronic Peripheral Devices
t Make sure that the balance is unplugged from the
power supply before connecting | disconnecting
a peripheral device (printer or PC) to or from the
interface port.
7
1
3
2
Page 8
Warm-up Time
In order to provide accurate results, the instrument
must warm up for 30 minutes. Only after this time
will the required operating temperature have been
reached.
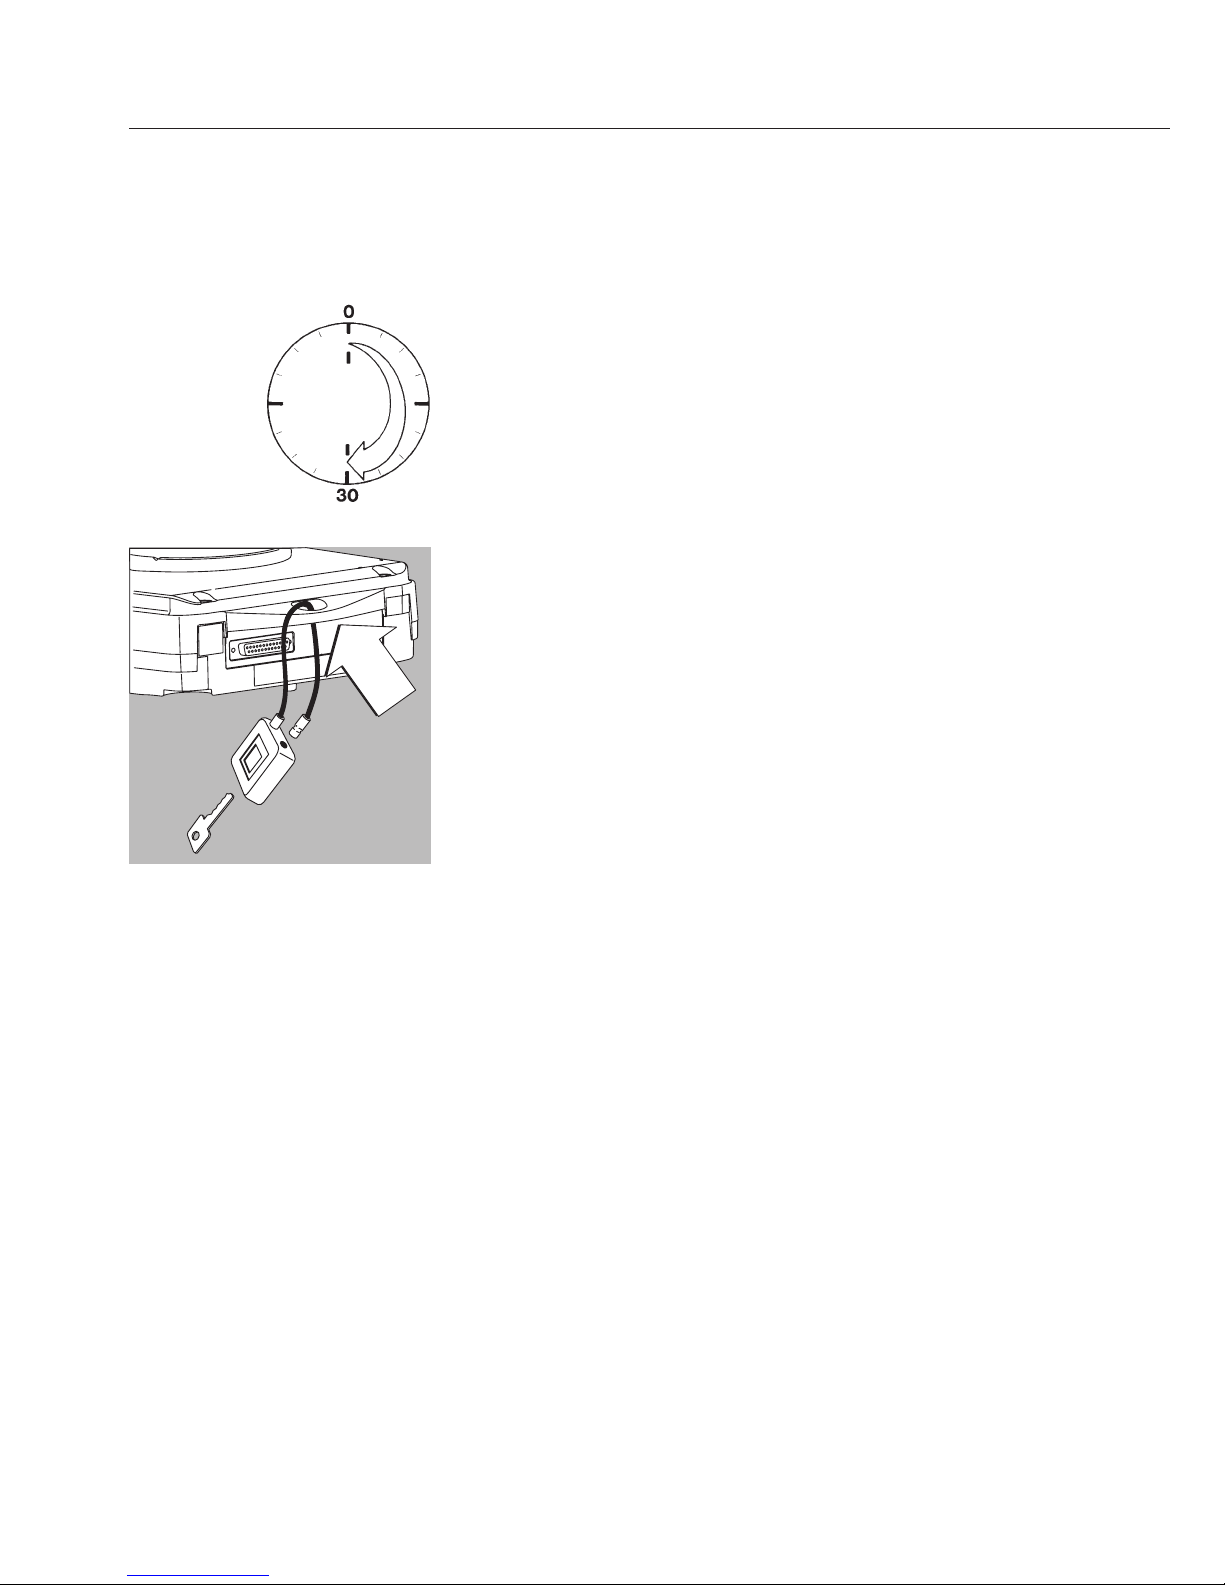
Anti-theft Locking Device
To fasten an anti-theft locking device, use the lug
located on the back of the balance.
t Secure the balance at the place of location,
e.g., with a chain or a lock.
8
Page 9
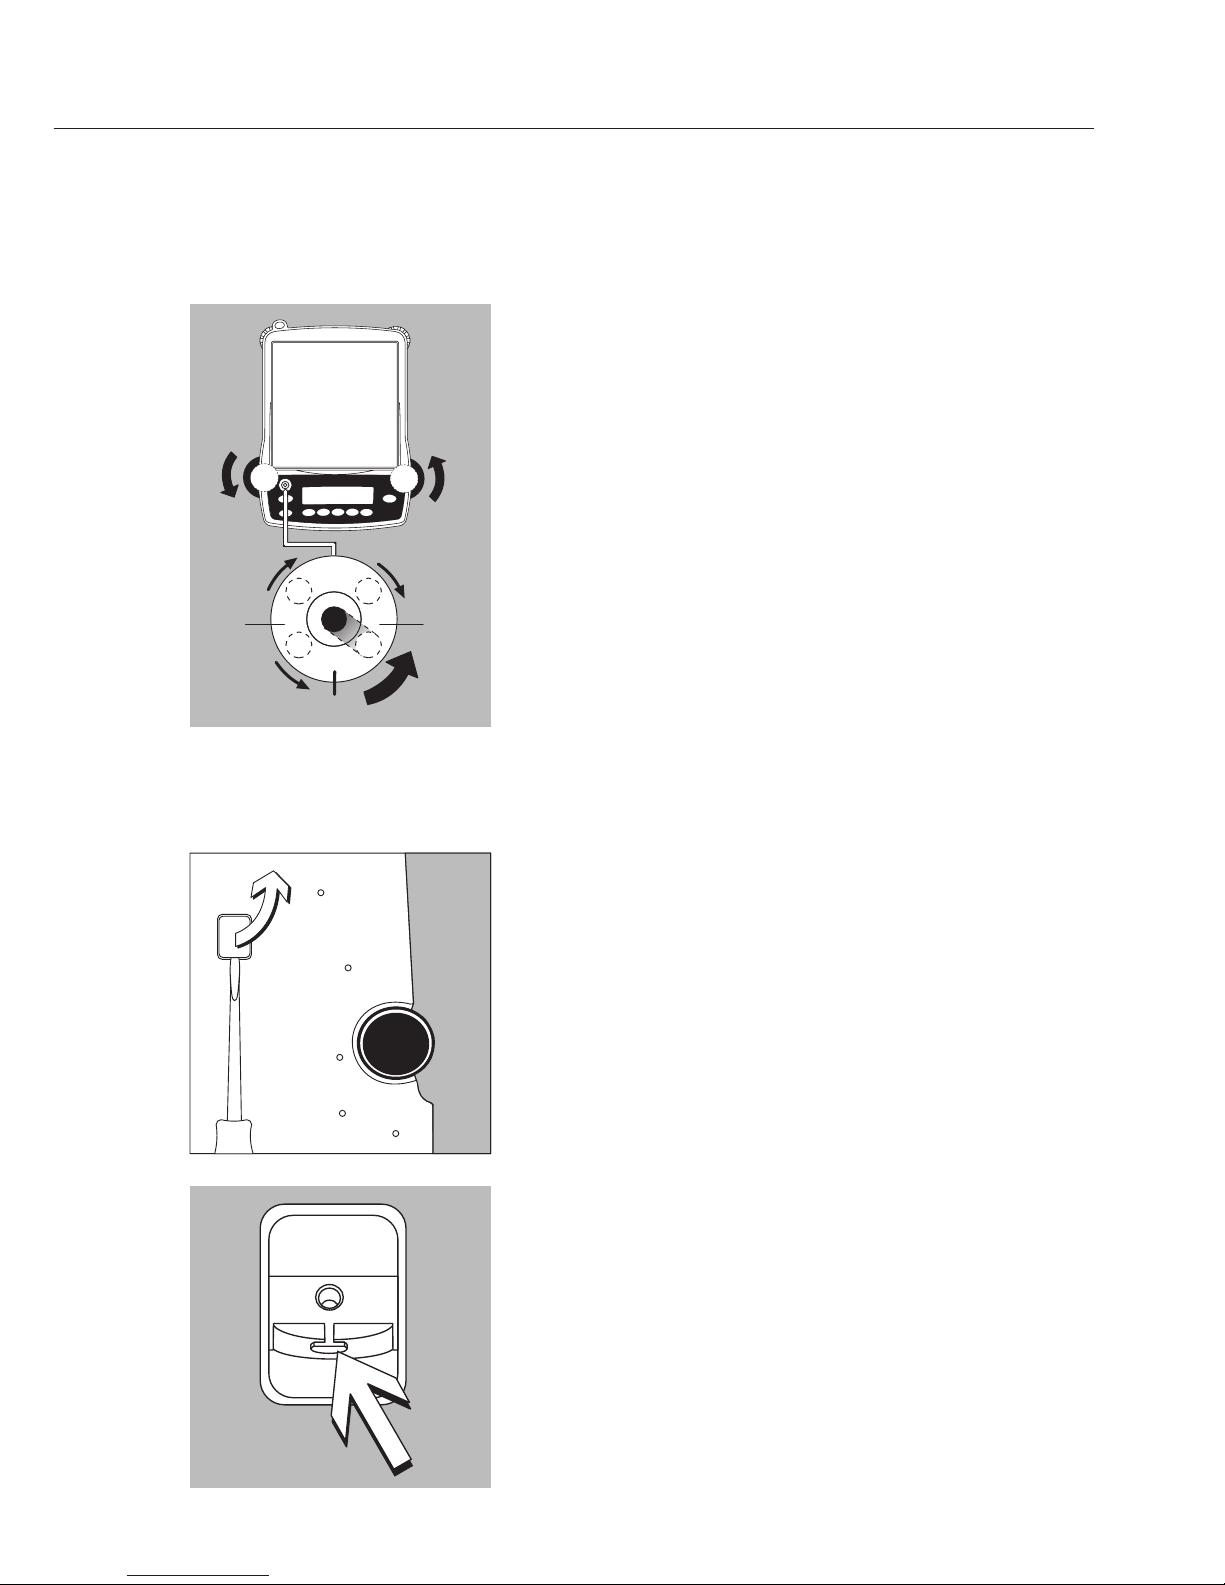
Levelling the Balance
Purpose:
– To compensate for unevenness at the place of
installation
Always level the balance again any time after it has
been moved to a different location. Only the 2 front
feet are used for leveling.
t Screw in both rear support feet (only on models with
a rectangular weighing pan).
t Turn the front levelingfeet as shown in the
illustration until the air bubble is centered within
the circle of the level indicator.
> Normally, several leveling steps are required.
t On models with a rectangular weighing pan:
Screw out both back leveling feet until they touch
the setup surface.
Below-Cell Weighing
A port for a below-cell weighing hook is located on
the bottom of the balance.
y Not permitted for applications in legal metrology.
t Lift cover plate out of the bottom of the balance.
Attention: Place the balance on its side, do not turn
over completely!
t Secure hook 1: Use a wire, for example, to suspend
the sample on the hook.
y Install a draft shield if necessary.
9
R
L
L
R
L
R
1
Page 10

10
Operation
Item Description
1 Weight units
2 Displays the menu level
3 Taring
4 Symbol for “GLP printing mode
active"
5
Symbol for “Printing mode active"
6 Application program active
7 Data output:
Press this key to send readout
values to the built-in data
interface.
8 Calculated-value indicator:
not a weight value
9 Start the application program
10 Symbol: Gross or net
11 Select an application program |
open the operating menu
12 Symbols for active application
(W, Z, L, V, R, A, C)
Item Description
13 Delete (Clear Function)
This key is generally used to
cancel functions:
– Quit application program
– Cancel calibration | adjustment
routine | Exit menu
14 Start calibration | adjustment
routine
15 On | Off
16 Symbol: Calibration | adjustment
function
17 Symbols for “zero range«
(verified models only)
18 Level indicator
19 Weight value displayed in selected
weight unit
Symbol:
<< Exit the operating menu
< One menu level higher
V Scroll throughmenu items
> Next item on current menu level
↵ Select a parameter setting
Overview of Display and Control Panel
Page 11
11
Basic Weighing Function
Features
– Tare the balance
– Printing weights
Preparation
t Switch on the balance:
Press the e key
t Tare the balance, if necessary:
Press the w key
y If necessary, change the configuration
settings:
see the chapter entitled “Configuration"
y If desired, load the factory settings:
see the chapter entitled “Configuration"
Additional Functions:
y Switching off the balance:
Press e
Example
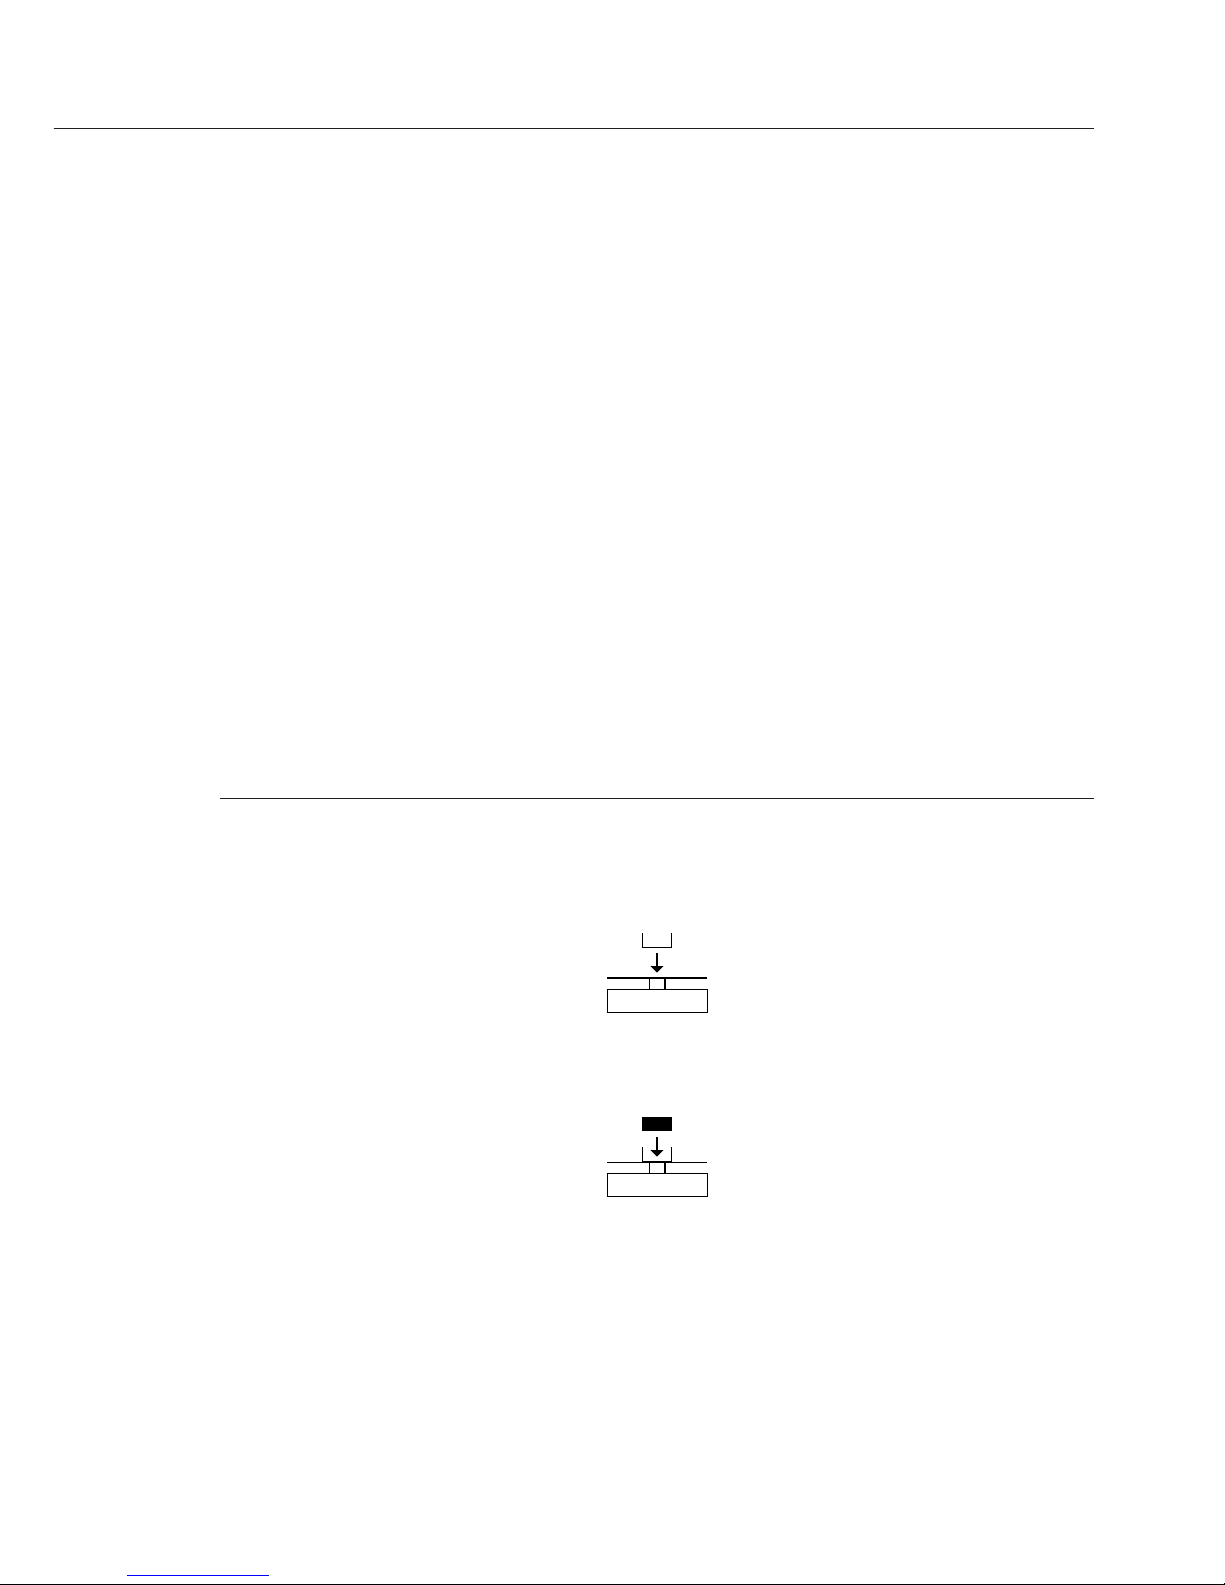
Simple Weighing
Step Press key Display | Printout
1. Switch on the balance
e 0.0 g
Self-test is performed,
followed by automatic
initial tare function.
2. Place container on weighing pan
+ 11.5 g
(in this example 11.5 g).
3. Tare the balance
e 0.0 g
4. Place sample in container + 132.0 g
(in this example: 132 g)
5. Print weight r N + 132.0 g
Page 12

Calibration and Adjustment
Purpose
Calibration is the determination of any
difference between the measured value
displayed and the true weight (mass) of
a sample. Adjustment is the correction
of this difference, or its reduction to
an allowable level within maximum
permissible error limits.
Features
Calibration | adjustment can be
performed only when
– there is no load on the balance
– the balance is tared
– the internal signal is stable
– the weight displayed for the sample on
the balance must not differ from the
nominal weight by more than 2%.
If these conditions are not met, an error
message is displayed “Err 02".
Following calibration | adjustment,
the application program is cleared.
Internal Calibration | Adjustment
Note:
Only for models with the label
Entris...i-1S !
In the operating menu, select
Cal.Just. - cal.int. before beginning.
The built-in motorized calibration
weight located in the housing is applied
and removed automatically for internal
calibration.
t Select calibration | adjustment:
Press Q
> The internal calibration weight is
applied automatically
> The balance is adjusted | calibrated
> The built-in calibration weight is
removed
12
Page 13

Internal Calibration | Adjustment
Note:
Only for models with the label Entris..i-1S !
Set the following parameters:
SETUP - BAL.SCAL.- CAL.Just. - Cal.Int. (Code 1.1. 9. 4)
The built-in motorized calibration weight located in the balance housing is applied and
removed automatically for internal calibration.
Step Key (or instruction) Display
1. Tare the balance
w 0.0 g
2. Start calibration
Q CAL.Int.
The internal calibration weight
is applied automatically.
CAL.RUN.
3. Adjustment carried out
CAL.end
4. The internal weight is
defined automatically
0.0 g
13
Page 14

14
External Calibration
Set the following parameters:
SETUP - BAL.SCAL.- CAL.Just. - Cal.Ext. (Code 1.1. 9. 1)
The required calibration weight is configured at the factory (see “Specifications").
Step Key (or instruction) Display
1. Tare balance
w 0.0 g
2. Start adjustment routine
Q Cal.Ext.
Once you store the zero point
- 5000.0 g
the display prompts for the required
calibration weight (flashing display)
3. Apply the prompted calibration
5000.0 g
weight (in this example 5000 g).
Weight too low:
a minus sign “-" is shown
Weight too high:
a plus sign “+" is shown
The display stops flashing as soon as
the weight value is within the defined
limit.
4. Calibration/adjustment executed;
Cal.end
then the calibration weight
is displayed
+ 5000.0 g
5. Remove the calibration weight
0.0 g
Page 15

15
Configuration (Operating Menu)
You can configure the balance; i.e., adapt it to individual requirements.
Functions of the Keys during Configuration:
Symbol Key Function
V b Scroll through menu items
>
u One menu level lower
(use right cursor to scroll through up to
4 menu levels)
↵ u Confirm menu item
c (Press and hold) Save settings and exit menu
from any position
<<
c At the top level:
Save settings and exit menu:
<
c One menu level higher (left cursor)
Indicates menu level
Page 16

16
Menu Navigation
Example: Setting the Language
Step Key (or instruction) Display
1. Open the menu:
b hold Applic.
Open the menu in weighing mode
2. Scroll upward within themenu level; Repeatedly
Input
b ...
After the last menu code,
the first code is displayed again
languag.
3. Select the next menu level Repeatedly
English
o
(scrolls to the right)
u
5. Change setting: b German
Scroll until the desired setting
is shown
6. Confirm the menu code;
u German
o
"o" indicates the active setting
7. Return to the next higher
c languag.
menulevel
y Set other menu items as desired
b, u
8. Save settings Repeatedly:
and exit menu
c
or
y Exit menu without
saving changes e
> Restart your application
0.0 g
Page 17

Parameter Settings (Overview)
Level 1 Level 2 Level 3 Menu code
Setup Bal.Scal. Ambient conditions 1. 1. 1.
Balance | scale parameters app.filt. Application filter 1. 1. 2.
Stab.rng.Stability range 1. 1. 3.
Taring
Taring 1) 1. 1. 5
Autzer. Auto zero 1. 1. 6
Wt.Unit Basic weight unit 1. 1. 7.
Display Display accuracy 1. 1. 8.
Cal./adj. Function of the Q key 1. 1. 9.
Cal.Unit. weight unit for calibration 1. 1.11.
Interf. Interface Baudrate 1. 5. 1.
Parity Parity 1. 5. 2.
StopBit Number of stop bits 1. 5. 3.
Handshk. Handshake mode 1. 5. 4.
Databit Number of data bits 1. 5. 5.
Dat.Rec. Output: SBI (ASCII) or printout 1. 5. 6.
Prnt.OutSettings for print (manual | automatic) 1. 6. 1.
print function StopAut. Stop automatic printing 1. 6. 2.
Aut.Cycl. Time-dependent autom. printing
1. 6. 3.
Tar./prt. Tare bal./balance after ind. print 1. 6. 4.
Prt.Init. Printout of appl. parameters 1. 6. 5.
Format Line format for printout 1. 6. 6.
extras menu Menu read only | can edit 1. 8. 1.
(Additional functions) Signal Acoustic signal (beep) 1. 8. 2.
Keys (Keypad) 1. 8. 3.
Ext.Key External switch function 1. 8. 4.
On Mode Power-on mode 1. 8. 5.
Backlit Display backlighting 1. 8. 6.
reset menu Factory settings 1. 9. 1.
Applic.ation weigh 2. 1.
programs unit Toggle wt. unit Disp.Dig. Display accuracy 2. 2. 2.
Count.ing Resolut. Resolution 2. 3. 1.
Ref.Updt. Autom. ref. sample updating 2. 3. 2.
Percent Weighing in percent Dec.Plcs Decimal places 2. 4. 1.
AnimalW.eighing Activty. Animal activity 2. 7. 1.
Start 2. 7. 2.
Calc.ulation Method (Operator) 2. 8. 1.
Dec.Plcs Decimal places 2. 8. 2.
Density determination Dec.Plcs Decimal places 2. 9. 1.
Input Input ID no. ID input; max. 7 characters, e.g. as 3. 1.
Inventory no.
Information Version , Ser. No., Model Display software ver., serial no., model 4. 1.|.2.|.3.
Languag. English (factory setting) 5. 1.
(Languag.) Deutsch (German) 5. 2.
Franc.çais (French) 5. 3.
ital.iano (Italian) 5. 4.
Espanol (Spanish) 5. 5.
pycckV|V| (Russian) 5. 6.
Polski (Polish) 5. 7.
Codes Menu shows codes (not texts) 5. 8.
17
Page 18

18
Parameter settings: Overview
ο = Factory setting; √ = User-defined setting
Level 1 Level 2 Level 3 Level 4 Menu code
Setup Bal.Scal. Ambient Very stable 1. 1. 1. 1
Balance conditions ο Stable 1. 1. 1. 2
parameters (Filter Unstabl 1. 1. 1. 3
adaptation) Very unstable 1. 1. 1. 4
App.filt. ο Final.Rd 1. 1. 2. 1
Application filter Filling 1. 1. 2. 2
Stability 1/4 Dig. (digit) 1. 1. 3. 1
range 1/2 Dig. (digit) 1. 1. 3. 2
1 - Digit (digit) 1. 1. 3. 3
ο 2 - Digit (digit) 1. 1. 3. 4
4 - Digit (digit) 1. 1. 3. 5
8 - Digit (digit) 1. 1. 3. 6
Taring w/o stb (W/o stability) 1. 1. 5. 1
Taring ο w/ stab (After stability) 1. 1. 5. 2
Aut.zero Off 1. 1. 6. 1
Auto zero ο On 1. 1. 6. 2
WT.UNIT For list of units, see Chapter 1. 1. 7. 1
Basic weight Toggling between
through unit weight units” 1. 1. 7.23
Disp.Dig. ο all 1. 1. 8. 1
Display Minus 1 1. 1. 8. 2
accuracy divis. 1 1 interval 1. 1. 8. 6
Cal./adj. Cal. ext. External cal./adj. 1. 1. 9. 1
Function of the ο Cal. int Internal cal./adj. 1. 1. 9. 2
of the Q key Blocked Q blocked 1. 1. 3. 3
Cal.Unit Unit ο Grams 1. 1.11. 1
for calibration Kilogr.ams 1. 1.11. 2
weight Pounds 1. 1.11. 3
Page 19

19
Level 1 Level 2 Level 3 Level 4 Menu code
Setup Interf. Baudrate 600 1. 5. 1. 3
Interface ο 1200 1. 5. 1. 4
2400 1. 5. 1. 5
4800 1. 5. 1. 6
9600 1. 5. 1. 7
19200 1. 5. 1. 8
Parity ο Odd 1. 5. 2. 3
Parity Even 1. 5. 2. 4
None 1. 5. 2. 5
StopBit ο 1 stop bit 1. 5. 3. 1
No. of stop bits 2 Bits 1. 5. 3. 2
Handshk. Sftware 1. 5. 4. 1
Handshake ο Hrdware. 1. 5. 4. 2
mode None 1. 5. 4. 3
DataBit ο 7 Bits 1. 5. 5. 1
No. of data bits 8 Bits 1. 5. 5. 2
Dat.Rec. Com- SBI (ASCII) 1. 5. 6. 1
munication mode ο Printer 1. 5. 6. 2
Prnt.Out Print Man. W/o stability 1. 6. 1. 1
Printing fct. (manual | ο Man.With, stability 1. 6. 1. 2
automatic) Aut. W/o stability 1. 6. 1. 3
Aut.With. stability 1. 6. 1. 4
StopAut. Stop ο off Not possible 1. 6. 2. 1
automatic printing
on Use print key r 1. 6. 2. 2
Aut.Cycl. ο EachVal (1 display update) 1. 6. 3. 1
Time-dependent After 2 (2 display updates) 1. 6. 3. 2
autom. printing
Tar./prt. ο off 1. 6. 4. 1
Tare the balance on 1. 6. 4. 2
after individual
printout
Page 20

20
Level 1 Level 2 Level 3 Level 4 Menu code
Setup Prnt.Out Prt.Init. Off 1. 6. 5. 1
Printing fct. Printing applica- ο all parameters 1. 6. 5. 2
tion parameters mainpar.ameters 1. 6. 5. 2
Format Line for-
16. char.(digit not identified) 1. 6. 6. 1
mat for printout ο 22. char.acters (w/ ID) 1. 6. 6. 2
extras menu CanEdit.le 1. 8. 1. 1
(Additional rd.only read only 1. 8. 1. 2
functions)
Signal off 1. 8. 2. 1
Acoustic signal ο on 1. 8. 2. 2
keys ο free 1. 8. 3. 1
(keypad) locked 1. 8. 3. 2
Ext.Key ο Print Key r 1. 8. 4. 1
External Z | Tare Key w 1. 8. 4. 2
switch function cal. Key Q 1. 8. 4. 3
select Key b 1. 8. 4. 4
cf Key c 1. 8. 4. 5
enter Key u 1. 8. 4. 6
on-mode ο off/on Off | on | stand-by 1. 8. 5. 1
Power-on standby On | Stand-by 1. 8. 5. 2
mode Auto-On Automatic on mode 1. 8. 5. 3
Backlit off 1. 8. 6. 1
Display ο on 1. 8. 6. 2
backlighting
reset menu yes restore factory settings 1. 9. 1. 1
Menu reset factory settings ο No Do not restore 1. 9. 1. 2
factory settings
Page 21

21
Level 1 Level 2 Level 3 Level 4 Menu code
Appl. weighing 2. 1.
ication toggling config. ο all 2. 2. 2. 1
programs between weight display accuracy Minus 1 2. 2. 2. 2
units div.1 1 interval 2. 2. 2. 6
Counting resolut. ο disp.dig. Display accuracy 2. 3. 1. 1
10 fold 10 times > display 2. 3. 1. 2
Ref.Updt. ο off 2. 3. 2. 1
Auto Reference- autom.atic 2. 3. 2. 2
updating
percent dec.plcs. none no decimal places 2. 4. 1. 1
Weighing Decimal ο 1 dec.pl. 1 decimal place 2. 4. 1. å2
in percent places 2 dec.pl. 2 decimal places 2. 4. 1. 3
3 dec.pl. 3 decimal places 2. 4. 1. 4
AnimalW. Activity calm (fluct.: 2% of test obj.) 2. 7. 1. 1
Animal Animal ο
active (fluct.: 5% of test obj.)
2. 7. 1. 2
weighing activity v.active (fluct.: 20% of
test obj.) 2. 7. 1. 3
start manual 2. 7. 2. 1
ο autom.atic 2. 7. 2. 2
Density dec.plcs none no decimal places 2. 9. 1. 1
determination decimal places ο 1 dec.pl. 1 decimal place 2. 9. 1. 2
2 dec.pl. 2 decimal places 2. 9. 1. 3
3 dec.pl. 3 decimal places 2. 9. 1. 4
Page 22

22
Device-specific information
Level 1 Level 2 Level 3 Example Code
InFo Ver. no. Show software version rel.32.09 4. 1.
rmation
Ser. nr. Show serial number, e.g.: 29712345 4. 2.
(To toggle focus between
upper and lower display
sections: Press
b)
model Show model designation ENTris124-1s 4. 3.
(to change focus from upper
to middle to lower display
section and back: Press
b)
Display of Menu Items: Selecting Languages or Codes
Languag. English (factory setting) 5. 1.
(Languag.) Deutsch (German) 5. 2.
franc.çais (French) 5. 3.
ital.iano (Italian) 5. 4.
Espanol (Spanish) 5. 5.
PyCCK (Russian) 5. 6.
Polski (Polish) 5. 7.
codes Menu shows codes (not texts) 5. 8.
Page 23

Preparation
t Select the Counting application in the
menu:
see “Configuration"
t Set the following parameters:
Applic.ation programs
Count.
Resolut.ion
o Disp.Acc. Display accuracy
10-fold 10-fold higher
Ref.Updt. Autom. ref. sample
updating
o Off Off
autom. Automatic
o = Factory setting
Printout: Counting
n R e f 1 0 :
Ref. sample quantity
wRef 21.14 g : Reference weight
for 1 unit
Qnt + 500 pcs : Calculated quantity
23
Application Programs
Counting
Display symbol: Z
Purpose
With the Counting application, you can
determine the number of parts that each
have approximately equal weight. To
do this, a known number of parts (the
reference sample quantity) is weighed first,
and the individual piece weight (reference
weight) is calculated from this result. Thus
the number of parts subsequently placed
on the balance can be determined from
their weight.
Changing the Reference Sample Quantity
Activate function:
Press the b key
Select the desired reference sample
quantity (1 to 100):
In increments of 1: Press the b key briefly
In increments of 10:
Press and hold the b key.
The quantity is stored in battery-backed
memory.
Reference Sample Updating
Automatic reference sample updating
optimizes the counting accuracy. You can
activate or deactivate this function in the
menu.
Automatic reference sample updating
is performed when the requirements,
including the specified stability criterion,
have been met.
The abbreviation opt for “optimizing”, is
displayed briefly with the new reference
sample quantity.
Page 24
24
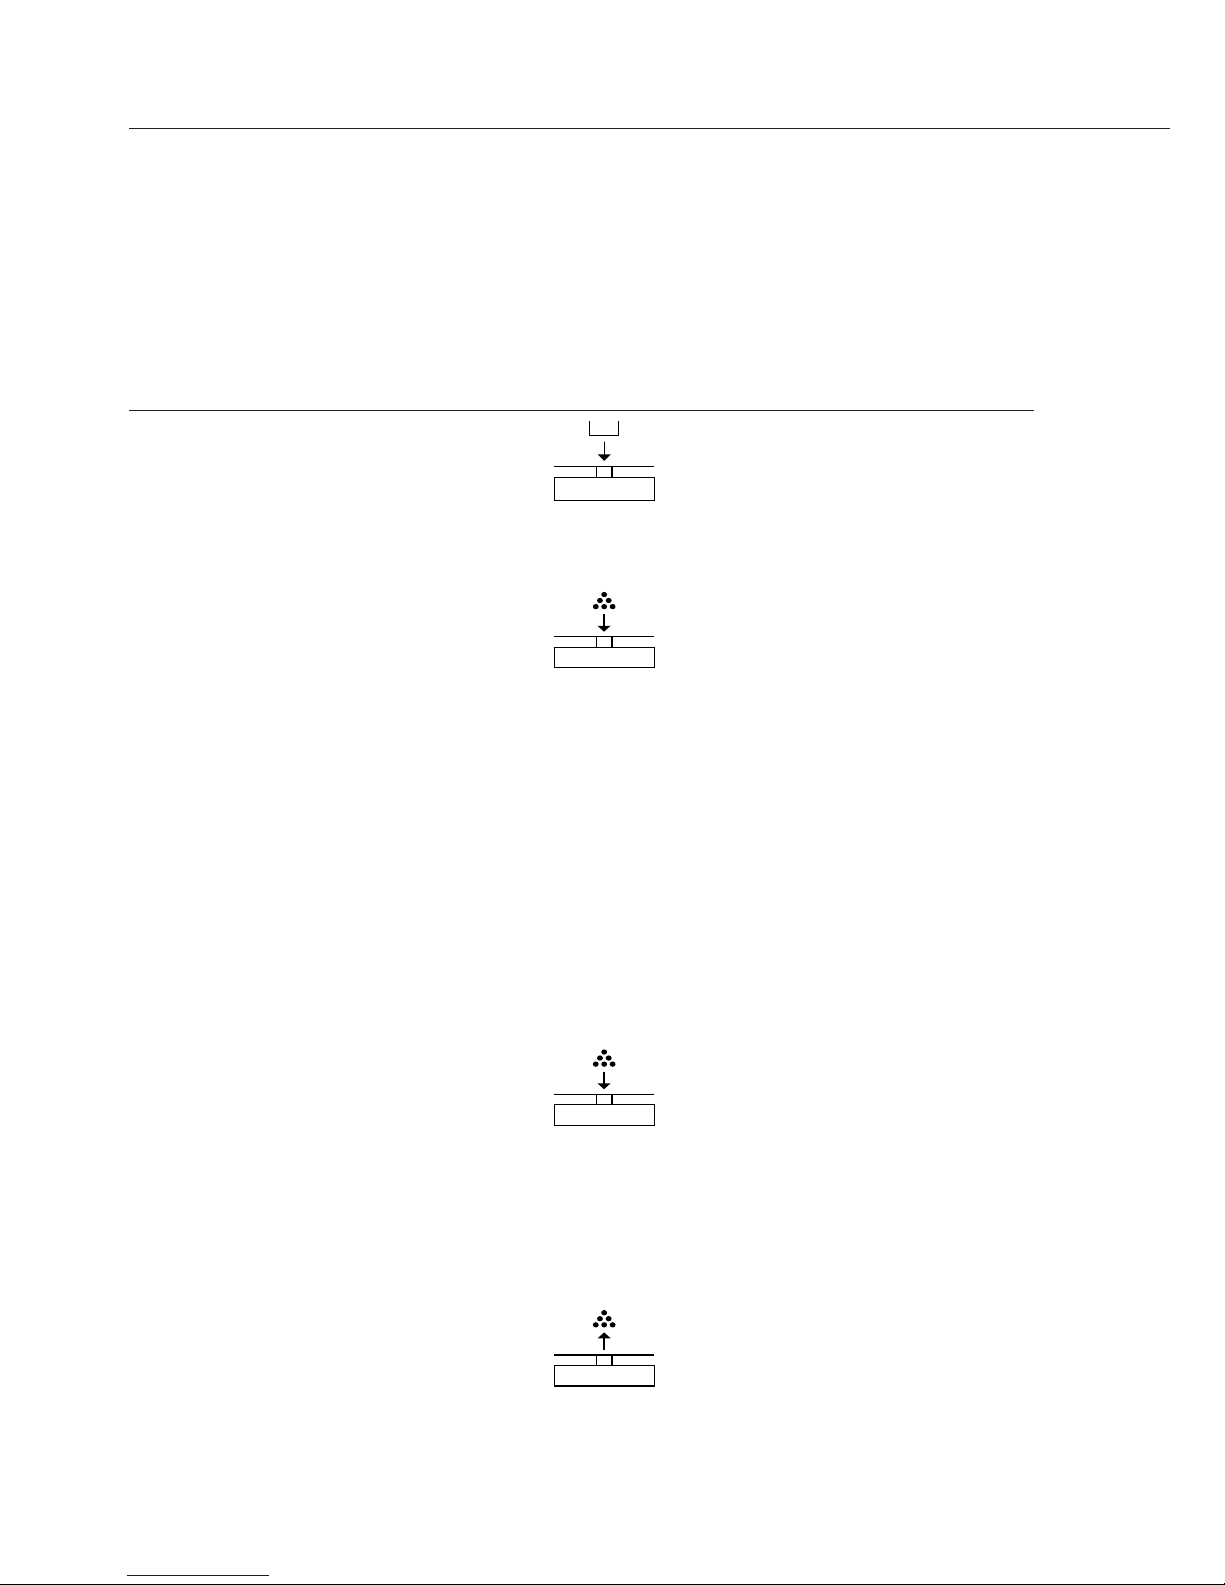
Example: Counting parts of equal weight
Parameter settings: Applic. - Count. (menu code 2. 3.)
Step Key (or instruction) Display/Data output
1. Place empty container +
22.6 g
on the balance
2. Tare the balance w 0.0 g
3. Add reference sample quantity to
container (in this example: 20 pcs)
4. Changing the reference sample quantity b ref 10
pcs
5. Select reference sample quantity: Repeatedly: b
In increments of 1 (1, 2, 3, ..., 100) Press briefly
b
In increments of 10 (10, 20, ..., 100) press and hold
ref 20
pcs
6. Confirm selected reference
u + 20
pcs
*
sample quantity and start nRef 20 pcs
the application. The current wRef 1.07 g
reference weight remains saved
until a new reference is set or
the power supply is interrupted.
7. Add desired number of pieces +
500
pcs
8. If desired, print quantity r Q nt + 500 pc s
9. Toggle display between mean + 1.07 g
G
*
piece weight, weight, quantity + 535.0 g *
Repeatedly:
b + 500
pcs
*
10. Unload the balance – 21
pcs
*
11. Repeat as needed, starting from Step 7
12. End “Counting"
c 0.0 g
Page 25

Preparation
t Select the Weighing in percent application
in the menu:
see “Configuration"
t Set the following parameters:
Applic.ation programs
Percent Weighing in percent
DEC.PLCS Decimal places
none Decimal places
o 1 dec.pl. 1 decimal place
2 dec.pl. 2 decimal places
3 dec.pl. 3 decimal places
o = Factory setting
Printout: Weighing in percent
p R e f 1 0 0 : Reference percentage
Wxx% 111.6 g : Reference weight for
selected reference
percentage xx%
Prc + 94.9 % : Calculated reference
percentage
25
Weighing in Percent
Display symbol: %
Purpose
This application allows you to obtain
weight readouts in percent which are
in proportion to a reference weight.
Changing the Reference Percentage
Activate function:
Press the b key
Select the desired reference (1 to 100):
In increments of 1: Press the b key
briefly
Increments of 10: Press and hold the
b key.
The percentage is stored in batterybacked memory.
Page 26

26
Example: Determining residual weight in percent
Parameter settings: Applic. - percent (menu code 2. 4.)
Reference percentage: Ref 100%
Step Key (or instruction) Display/Data output
1. Tare the balance
w 0.0 g
2. Changing the reference:
(see the previous page)
b ref 100
%
3. Place sample equal to 100% on the
balance (in this example: 111.6 g)
4. Start the application. u + 100.0
%
*
The current reference weight pRef 1 00 %
remains stored until a new Wxx% + 111.6 g
reference is set or power to the
power supply is interrupted.
5. Remove sample (e.g. for drying)
6. Place weight on the balance + 94.9
%
*
(in this example 322.5 g)
7. If desired, print percentage r Prc + 94 .9 %
8. Toggle display between + 105.9 g
*
weight and percentage Repeatedly: b + 94.9
%
*
9. Clear display of residual weight c + 105.9 g
and reference percentage
Exit application
10. If desired, print net residual weight
r N + 10 5.9 g
Page 27

Preparation
t Select the Animal weighing application
in the menu:
see “Configuration"
t Set the following parameters:
Applic.ation programs
Animalw. Animal weighing
Activty. Animal activity
calm Stable readout
o active Unstable
v.active Very unstable
Start
manual
o Autom.atic
o = Factory setting
Printout: Animal weighing
m D e f 2 0 : Number of
subweighing
operations
x-Net + 410.1 g : Calculated average
27
Animal Weighing/Averaging
Display symbol: V
Purpose
This application is used to determine the
weights of unstable samples (e.g., live
animals) or to determine weights under
very unstable ambient conditions. With
this program, the balance calculates the
weight as the average of a defined number
of individual weighing operations (also
referred to as “subweighing operations”).
Changing the Number of Subweighing
Operations
Activate function:
Press the b key
Select the desired number of measurements
(1 to 100):
In increments of 1: Press the b key
briefly
Increments of 10: Press and hold the
b key.
The selected number of measurements is
stored in battery-backed memory.
Page 28
28
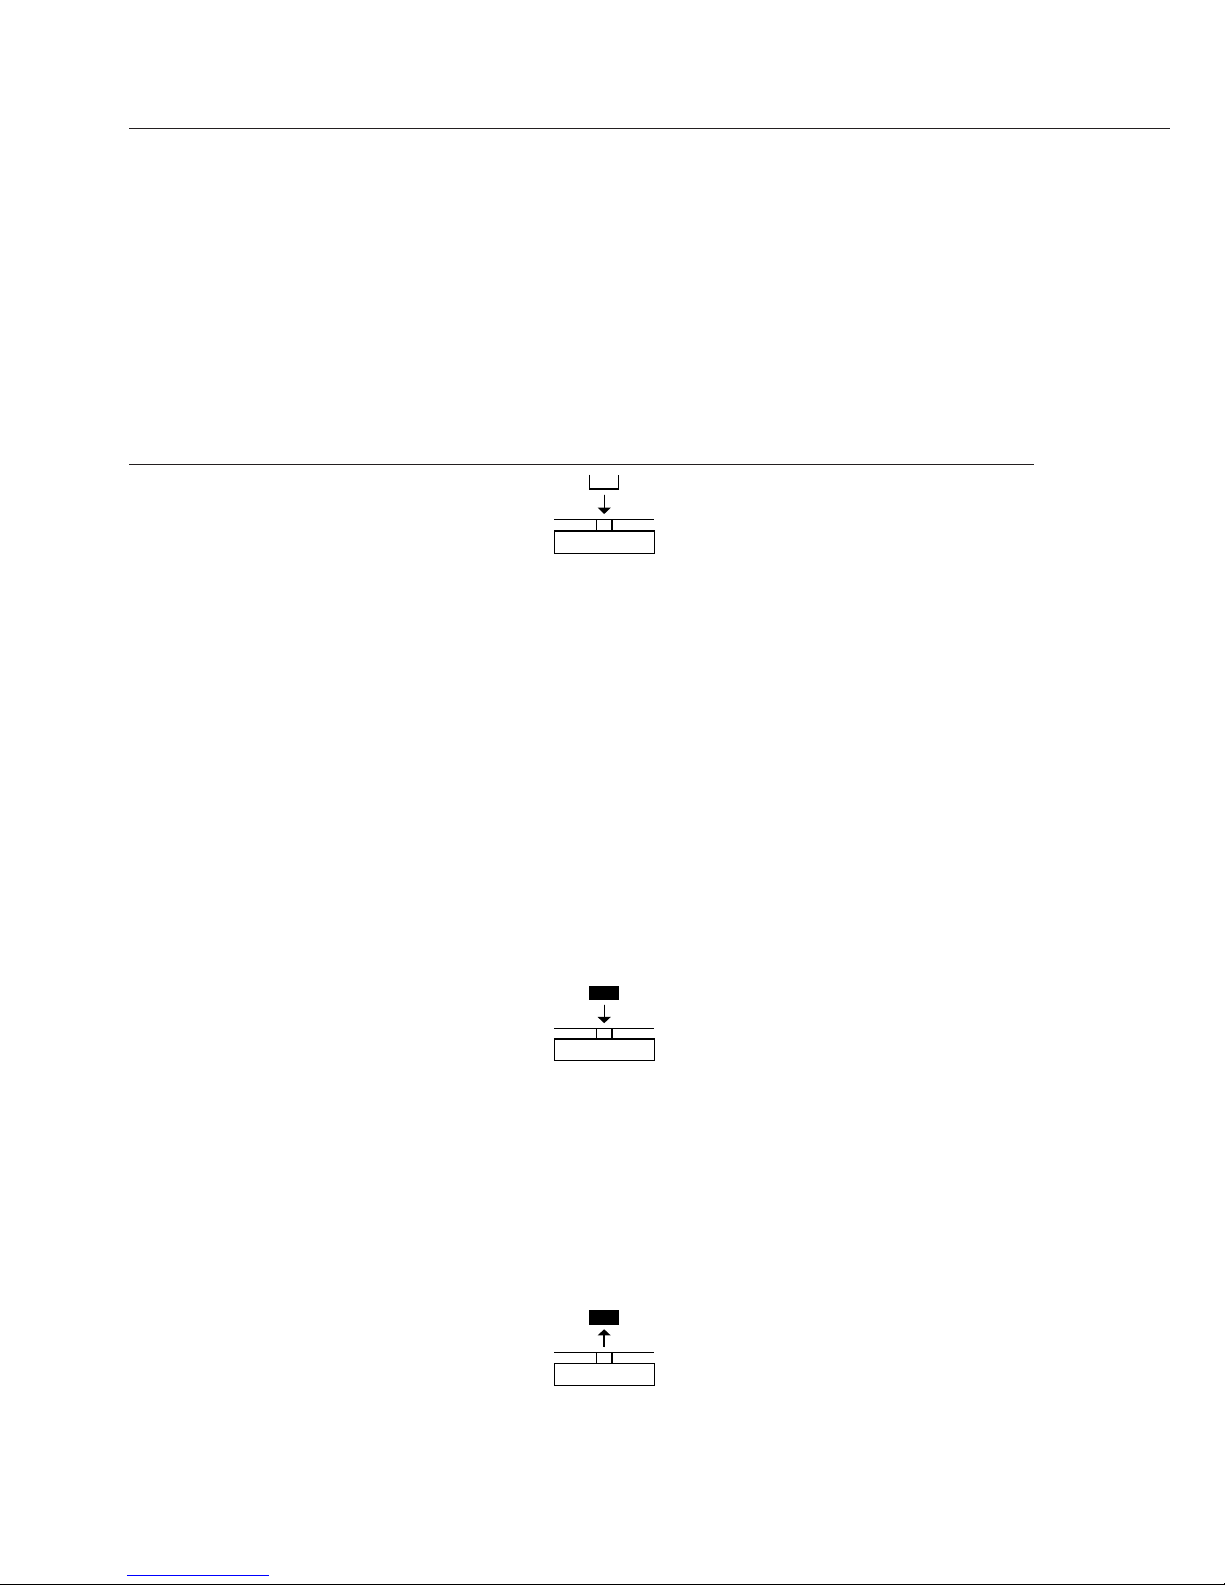
Example: Determining animal weight with automatic start and 20 subweighing operations
(measurements)
Parameter settings: Applic. - Animalw. (menu code 2. 7.)
Step Key (or instruction) Display/Data output
1. Place animal weighing
22.6 g
bowl on the balance
2. Tare the balance w 0.0 g
3. Change the number of
b ref 30
subweighing operations:
4. Select number of measurements: Repeatedly:
b
In increments of 1 (1, 2, 3, ..., 100) Press briefly
b
In increments of 10 (10, 20, ..., 100) press and hold
ref 20
5. Confirm number of measurements
u + 0.0 g *
and start automatic animal weighing.
The number of measurements remains
stored in battery-backed memory
until the setting is changed.
6. Place first animal in bowl.
888
The balance delays the start
19
of measurements until the
20
difference between 2 measure-
....
ments meets the criterion.
1
7. Read off the result. + 410.1 g
G
*
The result is displayed with
the “*” symbol (= calculated value)
m D e f 2 0
and remains displayed until the
x-Net + 410.1 g
sample (animal) is removed
from the load plate (bowl).
8. Unload the balance +
0.0 g
*
9. Weigh next animal (if des.)
Next weighing series begins automatically.
Page 29
29
Toggling between Weight Units
Purpose
With this application program you can change the weight value displayed from the basic
weight unit to any of 4 application weight units (see table on next page).
Features
– Set the basic unit and display accuracy in the Setup menu:
see “Configuration".
– Set the application weight units and display accuracies in the Application menu.
– These settings are stored in battery-backed memory.
– The basic unit is active when the balance is powered up.
Example: Change display from the basic unit (in this example, grams [g]) to pounds [lb]
and Troy ounces [ozt].
Set the following parameters: Applic. - unit (code 2. 2.)
Step Press key Display | Printout
Preparation:
1. Begin selection of an
b NONE
o
application weight unit
2. Select an application unit,
in this example “pounds" Repeatedly:
(see table on next page)
b pounds
3. Confirm the weight unit (pounds)
u pounds
o
4. Select the next application weight u, NONE
o
unit, in this example: Troy ounces Repeatedly:
(see table on next page)
b troy.oz.
5. Confirm weight unit (Troy ounces)
u troy.oz.
o
6. Select other application units if desired (max. 4 total)
(otherwise, confirm “NO" by pressing
u)
7. Store selection
c 0.00 g
Conversion:
8. Place sample on balance +
100.00 g
9. Toggle unit for weight value Repeatedly: + 0.22046 lb
u + 3.5275 ozt
Page 30

The following weight units are available in your balance: :
Menu item Unit Conversion factor Display
symbol
1) USERDEF.
1
) Grams 1.00000000000 o
2) Grams (Factory setting) Grams 1.00000000000 g
3) Kilogr. Kilograms 0.00100000000 kg
4) carats Carats 5,00000000000 o
5) Pounds Pounds 0.00220462260 lb
6) ounces Ounces 0.03527396200 oz
7) troy.oz. Troy ounces 0.03215074700 ozt
8) hktael Hong Kong taels 0.02671725000 tl
9) sing.tael. Singapore taels 0.02645544638 tl
10) twn.tael. Taiwanese taels 0.02666666000 tl
11) grains Grains 15.4323583500 GN
12) peny.wt. Pennyweights 0.64301493100 dwt
13) milligr. Milligrams 1000.00000000 mg
14) Pt.P.Lb. Parts per pound 1.12876677120 o
15) china.tael Chinese taels 0.02645547175 tl
16) mommes Mommes 0.26670000000 m
17) Aust.ct. Austrian carats 5.00000000000 Kt
18) tola Tola 0.08573333810 o
19) baht Baht 0.06578947436 b
20) mesghal Mesghal 0.21700000000 o
21) tons Tons 0.00000100000 t
22) Lb / Oz
2
) Pounds : ounces 0.03527396200 lb oz
23) newton Newton 0.00980665000 N
1
) = User-defined weight unit; can be loaded in the balance over an optional RS-232 or
USB interface using a computer program.
2
) = The format for display of pounds: ounces is xx:yy.yyy; x=lb, y=oz
30
Page 31

31
Density Determination
Display symbol: W
Purpose
This application program lets you determine the density of solid substances using the
buoyancy method.
Features
To enter the density of the buoyancy liquid(g/cm
3
) at the corresponding temperature,
press b. See the next page for a table of density values for water. The factory setting
is 1 g/cm
3
.
The following formula is applied:
Density of sample =
Weight in air
———————————————————— + density of liquid
(Weight in air – weight in water)
When you start the density determination routine, the density of the liquid is displayed
briefly.
Positive and negative values can be stored for weight in air and weight in water.
The weight in water must be less than the weight in air; otherwise, an error message is
displayed.
The results can be displayed with 0 to 3 decimal places: see “Configuration". Not part of
the scope of delivery: sample holder and suspension wire.
Preparation
t Select the Density Determination application in the menu:
see “Configuration"
t Set the following parameters:
Applic. ation programs
density determination
DEC.PLCS Decimal places
none No decimal places
o 1 dec.pl. 1 decimal place
2 dec.pl. 2 decimal places
3 dec.pl. 3 decimal places
o = Factory setting
Note on using 3 decimal places:
Using three decimal places for
density can result in a high
measurement error rate because
corrections to the air density and
the density calculation sets are not
taken into account, for example.
Page 32

32
Printout for Density Determination
RhoFl 0.99823 o : Density of liquid (g/cm
3
)
W a + 2 0 . 0 g : Weight in air
Wfl + 15.0 g : Weight in liquid
R h o 4 . 0 o : Result: density of the sample
Table:
Density of H
2
O at Temperature T (in °C)
T/°C 0.0 0.1 0.2 0.3 0.4 0.5 0.6 0.7 0.8 0.9
10. 0.99973 0.99972 0.99971 0.99970 0.99969 0.99968 0.99967 0.99966 0.99965 0.99964
11. 0.99963 0.99962 0.99961 0.99960 0.99959 0.99958 0.99957 0.99956 0.99955 0.99954
12. 0.99953 0.99951 0.99950 0.99949 0.99948 0.99947 0.99946 0.99944 0.99943 0.99942
13. 0.99941 0.99939 0.99938 0.99937 0.99935 0.99934 0.99933 0.99931 0.99930 0.99929
14. 0.99927 0.99926 0.99924 0.99923 0.99922 0.99920 0.99919 0.99917 0.99916 0.99914
15. 0.99913 0.99911 0.99910 0.99908 0.99907 0.99905 0.99904 0.99902 0.99900 0.99899
16. 0.99897 0.99896 0.99894 0.99892 0.99891 0.99889 0.99887 0.99885 0.99884 0.99882
17. 0.99880 0.99879 0.99877 0.99875 0.99873 0.99871 0.99870 0.99868 0.99866 0.99864
18. 0.99862 0.99860 0.99859 0.99857 0.99855 0.99853 0.99851 0.99849 0.99847 0.99845
19. 0.99843 0.99841 0.99839 0.99837 0.99835 0.99833 0.99831 0.99829 0.99827 0.99825
20. 0.99823 0.99821 0.99819 0.99817 0.99815 0.99813 0.99811 0.99808 0.99806 0.99804
21. 0.99802 0.99800 0.99798 0.99795 0.99793 0.99791 0.99789 0.99786 0.99784 0.99782
22. 0.99780 0.99777 0.99775 0.99773 0.99771 0.99768 0.99766 0.99764 0.99761 0.99759
23. 0.99756 0.99754 0.99752 0.99749 0.99747 0.99744 0.99742 0.99740 0.99737 0.99735
24. 0.99732 0.99730 0.99727 0.99725 0.99722 0.99720 0.99717 0.99715 0.99712 0.99710
25. 0.99707 0.99704 0.99702 0.99699 0.99697 0.99694 0.99691 0.99689 0.99686 0.99684
26. 0.99681 0.99678 0.99676 0.99673 0.99670 0.99668 0.99665 0.99662 0.99659 0.99657
27. 0.99654 0.99651 0.99648 0.99646 0.99643 0.99640 0.99637 0.99634 0.99632 0.99629
28. 0.99626 0.99623 0.99620 0.99617 0.99614 0.99612 0.99609 0.99606 0.99603 0.99600
29. 0.99597 0.99594 0.99591 0.99588 0.99585 0.99582 0.99579 0.99576 0.99573 0.99570
30. 0.99567 0.99564 0.99561 0.99558 0.99555 0.99552 0.99549 0.99546 0.99543 0.99540
Page 33

Parameter settings:
Applic. - Density - dec.plcs. -1 dec.pl. (menu code 2. 9. 1. 2)
Example: Determining the density of a solid using water as the buoyancy liquid.
The density of water at 20°C is 0.99823 g/cm
3
.
Step Key (or instruction) Display/Data output
1. Attach sample holder and suspension wire
2. Tare the balance
w 0.0 g
3. Edit the stored density value b _1.00000
4. Enter the density of the liquid Repeatedly: b,
(in this example: 0.99823): Enter briefly or press and
numerals in increments of 1 hold ;
u, etc. _0.99823
5. Save density value and start
application. The density value
u
is stored in battery-backed memory
until the setting is changed.
6. Confirm “air" display
u air
?
7. Determine the weight of
sample in the air:
Place sample on the balance
+ 20.0 g
?
*
8. Store value for weight in air u
9. Remove sample from the balance water
?
10. Determine weight in liquid:
Place sample in holder.
11. Confirm “water" display u 0.0 g
?
*
12. Immerse sample in liquid + 15.0 g
?
*
13. Store value for weight in u
liquid, view and print result + 4.0
o
?
*
RhoFl 0.6237 o
Wa + 20.0 g
Wfl + 15.0 g
14. Delete result c Rho 4.0 o
15. Repeat as needed, starting from Step 5.
33
Page 34

Purpose
Your balance comes equipped with
an interface port for connection to a
computer or other peripheral device.
You can use an on-line computer to
change, start and/or monitor the functions
of the balance and the application
programs.
Female interface connector
1
14
13
25
Pin Assignment Chart, 25-pin, RS-232:
Pin 1: Shield
Pin 2: Data output (TxD)
Pin 3: Data input (RxD)
Pin 4: Internal ground (GND)
Pin 5: Clear to Send (CTS)
Pin 6: Not connected
Pin 7: Internal ground (GND)
Pin 8: Internal ground (GND)
Pin 9: Not connected
Pin 10: Not assigned
Pin 11: + 12 V (operating voltage
for Sartorius printer)
Pin 12: Reset _ Out
Pin 13: + 5 V
Pin 14: Internal ground (GND)
Pin 15: Universal remote switch
Pin 16: Not connected
Pin 17: Not connected
Pin 18: Not connected
Pin 19: Not connected
Pin 20: Data Terminal Ready (DTR)
Pin 21: Not connected
Pin 22: Not connected
Pin 23: Not connected
Pin 24: Not connected
Pin 25: + 5 V
*) = Hardware restart
34
Data Interface
Preparation
You can set these parameters for other
devices in the Setup menu:
see “Configuration".
You will also find a detailed description
of the available data interface commands
in the file “Data Interface Descriptions for
Entris Models", which you can download
from the Sartorius website:
(www.sartorius.com
"Download Center".)
For remote switch*)
Page 35

Error codes are shown on the main display for approx. 2 seconds.
The program then returns automatically to the previous mode.
Display Cause Solution
No segments appear on No AC power is available Check the AC power supply
the display The power supply is not Plug in the power supply
plugged in
high The load exceeds the Unload the balance
balance capacity
low or Err 54 Something is touching the Move the object that is touching
weighing pan the weighing pan
App.err. Cannot store data: Increase load
Load on weighing pan too
light or no sample on pan
while application is active
dis.err. Display error: Change the configuration in the
Data output not compatible operating menu
with output format
prt.err. Interface port for printer Reset the menu factory settings
output is blocked or
Contact your local
Sartorius Service Center
err 02 Calibration parameter not met, Calibrate only when zero is displayed
e.g.:
– Press w to tare the balance
– load on weighing pan Unload the balance
err 10 The w key is blocked After the tare memory has been
for active application programs; deleted using the c key,
Only 1 tare function can be the w key can be used again
used at a time
err 11 Tara memory not allowed Press w
The weight readout Unstable ambient conditions Set up balance in another area
changes constantly (excessive vibration or draft) Adjust Setup configuration
A foreign object is caught Remove the foreign object
between weighing pan
and housing
The weight readout The balance was not Calibrated/adjust the balance
is obviously wrong calibrated/adjusted
Balance not tared before
weighing
If any other errors occur, contact your local Sartorius Service Center.
Web address: http://www.sartorius.com
Troubleshooting Guide
35
Page 36

36
Service
On request, Sartorius can offer you an individual service contract.
Repairs
Repair work must only be carried out by trained service technicians. Repairs
performed by untrained persons may result in considerable hazards for the user.
Cleaning
Unplug the AC adapter from the wall outlet (mains supply). If you have an interface
cable connected to the balance port, unplug it from the port.
Make sure that no liquid enters the balance housing.
t Clean the balance with a cloth lightly moistened with soap solution.
y The plastic top and bottom parts of the balance housing have a special coating
that allows acetone to be used to clean these parts.
Do not clean the following parts with acetone or aggressive cleaning agents:
foil-covered keypad, power connector port, data interface, or any other plastic
parts.
t Wipe the balance with a soft, dry cloth.
On analytical balances remove and clean the weighing pan
as follows:
Reach beneath the shield disk and lift it up
carefully together with the weighing pan to avoid
damaging the weighing system.
Make sure that no liquid enters the balance
housing.
Cleaning Stainless Steel Surfaces
Clean all stainless steel parts regularly. Remove the
stainless steel weighing pan and thoroughly clean it
separately. Use a damp cloth or sponge to clean stainless
steel parts on the balance.
You can use any household cleaning agent that is suitable
for use on stainless steel. Clean stainless steel surfaces
only by wiping them down. Then rinse the equipment
thoroughly, making sure to remove all residues.
Afterwards, allow the equipment to dry. If desired, you can
apply oil to the cleaned surfaces as additional protection.
Care and Maintenance
Page 37

37
Recycling
Safety Inspections
If there is any indication that safe opera-
tion of the balance is no longer warranted:
t
Disconnect the equipment from the
AC power: Unplug the power cord.
> Lock the balance in a secure place to
ensure that it cannot be used for the time
being
Inform Sartorius Service Center.
Maintenance and repair work may only be
carried out by trained service technicians.
We recommend that the device be
inspected by a certified electrician
at regular intervals, according to the
following checklist:
– Insulating resistance > 7 megaohms
measured with a constant voltage of at
least 500 V at a 500 kohm load
– Leakage current: < 0.05 mA measured
with a properly calibrated multimeter
Recycling
The packaging is made of environ mentally
friendly materials that can be used as
secondary raw materials. If you no longer
need this packaging, bring it to your
local recycling and waste disposal facility
according to the regulations applicable in
your country .
(Contract number D-59101-2009-1129).
Otherwise you should dispose of the
material in accordance with the waste
disposal regulations that are applicable
in your area.
The equipment, including
accessories and batteries, does
not belong in your regular
household waste. The EU legislation requires its Member
States to collect electrical and
electronic equipment and disposed of it
separately from other unsorted municipal
waste with the aim of recycling it.
For more information regarding disposal
and recycling, please contact our local
service representatives. Our partners
listed on the following website will also
be able to provide assistance within the
EU:
1) Go to http://www.sartorius.com.
2) Select the “Services" tab.
3) Then select “Disposal Information".
4) Addresses for the local Sartorius
disposal contacts can be found in the
PDF files available for download on this
page.
Sartorius will not take back
equipment contaminated with
hazardous materials (ABC
contamination) – either for repair
or disposal.
Service address disposal:
Please refer to our website (www.sartorius.
com) or contact the Sartorius Service
Center for more detailed information
regarding repair service addresses or the
disposal of your device.
Page 38

38
Overview
Specifications
General Specifications
Int. weight circuit All models with the designation Entris ... i-1S are
equipped with an internal calibration weight.
Mains connection, via Desktop power supply 697199, 100 – 240 Vac, ±10%,
voltage, frequency 50–60 Hz; 200 mA (max.)
Power consumption VA maximum 16; average 8 (including power supply)
Operating time with
external battery YRB11Z
(display backlighting on), approx. h 35
Ambient conditions
The Technical Data are valid for the following ambient conditions:
Operating temperature range +10 … +30 °C (+50 ° F ... +86 °F)
Permissible ambient operating temperature +5 … +40 °C
Functionality is guaranteed up to an ambient temperature +5 °C to 40 °C.
Electromagnetic Compatibility (EMC) EN61326-1
Interference emission Class B
Defined immunity to interference for industrial environments
Page 39

39
Model-specific Specifications
Modele: Entris 224-1S 124-1S 64-1S
224i-1S 124i-1S 64i-1S
Weighing capacity 220 g 120 g 60 g
Readability 0.0001 g 0.0001 g 0.0001 g
Tare range (subtractive) 220 g 120 g 60 g
Repeatability < ± 0.0001 g 0.0001 g 0.0001 g
(standard deviation)
Linearity <± 0.0002 g 0.0002 g 0.0002 g
Response time (average) s 2,5 2,5 2,5
Sensitivity drift within <±/K 3 · 10
–6
3 · 10–6 3 · 10–6
+10 ... +30 °C
Adaptation to ambient conditions By selection of 1 of 4 optimized filter levels;
display update: 0.1–0.4 (depends on filter level selected)
External calibration weight g 200 (E2) 100 (E2) 50 (E2)
(of at least accuracy class...)
Net weight, approx. kg 4.4 | 4.8 4.4 |4.8 4.4 | 4.8
Weighing pan size mm 90 d 90 d 90 d
Whg. chamber height mm 230 230 230
Dimensions (W + D + H) mm 230 + 303 + 330
Modele: Entris 623-1S 423-1S 323-1S
623i-1S 423i-1S 323i-1S
Weighing capacity 620 g 420 g 320 g
Readability 0.001 g 0.001 g 0.001 g
Tare range (subtractive) 620 g 420 g 320 g
Repeatability < ± 0.001 g 0.001 g 0.001 g
(standard deviation)
Linearity <± 0.002 g 0.002 g 0.002 g
Response time (average) s 1 1 1.1
Sensitivity drift within <±/K 3 · 10
–6
3 · 10
–6
3 · 10–6
+10 ... +30 °C
Adaptation to ambient conditions By selection of 1 of 4 optimized filter levels;
display update: 0.1 – 0.4 (depending on the
set filter level)
External calibration weight g 500 (F1) 200 (F1) 200 (F1)
(of at least accuracy class...)
Net weight, approx. kg 3.2|3.6 3.2|3.6 3.2|3.6
Weighing pan size mm 115 d 115 d 115 d
Dimensions (W + D + H) mm 230 + 303 + 136
Page 40

40
Modele: Entris 153-1S 822-1S
153i-1S 822i-1S
Weighing capacity 150 g 820 g
Readability 0.001 g 0.01 g
Tare range (subtractive) 150 g 820 g
Repeatability < ± 0.001 g 0.01 g
(standard deviation)
Linearity <± 0.002 g 0.03 g
Response time (average) s 1.3 1.5
Sensitivity drift within <±/K 3 · 10
–6
4 · 10–6
+10 ... +30 °C
Adaptation to ambient conditions By selection of 1 of 4 optimized filter levels;
display update: 0.1–0.4 (depends on filter level selected)
External calibration weight g 100 (F1) 500 (F2)
(of at least accuracy class...)
Net weight, approx. kg 2.6|3.0 2.0|2.6
Weighing pan size mm 115 d 150 d
Deviations (W + D + H) mm 230 + 303 + 136 230 + 303 + 87
Modele: Entris 6202-1S 4202-1S 3202-1S 2202-1S
6202i-1S 4202i-1S 3202i-1S 2202i-1S
Weighing capacity 6200 g 4200 g 3200 g 2200 g
Readability 0.01 g 0.01 g 0.01 g 0.01 g
Tare range (subtractive) 6200 g 4200 g 3200 g 2200 g
Repeatability < ± 0.01 g 0.01 g 0.01 g 0.01 g
(standard deviation)
Linearity <± 0.03 g 0.03 g 0.03 g 0.03 g
Response time (average) s 1.5 1.5 1.5 1.5
Sensitivity drift within <±/K 4 · 10
–6
4 · 10–6 4 · 10–6 4 · 10–6
+10 ... +30 °C
Adaptation to ambient conditions By selection of 1 of 4 optimized filter levels;
display update: 0.1–0.4 (depends on filter level selected)
External calibration weight g 5000 (F1) 2000 (F1) 2000 (F1) 2000 (F1)
(of at least accuracy class...)
Net weight, approx. kg 3.1|3.5 3.1|3.5 3.1|3.5 3.1|3.5
Weighing pan size mm 180 + 180 180 + 180 180 + 180 180 + 180
Dimensions (W + D + H) mm 230 + 303 + 91
Page 41

41
Modele: Entris 8201-1S 5201-1S 2201-1S
8201i-1S 5201i-1S 2201i-1S
Weighing capacity 8200 g 5200 g 2200 g
Readability 0.1 g 0.1 g 0.1 g
Tare range (subtractive) 8200 g 5200 g 2200 g
Repeatability < ± 0.1 g 0.1 g 0.1 g
(standard deviation)
Linearity <± 0.3 g 0.3 g 0.3 g
Response time (average) s 1.5 1.5 1.5
Sensitivity drift within <±/K 8 · 10
–6
8 · 10–6 8 · 10–6
+10 ... +30 °C
Adaptation to ambient conditions By selection of 1 of 4 optimized filter levels;
display update: 0.1–0.4 (depends on filter level selected)
External calibration weight g 5000 (F2) 5000 (F2) 2000 (F2)
(of at least accuracy class...)
Net weight, approx. kg 2,7|3,5 2,7|3,5 2,7|3,5
Weighing pan size mm 180 + 180 180 + 180 180 + 180
Dimensions (W + D + H) mm 230 + 303 + 91
Page 42

External calibration weights:
For Entris balance models Accuracy class Weight in grams Order no.:
224 E2 200 YCW522-AC-02
124 E2 100 YCW512-AC-02
64 E2 50 YCW512-AC-02
423 F1 200 YCW523-AC-02
323 F1 200 YCW523-AC-02
153 F1 100 YCW513-AC-02
623 F1 500 YCW553-AC-02
4202 F1 2000 YCW623-AC-02
6202 F1 5000 YCW653-AC-02
3202 F1 2000 YCW623-AC-02
2202 F1 2000 YCW623-AC-02
822 F2 500 YCW554-AC-02
8201 F2 5000 YCW654-AC-02
5201 F2 5000 YCW654-AC-02
2201 F2 2000 YCW624-AC-02
Accessories
42
Product Order No.
Data printer YDP20-0CE
with date, time, statistics
evaluation, transaction counter
functions and LCD display
Remote display,
reflective YRD03Z
(for connection to
data interface port)
External rechargeable
battery pack YRB11Z
With battery-level indicator (LED);
can be recharged using the AC
adapter (charge time for completely
discharged battery pack: 15 hours);
see “Specifications” for hours of
operation.
To recharge the battery pack:
Unplug the AC adapter from the balance
and plug it into the battery pack
Product Order No.
Density
determination kit YDK01LP
– for Entris 224
– for Entris 124
– for Entris 64
Data cable
– for connection to a
YCC01-USBM2
PC mit USB port
– for PC connection,
25-pin 7357312
– for PC connection,
9-pin 7357314
Adapter cable 6965619
from D-Sub 25-pin
male connector to
D-Sub 9-contact
female connector;
length: 0.25 m
Page 43

Product Order No.
Ionizing blower for eliminating static electricity
– 220 V YIB01-0DR
– 110 V YIB01-0UR
Stat-Pen antistatic device for eliminating electrostatic charges
on samples and containers (100 V bis 230 V, 50/60 Hz) YSTP01
Weighing Table
– made from wood with synthetic stone YWT09
– weighing table made from synthetic stone, with vibration dampening YWT03
Wall console YWT04
Weighing pans
– 1000 ml, EG 240 g, stainless steel 641211
– 500 ml 641212
– 110 ml, 90 mm d, aluminum 69GP0003
– 270 ml, EG 62 g, 137 mm d, stainless steel YWP03G
– 62 mm d, stainless steel 6910848
– 85 ml, 70 mm d, aluminum YWP06G
– 180 ml, 90 mm d, aluminum YWP05G
– 174 mm d, stainless steel YWP04G
43
Page 44

44
Page 45

45
Page 46

Sartorius Lab Instruments GmbH & Co. KG
Weender Landstrasse 94–108
37075 Goettingen, Germany
Telephone 0551.308.0
Fax 0551.308-3289
www.sartorius.com
Copyright by Sartorius, Goettingen,
Germany.
No part of this publication may be reprinted
or translated in any form or by any means
without prior written from Sartorius.
All rights reserved by Sartorius in accordance
with copyright law.
The information and figures contained in
these instructions correspond to the version
date specified below. Sartorius reserves the
right to make changes to the technology,
features, specifications, and design of the
equipment without notice.
Date:
February 2014,
Sartorius Lab Instruments GmbH & Co. KG
Printed in the EU on paper bleached without
chlorine. | W
Specifications subject to change without notice.
Publication No.: WEN6001-e140203
 Loading...