

Page 1
98648-012-28
Installation Instructions and Safety Information | Installation und Sicherheitshinweise |
Notice d’installation et consignes de sécurité | Istruzioni di installazione e di sicurezza |
Advertencias de instalación y de seguridad | Installatie- en veiligheidsinstructies |
Notas de instalação e de segurança | Installations- och säkerhetsanvisningar | Asennus- ja turvaohjeet |
Installations- og sikkerhedsanvisninger | Υποδεξεισ εγκατστασησ και ασφαλεασ
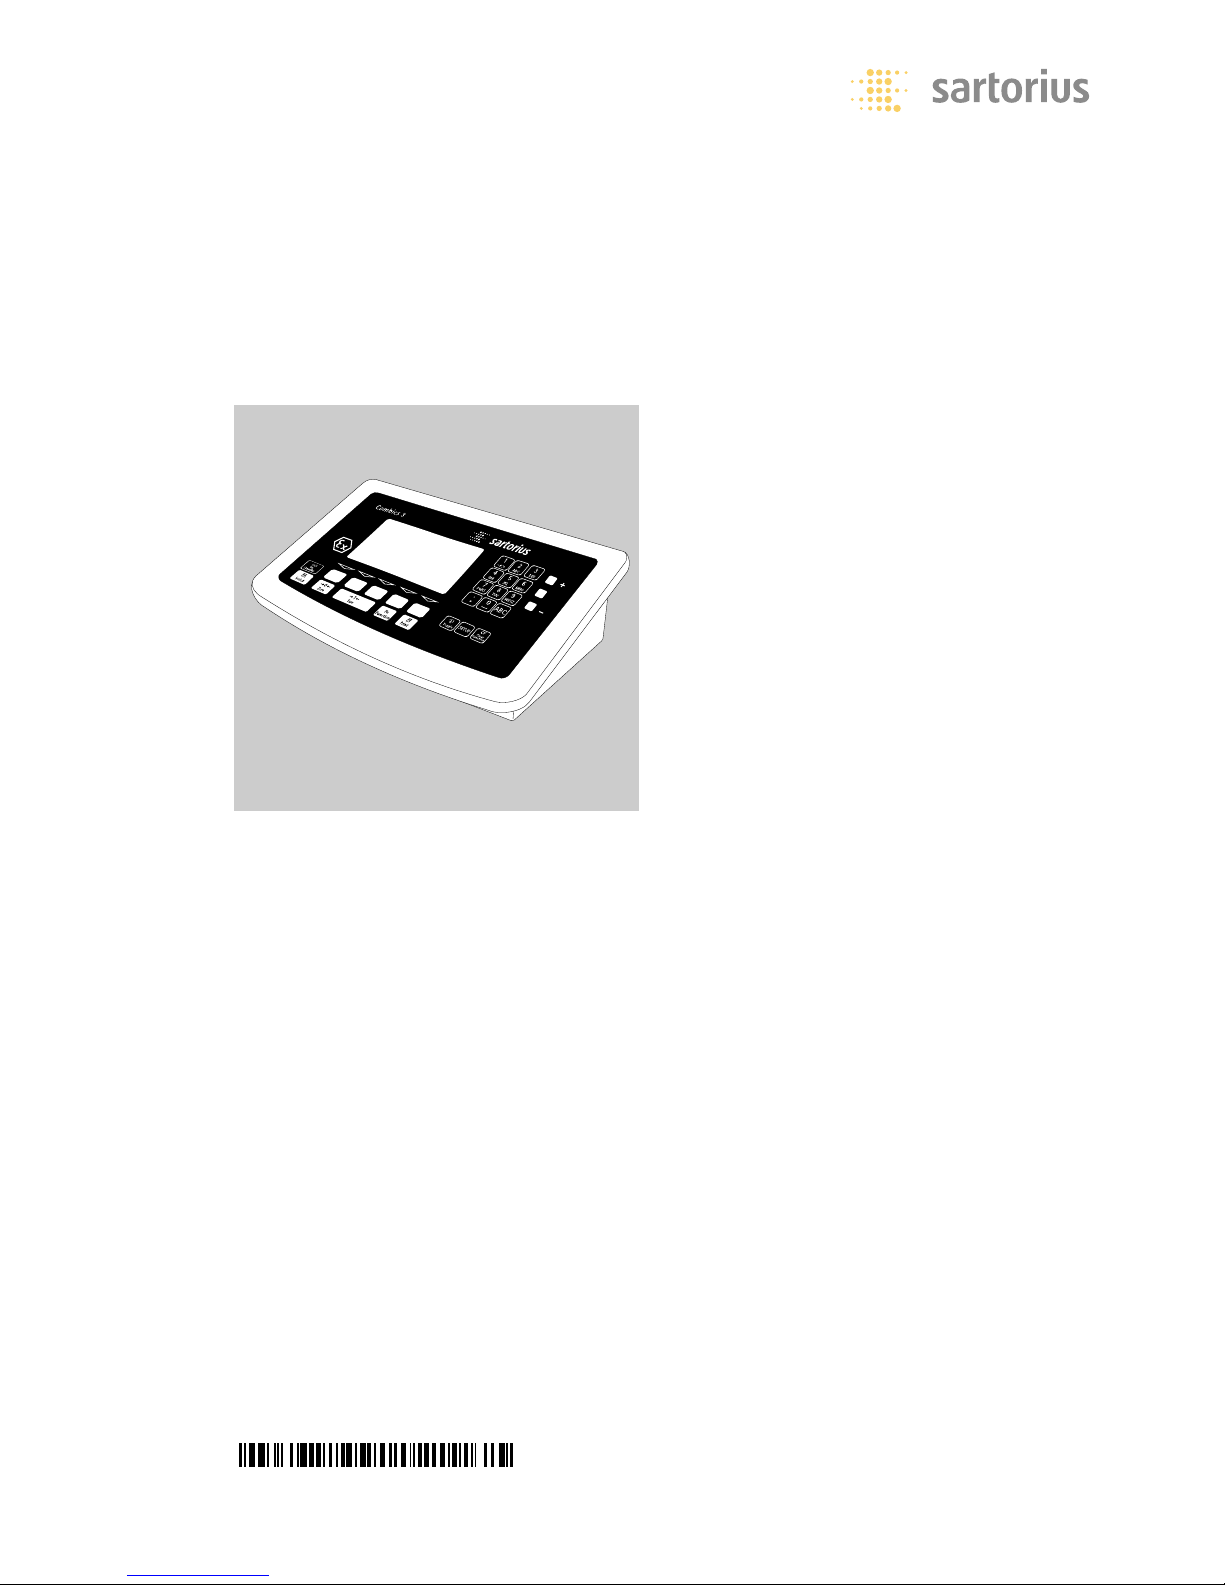
Sartorius Combics 3
Explosion-protected Model CIXS3
Intrinsically Safe Indicator
for Use in Hazardous Areas/Locations
Ex-Modell CIXS3
Eigensicheres Auswertegerät
für explosionsgefährdete Bereiche
Modèle EX CIXS3
Indicateur à sécurité intrinsèque pour domaines
à risques d’explosions
Modello CIXS3 con protezione antideflagrante
Indicatore a sicurezza intrinseca
per le aree a rischio di esplosione
Modelo CIXS3 antideflagrante
Visor con seguridad intrínseca para el uso
en zonas con peligro de explosión
EX-model CIXS3
Intrinsiek veilig afleesapparaat
voor explosiegevaarlijke ruimten
Modelo EX CIXS3
Aparelho de monitorização seguro
para áreas de perigo de explosão
EX-modell CIXS3
Egensäker analysapparat
för explosionsfarliga miljöer
EX-malli CIXS3
Omavarmisteinen vaakapääte
räjähdysvaarallisille alueille
Ex-model CIXS3
Egensikkert analyseapparat
til eksplosionsfarlige områder
Μοντλο EX CIXS3
Συσκευ αξιολγησησ ασφαλεασ
για περιοχσ µε κνδυνο κρηξησ
Page 2

English page 2
In cases involving questions
of interpretation, the German-language
version shall prevail.
Deutsch Seite 10
Im Auslegungsfall ist die
deutsche Sprache maßgeblich.
Français page 18
En cas de questions concernant
l’interprétation, la version
en langue allemande fera autorité.
Italiano pagina 26
In caso di interpretazione,
fa testo la versione in lingua tedesca.
Español página 34
En caso de interpretación,
la versión en lengua alemana
será determinante.
Nederlands pagina 42
Português página 50
Svenska sidan 58
Suomi sivu 66
Dansk side 74
Ελληνικ Σελδα 82
The explosion-protected Combics
model CIXS3 (Combics 3) is a rugged,
high-precision indicator that gives you
reliable weighing results in Zone 1, 2,
20, 21 and 22 hazardous areas.
The indicator has a stainless steel housing and is easy to operate. Additional
features include:
– Large keys with positive click action
– Numeric and alphabetic input
– Large, backlit, fully graphical dot-matrix
display
– Plain-text user guidance
– Connectivity for two weighing plat-
forms
– Automatic initialization when the
Combics is switched on
– Automatic taring when a load is placed
on the weighing platform
– Optional control through an external
computer
Combics indicators save work and speed
up routine applications through the
following features:
– Fast response times
– Independence from location of platform
installation
– Optional input of up to 4 alphanumeric
lines for identifying weight values
– Range of interfaces for flexible use
– Security through password protection
– Easy to clean and disinfect
Symbols
The following symbols are used in these
instructions:
§ denotes general operating instructions
$ indicates instructions for exceptional
cases
> describes the outcome of a preceding
operating step
! indicates a hazard
For technical advice on applications:
Phone (in Germany):
+49.(0)551.308.4440
Fax (in Germany):
+49.(0)551.308.3791
2 Intended Use
2 Contents
3 Warnings and Safety Precautions
4 Getting Started
4 Equipment Supplied
4 Installation Instructions
5 General View of the Equipment
7 Connecting the Combics to AC Power
8 Installing the Verification Adapter for
Use in Legal Metrology
8 Connecting the External Rechargeable
Battery Pack
9 Care and Maintenance
9 Repairs
9 Cleaning
9 Safety Inspection
9 Instructions for Recycling
2
Languages Intended Use Contents
Page 3

Safety Information
§ Please read these operating instructions
carefully before using your indicator.
The manufacturer accepts no liability
for damage occurring as a result of
failure to observe the warnings and
safety information in this manual.
The explosion-protected model CIXS3
indicator meets the requirements for
Group II, Category 1 (dusts) and Category 2 (gases) equipment in accordance
with EC Directive 94/9/EEC and bears
the designation hII 2 G 1 D EEx ib IIC
T4 T135°C in accordance with KEMA
EC type-examination certificate
03ATEX1157X. Furthermore, this
weighing system meets the EC Directives for electromagnetic compatibility
(see the Declaration of Conformity in
the enclosed installation instructions).
Improper use or handling, however, can
result in damage and/or injury. The
indicator may be used and operated by
qualified personnel only.
! In Germany, the intrinsically safe
indicator can be used in Zone 1 and 2
hazardous areas (gases) and Zone 20,
21 and 22 hazardous areas (dusts).
Whether the equipment can be used in
a given area containing potentially
explosive agents must be checked on
a case-by-case basis. Installation in a
Zone 1, 2, 20, 21 or 22 hazardous area
must be performed by a trained technician in accordance with the laws, guidelines and standards valid in your country. Always comply with the applicable
regulations for accident prevention. The
trained technician must be familiar with
the assembly, start-up and operation of
the system, and must furthermore have
the required qualifications and be familiar with the relevant guidelines and regulations in effect in your country. If you
need assistance, contact your Sartorius
dealer or the Sartorius Service Center.
! Operating the indicator beyond the
specifications listed in the typeapproval certificates is not permitted,
and is considered use of the equipment
for other than its intended purpose. All
specifications and restrictions listed in
the type-examination certificates must
be strictly observed (see “Documents for
Hazardous Areas” in the operating
instructions).
Any installation work that does not
conform to the instructions in this manual will result in forfeiture of all claims
under the manufacturer’s warranty.
– Have the equipment inspected at appro-
priate intervals for correct functioning
and safety by a trained technician.
– Always make sure the CIXS3 is discon-
nected from AC power before performing
3
Warnings and Safety Precautions
any installation, cleaning, maintenance
or repair work. If the equipment housing is opened by anyone other than persons authorized by Sartorius, this will
result in forfeiture of all claims under
the manufacturer’s warranty. Use only
original Sartorius spare parts.
– Do not expose the equipment to
aggressive chemical vapors or to
extreme temperatures, moisture, shocks,
or vibration. The allowable temperature
range during operation is -10°C to
+40°C (14°F to 104°F).
– If you use cables purchased from anoth-
er manufacturer, check the pin assignments in the cable against those specified by Sartorius before connecting the
cable to Sartorius equipment, and disconnect any wires that are assigned differently. The operator shall be wholly
responsible for any damage or injuries
that occur when using cables not supplied by Sartorius.
– When using the equipment in hazardous
areas, make sure there is no current or
voltage in the equipment before connecting or disconnecting current-carrying cables to or from the device.
Disconnect the weighing equipment
from AC power before connecting or
disconnecting cables.
– Avoid exposing the equipment (espe-
cially the dust cover) to static electricity;
be sure to connect the equipotential
bonding conductor.
– Disconnecting equipotential bonding
conductors is not permitted.
– If you see any indication that the equip-
ment cannot be operated safely, disconnect the system from power and lock
the equipment in a secure place so that
it cannot be used for the time being.
Observe the relevant safety precautions
and inform personnel as required.
!Make sure you disconnect the power
supply from the mains (wall outlet)
before connecting or disconnecting
peripheral devices to or from the
indicator.
– The casing on all connecting cables,
as well as the casing on wires inside the
equipment housing, is made of PVC.
Chemicals that corrode these materials
must be kept away from these cables.
– When connecting the CIXS3 to other
equipment, make sure to observe the
specifications listed in the type-approval
certificates. For more information,
see the “Certificate of Proof of Intrinsic
Safety” in the appendix to the operating
instructions.
Installation
– Proceed with extreme caution when
using pre-wired RS-232 connecting
cables, as the pin assignments may not
be compatible with Sartorius equipment. Before connecting the cable,
check all pin assignments against the
cabling diagrams and disconnect any
lines that are assigned differently.
! Use only standard cables that have
protective grounding conductors.
The protective conductor must not be
disconnected for any reason.
! If there is visible damage to the equip-
ment or power cord, disconnect the
equipment from power and lock it in
a secure place to ensure that it cannot
be used for the time being.
– Connect only Sartorius accessories and
options, as these are optimally designed
for use with your indicator. On request,
Sartorius will be happy to provide
information on operating specifications
(in accordance with the Standards for
defined immunity to interference).
$ If you have any problems with your
indicator, please contact your local
Sartorius office, dealer or service center.
IP Rating:
– The IP65/IP67 protection rating for the
indicator is ensured only if the rubber
gasket is installed and all connections
are fastened securely (including the caps
on unused sockets). Weighing platforms
must be installed and tested by a certified technician.
– If you install an interface port after set-
ting up your indicator, keep the protective cap in a safe place to be used for
protecting the interface port when not
in use or prior to shipment. The cap
protects the data interface connector
from vapors, moisture and dust or dirt.
Using the Equipment
in Legal Metrology in the EU*
– When the indicator is connected to a
weighing platform and the resulting
weighing instrument is to be verified,
make sure to observe the applicable
regulations regarding verification.
Please read the brochure entitled “Guide
to Verification” on the CD enclosed with
the operating instructions and observe
all guidelines contained therein. When
connecting a Sartorius weighing platform, make sure to observe the permitted weighing range as listed in the
Declaration of Conformity.
– If any of the verification seals are dam-
aged, make sure to observe the national
regulations and standards applicable in
your country in such cases. In some countries, the equipment must be re-verified.
* including the Signatories of the Agree-
ment on the European Economic Area
Page 4

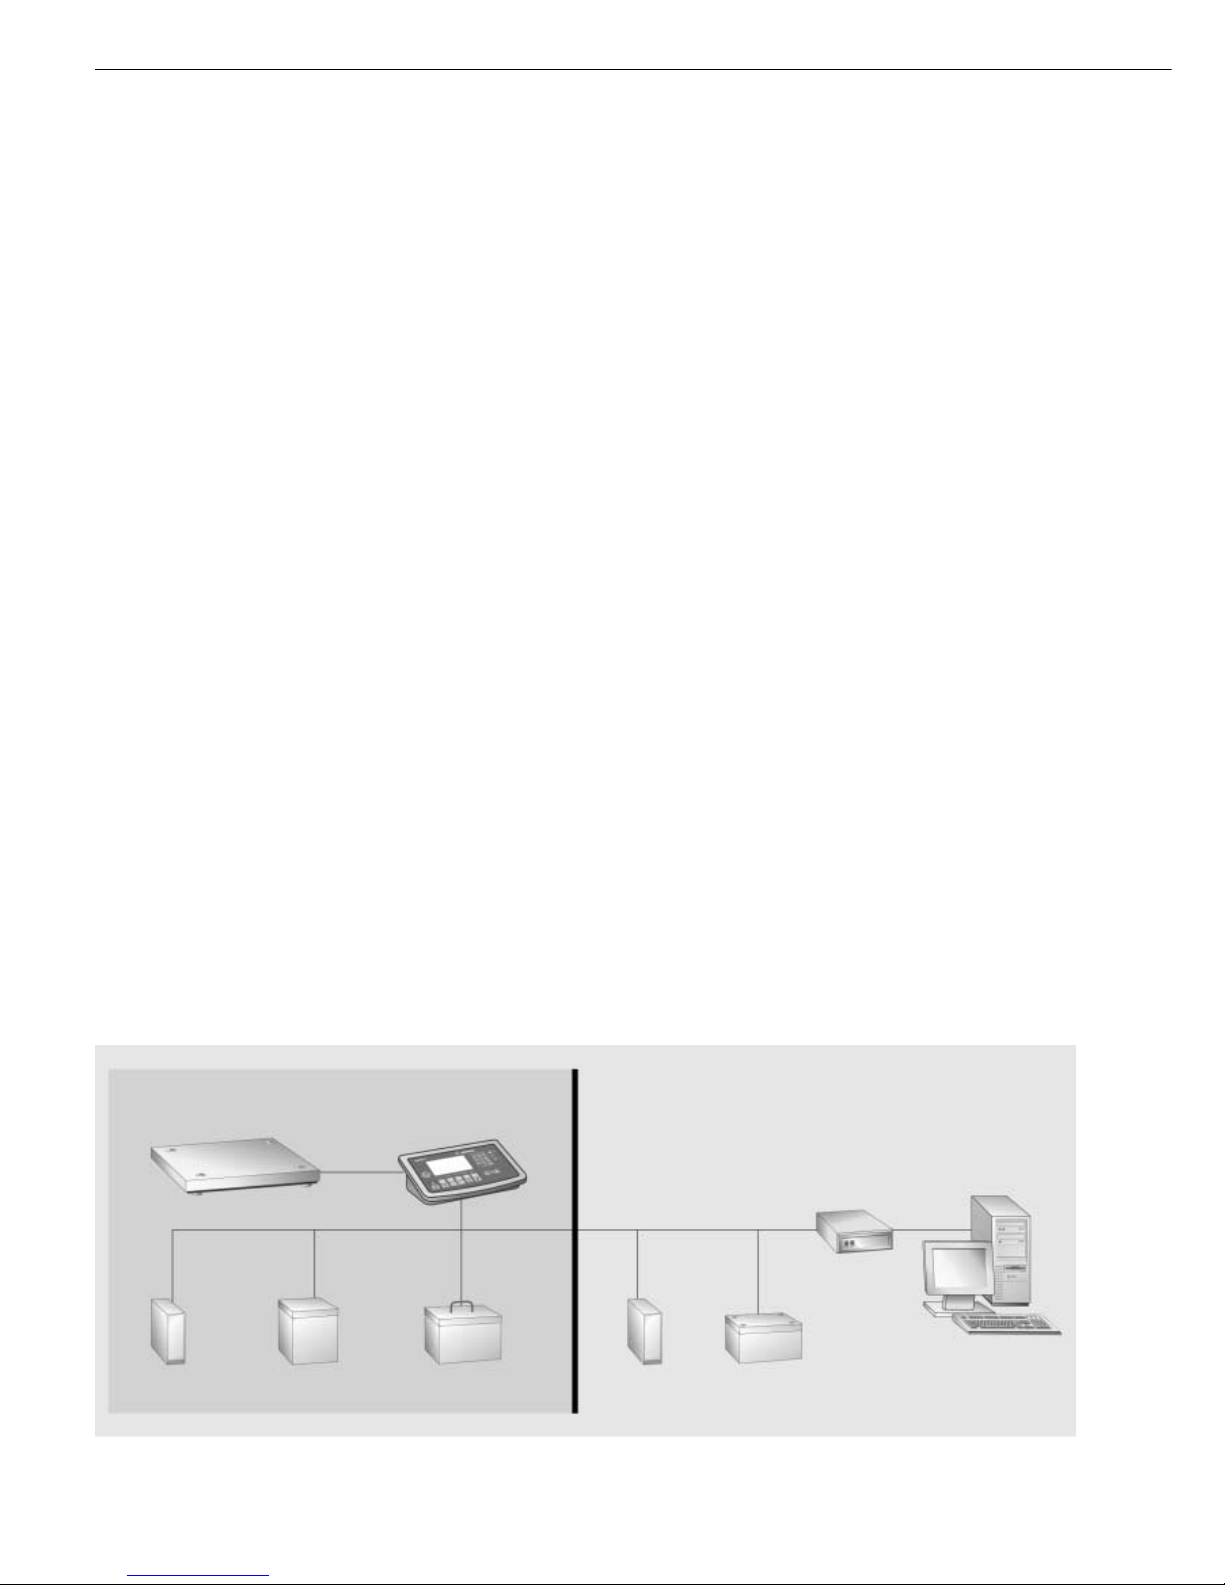
Overview of equipment for use in hazardous areas:
Ex zone 1, 2, 20, 21, 22 (hazardous area) Non-Ex area (safe area)
Zener barrier PC
or converter
Indicator with weighing platform
24 V module Power supply Battery pack 24 V module Power supply
(110 V–230 V) (110 V–230 V)
Unpacking the Indicator
§ After unpacking the equipment, please
check it immediately for any external
damage.
$ If you detect any damage, proceed as
directed in the chapter entitled “Care
and Maintenance,” under “Safety
Inspection.”
$ Save the box and all parts of the pack-
aging for any future transport. Before
packing your equipment, unplug all
connected cables to prevent damage.
Equipment Supplied
– Indicator
– Operating instructions
– Special accessories as listed on the bill
of delivery, if ordered
Installation Instructions
1) Connecting a weighing platform to the
Combics indicator:
see the page after next.
2) Configuring the A/D converter:
see the chapter entitled “Service” in the
operating instructions to configure the
following:
– Trade | Standard
– Weighing capacity, readability
– Calibration weight
– mV/V | Entering geographical data
– Linearization, calibration/adjustment
3) Adjusting the weighing platform:
see the section entitled “Calibration and
Adjustment” in the operating instructions.
4) Configuring application programs:
see the enclosed instruction manual for
application programs.
5) Connecting an interface, printer or Alibi
memory:
see “Pin Assignment Charts” in the
operating instructions.
6) Activating the interface, printer or Alibi
memory in the indicator Setup menu:
refer to the operating instructions and
configure the following for COM1/2:
– Printout format
– Printed lines/areas for the particular
printer
7) You may use the RS-422/RS-485
interface connector on COM2 only if
the RS-232 interface connector is not
plugged into COM2. In other words, it is
NOT permitted to have a simultaneous
electrical connection of both the
RS-232 and RS-422/485 on COM2.
Installation
Choose a location that is not subject to
the following negative influences:
– Heat (heater or direct sunlight)
– Drafts from open windows and doors
– Extreme vibrations during weighing
– Excessive moisture
Conditioning the Indicator
Moisture in the air can condense on the
surfaces of a cold indicator whenever
it is brought into a substantially warmer
place. If you transfer the indicator to
a warmer area, make sure to condition it
for about 2 hours at room temperature,
leaving it unplugged from AC power.
Indicator not In Use
Switch off the equipment when not in
use.
Seal on Indicators Verified for Use
in Legal Metrology in the EU*
A control seal in the form of a sticker
with the “Sartorius” logo has been
affixed to the indicator following
verification. This seal will be irreparably
damaged if you attempt to remove it.
If this seal is damaged or removed, veri-
fication will become null and void and
the indicator will have to be re-verified.
* including the Signatories of the Agree-
ment on the European Economic Area
4
Getting Started
Page 5
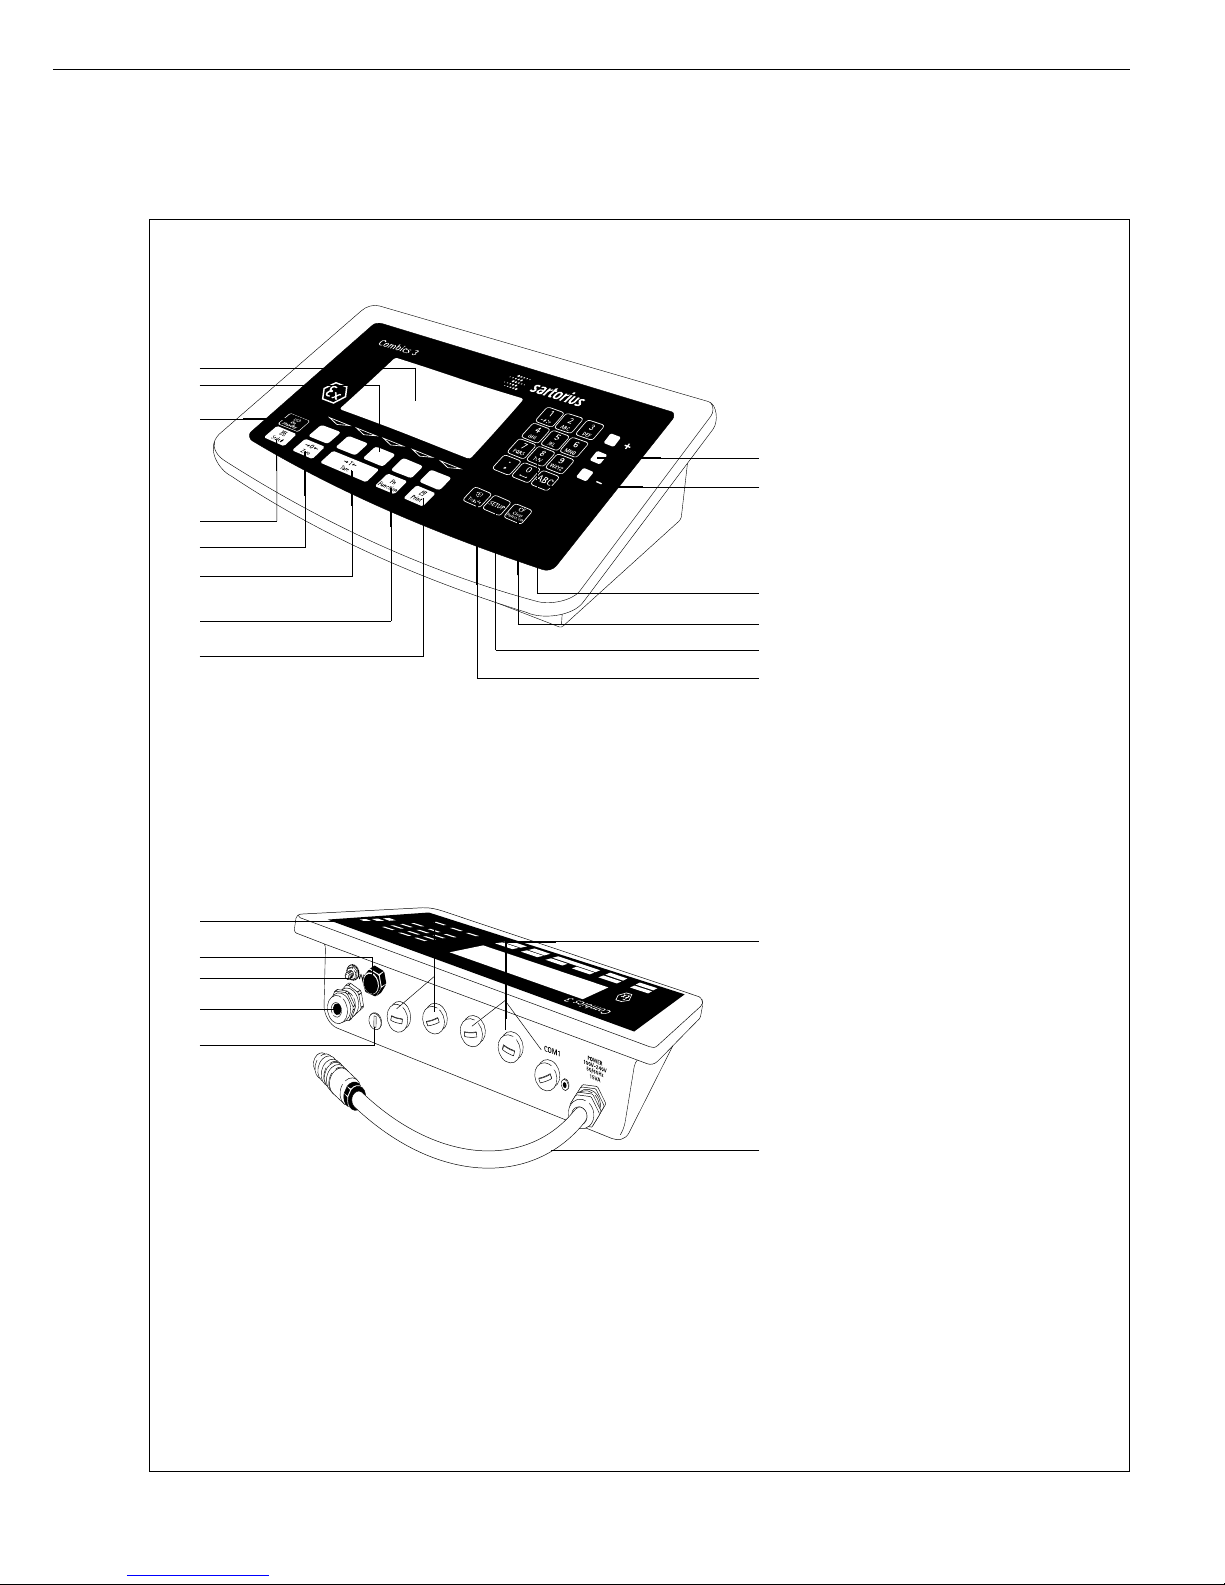
Display and keypad: Combics 3
5
General View of the Equipment
1
2
3
4
5
6
15
16
14
13
12
11
10
9
8
7
21
20
19
18
17
Display and Keypad:
1 LEDs (for checkweighing and
classification)
2 Toggle to alphabetical input
3 Alphanumeric keypad
4 CF key (clear function)
5 Settings: Access Setup program
6 Toggle to the application
program | application-specific
information
7 Data output key
8 Gross/net, 2nd unit or 10+ higher
resolution (depending on the
settings)
9 Tare key
10 Zero key
11 Toggle to different weighing
platform
12 On/off key
14 Graphic-capable dot-matrix
display
Rear View
15 COM1: RS-232C interface
16 DC adapter cable
17 Menu access switch
(standard operating mode or
legal metrology mode)
18 Connector for weighing platform
19 Equipotential bonding conductor
(ground)
20 Vent valve; torque: 1.5 Nm
21 COM2 interface
Rear view:
Page 6
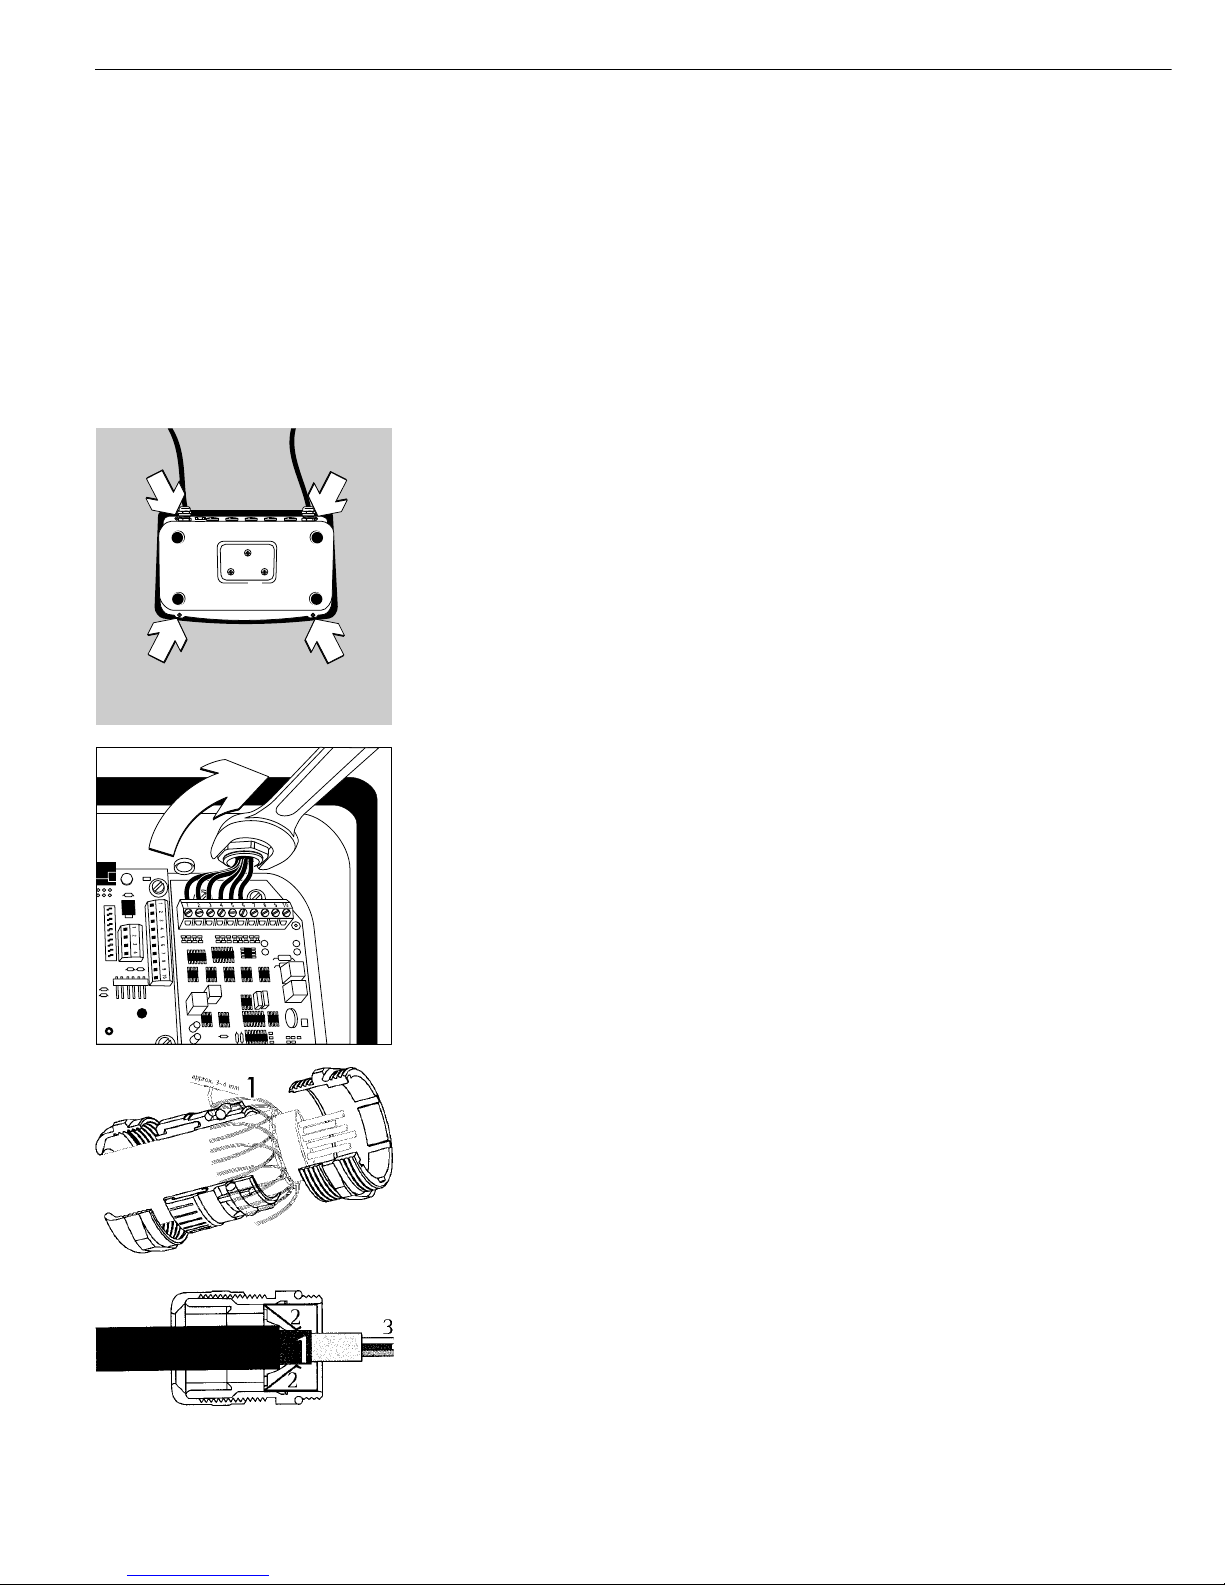
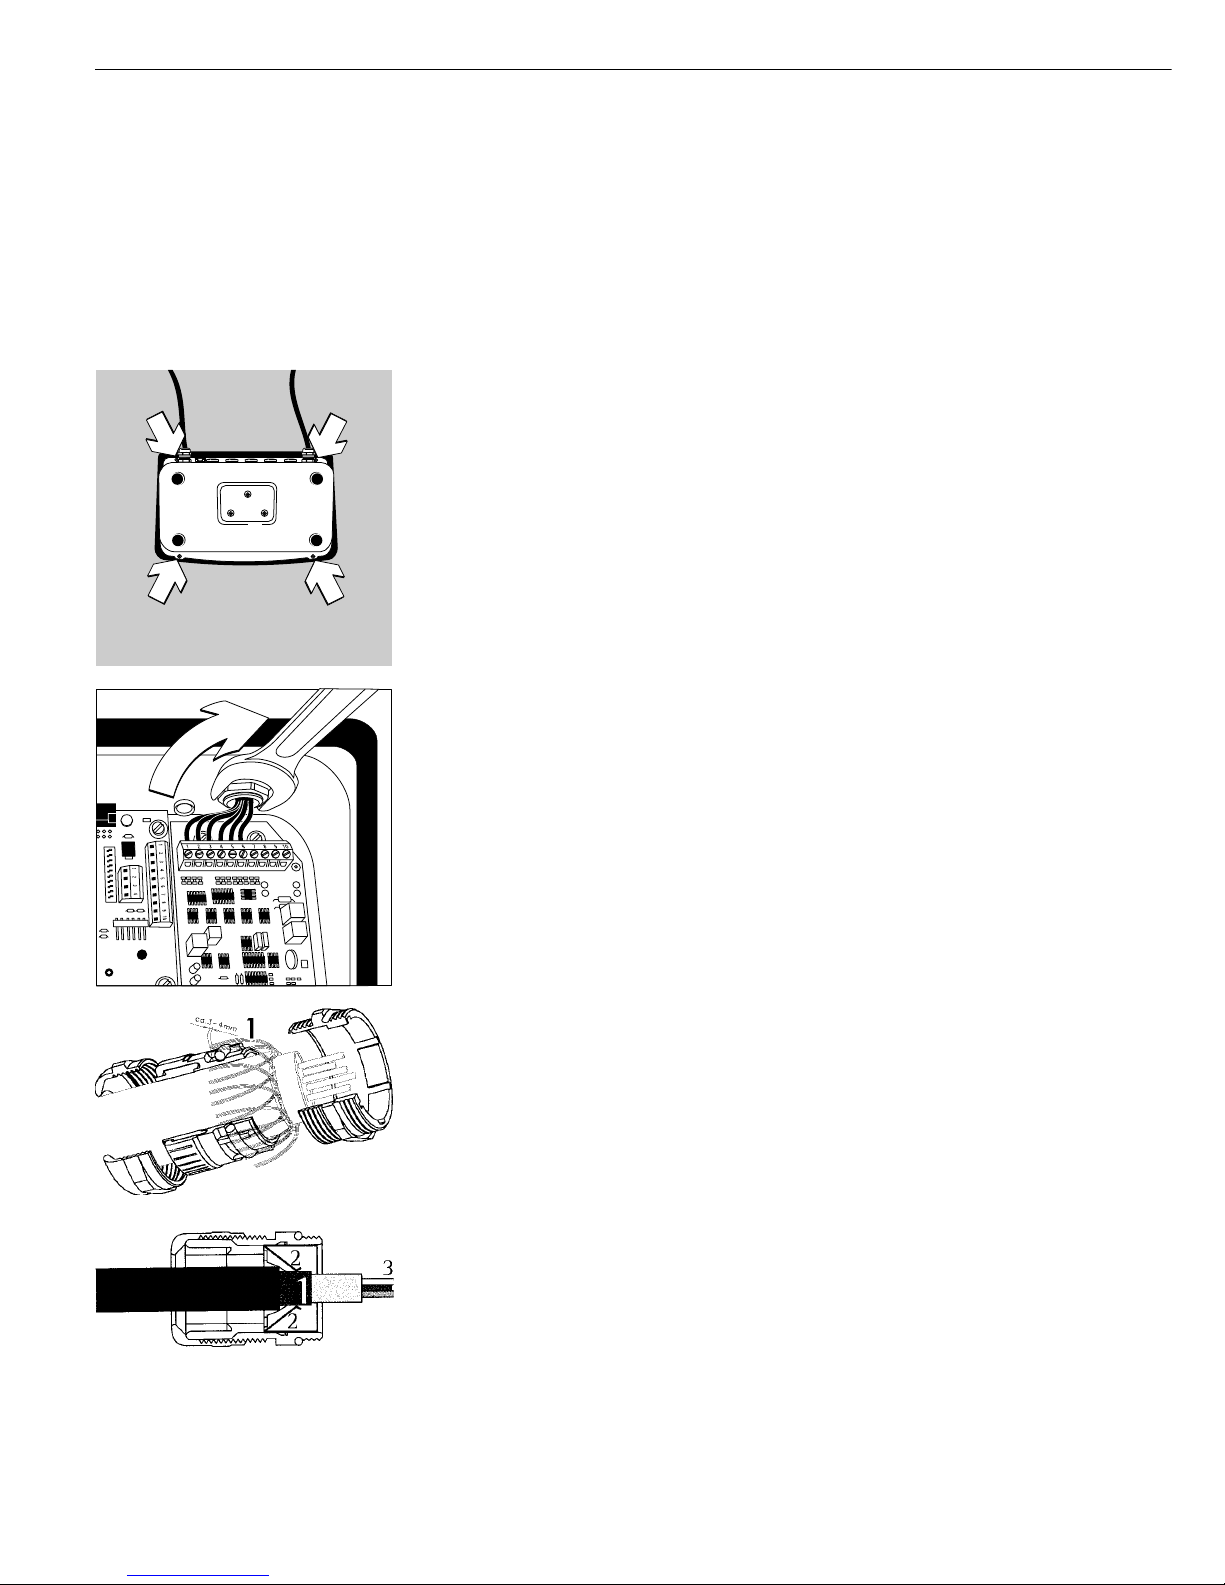
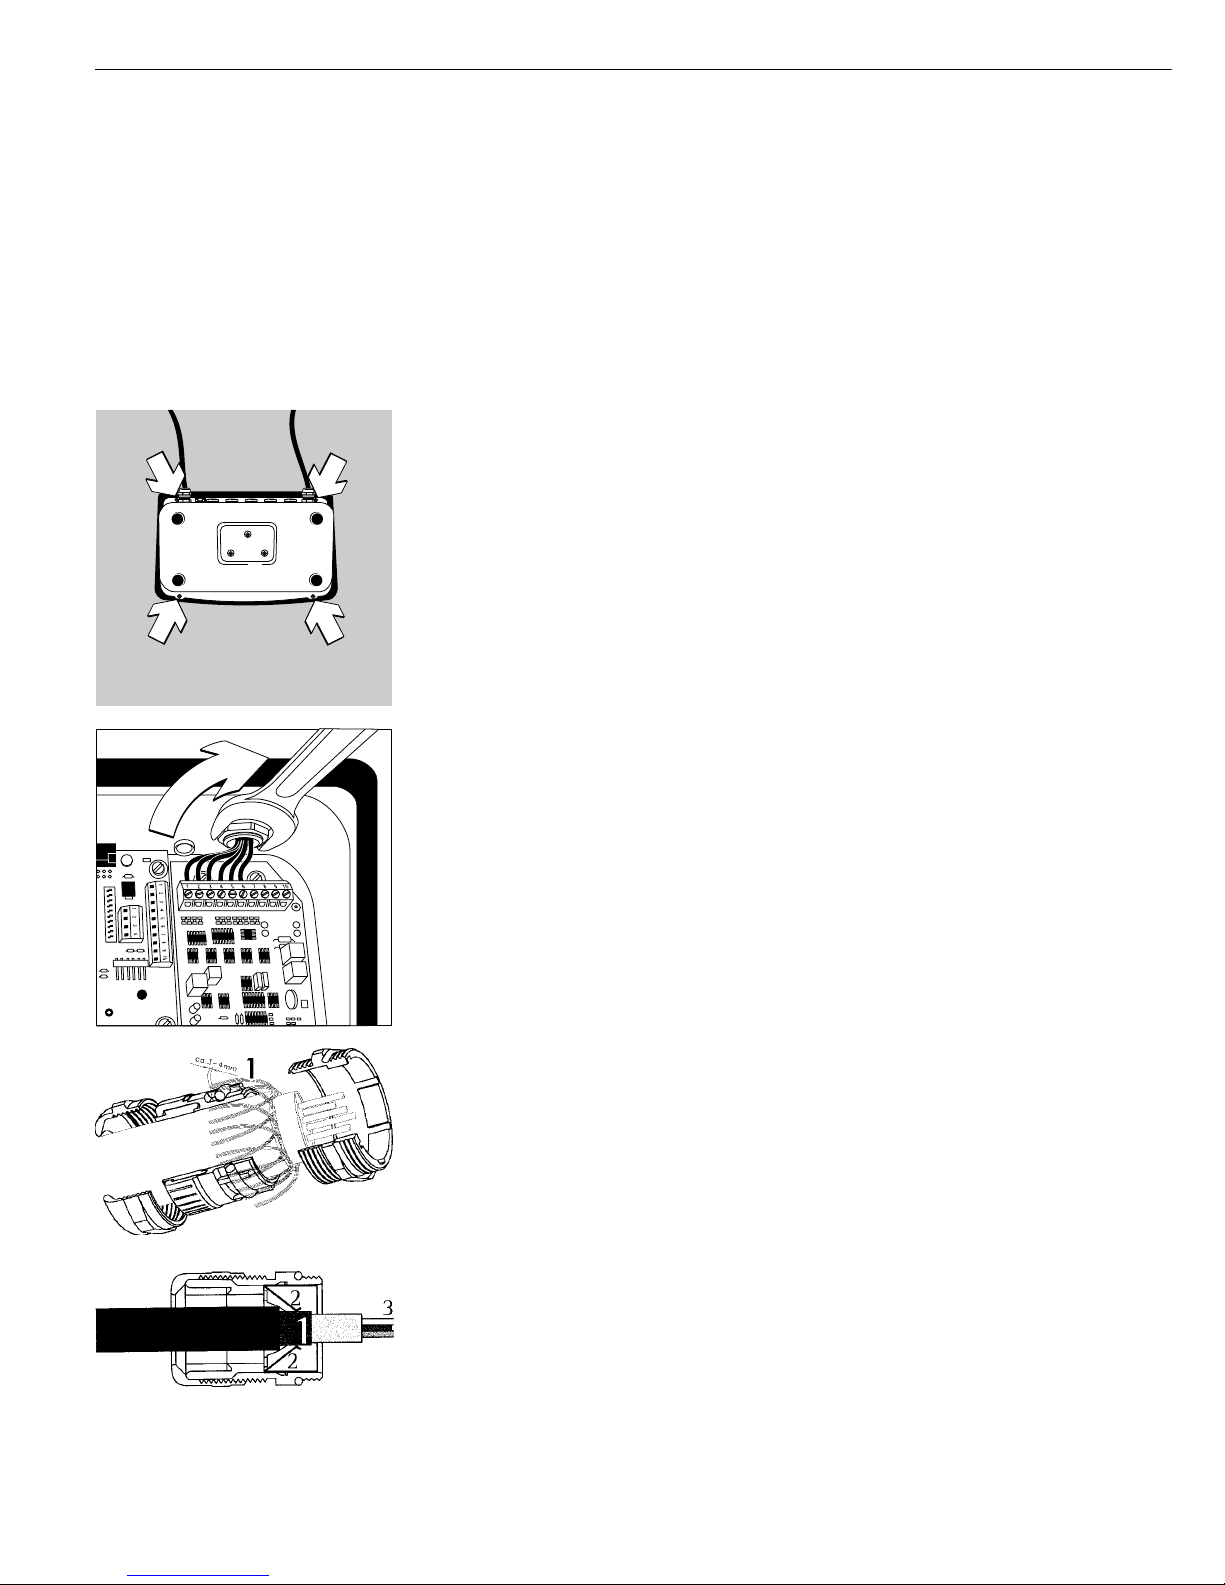
Installing the Weighing Platform
The connecting cable should be installed by a certified technician who has received specialized training from Sartorius.
! Installation work that affects the IP67 protection rating must be performed with extreme
care.
! Any installation work that does not conform to the instructions in this manual will result
in forfeiture of all claims under the manufacturer’s warranty.
! Always make sure the equipment is disconnected from power before performing any
installation, maintenance or repair work.
! An IP67-protected cable gland is installed on the indicator at the factory.
§ To open the indicator, remove the four screws from the front panel and remove the panel.
§ Use the connecting cable from the weighing platform to connect the indicator.
! The cable gland is installed at the factory. Please use extreme caution when performing
any work on the equipment that affects this cable gland. Use a torque wrench and
tighten the cable gland to 5 Nm.
§ Prepare and install the cable as follows:
– Route the cable through the cable gland.
– Close and tighten the cable gland in accordance with the applicable regulations.
– Remove the insulation from a section of the cable end (see illustration). The shielding (1)
must have contact with the clamps (2).
– Expose approx. 15 cm (6 inches) of the individually isolated wires (3) for installation.
– Route the cable through the cable gland.
– It is important to make sure that the shield is in contact with the clamps, because the
shield provides the ground connection for the cable.
6
Page 7

§ Connect the cable to the weighing platform as follows:
– Expose approximately 5 cm (2 inches) of the isolated wires for installation.
– Remove the casing from approximately 1 cm (1/2 inch) of the wires and attach ferrules to
the wire ends.
– Fit the ferrite ferrule over all wires.
– Attach the wires securely to the screw terminals.
Pin Assignments:
No. Signal name Meaning
1 BR_POS Bridge supply voltage (+)
2 SENSE_POS Sense (+)
Bridge supply voltage
3 OUT_POS Measuring voltage positive
4 OUT_NEG Measuring voltage negative
5 SENSE_NEG Sense (–)
Bridge supply voltage
6 BR_NEG Bridge supply voltage (–)
! Please refer to the data sheet or operating instructions for the load cell or weighing plat-
form in question for details on the assignment of wire colors to signals.
Isolate any lines that are not used.
Weighing platforms with 4-conductor technology:
! If a load receptor that uses 4-conductor technology is connected, connect wire 1
(BR_POS) to wire 2 (SENSE_POS) and wire 6 (BR_NEG) to wire 5 (SENSE_NEG).
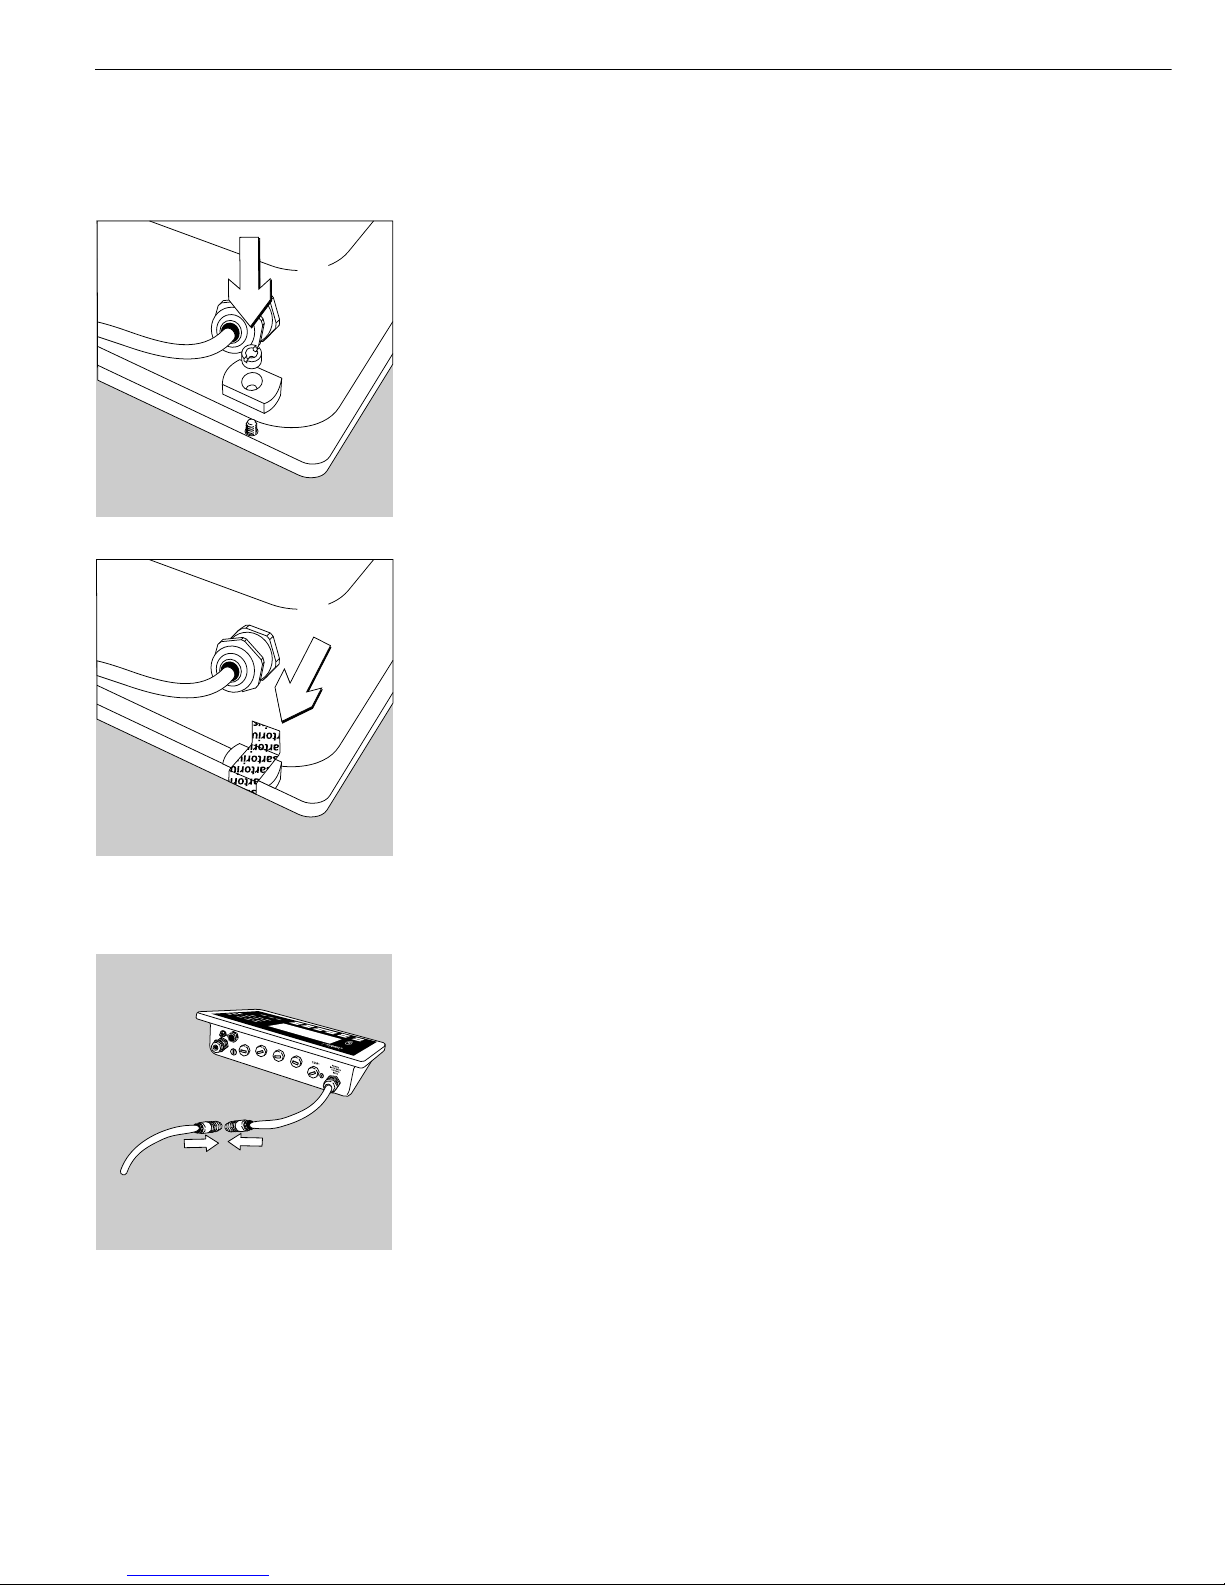
Connecting the Combics to AC Power
§ Check the voltage rating and the plug design.
$ The indicator is powered by an external power supply.
§ Use only original Sartorius power supplies:
– YPS02-X.. for use within the hazardous area.
– YPS02-XV24 24V industrial power module for use within the hazardous area.
Note: Install both cables so that they are stationary
(Devices suitable for flexible cable installation available on request.)
– YPS02-Z.. for use outside the hazardous area.
Connecting the External Rechargeable Battery Pack
– The model YRB02-X external explosion-protected rechargeable battery pack can be
installed within the hazardous area.
Connecting Electronic Peripheral Devices
§ Make absolutely sure to unplug the indicator from AC power before you connect or disconnect a peripheral device (printer or PC) to or from the interface port.
Grounding (Earthing) Using an Equipotential Bonding Conductor
§ Connect the CIXS using a grounding cable (equipotential bonding conductor not part of
the equipment supplied) to the main grounding terminal. In addition, the metal housing
of the power supply is grounded by the protective grounding conductor of the power
cable. The metal housing of the weighing platform is connected to the braided shield of
the AC adapter (power supply).
Warmup Time
To ensure accurate results, the indicator must warm up for 30 minutes before operation.
Only after this time will the indicator have reached the required operating temperature.
Using Equipment Verified as Legal Measuring Instruments in the EU*
$ Make sure to allow the equipment to warm up for at least 24 hours after initial connec-
tion to AC power or after a relatively long power outage.
* including the Signatories of the Agreement on the European Economic Area
7
Page 8

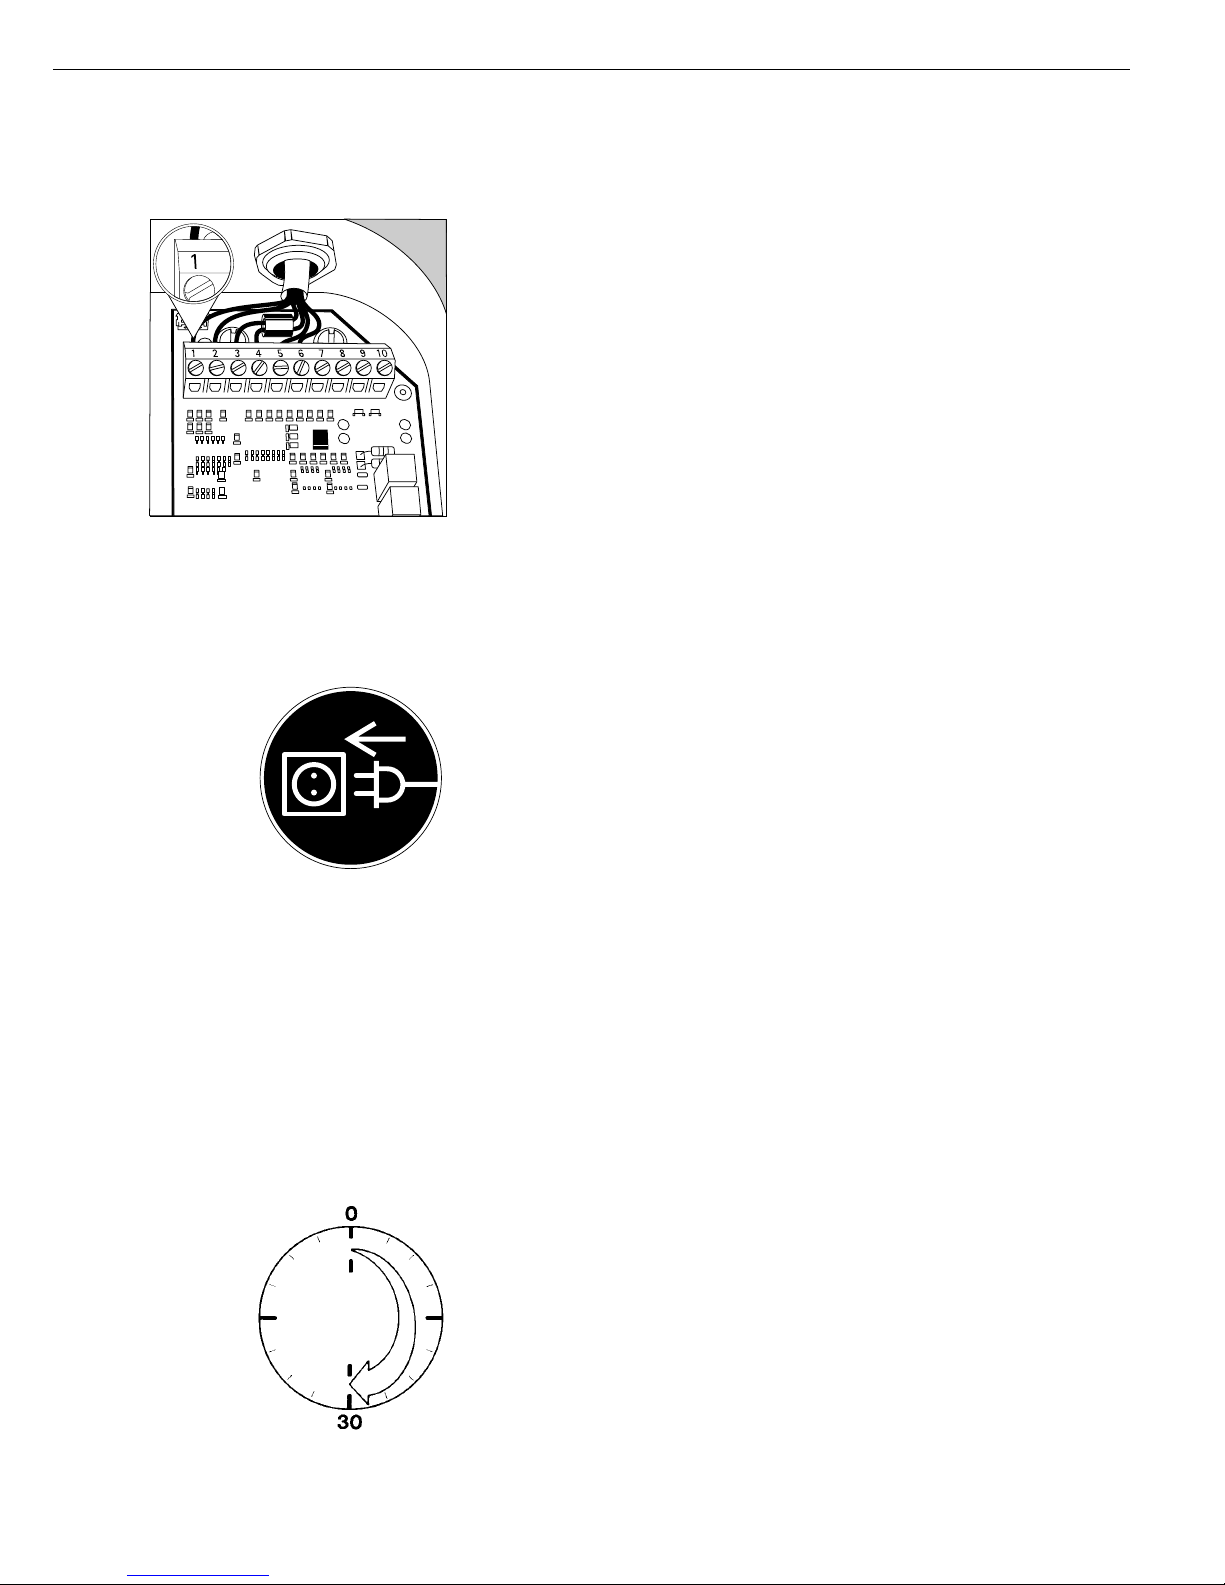
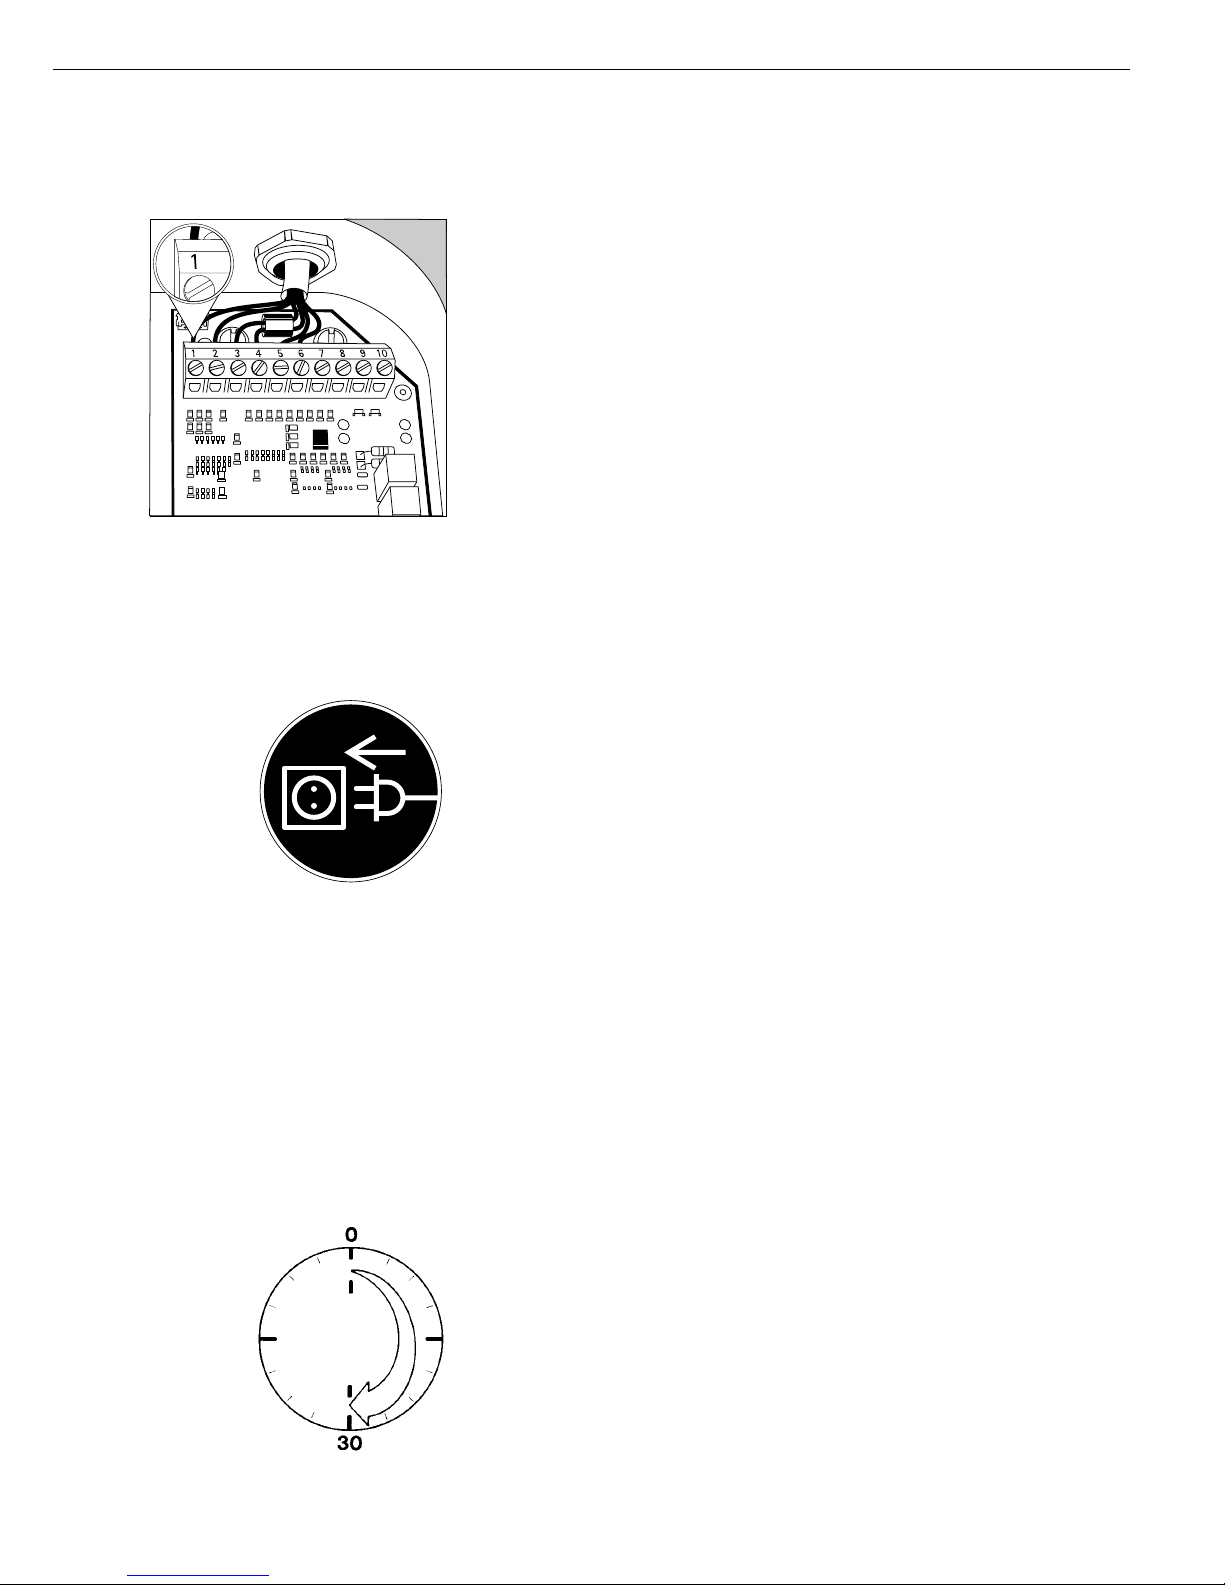
Installing the Verification Adapter for Use in Legal Metrology
(on verifiable models only)
§ Remove the nut located on the back of the indicator.
§ Use the slotted screw to install the adapter plate.
§ Affix the control seal over the adapter plate.
Connecting the External Rechargeable Battery Pack (Accessory; Order No. YRB02-X)
! Disconnect the equipment from AC power (unplug the power supply).
§ Installation in a Zone 1, 2, 20, 21 or 22 hazardous area:
Plug connector (A) (from the indicator) into connector (B) (from the external rechargeable
battery pack) and tighten the threaded connector housing.
Hours of operation: up to 30, depending on the weighing platform connected; without
options.
– Green LED: voltage OK
– Red LED: recharge batteries
Make sure to read the operating instructions for the external explosion-protected
rechargeable battery pack.
8
A
B
Page 9

Service
Regular servicing by a Sartorius technician will ensure the continued weighing
accuracy of your indicator. Sartorius can
offer you service contracts, with your
choice of regular maintenance intervals
ranging from 1 month to 2 years.
The optimum maintenance interval
depends on the operating conditions
at the place of installation and on the
individual tolerance requirements.
Repairs
! Defective equipment must be discon-
nected from power immediately. Repair
work must be performed by authorized
Sartorius service technicians using
original spare parts. Any attempt by
untrained persons to perform repairs
may result in considerable hazards for
the user. As long as the indicator is still
covered by the warranty, send the entire
indicator to the factory for repairs.
Safety Inspection
Safe operation of the equipment is no
longer ensured when:
– there is visible damage to the device or
power cord
– the power supply no longer functions
properly
– the device has been stored for a rela-
tively long period under unfavorable
conditions (such as excessive humidity)
– the equipment has been subjected to
rough handling during shipment.
If there is any indication that safe
operation of the device is no longer
warranted:
§ Disconnect the equipment from power
$ Lock it in a secure place to ensure that
it cannot be used for the time being
§ Notify your nearest Sartorius Service
Center or the International Technical
Support Unit based in Goettingen,
Germany.
! The seals affixed to this equipment
indicate that only authorized service
technicians are allowed to open the
equipment and perform maintenance
work so that safe and trouble-free operation of the equipment is ensured and
the warranty remains in effect.
! If a cable or cable gland is damaged
or defective, replace the cable as a
complete unit with all its connectors.
! Do not open the equipment while it is
carrying current. Wait at least 10 seconds
after disconnecting it from power before
beginning to open the equipment.
Proper fitting of all surfaces is essential
for the IP rating of the housing; for this
reason the device must be opened and
closed by a certified technician.
9
Care and Maintenance Instructions
for Recycling
Cleaning
The Sartorius Combics indicators are
designed in compliance with directives
of the European Hygienic Equipment
Design Group (EHEDG) for contamination prevention. Remove dust from the
equipment (weighing system) regularly;
please refer to the EC type-examination
certificate for details.
! Disconnect the power supply and any
other cables from the indicator.
! Make sure that no liquid enters the
indicator housing.
! Do not use aggressive cleaning agents
(solvents or similar agents)
! Avoid static electricity.
§ Clean the indicator using a piece of
cloth which has been wet with a mild
detergent (soap).
$ If used in the food industry, use a
cleaning agent suitable for the particular
working environment.
§ After cleaning, wipe down the indicator
with a soft, dry cloth.
! Do not wash down the equipment with
water or dry it with compressed air;
this is not permitted.
Cleaning Stainless Steel Surfaces
Clean all stainless steel parts regularly.
Remove the stainless steel load plate
and thoroughly clean it separately. Use
a damp cloth or sponge to wipe down
stainless steel parts on the weighing
instrument. You can use any household
cleaning agent that is suitable for use
on stainless steel. Then clean the equipment thoroughly, making sure to remove
all residues. Afterwards, allow the
equipment to dry. If desired, you can
apply oil to the cleaned surfaces as
additional protection.
Solvents are permitted for use only on
stainless steel parts.
Corrosive Environment
$ Remove all traces of corrosive sub-
stances on a regular basis.
Replacing the Dust Cover
$ Replace damaged dust covers.
§ Place the new dust cover on the indica-
tor and press down on the front and
back along the edges until the cover is
firmly seated.
Sartorius products are packaged to
ensure safe shipment using environmentally friendly materials. If you do
not need to save the packaging after
successful installation of the equipment,
you should return it for recycling. For
information on recycling options, including recycling of old weighing equipment, contact your municipal waste disposal center or local recycling depot.
If the equipment contains batteries,
make sure to remove them before
disposal. Batteries are hazardous waste
and must be disposed of separately.
Please contact your municipal waste
disposal center for details.
Model-specific Information: Serial
Number Coding
The month and year of manufacture are
encoded in the serial number as follows:
Y M M x x x x x
Y Year
1 2000–2006
2 2007–2013
3 2014–2020
4 2021–2027
5 2028–2034
6 2035–2041
7 2042–2048
8 2049-2055
9 2056-2062
The first digit represents a 7-year
period as indicated in the table above.
The next 2 digits represent the month.
The months are numbered consecutively,
starting with 13, over the entire 7-year
period. Thus, the number representing
the month also indicates the specific
year of manufacture.
2000 13-24
2001 25-26
etc.
Example:
113xxxxx -> January 2000
The individual devices are numbered
consecutively in the last 5 digits, start-
ing from 00000 again at the beginning
of each month.
Page 10

Als präzises und robustes Auswertegerät
bietet das EX-Modell CIXS3 (Combics 3)
zuverlässige Wägeergebinsse beim Einsatz in explosionsgefährdeten Bereichen
der Zone 1, 2, 20, 21 und 22.
Das Gerät hat ein Edelstahlgehäuse und
ist leicht zu bedienen.
Weitere Merkmale:
– Große Tasten mit spürbarem Druck-
punkt
– Zahlen- und Buchstabeneingabe
– Große, hinterleuchtete, voll grafikfähige
Punkt-Matrix-Anzeige
– Textunterstützte Bedienführung
– Anschlüsse für zwei Wägeplattformen
– Automatische Initialisierung beim
Einschalten
– Automatisches Tarieren beim Belasten
der Waage
– Optionale Steuerung durch externen
Rechner
Vorteile bei der täglichen Arbeit:
– Kurze Messzeiten
– Unabhängigkeit vom Standort der
Wägeplattform
– Kennzeichnung der Wägegüter mit bis
zu 4 alphanumerischen Bezeichnern
– Flexibilität durch unterschiedliche
Schnittstellen
– Sicherheit durch Codewort-Schutz
– Leichtes Reinigen und Desinfizieren
Zeichenerklärung
Im Text werden folgende Symbole
verwendet:
§ Anweisung für die richtige Bedienung
$ Besondere Anweisung für Ausnahme-
fälle
> Beschreibung der Auswirkungen eines
Bedienschrittes
! Gefahrenhinweise
Anwendungsberatung
Telefon: + 49 (0) 551 / 308-4440
Telefax: + 49 (0) 551 / 308-3791
10 Verwendungszweck
10 Inhalt
11 Warn- und Sicherheitshinweise
12 Inbetriebnahme
12 Lieferumfang
12 Aufstellhinweise
13 Gerätedarstellung
14 Netzanschluss herstellen
14 Eichadapter für den eichpflichtigen
Verkehr montieren
15 Externen Akku anschließen
15 Pflege und Wartung
15 Reparaturen
15 Reinigung
15 Sicherheitsüberprüfung
15 Entsorgung
10
Verwendungszweck Inhalt
Page 11

Sicherheit
§ Diese Betriebsanleitung vor Inbetriebnahme aufmerksam durchlesen.
Der Hersteller haftet nicht für Schäden,
die in Folge von Nichtbeachtung der
Sicherheitshinweise und Warnungen
verursacht werden.
Das EX-Modell CIXS3 erfüllt die Anforderungen der EG-Richtlinie 94/9/EG für
Geräte der Gerätegruppe II, Kategorie 2
(für Gas) bzw. 1 ( für Staub) und ist
gemäß EG-Baumusterprüfbescheinigung KEMA 03ATEX1157X gekennzeichnet mit:
h II 2 G 1 D EEx ib IIC T4 T135°C.
Ferner erfüllt das Gerät die Anforderungen der EG-Richtlinien für elektromagnetische Verträglichkeit und elektrische
Sicherheit (siehe Konformitätserklärungen).
Ein unsachgemäßer Gebrauch kann zu
Schäden an Personen und Sachen führen. Das Gerät ist nur von qualifiziertem
Personal einzusetzen und zu betreiben.
! Das eigensichere Gerät kann in
explosionsgefährdeten Bereichen:
Zone 1 und 2 für Gase,
Zone 20, 21 und 22 für Stäube
eingesetzt werden. Der Einsatz im
explosivstoffgefährdeten Bereich muss
im Einzelfall geprüft werden. Die Installation des Gerätes in der Zone 1, 2, 20,
21 oder 22 ist von einer Fachkraft
gemäß den in Ihrem Land geltenden
Gesetzen, Richtlinien und Normen
durchzuführen. Die entsprechenden
Unfallverhütungsvorschriften einhalten.
Als Fachkraft gilt eine Person, die mit
der Montage, Inbetriebnahme und
Betrieb der Anlage vertraut ist. Die
Fachkraft verfügt über die entsprechende Qualifikation, die einschlägigen länderspezifischen Bestimmungen und
Vorschriften sind Ihr bekannt. Bei
Bedarf den Händler oder Sartorius Kundendienst ansprechen.
! Ein Betrieb der Anlage über die in den
Baumusterprüfbescheinigungen angegebenen Daten hinaus ist nicht zulässig
und gilt als nicht besimmungsgemäßer
Gebrauch. Alle in den Baumusterprüfbescheinigungen genannten Daten und
Beschränkungen sind strikt einzuhalten
(siehe unter: EX-Zertifikate in der
Bedienungsanleitung).
Bei unsachgemäßer Installation entfällt
die Gewährleistung.
– Die Anlage in angemessenen Abständ-
en durch eine dafür entsprechend ausgebildete Fachkraft auf ihre ordnungsgemäße Funktion und Sicherheit
überprüfen lassen.
11
Warn- und Sicherheitshinweise
– Alle Wartungs-, Reinigungs- und
Reparaturarbeiten an dem Modell CIXS3
sind grundsätzlich im spannungsfreiem
Zustand des Gerätes durchzuführen.
Jeder Eingriff in das Gerät (außer von
Sartorius autorisierte Personen) führt
zum Verlust aller Garantieansprüche.
Nur Original- Sartorius-Ersatzteile
verwenden!
– Das CIXS3 nicht unnötig extremen
Temperaturen, aggressiven chemischen
Dämpfen, Feuchtigkeit, Stößen und
Vibrationen aussetzen. Die zulässige
Umgebungstemperatur im Betrieb
beträgt –10°C bis 40°C
– Bei Verwendung fremdbezogener
Kabel auf die Pinbelegungen achten.
Die Anschlüsse des Kabels deshalb vor
Anschluss an die Sartorius Geräte nach
dem entsprechenden Verbindungsplan
prüfen, die abweichend belegten Leitungen trennen. Nicht von Sartorius
gelieferte Kabel unterliegen der
Verantwortung des Betreibers.
– Beim Einsatz des CIXS3 im explosions-
gefährdeten Bereich dürfen alle Strom
führenden Kabel nur im strom-/spannungslosen Zustand von dem Gerät
gezogen oder aufgesteckt werden.
Vor Anschluss oder Trennen von Kabeln
die Waage vom Netz trennen.
– Elektrostatische Aufladung (insbesonde-
re der Schutzhaube) vermeiden, Potenzialausgleichsklemme anschließen.
– Eine Unterbrechung der Potenzialaus-
gleichsleitungen ist untersagt.
– Erscheint Ihnen ein gefahrloser Betrieb
nicht mehr gewährleistet, die Anlage
von der Betriebsspannung trennen und
gegen weitere Benutzung sichern (z.B.
bei einer Beschädigung). Unfallverhütungsvorschriften beachten, Bedienpersonal entsprechnd einweisen.
! Die Spannungsversorgung abschalten
(vom Netz trennen), bevor Zusatzgeräte
angeschlossen oder getrennt werden.
– Die Ummantelung aller Verbindungs-
kabel, sowie die der Litzen der inneren
Verdrahtungen bestehen aus PVCMaterial. Chemikalien, die dieses Material angreifen, müssen von diesen Leitungen ferngehalten werden.
– Für den Zusammenschluss des CIXS3
mit anderen Geräten sind die Angaben
in den jeweiligen EG-Baumusterprüfbescheinigungen zu beachten. Weitere
Informationen sind dem „Nachweis der
Eigensicherheit“ im Anhang der Bedienungsanleitung zu entnehmen.
Installation
– Vorsicht beim Verwenden fremder oder
handelsüblicher RS232-Verbindungskabel: Die Pinbelegungen sind häufig
nicht für Sartorius-Geräte geeignet!
Die Belegung sollte anhand der Verbindungspläne überprüft, abweichende
Leitungen sollten getrennt werden.
! Nur normgerechte Verlängerungskabel
mit Schutzleiter verwenden. Der Schutzleiter darf auf keinen Fall unterbrochen
werden.
! Weist das Gerät oder das Netzkabel
sichtbare Beschädigungen auf, Spannungsversorgung trennen und Gerät vor
weiterer Benutzung sichern.
– Zubehör und Optionen von Sartorius
sind optimal auf das Gerät angepasst.
Daher keine eigene Lösungen verwenden. Hinweise hierzu geben auch unsere
Angaben zur Betriebsqualität (gemäß
den Normen zur Störfestigkeit), die wir
Ihnen gerne zur Verfügung stellen.
$ Bei Problemen wenden Sie sich bitte
an die Kundendienst-Leitstelle von
Sartorius.
IP-Schutz:
– Das Auswertegerät hat nur bei einge-
bauter Gummidichtung und fester Verbindung (festgedrehte Verschlussstopfen) IP65-/IP67-Schutz. Die Installation
von Wägeplattformen muss durch einen
Fachmann ausgeführt und geprüft
werden.
– Wenn ein Datenausgang nachträglich
eingebaut wird, Verschlussstopfen
aufbewahren. Datenausgang durch eine
Kappe oder ähnliches vor Dampf,
Feuchtigkeit und Schmutz schützen.
Einsatz im eichpflichtigen Verkehr:
– Wird das Auswertegerät an eine Wäge-
plattform angeschlossen und die daraus
entstandene Waage zur Eichung
gestellt, sind die dazugehörigen Vorschriften einzuhalten. Beim Anschluss
von Sartorius Plattformen beiliegende
CD »Leitfaden zum Eichen« lesen und
beachten. Beim Anschluss von Sartorius
Plattformen Komformitätserklärung
mit Auflistung der zugelassenen
Wägebereiche beachten.
– Wird bei geeichten Geräten eine der
angebrachten Sicherungsmarken zerstört, sind immer die nationalen Gesetze
und Vorschriften einzuhalten. Eine
Nacheichung der Waage ist erforderlich.
Page 12

Auspacken
§ Das Gerät nach dem Auspacken sofort
auf äußere Beschädigungen überprüfen
$ Im Beschädigungsfall siehe Hinweise im
Kapitel »Pflege und Wartung«, Abschnitt
»Sicherheitsüberprüfung«
$ Alle Teile der Originalverpackung
für einen eventuellen Rücktransport
aufbewahren. Vor Versand alle Kabel
abziehen!
Lieferumfang
– Auswertegerät
– Betriebsanleitung
– Optionen (Sonderausstattung) wie auf
dem Lieferschein vermerkt
Arbeitsschritte zur Inbetriebnahme
1) Wägeplattform an dieses Combics-Auswertegerät anschließen:
siehe übernächste Seite
2) ADU konfigurieren:
siehe Kapitel »Service«
– Eiche | Standard
– Wägebereich, Ablesbarkeit
– Justiergewicht
– mV/V | Geodaten eingeben
– Linearisieren, Justieren
in der Bedienungsanleitung
3) Wägeplattform justieren:
Siehe Kapitel Betrieb, Abschnitt
»Justieren« in der Bedienungsanleitung.
4) Anwendungsprogramm einstellen:
siehe beiliegende Anleitung der Anwendungsprogramme
5) Schnittstellen, Drucker oder Alibispeicher
anschließen
siehe unter »Steckerbelegungsplan«
in der Bedienungsanleitung .
6) Schnittstellen, Drucker oder Alibispeicher
aktivieren durch Voreinstellungen im
Setup:
– Für COM-1/-2
– Druckprotokoll einstellen
– Druckzeilen/-bereiche für jeweiligen
Drucker in der Bedienungsanleitung
7) Der RS-422/RS-485-Datenausgang an
COM2 darf nur dann benutzt werden,
wenn an COM2 der RS-232-Datenausgang nicht angeschlossen ist. Eine
gleichzeitige elektrische Verbindung zu
COM2/RS-232 und COM2/RS422/485
ist also nicht erlaubt.
Aufstellung
Bei der Aufstellung Standorte mit
ungünstigen Einflüssen vermeiden:
– Hitze (Heizung, Sonneneinstrahlung)
– Direkter Luftzug durch offene Fenster
und Türen
– Erschütterungen während des Wägens
– Extreme Feuchtigkeit
Akklimatisieren
Wenn ein kaltes Gerät in eine warme
Umgebung gebracht wird, kann dies zu
Betauung (Kondensation) führen.
Daher sollte man das vom Netz
getrennte Gerät ca. 2 Stunden bei
Raumtemperatur akklimatisieren.
Nichtgebrauch
Die Anlage bei Nichtgebrauch
ausschalten.
Sicherungsmarke an geeichten
Varianten:
Die Sicherung des Gerätes erfolgt mit
dem Namenszug »Sartorius«. Beim Ver-
such die Klebemarke zu entfernen wird
diese zerstört. In diesem Fall erlischt die
Eichgültigkeit und die Waage muss
nachgeeicht werden.
12
Inbetriebnahme
Übersichtsdarstellung der Geräte für den explosionsgefährdeten Bereich
EX- Bereich: Zone 1, 2, 20, 21, 22 Nicht -Ex Bereich
Zenerbarriere PC
oder Wandler
Auswertegerät mit Wägeplattform
24 V Modul Netzgerät EX-Akku-Pack 24 V Modul Netzgerät
(110–230 V) (110–230V)
Page 13

Anzeige und Tastatur: Combics 3
13
Gerätedarstellung
1
2
3
4
5
6
15
16
14
13
12
11
10
9
8
7
21
20
19
18
17
Rückseite:
Anzeige und Tastatur
1 Kontrollleuchten (für Kontroll-
wägen und Klassieren)
2 Umschalttaste für
Buchstabeneingabe
3 Alphanumerische Tastatur
4 Taste »Löschen«
5 Voreinstellungen:
Zugang zum Setup
6 Umschalten Anwendungspro-
gramm | Anwendungsspezifische
Informationen
7 Datenausgabe
8 Brutto/Netto, 2. Einheit oder
10-fach höhere Auflösung
(je nach Voreinstellung)
9 Tarieren
10 Nullstellen
11 Wägeplattform wechseln
12 Ein-/Ausschalten
13 Funktionstasten
14 Graphikfähige Punkt-Matrix-
Anzeige
Rückseite
15 RS232C-Schnittstelle »COM1«
16 DC-Adapterkabel
17 Zugang zum Verriegelungs-
schalter (Standard- oder eichpflichtiger Betrieb)
18 Anschluss Wägeplattform
19 Potenzialausgleichsklemme
(Erdung)
20 Entlüftungsventil, Drehmoment:
1,5 Nm
21 Schnittstelle COM2
Page 14
Wägeplattform installieren
Das Verbindungskabel sollte durch einen geschulten und autorisierten SartoriusFachmann angeschlossen werden.
! Die Schutzart IP-67 beeinflussende Arbeiten äußerst sorgfälltig durchführen.
! Bei unsachgemäßer Installation entfällt die Gewährleistung.
! Arbeiten nur am spannungslosen Gerät ausführen.
! Die Kabeldurchführung (IP67-Schutz) am Auswertegerät ist vormontiert.
§ Die 4 Schrauben der Frontplatte lösen. Frontplatte abnehmen.
§ Wägeplattform mit Auswertegerät verbinden.
! Die Kabelverschraubung ist vormontiert. Alle Arbeiten an der Verschraubung
vorsichtig durchführen. Einen Drehmomentschlüssel verwenden. Drehmoment dieser
Kabelverschraubung: 5 Nm
§ Verbindungskabel abisolieren und montieren:
– Kabel durch die Kabelverschraubung stecken.
– Kabelverschraubung fachgerecht montieren.
– Kabel abisolieren: Die Schirmung (1) muss Kontakt mit den Klemmen (2) haben.
– Montage: Adern (3) des Kabels ca. 15cm lang lassen.
– Kabel durch die Kabelverschraubung stecken.
– Kontakt der Klemmen mit der Schirmung kontrollieren.
14
Page 15
15
§ Kabel der Wägeplattform montieren:
– Das Kabel abisolieren. Adern des Kabels ca. 5 cm lang lassen.
– Adern ca. 1 cm abisolieren und mit Aderendhülsen versehen.
– Ferritring über alle Adern stecken.
– Klemmen verschrauben.
Anschlussbelegung:
Nr. Signalbez. Bedeutung
1 BR_POS Brückenspeisespannung (+)
2 SENSE_POS Sense (+)
Brückenspeisespannung
3 OUT_POS Messspannung positiv
4 OUT_NEG Messspannung negativ
5 SENSE_NEG Sense (-)
Brückenspeisespannung
6 BR_NEG Brückenspeisespannung (-)
! Für die Zuordnung der Farben und Signale der jeweiligen Anleitung/Datenblatt der Wäge-
plattform entnehmen. Alle nicht benutzten Leitungen isolieren oder trennen!
Wägeplattform mit 4-Leitertechnik
! Bei Anschluss eines Lastaufnehmers in 4–Leiter Technik die Leitungen BR_POS (Nr.1) mit
SENSE_POS (Nr.2) und BR_NEG (Nr.6) mit SENSE_NEG (Nr. 5) zusammenklemmen.
Netzanschluss herstellen
§ Spannungswert und Steckerausführung überprüfen.
$ Die Stromversorgung erfolgt über ein Netzgerät.
§ Zugehörige Netzgeräte:
– YPS02-X.. zur Installation im explosionsgefährdeten Bereich.
– YPS02-XV24 24V-Netzmodul zur Installation im explosionsgefährdeten Bereich.
Hinweis: Beide Kabel fest verlegen
(Geräteversion für eine flexible Kabelverlegung auf Anfrage)
– YPS02-Z.. zur Installation ausserhalb des explosionsgefährdeten Bereiches.
Akku-Batteriepack
– YRB02-X EX-Akku-Pack zur Installation im explosionsgefährdeten Bereich.
Anschluss von elektronischen Komponenten (Peripherie):
§ Vor dem Anschluss oder Entfernen von Zusatzgeräten (Drucker, PC, Zener Barriere,
Wandler) muss das Gerät immer vom Netz getrennt werden!
Potenzialausgleichsanschluss herstellen (Erdungsanschluss)
§ CIXS3 mit einem Masseverbindungskabel (nicht im Lieferumfang) an die zentrale
Potenzialausgleichsschiene anschließen. Außerdem ist das metallische Gehäuse des
Netzgerätes über den Schutzleiter des Netzkabels geerdet. Das metallische Gehäuse der
Wägeplattform ist über das Schirmgeflecht des Verbindungskabels zum Netzgerät
verbunden.
Anwärmzeit
Um genaue Resultate zu liefern, braucht das Gerät eine Anwärmzeit von 30 Minuten.
Erst dann ist die notwendige Betriebstemperatur erreicht.
Einsatz bei Eichpflicht:
$ Nach erstmaligem Anschluss an das Stromnetz beträgt die Anwärmzeit 24 Stunden.
Page 16

Eichadapter montieren
(eichfähiger Auslieferungszustand)
§ Mutter an der Rückseite des Auswertegerätes entfernen.
§ Eichadapter-Platte mit der Schlitzschraube befestigen.
§ Eichadapter-Platte mit Sicherungsmarke überkleben.
Externen Akku anschließen (Zubehör: YRB02-X)
! Auswertegerät von der Spannungsversorgung trennen.
§ Installation in Zone 1, 2, 20, 21 oder 22:
Die Steckverbinder A (vom Auswertegerät) und B (vom Akku-Pack) fest verschrauben.
Die Betriebsdauer beträgt maximal 30 h (je nach angeschlossener Wägeplattform,
ohne angeschlossene Optionen).
– leuchtet die grüne LED ist die Spannung ok
– leuchtet die rote LED, den Akku aufladen.
Die Betriebsanleitung des EX-Akku-Pack lesen.
16
A
B
Page 17

Service
Die regelmäßige Wartung Ihres Geräts
durch den Sartorius-Kundendienst
gewährleistet fortdauernde Messsicherheit. Sartorius bietet Ihnen Wartungsverträge mit Zyklen von 1 Monat bis zu
2 Jahren. Das Wartungsintervall hängt
von den Betriebsbedingungen und
Toleranzanforderungen ab.
Reparaturen
! Defektes Gerät sofort vom Netz trennen.
Reparaturen nur durch von Sartorius
autorisiertes Fachpersonal und mit
Originalersatzteilen durchführen lassen.
Durch unsachgemäße Reparaturen können erhebliche Gefahren für den Benutzer entstehen. Während der Garantiezeit
das komplette Auswertegerät einsenden.
Sicherheitsüberprüfung
Ein gefahrloser Betrieb ist nicht mehr
gewährleistet:
– wenn das Gerät oder die Netzanschluss-
leitung sichtbare Beschädigungen
aufweist,
– wenn das Netzgerät nicht mehr arbeitet,
– bei längerer Lagerung unter ungünstigen
Verhältnissen (z. B. extremer Feuchte),
– nach schweren Transportbeanspruchun-
gen.
In diesen Fällen
§ das Gerät vom Netz trennen,
$ es vor weiterer Benutzung sichern und
$ den Sartorius-Kundendienst benach-
richtigen.
! Die Siegelmarken weisen darauf hin,
dass das Gerät nur durch autorisierte
Fachkräfte geöffnet und gewartet wer-
den darf, damit der einwandfreie und
sichere Betrieb des Gerätes gewährleis-
tet ist und die Garantie
erhalten bleibt.
! Defekte oder beschädigte Kabel oder
Kabelverschraubungen als Einheit aus-
tauschen lassen.
! Gerät nicht unter Spannung öffnen.
Nach der Trennung vom Netz mindes-
tens 10 Sekunden warten, bis das Gerät
geöffnet wird. Da die Passflächen an
den Gehäuseteilen den IP-Schutz beein-
flussen, das Auswertegerät sachkundig
öffnen und verschließen.
17
Pflege und Wartung Entsorgung
Reinigung
Das Auswertegerät entspricht den Richtlinien der EHEDG (European Hygienic
Equipment Design Group) zur Vermeidung von Kontaminierungen. Das Gerät
(Wägeanlage) regelmäßig von Staub
befreien, siehe auch EG-Baumusterprüfbescheinigung.
! Auswertegerät vom Netzgerät trennen,
angeschlossenes Datenkabel lösen.
! Flüssigkeit darf nicht ins Innere
gelangen.
! Keine aggressiven Reinigungsmittel
(Lösungsmittel o.ä.) verwenden.
! Elektrostatische Aufladung vermeiden.
§ Auswertegerät mit in Seifenlauge leicht
angefeuchtetem Tuch reinigen.
$ Bei Einsatz in der Lebensmittelindustrie
die dort gebräuchlichen Reiniger benutzen.
§ Auswertegerät mit weichem Tuch
abtrocknen.
! Abspritzen des Gerätes mit Wasser oder
Abblasen mit Druckluft ist unzulässig.
Reinigung der Edelstahloberflächen
Grundsätzlich alle Edelstahlteile in
regelmäßigen Abständen reinigen. Edelstahllastplatte separat gründlich reinigen. Edelstahlteile an der Waage mit
einem feuchten Tuch oder Schwamm
durch einfaches Abreiben reinigen.
Nur handelsübliche Haushaltsreiniger
verwenden, die für Edelstahl geeignet
sind (z.B. Stahlfix). Danach gründlich
nachspülen, bis alle Rückstände beseitigt sind. Anschließend das Gerät trocknen lassen. Als zusätzlicher Schutz kann
ein Pflegeöl aufgetragen werden.
Lösungsmittel nur ausschließlich für die
Reinigung von Edelstahlteilen verwenden.
Korrosive Umgebung
$ Korrosionsauslösende Substanzen regel-
mäßig entfernen.
Schutzhaube wechseln
$ Beschädigte Schutzhaube auswechseln.
§ Neue Schutzhaube an der Vorder- und
Rückseite des Gerätes über den Rand
drücken, bis sie fest sitzt.
Die Verpackung schützt SartoriusProdukte ausreichend vor Transportschäden. Sie besteht aus umweltverträglichen Materialien, die als wertvolle
Sekundärrohstoffe dem Recycling zugeführt werden sollten. Dasselbe gilt für
Altgeräte.
Akkus sind vor der Verschrottung des
Gerätes auszubauen und gehören in den
Sondermüll.
Informationen zur Entsorgung bieten
Gemeinde- und Stadtverwaltungen.
Waagenspezifische Informationen/
Codierung der Seriennummer
Das Herstelldatum des Gerätes ist in der
Seriennummer codiert. Die Struktur
ergibt sich wie folgt:
JMM x x x x x
J Jahr
1 2000–2006
2 2007–2013
3 2014–2020
4 2021–2027
5 2028–2034
6 2035–2041
7 2042–2048
8 2049-2055
9 2056-2062
Die Jahresspalte J steht für die Jahres-
gruppennummer, die einen Zeitraum
von jeweils 7 Jahren definiert. Innerhalb
jeder Jahresgruppe werden die Monate
(M M) von 13 an hochgezählt.
2000 13-24
2001 25-26
...
Beispiel:
113xxxxx (Januar 2000)
xxxxx ist eine fortlaufende Nummer,
die jeden Monat neu hochgezählt wird.
Page 18

Indicateur précis et robuste, le modèle
CIXS3-EX (Combics 3) garantit des
résultats de pesée fiables lors de
l’utilisation dans les domaines à risques
d’explosions et les zones 1, 2, 20, 21
et 22.
L’appareil a un boîtier en acier inoxydable et il est facile à utiliser. Autres
caractéristiques :
– Grandes touches avec un point de
poussé parfaitement perceptible
– Clavier alphanumérique avec une
touche ABC multifonctionnelle
– Grand afficheur rétroéclairé à matrice
à points entièrement graphique
– Interface utilisateur avec des textes
clairs en français
– Possibilité de raccorder deux plates-
formes de pesée
– Initialisation automatique à la mise sous
tension
– Tarage automatique lors du chargement
de la balance
– Possibilité de commander à distance par
l’intermédiaire d’un ordinateur externe.
Avantages pour le travail quotidien :
– Temps de mesure courts
– Utilisables indépendamment du lieu
d’installation de la plate-forme de pesée
– Possibilité d’identifier facilement les
échantillons à peser avec jusqu’à 4 ID
alphanumériques
– Flexibles dans leur utilisation grâce à
différentes interfaces
– Assurés contre toute modification non
autorisée des paramètres de fonctionne-
ment grâce à un mot de passe (code)
– Faciles à nettoyer et à désinfecter
Signification des symboles
Les symboles suivants sont utilisés dans
ce mode d’emploi :
§ Indique une action qu’il est conseillé
d’effectuer
$ Indique une action qu’il est conseillé
d’effectuer uniquement sous certaines
conditions
> Décrit ce que provoque l’action que
vous venez d’effectuer
! Indique un danger
Assistance
Téléphone : +49 (0) 551/308-4440
Téléfax : +49 (0) 551/308-3791
18 Description générale
18 Contenu
19 Consignes de sécurité
20 Mise en service
20 Contenu de la livraison
20 Conseils d’installation
21 Schéma des appareils
23 Raccordement au secteur
24 Montage de l’adaptateur
de vérification pour l’utilisation
en usage réglementé
24 Raccordement de l’accumulateur
externe
25 Entretien et maintenance
25 Réparations
25 Nettoyage
25 Contrôle de sécurité
25 Recyclage
18
Description générale Contenu
Page 19

Sécurité
§ Veuillez lire attentivement cette notice
d’installation avant la première mise en
service.
Le fabricant ne peut pas être tenu
responsable de dommages causés par le
non-respect des conseils de sécurité.
Le modèle CIXS3-EX est conforme
à la directive CE 94/9/CE concernant les
appareils du groupe d’appareils II,
catégorie 2 (pour le gaz) ou 1 (pour la
poussière), et elle est identifiée conformément au certificat d’examen de type
CE KEMA 03ATEX1157X :
h II 2 G 1 D EEx ib IIC T4 T135°C.
En outre l’appareil est conforme aux
directives CE concernant la compatibilité
électromagnétique et la sécurité électrique (voir les déclarations de conformité). Une utilisation non conforme de
l’appareil peut provoquer des dommages et s’avérer dangereuse pour l’utilisateur. L’appareil ne doit être utilisé
que par du personnel qualifié.
! L’appareil à sécurité intrinsèque peut
être utilisé dans des domaines à risques
d’explosions :
Zones 1 et 2 pour les gaz,
Zones 20, 21 et 22 pour les poussières.
L’utilisation dans un domaine à risques
d’explosions doit être examinée cas par
cas. L’installation de l’appareil dans la
zone 1, 2, 20, 21 ou 22 doit être effectuée par un spécialiste conformément
aux lois, directives et normes en vigueur
dans votre pays. Suivre le règlement de
prévention des accidents correspondant.
Un spécialiste est une personne qui est
familiarisée avec le montage, la mise en
service et le fonctionnement de l’installation. Le spécialiste dispose de la qualification correspondante, il connaît les
dispositions et les directives en vigueur.
En cas de besoin s’adresser au vendeur
ou au service après-vente Sartorius.
! Un fonctionnement du CIXS3 au-delà
des données indiquées dans le certificat
d’examen de type n’est pas autorisé et
est considéré comme utilisation non
conforme aux dispositions. Toutes les
limitations mentionnées dans le certificat d’examen de type doivent être
respectées (voir sous : certificats EX
dans le mode d’emploi).
– Toute installation non conforme fait
perdre tout droit à la garantie.
– Faire contrôler régulièrement le bon
fonctionnement et la sécurité de
l’installation par un spécialiste ayant
reçu la formation nécessaire.
– Toutes les opérations de maintenance,
de nettoyage et de réparation effectuées
sur le modèle CIXS3 doivent uniquement
avoir lieu lorsque l’appareil n’est pas sous
tension. Toute intervention sur l’appareil (excepté de la part des personnes
autorisées par la société Sartorius) fait
19
Consignes de sécurité
perdre tout droit à la garantie. N’utiliser
que des pièces de rechange Sartorius !
– N’exposez pas inutilement le CIXS3
à des températures, des dégagements
chimiques corrosifs, de l’humidité, des
chocs et des vibrations extrêmes.
La gamme de température ambiante
autorisée pendant le fonctionnement
est de -10°C à 40°C
– En cas d’utilisation de câbles préparés
par d’autres, veuillez contrôler l’affectation des broches. C’est pourquoi vous
devez vérifier les schémas de câblage
correspondants du câble avant de le
connecter aux appareils Sartorius et
supprimer les branchements non
conformes. L’utilisateur engage sa
propre responsabilité concernant tout
raccordement de câbles non livrés par
Sartorius.
– En cas d’utilisation du CIXS3 dans des
domaines à risques d’explosions, tous
les câbles conducteurs ne doivent être
tirés ou branchés que lorsque la balance
est hors tension. Avant de connecter ou
de retirer des câbles, débrancher la
balance.
– Eviter les charges électrostatiques,
connecter la borne de compensation de
potentiel.
– Le conducteur de protection ne doit pas
être interrompu.
– S’il vous semble que le CIXS3 ne peut
plus fonctionner sans danger, veuillez
le mettre hors service en le débranchant
du secteur et assurez-vous qu’il ne sera
plus utilisé (par ex. en cas de dommage). Suivre le règlement de prévention
des accidents, informer le personnel en
conséquence.
! Débrancher l’appareil du secteur avant
de connecter ou de séparer des accessoires.
– La gaine de tous les câbles de raccorde-
ment ainsi que les câbles toronnés des
câblages intérieurs sont en PVC. Tout
produit chimique pouvant attaquer
cette matière doit être tenu éloigné de
ces câbles.
– Lors de la connexion du CIXS3 à
d’autres appareils il faut tenir compte
des données caractéristiques se trouvant
dans les certificats d’examen de type CE
respectifs. Vous trouverez d’autres
informations dans le “Certificat de
preuve de sécurité intrinsèque“
à l’annexe de cette notice.
Installation
– Attention si vous utilisez des câbles de
raccordement RS232 prêts à l’emploi :
les câbles RS232 préparés par d’autres
ont souvent une mauvaise affectation
des broches pour les appareils Sartorius.
C’est pourquoi vous devez vérifier les
schémas de câblage avant de connecter
et de supprimer les branchements non
conformes.
! N’utiliser que des câbles de rallonge qui
correspondent aux normes et possèdent
également un conducteur de protection.
Le conducteur de protection ne doit pas
être interrompu.
! Si l’appareil ou le câble de réseau est
endommagé : débranchez-les de l’alimentation en courant et assurez-vous
que l’appareil ne sera plus utilisé.
– Les accessoires et options d’origine
Sartorius ont été adaptés de façon
optimale à l’appareil. C’est pourquoi il
ne faut pas utiliser de solutions personnelles. Vous trouverez également des
conseils à ce propos dans nos informations sur la qualité du fonctionnement
(conformément aux normes relatives
à l’immunité aux émissions parasites),
que nous mettons volontiers à votre
disposition.
$ En cas de problèmes, veuillez vous
adresser au service après-vente de
Sartorius.
Indice de protection IP :
– La protection IP65-/IP67 de l’indicateur
n’est garantie que lorsque l’appareil est
muni d’un joint en caoutchouc et que la
connexion est fixe (tous les capuchons
filetés sont serrés). L’installation de
plates-formes de pesée doit être effectuée et contrôlée par un spécialiste.
– Veuillez conserver le capuchon fileté de
l’appareil en cas de montage ultérieur
d’une interface de données. Protégez
l’interface de données en vissant un
capuchon ou un dispositif similaire pour
protéger contre les vapeurs, l’humidité
et la poussière.
Utilisation en usage réglementé :
– Si l’indicateur est raccordé à une plate-
forme de pesée et que l’instrument de
pesage qui en résulte est soumis à la
vérification, vous devez respecter les
directives correspondantes. Veuillez
d’abord lire et respecter le contenu du
CD ci-joint : « Manuel pour la vérification ». En cas de raccordement de
plates-formes Sartorius, respecter la
déclaration de conformité contenant la
liste des étendues de pesée autorisées.
– En cas de destruction des sceaux adhé-
sifs de vérification, vous devez respecter
les lois et directives nationales en
vigueur dans votre pays. Une nouvelle
vérification de la balance est obligatoire.
Page 20
Déballage
§ Aussitôt après avoir déballé l’appareil,
veuillez vérifier s’il ne présente aucune
détérioration externe visible.
$ Si ce devait être le cas, veuillez vous
reporter au chapitre «Entretien et maintenance», paragraphe «Contrôle de
sécurité».
$ Veuillez conserver tous les éléments
de l’emballage au cas où une éventuelle
réexpédition serait nécessaire. Avant le
transport, démontez tous les câbles
de connexion !
Contenu de la livraison
– Indicateur
– Mode d’emploi
– Options (équipement spécial) conformé-
ment au bordereau de livraison
Opérations pour la mise en service
1) Connecter la plate-forme de pesée à cet
indicateur Combics :
voir deux pages plus loin
2) Configuration du convertisseur
analogique-numérique :
voir chapitre «Service»
– Métrologie légale | Standard
– Etendue de pesée, précision de lecture
– Poids d’ajustage
– mV/V | Entrée des données
géographiques
– Linéarisation, ajustage
dans le mode d’emploi
3) Ajuster la plate-forme de pesée :
Voir chapitre Fonctionnement,
paragraphe «Ajustage» dans le mode
d’emploi.
4) Régler le programme d’application :
voir la notice d’utilisation jointe des
programmes d’application
5) Connecter des interfaces, des
imprimantes ou des mémoires alibi
voir sous Plan d’affectation des connecteurs dans le mode d’emploi.
6) Activer des interfaces, des imprimantes
ou des mémoires alibi par préréglages
dans le setup :
– Pour COM-1/-2
– Régler le procès-verbal d’impression
– Lignes/zones d’impression pour
l’imprimante respective dans le mode
d’emploi
7) Vous pouvez utiliser le connecteur
d’interface RS422/RS485 sur COM2
uniquement si le connecteur d’interface
RS232 n’est pas raccordé à COM2.
En d’autres mots, il n’est pas permis
d’avoir une connexion électrique simultanée de RS 232 et de RS 422/485 sur
COM2.
Installation
Pour l’installation, éviter des endroits
présentant des influences défavorables :
– Chaleur (chauffage, rayons du soleil)
– Courant d’air direct provoqué par des
fenêtres et des portes ouvertes
– Vibrations pendant la pesée
– Humidité extrême
Adaptation à l’environnement
Lorsqu’un appareil froid est placé
dans un environnement nettement plus
chaud, il peut se produire de la conden-
sation. C’est pourquoi il faut adapter
l’appareil, débranché du secteur, à la
température de la pièce pendant
environ deux heures.
Non utilisation
En cas de non utilisation, mettre
l’installation hors tension.
Sceaux de sécurité sur les modèles
approuvés pour l’utilisation en usage
réglementé :
Ce sceau adhésif est constitué d’une
bande de sécurité portant le sigle de la
société Sartorius. Si l’on tente de l’enle-
ver, ce sceau adhésif se brise. Dans ce
cas, l’autorisation pour l’utilisation en
usage réglementé n’est plus valide et la
balance doit faire l’objet d‘une nouvelle
vérification.
20
Mise en service
Schéma des appareils pour les domaines à risques d’explosions
Domaine à risques d’explosions : Zone 1, 2, 20, 21, 22 Domaine Sans risques d’explosions
Barrière Zener PC
ou convertisseur
Indicateur avec plate-forme de pesée
24 V Module Bloc d’alimentation Accumulateur externe 24 V Module Bloc d’alimentation
(110–230 V) antidéflagrant (110–230 V)
Page 21

Afficheur et clavier: Combics 3
21
Schéma des appareils
1
2
3
4
5
6
15
16
14
13
12
11
10
9
8
7
21
20
19
18
17
Face arrière :
Afficheur et clavier
1 Voyants de contrôle
(pour contrôle +/- et classement)
2 Touche de commutation pour
l’entrée de lettres
3 Clavier alphanumérique
4 Touche «Effacer»
5 Préréglages : Accès au setup
6 Commutation Programme
d’application|informations
spécifiques à l’application
7 Sortie des données
8 Brut/Net, 2ème unité ou
résolution 10 fois supérieure
(selon le réglage)
9 Tarage
10 Mise à zéro
11 Changement de plate-forme de
pesée
12 Mise en marche/Arrêt
13 Touches de fonction
14 Afficheur à matrice à point
graphique
Face arrière
15 Interface RS232C «COM1»
16 Câble de réseau avec connecteur
spécifique au pays
17 Accès au commutateur de
verrouillage (fonctionnement
standard ou en usage réglementé)
18 Raccordement de la plate-forme
de pesée
19 Borne de compensation de
potentiel (mise à la terre)
20 Vanne d’aération, moment de
couple : 1,5 Nm
21 Interface COM2
Page 22
Installation de la plate-forme de pesée
Seul un technicien spécialisé de la société Sartorius ayant reçu la formation nécessaire
est autorisé à connecter le câble de raccordement.
! Toutes les opérations pouvant influer sur la protection IP67 doivent être effectuées avec
le plus grand soin.
! Toute installation non conforme fait perdre tout droit à la garantie.
! Toutes les opérations effectuées sur l’appareil doivent uniquement avoir lieu lorsque
l’appareil n’est pas sous tension.
! Le passe-câble (protection IP67) sur l’indicateur est déjà monté.
§ Retirer la plaque avant : dévisser les 4 vis de la plaque avant.
§ Connecter la plate-forme de pesée à l’indicateur.
! Le presse-étoupe est déjà monté. Tous les travaux de raccordement doivent être effectués
avec le plus grand soin ! Utiliser une clé dynamométrique. Moment de ce presse-étoupe :
5 Nm.
§ Dénuder et monter le câble de raccordement :
– Introduire le câble à travers le presse-étoupe.
– Monter le presse-étoupe correctement.
– Dénuder le câble : le blindage (1) doit être en contact avec les bornes de connexion (2).
– Pour le montage : laisser aux conducteurs (3) du câble une longueur d’environ 15 cm.
– Introduire le câble à travers le presse-étoupe.
– Contrôler que les bornes de connexion sont bien en contact avec le blindage.
22
Page 23
23
§ Monter le câble de la plate-forme de pesée :
– Dénuder le câble. Laisser aux conducteurs du câble une longueur d’environ 5 cm.
– Dénuder les conducteurs sur une longueur d’environ 1 cm et y mettre des embouts.
– Passer l’anneau en ferrite autour de tous les conducteurs.
– Visser fermement les conducteurs aux bornes de connexion.
Schéma d’affectation :
No. Désignation du signal Signification
1 BR_POS Tension d’alimentation du pont (+)
2 SENSE_POS Sense (+)
Tension d’alimentation du pont
3 OUT_POS Signal positif
4 OUT_NEG Signal négatif
5 SENSE_NEG Sense (-)
Tension d’alimentation du pont
6 BR_NEG Tension d’alimentation du pont (-)
! Pour l’affectation des couleurs/signaux, utiliser le mode d’emploi/la fiche technique
respectif de la plate-forme de pesée. Isoler ou séparer tous les conducteurs inutilisés !
Plate-forme de pesée avec système à 4 conducteurs
! Lors du raccordement d’un récepteur de charge de système à 4 conducteurs, il faut relier
BR_POS (n°1) à SENSE_POS (n°2) et BR_NEG (n°6) à SENSE_NEG (n°5).
Raccordement au secteur
§ Vérifier la tension d’alimentation et la version de la prise secteur.
$ L’alimentation en courant s’effectue par un bloc d’alimentation.
§ Blocs d’alimentation correspondants :
– YPS02-X.. pour l’installation dans un domaine à risques d’explosions.
– YPS02-XV24 module 24V pour l’installation dans un domaine à risques d’explosions.
Remarque : poser les deux câbles à demeure
(version d’appareils pour une pose flexible des câbles sur demande)
– YPS02-Z.. pour l’installation en dehors d’un domaine à risques d’explosions.
Accumulateur externe
– YRB02-X Accumulateur externe antidéflagrant pour l’installation dans un domaine
à risques d’explosions.
Raccordement d’appareils périphériques électroniques :
§ Ne connectez ou déconnectez les appareils périphériques (imprimante, ordinateur, barrière
Zener, convertisseur) qu’une fois l’appareil débranché !
Connexion du conducteur d’équipotentialité (mise à la terre)
§ Relier le CIXS3 à une ligne d’équipotentialité centrale à l’aide d’un câble de mise à la
masse (non compris dans la livraison). Le boîtier métallique du bloc d’alimentation est en
outre mis à la terre par le conducteur de protection du câble d’alimentation. Le boîtier
métallique de la plate-forme de pesée est mis à la terre par la tresse blindée du câble de
raccordement menant au bloc d’alimentation.
Temps de préchauffage
Après tout premier raccordement au secteur, l’appareil a besoin d’un temps de préchauffage d’au moins 30 minutes afin de pouvoir donner des résultats précis. L’appareil atteint
la température de fonctionnement nécessaire seulement après ce laps de temps.
Utilisation en usage réglementé de l’appareil approuvé :
$ Respecter un temps de préchauffage d’au moins 24 heures après le premier raccordement
au secteur.
Page 24
Montage de l’adaptateur de vérification pour l’utilisation en usage réglementé
(état de la livraison pour usage en métrologie légale)
§ Enlever l’écrou sur la face arrière de l’indicateur.
§ Fixer la plaque de l’adaptateur de vérification avec la vis à fente.
§ Coller la bande de sécurité sur l’adaptateur de vérification.
Raccordement de l’accumulateur externe (accessoire : YRB02-X)
! Débrancher l’indicateur de l’alimentation en courant.
§ Installation dans la zone 1, 2, 20, 21 ou 22 :
Raccorder les connecteurs A (de l’indicateur) et B (de l’accumulateur externe).
La durée de vie est d’au maximum 30 h (selon la plate-forme de pesée connectée,
sans options connectées).
– si la DEL verte est allumée, la tension est ok
– si la DEL rouge est allumée, charger l’accu.
Lire le mode d’emploi de l’accumulateur externe antidéflagrant.
24
A
B
Page 25

Service après-vente
Une maintenance régulière de votre
appareil par un spécialiste du service
après-vente Sartorius prolonge la durée
de vie de l’appareil et augmente la précision de mesure. Sartorius vous propose différents contrats de maintenance
de 1 mois à 2 ans. La fréquence des
opérations de maintenance dépend des
conditions de fonctionnement et des
exigences de l’utilisateur en matière
de tolérance.
Réparations
! Tout appareil défectueux doit être
immédiatement débranché du secteur.
Les réparations doivent être effectuées
avec des pièces de rechange d’origine
Sartorius et cela uniquement par une
main d’œuvre qualifiée autorisée par la
société Sartorius. Des réparations effectuées par un membre du personnel non
qualifié peuvent représenter un danger
pour l’utilisateur. Tant que l’indicateur
se trouve sous garantie, veuillez, en cas
de réexpédition, le renvoyer en entier.
Contrôle de sécurité
Un fonctionnement de l’appareil
exempt de danger n’est plus garanti :
– lorsque l’appareil ou la ligne de raccor-
dement au secteur présentent des chocs
visibles,
– lorsque le bloc d’alimentation ne
fonctionne plus,
– après un stockage prolongé dans de
mauvaises conditions (par ex. humidité
très importante),
– après un transport dans de mauvaises
conditions.
Dans ces cas
§ débranchez l’appareil du secteur,
$ assurez-vous qu’il ne sera plus utilisé et
$ informez le service après-vente
Sartorius.
! Les sceaux adhésifs apposés sur l’appareil
indiquent que seul un personnel qualifié
est autorisé à ouvrir l’appareil et à en
effectuer la maintenance afin de garantir
un fonctionnement parfait et fiable de
l’appareil et afin que la garantie soit
maintenue.
! Echanger entièrement les câbles ou
raccords de câbles défectueux ou
endommagés.
! Ne pas ouvrir lappareil lorsqu’il se
trouve sous tension. Une fois l’installation débranchée du secteur, attendre au
moins 10 secondes avant de l’ouvrir.
Etant donné que les surfaces d’ajustage
des éléments du boîtier peuvent influer
sur la protection IP, il faut faire ouvrir
et fermer l’indicateur par un membre du
personnel qualifié.
25
Entretien et maintenance Recyclage
Nettoyage
Les indicateurs répondent aux directives
du EHEDG (European Hygienic Equipment Design Group) relatives aux
mesures appropriées afin d’éviter des
contaminations. Enlever régulièrement
la poussière se trouvant sur l’appareil
(installation de pesée), voir également
le certificat d’examen de type CE.
! Débrancher l’indicateur du secteur,
ainsi que le câble de transmissions des
données.
! Veillez à ce qu’aucun liquide ne pénètre
à l’intérieur de l’appareil.
! Ne pas utiliser de produits de nettoyage
corrosifs (détergents ou produits
similaires).
! Eviter la charge électrostatique.
§ Nettoyer l’indicateur avec un chiffon
humecté d’eau savonneuse.
$ En cas d’utilisation dans l’industrie
alimentaire, utiliser les produits de
nettoyage qui y sont habituels.
§ Essuyer l’indicateur avec un chiffon
doux.
! Il est interdit de projeter de l’eau sous
pression ou de l’air comprimé sur
l’appareil.
Nettoyage des surfaces en acier
inoxydable
En principe nettoyer toutes les parties
en acier inoxydable à intervalles réguliers. Nettoyer minutieusement le plateau de pesée en acier inoxydable séparément. Nettoyer les parties en acier
inoxydable de la balance avec un chiffon ou une éponge humide. N’utiliser
que des produits d’entretien ménagers
usuels appropriés pour l’acier inoxydable (par ex. Stahlfix). Puis rincer
minutieusement jusqu’à ce qu’il ne reste
plus de résidus. Puis laisser sécher l’appareil. Vous pouvez appliquer une huile
d’entretien comme protection supplémentaire.
Les détergents ne doivent être utilisés
que pour le nettoyage de parties en
acier inoxydable.
Environnement corrosif
$ Enlevez régulièrement toutes sub-
stances corrosives.
Changement de la housse de
protection
$ Changer la housse de protection abîmée.
§ Mettre en place la nouvelle housse de
protection en la fixant à l’avant et à
l’arrière de l’appareil.
Pour le transport, les produits Sartorius
sont protégés grâce à leur emballage.
Cet emballage se compose entièrement
de matériaux respectant l’environnement qui doivent donc être apportés
au service local de retraitement des
déchets.
Avant de mettre un appareil à la
ferraille, il faut toujours en enlever les
accumulateurs. Ces accumulateurs ne
doivent pas être jetés dans les ordures
ménagères normales (ordures spéciales).
Veuillez vous adresser à cet effet au
service chargé des ordures spéciales de
votre localité.
Informations spécifiques à la
balance/Codage des numéros de série
La date de fabrication de l’appareil est
codée dans le numéro de série.
La structure est la suivante :
AMM x x x x x
A Année
1 2000–2006
2 2007–2013
3 2014–2020
4 2021–2027
5 2028–2034
6 2035–2041
7 2042–2048
8 2049-2055
9 2056-2062
La colonne de l’année A représente le
numéro de groupe d’années qui définit
une période de respectivement 7 ans.
A l’intérieur de chaque groupe d’années
on augmente les chiffres des mois
(M M) en partant de 13.
2000 13-24
2001 25-26
...
Exemple :
113xxxxx (Janvier 2000)
xxxxx est un numéro en continu qui
augmente chaque mois.
Page 26

Il modello CIXS3 (Combics 3) con
protezione antideflagrante (Ex) è un
indicatore robusto e preciso che assicura
risultati di pesata affidabili per l’impiego
nelle aree a rischio di esplosione delle
Zone 1, 2, 20, 21 e 22.
Lo strumento ha un alloggiamento in
acciaio inossidabile ed è facile da usare.
Altre caratteristiche:
– Grandi tasti con chiara sensazione
di pressione
– Immissione alfanumerica
– Grande display retroilluminato, comple-
tamente grafico a matrice di punti
– Guida dell’utente con commenti testuali
– Possibilità di collegamento di due
piattaforme di pesata
– Inizializzazione automatica
all’accensione
– Taratura automatica quando si pone un
carico sulla bilancia
– Possibilità di comando tramite computer
esterno
Vantaggi per il lavoro quotidiano:
– Tempi di risposta brevi
– Impiego indipendente dal luogo di
installazione della piattaforma di pesata
– Identificazione dei campioni di pesata
mediante 4 codici alfanumerici
– Diverse interfacce per un utilizzo
versatile
– Sicurezza grazie alla protezione con
password
– Facile pulizia e disinfezione
Simboli
In questo manuale di istruzioni sono
impiegati i seguenti simboli:
§ Indica le operazioni richieste per un
corretto utilizzo
$ Indica le operazioni da eseguirsi solo
in certe condizioni
> Descrive l’effetto di un’operazione
! Indica un pericolo
Consulenza applicativa
Telefono: +49 (0) 551/ 308-4440
Telefax: +49 (0) 551/ 308-3791
26 Uso previsto
26 Indice
27 Istruzioni di sicurezza e avvertenza
28 Messa in funzione
28 Equipaggiamento fornito
28 Consigli per l’installazione
29 Visione d’insieme dello strumento
30 Collegamento alla rete
31 Montaggio dell’adattatore di verifica
per l’impiego in metrologia legale
32 Collegamento dell’unità di batterie
ricaricabili esterne
33 Cura e manutenzione
33 Riparazioni
33 Pulizia
33 Controllo di sicurezza
33 Smaltimento
26
Uso previsto Indice
Page 27

Sicurezza
§ Leggere attentamente le presenti
istruzioni. Il costruttore non può essere
reso responsabile per danni causati dalla
non osservanza delle istruzioni di sicurezza e di avvertenza.
Il modello CIXS3 con protezione antideflagrante soddisfa le prescrizioni della
Direttiva 94/9/CE relativa agli strumenti
appartenenti al Gruppo II, Categoria 2
(per gas) e 1 (per polvere) ed in conformità al Certificato di esame CE del tipo
KEMA 03ATEX1157X, contrassegnati
con:
h II 2 G 1 D EEx ib IIC T4 T135°C.
Inoltre lo strumento soddisfa le prescrizioni delle direttive CE relative alla compatibilità elettromagnetica e la sicurezza
elettrica (vedi dichiarazioni di conformità).
Un uso non idoneo può causare danni
a persone e a cose. Lo strumento deve
essere installato e usato da personale
qualificato.
! Lo strumento a sicurezza intrinseca può
essere impiegato nelle aree a rischio di
esplosione:
Zona 1 e 2 per gas,
Zona 20, 21 e 22 per polveri.
L’impiego in aree con presenza di
sostanze potenzialmente esplosive deve
essere esaminato caso per caso. L’installazione dello strumento nelle Zone 1, 2,
20, 21 oppure 22 deve essere eseguita
da un tecnico specializzato in conformità alle leggi, direttive e norme in
vigore in ogni singolo Paese. Osservare
le norme per la prevenzione degli infortuni. Per persona specializzata s’intende
una persona pratica del montaggio,
messa in funzione e funzionamento
dello strumento, che dispone della
qualifica corrispondente e che è a conoscenza delle norme e direttive vigenti.
Se necessario, rivolgersi al Centro
Assistenza Cliente Sartorius o al proprio
rivenditore autorizzato.
! Si devono rispettare tutte le limitazioni
indicate nel certificato di esame CE del
tipo. Non è ammesso un uso dello strumento che va oltre le limitazioni date;
un tale uso non è conforme alla destinazione dello strumento. Si devono
osservare tutte le specifiche e limitazioni
date nei certificati di esame del tipo
(vedi: Certificati per l’uso in aree a
rischio di esplosione nel manuale di
istruzioni per l’uso).
I diritti di garanzia decadono se l’installazione non è stata fatta in modo regolare.
– Far controllare l’impianto ad intervalli
regolari per garantirne un funzionamento regolare e la sua sicurezza;
il controllo deve essere seguito da un
tecnico specializzato qualificato.
27
Istruzioni di sicurezza e avvertenza
– Tutti i lavori di manutenzione, pulizia
e riparazione sul modello CIXS3 sono
da eseguirsi quando lo strumento non
è sotto tensione. Ogni intervento sullo
strumento (eccetto il personale autorizzato Sartorius) comporta la perdita dei
diritti di garanzia. Utilizzare soltanto
ricambi originali Sartorius!
– Non esporre l’indicatore CIXS3 a
temperature estreme, vapori chimici
aggressivi, umidità, urti e vibrazioni. La
temperatura ambiente ammessa durante
il funzionamento è -10°C - 40°C.
– cavi non forniti dalla Sartorius hanno
spesso un’altra assegnazione dei pin.
Prima del collegamento del cavo agli
strumenti Sartorius, controllare lo schema di assegnazione dei pin e staccare
le linee che differiscono. L’operatore si
assume la responsabilità per qualsiasi
danno a persona o cosa causato dall’uso
di cavi non forniti dalla Sartorius.
– Se si utilizza l’indicatore CIXS3 in un’a-
rea a pericolo di esplosione, tutti i cavi
conduttori di corrente possono essere
inseriti o estratti solo se lo strumento
non è sotto tensione. Prima di collegare
o scollegare i cavi, staccare lo strumento
dalla rete elettrica.
– Evitare il formarsi di cariche elettrostati-
che; collegare un morsetto del conduttore equipotenziale.
– È vietato staccare il conduttore di messa
a terra.
– Se Vi sembra che la sicurezza operativa
dello strumento non sia più garantita,
scollegare il CIXS3 dalla tensione di
rete e assicurare lo strumento contro un
eventuale utilizzo (per es. in caso di
guasto). Osservare il regolamento sugli
infortuni ed istruire il personale di
servizio in modo adeguato.
! Staccare l’alimentazione di tensione
prima di collegare/scollegare strumenti
supplementari.
- Il rivestimento di tutti i cavi di collegamento, così come di tutti i conduttori
del cablaggio interno sono in PVC.
I cavi non devono venire a contatto con
sostanze chimiche che possono
corrodere questo materiale.
– Per il collegamento dell’indicatore
CIXS3 ad altri strumenti, osservare le
indicazioni date nei rispettivi certificati
di esame CE del tipo. Ulteriori informazioni si trovano nel «Certificato di prova
di sicurezza intrinseca» nell’Allegato del
manuale di istruzioni per l’uso.
Installazione
–
Attenzione nell’usare cavi di collegamento
RS232 di altri costruttori o di uso comune,
questi hanno spesso un’assegnazione
dei pin non ammessa per gli strumenti
Sartorius. Controllare l’assegnazione in
base agli schemi di collegamento e staccare le linee che differiscono.
! Usare soltanto cavi di prolunga conformi
alle norme e dotati di un conduttore di
messa a terra. È vietato togliere il conduttore di messa a terra.
! Se lo strumento o il cavo di rete presen-
ta dei danni: staccare lo strumento dalla
tensione di rete e assicurare lo strumento contro un eventuale utilizzo.
– Utilizzare solo accessori e opzioni
Sartorius poiché sono adattati in modo
ottimale allo strumento. Non ricorrere
a soluzioni fai-da-te. L’utente risponde
in prima persona di qualsiasi modifica
apportata all’equipaggiamento così
come della realizzazione di collegamenti
con cavi o dispositivi di altri costruttori
ed è tenuto ad eseguire i dovuti controlli.
Su richiesta, Sartorius mette a disposizione informazioni riguardanti le caratteristiche minime di funzionamento
degli apparecchi (secondo le norme
sull’indifferenza ai disturbi).
$ Nel caso sorgessero dei problemi con lo
strumento contattare il Servizio Assistenza
Tecnica Sartorius o il Vostro rivenditore.
Protezione IP:
– Il livello di protezione IP65/67 dell’indi-
catore viene garantito solo se è montata
la guarnizione di gomma e la spina è
ben inserita (inclusi tutti i tappi di chiusura). L’installazione di piattaforme di
pesata deve essere eseguita e controllata
da un tecnico specializzato.
– Per l’installazione successiva di una porta
d’interfaccia o di un’unità di batterie
ricaricabili, conservare i tappi protettivi.
Proteggere l’interfaccia usando tappo
o un dispositivo simile contro vapori,
umidità e sporco.
Impiego dello strumento in metrologia
legale:
– Se l’indicatore è collegato ad una piat-
taforma di pesata e lo strumento per
pesare che ne risulta deve essere sottoposto alla verifica, si devono osservare le
disposizioni relative alla verifica. Leggere
e osservare le indicazioni contenute nel
CD allegato: «Manuale per la verifica di
strumenti per pesare». Se si collegano
piattaforme di pesata Sartorius, osservare le indicazioni date nel certificato di
conformità che contiene un elenco dei
campi di pesata ammessi.
– In caso di rottura di uno dei sigilli appli-
cati sugli strumenti al momento della
verifica, si devono osservare le leggi e
regolamenti nazionali in vigore. In alcuni
Paesi l’intero equipaggiamento deve
essere verificato nuovamente.
Page 28

Disimballaggio
§ Dopo aver disimballato lo strumento
controllare subito eventuali danni
visibili
$ In caso di danni, vedi il capitolo «Cura
e manutenzione», sezione «Controllo di
sicurezza».
$ Conservare tutte le parti dell’imballag-
gio per un’eventuale rispedizione dello
strumento. Prima della spedizione, staccare tutti i cavi!
Equipaggiamento fornito
– Indicatore
– Manuale d’istruzioni per l’uso
– Speciali accessori (opzioni) elencati nella
bolletta di consegna
Operazioni per la messa in funzione
1) Collegamento della piattaforma di pesata a questo indicatore Combics:
vedi pagina successiva
2) Configurazione del convertitore A/D:
vedi il capitolo «Service»
– Versione per la metrologia legale/Versione standard
– Campo di pesata, precisione di lettura
– Peso di regolazione
– mV/V / Immissione dei dati geografici
– Linearizzazione, regolazione
3) Regolazione della piattaforma di pesata:
vedi il capitolo «Funzionamento»,
sezione «Regolazione»
4) Impostazione del programma applicativo:
vedi manuale dei programmi applicativi
allegato
5) Collegamento delle interfacce, della
stampante oppure della memoria Alibi,
vedi schema di assegnazione dei pin
nel manuale per l’installazione e l’uso.
6) Attivazione delle interfacce, della
stampante oppure della memoria Alibi
mediante impostazione nel Setup:
– Per COM 1/2
– Impostazione del protocollo di stampa
– Campi e righe di stampa per la stam-
pante corrispondente nel manuale di
istruzioni per l’uso
7) Potete utilizzare il connettore d’interfaccia RS422/RS485 su COM2 solo se il
connettore d’interfaccia RS232 non è
collegato a COM2. In altri termini, NON
è ammessa una connessione elettrica
simultanea di RS 232 e RS 422/485
a COM2.
Per l’installazione evitare le seguenti
condizioni ambientali sfavorevoli:
– Calore forte (riscaldamento, irraggia-
mento solare)
– Correnti d’aria dirette provenienti da
porte, finestre aperte
– Forti vibrazioni durante le operazioni di
pesata
– Umidità estrema
Acclimatazione
L’umidità dell’aria può condensarsi sulle
superfici dello strumento quando da
freddo viene portato in un ambiente più
caldo. Acclimatare lo strumento staccato
dalla rete per circa 2 ore a temperatura
ambiente.
Non utilizzo
Spegnere lo strumento se non viene
usato.
Sigillo sulle versioni verificate:
La sigillatura consiste di un marchio
di controllo adesivo portante il logo
«Sartorius». Questo marchio si rompe se
si cerca di toglierlo. In questo caso viene
a meno la validità della verifica e lo
strumento deve essere verificato
nuovamente.
28
Messa in funzione
Visione d’insieme degli strumenti per l’area a rischio di esplosione
Area a rischio di esplosione: Zone 1, 2, 20, 21, 22 Area sicura
Barriera di Zener PC
o convertitore
Indicatore con piattaforma di pesata
Modulo 24 V Alimentatore Unità batterie ricaricabili Modulo 24 V Alimentatore
(110–230 V) con protezione antideflagrante (110–230 V)
Page 29

Display e tasti: Combics 3
29
Visione d’insieme
1
2
3
4
5
6
15
16
14
13
12
11
10
9
8
7
21
20
19
18
17
Lato posteriore:
Display e tasti
1 LED di controllo
(per la pesata di controllo +/–
e classificazione)
2 Tasto di commutazione per
l’immissione alfabetica
3 Tastiera alfanumerica
4 Tasto «Cancellazione»
5 Impostazioni: accesso a Setup
6 Commutazione tra il programma
applicativo e le informazioni
specifiche dell’applicazione
7 Uscita dati
8 Lordo/Netto, 2° unità oppure
risoluzione 10 volte più alta
(dipende dall’impostazione)
9 Taratura
10 Azzeramento
11 Commutazione della piattaforma
di pesata
12 Accensione/spegnimento
13 Tasti funzione
14 Display grafico a matrice di punti
Lato posteriore
15 Interfaccia RS232C «COM1»
16 Cavo di adattamento specifico del
Paese
17 Commutatore di accesso al menù
(funzionamento standard o per
l’impiego in metrologia legale)
18 Attacco della piattaforma
di pesata
19 Conduttore equipotenziale
(messa a terra)
20 Valvola di sfiato, momento
di torsione: 1,5 Nm
21 Interfaccia COM2
Page 30

Installazione della piattaforma di pesata
L’allacciamento del cavo di collegamento dovrebbe essere effettuato solo da parte
di un tecnico specializzato Sartorius.
! Interventi sull’apparecchio che possono influenzare il livello di protezione IP 66/67
devono essere eseguiti in modo molto accurato.
! In caso di un’installazione non conforme alle istruzioni, decadono i diritti di garanzia.
! Eseguire i lavori di installazione, manutenzione e riparazione sull’apparecchio quando
non è sotto tensione.
! Il pressacavo (con protezione IP68) è già preinstallato sull’indicatore.
§ Per togliere il pannello frontale, svitare le 4 viti.
§ Collegare il cavo di sistema della piattaforma di pesata all’indicatore.
! Il pressacavo è preinstallato. Tutti i lavori sul pressacavo devono essere eseguiti con molta
attenzione. Usare una chiave torsiometrica. Il momento torcente di questo pressacavo
è di 5 Nm
§ Togliere l’isolamento dell’estremità del cavo e collegare il cavo nel seguente modo:
– Inserire il cavo attraverso il pressacavo.
– Montare il pressacavo in modo corretto.
– Togliere l’isolamento protettivo dall’estremità del cavo (vedi figura). La schermatura (1)
deve avere contatto con i morsetti (2).
– Per l’installazione, i fili (3) del cavo devono avere una lunghezza di circa 15 cm.
– Inserire il cavo attraverso il pressacavo.
– Controllare che ci sia contatto tra i morsetti e la schermatura.
30
Page 31

31
§ Montare il cavo della piattaforma di pesata:
– Togliere l’isolamento del cavo e lasciare i fili lunghi circa 5 cm.
– Togliere l’isolamento dei fili, 1 cm circa, e applicare le boccole.
– Avvitare saldamente i fili ai morsetti.
Schema elettrico:
N° Nome del segnale Significato
1 BR_POS Tensione di alimentazione del ponte (+)
2 SENSE_POS Senso (+)
Tensione di alimentazione del ponte
3 OUT_POS Tensione di misura, positiva
4 OUT_NEG Tensione di misura, negativa
5 SENSE_NEG Senso (-)
Tensione di alimentazione del ponte
6 BR_NEG Tensione di alimentazione del ponte (-)
! Per l’assegnazione dei colori dei fili ai segnali, leggere il manuale d’istruzioni/foglio
tecnico della piattaforma di pesata relativa. Isolare tutte le linee non usate!
Piattaforma di pesata con tecnica a 4 conduttori
! Per il collegamento di un ricettore di carico a 4 conduttori, collegare le linee BR_POS
(n° 1) con SENSE_POS (n° 2) e BR_NEG (n° 6) con SENSE_NEG (n° 5).
Collegamento alla rete
§ Controllare il voltaggio e la forma della spina.
$ L’alimentazione dello strumento avviene mediante un alimentatore.
§ Alimentatori:
– YPS02-X.. per l’installazione nell’area a rischio di esplosione.
– YPS02-XV24 modulo di rete 24V per l’installazione nell’area a rischio di esplosione.
Nota: montare i cavi in modo fisso
(Su richiesta è disponibile la versione dello strumento per un montaggio flessibile del cavo)
– YPS02-Z.. per l’installazione nell’area sicura.
Unità di batterie ricaricabili
– Unità batterie ricaricabili YRB02-X con protezione antideflagrante per l’installazione
nell’area a rischio di esplosione.
Collegamento di dispositivi elettronici (periferiche)
§ Prima di collegare strumenti periferici (stampante, PC), lo strumento deve essere
assolutamente staccato dalla rete elettrica!
Come effettuare il collegamento del conduttore equipotenziale (collegamento a terra)
§ Collegare il CIXS3 con un cavo di massa (non è fornito con l’equipaggiamento) alla barra
centrale del conduttore equipotenziale. Inoltre l’alloggiamento metallico dell’alimentatore
è collegato a terra mediante il conduttore di protezione del cavo di alimentazione.
L’alloggiamento metallico della piattaforma di pesata è collegato all’alimentatore tramite
la gabbia schermante del cavo di collegamento
Tempo di preriscaldamento
Per dare risultati di pesata precisi, lo strumento ha bisogno di un tempo di preriscaldamento di almeno 30 minuti per raggiungere la temperatura di esercizio richiesta.
Impiego dello strumento verificato in metrologia legale:
$ Rispettare un tempo di preriscaldamento di almeno 24 ore dopo il collegamento iniziale
alla rete elettrica.
Page 32

Montaggio dell’adattatore di verifica per l’impiego in metrologia legale
(alla consegna lo strumento è verificabile)
§ Togliere il dado posto sul retro dell’indicatore.
§ Fissare la placca dell’adattatore con la vite con intaglio.
§ Applicare un sigillo adesivo di protezione sull’adattatore di verifica.
Collegamento dell’unità di batterie ricaricabili esterne (accessorio: YRB02-X)
! Staccare l’indicatore dalla alimentazione.
§ Installazione nelle Zone 1, 2, 20, 21 oppure 22:
avvitare insieme il connettore ad innesto A (dell’indicatore) e B (dell’unità di batterie).
Durata di funzionamento massima circa 40 h (dipende dalla piattaforma di pesata
collegata, e senza accessori collegati).
– LED verde: batterie cariche
– LED rosso: caricare le batterie.
Leggere il manuale d’uso delle batterie ricaricabili con protezione antideflagrante.
32
A
B
Page 33

Service
Una regolare manutenzione dello
strumento da parte del Servizio di Assistenza Cliente Sartorius garantisce una
continua precisione di misurazione.
Sartorius può offrire contratti di manutenzione con ogni tipo di frequenza, da
un mese, fino a due anni. La frequenza
degli intervalli di manutenzione dipende
dalle condizioni di funzionamento e
dalle richieste di tolleranza dell’utente.
Riparazioni
! Lo strumento difettoso deve essere
subito staccato dalla rete elettrica.
Le riparazioni devono essere eseguite
solo da parte di personale specializzato
autorizzato Sartorius e impiegando
ricambi originali Sartorius. In caso di
riparazioni non idonee possono insorgere
dei pericoli rilevanti per l’operatore. Se
l’indicatore è in garanzia, rispedire lo
strumento completo di tutto.
Controllo di sicurezza
La sicurezza operativa dello strumento
non è più garantita quando:
– lo strumento oppure il cavo di collega-
mento alla rete presenta segni visibili di
danneggiamento,
– l’alimentatore non funziona più corret-
tamente,
– lo strumento è stato conservato per
lungo tempo in condizioni ambientali
non adatte (per es. ambiente molto
umido),
– dopo forti sollecitazioni dovute al tra-
sporto.
In questi casi, procedere come segue:
§ Staccare lo strumento dalla rete elettrica
$ Assicurarlo contro un eventuale utilizzo
$ Rivolgersi al Servizio Assistenza Tecnica
Sartorius.
! I sigilli adesivi posti sullo strumento
indicano che questo può essere aperto
e sottoposto a manutenzione, solo da
parte di tecnici specializzati e autorizzati, al fine di garantire un funzionamento
perfetto ed affidabile dello strumento ed
il mantenimento dei diritti di garanzia.
Sostituire completamente i cavi o i raccordi a vite del cavo che sono difettosi
o danneggiati.
! Non aprire l’indicatore quando è sotto
tensione! Dopo aver staccato la tensione, aspettare almeno 10 secondi prima
di aprirlo. Dato che le superfici di congiunzione sulle parti dell’alloggiamento
influiscono sul livello di protezione IP,
lo strumento deve essere aperto e chiuso solo da personale qualificato.
33
Cura e manutenzione Smaltimento
Pulizia
Gli indicatori soddisfano le direttive di
EHEDG (European Hygienic Equipment
Design Group) per quanto riguarda
le misure di prevenzione contro le
contaminazioni. Togliere regolarmente
la polvere dallo strumento (sistema di
pesata), vedi anche il certificato d’esame
CE del tipo.
! Staccare l’indicatore dall’alimentazione
e, se collegato, anche il cavo per la
trasmissione dei dati.
! Non deve entrare liquido all’interno
dell’indicatore.
! Non utilizzare detergenti aggressivi
(solventi o simili).
! Evitare le cariche elettrostatiche.
§ Pulire l’indicatore con un panno legger-
mente inumidito con acqua saponata.
$ Per l’impiego nell’industria alimentare,
usare dei detergenti adatti.
§ Asciugare l’indicatore con un panno
morbido.
! Non è ammesso l’uso di acqua a getto
o aria compressa.
Pulizia delle superfici in acciaio
inossidabile
Si consiglia di pulire tutte le parti in
acciaio inossidabile in intervalli regolari.
Togliere il piatto di carico per poterlo
pulire a fondo. Per la pulizia delle parti
in acciaio inossidabile dello strumento,
utilizzare dei detergenti appositi disponibili in commercio e un panno umido
o una spugna. Strofinare leggermente
tutte le superfici in acciaio inossidabile
e poi sciacquare a fondo per togliere
ogni residuo. Lasciare asciugare lo strumento. Per una maggiore protezione si
può applicare un olio di manutenzione.
L’uso di solventi deve essere limitato
esclusivamente per la pulizia delle parti
in acciaio inossidabile.
Ambiente corrosivo
$ Togliere regolarmente tutte le tracce di
sostanze corrosive.
Cambio della copertina antipolvere
$ Cambiare la copertina antipolvere dan-
neggiata.
§ Premere la nuova copertina antipolvere
sulla parte anteriore e posteriore
dell’indicatore lungo il bordo, finché
si fissa.
L’imballaggio degli strumenti Sartorius
garantisce una protezione sicura durante
il trasporto. L’imballaggio consiste completamente di materie non inquinanti,
riciclabili come materie prime secondarie pregiate che possono essere portate
al centro locale di riciclo e di smaltimento dei rifiuti. Lo stesso vale anche
per gli strumenti non più in uso.
Le batterie ricaricabili devono essere
tolte prima della rottamazione dello
strumento. Le batterie ricaricabili appartengono alla categoria dei rifiuti speciali.
Per maggiori informazioni sulle possibilità di smaltimento/riciclaggio, rivolgersi
all’azienda comunale.
Informazioni specifiche della
piattaforma/Codificazione del numero
di serie
La data di fabbricazione dello strumento
è codificata nel numero di serie.
La struttura è la seguente:
AMM x x x x x
J Anno
1 2000–2006
2 2007–2013
3 2014–2020
4 2021–2027
5 2028–2034
6 2035–2041
7 2042–2048
8 2049-2055
9 2056-2062
La colonna dell’anno A indica il numero
del gruppo di anni che definisce un
periodo di 7 anni. All’interno di ogni
gruppo di anni, i mesi (M M) vengono
contati partendo da 13.
2000 13-24
2001 25-26
...
Esempio:
113xxxxx (Gennaio 2000)
xxxxx è un numero progressivo che
aumenta ogni mese.
Page 34

Como visor preciso y robusto, el modelo
CIXS3 (Combics 3) antideflagrante,
proporciona resultados de medida fiables, al utilizarse en zonas con peligro
de explosión: zona 1, 2, 20, 21 y 22.
El aparato tiene una carcasa de acero
inoxidable y es fácil de manejar.
Otras características:
– Teclas grandes con claro punto de
rebote
– Entrada numérica y alfabética
– Pantalla grande, retroiluminada, total-
mente gráfica por matriz de puntos
– Guía al usuario mediante textos en
pantalla
– Conectores para dos células de carga
– Inicio automático de la aplicación al
encender
– Tara automática al colocar la carga en
la báscula
– Control opcional a través de ordenador
externo
Ventajas para el trabajo diario:
– Tiempos cortos de medición
– Autonomía de lugar respecto a la célula
de carga
– Identificación de las muestras, con 4 ID
alfanuméricos, máximo
– Flexibilidad con diferentes interfaces
– Seguridad con entrada de contraseña
– Limpieza y desinfección fáciles
Explicación de símbolos
En el texto se emplean los siguientes
símbolos:
§ Instrucción para una operación correcta
$ Instrucción especial para casos excep-
cionales
> Descripción de los efectos de un paso
operacional
! Advertencia de peligro
Asesoría de aplicaciones
Teléfono: +49 (0) 551/ 308-4440
Fax: +49 (0) 551/ 308-3791
34 Uso previsto
34 Contenido
35 Advertencias de seguridad
36 Puesta en marcha
36 Suministro
36 Advertencias de instalación
37 Representación del aparato
38 Conectar a la red
39 Montar adaptador de verificación
modo metrología legal
39 Conectar equipo de batería externo
40 Cuidado y mantenimiento
40 Reparaciones
40 Limpieza
40 Controles de seguridad
40 Eliminación de desechos
34
Uso previsto Contenido
Page 35

Seguridad
§ Leer con atención estas instrucciones
de funcionamiento antes de la puesta
en marcha del equipo.
El fabricante no se responsabiliza por
daños a causa de la no observación de
las advertencias de seguridad.
El modelo CIXS3 antideflagrante cumple
los requisitos de la Directiva 94/9/CEE
para los aparatos del grupo II, categoría
2 (para gas), o bien 1 ( para polvo) y
está identificado, según Certificado de
ensayo CE de tipo KEMA 03ATEX1157X,
con:
h II 2 G 1 D EEx ib IIC T4 T135°C.
Además, el aparato cumple también los
requisitos de la Directiva CEE para la
Compatibilidad electromagnética y
Seguridad eléctrica (ver Declaraciones
de conformidad).
Un uso indebido puede ocasionar
daños a personas y bienes materiales.
El aparato ha de ser utilizado y manejado
solamente por personal cualificado.
! El aparato con seguridad intrínseca
puede ser usado en zonas con peligro
de explosión:
zona 1 y 2 para gases,
zona 20, 21 y 22 para polvos.
El uso en zonas con peligro de explosión tiene que controlarse en cada caso,
independientemente. La instalación del
aparato en la zona 1, 2, 20, 21 ó 22
tiene que ser realizada por un especialista, de acuerdo con la Ley vigente en
el país, Directivas y Normas. Tienen
que observarse las Prescripciones para
prevenir accidentes correspondientes. Se
entiende como especialista a la persona
que sabe cómo montar, poner en marcha y conoce el manejo y el funcionamiento del equipo. El especialista dispone de la cualificación correspondiente,
y conoce las disposiciones y prescripciones especializadas específicas del país.
En caso necesario, comunicarse con el
proveedor o servicio técnico Sartorius.
! Un funcionamiento del equipo que no
cumpla con los datos indicados en el
Certificado de ensayo CE de tipo se
considera como uso indebido. Todos los
datos y limitaciones mencionados en tal
Certificado han de cumplirse rigorosamente (ver bajo: Certificados EX en las
Instrucciones de funcionamiento).
Con instalación realizada incorrectamente caducan los derechos de garantía.
- Hacer controlar la correcta funcionalidad y seguridad del equipo en intervalos
razonables, por un especialista correspondientemente cualificado para tales
trabajos.
- Todos los trabajos de mantenimiento,
limpieza y reparaciones en el modelo
CIXS3 tienen que realizarse separándolo
primeramente de la alimentación de red.
Cualquiera intervención en el aparato
35
Advertencias de seguridad
(excepto la realizada por personal autorizado de Sartorius) lleva a la pérdida de
todos los derechos de garantía. ¡Utilizar
exclusivamente piezas de repuesto
originales Sartorius!
- No exponer innecesariamente el aparato
CIXS3 a temperaturas extremas, emanaciones químicas agresivas, humedad,
choques y vibraciones. La temperatura
ambiental de régimen permitida oscila
entre -10°C y 40°C
– Al emplear cables de otros fabricantes,
tener en cuenta la asignación de pines.
Por tal motivo, controlar las conexiones
del cable antes de conectar a los aparatos Sartorius, según el diagrama de
conexión respectivo, y separar las líneas
diferentes. Cables no suministrados por
Sartorius es responsabilidad exclusiva
del empresario.
- Al usar CIXS3 en la zona con peligro de
explosión, todos los cables conductores
de corriente tienen que separarse o
enchufarse del/en el aparato encontrándose éste separado de la tensión de red.
Antes de conectar o separar cables a/de
la báscula, separarla de la tensión de
red.
- Evitar las cargas electrostáticas (especialmente de la cubierta protectora),
conectar el dispositivo equipotencial.
- Se prohibe la interrupción de los conductores equipotenciales.
- Si un funcionamiento exento de peligro
ya no se garantiza, separar el equipo
de la tensión de red y asegurarlo contra
el uso (p. ej. al producirse algún daño).
Observar las Prescripciones para prevenir
accidentes, advertir correspondientemente al personal operador.
! Desconectar la alimentación de tensión
(separar de la red), antes de conectar
o separar aparatos adicionales.
- El recubrimiento de todos los cables
conectores, y de los conductores internos, es de material de polivinilcloruro
(PVC). Sustancias químicas que ataquen
este material, deben mantenerse alejadas de estos conductores.
– Para el enlace del CIXS3 con otros
aparatos han de cumplirse las especificaciones mencionadas en el Certificado
de ensayo CE de tipo respectivo. Más
informaciones, ver en la “Comprobación
de la seguridad intrínseca”, en el apéndice de estas instrucciones de funcionamiento.
Instalación
– Cuidado al utilizar cables conectores
RS332 de otros fabricantes: ¡las asignaciones de pines no son, por lo general,
apropiadas para los aparatos Sartorius!
La asignación debería controlarse de
acuerdo con los diagramas de conexión,
separándose las líneas que no correspondan.
! Utilizar solamente cable alargador de
acuerdo a la norma con conductor protector. El conductor protector no ha de
suprimirse por ningún motivo.
! Si el aparato o el cable de red presenta
daños visibles, separar la alimentación
de tensión y asegurar el aparato contra
el uso.
– Accesorios y opciones de Sartorius están
óptimamente adaptados al aparato.
Por lo tanto, no utilizar una solución
propia. Advertencias a este respecto se
encuentran también en nuestras especificaciones sobre la calidad del funcionamiento (según las normas de inmunidad
definida), que se las ponemos a disposición.
$ En caso de problemas, le rogamos se
dirija al servicio técnico de Sartorius.
Protección IP:
– El visor tiene el grado de protección
IP65/IP67 sólo con junta de goma
incorporada y conexión fija (tapones de
cierre firmemente atornillados. La instalación de células de carga tiene que
ser realizada y controlada por un
especialista.
– Si se monta posteriormente una salida
de datos, conservar los tapones de cierre. Proteger la salida de datos con tapa
o similar contra el vapor, la humedad
y la suciedad.
Uso en metrología legal:
– Si el visor se conecta a una célula de
carga, y la báscula que resulta de tal
enlace se presenta para la verificación,
tienen que cumplirse las prescripciones
respectivas. Al conectar células de carga
de Sartorius, leer y observar la “Guía
para realizar la verificación” en CD.
Al conectar células de carga de Sartorius
observar la Declaración de conformidad
con la lista de aprobación de las capacidades de pesaje.
– Si en los aparatos verificados se destru-
ye una de las marcas de sello adhesivas,
tienen que cumplirse siempre las leyes
y prescripciones nacionales; en tal caso,
una verificación ulterior de la báscula
es necesaria.
Page 36

Desembalar
§ Controlar el aparato al desembalar,
para detectar posibles daños visibles
exteriormente
$ En caso de daño, ver en Cuidado
y mantenimiento, párrafo Controles de
seguridad
$ Conservar todas las piezas del embalaje
original, para un reenvío eventual. Antes
de enviar ¡separar todos los cables!
Suministro
– Visor
– Instrucciones de funcionamiento
– Opciones (equipamiento especial) como
se indica en el talón de entrega
Pasos a realizar para la puesta en marcha
1) Conectar la célula de carga al visor
Combics:
ver en la página subsiguiente
2) Configurar CAD:
ver en el capítulo Servicio
– Modo metrología legal | estándar
– Capacidad de pesaje, legibilidad
– Pesa de calibración
– Entrar mV/V | datos geográficos
– Linealizar, calibrar en las instrucciones
de funcionamiento
3) Calibrar célula de carga:
ver en Funcionamiento, párrafo
Calibración, en las instrucciones de
funcionamiento.
4) Ajustar programa de aplicación:
ver las instrucciones adjuntas de los
programas de aplicación
5) Conectar interfaces, impresora
o memoria Alibi
ver en Diagrama de conexión,
en las instrucciones de funcionamiento.
6) Activar interfaces, impresora o memoria
Alibi, definiendo los ajustes previos en
el Setup:
– Para COM 1/2
– Ajustar protocolo de impresión
Líneas de impresión/áreas para
la impresora respectiva en las
instrucciones de funcionamiento
7) Puede utilizar el conector de interfaz
RS422/RS485 en COM2 sólo si el conector de interfaz RS232 no está enchufada
en COM2. Con otras palabras, no es
permitida una conexión eléctrica simultánea de RS232 y RS422/485 en COM2.
Instalación
Para la instalación, evitar lugares con
influencias negativas:
– Calor (calefactores, rayos solares)
– Corrientes de aire directas por puertas y
ventanas abiertas
– Vibraciones durante el pesaje
– Humedad extrema
Aclimatar
Si un aparato que está frio es colocado
en un lugar más temperado, puede
producirse condensación. Por lo tanto,
el aparato debería dejarse en el nuevo
lugar por 2 horas, aprox., para su
aclimatización, separado de la tensión
de red.
Al no usar
apagar el equipo.
Marcas de sello en variantes
verificadas:
El aseguramiento del aparato se realiza
con marca de sello adhesiva y el nombre
Sartorius. Al tratar de quitar esta marca
se autodestruye. En este caso, caduca la
validez de verificación y la báscula debe
ser nuevamente verificada.
36
Puesta en marcha
Esquema de aparatos para la zona con riesgo de explosión
Zona Ex: zona 1, 2, 20, 21, 22 Zona sin riesgo de explosión
Barrera Zener PC
o convertidor
Visor con célula de carga
Módulo 24 V Alimentador Equipo batería Módulo 24 V Alimentador
(110–230 V) antideflagrante (110–230 V)
Page 37

Pantalla y teclado: Combics 3
37
Representación del aparato
1
2
3
4
5
6
15
16
14
13
12
11
10
9
8
7
21
20
19
18
17
Parte trasera:
Pantalla y teclado
1 Luces de control (para el pesaje
de control y clasificación)
2 Tecla de conmutación para la
entrada de letras
3 Teclas alfanuméricas
4 Tecla Borrar
5 Ajustes previos: acceso a Setup
6 Conmutación programa de
aplicación | informaciones
específicas de aplicación
7 Salida de datos
8 Bruto/neto, 2. unidad,
o bien resolución factor 10
(según ajuste previo)
9 Tara
10 Puesta a cero
11 Conmutar célula de carga
12 Encender/apagar
13 Teclas de función
14 Pantalla gráfica por matriz de
puntos
Parte trasera
15 Interfaz RS232C COM1
16 Cable adaptador cd
17 Acceso al interruptor de bloqueo
(modo estándar o metrología
legal)
18 Conector célula de carga
19 Dispositivo equipotencial (tierra)
20 Válvula de ventilación, momento
de torsión: 1,5 Nm
21 Interfaz COM2
Page 38

Instalar célula de carga
El cable debería ser conectado por un técnico autorizado del servicio Sartorius.
! Los trabajos que influyen en el grado de protección IP67 deben realizarse con extremo
cuidado.
! Una instalación incorrecta anula los derechos de garantía.
! Todo trabajo en el aparato ha de realizarse sólo después de separarlo de la tensión de red.
! El paso de cable (borna atornillable) (protección IP67) ya está premontado.
§ Aflojar los 4 tornillos de la placa de base. Retirar la placa de base.
§ Enlace de la célula de carga con el visor.
! La borna atornillable ya está premontada. Todos los trabajos en la borna atornillable han
de realizarse con extremo cuidado. Utilizar una llave dinamométrica para la borna,
momento de torsión: 5 Nm
§ Desaislar el cable conector y montar:
– Pasar el cable por la borna atornillable.
– Montar correctamente la borna atornillable.
– Desaislar cable: el blindaje (1) debe tener contacto con las pinzas (2).
– Montaje: conductores (3) del cable, deben dejarse con un largo de 15cm, aprox.
– Pasar el cable a través de la borna atornillable.
– Controlar el contacto de las pinzas con el blindaje.
38
Page 39

39
§ Montar cable de la célula de carga:
– Desaislar cable. Dejar los conductores del cable con un largo de 5 cm de largo, aprox.
– Desaislar conductores 1cm, aprox., y proveerlos con virolas para cable.
– Pasar anillo de ferrita sobre todos los conductores.
– Atornillar los bornes.
Asignación de conectores:
N° ID señal Significado
1 BR_POS Tensión aliment. puente (+)
2 SENSE_POS Sense (+)
Tensión aliment. puente
3 OUT_POS Tensión de medida positiva
4 OUT_NEG Tensión de medida negativa
5 SENSE_NEG Sense (-)
Tensión aliment. puente
6 BR_NEG Tensión aliment. puente (-)
! Para la asignación de colores y señales, ver las instrucciones / hoja de datos de la célula
de carga respectiva.
¡Aislar o separar todas las línea no utilizadas!
Célula de carga con tecnología de 4 cables
! Al conectar un receptor de carga con tecnología de 4 cables tienen que vincularse las
líneas BR_POS (N° 1) con SENSE_POS (N°2) y BR_NEG (N° 6) con SENSE_NEG (N° 5).
Conectar a la red
§ Controlar el valor de tensión y diseño de conector.
$ La alimentación de corriente eléctrica se realiza a través de un alimentador.
§ Alimentadores respectivos:
– YPS02-X.. para la instalación en la zona con peligro de explosión.
– YPS02-XV24 24V-módulo de red para la instalación en la zona con peligro de explosión.
Advertencia: tender ambos cables en forma fija
(versión de aparato para un tendido de cables flexible, según consulta)
– YPS02-Z.. para instalar fuera de la zona con peligro de explosión.
Equipo de batería
– Equipo de batería YRB02-X antideflagrante, para instalar en la zona con peligro
de explosión.
Conexión de componentes electrónicos (periféricos):
§ Antes de conectar o separar aparatos adicionales (impresora, PC, barrera Zener,
convertidor) tiene que separarse siempre el aparato de la tensión de red
Conectar dispositivo equipotencial (tierra)
§ Conectar CIXS3 con un cable para la puesta a tierra (no suministrado) a la barra equipotencial central. Además, la caja metálica del alimentador está conectada a masa a través
del conductor protector del cable de red. La carcasa metálica de la célula de carga está
unida con el alimentador a través del trenzado de blindaje del cable conector.
Calentamiento previo
Para generar resultados exactos, el aparato necesita un calentamiento previo de
30 minutos, recién entonces se ha alcanzado la temperatura de régimen requerida.
Empleo en metrología legal:
$ Después de conectar por primera vez a la red de corriente, el aparato necesita un tiempo
de calentamiento previo de 24 horas.
Page 40

Montar adaptador de verificación
(suministro en modo metrología legal)
§ Quitar tuerca en la parte trasera del visor.
§ Fijar la placa del adaptador de verificación con la tuerca ranurada.
§ Fijar la marca de sello sobre la placa del adaptador de verificación.
Conectar el equipo de batería externo (accesorio: YRB02-X)
! Separar el visor de la alimentación de tensión.
§ Instalación en la zona 1, 2, 20, 21 ó 22:
Atornillar fijamente los conectores de enlace A (del visor) y B (del equipo de batería).
Horas de funcionamiento 30 horas, máximo (según célula de carga conectada,
sin conectar opciones).
– se activa LED verde, tensión ok
– se activa LED rojo, recargar equipo de batería
Leer las instrucciones de funcionamiento del equipo de batería antideflagrante.
40
A
B
Page 41

Servicio
Un mantenimiento regular del aparato
por técnicos de servicio Sartorius garantiza la continua exactitud de medida.
Sartorius ofrece contratos de servicio en
ciclos de 1 mes y hasta 2 años, máximo.
La secuencia de los intervalos de mantenimiento depende de las condiciones de
funcionamiento y requisitos de tolerancias del usuario.
Reparaciones
! Aparato defectuoso ha de ser separado
de inmediato de la tensión de red.
Reparaciones tienen que ser realizadas
sólo por personal técnico autorizado
de Sartorius, con repuestos originales.
Debido a reparaciones incorrectas el
usuario se expone a graves peligros.
Durante el plazo de garantía, enviar el
visor completo.
Controles de seguridad
Un funcionamiento libre de riesgos ya
no se garantiza si:
– el aparato o la línea de conexión a la
red presentan daños visibles,
– si el alimentador ya no funciona correc-
tamente,
– si el aparato ha estado almacenado por
largo tiempo, bajo condiciones inapropiadas (p. ej. humedad extrema),
– el aparato ha sido transportado bajo
condiciones difíciles.
En estos casos
§ separar el aparato de la tensión de red,
$ asegurarlo contra el uso y
$ comunicarse con el serv. técnico
Sartorius.
! Las marcas de sello indican que el
aparato ha de ser abierto y mantenido
sólo por especialistas autorizados, para
garantizar un funcionamiento correcto
del aparato y mantener la validez de los
derechos de garantía.
! Cable defectuoso o dañado, o bornas
atornillables han de reemplazarse como
unidad completa.
! No abrir el aparato bajo tensión.
Después de separarlo de la red, esperar
10 segundos mínimo antes de abrir.
Debido a que las superficies de contacto
de la carcasa influyen en el grado de
protección IP, la apertura y cierre del
visor tienen que ser ejecutados
técnicamente correctos.
41
Cuidado y mantenimiento Eliminación
de desechos
Limpieza
El visor cumple las recomendaciones
del Grupo Europeo para el Diseño de
Equipos (EHEDG European Hygienic
Equipment Design Group) para evitar
las contaminaciones. Quitar regularmente el polvo del aparato (equipo de
pesaje), ver también Certificado de
ensayo CE de tipo.
! Separar el visor de la tensión de red,
aflojar cable de datos conectado.
! No debe penetrar líquido en el aparato.
! No utilizar detergentes de limpieza
agresivos (disolventes o similares).
! Evitar cargas electrostáticas.
§ Limpiar el visor con un paño suave
humectado levemente en agua jabonosa.
$ Al utilizar en la industria alimentaria,
emplear aquí los detergentes apropiados.
§ Secar el visor con un paño suave.
! No se permite rocear con agua o soplar
el aparato con aire a presión.
Limpieza de las superficies de acero
inoxidable
Es fundamental limpiar todas las piezas
de acero inoxidable a intervalos regulares. Limpiar la placa de acero inoxidable
por separado. Limpiar las piezas de
acero inoxidable de la báscula frotándolas suavemente con un paño o esponja
humectados. Utilizar sólo detergentes
de limpieza de uso común, apropiados
para el acero inoxidable. Después de
limpiar, enjuagar minuciosamente,
hasta eliminar el más mínimo residuo.
A continuación, dejar secar el aparato.
Como protección puede aplicarse
adicionalmente un aceite cosmético.
Utilizar disolventes exclusivamente para
la limpieza de piezas de acero inoxidable.
Ambiente corrosivo
$ Eliminar regularmente las sustancias
que favorecen la corrosión.
Cambiar la cubierta protectora
$ Recambiar una cubierta protectora
dañada.
§ Presionar la nueva cubierta protectora
por delante y detrás del aparato, sobre
el borde, hasta que quede bien
posicionada.
El embalaje proteje los productos
Sartorius convenientemente contra
los daños por transporte. El embalaje
consta exclusivamente de materiales no
nocivos para el medio ambiente, que
como materia prima secundaria valiosa
debería eliminarse correspondientemente.
Lo mismo vale para los aparatos en
desuso.
Sacar las pilas o baterías antes de
eliminar el aparato, debido a que deben
ser eliminadas como basura especial.
Informaciones sobre eliminación de
desechos, las ofrecen las oficinas del
ayuntamiento.
Informaciones específicas de básculas/
codificación de los números de serie
La fecha de fabricación del aparato
se codifica con el número de serie,
resultando lo siguiente:
JMM x x x x x
J Año
1 2000–2006
2 2007–2013
3 2014–2020
4 2021–2027
5 2028–2034
6 2035–2041
7 2042–2048
8 2049-2055
9 2056-2062
La columna para el año J contiene
el número de grupo anual, que define
un lapso de tiempo de 7 años respecti-
vamente. Dentro de cada grupo anual se
cuentan los meses (M M) a partir de 13.
2000 13-24
2001 25-26
...
Ejemplo:
113xxxxx (enero del 2000)
xxxxx es un número consecutivo,
que se cuenta de nuevo aumentándolo
cada mes.
Page 42

Als nauwkeurig en robuust afleesapparaat biedt het EX-model CIXS3
(Combics 3) betrouwbare weegresultaten bij gebruik in explosiegevaarlijke
ruimten van zone 1, 2, 20, 21 en 22.
Het apparaat heeft een behuizing van
roestvrij staal en is gemakkelijk te
bedienen. Overige specificaties:
– Grote toetsen met voelbaar drukpunt
– Invoer voor getallen en voor tekst
– Groot puntmatrixscherm, met achter-
grondbelichting, en geschikt voor
grafische weergave
– Met teksten ondersteunde bediening
– Aansluitingen voor twee weegplatfor-
men
– Automatische initialisatie bij inschakelen
– Automatisch tarreren bij inschakelen
van de weegschaal
– Optionele aansturing door externe com-
puter
Voordelen bij het dagelijks werk:
– Korte meettijden
– Onafhankelijk van de opstelplaats van
het weegplatform
– Markeren van weeggoederen met max.
4 alfanumerieke codes
– Flexibiliteit door verschillende interfaces
– Veiligheid door wachtwoordbeveiliging
– Gemakkelijk te reinigen en te desinfec-
teren
Verklaring van de tekens
In de tekst worden de volgende tekens
gebruikt:
§ Instructie voor de juiste bediening
$ Bijzondere instructie voor uitzonderlijke
gevallen
> Beschrijving van het effect van een
bedieningsstap
! Gevaarinstructies
Toepassingsadvies
Telefoon: +49 (0) 551/308-4440
Telefax: +49 (0) 551/308-3791
42 Gebruiksdoel
42 Inhoud
43 Installatie- en veiligheidsinstructies
44 Ingebruikneming
44 Omvang van de levering
44 Opstelinstructies
45 Afbeeldingen van het apparaat
46 Aansluiting op het net
47 IJkadapter voor ijkplichtig
gebruik monteren
48 Externe accu aansluiten
49 Verzorging en onderhoud
49 Reparaties
49 Reiniging
49 Veiligheidscontrole
49 Verwijdering
42
Gebruiksdoel Inhoud
Page 43

Veiligheid
§ Lees vóór ingebruikneming deze handleiding zorgvuldig door.
De fabrikant is niet aansprakelijk voor
schade die veroorzaakt is door het niet
voldoen aan de veiligheidsinstructies en
waarschuwingen.
Het EX-model CIXS3 voldoet aan
de eisen van de EG-richtlijn 94/9/EG
voor apparaten van apparatengroep II,
categorie 2 (voor gas) resp. 1 (voor stof),
en is overeenkomstig EG-typegoedkeuringscertificaat KEMA 03ATEX1157X
gekenmerkt met:
h II 2 G 1 D EEx ib IIC T4 T135°C.
Voorts voldoet het apparaat aan
de eisen van de EG-richtlijnen voor
elektromagnetische compatibiliteit en
elektrische veiligheid (zie de conformiteitsverklaringen).
Onjuist gebruik kan tot schade aan personen en goederen leiden. Het apparaat
mag alleen door gekwalificeerd personeel worden geplaatst en gebruikt.
! Het intrinsiek veilige apparaat kan in
explosiegevaarlijke ruimten:
zone 1 en 2 voor gassen,
zone 20, 21 en 22 voor stof
worden gebruikt. Gebruik in ruimten
waar explosieve stoffen aanwezig zijn
dient per individueel geval onderzocht
te worden. Installatie van het apparaat
in zone 1, 2, 20, 21 of 22 dient door
een deskundige volgens de in uw land
geldende wetten, richtlijnen en normen
te worden uitgevoerd. De van toepassing zijnde voorschriften ter voorkoming van ongevallen moeten worden
aangehouden. Als deskundige geldt een
persoon die vertrouwd is met de montage, de ingebruikneming en het gebruik
van de installatie. De deskundige moet
beschikken over de juiste kwalificaties
en bekend zijn met de van toepassing
zijnde nationale bepalingen en voorschriften. Indien nodig dient contact
opgenomen te worden met de leverancier of met de servicedienst van Sartorius.
Gebruik van de installatie buiten de in
de typegoedkeuringscertificaten
genoemde gegevens is niet toegestaan
en geldt als onjuist gebruik. Men dient
zich strikt te houden aan alle in de
typegoedkeuringscertificaten vermelde
beperkingen (zie onder: EX-certificaten
in de handleiding).
Bij onjuiste installatie vervalt de garantie.
– De installatie dient periodiek door een
daartoe opgeleide deskundige op juiste
werking en veiligheid te worden gecontroleerd.
– Bij alle onderhouds-, reinigings- en
reparatiewerkzaamheden aan het model
CIXS3 mag er in principe geen spanning
op het apparaat staan. Iedere ingreep in
het apparaat (behalve door personen die
door Sartorius zijn geautoriseerd) leidt
43
Installatie- en veiligheidsinstructies
tot verlies van alle garantierechten.
Gebruik uitsluitend originele Sartoriusreserveonderdelen.
– Stel de CIXS3 niet bloot aan onnodig
extreme temperaturen, agressieve
chemische dampen, vocht, schokken
en trillingen. De toelaatbare omgevingstemperatuur tijdens gebruik bedraagt
–10 °C tot +40 °C.
– Bij gebruik van kabels van derden dient
op de pinaansluitingen te worden gelet.
Controleer daarom vóór het aansluiten
of de kabel overeenkomt met het
betreffende verbindingsschema, en
maak de afwijkend aangesloten aders
los. Niet door Sartorius geleverde kabels
vallen onder de verantwoordelijkheid
van de gebruiker.
– Bij gebruik van de CIXS3 in explosiege-
vaarlijke ruimten mogen alle stroomvoerende kabels alleen in stroom- en
spanningsvrije toestand van het apparaat losgemaakt of erin gestoken worden. Voor het aansluiten of losmaken
van kabels dient de weegschaal eerst
van het spanningsnet te worden losgekoppeld.
– Vermijd elektrostatische oplading (in het
bijzonder van de beschermkap); sluit de
aardklem aan.
– Het is verboden de aardverbinding te
onderbreken.
– Als u denkt dat een veilig gebruik niet
meer is gegarandeerd dient u de voedingsspanning van de installatie los te
koppelen en ervoor te zorgen dat deze
niet verder gebruikt kan worden (bijv.
bij beschadiging). Houdt u zich aan de
voorschriften ter voorkoming van ongevallen en instrueer het bedienend personeel dienovereenkomstig.
!Schakel de voedingsspanning af (los-
koppelen van het net) voordat er accessoires op worden aangesloten of ervan
worden verwijderd.
– De isolatie van zowel alle verbindings-
kabels als van de inwendige bedrading
bestaat uit PVC. Chemicaliën die dit
materiaal aantasten, dienen uit de buurt
van deze leidingen te worden gehouden.
– Voor het aansluiten van de CIXS3 op
andere apparaten dienen de bepalingen
in de betreffende EG-typegoedkeuringscertificaten te worden aangehouden.
Verdere informatie is te vinden in het
„Bewijs van intrinsieke veiligheid” in de
appendix van deze handleiding.
Installatie
– Wees voorzichtig bij het gebruiken
van vreemde of in de handel gangbare
RS232-verbindingskabels: de pinaansluitingen zijn vaak niet geschikt voor
Sartorius-apparaten! De aansluitingen
dienen aan de hand van de verbindingsschema’s gecontroleerd te worden;
afwijkende aders dienen losgemaakt te
worden.
! Gebruik uitsluitend gestandaardiseerde
verlengkabels met aardaansluiting.
De aardleiding mag in geen geval
worden onderbroken.
! Indien het apparaat of de netkabel
zichtbare beschadigingen vertoont,
moet de netvoeding losgekoppeld
worden en moet voorkomen worden dat
het apparaat verder gebruikt wordt.
– Accessoires en opties van Sartorius zijn
optimaal aan het apparaat aangepast.
Gebruik daarom geen eigen oplossingen. Instructies hierover staan ook in
onze informatie over gebruikskwaliteit
(volgens de normen m.b.t. storingsongevoeligheid), die wij u gaarne ter
beschikking stellen.
$ Bij problemen gelieve u contact op te
nemen met de centrale klantenservice
van Sartorius.
IP-veiligheid:
– Het afleesapparaat biedt alleen IP65-
/IP67-veiligheid bij ingebouwde rubberpakking en vaste aansluiting (vastgedraaide afsluitstop). De installatie van
weegplatformen moet door een deskundige worden uitgevoerd en gecontroleerd.
– Als er achteraf een gegevensaansluiting
wordt ingebouwd, moet de afsluitstop
worden bewaard. Bescherm de gegevensuitgang met een kapje of iets dergelijks tegen damp, vocht en vuil.
Toepassing onder ijkplicht:
– Als het afleesapparaat op een weegplat-
form wordt aangesloten en de aldus
ontstane weegschaal ter ijking wordt
aangeboden, dient aan de desbetreffende voorschriften te worden voldaan.
Lees bij het aansluiten van Sartoriusplatformen de bijgevoegde CD „Leidraad voor het ijken”, en houd daar
rekening mee. Houd bij het aansluiten
van Sartorius-platformen rekening met
de conformiteitsverklaring met de
opsomming van de toegestane weegbereiken.
– Als bij geijkte apparaten een van
de aangebrachte verzegelingen wordt
beschadigd, dient men zich steeds aan
de nationale wetten en voorschriften te
houden. De weegschaal dient opnieuw
geijkt te worden.
Page 44

Uitpakken
§ Controleer het apparaat meteen na het
uitpakken op uitwendige beschadigingen.
$ Zie in geval van beschadiging de
instructies in het hoofdstuk „Verzorging
en onderhoud”, paragraaf „Veiligheidscontrole”.
$ Bewaar alle onderdelen van de originele
verpakking, i.v.m. eventuele retourzending. Voor verzending alle kabels
losnemen.
Omvang van de levering
– Afleesapparaat
– Handleiding
– Opties (speciale uitvoering) zoals ver-
meld op de pakbon
Handelingen voor de ingebruikname
1) Sluit het weegplatform op dit Combicsapparaat aan.
zie twee pagina’s verderop.
2) ADC configureren:
zie hoofdstuk „Service”
– IJken | Standaard
– Weegbereik, afleesbaarheid
– justeergewicht
– mV/V | geogr. gegevens invoeren
– Lineariseren, justeren in de
handleiding
3) Weegplatform justeren
Zie hoofdstuk „Gebruik”, paragraaf
„Justeren” in de handleiding.
4) Toepassingsprogramma instellen.
zie bijgevoegde handleiding van de
toepassingsprogramma’s
5) Interfaces, printer of alibigeheugen
aansluiten
zie onder „Connectoraansluitschema” in
de handleiding.
6) Interfaces, printer of alibigeheugen
activeren door standaardinstellingen in
de setup.
– Voor COM-1/-2
– Printerprotocol instellen
– Afdrukregels/-bereik voor de
betreffende printer in de handleiding
7) De RS422/RS485-uitgang op COM2
mag alleen worden gebruikt wanneer
de RS232-uitgang niet op COM2 is
aangesloten. Een gelijktijdige elektrische
verbinding met COM2/RS232 und
COM2/RS422/485 is dus niet
toegestaan.
Opstelling
Vermijd bij het opstellen plaatsen met
ongunstige invloeden.
– Hitte (verwarming, direct zonlicht)
– Directe tocht door geopende ramen
en deuren
– Schokken tijdens het wegen
– Extreme vochtigheid
Acclimatiseren
Wanneer een koud apparaat in een
warme omgeving wordt gebracht, kan
er condensvorming optreden. Laat het
apparaat daarom los van het net ca.
2 uur bij omgevingstemperatuur
acclimatiseren.
Indien niet in gebruik
Schakel de installatie uit als deze niet
in gebruik is.
Verzegeling van geijkte versies:
De verzegeling vindt plaats d.m.v.
de naam „Sartorius”. Bij een poging de
sticker te verwijderen, wordt deze
beschadigd. In dat geval vervalt de
geldigheid van de ijking en moet de
weegschaal opnieuw worden geijkt.
44
Ingebruikneming
Overzichtsschema van apparaten voor explosiegevaarlijke ruimten
Ex-ruimte: Zones 1, 2, 20, 21, 22 Buiten Ex-ruimte
Zenerbarrière PC
of converter
Afleeseenheid met weegplatform
24V module Netvoeding EX-batterijvoeding 24V module Netvoeding
(110–230V) (110–230V)
Page 45

Scherm en toetsenbord: Combics 3
45
Afbeeldingen van het apparaat
1
2
3
4
5
6
15
16
14
13
12
11
10
9
8
7
21
20
19
18
17
Achterkant:
Scherm en toetsenbord
1 Controlelampjes (voor controle-
wegen en classificeren)
2 Omschakeltoets voor tekstinvoer
3 Alfanumeriek toetsenbord
4 Toets „Wissen”
5 Standaardinstellingen:
Toegang tot de setup
6 Omschakelen toepassingspro-
gramma | Toepassingsspecifieke
informatie
7 Gegevensuitvoer
8 Bruto/netto, 2
e
eenheid of 10x
hogere resolutie (afhankelijk van
de standaardinstelling)
9 Tarreren
10 Nulpunt instellen
11 Weegplatform verwisselen
12 Aan- en uitschakelen
13 Functietoetsen
14 Puntmatrixscherm, geschikt voor
grafische weergave
Achterkant
15 RS232C-interface „COM1”
16 Gelijkspanningadapterkabel
17 Toegang tot vergrendelings-
schakelaar (standaard- of
ijkplichtig gebruik)
18 Aansluiten weegplatform
19 Potentiaalvereffeningsklem
(aarding)
20 Ontluchtingsklep, Koppel: 1,5 Nm
21 Interface COM2
Page 46

Weegplatform installeren
De verbindingskabel dient door een daartoe opgeleide en bevoegde deskundige van
Sartorius te worden aangesloten.
! Werkzaamheden die de beveiliging IP-67 beïnvloeden, dienen uiterst zorgvuldig
te worden uitgevoerd.
! Bij onjuiste installatie vervalt de garantie.
! Werkzaamheden alleen uitvoeren wanneer er geen spanning op het apparaat staat.
! De kabeldoorvoer (IP67-bescherming) is op het apparaat voorgemonteerd.
§ Draai de vier schroeven van de frontplaat los. Neem de frontplaat eraf.
§ Verbind het weegplatform met het afleesapparaat.
! De kabelbevestiging is reeds voorgemonteerd. Voer alle werkzaamheden aan de
bevestiging voorzichtig uit. Gebruik een momentsleutel. Aandraaikoppel voor deze
kabelbevestiging: 5 Nm
§ Strip de aansluitkabel en monteer deze:
– Steek de kabel door de bevestigingsklem.
– Monteer de kabelbevestiging op de juiste wijze.
– Strip de kabel. De afscherming (1) moet contact maken met de klemmen (2).
– Montage: Laat de aders (3) van de kabel ca. 15 cm lang.
– Steek de kabel door de bevestigingsklem.
– Controleer of de klemmen contact maken met de afscherming.
46
Page 47
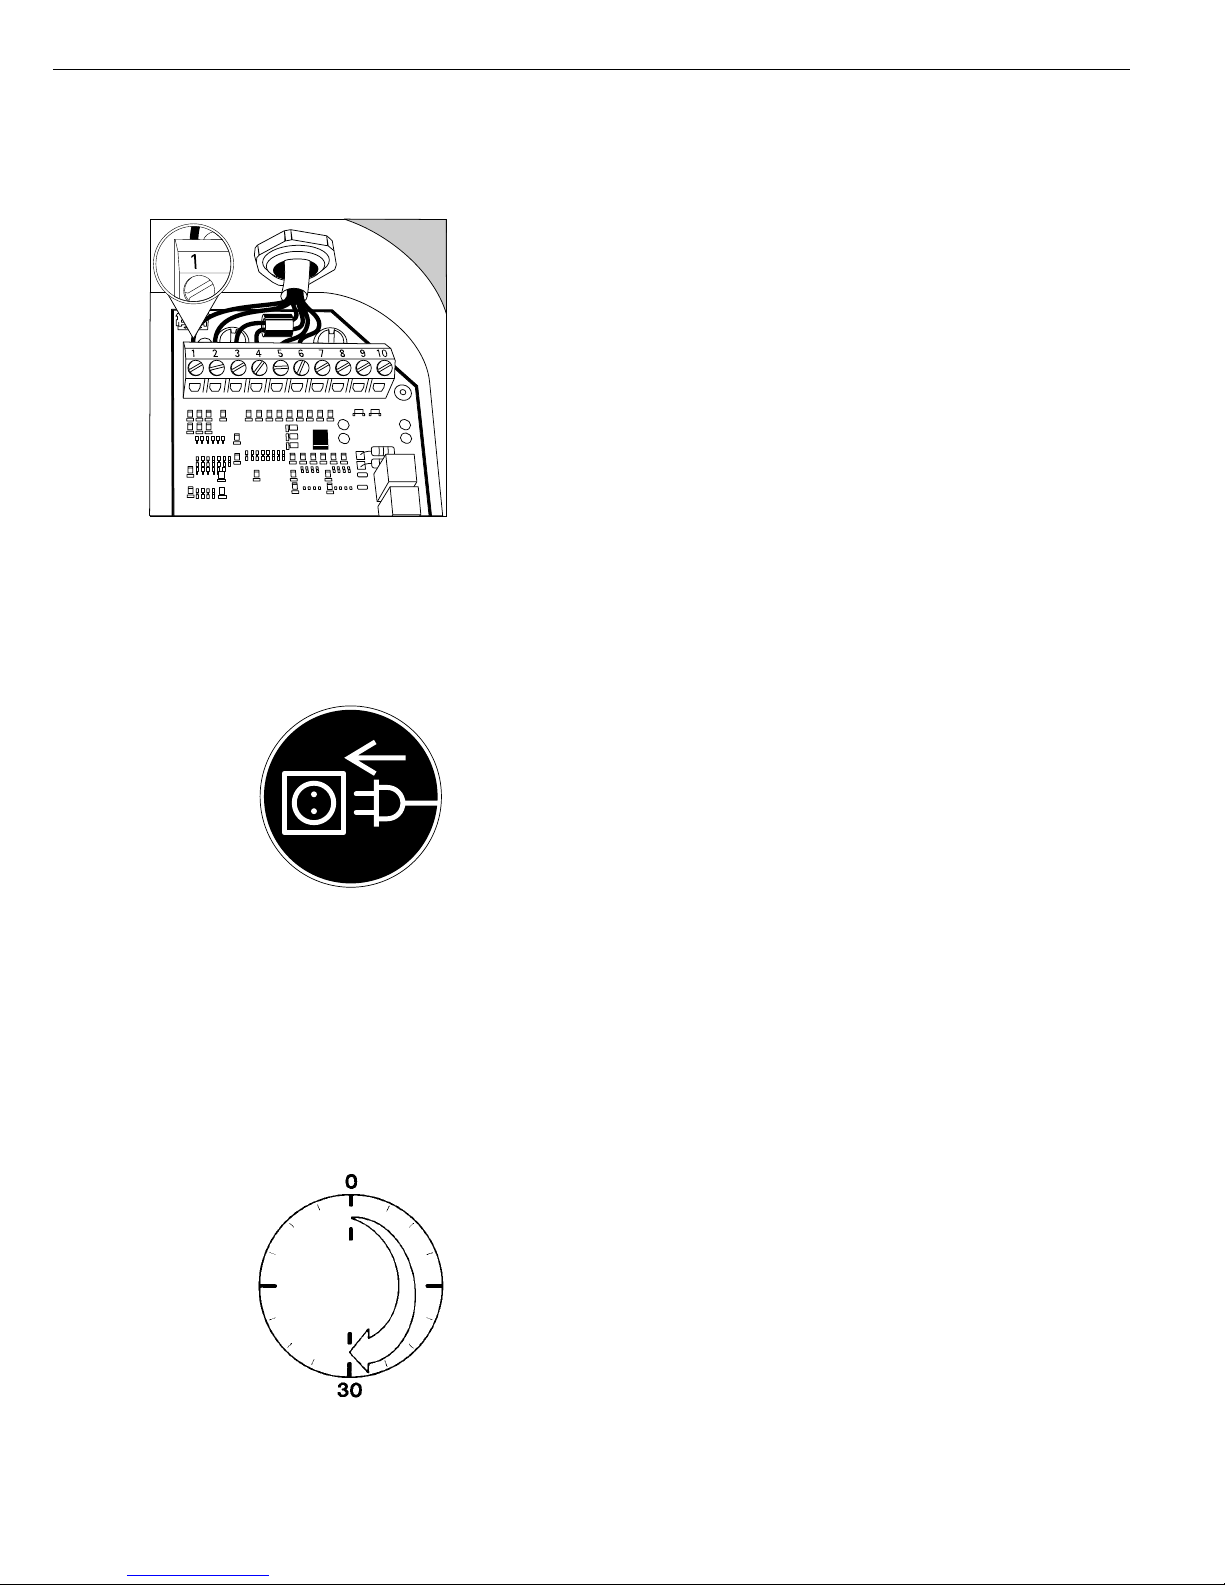
47
§ Monteer de kabel van het weegplatform:
– Strip de kabel. Laat de aders van de kabel ca. 5 cm lang.
– Strip de aders over ca. 1 cm en zet er kabelschoentjes op.
– Schuif een ferrietring over alle aders.
– Schroef de klemmen vast.
Aansluitschema:
no. signaalnaam betekenis
1 BR_POS brugvoedingsspanning (+)
2 SENSE_POS sense (+)
brugvoedingsspanning
3 OUT_POS meetspanning positief
4 OUT_NEG meetspanning negatief
5 SENSE_NEG sense (-)
brugvoedingsspanning
6 BR_NEG brugvoedingsspanning (-)
! De toewijzing van de kleuren en signalen vindt u in de handleiding of het specificatieblad
van het betreffende weegplatform. Alle niet-gebruikte aders isoleren of losmaken.
Weegplatform met viergeleidertechniek
! Bij het aansluiten van een krachtopnemer in viergeleidertechniek moet u de aders BR_POS
(no.1) met SENSE_POS (no.2) en BR_NEG (no.6) met SENSE_NEG (no. 5) doorverbinden.
Aansluiting op het net
§ Controleer de spanning en het stekertype.
$ De spanning wordt geleverd door een netvoeding.
§ Bijpassende netvoedingen:
– YPS02-X.. voor installatie in de explosiegevaarlijke ruimte.
– YPS02-XV24 24V-netspanningsmodule voor installatie in de explosiegevaarlijke ruimte.
Instructie: Beide kabels vast monteren
(Apparaatversie voor een flexibele kabelverbinding op aanvraag)
– YPS02-Z.. voor installatie buiten de explosiegevaarlijke ruimte.
Accupakket
– YRB02-X EX-Accupakket voor installatie in de explosiegevaarlijke ruimte.
Aansluiten van elektronische (perifere) componenten:
§ Vóór het aansluiten of verwijderen van accessoires (printer, PC, zenerbarrière, transformator) moet het apparaat altijd van het nest worden losgekoppeld!
Potentiaalvereffeningsaansluiting aanbrengen (aarding).
§ CIXS3 met een massaverbindingskabel (niet meegeleverd) aan de centrale aardingsrail
aansluiten. Bovendien is de metalen behuizing van het apparaat via de aarddraad van de
netkabel geaard. De metalen behuizing van het weegplatform is via de gevlochten
afscherming van de verbindingskabel met de netvoeding verbonden.
Opwarmtijd
Om nauwkeurige waarden te leveren, moet het apparaat ca. 30 minuten opwarmen.
Pas dan is de vereiste bedrijfstemperatuur bereikt.
Gebruik bij ijkplicht:
$ Nadat het apparaat voor het eerst op de netspanning is aangesloten, bedraagt de
opwarmtijd 24 uur.
Page 48

Monteer de ijkadapter
(ijkwaardige variant).
§ Verwijder de moer aan de achterkant van het afleesapparaat.
§ Bevestig de ijkadapterplaat met behulp van de zaagsneeschroef.
§ Plak een verzegelingssticker over de ijkadapterplaat.
Externe accu aansluiten (accessoire YRB02-X)
! Koppel het afleesapparaat los van de netspanning.
§ Installatie in zone 1, 2, 20, 21 of 22:
Schroef de connectors A (van het afleesapparaat) en B (van het accupakket) stevig vast.
De gebruiksduur bedraagt maximaal 30 h (afhankelijk van het aangesloten weegplatform,
zonder aangesloten opties).
– Als de groene LED oplicht is de spanning in orde.
– Als de rode LED oplicht moet de accu worden opgeladen.
Lees de gebruiksaanwijzing van het EX-accupakket.
48
A
B
Page 49

Service
Regelmatig onderhoud van uw apparaat
door de servicedienst van Sartorius
garandeert een voortdurende meetveiligheid. Sartorius biedt onderhoudscontracten met cycli van één maand tot
twee jaar. De service-interval hangt af
van de gebruikscondities en de tolerantie-eisen.
Reparaties
! Koppel een defect apparaat onmiddellijk
van het net los. Laat reparaties uitsluitend uitvoeren door deskundigen die
door Sartorius zijn geautoriseerd, en
met gebruik van originele reserveonderdelen. Door onjuiste reparaties kan de
gebruiker ernstig gevaar lopen. Stuur
gedurende de garantietermijn het hele
apparaat op.
Veiligheidscontrole
Veilig gebruik is niet meer gegarandeerd:
– wanneer het apparaat of de netkabel
zichtbare beschadigingen vertoont,
– wanneer de netvoeding niet meer werkt
– na langdurige opslag onder ongunstige
omstandigheden (bijv. extreme vochtig-
heid),
– na zware transportbelasting
In deze gevallen
§ moet het apparaat van het net worden
losgekoppeld,
$ moet voorkomen worden dat het verder
wordt gebruikt en
$ moet de servicedienst van Sartorius
worden verwittigd.
! De verzegelingen houden in dat het
apparaat uitsluitend door deskundigen
mag worden geopend en onderhouden,
opdat een onberispelijk en veilig gebruik
van het apparaat gegarandeerd is en de
garantie behouden blijft.
! Laat defecte of beschadigde kabels of
kabelconnectors in hun geheel vervan-
gen.
! Open het apparaat niet onder spanning.
Nadat het apparaat van het net is losge-
koppeld dient u ten minste 10 seconden
te wachten voor u het opent. Daar de
afdichtvlakken van de behuizingsdelen
de IP-bescherming beïnvloeden, moet
het afleesapparaat op deskundige wijze
geopend en gesloten worden.
49
Verzorging en onderhoud Verwijdering
Reiniging
Het afleesapparaat voldoet aan de richtlijnen van de EHEDG (European Hygienic Equipment Design Group) ter vermijding van verontreinigingen. Maak
het apparaat regelmatig vrij van stof;
zie ook het EG-typegoedkeuringscertificaat.
! Koppel het afleesapparaat van het net
los en maak de aangesloten gegevenskabel los.
! Er mogen geen vloeistoffen in het
apparaat komen.
! Gebruik geen agressieve reinigingsmid-
delen (oplosmiddelen e.d.).
! Vermijd elektrostatische oplading.
§ Reinig het afleesapparaat met een doek
die licht met zeepsop bevochtigd is.
$ Bij gebruik in de levensmiddelenindus-
trie de aldaar gebruikelijke reinigingsmiddelen gebruiken.
§ Droog het afleesapparaat met een zachte doek af.
! Het is verboden het apparaat met water
of met perslucht af te spuiten.
Reiniging van de roestvrijstalen oppervlakken
Alle roestvrijstalen delen moeten beslist
regelmatig gereinigd worden. Reinig de
roestvrijstalen weegplaat grondig. Reinig de roestvrijstalen gedeelten aan de
weegschaal door ze eenvoudig met een
vochtige doek of spons af te vegen.
Gebruik alleen de gangbare huishoudreinigingsmiddelen voor roestvrij staal
(bijv. Staalfix). Vervolgens grondig
afspoelen totdat alle resten verwijderd
zijn. Laat het apparaat vervolgens
drogen. Als extra bescherming kan een
onderhoudsolie worden opgebracht.
Oplosmiddelen mogen alleen uitsluitend
voor het reinigen van roestvrijstalen
delen worden gebruikt.
Corrosieve omgeving
$ Verwijder regelmatig corrosiebevorde-
rende stoffen.
Beschermkap vervangen
$ Vervang de beschermkap als deze
beschadigd is.
§ Druk de nieuwe beschermkap aan de
voor- en achterzijde van het apparaat
over de rand tot deze vastzit.
De verpakking biedt Sartorius-producten voldoende bescherming tegen
transportbeschadigingen. Deze bestaat
uit milieuvriendelijk materiaal, dat als
waardevolle secundaire grondstof gerecycled kan worden. Hetzelfde geldt voor
oude apparatuur.
Accu’s dienen vóór afvoer van het apparaat te worden verwijderd en als chemisch afval te worden ingeleverd.
De gemeente kan nadere inlichtingen
over de verwijdering verstrekken.
Weegschaalspecifieke informatie /
codering van het serienummer
De fabricagedatum van het apparaat is
in het serienummer gecodeerd. De
structuur is als volgt:
JMM x x x x x
J jaar
1 2000–2006
2 2007–2013
3 2014–2020
4 2021–2027
5 2028–2034
6 2035–2041
7 2042–2048
8 2049-2055
9 2056-2062
De jaarpositie J staat voor een jaargroepnummer die een periode van telkens 7 jaar definieert. Binnen elke jaargroep worden de maanden (MM) vanaf
13 omhoog geteld.
2000 13-24
2001 25-26
...
Voorbeeld:
113xxxxx (januari 2000)
xxxxx is een volgnummer, dat elke
maand opnieuw begint.
Page 50

Como aparelho de monitorização
robusto e preciso, o modelo EX CIXS3
(Combics 3) oferece resultados de
pesagem fiáveis durante a utilização em
áreas de perigo de explosão das zonas
1, 2, 20, 21 e 22.
O aparelho é totalmente revestido por
aço inoxidável e é de fácil utilização.
Outras características:
– Grandes teclas com pontos de pressão
sensíveis
– Introdução de números e letras
– Visualização ampliada de matriz de
pontos completamente gráfica com
iluminação de fundo
– Execução de serviço suportada por texto
– Ligações para duas plataformas de
pesagem
– Inicialização automática ao ligar
– Tara automática ao carregar a balança
– Controlo opcional por meio de uma
calculadora externa
Vantagens durante o trabalho diário:
– Tempos de medição curtos
– Independência da localização da
plataforma de pesagem
– Identificação do material sujeito a
pesagem até 4 caracteres alfanuméricos
– Flexibilidade através de várias interfaces
– Segurança através da protecção da
palavra-passe
– Limpeza e desinfecção simples
Explicação sobre os símbolos
No texto, são utilizados os seguintes
símbolos:
§ Indicações para uma utilização correcta
$ Indicações especiais em casos
excepcionais
> Descrição das consequências de uma
etapa de funcionamento
! Observações de perigo
Serviço de apoio
Telefone: +49 (0) 551/308-4440
Fax: +49 (0) 551/308-3791
50 Utilização
50 Conteúdo
51 Notas de advertência e de segu-
rança
52 Colocação em funcionamento
52 Volume do fornecimento
52 Montagem
53 Apresentação do aparelho
54 Estabelecer a ligação à rede
55 Adaptador de circulação para montar
a circulação calibrada
56 Ligar baterias externas
57 Conservação e manutenção
57 Reparações
57 Limpeza
57 Verificação de segurança
57 Eliminação
50
Utilização Conteúdo
Page 51

Segurança
§ Ler estas instruções de funcionamento
antes da colocação em funcionamento.
O fabricante não se responsabiliza por
danos resultantes do desrespeito das
notas de segurança e avisos.
O modelo EX CIXS3 preenche os requisitos da directiva da CE 94/9/CE para
aparelhos do grupo de aparelhos II,
Categoria 2 (para gás) ou 1 (para pó) e,
de acordo com o certificado de tipo CE
KEMA 03ATEX1157X, é assinalado com:
h II 2 G 1 D EEx ib IIC T4 T135°C.
Para além disso, o aparelho preenche
os requisitos das Directivas da UE sobre
compatibilidade electromagnética e
segurança eléctrica (consultar declarações de conformidade).
Um uso inadequado pode levar a danos
pessoais e materiais. O aparelho só deve
ser instalado e colocado em funcionamento por pessoal qualificado.
! O aparelho pode ser instalado em áreas
de perigo de explosão:
zona 1 e 2 para gases,
zona 20, 21 e 22 para pós. A utilização
em áreas com materiais potencialmente
explosivos deve ser verificada caso a
caso. A instalação do aparelho na zona
1, 2, 20, 21 ou 22 é efectuada por um
técnico de acordo com as leis em vigor,
directivas e normas do país correspondente. Ter em atenção as respectivas
normas para a prevenção de acidentes.
Como técnico entende-se uma pessoa
que está familiarizada com a montagem, a colocação em funcionamento
e a operação normal da instalação.
O técnico possui uma qualificação
correspondente e compreende as
respectivas determinações e normas do
país. Se necessário os clientes podem
entrar em contacto com o fornecedor
ou com o serviço a clientes da Sartorius.
Não é permitido um funcionamento do
aparelho de acordo com os dados indicados no comprovativo de verificação
de montagem e significa uma utilização
que não está de acordo com as disposições legais. Todas as limitações e
dados mencionados nos comprovativos
de verificação de montagem devem ser
cumpridos pormenorizadamente (ver
em baixo: certificado EX nas instruções
de funcionamento).
No caso de uma instalação imprópria a
garantia será anulada.
– A instalação nas condições apropriadas
deve ser verificada por um técnico adequadamente qualificado quanto ao funcionamento e segurança.
– Todas as operações de manutenção,
limpeza e reparação no modelo CIXS3
devem ser efectuadas com o aparelho
isento de tensão . Qualquer intervenção
no aparelho (excepto por pessoas autorizadas pela Sartorius) origina a perda de
51
Notas de advertência e de segurança
qualquer garantia. Utilizar apenas peças
sobressalentes originais da Sartorius!
- Não expor desnecessariamente o CIXS3
a temperaturas extremas, a vapores
químicos agressivos, humidade, pancadas e vibrações. A temperatura ambiente permitida para o funcionamento
suporta -10°C até 40°C.
- No caso de utilização de cabos de
terceiros deverá ser considerada a disposição dos pinos. Como tal, verificar
as ligações do cabo antes da ligação ao
aparelho da Sartorius de acordo com
o plano de ligação e separar os outros
fios. Os cabos não fornecidos pela
Sartorius são da exclusiva
responsabilidade do utilizador.
– Durante a utilização do CIXS3 numa
área de perigo de explosão, os cabos
condutores devem estar sem nenhuma
corrente/tensão quando forem ligados
ou desligados. Desligar a balança da
rede antes da ligação ou separação
dos cabos.
– Evitar a carga electrostática (especial-
mente na cobertura de protecção)
e ligar o terminal de ligação
equipotencial.
– É proibida uma interrupção do poten-
cial relativa às linhas de ligação
equipotencial.
– Caso se considere que já não é possível
garantir um funcionamento sem perigo,
desligar a instalação da corrente e protegê-la de outras utilizações (p.ex.
numa avaria). Observar as normas de
prevenção de acidentes, instruir o pessoal de forma correspondente.
! Desligar o aparelho da corrente antes de
ligar ou desligar aparelhos adicionais.
– O revestimento de todos os cabos, assim
como dos fios das cablagens interiores,
são compostos por material PVC.
Os produtos químicos nocivos a esse
material devem ser afastados dessas
instalações.
– Para ligar o CIXS3 a outros aparelhos,
ter em atenção as indicações no comprovativo de verificação de montagem
na UE correspondente. É possível obter
mais informações nas “Notas de segurança própria“ no anexo deste guia de
utilização.
Instalação
– Cuidados durante a utilização de cabos
de ligação externos ou comerciais
RS232: Muitas vezes, as disposições dos
pinos não são adequadas para aparelhos
da Sartorius! A disposição deveria ser
verificada de acordo com os planos de
ligação, que deveriam separar fios
diferentes.
Utilizar apenas cabos de extensão com
condutor de protecção, de acordo com
as normas em vigor! O condutor de
protecção não deve ser desligado em
nenhuma circunstância.
Caso o aparelho ou o cabo da rede
apresente danos visíveis, desligar da
corrente e proteger o aparelho antes de
o voltar a utilizar.
– Os acessórios e opções da Sartorius
estão ajustados de um modo optimizado ao aparelho. Como tal, não utilize
soluções próprias. Desta forma, as notas
fornecem também indicações sobre a
qualidade de funcionamento (de acordo
com as normas de estabilidade de interferências), que são disponibilizadas pela
Sartorius.
$ No caso de problemas, contactar
a assistência a clientes da Sartorius.
Protecção IP:
– O aparelho de monitorização tem apenas
nas juntas de borracha instaladas e na
conexão fixa (tampão fixo) a protecção
IP65/IP67. A instalação das plataformas
de pesagem deve ser efectuada e verificada por pessoal técnico.
– No caso de uma instalação posterior
de uma saída de dados, conservar os
tampões. Proteger a saída de dados
com uma cobertura ou algo semelhante
contra vapor, humidade e sujidade.
Instalação em circulação calibrada:
– Caso o aparelho de pesagem seja
ligado a uma plataforma de pesagem e
a balança esteja apta para a calibragem,
deve cumprir obrigatoriamente as normas correspondentes. Durante a instalação de plataformas da Sartorius, ler
o CD anexo “Manual de calibragem“.
Durante a instalação de plataformas da
Sartorius, ter em atenção a declaração
de conformidade com a lista de áreas
de pesagem permitidas.
– Caso uma das marcas de segurança
existentes esteja danificada nos aparelhos, são sempre aplicadas as leis e
directrizes nacionais. É necessária uma
calibração posterior da balança.
Page 52

Remover a embalagem
§ Verifique, imediatamente após a
remoção da embalagem, se o aparelho
não apresenta danos exteriores.
$ Se detectar danos deve consultar
as notas no capítulo “Conservação
e manutenção”, secção “Verificação de
segurança”
$ Guarde todas as peças da embalagem
original para um eventual transporte de
devolução. Retirar todos os cabos antes
da expedição!
Volume do fornecimento
– Aparelho de pesagem
– Instruções de funcionamento
– Opções (equipamento especial) como
observado na guia de remessa
Etapas de trabalho da colocação em
funcionamento
1) Ligar a plataforma de pesagem a este
aparelho de monitorização Combics:
consulte a página seguinte
2) Configurar ADU:
consulte o capítulo “Serviço“
– Calibragem | Standard
– Área de pesagem, Legibilidade
––
Peso de verificação
––
mV/V | Indicar geodados
– Linearizar, Ajustar nas instruções de
funcionamento
3) Ajustar plataforma de pesagem:
Consulte o capítulo Funcionamento,
secção “Ajustar“ nas instruções de
funcionamento.
4) Configurar programa da aplicação:
consulte o manual do programa de
aplicação
5) Ligar interfaces, impressoras ou
memória álibi em baixo, consulte o
plano de disposição dos conectores nas
instruções de funcionamento.
6) Activar as interfaces, impressoras ou
memória álibi através das configurações
preliminares na configuração:
– Para COM-1/-2
– Definir log de impressão
– Linhas/áreas de impressão para as
impressoras correspondentes nas
instruções de funcionamento
7) A saída de dados RS-422/RS-485 no
COM2, só pode ser utilizada se a saída
de dados RS-232 não estiver ligada
ao COM2. Por outras palavras, NÃO
é permitida a ligação eléctrica em
simultâneo à RS-232 e à RS-422/485
no COM2.
Montagem
Durante a montagem, evitar locais com
condições inadequadas:
– Calor (aquecimento, exposição solar
directa)
– Corrente de ar directa através de portas
e janelas abertas
– Vibrações durante a pesagem
– Humidade intensa
Aclimatizar
Quando um aparelho arrefecido é levado
para um ambiente quente, pode originar
condensação. Como tal, permita a
aclimatação do aparelho procedendo,
para esse efeito, à separação do mesmo
da rede e deixando-o nesse estado
durante cerca de 2 horas à temperatura
ambiente.
Não utilização
A instalação deve estar desligada
quando não está a ser utilizada.
Marcas de segurança em variantes
calibradas :
A segurança do aparelho é assegurada
pelo nome “Sartorius”. Ao tentar retirar
as marcas coladas, estas ficarão danifi-
cadas. Neste caso, a validade da cali-
bração é anulada e a balança deverá ser
calibrada novamente.
52
Colocação em funcionamento
Apresentação de síntese dos aparelhos para as áreas potencialment
Área ex.: zona 1, 2, 20, 21, 22 Área sem risco de explosão
Barreira Zener PC
ou conversor
Aparelho de monitorização com plataforma de pesagem
Módulo Fonte de alimentação Unidade de baterias Módulo Fonte de alimentação
de 24 V (110–230 V) com protecção de 24 V (110–230 V)
antideflagrantes
Page 53

Apresentação e teclado: Combics 3
53
Apresentação do aparelho
1
2
3
4
5
6
15
16
14
13
12
11
10
9
8
7
21
20
19
18
17
Parte traseira:
Apresentação e teclado
1 Luzes de controlo
(para balanças de controlo
e classificação)
2 Tecla de comutação para intro-
dução de letras
3 Teclado alfanumérico
4 Tecla “Eliminar“
5 Predefinições :
Acesso à configuração
6 Alterar programa da
aplicação|Informações específicas
da aplicação
7 Saída de dados
8 Bruto/líquido, 2º unidade ou
resultado superior a 10 (segundo
a predefinição)
9 Tarar
10 Colocar a zero
11 Trocar plataforma de pesagem
12 Ligar/desligar
13 Teclas de função
14 Exibição da matriz de pontos apta
para gráficos
Parte traseira
15 Interface RS232C “COM1“
16 Cabo adaptador DC
17 Acesso ao comutador de travagem
(funcionamento standard ou de
calibragem obrigatória)
18 Ligação da plataforma de
pesagem
19 Terminal de ligação equipotencial
(Ligação à terra)
20 Válvula de ventilação, Momento
angular: 1,5 Nm
21 Interface COM2
Page 54

Instalar plataforma de pesagem
O cabo de ligação deve ser ligado por um especialista autorizado pela Sartorius.
! Efectuar o tipo de protecção IP-67 cuidadosamente em trabalhos influenciados.
! No caso de uma instalação imprópria a garantia será anulada!
! Efectuar apenas operações com o aparelho isento de tensão .
! A passagem do cabo (protecção IP67) está montada previamente no aparelho de
monitorização.
§ Desapertar os 4 parafusos da placa frontal. Retirar a placa frontal.
§ Ligar a plataforma de pesagem ao aparelho de monitorização.
! A união roscada do cabo é montada previamente. Executar todas as operações na união
roscada cuidadosamente. Utilizar uma chave dinamométrica. Momento angular desta
união roscada do cabo: 5 Nm
§ Descarnar e montar o cabo de ligação:
– Prender o cabo através da união roscada do cabo.
– Montar a união roscada do cabo correctamente.
– Descarnar o cabo: A protecção (1) deve estar em contacto com os terminais (2).
– Montagem: Deixar os fios (3) do cabo com cerca de 15cm.
– Prender o cabo através da união roscada do cabo.
– Controlar o contacto dos terminais com a protecção.
54
Page 55

55
§ Montar o cabo da plataforma de pesagem:
– Descarnar o cabo. Deixar os fios do cabo com cerca de 5 cm.
– Os fios são descarnados em cerca de 1cm e estão munidos de um revestimento.
– Colocar uma protecção de ferrite em todos os fios.
– Aparafusar terminais.
Disposição da ligação:
Nº Desc. sinal Significado
1 BR_POS Tensão de alimentação em ponte (+)
2 SENSE_POS Sentido (+)
Tensão de alimentação em ponte
3 OUT_POS Tensão de medição positiva
4 OUT_NEG Tensão de alimentação negativa
5 SENSE_NEG Sentido (-)
Tensão de alimentação em ponte
6 BR_NEG Tensão de alimentação em ponte (-)
Para a atribuição de cores e sinais, retirar o respectivo manual/registo de dados da
plataforma de pesagem. Isolar ou separar todos os fios não utilizados!
Plataforma de pesagem com técnica de 4 condutores
! Durante a ligação de um sensor de carga na técnica de 4 condutores juntar os fios
BR_POS (nº 1) com SENSE_POS (nº 2) e BR_NEG (nº 6) com SENSE_NEG (nº 5).
Estabelecer a ligação à rede
§ Verificar valor da tensão e modelo do conector.
$ O abastecimento de corrente efectua-se através de uma unidade de alimentação.
§ Unidades de alimentação correspondentes:
– YPS02-X.. para instalação numa área de perigo de explosão.
– YPS02-XV24 24V-módulo de rede para instalação numa área de perigo de explosão.
Nota: Colocar correctamente ambos os fios
(Versão do aparelho para um assentamento de cabos flexível se solicitado)
– YPS02-Z.. para instalação fora da área de perigo de explosão.
Conjunto de baterias de acumulação
– YRB02-X EX-conjunto de acumulação para instalação em área de perigo de explosão.
Ligação dos componentes electrónicos (periferia):
§ Antes da ligação ou remoção de aparelhos adicionais (impressora, PC, barreira Zener,
transformador) o aparelho deve estar sempre desligado da rede!
Criar terminal de saída equipotencial (ligação à terra)
§ Ligar o CIXS3 com um cabo de ligação em massa (não incluído no fornecimento inicial)
à linha de transmissão principal equipotencial central. Para além disso, o invólucro
metálico da unidade de alimentação está ligado à terra através do condutor de protecção
do cabo de rede. O invólucro metálico da plataforma de pesagem está ligado através do
fio de blindagem do cabo de ligação à unidade de alimentação.
Tempo de pré-aquecimento
Para obter resultados precisos, o aparelho necessita de um período de aquecimento
de 30 minutos. Só depois disso se obtém a temperatura de funcionamento necessária.
Instalação com obrigação de calibragem:
$ Após a primeira instalação à rede, necessita de um período de aquecimento de 24 horas.
Page 56

Montar adaptador de calibragem
(Estado de fornecimento passível de ser calibrado)
§ Retirar a porca da parte traseira do aparelho de monitorização.
§ Apertar a placa do adaptador de calibragem com o parafuso fendido.
§ Colar a placa do adaptador com marcas de segurança.
Ligar as baterias externas (acessório: YRB02-X)
! Separar o aparelho de monitorização da alimentação.
§ Instalação na zona 1, 2, 20, 21 ou 22:
Aparafusar o conector da ficha A (do aparelho de monitorização) e B (do conjunto de
baterias).
A duração máxima possível de funcionamento é de 30 horas (por plataforma de pesagem
conectada, sem opções incluídas).
– se o LED estiver verde, a tensão está ok
– se o LED estiver vermelho, carregar as baterias.
Ler as instruções de funcionamento do conjunto de baterias do EX.
56
A
B
Page 57

Serviços
A manutenção frequente do aparelho
pela assistência a clientes da Sartorius
garante uma precisão de medição contínua. A Sartorius oferece contratos de
manutenção com ciclos de 1 mês até
2 anos. O intervalo de manutenção
depende das condições de funcionamento e dos requisitos de tolerância.
Reparações
! Separar um aparelho danificado imedia-
tamente da rede. As reparações podem
apenas ser executadas por funcionários
da Sartorius devidamente especializados
e autorizados e com peças sobressalentes
originais. Trabalhos de reparação incorrectos podem colocar em perigo a vida
do utilizador da máquina. Durante o
período de garantia, enviar o aparelho
de monitorização completo.
Verificação de segurança
Já não é assegurada a operação segura:
– quando o aparelho ou o cabo de ligação
à rede apresentem danos visíveis,
– quando a unidade de alimentação já
não funciona,
– em casos de armazenamento prolonga-
do em condições inadequadas (p.ex.
humidade extrema),
– após elevadas cargas de transporte.
Nestes casos
§ desligar o aparelho da corrente,
$ protegê-lo contra o funcionamento
futuro e
$ contactar a assistência a clientes da
Sartorius.
! Os selos alertam para o facto de que
o aparelho pode apenas ser aberto e
sujeito a trabalhos de manutenção por
funcionários devidamente autorizados,
de modo a permitir o funcionamento
correcto e seguro do mesmo (e para
assegurar a prestação dos direitos de
garantia.
! Substituir os cabos ou uniões roscadas
de cabos danificados como unidade.
! Não abrir o aparelho sob tensão .
Depois de o desligar da corrente,
aguardar 10 segundos até abrir o aparelho. Como a superfície de ajuste das
peças do invólucro influenciam a protecção IP, abrir e fechar o aparelho de
monitorização adequadamente.
57
Conservação e manutenção Eliminação
Limpeza
O aparelho de monitorização corresponde às normas do EHEDG (European
Hygienic Equipment Design Group) relativas à prevenção de contaminações.
Limpar regularmente o pó no aparelho
(instalação de pesagem); consulte o
comprovativo de verificação de montagem da CE.
! Desligar o aparelho de monitorização
da corrente, e separar o cabo de dados
ligado.
! Não permitir líquidos no interior do
aparelho.
! Não utilizar meios de limpeza agressivos
(solventes, etc.).
! Evitar o carregamento estático do
aparelho.
§ Limpar o aparelho de monitorização
com um pano húmido embebido p.ex.
em lixívia de sabão.
$ No caso de uma instalação na indústria
de bens alimentares, utilizar os meios de
limpeza adequados.
§ Secar o aparelho de monitorização com
um pano macio.
! Não é permitido lavar o aparelho com
água ou com ar comprimido.
Limpeza das superfícies em aço
inoxidável
De um modo geral, deverão ser limpos
todos os componentes em aço inoxidável
em intervalos regulares. Limpar a placa
em aço inoxidável adequadamente em
separado. Limpar as peças em ano inoxidável da balança com um pano húmido
ou com uma esponja através de um
esfregamento simples. Utilizar apenas
detergentes de uso doméstico que sejam
adequados para o aço inoxidável
(p.ex. Stahlfix). Proceda posteriormente
à lavagem, de modo a eliminar todos os
resíduos. Deixar o aparelho secar. Como
protecção adicional poderá ser aplicado
um óleo de conservação.
Os produtos solventes podem apenas ser
utilizados para a limpeza de componentes em aço inoxidável.
Ambiente corrosivo
$ Retirar regularmente substâncias que
provoquem corrosão.
Substituir a cobertura de protecção
$ Substituir uma cobertura de protecção
danificada.
§ Pressionar a nova cobertura de protecção sobre os bordos da parte
dianteira e traseira do aparelho até
encaixarem.
A embalagem protege os produtos da
Sartorius de eventuais danos durante
o transporte. É composta por materiais
biodegradáveis, que devem ser reciclados como matéria-prima reciclável.
O mesmo se aplica a aparelhos antigos.
As baterias são retiradas do aparelho
antes da sua destruição e colocadas no
lixo.
É possível obter mais informações sobre
a eliminação na Câmara Municipal ou
departamento responsável.
Informações específicas da balança/
Codificação do número de série
A data de fabrico do aparelho está
codificada no número de série.
A estrutura tem o seguinte aspecto:
AMM x x x x x
A Ano
1 2000–2006
2 2007–2013
3 2014–2020
4 2021–2027
5 2028–2034
6 2035–2041
7 2042–2048
8 2049-2055
9 2056-2062
A coluna do ano A corresponde ao
número de grupos de anos, que define
um período de 7 anos. Dentro de cada
grupo de anos, os meses (M M) são
contados de 13 de forma crescente.
2000 13-24
2001 25-26
...
Exemplo:
113xxxxx (Janeiro 2000)
xxxxx é um número sequencial, que
é novamente numerado de forma
crescente a cada mês.
Page 58

Som exakt och robust analysapparat
ger EX-modell CIXS3 (Combics 3)
tillförlitliga vågresultat vid användning
i explosionsfarliga miljöer i zon 1, 2, 20,
21 och 22. Apparaten har en kåpa av
rostfritt stål och är lätt att manövrera.
Ytterligare egenskaper:
– Stora knappar med kännbar tryckpunkt
– Siffer- och bokstavsinmatning
– Stort punkt-matrix-teckenfönster med
bakgrundsbelysning som är helt och
hållet grafikduglig
– Textstödd manövrering
– Anslutningar för två vågplattformar
– Automatisk initialisering när apparaten
sätts på
– Automatisk tarering då vågen belastas
– Valfri manövrering med extern dator
Fördelar i det dagliga arbetet:
– Korta mättider
– Oberoende av var vågplattformen står
– Märkning av gods med upp till 4 alfa-
numeriska beteckningar
– Flexibilitet tack vare olika gränssnitt
– Säkerhet tack vare löseordsskydd
– Lätt att rengöra och desinficera
Teckenförklaring
I texten används följande symboler:
§ Anvisning för rätt manövrering
$ Speciell anvisning för undantagsfall
> Beskrivning av vad som händer vid ett
manövreringssteg
! Tips beträffande risker
Rådgivning för användning
Telefon: +49 (0) 551/308-4440
Telefax: +49 (0) 551/ 308-3791
58 Användningssyfte
58 Innehåll
59 Varnings- och säkerhetsanvisningar
60 Idrifttagande
60 Leveransinnehåll
60 Installationsanvisningar
61 Beskrivning av apparaten
62 Upprättande av nätanslutning
63 Montering av kalibreringsadapter för
den obligatoriska kalibreringen av
trafiken
63 Anslutning av externt batteri
64 Skötsel och underhåll
64 Reparationer
64 Rengöring
64 Säkerhetskontroll
64 Avfallshantering
58
Användningssyfte Innehåll
Page 59

Säkerhet
§ Den här bruksanvisningen måste läsas
igenom noggrant före enheten tas i
drift.
Tillverkaren ansvarar inte för skador
som orsakas till följd av att säkerhetsanvisningarna och varningarna inte uppmärksammas.
EX-Modell CIXS3 uppfyller kraven i EGdirektivet 94/9/EG för enheter i apparatgrupp II, kategori 2 (för gas) och 1
(för damm) och har i enlighet med EGtypgodkännande KEMA 03ATEX1157X
beteckningen:
h II 2 G 1 D EEx ib IIC T4 T135°C.
Vidare uppfyller enheten kraven i EGdirektiven för elektromagnetisk tillförlitlighet och elsäkerhet (se konformitetsförklaringar).
Felaktig användning kan leda till person- eller egendomsskador. Enheten får
endast användas och skötas av utbildad
personal.
! Den egensäkra enheten kan användas
i explosionsfarliga områden:
zon 1 och 2 för gas,
zon 20, 21 och 22 för damm.
Användandet i områden där det föreligger explosionsrisk måste kontrolleras
i varje enskilt fall. Installationen av
apparaten i zon 1, 2, 20, 21 eller 22 ska
genomföras av utbildad personal enligt
gällande lagar, riktlinjer och normer i
aktuellt land. Ta hänsyn till de tillämpliga olycksfallsförebyggande föreskrifterna. Som fackman betecknas en person
som är väl förtrogen med hur anläggningen monteras, tas i bruk samt hur
den sköts. Fackmannen har den kvalifikationen som behövs och känner till de
tillämpliga bestämmelserna och föreskrifterna i aktuellt land. Kontakta vid
behov återförsäljaren eller Sartorius
serviceavdelning.
! Om anläggningen används utöver de
data som anges i typgodkännandet blir
resultatet inte tillförlitligt och föreskrifterna anses då inte ha beaktats. Alla
data och begränsningar som nämns
i typgodkännandet måste följas i sin
helhet (se under: EX-CERTIFIKAT i
bruksanvisningen).
Garantin gäller inte vid felaktig installation.
– Låt en fackman med lämplig utbildning
kontrollera anläggningen regelbundet
med avseende på funktion och säkerhet.
– I princip ska alla underhålls-, rengör-
ings- och reparationsarbeten utföras
på modell CIXS3 när den inte är kopplad
till någon strömkälla. Alla ingrepp i
apparaten (förutom de som utförs av
personer som har auktoriserats av
Sartorius) medför att garantin inte gäller.
Använd endast originalreservdelar från
Sartorius!
59
Varnings- och säkerhetsanvisningar
- Undvik att utsätta CIXS3 för väldigt
höga temperaturer, aggressiva kemiska
ångor, fukt, stötar och vibrationer i
onödan. Den tillåtna omgivningstemperaturen vid drift är –10°C till 40°C.
- Var noga med placeringarna av stiften
om främmande kablar används. Jämför
därför kabelanslutningarna med det
aktuella kopplingsschemat innan du
ansluter dem till Sartorius-produkterna
och skilj de ledningar som har avvikande hölje åt. Driftsansvarig ansvarar för
eventuella kablar som inte har
levererats från Sartorius.
- När CIXS3 används i explosionsfarlig
miljö får strömförande kablar endast tas
bort från eller anslutas till enheten när
denna inte är ansluten till någon
strömkälla. Koppla bort vågen från
elnätet innan du ansluter kablar till eller
tar bort kablar från vågen.
- Undvik elektrostatisk laddning (speciellt
på dammskyddet), anslut potentialutjämningsklämma.
- Det är förbjudet att bryta potentialutjämningsledningarna.
- Om du anser att du inte längre kan
garantera att det är riskfritt att använda
anläggningen kopplar du ur driftspänningen och säkrar denna mot vidare
användning (t.ex. vid skada). Följ säkerhetsföreskrifterna, ge driftspersonalen
nödvändiga anvisningar.
! Koppla bort spänningsförsörjningen
(från elnätet) före extrautrustning
ansluts eller kopplas bort.
– Höljet till alla förbindelsekablar, liksom
till trådarna i den invändiga ledningsdragningen, är tillverkat av PVC. Se till
att inga kemikalier som verkar frätande
på detta material kommer i kontakt med
ledningarna.
– För sammankoppling av CIXS3 med
andra enheter måste angivelserna i
aktuella EG-typgodkännanden uppmärksammas. Ytterligare information
finns i ”Konformitetsförklaring med
krav på inre säkerhet” i bilagan till den
här bruksanvisningen.
Installation
– Var försiktig när du använder en främm-
ande eller vanlig RS232-anslutningskabel: Placeringen av stiften är ofta inte
avsedda för apparater från Sartorius!
Placeringen bör kontrolleras med hjälp
av kopplingsschema och avvikande
ledningar bör skiljas åt.
! Använd endast normenliga förläng-
ningskablar med skyddsledare. Skyddsledaren får inte i något fall brytas.
! Om det finns skador på enheten eller
nätkabeln, dra ut spänningsförsörjningen och säkra enheten mot fortsatt
användning.
– Tillbehör och tillval från Sartorius är
optimalt anpassade till enheten. Använd
av denna anledning inga egna lösningar. Information om detta finns även
i våra upplysningar beträffande driftskvalitet (enligt standarderna beträffande
störningar) som vi gärna ställer till
förfogande.
$ Vid problem ber vi dig kontakta din
lokala Sartorius serviceavdelning.
IP-skydd:
– Analysapparaten har endast IP65-/IP67-
skydd med inbyggd gummitätning och
fast förbindelse (åtdragna ändförslutningsproppar). Installationen av vågplattformar måste utföras och kontrolleras av en fackman.
– När en datautgång ansluts i efterhand
måste ändförslutningspropparna sparas.
Datautgången måste skyddas mot ånga,
fuktighet och smuts med hjälp av ett
lock eller liknande.
Användning i kalibreringspliktig trafik:
– Om analysapparaten ansluts till en
vågplattform och vågen som uppstår av
detta måste kalibreras, måste de gällande föreskrifterna följas. Vid anslutning
av Sartorius-plattformar, läs igenom
och uppmärksamma bifogad CD »Handledning för kalibrering«. Vid anslutning
av Sartorius-plattformar måste konformitetsförklaringen med listan över
tillåtna vågområden uppmärksammas.
– Om en av de fastklistrade förseglingarna
hos kalibrerade apparater förstörs måste
alltid de nationella lagarna och föreskrifterna följas. Efterkalibrering av
vågen är nödvändig.
Page 60

Uppackning
§ Kontrollera omedelbart efter uppackningen om delarna har skadats
$ Följ anvisningarna i avsnitt »Säkerhets-
kontroll« i kapitlet »Skötsel och underhåll«, om det finns skador
$ Alla delar i originalförpackningen måste
sparas, om produkten ev. måste returneras. Dra ut alla kablar före produkten
skickas iväg!
Leveransinnehåll
– Analysapparat
– Bruksanvisning
– Tillval (specialutrustning) enligt infor-
mationen på följesedeln
Arbetssteg för idrifttagning
1) Ansluta vågplattformen till denna Combics-analysapparat:
se nästkommande sidor
2) Konfigurera ADU:
se kapitel »Service«
– Kalibrering | Standard
– Vågområde, läslighet
– Justeringsvikt
– mV/V | ange geodata
– Linearisering, justering i bruksanvis-
ningen
3) Justera vågplattformen:
se kapitlet Drift, avsnitt »Justera«
i bruksanvisningen.
4) Ställa in användningsprogrammet:
se bifogade instruktioner för användningsprogrammet
5) Ansluta gränssnitt, skrivare eller
alibiminne:
se under Kontaktbeläggningsschema
i bruksanvisningen.
6) Aktivera gränssnitt, skrivare eller
alibiminne med hjälp av förinställningar
i Setup:
– För COM-1/-2
– Ställa in utskriftsprotokoll
– Utskriftsrader/-områden för aktuell
skrivare i bruksanvisningen
7) Datautgång RS422/RS485 på COM2 får
endast användas när RS232-utgången
inte är ansluten till COM2. Det är alltså
inte tillåtet att ansluta COM2/RS232
och COM2/RS422/485 samtidigt.
Uppställning
Vid uppställningen bör orter med
ogynnsamma förhållanden undvikas:
– Värme (element, solsken)
– Direkt luftdrag genom öppna fönster
och dörrar
– Vibrationer under vägningen
– Extrem fuktighet
Acklimatisering
När en kall apparat förs in i en varm
miljö kan det leda till kondensering.
Därför bör man acklimatisera vågplatt-
formen i cirka 2 timmar i rumstempera-
tur utan att ansluta den till ström.
Om apparaten inte används
Stäng av anläggningen när den inte
används.
Försegling hos kalibrerade varianter:
Säkringen av apparaten sker med hjälp
av klistermärken med ”Sartorius”-logo.
Om man försöker ta loss klistermärket
kommer det att förstöras. I sådana fall
upphör kalibreringsgiltigheten att gälla
och vågen måste kalibreras om i efter-
hand.
60
Idrifttagande
Översikt över utrustning för explosionsfarliga miljöer
EX-område: Zon 1, 2, 20, 21, 22 Inte EX-område
Zenerbarriär PC
eller omvandlare
Analysapparat med vågplattform
24 V-modul Strömenhet EX-batteripaket 24 V-modul Strömenhet
(110–230V) (110–230V)
Page 61

Teckenfönster och knappsats: Combics 3
61
Beskrivning av enheten
1
2
3
4
5
6
15
16
14
13
12
11
10
9
8
7
21
20
19
18
17
Baksidan:
Teckenfönster och knappsats
1 Kontrollampor (för kontrollväg-
ning och klassering)
2 Växling för inmatning av
bokstäver
3 Alfanumerisk knappsats
4 Knappen »Radera«
5 Förinställningar: Tillgång till
Setup
6 Växla användnings-program
|Användningsspecifik information
7 Utmatning av data
8 Brutto/Netto, 2: a enhet eller
10 gånger högre upplösning
(beroende på förinställning)
9 Tarering
10 Nollställning
11 Växla vågplattform
12 Sätta på/stänga av
13 Funktionsknappar
14 Punkt-matrix-teckensats med
grafikvisning
Baksidan
15 RS232C-gränssnitt »COM1«
16 DC-adapterkabel
17 Åtkomst till spärrkontakt
(standard- eller kalibreringspliktig
drift)
18 Anslutning vågplattform
19 Potentialutjämningsklämma
(jordning)
20 Avluftningsventil, Vridmoment:
1.5 Nm
21 Gränssnitt COM2
Page 62

Installation av vågplattformen
Förbindelsekabeln ska anslutas av en utbildad och auktoriserad fackman från Sartorius.
! Genomför arbeten som påverkas av skyddsklass IP-67 mycket noggrant.
! Garantin gäller inte vid felaktig installation.
! Arbeten får endast utföras på apparaten när den inte är ansluten till någon strömkälla.
! Kabelgenomföringen (IP67-skydd) på analysapparten har förmonterats.
§ Lossa på de 4 skruvarna på frontplattan. Ta loss frontplattan.
§ Förbind vågplattformen med analysapparaten.
! Kabelförskruvningen har förmonterats. Alla arbeten på förskruvningen måste genomföras
försiktigt. Använd en vridmomentsnyckel. Vridmoment för denna kabelförskruvning:
5 Nm
§ Isolera och montera förbindelsekabeln:
– Sätt i kabeln genom kabelförskruvningen.
– Montera kabelförskruvningen på ett fackmässigt sätt.
– Isolera kabeln: Skärmningen (1) måste ha kontakt med klämman (2).
– Montering: Kabelledningarna (3) ska lämnas ca. 15 cm långa.
– Sätt i kabeln genom kabelförskruvningen.
– Kontrollera att klämmorna är i kontakt med skärmningen.
62
Page 63

63
§ Montera kabeln på vågplattformen:
– Isolera kabeln. Kabelledningarna (3) ska lämnas ca. 5 cm långa.
– Isolera ca. 1 cm av kabelledningarna och sätt ändhylsor på dem.
– Sätt en ferritring över alla ledningar.
– Skruva fast klämmorna.
Anslutningsbeläggning:
Nr. Signalomr. Betydelse
1 BR_POS Matarspänning, brygga (+)
2 SENSE_POS Sense (+)
Matarspänning, brygga
3 OUT_POS Mätspänning positiv
4 OUT_NEG Mätspänning negativ
5 SENSE_NEG Sense (-)
Matarspänning, brygga
6 BR_NEG Matarspänning, brygga (-)
! För anpassning av färger och signaler, använd respektive instruktioner/datablad
för vågplattformen. Alla ledningar som inte används ska isoleras eller åtskiljas!
Vågplattform med 4-ledarteknik
! När en lastupptagare ansluts med 4-ledarteknik ska ledning BR_POS (nr.1) klämmas ihop
med SENSE_POS (nr.2) och BR_NEG (nr.6) klämmas ihop med SENSE_NEG (nr. 5).
Upprätta nätanslutning
§ Kontrollera spänningsvärde och kontaktens utförande.
$ Strömtillförseln sker via en strömenhet.
§ Tillhörande strömenheter:
– YPS02-X.. för installation i explosionsfarliga miljöer.
– YPS02-XV24 24V-strömmodul för installation i explosionsfarliga miljöer.
Obs! Båda kablarna måste monteras fast
(apparatversion för en flexibel kabelföring erhålles på begäran)
– YPS02-Z.. för installation utanför den explosionsfarliga miljön.
Batteripaket
– YRB02-X EX-batteripaket för installation i explosionsfarliga miljöer.
Anslutning av elektroniska komponenter(kringutrustning):
§ Innan kringutrustning ansluts eller tas bort (skrivare, PC, zenerbarriär, omvandlare) måste
man se till att enheten alltid är fri från ström!
Skapa potentialutjämningsanslutning (jordanslutning)
§ Anslut CIXS3 till en central potentialutjämningsskena med en anslutningskabel (ingår ej
i leveransen). Dessutom är strömenhetens metallkåpa jordad via nätkabels jordade ledare.
Vågplattformens metallkåpa är ansluten till strömenheten via anslutningskabelns
skärmflätning.
Förvärmningstid
För att kunna ge exakta resultat behöver enheten värmas upp i 30 minuter.
Först då har den nödvändiga driftstemperaturen uppnåtts.
Användning om kalibrering är obligatorisk:
$ När enheten ansluts till strömnätet första gången ligger uppvärmningstiden på
24 timmar.
Page 64

Montering av kalibreringsadapter
(kalibreringsbart tillstånd vid leverans)
§ Ta loss muttern på baksidan av analysapparaten.
§ Sätt fast kalibreringsadapterplattan med slitsskruven.
§ Klistra över kalibreringsadapterplattan med en försegling.
Anslutning av externt batteri (tillbehör: YRB02-X)
! Ta loss analysapparaten från spänningsförsörjningen.
§ Installation i zon 1, 2, 20, 21 eller 22:
Skruva fast kontaktförbindelse A (från analysapparaten) och B (från batteripaketet).
Driftslängden är maximalt 30 timmar (beroende på ansluten vågplattform, utan anslutna
tillval).
– om den gröna lysdioden lyser är spänningen ok.
– lyser den röda lysdioden, måste batteriet laddas upp.
Läs igenom bruksanvisningen för EX-batteripaketet.
64
A
B
Page 65

Service
Regelbundet underhåll av enheten av
Sartorius serviceavdelning garanterar
vågens fortsatta mätsäkerhet. Sartorius
erbjuder underhållsavtal med intervaller
på mellan 1 månad och 2 år.
Underhållsintervallen är beroende av
driftsvillkoren och toleranskraven.
Reparationer
! Stäng genast av strömmen till en defekt
enhet. Reparationer får endast utföras
med originalreservdelar av personer som
är auktoriserade av Sartorius. Vid felaktigt utförda reparationer kan avsevärda
faror uppstå för användaren. Så länge
garantin gäller, skickas hela analysenheten in.
Säkerhetskontroll
En säker drift kan inte längre garanteras:
– om apparaten eller nätanslutningsled-
ningen har synliga skador
– om nätadaptern inte längre fungerar
– vid längre förvaring under ogynnsamma
förhållanden (t ex extrem fukt)
– efter kraftiga transportbelastningar
I dessa fall
§ ska strömtillförseln till apparaten
stängas av
$ ska den säkras mot vidare användning
$ ska Sartorius serviceavdelning informe-
ras
! Förseglingarna anger att den endast
får öppnas och underhållas av fackmän,
detta för att säkerställa en korrekt och
säker drift och för att garantin ska
fortsätta gälla.
! Byt ut defekta eller skadade kablar
respektive kabelförskruvningar som en
enhet.
! Öppna inte under spänning. Efter att
strömmen har brutits väntar du i minst
10 sekunder tills enheten öppnas. Efter-
som passytorna på kåpans delar påver-
kar IP-skyddet, måste enheten öppnas
och stängas sakkunnigt.
65
Skötsel och underhåll Avfallshantering
Rengöring
Analysapparaten motsvarar riktlinjerna
i European Hygienic Engineering &
Design Group, EHEDG, beträffande
undvikande av kontaminering. Enheten
(våganläggningen) måste regelbundet
dammtorkas, se även EG-typgodkännandet.
! Stäng av strömmen till analysenheten
och lossa på den anslutna datakabeln.
! Det får inte tränga in någon vätska
i enheten.
! Använd inte aggressiva rengöringsmedel
(lösningsmedel o.d.).
! Undvik elektrostatisk laddning.
§ Rengör analysapparaten med en fuktig
trasa med lite tvållösning.
$ När enheten används inom livsmedels-
industrin måste de brukliga rengöringsmedlen användas.
§ Torka av analysapparaten med en mjuk
trasa.
! Det är inte tillåtet att spruta av enheten
med vatten eller blåsa av den med
tryckluft.
Rengöring av ytor av rostfritt stål
Rengör i princip alla delar av rostfritt
stål i regelbundna intervaller. Vågplattan av rostfritt stål ska separat rengöras
grundligt. Delar av rostfritt stål på
vågen ska rengöras med en fuktig trasa
eller svamp genom att försiktigt gnugga.
Endast vanliga hushållsrengöringsmedel
som är avsedda för rostfritt stål får lov
att användas (till exempel Stahlfix).
Skölj därefter noggrant, tills alla rester
har avlägsnats. Låt sedan vågplattformen
torka. Som ett extra skydd kan en
skyddande olja appliceras.
Lösningsmedel får endast användas för
rengöring av delar av rostfritt stål.
Korrosiv omgivning
$ Ta med jämna mellanrum bort ämnen
som kan förorsaka korrosion.
Byte av dammskydd
$ Byt ett skadat dammskydd.
§ Tryck fast det nya dammskyddet över
kanten på vågens fram- och baksida tills
det sitter fast.
Förpackningen skyddar Sartorius
produkter tillräckligt mycket mot transportskador. Den består av miljövänliga
material som kan återvinnas. Samma
sak gäller för gamla enheter.
Uppladdningsbara batterier ska tas bort
innan enheten skrotas och betecknas
som specialavfall.
Information om avfallshantering får
du hos kommun- respektive stadsförvaltningen.
Vågspecifik information/kodning av
serienumret
Apparatens tillverkningsdatum finns
kodat i serienumret. Strukturen ser ut
på följande sätt:
ÅMM x x x x x
ÅÅr
1 2000–2006
2 2007–2013
3 2014–2020
4 2021–2027
5 2028–2034
6 2035–2041
7 2042–2048
8 2049-2055
9 2056-2062
Kolumnen för år, Å, står för årsgrupp-
nummer. Varje årsgruppnummer
omfattar 7 år. I varje årsgrupp läggs
exponenten 13 till månaderna (M M).
2000 13-24
2001 25-26
...
Exempel:
113xxxxx (januari 2000)
xxxxx är ett löpande nummer som
ändras varje månad.
Page 66

Tarkkana ja vankkana vaakapäätteenä
EX-malli CIX3 (Combics 3) tarjoaa
luotettavia punnitustuloksia tyypin 1, 2,
20, 21 tai 22 räjähdysvaarallisilla
alueilla.
Laite on koteloitu ruostumattomaan
teräkseen, ja sitä on helppo käyttää.
Lisää ominaisuuksia:
– Suuret painikkeet, joissa on tuntuva
painokohta
– Numeroiden ja kirjainten syöttö
– Iso, takavalollinen, grafiikan näyt-
tämiseen soveltuva pistematriisinäyttö
– Tekstiavusteinen hallinnan ohjaus
– Liitännät kahdelle punnitusalustalle
– Automaattinen käyntiinajo virran
kytkemisen yhteydessä
– Automaattinen taaraus vaa’an kuormit-
tamisen yhteydessä
– Lisävarustevaihtoehtona ohjaus ulko-
puolisella tietokoneella
Päivittäistä työtä helpottavia omi-
naisuuksia:
– Lyhyet mittausajat
– Riippumattomuus punnitusalustan
sijainnista
– Punnittavien esineiden merkitseminen
jopa 4 aakkosnumeerisella merkillä
– Joustavuutta erilaisten rajapintojen
avulla
– Turvallisuutta salasanasuojauksella
– Helppo puhdistaa ja desinfioida
Merkkien selitys
Tekstissä käytetään seuraavia symboleja:
§ Oikeaan käyttöön opastava ohje
$ Poikkeustapauksia koskeva erityisohje
> Käyttötoimen vaikutuksen kuvaus
! Varoitusohjeet
Käyttöneuvonta
Puhelin: +49 (0) 551/308-4440
Faksi: +49 (0) 551/308-3791
66 Käyttötarkoitus
66 Sisältö
67 Varoitus- ja turvaohjeet
68 Käyttöönotto
68 Toimituksen sisältö
68 Pystytysohjeet
69 Laitteen kuvaus
70 Verkkoliitännän järjestäminen
71 Kalibrointisovitteen asentaminen
kalibrointivelvollista käyttöä varten
72 Ulkopuolisen akun liittäminen
73 Hoito ja kunnossapito
73 Korjaukset
73 Puhdistus
73 Turvatarkastus
73 Jätehuolto
66
Käyttötarkoitus Sisältö
Page 67

Turvallisuus
§ Lue tämä käyttöohje huolellisesti ennen
käyttöönottoa.
Valmistaja ei vastaa sellaisista vahingoista, joihin on syynä turvaohjeiden ja
varoitusten laiminlyönti.
EX-malli CIXS3 täyttää direktiivin
94/9/EY ryhmän II luokan 2 (kaasu) ja 1
(pöly) vaatimukset ja on merkitty EYtyyppitarkastustodistuksen KEMA
03ATEX1157X mukaan seuraavalla
merkinnällä:
h II 2 G 1 D EEx ib IIC T4 T135°C.
Lisäksi laite täyttää sähkömagneettista
yhteensopivuutta ja sähköturvallisuutta
koskevien EY-direktiivien vaatimukset
(katso vaatimustenmukaisuusvakuutukset).
Asiaton käyttö voi aiheuttaa vahinkoja
henkilöille ja esineille. Laitetta saa käyttää ja ylläpitää vain ammattitaitoinen
henkilökunta.
! Omavarmisteinen laite soveltuu
käytettäväksi seuraavanlaisilla
räjähdysvaara-alueilla:
vyöhyke 1 ja 2 kaasuille,
vyöhyke 20, 21 ja 22 pölymäisille
aineille. Määritä tapauskohtaisesti,
voidaanko laitetta käyttää tilassa, jossa
on mahdollisesti räjähtäviä aineita.
Vyöhykkeillä 1, 2, 20, 21 tai 22 laitteen
asennus on annettava asiantuntevan
henkilökunnan tehtäväksi. Tällöin on
noudatettava kyseisen maan omia
lakeja, ohjeistuksia ja normeja. Noudata
turvaohjeita. Ammattitaitoiseksi
henkilöksi katsotaan henkilö, joka on
perehtynyt laitteen asennukseen,
käyttöönottoon ja käyttöön.
Ammattitaitoisella henkilöllä on
vaadittava pätevyys, ja hän tuntee
laitteen käyttöä koskevat määräykset.
Ota tarvittaessa yhteyttä laitteen
myyjään tai Sartorius-asiakaspalveluun.
! Laitteen käyttäminen tyyppitarkastus-
todistuksen vastaisella tavalla on
kiellettyä, ja se katsotaan määräysten
vastaiseksi käytöksi. Kaikkia EYtyyppitarkastustodistuksissa mainittuja
rajoituksia on noudatettava ehdottomasti (ks. kohdasta: EX-sertifikaatit
käyttöohjeissa).
Takuu raukeaa, jos laitetta ei ole asennettu asianmukaisesti.
- Pätevän ja koulutetun henkilökunnan
on tarkistettava laitteen toiminta ja turvallisuus säännöllisin välein.
- Mallia CIXS3 saa huoltaa, puhdistaa ja
korjata vain jännitteettömässä tilassa.
Kaikki takuuvaatimukset raukeavat, jos
laitetta yrittää korjata joku muu kuin
Sartoriuksen valtuuttama henkilökunta.
Käytä vain alkuperäisiä Sartoriusvaraosia!
67
Varoitus- ja turvaohjeet
– Älä altista CIXS3:a äärilämpötiloille,
vahingoittaville kemikaalihöyryille tai
kosteudelle. Suojaa laite iskuilta ja
tärinältä. Ympäristön lämpötila saa
vaihdella laitteen käytön aikana -10°C:
sta +40°C: seen.
– Ota huomioon liittimien napajärjestys,
kun käytät muiden valmistajien liitäntäkaapeleita. Tarkista kaapelin navat
napajärjestyskaaviosta, ennen kuin
kytket sen Sartorius-laitteeseen, ja irrota
kaapelit, joilla on poikkeava napajärjestys.
Muut kuin Sartoriuksen toimittamat
johdot ovat laitteen ylläpitäjän vastuulla.
– Kun CIXS3:a käytetään räjähdysvaaralli-
sissa tiloissa, sähköjohdot saa kytkeä
laitteeseen ja irrottaa vain silloin,
kun laite on jännitteetön ja irrotettu
virtalähteestä. Irrota vaa’an virtajohto
pistorasiasta, ennen kuin kytket johtoja
kiinni tai irti.
– Vältä staattista sähkölatausta (erityisesti
suojakuvussa). Maadoita laite potentiaalintasausliittimillä.
– Potentiaalintasausjohtoja ei saa kytkeä
irti.
– Jos laitettaa ei voida käyttää turvallises-
ti, kuten laitteen vaurioiduttua, tee laite
jännitteettömäksi ja estä sen käyttö.
Noudata turvaohjeita ja opasta
henkilökuntaa laitteen käytössä.
! Katkaise yhteys jännitelähteeseen (irrota
laite virtaverkosta), ennen kuin liität tai
irrotat lisälaitteita.
- Kaikkien liitäntäkaapeleiden ja niiden
sisäisten johtimien suojakuoret ovat
PVC-muovia. Suojaa kaapelit ja johdot
PVC:tä vaurioittavilta aineilta.
- CIXS3:a muihin laitteisiin yhdistettäessä
tulee seurata kulloistenkin EY:n tyyppitarkastustodistusten määräyksiä. Katso
myös tämän käyttöohjeen liitteessä
oleva kohta “Omavarmisteisuustodistus”.
Asennus
– Käytettäessä kaupasta ostettua toisen
valmistajan RS232-yhdyskaapelia on
noudatettava varovaisuutta:
napajärjestys ei välttämättä sovellu
Sartorius-laitteille! Järjestys tulisi
tarkistaa kytkentäkaavioiden avulla ja
poikkeavat johdot irrottaa.
! Käytä ainoastaan normien mukaisia
maadoitettuja jatkojohtoja. Maattojohtoa ei missään tapauksessa saa katkaista.
! Jos laite tai verkkojohto on näkyvästi
vaurioitunut, irrota se jännitelähteestä
ja varmista, ettei sitä enää käytetä.
– Sartoriuksen omat varusteet ja oheislait-
teet on sovitettu laitteeseen parhaalla
mahdollisella tavalla. Omia ratkaisuja
ei siis pidä käyttää. Tätä koskevia tietoja
sisältyy laadunvalvontaohjeisiimme
(häiriönkestävyysnormien noudattaminen), jotka järjestämme mielellämme
käytettäväksesi.
$ Ongelmien esiintyessä ota yhteyttä
Sartoriuksen asiakaspalveluun.
IP-luokitus:
– IP65-/IP67-luokitus on voimassa vain
kun laitteessa on kiinteästi asennettu
kumitiiviste ja tiivis yhteys (tiiviisti
suljettu suojatulppa). Punnitusalustojen
asennus on jätettävä ammattilaisten
tehtäväksi ja tarkistettavaksi.
– Jos laitteeseen asennetaan jälkeenpäin
tiedonsiirtolähto, suojatulpat on pidettävä tallessa. Suojaa tiedonsiirtolähtö
esimerkiksi suojahupulla höyryltä,
kosteudelta ja lialta.
Kalibrointivelvollisuuden ollessa
voimassa:
– Jos vaakapääte liitetään punnitusalus-
taan ja syntyvä vaakakokonaisuus
kalibroidaan, on noudatettava asiaan
liittyviä määräyksiä. Kun liität Sartoriuspunnitusalustoihin muita laitteita, lue ja
noudata laitteen mukana toimitetulla
CD-levyllä olevia kalibrointiohjeita. Kun
liität Sartorius-punnitusalustoihin muita
laitteita, ota huomioon vaatimuksenmukaisuusvakuutuksessa luetellut sallitut punnitusalueet.
– Jos kalibroituun laitteeseen asennettu
sinetti vaurioituu, noudata aina
paikallisia lakeja ja määräyksiä.
Kalibroi vaaka uudelleen.
Page 68

Pakkauksen purkaminen
§ Tarkista laite heti pakkauksen
purkamisen jälkeen mahdollisten
näkyvien ulkoisten vaurioiden varalta.
$ Jos vaurioita ilmenee, noudata luvun
“Hoito ja kunnossapito” kohdassa
“Turvatarkastus” annettuja ohjeita
$ Kaikki alkuperäisen pakkauksen osat
tulee säilyttää mahdollista vastaista
takaisinkuljetusta varten. Ennen
lähetystä tulee kaikki johdot irrottaa!
Toimituksen sisältö
– Vaakapääte
– Käyttöohje
– Lähetyslistaan merkityt lisä- tai erityis-
varusteet
Käyttöönoton työtoimet
1) Liitä punnitusalusta tähän Combicsvaakapäätteeseen.
ks. seuraavan sivun jälkeistä sivua
2) Konfiguroi ADU:n asetukset:
ks. lukua “Huolto”
– Kalibrointi | Vakio
– Punnitusalue, luettavuus
– Säätöpaino
– mV/V | Geotietojen syöttö
– Linjaus, säätö käyttöohjeessa
3) Säädä punnitusalustan asento:
katso käyttöohjeen lukua “Alkuasetukset”.
4) Säädä sovellusohjelma:
ks. mukana seuraavaa sovellusohjelmien
ohjetta
5) Liitä rajapinnat, tulostin tai
taustamuistit
ks. käyttöohjeen sisältämää
napajärjestyskaaviota .
6) Aktivoi rajapinnat, tulostin tai lisämuistit alustuksen esisäädöillä.
– COM-1/-2:lle
– Säädä tulostuskäytäntö
- Tulostusrivit/ -alueet kullekin
tulostimelle käyttöohjeessa
7) COM2: lla sijaitsevaa RS422/RS485tietolähtöä saa käyttää vain jos
COM2: lla ei ole tehty liitäntää RS232tietolähtöön. Yhtaikainen sähköliittymä
COM2/RS232: een ja COM2/RS422/485:
een ei siis ole luvallinen.
Käyttöpaikalle asettaminen
Kun laite asetetaan käyttöpaikalleen,
vältä epäsuotuisia ympäristövaikutuksia:
– kuumuus (lämmitin, auringonsäteily)
– suora ilmavirtaus avoimista ikkunoista
ja ovista
– voimakkaat tärähdykset punnituksen
aikana
– äärimmäinen kosteus
Lämpötilan tasaaminen
Laitteeseen voi tiivistyä kosteutta
ilmasta, jos kylmä laite joutuu
lämpimämpään ympäristöön. Siksi
laitetta ei pidä kytkeä sähköverkkoon
2 tuntiin, jotta se ehtii sopeutua
huoneenlämpöön.
Jos laitetta ei käytetä
Jos laitetta ei käytetä, virta on
katkaistava.
Sinetti kalibroiduissa versioissa:
Tämä sinetöinti tehdään liimamerkillä,
jossa on Sartorius-yhtiön merkki.
Jos liimamerkkiä yritetään irrottaa, se
tuhoutuu. Tällöin kalibrointi lakkaa
olemasta voimassa ja laite on
kalibroitava uudelleen.
68
Käyttöönotto
Räjähdysvaarallisissa tiloissa käytettävien laitteiden yleiskatsaus
Räjähdysvaara-alue: vyöhykkeet 1, 2, 20, 21, 22 Ei-räjähdysvaarallinen tila
Zener-este Tietokone
tai muunin
Vaakapääte ja punnitusalusta
Moduuli Verkkolaite Räjähdysvaarallisten Moduuli Verkkolaite
(24 V) (110–230 V) tilojen akkupakkaus (24 V) (110–230 V)
Page 69

Näyttö ja näppäimistö: Combics 3
69
Laitteen kuvaus
1
2
3
4
5
6
15
16
14
13
12
11
10
9
8
7
21
20
19
18
17
Takasivu:
Näyttö ja näppäimistö
1 Merkkivalot (kontrollipunnituk-
sille ja lajittelulle)
2 Vaihtokytkin kirjainten syöttöä
varten
3 Aakkosnumeerinen näppäimistö
4 Näppäin ”Poista”
5 Esisäädöt: Pääsy alustukseen
6 Vaihtokytkin, sovellus-ohjelma |
Sovelluskohtaiset tiedot
7 Tiedonsiirtoportti
8 Brutto/netto, toinen yksikkö tai
10-kertainen tarkkuus
(esisäädöistä riippuen)
9 Taaraus
10 Nollaus
11 Punnitusalustan vaihto
12 Päälle / pois
13 Toimintonäppäimet
14 Grafiikkakelpoinen pistematriisi-
näyttö
Takasivu
15 RS232C-rajapinta “COM1“
16 DC-sovitekaapeli
17 Pääsy lukitus-kytkimelle
(vakio tai kalibrointikäyttö)
18 Punnitusalustan liitäntä
19 Potentiaalintasausliitäntä
(maadoitus)
20 Ilmausventtiili, vääntömomentti
1,5 Nm
21 Rajapinta “COM2“
Page 70

Punnitusalustan asentaminen
Yhdyskaapelin liitäntä tulisi jättää koulutetun ja valtuutetun Sartorius-ammattimiehen
tehtäväksi.
! Suojausluokkaan IP-67 vaikuttavat työt tulee suorittaa mahdollisimman huolella.
! Takuu raukeaa, jos laitetta ei ole asennettu asianmukaisesti.
! Töitä suoritettaessa laitteen on oltava jännitteetön.
! Vaakapäätteen kaapeliläpivienti (luokka IP67) on valmiiksi asennettu.
§ Irrota etulevyn 4 kiinnitysruuvia. Irrota etulevy
§ Yhdistä punnitusalusta ja vaakapääte.
! Kaapelin kierreliitin on asennettu etukäteen. Käsittele kierreliitintä erittäin varovasti.
Käytä momenttiavainta. Tämän kierreliittimen vääntömomentti: 5 Nm
§ Kuori liitäntäkaapeli ja asenna se paikoilleen:
– Työnnä kaapeli kierreliittimen läpi.
– Asenna kierreliitin oikein.
– Kuori kaapelin suojakuori. Suojuksen (1) tulee olla kosketuksessa liittimiin (2).
– Asennus: Jätä kaapelin johtimet (3) noin 15 cm:n pituisiksi.
– Työnnä kaapeli kierreliittimen läpi.
– Tarkista, että liittimet koskettavat suojusta.
70
Page 71

71
§ Punnitusalustan kaapelin asentaminen:
– Kuori kaapelin suojakuori. Jätä kaapelin johtimet noin 5 cm:n pituisiksi.
– Poista johtimien päästä eristekuori noin 1 senttimetrin pituudelta ja aseta niiden päähän
suojahylsy.
– Rengasta kaikki johtimet ferriittirenkaalla.
– Ruuvaa liittimet kiinni.
Liitäntäjärjestys:
Nro Signaali Selitys
1 BR_POS Sillan syöttöjännite (+)
2 SENSE_POS Sense (+)
Sillan syöttöjännite
3 OUT_POS Mittausjännite (+)
4 OUT_NEG Mittausjännite (-)
5 SENSE_NEG Sense (-)
Sillan syöttöjännite
6 BR_NEG Sillan syöttöjännite (-)
! Värien ja signaalien järjestys selviää punnitusalustan kulloisestakin ohjeesta tai
tietolehtisestä. Irrota tai eristä kaikki johdot, joita ei käytetä!
Nelijohdintekniikalla toimiva punnitusalusta
! Liitettäessä punnitusalystaa nelijohdintekniikkaan tulee BR_POS (no.1) –johdot liittää
yhteen SENSE_POS (no. 2):in kanssa sekä BR_NEG (no.6) -johdot SENSE_NEG (no. 5) :iin.
Verkkoliitännän järjestäminen
§ Tarkista verkkojännite ja pistokkeen tyyppi.
$ Virransyöttö tehdään verkkolaitteen kautta.
§ Asiaankuuluvat verkkolaitteet:
– YPS02-X räjähdysvaarallisilla alueilla käytettäväksi.
– YPS02-XV24 24 V verkkomoduuli räjähdysvaarallisilla alueilla käytettäväksi.
Ohje: Sijoita molemmat johdot kiinteästi.
(Johdon joustava asennus mahdollinen eri pyynnöstä)
– YPS02-Z muilla kuin räjähdysvaarallisilla alueilla käytettäväksi.
Akku- tai paristopakkaus
– YRB02-X EX –akkupakkaus räjähdysvaarallisilla alueilla käytettäväksi.
Sähkölaitteiden (oheislaitteiden) liitäntä:
§ Ennen lisälaitteiden (tulostimen, PC:n, zener-esteen, muuntimen) liittämistä tai irrottamista laite on ehdottomasti irrotettava sähköverkosta!
Potentiaalintasausliitännän (maadoitusliitännän) tekeminen
§ Liitä CIXS3 maadoitusjohdolla (ei kuulu toimituksen piiriin) yhteiseen potentiaalintasoituskiskoon. Lisäksi verkkolaitteen metallikotelo on maadoitettu verkkojohdon suojajohtimen kautta. Punnitusalustan metallikotelo on yhdistetty verkkolaitteeseen yhdyskaapelin
suojapunoksen kautta.
Lämpenemisaika
Tarkkojen tulosten varmistamiseksi laitteen tulee antaa lämmetä vähintään 30 minuuttia.
Vasta tämän ajan kuluttua välttämätön toimintalämpötila on saavutettu.
Kalibrointivelvollisuuden ollessa voimassa:
$ Kun laite on ensin kytketty virtaverkkoon, sen lämpenemisaika on 24 tuntia.
Page 72

Asenna kalibrointisovite
(kalibrointikelpoinen altistustila)
§ Poista mutteri vaakapäätteen takasivulta.
§ Asenna kalibrointisovitelevy rakoruuvilla.
§ Liimaa sinetti kalibrointisovitelevyn päälle.
Ulkopuolisen akun liittäminen (lisälaite: YRB02-X)
! Irrota vaakapääte virtalähteestä.
§ Asennus alueille 1, 2, 20, 21 tai 22:
Pistoliitin A (vaakapäätteeltä) ja B (akkupakkaukselta) ruuvataan tiukasti kiinni.
Käyttöaika on korkeintaan 30 h (liitetystä punnitusalustasta riippuen, ilman liitettyjä
lisävarusteita).
– jos vihreä loistediodi palaa, jännite on riittävä
– jos punainen loistediodi palaa, akku on ladattava
Lue EX-akkupakkauksen käyttöohje.
72
A
B
Page 73

Huolto
Kun annat laitteen säännöllisesti
Sartoriuksen asiakaspalvelun huollettavaksi, takaat, että se pysyy kauan
tarkassa punnituskunnossa. Sartorius
tarjoaa huoltosopimuksia, joiden
huoltovälit voivat vaihdella kuukaudesta
kahteen vuoteen. Huoltoväli on
käyttöolojen ja toleranssivaatimusten
mukainen.
Korjaukset
! Viallinen laite on heti irrotettava
sähköverkosta. Korjaus on jätettävä
Sartoriuksen valtuuttamien ammattihenkilöiden tehtäväksi. Ainoastaan
alkuperäisten varaosien käyttö on sallittua. Asiantuntemattomat korjausyritykset voivat aiheuttaa käyttäjälle huomattavia vaaroja. Takuuhuoltoihin on
lähetettävä koko vaakapääte.
Turvatarkastus
Laitetta ei voi enää käyttää turvallisesti
näissä tapauksissa:
– jos laitteessa tai verkkoliitäntäjohdossa
on silminnähtäviä vaurioita
– jos verkkolaite on lakannut toimimasta
– jos laite on ollut pitempään varastoitu-
na epäsuotuisissa olosuhteissa
(esimerkiksi hyvin kosteana)
– jos laite on joutunut kovaan rasitukseen
kuljetuksen aikana.
Näissä tapauksissa
§ irrota laite sähköverkosta
$ varmista, ettei kukaan pääse käyttämään
laitetta
$ ota yhteyttä Sartoriuksen asiakas-
palveluun.
! Sinetit ilmoittavat, että laitteen saavat
avata ja huoltaa vain valtuutetut
ammattihenkilöt, jotta laitteen moittee-
ton ja varma toiminta taataan ja takuu
pysyy voimassa.
! Vialliset tai vahingoittuneet johdot ja
johtoliitännät on kokonaisuudessaan
vaihdettava uusiin.
! Älä avaa laitetta, kun se on jännitteinen.
Odota verkosta irrottamisen jälkeen
vähintään 10 sekuntia, ennen kuin
aloitat avaamisen. Koska kotelon
liitospinnat vaikuttavat IP-suojauslu-
okkaan, laitteen saa avata ja sulkea
vain asiantunteva henkilö.
73
Hoito ja kunnossapito Jätehuolto
Puhdistus
Vaakapääte vastaa EHEDGin (European
Hygienic Equipment Design Group)
kontaminoitumisen estämistä koskevia
ohjeita. Pyyhi laitteesta (vaakakokonaisuudesta) säännöllisesti pölyt; ks.
myös EY-tyyppitarkastustodistusta.
! Irrota vaakapääte virtalähteestä ja irrota
myös siihen liitetty tiedonsiirtokaapeli.
! Laitteen sisälle ei saa joutua nestettä.
! Minkäänlaisia syövyttäviä tai kemiallis-
esti aktiivisia puhdistus- tai liuotinaineita ei saa käyttää.
! Vältä staattista sähkölatausta.
§ Puhdista vaakapääte kevyesti saippuaveteen kostutetulla pyyhkeellä
$ Jos laitetta käytetään elintarviketeol-
lisuudessa, käytä siellä tavallisia
puhdistusaineita.
§ Kuivaa vaakapääte pehmeällä liinalla.
! Veden pirskottaminen ja paineilmalla
puhaltaminen on ehdottomasti
kiellettyä
Jaloteräksisten pintojen puhdistaminen
Puhdista kaikki jaloteräksiset osat
perusteellisesti säännöllisin väliajoin.
Puhdista jaloteräksinen kuormituslevy
erikseen huolellisesti. Puhdista vaa’an
jaloteräksiset osat kostealla liinalla tai
puhdistussienellä yksinkertaisesti hankaamalla. Käytä kaupasta saatavia kotitalouksissa käytettäviä jaloteräksisten
pintojen puhdistamiseen tarkoitettuja
puhdistusaineita. Huuhdo sitten perusteellisesti, kunnes kaikki jäämät on
poistettu. Anna laitteen kuivua kunnolla. Pinnat voidaan myös suojata
hoitoöljyllä.
Pesuainetiivisteitä saa käyttää ainoastaan jaloteräksisten osien puhdistamiseen.
Syövyttävät olosuhteet
$ Poista laitteesta syövyttävät aineet
säännöllisin väliajoin.
Suojuksen vaihtaminen
$ Vahingoittuneet suojukset on vaihdet-
tava.
§ Paina uusi käyttösuojus laitteen etu- ja
takaosan reunan yli kunnes se on lujasti
paikoillaan
Pakkaus suojaa Sartorius-tuotteita riittävän hyvin kuljetuskolhuilta. Pakkaus
on tehty ympäristöystävällisistä materiaaleista, jotka kannattaa kierrättää
paikallisen jätehuollon mahdollisuuksien
mukaan. Sama koskee loppuunkäytettyjä laitteita.
Poista laitteista akut ennen romuttamista. Ne kuuluu käsitellä ongelmajätteenä.
Jätehuoltoasioita koskevia tietoja saa
kaupungilta ja kunnalta.
Vaakojen tiedot ja sarjanumeron
koodit
Laitteen valmistuspäivämäärä on koodattu sarjanumeroon. Sarjanumerolla on
seuraava rakenne:
VKK x x x x x
V Vuosi
1 2000–2006
2 2007–2013
3 2014–2020
4 2021–2027
5 2028–2034
6 2035–2041
7 2042–2048
8 2049-2055
9 2056-2062
V-vuosisarakkeessa on vuosiryhmän
numero. Yksi numero kattaa seitsemän
vuoden ajanjakson. Jokaisessa vuosiryh-
mässä valmistuskuukausi (KK) merkitään
kaksipaikkaisella numerolla alkaen
numerosta 13.
2000 13-24
2001 25-26
...
Esimerkki:
Sarjanumero 113xxxxx osoittaa, että
laite on valmistettu tammikuussa 2000.
Sarjanumerossa xxxxx on juokseva
numero, joka nollataan joka kuukauden
alussa.
Page 74

Som et præcist og robust analyseapparat
giver Ex-modellen CIXS3 (Combics 3)
pålidelige vejeresultater ved anvendelse
i eksplosionsfarlige områder i zonerne 1,
2, 20, 21 og 22.
Apparatet er forsynet med et kabinet
af rustfrit stål, og er let at betjene.
Andre egenskaber:
– Store taster med et mærkbart trykpunkt
– Indtastning af tal og bogstaver
– Stort, baggrundsbelyst fuldt grafikegnet
punktmatrixdisplay
– Tekstunderstøttet betjeningsvejledning
– Tilslutninger til to vejeplatforme
– Automatisk initialisering, når der
tændes for apparatet
– Automatisk tarering ved belastning
af vægten
– Optimal styring vha. ekstern computer
Fordele i det daglige arbejde:
– Korte måletider
– Uafhængig af vejeplatformens placering
– Mærkning af vejegodset med op til 4
alfanumeriske identifikatorer
– Fleksibilitet med forskellige interfaces
– Sikkerhed med kodeordsbeskyttelse
– Let at rengøre og desinficere
Tegnforklaring:
I teksten anvendes følgende symboler:
§ Anvisning vedrørende korrekt betjening
$ Særlig anvisning vedrørende undtagel-
sestilfælde
> Beskrivelse af virkningerne af et
betjeningstrin
! Farehenvisninger
Rådgivning vedrørende anvendelse
Telefon: +49 (0) 551/308-4440
Telefax: +49 (0) 551/308-3791
74 Anvendelsesformål
74 Indhold
75 Advarsels- og sikkerhedsanvisninger
76 Ibrugtagning
76 Leveringsomfang
76 Opstillingsanvisninger
77 Afbildning af apparatet
78 Etablering af nettilslutning
79 Montering af kalibreringsadapter til
de kalibreringspligtige aktiviteter
79 Tilslutning af eksternt batteri
80 Service og vedligeholdelse
80 Reparationer
80 Rengøring
80 Sikkerhedskontrol
80 Bortskaffelse
74
Anvendelsesformål Indhold
Page 75

Sikkerhed
§ Læs denne betjeningsvejledning
omhyggeligt igennem, før apparatet
tages i brug.
Producenten hæfter ikke for skader,
som opstår som følge af manglende
overholdelse af sikkerhedsanvisningerne
og advarslerne.
Ex-modellen CIXS3 opfylder kravene
i direktiv 94/9/EF for apparater i apparatgruppe II, kategori 2 og skal jf. EF’s
typegodkendelsescertifikat KEMA
03ATEX1157X mærkes med:
h II 2 G 1 D EEx ib IIC T4 T135°C.
Endvidere opfylder apparatet kravene i
EU-direktiverne vedrørende elektromagnetisk kompatibilitet og elektrisk sikkerhed (se overensstemmelseserklæringerne).
Forkert anvendelse kan medføre
person- og tingsskade. Apparatet må
kun anvendes og betjenes af uddannet
personale.
! Det egensikre apparat kan i eksplosions-
farlige områder:
I zone 1 og 2 anvendes til gasser, i zone
20, 21 og 22 til støv. Anvendelse i eksplosive områder skal kontrolleres i hvert
enkelt tilfælde. Installationen af apparatet i zone 1, 2, 20, 21 eller 22 skal
udføres af en fagmand i henhold til de
i det pågældende land gældende love,
direktiver og standarder. Overhold de
relevante forskrifter for ulykkesforebyggelse. Fagfolk er personer, der er fortrolige med montering, ibrugtagning og
drift af anlægget. Fagmanden er i
besiddelse af de nødvendige kvalifikationer, og han kender de relevante
nationale bestemmelser og forskrifter.
Kontakt om nødvendigt forhandleren
eller Sartorius’ kundeservice.
! Brug af anlægget, der falder uden for
brugen anført i typegodkendelsescertifikatet, er ikke tilladt og anses for ikkebestemmelsesmæssig anvendelse. Alle
de i typegodkendelsescertifikaterne
nævnte data og begrænsninger skal
overholdes nøje (se under: Ex-certifikater i betjeningsvejledningen).
I tilfælde af ukorrekt installation bortfalder garantien.
- Anlægget skal med jævne mellemrum
kontrolleres af en fagmand for at sikre,
at det fungerer korrekt og sikkert.
- Al vedligeholdelse, rengøring og reparation af model CIXS3 skal foretages,
uden at der er netspænding på systemet. Ethvert indgreb i apparatet
(såfremt det ikke udføres af personer,
der er autoriseret af Sartorius) medfører,
at al garanti bortfalder. Anvend kun originale reservedele fra Sartorius!
75
Advarsels- og sikkerhedsanvisninger
- CIXS3 må ikke unødvendigt udsættes
for ekstreme temperaturer, aggressive
kemiske dampe, fugt, stød og vibrationer. Tilladt omgivelsestemperatur under
drift er -10° C til +40° C.
– Vær ved anvendelse af kabler fra andre
leverandører opmærksom på benkonfigurationen. Kontrollér derfor kablernes
tilslutning før tilslutning til udstyr fra
Sartorius jf. det relevante eldiagram, og
afbryd de kabler, der er konfigureret
anderledes. Kabler, der ikke er leveret
af Sartorius,
er operatørens ansvar.
– Ved anvendelse af CIXS3 i eksplosions-
farlige områder må de strømførende
kabler kun tages af eller sættes i vægten
i strøm-/spændingsløs tilstand. Før
isætning eller aftagning af kabler, skal
strømmen til vægten afbrydes.
– Undgå elektrostatisk opladning (især af
beskyttelsesskærmen), tilslut en potentialudligningsklemme.
– Potentialudligningsledningerne må ikke
afbrydes.
– Hvis betjeningen ikke længere synes at
kunne ske risikofrit, afbrydes netspændingen til anlægget, som sikres mod
videre brug (f.eks. i tilfælde af en beskadigelse). Overhold forskrifterne vedrørende ulykkesforebyggelse, og instruér
betjeningspersonalet i disse.
! Afbryd spændingsforsyningen (træk
netstikket ud), før ekstraudstyr tilsluttes
eller fjernes.
– Isoleringen på alle forbindelseskablerne
samt isoleringen af de indvendige lederes tråde består af PVC. Kemikalier, der
angriber dette materiale, skal holdes
væk fra kablerne.
- Ved sammensætning af CIXS3 med
andre apparater, skal anvisningerne i
de pågældende EU-typegodkendelsescertifikater overholdes. Der findes flere
oplysninger i ”Dokumentation af egensikkerheden” i tillægget til denne
betjeningsvejledning.
Installation
– Vær forsigtig ved anvendelse af
fremmede eller gængse RS232-forbindelseskabler: Benkonfigurationerne er
i mange tilfælde ikke egnet til Sartoriusapparater! Konfigurationen skal kontrolleres ved hjælp af eldiagrammerne,
og ledninger med afvigelser skal
afbrydes.
! Anvend kun forlængerledninger med
beskyttelsesleder, som overholder standarderne. Beskyttelseslederen må under
ingen omstændigheder afbrydes.
! Hvis apparatet eller netkablet har
synlige beskadigelser, skal spændingsforsyningen afbrydes og apparatet sikres
mod fortsat anvendelse.
– Tilbehør og ekstraudstyr fra Sartorius er
tilpasset optimalt til apparatet. Anvend
derfor ikke egne løsninger. Henvisninger
herom fås også i vores informationer
om driftskvalitet (i henhold til standarderne for støjimmunitet), som vi gerne
stiller til rådighed.
$ I tilfælde af problemer, bedes du hen-
vende dig til Sartorius´ kundeværksted.
IP-beskyttelse
– Analyseapparatet er kun IP 65/IP 67-
beskyttet med gummitætningen monteret og fast forbindelse (fastskruede
propper). Installationen af vejeplatforme
skal udføres og kontrolleres af en
fagmand.
– Hvis der efterfølgende monteres en
dataudgang, skal proppen gemmes.
Beskyt dataudgangen med en kappe
eller lignende mod damp, fugt og snavs.
Anvendelse til kalibreringspligtige
aktiviteter:
– Hvis analyseapparatet tilsluttes til en
vejeplatform, og den derved fremkomne
vægt sættes til kalibrering, skal de
tilhørende forskrifter overholdes. Ved
tilslutning af Sartorius platforme, skal
du læse og følge vedlagte CD ”Vejledning i kalibrering”. Ved tilslutning af
Sartorius platforme skal overensstemmelseserklæringen med oplistning af
tilladte vejeområder overholdes.
– Hvis et af de sikringsmærker, der
er anbragt på kalibrerede apparater
ødelægges, skal de nationale love og
forskrifter altid overholdes. En efterkalibrering af vægten er påkrævet.
Page 76

Udpakning
§ Kontrollér apparatet for udvendige
beskadigelser straks efter udpakningen
$ Læs afsnittet “Sikkerhedskontrol”
i kapitlet “Service og vedligeholdelse”
i tilfælde af skader.
$ Gem alle dele af den originale emballage
til en eventuel tilbagetransport.
Tag alle kabler af, før apparatet sendes!
Leveringsomfang
– Analyseapparat
– Betjeningsvejledning
– Ekstraudstyr (specialudstyr) som anført
på følgesedlen
Fremgangsmåde ved ibrugtagning
1) Tilslutning af vejeplatform til dette
Combics-analyseapparat:
se næstfølgende side
2) Konfiguration af ADU:
Se kapitlet ”Service”
– Kalibrering | standard
– Vejeområde, aflæselighed
– Justeringsvægt
– mV/V | indtastning af geodata
– Linearisering, justering i betjenings-
vejledningen
3) Justering af vejeplatform:
Se i betjeningsvejledningens kapitel
Drift, afsnittet ”Justering”.
4) Indstilling af applikationsprogram:
Se den medfølgende vejledning til
applikationsprogrammerne
5) Tilslutning af interfaces, printer eller
alibilager:
Se under Stikkonfigurationsskema
i betjeningsvejledningen.
6) Aktivering af interfaces, printer eller
alibilager vha. forindstillinger
i opsætningen:
– For COM-1/-2
– Indstilling af printprotokol
– Printlinjer/-områder for den
pågældende printer i betjeningsvejledningen
7) Dataudgangen RS422/RS485 på COM2
må kun benyttes, når dataudgangen
RS232 ikke er tilsluttet til COM2.
Det er altså ikke tilladt, samtidigt
at have elektrisk forbindelse til
COM2/RS232 og COM2/RS422/485.
Opstilling
Undgå ved opstillingen placeringer med
ugunstige påvirkninger:
– Varme (varmesystem, solindstråling)
– Direkte træk fra åbne vinduer og døre
– Rystelser under vejningen
– Ekstrem fugtighed
Akklimatisering
Hvis et koldt apparat bringes ind i
varme omgivelser, kan det medføre
dugdannelse (kondensering). Lad appa-
ratet akklimatisere i ca. 2 timer ved stu-
etemperatur, uden at strømmen er til-
sluttet.
Ikke i brug
Sluk for anlægget, når det ikke er i brug.
Sikringsmærke på kalibrerede
varianter:
Sikringen af apparatet sker med navnet
”Sartorius”. Gøres der forsøg på at fjerne
klæbemærket, ødelægges det. I så fald
udløber kalibreringsgyldigheden, og
vægten skal efterkalibreres.
76
Ibrugtagning
Oversigt over apparater til eksplosionsfarlige områder
EX-område: Zone 1, 2, 20, 21, 22 Ikke-EX-område
Zenerbarriere PC
eller omformer
Analyseapparat med vejeplatform
24 V-modul Strømforsyning EX-batteripakke 24 V-modul Strømforsyning
(110-230 V) (110-230 V)
Page 77

Display og tastatur: Combics 3
77
Afbildning af apparatet
1
2
3
4
5
6
15
16
14
13
12
11
10
9
8
7
21
20
19
18
17
Bagsiden:
Display og tastatur
1 Kontrollamper
(til kontrolvejning og sortering)
2 Omskiftertaste til indtastning af
bogstaver
3 Alfanummerisk tastatur
4 Tasten ”Slet”
Adgang til opsætningen
6 Skift af applikationsprogram
Applikationsspecifikke
oplysninger
7 Dataudlæsning
8 Brutto/netto, 2. enhed eller
10 gange højere opløsning
(afhængig af forindstilling)
9 Tarering
10 Nulstilling
11 Skift af vejeplatform
12 Tænd/sluk
13 Funktionstaster
14 Grafikegnet punktmatrix-display
Bagsiden:
15 RS232C-interface »COM1«
16 DC-adapterkabel
17 Adgang til låse-kontakten
(standard- eller kalibreringspligtig
drift)
18 Tilslutning til vejeplatform
19 Potentialudligningsklemme
(jording)
20 Udluftningsventil
Tilspændingsmoment: 1,5 Nm
21 Interface COM2
Page 78

Installation af vejeplatform
Forbindelseskablet skal tilsluttes af en uddannet og autoriseret Sartorius-tekniker.
! Arbejde, som påvirker IP-67-beskyttelsesklassen, skal udføres særdeles omhyggeligt.
I tilfælde af ukorrekt installation bortfalder garantien.
! Der må kun udføres arbejde på apparatet, når det er uden spænding.
! Kabelgennemføringen (IP67-beskyttelse) på analyseapparatet er formonteret.
§ Løsn de 4 skruer til frontpladen. Tag frontpladen af.
§ Forbind vejeplatformen med analyseapparatet.
! Kabelforskruningen er formonteret. Alt arbejde på forskruningen skal udføres med
stor forsigtighed Anvend en momentnøgle. Tilspændingsmomentet for denne
kabelforskruning: 5 Nm
§ Afisolér og tilslut forbindelseskablet.
– Før kablet gennem kabelforskruningen.
– Monter kabelforskruningen fagligt korrekt.
– Afisolering af kabel: Afskærmningen (1) skal have kontakt med klemmerne (2).
– Montering: Lad lederne (3) på kablet være ca. 15 cm lange.
– Før kablet gennem kabelforskruningen.
– Kontrollér, at klemmerne har kontakt med afskærmningen.
78
Page 79

79
§ Montering af vejeplatformens kabel:
– Afisolér kablet. Lad lederne på kablet være ca. 5 cm lange.
– Afisolér ca. 1 cm af ledernes ender, og sæt slutmuffer på.
– Sæt ferritringen ind over alle lederne.
– Skru klemmerne fast
Tilslutningskonfiguration:
Nr. Signalbet. Betydning
1 BR_POS Broforsyningsspænding (+)
2 SENSE_POS Sense (+)
Broforsyningsspænding
3 OUT_POS Målespænding, positiv
4 OUT_NEG Målespænding, negativ
5 SENSE_NEG Sense (-)
Broforsyningsspænding
6 BR_NEG Broforsyningsspænding (-)
! Tildelingen af farver og signaler kan findes i den pågældende vejledning/det pågældende
datablad for vejeplatformen. Alle ikke benyttede ledninger skal isoleres eller afbrydes!
Vejeplatform med firelederteknik
! Ved tilslutning af en vejeenhed i firelederteknik klemmes ledningerne BR_POS (nr.1)
sammen med SENSE_POS (nr.2) og BR_NEG (nr.6) med SENSE_NEG (Nr. 5).
Etablering af nettilslutning
§ Kontrollér spændingsværdi og stikudførelse.
$ Strømforsyningen foregår via en netenhed.
§ Tilhørende netenheder:
– YPS02-X.. til installation i eksplosionsfarlige områder.
– YPS02-XV24 24 V Netmodul til installation i eksplosionsfarlige områder.
Henvisning: Fastgør begge kabler ved udlægningen
(apparatversion til en fleksibel kabeludlægning på forespørgsel)
– YPS02-Z.. til installation udenfor det eksplosionsfarlige område.
Batteripakke
– YRB02-X EX-batteripakke til installation i eksplosionsfarlige områder.
Tilslutning af elektroniske komponenter (periferi):
§ Strømforsyningen til apparatet skal altid afbrydes, før der tilsluttes eller fjernes
ekstraudstyr (printer, PC, Zener-barriere, omformer)!
Etablér potentialudligningstilslutning (jordingstilslutning)
§ Slut CIXS3 til en central potentialudligningsskinne med et stelforbindelseskabel (medfølger ikke). Desuden er netenhedens metalkabinet jordforbundet via netledningens jordledning. Vejeplatformens metalkabinet er forbundet med netenheden via forbindelseskablets
afskærmningsfletværk.
Opvarmningstid
Apparatet skal have en opvarmningstid på 30 minutter for at kunne levere præcise
resultater. Først da er der opnået den nødvendige driftstemperatur.
Anvendelse ved kalibreringspligt:
$ Når apparatet tilsluttes til nettet første gang, er opvarmningstiden 24 timer.
Page 80

Montering af kalibreringsadapter
(leveret i kalibrerbar stand)
§ Tag møtrikken på bagsiden af analyseapparatet af.
§ Fastgør kalibreringsadapterpladen med kærvskruen.
§ Klæb kalibreringsadapterpladen over med et sikringsmærke.
Tilslutning af eksternt batteri (tilbehør: YRB02-X)
! Afbryd spændingsforsyningen til analyseapparatet.
§ Installation i zone 1, 2, 20, 21 eller 22:
Stikforbindelserne A (fra analyseapparatet) og B (fra batteripakken) skrues fast sammen.
Driftstiden er på maks. 30 timer (afhængig af den tilsluttede vejeplatform, uden tilsluttet
ekstraudstyr).
– Lyser den grønne lysdiode, er spændingen i orden
– Lyser den røde lysdiode, skal batteriet oplades.
Læs betjeningsvejledningen til Ex-batteripakken.
80
A
B
Page 81

Service
En regelmæssig vedligeholdelse af
apparatet udført af Sartorius´ kundeservice sikrer en vedblivende målesikkerhed. Sartorius kan tilbyde servicekontrakter med intervaller fra 1 måned og
op til 2 år. Serviceintervallet er afhængigt af driftsbetingelserne og
tolerancekravene.
Reparationer
! Strømforsyningen til et defekt apparat
skal straks afbrydes. Reparationer må
kun udføres med originale reservedele af
fagfolk, som er autoriseret af Sartorius.
Ved fagligt ukorrekt udførte reparationer kan der opstå betydelige farer for
brugeren. I garantiperioden indsendes
hele analyseapparatet.
Sikkerhedskontrol
Analyseapparatet kan ikke længere
bruges risikofrit:
– når apparatet eller nettilslutningsled-
ningen har synlige skader,
– når netdelen ikke længere fungerer,
– ved længerevarende opbevaring under
ugunstige forhold (f.eks. ekstrem
fugtighed),
– efter kraftige transportbelastninger.
I disse tilfælde
§ skal strømforsyningen til apparatet
afbrydes,
$ apparatet sikres mod fortsat anvendelse,
og
$ Sartorius´ kundeservice kontaktes.
Forseglingsmærkerne på apparatet
henviser til, at apparatet kun må åbnes
og serviceres af autoriserede fagfolk for
at sikre en korrekt og sikker drift af
apparatet og for at opretholde
garantien.
! Defekte eller beskadigede kabler eller
kabelforskruninger skal udskiftes som
en enhed.
! Apparatet må ikke åbnes, når der er
spænding på det. Når strømforsyningen
er afbrudt, skal du vente i mindst 10
sekunder, før apparatet åbnes. Da kabi-
netdelens pasflader har indflydelse på
IP-beskyttelsen, skal analyseapparatet
åbnes og lukkes fagligt forsvarligt.
81
Service og vedligeholdelse Bortskaffelse
Rengøring
Analyseapparatet overholder direktiverne
fra EHEDG (European Hygienic Equipment Design Group) til forhindring af
kontamineringer. Apparatet (vejeanlægget) skal med regelmæssige mellemrum rengøres for støv, se også EU-typegodkendelsescertifikatet.
! Adskil analyseapparatet fra netenheden,
og løsn det tilsluttede datakabel.
! Der må ikke komme væske ind
i apparatet.
! Undlad at benytte aggressive
rengøringsmidler (opløsningsmidler o.l.)
! Undgå elektrostatisk opladning.
§ Rens analyseapparatet med en klud
fugtet med en anelse sæbelud.
$ Hvis apparatet anvendes i levnedsmid-
delindustrien, skal apparatet rengøres
med de i denne branche anvendte
rengøringsmidler.
§ Tør analyseapparatet af med en blød
klud.
! Det er ikke tilladt at sprøjte apparatet
af med vand eller blæse det af med
trykluft.
Rengøring af overflader i rustfrit stål.
Rustfri ståldele skal som hovedregel
rengøres regelmæssigt. Vejeenheden af
rustfrit stål skal rengøres separat. Dele
af rustfrit stål på vægten rengøres simpelthen ved at gnide dem med en fugtig
klud eller svamp. Anvend kun gængse
husholdningsrengøringsmidler, som er
egnet til rustfrit stål (f.eks. Stahlfix).
Skyl derefter grundigt efter, til alle
rester er fjernet. Lad derefter apparatet
tørre. Som ekstra beskyttelse kan man
påføre en plejende olie.
Opløsningsmidler må udelukkende
anvendes til rengøring af rustfri ståldele.
Korrosive omgivelser
$ Fjern regelmæssigt korrosive substanser.
Udskiftning af beskyttelsesskærm
$ Beskadigede beskyttelsesskærme skal
udskiftes.
§ Den nye beskyttelsesskærm trykkes hen
over kanten på for- og bagsiden af
vægten, til den sidder fast.
Emballagen beskytter Sartorius-produkter tilstrækkeligt mod transportskader.
Den består af miljøvenlige materialer,
som skal bortskaffes som genbrugsmaterialer. Det samme gælder for gamle
apparater.
Batterierne skal tages ud, før apparatet
skrottes, og skal bortskaffes som farligt
affald.
Oplysninger om bortskaffelse kan fås
hos kommunens tekniske forvaltning.
Vægtspecifikke oplysninger/kodning
af serienummeret
Apparatets produktionsdato er indkodet
i serienummeret. Opbygningen er som
følger:
ÅMM x x x x x
ÅÅr
1 2000–2006
2 2007–2013
3 2014–2020
4 2021–2027
5 2028–2034
6 2035–2041
7 2042–2048
8 2049-2055
9 2056-2062
Spalten Å (år) står for årgruppenumme-
ret, der definerer et tidsrum på hver 7
år. Inden for hver årgruppe tælles
månederne (M M) op fra 13.
2000 13-24
2001 25-26
...
Eksempel:
113xxxxx (januar 2000)
xxxxx er et fortløbende nummer,
hvor der startes forfra hver måned.
Page 82

Ωσ συσκευ αξιολγησησ ακριβεασ
το µοντλο EX CIXS3 (Combics 3)
προσφρει αξιπιστα αποτελσµατα
ζγισησ ταν χρησιµοποιεται σε
περιοχσ µε κνδυνο κρηξησ τησ
ζνησ 1, 2, 20, 21 και 22.
Η συσκευ χει περβληµα απ
ανοξεδωτο χλυβα και εναι εκολη
στο χειρισµ. Περισστερα
χαρακτηριστικ:
- Μεγλα πλκτρα µε αισθητ σηµεο
πεσησ
- Εισαγωγ αριθµν και γραµµτων
- Μεγλη οθνη dot-matrix, οπσθιου
φωτισµο
- Υποστηριζµενη µε κεµενο
καθοδγηση του χρστη
- Συνδσεισ για δο πλατφρµεσ
ζγισησ
- Αυτµατη αρχικοποηση κατ την
ενεργοποηση
- Αυτµατη αντιστθµιση κατ τη
φρτωση τησ ζυγαρισ
- Προαιρετικσ λεγχοσ µσω
εξωτερικο υπολογιστ
Πλεονεκτµατα κατ την καθηµεριν
εργασα:
- Σντοµοι χρνοι µτρησησ
- Ανεξαρτησα απ τη θση τησ
πλατφρµασ ζγισησ
- Χαρακτηρισµσ των αγαθν ζγισησ
µε ωσ και 4 αλφαριθµητικοσ
χαρακτρεσ
- Ευελιξα χρη στισ διαφορετικσ
διεπαφσ
- Ασφλεια χρη στην προστασα µε
κωδικ πρσβασησ
- Ευκολτεροσ καθαρισµσ και
απολµανση
Επεξγηση συµβλων
Στο κεµενο χρησιµοποιονται τα
παρακτω σµβολα:
§ Υποδεξεισ για το σωστ χειρισµ
$ Ειδικσ υποδεξεισ για εξαιρετικσ
περιπτσεισ
> Περιγραφ των επιδρσεων ενσ
βµατοσ χειρισµο
! Υποδεξεισ κινδνων
Συµβουλσ εφαρµογν
Τηλφωνο: +49 (0) 551/308-4440
Φαξ: +49 (0) 551/308-3791
82
Σκοπσ χρσησ
82 Περιεχµενα
83 Υποδεξεισ προειδοποησησ και
ασφαλεασ
84 ναρξη λειτουργασ
84 Παραδιδµενοσ εξοπλισµσ
84 Υποδεξεισ τοποθτησησ
85 Περιγραφ συσκευσ
87 Σνδεση µε το δκτυο
88 Τοποθτηση µετασχηµατιστ
διακρβωσησ
για την εκτλεση των απαρατητων
διακριβσεων
88 Σνδεση εξωτερικσ µπαταρασ
89 Φροντδα και συντρηση
89 Επισκευσ
89 Καθαρισµσ
89 λεγχοσ ασφαλεασ
89 Απρριψη
82
Σκοπσ χρσησ Περιεχµενα
Page 83

Ασφλεια
§ ∆ιαβστε προσεκτικ το παρν
εγχειρδιο οδηγιν χρσησ πριν απ
την ναρξη τησ λειτουργασ.
Ο κατασκευαστσ δεν φρει ευθνη
για ζηµεσ που προκαλονται απ µη
τρηση των υποδεξεων ασφαλεασ και
των προειδοποισεων.
Το µοντλο EX CIXS3 ανταποκρνεται
στισ απαιτσεισ τησ οδηγασ 94/9/ΕΚ
περ συσκευν τησ οµδασ συσκευν
II, κατηγορα 2 (για αρια) 1 (για
σκνη), και φρει, σµφωνα µε το
πιστοποιητικ εξτασησ τπου
KEMA 03ATEX1157X, τη σµανση:
h II 2 G 1 D EEx ib IIC T4 T135°C.
Επιπλον, η συσκευ ανταποκρνεται
στισ απαιτσεισ των ευρωπαϊκν
οδηγιν περ ηλεκτροµαγνητικσ
συµβαττητασ και ηλεκτρικσ
ασφλειασ (βλπε δηλσεισ
συµµρφωσησ).
Ενδεχµενη µη ενδεδειγµνη χρση
µπορε να προκαλσει υλικσ ζηµισ
και τραυµατισµοσ. Η συσκευ πρπει
να χρησιµοποιεται µνο απ
εξειδικευµνο προσωπικ.
! Η συσκευ ασφαλεασ µπορε να
χρησιµοποιηθε σε περιοχσ µε
κνδυνο κρηξησ:
Ζνη 1 και 2 για αρια, ζνη 20, 21 και
22 για σκνη. Η χρση τησ συσκευσ σε
περιοχ που υφσταται κνδυνοσ
κρηξησ πρπει να ελγχεται για κθε
περπτωση ξεχωριστ. Η εγκατσταση
τησ συσκευσ στη ζνη 1, 2, 20, 21 22
πρπει να εκτελεται απ εξειδικευµνο
τεχνικ σµφωνα µε τουσ νµουσ, τισ
οδηγεσ και τα πρτυπα που ισχουν
στη χρα σασ. Πρπει να τηρονται οι
αντστοι-χεσ διατξεισ προστασασ απ
ατυχµατα. Εξειδικευµνοσ τεχνικσ
εναι να τοµο που εναι εξοικειωµνο
µε την τοποθτηση, τη θση σε λειτουργα για πρτη φορ και τη λειτουργα
του συστµατοσ.Το εξειδικευµνο
προσωπικ χει τα κατλληλα
προσντα, γνωρζει τισ σχετικσ
διατξεισ και καννεσ τησ εκστοτε
χρασ. Αν χρειαστε, απευθυνθετε
στον αντιπρσωπο το τµµα
εξυπηρτησησ πελατν τησ Sartorius.
! Χειρισµσ τησ συσκευσ που δεν
συµφωνε µε τα στοιχεα που
αναφρονται στο πιστοποιητικ
εξτασησ τπου ΕΚ δεν επιτρπεται
και θεωρεται µη ενδεδειγµνη χρση.
Πρπει να εφαρµζονται κατ γρµµα
λα τα δεδοµνα και οι περιορισµο
που αναφρονται στο πιστοποιητικ
εξτασησ τπου ΕΚ (βλπε παρακτω:
Πιστοποιητικ EX στο εγχειρδιο
λειτουργασ).
Σε περπτωση εσφαλµνησ
εγκατστασησ αρεται η εγγηση.
– Να αναθτετε σε κατλληλα χρονικ
διαστµατα τον λεγχο λειτουργασ και
ασφλειασ του συστµατοσ σε κατλληλα εκπαιδευµνο τεχνικ προσωπικ.
– λεσ οι εργασεσ συντρησησ,
83
Υποδεξεισ προειδοποησησ και ασφαλεασ
καθαρισµο και επισκευσ στο
µοντλο CIXS3 πρπει να εκτελονται
ταν η συσκευ δεν εναι συνδεδεµνη
µε παροχ ρεµατοσ. Οποιαδποτε
επµβαση στη συσκευ (µε εξαρεση
τα εξουσιοδοτηµνα απ τη
Sartorius
τοµα) χει ωσ αποτλεσµα την
κατργηση λων των αξισεων παροχσ
εγγησησ. Να χρησιµοποιετε µνο
γνσια ανταλλακτικ τησ Sartorius!
–Το CIXS3 δεν πρπει να εκτθεται
σκοπα σε ακραεσ θερµοκρασεσ,
διαβρωτικοσ ατµοσ χηµικν ουσιν,
υγρασα, κτυπµατα και κραδασµοσ.
Η επιτρεπτ θερµοκρασα περιβλλοντοσ κατ τη λειτουργα ανρχεται
στουσ –10°C ωσ 40°C.
– Σε περπτωση χρσησ καλωδων λλου
κατασκευαστ προσξτε τισ θσεισ
των επαφν. Γι’ αυτν ακριβσ το
λγο, προτο συνδσετε το καλδιο
στισ συσκευσ Sartorius, ελγξτε την
αντιστοιχα των επαφν του σµφωνα
µε το αντστοιχο διγραµµα σνδεσησ
και αποσυνδστε τουσ αγωγοσ µε
διαφορετικ αντιστοιχα επαφν.
Ευθνη για τη χρση καλωδων που
δεν παρχονται απ τη Sartorius.
φρει µνο ο υπεθυνοσ.
– Αν το CIXS3 χρησιµοποιηθε σε περιοχ
που υπρχει κνδυνοσ κρηξησ, λα
τα ρευµατοφρα καλδια πρπει να
αποσυνδονται απ τη συσκευ να
συνδονται σε αυτν, αφο προηγουµνωσ η συσκευ αποσυνδεθε απ
την παροχ ρεµατοσ. Πριν απ την
αποσνδεση τη σνδεση καλωδων,
βγλτε το καλδιο τροφοδοσασ τησ
ζυγαρισ απ την πρζα του δικτου
ηλεκτρικο ρεµατοσ.
– Αποφγετε ενδεχµενη
ηλεκτροστατικ φρτιση (ειδικ του
προστατευτικο καλµµατοσ),
συνδστε ισοδυναµικ αγωγ.
– Η αποσνδεση των ισοδυναµικν
αγωγν απαγορεεται.
– Αν χετε ενδεξεισ τι διακυβεεται
η ασφλεια λειτουργασ τησ συσκευσ,
αποσυνδστε την απ ρεµα και
προστατψτε την απ περαιτρω χρση
(π.χ. σε περπτωση ζηµασ). Λβετε
υπψη τουσ καννεσ πρληψησ
ατυχηµτων, ενηµερστε κατλληλα
το προσωπικ χειρισµο.
! Απενεργοποιστε την τροφοδοσα
πριν τη σνδεση την αποσνδεση
βοηθητικν συσκευν.
– Το περβληµα λων των καλωδων
σνδεσησ, πωσ και το περβληµα των
αγωγν των εσωτερικν καλωδισεων, εναι απ PVC. Για το λγο αυτν,
χηµικ που προσβλλουν το ανωτρω
υλικ πρπει να διατηρονται µακρι
απ τισ καλωδισεισ.
– Για τη σνδεση του CIXS3 µε λλεσ
συσκευσ πρπει να τηρονται τα
στοιχεα στα εκστοτε πιστοποιητικ
εξτασησ τπου ΕΚ. Περισστερεσ
πληροφορεσ µπορετε να βρετε στην
εντητα “Βεβαωση ενδογενοσ
ασφλειασ” στο παρρτηµα του
παρντοσ εγχειριδου.
Εγκατσταση
– Προσοχ κατ τη χρση καλωδου
σνδεσησ RS232 διαφορετικο
κατασκευαστ του εµπορου: Οι
αντιστοιχεσ των επαφν συχν δεν
εναι κατλληλεσ για τισ συσκευσ τησ
Sartorius! Η αντιστοιχα θα πρπει να
ελγχεται σε σγκριση µε τα σχεδιαγρµµατα σνδεσησ, οι αγωγο που δεν
συµφωνον πρπει να αποσυνδονται.
! Χρησιµοποιετε µνο κατλληλο
καλδιο επιµκυνσησ µε
προστατευτικ αγωγ. Ο προστατευτικσ αγωγσ δεν πρπει να
αποσυνδεται σε καµι περπτωση.
! Αν η συσκευ το καλδιο
τροφοδοσασ παρουσιζει εµφανεσ
φθορσ, αποσυνδστε την παροχ
τσησ και προστατεστε τη συσκευ
απ περαιτρω χρση.
– Τα εξαρτµατα και τα αξεσουρ τησ
Sartorius εναι τα πλον κατλληλα για
τη συσκευ. Συνεπσ, δεν πρπει να
χρησιµοποιετε δικσ σασ λσεισ.
Σχετικσ υποδεξεισ θα βρετε και στα
στοιχεα για την ποιτητα λειτουργασ
(σµφωνα µε τα πρτυπα ατρωσασ),
τα οποα µπορετε να προµηθευτετε
απ εµσ.
$ Σε περπτωση προβληµτων,
απευθυνθετε στο κντρο
εξυπηρτησησ πελατν τησ Sartorius.
Προστασα IP:
– Η συσκευ αξιολγησησ χει
προστασα IP65-/IP67 µνο µε ειδικ
τοποθτηση ελαστικν παρεµβυσµτων
και µε σταθερ σνδεση (καλ
βιδωµνα πµατα). Η εγκατσταση
πλατφρµων ζγισησ πρπει να
εκτελεται και να ελγχεται απ ειδικ.
– Σε περπτωση εκ των υστρων
προσθκησ εξδου δεδοµνων,
διατηρστε τα πµατα. Προστατεστε
την ξοδο δεδοµνων µε τη βοθεια
ενσ πµατοσ παρµοιου αντικειµνου απ ατµ, υγρασα και ρπουσ.
Χρση για την εκτλεση
διακριβσεων:
– Αν η συσκευ αξιολγησησ συνδεθε
σε µια πλατφρµα ζγισησ και η
προκπτουσα ζυγαρι χρησιµοποιηθε
για διακρβωση, πρπει να τηρηθον
οι σχετικσ διατξεισ. ταν συνδετε
πλατφρµεσ τησ Sartorius διαβζετε
και τηρετε το συνοδευτικ CD
“Κατευθυντριεσ οδηγεσ
διακρβωσησ”. ταν συνδετε
πλατφρµεσ τησ Sartorius τηρετε τη
δλωση συµµρφωσησ µε τη λστα
των επιτρεπµενων περιοχν ζγισησ.
– Αν σε κποια διακριβωµνη συσκευ
καταστραφε η σφραγδα ασφαλεασ
που αυτ φρει, πρπει να τηρονται
οι νµοι και οι διατξεισ τησ εκστοτε
χρασ. Μια συµπληρωµατικ
διακρβωση τησ ζυγαρισ εναι
απαρατητη.
Page 84

Ξεπακετρισµα
§ Μετ το ξεπακετρισµα, ελγξτε
αµσωσ τη συσκευ για εξωτερικσ
φθορσ
$ Σε περπτωση ζηµισ, ανατρξτε στισ
υποδεξεισ του κεφαλαου “Φροντδα
και συντρηση”, εντητα “λεγχοσ
ασφλειασ”
$ Φυλξτε λα τα µρη τησ αρχικσ
συσκευασασ για την περπτωση που
χρειαστε την επιστρψετε. Πριν την
αποστολ αποσυνδστε λα τα
καλδια!
Παραδιδµενοσ εξοπλισµσ
– Συσκευ αξιολγησησ
– Εγχειρδιο οδηγιν χρσησ
– Αξεσουρ (ειδικσ εξοπλισµσ) ωσ
αναφρονται στο δελτο παρδοσησ
Βµατα εργασασ για την ναρξη τησ
λειτουργασ
1) Συνδστε την πλατφρµα ζγισησ σε
αυτ τη συσκευ αξιολγησησ Combics:
δετε στη µεθεπµενη σελδα
2) Ρθµιση ADU:
δετε κεφλαιο “Σρβισ”
– ∆ιακρβωση | Πρτυπο
– Περιοχ ζγισησ, ευκρνεια
– βροσ προσαρµογσ
– mV/V | εισαγωγ γεωγραφικν
στοιχεων
– Ευθυγρµµιση, ρθµιση στο
εγχειρδιο λειτουργασ
3) Ρθµιση πλατφρµασ ζγισησ:
∆ετε κεφλαιο “Χειρισµσ”, εντητα
“Ρθµιση” στο εγχειρδιο λειτουργασ.
4) Ρθµιση προγρµµατοσ εφαρµογν:
βλπε συνοδευτικ εγχειρδιο οδηγιν
των προγραµµτων εφαρµογν
5) Σνδεση διαπαφν, εκτυπωτ
αποθηκευτικο µσου
δετε το σχεδιγραµµα αντιστοιχασ φισ
στο εγχειρδιο λειτουργασ.
6) Ενεργοποιστε τισ διεπαφσ, τον
εκτυπωτ το αποθηκευτικ µσο µε
τη βοθεια προεπιλογν στισ
ρυθµσεισ.
– Για
COM-1/-2
– Ρθµιση πρωτοκλλου εκτπωσησ
– Σειρσ/περιοχσ εκτπωσησ για
εκστοτε εκτυπωτ στο εγχειρδιο
λειτουργασ
7)
Η ξοδοσ δεδοµνων
RS422/RS485
στο COM2 µπορε να χρησιµοποιηθε
µνο εν στο
COM2 δεν εναι
συνδεδεµνη η ξοδοσ δεδοµνων
RS232. ∆ηλαδ, δεν επιτρπεται
ταυτχρονη ηλεκτρικ σνδεση
COM2/RS232 και COM2/RS422/485.
Εγκατσταση
Κατ την εγκατσταση αποφγετε
θσεισ µε αντξοεσ συνθκεσ:
- ζστη (θρµανση, ηλιακ ακτινοβολα)
- ρεµα απ ανοιχτ παρθυρα και
πρτεσ
- αναταρξεισ κατ τη διρκεια τησ
ζγισησ
- υπερβολικ υγρασα
Εγκλιµατισµσ
Τοποθετντασ µια κρα συσκευ σε
να ζεστ περιβλλον, µπορε να
προκληθον υδρατµο (συµπκνωση
υγρασασ). Για το λγο αυτν, αφστε
τη συσκευ να εγκλιµατιστε για περ. 2
ρεσ σε θερµοκρασα δωµατου,χωρσ
να εναι συνδεδεµνη στο ρεµα.
Αδρνεια
Απενεργοποιετε τη συσκευ ταν δεν
τη χρησιµοποιετε.
Σµβολο ασφαλεασ σε διακριβωµνα
µοντλα:
Η ασφλιση τησ συσκευσ γνεται
µσω τησ επιγραφσ µε το νοµα
“
Sartorius”. Αν προσπαθσετε να
αποµακρνετε το αυτοκλλητο, αυτ
καταστρφεται. Στην περπτωση αυτ
αρεται η ισχσ τησ διακρβωσησ και
πρπει να γνει εκ νου διακρβωση
τησ ζυγαρισ.
84
ναρξη λειτουργασ
Συνοπτικ απεικνιση των συσκευν για περιοχσ µε κνδυνο κρηξησ
Περιοχσ µε κνδυνο κρηξησ: Ζνη 1, 2, 20, 21, 22 Περιοχ στην οποα δεν υφσταται κνδυνοσ κρηξησ
∆ιταξη φραγσ
Zener PC
µετασχηµατιστσ
Συσκευ αξιολγησησ µε πλατφρµα
Μονδα 24 V Τροφοδοτικ Μπαταρεσ EX Μονδα 24 V Τροφοδοτικ
(110-230V) (110-230V)
Page 85

Οθνεσ και πληκτρολγιο: Combics 3
85
Περιγραφ συσκευσ
1
2
3
4
5
6
15
16
14
13
12
11
10
9
8
7
21
20
19
18
17
Πσω πλευρ:
Οθνεσ και πληκτρολγιο
1 Λυχνεσ ελγχου (για ζυγαρισ
ελγχου και ταξινµηση)
2 Πλκτρο εναλλαγσ για
εισαγωγ γραµµτων
3 Αλφαριθµητικ πληκτρολγιο
4 Πλκτρο ∆ιαγραφ (“C
F”)
5 Προεπιλογσ:
Πρσβαση στισ ρυθµσεισ
6 Εναλλαγ προγρµµατοσ
εφαρµογν | Ειδικσ για την
εφαρµογ πληροφορεσ
7 ξοδοσ πληροφοριν
8 Καθαρ/µικτ, 2. Μονδα
10πλσια ανλυση
(ανλογα µε την προεπιλογ)
9 Απβαρο
10 Μηδενισµσ
11 Αλλαγ πλατφρµασ ζγισησ
12 Ενεργοποηση/απενεργοποηση
13 Πλκτρα λειτουργασ
14 Οθνη dot-matrix
Πσω πλευρ
15 ∆ιεπαφ RS232C “COM1”
16
Καλδιο µετασχηµατιστ DC
17
Πρσβαση σε διακπτη
ασφλισησ (βασικ
λειτουργα διακρβωσησ).
18 Σνδεση πλατφρµασ ζγισησ
19 Ισοδυναµικ επαφ (γεωση)
20 Βαλβδα εξαρωσησ,
Ροπ στρψησ:
1,5 Nm
21
∆ιεπαφ COM2
Page 86

Εγκατσταση πλατφρµασ ζγισησ
Το καλδιο σνδεσησ πρπει να συνδεται απ εκπαιδευµνο και εξουσιοδοτηµνο
τεχνικ τησ Sartorius.
! Εργασεσ που επηρεζουν το εδοσ προστασασ IP-67 πρπει να εκτελονται µε
ιδιατερη προσοχ.
! Σε περπτωση εσφαλµνησ εγκατστασησ αρεται η εγγηση.
! Εκτελετε εργασεσ µνο ταν η συσκευ δεν εναι συνδεδεµνη στην πρζα.
! Τα καλδια (προστασα IP67) στη συσκευ αξιολγησησ χουν συνδεθε εκ των
προτρων.
§ Ξεβιδστε τισ 4 βδεσ τησ µπροστινσ πλκασ. Αφαιρστε την µπροστιν πλκα.
§ Συνδστε την πλατφρµα ζγισησ µε τη συσκευ αξιολγησησ.
! Οι στυπιοθλπτεσ καλωδων εναι τοποθετηµνοι εκ των προτρων. Εκτελετε λεσ τισ
εργασεσ στον στυπιοθλπτη µε προσοχ. Χρησιµοποιετε δυναµκλειδο. Ροπ
στρψησ αυτο του στυπιοθλπτη καλωδου: 5 Nm
§
Απογυµνστε και συνδστε το καλδιο σνδεσησ:
- Περστε το καλδιο απ το στυπιοθλπτη.
- Τοποθετστε σωστ το στυπιοθλπτη.
- Απογυµνστε το καλδιο: Η θωρκιση (1) πρπει να εναι σε επαφ µε τουσ
σφιγκτρεσ (2).
- Αποκατσταση συνδσεων:Τα σρµατα (3) του καλωδου θα πρπει να χουν µκοσ
περ. 15 cm.
- Περστε το καλδιο απ το στυπιοθλπτη.
- Ελγξτε την επαφ των σφιγκτρων µε τη θωρκιση.
86
Page 87

87
§
Τοποθετστε το καλδιο τησ πλατφρµασ ζγισησ:
– Απογυµνστε το καλδιο.Τα σρµατα του καλωδου θα πρπει να χουν µκοσ περ.
5 cm.
– Απογυµνστε τα σρµατα κατ 1 cm περπου και τοποθετστε στισ κρεσ δακτυλουσ.
– Τοποθετστε δακτλιο απ φερρτη σε λα τα σρµατα.
– Βιδστε τουσ σφιγκτρεσ.
Αντιστοιχα συνδσεων:
Αρ. Περιγρ.σµατοσ Σηµασα
1
BR_POS Τση τροφοδοσασ γεφρωσησ (+)
2 SENSE_POS Sense (+)
Τση τροφοδοσασ γεφρωσησ
3 OUT_POS Τση µτρησησ θετικ
4 OUT_NEG Τση µτρησησ αρνητικ
5 SENSE_NEG Sense (-)
Τση τροφοδοσασ γεφρωσησ
6 BR_NEG Τση τροφοδοσασ γεφρωσησ (-)
! Για την αντιστοχιση των χρωµτων και των σηµτων, ανατρξτε στισ αντστοιχεσ
οδηγεσ/φλλο δεδοµνων τησ πλατφρµασ ζγισησ. Απογυµνστε και αποσυνδστε
λουσ τουσ αγωγοσ που δεν χρησιµοποιονται!
Πλατφρµα ζγισησ µε τεχνικ 4 αγωγν
! Σε περπτωση σνδεσησ αισθητρα φορτου σε τεχνικ 4 αγωγν, συνδστε τουσ
αγωγοσ BR_POS (αρ.1) µε το SENSE_POS (αρ.2) και BR_NEG (αρ.6) µε το SENSE_NEG
(αρ. 5).
Σνδεση µε το δκτυο
§ Ελγξτε την τιµ τσησ και τον τπο του φισ.
$ Η παροχ τσησ γνεται µσω τροφοδοτικο.
§ Κατλληλα τροφοδοτικ:
– YPS02-X.. για εγκατσταση σε περιοχ µε κνδυνο κρηξησ.
– YPS02-XV24 24V-Τροφοδοτικ µονδα για εγκατσταση σε περιοχ µε κνδυνο κρηξησ.
Υπδειξη: Σφξτε καλ και τα δο καλδια
(κδοση συσκευσ για ευλικτη διταξη καλωδων κατπιν ατησησ)
– YPS02-Z.. για εγκατσταση εκτσ τησ περιοχσ µε κνδυνο κρηξησ.
Μπαταρεσ
– Μπαταρεσ YRB02-X EX για εγκατσταση σε περιοχ µε κνδυνο κρηξησ.
Σνδεση ηλεκτρονικν συσκευν (περιφερειακ):
§ Πριν απ τη σνδεση αποσνδεση βοηθητικν συσκευν (εκτυπωτσ, PC, διταξη
φραγσ Zener, µετασχηµατιστσ) πρπει η συσκευ να αποσυνδεται πντα απ το
ηλεκτρικ δκτυο!
Ισοδυναµικ σνδεσησ (σνδεση γεωσησ)
§ Συνδστε το CIXS3 µε να καλδιο σνδεσησ γεωσησ (δεν συµπεριλαµβνεται
στον παραδιδµενο εξοπλισµ) στην κεντρικ ισοδυναµικ γραµµ. Εκτσ αυτο, το
µεταλλικ περβληµα του τροφοδοτικο γεινεται µσω του προστατευτικο αγωγο
του καλωδου τροφοδοσασ.Το µεταλλικ περβληµα τησ πλατφρµασ ζγισησ εναι
συνδεδεµνο µσω τησ πλεξοδασ των συρµτων του καλωδου σνδεσησ στο
τροφοδοτικ.
Χρνοσ προθρµανσησ
Για την επτευξη ακριβν αποτελεσµτων, απαιτεται χρνοσ προθρµανσησ
30 λεπτν. Μνο ττε σηµεινεται η απαρατητη θερµοκρασα λειτουργασ.
Χρση για διακρβωση:
$ Μετ την πρτη σνδεση στο ηλεκτρικ δκτυο, ο χρνοσ προθρµανσησ ανρχεται
σε 24 ρεσ.
Page 88

Τοποθτηση µετασχηµατιστ διακρβωσησ
(κατσταση παρδοσησ µε ικαντητα διακρβωσησ)
§ Αποµακρνετε το παξιµδι απ την πσω πλευρ τησ συσκευσ αξιολγησησ.
§ Στερεστε την πλκα µετασχηµατιστ διακρβωσησ µε το κατσαβδι.
§ Συγκολλστε την πλκα µετασχηµατιστ διακρβωσησ µε τη σφραγδα ασφαλεασ.
Σνδεση εξωτερικσ µπαταρασ (Εξρτηµα: YRB02-X)
! Αποσυνδστε τη συσκευ αξιολγησησ απ την παροχ τσησ.
§ Εγκατσταση στη ζνη 1, 2, 20, 21 22:
Βιδστε καλ το φισ Α (απ τη συσκευ αξιολγησησ) και Β (απ την µπαταρα).
Η διρκεια λειτουργασ ανρχεται σε 30 ρεσ (ανλογα µε τη συνδεδεµνη
πλατφρµα ζγισησ, χωρσ συνδεδεµνα αξεσουρ.)
- αν ανβουν οι πρσινεσ λυχνεσ LED, η τση εναι εντξει
- αν ανβει η κκκινη λυχνα LED, φορτστε την µπαταρα.
∆ιαβστε το εγχειρδιο οδηγιν χρσησ των µπαταριν EX.
88
A
B
Page 89

Σρβισ
Η τακτικ συντρηση τησ ζυγαρισ
σασ στην υπηρεσα εξυπηρτησησ
πελατν τησ
Sartorius εξασφαλζει τη
συνεχ ακριβ λειτουργα τησ.
Η
Sartorius σσ προσφρει σµβαση
συντρησησ διρκειασ απ 1 µνα
ωσ και 2 τη.Το διστηµα συντρησησ
εξαρτται απ τισ συνθκεσ
λειτουργασ και την καταπνηση.
Επισκευσ
! Αποσυνδστε απ το ρεµα την
ελαττωµατικ συσκευ. Αναθστε τισ
επισκευσ µνο σε εξουσιοδοτηµνο
απ την Sartorius εξειδικευµνο
προσωπικ που χρησιµοποιε
αυθεντικ ανταλλακτικ. Σε περπτωση
ακατλληλησ επισκευσ µπορε να
προκψουν σοβαρο κνδυνοι για το
χρστη. Κατ τη διρκεια τησ
περιδου εγγησησ αποστλλετε
ολκληρη τη συσκευ αξιολγησησ.
λεγχοσ ασφαλεασ
∆εν µπορε πλον να διασφαλιστε
ασφαλσ λειτουργα:
– ταν η συσκευ η σνδεση
τροφοδοσασ χει εµφανεσ φθορσ,
– ταν το τροφοδοτικ δεν λειτουργε
πλον,
– µετ απ µακρχρονη αποθκευση
υπ δυσµενεσ συνθκεσ (π.χ.
εξωτερικ υγρασα),
– µετ απ επιβρυνση λγω µεταφορσ.
Στισ περιπτσεισ αυτσ
§ αποσυνδστε τη συσκευ απ την
πρζα,
$ προστατεστε την απ περαιτρω
χρση και
$ ενηµερστε την υπηρεσα
εξυπηρτησησ πελατν τησ Sartorius.
! Οι σφραγδεσ επισηµανουν τι η
συσκευ επιτρπεται να ανογεται και
να συντηρεται µνο απ ειδικευµνο
προσωπικ για να εξασφαλζεται η
ψογη και ασφαλσ λειτουργα τησ
και να παραµνει σε ισχ η εγγηση.
! Αντικαθισττε τα ελαττωµατικ
κατεστραµµνα καλδια τουσ
βιδωτοσ στυπιοθλπτεσ καλωδων
ωσ σνολο!
! Μην ανογετε τη συσκευ εν
βρσκεται στο ρεµα. Μετ την
αποσνδεση απ το ρεµα,
περιµνετε τουλχιστον 10
δευτερλεπτα πριν ανοξετε τη
συσκευ. Επειδ οι επιφνειεσ
προσαρµογσ στα τµµατα
περιβλµατοσ επηρεζουν την
προστασα IP, το νοιγµα και το
κλεσιµο τησ συσκευσ αξιολγησησ
πρπει να γνεται απ γνστη τησ
διαδικασασ.
89
Φροντδα και συντρηση Απρριψη
Καθαρισµσ
Η συσκευ αξιολγησησ συµµορφνεται µε τισ οδηγεσ τησ
EHEDG
(European Hygienic Equipment Design
Group)
για την αποφυγ µολνσεων.
Καθαρζετε τακτικ τη συσκευ
(ζυγαρι) απ σκνη, δετε επσησ το
πιστοποιητικ εξτασησ τπου ΕΚ.
! Αποσυνδστε τη συσκευ
αξιολγησησ απ το τροφοδοτικ,
αποσυνδστε το συνδεδεµνο
καλδιο δεδοµνων.
! ∆εν πρπει να εισλθει υγρ στο
εσωτερικ.
! Μην χρησιµοποιετε οξα καθαριστικ
(διαλυτικ κ.α.).
! Αποφγετε ενδεχµενη
ηλεκτροστατικ φρτιση.
§ Καθαρζετε τη συσκευ αξιολγησησ
µε να πανκι βρεγµνο ελαφρσ σε
σαπουνδα.
$ Σε χρση στη βιοµηχανα τροφµων
χρησιµοποιετε τα αντστοιχα
καθαριστικ.
§ Σκουπστε τη συσκευ αξιολγησησ
µε να µαλακ παν.
! ∆εν επιτρπεται να βρχετε τη
συσκευ µε νερ να χρησιµοποιετε
πεπιεσµνο αρα.
Καθαρισµσ επιφανειν απ
ανοξεδωτο χλυβα
Καθαρζετε καλ λα τα µρη απ
ανοξεδωτο χλυβα. Καθαρζετε
ξεχωριστ την πλκα ανοξεδωτου
χλυβα. Αποµακρνετε τα τµµατα
απ ανοξεδωτο χλυβα απ τη ζυγαρι
και χρησιµοποιστε να υγρ παν
σφουγγρι. Χρησιµοποιετε µνο
καθαριστικ οικιακσ χρσησ του
εµπορου, τα οποα εναι κατλληλα
για ανοξεδωτο χλυβα. Ξεπλνετε
καλ ωσ του αποµακρυνθον λα
τα υπολεµµατα.Τλοσ, στεγνστε τη
συσκευ. Ωσ πρσθετη προστασα,
µπορετε να χρησιµοποισετε λδι .
Η χρση διαλυτικν µσων επιτρπεται
αποκλειστικ και µνο για τον καθαρισµ των µερν απ ανοξεδωτο
χλυβα.
∆ιαβρωτικ περιβλλον
$ Να αποµακρνετε τακτικ τισ
διαβρωτικσ ουσεσ.
Αντικατσταση προστατευτικο
καλµµατοσ
$ Αν το προστατευτικ κλυµµα
παρουσιζει βλβη, αντικαταστστε το.
§ Τοποθετστε το νο προστατευτικ
κλυµµα στην µπροστιν την πσω
πλευρ τησ συσκευσ πιζοντσ το
πνω απ το πλασιο ωσ του να
εφαρµσει καλ.
Η συσκευασα προστατεει επαρκσ
τα προϊντα τησ
Sartorius απ ζηµεσ
απ τη µεταφορ.Αποτελεται απ
φιλικ προσ το περιβλλον υλικ, τα
οποα θα πρπει να παραδδονται στην
τοπικ αρµδια υπηρεσα ωσ
δευτερεουσεσ πρτεσ λεσ.Το διο
ισχει και για τισ παλισ συσκευσ.
Οι µπαταρεσ πρπει να αφαιρονται
απ τη συσκευ πριν την απρριψη
τησ και να απορρπτονται ξεχωριστ.
Πληροφορεσ για την απρριψη θα
βρετε απ τισ τοπικσ αρχσ.
Πληροφορεσ που αφορον τη
ζυγαρια/Κωδικοποηση των αριθµν
σειρσ
Η ηµεροµηνα κατασκευσ τησ
συσκευσ εναι κωδικοποιηµνη στον
αριθµ σειρσ. Η δοµ τησ προκπτει
ωσ εξσ:
ΕMM
x x x x x
Ε τοσ
1 2000-2006
2 2007-2013
3 2014-2020
4 2021-2027
5 2028-2034
6 2035-2041
7 2042-2048
8 2049-2055
9 2056-2062
Η στλη Ε δεχνει τον αριθµ τησ
οµδασ ετν, ο οποοσ αναφρεται σε
µια περοδο 7 ετν. Σε κθε οµδα
ετν οι µνεσ (M M) αυξνονται
ξεκινντασ απ το 13.
2000 13-24
2001 25-26
...
Παρδειγµα:
113xxxxxi (Ιανουριοσ 2000)
xxxxx εναι νασ συνεχµενοσ
αριθµσ που αυξνεται εκ νου κθε
µνα.
Page 90

Sartorius AG
Weender Landstrasse 94–108
37075 Goettingen, Germany
Phone +49.551.308.0
Fax +49.551.308.32 89
www.sartorius.com
Copyright by Sartorius AG,
Goettingen, Germany.
All rights reserved. No part
of this publication may
be reprinted or translated in
any form or by any means
without the prior written
permission of Sartorius AG.
The status of the information,
specifications and illustrations
in this manual is indicated
by the date given below.
Sartorius AG reserves the
right to make changes to
the technology, features,
specifications and design of
the equipment without notice.
Status:
October 2003, Sartorius AG,
Goettingen, Germany
Printed in Germany on paper that has been bleached
without any use of chlorine
W4A000 · KT
Publication No.: WCI6005-u03101
 Loading...