

Sargent and Greenleaf 6120,6123 User Manual

Sargent and Greenleaf
Electronic Safe Lock Guide

Sargent and Greenleaf is a company dedicated to providing security. Not just a sense of
security, but real security designed to meet real-world needs. We offer mechanical locks that
deliver an unbeatable combination of quality and value. Electronic locks that take control to a
level never before possible. And exit devices that achieve the highest standard of safety. Since
1857, Sargent and Greenleaf has provided innovative security solutions to financial institutions,
businesses and governments across the globe. Today, we are a subsidiary of Stanley Security
Solutions, a growing division of Stanley Black & Decker.
Contents
Product Overview . . . . . . . . . . . . . . . . . . . . . . . . . . . . . . . . . . . . . . 1
6120 / 6123 Installation Instructions. . . . . . . . . . . . . . . . . . . . . . . . . . . . . 3
6120 Operating Instructions . . . . . . . . . . . . . . . . . . . . . . . . . . . . . . . . . 8
6123 Operating Instructions . . . . . . . . . . . . . . . . . . . . . . . . . . . . . . . . . 12
6123 Quick Reference Programming Guide . . . . . . . . . . . . . . . . . . . . . . . . . 20
6120 / 6123 Battery Changing Instructions—Two-Battery Keypad . . . . . . . . . . . .22
6120 / 6123 Battery Changing Instructions—One-Battery Keypad . . . . . . . . . . . . .24
6120 / 6123 Troubleshooting Guide . . . . . . . . . . . . . . . . . . . . . . . . . . . . . 26
6120 / 6123 Troubleshooting Checklist . . . . . . . . . . . . . . . . . . . . . . . . . . .31
6120 / 6123 Management Reset Code Technical Bulletin. . . . . . . . . . . . . . . . . . 32
6120 / 6123 Commonly Asked Questions . . . . . . . . . . . . . . . . . . . . . . . . . . 33
A Brief History of Sargent & Greenleaf . . . . . . . . . . . . . . . . . . . . . . . . . . . 36
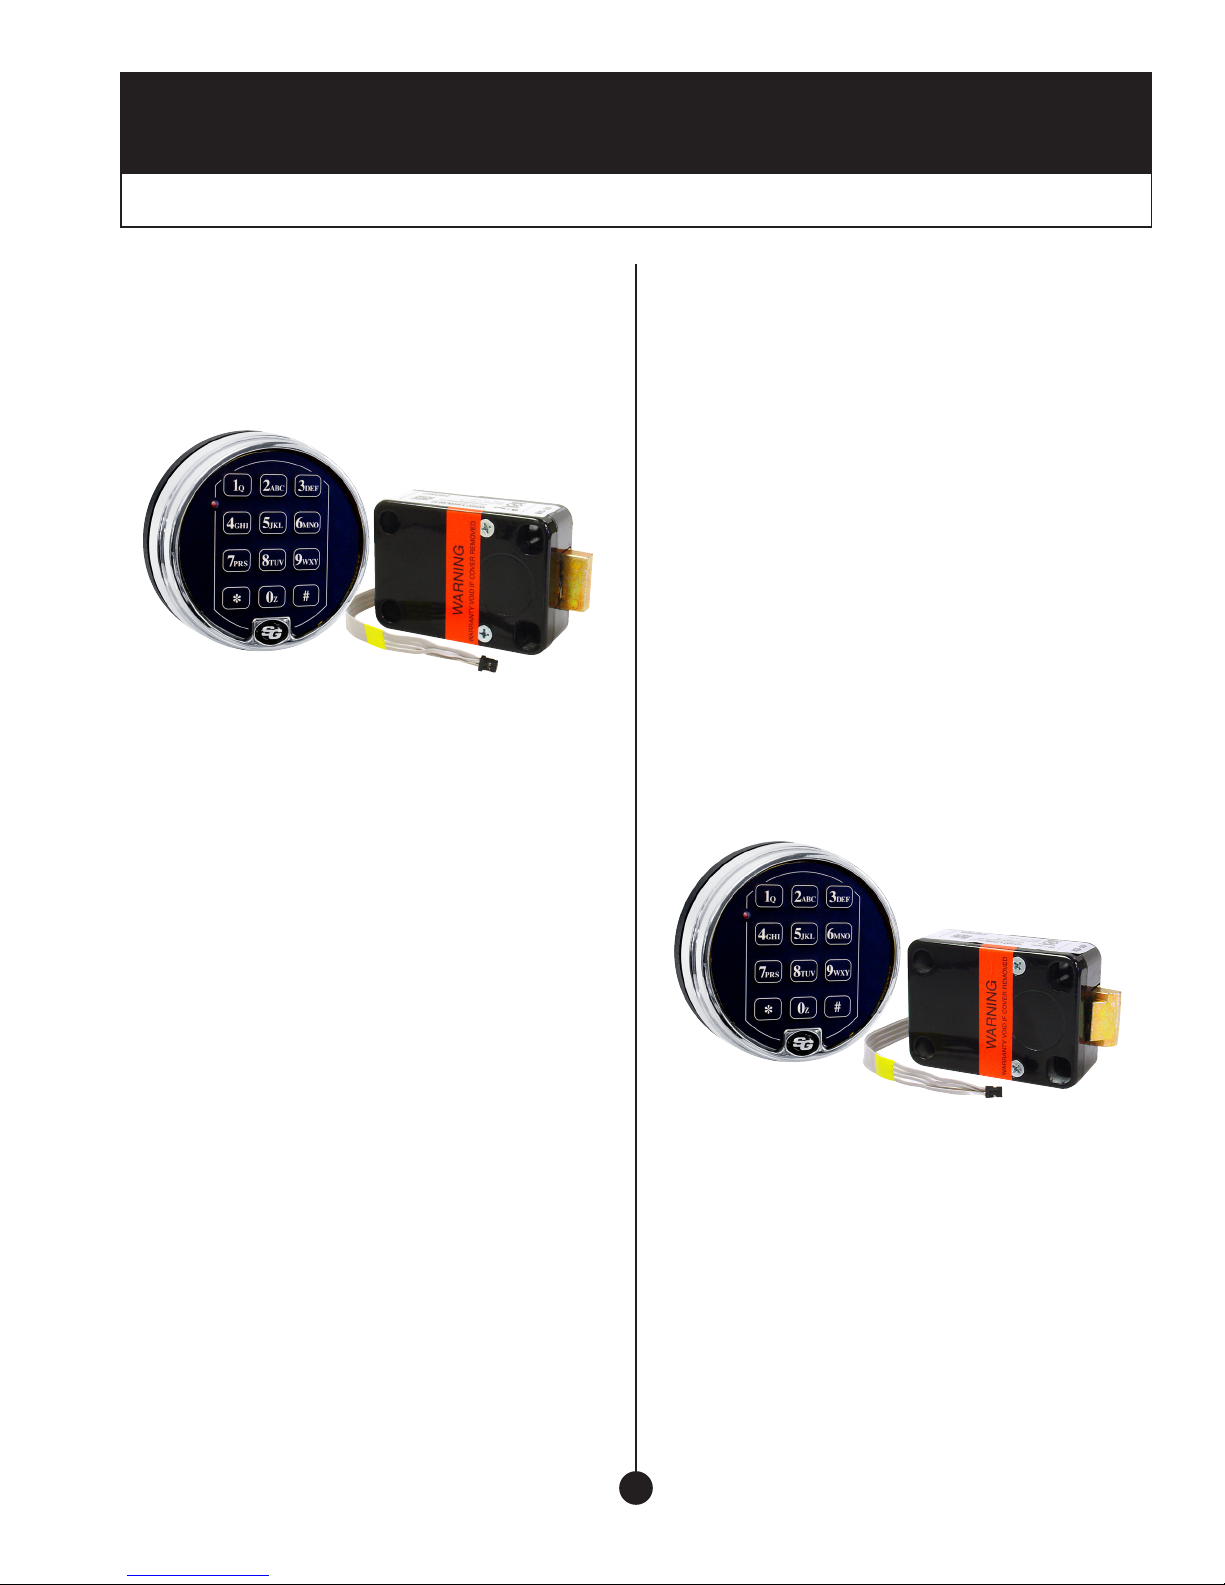
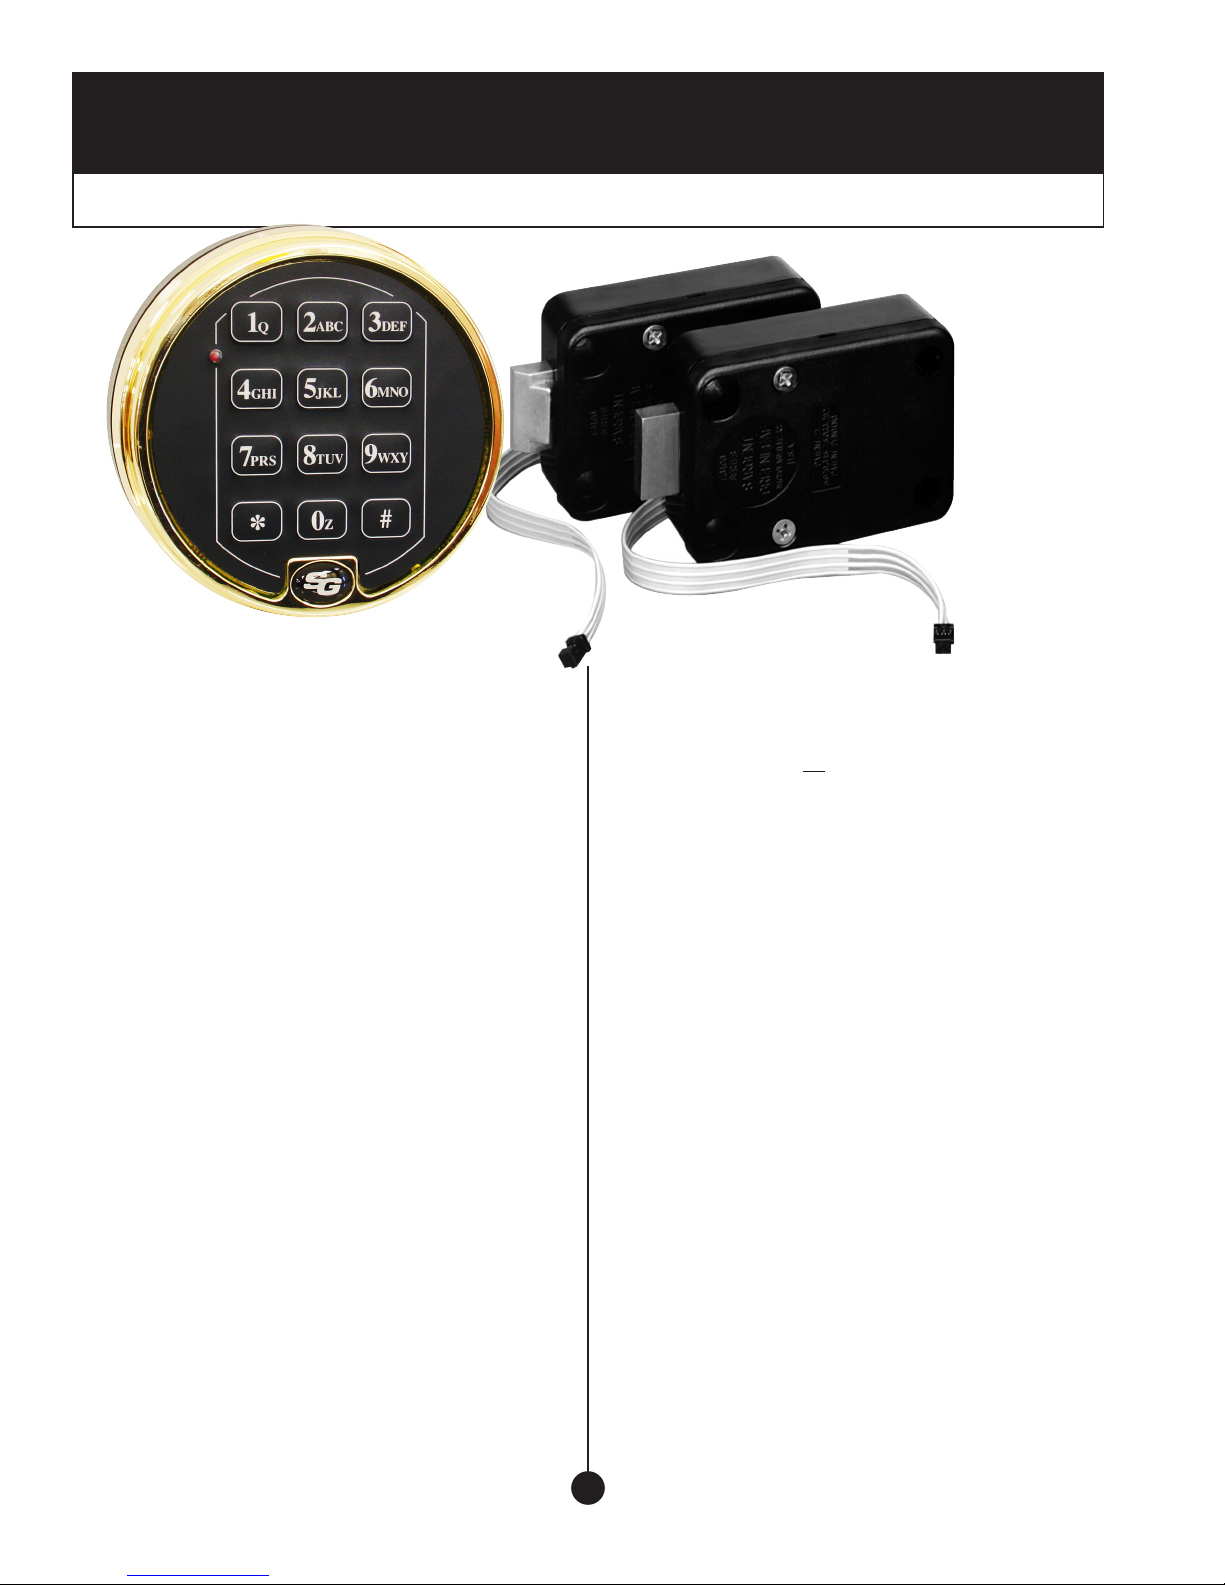
Product Overview
Models 6120 and 6123—Motorized Electronic Combination Locks
Added control And flexibility for greAter security
Sargent & Greenleaf safe locks have been protecting the assets
of banks, businesses, and governments for more than a century
and a half.
Features and Benefits:
• One-step operation—just enter the code and the lock
unlocks.
• Requires no turning of a dial to lock or unlock.
• Puts an end to the dangerous practice of “day locking” or
leaving the safe open.
• The 6120 gives you one master code and up to eight
independent user codes
• The 6123 gives you programmable time delay of up to ninetynine minutes with a variable opening window of two to nine
minutes.
• The 6123 gives you one master code, one supervisor code,
five independent user codes, and one time delay override
code.
• The 6123 lets you choose from three different modes of
operation: single user, dual control, and supervisor/user.
• The 6123 lets you choose between single code time delay
override, dual code override, or no time delay override.
• The 6123 lets individual users change their own codes
without supervisory assistance.
• Automatically re-locks when you close the safe.
• Lets you change codes at any time with just a few touches of
the keypad.
• Protects from being opened or manipulated by repeated,
random code entry.
• Offers secure and reliable motor-driven lock bolt operation.
• Flexible interface capability — works with security systems,
time locks, alarm systems and CCTV.
• Allows for multiple users, while at the same time giving you
greater control over access.
• The 6120 has a built in programmable time delay of up to
nine minutes.
© Copyright 2011, Sargent & Greenleaf, Inc.
1
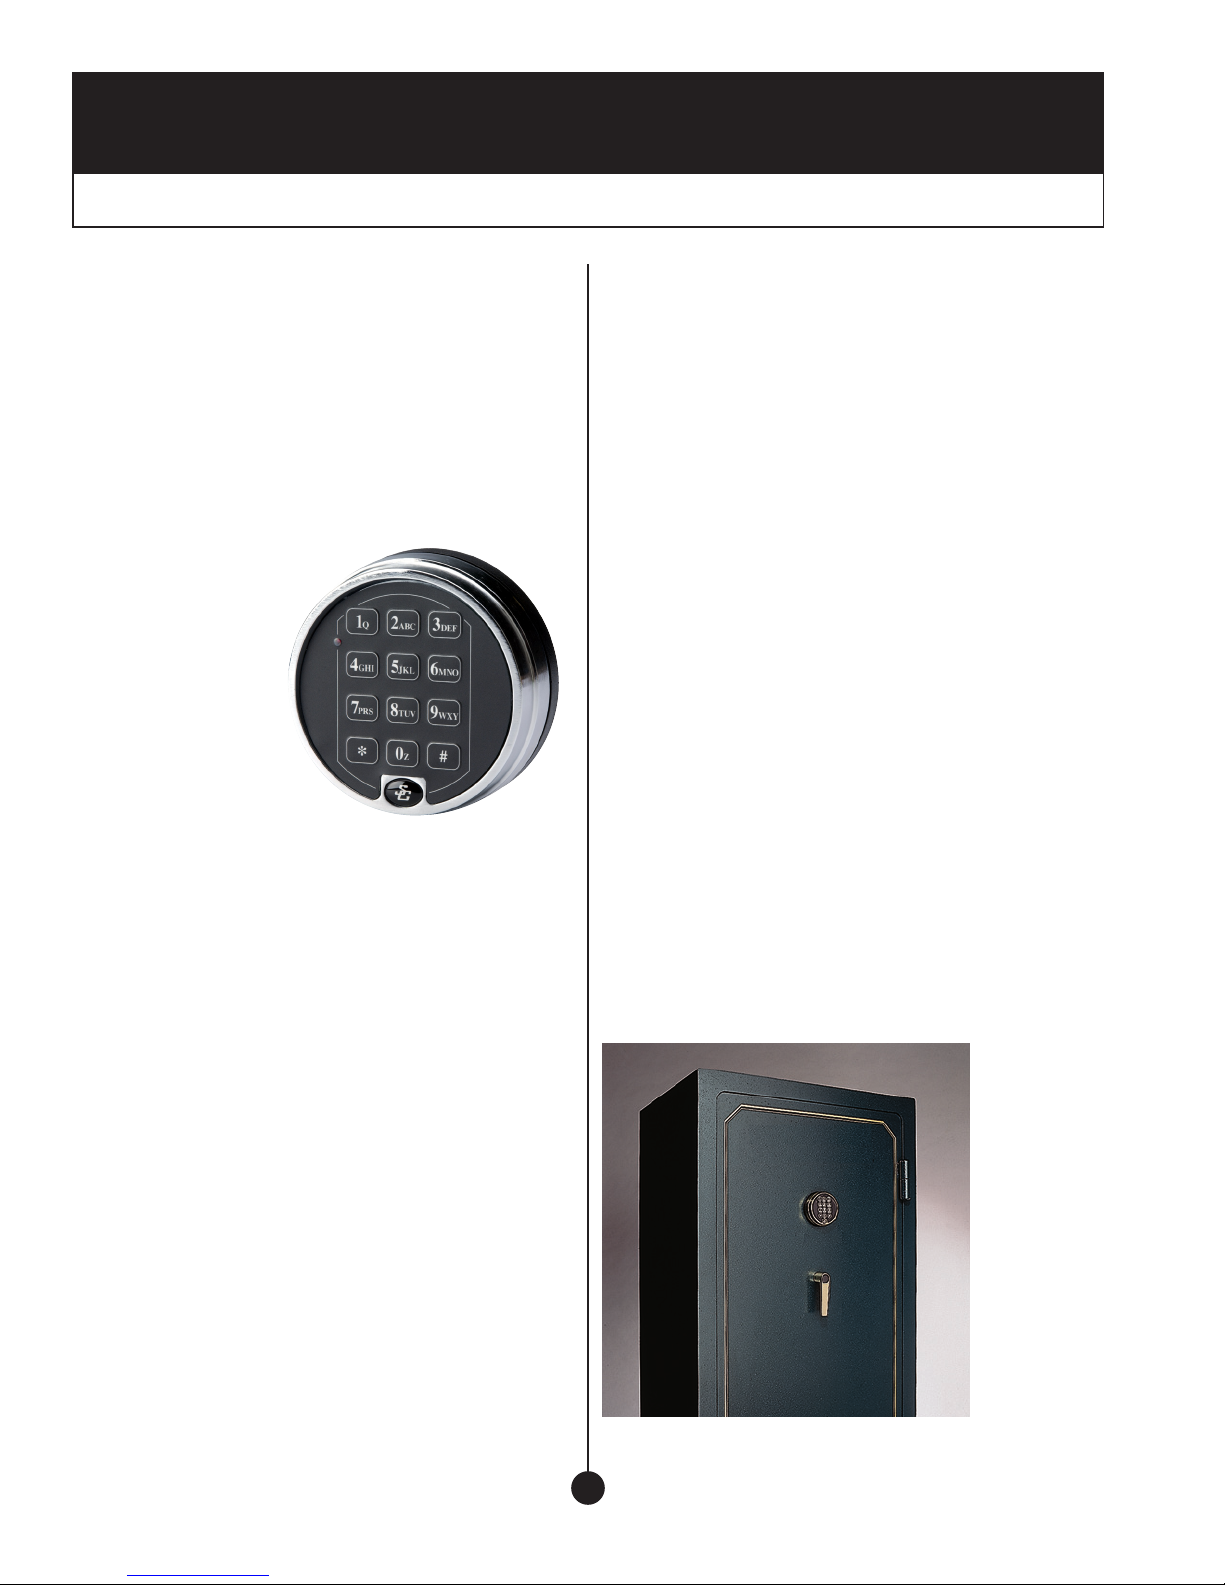
Product Overview
Models 6120 and 6123—Motorized Electronic Combination Locks
the secure, smArt wAy to protect your Assets.
Easy to use. Just enter your personal six-digit code and the
Comptronic lock automatically unlocks your safe door in one easy
step. It’s as simple as punching in a telephone number. There’s no
dial to turn.
Relocks automatically. There’s nothing to turn, and it re-locks
itself after 6 seconds. That’s because the bolt mechanism on
Comptronic locks is driven by an extremely reliable DC motor.
Easy to program. Every
Comptronic lock gives
you a choice of one
million six-digit codes.
Change them yourself
anytime. Programming is
easy and done through
the keypad. There is no
need for additional tools,
programming boxes, or
disassembly of your lock or safe.
Control access. The 6120 conveniently lets you assign up
to eight individual employee access codes. Perhaps more
importantly, you can delete and reprogram these codes at any
time with your Master Code, even if the code being deleted is
not known.
Protects against random dialing. With a million possible codes,
it’s unlikely a thief would ever have time to randomly enter
the right code, but why take a chance? Anytime four incorrect
codes are entered into the Comptronic 6120 or 6123, they
automatically shut down for five minutes.
Fits new and existing safes. You can request a Comptronic
6120 or 6123 for a new safe, or you can replace the lock on
your existing safe. And because it’s available in a variety of
attractive keypad finishes (including 24 karat gold), your
Comptronic lock will look as good on your safe as it works.
Over 8,000 openings between battery changes. Two
9-volt alkaline batteries are housed in the standard keypad
(S&G recommends Duracell®). When batteries get low, the
Comptronic’s audio signal changes pitch to let you know it’s
time for fresh ones. Your access codes remain unchanged while
you install new batteries.
The support of the industry leader. S&G is a leading global
manufacturer of high security safe combination locks, with the
broadest array of locks available. Our electronic locks have more
applications than all others. We provide excellence in all areas,
from our ISO 9001, U.L., and other worldwide certifications to
our experienced customer service staff. And, as with all our
products, we stand behind the 6120 and 6123 with one of the
best warranties in the industry.
The 6123 lets you assign a Supervisor Code, a time delay
override code, and up to five individual employee access codes.
Either the Master Code holder or Supervisor Code holder can
delete and reprogram these codes at any time, even if the
employee access code is unknown.
Time delay opening and control. No robber can afford to wait
for a safe to be opened. The Comptronic 6120 lets you program
an opening delay of up to nine minutes. The 6123 time delay
can be set up to ninety-nine minutes. Employees enter their
access code, wait the delay period, and re-enter their code to
open the safe.
2
© Copyright 2011, Sargent & Greenleaf, Inc.

Installation Instructions
Models 6120 and 6123—Motorized Electronic Combination Locks
Sargent & Greenleaf 6120 series electronic locks combine ease
of operation with security. Advanced electronic circuit design
makes them easy to install, easy to open, and easy to change
codes. Follow these instructions carefully to get the best
possible performance from your lock.
• Modifications to the lock (including lock bolt attachments)
are not recommended, and will void the manufacturer’s
warranty.
mounting considerAtions
• Sargent & Greenleaf 6120 series Motorized Electronic
Combination Locks have been designed to use the same
mounting screw locations and occupy the same space as a
standard S&G 6730 mechanical lock. The 6120 series uses
standard mounting dimensions to simplify retrofit in safes
originally equipped with mechanical locks.
• The keypad base diameter is 4” (101,6 mm). This is slightly
greater than the diameter of standard S&G dial rings for
mechanical locks. The 6120 series keypad will cover any
scratches or paint blemishes left by the old lock.
© Copyright 2011, Sargent & Greenleaf, Inc.
• A minimum distance of .150” (3,8 mm) is required between
the end of the lock case containing the bolt and the safe’s
blocking bar or cam plate which is normally blocked by the
extended lock bolt. This is because the lock bolt may not be
retracted quite as far by older batteries as by fresh ones.
• You should install fresh alkaline batteries in the keypad and
connect the lock wiring cable to check the functions of the
lock prior to installation. Follow the procedures given in the
Operating Instructions. Avoid pressure to the end of the
lock bolt during these checks.
• Do not allow the safe’s blocking bar or cam plate
to depress the electronic lock’s bolt farther than it
retracts during normal motor operation. This can lead to
inconsistent lock operation.
3
Installation Instructions
Models 6120 and 6123—Motorized Electronic Combination Locks
instAllAtion notes
Although the 6120 series is easy to install, we recommend
the following procedures be performed only by an experienced
locksmith or safe technician. Your safe may incorporate
relocking devices that are attached to the combination lock.
Misalignment or detachment of these devices can result in a
lockout—a condition that makes it unlikely that the safe can be
opened without damage.
AdditionAl items you will need
The 6120 series requires two 9-volt alkaline batteries (not
included). We recommend fresh Duracell® batteries. Do not use
old or partially drained batteries in your lock. New batteries will
power your lock for approximately 8,000 openings when used
without the time delay feature.
Many installations can be performed with nothing more that
a medium Phillips screwdriver. If the manufacturer of your
safe has made external relock device attachments to the lock,
specialized tools and knowledge may be required.
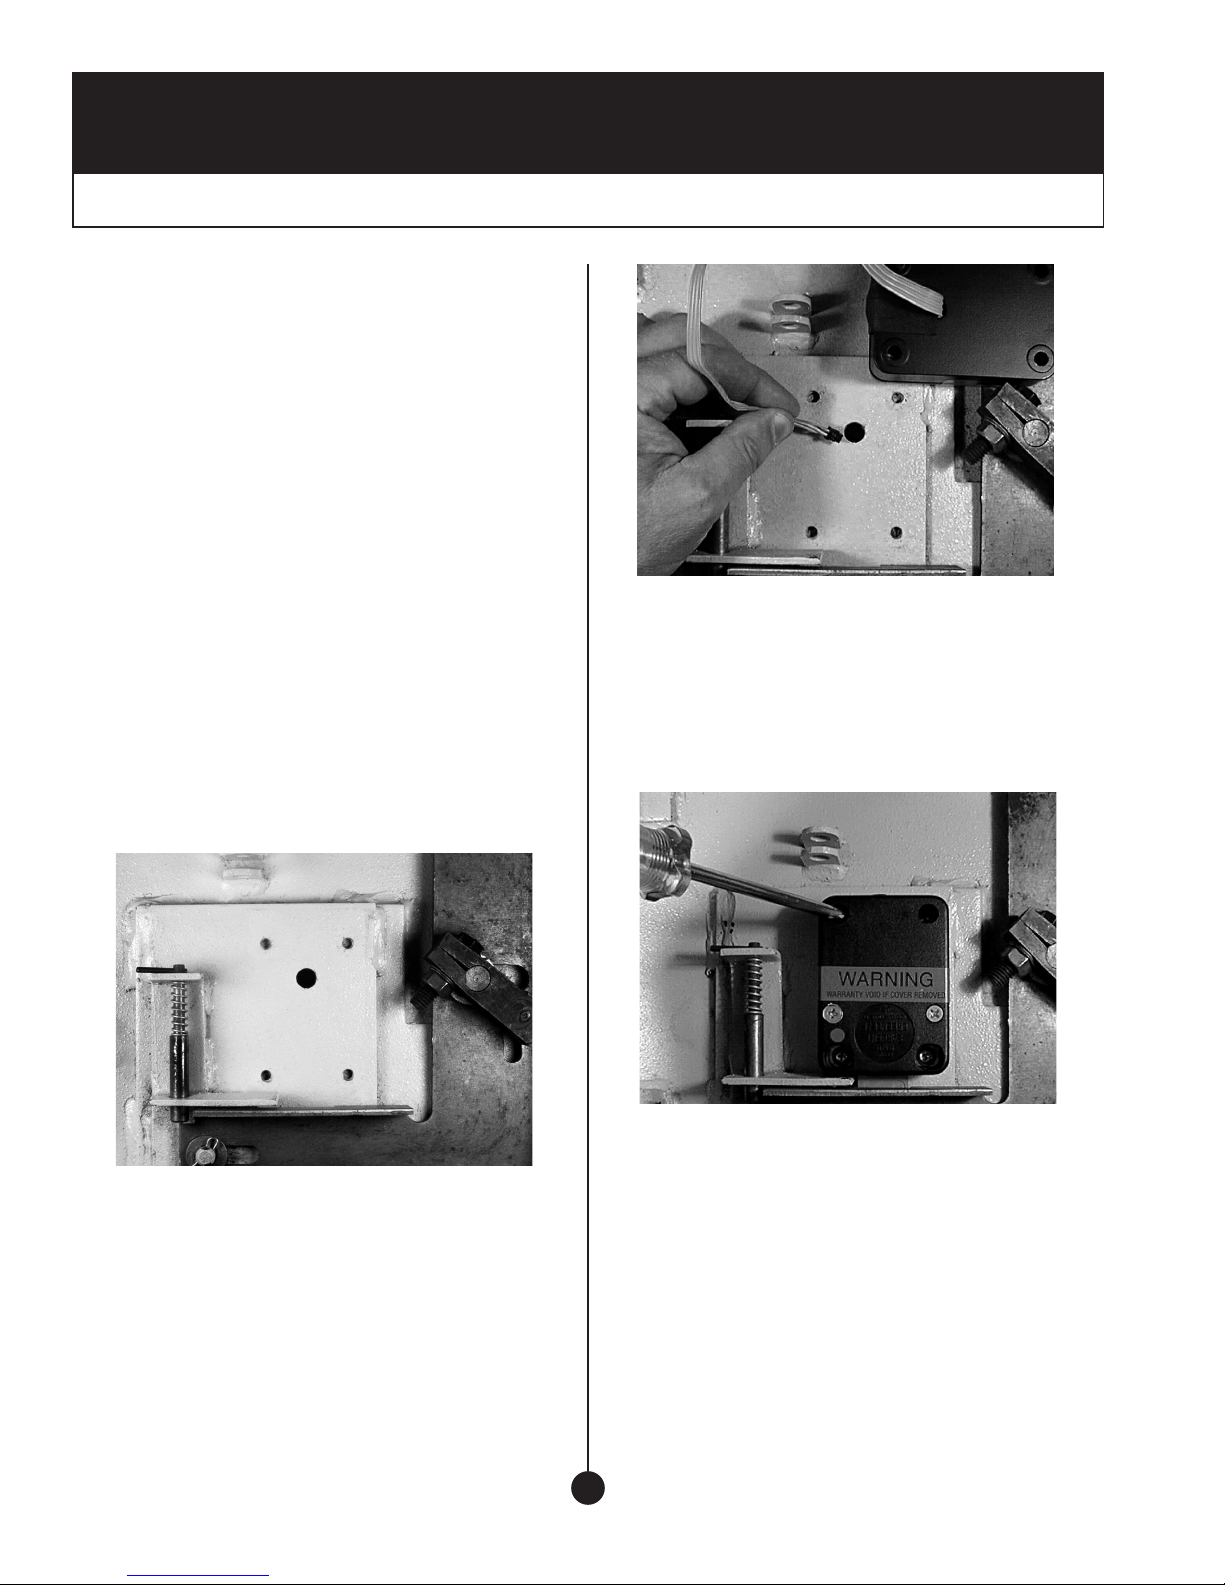
Step 2
Use a reamer or round file to remove any sharp edges from the
wire channel (spindle hole) that might damage the wire cable.
Run the connector through the wire channel. Gently pull the
connector and all excess cable to the outside of the safe. Make
sure the cable is not crimped or stressed at any point.
instAllAtion
Step 1
Remove the existing lock (if present). The mounting plate should
be smooth and flat, with 1⁄4-20 mounting screw holes. The wire
channel (spindle hole) must have a diameter of at least 5⁄16”.
The 6120 series can be mounted right-hand, left-hand, verticalup, or vertical-down without any modifications or adjustments.
Step 3
Once you’ve made sure the wire cable is not crimped or in
contact with any sharp surface, attach the lock to the safe’s
mounting plate. Use the four 1⁄4-20 (or metric M6) screws
provided. Tighten securely, attaching the lock firmly to the plate.
The lock incorporates a bolt-through cover that allows mounting
with the cover in place. Removing the cover voids the warranty.
4
© Copyright 2011, Sargent & Greenleaf, Inc.
Installation Instructions
Models 6120 and 6123—Motorized Electronic Combination Locks
C L E A RA NC E
Step 4 (FOR SAFES WITH RELOCK DEVICES)
This is an installation that requires attachment of the safe
manufacturer’s relock device plate to the lock cover using the
cover screws. If your situation is similar, be sure the thickness
of the relock device plate(s) is not great enough to prevent the
screws from engaging the lock case by at least four threads. If
necessary, use longer 8-32 machine screws to insure proper fit.
The photo also illustrates a required space of at least .150” (3,8
mm) between the end of the lock body and the blocking bar of
the safe’s boltwork.
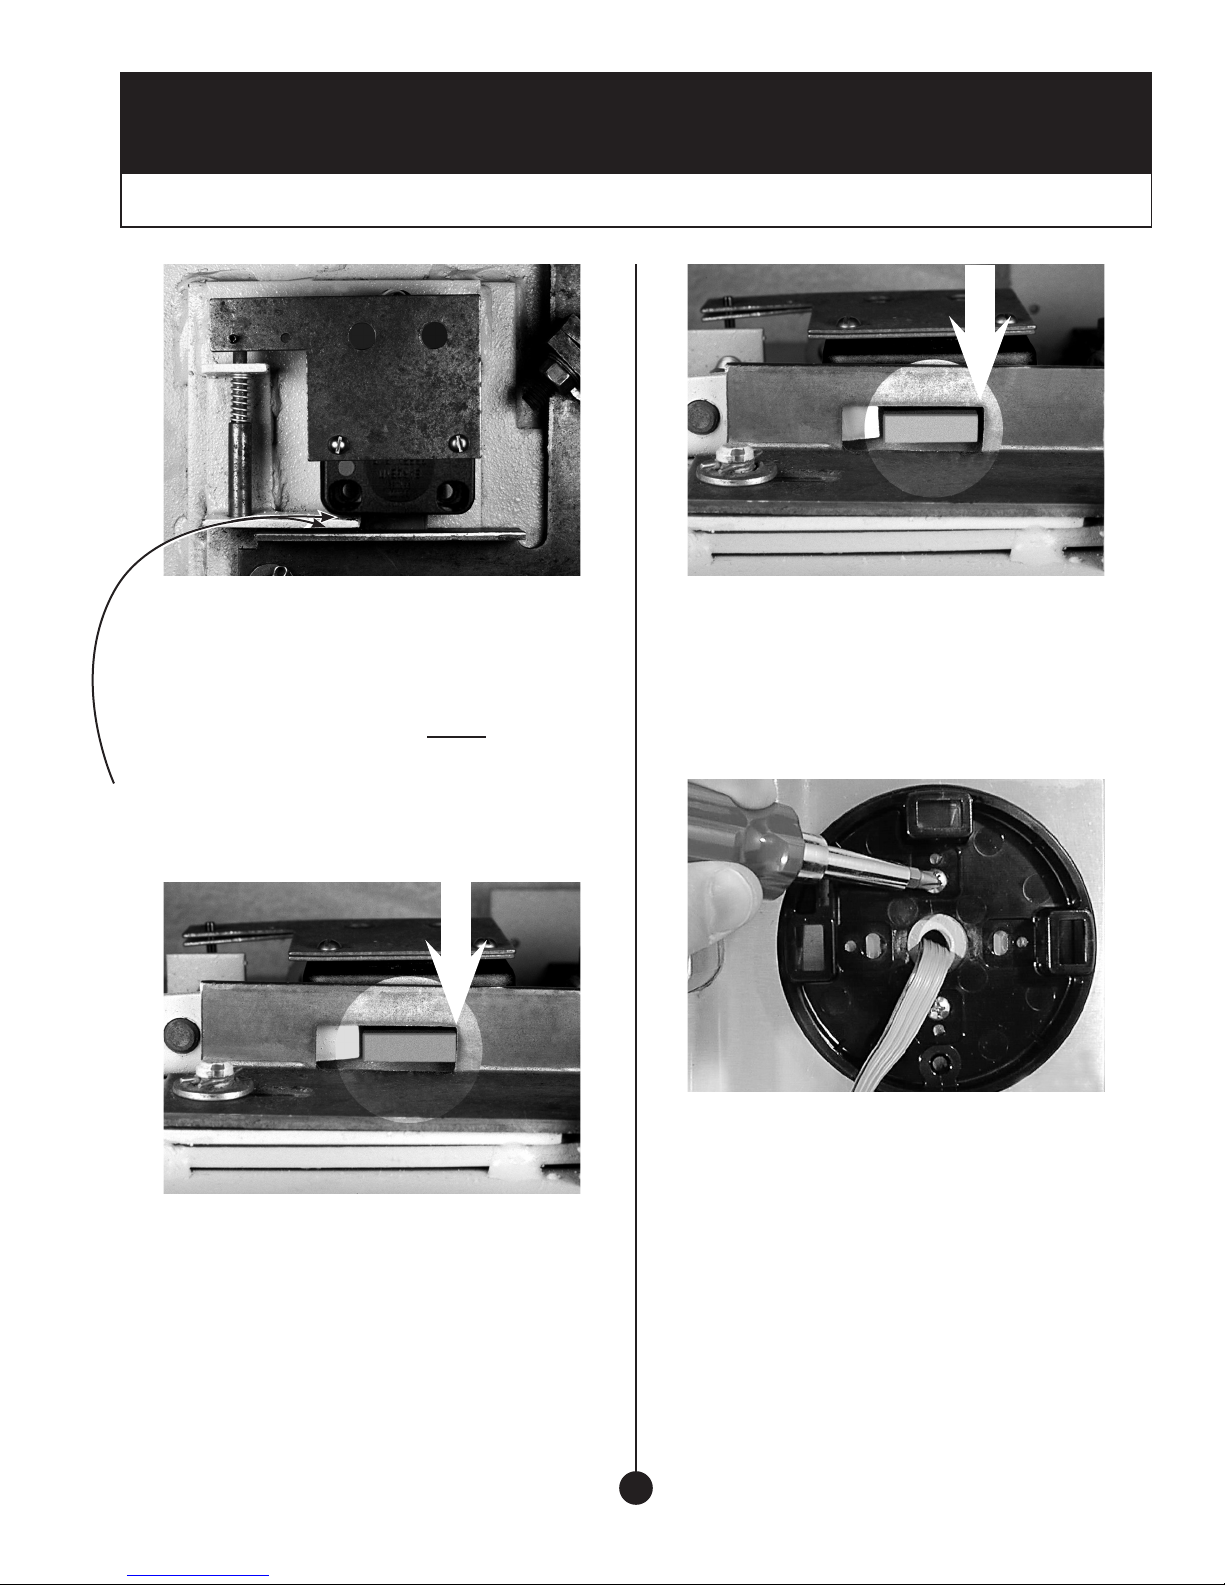
B I ND
Step 5
Make sure that the lock bolt does not bind against the safe’s
boltwork. 6120 series locks are sensitive to bolt end and side
pressure. The safe’s blocking bar or cam must not depress the
lock’s bolt farther than it retracts under normal motor operation.
Check to make sure this doesn’t happen when the safe handle
is moved to retract the door bolts (unlock the safe).
Step 6
The boltwork bind has been relieved by removing a small
amount of material from the right side of the boltwork opening.
When the safe’s boltwork is fully thrown to the locked position,
there is air space on all sides of the electronic lock’s bolt.
Step 7
Run the connector and wire cable through the center hole of the
mounting base. Then use the included 8-32 machine screws
to attach the base to the safe door. The attaching screw holes
will line up with those used for any standard S&G dial ring
(excluding R132 key locking dial rings).
This photograph shows boltwork in the locked position which
places pressure on the side of the lock bolt. This could prevent
the lock from opening properly.
© Copyright 2011, Sargent & Greenleaf, Inc.
5
Installation Instructions
Models 6120 and 6123—Motorized Electronic Combination Locks
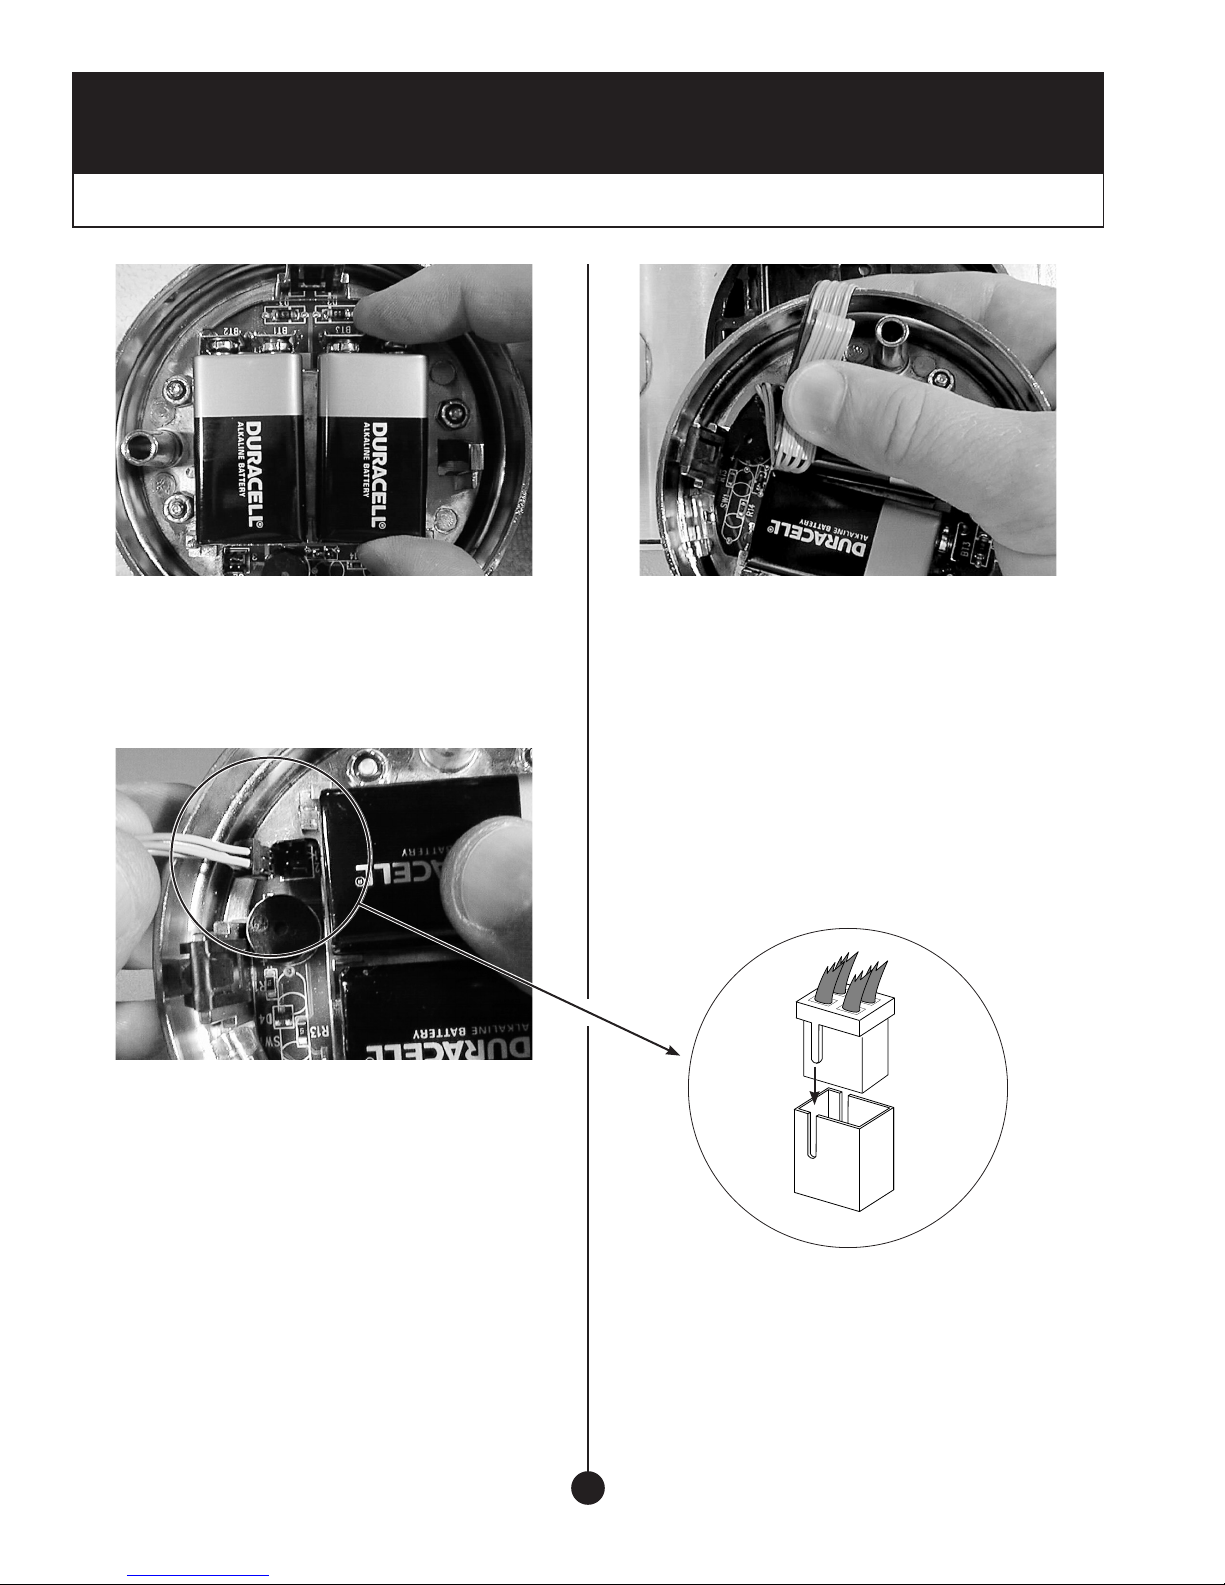
Step 8
Install a new 9-volt alkaline battery in each of the keypad’s
battery holders (Duracell® is recommended). Support the top of
each holder as the battery is inserted. This will prevent bending
or breaking the holder.
Step 9
The wire cable connector is shaped so that it will fit into the
circuit board receptacle only when aligned correctly. Insert the
connector into its receptacle in the keypad housing. If it does
not slide easily into place, do not force it. This means you need
to turn it 180º before attempting to insert it again.
Step 10
Make a loose coil of the excess wire cable. Hold the coil
away from the spring clips that will secure the keypad to the
mounting base.
A
L
I
G
N
R
I
D
G
E
W
T
O
L
S
H
T
I
6
© Copyright 2011, Sargent & Greenleaf, Inc.
Installation Instructions
Models 6120 and 6123—Motorized Electronic Combination Locks
Step 11
Place the keypad over the base. Make sure the wire cable is still
clear of the spring clips, then push the keypad firmly onto the
base. It should snap into place.
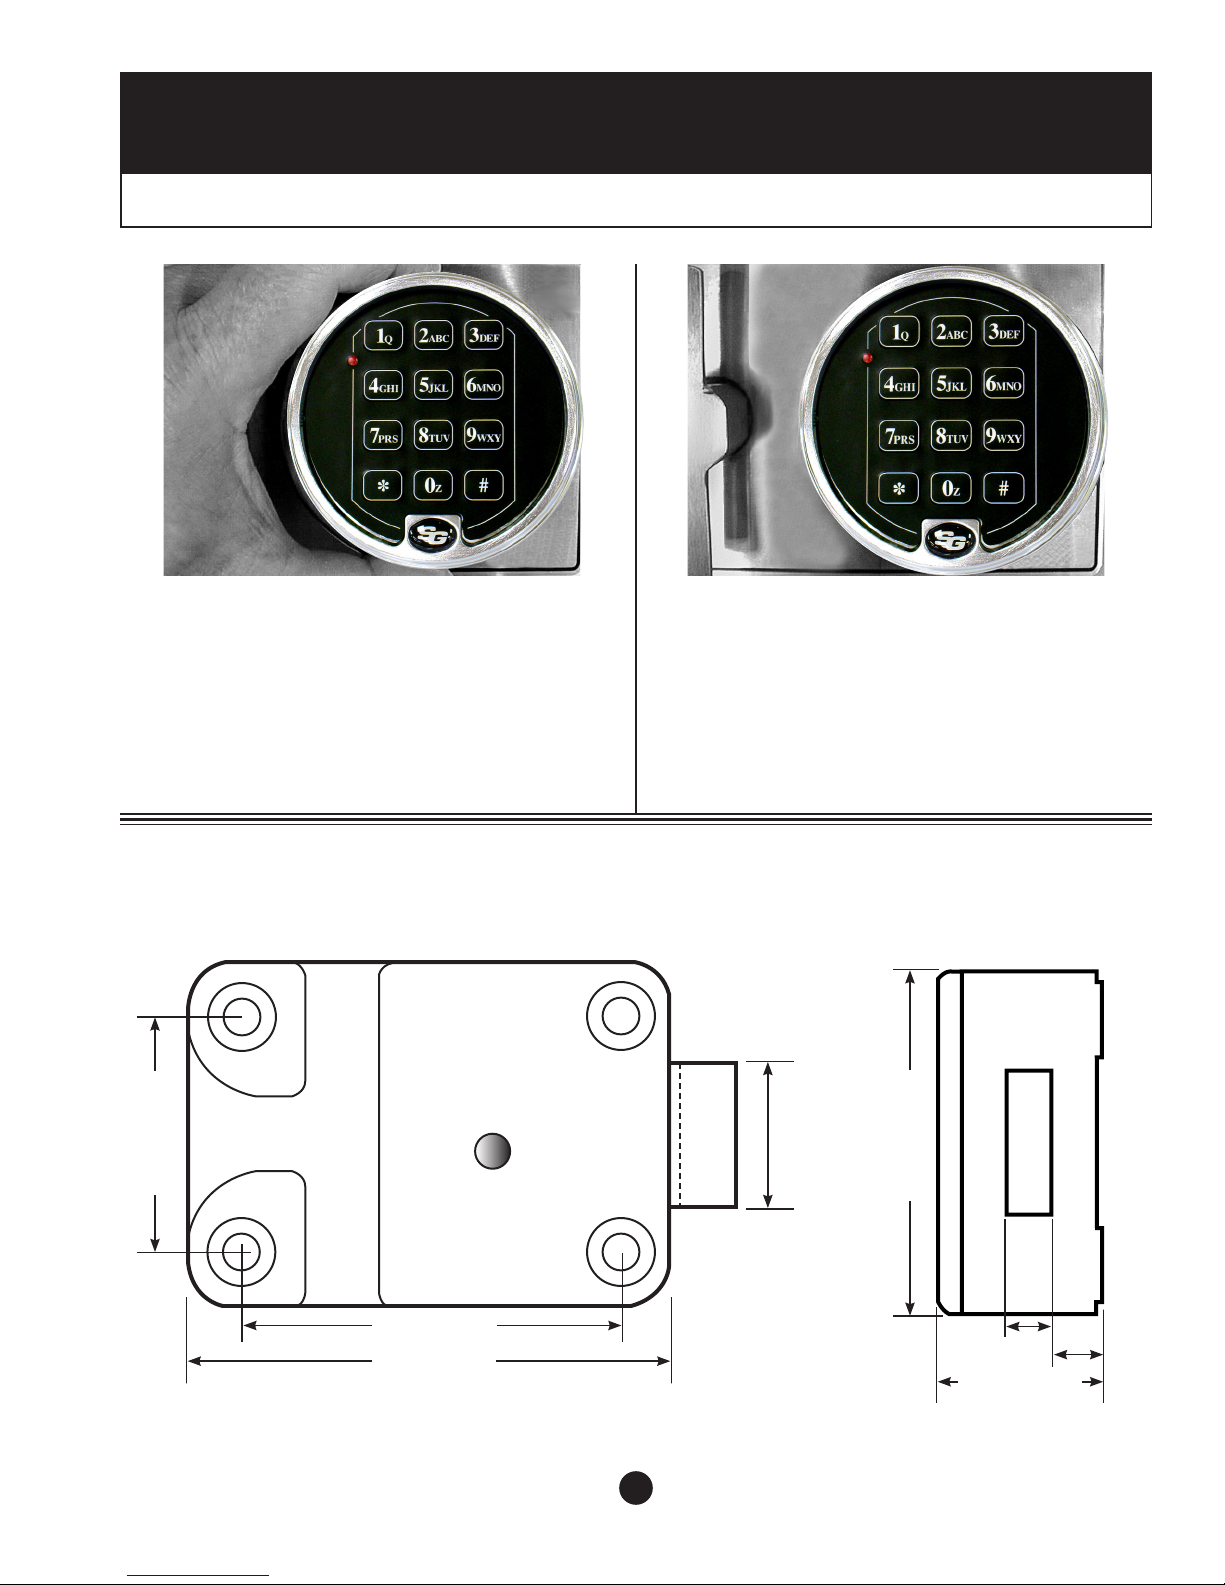
importAnt dimensions
Step 12
The installation is complete. Refer to your lock’s Operating
Instructions for opening, code changing, time delay, and battery
changing instructions.
Make sure your lock is fully operational before closing the safe
door for the first time.
1.624" (41,2 mm)
2.624" (66,6 mm)
3.320" (84,3 mm)
© Copyright 2011, Sargent & Greenleaf, Inc.
1.000" (25,4 mm)
7
2.400" (61,0 mm)
.312"
7,9 mm
.281"
7,1 mm
1.165" (29,6 mm)
Operating Instructions
Model 6120 —Motorized Electronic Combination Lock
The Sargent & Greenleaf Model 6120 combines ease of
operation with security. Its advanced electronic circuit
design makes it easy to open and easy to change codes.
Follow these instructions carefully to get the best
possible use from your lock.
introduction
• The Sargent & Greenleaf Model 6120 Motorized Electronic
Combination Lock is shipped from the factory with a factory
master code only. It is 1 2 3 4 5 6 #. This code is used to
open the lock and set or change all of its codes. If the safe
maker or your dealer sets a new master code, he will advise
you of the change. You should set the lock to your own,
unique master code immediately.
• The Model 6120 will always open on the master code. At your
discretion, it can also be set to accept up to eight different
user codes. The master code holder is responsible for
maintaining the number of active users programmed into
each lock. The master code is designated as code #1, and
the user codes (if set) are designated by user I.D. number 2,
3, 4, 5, 6, 7, 8, and 9. The user codes do not exist until they
are programmed into the lock.
• Each time a button is pressed and the lock accepts the
input, it emits a “chirp,” and the LED on the keypad lights
momentarily.
• All codes must contain six digits or six letters. Any digit or
letter can be used as many times as you wish. For instance,
the following codes (while not recommended) will operate the
lock: 5 5 5 5 5 5 # OR J J J J J J #
• All codes end with #. This signals the lock that you have
finished entering all digits of the code.
• If you pause more than ten seconds between button presses
when entering a code, the lock will assume you do not want
to continue, and it will reset itself. To open the lock, begin
the code entry sequence again from the first step.
• If you realize you have pressed an incorrect button when
entering a code, press * or simply pause ten seconds or
more, then begin entering your code again.
• If four incorrect codes are entered in a row, the Model 6120
will shut down for a period of as long as fifteen minutes.*
This is a security feature. Pressing any button anytime during
the lockout period will reset the timer to its maximum penalty
time. Do not touch any keypad buttons for a period of fifteen
minutes, then enter any valid code to open the lock.
* Locks produced before mid 1997 shut down for fifteen minutes. Locks
produced after this shut down for five minutes.
8
© Copyright 2011, Sargent & Greenleaf, Inc.

Operating Instructions
Model 6120 —Motorized Electronic Combination Lock
to open the lock
Press the code digits or letters in order, followed by #. The lock
bolt will retract for six seconds, allowing you time to operate the
safe handle and open the door. Do not put any pressure on the
safe handle until after the code has been entered. The Model
6120 will lock automatically when the safe door is closed and
the handle is turned to the locked position.
Note: The Master Code Holder is responsible for maintaining
the number of active users programmed into each lock.
in cAse of trouble
If your lock should fail to open when a valid code is entered,
check for the following:
1. The boltwork of a safe can, under certain conditions, place
pressure on the side of the lock’s bolt. This is often caused
by something inside the safe pressing against the door or by
something caught between the safe door and its frame. When
this occurs, the lock will not operate properly. To relieve side
pressure on the lock bolt, move the safe’s handle to the fully
locked position, then re-enter a working code. The lock should
open after the pressure is removed.
2. If the lock “chirps” when keys are pressed, but it will not
open, the batteries may be drained to the point that they will
not operate the lock’s motor. Follow the battery replacement
procedure in this manual.
3. If the lock makes no sound when any of the keys are pressed,
dead batteries are likely to be the cause. Follow the battery
replacement procedure in this manual.
4. This item applies to the two-battery keypad only:
If the lock makes no sound when any of the keys are pressed,
but the batteries have been checked and found to be good,
a loose keypad connector may be the cause. Pull the keypad
away from the base as described in the battery changing
procedure. Check to make sure the wire connector is firmly
seated into its receptacle on the keypad circuit board. The
connector is designed so that it will only slide into the
receptacle when aligned correctly.
A
L
I
G
N
R
I
D
© Copyright 2011, Sargent & Greenleaf, Inc.
H
T
I
G
E
W
If all of the preceding remedies have been exhausted
T
O
L
S
and the lock still does not open, contact a qualified safe
technician in your area for professional service.
9

Operating Instructions
Model 6120 —Motorized Electronic Combination Lock
mrc — mAnAgement reset code
If a management reset code is used, it must be programmed into the
lock before the master code is changed for the first time. Once the
master code is changed, the lock cannot accept an MRC. Conversely,
once an MRC is programmed into a lock, it is always present. It
cannot be deleted or changed.
Some 6120 locks have factory installed management reset codes,
You cannot install a new MRC to replace an existing one.
The management reset code is used to regain control of a lock when
its master code is lost. When the MRC is employed, it deletes all
codes and changes the master code back to 1 2 3 4 5 6 #. See the
technical bulletin on page 32 for detailed information on how to set
and use a management reset code.
About chAnging codes
Always keep the safe door open when changing codes and
making other programming changes.
All code changing procedures begin by pressing SG* (the same
as 74*), followed by the existing six-digit master code and #.
The lock immediately chirps five times ( ). If the lock emits
a series of closely spaced chirps (nearly a continuous tone)
you’ve made a mistake and must start again.
to chAnge the mAster code (code #1)
Whenever # is pressed, the lock chirps to acknowledge the entry.
Wait for the chirps before proceeding. If a long series of closely
spaced chirps (almost a continuous tone) sounds when # is
pressed, the new code will not be accepted. Any existing user
code remains.
For instance, if you want to enable the #3 user code to open
the lock with a code of 4 4 6 6 3 3, you will use the following
procedure.
Press SG* (____) #
existing master code(7 4)
This same procedure would change any existing #3 user code to
4-4-6-6-3-3.
3 * 446633 #
new user code new user code
446633 #
to delete A user code
You may find that a particular user code which you have enabled
is no longer needed. It is a good security policy to remove any
unneeded codes. To do so, follow this procedure.
Press SG* (___) #
existing master code(7 4)
Whenever # is pressed, the lock chirps to acknowledge the entry.
Wait for the chirps before proceeding. If a long series of closely
spaced chirps (almost a continuous tone) sounds when # is
pressed, the user code will not be deleted.
(user I.D. 2 through 9) * #
#
Press SG* (___) #
existing master code new master code new master code(7 4)
Whenever # is pressed, the lock chirps to acknowledge the entry.
Wait for the chirps before proceeding. If a long series of closely
spaced chirps (almost a continuous tone) sounds when # is
pressed, the new master code will not be accepted—the old
code is retained.
1 * (___) #
(___) #
to enter or chAnge A user code (codes #2- #9)
Press SG* (___) #
(user I.D.) *(___) #
new user code new user codeexisting master code(7 4)
(___) #
In this procedure, the Model 6120 lock will not allow you to
inadvertently remove the master code.
security Advisory
If your lock is used many times a day (50 or more openings
daily), it is advisable to use as many different keys as possible
in your code number. Avoid using a key more than once whenever
possible. Check the keypad frequently for visible wear which
indicates which keys are being pressed for code entry. Change
the code to use different keys when wear is evident. If necessary,
have a qualified service technician replace the keypad.
10
© Copyright 2011, Sargent & Greenleaf, Inc.
 Loading...