

Saramonic Uwmic9s User Manual

UHF Wireless Microphone System
UwMic9
User Manual

Statement
Please read this manual carefully before use and operate and store in strict accordance with the
instructions provided. Please retain for future reference.
For any issues that cannot be resolved with the user manual, please refer to your retailer for help
or contact us at: info@saramonic.com.
Cautions
1. Take care not to use the unit underwater or unprotected in rainy conditions. Store in a cool, dry
place.
2. Designed for use and storage at normal temperatures. Do not move the unit from overheated
to cold conditions frequently, and keep away from heat sources such as heaters and ovens.
3. When in use, or when storing, avoid contact with dust and moisture.
4. Do not subject to device to violent collisions, as this can damage the device.
5. In order to avoid acoustic feedback, do not hold the microphone close to loudspeakers.
6. For optimal sound detection, do not hold your hand against the microphone head.
General Introduction
The Saramonic UwMic9S wireless microphone
system provides a premium 2-person wireless
audio solution for Broadcast & TV, ENG,
filmmakers, vloggers, mobile journalists and
content creators for a remarkable price. It is
an easy-to-use, high-quality and flexible UHF
system. The external input allows the receiver
to be connected to a mic or line level device,
such as a shotgun microphone, mixer, recorder
or music player to capture additional sound or
music. The system can be powered through its
USB-C ports, allowing it to run for numerous
hours on a USB-C 5V power bank.
RX9S Portable Receiver
Introduction
The Saramonic RX9S is a camera-mountable
dual-channel UHF wireless receiver. It features
wide switching RF bandwidth, a high-contrast
OLED display and infrared synchronization
between transmitter and receiver. The two
detachable antennas can be rotated 360° for
better reception. The receiver's output can be
toggled between mono and stereo modes. The
low-cut function on the receiver minimizes lowfrequency rumble.
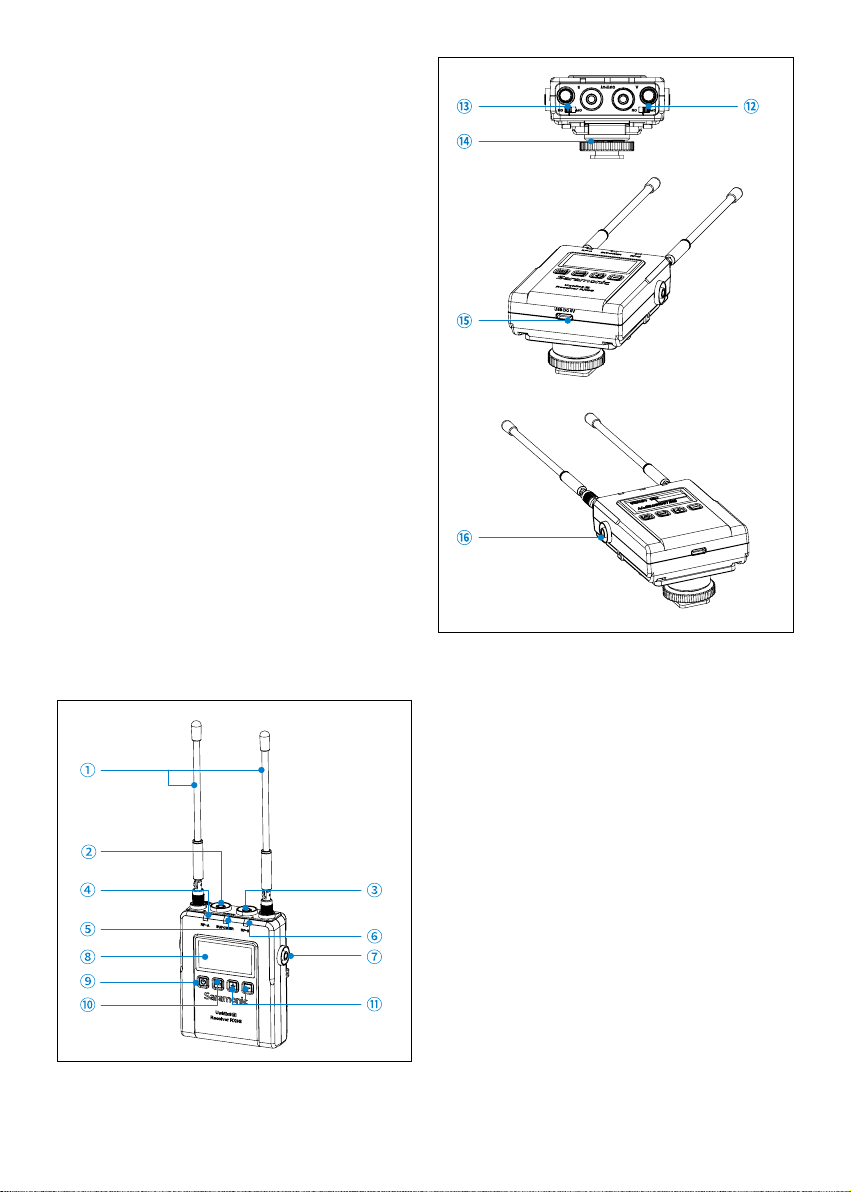
Product Structure
Detachable antennas
Group A output jack
Connect the RX9S to a video camera,
camcorder, mixer or amplifier with the
supplied output cables supplied.
Group B output jack
Connect the RX9S to a video camera,
camcorder, mixer or amplifier with the
supplied output cables.
RF-A indicator
The RF indicator displays the RF input level of
group A as follows:
Solid Blue: RF signal is strong.
Lights off: RF signal is disconnected.
IR/POWER indicator
Indicates the battery level as follows:
Solid blue: battery fully charged and
sufficient.
Solid Red: Battery low.
Charging Status:
Flashing Red: Charging.
2

RF-B indicator
The RF indicator displays the RF input level of
group B as follows:
Solid Blue: RF signal is strong.
Lights off: RF signal is disconnected.
MIC IN/LINE IN jack
Connect a 3.5mm microphone or a line level
device to receiver.
OLED display
Display menus, please refer to "OLED Display
Operation Guide" (page 4) for more details.
Power button
Long Press to turn the RX9S on or off.
SET button
Long press the SET button to change settings
on the display menu.
Then, short press the SET button to confirm
your setting change, or long press again to
exit without saving.
Selects functions or values shown on the
display.
ON/OFF switch A (for Group A)
ON/OFF switch B (for Group B)
Cold shoe mount adapter
USB-C charging port (DC 5V)
3.5mm headphone output
Connect headphones to monitor the audio.
Attaching Accessories
Connect the supplied cable to the output jack.
It is possible to attach a belt clip. Please Refer to
"Attaching Accessories" (page 7).
Attaching the shoe mount adapter.
Please attach the belt clip upside-down
before attaching the shoe mount adapter.
Push the bottom of the belt clip to make
some space between the belt clip and the
receiver.
Align the belt clip with the two vertical
grooves on the shoe mount adapter and
insert the adapter in the direction of the
arrow.
Push the shoe mount adapter in fully until the
belt clip fits into the horizontal groove on the
adapter’s holder.
Choose the corresponding cable and plug into
the OUTPUT jack.
For a secure connection, turn to lock the
connector.
3
 Loading...