

Page 1
1 Product Introduction
1.1 General Introductions
The SARAMONIC SR-PAX2 is a two-channel active audio mixer with preamplifier and
phantom power, specially designed for mirrorless digital camera, Blackmagic Design
pocket cinema camera and DSLR camera with a microphone jack. It is a compact and
lightweight mixer ideal for recording professional-quality audio from two sources and
mixing them into your camera. It attaches to the base of a camera, and a threaded
socket on its base allows for mounting on a tripod or case.
With two sets of inputs, the SR-PAX2 accepts signals from a wide variety of mic or line
level sources such as balanced XLR microphones, 3.5mm microphones, wireless
microphones and external audio mixers. The 3.5mm inputs are also ideal for connecting
audio devices with a 3.5mm output such as a smart phone or an MP3 player. The input
levels of each channel can be easily controlled with the dual gain control knobs. The
cold shoe on the side gives you space to mount and move other equipment. A phone
jack allows you to monitor the audio in real time. The SR-PAX2 makes your recording
work much easier.
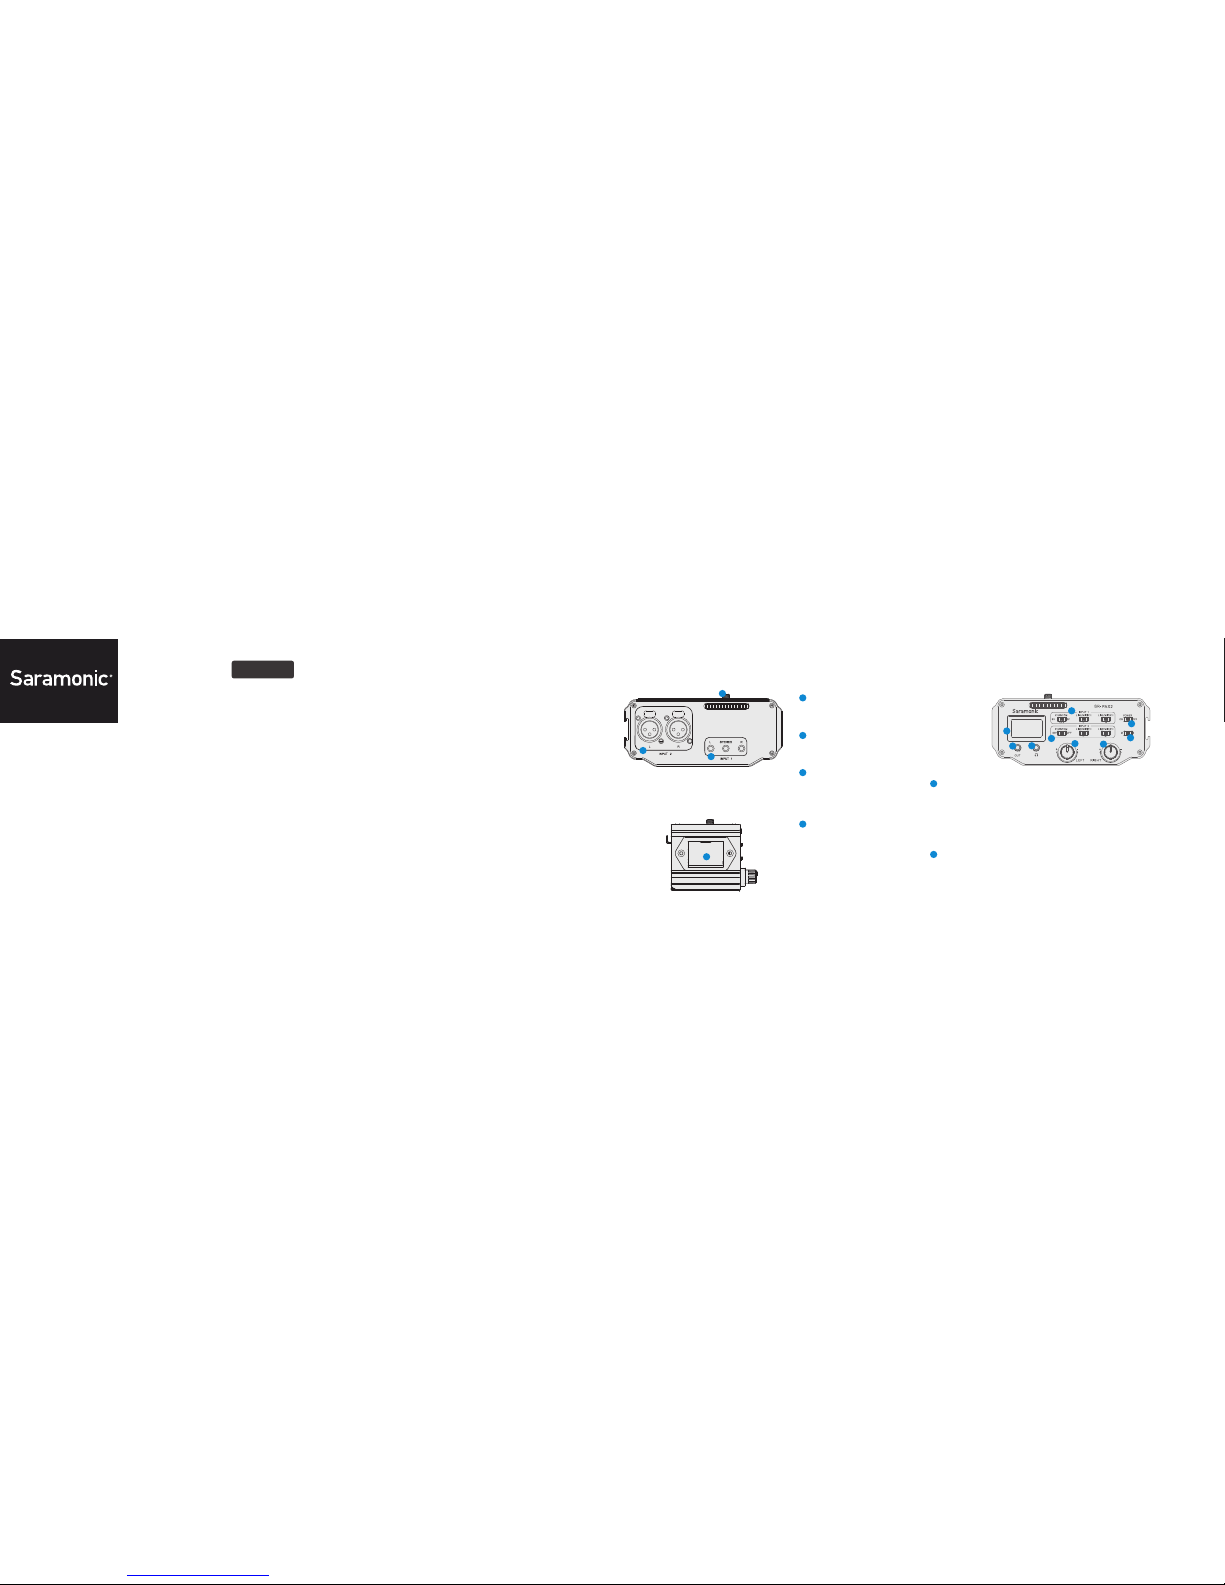
1.2 Product Structure
User Manual
SR-PAX2
1
2
3
INPUT 1: 3.5mm Inputs
One stereo input
LEFT and RIGHT mono inputs
INPUT 2: XLR Inputs
Balanced LEFT and RIGHT
XLR inputs
1/4” Screw Thread
INPUT 1 Switch Group
Control the 3.5mm inputs.
• LINE/MIC/PH L, select LINE or MIC or Phantom level for the left channel
• LINE/MIC/PH R, select LINE or MIC or Phantom level for the right channel
• PHANTOM 5V/OFF/3V Switch
Optional 5 volt or 3 volt phantom power for microphones that require phantom power.
INPUT 2 Switch Group
Control the XLR inputs.
• LINE/MIC/PH L, select LINE or MIC or Phantom level for the left channel
• LINE/MIC/PH R, select LINE or MIC or Phantom level for the right channel
• PHANTOM 48V/OFF Switch
Select 48 volt phantom power for XLR microphones that require phantom power.
Battery Compartment
Operates on a 9 volt battery
(not included). You could use
a lithium type battery for
longer operating time.
Audio Mixer
The SARAMONIC SR-PAX2 is a two-channel active audio mixer with
preamplifier and phantom power, specially designed for mirrorless
digital camera, Blackmagic Design pocket cinema camera and DSLR
camera with a microphone jack.
1
2
3
4
4
5
5
6
6
10
11
12
9
7
8
9
Page 2

2
3
POWER Switch
Main power switch for SR-PAX2.
Mono/Stereo Switch (M/S)
When recording one channel, please use the mono(M) setting. The signal will be sent
to both left and right channels. When recording two channels, please use the stereo(S)
setting. The level of each channel can be controlled individually.
Left and Right Channel Control Knobs
Adjust the signal of each channel to the optimum recording levels.
Level Meter
Indicates the sound level in dB for each channel.
Output (OUT)
Use the included stereo 3.5mm signal transmission line to connect to the mic input of
your camera.
Phone
Headphone jack to monitor the audio from microphones.
10
11
12
7
8
9
the MIC input of camera. If there is a Mic/ Line switch on the camera, select it to Mic.
Connect microphones or other audio sources to the XLR inputs or 3.5mm inputs of
the mixer.
Set the LINE/MIC/PH switch.
When using self-powered microphones and wireless systems, set to MIC for 20dB gain
or set to LINE for 0dB gain.
When using other audio devices, please set to LINE.
When using microphones operating on phantom power, please set to PH for phantom
power.
Note: Please DO NOT select phantom level when recording with microphones that do
not operate on phantom power, like wireless receivers, mixing boards or any unbalanced
device, because it may damage both the mixer and audio device.
Set the 3V/5V/48V/OFF phantom power according to your needs.
Set the M/S switch according to your needs. (Please refer to “1.2 Mono/Stereo Switch”
Turn the POWER switch to ON.
Please set the volume control knobs to low to avoid excessively loud audio from damaging
your hearing. Plug an headphone into the phone jack to monitor the sound.
We suggest you to do a test recording and playback the audio to see if it is acceptable.
When testing, you could adjust the knobs flexibly to get the the optimum signal levels.
4
5
6
10
7
8
8
9
2 Set Up Guide
1
INPUT1 GAIN
LINE: 0 dB
MIC/PH: 20dB
INPUT2 GAIN
LINE: 0 dB
MIC/PH: 20dB
INPUT 1 Phantom Power 5V/3V power supplies
INPUT 2 Phantom Power 48V power supplies
Level Meter -18 dB to +3 dB in 3 dB increments
Power Requirements 9 V alkaline or lithium battery
Battery Duration
Dimensions (L x W x H) 136 mm x 80.5 mm x 62.5 mm
Weight 13.5 oz (0.385 kg)
Install the battery.
Lift up and pull out the drawer from the battery compartment.
Insert 9V battery into place aligning + and - polarity as shown.
Slide the drawer closed until it clicks into place.
Attach the SR-PAX2 to the base of the camera. Spin counter-clockwise to tighten up
the mixer with the camera. Mount the mixer to a tripod with the tripod socket on the
bottom of the mixer.
Connect the supplied signal transmission line from the output jack (OUT) of mixer to
1.3 Specification
Frequency Response 20 Hz to 20 Khz, +/-0.5 dB
THD Less than 0.01% @ 1 kHz, -30 dBu input
SNR 80 dB @ 1 kHz, -30 dBu input
3 Warranty
4 Packing List
One SR-PAX2 main unit One signal transmission line User manual Warranty card
Saramonic International provides one-year warranty under normal use and lifelong paid
maintenance from the date you purchase this product.
Saramonic International will repair or replace the product that under the warranty for free
during the one-year valid period, but customers should pay for shipping and insurance
charges for returning the product to Saramonic International.
This warranty only applies where a defect has arisen, wholly or substantially, as a result
of faulty manufacture, parts or workmanship during the warranty period.
This warranty does not cover:
• All damages caused by human factors include using the products in abnormal
conditions and operate the device without according to the user manual.
• The guarantee is invalid if defect is caused by incorrect use, poor maintenance or if
persons not authorized by Saramonic International have carried out alterations or repairs.
• Damages caused by poor transportation after you purchased this product.
• Force majeure such as fire, flood, lighting stroke, earthquake.
• Customers who can not show valid invoice.
Wherever you purchased our products, you will be served very well at local retailers.
Saramonic International reserves all the rights for the ultimate interpretation.
5 hours typical lithium battery (no phanton)
3 hour typical lithium batter (with phanton)
 Loading...