

Page 1

COPYRIGHT 2011-2021 SARAMONIC INTERNATIONAL
A brand of DSQN
Web: www.saramonic.com
Email: info@saramonic.com
Audio Adapter
The SARAMONIC SR-AX101 is a 2-channel XLR audio
adapter ideal for any compact camcorder or DSLR
camera with a built-in microphone jack. It enables you
to acquire professional audio from XLR outputs into a
camcorder that has a 3.5mm (1/8") audio input.
User Manual
SR-AX101
Page 2
1 PRODUCT INTRODUCTION
1.1General Introductions
The SARAMONIC SR-AX101 is a 2-channel XLR audio adapter ideal for any
compact camcorder or DSLR camera with a built-in microphone jack.
Wide-variety of audio devices like balanced XLR microphones, wireless
microphones, external audio mixers, preampliers and more can be
connected to the camera via this adapter.
The SR-AX101 enables you to acquire professional audio from XLR outputs
into a camera that has a 3.5mm (1/8") audio input. The passive operation
provides you superb sound quality with an extremely wide dynamic
range, and no batteries or power source are needed.
The SR-AX101 is simple to set up and use. With the trim control knobs for
each channel, you can adjust the recording levels. It’s a compact and
economical way to add excellent audio to your camcorder.
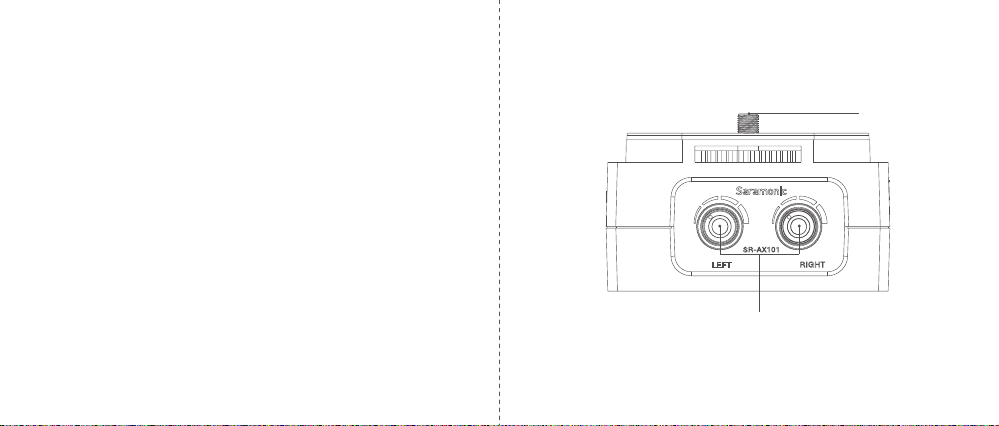
1.2 Product Structure
Dual Trim
Control Knobs
1/4″Screw Thread
Page 3

Balanced
XLR Inputs
LINE/MIC
Switches
Auxiliary Mini-Jack Input
LINE/MIC
Switches
Mono/Stereo Switch
GND1/GND2
Ground Switch
Stereo Output
Page 4

1.3 Highlights
1.3.1 Inputs
※ One 1/8" (3.5 mm) Auxiliary Mini-Jack Input
※ Two balanced XLR inputs
Note: The AUX Input is ideal for connceting wireless deceives with a 3.5mm
output. As it sends signal to the right channel, please do not use the right
XLR Input while using the AUX Input.
1.3.2 Output
※ One stereo 1/8" (3.5 mm) Mini-Jack output
1.3.3 Dual Trim Control Knobs
※ Adjust the signal of each channel to the optimum recording levels
1.3.4 Mono /Stereo Switch
※ Select mono or stereo output mode
The Mono mode is for one mono microphone recording. It can send the
mono audio signal to each channel and output stereo audio signal.
The Stereo mode is for two channels recording, it provides two separate
channels of audio.
1.3.5 LINE / MIC Switches
※ Select LINE or MIC levels
The MIC level is for microphones or wireless system.
The LINE level is for mixers and other audio devices with a line level output.
Set the LINE/MIC switch to LINE to attenuates the signal about 40dB
1.3.6 GND1/GND2 Ground Switch
※ Eliminate ground hum and noise for getting the best sound
GND1: Separate the output signal ground from the input signal ground. To
avoid the noise of the input signal passing to the output signal. This noise is
usually caused by AC power, for instance, mixer with AC power adapter.
GND2: Connect the output signal ground to the input signal ground.
1.3.7 Plastic Chassis With a Tripod Socket
1.3.8 Passive Circuit Make it Noise Free
1.3.9 No Power or Batteries are Needed
1.3.10 Easy to Set Up and Use
Page 5

1.4 Specications d) Set the LINE/MIC switch.
Input Level MIC: -35 dBu LINE:-10 - +4 dBu
Output Level General Mic Levels
Frequency Response 10Hz to 100kHz (+/-1.5 dB)
Dimensions 87 (L) x 80(W ) x 52(H) mm
Weight 191g (6.7oz.)
When using microphones and wireless systems, set to MIC for microphone.
When using other audio devices, set to LINE for Line.
e) Set the M/S switch.
When using one channel, switch to M for mono.
When using two channels, switch to S for stereo.
f) Set the GND1/GND2 switch
Set the ground switch to GND1 initially. When recording, if there are some
odd noises from ground loop, you could switch it to GND2. Please switch it
2 Quick Start Guide
a) Attach the SR-AX101 to the base of the camera. Spin counter-clockwise to
tighten up the adapter with the camera. Mount the adapter to a tripod with
the tripod socket on the bottom of the adapter.
b) Connect the supplied signal transmission line from the output jack(OUT) of
adapter to the MIC input of camera. If there is a MIC / Line switch on the
camera, select it to MIC.
Note: Please switch o the AGC function of your camera if possible.
exibly to the side with a better sound quality.
g) In case of any distortion, you should initially set the LEFT and RIGHT trim
controls fully clockwise. When test recording, you could adjust the knobs
exibly to get the the optimum signal levels.
h) If your camera has a headphone jack, you can plug an earphone into the
headphone terminal on the camera to monitor the audio. Please make sure
that both channels can be heard and adjust the trim controls if any
distortion.
c) Connect balanced XLR microphones, wireless mics or other audio sources
to the LEFT and RIGHT XLR or AUX inputs on the SR-AX101.
Page 6

3 Warranty
3.1 Saramonic International provides one-year warranty under normal use
and lifelong paid maintenance from the date you purchase this product.
3.2 Saramonic International will repair or replace the product that under the
warranty for free during the one-year valid period, but customers should
pay for shipping and insurance charges for returning the product to
Saramonic International.
3.3 This warranty only applies where a defect has arisen, wholly or
substantially, as a result of faulty manufacture, parts or workmanship during
the warranty period.
3.4 This warranty does not cover:
a) All damages caused by human factors include using the products in
abnormal conditions and operate the device without according to the user
manual.
b) The guarantee is invalid if defect is caused by incorrect use, poor
maintenance or if persons not authorized by Saramonic International have
carried out alterations or repairs.
c) Damages caused by poor transportation after you purchased this
product.
d) Force majeure such as re, ood, lighting stroke, earthquake.
e) Customers who can not show valid invoice.
3.5 Wherever you purchased our products, you will be served very well at
local retailer.
3.6 Saramonic International reserves all the rights for the ultimate
interpretation.
4 Compatibility
Self-powerd professional XLR microphones, wireless systems, other audio
devices such as mixing boards and preampliers.
Any compact comcorder or DSLR camera with a microphone jack.
5 Packing List
One SR-AX101 main unit
One signal transmission line
User manual
Warranty card
 Loading...