

Page 1
Stryker
Cleaning and Extraction Wand
User Instructions
The Stryker wand is designed to clean all types of carpet surfaces, including cut pile,
commercial, berber, etc. The unit provides deep, rapid penetration of cleaning solution and
simultaneous high volume extraction.
Patent Pending
READ AND SAVE THESE INSTRUCTIONS
DESCRIPTION
The Stryker uses a specially designed injection/
extraction manifold that injects high volumes of w ater
while allowing for continuous bi-directional cleaning. The
unit may be used with a commercial quality portable
extractor, a truckmount carpet cleaning machine, or with
a truckmount extraction system.
Key features
• Ergonomic rotomolded polyethylene ha ndle provides
comfortable, balanced handling and subst antially
reduces operator fatigue
• Stainless steel extraction tube for rugge d serv ice
• In-line solution strainer helps prevent cloggin g.
• Rotomolded cleaning head resists dents and
scratches and doesn’t readily gouge molding or
furniture
• High pressure injector nozzle has 95 injection ports
to provide deep, even penetration of solution into t he
carpet surface
• Unique dual extraction slots permit full extraction in
both directions across carpet surface
• Purge valve for easy injector nozzle cleaning
SETTING UP THE STRYKER
1. Attach solution line to coupling under handle (see
Fig. A).
2. Attach a 2 in. i.d. extractor hose to the Stryker (see
Fig. A). Use an adaptor (purchased separately) for
1½ in. i.d. hoses.
3. Attach the solution line and the vacuum hose t o your
extractor unit.
The Stryker is now ready for use. Use the solution control valve (Fig. A) to adjust flow of solution as needed.
Using the Stryker
1. Place the Stryker in position on the carpet.
2. Start the extractor blower and solution pump.
3. Open the solution control valve by turning
counterclockwise. A 90° turn – orienting the valve
handle in line with the extraction tube –opens the
valve fully.
4. Begin cleaning. The unit extracts dissolved carpet
soils in both directions (push and pull).
5. Clean in small sections at a time, starting in a corner
and move along a wall then work inward toward the
center of the room.
For more information about carpet cleaning, visit
www.sapphirescientific.com.
MAINTENANCE
Clean the inline strainer (Fig. A) when solution flow is
visibly reduced. To clean the filter, loosen the st rainer
assembly nut, and remove the strainer and strainer
washer (Fig. B). Rinse these items in clean water and
reassemble the strainer. Take care not to over-tighten.
Regularly check the glide assembly for steady, even
flow of solution through the injector nozzles. If any of the
injector ports appear clogged, loosen the purg e valve
two full turns (see Fig. A), and open the solution control
valve fully for 15–20 seconds. After the injector nozzles
have been cleared, retighten the purge valve (do not
over-tighten). If the injector manifold is scratched,
gouged, snags on carpets, or flows excessively, it may
need to be replaced (see Fig D). Replacement glide
assemblies are available from your distributor.
To maintain appearance, wipe exterior surfaces with a
damp cloth. For lasting shine and protection on the
rotomolded surfaces, use Dri-Eaz MicroGuar d Cleaner
and MicroGuard Protectant, available from a Dri-Eaz
distributor.
07-01698B F425 2009-08 Sapphire Scientific 67-014 B 1
Page 2
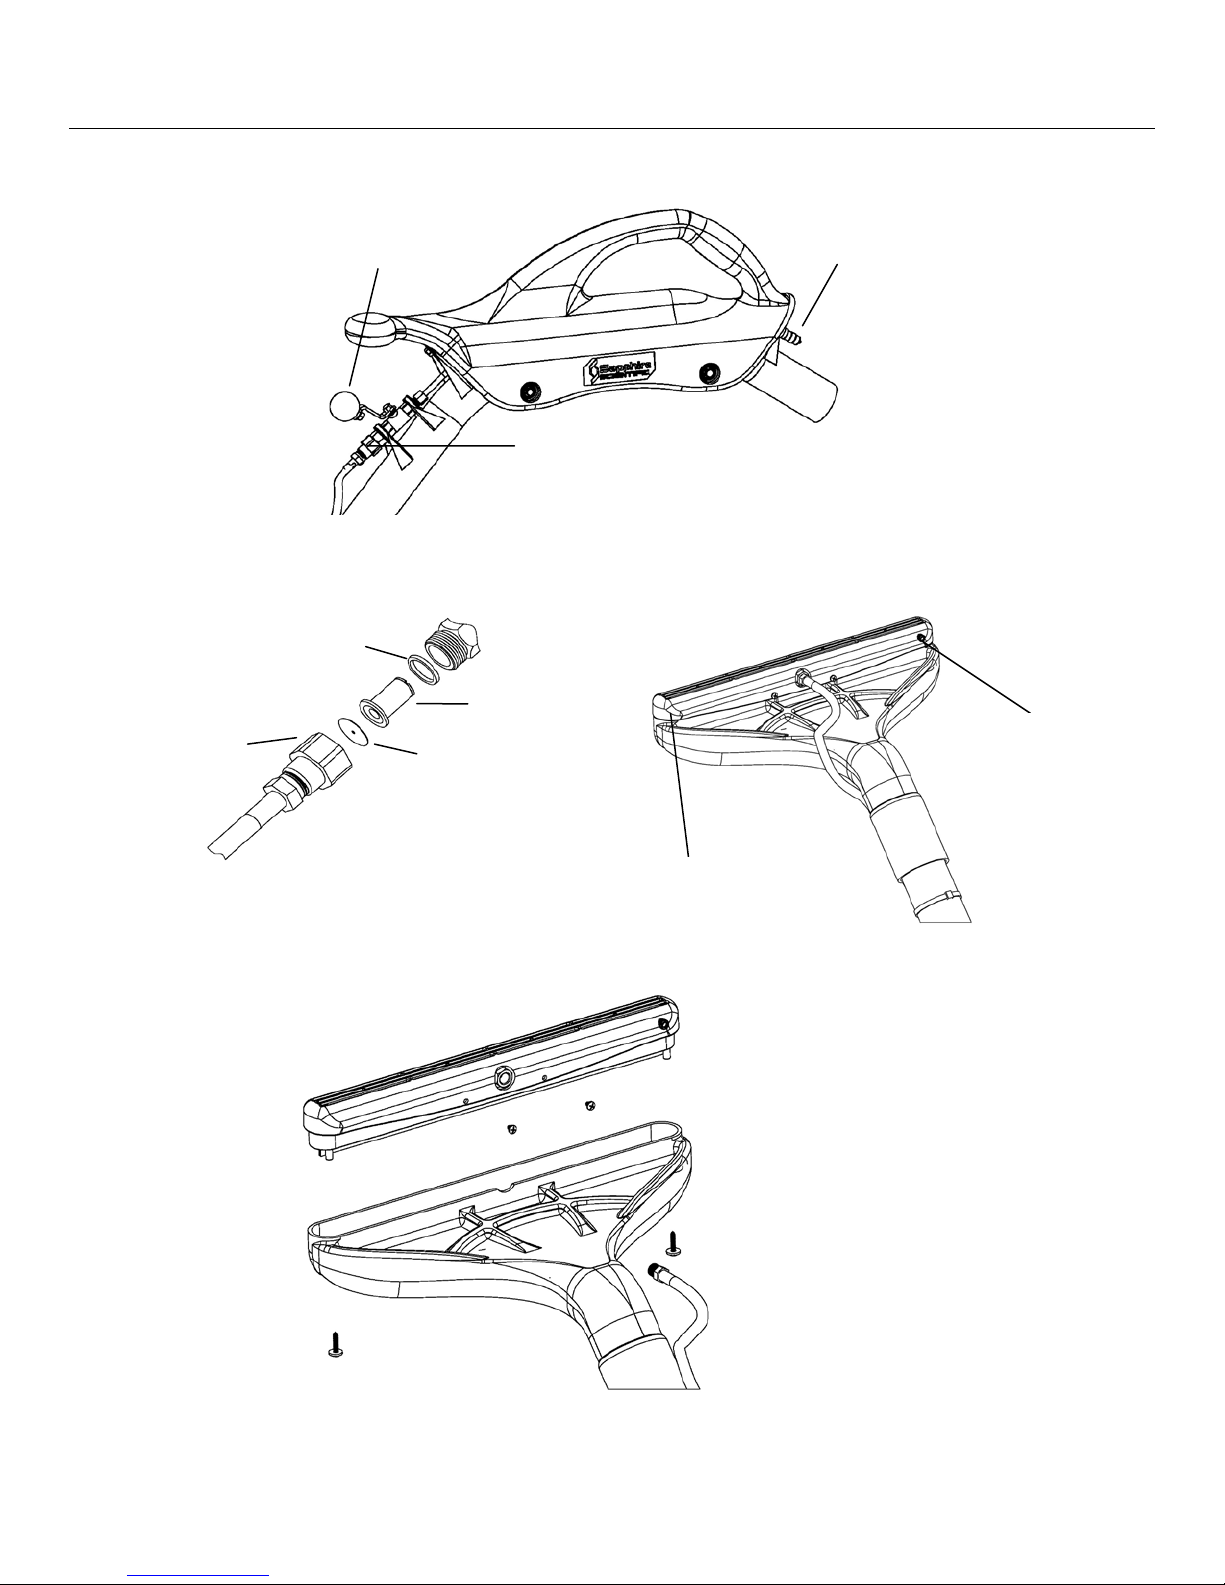
PARTS IDENTIFICATION
Strainer washer
FIG. C: EXTRACTION HEAD (Bottom view)
at full force.
Glide assembly
Solution line
coupling.
FIG. A: HANDLE DETAIL
FIG. B: IN-LINE STRAINER ASSEMBLY
Assembly nut
FIG. D: REPLACING THE GLIDE
ASSEMBLY (bottom view)
Solution control lever.
Strainer
Orifice plate
In-line strainer assembly.
Injector/extraction
Purge valve. To flush
out or debris from
injector, loosen
purge valve and
allow solution to flow
STEP 1: Remove four screws and
detach solution line from glide
assembly.
STEP 2: Remove glide assembly
from extractor head.
STEP 3: Reinstall solution line into
replacement manifold, insert
manifold into head and reinsert
screws.
07-01698B F425 2009-08 Sapphire Scientific 67-014 B 2
Page 3

WARRANTY
Warranty information is available from your deal er or at
www.sapphirescientific.com.
Warranty registration
Visit www.SapphireScientific.com to register your
purchase. Registration allows us to better assist you with
using, maintaining or servicing your equipment , as well
as to contact you in case we have important safety
information concerning your Sapphire Scientific product.
If you determine service is required, have your
equipment model, serial number and original proof of
purchase available and call your distributor f or
assistance with obtaining a return material authorization
(RMA).
CONTACT
Sapphire Scientific
2604 Liberator • Prescott, AZ 86301
Sales: 800-932-3030 • Technical Support: 866-445-3030.
SPECIFICATIONS
Model
Glide 14 in. wide with solution injector strip.
Handle and extraction head Rotomolded polyethylene
Tube
Control valve and fittings Brass
Specifications are subject to change without notice. Some values may
be approximate.
Sapphire Scientific Stryker
Cleaning and Extraction Wand
Stainless steel
07-01698B F425 2009-08 Sapphire Scientific 67-014 B 3
 Loading...