

Page 1

www.sapphiretech.com
Graphics Card
U
SER
M
ANUAL
Getting Started
Mise en route
Erste Schritte
Guida introduttiva
Primeros Pasos
ML00042-R5
Primeiros Passos
Başlarken
Page 2

Table of Contents
English
Installing Your VGA Card .................................................................................................
Using the Online Manual .................................................................................................
Troubleshooting ...............................................................................................................
Table des matières
Français
Installation de votre carte VGA ......................................................................................
Utilisation du manuel en ligne ........................................................................................
Dépannage ....................................................................................................................
Inhaltsverzeichnis
Deutsch
Installation Ihrer VGA-Karte .............................................................................................
Nutzung des Online-Handbuchs ......................................................................................
Fehlersuche und-behebung ...........................................................................................
Sommario
Italiano
Installazione della scheda VGA .....................................................................................
Utilizzo del manuale online ............................................................................................
Risoluzione dei problemi di funzionamento ...................................................................
Índice
Español
Instalación de la tarjeta VGA .........................................................................................
Uso del manual en línea ...............................................................................................
Solución de problemas ..................................................................................................
5
8
9
10
13
14
15
18
19
20
23
24
25
28
29
Índice
Português
Instalação da placa VGA .............................................................................................
Uso do manual on-line ..............................................................................................
Diagnóstico de problemas .............................................................................................
Türkçe
VGA Kartınızın Takılması ..............................................................................................
Online Kılavuzun Kullanılması........................................................................................
Arıza Teşhis ...................................................................................................................
30
33
34
35
38
39
Page 3

2
Copyright
This manual is copyrighted with all rights reserved. No portion of this manual may be copied or reproduced by any
means.
While every precaution has been taken in the preparation of this manual, no responsibility for errors or omissions is
assumed. Neither is any liability assumed for damages resulting from the use of the information contained herein.
Trademarks
ATI is a registered trademark of 2008 Advanced Micro Devices, Inc. in Canada, the United States and/or other
countries. Windows and Microsoft are registered trademark of Microsoft Corporation in the United States and/or other
countries. All other trademarks and/or registered trademarks are the properties of their respective owners.
Copyright
Ce manuel est protégé par un copyright et tous les droits afférents sont réservés. Aucune partie de ce manuel ne peut
être copiée ou reproduite par aucun moyen que ce soit.
Bien qu’un grand soin ait été apporté à la préparation de ce manuel, il n’est accepté aucune responsabilité pour les
erreurs et les omissions qu’il pourrait contenir. En outre, il n’est accepté aucune responsabilité pour les dommages
qui pourraient résulter de l’utilisation des informations contenues dans ce manuel.
Mentions légales
ATI est une marque déposée d’Advanced Micro Devices, Inc. (2008) au Canada, aux Etats-Unis et/ou dans d’autres
pays. Windows et Microsoft sont des marques déposées de Microsoft Corporation aux Etats-Unis et/ou dans
d’autres pays. Toutes les autres marques commerciales et/ou marques déposées sont la propriété de leurs
propriétaires respectifs.
Copyright
Dieses Handbuch ist urheberrechtlich geschützt. Alle Rechte sind vorbehalten. Unbefugte Vervielfältigung dieses
Handbuchs oder eines Teils desselben oder die Reproduktion mit Hilfe jeglicher anderer Mittel oder Methoden ist
untersagt.
Trotz größter Sorgfalt bei der Erstellung dieses Handbuchs wird jede Verantwortung für Fehler oder Auslassungen
abgelehnt. Es wird weiterhin keinerlei Haftung für Schäden übernommen, die sich aus der Verwendung der in diesem
Handbuch enthaltenen Informationen ergeben.
Warenzeichen
ATI ist ein in Kanada, den Vereinigten Staaten und/oder anderen Ländern eingetragenes Warenzeichen von 2008
Advanced Micro Devices, Inc. Windows und Microsoft sind in den Vereinigten Staaten und/oder anderen Ländern
eingetragene Warenzeichen der Microsoft Corporation. Alle anderen Warenzeichen und/oder eingetragenen
Warenzeichen sind Eigentum der jeweiligen Besitzer.
Diritti d’autore
Il presente manuale è protetto da diritti d’autore riservati. Nessuna porzione del manuale può essere copiata o
riprodotta con qualsiasi mezzo.
Sebbene siano state adottate tutte le precauzioni possibili nella redazione di questo manuale, gli autori non si
assumono alcuna responsabilità di errori od omissioni. Si nega altresì qualsiasi responsabilità per danni risultanti
dall’uso delle informazioni in esso contenute.
Marchi commerciali
ATI è un marchio depositato di 2008 Advanced Micro Devices, Inc. in Canada, Stati Uniti e/o altri paesi. Windows e
Microsoft sono marchi depositati di Microsoft Corporation negli Stati Uniti e/o altri paesi. Tutti gli altri sono marchi
commerciali e/o depositati di proprietà dei rispettivi proprietari.
Copyright
Este manual está protegido por las leyes del copyright. Todos los derechos están reservados. Queda prohibida su copia
o reproducción, total o parcial, independientemente del medio por el que se realice.
Aunque se ha puesto el máximo cuidado en la preparación de este texto, el fabricante no asume responsabilidad alguna
por posibles errores u omisiones, ni tampoco por daños resultantes del uso de la información aquí contenida.
Marcas registradas
ATI es una marca registrada de 2008 Advanced Micro Devices, Inc. en Canadá, EE.UU. y otros países. Windows y
Microsoft son marcas registradas de Microsoft Corporation EE.UU. y otros países. Todos marcas comerciales y/o
marcas registradas son propiedad de sus respectivos propietarios.
Direitos autorais
Este manual está protegido por direitos autorais com todos os direitos reservados. Nenhuma parte deste manual pode
ser copiada ou reproduzida, independentemente da forma.
Apesar de todas as diligências aplicadas na preparação deste manual, não nos responsabilizamos por eventuais
erros ou omissões. Além de que, não nos responsabilizamos por quaisquer danos resultantes da utilização da
informação incluída no presente.
Marcas registradas
ATI é uma marca registrada da 2008 Advanced Micro Devices, Inc. no Canadá, nos EUA e/ou em outros países.
Windows e Microsoft são marcas registradas da Microsoft Corporation nos EUA e/ou em outros países. Todas as
demais marcas comerciais e/ou marcas registradas pertencem a seus proprietários respectivos.
Ticari Markalar
ATI markası, 2008 Advanced Micro Devices, Inc. şirketinin Kanada, Amerika Birleşik Devletleri ve/veya diğer
ülkelerdeki tescilli ticari markasıdır. Windows ve Microsoft, Microsoft Corporation şirketinin Amerika Birleşik Devletleri
ve/veya diğer ülkelerdeki tescilli ticari markasıdır. Diğer tüm ticari markalar ve/veya tescilli ticari markalar, ilgili
sahiplerinin malıdır.
Page 4

Macrovision
Apparatus Claims of U.S. Patent Nos. 4.631.603, 4.577.216, 4.819.098, and 4.907.093
licensed for limited viewing uses only.
This product incorporates copyright protection technology that is protected by method claims
of certain U.S. patents and other intellectual property rights owned by Macrovision
Corporation and other rights owners. Use of this copyright protection technology must be
authorized by Macrovision Corporation, and is intended for home and other limited viewing
uses only unless otherwise authorized by Macrovision Corporation. Reverse engineering or
disassembly is prohibited.
Macrovision
L’appareil revendique les droits de brevet n° 4.631.603, 4.577.216, 4.819.098, et 4.907.093
déposés aux Etats-Unis pour une visualisation limitée seulement.
Ce produit contient une technologie protégée par des droits d’auteur, par certains droits de
brevets déposés aux Etats-Unis, ainsi que d’autres droits de propriété intellectuelle
appartenant à Macrovision Corporation et d’autres. L’utilisation de ladite technologie doit être
préalablement autorisée par Macrovision Corporation et est destinée à un usage domestique
et à d’autres visualisations limitées, sauf autorisation spéciale de Macrovision Corporation. Le
démontage et la rétro-ingénierie sont interdits.
Macrovision
Vorrichtungsansprüche der US-Patente Nr. 4.631.603, 4.577.216, 4.819.098, und 4.907.093
für begrenzten Gebrauch.
Dieses Produkt beinhaltet urheberrechtlich geschützte Technologie, die durch die
Verfahrenansprüche bestimmter US-Patente und anderer geistiger Urheberrechte geschützt
ist, die von der Macrovision Corporation und anderen Rechtebesitzern gehalten werden. Die
Nutzung der urheberrechtlich geschützten Technologie muss von Macrovision Corporation
genehmigt werden und gilt nur für beschränkten Gebrauch, falls nicht anders von der
Macrovision Corporation genehmigt. Reverse Engineering oder Disassemblierung sind
verboten.
3
Macrovision
Rivendicazione dei brevetti statunitensi numero 4.631.603, 4.577.216, 4.819.098, e 4.907.093
per gli apparecchi concessi in licenza per proiezioni limitate.
Questo prodotto integra una tecnologia di protezione del copyright tutelata da determinati
brevetti statunitensi sul metodo e da altri diritti di proprietà intellettuale di Macrovision
Corporation e altri titolari. L’utilizzo di questa tecnologia di protezione del copyright deve
essere autorizzato da Macrovision Corporation ed è ristretto unicamente alla proiezione ad
uso domestico e ad altri ambiti limitati, salvo diversa autorizzazione concessa da Macrovision
Corporation. Sono vietate operazioni di reverse engineering o disassemblaggio.
Macrovision
O aparelho é registrado sob as patentes norte-americanas de n.os 4.631.603, 4.577.216,
4.819.098 e 4.907.093, licenciado exclusivamente para usos limitados de visualização.
Este produto incorpora tecnologia de proteção de direitos autorais (copyright) que é protegida
por determinadas patentes norte-americanas e outros direitos de propriedade intelectual
detidos pela Macrovision Corporation e outros proprietários de direito. O uso desta
tecnologia de proteção de direitos autorais precisa ser autorizado pela Macrovision Corporation, sendo destinado exclusivamente a usos domésticos e outros usos limitados de
visualização, exceto onde autorizado de outra maneira pela Macrovision Corporation. São
proibidas a engenharia reversa e a desmontagem.
Page 5

4
Macrovision
Dispositivo sujeto a patentes de EE.UU. nº 4.631.603, 4.577.216, 4.819.098 y 4.907.093
licenciado para usos de visualización limitados.
Este producto incorpora tecnología de protección del copyright y está sujeto a determinadas
patentes de EE.UU. y otros derechos de propiedad intelectual que son propiedad de
Macrovision Corporation y otros titulares de derechos. El uso de esta tecnología de
protección del copyright debe estar autorizada por Macrovision Corporation exclusivamente,
y se dirige al uso doméstico y otros usos de visualización limitados, a menos que Macrovision
Corporation haya autorizado lo contrario. El desensamblaje y la descompilación están
prohibidos.
Macrovision
Sadece sınırlı görüntüleme kullanımları için lisanslı 4.631.603, 4.577.216, 4.819.098 ve
4,907,093 sayılı ABD patentlerinin cihaz talepleri.
Bu ürün, Macrovision Corporation ve diğer hak sahiplerinin mülkiyetinde olan belirli ABD
patentlerinin yöntem talepleri ve diğer bilgi mülkiyet hakları ile korunma altına alınmış telif
hakkı koruma teknolojisi içermektedir. Bu telif hakkı koruma teknolojisinin kullanımı, aksi
açıkça beyan edilmedikçe sadece evde kullanım ve diğer sınırlı görüntüleme amaçlı kullanım
ile kısıtlanmış olup Macrovision Corporation tarafından onaylanmış olmalıdır. Ürün üzerinde
ters mühendislik uygulaması veya de-montaj yasaktır.
Page 6
5
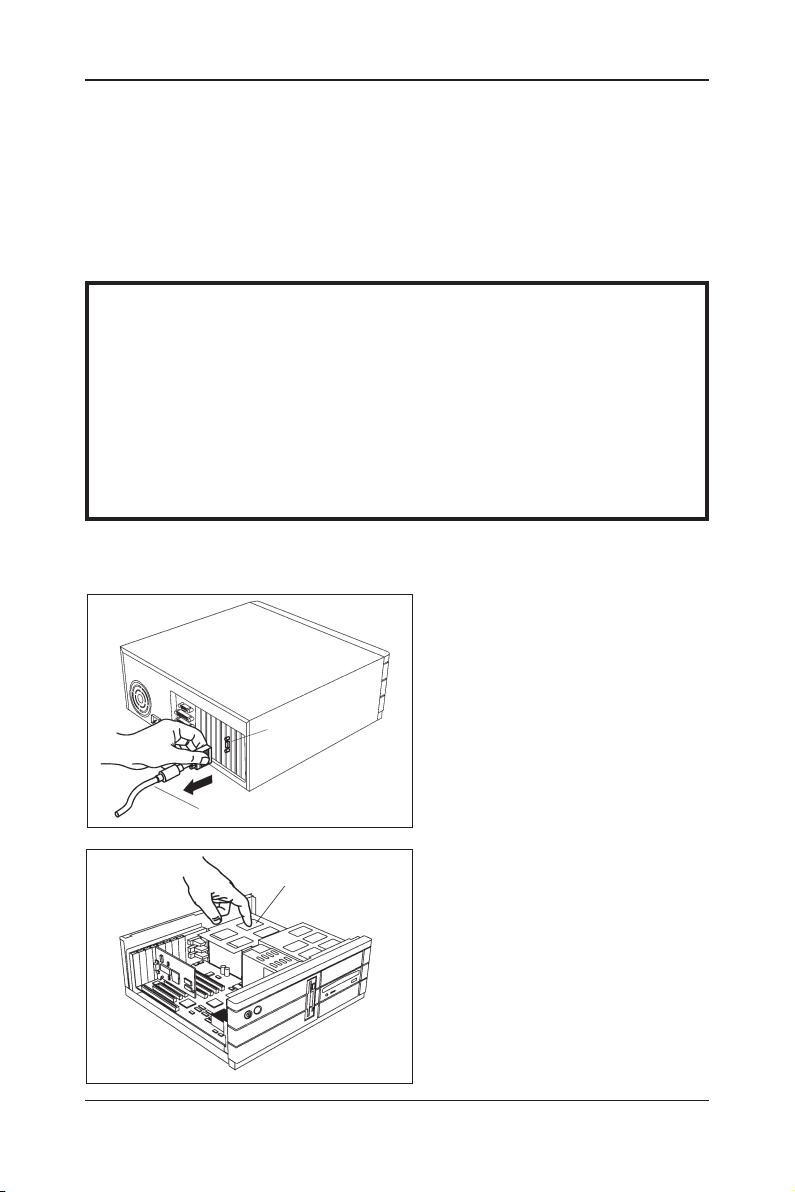
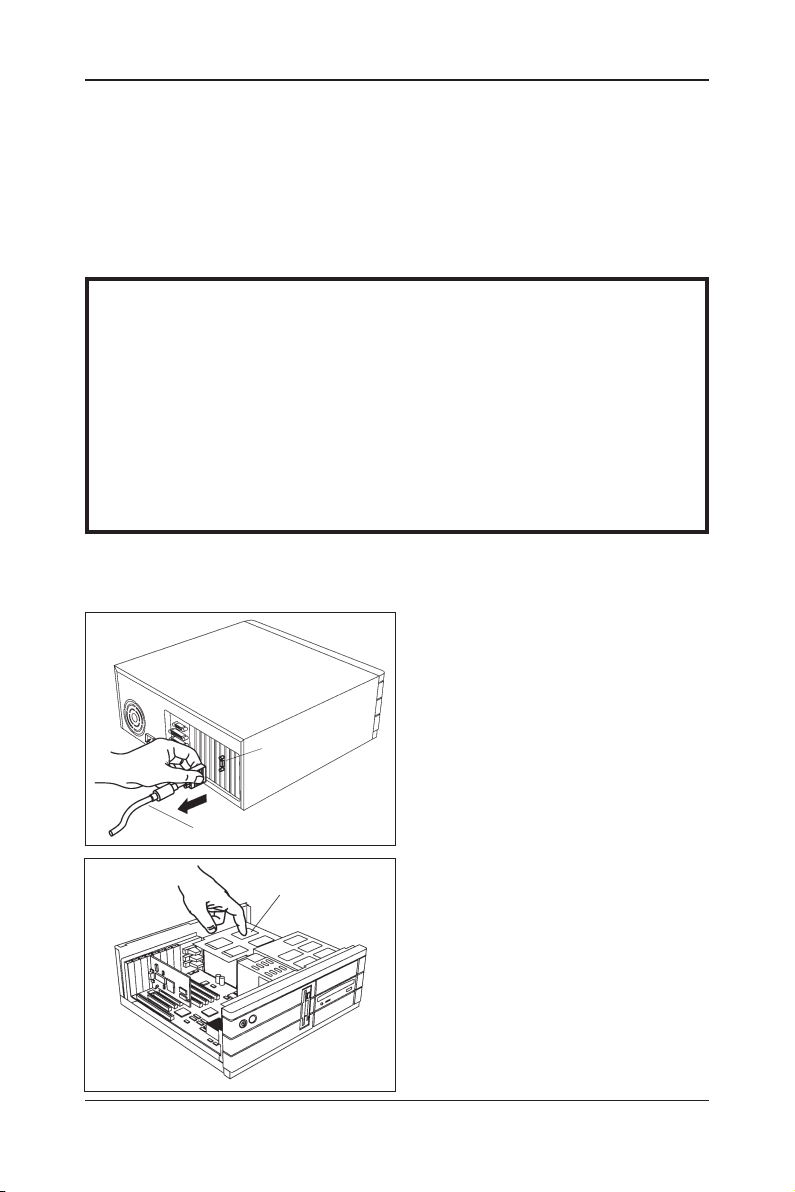
Installing Your VGA Card
Preparing Your Computer
Before installing your VGA Card we recommend that you first uninstall the driver for
your current video card and reconfigure your operating system to use the standard
display driver (VGA) supplied with your operating system. For more information about
changing to the VGA driver see your operating system documentation.
READ ME FIRST
Turn off the power to your system and discharge your body's static electric
charge by touching a grounded surface-for example, the metal surface of the
The manufacturer assumes no liability for any damage, caused directly or
indirectly, by improper installation of any components by unauthorized service
power supply-before performing any hardware procedure.
personnel. If you do not feel comfortable performing the installation,
consult a qualified computer technician.
Damage to system components, the accelerator card, and injury to yourself
Now that you have prepared your computer, you are ready to install your VGA Card.
To Install Your VGA Card
may result if power is applied during installation.
Power off the computer and monitor, then
disconnect the display cable from the back
of your computer.
Video Output
Connector
Display Cable
Remove the computer cover.
Power Supply
If necessary, consult your computer’s
manual for help in removing the cover.
(Remember to discharge your body's
static electricity by touching the metal
surface of the computer chassis.)
Page 7

6
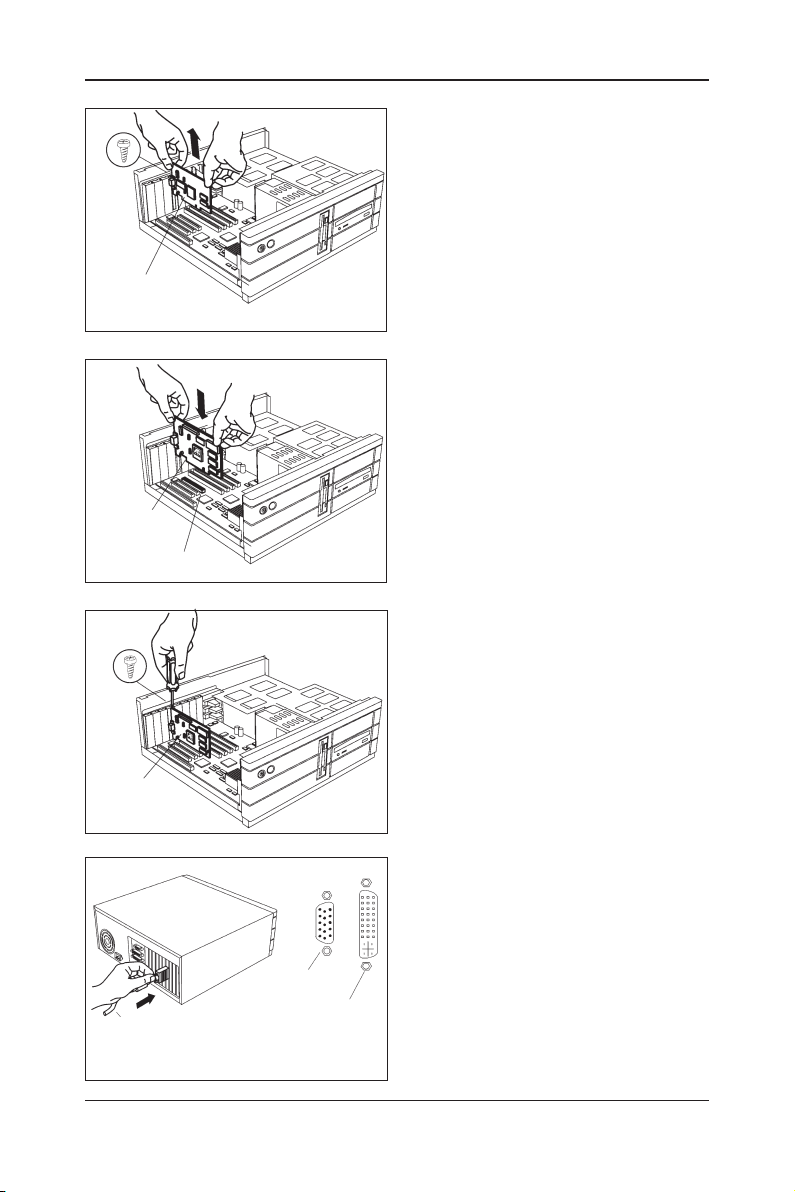
Screw
Existing
VGA Card
VGA Card
Remove any existing VGA Card from your
computer.
Or, if your computer has any on-board
graphics capability, you may need to disable
it on the motherboard. For more information,
see your computer documentation.
(If the old VGA Card sticks, rock it gently
from end to end. Remember to save the
screw.)
Locate the slot. If necessary, remove the
metal cover from this slot; then align your
VGA Card with the PCI/AGP/PCI-E slot, and
press it in firmly until the card is fully seated.
(Grasp the VGA Card by the top edge and
carefully seat it into the slot. Ensure that the
metal contacts are completely pushed into
the slot.)
Slot
Replace the screw to fasten the card in
place, and replace the computer cover.
Screw
VGA Card
Display Cable
To VGA Monitor
(All VGA Cards)
To Flat Panel/LCD Display
(DVI-Ready VGA Cards Only)
Plug the display cable into VGA Card; then
turn on the computer andmonitor. If your VGA
Card came with a DVI connector, you can
connect a flat panel display to the
appropriate connector, as shown ...
(Make sure all cables are securely
connected.)
Page 8

7
Installing Your VGA Card
Uninstall Old Graphics Drivers
To ensure successful installation of the graphics card driver, uninstall the graphic
drivers for the existing graphics card before removing the graphics card from the
computer.
Depending on the operating system, choose either the Windows® XP or Windows
Vista™ uninstall procedure:
• Uninstall old graphics drivers (Windows® XP)
• Uninstall old graphics drivers (Windows Vista™)
Uninstall old graphics drivers (Windows® XP)
With the current graphics card still in the computer, close all open applications.
1.
From the Control Panel, select Add/Remove Programs.
2.
Select the current graphics card drivers, and then click Add/Remove.
3.
The Wizard helps remove the current display drivers.
Note: If the previously installed graphics card has any additional software
installed, it may also be removed at this point. For example, DVD player or
multimedia applications.
Turn off the system after removing the drivers.
4.
Uninstall old graphics drivers (Windows Vista™)
With the current graphics card still in the computer, close all open applications.
1.
From Control Panel, double-click Programs and Features, and then select the
2.
graphics card driver from the list of software programs.
Click Uninstall.
3.
If the Programs and Features uninstall confirmation dialog appears, click Yes.
4.
Note: If the previously installed graphics card has any additional software
installed, it may also be removed at this point. For example, DVD player or
multimedia applications.
Turn off the system after removing the drivers.
5.
Page 9

8
Installing Software and Drivers
Software is provided to take advantage of all the features of your Sapphire graphics
card, including:
• Graphics card driver
• ATI Catalyst™ Control Center
Install the software
To install or remove the drivers, you must have administrator rights or be logged on as
a user with administrator rights. Make sure your monitor cable is properly connected
before you begin.
Note: The installation dialog displays in English if your operating system’s
language is not supported.
Insert the Sapphire installation CD into the computer.
1.
If Windows® runs the CD automatically, proceed to step 3.
Double-click the CD, double-click LAUNCH ( or ATISETUP ), and then click OK.
2.
Follow the on-screen instructions, and then select either Express or Custom Install.
3.
Note: Not all software components are installed using the Express installation.
Custom installation allows you to select individual software components for
installation.
Tip! If the installer fails to install the driver or you have a software conflict, you
can download the latest software from www.sapphiretech.com or ati.amd.com and
then install it.
Using the Online Manual
The VGA Card comes with an online manual that describes its advanced features. The
Online Manual provides reference, specification, disclaimer, legal, and compliance
information that is not contained in this guide.
To Open the Online Manual
Insert the VGA CARD INSTALLATION CD into your CD-ROM drive.
1.
If Windows® runs the CD automatically, proceed to step 6.
Click Start.
2.
Select Run.
3.
Type the following:
4.
D:\ LAUNCH ( or D:\ATISETUP )
(If D is not your CD-ROM drive, substitute D with the correct drive letter.)
Click OK.
5.
Click Online User Manual.
6.
Page 10

Troubleshooting
The following troubleshooting tips may help if you experience problems.
For more help, contact customer care at ati.amd.com/support or your PC manufacturer.
General Troubleshooting
Problem Possible solution
9
Computer does not
boot-up properly
No display
Screen defects appear
Off-center screen
image, odd colors or
no picture
Operating system warns
that video card isn’t
properly configured
Make sure:
• The card is seated properly in its expansion slot.
• The monitor cable is securely fastened to the card.
• The monitor and computer are plugged in and receiving power.
• You selected the appropriate monitor when you installed the driver.
• If you are installing an AGP graphics card, make sure you have the
• Check if the monitor supports the resolution, horizontal (kHz) and vertical
• Check the current resolution, refresh rate, and color depth settings in the
Caution! Ensure that both video card and monitor support resolution and
refresh rates you select. Incompatible resolution/refresh rate selection may
result in monitor damage. Refer to the monitor documentation for
recommended resolutions and refresh rates.
• Try adjusting the brightness, sharpness, contrast, and color balance
• Try adjusting the centering and positioning controls of the monitor to
• Set the monitor RGB inputs (and sync switches, if this option is
• LCD monitor users: Refer to the monitor documentation for the
• Remove and re-install the ATI drivers for the graphics card.
• Check the driver installation and make sure that all software is correctly
• Verify that the installation instructions were properly followed.
• Check that the card is properly installed in the system and connected to
the monitor.
• If you have problems during start-up, restart the computer in Safe Mode.
While starting Windows® XP, press and hold F8 until you see the
Windows® Advanced Options Menu. Use the arrow keys to select Safe
Mode and then press Enter.
• Check the system configuration utility of the operating system for the
interrupt assignments.
• If the computer has on-board graphics capability, you may need to
disable it on the motherboard. For more information, see the computer
documentation.
latest version of the AGP Motherboard / Chipset drivers.
(Hz) refresh rates as required by the graphics card.
Settings and Monitor tabs in the Display Properties dialog.
controls of the monitor.
position the picture on the screen.
available) to 75 ohms, with the sync set to external.
appropriate cable and connector to plug into the DVI-I connector on the
graphics card.
loaded corresponding to the operating system and applications.
Page 11
10
Installation de votre carte VGA
Préparation de l’ordinateur
Avant d’installer la carte VGA, nous vous recommandons de désinstaller préalablement
le pilote de la carte vidéo que vous utilisez actuellement et de reconfigurer le système
d’exploitation pour qu’il utilise le pilote d’affichage standard (VGA) fourni avec le système
d’exploitation. Pour obtenir de plus amples informations sur la manière de changer le
pilote VGA, veuillez consulter la documentation du système d’exploitation.
VEUILLEZ D’ABORD LIRE CE QUI SUIT
Veuillez éteindre l’ordinateur et décharger l’électricité statique de votre corps
en touchant une surface mise à la terre, par exemple la surface métallique du
bloc d’alimentation électrique, avant d’entreprendre toute manipulation sur le
matériel. Le constructeur ne pourra être tenu pour responsable d’aucun
dommage occasionné directement ou indirectement par la mauvaise
installation d’un composant quelconque par un personnel non qualifié.
Si vous ne vous sentez pas capable d’effectuer vous-même l’installation,
veuillez consulter un technicien informatique compétent.
Si l’appareil est mis en marche pendant l’installation, cela peut occasionner
un endommagement des composants du système et de la carte accélératrice,
ainsi que présenter des risques de blessure corporelle pour vous.
Maintenant que vous avez effectué la préparation de votre ordinateur, vous êtes prêt à
installer la carte VGA.
Pour installer la carte VGA
Veuillez éteindre l’ordinateur et le moniteur
et débrancher le cordon d’affichage de la
partie arrière de l’ordinateur.
Connecteur de
sortie vidéo
Cordon d’affichage
Bloc d’alimentation
électrique
Retirez le couvercle de l’ordinateur. Si
nécessaire, consultez le manuel de votre
ordinateur pour savoir comment retirer le
couvercle.
(Rappelez-vous de décharger l’électricité
statique de votre corps en touchant la sur
face métallique du châssis de l’ordinateur.)
Page 12
Vis
Carte VGA
existante
Carte VGA
Logement
11
Retirez toute carte VGA qui pourrait se
trouver dans l’ordinateur.
Ou, si l’ordinateur comporte une fonction
graphique intégrée, il se peut que vous
deviez la désactiver sur la carte mère. Pour
obtenir de plus amples informations à ce
sujet, veuillez consulter la documentation
de l’ordinateur.
(Si la carte VGA que vous retirez ne sort
pas facilement de son logement, exercez
un faible mouvement de balancement dans
le sens longitudinal. Rappelez-vous de
conserver la vis.)
Localisez le logement. Si nécessaire,
retirez le couvercle métallique de ce
logement; puis alignez la carte VGA dans
le logement AGP/PCI/PCI-Express et
appuyez fermement pour la faire entrer
jusqu’à ce qu’elle soit complètement
enfoncée.
(Saisissez la carte VGA par le bord
supérieur et engagez-la avec précaution
dans le logement. Assurez-vous que les
contacts métalliques sont complètement
enfoncés dans le logement.)
Remettez la vis en place afin de bien fixer
la carte, puis remettez le couvercle de
l’ordinateur en place.
Vis
Carte VGA
Cordon d’affichage
Pour moniteur VGA
(toutes cartes VGA)
Pour écran plat / afficheur
LCD (cartes VGA compatibles
DVI uniquement)
Enfichez le cordon d’affichage dans la
carte VGA; puis allumez l’ordinateur et le
moniteur. Si la carte VGA comporte un
connecteur DVI, il vous est possible de
connecter un écran plat au connecteur
correspondant, comme indiqué ...
(Veillez à ce que tous les câbles soient
bien connectés.)
Page 13

12
Installation de votre carte VGA
Désinstallation de vos anciens pilotes graphiques
Pour assurer une bonne installation des pilotes de votre nouvelle carte graphique,
vous devez d’abord désinstaller les pilotes existants puis procéder à la désinstallation
matérielle de votre carte graphique actuelle.
Selon votre système d’exploitation, choisissez la procédure de désinstallation pour
Windows® XP ou pour Windows Vista™.
• Désinstallation de vos anciens pilotes graphiques (Windows® XP)
• Désinstallation de vos anciens pilotes graphiques (Windows Vista™)
Désinstallation de vos anciens pilotes graphiques (Windows® XP)
Alors que votre carte graphique existante est toujours installée physiquement sur votre
1.
système, fermez toutes les applications en cours d’exécution.
Depuis le Panneau de configuration, cliquez sur Ajout/Suppression de programmes.
2.
Sélectionnez les pilotes de votre carte graphique actuelle, puis cliquez sur Supprimer.
3.
L’assistant de désinstallation vous indique la marche à suivre.
Remarque : si la carte graphique que vous voulez remplacer utilise des
logiciels additionnels, désinstallez-les également de votre système. Exemple :
logiciel de lecture DVD ou application multimédia.
Eteignez votre système après avoir supprimé les pilotes
4.
Désinstallation de vos anciens pilotes graphiques (Windows Vista™)
Alors que votre carte graphique existante est toujours installée physiquement sur
1.
votre système, fermez toutes les applications en cours d’exécution.
Depuis le Panneau de configuration, faites un double clic sur Programmes et
2.
fonctionnalités puis sélectionnez les pilotes de votre carte graphique actuelle
dans la liste des programmes.
Cliquez sur Désinstaller.
3.
Sur la boîte de dialogue de confirmation du menu Programmes et
4.
fonctionnalités, cliquez sur Oui.
Remarque : si la carte graphique que vous voulez remplacer utilise des
logiciels additionnels, désinstallez-les également de votre système. Exemple :
logiciel de lecture DVD ou application multimédia.
Eteignez votre système après avoir supprimé les pilotes.
5.
Page 14

13
Installation du logiciel et des pilotes
Le logiciel fourni avec les cartes graphiques Sapphire est conçu pour exploiter
l'ensemble des capacités de votre matériel. Il inclut :
• Le(s) pilote(s) de votre carte graphique.
• La solution ATI Catalyst™ Control Center
Installation du logiciel
Pour installer ou désinstaller les pilotes, vous devez disposer des droits d’administration
de votre système. Avant toute chose, assurez-vous de la bonne connexion du câble de
votre moniteur.
Remarque : si la langue de votre système d’exploitation n’est pas supportée, la
procédure d’installation s’affiche en anglais.
Insérez le CD d’installation de votre carte Sapphire dans votre lecteur.
1.
Si Windows® lance automatiquement le CD-ROM, passez à l’étape 3.
Faites un double clic sur l'icône du CD, puis sur LAUNCH (ou ATISETUP) et
2.
cliquez enfin sur OK.
Suivez les instructions à l’écran puis choisissez l’installation rapide ou personnalisée.
3.
Remarque : certains composants logiciels ne sont pas installés pendant
l’installation rapide. L’installation personnalisée vous permet de sélectionner les
composants de votre choix.
Astuce ! Si la procédure d’installation ne parvient pas à installer les pilotes ou
signale un conflit matériel, téléchargez la dernière version du logiciel sur
www.sapphiretech.com ou ati.amd.com puis installez-la.
Utilisation du manuel en ligne
La carte VGA est fournie avec un manuel en ligne qui détaille ses fonctionnalités
avancées. Le manuel en ligne contient des informations de référence, des
caractéristiques, une exclusion de responsabilité, des mentions légales et des
informations de compatibilité qui ne figurent pas dans ce guide.
Pour ouvrir le manuel en ligne :
Insérez le CD-ROM d’installation de la carte VGA dans le lecteur
1.
correspondant. Si Windows® lance automatiquement le CD-ROM, passez à l’étape 6.
Cliquez sur Démarrer.
2.
Cliquez sur Exécuter.
3.
Tapez la commande suivante :
4.
D:\ LAUNCH ( ou D:\ATISETUP )
(Si D ne représente pas la lettre de votre lecteur de CD-ROM, remplacez-la par la
lettre de lecteur correcte.)
Cliquez sur OK.
5.
Cliquez sur Manuel en ligne.
6.
Page 15

14
Dépannage
Les conseils de résolution des problèmes suivants peuvent vous être utiles en cas de
dysfonctionnement. Pour de plus amples informations, veuillez contacter votre
revendeur local ou consulter le centre de support à l’adresse suivante :
Dépannage général
Problème Solution possible
L’ordinateur ne démarre
pas correctement
• Vérifiez si les instructions d’installation ont bien été suivies.
• Vérifiez l’installation matérielle de la carte et
sa connexion au moniteur.
• Si les problèmes de démarrage persistent,
démarrez votre ordinateur en mode Sans échec.
En démarrant Windows® XP, maintenez la touche F8 pour accéder au menu
d’options avancées de Windows®. Utilisez les touches fléchées pour sélectionner
le mode Sans échec puis appuyez sur Entrée.
• Lancez l’utilitaire de configuration système de votre
système d’exploitation pour plus de détails.
• Si votre carte-mère embarque un processeur graphique intégré, vous devrez
peut-être le désactiver. Pour plus d’informations, référez-vous à la documentation
de votre système.
Pas d’affichage
Affichage imparfait
Image non centrée,
couleurs étonnantes ou
pas d’image
Votre système vous
informe que la carte
vidéo est mal configurée
Vérifiez que :
• La carte graphique est correctement insérée dans son logement d’extension.
• Le câble du moniteur est correctement fixé à la carte.
• Le moniteur et l’ordinateur sont branchés et alimentés.
• Vous avez installé les pilotes pour le moniteur approprié.
• Si vous installez une carte AGP, assurez-vous de bien disposer de la dernière
version des pilotes AGP pour votre carte-mère et/ou votre chipset graphique.
• Vérifiez que votre moniteur supporte les taux de rafraichissement des résolutions
horizontales (kHz) et verticales (Hz) requises par votre carte graphique.
• Vérifiez les paramètres de la résolution, du taux de rafraichissement et du nombre
de couleurs dans les onglets Paramètres et Moniteur de la boîte de dialogue
Affichage.
Attention ! Assurez-vous que votre carte graphique et votre moniteur supportent bien
la résolution et le taux de rafraichissement sélectionnés. Une sélection incompatible
avec votre système risquerait d’endommager votre moniteur. Référez-vous à la
documentation fournie avec votre moniteur pour consulter les résolutions et les taux
de rafraichissement recommandés.
• Ajustez la luminosité, la netteté, le contraste et la balance des couleurs de votre
moniteur.
• Utilisez les commandes de centrage et de positionnent de votre moniteur pour bien
positionner l’image sur l’écran.
• En synchronisation externe, réglez les entrées RGB de votre moniteur (et les
interrupteurs de synchronisation, si cette option est disponible) sur 75 ohms.
• Pour les utilisateurs de moniteurs LCD : référez-vous à la documentation de votre
moniteur pour voir quel câble et quel connecteur brancher sur le connecteur DVI-I
de votre carte graphique.
• Désinstallez et réinstallez les pilotes ATI de votre carte graphique.
• Vérifiez l’installation des pilotes et assurez-vous que les réglages de vos logiciels
sont conformes à ceux de votre système d’exploitation et de vos applications.
Page 16

15
Installation Ihrer VGA-Karte
Vorbereitungen
Es ist ratsam, vor der Installation Ihrer VGA-Karte zunächst den Treiber für Ihre
aktuelle Videokarte zu deinstallieren und Ihr Betriebssystem neu zu konfigurieren, um
den Standard-Displaytreiber (VGA), der Teil Ihres Betriebssystems ist, zu verwenden.
Informationen, wie Sie zum VGA-Treiber wechseln, finden Sie in der Dokumentation
zu Ihrem Betriebssystem.
WICHTIGE INFORMATIONEN
Schalten Sie die Stromzufuhr zu Ihrem System aus und vermeiden Sie
elektrostatische Aufladung, indem Sie eine geerdete Oberfläche berühren – z.B.
die Metalloberfläche der Stromversorgung auf der Rückseite des Gehäuses.
Der Hersteller übernimmt keinerlei Haftung für Schäden, die, direkt oder
indirekt, durch unsachgemäße Installation von Komponenten durch Unbefugte
vorgenommen wurde. Sollten Sie diesbezüglich Bedenken haben, wenden Sie
Nach diesen Maßnahmen können Sie nun Ihre VGA-Karte installieren.
So installieren Sie Ihre VGA-Karte
sich an entsprechend qualifiziertes Computer-Fachpersonal.
Schäden an Systemkomponenten und der Grafikbeschleunigerkarte sowie
eigene körperliche Schäden könnten die Folge sein, wenn Stromzufuhr
während der Installation erhalten bleibt.
Schalten Sie den Computer und den
Monitor aus. Ziehen Sie dann das
Monitorkabel von der Rückseite Ihres
Computers.
Monitorkabel
Video-Ausgang
Stromversorgung
Nehmen Sie das Computer-Gehäuse ab.
Falls erforderlich, ziehen Sie Ihr ComputerHandbuch dafür zu Rate.
(Vergessen Sie nicht, sich elektrostatisch
zu entladen, indem Sie die Metalloberfläche
des Computergehäuses berühren)
Page 17

16
Schraube
Vorhandene
VGA-Karte
VGA-Karte
Schraube
Steckplatz
Entfernen Sie jede vorhandene VGA-Karte
von Ihrem Computer.
Besitzt Ihr Computer eine auf dem
Motherboard integrierte Grafikfunktion,
müssen Sie diese dort deaktivieren. Nähere
Informationen dazu finden Sie in der
Dokumentation zu Ihrem Computer.
(Sollte die alte VGA-Karte etwas klemmen,
bewegen Sie sie behutsam hin und her.
Legen Sie die Schraube zur späteren
Verwendung an einen sicheren Ort.)
Suchen Sie den Steckplatz. Falls
erforderlich, entfernen Sie die
Metallabdeckung von diesem Steckplatz.
Richten Sie dann Ihre VGA-Karte am
AGP/PCI/PCI-Express Steckplatz aus
und drücken Sie sie fest ein, bis sie sitzt.
(Halten Sie die VGA-Karte am oberen
Rand und drücken Sie sie behutsam in
den Steckplatz ein. Achten Sie darauf,
dass die Kontakte aus Metall ganz im
Steckplatz stecken.)
Befestigen Sie die Karte mit der Schraube
und bauen Sie das Computer-Gehäuse
wieder ein.
VGA-Karte
Monitorkabel
An VGA-Monitor
(Alle VGA-Karten)
An Flachbildschirm/LCD-Display
(Nur DVI-fähige VGA-Karten)
Stecken Sie das Display-Kabel in die VGA Kartenbuchse. Schalten Sie dann den
Computer und den Monitor ein. Ist Ihre
VGA-Karte mit einem DVI (Digital Video
Interactive)-Anschluss ausgestattet, können
Sie einen Flachbildschirm an die
entsprechende Buchse anschließen (siehe
Abbildung).
(Vergewissern Sie sich, dass alle Kabel fest
angeschlossen sind.)
Page 18

17
Installation Ihrer VGA-Karte
Deinstallation der alten Grafiktreiber
Um den Grafikkartentreiber erfolgreich zu installieren, müssen Sie zunächst die
Grafiktreiber der vorhandenen Grafikkarte deinstallieren, bevor Sie sie aus dem
Computer ausbauen.
Je nach Betriebssystem wählen Sie entweder das Windows® XP- oder Windows
Vista™-Deinstallationsverfahren:
• Alte Grafiktreiber deinstallieren (Windows® XP)
• Alte Grafiktreiber deinstallieren (Windows Vista™)
Alte Grafiktreiber deinstallieren (Windows® XP)
Bevor Sie die aktuellen Grafikkarten ausbauen, schließen Sie alle offenen
1.
Anwendungen.
Wählen Sie in der Systemsteuerung die Option Programme hinzufügen/entfernen.
2.
Wählen Sie die aktuellen Grafikkartentreiber und klicken Sie auf
3.
Hinzufügen/Entfernen. Mit Hilfe des Assistenten deinstallieren Sie die aktuellen
Grafiktreiber.
Hinweis: Wenn für die bisher installierte Grafikkarte zusätzliche Software
installiert wurde, können Sie diese an dieser Stelle ebenfalls entfernen. Beispiele
sind DVD-Player oder Multimedia-Anwendungen.
Schalten Sie das System nach dem Entfernen der Treiber aus.
4.
Alte Grafiktreiber deinstallieren (Windows Vista™)
Bevor Sie die aktuellen Grafikkarten ausbauen, schließen Sie alle offenen
1.
Anwendungen.
Doppelklicken Sie in der Systemsteuerung auf Programme und Funktionen und
2.
wählen Sie die Grafikkartentreiber aus der Liste der Softwareprogramme.
Klicken Sie auf Deinstallieren.
3.
Wenn das Bestätigungsdialogfeld zur Deinstallation der Programme und
4.
Funktionen angezeigt wird, klicken Sie auf Ja.
Hinweis: Wenn für die bisher installierte Grafikkarte zusätzliche Software
installiert wurde, können Sie diese an dieser Stelle ebenfalls entfernen.
Beispiele sind DVD-Player oder Multimedia-Anwendungen.
Schalten Sie das System nach dem Entfernen der Treiber aus.
5.
Page 19

18
Installation von Software und Treiber
Es wird eine Software mitgeliefert, mit der Sie alle Funktionen Ihrer Sapphire-Grafikkarte
nutzen können. Dazu gehören:
• Grafikkartentreiber
• ATI Catalyst™ Control Center
Software installieren
Um die Treiber zu installieren oder zu entfernen, benötigen Sie Administratorrechte oder
müssen als Anwender mit Administratorrechten angemeldet sein. Ihr Monitorkabel muss
richtig angeschlossen sein, bevor Sie mit der Installation beginnen.
Hinweis: Das Installationsdialogfenster wird in Englisch angezeigt, wenn die
Sprache Ihres Betriebssystems nicht unterstützt wird.
Legen Sie die Sapphire Installations-CD in den Computer.
1.
Sollte Windows® die CD automatisch starten, fahren Sie mit Schritt 3 fort.
Doppelklicken Sie auf CD, doppelklicken Sie auf LAUNCH (oder ATISETUP) und
2.
klicken Sie anschließend auf OK.
Führen Sie die Anweisungen auf dem Bildschirm durch und wählen Sie entweder
3.
Express- oder benutzerdefinierte Installation.
Hinweis: Bei der Expressinstallation werden nicht alle Softwarekomponenten
installiert. Bei der benutzerdefinierten Installation können Sie die einzelnen zu
installierenden Softwarekomponenten auswählen.
Tipp! Wenn das Installationsprogramm den Treiber nicht installiert oder ein
Softwarekonflikt entsteht, können Sie die neueste Software von
www.sapphiretech.com oder ati.amd.com herunterladen und installieren.
Nutzung des Online-Handbuchs
Zur VGA-Karte gehört ein Online-Handbuch, das die erweiterten Funktionen beschreibt.
Das Online-Handbuch enthält Informationen zu technischen Daten, Spezifikationen,
Haftungsausschluss, rechtlichen Fragen und Erfüllung, die nicht in dieser Anleitung zu
finden sind.
So öffnen Sie das Online-Handbuch
Legen Sie die Installations-CD der VGA-Karte in Ihr CD-ROM-Laufwerk.
1.
Sollte Windows® die CD automatisch starten, fahren Sie mit Schritt 6 fort.
Klicken Sie auf Start.
2.
Wählen Sie Ausführen.
3.
Geben Sie Folgendes ein:
4.
D:\LAUNCH (oder D:\ATISETUP)
(Wenn D nicht Ihr CD-ROM-Laufwerk ist, ersetzen Sie den Buchstaben D durch
den entsprechenden Laufwerksbuchstaben.)
Klicken Sie auf OK.
5.
Klicken Sie auf Online-Benutzerhandbuch.
6.
Page 20

19
Fehlersuche und -behebung
Die folgenden Tipps zur Fehlersuche und -behebung können Ihnen bei auftretenden
Problemen helfen. Hilfe erhalten Sie vom Kundendienst unter ati.amd.com/support oder
von Ihrem Computerhersteller.
Allgemeine Fehlersuche und -behebung
Problem Mögliche Lösung
Computer startet nicht
richtig.
Keine Anzeige
Bildschirmfehler
• Überprüfen Sie, ob die Installationsanweisungen korrekt ausgeführt wurden.
• Überprüfen Sie, ob die Karte richtig im System installiert und mit dem Monitor
verbunden ist.
• Wenn beim Start Probleme auftreten, starten Sie den Computer im abgesicherten
Modus.
Drücken Sie beim Start von Windows® XP die Taste F8 so lange, bis das
Windows®-Menü „Erweiterte Optionen“ angezeigt wird. Wählen Sie mit den
Pfeiltasten die Option Abgesicherter Modus und drücken Sie die Eingabetaste.
• Überprüfen Sie das Systemkonfigurationsprogramm des Betriebssystems auf
abgebrochene Aufgaben.
• Wenn der Computer eine integrierte Grafikfunktion besitzt, müssen Sie diese
möglicherweise auf dem Motherboard deaktivieren. Weitere Informationen finden
Sie in der Computerdokumentation.
Kontrollieren Sie, ob:
• die Karte richtig im Erweiterungssteckplatz sitzt.
• das Monitorkabel fest mit der Karte verbunden ist.
• der Monitor und Computer angeschlossen sind und mit Strom versorgt werden.
• Sie den richtigen Monitor bei der Installation des Treibers ausgewählt haben.
• Wenn Sie eine AGP-Grafikkarte installieren, müssen Sie die neueste Version der
AGP Motherboard-/Chipset-Treiber installiert haben.
• Überprüfen Sie, ob der Monitor die Auflösung sowie die horizontalen (kHz) und
vertikalen (Hz) Aktualisierungsraten unterstützt, die für die Grafikkarte
erforderlich sind.
• Überprüfen Sie die aktuellen Einstellungen für Auflösung, Aktualisierungsrate
und Farbtiefe auf den Registerkarten Einstellungen und Monitor im Dialogfeld
Eigenschaften von Anzeige.
Achtung! Sowohl die Videokarte als auch der Monitor müssen die ausgewählte
Auflösung und Aktualisierungsrate unterstützen. Bei Auswahl einer inkompatiblen
Auflösung/Aktualisierungsrate kann der Monitor beschädigt werden. Schlagen Sie in der
Monitordokumentation die empfohlenen Auflösungen und Aktualisierungsraten nach.
Bild außerhalb der Mitte
des Bildschirm seltsame
Farben oder kein Bild
Das Betriebssystem sendet
eine Warnmeldung dass die
Videokarte nicht korrekt
konfiguriert ist.
• Versuchen Sie, Helligkeit, Schärfe, Kontrast und Farbauswahl des Monitors
einzustellen.
• Versuchen Sie, das Bild mit den Zentrier- und Positioniersteuerungen des
Monitors auf dem Bildschirm zu positionieren.
• Setzen Sie die Monitor-RGB-Eingänge (und sync-Schalter wenn diese Option
vorhanden ist) auf 75 Ohm und sync auf extern.
• LCD-Monitoranwender: Schlagen Sie in der Monitordokumentation die Angaben
zum geeigneten Kabel und Stecker für den DVI-I-Anschluss der Grafikkarte nach.
• Entfernen Sie alle ATI-Treiber der Grafikkarte und installieren Sie sie erneut.
• Überprüfen Sie die Treiberinstallation und stellen Sie sicher, dass alle
Software-Komponenten dem Betriebssystem und den Anwendungen entsprechend
korrekt geladen wurden.
Page 21

20
Installazione della scheda VGA
Preparazione del computer
Prima di installare la scheda VGA si consiglia di disinstallare il driver della scheda video
attuale e riconfigurare il sistema operativo per accogliere il driver di visualizzazione
standard (VGA) fornito con tale sistema. Per maggiori informazioni sulla sostituzione del
driver VGA, consultare la documentazione del sistema operativo.
LEGGERE PRIMA QUESTA NOTA
Prima di eseguire qualsiasi intervento sull’hardware, spegnere il sistema e scaricare
l’elettricità statica del corpo toccando una superficie collegata a terra – per es. la
superficie metallica dell’alimentatore. Il produttore non si assume alcuna
responsabilità in relazione ad eventuali danni, causati direttamente o indirettamente
dalla installazione errata di qualsiasi componente ad opera di personale di
manutenzione non autorizzato. Se l’utente non si sente sicuro di eseguire
l’installazione, consultare un tecnico informatico qualificato.
L’applicazione di corrente durante l’installazione può causare danni ai componenti del
sistema, alla scheda dell’acceleratore e infortuni personali.
Una volta predisposto il computer, si può procedere all’installazione della scheda VGA.
Installazione della scheda VGA
Spegnere il computer e il monitor, quindi
scollegare il cavo del monitor dal retro del
computer.
Connettore
uscita video
Cavo del monitor
Alimentatore
Rimuovere il coperchio del computer,
consultando all’occorrenza il manuale del
computer. (Ricordarsi di scaricare
l’elettricità statica del corpo toccando la
superficie metallica del telaio del
computer).
Page 22

Vite
Scheda VGA
esistente
Scheda VGA
Vite
Slot
21
Rimuovere la scheda VGA eventualmente
presente nel computer.
Se il computer dispone di funzionalità
grafiche incorporate, può essere
necessario disabilitarle sulla scheda
madre. Per maggiori informazioni,
consultare la documentazione del
computer.
(Se la vecchia scheda VGA è inceppata,
smuoverla delicatamente da lato a lato.
Ricordarsi di conservare la vite.)
Individuare lo slot. All’occorrenza,
rimuovere il coperchio di metallo da
questo slot; quindi allineare la scheda
VGA allo slot AGP/PCI/PCI-Express e
premerla con decisione finché non è
completamente in posizione.
(Afferrare la scheda VGA dal bordo
superiore e inserirla attentamente nello
slot. Assicurarsi che i contatti metallici
siano inseriti completamente nello slot.)
Reinserire la vite per fissare la scheda in
posizione e riporre il coperchio del
computer.
Scheda VGA
Cavo del monitor
Al monitor VGA
(tutte le schede VGA)
Al monitor/LCD a schermo piatto
(solo schede VGA predisposte
per DVI)
Collegare il cavo del monitor alla scheda
VGA; quindi accendere il computer e il
monitor. Se la scheda VGA è provvista di
connettore DVI, si può collegare un
monitor a schermo piatto al connettore
pertinente, come da figura.
(Accertarsi che tutti i cavi siano collegati
saldamente.)
Page 23

22
Installazione della scheda VGA
Disinstallazione dei driver grafici precedenti
Per garantire la corretta installazione del driver della scheda grafica, disinstallare i
driver grafici della scheda grafica esistente prima di rimuoverla dal computer.
In funzione del sistema operativo, scegliere la procedura di disinstallazione di
Windows® XP o di Windows Vista™:
• Disinstallazione dei driver grafici precedenti (Windows® XP)
• Disinstallazione dei driver grafici precedenti (Windows® Vista™)
Disinstallazione dei driver grafici precedenti (Windows® XP)
Quando la scheda grafica corrente è ancora presente sul computer, chiudere tutte le
1.
applicazioni aperte.
Dal Pannello di controllo, scegliere Installazione applicazioni.
2.
Selezionare i driver della scheda grafica corrente e fare clic su Cambia/rimuovi
3.
programmi. La procedura guidata assiste l’utente nella rimozione dei driver
correntemente selezionati.
Nota: Se la scheda grafica installata precedentemente include software
supplementari, in questa fase sarà possibile rimuovere anche tali software, per
esempio, lettore DVD o applicazioni multimediali.
Spegnere il sistema dopo aver rimosso i driver.
4.
Disinstallazione dei driver grafici precedenti (Windows® Vista™)
Quando la scheda grafica corrente è ancora presente sul computer, chiudere tutte
1.
le applicazioni aperte.
Dal Pannello di controllo, fare doppio clic su Programmi e Funzioni e
2.
selezionare il driver della scheda grafica dall’elenco dei programmi.
Fare clic su Disinstalla.
3.
Nella finestra di dialogo di Programmi e Funzioni che chiede di confermare la
4.
disinstallazione, fare clic su Sì.
Nota: Se la scheda grafica installata precedentemente include software
supplementari, in questa fase sarà possibile rimuovere anche tali software, per
esempio, lettore DVD o applicazioni multimediali.
Spegnere il sistema dopo aver rimosso i driver.
5.
Page 24

23
Installazione del software e dei driver
Il pacchetto include il software al fine di utilizzare appieno tutte le funzioni della
scheda grafica Sapphire, inclusi:
• Driver della scheda grafica
• ATI Catalyst™ Control Center
Installazione del software
Per installare o rimuovere i driver, occorre disporre dei privilegi di amministratore o
essere collegati come utente con privilegi di amministratore. Assicurarsi che il cavo del
monitor sia collegato correttamente prima di cominciare.
Nota: Se la lingua del sistema operativo non è supportata, la procedura di
installazione sarà visualizzata in Inglese.
Inserire il CD di installazione Sapphire nel computer.
1.
Se il CD viene eseguito automaticamente, passare al punto 3.
Fare doppio clic sul CD, doppio clic su LAUNCH (Lancia) ( o ATISETUP ), quindi
2.
clic su OK.
Seguire le istruzioni a video, quindi selezionare installazione Express o Custom
3.
(Personalizzata).
Nota: Nell’installazione Express, non sono installati tutti i componenti software.
L’installazione Custom consente di selezionare i singoli componenti software da
installare.
Suggerimento! Se l'installazione del software non riesce o se si verifica un
conflitto di software, è possibile scaricare la versione più aggiornata del software
dal sito www.sapphiretech.com o ati.amd.com.
Utilizzo del manuale on-line
La scheda VGA viene fornita con un manuale on-line che ne descrive le funzioni avanzate.
Il manuale on-line fornisce riferimenti, specifiche tecniche, declinazioni di responsabilità,
note legali e informazioni sulla conformità non contenute nel presente manuale.
Apertura del manuale on-line
Inserire il CD di installazione della scheda VGA nell’unità CD-ROM del
1.
computer. Se il CD viene eseguito automaticamente, passare al punto 6.
Fare clic su Start (Avvia).
2.
Selezionare Run (Esegui)
3.
Immettere quanto segue:
4.
D:\ LAUNCH ( o D:\ATISETUP )
(Se D non corrisponde all’unità CD-ROM, sostituire la D con la lettera dell'unità corretta).
Fare clic su OK.
5.
Fare clic su Online User Manual (Manuale dell’utente on-line).
6.
Page 25

24
Risoluzione dei problemi di funzionamento
Qualora insorgano problemi, i suggerimenti riportati di seguito possono aiutare a risolverli.
Per ulteriore assistenza, contattare il servizio clienti sul sito ati.amd.com/support o il
vendor del proprio PC.
Risoluzione di problemi di funzionamento generici
Problema Possibile soluzione
Il computer non si avvia
correttamente
Nessuna immagine
visualizzata
Comparsa di difetti sullo
schermo
Immagine scentrata
sullo schermo, colori
sfuocati o assenza di
immagini
Il sistema operativo
comunica che la
configurazione della
scheda video non è
corretta
• Verificare di avere seguito correttamente le istruzioni di installazione.
• Controllare che la scheda sia installata correttamente nel sistema e collegata al
monitor.
• In caso di problemi durante l'avvio, riavviare il computer in Modalità provvisoria.
Durante l’avvio di Windows® XP, tenere premuto F8 fino a visualizzare il menu
delle opzioni avanzate di Windows® . Utilizzare i tasti delle frecce per selezionare
la Modalità provvisoria, quindi premere Invio.
• Verificare le assegnazioni di interrupt del sistema operativo attraverso la utility di
configurazione di sistema.
• Se il computer è dotato di funzionalità grafiche incorporate, potrebbe essere
necessario disabilitarle sulla scheda madre. Per ulteriori informazioni, vedere la
documentazione del computer.
Verificare:
• Che la scheda sia inserita correttamente nel relativo slot di espansione.
• Che il cavo del monitor sia collegato correttamente alla scheda.
• Che il monitor e il computer siano collegati alla corrente elettrica.
• Di aver selezionato il monitor corretto al momento dell'installazione del driver.
• Per l’installazione della scheda grafica AGP, verificare di disporre dell’ultima versione
dei driver della scheda madre/chipset AGP.
• Controllare che il monitor supporti la risoluzione e le velocità di aggiornamento
orizzontale (kHz) e verticale (Hz) richieste dalla scheda grafica.
• Controllare la risoluzione, la velocità di aggiornamento e le impostazioni di profondità
colore correnti nelle schede Settings (Impostazioni) e Monitor della finestra di
dialogo
Display Properties (Proprietà visualizzazione).
Attenzione! Verificare che sia la scheda video che il monitor supportino la risoluzione
e le velocità di aggiornamento selezionate. La selezione di risoluzioni e velocità di
aggiornamento incompatibili possono causare danni al monitor. Fare riferimento alla
documentazione del monitor per conoscere le risoluzioni e le velocità di
aggiornamento consigliate.
• Tentare di regolare luminosità, nitidezza, contrasto e bilanciamento colori del
monitor.
• Tentare di regolare la centratura e il posizionamento del monitor per posizionare
l’immagine sullo schermo
• Configurare gli ingressi RGB del monitor (e gli interruttori sync, se tale opzione è
disponibile) a 75 ohm, con l’ingresso sync impostato su esterno.
• Utenti monitor LCD: Consultare la documentazione del monitor per conoscere il cavo
e il connettore appropriati da inserire sul connettore DVI-I sulla scheda grafica.
• Rimuovere e reinstallare i driver ATI della scheda grafica.
• Verificare l'installazione del driver e assicurarsi che tutto il software sia caricato
correttamente in funzione del sistema operativo e delle applicazioni.
Page 26

25
Instalación de la tarjeta VGA
Pasos previos
Antes de instalar su nueva tarjeta VGA le recomendamos que desinstale el controlador
de su tarjeta actual, y reconfigure su sistema operativo para usar el controlador de vídeo
estándar (VGA) proporcionado con éste. Para más información sobre cómo seleccionar
el controlador VGA, le recomendamos que repase la documentación incluida con el
sistema operativo.
AVISO IMPORTANTE
Apague la alimentación de su sistema y descargue la electricidad estática
acumulada en su cuerpo tocando una superficie con conexión a tierra (por
ejemplo, la superficie metálica de su fuente de alimentación). Es importante
hacer esto antes de efectuar ninguna operación en su equipo. El fabricante no
asume responsabilidad alguna por daño directo o indirecto causado por la
incorrecta instalación de cualquier componente por parte de personal no
autorizado. Si no se siente capacitado para realizar la instalación, póngase en
contacto con un técnico informático cualificado.
La aplicación de corriente eléctrica durante la instalación puede producirle
lesiones, además de ocasionar daños en su tarjeta aceleradora u otros
componentes de su sistema.
Ahora que su ordenador ya está listo, puede comenzar a instalar la nueva tarjeta VGA.
Para instalar su tarjeta VGA
Apague el ordenador y el monitor.
Después, desenchufe de la parte trasera
de su ordenador el cable que se conecta
al monitor.
Conector de
salida de
vídeo
Cable del monitor
Fuente de
alimentación
Extraiga la carcasa del ordenador. Si es
necesario, consulte el manual de éste
para saber cómo efectuar esta operación.
(Recuerde descargar la electricidad
estática de su cuerpo tocando la
superficie metálica en donde se acoplan
los componentes).
Page 27

26
Tornillo
Tarjeta VGA
antigua
Tarjeta VGA
nueva
Ranura
Extraiga del ordenador su actual tarjeta
VGA.
Es posible que las funciones gráficas de su
ordenador estén incorporadas en la placa.
En ese caso no habrá nada que extraer,
sino que deberá desactivar éstas en la
propia placa madre. Revise la
documentación de su ordenador para más
información.
(Si la tarjeta VGA actual se resiste, realice
un suave movimiento de lado a lado a la
vez que tira con cuidado. No se olvide de
guardar el tornillo).
Localice la ranura de la tarjeta gráfica. Si
está tapada por una cubierta metálica,
extráigala. Después alinee su nueva tarjeta
con el conector AGP/PCI/PCI-Express y
presione con firmeza hasta que la tarjeta
haya quedado completamente insertada y
no se mueva.
(Coja la tarjeta VGA por su extremo superior
e insértela cuidadosamente en la ranura.
Asegúrese de que los contactos metálicos
se hayan introducido en la ranura en su
totalidad).
Vuelva a colocar el tornillo para asegurar
firmemente la tarjeta y ponga la carcasa de
su ordenador de nuevo.
Tornillo
Tarjeta VGA
nueva
Cable del monitor
A monitor VGA (todas
las tarjetas VGA)
A pantalla plana / monitor LCD
(sólo tarjetas VGA con DVI)
Enchufe el cable del monitor a la salida de
su tarjeta VGA, y encienda el monitor y el
ordenador. Si su nueva tarjeta VGA
incorpora un conector DVI, podrá
conectarla a una pantalla plana, tal y como
se muestra...
(Asegúrese de que todos los cables estén
firmemente insertados).
Page 28

27
Instalación de la tarjeta VGA
Desinstale los controladores de gráficos antiguos
Para garantizar una instalación con éxito del controlador de gráficos, desinstale los
controladores de la tarjeta de gráficos existente antes de extraerla del ordenador.
Dependiendo del sistema operativo, elija el procedimiento de desinstalación de
Windows® XP o Windows Vista™:
• Desinstalar controladores gráficos antiguos (Windows® XP)
• Desinstalar controladores gráficos antiguos (Windows Vista™)
Desinstale los controladores de gráficos antiguos (Windows® XP)
Con la tarjeta de gráficos aún en el ordenador, cierre las demás aplicaciones.
1.
En el Panel de control, seleccione Agregar o quitar programas.
2.
Seleccione los controladores de la tarjeta de gráficos y haga clic en Cambiar o
3.
quitar. El Asistente ayuda a eliminar los controladores actuales.
Nota: Si la tarjeta de gráficos tenía software adicional instalado, también se
puede desinstalar en este momento. Por ejemplo, un reproductor de DVD o
aplicaciones multimedia.
Apague el sistema después de eliminar los controladores.
4.
Desinstale los controladores de gráficos antiguos (Windows Vista™)
Con la tarjeta de gráficos aún en el ordenador, cierre las demás aplicaciones.
1.
En el Panel de control, haga doble clic en Programas y características, y
2.
después seleccione el controlador de la tarjeta de gráficos en una lista de
programas de software.
Haga clic en Desinstalar.
3.
Si aparece el cuadro de confirmación de desinstalación de Programas y
4.
características, haga clic en Sí.
Nota: Si la tarjeta de gráficos previamente instalada tenía software adicional
instalado, también se puede desinstalar en este momento. Por ejemplo, un
reproductor de DVD o aplicaciones multimedia.
Apague el sistema después de eliminar los controladores.
5.
Page 29

28
Instalación de software y controladores
El software se proporciona para que pueda aprovechar todas las funciones de su
tarjeta de gráficos Sapphire, incluyendo:
• Controlador de tarjeta de gráficos
• Centro de control ATI Catalyst™
Instale el software
Para instalar o eliminar los controladores, debe tener derechos administrativos o haber
iniciado una sesión con derechos administrativos. Compruebe que el cable de su
monitor está bien conectado antes de empezar.
Nota: El diálogo de instalación se muestra en inglés si no se admite el idioma
de su sistema operativo.
Inserte el CD de instalación de Sapphire en el ordenador.
1.
Si Windows® ejecuta el CD automáticamente, vaya al paso 3.
Haga doble clic en el CD, haga clic en LAUNCH ( o ATISETUP ) y después en Aceptar.
2.
Siga las instrucciones en pantalla y después seleccione Express o Custom Install.
3.
Nota: Con la instalación Express no se instalan todos los componentes de
software. La instalación Custom permite seleccionar componentes de software
individuales.
¡Consejo! Si el instalador no instala el controlador o se presenta un conflicto de
software, puede descargar el software más reciente de www.sapphiretech.com o
ati.amd.com e instalarlo.
Uso del manual en línea
La tarjeta VGA se suministra con un manual en línea que explica sus características
avanzadas. El manual en línea suministra referencias, especificaciones, aviso legal y
de exención de responsabilidad, y datos de compatibilidad que esta guía no contiene.
Para abrir el manual en línea
Inserte el CD de instalación de la tarjeta VGA en la unidad de CD-ROM.
1.
Si Windows® ejecuta el CD automáticamente, vaya al paso 6.
Haga clic en Start.
2.
Seleccione Run.
3.
Escriba lo siguiente:
4.
D:\ LAUNCH (o D:\ATISETUP )
(Si D no es la unidad del CD-ROM, sustituya D por la letra de unidad correspondiente.)
Haga clic en Aceptar.
5.
Haga clic en Online User Manual.
6.
Page 30

Solución de problemas
Los consejos siguientes pueden ayudarle a resolver problemas si se presentan. Para
obtener más ayuda, póngase en contacto con la asistencia al cliente
ati.amd.com/support o con el fabricante del PC.
Solución de problemas general
Problema Solución posible
El ordenador no se
enciende correctamente
No se ve nada en la
pantalla
Aparecen fallos en la
pantalla
Imágenes descentradas,
colores extraños o sin
imagen
El sistema operativo
avisa que la tarjeta de
vídeo no está bien
configurada
• Verifique que se cumplieron las instrucciones de instalación.
• Compruebe que la tarjeta esté bien instalada en el sistema y conectada al
sistema.
• Si tiene problemas durante el encendido, reinicie el ordenador en Modo seguro.
Cuando se inicie Windows® XP, mantenga pulsada F8 hasta que vea el menú
Opciones avanzadas de Windows®. Utilice las teclas de flecha para seleccionar
el Modo seguro y después pulse Intro.
• Compruebe en la utilidad de configuración del sistema operativo las asignaciones
de interrupción.
• Si el ordenador incorpora capacidad de gráficos en placa, es posible que deba
deshabilitarla en la placa pase. Para obtener más información, consulte la
documentación del ordenador.
Asegúrese de que:
• La tarjeta está bien introducida en la ranura de expansión.
• El cable del monitor está firmemente conectado a la tarjeta.
• El monitor y el ordenador están enchufados y reciben alimentación eléctrica.
• Ha seleccionado el monitor adecuado cuando instaló el controlador.
• Si va a instalar una tarjeta de gráficos AGP, asegúrese
de disponer de la versión más reciente de los controladores de placa base/chipset
AGP.
• Compruebe si el monitor es compatible con la resolución y las velocidades de
refresco horizontal (kHz) y vertical (Hz) que requiere la tarjeta de gráficos.
• Compruebe los ajustes de resolución, velocidad de refresco y profundidad del
color en las fichas Configuración y Monitor del cuadro de diálogo Propiedades
de pantalla.
¡Precaución! Asegúrese de que tanto la tarjeta de vídeo como el monitor admiten
la resolución y velocidades de refresco que seleccione. La selección de
resoluciones o velocidades de refresco no compatibles puede causar daños en el
monitor. Consulte en la documentación del monitor las resoluciones y velocidades
de refresco recomendadas.
• Pruebe a ajustar los controles de brillo, nitidez, contraste y balance del color del
monitor.
• Pruebe a ajustar los controles de centrado y posición del monitor para colocar la
imagen en la pantalla.
• Ajuste las entradas de monitor RGB (e interruptores de sincronización, si está
disponible esta opción) en 75 ohmios, con la sincronización ajustada en externa.
• Usuarios de monitores LCD: consulte en la documentación del monitor el cable y
conector adecuado para enchufar el conector DVI-I en la tarjeta de gráficos.
• Elimine y vuelva a instalar los controladores ATI para la tarjeta de gráficos.
• Compruebe que el controlador está instalado y está cargado el software
correspondiente al sistema operativo y las aplicaciones.
29
Page 31

30
Instalação da placa VGA
Preparar o computador
Antes de instalar a placa VGA recomendamos-lhe que comece por desinstalar o
driver da sua placa de vídeo atual e reconfigurar o sistema operacional para poder
usar o controlador de monitor standard (VGA) fornecido com o seu sistema
operacional. Para mais informações sobre como mudar o driver VGA, consulte a
documentação do sistema operativo.
NOTA IMPORTANTE ANTES DE COMEÇAR
Antes de efetuar qualquer alteração no hardware, desligue a alimentação do
sistema e descarregue a carga de eletricidade estática acumulada no
seu corpo tocando numa superfície ligada à terra – por exemplo, a superfície
metálica da fonte de alimentação. O fabricante exclui qualquer
responsabilidade por danos causados, direta ou indiretamente,
pela instalação indevida de quaisquer componentes por pessoal técnico não
autorizado. Caso não se sinta à vontade para efetuar a instalação,
consulte um técnico de informática qualificado.
A utilização de corrente durante a instalação pode resultar em danos nos
componentes do sistema e na placa aceleradora, podendo mesmo provocar
lesões graves no próprio usuário.
Agora que já preparou o computador, está pronto para instalar a Placa VGA.
Para Instalar a Placa VGA
Desligue a alimentação do computador e
do monitor e em seguida desligue o cabo
do monitor que está ligado à parte de trás
do seu computador.
Conector de
saída de
vídeo
Cabo do monitor
Fonte de alimentação
Retire a tampa do computador. Se
necessário, consulte o manual do
computador para o ajudar a remover a
tampa. (Não se esqueça de descarregar
a eletricidade estática acumulada no seu
corpo tocando na superfície metálica da
caixa do computador.)
Page 32

Parafuso
Placa VGA
existente
Placa VGA
Parafuso
31
Retire a placa VGA existente no seu
computador.
Ou, se o computador possuir capacidades
gráficas integradas na placa, pode ter de
desativá-la na placa-mãe. Para obter mais
informações, consulte a documentação do
computador.
(Se a placa VGA antiga estiver presa,
mova-a de um lado para o lado e puxe-a
com cuidado. Não se esqueça de guardar
o parafuso.)
Localize o slot. Se necessário, remova a
tampa metálica deste slot, depois alinhe a
sua placa VGA com o slot AGP/PCI e
encaixe-a bem até a placa estar totalmente
assentada.
(Segure a placa VGA pela extremidade
superior e, com cuidado, encaixe-a no slot.
Confirme se os contatos metálicos ficam
totalmente encaixados no slot.)
Slot
Volte a colocar o parafuso, para
prender a placa, e recoloque a tampa do
computador.
Placa VGA
Cabo do monitor
Para monitor VGA
(Todas as placas
VGA)
Para monitor plano/LCD
(Apenas placas VGA
equipadas com DVI)
Ligue o cabo do monitor à placa VGA e
depois ligue o computador e o monitor. Se
a sua placa VGA vier equipada com um
conector DVI, pode ligar um monitor plano
ao respectivo conector, conforme
ilustrado...
(Verifique se todos os cabos estão
devidamente ligados.)
Page 33

32
Instalação da placa VGA
Desinstalação de drivers gráficos antigos
Para assegurar a instalação bem-sucedida do driver da placa gráfica, desinstale os
drivers gráficos da placa gráfica existente antes de removê-la do computador.
Dependendo do sistema operacional, escolha o procedimento de desinstalação do
Windows® XP ou do Windows Vista™:
• Desinstalação de drivers gráficos antigos (Windows® XP)
• Desinstalação de drivers gráficos antigos (Windows Vista™)
Desinstalação de drivers gráficos antigos (Windows® XP)
Com a placa gráfica ainda no conectada no computador, feche todas as aplicações
1.
abertas.
No Painel de controle, selecione Adicionar ou remover programas.
2.
Selecione os drivers da placa gráfica atual e, em seguida, clique em Adicionar ou
3.
remover. O assistente o ajudará a remover os drivers de vídeo atuais.
Nota: se a placa gráfica instalada anteriormente tiver algum software adicional
instalado, este também será removido nesse ponto. Por exemplo, leitor de
DVD ou aplicações de multimídia.
Desligue o sistema após remover os drivers.
4.
Desinstalação de drivers gráficos antigos (Windows Vista™)
Com a placa gráfica ainda no conectada no computador, feche todas as aplicações
1.
abertas.
No Painel de controle, clique duas vezes em Programas e Recursos e, em
2.
seguida, selecione o driver da placa gráfica na lista de programas de computador.
Clique em Desinstalar.
3.
Se aparecer a caixa de diálogo de confirmação de desinstalação de Programas e
4.
Recursos, clique em Sim.
Nota: se a placa gráfica instalada anteriormente tiver algum software adicional
instalado, este também será removido nesse ponto. Por exemplo, leitor de
DVD ou aplicações de multimídia.
Desligue o sistema após remover os drivers.
5.
Page 34

33
Instalação de software e drivers
O software é fornecido para aproveitar todos os recursos de sua placa gráfica
Sapphire, incluindo:
• Driver da placa gráfica
• ATI Catalyst™ Control Center
Instalação do software
Pata instalar ou remover os drivers, é necessário ter direitos de administrador ou estar
conectado como um usuário com
direitos de administrador. Certifique-se de que o cabo do monitor esteja conectado
corretamente antes de iniciar.
Nota: a caixa de diálogo de instalação será exibida em inglês se o idioma de
seu sistema operacional não for suportado.
Insira o CD de instalação da Sapphire no computador.
1.
Se o Windows® executar o CD automaticamente, vá para o passo 3.
Clique duas vezes no CD, clique duas vezes em LAUNCH (ou ATISETUP) e, em
2.
seguida, clique em OK.
Siga as instruções na tela e, em seguida, selecione a instalação Expressa ou
3.
Personalizada.
Nota: nem todos os componentes do software são instalados com a instalação
Expressa. A instalação personalizada permite selecionar componentes
individuais do software.
Dica! Se o instalador falhar na instalação do driver ou se houver um conflito de
software, você poderá fazer o download do software mais recente em
www.sapphiretech.com ou ati.amd.com e, em seguida, instalá-lo.
Uso do manual on-line
A placa VGA vem com um manual on-line que descreve seus recursos avançados. O
manual on-line fornece especificações, informações de referência, legais, de isenção de
responsabilidade e atendimento a normas que não foram incluídas neste guia.
Para abrir o manual on-line
Insira o CD DE INSTALAÇÃO DA PLACA VGA na unidade de CD-ROM.
1.
Se o Windows® executar o CD automaticamente, vá para o passo 6.
Clique em Iniciar.
2.
Selecionar Executar.
3.
Digite o seguinte:
4.
D:\ LAUNCH (ou D:\ATISETUP)
(caso a unidade de CD-ROM não seja D, substitua o D pela letra da unidade correta)
Clique em OK.
5.
Clique em Online User Manual (manual do usuário on-line).
6.
Page 35

34
Diagnóstico de problemas
As dicas de solução de problemas a seguir poderão ajudá-lo se você tiver problemas.
Para obter mais ajuda, consulte o atendimento ao cliente em ati.amd.com/support ou o
fabricante do PC.
Diagnóstico de problemas gerais
Problema Solução possível
O computador não
inicializa corretamente
Não há exibição
Aparecem defeitos na
tela
Imagem fora do centro
na tela, cores
indefinidas ou falta de
imagem
O sistema operacional
avisa que a placa de
vídeo não está
configurada corretamente
• Verifique se as instruções de instalação foram seguidaas corretamente.
• Verifique se a placa está instalada corretamente no sistema e conectada ao
monitor.
• Se houver problemas durante a inicialização, reinicie o computador no Modo de
segurança.
Ao iniciar o Windows® XP, mantenha pressionada a tecla F8 até ver o menu de
opções avançadas do Windows®. Use as teclas de seta para selecionar o Modo
de segurança e, em seguida, pressione Enter.
• Marque o utilitário de configuração do sistema do sistema operacional para obter
as atribuições de interrupção.
• Se o computador tiver recursos de gráficos on-board, poderá
ser necessário desativá-los na placa-mãe. Para obter mais
informações, consulte a documentação do computador.
Certifique-se de que:
• A placa esteja assentada corretamente em seu slot de expansão.
• O cabo do monitor esteja fixado com firmeza na placa.
• O monitor e o computador estejam conectados e estejam recebendo alimentação.
• Você selecionou o monitor apropriado ao instalar o driver.
• Se você estiver instalando uma placa gráfica AGP, certifique-se de ter a versão
mais recente dos drivers da placa-mãe/ chipset AGP.
• Verifique se o monitor suporta a resolução e as taxas de atualização horizontal
(kHz) e vertical (Hz) requeridas pela placa gráfica.
• Verifique a resolução, a taxa de atualização e as configurações de profundidade
de cores atuais nas guias Configurações e Monitor da caixa de diálogo
Propriedades de exibição.
Cuidado! Certifique-se de que a placa de vídeo e o monitor suportem a resolução
e as taxas de atualização selecionadas. Uma seleção incompatível de
resolução/taxa de atualização pode causar danos ao monitor. Consulte a
documentação do monitor para obter as resoluções e as taxas de atualização
recomendadas.
• Tente ajustar os controles de brilho, nitidez, contraste e balanço de cores do
monitor.
• Tente ajustar os controles de centralização e posicionamento para a localização
da imagem na tela
• Ajuste as entradas de RGB do monitor (e os comutadores de sincronização, se
essa opção estiver disponível) para 75 ohms, com a sincronização definida em
externa.
• Usuários de monitores LCD: Consulte a documentação do monitor para obter o
cabo e o conector apropriados para ligação no conector DVI-I da placa gráfica.
• Remova e reinstale os drivers da ATI para a placa gráfica.
• Verifique a instalação do driver e certifique-se de que todo o software carregado
combine corretamente com o sistema operacional e as aplicações.
Page 36

35
VGA Kartınızın Takılması
Bilgisayarınızın Hazırlanması
VGA Kartınızı yerleştirmeden önce mevcut video kartınızın sürücüsünü silmenizi ve
işletim sisteminizi kendisine ait görüntü sürücüsünü (VGA) kullanacak şekilde baştan
ayarlamanızı tavsiye ederiz. VGA sürücüsünü değiştirmek konusunda daha fazla bilgi
için işletim sisteminize ilişkin belgelere bakın.
ÖNCE BU BÖLÜMÜ OKUYUN
Donanımla ilgili herhangi bir işlem yapmadan önce, sisteminizin elektrik
düğmesini kapatın ve topraklanmış bir yüzeye – örneğin, güç kaynağının metal
yüzeyine – dokunarak vücudunuzdaki statik elektriği boşaltın.
Üretici, parçaların yetkili servis personeli dışında kimseler tarafından
yerleştirilmesinden doğrudan ya da dolaylı olarak kaynaklanan zararlarla ilgili
hiçbir sorumluluk kabul etmez. Yerleştirmeyi yapabileceğinizden emin
değilseniz bir bilgisayar teknisyenine başvurun.
Yerleştirme sırasında elektriğin açılması sistem parçalarının, hızlandırma
kartının ve şahsınızın zarar görmesine yol açabilir.
Bilgisayarınızı hazırlamayı bitirdikten sonra VGA kartınızı yerleştirmeye başlayabilirsiniz.
VGA Kartınızı Yerleştirmek İçin
Bilgisayarınızı ve ekranı kapatın ve
görüntü kablosunu bilgiyaranızın
arkasından çıkarın.
Video Çıkışı
Bağlantısı
Görüntü Kablosu
Güç Kaynağı
Bilgisayarın muhafazasını çıkarın.
Gerekirse, muhafazayı çıkarmak
konusunda bilgisayara ilişkin elkitabına
danışın.
(Bilgisayarın şasisinin metal yüzeyine
dokunarak vücudunuzdaki statik elektriği
boşaltmayı unutmayın.)
Page 37

36
Vida
Mevcut VGA Kartı
VGA Kartı
Mevcut bir VGA kartı varsa bilgisayarınızdan
çıkarın.
Ya da bilgisayarınızın yerleşik grafik gücü
varsa bunu ana karttan pasif hale getirmeniz
gerekebilir. Daha fazla bilgi için
bilgisayarınızla ilgili belgelere bakın.
(VGA Kartı takılıp çıkmayacak olursa, hafifçe
iki yana doğru oynatın. Vidayı saklamayı
unutmayın.)
Yuvayı bulun. Gerekirse metal muhafazasını
çıkarın. Sonra VGA Kartınızı
AGP/PCI/PCI-Express yuvasıyla aynı hizaya
getirin ve tümüyle yerine oturuncaya kadar
bastırın.
(VGA Kartını üst kenarından tutup dikkatle
yuvaya oturtun. İletken metal parçaların
tümüyle yuvaya girmesini sağlayın.)
Yuva
Vidayı yerine takarak kartı sabitleştirin ve
bilgisayarın muhafazasını takın.
Vida
VGA Kartı
Görüntü Kablosu
VGA Ekranına
(Tüm VGA Kartları için)
Düz / Sıvı Kristal (LCD) Ekrana
(Yalniz Dijital Görüntü Arayüzü)
(DVI) için Hazır VGA Kartları için
Görüntü kablosunu VGA Kartına takın ve
bilgisayarı ve ekranı açın. Kartınızın DVI
bağlantısı varsa, şekilde gösterilen
bağlantıya düz ekran bağlayabilirsiniz...
(Bütün kabloların sağlam bir şekilde takılı
olmasına dikkat edin.)
Page 38

VGA Kartınızın Takılması
Eski Grafik (Ekran Kartı) Sürücülerinizi Kaldırın
Grafik kartı sürücüsünü başarılı bir şekilde yükleyebilmek için, eski grafik kartını
bilgisayarınızdan çıkartmadan önce bu grafik kartının sürücülerini kaldırınız.
İşletim sisteminize bağlı olarak, Windows® XP veya Windows Vista™ sürücü kaldırma
prosedürünü seçiniz:
• Eski grafik sürücülerinin kaldırılması (Windows® XP)
• Eski grafik sürücülerinin kaldırılması (Windows Vista™)
Eski grafik sürücülerinin kaldırılması (Windows® XP)
Mevcut grafik kartınız bilgisayarınızda takılı iken, tüm açık uygulamaları kapatın.
1.
Denetim Masasından, Program Ekle veya Kaldır seçeneğini seçin.
2.
Mevcut grafik kartı sürücülerini seçin ve sonra Ekle/Kaldır tuşuna tıkayın. Sihirbaz,
3.
mevcut ekran kartı sürücülerini kaldırırken size yardım edecektir.
Not: Eğer önceden takılı olan grafik kartının yüklü ek bir yazılımı varsa, bu
aşamada onu da bilgisayarınızdan kaldırın. Örneğin DVD oynatıcı veya
multimedya uygulamaları.
Sürücüleri kaldırdıktan sonra sistemi kapatın.
4.
Eski grafik sürücülerinin kaldırılması (Windows Vista™)
Mevcut grafik kartınız bilgisayarınızda takılı iken, tüm açık uygulamaları kapatın.
1.
Denetim Masasından, Programlar ve Özellikler seçeneğine çift tıklayın ve sonra
2.
yazılım programları listesinden grafik kartı sürücüsünü seçin.
Kaldır tuşuna tıklayın.
3.
Programlar ve Özellikler kaldırma teyit diyalogu görüntülendiğinde, Evet seçeneğini
4.
tıklayın.
37
Not: Eğer önceden takılı olan grafik kartının yüklü ek bir yazılımı varsa, bu
aşamada onu da bilgisayarınızdan kaldırın. Örneğin DVD oynatıcı veya
multimedya uygulamaları.
Sürücüleri kaldırdıktan sonra sistemi kapatın.
5.
Page 39

38
Yazılım ve Sürücülerin Yüklenmesi
Yazılım, Sapphire grafik kartınızın tüm özelliklerinden faydalanabilmeniz için
sağlanmıştır, bu özellikler:
• Grafik kartı sürücüsü
• ATI Catalyst™ Kontrol Merkezi
Yazılımın yüklenmesi
Sürücüleri yüklemek veya kaldırmak için, yönetici yetkilerine sahip olmanız veya yönetici
yetkilerine sahip bir kullanıcı olarak giriş yapmanız gerekir. İşlemlere başlamadan önce
monitör kablonuzun doğru şekilde takılı olduğundan emin olun.
Not: Eğer işletim sisteminizin dili desteklenmiyorsa, kurulum (yükleme) diyalog
penceresi İngilizce dilinde görüntülenecektir.
Sapphire yükleme CD’sini bilgisayara yerleştirin.
1.
Eğer Windows® CD’yi otomatik olarak çalıştırırsa, aşama 3’e geçin.
CD’nin üzerine çift tıklayın, LAUNCH (veya ATISETUP) seçeneğine çift tıklayın ve
2.
sonra OK (TAMAM) tuşuna tıklayın.
Ekran-üstü talimatları izleyin ve sonra Ekspres veya Özel Yükleme seçeneklerinden
3.
birisini seçin.
Not: Yazılım bileşenlerinin tümü Ekspres kurulum kullanılarak yüklenemez. Özel
kurulum, kurulumda her bir yazılım bileşenini sizin seçmenize imkan tanır.
İpucu! Eğer yükleme yazılımı sürücüyü yükleyemezse veya bir yazılım çakışması
yaşarsanız, en güncel yazılımı www.sapphiretech.com veya ati.amd.com
adresinden indirebilir ve kurabilirsiniz.
Online Kılavuzun Kullanılması
VGA Kartı, ileri teknoloji özelliklerini açıklayan bir online kılavuzla birlikte temin edilir.
Online Kılavuz, bu kılavuz kitapta yer almayan referans, spesifikasyon, feragat, yasal
bilgiler ve uyumluluk bilgilerini içerir.
Online Kılavuzun Açılması
VGA KARTI KURULUM CD’SİNİ CD-ROM sürücünüze yerleştirin. Eğer
1.
Windows® CD’yi otomatik olarak çalıştırırsa, aşama 6’ya geçin.
Başlat tuşuna tıklayın.
2.
Çalıştır seçeneğini seçin.
3.
Aşağıdaki komutu yazın:
4.
D:\ LAUNCH (veya D:\ATISETUP)
(Eğer “D” CD-ROM sürücünüze ait değilse, D yerine doğru sürücü harfini yazın.)
TAM AM tuşuna tıklayın.
5.
Online User Manual seçeneğine tıklayın.
6.
Page 40

Arıza Teşhis
Aşağıdaki arıza-teşhis ipuçları, sorun yaşamanız halinde size yardımcı olabilir. Daha
fazla yardım almak için, ati.amd.com/support adresinden müşteri hizmetleri ile veya
bilgisayar üreticiniz ile temasa geçin.
Genel Arıza Teşhisi
Problem Muhtemel çözüm
39
Bilgisayar düzgün bir
şekilde başlamıyor
Görüntü yok
Ekranda bozukluklar
var
Görüntü ortalaması
hatalı, garip renkler
veya görüntü yok
İşletim sistemi, video
kartının doğru şekilde
konfigüre edilmediği
uyarısını veriyor
• Kurulum/yükleme talimatlarına doğru bir şekilde riayet ettiğinizden emin olun.
• Kartın sisteme doğru bir şekilde takıldığından ve monitör bağlantısının doğru
olduğundan emin olun.
• Eğer başlatma aşamasında sorunlar yaşıyorsanız, bilgisayarınızı Güvenli
Mod’da yeniden başlatın.
Windows® XP’yi başlatırken, Windows® Gelişmiş Seçenekler Menüsünü
görünceye kadar F8 tuşuna basın ve basılı tutun. Güvenli Mod’u seçmek
için ok tuşlarını kullanın ve sonra Enter tuşuna basın.
• İşletim sisteminin sistem konfigürasyonu ayarlarında sonlandırma görevlerini
kontrol edin.
• Eğer bilgisayarın ana kartında tümleşik grafik kartı varsa, bunu devre dışı
bırakmanız gerekebilir. Daha fazla bilgi için, bilgisayarınızın belgelerine bakın.
Aşağıdaki hususları kontrol edin:
• Kartın yuvaya doğru bir şekilde oturup oturmadığını.
• Monitör kablosunun karta tam olarak takıldığını.
• Monitör ve bilgisayarın fişinin prize takılı olduğundan ve elektrik geldiğinden.
• Sürücüyü kurarken, doğru monitörü seçtiğinizden.
• Eğer bir AGP grafik kartı takıyorsanız, AGP Ana kart/Yonga seti sürücülerinin
en güncel sürücülerine sahip olduğunuzdan.
• Monitörün, çözünürlüğü, yatay (kHz) ve dikey (Hz) yenileme hızlarını
destelediğinden emin olun.
• Görüntü Özellikleri penceresindeki Ayarlar ve Monitör sekmelerinden mevcut
çözünürlüğü, yenileme hızını ve renk derinliği ayarlarını kontrol edin.
Uyarı! Hem video kartının hem de monitörün, seçmiş olduğunuz çözünürlüğü ve
yenileme hızını desteklediğinden emin olun. Uyumsuz çözünürlük/yenileme hızı
seçimi, monitöre zarar verebilir. Önerilen çözünürlükler ve yenileme hızları
hakkında bilgi için monitör belgelerine bakınız.
• Monitörün parlaklık, keskinlik, kontrast ve renk dengesi kontrollerini ayarlamaya
çalışın.
• Görüntüyü ekranda ortalamak için monitörün ortalama ve konumlandırma
kontrollerini ayarlamaya çalışın.
• Monitörün RGB girişlerini (eğer seçenek olarak mevcutsa sync düğmelerini)
sync ayarını harici olarak belirleyerek 75 ohm değerine ayarlayın.
• LCD monitörü kullanıcıları: Grafik kartı üzerindeki DVI-I konnektörüne takılacak
uygun kablo ve konnektör hakkında bilgi için monitör belgelerine bakınız.
• Grafik kartının ATI sürücülerini kaldırıp baştan kurun.
• Sürücü yüklemesini kontrol edin ve işletim sistemi ile uygulamalarına uygun
tüm yazılımların doğru bir şekilde yüklendiğinden emin olun.
Page 41

40
Disposal
Do not dispose this product as unsorted municipal waste. Collection of such waste separately
for special treatment is necessary.
Mise au rebut
Ce produit ne doit pas être considéré comme un déchet ordinaire. Il nécessite une mise au
rebut spéciale pour être traité séparément.
Entsorgung
Das Produkt nicht mit dem Restmüll entsorgen. Abfallprodukte dieser Art sind getrennt zu
sammeln und speziell zu entsorgen.
Smaltimento
Non smaltire il prodotto tra i normali rifiuti domestici. È necessario smaltire il prodotto
secondo i requisiti della raccolta differenziata per i rifiuti speciali.
Descarte
Não descarte este produto como lixo comum. É necessário coletar este produto de forma
diferenciada, com tratamento especial.
Eliminación
No elimine este producto con los residuos domésticos no clasificados. Es necesario que sea
recogido por separado para su tratamiento especial.
İmha
Bu ürünü sıradan ev çöpü gibi atmayınız. Bu tür ürünlerin imhası, özel işlem tesislerine teslim
edilmek suretiyle yapılmalıdır.
 Loading...