

Page 1

EDGE‐HD4MiniPC
Sapphire EDGE-HD4 Mini PC
User Manual ............................................ 1
Benutzerhandbuch .............................. 10
Manual del usuario .............................. 19
Manuel de l'utilisateur ......................... 28
Manuale dell'utente ............................. 37
Руководство пользователя ............... 46
Page 2
EDGE‐HD4MiniPC
- 1 -
EN
User Manual
EDGE-HD4 Mini PC
1. Product Specifications
Important information for your safety and comfort
Please read these instructions carefully before using the product and
save for future reference.
Ensure that the Mini-PC is turned off and disconnected from the
mains supply before cleaning
Do not use liquid or aerosol cleaners, a damp cloth should suffice
Insert the power connector into the Mini PC before plugging the
mains cable into the AC power outlet.
When you need to disconnect power to the equipment, unplug the
power cord from the AC power outlet before removing the power
connector from the Mini PC.
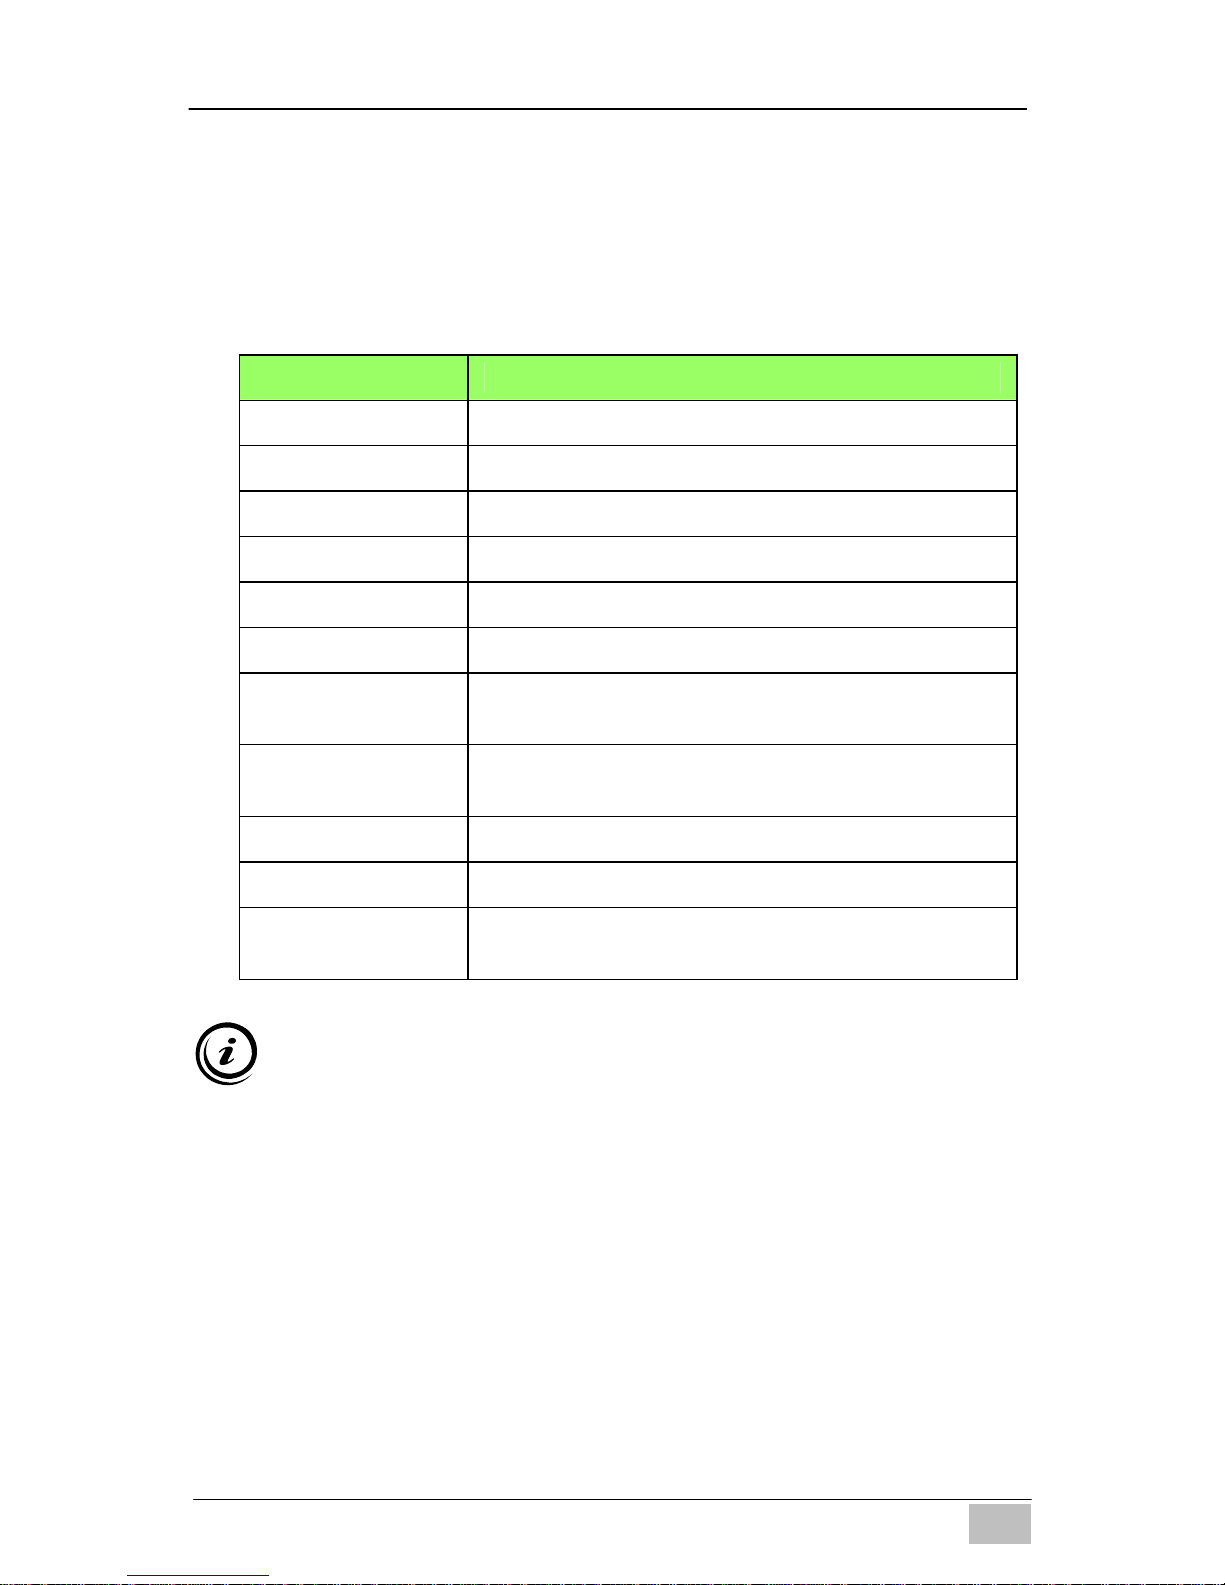
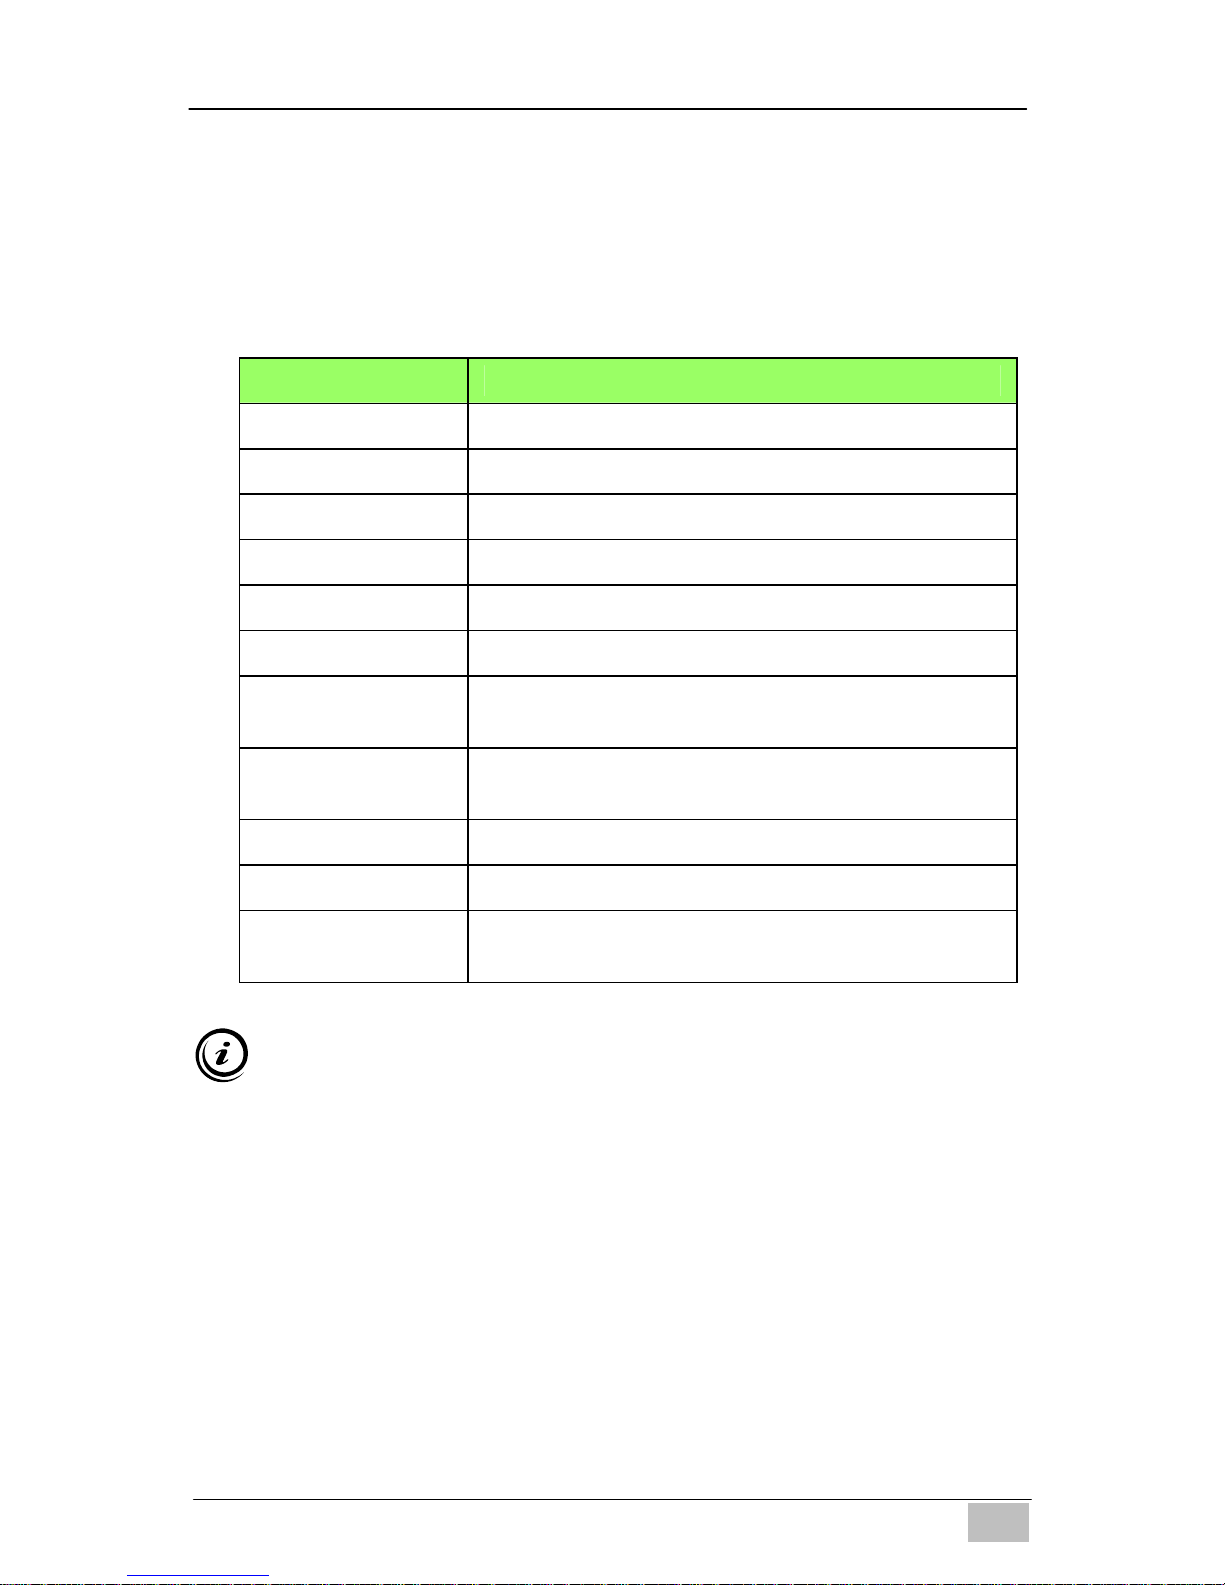
Item Description
CPU Intel Sandy Bridge 847
Chipset INTEL Panther Point (NM70)
RAM 4GB – DDR3
Storage Support 2.5'' SATA 250GB / 320GB / 500GB HDD
LAN Built-in Ethernet supporting 10/100/1000 Mbps
WIFI Built-in WIFI supporting IEEE 802.11 b/g/n
I/O
1 x VGA,1 x HDMI, 1 x RJ45, 1 x USB 3.0 Port,
3 x USB 2.0 Ports, 1 x Audio-In, 1 x Line Out
AC Power Adapter
Input: AC 100~240V, 50/60MHz
Output: DC 19V, 3.42A, 65W
Dimensions 19.3(L) X 14.8(W) X 2.2(H) cm
Weight 530g
Operating System
Pre-installed with FREE DOS;
Supports Win8 / Win7 / Vista
Page 3
EDGE‐HD4MiniPC
- 2 -
EN
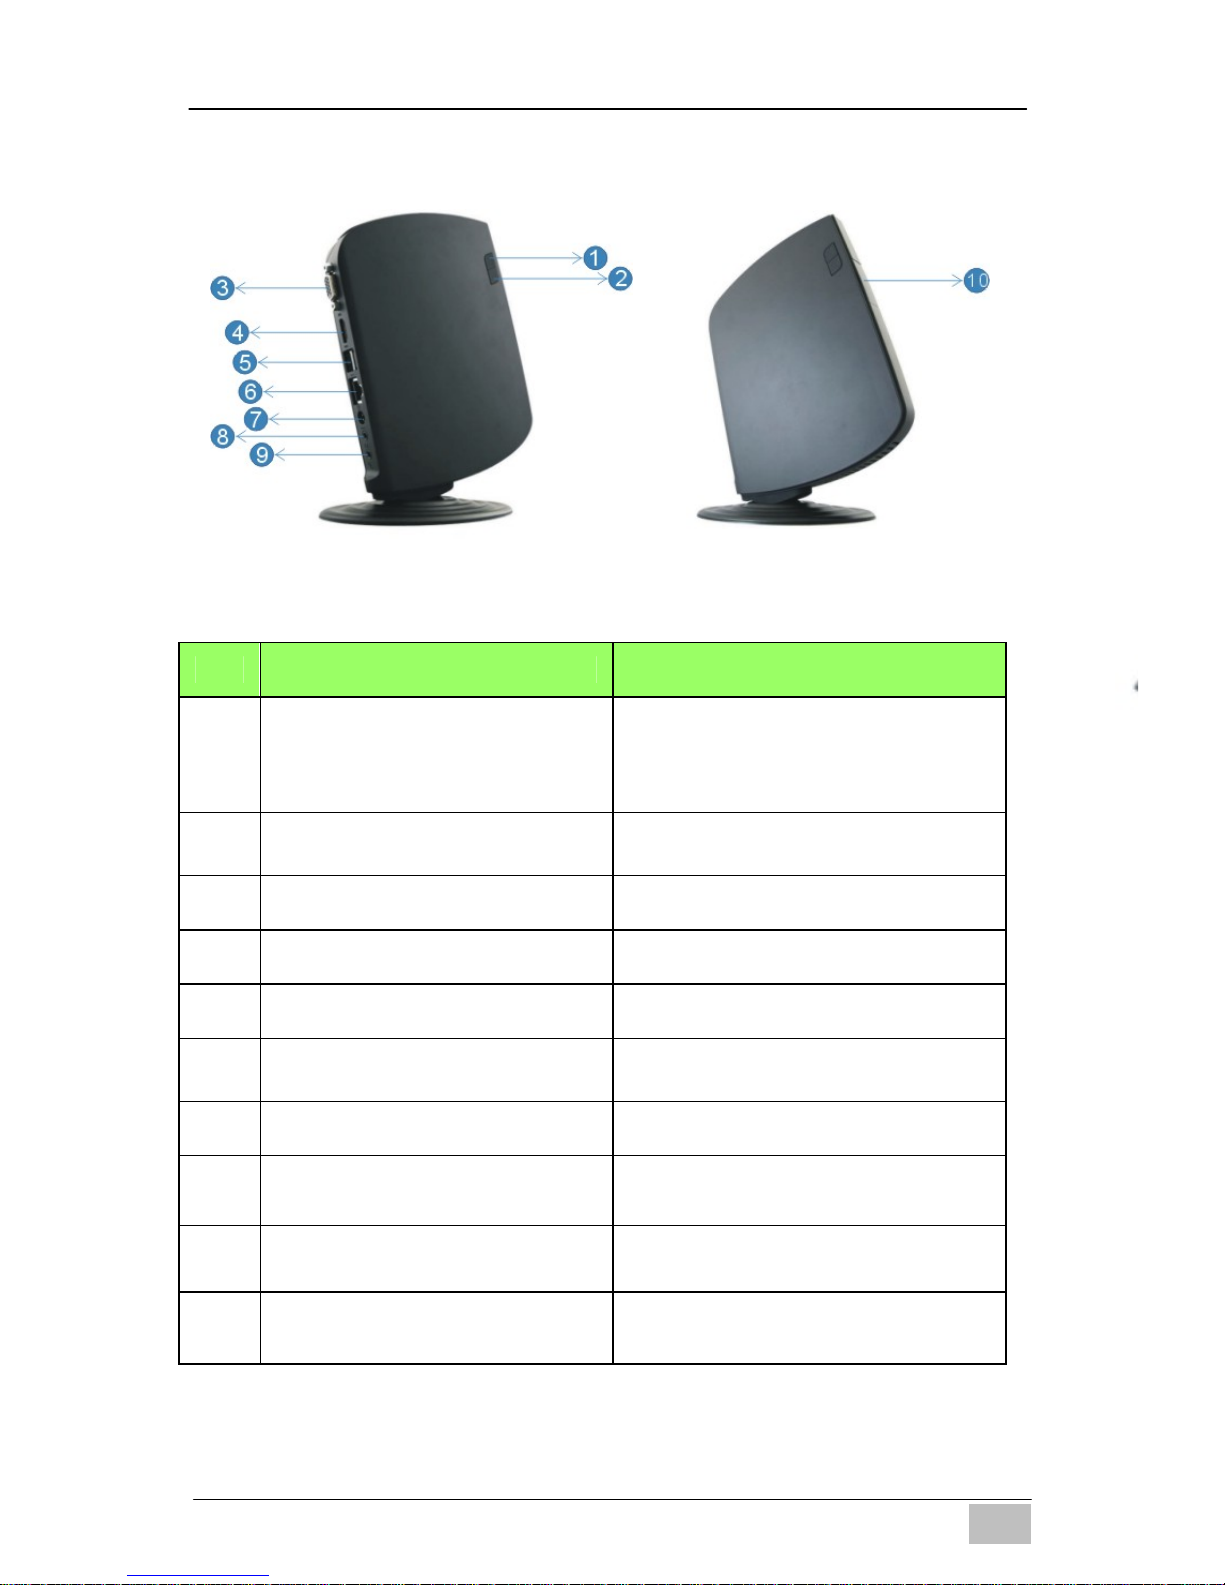
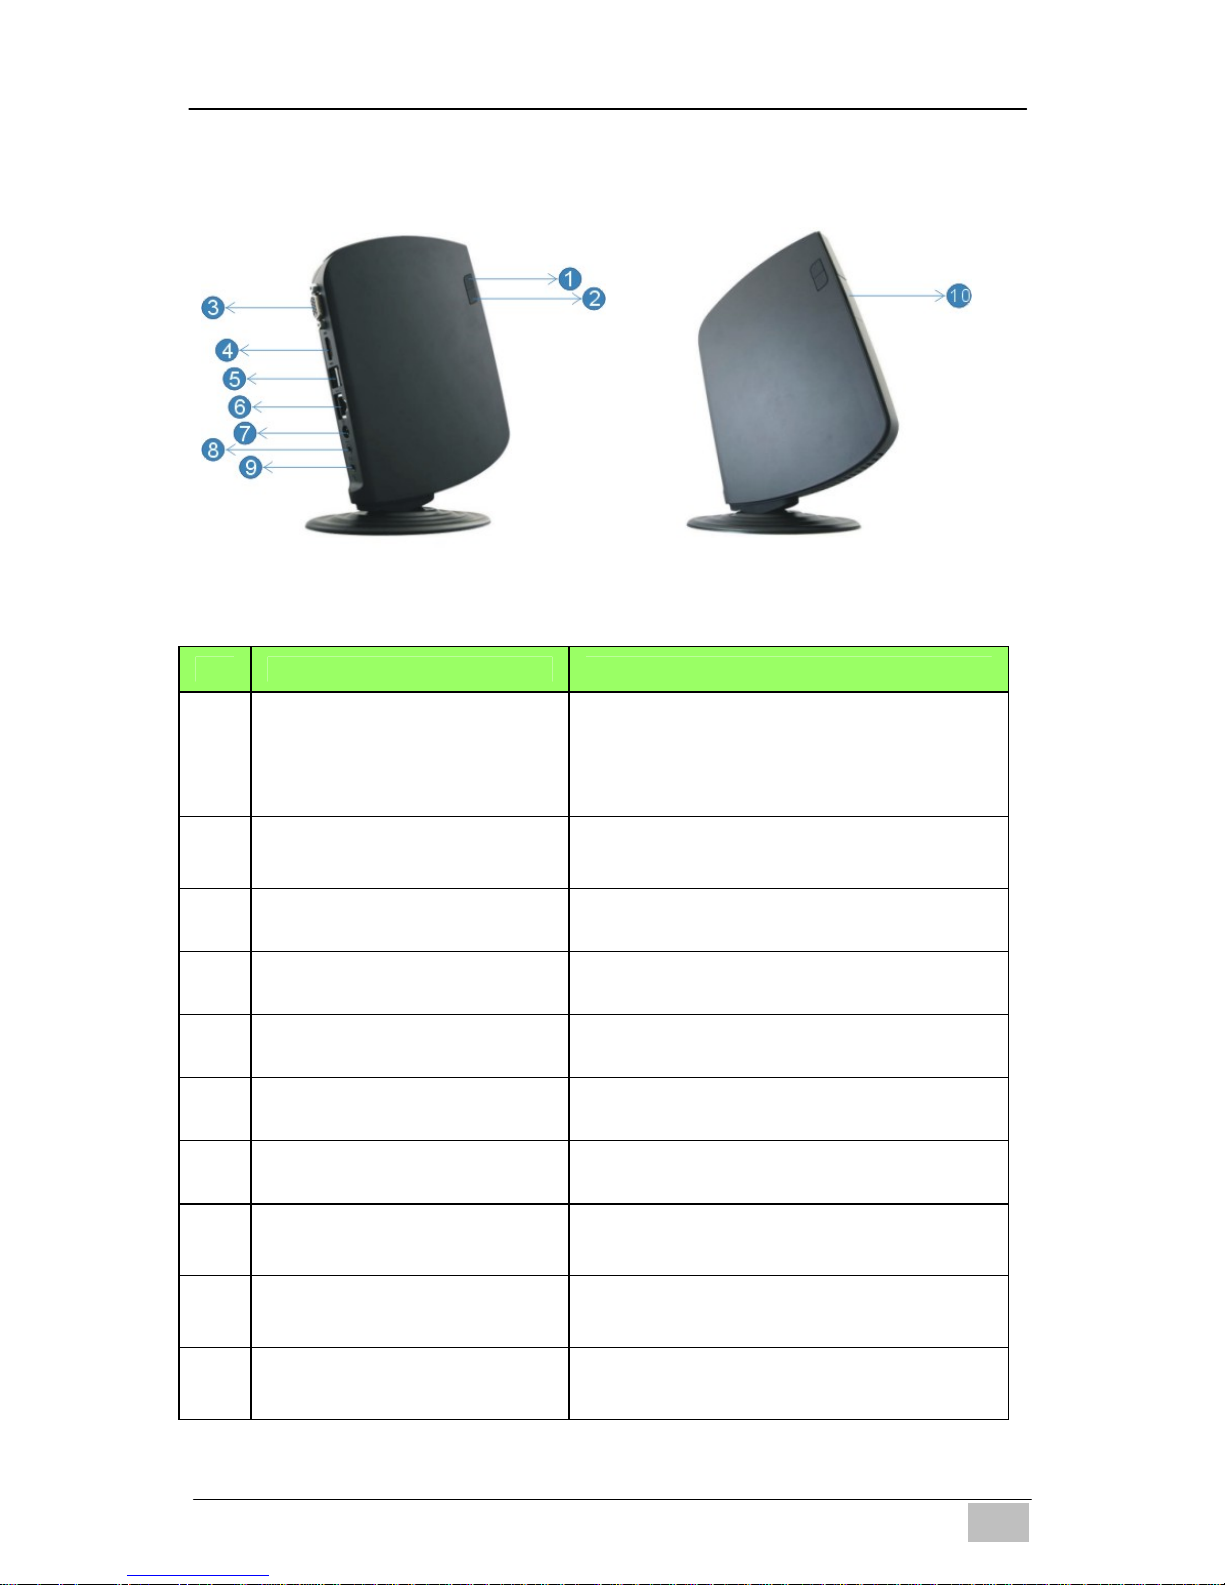
2. Product Overview
Features
No. Item Description
1
Power Switch and Power
Indication light
The power switch allows you to
switch the Mini PC ON or OFF.
The light will glow when the power
is on
2
HDD Activity Indicator
Light will glow when the hard disk
is in use
3
VGA port To connect to a VGA monitor
4
HDMI port To connect to an HDMI monitor
5
Rear USB 2.0 Ports To connect to USB devices
6
LAN Port
To connect to an Ethernet LAN
cable
7
DC Input To connect the power supply
8
Audio out jack
To connect to headphones or
speakers
9
Microphone in jack
To connect to a microphone or
other audio source
10
Front USB2.0/3.0 Ports
(remove cover)
To connect to USB devices.
Page 4
EDGE‐HD4MiniPC
- 3 -
EN
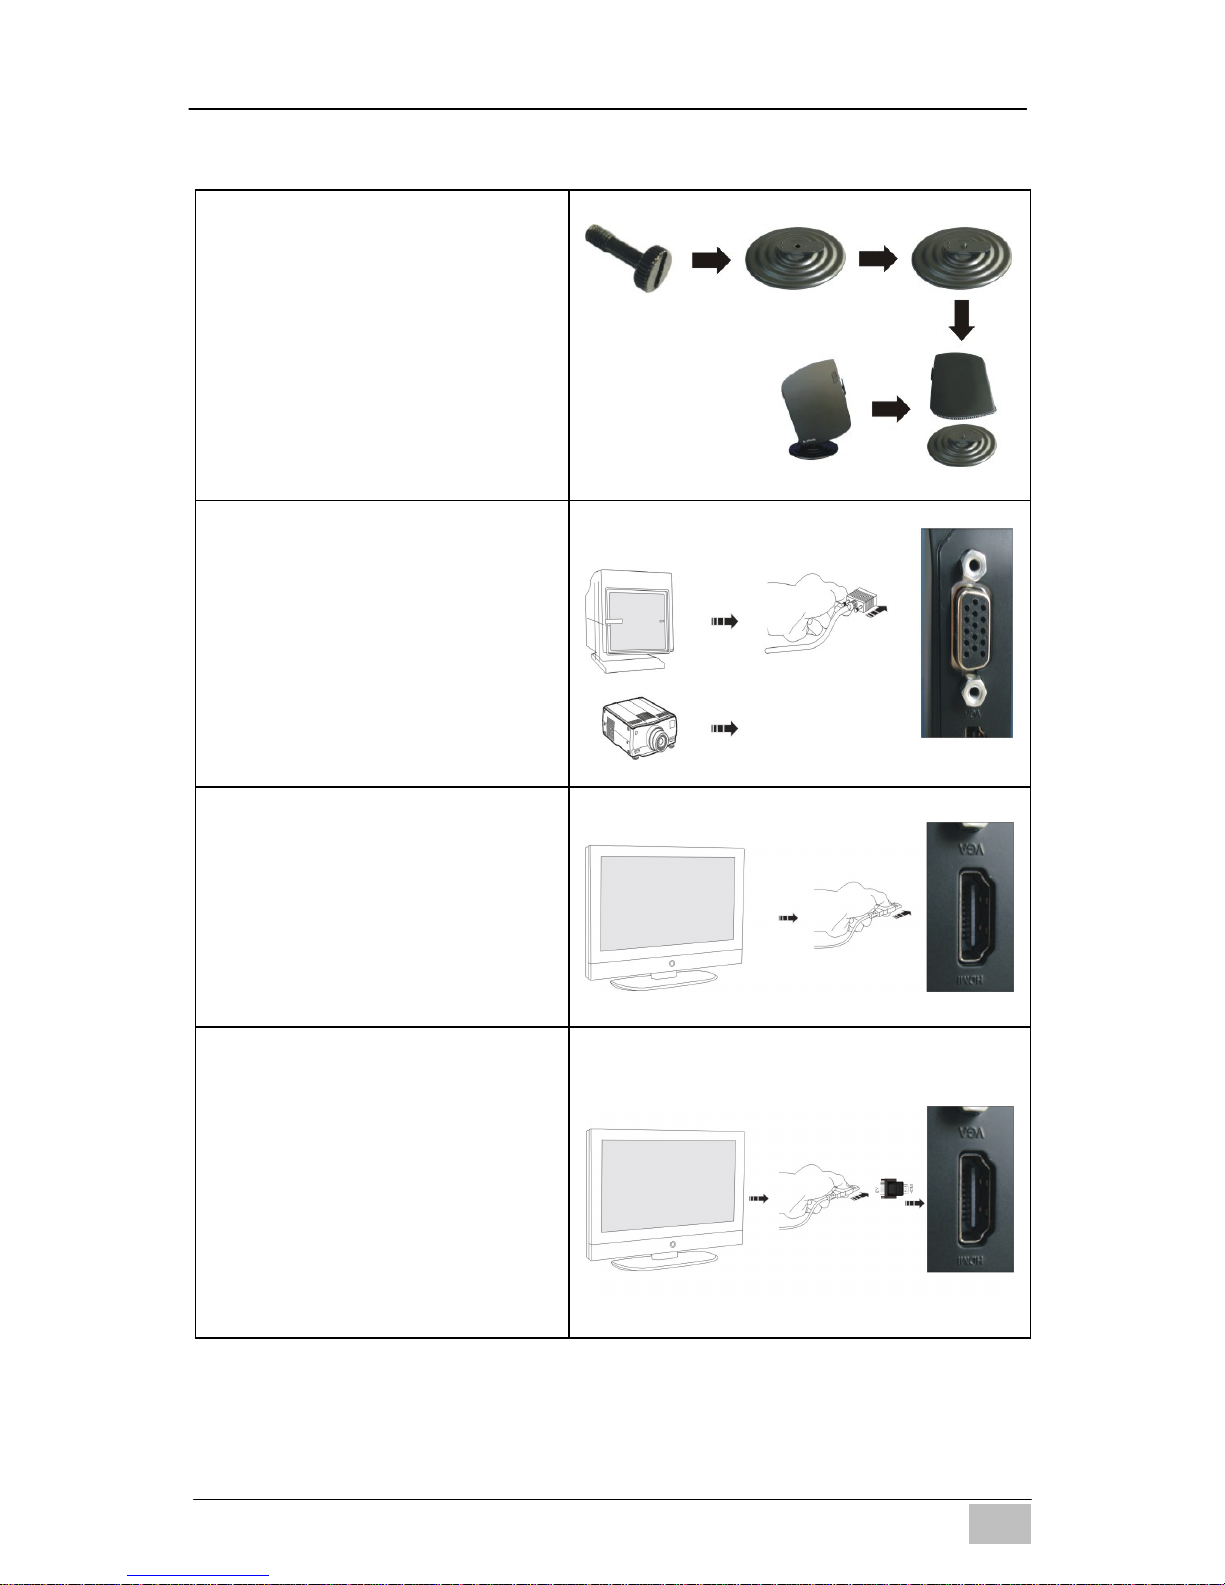
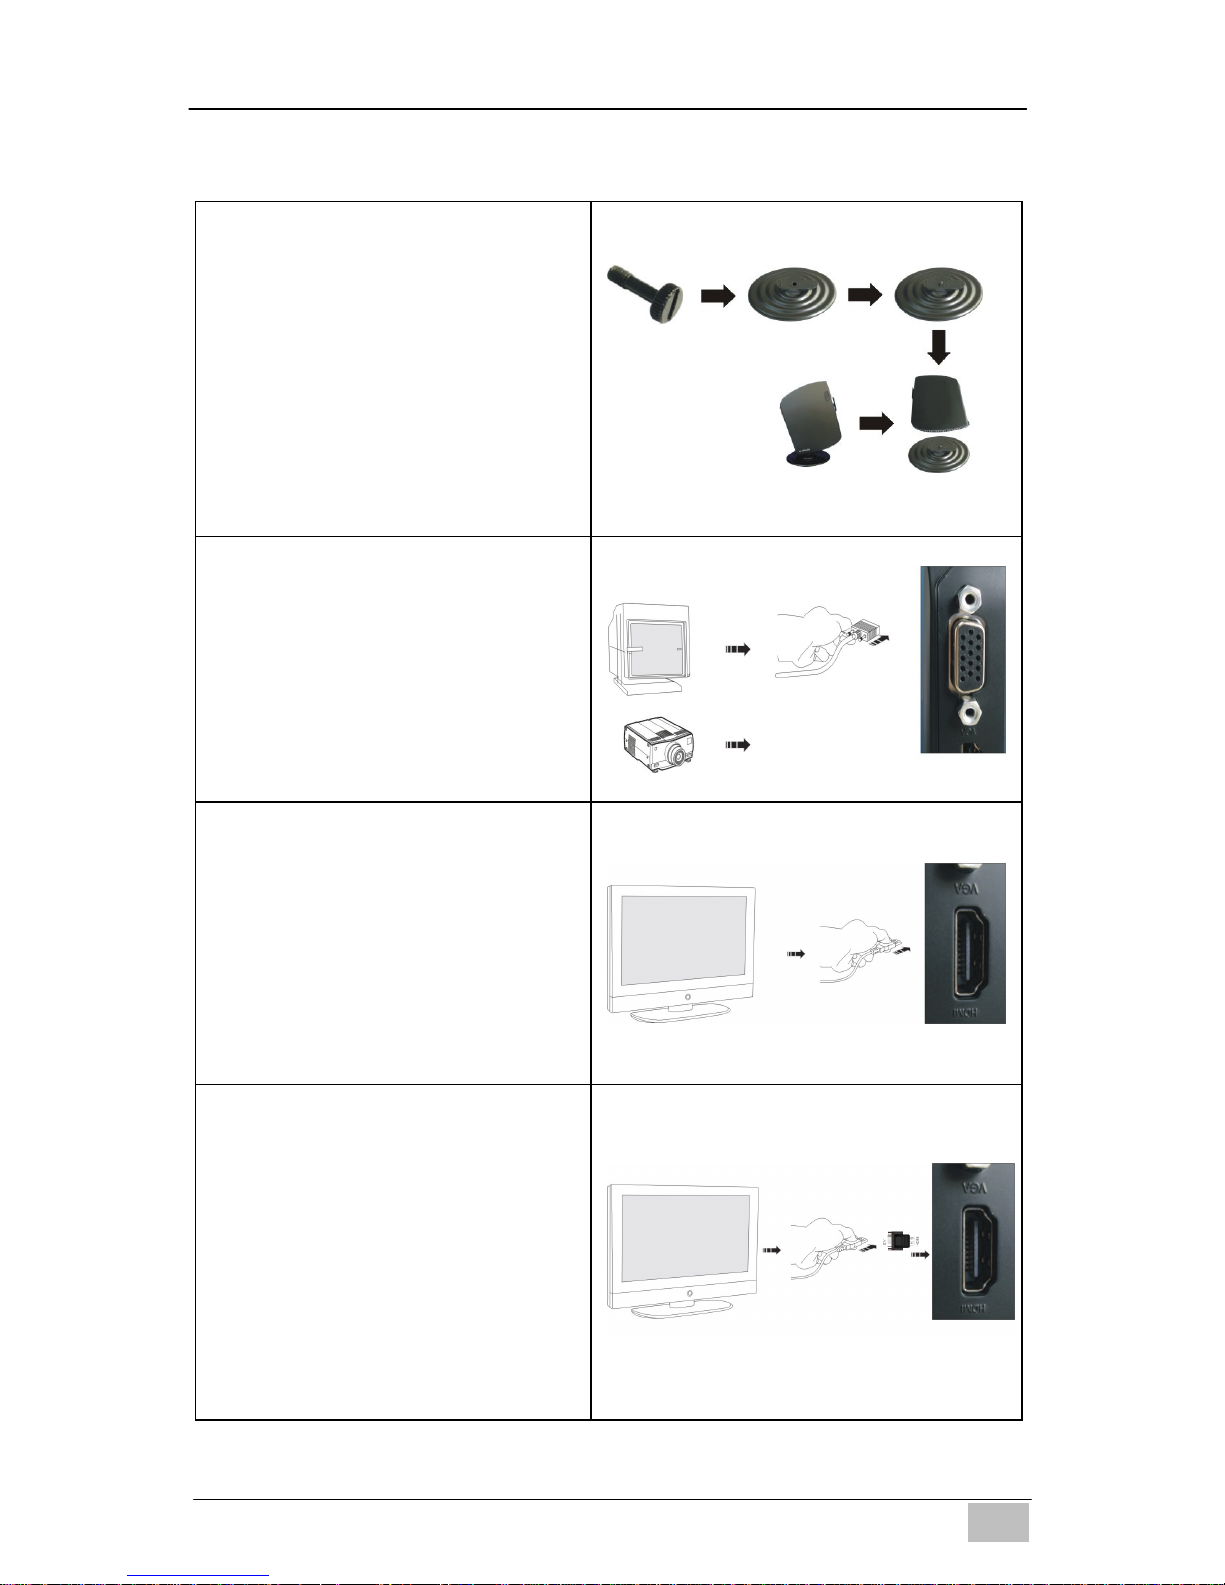
3. Mini PC Setup and Connections
To attach the Desktop Stand
(1). Feed the thumb screw
provided through the hole
in the base of the stand
(2). Align stand with the base
of the Mini PC
(3). Hand tighten the screw
To connect to a VGA display
Connect the VGA monitor or
other display device to the 15
pin D-Sub connector found on
the rear of the unit.
To connect to an HDMI
display / TV
Connect the HDMI monitor or
other display device to the
HDMI connector found on the
rear of the unit.
To connect to a DVI display
(1). Connect the HDMI to DVI
adapter included with the
Mini PC to the HDMI port
found at the rear of the
unit.
(2). Connect the DVI monitor
to the female DVI port on
the adapter.
Page 5
EDGE‐HD4MiniPC
- 4 -
EN
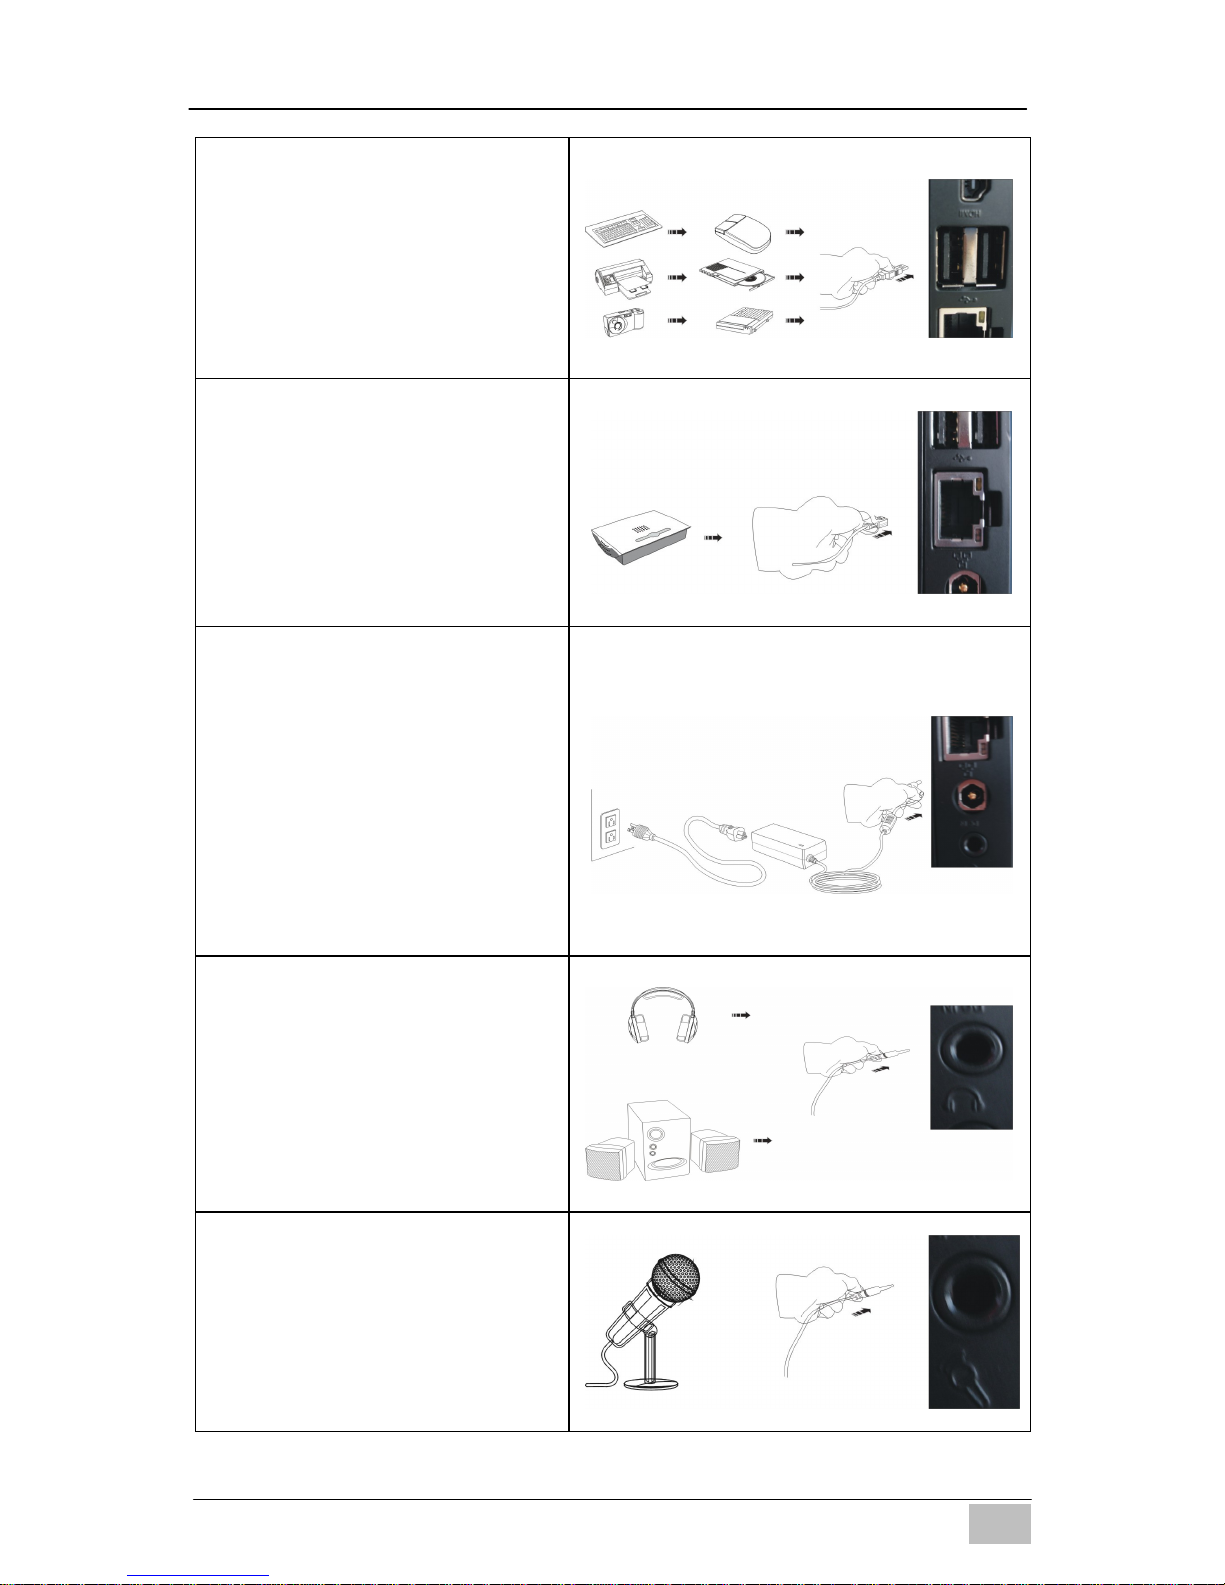
To connect USB devices
Connect USB devices to the
USB ports found both at the
rear of the unit and under the
cover on the front of the unit.
To connect to the network
Connect the Ethernet cable
from your network switch /
router to the RJ45 LAN
connector found at the back of
the unit.
To connect the power
adapter
Connect the power connector
from the supplied power
supply to the DC – In
connector found on the rear of
the unit BEFORE attaching the
mains power cable to an AC
outlet.
To connect speakers or
headphones
Connect the 3.5mm audio
cable to the Audio Out jack
found at the rear of the unit.
To connect a microphone or
other audio source
Connect the 3.5mm audio
cable to the Line In jack found
at the rear of the unit.
Page 6
EDGE‐HD4MiniPC
- 5 -
EN
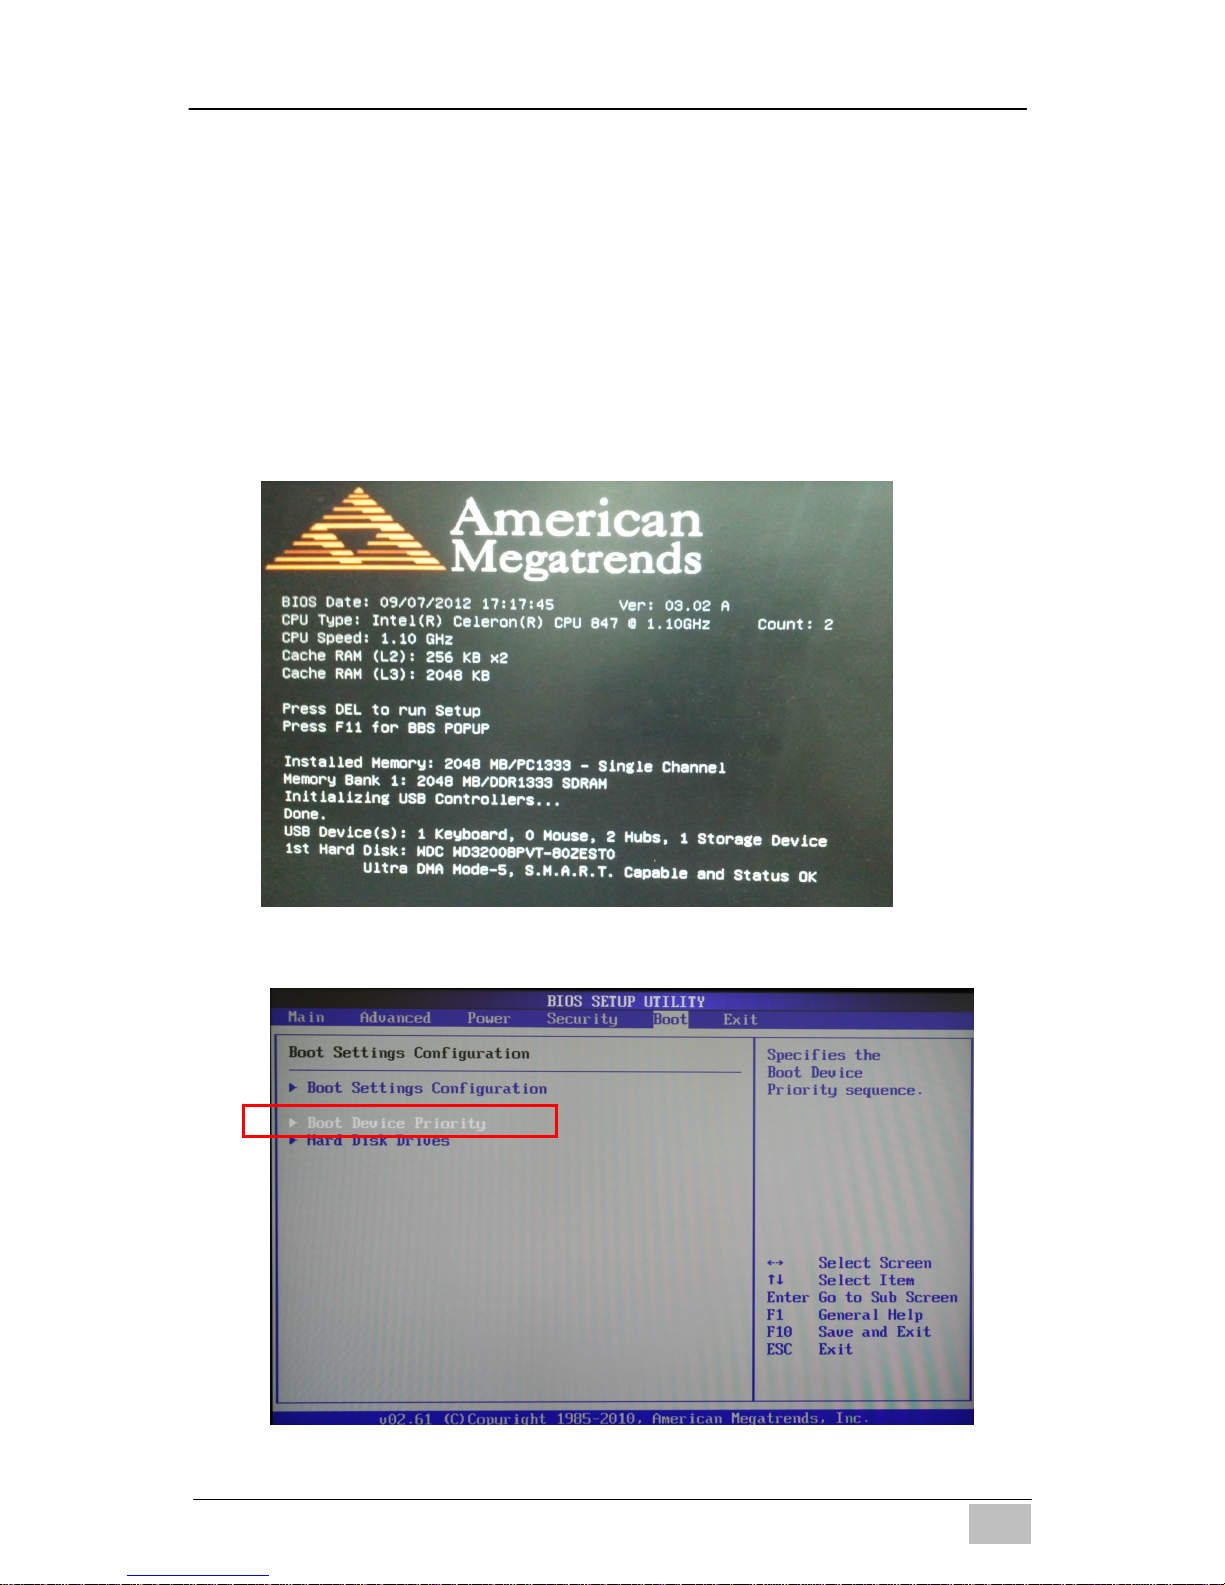
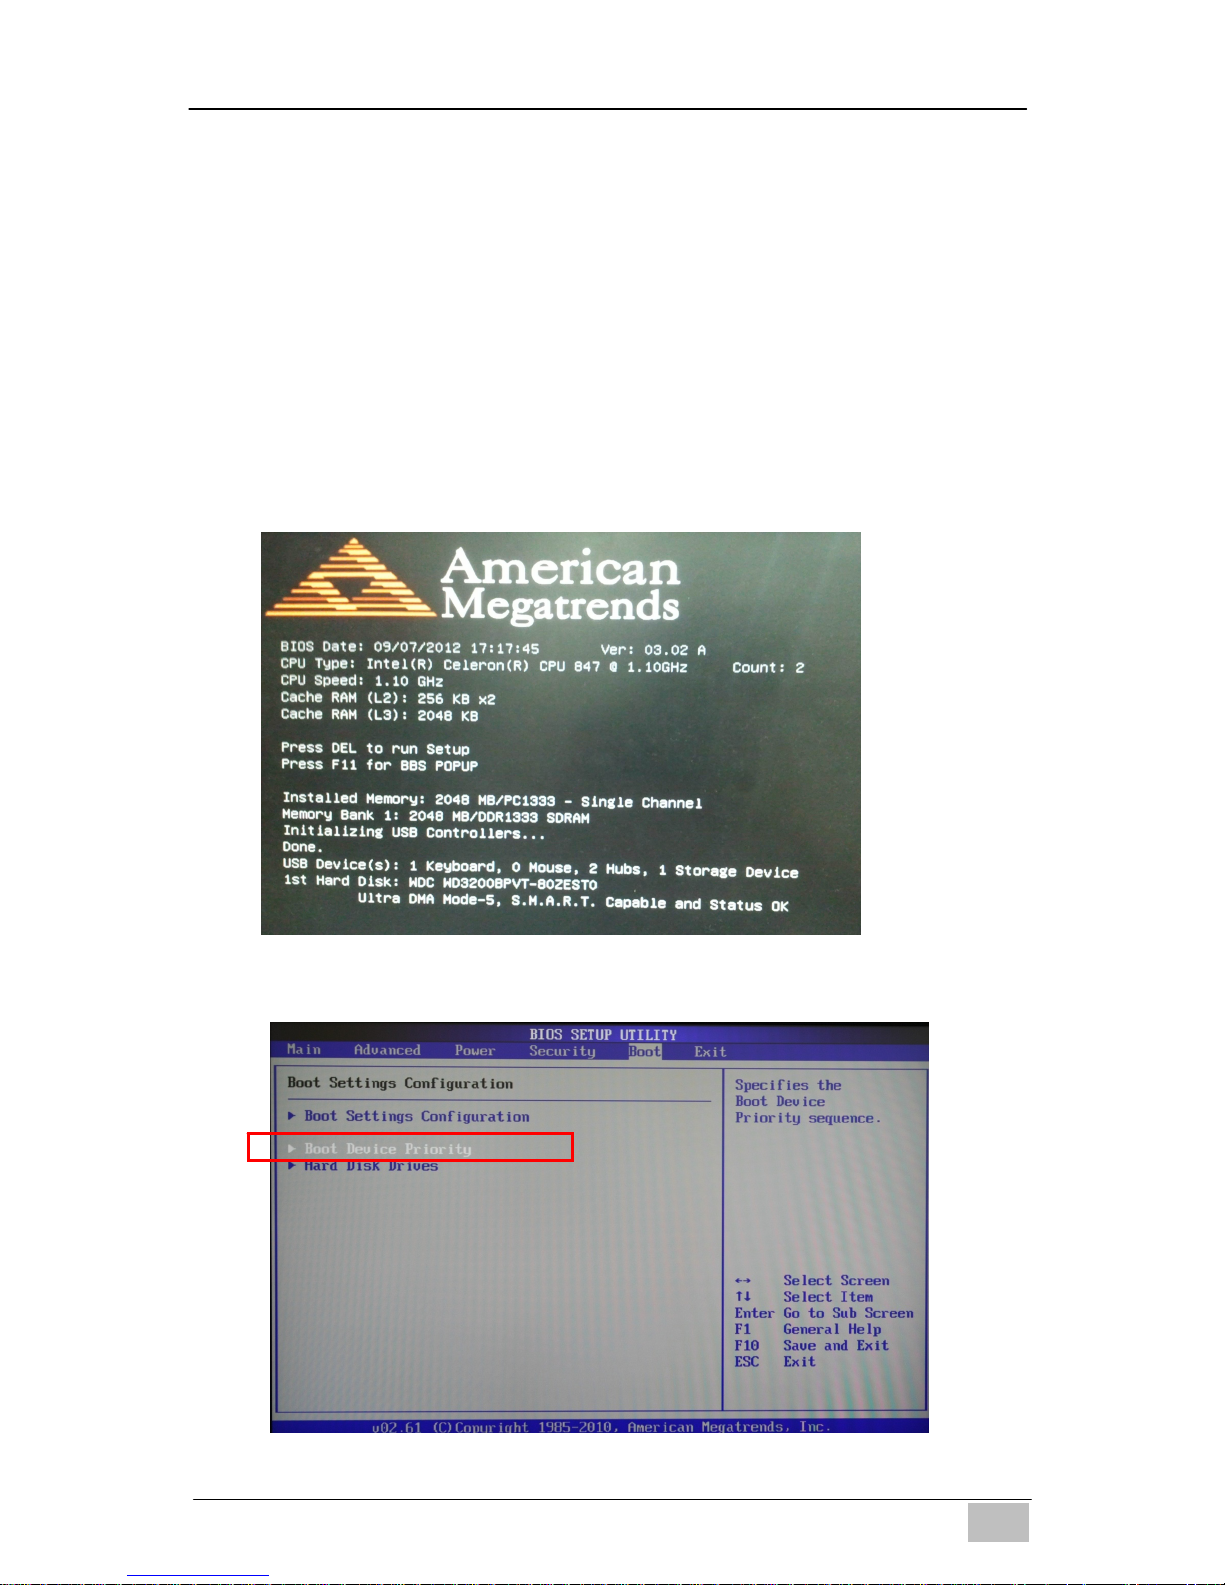
4. Changing Boot Device Priority
(To install another Operating System for example)
By default, the Mini PC is set to boot into DOS from its own internal hard
disk drive. In order to install a different operating system (Linux or
Windows 7
®
for example) you first need to change the boot device
priority in the BIOS to ensure that the Mini PC will try to boot from the
USB CD drive / HDD / pen drive where the new operating system
installation files reside.
Power on the computer and press <DEL> immediately to enter the BIOS
setup utility.
(1) Go to <Boot> page and choose “Boot Device Priority”
Page 7
EDGE‐HD4MiniPC
- 6 -
EN
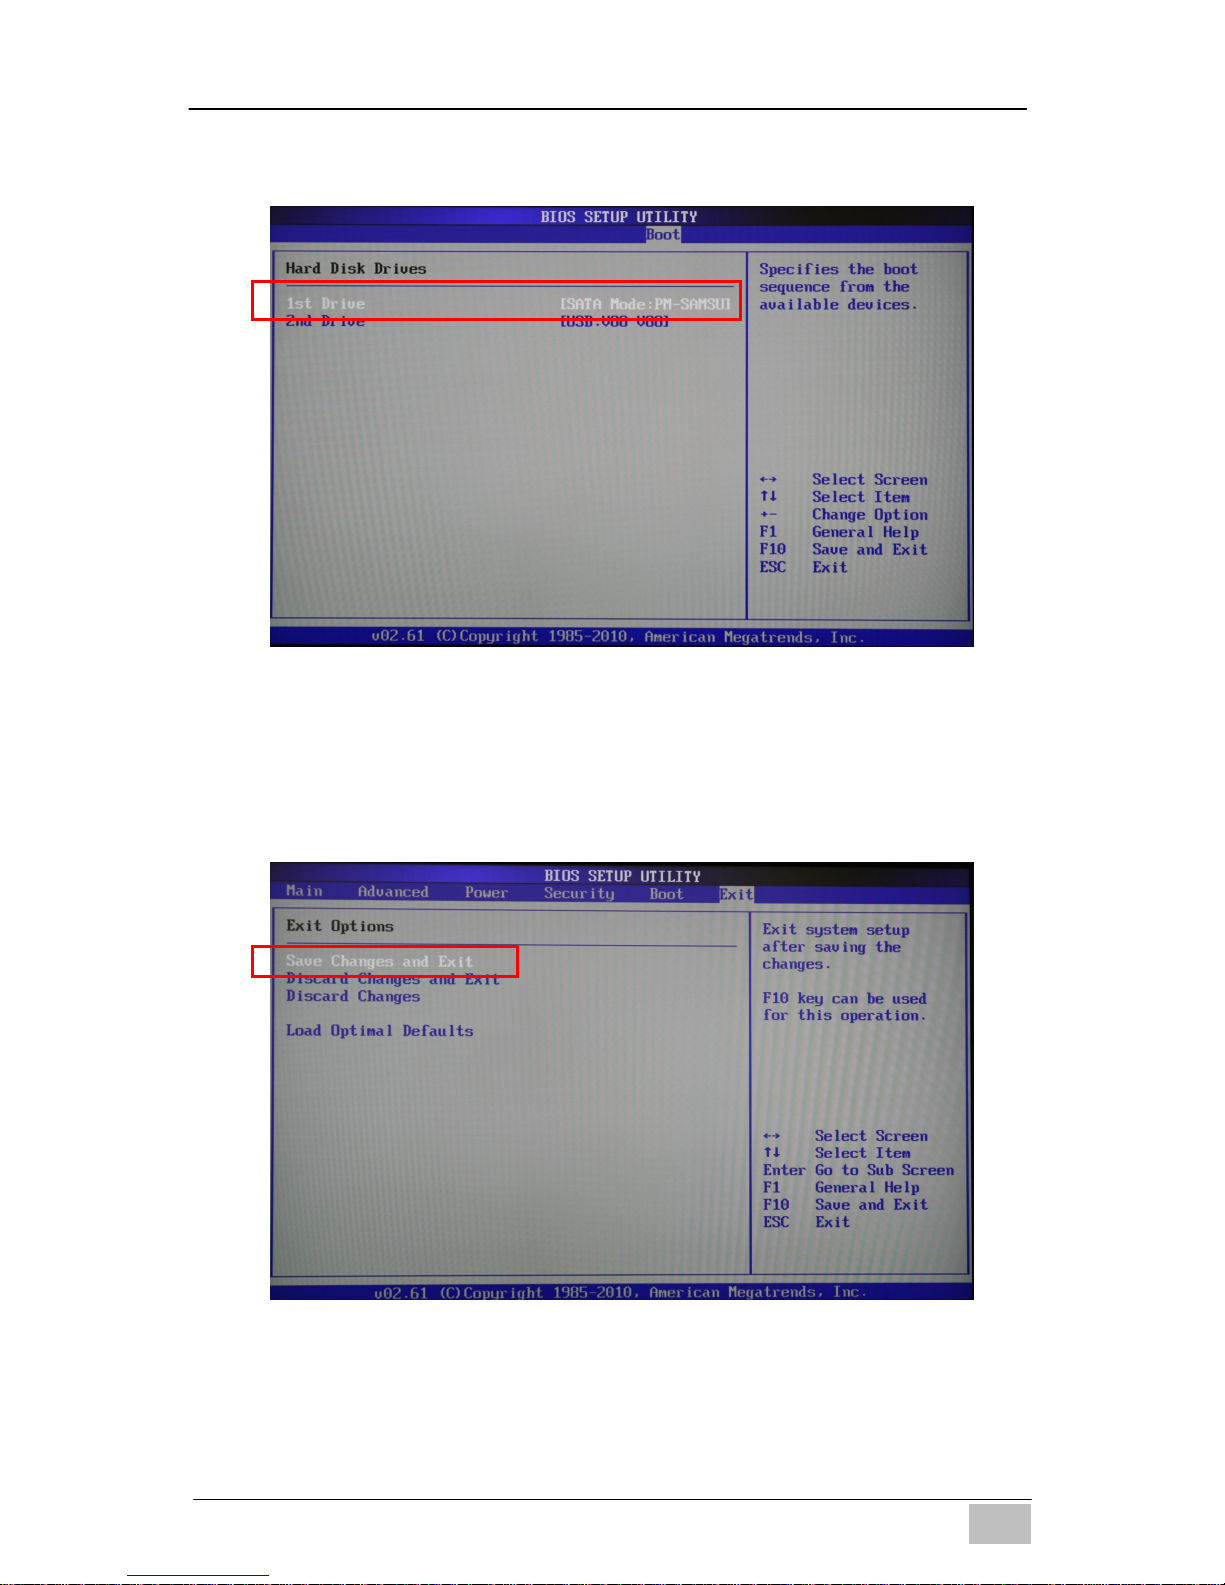
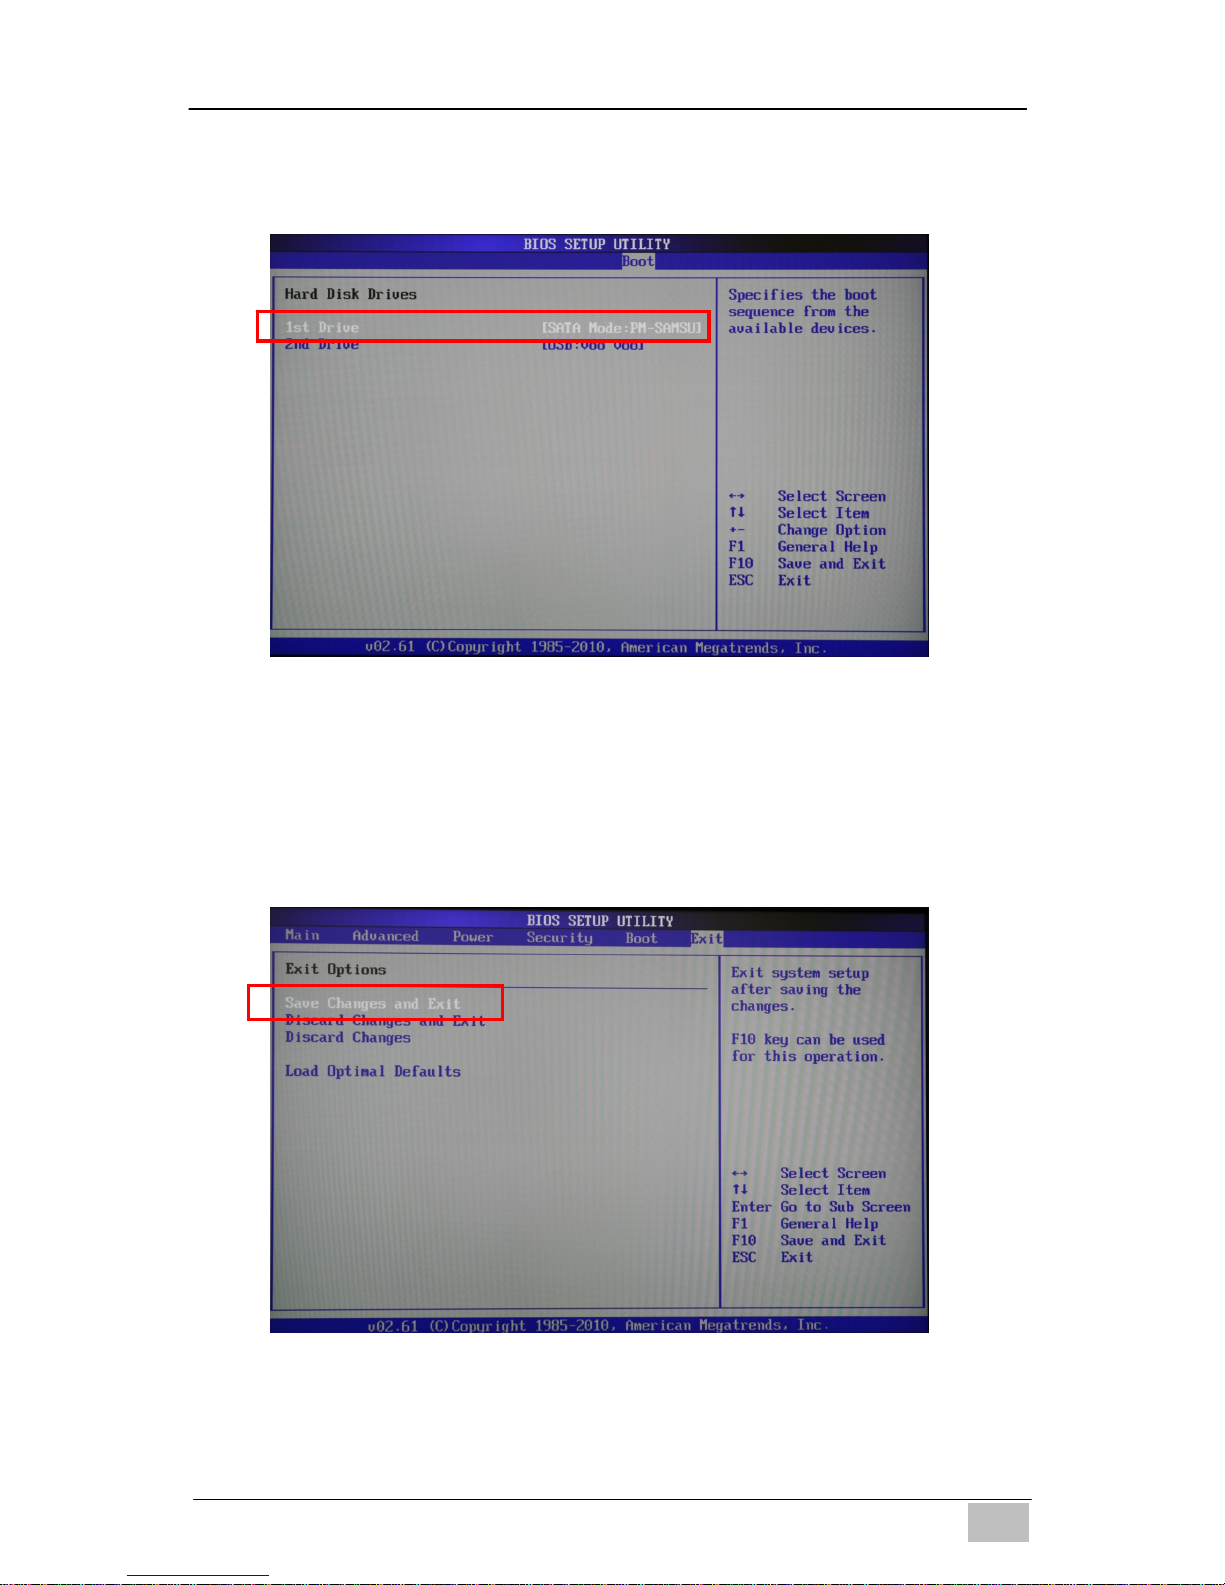
(2) Set the ‘1st Drive’ to be your attached USB CD/DVD/HDD device.
This will automatically set the internal HDD to be the 2
nd
Drive.
(3) Go to the <Exit> page and choose ‘Save Changes and Exit’. After the
Mini PC reboots it will try to boot from your chosen drive before the
internal HDD allowing the installation of another Operating System for
example. Additional device drivers required for some Microsoft
®
Operating Systems can be found on the USB Pen Drive included with
your Mini PC.
Page 8

EDGE‐HD4MiniPC
- 7 -
EN
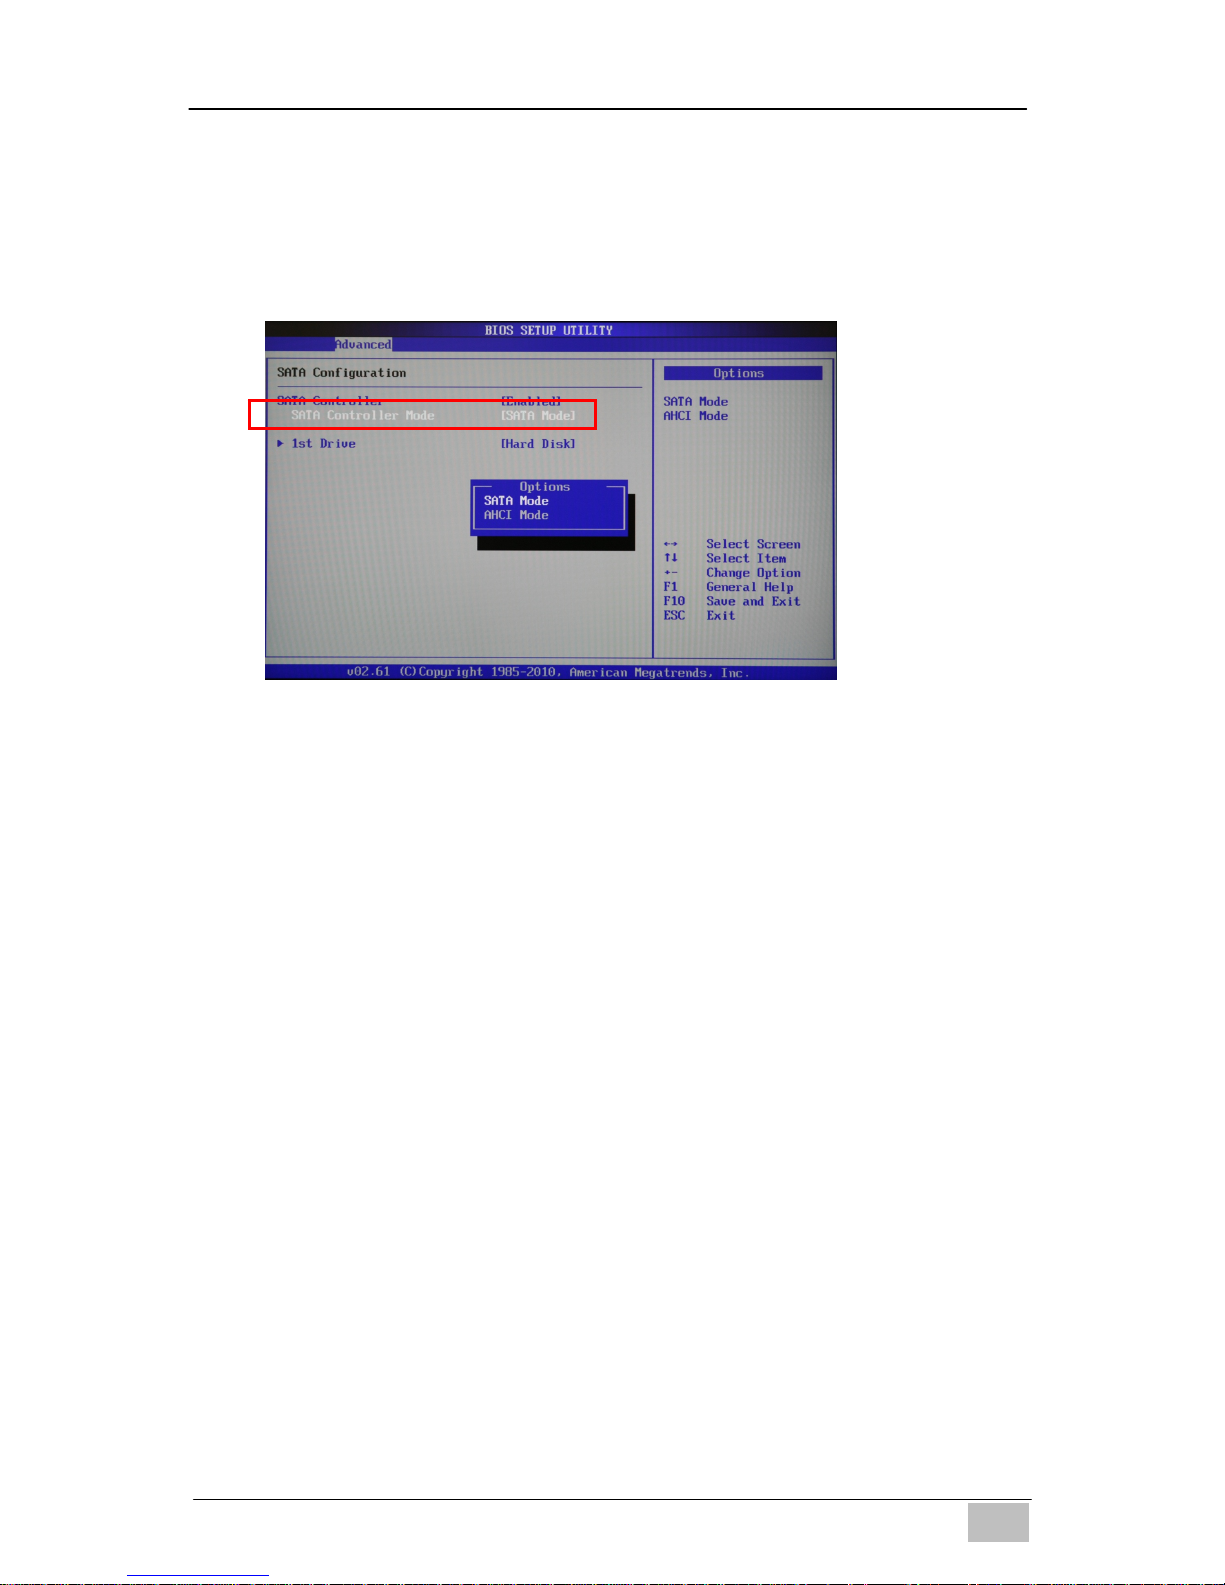
Note:
Some older Operating Systems do not support AHCI mode. If the Operating
System you try to install does not see the HDD as a valid destination, please
go to the <Advanced> page in the BIOS Setup Utility, choose “SATA
Configuration” page and set “SATA Controller Mode” to “SATA Mode”.
Warnings
Do not use this product near water or a heat source such as a radiator.
Do not place this product on an unstable stand or surface. If the
product falls, it could be seriously damaged.
The ventilator on the enclosure is used for air convection and to
prevent the equipment from overheating. Do not cover the ventilator
Never push objects of any kind into this product through cabinet slots
as they may touch dangerous voltage points or short-out parts that
could result in a fire or electric shock.
Never spill liquid of any kind onto or into the product.
To avoid damage of internal components and to prevent battery
leakage, do not place the product on a vibrating surface.
Keep this equipment away from humidity and high temperature
Do not operate the product in a location that is subject to an ambient
temperature above 35
o
C (95oF) or below 0oC (32oF).
Avoid using a cleaner containing alcohol or acetone to clean the
equipment.
Danger of explosion if battery is incorrectly replaced. Replace only
with the same or equivalent type recommended by the manufacturer.
Page 9

EDGE‐HD4MiniPC
- 8 -
EN
Route the power cord in a way that people are unlikely to step on it. Do
not place anything on top of the power cord.
Keep any strong magnetic or electrical objects away from the
equipment.
Your device and its accessories may contain small parts. Keep them
out of the reach of small children.
REACH
Complying with the REACH (Registration, Evaluation, Authorization, and
Restriction of Chemicals) regulatory framework.
RoHS
Complying with the RoHS (Restriction of Hazardous Substances) regulatory
framework.
Lithium-Ion Battery Warning
Danger of explosion if battery is incorrectly replaced. Replace only with the
same or equivalent type recommended by the manufacturer. Dispose of
used batteries according to the manufacturer’s instructions.
CE Mark Warning
This is a Class B product, in a domestic environment, this product may
cause radio interference, in which case the user may be required to take
adequate measures.
CE marking for devices without wireless LAN/Bluetooth
The shipped version of this device complies with the requirements of the
EEC directives 2004/108/EC “Electromagnetic compatibility” and
2006/95/EC “Low voltage directive”.
R&TTE Directive 1999/5/EC as attested by conformity with the following
harmonized standard:
• Article Safety
• EN60950
• Article EMC
• EN301 489-1/-17
• Article Spectrum Usages
• EN300 328
Page 10
EDGE‐HD4MiniPC
- 9 -
EN
WEEE Statement
Under the European Union (“EU”) Directive on Waste Electrical and
Electronic Equipment, Directive 2002/96/EC, effective from August 13, 2005,
states products of “electrical and electronic equipment” no longer may be
discarded as municipal waste. Please refer to your original point of purchase
for instruction on the correct procedure of discarding as municipal waste. It
is the sole responsibility/obligation of the local authorized reseller/distributor
of such covered electronic equipment to take back such products at the end
of their useful life.
For better environmental protection, waste batteries should be
collected separately for recycling or special disposal.
FCC Statement This device complies with Part 15 of the FCC Rules.
Operation is subject to the following two conditions:
(1) This device may not cause harmful interference, and
(2) This device must accept any interference received, including
interference that may cause undesired operation.
Note:
The manufacturer is not responsible for ANY interference, for example
RADIO or TV interference, caused by unauthorized modifications to this
equipment. Such modifications could void the user’s authority to operate the
equipment.
Page 11
EDGE‐HD4MiniPC
- 10 -
DE
Benutzerhandbuch
EDGE-HD4 Mini PC
1. Technische Daten
Wichtige Sicherheitsinformationen
Bitte lesen Sie dieses Handbuch sorgfältig durch, bevor Sie dieses
Produkt verwenden und bewahren Sie es für zukünftige Zwecke auf.
Stellen Sie sicher, dass der Mini-PC ausgeschaltet und von der
Stromversorgung abgetrennt ist, bevor Sie ihn reinigen.
Verwenden Sie keine Flüssigreiniger oder Sprays, ein feuchtes
Tuch sollte genügen
Verbinden Sie den Stromstecker mit dem Mini PC bevor Sie das
Stromkabel mit der Steckdose verbinden.
Wenn Sie die Stromversorgung zum Gerät abtrennen müssen,
trennen Sie das Stromkabel von der Steckdose, bevor Sie den
Stromstecker vom Mini PC entfernen.
Item Description
CPU Intel Sandy Bridge 847
Chipset INTEL Panther Point (NM70)
RAM 4GB – DDR3
Storage Support 2.5'' SATA 250GB / 320GB / 500GB HDD
LAN Built-in Ethernet supporting 10/100/1000 Mbps
WIFI Built-in WIFI supporting IEEE 802.11 b/g/n
I/O
1 x VGA,1 x HDMI, 1 x RJ45, 1 x USB 3.0 Port,
3 x USB 2.0 Ports, 1 x Audio-In, 1 x Line Out
AC Power Adapter
Input: AC 100~240V, 50/60MHz
Output: DC 19V, 3.42A, 65W
Dimensions 19.3(L) X 14.8(W) X 2.2(H) cm
Weight 530g
Operating System
Pre-installed with FREE DOS;
Supports Win8 / Win7 / Vista
Page 12
EDGE‐HD4MiniPC
- 11 -
DE
2. Produktübersicht
Eigenschaften
Nr. Komponente Beschreibung
1
Ein/Ausschalter und
Betriebsanzeige
Mit dem Ein/Ausschalter können Sie
den Mini PC EIN oder AUS schalten.
Die Lampe wird leuchten, wenn das
Gerät eingeschaltet ist
2
HDD Aktivitätsanzeige
Die Lampe wird leuchten, wenn die
Festplatte verwendet wird
3
VGA Anschluss Zum Anschluss eines VGA Monitors
4
HDMI Anschluss Zum Anschluss eines HDMI Monitors
5
Hintere USB 2.0 Ports Zum Anschluss von USB Geräten
6
LAN Anschluss
Zum Anschluss eines Ethernet LAN
Kabels
7
Netzeingang Zum Anschluss der Stromversorgung
8
Audio Ausgangsbuchse
Zum Anschluss von Kopfhörern oder
Lautsprechern
9
Mikrofon Eingangsbuchse
Zum Anschluss eines Mikrofons oder
anderer Audioquellen
10
Vordere USB 2.0/3.0 Ports
(Abdeckung entfernen)
Zum Anschluss von USB Geräten.
Page 13
EDGE‐HD4MiniPC
- 12 -
DE
3. Mini PC Einrichtung und Anschlüsse
Anbringen des Tischständers
(1).Führen Sie die mitgelieferte
Flügelschraube durch die
Öffnung an der Unterseite
des Ständers
(2).Richten Sie den Ständer an
der Unterseite des Mini PC
aus
(3).Ziehen Sie die Schraube mit
der Hand fest
Anschluss eines VGA
Monitors
Schließen Sie den VGA Monitor
oder ein anderes Anzeigegerät
an den 15 Pin D-Sub Anschluss
an der Rückseite des Gerätes
an.
Anschluss eines HDMI
Bildschirms / Fernsehers
Schließen Sie den HDMI
Monitor oder ein anderes
Anzeigegerät an den HDMI
Anschluss an der Rückseite des
Gerätes an.
Anschluss eines DVI Monitors
(1). Schließen Sie den mit dem
Mini PC mitgelieferten HDMI
oder DVI Adapter an den
HDMI Anschluss an der
Rückseite des Gerätes an.
(2). Schließen Sie den DVI
Monitor an die DVI Buchse
des Adapters an.
Page 14

EDGE‐HD4MiniPC
- 13 -
DE
Anschluss von USB Geräten
Schließen Sie USB Geräte an
die USB Ports an der Rückseite
des Gerätes und unter der
Abdeckung an der Vorderseite
des Gerätes an.
Anschluss an das Netzwerk
Schließen Sie das
Ethernetkabel von Ihrem
Netzwerk Switch / Router an
den RJ45 LAN Anschluss an der
Rückseite des Gerätes an.
Anschluss des Netzteils
Schließen Sie den Stromstecker
des mitgelieferten Netzteils an
die Strombuchse an der
Rückseite des Gerätes an
BEVOR Sie das Stromkabel mit
der Steckdose verbinden.
Anschluss von Lautsprechern
oder Kopfhörern
Schließen Sie das 3,5mm
Audiokabel an die Audio
Ausgangsbuchse an der
Rückseite des Gerätes an.
Anschluss eines Mikrofons
oder einer anderen
Audioquelle
Schließen Sie das 3,5mm
Audiokabel an die Line In
Buchse an der Rückseite des
Gerätes an.
Page 15
EDGE‐HD4MiniPC
- 14 -
DE
4. Ändern der Bootlaufwerk-Priorität
(Zum Beispiel für die Installation eines anderen Betriebssystems)
Standardmäßig ist der Mini PC so eingestellt, dass er von seiner eigenen
Festplatte in DOS bootet. Um ein anderes Betriebssystem zu installieren
(zum Beispiel Linux oder Windows 7
®
), müssen Sie zunächst die
Bootlaufwerk-Priorität im BIOS ändern, um sicherzustellen, dass der Mini PC
vom USB CD-Laufwerk / HDD / USB-Stick booten wird, auf dem/der sich die
Installationsdateien des neuen Betriebssystems befinden.
(1) Schalten Sie den Computer ein und drücken Sie sofort auf <ENTF>,
um das BIOS aufzurufen.
(2) Gehen Sie zur <Boot> Seite und wählen Sie “Boot Device Priority” aus
Page 16
EDGE‐HD4MiniPC
- 15 -
DE
(3) Wählen Sie als ‘1st Drive’ Ihr angeschlossenes USB CD/DVD/HDD
Gerät aus. Dies wird die interne HDD automatisch als 2
nd
Drive
einstellen.
(4) Gehen Sie zur <Exit> Seite und wählen Sie ‘Save Changes and Exit’.
Nach dem Neustart wird der Mini PC versuchen, von Ihrem
ausgewählten Laufwerk vor der internen HDD zu booten, um zum
Beispiel die Installation eines anderen Betriebssystems zu
ermöglichen. Für einige Microsoft
®
Betriebssysteme benötigte
Gerätetreiber können Sie auf dem USB-Stick finden, der dem Mini PC
beiliegt.
Page 17
EDGE‐HD4MiniPC
- 16 -
DE
Hinweis:
Einige ältere Betriebssysteme unterstützen den AHCI Modus nicht. Falls das
Betriebssystem, das Sie versuchen zu installieren, die HDD nicht als
gültiges Ziel erkennt, gehen Sie bitte zur <Advanced> Seite im BIOS,
wählen Sie die “SATA Configuration” Seite und stellen Sie “SATA Controller
Mode” auf “SATA Mode”.
Warnungen
• Verwenden Sie dieses Produkt nicht in der Nähe von Wasser oder
einer Wärmequelle wie z.B. einer Heizung.
• Stellen Sie dieses Produkt nicht auf einen wackeligen Ständer oder
Unterlage. Wenn das Produkt fallengelassen wird, könnte es ernsthaft
beschädigt werden.
• Der Lüfter im Gehäuse wird für den Luftaustausch verwendet und
bewahrt das Gerät vor Überhitzung. Blockieren Sie keinesfalls die
Lüftungsöffnungen.
• Stecken Sie keine Gegenstände, egal welcher Art, durch die
Öffnungen des Gehäuses. Dies kann zum Berühren gefährlicher
Spannungspunkte oder zu Kurzschlüssen führen und somit ein Feuer
oder einen Stromschlag auslösen.
• Schütten Sie niemals Flüssigkeit, egal welcher Art, auf oder in das
Produkt.
• Um Schäden an den internen Bauteilen und Auslaufen der Batterie zu
vermeiden, stellen Sie das Produkt nicht auf eine vibrierende
Unterlage.
• Halten Sie dieses Gerät von Feuchtigkeit und hohen Temperaturen
fern
• Betreiben Sie dieses Gerät nicht in einer unklimatisierten Umgebung
mit einer Temperatur über 35
o
C (95oF) oder unter 0oC (32oF). Dies
kann zu Schäden im Gerät führen.
Page 18

EDGE‐HD4MiniPC
- 17 -
DE
• Verwendung Sie einen Reiniger ohne Alkohol oder Aceton, das Gerät
zu löschen.
• Es besteht Explosionsgefahr, wenn die Batterie falsch eingelegt wird.
Nur mit Batterie desselben Typs oder mit vom Hersteller empfohlenen
Batterie-Typen ersetzen.
• Verlegen Sie das Stromkabel so, dass niemand darüber stolpern kann.
Nichts auf das Stromkabel legen.
• Gegenstände mit starken Magnetfeldern oder elektromagnetischen
Feldern vom Gerät fernhalten.
• Das Gerät und seine Zubehörteile können Kleinteile enthalten. Halten
Sie sie von kleinen Kindern fern.
REACH
Entspricht der REACH (Registration, Evaluation, Authorization, and
Restriction of Chemicals) Verordnung
RoHS
Entspricht der RoHS (Restriction of Hazardous Substances) Verordnung
Lithium-Ion Batteriewarnung
Es besteht Explosionsgefahr, wenn die Batterie falsch eingelegt wird. Nur
mit Batterien desselben Typs oder mit vom Hersteller empfohlenen Typen
ersetzen. Entsorgen Sie verbrauchte Batterien gemäß Herstelleranweisung.
CE Zeichen
Dies ist ein Produkt der Klasse B. Bei häuslichen Installationen könnte das
Produkt Störungen verursachen, was die Behebung der Störung durch eine
oder mehrere der folgenden Maßnahmen durch
den Benutzer zur Folge haben könnte.
CE Zeichen für Geräte ohne Wireless LAN/Bluetooth
Die ausgelieferte Versionen dieses Gerätes entspricht den Bestimmungen
der EU Richtlinien 2004/108/EC “Elektromagnetische Verträglichkeit” und
2006/95/EC “Niederspannungsrichtlinie”.
Die Konformität mit den folgenden harmonisierten Normen gemäß der
R&TTERichtlinie 1999/5/EG wurde bescheinigt:
• Artikel Sicherheit
• EN60950
• Artikel EMV
• EN301 489-1/-17
• Artikel Nutzung des Hochfrequenzspektrums
• EN300 328
Page 19

EDGE‐HD4MiniPC
- 18 -
DE
WEEE Erklärung
Die Richtlinie der Europäischen Union (“EU”) Direktive zur Vermeidung von
Elektroschrott (Waste Electrical and Electronic Equipment), Richtlinie
2002/96/EC, die am 13. August 2005 in Kraft getreten ist, regelt, dass
“elektrische und elektronische Geräte” nicht mehr länger als Hausmüll
entsorgt werden dürfen. Bitte wenden Sie sich an die Stelle, bei der Sie das
Gerät erworben haben, um den korrekten Ablauf für die Entsorgung zu
erfahren. Es ist die alleinige Verantwortung/Pflicht des lokal autorisierten
Einzel-/Großhändlers eines solchen Gerätes, diese Produkte am Ende der
Betriebszeit zurückzunehmen.
Falls Batterien oder Akkus vom falschen Typ eingesetzt werden,
besteht Explosionsgefahr. Ersetzen Sie Batterien und Akkus nur mit
identischen oder gleichwertigen, vom Hersteller empfohlenen
Typen.
Page 20

EDGE‐HD4MiniPC
- 19 -
ES
Manual del usuario
EDGE-HD4 Mini PC
1. Especificaciones del producto
Información importante para su seguridad y comodidad
Lea estas instrucciones atentamente antes de utilizar el producto y
guárdela para su consulta en el futuro.
Asegúrese de que el Mini-PC esté apagado y desconectado de la
fuente de alimentación principal antes de su limpieza
No utilice líquido ni limpiadores de aerosol, un trapo humedecido
debería ser suficiente
Inserte el conector de corriente en el Mini PC antes de enchufar el
cable de corriente en la toma de corriente AC.
Cuando necesite desconectar la alimentación del equipo,
desenchufe el cable de corriente de la toma de corriente AC antes
de quitar el conector de corriente del Mini PC.
Item Description
CPU Intel Sandy Bridge 847
Chipset INTEL Panther Point (NM70)
RAM 4GB – DDR3
Storage Support 2.5'' SATA 250GB / 320GB / 500GB HDD
LAN Built-in Ethernet supporting 10/100/1000 Mbps
WIFI Built-in WIFI supporting IEEE 802.11 b/g/n
I/O
1 x VGA,1 x HDMI, 1 x RJ45, 1 x USB 3.0 Port,
3 x USB 2.0 Ports, 1 x Audio-In, 1 x Line Out
AC Power Adapter
Input: AC 100~240V, 50/60MHz
Output: DC 19V, 3.42A, 65W
Dimensions 19.3(L) X 14.8(W) X 2.2(H) cm
Weight 530g
Operating System
Pre-installed with FREE DOS;
Supports Win8 / Win7 / Vista
Page 21

EDGE‐HD4MiniPC
- 20 -
ES
2. Vista general del producto
Características
Nº Elemento Descripción
1
Interruptor de corriente y luz
indicadora de corriente
El interruptor de corriente le permite
encender o apagar el Mini PC. La luz
se iluminará cuando la corriente esté
encendida
2
Indicador de actividad del
disco duro
La luz se iluminará cuando el disco
duro esté en funcionamiento
3
Puerto VGA Para conectar a un monitor VGA
4
Puerto HDMI Para conectar a un monitor HDMI
5
Puertos USB 2.0 posteriores Para conectar a dispositivos USB
6
Puerto LAN Para conectar a un cable LAN Ethernet
7
Entrada DC Para conectar la fuente de alimentación
8
Clavija de salida de audio Para conectar auriculares o altavoces
9
Clavija de entrada de
micrófono
Para conectar un micrófono u otra
fuente de audio
10
Puertos USB2.0/3.0 frontales
(tapa extraíble)
Para conectar a dispositivos USB.
Page 22

EDGE‐HD4MiniPC
- 21 -
ES
3. Instalación y conexiones de Mini PC
Para conectar un soporte
de sobremesa
(1). Pase el tornillo incluido
por el agujero de la base
del soporte
(2). Alinee el soporte con la
base del Mini PC
(3). Apriete el tornillo a
mano
Para conectar una pantalla
VGA
Conecte el monitor VGA u
otro dispositivo de
visualización al conector
D-Sub de 15 contactos de la
parte posterior de la unidad.
Para conectar una pantalla
o televisor con HDMI
Conecte el monitor HDMI u
otro dispositivo de
visualización al conector
HDMI de la parte posterior
de la unidad.
Para conectar una pantalla
DVI
(1). Conecte el adaptador
HDMI a DVI incluido con
el Mini PC al puerto
HDMI de la parte
posterior de la unidad.
(2). Conecte el monitor DVI
al puerto DVI hembra del
adaptador.
Page 23

EDGE‐HD4MiniPC
- 22 -
ES
Para conectar dispositivos
USB
Conecte los dispositivos
USB a los puertos USB de la
parte posterior de la unidad y
bajo la tapa de la parte
frontal de la unidad.
Para conectar a la red
Conecte el cable Ethernet
del switch o router de su red
al conector LAN RJ45 de la
parte posterior de la unidad.
Para conectar la el
adaptador de corriente
Conecte el conector de
corriente de la fuente de
alimentación al conector
DC – In de la parte posterior
de la unidad ANTES DE
conectar el cable de
corriente principal en una
toma AC.
Para conectar altavoces o
auriculares
Conecte el cable de audio de
3.5mm a la clavija Audio Out
(Salida de audio) de la parte
posterior de la unidad.
Para conectar un
micrófono u otra fuente de
audio
Conecte el cable de audio de
3.5mm a la clavija Line In
(Entrada de línea) de la
parte posterior de la unidad.
Page 24

EDGE‐HD4MiniPC
- 23 -
ES
4. Cambiar la prioridad del dispositivo de arranque
(Para instalar otro sistema operativo, por ejemplo)
Por defecto, el Mini PC arranca en DOS desde su propia unidad de
disco duro interna. Para instalar otro sistema operativo (Linux o
Windows 7
®
por ejemplo) primero deberá cambiar la prioridad del
dispositivo de arranque en la BIOS para asegurarse de que el Mini PC
intente arrancar desde la unidad USB CD / disco duro / lápiz de
memoria donde se encuentren los archivos de instalación del sistema
operativo.
(1) Encienda el ordenador y presione <DEL> inmediatamente para entrar
en la utilidad de configuración de la BIOS.
(2) Vaya a la página de arranque <Boot> y elija “Boot Device Priority”
(Prioridad del dispositivo de arranque)
Page 25

EDGE‐HD4MiniPC
- 24 -
ES
(3) Ajuste ‘1st Drive’ (1ª unidad) para que sea el dispositivo USB
CD/DVD/disco duro. Esto ajustará automáticamente el disco duro
interno como 2
nd
Drive (2ª unidad).
(4) Vaya a la página <Exit> (Salir) y elija ‘Save Changes and Exit’
(Guardar cambios y salir). Tras reiniciar el Mini PC intentará arrancar
desde la unidad elegida antes que desde el disco duro interno para
poder ejecutar la instalación de otro sistema operativo. Puede
encontrar otros controladores de dispositivos para algunos sistemas
operativos de Microsoft® en el lápiz de memoria USB incluido con su
Mini PC.
Page 26

EDGE‐HD4MiniPC
- 25 -
ES
Nota:
Algunos sistemas operativos anteriores no soportan el modo AHCI. Si el
sistema operativo que intenta instalar no detecta el disco duro como destino
válido, vaya a la página <Advanced> (Avanzada) en la utilidad de
configuración de la BIOS, elija “SATA Configuration” (Configuración SATA) y
ajuste “SATA Controller Mode” (Modo de controlador SATA) a “SATA Mode”
(Modo SATA).
Advertencias
• No utilice este producto cerca del agua o una fuente de calor como un
radiador.
• No coloque este producto en un estante o superficie inestables. Si el
producto se cae, podría resultar seriamente dañado.
• El ventilador de la carcasa se utiliza para convección del aire y para
evitar que el equipo se sobrecaliente. No cubra el ventilador
• Nuca introduzca objetos de ningún tipo en el interior del producto a
través de las ranuras de la carcasa, pues pueden tocar puntos
peligrosos con voltaje o cortocircuitar partes dando como resultado
fuego o descarga eléctrica.
• Nunca derrame líquidos de ningún tipo en el interior del producto.
• Para evitar daños en los componentes internos y evitar fugas en la
batería, no coloque el producto sobre una superficie con vibración.
• Mantenga este equipo alejado de la humedad y altas temperaturas
• No deje el equipo en un entorno no acondicionado con una temperatura
de almacenamiento superior a 35
o
C (95oF) o inferior a 0oC (32oF), pues
el equipo podría dañarse.
Page 27

EDGE‐HD4MiniPC
- 26 -
ES
• Evite utilizar productos de limpieza que contenga alcohol o acetona,
para limpiar el equipo.
• Peligro de explosión si la batería no se reemplaza correctamente.
Cambiar sólo por otra igual o del tipo equivalente recomendado por el
fabricante.
• Coloque el cable de corriente de forma que la gente no tropiece con él.
No coloque nada encima del cable de alimentación.
• Mantenga el equipo alejado de objetos con fuerte magnetismo o
eléctricos.
• Su dispositivo y accesorios pueden contener partes pequeñas.
Manténgalos lejos del alcance de niños pequeños.
REACH
Cumple con el marco de regulación REACH (Registro, Evaluación,
Autorización y Restricción de Químicos)
RoHS
Cumple con el marco de regulación RoHS (Restriction of Hazardous
Substances)
Advertencia sobre las baterías de Litium-Ion
Peligro de explosión si la batería no se reemplaza correctamente. Cambiar
sólo por otra igual o del tipo equivalente recomendado por el fabricante.
Deseche las pilas usadas según las instrucciones del fabricante.
Advertencia sobre la Marca CE
É ste es un producto de Clase B, en un entorno doméstico, este producto
puede causar interferencias de radio, en cuyo caso puede que el usuario se
vea obligado a tomar las medidas apropiadas.
Marca CE para dispositivos sin LAN/Bluetooth
inalámbricos
La versión entregada de este dispositivo cumple con los requisitos de las
directivas de la CEE 2004/108/EC “Electromagnetic compatibility”
(Compatibilidad electromagnética) y 2006/95/EC “Low voltage directive”
(Directiva de bajo voltaje).
La directiva R&TTE 1999/5/EC sancionada por la conformidad con las
siguientes normas armonizadas:
• Artículo sobre Seguridad
• EN60950
• Artículo EMC
Page 28

EDGE‐HD4MiniPC
- 27 -
ES
• EN301 489-1/-17
• Usos del Artículo Espectro
• EN300 328
Comunicado WEEE
Según la Directiva sobre el Desecho de Equipos Eléctricos y Electrónicos
de la Unión Europea (“UE”), Directiva 2002/96/EC, efectiva desde el 13 de
agosto de 2005, los productos de “equipos eléctricos y electrónicos”no
pueden mezclarse con la basura municipal. Consulte en su punto original de
compra las instrucciones sobre el procedimiento correcto para desechar
basura municipal. Es responsabilidad y obligación única del vendedor o
distribuidor local autorizado de dicho equipo electrónico el recoger dichos
productos al final de su vida útil.
Para una mejor protección del medio ambiente los residuos de pilas
se deben recoger por separado
para el reciclaje o disposición especial.
Page 29

EDGE‐HD4MiniPC
- 28 -
FR
Manuel de l'utilisateur
EDGE-HD4 Mini PC
1. Spécifications du produit
Informations importantes pour votre sécurité et votre confort
Veuillez lire attentivement ces instructions avant d'utiliser le produit et
conservez-les pour pouvoir vous y référer ultérieurement.
Veillez à ce que le Mini-PC soit éteint et débranché du secteur
avant de le nettoyer
Ne pas utiliser de nettoyants liquides ou aérosols, un chiffon
humide devrait suffire
Insérez le connecteur d'alimentation dans le Mini PC avant de
brancher le cordon du secteur dans la prise de courant.
Lorsque vous devez couper l'alimentation de l'équipement,
débranchez le cordon d'alimentation de la prise de courant avant
de retirer le connecteur d'alimentation du mini-PC.
Item Description
CPU Intel Sandy Bridge 847
Chipset INTEL Panther Point (NM70)
RAM 4GB – DDR3
Storage Support 2.5'' SATA 250GB / 320GB / 500GB HDD
LAN Built-in Ethernet supporting 10/100/1000 Mbps
WIFI Built-in WIFI supporting IEEE 802.11 b/g/n
I/O
1 x VGA,1 x HDMI, 1 x RJ45, 1 x USB 3.0 Port,
3 x USB 2.0 Ports, 1 x Audio-In, 1 x Line Out
AC Power Adapter
Input: AC 100~240V, 50/60MHz
Output: DC 19V, 3.42A, 65W
Dimensions 19.3(L) X 14.8(W) X 2.2(H) cm
Weight 530g
Operating System
Pre-installed with FREE DOS;
Supports Win8 / Win7 / Vista
Page 30

EDGE‐HD4MiniPC
- 29 -
FR
2. Vue d’ensemble du produit
Caractéristiques
N° Elément Description
1
Interrupteur d'alimentation et voyant
d'alimentation
L'interrupteur permet d'allumer ou
d'éteindre le Mini PC. Le voyant
s'allume lorsque l'appareil est allumé
2 Voyant d'activité du disque dur
Le voyant s'allume lorsque le disque
dur est en cours d'utilisation
3 Port VGA Pour connecter à un moniteur VGA
4 Port HDMI Pour connecter à un moniteur HDMI
5 Ports USB 2.0 arrière
Pour connecter à des périphériques
USB
6 Port LAN
Pour connecter à un réseau local
Ethernet par câble
7 Entrée CC Pour connecter l’alimentation
8 Prise de sortie audio
Pour connecter à un casque ou à des
haut-parleurs
9 Prise d'entrée microphone
Pour connecter à un microphone ou
toute autre source audio
10
Ports USB2.0/3.0 avant (retirer le
couvercle)
Pour connecter à des périphériques
USB.
Page 31

EDGE‐HD4MiniPC
- 30 -
FR
3. Configuration et connexions du Mini PC
Pour fixer le socle de bureau
(1). Insérez la vis à main
fournie, dans le trou de la
base du socle
(2). Alignez le socle avec la
base du Mini PC
(3). Serrez la vis à la main
Pour connecter à un écran
VGA
Connectez le moniteur VGA ou
autre dispositif d'affichage au
connecteur D-Sub 15 broches
situé au dos de l'appareil.
Pour connecter à un écran
HDMI / TV
Connectez le moniteur HDMI
ou autre dispositif d'affichage
au connecteur HDMI situé au
dos de l'appareil.
Pour connecter à un écran
DVI
(1). Connectez l'adaptateur
HDMI vers DVI fourni avec
le Mini PC au port HDMI
situé au dos de l'appareil.
(2). Connectez le moniteur DVI
au port DVI femelle de
l'adaptateur.
Page 32

EDGE‐HD4MiniPC
- 31 -
FR
Pour connecter des
périphériques USB
Connectez des périphériques
USB aux ports USB situés tous
deux au dos de l'appareil et
sous le couvert se trouvant sur
le devant de l'appareil.
Pour vous connecter au
réseau.
Connectez le câble Ethernet
depuis votre commutateur de
réseau / routeur au connecteur
LAN RJ45 situé au dos de
l'appareil.
Pour connecter l'adaptateur
d'alimentation:
Branchez le connecteur
d'alimentation du bloc
d'alimentation fourni au
connecteur d'entrée CC situé
au dos de l'appareil AVANT de
brancher le cordon
d'alimentation à une prise
secteur.
Pour connecter des
haut-parleurs ou un casque
Connectez le câble audio 3,5
mm à la prise de sortie audio
située au dos de l'appareil.
Pour connecter un
microphone ou toute autre
source audio
Connectez le câble audio 3,5
mm à la prise d'entrée de ligne
située au dos de l'appareil.
Page 33

EDGE‐HD4MiniPC
- 32 -
FR
4. Modification de la priorité du périphérique d'amorçage
(Pour installer un autre système d'exploitation par exemple)
Par défaut, le Mini PC est configuré pour démarrer en mode DOS à partir de
son disque dur interne propre. Pour installer un autre système d'exploitation
(Linux ou Windows 7
®
par exemple) vous devez d'abord changer la priorité
du périphérique d'amorçage dans le BIOS pour que le PC Mini tente de
démarrer à partir du lecteur de CD USB / le disque dur / une clé USB où se
trouvent les fichiers d'installation du nouveau système d'exploitation.
(1) Allumez l'ordinateur et appuyez immédiatement sur <SUPPR> pour
entrer dans le BIOS.
(2) Aller à la page <Boot> et choisissez «Boot Device Priority» (Priorité de
périphérique de d'amorçage)
Page 34

EDGE‐HD4MiniPC
- 33 -
FR
(3) Réglez le ‘1er lecteur) sur votre périphérique USB CD/DVD/disque dur
connecté. Cela définira automatiquement le disque dur interne comme
étant le 2
ème
lecteur.
(4) Allez à la page <Exit> (Quitter) et choisissez ‘Save Changes and Exit’
(Enregistrer les modifications et quitter). Après le redémarrage, le Mini
PC va essayer de démarrer à partir du disque choisi avant le disque
dur interne permettant l'installation d'un autre système d'exploitation
par exemple. Les pilotes de périphériques supplémentaires requis
pour certains systèmes d'exploitation Microsoft® peuvent être trouvés
sur la clé USB fournie avec votre Mini PC.
Page 35

EDGE‐HD4MiniPC
- 34 -
FR
Remarque:
Certains anciens systèmes d'exploitation ne prennent pas en charge le
mode AHCI. Si le système d'exploitation que vous essayez d'installer ne
reconnaît pas le disque dur en tant que destination valide, allez à la page
<Advanced> (Avancé) dans le Setup du BIOS, choisissez «SATA
Configuration» (Configuration SATA) et mettez «SATA Controller Mode»
(Mode du contrôleur SATA) sur «SATA Mode» (Mode SATA).
Avertissements
• Ne pas utiliser ce produit près de l'eau ou d'une source de chaleur
comme un radiateur.
• Ne placez pas ce produit sur un chariot, un support ou une surface
instable. Si le produit tombait, il pourrait être sérieusement endommagé.
• Le ventilateur situé sur le boîtier est utilisé pour la convection de l'air et
pour empêcher l'appareil de surchauffer. Ne couvrez pas le ventilateur
• N'introduisez jamais de quelconques objets dans les fentes du boîtier
car ils pourraient toucher des points de tension ou mettre des pièces en
court-circuit ce qui pourrait provoquer un incendie ou un choc électrique.
• Ne projetez jamais de liquide d'aucune sorte sur le produit.
• Pour éviter d'endommager des composants internes et empêcher la
fuite de la batterie, ne placez pas le produit sur une surface vibrante.
• Maintenez cet appareil à l'écart de l'humidité et de températures élevées
• Ne laissez pas l'appareil dans un environnement comportant une
température ambiante supérieure à 35
o
C (95oF) ou inférieure à 0oC
(32
o
F), car cela pourrait endommager l'appareil.
• Évitez d'utiliser un produit de nettoyage contenant de l'alcool ou de
l'acétone pour effacer l'équipement.
Page 36

EDGE‐HD4MiniPC
- 35 -
FR
• Il existe un risque d'explosion si la batterie n'est pas remplacée
correctement. Remplacez-la uniquement par un type identique ou
équivalent recommandé par le fabricant.
• Placez le cordon d'alimentation de manière à ce qu'il ne soit pas piétiné.
Ne placez rien sur le cordon d’alimentation.
• Gardez les objets magnétiques ou électriques éloignés de l'appareil.
• Votre appareil et ses accessoires peuvent contenir de petits
composants. Gardez-les hors de portée des petits enfants.
REACH
Conforme à la règlementation REACH (Enregistrement, évaluation et
autorisation des substances chimiques)
RoHS
Conforme à la règlementation RoHS (Restriction of Hazardous Substances)
Mise en garde concernant les batteries Lithium-ion
Il existe un risque d'explosion si la batterie n'est pas remplacée
correctement. Remplacez-la uniquement par un type identique ou
équivalent recommandé par le fabricant. Eliminez les batteries usagées
conformément aux instructions du fabricant.
Avertissement de la marque CE
Il s'agit d'un produit de classe B, dans un environnement domestique, ce
produit peut provoquer des interférences radio, auquel cas l'utilisateur peut
être amené à prendre des mesures adéquates.
Marquage CE pour appareils sans LAN/Bluetooth sans fil
La version livrée de cet appareil est conforme aux exigences des directives
EEC 2004/108/CE «Compatibilité électromagnétique» et 2006/95/CE
«Basse tension».
La Directive 1999/5/EC R&TTE a attesté par conformité les normes
harmonisées suivantes :
• Article Sécurité
• EN60950
• Article EMC
• EN301 489-1/-17
• Article Utilisation du Spectre
• EN300 328
Page 37

EDGE‐HD4MiniPC
- 36 -
FR
Déclaration WEEE
Selon la directive de l'Union européenne («UE») sur les déchets
d'équipements électriques et électroniques, directive 2002/96/EC, en
vigueur depuis le 13 août 2005, les produits des états d’«équipements
électriques et électroniques » ne peuvent plus être éliminés comme déchets
municipaux. Veuillez vous renseigner auprès de votre point d'achat pour les
instructions sur la procédure correcte pour l’élimination comme déchets
municipaux. Il est de la seule responsabilité/obligation du
revendeur/distributeur agréé local de tels équipements électroniques visés
de récupérer ces produits à la fin de leur vie utile.
Danger d'explosion si la batterie est remplacée de manière
incorrecte. Remplacez uniquement par une batterie identique ou de
type équivalent recommandé par le fabricant.
Page 38

EDGE‐HD4MiniPC
- 37 -
IT
Manuale dell'utente
EDGE-HD4 Mini PC
1. Caratteristiche tecniche del prodotto
Informazioni importanti per sicurezza e comfort
Leggere attentamente le istruzioni riportate di seguito prima di
utilizzare il prodotto e conservarle per consultarle in futuro.
Assicurarsi che il Mini-PC sia spento e scollegato dall'elettricità
prima di pulirlo
Non utilizzare detergenti liquidi o spray, un panno morbido
inumidito dovrebbe essere sufficiente
Inserire il connettore di alimentazione nel Mini PC prima di
collegare il cavo dell'elettricità alla presa di corrente.
Quando occorre scollegare l'alimentazione all'apparecchio,
scollegare il cavo di alimentazione dalla presa di corrente prima di
rimuovere il connettore di alimentazione dal Mini PC.
Item Description
CPU Intel Sandy Bridge 847
Chipset INTEL Panther Point (NM70)
RAM 4GB – DDR3
Storage Support 2.5'' SATA 250GB / 320GB / 500GB HDD
LAN Built-in Ethernet supporting 10/100/1000 Mbps
WIFI Built-in WIFI supporting IEEE 802.11 b/g/n
I/O
1 x VGA,1 x HDMI, 1 x RJ45, 1 x USB 3.0 Port,
3 x USB 2.0 Ports, 1 x Audio-In, 1 x Line Out
AC Power Adapter
Input: AC 100~240V, 50/60MHz
Output: DC 19V, 3.42A, 65W
Dimensions 19.3(L) X 14.8(W) X 2.2(H) cm
Weight 530g
Operating System
Pre-installed with FREE DOS;
Supports Win8 / Win7 / Vista
Page 39

EDGE‐HD4MiniPC
- 38 -
IT
2. Cenni generali sul prodotto
Descrizione delle parti
N. Elemento Descrizione
1
Interruttore di alimentazione e
indicatore di accensione
L'interruttore di alimentazione consente di
accendere e spegnere il Mini PC.
L'indicatore si accende quando l'unità è
accesa.
2
Indicatore attività del disco
rigido
L'indicatore si accende quando il disco
rigido è in uso.
3 Porta VGA Per collegare un monitor VGA
4 Porta HDMI Per collegare uno schermo HDMI
5 Porte USB 2.0 posteriori Per collegare dispositivi USB
6 Porta LAN Per collegare un cavo LAN Ethernet
7 Ingresso alimentazione DC Per collegare l'alimentazione
8 Jack di uscita audio Per collegare cuffie o altoparlanti
9 Jack di ingresso del microfono
Per collegare un microfono o un'altra
sorgente audio
10 Porte USB 2.0/3.0 anteriori Per collegare dispositivi USB.
Page 40

EDGE‐HD4MiniPC
- 39 -
IT
3. Installazione e collegamenti del Mini PC
Aggancio del supporto da
scrivania
(1). Inserire la vite zigrinata
fornita a corredo nel foro alla
base del supporto
(2). Allineare il supporto e la
base del Mini PC
(3). Serrare con le mani la vite
zigrinata
Collegamento di monitor VGA
Collegare il monitor VGA o altra
periferica di visualizzazione al
connettore D-Sub a 15 piedini
che si trova dietro l'unità.
Collegamento di uno schermo
HDMI o di una TV
Collegare il monitor HDMI o altra
periferica di visualizzazione al
connettore HDMI che si trova
dietro l'unità.
Collegamento di uno schermo
DVI
(1). Collegare l'adattatore da
HDMI a DVI fornito a corredo
del Mini PC alla porta
HDMI che si trova dietro
l'unità.
(2). Collegare il monitor DVI alla
porta DVI femmina
sull'adattatore.
Page 41

EDGE‐HD4MiniPC
- 40 -
IT
Collegamento di dispositivi
USB
Collegare i dispositivi USB alle
porte USB che si trovano sia
dietro l'unità che sotto il
coperchio della parte anteriore
dell'unità stessa.
Collegamento alla rete
Collegare il cavo Ethernet dallo
switch di rete o dal router al
connettore LAN RJ45 che si
trova dietro l'unità.
Collegamento
dell'alimentazione
Collegare il connettore di
alimentazione dall'alimentatore
fornito a corredo al connettore di
ingresso DC che si trova dietro
l'unità PRIMA di collegare il cavo
di alimentazione alla presa
elettrica.
Collegamento di cuffie o
altoparlanti
Collegare il cavo audio da 3,5
mm al jack di uscita audio che si
trova dietro l'unità.
Collegamento di un microfono
o di un'altra sorgente audio
Collegare il cavo audio da 3,5
mm al jack di ingresso audio che
si trova dietro l'unità.
Page 42

EDGE‐HD4MiniPC
- 41 -
IT
4. Cambiamento della priorità di avvio delle periferiche
(ad esempio allo scopo di installare un altro sistema operativo)
Per impostazione predefinita, il Mini PC è configurato per avviarsi in DOS dal
proprio disco rigido interno. Per poter installare un sistema operativo diverso
(Linux o Windows 7
®
, ad esempio) è dapprima necessario cambiare la
priorità di avvio delle periferiche nel BIOS affinché il Mini PC tenti di avviarsi
da un'unità CD / disco rigido / pen drive USB su cui risiedono i file
d'installazione del nuovo sistema operativo.
(1) Accendere il computer e premere immediatamente <DEL> (tasto
Canc) per entrare nell'utilità di configurazione del BIOS.
(2) Aprire la pagina <Boot> (avvio) e scegliere “Boot Device Priority”
(priorità di avvio delle periferiche)
Page 43

EDGE‐HD4MiniPC
- 42 -
IT
(3) Impostare la voce "1st Drive" (prima unità) in modo che punti al
dispositivo CD/DVD/disco rigido USB collegato. In questo modo, il
disco rigido interno viene automaticamente impostato come "2
nd
Drive" (seconda unità).
(4) Aprire la pagina <Exit> (esci) e scegliere "Save Changes and Exit"
(salva modifiche ed esci). Al successivo avvio, il Mini PC tenterà di
avviarsi dall'unità selezionata prima del disco rigido interno,
consentendo ad esempio di avviare l'installazione del nuovo sistema
operativo. Nel pen drive USB fornito a corredo con il Mini PC si
possono trovare gli ulteriori driver di periferica richiesti da alcuni
sistemi operativi Microsoft®.
Page 44

EDGE‐HD4MiniPC
- 43 -
IT
Nota:
alcuni sistemi operativi più vecchi non supportano la modalità AHCI. Se il
sistema operativo che si sta tentando di installare non vede il disco rigido
come destinazione valida, aprire la pagina <Advanced> (avanzate)
dell'utilità di configurazione del BIOS, scegliere la pagina “SATA
Configuration” (configurazione SATA) e impostare la “SATA Controller
Mode” (modalità controller SATA) su “SATA Mode” (modalità SATA).
Avvertenze
• Non utilizzare il prodotto nelle vicinanze di acqua o di una sorgente di
calore, come ad esempio un termosifone.
• Non appoggiare il prodotto su un supporto o su una superficie
instabile. Se il prodotto cade si danneggerebbe seriamente.
• Il ventilatore sull'involucro è utilizzato per far circolare l'aria ed evitare
il surriscaldamento dell'unità. Non coprire il ventilatore.
• Non spingere mai oggetti di alcun tipo nel computer attraverso le
feritoie dell'involucro poiché potrebbero venire a contatto con punti di
tensione pericolosi o cortocircuitare parti che possono causare un
incendio o una scossa elettrica.
• Non gettare mai liquido di alcun tipo sopra o all'interno del prodotto.
• Per evitare danni ai componenti interni e per impedire perdite della
batteria, non appoggiare il prodotto su una superficie vibrante.
• Tenere il prodotto lontano da umidità e alta temperatura
• Non lasciare l'apparecchio in un ambiente senza passaggio d'aria e a
una temperatura di conservazione superiore a 35
o
C (95oF) o inferiore
a 0
o
C (32oF), il che lo danneggerebbe.
Page 45

EDGE‐HD4MiniPC
- 44 -
IT
• Evitare di utilizzare un detergente contenente alcol o acetone per
cancellare l'apparecchiatura.
• Se si sostituisce la batteria in modo errato vi è il rischio di
un'esplosione. Sostituirla solo con batteria di tipo uguale o equivalente
fornite dal produttore.
• Passare il cavo di alimentazione in modo che non lo possa calpestare.
Non appoggiare nulla sopra il cavo di alimentazione.
• Tenere tutti gli oggetti magnetici o elettrici lontani dall'apparecchio.
• Il prodotto e i suoi accessori possono contenere parti più piccole.
Tenerli lontani dalla portata dei bambini.
REACH
Prodotto conforme al quadro normativo REACH (registrazione, valutazione,
autorizzazione e limitazione di agenti chimici)
RoHS
Prodotto conforme al quadro normativo RoHS (Restriction of Hazardous
Substances)
Avvertenza sulla batteria agli ioni di litio
Se si sostituisce la batteria in modo errato vi è il rischio di un'esplosione.
Sostituirla solo con batteria di tipo uguale o equivalente fornite dal
produttore. Smaltire le batterie usate in conformità con le istruzioni del
produttore.
Avvertenza relativa al marchio CE
Questo è un prodotto di Classe B. In un ambiente domestico esso può
causare interferenze radio, nei quali casi l'utente potrebbe dover prendere
adeguate contromisure.
Marchio CE per dispositivi senza LAN/Bluetooth wireless
La versione in vendita di questo prodotto è conforme con i requisiti delle
direttive EEC 2004/108/EC “Compatibilità elettromagnetica” e 2006/95/EC
“Direttiva sulla bassa tensione“
Direttiva R&TTE 1999/5/EC in conformità alle seguenti norme armonizzate:
•Normativa sulla sicurezza
•EN60950
•Normativa sulla compatibilità elettromagnetica EMC
•EN301 489-1/-17
•Normativa per i sistemi radio
•EN300 328
Page 46

EDGE‐HD4MiniPC
- 45 -
IT
Dichiarazione WEEE
In base alla Direttiva dell'Unione Europea sullo smaltimento
dell'apparecchiatura elettrica ed elettronica (WEEE, Waste Electrical and
Electronic Equipment), Direttiva 2002/96/EC, in vigore dal 13 agosto 2005, i
prodotti classificabili come "apparecchiatura elettrica ed elettronica" non
possono più essere smaltiti nei rifiuti municipali. Consultare il punto
d'acquisto originale per istruzioni sulla corretta procedura a cui attenersi per
smaltire i rifiuti. È fatta unica responsabilità/obbligo del
rivenditore/distributore locale di prendere in carico questi prodotti e di
provvedere al loro smaltimento alla fine della loro vita utile.
Per una migliore tutela dell'ambiente, le batterie esauste devono
essere raccolte separatamente per
il riciclaggio o lo smaltimento speciale
Page 47

EDGE‐HD4MiniPC
- 46 -
RU
Руководство пользователя
Мини-ПК EDGE-HD4
1. Технические характеристики изделия
Важная информация по вашей безопасности и удобству
Пожалуйста, внимательно прочтите данные указания перед
началом использования изделия и сохраните их для справки в
будущем.
Перед чисткой убедитесь, что мини-ПК выключен и отключен от сети
электропитания.
Запрещается использовать жидкие или аэрозольные чистящие
средства, достаточно протереть устройство влажной тряпкой.
Вставьте разъем питания в мини-ПК, прежде чем подключить шнур
питания к сетевой розетке переменного тока.
Если необходимо обесточить оборудование, отключите шнур
питания от сетевой розетки, прежде чем вытащить разъем питания
из мини-ПК.
Item Description
CPU Intel Sandy Bridge 847
Chipset INTEL Panther Point (NM70)
RAM 4GB – DDR3
Storage Support 2.5'' SATA 250GB / 320GB / 500GB HDD
LAN Built-in Ethernet supporting 10/100/1000 Mbps
WIFI Built-in WIFI supporting IEEE 802.11 b/g/n
I/O
1 x VGA,1 x HDMI, 1 x RJ45, 1 x USB 3.0 Port,
3 x USB 2.0 Ports, 1 x Audio-In, 1 x Line Out
AC Power Adapter
Input: AC 100~240V, 50/60MHz
Output: DC 19V, 3.42A, 65W
Dimensions 19.3(L) X 14.8(W) X 2.2(H) cm
Weight 530g
Operating System
Pre-installed with FREE DOS;
Supports Win8 / Win7 / Vista
Page 48

EDGE‐HD4MiniPC
- 47 -
RU
2. Обзор изделия
Функциональные особенности
№ Позиция Описание
1
Выключатель и индикатор
питания
Выключатель позволяет включать и
выключать мини-ПК. Индикатор
светится, когда питание включено.
2
Индикатор активности
жесткого диска
Индикатор светится, когда
происходит обращение к жесткому
диску.
3 Порт VGA Для подключения VGA-монитора.
4 Порт HDMI Для подключения HDMI-монитора.
5 Задние порты USB 2.0 Для подключения USB-устройств.
6 Порт локальной сети
Для подключения кабеля локальной
сети Ethernet.
7 Вход постоянного тока Для подключения источника питания.
8 Аудиовыход
Для подключения наушников или
динамиков.
9 Микрофонный вход
Для подключения микрофона или
другого источника звука.
10
Передние порты USB 2.0/3.0
(снимите крышку)
Для подключения USB-устройств.
Page 49

EDGE‐HD4MiniPC
- 48 -
RU
3. Подготовка к работе и подключение мини-ПК
Монтаж настольной
подставки
(1). Вставьте входящий в
комплект поставки винт с
накатанной головкой
через отверстие в
основании стойки.
(2). Выровняйте стойку с
основанием мини-ПК.
(3). Затяните винт от руки.
Подключение
VGA-монитора
Подключите VGA-монитор
или другое устройство
отображения к
15-контактному разъему
D-Sub на задней стороне
модуля.
Подключение
HDMI-монитора /
телевизора
Подключите HDMI-монитор
или другое устройство
отображения к разъему
HDMI на задней стороне
модуля.
Подключение DVI-дисплея
(1). Подсоедините
переходник HDMI–DVI,
входящий в комплект
поставки мини-ПК, к
порту HDMI на задней
стороне модуля.
(2). Подключите DVI-монитор
к порту DVI переходника.
Page 50

EDGE‐HD4MiniPC
- 49 -
RU
Подключение
USB-устройств
Подключите USB-устройства
к портам USB на задней
стороне модуля или под
крышкой на его передней
стороне.
Подключение к сети
Подключите кабель Ethernet
от коммутатора/
маршрутизатора вашей сети
к разъему локальной сети
RJ45 на задней стороне
модуля.
Подключение источника
питания
Подключите разъем питания
от входящего в комплект
поставки источника питания
к разъему DC–IN на задней
стороне модуля, ПРЕЖДЕ
ЧЕМ включить шнур питания
в сетевую розетку
переменного тока.
Подключение динамиков
или наушников
Подключите звуковой кабель
с разъемом 3,5 мм к
аудиовыходу на задней
стороне модуля.
Подключение микрофона
или другого источника
звука
Подключите звуковой кабель
с разъемом 3,5 мм к
линейному входу на задней
стороне модуля.
Page 51

EDGE‐HD4MiniPC
- 50 -
RU
4. Изменение приоритета загрузочных устройств
(например, для установки другой операционной системы)
По умолчанию мини-ПК настроен на загрузку DOS со своего
встроенного жесткого диска. Для того чтобы установить другую
операционную систему (например, Linux или Windows 7
®
), вначале вам
необходимо изменить приоритет загрузочных устройств в BIOS, чтобы
мини-ПК попытался загрузиться с CD-привода / жесткого диска /
флеш-накопителя USB, на которых находятся установочные файлы
новой операционной системы.
(1) Включите компьютер и сразу нажмите клавишу <DEL>, чтобы
войти в утилиту настройки BIOS (BIOS Setup Utility).
(2) Перейдите на страницу <Boot> (Загрузка) и выберите “Boot Device
Priority” (Приоритет загрузочных устройств).
Page 52

EDGE‐HD4MiniPC
- 51 -
RU
(3) Установите в качестве первого устройства (“1st Drive”) ваше
подключенное USB-устройство (CD/DVD/жесткий диск).
Встроенный жесткий диск автоматически будет назначен в
качестве второго устройства (“2
nd
Drive”).
(4) Перейдите на страницу <Exit> (Выход) и выберите “Save Changes
and Exit” (Сохранить изменения и выйти). После перезагрузки
мини-ПК попытается загрузиться с выбранного вами устройства,
прежде чем обращаться к встроенному жесткому диску, что
позволит вам, к примеру, установить другую операционную
систему. Дополнительные драйверы устройств, необходимые для
некоторых операционных систем Microsoft®, можно найти на
флеш-накопителе USB, входящем
в комплект поставки вашего
мини-ПК.
Page 53

EDGE‐HD4MiniPC
- 52 -
RU
Примечание.
Некоторые старые операционные системы не поддерживают режим
AHCI. Если операционная система, которую вы пытаетесь установить,
не распознает жесткий диск в качестве верного пункта назначения,
перейдите на страницу <Advanced> (Дополнительно) в утилите
настройки BIOS, выберите страницу “SATA Configuration”
(Конфигурация SATA) и установите параметр “SATA Controller Mode”
(Режим контроллера SATA) в значение “SATA Mode” (Режим SATA).
Предупреждения
• Не используйте данное изделие рядом с водой или источником
тепла, таким как батарея отопления.
• Не помещайте данное изделие на неустойчивую подставку или
поверхность. В случае падения изделие может получить серьезные
повреждения.
• Вентилятор на корпусе используется для переноса воздуха и
предохранения устройства от перегрева. Не перекрывайте
вентилятор.
• Запрещается проталкивать любые
предметы внутрь данного
изделия через прорези в корпусе, поскольку предметы могут
коснуться точек опасного напряжения или замкнуть накоротко
элементы, что может привести к возгоранию или поражению
электрическим током.
• Запрещается проливать жидкость любого рода на корпус или
внутрь изделия.
• Во избежание повреждения внутренних компонентов и для
предотвращения утечки аккумулятора не
помещайте изделие на
Page 54

EDGE‐HD4MiniPC
- 53 -
RU
вибрирующие поверхности.
• Не подвергайте устройство воздействию влажности и высоких
температур.
• Не оставляйте устройство в некондиционируемых помещениях при
температуре хранения выше 35
o
C (95oF) или ниже 0oC (32oF) — это
может привести к повреждению устройства.
• Избегайте использовать чистящие средства, содержащие спирт
или ацетон для чистки оборудования.
• При установке неподходящего аккумулятора появляется опасность
взрыва. Заменяйте аккумулятор только таким же или
эквивалентным аккумулятором, рекомендованным
производителем.
• Располагайте шнур питания таким образом, чтобы люди, по
возможности, не наступали на него. Не кладите никакие предметы
сверху на шнур питания.
• Держите любые источники сильного магнитного или электрического
полей вдали от устройства.
• Ваше устройство и его принадлежности могут содержать мелкие
детали. Держите их вне пределов досягаемости маленьких детей.
REACH
Соответствие нормативно-правовой базе, касающейся регистрации,
оценки, санкционирования и ограничения химических веществ
(Registration, Evaluation, Authorization, and Restriction of Chemicals,
REACH).
RoHS
Соответствие нормативно
-правовой базе, касающейся регистрации,
оценки, санкционирования и ограничения химических веществ
(Restriction of Hazardous Substances,RoHS)
Предупреждение относительно литий-ионного аккумулятора
При установке неподходящего аккумулятора появляется опасность
взрыва. Заменяйте аккумулятор только таким же или эквивалентным
аккумулятором, рекомендованным производителем.
Утилизировать использованные аккумуляторы следует в соответствии
с указаниями производителя.
Предупреждение относительно знака соответствия европейским
стандартам (CE)
Данное
устройство является изделием класса B; в жилых помещениях
оно может вызывать радиопомехи, в этом случае пользователю,
возможно, потребуется принять соответствующие меры.
Page 55

EDGE‐HD4MiniPC
- 54 -
RU
Маркировка CE для устройств, не оборудованных
модулем беспроводной локальной сети/Bluetooth.
Поставляемая версия данного устройства соответствует требованиям
директив ЕЭС 2004/108/EC ―Электромагнитная совместимостьǁ и
2006/95/EC ―Директива по низковольтным устройствамǁ.
Согласно Директиве R&TTE 1999/5/EC подтверждено соответствие
следующим унифицированным стандартам:
• Статья безопасность
• EN60950
• Статья Электромагнитная совместимость
• EN301 489-1/-17
• Статья Использование РЧ-спектра
• EN300 328
Заявление по Директиве WEEE
Согласно Директиве Европейского
союза (ЕС) об утилизации
электрического и электронного оборудования (Waste Electrical and
Electronic Equipment, WEEE) 2002/96/EC, вступившей в силу 13 августа
2005 г., изделия, представляющие собой «электрическое или
электронное оборудование», запрещается выбрасывать так же, как
бытовые отходы. Пожалуйста, обратитесь в пункт первоначальной
покупки устройства для получения указаний по надлежащей процедуре
его утилизации. Обратный прием таких изделий по завершении срока
их
службы является исключительной ответственностью/обязанностью
местных уполномоченных торговых посредников и дистрибьюторов
электронного оборудования, попадающего под действие указанной
Директивы.
Неправильная замена батареи может привести к взрыву.
Заменяйте батареи только
батареями того же или аналогичного типа, рекомендуемыми
производителем.
 Loading...