

Page 1

1
Page 2

2
Table of Content
CHAPTER 1. ABOUT NES MINI SERVER ROUTER WITH MFP.............................................................................6
1.1
P
RODUCT INTRODUCTION
................................................................................... 6
1.2
LED I
NDICATOR STATUS DESCRIPTION
.................................................................... 6
CHAPTER 2. INSTALL WE-1510 SADOGO.................................................................................................................7
2.1
W
HAT IS SADO
GO ........................................................................................... 7
2.2
I
NSTALL SADO
GO ........................................................................................... 7
CHAPTER 3. ROUTER MODE...................................................................................................................................... 11
3.1
C
OMPLETE SETTING
....................................................................................... 11
3.1.1 Password Setup ......................................................................... 13
3.1.2 WAN Type Setup ......................................................................... 13
3.1.2.1
WAN Type – DHCP.................................................................................................... 14
3.1.2.2
WAN Type – Static IP................................................................................................ 14
3.1.2.3
WAN Type– PPPoE ................................................................................................... 15
3.1.2.4
WAN Type – PPTP.....................................................................................................15
3.1.3 SSID Setup ................................................................................ 16
3.1.4 Wireless Security Setup ............................................................... 16
3.1.4.1
Encrypt Type - WEP ................................................................................................. 17
3.1.4.2
Encrypt Type - WPA ................................................................................................. 17
3.1.5 Search USB Device ..................................................................... 18
3.1.6 Server Function - Disk Format ....................................................... 19
3.1.7 Server Functions ........................................................................ 20
3.1.8 Add User Account....................................................................... 22
3.1.9 Complete Setting Finish ............................................................... 22
3.1.10 Server Login .............................................................................. 23
3.1.10.1
Server Login of administrator ............................................................................... 23
3.1.10.2
Server Login of personal user............................................................................... 23
3.2
S
INGLE FEATURE SETTING
................................................................................ 25
3.2.1 My FTP ..................................................................................... 26
3.2.2 Network Disk ............................................................................. 26
3.2.3 My Webcam............................................................................... 27
3.2.4 Account Create .......................................................................... 27
3.2.5 DDNS ....................................................................................... 28
3.2.6 My Audio .................................................................................. 29
3.2.7 Quick Setup............................................................................... 29
3.2.8 Advance Setup........................................................................... 30
Page 3

3
3.3
S
ERVER LOGIN
............................................................................................. 31
3.3.1 Server Login of administrator ........................................................ 32
3.3.1.1
My FTP......................................................................................................................... 33
3.3.1.2
My Webcam Record ................................................................................................. 34
3.3.1.3
EXIT.............................................................................................................................. 35
3.3.2 Server Login of personal account................................................... 36
3.3.2.1
My FTP......................................................................................................................... 37
3.3.2.2
Anonymous................................................................................................................ 37
3.3.2.3
Network Disk..............................................................................................................38
3.3.2.4
My Webcam................................................................................................................ 39
My Printer 40
3.3.2.5
My Scanner ................................................................................................................ 41
My Audio 43
3.3.2.6
EXIT.............................................................................................................................. 43
3.4
E
XIT
......................................................................................................... 44
CHAPTER 4. AP MODE ................................................................................................................................................. 45
4.1
C
OMPLETE SETTING
....................................................................................... 45
4.1.1 Password Setup ......................................................................... 45
4.1.2 LAN IP Address Setup ................................................................. 46
4.1.3 SSID Setup ................................................................................ 46
4.1.4 Wireless Security Setup ............................................................... 47
4.1.4.1
Encrypt Type - WEP ................................................................................................. 48
4.1.4.2
Encrypt Type - WPA ................................................................................................. 48
4.1.5 Search USB Device ..................................................................... 49
4.1.6 Server Function – Disk Format ...................................................... 50
4.1.7 Server Functions ........................................................................ 51
4.1.8 Add User Account....................................................................... 53
4.1.9 Complete Setting Finish ............................................................... 53
4.1.10 Server Login .............................................................................. 54
4.1.10.1
Server Login of administrator ............................................................................... 54
4.1.10.2
Server Login of personal user............................................................................... 54
4.2
S
INGLE FEATURE SETTING
................................................................................ 56
4.2.1 My FTP ..................................................................................... 57
4.2.2 Network Disk ............................................................................. 57
4.2.3 My Webcam............................................................................... 58
4.2.4 Account Create .......................................................................... 58
4.2.5 Quick Setup............................................................................... 59
4.2.6 dvance Setup............................................................................. 59
4.3
S
ERVER LOGIN
............................................................................................. 60
Page 4

4
4.3.1 Server Login of administrator ........................................................ 60
4.3.1.1
My FTP......................................................................................................................... 61
4.3.1.2
My Webcam Record ................................................................................................. 62
4.3.1.3
EXIT.............................................................................................................................. 63
4.3.2 Server Login of personal account................................................... 64
4.3.2.1
My FTP......................................................................................................................... 65
4.3.2.2
Anonymous................................................................................................................ 65
4.3.2.3
Network Disk..............................................................................................................66
4.3.2.4
My Webcam................................................................................................................ 67
4.3.2.5
My Printer ................................................................................................................... 68
4.3.2.6
My Scanner ................................................................................................................ 69
4.3.2.7
My Audio..................................................................................................................... 71
4.3.2.8
EXIT.............................................................................................................................. 71
4.4
E
XIT
......................................................................................................... 72
CLIENT MODE................................................................................................................................................................. 73
5.1
C
OMPLETE SETTING
....................................................................................... 73
5.1.1 Password Setup ......................................................................... 74
5.1.2 Site Survey................................................................................ 74
5.1.3 Wireless Security Setup ............................................................... 75
5.1.3.1
Wireless Security Setup - Open-System & Shared-Key.................................. 75
5.1.3.2
Wireless Security Setup - TKIP & AES................................................................ 76
5.1.4 Search USB Device ..................................................................... 77
5.1.5 Server Function – Disk Format ...................................................... 77
5.1.6 Server Functions ........................................................................ 79
5.1.7 Add User Account....................................................................... 81
5.1.8 Complete Setting Finish ............................................................... 81
5.1.9 Server Login .............................................................................. 82
5.1.9.1
Server Login of administrator ............................................................................... 82
5.1.9.2
Server Login of personal user............................................................................... 83
5.2
S
INGLE FEATURE SETTING
................................................................................ 84
5.3
S
ERVER LOGIN
............................................................................................. 88
5.3.1 Server Login of administrator ........................................................ 89
5.3.1.1
My FTP......................................................................................................................... 90
5.3.1.2
My Webcam Record ................................................................................................. 91
5.3.1.3
EXIT.............................................................................................................................. 92
5.3.2 Server Login of personal account................................................... 93
5.3.2.1
My FTP......................................................................................................................... 94
5.3.2.2
Anonymous................................................................................................................ 94
5.3.2.3
Network Disk..............................................................................................................95
Page 5

5
5.3.2.4
My Webcam................................................................................................................ 96
5.3.2.5
My Printer ................................................................................................................... 97
5.3.2.6
My Scanner ................................................................................................................ 98
5.3.2.7
My Audio................................................................................................................... 100
5.3.2.8
EXIT............................................................................................................................ 100
5.4
E
XIT
....................................................................................................... 101
Page 6

6
Chapter 1. About NES Mini Server Router With MFP
1.1 Product Introduction
Power Plug 100V ~ 240V Input
Operation
Switching Mode
Router, AP, and Client. 3 operation modes
Reset Button Press this button and then release in 7 seconds, Status
Indicator turns from flashing to solid, it means factory setting is
done.
Ethernet Port 2 RJ-45 Ports, Ethernet 10/100 Ports
USB2.0 Ports 2 USB Ports
Power on the unit and when Power, Status & Wireless indicator lights become solid,
it means the WE-1510 is ready to function.
1.2 LED Indicator Status Description
Status
LED Indicator
Solid Flashing
WIRELESS Operation OK Transmitting Data
LAN Ethernet OK Transmitting Data
WAN Internet OK Transmitting Data
STATUS Operation OK Resetting to Factory
Setting
POWER Operation OK
Page 7

7
Chapter 2. Install WE-1510 SadoGO
2.1 What is SadoGO
A quick and easy install genie created by Sapido, SadoGO is the program which offers you
a super easy way to set up the internet connection and USB devices.
2.2 Install SadoGO
Step 1.
After inserting the Install CD, please click “SadoGo” on the auto-run menu to start the
installation.
Page 8

8
Step 2.
Please select your program language, and click on “Next” button.
Step 3.
Start the install wizard, and click on “Next” button.
Page 9

9
Step 4.
The wizard is ready to begin installation. Please click on “Install” button.
Step 5.
Then it goes to install page.
Page 10

10
Step 6.
Please click on “Finish” button.
After completing, WE-1510 icon will be created on wallpaper automatically.
Page 11

11
Chapter 3. Router Mode
3.1 Complete Setting
It allows several computers to connect to the Internet with the wireless or the wired mode in
the meantime.
Please click the icon to enter the setting page.
The system will detect the network mode, please wait for 10 minutes.
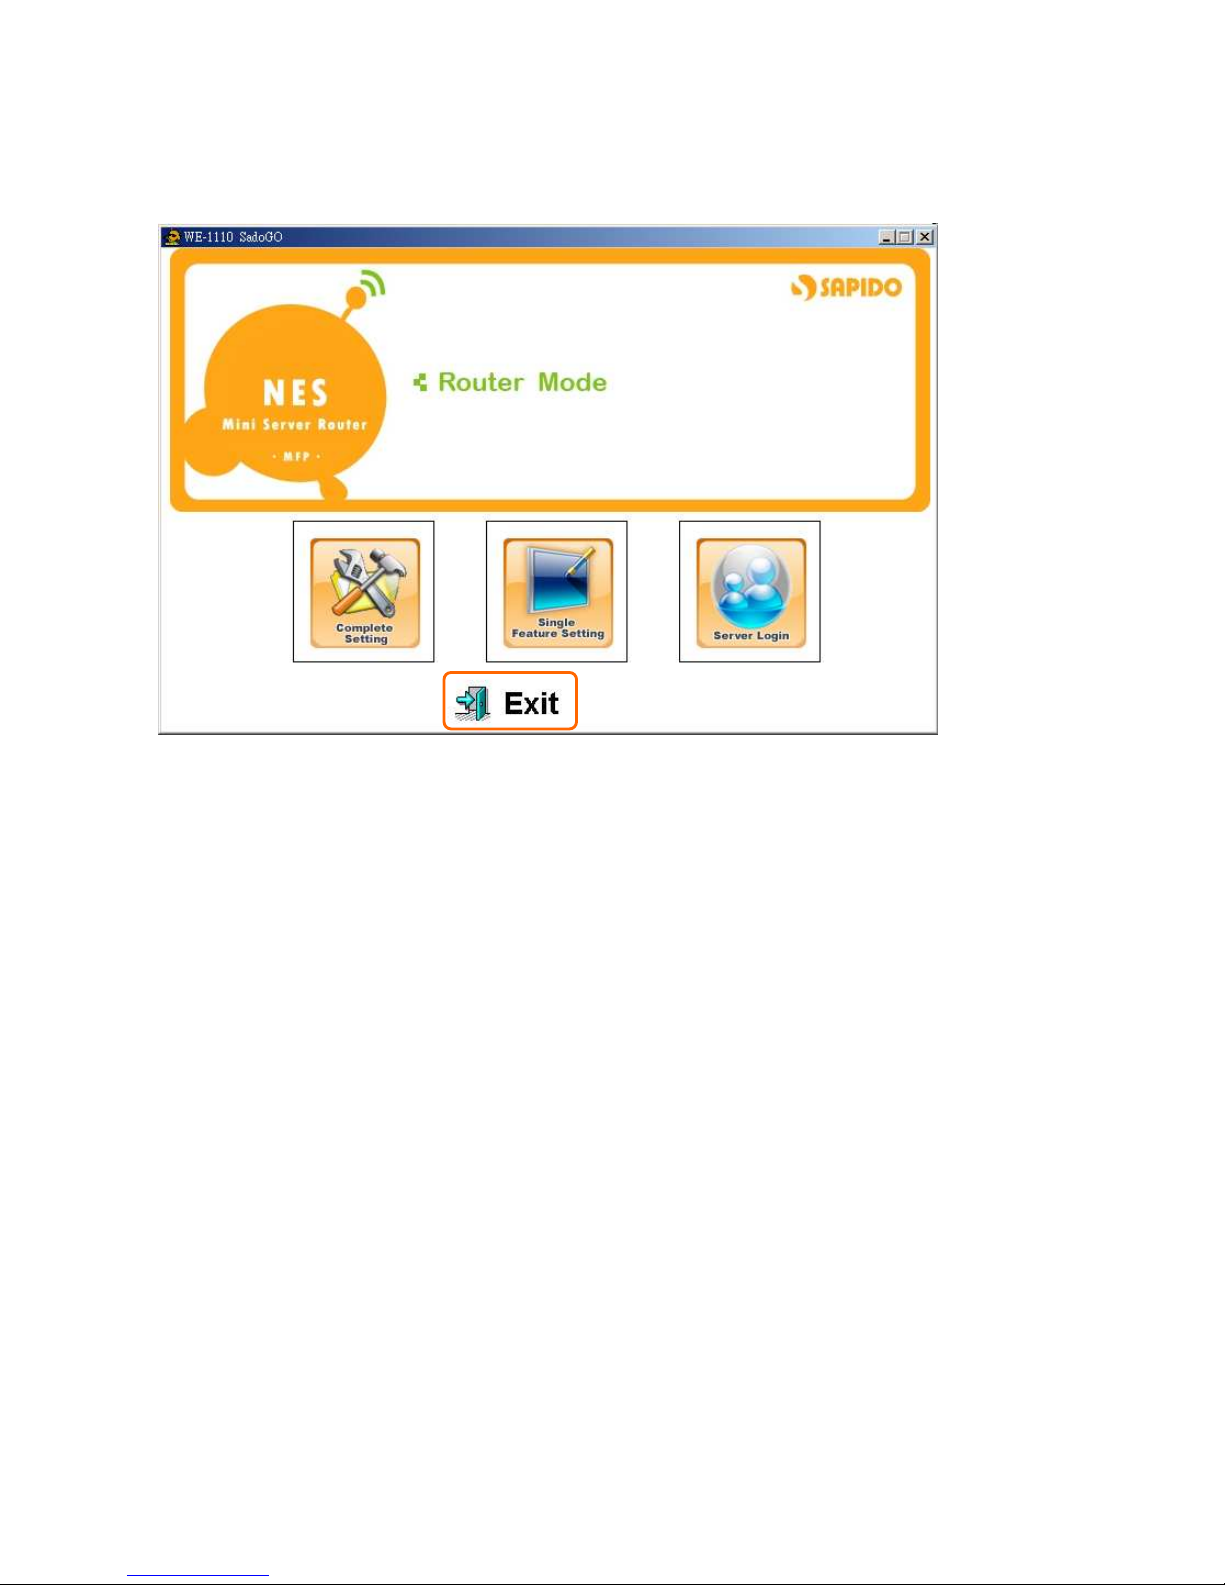
Select "Complete Setting" to quick setup after the setup main page appearing.
Page 12

12
The default Username and Password is “admin”, and then click “Yes”.
Page 13
13
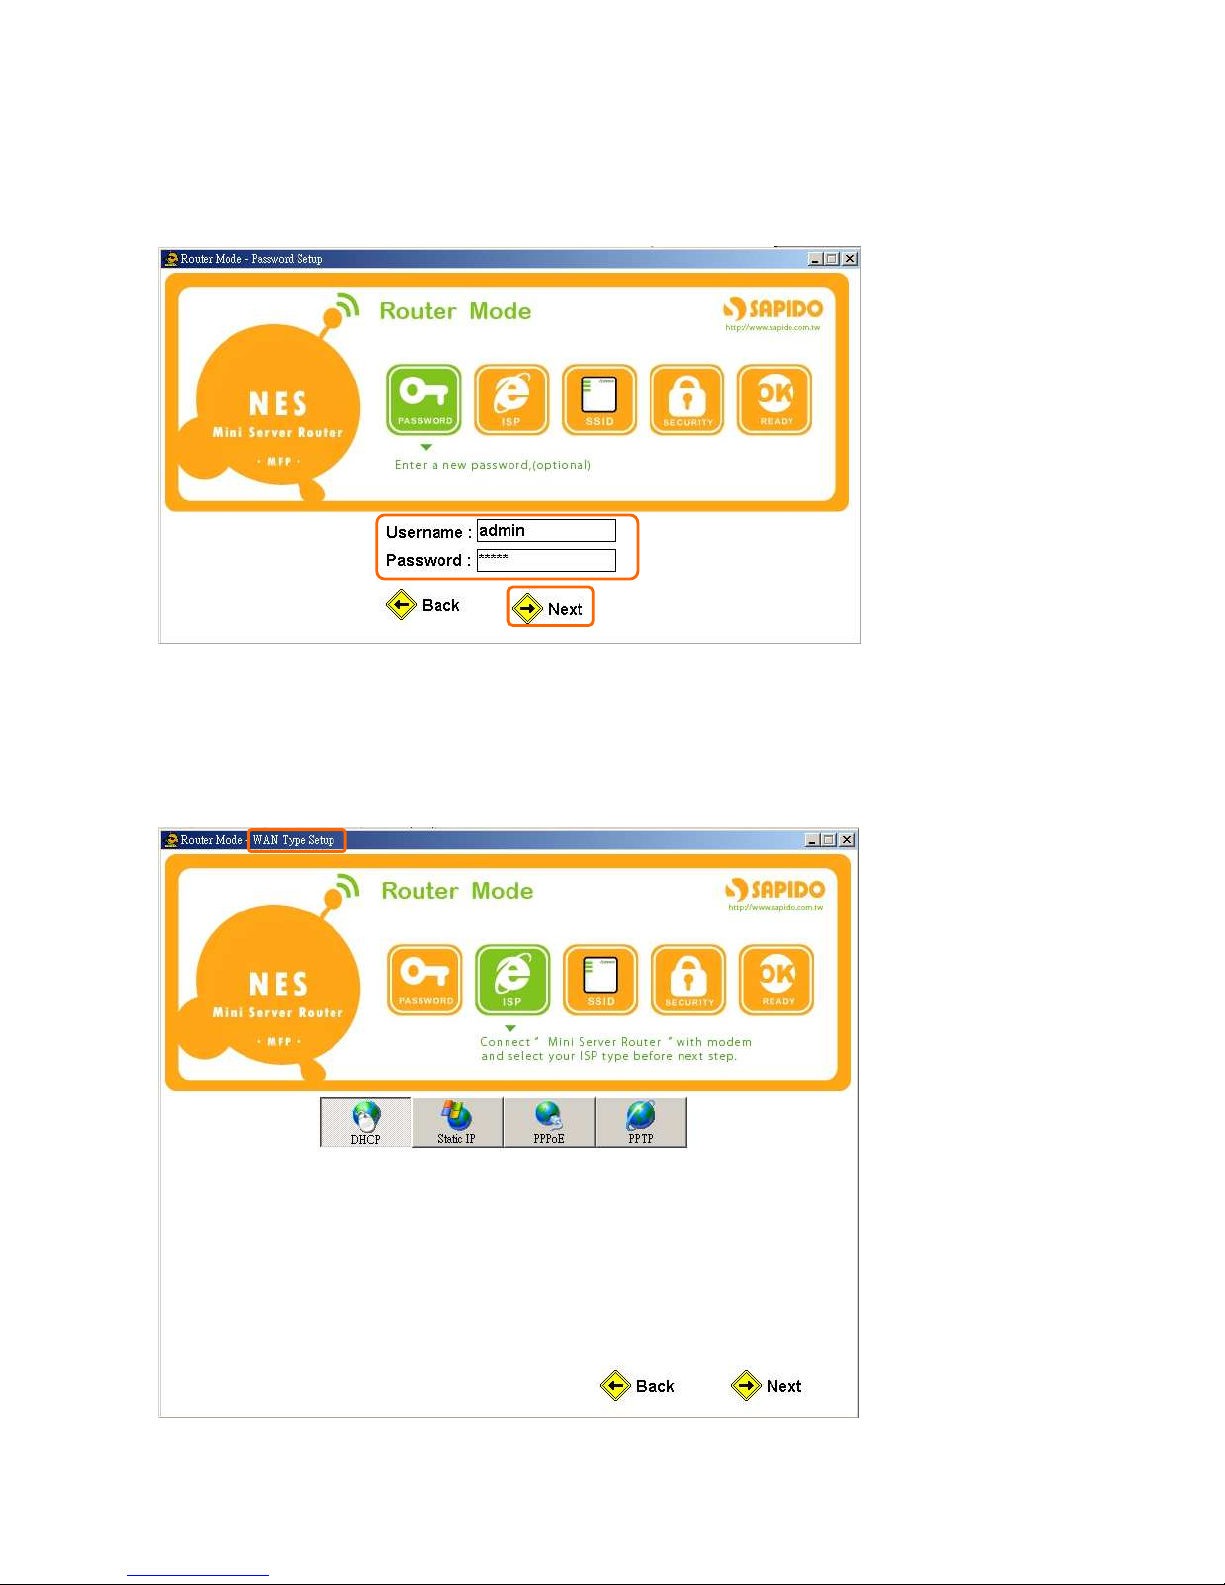
3.1.1 Password Setup
If you want to change password, please input new password in this step, and then click
“Next” button to continue.
3.1.2 WAN Type Setup
If you don’t know what your WAN type is, please inquire your ISP. After completing,
please click “Next” to carry on the next setting.
Page 14

14
3.1.2.1 WAN Type – DHCP
The related information of IP address will be obtained automatically from your ISP. If you
don’t know, please inquire your ISP. After completing, please click “Next” to carry on the
next setting.
3.1.2.2 WAN Type – Static IP
Please input related information provided by your ISP. If you don’t know, please inquire
your ISP. After completing, please click “Next” to carry on the next setting.
Page 15

15
3.1.2.3 WAN Type– PPPoE
You must input the Username and Password provided by your ISP. If you don’t know,
please inquire your ISP. After completing, please click “Next” to carry on the next setting.
3.1.2.4 WAN Type – PPTP
Please input related information provided by your ISP. If you don’t know, please
inquire your ISP. After completing, please click “Next” to carry on the next setting.
Page 16

16
3.1.3 SSID Setup
Please input the WLAN SSID. After completing, please click “Next” to carry on the next
setting. Suggest using the default value “MFP_Server_Router”.
3.1.4 Wireless Security Setup
You can select encryption or no encryption according to your need. If you would like to
have no encryption, please select “None”. After completing, please click “Next” to carry
on the next setting.
If you select encryption, please refer to following setting.
Page 17

17
3.1.4.1 Encrypt Type - WEP
Support WEP encryptions with 64 bits and 128 bits, it can protect wireless security, and
provide ASCII and 16 hex key. After completing, please click “Next” button.
3.1.4.2 Encrypt Type - WPA
Allow the access from WPA clients simultaneously and the encryption keys are given from
PSK respectively. After completing setting, please click “Next”.
Page 18

18
Radius with 802.1x can be compatible with original WPA standard, so Radius with 802.1x
can also support WEP Encryption, WPA, WPA-PSK and 802.1x certification WPA network.
After completing setting, please click “Next”.
3.1.5 Search USB Device
The system will search USB device and check its status. You can click “Rescan” to
search update equipment item. After completing search, please click “Next” to carry on
the next setting.
Page 19

19
3.1.6 Server Function - Disk Format
To enable server function setting, click “Next” to continue.
Below message window will be appeared asking for disk format, if you want to format this
disk, please click “Yes”.
Page 20

20
3.1.7 Server Functions
FTP Server and Samba Server enable or not. After completing setting, please click “Next”.
Webcam Server enable or not. After completing setting, please click “Next”.
Page 21

21
Printer Server enable or not. After completing setting, please click “Next”.
Note: Only support HP serial and EPSON serial scanner.
Audio Server enable or not. After completing setting, please click “Next”.
Page 22

22
3.1.8 Add User Account
It provides setting user account function. You can set username and password in this page,
select the right of user. After completing, please click the “Add” to add a new user account.
After adding a new user account, please click the “Next”.
3.1.9 Complete Setting Finish
When the below graphic appearing, please press “Finish”.
Page 23

23
3.1.10 Server Login
3.1.10.1 Server Login of administrator
Please select “admin” of Username and input the Password (Default: admin). After
completing, please click "Login" to carry on the next setting.
Appear administrator can use function icons. Please refer to 3.3.1.1 My FTP ~ 3.3.1.2 My
Webcam Record.
3.1.10.2 Server Login of personal user
Please select your Username and input the Password. After completing, please click
"Login" to carry on the next setting.
Appear personal user can use function icons. Please refer to
3.3.2.1 My FTP ~ 3.3.2.4 My
Webcam.
Page 24

24
Page 25

25
3.2 Single Feature Setting
Click “Single Feature Setting” can setup each server function.
The system will request you to input the Password (Default:
admin). After completing,
please click "Next" to carry on the next setting.
Page 26

26
3.2.1 My FTP
Click “My FTP”; select “Enable FTP Server”. After completing setting, please click “Finish”.
3.2.2 Network Disk
Click “Network Disk”; select “Enable Samba Server” and setup workgroup name and
server name. After completing setting, please click “Finish”.
Page 27

27
3.2.3 My Webcam
Click “My Webcam”; select “Enable Webcam Server”. After completing setting, please
click “Finish”.
3.2.4 Account Create
Click “Account Create”; you can input user name and password, and setup right. After
completing setting, please click “Add”.
Page 28

28
3.2.5 DDNS
You can set Dynamic DNS function in this page.
1. Enabled Dynamic DNS
Select the function to enable DDNS service.
2. Service Provider
Select your service provider, including dyndns, ods and tzo.
3. Hostname
Input login server name of DDNS service.
4. User Name
Input login user name of DDNS service.
5. Password
Input login password of DDNS service.
6. Enable FTP, Webcam & Print Access from WAN
Select functions you want to enable.
After completing, please click the “Finish” to enable DDNS function.
Page 29

29
3.2.6 My Audio
Click “My Audio”; select “Enable Audio Server”. After completing setting, please click
“Finish”.
3.2.7 Quick Setup
Click “Quick Setup”, you can set router basic network functions. Please refer 3.1
Complete Setting.
Page 30

30
3.2.8 Advance Setup
Click “Advance Setup”, it will appear another one web browser window, this window
manages main menu of function. It can do the detail setup. Please refer to the user guide.
Page 31

31
3.3 Server Login
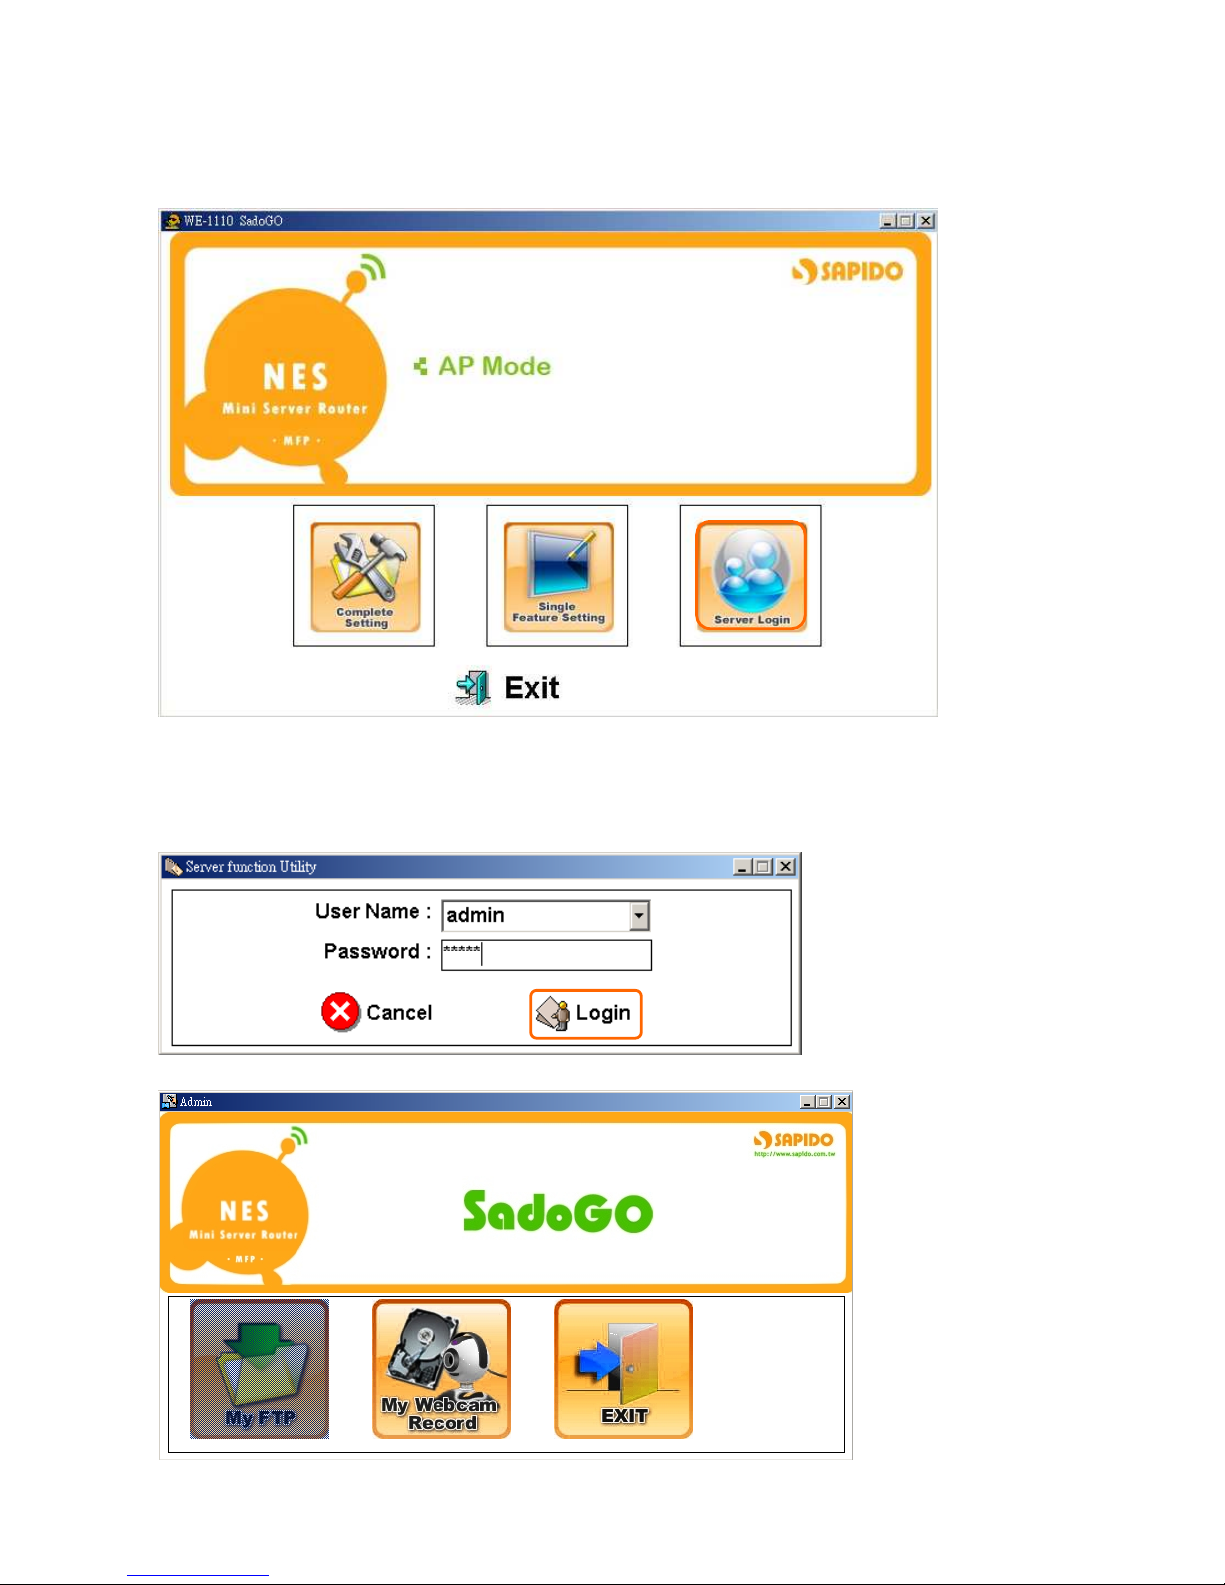
It has LAN USER and WAN USER, LAN USER for administrator and personal in LAN,
WAN USER only for personal in WAN.
Click WAN USER, must input IP Address or Domain name, and then click “Next”.
Page 32

32
3.3.1 Server Login of administrator
Login administrator user name and password, and then click “Login”.
Page 33

33
3.3.1.1 My FTP
Click My FTP, will appear a window as below.
Page 34

34
3.3.1.2 My Webcam Record
Click My Webcam Record, you can see the webcam real-time picture as below window.
Click “Enable Webcam record” to start webcam record function. If you don’t want to
enable this function, please click “Disable Webcam record”.
Page 35

35
Click “
Advance Setup”, you can set “Save image interval” and “Save Location”. After
completing, please click “OK”.
Click “Storage folder”, you can see webcam record image of “webcam_recorded_files”
folder.
3.3.1.3 EXIT
Return to setting main screen.
Page 36

36
3.3.2 Server Login of personal account
Account number and password of log-in personal users can be keyed in or chosen from the
drop-down list, after inputting and finishing, please press Login.
The authority icon which users can use appears, select whitely for what has been chosen
instead.
Page 37

37
3.3.2.1 My FTP
Click the “My FTP” icon; you can check FTP internal information.
It will appear your file folder of FTP.
3.3.2.2 Anonymous
Click the “Anonymous” icon; you can check anonymous of FTP internal information.
It will appear the anonymous folder, it’s administrator for sharing files to users.
Page 38

38
3.3.2.3 Network Disk
Click the “Network Disk” icon; you can check samba folder internal information.
It will appear the following screen; you can upload or download internal files
for sharing.
Page 39

39
3.3.2.4 My Webcam
Click the “My Webcam” icon; you can check webcam in real time.
Jump out another window to reveal the instant image。
Page 40

40
My Printer
Click the “My Printer” icon; you can set the printer by LPR protocol.
Please select printer of connect to the WE-1510, click “SET” button to setting LPR protocol.
Jump out one information frame reveal printer set success! Please click “OK” to can start
the movements printed.
Page 41

41
3.3.2.5 My Scanner
Click the “My Scanner” icon; you can use scan function via scanner.
Choice image type, include “Color (RGB)”, “Black & White”, and “Grayscale”, then click
“Start” button to scan picture.
If you want to save picture, please click “Save” button.
After select save poison, please click the “save” button.
If you want to set advance, please click the “Advance setup” button.
Page 42

42
It will appear the following window.
• Media
Include “Reflective” and “Transparent”.
• Resolution
Include “75”, “150”, “300”, and “600” dpi.
• Scan Area
Setting scan area “Width” and “Height”.
• Offset
Setting picture offset “Left” and “Top” size.
• Use Document Feeder((((ADF))))
If your scanner is feeder type, please enable the function.
After complete setting, please click “OK” button.
Page 43

43
My Audio
Click the “My Audio” button; it will install a software program.
It will appear the “Windows Media Player”.
Please open your media files to the Windows Media Player. And then you can listen to the
music via Audio Server of WE-1510.
3.3.2.6 EXIT
Click on “EXIT” button to return to the setting main screen.
Page 44
44
3.4 Exit
If you want to close the SadoGO Utility, please click on “Exit” button.
Page 45

45
Chapter 4. AP Mode
4.1 Complete Setting
WE-1510 will change to wireless AP, and have two LAN ports. WE-1510 can connect to
upper Router or AP via LAN port or Wireless (WDS). It doesn’t provide WAN and DDNS
functions in AP mode.
Select “Complete Setting” to quick setup after the setup main page appearing.
The default Username and Password is “admin”, and then click “Yes”.
4.1.1 Password Setup
If you want to change password, please input new password in this step, and then click
“Next” button to continue.
Page 46

46
4.1.2 LAN IP Address Setup
Please input the AP IP address and gateway IP address, and then click on “Next”.
4.1.3 SSID Setup
Please input the WLAN SSID. After completing, please click carry on the next move setting
“Next”. Suggest using the default value “MFP_Server_Router”.
Page 47

47
4.1.4 Wireless Security Setup
You can select encryption or non encryption according to your need, as select don’t encrypt,
ask the select “None”. After completing, please click "Next" to carry on the next setting.
If you select encryption, please refer to following setting.
Page 48

48
4.1.4.1 Encrypt Type - WEP
Support WEP encryptions with 64 bits and 128 bits, it can protect wireless security, and
provide ASCII and 16 hex key. After completing, please click “Next” button.
4.1.4.2 Encrypt Type - WPA
Allow the access from WPA clients simultaneously and the encryption keys are given from
PSK respectively. After setting completing, please click “Next”.
Radius with 802.1x can be compatible with original WPA standard, so Radius with 802.1x
Page 49

49
can also support WEP Encryption, WPA, WPA-PSK and 802.1x certification WPA network.
After completing setting, please click “Next”.
4.1.5 Search USB Device
The system will search USB device and check its status. You can click “Rescan” to search
update equipment item. After completing search, please click "Next" to carry on the next
setting.
Page 50

50
4.1.6 Server Function – Disk Format
To enable the server function, click “Next” to continue.
Below message window will be appeared asking for disk format, if you want to format this
disk, please click “Yes”.
Page 51

51
4.1.7 Server Functions
FTP Server and Samba Server enable or not. After completing setting, please click “Next”.
Webcam Server enable or not. After completing setting, please click “Next”.
Page 52

52
Printer Server enable or not. After completing setting, please click “Next”.
Note: Only support HP serial and EPSON serial scanner.
Audio Server enable or not. After completing setting, please click “Next”.
Page 53

53
4.1.8 Add User Account
It provides setting user account function. You can set username and password in this page,
and select the right of user. After completing, please click the “Add” to add a new user
account. After adding a new user account, please click the “Next”.
4.1.9 Complete Setting Finish
When the below graphic appearing, please press “Finish”.
Page 54

54
4.1.10 Server Login
4.1.10.1 Server Login of administrator
Please select “admin” of Username and input the Password (Default: admin). After
completing, please click "Login" to carry on the next setting.
Appear administrator can use function icons. Please refer to 4.3.1.1 My FTP ~ 4.3.1.2 My
Webcam Record.
4.1.10.2 Server Login of personal user
Please select your Username and input the Password. After completing, please click
"Login" to carry on the next setting.
Appear personal user can use function icons. Please refer to 4.3.2.1 My FTP ~ 4.3.2.4 My
Webcam.
Page 55

55
Page 56

56
4.2 Single Feature Setting
Click “Single Feature Setting” can setup each server function.
The system will request you to input the Password (Default:
admin). After completing,
please click "Next" to carry on the next setting.
Page 57

57
4.2.1 My FTP
Click “My FTP”; select “Enable FTP Server”. After completing setting, please click “Finish”.
4.2.2 Network Disk
Click “Network Disk”; select “Enable Samba Server” and setup workgroup name and
server name. After completing setting, please click “Finish”.
Page 58

58
4.2.3 My Webcam
Click “My Webcam”; select “Enable Webcam Server”. After completing setting, please
click “Finish”.
4.2.4 Account Create
Click “Account Create”; you can input user name and password, and setup right. After
completing setting, please click “Add”.
Page 59

59
4.2.5 Quick Setup
Click “Quick Setup”; it goes to router basic setup.
4.2.6 dvance Setup
If you want to set up detail function, please click “Advance Setup”, it will appear the
WE-1510 website screen. Please refer the user guide.
Page 60
60
4.3 Server Login
Check users’ usufruct; please click “Server Login”.
4.3.1 Server Login of administrator
Login administrator user name and password, and then click “Login”.
Page 61

61
4.3.1.1 My FTP
Click My FTP, it will appear a window as below.
Page 62

62
4.3.1.2 My Webcam Record
Click My Webcam Record, you can see the webcam real-time picture. Like below window.
Click “Enable Webcam record” to start webcam record function. If you don’t want to
enable this function, please click “Disable Webcam record”.
Page 63

63
Click “
Advance Setup”, you can set “Save image interval” and “Save Location”. After
complete, please click “OK”.
Click “Storage folder”, you can see webcam record image of “webcam_recorded_files”
folder.
4.3.1.3 EXIT
Return to setting main screen.
Page 64

64
4.3.2 Server Login of personal account
Account number and password of log-in personal users can be keyed in or chosen from the
drop-down list, after inputting and finishing, please press Login.
The authority icon which users can use appears, select whitely for what has been chosen
instead.
Page 65

65
4.3.2.1 My FTP
Click the “My FTP” icon; you can check FTP internal information.
It will appear your file folder of FTP.
4.3.2.2 Anonymous
Click the “Anonymous” icon; you can check anonymous of FTP internal information.
It will appear the anonymous folder, it’s administrator for sharing files to
users.
Page 66

66
4.3.2.3 Network Disk
Click the “Network Disk” icon; you can check samba folder internal information.
It will appear the following screen; you can upload or download internal files to sharing.
Page 67

67
4.3.2.4 My Webcam
Click the “My Webcam” icon; you can check webcam in real time.
Jump out another window to reveal the instant image。
Page 68

68
4.3.2.5 My Printer
Click the “My Printer” icon; you can set the printer by LPR protocol.
Please select printer of connect to the WE-1510, click “SET” button to setting LPR protocol.
Jump out one information frame reveal printer set success! Please click “OK” to can start
the movements printed.
Page 69

69
4.3.2.6 My Scanner
Click the “My Scanner” icon; you can use scan function via scanner.
Choice image type, include “Color (RGB)”, “Black & White”, and “Grayscale”, then click
“Start” button to scan picture.
If you want to save picture, please click “Save” button.
After select save poison, please click the “save” button.
If you want to set advance, please click the “Advance setup” button.
Page 70

70
It will appear the following window.
• Media
Include “Reflective” and “Transparent”.
• Resolution
Include “75”, “150”, “300”, and “600” dpi.
• Scan Area
Setting scan area “Width” and “Height”.
• Offset
Setting picture offset “Left” and “Top” size.
• Use Document Feeder((((ADF))))
If your scanner is feeder type, please enable the function.
After complete setting, please click “OK” button.
Page 71

71
4.3.2.7 My Audio
Click the “My Audio” button; it will install a software program.
It will appear the “Windows Media Player”.
Please open your media files to the Windows Media Player. And then you can listen the
music via Audio Server of WE-1510.
4.3.2.8 EXIT
Click on “EXIT” button to return the setting main screen.
Page 72

72
4.4 Exit
If you want to close the SadoGO Utility, please click on “Exit” button.
Page 73

73
Client Mode
5.1 Complete Setting
WE-1510 will be changed to a network adapter. Your computer can use RJ-45 cable to link
the WE-1510, or connect to remote AP via wireless. WE-1510 in Client Mode doesn’t
provide WAN functions, but it provides Site Survey function, which allows users to search
AP signal and setting wireless network.
Select "Complete Setting" to quick setup after the main page appearing.
The default Username and Password is “admin”, and then click “Yes”.
Page 74

74
5.1.1 Password Setup
If you want to change password, please input new password in this step, and then click
“Next” button to continue.
5.1.2 Site Survey
Provide to search AP or ISP wireless signal. When Client Mode enabling, you can select
SSID signal to connect; in “AP Details” field you can check SSID information. Select the
SSID you would like to connect, and then click “Next” button. Click “Rescan” button will
research AP signal.
Page 75

75
5.1.3 Wireless Security Setup
The SSID indicated is your selected SSID in Site Survey. Encryption type including
“Open-System”, “Shared-Key”, “TKIP”, and “AES”; you can also select “None”, it is
decided from your selected SSID encryption type.
After completing setting, please click “Next” button.
5.1.3.1 Wireless Security Setup - Open-System & Shared-Key
Provide 64-bits and 128-bits WEP encryption, and provide ASCII and HEX. key types.
Complete setting, please click “Next” button.
Page 76

76
5.1.3.2 Wireless Security Setup - TKIP & AES
If it is WPA-PSK encryption, you just input single key.
WPA((((TKIP))))
Temporal Key Integrity Protocol(TKIP) dynamically produce 128-bits length key, you
can set key length at least 8 characters.
WPA((((AES))))
WPA can define AES the use, does for extra substitutes the WEP encryption to select
the work.
Complete setting, please click “Next” button.
Then it will appear “Connect status” message window, you can see connect detail
information. Please click “OK” button.
Page 77

77
5.1.4 Search USB Device
The system will search USB device and check its status. You can click “Rescan” to search
update equipment item. After completing search, please click "Next" to carry on the next
setting.
5.1.5 Server Function – Disk Format
To enable server function, click “Next” to continue.
Below message window will be appeared asking for disk format, if you want to format this
disk, please click “Yes”.
Page 78

78
Page 79

79
5.1.6 Server Functions
FTP Server and Samba Server enable or not. After completing setting, please click “Next”.
Webcam Server enable or not. After completing setting, please click “Next”.
Page 80

80
Printer Server enable or not. After completing setting, please click “Next”.
Note: Only support HP serial and EPSON serial scanner.
Ensure that Audio Server enable or not. After completing setting, please click “Next”.
Page 81

81
5.1.7 Add User Account
It provides setting user account function. You can set username and password in this page,
and select the right of user. After completing, please click the “Add” to add a new user
account. After adding a new user account, please click the “Next”.
5.1.8 Complete Setting Finish
When the below graphic appearing, please press “Finish”.
Page 82

82
5.1.9 Server Login
5.1.9.1 Server Login of administrator
Please select “admin” of Username and input the Password (Default: admin), after
completion, please click carry on the next move setting "Login".
Appear administrator can use function icons. Please refer to 5.3.1.1 My FTP ~ 5.3.1.2 My
Webcam Record.
Page 83

83
5.1.9.2 Server Login of personal user
Please select your Username and input the Password. After completing, please click
"Login" to carry on the next setting.
Appear personal user can use function icons. Please refer to 5.3.2.1 My FTP ~ 5.3.2.4 My
Webcam.
Page 84

84
5.2 Single Feature Setting
Click “Single Feature Setting” can to setup each server function.
The system will request you to input the Password (Default:
admin). After completing,
please click "Login" to carry on the next setting.
Page 85

85
5.2.1 My FTP
Click “My FTP”; select “Enable FTP Server”. After completing setting, please click “Finish”.
5.2.2 Network Disk
Click “Network Disk”; select “Enable Samba Server” and setup workgroup name and
server name. After completing setting, please click “Finish”.
Page 86

86
5.2.3 My Webcam
Click “My Webcam”; select “Enable Webcam Server”. After completing setting, please
click “Finish”.
5.2.4 Account Create
Click “Account Create”; you can input user name and password, and setup right. After
completing setting, please click “Add”.
Page 87

87
5.2.5 My Audio
Click “My Audio”; select “Enable Audio Server”. After completing setting, please click
“Finish”.
5.2.6 Quick Setup
Click “Quick Setup”, you can set up router basic network functions. Please refer to 5.1
Complete Setting.
5.2.7 Advance Setup
Click “Advance Setup”, it will appear another one web browser window, this window
manages main menu of function. It can do the detail setup. Please refer to the user guide.
Page 88

88
5.3 Server Login
There are LAN USER and WAN USER, LAN USER for administrator and personal in LAN,
WAN USER only for personal in WAN.
Click WAN USER, must input IP Address and Domain name, and then click “Next”.
Page 89

89
5.3.1 Server Login of administrator
Login administrator user name and password, and then click “Login”.
Page 90

90
5.3.1.1 My FTP
Click My FTP, will appear a window like below.
Page 91

91
5.3.1.2 My Webcam Record
Click My Webcam Record, you can see the webcam real-time picture. Like below window.
Click “Enable Webcam record” to start webcam record function. If you don’t want to
enable this function, please click “Disable Webcam record”.
Page 92

92
Click “
Advance Setup”, you can set “Save image interval” and “Save Location”. After
complete, please click “OK”.
Click “Storage folder”, you can see webcam record image of “webcam_recorded_files”
folder.
5.3.1.3 EXIT
Return to setting main screen.
Page 93

93
5.3.2 Server Login of personal account
Account number and password of the personal users of log-in, can choose one's own account
number through making drawing type menus, after inputting and finishing, please press Login.
The authority icon which users can use appears, select whitely for what has been chosen
instead.
Page 94

94
5.3.2.1 My FTP
Click the “My FTP” icon; you can check FTP internal information.
It will appear your file folder of FTP.
5.3.2.2 Anonymous
Click the “Anonymous” icon; you can check anonymous of FTP internal information.
It will appear the anonymous folder, it’s administrator for sharing files to users.
Page 95

95
5.3.2.3 Network Disk
Click the “Network Disk” icon; you can check samba folder internal information.
It will appear the following screen; you can upload or download internal files
for sharing.
Page 96

96
5.3.2.4 My Webcam
Click the “My Webcam” icon; you can check webcam in real time.
Jump out another window to reveal the instant image.
Page 97

97
5.3.2.5 My Printer
Click the “My Printer” icon; you can set the printer by LPR protocol.
Please select printer of connect to the WE-1510, click “SET” button to setting LPR protocol.
Jump out one information frame reveal printer set success! Please click “OK” to can start the
movements printed.
Page 98

98
5.3.2.6 My Scanner
Click the “My Scanner” icon; you can use scan function via scanner.
Choice image type, include “Color (RGB)”, “Black & White”, and “Grayscale”, then click “Start”
button to scan picture.
If you want to save picture, please click “Save” button.
After select save poison, please click the “save” button.
If you want to set advance, please click the “Advance setup” button.
Page 99

99
It will appear the following window.
• Media
Include “Reflective” and “Transparent”.
•
Resolution
Include “75”, “150”, “300”, and “600” dpi.
• Scan Area
Setting scan area “Width” and “Height”.
• Offset
Setting picture offset “Left” and “Top” size.
• Use Document Feeder((((ADF))))
If your scanner is feeder type, please enable the function.
After complete setting, please click “OK” button.
Page 100

100
5.3.2.7 My Audio
Click the “My Audio” button; it will install a software program.
It will appear the “Windows Media Player”.
Please open your media files to the Windows Media Player. And then you can listen the music via
Audio Server of WE-1510.
5.3.2.8 EXIT
Click on “EXIT” button to return the setting main screen.
 Loading...