

Page 1
http://www.sapido.com.tw/ User Manual v1.0.0
1
Page 2

http://www.sapido.com.tw/ User Manual v1.0.0
2
Table of Contents
Ta bl e of Contents ........................................................................................................................ 2
FCC Ca uti on ............................................................................................................................... 4
Chapter 1 Introduction ........................................................................................................ 5
1.1 Product Appea ra nce ........................................................................................... 5
Chapter 2 System and Network Setup................................................................................. 6
2.1 Build Network Connec tion .................................................................................. 6
2.2 Connecting BR070N............................................................................................ 6
2.3 Ne two rk setup ..................................................................................................... 6
2.3.1 Windows 2000............................................................................................. 7
2.3.2 Windows XP................................................................................................ 8
2.3.3 Windows Vista / Windows 7 ........................................................................ 9
2.4 Router IP Address L ookup................................................................................ 10
2.4.1 Log into We b GUI...................................................................................... 11
Chapter 3 Interne t Connection .......................................................................................... 12
3.1 Using a s a broadband router ............................................................................ 13
3.2 Home button menu ........................................................................................... 13
3.3 In ternet Setup ................................................................................................... 16
3.3.1 PPPoE....................................................................................................... 17
3.3.2 DHCP ........................................................................................................ 17
3.3.3 Static I P..................................................................................................... 19
3.3.4 PPTP ......................................................................................................... 19
3.3.5 L2TP ......................................................................................................... 21
3.3.6 WiFi ISP .................................................................................................... 22
3.4 AP ..................................................................................................................... 22
3.5 WiF i A P ............................................................................................................. 23
Chapter 4 GUI Function Se tup........................................................................................... 25
4.1 Status................................................................................................................ 25
4.2 Pa re ntal Control ................................................................................................ 27
4.2.1 URL Filte ri ng ............................................................................................. 27
4.2.2 MAC Fil ter S che dul e ................................................................................. 28
4.2.3 Wireless Sch edul e .................................................................................... 29
4.3 Offic e Control ................................................................................................... 30
4.3.1 Multiple AP................................................................................................ 30
4.3.2 Wireless Access Control........................................................................... 31
4.3.3 IP Filtering ................................................................................................ 32
4.3.4 IP Binding ................................................................................................. 32
4.3.5 QoS ........................................................................................................... 33
4.4 Firmware Upgrade ............................................................................................ 34
4.4.1 Auto up grade ............................................................................................ 35
4.4.2 Manua l upgrade ........................................................................................ 35
4.5 DoS ................................................................................................................... 35
4.6 VPN Server ....................................................................................................... 37
4.7 NAT Manage m ent.............................................................................................. 38
4.7.1 Virtual Server ............................................................................................ 39
4.7.2 DMZ .......................................................................................................... 40
4.8 Remote Management ........................................................................................ 41
4.9 Time Zone ......................................................................................................... 41
4.10 Factory Default ................................................................................................. 41
4.11 Reboot .............................................................................................................. 42
4.12 Logout .............................................................................................................. 42
Chapter 5 Advance Setup.................................................................................................. 43
5.1 Interne t Mode .................................................................................................... 43
5.1.1 Internet Setup ................................................................................................... 43
5.1.2 AP(switch to AP mod e)....................................................................................... 43
5.1.3 W iFi AP( sw itch to WiFi AP mo de) ....................................................................... 43
5.1.4 WiFi ISP ............................................................................................................ 43
Page 3

http://www.sapido.com.tw/ User Manual v1.0.0
3
5.2 IP Config ........................................................................................................... 43
5.2.1 WAN .......................................................................................................... 43
5.2.1.1 PPPoE....................................................................................................... 43
5.2.1.2 DHCP ........................................................................................................ 45
5.2.1.3 Static IP..................................................................................................... 45
5.2.1.4 PPTP ......................................................................................................... 46
5.2.1.5 L2TP ......................................................................................................... 48
5.2.2 LAN ........................................................................................................... 49
5.2.3 DDNS ........................................................................................................ 50
5.3 IP v6 Confi g ....................................................................................................... 51
5.4 Wireless ............................................................................................................ 52
5.4.1 Basic Settin gs................................................................................................... 52
5.4.2 Adva nce d S e ttings............................................................................................ 54
5.4.3 Security ............................................................................................................ 56
5.4.4 Acce ss Contro l ................................................................................................. 57
5.4.5 WPS .................................................................................................................. 57
5.4.6 WDS .................................................................................................................. 59
5.4.7 Schedule ........................................................................................................... 62
5.5 NAT ................................................................................................................... 62
5.6 VPN Server ....................................................................................................... 63
5.7 Firewall ............................................................................................................. 63
5.7.1 DoS ........................................................................................................... 63
5.5.2 QoS .............................................................................................................. 63
5.5.3 Port Filtering ............................................................................................. 64
5.5.4 IP Filtering ................................................................................................ 65
5.5.5 Mac Filte r S che dule .................................................................................. 65
5.5.6 URL Filte ri ng ............................................................................................. 65
5.5.8 VLAN......................................................................................................... 65
5.6 System .............................................................................................................. 66
5.6.3 Wa ke on Lan ............................................................................................. 66
5.6.4 Change User name/Password................................................................... 67
5.6.5 Upgrade Firm ware .................................................................................... 67
5.6.6 Profiles Save............................................................................................. 67
5.6.7 Remote Management ................................................................................ 69
5.6.8 Time Zone ................................................................................................. 69
5.6.9 UpnP ......................................................................................................... 70
5.6.10 Route Setup .............................................................................................. 71
5.6.11 VPN Pa ssthough ....................................................................................... 72
5.6.12 Wan Type Auto Detection .......................................................................... 73
6 Q & A ................................................................................................................................ 74
6.5 Installation ........................................................................................................ 74
6.6 LED ................................................................................................................... 74
6.7 IP Address ........................................................................................................ 74
6.8 OS Setting......................................................................................................... 75
6.9 BR070N Setup................................................................................................... 76
6.10 W i r el ess LAN .................................................................................................... 77
6.11 Support ............................................................................................................. 79
6.12 Others ............................................................................................................... 79
7 Appendices....................................................................................................................... 80
7.5 Opera ting Systems ........................................................................................... 80
7.6 Brow sers .......................................................................................................... 80
7.7 Communica tions Re gul a tion I nforma tion ......................................................... 80
Page 4

http://www.sapido.com.tw/ User Manual v1.0.0
4
FCC Caution
FCC Par t 15. 19 Cauti on:
1. This device complies with Part 15 of th e FCC Rul es. Operat ion is subject to the
following two conditions:
(1) this device may n ot caus e h ar mful interfer ence and
(2) this device must accept any interfer ence r eceived, inclu ding interfer ence th at
may cause undesired oper ation
2. This device and it s antenn a(s) must not be co-located or operatin g in conjunction
wit h any other anten na or trans mitt er.
3. Ch anges or modificat ion s to this unit not expressly appr oved by the party
responsible f or compl iance coul d void th e user auth ority t o oper at e the equipment.
IMPORTANT NOTE:
FCC Radi ation Exposure Stat em ent:
This equipment complies with FCC radiation exposure limits set forth for an uncontrolled
environment. This equipment should be installed and operated with minimum distance 20cm
between the radiator & your body.
This transmitter must not be co-l ocat ed or operat ing in conjunction with any other
a nten na or tran smi tter.
The antennas used for this transmitter must be instal l ed to prov ide a separation
distan ce of at l east 20 cm from all persons and mu st not be co-l oc at ed or operatin g in
con jun ction with any other antenn a or t r ansm itter .
FC C Statement in User’s M anual (fo r calss B)
FC C Section 15. 105
“Federal Communications Commission (FCC) Statement”
This equipment has been tested and found to com ply w ith the l imit s for a lass B digital
device, p ursua nt to Part 15 of the FCC Rules. These limits are designed to pro vide
reasonable protection against harmful inte rference in a residential i nstallatio n. This
equipment generates uses and can radiate radio frequency energy and, if not
installed and used in accordance with the instructions, may cause harmful
interference to radio communications. However, there is no guarantee that
i nte r fe re nc e wi l l no t oc c ur i n a pa rti c ul a r installat i o n. I f t his e q ui pm e nt d oe s c a us e
harmful interference to radio or television receptio n, which can be determined by
turning the equipment off and on, the user is encouraged to try to correct the
int erfer ence by one or more of the following measures:
-- Reorient or relocate the r eceivin g antenn a.
-- In crease the separation bet w een the equipment and receiv er .
-- Conn ect the equipment int o an outlet on a cir cuit diff er ent from that to which th e
receiv er is connect ed.
-- Con sult the dealer or an ex per ienced radio/TV t echnician for help.
CE Statement of Conformit y
Our product has been tested in typical configuration by Ecom Sertech Corp and was found to
comply with the essential requirement of “Council Directive on the Approximation of the Laws
of the Member States relating t o Elec tromagnet ic Com patibility” ( 89/336/EEC ; 92/31/ EEC;
93/68/EEC)
Page 5

http://www.sapido.com.tw/ User Manual v1.0.0
5
Chapter 1 Introduction
1.1 Product Appear ance
LED Indicator Status Description:
LED
Function
Color
Status
Description
Status x 1
Sy s tem status
Green
On System is ready to work
Blin king
120ms
1.
Power is being applied and system
boot in progress
2. Reset or firmware upgrade
i n progress
Wireless / WPS x 1
Wire less activity
&
WPS status
Green
On Wire less is active
Blin king
30ms
Wire less Tx /Rx activity
Red
Orange
Blin king
30ms
WPS func tion in progr e ss
WAN x 1
WAN port activity
Green
On 10/100Mbps Ethernet is connected
Blin king
30ms
100Mbps Ethernet Tx/Rx activity
Blin king
120ms
10Mbps Ethernet Tx/Rx activity
LAN x 1
LAN port activity
Green
On 10/100Mbps Ethernet is connected
Blin king
30ms
100Mbps Ethernet Tx/Rx activity
Blin king
120ms
10Mbps Ethernet Tx/Rx activity
Page 6

http://www.sapido.com.tw/ User Manual v1.0.0
6
Chapter 2 System and Network Setup
The BR070N is an easy to setup and wireless device for various application and environment,
especially for large installs such as hotels, office s space, warehouses, hot-spots and more.
To begin w ith BR070N , you mus t have the follow in g m inim um sys tem requirem ent s . If your
syste m can’t correspond to the following requirements, you might get some unknown troubles
on your system.
Internet Account for XDSL/Cable Modem
One Ethernet (10/100mbps) network interface card.
TCP/IP and at least one web browser software installed (E.g.: Internet Explorer, Firefox,
Safari、Chrome latest version).
802.11b、g、n wireless adapter for wireless mobile clients.
Recommended OS: WinXP, Visata or Win7 / Linux.
2.1 Build Networ k Connect ion
Adminis trator c an manage the s ettings for WAN, LAN, W ireles s Network, NTP, pas swor d,
VPN, Firewall, etc.
Please confirm the network environment or the purpose before setting this product.
2.2 Connecting BR070N
Prepare the followings before the connection:
PC or N otebook for setup
Ethernet cable
1. Make sure you are under “Router Mode”.
2. Connect BR070N to xDSL/ Cable modem with the Ethernet cable, WAN to LAN.
3. Turn on your Computer.
2.3 Net work setup
After the networ k connec tion is built, the next s tep is s etup the router with proper netw ork
Page 7

http://www.sapido.com.tw/ User Manual v1.0.0
7
parameters, so it can work properly in your network environment. Before you connect to the
wireles s r outer and s t art configur ation proc edur es , your c om puter m ust be able to get an IP
addres s from the wireless router autom atically ( use dynamic IP addr ess) . If it’s set to us e
st atic IP address , or you’re u nsur e, please fol low the b elow ins tructions to conf igure your
computer with dynamic IP address:
If the operating system of your computer is….
Windows 2000 - please go to section 2.3.1
Windows XP - please go to section 2.3.2
Windows Vista/Win7 - please go to section 2.3.3
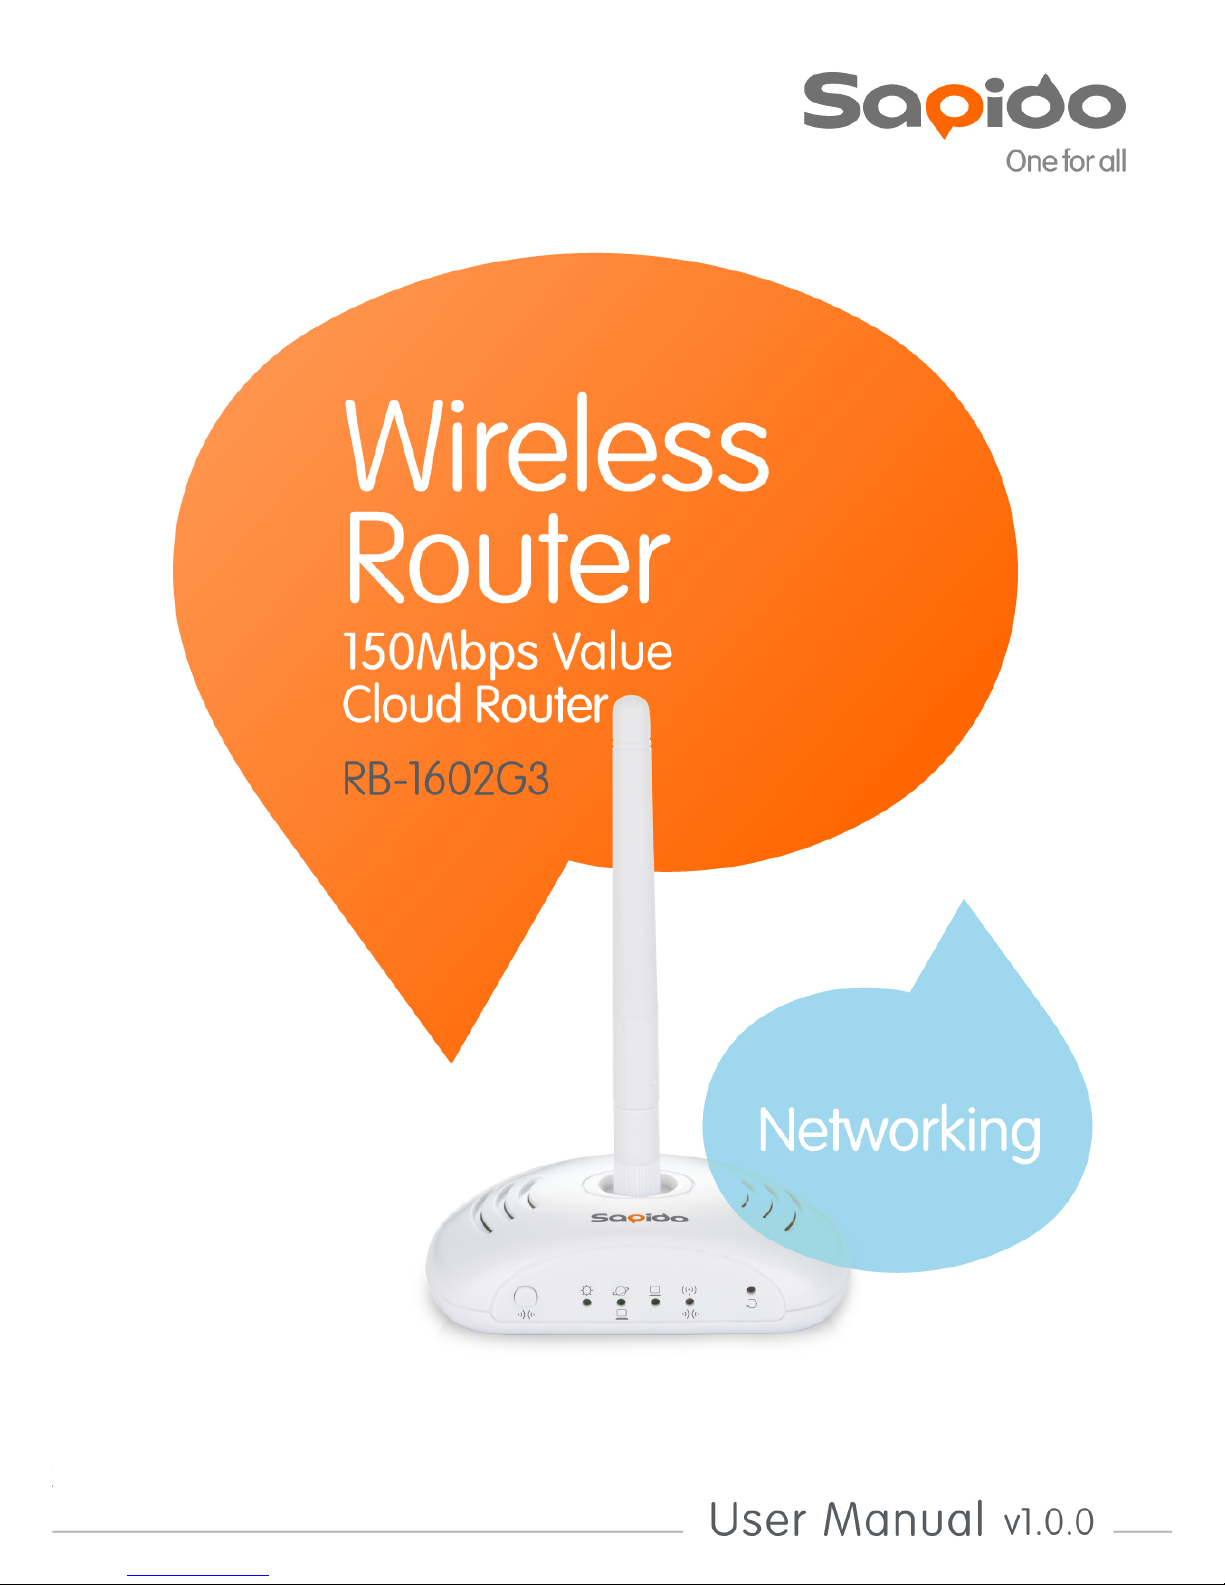
2.3.1 Windows 2000
Click “Start” button (it should be located at lower-left corner of your computer), then click
control panel. Double-click N etwork and Dial-up Connections icon, double click Local Area
Connection, and Local Area Connection Properties window will appear. Select “Internet
Protocol (T CP/IP)”, then cli ck “Properti es”.
1. Select “Obtain an IP address automatically” and “Obtain DNS server address
automatically”, then click “OK”.
Page 8

http://www.sapido.com.tw/ User Manual v1.0.0
8
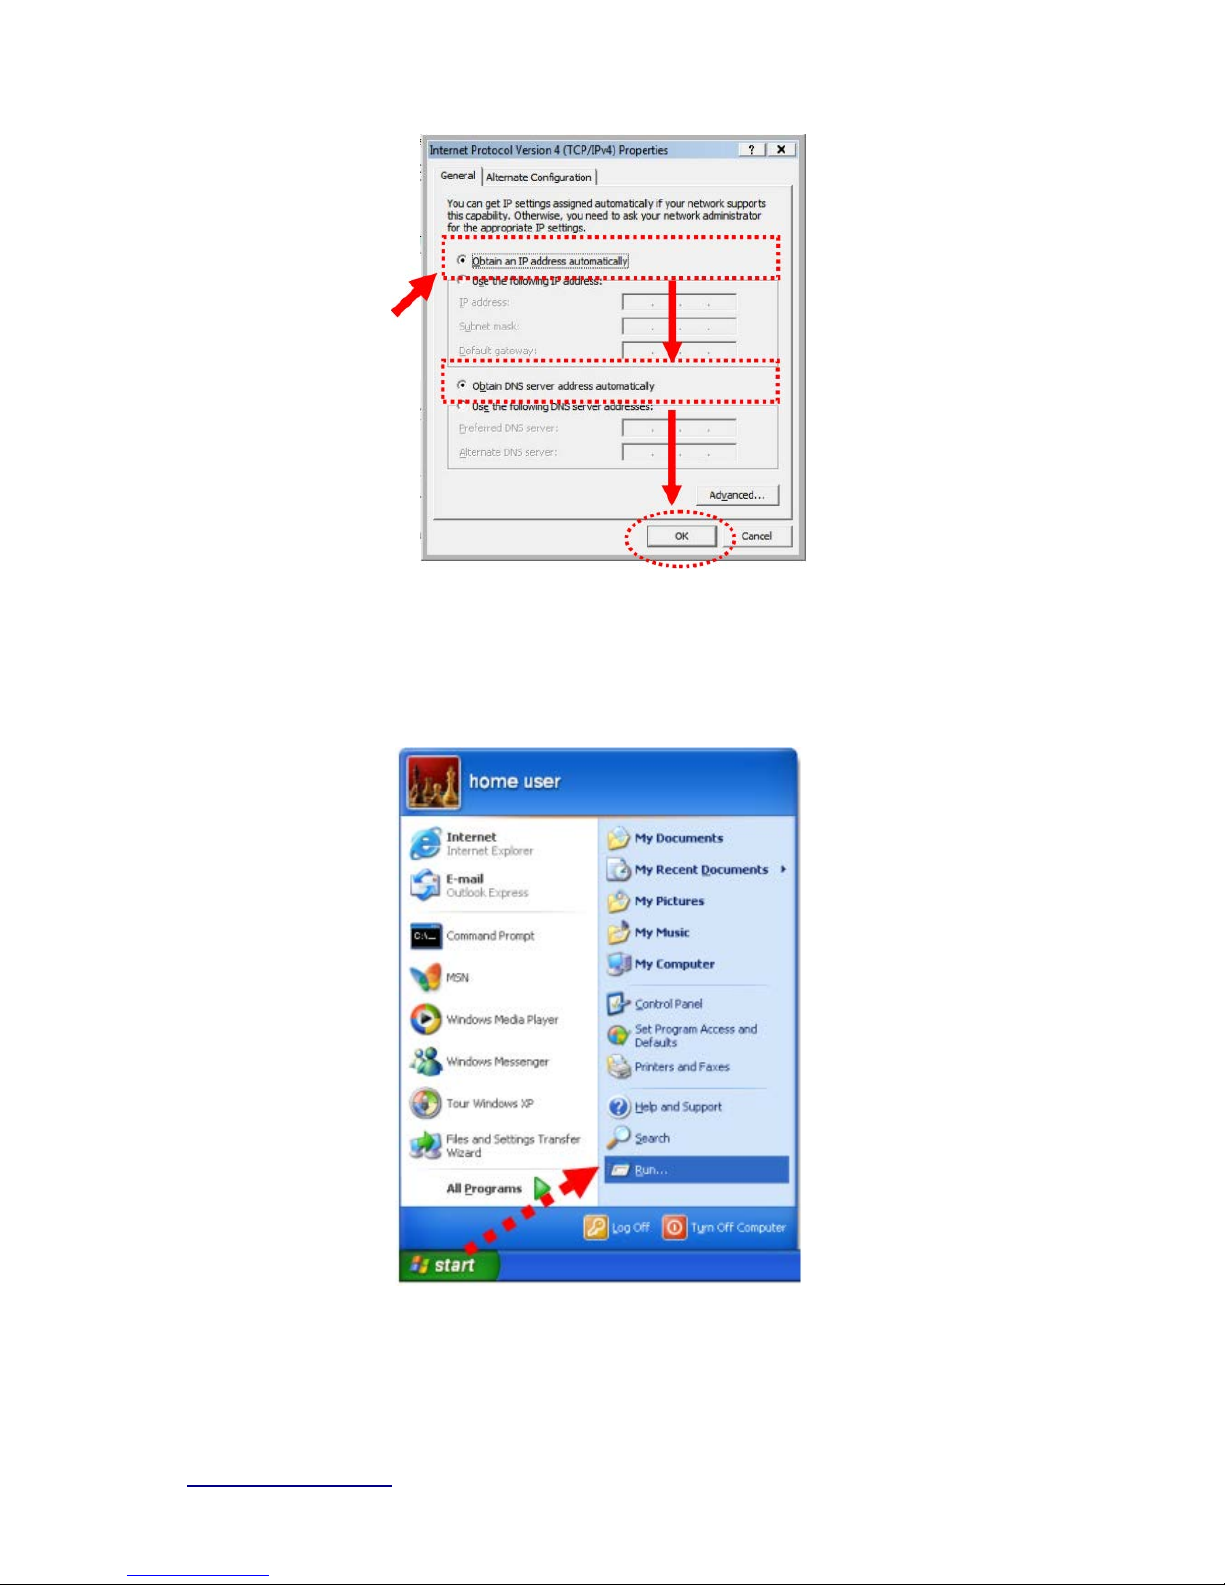
2.3.2 Windows XP
1. Click “Start” button (it should be located at low er-left corner of your computer), then
click control panel. Double-click Network and Internet Connections icon, click Network
Connections, then double-click Local Area Connection, Local Area Connection Status
window will appear, and then click “Properties”.
2. Select “Obtain an IP address automatically” and “Obtain DNS server address
automatically”, then click “OK”.
Page 9
http://www.sapido.com.tw/ User Manual v1.0.0
9
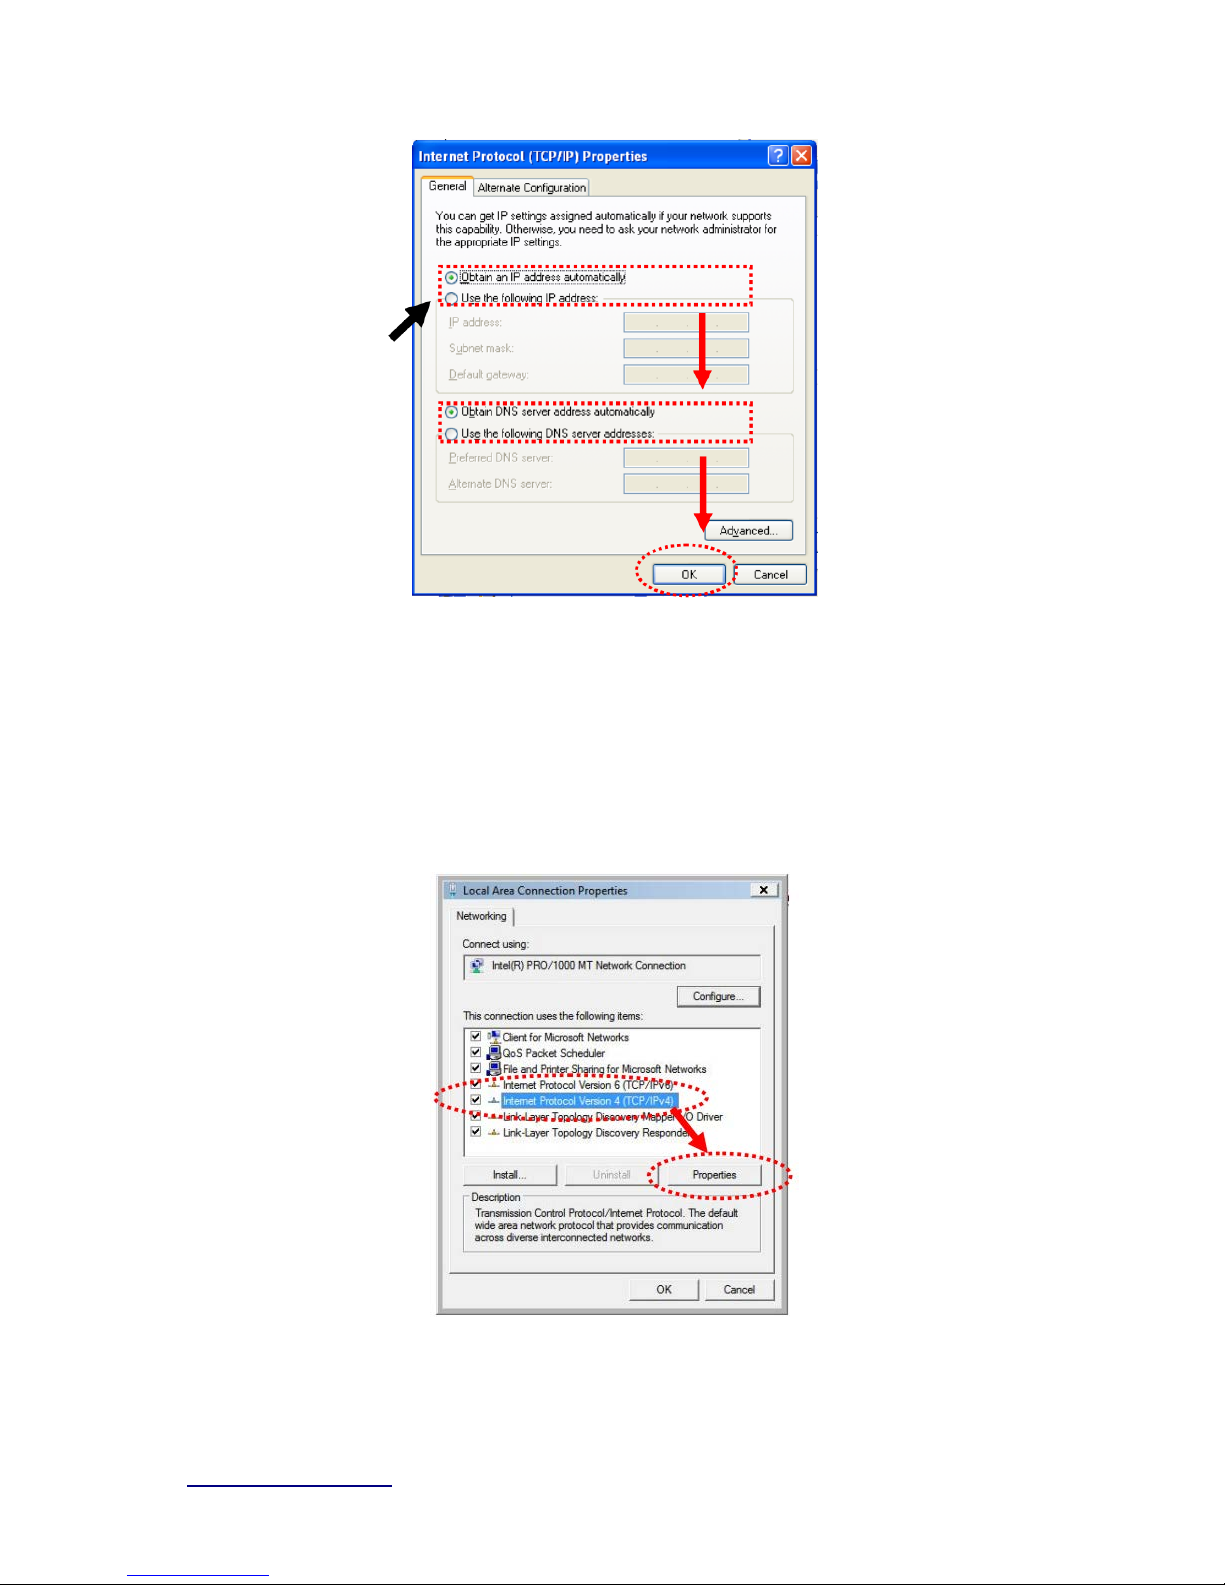
2.3.3 Windows Vi sta / W i ndows 7
1. Click “Start” button (it should be located at lower-left corner of your computer), then
click control panel. Click View Network Status and Tasks, and then click Manage Network
Connections. Right-click Local Area Network, then select “Properties”. Local Area
Connection Properties window will appear, select “Internet Protocol Version 4 (TCP / IPv4)”,
and then click “Prop erties”.
2. Select “Obtain an IP address automatically” and “Obtain DNS server address
automatically”, then click “OK”.
Page 10
http://www.sapido.com.tw/ User Manual v1.0.0
10
2.4 Router IP Address Look up
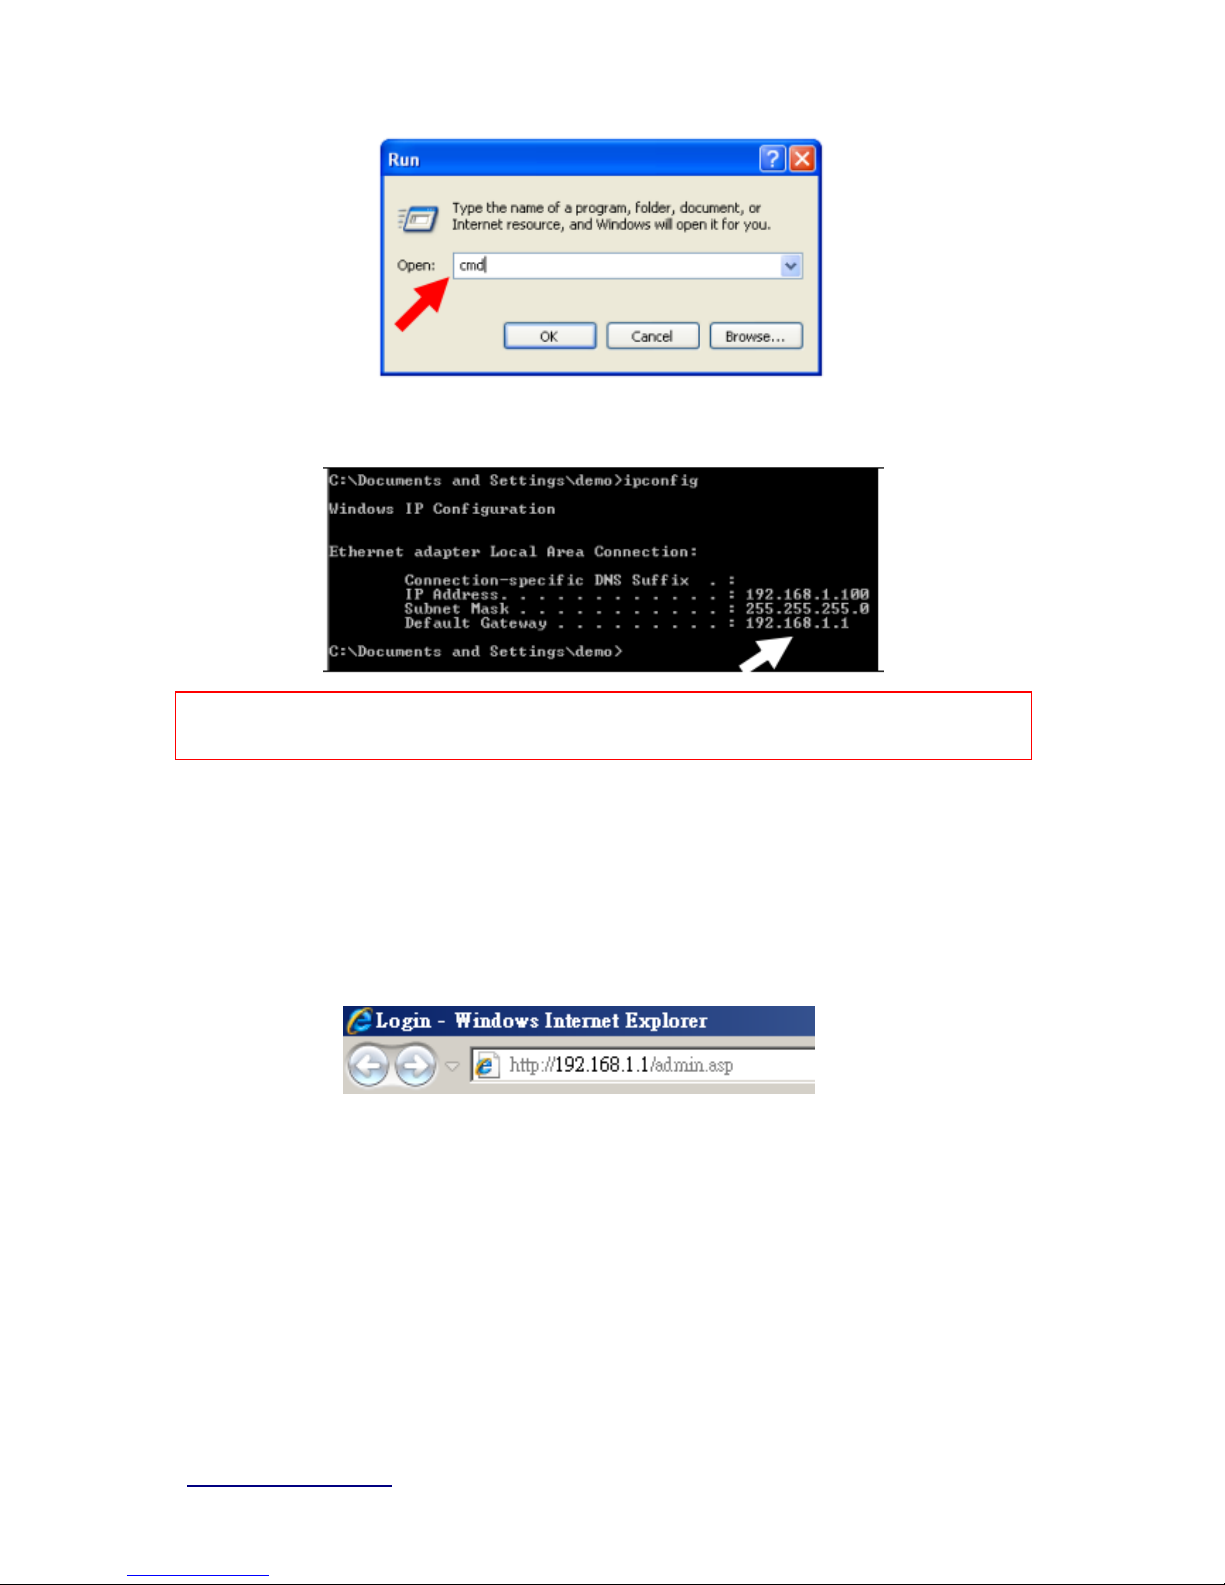
After the IP address setup was completed, please clicks “start” → “run” at the bottom -lower
corner of your desktop:
Input “cmd”, and then click “OK”.
Page 11
http://www.sapido.com.tw/ User Manual v1.0.0
11
Input “ipconfig”, then press “Enter” key. Please check the IP address followed by “Default
Gateway” (In this example, the gateway I P address of router is 192.168.1.1)
NOTE: If the I P addr es s of Gateway is not displayed, or the address followed by ‘IP Addr es s’ b egins with
“169. x.x.x”, plea se recheck network c onnectio n betwe en your comput er and router, and / or go t o the
begi nning of this chapter, to rec hec k every step of networ k setup procedur e.
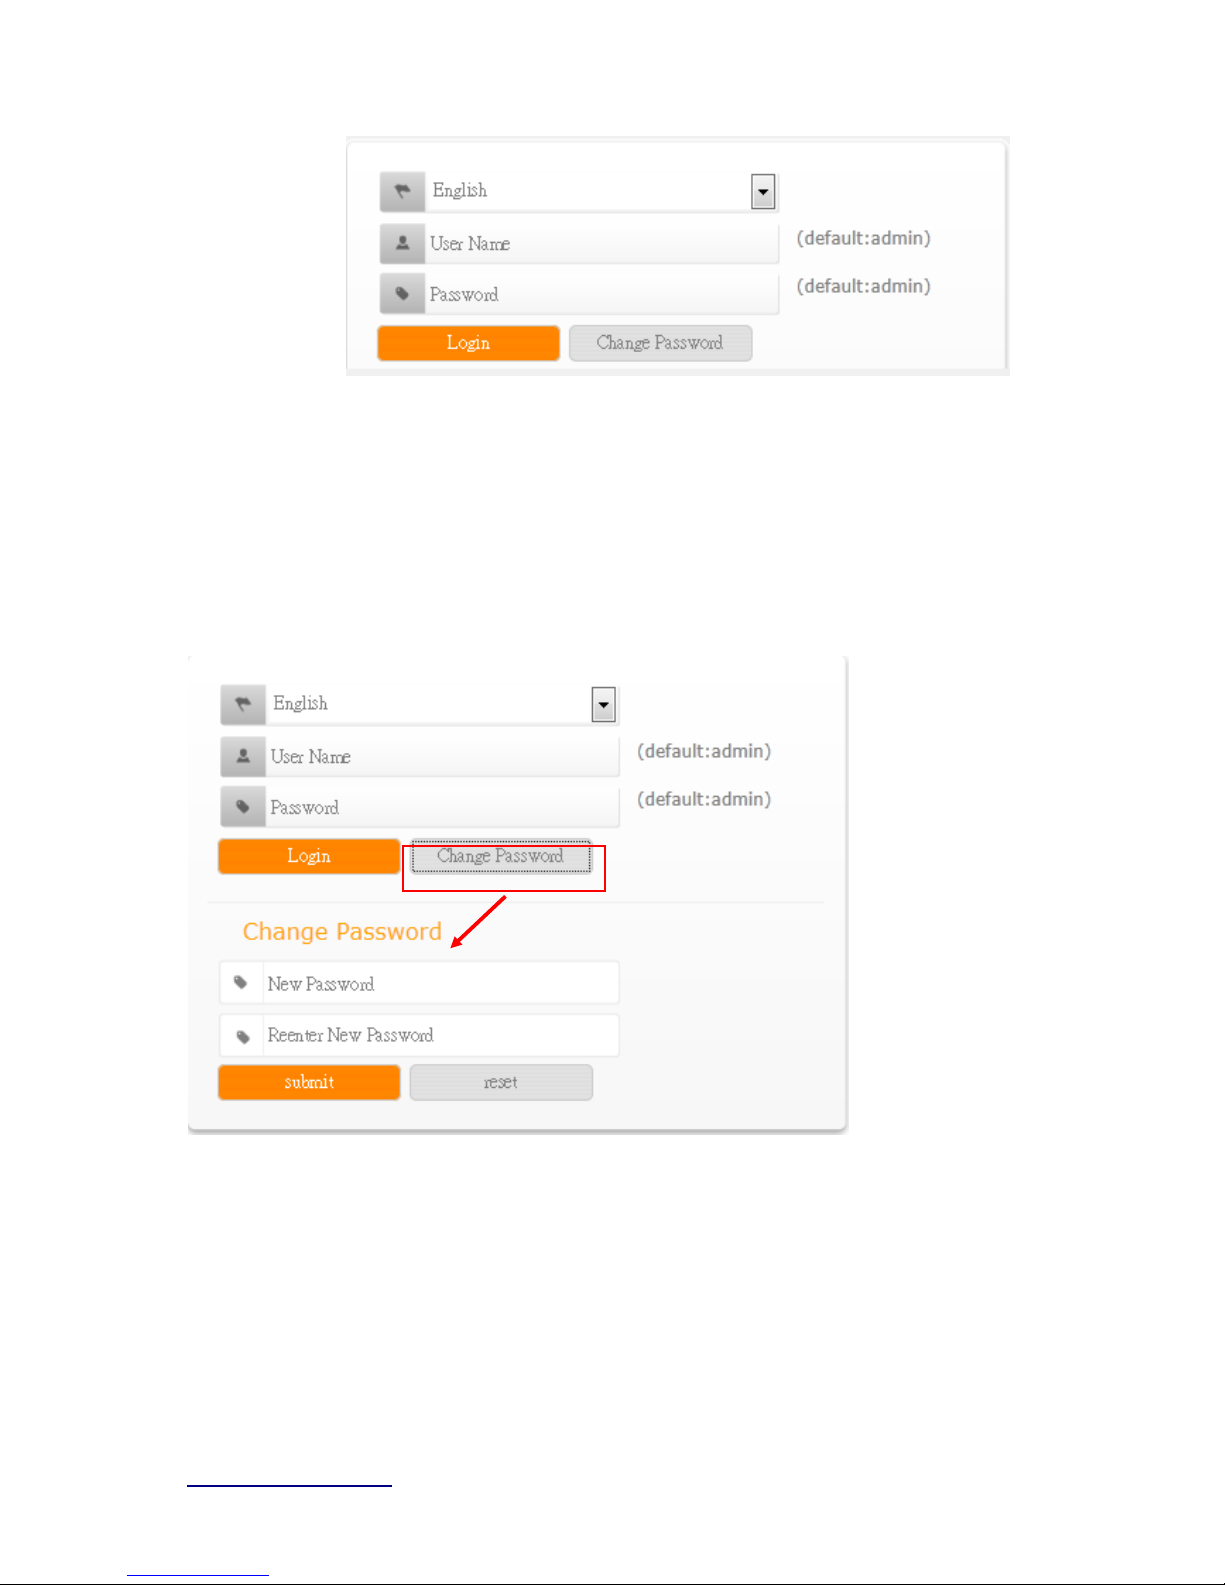
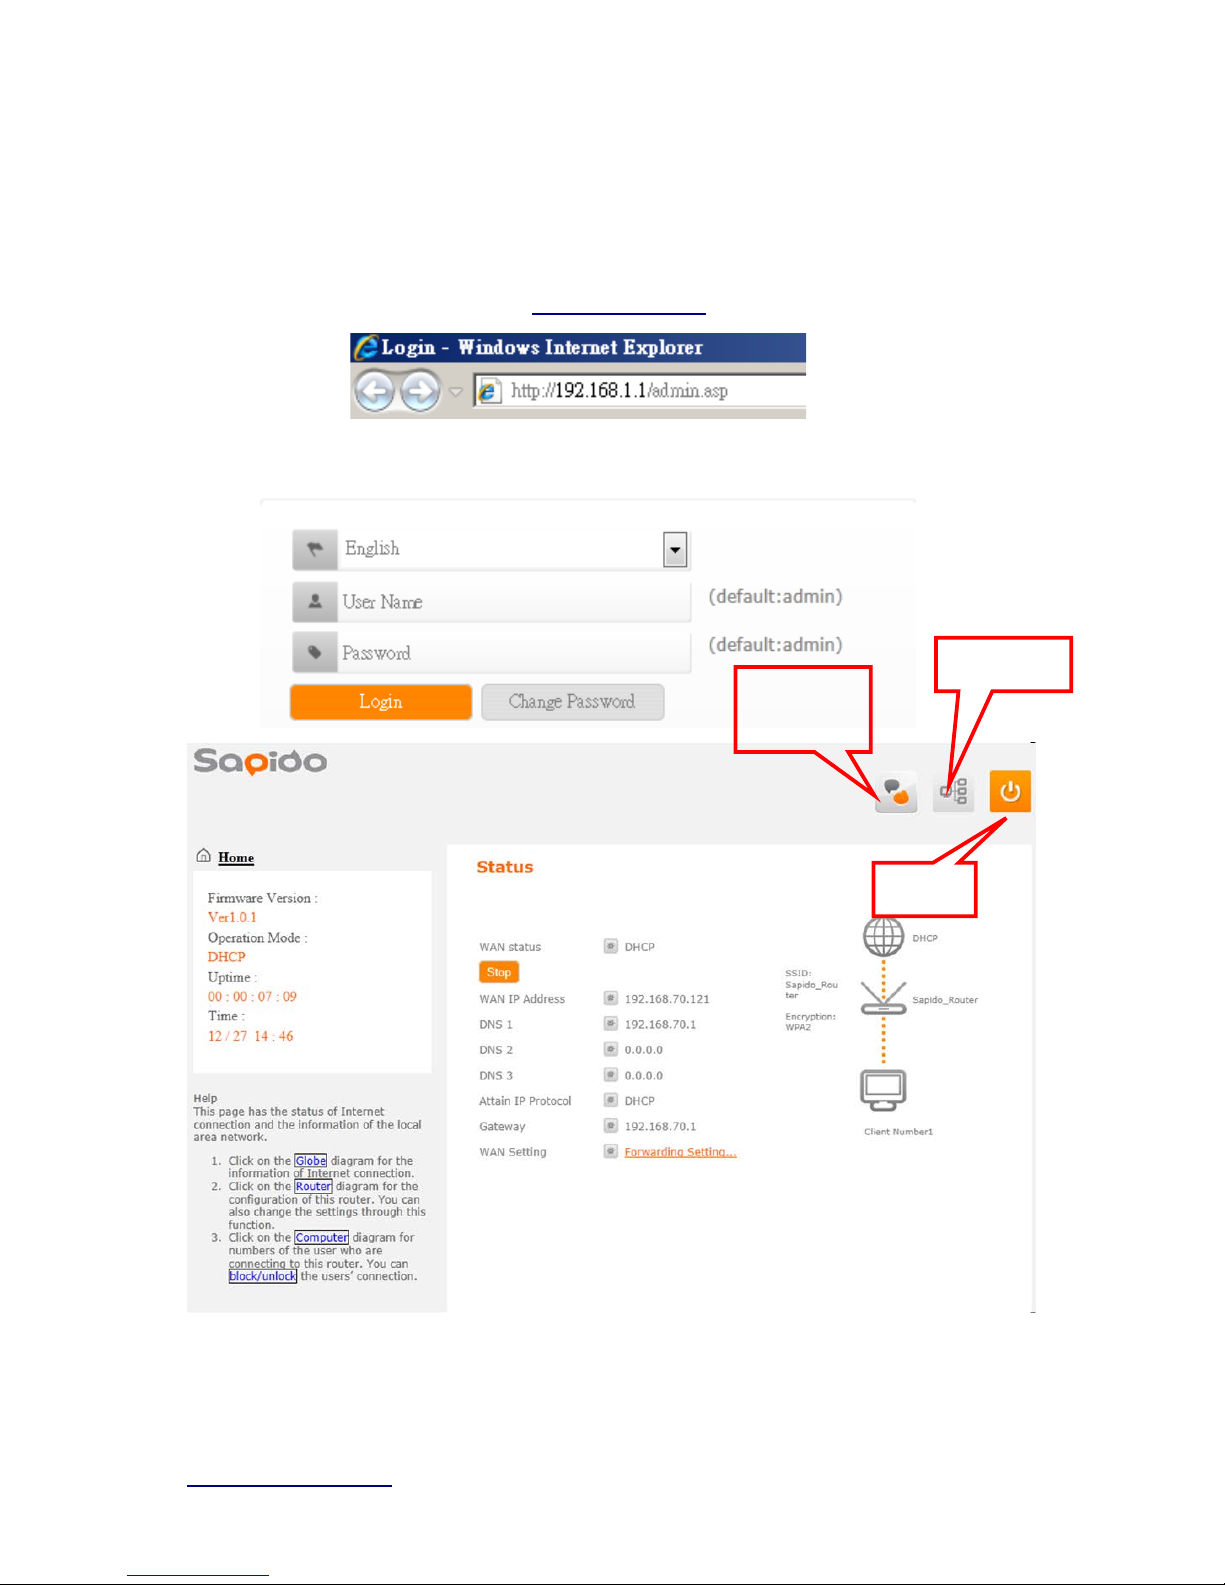
2.4.1 Log int o We b G UI
After your computer obtained an IP address from wireless router, please start your web
brows er, and input the IP addres s of the w ireless router in addr ess bar, and the fol lowing
message should be shown. Please click “admin” to login the BR070N .
Enter the User name and Password in to the blank and then Click Login. The default values
for User N ame and Password are admin (all in lowercase letters).
Page 12
http://www.sapido.com.tw/ User Manual v1.0.0
12
Users can set or change user name and password used for accessing the web management
interface in this section.
Input User Name and New Password, then input Confirm Password again.
Chapter 3 Internet Connection
This Chapter desc ribes how to setup BR070N to the internet . The BR070N is deliver ed wit h
the following factory default parameters.
Default IP address: 192.168.1.1
Default IP subnet mask: 255.255.255.0
Web login user name: admin
Page 13
http://www.sapido.com.tw/ User Manual v1.0.0
13
Web login password: admin
3.1 Using as a broadba nd r out er
Open a Web browser, and enter http://192.168.1.1 (Default Gateway) into the blank.
Enter the User name and Password into the blank and then click Login. The default
values for U ser Name and Password are admin (all in lowercase letters).
3.2 Home button m enu
Download
pdadd
Status page
Logout
Page 14
http://www.sapido.com.tw/ User Manual v1.0.0
14
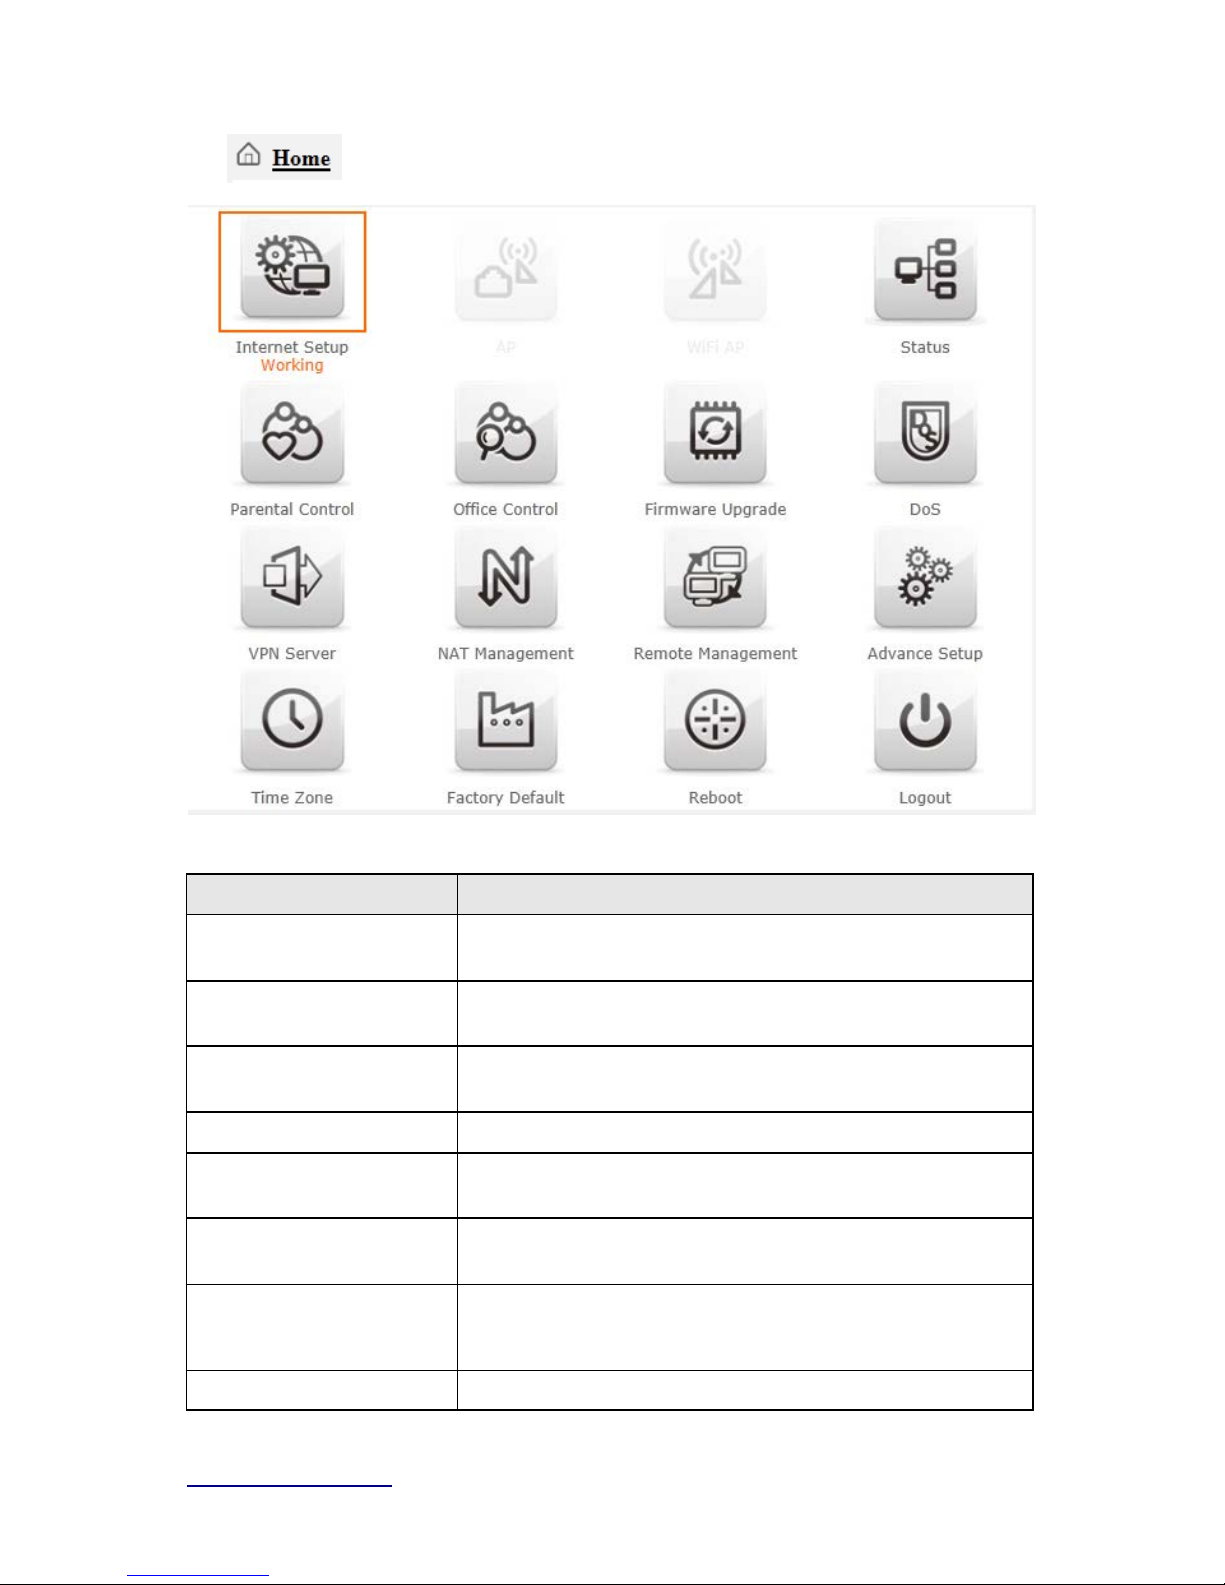
Cli ck Hom e but ton icon to ent er MENU as below.
Item Description
In ternet Setup
Ther e are several different met hod to acc ess Intern et,PPPoE、
DHCP、Static IP、PPTP、L2TP、WiFi ISP
AP(swi tch to AP mode)
If a router is already set at the house, and you want to make
the wireless LAN communication
WiFi AP(swi tch to WiFi AP
mode)
When you connect to the internet wirelessly through PC and
wireless device without wireless LAN function equipped.
Status You could check WAN, LA N, Cl i ent network in stat us.
Pa re ntal control
You can use URL filter 、MAC Filter S chedul e and W ireles s
Schedule to lim i t acc ess Internet.
Offic e Control
For office environment,there are Multiple AP、Wire less Access
Control、IP Filtering、IP B i ndi ng and QoS
Firmware Upgrade This function allo ws you upgrade the BR070N firmware to new
version. P l ease note do not powe r of f t he device du ring the upl oad
because it m ay cras h t he system.
DoS Denial of Service
Page 15

http://www.sapido.com.tw/ User Manual v1.0.0
15
VPN Server PPTP/L2TP general setu p i ntroduction.
NAT Manage m ent Ther e are po rt forwar di ng and DMZ functio n
Remote management This page al l ow y ou to acces s the GUI on WAN.
Advance Se tup Adva nc e sett i ng m enu
Time Zone You can mai nt ain t he sys tem ti m e by sy nchronizi ng with a publ i c
ti m e s erver over the Internet.
Factory Default You could reset the curr ent configuration to fac tory de fault.
Reboot This function is us ed to reboot
Logout T hi s page is used to logo ut .
Page 16
http://www.sapido.com.tw/ User Manual v1.0.0
16
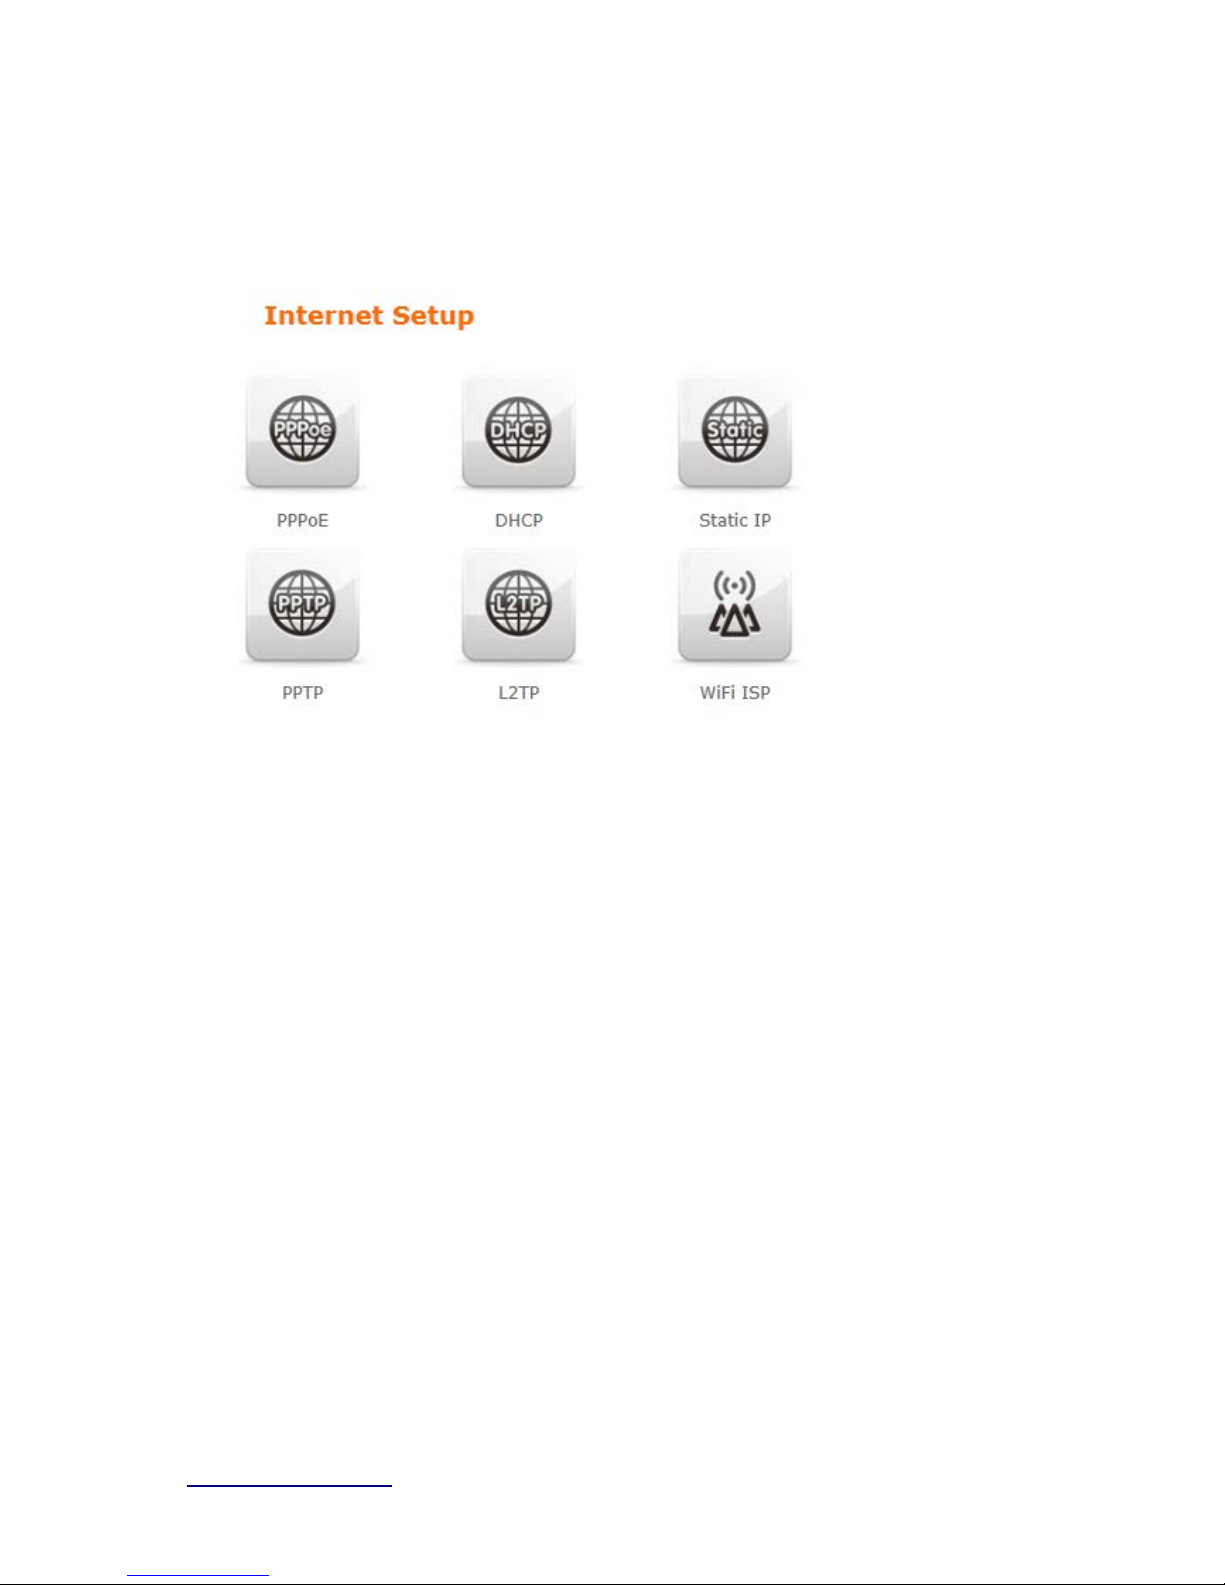
3.3 Internet Setup
Click Inter ne t Set up icon t o en t er WAN setup as below . The Intern et Setup is
dep ended on the service t hat you c ont ract wit h the provide r. The BR070N provid es five s el ections
for t he Inter net Mod e type, PPPoE, DHCP, Static IP , PPTP and L2TP and WiFi ISP. Check
with your ISP if you don’t know th e WAN t ype.
Page 17
http://www.sapido.com.tw/ User Manual v1.0.0
17
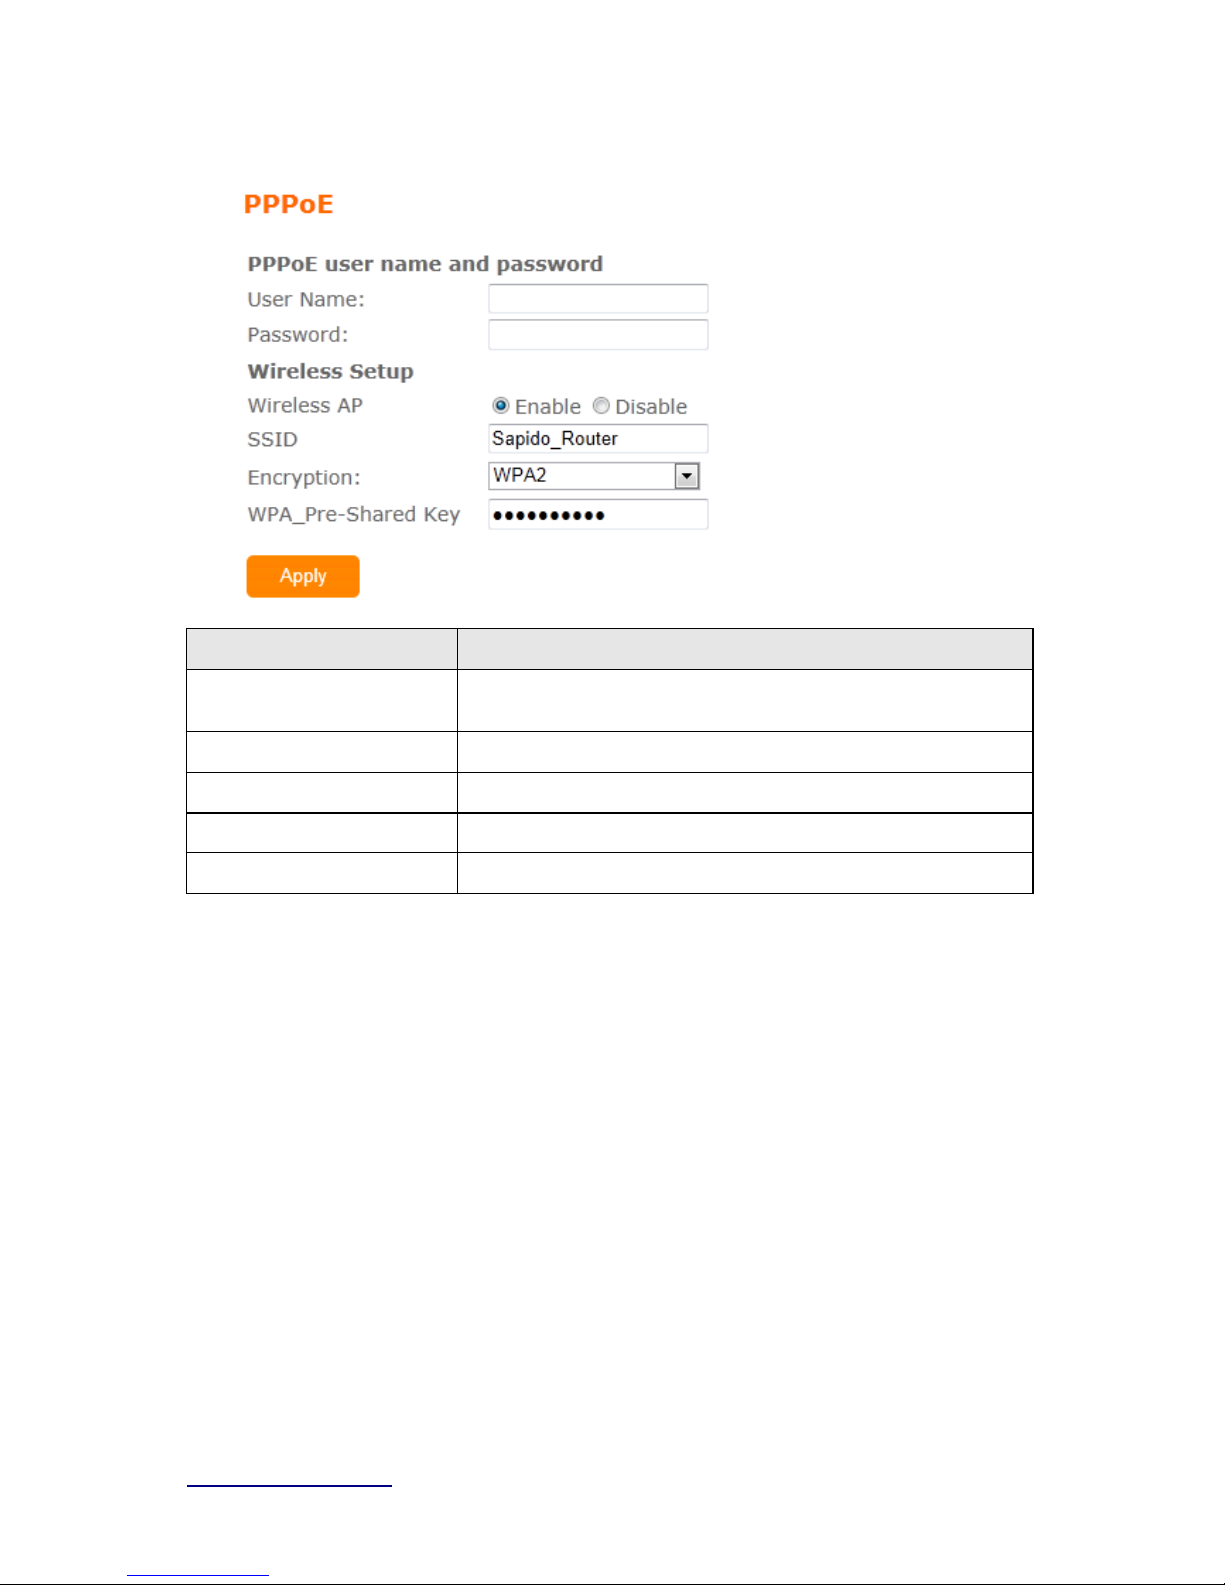
3.3.1 PPPoE
Item Description
User Name Input your user nam e provi ded by y our ISP. If you do n’ t know,
pleas e check wit h your ISP.
Password In put the pas sword provi ded by your ISP.
W i r el ess AP Turn on/off wireless
SSID Service Set identifie r, us ers can define t o any or keep as default.
Encryption Select wi reles s encry pt i on type form t he drop -down li st.
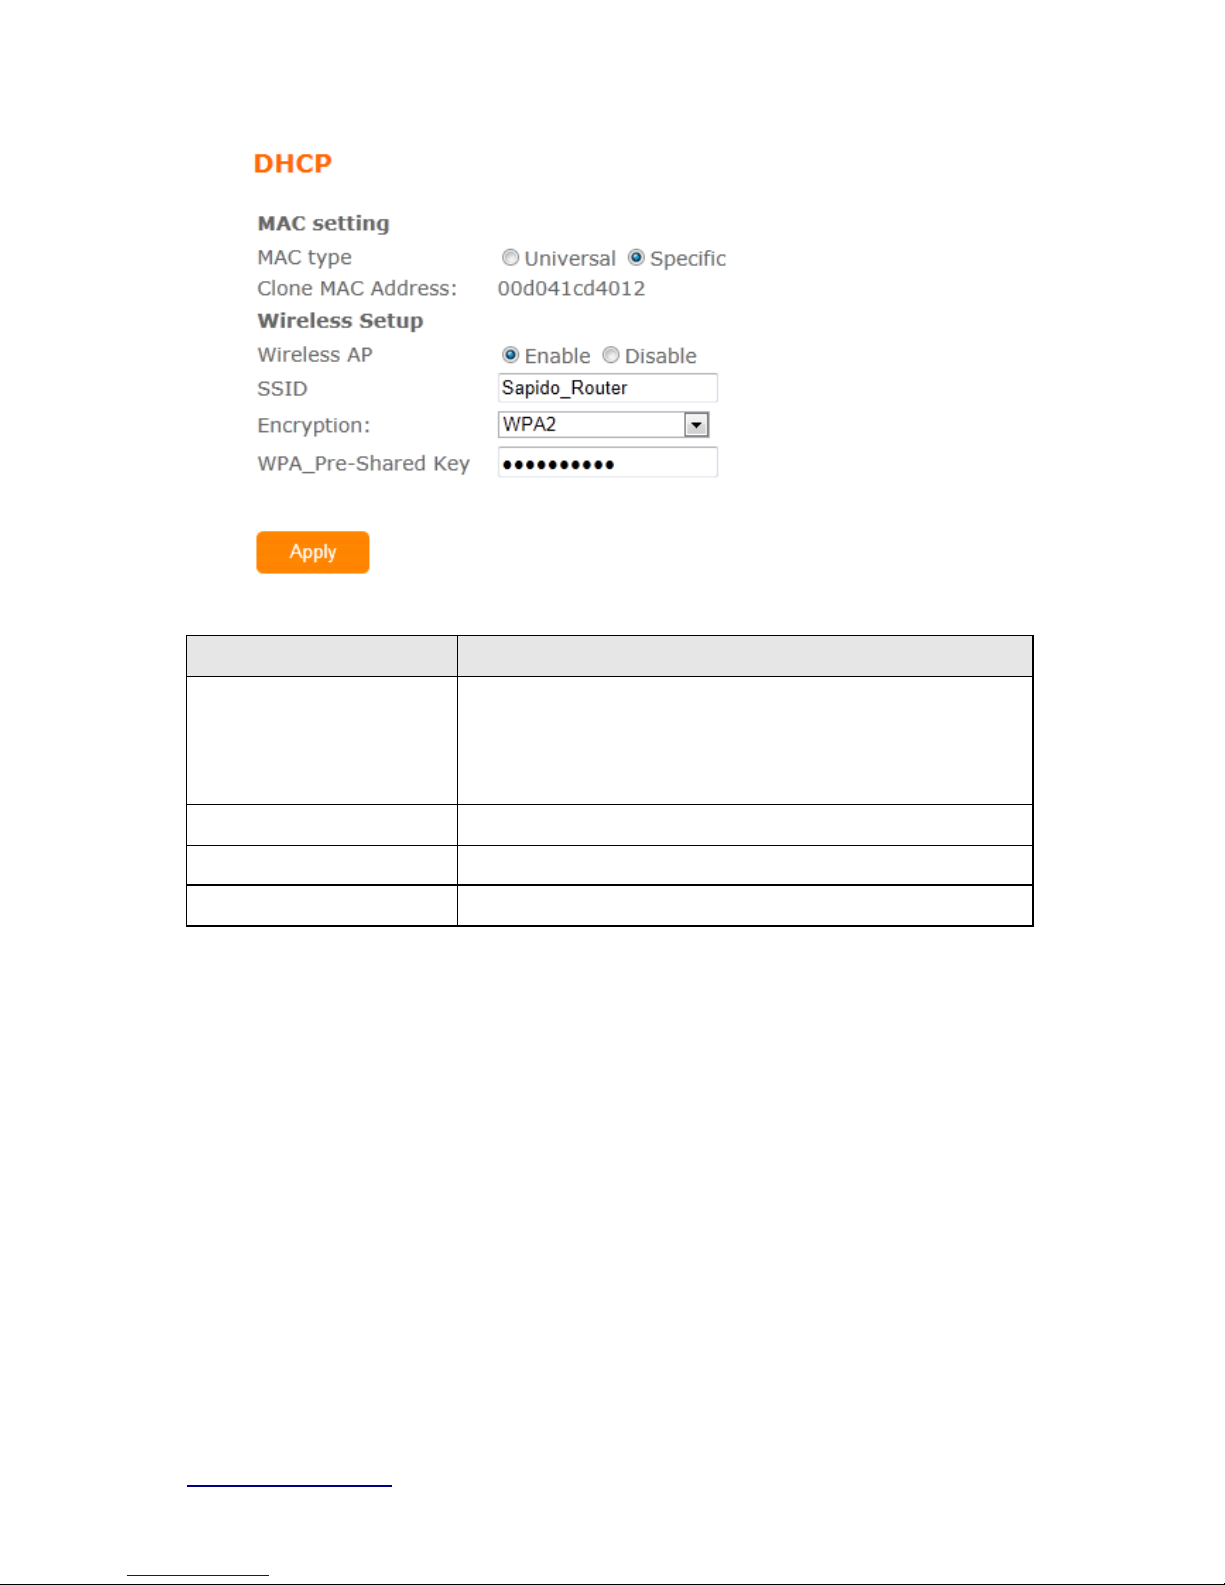
3.3.2 DHCP
Page 18
http://www.sapido.com.tw/ User Manual v1.0.0
18
Item Description
MAC typ e Select "Unive rsal” or “Specific"
Universal:clone cont rol ler PC m ac address as BR070n WAN m ac
address
Specific:use BR070n its el f mac address
W i r el ess AP Turn on/off wireless
SSID Service Set identifie r, us ers can define t o any or keep as default.
Encryption Select wireles s encrypt i on type form t he drop -down li st.
Page 19
http://www.sapido.com.tw/ User Manual v1.0.0
19
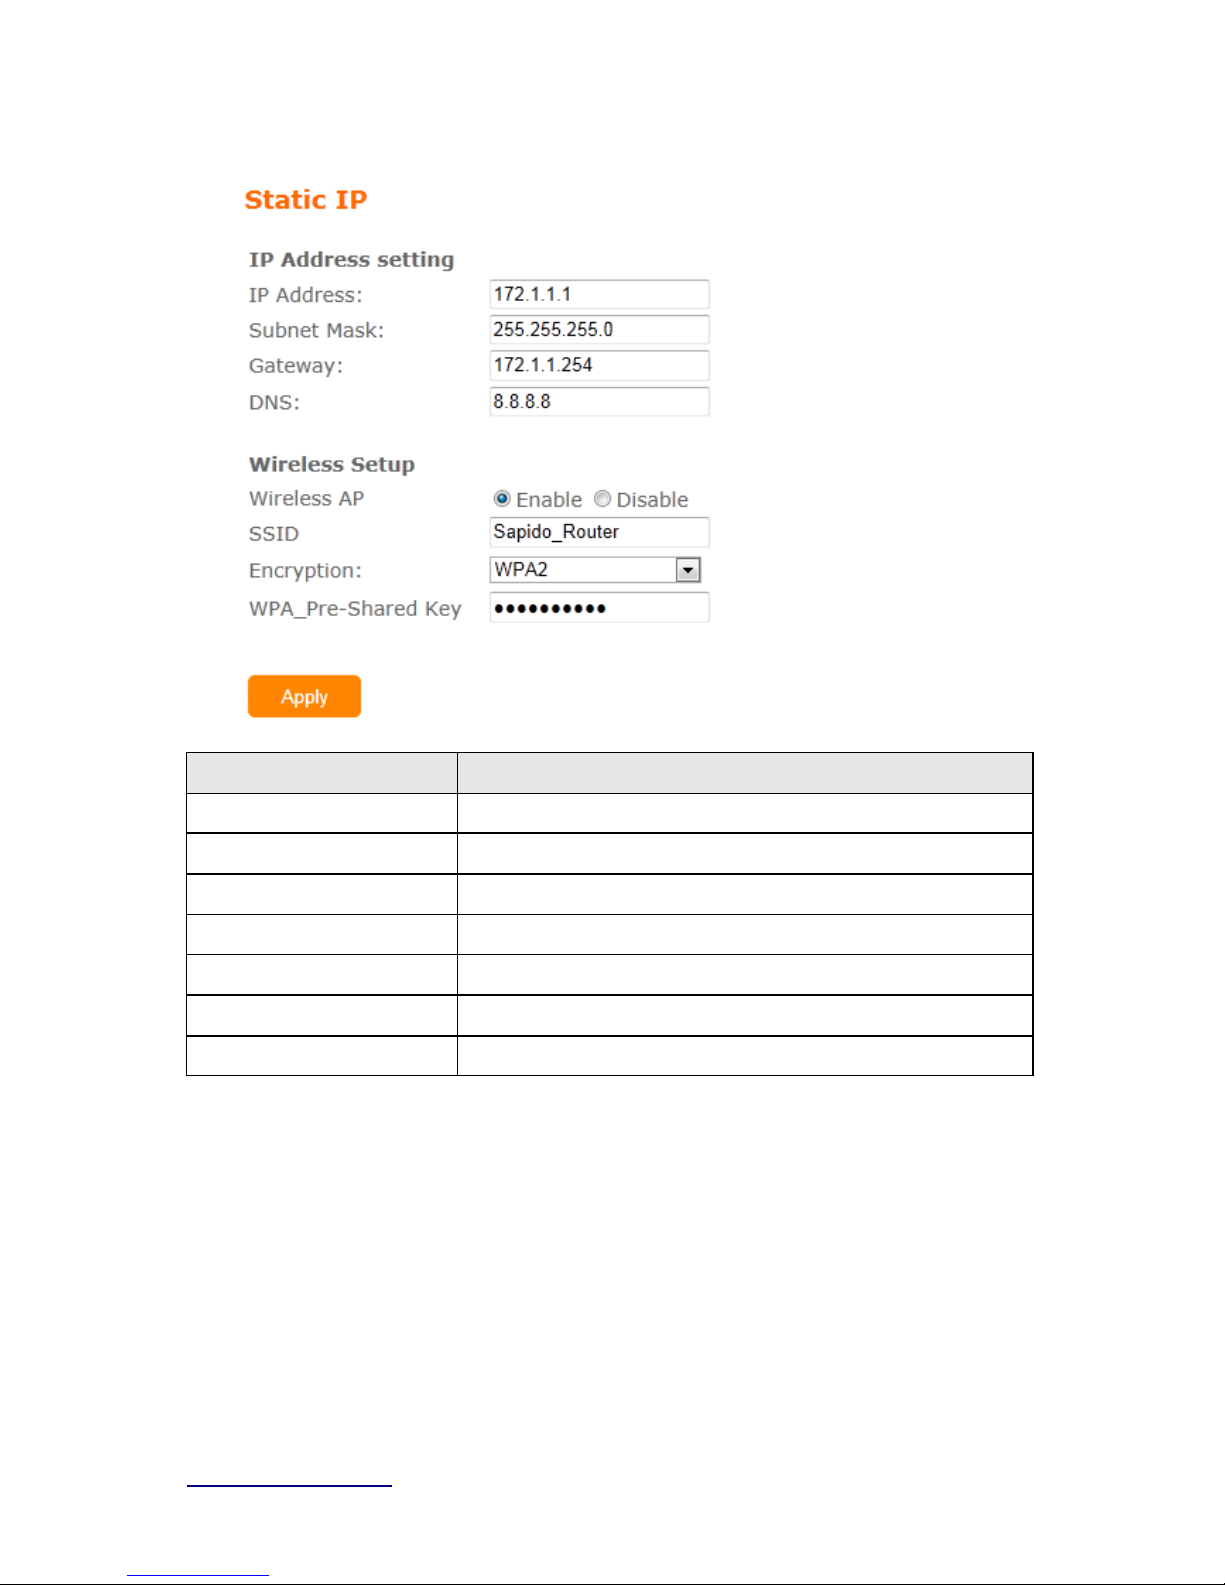
3.3.3 Static IP
Item Description
IP Address Ent er the IP address which i s provided by your ISP.
Subnet Mask Please enter the Subnet M ask address
Gateway Input IS P Default Gateway Ad dress .
DNS Input DNS information whi c h i s provided by your IS P
W i r el ess AP Turn on/off wireless
SSID Service Set identifie r, us ers can define t o any or keep as default.
Encryption Select wireles s encrypt i on type form t he drop -down li st.
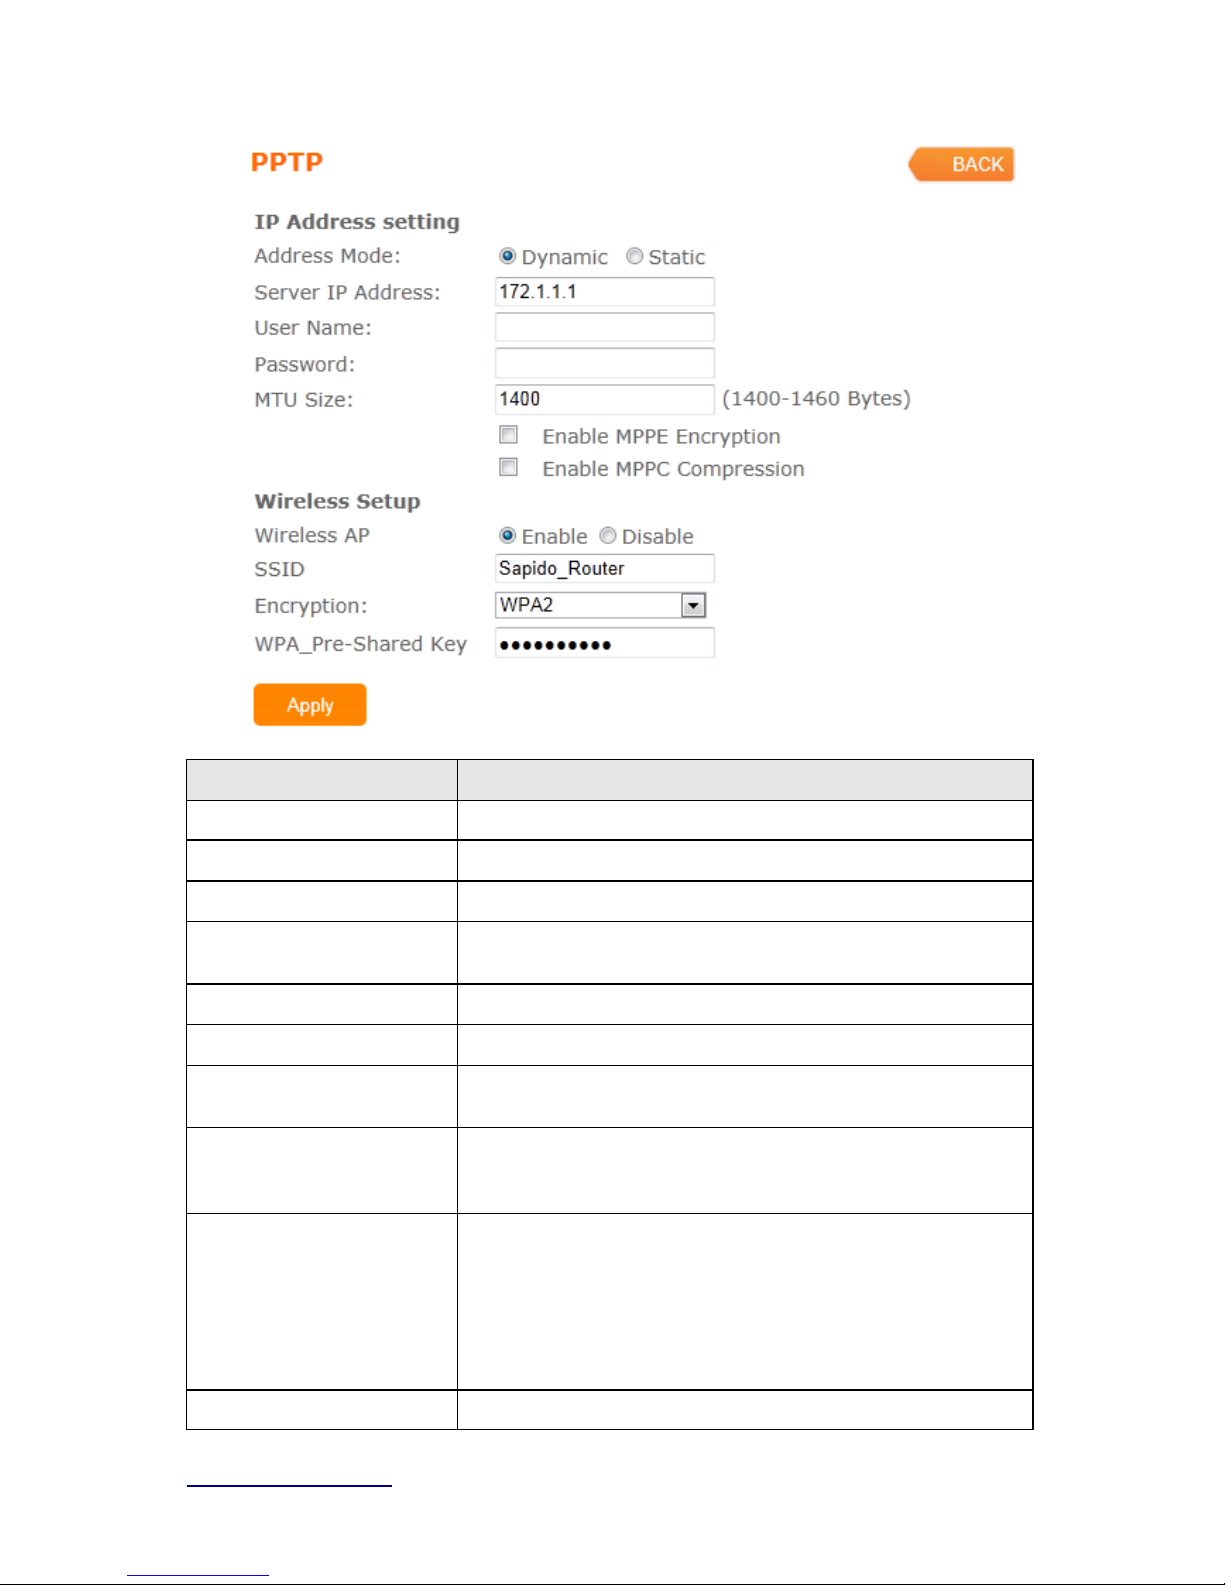
3.3.4 PPTP
Page 20
http://www.sapido.com.tw/ User Manual v1.0.0
20
Item Description
Addre ss Mode Select "Dynamic" or "Static"
IP Address Input your IP address or dom ain name
Gateway Input IS P Default Gateway Ad dress .
Se rver IP Address Input your server IP address provided by your ISP. I f y ou don’t
know, please c heck with your ISP.
User Name Input PPTP account provided by your ISP.
Password Input the pass word pro vided by your ISP.
MTU Size Max i m um Transmis sion U ni t . Usuall y provide by c om puter
ope rat i on syst em s (OS). Advanced users can s et it m anual l y.
Enable MPPE Enc ryption Microsoft Point-to-Point E ncrypt i on (M P PE ) provi des data s ec urit y
for t he P PTP c onnection that i s betwee n the VPN c l i ent and V PN
server.
Enable MPPC Compression Microsoft P oi nt-to-Poi nt Com pres sio n (M PPC ) is a scheme used to
com press Poi nt-to-Point Protoc ol (P P P) pac kets between Cisco
and Microsoft cl i ent devices. The M PPC algorithm is designed to
opti m i z e band wi dt h utilization i n order to support m ul tiple
si m ul t aneous connect i ons. The MPP C al gorithm uses a
Lempel-Ziv (L Z) b ased al gorithm wi t h a continuo us history bu ff er,
cal l ed a di ctionar
W i r el ess AP Turn on/off wireless
Page 21
http://www.sapido.com.tw/ User Manual v1.0.0
21
SSID Service Set ident ifie r, us ers can define t o any or keep as default.
Encryption Select wireles s encrypt i on type form t he drop -down li st.
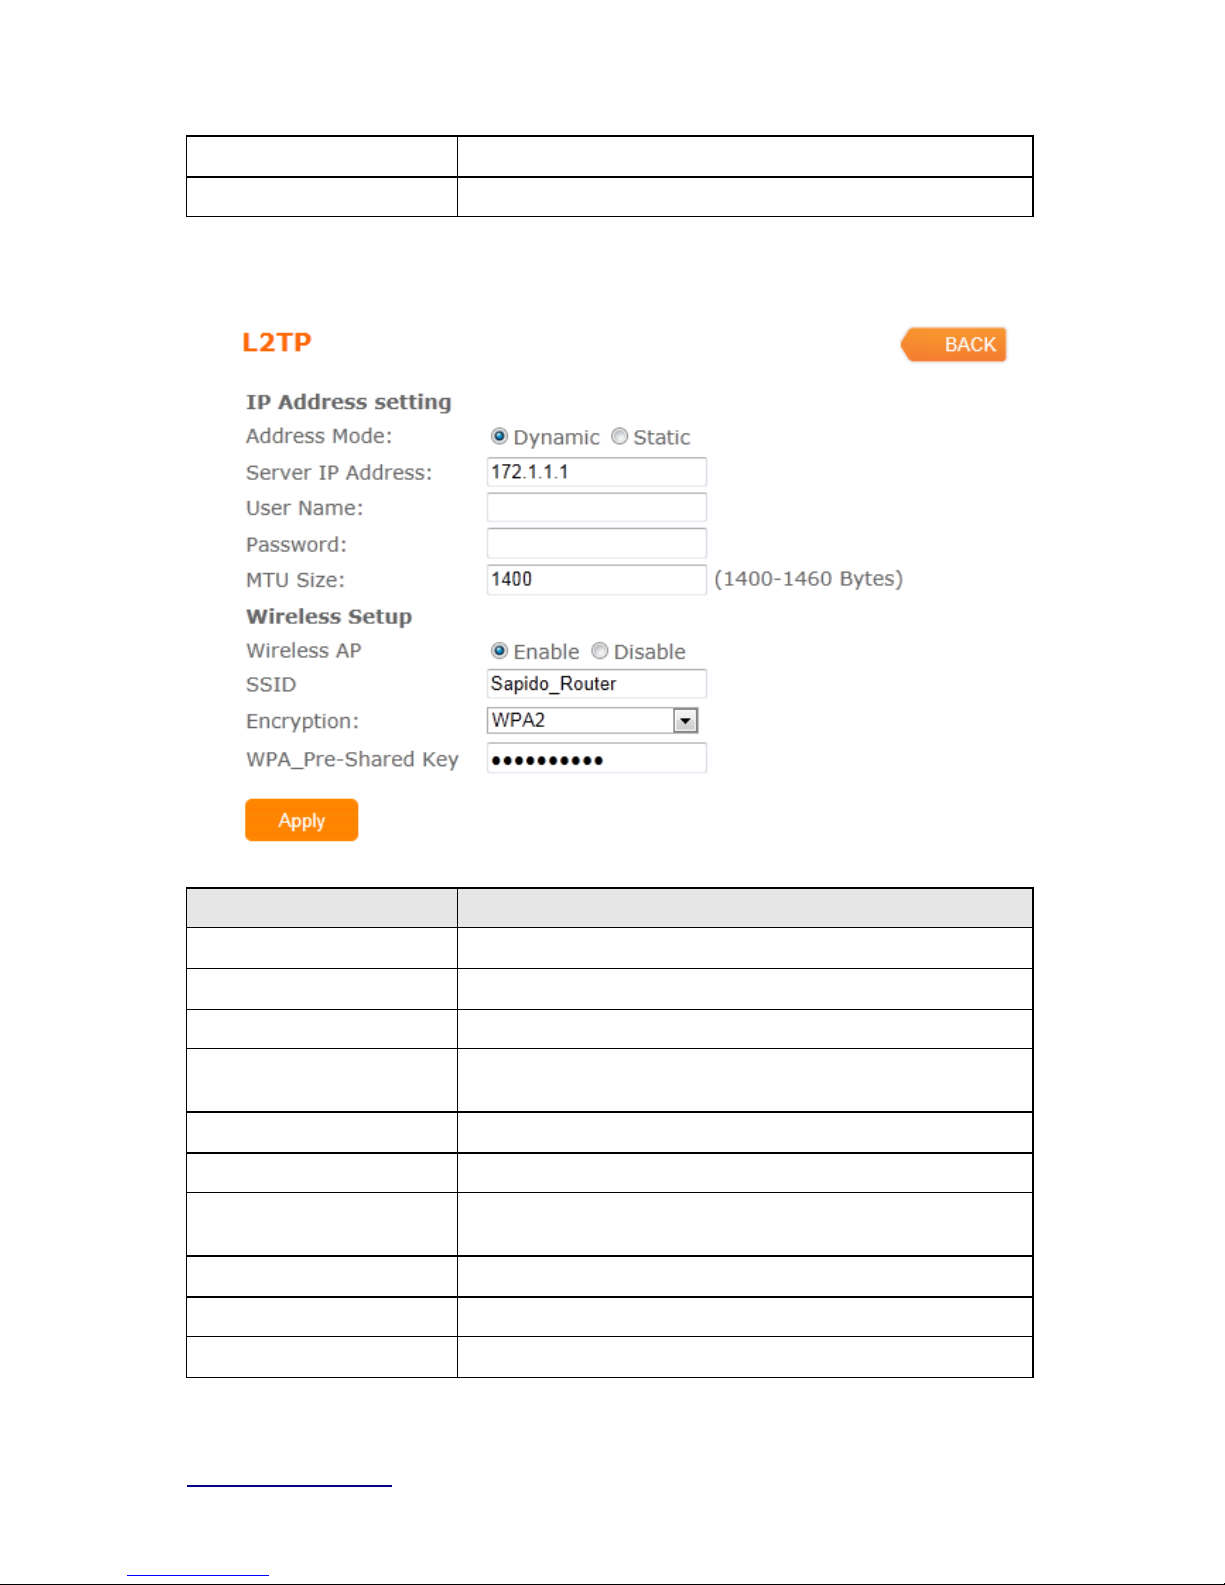
3.3.5 L2TP
Item Description
Addre ss Mode Select "Dynamic" or "Static"
IP Address Input your IP address or dom ain name
Gateway Input ISP Def aul t Gateway Address.
Se rver IP Address Input your server IP address provided by your ISP. I f y ou don’t
know, please c heck with your ISP.
User Name Input PPTP account provided by your ISP.
Password Input the pass word pro vided by your ISP.
MTU Size Max i m um Transmis sion U ni t . Usuall y provide by c om puter
ope rat i on syst em s (OS). Advanced users can s et it m anual l y.
W i r el ess AP Turn on/off wireless
SSID Service Set identifie r, us ers can define t o any or keep as default.
Encryption Select wireles s encry pt i on type form t he drop -down li st.
Page 22
http://www.sapido.com.tw/ User Manual v1.0.0
22
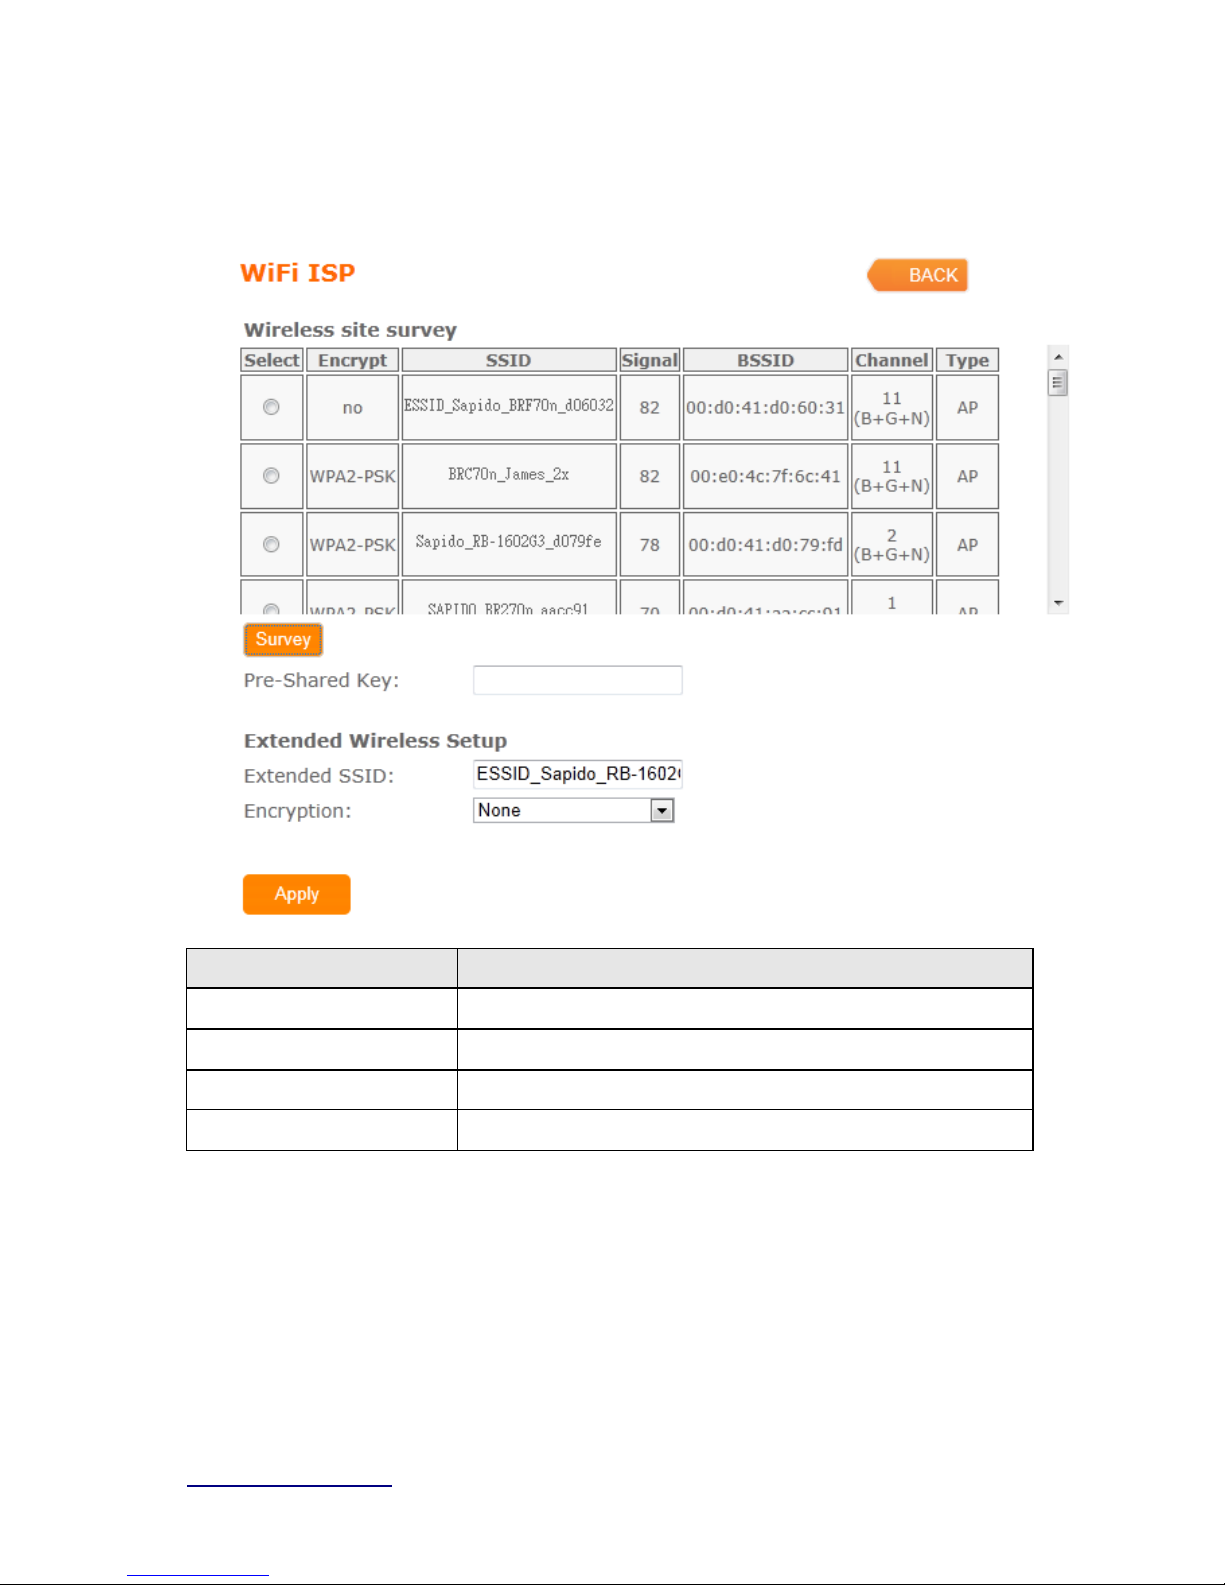
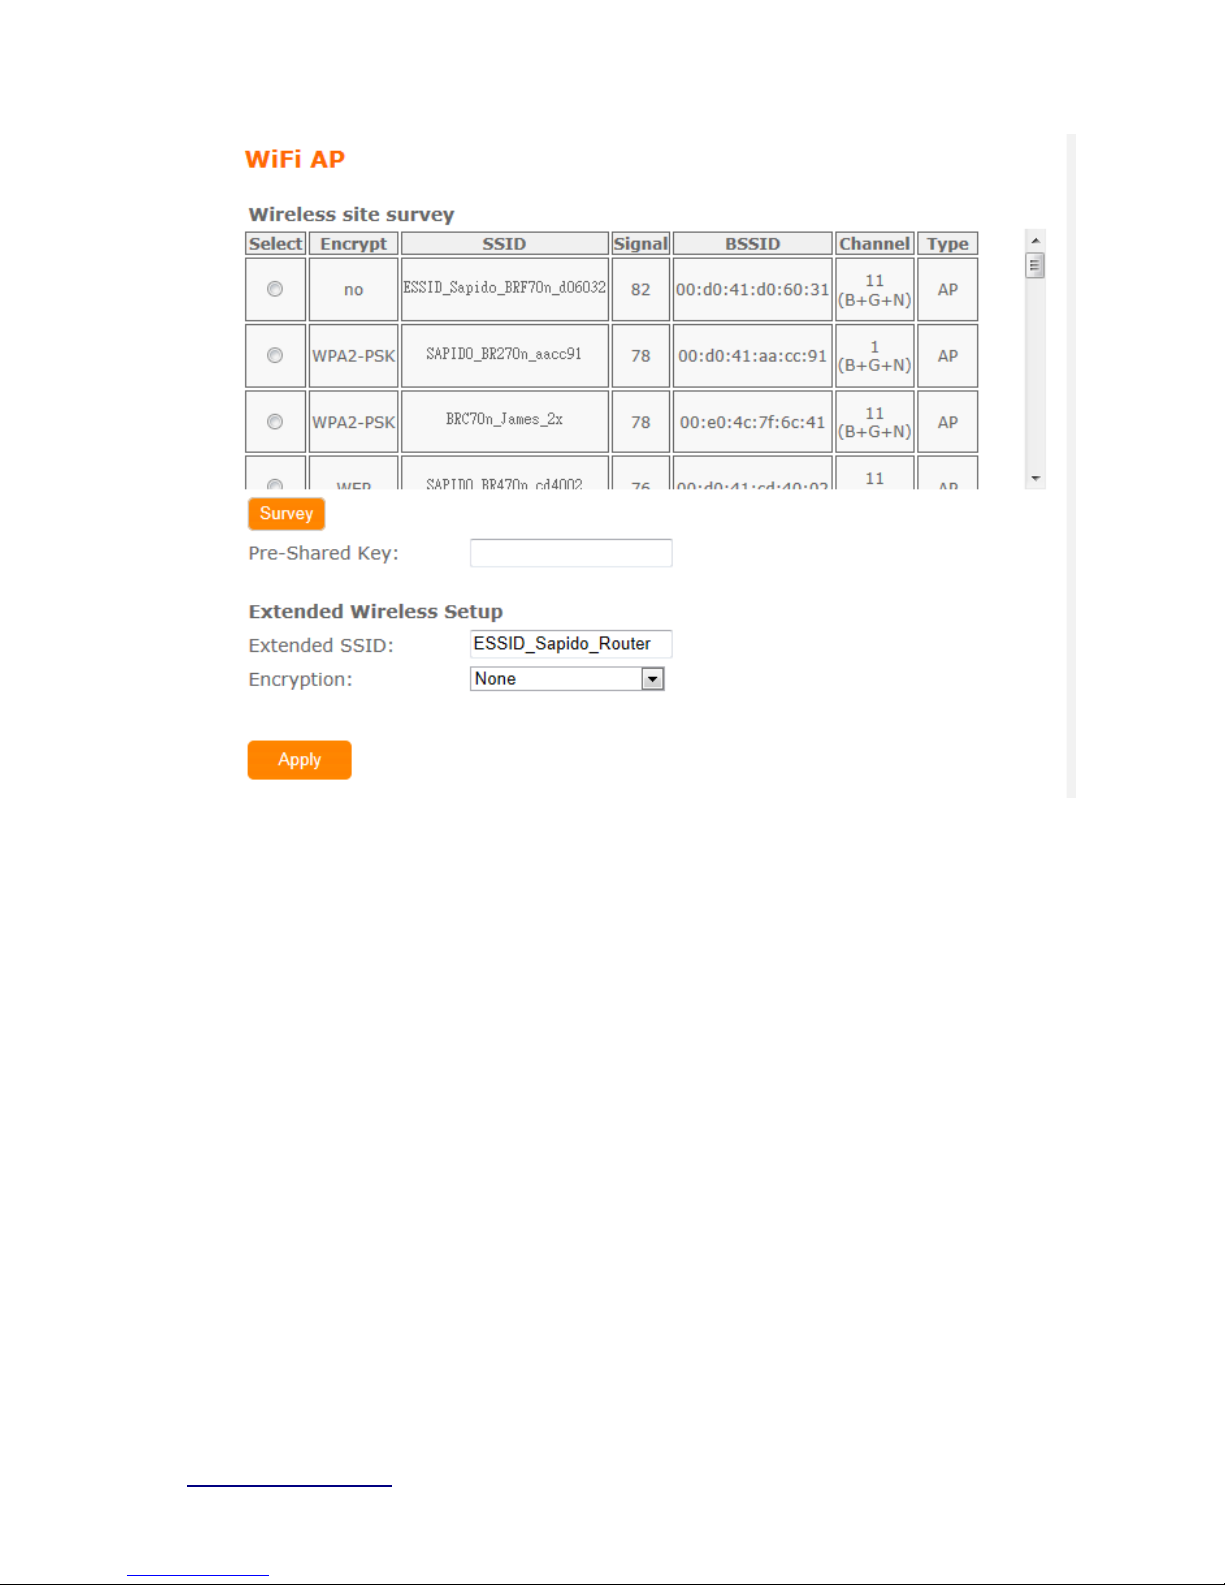
3.3.6 WiF i IS P
BR070n WAN get IP address from other wireless AP and LAN/Wireless LAN client get IP
from BR070n.
Item Description
Survey Lis t al l available wirel ess AP
Pre-Shared Key Input the wireles s AP key whic h you want to c onnect
Extend SSI D Provi de SSID f or wir el ess c l i ent which want to connect t o BR070n
Encryption Select wireles s encrypt i on type form t he drop -down li st.
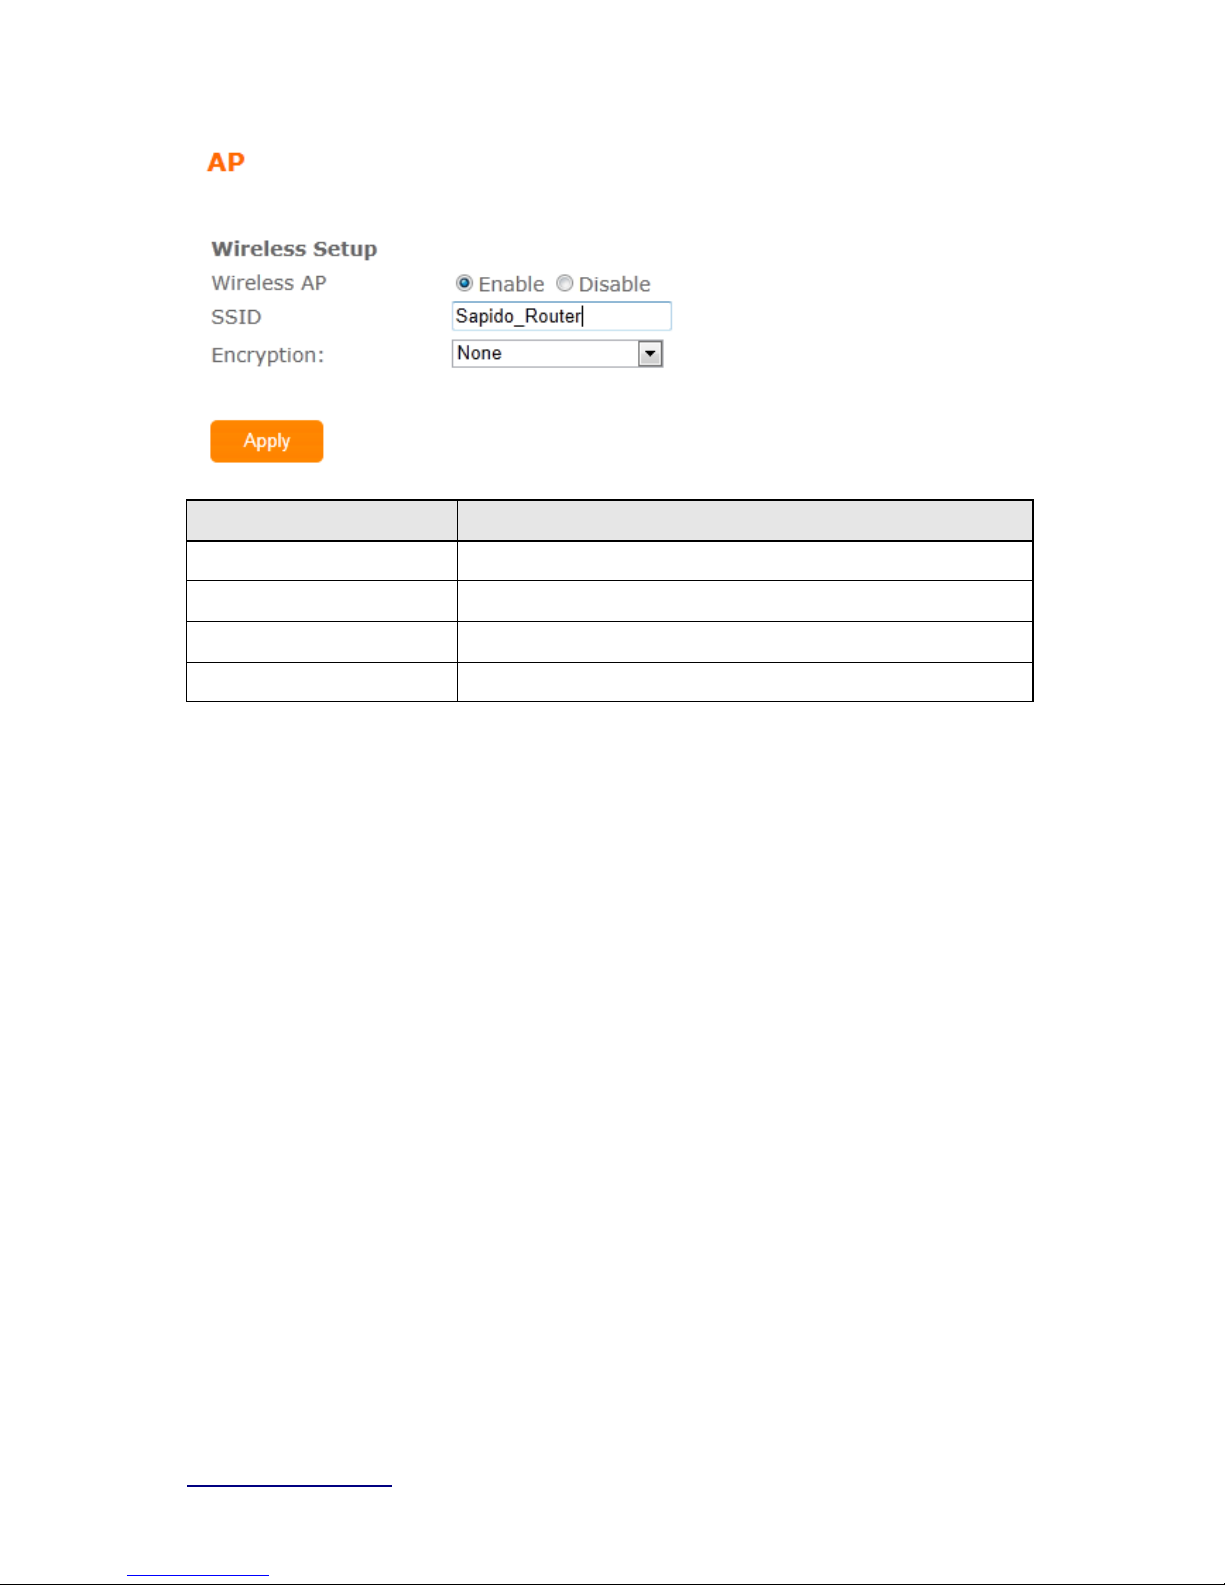
3.4 AP
If a router is already set at the house, and you want to make the wireless LAN communication.
This mode does not support
WAN、DHCP、NAT、DDNS、QoS、Firewall、
Stati c /D y nam i c ro u te 、VPN Server features.
Page 23
http://www.sapido.com.tw/ User Manual v1.0.0
23
Item Description
W i r el ess AP Turn on/off wireless
SSID Service Set identifie r, us ers can define t o any or keep as default.
Encryption Select wi reles s encry pt i on type form t he drop -dow n list .
W i r el ess AP Turn on/off wireless
3.5 WiFi AP
When you connect to the internet wirelessly through PC and wireless device without
wireless LAN function equipped. This mode does not support WAN、DHCP、NAT、
DDNS、QoS、Firewall、Static/Dynamic route、VPN Server features.
Page 24
http://www.sapido.com.tw/ User Manual v1.0.0
24
Page 25

http://www.sapido.com.tw/ User Manual v1.0.0
25
Chapter 4 GUI Function Setup
4.1 Status
You could check WAN, LA N, Cl i ent network in stat us.
WAN Configura tion
Page 26

http://www.sapido.com.tw/ User Manual v1.0.0
26
LAN Configura tion
Page 27

http://www.sapido.com.tw/ User Manual v1.0.0
27
Client Configuration
4.2 Parental Control
Parental Control provide URL Filtering and MAC Filter Schedule for setup
4.2.1 URL Filtering
URL Filtering is used to restrict users to access specific websites in internet
Allow or block client
to access internet
Page 28

http://www.sapido.com.tw/ User Manual v1.0.0
28
Item Description
Enable URL Filtering Please sel ec t Enable MA C Fi l t ering t o fil t er MA C addres ses
URL Address Please enter t he M AC address that ne eds to be filtered.
Apply Click on Apply to s ave the setting dat a.
Current Filter Table It will di splay al l ports that are filtering no w.
Delete Selected & Delete
All
Click Delete Selected wil l delete the s el ected it em. Click Delete All
will delet e all items in thi s table.
Notes : This function wil l not be in effect when the Virtual Server is enabled. Please disable Virtual Server before
act ivate the URL Filter ing func tion.
4.2.2 MA C Filt e r Schedule
When enabled, filtering will be based on the MAC address of LAN computers. Any computer
with its MAC address on this list will be blocked from accessing the Internet.
Page 29

http://www.sapido.com.tw/ User Manual v1.0.0
29
Item Description
Enable MAC Filtering Pleas e selec t Enabl e M A C Fi l teri ng t o fil ter M A C addresses .
4.2.3 Wirel ess Schedule
Wireles s avail abl e sch edule, this page allows you setup the wireless s chedule
rul e. Please do not forget to conf igure systeim bef ore enable th is f eature
Page 30

http://www.sapido.com.tw/ User Manual v1.0.0
30
4.3 Office Contr ol
Office control provide Multiple AP、Wireless Access Control、IP F i l t ering、IP Binding、QoS
4.3.1 Multiple AP
Page 31

http://www.sapido.com.tw/ User Manual v1.0.0
31
The BR070n can register up to 4 SSIDs (wireless LAN group). It can be used as if there
are multiple wireless LAN access points with one product.
Item Description
Enable Enable or dis able t he servic e.
SSID Ent er the SSID
Data Rate Selec t the dat a t ransmis sion rat e.
Access
Enable thi s functi on can l et client s use t wo acces s ty pes:
a. LA N+ WAN: the cli ent can access to the Internet and access in t he
router’s GUI.
b. WAN: the cli ent can onl y acc ess to the Int ernet.
Active Client Li st
Displ ay the propert i es of t he client which i s connec ting succes sfully.
4.3.2 Wirel ess A ccess Control
Access Control allows user to block or allow wireless clients to access this router. Users
can select the access control mode, then add a new MAC address with a simple
comment and click on “Apply Change” to save the new addition. To delete a MAC
address, select its corresponding checkbox under the Select column and click on “Delete
Selected” button.
Page 32

http://www.sapido.com.tw/ User Manual v1.0.0
32
4.3.3 IP Filtering
When enabled, LAN clients are blocked / filtered from accessing the Internet based on
their I P addresses
Item Description
Enable IP Filtering Please sel ec t Enable IP Fil terin g t o fil ter IP addresses.
Local I P Address Please enter the IP address t hat needs to be filtered.
Protocol Please sel ec t the protoc ol t ype of t he IP addr ess
Apply Click on Apply to add t he sett i ng dat a
Current Filter Table It will di splay al l ports that are filtering no w.
Delete Selected & Delete
All
Click Delete Selected wil l delete the s el ected it em. Click Delete All
will del ete al l i t em s in thi s table.
4.3.4 IP Binding
This function allows you reserve IP addresses, and assign the same IP address to the
networ k devic e w ith the s pec ified MAC addres s any t im e it r eques ts an IP address . T his is
almos t the s ame as when a devic e has a s tatic IP addres s exc ept that the devic e m us t s till
request an IP address from the DHCP server.
Page 33

http://www.sapido.com.tw/ User Manual v1.0.0
33
Item Description
Enable Static DHCP Select enable to use Static DHCP function
IP Address Please enter IP address to li m i t
MAC addr e ss Pleas e enter M A C add res s to li m i t
Stati c DHCP List It will display all IP and MAC a ddre ss you made .
Delete Selected & Delete
All
Click Delete Selected wil l delete the s el ected it em. Click Delete All
will delet e all items i n t hi s table.
4.3.5 QoS
The QoS can let you classify I nternet application traffic by source/destination IP address and
port number .
To assign priority for each type of application and reserve bandwidth can let you have a better
experience in using critical real time services like I nternet phone, video conference …etc.
Page 34

http://www.sapido.com.tw/ User Manual v1.0.0
34
Item Description
Enable QoS Check “Enabl e QoS” t o ena ble Q oS function f or the WA N port. You
als o can uncheck “E nable QoS” to di sable QoS function for t he WAN
port.
Manual Uplink Speed Set t he upl i nk speed by manual t o assign the downlo ad or upl oad
ban dwidth by the unit of Kbps .
Manual Downlink Speed Set the downlink speed by manual t o assign the downl oad or upl oad
ban dwidth by the unit of Kbps .
Mode Select Guaranteed minimum band wi dt h or Restricted maximum
bandwidth
MAC Addr e ss Set M A C Add ress if t he addr es s ty pe i s by M A C Address
Uplink Bandwidth
Percentage
LAN device bandwi dth of upl i nk bandwidth
Download Bandwidth
Percentage
LAN device bandwi dth of downlo ad ban dwidth
Add Add t he sett i ng data
Delete Selected & Delete
All
Click Delete Selected wil l delete the s el ected it em. Click Delete All
will del ete al l i t em s in thi s table.
4.4 Firmware Upgrade
Page 35

http://www.sapido.com.tw/ User Manual v1.0.0
35
This function can upgrade the firmware of the router. There are two methods for user upgrade
firmware: A uto upgrade and Manual upgrade.
Caution: To prev ent that f irmware up g rading is int errupt ed by other wireless signals and causes f ailu re.
We recommend users to use wired connection during upgrading.
Note: The firmware upgrade will not remov e you r previo us settings.
4.4.1 Aut o upgr ade
It provi de auto detect new firmware from Internet, and user can select to
upgrade new ver sion or not .
4.4.2 Manual upgr ade
If you downl oad firmwar e f r om websi te, you can upgrade f irm war e m anua l
as below.
4.5 DoS
It provide 2 kind of Deni al of Service: Home and Enterprise
Page 36

http://www.sapido.com.tw/ User Manual v1.0.0
36
Home:
Item Description
Home
Check “
Home” to enabl e DoS function for prevention. You also can
check “
No Prevention” to di sabl e DoS function.
Enterprise:
Page 37

http://www.sapido.com.tw/ User Manual v1.0.0
37
Item Description
Enterprise
Check “
Enterprise” to ena bl e DoS funct i on f or prevention. You als o
can check “
No Prevention” to di s able DoS function.
4.6 VPN Server
The VPN Server function providing PPTP/L2TP mode are designed to allow users to an
external network device / computer and office local area network to establish a secure
network connection. And User can safe login office local area network and access to personal
documents, files Sharing and other resources. It provides the most convenient VPN
encryption.
Page 38

http://www.sapido.com.tw/ User Manual v1.0.0
38
Item Description
Enable Setting
Check this option, will start the VPN Server feature.
Connection Type
Provide PPTP or L2TP access connection type.
VPN Server IP
Input the I P address of VPN server
Remote I P range
It is the IP range of assigned to the VPN Client
Authentica tion Protocol
It is provided three types of authentication protocol
MPPE Encryption Mode
(RC4)
It is provided three encryption modes
User Name
Input the login name of the client user
Password
Input the login password of the client user
Current Filter Table It will di splay al l ports that are filtering no w.
Delete Selected & Delete
All
Click Delete Selected wil l delete the s el ected it em. Click Delete All
will del ete al l i t em s in thi s table.
4.7 NAT Management
This s ec tion c ontains c onfigur ations for the BR070N ’s adv anc ed func tions s uc h as : vir t ual
server, and DMZ to provide your network under a security environment.
Page 39

http://www.sapido.com.tw/ User Manual v1.0.0
39
4.7.1 Virtual Server
The Virtu al Server featur e allow s user s to c reat e Virtual Servers by re-direc t ing a partic ular
range of service port numbers (from the WAN port) to a particular LAN IP address.
Item Description
Enable Port Forw a rdi ng Select t o enable P ort F orwarding ser vice or not.
Address Speci fy t he IP add ress which recei ves t he i ncoming packets .
Protocol Select t he prot ocol type.
Public Port Range Ent er the port number, f or exam pl e 80-80.
Private P ort Range Ent er t he port number, f or exam pl e 20-22.
Current Port Forw a rdi ng
Table
It wi ll display al l port forw arding regulation you made.
Delete Selected & Delete
Click Delete Selected will delet e t he selec t ed i tem. Cli ck Delete All
Page 40

http://www.sapido.com.tw/ User Manual v1.0.0
40
All
will del ete al l i t em s in thi s table.
Pleas e find the foll owing figur e to k now that what the virt ual ser ver is. The w eb server is
located on 192.168.1.100, forwarding port is 80, and type is TCP+UDP.
4.7.2 DMZ
The DMZ f eature allow s one local us er to be ex posed to t he Intern et for s pecial-purpose
applicat ions like Internet gam ing or vide oc onfer enc ing. W hen enabled, t his feature opens all
ports to a singl e station and henc e renders t hat sys tem expos ed to intrus ion from outside.
The port for war ding featur e is m ore s ec ure becaus e it only opens the por ts requir ed by that
application.
Item Description
Enable DMZ It will enable t he DM Z service if you select it.
DMZ Host IP Ad d r ess Pl ease enter the s pec ific IP address for DMZ hos t .
Page 41

http://www.sapido.com.tw/ User Manual v1.0.0
41
4.8 Rem ote M anagement
This page al l ows you to acces s the GUI on W AN.
Item Description
HTTP Connection Port Users c an acces s GUI by this port ,de fault is 80
Enable Web Server Access
on WAN
Allow user access GUI from WAN side
4.9 Time Zone
Users can select time zone and synchronize the local clock on the router.
Item Description
Time Zone Select Please sel ec t the t i m e zone.
4.10 Factory Default
You could reset the curr ent configuration to fac tory de fault.
Page 42

http://www.sapido.com.tw/ User Manual v1.0.0
42
4.11 Reboot
This function is us ed to reboot
4.12 Logout
This page is used to logo ut
Page 43

http://www.sapido.com.tw/ User Manual v1.0.0
43
Chapter 5 Advance Setup
5.1 Inter net Mode
5.1.1 Internet Setup
Please ref er Internet Setup
5.1.2 AP(switch to AP mode)
Please ref er AP
5.1.3 WiFi AP(switch to WiFi AP mode)
Please ref er WiFi AP
5.1.4 WiF i IS P
Please ref er
W iF i ISP
5.2 IP Config
5.2.1 WAN
5.2.1.1 PPPoE
Page 44

http://www.sapido.com.tw/ User Manual v1.0.0
44
Item Description
User Name Input y our user name p rovid ed by your IS P. If you don’ t know,
pleas e check wit h your ISP.
Password In put the pass word pro vided by your ISP.
Service Name Input the service name p rovide d by your IS P.
Connection Type Thre e types for select: Continues, Conne c t on Dem and, and
Manual.
MTU Size Max i m um Transmis sion U ni t . Usuall y provide by c om puter
ope rat i on syst em s (OS). Advanced users can s et it m anual l y.
DNS Select Attain DNS Automa tica lly. Or select Set DNS Manually,
if you want to spec i fy the DNS, and ent er the DNS pro vided by your
ISP i n DNS 1 2 3.
Clone Mac Address Som e ISP s require MA C add res s registrat i on. In t hi s cas e, enter
the M A C address registered to the pro vider to " Cl one MAC
Address"
Page 45

http://www.sapido.com.tw/ User Manual v1.0.0
45
Save & Apply Clic k on Save t o save the setting date, the Apply button for execut e
current c onfigu rat i on.
5.2.1.2 DHCP
Item Description
Host Na me You c an keep the defa ul t as t he host name, or input a specific
name if required by your ISP.
MTU Size Max i m um Transmis sion U ni t . Usuall y provide by c om puter
ope rat i on syst em s (OS). Advanced users c an set it manually.
DNS Select Attain DNS Automa tica lly. Or select Set DNS Manually,
if you want to spec i fy the DNS, and ent er the DNS pro vided by your
ISP i n DNS 1 2 3.
Clone Mac Address Som e ISP s require MA C add res s registration. I n this case, enter
the M A C address registered to the pro vider to " Cl one MAC
Address"
Save & Apply Clic k on Save t o save the setting date, the Appl y button f or ex ecute
current c onfigu rat i on.
5.2.1.3 Static IP
Page 46

http://www.sapido.com.tw/ User Manual v1.0.0
46
Item Description
IP Address Ent er the IP address which i s provided by your ISP.
Subnet Mask Please enter the Subnet M ask address
Gateway Input IS P Default Gateway Ad dress , .
MTU Size Max i m um Transmis sion U ni t . Usuall y provide by c om puter
ope rat i on syst em s (OS). Advanced users can s et it m anually.
DNS Input DNS information whi c h i s provided by your IS P
Clone Mac Address Som e ISP s require MA C add res s registrat i on. In t hi s cas e, enter
the M A C address registered to the pro vider to " Cl one MAC
Address"
Save & Apply Clic k on Save t o save the setting date, the Appl y button f or ex ecute
current c onfigu rat i on.
5.2.1.4 PPTP
Page 47

http://www.sapido.com.tw/ User Manual v1.0.0
47
Item Description
Se rver IP Address Input your server IP address provided by your ISP. I f y ou don’t
know, please c heck with your ISP.
User Name Input P PTP account provided by your ISP.
Password In put the pass word pro vided by your ISP.
MTU Size Max i m um Transmis sion U ni t . Usuall y provide by c om puter
ope rat i on syst em s (OS). Advanced users can s et it m anual l y.
Enable MPPE Enc ryption Microsoft Point-to-Point E ncrypt i on (M P PE ) provi des data s ec urit y
for t he P PTP c onnection that i s betwee n the VPN c l i ent and V PN
server.
Enable MPP C Compression M i crosoft P oi nt-to-Point Compress i on (MPPC) is a sc hem e used to
com press Poi nt-to-Point Protoc ol (P P P) pac kets between Cisco
and Microsoft cl i ent devices. The M PPC algorithm is designe d to
opti m i z e band wi dt h utilization i n order to support m ul tiple
si m ul t aneous connect i ons. The MPP C al gorithm uses a
Lempel-Ziv (L Z) b ased al gorithm wi t h a continuo us history bu ff er,
cal l ed a di ctionar
DNS Select Attain DNS Au to matically. Or select Set DNS Manually, if
Page 48

http://www.sapido.com.tw/ User Manual v1.0.0
48
you want t o specify the DNS, and enter th e DNS pro vided by y our
ISP i n DNS 1 2 3.
Clone Mac Address Som e ISP s require MA C add res s registrat i on. In t hi s cas e, enter
the M A C address registered to the pro vider to " Cl one MAC
Address"
Save & Apply Clic k on Save t o save the setting date, the Appl y button f or ex ecute
current c onfigu rat i on.
5.2.1.5 L2TP
Item Description
Se rver IP Address Input your server IP address or Hos t Name provid ed by your ISP.
If y ou d on’t k now, please check wi t h your IS P.
User Name Input P PTP account provided by your ISP.
Password In put the pass word pro vided by your ISP.
MTU Size Max i m um Transmis sion U ni t . Usuall y provide by c om puter
ope rat i on syst em s (OS). Advanced users can s et it m anual l y.
DNS Select Attain DNS Automa tica lly. Or select Set DNS Manually, if
you want t o specify the DNS, and enter th e DNS pro vided by y our
Page 49

http://www.sapido.com.tw/ User Manual v1.0.0
49
ISP i n DNS 1 2 3.
Clone Mac Address Som e ISP s require MA C add res s registrat i on. In t hi s cas e, enter
the M A C addr ess registered to the pro vider to " Cl one MAC
Address"
Save & Apply Clic k on Save t o save the setting date, the Appl y button f or ex ecute
current c onfigu rat i on.
5.2.2 LAN
Use this page to set up the local IP address and subnet mask for your router.
Please select LAN Interface Setup under the IP Co nfig menu and follow the
instructions below to enter t he LAN se tti ng page to co nfigure t he settings you
want.
Item Description
IP Address
The d efault value o f LAN IP ad dress is 192.168.1.1 fo r this router.
Subnet Mask
Input Subnet M ask, norm al l y it i s 255.25 5.255.0.
Gateway
Input ISP Default Gateway Address. If you don’t know, please
check wit h your ISP.
DHCP
Enable or dis able D HCP s ervic es. The DHCP s erver wi ll
autom at i cally al l ocate an unused IP address from the IP address
pool t o t he req uesting c omput er if e nabled.
DH CP Client Rang e
Define the DHCP client range and then the DHCP server will
assign an IP to the requesting computer from this range. The
Show Client wil l di splay every assigned IP addr ess, M A C address,
Page 50

http://www.sapido.com.tw/ User Manual v1.0.0
50
and expired time. The default range is 192.168.1.100 -
192.168.1.200.
DHCP Lease Time
IP a vali able t i m e
Static DHCP
Please refer IP Binding
Domain Name
The n am e of device
802.1d Spa nni ng Tree
IEEE 802.1d Spanning Tree Protocol (STP) is a link layer
network protocol t hat ensures a lo op-free topology f or any bridged
LAN. The mai n purpose of S TP i s to ens ure that you do not c reate
loops when y ou have r ed undant paths in y our net work . Loops are
dea dl y to a netw ork.
Clone MAC
Address
Copy t he MA C address from the device you had re gi stere d to your
ISP i f y our ISP as ks for the specific MAC A ddress.
5.2.3 DDNS
You c an as s ign a f ixed host and dom ain nam e to a dy nam ic Internet IP addres s . Eac h t im e
the router boots up, it will re-register its domain-name-to-IP-address mapping with the DDN S
service provider. This is the way Internet users can access the router through a domain name
instead of its IP address.
Note: make sur e that you have r egister ed with a DDNS s er vice provider bef or e enablin g thi s feature.
Pleas e enter D om ain Nam e, User Nam e/ Em ail, and P as s wor d/Key. After entering, c lic k on
Apply Changes to save the setting, or you may click on Reset to clear all the input data.
Item Description
Enable/Disable DDNS Select enable to use DDNS function. Each time y our IP add ress t o
W A N is c hanged, and the inform at i on will be updated to D DNS
servic e provi der automati cally.
Service Provide r Cho ose cor rect S ervice P rovid er f rom drop-down l i st, here i nclu di ng
Page 51

http://www.sapido.com.tw/ User Manual v1.0.0
51
DynDNS, T ZO , Chang eIP, Eurodns , OVH, NO-IP, ODS, R e gfi sh
embedded i n BR070N .
User Name/Email User nam e i s used as an ident i t y to logi n Dynam i c-D NS service.
Password/Key Pas sword i s applie d to login Dynamic-DNS s ervice.
Save & Apply Click on “Save” to save t he setti ng data. The “Apply” butt on can
execute c urrent c onfig uration
5.3 IPv6 Config
Item Description
Page 52

http://www.sapido.com.tw/ User Manual v1.0.0
52
Origin Type
SLAAC、DHCPv6、IP 。Pl eas e check ISP to get correct ty pe
WAN Link Type
PPPoE、IP
PPPoE
Use IPv4 PPPo E account and password to do IPv6 conne ct
Child Pre fix Address
Check ISP to get this data
Static IP
Check ISP to get IP addr ess and default gatew ay IP address
Rout er Name
Router domain
DNSv6 Select Attain DNS Automatically. Or select Set DNS M anually, if
you want t o specify the DNS, and enter th e DNS pro vided by y our
ISP in DNS
5.4 Wireless
5.4.1 Basic Setti ngs
This page is u s ed to configure the parameter s for wireless LAN clients who may
conn ect to your Acces s Point. Here you may change wirel ess encrypt ion settin gs
as well as wireless network par ameter s
Page 53

http://www.sapido.com.tw/ User Manual v1.0.0
53
Item Description
Disable Wireless Tu rn off the wireles s service.
Band Select t he fr equency. It has 6 options: 2.4 GHz
(B/G/N/B+G/G+N/B+G+N).
Mode Sel ect t he m ode. It has 3 m odes to select: (AP, Client, WDS,
AP+WDS).
Page 54

http://www.sapido.com.tw/ User Manual v1.0.0
54
Multiple AP: P l ease chec k Sec tion 4.1. 2.1.
* In Wi -Fi AP m ode only support Cli ent mod e.
Network Type
Infrastructure:o ne of the t wo methods for con necting to
wireless network s with Wi-Fi enable d devices suc h as
lapt ops , Pda’s I-pho ne et c. These devic es are connected t o
wireless network wi t h the hel p of Ac cess poi nt (AP). Wireless
Ac cess Point s are us ual l y rout ers or switc hes which are
connected to int ernet by Ethernet port.
Ad hoc:By usi ng ad hoc m ode, devices are capable f or
com m uni cating dir ectly with each othe r. N o Ac cess poi nt
(routers / s wi tches ) i s required for com m unic ation b etween
de vices and all de vices in the range connect in peer to peer
com m uni cation mode.
SSID Service Set identifie r, us ers can define t o any or keep as default.
Channel Width Please sel ec t the c hannel widt h, it has 3 options: 20MHz / 40MHz /
Auto
Control Sideband Enable thi s functi on will control your router use lower or upper
channel.
Channel Number Pleas e select the c hannel; i t has Auto, 1, 2~11 or 13 o ptions.
Broadband S SI D User may choose t o enable Bro adca st SSID or not .
WMM Enable / Di sable Wi -Fi Multime dia
Data Rate Pl ease select t he dat a transmis sion rate.
Asso ciate Clients Check t he AP connectors and the Wireles s connect i ng status.
Enable MAC Clone
(Single Ethernet Client)
Clon e the MAC address fo r ISP to ide ntify.
Enable Universal Repeater
Mode (Acting a s AP and
Client simultaneously)
All ow to equi p with th e wi reles s way conjunction u pper le vel,
provi de the bott om l ay er user l i nk in wir el ess and wired way i n t he
meantime.
(The IP t hat bott om l ay er obtai ns is fr om uppe r l evel.) P l ease al so
check S ection 4. 1.2.2
SS ID of Ex tende d Inte rfa ce W hil e l i nking the upp er level d evice in wireles s way, you c an set
SS ID to give the bott om layer user s earch.
Multiple AP BR070n can register up to 4 SSIDs (wireless LAN group). It
can be used as if there are multiple wireless LA N access
points with one product. Each SSID could be set with
different data rate, WMM and access type
Save & Apply Cl i c k on “Save” to save t he sett i ng data. T he “Apply” but ton can
execute c urrent c onfig uration
5.4.2 Advanced Setti ngs
Page 55

http://www.sapido.com.tw/ User Manual v1.0.0
55
Item Description
Fragment Threshold To ident i fy the maxi m a l engt h of pack et, t he over length pac ket wil l be
fragmenti zed. The al low ed range i s 256 -2 346, and defaul t l ength i s
2346.
RTS Threshol d This value should remain at i t s default set ting o f 23 47. The range is
0~2347. S hould y ou encounter inconsis t ent data fl ow, only m i nor
modifications are recommended. If a network pack et is smaller than
the present RTS thr eshold s ize, t he RTS/C TS mec hanis m wil l not be
ena bl ed. The ro uter sends Re quest to S end (R TS) frames to a
particula r recei ving st ation an d negoti at es the s ending of a dat a
frame. Aft er receivin g an RTS, the wireless st at i on responds with a
Clea r to Sen d (CTS) f rame t o acknowledge the ri ght to begi n
trans m i ssion. Fill the range from 0 to 2347 i nt o this bl ank.
Beacon Interval Beacons are pack ets s ent by an ac cess poi nt to s ynchronize a
wireless network . Specify a beacon interval value. T he al low ed
setting range is 20-1024 m s..
Preamble Type P LCP i s Phy sical l ayer convergence protoc ol and PP DU is PLCP
protoc ol data uni t during tra nsmission, the PSDU shall be ap pended
to a P LCP preamble an d header to create the PPD U. It has 2
opti ons : Long Preamble and Short Preamble.
IAPP Inter-Acc ess P oi nt Protocol is a recommendation that des crib es an
opti onal extension to IE E E 802.11 that provi des wireless
access-point c om m unic ations among mult ivend or sys tems.
Protection P l ease select t o enable wireless prot ection or not.
Aggregation Enable thi s functi on wi ll combine several packet s to one and t ransm i t
it . It can reduce the pro bl em when m ass packet s are transmit t i ng.
Page 56

http://www.sapido.com.tw/ User Manual v1.0.0
56
Short GI Users can get bett er wirel ess t ransmis sion efficiency when t hey
ena bl e t hi s func tion.
W L AN Par titio n Shut dow n th e c om m unic ation between th e c onnec t ed
wireles s LA N devices .
If you set up as "Enabled", devices connected with th e
router, s uc h as a pr inter, wi ll not be a ble to us e.
Default Sett i ng: "D is ab led "
20/40MHz Co exist Config ur e 2 0/40 MHz c oe xis tin g s c hem e.
If yo u s et u p as "Enable d", "20 MHz " and "40 MHz " w ill
coexist.
Normall y us e as "D is abl ed".
Default Sett i ng: "D is ab led"
RF Output Powe r Users c an adjus t RF output power t o get the best wireless network
en vironme nt. Us ers can choose fr om 100%, 70%, 50% , 35%, and
15%.
5.4.3 Security
Here users define the security type and level of the wireless network. Selecting different
methods provides different levels of security. Please note that using any encryption
may cause a significant degrada tion of data throughput on th e wireless link. There
are five Encryption types supported: “None”, “WEP”, “WP A”, ”WPA2”, and “WPA-Mixed”.
Enabling WEP can protect your data from eavesdroppers. If you do not need this feature,
select “None” to skip the following setting
Item Description
WEP W EP i s t he most ge ner al e ncry pti on s ch em e am on g
Page 57

http://www.sapido.com.tw/ User Manual v1.0.0
57
wir el ess LAN s ec uri ty, c on figu re th e c om mo n enc rypt ed
key (WEP Key) for ac cess poi nt an d wir el ess LAN handset.
W EP k ey l engt h a re "6 4bi t", "128 bit ", and " 2 56bi t" ( This
prod uc t c orrespo nds up t o 12 8bit), la rger t he va lu e is,
mor e the character c an b e set, and encryption strength will
enhanced.
* If y ou c on figu r e the enc ry ptio n key as "5 l ett e rs in
half-wi dt h alpha bet s a nd num bers " o r "H exa dec i mal i n 1 0
digit s" , pl eas e s elec t " 64-bit".
* If y ou c on figu r e the enc ry ptio n key as "1 3 l ett ers i n
half-wi dt h alpha bet s a nd num bers " o r "H exa dec i mal i n 2 6
digit s" , pl eas e s elec t " 128 -bit".
WPA / WPA2 WPA/ WPA2 i s wir eles s LA N s ec urit y s tan da rd w hic h is
st rengt h en o ve r WE P. On W PA-PSK/WPA2-P S K, uses
encrypt ed k ey c all ed pr e-s ha re d key, and s et up c omm on
encrypt io n key fo r acc ess p oint an d wi rel ess LA N ha nds et
lik e W EP. T here ar e "AE S" and "TK IP" as e ncry pt io n
sc hem e. " TKIP " auto mat ic all y up d ates t h e key at r eg ular
int er vals, chec k a nd a pp ro ve the c o mmu nic ati o n, s o it c an
com mu nicate s a fer th an W EP key whi ch uses si ngl e
encrypt io n key fo r lo ng ti m e. "A ES " is ha rder t o d ec ode
compari ng t o "TKIP" , s o it c a n say to ug her e nc ry ptio n
sc hem e tha n " TK IP"
WPA-Mixed Support W PA and W PA2 at the s am e t i m e
802.1x Authe n tication
Radius
For r adi us ser ver authentication
Pe rsonal (Pre-Shared
Key)
* If y ou c on figu r e Pr e-S ha re d Key as "Hex ad ec im al i n 64
digit s" , pl eas e s elec t " Hex (64 c h arac te rs) " .
* If y ou c on figu r e enc rypt i on key i n "8 t o 63 l et ters i n
half-wi dt h alpha bet s a nd num bers ", pl eas e sel ec t
"Passphrase
5.4.4 Access Control
Please ref er Wireless A ccess Control
5.4.5 WPS
This page allows user to change the setting for WPS (Wi-Fi Protected Setup). Using this
feature could let your wireless client atomically synchronize it’s setting and connect to the
Access Point in a minute without any hassle. SAPIDO BR070N could support both Self-PIN
or PBC modes, or use the WPS button (at real panel) to easy enable the WPS function.
PIN model, in which a PIN has to be taken either from a sticker label or from the web
interface of the WPS device. This PIN will then be entered in the A P or client WPS device to
Page 58

http://www.sapido.com.tw/ User Manual v1.0.0
58
connect.
PBC model, in which t he user simply has to pus h a button, either an ac t ual or a virtual one,
on both WPS devices to connect.
BR070n WPS only support no encryption and WPA2
Please follow instructions below to enable the WPS function.
1. Setup Wireless LAN with WPS PIN :
(1). Get the WPS PIN number from wireless card and write it down.
(2). F ill in the P IN num ber f rom the w ireless card in C lient P IN Number field, an d then
click “Start PIN”.
(3). Click PIN from Adapter Utility to complete the WPS process with the wireless
router.
Page 59

http://www.sapido.com.tw/ User Manual v1.0.0
59
(4). Wireless dongle should connect to BR070n
2. Start PBC:
(1). Press the BR070n WPS button and wait for WPS LED blinking
(2). Press the dongle WPS button
(3). Wireless dongle should connect to BR070n
5.4.6 WDS
W hen s elected i n the Basic Sett ings page and enabled here, W ireles s Dist ribution Syst em
(WDS) enables the router to be used as a wireless bridge. Two Wireless-N Routers in bridge
mode can communicate with each other through their wireless interfaces. To accomplish this,
all wireles s r outers s hould be s et to th e s am e c hannel and the MAC addres s of other AP /
Routers should be entered in the table.
The WDS explanation is as the following picture.
Router_A:
Set the connection mode to “AP+WDS” from “Wireless Basic Setting”, and then select
the channel number (in this example is "11”). Click Apply Changes to save the setting.
Page 60

http://www.sapido.com.tw/ User Manual v1.0.0
60
Please check the MAC address
Enable WDS function from the page – “WDS Sett ing”, and then fill in the MAC address
of Router_B. Click Apply Changes to save the setting data.
Page 61

http://www.sapido.com.tw/ User Manual v1.0.0
61
The WDS AP List will show the WDS device MAC address.
Router_B:
Setup Router_B WDS.
Router_B mac address
Select enc ryption for s ecurity
Router_A mac address
Select enc ryption for s ecurity
Page 62

http://www.sapido.com.tw/ User Manual v1.0.0
62
Router_B LAN PC will get IP address from Router_A.
If yo u failed the WDS setting, please check you setting with refer to the list below.
Note 1: LAN IP address s houl d be und er t he sam e segm ent but c annot be t he sam e number.
5.4.7 Schedule
Please ref er Wir el ess Schedule
5.5 NAT
Please ref er
NAT Manageme nt
Router_A
Router_B
Wireless Mode
AP+WDS
WDS
LAN IP Address
Set the same segme nt as t he
router B( Not e 1)
Ex am pl e :192.168. 1.1
Set the same segme nt as t he
router_A (Note 1)
Ex am pl e :192.168. 1.2
Security
Set the same security as
Router_B
Set the same security as
Router_A
DHCP
Enable
Disable
Page 63

http://www.sapido.com.tw/ User Manual v1.0.0
63
5.6 VPN Server
Please ref er VPN server
5.7 Firewall
5.7.1 DoS
Please ref er DoS
5.5.2 QoS
Item Description
Enable QoS Check “Enabl e QoS” t o ena ble Q oS fu nction for the W AN port . You
als o can uncheck “E nable QoS” to di sable QoS function for t he WAN
port.
Automatic uplink speed Check t he Aut omat ic uplink speed.
Page 64

http://www.sapido.com.tw/ User Manual v1.0.0
64
Manual Uplink speed Input uplink ba ndwidth m anually
Automatic downl ink
speed
Check the Automati c downli nk speed.
Manual Downlink spee d Input downlink bandwi dth m anually
Addre ss Type Set QoS by IP Address or MAC addres s
Local I P Address Set l ocal IP Address if t he address t ype is by IP Address
MAC Addr e ss Set M A C Add ress if t he addr es s ty pe i s by M A C Address
Mode Select Guaranteed minimum band wi dt h or Restricted maximum
bandwidth
Uplink Bandwidth Key in the bandwidth.
Downli nk Bandwidth Key in the bandwidth.
5.5.3 Port Filtering
W hen enabled packets are denied ac cess to Intern et/filt ered bas ed on their p ort addres s.
Item Description
Enable Port Fil teri ng Select E nable Port F i l tering to filter ports .
Port Range Enter the port numbe r that ne eds to be filtered.
Protocol Please sel ec t the protoc ol t ype of t he port.
Add Click on Add to save the setting data.
Current Filter Table It will di splay al l ports that are filtering no w.
Delete Selected & Delete
All
Click Delete Selected wil l delete the s el ected it em. Click Delete All
will del ete al l i t em s in thi s table.
Port 80 has been blocked as the following illustrate.
Page 65

http://www.sapido.com.tw/ User Manual v1.0.0
65
5.5.4 IP Filtering
Please ref er
IP Filtering
5.5.5 Mac Filter Schedule
Please ref er Mac Filter Schedule
5.5.6 URL Filtering
Please ref er URL Filtering
5.5.7 IP Binding
Please ref er
IP Binding
5.5.8 VLAN
IP : 192. 168.1.x
Po rt: 80
-80
Page 66

http://www.sapido.com.tw/ User Manual v1.0.0
66
Item Description
Forwardi ng Rul e B ri dge or NAT m ode
Tag Add VLAN tag to packet
VID
Set VLAN ID(1~4096)
Priority It i ndi cates the frame prio ri t y le vel. Values are from 0 (best effort) t o
7 (hig hest); 1 represents t he l owest priori ty
CIF E nable or Dis able CIF
5.6 System
This s ec tion inc luding Wake o n L AN, Change Username/Password, Upgrade Firmware ,
Profiles Save, Remote Managem ent, Time Z one, UPnP, Route Setup, VPN Passthrough,
and Wan Type Auto Detection. It is easy and helpful for users making more detailed
settings.
5.6.3 W ake on Lan
Switch y our comp ut er ON through your LA N or the I nternet . To support WOL y ou m ust ha ve a
com puter with Motherboard that s upports WOL, as well as a Netw ork Cont roller (NIC) sup port ing
thi s func tion. Most of the newer Mot herboard (ci rca 2002 and O n), have an On Board NIC that
supports WOL. Otherwise you need to i nstall a P CI NIC that i s WOL capable.
Page 67

http://www.sapido.com.tw/ User Manual v1.0.0
67
5.6.4 Change User nam e/ Password
Users can set or change user name and password used for acce ssing the web management
interface in this section.
Input User Name and New Password, then input Confirm Password again.
5.6.5 Upgrade Firmware
Please ref er Firmware Upgrade
5.6.6 Profil es Save
Users can create a backup file that contains current router settings. This backup file can be
used t o res tor e router settings . This is es pecially us eful in the eve nt you need to r es et the
router to its default settings.
1. Save Configuration
(1). Click Save
Page 68

http://www.sapido.com.tw/ User Manual v1.0.0
68
(2). Please click “Save” to save the configuration to your computer.
(3). Select the location which you want to save file, then click Save.
2. Load configuration file
(1). Tap “browse” and select configuration file then click Open
Page 69

http://www.sapido.com.tw/ User Manual v1.0.0
69
(2). Click Upload to upload configuration file to BR070N .
(3). After 60 seconds, BR070N will reboot automatically.
5.6.7 Remote Management
Please ref er Remote Management
5.6.8 Tim e Zone
Users can synchronize the local clock on the router to an available NTP server (optional).
To complete this setting, enable NTP client update and select the correct Time Zone.
Page 70

http://www.sapido.com.tw/ User Manual v1.0.0
70
Item Description
Time Zone Select Please sel ec t the t i m e zone.
Enable NTP client update Please sel ec t to enable NTP client update or not.
Automatically Adjust
Daylight Sa ving
Please sel ec t to enable Automatically Adjust Day l i ght Saving or
not.
NTP Server P l ease select t he NTP server from the pul l -down li st, or y ou can
enter t he NTP server IP address manually.
Save & Apply Click on Sa ve to save the setti ng date, the Apply button f or ex ecute
current c onfigu rat i on.
5.6.9 UpnP
UPNP
Universal Plug and Play (UPnP) is a standard of networking protocols
promulgated b y t he UPnP Forum. The goals of UP nP are to allow devices to
connect seamlessly and to simplify the implementation of networks in the
home (data sharing, communications, and entertainment) and in corporate
environments for simplified installation of computer components. BR070N
supports UPnP function, and ca n cooperate with othe r UP nP devices. W hen
y ou activ ate UPn P, please click My Networ k Places. U ser s will see an In t ernet
Gateway Dev ice icon . By click the icon, users can enter the GUI of the router. If
y ou do not wish to use UPn P, you can disable it.
Page 71

http://www.sapido.com.tw/ User Manual v1.0.0
71
5.6.10 Route Set up
Dynam ic routing is a distance-vec tor routing protocol, which employs t he hop c ount as a
routing met ri c. R IP prevents rout i ng loops by impl ementi ng a lim i t on the numbe r of hops al l owed
in a pat h f rom the source to a destinati on. The m aximum number of h ops allowed fo r RIP is 15
Stati c routing is a data c om m unic at i on co ncept des cri bi ng one way of configuring path
selection of routers in com puter netwo rks. It is the type of routing cha racte ri zed by t he absence of
com m uni cation between routers regardi ng the current topology of the network. This i s achieved by
manually adding routes to t he router ro uting table.
Item Description
Enable Dynami c Route Enabl e or Di sabl e dynam i c route
NAT Enable or Dis able NAT fu nction
Transmit
Ther e are 3 o pt i ons:
1. Disable:do not send any RIP packet out
2. S end RIP 1 packet out
3. S end RIP 2 packet out
Receive
Ther e are 3 o pt i ons:
4. Disable:do not receive any RIP packet
5. Onl y receive RIP1 packet
6. Onl y receive RIP2 packet
Page 72

http://www.sapido.com.tw/ User Manual v1.0.0
72
Item Description
Enable Sta tic Route Enable or Disable dynamic route
IP Address Dest i natio n IP addr ess
Subnet Mask Dest i natio n IP subnet mask
Gateway Gateway IP addr es s for des tinati on
Metric Metri c numb er on router’s routing tabl e
Interface Stat i c route rule for LAN or WAN interface
5.6.11 VPN Passthough
Virtual Private Netwo rking (VPN) is typically used for wo rk-relat ed networking. F or V PN t unnels ,
the router s uppo rt s IPSec , Pas s-through, PPTP P ass-throug h, and L2TP Pas s-through.
Item Description
IP Sec Pa ss-through Inte rnet P rotocol S ecurity (IPSec) is a suite of protocols used to
impl em ent secure ex c hang e of pack ets at t he IP l ayer. To allow
IPSec tunnels to pass t hrough the router, IPSec P ass-through is
ena bl ed by default. To disabl e IPSec Pas s-through , select Disabl e
PPTP Pass-through Point-to-Point Tu nneling P rotocol is the method used t o ena bl e
VP N s essi ons to a Wi ndows NT 4.0 o r 2000 server. To allow P PTP
tunnel s to pass through t he ro uter, PP TP P ass-t hrough i s enabl ed
by default. To disa bl e P PTP P ass-through, select Disable.
L2TP P ass-through To allow the L2TP network traffic t o be fo rwarded to i t s dest i nation
without the netw ork addr ess t rans l ation tasks .
IPV6 Pass-through All ow IPV6 packet t o be forwarded to its dest ination wit hout t he
network addres s trans l ation tas ks.
Page 73

http://www.sapido.com.tw/ User Manual v1.0.0
73
5.6.12 W an Type Auto Detect i on
Page 74

http://www.sapido.com.tw/ User Manual v1.0.0
74
6 Q & A
6.5 Installation
1. Q: Where is the XDSL Router installed on the network?
A: In a typical environment, the Router is installed between the X DSL line and the LAN.
Plug the XDSL Router int o the XDSL line on t he wall and E th er net port o n the Hub
(switch or computer).
2. Q: Why does the throughput s eem slow ?
A: To achieve maximum throughput, verify that your cable doesn’t exceed 100 meter. If
you have to do so, we advise you to purchase a bridge to place it in the middle of the
route in order to keep the q uality of transm itting s ignal. O ut of t his condit ion you
would better test something else.
Verify network traffic does not exceed 37% of bandwidth.
Check to see that the network does not exceed 10 broadcast messages per
second.
Verify network topology and configuration.
6.6 LED
1. W hy doesn’t BR070N power up?
A: Check if the output voltage is suitable, or check if the power supply is out of order.
2. T he Internet browse r still cannot find or connect t o BR070N afte r verifying the IP
address and LAN cable, the changes cannot b e made, or pas s word is lost.
A: In cas e BR070N is inac cess ible; you can try to r estore it s factory default s ettings .
Please press the “Reset” button and keep it pressed for over 7 seconds and the light
of STATUS will vanish. The LEDs will flash again when reset is successful.
3. W hy does BR070N shut dow n unexpectedly?
A: Re-plug your power adapter. Then, check the STAT US indicator; if it is off, the
internal flash memory is damaged. For more help, please contact with your provider.
6.7 I P Address
1. Q: What is the default IP a ddress of the router for LAN port?
A: The default IP address is 192.168.1.1 with subnet mask 255.255.255.0
2. Q: I don't know my WAN IP.
A: There are two ways to know.
Way 1: Check with your Internet Service Provider.
Way 2: Check the setting screen of BR070N . Click on Status & Log item to select
Network Configuration on the M ain Menu. WAN IP is shown on the WAN
interface.
Page 75

http://www.sapido.com.tw/ User Manual v1.0.0
75
3. How can I check whether I have static WAN IP A ddress?
A: Consult your ISP to confirm the information, or check Network Configuration in
BR070N ’s Main Menu.
4. W ill the Router allow m e to us e my own public IPs and Domain, or do I have to use
the IPs provided by the Router?
A: Yes, the Router mode allows for customization of your public IPs and Domain.
6.8 OS Setting
1. Why can’t my computer work online after connecting to BR070N ?
A: It’s possible that your Internet protocol (TCP/IP) was set to use the following IP
address. Please do as the following steps. (Windows 2000 & XP) Start>Settings>
Ne twork and Dial-up Connections>double clic k on Internet Protocol(TCP/IP)>
select obtain IP address a utomatically> Click on OK button. Then, open Internet
browser for testing. If you still can’t go online, please test something else below.
Verify network configuration by ensuring that there are no duplicate IP
addresses.
Power down the device in question and ping the assigned IP address of the
device. Ensure no other device responds to that address.
Check that the cables and connectors or use another LAN cable.
2. Q: Why can't I connect to the rout er's configuration utility?
A: Pos sible Solut ion 1: Make s ure that your Ether net connec t properl y and secur ely.
Make sure that you've plugged in the power cord.
Possible Solution 2: Make sure that your PC is using an IP address within the range
of 192.168.1 .2 t o 192. 168.1.254. Make s ure that t he addres s of the s ubnet m as k is
255.255.255.0. If necessary, the Default G ateway data should be at 192.168.1.1. To
verify these settings, perform the following steps:
Windows 2000, or XP Users:
1. Click on Windows Start > click on Run > input cmd > click on OK button.
2. At the DOS prompt, type ipconfig/all.
3. Check the IP Address, Subnet Mask, Default Gateway data. Is this data
correct? If the data is n' t c orr ec t. Pleas e input ipconfig/release > press Enter >
input ipconfig/renew > press Enter.
Possible Solution 3: Verify the connection setting of your Web browser and verify that
the HTTP Proxy feature of your Web browser is disabled. Make these verifications so
that your Web browser can read configuration pages inside your router. Launch your
Web browser.
Internet Explorer Users:
1. Click on Tools > Internet Options > Connections tab.
2. Select neve r dial a connection, c lic k on Apply button, a nd then clic k on OK
button.
3. Click on Tools and then click on Internet Options.
4. Click on Connections and then click on LAN Settings.
Page 76

http://www.sapido.com.tw/ User Manual v1.0.0
76
5. Make sure none of the check boxes are selected and click on OK button.
6. Click on OK button.
Netscape Navigator Users:
1. Click on Edit > Preferences > double-click Advanced in the Category window.
2. Click on Proxies > select Direct connection to the Intern et > click on OK button.
3. Click on Edit again and then click on Preferences.
4. Under category, double-click on Advanced and then click on Proxies.
5. Select Direct connection to the Internet and click on OK button.
6. Click on OK button.
3. Q: Web page hangs, corrupt downloads, or nothing but junk characters is being
displayed on the screen. What do I need to do?
A: Forc e your NIC to 10 Mbps or half du plex m ode, and turn off the " Aut o-negotiate"
feature of your NIC as a tempor ary meas ure. (Please look at the Netw ork Control
Panel, in your Ethernet Adapter's Advanced Properties tab.)
4. Q: Why can't I connect to the Web Configuration?
A: you can remove the proxy server settings in your web browser.
6.9 BR070N Setup
1. Q: Why does BR070N ’s setup page shut down unexpectedly ?
A: If one of the pages appears incompletely in BR070N ’s setup pages, please click on
Logout item on the Main Menu before shutt ing it down. Don’t kee p it wor king. Then,
close Internet browser and open it again for going back to the previous page.
2. Q: I don’t know how to configure DHCP.
A: DHCP is commonly us ed in the large local networ k. It allow s you to m anage and
dist ribute IP addr esses from 2 to 254 throughout your local netw ork via BR070N .
Without DHCP, you would have to configure each computer separately. It’s very
troubles ome. Pleas e Open Int erne t browse r > Input 192.168.1.1 i n the websi te
blank field > Select DHCP Serv er un der the IP Config Menu. For more information,
please refer to 3.3.2 (Router Mode) or 4.3.1 (AP Mode).
3. Q: How do I upgrade the firmware of BR070N ?
A: Per iodic ally, a n ew F las h Code is availa ble for BR070N o n y our pro duc t s upplier ’s
website. Ideally , you should update BR070N ’s Flash Code using Firmw a re Upgra de
on the System Management menu of BR070N Settings.
4. Q: Why is that I can ping to outside hosts, but cannot access Intern et websites?
A: Check the DNS server settings on your PC. You should get the DNS servers settings
from your ISP. If y our PC is running a DHCP c lient, rem ove any DNS IP addres s
setting. As the router assign the DN S settings to the DHCP-client-enabled PC.
5. Q: BR070N c ouldn’t s a ve the setting after click on Apply button?
A: BR070N will start to run after the setting finished applying, but the setting isn’t written
into memory. Here we suggest if you want to make sure the setting would be written
into memory, please reboot t he device via Reboot under Syst em Man agement
directory.
Page 77

http://www.sapido.com.tw/ User Manual v1.0.0
77
6.10 Wirel ess LA N
1. Q: Why couldn’t m y wireless notebook work on-line after ch ecking?
A: Generally, Wireless networks can sometimes be very complicated to set up,
particularly if you're dealing with encryption and products from different vendors. A ny
number of variables c an keep your w orks tati ons from talking to eac h ot her. Let's go
over some of more common ones.
For s tar ters , ver ify th at y our router and yo ur w orks t ation are us ing the s am e SSID
descriptions. SSID acts as a password when a mobile device tries to connect to the
wireless network. The SSID also differentiates one WLAN from another, so all
acce ss points and all devices attempting to connect to a specific WLAN must use the
sam e S SID. A wor kst ation w ill not b e per m itted to c onnec t to the netw ork un les s it
can pr ovide this unique ide ntifier. This is s imilar t o the func tion of your netw ork's
Workgroup or Domain name.
W hen you're exper iencing c onductivit y problem s, it is always best to keep thi ngs
simple. So next you are going to do is that, please disable any WEP encryption you
might have configured.
Suc cessful im plementation of enc ryption also inc ludes the us e of a shar ed key. A
HEX key is t he m os t c omm on, but oth er form at s are als o us ed. Thi s ke y i dentif ies
the workstation to the router as a trusted member of this network. Different
manuf ac turer s can implem ent this key tec hnolo gy i n w ays t hat m ight prevent t hem
from w orking c orr ec tly wit h anot her ve ndor 's pr oduc ts . S o pay atte ntion t o d etail is
going to be the key to a successful installation.
Next make sure the router and the NIC are configured to use the same
comm unications c hannel. There are norm ally 11 of t hem, and the defau lt c hannel
can als o var y from vendor to vendor. You might als o want t o c onfirm that t he router
has DHCP services enabled and an address pool configured. If not, the NIC won't be
able to pick up an IP address. I have run across a few access points that offer DHCP
ser vic es but do not ass ign all of the needed IP inform ation t o the NIC. As a res ult, I
was able to connect to the network, but could not browse the web. The point is, don't
assume anything. Verify for yourself that all of the required settings are being
received by the workstation.
Finally, you m ight want to ke ep the syst em you're t rying to configure in the s ame
room as the router, at least during the initial configuration, in order to minimize
potential interference from concrete walls or steel beams.
2. Q: My PC can’t locate the Wireless Access Point.
A: Check the following:
Your PC is set to Infrastructure Mode. (A ccess Points are always in Infrastructure
Mode.)
The SSID on your P C and the W ireles s Access Point are the s ame. R emember
that the SSID is case-s ensitive. So, for e xam ple “Workgroup” does NOT m atc h
“workgroup”.
Both your P C and the W ireles s Acc ess Point m ust have t he same s etting for
W EP. The default s etting for the W ireles s Rout er is dis abled, so your w ireless
station should also have WEP disabled.
If WEP is enabled on the Wir eless Router, your PC must have WEP enabled,
and the key must match.
If the Wir eles s Router’s Wireless sc r een is set to Allow LAN acc ess to s elec t ed
Wireless Stations only, then each of your W ireless stations must have been
selected, or access will be blocked.
Page 78

http://www.sapido.com.tw/ User Manual v1.0.0
78
To s ee if radio interf erence is caus ing a problem, see if connec tion is possible
when c los e to the W ireless Acc ess Point. Rem ember t hat the c onnec tion r ange
can be as little as 100 feet in poor environments.
3. Q: Wireless connection speed is very slow.
A: The wireless system will connect at highest possible speed, depending on the
distance and the environment. To obtain the highest possible connection speed, you
can experiment with following:
Acc ess Point locat ion: Try adjus ting the location an d orientati on of the Acc ess
Point.
W ireless Channel : If i nterferenc e is the probl em, c hanging to anot her channel
may show a marked improvement.
Radio Interference: Other devices may be causing interference. You can
experiment by switching other devices off, and see if this helps. Any “noisy”
devices should be shielded or relocated.
RF Shielding: Your environment may tend to block transmission between the
wireles s stat ions . This wi ll mean high acc ess speed is only pos s ible when close
to the Access Point.
4. Q: Some applications do not run properly when using the Wireless Router.
A: The W ir eless Router proc ess es the data pass ing thr ough it, s o it is not trans par ent.
Use the Special Application feature to allow the use of Internet applications which do
not func tion c orr ec tly. If this does solve the problem , you c an use the D MZ f unc tion.
This should work with almost every application, but:
It is a security risk, since the firewall is disabled.
Only one (1) PC can use this feature.
5. Q: I can’t connect to the Wireless Router to configure it.
A: Check the following:
The Wireless Router is properly installed, LAN connections are OK, and it is
powered ON.
Make sure that your PC and the Wireless Router are on the same network
segment.
If your PC is set to “Obtain an IP A ddress automatically” (DHCP client), restart it.
If your PC us es a Fixed (Static) IP address , make s ure that it is us ing an IP
Address w ithin t he r a nge 192.168 . 1.129 to 192. 16 8.1.253 and thus c om patible
with the Wireless Router’s default IP Address of 192.168.1.254. Also, the
Network Mask should be s et to 255 .255.255.0 to m atc h the Wireles s R outer. In
W indows, you c an chec k these s ettings by us ing Control Panel ~ Network to
check the Properties for the TCP/IP protocol.
6. Q: The WinXP wireless interface couldn’t communicate the WEP with SAPIDO
BR070N’ s wireless interface.
A: The default WEP of WinXP is Authentication Open System - WEP, but the WEP of
SAPIDO BR070N is only for Shared Key - WEP, it caused both sides couldn’t
communicate. Please select the WEP of WinXP from Authentication Open System to
Pre-shared Key - WEP, and then the W EP wir eles s inter fac e betw een W inXP and
SAPIDO BR070N would be communicated.
Page 79

http://www.sapido.com.tw/ User Manual v1.0.0
79
6.11 Support
1. Q: What is the maximum number of IP addresses that the XDSL Router will
support?
A: The Router will support to 253 IP addresses with NAT mode.
5. Q: Is the Router cross -pla tform compatible?
A: Any platform that supports Ethernet and TCP/IP is compatible with the Router.
6.12 Others
1. Q: Why does the router dial out for PPPoE mode very often?
A: Normally some of game, music or anti-virus program will send out packets that
trigger t he router to dial o ut, you c an c los e thes e pr ograms . Or you c an set the idle
time to 0, then control to dial out manually.
2. Q: What can I do if there is already a DHCP server in LAN?
A: If ther e are t wo D HCP s er vers exis ting on th e s am e netw ork, it m ay c aus e conf lic t
and generate tr oubl e. In this s it uation, w e s ugges t to disable DHC P server in r outer
and configure your PC manually.
Page 80

http://www.sapido.com.tw/ User Manual v1.0.0
80
7 Appendices
7.5 Operati ng Systems
1. Microsoft:Windows 2000, XP, Vista, Windows 7.
2. Apple:Mac OS X 10.4.7, Leopard and the following related versions.
3. Linux:Redhat 9, Fedora 6 & 7, Ubuntu 7.04 and the following related versions.
7.6 Browsers
1. Internet Explorer ver. 6 and 7 and the following related vers ions .
2. FireFox ver. 2.0.0.11 and the following related versions.3.
3. Safari ver. 3.04 and the following related versions.
7.7 Comm uni c at ions Regulation Infor m ati on
Should any consumers need to learn more information, services and supports, please contact
the supplier of your product directly.
 Loading...