

Sapido RB-1232V2,RB-1802,RB-1842,RB-1800,RB-1732,GR-1733,RB-1733 Quick Installation Manual

Quick Installation Guide (V2.1)
Quick Installation Guide (V2.1)
Applicable Model:RB-1232V2/RB-1802/RB-1842
RB-1800/RB-1732/GR-1733/RB-1733

Default IP:
192.168.1.1 (Router Mode)
192.168.1.254 (AP Mode)
192.168.1.254 (WiFi AP Mode)
Default Username:admin
Default Password:admin
Important Information
※
Press the Reset button to set the router back to factory settings while
forgetting the users name and password.
※
We suggest using WiMAX modem with a USB extended cable for
the best performance.

Frequently Asked Questions
FAQ
24
1-5
6-7
8-9
8
10-11
12-13
14-15
16-17
18-19
20-21
22
22
23
Configuration
Basics
Table of Contents
Getting to Know your Router
Installing the Router
Logging into your Router
Connecting this Router to a 3G/4G Modem
Connecting this Router to a Cable/DSL Modem
Connecting this Router to a Smartphone
Connecting this Router to a WiMAX Modem
Connecting to an Existing WiFi Router(Public WiFi)
Connecting to an Existing Wired IP Router
Connecting to Another WiFi network to extend the Signal
SAMBA
Optional Firmware Upgrade
Resetting Your Router back to Factory Settings
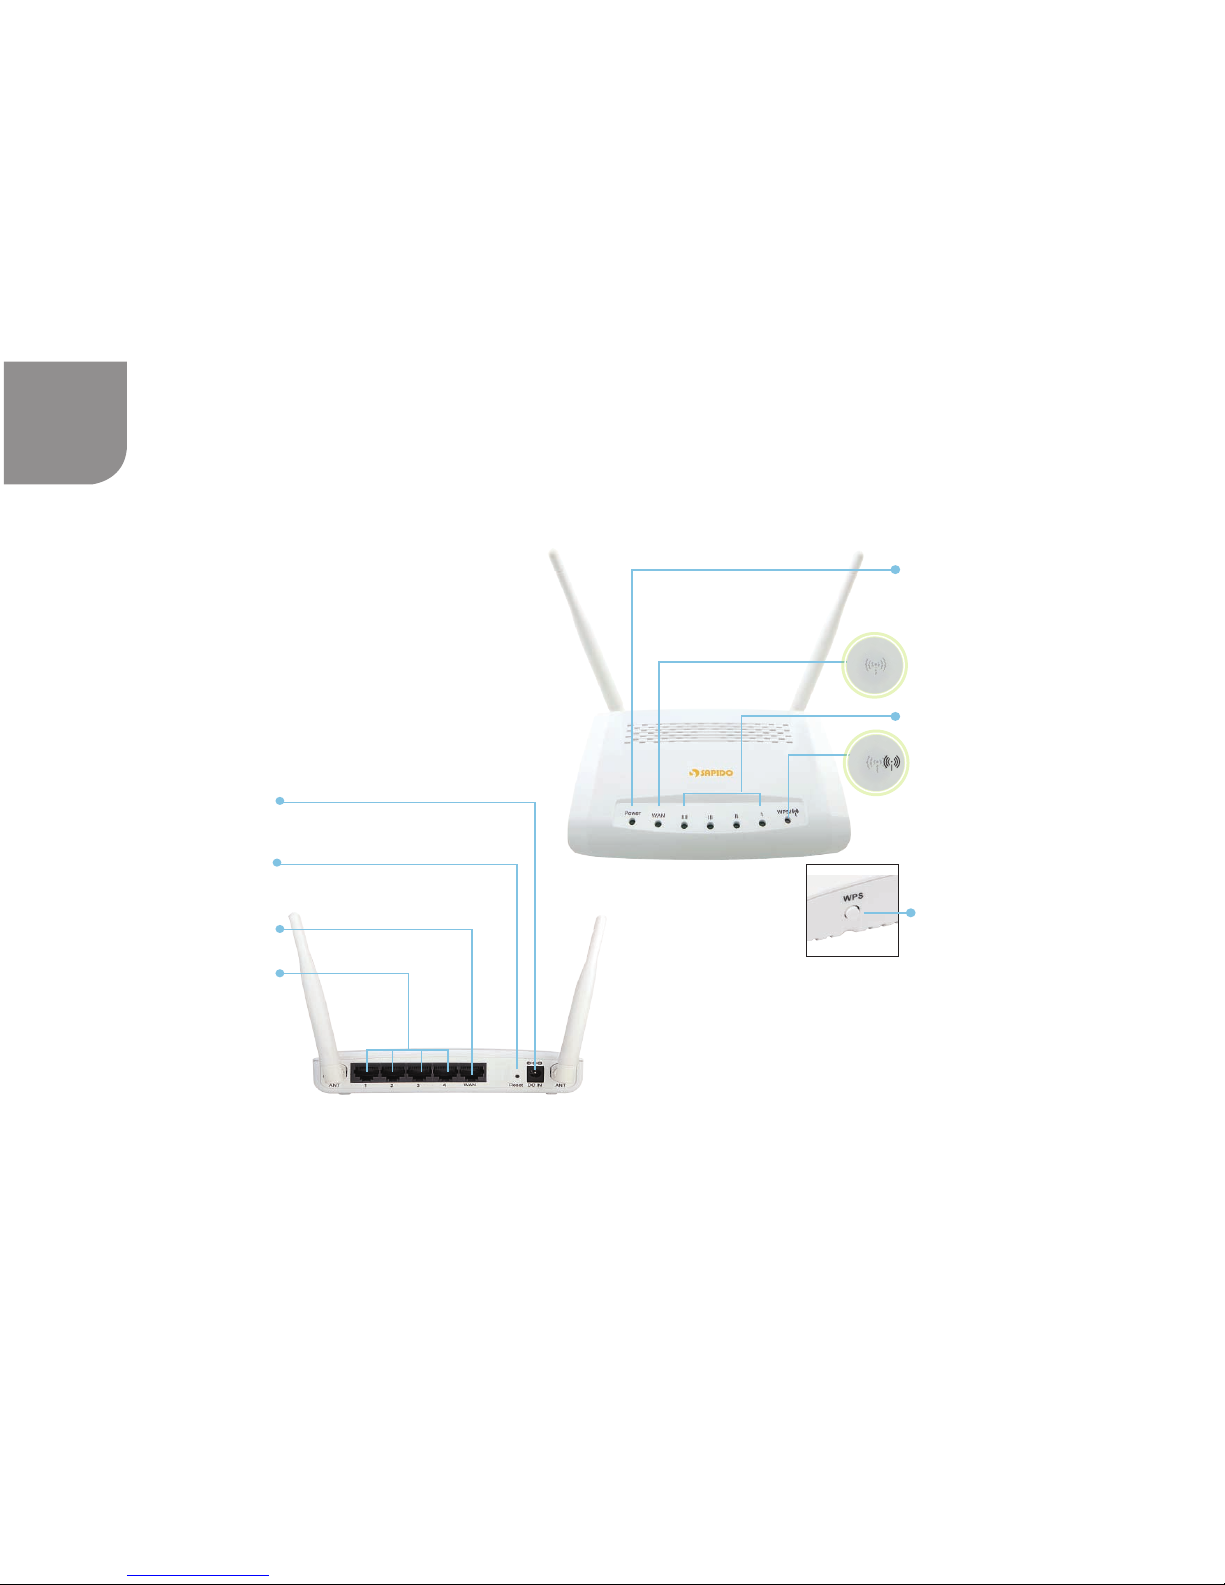
Getting to Know Your Router
RB-1800
1
1 Router
1 Power Adapter,
1 Quick Installation Guide
Package Contents
LAN Port
Use these ports to
connect to your
computer.
Reset Button
Back to factory setting.
WAN Port
This connects to your
DSL/Cable Modem.
Power Connector
WPS/
WPS Button
See the WPS one-button setup
section for additional information.
Power Indicator
When the light is green,
the device is receiving
power.
LAN Indicator
WPS/Wireless Indicator
When this light is green, wireless
is active.When this light starts to
flash and turns to reddish orange.
WPS setup is in progress.
WAN
WAN Indicator

2
/WPS
WAN
Power Indicator
When the light is green, the device is
receiving power.
WAN Indicator
LAN Indicator
WPS/Wireless Indicator
When this light is green, wireless
is active.When this light starts to
flash and turns to reddish orange.
WPS setup is in progress.
1 Router.
1 Power Adapter,
1 Quick Installation Guide
Package Contents
RB-1802
WPS Button
See the WPS one-button
setup section for additional
information.
Reset Button
Back to factory setting.
WAN Port
This connects to your DSL/
Cable Modem.
Power Connector
LAN Port
Use these ports to connect
to your computer.
3
1 Router.
1 Power Adapter,
1 Quick Installation Guide
Package Contents
WPS Button
See the WPS one-button setup
section for additional information.
USB Port
Use this port to connect a
3G/4G modem or smartphone.
LAN Port
Use these ports to
connect to your
computer.
Reset Button
Back to factory setting.
WAN Port
This connects to your DSL/
Cable Modem.
Power Connector
RB-1842
Power Indicator
When the light is green,
the device is receiving
power.
WAN Indicator
LAN Indicator
Wireless/WPS Indicator
When this light is green, wireless is
active. When this light starts to flash
and turns to reddish orange.
WPS setup is in progress.
/WPS
WAN

4
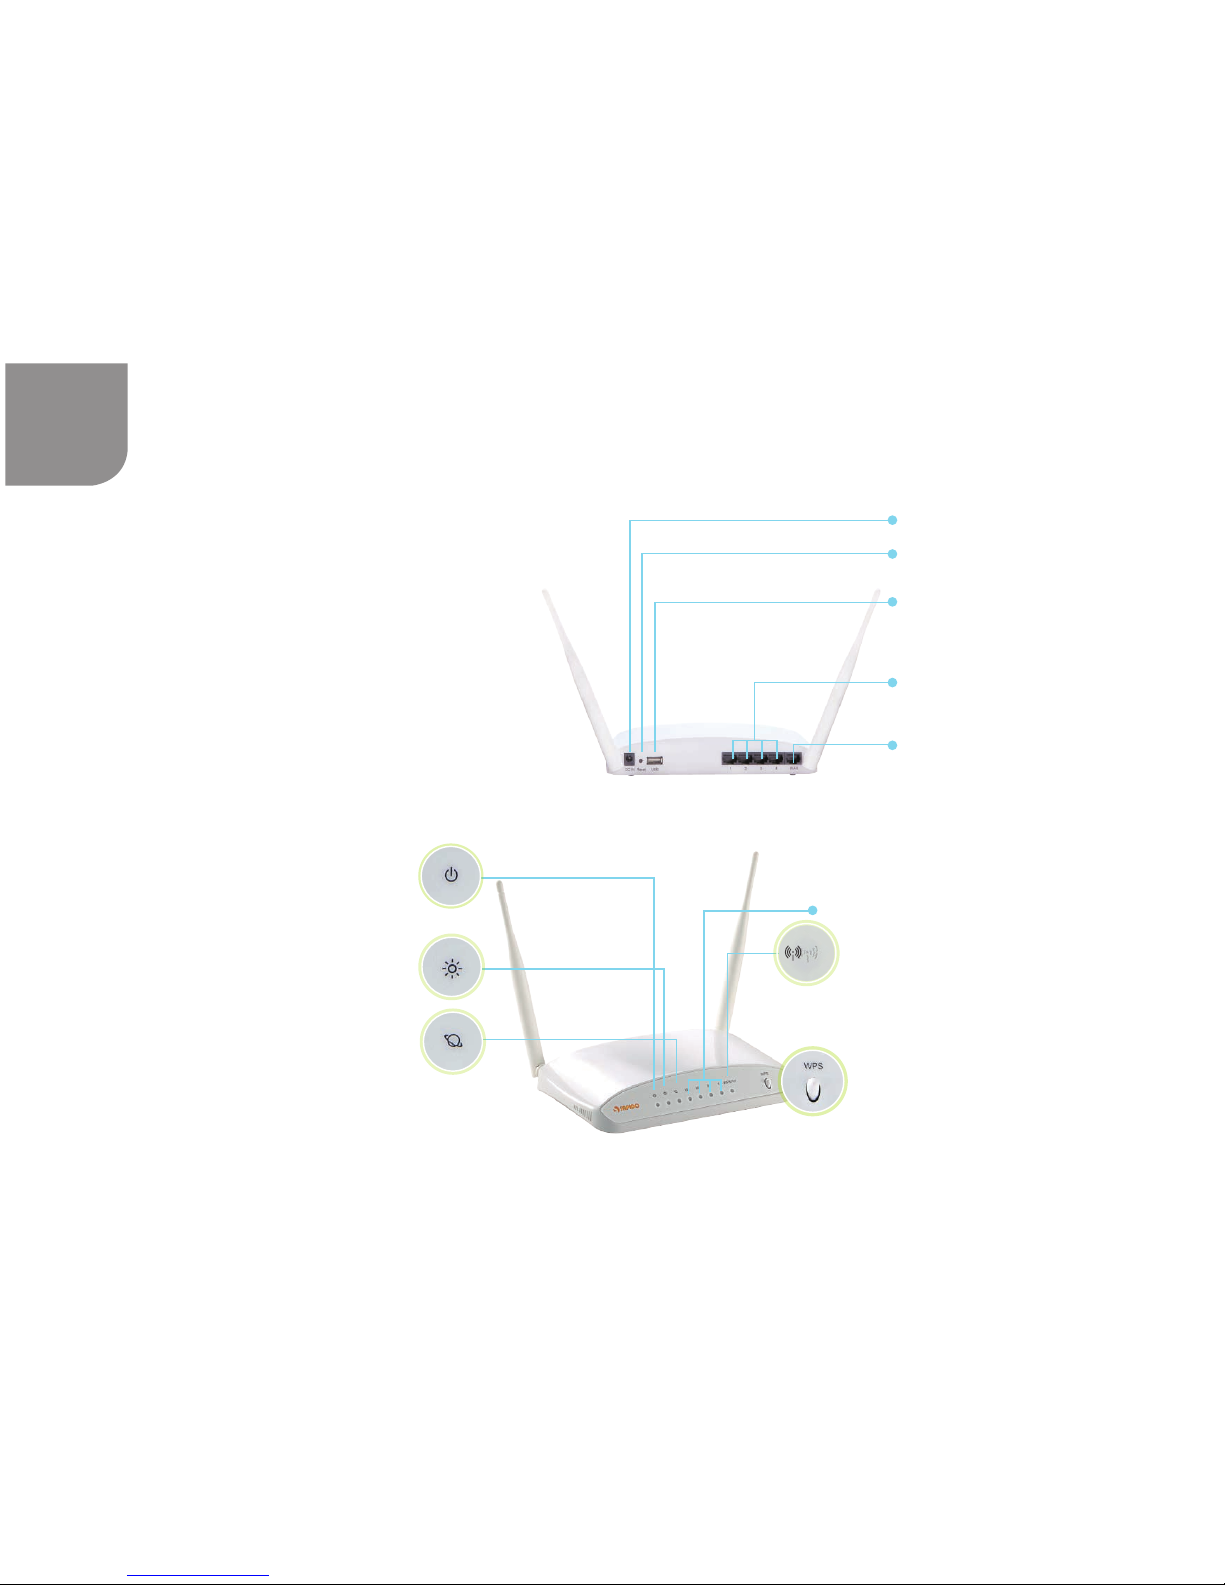
RB-1232 V2
Package Contents
1 Router
1 Power Adapter, 1 Base Holder,
1 Antenna,(detachable)
1 Quick Installation Guide
Status Indicator
When the green light is on, system is ready to
work. When the light is blinking means reset or
firmware update is in progress.
LAN Indicator
WAN Indicator
WPS Button
See the WPS one-button setup
section for additional information.
Power Indicator
When the light is green, the device is receiving power.
Wireless/WPS Indicator
When this light is green, wireless is active.
When this light starts to flash and turns to
reddish orange.
WPS setup is in progress.
Use this port
to connect a
3G/4G/WiMAX
modem or
smartphone.
Power Connector
LAN Port
Use these ports to connect to
your computer.
Reset Button
Back to factory setting.
WAN Port
This connects to your DSL/Cable Modem.
USB Port
5
Package Contents
1 Router
1 Power Adapter,
2 Antennas,(some are detachable)
1 Quick Installation Guide
RB-1732/GR-1733/RB-1733
Status Indicator
When the green light is on, system is
ready to work. When the light is blinking
means reset or firmware update is in
progress.
WAN Indicator
Power Indicator
When the light is green, the device is
receiving power.
LAN Indicator
WPS Button
See the WPS one-button setup section
for additional information.
Wireless/WPS Indicator
When this light is green, wireless is
active. When this light starts to flash
and turns to reddish orange.
WPS setup is in progress.
/WPS
Power Connector
USB Port
Use this port to connect a
3G/4G/WiMAX modem or
smartphone.
LAN Port
Use these ports to connect to
your computer.
Reset Button
Back to factory setting.
WAN Port
This connects to your DSL/
Cable Modem.
6
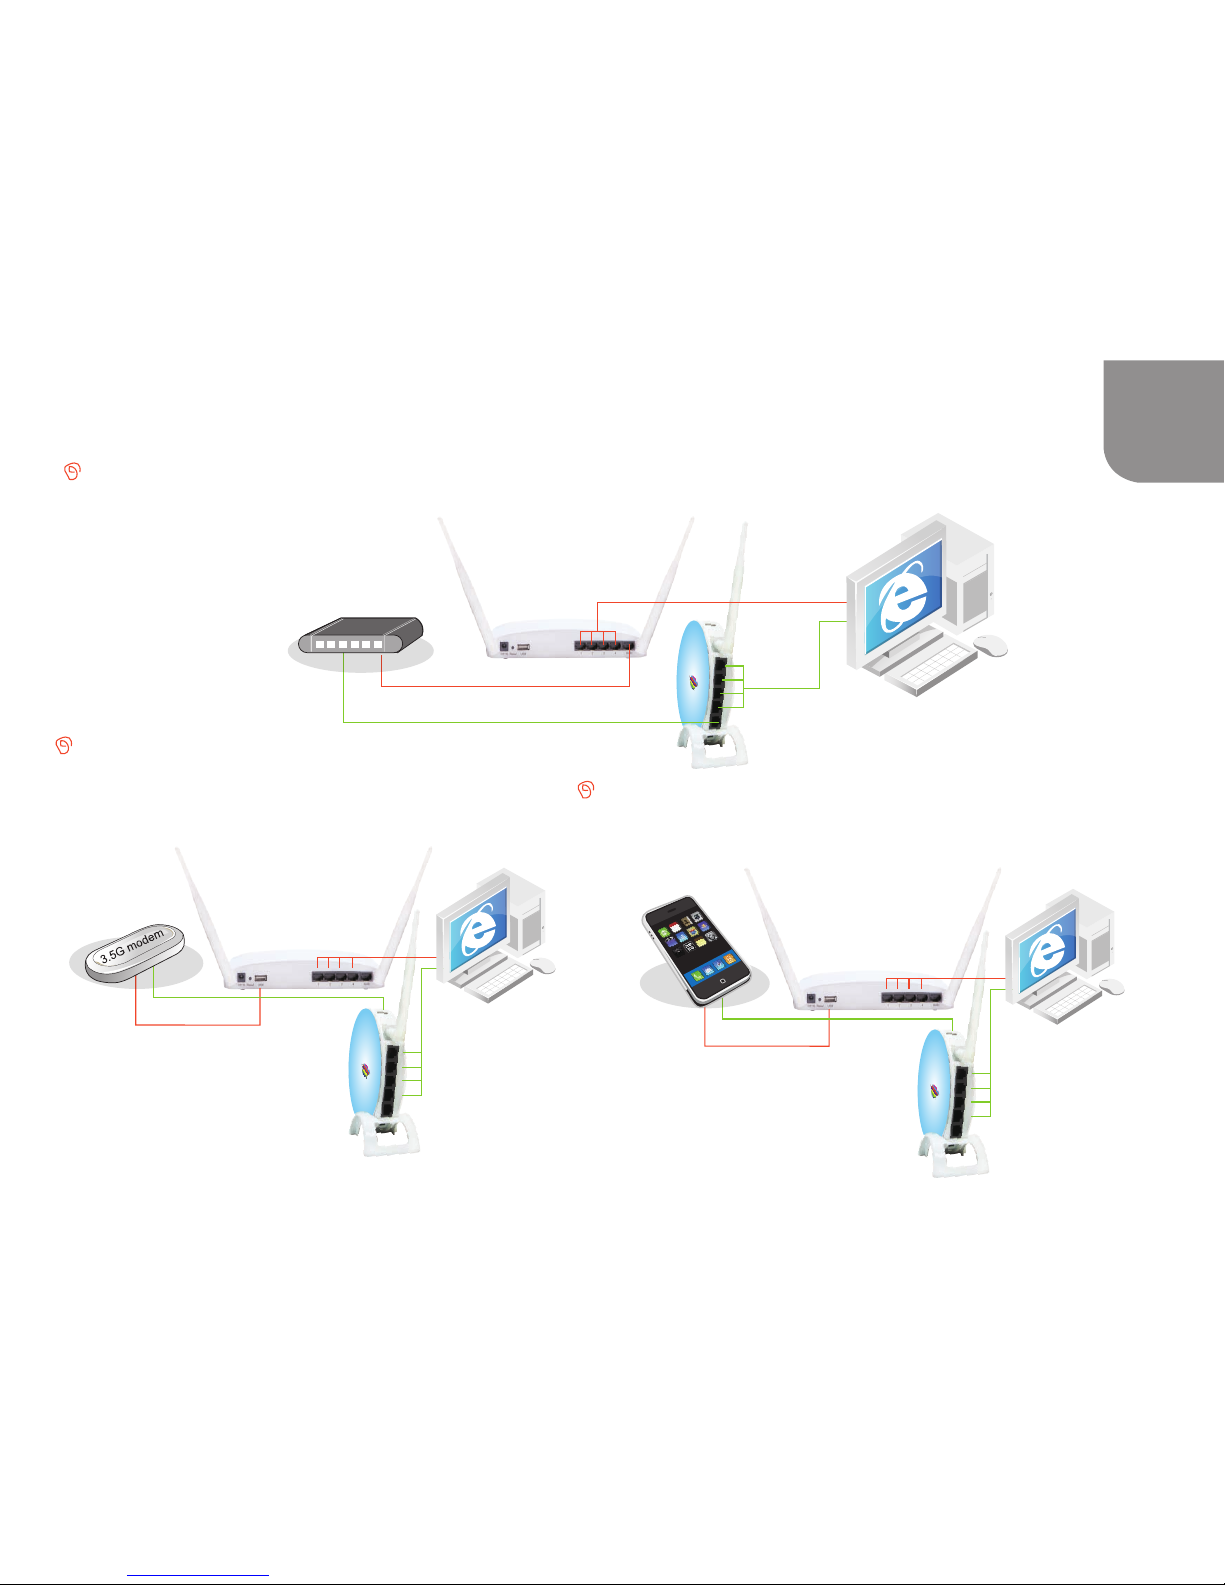
Installing the Router
DSL/Cable Modem :
1.
Use an Ethernet cable to connect the modem to the WAN port of the SAPIDO router.
2.
Use Ethernet cable to connect PC and LAN port of the SAPIDO router.
Smartphone :
1. Use a USB cable to connect the smartphone to the SAPIDO
router. See the smartphone section for additional information.
2.
Use Ethernet cable to connect PC and LAN port of the SAPIDO
router.
3G/4G/WiMAX modem :
1. Connect the 3G/4G/WiMAX modem to the SAPIDO
router using a USB cable.
2.
Use Ethernet cable to connect PC and LAN port of
the SAPIDO router.
Ethernet Cable
Ethernet Cable
Ethernet Cable
Wired xDSL/Fiber/
Cable Modem
Ethernet Cable
plug into USB port
Ethernet Cable
Ethernet Cable
plug into USB port
plug into USB port
Ethernet Cable
Ethernet Cable
plug into USB port
 Loading...