

Page 1
Sapido
Smart Cloud Night Vision Camera Router supports Sapido
Mobile APP to offer the real-time monitoring and security
detection. Send a push notification when intruders are detected
and trigger alarm to keep the home safe anytime everwhere.
H.264 IP Cam Router
Smart Cloud Night Vision Camera with Audio Wireless Router
IPJC2n
Quick Installation Guide
( v1.0 )
Android
1
iOS
2
3
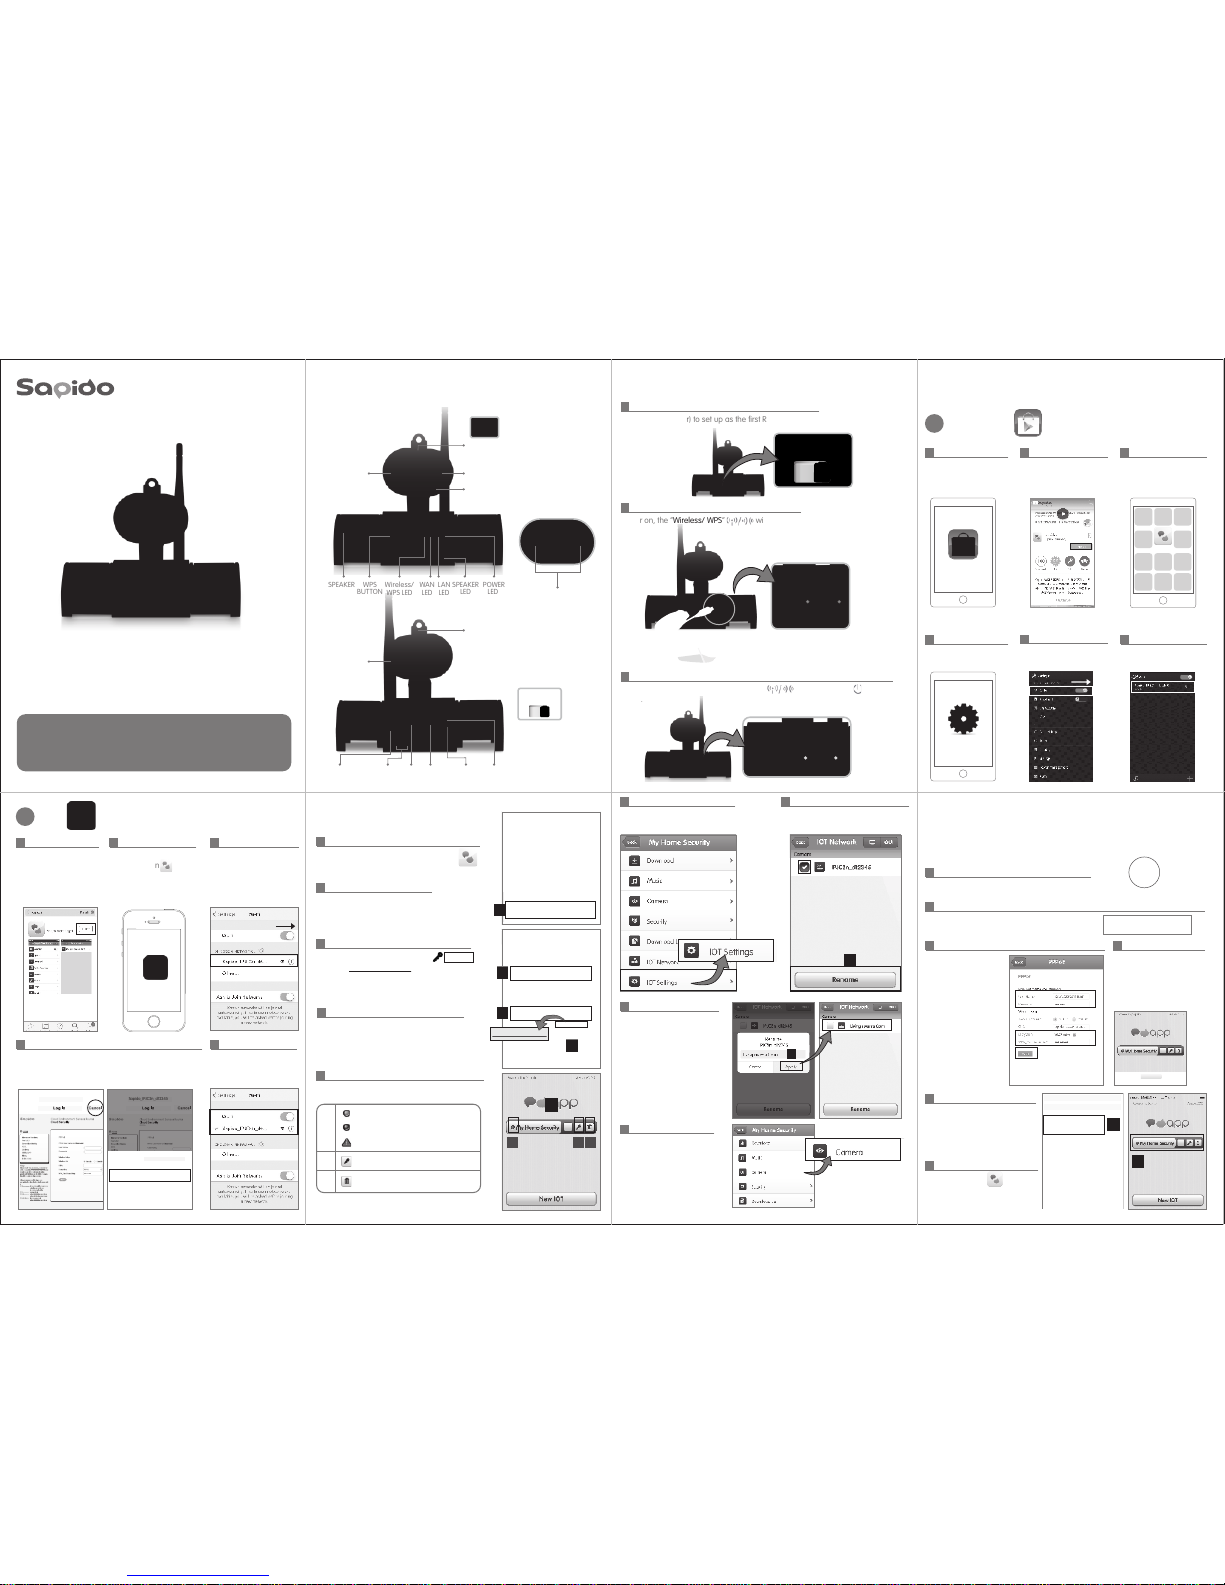
Complete the APP installation,
and Sapido icon will show
on smartphone desktop
Sapido
1
Go to Google Play store
2
Search for “Sapido” and
INSTALL
4
Go to Smartphone/Tablet's
Settings
5
Turn on Wi-Fi and search for
IPJC2n WiFi signal
6
Connect to IPJC2n
2
Complete the APP installation,
and Sapido icon will show
on smartphone desktop.
Go to Smartphone/Tablet's
Settings.
1
Go to APP Store.
Search for “Sapido” and
Download.
3
Turn on Wi-Fi → search for
IPJC2n WiFi signal
1
Switch to “R” (Router) to set up as the first Router at Home.
2
Power on, the “Wireless/ WPS” will flash red.
3
Wait for 30 seconds till the “Wireless/WPS” and the ”Power” LED turn
green.
5
Successfully connected to
IPJC2n.
4
Connect to Sapido IPJC2n WiFi network, it will pop out
the login page, please select “Cancel” and “Use Without
Internet”.
Sapido_IPJC2n_d12345
IPJC2n
Sapido_IPJC2n_d12345
Sapido_IPJC2n_d12345
IPJC2n
SAPIDO_IPJC2n_d12345
Hardware Content
Step 1-1.
Hardware Installation
Step 2.
Download APP
Step 3.
Internet Settings
Step 5.
IOT Settings
Step 4.
1
2
Please create your “IOT Name”.
For example: “My Home Security”
3
Please enter the default password “admin” ,
then click Change Password to setup your new
password.
4
Click “New IOT” and wait for the connection.
1
Find Sapido APP icon and Click “New IOT”
5
You'll find the New IOT Account in APP login page.
(Green)Online
(Grey)Offline
(Red)Alert Message
Change Password
Delete IOT Account
A
C
B
IPJC2n
4
2
3
Change password
5
A B
C
6
Login the Account and Go to
“IOT Settings”
7
IPJC2n is successfully added on the list.
Choose IPJC2n and click “Rename”.
WALL MOUNT HOLE
R - ROUTER MODE
A - AP MODE
W - WIRELESS AP MODE
RECORDING BUTTON
INFRARED NI GHT VISION LED
CAMERA LED
SPEAKER
WPS
BUTTON
Wireless/
WPS LED
WAN
LED
LAN
LED
POWER
LED
MICROPHONE
SPEAKER
LED
USB FLASH DR IVE
ANTENNA
R/A/ W
MODE SWITCH
WAN
PORT
LAN
PORT
VOLUME
RESET
Micro USB
POWER PORT
7
8
8
Enter the new device name
and click “Apply”. Click “Back”
to the APP main page.
9
Go to APP main page and
choose “Camera” to watch
the real-time surveillance.
1
Connect the Ethernet cable to IPJC2n's WAN port
Setup the internet connection to enjoy the real-time surveillance and
receive the push notificaiton on a smartphone or tablet when you are
away from the home.
6
5
If you don't have 3G/4G network,
please connect WDG71n Wi-Fi to
check the Internet Settings
Password
Enter Password
Enter The Password For “Sapido_IPJC2n_d12345”
Cancel
5
6
Open Sapido APP and you'll
see the IOT account
2
Go to “Internet Settings” in APP main page,
it will automatically detect the WAN type (Internet)
Internet Settings
3
It will direct to the setting
page.
For xDSL Setting, please
enter the username and
password provided by ISP.
Wireless Encr yption WPA 2
is recommended with at
least 8 let ters/numbers.
Click Apply to complete
the Internet Settings.
(Please remember your
WiFi Password)
4
New IOT
After the internet setup,
you'll be guided to the first
login page. You can use
smartphone 3G/4G
network to login APP and
check the Internet Settings.
Page 2

Switch to W mode on the IPJC2n->Power on and wait for 30 seconds to turn on.
Press the WPS button on the existing Sapido Router till the Wireless/WPS LED flash
red and press the WPS button on the IPJC2n. Wait till LEDs on both devices turn
green, the WiFi bridge is successfully connected and encrypted automatically.
How to connect IPJC2n with
the existing Sapido router?
9
4 Times Digital Zoom
Use finger s to zoom in/out the scene.
1.View the real-time scene
and receive sound remotely
2.Click Voice Sender and the
“microphone symbol ”
will appear on the top of
screen to make two-way
communicationsimmidiately
3.Click “ ” to stop
communication and back
to sound received mode
Two-Way communication. Sending voice through the speakers of IPJC2n.
8
Voice Sender
1
Record/View Videos
Make real-time recordings and view videos that saved in the USB flash drive of IPJC2n.
3. Select the video to review.2.Stop recording. Click View
Videos “ ” to view the
videos.
1.Click “ ” to record. The
red spot “ “ recording will
appear on the top left corner.
2
Schedule
Set up the Record / Al arm / Play schedule
2.Click New on the top right
corner to enter the Schedule
setting (as above picture).
Set up the schedule, time
and day and click ”Done” .
1.Click “ ” to set up
schedule.
※You can set up Music schedule as alarm.
3.When the schedule is
successfully added, go
back to Schedule setting.
If you want to set up a
new schedule, please
click New.
Edit the schedule.
Delete the schedule.
If you already have one Sapido router at home, switch to “A” mode on IPJC2n to turn
wired network into wireless network. Switch to “W mode” - connect via wireless to set
up Smart Repeater to the existing router.
1
A mode
Connect one Ethernet cable between the existing Sapido router's LAN port and IPJC2n's
LAN port. Switch to A mode on IPJC2n and power on.
MODEM
Sapido Router
IPJC2n
Ethernet Cable Ethernet Cable
MODEM
Sapido Router
IPJC2n
Ethernet Cable
Press WPS Press WPS
Sapido Application- Camera
Click “Set ting” on the top right co rner for advanced s etting.
Enter Sapido AP P main menu and click Ca mera.
Motion Detect ScreenshotPlay Record Schedule
Sound Detect Arm View Picture View Vedio Voice Sender
When it detec ts
abnormal m ovement,
it will record a nd send
push notification.
Capture the s creen.Play music f rom the
USB flash dr ive.
When you find t he
intruder, you ca n
click "Arm" to dete r
the intruder.
Take the real-time
event recordi ng
(avi format)
When it detec ts the
abnormal s ound, it will
record and sen d push
notification.
View video s that
recorded by IP
camera.
Set up the reco rd/
alarm/music
schedule.
Sending vo ice to
broadcast from
the speaker.
View pictu res that
captured by IP
camera.
Camera Features by Sapido App
Setting
Add Family User
Smart Sha re the IOT Network wit h family members by d ownloading the Sa pido
APP and enter th e IOT device name and pas sword to enjoy the sma rt life together.
2
Setting
The device name and user name will Show
out automatically on the login page. You only
need to enter the password and Click “New IOT”
to log in.
2
Setting
Enter the device name , user name and
password . Click “New IOT” to log in.
1
Connect to the IPJC2n network
Turn on Wi-Fi and connect to the IPJC2n network.
Download Sapido APP and open it and then click
“New IOT”.
1
Turn on Wi-Fi and Download Sapido App
Turn on Wifi and download Sapido App . Open
Sapido APP and click “New IOT”.
New IOT
New IOT
【When the family user’s handheld device is around the same place
as IPJC2n】
【When the family user’s handheld device is not around the same
place as IPJC2n】
【AP Bridge】Connect through Ethernet cable
【WiFi-AP Bridge】Connect through Wireless
1
Switch to W mode on the 2nd IPJC2n and
power on.
2
Press the WPS b utton on the 1st and 2nd IPJC2n till the Wirel ess/WPS LED stop
flashing, t he WiFi bridge is su ccessfully conne cted and encrypte d automatically.
3
Click APP and go to “ IOT Settings” on the
main page.
4
The 2nd IPJC2n is successfully
added on the list
5
Enter to “Camera”, you
will see the re are 2
out of 4 screens f rom
2 camera monitors.
Slide to view ot her
screen if the re are
more than 4 IPJC1n's
camera monitors. You
can arrange the
screen manua lly for
zoom-in or zoom-out.
Press WPS Press WPS
IOT Settings
4
Arm
1.Click Arm “ ” to create
alarm sound to deter the
intruder.
2.Click Setting to select
different sirens.
3.Select Siren from five
default sirens.
※You can add new siren by UPLOAD feature.
3 Screenshot/ View Pictures
Screenshot t he event and view pic tures.
1. Click “Screenshot” to
take a real-time photo
3.Select picture to view.
2.Click View Pictures “ ”
to view pictures.
6
Sound Detect
Same as Motio n Detect
Click “ ” and the “ ”will
appear on the screen to
start sound detection
※You can start Motion Detect and
Sound Detect function simultaneously.
7
Play
Play the music o f USB flash drive.
2.Select the music and click
to play music. Click “Change”
to select the mode of play
Ex. Play in order/ Shuffle/Timer.
1.Click “ ” to play music
to adjust the volume
3.When the warning sign
appears in front of the domain,
click to quick view the event
video
1.Click “ ” and the “ ”will
appear on the screen to
start motion detection
5
Motion Detect
When IPJC2n detect s abnormal moveme nt, it will take the real-t ime event recording
for 30 seconds an d send push notifica tion to your smartp hone. You can quick view
videos that a re saved in the USB fla sh drive of IPJC2n automati cally.
2.Receive the push notification
and log in APP to view the
event message
Today All Missed
Sapido
2 mins ago
Sapido
My Home Security: 2F window OPEN
Taday All Missed
Sapido
2 mins ago
Sapido
My Home Security: 2F window OPEN
W mode
How to Add new IPJC2n in
the IOT Network?
Connect mul tiple IP cameras an d build WiFi Bridge to u ltimate Sapido Sma rt
Repeater Technology.
 Loading...