

Page 1

Supervisor’s Guide
Supervisor 6. 5
Windows
Page 2

2 Supervisor’s Guide
Copyright
Trademarks
Use restrictions
Patents
Service Pack
Copyright © 2004 Business Objects. All rights reserved.
If you find any problems with this documentation, please report them to Business Objects in
writing at documentation@businessobjects.com.
Printed in France.
Business Objects, the Business Objects logo, Crystal Reports, and Crystal Enterprise are
trademarks or registered trademarks of Business Objects S.A. or its affiliated companies in the
United States and other countries. All other names mentioned herein may be trademarks of their
respective owners.
Contains IBM Runtime Environment for AIX(R), Java(TM) 2 Technology Edition Runtime
Modules (c) Copyright IBM Corporation 1999, 2000. All Rights Reserved.
This product includes code licensed from RSA Security, Inc. Some portions licensed from IBM
are available at http://oss.software.ibm.com/icu4j.
Contains ICU libraries (c) 1995-2003 International Business Machines Corporation and others.
All rights reserved.
This software and documentation is commercial computer software under Federal Acquisition
regulations, and is provided only under the Restricted Rights of the Federal Acquisition
Regulations applicable to commercial computer software provided at private expense. The use,
duplication, or disclosure by the U.S. Government is subject to restrictions set forth in
subdivision (c)(1)(ii) of the Rights in Technical Data and Computer Software clause at 252.227-
7013.
Business Objects owns the following U.S. patents, which may cover products that are offered
and sold by Business Objects: 5,555,403, 6,247,008 B1, 6,578,027 B2, 6,490,593, and
6,289,352.
Last updated for 6.5.0
Part Number
311-10-650-01
Page 3

Supervisor’s Guide 3
Contents
Preface Maximizing Your Information Resources 7
Information resources . . . . . . . . . . . . . . . . . . . . . . . . . . . . . . . . . . . . . . . . . . 9
Services . . . . . . . . . . . . . . . . . . . . . . . . . . . . . . . . . . . . . . . . . . . . . . . . . . . . 11
Useful addresses at a glance . . . . . . . . . . . . . . . . . . . . . . . . . . . . . . . . . . . . 12
About this guide . . . . . . . . . . . . . . . . . . . . . . . . . . . . . . . . . . . . . . . . . . . . . . 14
Chapter 1 Introduction 15
Where to start with Supervisor . . . . . . . . . . . . . . . . . . . . . . . . . . . . . . . . . . . 17
User profiles . . . . . . . . . . . . . . . . . . . . . . . . . . . . . . . . . . . . . . . . . . . . . . . . . 18
Resources . . . . . . . . . . . . . . . . . . . . . . . . . . . . . . . . . . . . . . . . . . . . . . . . . . 20
The repository domains . . . . . . . . . . . . . . . . . . . . . . . . . . . . . . . . . . . . . . . . 23
Supervisor over the Web . . . . . . . . . . . . . . . . . . . . . . . . . . . . . . . . . . . . . . . 26
Chapter 2 Installing the Repository 27
Choosing a setup configuration . . . . . . . . . . . . . . . . . . . . . . . . . . . . . . . . . . 29
Running a default installation . . . . . . . . . . . . . . . . . . . . . . . . . . . . . . . . . . . . 32
Running a custom installation . . . . . . . . . . . . . . . . . . . . . . . . . . . . . . . . . . . 41
Running a recovery installation . . . . . . . . . . . . . . . . . . . . . . . . . . . . . . . . . . 46
Chapter 3 Basic Procedures 49
Starting Supervisor . . . . . . . . . . . . . . . . . . . . . . . . . . . . . . . . . . . . . . . . . . . . 51
Refresh versus Regenerate . . . . . . . . . . . . . . . . . . . . . . . . . . . . . . . . . . . . . 53
Creating user groups . . . . . . . . . . . . . . . . . . . . . . . . . . . . . . . . . . . . . . . . . . 54
Creating users . . . . . . . . . . . . . . . . . . . . . . . . . . . . . . . . . . . . . . . . . . . . . . . 56
Testing your setup . . . . . . . . . . . . . . . . . . . . . . . . . . . . . . . . . . . . . . . . . . . . 63
Creating a second general supervisor . . . . . . . . . . . . . . . . . . . . . . . . . . . . . 65
Creating a group reference profile . . . . . . . . . . . . . . . . . . . . . . . . . . . . . . . . 66
Contents
Page 4

4 Supervisor’s Guide
Chapter 4 Customizing Your Environment 71
Chapter 5 Managing Users and Groups 93
Chapter 6 Managing Resources 141
Setting your default options . . . . . . . . . . . . . . . . . . . . . . . . . . . . . . . . . . . . . 73
Other options . . . . . . . . . . . . . . . . . . . . . . . . . . . . . . . . . . . . . . . . . . . . . . . . 89
Managing user groups . . . . . . . . . . . . . . . . . . . . . . . . . . . . . . . . . . . . . . . . . 97
Managing users . . . . . . . . . . . . . . . . . . . . . . . . . . . . . . . . . . . . . . . . . . . . . 114
Finding users or user groups in the repository . . . . . . . . . . . . . . . . . . . . . 128
Printing information on users, groups and resources . . . . . . . . . . . . . . . . 130
Managing the repository . . . . . . . . . . . . . . . . . . . . . . . . . . . . . . . . . . . . . . 144
Changing or removing the schedule of tasks . . . . . . . . . . . . . . . . . . . . . . 152
Purging inbox documents . . . . . . . . . . . . . . . . . . . . . . . . . . . . . . . . . . . . . 159
Managing connections . . . . . . . . . . . . . . . . . . . . . . . . . . . . . . . . . . . . . . . 163
Importing/exporting universes . . . . . . . . . . . . . . . . . . . . . . . . . . . . . . . . . . 166
Managing resources . . . . . . . . . . . . . . . . . . . . . . . . . . . . . . . . . . . . . . . . . 172
Contents
Chapter 7 Assigning Resources to Users 175
Assigning and restricting resources to multiple user instances . . . . . . . . . 177
Assigning BusinessObjects products to users . . . . . . . . . . . . . . . . . . . . . 183
Assigning universes to users or groups . . . . . . . . . . . . . . . . . . . . . . . . . . 194
Assigning stored procedures to users or groups . . . . . . . . . . . . . . . . . . . . 211
Assigning documents and templates to users . . . . . . . . . . . . . . . . . . . . . . 213
Assigning repository domains to users . . . . . . . . . . . . . . . . . . . . . . . . . . . 215
Chapter 8 Importing and Export ing Users and Groups 217
Generating the import file . . . . . . . . . . . . . . . . . . . . . . . . . . . . . . . . . . . . . 220
Using batch mode and interactive mode . . . . . . . . . . . . . . . . . . . . . . . . . . 221
Using import file commands and global commands . . . . . . . . . . . . . . . . . 223
Importing users and groups . . . . . . . . . . . . . . . . . . . . . . . . . . . . . . . . . . . . 226
Generating the log file . . . . . . . . . . . . . . . . . . . . . . . . . . . . . . . . . . . . . . . . 237
Using undo files . . . . . . . . . . . . . . . . . . . . . . . . . . . . . . . . . . . . . . . . . . . . . 238
Exporting your configuration to file . . . . . . . . . . . . . . . . . . . . . . . . . . . . . . 240
Page 5

Supervisor’s Guide 5
Chapter 9 Managing Categories 241
Managing categories . . . . . . . . . . . . . . . . . . . . . . . . . . . . . . . . . . . . . . . . . 243
Appendix A BusinessObjects 6.5 Security Command Reference 251
About security commands . . . . . . . . . . . . . . . . . . . . . . . . . . . . . . . . . . . . . 253
BusinessObjects security commands . . . . . . . . . . . . . . . . . . . . . . . . . . . . 256
Designer security commands . . . . . . . . . . . . . . . . . . . . . . . . . . . . . . . . . . . 298
Supervisor security commands . . . . . . . . . . . . . . . . . . . . . . . . . . . . . . . . . 309
WebIntelligence security commands . . . . . . . . . . . . . . . . . . . . . . . . . . . . . 336
BusinessQuery security commands . . . . . . . . . . . . . . . . . . . . . . . . . . . . . . 354
Index 359
Contents
Page 6

6 Supervisor’s Guide
Contents
Page 7

Maximizing Your Information Resources
preface
Page 8

8 Supervisor’s Guide
Overview
Information, services, and solutions
The Business Objects business intelligence solution is supported by thousands
of pages of documentation, available from the products, on the Internet, on CD,
and by extensive online help systems and multimedia.
Packed with in-depth technical information, business examples, and advice on
troubleshooting and best practices, this comprehensive documentation set
provides concrete solutions to your business problems.
Business Objects also offers a complete range of support and services to help
maximize the return on your business intelligence investment. See in the
following sections how Business Objects can help you plan for and successfull y
meet your specific technical support, education, and consulting requirements.
Maximizing Your Information Resources
Page 9

Information resources
Whatever your Business Objects profile, we can help you quickly access the
documentation and other information you need.
Where do I start?
Below are a few suggested starting points; there is a summary of useful web
addresses on page 12.
!
!
Documentation Roadm ap
! !
The Documentation Roadmap references all Business Objects guides and
multimedia, and lets you see at a glance what information is available, from
where, and in what format.
View or download the Business Objects Documentation Roadmap at
www.businessobjects.com/services/documentation.htm
!
!
Documentation from the products
! !
You can access electronic documentation at any time from the product you are
using. Online help, multimedia, and guides in Adobe PDF format are available
from the product Help menus.
Supervisor’s Guide 9
!
!
Documentation on the web
! !
The full electronic documentation set is available to customers with a valid
maintenance agreement on the Online Customer Support (OCS) website at
www.businessobjects.com/services/support.htm
!
!
Buy printed documentation
! !
You can order printed documentation through your local sales office, or from the
online Business Objects Documentation Supply Store at
www.businessobjects.com/services/documentation.htm
!
!
Search the Docume ntation CD
! !
Search across the entire documentation set on the Business Objects
Documentation CD shipped with our products. This CD brings together the full set
of documentation, plus tips, tricks, multimedia tutorials, and demo materials.
Order the Documentation CD online, from the Business Objects Documentation
Supply Store, or from your local sales office.
Information resources
Page 10

10 Supervisor’s Guide
How can I get the most recent documentation?
!
!
Multimedia
! !
Are you new to Business Objects? Are you upgrading from a previous release or
expanding, for example, from our desktop to our web solution? Try one of our
multimedia quick tours or Getting Started tutorials. All are available via the Online
Customer Support (OCS) website or on the Documentation CD.
You can get our most up-to-date documentation via the web. Regularly check the
sites listed below for the latest documentation, samples, and tips.
!
!
Tips & Tricks
! !
Open to everyone, this is a regularly updated source of creative solutions to any
number of business questions. You can even contribute by sending us your own
tips.
www.businessobjects.com/forms/tipsandtricks_login.asp
!
!
Product documentation
! !
We regularly update and expand our documentation and multimedia offerings.
With a valid maintenance agreement, you can get the latest documentation – in
seven languages – on the Online Customer Support (OCS) website.
!
!
Developer Suite Online
! !
Developer Suite Online provides documentation, samples, and tips to those
customers with a valid maintenance agreement and a Developer Suite license
via the Online Customer Support (OCS) website.
Send us your feedback
Do you have a suggestion on how we can improve our documentation? Is there
something you particularly like or have found useful? Drop us a line, and we wil l
do our best to ensure that your suggestion is included in the next release of our
documentation: documentation@businessobjects.com
NOTE
If your issue concerns a Business Objects product and not the documentation,
please contact our Customer Support experts. For information about Customer
Support visit: www.businessobjects.com/services/support.htm
Maximizing Your Information Resources
Page 11

Services
A global network of Business Objects technology experts provides customer
support, education, and consulting to ensure maximum business intelligence
benefit to your business.
How we can support you?
Business Objects offers customer support plans to best suit the size and
requirements of your deployment. We operate three global customer support
centers:
• Americas: San Jose, California and Atlanta, Georgia
• Europe: Maidenhead, United Kingdom
• Asia: Tokyo, Japan and Sydney, Australia
!
!
Online Customer Support
! !
Our Customer Support website is open to all direct customers with a current
maintenance agreement, and provides the most up-to-date Business Objects
product and technical information. You can log, update, and track cases from this
site using the Business Objects Knowledge Base.
Having an issue with the product?
Have you exhausted the troubleshooting resources at your disposal and still not
found a solution to a specific issue?
For support in deploying Business Objects products, contact Worldwide
Customer Support at: www.businessobjects.com/services/support.htm
Supervisor’s Guide 11
Looking for the best deployment solution for your company?
Business Objects consultants can accompany you from the initial analysis stage
to the delivery of your deployment project. Expertise is available in relational and
multidimensional databases, in connectivities, database design tools,
customized embedding technology, and more.
For more information, contact your local sales office, or contact us at:
www. businessobjects.com/services/consulting.htm
Looking for training options?
From traditional classroom learning to targeted e-learning seminars, we can offer
a training package to suit your learning needs and preferred learning style. Find
more information on the Business Objects Education website:
www.businessobjects.com/services/education.htm
Services
Page 12
12 Supervisor’s Guide
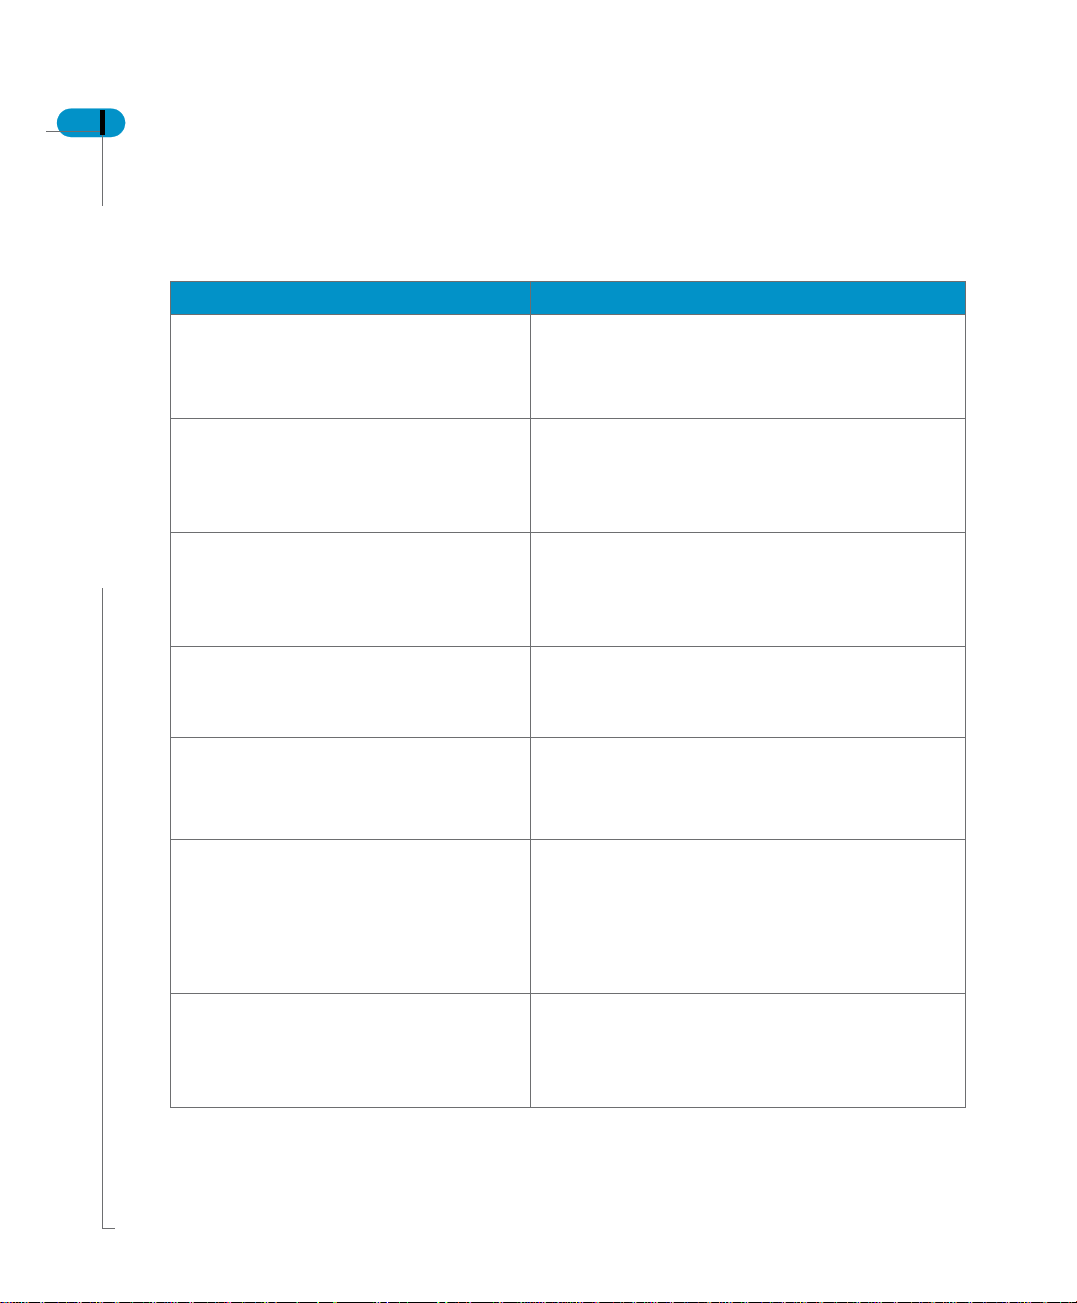
Useful addresses at a glance
Address Content
Business Objects Documentation
www.businessobjects.com/services/
documentation.htm
Business Objects Documentation
mailbox
documentation@businessobjects.com
Product documentation
www.businessobjects.com/services/
support.htm
Business Objects product information
Overview of Business Objects documentation. Links
to Online Customer Support, Documentation Supply
Store, Documentation Roadmap, Tips & Tricks,
Documentation mailbox.
Feedback or questions about documentation.
The latest Business Objects product
documentation, to download or view online.
Information about the full range of Business
Objects products.
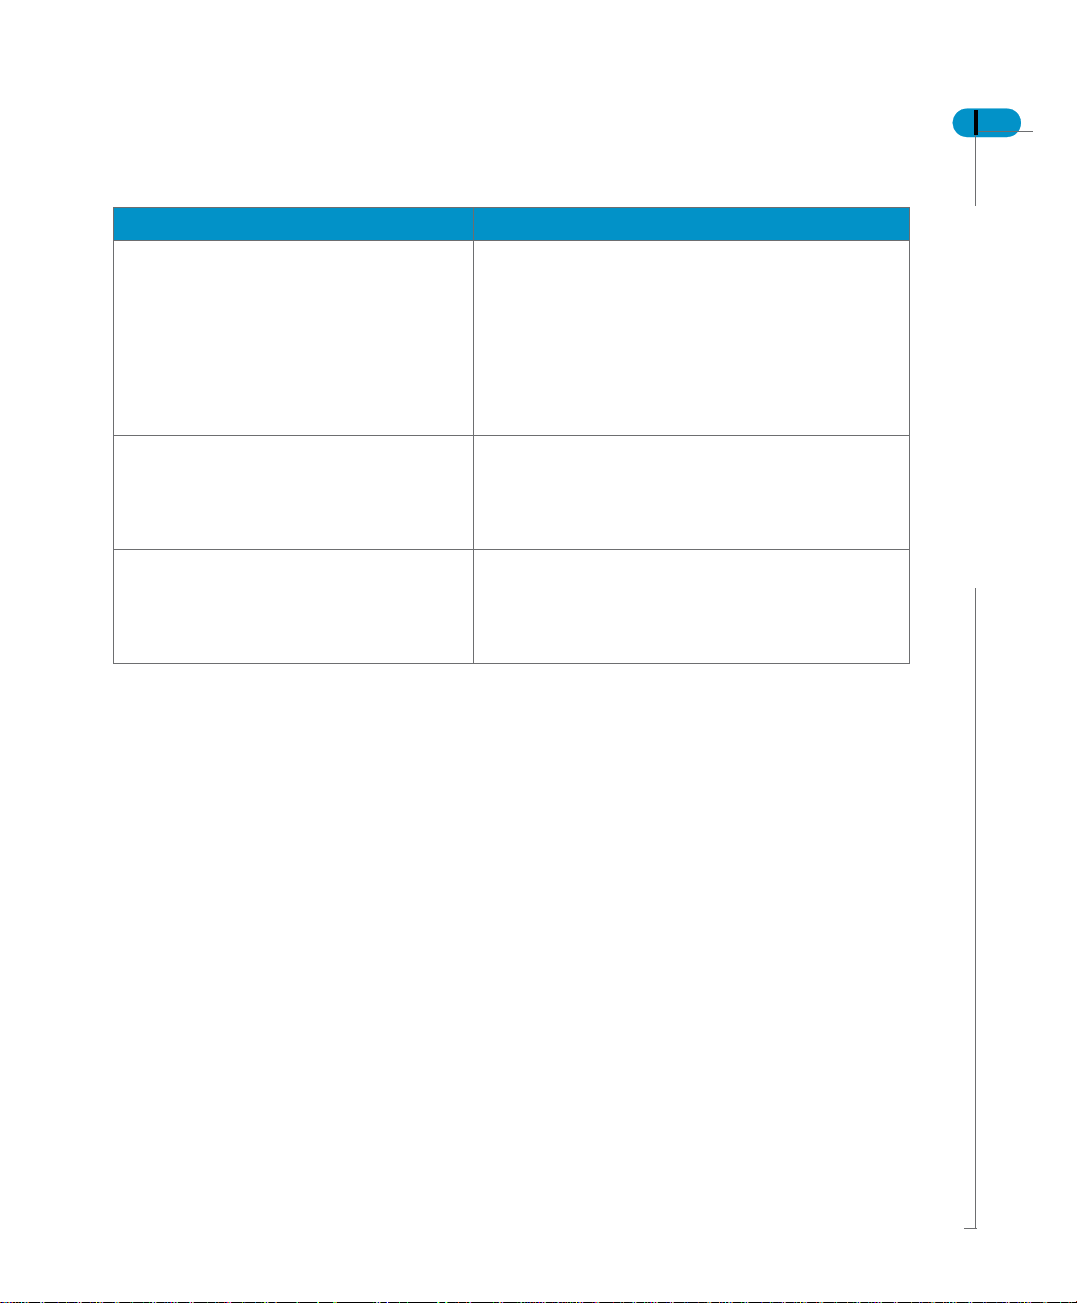
www.businessobjects.com
Developer Suite Online
www.techsupport.businessobjects.com
Knowledge Base (KB)
www.techsupport.businessobjects.com
Tips & Tricks
www.businessobjects.com/forms/
tipsandtricks_login.asp
Maximizing Your Information Resources
Available to customers with a valid maintenance
agreement and a Developer Suite license via the
Online Customer Support (OCS) website. Provides
all the documentation, latest samples, kits and tips.
Technical articles, documents, case resolutions.
Also, use the Knowledge Exchange to learn what
challenges other users – both customers and
employees – face and what strategies they find to
address complex issues. From the Knowledge
Base, click the Knowledge Exchange link.
Practical business-focused examples.
Page 13
Address Content
Online Customer Support
Supervisor’s Guide 13
www.techsupport.businessobjects.com
www.businessobjects.com/services
Business Objects Education Services
www.businessobjects.com/services/
education.htm
Business Objects Consulting Services
www.businessobjects.com/services/
consulting.htm
Starting point for answering questions, resolving
issues.
Information about registering with Worldwide
Customer Support.
The range of Business Objects training options and
modules.
Information on how Business Objects can help
maximize your business intelligence investment.
Useful addresses at a glance
Page 14
14 Supervisor’s Guide
About this guide
Audience
Conventions used in this guide
This guide describes how to use Supervisor, the administration tool for
BusinessObjects users and secured resources. You will learn how to use
Supervisor to create the Business Objects repository, define user and group
accounts, set options for administrators and users, control access to shared
resources such as documents and universes, and use security commands to
control rights to product functionality.
This guide is intended both for administrators (general supervisors) creating the
repository and managing options for all and users, and for administrators in
charge of managing user rights on a day-to-day basis (supervisors).
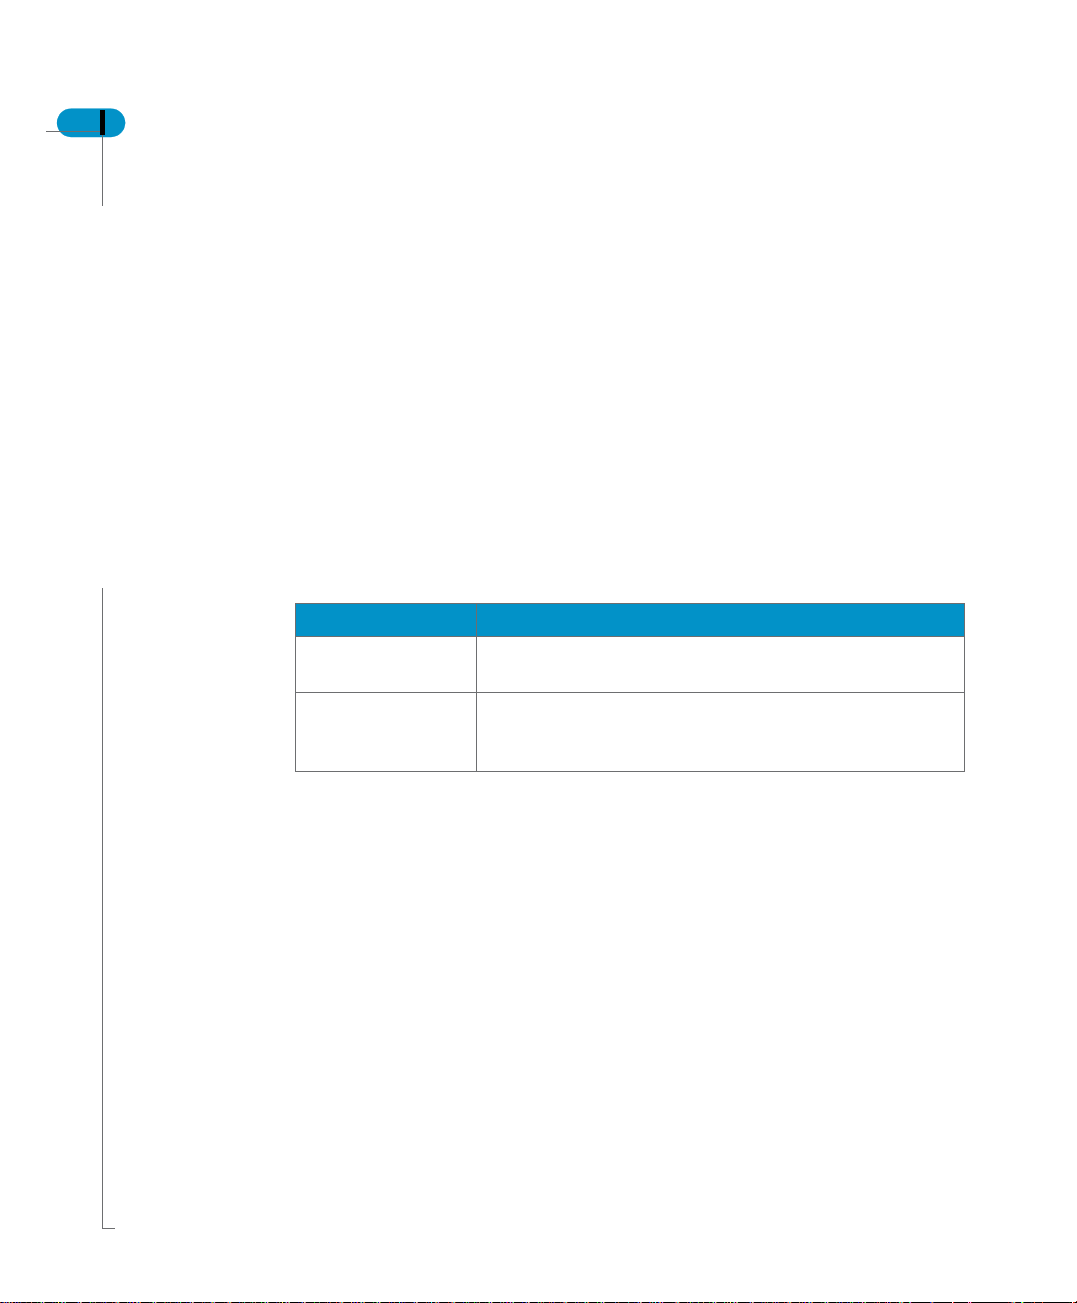
The conventions used in this guide are described in the table below.
Convention Indicates
This font Code, SQL syntax, computer programs. For example:
@Select(Count ry\Country Id)
Some code #
more code
Placed at the end of a line of code, the symbol (#)
indicates that the next line should be entered
continuously with no carriage return.
Maximizing Your Information Resources
Page 15

Introduction
1
chapter
Page 16

16 Supervisor’s Guide
Overview
What is Supe r viso r?
Supervisor is the product you need in order to set up and maintain a secure
environment for Business Objects products. It provides you with a powerful and
easy-to-use structure for distributing information to be shared by all users. This
information is centralized through relational data accounts called repositories.
It is with Supervisor that you create the Business Objects repository. You then
define users and user groups, and assign profiles to users. User profiles include
user identification (user name and password), the products and modules they
can work with, the universes they can access, and the documents that they can
share. You can control user access to Business Objects products, and manage
the exchange and distribution of the universes and documents of all users.
Supervisor can run only in client/server mode. Its use requires a connection to a
relational database. Any operation you perform with Supervisor is stored in the
repository you are working with.
NOTE
More than one administrator working on the same repository resources at the
same time from different desks can interfere with one another’s work without this
being immediately noticeable to them. We recommend that the same resources
should not be granted to multiple supervisors without careful coordination of their
work.
Introduction
Page 17

Where to start with Supervisor
The first time you launch Supervisor, you launch the Administration Setup wizard.
This user-friendly tool helps you create the repository needed to define users and
groups and to share resources.
When you create the repository, a general supervisor is automatically created as
the first user. As general supervisor you then create a series of supervisors who
are to define the various user profiles, in addition to a second, “backup” general
supervisor for security purposes. Users are then granted access to repository
domains via a special key file that contains the address of the repository they are
to work with.
Supervisor’s Guide 17
Where to start with Supervisor
Page 18

18 Supervisor’s Guide
User profiles
General supervisor
Supervisor offers several standard profiles for the various types of users of
Business Objects products. The user profile determines by default what products
a user can use:
• General Supervisor (all products)
• Supervisor (all products)
• Designer (all products but Supervisor and Supervisor over the Web)
• Supervisor-Designer (all products)
• User (all products but Designer, Supervisor, and Supervisor over the Web)
• Versatile (configurable)
You can customize these profiles to reflect the needs of the users. In this way,
the role of each user in a user group will be clearly adapted to the actual position
the person holds in your company.
The general supervisor is the senior system administrator. Using Supervisor, the
general supervisor can:
• create repositories
• create any type of user, including other general supervisors
• create user groups
• administer user accounts and privileges for repository users
• import and export universes to and from the repository
• use any feature of all Business Objects products
• define a Broadcast Agent for a group
• launch a Broadcast Agent from the Broadcast Agent Administrator
• use Supervisor over the Web
• add, delete, and edit OLAP data sources
Supervisor
Introduction
The supervisor is responsible for user administration. The supervisor can:
• create users with any profile except general supervisor
• create user groups
• administer user accounts and privileges for repository users
• import and export universes to and from the repository
• use Supervisor over the Web
Page 19

By default, the supervisor can use any feature of all Business Objects products
except Designer, but may be restricted in order to limit the ways in which he or
she can manage users or resources.
Designer
The universe designer uses Designer to create and maintain universes for a
particular group of users. A universe designer can distribute a universe as a file
through the file system, or by exporting it to a repository.
Supervisor-Designer
A supervisor-designer creates user profiles, user groups, and universes. This
user has all the rights of the supervisor and the universe designer combined. A
supervisor-designer can use Supervisor, Supervisor over the Web, and
Designer, as well as the Business Objects end-user products (InfoView,
BusinessObjects and WebIntelligence).
User
Users use the Business Objects end-user products to view, query, report and
analyze data. They may also use the optional R
for multidimensional analysis. End users can produce documents containing data
from one or more data sources.
Supervisor’s Guide 19
EPORTER and Explorer modules
Versatile
A versatile user is a customized user who may be given access by a supervisor
to any combination of Business Objects products. We recommend that you not
create a versatile user with rights only to BusinessQuery. BusinessQuery users
should also have rights to BusinessObjects.
User profiles
Page 20

20 Supervisor’s Guide
Resources
Products
Universes
The resources that can be managed and controlled by Supervisor fall into the
following categories:
• Business Objects products
• Universes
• Documents
• Repository domains
• Stored procedures
The supervisor can grant or deny access to these Business Objects products:
BusinessObjects, Supervisor, Designer, BusinessQuery and WebIntelligence.
WebIntelligence access is granted to users of InfoView, which provides the core
functionality of WebIntelligence, whether or not they also use the optional
WebIntelligence modules, Reporter and Explorer.
A universe is the semantic layer that isolates the end user from the technical
issues of the database structure. It lets you work with data in terms you can easily
understand. With Supervisor, you can manage universes created by the
designer(s), and you can authorize users and user groups to access one or more
universes.
As the supervisor, you can also define certain security levels within the universes
based on the user type. For example, you can set restrictions on a class or object,
and define other parameters pertaining to the components in universes. You can
also redefine certain critical parameters such as the address of the connection to
the RDBMS.
Documents
Introduction
Supervisor lets you manage the assignment of documents or shared templates.
You can also authorize specific users to update both the data and formats of
these documents.
Supervisor lets you manage categories, which are properties that end-users can
assign documents they send to users, groups or the Broadcast Agent. You can
also authorize specific users to manage categories. While general supervisors
can manage categories without restriction, supervisors and authorized users can
manage only the categories they create.
Page 21

Repositories
With Supervisor, you set up the structure for distributing information which is to
be shared by all users. This information is centralized through relational data
accounts called repositories.
When you launch Supervisor the first time, you use the Administration Setup
Wizard to create a repository with a general supervisor. You can then use the
Wizard to create other repositories as well.
For each repository, you can create a series of supervisors who are authorized
to create users and to define their access to the repository’s domains and
resources. Users who belong to more than one repository choose which one they
want to work with at login.
We recommend that you work with a single repository as a matter of general
practice. Multiple repositories should only be used by supervisors managing
several sites or by very advanced users.
For more information on the structure of the repository, refer to The repository
domains on page 23.
Stored procedures
A stored procedure is a combination of SQL statements that are translated,
optimized, and stored in executable form on certain SQL servers. End users can
execute stored procedures on the universes assigned to them by the supervisor.
The resource called “stored procedure” in Supervisor is the secured connection
to the database account that stores the procedure. After creating that connection,
you assign it as a stored procedure to a user or group. It is then visible in
Supervisor as a stored procedure.
Supervisor’s Guide 21
Resources
Page 22
22 Supervisor’s Guide
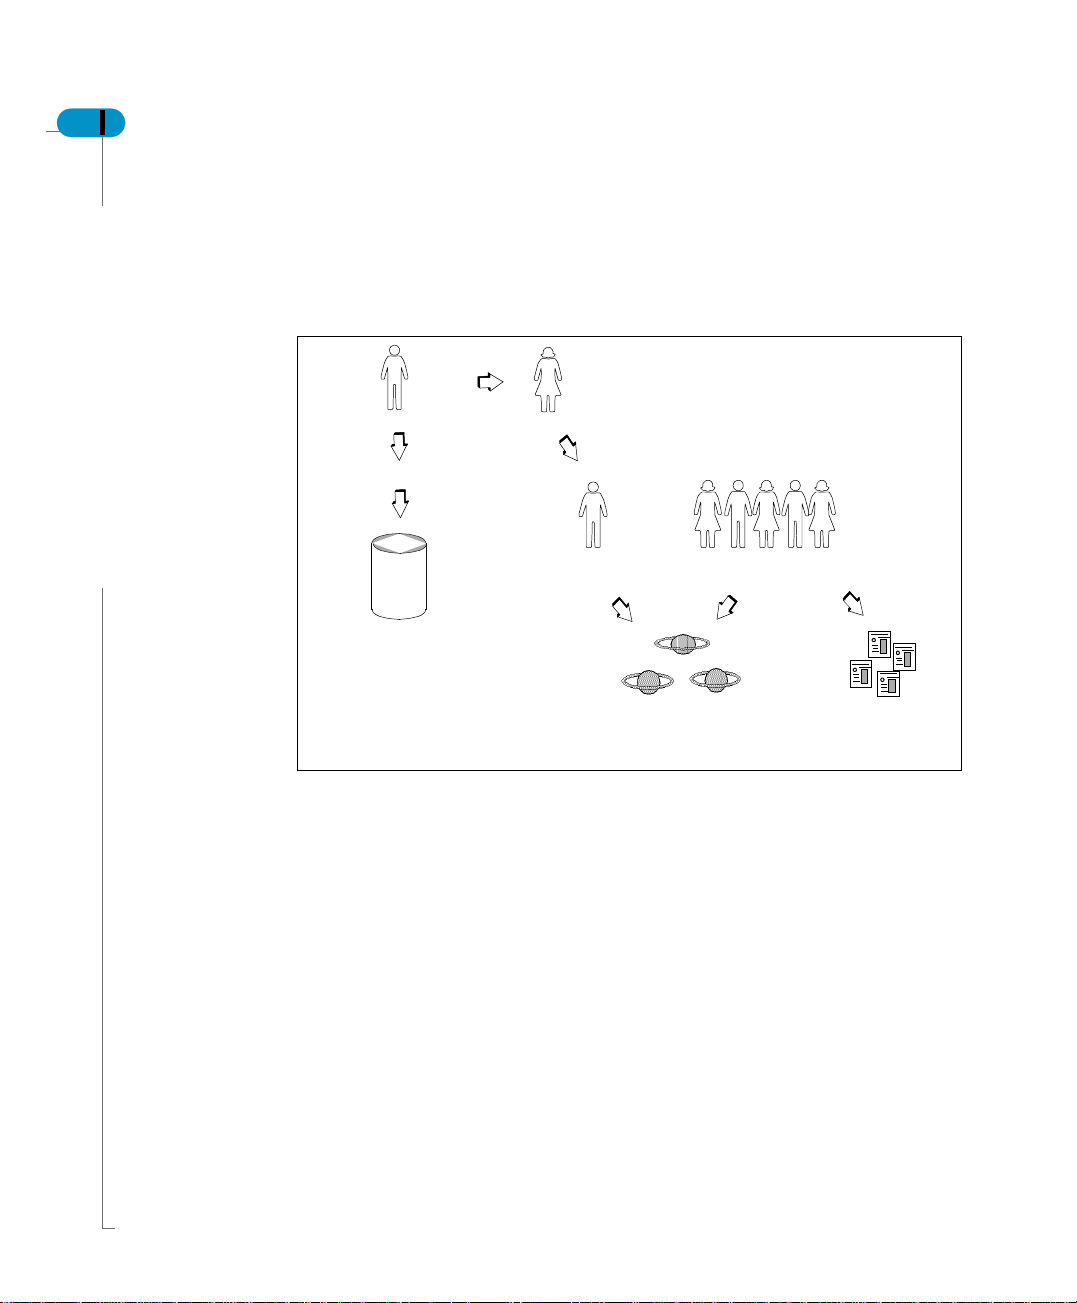
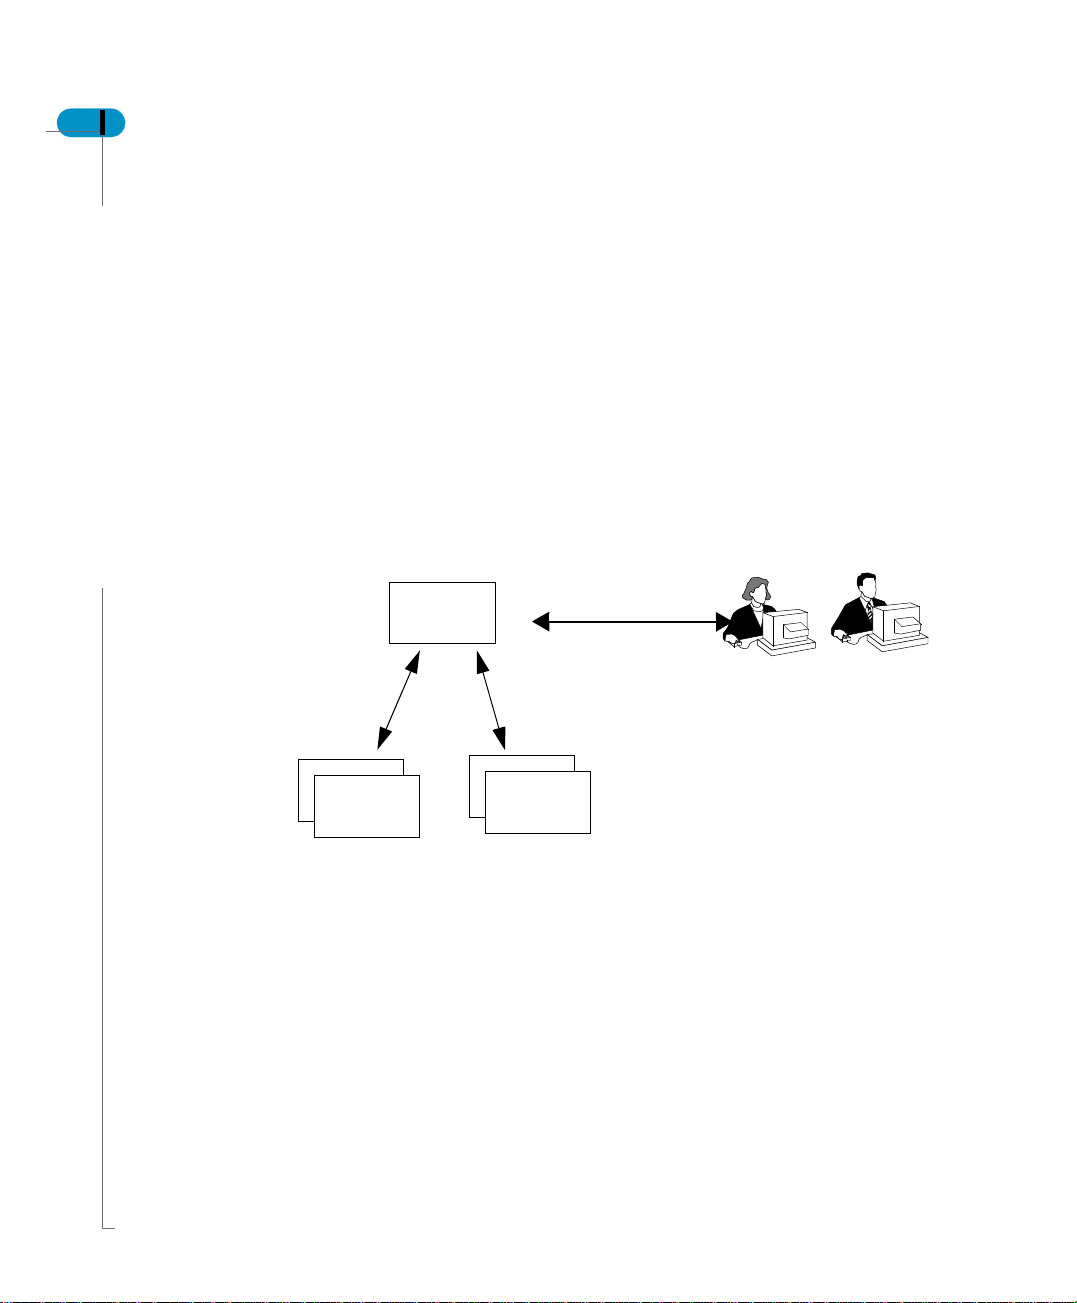
User hierarchy and resource access
The role and the relationship of the supervisor with respect to other
BusinessObjects and InfoView users and resources are depicted in the diagram
below.
Gene ral Supe rvisor
create s and manages
repository
defines
Supervisor
Universe Designer
creates
identifies and manages
query
universes
End Users
create
BusinessObjects or
WebIntelligence
documents
The general supervisor defines the supervisor and creates the necessary
structure (the data accounts on which the repository resides) for t he purposes of
resource-sharing. The general supervisor also ensures the security of access to
the different products. The supervisor also creates user groups and defines user
profiles such as the universe designer and end users. The universe designer
creates universes from which end users can query data and create documents.
Introduction
Page 23

The repository domains
A Business Objects repository is a set of data structures stored on a database. A
repository makes it possible to share the resources necessary for a distributed
architecture.
To ensure security and manage user resources, a repository comprises three
types of domains:
• a security domain, which contains the definition of the other domains as well
as the definition of users
• universe domains, which are meta-models of related databases, containing a
description of the data to be accessed
• document domains, which contain the structures for storing shared
documents and for executing tasks according to a timestamped definition.
These three types of domains make it possible for all users to share resources.
Supervisor’s Guide 23
Security
Reference
Universes
Documents
Although a general supervisor can create additional domains, two domains of the
same type cannot be located in the same data account.
You create repositories with the Administration Setup wizard, as explained in
Installing the Repository on page 27.
The repository domains
Page 24
24 Supervisor’s Guide
The security domain
The security domain is a set of data structures created with the Administration
Setup wizard whenever a repository is created (see ‚ “Installing the Repository”
on page 27).
Each domain of a repository is identified in its security domain. When a domain
is created, its reference is automatically stored in the security domain. The
security domain also contains information on the identification of the users, and
on the management of the different products.
The address of the security domain must be recognized by all workstations using
Business Objects products in client/server mode, so that all users can
communicate with the other domains of the repository in a transparent manner.
This address is contained in the key file, which is created at the same time as the
security domain, and which must be distributed to all authorized users.
Universes
Each time you create a domain, Supervisor automatical ly updates the repository.
The universe domain
The universe domain is a set of data structures containing universes created with
Designer. In order for a universe to be shared, it must be exported to the universe
domain by the designer or supervisor.
When you create a repository using the Administration Setup wizard and the
“Default installation” option, a universe domain is created automatically at the
same time as the security and document domains. The wiz ard can be started by
the Repository command on the Tools menu or the Admin button of the
Supervisor login window.
Security
Domain
references
Key file (*.key)
Documents
Introduction
Page 25

The document domain
The document domain is a set of data structures containing documents.
Documents stored in the document domain can include those created by end
users with Business Objects products, or any other file format. In order to share
documents or cause them to be refreshed during scheduled processing, end
users must send them to the document domain.
To submit documents for scheduled processing, end users send them to the
Broadcast Agent. Documents submitted for scheduled processing can be
monitored by the administrator from the Broadcast Agent console. For more
information, refer to the Broadcast Agent Administrator’s Guide.
When you create a repository using the Administration Setup wizard and the
“Default installation” option, a document domain is created automatically at the
same time as the security and universe domains. The wizard is launched the first
time you launch Supervisor and can also be started by the Repository command
on the Tools menu or the Admin button of the Supervisor login window.
Supervisor’s Guide 25
The repository domains
Page 26

26 Supervisor’s Guide
Supervisor over the Web
What can you do with Supervisor over the Web?
Supervisor over the Web allows you to manage users and groups via a web
browser. You create a Business Objects repository using Supervisor, and the
repository containing the security domain. Then you use either Supervisor or
Supervisor over the Web to define users and user groups, assign profiles to
users, and edit their properties in the security domain.
Supervisor over the Web runs in 3-tier architecture in a JSP environment. It
requires an application server and a Business Objects server with a connection
to the relational database that hosts the repository.
NOTE
More than one administrator working on the same repository resources at the
same time from different desks can interfere with one another’s work without this
being immediately noticeable to them. The same resources should not be
granted to multiple supervisors without careful coordination of their work.
Supervisor over the Web offers the following abilities:
• managing groups - you can create, move, delete, and rename groups
• managing users - you can create, rename, and delete users, assign and
remove them from groups, change passwords, and edit user properties
• managing many users at the same time - you can edit add, remove, and
delete multiple users, and edit the properties for a selection of users.
All changes performed in the Supervisor over the Web are immediately taken into
account in the repository and in the Administration Server cache.
Who can use Supervisor over the Web?
Any user authorized to access Supervisor can access Supervisor over the Web.
This includes users with the following profiles:
• General Supervisor
• Supervisor
• Supervisor-Designer
• Versatile with Supervisor rights
To install, configure, and use Supervisor over the Web, refer to the
Guide: Supervisor over the Web.
Introduction
Supervisor’s
Page 27

Installing the Repository
2
chapter
Page 28
28 Supervisor’s Guide
Overview
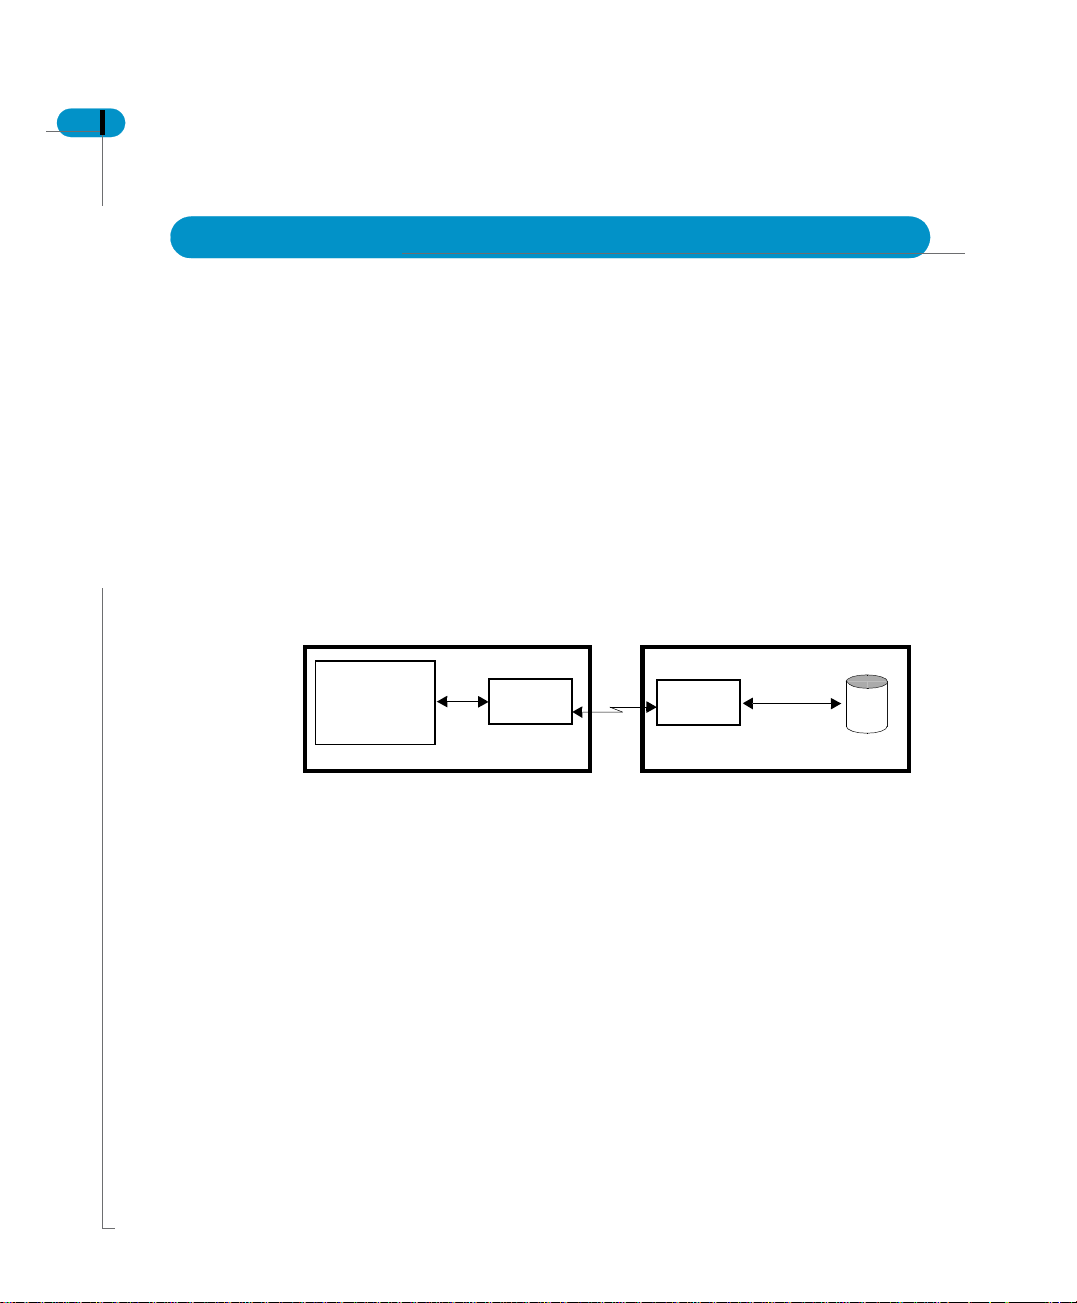
Supervisor runs in client/server mode. Before you can successfully start a
Supervisor session, the following must be installed on the client and server
workstations:
On the server:
• an RDBMS, on which the repository resides
• an SQL communication driver
• a data communication protocol
On the client workstation:
• a data communication protocol
• an SQL communication driver
• Supervisor
The client and the server can be located on the same computer.
For information on the database configuration and network protocols, refer to the
section in the Data Access Guide that corresponds to your RDBMS.
Installing the Repository
BusinessObjects
SQL Driver
Client Workstation Server
Network
SQL Driver
RDBMS
Page 29

Choosing a setup configuration
The Administration Setup wizard is automatically started when you launch
Supervisor for the first time. The wizard allows you to set up a repository
necessary for resource-sharing quickly and efficiently.
During subsequent logins, you can start the wizard by clicking Admin in the
Supervisor login window if you want to create another repository.
To launch Supervisor:
1. Select Start, Programs, BusinessObjects, Supervisor.
You can also launch Supervisor by entering Supervsr.exe in the Run
command line.
The User Identification dialog box appears.
Supervisor’s Guide 29
Choosing a setup configuration
Page 30
30 Supervisor’s Guide
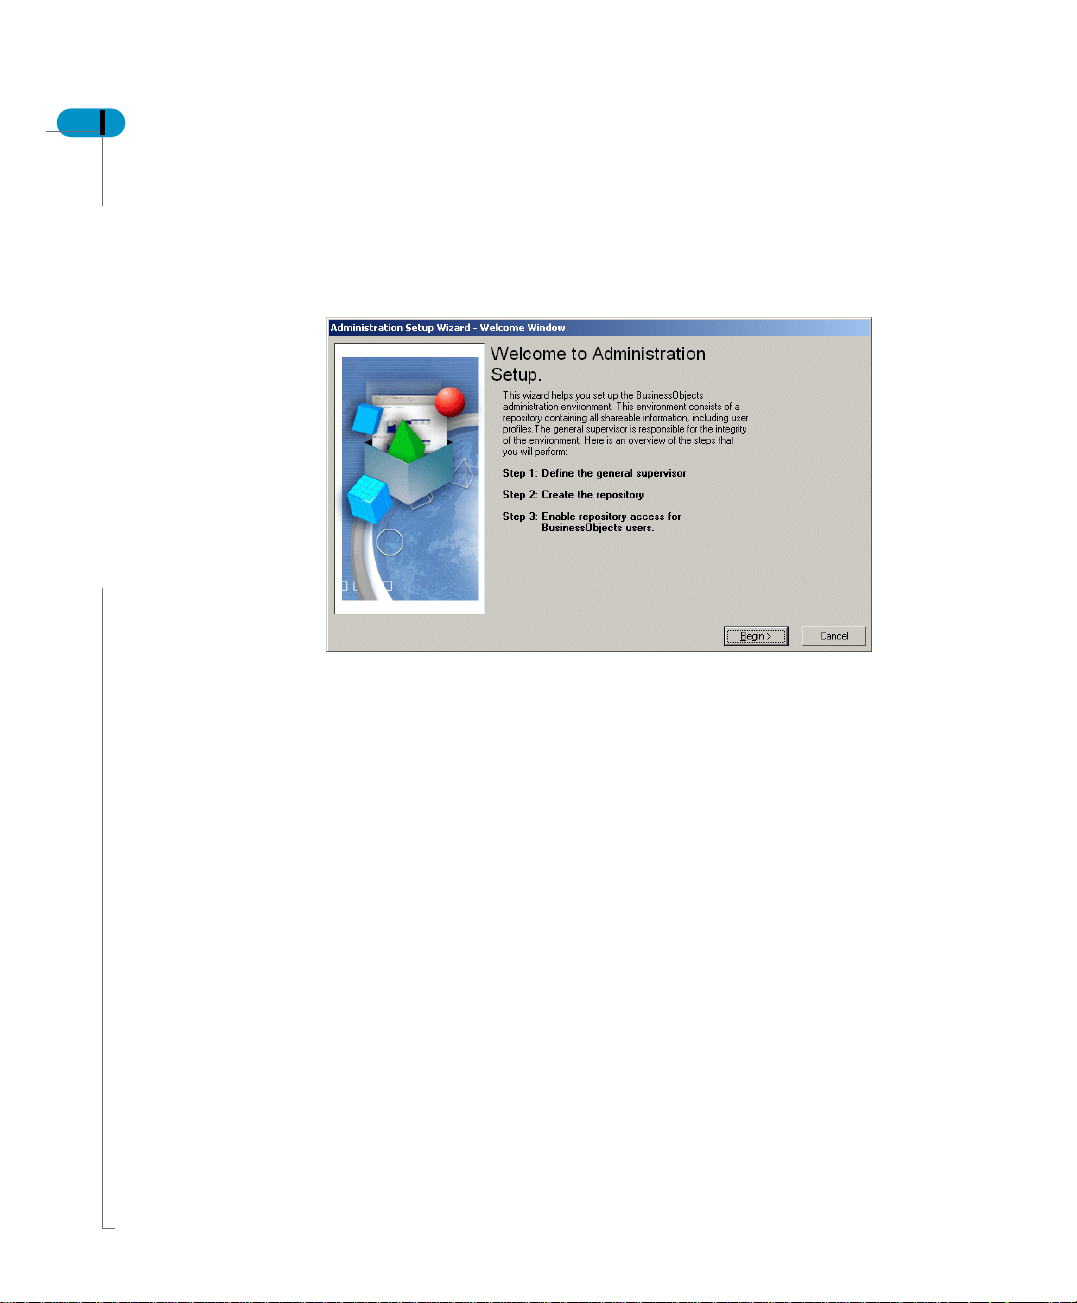
2. Click Admin.
You can also start the Administration Setup wizard by entering the user name
GENERAL and the password SUPERVISOR, and clicking OK.
The Welcome dialog box appears.
The Welcome dialog box displays an overview of the main steps that you will
perform with the wizard.
Installing the Repository
Page 31

Supervisor’s Guide 31
3. Click Begin to start the wizard.
The Choose Setup Configuration dialog box appears.
The Choose Setup Configuration dialog box prompts you to select one of the
following installation options:
• Run a default installation (recommended): Automatically creates the three
repository domains—security, universe and document—on the same data
account. This is the option most frequently used.
• Run a custom installation: Allows you to distribute all repository domains in
the database environments of your choice. This type of installation requires
extensive knowledge of your database environment, and should only be
selected if you want to manage several versions of your resources
simultaneously. For more information, see Running a custom installation on
page 41.
• Run a safe recovery: Allows you to perform a recovery installation. This is
necessary in the following situations:
- The location of the security domain has been modified.
- One of the parameters in the connection string of the security domain, such
as the user name or password, has been changed.
- The key file of the repository you want to work with has been inadvertently
moved, renamed or damaged.
For more information on safe recovery, see Running a recovery installation on
page 46.
Choosing a setup configuration
Page 32

32 Supervisor’s Guide
Running a default installation
Defining the general supervisor
The default installation comprises four successive steps in which you:
• define the general supervisor
• define a connection to the repository
• build the repository structures
• distribute repository access to users
In this step, you identify the general supervisor.
1. Select the option Run a default installation, and click Next.
The Define the General Supervisor dialog box appears.
2. Enter your name, password, the confirmation of your password, and the name
3. Click Next.
Installing the Repository
of your company. In this example the XYZCompany is given as the com pany
name.
The company name you enter becomes the first user group created and
appears as the root group in the Supervisor interface. The user name and
password you enter are the ones you will use each time you wish to log into
Supervisor as the general supervisor.
The Define the Repository Connection dialog box appears.
Page 33

Defining the connection to the repository
In this step, you create a connection to the database in which the wizard is to
create the repository.
At any time after installation, you can run the wizard from the Supervisor main
window in order to redefine the repository connection of document and universe
domains. For information on how to do this, refer to Managing the repository on
page 144.
1. Click Setup.
The New Connection Wizard appears.
Supervisor’s Guide 33
Running a default installation
Page 34

34 Supervisor’s Guide
2. Click Next.
The Database Middleware Selection dialog box appears.
3. From the tree select the driver for your connection, then click Next
The Login Parameters dialog box appears.
4. Select the type of connection from the Type list.
5. In the Connection Name text box, type the name of the connection.
Installing the Repository
Page 35

Supervisor’s Guide 35
6. Enter the user name, password, and datasource name for the security
repository. Click Next.
The Perform a test dialog box appears.
NOTE
Characters entered in the password field are displayed as asterisks. To avoid
making typing errors in the Password field, type the password in the User Name
field; select it; press Ctrl-X to cut; then in the password field press Ctrl-V t o paste.
7. Click Test Data Source.
Any errors appear in the scroll box in the dialog box. If the test is not
successful, check the information in the Login Parameters dialog box for
correctness.
8. If the test is successful, click Next.
The Advanced Parameters dialog box appears. For information on setting the
parameters in this dialog box, see the
Data Access Guide.
9. Click Next.
The Custom Parameters dialog box appears. For information on setting the
parameters in this dialog box, see the
Data Access Guide.
10.Click Finish.
The Build the Repository dialog box appears.
Running a default installation
Page 36

36 Supervisor’s Guide
Building the repository
The Build the Repository dialog box informs you that the wizard is ready to create
the repository.
1. Click Next to start building the repository.
Once the creation process has begun, you cannot interrupt it.
When the script has finished processing, the following dialog box appears.
Installing the Repository
If an error occurs during the creation of the repository, a dialog box appears
informing you of the cause of the error.
Page 37

Supervisor’s Guide 37
2. Save the SQL script which created the repository by clicking Save As, and
specifying the location where the SQL script is to be stored.
The SQL script contains useful structural information on the repository. We
recommend you save the script in a safe location.
3. Click Next.
The Repository Access dialog box appears.
Running a default installation
Page 38

38 Supervisor’s Guide
Defining repository access
The Repository Access dialog box is where you specify where to create the key
file and what to name it.
The key file contains the address of the repository’s security domain. A ll users of
Business Objects products who will be using this repository must therefore hav e
access to the key file.
The wizard suggests an option based on the deployment method and installation
folder selected during installation. The option you select determines how users
will access the repository.
1. Select an option.
- Create the file in a default shared folder on the network. The folder displayed
is the shared folder defined during installation. In deployments using a
shared key file, all Desktop and Administration Products should specify
the same shared folder at installation. See the
for Windows guide for a list of Desktop and Administration Products.
Installation and Configuration
Choose this option to allow users of Desktop and Administration Products to
connect to the repository through a single access point on the network.
- Create the file locally on your machine.
Choose this option to allow users of Desktop and Administration Products to
connect to the repository directly from their own machines. If you choose this
option you must distribute this key file to users of Desktop and Administration
Products.
2. If you want to name your key file something other than the default name,
bomain.key, enter the name. Click Next.
Once the file is copied, a message confirming the creation of the key file and
the general supervisor appears.
NOTE
WebIntelligence works only with key files named "bomain.key" in lower-case
letters. Choose this name if your deployment includes WebIntelligence.
Installing the Repository
Page 39

Supervisor’s Guide 39
3. Click Finish to quit the wizard.
A dialog box appears advising you to create a second general supervisor.
This is important since if at any time you forget the general supervisor’s
password, or you enter the password incorrectly three times in a row, you will
no longer be able to access Supervisor as a general supervisor. You are
therefore strongly advised to create a second “backup” general supervisor.
For more information, refer to Creating a second general supervisor on
page 65.
4. Click OK to clear the Supervisor message.
The main window of Supervisor appears (see The Supervisor main window
on page 52).
Running a default installation
Page 40

40 Supervisor’s Guide
Distributing the key file
Distribute the key file according to the option you chose in the Repository Access
step of the Administration Setup Wizard.
!
!
For users of desktop and administration products
! !
Users of Desktop Products and Administration Products (BusinessObjects,
Supervisor, Designer, BusinessQuery) can access the repository either through
a single, shared point of access on the network, or from their own machines. To
do so they must have the necessary middleware and network permissions.
Shared folder (ShData)
If, to create the key file, you chose the "shared folder" option in the Repository
Access step of the Administration Setup Wizard, you mus t make sure all users of
Desktop and Administration Products have access to that folder in the network.
Local folder
If, to create the key file, you chose the "LocData subfolder" option in the
Repository Access step of the Administration Setup Wizard, you must send a
copy of the key file to each user, or make it available on the network for them to
copy, with instructions to store it in the following local folder:
\\<installation folder>\BusinessObjects 5.1\LocData\
\\<Windows profile folder>\Application Data\Business
Objects\Busi ness Objects 6.0\M yL ocData\
where <Windows profi le folder> is, for example, C:\Docume nt s and
Settings\<user name>.
!
!
! !
Users of Server Products, i.e. InfoView, WebIntelligence, Broadcast Agent, and
3-tier BusinessObjects, access the repository via the Business Objects server.
You must log in as an administrator to the Business Objects server machine and
store a copy of the key file in the locData folder whose location was defined at
installation and configuration. By default its location is:
\\<installation folder>\BusinessObjects Enterprise 6\locData\
where <installation folder> is the location chosen at installation to store
the Business Objects program files.
If you modify the location of the security domain, you must re-create the key file
and distribute it as described above. For more information, refer to Running a
recovery installation on page 46.
Installing the Repository
Server products
Page 41

Running a custom installation
A custom installation allows you to distribute all repository domains in the
database environments of your choice. This type of installation requires
extensive knowledge of your database environment, and should only be selected
in special situations (for example, if you want to manage several versions of your
resources simultaneously).
Running a custom installation is the onl y way you can manage different universes
with the same name within the same repository.
To perform a custom installation, proceed as follows:
1. Follow the procedures described in Choosing a setup configuration on
page 29.
2. Select the Run a custom installation option from the Choose Setup
Configuration dialog box.
Before you can create other repository domains, you must first create the
security domain. To create a domain, you need the following rights on your
target database:
- read/write access
- the right to create tables, insert rows, create the index, create comments on
system tables, and delete tables
3. Create the security domain.
These steps are the same as those for the default installation (see Running a
default installation on page 32).
Once you have created the security domain and the key file is distributed to
your users, you can create any other domain with the next three steps:
- defining a connection to the domain
- building the domain
- viewing the domains created
Supervisor’s Guide 41
Running a custom installation
Page 42

42 Supervisor’s Guide
You can create the other domains as described below. Regardless of the
domain type (such as universe or document), the procedure is always the
same.
Once the general supervisor, the key file, and the security domain are
created, the Repository Access dialog box prompts you to create another
domain, or to quit the wizard.
4. To create another repository domain, click Next.
Installing the Repository
The Define the Repository Domain dialog box appears.
Page 43

Defining the connection to a new repository domain
You create the new repository domain in the database to which you are
connected. To do so, you must first select the Select the network layer from the
drop-down list box.
Supervisor’s Guide 43
1. Click Setup.
2. In the Setup dialog box, enter the user name, password, and pathname of the
database to be opened and in which the domain is to be created.
Depending on the driver you selected, the parameters of this dialog box vary.
For more information on this dialog box, refer to the
that applies to your RDBMS.
Guide
section in the Data Acce ss
3. Enter the name of the domain, and select a domain type from the drop-down
list box.
4. Click Next.
The Build the Repository dialog box appears.
Running a custom installation
Page 44

44 Supervisor’s Guide
Building the repository domain
This dialog box informs you that the wizard is ready to create the new domain.
1. Click Next to begin the process.
During the process, the SQL script which is used to create the repository
domain is scrolled rapidly in a pane within the dialog box.
If no errors occurred during the execution of the script, a message confirms
the successful execution.
If an error occurs during the creation of the repository, a message appears
informing you of the cause of the error.
2. Click Next to display the result of the execution.
Installing the Repository
Page 45

Viewing the domains created
The list of repository domains created appears in the final dialog box. This list
contains the name of the domain, its status, and its type.
The status field indicates whether the domain was created successfully (OK) or
not (Error).
Supervisor’s Guide 45
3. If you want to create a new domain, click Next.
For more information, refer to Defining the connection to a new repository
domain on page 43.
4. Click Finish to quit the wizard.
The main window of Supervisor appears (see The Supervisor main window
on page 52).
Running a custom installation
Page 46

46 Supervisor’s Guide
Running a recovery installation
You may need to perform a recovery installation in the following situations:
• The location of the security domain has been changed.
• One of the parameters in the connection string, such as the user name or
password, has been changed.
• The key file has inadvertently been moved, renamed or damaged.
In any of these situations, you can perform a recovery installation as follows:
1. Follow the procedures described in Choosing a setup configuration on
page 29.
2. Select Run a Safe recovery from the Choose Setup Configuration dialog
box, and then click Next.
The New Connection Wizard appears.
3. Click Next.
The Database Middleware Selection dialog box appears.
4. From the tree select the driver for your connection, then click Next
The Login Parameters dialog box appears.
5. Select the type of connection from the Type list.
6. In the Connection Name text box, type the name of the connection.
7. Enter the user name, password, and datasource name for the database. Click
Next.
The Perform a test dialog box appears.
8. Click Test Data Source.
Any errors appear in the scroll box in the dialog box. If the test is not
successful, check the information in the Login Parameters dialog box for
correctness.
9. If the test is successful, click Next.
The Advanced Parameters dialog box appears. For information on setting the
parameters in this dialog box, see the
10.Click Next.
The Custom Parameters dialog box appears. For information on setting the
parameters in this dialog box, see the
11.Click Finish.
12.Select the physical location in which the key file is to be created in one of the
Data Access Guide.
Data Access Guide.
Installing the Repository
Page 47

Supervisor’s Guide 47
following:
- the shared folder defined at installation and configuration
- the local data folder
You can also enter the name of the key file if you do not want to use the
default name, bomain.key.
NOTE
WebIntelligence works only with key files named "bomain.key" in lower-case
letters. Choose this name if your deployment includes WebIntelligence.
Once the file is copied, a message appears confirming that the key file was
created.
To ensure that Business Objects users have access to the key file, see
Distributing the key file on page 40.
13.Click Finish to quit the wizard.
The User Identification dialog box appears.
14.Log into Supervisor by entering the same identification (user name and
password) you entered previously with the wizard.
The main window of Supervisor appears.
Running a recovery installation
Page 48

48 Supervisor’s Guide
Installing the Repository
Page 49

Basic Procedures
3
chapter
Page 50

50 Supervisor’s Guide
Overview
This chapter shows you how to perform some basic tasks the first time you use
Supervisor, and should help you to quickly acquire the main principles of user
administration. Once you master the basics of using S upervisor, you will be ready
for the more detailed information provided in the later chapters.
You should follow each of the procedures in order, so that you can check the
results you obtain with the tests provided at the end of the chapter. The
procedures are repeated and subsequently enhanced by further, increasingly
complex actions.
NOTE
If you enter the same values as those used in the examples in this chapter, you
should be aware that Supervisor inserts these values into the security domain
tables of the repository you are logged in to. You may want to start by creating a
test repository in which to do these practice exercises. To do so, see Installing
the Repository on page 27.
Basic Procedures
Page 51

Starting Supervisor
When you installed the repository, you defined the user name and password of
the first general supervisor (see Choosing a setup configuration on page 29).
You will now use these to launch your first Supervisor session.
1. To launch Supervisor select Start, Programs, BusinessObjects,
Supervisor or enter Supervsr.exe in the Run command line.
The User Identification dialog box appears.
Supervisor’s Guide 51
2. In the User Name text box, enter the name you chose when you ran the
installation (see Defining the general supervisor on page 32).
By default, the last user name entered is already displayed in the User Name
text box.
3. In the Password text box, enter the password you chose during installation.
Depending on your database, user names and passwords may be casesensitive.
4. If there is more than one repository, choose which one you want to work with
by choosing its Security Domain (this is the name of the repository’s key file).
5. Click OK.
After a few seconds, the Supervisor main window appears.
NOTE
It is not possible to have two Supervisor sessions running at the same time on
the same machine.
Starting Supervisor
Page 52

52 Supervisor’s Guide
The Supervisor main window
title bar
menu
toolbar
the User pane
lists all users
and user groups
The Supervisor main window comprises the following:
• the title bar, which displays the name of the application followed by your user
name and, if you have more than one repository, the name of the repository’s
key file
• the menu bar
• the toolbar
• the User pane, which lists the hierarchy of users and user groups created in
the security domain of the repository
• the Resource pane, with five tabs for viewing and assigning resources
Basic Procedures
the Resource pane lists tabs for assigning resources
Page 53

Refresh versus Regenerate
When you work in Supervisor, you make changes to the repository that are
reflected in your local cache. If other supervisors are also making changes to the
same repository, their changes are reflected in their local cache. However their
changes do not appear automatically in your display or local cache.
To update your display and cache in Supervisor, you have two options in the
View menu:
• Refresh
• Regenerate
What does Refresh do?
When you select View > Refresh or F5, your local display and cache are updated
with your changes to the repository. You do not see any changes made to the
repository by other supervisors.
What does Regenerate do?
When you select View > Regenerate, or Ctrl + F5, your loca l display and cache
are updated with all of the changes made to the repository since you logged in.
It is important to regenerate before creating anything new, for example, users,
groups, universes, and domains, to be sure you have an up-to-the-minute view
of the repository.
Supervisor’s Guide 53
Refresh versus Regenerate
Page 54

54 Supervisor’s Guide
Creating user groups
Creating the first group
New Group
The User pane is the area in which you manage all users and user groups. The
root group in the User pane represents the organization (such as a corporation,
company or bank for which you will set up user administration. This is the name
you entered as the "company name" when you built the repository using the
wizard (see Installing the Repository on page 27).
Any operation resulting in the creation of a group or user is automatically
recorded in the security domain of the repository.
When you installed the repository, you created the root group. We’ll assume you
called it XYZCompany as suggested in the previous chapter for performing these
exercises. All groups you subsequently create will belong to this root group.
Group names are unique within the repository. No two groups may have the
same name.
The first time you start Supervisor, the root group (XYZ company) is selected.
To create the first group:
1. Do one of the following:
- select User, New, Group
-click New Group.
The group symbol, a folder, appears immediately in the User pane under the
root group level.
2. In the name label, enter the name Finance, and press the Enter key on your
keyboard.
The Finance group is now displayed in the User pane.
Creating the second group
To create a second group in the root group:
1. Click the XYZ Company root group.
2. Click New Group.
New Group
Basic Procedures
The group symbol appears.
3. In the name label of the group, enter the name Human Res ources, and press
the Enter key on your keyboard.
The Human Resources group is now displayed in the User pane.
Page 55

Creating a subgroup
To create a subgroup within the Human Resources group:
1. Make sure that Human Resources is still selected.
2. Click New Group.
New Group
3. In the name label, enter the name Payroll, and press the Enter key on your
keyboard.
The Payroll subgroup appears within the Human Resources group.
In addition, you can define properties for groups and subgroups from the Group
Properties dialog box. This procedure is described in Managing user groups on
page 97.
Supervisor’s Guide 55
Creating user groups
Page 56

56 Supervisor’s Guide
Creating users
Creating the first user
New User
You created the general supervisor when you ran the wizard. You can create
additional users as described below.
User names are unique within the repository. No two users may have the same
name. However, the same user can belong to more than one group and appear
in each in the User Pane. These are considered as different instances of a single
user.
To create a user belonging to the Finance group:
1. Click the Finance group.
2. Do one of the following:
- Select User, New, User.
- Click New User.
The new user appears immediately in the User pane.
3. In the name label of the user, enter the name John, and press Enter.
John’s default profile is User. This means user John can access only the
Business Objects end-user products but not Designer or Supervisor.
4. If it is not already selected, click the Configuration tab in the Res ource pane.
In the Resource pane, BusinessObjects is followed by the word Profile,
meaning John has access to BusinessObjects because that is the default
setting for his profile. The products the user cannot access are flagged with a
red X: .
Basic Procedures
Page 57

Assigning a profile to a user
To create a user belonging to the Payroll subgroup, and to assign a new profile
to this user:
1. Click the Payroll subgroup.
2. Do one of the following:
- Select User, New, User.
-Click New User.
New User
The new user appears immediately in the User pane.
3. In the name label of the user, enter the name Anne, and press Enter.
User Anne appears immediately in the User pane within the Payroll subgroup.
By default, her profile is User. Anne can therefore access only the Business
Objects end-user products. In the Resource pane, these products are
followed by the word Profile. The products this user cannot access are
flagged with red X’s.
To modify this user profile:
1. Right-click user Anne.
2. Select the Set Profile To command, and then select the Designer profile.
The symbol identifying Anne in the User pane changes to reflect her new
profile. Her access authorizations are modified.
By default, a universe designer can access Designer and the Business
Objects End-user products. In the Resource pane, Designer is follo wed by the
word Profile. Supervisor, which a designer cannot access, is flagged with a
red X.
Supervisor’s Guide 57
Creating users
Page 58

58 Supervisor’s Guide
Assigning a password to a user
New User
You can create a user belonging to a subgroup and assign a new profile and
password to this user. Using the example from the previous section, user Anne
should already be selected. If not click, click user Anne in the Payroll subgroup.
1. Do one of the following:
- Select User, New, User.
- Click New User.
The new user appears immediately in the User pane.
2. In the name label of the user, enter the name Pat, and press Enter.
User Pat appears immediately in the User pane in the Payroll subgroup. By
default, Pat’s profile is User.
3. To change the profile of user Pat from User to Supervisor, right-click the user,
and select Set Profile To, Supervisor.
The symbol representing user Pat in the User pane changes to reflect his new
profile. His access authorizations are modified.
By default, the supervisor has access to Supervisor and to Business Objects
end-user products. In the Resource pane, Supervisor is followed by the word
Profile. Designer, which a supervisor cannot access, is flagged with a red X.
4. To assign a password, double-click Supervisor Pat.
The Definition tab of the User Properties dialog box appears.
5. Enter the password Patty.
Depending on your database, passwords may be case-sensitive. If you use
any uppercase characters in the password (as in the example above, P
atty),
you may need to enter the password in exactly the same way.
6. Confirm the password by entering it in the Confirm Password text box, and
click OK.
The dialog box closes.
Basic Procedures
Page 59

Moving a user
If you want to move supervisor Pat from the Payroll subgroup to the Human
Resources group:
1. Click supervisor Pat in the Payroll subgroup.
Supervisor Pat is highlighted.
2. drag supervisor Pat to the Human Resources group (the Human Resources
group is correctly selected when you see a box around the text).
Pat now belongs to the Human Resources group. His icon appears on the
same level in the tree structure as the Payroll subgroup.
Duplicating a user and modifying a user profile
The universe designer of the Payroll subgroup, Anne, can also belong to the
Finance group as a User.
To duplicate designer Anne in the Finance group:
1. Click designer Anne in the Payroll subgroup.
Designer Anne is highlighted.
2. While holding down the Ctrl key on your keyboard, drag Designer Anne to the
Finance group. (The Finance group is correctly selected when you see a box
around the text.)
Anne appears in both the Payroll and Finance groups with the same profile.
3. To assign a User profile to Anne in the Finance group, right-click user Anne
in the Finance group.
4. Select Set Profile To, User.
The symbol identifying Anne in the Finance group changes to reflect her new
profile. Her access authorizations are modified.
By default, a User has access only to Business Objects end-user products. In the
Resource pane, BusinessObjects is followed by the word Profile. The products
that the user cannot access are flagged with a red X.
You can also move a user via the Add to Group and User Properties dialog
boxes. These methods are explained in Managing Users and Groups on
page 93.
Supervisor’s Guide 59
Creating users
Page 60

60 Supervisor’s Guide
Disabling a user
Disable/
Enable User
Restricting user or group access to commands
If you don’t want user Anne to be able to use Business Objects products right
away, you can disable this user.
1. Click user Anne in one of the groups to which she belongs.
2. Do one of the following:
- Select User, Disable/Enable.
- Click Disable/Enable User.
The symbol for Anne in the User pane appears with a red X.
Supervisor automatically disables Anne in the Payroll subgroup and in the
Finance group. Why in both groups? Because although an instance of Anne
appears in both groups, they represent a single user. Now Anne can no longer
log into any Business Objects products.
You can restrict the use of any product by limiting access to certain commands
or menus of its interface. Because some users in your organization may still be
using an earlier release, you can manage command restrictions for both the
current and the previous release.
This feature is available through the Command Restrictions dialog box, called by
double-clicking a Business Objects product in the Configuration tab or by
selecting a product, then selecting Resource, Properties.
See Restricting the use of commands in the interface on page 184 for a full
explanation of how to restrict commands for users or groups.
Basic Procedures
Page 61

Controlling rights of supervisors
By using the Command Restriction dialog box, you can prevent supervisors you
create from having access to certain commands.
For example, you can prevent a supervisor from creating users by setting the
status of a secured command.
However, all users inherit the secured command settings of the group they
belong to. This means that if the secured command setting does not apply to the
supervisor’s group, the supervisor need only create another user in the group,
give that user a supervisor profile, and log in as that supervisor to get around the
command restriction.
To reliably restrict the rights of a supervisor, therefore, you must set the
restriction not on the supervisor but on the group the supervisor belongs to.
Proceed as follows to keep a supervisor from creating new users:
1. In the User pane of Supervisor, select the group the supervisor belongs to.
2. Double-click Supervisor in the Resource pane.
The Command Restriction dialog box appears.
Supervisor’s Guide 61
Creating users
Page 62

62 Supervisor’s Guide
3. Click the User and Group command family in the tree on the left, then click
Create User in the list on the right.
4. Select Hidden in the Status box.
A grey icon appears next to the command.
5. Click OK to close the dialog box.
See Restricting the use of commands in the interface on page 184 for full
information on how to use the Command Restriction dialog box.
If a Supervisor applies a command restriction to the group to which he or she
belongs, that restriction applies to the Supervisor as well as the rest of the group.
Basic Procedures
NOTE
Only the General Supervisor can then remove the restriction. If you are a
Supervisor, only during the current session will you be able to remove any
restrictions you apply to your own group. After you log out, you will not be
able to remove them in future sessions.
Page 63

Testing your setup
This section allows you to test the results you obtained wh ile working through the
procedures in this chapter. If you have followed these procedures step-by-step,
you should now have the following results displayed in the User pane.
Checking user authorizations
To check whether you correctly assigned a password to supervisor Pat:
1. Select Tools, Login As.
2. Enter Pat as the user name, and PASS as the password.
3. Click OK.
An error message appears informing you that the password is not correct.
This means that you need to enter the password (Patty) you previously
assigned to Pat. As indicated in the error message, you are allowed only two
more attempts to enter the correct password.
Supervisor’s Guide 63
NOTE
Depending on your database, the user name and password may be casesensitive. You may need to enter them exactly as they were when the user was
created.
Testing your setup
Page 64

64 Supervisor’s Guide
4. Click OK.
The User Identification dialog box is re-displayed.
5. Enter Patty as the password.
The resulting window contains the title bar with the user name, Pat, and the
name of the key file in parentheses.
Basic Procedures
The User pane displays only the group in which Pat has a supervisor profile
(Human Resources). It also shows Payroll, a subgroup of the Human Resources
group.
The User menu no longer contains the New, User command, and the New User
button does not appear on the toolbar, because you restricted this command for
supervisor Pat.
Page 65

Creating a second general supervisor
Normally, you should have only one general supervisor to manage and control all
users, user groups, and resources. However, if at any time you forget the general
supervisor’s password, or you fail to enter the password correctly three times in
a row, then you will no longer be able to access Supervisor as a general
supervisor.
For this reason, you are strongly advised to create a second general supervisor
soon after installing Supervisor. You should keep this backup general supervisor
in reserve and keep secure a separate record of the password. If you should be
unable to log in as the first general supervisor for the reasons described above,
you will still be able to log in as the backup general supervisor.
To create a second general supervisor:
1. Log in as the general supervisor.
2. Click the root XYZ Company group.
3. Click New User on the toolbar.
The new user appears in the User pane.
4. In the name label of the user, enter a name (such as “2ndGenSup”), and
press Enter.
By default, the new user’s profile is User. You need to modify this profile.
5. Right-click the new user, and select the Set Profile To, G ener al Su per visor .
6. Right-click the new user again, and select Properties.
The User Properties dialog box appears.
7. Enter and confirm a password in the Definition tab, then click OK.
You have now defined your reserve general supervisor. Be sure to keep a
record of the password secure for future reference.
Supervisor’s Guide 65
NOTE
If you do not create a reserve general supervisor, Supervisor will remind you to
do so each time you launch the program!
Creating a second general supervisor
Page 66

66 Supervisor’s Guide
Creating a group reference profile
When a document is distributed to a group of users using Broadcast Agent
(BCA), BCA has to compute the rights of each individual user to filter out
restricted data. This causes a performance problem.
When you add a Group Reference profile (GRP) to a user profile, BCA uses the
GRP rights to filter out restricted information for the whole group. This saves time
and reduces server activity. If there is no GRP identified, a document cannot be
sent to a group.
The GRP profile should have:
• a “user” profile
• no access to Supervisor or Designer
• a disabled login
Although the GRP can be applied to an existing user, it is best to c reate a specific
GRP user for any group that receives batch distribution via BCA.
NOTE
The primary general supervisor cannot be the GRP.
Basic Procedures
REMINDER
The removal of a GRP impacts the BCA tasks for the whole group.
Page 67

Supervisor’s Guide 67
EXAMPLE
Creating a GRP-specific user
1. Log in as the general supervisor.
2. Click the root XYZ Company group.
3. Click New User.
The new user appears in the User pane.
4. In the name label of the user, enter “GRP”, and press Enter.
5. Right-click the new user, select Set Profile To, Group Reference.
The GRP user name is now in bold text.
a user assigned the Group
Reference profile is in bold
An error message appears if a GRP has already been assigned in the group.
Creating a group reference profile
Page 68

68 Supervisor’s Guide
Adding a group reference profile
You can use either the User Properties or Group Properties dialog box to add the
General Reference profile to an existing user.
!
!
Adding a general reference profile in the user properties dialog box
! !
1. Log in as the general supervisor.
2. Click the root company group.
3. Select from a group the user you want to designate as the GRP.
4. Do one of the following:
- Select User, Properties.
- Right-click on the user and select Properties.
The User Properties dialog box appears.
5. Click the Group And Profile tab.
6. Select the user.
7. Activate Group Reference.
8. Click OK to confirm.
The GRP user name is now in bold text.
NOTE
You can also right-click a user and select Set Profile To, Group Reference.
Basic Procedures
Page 69

!
!
Adding a general reference profile in the group properties dialog box
! !
1. Log in as the general supervisor.
2. Click the root company group.
3. Select the group for which you want to designate a GRP.
4. Do one of the following:
- Select User, Properties.
- Right-click on the group and select Properties.
The Group Properties dialog box appears.
5. Click the Users And Profile tab.
6. Select a user.
7. Activate Group Reference.
If a user in the group already has this profile, an error message appears.
8. Click OK to confirm.
The GRP user name is now in bold text.
The GRP user is also listed in the Group Properties dialog box. Click the
Broadcast Agent tab, and in the Reference user text box is listed the GRP.
Finding the GRP in a group
To find the user that has the GRP profile:
1. Do one of the following:
- Right-click in the User pane.
- Select User in the toolbar menu.
Supervisor’s Guide 69
2. Select Find Group Reference User.
The GRP user is highlighted. If there is no user with the GRP profile, the
option is in gray.
the option is grayed out because there is no
GRP user assigned to the group
Creating a group reference profile
Page 70

70 Supervisor’s Guide
Basic Procedures
Page 71

Customizing Your Environment
4
chapter
Page 72

72 Supervisor’s Guide
Overview
You can customize your Supervisor environment to control default and other
options. This chapter explains how to do so.
A number of options are available for customizi ng your working environment. You
to set the following default options:
• enable or disable confirmation messages
• quickly create new users and groups
• quickly rename users and groups
• select an interface language
• set user and group sorting options
• set options for all supervisors
This section also shows you how to:
• move or hide the toolbar
• change your password
• log in as a different user
• run other products from Supervisor
Customizing Your Environment
Page 73

Setting your default options
Using the following four tabs in the Options dialog box you can select default
options:
• General
• Tree List
• Repository
• Security Policy
Enabling/disabling confirmation messages
In the General tab of the Options dialog box, there are default options that allow
you to control the messages that appear when you attempt to remove a user from
a group, or delete a user or group.
The procedure is as follows:
1. Select Tools, Options.
The Options dialog box appears.
Supervisor’s Guide 73
Setting your default options
Page 74

74 Supervisor’s Guide
NOTE
The Repository and Security Policy tabs are only visible to general supervisors.
If you log in as a supervisor you will see only the General and Tree List tabs in
the Options dialog box.
2. Select the General tab.
The options in the Messages group allow you to control the confirmation
messages that appear when you attempt to remove a user from a group, or
delete a user or group. By default, all options are selected.
3. If you do not want a given message to appear, simply deactivate the
corresponding check box, and click OK to confirm your selection.
What is the difference between removing and deleting a user?
When you remove a user from a group, the user is not removed from other
groups to which he or she was assigned. If the user belongs to only one group,
then you must delete (and not remove) the user.
Deleting a user in Supervisor will permanently delete the user from the database.
For more i nform ati on , r efe r to Deleting a us er and removing a user from a group
on page 124.
Quickly creating new users and groups
In the General tab of the Options dialog box, there are default options that allow
you to create a user or group simply by clicking the Insert key on your keyboard.
This can be useful for creating a series of users or groups rapidly.
To activate or deactivate this feature:
1. Select Tools, Options.
2. Select the General tab.
3. In the Insert Key group, click one of the options:
Option Description
Insert Key is Not Active The Insert key has no assigned function. This is
Use Insert Key to
Create New User
Use Insert Key to
Create New Group
Customizing Your Environment
the default option.
Allows you to create new users using the Insert
key on your keyboard.
Allows you to create new groups using the Insert
key on your keyboard.
Page 75

Quickly renaming a user or group
In the General tab of the Options dialog box, there are default options that allow
you use to rename a user or group directly from the User pane without using the
Rename command.
!
!
To enable this feature
! !
1. Select Tools, Options.
2. Select the General tab.
3. Select Enable Edit in Place and click OK to confirm.
!
!
To test this fea tu re
! !
1. In the User pane, click the name of the user or group to be renamed.
The name is highlighted.
2. Click the name again.
A box appears around the name.
3. Enter a new name.
4. Press Enter.
The user or group is renamed.
NOTE
User and group names are unique within the repository. No two users or groups
may have the same name.
Supervisor’s Guide 75
Changing the interface language
In the General tab of the Options dialog box, there are default options that allow
you to choose the Business Objects product interface language to use.
!
!
To enable this feature
! !
1. Select Tools, Options.
2. Click the General tab.
3. Select a language in the Language drop-down list and click OK.
The interface appears in the language you chose.
Setting your default options
Page 76

76 Supervisor’s Guide
Setting user and group sorting options
In the Tree List tab of the Options dialog box, there are default options that allow
you to control the order in which users and user groups are displayed by
customizing a series of sorting options.
To do this:
1. Select Tools, Options.
2. Click the Tree List tab.
Options for sorting the users and groups are available under Sort. You can try out
an option simply by clicking it. You can then view the effect on the display in the
Preview pane.
!
!
Activating the case sensitive option
! !
Activate Case Sensitive to sort users and/or groups while taking into account
uppercase and lowercase characters. Names in uppercase characters have
precedence over those in lowercase.
Customizing Your Environment
Page 77

Supervisor’s Guide 77
!
!
Activating primary and secondary keys
! !
Two keys are used for sorting users and groups:
• the primary key
• the secondary key
The primary key
The primary key indicates whether the sort is by type or by name, in ascending
or descending order. The options for defining the primary key are as follows:
Option Description
Type Sorts the users in a group by user profile. General
supervisors are displayed first, followed by supervisors,
designers, supervisor-designers, users, and finally
versatile users.
Users of a given user profile can be sorted in alphabetical
or reverse alphabetical order.
Name Sorts all users and groups by name. The names are listed
in either alphabetical or reverse alphabetical order.
Ascending Sorts user profiles or names in alphabetical order.
Descending Sorts user profiles or names in reverse alphabetical order.
The following rules apply for primary key options:
• If you click the Type and Ascending options, Supervisor displays users by
user profile in order of type (see above).
• If you click th e Type and Descending options, Supervisor displays users by
user profile in reverse order of type (see above).
• If you click the Name and Ascending options, Supervisor displays users and
groups in alphabetical order.
• If you click the Name and Descending options, Supervisor displays users
and groups in reverse alphabetical order.
The secondary key
You can also define a secondary key to further refine the sorting process:
• If you select Type as the primary key, then the secondary key applies to
Name, and will sort all names in ascending or descending order.
• If you select Name as the primary key, then the secondary key applies to
Type, and will sort all types in ascending or descending order.
Setting your default options
Page 78

78 Supervisor’s Guide
Setting repository options
In the Repository tab of the Options dialog box, there are default options that
allows the general supervisor to set options for all the supervisors working with
UPERVISOR, as well as for all users who access Business Objects products.
S
The general supervisor can, for example:
• restrict or extend the powers of supervisors on a session-to-session basis
• control access to the repository, set password options
• set default names for new users and groups
The options in this tab are organized in the following groups:
• Repository Access
• Refresh when idle for more than...
• Name Generated by Default
• Valid characters for repository.
NOTE
You can set the options in this section only if you are a general supervisor.
Customizing Your Environment
Page 79

Supervisor’s Guide 79
!
!
Controlling repository access
! !
The options in the Repository Access group let you decide how Supervisor is to
interact with the repository. They are described below.
NOTE
You should disable the Repository Access options if you do not intend to use
them, since enabling these options will increase the time it takes for users to log
in.
Work with timestamps
Supervisor collects timestamp information from the repository at login only if this
is selected. This optimizes login when you are not working with timestamps and
the option is not selected. For more information on timestamp logins, refer to
Controlling user login times on page 121.
Work with universe overrides
Supervisor collects universe override information from the repository at login only
if this is selected. This optimizes login when you are not working with universe
overrides and the option is not selected.
Activate universe Imp act Analysis
This option allows you to export universes that are used for impact analysis in
Business Objects Auditor. Refer to the
Business Objects Auditor Guide for more
information on Impact Analysis universes.
!
!
Refresh when idle for more than
! !
This option allows you to specify how often the Supervisor window is refreshed
to reflect the most up-to-date information in the repository.
1. Select Tools, Options.
2. Click the Repository tab.
3. Select Refresh when idle for more than.
By default, this option is not selected. When it is selected, the Minutes scroll
box becomes available.
4. In the Minutes scroll box, select a value to indicate how often the Supervisor
window is to be refreshed.
5. Click OK to confirm.
Setting your default options
Page 80

80 Supervisor’s Guide
NOTE
A supervisor can also refresh the display at any time by clicking View, Refresh
or F5. If there are two or more supervisors working on the same repository, then
View, Regenerate or Crtl + F5, to synchronize changes on the repository.
!
!
Setting default nam es
! !
You can set a default name for the users and/or groups created by supervisors:
1. Select Tools, Options.
2. Click the Repository tab.
3. Select New User Name.
The text box beside the check box is activated.
4. In the text box, enter the name for the new user.
By default, the name of the first user is New User, the name for the second
user is New User2, and so on.
5. Click OK to apply the changes.
To set the default name of a new group, select the New Group Name option,
then follow the same procedure as above.
!
!
Defining valid characters for repository
! !
You can determine which characters can be used in BusinessObjects operations
with the repository. By default, valid characters are:
• a-z: all lowercase letters
• A-Z: all uppercase letters
• 0-9: integers from 0 to 9
• the dash (-), underscore (_), and dollar ($) characters
• the blank space
You can type other characters or character sequences here in a regular
expression using the dash (-) in the syntax to express a sequence. For example,
in A-Z the dash means “all the characters in the alphabet between A and Z”. Any
characters may be authorized as valid, including the Euro symbol (
they are not supported by your database. To know which characters are
supported by the database, see your database administrator.
Click Test to make sure your expression is correct and see the list of valid
characters.
Customizing Your Environment
€), unless
Page 81

NOTE
To use the dash (-) as a character in the repository, you must enter a back slash
(\) before it in the list of valid characters. This is already done the first time you
open the Repository tab, since the dash is a valid character by default.
Setting security default options
In the Security Policy tab of the Options dialog box, there are default op tions that
allows the General Supervisor to set for all supervisors the following:
• scope management
• password options
• Win NT authentication
Supervisor’s Guide 81
Setting your default options
Page 82

82 Supervisor’s Guide
!
!
Scope management
! !
Scope management is a Supervisor option which all ows you to control the extent
of the access that all supervisors are granted to users and user groups.
In a typical working environment, you create a series of supervisors who are
responsible for a particular department or area of your business. You can do this,
for example, by creating a group for each department, and then creating users
within each group. At this point, you may also want to assign a supervisor to each
group to handle the local group administration.
As the general supervisor, whenever you log on you will always have a complete
view of all the users and groups that have been created by you or by other
supervisors. However, when one of your group supervisors logs on, he will only
see the users and groups that have been defined locally within his own group. In
other words, the group supervisor will not have a global overview (see example
below).
general supervisor’s
view (global)
marketing supervisor’s
view (local)
Supervisor lets you choose between three scope management options:
Standard, Secured, and Extended. These options are described below. Standard
mode was formerly the default setting, hence its name, but the standard scope
management setting is now Secured.
Customizing Your Environment
Page 83

Supervisor’s Guide 83
What is standard mode?
In the scenario illustrated above, the Marketing supervisor has access only to the
users within his group. He cannot see or manage any other users or groups. In
addition, if he checks his group properties, he will see an empty All users pane.
The Marketing supervisor cannot add users from any of the other groups to his
group. The “scope” of the Marketing manager is therefore restricted to his own
group. This situation is useful if you want to strictly control the scope of your
group supervisors, and is referred to as Standard Mode.
Setting your default options
Page 84

84 Supervisor’s Guide
What is extended mode?
If, on the other hand, you want to allow your group supervisors access to users
outside their own group(s) so that they can add or remove users to their own
groups, then you can do so by setting Scope Management to Extended Mode. In
this mode, when the Marketing supervisor checks his group properties, he will
see that the All users pane now displays all of the users from all of the other
groups.
In Extended Mode, the Marketing manager is free to add external users to his
group and to remove them.
Also, in extended mode, if a supervisor tries to create a user with a name that
already exists in a group outside his scope, the following message appears:
The supervisor can then create another instance of the user within his own group.
Customizing Your Environment
Page 85

Supervisor’s Guide 85
What is secured mode?
As explained in Chapter 7, “Assigning Resources to Users” on page 175, you can
restrict the access of specific users to s pecific commands. For example , you can
select a user, double-click on BusinessObjects in the resource pane, and disable
one or more commands (see Restricting the use of commands in the interface on
page 184).
However, if you are working in Standard Mode, any supervisors that you restrict
in this way can continue to create new users of their own—and these users will
have no command restrictions applied (in other words, all module commands will
be enabled by default).
In order to address this potential security hazard, the general supervisor by
default uses the “Secured” mode of operation. In this mode, a supervisor can
create new users, but can only control access of these users to resources, such
as products, documents, or universes, to resources already granted to at least
one user the supervisor administrates, if those resources have not disabled for
the supervisor either directly or through inheritance. In addition, the supervisor
cannot add users from other groups to their own.
Setting your scope management option
To set your scope management option:
1. Select Tools, Options.
2. Click the Security Policy tab.
3. From the Scope Management drop-down list box, select an option, and click
OK.
Setting your default options
Page 86

86 Supervisor’s Guide
!
!
Setting passwords
! !
You can set options that determine how supervisors set passwords on the users
they create. These options are described below:
Option Description
Number of logins
allowed after
password expiry
Sets the number of times a user can log into a product
once his or her password has expired. Enter the
number in the text box. By default, a product allows
three more logins before forcing the user to change the
password.
Password is
mandatory
Prohibits supervisors from creating a new user without
a password. If a supervisor attempts to create a user
without assigning a password, Supervisor returns an
error message.
Default password is
user name
The new user has a default password which is the
same as the user name. The supervisor can change
this password if necessary.
No default password Allows supervisors to create a new user without a
password. This option is the default.
Minimum password
length
Lets you determine the minimum number of characters
that a valid password can have. By default, the option
is unchecked (i.e., no minimum password length).
Checking this option automatically sets the mandatory
password option as well.
Number of failed
logins allowed
Select the number of times a user is allowed to enter an
incorrect login. The default is 3.
To set password options:
1. Select Tools, Options.
2. Click the Security Policy tab.
3. Select the options required, and click OK.
Customizing Your Environment
Page 87

Supervisor’s Guide 87
!
!
WinNT authentication (for Windows NT and W ind ows 2000)
! !
You can enable Windows NT or Windows 2000 authentication for users in your
deployment. To do this you need to:
1. Install the Windows NT authentication driver.
This driver, used only on Windows NT and Windows 2000 machines,
authenticates Business Objects users by reusing information from the
Windows NT or 2000 system login. This makes it possible to avoid the
redundant use of login dialog boxes in Business Objects Desktop and
Administration Products. For information on how to install the Windows NT
authentication driver, see the
Deployment Guide, which can be opened from
the Help menu.
2. Enable the WinNT authentication and specify domain access in Supervisor.
The steps for this are detailed in this section.
3. Configure the Business Objects authorization and authentication modes in
the Security Configuration Tool. For information on this, see the
and Configuration Guide for Windows.
Installation
InfoView and WebIntelligence do not use the Windows NT authentication driver
for NT authentication. For information on how to use NT or other authentication
methods with WebIntelligence, see the
System Adm inistrator’ s Guide for Windows
To enable WinNT authentication in Supervisor:
1. Select Tools, Options.
2. Click the Security Policy tab.
3. Select Enable WinNT Authentication.
This enables authentication of user identity by the Windows NT authentication
driver. When selected, the relevant options become available.
4. Select one of the following:
- To let the driver authenticate users from all NT domains, click From all
domains.
- To restrict authentication to users from trusted domains only, click From
list.
Setting your default options
Page 88

88 Supervisor’s Guide
5. If you selected From list as the authentication option, click New to add a
domain to the trusted list.
The Define a Primary Domain Controller dialog box appears.
6. Enter the name of a domain from which login will be allowed using the
Windows NT authentication driver, then click OK.
The driver is used only on Windows NT and Windows 2000 machines. Only if
the domain is a trusted one, and the user is defined in the repository, will
access be granted.
7. Click OK to confirm.
NOTE
You can only enter the names of domains to which you have network access.
Removing domains from the list
To remove a domain name from the list of trusted domains:
1. Select the domain in the list.
2. Click Delete.
The domain is immediately removed from the list.
Customizing Your Environment
Page 89

Other options
In addition to modifying your default settings, you can also:
• move or hide the tool bars
• change your password
• log in as a different user
• run other products from Supervisor
Moving or hiding the toolbar
The Supervisor window contains a toolbar called the Standard toolbar. By
default, it is positioned within the Supervisor window as shown below:
click an area in the toolbar that is not an active button and drag to change the
Standard toolbar into a window
standard
toolbar
Supervisor’s Guide 89
You can click and drag this toolbar out of its position to make it a floating toolbar
or dock it to any edge of the application frame. To do so:
1. Click in an area that is not an active button within the rectangle containing the
toolbar.
2. Drag the toolbar down.
3. Release the mouse button.
Depending on where you move it, the toolbar appears as a window or docked
on an edge of the application frame.
The Standard toolbar disp layed as a window
You can also toggle the display of the toolbar on or off by selecting the Toolbars
command from the View menu. A checkmark indicates that the toolbar appears.
Other options
Page 90

90 Supervisor’s Guide
Changing your password
Provided that the Enable Password Modification option is checked in your user
properties (see Defining user properties on page 115), you can change your
password at any time during a Supervisor session.
NOTE
This feature is not compatible with use of the Windows NT Authentication Driver.
For information on how to activate and deactivate this driver, refer to the
Deployment Guide.
To change your password:
1. Select Tools, Change Password.
The Change Password dialog box appears.
2. Enter your existing password in the Enter Old Password text box.
3. Enter your new password in the Enter New Password text box.
4. Confirm your new password by entering it again in the Confirm New Password
text box.
5. Click OK to confirm.
Customizing Your Environment
Page 91

Logging in as a different user
You can log into Supervisor as a different user without quitting your work session.
To do so, you need to know the user name and password of the user you want
to log in as. This lets you view the users and resources that this person can
administer.
This operation is equivalent to exiting Supervisor, then running it again and
logging in with a different user ID and password.
If you are using the Windows NT Authentication Driver, you will only be able to
log in again with your own user name and password. This can be useful if, for
example, you are logged in as a supervisor and you wish to log in again because
your General Supervisor has just modified your privileges.
For information on how to activate and deactivate the Windows NT
Authentication Driver, refer to the
To quickly log in as a different user:
1. Select Tools, Login As.
The User Identification dialog box appears.
2. Enter the user name in the User Name text box.
3. Enter the password in the Password text box.
4. Click OK.
The title bar of the Supervisor window indicates the user name with whic h you
logged in.
Supervisor’s Guide 91
Deployment Guide.
NOTE
When you log into Supervisor as another user, you are automatically entitled to
all the rights of that user. However, you will also have any restrictions that any
supervisor may have set on that user.
Running other products from supervisor
From a Supervisor work session, you can launch a BusinessObjects session by
selecting Tools, Run, BusinessObjects.
If you are a supervisor-designer, then you can launch a Designer session by
selecting Tools, Run, Designer.
Other options
Page 92

92 Supervisor’s Guide
Customizing Your Environment
Page 93

Managing Users and Groups
5
chapter
Page 94

94 Supervisor’s Guide
Overview
The general supervisor is responsible for creating users and assigning profiles to
them. The users that are assigned the supervisor profile can then log in and
create users of their own.
When created, users and/or user groups are displayed in a tree list in the User
pane of the Supervisor window. Resources that may be granted appear in the
Resource pane of the window. Options for each type of resource appear in one
of five tabs.
title bar
menu
toolbar
the User
pane lists
all users
and user
groups
In the User pane, the root group (XYZ Company) represents the organization
(company, hospital, agency) created with the wizard during the installation of the
repository.
Managing Users and Groups
the Resource pane has tabs for assigning resources
Page 95

Open Group
Closed Group
Empty Group
Supervisor’s Guide 95
The structure of the list proceeds from the general to the specific; it also displays
the first general supervisor. The general supervisor has all the rights needed to
carry out user administration, and can delegate all or part of these rights when
defining other general supervisors or supervisors. Any action resulting in the
creation of users or user groups is automatically written to the security domain of
the repository. A user group is symbolized by a folder icon. This icon can be
displayed in one of three states: open, closed, or empty.
A group is “open” when it contains either users and/or groups displayed in the
User pane. The icon for an open group is preceded by a minus sign (-).
A “closed” group is a group containing components (users and/or groups) that are
not displayed in the User pane. You can display the components of a closed
group in the User pane by clicking the plus sign (+) beside the icon.
An empty group contains no components at all; it has no users and no groups.
There is no particular sign displayed with the empty group icon.
In the User pane, each user type is identified by a symbol as follows:
Symbol User Profile
User
Supervisor
Designer
Supervisor-Designer
Versatile User
Disabled User
General Supervisor
For full explanations of each of these user types, refer to User profiles on
page 18. You can also customize the display of users and groups in the User
pane. For more information, refer to Setting user and group sorting options on
page 76.
Page 96

96 Supervisor’s Guide
Techniques for creating users and user groups
You can use three techniques to organize users and groups in the User pane:
• You can create all user groups, and then add users to each group.
• You can create all users, then assign them to groups. To do this refer to
Managing users on page 114.
• You can create users and groups by importing a preformatted text file
containing the information that describes them. To do this refer to Importing
and Exporting Users and Groups on page 217.
This section describes how to create user groups and users.
Managing Users and Groups
Page 97

Managing user groups
You define users and user groups via the commands of the User menu or their
corresponding buttons on the toolbar.
a
a - to create a group
b - to create or modify group properties
You can also use the commands of the shortcut menu that appears when you
right-click a group. These commands are identical to those on the User menu.
Creating a group
The root group, which is automatically created during installation, represents
your organization. All other groups that you create will belong to this group.
Although you can rename the root group, you can never delete or lock it.
To create an additional group:
1. Click the group in which you want to create a new group.
2. Do one of the following:
New Group
3. In the name label, enter a name for the group, and press Enter.
b
During a first-time setup, you must click the root group.
- Select User, New, Group.
-Click New Group on the toolbar.
The new group appears immediately in the User pane.
Supervisor’s Guide 97
NOTE
You can customize certain aspects of the creation process. For more information,
refer to Quickly creating new users and groups on page 74.
Managing user groups
Page 98

98 Supervisor’s Guide
Defining group properties
Properties
You can simultaneously name and assign properties to the groups that you
create. To do this do one of the following:
• Right-click the group in the User pane, and select Properties
• Click Properties on the toolbar.
The Group Properties dialog box appears. Its title bar shows the name of the
group you selected. By default, the Definition tab of the dialog box appears.
!
!
Defining a group
! !
In the Definition tab of the Group Properties dialog box, assign ascendant groups.
To define the group:
1. Enter the name of the new group in the Name text box.
2. From the In Group drop-down list box, select the group to which the new
group is to belong.
By default, the group displayed is the one in which you created the new group.
Managing Users and Groups
Page 99

Supervisor’s Guide 99
!
!
Assigning users to a new group
! !
You can assign users to a new group in the Users and Profile tab of the Group
Properties dialog box.
If you have created no users yet, the left-hand list shows only the general
supervisor. Otherwise, it lists all the users you have already created.
The name of the group to which you want to assign users is dynamically
displayed both in the title bar and in the heading of the right-hand list: Users of
“group name.”
To assign a user to a group:
1. Select the user in the left-hand list.
2. Click Add.
The user appears in the right-hand list.
Managing user groups
Page 100

100 Supervisor’s Guide
!
!
Defining user profiles
! !
You can also quickly define or redefine the user profile; however, this profile is
valid only for the current group.
To define the user profile:
1. Click the user in the right-hand list.
2. Select a profile from the Profile drop-down list box.
At this point, you can do one of the following:
• Check the properties of the group by clicking OK. The Group Properties
dialog box is closed, and the icon symbolizing the new group appears in the
User pane. To view the new user in the group, double-click the group icon.
The symbol for the user appears in the User pane.
• Click the Timestamp tab to set restrictions on when the group can log into a
Business Objects product. See the next section for a description of this tab.
!
!
Controlling group login times
! !
You can specify a time period during which the users in a given group can log into
the Business Objects repository. This authorized login time is called a timestamp.
There are three types of timestamp, and they can be combi ned to allow powerful
and flexible control of authorized login times.
If you have any problems with timestamps defined with earlier versions of
Supervisor, you need to remove them and recreate them in the procedure
described below.
NOTE
Timestamps will only be taken into account if the "Work With Timestamps" option
is selected for the repository. This option is set in the Repository tab of the
Options dialog box, which is accessed by selecting Tools, Options. See Work
with timestamps on page 79 for details.
Timestamp inheritance
When a timestamp is created for a group, all users in the group and its subgroups
inherit the timestamp. The timestamp can only be removed from the group for
which it was created, at which point it is no longer inherited by the group’s users
and subgroups.
If a user belongs to several groups, it is the Groups And Profile tab of the User
Properties window that determines which timestamps govern that user’s login.
Managing Users and Groups
 Loading...