

Page 1

Getting Started
Release 4.70
Page 2

SAP Online Help
Copyright
© Copyright 2004 SAP AG. All rights reserved.
No part of this publication may be reproduced or transmitted in any form or for any purpose
without the express permission of SAP AG. The information contained herein may be
changed without prior notice.
Some software products marketed by SAP AG and its distributors contain proprietary
software components of other software vendors.
Microsoft, Windows, Outlook, and PowerPoint are registered trademarks of Microsoft
Corporation.
IBM, DB2, DB2 Universal Database, OS/2, Parallel Sysplex, MVS/ESA, AIX, S/390, AS/400,
OS/390, OS/400, iSeries, pSeries, xSeries, zSeries, z/OS, AFP, Intelligent Miner,
WebSphere, Netfinity, Tivoli, and Informix are trademarks or registered trademarks of IBM
Corporation in the United States and/or other countries.
Oracle is a registered trademark of Oracle Corporation.
UNIX, X/Open, OSF/1, and Motif are registered trademarks of the Open Group.
Citrix, ICA, Program Neighborhood, MetaFrame, WinFrame, VideoFrame, and MultiWin are
trademarks or registered trademarks of Citrix Systems, Inc.
HTML, XML, XHTML and W3C are trademarks or registered trademarks of W3C®, World
Wide Web Consortium, Massachusetts Institute of Technology.
Java is a registered trademark of Sun Microsystems, Inc.
JavaScript is a registered trademark of Sun Microsystems, Inc., used under license for
technology invented and implemented by Netscape.
MaxDB is a trademark of MySQL AB, Sweden.
SAP, R/3, mySAP, mySAP.com, xApps, xApp, SAP NetWeaver, and other SAP products and
services mentioned herein as well as their respective logos are trademarks or registered
trademarks of SAP AG in Germany and in several other countries all over the world. All other
product and service names mentioned are the trademarks of their respective companies.
Data contained in this document serves informational purposes only. National product
specifications may vary.
These materials are subject to change without notice. These materials are provided by SAP
AG and its affiliated companies ("SAP Group") for informational purposes only, without
representation or warranty of any kind, and SAP Group shall not be liable for errors or
omissions with respect to the materials. The only warranties for SAP Group products and
services are those that are set forth in the express warranty statements accompanying such
products and services, if any. Nothing herein should be construed as constituting an
additional warranty.
Getting Started 4.70 2
Page 3
SAP Online Help
program names, transaction codes, table names, and key concepts of a
Icons in Body Text
Icon Meaning
Additional icons are used in SAP Library documentation to help you identify different types of
information at a glance. For more information, see Help on Help → General Information
Classes and Information Classes for Business Information Warehouse on the first page of any
version of SAP Library.
Caution
Example
Note
Recommendation
Syntax
Typographic Conventions
Type Style Description
Example text
Words or characters quoted from the screen. These include field
names, screen titles, pushbuttons labels, menu names, menu paths,
and menu options.
Cross-references to other documentation.
Example text
EXAMPLE TEXT Technical names of system objects. These include report names,
Example text
Example text
<Example text>
EXAMPLE TEXT
Emphasized words or phrases in body text, graphic titles, and table
titles.
programming language when they are surrounded by body text, for
example, SELECT and INCLUDE.
Output on the screen. This includes file and directory names and their
paths, messages, names of variables and parameters, source text, and
names of installation, upgrade and database tools.
Exact user entry. These are words or characters that you enter in the
system exactly as they appear in the documentation.
Variable user entry. Angle brackets indicate that you replace these
words and characters with appropriate entries to make entries in the
system.
Keys on the keyboard, for example, F2 or ENTER.
Getting Started 4.70 3
Page 4

SAP Online Help
Getting Started...........................................................................................................................8
Getting Started: Accessibility Supplement .............................................................................8
Selecting the Accessibility Option .......................................................................................9
R/3 Enterprise Navigation...................................................................................................9
Moving the Focus to the Initial Position...........................................................................9
Navigating with the Tab Key .........................................................................................10
Starting a Transaction...................................................................................................10
Finding Shortcut Keys for Functions.............................................................................10
Screen Elements Usage with the Keyboard.....................................................................11
Using ABAP Lists..........................................................................................................11
Using Checkboxes ........................................................................................................12
Data Tables Usage........................................................................................................12
Using a Data Table in a Standard Table ...................................................................12
Using a Data Table in an ALV Grid ...........................................................................13
Using a Data Table in a Steploop..............................................................................13
Using Dropdown Lists ...................................................................................................13
Displaying Error and Status Messages.........................................................................13
Using Graphics and Icons.............................................................................................14
Using Group Boxes.......................................................................................................14
Using Input Fields..........................................................................................................14
Using the Menu Bar, Dropdown Menus, and Standard Toolbar...................................15
Using Pushbuttons........................................................................................................15
Using Radio Buttons......................................................................................................16
Using Subwindows........................................................................................................16
Using Tabstrips .............................................................................................................16
Using Text Areas...........................................................................................................17
Using Toolbars..............................................................................................................17
Using Trees...................................................................................................................17
Working with the SAP GUI ...................................................................................................18
SAP Easy Access.............................................................................................................18
SAP Easy Access Settings ...........................................................................................19
Using the Navigation Area ............................................................................................20
Creating Favorites.........................................................................................................21
Managing Favorites.......................................................................................................22
Roles .............................................................................................................................23
System Administrator Functions ...................................................................................24
The SAP Window..............................................................................................................26
Release 4.6: The New SAP GUI...................................................................................28
The Menu Bar................................................................................................................31
Getting Started 4.70 4
Page 5

SAP Online Help
The Status Bar ..............................................................................................................32
Tabs...............................................................................................................................32
Table Controls...............................................................................................................33
Creating Table Control Variants................................................................................34
Activating Table Control Variants..............................................................................35
Radio Buttons and Checkboxes....................................................................................35
Dialog Boxes .................................................................................................................36
Scrolling to View Information.........................................................................................36
Customizing the Display Options......................................................................................38
Configuring the SAP GUI ..............................................................................................39
SAP GUI Color Settings ............................................................................................41
SAP GUI Sound and Animation Settings...................................................................44
Customizing the SAP Window ......................................................................................46
Tabbing Between Fields Automatically......................................................................48
Cursor Position and Width.........................................................................................49
Creating Screen Shots...............................................................................................50
Multiple SAP Sessions ......................................................................................................50
Creating a New Session................................................................................................50
Creating a New Session and a Task at Once...............................................................51
Moving Among Sessions...............................................................................................52
Ending a Session ..........................................................................................................52
Startup and Shutdown of the SAP System.......................................................................53
Starting the SAP System...............................................................................................53
Logging On....................................................................................................................54
Logging On the First Time.........................................................................................55
The SAP Logon......................................................................................................58
Adding and Editing Entries Manually .................................................................59
Adding a New Logon User Group ......................................................................60
Adding an Application Server.............................................................................60
Configuring the SAP Logon................................................................................61
Passwords.....................................................................................................................62
Changing Your Password..........................................................................................63
SAP Shortcuts...............................................................................................................64
Creating an SAP Shortcut .........................................................................................65
Using SAP Shortcuts.................................................................................................67
Logging Off....................................................................................................................68
What Are the Steps in a Typical Task?.............................................................................69
Accessing Tasks in the SAP System............................................................................69
Choosing Menus and Functions with the Mouse.......................................................70
Choosing Menus and Functions with the Keyboard..................................................72
Getting Started 4.70 5
Page 6

SAP Online Help
Task Selection with Transaction Codes ....................................................................73
Finding the Transaction Code for the Task You Want to Start..............................74
Finding the Transaction Code for the Current Task...............................................75
Entering a Transaction Code.................................................................................76
Choosing a Transaction Code from the History List..............................................77
Entering Data on a Screen............................................................................................77
Fields .........................................................................................................................78
Insert and Overwrite Modes...................................................................................80
Typing Data into an Input Field..............................................................................80
Changing the Data in an Input Field......................................................................80
Moving from Field to Field......................................................................................81
Using the Clipboard ...............................................................................................82
Required Input Fields.............................................................................................83
Hold Data and Set Data.............................................................................................83
Holding Data on a Screen......................................................................................84
Canceling All the Data on a Screen..............................................................................84
Saving the Data on a Screen........................................................................................85
Going to Related Tasks.................................................................................................85
Ending a Task ...............................................................................................................86
Reports .............................................................................................................................86
Executing a Report........................................................................................................87
Finding the Name of a Report You Want to Execute ................................................89
Finding the Name of a Current Report ......................................................................91
Selection Criteria...........................................................................................................91
Entering Values for Selection Criteria........................................................................92
Report Variants .............................................................................................................93
Creating Report Variants...........................................................................................93
Displaying Available Report Variants ........................................................................95
Using Report Variants................................................................................................96
Report List Output.........................................................................................................97
Displaying and Printing Report Lists..........................................................................97
Lists...................................................................................................................................99
Printing from the SAP System........................................................................................100
Print Options in the SAP Spool System......................................................................101
The Print Window........................................................................................................101
Output Controller.........................................................................................................104
Working with the Output Controller..........................................................................104
Defining Default Values...............................................................................................105
Background Processing..................................................................................................105
Accessing the Background Processing System..........................................................106
Getting Started 4.70 6
Page 7

SAP Online Help
Scheduling Background Jobs......................................................................................107
Scheduling ABAP Jobs............................................................................................108
Scheduling Standard Jobs.......................................................................................109
Identifying Your Job.............................................................................................109
Specifying a Recipient .........................................................................................109
Choosing a Start Time.........................................................................................110
Specifying the Program to Run............................................................................111
Checking the Status of a Background Job..................................................................112
Help on Help.......................................................................................................................113
SAP Library.....................................................................................................................114
Application Help..............................................................................................................114
General Information Classes ..........................................................................................114
Information Classes for Business Information Warehouse.............................................117
Icons and Typographic Conventions ..............................................................................120
Full-Text Search..............................................................................................................121
Index ...............................................................................................................................124
Glossary ..........................................................................................................................125
Searching the Glossary...............................................................................................125
Quick Infos......................................................................................................................125
Data Tips.........................................................................................................................126
Help on Fields and Field Input........................................................................................126
Help on Possible Entries for a Field................................................................................127
Help on Reports..............................................................................................................128
Help on Messages..........................................................................................................129
Status Information About Your System...........................................................................129
Release Notes ................................................................................................................131
Getting Started 4.70 7
Page 8

SAP Online Help
Getting Started
Getting Started: Accessibility Supplement
Purpose
This document is intended to assist SAP users who have disabilities and require information
about accessibility features in SAP R/3 Enterprise. It includes background information such as
the software environment required to take advantage of SAP accessibility features, and it
describes how to use the accessibility features. It is meant as a supplement to the general
Getting Started document, not as a replacement.
The primary audience for this document is SAP users with disabilities, including motor
impairments and visual impairments. This document contains information for both disabled
users who use assistive technologies and those who do not use assistive technologies but
need full keyboard access.
Implementation Considerations
To ensure accessible use of R/3 Enterprise, you must have the software environment
described here.
Server:
• Internet Transaction Server (ITS) 6.20 (the changes are also available with the most
recent patch for ITS 6.10)
• R/3 Enterprise with an HTML front end (SAPGUI for HTML)
Client:
• Windows NT
• Microsoft Internet Explorer 4.x or higher (SAP recommends IE 5.x or higher)
• The accessibility option must be selected. For more information about selecting the
accessibility option, see Selecting the Accessibility Option [Seite 9].
• If a screen reader is required: JAWS for Windows 4.x by Freedom Scientific
• If screen magnification software is required: Magic Version 6.2 by Freedom Scientific
Although SAP R/3 Enterprise may function properly with other assistive
technology software such as other screen readers or other screen magnification
programs, SAP’s support is currently provided for the following assistive
technologies: JAWS for Windows 4.x screen reader and Magic 6.2 screen
magnifier. SAP JAWS support assumes that the screen reader is used with all of
the default settings.
Note that in JAWS, technical names of R/3 buttons also appear in the links list,
along with any links there may be on the screen.
Getting Started 4.70 8
Page 9

SAP Online Help
Selecting the Accessibility Option
Use
In order to use the accessibility features of R/3 Enterprise, you must ensure that the
accessibility option has been selected.
Procedure
...
1. To select the accessibility option, on the system logon screen, make sure the
Accessibility checkbox is checked.
R/3 Enterprise Navigation
Purpose
This section contains information on navigating on R/3 Enterprise screens using the
keyboard.
Note for JAWS users: SAP does not recommend using the virtual PC cursor for general
navigation on SAP screens. Accessible use of R/3 Enterprise is based on navigation using
the Tab key. However, in certain circumstances, it may be appropriate to switch to the JAWS
virtual PC cursor mode, for example if an input field does not appear to have a label, and you
want to explore the area around the field to determine whether a label is available. Other
specific circumstances under which it is useful to switch to the virtual PC cursor are described
in this document.
Process Flow
To navigate on an R/3 Enterprise screen, you begin by moving the focus to the initial position.
To move between screen elements, you use the Tab key. To start a transaction, you can
navigate to that transaction using the menus or you can enter the transaction code for that
transaction directly into a transaction code field. Finally, you can use shortcut keys to access
functions on the screen.
Moving the Focus to the Initial Position
Use
When you first open a screen in an SAP application, the focus may or may not be on the first
user interface element on that screen. To ensure that the focus is at the top of the screen
before you begin navigating, you must move the focus to the initial position, which is the
browser’s address field.
Procedure
...
1. To place the cursor in the browser’s address field when you first open a screen, use the
Windows key command Ctrl+Tab.
Getting Started 4.70 9
Page 10
SAP Online Help
Result
This will place the cursor into the browser’s address field, from where you can start navigating
to the user interface elements on the screen.
Navigating with the Tab Key
Procedure
...
1. When you are using R/3 Enterprise with the accessibility option selected, to navigate
between user interface elements, use the Tab key. You use the tab key regardless of
whether you are using assistive technology such as a screen reader or screen
magnifier, or not.
Note for JAWS users: Be sure you are using PC cursor mode when you
navigate in an SAP screen.
The general tab order in all SAP applications is from left to right, top to bottom.
In R/3 Enterprise, you cannot navigate to freestanding text, graphics and icons
that are not on pushbuttons, labels, or short descriptions using the Tab key.
These elements are not included in the tab chain
Starting a Transaction
Procedure
...
1. In R/3 Enterprise, to start a transaction, select the transaction from a menu in the menu
bar or from a menu tree. Alternatively, you can enter a transaction code for that
transaction into the transaction code field (which is located in the toolbar). Often,
entering a transaction code is a much quicker way to access the transaction. For
information about the transaction codes that correspond to the menu items you want to
use, see your system administrator.
Note for JAWS users: When you first open an R/3 Enterprise screen, when you
tab to the menu bar, you can press T to go directly to the transaction code input
field.
The first time you reach the initial screen of a transaction, SAP recommends
listening to the entire screen in the JAWS Say All mode to gain an overview
before navigating through the screen using the Tab key.
Finding Shortcut Keys for Functions
Procedure
...
Getting Started 4.70 10
Page 11
SAP Online Help
1. To find the shortcut keys that are available for certain functions on an R/3 Enterprise
screen, open the Functions menu in the menu bar. The Functions menu provides a list
of all of the shortcut keys that are available on that screen.
Screen Elements Usage with the Keyboard
Purpose
This section provides information about navigating between user interface elements in R/3
Enterprise using the keyboard, as well as how to execute functions. In cases where additional
features are available to users using JAWS for Windows, that information is noted as well.
Warning: Using the Esc key at any time while you are working in an R/3 Enterprise
transaction will cause the transaction to exit, and you will lose any unsaved data.
Process Flow
Accessing an R/3 Enterprise screen using the keyboard involves using the following
elements:
• ABAP lists
• Checkboxes
• Data tables
• Dropdown lists
• Error and status messages
• Graphics and icons
• Group boxes
• Input fields
• Menu bar, dropdown menus, and standard toolbar
• Pushbuttons
• Radio buttons
• Subwindows
• Tabstrips
• Text areas
• Toolbars
• Trees
Using ABAP Lists
Use
An ABAP list is a control that is used to display a data table, a tree, or a simple list of items.
Getting Started 4.70 11
Page 12
SAP Online Help
The scroll bars in an ABAP list are not accessible using the keyboard. However,
buttons are available above the data in an ABAP list that you can use to scroll
lines and pages in the ABAP list.
For JAWS users: When you tab to an ABAP list, JAWS announces that you are entering an
ABAP list. At this point, switch to the JAWS virtual PC cursor to navigate in the ABAP list text.
Using Checkboxes
Use
When you tab to a checkbox, if the checkbox is enabled, you can check or uncheck the
checkbox using the Spacebar.
For JAWS users: JAWS announces the label of the checkbox, tells you whether it is
currently checked or unchecked, and whether it is disabled (unavailable).
Data Tables Usage
Purpose
R/3 Enterprise data tables are created using several different programming controls, including
standard tables, ALV grids, and steploops. Depending on the control used to create a
particular data table, keyboard navigation and screen reader announcements differ slightly.
Using a Data Table in a Standard Table
Use
When you tab to a data table in a standard table, you can navigate between the data cells
using the Tab key. You use the element in the table cell (input field, checkbox, dropdown list,
pushbutton etc.) the same way you use it elsewhere on the screen.
For JAWS users: When you tab to a data table, JAWS announces that you are entering a
table, tells you how many rows the table has, tells you how many rows are currently
displayed, and tells you how to skip the table.
When you tab into the column header row, JAWS announces that you are entering the header
row. When you tab to a column header in the row, JAWS announces that it is a column
header and tells you the name of the header. When you tab out of the column header row,
JAWS announces that you are leaving the header row.
When you tab to a data cell, JAWS announces the cell contents (if any are available), tells
you if input help is available (assuming this is an input field and input help is available), and
lets you know if the cell is disabled (unavailable).
When you are on a data cell in the data table, you can use the JAWS virtual PC cursor to
determine the column header for that data cell. To do so, while in the virtual PC cursor mode,
press Alt + Ctrl + NumPad 5 .
When you tab out of the data table entirely, JAWS announces that you are leaving the table.
Getting Started 4.70 12
Page 13
SAP Online Help
Using a Data Table in an ALV Grid
Use
Data tables in ALV grids behave the same as tables in standard tables, except that if you are
using JAWS, the screen reader announces that you are entering and exiting an ALV grid
instead of announcing that you are entering and exiting a table, and it provides additional
information and instructions.
Using a Data Table in a Steploop
Use
Data tables in steploops behave the same as tables in standard tables, with the following
exceptions:
• If you are using JAWS, the screen reader announces that you are entering and exiting a
steploop instead of announcing that you are entering and exiting a table.
• If you are using JAWS, when you tab to a data cell, JAWS announces the column and
row headers, as well as the cell contents (if any are available), tells you if input help is
available (assuming this is an input field and input help is available), and lets you know if
the cell is disabled (unavailable).
Using Dropdown Lists
Procedure
When you tab to a dropdown list, if the list is enabled, proceed as follows:
Function User Action
To open the list, press Alt + Down Arrow.
To navigate between the items in the dropdown
list,
To select an item from the dropdown list, navigate to that item, then close the list by
For JAWS users: JAWS announces the label of the dropdown list, how many items are in the
list, which item in the list is currently selected, and whether the list is disabled (unavailable).
use the Up and Down Arrow keys.
pressing Alt + Up Arrow (the item that has the
focus when you close the list is selected).
Displaying Error and Status Messages
Use
In R/3 Enterprise, with the accessibility option selected, error and status messages are
actively identified to the user in browser pop-up windows. In addition, all messages appear in
Getting Started 4.70 13
Page 14
SAP Online Help
the R/3 Enterprise status bar at the bottom of the screen (note that this is not the browser
status bar).
Using Graphics and Icons
Use
In R/3 Enterprise, you cannot tab to graphics or icons that are not on pushbuttons. However,
very few such graphics or icons are used to convey meaning.
Using Group Boxes
Use
A group box is an SAP user interface element that groups together several other user
interface elements. It is similar to a frame, although it is not a standard HTML frame.
For JAWS users: When you tab to a group box, JAWS announces that you are entering a
group box and tells you the group box title, as well as how to skip the group box. When you
tab out of the group box, JAWS announces that you are leaving the group box.
Using Input Fields
Use
When you tab to an input field that is enabled, you can enter data as necessary.
For JAWS users: When you tab to a single input field, JAWS announces the label of the
input field, the short description if one is available, how to access input help if it is available,
and whether the field is disabled (unavailable).
When you tab to an input field that is the first in a series of input fields associated with a
single label, JAWS announces the field label and how to access input help if it is available,
then it tells you that the label has X number of input fields associated with it and that this is
the first input field. It also announces the short description if there is one, and whether the
field is disabled (unavailable). For all subsequent input fields associated with that label, JAWS
announces only which number of input field it is (second, third, and so on).
Example
If there were two input fields with a single, common label “country,” when you tab to the first
input field, JAWS would announce “country this field has two input fields first input field edit
type a text.” When you tab to the second input field, JAWS would announce “second input
field edit type a text.”
Getting Started 4.70 14
Page 15

SAP Online Help
Using the Menu Bar, Dropdown Menus, and
Standard Toolbar
Procedure
When you tab to the menu bar, to use the menus, proceed as follows:
Function User Action
To move from menu to menu, use the Tab key
To open a menu, press Enter.
To move between the menu items on the open
menu,
To select a menu item, press Enter.
If a menu item has a submenu, to open the
submenu,
To close a menu, tab out of the menu.
When you tab to the toolbar, you can navigate between the items in the toolbar using the Tab
key. You use the items in the toolbar (input field, pushbuttons, etc.) the same way you use
them elsewhere on the screen.
You have the option to skip the entire menu bar and toolbar. When you tab to the menu bar
(and the focus is on the menu bar), press S to skip.
For JAWS users: When you tab to the menu bar and toolbar, JAWS announces that you are
entering the menus and standard toolbar and tells you how to skip the entire menu bar and
toolbar; it also tells you that you can go directly to the transaction code input field to enter a
transaction code directly. When you tab again, JAWS announces that you are entering the
menu section and tells you how to open individual menus.
When you tab to a menu, JAWS announces the menu name and tells you it is a menu. It also
tells you if the menu is disabled (unavailable).
When you tab to a menu item on an open menu, JAWS announces the menu level and the
name of the menu item, as well as whether it is disabled (unavailable), and tells you whether
the menu item has a submenu.
use the Up and Down Arrow keys.
use the Right Arrow key.
When you tab out of the menu bar, JAWS announces that you are leaving the menu section.
When you tab out of the toolbar, JAWS announces that you are leaving the menus and the
standard toolbar.
Using Pushbuttons
Use
When you tab to a pushbutton, you can execute the button’s function by pressing Enter.
For JAWS users: When you tab to a pushbutton, JAWS announces the button’s text label
and whether it is disabled (unavailable). If there is a shortcut key for the button, that is also
announced.
Getting Started 4.70 15
Page 16
SAP Online Help
Using Radio Buttons
Use
When you tab into a set of enabled radio buttons, you always tab to the currently selected
radio button. To move between the radio buttons in the set, use the Up and Down Arrow keys.
Note that moving to a different radio button activates that radio button. To leave the radio
button set, press Tab (the radio button that has the focus when you leave the set remains
selected).
When you tab into a set of disabled radio buttons, you can move between the radio buttons in
the set using the Tab key.
For JAWS users: When you tab to a radio button, JAWS announces the radio button’s label
and tells you that it is checked. If the radio button is disabled, JAWS announces that it is
disabled and tells you whether it is checked or unchecked.
Using Subwindows
Use
You can use the Tab key to move between elements in subwindows.
For JAWS users: When you tab to a subwindow, JAWS announces that you are entering a
subwindow. When you tab out of the subwindow, JAWS announces that you are leaving the
subwindow.
Using Tabstrips
Procedure
Using R/3 Enterprise tabstrips, there are several ways to move through and activate the tabs,
depending on the access technology you are using.
Keyboard-only, non-screen-reader users: When you tab to a tabstrip, proceed as follows:
...
1. Tab until you reach the tab selection button.
2. Activate the tab selection button by pressing Enter. A dropdown menu appears
containing all of the tab names.
3. To navigate between the tab names, use the Up and Down Arrow keys.
4. To select a tab name, press Enter. The selected tab becomes the active tab and that
tab page opens.
5. To exit the tabstrip, tab through the end of the active tab page.
Users using Magic with a mouse:
• To activate a tab on the tabstrip, click on the tab name.
• To view hidden tabs, click on the tab selection button. A drop-down menu appears
containing all of the tab names. To select a tab name click on the tab name on the dropdown menu.
JAWS users: When you tab to a tabstrip, proceed as follows:
• To move between tabs on the tabstrip, use the Tab key.
Getting Started 4.70 16
Page 17

SAP Online Help
• To activate a tab on the tabstrip, press Enter.
• To exit the tabstrip, you must tab through the end of the active tab page.
When you tab to the tabstrip, JAWS announces that you are entering the tabstrip, and it tells
you what level tabstrip it is.
When you tab to a tab on the tabstrip, JAWS announces the tab name and tells you if it is the
active tab.
When you tab out of the active tab page, JAWS announces that you are leaving the tabstrip.
Using Text Areas
Use
When you tab to a text area, if that area is enabled, you can enter text as necessary.
For JAWS users: JAWS announces the label of the text area and tells you that you are
entering a text area, as well as whether the text area is disabled (unavailable).
Using Toolbars
Use
When you tab to a toolbar, you can navigate between the items in the toolbar using the Tab
key. You use the items in the toolbar (pushbuttons, input fields, etc.) the same way you use
them elsewhere on the screen.
For JAWS users: When you tab to a toolbar, JAWS announces that you are entering a
toolbar. When you tab out of the toolbar, JAWS announces that you are leaving the toolbar.
Using Trees
Procedure
When you tab to a tree, proceed as follows:
Function User Action
To move between the nodes in the tree, use the Tab key.
To expand or collapse a node, use the Right and Left Arrow keys.
To activate an end node, use the Enter key.
For JAWS users: When you tab to the tree, JAWS announces that you are entering the tree.
If the tree is a tree table (a table with expandable and collapsible rows) and it has column
headers, when you tab to a column header in the tree table, JAWS announces the name of
the header and tells you it is a tree column header.
Getting Started 4.70 17
Page 18
SAP Online Help
When you tab to a node in the tree, JAWS announces the level of the node, tells you whether
it is expanded or collapsed. When you tab again, it tells you the node label. If the node is an
end node, no announcement is made regarding whether the node is expanded or collapsed.
When you tab out of the tree, JAWS announces that you are leaving the tree.
Working with the SAP GUI
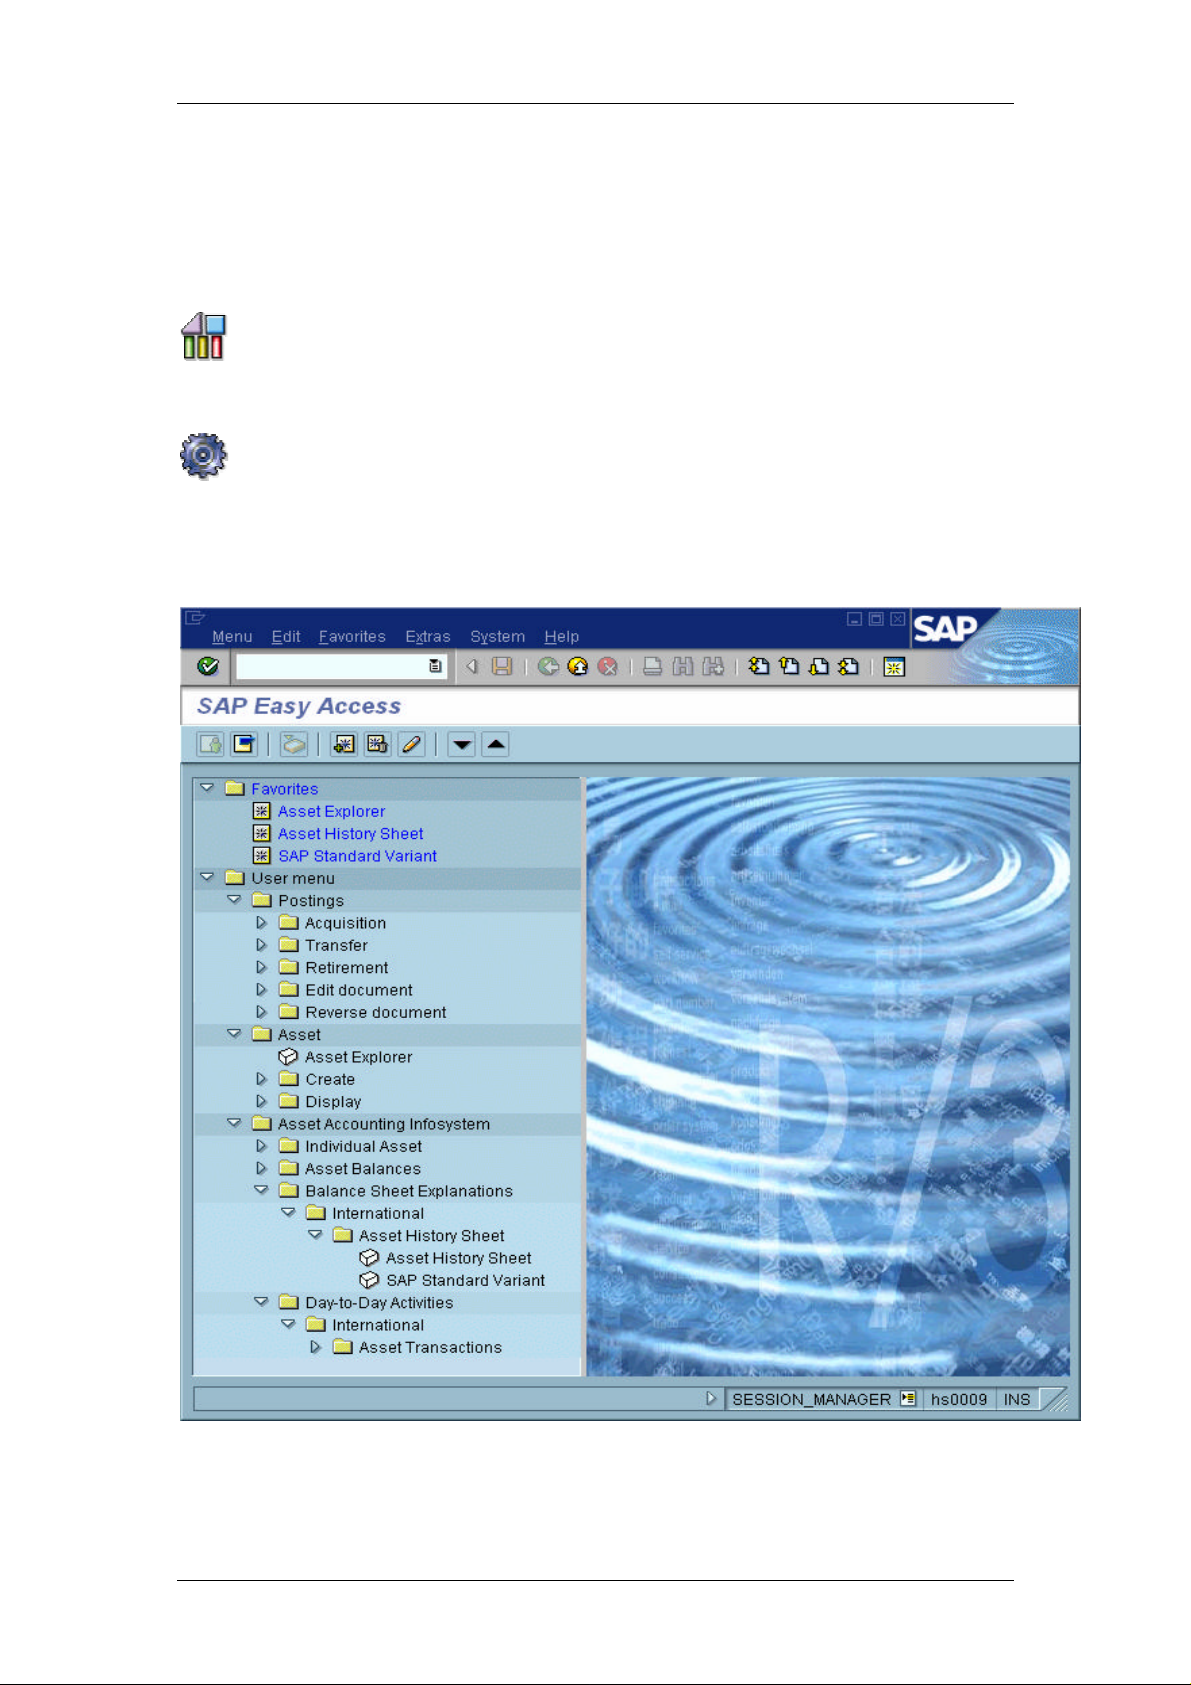
SAP Easy Access
Use
The new SAP Easy Access user menu is the user-specific point of entry into the SAP
System.
The user menu contains only those items – such as transactions, reports, and Web
addresses – you need to perform your daily tasks.
If a user menu has been defined by your system administrator, it appears when you log on to
the system.
Getting Started 4.70 18
Page 19
SAP Online Help
If you have not been assigned a user menu, or you need to access items that
are not contained in your user menu:
• Open the SAP standard menu by choosing Menu → SAP standard menu. You now
have a complete overview of the SAP System you are currently working with. Use the
navigation area to navigate to the items you need.
• Or, contact your system administrator. See System Administrator Functions [Seite 24].
On the SAP Easy Access initial screen, you can also:
• Create a favorites list consisting of the transactions, files, and Web addresses you use
most frequently
• Go to SAP Business Workplace, if you are using Work items. See Working with the
Business Workplace [Extern].
Additional Information
Roles [Seite 23]
SAP Easy Access Settings
Procedure
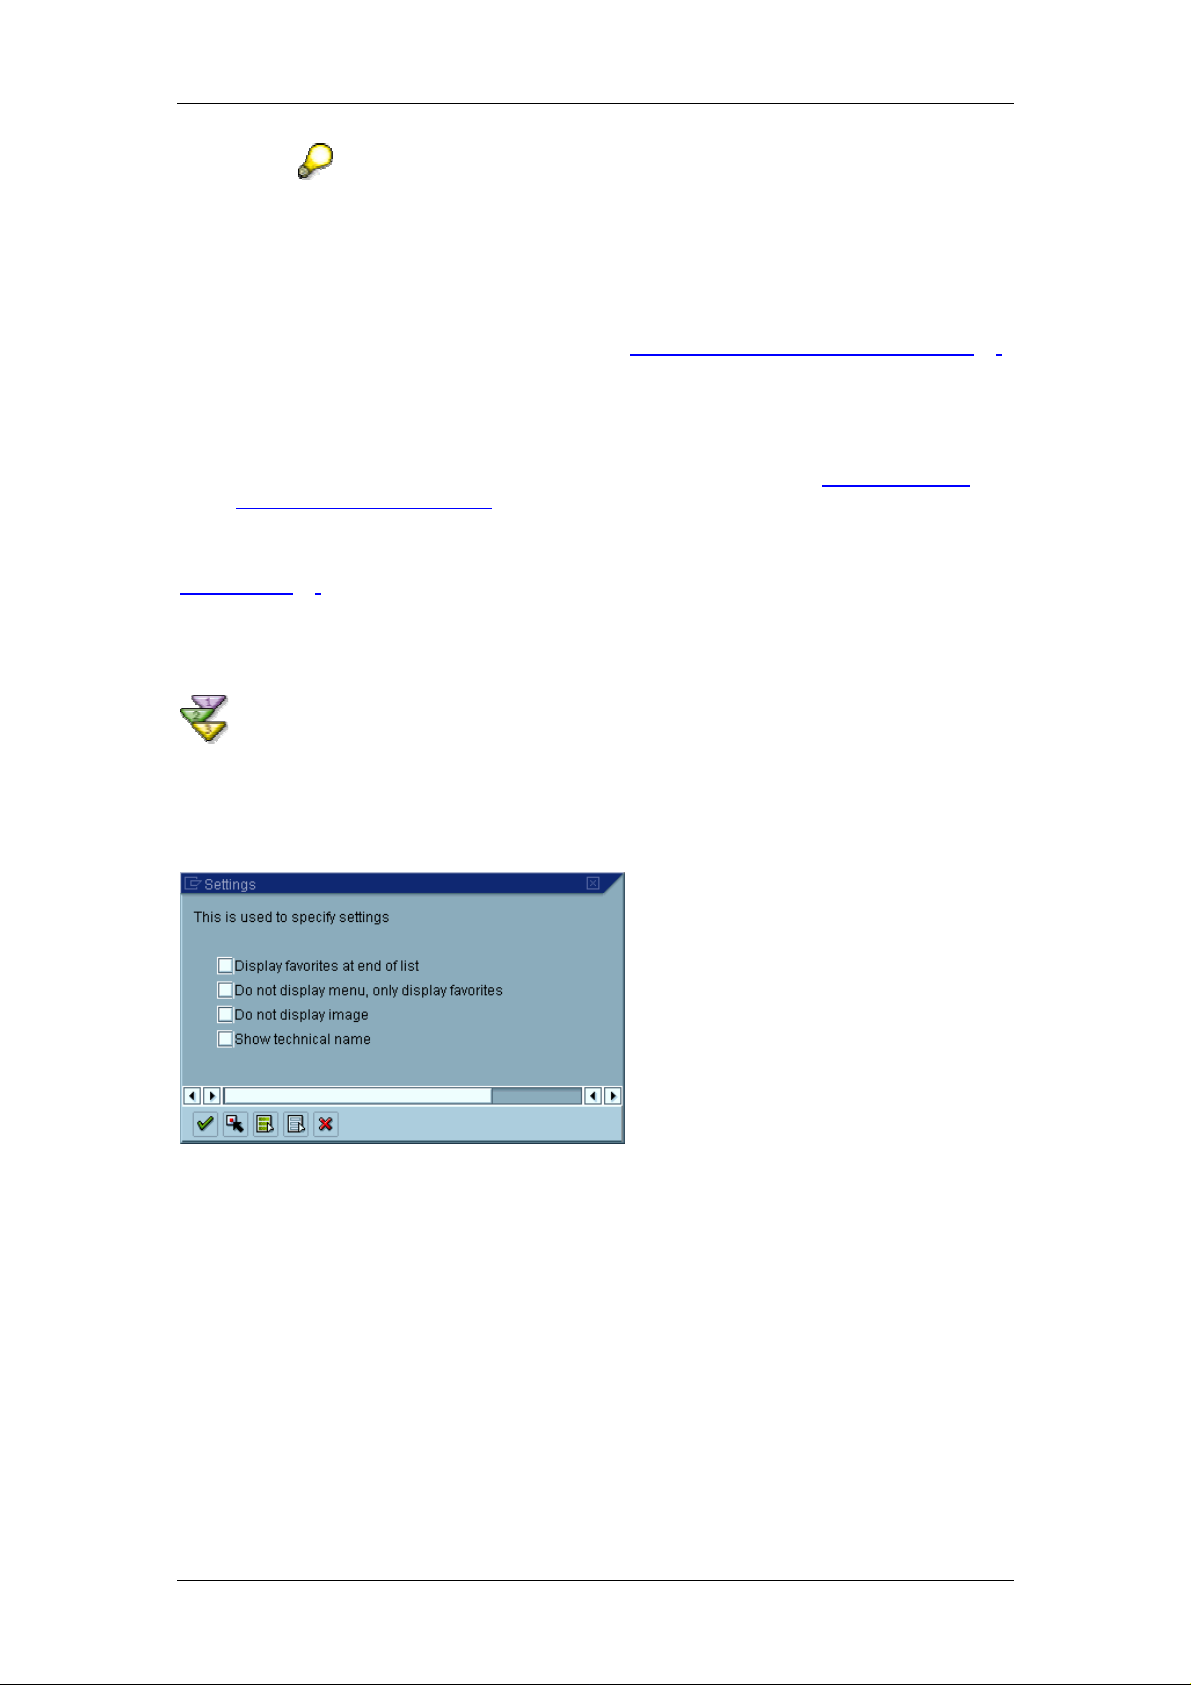
To make SAP Easy Access settings, choose Extras → Settings. The following dialog box
appears:
Here, you can specify whether:
• Your favorites should appear before or after the menu
• Only your favorites, and not the menu, should appear
• Technical names of menu options should appear in the navigation area
• The SAP Easy Access graphic should appear on the right-hand side of the screen, as
shown below:
Getting Started 4.70 19
Page 20

SAP Online Help
You can hide this graphic by dragging the split bar from the center to the righthand edge of the screen. To deactivate the graphic completely, select Do not
display image.
You can also define whether a user or an SAP standard menu should appear. To make this
setting, choose either Menu → User menu or Menu → SAP standard menu.
Using the Navigation Area
Procedure
You can expand and collapse menus in the navigation area by choosing the dropdown
arrows to the left of the menu items, as in the example below:
Getting Started 4.70 20
Page 21

SAP Online Help
To open an application in the navigation area:
• Double-click its node, or
• Choose Enter, or
• Choose Edit → Execute
To run an application in a new session, choose Edit → Run in new window.
You can access the most important commands and functions in the navigation
area by opening the context menu. To open the context menu, place the cursor
on any item in the menu bar, and click the alternate mouse button.
Creating Favorites
Use
In SAP Easy Access, you can create a favorites list containing:
• Transactions
• Files
• Web addresses
Procedure
Inserting an Item from the SAP Standard or User Menu
Use drag and drop:
...
1. Select an executable menu item using the mouse, and keep the mouse button pressed.
Getting Started 4.70 21
Page 22

SAP Online Help
2. Drag the item to the desired position in your favorites list, and release the mouse
button.
3. The new item appears below the position where you dropped it.
Or, use the menu bar:
...
1. Select an executable item in the user menu.
2. Choose Favorites → Add.
3. The new item appears at the end of your list.
Inserting a Transaction
...
1. Choose Favorites → Insert transaction.
2. The following dialog box appears:
3. Enter the transaction code, and choose Continue.
4. The new item appears at the end of your list, and is automatically labeled with the
transaction name.
Inserting a Web Address or a File
...
1. Choose Favorites → Link or file
2. The following dialog box appears:
3. Enter a name and the Web address or file name, and choose Continue.
• The Web address should start with http://...
EXAMPLE: http://www.sap.com
• The file name should have the format: X:\filename\filepath.
EXAMPLE: C:\Texts\SAP.doc. You can only use this function if you can
access local files from your Web browser.
Managing Favorites
Use
SAP Easy Access allows you to organize your favorites by:
• Creating folders in your favorites list
• Moving, renaming, or deleting favorites and folders
Getting Started 4.70 22
Page 23

SAP Online Help
Procedure
Inserting Folders
...
1. Choose Favorites → Insert folder.
2. A dialog box appears. Enter a name, and choose Continue.
3. The new folder appears below the currently selected favorite.
Moving Favorites and Folders
To move favorites or folders within a hierarchy level:
...
1. Select the favorite or folder you want to move.
2. Choose Favorites → Move → Up/Down; or choose Move favorites downwards /Move
favorites upwards.
3. Repeat this step until the favorite or folder is where you want it.
To move favorites or folders between hierarchy levels, use drag and drop:
...
1. Select the favorite or folder with the mouse, and keep the mouse button pressed.
2. Drag the favorite or folder to the desired position in the favorites list, and release the
mouse button.
3. The favorite or folder appears below the position where you let it go.
Renaming Favorites and Folders
...
1. Select the favorites or folders you want to rename.
2. Choose Favorites → Change.
3. A dialog box appears. Enter a new name, and choose Continue.
Or:
From the context menu, choose Change favorites. To open the context menu, click the
alternate mouse button.
Deleting Favorites and Folders
...
1. Select the favorites or folders you want to delete.
2. Choose Favorites → Delete.
Or:
From the context menu, choose Delete favorites. To open the context menu, click the
alternate mouse button.
When you remove a favorite from your favorites list, you are not actually deleting
the respective file, program, or transaction; you are merely removing a link to
that particular item.
Roles
Use
Roles are collections of activities used in business scenarios. Users access the transactions,
reports, or Web-based applications through user menus. The SAP Standard contains a large
number of predefined roles.
Getting Started 4.70 23
Page 24

SAP Online Help
When a role is assigned to a user, the menu for that role appears when the user logs on to
the system. The integrity of business data is also ensured by the assignment of roles.
Authorization profiles are generated which restrict the activities of users in the SAP System,
depending on the activities in the roles.
The mySAP.com Workplace provides users with a portal via a Web browser to perform his or
her tasks. Roles can be assigned here as well.
The user can change the roles assigned to him or her as required. He or she can. for example
Create [Seite 21] and Manage [Seite 22] Favorites.
The system administrator can tailor the user menu to the personal requirements of each user,
by adding or deleting menu entries.
For more information about role-specific system administrator functions, see System
administrator functions [Seite 24].
System Administrator Functions
Use
There are various ways in which the system administrator can define user menus for the staff
in a company.
He or she can:
• Directly assign roles to a user
• Change and Assign Roles
• Create Roles
If you have system administrator authorization, SAP Easy Access provides additional
functions that enable you to:
• Call role menus and assign users to the menus
• Create roles
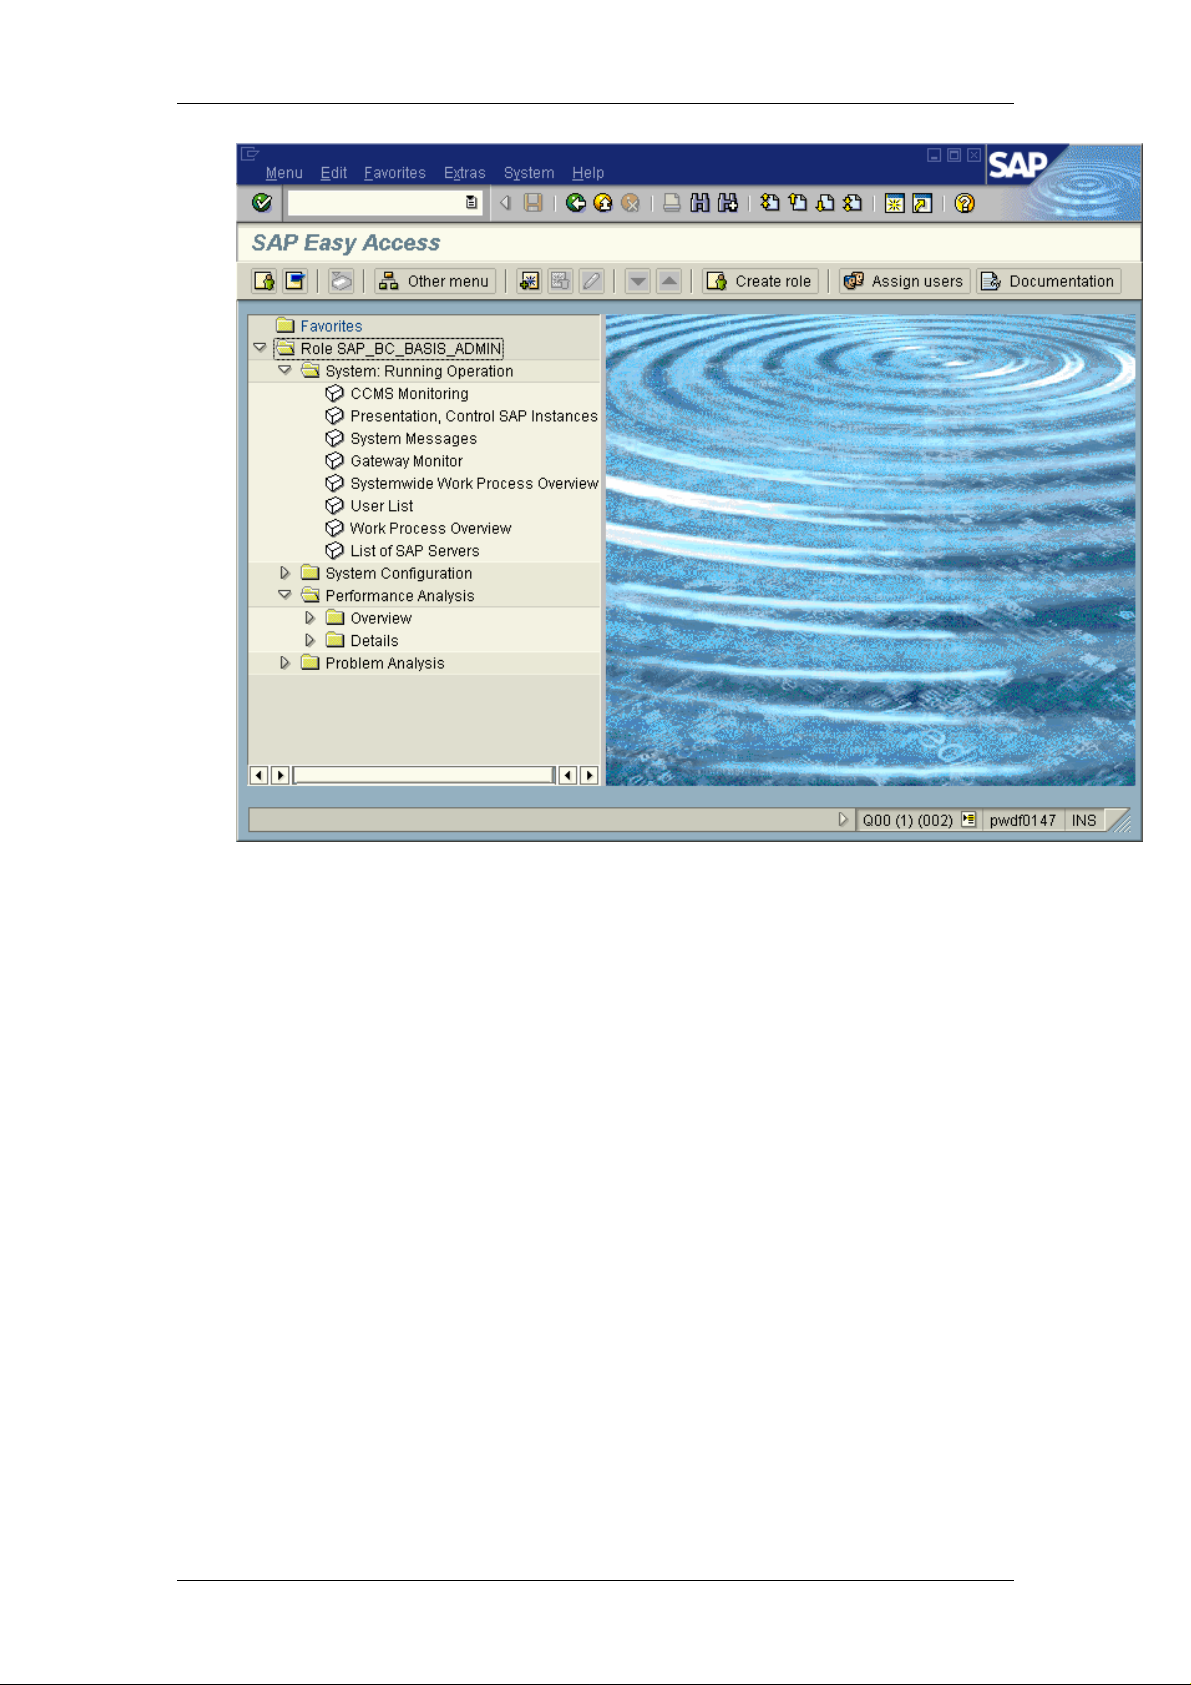
A sample SAP Easy Access initial screen for system administrators is shown below.
The application toolbar contains additional options.
Getting Started 4.70 24
Page 25
SAP Online Help
Activities
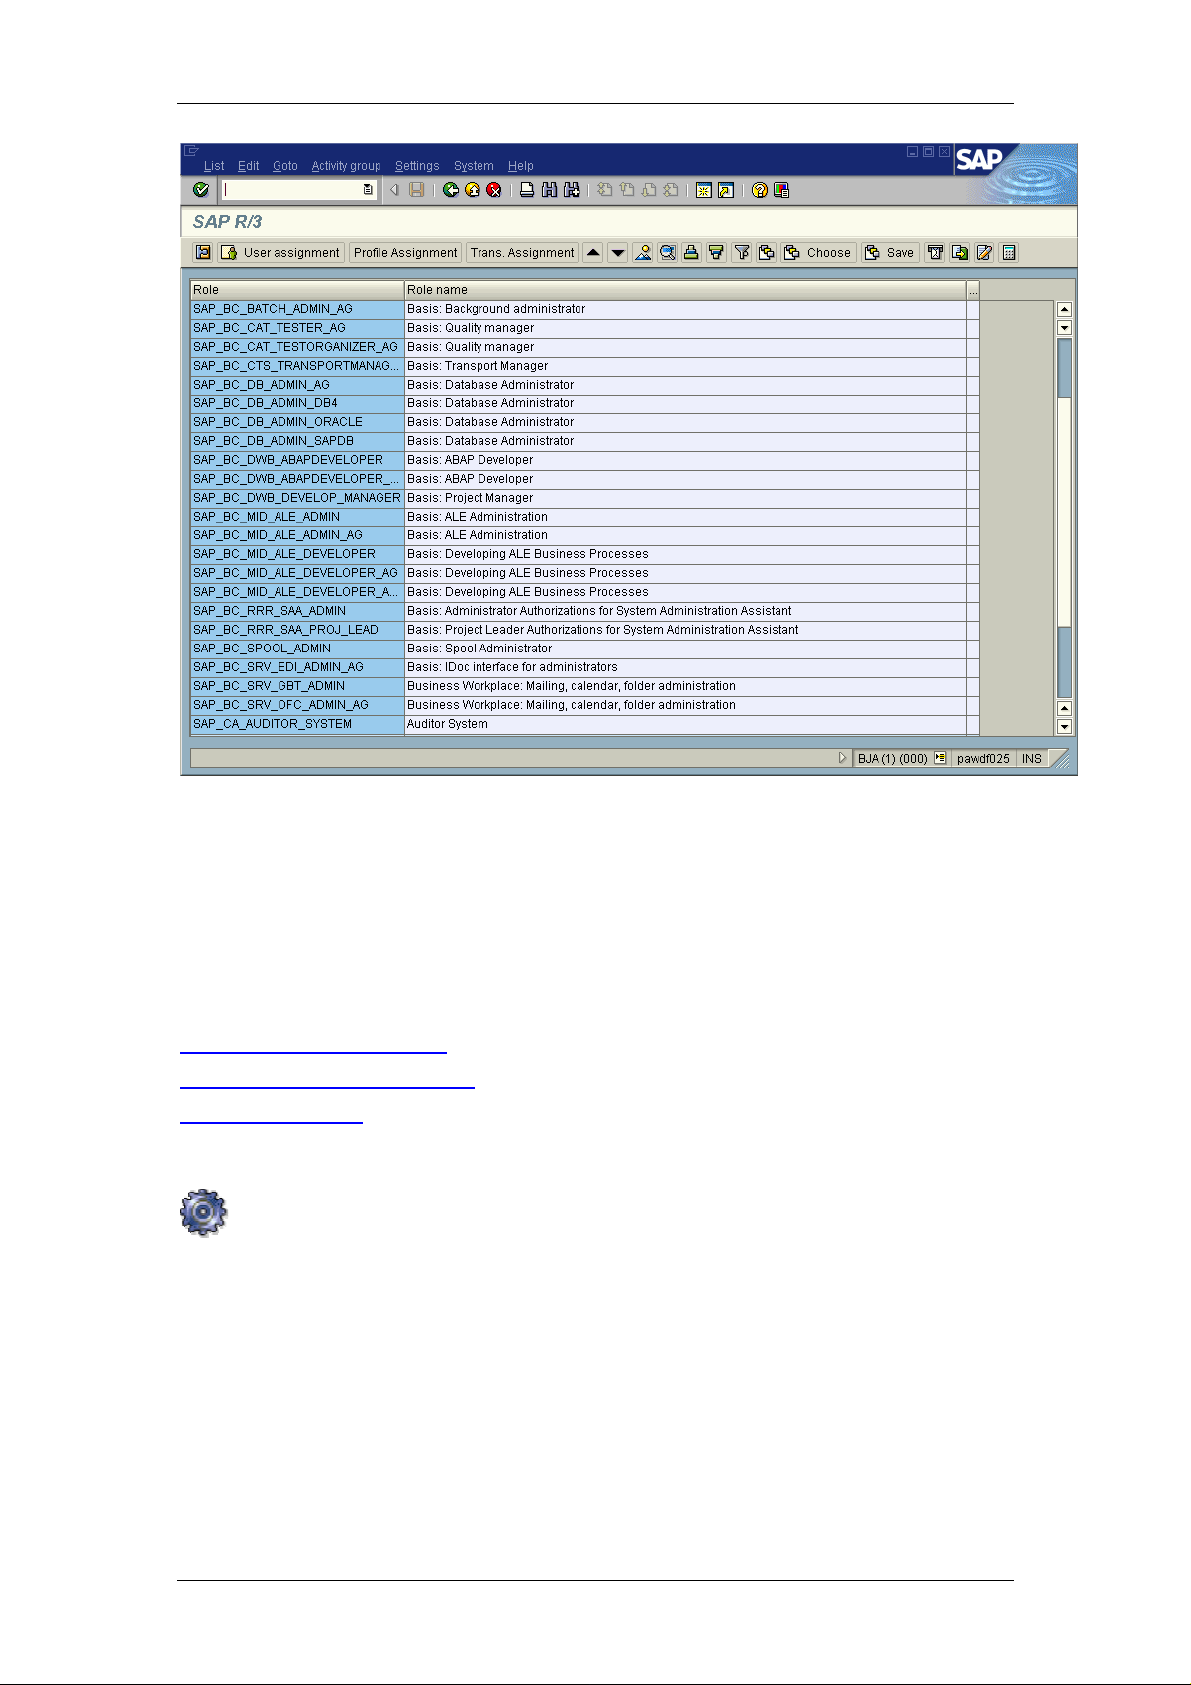
To display a role menu, choose Other menu. A list of all roles in the SAP System are
displayed in the dialog box that appears. If you select a role it is displayed.
Getting Started 4.70 25
Page 26
SAP Online Help
If the selected role corresponds with the activities of a member of staff, choose Assign user.
On the following screen, you enter the user ID of the user.
The system then asks you whether you want to generate an authorization profile. If you
choose Yes, the system assigns the user the authorizations for the role.
For display more information about the select role, choose Documentation.
To create roles, choose Create role or start the Role Maintenance transaction PFCG as
System Administrator.
See also:
Assign standard roles [Extern]
Change and assign roles [Extern]
Create roles [Extern]
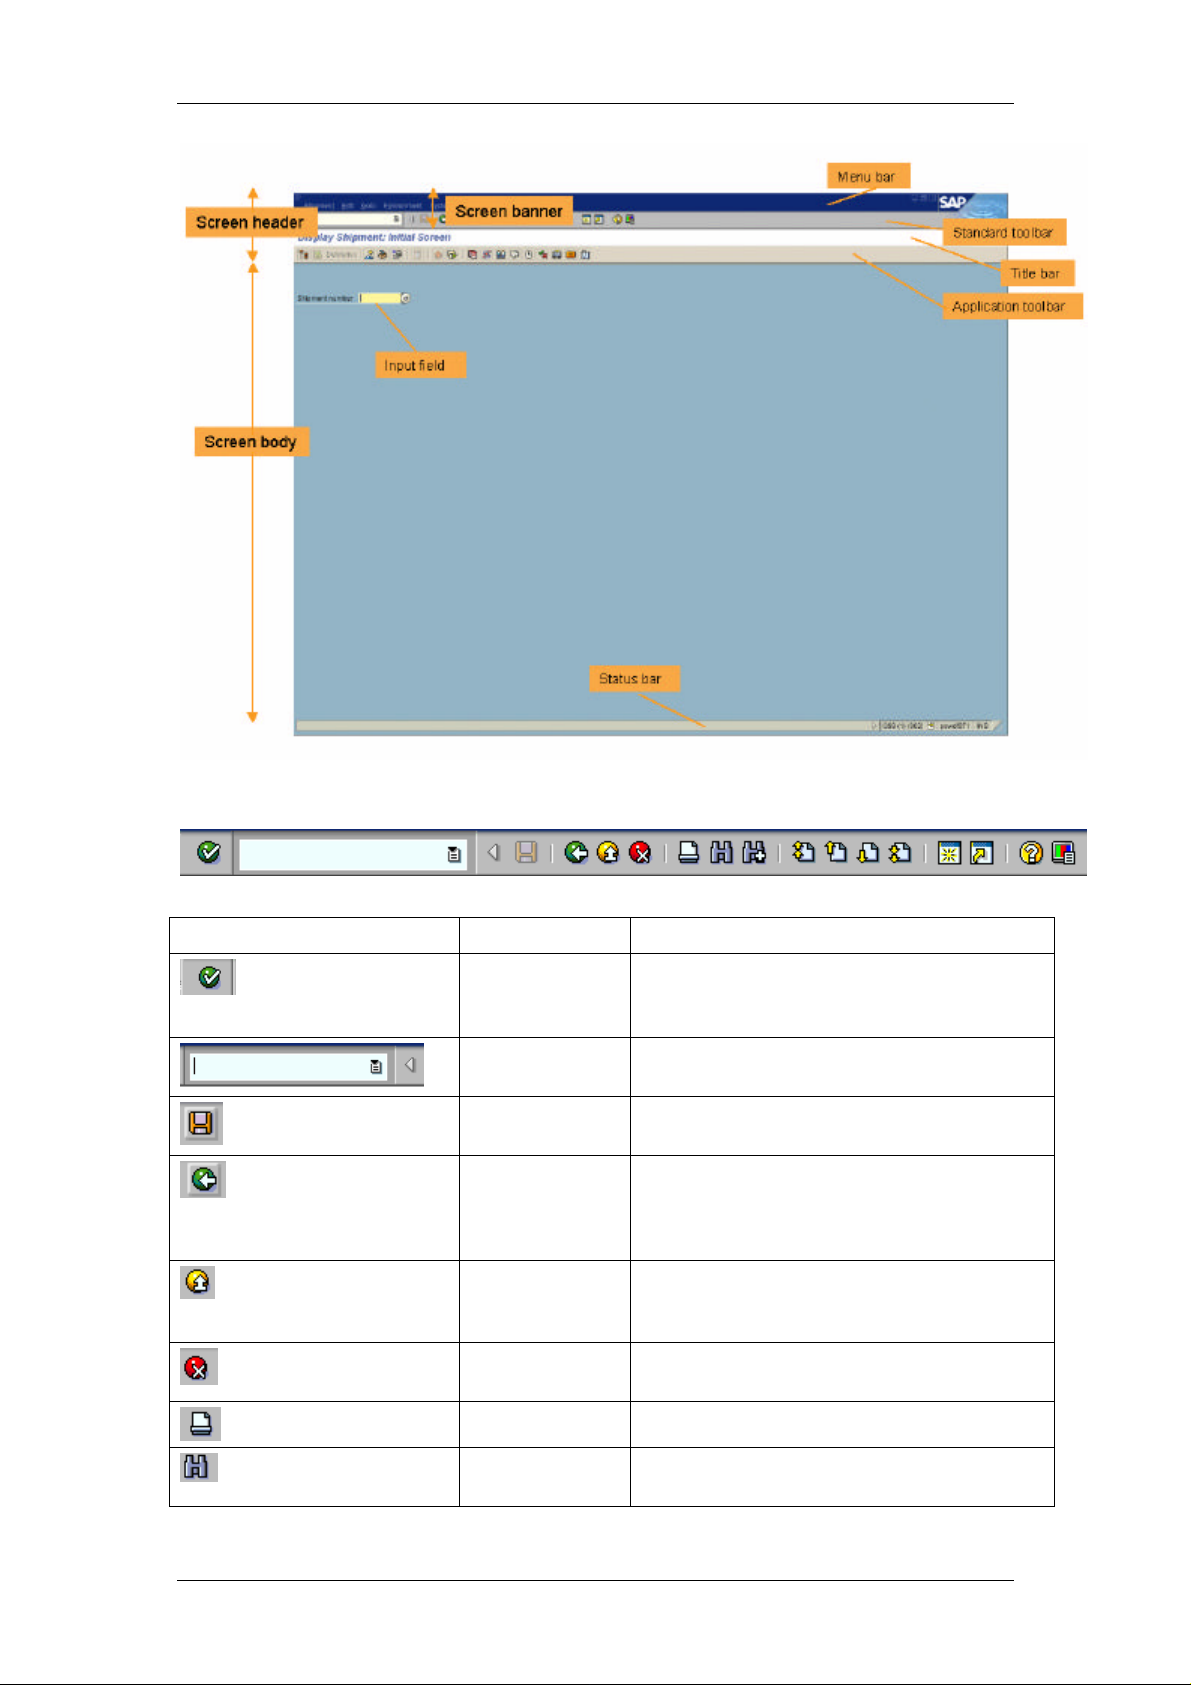
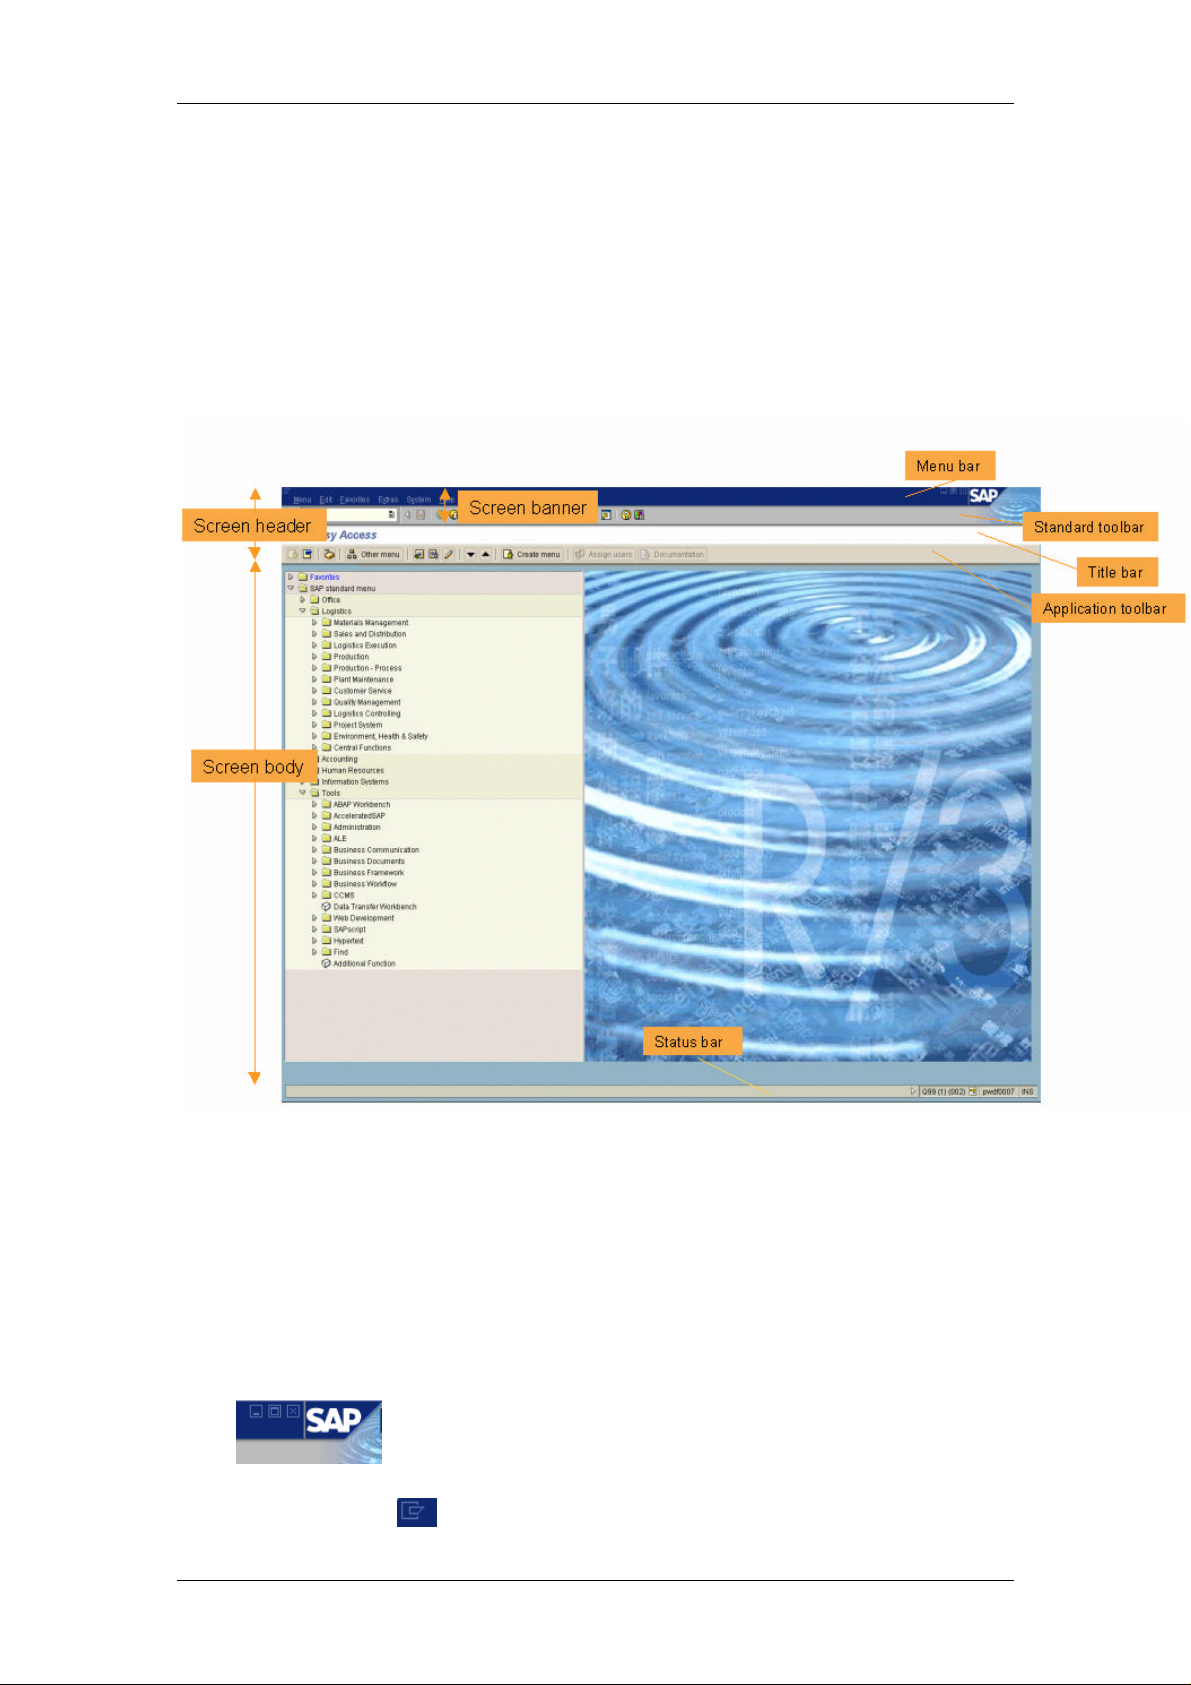
The SAP Window
Use
The SAP window is the user interface to the SAP System.
Features
The elements of a typical SAP window are shown below:
Getting Started 4.70 26
Page 27
SAP Online Help
The standard toolbar contains buttons for performing common actions such as Save and
Enter.
The functions assigned to the standard toolbar are listed below:
Button Name Function
Enter Confirms the data you have selected or
entered on the screen. Same function as the
Enter key. Does not save your work.
Command field Allows you to enter commands, such as
Save
Back Returns you to the previous screen without
Exit Exits the current function without saving.
transaction codes.
Saves your work. Same function as Save in
the Edit menu.
saving your data. If there are required fields
on the screen, these fields must be
completed first.
Returns you to the initial screen or main
menu screen.
Getting Started 4.70 27
Cancel Exits the current task without saving. Same
function as Cancel in the Edit menu.
Print Prints data from the current screen.
Find Searches for data required in the current
screen.
Page 28

SAP Online Help
Depending on your actions as you work with the SAP System, you may also see:
Find next Performs an extended search for data
required in the current screen.
First page Scrolls to the first page. Same function as the
CTRL + Page Up keys.
Previous page Scrolls to the previous page. Same function
as the Page Up key.
Next page Scrolls to the next page. Same function as
the Page Down key.
Last page Scrolls to the last page. Same function as the
CTRL + Page Up key.
Create session Creates a new SAP session. Same function
as Create session in the System menu.
Create shortcut Allows you to create a desktop shortcut to
any SAP report, transaction, or task if you
are working with a Windows 32-bit operating
system.
F1 Help Provides help on the field where the cursor is
positioned.
Layout menu Allows you to customize the display options.
• Radio buttons and checkboxes. For more information, see Radio Buttons and
Checkboxes [Seite 35].
• Dialog boxes. For more information, see Dialog Boxes [Seite 36].
Release 4.6: The New SAP GUI
Definition
The SAP graphical user interface (SAP GUI) consists of the technical features that enable
you to exchange information with the SAP System (by entering data, choosing functions, and
so on). For Release 4.6, SAP has made extensive changes to the SAP GUI design.
Use
New Display Options
The redesigned features include:
• Text fonts and colors
• Color schemes
• Sound and animation settings
• Additional options for data presentation
Structure
The new SAP GUI consists of two main screen areas.
• Screen header
The screen header consists of:
Getting Started 4.70 28
Page 29
SAP Online Help
− Menu bar
− Standard toolbar
− Title bar
− Application toolbar
• Screen body
The screen body is the area between the screen header and the status bar.
A typical example of an SAP screen (here, the SAP Easy Access initial screen) with the new
SAP GUI is shown below:
Changes to the Screen Header
Screen Banner
In previous releases, the title bar and menu bar were at the top of the R/3 window. As of
Release 4.6, a screen banner replaces these two elements. The screen banner consists of:
• Menu bar
GUI interaction buttons
The Minimize, Maximize, and Close buttons are no longer in the top right-hand corner.
They are now slightly to the left, beside the SAP logo:
You can also find these GUI interaction options in the dropdown menu that appears
when you choose in the top left-hand corner.
Getting Started 4.70 29
Page 30

SAP Online Help
• Standard toolbar
Command field
By default, the command field is closed. To display it, choose the arrow to the left of the
Save icon:
The command field appears:
To hide it, choose the arrow to the right (outside) of the field.
To display a list of the transactions you used last, choose the dropdown arrow at
the right-hand end of the field.
• Other features
In the top right-hand corner, the ripple animation indicates data request activity: .
This was previously shown by a change of color in the status fields.
Changes to the Screen Body
Screen Elements and Layout
• The screen elements (group boxes, buttons, scrollbars, and so on) have a new design.
• The screen layout has changed. For example, a tab leader now guides the eye from
field names to fields, and important screen areas are highlighted more prominently.
• Required input fields were previously identified by a question mark within the field.
They now have a checkmark icon at the left-hand end: .
Status Bar
• System message identification (far left)
¡ identifies error messages.
¡ identifies affirmative system messages.
• Status fields (far right)
By default, the status fields appear at the far right:
To hide these fields, choose the arrow pointing to the right:
When the fields are hidden, the arrow points in the other direction:
To display the status fields, choose the arrow pointing to the left:
Icons
SAP has changed the graphical design of all icons used in the SAP System.
Changes to GUI Controls
SAP has also redesigned screen elements such as trees, tables, and tabs.
GUI Interaction Principles
The GUI interaction principles – such as minimizing, maximizing, canceling, and dropdown
menus – remain the same.
Getting Started 4.70 30
Page 31

SAP Online Help
The Menu Bar
Use
Menus allow you to find a specific transaction when you do not know the transaction code.
The menu is organized according to the task you are doing in the SAP System.
Menus are dropdown; that is, when you choose a menu item, further options appear.
A typical menu bar in the SAP System is shown below:
Features
This following menus are standard on every SAP screen:
Menu Description
System Contains functions that affect the system as a whole – such as Create
session, User profile, and Log off.
Help
The following menus are standard in most SAP applications:
Menu Description
<Object>
Edit Allows you to edit components of the current object – for example Select,
Goto
The following menus may also appear:
Provides various forms of online help.
The layout menu, identified by at the far right of the standard toolbar,
allows you to customize certain SAP window settings (for example, cursor
position and the TAB function).
Usually named after the object you are currently working with, for example,
Material. Contains functions that affect the object as a whole – such as
Display, Change, Print, or Exit.
Edit, and Copy. The Cancel option lets you leave a task without saving the
data you have entered.
Allows you to move directly to other screens of the current task. Also contains
the Back option, which takes you back one level in the system hierarchy.
Before going back, the system checks the data you have entered on the
current screen, and displays a dialog box if it detects a problem.
Menu Description
Extras
Environment
View
Settings
Utilities
Getting Started 4.70 31
Contains additional functions you can choose to complete the current object
or an object component, but which you do not need regularly.
Contains functions you can choose to display additional information about the
current object.
Allows you to display the current object in different views, for example,
switching between a single-line and double-line display of a table.
Allows you to set user-specific transaction parameters.
Allows you to do object-independent processing, such as delete, copy, and
print functions.
Page 32

SAP Online Help
Sometimes not all of the available menus fit on one line in the menu bar. In this case, they
wrap to the next line. The dropdown principle stays the same.
The Status Bar
Use
The status bar provides general information on the SAP System and transaction or task you
are working on. At the left of the status bar, system messages are displayed. The right end of
the status bar contains three fields: one with server information, the other two with status
information.
Features
The status fields, shown below, are described from left to right:
• At the far left,
¡ identifies error messages.
¡ identifies other system messages.
• To hide (or display) the status fields, choose to their left (or right, respectively).
• To display the following system information, choose in the first status field:
¡ System
¡ Client
¡ User
¡ Program
¡ Transaction
¡ Response time
• The second status field displays the server to which you are connected.
• The third status field specifies your data entry mode. By clicking this field, you can
toggle between the Insert (INS) and Overwrite (OVR) modes. For more information,
see Insert and Overwrite Modes [Seite 80].
Tabs
Use
Tabs enable you to enter, display, and alternate between multiple screens. In transactions
containing multiple screens, they provide a clearer overview. In addition, tabs enable you to
proceed from one tab page to the next without having completed all the data. To access a tab
page, select the corresponding tab header.
Getting Started 4.70 32
Page 33

SAP Online Help
In some cases, you must complete all required input fields on a tab page before
you can move to the next tab page.
Features
• In the case of longer tabstrips, not all of the tabs appear on the screen. The left and
right arrows at the top of the tabstrip allow you to scroll to all the tabs.
• If you choose the button at the right of the tabstrip, the system displays a list of all the
tabs on the tabstrip. If you select a tab from this list, the selected tab page moves to the
foreground.
• Tabs are arranged in order of importance or in the process order of the transaction.
• Tab headers can contain text, icons, or both.
Table Controls
Use
The table control function enables you to modify standard SAP table format as necessary.
This is especially useful when standard SAP tables contain columns you do not use.
Features
Table controls provide the following features:
• Fixed and variable columns. Variable columns have a horizontal scrollbar at the
bottom.
• Columns you can resize:
When you move the cursor to the gridline between two columns, the cursor changes to
a double-headed arrow. To change column width, click the left mouse button, and
move the gridline to the desired width.
• Columns you can rearrange using drag and drop:
Place the cursor in the header of the column you want to move, hold the left mouse
button, and move the column to the desired position.
• If you move the cursor along the horizontal scrollbar, quick infos appear indicating the
column that would jump to the first display position (after the fixed columns) if you click
the scrollbar at that location.
Getting Started 4.70 33
Page 34

SAP Online Help
• You can set the optimal column width (as defined in the SAP System) by pressing and
holding the Shift key, and clicking the left mouse button within any column header.
• Icons at the bottom of a table are specific to that table. Some icons commonly used in
tables are:
Icon Name Description
Choose detail
Create line
Delete line
Select all
Deselect all
Displays all information currently available on the selected item
Adds a line
Deletes a line
Selects all table entries
Deselects all table entries
Creating Table Control Variants
Prerequisites
The table control icon must be present in the upper right-hand corner of the table.
Procedure
...
1. Start the transaction containing the table control you want to change, and go to the
appropriate screen.
2. Set the table controls as desired:
...
a. To change column width, place the cursor between two columns, click the left
mouse button, and drag the column border to the left or right until you have the
desired size.
b. To change column position, select and hold the column header, and drag it to
the desired position.
3. Choose . The Table Settings dialog box appears.
4. Enter a name for the table control variant. Choose Create.
5. If applicable, select Use as standard setting.
6. To delete a variant, choose Delete.
Result
You have created a table control variant. You can repeat this procedure to create new
variants.
The first item in the variant list is Basic setting, the default SAP table control. It is
set by the system and cannot be deleted.
Getting Started 4.70 34
Page 35

SAP Online Help
Activating Table Control Variants
Prerequisites
• The table control icon must be present in the upper right-hand corner of the table.
• You must have created a table control variant.
Procedure
...
1. Start the transaction containing the table control you want to change, and go to the
appropriate screen.
2. Choose . The Table Settings dialog box appears.
3. Specify the variant you want for the table control and how it should be used:
¡ To make the variant the standard setting, choose Set standard.
This table control variant now appears each time you use this table.
¡ To make the variant the current setting, choose Set active.
This table control variant will only be used while you have the transaction open.
If you exit the transaction, and return to it later, the system uses the standard
setting for the table control.
4. Choose Close. The settings are now complete.
Radio Buttons and Checkboxes
Use
To enter information in the SAP System, you must sometimes select among several options.
In some cases, you can select only one option; in others, you can select more than one.
When you can select only one, the options are identified by radio buttons:
When you can select more than one, the options are identified by checkboxes:
Getting Started 4.70 35
Page 36

SAP Online Help
Activities
Choosing Options with Radio Buttons
• To select an option, click the radio button next to that option. The selected radio button
is now filled in.
• To change your selection, click a different radio button. The original button is now
empty and the new selection is filled in.
• To select a radio button using the keyboard, use the Tab key to move to the group of
options. Use the ↑ and ↓ keys to move to the desired option, and press the spacebar.
Choosing Options with Checkboxes
• To select one or more options, click the checkbox next to each desired option. The
selected checkboxes now contain a checkmark.
• To deselect a checkbox containing a checkmark, click it again. The checkmark
disappears.
• To select a checkbox using the keyboard, use the Tab key to go to the group of
options. Use the ↑ and ↓ keys to go to each desired option, and press the spacebar.
• To deselect a checkbox containing a checkmark, use the ↑ and ↓ keys to go to the
option, and press the spacebar. The checkmark disappears.
Dialog Boxes
Use
The SAP System displays dialog boxes when it:
• Requires more information before it can proceed
• Is providing information, such as messages or specific information about your current
task
Before you can continue, you must choose an action from a dialog box. To choose an action,
choose one of the buttons at the bottom of the dialog box.
A sample dialog box is shown here:
When you end a task without saving your data, or you choose a function that may cause you
to lose data, the SAP System usually displays a dialog box in which you are asked to confirm
or cancel your action.
Scrolling to View Information
Use
When you view information (for example, a list or online help), not all of the information may fit
in your window. To see the additional information, you use scrollbars. To move:
Getting Started 4.70 36
Page 37

SAP Online Help
• Up and down, use the vertical scrollbar
• Left and right, use the horizontal scrollbar
Procedure
To move Do this
Up or down one line Choose the up or down scroll arrow on the
vertical scrollbar.
Left or right one character Choose the left or right scroll arrow on the
horizontal scrollbar.
Up or down one page Click above or below the slider box on the
vertical scrollbar.
Left or right the width of the page Click to the right or left of the slider box on the
horizontal scrollbar.
To a certain position in the
information (up or down)
To a certain position in the
information (left or right)
You can also:
Move to By choosing Or pressing Or pressing
First page
Last page
Previous page
Next page
Drag the slider box on the vertical scrollbar to the
approximate location of the desired information,
and release the mouse button.
Drag the slider box on the horizontal scrollbar to
the approximate location of the desired
information, and release the mouse button.
Shift + F9 CTRL+PageUp
Shift + F12 CTRL+PageDown
Shift + F10 PageUp
Shift + F11 PageDown
Getting Started 4.70 37
Page 38

SAP Online Help
Customizing the Display Options
If you are using the “classic” SAP graphical user interface (GUI) and you need
information on customizing the display options, see the Online Help for SAP
Releases up to and including 4.5B.
Use
After you have logged on, you can change the appearance of various elements of the SAP
window by customizing the display options.
As of Release 4.6B, you access the display options by choosing:
• The layout menu icon at the far right of the standard toolbar, for various SAP
window settings, or
• The SAP GUI customizing icon in the system tray (that is, the corner of the
Windows task bar), for SAP graphical user interface (GUI) settings such as color
customizing and sound settings
Prerequisite
You have installed the new SAP GUI for Release 4.6.
Features
In the layout menu, you can:
• Customize the SAP window (for example, set the display options for quick infos and
system messages, or return to the default window size)
• Enable or disable automatic tabbing between fields
• Define where the cursor should appear when you click a field
• Create a hard copy of the current screen
Using the SAP GUI customizing options, you can change:
• Color settings
• Sound and animation settings
Additional Information
Configuring the SAP GUI [Seite 39]
Using SAP Shortcuts [Seite 67]
Customizing the SAP Window [Seite 46]
Tabbing Between Fields Automatically [Seite 48]
Cursor Position and Width [Seite 49]
Creating Screen Shots [Seite 50]
SAP GUI Color Settings [Seite 41]
SAP GUI Sound and Animation Settings [Seite 44]
Getting Started 4.70 38
Page 39

SAP Online Help
Configuring the SAP GUI
Use
When you configure the SAP graphical user interface (GUI), you can alternate between:
• The “classic” (that is, pre-Release 4.6) SAP GUI
and
• The new (that is, redesigned) SAP GUI delivered as of Release 4.6
These settings are also available for other SAP applications and executable programs.
Prerequisite
You have installed the new SAP GUI for Release 4.6.
Procedure
1. On your Windows desktop, choose Start ? Settings ? Control Panel.
2. Choose the SAP Configuration icon.
You can create a shortcut to this function by dragging the icon to your desktop.
The following dialog box appears:
By default, the new visual design setting is activated.
3. To switch to the “classic” SAP GUI configuration, click the screen shot at the left.
You now see:
Getting Started 4.70 39
Page 40

SAP Online Help
4. Choose OK.
5. Open a new session for the “classic” setting to take effect.
6. To reverse the setting, use the same procedure.
7. When you choose the Applications tab, the following dialog box appears:
Here you can enter (by choosing Add) or delete (by choosing Remove) the names of
applications and programs to which you want to apply the specified setting. When you
have finished making your settings, choose Apply or OK.
Getting Started 4.70 40
Page 41

SAP Online Help
SAP GUI Color Settings
If you are using the “classic” SAP graphical user interface (GUI) and you need
information on customizing the color settings, see the Online Help for SAP
Releases up to and including 4.5B.
Use
You can customize your SAP graphical user interface (GUI) color settings by:
• Choosing from among a number of predefined (default) color schemes, or
• Defining your own (custom) colors
Only the SAP-defined default color schemes ensure optimal readability of all
items on a screen.
Prerequisite
You have installed the new SAP GUI for Release 4.6.
Procedure
Accessing the SAP GUI Customizing Functions
To access the SAP GUI Customizing functions:
...
1. In the system tray (in the corner of your Windows task bar),
...
a. Choose the SAP GUI customizing icon .
This icon appears on the task bar when you log on or open a new session (and
stays there when you move between sessions).
When you log off the last session you were working with, the icon disappears.
b. Or, right-click .
The following context menu appears:
When you choose Close, the SAP GUI customizing icon disappears from the
system tray. You can restore it by opening another session.
2. Choose Customize SAP GUI Settings.
The SAP GUI Settings dialog box appears, as shown below.
Getting Started 4.70 41
Page 42

SAP Online Help
On the Color Settings tab page, you can:
• Activate the default color schemes
• Create customized color schemes, by adjusting hues, saturation, and luminosity
• Have your color settings shift gradually in the course of the day
3. You define your settings as described in the following sections.
Activating a Default Color Scheme
The default color schemes listed on the Color Settings tab page are based on either of two
predefined color combinations:
• Complementary, which uses two different colors (default: blue/tan)
• Harmonic, which uses several shades of the same color (default: blue)
Each of these types also has a bright version, which has a higher contrast than the SAP
delivery standard default setting. For maximum contrast, select High Contrast Blue.
When you log on to the SAP delivery standard, the default setting is Complementary.
To activate another default color scheme on the Color Settings list, place the cursor on the
desired setting. The name of your selection now appears at the top of the list, and you see a
preview in the simulated SAP window to the right. Then,
• Choose Apply. The color scheme takes effect, and the dialog box stays open. You can
now make additional changes to your color settings.
• Or, choose OK. The color scheme takes effect, and the dialog box closes.
Creating a Customized Color Scheme
Foreground and Background Hues
In the Foreground Color and Background Color frames, you can use the slider box to create
your own color schemes.
By default, the foreground and background hues are linked – that is, as you adjust the slider,
the predefined intervals between the shades in a default color scheme stay the same.
• To change your color scheme while keeping these default intervals, select a predefined
color scheme, and adjust the slider to the desired hue.
Getting Started 4.70 42
Page 43

SAP Online Help
• To change the foreground and background hues individually, you must first deselect
the Link checkbox.
As you are trying out colors, you can preview the results:
• In the simulated SAP window at the right (for the complete color scheme)
• In the shaded bar in the top right-hand corner of either slider box (for individual hues)
Color Saturation and Luminosity
In the Foreground Color and Background Color frames, you can fine-tune the hue, saturation,
and luminosity of the respective colors individually.
To do this, double-click the shaded bar in the top right-hand corner of either slider box:
The Color Picker dialog box appears, as shown below:
To fine-tune the foreground and background hue, you use the slider box as before.
In the color palette to the right, a small ring localizes the selected color in relation to
neighboring shades, with respect to:
• Saturation (vertical axis)
• Luminosity (horizontal axis)
To adjust either of these variables, click inside this palette, and drag the cursor to the desired
position. The localizer disappears until you let go of the cursor. As before, you can preview
the results.
Gradual Color Shift
You can choose to have your color settings shift gradually in the course of the day.
To do this, select the Activate Time Settings checkbox. The following additional options now
appear in the lower part of the SAP GUI Settings dialog box:
Getting Started 4.70 43
Page 44

SAP Online Help
To set the time frame in which you want your colors to shift:
...
1. Select the Start or End radio button at the right, and use the time buttons to define the
respective time settings.
2. In the subsequent dialog box, enter the desired time (hh:mm) in the Custom field. If
applicable, choose Set As Default.
3. Refer to the the Start... End preview bar when adjusting the colors for the respective
times of day.
Saving and Deleting Your SAP GUI Customizing Settings
When you have finished defining your settings, the new color scheme takes effect for all SAP sessions that are currently open.
To save your new color scheme, choose Save As..., and enter a name in the subsequent dialog box. Choose OK.
To delete a color scheme from the list, choose Delete.
If you have customized any of the default color schemes, and you want to revert to the default originals, choose Restore. This restores the original default settings without affecting the settings you have created.
To exit the SAP GUI Settings dialog box, choose OK.
SAP GUI Sound and Animation Settings
Use
You can customize sound and animation settings for the SAP graphical user interface (GUI).
Prerequisite
You have installed the new SAP GUI for Release 4.6.
Getting Started 4.70 44
Page 45

SAP Online Help
Procedure
In the system tray (in the corner of your Windows task bar), choose .
(You can also right-click this icon, and choose Customize SAP GUI Settings from the context
menu.)
The SAP GUI Settings dialog box appears:
Choose the General tab. The following dialog box appears:
Getting Started 4.70 45
Page 46

SAP Online Help
Here, you can customize:
• The sound settings (default: On)
When you select Off, you deactivate certain SAP-defined sounds that are designed to
complement standard Windows sounds. These sounds provide subtle feedback for
user actions such as those resulting in system messages. This setting applies only to
SAP applications.
• The logon video (default: On)
When you log on to the SAP System (for the first time after you have started your
computer), a logon video appears.
You can deactivate the first part of this video:
− Permanently, by selecting Off for this setting, or
− Case by case, by pressing Esc while the video is running
Customizing the SAP Window
If you are using the “classic” SAP graphical user interface (GUI) and you need
information on customizing the SAP window, see the Online Help for SAP
Releases up to and including 4.5B.
Use
The layout menu contains customizing options for:
Getting Started 4.70 46
Page 47

SAP Online Help
• Quick infos:
¡ On/off
¡ Speed of display
• System messages:
¡ Sound feedback
¡ Display as dialog boxes
• System programs for SAP graphics: performance options
• Automation timeout period (for programs triggered by OLE automation)
• Cursor:
¡ Automatic tabbing
¡ Position, width, and display in lists
• Trace:
¡ Select type of trace
¡ Enable trace file
¡ Display trace output in window
Using this menu, you can also:
• Create SAP shortcuts. (For more information, see Creating an SAP Shortcut [Seite
65].)
• Activate GuiXT, an alternative to transaction variants, for the screen output of any
transaction. (For more information on GuiXT, see http://www.synactive.com.)
• Set the window to default size (for batch input only)
• Create screen shots. (For more information, see Creating Screen Shots [Seite 50].)
Prerequisite
You have installed the new SAP GUI for Release 4.6.
Procedure
In the standard toolbar, choose the layout menu icon .
Layout Menu: Options
...
1. Choose Options....
2. On the General tab, you can:
• Deactivate the quick infos on your screen, or set the speed at which they appear
• Have system messages appear as dialog boxes, with or without sound feedback
• Set performance options for SAP graphics system programs:
By default, the Libraries option, which refers to SAP graphics system programs,
is set to Keep loaded. This means that SAP graphics stay loaded in the main
memory even if they are not used. If you encounter performance problems
during graphics loading – that is, if a graphic terminates before it has finished
loading for the first time – you can prevent this from happening again by
changing the setting to Preload. To have graphics unloaded after use, choose
Free after use.
Getting Started 4.70 47
Page 48

SAP Online Help
• Specify an automation timeout period for OLE connections to external programs
(such as MS Word or Excel):
If you get System busy messages with external programs that are triggered by
OLE automation, SAP recommends that you set the number of seconds to a
higher value.
3. On the Cursor tab, you can set automatic tabbing, and define cursor position, width,
and display in lists.
For more information, see:
Tabbing Between Fields Automatically [Seite 48]
Cursor Position and Width [Seite 49]
4. You use the Trace tab primarily when you are working with a hotline. On this tab, you
can:
• Select the type of trace. To obtain the log:
− For screen layout, select Monitor.
− For OLE controls, select Automation.
• Enable trace files
• Display the trace output in your window
5. Choose OK to confirm your choices, or Cancel to reset the options to the previous
settings.
Layout Menu: Additional Customizing Items
• For information on creating an SAP shortcut, see Creating an SAP Shortcut [Seite 65].
• To activate GuiXT for screen output, choose Activate GuiXT.
• To change the default window size (for batch input only), choose Default Size.
• For information on creating a screen shot, see Creating Screen Shots [Seite 50].
Tabbing Between Fields Automatically
Use
You can set automatic tabbing (AutoTAB) to have the cursor move between input fields
automatically. This function is useful when you are entering a large amount of data and you
do not want to press the TAB key to move from field to field.
AutoTAB only works at the end of an input field. For example, if the Material
field can hold 12 characters, but the material number you enter is only 7
characters long, you must still press the TAB key to move to the next input field.
Procedure
To turn automatic tabbing on or off:
...
1. In the standard toolbar, choose the layout menu icon ? Options.... ? Cursor.
2. To enable AutoTAB, select Automatic TAB at Field End. To disable AutoTAB, deselect
this option.
3. Choose OK to confirm your choice, or Cancel to reset the AutoTAB option to the
previous setting.
Getting Started 4.70 48
Page 49

SAP Online Help
Cursor Position and Width
Use
You can change the following default cursor settings:
• Position when you select an input field with a mouse-click or tab
• Width
• Display in lists, so that the cursor marks:
¡ Only one character
¡ An entire column
Procedure
To change your cursor settings, choose the layout menu icon ? Options... ? Cursor.
The following dialog box appears:
Cursor Position
Setting Function
Note Cursor Position in Field at TAB On: Places the cursor exactly where you last clicked
within an input field
Off: Places the cursor at the beginning of the input field
Position Cursor to End of Text On: Places the cursor at the end of a text in an input field
when you click to the right of the text
Off: Places the cursor exactly where you click
Selecting the text in Editfield
Cursor in Lists On: Marks only one character
Getting Started 4.70 49
Selects and highlights the text when you tab to an input
field. Any input in this field will clear the field.
Off: Marks an entire column
Page 50

SAP Online Help
Creating Screen Shots
Use
You can print the content of any SAP window.
Prerequisite
You are working with a Microsoft Windows 32-bit operating system.
Procedure
In the standard toolbar, choose the layout menu icon ? Hardcopy.
At the default printer specified for your PC, the window's content is printed.
Multiple SAP Sessions
Use
A session is basically another SAP instance on your screen. Multiple sessions allow you to
work on more than one task at a time. This can save you time and reduces the need to jump
from screen to screen.
Features
You can open up to six sessions, and do a different task, or even the same task, in each one.
You can move around between the open sessions, and you can close any session without
having to log off from the system.
If you try to work on the same record (for example, the material master record
for a specific material) at the same time on multiple sessions, you may "lock
yourself out" of one of the sessions. If this happens, choose Exit or Back to
move out of the transaction. Then you will be able to proceed.
Additional Information
Creating a New Session [Seite 50]
Creating a New Session and a Task at Once [Seite 51]
Moving Among Sessions [Seite 52]
Ending a Session [Seite 52]
Creating a New Session
Use
You can create a session at any time. You do not lose any data in sessions that are already
open.
You can create up to six sessions. Each session you create is as if you logged on to the
system again. Each session is independent of the others. For example, closing the first
session does not cause the other sessions to close.
Getting Started 4.70 50
Page 51

SAP Online Help
Too many open sessions can result in slower system performance. For this
reason, your system administrator may limit the number of sessions you can
create to fewer than six.
Procedure
To create a new session from anywhere in the system:
• Choose System → Create session from the menu bar, or
• Choose .
Result
The system opens an additional window. The new session becomes the active session and
remains the active session unless you click on a different (open or new) session.
Each session has a session number, which appears in that session’s status bar. It appears in
parentheses next to the system name.
This graphic shows the new session window on top of the original window. Note the session
number in parentheses in the status bar.
Session number
Additional Information
Creating a New Session and a Task at Once [Seite 51].
Creating a New Session and a Task at Once
Use
You can create a session and start a task in one step by using a transaction code. When you
open a session with a transaction code, the system displays the initial screen of the task in a
new session. To use this method, you must know which transaction code to use for the task
you want to perform.
Getting Started 4.70 51
Page 52

SAP Online Help
For more information, see Finding the Transaction Code for the Task You Want to Start [Seite
74].
Procedure
To create a new session and a task simultaneously:
...
1. In the command field, enter /o (the forward slash and the letter o) followed by the
transaction code for the task you want to start.
For example, to create a customer master record in the Accounts Receivable
application, you use Transaction FD01. To open a session and start this task at the
same time, you enter /ofd01 in the command field.
2. Choose Enter.
Result
The system opens an additional window for the new session and displays the initial screen of
the transaction.
Moving Among Sessions
Prerequisites
You can move among sessions as often as you like without losing any data.
As long as you remain logged on to the SAP System, you can leave a session for as long as
you like. Moving to a different session is like putting a telephone call on hold: You can resume
the call whenever you are ready.
Procedure
To move from one session to another, click any part of the window that contains the session
you want to go to (or use the key(s) specified for changing windows).
The window you choose becomes the active window: it moves in front of all the other
windows on your screen.
If you have several sessions open, you can minimize the sessions you are not
using. When you need to use one of these sessions later, you can restore it by
clicking the appropriate symbol in the status bar, making it the active session.
By minimizing the sessions you are not using, you can significantly reduce the
system load.
Ending a Session
Use
After you are done using a session, it is a good idea to end it. Each session uses system
resources that can affect how fast the SAP System responds to your requests.
Before you end a session, save any data you want to keep. When you end a session, the
system does NOT prompt you to save your data.
Getting Started 4.70 52
Page 53

SAP Online Help
If you have only one session open and you end it, you will log off from the
system. However, before logging you off, the system prompts you to save your
data.
Procedure
You can either
• Choose System → End session from the menu bar, or
• Choose in the upper right-hand corner of the active session.
The session is closed and you return to the previous session.
Startup and Shutdown of the SAP System
Use
Before you can use the SAP System, you must log on. When you are finished using the SAP
System, you log off. The first time you log on, and at regular intervals thereafter, you should
change your password.
Activities
• Regardless of the tasks you will be performing in the SAP System, you will always be
starting up and shutting down the SAP System.
• You start the SAP System by selecting the logon icon on your desktop.
• You log on to the SAP System.
• If this is your first time logging on, you will have to change the initial password provided
by your system administrator. If this is not your first time logging on, you may have to
change your password in accordance with the security policies at your company.
• When you are finished working with the SAP System, you log off.
Additional Information
The SAP Logon [Seite 58]
Starting the SAP System
Procedure
To start the SAP System, choose the icon for the SAP System.
For example, start the SAP System by double-clicking the SAP icon in your SAP application
window.
Result
The logon screen (in the example below, with the title SAP R/3) appears in a new window.
You are now ready to log on.
Getting Started 4.70 53
Page 54

SAP Online Help
For more information on starting the SAP System, contact your system
administrator.
Logging On
Prerequisites
Before you log on, make sure you know:
• Your client number
• Your user ID
• Your password
If you want to work in a language other than English, make sure you know the language key
for your desired language. For more information, contact your system administrator.
After you have entered data in a field, you can move the cursor to the beginning
of the next field by pressing the TAB key.
If you have set the Autotab option, you do not have to press the TAB key if you
enter the maximum number of characters possible in a field. For example, the
maximum number of characters you can enter in the Client field is three. If you
enter 001 in the Client field, the cursor automatically moves to the beginning of
Getting Started 4.70 54
Page 55

SAP Online Help
the next field. For more information, see Tabbing Between Fields Automatically
[Seite 48].
Procedure
If you are logging on for the first time, see Logging On the First Time [Seite 55].
If you have logged on previously, but cannot remember how:
...
1. Check the Client field. This field may already contain a default client number.
You can either accept the client number, or change it by typing over it.
To move the cursor to the Client field, press the TAB key.
2. If necessary, move the cursor to the User ID field by pressing the TAB key.
In the User ID field, enter your user ID.
To move the cursor to the Password field, press the TAB key.
3. In the Password field, enter your password.
As you type your password, the asterisks remain in the field, and only the cursor
moves. As a security measure, the system does not display what you type.
4. To display screens, menus, and fields in a language other than English, move the
cursor to the Language field by pressing the TAB key. Enter the language key for the
desired language.
5. Choose Enter.
In the standard SAP System, the Copyright dialog box appears.
If you do not see this dialog box, check the status bar for a system message. You may
have entered an incorrect client number, password, user ID, or language key. If this is
the case, repeat steps 1 through 5.
6. In the Copyright dialog box, choose Continue.
If there are systemwide messages – for example, from your system administrator – the
System Messages dialog box is displayed. After you have read the messages, choose
Continue to close the dialog box.
Result
You have successfully logged on to the SAP System.
Additional Information
Passwords [Seite 62]
The SAP Logon [Seite 58]
Logging On the First Time
Prerequisites
Before you log on the first time, your system administrator will give you an initial password.
During the logon process, you should create a new password, one that you alone will know.
After that, you use your own password whenever you log on. (These procedures may differ
somewhat at your company; for more information, contact your system administrator.)
To log on, you must first open the SAP Logon Menu by double-clicking its icon. For more
information, see The SAP Logon [Seite 58].
Getting Started 4.70 55
Page 56

SAP Online Help
The SAP logon icon now appears in both the task bar (together with the SAP
Release number) and the system tray (that is, the bottom right-hand corner of
your desktop).
After you start the SAP System (see Starting the SAP System [Seite 53]), the first screen you
see is the logon screen (in this case, with the title SAP R/3).
When you press the TAB key after you have entered data in a field, the cursor moves to the
beginning of the next field. However, if you enter the maximum number of characters possible
in a field, you do not have to press the TAB key. For example, the maximum number of
characters you can enter in the Client field is three. If you enter 001 in the Client field, the
cursor automatically moves to the beginning of the next field. For more information on
automatic tabbing, see Tabbing Between Fields Automatically [Seite 48].
For more information on entering data, see Entering Data in Fields [Seite 78].
Procedure
The logon screen is shown above. To log on to the SAP System:
...
1. In the Client field, enter the client number.
If a default client number appears in the field, you can either accept it, or change it by
typing over it.
To move the cursor to the User ID field, press the TAB key.
2. In the User ID field, enter your user ID.
Getting Started 4.70 56
Page 57

SAP Online Help
To move the cursor to the Password field, press the TAB key.
3. In the Password field, enter the initial password provided by your system administrator.
As you type the initial password, the asterisks remain in the field, and only the cursor
moves. As a security measure, the system does not display what you type.
In the SAP System, passwords are not case-sensitive.
4. To display screens, menus, and fields in another language, move the cursor to the
Language field by pressing the TAB key. Enter the language key for the desired
language.
5. Choose Enter.
6. The system automatically displays the new password dialog box. You must change
your initial password.
If you do not see the new password dialog box, check the status bar for a system
message. You may have entered an incorrect client number, password, user ID, or
language key. If this is the case, repeat steps 1 through 5.
7. In the New password field, enter a new password. (If you need help, see Passwords
[Seite 62].)
Memorize your password. You cannot log on to the SAP System without it.
As you type the new password, the asterisks remain in the field, and only the cursor
moves. As a security measure, the system does not display what you type.
To move the cursor to the Repeat password field, press the TAB key.
8. In the Repeat password field, enter the new password again, exactly as you entered it
the first time.
9. Choose Confirm (or choose Enter). If you have successfully changed your password,
the Copyright dialog box appears.
10. In the Copyright dialog box, choose Continue (or choose Enter).
If there are systemwide messages, the System Messages dialog box appears. After
you have read the messages, choose Continue (or choose Enter) to close the dialog
box.
You can display the system messages later by choosing Tools → Administration →
Administration → System Messages.
Result
In the standard SAP System, the SAP Easy Access initial screen appears, as shown here.
Getting Started 4.70 57
Page 58

SAP Online Help
Additional Information
The SAP Logon [Seite 58]
The SAP Logon
Definition
The SAP Logon is the Windows program that you use to log on to SAP Systems on Windows
PCs. It mediates between the SAP System and the SAPgui user interface. The SAP Logon
displays a list of available SAP Systems and automatically selects servers with the best
current response times. You can add available systems or servers to this menu.
Use
When you log on to the SAP System, you can:
• Log on to a specific application server.
• Log on to a group. In this case, the application server with the best response time is
selected automatically.
From Release 4.6A, when you log on to the SAP Logon, the SAP Logon icon is
displayed in the system tray of the system taskbar (in the bottom right-hand
corner of the screen). You can maximize or minimize the SAP Logon by clicking
the icon using the left mouse button.
If you click the icon using the right mouse button, you can display a list of
connections to SAP Systems that are already open.
Getting Started 4.70 58
Page 59

SAP Online Help
From 4.6A you can also use the mouse to increase the size of the SAP Logon. This enables
you to see all of the following information:
• Description of the SAP System and its system ID
• The group or server
• The system number
• The message server
• SAP routers.
See also:
Adding a New Logon User Group [Seite 60]
Adding an Application Server [Seite 60]
Configuring the SAP Logon [Seite 61]
Questions and Answers: Logon Load Balancing [Extern]
Adding and Editing Entries Manually
Procedure
To add a new entry:
...
1. Display the SAP Logon by choosing Start Õ SAP Frontend Õ SAPlogon
2. Choose New... to display the New Entry dialog box.
3. Enter the following information:
Description: A short description of the system
Application Server: The name of the host that you want to connect to
SAP Router String: A routing entry (for example, saproute.ini.)
SAP System: Specify whether the new SAP System is an R/2 or an R/3 System
System Number: Specify the system number of the SAP System that you want to
connect to
To change an existing entry:
From the SAP Logon, select a system and choose Properties.
For server entries, you can change all data. For logon group entries, you cannot
change the Application Server, the SAP System or the System Number.
To remove an entry:
From the SAP Logon, select a system and choose Delete.
To exit:
To exit the SAP Logon, choose Close.
See also:
Configuring Logon Groups [Extern]
Recommendations for Logon Groups [Extern]
Getting Started 4.70 59
Page 60

SAP Online Help
Adding a New Logon User Group
Use
Most users only have one group in their selection. You can add additional groups to the SAP
Logon.
Procedure
...
1. Display the SAP Logon by choosing Start Õ SAP Frontend Õ SAPlogon.
2. Choose Groups… to display the Group Selection dialog box.
3. In the System ID field, enter the system that you want to log on to.
If a SAP Router is used to connect to the message server, select the SAP router
in the SAP Router for field.
4. Choose Generate list. The system displays the logon groups that are active.
5. Select a logon group and then choose:
• Logon to log on without adding the logon group to the list
• Add to add the logon group to the list without logging on
• Add and Logon to add a logon group to the list and log on immediately.
See also:
Adding an Application Server [Seite 60]
Adding an Application Server
Procedure
...
1. Display the SAP Logon by choosing Start Õ SAP Frontend Õ SAPlogon.
2. Choose Server… to display the Server Selection dialog box.
3. In the System ID field, enter the system that you want to log on to.
If a SAP router is used to connect to the message server, select the SAP Router
in the SAP Router for field.
4. Choose Generate list to display the active servers.
5. Select a server and choose:
• Logon to log on without adding the server to the list
• Add to add the server to the list without logging on
Getting Started 4.70 60
Page 61

SAP Online Help
• Add and Logon to add a server to the list and log on immediately
See also:
Adding a New Logon User Group [Seite 60]
Adding and Editing Entries Manually [Seite 59] [Seite 59]
Configuring Logon Groups [Extern]
Configuring the SAP Logon
Use
You can change the following settings in the SAP Logon:
Language
You can display the SAP Logon in the language that you select. To use this option, the SAP
Logon language file must be installed by the system administrator.
Message Server Timeout: ____ secs
Specifies how long the SAP Logon waits for a response from the R/3 Message Server. The
default value, ten seconds, is normally sufficient, even with slow wide-area network
connections.
If you experience repeated timeout connection errors, increase this value. If the error persists,
there is probably a network installation problem.
Confirmation of listbox entry delete
Check this box if you want to display a warning before you delete a system or logon group
from the SAP Logon.
Disable editing functionality
Check this box if you want to prevent logon entries from being changed. If editing functionality
is disabled, you cannot use the options Properties, Groups, Server, New and Delete in the
SAP Logon.
Activate SAPgui trace level
Check this box if you want to define and activate a network trace (SAPGUI trace). For
reasons of security and performance, you should only activate the trace options to diagnose
the system.
When you choose this option, you can select the trace level that is used. If you select level 2
or 3, an additional log file is generated that records all incoming data in an encrypted binary
code.
Additional data hexdump in trace
Check this box if you want to list additional memory areas in the SAPgui trace. This option is
only available if you choose trace level 2 or 3, since these trace the data that must be
checked against the hexdump when errors occur.
This option can result in both considerable losses in performance and very large
trace files.
Getting Started 4.70 61
Page 62

SAP Online Help
Additional command line arguments
You can enter any additional command lines arguments in this input field.
The additional information that appears here can help solve particular frontend
problems. Only perform the network trace options if the SAP Hotlines requests
you to. You should cancel the network trace options as quickly as possible and
remove the trace files.
Procedure
...
1. Display the SAP Logon by choosing Start Õ SAP Frontend Õ SAPlogon.
2. Click on the SAP Logon icon in the top left-hand corner of the window and choose
Options. You can then change the settings that are described above in the SAP Logon
configuration dialog box.
3. Choose OK to return to the initial screen of the SAP Logon.
When you change the SAP Logon language, the system asks you to restart the
SAP Logon that is affected by the new language setting. You should then close
the SAP Logon and restart it.
Passwords
Definition
A password is a combination of characters that you enter every time you log on to the SAP
System.
Use
Your password prevents other people from accessing or changing your work.
Memorize your password. You cannot log on to the SAP System without it.
Structure
When creating a password:
• You must use at least 3 but no more than 8 characters.
• You can use any combination of alphanumeric characters, including:
¡ The letters a through z
¡ The numbers 0 through 9
¡ Punctuation marks
Do not begin a password with:
• A question mark (?)
• An exclamation point (!)
• A blank space
• Three identical characters (for example, bbbat)
Getting Started 4.70 62
Page 63

SAP Online Help
jullo=6
• Any sequence of three characters contained in your user ID (for example, man, if your
user ID is Friedman).
Do not use:
• pass or init as your password
• Any of the last five passwords you used
In the SAP System, passwords are not case-sensitive. For example, the
password blue is the same as Blue or BLUE.
The table below gives examples of valid and invalid passwords.
Valid Invalid
frtas !brex (begins with an invalid character)
aaab (begins with three identical characters)
3bar me (contains fewer than three characters)
Changing Your Password
Prerequisites
You can change your password whenever you log on to the SAP System. For security
reasons, however, your system administrator may require that you change your password at
regular intervals, for example, every 30 days. In this case, you will receive a message from
the SAP System when it is time to change your password.
You can only change your password from the logon screen.
To check the rules for creating a new password, see Passwords [Seite 62].
In the steps below, you are instructed to press the TAB key after you enter data in a field. In
the standard system, when you press the TAB key, the cursor moves to the beginning of the
next field. However, you do not have to press the TAB key if you enter the maximum number
of characters possible in a field. For example, the maximum number of characters that you
can enter in the Client field is three. If you enter 001 in the Client field, the cursor
automatically moves to the beginning of the next field.
For more information about entering data, see Entering Data in Fields [Seite 78].
Procedure
...
1. Enter the following data in the respective fields on the logon screen:
...
a. Client number
b. User ID
c. Your current password
d. Language key, if you want to work in a language other than English
For more details, see Logging On [Seite 54].
2. In the application toolbar, choose New password.
Getting Started 4.70 63
Page 64

SAP Online Help
The new password dialog box appears, as shown here.
If you do not see this dialog box, check the status bar for a system message. You may
have entered an incorrect client number, password, user ID, or language key. If this is
the case, repeat steps 1 through 5.
3. In the New password field, enter a new password. (If you need help, see Passwords
[Seite 62].)
As you type the new password, the asterisks remain in the field and only the cursor
moves. As a security measure, the system does not display what you type.
Press the TAB key to move the cursor to the Repeat password field.
4. In the Repeat password field, enter the new password again, exactly as you entered it
the first time.
Memorize your password. You cannot log on to the SAP System without it. If
you forget your password, contact your system administrator.
5. Choose Enter.
In the standard SAP System, the Copyright dialog box appears.
If a different dialog box appears, you have either made a mistake entering your new
password, or it is not a valid password. The dialog box contains a message describing
the mistake. In this case:
...
a. Remove the dialog box by choosing Confirm.
The new password dialog box reappears.
b. Repeat steps 3 through 5. (If you need help creating a valid password, see
Passwords [Seite 62].)
6. In the Copyright dialog box, choose Continue.
The copyright notice disappears.
If there are systemwide messages, they appear. After you have read the messages,
choose Continue in the dialog box to close it.
Result
In the standard system, the SAP Easy Access initial screen appears.
SAP Shortcuts
Use
Using SAP Shortcuts, you can start an SAP transaction, run a report, or execute a system
command directly from your Microsoft Windows desktop. Shortcuts eliminate the need to
navigate through menus to access screens. This is particularly useful for tasks you run
regularly.
Getting Started 4.70 64
Page 65

SAP Online Help
Prerequisites
To use SAP Shortcuts, you must be running a Windows 32-bit operating system.
Features
• You can create SAP Shortcuts for direct access to:
¡ Transactions
¡ Reports
¡ System commands
• You can use SAP Shortcuts even if you have the SAP System running with an open
dialog box.
• You can store your SAP Shortcuts either directly on your desktop, or in a directory on
your system.
• There is no limit to the number of SAP Shortcuts you create.
Creating an SAP Shortcut
Prerequisites
• You are running a Microsoft Windows 32-bit operating system.
• The SAP Shortcut file type has been registered in your Windows registry. This happens
automatically during successful installation of an SAP graphical user interface (SAP
GUI).
• You have received an SAP user ID from your system administrator, and created a
password.
• You know the transaction code for the screen for which you want to create an SAP
Shortcut.
Procedure
Creating an SAP Shortcut from Your Desktop
...
1. Place the cursor anywhere on the desktop (not on an open Windows application), and
click the right mouse button.
2. Choose New → Sapgui Shortcut.
3. Enter the name of the shortcut as desired, but keep the .SAP file extension. Choose
Enter.
You have now created a file for your shortcut. Next, you must define this file.
4. Click the right mouse button. Choose Edit.
A dialog box appears. The title bar contains the complete path of the shortcut file.
Getting Started 4.70 65
Page 66

SAP Online Help
5. From the dropdown list for the System field, select the system ID. Complete the Client
field. If you do not remember your client, check the SAP GUI logon dialog box you were
using previously.
6. Complete the User name and Language fields. If you leave User name blank, the
system automatically uses your Windows user ID. The Password field is normally
deactivated, for security reasons. Only your PC administrator can activate this field.
7. In the Type field, specify whether the shortcut is for a:
¡ Transaction
¡ Report
¡ System command
8. In the Title field, enter the shortcut title.
9. In the Command field, enter the appropriate code. For example:
...
a. To create a shortcut that takes you to the Create Material: General screen, enter
Transaction code MM01.
b. To create a shortcut for the Archiving Check Data report, enter report name
RFCHKA00.
c. To create a shortcut that immediately logs you off, enter system command
/nex.
To obtain the transaction code for the Command field, go to the status bar of the
task for which you are creating a shortcut, and click the list arrow. If you do not
enter a code, the system defaults to Transaction code S000, which is the initial
screen of the SAP System.
10. Choose OK. The shortcut appears on your desktop.
Getting Started 4.70 66
Page 67

SAP Online Help
11. The system automatically saves the <NAME>.SAP file corresponding to this shortcut in
your desktop directory under your operating system directory. If you prefer to keep all
your SAP Shortcut files in one place, you can move this file to a directory of your
choice.
Creating an SAP Shortcut from a Specific Screen in the SAP System
...
1. Go to the screen for the task you want to run, and choose or .
The New Sapgui Shortcut dialog box appears.
2. Check that the information in the dialog box (User name, Language, Type, Title,
Command) is correct.
3. Choose OK.
The shortcut appears on your desktop.
4. The system automatically saves the <NAME>.SAP file corresponding to this shortcut in
your desktop directory under your operating system directory. If you prefer to keep all
your SAP Shortcut files in one place, you can move this file to a directory of your
choice.
If the Password field of the New Sapgui Shortcut dialog box has been activated,
you can specify a password. However, for security reasons, this is not
recommended, and a warning appears. You should only include your password
in an SAP Shortcut if you are certain no one can access your PC or your
disk/directory.
Using SAP Shortcuts
Prerequisites
• You have received an SAP user ID from your system administrator, and created a
password.
• You have created an SAP Shortcut. It is available on your desktop.
Procedure
If you do not have an SAP session running
...
1. Double-click the SAP Shortcut for the task you want to run.
A logon dialog box is displayed. The title bar specifies the system ID, client, language,
and task.
Getting Started 4.70 67
Page 68

SAP Online Help
2. Enter your password. Choose Logon, or choose Enter.
The SAP session starts.
3. To view or change your shortcut definition while you are logging on, position the cursor
anywhere in this logon dialog box (not on the title bar, input fields, or pushbuttons), and
click the right mouse button. The context menu is displayed.
In this context menu, if you do not enter a password, only the Edit option is activated.
After you have entered the first character of your password, both the Open and Edit
options are activated.
If you have an SAP session running
Double-click the SAP Shortcut for the task you want to run.
• If an application is already running, a new SAP session starts.
• Otherwise, the current SAP session starts the task you want to run.
To start a shortcut from within an open SAP session, drag and drop the shortcut
onto the open session. The system starts the task you want to run. The following
functions are also available:
Key + Drag and Drop Result: You can now...
Shift + Drag and Drop Edit the shortcut.
CTRL + Drag and Drop Open a new session, and start the task you want to run.
Logging Off
Procedure
You can log off from the SAP System from any screen.
...
1. From the menu bar, choose System → Log off.
2. Click the button at the upper right-hand corner of the screen (if you only have one
session running).
The Log off dialog box appears (as shown here), informing you that any data you have
not yet saved will be lost if you proceed with logging off.
Getting Started 4.70 68
Page 69

SAP Online Help
3. If you are not certain that you have saved all of your data, and you do not want to log
off after all, choose No. You return to the screen in which you were working.
If you are certain that you have saved all of the data you want to save, choose Yes. All
of your SAP System sessions close. You have successfully logged off.
What Are the Steps in a Typical Task?
Use
In the SAP System, a task consists of one or more screens on which you enter data. Some
typical tasks might be creating customer master records, entering invoices, or creating sales
documents.
Activities
To perform a task in the SAP System, you typically:
...
1. Choose the task that you want to work on. (See Accessing Tasks in the SAP System
[Seite 69].)
2. Enter data on the initial screen of your task.
Each screen contains input fields in which you enter data. Some fields require entries,
others do not. (See Entering Data on a Screen [Seite 80].)
3. Go to the next screen.
When you go to the next screen, the SAP System temporarily stores the data you have
just entered. (See Moving Through Tasks [Seite 85].)
4. Enter data on the next screen of your task.
You can:
• Return to previous screens to make changes
• Skip screens that are not required
• Go to a related task to get information or to complete additional screens
(See Moving Through Tasks [Seite 85].)
5. Repeat steps 3 and 4 until all the screens that make up your task are completed.
6. Save your data for the entire task.
The system saves the data from all the screens you have completed. (See Saving the
Data on a Screen [Seite 85].)
Accessing Tasks in the SAP System
Procedure
After you log on to the SAP System, you choose the task that you want to work on. You can
switch to different tasks at any time.
Getting Started 4.70 69
Page 70

SAP Online Help
In the SAP System, you can:
• Choose a task from the SAP Easy Access workplace menu. With this menu, you can
easily find your application without having to memorize transaction codes.
For more information, see:
SAP Easy Access [Seite 18]
Navigating in the Workplace Menu [Seite 20]
Choosing Menus and Functions with the Mouse [Seite 70]
Choosing Menus and Functions with the Keyboard [Seite 72]
• Enter a transaction code in the command field. With transaction codes, you can go
directly to a task without having to navigate through several different menus.
Choosing Menus and Functions with the Mouse
Prerequisites
You choose menus, submenus, and functions by clicking them.
Procedure
Choosing from a Menu
To choose a menu with the mouse, click the desired menu in the menu bar or SAP Easy
Access workplace menu.
The menu opens – that is, its contents (functions, submenus, or both) appear.
In the menu bar of the SAP window, the dropdown arrows indicating submenu options are to
the right of each menu item, as in the following example:
In the SAP Easy Access workplace menu, the dropdown arrows indicating submenu choices
are to the left of each menu item, as in the following example. (After you have opened a
submenu, the dropdown arrow you have just used points downward.) If there is no arrow next
to a menu item, you go directly to the transaction screen.
Getting Started 4.70 70
Page 71

SAP Online Help
Choosing a Submenu
To choose a submenu with the mouse, click the desired submenu.
The submenu opens next to the original menu, as shown in the above example. If your
system is busy, it may take a few seconds to display the submenu.
Canceling a Menu or Submenu Choice
You can cancel, or close, any menu with its submenus by clicking any blank area of the
screen.
Choosing a Function from a Menu or Submenu
To choose a function from an open menu or submenu, click the desired function.
The selected menu and any submenus close, and the system executes the function of your
choice.
Choosing Functions from the Toolbars (Shortcut)
Depending on your current task, various buttons are available on the standard toolbar and on
the application toolbar. To choose a function with one of these buttons, you click the
appropriate button.
In the standard toolbar, these buttons can include functions such as Save, Display, or Exit.
A typical application toolbar is shown here:
Getting Started 4.70 71
Page 72

SAP Online Help
Choosing Functions from the Context Menu (Shortcut)
The SAP System uses the function keys on your keyboard. Depending on your task, certain
function keys are active – that is, various functions from your application and task are
assigned to them.
You can display a context menu with these function keys and their assigned functions. By
default, this context menu is not visible. To display it, click the the right mouse button. Since
the only other way to access some of these functions may be to navigate the menus, you can
use the context menu as a shortcut.
To choose a function from the context menu on any screen:
...
1. Place the cursor anywhere below the toolbars.
2. Click the right mouse button.
The context menu opens, as shown in this example:
3. Choose the desired function.
Choosing Menus and Functions with the
Keyboard
Use
To navigate in the SAP Easy Access workplace menu, you use the up and down cursors as
well as the Delete and Enter keys.
To choose a menu from the menu bar, you use the F10 key, the cursors, and the Enter key.
Procedure
Using the Keyboard to Navigate in the SAP Easy Access Workplace
Menu
• To move up and down in the workplace menu, use the up and down cursors (↑ and ↓).
• To delete a favorite from your favorites list, choose Delete.
• To open a folder or start a transaction, choose Enter.
Choosing a Menu in the Menu Bar
To choose a menu with the keyboard:
...
Getting Started 4.70 72
Page 73

SAP Online Help
1. Press F10.
The system activates the menu bar and highlights the first menu on the left.
2. To highlight the menu of your choice, use the left and right cursors (← and →).
3. Press the down cursor (↓).
The menu opens. If your system is busy, it may take a few seconds for the contents to
appear.
The system highlights the first item in the menu. Submenus are indicated by dropdown
arrows to the right of menu items.
Choosing a Submenu
To choose a submenu with the keyboard:
...
1. From the open menu, use the up and down cursors (↑ and ↓) to move the highlight to
the desired submenu.
2. Press the right cursor (→).
The submenu opens next to the original menu, and its contents (functions, submenus,
or both) appear. If your system is busy, it may take a few seconds to display the
contents.
The system highlights the first item in the submenu.
Canceling a Menu or Submenu Choice
To cancel, or close, any menu or submenu, press ESC. Or, press F10.
The system closes the respective menu and submenus, and deactivates the menu bar. To
choose another menu, press F10 again.
Choosing a Function from a Menu or Submenu
To choose a function from an open menu or submenu:
...
1. From the open menu or submenu, use the up and down cursors (↑ and ↓) to highlight
the desired function.
2. Choose Enter.
The system closes the respective menu and any submenus, and executes the selected
function.
Choosing Functions with Function Keys (Shortcut)
The SAP System uses the function keys on your keyboard. Depending on your task, certain
function keys are active – that is, they are assigned various functions from your application
and task.
To choose a function using a function key:
...
1. Display a list of the function keys available in your current task, press and hold CTRL,
and press F.
2. Press the function key for that function.
Task Selection with Transaction Codes
Use
After you have logged on to the SAP System, you choose the task that you want to work on.
You can switch to different tasks at any time.
Getting Started 4.70 73
Page 74

SAP Online Help
Each function in the SAP System has a transaction code associated with it. A transaction
code consists of letters, numbers, or both, for example, FB05 or SUSR. You enter transaction
codes in the command field. For more information on the command field, see Release 4.6:
The New SAP GUI [Seite 28].
By entering a transaction code instead of using the workplace menu, you can go to a task and
start the function in a single step. Although using transaction codes efficiently requires some
memorization of codes, it is also a quicker way to get around in the SAP System.
For example, entering transaction code FD01 takes you directly to the screen for creating a
customer master record in Accounts Receivable.
You can use a transaction code to go to any task in any SAP application. For example, if you
are working in the Accounts Receivable application, you can go to a task in the Accounts
Payable application.
Prerequisites
Before you can use a transaction code, you have to find the right transaction code for the task
you want to start.
Additional Information
Finding the Transaction Code for the Task You Want to Start [Seite 74]
Finding the Transaction Code for the Current Task [Seite 75]
Entering a Transaction Code [Seite 76]
Choosing a Transaction Code from the History List [Seite 77]
Finding the Transaction Code for the Task You
Want to Start
Prerequisites
Before you can use a transaction code, you must find the transaction code for the task you
want to start.
Procedure
To find a transaction code for a certain task, place the cursor on the appropriate function (that
is, menu item) in the SAP Easy Access workplace menu, and either:
• Choose Extras → Technical details.
A dialog box appears displaying the details for the selected menu item, as in the
following example:
Getting Started 4.70 74
Page 75

SAP Online Help
• Or, choose Extras → Settings → Show technical name.
The menu closes. When you reopen it, the system displays the transaction code (not
only for the selected item, but throughout the workplace menu), as in the following
example:
Result
You can start the task now by double-clicking it, or by choosing Enter. You can also use the
transaction code to start this task from any screen in the SAP System. When you use a
transaction code to start a task, the SAP System ends your current task and then displays the
initial screen of the new task.
Finding the Transaction Code for the Current
Task
Procedure
To find the transaction code for the current task:
• Choose the arrow at the far right of the first status field, as in this example:
The transaction code appears, along with other system information:
Getting Started 4.70 75
Page 76

SAP Online Help
• Or, from the menu bar, choose System → Status.
The System Status dialog box appears. You can find the transaction code for the
current task in the Repository data frame of the SAP data screen area, as in this
example:
To find the transaction code for a different task, you can either:
• Open the task, and choose System → Status.
• Or, activate the appropriate options on the SAP Easy Access workplace menu (see
Finding the Transaction Code for the Task You Want to Start [Seite 74]).
Entering a Transaction Code
Procedure
To enter a transaction code and start a task:
...
1. Place the cursor in the command field.
As of Release 4.6, the command field is closed by default. To display it, choose
the arrow to the left of the Save icon: .
The command field appears:
To hide it, choose the arrow to the right (outside) of the field.
To display a list of the transactions you used last, choose the dropdown arrow
at the right-hand end of the command field.
2. Enter /n (to end the current task) followed by a transaction code.
For example, for Transaction code MB01, you would enter /nmb01, as shown here.
3. Choose Enter.
You exit the current task, and the initial screen of the new task appears.
Getting Started 4.70 76
Page 77

SAP Online Help
If you do not want to end your current task, but you need to do another task, you
can create a new session.
For example, suppose you are creating a purchase order and you need to look
at a table with exchange rates. You can open a session to look at the exchange
rate table without having to end your first task of creating a purchase order.
See Creating a New Session and a Task at Once [Seite 51].
Choosing a Transaction Code from the History
List
Use
You can display a list of the transaction codes processed since you logged on (called a
history list), and then choose a transaction code from that list.
Procedure
...
1. In the standard toolbar, open the command field.
As of Release 4.6, the command field is closed by default. To display it, choose
the arrow to the left of the Save icon:
The command field appears:
To hide it, choose the arrow to the right (outside) of the field.
2. Choose the dropdown arrow at the right-hand end of the command field.
The history list appears, displaying the transaction codes for all the transactions you
have accessed in all of your sessions since you logged on. A sample history list is
shown here.
3. Choose the desired transaction code.
4. Choose Enter.
This takes you to the initial screen of the task associated with that transaction code.
Entering Data on a Screen
Procedure
Most of the tasks you perform in the SAP System involve data entry on a screen.
Getting Started 4.70 77
Page 78

SAP Online Help
To enter data on a screen:
...
1. Enter data in all of the appropriate input fields on the screen.
For details about fields and data entry, see Fields [Seite 78].
2. To have the system check the entries and proceed to the next screen in the task,
choose Enter.
The system checks your entries. If the system finds any errors, for example entries
whose format is incorrect, it displays a message in the status bar and places the cursor
in the field you need to correct.
If the system does not find any errors, the next screen appears.
3. If the system found errors, change the incorrect entries.
If you need help determining valid entries for an input field, see Help on Possible
Entries for a Field [Seite 127].
4. When you are done making changes, choose Enter.
The system checks your entries again. Repeat steps 3 and 4 until the system does not
find any more errors and the next screen appears.
At this point, you can either save your data or cancel the task. For more information, see
Saving the Data on a Screen [Seite 85] and Canceling All the Data on a Screen [Seite 84].
Fields
Definition
A field consists of:
• A field name
• Field data
Field data is a single unit of information, such as a customer's name or account number.
Use
Most of the tasks you perform in the SAP System involve data entry. Typically, you enter data
in the system in fields.
Most screens in the SAP System contain fields in which you enter data (input fields) or that
provide information (display fields). Here is an example of the different field types:
Getting Started 4.70 78
Page 79

SAP Online Help
Structure
Input fields vary in length. In some cases, the length of an input field determines how many
characters you can enter in the field. In other cases, input fields are scrollable – that is, you
only see part of the entry in the field.
Activities
Working in Fields Using the Keyboard
As an alternative to using the mouse, the following table shows the key combinations you use
to work with fields. These functions are identical to the corresponding MS Windows functions.
Key combination Result
↓
↑
àß
Ctrl+à Moves the cursor word-by-word to the right
Ctrl+ß Moves the cursor word-by-word to the left
Home Moves the cursor to the beginning of the input field
End Moves the cursor to the end of the input field
Shift+à Marks text character-by-character to the right
Shift+ß Marks text character-by-character to the left
Shift+Ctrl+à Marks text word-by-word to the right
Shift+Ctrl+ß Marks text word-by-word to the left
Shift+Home Marks texts from the cursor position to the beginning of the line
Shift+End Marks text from the cursor position to the end of the line
Ctrl+C, Shift+Insert Copies marked text to the clipboard
Ctrl+V, Shift+Delete Inserts text stored on the clipboard
Ctrl+X, Shift+Delete Deletes marked text from the input field and copies it to the clipboard
Moves the cursor to the beginning of the next input field or next line.
Moves the cursor to the beginning of the previous input field or previous
line.
Moves the cursor to the left or right within the input field
Delete Deletes text to the right of or highlighted by the cursor
Backspace Deletes text to the left of the cursor
Insert Toggles between insert and overwrite modes
Additional Information
Insert and Overwrite Modes [Seite 80]
Typing Data into an Input Field [Seite 80]
Changing the Data in an Input Field [Seite 80]
Moving from Field to Field [Seite 81]
Using the Clipboard [Seite 82]
Required Input Fields [Seite 83]
Help on Possible Entries for a Field [Seite 127]
Getting Started 4.70 79
Page 80

SAP Online Help
Insert and Overwrite Modes
Use
You can enter data in two modes:
• Insert: Any data to the right of the cursor moves to the right as you type.
• Overwrite: You type over any data to the right of the cursor.
Typically, you use the Overwrite mode to enter data, and the Insert mode to enter data
between existing data (for example, if you left out a letter in the middle of a word).
In the standard system, the default entry mode is Insert. However, you can to switch to
Overwrite at any time.
The status bar shows which mode you are currently in. It displays INS when you are in the
Insert mode and OVR when you are in the Overwrite mode. For more information, see The
Status Bar [Seite 32].
Activities
To switch entry modes, press INS (insert).
The current entry mode changes to the new entry mode.
The INS key is a toggle between the two modes, that is, the entry mode changes each time
you press INS.
You can also toggle between modes by clicking the entry mode status field at the far right of
the status bar.
Typing Data into an Input Field
Procedure
In the standard system, when you place the cursor anywhere in an empty input field, the
cursor jumps to the beginning of the field.
...
1. Click anywhere in the empty input field.
The cursor jumps to the beginning of the field.
2. Type in the data. (If you need help determining valid entries for the field, see Help on
Possible Entries for a Field [Seite 127].)
If the data fills the input field, the cursor automatically moves to the next input field.
Otherwise, the cursor remains in the input field until you press the TAB key to move it or
you click another input field.
Changing the Data in an Input Field
Use
You can change data in an input field by either:
• Switching the data entry mode to Overwrite, and typing over the data in the field, or
• Highlighting the entry in the Insert mode and typing the new data
Getting Started 4.70 80
Page 81

SAP Online Help
Some input fields contain data that is for display only; you cannot change or
delete the data in these input fields. Input fields whose background is the same
color as the background of the screen contain data that you cannot change.
Procedure
Insert Mode
...
1. Use the cursor to highlight the existing content of the field.
2. Type in the new data.
The entire content of the field is replaced by whatever you type.
Overwrite Mode
...
1. Make sure you are in the Overwrite mode (OVR in the status bar). If you are not, press
INS to switch to this mode.
2. Place the cursor at the point in the data where you want to start overwriting.
3. Type over the old data. You can use the DEL key to delete data to the right of the
cursor.
To change other input fields on the screen, repeat steps 2 and 3.
Moving from Field to Field
Procedure
Moving from Field to Field with the Mouse
Click the input field that you want to move to.
The cursor now appears in that field.
Moving from Field to Field with the Keyboard
To move the cursor with the keyboard, use any of the following keys:
Key Moves the cursor to the beginning of
TAB
SHIFT+TAB
↓
↑
In the standard SAP System, the cursor automatically moves to the next input
field when it reaches the end of the current input field. This feature is called
automatic tabbing (AutoTAB). It is useful when you are entering data in many
fields and you want to avoid having to press the TAB key to move among these
fields.
The next input field
The previous input field
The next input field or next line
The previous input field or previous line
However, AutoTAB only works at the end of an input field. For example, if the
Material field can hold 12 characters, but the material number you enter is only 7
characters long, you must press the TAB key to move to the next input field.
Getting Started 4.70 81
Page 82

SAP Online Help
For information on activating AutoTAB, see Tabbing Between Fields
Automatically [Seite 48].
Using the Clipboard
Prerequisites
You can transfer the contents of fields onto the clipboard of your operating system and then
paste them into other fields of the SAP System or into other applications. To do this, you use
the Clipboard functions.
There is a difference between the functions described here and similar functions
you may sometimes find in the Edit menu. The Clipboard functions, though
limited, work for the clipboard of your windowing environment, which means you
can use them to move or copy contents between the SAP System and other
applications. The functions in the Edit menu, though more extensive, only work
within the SAP System.
Procedure
...
1. To select a field or the text you want to copy or move, click and drag the cursor over the
desired text. The selected text is highlighted.
...
a. To remove the information from an input field and place it onto the clipboard of
your operating system, choose Cut (CTRL+X) The field is now blank.
b. To copy the selected information onto the clipboard, choose Copy (CTRL+C)
Data remains in the field.
2. To paste the text, position the cursor where you want the information and then choose
Paste (CTRL+V). The text is pasted at the current cursor position.
The transferred data remains in the clipboard until you use Cut or Copy again to move
or copy new texts onto the clipboard. You can insert the texts into fields on another
SAP screen or an external application.
To copy the data from several fields or different field types of the screen onto the clipboard,
you must turn on the selection mode:
...
1. Select Clipboard → Mark (CTRL+Y) in the Layout menu. The pointer changes into a
crosshair cursor.
2. Click in one corner of the area you want to copy, hold the mouse button down and drag
the cursor to the diagonally opposite corner (for example, from top left to bottom right).
The system displays a rectangle to indicate the selected area.
3. Release the mouse button when the rectangle covers the entire text you want to copy.
4. Select Copy (CTRL+C) or Cut (CTRL+X). The selected text is copied onto the clipboard.
When you choose Cut, the selected texts are deleted from the input fields.
The clipboard now holds all the information from the fields you have selected, including
the field names and short descriptions. For this reason, you usually cannot insert the
contents of the clipboard in the current screen. This feature is primarily intended for
copying SAP information and pasting it into an external program, such as Microsoft
Word.
Getting Started 4.70 82
Page 83

SAP Online Help
Required Input Fields
Definition
When you work in the SAP System, you will sometimes encounter input fields containing a
question mark (?). These are required input fields. An example is shown below:
As of Release 4.6, required input fields are identified by a checkmark icon:
Use
If the screen you are working in contains any required input fields, you must enter data in
these input fields before you can proceed to the next screen or tab (if the screen is using
tabs).
Generally, if a screen has no required input fields, you can go to the next screen
or tab without entering data in any fields. Some screens, however, have
required input fields that are not identified. This situation can occur when
• You enter data in an optional field that has required fields associated with
it
• You need to enter data in one of several input fields
For example, freight can be delivered by a specific day or week. Neither
the Day field nor the Week field are identified as required input fields;
however, you must complete one of the fields (not both).
When you choose OK to proceed to another screen, if you have not completed all the
required input fields on a screen, the SAP System displays an error message in the status
bar. At the same time, it places the cursor in the required input field so that you can make the
necessary data entry.
Hold Data and Set Data
Use
When you want to create a group of objects that contain similar data or the same data (say, a
group of purchase orders), you use the functions Hold data or Set data. Both of these
functions automatically enter the specified data for a specified field, with only one difference:
• Hold data: You can change the held data.
• Set data: You cannot change the held data.
For example, suppose you want to enter 20 purchase orders (POs). Each PO has the same
delivery date, and the ordered goods will be delivered to the same plant and storage location.
Instead of entering the same data 20 times, you can enter the data in the input fields once
and "hold" it on the screen. Then, every time you create an invoice, the system enters the
same data – the held data – in the appropriate input fields.
When you use Hold data, you can change the held data when it appears in the input fields;
when you use Set data, you cannot. For example, if you are entering invoices, suppose the
date and document type are the same for most of the invoices, but not all. If you use Hold
data, you can change (that is, overwrite) the date or document type for the few invoices that
Getting Started 4.70 83
Page 84

SAP Online Help
differ. If you use Set data, you cannot change the date or document type for the few invoices
that differ.
Using Set data also has an advantage, however. When you use Set data, the cursor skips
over input fields with held data, so that you do not always have to press TAB to move to the
next input field.
You can hold data for as many different screens as you like. The data you enter and hold on a
screen is held for that screen until you delete it or until you log off the SAP System.
The functions Hold data and Set data are not available for every task. If you try
to use them in a task where they are not available, the SAP System displays a
message in the status bar.
Holding Data on a Screen
Procedure
To avoid having to enter the same data repeatedly, hold the data on the screen, as follows:
...
1. On the screen, enter the data that you want to hold in the input fields.
2. From the menu bar, choose System → User profile.
The User profile menu appears.
3.
...
a. To hold data with the option of changing it, from the User profile menu, choose
Hold data.
a) To hold data with the option of automatically skipping fields with held data, from
the User profile menu, choose Set data. You will not be able to change the data.
If Hold data and Set data are not available, a message appears in the status bar. Otherwise,
the data you entered is held on the screen. It will be held on the screen until you delete it or
until you log off the SAP System.
Deleting Data Held on a Screen
...
1. Go to the screen that contains the data you want to delete.
2. Choose System → User profile → Delete data.
The data is deleted. The next time you access the screen, no held data will be displayed.
You can also simplify the input of repeated data using user parameters.
Canceling All the Data on a Screen
Use
You may want to cancel, or delete, the data you just entered. For example, you are missing a
piece of required data and cannot proceed until you locate it.
Procedure
To cancel all the data you just entered on a screen, choose or choose Edit → Cancel.
Getting Started 4.70 84
Page 85

SAP Online Help
The system removes the data on your current screen, closes the current screen, and returns
you to the previous screen. Depending on the situation, the system may display a dialog box
prompting you to confirm your action.
Saving the Data on a Screen
Prerequisites
When you are working in a task that consists of several screens, the system temporarily
stores the data that you enter on each screen. After you complete all the necessary screens
in your task, you need to save your data.
Procedure
To save the data for a task you are working in, choose or press CTRL + S.
The system processes the stored data and saves it in the appropriate database.
If you are doing a task for the first time and you do not know which screen is the
last screen, the system prompts you to save when you reach the last screen.
For example, if you are on the last screen of your task and you choose Enter
instead of choosing Save or Post, a dialog box appears. The dialog box prompts
you to save your data.
Going to Related Tasks
Use
When you are working in a task, you can use certain menus and functions to go to other
screens within your task, as well as to screens in related tasks.
To find out which other screens and related tasks are available, check the Goto, Extras, and
Environment menus in the menu bar. The contents of these menus change depending on the
task you are doing.
Activities
Use In order to
Goto
Extras
Environment
Move among the different screens within your task
Often you do not need to complete every screen in your task, or you may
want to return to a screen to make changes.
Access additional information and fields
Sometimes you need additional information to complete a screen. Or you
may need to complete fields that are used less frequently.
Go to a related task
Often, when doing a task, you need to do a related task. The related task
can be either in your current application or in another application. For
example, suppose you are checking an invoice (Invoice Verification
application) and you want to compare it to the purchase order (Purchasing
application). From the Environment menu, you can display the purchase
order, check the data on the purchase order, and then return to the
Getting Started 4.70 85
Page 86

SAP Online Help
invoice.
Depending on the application, you can often move from one screen to the next
by choosing or by choosing Enter. If you have not filled out all required
input fields, however, this will not work.
Ending a Task
Use
After you have completed a task, you will want to end it. Sometimes you may want to end a
task without completing it.
Procedure
To end a task:
...
1. In the standard toolbar, choose or press Shift+F3.
If you have already saved the data, or if you have not entered any data, the system
ends the task and returns to the initial screen of your application.
2. If you have entered data while working in this task, but have not saved it yet, the
system displays a dialog box prompting you to save your data.
¡ To save the data and end the task, choose Yes.
¡ To end the task without saving the data, choose No.
¡ To return to the task, choose Cancel.
Reports
Use
When you are working in the SAP System, you may want to access information from the
database. To do this, you use reports.
In this documentation, report refers to the report program, and list refers to the
output – that is, the results of the report.
Some reports display information; others allow you to perform analyses.
A report must be started, or executed. In many cases, the SAP System automatically
executes a report. Sometimes, however, you will want to execute a report yourself.
In addition to report programs, the SAP System provides numerous reporting tools, each of
which has its own set of procedures for executing report programs.
This documentation describes report programs only. For an introduction to the SAP reporting
tools, refer to the Reporting Made Easy guidebooks (Release 4.0B). You can find these
guidebooks at: www.saplabs.com/rme.
Getting Started 4.70 86
Page 87

SAP Online Help
Executing a Report
Prerequisites
To display or analyze information from the database, you execute a report. Some reports are
linked directly to tasks in the SAP System, and can be executed from one of the menus on
the screen you are working with.
Reports that are directly linked to your task sometimes use the data already entered on your
screen as selection criteria. This means you do not have to enter selection criteria when the
report is executed.
Procedure
Accessing Reports in the SAP Easy Access Workplace Menu
To access the reports used most frequently in the SAP System, go to the SAP standard
menu, and choose Information Systems. In this directory, the reports are grouped by
application:
Alternatively, you can access the reports belonging to a particular application by choosing the
relevant application from the SAP standard menu, and choosing Information System, as
shown in the example below:
Not all applications have this menu option.
Executing a Report in Your Task
To execute a report in your task:
...
1. Navigate to the function that corresponds to the report you want to execute, and
choose that function. For example, to display a report of purchase orders issued to
Getting Started 4.70 87
Page 88

SAP Online Help
particular vendors, you would go to the Purchasing menu, and choose Purchase order
→ List displays → By vendor.
2. If no additional selection criteria are required, the system executes the report and
displays the resulting list.
3. If additional selection criteria are required, the system displays the selection criteria
screen. For more information, see Selection Criteria [Seite 91].
Accessing Tool-Based Reports
ABAP Query
To execute a report using the ABAP Query, choose Information Systems → Ad Hoc Reports
→ ABAP Query.
QuickViewer
To execute a report using the QuickViewer, go to the menu bar of the SAP Easy Access
initial screen, and choose System → Services → QuickViewer.
You can also start QuickViewer reports by using the ABAP Query.
Report Painter and Report Writer
To access the Report Painter and Report Writer, choose Information Systems → Ad Hoc
Reports → Report Painter → Report Writer → Report group → Execute.
Executing All Other Reports
If a report is not available directly from the task you are working in, you can execute it by
starting the Reporting function.
...
1. From the menu bar of the SAP Easy Access initial screen, choose System → Services
→ Reporting.
The report selection screen appears:
Getting Started 4.70 88
Page 89

SAP Online Help
2. In the Program field, enter the report name. If you do not know the name, see Finding
the Name of a Report You Want to Execute [Seite 89].
3. Choose Execute.
The system displays the selection criteria screen. An example is shown here:
4. Enter the selection criteria.
To enter your selection criteria using a variant, you can choose a variant from the
dropdown list of possible entries. This list only contains entries if variants were created
earlier. For more information on variants, see Report Variants [Seite 93].
5. To start the report, choose Program → Execute.
The system executes the report and displays the resulting list.
If you receive the message No data exists, recheck your selection criteria, including the
From/To Date.
Additional Information
Selection Criteria [Seite 91]
Displaying Available Report Variants [Seite 95]
Finding the Name of a Report You Want to Execute
Prerequisites
You can search for a report name even when you do not know the exact name of a report.
Procedure
...
1. Choose System → Services → Reporting.
Getting Started 4.70 89
Page 90

SAP Online Help
The report selection screen appears.
2. Choose Utilities → Find Program. Or, choose the possible entries icon for Program,
and select an entry from the dropdown list box.
The report search screen (ABAP Program Directory) appears:
3. In the Program field, enter any part of the report name that you know, plus any
wildcards (* or +), as needed.
Wildcard Represents
* and +
*
+
Use the * and + anywhere in the report name, as often as necessary. For
example:
Character Represents all report names...
z*
*sale*
*f+
Getting Started 4.70 90
Characters you do not know
Multiple characters
Exactly one character
Starting with z
Containing the character string sale, such as rvsale07
Containing an f as the second-to-last character, such as rmlogifa
Page 91

SAP Online Help
rp+++sch
The report name can be upper- or lowercase; for example, RF is the same as rf.
4. Choose Execute.
A list of reports appears.
5. Place the cursor on the report name, and choose Choose. Or, double-click the report
name.
6. Choose Program → Execute.
If the report does not require a variant, the selection criteria screen for the report
appears.
If the report requires a variant, the system displays a message stating that you cannot
select the report from this screen. Return to the report selection screen (choose ,
or press F3), and then enter the report and variant name. Before leaving this screen,
note the name of the report. (For more information, see Report Variants [Seite 93].)
7. Enter the selection criteria.
8. Choose Program → Execute.
The system executes the report and displays the resulting data.
Starting with rp, ending in sch, and containing any three characters in
between, such as rp012sch or rpinvsch
Additional Information
Selection Criteria [Seite 91]
Finding the Name of a Current Report
Procedure
...
1. Execute the report.
2. From the menu bar, choose System → Status.
The name of the report appears in the Program field.
Selection Criteria
Definition
Fields you use to define the type and amount of information you want a report to process.
Reports are generated using selection criteria. For example, a selection criterion for a report
on vendors would be the vendor number. This means that you can select a single vendor
number or a range of numbers.
Getting Started 4.70 91
Page 92
SAP Online Help
Use
You enter delimiting values in the selection criteria input fields. Only the data that matches
these limits appears in the list. For example, to obtain data from customer accounts between
600 and 700 only, you enter those values in the input field for the Customer account selection
criteria. If you do not enter any values for the Customer account selection criteria, the system
uses data from all of the customer accounts when it executes the report.
You should aim for precision when specifying selection criteria. Your lists will be
smaller, and the system will process them faster. Otherwise, the amount of data
may be very large, and the system may not be able to process it all. In this case,
a message indicating processing limitations appears in the status bar.
If you receive the error message No data exists after executing a report using a
selection criterion, recheck the selection criteria input fields.
Entering Values for Selection Criteria
Procedure
Entering a Single Value for a Selection Criterion
...
1. Place the cursor on the input field for the desired selection criterion.
2. Enter the value. For more information on entering data in fields, see Fields [Seite 78].
3. To further qualify this selection criterion, choose Selection options.
4. You can specify that only the records greater than or less than a value should appear in
the list. You can also specify that all records meeting the selection criteria should be
excluded; in this case, the system displays all records that do not meet the selection
criteria.
You have entered a value for a selection criterion. Repeat this procedure for all other
selection criteria desired for this report.
Entering a Range of Values for a Selection Criterion
...
1. Place the cursor on the input field for the desired selection criterion.
2. Enter the lower limit of the range in this field. This is the “from” value for the range. For
example, for storage types from 007 to 014, you would enter 007. For more information
on entering data in fields, see Fields [Seite 78].
3. Place the cursor in the adjacent To input field.
4. Enter the upper limit of the range in this field. This is the “to” value for the range.
5. To further qualify this selection criterion, choose Selection options.
Repeat this procedure for all other ranges of selection criteria desired for this report.
Multiple Selection
If you choose next to a selection criterion, the system displays a multiple selection
screen. On this screen you can enter multiple single values or value ranges for each selection
criterion.
Getting Started 4.70 92
Page 93

SAP Online Help
Report Variants
Definition
Group of selection criteria that has been saved. A report can have several different variants,
with each variant retrieving different types of information. For example, a vendor report might
have one variant for U.S. vendors and another variant for European vendors.
Use
Instead of entering the same values in the selection criteria input fields each time you execute
a report, you can enter the values once and then save the selection criteria as a variant. The
next time you execute the report, you only need to enter the variant name, not the selection
criteria. If you use variants, the selection criteria screen is already filled with data.
To execute certain reports, you must use a variant. In this case, a system message prompts
you to do so. Although you are not always required to use variants or selection criteria, it is a
good idea to use them when possible. Your resulting lists will be smaller and take less time
for the system to process.
Creating Report Variants
Use
Instead of entering the same values in selection criteria fields each time you execute a report,
you can create a variant. Using variants reduces both data entry time and system processing
time.
Prerequisites
You must have the proper authorization to create a variant. For information on authorizations,
see your system administrator.
Getting Started 4.70 93
Page 94

SAP Online Help
A report can have any number of variants attached to it.
Procedure
...
1. From the menu bar, choose System → Services → Reporting.
2. In the Program field, enter the name of the report that the variant will be attached to. If
you do not know the name, see Finding the Name of a Report You Want to Execute
[Seite 89].
3. From the menu bar, choose Goto → Variants.
The ABAP Variants initial screen appears, as shown here:
4. In the Variant field, enter a name for this variant, and choose Create. You can use any
combination of characters to create the variant name except for special characters,
such as the percent sign (%) or dollar sign ($).
The selection criteria screen for the report appears.
5. Enter values in the selection criteria input fields.
For information on entering or changing values, see Entering Values for Selection
Criteria [Seite 92].
6. Choose Continue.
The Save variant screen appears. The name you entered for the variant is displayed in
the Variant field.
7. In the Description field, enter a short description of the variant.
Getting Started 4.70 94
Page 95

SAP Online Help
8. Choose any of the following environment options by selecting the checkbox to the left
of the option. Your choices will affect the variant as a whole.
Only for background processing
Protect variant
Only display in catalog
System variant (automatic transport)
9. Choose any of the following characteristics for the individual selection criteria by
selecting the appropriate checkbox:
• Type protected
• Invisible
• Selection variable
• Without value SPA/GPA
10. Save the variant by choosing or pressing CTRL+S.
The variant is saved and its values appear on the selection criteria screen.
To print the list using background processing. You
should always print large lists in the background.
To protect the entire variant. Only the person who
created the variant can change or delete it.
To reduce the number of variants displayed when
using possible entries help.
To make the variant a system variant.
Additional Information
Displaying Available Report Variants [Seite 95]
Using Report Variants [Seite 96]
Displaying Available Report Variants
Use
Many reports have variants. If you do not know which variants are available, you can display
a list of variants attached to a report. You can also view the contents of a variant before you
choose it.
Procedure
...
1. From the menu bar, choose System → Services → Reporting.
2. In the Program field, enter the report name. (If you do not know the name, see Finding
the Name of a Report You Want to Execute [Seite 89].)
3. From the application toolbar, choose Overview of variants.
4. All the variants attached to the report appear.
5. To view the contents of the variant, place the cursor on a variant and choose Variants
→ Display values.
6. To use the variant, highlight the variant and choose Execute with variant.
7. The system displays the selection screen for the report, complete with data.
If a variant has not been created for this report, you receive the error message
Variant for program <program name> does not exist.
Getting Started 4.70 95
Page 96

SAP Online Help
Additional Information
Creating Report Variants [Seite 93]
Using Report Variants [Seite 96]
Using Report Variants
Procedure
...
1. From the menu bar, choose System → Services → Reporting.
2. In the Program field, enter the report name. (If you do not know the name, see Finding
the Name of a Report You Want to Execute [Seite 89].)
3. Choose With variant.
The Execute program with variant dialog box appears:
4. In the Variant field, enter the desired variant. To obtain a list of available variants,
choose the possible entries button.
5. To execute the report with the variant, choose Execute.
The system displays the selection screen filled with data.
6. Choose Execute.
The system executes the report and displays the resulting list.
Getting Started 4.70 96
Page 97

SAP Online Help
Additional Information
Creating Report Variants [Seite 93]
Displaying Available Report Variants [Seite 95]
Report List Output
Use
You can display and print a report list by executing a report from within your task or from the
System menu.
Most of the reports you need are available in your application, where you can choose them
from the menus. The menu that contains the reports varies from application to application;
however, many reports are available from the Environment menu. To choose a report in some
applications, you may first need to enter a value, for example, a material number. Your
application documentation describes which menus contain the reports, and provides
instructions for choosing them.
You can find a complete list of report programs and report lists in the so-called report tree. To
access the report tree from the SAP Easy Access standard menu, choose Information
Systems → General Report Selection. To display your report program and report list options,
choose the application from which you want to execute the report or report list.
To execute a report, double-click the report name. The selection criteria screen appears.
Enter your selection criteria, and choose Execute. See also Executing a Report [Seite 87].
Activities
To choose a report from the System menu, you must know the program name for the report.
This applies only to the System menu. Using the System menu, you can execute reports:
• That are not available from menus
• From anywhere in the SAP System
For more information on report names, see Finding the Name of a Report You Want to
Execute [Seite 89].
You can either print a list, or display a list and then print it. If you have large lists, you should
print them using background processing.
Displaying and Printing Report Lists
Procedure
Displaying a List
To display a list:
...
1. Execute the report from your task or from the System menu.
See Executing a Report [Seite 87].
2. In the selection criteria screen, enter the selection criteria in the appropriate input fields.
See Selection Criteria [Seite 91].
To enter your selection criteria using a variant, you can select a variant from the
dropdown list of possible entries.
See Displaying Available Report Variants [Seite 95].
Getting Started 4.70 97
Page 98

SAP Online Help
3. From the selection criteria screen, choose Program → Execute.
The list appears. A sample list is shown here:
If your list is large, the SAP System takes longer to process all the data. If the SAP System
cannot process all the data, a message indicating processing limitations appears in the status
bar. In that case, you must:
• Execute the report with a variant, or
• Enter more selection criteria values, or
• Print the list using background processing
Printing a List
To print a list:
...
1. Execute the report from your task or from the System menu.
See Executing a Report [Seite 87].
2. In the selection criteria screen, enter the selection criteria in the appropriate fields.
See Selection Criteria [Seite 91].
To enter your selection criteria using a variant, you can select a variant from the
dropdown list of possible entries. See Displaying Available Report Variants [Seite 95].
3. Choose Program → Execute + print.
The print screen appears. Complete the appropriate input fields.
The system displays default values that you can overwrite. If your list is large, you may
want to store it in the output controller and print it later, outside of business hours.
Getting Started 4.70 98
Page 99

SAP Online Help
Printing large lists can slow down the system and tie up printers. See Printing from the
SAP System [Seite 100].
In general, after you start printing a list, you cannot cancel it. You can cancel a list (that
is, a spool request) only if you delete it immediately, before it leaves the SAP spool
system.
4. On the print screen, choose Output → Print from the menu bar.
A print summary screen appears.
If your list is large, the SAP System takes longer to process all the data. If the SAP System
cannot process all the data, a message indicating processing limitations appears in the status
bar. In that case, you must:
• Execute the report with a variant, or
• Enter more selection criteria values, or
• Print the list using background processing
Lists
Use
Lists are used to present hierarchical data. In the SAP System, lists present the results of
• Reports
• Searches
• Queries for possible entries (in some cases)
Features
To save a list:
• To SAPoffice, choose System → List → Save → Office folders. In the subsequent
dialog box, specify the folder where the list should be stored.
• To an external file format such as a Microsoft Excel spreadsheet or an HTML page,
choose System → List → Save → Local file. Specify the external format type.
• In a report tree, choose System → List → Save → Report tree. The system saves this
list to the node and report tree you specify.
Lists can be interactive:
• Double-clicking a list entry automatically opens the entry.
• Clicking a hotspot triggers an action in the system. The most common example of a
hotspot is a hyperlink; when you click a hyperlink, you jump to a different topic or page.
Navigating Through Lists with the Keyboard
In addition to using the mouse, you can also use the following key combinations to work with
lists:
Key combination Result
àß
áâ
PgUp
PgDn
Home
Getting Started 4.70 99
Moves the cursor to the left or right
Moves the cursor up and down
Scrolls back one screen
Scrolls forward one screen
Scrolls to the first column
Page 100

SAP Online Help
End
Alt+PageDown
Alt+PageUp
Ctrl+PageUp
Ctrl+PageDown
Tab
Shift+Tab
Ctrl+Tab
F2
Ctrl+Y
Ctrl+C,
Ctrl+Insert
Ctrl+X,
Ctrl+Delete
Scrolls to the last column
Scrolls one screen to the left
Scrolls one screen to the right
Scrolls to the first line
Scrolls to the last line
Moves to the next input field
Moves to the previous input field
Toggles between the list and command field
Chooses an entry
Switches to the highlight mode, which lets you highlight sections of the
screen
Copies marked text to the clipboard
Deletes marked text and copies it to the clipboard
Printing from the SAP System
Features
Using the SAP output system, you can output many types of documents on output devices
such as printers or fax machines: purchase orders, invoices, delivery note, payroll documents,
e-mails, report lists, and so on.
Process Flow
Unlike most other programs, which forward print requests directly to the printer, the SAP
System temporarily stores the print data. If you want to print data in an SAP System (online or
in the background [Seite 105]) and choose a print function, such as , the SAP output
system creates two types of print requests:
...
1. a spool request [Extern], which temporarily stores the data to be printed in the system
2. an output request [Extern], which sends the data to the desired output device
If you want your document to be printed immediately on your printer without temporary
storage, you must have made a setting in the print window [Seite 101] for immediate output
[Extern]. In this case, the spool request and output request are generated immediately, and
the data is printed.
If you want to temporarily store the data, do not choose print out immediately. You can display
the temporarily stored print request (spool request) in the output controller [Seite 104] and/or
print it at a later time.
More Information
Print Window [Seite 101]
BC - SAP-Printing Manual [Extern]
Getting Started 4.70 100
 Loading...