

Page 1

BusinessObjects LifeCycle Manager
User's Guide
BusinessObjects Enterprise XI 3.1 Service Pack2
windows
Page 2

Copyright
© 2009 SAP® BusinessObjects™. All rights reserved. SAP BusinessObjects and
its logos, BusinessObjects, Crystal Reports®, SAP BusinessObjects Rapid Mart™,
SAP BusinessObjects Data Insight™, SAP BusinessObjects Desktop Intelligence™,
SAP BusinessObjects Rapid Marts®, SAP BusinessObjects Watchlist Security™,
SAP BusinessObjects Web Intelligence®, and Xcelsius® are trademarks or
registered trademarks of Business Objects, an SAP company and/or affiliated
companies in the United States and/or other countries. SAP® is a registered
trademark of SAP AG in Germany and/or other countries. All other names
mentioned herein may be trademarks of their respective owners.
2009-07-17
Page 3

Contents
Introduction 7Chapter 1
About this Guide..........................................................................................8
What is Life-Cycle Management?................................................................8
What is LifeCycle Manager? .......................................................................8
LifeCycle Manager Terms............................................................................9
LifeCycle Manager Features 13Chapter 2
Authorization in LifeCycle Manager...........................................................15
Security in LifeCycle Manager...................................................................16
LifeCycle Manager Application Access Rights..........................................17
Workflows in LifeCycle Manager...............................................................18
LifeCycle Manager Home Page and Shopping Cart 21Chapter 3
Getting Started with LifeCycle Manager 25Chapter 4
Logging into the LifeCycle Manager Tool..................................................26
Using the Administration Options..............................................................27
Setting Preferences...................................................................................33
Logging Options in LifeCycle Manager......................................................33
Using the Manage Systems Option .....................................................28
Using the Rollback Settings Option .....................................................28
Using the Job Settings Option .............................................................29
Using the Audit Log Option .................................................................29
Using the Version Management System Settings Option ...................30
BusinessObjects LifeCycle Manager User's Guide 3
Page 4

Contents
Using LifeCycle Manager 35Chapter 5
Creating and Deleting a Folder .................................................................36
Creating a Folder..................................................................................37
Deleting a Folder..................................................................................37
Creating a New Job ..................................................................................37
Logging into a New CMS .....................................................................40
Creating a New Job by Copying an Existing Job ......................................40
Searching for a Job....................................................................................41
Editing a Job .............................................................................................42
Adding an Infoobject to a Job ...................................................................42
Searching for Dependents ........................................................................43
Managing Job Dependencies....................................................................44
Promoting a Job When the Repositories are Connected..........................47
Mappings in LifeCycle Manager...........................................................52
Promoting a Job by Using a BIAR File......................................................57
Exporting a Job to a BIAR File ............................................................57
Importing a Job from a BIAR File ........................................................59
Scheduling a Job in LifeCycle Manager....................................................60
Scheduling a Job Promotion................................................................62
Updating the Recurring and Pending Job Promotion Instances..........63
Viewing the History of a Job .....................................................................64
Rolling Back a Job in LifeCycle Manager.............................................65
Auditing in LifeCycle Manager 69Chapter 6
How Auditing Works..................................................................................70
Creating Custom Audit Reports ................................................................70
Audit Database Schema Reference.....................................................70
User Events Enabled for LifeCycle Manager Client.............................71
Event and Detail Reference Tables .....................................................71
4 BusinessObjects LifeCycle Manager User's Guide
Page 5

Contents
LifeCycle Manager Job Server Auditing Events...................................91
Managing Different Versions of an infoobject 93Chapter 7
More Information 97Appendix A
Index 101
BusinessObjects LifeCycle Manager User's Guide 5
Page 6

Contents
6 BusinessObjects LifeCycle Manager User's Guide
Page 7

Introduction
1
Page 8

Introduction
1
About this Guide
About this Guide
BusinessObjects Enterprise XI 3.1 Service Pack2 LifeCycle Manager is a
web-based tool that enables you to move business intelligence (BI) resources
from one repository to another. It also supports the management of different
versions of the same BI resource.
This guide introduces you to the LifeCycle Manager tool and discusses its
features. It also describes how to use the different features that this tool
supports.
What is Life-Cycle Management?
Life-Cycle Management refers to the set of processes involved in managing
information related to a product life cycle, from the stage of concept through
delivery. It establishes procedures for governing the entire product life cycle,
which includes phases such as development, production, and testing.
The BI resources that are present in the development repository must be
transferred to the testing repository for testing deployment. These phases
can occur at the same site or at different geographical locations. The time
required to transfer resources from one repository to another repository must
be minimal, to obtain a high-quality and competitive product. These resources
also have dependencies that have to be moved from one repository to
another. The dependencies of resources add more complexity to the problem,
because these resources have to move along with the dependents.
What is LifeCycle Manager?
BusinessObjects LifeCycle Manager (LCM) is a web-based tool that enables
you to move BI resources from one system to another system, without
affecting the dependencies of these resources. It also enables you to manage
different versions of BI resources, manage dependencies of BI resources,
and roll back a promoted resource to restore the destination system to its
previous state.
The LifeCycle Manager tool is a plug-in for the BusinessObjects Enterprise
application. You can promote a BI resource from one system to another
8 BusinessObjects LifeCycle Manager User's Guide
Page 9

system only if the same version of the BusinessObjects Enterprise application
is installed on both the source and destination systems.
LifeCycle Manager Terms
This section discusses some of the terms that are relevant for understanding
and using the LifeCycle Manager tool.
Job
A job is a collection of infoobjects that can be moved from one
BusinessObjects Enterprise deployment to another BusinessObjects
Enterprise deployment. It can also refer to a collection of related and
dependent cluster unique IDs (CUIDs) that needs to be promoted to the
destination system.
Job instance
A job instance is a job that is scheduled to run at a specific time set by the
user.
Introduction
LifeCycle Manager Terms
1
Primary resource
A primary resource refers to a user-selected resource that is promoted by
the LifeCycle Manager tool.
Direct dependent resource
A direct dependent resource refers to a LifeCycle Manager tool-selected
resource that the primary resource directly depends on. For example, a Web
Intelligence report depends on a universe. In this case, the Web Intelligence
report is the primary resource and the universe is the direct dependent
resource.
Indirect dependent resource
An indirect dependent resource refers to a LifeCycle Manager tool-selected
resource that the selected resource indirectly depends on. For example, a
Web Intelligence report exists in a folder. In this case, the Web Intelligence
report is the primary resource and the folder in which the Web Intelligence
report exists is the indirect dependent resource.
BusinessObjects LifeCycle Manager User's Guide 9
Page 10

Introduction
1
LifeCycle Manager Terms
infoobjects
An infoobject is a meta-data representation of reports, folders, servers,
personal inboxes, or any other managed components in a BI platform. It
exposes a standard set of information and interfaces, and encapsulates the
specific details of each managed component. All components that are used
and managed by the BI platform are represented as infoobjects. An infoobject
contains information such as the ID number, infoobject type, and scheduling
information. These types of information enable the BI platform to manage
each component.
Promotion
Promotion refers to the activity of creating or updating an infoobject, along
with its dependents, in the destination system.
Promotion Jobs Folder
The Promotion Jobs folder is a repository in which all the LifeCycle Manager
jobs are stored.
Rollback
Rollback refers to the activity of restoring the destination system to its previous
state, after a job has been promoted.
Shopping Cart
The Shopping Cart is a dynamically generated hierarchical tree list that
displays the hierarchy of folders based on the objects selected. It also
includes all the direct and indirect dependents of the job. The contents in the
Shopping Cart are categorized according to their object type.
Version Management
Version management, also known as version control, refers to the
management of multiple versions of the same unit of information. It is used
in engineering and software development to manage ongoing evolution of
digital documents that may be worked on by a team.
10 BusinessObjects LifeCycle Manager User's Guide
Page 11

Introduction
LifeCycle Manager Terms
BIAR File
A Business Intelligence Archive Resource (BIAR) file is a tool that enables
you to pack managed content in a BusinessObjects Enterprise system. It
can be used to archive folders and objects in the Enterprise repository, so
that the archived contents can be transferred easily to a different location.
This tool is also useful for backing up objects. BIAR files are available only
on BusinessObjects Enterprise XI 3.1 systems.
1
BusinessObjects LifeCycle Manager User's Guide 11
Page 12

Introduction
LifeCycle Manager Terms
1
12 BusinessObjects LifeCycle Manager User's Guide
Page 13

LifeCycle Manager Features
2
Page 14

LifeCycle Manager Features
2
Authorization in LifeCycle Manager
The LifeCycle Manager tool supports the following features:
• Promotion - This feature enables you to create or update infoobjects in
the destination system. Apart from promoting infoobjects, this feature
enables you to perform the following tasks:
• Create a new job
• Copy an existing job
• Edit a job
• Schedule a job promotion
• View the history of a job
• Managing Dependencies - This feature enables you to select, filter, and
manage dependents of infoobjects in the job that you want to promote.
• Mappings - This feature enables you to modify a source connection or
URL in the source system to match with a dependency type that exists
in the destination system. The LifeCycle Manager tool supports the
following mapping types:
• Connection Mapping
• QaaWS Mapping
• Crystal Report Mapping
• Federation Mapping
• Scheduling - This feature enables you to specify a time for job promotion,
rather than promote a job as soon as it is created. You can specify the
time for job promotion by using any of the following parameters: hourly,
daily, weekly, or monthly.
• Security - This feature enables you to promote infoobjects along with the
associated security rights. You can also use this feature to promote
infoobjects associated with application rights.
• Test Promotion - This feature enables you to match the cluster unique
IDs (CUIDs) of infoobjects in the source system with the cluster unique
IDs (CUIDs) of infoobjects in the destination system. This feature is
especially useful in detecting conflicts between CUIDs of infoobjects in
the source system and the destination system.
• Rollback - This feature enables you to restore the destination system to
its previous state, after a job is promoted. You can roll back an entire job
or a part of the job.
• Version Management - This feature enables you to manage different
versions of the same document. It also enables you to track the changes
in the directory.
14 BusinessObjects LifeCycle Manager User's Guide
Page 15
LifeCycle Manager Features
Authorization in LifeCycle Manager
• Auditing - The events generated by the LifeCycle Manager tool are stored
in the audit database. The Auditing feature enables you to monitor the
events that are logged in the audit database.
• Administration options - This feature enables the administrator to configure
some of the parameters of the LifeCycle Manager tool.
Authorization in LifeCycle Manager
The LifeCycle Manager tool allows you to log into the source system only if
you have adequate permissions. However, to promote a job, the user must
have adequate permissions on both the source and the destination systems.
LifeCycle Manager allows you to log into different CMSs while creating,
editing, or promoting a job. You can select the appropriate CMS from the
CMS drop-down list, provided you have adequate rights. The administrator
creates the list of CMSs that the LifeCycle Manager users can log into. You
can also add new CMSs to the list.
Whenever you log into a CMS, the LifeCycle Manager tool stores your login
credentials in the job session. Hence, you need not log into the same CMS
multiple times within a single session.
2
The following table lists the permission types required to perform various
operations with the LifeCycle Manager tool:
OperationsUser Rights on the LifeCy-
cle Manager Folder
To log into the LifeCycle Manager tool.View
Edit Objects
To edit jobs and folders, and add infoobjects,
user groups, and folders.
To schedule a job.Schedule Objects
To promote or test promote a job.Edit and Schedule Job
BusinessObjects LifeCycle Manager User's Guide 15
Page 16
LifeCycle Manager Features
2
Security in LifeCycle Manager
OperationsUser Rights on the LifeCy-
cle Manager Folder
To delete a job.Delete Object
To copy and remove, or paste a job.Delete Object and Edit Ob-
jects
To roll back a job.Edit Objects and Delete In-
stances
Security in LifeCycle Manager
This section describes the security feature in the LifeCycle Manager tool.
The LifeCycle Manager tool supports the following security options:
• Do not Promote Security - If you select this option, jobs are promoted
without the associated security rights. This is the default option.
• Promote Security - If you select this option, jobs are promoted along with
the associated security rights.
• Include application rights - If the infoobjects in the job inherit any
application rights, the job is promoted along with these application rights.
This option is enabled only if you select Promote Security.
The following table discusses the behavior of infoobjects in relation to the
supported security options:
16 BusinessObjects LifeCycle Manager User's Guide
Page 17
LifeCycle Manager Features
LifeCycle Manager Application Access Rights
2
If infoobjects do not
exist in the destination system.
If infoobjects exist
in the destination
system.
If users or user
groups do not exist
in the destination
system.
If users or user
groups exist in the
destination system.
Promotion with securityBehavior
infoobjects are created in
the destination system. They
have identical rights on both
source and destination systems.
infoobjects are copied to the
destination system. The infoobjects have rights identical to the rights of the
source system.
Users or user groups are
created in the destination
system. The rights of the
source system are carried to
the destination system.
Users or user groups are
mapped to the destination
system; the rights of users
or user groups are identical
on both source and destination systems.
Promotion without security
infoobjects are created in the
destination system and inherit the rights of the destination
system.
infoobjects are updated;
however, the rights remain
unchanged.
Users or user groups are not
created in the destination
system, if they are primary
objects.
Users or user groups are
mapped to the destination
system; the rights of users
or user groups do not
change in the destination
system.
Universe restriction
set
Note:
The universe and its restriction set, along with the
rights, are promoted.
The Universe and its restriction set are promoted. The
security rights are dropped.
The LifeCycle Manager tool does not support merging of security rights.
LifeCycle Manager Application Access
Rights
This section describes the application access rights for LifeCycle Manager.
• You can set access rights to the LifeCycle Manager application within the
CMC.
BusinessObjects LifeCycle Manager User's Guide 17
Page 18

LifeCycle Manager Features
2
Workflows in LifeCycle Manager
• You can set granular application rights to various functions within LifeCycle
To set specific rights in the LifeCycle Manager application, complete the
following steps:
1. Log into CMC and select Applications.
2. Double-click LifeCycle Manager.
3. Click User Security, and select Administrators.
4. Select the rights you want to set.
Manager.
The View Security tab is enabled.
You can set the following rights:
• Create a job
• Edit a job
• Promote a job
• Export a BIAR file
• Edit a BIAR file
• Delete a job
• Rollback a job
• Use Administration options
• Edit Connections properties
• Use Version Management System
5. Click OK.
The LifeCycle Manager application access rights are set within the CMC.
Workflows in LifeCycle Manager
This section describes the workflows that the LifeCycle Manager tool supports
for promoting a job from the source system to the destination system.
You can promote a job from the source system to the destination in the
following scenarios:
• When the source system and the destination system are connected
• When the source system and the destination system are not connected
18 BusinessObjects LifeCycle Manager User's Guide
Page 19

LifeCycle Manager Features
Workflows in LifeCycle Manager
Promoting a job when the source system and the destination system are
connected
To promote a job when the source and the destination systems are
connected, complete the following steps:
1. Connect to the source system.
2. Create a new job. You can also copy an existing job.
3. Add infoobjects to the job you want to promote. If you do not want to
promote all the dependents of the infoobjects, you can use the Manage
Dependencies option to select the dependents you want to promote.
Note:
You can select the type of dependents you want to promote from the
Type drop-down list.
4. Promote the job.
Promoting a job when the source system and the destination system are
not connected
To promote a job when the source and the destination systems are not
connected, complete the following steps:
1. Connect to the source system, and create a job. You can also copy an
existing job.
2. Add infoobjects to the job you want to promote. You can use the Manage
Dependencies option to select the required dependents.
2
Note:
You can select the type of dependents you want to promote from the
Type drop-down list.
3. Export infoobjects with Output to BIAR file as the destination system.
4. Import infoobjects from the BIAR file by clicking the Import BIAR tab.
5. Promote the job.
BusinessObjects LifeCycle Manager User's Guide 19
Page 20

LifeCycle Manager Features
Workflows in LifeCycle Manager
2
20 BusinessObjects LifeCycle Manager User's Guide
Page 21

LifeCycle Manager Home Page and Shopping Cart
3
Page 22
LifeCycle Manager Home Page and Shopping Cart
3
This chapter discusses the GUI components in the LifeCycle Manager tool.
The LifeCycle Manager home page is divided into the following panels:
• LifeCycle Manager workspace toolbar
• Workspace panel
• Tree panel
• Administrator and Details panel
• Shopping Cart and Job Viewer page
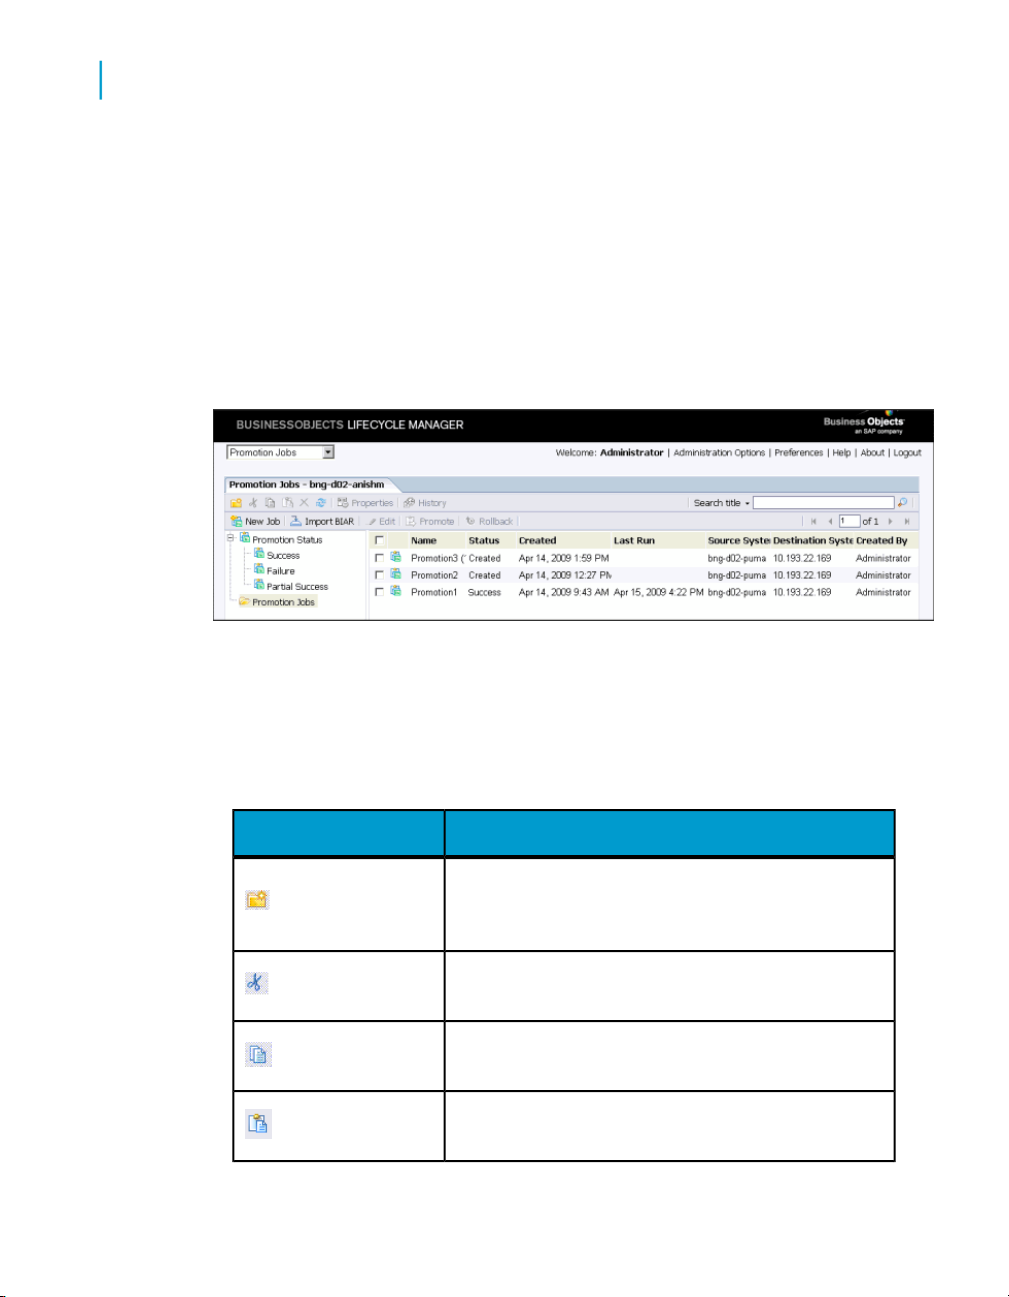
The following figure shows the LifeCycle Manager home page:
LifeCycle Manager workspace toolbar
The following table lists the options included in the LifeCycle Manager
workspace toolbar and discusses the tasks that you can perform using these
options:
DescriptionOption
Enables you to create a new folder. The new folder
is created as a subfolder in the Promotion Jobs
folder.
Enables you to cut the selected job or folder from its
current location.
Enables you to copy the job or folder in a new location.
Enables you to paste the copied job or folder in a new
location.
22 BusinessObjects LifeCycle Manager User's Guide
Page 23
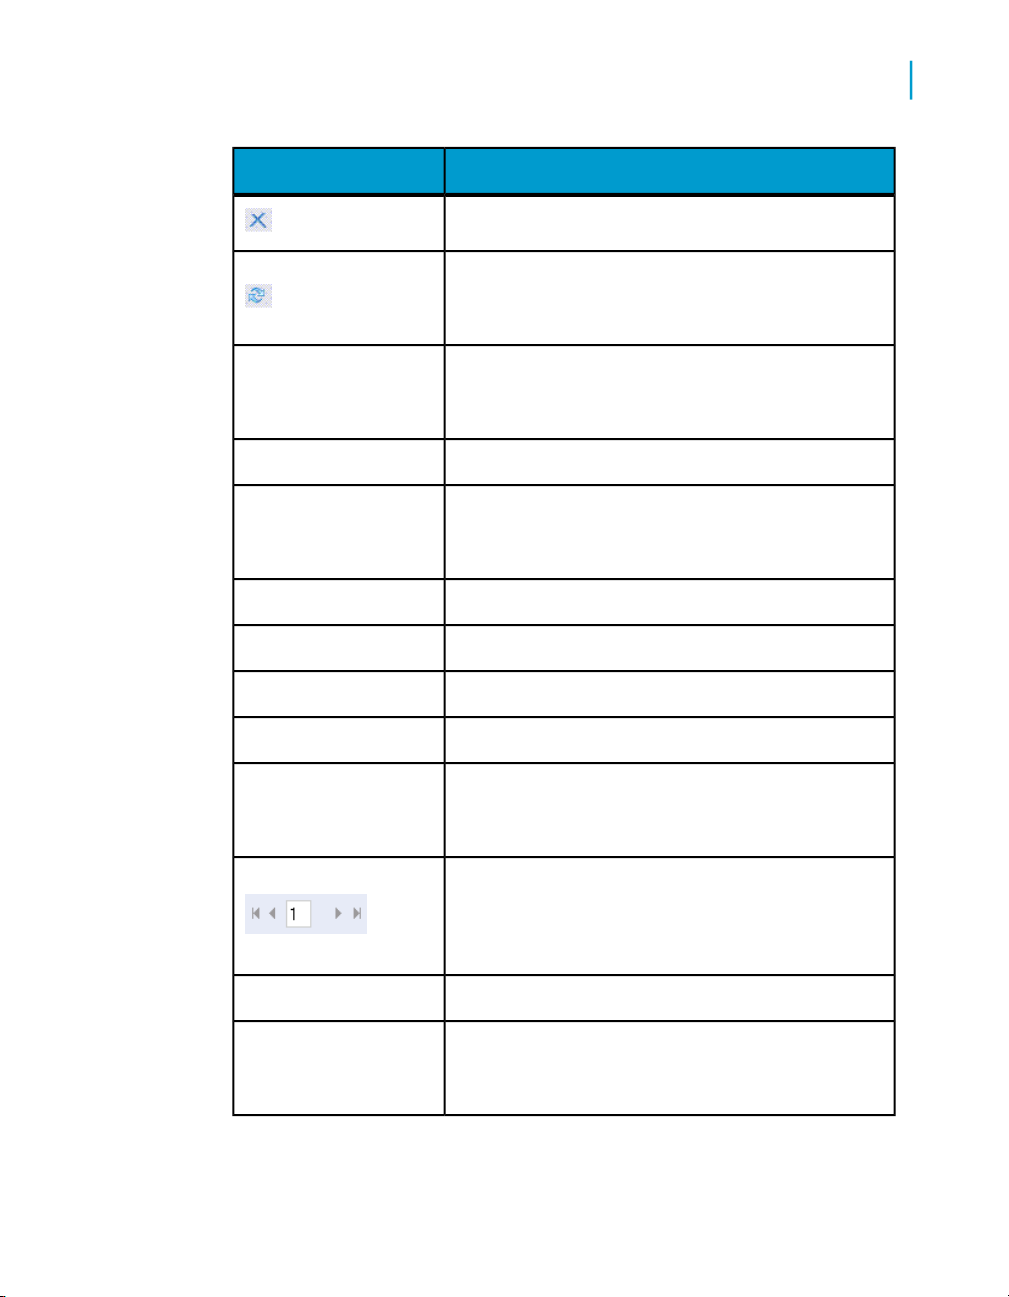
Properties
Search
LifeCycle Manager Home Page and Shopping Cart
3
DescriptionOption
Enables you to delete an existing job.
Enables you to refresh the LifeCycle Manager home
page, to obtain the updated list of jobs or folders
available for promotion.
Enables you to modify the properties of the selected
job. You can modify the title, description, and keywords of the selected job.
Enables you to view the history of the selected job.History
Enables you to search for a specific job. You can
search for a job by its name, keywords, description,
or all three parameters.
Enables you to create a new job.New Job
Enables you to import a BIAR file.Import BIAR
Rollback
Promotion Status
Enables you to edit the selected job.Edit
Enables you to promote the selected job.Promote
Enables you to roll back a promoted job from the
destination system. You can roll back a promoted job
either partially or completely.
Enables you to navigate between pages of the jobs
list. You can use this option to navigate a single page,
or navigate to a specific page by entering the relevant
page number.
Enables you to view the promoted jobs.Promotion jobs
Enables you to view the status of the promoted jobs.
The Promotion Status folder includes Success, Failure, and Partial Success subfolders.
BusinessObjects LifeCycle Manager User's Guide 23
Page 24

LifeCycle Manager Home Page and Shopping Cart
3
Workspace panel
The Workspace panel in the LifeCycle Manager home page displays the list
of newly created jobs. You can use this panel to view the name of the job,
status of the job, job creation information, and information about the
destination system.
Tree panel
The Tree panel in the LifeCycle Manager home page displays the tree
structure, which includes the Promotion Jobs folder and the Promotion
Status folder. The newly created folders are displayed in a hierarchical
structure under the Promotion Jobs folder. The promoted jobs are listed
according to their status of promotion in the Promotion Status folder.
Administrator and Details panel
The Administrator and Details panel includes the Administration Options
link. The system administrator can use this link to access the Administration
options. It also includes the Preferences link that enables the administrator
and users to set the LifeCycle Manager preferences. The Help and About
links enable you to obtain more information about using the LifeCycle
Manager tool.
Shopping Cart and Job Viewer page
A Shopping Cart is a dynamically generated hierarchical tree list that contains
a list of the infoobjects to be promoted. It displays the root folder and the
objects folder for both selected and dependent objects. The Job Viewer page
enables you to view the infoobjects that are added to a job.
24 BusinessObjects LifeCycle Manager User's Guide
Page 25

Getting Started with LifeCycle Manager
4
Page 26

Getting Started with LifeCycle Manager
4
Logging into the LifeCycle Manager Tool
This section describes how to get started with the LifeCycle Manager tool
and how to set various options in the LifeCycle Manager tool.
Logging into the LifeCycle Manager Tool
This section describes how to log into the LifeCycle Manager tool.
To log into the LifeCycle Manager tool, complete the following steps:
1. Select Start > Programs > BusinessObjects XI 3.1 > BusinessObjects
Enterprise > BusinessObjects LifeCycle Manager.
The LifeCycle Manager login screen appears.
2. In the System field, enter the name of the Central Management Server
(CMS) on which the LifeCycle Manager tool is installed.
3. Enter the user name and password.
4. Select the appropriate authentication method from the Authentication
drop-down list.
The LifeCycle Manager tool supports the following authentication types:
• Enterprise authentication - This authentication type requires a user
name and a password that are recognized by the BusinessObjects
Enterprise system. This is the default authentication method.
• LDAP authentication - This authentication type requires a user name
and a password that are recognized by the BusinessObjects Enterprise
system.
• Windows AD - This authentication type requires a user name and a
password that are recognized by the BusinessObjects Enterprise
system.
The LDAP, Windows AD, and other third-party authentication types require
a special setup. For information on setting up these authentication types,
see the BusinessObjects Enterprise Administrator's Guide.
5. Click Log on.
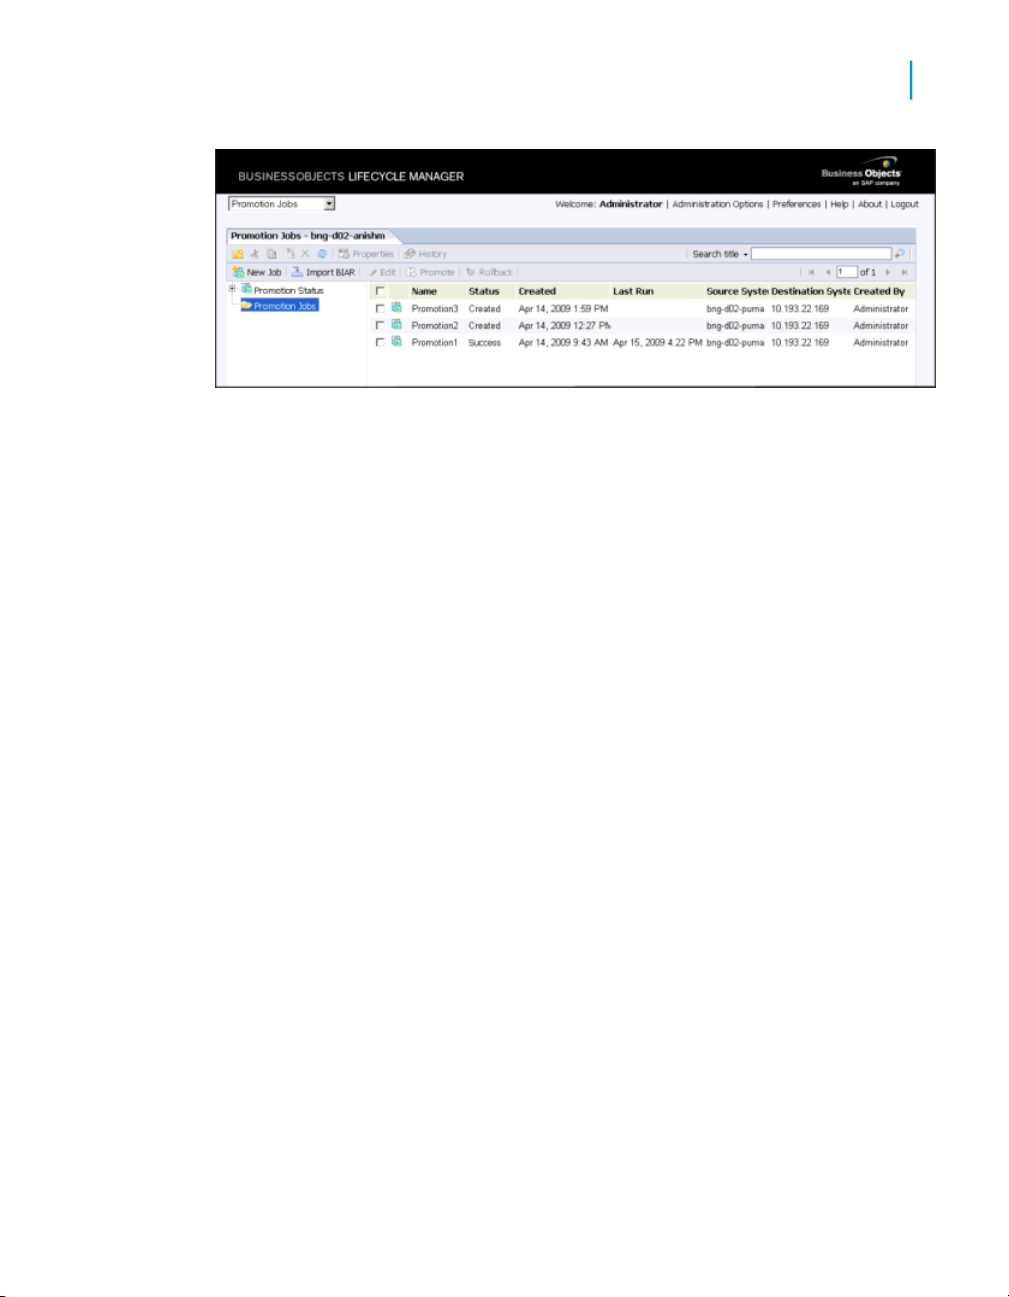
The "Promotion Jobs" home page is displayed, as shown in the following
figure:
26 BusinessObjects LifeCycle Manager User's Guide
Page 27
Getting Started with LifeCycle Manager
Using the Administration Options
Note:
• Any user with View permissions to the LifeCycle Manager folder can log
into the LifeCycle Manager tool. However, to create, schedule, or promote
a job, the user must be granted additional rights by the administrator.
Using the Administration Options
4
The Administration Options enable you to configure settings before promoting
infoobjects from one BusinessObjects Enterprise deployment to another
BusinessObjects Enterprise deployment. This section describes how to use
the Administration options.
To access the Administration options, click the Administration Options link
in the "Promotion Jobs" screen. The "Administration Options" dialog box
appears. This dialog box displays the following options:
• Manage Systems - This option enables you to add and remove the host
systems.
• Rollback Settings - This option enables you to configure the rollback
process at the system level.
• Job Settings - This option enables you to specify the number of job
instances that can exist in the LifeCycle Manager system.
• Audit Log - This option enables you to audit various events that are logged
while the LifeCycle Manager tool is in use.
• VMS Settings - This option enables you to configure version management
systems.
BusinessObjects LifeCycle Manager User's Guide 27
Page 28

Getting Started with LifeCycle Manager
4
Using the Administration Options
Using the Manage Systems Option
This section describes how to use the Manage Systems option. This option
enables you to add or remove the host systems.
To add a host system, complete the following steps:
1. In the "Administration Options" window, click Manage Systems.
The list of host names, port numbers, display names, and descriptions is
displayed.
2. Click Add.
The "Add System" dialog box appears.
3. Add the host name, port number, display name, and the description in
the appropriate fields.
4. Click Add to add the system.
The host system is added to the list.
Note:
To remove a host system, select the host system you want to remove, and
click Remove. The selected host system is removed from the list.
You can also edit the host name, port number, display name, and the
description.
Using the Rollback Settings Option
The Rollback Settings option allows you to disable the rollback process at
the system level. By default, the rollback process is enabled at the system
level.
To disable the rollback process at the system level, complete the following
steps:
1. In the "Administration Options" window, click the Rollback Settings
option.
The list of host systems is displayed.
2. Select the host system to disable the rollback process.
3. Click Save and Close to save the modifications.
28 BusinessObjects LifeCycle Manager User's Guide
Page 29

Using the Job Settings Option
The Job Settings option enables you to specify the number of job instances
that can exist in the system. You can specify one of the following options:
• Delete job instances when more than - This option enables you to specify
the maximum number of job instances per job that can exist in the system.
• Delete job instances when older than - This option enables you to specify
that all job instances created before the specified number of days must
be deleted.
To set the Job Settings option, complete the following steps:
1. Select the option, and enter the preferred value.
2. Click Save Changes to save the changes.
You can click Default Settings to set the default values.
Note:
The old job instances are deleted only when the job is executed the next
time.
Getting Started with LifeCycle Manager
Using the Administration Options
4
Using the Audit Log Option
To audit the LifeCycle Manager events, complete the following steps:
1. In the "Administration Options" window, click Audit Log.
2. Select the events that you want to audit.
You can also use the Select All option to audit all events.
3. Click Save and Close.
Note:
To audit the LifeCycle Manager events, you must enable the Audit Events
option in the Adaptive Processing server.
To enable the Audit Events option, complete the following steps:
1. Log into CMC, and select Servers > Adaptive Processing server >
Audit Events.
2. Select the Auditing is Enabled option.
BusinessObjects LifeCycle Manager User's Guide 29
Page 30

Getting Started with LifeCycle Manager
4
Using the Administration Options
To audit LifeCycle Manager scheduled events, you must enable the Audit
Events option in the LifeCycle Manager job server.
To enable the Audit Events option, complete the following steps:
1. Log into CMC, and select Servers > LCM Job Server > Audit Events.
2. Select the Auditing is Enabled option.
3. Select the events you want to audit.
For more information on auditing in LifeCycle Manager, see Auditing in
LifeCycle Manager on page 69
Using the Version Management System Settings Option
The LifeCycle Manager tool enables you to set the version management
system settings. You can select either SubVersion or ClearCase version
management system.
To set the SubVersion management system, complete the following steps:
1. In the "Administration Options" window, click VMS Settings.
2. From the Version Management Systems drop-down list, select
SubVersion.
By default, the server port, password, repository name, server name, user
name, workspace directory, and the install path, which are provided during
the LifeCycle Manager installation, are displayed in the appropriate fields.
30 BusinessObjects LifeCycle Manager User's Guide
Page 31

Getting Started with LifeCycle Manager
Using the Administration Options
4
3. Modify the fields, if required.
Ensure that you enter the Install Path extending till the .exe file. For
example: C:\Program Files\Subversion\bin
4. Click Save.
Note:
After modifying the required fields, you must manually configure the
Subversion passwd file, or modify the Subversion windows service. For more
information, see the BusinessObjects Enterprise Service Pack 2 LifeCycle
Manager Installation Guide.
To set the ClearCase version management system in Windows, complete
the following steps:
1. In the "Administration Options" window, click VMS Settings.
2. From the Version Management Systems drop-down list, select
ClearCase.
BusinessObjects LifeCycle Manager User's Guide 31
Page 32

Getting Started with LifeCycle Manager
4
Using the Administration Options
3. Enter the following details:
• ClearCase Map Drive - Enter the drive name. By default, it is the M
drive. For example: M:
• VOB Tag Name - Enter the Versioned Object Base (VOB) name. For
example: FridayVB
• View Storage Directory - Enter the path to the shared folder. For
example: \\HostName\FolderName
Note:
The host name must not be written as localhost.
4. Click Save.
To set the ClearCase version management system in Unix, complete the
following steps:
1. In the Administration Options window, click VMS Settings.
2. From the Version Management Systems drop-down list, select ClearCase.
3. Enter the following details:
• ClearCase Map Drive - Enter the name of the folder where the MVFS
is located. By default, it is /view
• VOB Tag Name - Enter the VOB name and the folder where the VOB
is located. For example: VobFolder/VobName
• View Storage Directory: Enter the path of the directory where the views
are created.
32 BusinessObjects LifeCycle Manager User's Guide
Page 33

Note:
You can select Use as Default VMS if you want to use ClearCase as the
default version management system.
Setting Preferences
You can specify the number of jobs that must be displayed in the "Promotion
Jobs" screen. You can also view jobs that were created during a particular
time interval.
To set preferences, complete the following steps:
1. In the "Promotion Jobs" screen, click the Preferences link.
The "Preferences" window appears.
2. In the "Enter the Maximum Page Size" dialog box, specify the number of
objects that must be displayed per page in the "Promotion Jobs" screen.
3. From the Show Jobs Created drop-down list, select the time interval to
view the jobs created during the specified period.
Getting Started with LifeCycle Manager
Setting Preferences
4
4. Click OK.
Note:
The values set in "Preferences" page are specific to each session.
Logging Options in LifeCycle Manager
The Logging options in LifeCycle Manager enable you obtain logging details
of the application.
The following are required to set the logging levels in LifeCycle Manager in
Windows:
• UI Log: ${user.home}/.businessobjects/lcm.log, where user.home
is C:\documents and settings\user1
• Server Log: ${bobj_logging_folder}/lcm.log, where
bobj_logging_folder is C:\Program Files\Business
Objects\BusinessObjects Enterprise 12.0\Logging
The following are required to set the logging levels in LifeCycle Manager in
Unix:
BusinessObjects LifeCycle Manager User's Guide 33
Page 34

Getting Started with LifeCycle Manager
4
Logging Options in LifeCycle Manager
• UI Log: ${user.home}/.businessobjects/lcm.log, where user.home
is C:\documents and settings\user1
• Server Log: %InstallDir%/bobje/logging folder. For example:
"/export/home/user/LCMbuild/bobje/logging"
You can control the logging level by adding bobj_lcm_log_level as the
environment variable and by setting the integer value as 0/1/2/3/4, where
the values are: DEBUG(0) < INFO(1) < WARN(2) < ERROR(3) < FATAL(4).
• DEBUG: When you set the logging level to DEBUG, you get a log file
containing all the logging details.
If you set bobj_lcm_log_level=0, you can log all the levels.
• INFO: When you set the logging level to INFO, you get a log file containing
information on the steps of execution.
If you set bobj_lcm_log_level=1, you can log INFO/WARN/ERROR/FATAL.
However, you cannot log DEBUG.
• WARN: When you set the logging level to WARN, you get a log file
containing warning messages.
If you set bobj_lcm_log_level=2, you can log WARN/ERROR/FATAL.
However, you cannot log DEBUG and INFO.
• ERROR: When you set the logging level to ERROR, you get a log file
containing that some of the processes were not carried out.
If you set bobj_lcm_log_level=3, you can log ERROR/FATAL. However,
you cannot log DEBUG, INFO, and WARN.
• FATAL: When you set the logging level to FATAL, you get a log file
containing the system errors.
If you set bobj_lcm_log_level=4, you can log only FATAL. You cannot
log DEBUG, INFO, WARN, and ERROR.
After setting the log level, start the LifeCycle Manager application from a
different browser instance for the environment variable values to take effect.
Note:
By default, the LifeCycle Manager logging level is set to INFO. Only System
Administrator can set the environment variables in the operating system.
The procedure for setting environment variables differs from one operating
system to another.
34 BusinessObjects LifeCycle Manager User's Guide
Page 35

Using LifeCycle Manager
5
Page 36

Using LifeCycle Manager
5
Creating and Deleting a Folder
Promotion Job
When you log into the LifeCycle Manager application, by default, you are
taken to the "Promotion Jobs" page. The "Promotion Jobs" home page screen
includes various tabs that you can use to perform the following tasks:
• Select New Job to select job-related processes. You can also right-click
• Select Import BIAR file to import a BIAR file directly from the file system,
• Select Edit to edit the existing jobs.
• Select Promote to promote a job from the source system to the destination
• Select Rollback to retrieve the promoted jobs from the destination system.
• Select History to view the previous promotion instances of the job.
• Select Properties to view the properties of the selected job instance,
The "Promotion Jobs" application area displays the jobs that exist in the
system, along with the following information for each job:
• Name: Displays the name of the job that was created.
• Status: Displays the status of the job, such as Created, Success, Partial
• Created: Displays the date and time when the job was created.
• Last Run: Displays the date and time when the job was last promoted.
• Source System: Displays the name of the system from which the job is
• Destination System: Displays the name of the system to which the job
• Created by: Displays the name of the user who created the job.
the home page screen and select the job-related processes from the list.
instead of performing the entire procedure of creating a new job.
system, or export a job to a BIAR file.
such as title, ID, file name, and description.
Success, Running, or Failure.
promoted.
is promoted.
Note:
The LifeCycle Manager tool uses BusinessObjects Enterprise SDK for all its
activities.
Creating and Deleting a Folder
This section describes how to create and delete a folder.
36 BusinessObjects LifeCycle Manager User's Guide
Page 37

Creating a Folder
To create a folder, complete the following steps:
1.
In the "Promotion Jobs" home page, click .
2. Enter the folder name in the "Create Folder" dialog box.
3. Click OK.
A new folder is created.
Deleting a Folder
To delete a folder, complete the following steps:
1. In the "Promotion Jobs" home page, select a folder or a job.
2.
Click .
The "Delete" dialog box appears.
Using LifeCycle Manager
Creating a New Job
5
3. Click OK.
The selected folder is deleted.
Creating a New Job
This section describes how to create a new job by using the LifeCycle
Manager tool.
The following table discusses the GUI elements and fields that you can use
to create a new job:
BusinessObjects LifeCycle Manager User's Guide 37
DescriptionItem
Name of the job that you want to create.Name
Description of the job you want to create.Description
Page 38

Using LifeCycle Manager
5
Creating a New Job
DescriptionItem
Keywords
Source System
Destination System
User name
Password
Authentication
The keywords for the contents of the job you want
to create.
You must browse and select a folder to create a job.Save Job in
The name of the BusinessObjects Enterprise system
from which you want to promote a job.
The name of the BusinessObjects Enterprise system
to which you want to promote a job.
The login ID that you must use to log into the source
or destination system.
The password that you must use to log into the
source or destination system.
The authentication type that is used to connect to
the source or destination system.
The LifeCycle Manager tool supports the following
authentication types:
• Enterprise
• Windows AD
• LDAP
To create a new job by using the LifeCycle Manager tool, complete the
following steps:
1. Log into the LifeCycle Manager tool.
2. In the "Promotion Jobs" home page, click New Job. The "New Job"
window appears .
38 BusinessObjects LifeCycle Manager User's Guide
Page 39

Using LifeCycle Manager
Creating a New Job
5
3. Enter the name, description, and keywords for the job in the appropriate
fields.
4. In the Save Job in field, browse and select the folder in which you want
to save the job.
5. Select the source system and the destination system from the drop-down
lists.
If the name of the system is not displayed in the drop-down list, click the
Login to a new CMS option. A new window is launched. Enter the name
of the system along with the user name and password.
6. Click Create.
BusinessObjects LifeCycle Manager User's Guide 39
Page 40

Using LifeCycle Manager
5
Creating a New Job by Copying an Existing Job
A new job is created and stored in the CMS repository of the source
system.
Note:
Providing information in the Description, Keywords, and Destination
System fields is optional.
Logging into a New CMS
To log into a new CMS, complete the following steps:
1. Log into the LifeCycle Manager tool.
2. Create a new job.
For more information on creating a new job, see Creating a New Job on
page 37.
3. From the Source System drop-down list, select Login to a New CMS.
The "Login to System" dialog box appears.
4. Enter the user credentials, select the appropriate authentication type, and
click Login.
5. From the Destination System drop-down list, select Login to a New
CMS.
6. Enter the user credentials, select the appropriate authentication type, and
click Login.
Creating a New Job by Copying an
Existing Job
This section describes how to create a new job by copying an existing job.
To create a new job by copying an existing job, complete the following steps:
1. Log into the LifeCycle Manager tool.
2. In the "Promotion Jobs" home page, click New Job.
3. Click the Copy an Existing Job option. The list of jobs in the Promotion
Job folder is displayed.
40 BusinessObjects LifeCycle Manager User's Guide
Page 41

Using LifeCycle Manager
Searching for a Job
4. Select a job from the job list, and click Create.
The name, keywords, and description of the job are displayed. You can
modify these fields, if required. However, you cannot change the source
system.
5. In the Save Job in field, browse and select the folder in which you want
to save the job, and click Create.
A new job is created.
5
Searching for a Job
The search feature in the LifeCycle Manager tool enables you to locate a
job that is available in the LifeCycle Manager repository.
To search for a job, complete the following steps:
1. In the Search field of the LifeCycle Manager home page, enter the text
that you want to locate.
2. Click the list that appears beside the Search field to specify the search
parameters. The LifeCycle Manager tool supports the following search
parameters:
• Search Title - This option enables you to search for a job by its name.
• Search Keyword - This option enables you to search for a job by its
keywords.
• Search Description - This option enables you to search for a job by
its description.
• Search All Fields - This option enables you to search for a job by its
title, keywords, and description.
BusinessObjects LifeCycle Manager User's Guide 41
Page 42

Using LifeCycle Manager
5
Editing a Job
Editing a Job
This section describes how to edit a job.
Note:
Editing a job does not amount to creating a new job.
To edit a job, complete the following steps:
1. Log into the LifeCycle Manager tool.
2. In the "Promotion Jobs" home page, select the job that you want to edit,
and click Edit.
The details of the selected job are displayed. Based on your requirements,
you can add or remove infoobjects.
Note:
If you have not logged into the destination system, complete the following
steps:
a. Modify the contents of the name, description, keywords, and save job
in fields per your requirements.
You can click Login to access a different destination system, if
required.
b. Click Update.
Note:
While editing a job, you cannot change the source system to another CMS.
Adding an Infoobject to a Job
Each job must include a set of infoobjects and their dependents. Hence, you
must add infoobjects to a job before you promote it to the destination system.
To add an infoobject to a job, complete the following steps:
1. Log into the LifeCycle Manager tool.
2.
Create a new job. For information on creating a new job, see Creating a
New Job on page 37
42 BusinessObjects LifeCycle Manager User's Guide
Page 43

Using LifeCycle Manager
Searching for Dependents
The "Add Objects" screen appears. The folder and subfolders are
displayed in a tree structure.
3. Navigate to the folder from which you want to select the infoobject.
The list of infoobjects in the selected folder is displayed.
4. Select the infoobject that you want to add to the job, and click Add.
If you want to add an infoobject and exit the "Add Objects" screen, click
Add and Close. The infoobject is appended to the job, and the "Add
Objects" screen closes.
After you add an infoobject to a job, you can right-click the "Add Objects"
screen and select the job-related processes to proceed with the promotion
task. You can also use the Manage Dependencies option in the "Job Viewer"
page, to manage the dependents of the infoobject you selected.
Note:
• The Shopping Cart, which appears in the left panel of the "Add Objects"
screen, displays the name of the job, and the name of the folders. When
you select an object, the folders to which the selected object belongs are
implicitly displayed in a hierarchical tree structure.
• Click Save after adding infoobjects. Otherwise, the user is prompted with
an option to save the job when the user closes the tab.
5
Best Practice: Business Objects recommends that you select a small number
of infoobjects, which should not exceed 100 at a time, for promotion to obtain
optimum performance of the LifeCycle Manager tool.
Related Topics
• Creating a New Job on page 37
• Editing a Job on page 42
Searching for Dependents
The advanced search feature in LifeCycle Manager enables you to locate
the dependents of infoobjects that are available in the repository.
To search for the dependents of an infoobject, complete the following steps:
1. Log into the LifeCycle Manager tool.
2. Create a new job, or edit an existing job.
BusinessObjects LifeCycle Manager User's Guide 43
Page 44

Using LifeCycle Manager
5
Managing Job Dependencies
If you have created a new job, add infoobjects to the job. If you are editing
an existing job, you can add infoobjects, if required.
3. Click Manage Dependencies.
4. In the Search Dependents field, enter the name of the dependent you
want to locate.
Related Topics
• Managing Job Dependencies on page 44
Managing Job Dependencies
In a BusinessObjects Enterprise environment, infoobjects are dependent on
other infoobjects. For example, a Web Intelligence document is dependent
on the underlying Universe for its structure, content, and so on. While
promoting an object, you can select and filter the dependents that you want
to promote, or permit the promotion of all the dependents to another
BusinessObjects Enterprise system. To select and filter the dependents you
want to promote along with the infoobject, you must use the Manage
Dependencies option. If you do not use this option, the dependents are not
promoted along with the job.
The following table discusses options that you can use to manage the
dependents:
Universe for selected reports
Selected universes, Universe restriction set
Access levels set on selected objects
Connections used by selected universes
44 BusinessObjects LifeCycle Manager User's Guide
DescriptionTypes of Dependency objects
Promotes the universe on which the
selected infoobject is dependent.
Promotes universes that are dependent
on other universes and Universe restriction set.
Promotes access levels that are used
on the selected infoobjects.
Promotes universe connection objects
that are used by the selected infoobjects.
Page 45

Business Views for selected reports
Using LifeCycle Manager
Managing Job Dependencies
DescriptionTypes of Dependency objects
Promotes Business Views, Business
elements, Data foundation, data
connection, and List of Values (LoVs)
that the selected infoobjects depend
on.
5
Events, calendars, profiles used by
selected publication
To manage dependencies of an infoobject, complete the following steps:
1. Log into the LifeCycle Manager tool.
2.
Create a new job. For information on creating a new job, see Creating a
New Job on page 37.
3. Add the required infoobjects to the new job.
4. In the "Promotion Jobs" home page, click Manage Dependencies.
The "Manage Dependencies" window appears. This window displays the
list of infoobjects and their dependents, as shown in the following figure:
Promotes event, calendar, and user
profile objects that are used by a selected publication.
BusinessObjects LifeCycle Manager User's Guide 45
Page 46

Using LifeCycle Manager
5
Managing Job Dependencies
5. From the Select Dependents drop-down list, select any of the options
6.
7. Click Apply Changes to update the list of dependents.
8. Click Apply Changes and Close to save the changes.
available to add the dependents to the job. The dependents are displayed
on the right side. The dependents are not selected by default; you must
explicitly select the dependents you want to promote.
For example, if you select All Universes from the Select Dependents
drop-down list, then all the universes included in the list of dependents
are automatically selected.
Note:
You can also select the dependents manually.
When you select the dependents from the Dependents column, the
dependents are automatically moved to the Objects in Job column.
You can also enter the name of the dependent in the Search Dependents
field to search for a dependent. For more information on searching for
the dependents, see Searching for Dependents on page 43.
Click to view the supported filtering options of infoobjects in the
drop-down list. Select an option, and click OK. The filtered infoobjects
are displayed.
Note:
• Dependent objects are computed automatically by the LifeCycle Manager
tool. These dependents are computed based either on the infoobject
relationships or infoobject properties.
• If you select a folder for promotion, then the contents in the selected folder
are considered as primary resources.
• In the "Manage Dependencies" screen, when you place the cursor on the
scheduled infoobject, a tool tip appears describing the file name, file path,
created date and time, last modified date and time, next run, expiry, owner,
and recurrence of the schedule.
46 BusinessObjects LifeCycle Manager User's Guide
Page 47

Using LifeCycle Manager
Promoting a Job When the Repositories are Connected
Promoting a Job When the Repositories
are Connected
This section describes how to promote a job from a source system to a
destination system if the repositories are connected.
The following table lists the infoobject types that can be promoted by using
the LifeCycle Manager tool:
5
Category
Business Views
Reports
Third-Party Objects
Business Intelligence
Platform
Universe
Object types you can
promote
Business View Manager,
DataConnection, List Of
Values (LoV), Data
Foundation, and so on
Crystal reports, Web Intelligence, Full Client, and
Xcelsius
Excel, PDF, PowerPoint,
Flash, Word, .txt, .rtf, and
.swf files
Users and user groupsUsers
Folders, events, calendars, custom roles, hyperlinks, shortcuts, programs, profiles, MyInfoView, object packages,
diagnostics
Universe, Connections
Universe, and Universe
restriction set
Additional notes
Full client add-in and
templates are supported.
Polestar
Universes, Connections,
and universes with access restrictions
BusinessObjects LifeCycle Manager User's Guide 47
Page 48

Using LifeCycle Manager
5
Promoting a Job When the Repositories are Connected
Category
Federation
• Replication List
• Replication Connec-
tions
Object types you can
promote
Replication List promotes
the following objects:
Flash, .txt, Discussions,
Xcelsius, .pdf, Hyperlink,
.xls, ObjectPackage,
Crystal Reports, Web Intelligence Documents,
Universes, Program,
FullClient Template, AFDashboardPage, FullClientAddin, Connections, MyInfoView,
DataFoundation, Business Element,
DataRepositoryInfo,
Business Views, .rtf,
Custom Access Level,
Profile, Event, Users, and
userGroups. Replication
Connections promotes
Replication Jobs.
Replication Connections
promotes Replication
Jobs.
Additional notes
EPM Dashboard
48 BusinessObjects LifeCycle Manager User's Guide
Universes, Connections,
Reports, and Analytics
Page 49

Using LifeCycle Manager
Promoting a Job When the Repositories are Connected
5
Category
Encyclopedia
MyinfoView
Object types you can
promote
Xcelsius, Crystal Reports,
Business Views,
DataFoundation, Connections, Business ParameterField, Business Element, Universes, ObjectPackage, Voyager
Workspace, Voyager
Connection, MyInfoView,
FullClient, Web Intelligence Documents, Discussions, .rtf, .txt, and
.pdf
Crystal Reports, Business Views, DataFoundation, Connections, Business ParameterField,
Business Element, Universes, Voyager
Workspace, Voyager
Connection, MyInfoView,
FullClient, Web Intelligence Documents, Flash
and Analytic
Additional notes
Web Intelligence Docu-
BI Services
BOMM (BuisnessObjects
Metadata Manager)
• Integrator Source
• Source Group
ments, Universes and
Connections
Integrator Source promotes Integrator and
Source Group promotes
Integrator Source and Integrator.
To promote a job, complete the following steps:
1. Log into the LifeCycle Manager tool.
BusinessObjects LifeCycle Manager User's Guide 49
Page 50

Using LifeCycle Manager
5
Promoting a Job When the Repositories are Connected
2. In the "Promotion Jobs" home page, select the job that you want to
promote. You can also right-click the home page screen, and click
Promote.
The following figure shows the "Promote" page in LifeCycle Manager tool:
3. From the source and the destination systems drop-down lists, select the
source and destination systems.
Note:
Ensure that you have logged into both the source and destination systems
before you proceed with the promotion process.
4. In the External Change Management ID field, enter the appropriate
value, and click Save.
Note:
The Change Management ID is used for obtaining information related to
logging, auditing, job history, and so on. The LifeCycle Manager tool
enables you to map each instance of job creation to a change in the
Management ID. The Management ID is an attribute that is set by the
user in the job definition while creating a new job. The LifeCycle Manager
tool automatically generates an ID for each job.
5. Click Mappings. Click Edit Mappings if you want to create and validate
mappings.
50 BusinessObjects LifeCycle Manager User's Guide
Page 51

Using LifeCycle Manager
Promoting a Job When the Repositories are Connected
Note:
For more information on mappings, click .
6. Click Security Settings, if required. The following options are displayed:
• Do not Promote Security - This is the default option.
• Promote Security - Use this option to promote jobs along with the
associated security rights.
• Include application rights - This option is enabled only if you select
Promote Security. If the objects in the job inherit any application
rights, the job is promoted along with these rights.
You can also click View Security to view the security dependencies of
the infoobjects in the job.
5
7. Click Test Promote to ensure that there is no conflict between CUIDs in
the source and destination systems. The promotion details are displayed.
The first column displays the objects to be promoted, and the second
column displays the promotion status. The LifeCycle Manager tool
classifies the selected objects into users, groups, universes, and so on.
Note:
Running the Test Promote feature does not commit any infoobjects for
promotion.
The result of a test promote can be any of the following:
• Overwritten - The infoobject in the destination is overwritten by the
infoobject in the source system.
• Mapped - The following infoobject types are mapped to the destination
system: folders, users, user groups, and custom roles. An infoobject
BusinessObjects LifeCycle Manager User's Guide 51
Page 52

Using LifeCycle Manager
5
Promoting a Job When the Repositories are Connected
is mapped to the destination system and promoted only if the Security
option is enabled. Otherwise, the infoobject is not promoted.
• Copied - The infoobject in the source system is copied to the
destination system.
• Dropped - The infoobject is not promoted from the source system to
the destination system.
• Warning - The infoobject in the destination system is the newer version
and you can remove the infoobject from the Job. However, if you want
to promote, the infoobject gets promoted.
8. Click Schedule Job if you want to schedule the job promotion.
9. Click Promote.
The selected job is promoted.
Note:
If you do not want to promote the job, you can use the Save option to save
modifications such as Security, Change Management ID, and Schedule
settings.
Related Topics
• Mappings in LifeCycle Manager on page 52
• Scheduling a Job Promotion on page 62
• Security in LifeCycle Manager on page 16
Mappings in LifeCycle Manager
The Mapping feature in the LifeCycle Manager tool enables you to map a
universe or Business Views connection that exists in the source system to
a connection that exists in the destination system.
For example, a universe called Finance uses a test connection in the source
system. While promoting this universe, you can swap the test connection to
a live connection that exists in the destination system.
This section describes how to map the relationship between a job and its
dependents that is obtained in the source system to the destination system.
The LifeCycle Manager tool supports the following types of mappings:
• Connection Mappings
• Query as a Web Service (QaaWS) Mappings
• Crystal Report Mappings
52 BusinessObjects LifeCycle Manager User's Guide
Page 53

Using LifeCycle Manager
Promoting a Job When the Repositories are Connected
• Federation Mappings
Mapping a connection
To map a connection, complete the following steps:
1. In the "Promote" window, click Mappings.
2. Click Edit Mappings.
The following tabs are displayed:
• Connection Mappings
• QaaWS Mappings
• Crystal Report Mappings
• Federation Mappings
3. Click the Connection Mappings tab.
The source connections and the database types are displayed.
If you want to edit the properties of a source connection, select the source
connection, and click Edit Connection Properties. The "Edit Connection
Properties" tab appears. This tab displays the list of properties and their
values. Modify the values per your requirements, and click Apply. The
"Connection Mappings" tab appears.
5
Note:
If you edit the source connection, the destination field displays the
following message: Edited Source Connection
4. From the Destination Connection drop-down list, select a destination
connection for the selected source connection.
5. Click Apply.
BusinessObjects LifeCycle Manager User's Guide 53
Page 54

Using LifeCycle Manager
5
Promoting a Job When the Repositories are Connected
Behavior: When you map a connection, the source universe connection is
automatically updated to reflect the state of the destination universe
connection.
In this version of LifeCycle Manager, the connection mapping feature is
supported for Universe connection, Voyager connection, and Business View
Management (BVM) connection.
Important: You can edit the existing source connection by selecting the check
box that appears next to the source connection and clicking the "Edit
Connection Properties".
All Business Views connections appear in the BusinessObjects Business
View section.
Note:
You cannot edit a Business View connection; you can only map a connection.
You can either retain an original source connection, or map the same to an
existing destination connection.
Mapping a QaaWS
The LifeCycle Manager tool enables you to map a server_ID_URL that exists
in the source system to an existing server_ID_URL in the destination system.
To map a QaaWS, complete the following steps:
1. In the "Promote" window, click Mappings.
2. Click Edit Mappings.
The following tabs are displayed:
• Connection Mappings
• QaaWS Mappings
• Crystal Report Mappings
• Federation Mappings
3. Click QaaWS Mappings.
The source URL and the Query as a Web Service types are displayed.
If you want to edit the properties of the source URL, select the source
URL, and click Edit QaaWs Properties. The Edit QaaWS Properties
54 BusinessObjects LifeCycle Manager User's Guide
Page 55

Using LifeCycle Manager
Promoting a Job When the Repositories are Connected
tab appears. This tab displays the list of properties and their values. Modify
the values per your requirements, and click Apply. The QaaWS Mappings
tab appears.
Note:
If you edit the source URL, the destination field displays the following
message: Edited Source URL
4. From the Destination URL drop-down list, select a destination URL for
the selected source URL.
If you want to reset the modifications made to the destination URL, click
the icon.
5. Click Apply.
Note:
QaaWS connections are grouped based on similar URLs. You can select
the group and map it. You can also map a single or multiple QaaWS
connections.
5
Mapping a Crystal Report
A Crystal report in the source system can be connected to a single or multiple
databases. The LifeCycle Manager tool enables you to modify some of the
properties of a Crystal report.
To modify the properties of a Crystal report, complete the following steps:
1. In the "Promote" window, click Mappings.
2. Click Crystal Report Mappings.
The list of Crystal reports in the source system is displayed.
3. Select the required Crystal report, and click Edit Crystal Report
Properties.
The "Edit Crystal Report Properties" tab appears, as shown in the following
figure:
BusinessObjects LifeCycle Manager User's Guide 55
Page 56

Using LifeCycle Manager
5
Promoting a Job When the Repositories are Connected
This tab displays the list of properties and their values.
4. Modify the appropriate fields, and click Apply.
The Crystal Report Mappings tab appears.
Note:
• If you edit a Crystal report in the source system, the following message
is displayed beside the Crystal report: edited
• A Crystal Report created using Universes cannot be mapped in the
Crystal Report Mappings. However, it can be mapped in the
Connections Mappings.
• Crystal Reports are grouped based on the same servers. You can
either map a single Crystal Report or the group,. However, you cannot
map multiple Crystal reports at the same time.
5. Click Save or Promote per your requirements.
Mapping a Federation
LifeCycle Manager enables you to map a Federation connection that exists
in the source system to a Federation connection that exists in the destination
system.
To map a Federation connection, complete the following steps:
1. In the "Promote" window, click Mappings.
2. Click Federation Mappings.
The list of Federation connections is displayed.
3. Select a Federation connection, and click Edit Federation Connection
Properties.
56 BusinessObjects LifeCycle Manager User's Guide
Page 57

Using LifeCycle Manager
Promoting a Job by Using a BIAR File
The "Edit Federation Connection Properties" tab appears. This tab displays
the list of properties and their values.
4. Modify the appropriate fields, and click Apply.
The "Federation Mappings" tab appears.
Note:
If you edit a Federation connection in the source system, the following
message is displayed beside the federation connection: edited
5. Click Save or Promote as per your requirement.
Important: Mapping must be performed by an expert user who has
adequate knowledge of the artefacts in both source and destination
systems.
Promoting a Job by Using a BIAR File
Promoting refers to the activity of transferring a BI resource from one
repository to another. If the source and destination systems are connected,
the LifeCycle Manager tool uses WAN or LAN to promote the infoobject.
However, LifeCycle Manager also facilitates the promotion of infoobjects
even if the source and destination systems are not connected. In scenarios
where the source and destination systems are not connected, the LifeCycle
Manager tool enables you to promote jobs to the destination system by
exporting a job from the source system to a BIAR file and then importing the
same job from the BIAR file to the destination system.
5
This section describes how to export a job to a BIAR file and then import the
job from the BIAR file to the destination system.
Note:
In the LifeCycle Manager tool, you cannot use a BIAR file that was created
by using the Import Wizard tool.
Exporting a Job to a BIAR File
This section describes how to export a job to a BIAR file.
To export a job to a BIAR file, complete the following steps:
BusinessObjects LifeCycle Manager User's Guide 57
Page 58

Using LifeCycle Manager
5
Promoting a Job by Using a BIAR File
1. Log into the LifeCycle Manager tool, and create a new job.
For more information on creating a new job, see Creating a New Job on
page 37
2. In the Destination System drop-down list, select Output to a BIAR file
option and click Create.
3. Click Add objects to add infoobjects to the job.
You can use the Manage Dependencies option to manage the
dependencies of the selected job.
4. Click Promote.
The "Promote - Job Name" screen appears.
5. Click Export.
The BIAR file is created. You can save a BIAR file to a File System or an
FTP location.
6. In the "Promote - Job Name"screen, click Biar File Destination.
Biar File Destination pane appears.
7. Select either File System or FTP.
8. To export the BIAR file to a file system, select File System and click
Export.
The BIAR file is exported to a file system.
9. To export the BIAR file to an FTP location, select FTP. Enter appropriate
details in the host, port, username, password, directory, and filename
fields.
10. Click Export.
The BIAR file is exported to an FTP location.
Note:
The Mappings and Schedule Job fields are disabled.
58 BusinessObjects LifeCycle Manager User's Guide
Page 59

Related Topics
• Logging into a New CMS on page 40
• Adding an Infoobject to a Job on page 42
• Managing Job Dependencies on page 44
Importing a Job from a BIAR File
To import a BIAR file, complete the following steps:
1. From the storage device, copy the BIAR file to the destination system.
2. Log into the LifeCycle Manager tool.
3. In the "Promotion Jobs" home page, click Import BIAR.
The "Import BIAR file" window appears.
Using LifeCycle Manager
Promoting a Job by Using a BIAR File
5
4. Click Browse to select a BIAR file from the file system.
5. Select the BIAR file from the file system, and click Copy.
The details of the selected file appear in the "New Job" screen.
6. Click Create.
The job is created. You can also manage the dependencies of the job in
the "Managing Dependencies" window.
7. Click Promote.
The "Promote - Job Name" window appears.
8. Confirm the login credentials of the destination system.
9. Click Promote to promote the contents to the destination system.
You can also click the Test Promote option to view the objects to be
promoted and the promotion status.
BusinessObjects LifeCycle Manager User's Guide 59
Page 60

Using LifeCycle Manager
5
Scheduling a Job in LifeCycle Manager
Note:
When you import BIAR files, the Mappings option is enabled.
Scheduling a Job in LifeCycle Manager
The LifeCycle Manager tool enables you to specify when a job must be
promoted, rather than promote it as soon as it is created. It also enables you
to schedule job promotion at fixed intervals. This feature is useful for
promoting large jobs when the load on the server is at its minimum.
To schedule a job promotion, you must specify a time in future or select a
recurrence pattern, and specify additional parameters.
The following table discusses the recurrence patterns that the LifeCycle
Manager tool supports for scheduling a job promotion:
DescriptionRecurrence pattern
Now
Once
Hourly
Daily
Weekly
If you select this option, the job is run as soon as you
click Schedule.
If you select this option, then the job is run only once.
It can be run immediately, at a specified time in future,
or when a specific event occurs.
If you select this option, then the job is run every hour.
You can specify the start time, as well as the start and
end dates.
If you select this option, then the job is run every day.
It can be run either once or several times a day. You
can specify the hour when it must be run, and also the
start and end dates.
If you select this option, then the job is run every week.
It can be run either once a week or several times a
week. You can specify the day and time at which the
job must be run, and also the start and end dates.
60 BusinessObjects LifeCycle Manager User's Guide
Page 61

Using LifeCycle Manager
Scheduling a Job in LifeCycle Manager
DescriptionRecurrence pattern
If you select this option, then the job is run once every
Monthly
Run options
month or several times a month. You can specify the
day and time of the month when the job must be run,
and also the start and end dates.
The following table discusses the parameters you can specify while
scheduling a job promotion:
DescriptionRun option
The X and Y variables are applicable
for both Daily and Monthly recurrence
patterns. When you select the Run option that contains these variables, the
system displays their default values.
However, you can modify these values
X and N variables
per your requirements. For example, if
you select the Daily recurrence pattern,
and the Every N hour(s) and X
minute(s) Run options, then you can
schedule the report to run every 4 (X)
hours and 30 (N) minutes. If you do not
modify the X or N value, the system
runs the report every hour.
5
Run Days
This option appears if you select the
Weekly recurrence pattern. You can
select the days of the week on which
you want to run the job, by clearing the
check boxes for the appropriate days.
BusinessObjects LifeCycle Manager User's Guide 61
Page 62

Using LifeCycle Manager
5
Scheduling a Job in LifeCycle Manager
Start Time
End Time
DescriptionRun option
Applies to most, but not all, recurrence
patterns and Run options. The default
is the current date and time. The system runs the job according to the
specified schedule as soon as it can,
after the Start Time has passed. For
example, if you specify a start time that
is three months from now, the system
does not run the job until the start date
has passed, even if all the other criteria
are met. However, once the start time
has passed, the system runs the report
at the specified time.
The default is the current time and a
date in the distant future, to ensure that
a job will run indefinitely. Specify a different End Time, if required. Once the
End Time has passed, the LifeCycle
Manager tool does not run the job.
Number of retries allowed
Retry interval in seconds
Scheduling a Job Promotion
This section describes how to schedule a job promotion. It also describes
how to specify recurrence options and parameters.
To schedule a job promotion, complete the following steps:
62 BusinessObjects LifeCycle Manager User's Guide
The number of times the system attempts to process a job if the first attempt fails. Applicable in all cases. By
default, the number is zero.
The period, in seconds, that the system
will wait before it attempts to process
the job again, if the first attempt is unsuccessful. Applicable in all cases.
Page 63

Using LifeCycle Manager
Scheduling a Job in LifeCycle Manager
1. In the "Promote - Job Name" window, click the Schedule Job option, as
shown in the following figure:
2. Select the appropriate schedule option from the Run Job drop-down list.
Based on the Run Job option selected, the values displayed in the
Objects will run field change automatically. For example, if you select
the Weekly option, you must also specify the preferred days.
5
3. For the selected schedule, specify the parameters.
You can also specify the number of retries allowed and the time interval
between successive retries in the Number of retries allowed and Retry
Interval in Seconds fields, respectively.
Updating the Recurring and Pending Job Promotion Instances
The LifeCycle Manager tool enables you to track and update the status of a
scheduled job promotion instance by using the Recurring and Pending
Instances option.
To track and update the scheduled job promotion instances, complete the
following steps:
1. Log into the LifeCycle Manager tool.
2. In the "Promotion Job" home page, select a job.
BusinessObjects LifeCycle Manager User's Guide 63
Page 64

Using LifeCycle Manager
5
Viewing the History of a Job
3. Click History.
The "Job History" window appears.
4. Click Recurring & Pending Instances.
The "Job History" window appears, as shown in the following figure:
This window displays the list of recurring and pending job promotion
instances.
Based on your requirements, you can use the following options:
• Click Promoted Instances to view the list of scheduled job promotion
instances.
• Click the Pause option to pause the scheduled job promotion.
• Click the Resume option to resume the paused scheduled job
promotion instance.
• Click the Reschedule option to reschedule a job promotion instance.
•
Click the icon to delete a scheduled job promotion instance.
•
Click the icon to refresh the status of a scheduled job promotion
instance.
Viewing the History of a Job
The LifeCycle Manager tool enables you to view and track the status of a
job promotion instance. To view the history of a job, you must ensure that
the status of the job is one of the following:
• Success
• Failure
• Partial Success
64 BusinessObjects LifeCycle Manager User's Guide
Page 65

Using LifeCycle Manager
Viewing the History of a Job
To view the history of a job, complete the following steps:
1. Log into the LifeCycle Manager tool.
2. In the "Promotion Job" home page, select a job.
3. Click History.
The job instance, name of the job, names of the source and destination
systems, the ID of the user who promoted the job, and the status
(Success, Failure, or Partial Success) of the job are displayed.
You can view the status of the job by using the link displayed in the Status
column. The status of the job is displayed, as shown in the following
figure:
5
Rolling Back a Job in LifeCycle Manager
The Rollback option enables you to restore the destination system to its
previous state, after a job is promoted.
To roll back a job, complete the following steps:
1. Log into the LifeCycle Manager tool.
2. In the "Promotion Jobs" home page, select a job.
3. Click Rollback.
The "Rollback" window appears.
4. Select the job at the top of the list, and click Complete Rollback.
The job is rolled back.
Note:
You can roll back only the most recent instance of a job promotion. You
cannot roll back two job instances at the same time.
BusinessObjects LifeCycle Manager User's Guide 65
Page 66

Using LifeCycle Manager
5
Viewing the History of a Job
Using the Partial Rollback Option
The LifeCycle Manager tool enables you to roll back infoobjects that are
included in a job. You can roll back either some objects in a job or all the
infoobjects.
To roll back the infoobjects included in a job, complete the following steps:
1. Log into the LifeCycle Manager tool.
2. In the "Promotion Job" home page, select a job.
3. Click Rollback
The "Rollback" window appears.
4. Select the job at the top of the list, and click Partial Rollback.
The list of infoobjects in the selected job is displayed in the "Job Viewer"
page.
5. Select the infoobjects that you want to roll back, and click Rollback.
Note:
You must ensure that you have rolled back all the infoobjects in a job
before you roll back the next job or infoobjects in the next job.
Important: If a job is promoted with security, then, during the partial
rollback of infoobjects, the security of the selected dependent infoobjects
may not be rolled back to its previous state.
Rolling Back a Job After the Password Expires
This section describes how to roll back a job after the password for the source
or destination system expires.
To roll back a job after the password expires, complete the following steps:
1. Select the job you want to roll back, and click Rollback.
The "Rollback" page appears.
2. Click the required job instance, and click Complete Rollback.
An error message is displayed. This message states that the job cannot
be rolled back. You are also prompted to log into the source or destination
system.
66 BusinessObjects LifeCycle Manager User's Guide
Page 67

Using LifeCycle Manager
Viewing the History of a Job
3. Enter the new login credentials, and click Login.
A dialog box appears indicating that the rollback process is complete.
The jobs that were promoted by using the source or destination system
credentials are updated automatically.
Related Topics
• Rolling Back a Job in LifeCycle Manager on page 65
• Using the Partial Rollback Option on page 66
• Rolling Back Infoobjects After the Password Expires on page 67
Rolling Back Infoobjects After the Password Expires
This section describes how to roll back infoobjects after the password for
the source or destination system expires.
To roll back infoobjects after the password expires, complete the following
steps:
1. Select the job you want to rollback, and click Rollback.
The "Rollback" page appears.
5
2. Select the job, and click Partial Rollback.
An error message is displayed. This message states that the infoobjects
cannot be rolled back. You are also prompted to log into the source or
destination system.
3. Enter the new login credentials, and click Login.
The "Job Viewer" page appears. This page displays the list of infoobjects.
4. Select the required infoobjects, and click Rollback.
The jobs that were promoted by using this source or destination system
credentials are updated automatically.
Related Topics
• Rolling Back a Job in LifeCycle Manager on page 65
• Using the Partial Rollback Option on page 66
• Rolling Back a Job After the Password Expires on page 66
BusinessObjects LifeCycle Manager User's Guide 67
Page 68

Using LifeCycle Manager
Viewing the History of a Job
5
68 BusinessObjects LifeCycle Manager User's Guide
Page 69

Auditing in LifeCycle Manager
6
Page 70

Auditing in LifeCycle Manager
6
How Auditing Works
This section provides an overview of the auditing functionality in LifeCycle
Manager. It also discusses the actions that you can perform to audit and to
create custom audit reports.
How Auditing Works
Auditing in LifeCycle Manager uses the existing infrastructure of the
BusinessObjects Enterprise application.
For more information, see the BusinessObjects Enterprise Administrator's
Guide.
Creating Custom Audit Reports
This section discusses the audit database, the activity universe, and the
information recorded about audit actions. You can use this information with
Crystal Reports, Web Intelligence, or Desktop Intelligence to create custom
audit reports of LifeCycle Manager events.
Audit Database Schema Reference
The audit database consists of the following tables:
• Audit_Event
• Audit_Detail
• Server_Process
• Detail_Type
• Event_Type
• Application_Type
For more information about the audit tables, see the BusinessObjects
Enterprise Administrator's Guide.
70 BusinessObjects LifeCycle Manager User's Guide
Page 71

Auditing in LifeCycle Manager
Creating Custom Audit Reports
User Events Enabled for LifeCycle Manager Client
The following figure shows the client-based events that can be audited.
Client-based events are set in Admin options > Audit Log of the LifeCycle
Manager tool.
6
Event and Detail Reference Tables
The following tables list the Event_Type_ID and Event_Type_Description of
the events that can be audited in your system. For your convenience, these
events are ordered according to the service that generates each type of
event.
The following table shows the description captured for a Job Created event:
BusinessObjects LifeCycle Manager User's Guide 71
Page 72

Auditing in LifeCycle Manager
6
Creating Custom Audit Reports
Event Type
Description
Detail Type
ID
91Job Created
Detail Type Description
Description14Job Created
User Groups42Job Created
Object Folder Path43Job Created
Template Document
CUID
Object CUID92Job Created
Detail Text
Q2 Finance jobObject Name3Job Created
Job has all the Q2 Finance documents to
promote.
Q2 FinanceKeywords16Job Created
Everyone|Administra
tors
/LCM/Promotion
Jobs/Finance/
5063Session ID45Job Created
0Object Instance90Job Created
AWXv5fo3dYp
Ni_D3kg0DsL0
AWXv5fo3dYp
Ni_D3kg0DsL0
7003Job Created
72 BusinessObjects LifeCycle Manager User's Guide
Host Name of Destination
5065Job ID7001Job Created
Machine NameHost Name of Source7002Job Created
Machine Name
DelAdminSource User Name7004Job Created
DelAdminDestination User Name7005Job Created
Page 73

LifeCycle Manager Auditing Events
The following table lists the Event_Type_ID code, the description, and details
of each event, along with the Detail_ID code in parentheses:
Auditing in LifeCycle Manager
Creating Custom Audit Reports
6
Event_Type_ ID
Event_Type_Description
Auditing Event Enabled61
Auditing Event Disabled62
Description
• Event ID (40)
• Object CUID (92)
• Object Folder Path (43)
• Object Instance (90)
• Object Name (3)
• Session ID (45)
• Template Document CUID
(91)
• User Groups (42)
• Event ID (40)
• Object CUID (92)
• Object Folder Path (43)
• Object Instance (90)
• Object Name (3)
• Session ID (45)
• Template Document CUID
(91)
• User Groups (42)
BusinessObjects LifeCycle Manager User's Guide 73
Page 74

Auditing in LifeCycle Manager
6
Creating Custom Audit Reports
Event_Type_ ID
Event_Type_Description
Job Created770001
Description
• Description (14)
• Destination User Name
(7005)
• Hostname of Source
(7002)
• Hostname of Destination
(7003)
• Job ID (7001)
• Keywords (16)
• Object CUID (92)
• Object Folder Path (43)
• Object instance (90)
• Object Name (3)
• Session ID (45)
• Source User Name (7004)
• Template Document CUID
(91)
• User Groups (42)
770002
74 BusinessObjects LifeCycle Manager User's Guide
Job Copied from Existing
File
• Description (14)
• File Name (68)
• Job ID (7001)
• Keywords (16)
• Object CUID (92)
• Object Folder Path (43)
• Object instance (90)
• Object Name (3)
• Session ID (45)
• Template Document CUID
(91)
• User Groups (42)
Page 75

Auditing in LifeCycle Manager
Creating Custom Audit Reports
6
Event_Type_ ID
770003
Event_Type_Description
Job Copied from Existing
Job
Description
• Description (14)
• Destination User Name
(7005)
• Hostname of Source
(7002)
• Hostname of Destination
(7003)
• Job ID (7001)
• Keywords (16)
• Object CUID (92)
• Object Folder Path (43)
• Object instance (90)
• Object Name (3)
• Session ID (45)
• Source User Name (7004)
• Template Document CUID
(91)
• User Groups (42)
• Description (14)
• Destination User Name
(7005)
• Hostname of Source
(7002)
• Hostname of Destination
Job Deleted770004
BusinessObjects LifeCycle Manager User's Guide 75
(7003)
• Job ID (7001)
• Keywords (16)
• Object CUID (92)
• Object Name (3)
• Session ID (45)
• Source User Name (7004)
• User Groups (42)
Page 76

Auditing in LifeCycle Manager
6
Creating Custom Audit Reports
Event_Type_ ID
Event_Type_Description
Job Modified770005
Description
• Description (14)
• Destination User Name
(7005)
• Hostname of Source
(7002)
• Hostname of Destination
(7003)
• Job ID (7001)
• Keywords (16)
• Object CUID (92)
• Object Folder Path (43)
• Object instance (90)
• Object Name (3)
• Session ID (45)
• Source User Name (7004)
• Template Document CUID
(91)
• User Groups (42)
76 BusinessObjects LifeCycle Manager User's Guide
Page 77

Auditing in LifeCycle Manager
Creating Custom Audit Reports
6
Event_Type_ ID
Event_Type_Description
Job Exported770006
Description
• Description (14)
• File Name (68)
• Hostname of Source
(7002)
• Job ID (7001)
• Keywords (16)
• Object CUID (92)
• Object Folder Path (43)
• Object instance (90)
• Object Name (3)
• Session ID (45)
• Source User Name (7004)
• Template Document CUID
(91)
• User Groups (42)
BusinessObjects LifeCycle Manager User's Guide 77
Page 78

Auditing in LifeCycle Manager
6
Creating Custom Audit Reports
Event_Type_ ID
770011
Event_Type_Description
Promotion Started
Note:
Promotion Started event
captures the event details
of each of the resources
available in the job.
Description
• Comment (7011)
• Description (14)
• Destination User Name
(7005)
• Hostname of Source
(7002)
• Hostname of Destination
(7003)
• Job ID (7001)
• Keywords (16)
• Object CUID (92)
• Object Folder Path (43)
• Object instance (90)
• Object Name (3)
• Object type (50)
• Session ID (45)
• Source User Name (7004)
• Template Document CUID
(91)
• User Groups (42)
78 BusinessObjects LifeCycle Manager User's Guide
Page 79

Auditing in LifeCycle Manager
Creating Custom Audit Reports
6
Event_Type_ ID
770012
Event_Type_Description
Promotion Succeeded
Note:
Promotion Succeeded
event captures the status
of the job.
Description
• Description (14)
• Destination User Name
(7005)
• Hostname of Source
(7002)
• Hostname of Destination
(7003)
• Job ID (7001)
• Keywords (16)
• Object CUID (92)
• Object Folder Path (43)
• Object instance (90)
• Object Name (3)
• Session ID (45)
• Source User Name (7004)
• Template Document CUID
(91)
• User Groups (42)
BusinessObjects LifeCycle Manager User's Guide 79
Page 80

Auditing in LifeCycle Manager
6
Creating Custom Audit Reports
Event_Type_ ID
770013
Event_Type_Description
Promotion Partially Succeeded
Note:
Promotion Succeeded
event captures the status
of the job.
Description
• Description (14)
• Destination User Name
(7005)
• Hostname of Source
(7002)
• Hostname of Destination
(7003)
• Job ID (7001)
• Keywords (16)
• Object CUID (92)
• Object Folder Path (43)
• Object instance (90)
• Object Name (3)
• Session ID (45)
• Source User Name (7004)
• Template Document CUID
(91)
• User Groups (42)
80 BusinessObjects LifeCycle Manager User's Guide
Page 81

Auditing in LifeCycle Manager
Creating Custom Audit Reports
6
Event_Type_ ID
770014
Event_Type_Description
Promotion Failed
Note:
Promotion Succeeded
event captures the status
of the job.
Description
• Description (14)
• Destination User Name
(7005)
• Error Message (76)
• Hostname of Source
(7002)
• Hostname of Destination
(7003)
• Job ID (7001)
• Keywords (16)
• Object CUID (92)
• Object Folder Path (43)
• Object instance (90)
• Object Name (3)
• Session ID (45)
• Source User Name (7004)
• Template Document CUID
(91)
• User Groups (42)
• Description (14)
• Destination User Name
(7005)
• Hostname of Destination
(7003)
Rollback Started770021
BusinessObjects LifeCycle Manager User's Guide 81
• Job ID (7001)
• Keywords (16)
• Object CUID (92)
• Rollback Type (7008)
• Session ID (45)
• User Groups (42)
Page 82

Auditing in LifeCycle Manager
6
Creating Custom Audit Reports
Event_Type_ ID
Event_Type_Description
Rollback Succeeded770022
Rollback Failed770023
Dependencies Selected770031
Description
• Description (14)
• Job ID (7001)
• Keywords (16)
• Object CUID (92)
• Object Folder Path (43)
• Object Name (3)
• Object Type (50)
• Session ID (45)
• User Groups (42)
• Job ID (7001)
• Object CUID (92)
• Object Name (3)
• Object Type (50)
• Session ID (45)
• User Groups (42)
• Job ID (7001)
• Object CUID (92)
• Object Folder Path (43)
• Object Name (3)
• Object Type (50)
• Session ID (45)
• User Groups (42)
82 BusinessObjects LifeCycle Manager User's Guide
Page 83

Auditing in LifeCycle Manager
Creating Custom Audit Reports
6
Event_Type_ ID
Event_Type_Description
Dependencies Deselected770032
System Detail Added770041
Description
• Job ID (7001)
• Object CUID (92)
• Object Folder Path (43)
• Object Name (3)
• Object Type (50)
• Session ID (45)
• User Groups (42)
• Comment (7011)
• Description (14)
• Host Name (70)
• Object CUID (92)
• Object Folder Path (43)
• Object instance (90)
• Object Name (3)
• Port (72)
• Session ID (45)
• Template Document CUID
(91)
• User Groups (42)
• Comment (7011)
• Description (14)
• Host Name (70)
• Object CUID (92)
• Object Folder Path (43)
System Detail Modified770042
BusinessObjects LifeCycle Manager User's Guide 83
• Object instance (90)
• Object Name (3)
• Port (72)
• Session ID (45)
• Template Document CUID
(91)
• User Groups (42)
Page 84

Auditing in LifeCycle Manager
6
Creating Custom Audit Reports
Event_Type_ ID
Event_Type_Description
System Detail Removed770043
Properties Modified770051
Description
• Comment (7011)
• Description (14)
• Host Name (70)
• Object CUID (92)
• Object Folder Path (43)
• Object instance (90)
• Object Name (3)
• Port (72)
• Session ID (45)
• Template Document CUID
(91)
• User Groups (42)
• Job ID (7001)
• Object CUID (92)
• Object Folder Path (43)
• Object instance (90)
• Object Name (3)
• Object Type (50)
• Session ID (45)
• Template Document CUID
(91)
• User Groups (42)
84 BusinessObjects LifeCycle Manager User's Guide
Page 85

Auditing in LifeCycle Manager
Creating Custom Audit Reports
6
Event_Type_ ID
Event_Type_Description
Mapping Modified770061
Mapping Removed770062
Description
• Comment (7011)
• Job ID (7001)
• Object CUID (92)
• Object Folder Path (43)
• Object instance (90)
• Object Name (3)
• Object Type (50)
• Session ID (45)
• Template Document CUID
(91)
• User Groups (42)
• Comment (7011)
• Job ID (7001)
• Object CUID (92)
• Object Folder Path (43)
• Object Name (3)
• Object Type (50)
• Session ID (45)
• User Groups (42)
BusinessObjects LifeCycle Manager User's Guide 85
Page 86

Auditing in LifeCycle Manager
6
Creating Custom Audit Reports
Event_Type_ ID
770071
770072
Event_Type_Description
Addition to Source Control
Succeeded
Addition to Source Control
Failed
Description
• Comment (7011)
• Host Name (70)
• Object CUID (92)
• Object Folder Path (43)
• Object instance (90)
• Object Name (3)
• Object Type (50)
• Session ID (45)
• Template Document CUID
(91)
• User Groups (42)
• User Name (69)
• Error Message (76)
• Host Name (70)
• Object CUID (92)
• Object Folder Path (43)
• Object instance (90)
• Object Name (3)
• Object Type (50)
• Session ID (45)
• Template Document CUID
(91)
• User Groups (42)
• User Name (69)
86 BusinessObjects LifeCycle Manager User's Guide
Page 87

Auditing in LifeCycle Manager
Creating Custom Audit Reports
6
Event_Type_ ID
770081
770082
Event_Type_Description
Retrieval of Deleted Resource Succeeded
Retrieval of Deleted Resource Failed
Check In Succeeded770091
Description
• Host Name (70)
• Object CUID (92)
• Object Folder Path (43)
• Object instance (90)
• Object Name (3)
• Object Type (50)
• Session ID (45)
• Template Document CUID
(91)
• User Groups (42)
• User Name (69)
• Error Message (76)
• Object CUID (92)
• Session ID (45)
• User Groups (42)
• Comment (7011)
• Host Name (70)
• Object CUID (92)
• Object Folder Path (43)
• Object instance (90)
• Object Name (3)
• Object Type (50)
• Session ID (45)
• Template Document CUID
(91)
• User Groups (42)
• User Name (69)
BusinessObjects LifeCycle Manager User's Guide 87
Page 88

Auditing in LifeCycle Manager
6
Creating Custom Audit Reports
Event_Type_ ID
770101
Event_Type_Description
Check In Failed770092
Latest Version Retrieval
Succeeded
Description
• Error Message (76)
• Host Name (70)
• Object CUID (92)
• Object Folder Path (43)
• Object instance (90)
• Object Name (3)
• Object Type (50)
• Session ID (45)
• Template Document CUID
(91)
• User Groups (42)
• User Name (69)
• Comment (7011)
• Host Name (70)
• Object CUID (92)
• Object Folder Path (43)
• Object instance (90)
• Object Name (3)
• Object Type (50)
• Session ID (45)
• Template Document CUID
(91)
• User Groups (42)
• User Name (69)
88 BusinessObjects LifeCycle Manager User's Guide
Page 89

Auditing in LifeCycle Manager
Creating Custom Audit Reports
6
Event_Type_ ID
770102
Event_Type_Description
Latest Version Retrieval
Failed
Object Added770111
Description
• Error Message (76)
• Host Name (70)
• Object CUID (92)
• Object Folder Path (43)
• Object instance (90)
• Object Name (3)
• Object Type (50)
• Session ID (45)
• Template Document CUID
(91)
• User Groups (42)
• User Name (69)
• Job ID (7001)
• Object CUID (92)
• Object Folder Path (43)
• Object instance (90)
• Object Name (3)
• Object Type (50)
• Session ID (45)
• Template Document CUID
(91)
• User Groups (42)
• Job ID (7001)
• Object CUID (92)
• Object Folder Path (43)
• Object instance (90)
Object Removed770112
BusinessObjects LifeCycle Manager User's Guide 89
• Object Name (3)
• Object Type (50)
• Session ID (45)
• Template Document CUID
(91)
• User Groups (42)
Page 90

Auditing in LifeCycle Manager
6
Creating Custom Audit Reports
Event_Type_ ID
770121
Event_Type_Description
Administration Options
Accessed
Description
• Comment (7011)
• Directory (67)
• File Name (68)
• Host Name (70)
• Number of Days (7007)
• Number of Instances (7006)
• Object CUID (92)
• Object Folder Path (43)
• Object instance (90)
• Object Name (3)
• Port (72)
• Rollback Settings (7010)
• Session ID (45)
• Template Document CUID
(91)
• User Groups (42)
• User Name (69)
LifeCycle Manager Detail Codes ReferenceTable
The following table lists the standard details that are recorded for the LifeCycle
Manager tool:
Detail_Type_DescriptionDetail_ID
Job ID7001
Hostname of Source7002
Hostname of Destination7003
Source User Name7004
90 BusinessObjects LifeCycle Manager User's Guide
Page 91

Auditing in LifeCycle Manager
Creating Custom Audit Reports
Detail_Type_DescriptionDetail_ID
Destination User Name7005
Number of Instances7006
Number of Days7007
Rollback Type7008
Options7009
Rollback Settings7010
Comment7011
LifeCycle Manager Application_Type Table References
6
The following table lists the application type that is recorded for the LifeCycle
Manager tool:
Application_Type_DescriptionApplication_Type_ID
LifeCycle Manager44
LifeCycle Manager Job Server Auditing Events
For scheduled jobs, the auditing message provides information about the
status of the scheduled actions. For example, the auditing messages indicate
whether the scheduled job was successfully executed.
The following table lists the Event_Type_IDs, their description, and their
details:
BusinessObjects LifeCycle Manager User's Guide 91
Page 92

Auditing in LifeCycle Manager
6
Creating Custom Audit Reports
327683
Scheduling Succeeded327681
Scheduling Failed327682
Scheduling failed, but will
be reattempted.
Event_DetailsEvent_Type_DescriptionEvent_Type_ID
• Object Name (3)
• Parent Document CUID (91)
• User Groups (42)
• Object Folder Path (43)
• Session ID (45)
• Object Instance (90)
• Universe Name (2)
• Object Name (3)
• Parent Document CUID (91)
• User Groups (42)
• Object Folder Path (43)
• Session ID (45)
• Object Instance (90)
• Universe Name (2)
• Object Name (3)
• Parent Document CUID (91)
• User Groups (42)
• Object Folder Path (43)
• Session ID (45)
• Object Instance (90)
• Template Document (91)
• Universe Name (2)
92 BusinessObjects LifeCycle Manager User's Guide
Page 93

Managing Different Versions of an infoobject
7
Page 94

Managing Different Versions of an infoobject
7
The LifeCycle Manager tool enables you to manage versions of BI resources
that exist in the BusinessObjects Enterprise repository. It supports both
Subversion and ClearCase version management systems. This section
describes how to use the Version Management feature in the LifeCycle
Manager tool.
To create and manage different versions of an infoobject, complete the
following steps:
1. Log into the LifeCycle Manager tool.
2. In the LifeCycle Manager home page, select Version Management from
the drop-down list.
The "Login to System" dialog box appears.
3. Enter the login credentials, and click Login.
The "Version Management" window appears.
Note:
You can log into the version management system (VMS) only if it is already
configured. For information on configuring the version management
system, see the BusinessObjects LifeCycle Manager Installation Guide.
4.
If you want to change the host system, click .
The "Login to System" dialog box appears.
5. Enter the user credentials, and click Login.
6. From the left panel of the "Version Management" window, select the folder
to view the infoobjects whose versions you want to manage.
7. Select the infoobjects and click Add to VM.
Note:
Clicking "Add to Version Management" results in the creation of a base
version of the object in the VMS repository. A base version is required
for subsequent check-in.
8. Click Checkin to update the document that exists in the VMS repository.
The "Check-in Comments" dialog box appears.
9. Enter your comments, and click OK.
The change in the version number of the selected infoobject is displayed
in the VMS and Content Management System columns.
10. To obtain the latest version of the document from the VMS, select the
required infoobject, and click Get latest Version.
94 BusinessObjects LifeCycle Manager User's Guide
Page 95

Managing Different Versions of an infoobject
11. To create a copy of the latest version, click Create Copy.
A copy of the selected version is created.
12. Select History to view all the versions available for the selected resource.
The "History" window appears. The following options are displayed:
• Get Version - If there are multiple versions, and if you require a
particular version of the BI resource, then you can select the required
resource and click Get Version.
• Get Copy of Version - This option enables you to obtain a copy of
the selected version.
• Export Copy of Version - This option enables you to obtain a copy
of the selected version and save it to your local system.
13. Select an infoobject and click Lock to lock the infoobject and click Unlock
to unlock the infoobject.
Note:
If you lock an infoobject, you cannot perform any action on that infoobject.
14. CMS and VMS Synchronisation - When the CMS version of the infoobject
is updated, an indicator appears beside the updated infoobject. When
you place the cursor on the indicator, you get a tool tip describing that
the infoobject in the CMS is updated.
15. To view the list of all checked in resources that exist in the VMS, but not
in the CMS, click View Deleted resources.
Click any deleted resource to view the history of that resource. You can
select a deleted resource, and click Get Version to view that particular
version of the resource. You can click Get Copy of Version to get a copy
of the selected resource.
7
Note:
If you use either Get Version or Get Copy of Version option, the resource
is moved to CMS from the VMS missing file list.
16.
Select a resource, and click to view the properties of the resource.
BusinessObjects LifeCycle Manager User's Guide 95
Page 96

Managing Different Versions of an infoobject
7
96 BusinessObjects LifeCycle Manager User's Guide
Page 97

More Information
A
Page 98

More Information
A
LocationInformation Resource
SAP BusinessObjects product
information
SAP Help Portal
SAP Service Marketplace
http://www.sap.com
Select http://help.sap.com > SAP BusinessObjects.
You can access the most up-to-date documentation covering all SAP BusinessObjects products and their deployment
at the SAP Help Portal. You can download PDF versions
or installable HTML libraries.
Certain guides are stored on the SAP Service Marketplace
and are not available from the SAP Help Portal. These
guides are listed on the Help Portal accompanied by a link
to the SAP Service Marketplace. Customers with a maintenance agreement have an authorized user ID to access
this site. To obtain an ID, contact your customer support
representative.
http://service.sap.com/bosap-support > Documentation
•
Installation guides: https://service.sap.com/bosap-inst
guides
•
Release notes: http://service.sap.com/releasenotes
The SAP Service Marketplace stores certain installation
guides, upgrade and migration guides, deployment guides,
release notes and Supported Platforms documents. Customers with a maintenance agreement have an authorized
user ID to access this site. Contact your customer support
representative to obtain an ID. If you are redirected to the
SAP Service Marketplace from the SAP Help Portal, use
the menu in the navigation pane on the left to locate the
category containing the documentation you want to access.
Developer resources
98 BusinessObjects LifeCycle Manager User's Guide
https://boc.sdn.sap.com/
https://www.sdn.sap.com/irj/sdn/businessobjects-sdklibrary
Page 99

More Information
A
LocationInformation Resource
SAP BusinessObjects articles
on the SAP Community Network
Notes
Forums on the SAP Community Network
Training
Online customer support
https://www.sdn.sap.com/irj/boc/businessobjects-articles
These articles were formerly known as technical papers.
https://service.sap.com/notes
These notes were formerly known as Knowledge Base articles.
https://www.sdn.sap.com/irj/scn/forums
http://www.sap.com/services/education
From traditional classroom learning to targeted e-learning
seminars, we can offer a training package to suit your
learning needs and preferred learning style.
http://service.sap.com/bosap-support
The SAP Support Portal contains information about Customer Support programs and services. It also has links to
a wide range of technical information and downloads.
Customers with a maintenance agreement have an authorized user ID to access this site. To obtain an ID, contact
your customer support representative.
Consulting
http://www.sap.com/services/bysubject/businessobjectscon
sulting
Consultants can accompany you from the initial analysis
stage to the delivery of your deployment project. Expertise
is available in topics such as relational and multidimensional
databases, connectivity, database design tools, and cus
tomized embedding technology.
BusinessObjects LifeCycle Manager User's Guide 99
Page 100

More Information
A
100 BusinessObjects LifeCycle Manager User's Guide
 Loading...