


BusinessObjects Enterprise XI 3.0
Integration for PeopleSoft
BusinessObjects Enterprise XI 3.0 Integration for PeopleSoft

Copyright
© 2008 Business Objects. All rights reserved. Business Objects owns the following
U.S. patents, which may cover products that are offered and licensed by Business
Objects: 5,555,403; 5,857,205; 6,289,352; 6,247,008; 6,490,593; 6,578,027;
6,831,668; 6,768,986; 6,772,409; 6,882,998; 7,139,766; 7,299,419; 7,194,465;
7,222,130; 7,181,440 and 7,181,435. Business Objects and the Business Objects
logo, BusinessObjects, Business Objects Crystal Vision, Business Process On
Demand, BusinessQuery, Crystal Analysis, Crystal Applications, Crystal Decisions,
Crystal Enterprise, Crystal Insider, Crystal Reports, Desktop Intelligence, Inxight,
the Inxight Logo, LinguistX, Star Tree, Table Lens, ThingFinder, Timewall, Let
there be light, Metify, NSite, Rapid Marts, RapidMarts, the Spectrum Design, Web
Intelligence, Workmail and Xcelsius are trademarks or registered trademarks in
the United States and/or other countries of Business Objects and/or affiliated
companies. All other names mentioned herein may be trademarks of their respective
owners.
Third-party
Contributors
Business Objects products in this release may contain redistributions of software
licensed from third-party contributors. Some of these individual components may
also be available under alternative licenses. A partial listing of third-party
contributors that have requested or permitted acknowledgments, as well as required
notices, can be found at: http://www.businessobjects.com/thirdparty
2008-04-01

Contents
Welcome to the BusinessObjects XI Integration for PeopleSoft 9Chapter 1
What is the BusinessObjects XI Integration for PeopleSoft?.....................10
Who should use this guide?......................................................................10
What's New................................................................................................10
Installing on PeopleSoft Enterprise: PeopleTools 8.46 to 8.49 15Chapter 2
Overview....................................................................................................16
Component architecture............................................................................16
Installation..................................................................................................17
Multiple systems........................................................................................21
Installing on PeopleSoft Enterprise: PeopleTools 8.21-8.45 23Chapter 3
Overview....................................................................................................24
Component architecture............................................................................24
Installation..................................................................................................28
Multiple systems........................................................................................43
Data Connectivity.................................................................................11
Security Connectivity............................................................................12
Features...............................................................................................25
Creating the Component Interfaces.....................................................29
Securing the Component Interfaces.....................................................33
Installing BusinessObjects Enterprise XI 3.0 Integration for
PeopleSoft............................................................................................35
Installing features on Unix....................................................................37
Deploying the PeopleSoft Application Server feature..........................41
Enabling access to required PeopleSoft files.......................................41
BusinessObjects Enterprise XI 3.0 Integration for PeopleSoft 3

Contents
Duplicating and renaming the default folder structure..........................44
Installing multiple instances of the BusinessObjects Sign-on Server for
PeopleSoft............................................................................................45
Installing the PeopleSoft EPM Security Bridge 51Chapter 4
Overview....................................................................................................52
Component architecture............................................................................52
Features...............................................................................................53
Installation..................................................................................................54
Deploying web applications 57Chapter 5
Deploying on Windows..............................................................................58
To deploy web applications on Tomcat.................................................58
To deploy web applications on IBM WebSphere .................................60
To deploy web applications on BEA WebLogic....................................62
To deploy web applications on Oracle Application Server...................64
Deploying on UNIX....................................................................................66
To deploy web applications on Tomcat.................................................66
To deploy web applications on IBM WebSphere..................................68
To deploy web applications on BEA WebLogic....................................70
To deploy web applications on Oracle Application Server...................72
Firewall settings 75Chapter 6
Guidelines for communication between BusinessObjects Enterprise and
PeopleSoft Enterprise system ..................................................................76
For PeopleSoft Enterprise: PeopleTools 8.46-8.49 .............................76
For PeopleSoft Enterprise: PeopleTools 8.21-8.45 .............................77
Detailed description of ports......................................................................78
Port Requirements for BusinessObjects Enterprise XI 3.0 servers......78
Port Requirements for PeopleSoft........................................................79
4 BusinessObjects Enterprise XI 3.0 Integration for PeopleSoft

Contents
Configuring BusinessObjects XI 3.0 Integration for PeopleSoft for
firewalls................................................................................................79
Chapter 7
Configuring BusinessObjects XI 3.0 Integration for PeopleSoft for Secure
Socket Layer Communication 83
SSL configuration property file...................................................................84
To enable PeopleSoft Sign-on Server for SSL..........................................85
To enable PeopleSoft Query Server with SSL...........................................85
To enable Security Bridge with SSL..........................................................86
Uninstalling BusinessObjects XI 3.0 Integration for PeopleSoft 89Chapter 8
To uninstall BusinessObjects XI 3.0 Integration for PeopleSoft.................90
Migrating content 93Chapter 9
To migrate content from previous versions................................................94
Working with Crystal Reports 95Chapter 10
Overview....................................................................................................96
Accessing data..........................................................................................96
Working with BusinessObjects Enterprise 99Chapter 11
Overview..................................................................................................100
Mapping PeopleSoft roles to BusinessObjects Enterprise......................100
Remapping consideration...................................................................104
Unmapping roles................................................................................104
Customizing security rights......................................................................105
Assigning publishing rights.................................................................105
Assigning administration rights...........................................................105
Configuring Single Sign-on (SSO) for Report Viewing and Scheduling...106
BusinessObjects Enterprise XI 3.0 Integration for PeopleSoft 5

Contents
Working with the PeopleSoft EPM Security Bridge 107Chapter 12
Overview..................................................................................................108
Importing security settings.......................................................................108
Defining managed objects..................................................................109
Creating a response file ....................................................................110
Applying the security settings.............................................................113
Managing security settings......................................................................114
Managed users...................................................................................114
Managed universes............................................................................115
Command Line Options 117Chapter 13
Overview..................................................................................................118
Options and arguments...........................................................................118
Performance Tuning 125Chapter 14
Overview..................................................................................................126
PeopleSoft servers..................................................................................126
Recommendations.............................................................................127
Response File Parameters 129Chapter 15
Overview..................................................................................................130
Parameters..............................................................................................130
Troubleshooting 137Chapter 16
When scheduling a PeopleSoft report, there is no "Enable SSO" checkbox
in the Database Logon section. ..............................................................138
To run the partnercafinstall command................................................138
6 BusinessObjects Enterprise XI 3.0 Integration for PeopleSoft

Contents
Get More Help 139Appendix A
Index 143
BusinessObjects Enterprise XI 3.0 Integration for PeopleSoft 7

Contents
8 BusinessObjects Enterprise XI 3.0 Integration for PeopleSoft
Welcome to the BusinessObjects XI Integration for PeopleSoft
1

Welcome to the BusinessObjects XI Integration for PeopleSoft
1
What is the BusinessObjects XI Integration for PeopleSoft?
What is the BusinessObjects XI
Integration for PeopleSoft?
The BusinessObjects XI Integration for PeopleSoft allows you to combine
the functionality of Crystal Reports and BusinessObjects Enterprise to extract,
report, and distribute data from your PeopleSoft system.
Who should use this guide?
This guide shows you how to configure the components that enable Crystal
Reports and BusinessObjects Enterprise to work with your PeopleSoft system
after you have installed the BusinessObjects XI Integration for PeopleSoft .
This guide is intended primarily for administrators.
After configuration, you can use your PeopleSoft credentials to logon to
BusinessObjects Enterprise and report on your PeopleSoft data.
What's New
The BusinessObjects XI Integration for PeopleSoft offers the following new
and enhanced functionality for an improved overall user experience. With
enhanced integration with and ease of access to BusinessObjects InfoView
and Central Management Console (CMC) users can now:
• Seamlessly log on with Single Sign-On (SSO) to take advantage of
BusinessObjects capabilities and workflows from within the PeopleSoft
web portal.
• Use SSO to view and schedule PeopleSoft reports in BusinessObjects
InfoView and CMC without being prompted for their PeopleSoft credentials.
• Use Preferred Viewing Language (PVL) to display PeopleSoft metadata
and business data (for PeopleTools 8.21 - 8.45)
• A completely new interface to the full documentation set now has guides
for all Business Objects products. The new online documentation library
has the most up-to-date version of the Business Objects product
documentation, posted upon publication and updated regularly. You can
browse the library contents, run full-text searches, read guides on line,
and download PDFs. http://support.businessobjects.com/documenta
tion/product_guides/default.asp
10 BusinessObjects Enterprise XI 3.0 Integration for PeopleSoft

Data Connectivity
The Data Connectivity feature of the integration kit includes the Native Driver
for PeopleSoft, a Unicode-compliant driver that allows you to report off
PeopleSoft data.
The driver allows you to connect to PeopleSoft queries from within Crystal
Reports. It also enables BusinessObjects Enterprise to run reports against
data from your PeopleSoft system. The driver honors any query-level and
row-level security that has been defined for the queries and supports features
such as parameters and translation tables.
Requirements
To enable the Data Connectivity feature, your system must have the following
components already deployed:
Welcome to the BusinessObjects XI Integration for PeopleSoft
What's New
ComponentLocation
1
Server Side
Client Side
One of the following BusinessObjects
Enterprise servers:
•
Crystal Reports Processing Server
•
Job Server
•
Report Application Server
•
LOV Job Server
One of the following components:
• Crystal Reports Business View
Manager
• Crystal Reports Publishing Wizard
BusinessObjects Enterprise XI 3.0 Integration for PeopleSoft 11
Welcome to the BusinessObjects XI Integration for PeopleSoft
1
What's New
Security Connectivity
The Security Connectivity feature of the integration kit includes the PeopleSoft
Security Plug-in. This component allows PeopleSoft users to use their
PeopleSoft credentials to log on to BusinessObjects Enterprise.
The PeopleSoft Security Plug-in offers several benefits:
• It allows the BusinessObjects Enterprise Central Management Server
(CMS) to verify user credentials against a PeopleSoft system.
• It enables you to map PeopleSoft roles to groups in BusinessObjects
Enterprise.
• It allows you to assign rights to users and groups in a consistent manner
within BusinessObjects Enterprise.
Along with this component, the integration kit provides a web application that
you can use to configure the settings of the Security Connectivity feature.
This application is displayed as an additional tab within the Central
Management Console (CMC) in BusinessObjects Enterprise. For more
information about the web application, see Working with BusinessObjects
Enterprise on page 99.
Requirements
To enable the Security Connectivity feature, your system must have the
following components already deployed:
ComponentLocation
BusinessObjects Enterprise CMSServer Side
•
One of the following BusinessObjects Enterprise components:
Client Side
12 BusinessObjects Enterprise XI 3.0 Integration for PeopleSoft
•
•
Crystal Reports
Java WCA
Welcome to the BusinessObjects XI Integration for PeopleSoft
What's New
ComponentLocation
Java WCAWeb Content
1
BusinessObjects Enterprise XI 3.0 Integration for PeopleSoft 13

Welcome to the BusinessObjects XI Integration for PeopleSoft
What's New
1
14 BusinessObjects Enterprise XI 3.0 Integration for PeopleSoft

Installing on PeopleSoft
Enterprise: PeopleTools
8.46 to 8.49
2

Installing on PeopleSoft Enterprise: PeopleTools 8.46 to 8.49
2
Overview
Overview
Crystal Reports is the program that you use to create and format Crystal
reports, and BusinessObjects Enterprise is the multi-tier system that allows
you to distribute these reports over the Web in a secure and managed
environment. The BusinessObjects XI Integration for PeopleSoft provides
components that enable you to combine the functionality of Crystal Reports
and BusinessObjects Enterprise to work with your PeopleSoft system.
This chapter provides information about installing the BusinessObjects XI
Integration for PeopleSoft on a PeopleSoft Enterprise (PeopleTools 8.46-8.49)
environment. For information about installing in other environments, see the
following chapters:
•
Installing on PeopleSoft Enterprise: PeopleTools 8.21-8.45 on page 23
•
Installing the PeopleSoft EPM Security Bridge on page 51
After you install the integration kit, you can begin to work with PeopleSoft
data in Crystal Reports and/or BusinessObjects Enterprise. For details, see
Working with Crystal Reports on page 95 and Working with BusinessObjects
Enterprise on page 99.
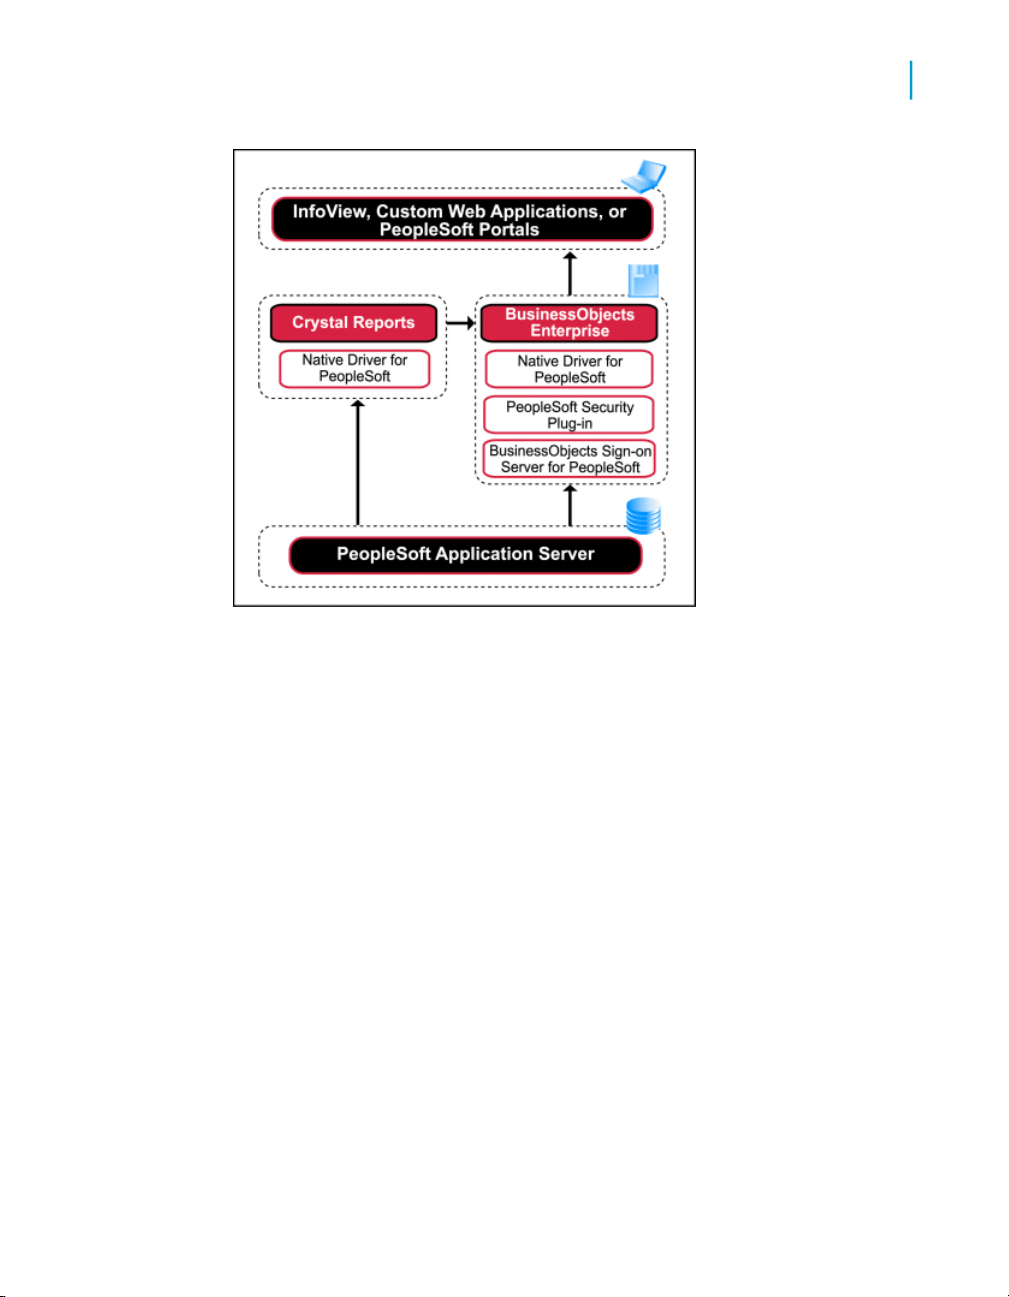
Component architecture
This section provides information about the components that are included
in the integration. It describes how they function within the framework of
Crystal Reports, BusinessObjects Enterprise, and your PeopleSoft system.
The following diagram illustrates how the components interact with each
other:
16 BusinessObjects Enterprise XI 3.0 Integration for PeopleSoft

Installing on PeopleSoft Enterprise: PeopleTools 8.46 to 8.49
Installation
2
Installation
This section provides step-by-step instructions for installing the features of
the BusinessObjects XI Integration for PeopleSoft. To install on UNIX, you
must perform the installation process on each UNIX machine that runs
BusinessObjects Enterprise.
You must have Crystal Reports,BusinessObjects Enterprise and PeopleTools
8.46-8.49 installed and correctly configured before you can install the
integration kit.
To install features on Windows
Before you begin, ensure that:
• The Central Management Server (CMS) is running.
• You know the credentials for the BusinessObjects Enterprise Administrator
account. You will be prompted for the Administrator logon credentials for
the CMS machine.
BusinessObjects Enterprise XI 3.0 Integration for PeopleSoft 17

Installing on PeopleSoft Enterprise: PeopleTools 8.46 to 8.49
2
Installation
1. From your BusinessObjects XI Integration for PeopleSoft product
distribution, run setup.exe.
The setup program begins.
2. Select the language in which you want to perform the installation, and
click OK.
The Welcome to BusinessObjects XI Integration for PeopleSoft dialog
box appears.
3. Click Next.
The License Agreement dialog box appears.
4. To continue the installation, you must accept the license agreement and
click Next.
The Destination Folder dialog box appears.
5. Specify the folder where you want the integration kit files to be installed,
and click Next.
The Choose Language Pack dialog box appears.
6. Choose the language pack you want to install and click Next.
The Functional Domain dialog box appears
7. Choose PeopleSoft 8.46-8.49 Environment and click Next.
The Target Computer dialog box appears.
8. Choose Server computer, Client computer, or Single Computer and click
Next.
• If only BusinessObjects Enterprise is installed, select the Server
computer type.
• If only Crystal Reports or Business View Manager or Publishing Wizard
is installed, select the Client computer type.
• If both BusinessObjects Enterprise and Crystal Reports or Business
View Manager or Publishing Wizard are installed, select the Single
Computer type.
The installation options are described in the following table.
18 BusinessObjects Enterprise XI 3.0 Integration for PeopleSoft
Client computer
Server computer
Installing on PeopleSoft Enterprise: PeopleTools 8.46 to 8.49
Installation
Installs these componentsThis option …
• Database driver so Crystal Reports users can
create reports off PeopleSoft data sources
• Security plug-in (client side components only)
so Crystal Reports users can log on to BusinessObjects Enterprise and save reports using
PeopleSoft credentials
•
Database driver so BusinessObjects Enterprise users can view and schedule reports
that are created off PeopleSoft data source
•
Security plug-in so PeopleSoft users can
leverage their PeopleSoft credentials to log
on to BusinessObjects Enterprise
• Integration files, which get deployed manually
to PeopleSoft by PeopleSoft administrators,
and are used by the database driver, and the
security plug-in components.
2
Single computer
The BusinessObjects Central Management Server dialog box appears
9. Specify your login information and click Next.
The AutoDeploy web applications dialog box appears
10. Select a deployment option and click Next.
The "Application Installation" dialog box appears.
Note: If you selected Auto deploy, the "Configure Web Application
Server" dialog box appears. Type a valid password and click Enter, and
the "Application Installation" dialog box appears.
11. Click Next to continue the installation.
BusinessObjects Enterprise XI 3.0 Integration for PeopleSoft 19
• All of the above

Installing on PeopleSoft Enterprise: PeopleTools 8.46 to 8.49
2
Installation
To install features on Unix
Before you begin, ensure that:
• The Central Management Server (CMS) is running.
• You know the credentials for the BusinessObjects Enterprise Administrator
account. You will be prompted for the Administrator logon credentials on
the CMS machine.
1. In your BusinessObjects XI Integration for PeopleSoft product distribution,
go to the appropriate directory for your platform:
• Solaris
• AIX
• HP-UX
• Linux
2. Type ./install.sh, and press Enter.
3. To continue the installation, you must accept the license agreement. Use
the D and U keys to scroll down or up, or press the Y key to accept the
agreement.
4. In the next screen, specify the folder where BusinessObjects Enterprise
is installed (for example, type /home/user/install/bobje), and press
Enter.
The integration kit files are installed in the peoplesoft subfolder in the
location that you specify.
5. Use the arrow keys to select the language in which you want to perform
the installation, and press Enter.
6. In the screen that follows, select 1 - PeopleSoft Enterprise for
PeopleTools versions 8.46-8.49 environment, and press Enter.
7. The next screen provides a summary and asks you whether or not you
want to proceed with the installation. Press Enter to install the integration
kit.
You have successfully installed the BusinessObjects XI Integration for
PeopleSoft. You can now work with PeopleSoft data in BusinessObjects
Enterprise. For details, see Working with BusinessObjects Enterprise on
page 99.
20 BusinessObjects Enterprise XI 3.0 Integration for PeopleSoft

Multiple systems
After you install the BusinessObjects XI Integration for PeopleSoft, you can
work with data from multiple PeopleSoft systems.
In Crystal Reports, you can use queries from any PeopleSoft Enterprise
(PeopleTools 8.46-8.49) system as data sources. In BusinessObjects
Enterprise, you can enable authentication for all of the PeopleSoft Enterprise
(PeopleTools 8.46-8.49) systems that you want to allow users to access.
If you want to work with data from PeopleSoft systems other than PeopleSoft
Enterprise (PeopleTools 8.46-8.49) environments (for example, you must
perform the installation for the appropriate system(s). For details, see
Installing on PeopleSoft Enterprise: PeopleTools 8.21-8.45 on page 23
Installing on PeopleSoft Enterprise: PeopleTools 8.46 to 8.49
Multiple systems
2
BusinessObjects Enterprise XI 3.0 Integration for PeopleSoft 21

Installing on PeopleSoft Enterprise: PeopleTools 8.46 to 8.49
Multiple systems
2
22 BusinessObjects Enterprise XI 3.0 Integration for PeopleSoft

Installing on PeopleSoft
Enterprise: PeopleTools
8.21-8.45
3

Installing on PeopleSoft Enterprise: PeopleTools 8.21-8.45
3
Overview
Overview
Crystal Reports is the program that you use to create and format Crystal
reports, and BusinessObjects Enterprise is the multi-tier system that allows
you to distribute these reports over the Web in a secure and managed
environment. The BusinessObjects XI Integration for PeopleSoft provides
components that enable you to combine the functionality of Crystal Reports
and BusinessObjects Enterprise to work with your PeopleSoft system.
This chapter provides information about installing the BusinessObjects XI
Integration for PeopleSoft on a PeopleSoft Enterprise (PeopleTools 8.21-8.45)
environment. For information about installing the integration kit in other
environments, see the following chapters:
•
Installing on PeopleSoft Enterprise: PeopleTools 8.46 to 8.49 on page 15
•
Installing the PeopleSoft EPM Security Bridge on page 51
After you install the integration kit, you can begin to work with PeopleSoft
data in Crystal Reports and/or BusinessObjects Enterprise. For details, see
Working with Crystal Reports on page 95 and Working with BusinessObjects
Enterprise on page 99.
Component architecture
This section provides information about the components that are included
in the integration kit. It describes how they function within the framework of
Crystal Reports, BusinessObjects Enterprise, and your PeopleSoft system.
The following diagram illustrates how the components interact with each
other:
24 BusinessObjects Enterprise XI 3.0 Integration for PeopleSoft
Installing on PeopleSoft Enterprise: PeopleTools 8.21-8.45
Component architecture
3
Features
On a PeopleSoft Enterprise (PeopleTools 8.21-8.45) environment, the
BusinessObjects XI Integration for PeopleSoft installs three features: Data
Connectivity, Security Connectivity, and the PeopleSoft Application Server
feature.
Data Connectivity
The Data Connectivity feature of the integration kit includes the Native Driver
for PeopleSoft, a Unicode-compliant driver that allows you to report off
PeopleSoft data.
The driver allows you to connect to PeopleSoft queries from within Crystal
Reports. It also enables BusinessObjects Enterprise to run reports against
data from your PeopleSoft system. The driver honors any query-level and
row-level security that has been defined for the queries and supports features
such as parameters and translation tables.
BusinessObjects Enterprise XI 3.0 Integration for PeopleSoft 25

Installing on PeopleSoft Enterprise: PeopleTools 8.21-8.45
3
Component architecture
Requirements
To enable the Data Connectivity feature, your system must have the following
components already deployed:
Server Side
ComponentLocation
•
One of the following BusinessObjects Enterprise servers:
•
Crystal Reports Processing
Server
•
Job Server
•
Report Application Server
•
LOV Job Server
•
Java Runtime Environment (JRE)
or Java SDK (J2SE) 1.4 or above
•
One of the following components:
• Crystal Reports Business View
Client Side
• Crystal Reports Publishing
•
Java Runtime Environment (JRE)
or Java SDK (J2SE) 1.4 or above
Security Connectivity
The Security Connectivity feature of the BusinessObjects XI Integration for
PeopleSoft includes the PeopleSoft Security Plug-in and the BusinessObjects
Sign-on Server for PeopleSoft. Together, these components allow PeopleSoft
users to use their PeopleSoft credentials to log on to BusinessObjects
Enterprise.
26 BusinessObjects Enterprise XI 3.0 Integration for PeopleSoft
Manager
Wizard

Installing on PeopleSoft Enterprise: PeopleTools 8.21-8.45
Component architecture
The PeopleSoft security plug-in and the BusinessObjects Sign-on Server for
PeopleSoft offer several benefits:
• They allow the BusinessObjects Enterprise Central Management Server
(CMS) to verify user credentials against a PeopleSoft system.
• They enable you to map PeopleSoft roles to groups in BusinessObjects
Enterprise.
• They allow you to assign rights to users and groups in a consistent manner
within BusinessObjects Enterprise.
Along with the two components, the integration provides a web application
that you can use to configure the settings of the Security Connectivity feature.
This application is displayed as an additional web page within the Central
Management Console (CMC) in BusinessObjects Enterprise. For more
information about the web application, see Working with BusinessObjects
Enterprise on page 99.
Requirements
To enable the Security Connectivity feature, your system must have the
following components already deployed:
3
Server Side
Client Side
ComponentLocation
•
BusinessObjects Enterprise CMS
•
Java Runtime Environment (JRE)
or Java SDK (J2SE) 1.4 or above
•
Crystal Reports
•
Java Runtime Environment (JRE)
or Java SDK (J2SE) 1.4 or above
Java web app.Web Content
BusinessObjects Enterprise XI 3.0 Integration for PeopleSoft 27

Installing on PeopleSoft Enterprise: PeopleTools 8.21-8.45
3
Installation
PeopleSoft Application Server feature
The PeopleSoft Application Server feature of the BusinessObjects XI
Integration for PeopleSoft is available only if you choose to install the
integration kit on a PeopleSoft Enterprise (PeopleTools 8.21-8.45)
environment. The integration kit requires the installation of this feature on all
of the PeopleSoft Application Servers in your deployment.
Requirements
To enable the PeopleSoft Application Server feature, your system must have
the following components already deployed:
ComponentLocation
Server Side
Installation
This section provides step-by-step instructions for installing the features of
the BusinessObjects XI Integration for PeopleSoft. You must complete the
following tasks in order:
• Create Component Interfaces in your PeopleSoft system.
For details, see Creating the Component Interfaces on page 29.
• Secure the Component Interfaces.
For details, see Securing the Component Interfaces on page 33.
• Install the features of the integration kit.
For details, see Installing features on Unix on page 37.
• Provide access to required PeopleSoft files.
For details, see Enabling access to required PeopleSoft files on page 41.
One or more PeopleSoft Application
Servers
28 BusinessObjects Enterprise XI 3.0 Integration for PeopleSoft

Installing on PeopleSoft Enterprise: PeopleTools 8.21-8.45
For a complete list of system requirements, consult the supported platforms
file, available on the Business Objects support website. Typically, however,
you must have Crystal Reports, BusinessObjects Enterprise, PeopleTools
8.21-8.45, and the Java Runtime Environment (JRE) or Java SDK (J2SE)
1.4 or higher (available for download at http://java.sun.com/) installed and
correctly configured before you can install the integration kit.
Creating the Component Interfaces
Both the Data Connectivity feature and the Security Connectivity feature of
the integration kit communicate with PeopleSoft through Component
Interfaces. In the PeopleTools Application Designer, you must create a new
project and three Component Interfaces.
Note: The procedures that are described in this section require a high level
of familiarity with administrative tasks in PeopleSoft and the PeopleTools
Application Designer. For more information about the PeopleTools Application
Designer, consult your PeopleSoft documentation.
Installation
3
Setting up a new project
You must set up a new project to be the location of the Component Interfaces.
To set up the project
1. Open the PeopleTools Application Designer in two-tier mode, and connect
to PeopleSoft with administration privileges.
2. Create a new project, and save it as CRYSTAL_SK.
CRYSTAL_SK appears in the Project Workspace.
Creating Component Interfaces
You must create three new Component Interfaces and save them in the
CRYSTAL_SK project
To create the Component Interfaces
1. In the CRYSTAL_SK project, click File > New > Select Component
Interface, and then click OK.
2. Choose USERMAINT as a source Component, and then click Select.
BusinessObjects Enterprise XI 3.0 Integration for PeopleSoft 29

Installing on PeopleSoft Enterprise: PeopleTools 8.21-8.45
3
Installation
3. When you are prompted for default properties, click Yes.
4. Save the Component Interface as CRYSTAL_QRY_ACCESS_CI.
5. On the Insert menu, click Current Object into Project.
CRYSTAL_QRY_ACCESS_CI appears as a branch under the
CRYSTAL_SK tree in the Project Workspace.
6. On the File menu, click Object Properties.
7. Click the Standard Methods tab, and ensure that only the Get option is
selected.
8. Click OK, and save your changes.
9. In the Object Workspace, ensure that the groups, collections, keys,
properties, and methods that are shown in the table below appear in the
CRYSTAL_QRY_ACCESS_CI tree:
Collection/Property/Key/MethodGroup
OPRIDGETKEYS
OPRIDPROPERTIES
GETMETHODS
10. Delete any of the items that are not listed in the table.
Note: In PeopleTools 8.4x, some items cannot be deleted.
11. Right-click each item, and select Toggle Read Only Access to set Read
Only access for all of the collections, keys, properties, and methods that
remain in the Object Workspace.
When an item is set to Read Only access, a Y appears next to it in the
Read Only column.
12. Save your changes.
13. Repeat steps 1 through 12 with the following modifications to create the
CRYSTAL_SSO_ROLE_CI Component Interface:
30 BusinessObjects Enterprise XI 3.0 Integration for PeopleSoft

Installing on PeopleSoft Enterprise: PeopleTools 8.21-8.45
Source Component: ROLEMAINT•
• Save as: CRYSTAL_SSO_ROLE_CI
• Standard Methods: Find, Get
• Object Workspace values:
Collection/Property/Key/MethodGroup
ROLENAMEGETKEYS
ROLENAMEFINDKEYS
DESCRPROPERTIES
Installation
ROLEUSERPSROLEMEMBER
3
PSROLEDYNMEM
BER
FINDMETHODS
GET
Note: In PeopleTools 8.4x, select PSROLEMEMBER and
PSROLEDYNMEMBER in the list to the left of the Objects Workspace,
and drag them to the main area.
14. Repeat steps 1 through 12 with the following modifications to create the
CRYSTAL_SSO_USER_CI Component Interface:
• Source Component: USERMAINT
• Save as: CRYSTAL_SSO_USER_CI
BusinessObjects Enterprise XI 3.0 Integration for PeopleSoft 31
ROLEUSER

Installing on PeopleSoft Enterprise: PeopleTools 8.21-8.45
3
Installation
• Standard Methods: Find, Get
• Object Workspace values:
Collection/Property/Key/MethodGroup
OPRIDGETKEYS
OPRIDFINDKEYS
OPRIDPROPERTIES
OPRDEFNDESC
ROLENAMEPSROLEUSER_VW
FINDMETHODS
GET
Note: In PeopleTools 8.4x, select OPRDEFNDESC in the list to the left
of the Objects Workspace, and drag it to the main area.
Adding PeopleCode
To complete the configuration of the Component Interfaces, you must add
PeopleCode to CRYSTAL_QRY_ACCESS_CI and
CRYSTAL_SSO_USER_CI. The PeopleCode that you need to add is provided
in text files, which are located in the integration files folder.
32 BusinessObjects Enterprise XI 3.0 Integration for PeopleSoft
DYNAMIC_SW

• On Windows: BusinessObjects 12.0 Integration Kit for PeopleSoft\ps8\in
tegration files
• On Unix: bobje/enterprise120/platform/peoplesoft/12.0/ps8/in
tegration files
Note: The PeopleCode that is included in this version of the integration kit
is different from that of previous versions. If you have previously installed
other versions of the integration kit, you must update the PeopleCode.
To add PeopleCode
1. In the PeopleTools Application Designer, open the CRYSTAL_QRY_AC
CESS_CI and CRYSTAL_SSO_USER_CI Component Interfaces.
2. On the View menu, click View PeopleCode.
3. From your desktop, go to the integration files folder, and open the text
file that corresponds to the Component Interface to which you are adding
PeopleCode:
• CRYSTAL_QRY_ACCESS_CI.txt
• CRYSTAL_SSO_USER_CI.txt
Installing on PeopleSoft Enterprise: PeopleTools 8.21-8.45
Installation
3
4. Copy the code, and paste it in the PeopleTools Application Designer.
5. Save your changes.
Securing the Component Interfaces
You must secure the Component Interfaces to set restrictions on the users
who can access data through the integration. To set security for the
Component Interfaces, you must create two new Permission Lists in
PeopleSoft:
• CD_PSQRY (for the Native Driver for PeopleSoft)
• CD_SSO (for the BusinessObjects Sign-on Server for PeopleSoft)
Afterwards, you must assign the Component Interfaces to the corresponding
Permission Lists that you made.
BusinessObjects Enterprise XI 3.0 Integration for PeopleSoft 33

Installing on PeopleSoft Enterprise: PeopleTools 8.21-8.45
3
Installation
To secure the Component Interfaces
1. From your web browser, log on with administrative rights to the PeopleSoft
Internet Architecture.
2. Go to the Permission Lists area.
Note: The navigation path varies depending on the PeopleSoft system
that you use:
• In PeopleSoft 8.2x, click PeopleTools > Maintain Security > Use >
Permission Lists.
• In PeopleSoft 8.4x, click PeopleTools > Security > Permissions &
Roles > Permission Lists.
3. Click Add a New Value.
4. In the Permission List field, type CD_PSQRY, and then click Add.
5. In the Description field, type Native Driver for PeopleSoft.
6. On the navigation bar at the bottom of the page, click Component
Interface.
7. In the Name field, type CRYSTAL_QRY_ACCESS_CI, and then click Edit.
The Component Interface Permissions area appears.
8. Click Full Access (All) to give the Permission List full access, and then
click OK.
9. Save your changes.
10. Repeat steps 1 through 9 with the following modifications to create the
CD_SSO Permission List.
• Permission List field: CD_SSO
• Description field: BusinessObjects Sign-on Server for People
Soft
• Name field: CRYSTAL_SSO_ROLE_CI
• Component Interface Permissions area: Full Access (ALL)
11. Click OK.
12. Click the + button to add the CRYSTAL_SSO_USER_CI Component Interface
to the CD_SSO Permission List.
13. In the Name field, type CRYSTAL_SSO_USER_CI, and then click Edit.
34 BusinessObjects Enterprise XI 3.0 Integration for PeopleSoft

Installing on PeopleSoft Enterprise: PeopleTools 8.21-8.45
14. Click Full Access (All) to give the Permission List full access, and then
click OK.
15. Save your changes.
You now have two Permission Lists that enable PeopleSoft authentication.
Note:
• You must create a dedicated PeopleSoft user account to which you can
assign the CD_SSO permission list (through a role). This account must
be used only by the BusinessObjects Sign-on Server for PeopleSoft and
must not be used to run reports.
• Before users can build or run reports that are based on PeopleSoft
queries, they must have the CD_PSQRY permission list assigned to them
(through a role).
For information about creating users and roles, see your PeopleSoft
documentation.
Installing BusinessObjects Enterprise XI 3.0 Integration for PeopleSoft
Installation
3
After you create and secure the Component Interfaces in your PeopleSoft
system, you can install features of the BusinessObjects XI Integration for
PeopleSoft.
To install the features of the integration on Windows
Before you begin, ensure that:
• The Central Management Server (CMS) is running.
• You know the credentials for the BusinessObjects Enterprise Administrator
account. You will be prompted for the Administrator logon credentials on
the CMS machine.
1. From your BusinessObjects XI Integration for PeopleSoft product
distribution, run setup.exe.
The setup program begins.
2. Select the language in which you want to perform the installation, and
click OK.
BusinessObjects Enterprise XI 3.0 Integration for PeopleSoft 35

Installing on PeopleSoft Enterprise: PeopleTools 8.21-8.45
3
Installation
The Welcome to BusinessObjects XI Integration for PeopleSoft dialog
box appears.
3. Click Next.
The License Agreement dialog box appears.
4. To continue the installation, you must accept the license agreement and
click Next.
The Destination Folder dialog box appears.
5. Specify the folder where you want the integration kit files to be installed,
and click Next.
The Choose Language Pack dialog box appears.
6. Choose the language pack you want to install and click Next.
The Functional Domain dialog box appears
7. Select PeopleTools 8.21-8.45 environment, and click Next.
The Target Computer dialog box appears.
8. Choose Server computer, Client computer, or Single Computer and click
Next.
If only BusinessObjects Enterprise is installed, select the Server computer
type:
• If only Crystal Reports or Business View Manager or Publishing Wizard
is installed, select the Client computer type.
• If both BusinessObjects Enterprise and Crystal Reports or Business
View Manager or Publishing Wizard are installed, select the Single
computer type.
The installation options are described in the following table.
Installs these componentsThis option …
• Database driver so Crystal Reports users can
create reports off PeopleSoft data sources
Client computer
36 BusinessObjects Enterprise XI 3.0 Integration for PeopleSoft
• Security plug-in (client side components only)
so Crystal Reports users can log on to BusinessObjects Enterprise and save reports using
PeopleSoft credentials

Server computer (BusinessObjects Enterprise
Servers)
Server computer (PeopleSoft Application
Servers)
Installing on PeopleSoft Enterprise: PeopleTools 8.21-8.45
Installation
Installs these componentsThis option …
• Database driver so BusinessObjects Enter-
prise users can view and schedule reports that
are created off PeopleSoft data source
• Security plug-in so PeopleSoft users can
leverage their PeopleSoft credentials to log on
to BusinessObjects Enterprise
•
BusinessObjects Enterprise Java SDK,
which is used by the database driver to
convey data from PeopleSoft to Crystal Reports and/or BusinessObjects Enterprise
3
Single computer
The BusinessObjects Central Management Server dialog box appears
9. Specify your login information and click Next.
The AutoDeploy web applications dialog box appears
10. Select a deployment option and click Next.
The Application Installation dialog box appears.
11. Click Next and then click Finish to complete the installation.
• All of the above
Installing features on Unix
After you create and secure the Component Interfaces in your PeopleSoft
system, you can install the BusinessObjects XI Integration for PeopleSoft.
To install the integration kit on UNIX, you must perform the installation process
on each UNIX machine that runs BusinessObjects Enterprise.
Tip: Before you begin the installation, locate the libjvm file (and the libjava
file, if your system runs on an AIX, HPUX, or Linux platform). These files are
included in the JRE/Java SDK that must be installed on your system for the
integration to work.
BusinessObjects Enterprise XI 3.0 Integration for PeopleSoft 37

Installing on PeopleSoft Enterprise: PeopleTools 8.21-8.45
3
Installation
To install features on Unix
Before you begin, ensure that:
• The Central Management Server (CMS) is running.
• You know the credentials for the BusinessObjects Enterprise Administrator
account. You will be prompted for the Administrator logon credentials on
the CMS machine.
1. In your BusinessObjects XI Integration for PeopleSoft product distribution,
go to the appropriate directory for your platform:
• Solaris
• AIX
• HP-UX
• Linux
2. Type ./install.sh, and press Enter.
3. Use the arrow keys to select the language in which you want to perform
the installation, and press Enter.
4. In the screen that follows, select 2- PeopleSoft Enterprise for
PeopleTools versions 8.21-8.45 environment, and press Enter.
5. To continue the installation, you must accept the license agreement. Use
the D and U keys to scroll down or up, or press the Y key to accept the
agreement.
6. In the next screen, specify the folder where BusinessObjects Enterprise
is installed (for example, type /home/user/install/bobje), and press
Enter.
The integration kit files are installed in the peoplesoft subfolder in the
location that you specify.
7. In the next screen, specify the full path to the directory where the libjvm
file is installed, and press Enter.
Note:
• The libjvm file is included in the Java Runtime Environment or Java
SDK, which must be installed on your system before you install the
integration kit.
38 BusinessObjects Enterprise XI 3.0 Integration for PeopleSoft

Installing on PeopleSoft Enterprise: PeopleTools 8.21-8.45
Installation
• You must specify the path to the directory of the libjvm file, not the full
path to the file.
8. If you are installing the integration kit on AIX, HPUX, or Linux, you are
also prompted to specify the full path to the directory where the libjava
file is installed. Type the path to the directory, and press Enter.
• The libjava file is included in the Java Runtime Environment or Java
SDK, which must be installed on your system before you install the
integration.
• You must specify the path to the directory of the libjava file, not the
full path to the file.
9. In the next screen, specify a local folder, a mapped folder, or a network
UNC folder to be the location of the JAR modules, and press Enter.
The JAR modules are files in the PeopleSoft system that users need to
be able to access. As the administrator, you must decide how you want
to enable individual users to access them: for example, you can place
copies of the files locally on individual workstations, or you can place
them in a shared network directory that all Crystal Reports users and
BusinessObjects Enterprise servers can access. The folder that you
specify in this dialog box is the location where the files will be accessed.
3
Note:
• In this step, you only specify a location for the files; you add the files
to the location after the installation. For details, see Enabling access
to required PeopleSoft files on page 41.
• If you have a large user group, or if you run multiple PeopleSoft
systems, the recommended setup is to place the files in a shared
network directory. If you choose to do so, you must ensure that the
following servers operate on a network account that has permission
to access to the files from the location that you specify:
• BusinessObjects XI Sign-on Server for PeopleSoft
• BusinessObjects Enterprise CMS
• List of Values Job Server
• Report Application Server
• Crystal Reports Processing Server
• Crystal Reports Job Server
BusinessObjects Enterprise XI 3.0 Integration for PeopleSoft 39

Installing on PeopleSoft Enterprise: PeopleTools 8.21-8.45
3
Installation
For information about the PeopleSoft JAR modules, see Enabling access
to required PeopleSoft files on page 41.
10. In the next screen, provide the following information:
Tip: Press the Tab key to move to the next option.
• The machine name or IP address of the PeopleSoft Application Server
JSL server that you want to use to authenticate users against
PeopleSoft security.
• The JSL port number that the PeopleSoft Application Server JSL
Server uses for the Jolt listener
Note: This value can be found in the PeopleSoft Application Server
configuration file (psappsrv.cfg) under the Jolt listener section. By
default, this value is 9000.
• Your PeopleSoft Application Server JSL server admin logon username
and password for the BusinessObjects Sign-on Server for PeopleSoft
to use to authenticate users against PeopleSoft security.
Note: You must specify a dedicated PeopleSoft user account to which
you assign appropriate PeopleSoft security rights. For details, see
Securing the Component Interfaces on page 33.
• A free port number for the BusinessObjects Enterprise Sign-on Server
on the machine on which you are currently running the installation.
Note: By default, the BusinessObjects Sign-on Server for PeopleSoft
uses port 8446 to communicate with BusinessObjects Enterprise.
11. Press Enter.
12. The next screen provides a summary and prompts you whether or not
you want to proceed with the installation. Press Enter to install the
integration kit.
13. After the installation is complete, type ./ccm.sh -start pssso to start
the BusinessObjects XI Sign-on Server for PeopleSoft.
After you run the installation, you must manually deploy the PeopleSoft
Application Server feature. For details, see Deploying the PeopleSoft
Application Server feature on page 41.
40 BusinessObjects Enterprise XI 3.0 Integration for PeopleSoft

Installing on PeopleSoft Enterprise: PeopleTools 8.21-8.45
Installation
Deploying the PeopleSoft Application Server feature
The BusinessObjects XI Integration for PeopleSoft requires the installation
of the PeopleSoft Application Server feature on one or more PeopleSoft
Application Servers.
To deploy the PeopleSoft Application Server feature
1. Locate the psqrycb.jar and ebus405.jar files.
Note: These files were added to the
/bobje/peoplesoft/12.0/java/applications folder by the setup program.
2. For UNIX,copy the two files to the class directory of your PeopleSoft
Application Server ($PSHOME/class).
You have successfully installed the features of the BusinessObjects XI
Integration for PeopleSoft. You must now enable access to required
PeopleSoft files. For details, see Enabling access to required PeopleSoft
files on page 41.
3
Enabling access to required PeopleSoft files
After you install the BusinessObjects XI Integration for PeopleSoft, you must
enable access to the following files, which are located in your PeopleSoft
system:
• peoplecode.jar
• psjoa.jar
• pstools.properties
To provide access to required PeopleSoft files
1. Ensure that the peoplecode.jar file is in the class directory of your
PeopleSoft file server.
The class directory is the default location of peoplecode.jar. If the file
is not in this location, you must search for it and move it to the class
BusinessObjects Enterprise XI 3.0 Integration for PeopleSoft 41

Installing on PeopleSoft Enterprise: PeopleTools 8.21-8.45
3
Installation
directory. For example, the final full path to this file may be
c:\psoft\hr830\class\peoplecode.jar on Windows, or
/psoft/hr830/class/peoplecode.jar on UNIX.
2. In your PeopleSoft system, locate the two remaining files that are required:
• psjoa.jar
The default location of this file is the ...\web\psjoa on Windows, or
.../web/psjoa directory on UNIX. For example, the full path to that
file may be c:\psoft\hr830\web\psjoa\psjoa.jar (Windows) or
/psoft/hr830/class/peoplecode.jar (UNIX).
• pstools.properties
The default location of this file varies depending on the PeopleSoft
system that you use. The default location is either your PeopleSoft
file server or your PeopleSoft web server.
3. Copy psjoa.jar and pstools.properties to the appropriate locations
in the jadir folder structure.
Note: The jardir folder is located in the folder that you specified during
the integration kit installation as the location for the PeopleSoft JAR
modules. (For details, see Step 8 of Installing BusinessObjects Enterprise
XI 3.0 Integration for PeopleSoft on page 35. For details, see Step 9 of
Installing features on Unix on page 37.)
• psjoa.jar
Place this file in the
...\jardir\default\peoplesoft.../jardir/default/peoplesoft folder.
• pstools.properties
Place this file in the ...\jardir\default\peoplesoft (for Windows)
or .../jardir/default/peoplesoft (for UNIX) folder.
4. In the ...\jardir\default (Windows) .../jardir/default (UNIX)
folder, open the pstools.properties file.
5.
Locate the string tuxedo_receive_timeout=number, where number is
a default numeric value.
Reports that are based on long-running queries may encounter timeout
issues. Timeout issues can be avoided by updating the value of the
tuxedo_receive_timeout property. The tuxedo_receive_timeout property
42 BusinessObjects Enterprise XI 3.0 Integration for PeopleSoft

Installing on PeopleSoft Enterprise: PeopleTools 8.21-8.45
Multiple systems
indicates the maximum number of seconds that a PeopleSoft Jolt client
waits for a response from a PeopleSoft Application Server.
6.
Replace the number value with 3600 or any other value that is appropriate
for your configuration, and save your changes.
Note: The number value that you enter is in seconds.
7. Set permissions on the top-level network folder to ensure the following
configuration:
• The network accounts of all Crystal Reports users have permission
to access all the JAR files.
• The network account under which the following servers run provides
the servers with permission to access all the JAR files:
• BusinessObjects XI Sign-on Server for PeopleSoft
• BusinessObjects Enterprise CMS
• List of Values Job Server
• Report Application Server
3
• Crystal Report Processing Server
• Crystal Report Job Server
You have successfully installed the BusinessObjects XI Integration for
PeopleSoft. You can now work with PeopleSoft data in Crystal Reports and/or
BusinessObjects Enterprise. For details, see Working with Crystal Reports
on page 95 and Working with BusinessObjects Enterprise on page 99.
Multiple systems
After you install the BusinessObjects XI Integration for PeopleSoft, you can
work with data from multiple PeopleSoft systems.
In Crystal Reports, you can use queries from any PeopleSoft Enterprise
(PeopleTools 8.21-8.45) system as data sources. In BusinessObjects
Enterprise, you can enable authentication for all of the PeopleSoft Enterprise
(PeopleTools 8.21-8.45) systems that you want to allow users to access.
If you want to work with data from PeopleSoft systems other than PeopleSoft
Enterprise (PeopleTools 8.21-8.45) environments (for example, you also
BusinessObjects Enterprise XI 3.0 Integration for PeopleSoft 43

Installing on PeopleSoft Enterprise: PeopleTools 8.21-8.45
3
Multiple systems
want to enable connection to a PeopleSoft Enterprise for a PeopleTools
8.46-8.49 system), you must perform the installation for the appropriate
system(s). For details, see Installing on PeopleSoft Enterprise: PeopleTools
8.46 to 8.49 on page 15.
To enable your current installation to work with multiple PeopleSoft systems,
you must do the following tasks for every additional PeopleSoft system that
you want to allow users to access in BusinessObjects Enterprise:
• Duplicate and rename the default folder structure.
• Create a new instance of the BusinessObjects Sign-on Server for
PeopleSoft.
Duplicating and renaming the default folder structure
When you installed the integration kit, you were asked to specify a path to
a source folder for the PeopleSoft JAR modules. (For details, see Step 8 of
Installing BusinessObjects Enterprise XI 3.0 Integration for PeopleSoft on
page 35. For details, see Step 10 of Installing features on Unix on page 37.)
In this location, the setup program creates a folder named "default", which
contains a structure of subfolders.
If, during the installation, you chose to set up a network access to the required
PeopleSoft files, you do not need to duplicate and rename the folder structure.
To work with multiple PeopleSoft systems, you only need to install multiple
instances of the BusinessObjects Sign-on Server for PeopleSoft. (For details,
see Installing multiple instances of the BusinessObjects Sign-on Server for
PeopleSoft on page 45.)
However, if you chose to store the files locally, then you must duplicate and
rename the "default" folder for each PeopleSoft system that you want to
access.
To duplicate and rename the default folder structure
1. Navigate to the location that you specified as the source for the PeopleSoft
JAR modules during the installation of the integration.
2. Create a copy of the default folder in the same directory as the original
default folder.
44 BusinessObjects Enterprise XI 3.0 Integration for PeopleSoft

Installing on PeopleSoft Enterprise: PeopleTools 8.21-8.45
Multiple systems
Repeat this step until you have one copy of the default folder for each
PeopleSoft system that you want to access.
3.
Rename each folder. Use the format psappserver_port, where
psappserver is the machine name (or IP address) of a PeopleSoft
Application Server that you want to access, and port is the JSL port
number that the server uses for the Jolt listener.
For example, if you also want to access a PeopleSoft HR 8.3 system on
a server named PSFT83, which uses JSL port 9000, then name the
corresponding folder PSFT83_9000
Note:
• When you rename the folders, you must be consistent with the
information that you specified during the installation of the integration
kit. If you used the machine name of the PeopleSoft Application Server
during the installation (Step 12 in Installing BusinessObjects Enterprise
XI 3.0 Integration for PeopleSoft on page 35)(Step 11 in Installing
features on Unix on page 37), then you must use the machine name
as the psappserver value for the folder name. Similarly, if you used
the IP address during the installation, then you must use the IP address
as the psappserver value for the folder name.
• psappserver and port correspond to the information that Crystal
Reports users must enter to access the PeopleSoft queries in Crystal
Reports. See Working with Crystal Reports on page 95.
• If a machine requires the fully qualified machine name to access the
PeopleSoft application server, rename the copy of the default folder
to FullyQualifiedMachineName_port.
3
Once you have duplicated the default folder and renamed the copies, you
must copy the required PeopleSoft files from your PeopleSoft system into
the corresponding folders that you created. (For information about the
required PeopleSoft files, see Enabling access to required PeopleSoft files
on page 41.)
Installing multiple instances of the BusinessObjects Sign-on Server for PeopleSoft
Each PeopleSoft system that you run requires its own instance of the
BusinessObjects Sign-on Server for PeopleSoft. You must use the command
BusinessObjects Enterprise XI 3.0 Integration for PeopleSoft 45

Installing on PeopleSoft Enterprise: PeopleTools 8.21-8.45
3
Multiple systems
line to set up and install multiple instances of the server. For information
about command-line options, see Command Line Options on page 117.
To create a new instance of the sign-on server on Windows
1. At the command line, go to the folder where the BusinessObjects Sign-on
Server for PeopleSoft executable (crpsssoserver) is installed.
If the server is installed in its default location, run the following command:
cd "C:\Program Files\Business Objects\BusinessObjects Enterprise
12.0\win32_x86"
2. Execute the following setup command:
crpsssoserver -setup -name newSSOname -port portnumber -domain
newdomainname -psaddr //psappserver:port -psuser psusername -pspass
pspassword -log "C:\Program Files\Business Objects\BusinessObjects
12.0 Integration Kit for PeopleSoft\ps8\log\newSSOname.log"
Note:
• newSSOname is the name of the new BusinessObjects Sign-on Server
for PeopleSoft.
• portnumber is the port number to be used by the new BusinessObjects
Sign-on Server for PeopleSoft.
Each instance of the BusinessObjects Sign-on Server for PeopleSoft
requires its own port.
Note: newdomainname is the new domain name.
This domain name must correspond with the PeopleSoft system name
for which you are setting up the new instance of the BusinessObjects
Sign-on Server for PeopleSoft.
Note:
• //psappserver:port is the machine name (or IP address) of the
PeopleSoft Application Server, followed by the JSL port number that
this server is using for the Jolt listener. Be consistent throughout the
installation and configuration of the integration kit; use either the
machine name or IP address.
• psusername is the PeopleSoft user name to be used by the
BusinessObjects Sign-on Server for PeopleSoft when authenticating
users against PeopleSoft security.
46 BusinessObjects Enterprise XI 3.0 Integration for PeopleSoft

Installing on PeopleSoft Enterprise: PeopleTools 8.21-8.45
• pspassword is the PeopleSoft password to be used by the
BusinessObjects Sign-on Server for PeopleSoft when authenticating
users against PeopleSoft security.
3.
Execute the following command, where newSSOname is the name of the
BusinessObjects Sign-on Server for PeopleSoft that you specified in step
2:
crpsssoserver -install -name newSSOname
Note: Executing this command creates a Windows service.
Each PeopleSoft system that you run requires its own instance of the
BusinessObjects Sign-on Server for PeopleSoft. On UNIX, you set up multiple
instances of the server by sourcing the required environment variables,
creating a new instance of the server, and adding the server's launch string
to the ccm.config file. Adding the launch string to this file allows you to start
and stop the server with the ccm.sh script. For more information about the
ccm.sh script, see the BusinessObjects Enterprise XI Administrator's Guide.
To create a new instance of the sign-on server on Unix
Multiple systems
3
1. From a Bash shell, execute the following command:
source /BOBJErootpath/setup/env.sh
Replace BOBJErootpath with the full path to the top-level bobje folder of
your BusinessObjects Enterprise installation.
2. Go to the folder where the BusinessObjects Sign-on Server for PeopleSoft
executable (crpsssoserver) is installed.
If the server is installed in its default location, run the following command:
cd /BOBJErootpath/bobje/enterprise120/platform
3. Execute the following setup command:
crpsssoserver -setup -name newSSOname -port portnumber -domain
newdomainname -psaddr //psappserver:port -psuser psusername -pspass
pspassword -log "/BOBJErootpath/bobje/enterprise120/platform/people
soft/12.0/ps8/log/newSSOname.log
Note:
• newSSOname is the name of the new BusinessObjects Sign-on Server
for PeopleSoft.
BusinessObjects Enterprise XI 3.0 Integration for PeopleSoft 47

Installing on PeopleSoft Enterprise: PeopleTools 8.21-8.45
3
Multiple systems
• portnumber is the port number to be used by the new BusinessObjects
Sign-on Server for PeopleSoft.
Each instance of the BusinessObjects Sign-on Server for PeopleSoft
requires its own port.
Note: newdomainname is the new domain name.
This domain name should correspond with the PeopleSoft system name
you are setting up the new BusinessObjects Sign-on Server for PeopleSoft
for.
Note:
• //psappserver:port is the machine name or IP address of the PeopleSoft
Application Server, followed by the JSL port number that this server
is using for the Jolt listener. Be consistent throughout the installation
and configuration of the integration kit; use either machine name or
IP address, not both.
• psusername is the PeopleSoft user name to be used by the
BusinessObjects Sign-on Server for PeopleSoft for authentication in
the PeopleSoft system.
• pspassword is the PeopleSoft password to be used by the
BusinessObjects Sign-on Server for PeopleSoft for authentication in
the PeopleSoft system.
• BOBJErootpath is the full path to the top-level bobje folder of your
BusinessObjects Enterprise installation.
To add the sign-on server to the ccm.sh script
1. Locate the ccm.config file in your top-level bobje folder.
2. Open ccm.config by using a text editor such as Notepad or vi.
3. In the file, note the following launch string and create a copy of it:
psssoLAUNCH="BOBJErootpath/bobje/enterprise120/plat
form/crpsssoserver" -pidFile "BOBJErootpath/bobje/serverpids/pssso.pid"'
4. Make the following modifications in the copy that you created of the launch
string:
•
Insert the -namenewSSOname command, where newSSOname is the
name that you assigned to the new instance of the BusinessObjects
Sign-on Server for PeopleSoft.
48 BusinessObjects Enterprise XI 3.0 Integration for PeopleSoft

Installing on PeopleSoft Enterprise: PeopleTools 8.21-8.45
Multiple systems
• Update the LAUNCH value to correspond with the instance of the
BusinessObjects Sign-on Server for PeopleSoft that you created.
For example, if your second BusinessObjects Sign-on Server for
PeopleSoft is called hrsso, your LAUNCH value is hrssoLAUNCH.
• Update the name of pidFile to correspond with the instance of the
BusinessObjects Sign-on Server for PeopleSoft that you created.
For example, if your second BusinessObjects Sign-on Server for
PeopleSoft is called hrsso, your PidFile name is hrsso.pid.
5. Save your changes to the ccm.config file.
Your installation of the BusinessObjects XI Integration for PeopleSoft is now
configured to work with multiple PeopleSoft systems.
3
BusinessObjects Enterprise XI 3.0 Integration for PeopleSoft 49

Installing on PeopleSoft Enterprise: PeopleTools 8.21-8.45
Multiple systems
3
50 BusinessObjects Enterprise XI 3.0 Integration for PeopleSoft

Installing the PeopleSoft EPM Security Bridge
4

Installing the PeopleSoft EPM Security Bridge
4
Overview
Overview
In a PeopleSoft Enterprise Performance Management (EPM) environment,
users perform ad hoc and query analysis against PeopleSoft data, which
can be accessed through Business Objects universes. To prevent users from
potentially viewing data that they are not authorized to view, the
BusinessObjects XI Integration for PeopleSoft provides a Security Bridge,
which allows administrators to apply row and column-level security to
universes based on security definitions that are created in PeopleSoft.
This chapter provides information about installing the Security Bridge. To
install the feature, see the following sections in this chapter:
•
Component architecture on page 52
•
Installation on page 54
After you install the feature, you can begin to import PeopleSoft security
settings to your universes. For details, see Working with the PeopleSoft EPM
Security Bridge on page 107.
Note: Universes for PeopleSoft EPM and sample reports are available from
PeopleSoft.
Component architecture
The following diagram illustrates how the Security Bridge interacts with the
components of your PeopleSoft EPM system and BusinessObjects Enterprise:
52 BusinessObjects Enterprise XI 3.0 Integration for PeopleSoft

Features
On a PeopleSoft EPM environment, the BusinessObjects XI Integration for
PeopleSoft installs the Security Bridge.
Security Bridge
The Security Bridge enables you to import the security settings that are
defined for dimension tables in PeopleSoft EPM to universes in
BusinessObjects Enterprise. As a result, PeopleSoft users who also work
with the universes are able to access only the PeopleSoft data that they are
authorized to view.
Requirements
To enable the Security Bridge feature, your system must have the following
components already deployed:
Installing the PeopleSoft EPM Security Bridge
Component architecture
4
Server Side
Client Side
ComponentLocation
BusinessObjects Enterprise Web Intelligence Report Server
One of the following BusinessObjects
Enterprise components:
•
Desktop Intelligence
•
Report Conversion Tool
•
Import Wizard
•
Web Intelligence Rich Client
•
Designer
BusinessObjects Enterprise XI 3.0 Integration for PeopleSoft 53

Installing the PeopleSoft EPM Security Bridge
4
Installation
Installation
This section provides step-by-step instructions for installing the Security
Bridge feature of the BusinessObjects XI Integration for PeopleSoft. To install
the feature on UNIX, you must perform the installation process on each UNIX
machine that runs BusinessObjects Enterprise.
For a complete list of system requirements, consult the supported platforms
file, which is available on the Business Objects support site www.busines
sobjects.com. Typically, however, you must have BusinessObjects Enterprise
and the PeopleSoft EPM installed and correctly configured before you can
install the integration kit.
To install the security bridge
1. From your BusinessObjects XI Integration for PeopleSoft product
distribution, run setup.exe.
The setup program begins.
2. Select the language in which you want to perform the installation, and
click OK.
The Welcome to BusinessObjects XI Integration for PeopleSoft dialog
box appears.
3. Click Next.
4. To continue the installation, you must accept the license agreement and
click Next.
The Destination screeb appears.
5. Specify the folder where you want the integration kit files to be installed,
and click Next.
The Language Pack screen appears.
6. Select any language packs you want to have available in the system, and
click Next.
The Select Functional Domain dialog box appears.
7. Select PeopleSoft EPM environment, and click Next.
8. Ensure that the feature is selected, and click Next.
54 BusinessObjects Enterprise XI 3.0 Integration for PeopleSoft

Installing the PeopleSoft EPM Security Bridge
The Select Features dialog box appears.
You can choose to install the Security Bridge feature.
Note: For more information about the feature, see Component architecture
on page 52.
9. Click Next.
The setup program installs the integration kit.
10. Click Finish.
Installation
4
BusinessObjects Enterprise XI 3.0 Integration for PeopleSoft 55

Installing the PeopleSoft EPM Security Bridge
Installation
4
56 BusinessObjects Enterprise XI 3.0 Integration for PeopleSoft

Deploying web applications
5

Deploying web applications
5
Deploying on Windows
This section guides you through the process of manually deploying PeopleSoft
integration web applications on web servers in a variety of operating
environments.
To deploy BusinessObjects Integration for PeopleSoft web applications after
installation, you must use the wdeploy found in the BusinessObjects
Enterprise installdir\deployment folder instead of the standalone wde
ploy.
Deploying on Windows
To deploy web applications on Tomcat
To deploy BusinessObjects Integration for PeopleSoft web applications after
installation, you must use the wdeploy found in the BusinessObjects
Enterprise installdir\deployment folder instead of the standalone wdeploy
.
1. Manually deploy the BusinessObjects XI Integration for PeopleSoft web
applications using wdeploy found under installdir\deployment
a. Move to businessobjects_root\BusinessObjects12.0\java\ap
plications\, and use the following command to package the WAR
files:
"businessobjects_root\javasdk\bin\jar.exe" cf CmcApp.war -C
"businessobjects_root\BusinessObjects Enterprise
12.0\warfiles\WebApps\CmcApp" .
"businessobjects_root\javasdk\bin\jar.exe" cf InfoViewApp.war -C
"businessobjects_root\ BusinessObjects Enterprise
12.0\warfiles\WebApps\InfoViewApp" .
"businessobjects_root\javasdk\bin\jar.exe" cf OpenDocument.war -C
"businessobjects_root\ BusinessObjects Enterprise
12.0\warfiles\WebApps\OpenDocument" .
"businessobjects_root\javasdk\bin\jar.exe" cf bobjpsft.war -C
"businessobjects_root\ BusinessObjects Enterprise
12.0\warfiles\WebApps\bobjpsft" .
58 BusinessObjects Enterprise XI 3.0 Integration for PeopleSoft

Deploying web applications
Deploying on Windows
"businessobjects_root\javasdk\bin\jar.exe" cf bobjpsenterprise.war -C
"businessobjects_root\ BusinessObjects Enterprise
12.0\warfiles\WebApps\bobjpsenterprise" .
"businessobjects_root\javasdk\bin\jar.exe" cf
PartnerPlatformService.war -C "businessobjects_root\ BusinessObjects
Enterprise 12.0\warfiles\WebApps\PartnerPlatformService" .
b. Open config.WAS_Type file (for example, config.tomcat55) located
under businessobjects_root\deployment, set the parameters
appropriate for your environment, and save the file. For more
information about config file parameters, see the BusinessObjects
Enterprise XI 3.0 Installation and Configuration Guide.
c. Move to installdir\deployment folder, and use the following command
to redeploy related BusinessObjects Enterprise web applications:
wdeploy.bat tomcat55 -DAPP=CmcApp -Das_admin_password=your
password here undeploy
wdeploy.bat tomcat55 -DAPP=CmcApp -Das_admin_password=your
password here deploy
wdeploy.bat tomcat55 -DAPP=InfoViewApp
-Das_admin_password=your password here undeploy
5
wdeploy.bat tomcat55 -DAPP=InfoViewApp
-Das_admin_password=your password here deploy
wdeploy.bat tomcat55 -DAPP= OpenDocument
-Das_admin_password=your password here undeploy
wdeploy.bat tomcat55 -DAPP= OpenDocument
-Das_admin_password=your password here deploy
d. Use the following command to deploy PeopleSoft integration web
applications:
wdeploy.bat tomcat55 -DAPP=bobjpsft -Das_admin_password=your
password here deploy
wdeploy.bat tomcat55 -DAPP=bobjpsenterprise
-Das_admin_password=your password here deploy
wdeploy.bat tomcat55 -DAPP=PartnerPlatformService
-Das_admin_password=your password here deploy
BusinessObjects Enterprise XI 3.0 Integration for PeopleSoft 59

Deploying web applications
5
Deploying on Windows
2. To test if the PeopleSoft authentication module is now available, open a
web browser and type http://servername:8080/CmcApp in its address
bar to launch the Central Management Console (CMC).
3. Log on to the CMC using your Administrator account and password. The
password is set when you install BusinessObjects Enterprise.
4. Click Authentication, and then double-click the PeopleSoft link. The
PeopleSoft authentication page should appear.
To deploy web applications on IBM WebSphere
To deploy BusinessObjects Integration for PeopleSoft web applications after
installation, you must use the wdeploy found in the BusinessObjects
Enterprise, installdir\deployment folder instead of the standalone
wdeploy .
1. Manually deploy the BusinessObjects XI Integration for PeopleSoft web
applications using wdeploy found under INSTALLDIR\deployment.
a. Move to businessobjects_root\BusinessObjects12.0\java\ap
plications\ , and use the following command to package the WAR
files:
"businessobjects_root\javasdk\bin\jar.exe" cf CmcApp.war -C "
businessobjects_root\BusinessObjects Enterprise
12.0\warfiles\WebApps\CmcApp" .
"businessobjects_root\javasdk\bin\jar.exe" cf InfoViewApp.war -C "
businessobjects_root\BusinessObjects Enterprise
12.0\warfiles\WebApps\InfoViewApp" .
"businessobjects_root\javasdk\bin\jar.exe" cf OpenDocument .war -C
" businessobjects_root\BusinessObjects Enterprise
12.0\warfiles\WebApps\ OpenDocument" .
"businessobjects_root\javasdk\bin\jar.exe" cf bobjpsft.war -C "
businessobjects_root\BusinessObjects Enterprise
12.0\warfiles\WebApps\bobjpsft" .
"businessobjects_root\javasdk\bin\jar.exe" cf bobjpsenterprise.war -C
" businessobjects_root\BusinessObjects Enterprise
12.0\warfiles\WebApps\bobjpsenterprise" .
60 BusinessObjects Enterprise XI 3.0 Integration for PeopleSoft

Deploying web applications
Deploying on Windows
"businessobjects_root\javasdk\bin\jar.exe" cf
PartnerPlatformService.war -C " businessobjects_root\BusinessObjects
Enterprise 12.0\warfiles\WebApps\PartnerPlatformService" .
b. Open the config.WAS_Type file (for example, config.webSphere6 )
located under installdir\deployment, set the parameters
appropriate for your environment, and save the file. For more
information about config file parameters, see the "Post Installation
Web Application Deployment" chapter of the BusinessObjects
Enterprise Installation and Configuration Guide .
c. Navigate to the installdir\deployment folder, and use the following
command to redeploy related BusinessObjects Enterprise web
applications.
wdeploy.bat webSphere6 -DAPP=CmcApp
-Das_admin_password=your password here undeploy
wdeploy.bat webSphere6 -DAPP=CmcApp
-Das_admin_password=your password here deploy
wdeploy.bat webSphere6 -DAPP=InfoViewApp
-Das_admin_password=your password here undeploy
5
wdeploy.bat webSphere6 -DAPP=InfoViewApp
-Das_admin_password=your password here deploy
wdeploy.bat webSphere6 -DAPP= OpenDocument
-Das_admin_password=your password here undeploy
wdeploy.bat webSphere6 -DAPP= OpenDocument
-Das_admin_password=your password here deploy
d. Use the following command to deploy PeopleSoft web applications.
wdeploy.bat webSphere6 -DAPP=bobjpsft -Das_admin_password=your
password here deploy
wdeploy.bat webSphere6 -DAPP=bobjpsenterprise
-Das_admin_password=your password here deploy
wdeploy.bat webSphere6 -DAPP=PartnerPlatformService
-Das_admin_password=your password here deploy
2. To test if the PeopleSoft authentication module is now available, open a
web browser and type http://servername:port/CmcApp in its address
bar to launch the Central Management Console (CMC).
BusinessObjects Enterprise XI 3.0 Integration for PeopleSoft 61

Deploying web applications
5
Deploying on Windows
3. Log on to the CMC using your Administrator account and password. The
password is set when you first install BusinessObjects Enterprise.
4. Click Authentication, and then double-click PeopleSoft link. The
PeopleSoft authentication page should appear.
To deploy web applications on BEA WebLogic
To deploy BusinessObjects Integration for PeopleSoft web applications after
installation, you must use the wdeploy found in the BusinessObjects
Enterprise installdir\deployment folder instead of the standalone wdeploy.
1. Start the WebLogic Admin server. To start the admin server, open a
console window, navigate to the WebLogic installdir\us
er_projects\domains\mydomain directory, then execute startWebLog
ic.cmd.
Tip: You can also start the admin server by going to Start > Programs
> Bea WebLogic Platform > User Projects > My Domain > Start Server
2. Manually deploy the BusinessObjects XI Integration for PeopleSoft web
applications, using wdeploy found under installdir\deployment.
a. Move to businessobjects_root\BusinessObjects12.0\java\ap
plications\, and use the following command to package the WAR
files:
"businessobjects_root\javasdk\bin\jar.exe" cf CmcApp.war -C
"businessobjects_root\BusinessObjects Enterprise
12.0\warfiles\WebApps\CmcApp" .
"businessobjects_root\javasdk\bin\jar.exe" cf InfoViewApp.war -C
"businessobjects_root\BusinessObjects Enterprise
12.0\warfiles\WebApps\InfoViewApp" .
"businessobjects_root\javasdk\bin\jar.exe" cf OpenDocument .war -C
"businessobjects_root\BusinessObjects Enterprise
12.0\warfiles\WebApps\OpenDocument" .
"businessobjects_root\javasdk\bin\jar.exe" cf bobjpsft.war -C
"businessobjects_root\ BusinessObjects Enterprise
12.0\warfiles\WebApps\bobjpsft" .
62 BusinessObjects Enterprise XI 3.0 Integration for PeopleSoft

Deploying web applications
Deploying on Windows
"businessobjects_root\javasdk\bin\jar.exe" cf bobjpsenterprise.war -C
"businessobjects_root\ BusinessObjects Enterprise
12.0\warfiles\WebApps\bobjpsenterprise" .
"businessobjects_root\javasdk\bin\jar.exe" cf
PartnerPlatformService.war -C "businessobjects_root\ BusinessObjects
Enterprise 12.0\warfiles\WebApps\PartnerPlatformService" .
b. Open config.WAS_Type file (for example, config.weblogic9) located
under installdir\deployment, set the parameters appropriate for
your environment, and save the file. For more information about config
file parameters, see the BusinessObjects Enterprise XI 3.0 Installation
and Configuration Guide.
c. Move to installdir\deployment folder, and use the following command
to redeploy related BusinessObjects Enterprise web applications:
wdeploy.bat weblogic9 -DAPP=CmcApp -Das_admin_password=your
password here undeploy
wdeploy.bat weblogic9 -DAPP=CmcApp -Das_admin_password=your
password here deploy
wdeploy.bat weblogic9 -DAPP=InfoViewApp
-Das_admin_password=your password here undeploy
5
wdeploy.bat weblogic9 -DAPP=InfoViewApp
-Das_admin_password=your password here deploy
wdeploy.bat weblogic9 -DAPP= OpenDocument
-Das_admin_password=your password here undeploy
wdeploy.bat weblogic9 -DAPP= OpenDocument
-Das_admin_password=your password here deploy
d. . Use the following command to deploy PeopleSoft integration web
applications:
wdeploy.bat weblogic9 -DAPP=bobjpsft -Das_admin_password=your
password here deploy
wdeploy.bat weblogic9 -DAPP=bobjpsenterprise
-Das_admin_password=your password here deploy
wdeploy.bat weblogic9 -DAPP=PartnerPlatformService
-Das_admin_password=your password here deploy
BusinessObjects Enterprise XI 3.0 Integration for PeopleSoft 63

Deploying web applications
5
Deploying on Windows
3. To test that BusinessObjects Enterprise deploys correctly, open a web
browser and type http://servername:7001/InfoViewApp in its address
bar.
4. To test if the PeopleSoft authentication module is now available, open a
web browser and type http://servername:7001/CmcApp in its address
bar to launch the Central Management Console (CMC).
5. Log on to the CMC using your Administrator account and password. The
password is set when you first install BusinessObjects Enterprise.
6. Click Authentication , and then double-click PeopleSoft link. The
PeopleSoft authentication page should appear.
To deploy web applications on Oracle Application Server
1. Manually deploy the BusinessObjects XI Integration for PeopleSoft web
applications using wdeploy found under INSTALLDIR\deployment
a. Move to businessobjects_root
\BusinessObjects12.0\java\applications\, and use the following
command to package the WAR files:
"businessobjects_root\javasdk\bin\jar.exe" cf CmcApp.war -C
"businessobjects_root\BusinessObjects Enterprise
12.0\warfiles\WebApps\CmcApp" .
"businessobjects_root\javasdk\bin\jar.exe" cf InfoViewApp.war -C
"businessobjects_root\BusinessObjects Enterprise
12.0\warfiles\WebApps\InfoViewApp" .
"businessobjects_root\javasdk\bin\jar.exe" cf OpenDocument.war -C
"businessobjects_root\ BusinessObjects Enterprise
12.0\warfiles\WebApps\OpenDocument" .
"businessobjects_root\javasdk\bin\jar.exe" cf bobjpsft.war -C
"businessobjects_root\BusinessObjects Enterprise
12.0\warfiles\WebApps\bobjpsft" .
"businessobjects_root\javasdk\bin\jar.exe" cf bobjpsenterprise.war -C
"businessobjects_root\ BusinessObjects Enterprise
12.0\warfiles\WebApps\bobjpsenterprise" .
64 BusinessObjects Enterprise XI 3.0 Integration for PeopleSoft

Deploying web applications
Deploying on Windows
"businessobjects_root\javasdk\bin\jar.exe" cf
PartnerPlatformService.war -C "businessobjects_root\ BusinessObjects
Enterprise 12.0\warfiles\WebApps\PartnerPlatformService" .
b. Open the config.WAS_Type file (for example, config.oas1013)
located under installdir\deployment, set the parameters
appropriate for your environment, and save the file.
For more information about config file parameters, see the
BusinessObjects Enterprise Installation and Configuration Guide
c. Navigate to the installdir\deployment folder, and use the following
command to redeploy related BusinessObjects Enterprise web
applications.
wdeploy.bat oas1013 -DAPP=CmcApp -Das_admin_password=your
password here undeploy
wdeploy.bat oas1013 -DAPP=CmcApp -Das_admin_password=your
password here deploy
wdeploy.bat oas1013 -DAPP=InfoViewApp
-Das_admin_password=your password here undeploy
5
wdeploy.bat oas1013 -DAPP=InfoViewApp
-Das_admin_password=your password here deploy
wdeploy.bat oas1013 -DAPP= OpenDocument
-Das_admin_password=your password here undeploy
wdeploy.bat oas1013 -DAPP=OpenDocument
-Das_admin_password=your password here deploy
d. Use the following command to deploy PeopleSoft web applications.
wdeploy.bat oas1013 -DAPP=bobjpsft -Das_admin_password=your
password here deploy
wdeploy.bat oas1013 -DAPP=bobjpsenterprise
-Das_admin_password=your password here deploy
wdeploy.bat oas1013 -DAPP=PartnerPlatformService
-Das_admin_password=your password here deploy
2. To test if the PeopleSoft authentication module is now available, open a
web browser and type http://servername:port/CmcApp in its address
bar to launch the Central Management Console (CMC).
BusinessObjects Enterprise XI 3.0 Integration for PeopleSoft 65

Deploying web applications
5
Deploying on UNIX
3. Log on to the CMC using your Administrator account and password. The
password is set when you first install BusinessObjects Enterprise.
4. Click Authentication, and then double-click PeopleSoft link. The
PeopleSoft authentication page should appear.
Deploying on UNIX
To deploy web applications on Tomcat
Note: If Tomcat was installed with BusinessObjects Enterprise, the
BusinessObjects Integration for PeopleSoft installation automatically deploys
to the same server.
1. Ensure that Tomcat is running.
Note: %CATALINA_HOME% represents the root directory of the Tomcat
installation.
2. Manually deploy the BusinessObjects XI Integration for PeopleSoft web
applications using wdeploy found under businessobjects_root/deploy
ment
a. Move to businessobjects_root /bobje/enterprise120/java/applications,
and use the following command to package the WAR files:
"businessobjects_root/bobje/jdk/bin/jar" cf CmcApp.war -C " usines
sobjects_root/bobje/enterprise120/warfiles/WebApps/CmcApp" .
"businessobjects_root/bobje/jdk/bin/jar" cf InfoViewApp.war -C "busi
nessobjects_root/bobje/enterprise120/warfiles/WebApps/InfoViewApp"
.
"businessobjects_root/bobje/jdk/bin/jar" cf OpenDocument .war -C
"businessobjects_root/bobje/enterprise120/warfiles/WebApps/ Open
Document" .
"businessobjects_root/bobje/jdk/bin/jar" cf bobjpsft.war -C "busines
sobjects_root/bobje/enterprise120/warfiles/WebApps/bobjpsft" .
"businessobjects_root/bobje/jdk/bin/jar" cf bobjpsenterprise.war -C
"businessobjects_root/bobje/enterprise120/warfiles/WebApps/bob
jpsenterprise" .
66 BusinessObjects Enterprise XI 3.0 Integration for PeopleSoft

Deploying web applications
Deploying on UNIX
"businessobjects_root/bobje/jdk/bin/jar" cf PartnerPlatformService.war
-C "businessobjects_root/bobje/enterprise120/warfiles/WebApps/Part
nerPlatformService" .
b. Open the config.WAS_Type file (for example, config.tomcat55)
located under businessobjects_root/deployment , set the
parameters appropriate for your environment, and save the file. For
more information about config file parameters, see the BusinessObjects
Enterprise Installation and Configuration Guide.
c. Navigate to the businessobjects_root/deployment folder, and use
the following command to redeploy related BusinessObjects Enterprise
web applications:
wdeploy.sh tomcat55 -DAPP=CmcApp -Das_admin_password=your
password here undeploy
wdeploy.sh tomcat55 -DAPP=CmcApp -Das_admin_password=your
password here deploy
wdeploy.sh tomcat55 -DAPP=InfoViewApp
-Das_admin_password=your password here undeploy
wdeploy.sh tomcat55 -DAPP=InfoViewApp
-Das_admin_password=your password here deploy
5
wdeploy.sh tomcat55 -DAPP=OpenDocument
-Das_admin_password=your password here undeploy
wdeploy.sh tomcat55 -DAPP=OpenDocument
-Das_admin_password=your password here deploy
d. Use the following command to deploy PeopleSoft integration web
applications:
wdeploy.sh tomcat55 -DAPP=bobjpsft -Das_admin_password=your
password here deploy
wdeploy.sh tomcat55 -DAPP=bobjpsenterprise
-Das_admin_password=your password here deploy
wdeploy.sh tomcat55 -DAPP=PartnerPlatformService
-Das_admin_password=your password here deploy
3. To test if the PeopleSoft web applications are now available, open a web
browser and type http://servername:8080/CmcApp in its address bar
to launch the Central Management Console (CMC).
BusinessObjects Enterprise XI 3.0 Integration for PeopleSoft 67

Deploying web applications
5
Deploying on UNIX
4. Log on to the CMC using your Administrator account and password. The
password is set when you install BusinessObjects Enterprise.
5. Click Authentication , and then double-click PeopleSoft. The PeopleSoft
authentication page should appear.
To deploy web applications on IBM WebSphere
1. Ensure that your IBM WebSphere server is running.
2. To manually deploy the BusinessObjects XI Integration for PeopleSoft
web applications, use wdeploy found under INSTALLDIR\deployment.
a. Move to businessobjects_root/bobje/enterprise120/java/ap
plications, and use the following command to package the WAR
files:
"businessobjects_root/bobje/jdk/bin/jar" cf CmcApp.war -C " usines
sobjects_root/bobje/enterprise120/warfiles/WebApps/CmcApp" .
"businessobjects_root/bobje/jdk/bin/jar" cf InfoViewApp.war -C "busi
nessobjects_root/bobje/enterprise120/warfiles/WebApps/InfoViewApp"
.
"businessobjects_root/bobje/jdk/bin/jar" cf OpenDocument.war -C
"businessobjects_root/bobje/enterprise120/warfiles/WebApps/Open
Document" .
"businessobjects_root/bobje/jdk/bin/jar" cf bobjpsft.war -C "busines
sobjects_root/bobje/enterprise120/warfiles/WebApps/bobjpsft" .
"businessobjects_root/bobje/jdk/bin/jar" cf bobjpsenterprise.war -C
"businessobjects_root/bobje/enterprise120/warfiles/WebApps/bob
jpsenterprise" .
"businessobjects_root/bobje/jdk/bin/jar" cf PartnerPlatformService.war
-C "businessobjects_root/bobje/enterprise120/warfiles/WebApps/Part
nerPlatformService" .
b. Open the config.WAS_Type file (for example, config.websphere6)
located in INSTALLDIR\deployment, set the parameters appropriate
to your environment, and save the file.
For more information about config file parameters, see the
BusinessObjects Enterprise Installation and Configuration Guide.
68 BusinessObjects Enterprise XI 3.0 Integration for PeopleSoft

Deploying web applications
Deploying on UNIX
c. Navigate to the businessobjects_root/deployment folder, and use the
following command to redeploy related BusinessObjects Enterprise
web applications:
wdeploy.sh websphere6 -DAPP=CmcApp -Das_admin_password=your
password here undeploy
wdeploy.sh websphere6 -DAPP=CmcApp -Das_admin_password=your
password here deploy
wdeploy.sh websphere6 -DAPP=InfoViewApp
-Das_admin_password=your password here undeploy
wdeploy.sh websphere6 -DAPP=InfoViewApp
-Das_admin_password=your password here deploy
wdeploy.sh websphere6 -DAPP=OpenDocument
-Das_admin_password=your password here undeploy
wdeploy.sh websphere6 -DAPP=OpenDocument
-Das_admin_password=your password here deploy
d. Use the following command to deploy PeopleSoft web applications:
5
wdeploy.sh websphere6 -DAPP=bobjpsft -Das_admin_password=your
password here deploy
wdeploy.sh websphere6 -DAPP=bobjpsenterprise
-Das_admin_password=your password here deploy
wdeploy.sh websphere6 -DAPP=PartnerPlatformService
-Das_admin_password=your password here deploy
3. To test that InfoView deploys correctly, type http://servername:port/In
foViewApp in the address bar of a web browser.
4. To test if the PeopleSoft authentication module is now available, open a
web browser and type http://servername:port/CmcApp in its address
bar to launch the Central Management Console (CMC).
5. Log on to the CMC using your Administrator account and password. The
password is set when you first install BusinessObjects Enterprise.
6. Click Authentication, and then double-click the PeopleSoft link. The
PeopleSoft authentication page should appear.
BusinessObjects Enterprise XI 3.0 Integration for PeopleSoft 69

Deploying web applications
5
Deploying on UNIX
To deploy web applications on BEA WebLogic
1. Ensure that your BEA WebLogic server is running.
2. Open a web browser, and type http://servername:7001/console in
its address bar to open the BEA WebLogic Administrative Console.
Substitute the name of the machine where you installed BEA WebLogic
for servername.
Note: By default, BEA WebLogic uses port 7001. If you configured your
application server to use a different port number, substitute that port
number in the URL.
3. To manually deploy the BusinessObjects XI Integration for PeopleSoft
web applications, use wdeploy found under INSTALLDIR\deployment.
a. Move to businessobjects_root/bobje/enterprise120/java/applications,
and use the following command to package the WAR files:
"businessobjects_root/bobje/jdk/bin/jar" cf CmcApp.war -C "busines
sobjects_root/bobje/enterprise120/warfiles/WebApps/CmcApp" .
"businessobjects_root/bobje/jdk/bin/jar" cf InfoViewApp.war -C "busi
nessobjects_root/bobje/enterprise120/warfiles/WebApps/InfoViewApp"
.
"businessobjects_root/bobje/jdk/bin/jar" cf OpenDocument .war -C
"businessobjects_root/bobje/enterprise120/warfiles/WebApps/ Open
Document" .
"businessobjects_root/bobje/jdk/bin/jar" cf bobjpsft.war -C "busines
sobjects_root/bobje/enterprise120/warfiles/WebApps/bobjpsft" .
"businessobjects_root/bobje/jdk/bin/jar" cf bobjpsenterprise.war -C
"businessobjects_root/bobje/enterprise120/warfiles/WebApps/bob
jpsenterprise" .
"businessobjects_root/bobje/jdk/bin/jar" cf PartnerPlatformService.war
-C "businessobjects_root/bobje/enterprise120/warfiles/WebApps/Part
nerPlatformService" .
b. Open the config.WAS_Type file (for example, config.weblogic9)
located under INSTALLDIR\deployment, set the parameters
appropriate for your environment, and save the file.
70 BusinessObjects Enterprise XI 3.0 Integration for PeopleSoft

Deploying web applications
Deploying on UNIX
For more information about config file parameters, see the
BusinessObjects Enterprise Installation and Configuration Guide.
c. Navigate to the businessobjects_root/deployment folder and use the
following command to redeploy related BusinessObjects Enterprise
web applications:
wdeploy.sh weblogic9 -DAPP=CmcApp -Das_admin_password=your
password here undeploy
wdeploy.sh weblogic9 -DAPP=CmcApp -Das_admin_password=your
password here deploy
wdeploy.sh weblogic9 -DAPP=InfoViewApp
-Das_admin_password=your password here undeploy
wdeploy.sh weblogic9 -DAPP=InfoViewApp
-Das_admin_password=your password here deploy
wdeploy.sh weblogic9 -DAPP=OpenDocument
-Das_admin_password=your password here undeploy
wdeploy.sh weblogic9 -DAPP=OpenDocument
-Das_admin_password=your password here deploy
5
d. Use the following command to deploy PeopleSoft web applications:
wdeploy.sh weblogic9 -DAPP=bobjpsft -Das_admin_password=your
password here deploy
wdeploy.sh weblogic9 -DAPP=bobjpsenterprise
-Das_admin_password=your password here deploy
wdeploy.sh weblogic9 -DAPP=PartnerPlatformService
-Das_admin_password=your password here deploy
4. To test that BusinessObjects Enterprise deploys correctly, type
http://servername:7001/InfoViewApp/ in the address bar of a web
browser.
5. To test if the PeopleSoft authentication module is now available, open a
web browser and type http://servername:7001/CmcApp in its address
bar to launch the Central Management Console (CMC).
6. Log on to the CMC using your Administrator account and password. The
password is set when you first install BusinessObjects Enterprise.
7. Click Authentication, and then double-click PeopleSoft link. The
PeopleSoft authentication page should appear.
BusinessObjects Enterprise XI 3.0 Integration for PeopleSoft 71

Deploying web applications
5
Deploying on UNIX
To deploy web applications on Oracle Application Server
To deploy BusinessObjects Integration for PeopleSoft web applications after
installation, you must use the wdeploy found in the BusinessObjects
Enterpriseinstalldir\deployment folder instead of the standalone wdeploy.
1. Ensure that your Oracle Application Server is running.
2. To manually deploy the BusinessObjects XI Integration for PeopleSoft
web applications, use wdeploy found under INSTALLDIR\deployment.
a. Move to businessobjects_root/bobje/enterprise120/java/ap
plications, and use the following command to package the WAR
files:
"businessobjects_root/bobje/jdk/bin/jar" cf CmcApp.war -C "busines
sobjects_root/bobje/enterprise120/warfiles/WebApps/CmcApp" .
"businessobjects_root/bobje/jdk/bin/jar" cf InfoViewApp.war -C "usi
nessobjects_root/bobje/enterprise120/warfiles/WebApps/InfoViewApp"
.
"businessobjects_root/bobje/jdk/bin/jar" cf OpenDocument .war -C
"businessobjects_root/bobje/enterprise120/warfiles/WebApps/Open
Document" .
"businessobjects_root/bobje/jdk/bin/jar" cf bobjpsft.war -C "busines
sobjects_root/bobje/enterprise120/warfiles/WebApps/bobjpsft" .
"businessobjects_root/bobje/jdk/bin/jar" cf bobjpsenterprise.war -C
"businessobjects_root/bobje/enterprise120/warfiles/WebApps/bob
jpsenterprise" .
"businessobjects_root/bobje/jdk/bin/jar" cf PartnerPlatformService.war
-C "businessobjects_root/bobje/enterprise120/warfiles/WebApps/Part
nerPlatformService" .
b. Open the config.WAS_Type file (for example, config.oas1013 )
located in INSTALLDIR\deployment , set the parameters appropriate
to your environment, and save the file. For more information about
config file parameters, see the "Post Installation Web Application
Deployment" chapter of the BusinessObjects Enterprise Installation
and Configuration Guide.
72 BusinessObjects Enterprise XI 3.0 Integration for PeopleSoft

Deploying web applications
Deploying on UNIX
c. Navigate to the businessobjects_root/deployment folder, and use
the following command to redeploy related BusinessObjects Enterprise
web applications:
wdeploy.sh oas1013 -DAPP=CmcApp -Das_admin_password=your
password here undeploy
wdeploy.sh oas1013 -DAPP=CmcApp -Das_admin_password=your
password here deploy
wdeploy.sh oas1013 -DAPP=InfoViewApp -Das_admin_password=your
password here undeploy
wdeploy.sh oas1013 -DAPP=InfoViewApp -Das_admin_password=your
password here deploy
wdeploy.sh oas1013 -DAPP=OpenDocument
-Das_admin_password=your password here undeploy
wdeploy.sh oas1013 -DAPP=OpenDocument
-Das_admin_password=your password here deploy
d. Use the following command to deploy PeopleSoft web applications:
5
wdeploy.sh oas1013 -DAPP=bobjpsft -Das_admin_password=your
password here deploy
wdeploy.sh oas1013 -DAPP=bobjpsenterprise
-Das_admin_password=your password here deploy
wdeploy.sh oas1013 -DAPP=PartnerPlatformService
-Das_admin_password=your password here deploy
3. To test that InfoView deploys correctly, type http://servername:port/In
foViewApp in the address bar of a web browser.
4. To test if the PeopleSoft authentication module is now available, open a
web browser and type http://servername:port/CmcApp in its address
bar to launch the Central Management Console (CMC).
5. Log on to the CMC using your Administrator account and password. The
password is set when you first install BusinessObjects Enterprise.
6. Click Authentication , and then double-click the PeopleSoft link. The
PeopleSoft authentication page should appear.
BusinessObjects Enterprise XI 3.0 Integration for PeopleSoft 73

Deploying web applications
Deploying on UNIX
5
74 BusinessObjects Enterprise XI 3.0 Integration for PeopleSoft

Firewall settings
6

Firewall settings
6
Guidelines for communication between BusinessObjects Enterprise and PeopleSoft Enterprise system
This section shows what ports are used for communication specifically
between BusinessObjects Enterprise XI 3.0 Integration for PeopleSoft and
PeopleSoft Enterprise systems when configuring to work with firewalls.
You need to configure BusinessObjects Enterprise system to work in a
firewalled environment first, for detailed information about this , please refer
to the BusinessObjects Enterprise Administrator's Guide.
Guidelines for communication between
BusinessObjects Enterprise and
PeopleSoft Enterprise system
BusinessObjects Enterprise components include browser clients, rich clients,
servers, and the BusinessObjects Enterprise SDK hosted in the Web
Application server. BusinessObjects XI 3.0 Integration for PeopleSoft
components can be distributed installed on the appropriate machines. It is
helpful to understand the basics of communications with BusinessObjects
XI 3.0 Integration for PeopleSoft components before configuring your
BusinessObjects Enterprise system to work with firewalls.
Deployments of BusinessObjects XI 3.0 Integration for PeopleSoft must
conform to these general communication rules.
For PeopleSoft Enterprise: PeopleTools 8.46-8.49
• The Central Management Server (CMS) with the Security Connectivity
component must be able to initiate communication with PeopleSoft Query
Access (QAS) web service.
• BusinessObjects Enterprise servers with Data Connectivity component
must be able to initiate communication with PeopleSoft QAS web service.
• Crystal Reports with Data Connectivity client side component must be
able to initiate communication with PeopleSoft QAS web service.
• Enterprise Management (EPM) Bridge must be able to communicate with
CMS and Input File Repository Server.
• EPM Bridge must be able to communicate with PeopleSoft database
using ODBC connection.
76 BusinessObjects Enterprise XI 3.0 Integration for PeopleSoft

Firewall settings
Guidelines for communication between BusinessObjects Enterprise and PeopleSoft Enterprise system
The web service port number is the same as that specified in PeopleSoft
Enterprise Domain name.
For PeopleSoft Enterprise: PeopleTools 8.21-8.45
• Web Application must be able to initiate communication with
BusinessObjects Enterprise Sign-on Server for PeopleSoft.
Three ports are needed: Echo (TCP) port 7 for checking the reachability
of the Sign-on Server, BusinessObjects Enterprise Sign-on Server for
PeopleSoft port (By default 8446) for CORBA IOR listening port, and a
random POA port for CORBA communication that cannot be controlled,
so all ports need to open.
• Crystal Reports with Data Connectivity client side component must be
able to initiate communication with PeopleSoft Tuxedo Jolt Server Listener
(JSL) port and Jolt Server Handler (JSH) ports. Meanwhile, for retrieving
data, PeopleSoft side must be able to communicate with the driver through
a random port that cannot be controlled.
• CMS must be able to initiate communication with PeopleSoft Tuxedo JSL
port and JSH ports.
• BusinessObjects Enterprise Query Server for PeopleSoft must be able
to initiate communication with PeopleSoft Tuxedo JSL port and JSH ports.
Meanwhile, for retrieving data, PeopleSoft side must be able to
communicatewith the driver through a random port that cannot be
controlled.
• BusinessObjects Enterprise Sign-on Server for PeopleSoft must be able
to initiate communication with PeopleSoft Tuxedo JSL port and JSH ports.
6
The JSL port number can be found in the PeopleSoft Application Server
configuration file (PSAPPSRV.CFG) under the Jolt Server listener section.
It’s the same as specified in the installation of the BusinessObjects XI 3.0
Integration for PeopleSoft. By default, the value is set as 9000.
JSH Handlers spawn using successive port numbers starting at the JSL
port number (e.g. 9001/9002/9003/…), if the additional ports are free
before configuration. The number of JSH is defined in PSAPPSRV.CFG by
the variables Min Handlers and Max Handlers of the JOLT Listener.
For further information about how Tuxedo communication works, consult
your PeopleSoft documentation.
BusinessObjects Enterprise XI 3.0 Integration for PeopleSoft 77

Firewall settings
6
Detailed description of ports
Detailed description of ports
This section lists the ports that are used BusinessObjects XI Integration for
PeopleSoft. If you deploy BusinessObjects Enterprise with firewalls, you can
use this information to open the minimum number of ports in those firewalls
specific for BusinessObjects XI Integration for PeopleSoft.
Port Requirements for BusinessObjects Enterprise XI 3.0 servers
Server Port RequirementsApplicationProduct
• Central Management Server Name Server
port
• Central Management Server Request port
• Input FRS Request port
BusinessObjects XI Integration for
PeopleSoft
BusinessObjects XI Integration for PeopleSoft
• Output FRS Request port
• Report Application Server Request port
• Crystal Reports Cache Server Request port
• Crystal Reports Page Server Request port
• Crystal Reports Processing Server Request
Port
• BusinessObjects Enterprise Sign-on Server
port
• Echo (TCP) port – 7
For detailed information about how to configure your BusinessObjects
Enterprise system to work in a firewalled environment, please refer to the
BusinessObjects Enterprise Administrator's Guide
78 BusinessObjects Enterprise XI 3.0 Integration for PeopleSoft

Port Requirements for PeopleSoft
PeopleSoft Enterprise:
People Tools 8.46 to 8.49
PeopleSoft Enterprise:
People Tools 8.21 to 8.45
Web Service
HTTP/HTTPS port
JSL port and multiple
JSH ports
Firewall settings
Detailed description of ports
DescriptionPort RequirementProduct
This port is required when
using SOAP connection
for PeopleSoft Enterprise
for People Tools 8.46 and
newer solution
The ports are required
when using Tuxedo connection for PeopleSoft
Enterprise for People
Tools 8.45 and older solution
6
Configuring BusinessObjects XI 3.0 Integration for PeopleSoft for firewalls
This section shows how to configure a firewall and BusinessObjects
Enterprise with BusinessObjects XI Integration for PeopleSoft to work together
in a deployment scenario where the firewall separates the Web Application
server from other BusinessObjects Enterprise servers.
For firewall configuration with BusinessObjects Enterprise servers and clients,
please refer to the BusinessObjects Enterprise XI 3.0 Administrator's Guide.
Besides the firewall configuration with BusinessObjects Enterprise,
BusinessObjects XI Integration for PeopleSoft needs to do some extra
configurations.
BusinessObjects Enterprise XI 3.0 Integration for PeopleSoft 79

Firewall settings
6
Detailed description of ports
Table 6-3: For PeopleSoft Enterprise: PeopleTools 8.46-8.49
CMS with Security Connectivity feature for
PeopleSoft
BusinessObjects Enterprise servers with Data
Connectivity for PeopleSoft
CrystalReports with
client side Data Connectivity for PeopleSoft
PortSource Computer
AnyEPM Bridge
Destination
Computer
PeopleSoftAny
PeopleSoftAny
PeopleSoftAny
CMSAnyEPM Bridge
CMSAnyEPM Bridge
Input File Repository Server
PeopleSoft
web service
HTTP /HTTPS
port
PeopleSoft
web service
HTTP /HTTPS
port
PeopleSoft
web service
HTTP /HTTPS
port
CMS Name
Server Port
CMS requested port
ActionPort
Allow
Allow
Allow
Allow
Allow
AllowInput FRS port
PeopleSoftAnyEPM Bridge
Table 6-4: For PeopleSoft Enterprise: PeopleTools 8.21-8.45
PortSource Computer
AnyWeb Application Server
80 BusinessObjects Enterprise XI 3.0 Integration for PeopleSoft
Destination Computer
BusinessObjects
Enterprise Sign-on
Server for PeopleSoft
PeopleSoft
Database Port
Allow
ActionPort
AllowAny

Firewall settings
Detailed description of ports
6
CMS with Security
Connectivity for PeopleSoft
BusinessObjects Enterprise servers with server side Data Connectivity for PeopleSoft
CrystalReports with
client side Data Connectivity for PeopleSoft
PortSource Computer
AnyPeopleSoft
AnyPeopleSoft
Destination Computer
PeopleSoftAny
PeopleSoftAny
PeopleSoftAny
BusinessObjects
Enterprise servers
with server side
Data Connectivity
for PeopleSoft
CrystalReports
with client side Data Connectivity for
PeopleSoft
JSL port and
JSH ports
JSL port and
JSH ports
JSL port and
JSH ports
ActionPort
Allow
Allow
Allow
AllowAny
AllowAny
BusinessObjects Enterprise XI 3.0 Integration for PeopleSoft 81

Firewall settings
Detailed description of ports
6
82 BusinessObjects Enterprise XI 3.0 Integration for PeopleSoft

Configuring BusinessObjects XI 3.0 Integration for PeopleSoft for Secure Socket Layer Communication
7

Configuring BusinessObjects XI 3.0 Integration for PeopleSoft for Secure Socket Layer Communication
7
SSL configuration property file
You can use the Secure Sockets Layer (SSL) protocol for all network
communication between clients and servers in your BusinessObjects
Enterprise and BusinessObjects XI Integration for PeopleSoft deployment.
For deploying CORBA SSL with BusinessObjects Enterprise servers and
clients, please refer BusinessObjects Enterprise XI 3.0 Administrator's Guide.
Besides the deployment of BusinessObjects Enterprise, BusinessObjects
XI 3.0 Integration for PeopleSoft requires some extra configuration.
Similar to the SSL configuration for other BusinessObjects Enterprise servers
and clients, store the following key and certificate files in a secure location
(under the same directory) that can be accessed by the machines in your
BusinessObjects Enterprise deployment.
• The trusted certificate file (cacert.der).
• The generated server certificate file (servercert.der).
• The server key file (server.key).
• The passphrase file (passphrase.txt).
SSL configuration property file
The property file sslconf.properties contains all the information for
required certificates and keys used by BusinessObjects XI 3.0 Integration
for PeopleSoft components. For example:
[default]
businessobjects.orb.oci.protocol=ssl
certDir=d:/ssl
trustedCert=cacert.der
sslCert=servercert.der
sslKey=server.key
passphrase=passphrase.txt
The sslconf.properties file should be put in the folder where
BusinessObjects XI 3.0 Integration for PeopleSoft product is installed.,
C:\Program Files\Business Objects\BusinessObjects 12.0
Integration Kit for PeopleSoft\ by default.
84 BusinessObjects Enterprise XI 3.0 Integration for PeopleSoft

Configuring BusinessObjects XI 3.0 Integration for PeopleSoft for Secure Socket Layer Communication
To enable PeopleSoft Sign-on Server for SSL
To enable PeopleSoft Sign-on Server for
SSL
Note: All values described in the following procedure are case-sensitive.
• Configure the two registry values under the registry key for every Sign-on
Server, for example:
[HKEY_LOCAL_MACHINE\SOFTWARE\Business
Objects\Suite 12.0\Integration Kit for
PeopleSoft\SSO\Instances\noname]
"CommunicationProtocol"="ssl"
"SSL Configuration File"="C:\Program
Files\Business Objects\BusinessObjects 12.0 Integration Kit
for
PeopleSoft\sslconf.properties"
Please refer to SSL configuration property file on page 84 for detailed
information on the sslconf.properties file.
You must restart your Sign-on Server for these changes to take effect.
7
To enable PeopleSoft Query Server with SSL
Note: All values described in the following procedure are case-sensitive.
• Configure the two registry values under the registry key for every query
server, for example.
[HKEY_LOCAL_MACHINE\SOFTWARE\Business
Objects\Suite 12.0\Integration Kit for
PeopleSoft\QRY\Instances\noname]
"CommunicationProtocol"="ssl"
"SSL Configuration File"="C:\Program
Files\Business Objects\BusinessObjects 12.0 Integration Kit
for
PeopleSoft\sslconf.properties"
Please refer to SSL configuration property file on page 84 for detailed
information on the sslconf.properties file.
You must restart your Query Server for these changes to take effect.
BusinessObjects Enterprise XI 3.0 Integration for PeopleSoft 85

Configuring BusinessObjects XI 3.0 Integration for PeopleSoft for Secure Socket Layer Communication
7
To enable Security Bridge with SSL
To enable Security Bridge with SSL
Note: All values described in the following procedure are case-sensitive.
• Run crpsepmsecuritybridge.bat with following arguments by adding
them to the .bat file.
-Dbusinessobjects.orb.oci.protocol=ssl
-DcertDir="d:\ssl"
-DtrustedCert=cacert.der
-DsslCert=servercert.der
-DsslKey=server.key
-Dpassphrase=passphrase.txt
Please be sure that the arguments are added in the correct location in
the .bat file, right after the java.exe and before giving -jar arguments. For
example:
@ECHO OFF
SETLOCAL
SET PATH=%PATH%;C:\Program Files\Business
Objects\BusinessObjects Enterprise 12.0\win32_x86\;C:\Program
Files\Business Objects\BusinessObjects 12.0 Integration Kit
for
PeopleSoft\\epm;
"C:\Program Files\Business Objects\javasdk\bin\java.exe" Dbusinessobjects.orb.oci.protocol=ssl
-DcertDir="C:\!test" -DtrustedCert=cacert.der
-DsslCert=servercert.der -DsslKey=server.key
-Dpassphrase=passphrase.txt -jar "C:\Program Files\Business
Objects\BusinessObjects 12.0 Integration Kit for
PeopleSoft\\epm\crpsepmsecuritybridge.jar" %1 "language"
"C:\Program Files\Business
Objects\\LanguagePacks.xml\LanguagePacks.xml"
The following table shows the descriptions that correspond to these
examples:
The directory to store all the certificates and keys.DcertDir=d:\ssl
DtrustedCert=cac
ert.der
86 BusinessObjects Enterprise XI 3.0 Integration for PeopleSoft
Trusted certificate file. If specifying more than one,
separate with semicolons.
Certificate used by the SDK.DsslCert=clientcert.der
Private key of the SDK certificate.DsslKey=client.key

Configuring BusinessObjects XI 3.0 Integration for PeopleSoft for Secure Socket Layer Communication
To enable Security Bridge with SSL
The file that stores the passphrase for the private key.Dpassphrase=passphrase.txt
7
BusinessObjects Enterprise XI 3.0 Integration for PeopleSoft 87

Configuring BusinessObjects XI 3.0 Integration for PeopleSoft for Secure Socket Layer Communication
To enable Security Bridge with SSL
7
88 BusinessObjects Enterprise XI 3.0 Integration for PeopleSoft

Uninstalling BusinessObjects XI 3.0 Integration for PeopleSoft
8

Uninstalling BusinessObjects XI 3.0 Integration for PeopleSoft
8
To uninstall BusinessObjects XI 3.0 Integration for PeopleSoft
This section describes uninstalling BusinessObjects XI Integration for
PeopleSoft.
If you want to delete users and groups that were imported from PeopleSoft
through the Central Management Console (CMC) and the PeopleSoft
Enterprise or PS8 authentication plug-in, you must remove the users and
groups before you uninstall BusinessObjects XI 3.0 Integration for PeopleSoft.
You cannot delete PeopleSoft users from BusinessObjects Enterprise without
BusinessObjects XI 3.0 Integration for PeopleSoft.
Note: If you have installed multiple PeopleSoft integrations on the same
Crystal Reports or BusinessObjects Enterprise server, and you want to
uninstall them, you must uninstall the PeopleSoft integrations in the reverse
order in which they were installed. In other words, you must always uninstall
the most recently installed PeopleSoft integration first.
To uninstall BusinessObjects XI 3.0
Integration for PeopleSoft
1. Depending on your operating system environment, choose one of the
following options.
• On a Windows computer, uninstall the BusinessObjects XI Integration
for PeopleSoft from Add/Remove Programs
• On a UNIX computer, run the AddOrRemoveProducts.sh command.
This will uninstall the program files.
2. Update the IK parameter in the partnercafinstall.bat or partner
cafinstall.sh script, depending on your platform. The IK parameter
must be set according to the PeopleSoft integration type to either psft if
you installed 8.21-8.45 PeopleSoft integration components or to psenter
prise if you installed 8.46-8.49 PeopleSoft integration components.
3. Depending on your operating system environment, choose one of the
following options.
•
On Windows, run partnercafuninstall.bat BOE_PASSWORD
• On UNIX, run businessobjects_root/bobje/java/lib/partnercafuninstall.sh
-p BOE_PASSWORD -i IK
This will clean up a number of files that are not removed by the uninstall
process.
90 BusinessObjects Enterprise XI 3.0 Integration for PeopleSoft

Uninstalling BusinessObjects XI 3.0 Integration for PeopleSoft
To uninstall BusinessObjects XI 3.0 Integration for PeopleSoft
4. In the installdir\deployment\apps folder, delete bobjpsft.proper
ties, bobjpsenterprise.properties, and PartnerPlatformSer
vices.properties files.
5. Undeploy and redeploy BusinessObjects Enterprise web applications
using wdeploy from the install\deployment folder and the following
commands:
•
wdeploy.bat WAS type -DAPP=CmcApp -Das_admin_password=your
password here undeploy
•
wdeploy.bat WAS type -DAPP=CmcApp -Das_admin_password=your
password here > deploy
•
wdeploy.bat WAS type -DAPP=InfoViewApp
-Das_admin_password=your password here undeploy
•
wdeploy.bat WAS type -DAPP=InfoViewApp
-Das_admin_password=your password here deploy
•
wdeploy.bat WAS type -DAPP=OpenDocument
-Das_admin_password=your password here undeploy
•
wdeploy.bat WAS type -DAPP=OpenDocument
-Das_admin_password=your password here deploy
8
BusinessObjects Enterprise XI 3.0 Integration for PeopleSoft 91

Uninstalling BusinessObjects XI 3.0 Integration for PeopleSoft
To uninstall BusinessObjects XI 3.0 Integration for PeopleSoft
8
92 BusinessObjects Enterprise XI 3.0 Integration for PeopleSoft

Migrating content
9

Migrating content
9
To migrate content from previous versions
The following section shows you how to migrate content from previous
versions of BusinessObjects Enterprise using the Import Wizard.
To migrate content from previous
versions
Install BusinessObjects XI Integration for PeopleSoft following the instructions
of Chapter 2 and Chapter 3.
1. Launch Import Wizard.
The "Source Environment" screen is displayed.
2. Fill in the source environment information (system and version,CMS
name, Administrator user name and password).
3. Click Next.
The "Destination environment" screen is displayed.
4. Fill in the destination environment information (system and version,CMS
name, Administrator user name and password).
5. Click Next.
The "Select objects to import" screen is displayed.
6. Select the objects you want to migrate.
7. Click Next.
The "Import Scenario" screen is displayed.
8. Select the options you wish to use in the event of duplicate objects.
For more information on these options, please click the help button to
access the BusinessObjects Enterprise XI 3.0 Import Wizard Guide .
9. Click Next.
The "Incrimental import" screen appears.
10. Select the options you wish to use for this operation.
11. Click Next.
A note regarding importing server groups appears.
12. Click Next to begin the import.
BusinessObjects Enterpirse will import the objects you have selected.
94 BusinessObjects Enterprise XI 3.0 Integration for PeopleSoft

Working with Crystal Reports
10

Working with Crystal Reports
10
Overview
Overview
If you installed the Data Connectivity feature of the BusinessObjects XI
Integration for PeopleSoft, you can work with PeopleSoft data in Crystal
Reports.
Accessing data
To access data in Crystal Reports
1. Start Crystal Reports.
2. On the Start Page, click Blank Report.
3. In the Database Expert, expand Create New Connection.
4. Double-click the data source type that corresponds to your installation:
• If you installed the integration kit on a PeopleSoft Enterprise
(PeopleTools 8.46-8.49) environment, click PeopleSoft Enterprise,
and provide the following information:
ActionField
Type the appropriate URL to connect to the Query Access Services through the PeopleSoft Integration Gateway. (For example,
Server
96 BusinessObjects Enterprise XI 3.0 Integration for PeopleSoft
type http://webserv
er/PSIGW/QueryListeningCon
nector.)
Note: This URL is specified when
you configure the Query Access
Services in PeopleSoft.
Type your user name.User

Working with Crystal Reports
Accessing data
ActionField
Type your password.Password
• If you installed the integration kit on a PeopleSoft Enterprise
(PeopleTools 8.21-8.45) environment, click PeopleSoft Query, and
provide the following information:
ActionField
Type //server:port , where server
is the name of your PeopleSoft
Server
Application Server, and port is the
JSL port number that the server
uses for the Jolt listener.
10
Type your user name.User
Type your password.Password
5. Click Finish.
You can now create Crystal reports with data from your PeopleSoft
Enterprise system.
Note: Private queries in PeopleSoft Enterprise are marked with an asterisk
(*) to distinguish them from public queries.
Once you have connected to a data source, you can save the connection in
your Favorites folder. In the Database Expert, right-click the connection, and
click Add to Favorites.
For detials on using Crystal Reports please see the Crystal Reports User's
Guide.
BusinessObjects Enterprise XI 3.0 Integration for PeopleSoft 97

10
Working with Crystal Reports
Accessing data
To enable Unicode support, you must configure your system as described
in the Crystal Reports User's Guide and the BusinessObjects Enterprise XI
3.0 Installation Guide.
98 BusinessObjects Enterprise XI 3.0 Integration for PeopleSoft

Working with BusinessObjects Enterprise
11

Working with BusinessObjects Enterprise
11
Overview
Overview
After you install the BusinessObjects XI Integration Kit for PeopleSoft, you
must provide BusinessObjects Enterprise with information about your
deployment. This infomation is what allows BusinessObjects Enterprise to
authenticate users so that they can use their PeopleSoft credentials to log
on to BusinessObjects Enterprise.
Mapping PeopleSoft roles to BusinessObjects Enterprise
BusinessObjects Enterprise automatically creates a group for each PeopleSoft
role that you map. As well, BusinessObjects Enterprise creates aliases to
represent the members of the mapped PeopleSoft roles.
You can create a user account for each alias that is created.
However, if you run multiple systems, and your users have accounts in more
than one of the systems, then you can assign each user to an alias with the
same name before you create the accounts in BusinessObjects Enterprise.
100 BusinessObjects Enterprise XI 3.0 Integration for PeopleSoft
 Loading...