

Page 1

Data Services Advanced
Development Guide
BusinessObjects Data Services XI 3.1 (12.1.1)
Page 2

Copyright
© 2008 Business Objects, an SAP company. All rights reserved. Business Objects
owns the following U.S. patents, which may cover products that are offered and
licensed by Business Objects: 5,295,243; 5,339,390; 5,555,403; 5,590,250;
5,619,632; 5,632,009; 5,857,205; 5,880,742; 5,883,635; 6,085,202; 6,108,698;
6,247,008; 6,289,352; 6,300,957; 6,377,259; 6,490,593; 6,578,027; 6,581,068;
6,628,312; 6,654,761; 6,768,986; 6,772,409; 6,831,668; 6,882,998; 6,892,189;
6,901,555; 7,089,238; 7,107,266; 7,139,766; 7,178,099; 7,181,435; 7,181,440;
7,194,465; 7,222,130; 7,299,419; 7,320,122 and 7,356,779. Business Objects and
its logos, BusinessObjects, Business Objects Crystal Vision, Business Process
On Demand, BusinessQuery, Cartesis, Crystal Analysis, Crystal Applications,
Crystal Decisions, Crystal Enterprise, Crystal Insider, Crystal Reports, Crystal
Vision, Desktop Intelligence, Inxight and its logos , LinguistX, Star Tree, Table
Lens, ThingFinder, Timewall, Let There Be Light, Metify, NSite, Rapid Marts,
RapidMarts, the Spectrum Design, Web Intelligence, Workmail and Xcelsius are
trademarks or registered trademarks in the United States and/or other countries
of Business Objects and/or affiliated companies. SAP is the trademark or registered
trademark of SAP AG in Germany and in several other countries. All other names
mentioned herein may be trademarks of their respective owners.
Third-party
Contributors
Business Objects products in this release may contain redistributions of software
licensed from third-party contributors. Some of these individual components may
also be available under alternative licenses. A partial listing of third-party
contributors that have requested or permitted acknowledgments, as well as required
notices, can be found at: http://www.businessobjects.com/thirdparty
2008-11-28
Page 3

Contents
Introduction 7Chapter 1
Welcome to Data Services..........................................................................8
Overview of this guide...............................................................................14
Migration Basics 17Chapter 2
Development phases.................................................................................18
Migration mechanisms and tools...............................................................20
Welcome................................................................................................8
Documentation set for Data Services.....................................................8
Accessing documentation....................................................................11
Business Objects information resources..............................................12
About this guide....................................................................................14
Who should read this guide..................................................................15
About environment migration...............................................................15
Design phase.......................................................................................19
Test phase............................................................................................19
Production phase.................................................................................20
Which mechanism is best?...................................................................21
Export/import migration........................................................................23
Multi-user migration..............................................................................23
Preparing for Migration 25Chapter 3
Naming conventions for migration.............................................................26
Connections to external datastores......................................................27
Directory locations................................................................................29
Schema structures and owners............................................................29
Data Services Advanced Development Guide 3
Page 4

Contents
Datastore and system configurations........................................................30
Datastore configurations and migration...............................................31
Multiple configurations in multi-user environments..............................33
Command line login to the Designer.........................................................34
Export/Import 37Chapter 4
Exporting/importing objects in Data Services............................................38
The Export editor..................................................................................39
Exporting objects to another repository................................................42
Exporting objects to a file.....................................................................43
Exporting a repository to a file..............................................................44
Importing from a file..............................................................................45
Command line options to export objects to an XML file.......................46
Removing obsolete repository contents....................................................48
To compact your repository by creating a new repository....................48
Backing up repositories.............................................................................49
Maintaining Job Server performance.........................................................49
Multi-user Development 51Chapter 5
Central versus local repository..................................................................52
Data Services and multiple users..............................................................53
Security and the central repository............................................................56
Multi-user Environment Setup 57Chapter 6
Create a nonsecure central repository......................................................58
To create a nonsecure central repository.............................................58
Define a connection to a nonsecure central repository.............................59
To define a connection to a central repository......................................59
Activating a central repository....................................................................60
To activate a central repository.............................................................60
4 Data Services Advanced Development Guide
Page 5

Contents
To open the central object library.........................................................61
To change central repository connections............................................62
Implementing Central Repository Security 65Chapter 7
Overview....................................................................................................66
Group-based permissions....................................................................66
Permission levels.................................................................................67
Process summary.................................................................................67
Creating a secure central repository..........................................................68
To create a secure central repository...................................................68
To upgrade a central repository from nonsecure to secure..................69
Adding a multi-user administrator (optional)..............................................69
Setting up groups and users......................................................................70
Defining a connection to a secure central repository.................................70
To define a connection to a secure central repository..........................70
Working with objects in a secure central repository..................................72
Viewing and modifying permissions.....................................................72
Working in a Multi-user Environment 75Chapter 8
Filtering......................................................................................................76
Adding objects to the central repository....................................................78
To add a single object to the central repository....................................78
To add an object and its dependent objects to the central repository...79
Checking out objects.................................................................................79
Check out single objects or objects with dependents..........................80
Check out single objects or objects with dependents without
replacement..........................................................................................82
Check out objects with filtering.............................................................83
Undoing check out.....................................................................................84
To undo single object check out...........................................................84
Data Services Advanced Development Guide 5
Page 6

Contents
To undo check out of an object and its dependents.............................85
Checking in objects....................................................................................85
Checking in single objects, objects with dependents...........................86
Checking in an object with filtering.......................................................87
Labeling objects.........................................................................................88
To label an object and its dependents..................................................90
Getting objects...........................................................................................90
To get a single object............................................................................90
To get an object and its dependent objects..........................................91
To get an object and its dependent objects with filtering......................91
To get a previous version of an object..................................................92
To get an object with a particular label.................................................92
Comparing objects.....................................................................................92
Viewing object history................................................................................92
To examine the history of an object......................................................92
To get a previous version of an object..................................................94
To get an object with a particular label.................................................95
Deleting objects.........................................................................................95
Migrating Multi-user Jobs 97Chapter 9
Application phase management................................................................98
Copying contents between central repositories.......................................100
To copy the contents of one central repository to another central
repository............................................................................................100
Central repository migration.....................................................................101
Index 103
6 Data Services Advanced Development Guide
Page 7

Introduction
1
Page 8
Introduction
1
Welcome to Data Services
Welcome to Data Services
Welcome
Data Services XI Release 3 provides data integration and data quality
processes in one runtime environment, delivering enterprise performance
and scalability.
The data integration processes of Data Services allow organizations to easily
explore, extract, transform, and deliver any type of data anywhere across
the enterprise.
The data quality processes of Data Services allow organizations to easily
standardize, cleanse, and consolidate data anywhere, ensuring that end-users
are always working with information that's readily available, accurate, and
trusted.
Documentation set for Data Services
You should become familiar with all the pieces of documentation that relate
to your Data Services product.
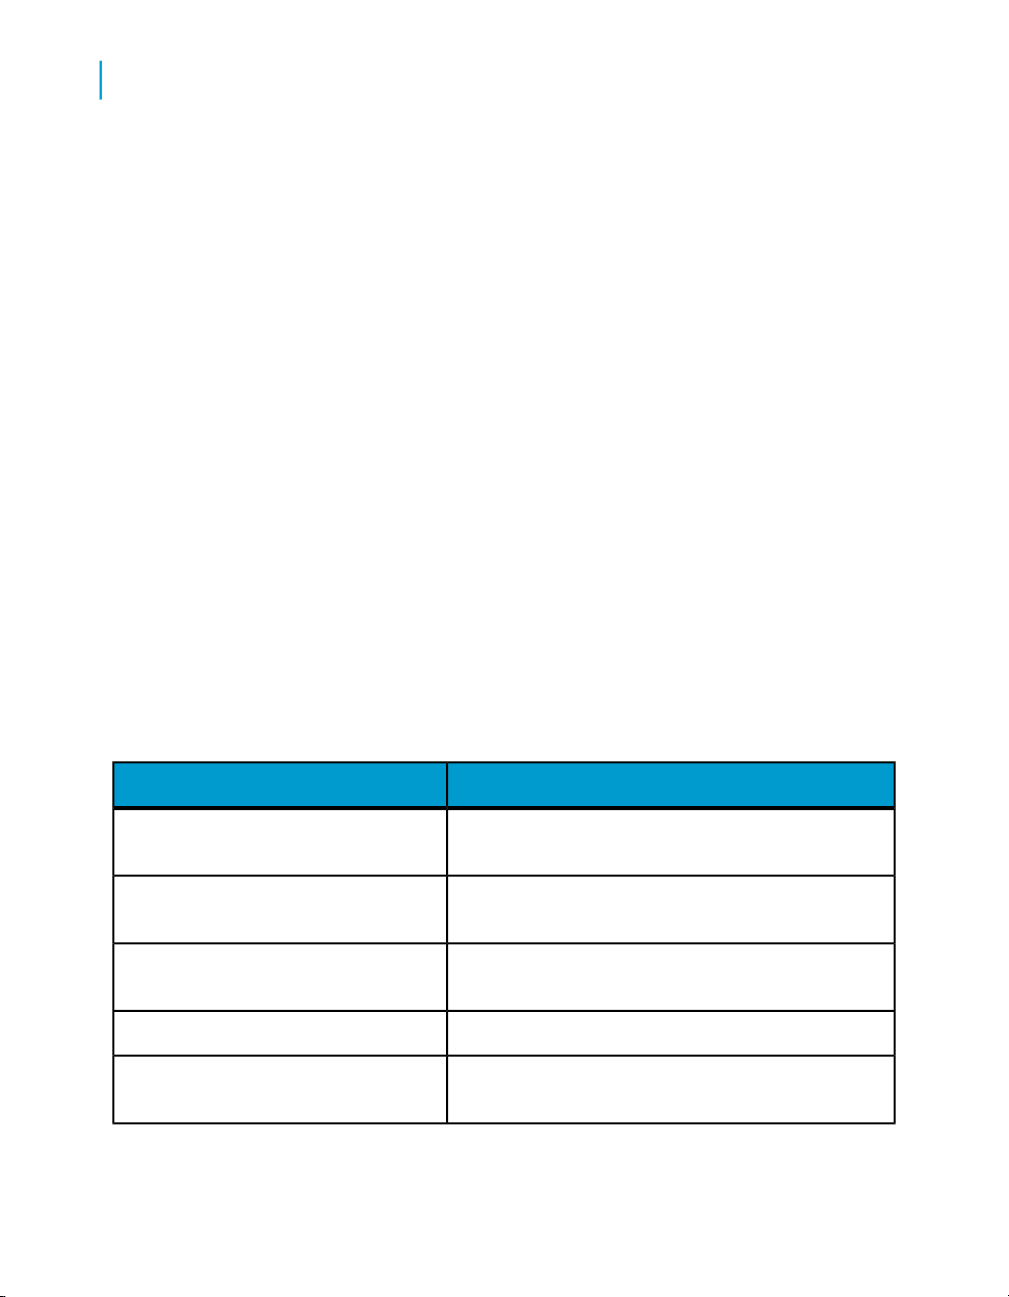
What this document providesDocument
Documentation Map
Release Summary
Release Notes
Getting Started Guide
Installation Guide for Windows
8 Data Services Advanced Development Guide
Information about available Data Services books,
languages, and locations
Highlights of key features in this Data Services release
Important information you need before installing and
deploying this version of Data Services
An introduction to Data Services
Information about and procedures for installing Data
Services in a Windows environment.
Page 9

Introduction
Welcome to Data Services
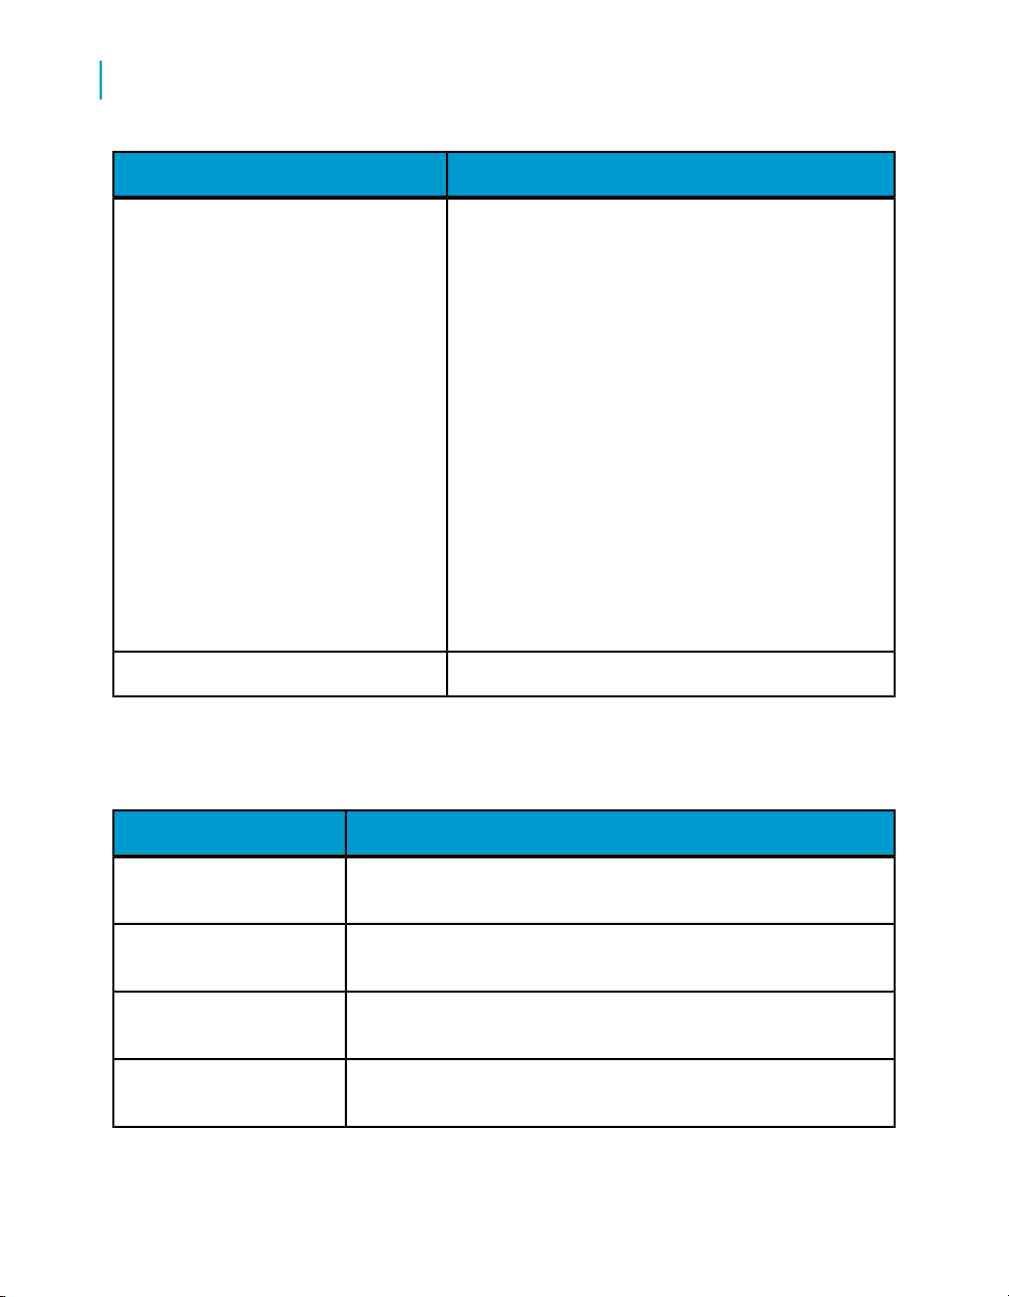
What this document providesDocument
1
Installation Guide for UNIX
Advanced Development Guide
Designer Guide
Integrator's Guide
Management Console: Administrator
Guide
Management Console: Metadata Reports Guide
Migration Considerations Guide
Information about and procedures for installing Data
Services in a UNIX environment.
Guidelines and options for migrating applications including information on multi-user functionality and
the use of the central repository for version control
Information about how to use Data Services Designer
Information for third-party developers to access Data
Services functionality. Also provides information about
how to install, configure, and use the Data Services
Adapter for JMS.
Information about how to use Data Services Administrator
Information about how to use Data Services Metadata
Reports
Information about:
• Release-specific product behavior changes from
earlier versions of Data Services to the latest release
• How to migrate from Data Quality to Data Services
Performance Optimization Guide
Reference Guide
Information about how to improve the performance
of Data Services
Detailed reference material for Data Services Designer
Data Services Advanced Development Guide 9
Page 10
Introduction
1
Welcome to Data Services
Technical Manuals
What this document providesDocument
A compiled “master” PDF of core Data Services books
containing a searchable master table of contents and
index:
•
Getting Started Guide
•
Installation Guide for Windows
•
Installation Guide for UNIX
•
Designer Guide
•
Reference Guide
•
Management Console: Metadata Reports Guide
•
Management Console: Administrator Guide
•
Performance Optimization Guide
•
Advanced Development Guide
•
Supplement for J.D. Edwards
•
Supplement for Oracle Applications
•
Supplement for PeopleSoft
•
Supplement for Siebel
•
Supplement for SAP
Tutorial
A step-by-step introduction to using Data Services
In addition, you may need to refer to several Adapter Guides and
Supplemental Guides.
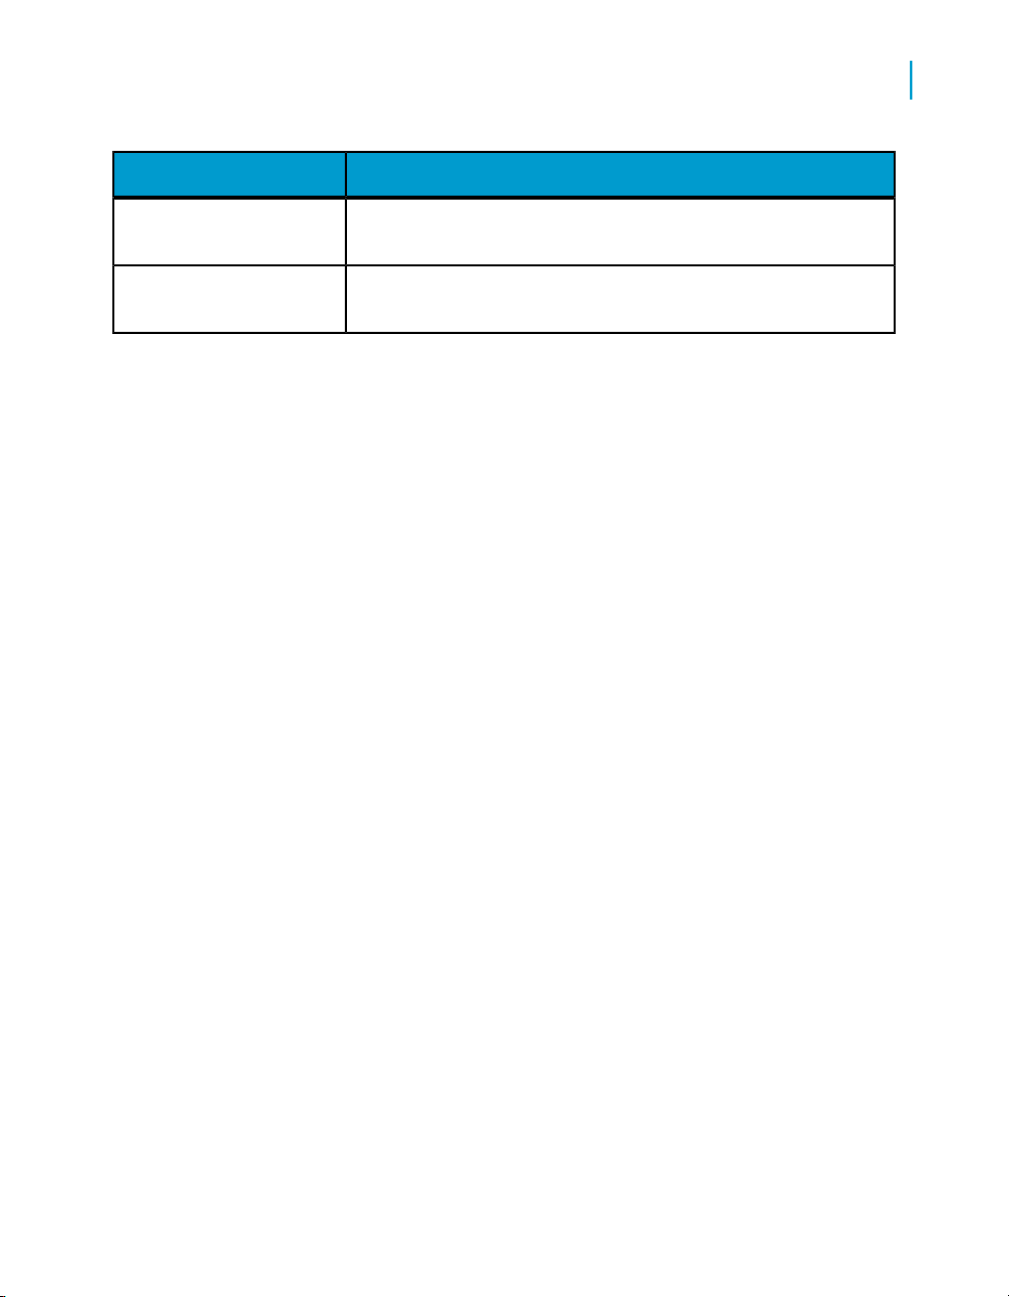
What this document providesDocument
Salesforce.com Adapter
Interface
Supplement for J.D. Edwards
Supplement for Oracle Applications
Supplement for PeopleSoft
10 Data Services Advanced Development Guide
Information about how to install, configure, and use the Data
Services Salesforce.com Adapter Interface
Information about license-controlled interfaces between Data
Services and J.D. Edwards World and J.D. Edwards OneWorld
Information about the license-controlled interface between Data
Services and Oracle Applications
Information about license-controlled interfaces between Data
Services and PeopleSoft
Page 11
Introduction
Welcome to Data Services
What this document providesDocument
1
Supplement for SAP
Supplement for Siebel
Information about license-controlled interfaces between Data
Services, SAP ERP, and SAP BI/BW
Information about the license-controlled interface between Data
Services and Siebel
Accessing documentation
You can access the complete documentation set for Data Services in several
places.
Accessing documentation on Windows
After you install Data Services, you can access the documentation from the
Start menu.
1. Choose Start > Programs > BusinessObjects XI 3.1 >
BusinessObjects Data Services > Data Services Documentation.
Note:
Only a subset of the documentation is available from the Start menu. The
documentation set for this release is available in LINK_DIR\Doc\Books\en.
2. Click the appropriate shortcut for the document that you want to view.
Accessing documentation on UNIX
After you install Data Services, you can access the online documentation by
going to the directory where the printable PDF files were installed.
1. Go to LINK_DIR/doc/book/en/.
2. Using Adobe Reader, open the PDF file of the document that you want
to view.
Data Services Advanced Development Guide 11
Page 12

Introduction
1
Welcome to Data Services
Accessing documentation from the Web
You can access the complete documentation set for Data Services from the
Business Objects Customer Support site.
1.
Go to http://help.sap.com.
2. Cick Business Objects at the top of the page.
You can view the PDFs online or save them to your computer.
Business Objects information resources
A global network of Business Objects technology experts provides customer
support, education, and consulting to ensure maximum business intelligence
benefit to your business.
Useful addresses at a glance:
ContentAddress
12 Data Services Advanced Development Guide
Page 13

Introduction
Welcome to Data Services
ContentAddress
1
Customer Support, Consulting, and Education
services
http://service.sap.com/
Data Services Community
https://www.sdn.sap.com/irj/sdn/businessob
jects-ds
Forums on SCN (SAP Community Network)
https://www.sdn.sap.com/irj/sdn/businessob
jects-forums
Blueprints
http://www.sdn.sap.com/irj/boc/blueprints
Information about Customer Support programs,
as well as links to technical articles, downloads,
and online forums. Consulting services can
provide you with information about how Business Objects can help maximize your business
intelligence investment. Education services can
provide information about training options and
modules. From traditional classroom learning
to targeted e-learning seminars, Business Objects can offer a training package to suit your
learning needs and preferred learning style.
Get online and timely information about Data
Services, including tips and tricks, additional
downloads, samples, and much more. All content is to and from the community, so feel free
to join in and contact us if you have a submission.
Search the Business Objects forums on the
SAP Community Network to learn from other
Data Services users and start posting questions
or share your knowledge with the community.
Blueprints for you to download and modify to fit
your needs. Each blueprint contains the necessary Data Services project, jobs, data flows, file
formats, sample data, template tables, and
custom functions to run the data flows in your
environment with only a few modifications.
Data Services Advanced Development Guide 13
Page 14

Introduction
1
Overview of this guide
http://help.sap.com/
ContentAddress
Business Objects product documentation.Product documentation
Documentation mailbox
documentation@businessobjects.com
Supported platforms documentation
https://service.sap.com/bosap-support
Send us feedback or questions about your
Business Objects documentation. Do you have
a suggestion on how we can improve our documentation? Is there something that you particularly like or have found useful? Let us know,
and we will do our best to ensure that your
suggestion is considered for the next release
of our documentation.
Note:
If your issue concerns a Business Objects
product and not the documentation, please
contact our Customer Support experts.
Get information about supported platforms for
Data Services.
In the left panel of the window, navigate to
Documentation > Supported Platforms >
BusinessObjects XI 3.1. Click the BusinessObjects Data Services link in the main window.
Overview of this guide
About this guide
The guide contains advanced development information. Topics include:
• Migration—How to move your projects to different development
environments
• Multi-user development—How to manage a project developed by multiple
users
14 Data Services Advanced Development Guide
Page 15

You will find this guide most useful:
• After you have learned product basics
• While planning the design, test, and production phases of your
data-movement projects
• As an advanced source of information during any phase of your projects
Who should read this guide
This and other Data Services product documentation assumes the following:
• You are an application developer, consultant, or database administrator
working on data extraction, data warehousing, or data integration.
• You understand your source data systems, RDBMS, business intelligence,
and messaging concepts.
• You understand your organization's data needs.
• You are familiar with SQL (Structured Query Language).
Introduction
Overview of this guide
1
• If you are interested in using this product to design real-time processing,
you are familiar with:
• DTD and XML Schema formats for XML files
• Publishing Web Services (WSDL, HTTP, and SOAP protocols, etc.)
• You are familiar Data Services installation environments—Microsoft
Windows or UNIX.
Further, Business Objects recommends that you review both the Data
Services Getting Started Guide and the Data Services Designer Guide before
using advanced concepts in this document.
About environment migration
One of the most powerful aspects of Data Services is its architectural flexibility
through development, test, and production environments. Data Services is
designed to support various configurations including large enterprises with
many developers working on multiple projects. Data Services supports
multi-site architectures whether centralized or not.
Data Services Advanced Development Guide 15
Page 16

Introduction
1
Overview of this guide
This guide discusses architectural options for implementing Data Services
in development, test, and production environments.
Related Topics
• Migration Basics on page 17
• Preparing for Migration on page 25
• Export/Import on page 37
• Multi-user Development on page 51
• Multi-user Environment Setup on page 57
• Working in a Multi-user Environment on page 75
• Migrating Multi-user Jobs on page 97
16 Data Services Advanced Development Guide
Page 17

Migration Basics
2
Page 18

Migration Basics
2
Development phases
About this section
Migration as it relates to Data Services is the process of moving applications
through multiple development phases into production. Data Services supports
simple and complex application migration through all phases into production.
Related Topics
• Development phases on page 18
• Migration mechanisms and tools on page 20
Development phases
The ETL application development process typically involves three distinct
phases:
• Design phase
• Test phase
• Production phase
You can use Data Services in all three phases. Because each phase might
require a different repository to control environment differences, Data Services
provides controlled mechanisms for moving objects from phase to phase.
Each phase could involve a different computer in a different environment
with different security settings. For example, design and initial test may only
require limited sample data and low security, while final testing may require
a full emulation of the production environment including strict security.
18 Data Services Advanced Development Guide
Page 19

Design phase
In this phase, you define objects and build diagrams that instruct Data
Services in your data movement requirements. Data Services stores these
specifications so you can reuse them or modify them as your system evolves.
Design your project with migration to testing and final production in mind.
Consider these basic guidelines as you design your project:
• Construct design steps as independent, testable modules.
• Use meaningful names for each step you construct.
• Make independent modules that can be used repeatedly to handle
common operations.
• Use test data that reflects all the variations in your production data.
Test phase
Migration Basics
Development phases
2
In this phase, you use Data Services to test the execution of your application.
At this point, you can test for errors and trace the flow of execution without
exposing production data to any risk. If you discover errors during this phase,
return the application to the design phase for correction, then test the
corrected application.
Testing has two parts:
• The first part includes designing the data movement using your local
repository.
• The second part includes fully emulating your production environment,
including data volume.
Data Services provides feedback through trace, error, and monitor logs during
both parts of this phase.
The testing repository should emulate your production environment as closely
as possible, including scheduling jobs rather than manually starting them.
Data Services Advanced Development Guide 19
Page 20

Migration Basics
2
Migration mechanisms and tools
Production phase
In this phase, you set up a schedule in Data Services to run your application
as a job. Evaluate results from production runs and when necessary, return
to the design phase to optimize performance and refine your target
requirements.
After moving a Data Services application into production, monitor it in the
Administrator for performance and results. During production:
• Monitor your jobs and the time it takes for them to complete.
The trace and monitoring logs provide information about each job as well
as the work flows and data flows contained within the job.
You can customize the log details. However, the more information you
request in the logs, the longer the job runs. Balance job run-time against
the information necessary to analyze job performance.
• Check the accuracy of your data.
To enhance or correct your jobs:
• Make changes in your design environment.
• Repeat the object testing.
• Move changed objects back into production.
Migration mechanisms and tools
Data Services provides two migration mechanisms:
• Export/import migration works best with small to medium-sized projects
where a small number of developers work on somewhat independent
Data Services applications through all phases of development.
• Multi-user development works best in larger projects where two or more
developers or multiple teams are working on interdependent parts of Data
Services applications through all phases of development.
Regardless of which migration mechanism you choose, Business Objects
recommends you prepare for migration using one or more tools that best fit
20 Data Services Advanced Development Guide
Page 21

your development environment for more information). The mechanism and
tools you use will depend on the needs of your development environment.
If your source data will come from multiple, homogeneous systems, Business
Objects recommends you use Datastore and system configurations tools.
When migrating applications in a multi-user environment, Business Objects
strongly recommends you use Naming conventions for migration.
Related Topics
• Export/import migration on page 23
• Multi-user Development on page 51
• Preparing for Migration on page 25
• Datastore and system configurations on page 30
• Designer Guide: Datastores, Creating and managing multiple datastore
configurations
• Naming conventions for migration on page 26
Which mechanism is best?
Migration Basics
Migration mechanisms and tools
2
Although Data Services supports a multi-user environment, you may not
need to implement this architecture on all projects. If your project is small to
medium in size and only consists of one or two developers, then a Central
Repository may not be a necessary solution to integrating the work of those
developers.
For example, only two consultants worked on a certain HR data mart
application. The Development system was designed so that while Consultant
1 managed the Master Repository, Consultant 2 worked on a new section
within a complete copy of the Master Repository.
Consultant 2 then exported this new section back into the Master Repository
using the export utility that allows objects to be 'Created', 'Replaced', or
'Ignored'. After updating the Master Repository, Consultant 2 took a new
complete copy of the Master Repository, overwriting the previous copy.
Use the following matrix to help you determine which mechanism and tools
would work best in your environment.
Data Services Advanced Development Guide 21
Page 22

Migration Basics
2
Migration mechanisms and tools
Situation/re
quirements
Small to
medium-sized
project
Export/im
port
Multi-user
ToolsMigration Mechanisms
Naming conventions
Configura
tions
OOX
Multiple-team
project
Source data
from multiple,
homogeneous systems
Different
source or target database
among environments
Need a "fast
and easy" migration solution
Optimal solution: X Compatible solution: O
OXX
XX
XX
XO
22 Data Services Advanced Development Guide
Page 23
Export/import migration
Export/import is the basic mechanism for migrating Data Services applications
between phases. First, you export jobs from the local repository to another
local repository or to an intermediate file which you can then import into
another local repository. For example, when moving from design repository
to test repository, you export from the design repository to a file, then import
the file to your test repository.
Migration Basics
Migration mechanisms and tools
2
If you find application errors during testing, you can correct them in the
development environment, then export the corrected version and import it
back into the test repository for retesting.
Related Topics
• Export/Import on page 37
Multi-user migration
You can also migrate Data Services applications between phases in more
complex development environments. Instead of exporting and importing
applications, multi-user development provides a more secure check-in,
check-out, and get mechanism, using a central repository to store the master
copies of your application elements. Multi-user development includes other
advanced features like labeling and filtering to provide you more flexibility
and control in managing application objects.
Data Services Advanced Development Guide 23
Page 24

Migration Basics
2
Migration mechanisms and tools
Related Topics
• Migrating Multi-user Jobs on page 97
24 Data Services Advanced Development Guide
Page 25

Preparing for Migration
3
Page 26

Preparing for Migration
3
Naming conventions for migration
About this section
Before you develop Data Services applications, Business Objects
recommends that you first set up a comprehensive structure to facilitate the
migration process between development phases.
This section discusses tools that can help you build your migration structure.
Business Objects recommends that you implement standardized naming
conventions for connectivity between computer systems. Add datastore and
system configurations to more easily work with multiple homogeneous
systems.
Related Topics
• Naming conventions for migration on page 26
• Datastore and system configurations on page 30
Naming conventions for migration
The best way to ensure fast and seamless migration is to use common
naming conventions across all systems and phases of all your development
environments.
Just as Business Objects recommends you standardize object prefixes,
suffixes, and path name identifiers to simplify your projects internally, we
also recommend the use of naming conventions externally for migration
purposes.
To ease migration, use common naming conventions for:
• Connections to external datastores
• Directory locations
• Schema structures and owners
You want to make it as quick and easy as possible to migrate applications
between users and between phases. This translates to significantly reducing
or eliminating time spent reconfiguring your jobs to work in each specific
environment.
While the actual data you are extracting, transforming, and loading usually
differs by database, the essential structure of the data should be the same
26 Data Services Advanced Development Guide
Page 27
on every database with which you want the same applications to work.
Therefore, it makes the most sense to standardize your database naming
and structuring before starting the development process.
Related Topics
• Designer Guide: Projects and Jobs, Naming conventions for objects in
jobs
• Connections to external datastores on page 27
• Directory locations on page 29
• Schema structures and owners on page 29
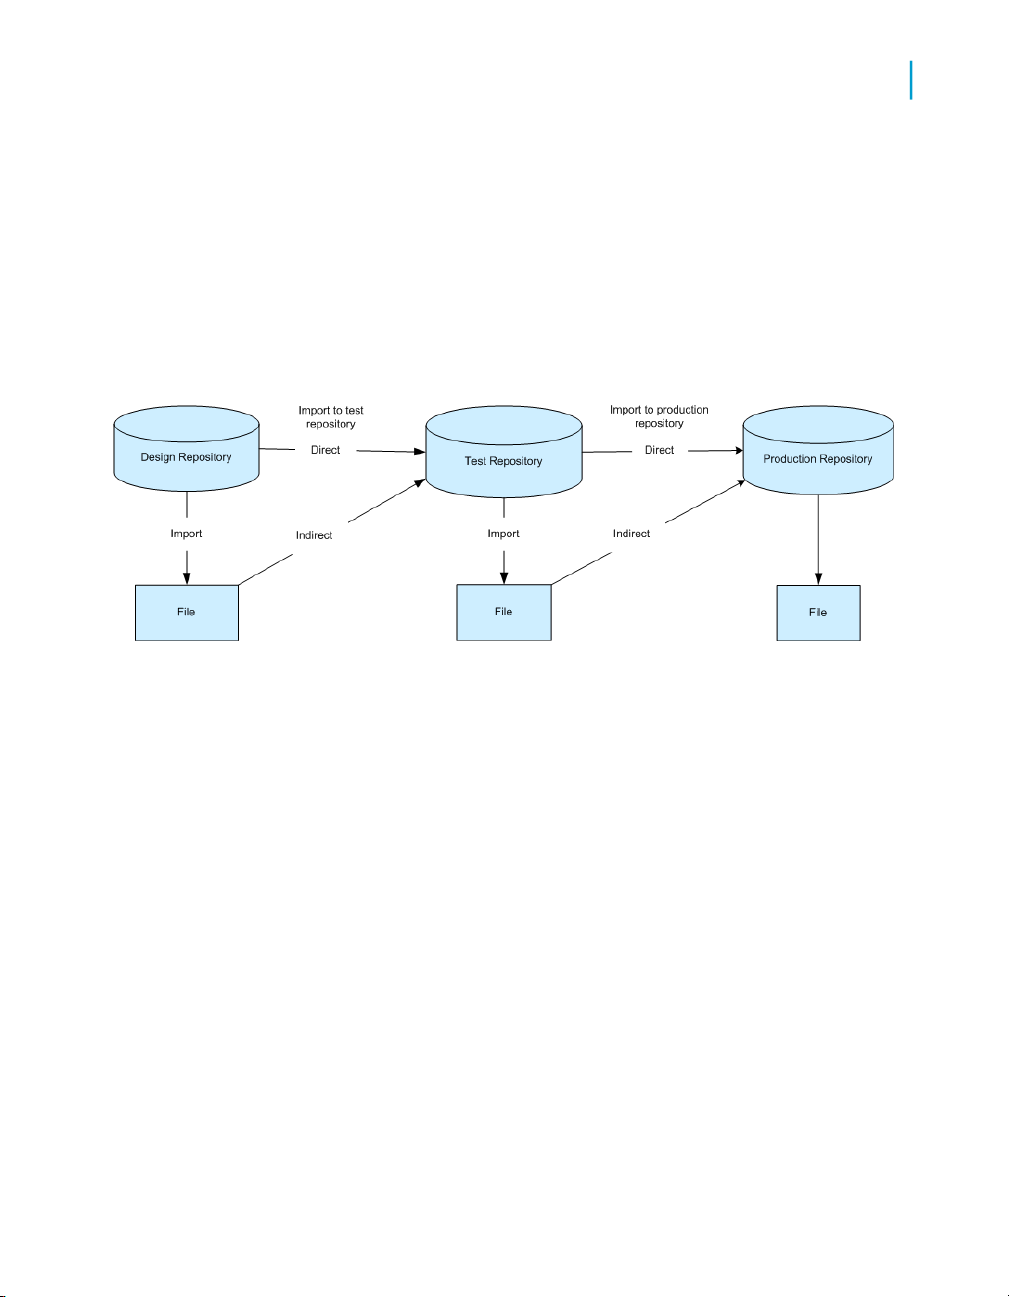
Connections to external datastores
In Data Services, migration is the process of moving objects between local
repositories, whether directly using the Export/Import method or indirectly
using the Multi-user development method. Regardless of method, you must
consider how the migration will impact connection configurations associated
with your jobs.
Preparing for Migration
Naming conventions for migration
3
Using generic naming for similar external datastore connections reduces the
time you spend on reconfiguring the connections to the same database type.
For example, you should choose the same logical name for all your Oracle
datastore connections to the same type of database structure regardless of
migration phase environment.
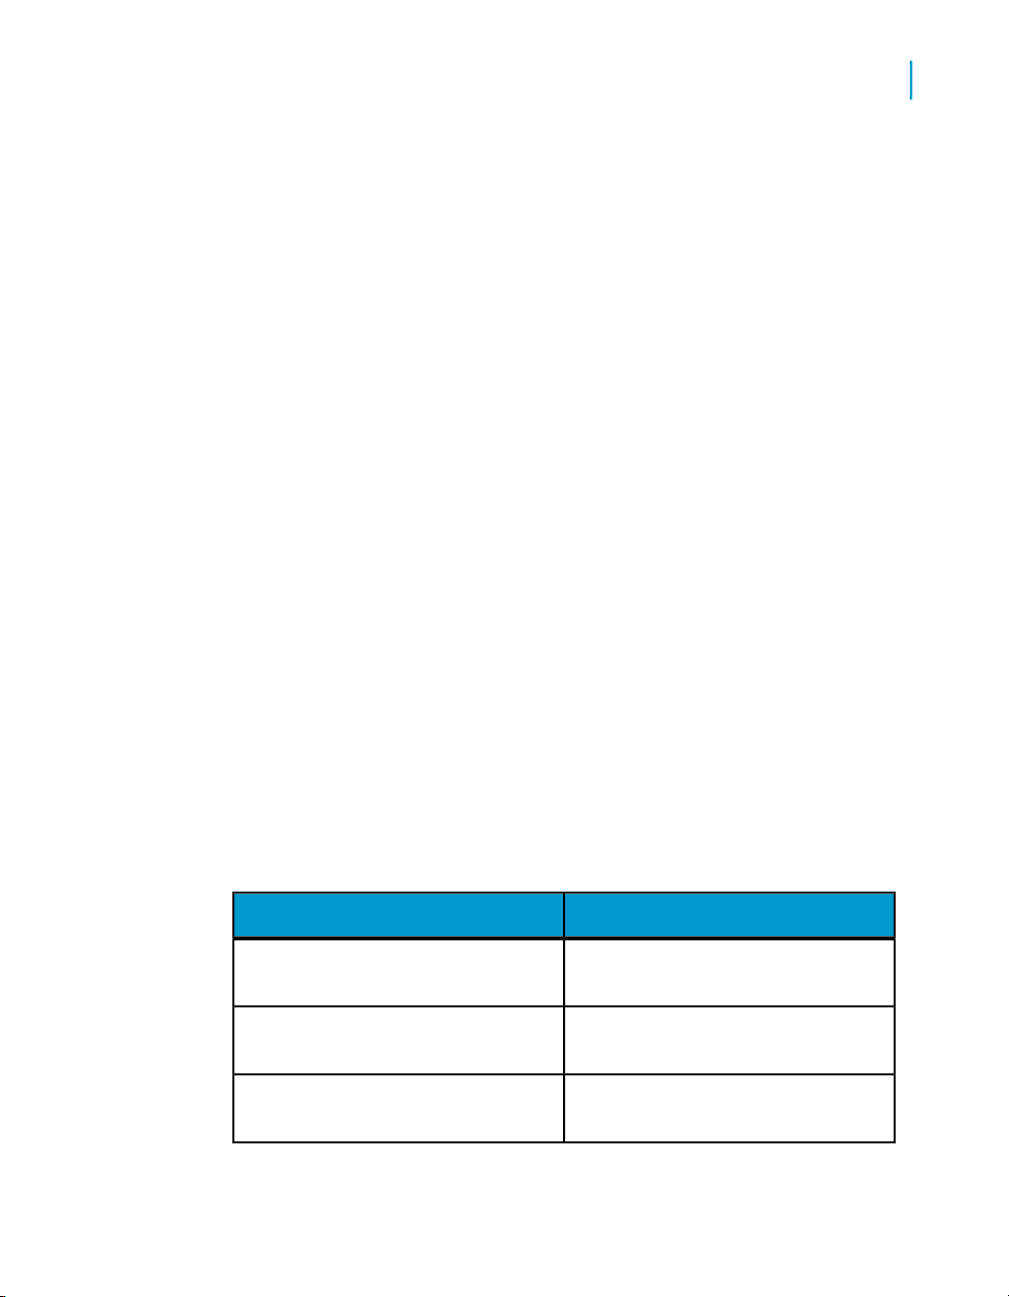
You can make connection names meaningful to a certain phase and specific
computer system names (Test_DW, Dev_DW, Prod_DW), however if you
choose this naming structure, Business Objects recommends that you use
datastore configurations for migration purposes.
Test phaseDevelopment phase
User name: Test_DWUser name: Dev_DW
Password: Test_DWPassword: Dev_DW
Host String: Test_DWHost String: Dev_DW
Data Services Advanced Development Guide 27
Page 28

Preparing for Migration
3
Naming conventions for migration
For a job to run against Test and Development, it would have to use Test_DW
and Dev_DW and this would require you to create different datastore
configurations for when the job runs against the Test or the Dev instance,
respectively.
Alternatively, you could call the connection string DW and regardless of what
instance you ran the job against, it would run without users having to create
multiple datastore configurations.
Test PhaseDevelopment Phase
Database A
Examples:
• There is one Oracle source system in your company that processes order
entry data. Multiple instances of this system exist for development, test,
and production purposes. Therefore, you name the connection string to
your Oracle source system "ORDER_SYSTEM". Then in all phases, you
configure that name to point to the correct (phase-specific) instance of
the system.
• Name the connection string to your target data warehouse "DW" then
point it to different databases depending on whether you are in the
development, test, or production environment.
Datastore Connection
Database B
Datastore Connection
User name: DWUser name: DWUser name: DWUser name: DW
Password: DWPassword: DWPassword: DWPassword: DW
Owner name: DWHost String: DWOwner name: DWHost string: DW
When you use this generic, cross-phase naming method, you cannot access
both dev and test from the same computer (since the connection string maps
only to one instance). If you require access to both, use multiple datastore
configurations.
28 Data Services Advanced Development Guide
Page 29

Related Topics
• Export/Import on page 37
• Multi-user Development on page 51
Directory locations
Business Objects recommends you use logical directory names (for example,
X:\) or point to common local drives to standardize directory location. For
example, since every computer has a C:\ drive, pointing to the directory
location, C:\TEMP would be a safe, reproducible standard.
Schema structures and owners
To further facilitate a seamless structure between development phases, give
all your database instances the same owner name for the same schema
structures from which you are reading and to which you are loading.
Regardless of name, the owner of each schema structure can vary and Data
Services will reconcile them.
Preparing for Migration
Naming conventions for migration
3
Data Services Advanced Development Guide 29
Page 30
Preparing for Migration
3
Datastore and system configurations
Datastore and system configurations
Datastore and system configurations are powerful tools for reducing the
configurations required to execute the same logic against different datastore
environments. With configurations, migration between development phases
becomes faster and more simplified.
Related Topics
• Datastore configurations and migration on page 31
• Multiple configurations in multi-user environments on page 33
30 Data Services Advanced Development Guide
Page 31

Datastore and system configurations
Datastore configurations and migration
Without multiple configuration datastores, each time you export/import from
one repository to another, you may need to spend time reconfiguring
datastore connections to work with the new repository (and sometimes new
host computer).
Without multiple configurations, each job in a repository can run only against
one datastore configuration.
Preparing for Migration
3
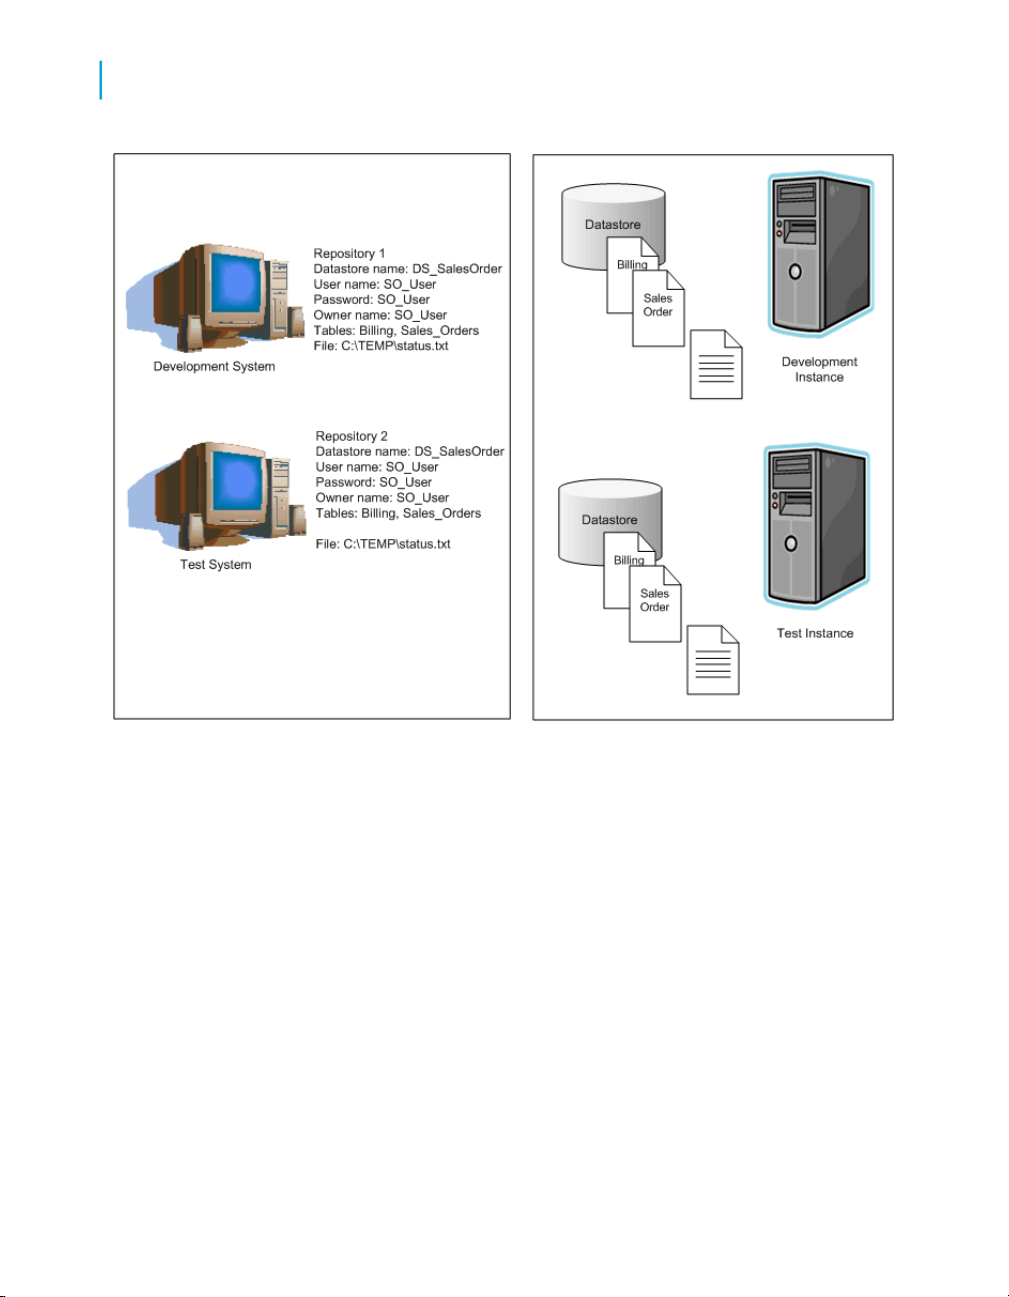
With multiple configurations, instead of a separate datastore (and datastore
configuration) for each database instance, you can associate multiple
datastore configurations with a single datastore definition.
Each system configuration defines a set of datastore configurations that you
want to use together when running a job. You must create datastore
configurations for the datastores in your repository before you can create
system configurations.
Data Services Advanced Development Guide 31
Page 32
Preparing for Migration
3
Datastore and system configurations
All objects you want to import into a multiple configurations datastore must
share the same owner.
32 Data Services Advanced Development Guide
Page 33
Preparing for Migration
Datastore and system configurations
3
Related Topics
• Designer Guide: Datastores, Creating and managing multiple datastore
configurations
Multiple configurations in multi-user environments
Data Services also supports a multi-user development environment. A team
can work together on an application during development, testing, and
production phases. Further, different teams can work on the different phases
simultaneously.
Individual users work on an application in their unique local repositories. The
team uses a central repository to store, check in, and check out objects that
belong to the application master copy. The central repository preserves all
Data Services Advanced Development Guide 33
Page 34

Preparing for Migration
3
Command line login to the Designer
versions of an application's objects, allowing you to revert to a previous
version if needed.
The easiest way to set up your environment to work with multi-user
functionality is by establishing the exact same environment naming standards
among your developers. In each developer's environment, the configuration
would be different. For example a database connection string would point
to their local database. However, if implementing these naming standards
is not possible, you can still save time and streamline your multi-user
environment by using multiple-configuration datastores.
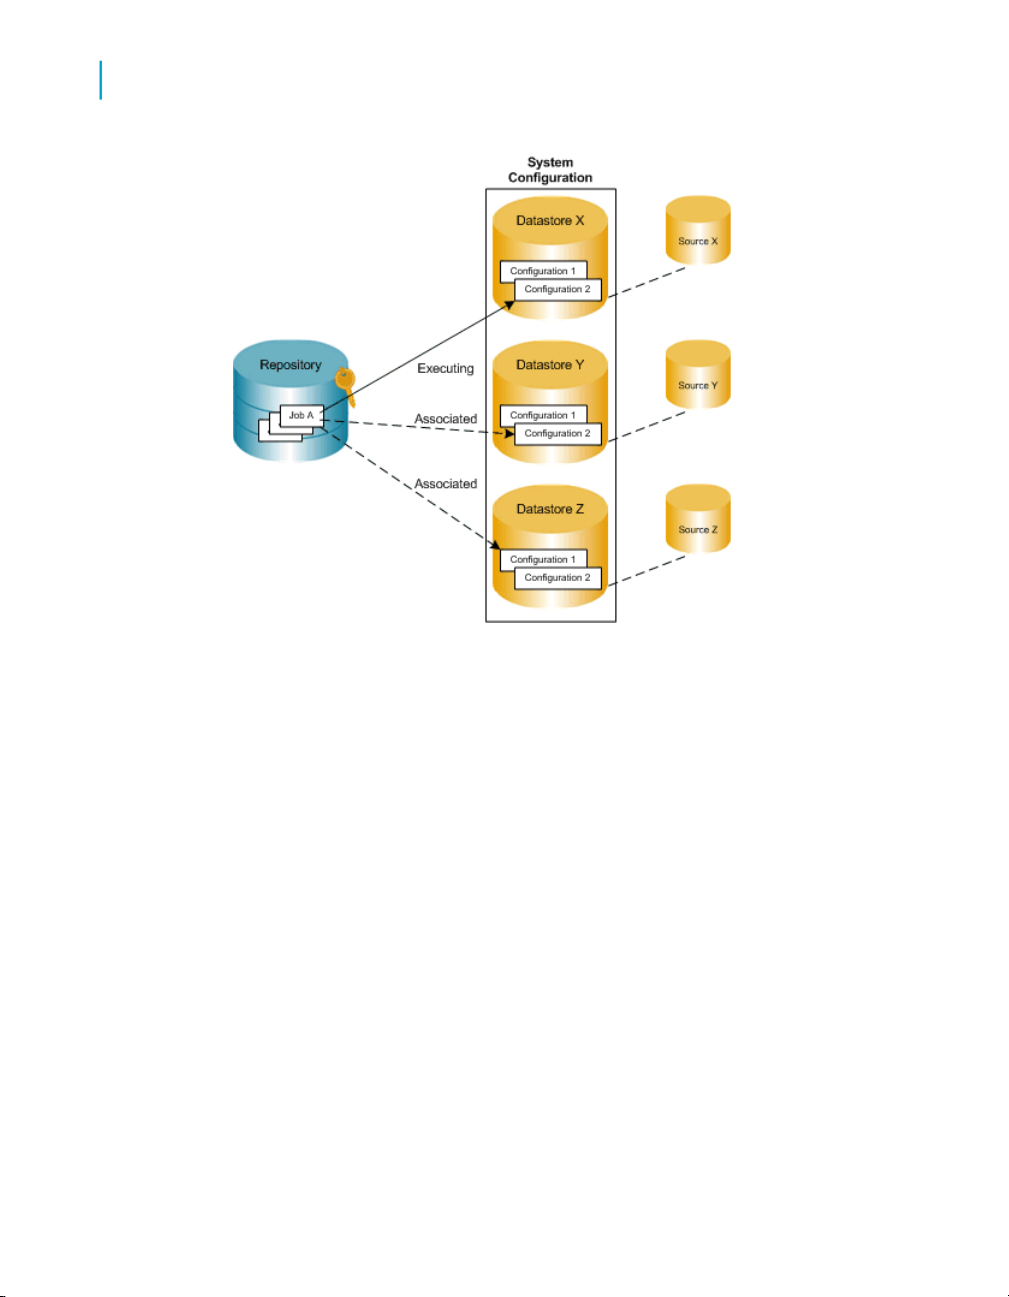
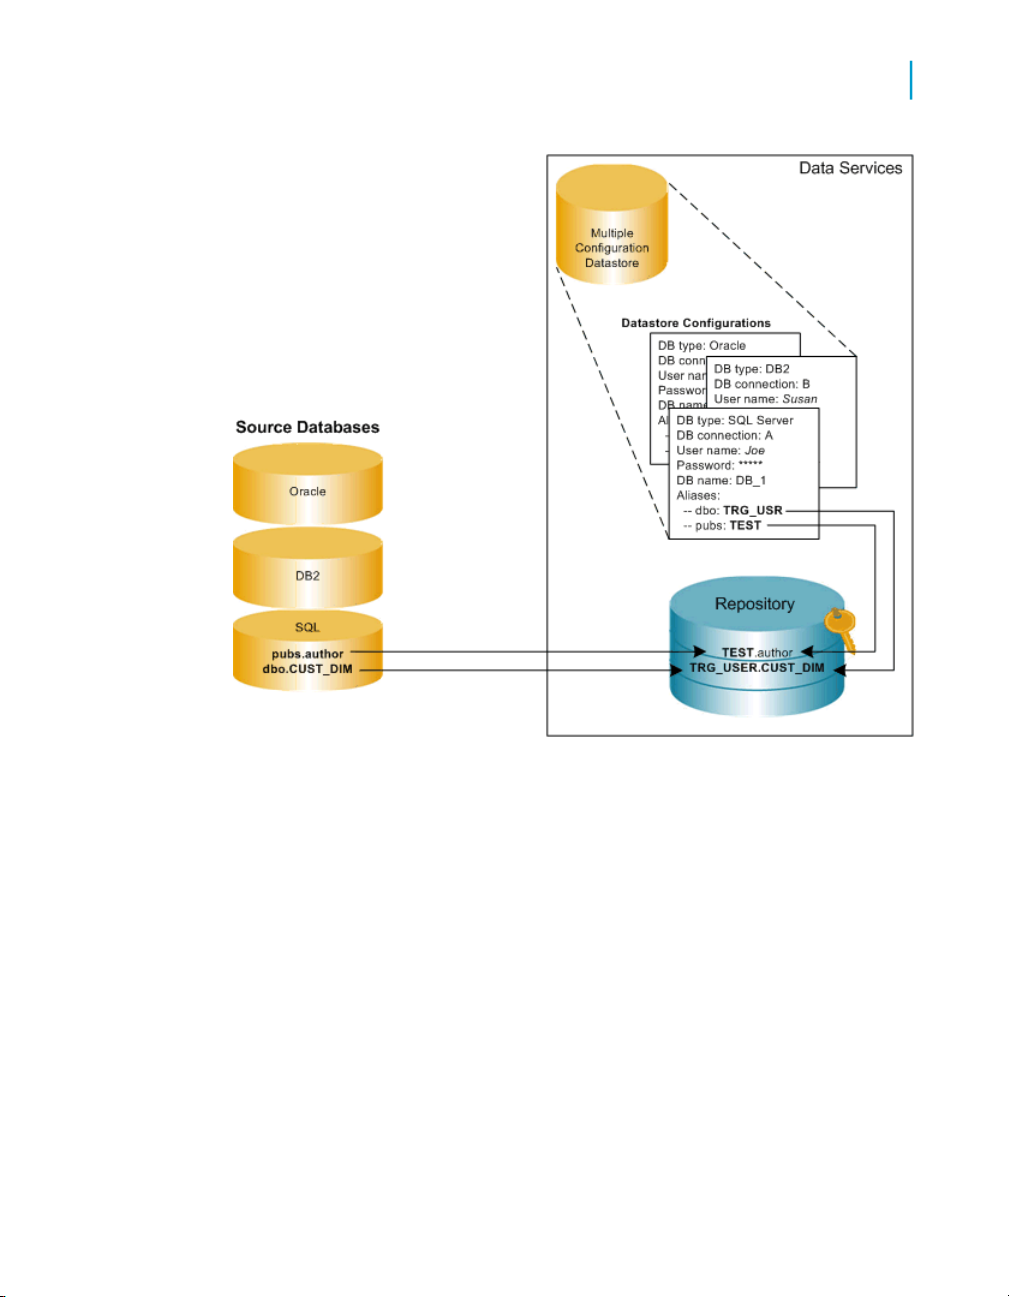
For example, if your developers use databases with the same metadata
structure but different database instances and owners, you can define a
datastore configuration for each developer on your design team, mapping
different owners to a common set of aliases used by all. This way, they can
share and contribute to the same projects without having to set up their
datastore connection information each time they check out a project from
the central repository.
Related Topics
• Multi-user Development on page 51
• Multi-user Environment Setup on page 57
• Working in a Multi-user Environment on page 75
• Migrating Multi-user Jobs on page 97
Command line login to the Designer
You can log in to the Designer from the command line. This feature facilitates
logging into multiple repositories, such as DEV, TEST, PROD, or different
departments, and different versions.
With this feature you can create different shortcuts on your Desktop with
different connection parameters, and you can choose the repository you
want to connect to merely by clicking its shortcut.
The following table describes the AL_Designer command options.
34 Data Services Advanced Development Guide
Page 35

Preparing for Migration
Command line login to the Designer
DescriptionOption
3
-U user
-P password
-S server
-Q database
-N dbtype
-g
User name
Password
This option contains one of the following:
•
Database connection name for Oracle
•
DB2 data source for DB2
•
Database server name for SQL Server
•
Database server name for Sybase
•
ODBC DSN for MySQL
•
Database name for SQL Server,
•
Database name for Sybase
Database type, which can be Oracle, DB2, MySQL,
Microsoft, and Sybase
Windows authentication mode, which applies to SQL
Server only
Data Services Advanced Development Guide 35
Page 36

Preparing for Migration
Command line login to the Designer
3
36 Data Services Advanced Development Guide
Page 37

Export/Import
4
Page 38

Export/Import
4
Exporting/importing objects in Data Services
Overview of export/import
The simplest type of migration in Data Services is called export/import.
This section discusses the export/import method.
Related Topics
• Exporting/importing objects in Data Services on page 38
• Removing obsolete repository contents on page 48
• Backing up repositories on page 49
• Maintaining Job Server performance on page 49
Exporting/importing objects in Data
Services
The export feature gives you the flexibility to manage and migrate projects
involving multiple developers and different execution environments. When
you export a job from a development repository to a production repository,
you can change the properties of objects being exported to match your
production environment.
In particular, you can change datastore definitions—application and database
locations and login information—to reflect production sources and targets.
You can export objects to another repository or a flat file (.atl or .xml). If the
destination is another repository, you must be able to connect to and have
write permission for that repository, and your repository versions must match.
You cannot export read-only transform configurations.
Related Topics
• The Export editor on page 39
• Exporting objects to another repository on page 42
• Exporting objects to a file on page 43
• Exporting a repository to a file on page 44
• Importing from a file on page 45
• Command line options to export objects to an XML file on page 46
38 Data Services Advanced Development Guide
Page 39

The Export editor
In the Export editor, specify the objects you want to export and an export
location. Choose Tools > Export or select an object and right-click Export
to open the export editor.
To specify an object to export, drag the object from the object library into the
Objects to Export window.
The Object to Export window shows the final list of objects to be exported.
When you drag any object from the object library, the datastores, file formats,
custom functions, and transform configurations included in the object definition
are automatically added to the other export sections. Each object in an export
window opens to show objects called by this object.
Export/Import
Exporting/importing objects in Data Services
4
You can control which associated objects to exclude or include. For example,
you can export a work flow and all tables contained in the work flow without
exporting an associated data flow.
Data Services Advanced Development Guide 39
Page 40

Export/Import
4
Exporting/importing objects in Data Services
To control which objects to export, either select an object, right-click, and
choose a shortcut menu option, or select the white space in the Export editor,
right-click, and choose a shortcut menu option:
• Export
Starts the export process.
• Exclude
Removes only the selected object from the list of objects to be exported.
The object remains in the list, but its exclusion is indicated by a red "x"
on the object icon.
All occurrences of the object are excluded.
When you export the list, excluded objects are not copied to the
destination. Objects called by this object are not removed from the list of
objects to be exported, unless they are specifically excluded.
Note:
You cannot export read-only transform configurations, so they are
automatically excluded.
• Include
Adds an excluded object to the export plan. The red "X" on the icon
disappears. All occurrences of the object are included.
When you export, the included objects are copied to the destination.
• Exclude Tree
Removes the selected object and all objects called by this object from
the export. The objects remain in the list, but their exclusion is indicated
by a red "x" on the icons—the selected object and any objects it calls are
excluded.
When you export the list, the excluded objects are not copied to the
destination.
• Include Tree
Adds the selected excluded object and the objects it calls to the export
list. The red x on the selected object and dependents disappears. When
you export the list, the included objects are copied to the destination.
• Exclude environmental information
40 Data Services Advanced Development Guide
Page 41

Export/Import
Exporting/importing objects in Data Services
Removes all connections (datastores and formats) and their dependent
content (tables, files, functions) from the objects in the Export editor. Note
that if you exclude datastores during export, data flows that depend on
those datastores will not execute properly unless your destination
repository has the same set of datastores with the same database types
and versions (connection strings can be different).
When you export, excluded objects are not copied to the destination.
From the white space in the Export editor, right-click to select Exclude
environmental information from the menu. Using this option you can export
jobs without connections as a way to avoid connection errors. If you decide
to use this option, Business Objects recommends that you configure
datastores and formats for the new environment separately.
Note:
Business Objects recommends that instead of excluding environmental
information you simply add additional datastore configurations that match
the destination environment either before or after the export (and import,
if exported to a file).
• Clear All
4
Removes all objects from all sections of the editor.
• Delete
Removes the selected object and objects it calls from the Export editor.
Only the selected occurrence is deleted; if any of the effected objects
appear in another place in the export plan, the objects are still exported.
This option is available only at the top level. You cannot delete other
objects; you can only exclude them.
Related Topics
• Designer Guide: Datastores, Database datastores
• Designer Guide: Datastores, Creating and managing multiple datastore
configurations
• Reference Guide: Data Services Objects, Datastore
Data Services Advanced Development Guide 41
Page 42

Export/Import
4
Exporting/importing objects in Data Services
Exporting objects to another repository
You can export objects from the current repository to another repository.
However, the other repository must be the same version as the current one.
The export process allows you to change environment-specific information
defined in datastores and file formats to match the new environment.
To export a repository object to another repository
1. In the object library, choose an object to export.
Right-click and choose Export.
The Export editor opens in the workspace. To add more objects to the
list of objects to export, drag the objects from the object library into the
Objects to Export section of the editor.
2. Refine the list of objects to export.
You can use the options available in the right-click menu for each object
to include or exclude the object from the export list.
3. When your list is complete, right-click and choose Export.
4. In the Export Destination window, add the destination database connection
information.
5. In Export Confirmation window, verify the components to export.
The Destination status column shows the status of the component in the
target database and the proposed action.
42 Data Services Advanced Development Guide
ActionDestination Status
Create/ExcludeDoes not exist
Replace/ExcludeExists
Page 43

Export/Import
Exporting/importing objects in Data Services
To edit an action, select any number of objects (using SHIFT and CTRL
keys) and select either Create, Exclude, or Replace from the Target
Status list box.
6. Click Next.
7. In the Datastore Export Options window, select the datastore.
You can change the owner of a table or the connection properties of the
datastore.
Click Advanced.
8. Change the database connection information as required by the target
database.
Click Next.
9. In the File Format Mapping dialog, select a file and change the Destination
Root Path if necessary.
You can change the Destination Root Path for any file formats to match
the new destination.
10. Click Finish.
4
Data Services copies objects in the Export editor to the target destination.
When copying is complete, the objects display in the Output window. The
Output window shows the number of objects exported as well as a list of any
errors.
Exporting objects to a file
You can also export objects to a file. If you choose a file as the export
destination, Data Services does not provide options to change
environment-specific information.
Note:
Objects in a repository are exported in the .atl format, while whole repositories
can be exported in either the .atl or .xml format. ATL is Data Services'
scripting language format. Using the .xml file format might make repository
content easier for you to read. It also allows you to export Data Services to
other products.
Data Services Advanced Development Guide 43
Page 44

Export/Import
4
Exporting/importing objects in Data Services
Exporting a repository to a file
You can also export an entire repository to a file. When you export or import
a repository, jobs and their schedules (created in Data Services) are
automatically exported or imported as well. Schedules cannot be exported
or imported without an associated job and its repository.
If you choose a file as the export destination, Data Services does not provide
options to change environment-specific information.
To export a repository to a file
1. From the object library, right-click and choose Repository > Export To
File.
A window opens to prompt you for the destination of the export file. You
can browse the directory to change the location, set the file type (.xml or
.atl), and enter a name for the file.
2. Click Open.
44 Data Services Advanced Development Guide
Page 45

The repository is exported to the file.
Importing from a file
Importing objects or an entire repository from a file overwrites existing objects
with the same names in the destination repository.
To import a repository from a file
1. There are two ways to import Data Services repository files into another
repository. Use Tools > Import from file, or in the object library, right-click
and choose Repository > Import from File.
A window opens for you to specify the file to import. You can import
individual files or the whole repository using either an ATL, XML, DMT,
or FMT file type. (ATL is Data Services' internal scripting language. DMT
and FMT are files exported from the Data Quality or IQ8 products.)
2. Select a file to import and click Open.
• If you attempt to import an ATL file saved from an earlier version of
Data Services, a warning displays indicating that the version of the
ATL file is lower than the repository version and that the ATL file you
are about to import might contain objects that do not make optimal
use of your upgraded repository. For example, new options for some
features might not be available. To update an ATL file, import it into
a repository of the same version then upgrade that repository. To abort
the import, click No. To continue with the import, click Yes.
• If you attempt to import an ATL file saved from a repository that is later
than your current version, an error message displays indicating that
the version of the ATL file is higher than the repository version and
cannot be imported. Click OK.
• If you attempt to import a DMT or FMT file, Data Services displays the
File Format Editor to allow you to allow you to complete missing values
for the properties of the file. Also, because DMT and FMT formats
support field names longer than 60 characters, you must uniquely
rename any field names longer than 60 characters prior to importing
the file.
Export/Import
Exporting/importing objects in Data Services
4
3. Choose Programs > Business Objects XI 3.1 > BusinessObjects Data
Services > Data Services Designer from the Start menu.
Data Services Advanced Development Guide 45
Page 46

Export/Import
4
Exporting/importing objects in Data Services
4. Log in to the repository where the file was imported.
5. Verify that the file or repository was imported.
Command line options to export objects to an XML file
Data Services provides options on the al_engine command to export an
entire repository or individual objects to an XML file. This capability provides
the following benefits:
• Allows external version management tools to obtain objects from the Data
Services repository. This ability is useful if you use one version control
system and want to integrate with Data Services.
• Facilitates automate migration from one repository to another (for example,
DEV, TEST, and PROD) when you include the command in scripts.
The following table describes the al_engine command options to export to
an XML file.
-XX
-XX ObjectType @FileName
46 Data Services Advanced Development Guide
DescriptionOption
Full repository export. This option
exports the repository to file with the
name export.xml.
Export all objects of the specific object type to the specified file.
ObjectType can be one of the values listed in the following option.
Page 47

-XX ObjectType @ FileName@Ob
jectName
Export/Import
Exporting/importing objects in Data Services
DescriptionOption
Export the specific ObjectName of
the specified object type to the specified file.
ObjectType can be one of the following values:
•
P - Exports all projects
•
J - Exports all jobs
•
W - Exports all work flows
•
D- Exports all data flows
•
T - Exports all user-defined
transforms
•
F - Exports all user-defined file
formats
4
-XX ObjectType @ FileName@Ob
jectName@DE
-XX ObjectType @ FileName@Ob
jectName@D
Data Services Advanced Development Guide 47
•
X - Exports all XML and DTD
message formats
•
S - Exports all datastores
•
C - Exports all custom functions
•
p - Exports all system configura-
tions
Export the specific ObjectName and
its dependents with datastore information to the specified file.
Export the specific ObjectName and
its dependents without datastore information to the specified file.
Page 48

Export/Import
4
Removing obsolete repository contents
Removing obsolete repository contents
Data Services saves a version of each object every time you save the object.
Repeatedly modified object definitions can consume a substantial amount
of space. If you notice your repository performance degrading, consider
compacting the repository.
To access the Compact Repository command, select Project > Compact
Repository from the menu bar. This command removes previous object
versions maintained by Data Services.
You can also compact your repository manually. If you have never compacted
the repository, the majority of space in the repository could be occupied by
old versions of Data Services objects. In this case, the Compact Repository
command might be too slow and tedious. Instead, you can export the latest
versions of the repository object definitions to a file, clear the repository
database by creating a new repository, then reimport the object definitions.
To compact your repository by creating a new repository
1. Export the repository to a file.
The file type can be either XML or ATL. The latest version of each object
is exported.
2. Choose Data Services Repository Manager from the Start > Programs
> BusinessObjects XI 3.1 > BusinessObjects Data Services menu.
3. From the Repository Manager, add the database connection information
for the repository.
4. Click Create.
Data Services warns that a valid repository already exists.
5. Click Yes to overwrite the old repository.
The Repository Manager creates a new repository, removing all of the
old objects.
6. Import the previously exported repository.
48 Data Services Advanced Development Guide
Page 49

Backing up repositories
Backing up repositories
Use your DBMS utilities to back up your repositories regularly. For information,
refer to your DBMS documentation.
Maintaining Job Server performance
If you are designing jobs, typically you might use the same computer for your
Designer, repository, and Job Server. In addition, you might use the same
datastore for both your repository and your target database.
However, when you migrate your jobs into a test environment, the Job Server
could move to a separate computer (typically from a Windows to a UNIX
platform). The Data Services Job Server computer uses source, target, and
repository database client libraries to extract, transform, and load data
according to a job's design. Therefore, the Job Server computer must have
a database client installed for each database you are using to run a Data
Services job. In addition, Data Services allows you to localize source and
target databases using locale and code page settings.
Export/Import
4
When migrating jobs between different Job Servers verify that the code page
used by each source and target database is the same as the code page set
for the corresponding database client on the Job Server's computer.
The database client code page used by a Job Server on a Windows might
be different from the one used on UNIX. For example, the Oracle client code
page MS1252 on Windows should be changed to the ISO88591 code page
on UNIX.
Data Services allows different code pages to be used in sources and targets.
Mismatched locale settings do not cause errors and Data Services attempts
to treat equivalent settings without any transcoding. However, mismatches
may result in performance degradation from transcoding done by Data
Services during job execution.
If your jobs do not require the use of different locales, you can increase
performance by ensuring that default locales are not mismatched. After
migration, if you notice a significant difference between the speed of design
and test environments, check locale settings. In the Designer, check to see
that datastore code pages for sources and targets match client code pages
on the Job Server computer.
Data Services Advanced Development Guide 49
Page 50

Export/Import
4
Maintaining Job Server performance
Related Topics
• Reference Guide: Locales and Multi-Byte Functionality
50 Data Services Advanced Development Guide
Page 51

Multi-user Development
5
Page 52

Multi-user Development
5
Central versus local repository
About multiple users
Data Services supports a multi-user development environment. A team can
work together on an application during the development, testing, or production
phase. Also, different teams can work on the different phases at the same
time.
Each individual developer works on an application in their unique local
repository. Each team uses a central repository to store the master copy of
its application. The central repository preserves all versions of all objects in
the application so you can revert to a previous version if necessary.
Related Topics
• Central versus local repository on page 52
• Data Services and multiple users on page 53
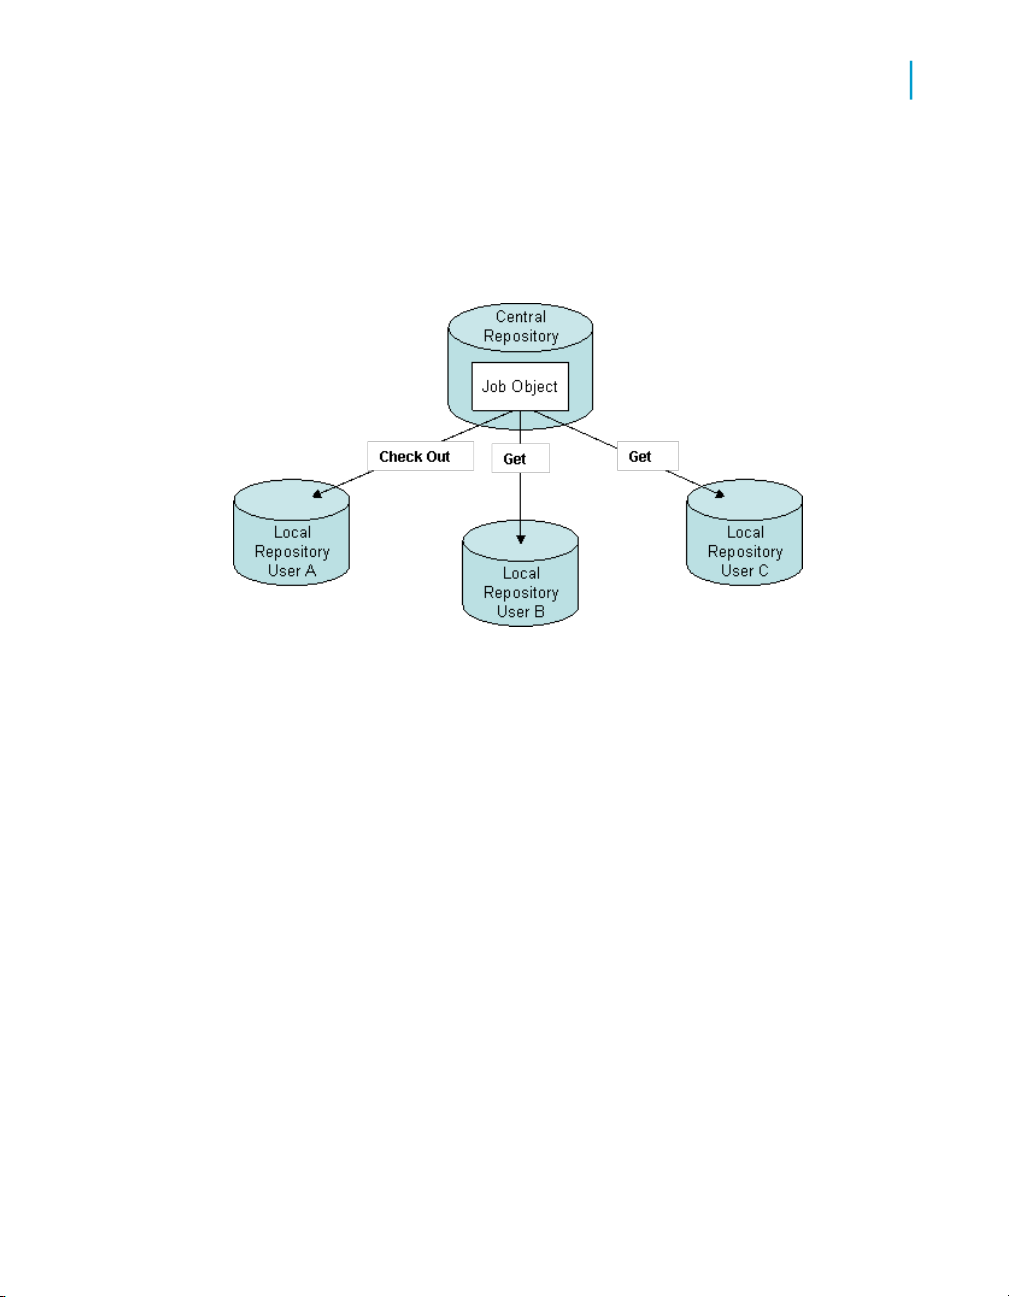
Central versus local repository
Data Services allows you to create a central repository for storing the team
copy of a Data Services application. The central repository contains all
information normally found in a local repository such as definitions for each
object in an application. However, the central repository is merely a storage
location for this information. To change the information, you must work in a
local repository.
A local repository provides a view of the central repository. You can "get"
(copy) objects from the central repository into your local repository. However,
to make changes to an object, you must "check out" that object from the
central repository into your local repository. While you have an object checked
out from the central repository, other users cannot check out that object, so
they cannot change the information.
After completing changes, you "check in" the changed object. When you
check in objects, Data Services saves the new, modified objects in the central
repository.
52 Data Services Advanced Development Guide
Page 53
Multi-user Development
Data Services and multiple users
Multiple users working from unique local repositories can connect to the
same central repository. These users can work on the same application and
share their work. However, at any given time only one user can check out
and change a particular object. While an object is checked out to one user,
other users can "get" (obtain a copy of) the object but cannot make changes
that will update the central repository.
5
The central repository retains history for each object. Therefore, if you find
you made a change that did not work as planned, you can revert to a previous
version of the object.
The local repository and the central repository must use the same Data
Services repository version. For example, you can run Data Services Designer
X.2 with a central and local repository version X.1. However, you cannot run
Data Services Designer X.2 with a central repository X.1 and a local repository
X.2
Data Services and multiple users
A multi-user environment affects how you use Data Services and how you
manage different phases of an application. For success in a multi-user
environment, you must maintain consistency between your local repository
and the central repository.
The following terms apply when discussing multi-user environments and
Data Services:
• Highest level object
Data Services Advanced Development Guide 53
Page 54
Multi-user Development
5
Data Services and multiple users
The highest level object is the object that is not a dependent of any object
in the object hierarchy. For example, if Job 1 is comprised of Work Flow
1 and Data Flow 1, then Job 1 is the highest level object.
• Object dependents
Object dependents are objects associated beneath the highest level object
in the hierarchy. For example, if Job 1 is comprised of Work Flow 1 which
contains Data Flow 1, then both Work Flow 1 and Data Flow 1 are
dependents of Job 1. Further, Data Flow 1 is a dependent of Work Flow
1.
• Object version
An object version is an instance of an object. Each time you add or check
in an object to the central repository, Data Services creates a new version
of the object. The latest version of an object is the last or most recent
version created.
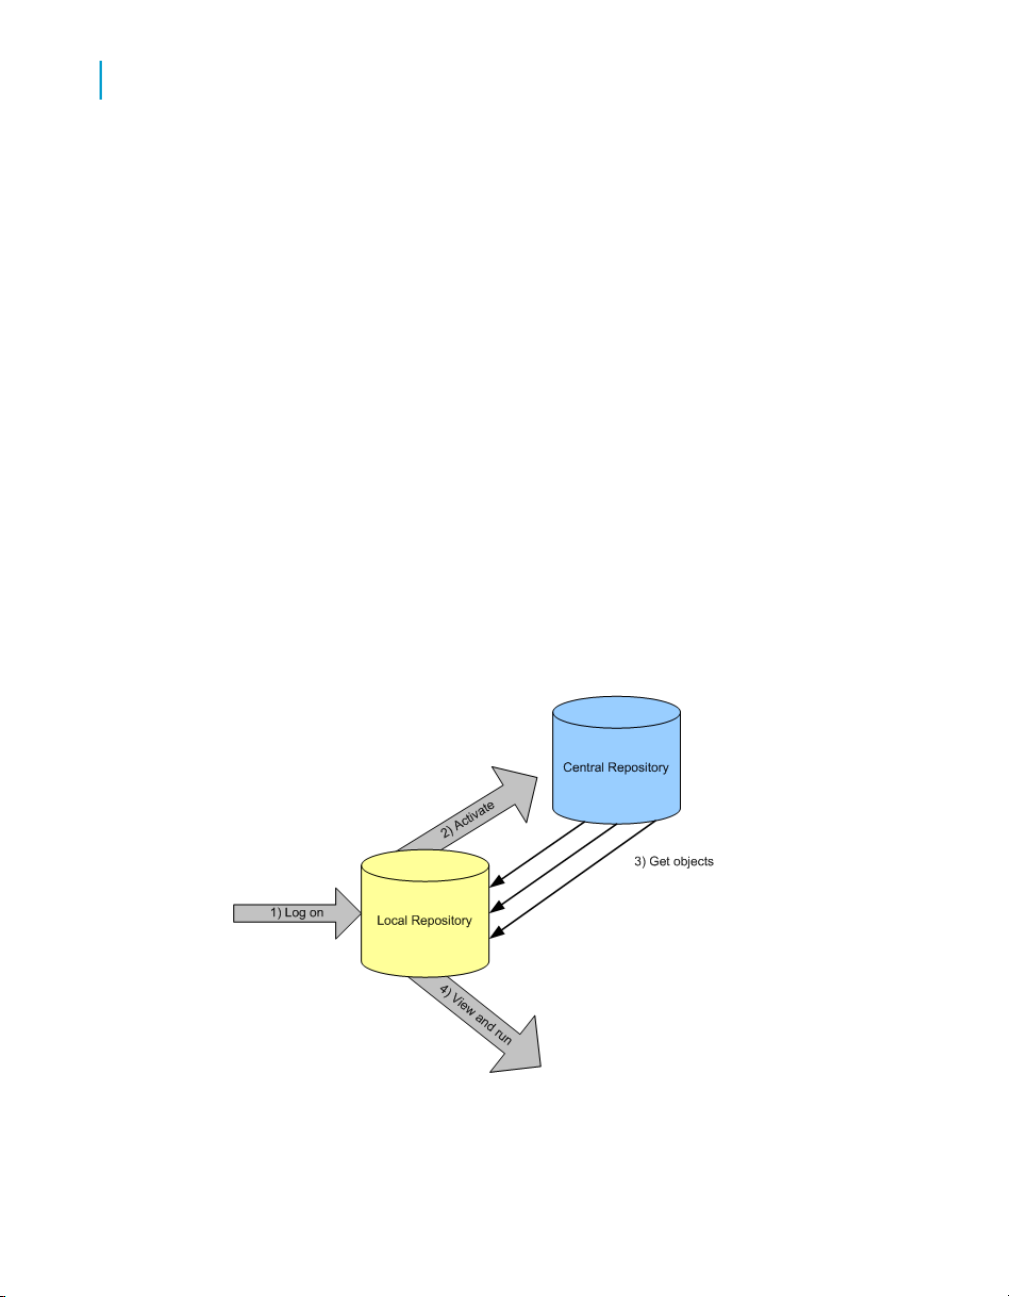
When working in a multi-user environment, you activate the link between
your local repository and the corresponding central repository each time you
log in. To ensure that your repository is current, you can get (copy) the latest
version of each object in the central repository. Once you get an application
in your local repository, you can view and run it from the Designer.
However, if you plan to make changes to objects in the application, you must
check out those objects. After you check out an object, no other user can
54 Data Services Advanced Development Guide
Page 55

Multi-user Development
Data Services and multiple users
make changes. Essentially, you lock the version in the central repository;
only you can change that version. Other users can only get and view the
object.
When you are done making changes to an object, save those changes in
the local repository and check the object back into the central repository.
Data Services saves the changed object in the central repository and makes
the object available for check-out by others. Data Services maintains all
versions of saved objects in the central repository. Thus later, you can copy
an old version of a saved object, even after replacing it in your local repository
with a new version.
5
At any time, you can label an object or a group of objects. An object label
provides a convenient mechanism for identifying objects later. For example,
you may find it helpful to label objects by feature. Later, if you decide you
want to eliminate a recently-added feature, you can get all objects that have
the label without that feature.
You can also compare two objects—such as two different object versions in
the central repository, or an object in your local repository to an object in the
central repository. By comparing two objects, you can determine what parts
of an object changed and decide whether you want to revert to an older
version of an object.
Related Topics
• Designer Guide: Design and Debug, Comparing Objects
Data Services Advanced Development Guide 55
Page 56

Multi-user Development
5
Security and the central repository
Security and the central repository
Data Services also provides options to make your central repository secure.
Use these options when you need to control access and provide for object
tracking within your central repository. These security options apply only to
central repositories and include:
• Authentication — Allows only valid users to log in to a central repository.
• Authorization — Grants various levels of permissions to objects.
• Auditing — Maintains a history of changes made to an object including
user names.
Implement security for a central repository by establishing a structure of
groups and associated users using the Administrator.
Related Topics
• Implementing Central Repository Security on page 65
56 Data Services Advanced Development Guide
Page 57
Multi-user Environment Setup
6
Page 58

Multi-user Environment Setup
6
Create a nonsecure central repository
Overview of multi-user setup
To support multiple Data Services developers, configure a multi-user
environment and set up several repositories. Specifically, you must:
• Create a local repository for each developer.
• Create a central repository.
• Define a connection to central repository from each local repository.
• Activate the connection to a central repository.
Related Topics
• Create a nonsecure central repository on page 58
• Define a connection to a nonsecure central repository on page 59
• Activating a central repository on page 60
Create a nonsecure central repository
To support multiple Data Services users in a single development environment,
Business Objects recommends that you use a central repository. The central
repository stores master information for the development environment.
This procedure applies to nonsecure repositories only.
Related Topics
• Implementing Central Repository Security on page 65
To create a nonsecure central repository
1. Create a database to be used for the central repository using your
database management system.
2. From the Start menu, choose Programs > BusinessObjects XI 3.1 >
BusinessObjects Data Services > Data Services Repository Manager.
3. In the Repository Manager window, click the Central button in the
Repository Type field, and enter the database connection information
for the central repository.
4. Click Create.
Data Services creates repository tables in the database you identified.
58 Data Services Advanced Development Guide
Page 59

Multi-user Environment Setup
Define a connection to a nonsecure central repository
Define a connection to a nonsecure
central repository
A team working on an application only needs one central repository. However,
each team member requires a local repository. Furthermore, each local
repository requires connection information to any central repository it must
access.
This procedure applies to nonsecure repositories only.
Note:
The version of the central repository must match the version of the local
repository.
Related Topics
• Implementing Central Repository Security on page 65
To define a connection to a central repository
6
1. Start the Data Services Designer and log in to your local repository.
2. Choose Tools > Central Repositories to open the Options window.
The Central Repository Connections option is selected in the Designer
Options list.
3. Right-click in the Central Repository Connections box and select Add.
The Datastore Administrator window opens.
4. In the Name box, enter a name to identify your central repository.
5. In the Database Type list, select the appropriate database type for your
central repository.
6. Complete the appropriate login information for your database type.
7. Click OK.
The list of central repository datastores now includes the newly connected
central repository. You can continue adding additional connections or you
can proceed to the next step.
Data Services Advanced Development Guide 59
Page 60

Multi-user Environment Setup
6
Activating a central repository
Activating a central repository
To connect to a central repository, you must activate the link between your
local repository and a specific central repository.
Note:
When you start the Designer, always log in to a local repository. Never log
into a central repository. If you do, then the central repository acts as a local
repository. Then you run the risk of corrupting version information. If you
attempt to log in to the central repository, Data Services will present a warning
message. You should log out immediately and log into a local repository.
Your local repository provides a view of the objects in the active central
repository. Whenever you get or check out objects, you copy objects from
the active central repository. Whenever you check in objects, you save the
version from your local repository into the active central repository.
You must activate the correct central repository each time you log in. When
you activate a central repository, Data Services opens the central object
library, which shows all the objects in the central repository and the check-out
status of each object.
To activate a central repository
1. Choose Tools > Central Repositories to open the Options window.
The Central Repository Connections option is selected in the Designer
Options list.
2. In the Central repository connections list, determine a central repository
to make active.
3. Check Reactivate automatically if you want the active central repository
to be reactivated when you next log on to this local repository.
4. Right-click the central repository and select Activate.
Data Services activates the link between your local repository and the
selected central repository and opens the central object library. The
Options window indicates that the selected central repository is active
and closes automatically.
60 Data Services Advanced Development Guide
Page 61

Multi-user Environment Setup
Activating a central repository
6
To open the central object library
Click the Central Object Library button on the toolbar.
The central object library looks like the object library—it shows all the objects
in the repository, grouped on appropriate tabs.
Data Services Advanced Development Guide 61
Page 62

Multi-user Environment Setup
6
Activating a central repository
The window opens in floating mode. Drag the window to dock it. To change
the docking state, right-click the Central Object Library tool bar and toggle
Allow Docking.
You can also change central repository connection information from the
central object library.
To change central repository connections
1. Click the Edit Central Repository Connection button on the top of the
central object library.
Data Services opens the Options window with the Central Repository
Connections option selected in the Designer Options list.
Alternatively, you can open the Options window by selecting Tools >
Central Repositories.
2. Select a central repository in the Central Repository Connections box,
right-click, and select Edit.
62 Data Services Advanced Development Guide
Page 63

Multi-user Environment Setup
Activating a central repository
When the Datastore Administrator window opens:
• To disconnect from the currently active central repository, right-click
the central repository in the Central Repository Datastores box and
select Deactivate
• To delete connection information for a central repository, right-click
the central repository in the Central Repository Datastores box and
select Delete.
After confirming your selection, Data Services deletes the connection
information from this local repository. You can no longer connect to
that central repository from this local repository.
Note:
You are not deleting the central repository; you are only deleting the
connection information between your local repository and this central
repository.
• To make another repository the active central repository, right-click
the central repository in the Central Repository Datastores box and
select Activate.
6
Data Services Advanced Development Guide 63
Page 64

Multi-user Environment Setup
Activating a central repository
6
64 Data Services Advanced Development Guide
Page 65

Implementing Central Repository Security
7
Page 66

Implementing Central Repository Security
7
Overview
About this section
This section describes how to implement optional security features for central
repositories.
Related Topics
• Overview on page 66
• Creating a secure central repository on page 68
• Adding a multi-user administrator (optional) on page 69
• Defining a connection to a secure central repository on page 70
• Working with objects in a secure central repository on page 72
Overview
Data Services provides options for managing secure access and tracking
for objects in central repositories. Mechanisms for managing central repository
security include:
• Authentication — Allows only valid users to log in to a central repository.
• Authorization — Grants various levels of permissions to objects.
• Auditing — Maintains a history of changes made to an object including
user names.
Note that these security mechanisms and procedures apply only to central
repositories.
Group-based permissions
You implement security for a central repository by establishing a structure
of groups and associated users using the Administrator. (You can optionally
add a user to the Administrator with the role Multi-user administrator.
Access permissions for objects apply at the group level. More than one group
can have the same permissions to the same object at a time. Groups are
specific to a repository and are not visible in any other local or central
repository.
66 Data Services Advanced Development Guide
Page 67

Therefore, users do not get individual permissions. In the Designer, users
select from the group(s) to which they belong, and the selected (current)
group dictates their access to that object. Each user must have one default
group but can belong to more than one group. When a user adds an object
to a secure central repository, the user's current group automatically has Full
permissions to that object.
User name and password authentication is required for every logon to a
secure central repository. Users can change their passwords at any time
from the Central Repository Editor in the Designer.
Related Topics
• Management Console—Administrator Guide: Administrator Management,
Managing user roles
Permission levels
Each object in a secure central repository can have one of the following
permissions levels:
• Full — This is the highest level of permission. The group can perform all
possible actions including checking in, checking out, and deleting the
object. You might assign this type of access to developers, for example.
Implementing Central Repository Security
Overview
7
• Read — Users can only get a copy of the object from the central repository
or compare objects between their local and central object libraries. You
might assign this type of access to QA, for example.
• None — Users cannot get copies of the object but can view it and its
properties.
When an authenticated user adds an object to a secure central repository,
the user's current group receives Full permissions to the object. All other
groups receive Read permissions. Members of the group with Full
permissions can change the other groups' permissions for that object.
Process summary
You implement security for a central repository by:
Data Services Advanced Development Guide 67
Page 68

Implementing Central Repository Security
7
Creating a secure central repository
1. Using the Repository Manager to add a secure central repository or
upgrade an existing nonsecure central repository.
2. Using the Administrator to add groups and users.
3. Defining the connection from the Designer.
4. Adding objects to the central repository as well as view and modify object
permissions.
Related Topics
• Creating a secure central repository on page 68
• Adding a multi-user administrator (optional) on page 69
• Setting up groups and users on page 70
• Defining a connection to a secure central repository on page 70
• Working with objects in a secure central repository on page 72
Creating a secure central repository
The first step in establishing security measures for multi-user development
is to create a secure central repository or upgrade an existing nonsecure
central repository.
Note:
These procedures apply to secure repositories only.
Related Topics
• Multi-user Environment Setup on page 57
To create a secure central repository
1. Create a database to be used for the central repository using your
database management system.
2. From the Start menu, click Programs > BusinessObjects XI 3.1 >
BusinessObjects Data Services > Data Services Repository Manager
.
3. In the Repository Manager window, click the Central button in the
Repository Type field and enter the database connection information for
the central repository.
4. Select the Enable security check box.
5. Click Create.
68 Data Services Advanced Development Guide
Page 69

Implementing Central Repository Security
Adding a multi-user administrator (optional)
Data Services creates repository tables in the database you identified.
Data Services creates a security key file with a name in the form of
databaseserver_database_user.key.
To upgrade a central repository from nonsecure to secure
You can modify an existing central repository to make it secure; however,
you cannot undo this change.
1. From the Start menu, click Programs > BusinessObjects XI 3.1 >
BusinessObjects Data Services > Data Services Repository Manager
.
2. In the Repository Manager window, click the Central button in the
Repository Type field and enter the database connection information for
the central repository to modify.
3. Select the Enable security check box.
4. Click Upgrade.
7
Data Services updates the repository tables in the database you identified.
Data Services creates a security key file with a name in the form of
databaseserver_database_user.key .
Adding a multi-user administrator
(optional)
In the Administrator, you have the option of adding a user with the role of
Multi-user Administrator. This role is limited to managing secure central
repositories, so it is therefore a subset of the Administrator role. For example,
Multi-user Administrators cannot add a local repository or a nonsecure central
repository.
Multi-user Administrators can:
• Add and remove secure central repositories.
• Manage users and groups.
Data Services Advanced Development Guide 69
Page 70

Implementing Central Repository Security
7
Setting up groups and users
• View secure central repository reports.
Related Topics
• Management Console—Administrator Guide: Administrator Management,
Managing user roles
Setting up groups and users
The next step in implementing central repository security is to add and
configure groups and users with the Data Services Administrator.
Related Topics
• Management Console—Administrator Guide: Administrator Management,
Managing user roles
Defining a connection to a secure central repository
The next step in implementing central repository security is to define a
connection to the repository in the Designer.
This procedure applies to secure central repositories only.
Related Topics
• Multi-user Environment Setup on page 57
To define a connection to a secure central repository
1. Start the Data Services Designer and log in to your local repository.
2. From the Tools menu, click Central Repositories to open the Options
window.
The Central Repository Connections option should be selected in the
Designer list.
3. Click Add to open the Central Repository Editor.
70 Data Services Advanced Development Guide
Page 71

Implementing Central Repository Security
Defining a connection to a secure central repository
4. In the Repository Name box, enter a name to identify the connection to
this central repository (this name is only visible in the Options window in
the Central Repository Connections list).
5. Click the Secure check box.
6. This enables the Repository User Information fields and the Security
key buttons.
7. In the Database Connection Information area, your options are:
a. Click Read Security Key to import the database connection
information values from the key that Data Services generated when
you created the secure central repository using the Repository
Manager.
b. Or manually enter the appropriate database and user information.
(Optional) To save this information for future use, click Generate Security
Key, which creates a key file with a name in the form of databaseserv
er_database_user.key.
8. In the Repository User Information area, enter the user name and
password as defined in the Administrator.
9. (Optional) Click the Remember check box to store this information for
the next time you log in.
10. (Optional) Click Change Password to change the user's password for
accessing this secure central repository. In the Change Password dialog
box, type the current password, the new password, then again to confirm
it, and click OK.
11. Click OK.
7
The list of central repository connections now includes the newly
connected central repository and it is identified as being secure.
12. With the repository selected, click Activate.
13. Click OK.
Related Topics
• Activating a central repository on page 60
Data Services Advanced Development Guide 71
Page 72

Implementing Central Repository Security
7
Working with objects in a secure central repository
Working with objects in a secure central
repository
Related Topics
• Adding objects to the central repository on page 78
• Viewing and modifying permissions on page 72
Viewing and modifying permissions
After completing all configuration tasks and adding objects to the secure
central repository, use the central object library to view and modify group
permissions for objects.
To view permissions for an object
1. Start the Data Services Designer and log in to your local repository.
2. Open the secure central object library.
Your default group appears in the drop-down list at the top of the window
and is marked with an asterisk. The Permissions column displays the current
group's access level for each object. If you add a new object to the central
library, the current group gets FULL permissions and all other groups get
READ permission.
72 Data Services Advanced Development Guide
Page 73

Implementing Central Repository Security
Working with objects in a secure central repository
To change object permissions to other groups
You must have Full permissions to change object access to other groups.
1. In the central object library, right-click the object and click Permission >
CDC Adapter Configuration > Object or Permission > Object and
dependants.
2. The Permission dialog box opens, which displays a list of available
groups and the group's access level for the object(s).
3. Click in the Permission column, and from the drop-down list select a
permission level for the group.
4. Click Apply or OK.
To change the current group or the default group
1. To change the current group, in the central object library select a group
from the drop-down box.
2. To change your default group, select the desired group from the drop-down
box and click the save icon.
7
Data Services marks the default group with an asterisk.
Data Services Advanced Development Guide 73
Page 74

Implementing Central Repository Security
Working with objects in a secure central repository
7
74 Data Services Advanced Development Guide
Page 75

Working in a Multi-user Environment
8
Page 76

Working in a Multi-user Environment
8
Filtering
Overview of multi-user tasks
To obtain optimal results from development in a multi-user environment,
Business Objects recommends certain processes, such as checking in and
checking out objects that you change, and establishing a set of conventions
that your team follows, such as labeling objects.
Related Topics
• Filtering on page 76
• Adding objects to the central repository on page 78
• Checking out objects on page 79
• Undoing check out on page 84
• Checking in objects on page 85
• Labeling objects on page 88
• Getting objects on page 90
• Comparing objects on page 92
• Viewing object history on page 92
• Deleting objects on page 95
Filtering
Data Services allows you to customize by filtering (selectively changing)
environment-specific information in object definitions. Application objects
can contain repository-specific information. For example, datastores and
database tables might refer to a particular database connection unique to a
user or a phase of development. When multiple users work on an application,
they can change repository-specific information.
Specifically, filtering allows you to:
• Change datastore and database connection information
• Change the root directory for files associated with a particular file format
• Select or clear specific dependent objects
The filtering process is available when adding, checking in, checking out, or
getting latest objects in a central repository.
When you select any command that uses the filtering option, Data Services
presents the following two windows:
76 Data Services Advanced Development Guide
Page 77
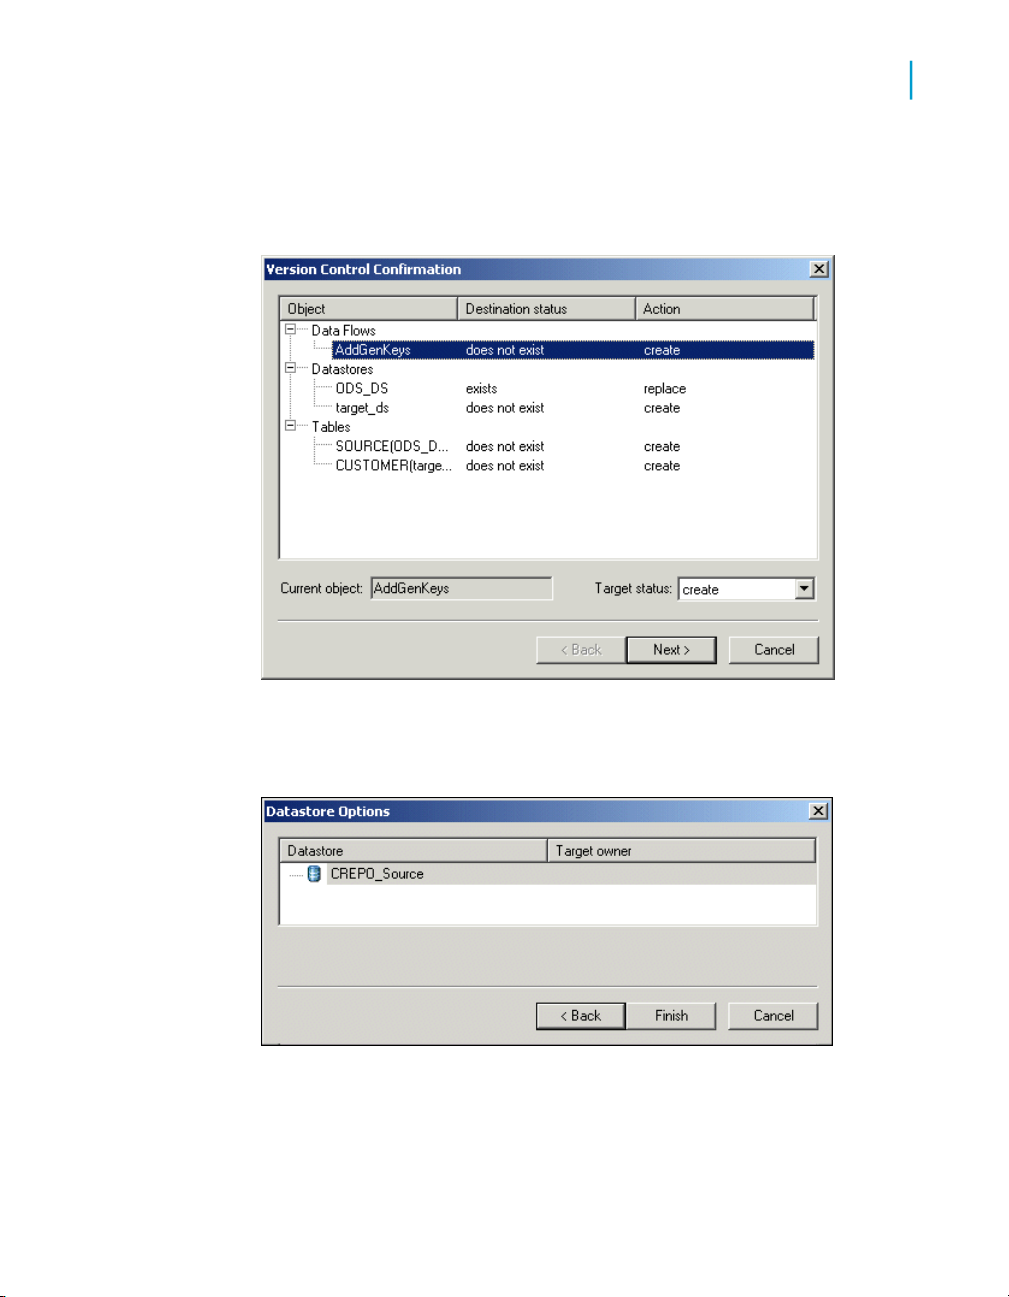
Working in a Multi-user Environment
Filtering
1. The Version Control Confirmation window shows your selected object
and any dependent objects. You can exclude objects by selecting the
object and changing the Target status (lower right) from create or replace
to exclude.
8
2. The Datastore Options window shows any datastores used by the object.
This window only opens if the objects that you are adding, checking in,
or checking out include a datastore.
Data Services Advanced Development Guide 77
Page 78

Working in a Multi-user Environment
8
Adding objects to the central repository
Adding objects to the central repository
After creating a central repository, connecting it to the local repository, and
activating the central repository, you can add objects from the local repository
to the central repository. Remember that you do all design work—the creation
of jobs, work flows, and data flows—in a local repository. Therefore, you use
a local repository for the initial creation of any objects in an application. After
the initial creation of an object, you add it to the central repository. Once in
the central repository, the object is subject to version control and can be
shared among users.
You can add a single object to the central repository, or you can add an
object with all of its dependents to the central repository. When you add a
single object, such as a data flow, you add only that object. No dependent
objects are added.
You can add objects to the central repository at any point. However, you
cannot add an object that already exists in the central repository.
You cannot add a read-only transform configuration to the repository. You
can, however, replicate a transform configuration and add the replica to the
repository.
To add a single object to the central repository
1. Open the local object library.
2. Right-click the object and select Add to Central Repository > Object.
3. The Comments window opens. Enter any comments in the Comments
field, and click OK.
Data Services adds the object to the active central repository.
Note:
The Add to Central Repository command is not available if the object
already exists in the central repository.
78 Data Services Advanced Development Guide
Page 79

Working in a Multi-user Environment
Checking out objects
To add an object and its dependent objects to the central repository
1. Open the local object library.
2. Right-click the object and select either Add to Central Repository >
Object and dependents or Add to Central Repository > With filtering
(if filtering is required) .
3. The Comments window opens. Enter any comments in the Comments
field, and click OK.
4. If you selected With filtering, complete the filtering windows.
5. Click Finish to add the selected objects.
Alternatively, you can select the object and drag it to the central object library
to add the object and its dependents to the central repository. The filtering
windows are displayed.
Note:
• The Add to Central Repository command is not available if the object
already exists in the central repository. However, the Addto Central
Repository command is available if the object's dependents already exist
in the central repository but the object itself does not.
• You cannot add a read-only transform configuration to the repository. To
do so, you must create a new repository, upgrade the existing repository,
or import ATL that contains a new version of read-only transform
configurations.
8
Related Topics
• Filtering on page 76
Checking out objects
When you might change any of the objects in an application, you should
check out the objects that you expect to change. When you check out an
object, you make that object unavailable to other users—other users can
view the object but cannot make changes to the object. Checking out an
object ensures that two users do not make conflicting changes to the object
simultaneously.
Data Services Advanced Development Guide 79
Page 80
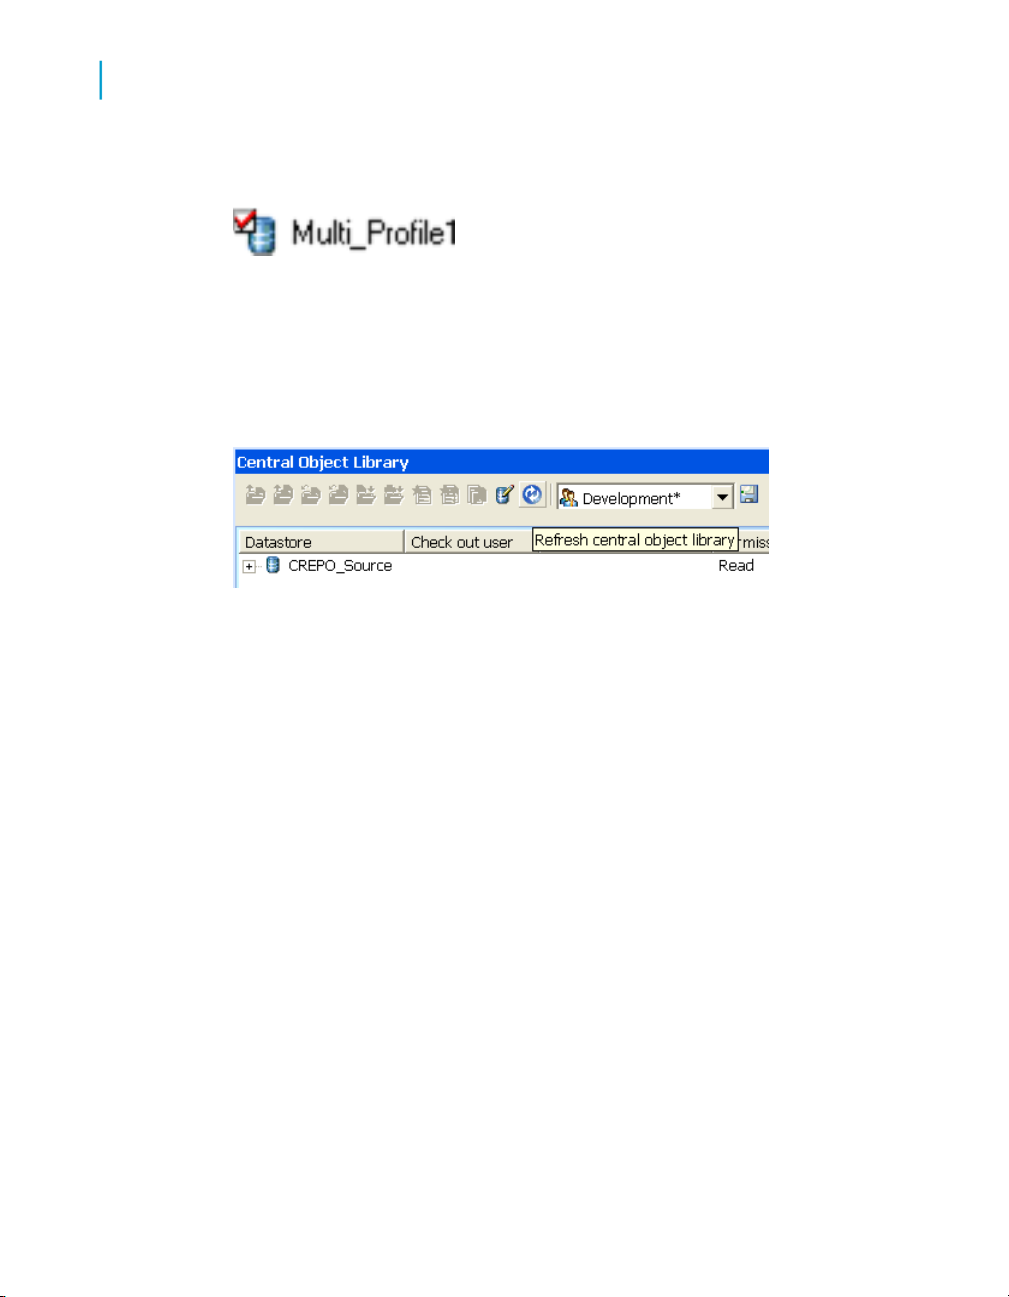
Working in a Multi-user Environment
8
Checking out objects
Data Services changes the object icons in both the local and central object
libraries to indicate that the object is checked out.
When an object is checked out, your central object library shows you the
local repository that has checked out the object. Based on the repository
name, you can determine which user is working with that object.
To see periodic changes, refresh the central object library by clicking on the
refresh central object library icon in the toolbar of the central object library.
Choose a check-out command based on what you will do to an object.
Related Topics
• Check out single objects or objects with dependents on page 80
• Check out single objects or objects with dependents without replacement
on page 82
• Check out objects with filtering on page 83
Check out single objects or objects with dependents
Dependents are objects used by another object—for example, data flows
that are called from within a work flow. You can check out a single object or
an object with all of its dependents (as calculated in the central repository).
For example, you can simply check out a work flow. In that case, you can
change that work flow, such as adding a new script to the work flow; however,
you cannot change dependent objects in the work flow, such as data flows,
and retain the changes in the central repository. Changes to dependent
objects will only be retained in the local repository. Alternatively, you can
check out the work flow with all of its dependents. In that case, you can make
80 Data Services Advanced Development Guide
Page 81

changes to the work flow or any of its dependents and retain the changes in
both central and local repositories.
Generally, it is safest to check out an object with all dependents. When you
do this, you prevent others from accidentally changing dependent objects.
To check out a single object
1. Open the central object library.
2. Right-click the object you want to check out.
3. Choose Check Out > Object.
Alternatively, you can select the object in the central object library, and
click the Check Out Object button on the top of the central object library.
Working in a Multi-user Environment
Checking out objects
8
Data Services copies the most recent version of the selected object from
the central repository to your local repository, then marks the object as
checked out.
To check out an object and its dependent objects
1. Open the central object library.
2. Right-click the object you want to check out.
3. ChooseCheck Out > Object and dependents.
Alternatively, you can select the object in the central object library, and
click the Check out object and dependents button on the top of the central
object library.
Data Services Advanced Development Guide 81
Page 82

Working in a Multi-user Environment
8
Checking out objects
Data Services copies the most recent version of the selected object and
all of its dependent objects from the central repository and marks these
objects as checked out.
If a dependent object is checked out by you or another user, then Data
Services alerts you with a Check Out Alert window, asking to get the latest
version of the checked out object.
Related Topics
• Getting objects on page 90
Check out single objects or objects with dependents without replacement
When you check out an object, you can replace the object in your local
repository with the latest version from the central repository, or you can leave
the current version in your local repository intact.
When you check out an object, Data Services copies the object definition
from the central repository and replaces any existing definitions for that object
in your local repository.
You can check out objects without replacing the objects in your local
repository. For example, suppose you are working in your local repository
and you make a change to an object that is not checked out. If you determine
that the change improves the design or performance of your application, you
will want to include that change in the central repository.
To do this, check out the object without replacing the object in your local
repository—the object that you have already improved with a change. Then,
check the changed object back into the central repository.
Note:
Use caution when checking out objects without replacing the version in your
local repository. When you do not replace the version in your local repository,
you can lose changes that others have incorporated into those objects.
82 Data Services Advanced Development Guide
Page 83

Working in a Multi-user Environment
Checking out objects
To check out an object or an object and its dependent objects without replacement
1. Open the central object library.
2. Right-click the object you want to check out and choose Check Out >
Object > without replacement to check out the single object or choose
Check Out > Object and dependents without replacement to check
out the object and all of its dependent objects.
Data Services marks all appropriate objects as checked out—in both the
object library and in the workspace—but does not copy any objects from
the central repository to the local repository.
Check out objects with filtering
When you check out an object with filtering, the object and all its dependents
are checked out.
8
Note:
When you check out objects with filtering, you always replace local versions
with the filtered objects from the central repository.
To check out and object and its dependent objects with filtering
1. Open the central object library.
2. Right-click the object you want to check out and choose Check Out >
With filtering.
3. Complete the filtering windows.
4. Click Finish to check out the selected objects.
Related Topics
• Filtering on page 76
Data Services Advanced Development Guide 83
Page 84
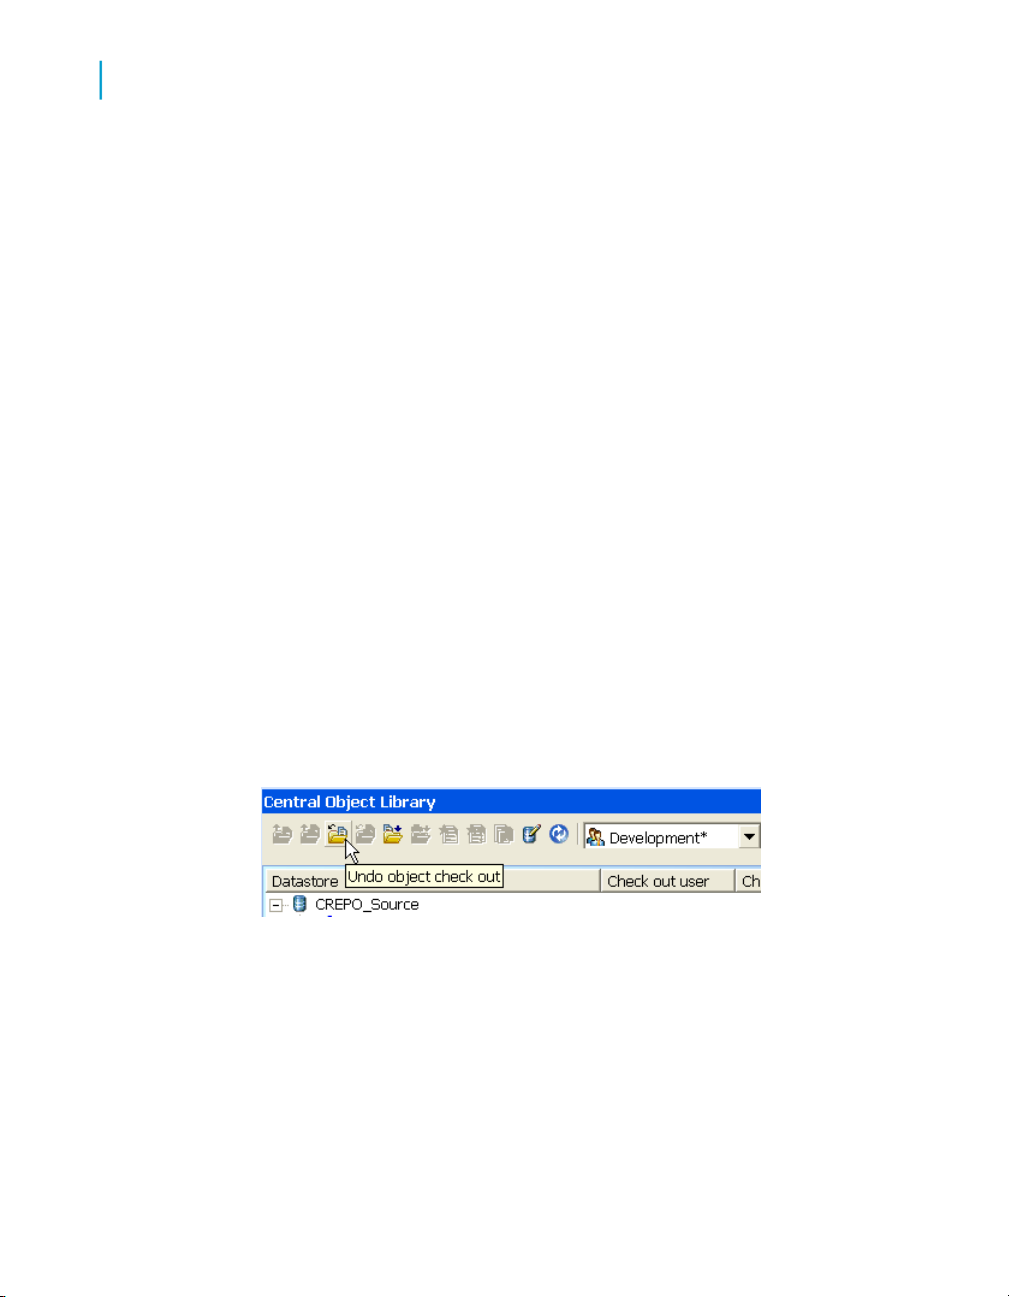
Working in a Multi-user Environment
8
Undoing check out
Undoing check out
Occasionally, you may decide that you did not need to check out an object
because you made no changes. Or, you may decide that the changes you
made to a checked-out object are not useful and you prefer to leave the
master copy of the object as is. In these cases, you can undo the check out.
When you undo a check out:
• the object in the central repository remains as it was before the checkout;
no changes are made and no additional version is saved in the central
repository. Only the object status changes from checked out to available.
• the local version of the object maintains the changes you made. If you
want the local object to be an exact copy of the central object, perform a
Get latest operation on that object.
After you undo a check out, other users can check out and make changes
to the object.
To undo single object check out
1. Open the central object library.
2. Select a checked-out object.
3. Click the Undo object check out button.
Data Services removes the check-out symbol and makes no changes to
the object in the central repository. Any checked-out dependent objects
remain checked out.
Alternatively, you can right-click the object and select Undo Check Out
> Object.
84 Data Services Advanced Development Guide
Page 85
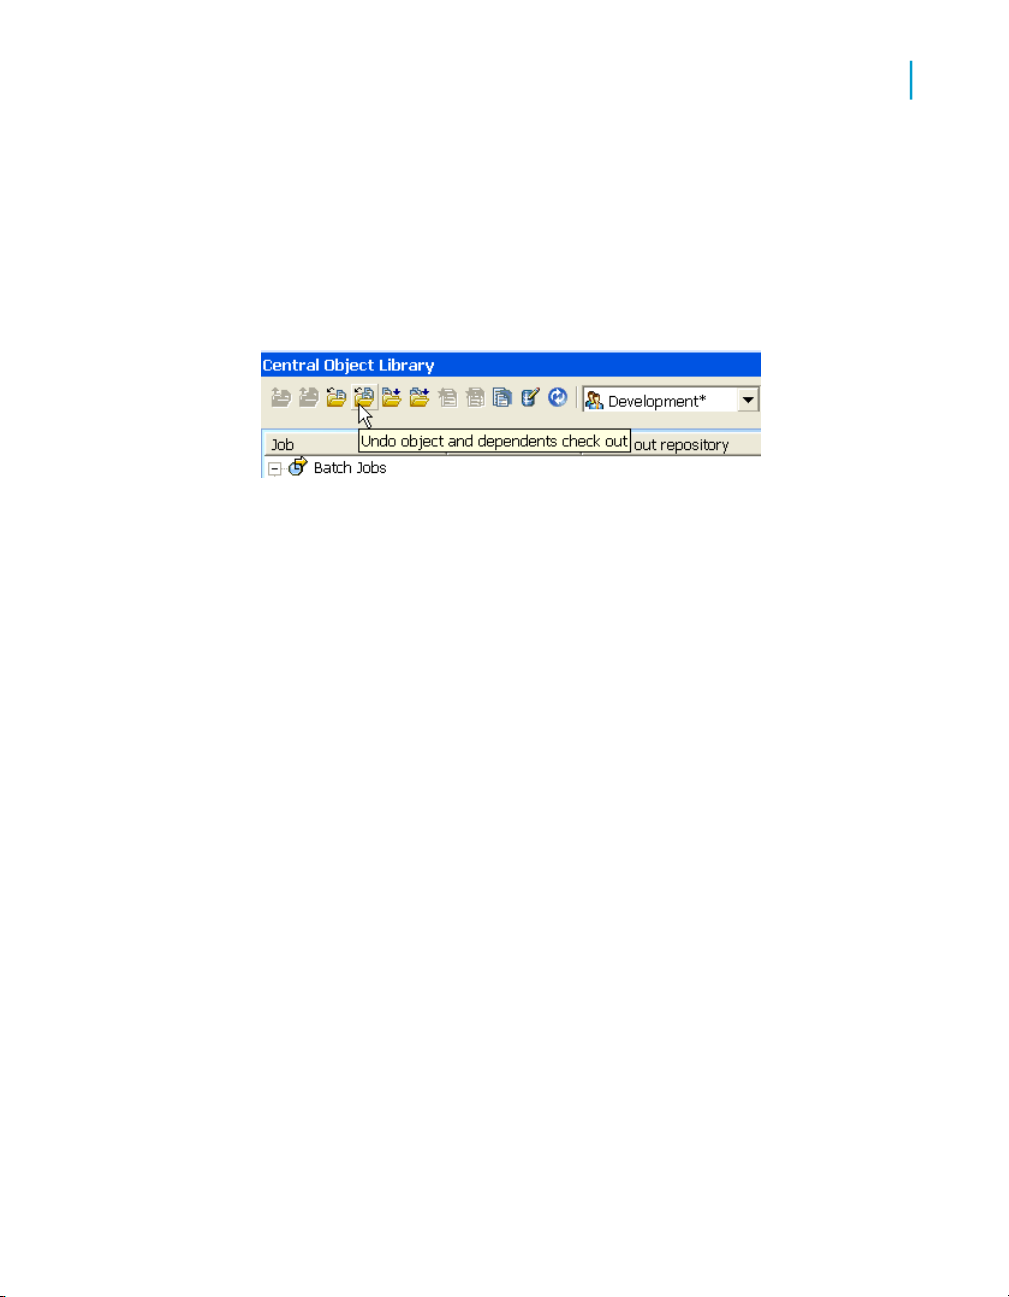
Working in a Multi-user Environment
Checking in objects
To undo check out of an object and its dependents
1. Open the central object library.
2. Select the checked-out object that is the highest level for which you want
to undo the check out.
3. Click the Undo object and dependents check out button.
Data Services removes the check-out symbols for the object and any
dependent objects that are also checked out. No changes are made to
these objects in the central repository.
Alternatively, you can right-click the object in the central object library
and select Undo Check Out > Object and dependents.
8
Checking in objects
After you finish making changes to checked out objects, you must check
them back into the central repository. Checking in objects creates a new
version in the central repository, and allows others to get the changes that
you have made. Checking in objects also preserves a copy of the changes
for revision control purposes. Later, you can get a particular version of a
checked in object and compare it to subsequent changes or even revert to
the previous version.
Check in an object when you are done making changes, when others need
the object that contains your changes, or when you want to preserve a copy
of the object in its present state.
Choose a check-in command based on what you will do to an object.
Related Topics
• Checking in single objects, objects with dependents on page 86
• Checking in an object with filtering on page 87
Data Services Advanced Development Guide 85
Page 86
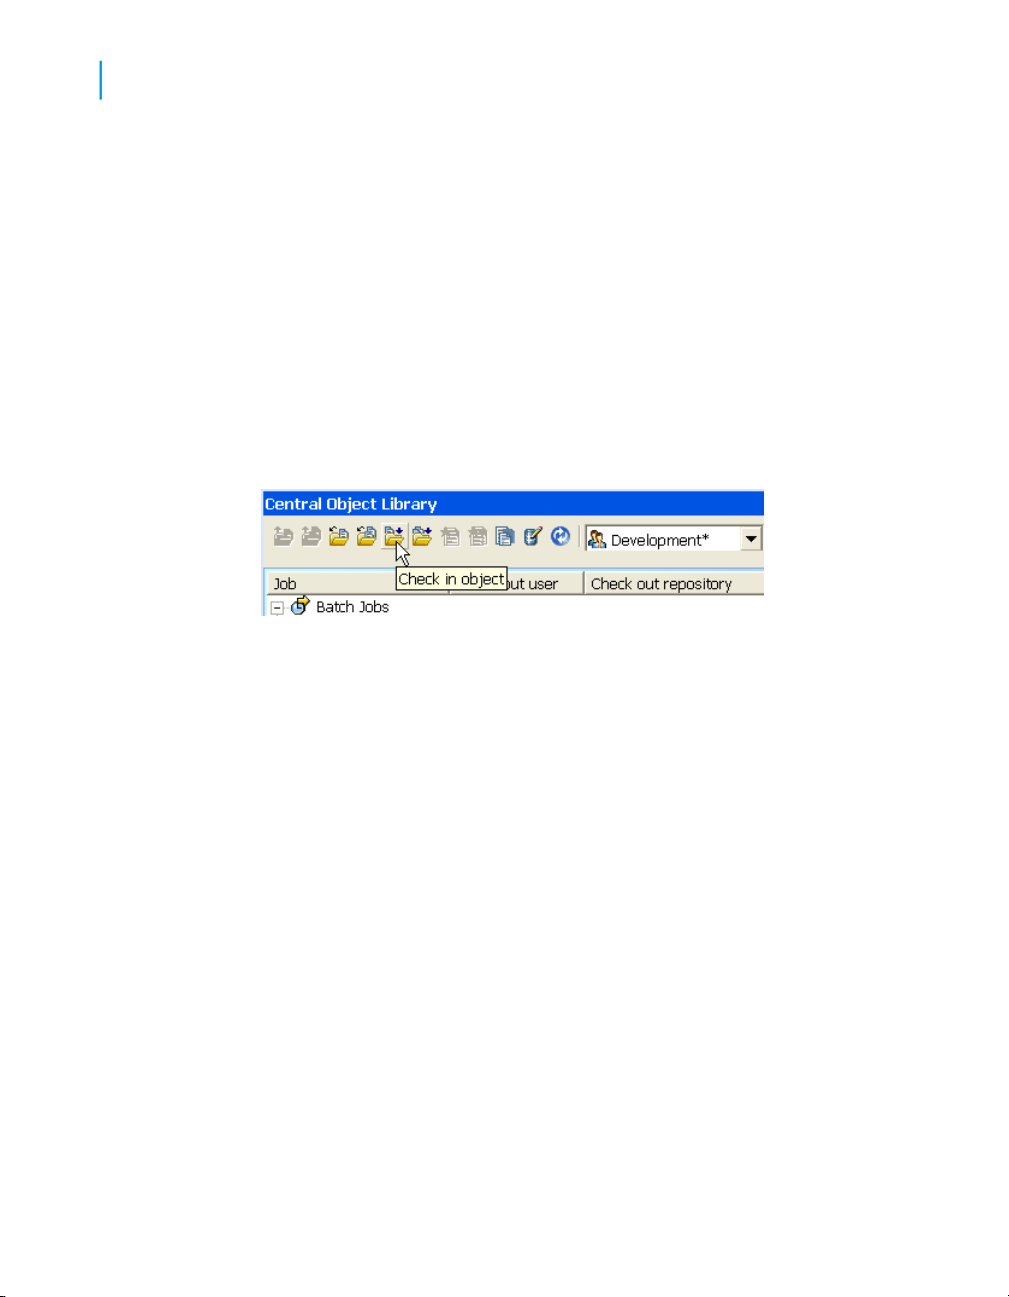
Working in a Multi-user Environment
8
Checking in objects
Checking in single objects, objects with dependents
Just as you can check out a single object or an object with all dependent
objects, you can check in a single object or an object with all checked-out
dependent objects (as calculated in the local repository).
To check in a single object
1. Open the central object library.
2. Select the object you want to check in.
3. Click Check in object button at the top of the central object library.
Alternatively, you can right-click the object in the central object library
and select Check In > Object.
4. A Check In window opens with a Comment box, in which you can enter
comments. After entering any comments, click OK.
Data Services copies the object from your local repository to the central
repository, and removes the check-out mark.
To check in an object and its dependent objects
1. Open the central object library.
2. Select the highest level object you want to check in.
3. Click Check in object and dependents button at the top of the central
object library.
86 Data Services Advanced Development Guide
Page 87

Alternatively, you can right-click the object in the central object library
and select Check In > Object and dependents.
4. A Check In window opens with a Comment box, in which you can enter
comments. After entering any comments, click OK.
Data Services copies the selected object and all of its dependent objects
from your repository to the central repository and removes the check-out
mark.
Checking in an object with filtering
Working in a Multi-user Environment
Checking in objects
8
Just as you could check out objects with filtering, you can check in objects
with filtering. When you check in an object with filtering, the object and all its
dependent objects are checked in.
To check in an object with filtering
1. Open the central object library.
2. Right-click the object you want to check out and choose Check In > With
filtering.
3. A Check In window opens with a Comment box, in which you can enter
comments. After entering any comments, click OK.
Data Services warns you that you are about to create a new version of
the object in the central repository.
4. Click Yes to continue with the check in.
5. Complete the filtering windows.
6. Click Finish to check in the selected objects.
Data Services Advanced Development Guide 87
Page 88

Working in a Multi-user Environment
8
Labeling objects
Related Topics
• Filtering on page 76
Labeling objects
To help organize and track the status of objects in your application, you can
label objects. You can choose to either label an object, or label an object
and all of its dependent objects. A label not only describes an object, but
also allows you to maintain relationships between various versions of objects.
For example, suppose developer A adds a job to the central repository and
works on a work flow in that job while developer B works on a data flow in
the same job. At the end of the week, after developer A checks in two versions
of the work flow and developer B checks in four versions of the data flow to
the central repository, the job is labeled "End of week 1 status." This label
contains version 1 of the job, version 2 of the work flow, and version 4 of the
data flow. Both developers can continue to change their respective work flow
and data flow.
88 Data Services Advanced Development Guide
Page 89

Working in a Multi-user Environment
Labeling objects
8
At some later point, if you want to get the job with the version of the data
flow with this label, getting the job by its label accomplishes this, whereas
checking out the job and its dependents does not.
The label "End of week 1 status" serves the purpose of collecting the versions
of the work flow and data flow that were checked in at the end of the week.
Without this label, you would have to get a particular version of each object
in order to reassemble the collection of objects labeled "End of week 1 status."
Data Services Advanced Development Guide 89
Page 90

Working in a Multi-user Environment
8
Getting objects
Related Topics
• Getting objects on page 90
To label an object and its dependents
1. Open the central object library.
2. Right-click the object you want to label and choose Label Latest Version
> Object to label only the highlighted object, or choose Object and
dependents to label the highlighted object and all its related objects.
Data Services opens the "Label Latest Version" window.
3. In the Label box, enter text that describes the current status of the object,
then click OK.
Data Services inserts this label in the history of the object and its
dependents.
Related Topics
• Viewing object history on page 92
Getting objects
To make sure that your repository is up-to-date, you "get" objects. When you
get an object, you copy the latest version of that object in the central object
library and copy it into your local repository, replacing the version in your
local repository. When you get an object, you do not check out the object.
The object remains free for others to check out and change.
You can get an object with or without dependent objects and filtering.
Related Topics
• Viewing object history on page 92
To get a single object
1. Open the central object library.
2. Select the object you want to get.
3. Click Get latest version of object at the top of the central object library.
90 Data Services Advanced Development Guide
Page 91

Working in a Multi-user Environment
Alternatively, right-click the object in the central object library and select
Get Latest VersionObject.
Data Services copies the most recent version of the object in the central
repository to your local repository.
To get an object and its dependent objects
1. Open the central object library.
2. Select the highest level object you want to get.
3. Click Get latest version of objects and dependents at the top of the
central object library.
Getting objects
8
Alternatively, right-click the object in the central object library and select
Get Latest Version > Object and dependents.
Data Services copies the most recent version of the selected object and
all dependent objects from the central repository to your local repository.
To get an object and its dependent objects with filtering
1. Open the central object library.
2. Select the highest level object you want to get.
3. Right-click the object in the central object library and select Get Latest
Version > With filtering.
4. Complete the filtering windows.
5. Click Finish to get the selected objects.
Related Topics
• Filtering on page 76
Data Services Advanced Development Guide 91
Page 92

Working in a Multi-user Environment
8
Comparing objects
To get a previous version of an object
Related Topics
• To get a previous version of an object on page 92
To get an object with a particular label
Related Topics
• To get an object with a particular label on page 92
Comparing objects
Data Services allows you to compare two objects from local and central
repositories to determine the differences between those objects.
Related Topics
• Designer Guide: Design and Debug, Comparing Objects
Viewing object history
The central repository retains a history of all changes made to objects in the
central repository. Use this history to help manage and control development
of your application.
Related Topics
• To examine the history of an object on page 92
• To get a previous version of an object on page 92
• To get an object with a particular label on page 92
To examine the history of an object
1. Open the central object library.
2. Select an object.
92 Data Services Advanced Development Guide
Page 93

Working in a Multi-user Environment
Viewing object history
3. Click the Show History button at the top of the central object library.
Alternatively, you can right-click the object in the central object library
and select Show History.
Data Services opens the History window.
8
This window shows several pieces of information about each revision of
the object.
DescriptionColumn
The object revision number. Each time a user
Version
Label
saves the object, Data Services creates a new
version.
Text that a user enters to describe the status of
the object at a given point.
Data Services Advanced Development Guide 93
Page 94

Working in a Multi-user Environment
8
Viewing object history
Repository
DescriptionColumn
Information about the local repository from which
Data Services saved this version of the object.
Other information includes:
•
user name
•
database connection name
•
type of database
Date
Action
Comment
Related Topics
• Labeling objects on page 88
The date and time Data Services saved this version of the object.
The type of change a user made to the object.
This table records actions such as:
Checked in — User checked in object
Comments a user enters when adding an object
or checking it into a central repository.
To get a previous version of an object
1. Select an object.
2. Click the Show History button at the top of the central object library.
3. Click the version of the object you want.
4. Click the Get Obj By Version button.
Note:
When you get a previous version of an object, you only get the object but
not its dependent objects.
94 Data Services Advanced Development Guide
Page 95

Working in a Multi-user Environment
To get an object with a particular label
1. Select an object.
2. Click the Show History button at the top of the central object library.
3. Click the version of the object with the particular label you want.
4. Click the Get By Label button.
Deleting objects
You can delete objects from either the central repository or a local repository.
To delete an object from the central repository, right-click the object in the
central object library and select Delete. To delete an object from the local
repository, right-click on the object in the object library and select Delete.
When you delete an object from a local repository, you do not automatically
delete that object from the active central repository. In fact, you can get the
object from the central repository to re-insert it.
Deleting objects
8
Similarly, when you delete an object from a central repository, you do not
automatically delete the object from connected local repositories. Until you
delete the object from the local repository, you can add the object back to
the central repository.
When you delete objects from the central repository, you only delete the
selected object and all versions of the selected object; you do not delete any
dependent objects.
To delete all versions except the latest version of an object from the central
repository, use the compact repository. Select Project > Compact
Repository from the menu bar.
Data Services Advanced Development Guide 95
Page 96

Working in a Multi-user Environment
Deleting objects
8
96 Data Services Advanced Development Guide
Page 97

Migrating Multi-user Jobs
9
Page 98

Migrating Multi-user Jobs
9
Application phase management
Overview of multi-user job migration
Job migration applies to Data Services on multiple levels: application level,
repository management level, and product upgrade level. Application
migration is much more flexible in a multi-user environment, allowing you to
maintain not only multiple versions of your objects during development, but
also during test and production phases if you choose.
Related Topics
• Application phase management on page 98
• Copying contents between central repositories on page 100
• Central repository migration on page 101
Application phase management
Typically, applications pass through different phases on the way from
development to production. For example, an application might pass through
three phases:
• Developers creating an application
• Testers validating the application
• Administrators running the application
A single central repository can support your application through all phases.
Use job labeling and projects to maintain application components
independently for each phase. For example, if development wants to make
a certain version of an application ready for testing, they may label it
"APPL_V1". Testers can then get that particular application version using
the label and proceed with testing. If testing is successful, an administrator
can get the application to run in the production environment. In addition,
datastore configurations and file locations allows you to configure the
application to run in each local environment.
In some situations, you may require more than one central repository for
application phase management. If you choose to support multiple central
repositories, use a single local repository as a staging location for the
transition.
In some situations, you may require more than one central repository for
application phase management. Following the example above, once
98 Data Services Advanced Development Guide
Page 99
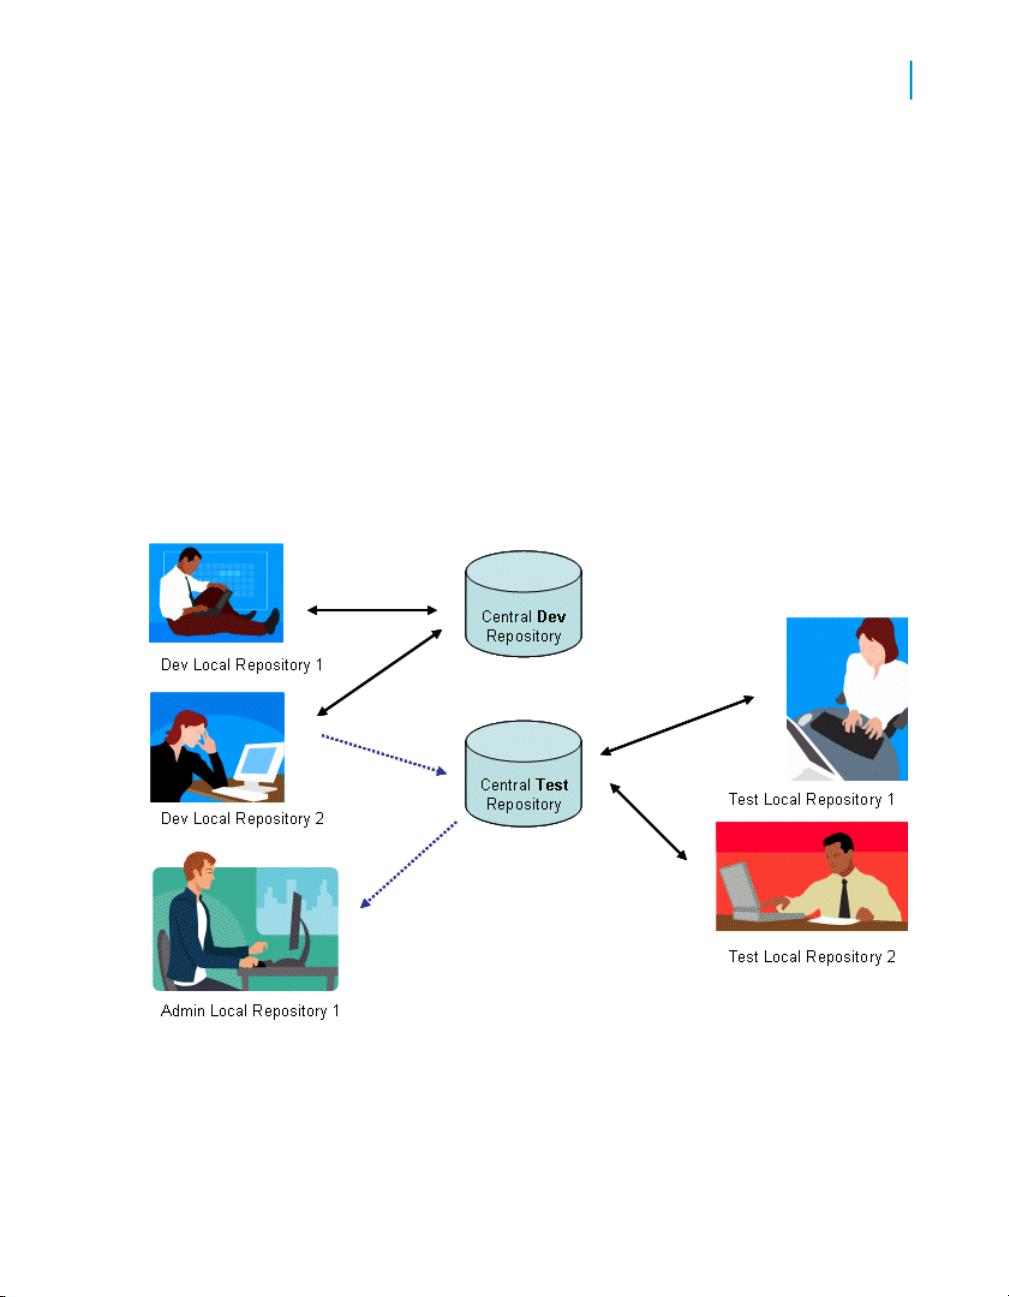
Migrating Multi-user Jobs
Application phase management
developers create an application version ready for testing by labeling it, a
tester would get that version from the development central repository, test
it and then check it into a test central repository.
That test central repository will contain all versions tested over time, allowing
flexibility for testers to go back to any previous version without relying on the
development environment. When an application version passes testing, an
administrator can get it from the test repository and make it available in
production. Again, if you need to maintain previous versions of an application
already in production, you can create another central repository.
With this scheme, a developer will never interfere with the test environment,
and a tester will never interfere with a production environment, creating an
extremely safe process of migration.
Note that if you choose to support multiple central repositories, use a single
local repository as a staging location for file transition.
9
Data Services Advanced Development Guide 99
Page 100

Migrating Multi-user Jobs
9
Copying contents between central repositories
Copying contents between central
repositories
You cannot directly copy the contents of one central repository to another
central repository. Rather, you must use your local repository as an
intermediate repository.
To copy the contents of one central repository to another central repository
1. Activate the central repository whose contents you will copy.
2. Get the latest version of all objects in this active central repository so they
exist in your local repository.
3. Activate the central repository into which you want to copy the contents.
4. The first time you copy the contents, add the objects from your local
repository into this central repository.
However, if you must re-copy the contents of one central repository into
another (for example, during your testing phase some part of a job was
reassigned to the development phase for redesign), the process is slightly
more complex:
a. First check out specific objects without replacement from the second
central repository.
b. From your local repository, get the latest version of the objects from
the first (for example, development) central repository.
c. Then, instead of adding, check in the updated objects from your local
repository to the second (for example, test) central repository.
Related Topics
• Activating a central repository on page 60
• Getting objects on page 90
• Adding objects to the central repository on page 78
• Checking out objects on page 79
• Checking in objects on page 85
100 Data Services Advanced Development Guide
 Loading...