

Page 1

Data Services Installation Guide for
Windows
BusinessObjects Data Services XI 3.0 (12.0.0)
Page 2

Copyright
© 2008 Business Objects. All rights reserved. Business Objects owns the following
U.S. patents, which may cover products that are offered and licensed by Business
Objects: 5,555,403; 5,857,205; 6,289,352; 6,247,008; 6,490,593; 6,578,027;
6,831,668; 6,768,986; 6,772,409; 6,882,998; 7,139,766; 7,299,419; 7,194,465;
7,222,130; 7,181,440 and 7,181,435. Business Objects and the Business Objects
logo, BusinessObjects, Business Objects Crystal Vision, Business Process On
Demand, BusinessQuery, Crystal Analysis, Crystal Applications, Crystal Decisions,
Crystal Enterprise, Crystal Insider, Crystal Reports, Desktop Intelligence, Inxight,
the Inxight Logo, LinguistX, Star Tree, Table Lens, ThingFinder, Timewall, Let
there be light, Metify, NSite, Rapid Marts, RapidMarts, the Spectrum Design, Web
Intelligence, Workmail and Xcelsius are trademarks or registered trademarks in
the United States and/or other countries of Business Objects and/or affiliated
companies. All other names mentioned herein may be trademarks of their respective
owners.
Third-party
Contributors
Business Objects products in this release may contain redistributions of software
licensed from third-party contributors. Some of these individual components may
also be available under alternative licenses. A partial listing of third-party
contributors that have requested or permitted acknowledgments, as well as required
notices, can be found at: http://www.businessobjects.com/thirdparty
2008-03-14
Page 3

Contents
Preparing to Install Data Services 9Chapter 1
Pre-installation overview............................................................................10
Repository database requirements and preparation.................................22
Installation scenarios.................................................................................31
System requirements...........................................................................11
Network requirements..........................................................................11
User permissions for installing Data Services......................................12
Choose components and determine component distribution...............13
Create a database for each repository.................................................17
Check port assignments.......................................................................18
Check network connections.................................................................20
Create a Windows cluster....................................................................20
Installing MySQL as the repository database.......................................23
To set up a database account for BusinessObjects Data Services......24
Setting up an empty database for the repository.................................24
Standard installation overview..............................................................31
Silent installation overview ..................................................................32
Standard Installation of Data Services 35Chapter 2
Beginning your installation.........................................................................36
To accept the license agreement.........................................................36
To enter user information and a product keycode................................37
To specify the installation location........................................................39
To select which features to install.........................................................40
To select a repository.................................................................................42
To configure a MySQL database server...............................................43
Data Services Installation Guide for Windows 3
Page 4

Contents
To configure an existing database server.............................................45
To configure a Job Server..........................................................................46
To specify login information..................................................................48
To configure an Access Server..................................................................49
To configure Metadata Integrator...............................................................50
To specify Metadata Integrator configuration details............................51
To specify Metadata Integrator SSL details..........................................53
To select a web application server configuration option............................54
To configure your Tomcat application server........................................55
To configure an existing Web application server..................................56
To start the installation...............................................................................58
Silent Installation of Data Services 59Chapter 3
Silent installation........................................................................................60
Silent install parameters............................................................................61
Custom install options for silent installation...............................................65
Silent/scripted installation .ini file...............................................................66
Sample installation script file.....................................................................67
After Installing Data Services 71Chapter 4
Starting Data Services services automatically...........................................72
Logging in to the Management Console....................................................72
Using the Repository Manager..................................................................72
To create or upgrade repositories........................................................73
To create or upgrade repositories in batch mode.................................74
Using the Server Manager.........................................................................76
To configure Job Servers......................................................................78
To resynchronize Job Servers..............................................................80
To configure run-time resources for Job Servers.................................81
To configure Access Servers................................................................82
4 Data Services Installation Guide for Windows
Page 5

Contents
Verifying that Job and Access servers are running..............................84
Using the License Manager.......................................................................84
To start License Manager.....................................................................84
To view product activation keycodes....................................................85
To add a product activation keycode....................................................85
To remove a product activation keycode..............................................85
To use License Manager from the command line................................86
Installing and configuring the Metadata Integrator....................................87
Installing Metadata Integrator...............................................................88
Metadata Integrator installation tips and troubleshooting.....................89
Configuring the Metadata Integrator....................................................90
Connecting the Data Profiler......................................................................94
Troubleshooting installation problems.......................................................95
Repository problems............................................................................95
Management Console problems..........................................................96
Upgrading Data Services 97Chapter 5
Data Services component upgrades.........................................................98
Repository upgrades............................................................................98
Upgrading your Data Services system......................................................99
Using configurations from a previous version....................................100
Before installing a new version...........................................................101
To install a new version of Data Services...........................................101
Upgrading repositories.............................................................................102
To upgrade a repository......................................................................102
After upgrading Data Services.................................................................103
Citrix Support 105Chapter 6
Installing BusinessObjects Data Services on a Citrix Server..................106
Initial installation.................................................................................107
Data Services Installation Guide for Windows 5
Page 6

Contents
Running Data Services components in multi-user mode.........................108
Serial access to the License, Server, and Repository Managers.......108
Parallel access to the Management Console and Designer..............108
Using a shell script to access the Designer.......................................109
Publishing Data Services.........................................................................114
To publish a Data Services component..............................................115
Connection management...................................................................117
Client setup........................................................................................117
Limitations................................................................................................117
Directory Data 119Chapter 7
Directory listing and update schedule......................................................120
U.S. Directory expiration..........................................................................122
U.S. Directory expiration schedule..........................................................122
U.S. National Directories are zipped.......................................................123
Where to copy directories........................................................................123
Copy International directory files to a non-default location ...............124
Download directories from the internet....................................................125
Install directories from disk on Windows.................................................125
Unzip Windows file with Winzip..........................................................125
Global Parsing Options 127Chapter 8
Data Cleanse repository database requirements and preparation..........128
DB2 database setup requirements.....................................................128
Microsoft SQL Server database setup requirements.........................129
Oracle database setup requirements.................................................129
MySQL database setup requirements................................................130
Install Global Parsing Options.................................................................130
Silent installation......................................................................................132
To perform a silent-mode installation.................................................132
6 Data Services Installation Guide for Windows
Page 7

Contents
To install using the command line......................................................133
Index 137
Data Services Installation Guide for Windows 7
Page 8

Contents
8 Data Services Installation Guide for Windows
Page 9

Preparing to Install Data Services
1
Page 10

Preparing to Install Data Services
1
Pre-installation overview
Pre-installation overview
BusinessObjects Data Services provides an open and flexible architecture
that supports a multitude of deployment and configuration scenarios. Before
you install BusinessObjects Data Services you should:
• Ensure that that your network and systems meet the basic requirements
for a BusinessObjects Data Services installation.
• Obtain the BusinessObjects Data Services software by electronic
download or on CD/DVD, as well as any required licensing keycodes.
•
Review the BusinessObjects Data Services Release Notes and the Data
Services Architecture section of the BusinessObjects Data Services
Getting Started Guide.
• Ensure that the user who will run the installation setup program has
adequate permissions to complete the installation tasks.
• Decide which BusinessObjects Data Services components to install and
which of your own components to integrate.
• Determine where the components should be installed and consider how
you should prepare your infrastructure and set up your environment,
including server locations.
• If you are using an existing database server, create a database instance
if you want to configure a repository during Data Services installation.
• Check available port assignments and verify that all machines that will
be part of your BusinessObjects Data Services deployment have the
required network access to each other.
• Decide whether you want to take advantage of Windows clustering
fail-over support which attempts to automatically restart your Data Services
services in the event of a hardware or Windows software failure.
• Choose an installation method.
The following sections list the core software and system requirements, the
choices available to you within the core requirements, and the install methods
available to you for installing BusinessObjects Data Services.
Related Topics
• Getting Started Guide: Data Sevices Architecture
• System requirements on page 11
• Network requirements on page 11
• User permissions for installing Data Services on page 12
• Choose components and determine component distribution on page 13
10 Data Services Installation Guide for Windows
Page 11

• Create a database for each repository on page 17
• Check port assignments on page 18
• Create a Windows cluster on page 20
System requirements
For a detailed list of supported environments and hardware requirements,
see the Platforms Availability Report available on the Business Objects
support site: http://support.businessobjects.com/documentation/support
ed_platforms. This document includes specific version and patch-level
requirements for databases, applications, web application servers, web
browsers, and operating systems.
Generally, the following components must be preinstalled and configured
correctly before you can install BusinessObjects Data Services:
• Web application server (unless you want to use the Tomcat installation
packaged with Business Objects products, or you do not want to install
the Web Tier components)
• Database software that is compatible with the Data Services repository
(unless you want to use the MySQL installation packaged with the Data
Services installer).
Preparing to Install Data Services
Pre-installation overview
1
Note: Only the database client tools or middleware needs to be installed
on the Data Services server; the database server itself can reside on a
separate physical machine accessible by network from the Data Services
server.
Note: For the repository, BusinessObjects Data Services requires a database
that stores metadata about all objects created with the Data Services
Designer. For best Designer performance, Business Objects recommends
that the repository database server and the Designer computer reside in the
same network.
Network requirements
When installing BusinessObjects Data Services on multiple machines, you
must ensure that each machine can communicate over TCP/IP with the
machine running the database that contains the repository.
Data Services Installation Guide for Windows 11
Page 12

Preparing to Install Data Services
1
Pre-installation overview
Client components, such as the Data Services Designer, require network
access to the Data Services Job Server(s).
Note: If your servers are firewalled, you may need to open the necessary
ports to allow the Data Services client components to communicate with the
servers.
User permissions for installing Data Services
To successfully install BusinessObjects Data Services on Windows, the user
running the setup program must have the permissions listed in the table
below.
Required permissionsCategory
Administrative privileges on the local machine.Operating Sys-
tem
Network
Database
Web application server
Note:
• The following scenarios are not supported:
• Installing on a domain controller.
• Installing on a machine where the Windows default security settings
given to the local Administrators group have been modified.
• To run the Data Services Designer, a user requires both read and write
access to the Data Services installation folder. If you choose to install in
the default Program Files folder, regular users do not have write access.
Choose another installation directory or assign the Designer user write
access to LINK_DIR.
TCP/IP access to all machines where you want to install components — all specified ports must be available.
Rights to add and drop tables to and from the database, plus
rights to read, write, and edit table rows.
It is recommended that you use the same user account for installing BusinessObjects Data Services and your web application server.
12 Data Services Installation Guide for Windows
Page 13

Preparing to Install Data Services
Pre-installation overview
Choose components and determine component distribution
You may choose to upgrade or install components on one or more computers
based on available resources and amount of system traffic.
Note: You must install the Designer on a supported Windows platform. You
can install the other components on Windows, UNIX, or Linux platforms.
The installation program can install multiple Data Services feature categories.
DescriptionComponentFeature category
Executes batch Data Services jobs.Job Server
Provides real-time access to Data Ser-
Access Server
vices, routes real-time messages to the
appropriate real-time interface.
1
Server Components
Client Components
Technology Interfaces
Metadata Integrator
Designer
Repository Manager
Provides access to techologies such as
JMS (Java Messaging System) and
Salesforce.com.
Collects metadata from a BusinessObjects Enterprise system for impact and
lineage analysis in the Data Services
Management Console.
Graphical user interface that is used to
design and test all Data Services jobs.
Creates and manages all types of Data
Services repositories (local, central,
profiler, and Global Parsing Option).
Data Services Installation Guide for Windows 13
Page 14

Preparing to Install Data Services
1
Pre-installation overview
Tomcat application server
(optional)
DescriptionComponentFeature category
Web application server that can be used
to deploy BusinessObjects applications.
You can also use your own existing web
application server.
Web Tier Components
Message Client
Components
Documentation
Components
For complete description of the components and how they interact, see "Data
Services Architecture" in the BusinessObjects Data Services Getting Started
Guide.
Note: You can configure several Job Server and Access Server instances
from one Job Server or Access Server installation. Configure Job Server and
Access Server instances using the Server Manager.
You can install Data Services components on one or more computers based
on available resources and the amount of traffic the system processes. Before
installing Data Services components, consider the following:
• A local repository connects a Data Services Designer with a Data Services
Web application that manages the Data
Services environment (monitors, executes, and schedules jobs), as well as
Management Console
metadata reporting (auto-documentation, Validation and Operational dashboards, Data Quality reports, and impact
and lineage analysis).
Message Client SDK that other applications can use to integrate with real-time
Data Services jobs.
Data Services product documentation.
Job Server. You can install a Job Server on the same computer as the
repository, on a stand-alone computer (with repository database client
software), or on the same computer as a Data Services Designer.
• Any Data Services Designer can access any local repository and Data
Services Job Server. Multiple Data Services Designers cannot
simultaneously access the same local repository. Simultaneous access
14 Data Services Installation Guide for Windows
Page 15

Preparing to Install Data Services
Pre-installation overview
risks metadata corruption in the repository. Also, you cannot link Data
Services Designer to more than one local repository at any given time.
• Install database client software on the computer containing the Job Server
to support the repository associated with that Job Server. For example,
if the repository associated with a Job Server named "oradev" is an Oracle
database, then Oracle client software must be installed and configured
on the computer containing the "oradev" Job Server.
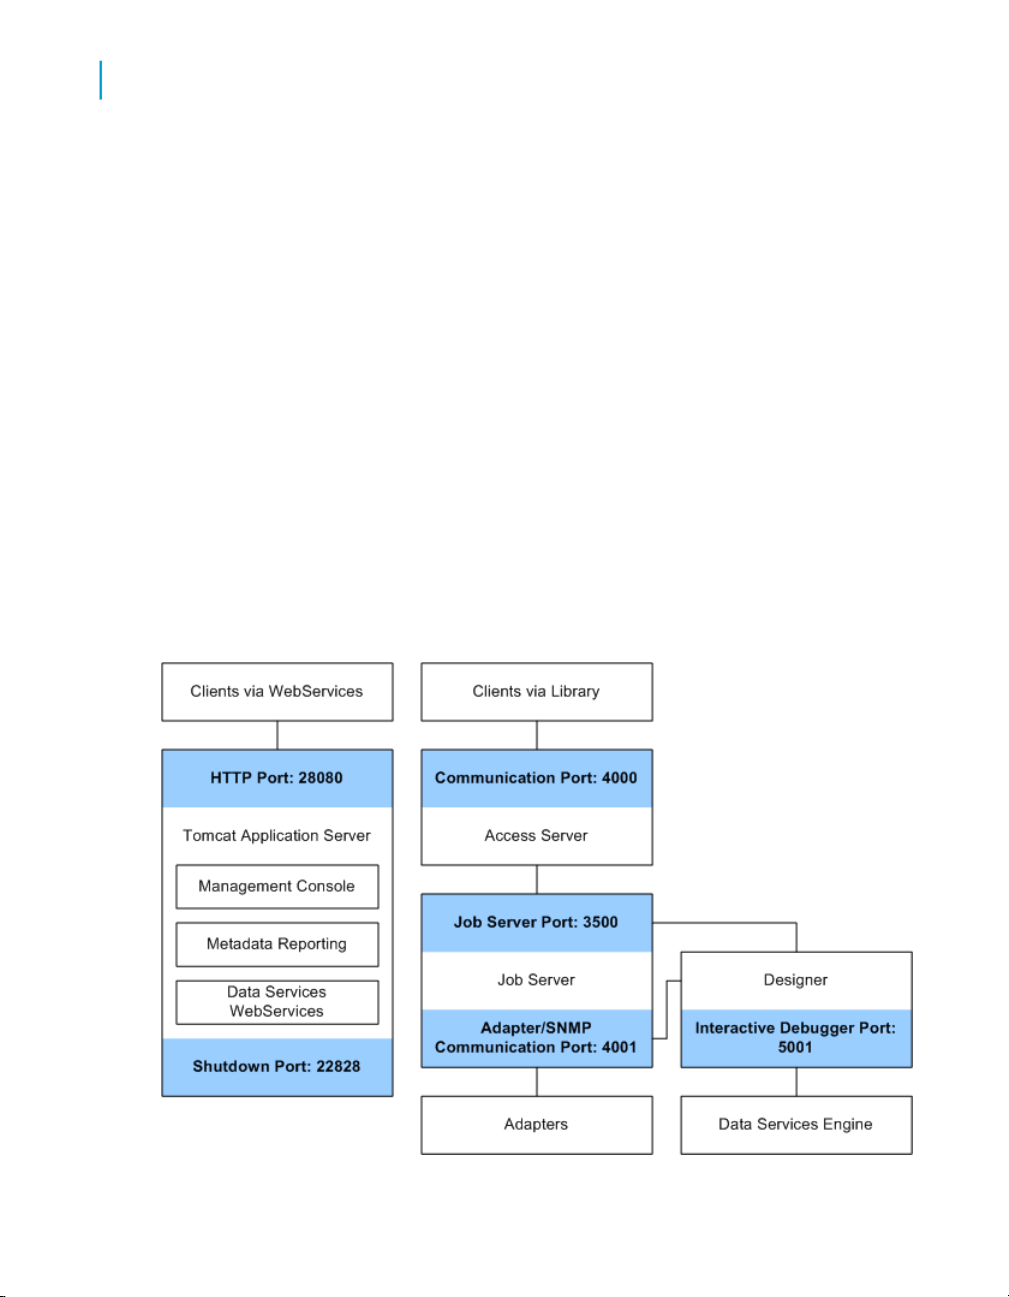
The following diagram depicts a simple distribution of Data Services
components among computers in a network. Note that you can install each
Data Services component on one or more computers. Also note that there
are many possible connections between Data Services components. Each
box in the diagram represents a different computer.
1
Data Services Installation Guide for Windows 15
Page 16

Preparing to Install Data Services
1
Pre-installation overview
16 Data Services Installation Guide for Windows
Page 17

You can install the Data Services Management Console on any computer
with or without other Data Services components. It is Java-based. You have
the choice to use the packaged Tomcat server, or use a previously installed
application server.
Note: If BusinessObjects Enterprise is installed on the same machine with
the BusinessObjects Enterprise-packaged Tomcat application server, the
installer will detect the existing Tomcat instance and share it with
BusinessObjects Data Services instead of installing a new instance.
Related Topics
• Getting Started Guide: Data Services Architecture
• Getting Started Guide: Data Services distributed architecture
Create a database for each repository
Data Services uses four types of repositories:
• Local — working repositories where you create and modify applications.
• Central — supports multi-user development and allows for check-in and
check-out. Also provides versioning to keep and allow restore for several
versions for the same object.
• Profiler — stores profiling metadata when the built-in Data Services profiler
is configured.
• Global Parsing Option — stores dictionaries for the Global Parsing Options
used by Data Cleanse transforms.
Preparing to Install Data Services
Pre-installation overview
1
You associate each Job Server with one or more local repositories. There
is no relationship between central repositories and Job Servers.
Create local repositories before you install each Job Server, or configure
them after you install Job Servers by using the Repository Manager.
• To set up a single-user development environment, create a database for
the local repository.
• To set up a multi-user development environment, create databases for
each local repository (one per user) and a database for the central
repository.
• Multiple Designers can share the same Global Parsing Option repository.
• Multiple Designers can share the same profiler and profiler repository.
Data Services Installation Guide for Windows 17
Page 18
Preparing to Install Data Services
1
Pre-installation overview
Related Topics
• Repository database requirements and preparation on page 22
• Using the Repository Manager on page 72
• Advanced Development Guide: Multi-user development
Check port assignments
Verify that all ports to be used by Data Services components are available
and not in use by other programs on each computer.
For a development system, you can install many components on the same
computer. This simplifies many connections between components (the host
name is always the same), but you must still define connections based on
TCP/IP protocol.
Note: If you choose to set ports manually during installation, verify that the
ports you specify are available. The following example configuration diagram
shows default port numbers, as well as the packaged Tomcat installation.
Default ports for other web application servers may differ.
18 Data Services Installation Guide for Windows
Page 19

Component
Job Server
This table details Data Services default ports:
Preparing to Install Data Services
Pre-installation overview
To setDefaultDescriptionPort
1
Job Server port or
TCP/IP port
Adapter/SNMP
communication
port
Packaged Tomcat Application Server
HTTP port
Shutdown port
Access Server
Communication
port
Receives commands from
Designer, Access Server,
and schedulers.
Receives commands and
sends data to adapters.
Supports communication between web browsers and the
management console.
The Tomcat service uses this
port to start and shutdown
the Web Server which supports the Management Console.
Receives and sends messages from clients and services
28080
28005
Use Server Manager3500
Use Server Manager4001
Tomcat conf\server.xml
Tomcat conf\server.xml
Use Server Manager4000
Designer
Interactive Debugger port
Address Server
Supports communication for
the debugging feature
Data Services Installation Guide for Windows 19
5001
ChooseTools > Options
in the Designer.
Page 20

Preparing to Install Data Services
1
Pre-installation overview
Component
To setDefaultDescriptionPort
Control port
Application port
Supports communication for
the Address Server
Supports communication for
the Address Server
Check network connections
Before you install Data Services components, check the computers involved
and verify network connections by executing the ping command on each
computer.
For example, if the Designer will be on a Windows computer and your Job
Server will be on a UNIX computer, from the Windows computer open the
DOS prompt and enter:
C:\> ping hostname
where hostname is the host name of the UNIX computer.
Then from the UNIX computer, log in as root and from the prompt, enter:
$ ping hostname
40010
40011
LINK_DIR\bin\ad
dress_server\Ad
dressServerConfig.txt
LINK_DIR\bin\ad
dress_server\Ad
dressServerConfig.txt
where hostname is the host name of the Windows computer.
Create a Windows cluster
To take advantage of fail-over support for Data Services services in a
Windows Clustering Environment, you must create a Windows cluster before
you install Data Services (refer to your Microsoft documentation for details).
If you choose this option, in the event of a hardware failure or Windows
20 Data Services Installation Guide for Windows
Page 21

Preparing to Install Data Services
Pre-installation overview
software failure, the Windows Cluster Manager will attempt to restart your
Data Services services.
After you create a Windows cluster:
1. Install Data Services on a shared drive from the first cluster computer.
2. After you install Data Services, create a new resource for the Data
Services service as a Generic Service.
a. Open the Cluster Administrator.
b. Under Active Resources, add a new resource. Enter a Name,
Description and choose Generic Service for the Resource Type.
c. Configure resource dependencies. Since Data Services is a Generic
Service, it requires a file share, IP address, Network Name, and
available physical disk resources.
d. Configure Generic Service Parameters. Enter DI_JOBSERVICE as
the Service name.
3. Create a new resource for the Data Services Web Server Service as a
Generic Service. (If you did not install the Data Services Management
Console, skip this step.)
a. Under Active Resources, add a new resource. Enter a Name,
Description and choose Generic Service for the Resource Type.
b. Configure Generic Service Parameters. Enter DataServicesWebServer
as the Service name and click to select the Use Network Name for
computer name option.
1
4. Run the Data Services cluster install utility (js_cluster_install.exe
located in the bin directory of your Data Services installation) on the other
cluster computers to populate them with the Data Services service-related
information.
a. Copy the js_cluster_install.exe and bodi_cluster_conf.txt
files from the Data Services bin directory on your primary cluster
computer.
b. Paste these files to each non-primary cluster computer and run the
following commands to install the Data Services Service and Data
Services Web Server Service, and to replicate the shortcuts set up on
the primary cluster computer:
js_cluster_install.exe -install if using system account
js_cluster_install.exe -install -Uuser -Ppasswd -Ddomain
when not using system account on primary node
js_cluster_install.exe -remove
Data Services Installation Guide for Windows 21
Page 22

Preparing to Install Data Services
1
Repository database requirements and preparation
c. Data Services components will use a Cluster Network Name to
communicate with other Data Services components over your network.
Open the Data Services Server Manager, enter the Cluster Network
Name and click Apply.
Note: If Job Servers are already configured before you enter the
Cluster Network Name, the Server Manager will prompt you to enter
a password for each currently configured repository associated with
each configured Job Server.
d. Click Restart.
Related Topics
• Beginning your installation on page 36
Repository database requirements and
preparation
BusinessObjects Data Services stores your design metadata for source and
target tables as well as database functions and definitions of built-in Data
Services objects in database tables. This set of database tables is called the
Data Services repository.
You can create one repository during installation. If you want to create a
repository in an existing database, you must create space for the repository
before you run the Data Services installation program. The Data Services
installation program connects to the repository and populates it.
A Data Services repository requires a minimum of 20 MB of free disk space
on the database server.
The following sections detail required settings for:
• IBM DB2
• Microsoft SQL Server
• MySQL
• Oracle
• Sybase ASE
Before you install BusinessObjects Data Services, you should review this
information in order to properly prepare your repository database.
22 Data Services Installation Guide for Windows
Page 23

Preparing to Install Data Services
Repository database requirements and preparation
Note: You can also choose to skip creating a repository during installation,
and use the Repository Manager to create it at a later time.
Note: If you want to use multi-byte metadata, such as Japanese column
names on imported tables or multi-byte data in Data Quality reports, your
database must be configured to use Unicode character encoding, such as
UTF-8.
Related Topics
• Using the Repository Manager on page 72
Installing MySQL as the repository database
MySQL database server is an open-source database that provides local data
storage. The BusinessObjects Data Services setup program can install and
configure MySQL as the database server for a BusinessObjects Data Services
installation. If you already have MySQL installed, the installation program
can be used to configure the repository database using your existing database
engine.
1
Note:
• The packaged MySQL database can be used only to store the different
Data Services repository tables. You are not allowed to store your own
data (datamart, data warehouse) in this MySQL instance.
• If you choose to use the packaged MySQL installation, the database
server is uninstalled if you uninstall Data Services. Back up the Data
Services repository with the MySQL admininstration tools if you want to
uninstall Data Services before upgrading to a new version.
MySQL installation details
Data Services installation setup creates a new MySQL installation with the
following details:
ValueProperty
DataServicesODBC datasource name
DataServicesMySQL schema name
BOE120MySQLMySQL service name
Data Services Installation Guide for Windows 23
Page 24

Preparing to Install Data Services
1
Repository database requirements and preparation
Note: The TCP/IP port number, the root user password, and the username
and password for the account that owns the MySQL schema can be
configured during installation setup.
The MySQL administration tools are also installed to the MySqlAdmin5 folder
at the same level as LINK_DIR. To start or stop the MySQL service, you can
use the installed MySQL administration tools or the "Services" panel located
in the "Administrative Tools" section of the Windows Control Panel.
For more information about administering the MySQL installation, refer to
the MySQL documentation at http://dev.mysql.com/doc/index.html.
To set up a database account for BusinessObjects Data Services
To administer the repository database, you need to set up a database
account. If you choose to install MySQL as part of your BusinessObjects
Data Services installation, you are prompted during installation to set up this
account. If you plan to use your own database, you should complete the
steps listed below before you install BusinessObjects Data Services.
1. Create or select a user account that provides BusinessObjects Data
Services with the appropriate privileges to your database server.
2. Verify that you can log on to your database and carry out administrative
tasks using this account.
Setting up an empty database for the repository
If you want to use an existing database server, you must create a new
database on your database server before you install BusinessObjects Data
Services.
The following database servers are supported for the repository database:
• IBM DB2
• Microsoft SQL Server
• MySQL
• Oracle
• Sybase ASE
24 Data Services Installation Guide for Windows
Page 25

Preparing to Install Data Services
Repository database requirements and preparation
Note: For information related to supported database software and version
requirements, review the online BusinessObjects Data Services supported
platforms document: http://support.businessobjects.com/documentation/sup
ported_platforms
To use your existing database with BusinessObjects Services, you need to
prepare it.
1. Create a new database.
2. Create a new user account and password for the database — to be used
by BusinessObjects Data Services.
3. Specify that the new user account has required permissions to create,
modify, and delete tables and create procedures so that the database
can be modified as required.
4. Record the name of the database, the user account, and the password
when you run the BusinessObjects Data Services installation setup
program.
During the installation setup, you can choose to reinitialize the existing
database. This will cause new tables to be created in your existing database
to store BusinessObjects Data Services data. If you are unsure of the
procedure for creating a new database, consult your specific database server
documentation.
1
Note: If you have an existing Data Services or Data Integrator repository,
you can upgrade the repository during installation or use the Data Services
Repository Manager to upgrade it after installation. If you have an existing
Data Quality repository, create a new Data Services repository and see the
Data Services Migration Considerations.
32-bit and 64-bit notes
Data Services 32-bit and 64-bit applications are supported on a variety of
operating systems. When you use a database client with the Data Services
32-bit application, the 32-bit database client libraries must be installed and
referenced in the library paths.
For example, the default installation of the Oracle 64-bit client includes
installation of the 32-bit client. For non-standard installations, these libraries
must be specified as part of the installation. After installation, the libraries
should be in the $ORACLE_HOME\lib32 directory.
Data Services Installation Guide for Windows 25
Page 26

Preparing to Install Data Services
1
Repository database requirements and preparation
If these 32-bit libraries are not present, you receive an error message stating
that Data Services cannot load the client library. Examples of error messages
include:
(5.2) 02-05-02 14:55:23 (E) (26797:0001) CON-120103: System
call <dlopen> to load and initialize functions failed for
<libclntsh.a>. Make sure the SHARED LIBRARY is installed and
resides in the correct location.
\(5.2) 02-05-02 14:55:23 (E) (26797:0001) REP-100108: Cannot
perform operation on Repository<Default Repository> because a
connection to the repository was never opened. A connection
must be opened to the repository before performing any opera
tion.
When you use a database client with the Data Services 64-bit application,
the 64-bit client libraries must be installed and referenced in the library paths.
Related Topics
• DB2 database setup requirements on page 26
• Microsoft SQL Server database setup requirements on page 27
• MySQL database setup requirements on page 27
• Oracle database setup requirements on page 28
• Sybase database setup requirements on page 29
DB2 database setup requirements
A local or central Data Services repository requires that you create a
dedicated database and define a user with the rights:
• To create a table
• To start a session
• To create a sequence
Install the DB2 Application Enabler software and use DB2 Control Center
and DB2 Script Center to verify the connection between the Designer
computer and the Data Services repository computer.
When the database is created, you need to prepare it for the BusinessObjects
Data Services installation.
Related Topics
• To prepare your database on page 29
26 Data Services Installation Guide for Windows
Page 27

Preparing to Install Data Services
Repository database requirements and preparation
Microsoft SQL Server database setup requirements
When you create a repository on Microsoft SQL Server, choose between
Windows authentication (by selecting the check box) or Microsoft SQL Server
authentication (by completing the Microsoft SQL Server user name and
password fields):
• Windows authentication — Microsoft SQL Server validates the login
account name and password using information from the Windows
operating system.
• Microsoft SQL Server authentication — Microsoft SQL Server
authenticates the existing Microsoft SQL Server login account name and
password.
When the database is created, you need to prepare it for the BusinessObjects
Data Services installation.
Related Topics
• To prepare your database on page 29
1
MySQL database setup requirements
When you create a repository on MySQL, you must supply the following
information in order to log in to the Repository Manager and the Designer
later:
• ODBC (MySQL) Data Source Name
• Username
• Password
The ODBC name is either the user Data Source Name (DSN), or the system
DSN.
Note: ODBC driver version 3.51.22 is recommended for use with MySQL.
If you select the option to install and configure MySQL that is supplied with
your installation, the installation creates a MySQL database with the default
settings for the repository database.
When the database is created, you need to prepare it for the BusinessObjects
Data Services installation.
Data Services Installation Guide for Windows 27
Page 28

Preparing to Install Data Services
1
Repository database requirements and preparation
Caution: If you provide the password when creating an ODBC data source,
users will be able to log into the Data Services Designer without specifying
a password. If you choose to install the packaged MySQL server, the
password is automatically specified for the ODBC data source, and anyone
with a valid username can access the Data Services Designer without
specifying a password.
Related Topics
• To prepare your database on page 29
Oracle database setup requirements
A local or central Data Services repository requires that you create a
dedicated database and define a user with the rights:
• To create a table
• To start a session
• To create a sequence
Grant the user the connect and resource roles. For Oracle 10G/R2, also
grant the create view role.
Install the Oracle client software and use SQL*Plus to verify the connection
between the Designer computer and the Data Services repository.
Note: To store multi-byte characters in a Data Services repository table
when the repository is on an Oracle database, you must change the Oracle
database character set to a code page that supports the multi-byte language
that you plan to use or you risk corrupting your metadata. For example, to
store Japanese characters, change the Oracle database character set to
either SHIFT_JIS or UTF8.
When the database is created, you need to prepare it for the BusinessObjects
Data Services installation.
Related Topics
• To prepare your database on page 29
28 Data Services Installation Guide for Windows
Page 29

Repository database requirements and preparation
Sybase database setup requirements
A local or central Data Services repository requires that you create a
dedicated database and define a user.
Note: For UNIX Job Servers, when logging in to a Sybase repository in the
Designer, the case you type for the database server name must match the
associated case in the SYBASE_Home\interfaces file. If the case does not
match, you might receive an error because the Job Server cannot
communicate with the repository.
If you are using both Sybase and Microsoft SQL Server on a Windows
platform, ensure the Sybase path precedes the Microsoft SQL Server path
in the environment variables %PATH% statement.
When the database is created, you need to prepare it for the BusinessObjects
Data Services installation.
Related Topics
• To prepare your database on page 29
Preparing to Install Data Services
1
To prepare your database
1. Create a new, empty database on your database server.
2. Create a new user and assign it a secure password.
3. Ensure that the new account has permission to create, modify, delete
tables and create procedures so that BusinessObjects Data Services can
modify the database as required.
Note: If you are not the owner of the database, you must have
permissions to perform the necessary operations.
4. Ensure the following are set up before you begin your installation:
Information requiredDatabase type
DB2 database aliasDB2
Database nameMicrosoft SQL Server
Data Services Installation Guide for Windows 29
Page 30

Preparing to Install Data Services
1
Repository database requirements and preparation
Information requiredDatabase type
ODBC datasource nameMySQL
tnsnames connect identifierOracle
Sybase ASE
Note: The Sybase server name is a combination of the host name and
the port number which is set by your database administrator in the file
sql.ini.
5. Record these details because you are required to provide them during
installation:
• The name of your database, ODBC datasource name, Sybase server
name, Oracle tnsnames connect identifier, or DB2 database alias.
• The user account and the password authorized to the database.
For information on how to create a new database, consult your database
server documentation or your database administrator.
Related Topics
• DB2 database setup requirements on page 26
• Microsoft SQL Server database setup requirements on page 27
• MySQL database setup requirements on page 27
• Oracle database setup requirements on page 28
• Sybase database setup requirements on page 29
Sybase server name
Database name
30 Data Services Installation Guide for Windows
Page 31

Installation scenarios
Standard installation overview
A standard installation allows you to specify which components to install.
You may want to perform a custom installation when you want to exclude
some components, or install only a limited set of components.
The installable feature categories include:
• Server Components
• Client Components
• Web Tier Components
• Message Client Components
• Documentation Components
By default, MySQL is installed as the repository database, and Tomcat is
installed as the web application server. You can also choose to use your
own database or web application server during the installation process.
Preparing to Install Data Services
Installation scenarios
1
Note: During installation, you can choose whether to configure many of the
components, such as Job Servers and Access Servers. If you skip component
configuration during installation, you can use the Data Services configuration
tools to accomplish these tasks after installation has finished.
Related Topics
• Choose components and determine component distribution on page 13
• Getting Started Guide: Data Services Architecture
To perform a standard installation
1. Obtain the Data Services software and licensing keycodes.
2. Confirm requirements and determine component distribution.
3. Check port assignments and network connections.
4. Create databases for repositories that you want to configure during
installation.
5. Install Data Services components.
Data Services Installation Guide for Windows 31
Page 32

Preparing to Install Data Services
1
Installation scenarios
Following installation, you can perform any additional configuration needed
using Data Services configuration tools. For example, you can:
• Create additional local, central, or Global Parsing Option repositories with
the Repository Manager.
• Register any repositories in the Management Console.
• Create and configure a profiler repository.
• Configure additional Job Servers with the Server Manager.
• Add any additional license keycodes with the License Manager.
Related Topics
• Pre-installation overview on page 10
• Beginning your installation on page 36
• Using the Repository Manager on page 72
• Using the Server Manager on page 76
• Using the License Manager on page 84
• Logging in to the Management Console on page 72
Silent installation overview
You can run a silent installation to install BusinessObjects Data Services
from the command line using a response file containing installation setup
parameters. This method is particularly useful when you need to perform
multiple installations or you do not want to interrupt people who are working
on machines in your system.
You can also incorporate the silent installation command into your own build
scripts. For example, if your organization uses scripts to install software on
machines, you can add the silent BusinessObjects Data Services installation
command to those scripts.
You may want to choose a silent installation if:
• You are already familiar with the BusinessObjects Data Services
installation program.
• You need an automated method for performing similar installations on
several machines.
• You do not want to run the BusinessObjects Data Services Setup program.
32 Data Services Installation Guide for Windows
Page 33

Related Topics
• Silent installation on page 60
Preparing to Install Data Services
Installation scenarios
1
Data Services Installation Guide for Windows 33
Page 34

Preparing to Install Data Services
Installation scenarios
1
34 Data Services Installation Guide for Windows
Page 35

Standard Installation of Data Services
2
Page 36

Standard Installation of Data Services
2
Beginning your installation
Beginning your installation
The following instructions lead you through the initial steps of setting up your
BusinessObjects Data Services installation on Windows. In this stage you
will do the following:
• Agree to the license terms.
• Enter the product key codes.
• Select where to install BusinessObjects Data Services.
• Select which features to install.
When you perform the following installation setup, all the components that
you select are installed on the local machine.
You can start the installation setup by running setup.exe, or by inserting
the application CD, selecting a language, and clicking Install if your system
is configured for autorun. After the Welcome screen is displayed, click Next
to begin your installation.
Tip: Before beginning your installation, review the Installation Overview to
ensure that you have prepared all necessary systems.
Related Topics
• Pre-installation overview on page 10
To accept the license agreement
At the "License Agreement", review and accept the license agreement for
BusinessObjects Data Services. You must accept the agreement to continue
with the installation setup.
36 Data Services Installation Guide for Windows
Page 37

Standard Installation of Data Services
Beginning your installation
2
1. Review the License Agreement.
2. Select I accept the License Agreement.
You cannot continue unless you accept the License Agreement.
3. Click Next to continue the installation setup.
The "User Information" screen is displayed.
To enter user information and a product keycode
At the "User Information" screen, enter user information and provide a product
code for your BusinessObjects Data Services installation.
Data Services Installation Guide for Windows 37
Page 38

Standard Installation of Data Services
2
Beginning your installation
1. Provide your user credentials in the Full Name and Organization fields.
This information personalizes your installation and is recorded in the
registry.
2. Enter a valid code in the Product Keycode field.
Note: You can enter a single base product keycode during Data Services
installation. If you need to add additional keycodes for other features that
you've purchased, you can enter them after installation with the Data
Services License Manager.
3. Click Next to continue the installation setup.
The "Directory Selection" screen is displayed.
Related Topics
• Using the License Manager on page 84
38 Data Services Installation Guide for Windows
Page 39

To specify the installation location
At the "Directory Selection" screen, enter the location for your
BusinessObjects Data Services installation.
Standard Installation of Data Services
Beginning your installation
2
1. Specify where to install the BusinessObjects Data Services components
in the Destination Folder field.
The default location is C:\Program Files\Business
Objects\BusinessObjects Data Services\.
Restriction: The maximum allowable path length is 100 characters.
Note: Data Services installation setup creates a Windows environment
named LINK_DIR for this path. LINK_DIR is used throughout the Data
Services documentation to refer to this path.
Depending on your component selection, the Data Services installation
setup may create other folders or files at the same level as the Data
Services installation folder:
• BusinessObjects Enterprise 12.0
Data Services Installation Guide for Windows 39
Page 40

Standard Installation of Data Services
2
Beginning your installation
• common
• deployment
• javasdk
• Tomcat55
• LanguagePacks.xml
2. Click Next to continue the installation setup.
The "Select Features" screen is displayed.
Note: To run the Data Services Designer, a user requires both read and
write access to the Data Services installation folder.
To select which features to install
At the "Select Features" screen, choose which components to install.
You can select or deselect the following categories and their sub-components:
40 Data Services Installation Guide for Windows
Page 41

Standard Installation of Data Services
Beginning your installation
DescriptionFeature category
2
Server components
Client components
Web Tier components
Message Client
components
Includes the Job Server, Access Server, MySQL (Server), Metadata Integrator, Address Server, Technology
Interfaces, and other adapters.
All Server components install by default unless deselected.
Includes the Designer and Repository manager.
All client components install by default unless deselected.
Includes the optional Tomcat application server installation and the Management Console web application (including the Administrator, Impact and Lineage Analysis,
Operational Dashboards, Data Quality Dashboards, and
Auto Documentation).
All Web Tier components install by default unless deselected.
Includes the C++ and Java libraries for integrating external application with Data Services real-time jobs.
The Message Client components do not install by default
unless selected.
Documentation
components
1. Select the features that you want to install. Each component displays a
drop-down menu that allows you to choose from the following options:
• Will be installed on local hard drive — Installs only the selected
component in the tree for that feature.
• Entire feature will be installed on local hard drive — Installs all
components in the tree for that feature.
Includes BusinessObjects Data Services product documentation as PDF documents.
The Documentation components install by default unless
deselected.
Data Services Installation Guide for Windows 41
Page 42

Standard Installation of Data Services
2
To select a repository
• Entire feature will be unavailable — No components for that feature
are installed. An X appears next to the deselected component.
2. To check if you have enough available disk space for the selected
components, click Disk Cost.
The disk cost screen appears. Click OK to return to feature selection.
3. If you want to reset the feature selection to default, click Reset.
4. When you have made your component selections, click Next to continue
the installation setup.
The next screen appears based on the features that you chose to install.
To select a repository
At the "Repository Selection" screen, choose which type of database to use
for the repository.
1. Select the type of repository that you want to configure.
• Install MySQL database server (Default)
42 Data Services Installation Guide for Windows
Page 43

Standard Installation of Data Services
Note: The MySQL administration tools are also installed to the
MySqlAdmin5 folder at the same level as LINK_DIR.
• Use an existing database server
• Skip configuration
If you choose to install MySQL or use an existing database, you can
configure one local repository during installation. If you skip the
configuration, or you need more repositories, you can configure additional
repositories later using the Data Services Repository Manager.
2. Click Next to continue the installation setup.
The next screen appears based on which configuration you chose to
perform.
Related Topics
• To create or upgrade repositories on page 73
To configure a MySQL database server
To select a repository
2
The "MySQL Database Server Configuration" screen appears if you chose
to install MySQL as the database server for the new installation.
Data Services Installation Guide for Windows 43
Page 44

Standard Installation of Data Services
2
To select a repository
1. Specify the port number for the MySQL database server in the MySQL
Port Number field.
The default port number is 3306. Use this number unless this port is
unavailable.
2. Specify and confirm a password for the MySQL root user account in the
MySQL root User Account area.
The root user is required for administrative and maintenance tasks on
the MySQL server, such as creating new users for more repositories or
performing backups.
3. Specify and confirm a username and password for the MySQL Repository
user account in the MySQL Repository User Account area.
4. Click Next to continue the installation setup.
The "Configure Job Server" screen is displayed.
44 Data Services Installation Guide for Windows
Page 45

Standard Installation of Data Services
To configure an existing database server
The "Local Repository Location" screen appears if you chose to use an
existing database server as your repository for the new BusinessObjects
Data Services installation. At this screen, specify the connection information
for the database where the repository will be created.
To select a repository
2
1. Select a database type from the Database type drop-down list.
Depending on your database type selection, corresponding input fields
are displayed.
2. Provide the database-specific required information in the fields displayed.
Required informationDatabase type
DB2 datasource nameDB2
Data Services Installation Guide for Windows 45
Page 46

Standard Installation of Data Services
2
To configure a Job Server
Required informationDatabase type
Microsoft SQL
Server
Sybase ASE
3. Specify the user name for the account authorized to use the database in
the User name field.
4. Specify the password for the account authorized to use the database in
the Password field.
5. Click Get Version to check the database connection and verify whether
a version of the repository already exists. If you are upgrading from an
existing Data Integrator or Data Services repository, click Upgrade to
keep and upgrade the existing repository. If you are creating a new
repository, click Create.
Database server name
Database name
Windows authentication
ODBC datasource nameMySQL
Database connection nameOracle
Sybase server name
Database name
Caution: If you choose to use Create on an existing repository, the
repository tables are recreated, and all data in the existing repository will
be lost.
6. Click Next to continue the installation setup.
The "Configure Job Server" screen is displayed.
To configure a Job Server
At the "Configure Job Server" screen, create a new job server.
46 Data Services Installation Guide for Windows
Page 47

Standard Installation of Data Services
To configure a Job Server
2
1. Select the type of Job Server configuration to perform:
• Configure a new Job Server (Default)
• Skip Job Server configuration
If you skip the configuration, you can configure a Job Server later using
the Data Services Server Manager. Any existing Job Servers from a
previous Data Integrator or Data Services installation will be kept, unless
it has been uninstalled or DSConfig.txt has been removed.
2. If you chose to configure a new Job Server, specify a name and port
number for the new server in the Job Server name and Job Server port
fields.
The default Job Server port is 3500.
3. If you need to configure SNMP support or change the runtime resources
for the Job Server, click Advanced.
The Job Server details screen is displayed. Make any necessary
configuration changes and click OK.
4. Click Next to continue the installation setup.
The "Login Information" screen is displayed.
Data Services Installation Guide for Windows 47
Page 48

Standard Installation of Data Services
2
To configure a Job Server
Note: If you are using a Sybase or DB2 repository, and need to change the
locale of your Job Server, use the Data Services Locale Selector after
installing Data Services. To use the Locale Selector, choose Start >
Programs > BusinessObjects XI 3.0 > BusinessObjects Data Services
> Data Services Locale Selector.
Related Topics
• To configure Job Servers on page 78
To specify login information
At the "Login Information" screen, specify the account that the Data Services
Windows service will use to start Job and Access Servers.
1. Select the type of account to use:
• Use system account
• Use this account
If you use the system account, you must reboot the system following Data
Services installation.
48 Data Services Installation Guide for Windows
Page 49

Standard Installation of Data Services
Note: The account you use must have:
• full access to the Data Services installation directory
• rights to Log on as a Service
You can change this account and password later using the Windows
Services tool.
2. If you chose to specify a user account, enter the username and password
in the User and Password fields.
3. Click Next to continue the installation configuration.
The "Configure Access Server" screen is displayed.
To configure an Access Server
At the "Configure Access Server" screen, create a new access server.
To configure an Access Server
2
1. Select the type of Access Server configuration to perform:
• Configure a new Access Server (Default)
• Skip Access Server configuration
Data Services Installation Guide for Windows 49
Page 50

Standard Installation of Data Services
2
To configure Metadata Integrator
Note: The Access Server is only required for real-time processing.
Because of this, you should skip configuration if you do not need real-time
processing. Real-time and transactional processing is not licensed in all
Data Service packages and is available as an option.
If you skip the configuration, you can configure an Access Server later
using the Data Services Server Manager. Any existing Access Servers
from a previous Data Integrator or Data Services installation will be kept,
unless it has been uninstalled or DSConfig.txt has been removed .
2. If you chose to configure a new Access Server, specify a directory and
port number for the new server in the Directory and Communication
port fields.
The default directory for the Access Server is LINK_DIR\Log\AccessServ
er_1.
3. Check Enable Access Server if you want the Access Server to start
when the Data Services system service is started. By default, Enable
Access Server is checked.
4. Click Next to continue the installation setup.
If BusinessObjects Enterprise is installed, the "Configure Metadata
Integrator" screen is displayed. If not, the next screen appears based on
which features you chose to install.
Related Topics
• To configure Access Servers on page 82
To configure Metadata Integrator
If you chose to install Metadata Integrator and BusinessObjects Enterprise
is already installed, the "Configure Metadata Integrator" screen appears. At
this screen, create a new Metadata Integrator configuration.
50 Data Services Installation Guide for Windows
Page 51

Standard Installation of Data Services
To configure Metadata Integrator
2
1. Select the type of Metadata Integrator configuration to perform:
• Configure a new Metadata Integrator
• Skip Metadata Integrator configuration
If you skip the configuration, you can configure Metadata Integrator later
by choosing Start > Programs > BusinessObjects XI 3.0 >
BusinessObjects Data Services > Data Services Metadata Integrator.
2. If you chose to create a new Metadata Integrator configuration, specify
a name for the new configuration in the Configuration name field.
3. Click Next to continue the installation setup.
The next screen appears based on which configuration you chose to
perform.
To specify Metadata Integrator configuration details
At the "Configure Metadata Integrator" screen, specify details for your
Metadata Integrator configuration.
Data Services Installation Guide for Windows 51
Page 52

Standard Installation of Data Services
2
To configure Metadata Integrator
1. Specify the host name of your BusinessObjects Enterprise CMS server
in the Server name field.
2. Check Enable SSL if you want to use a SSL secure connection.
3. Specify the user name used to connect to the CMS server to register and
execute the Metadata Integrator in the User field.
4. Specify the password for the CMS user in the Password field.
5. Select the CMS authentication mode from the Authentication Mode
drop-down list.
For more information about the available modes, see the BusinessObjects
Enterprise Administrator's Guide.
6. Specify the folder in which the CMS system adds the Metadata Integrator
as a program object in the Folder name field.
The default value is Data Services. If the specified folder does not exist,
it is created automatically.
7. Specify configuration for your Data Services Repository database in the
"Repository Database server" area.
If you chose to use the packaged MySQL server or an existing
BusinessObjects Enterprise MySQL installation, this area is disabled.
52 Data Services Installation Guide for Windows
Page 53

Standard Installation of Data Services
To configure Metadata Integrator
8. Click Next to continue the installation setup.
The next screen appears based on which features you chose to install.
To specify Metadata Integrator SSL details
If you chose to enable SSL for the Metadata Integrator, the "Configure
repository for Metadata Integrator" screen is displayed. At this screen, specify
the SSL details for your Metadata Integrator configuration.
2
1. Click Browse to specify the location of your SSL certificates.
2. Specify the filenames for the Server SSL Certificate, SSL Trusted
Certificates, SSL Private key, and SSL Passphrase in the appropriate
fields.
3. Click Next to continue the installation setup.
Data Services Installation Guide for Windows 53
Page 54

Standard Installation of Data Services
2
To select a web application server configuration option
To select a web application server
configuration option
If you chose to install the Web Tier Components, you need to provide
information about the web application server that will work with your
BusinessObjects applications. Use the "Select Web Application Server"
screen to either install Tomcat as your application server, or to work with
your existing web application server.
To configure your web application server for BusinessObjects Data Services,
you need account information along with port information.
1. Select one of the following options:
• Use a pre-installed Web Application Server
• Install Tomcat application server
2. To use your current Web application server, you can Specify your server
from the drop-down list provided.
54 Data Services Installation Guide for Windows
Page 55

Standard Installation of Data Services
To select a web application server configuration option
Tip: You can configure the server during the current installation setup.
You will need to provide access information for this server in a subsequent
screen.
3. Click Next to continue the installation setup.
The next screen appears, based on your selection.
To configure your Tomcat application server
The "Configure Tomcat" screen is displayed during installation setup if you
choose to install Tomcat as the web application server for your current
BusinessObjects Data Services installation. At this screen, configure Tomcat
and the Java SDK.
2
1. In the fields provided, specify which port numbers will be used by Tomcat
for connection, shutdown, and redirect.
Tip: You can accept the default values for each port setting.
2. Click Next to continue with the installation setup.
Data Services Installation Guide for Windows 55
Page 56

Standard Installation of Data Services
2
To select a web application server configuration option
The "Start Installation" screen is displayed.
Note: If you need to change the Tomcat port settings after installation, you
can modify the Tomcat setup.xml file. By default, this file is installed to the
Tomcat55\conf folder at the same level as LINK_DIR.
To configure an existing Web application server
The Configure Web Application Server screen is displayed during installation
after you specify an existing server in the Select Web Application Server
screen. To properly install web components on your web application server,
you must provide specific configuration information about your existing web
application server.
1. Specify the required configuration information for your existing web
application server.
Required informationWeb Application
Server
Apache
Tomcat 5.5
WebLogic
10
56 Data Services Installation Guide for Windows
• Server Instance: Name of the current web application
server instance (e.g. "localhost").
• Service Name: Name of the Windows service if the appli-
cation server will be installed as a Windows service (e.g.
"Tomcat5").
• Application Server Installation Directory: The directory
where the web application server is installed.
• Port: Administration port of the application server -
mandatory for Weblogic (e.g. "7001").
• Username: User name with administration rights to the
application server - mandatory for Weblogic.
• Password: Password for account with administration rights
to the application server - mandatory for Weblogic.
• Server Instance: Name of the current web application
server instance (e.g. "mserver1").
• Application Server Installation Directory: The directory
for the web application server instance (e.g. C:\bea\we
blogic10\samples\domains\wl_server).
Page 57

cation
Server
Standard Installation of Data Services
To select a web application server configuration option
Required informationWeb Appli-
2
WebLogic 9
WebSphere
6.1
• Port: Administration port of the application server -
mandatory for Weblogic (e.g. "7001").
• Username: User name with administration rights to the
application server - mandatory for Weblogic.
• Password: Password for account with administration rights
to the application server - mandatory for Weblogic.
• Server Instance: Name of the current web application
server instance (e.g. "mserver1").
• Application Server Installation Directory: The directory
for the web application server instance (e.g. C:\bea\we
blogic92\samples\domains\wl_server).
• Port: Administration port of the WebSphere application
server - the SOAP port. Default SOAP port will be used if
not specified.
• Username: User name with administration rights to the
WebSphere application server.
Note: If Admin is Secure is not selected you do not need
to specify a username or a password.
• Password: Password for account with administration rights
to the application server.
• Server Instance: Name of the current web application
server instance (e.g. "server1").
• Virtual Host: The virtual host to which the application must
be bound (e.g. "default_host").
• Admin is Secure: Select this option to enable security
requiring administrative access credentials to the application. If WebSphere was installed with the secure option,
this is required.
• Application Server Installation Directory: The directory
for the web application server instance (e.g. C:\Program
Files\IBM\WebSphere\AppServer\profiles\AppSrv01).
2. Click Next to continue the installation setup.
The "Start Installation" screen is displayed.
Data Services Installation Guide for Windows 57
Page 58

Standard Installation of Data Services
2
To start the installation
Note: To deploy the Management Console to a web server farm, run the
Data Services installation setup on each web server in the farm.
To start the installation
The "Start Installation" screen is the final screen in the installation setup.
• Review the components that will be installed and any associated settings.
If you want to make changes, use the Back button. All entries are retained;
you do not need to re-enter all the information.
Note: If you are running the setup.exe program from the command line,
and have the -w filename parameter switch enabled, this is the point at
which you can Cancel the installation process to have the .ini file written
with all the installation parameter information. This .ini file can then be
used in silent and scripted installations.
• Click the Next button to start the installation process.
• At the end of installation, you can launch the Data Services License
Manager automatically by checking Launch License Manager before
clicking Finish.
58 Data Services Installation Guide for Windows
Page 59

Silent Installation of Data Services
3
Page 60

Silent Installation of Data Services
3
Silent installation
Silent installation
A silent installation is one that you run from the command line to install
BusinessObjects Data Services on any machine in your system. When you
run a silent installation, you can specify all the parameters to be used for the
install at the same time on the command line, rather than following the install
wizard.
The silent install command line includes a series of parameters that provide
information for installation settings and directory paths. You can also specify
options that control the level of prompts during an install.
The silent BusinessObjects Data Services installation is particularly useful
when you need to perform multiple installations or you do not want to interrupt
people who are working on machines in your system.
You can also use the silent installation command in your own scripts. For
example, if your organization uses scripts to install software on machines,
you can insert the silent BusinessObjects Data Services installation command
into your scripts.
The silent installation command consists of the command setup.exe, followed
by the install destination, and a number of parameters that provide information
about the installation.
The following example installs BusinessObjects Data Services with Tomcat
and MySQL onto the machine with no user interface and no prompts through
to the end of the installation:
setup.exe /qn+ INSTALLDIR="C:\Program Files\BusinessObjects\"
ADDLOCAL="Data_Integrator,Tomcat,MySQL"
The example uses the most common parameters. You can choose any
number of valid parameters, but it is good practice to keep the silent
installation as simple as possible. If you need to specify many parameters
it is best to create an installation .ini file.
Related Topics
• Silent/scripted installation .ini file on page 66
60 Data Services Installation Guide for Windows
Page 61

Silent install parameters
The following table lists the most common parameters used in a silent
installation of BusinessObjects Data Services. To use a parameter, place it
on the command line after the setup.exe command and after the path for
the installation files. Or, you may use these parameters in the installation
.ini file.
Note: These parameters are case sensitive.
/qn+
/qn
Silent Installation of Data Services
Silent install parameters
DescriptionInstallation parameter
Specifies that the user is only
prompted when the installation is
complete.
Specifies that the user is not
prompted during the install, or when
the install is complete.
3
/qa /qb
INSTALLDIR
PIDKEY
Specifies that the user is not
prompted during the install, or when
the install is complete.
Specifies the machine and directory
where you want to install the new
BusinessObjects Data Services
components.
For example, C:\Program
Files\Business Objects\Busines
sObjects Data Services
Specifies your base product activation keycode.
Data Services Installation Guide for Windows 61
Page 62

Silent Installation of Data Services
3
Silent install parameters
DescriptionInstallation parameter
Specifies the user ID for the
database.
DATABASEUID
DATABASEPWD
DATABASEDRIVER
For trusted authentication this parameter is not required, use
DATABASEAUTHENTICATION=trusted.
Specifies the MySQL root password.DATABASEPWD_MYSQLROOT
Specifies the account password for
the database you'll be using for
BusinessObjects Data Services.
For trusted authentication, this parameter is not required, use
DATABASEAUTHENTICATION=trusted instead.
Identify the type of database for the
repository.
For Oracle, enter OracleDatabaseSubsystem.
For DB2, enter DB2DatabaseSubsystem.
For Sybase, enter SYBASEDatabaseSubsystem.
62 Data Services Installation Guide for Windows
For ODBC SQL, enter ODBCDatabaseSubsystem.
For Remote MySQL, enter MySqlDatabaseSubsystem.
Page 63

Silent Installation of Data Services
Silent install parameters
DescriptionInstallation parameter
3
DATABASEDSN
DATABASEPORT
DATABASEDB
DATABASEDB_AUDIT
DATABASEUID_AUDIT
Specifies the ODBC DSN for the
Data Services repository database.
Specifies the port used for MySQL
Server. Defaults to port 3306 if it is
not specified.
Specifies the name of the CMS
database. This database name defaults to BOE120 if this parameter is
not specified.
Changes the name of the MySQL
audit database, otherwise, the default
name of BOE120_Audit will be used.
Specifies the user ID for the
database.
For trusted authentication this parameter is not required, use
DATABASEAUTHENTICATION=trusted.
DATABSEPWD_AUDIT
Specifies the account password for
the database you'll be using for
BusinessObjects Data Services.
For trusted authentication, this parameter is not required, use
DATABASEAUTHENTICATION=trusted instead.
Data Services Installation Guide for Windows 63
Page 64

Silent Installation of Data Services
3
Silent install parameters
DescriptionInstallation parameter
Changes the default directory where
Tomcat is installed.
TOMCATDIR
TOMCAT_CONNECTION_PORT
TOMCAT_REDIRECT_PORT
TOMCAT_SHUTDOWN_PORT
ADDLOCAL
If you don't specify this parameter,
Tomcat will be installed the directory
TOMCAT under the default directory
for BusinessObjects Data Services.
Specifies a different connection port.
If this option is not specified, port
28080 will be used.
Specifies a different redirect port. If
this option is not specified, port
28443 will be used.
Specifies a different shutdown port.
If this option is not specified, port
28005 will be used.
Specifies which components will be
installed. This is the same as running
a Custom install. Each component is
specified, comma separated and
grouped within quotes.
Related Topics
• Silent/scripted installation .ini file on page 66
• Custom install options for silent installation on page 65
64 Data Services Installation Guide for Windows
Page 65

Silent Installation of Data Services
Custom install options for silent installation
Custom install options for silent
installation
This is an exhaustive list of all Custom Install Options that are available as
features that can be included or excluded during a silent installation.
Silent Install of Data Services Designer
setup.exe /qn+ INSTALLDIR='C:\Program Files\BusinessObjects\'
ADDLOCAL='Data_Integrator_Designer'
The following table specifies each feature category and its corresponding
silent installation feature names.
Note: Silent installation feature names are case sensitive.
Silent Installation Feature NameFeature Category
3
Server Components
Client Components
Web Tier Components
Data_Integrator
Data_Integrator_Server
Data_Integrator_AccessServer
Data_Integrator_JobServer
Data_Integrator_Interfaces
Data_Integrator_MetadataIntegrator
Data_Integrator_Client
Data_Integrator_Designer
Data_Integrator_Repository
Data_Integrator_WebTier
Data_Integrator_ManagementConsole
Data Services Installation Guide for Windows 65
Page 66

Silent Installation of Data Services
3
Silent/scripted installation .ini file
Silent Installation Feature NameFeature Category
Data_Integrator_DocumentationDocumentation Com-
ponents
MySQLPackaged MySQL
Database
TomcatPackaged Tomcat
Application Server
Note: Dependencies between features are automatically enforced even if
not explicitly specified in the silent install command line.
Silent/scripted installation .ini file
There are three additional parameters than can be used with setup.exe on
the command line. These parameters provide a way to pass installation
settings to an .ini file. During a regular full user interface install, installation
settings such as target directories are set as properties in the screens. The
properties set can be written to the .ini file to replicate the install at a later
date without having to use the user interface.
DescriptionInstallation
parameter
-w filename
66 Data Services Installation Guide for Windows
Writes the .ini file to filename. (You may specify the full
path.)
The simplest way to write to the .ini file is to go through
the user interface install and select whatever parameters
you want in each dialog box. At the Start Installation screen,
cancel out of the install. The .ini file is written with the
closing of the installation setup sequence.
Page 67

parameter
Silent Installation of Data Services
Sample installation script file
DescriptionInstallation
3
-r filename
-l filename
Each installation setup screen that has relevant properties writes that
configuration information to the file.
Reads the .ini file and passes the properties to the installer
as settings.
Within the .ini file there is a section titled [OTHERS]. If you
set QUIET= to /qb, then it will do an install showing the
progress meter. If set to /qa, then it will do a full silent install.
Sets the install log to this path and file name and is used in
conjuction with the -r switch. If not specified, the log file will
be written to the default %TEMP% folder.
Sample installation script file
This is a sample installation script file that was generated from the command
line: setup.exe -w "FILEPATH". The standard installation program runs, and
the parameters are written to the .ini file by cancelling out of the installation
at the "Start Installation" screen.
This file can now be used for future silent installs or scripted installs by
including the file name and path in the command line: setup.exe -r
"FILEPATH".
[OTHER]
QUIET=/qa
[INSTALL]
ALLUSERS=""
AS_ADMIN_IS_SECURE=""
AS_ADMIN_PASSWORD=""
AS_ADMIN_PORT="28080"
AS_ADMIN_USERNAME="admin"
AS_DIR="../Tomcat55"
AS_INSTANCE="localhost"
AS_SERVER="tomcat55"
AS_SERVICE_NAME="BOE120Tomcat"
AS_VIRTUAL_HOST=""
ApplicationUsers="AllUsers"
AspNetVersionRequirementMet="1"
BOBJRESETFEATURES=""
Data Services Installation Guide for Windows 67
Page 68

Silent Installation of Data Services
3
Sample installation script file
CMSAUTHENTICATION=""
CMSUSERNAME=""
COMPANYNAME="Company Name, Inc."
DATABASEDB="EIM120"
DATABASEDB_AUDIT="BOE120_AUDIT"
DATABASEDRIVER="MySQLDatabaseSubSystem"
DATABASEDSN=""
DATABASEPWD="bobj"
DATABASEPWD_AUDIT="bobj"
DATABASEPWD_MYSQLROOT="root"
DATABASEUID="bobj"
DATABASEUID_AUDIT="bobj"
DIASCONFIG="Yes"
DIASENABLE="Yes"
DIASPATH="C:\Program Files\Business Objects\BusinessObjects
Data Services\Log\AccessServer_1"
DIASPORT="4000"
DIJSCACHEPATH="C:\Program Files\Business Objects\BusinessObjects
Data Services\Log\pCache"
DIJSCOMMPORT="4001"
DIJSCONFIG="Yes"
DIJSENABLECOMMPORT="No"
DIJSENABLESNMP="No"
DIJSENDPORT="32767"
DIJSNAME="JobServer_1"
DIJSPORT="3500"
DIJSSTARTPORT="1025"
DILIPW="password"
DILIUSER="DOMAIN\username"
DILIUSESYSACCOUNT="No"
DILRDBNAME=""
DILRDBTYPE=""
DILROPTYPE=""
DILRPASSWORD=""
DILRSERVERNAME=""
DILRUSERNAME=""
DILRWINDOWSAUTHENTICATION=""
DIMICERTFILE=""
DIMICERTFOLDER=""
DIMICFGNAME=""
DIMICONFIGURE=""
DIMIDBHOST=""
DIMIDBPORT=""
DIMIFOLDERNAME=""
DIMIPASSPHRASEFILE=""
DIMIPRIVKEYFILE=""
DIMISID=""
DIMISSLENABLED=""
DIMITRUSTEDCERTFILE=""
DIREPOSELECTION="MySQL"
DSCFGFOUND="Yes"
DotNetFrameworkVersionRequirementMet="1"
ENABLESERVERS=""
68 Data Services Installation Guide for Windows
Page 69

Silent Installation of Data Services
Sample installation script file
ENTERPRISE110=""
EXPANDCMS="1"
FOUNDDOTNET=""
HASIIS4=""
INSTALLDIR="C:\Program Files\Business Objects\"
INSTALLLEVEL="3"
INSTALLSWITCH=""
INSTALL_DB_TYPE="NoNeed"
IS_CA_INSTALLED=""
IS_CLIENT_INSTALL=""
IS_UPGRADE_UNSUPPORTED=""
KeycodeIsValid=""
KeycodeIsValid_AFSets=""
KeycodeIsValid_DM=""
KeycodeIsValid_Prediction=""
KeycodeIsValid_RAS=""
KeycodeIsValid_SPC=""
LUGE=""
MYSQLDIR="C:\Program Files\Business Objects\MySql5\"
MYSQLPORT="3306"
NAMESERVER=""
NEWCMSPASSWORD=""
NODAS=""
NO_INPUT_NEEDED=""
PIDKEY="00000-0000000-0000000-0000"
PREVIOUS_CA=""
PREVIOUS_CE_UPGRADE=""
Preselected=""
Privileged="1"
ProductID="none"
ProductName="BusinessObjects Data Services"
RAS_RegWizCmdLine=""
RESUME=""
REUSEDSCONFIG=""
RegWizCmdLine=""
SKIP_DEPLOYMENT=""
SUPPORTED_UPGRADES=""
TOMCATDIR="C:\Program Files\Business Objects\Tomcat55\"
TOMCAT_CONNECTION_PORT="28080"
TOMCAT_REDIRECT_PORT="28443"
TOMCAT_SHUTDOWN_PORT="28005"
UNSUPPORTED_UPGRADES=""
USERNAME="User Name"
WCADOTNETINSTALL=""
WCAJAVAINSTALL="True"
WCATOMCATINSTALL="True"
WDEPLOY_LATER=""
WEBSERVER_CONFLICT="1"
WEBSITE_HOST="LOCAL-HOST"
WEBSITE_METABASE_NUMBER=""
WEBSITE_PORT="80"
_ServiceAccountName="Local System Account"
[FEATURES]
3
Data Services Installation Guide for Windows 69
Page 70

Silent Installation of Data Services
3
Sample installation script file
REMOVE=""
ADDLOCAL="Data_Integrator_AccessServer,Data_Integrator_Serv
er,Data_Integrator_JMSAdapter,Data_Integrator_Interfaces,Da
ta_Integrator_SFDCAdapter,MySQL,Data_Integrator_JobServer,Da
ta_Integrator_MetadataIntegrator,Data_Integrator,Data_Integra
tor_R3Functions,Data_Integrator_Designer,Data_Integrator_JDEd
wards,Data_Integrator_MultiUser,Data_Integrator_OraApps,Data_In
tegrator_PeopleSoft,Data_Integrator_SAPBW,Data_Integra
tor_SAPR3Abap,Data_Integrator_SAPR3Bapi,Data_Integra
tor_SAPR3Idoc,Data_Integrator_Siebel,Data_Integrator_Client,Da
ta_Integrator_Repository,Tomcat,Data_Integrator_WebTier,Data_In
tegrator_ManagementConsole,Data_Integrator_Documentation"
ADDSOURCE=""
ADVERTISE=""
70 Data Services Installation Guide for Windows
Page 71

After Installing Data Services
4
Page 72

After Installing Data Services
4
Starting Data Services services automatically
Starting Data Services services
automatically
The Data Services service and packaged Tomcat service start automatically
when the computer restarts. The Data Services service then starts Job
Servers and Access Servers on the restarted computer.
You can change service startup to Manual in the Windows Services window.
Note: The Data Services Address Server service is set to Manual startup
by default, but must be started before using the Global Address Cleanse or
Global Suggestion List transforms. If you do not need Global Address Cleanse
or Global Suggestion List functionality, Business Objects recommends that
you leave the Address Server service as Manual and do not start it.
Logging in to the Management Console
After an Access Server is running, you can configure it by using the Data
Services Management Console.
From the Start menu, select Programs > BusinessObjects XI 3.0 >
BusinessObjects Data Services > Data Services Management Console.
Log in to Data Services Management Console using the default name (admin)
and password (admin).
Related Topics
• Management Console Administrator Guide: Logging in
• Management Console problems on page 96
Using the Repository Manager
Use the Data Services Repository Manager to check the version, to upgrade,
or to create a repository after installation:
1. From the Start > Programs > Business Objects XI 3.0 >
BusinessObjects Data Services menu, choose Data Services
Repository Manager.
2. To check the version of an existing repository, click Get version.
72 Data Services Installation Guide for Windows
Page 73

Related Topics
• To create or upgrade repositories on page 73
• To create or upgrade repositories in batch mode on page 74
To create or upgrade repositories
1. If you are creating a new repository, ensure that you created a database
for the new repository to use.
2. In the Data Services Repository Manager window, select the database
type of your repository.
3. Complete the information for your database type.
4. Enter the user name and password that you want to use for your
repository.
5. Select one of the following repository types:
DescriptionRepository
type
After Installing Data Services
Using the Repository Manager
4
Local
Central
Profiler
GPO
6. If you are creating a new repository, click Create. If you are upgrading
an existing repository, click Upgrade.
7. If you want to create or upgrade another repository, repeat steps 1 through
6.
8. When you finish creating or upgrading repositories, click Close.
(Default) Stores definitions of Data Services objects in your
local repository.
Stores definitions of Data Services objects in a central repository for multiple-user users.
Stores information generated by the Data Profiler for determining the quality of your data.
Stores dictionary information for Global Parsing Options used
by Data Cleanse transforms.
Data Services Installation Guide for Windows 73
Page 74

After Installing Data Services
4
Using the Repository Manager
Note: If you created a profiler repository, you must associate it to a Job
Server and connect it to the Management Console Administrator.
Related Topics
• Management Console Administrator Guide: Connecting repositories to
the Administrator
• Using the Server Manager on page 76
• To configure Job Servers on page 78
• Repository database requirements and preparation on page 22
To create or upgrade repositories in batch mode
You can use the executable called RepoManBatch.exe (stored in the
LINK_DIR\bin directory) to create or update repositories in batch mode.
Specify parameters using a command prompt.
C:\Program Files\Business Objects\BusinessObjects Data Ser
vices\bin>RepoManBatch.exe
Usage:
-U<User> : Repository login user
-P<Password> : Repository login password
-S<Server> : Repository server name
-N<DatabaseType> : Repository database type
-Q<Database> : Repository database
-g : Repository using Windows Authentication
(Microsoft SQL Server only)
-t<local> : Repository type: local, central, pro
filer, GPO
-c : Repository create
-u : Repository upgrade
-v : Repository version
-d : Show details
-a : Repository security
C:\Program Files\Business Objects\BusinessObjects Data Ser
vices\bin>
For example:
RepoManBatch -Usa -P -NMicroSoft_SQL_Server -SServer -QJake c -tcentral -d
or
RepoManBatch -UJake -PJake -NOracle -Sdbsvr -v
74 Data Services Installation Guide for Windows
Page 75

Usage:
-S
-N
After Installing Data Services
Using the Repository Manager
DescriptionFlag
Repository login user-U
Repository login password-P
Repository server name:
• For Microsoft SQL Server: database server name
• For Oracle: database connection name
• For DB2: data source
• For Sybase ASE: server
• For MySQL: ODBC data source name
Repository database type:
• Microsoft_SQL_Server
• DB2
• Oracle
• Sybase
• MySQL
4
Repository database name-Q
Repository Type: local, central, profiler, GPO-t
Create repository-c
Upgrade repository-u
Get repository version-v
Show details-d
Central repository security-a
Data Services Installation Guide for Windows 75
Page 76

After Installing Data Services
4
Using the Server Manager
Using the Server Manager
Use the Data Services Server Manager to create, edit, or delete Job Servers
and Access Servers after installation:
1. From the Start menu, choose Programs > Business Objects XI 3.0 >
BusinessObjects Data Services > Data Services Server Manager.
The Data Services Server Manager utility window opens. This window
shows the Job Servers and Access Servers currently configured to run
on your computer.
76 Data Services Installation Guide for Windows
Page 77

After Installing Data Services
Using the Server Manager
4
2. Follow the procedures in the next sections to configure Job and Access
servers as needed.
3. In the Data Services Server Manager window, click Restart.
Related Topics
• To configure Job Servers on page 78
Data Services Installation Guide for Windows 77
Page 78

After Installing Data Services
4
Using the Server Manager
• To resynchronize Job Servers on page 80
• To configure run-time resources for Job Servers on page 81
• To configure Access Servers on page 82
• Configuring the Metadata Integrator on page 90
To configure Job Servers
1. In the Data Services Server Manager window, click Edit Job Server
Config.
2. In the Job Server Configuration Editor window, click Add to add a Job
Server.
3. In the Job Server Properties window, enter information about the Job
Server.
Job Server port
DescriptionProperty
Enter a name that uniquely identifies the Job Server.Job Server name
Enter the TCP/IP port that the Job Server uses to receive commands from the Designer and the Access
Server. If a computer hosts multiple Jobs Servers,
each Job Server must have a unique port number.
Choose a port number for a server that is not used
by another process on the computer. If you are unsure
of which port number to use, use the default port
number and increment it for each additional Job
Server you configure.
Select this check box if the Job Server manages
Support Adapter and
SNMP communication
Communication port
Enable SNMP
78 Data Services Installation Guide for Windows
adapters or if this Job Server will be the one to com-
municate with an SNMP agent. Each computer that
hosts adapters and an SNMP agent must have exactly
one Job Server designated to manage them.
Enter the port number that the Job Server uses for
communicating with adapters or an SNMP agent. The
default is 4001.
Check this to enables this Job Server to send events
to the SNMP agent.
Page 79

After Installing Data Services
Using the Server Manager
4. Under Associated Repositories, enter the local and profiler repositories
to associate with this Job Server. Each Job Server must be associated
with at least one local repository.
a. Click Add to associate a new local or profiler repository with this Job
Server.
b. Enter the required information for your database type.
c. Enter the user name and password that you want to use for your
repository.
d. Select the Default repository check box if this is the default repository
for this Job Server. You must specify exactly one default repository.
Note: Do not select the Default repository check box if this is a profiler
repository.
e. Click Apply to save your entries and associate the repository with the
Job Server.
The associated repository updates with the Job Server's computer
name and port number.
f. Repeat steps a through e until you are done adding all associated
repositories.
4
5. To edit an associated repository:
a. Select a repository and click Edit to change the repository's default
setting.
b. Under Repository Information, enter the password.
c. Select or clear the Default repository check box, indicating whether
this is the default repository for the Job Server.
d. Click Apply to save the change.
6. To delete an associated repository:
a. Select a repository and click Delete.
b. Under Repository Information, enter the password.
c. Click Apply to remove this associated repository.
7. When you finish adding all associated repositories, including one default,
click OK.
8. From the Job Server Configuration Editor window, complete any other
necessary steps. You can:
• Add another Job Server
a. Click Add.
b. Repeat steps 3 through 7.
Data Services Installation Guide for Windows 79
Page 80

After Installing Data Services
4
Using the Server Manager
9. When you have configured all the Job Servers you want, click OK.
10. Click Restart to restart the services with the updated configurations.
• Change a Job Server's configuration
a. Select the Job Server.
b. Click Edit.
c. Repeat steps 3 through 7.
• Remove a Job Server
a. Select the Job Server.
b. Click Delete.
Note: If the Job Server has associated repositories, you must first
delete those and then click OK before you can delete the Job
Server.
• Resynchronize your Job Server configuration with a local repository.
Resynchronizing registers the Job Server again in all associated
repositories.
You return to the Data Services Server Manager window.
Related Topics
• Designer Guide: SNMP support
• To resynchronize Job Servers on page 80
• To configure run-time resources for Job Servers on page 81
To resynchronize Job Servers
Situations when you must resynchronize the Job Server and the local
repository include:
• When the Job Server information is not available or not correct in the
local repository.
• You have uninstalled Data Services and are reinstalling the same Data
Services version without creating a new local repository.
• You created a new local repository using the Repository Manager after
installing Data Services.
To resynchronize Job Servers:
1. In the Job Server Configuration Editor window, select the name of your
Job Server.
80 Data Services Installation Guide for Windows
Page 81

After Installing Data Services
Using the Server Manager
2. Click Resync with Repository.
3. In the Job Server Properties window, select an associated local repository.
4. Click Resync.
5. When asked whether to update this associated repository with this local
machine information, click Yes.
6. Under Repository Information, enter the local repository password.
7. Click Apply.
8. Click OK on the Job Server Properties window.
If you resynchronize your Job Server configuration with a local repository,
you must reassociate this repository with the Management Console.
Related Topics
• Management Console Administrator Guide: Connecting repositories to
the Administrator
To configure run-time resources for Job Servers
4
1. Open the Data Services Server Manager and find the "Runtime resources
configured for this computer" section.
2. For the Specify a directory with enough disk space for pageable
cache option, you can accept the default directory
(LINK_DIR\Log\PCache) or click the ellipses button to browse to a different
directory.
Note: For memory-intensive operations such as Group By, Order By,
and Detailed profiling, specify a pageable cache directory that:
• Contains enough disk space for your data. To estimate the amount of
space required for pageable cache, consider factors such as:
• Number of concurrently running jobs or data flows.
• Amount of pageable cache required for each concurrent data flow.
• Exists on a separate disk or file system from the Data Services system
and Operating system (such as the C: drive on Windows, or the root
file system on UNIX).
• Limits the disk space that Data Services data flows consume. The
Data Services pageable cache uses all available disk space on the
file system that contains the pageable cache directory. So, to limit the
disk space that Data Services data flows consume, create a file system
Data Services Installation Guide for Windows 81
Page 82

After Installing Data Services
4
Using the Server Manager
3. In the "Peer-to-peer options" area, change the values for Start port and
Related Topics
• To configure Access Servers on page 82
• Performance Optimization Guide: Caching data
• Reference Guide: Data_Transfer
• Performance Optimization Guide: Using grid computing to distribute data
(or partition on Windows) with a limited size. Use the new file system
(partition on Windows) as the pageable cache directory.
Data Services uses this directory:
• For pageable caching, which is the default cache type for data
flows.
• When selecting a file transfer type and Automatic is specified in
the Data_Transfer transform.
End port to restrict the number of ports used by Data Services. The
default values for Start port and End port are 1025 and 32767,
respectively.
Data Services uses these ports for peer-to-peer communications when
sending data between data flows or sub data flows.
flows execution
To configure Access Servers
When you configure the location for an Access Server installation, Data
Services creates space for the Access Server log files.
1. In the Data Services Server Manager window, click Edit Access Server
Config.
2. In the Access Server Configuration Editor window, click Add.
3. In the Access Server Properties window, enter the Access Server
configuration information.
82 Data Services Installation Guide for Windows
Page 83

Directory
Communication Port
After Installing Data Services
Using the Server Manager
DescriptionField
The location of the log files for this instance of
the Access Server. Click the ellipses button to
browse to the Log directory under the directory
where you installed Data Services.
Do not change this value after the initial configuration.
The port on this computer that the Access
Server uses to listen for incoming messages
from clients.
Make sure that this port number is unused and
is unique for each Access Server.
You can leave this box blank.Parameters
4
An option to control the automatic start of the
Enable Access Server
Click OK. You return to the Access Server Configuration Editor window:
4. Optionally, perform further actions:
• To change an Access Server's configuration:
In the Access Server Configuration Editor window, highlight the Access
Server, click Edit, and repeat step 3.
• To remove an Access Server:
In the Access Server Configuration Editor window, highlight the Access
Server and click Delete.
5. After you configure your Access Servers, click OK to return to the Data
Services Server Manager window.
Access Server when the Data Services Service
starts.
Data Services Installation Guide for Windows 83
Page 84

After Installing Data Services
4
Using the License Manager
6. Click Restart to restart the services with the updated configuration.
Verifying that Job and Access servers are running
To verify that Job Servers are running, check in the Windows Task Manager
Processes tab for:
• al_jobservice.exe (represents the Data Services service)
• al_jobserver.exe (one per Job Server)
• AL_AccessServer.exe (one per Access Server)
If you do not see all the processes expected, check for error messages in
the Job Server event log in LINK_DIR/log/JobServer
name/server_eventlog.txt.
• Access Server logs are in AccessServerPathName/er
ror_mm_dd_yyyy.log
Using the License Manager
License Manager is a Business Objects application that lets you manage
your product activation keycodes—the alphanumeric codes that are referred
to each time that you run certain Business Objects products. By using the
License Manager application, you can view, add, and remove product
activation keycodes for Business Objects products (such as BusinessObjects
Data Services) that require them.
Note: License Manager accesses keycodes on the local system only; you
cannot access the keycodes from a remote system. When updating keycodes,
make the changes on all Data Services computers by launching License
Manager on each computer, including Designer and Job Server computers.
To start License Manager
You can run License Manager after the Data Services installation has
completed. You can either locate where it’s installed or access it through the
Start menu.
• From the Start menu, choose Programs > BusinessObjects XI 3.0 >
BusinessObjects Data Services > Data Services License Manager.
84 Data Services Installation Guide for Windows
Page 85

To view product activation keycodes
1. Start License Manager.
When you click the shortcut on the Start menu, the License Manager
window displays your key code(s) sorted alphabetically.
2. Select a licensed product or feature in the Registered Keycodes tree to
view detailed information:
• Product or feature keycode
• Whether the keycode is a trial version
• Whether the keycode is expired
• Number of days remaining until the keycode expires
Related Topics
• To start License Manager on page 84
To add a product activation keycode
After Installing Data Services
Using the License Manager
4
1. Start License Manager.
2. In the Product Activation Keycodes text box, type the keycode(s) that
you want to add (each keycode must be on a separate line) and click
Add.
3. When you have added your keycode(s), close the License Manager.
4. To make sure the new keycode(s) take effect, restart your application.
Related Topics
• To start License Manager on page 84
To remove a product activation keycode
1. Start License Manager.
2. In the Registered Keycodes tree, select the keycode(s) that you want
to remove and click Remove.
3. When you have removed your keycode(s), close the License Manager.
4. Restart your application.
Data Services Installation Guide for Windows 85
Page 86

After Installing Data Services
4
Using the License Manager
Related Topics
• To start License Manager on page 84
To use License Manager from the command line
License Manager includes a command-line mode that you can use if you
don't want to use the graphical interface, or need to script License Manager
operations.
Syntax
LicenseManager [-v | -a keycode | -r keycode [registry_loca
tion]]
DescriptionParameter
Displays the product activation keycodes stored in the
registry in a format similar to the License Manager
graphical interface. For example:
------ Registered Keycodes ------
-v or --view
EIM Titan
Suite 12.0
Data Services XI 3.0 Premium
Keycode: 00000-0000000-0000000-0000
Trial Option: Yes
Expired: No
Days Remaining: 54
86 Data Services Installation Guide for Windows
Page 87

After Installing Data Services
Installing and configuring the Metadata Integrator
DescriptionParameter
Adds the specified license keycode to the registry,
and displays the keycodes stored in the registry in a
format similar to the License Manager graphical interface. Returns status messages for the following conditions:
4
-a or --add keycode
-r or --remove key
code [registry_loca
tion]
• An internal error occurred.
• Successfully added the keycode.
• Successfully added the keycode and replaced a
trial version.
• Keycode not added because it is invalid.
• Keycode not added because it is a duplicate.
Removes the specified product activation keycode
from the registry, and displays the keycodes stored
in the registry in a format similar to the License Manager graphical interface. If registry_location is specified, the removal is restricted to that registry node.
Returns status messages for the following conditions:
• An internal error occurred.
• Removed one keycode from the registry.
• Removed multiple keycodes from the registry.
• Keycode not removed because it is invalid.
• Keycode not removed because it was not found.
Installing and configuring the Metadata
Integrator
The Metadata Integrator reads through Crystal Reports, Business View,
Universe, Desktop Intelligence document, and Web Intelligence document
definitions on a Central Management Server (CMS) to find the tables and
columns used by the reports, views, and documents. The Metadata Integrator
Data Services Installation Guide for Windows 87
Page 88

After Installing Data Services
4
Installing and configuring the Metadata Integrator
stores the information in Data Services repository for impact analysis and
lineage analysis. You can install the Metadata Integrator on multiple CMS
systems and store the report information in one Data Services repository.
Related Topics
• Installing Metadata Integrator on page 88
• Metadata Integrator installation tips and troubleshooting on page 89
• Configuring the Metadata Integrator on page 90
Installing Metadata Integrator
You can install the Metadata Integrator on multiple CMS systems and store
the report information in one Data Services repository.
Metadata Integrator has the following prerequisites:
• Runs on Windows only
• Must have the BusinessObjects Enterprise client installed
Installing on the same computer as Data Services
Metadata Integrator can be installed with the Data Services Server
Components. However, if no Central Management Server (CMS) exists on
the same computer as Data Services, the Metadata Integrator configuration
screens do not appear during installation.
You have the option to configure the Metadata Integrator during Data Services
installation, or you can defer configuration.
Related Topics
• To configure the Metadata Integrator on page 91
Installing on a different computer than Data Services
In many cases, your Central Management Server resides on a separate
computer than Data Services.
Perform a standard installation of Data Services, but choose only Metadata
Integrator in the feature selection screen.
88 Data Services Installation Guide for Windows
Page 89

After Installing Data Services
Installing and configuring the Metadata Integrator
Related Topics
• Standard installation overview on page 31
• To configure the Metadata Integrator on page 91
Metadata Integrator installation tips and troubleshooting
Below are several Metadata Integrator installation tips and problems that
you can troubleshoot:
Configuration fails during installation
If the CMS is unavailable during the Metadata Integrator installation, or if the
CMS version has changed since installation, the Metadata Integrator will not
run successfully. Is these cases, the Metadata Integrator will report an error
such as the following when launched:
java.lang.NoClassDefFoundError:
com/crystaldecisions/sdk/exception/SDKException
at com.acta.crystalrepo.config.crConfigFrame.setupWizardPages(cr
ConfigFrame.java:84)
at com.acta.crystalrepo.config.crConfigFrame.run(crCon
figFrame.java:73)
at com.acta.crystalrepo.config.crConfigLaunch.main(crCon
figLaunch.java:68)Exception in thread "main"
4
To reconfigure the Metadata Integrator environment
1. In LINK_DIR/ext/cmsCollector, run cmsSetEnv.cmd to reset all
command files to point to the installed version of CMS.
2. Run cmsConfig.cmd to update any configured Metadata Integrators to
point to the installed version of CMS.
Changing Data Services repository connection information
• To change the Data Services repository connection information supplied
during configuration, run the configuration utility:
LINK_DIR/ext/cmsCollector/cmsConfig.cmd
Data Services Installation Guide for Windows 89
Page 90

After Installing Data Services
4
Installing and configuring the Metadata Integrator
Metadata Collector fails to start with java version error
If the Metadata collector indicates the run has failed, click the run instance
to view the error log. If the error indicates the java run-time environment
cannot be found or is the wrong version, you must define the JAVA_HOME
environment variable.
To define the JAVA_HOME environment variable, add the environment
variable and reboot your machine for it to take effect. Java 1.3.1 or higher
is required. JAVA_HOME must be set to the java run-time root directory. For
example:
JAVA_HOME=C:\Program Files\Java\j2re1.4.2_03
Metadata Collector fails to start
If the Metadata collector indicates the run has failed, click the run instance
to view the error log. The error indicates you do not have the permission to
run the program.
Press the Process tab and select Logon to determine the user name and
password used to run the collector. To check the permissions, press the
Rights tab to see what permissions are set. If you do not have permission
to run programs, check with your Business Objects administrator to get the
correct permission.
Metadata Integrator runs but report information is missing
From the Central Management Console, click the run instance for the
Metadata Integrator even though it says the run was successful. The collector
will only be in a failed state if the CMS is unable to start the program. There
is no mechanism to get run-time errors listed as a failed run. The work around
is to look at successful runs to see if any errors are reported.
Configuring the Metadata Integrator
Invoke the Metadata Integration Configuration window with one of the
following actions:
90 Data Services Installation Guide for Windows
Page 91

• During Data Services installation on the computer where the
BusinessObjects Enterprise CMS resides, click Configure on the
Metadata Integrator Manager window.
• During installation for the Metadata Integrator when the CMS is installed
on a different computer than Data Services, click Configure on the
Metadata Integrator Manager window.
• If you deferred the configuration or you want to modify the configuration,
use the Start > Programs > Business Objects XI 3.0 >
BusinessObjects Data Services > Data Services Metadata Integrator
option. This Start menu option exists when you install either Data Services
or the Data Services Metadata Integrator.
Related Topics
• Installing on a different computer than Data Services on page 88
To configure the Metadata Integrator
1. When the Metadata Integrator Configuration window displays, choose
one of the following options:
a. To add a new Metadata Integrator, select the Add Metadata Integrator
option and click Next.
After Installing Data Services
Installing and configuring the Metadata Integrator
4
Configure multiple Metadata Integrators when you have multiple CMS
servers. For example, one CMS server might manage your Crystal
Reports, and a different CMS server manages your Business Objects
Documents (Desktop Intelligence or Web Intelligence).
b. To change an existing Metadata Integrator, select the Edit Metadata
Integrator option, select the name of the Metadata Integrator in the
drop-down list, and click Next.
c. To delete a Metadata Integrator, select the name of the Metadata
Integrator in the drop-down list, select the Delete option, and click
Next.
2. On the Business Objects Enterprise window, enter the following CMS
connection information. Consult your Business Objects administrator if
you need assistance with these values.
Data Services Installation Guide for Windows 91
Page 92

After Installing Data Services
4
Installing and configuring the Metadata Integrator
Configuration Name
DescriptionOption
Name for this Metadata Integrator configuration. The default name is "Metadata Integrator" followed by a sequential number. For example:
Metadata Integrator 2
CMS Server Name
CMS User Name
CMS Password
CMS Authentication
Mode
CMS Folder Name
Host name of the Central Management
Server (CMS) server.
The user name to connect to the CMS server
to register and execute the Metadata Integrator. If you want a different user to execute the
Metadata Integrator, use the Central Management Console to change the rights for the
user. See the BusinessObjects Enterprise
Administrator's Guide for details.
The password to connect to the CMS server
to register and execute the Metadata Integrator.
The CMS authentication mode. See the
Business Objects Enterprise Administrator's
Guide for available modes.
The folder in which the CMS system adds the
Metadata Integrator as a program object. This
folder is only visible in the Business Objects
Central Management Console. The default
value is Data Services (the wizard creates
this folder if it does not exist).
92 Data Services Installation Guide for Windows
Page 93

After Installing Data Services
Installing and configuring the Metadata Integrator
3. Click Next.
4. On the "Metadata Repository" window, enter the following information to
connect to the Data Services repository. Consult your database
administrator if you need assistance with these values.
DescriptionOption
The database type of the Data Services
repository. The available database types are:
• DB2
Database type
• Microsoft SQL Server
• Oracle
• Sybase ASE
• MySQL
4
Computer Name
Database Port
Service Name/SID
Database name
Datasource
Database Name
Connection String
Database Port and Server
User name
Host name on which the Data Services
repository resides.
Port number that the Central Management
Server (CMS) uses to connect to the Data
Services repository.
This field requires additional information
based on the Database type you select.
The login name to connect to the Data Services repository.
Data Services Installation Guide for Windows 93
Page 94

After Installing Data Services
4
Connecting the Data Profiler
DescriptionOption
Password
5. (Optional) Click Test to check the connection to the metadata repository.
6. Click Next.
The status window for Metadata Integrator Configuration displays.
7. Click Finish.
The login password to connect to the
repository.
Connecting the Data Profiler
The Data Profiler installs automatically when you install Data Services. To
use the Data Profiler, perform the following steps:
1. Define a profiler repository in which the Data Profiler will store the
generated profile data.
2. Associate the profiler repository with a Job Server on which the profiler
tasks will run.
3. Connect the profiler repository to the Data Services Administrator which
will manage the profile data and profiler tasks.
4. Connect the profiler server to the Designer from which you submit profiler
tasks and view the generated profile data.
5. If you plan to use Detailed profiling or Relationship profiling, ensure that
you specify a pageable cache directory that contains enough disk space
for your data and that you place on a separate disk or file system from
the Data Services system.
Related Topics
• To create or upgrade repositories on page 73
• To configure Job Servers on page 78
• To configure run-time resources for Job Servers on page 81
• Management Console Administrator Guide: Connecting repositories to
the Administrator
94 Data Services Installation Guide for Windows
Page 95

After Installing Data Services
Troubleshooting installation problems
• Designer Guide: Connecting to the profiler server
Troubleshooting installation problems
Errors that prevent installation progress (for example, an incorrect server
name, user name, or password) result in an immediate error message
describing the problem.
For some common issues, such as the service scheduler failing to launch
Data Services, reboot the computer after installation has finished.
Related Topics
• Repository problems on page 95
• Management Console problems on page 96
• Metadata Integrator installation tips and troubleshooting on page 89
Repository problems
4
Common repository-related installation errors include:
• The DBMS connection was lost while building the repository tables. If this
happens, recreate the repository with the Repository Manager.
• There is not enough space available in the database for the repository
tables. If this happens, use your DBMS administration tools to allocate
more space for the repository and run the Repository Manager.
If you experience problems when upgrading or creating a repository, you
can select the Show Details check box before you click Update or Create
again. This option allows you to view the SQL code that Data Services uses
to perform these operations. The Show Details option can help you diagnose
problems.
Related Topics
• Using the Repository Manager on page 72
Data Services Installation Guide for Windows 95
Page 96

After Installing Data Services
4
Troubleshooting installation problems
Management Console problems
Common Management Console and web application-related installation
problems include:
• Login page not found when choosing Programs > BusinessObjects XI
3.0 > BusinessObjects Data Services > Data Services Management
Console from the Start menu.
This problem can occur when the web application service is not running
or needs to be restarted. For the packaged Tomcat web application server,
use the Services tool in the Administrative Tools section of the Windows
Control Panel. For other web application servers, refer to your product
documentation.
• Web application deployment fails because web application server
information was incorrectly entered during the installation process.
The Data Services installation setup does not verify the specified web
application server information. If there is an error in the information, the
web applications can not be deployed during installation. You can manually
deploy the web applications after installation. The required WAR files
(DataServices.war, webservice.war, and doc.war) are installed to the
deployment/workdir/webserver/application/ folder, where webserver
is the type of web application server. The deployment folder can be found
on the same level as LINK_DIR.
For instructions on how to manually deploy WAR files, refer to your web
application server documentation.
• The Management Console cannot be launched on WebSphere.
If your WebSphere installation uses a port other than 9080 for the
application port, you may need to modify the link to the Management
Console. In LINK_DIR/ext/DataServices.html, replace 9080 in the
following line with your WebSphere application port:
<META HTTP-EQUIV=Refresh CONTENT= "0; URL=http://host
name:9080/DataServices/">
96 Data Services Installation Guide for Windows
Page 97

Upgrading Data Services
5
Page 98

Upgrading Data Services
5
Data Services component upgrades
To upgrade from an existing Data Integrator or Data Services installation,
install the new Data Services components and then upgrade your repositories.
To upgrade from an existing Data Quality XI installation, see the
BusinessObjects Data Services Migration Considerations.
Data Services component upgrades
In addition to upgrading repositories, you must upgrade all Data Services
components to the same version.
Business Objects recommends that after you back up existing repositories
(using your database's backup utility) and read the release notes, you upgrade
components in the following order:
1. Data Services Designer
2. Data Services repository
3. Data Services Job Server
4. Data Services Access Server
5. Data Services Message Client libraries
Note: If you are using the SAP ERP or R/3 ABAP interface, re-install the
Data Services functions for SAP ERP or R/3.
Related Topics
• Supplement for SAP: Installing Data Services functions on SAP R/3
Repository upgrades
Minor releases do not require a repository upgrade. For example, if 11.7 is
a major release and 11.7.3 is a minor release, then when upgrading from
11.7 to 11.7.3, it would not be necessary to upgrade your repository. However,
product features introduced in the latest product version might not be available
without the repository upgrade. To see whether you need to upgrade your
repository for a particular release, see the Release Notes for that release.
Using database backup utilities, always make a copy of your existing
repository before upgrading. Note that you will upgrade using the original
repository (not your backup copy).
Several repository upgrade paths are available.
98 Data Services Installation Guide for Windows
Page 99

Upgrading Data Services
Upgrading your Data Services system
ProcedureTo upgrade from
Install this release using one of the
following methods:
•
Upgrade your repository during
Data Integrator Version 11.0.x, 11.5.x,
11.6.x, 11.7.x
Note: If you are using an end-of-life version of Data Integrator, first upgrade
to a supported version before upgrading to Data Services. For example, if
you have Data Integrator 6.5, first upgrade to Data Integrator 11.7 and then
upgrade to Data Services.
the installation process
•
Upgrade your repository after installing the Client Components by
running the Repository Manager
utility and choosing the Upgrade
option.
5
Related Topics
• Upgrading repositories on page 102
Upgrading your Data Services system
When moving to a new product version, upgrade your test or development
environment before upgrading your production environment.
To install a new product version on a computer hosting an existing version,
run the installation program without uninstalling the existing version.
Uninstalling the existing version can cause a potential loss of repository
information if you are using the packaged MySQL database server, which
is uninstalled with Data Services.
Note: The procedure in the following section directs you to follow instructions
in this guide that explain how to use the Data Services installation program.
Business Objects recommends that while upgrading Data Services you do
not use the installation program to reconfigure Job or Access Servers or
upgrade the repository. Instead, after updating components with the
Data Services Installation Guide for Windows 99
Page 100

Upgrading Data Services
5
Upgrading your Data Services system
installation program, use the Server Manager and Repository Manager to
reconfigure Job and Access Servers and upgrade the repository.
Related Topics
• Beginning your installation on page 36
• Using configurations from a previous version on page 100
Using configurations from a previous version
If you want to use custom configurations from a previous version of the
product:
1. Move the DSConfig.txt file, from the bin subdirectory, into a newly
created "dummy" installation directory structure before installing the new
version.
Example "dummy" directory structure:
C:\Program Files\Business Objects\BusinessObjects Data
Services\bin\DSConfig.txt
During the installation process, Data Services will overwrite the "dummy"
directory structure with the new installation structure, merging custom
settings (such as repository and Access Server connections added to the
Administrator) from your old DSConfig.txt file into the new DSConfig.txt
file.
2. Before installing the new version, manually move the following
subdirectories out of your installation directory.
• Conf - Contains Administrator settings
• Log - Contains old logs
3. If your current installation includes support for real-time message handling,
then when you configured an Access Server (using the Data Services
Server Manager) you specified a location for each Access Server
configuration directory. If those directories are in the Data Services
installation directory make a copy of each Access Server configuration
directory.
Save your current copy until after you test the upgrade and confirm that
your new system is working as expected. When you merge the old
DSConfig.txt file with the new one, Data Services should find the Access
Server configuration directories. If not, use the Server Manager to point
to the backup Access Server directories.
100 Data Services Installation Guide for Windows
 Loading...